

Page 1
ÄKTA
™
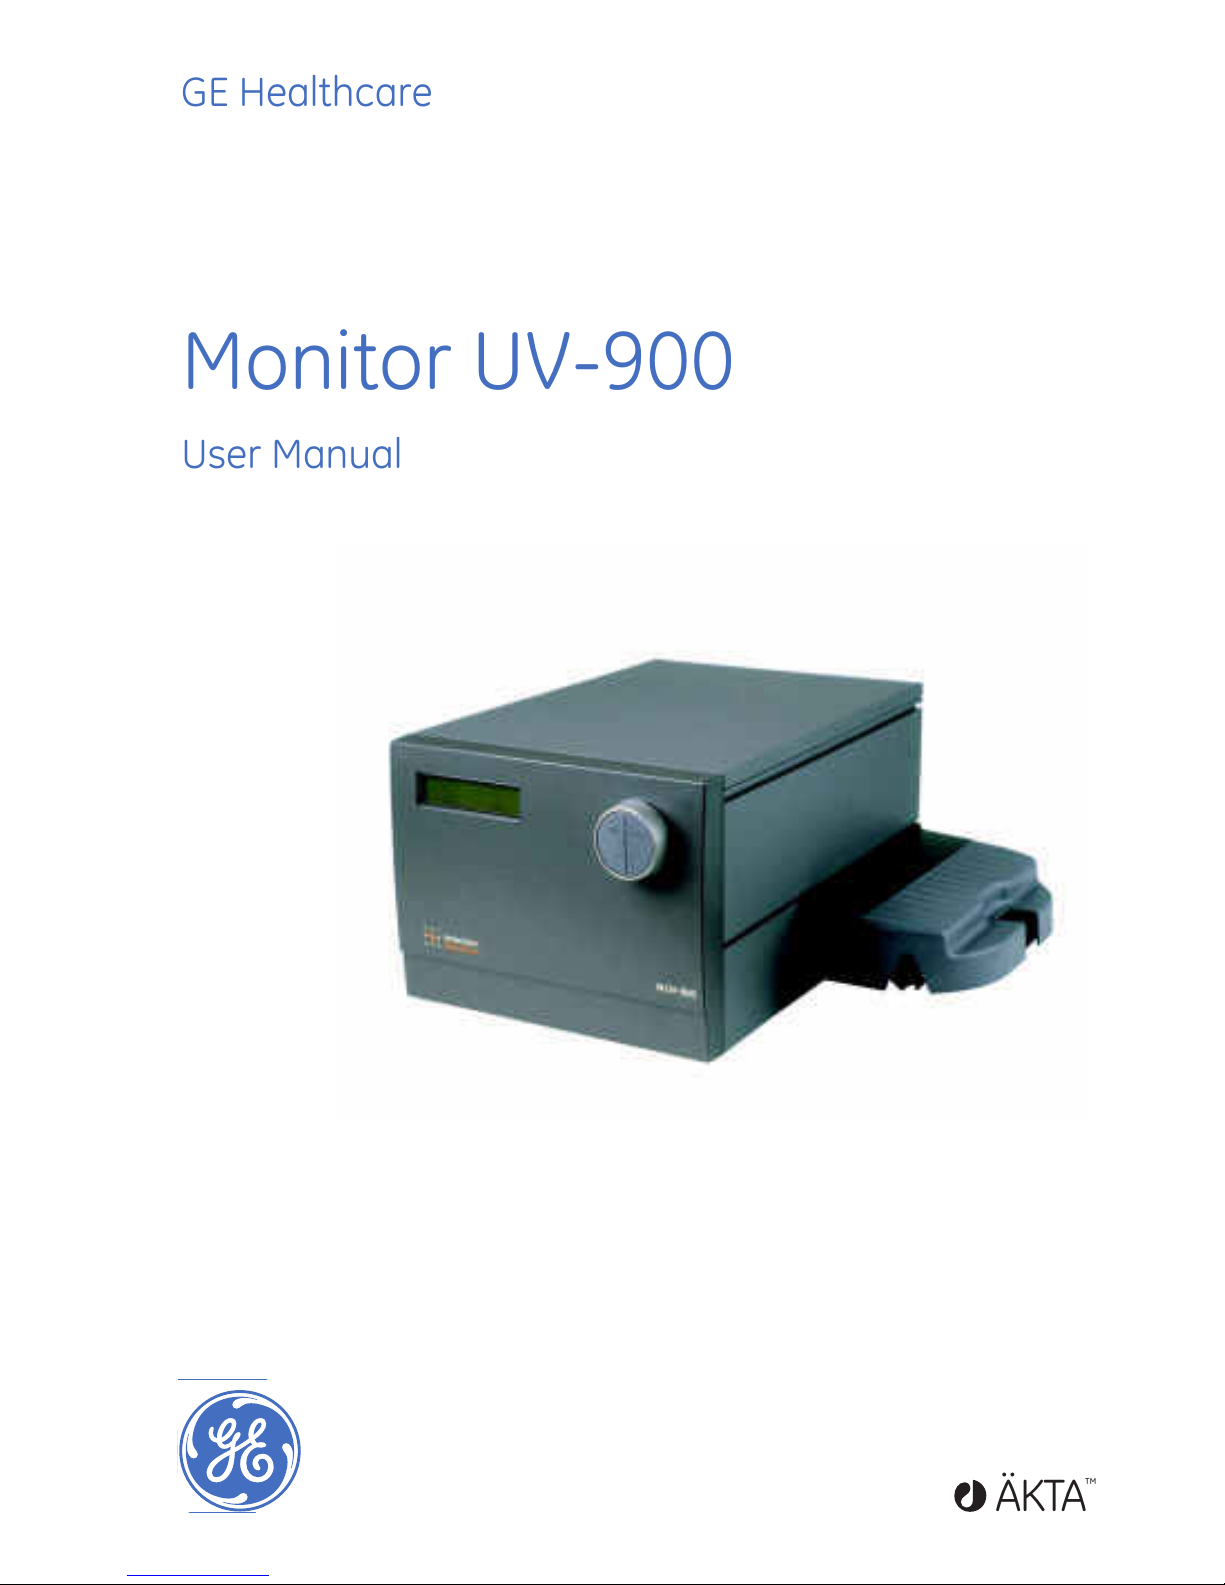
Monitor UV-900
User Manual
GE Healthcare
Page 2

Page 3
Important user information
All users must read this entire manual to fully under-
stand the safe use of Monitor UV-900.
WARNING !
The WARNING! sign hig hlights instructions
that must be followed to avoid personal
injury. It is important not to proceed until
all stated conditions are met and clearly
understood.
CAUTION!
The Caution! sign highlights instructions that must be
followed to avoid damage to the product or other equip-
ment. It is important not to proceed until all sta ted con-
ditions are met and clearly understood.
Note
The Note sign is used to indicate information important
for trouble-free and optimal use of the product.
CE Certifying
This product meets the requir e ment s of app licable CE-
directives. A copy of the corresponding Declaration of
Conformity is available on request.
The CE symbol and corre spon ding dec lara tion of con for-
mity, is valid for the instrument when it is:
– used as a stand-alone unit, or
– connected to other CE-marked GE Healthcare
instruments, or
– connected to other products recommended or
described in this manual, and
– used in the same state as it was delivered from GE
Healthcare except for alterations described in this
manual.
Recycling
This symbol indicates that the waste of
electrical and electronic equipment must
not be disposed as unsorted municipal
waste and must be collected separately.
Please contact an au thorized r epr ese nta-
tive of the manufacturer for information
concerning the decommissioning of equip-
ment.
WARNING!
This is a Class A pruduct. In a domestic environment this
product may cause radio interference in whi ch ca se the
user may be required to make adequate measures
Monitor UV-900 User Manual 18-1120-05 Edition AF
Page 4

Page 5
Monitor UV-900 User Manual 18-1120-05 Edition AF
V
Contents
1 Introduction
1.1 General ................................................................................................7
1.2 Safety ...................................................................................................8
2 Installation
2.1 Unpacking ..........................................................................................9
2.2 General precautions .....................................................................9
2.3 Installing the flow cell ................................................................10
2.3.1 Fixing the flow cell.................................................................... 10
2.3.2 Connecting the optical fibers...............................................11
2.4 Connecting electrical signal cables .................................... 12
2.4.1 Connecting to recorder (if used)..........................................12
2.5 Connecting to communication link .....................................12
2.6 Connecting to supply voltage ...............................................13
2.7 Connecting the tubing .............................................................. 13
2.8 Mounting the cell holder cover .............................................14
3Operation
3.1 On/off ................................................................................................15
3.2 Menu selection and settings ..................................................15
3.2.1 Menu selection ...........................................................................15
3.2.2 Return to main menu .............................................................. 16
3.2.3 Select value..................................................................................16
3.3 Main menu overview .................................................................17
3.4 Setting lamp on/off .....................................................................17
3.5 Reading absorbance values ...................................................18
3.6 Setting wavelength .....................................................................18
3.7 Autozero .......................................................................................... 19
3.8 Storage and shut-down ...........................................................19
3.9 Using an external chart recorder ........................................20
3.9.1 Setting range and zero...........................................................20
3.9.2 Event mark...................................................................................20
3.10 Filtering noise ................................................................................21
3.11 UV cell calibration .......................................................................22
3.12 Changing flow cell .......................................................................24
3.13 Restart after power failure ...................................................... 24
4 Maintenance
4.1 Periodic maintenance ...............................................................25
Page 6
Contents
VI
Monitor UV-900 User Manual 18-1120-05 Edition AF
4.2 Cleaning-in-place .........................................................................25
4.3 Checking the instrument ..........................................................26
4.3.1 Lamp intensity ............................................................................26
4.3.2 Lamp on–time .............................................................................26
4.3.3 Flip time..........................................................................................26
4.3.4 UV flow cell ...................................................................................26
4.4 Cleaning the flow cell and optical fiber connectors ....27
4.4.1 Cleaning the flow cell...............................................................27
4.4.2 Cleaning the optical fiber connectors...............................27
4.4.3 Instrument housing...................................................................27
4.5 ..................................................................Cleaning the system 27
4.6 Recycling ..........................................................................................28
5 Trouble-shooting
5.1 General .............................................................................................29
5.2 Faults and actions .......................................................................29
5.3 Error messages .............................................................................30
Reference information
A Description ........................................................................................................31
A.1
Instrument
............................................................................................................31
A.2
Flow cell
.................................................................................................................32
A.3
Monitor principle
................................................................................................32
B Menus .................................................................................................................. 34
B.1
Check menu
.......................... ..... ..... ..... ..... ..... ..... ..... ..... ..... .... ..... ..... ..... ..... ..... .....34
B.2
Setup menu
..........................................................................................................36
B.3
Setting and using the alarm timer
.............................................................37
B.4
Service displays
..................................................................................................37
B.5
Menu overview
...................................................................................................38
C Technical specifications .............................................................................39
D Accessories and spare parts ....................................................................42
Short instructions on side 39
About this manual
This manual comprises two parts; a practical part
(sections 1–5) and a reference part (sections A-D).
Sections 1–5 contain the necessary information for operating the
instrument.
Page 7
Introduction 1
Monitor UV-900 User Manual 18-1120-05 Edition AF
7
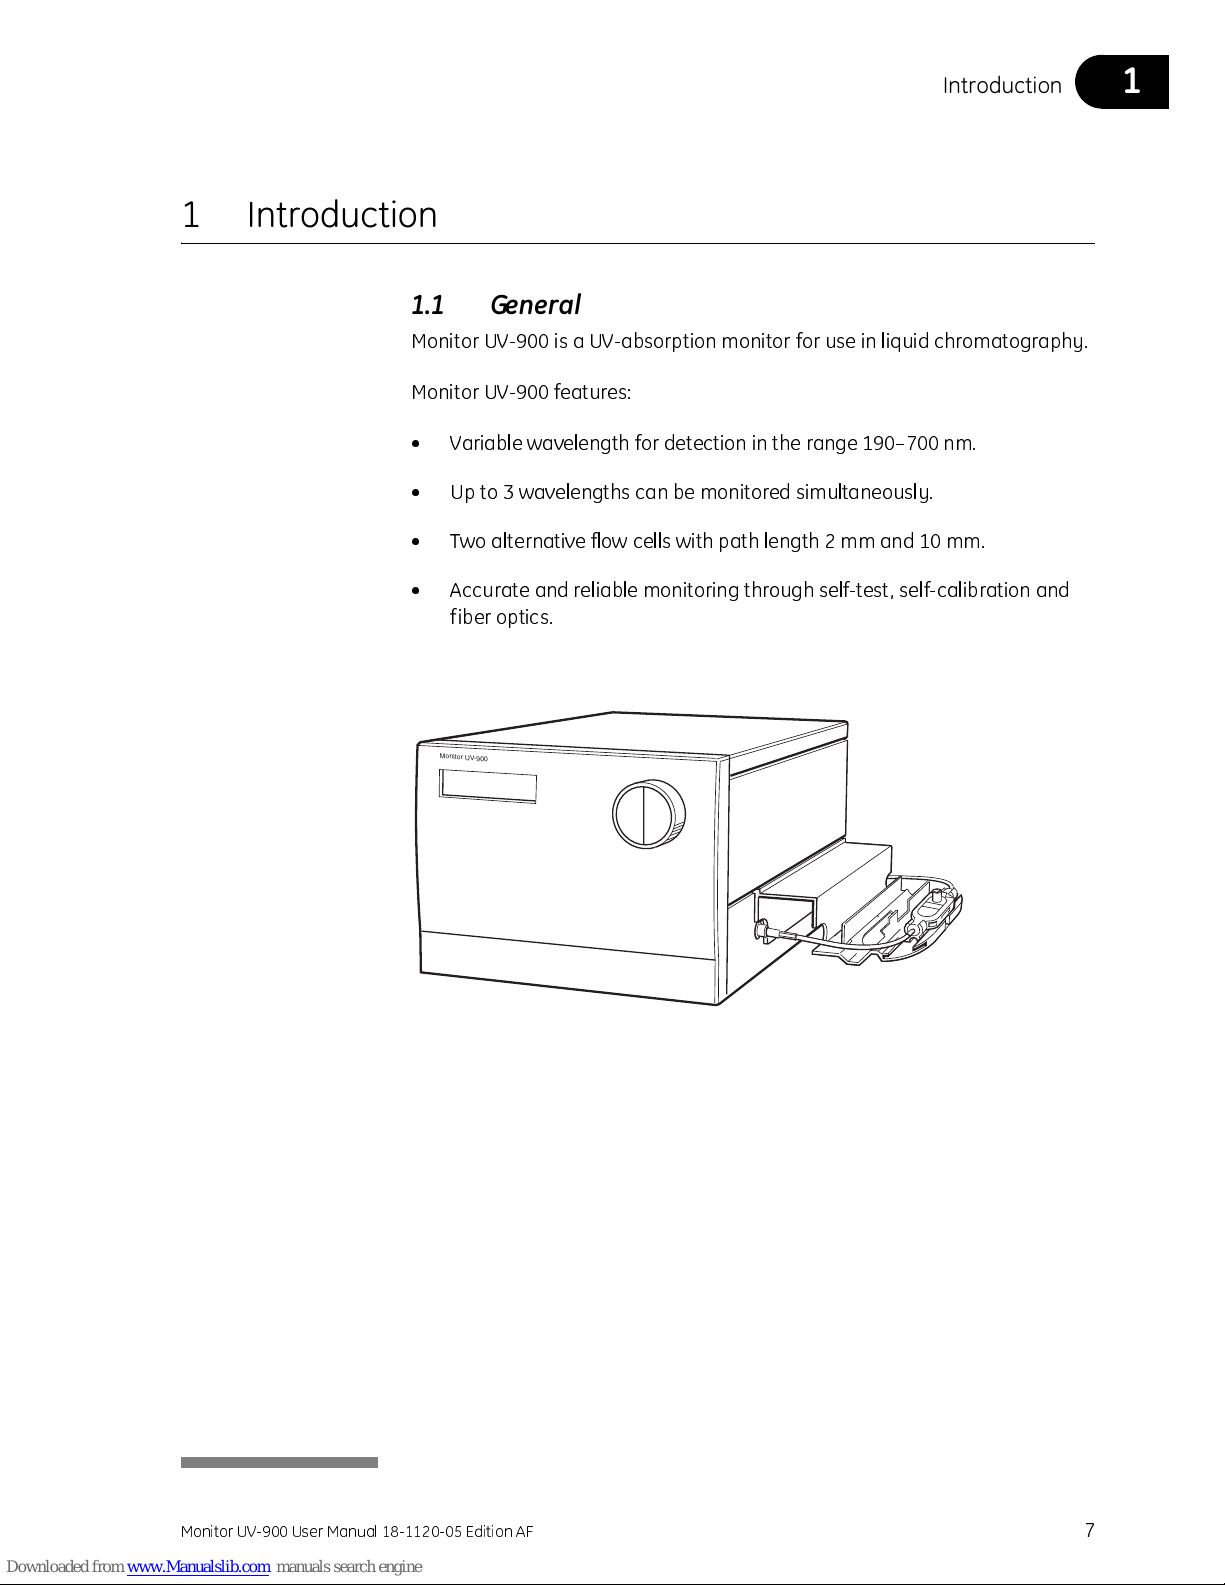
1 Introduction
1.1 General
Monitor UV-900 is a UV-absorption monitor for use in liquid chromatography.
Monitor UV-900 features:
• Variable wavelength for detection in the range 190–700 nm.
• Up to 3 wavelengths can be monitored simultaneously.
• Two alternative flow cells with path length 2 mm and 10 mm.
• Accurate and reliable monitoring through self-test, self-calibration and
fiber optics.
M
on
ito
r U
V
-9
00
Page 8
1 Introduction
8
Monitor UV-900 User Manual 18-1120-05 Edition AF
1.2 Safety
• The instrument is designed for indoor use only.
• Do not use in a dusty atmosphere or close to spraying water.
IMPORTANT!
Monitor UV-900 is intended for laboratory use only, not for
clinical or in vitro use, or for diagnostic purposes.
WARNING!
When using hazardous chemicals, all suitable protective
measures, such as protective glasses, must be taken.
WARNING
! The instruments must not be opened by the user. They contain
high voltage circuits which can give a lethal electric shock.
WARNING
! The system must be connected to a grounded mains socket.
WARNING
! Always disconnect the power supply before attempting to
replace any item on the instrument.
WARNING!
The instrument uses high intensity ultra-violet light. Do not
disconnect the optical fibers while the monitor is running.
CAUTION!
The flow cell must not be used at pressures above 2 MP a (20 bar,
290 psi). At higher pressures the flow cell may break.
WARNING!
When using hazardous chemicals, take all suitable protective
measures, such as wearing protective glasses and gloves resistant to the
chemicals used. Follow local regulations and instructions for sa fe operati on
and maintenance of the system.
WARNING!
There must always be a sample loop connected to ports 2 and 6
of the injection valve. This is to prev ent liquid spraying out of the ports when
switching the valve. This is especially dangerous if hazardous chemicals are
used.
WARNING!
This is a Class A product. In domestic environment this product
may cause radio interference in which the user may be required to take
adequate measures.
Page 9

Installation 2
Monitor UV-900 User Manual 18-1120-05 Edition AF
9
2 Installation
2.1 Unpacking
Unpack the instrument and check the items against the supplied packing list.
Inspect the items for obvious damage which may have occurred during
transportation.
• The system should be installed on a stable laboratory bench providing a
suitable working area.
• To maintain correct ventilation, the system requires an appropriate
amount of free space. Do not block the ventilation inlets or outlets on the
system!
It is recommended that all packing materials should be retained if onward
transport of the instrument is expected.
2.2 General precautions
The instrument should not be installed in a corrosive atmosphere or in an
atmosphere where deposits are liable to form on the optical surfaces.
The instrument should be located in a place of low temperature variations,
away from heat sources, draughts and direct sunlight.
The instrument may be operated at normal ambient temperatures in the range
+4 to +40 °C.
The instrument should be installed on a stable laboratory bench or in
ÄKTA™
explorer or ÄKTApurifier. To ensure correct ventilation a free space of
0.1 m is required behind and in front of the instrument. Place the instrument
directly on the bench. Do not use any soft material under the instrument, to
ensure that the ventilation inlet in the front is not blocked.
CAUTION! The following information should be read car efully to ensur e that
the instrument is installed correctly.
Monitor UV
-900
Page 10
2 Installation
10
Monitor UV-900 User Manual 18-1120-05 Edition AF
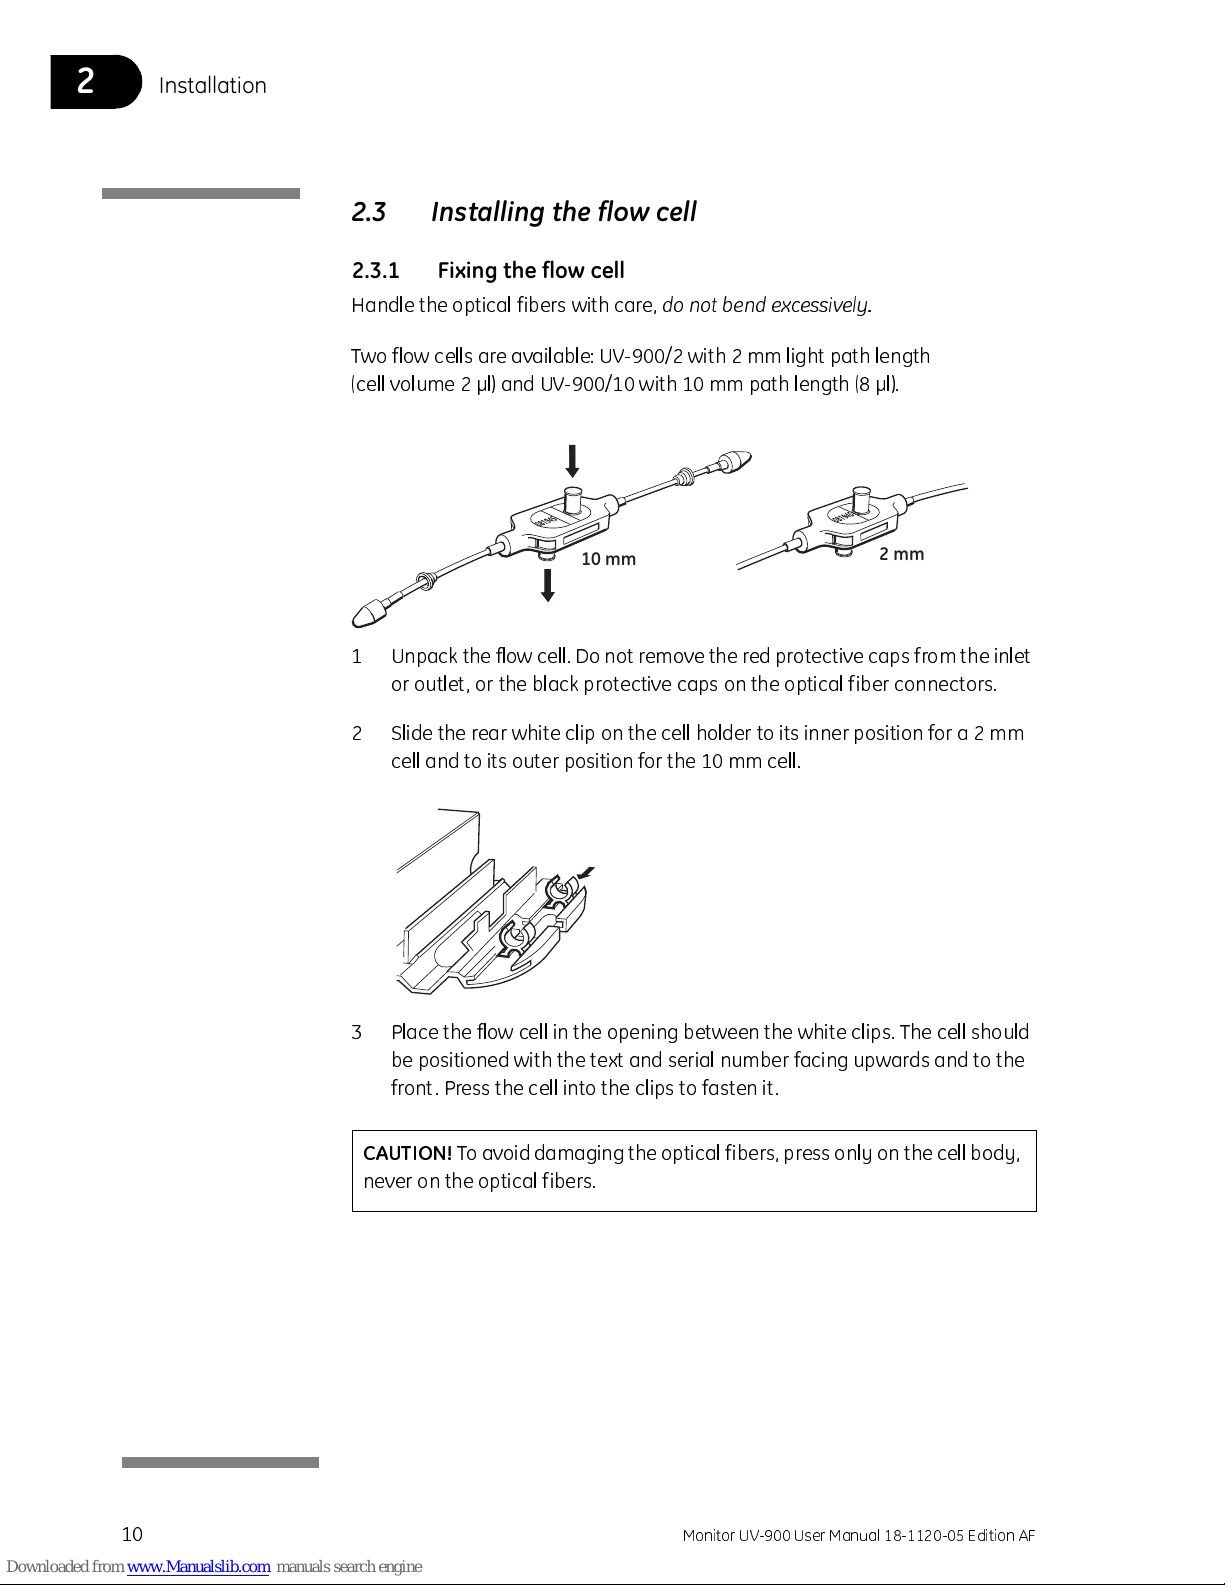
2.3 Installing the flow cell
2.3.1 Fixing the flow cell
Handle the optical fibers with care,
do not bend excessively.
Two flow cells are available: UV-900/2 with 2 mm light path length
(cell volume 2 µl) and UV-900/10 with 10 mm path length (8 µl).
1 Unpack the flow cell. Do not remove the r ed pr otective caps f r om the inle t
or outlet, or the black protective caps on the optical fiber connectors.
2 Slide the rear white clip on the cell holder to its inner position for a 2 mm
cell and to its outer position for the 10 mm cell.
3 Place the flow cell in the opening between the white clips. The cell should
be positioned with the text and serial number facing upwards and to the
front. Press the cell into the clips to fasten it.
10 mm
2 mm
CAUTION!
To avoid damaging the optical fibers, press only on the cell body,
never on the optical fibers.
Page 11

Installation 2
Monitor UV-900 User Manual 18-1120-05 Edition AF
11
To improve t he access to the tubing connections, the flow cell can alternatively
be positioned with the tubing connections.
2.3.2 Connecting the optical fibers
1 Remove the 2 black protective caps from the optical fiber connectors.
2 Remove the 2 rubber protective caps from the optical fiber receptacles on
the right side of the housing.
3 Connect the 2 optical fibers to the housing by carefully inserting them into
the sockets and tightening the nut s fingertight using the fiber detachment
tool supplied.
4 Slide the rubber sleeves on the 2 optical fibers onto the connectors. Make
sure that the sleeves are pushed tight to the housing to prevent dust or
fluid entering the connection.
Serial number
Normal position
Serial number
Alternative position
CAUTION! Do not touch the tips of the optical fibers with your fingers as
this will result in poor monitor performance. If you accidentally touch the
optical fiber tip, it can be wiped with 30% isopropanol using lens pape
r.
Fiber
detachmen
t
tool
CAUTION! Do not twist the optical fibers during tightening.
Rubber sleeve
Page 12
2 Installation
12
Monitor UV-900 User Manual 18-1120-05 Edition AF
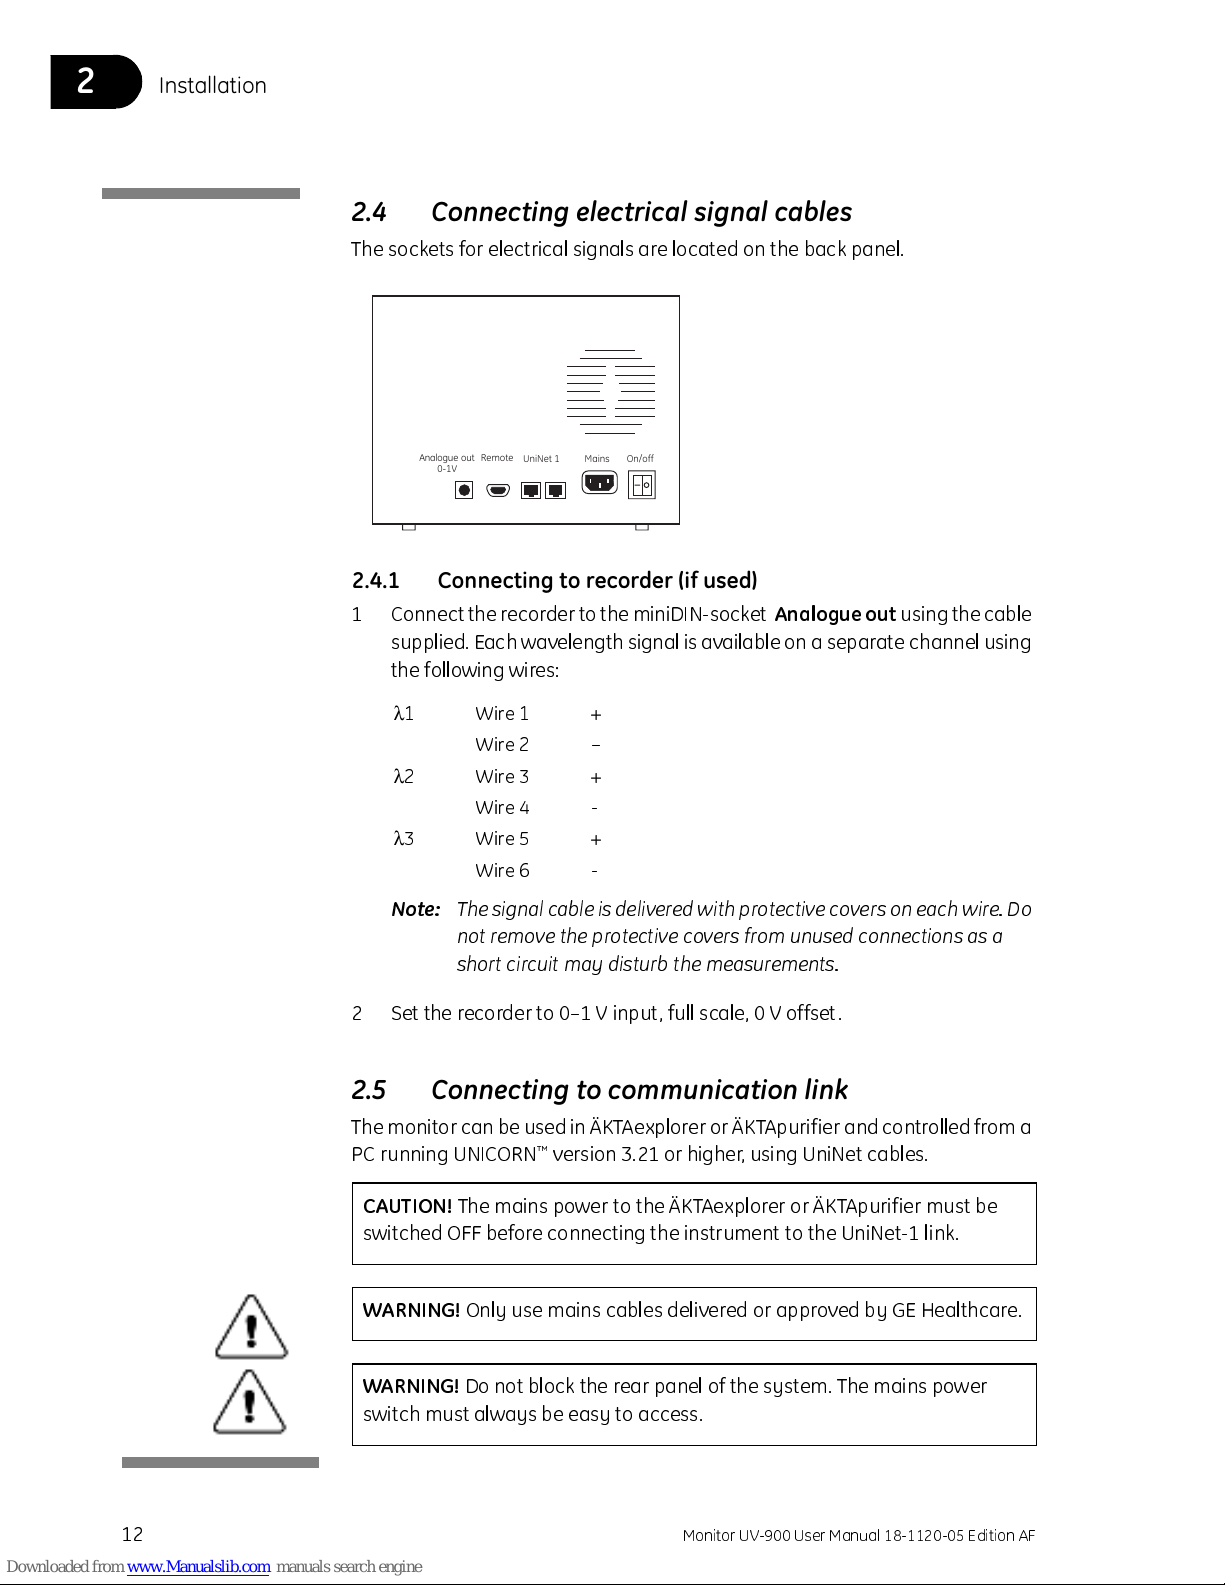
2.4 Connecting electrical signal cables
The sockets for electrical signals are located on the back panel.
2.4.1 Connecting to recorder (if used)
1 Connect the recorder to the miniDIN-socket
Analogue out using the cable
supplied. Each wavelength signal is available on a separate channel using
the following wires:
Note:
The signal cable is delivered with protective covers on each wir e. Do
not remove the protective covers from unused connections as a
short circuit may disturb the measurements.
2 Set the recorder to 0–1 V input, full scale, 0 V offset.
2.5 Connecting to communication link
The monitor can be used in ÄKTAexplorer or ÄKT Apurifier and controlled from a
PC running UNICORN™ version 3.21 or higher, using UniNet cables.
Analogue out
0-1V
Remote
UniNet 1 Mains On/off
λ
1 Wire 1 +
Wire 2 –
λ
2 Wire 3 +
Wire 4 -
λ
3 Wire 5 +
Wire 6 -
CAUTION!
The mains power to the ÄKTAexplorer or ÄKTApurifier must be
switched OFF before connecting the instrument to the UniNet-1 link.
WARNING!
Only use mains cables delivered or approved by GE Healthcare.
WARNING!
Do not block the rear panel of the system. The mains power
switch must always be easy to access.
Page 13
Installation 2
Monitor UV-900 User Manual 18-1120-05 Edition AF
13
Connect two UniNet cables to the UniNet-1 connectors. The inst rument can be
connected in series anywhere in the chain between the PC and the termination
plug. The UniNet-1 link connects, in series, the PC with Pump P-905,
Monitor pH/C-900 and Monitor UV-900. The termination plug is connected to
the last instrument in the chain.
2.6 Connecting to supply voltage
1 Make sure the on/off switch is in the OFF position (O).
2 Connect a mains cable between the instrument and a grounded mains
socket. The instrument is delivered with both European and US type mains
cables, as standard. Any voltage 100–240 V AC, 50–60 Hz, can be used.
The instrument contains no user replaceable fuse.
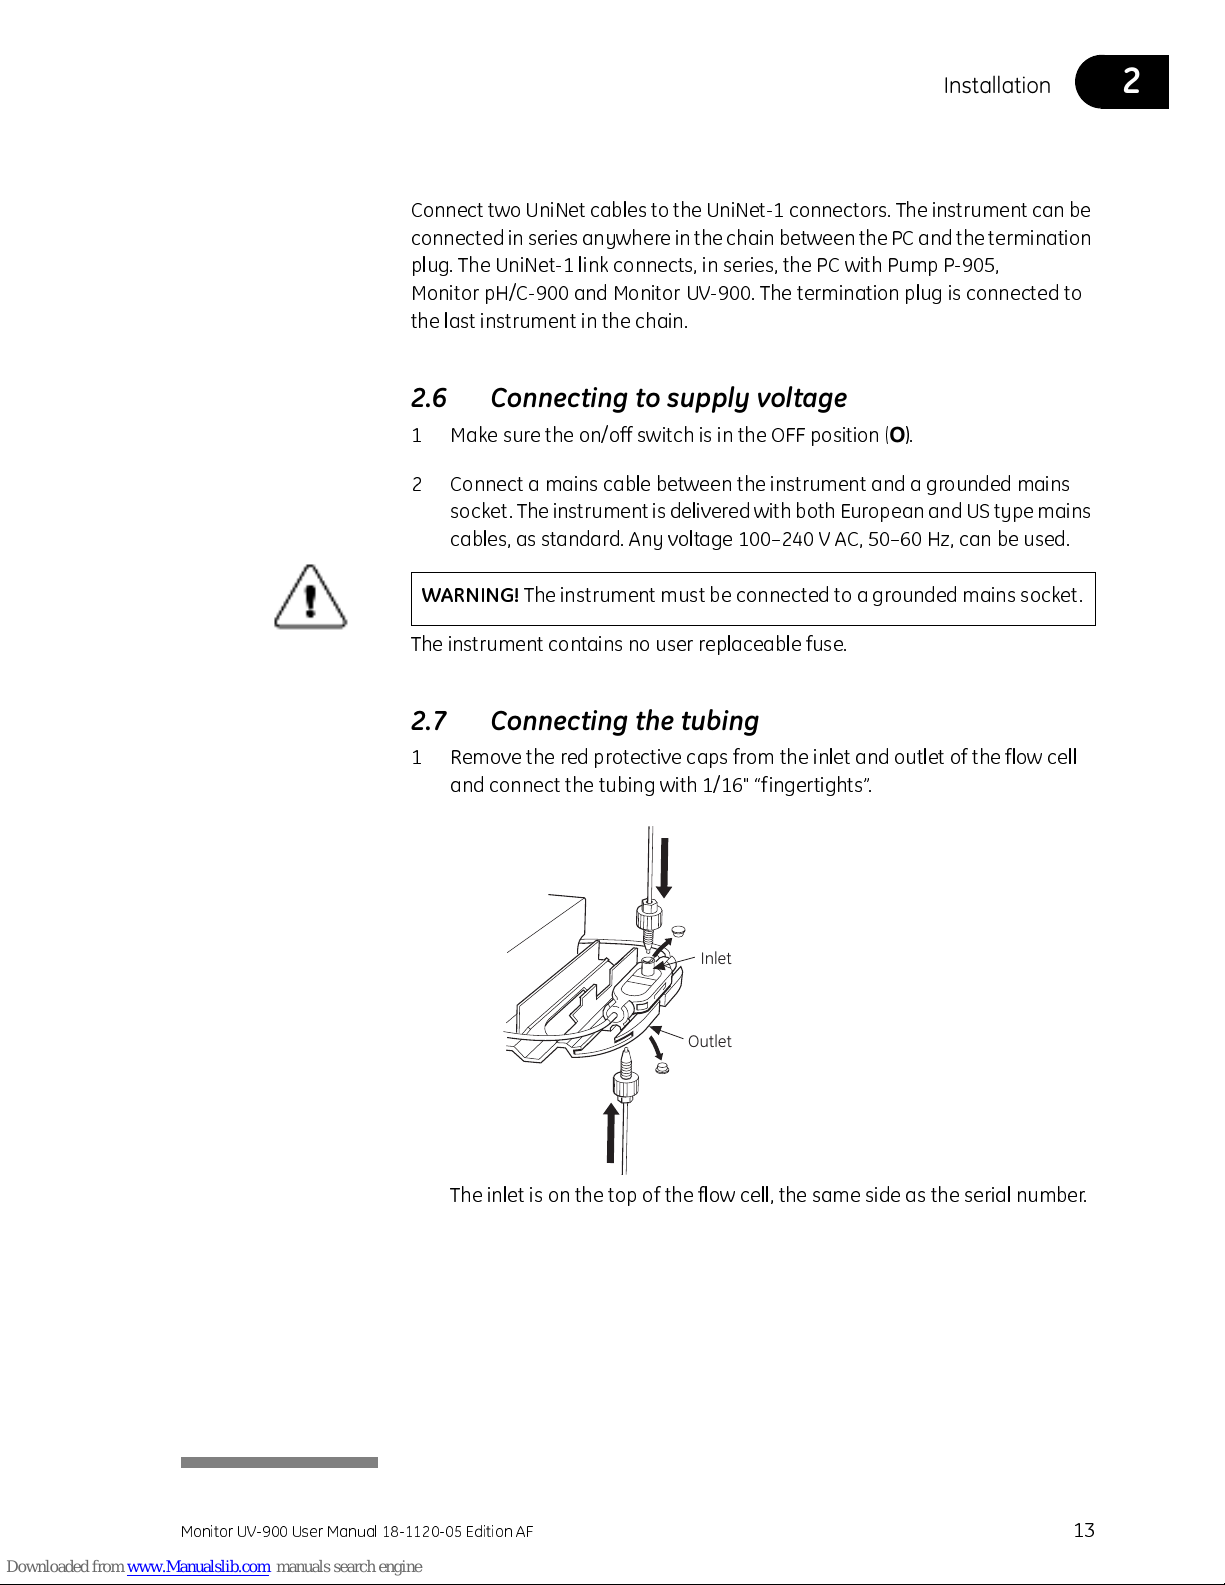
2.7 Connecting the tubing
1 Remove the red protective caps from the inlet and outlet of the flow cell
and connect the tubing with 1/16" “fingertights”.
The inlet is on the top of the flow cell, the same side as the serial number.
WARNING!
The instrument must be connected to a grounded mains socket.
Inlet
Outlet
Page 14
Installation 2
Monitor UV-900 User Manual 18-1120-05 Edition AF
14
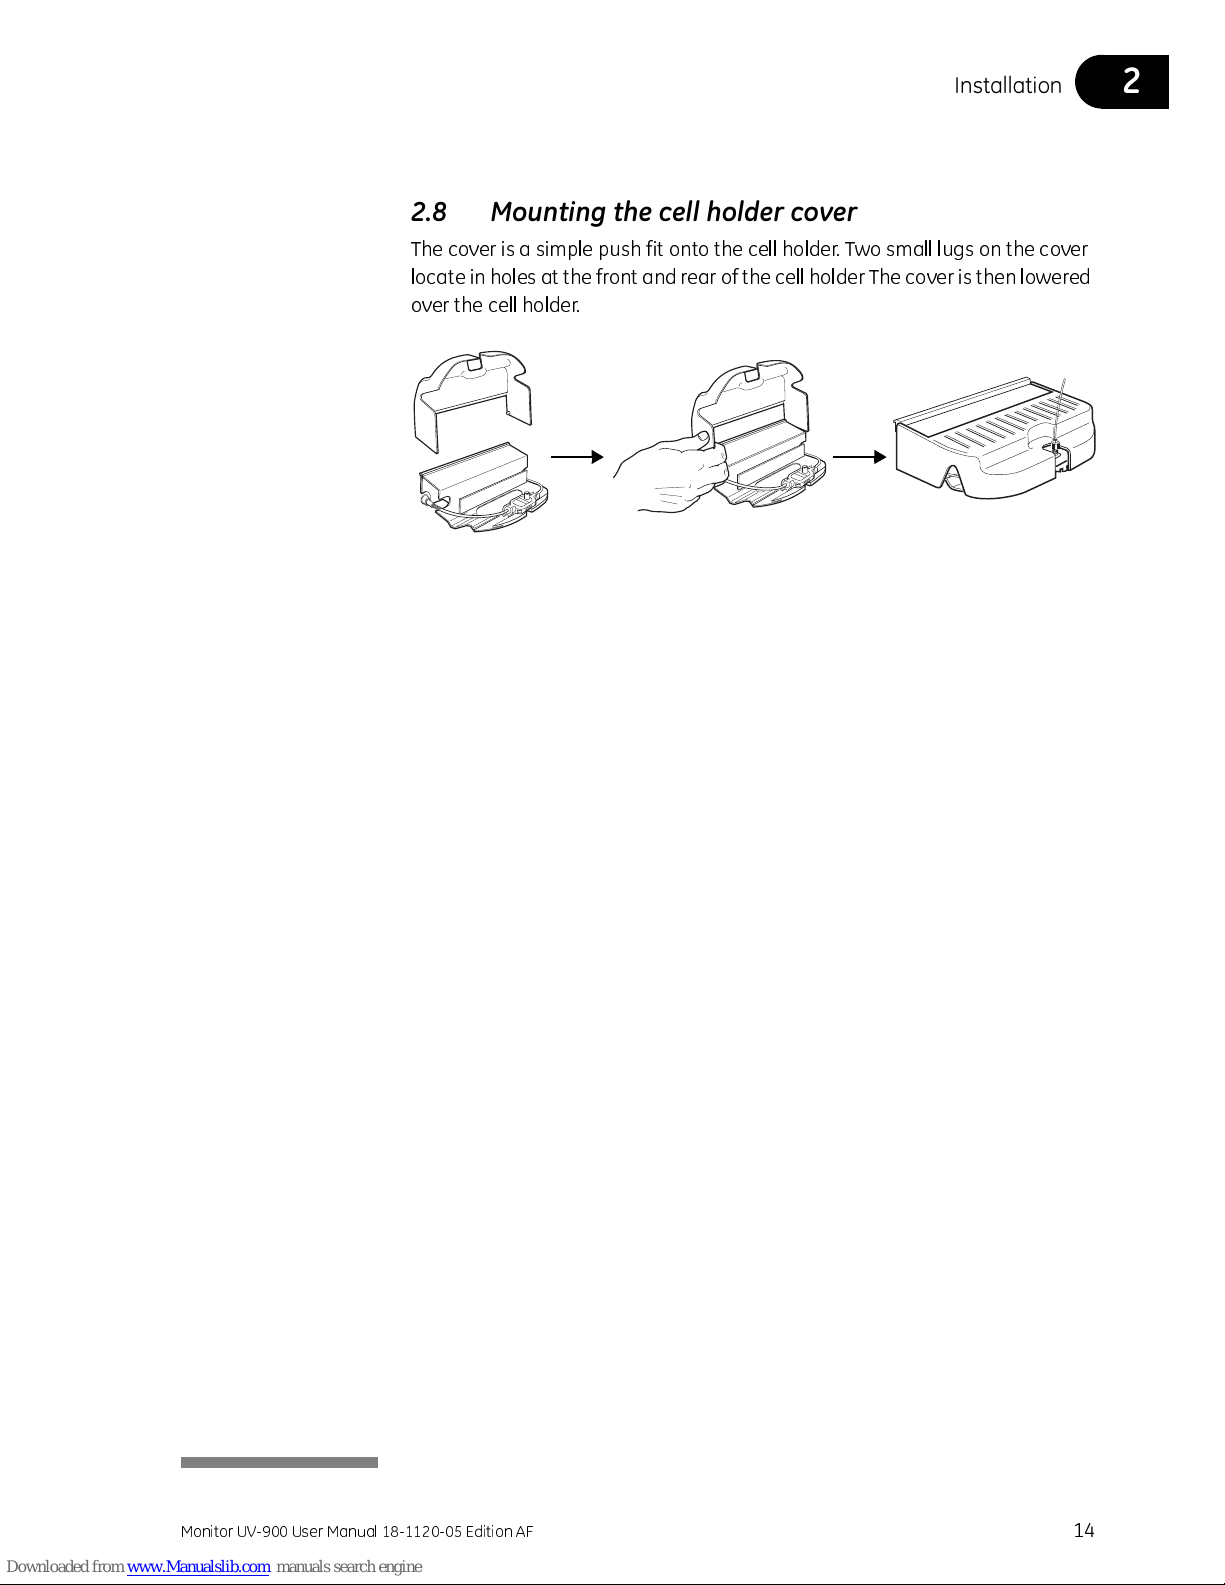
2.8 Mounting the cell holder cover
The cover is a simple push fit onto the cell holder. Two small lugs on the cover
locate in holes at the front and rear of the cell holder The cover is then lowered
over the cell holder.
Page 15

Operation 3
Monitor UV-900 User Manual 18-1120-05 Edition AF
15
3 Operation
3.1 On/off
1 Switch on the instrument at the mains switch on the rear panel.
2 The instrument performs a self-test and then starts calibration.
3 If the instrument has a calibrated cell path length set that differs from the
nominal length, a warning message appears on the monitor display.
Another message, displaying the calibrated cell length, also appears. The
display toggles between these messages.
4 To go to the
Main operating menu
, press
OK
or wait for about 45 seconds
to return automatically.
5 If no such warning messages appear , th e display automatically shows the
Main operating menu
after approximately 1 minute. The instrument is
ready to use.
All parameters are factory set to default values.
3.2 Menu selection and settings
3.2.1 Menu selection
A specific menu is selected by turning the front selection dial clockwise or
counter clockwise. When the required menu is visible the menu or selection is
accepted by pressing the OK button.
Selftest
Please wait...
Calibrating
Please wait...
Please Check UV Cell!
Press OK/Esc to cont.
Real UV Cell Length
(?,??mm, SN??????
λ1(215) 1.123 AU
λ2(254) 0.02345 AU
Menu selection
OK
button
ESC
button
Select submenu Return one menu level
Page 16

3 Operation
16
Monitor UV-900 User Manual 18-1120-05 Edition AF
If a menu has sub levels, the sub menu is displayed by pressing the
OK
button. Pressing the
ESC
button moves back one menu level.
3.2.2 Return to main menu
Pressing
ESC repeatedly, always returns to the
main menu 2 which is the main
operating menu. Press ESC
once more to return to
main menu 1
, the mode
changing menu.
3.2.3 Select value
A cursor below a text or numerical value shows what is a ffected by t he dial. T o
increase the value turn the dial clockwise. To decrease the value turn the dial
counter clockwise.
When setting numerical values, the cursor moves up to the next digit if the dial
is turned quickly in one direction, to simplify entering large values. The cursor
moves back one place to the right every two seconds if the dial is not turned.
The text or numerical value displayed is accepted by pressing the OK
button.
To cancel, press the
ESC
button.
Sub menu 3.3.1
Sub menu 3.3.2
Main menu 1
Main menu 2
Main menu 3
Main menu 4
Main menu 5
Sub menu 3.1
Sub menu 3.2
Sub menu 3.3
Sub menu 3.1.1
ESC
OK
ESC
OK
ESC
OK
Main menus Sub menus Sub menus
Main menu 1
Main menu 2
ESC
ESC ESC ESC
ESC
Parameter
Current value
New value to be set
Set Wavelength
(280 nm) 250.0
Page 17

Operation 3
Monitor UV-900 User Manual 18-1120-05 Edition AF
17
3.3 Main menu overview
Mode changing menu (mode menu)
.The menu is accessed from all positions by
pressing the
ESC
button repeatedly.
Main operating menu 1
. Wavelength display showing first two wavelengths
and, if the instrument is in Run mode, their absorbance.
Main operating menu 2
. Wavelength display showing the thir d wavelength and,
if the instrument is in Run mode, the absorbance.
Autozero the instrument.
Produce event mark.
Set the wavelengths for the measurements.
Set the recorder output
.
Filtering noise.
Flow cell path length calibration.
Check internal operating values.
See section
B.1 Check menu.
Setup language, unit number etc.
See section
B.2 Setup menu.
Set different timer options.
See section
B.3 Setting and using the alarm timer.
3.4 Setting lamp on/off
The lamp should be switched off when no measurement is made to conserve
the lamp operating time. The lamp is switched on when a run is started. No
warm-up time is required.
1 Select the mode changing menu.
2 Switch the lamp on (
Run
) or off (
End
) by pressing OK. Its current status is
shown in the upper left of the display.
When controlled from UNICORN, the lamp is switched on automatically when
the flow is started and off when the run is ended.
Run
Press OK to End
λ1(215) 1.123 AU
λ2(254) 0.02345 AU
λ3(280) 1.123 AU
Autozero
Eventmark
Set Wavelength
(215, 254, 280 nm)
Set Analogue Out
(2.000AUFS, 10%)
Set Averaging Time
(2,56s)
Set UV Cell Length
(--.-- mm, SN ------)
Check
Setup
Alarm/Timer 00:22:24
Current status
Run
Press OK to End
Page 18

3 Operation
18
Monitor UV-900 User Manual 18-1120-05 Edition AF
3.5 Reading absorbance values
The main operating menu shows the absorbance values for up to 3 active
wavelengths. The menu is reached from any other menu by pressing the
ESC
button repeatedly. The display for the third wavelength is reached by turning
the dial clockwise.
As an alternative all 3 wavel engths can be shown in a single display, but limited
to 3 decimals. This alternative is reached by turning the dial clockwise.
3.6 Setting wavelength
The instrument can measure up to 3 wavelengths simultaneously and
wavelength changes can be set at any time.
1 Select main menu Set Wavelength
, press OK.
2 Select sub menu
Set Wavelength λ1
, press OK.
3 Set the value, press OK.
4 The next wavelength λ2 is now shown. Set the value or turn the
wavelength off, by turning the dial counter clockwise until the value passes
through 190 nm. If only one wavel ength is to be used, λ2 and
λ3
should be
set to off. Press OK.
The first wavelength λ1
can never be set to off.
5 Repeat step 4 in the menu Set Wavelength λ3
.
6 Press
ESC
to return to the main operating menu.
In UNICORN, the wavelengths are set with the instruction
Wavelength in
System Control:Manual:Alarm&Mon
.
λ1(215) 1.123 AU
λ2(254) 0.02345 AU
λ3(280) 1.123 AU
or
215nm 254nm 280nm
1.123 0.023 0.123
Set Wavelength
(215, 254, 280 nm)
Set Wavelength λ1
(215, 254, 280 nm)
Set Wavelength λ1
(215nm) 234
Set Wavelength λ2
(254nm)
Page 19

Operation 3
Monitor UV-900 User Manual 18-1120-05 Edition AF
19
3.7 Autozero
The autozero function sets the detected absorbance to zero when the OK
button is pressed. All three wavelengths are autozeroed. Autozero is
recommended after wavelength changes in a method and before the sample
is injected.
1 Select main menu
Autozero
, press OK. The normal absorbance value
display is then shown.
In UNICORN, Autozero is set with the instruction
AutoZeroUV in
System
Control:Manual:Alarm&Mon
.
3.8 Storage and shut-down
Overnight:
The flow cell can be left filled with buffer.
Weekend and long term storage:
Flush the flow cell with distilled water and
then fill it with 20% ethanol.
The flow cell can also be stored dry by flushing as above with distilled water
and then blowing a compressed inert gas such as nitrogen (N2) through the cell.
Replace the red protective caps. Never use compressed air as th is may contain
droplets of oil.
Autozero
CAUTION!
Do not allow solutions which contain dissolved salts, proteins or
other solid solutions to dry out in the flow cell. Do not allow particles to
enter the flow cell as damage to the flow cell may occur.
Page 20

3 Operation
20
Monitor UV-900 User Manual 18-1120-05 Edition AF
3.9 Using an external chart recorder
3.9.1 Setting range and zero
The external chart recorder output fr om the instrument is always 0–1 V, but the
absorbance value for full scale defle ction and the Zero Absorbance lev el on the
recorder can be set.
1 Select main menu
Set Analogue Out
, press OK.
2 Set the range value in the sub menu
Set Range
and press OK. The range is
the full scale absorbance range for the chart recorder (1 V). Only fixed
steps between 5.0 AU and 0.01 AU can be set and the value is the same for
all 3 wavelengths.
3 Select menu
Set Zero Level
, press OK.
4 Set the value and press OK. This value determines where the zero
absorbance level should be in relation to full scale on the recorder.
The instrument has an automatic overrange
function. If during a peak the monitor signal
reaches the full scale value, the signal will drop
instantly to 0 V and give an accurate display of
the peak starting from this position.
3.9.2 Event mark
Event marks can be set, for example when the
sample is injected, and displayed as spikes on all
three channels of the chart recorder. The spikes are
10% of the full scale of the chart recorder which
corresponds to 0.1 V.
1 Select main menu
Event mark, press OK.
Set Analogue Out
(2.000AUFS, 10%)
Set Range
(2.000AUFS) <0.1>
Set Zero Level
(10% of FS) 20
Range
AU
Overrange
Measured absorbance
level (A U)
Signal to
recorder (V)
0 V
1 V
Page 21

Operation 3
Monitor UV-900 User Manual 18-1120-05 Edition AF
21
3.10 Filtering noise
To filter the noise in the UV-signal, a moving average filter is used. The
averaging time is the time interval used for calculating the moving average of
the absorbance signal. A long averaging time will smooth out noise efficiently,
but it will also distort the peaks. Peaks narrower than the minimum peak width
value may be distorted. Because of this the averaging time should be as short
as possible, see the table be low. On delivery the averaging time is set to 2.56 s.
1 Select menu
Set Averaging Time
, press OK.
2 Set the value, press OK. Use the fixed
values
between 5.12 and 0.08 s.
When monitoring more than one wavelength, the recommended
averaging time is a minimum of 1.28 s.
In UNICORN the averaging ti me is set with the i nstruction
AveragingTime
in System Control:Manual:Alarm&Mon
.
Set Averaging Time
(2.56s) <2.56>
Averaging time (s) Time constant (s)
(approximate)
Min. peak width
at half height (s)
5.12 2.0 32
2.56 1.0 16
1.28 0.5 8.0
0.64 0.2 3.2
0.32 0.1 1.6
0.16 0.05 0.8
0.08 0.03 0.5
Page 22

3 Operation
22
Monitor UV-900 User Manual 18-1120-05 Edition AF
3.11 UV cell calibration
The path length in the UV flow cell might differ from the nominal lengt h (1, 2 , 5
respective 10 mm) which interferes the calculation of the protein concentration
in the eluate. To achieve normalized absorbance, the path length in the UV flow
cell must be calibrated.
It is recommended to calibrate a new UV flow cell before use. An old flow cell
can be calibrated whenever you think that a calibration is required.
Equipment required
To perform the calibration you need test solutions, syringes and accessories for
desired cell length:
• UV-900 1 mm Calibr. kit, no. 18-6324-01
• UV-900 2 mm Calibr. kit, no. 18-6324-02
• UV-900 5 mm Calibr. kit, no. 18-6324-04
• UV-900 10 mm Calibr. kit, no. 18-6324-05
To calculate the real cell length use the supplied Excel-file:
• UV-900 Cell Calibr. Excel-file, no. 18-6324-06
Removing an old calibration setting
If the instrument already has a calibrated cell length set that differs from the
nominal length, a warning message appears on the UV monitor display at
start-up. Anothe r message, displaying the calibrated cell length, also appe ars.
The display toggles between these messages. The display automatically
returns to the main operating menu after about 45 seconds, or if pressing OK.
1 To remove an old calibration value, press
Esc
while the display toggles
between the two messages. The
Set UV Cell Length
menu appears.
Press OK.
2 At the
Set Calibr. Length
menu, set the cell length to 0. Press OK.
Preparing the calibration
1 Remove any old calibration value by setting the cell length to 0 (see above).
2 Unpack the UV Test kit.
3 Make sure that the Flow restrictor is connected in the flow path after the
UV flow cell.
4 Mount the Union Luer female/ 1/16" male, included in the test kit, in the
upper inlet of the UV flow cell.
Please Check UV Cell!
Press OK/Esc to cont.
Real UV Cell Length
(?,??mm, SN??????
Set UV Cell Length
(--,--mm, SN------)
Set Calibr. Length
(--,--mm) --.--
Union
Page 23

Operation 3
Monitor UV-900 User Manual 18-1120-05 Edition AF
23
5 Open the UV-900 Cell Calibr. Excel-file on the computer.
6 The solution bottles are marked with the concentration value and the
reference absorbance value for each solution.
Enter the concentration of the solutions in increasing order in the column
UV Test kit Concentration (mg/l)
.
Enter the absorbance value in increasing order in the column
UV Test kit Absorbance (AU/cm)
.
Performing the absorbance measurements
For each of the four test solutions, the absorbance will be measured and
automatically compared to its reference value.
1 Switch on the UV lamp, see
3.4 Setting lamp on/off
.
2 Select a main menu on the monitor display that shows wavelength
254 nm.
3 Fill one of the supplied syringes with 1.5–2 ml of the 0 AU/cm solution.
Make sure that there is no air in the syringe!
4 Fit the syringe in the Union Luer connector and inject the solution. Do NOT
remove the syringe.
5 Wait until the monitored absorbance value is stable.
6 Perform an
Autozero
operation. See section
3.7 Autozero
.
WARNING!
When using hazardous chemicals, take all suitable protective
measures, such as wearing protective glasses and gloves resistant to the
chemicals used. Follow local regulations and instructions for safe operation
and maintenance of the system.
WARNING!
Sulfuric acid included in the test soluitons is injurious to health.
Avoid spillage and use eye protection.
Page 24

3 Operation
24
Monitor UV-900 User Manual 18-1120-05 Edition AF
7 Remove the syringe.
8 Inject the other four test solutions in increa sing concentration or der. Use a
new syringe for each solution.
Note:
Air trapped in the UV cell causes inaccurate measur ements. To avoid
introducing air into the cell, gently fill the Luer union up to the edge
using test solution from the syringe that is next. Then insert the
syringe into the Luer union.
9 After each injection, wait for a stable absorbance value and enter the
measured values in the column
UV -900 Absorbance (AU) in the UV-900
Cell Calibr . Excel-file.
10 When all absorbance values have been entered, the real cell length is
shown next to the
Real cell length square.
Note:
The regressions coefficient should be larger than 0.999.
If not, one or several measured values are faulty.
Entering the new real length
1 Select menu
Set UV Cell Length
in the UV monitor. Press OK.
The Set
Calibr. Length menu appears. Press OK.
2 Enter the
Real cell length value (from the Excel-file) and press OK.
3The
Set UV Cell Type
menu appears. Check the cell type value.
If the value is corre ct, turn the selection dial clockwise to go to next menu.
If the value has to be changed, press OK to change it.
4 At the
Set Cell Serial No.
menu press OK.
5 Enter the serial number of the cell (see the label on the flow cell). Press OK.
3.12 Changing flow cell
The flow cell can be changed when required, for example from 2 mm to 10 mm
when the sensitivity of the measur ement must change due to a small amount
of sample being applied, or from a 10 mm to 2 mm when a lower sensitivity is
desired, due to output signal limitation.
See section
2.3 Installing the flow cell
.
3.13 Restart after power failure
If the power supply to the instrument is interrupted, the instrument
automatically restarts itself and displays the main operating window. All set
values are retained in the instrument but the instrument starts with the lamp
switched-off.
Set UV Cell Length
(--,--mm, SN------)
Set Calibr. Length
(--,--mm) --.--
Set UV Cell Type
(2 mm)
Set Cell Serial No.
(SN ------) ------
Page 25

Maintenance 4
Monitor UV-900 User Manual 18-1120-05 Edition AF
25
4 Maintenance
4.1 Periodic maintenance
4.2 Cleaning-in-place
Pump a cleaning or sanitizing agent through the flow cell. The standard
recommendation is to pump 1 M NaOH at 1 ml/min for 30 minutes and then
wash out with buffer.
WARNING!
Always disconnect the power supply before attempting to
replace any item on the system during maintenance.
WARNING!
Only spare parts that are approved or supplied by GE
Healthcare may be used for maintaining or servicing the system.
Interval Action (see procedures below)
Every 3 month Check the instrument
Every 6 month
or more often if required
Clean the flow cell and optical fiber connectors
WARNING!
Remove liquid or dirt from the system surface using a cloth and,
if necessary, a mild cleaning agent.
WARNING!
When using hazardous chemicals, take all suitable protective
measures, such as wearing protective glasses and gloves resistant to the
chemicals used. Follow local regulations and instructions for safe operation
and maintenance of the system.
WARNING!
When using hazardous chemicals, make sure that the entire
system has been flushed thoroughly with bacteriostatic solution, e.g. NaOH,
and distilled water before service and maintenance.
WARNING!
NaOH is injurious to health. Avoid spillage.
Page 26

Maintenance 4
Monitor UV-900 User Manual 18-1120-05 Edition AF
26
4.3 Checking the instrument
4.3.1 Lamp intensity
1 Select menu
Check
, press OK.
2 Select menu
Check Lamp Intensity
.
If the lamp intensity is < 20%, contact GE Healthcare for lamp replacement or
change of internal optical fiber.
4.3.2 Lamp on–time
1 Select menu
Check
, press OK.
2 Select menu
Check Lamp Run Time
.
If the lamp ontime is > 4000 hours, contact GE Healthcare for lamp
replacement.
4.3.3 Flip time
The flip time is the time the monochromator stepper motor has been in
operation.
1 Select menu Check
, press OK.
2 Select menu
Check Flip Time
.
If the flip time is > 2000 hours, contact GE Healthcare for maintenance.
4.3.4 UV flow cell
This menu shows the set path length and the serial number of the UV flow cell.
1 Select menu Check
and press OK.
2 Select menu
UV Flow Cell
.
Check Lamp Intensity
210nm 85% 300nm 95%
Check Lamp Run Time
200h
Check Flip Time
50h
UV Flow Cell
(--,--mm, SN -----)
Page 27

Maintenance 4
Monitor UV-900 User Manual 18-1120-05 Edition AF
27
4.4 Cleaning the flow cell and optical fiber connectors
A clean flow cell and optical connectors are essential for ensuring the correct
operation of the UV-monitor.
4.4.1 Cleaning the flow cell
1 Connect a syringe to the inlet of the flow cell and squirt distilled water
through the cell in small amounts. Then fill the syringe with a 10% surface
active detergent solution like
Decon 90, Deconex 11, RBS 25
or equivalent,
and squirt five times.
2 After five squirts, leave the detergent solution in the flow cell for at least
20 minutes.
3 Pump the remaining detergent solution through the flow cell.
4 Rinse the syringe and flush the cell with distilled water (10 ml).
4.4.2 Cleaning the optical fiber connectors
Wipe with 30% isopropanol on lens paper.
4.4.3 Instrument housing
4.5 Cleaning the system
• Wipe the surface regularly with a damp cloth. Do not allow spilt liquid to
dry on the instrument.
• Remove dirt from the surface using a cloth and a mild cleaning agent.
• Let the system dry completely before using it.
Wipe the instrument housing regularly with a damp cloth. Let the instrument
dry completely before use.
CAUTION!
Do not allow solutions containing dissolved salts, proteins or
other solid solutes to dry out in the cell. Do not allow particles to enter the
flow cell as damage to the flow cell may occur.
WARNING!
When using hazardous chemicals, make sure that the entire
system has been flushed thoroughly with bacteriostatic solution, e.g. NaOH,
and distilled water before service and maintenance.
Page 28

4 Maintenance
28
Monitor UV-900 User Manual 18-1120-05 Edition AF
4.6 Recycling
This symbol indicates that the waste of electrical and electronic equipment
must not be disposed as unsorted municipal waste and must be collected
separately. Please contact an authorized representative of the manufacturer
for information concerning the decommissioning of equipment
Page 29

Trouble-shooting 5
Monitor UV-900 User Manual 18-1120-05 Edition AF
29
5 Trouble-shooting
5.1 General
When contacting GE Healthcare for support, state the program version of the
instrument, which is shown for 2 seconds after the self-test, during switch-on,
or in the menu
Check Service Mode
, see
page 35
.
5.2 Faults and actions
If the suggested actions do not correct the fault, call GE Healthcare.
Monitor UV-900
V1.06
WARNING!
The instruments must not be opened by the user. They contain
high voltage circuits which can give a lethal electric shock.
Fault Possible cause Corrective action
No text on the front display
No power to the monitor Check that the mains cable is connected
and the power switch is in ON-position I
Noisy UV-signal, signal drift
or instability
The buffer may be impure Check if the signal is still noisy with water
There may be air in the flow cell Check that the flow restrictor gives a back
pressure of 0.2 MPa in ÄKTAexplorer, and
3-5 MPa in ÄKTApurifier
If there is a lot of air in the water, degas
the buffer continuously (we recommend
helium sparging)
Check the connections of the UV cell
optical fibers
Clean the UV cell, see section 4.4
Ghost peaks
Air in the eluents Degas if necessary (we recommend
helium sparging)
Dirt or residues in the flow path
from previous runs
Clean the system in accordance
with ÄKTAexplorer or
ÄKTApurifier System Manual
Residues in the column from
previous runs
Clean the column in accordance with the
column instructions
Bad mixing of the eluents Check that the mixer is functioning
correctly and that the correct chamber
volume is being used
Error in external chart
recorder
The recorder not properly set up Check the chart recorder in accordance
with its manual
Monitor UV-900 not properly set upTest the recorder function by selecting
recorder test according to section
Check
Analogue Out on page 35
Page 30

5 Trouble-shooting
30
Monitor UV-900 User Manual 18-1120-05 Edition AF
5.3 Error messages
If the suggested actions do not correct the fault, call GE Healthcare.
Message Action
Sample fiber failure
There may be too high absorption in the UV cell.
1. Check the liquid.
2. Ensure that there are no air bubbles in the system.
3. Check the connections of the UV cell optical fibers.
4. Clean the UV cell, see section
Cleaning the flow cell and
optical fiber connectors
.
Not calibrated
Calibration failed
Recalibrate by switching the instrument off and then back to
on, or choose
Recalibrate
in the
Check
menu
Change lamp
Call GE Healthcare for Xe-lamp exchange
Mode fiber failure
Reference fiber failure
Lamp module failure
Low light intensity
Block filter is defect
Call GE Healthcare
High intensity
in Reference fiber
Recalibrate by switching the instrument off and on
High intensity
in Sample fiber
1. Disconnect the optical fiber connectors.
2. Recalibrate by switching the instrument off and on.
ERROR Number 10
ERROR Number 16
ERROR key(OK)
ERROR key(Esc)
ERROR key(OK+Esc)
ERROR 100
ERROR 109-113
ERROR 120-121
1. Switch off the instrument.
2. Check all connections.
3. Switch on the instrument.
ERROR 106-108
ERROR 118
1. Switch off the instrument.
2. Check all UniNet connections.
3. Switch on the instrument.
Page 31

Reference information A
Monitor UV-900 User Manual 18-1120-05 Edition AF
31
Reference information
A Description
A.1 Instrument
The Monitor UV-900 is a UV-absorption monitor with v ariabl e w av elen gth. The
instrument contains no internal user replaceable items.
Connect any auxiliary equipment to the 9-pole D–Sub female REMOTE
connector (5 V TTL signals only).
Connector/switch Function
Analogue out 0–1 V Recorder output, 3 channels 0–1 V
Remote Digital signal inputs, lamp on/off, autozero, event mark
UniNet 1 Computer network
Mains Supply voltage, grounded
On/off Instrument on/off switch
M
onitor U
V
-900
Analogue out
0-1V
Remote
UniNet 1 Mains On/off
12345
6789
Pin Signal Function
Active status = low or closed terminal to pin 5 (0V)
1 Remote on/off Active = lamp on, inactive = lamp off
2 Autozero From inactive to active > 100 ms = Autozero
3 Event mark From inactive to active > 100 ms = Event mark
4–
50 V
6–9 –
Page 32

A Reference information
32
Monitor UV-900 User Manual 18-1120-05 Edition AF
A.2 Flow cell
The optical path length of the flow cell is 2 mm and 10 mm. The flow cell is made
of quartz with a titanium housing.
The unique design of the flow cell prev ents the formation of distinct interfaces
between eluent components with different refractive indices and eliminates
the negative influence these would cause. The precision of monitoring is
enhanced by the construction of the flow cell, which ensures total reflectance
of light. This maintains a high intensity of light to the detector. The long path
length combined with a small cell volume increases sensitivity.
A.3 Monitor principle
A Xenon flash lamp gives a high intensity, continuous spectrum throughout the
range 160–2000 nm. The light enters a monochromator which includes a
condensing system, blocking filter, entrance slit and a concave aberration-
corrected holographic grating. Monochromatic light from the grating is
directed to an optical fibre. The grating is turned by a stepping motor for
wavelength selection between 190–700 nm, in steps of 1 nm. Up to 3
wavelengths can be monitored simultaneously.
For wavelengths between 360 –700 nm, a blocking filter is moved into the light
path to filter out unwanted light, of a half wavelength from the second order
spectrum, before entering the monochromator.
The light from the monochromator to the flow cell and from the cell to the
detector electronics is guided by optical fibres which focus its full intensity on
the liquid flow path, maximising the sensitivity of the monitoring. Before
entering the flow cell, the monochromatic light is split in a beam splitter, with
50% of the light passing through the sample fibre (S) and the flow cell, and 50%
being directed through the reference fibre (R). Two photodiodes with identical
characteristics monitor the intensities of the measuring and reference beams.
Page 33

Reference information A
Monitor UV-900 User Manual 18-1120-05 Edition AF
33
The long path length and small volume of the flow cell ensure very high
sensitivities and high signal-to-noise ratios. The detection system is also very
stable and because the optical unit is located away from the lamp and
electronics, noise and drift caused by temperature variations is avoided.
At calibration the instrument automatically finds 2 persistent lines in the
spectrum of Xenon. The wavelengt hs of these known lines are used to calibrate
the stepper motor that turns the grating.
Detectors
and electronics
Flash lamp 100 Hz
Monochromator
Beam
splitter
S
R
Con-
densor
Block
filter
Flow cell
Page 34

B Reference information
34
Monitor UV-900 User Manual 18-1120-05 Edition AF
B Menus
B.1 Check menu
Checking autozero level
The instrument internal absorbance value for autozero can be checked to test
the consistency in buffers.
1 Select main menu
Check
, press OK. The autozero absorbance value for
wavelength 1 is shown.
2 Turn the selection dial clockwise to display wavelengths 2 and 3.
Lamp intensity, Lamp Ontime, Fliptime, UV Flow cell
See
Chapter 4 Maintenance.
Checking the wavelength
If there is any doubt that the instrument is showing the correct values, the
wavelength calibration can be checked.
1 Select main menu
Check
, press OK.
2 Select sub menu
Check Wavelength
, press OK. The check starts and after
approx. 20 seconds the message Wavelength OK
or
Wavelength not OK
is shown together with the deviation values. If not OK, recalibration can be
selected.
If a deviation in wavelength occurs repeatedly when checked, contact
Amersham Biosciences.
Recalibrate
If the instrument is left switched on for a long period (> 10 days), it may be
necessary to recalibrate it. This calibration is identical to that done when the
instrument is switched on.
1 Select main menu
Check
, press OK.
2 Select sub menu
Recalibrate, press OK. The recalibration starts and af ter
approx. 60 seconds the message
Recalibration finished is shown.
Check Autozero
AZ1 (215) 0.23456 AU
AZ2 (254) 0.23775 AU
AZ3 (280) 0.12326 AU
Checking Wavelength
Please wait...
Wavelengths OK
230+0 459+0 542+0 OK
Checking Wavelength
Please wait...
or
Wavelengths not OK
230-4 459+3 542+4 OK
Wavelengths not OK
Recalibrate? OK
Recalibrating
Please wait...
Recalibration
finished OK
Page 35

Reference information B
Monitor UV-900 User Manual 18-1120-05 Edition AF
35
Check Analogue Out
The function of the connected chart recorder can be tested.
1 Select main menu
Check
, press OK.
2 Select sub menu
Check Analogue Out
, press OK.
3 Start the test by selecting on, press OK. The
test will ramp the signal on each channe l up
to 1 V and then decrease the signal in 10%
steps back to 0 V. The test is run
continuously. Compare the diagram of the
chart recorder with the figure.
4 Stop the test by pressing OK or
ESC
.
Check Service Mode
Service information relevant to the instrument can be checked. Information
may not be available in all menus.
1 Select main menu Check
, turn the selection dial clockwise for next display.
2 Select sub menu
Check Service Mode
by pressing OK.
3 The service telephone number is displayed. Turn the selection dial
clockwise to view the next display.
4 The service contract number is displayed. Turn the selection dial clockwise
to view the next display.
5 The instrument serial number is displayed. Turn the selection dial
clockwise to view the next display.
6 The instrument name and software version are displayed. Turn the
selection dial clockwise to view the next display.
7 The date of the last service is displayed. Turn the selection dial clockwise
to view the next display.
8 Press OK to test the instrument buzzer.
Press
Esc to return to the
Check Service Mode
menu.
Check Analogue Out
(off) on
1 V
Signal to recorder
0 V
Check Service Mode
Telephone Service
012345678901
Contract Number
012345678901
Serial Number
01234567 YM 012345
Monitor UV-900
V1.06
Date of Maintenance
?
Buzzer Test.
Page 36

B Reference information
36
Monitor UV-900 User Manual 18-1120-05 Edition AF
B.2 Setup menu
Setup language
Sets the language used in the display.
1 Select main menu
Setup
, press OK.
2 Select sub menu
Setup Language, press OK.
3 Select the desired language.
GB
= British English
D
= German
F
= French
E
= Spanish
I = Italian
Setup unit number
The unit number is the identification the UV monitor has on the UniNet-bus. It
should correspond to the number set in UNICORN for the UV monitor. The
number should be set to 0 if one UV monitor is used. If more than one UV
monitor is used, they must all have different identification numbers.
1 Select main menu
Setup
, press OK.
2 Select sub menu
Setup Unit Numbe
r,
press OK.
3 Select unit number (0–25).
Setup display angle
The display angle can be set to compensate for different viewing heights.
1 Select main menu
Setup, press OK.
2 Select sub menu
Set Display Angle, press OK.
3 Select viewing angle (-> \ Up, -> | Mid or -> / Down).
Setup Language
(GB) GB D F E I
Setup Unit Number
(0)
Setup Display Angle
( ->I ) ->\ ->I ->/
Page 37

Reference information B
Monitor UV-900 User Manual 18-1120-05 Edition AF
37
B.3 Setting and using the alarm timer
You can set the alarm function to either a fixed alarm time or using a count-
down timer. The UV monitor can be started or stopped automatically, or an
alarm can sound, at the set time. It is not possible to set both an alarm time and
a count-down timer. Current values are shown in parentheses.
1 Select main menu
Alarm/Timer
, press OK.
2 Set the action to t ake place. Pr ess
OK to select action.
Buzzer will generate
an audible alarm for 15 s and a message. Run will start the pump at the
set flow rate,
End will stop the pump, each generating one beep and a
message.
3 Use the sub menu
Set Alarm
if you want to set an alarm at a fixed time.
Press OK to enter the time value in the form
HH.MM.SS
, pressing the OK
button after entering each time unit.
4 If you want to set a count-down timer , turn the dial to select sub menu Set
Timer
. Press OK to enter the countdown value in the form
HH.MM.SS
,
pressing the OK button after entering each time unit.
5 Press
ESC
button to return to the
Alarm/Timer
menu which now shows the
set alarm time or count-down time as
BzzHH:MM:SS
.
6 When the alarm time is due or the count-down timer reaches 00:00:0 0, an
alert display is shown and the instrument beeps, until the OK button is
pressed.
The alarm timer is based on the internal instrument clock which can be set in
the Set Clock
menu placed after the Alarm/Timer
menu. The clock will be reset
when power is turned
OFF
.
An already set alarm/timer function can be reset by pressing OK in the menu
Alarm/Timer off?
B.4 Service displays
The instrument has service displays for use by authorised service personnel. If
the service display
Enter Access Code: is accidentally selected, press the
ESC
button to exit to the normal operation display.
Alarm/Timer 12:30:52
Alarm/ Timer Action
(Bzz) Buzzer Run End
Set Alarm 12:32:22
(0) 00.00.00
Set Timer
(0) 00.00.00
Alarm/Timer 12:30:52
(Bzz 12:33:00)
Bzz12:41:29 12:41:49
! ! Alarm time ! !
Set Clock
00
:32:22 (00:36:53)
Alarm/Timer off?
(Bzz 05:33:00)
Enter Access Code!
Page 38

B Reference information
38
Monitor UV-900 User Manual 18-1120-05 Edition AF
B.5 Menu overview
Run
Press OK to End
Alarm/Timer 00:22.24
Set Averaging Time
(2.56s)
Set Analogue Out
(2.000AUFS, 10%)
Autozero
Set Range
(2.000AUFS)
Set zero Level
(10% of FS)
Check Autozero
AZ1 214nm 0.0356AU
AZ2 254nm 0.0356AU
AZ3 280nm 0.3876AU
Check Lamp Intensity
210 nm 85% 300 nm 95%
Check Lamp Run Time
40h
Check Flip Time
87h
Setup language
(GB) GB D F E I
Setup Unit Number
(0)
Setup Display Angle
( ->I ) ->\ ->I ->/
Alarm/Timer off?
Set Wavelength λ1
(215nm)
Set Wavelength λ2
(254nm)
Set Wavelength λ3
(280nm)
λ1(280) 1.123 AU
λ2(254) 0.02345 AU
Set Wavelength
(215, 254, 280 nm)
Set Wavelength λ1
(215nm) 214
Set Wavelength λ2
(215nm) 260
Set Range
(2.000AUFS) <0.01>
Set zero Level
(10% of FS) 20
Set Averaging Time
(2.56s) <2.56>
Check
Setup
Checking Wavelength
Please wait...
Wavelengths OK
230+0 459+0 542+0 OK
Wavelengths not OK
Recalibrate? OK
Recalibrating
Please wait...
Recalibration finished
OK
Check Analogue Out
(off) on
Setup Unit Number
(0)
Eventmark
λ3(215) 0.00000 AU
280nm 254nm 215nm
0.000 0.000 0.000
Set Clock
(00:36:53) 00.00.00
Set Timer
(0) 00.00.00
Set Alarm 12:32:21
(0) 00.00.00
A l a rm / T i m e r a c t io n
(Bzz) Buzzer Run End
Set Calibr. Length
(--.--mm)
Set UV Cell Type
(2 mm)
Set Cell Serial No.
(SN------)
Set Calibr. Length
(--.--mm) --.--
Set UV Cell Type
(2 mm) 2
UV Flow Cell
(--,--mm, SN -----)
Check Wavelength
Recalibrate
Check Analogue Out
Check Service Mode
Set UV Cell Length
(--.--mm, SN ------)
Set Cell Serial No.
(SN -------) ------
Set UV Cell Type
(2 mm)
Set Wavelength λ1
(215nm) 214
Set Wavelength λ2
(215nm) 260
Set Wavelength λ3
(215nm) 278
Page 39

Reference information C
Monitor UV-900 User Manual 18-1120-05 Edition AF
39
C Technical specifications
Operating data
Wavelength range
190–700 nm in steps of 1 nm,
3 wavelengths simultaneously
Bandwidth
4 nm
Wavelength accuracy
±2 nm
Wavelength reproducibility
±0.01 nm
Wavelength switch time
< 500 ms (one cycle from 214 nm to
254 nm and back to 214 nm)
Linearity
< 2% deviation up to 2 AU at 260 nm with
Uracil at pH 2
Noise (specified for 10 mm
flow cell)
1, 2
Single wavelength
short term (0.5–1 min)
long term (1–10 min)
Dual wavelengths
short term (0.5–1 min)
long term (1–10 min)
< 6x10⁻⁵ AU at 230 nm
< 6x10⁻⁵ AU at 230 nm
< 2x10⁻⁴ AU at 230 and 254 nm
< 2x10⁻⁴ AU at 230 and 254 nm
Drift
2)
< 2x10⁻⁴ AU/h at 254 nm
Environment
+4 to +40 °C
20–95% relative humidity
84–106 kPa (840-1060 mbar)
atmospheric pressure
1)
Measured with water at 1 ml/min, time constant 1 s.
2)
Typical values at room temperature after varm-up.
Flow cell
Max. flow rate
100 ml/min
Max. pressure
2 MPa (20 bar, 290 psi)
Backpressure
Max. 0.5 bar at 2 ml/min with water at
25 °C
Liquid temperature range
+4 to +40 °C
Optical path length
2 mm cell
10 mm cell
2 mm
10 mm
Cell volume
2 mm cell
10 mm cell
2 µl
8 µl
Degree of protection
IP 21
Wetted materials
PTFE (polytetrafluoroethylene)
PEEK (polyetheretherketone)
Titanium (palladium alloy)
Quartz (synthetic fused silica)
pH stability range
1–13, 1–14 (<1 days exposure)
Page 40

C Reference information
40
Monitor UV-900 User Manual 18-1120-05 Edition AF
Physical data
Chemical resistance
The wetted parts are resistant to organic
solvents and salt buffers commonly used
in chromatography of biomolecules,
except 100% Ethyl acetate, 100%
Hexane, and 100% Tetrahydrofuran (THF)
Tubing connections
UNF 10-32 "fingertights" for capillary
tubing with 1/16” outer diameter
Light source
Xenon flash lamp
Lamp lifetime
> 4000 hours
Control
Stand alone or from a computer running
UNICORN 3.21 or higher through
UniNet-1 connection
Power consumption
65 VA
Power requirement
100–240 V AC, 50–60 Hz
Analogue output
3 signals, 0–1 V full scale, overrange function
Digital inputs
5 V, 1 mA current sinking, lamp on/off,
autozero, event mark
Display
2 rows with 20 characters each
Dimensions (H xW xD)
200 x 260 x 370 mm
Weight
8.5 kg
Degree of protection
IP 20
Compliance with standards
The declaration of conformity is valid for the
instrument only if it is:
• used in laboratory locations
• used in the same state as it was delivered
from GE Healthcare except for
alterations described in the User Manual
• connected to other CE labelled
GE Healthcare modules or other products
as recommended.
Safety Standards
This product meets the requirement of the
Low Voltage Directive (LVD) 73/23/EEC
through the following harmonized standards:
• EN61010-1
• IEC 61010-1
• CAN/CSA-C22.2 No. 61010-1
• UL61010-1
Page 41

Reference information C
Monitor UV-900 User Manual 18-1120-05 Edition AF
41
EMC standards
This device meets the requirements of the
EMC Directive 89/336/EEC through the
following harmonized standards:
• EN 61326 (emission and immunity)
• EN 55011, GR 2, Class A (emission)
• This device complies with part 15 of the
FCC rules (emission). Operation is subject
to the following two conditions:
1 This device may not cause harmful
interference.
2 This device must accept any
interference received, including
interference that may cause
undesired operation.
Page 42

D Reference information
42
Monitor UV-900 User Manual 18-1120-05 Edition AF
D Accessories and spare parts
Item Quantity per pack Code no.
Monitor UV-900 complete but without
flow cells
1 18-1108-35
Flow cell UV-900/2 (2 mm) 1 18-1111-10
Flow cell UV-900/10 (10 mm) 1 18-1111-11
Signal cable 1 18-1110-64
Fibre detachment tool 1 18-1111-16
Teflon tubing, i.d. 1/8", o.d. 3/16" 3 m 18-1112-47
Tubing connector for 3/16" o.d. tubing 10 18-1112-49
Ferrule for 3/16" tubing 10 18-1112-48
Stop plug, 5/16" 5 18-1112-50
Stop plug, 1/16" 5 18-1112-52
Union Luer female/1/16" male 2 18-1112-51
Union 1/16" female/M6 male 6 18-1112-57
Union M6 female/1/16" male 8 18-1112-58
Union 1/16" male/ 1/16" male,
i.d. 0.25 mm
2 18-1120-92
Union 1/16" male/ 1/16" male,
i.d. 0.50 mm
2 18-1120-93
PEEK tubing, i.d. 0.15 mm, o.d. 1/16" 2 m 18-1156-59
PEEK tubing, i.d. 0.25 mm, o.d. 1/16" 2 m 18-1120-95
PEEK tubing, i.d. 0.50 mm, o.d. 1/16" 2 m 18-1113-68
PEEK tubing, i.d. 0.75 mm, o.d. 1/16" 2 m 18-1112-53
PEEK tubing, i.d. 1.0 mm, o.d. 1/16" 2 m 18-1115-83
Tefzel tubing, i.d. 0.25 mm, o.d. 1/16" 2 m 18-1121-36
Teflon tubing, i.d. 0.75 mm, o.d. 1/16" 2 m 18-1112-54
Fingertight connector 1/16" 10 18-1112-55
UV-900 1 mm Calibr. kit 1 18-6324-01
UV-900 2 mm Calibr. kit 1 18-6324-02
UV-900 5 mm Calibr. kit 1 18-6324-04
UV-900 10 mm Calibr. kit 1 18-6324-05
UV-900 Cell calibr. Excel-file 1 18-6324-06
Page 43

Monitor UV-900
User Manual 18-1120-05 Edition AF
43
Short instructions
The following short instructions are intended as a
guide for users who are fully familiar with the safety
precautions and operating instructions described in
this manual. The instructions assume that the unit is
installed according to the installation instructions.
1
Switch on the module
with the mains
switch on the rear panel.
2
Switch on the UV-lamp
by selecting
Run
.
3
Select wavelength
for one, two or three
wavelengths.
4
Autozero
the module by pressing OK.
5
The main operating menu
(RUN-menu)
is shown.
M
onitor U
V
-900
Select OK
ESC
Calibrating
Please wait...
End
Press OK to Run
Set Wavelength
(215, 254, 280 nm)
Set Wavelength λ1
(215nm)
Set Wavelength λ2
(254nm)
Set Wavelength λ3
(280nm)
Autozero
λ1(215) 1.123 AU
λ2(254) 0.02345 AU
λ3(280) 1.123 AU
Page 44

Page 45

Page 46

www.chromatography.
amershambiosciences.com
GE Healthcare Bio-Sciences AB
Björkgatan 30
751 84 Uppsala
Sweden
ÄKTA, ÄKTAdesign, UNICORN and DropDesign are trademarks of
GE Healthcare Ltd, a General Electric Company. GE, imagination at work and
GE monogram are trademarks of General Electric Company.
All goods and services are sold subject to the terms and conditions of sale of
the company within GE Healthcare which supplies them. GE Healthcare
reserves the right, subject to any regulatory and contractual approval, if
required, to make changes in specifications and features shown herein, or
discontinue the product described at any time without notice or obligation.
Contact your local GE Healthcare representative for the most current infor-
mation.
© 2005 General Electric Company – All rights reserved.
GE Healthcare AB
Björkgatan 30, 751 84 Uppsala, Sweden
GE Healthcare AB
Munzinger Strasse 9, D-79111 Freiburg, Germany
GE Healthcare AB
Amersham Place, Little Chalfont, Buckinghamhire, HP7 9NA, UK
GE Healthcare AB
800 Centennial Avenue, P.O. Box 1327, Piscataway, NJ 08855-1327, USA
GE Healthcare AB
Sanken Bldg. 3-25-1, Huakunincho, Shinjuku-ku, Tokyo 169-0073, Japan
Asia Paci.c Tel: +852 2811 8693 Fax: +852 2811 5251 • Australasia Tel: + 61 2 9899 0999 Fax: +61 2 9899 7511 • Austria Tel: 01/57606-1619 Fax: 01/57606-1627 • Belgium Tel: 0800 73 888
Fax: 03 272 1637 • Canada Tel: 800 463 5800 Fax: 800 567 1008 • Central, East, & South East Europe Tel: +43 1 982 3826 Fax: +43 1 985 8327 • Denmark Tel: 45 16 2400 Fax: 45 16 2424 •
Finland & Baltics Tel: +358-(0)9-512 39 40 Fax: +358 (0)9 512 39 439 • France Tel: 01 69 35 67 00 Fax: 01 69 41 96 77 • Germany Tel: 0761/4903-490 Fax: 0761/4903-405 • Italy T el: 02 27322 1
Fax: 02 27302 212 • Japan Tel: +81 3 5331 9336 Fax: +81 3 5331 9370 • Latin America Tel: +55 11 3933 7300 Fax: +55 11 3933 7304 • Middle East & Africa Tel: +30 210 9600 687
Fax: +30 210 9600 693 • Netherlands Tel: 0165 580 410 Fax: 0165 580 401 • Norway Tel: 815 65 555 Fax: 815 65 666 • Portugal Tel: 21 417 7035 Fax: 21 417 3184 • Russia & other C.I.S. & N.I.S
Tel: +7 (095) 232 0250, 956 1137 Fax: +7 (095)230 6377 • South East Asia Tel: 60 3 8024 2080 Fax: 60 3 8024 2090 • Spain Tel: 93 594 49 50 Fax: 93 594 49 55 • Sweden Tel: 018 612 1900
Fax: 018 612 1910 • Switzerland Tel: 0848 8028 12 Fax: 0848 8028 13 • UK Tel: 0800 616928 Fax: 0800 616927 • USA Tel: 800 526 3593 Fax: 877 29 5 81 02
E
l
a
n
d
e
r
s
T
o
f
t
e
r
s
2
0
0
5
imagination at work
User Manual 18-1120-05 AF
 Loading...