

Page 1
MDS™ TD220MAX
Robust Communications for Positive Train Control
MDS 05-6906A01, Rev. R
DECEMBER 2018
Technical Manual
Page 2

[This page intentionally left blank]
Page 3

MDS 05-6906A01, Rev. R TD220MAX Technical Manual i
TABLE OF CONTENTS
1.0 INTRODUCTION .................................................................................................................................... 1
1.1 Key Product Features ............................................................................................................................. 1
1.1.1 Authorization Features ......................................................................................................... 1
1.2 Accessories and Spares ......................................................................................................................... 2
1.3 40-Watt Power Amplifier ......................................................................................................................... 2
2.0 PRODUCT DESCRIPTION .................................................................................................................... 3
2.1 Front Panel Connectors and Indicators .................................................................................................. 3
3.0 INSTALLATION PLANNING .................................................................................................................. 4
3.1 Chassis Dimensions ............................................................................................................................... 4
3.2 Mounting Bracket Options ...................................................................................................................... 4
3.2.1 Optional DIN Rail Mounting .................................................................................................. 5
3.3 Antennas and Feedlines ......................................................................................................................... 5
3.3.1 Antennas............................................................................................................................... 5
3.3.2 Feedlines .............................................................................................................................. 5
3.4 Power ...................................................................................................................................................... 6
3.5 Grounding Considerations ...................................................................................................................... 7
3.6 Data Interface (DB-25) ............................................................................................................................ 7
3.6.1 Adapter Board ...................................................................................................................... 8
3.7 USB ......................................................................................................................................................... 9
3.8 Antenna Connector ................................................................................................................................. 10
4.0 STEP-BY-STEP INSTALLATION .......................................................................................................... 11
4.1 Logging On ............................................................................................................................................. 11
4.1.1 Serial Console ...................................................................................................................... 11
4.1.2 Telnet Console ..................................................................................................................... 12
4.2 Initial Startup & Checkout ....................................................................................................................... 12
4.3 Upgrade the Firmware ............................................................................................................................ 12
4.3.1 Introduction ........................................................................................................................... 12
4.3.2 Installing TD220MAX Firmware by TFTP ............................................................................. 13
4.3.3 Reprogramming Procedure .................................................................................................. 13
4.4 Set Up a GPS Base Unit ......................................................................................................................... 13
4.5 Set Up a PTP Base Unit ......................................................................................................................... 14
4.6 Set Up an OTA Mobile Unit .................................................................................................................... 15
4.7 Key the Transmitter ................................................................................................................................ 15
4.8 Perform Test Polling ............................................................................................................................... 15
5.0 MENU INTERFACE ................................................................................................................................ 16
5.1 Main Menu .............................................................................................................................................. 17
5.2 Network Configuration Menu .................................................................................................................. 18
5.2.1 IP Configuration Menu .......................................................................................................... 18
5.2.2 SNMP Agent Configuration Menu ........................................................................................ 19
5.3 System Configuration Menu ................................................................................................................... 20
5.3.1 STFP Configuration Menu .................................................................................................... 21
5.4 Radio Configuration Menu ...................................................................................................................... 22
5.5 GPS Configuration Menu ........................................................................................................................ 23
Page 4

ii TD220MAX Technical Manual MDS 05-6906A01, Rev R
5.6 PTP Configuration Menu ........................................................................................................................ 23
5.7 Security Configuration Menu .................................................................................................................. 25
5.7.1 User Passwords Menu ......................................................................................................... 26
Console/Telnet Lockout Security .................................................................................................. 26
5.8 Statistics/Logging Menu .......................................................................................................................... 27
5.8.1 STFP Logger Menu .............................................................................................................. 28
5.8.2 Wireless Packet Statistics Menu .......................................................................................... 29
5.8.3 Dropped Packet Statistics Menu .......................................................................................... 30
5.8.4 Ethernet Packet Statistics Menu .......................................................................................... 31
5.8.5 Event Log Menu ................................................................................................................... 32
5.8.6 View Event Log Menu ........................................................................................................... 33
5.8.7 Transfer Options Submenu .................................................................................................. 33
5.8.8 GPS Status Menu (Base Radios Only) ................................................................................ 34
5.8.9 Clock Source Status Menu (Base Radios Only) .................................................................. 34
5.9 Device Information Menu ........................................................................................................................ 35
5.9.1 Device Names Submenu ...................................................................................................... 36
5.10 Maintenance/Tools Menu ....................................................................................................................... 37
5.10.1 Reprogramming Menu .......................................................................................................... 38
5.10.2 Configuration Scripts Menu .................................................................................................. 39
5.10.3 Ping Utility Menu ................................................................................................................... 40
5.10.4 Authorization Codes Menu ................................................................................................... 40
5.10.5 Radio Test Menu .................................................................................................................. 41
5.11 Communications Manager Menu ............................................................................................................ 42
5.11.1 CM Version Menu ................................................................................................................. 43
5.11.2 CM Provisioning Menu ......................................................................................................... 43
5.11.3 CM Configuration Menu ........................................................................................................ 44
5.11.4 CM Process Status Menu ..................................................................................................... 44
5.11.5 CM Log Menu ....................................................................................................................... 45
6.0 TROUBLESHOOTING ........................................................................................................................... 46
6.1 Alarm/Event Conditions .......................................................................................................................... 46
6.1.1 Alarms ................................................................................................................................... 46
6.1.2 Correcting Alarm Conditions................................................................................................. 46
6.1.3 Logged Events ...................................................................................................................... 48
6.2 Technical Specifications ......................................................................................................................... 50
7.0 ACKNOWLEDGEMENTS ...................................................................................................................... 51
Page 5
MDS 05-6906A01, Rev. R TD220MAX Technical Manual iii
Copyright and Trademark
This manual and all software described herein is protected by Copyright: 2018 GE MDS, LLC. All
rights reserved. GE MDS, LLC reserves its right to correct any errors and omissions in this
publication.
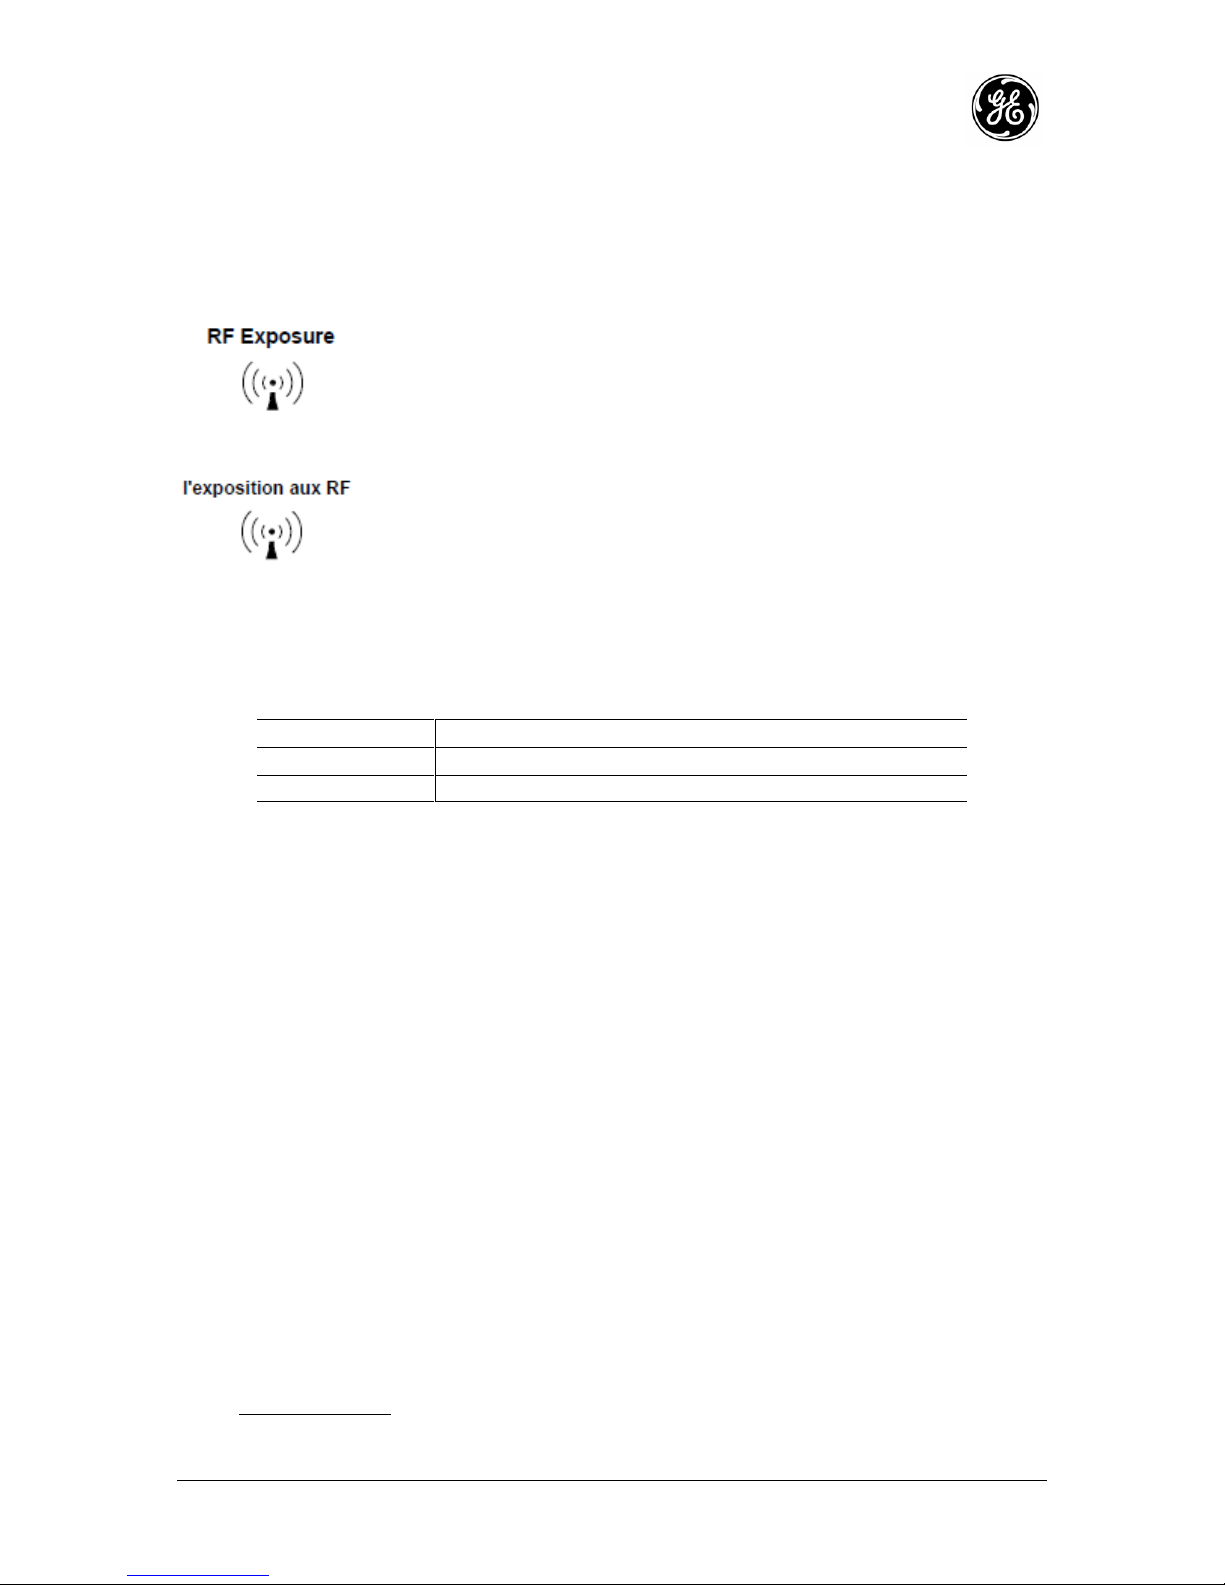
RF Safety Notice (English and French)
Concentrated energy from a directional antenna may pose a health hazard
to humans. Do not allow people to come closer to the antenna than the
distances listed in the table below when the transmitter is operating. More
information on RF exposure can be found online at the following website:
www.fcc.gov/oet/info/documents/bulletins.
Concentré d'énergie à partir d'une antenne directionnelle peut poser un
risque pour la santé humaine. Ne pas permettre aux gens de se rapprocher
de l'antenne que les distances indiquées dans le tableau ci-dessous
lorsque l'émetteur est en marche. Plus d'informations sur l'exposition aux
RF peut être trouvé en ligne à l'adresse suivante:
www.fcc.gov/oet/info/documents/bulletins.
Antenna Gain vs. Minimum Safety Distance
(Based upon a 50% Duty Cycle, 0 dB Feedline Loss) Uncontrolled Environment Exposure limits
Fixed/Mobile Antenna Gain
0-6 dBi
6-10 dBi
10-16.5 dBi
Safety Distance
1.78 meters
2.82 meters
5.01 meters
FCC Part 15 Notice
Operation is subject to the following two conditions: (1) this device may not cause harmful
interference, and (2) this device must accept any interference received, including interference that
may cause undesired operation. Any unauthorized modification or changes to this device without
the express approval of the manufacturer may void the user’s authority to operate this device.
Furthermore, this device is intended to be used only when installed in accordance with the
instructions outlined in this manual. Failure to comply with these instructions may void the user’s
authority to operate this device.
Servicing Precautions
When servicing energized equipment, be sure to wear appropriate Personal Protective
Equipment (PPE). During internal service, situations could arise where objects accidentally
contact or short circuit components and the appropriate PPE would alleviate or decrease the
severity of potential injury. When servicing radios, all workplace regulations and other applicable
standards for live electrical work should be followed to ensure personal safety.
Manual Revision and Accuracy
This manual was prepared to cover a specific version of firmware code. Accordingly, some
screens and features may differ from the actual unit you are working with. While every reasonable
effort has been made to ensure the accuracy of this publication, product improvements may also
result in minor differences between the manual and the product shipped to you. If you have
additional questions or need an exact specification for a product, please contact GE MDS using
the information at the back of this guide. In addition, manual updates can be found on our web
site at www.gemds.com
Page 6

iv TD220MAX Technical Manual MDS 05-6906A01, Rev R
Environmental Information
The manufacture of this equipment has required the extraction and use of natural resources.
Improper disposal may contaminate the environment and present a health risk due to hazardous
substances contained within. To avoid dissemination of these substances into our environment,
and to limit the demand on natural resources, we encourage you to use the appropriate recycling
systems for disposal. These systems will reuse or recycle most of the materials found in this
equipment in a sound way. Please contact GE MDS or your supplier for more information on the
proper disposal of this equipment.
ESD Notice
To prevent malfunction or damage to this product, which may be caused by Electrostatic
Discharge (ESD), the radio should be properly grounded at the time of installation. In addition, the
installer or maintainer should follow proper ESD precautions, such as touching a bare metal
object to dissipate body charge, prior to touching components or connecting/disconnecting
cables.
Antenna Installation Warnings
1. A suitable lightning arrestor should be used when indicated by applicable standards or
codes.
2. All antenna installation and servicing are to be performed by qualified technical personnel
only. When servicing the antenna, or working at distances closer than those listed below,
ensure the transmitter has been disabled.
3. Depending upon the application and the gain of the antenna, the total composite power
could exceed 90 watts EIRP. For fixed/mobile configuration, the distances in the table
below must be followed.
FCC Compliance Notice
This device is offered as a licensed transmitter per FCC Parts 80, 90 and 95. It is approved for
use under the following conditions: Changes or modifications not expressly approved by GE
MDS, LLC will void the user’s authority to operate the equipment.
The TD220MAX is approved in the following FCC rule parts:
• FCC part 80, approved for operation from 216-220MHz, 28 watts
• FCC part 90, approved for operation from 217-220MHz, 1.66 watts
• FCC part 90, approved for operation from 220-222MHz, 27.5 watts
• FCC part 95F, approved for operation from 218-219MHz, 20 watts
Please refer to your FCC spectrum license to ensure you are in compliance with the appropriate
radiated power levels.
For FCC Part 95, the Effective Radiated Power (ERP) must be less than or equal to 4 Watts for
mobile use and 20 Watts for fixed use. This can be accomplished by adjusting the output power
of the radio and selecting an antenna with appropriate gain. Consult the following table for
assistance in setting the output power and selecting an antenna to maintain compliance. The
table provides examples, however other combinations can be used.
Effective Radiated Power vs Radio Power
Radio Power Setting
ERP
Maximum Antenna Gain
2 W
4 W
3 dBd (5.2 dBi)
4 W
4 W
0 dBd (2.2 dBi)
2 W
20 W
10 dBd (12.2 dBi)
10 W
20 W
3 dBd (5.2 dBi)
20 W
20 W
0 dBd (2.2 dBi)
Page 7

MDS 05-6906A01, Rev. R TD220MAX Technical Manual 1
1.0 INTRODUCTION
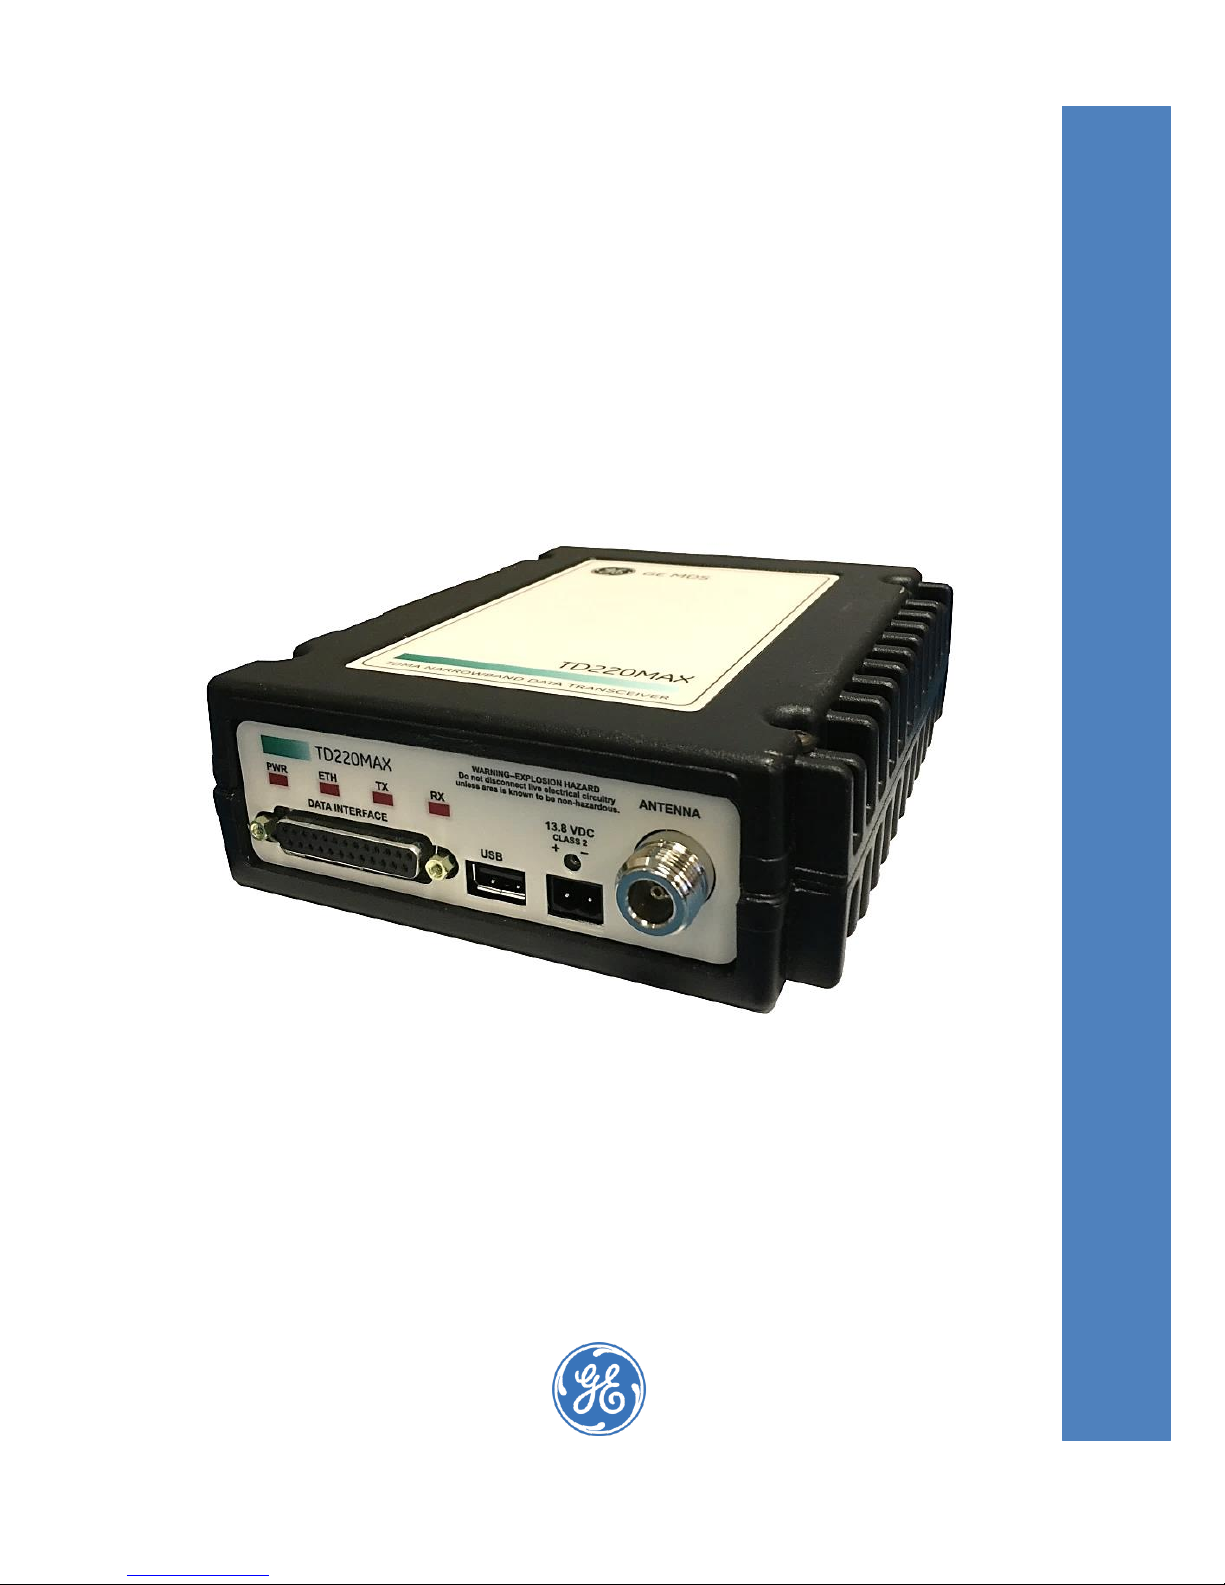
This manual is for users of the MDS TD220MAX Transceiver shown in Figure 1. It contains an overview
of installation planning data, specifications, troubleshooting, and instructions for using the radio’s menu
system. This manual is intended for technical personnel who perform network design, configuration, and
troubleshooting of the equipment.
All product documentation can be downloaded free of charge from the GE MDS website at
www.gemds.com. The website also contains links to Application Bulletins and other product information.
Figure 1. TD220MAX Transceiver
1.1 Key Product Features
• 25 Watt transmit power for long-haul coverage
• Cost-effective solution with no software license or maintenance fees
• Optimized TDMA MAC supports single-frequency operation reducing spectrum license
requirements
• Provides patented Forward Error Correction scheme for robustness in high-speed rail
applications
• Internal or external Communications Manager available
• Provides Ethernet interface for use with local or remote controllers and devices
• Meets environmental specs for rail applications
• Ethernet and Serial Ports via a single rugged DB-25 connector
• Supports SNMP
• Command Console via Serial or Telnet
1.1.1 Authorization Features
Some features of the radio are dependent on purchased options and applicable regulatory constraints. A
“key” icon is shown near the heading of any such features. In some cases, a feature upgrade may
be available. Contact your sales representative for additional information.
Page 8
2 TD220MAX Technical Manual MDS 05-6906A01, Rev R
1.2 Accessories and Spares
Table 1 lists common accessories and spare items for the transceiver.
Table 1. Accessories & Spare Items
Accessory
Description
Part Number
DIN Rail Mounting Bracket Kit
Contains bracket for mounting the transceiver
to standard 35 mm DIN rails commonly used
in equipment cabinets and panels.
03-4125A04
Flat Mounting Bracket Kit
Brackets that attach to the bottom of the unit.
Used for mounting to a flat mounting surface.
03-4123A13
Power Cable
Mates with power connector on radio case
with 3-foot feedline.
03-1846A02
TD220 DB25 Adapter Board
Breakout board for the DB25 connector.
03-6139A01
PPS Cable for Adapter Board
Provides connection to the header on the
adapter board
03-4152A01
Amplifier/Timing Cable
Connects to the PPS cable and carries the
signal to the GPS connection and amplifier.
03-4224A01
DB9 to RJ11 Adapter
Custom MDS serial converter
73-2434A02
DB25 Ribbon Cable
6-inch DB25 straight cable to connect from
the radio to the adapter board
03-3828A01
DB25 Adapter Kit
Contains adapter board, I/O cable, serial
cable, ribbon cable, and DB9 adapters
03-4758A03
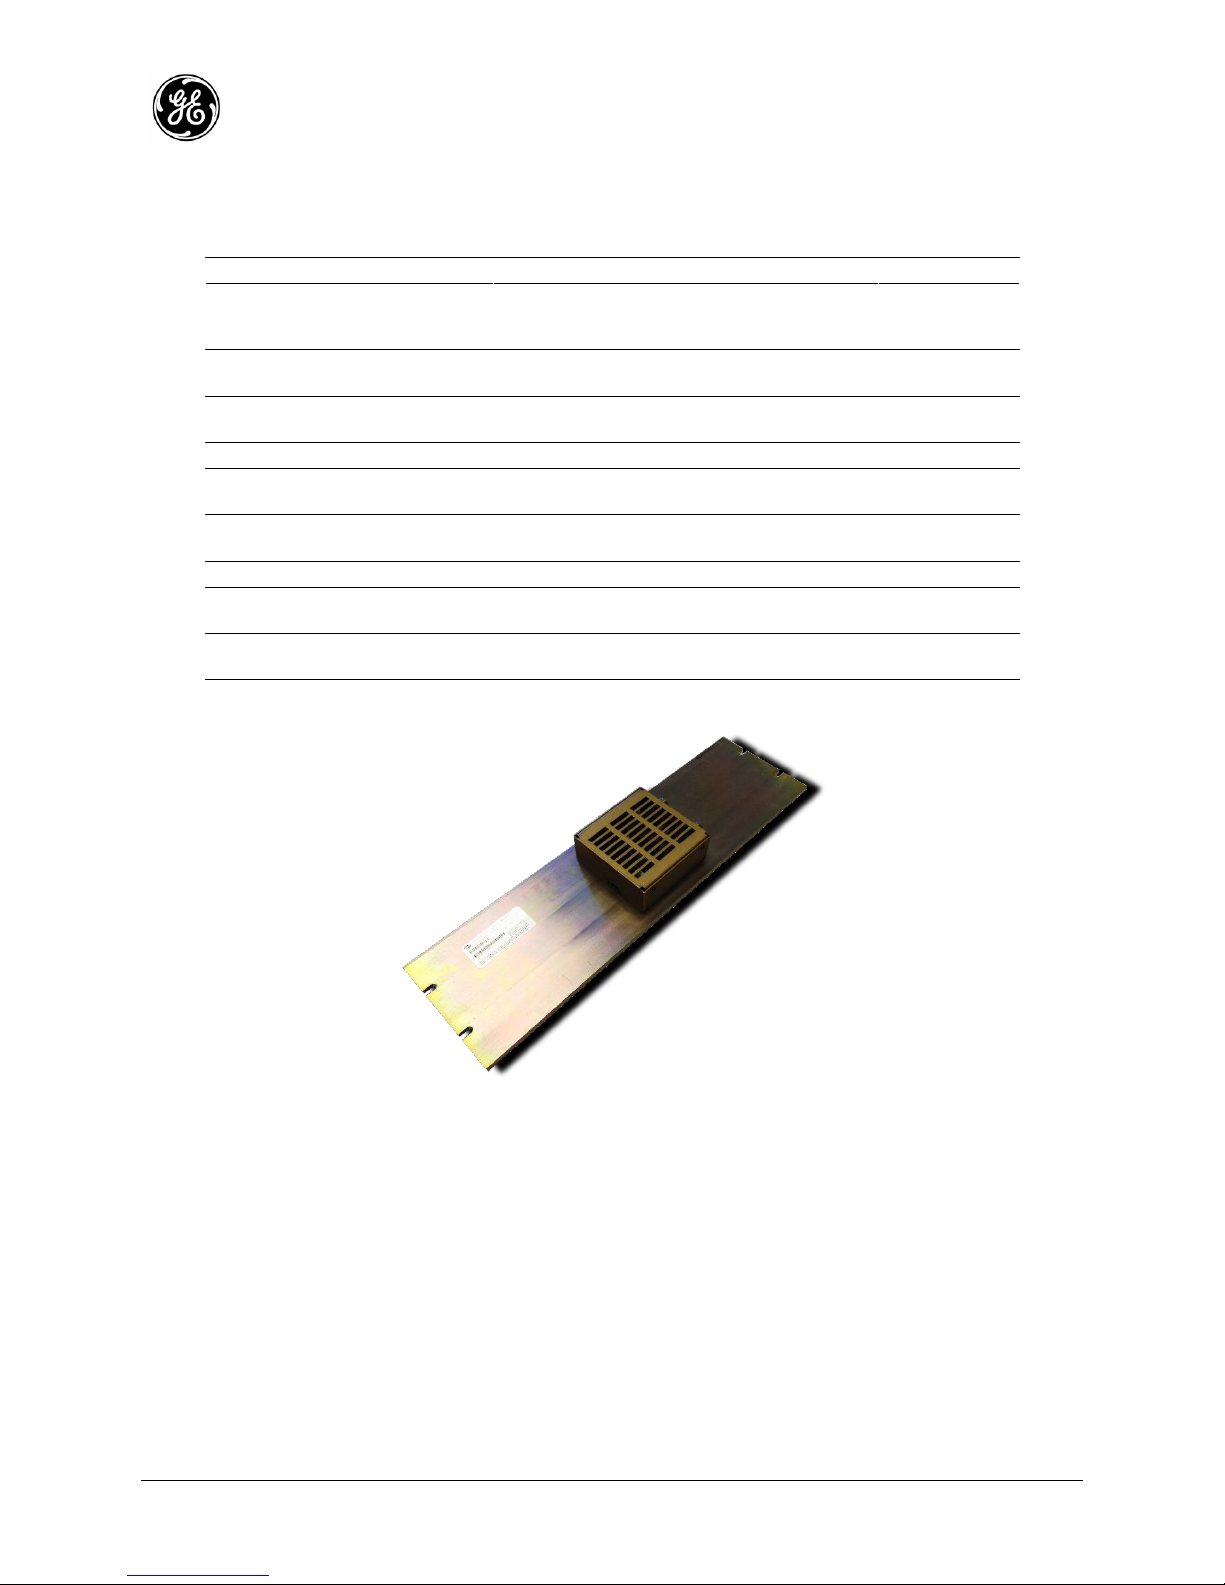
1.3 40-Watt Power Amplifier
Figure 2. 220 eNETL2T/U Power Amplifier
The ENETL2T/U is an RF power amplifier designed for use in the 216-222 MHz frequency range at up to
40 Watts. It is intended to serve as a 100% duty cycle amplifier for MDS TD and other radios operating in
point-to-multipoint repeater or base applications.
The power amplifier consists of an RF amplifier and PCB mounted to a heat sink, with a DC Power
interface, power control interface, and input/output RF connections on the sidewalls of the chassis. DC
power is supplied to the amplifier from a regulated and filtered DC source capable of supplying 10-16
VDC at a maximum current of 8 Amperes. The DC power source should be current limited or have a
protective fuse or circuit breaker.
For additional details on the power amplifier, please contact your local sales representative.
Page 9
MDS 05-6906A01, Rev. R TD220MAX Technical Manual 3
2.0 PRODUCT DESCRIPTION
The GE MDS TD220MAX is a 25-Watt 220 MHz GMSK data radio intended for bridging messages over
the air between locomotives and wayside devices in rail applications or between ship and shore in
maritime applications. The data interface is Ethernet and uses the UDP/IP-based Simple
Timeslot/Frequency/Power Protocol (STFP), defined elsewhere. STFP can support various payload
protocols.
A time division channel access method is used by the TD220MAX for wireless communication. Each
second is divided into 8, 133-byte time slots. The radio further defines a multi-second epoch to allow the
effective number of time slots to be scaled according to system design. All radios in a system must be
configured with the same epoch size.
Precise synchronization of timing amongst radios is necessary for operation. Each radio can be
configured to use one of three timing sources: GPS, Precision Time Protocol (PTP), and over-the-air
(OTA). While system design can be flexible, a base radio installation typically uses either GPS or PTP
timing and a mobile radio typically uses OTA to synchronize to the wireless transmissions of a base radio.
Radios configured for GPS timing must be connected to an external GPS unit to receive NMEA sentence
information and the PPS signal. Radios configured for PTP timing will interact with a PTP Grandmaster
Clock over the Ethernet port using IEEE 1588 (PTPv2). Radios configured for OTA timing use messages
received wirelessly in the first timeslot of each second to maintain timing.
With its time slot definition and variable epoch size, the TD220MAX provides a generic TDMA
implementation that can be used by an external Communication Manager (CM) to support a variety of
TDMA schemes. A CM is responsible for making decisions regarding timeslot, frequency, power, and
payload organization. The TD220MAX is responsible for requesting data from a CM for upcoming
timeslots, forwarding messages received wirelessly to a CM, and wirelessly transmitting messages
received from a CM using the specified timeslot, frequency, and power. All communication between the
TD220MAX and a CM is done using STFP.
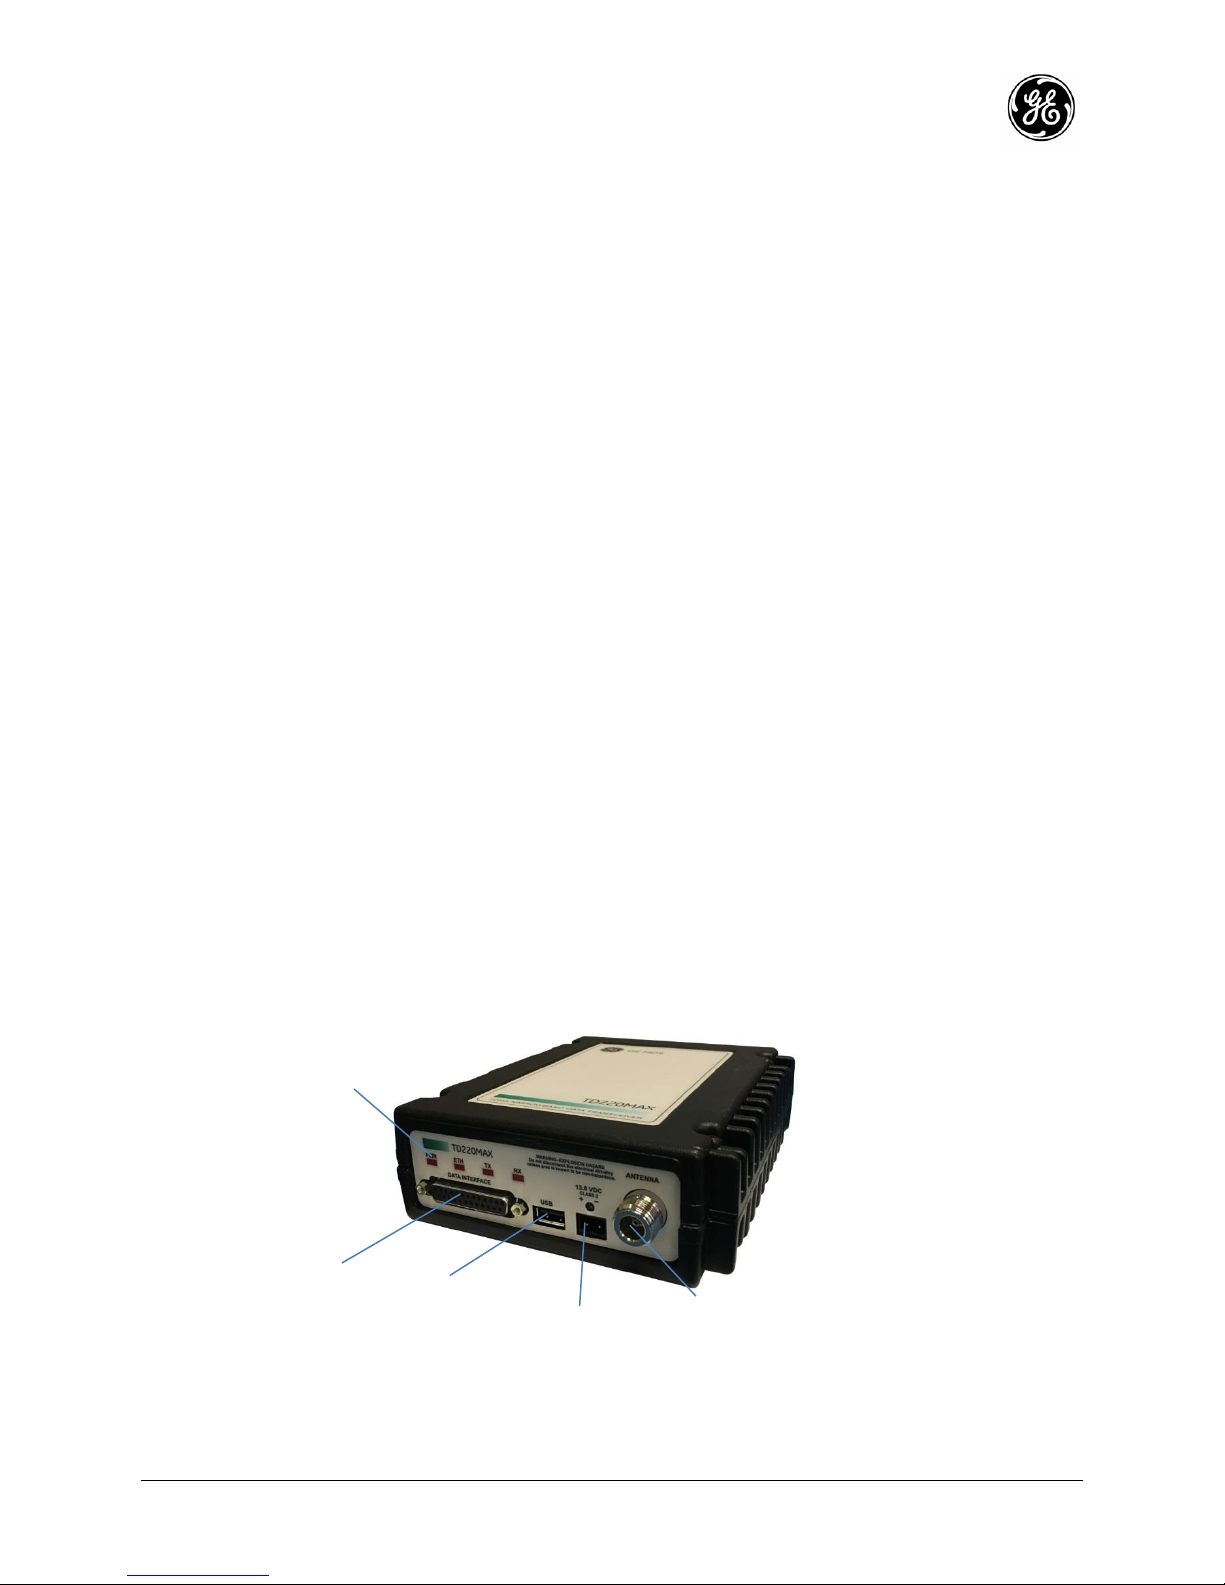
2.1 Front Panel Connectors and Indicators
Figure 3 shows the transceiver’s front panel connectors and indicators. These items are referenced in the
installation steps and in various other locations in the manual. The transceiver’s LED functions are
described in Table 6 on Page 12.
Figure 3. Front Panel Connectors & Indicators
LED
INDICATORS
SERIAL
CONNECTOR
(DB-25)
USB
CONNECTOR
DC INPUT
POWER
ANTENNA
CONNECTOR
(N FEMALE)
Page 10

4 TD220MAX Technical Manual MDS 05-6906A01, Rev R
3.0 INSTALLATION PLANNING
This section covers pre-installation factors that should be considered when installing the transceiver in the
field. Careful planning will help achieve optimal performance from the transceiver. The specific details at
an installation site may vary, but there are four main requirements for installing the transceiver in all
cases:
• Adequate and stable primary power
• An efficient and properly installed antenna system
• Ethernet connection to local network
• Proper connections to a time source (PTP, GPS, Over-The-Air)
3.1 Chassis Dimensions
Figure 4 shows the external chassis dimensions of the TD220MAX Transceiver.
Figure 4. Transceiver Dimensions
3.2 Mounting Bracket Options
The transceiver is normally provided with flat mounting brackets attached to the bottom of the radio as
shown in Figure 5. An optional 35 mm DIN rail mounting bracket is also available and is described below.
5.625"
143 mm
7.25"
184 mm
2.0"
50 mm
Page 11

MDS 05-6906A01, Rev. R TD220MAX Technical Manual 5
6.63"
168 mm
2.75"
70 mm
Figure 5. Mounting Bracket Dimensions
NOTE To prevent moisture from entering the radio, do not mount the case with the cable connectors
pointing up. Also, dress all cables to prevent moisture from running along the cables and into the
radio.
The figure above shows the mounting brackets at the furthest in (shortest distance) apart. The standard
mounting brackets can be mounted with the second pair of holes to increase the distance. The new width
of the radio with the mounting brackets would be 8.5 inches (216 mm).
3.2.1 Optional DIN Rail Mounting
The unit may be mounted with an optional 35 mm DIN Rail Mounting Bracket Kit (Part No. 03-4125A04).
Equipment cabinets and racks of modern design often employ this type of mounting. Once the DIN
bracket is attached to the radio, it allows for quick installation and removal of the radio from its mounting
rail without the need for tools.
The DIN Rail bracket attaches to the unit’s case along the left side of the transceiver (DB25 connector
side) with two screws. Ensure that the pull tab is located towards the back of the radio. The entire
assembly then attaches to the mounting rail with the connectors facing upwards.
3.3 Antennas and Feedlines
3.3.1 Antennas
The transceiver may be used with several different antennas. The exact style and gain factor depend on
the physical size and layout of your system. Connection is made to the radio via a N coaxial connector.
Contact your factory representative for details for Antennas available from GE MDS for this radio.
3.3.2 Feedlines
The selection of an antenna feedline is very important. Poor quality cable should be avoided as it will
result in power losses that may reduce the range and reliability of the radio system.
Page 12

6 TD220MAX Technical Manual MDS 05-6906A01, Rev R
The table which follows, shows the approximate losses that will occur when using various lengths and
types of coaxial cable in 200 MHz band. Regardless of the type used, the cable should be kept as short
as possible to minimize signal loss.
Table 2. Signal Loss in Coaxial Cables (at 200 MHz)
Cable Type
10 Feet
(3 Meters)
50 Feet
(15 Meters)
100 Feet
(30.5 Meters)
200 Feet
(61 Meters)
RG-8A/U
0.26 dB
1.27 dB
2.50 dB
5.07 dB
1/2-inch HELIAX
0.06 dB
0.38 dB
0.76 dB
1.60 dB
7/8-inch HELIAX
0.04 dB
0.21 dB
0.42 dB
0.83 dB
1-1/4-inch HELIAX
0.03 dB
0.16 dB
0.31 dB
0.62 dB
1-5/8-inch HELIAX
0.025 dB
0.13 dB
0.26 dB
0.52 dB
3.4 Power
The transceiver may be operated from any well-filtered 10 to 16 VDC Power source; 13.8 VDC Nominal.
The supply must be capable of providing up to 7 Amps maximum, and 2.5 Amp consistently. With each
radio, an 03-1846A02 cable (as shown in Figure 6 below) is shipped, providing the matching power
connector on a 3-foot power cable. Ensure to tighten the connector securely to the radio. A surge
protection device such as a Transtector 1101-624 should be employed.
Figure 6. DC Power Cable (P/N 03-1846A02)
NOTE The radio is designed for use in negative ground systems only.
Consult the following table to determine how much current is required for receiving or transmitting vs.
input voltage and RF power output. Duty cycle is a function of how many time slots of the 8 per second
are used for transmission. The STFP protocol used by the communications manager to send data into the
radio for transmission over the air specifies what time slot to use for each. If the communications manager
uses all 8 slots, the duty cycle is 100%. If four are used every second, the duty cycle is 50%. If 7 are used
every 3 seconds (24 slots), the duty cycle is 29% (roughly 30%). Many other duty cycles are possible
depending on the epoch size and number of transmissions within each epoch. All MPE RF safety
calculations are based on the highest ERP levels.
Page 13

MDS 05-6906A01, Rev. R TD220MAX Technical Manual 7
Table 3. Current Consumption vs Input Power and Duty Cycle
Voltage (V)
RF Power Out (W)
Duty Cycle (%)
Current Required (A)
Thermal
Dissipation (W)
12
0 (RX) 0 0.3
3.6
12 2 100
1.4
14
12
10
30
3.6
14
12
25
30
6.3
15
13.8
0 (RX) 0 0.3
4
13.8 2 100
1.2
14
13.8
10
30
3.2
14
13.8
25
30
5.5
15
3.5 Grounding Considerations
To minimize the chance of damage to the transceiver and connected equipment, a safety ground (NEC
Class 2 compliant) is recommended which bonds the antenna system, transceiver, power supply, and
connected data equipment to a single-point ground, keeping all ground leads as short as possible.
Normally, the transceiver is adequately grounded if the supplied flat mounting brackets are used to mount
the radio to a well-grounded metal surface. If the transceiver is not mounted to a grounded surface, it is
recommended that a safety ground wire be attached to one of the mounting brackets or a screw on the
transceiver’s case.
The use of a lightning protector is recommended where the antenna cable enters the building; bond the
protector to the tower ground, if possible. All grounds and cabling must comply with applicable codes and
regulations.
3.6 Data Interface (DB-25)
The Data Interface has several ports integrated into one connector: Ethernet, COM1 and COM2 Serial
Ports, and GPS signaling.
Figure 7. COM Connector (DB-25F)
As viewed from outside the unit
Page 14

8 TD220MAX Technical Manual MDS 05-6906A01, Rev R
Table 4. DB25 Serial Interface Pinouts
DB-25
Pin
Signal
Direction WRT MDS
Equipment
Notes
1
Not Connected
N/A
Reserved
2
COM2_TXD
Input
GPS NMEA Port
3
COM2_RXD
Output
GPS NMEA Port
4
COM2_RTS
Input
GPS NMEA Port
5
COM2_CTS
Output
GPS NMEA Port
6
Not Connected
N/A
Reserved
7
GND
Input/Output
Ground
8
EXT_ALARM
Output
See External Alarm Sense in section 5.3
9
Not Connected
N/A
Reserved
10
Not Connected
N/A
Reserved
11
Not Connected
N/A
Reserved
12
Not Connected
N/A
Reserved
13
GND
Input/Output
Ground
14
ETH_TX_H
Output
Ethernet
15
ETH_TX_L
Output
Ethernet
16
ETH_RX_H
Input
Ethernet
17
ETH_RX_L
Input
Ethernet
18
EXT_KEY
Output
Reserved – Power Amplifier
19
EXT_DET
Input
Reserved – Power Amplifier
20
COM2_DTR
Input
GPS NMEA Port
21
Not Connected
N/A
Reserved
22
GPS_PPS_L
Input
Not Connected
23
GPS_PPS_H
Input
TTL level 1PPS signal input. 0 to 5 VDC nominal.
24
COM1_RXD
Input
Console
25
COM1_TXD
Output
Console
3.6.1 Adapter Board
GE MDS has available a breakout adapter board that separates the DB25 connector into an Ethernet
port, PPS port, as well as three COM connectors. This board is for controlled environment applications
only. For additional details regarding the adapter board, view the “TD_RCL” adapter board instruction
sheet located here http://www.gegridsolutions.com/app/resources.aspx?prod=td-series&type=9.
Page 15

MDS 05-6906A01, Rev. R TD220MAX Technical Manual 9
Figure 8. 03-6139A01 Adapter Board Top View
Figure 9. 03-6139A01 Adapter Side View
3.7 USB
The radio provides a USB Port conforming to version 1.1 of the USB standard. This port is provided for
features such as logging STFP messages to text files on a memory stick. Consult GE MDS for information
on this feature. The pinout for this connector is given in the table below.
Table 5. USB Port Pinout
Pin
Signal Name
Description
1
PC_USB_+5V
+5 VDC
2
USBD-
USB Data Minus
3
USBD+
USB Data Plus
4
GROUND
Ground
PPS
Connector
Ethernet
(RJ45)
COM 2
(RJ45)
Not
Used
COM 1
(RJ11)
Page 16

10 TD220MAX Technical Manual MDS 05-6906A01, Rev R
3.8 Antenna Connector
The Antenna Connector is a type N female connector with 50-Ohm characteristic impedance. A suitable
lightning arrestor such as a Polyphaser VHF50HN should be employed when indicated by applicable
standards or codes.
Page 17

MDS 05-6906A01, Rev. R TD220MAX Technical Manual 11
4.0 STEP-BY-STEP INSTALLATION
In most cases, the steps given here are sufficient to install the transceiver.
1. Mount the transceiver. Attach the mounting brackets to the bottom of the transceiver case (if not
already installed), using the four 6-32 x 1/4-inch (6 mm) screws supplied. Mounting bracket
dimensions are shown in Figure 5 on Page 5. Secure the brackets to a flat, grounded surface. (If
a grounded surface is not available, run a separate ground wire to the transceiver — see
Grounding Considerations on Page 7.)
2. Install the antenna and feedline. The antenna used with the radio must be designed to operate
in the radio’s frequency band and be mounted in a location providing a clear path to the
associated radio(s).
3. Connect primary power. Input power must be within 10 to 16 VDC and capable of providing up
to 7 Amperes maximum.
The unit is designed for use with negative-ground systems only. The power supply should be
equipped with overload protection (NEC Class 2 rating), to protect against a short circuit between its
output terminals and the radio’s power connector.
4. Configure Basic Settings. Connect a PC to the radio and access the radio’s menu system. See
the following section on details in communicating with the radio.
4.1 Logging On
The radio has a menu system that can be accessed in one of two ways:
• Terminal Emulator—Use a terminal emulator program on your PC, such as HyperTerminal or
PuTTy, connected directly to the TD220MAX COM1 port via a serial cable.
• Telnet—Text-based access to the menu system through a network connection.
The serial console is typically used to configure the network parameters prior to connecting to the radio
via Telnet remotely. Each radio is assigned a default IP Address, a Netmask, and a Gateway IP Address.
These are as follows;
• IP Address: 192.168.1.1
• IP Netmask: 255.255.255.0
• IP Gateway: 0.0.0.0.
The IP Address and Netmask should be chosen carefully. The radio will network directly with other
equipment with IP Addresses that are on a common Subnet. IP Addresses that begin with the same
numerical IP address bits where the Netmask is one will be on the same Subnet. For example, if the IP
Address is 10.4.100.1 and the Netmask is 255.255.0.0, the radio will attempt direct Ethernet
communication with any node whose IP Address begins with 10.4. If a message is bound for a node
outside of the 10.4 network, it will be sent to the Gateway IP address instead so that it can be placed from
the radio’s subnet onto another subnet.
4.1.1 Serial Console
For accessing the COM1 console, use a serial terminal emulator program such as HyperTerminal or
PuTTy. The default settings are: baud rate 19200, no parity, 8 data bits, and 1 stop bit. The pins for this
port are listed in Section 3.6. The serial console is typically used to configure the network parameters to
connect to the radio via Telnet remotely.
1. Log in to the radio on its COM1 console using a serial terminal emulator program.
2. If you wish to change the default IP settings, go to the IP Configuration menu.
o Set the IP address, the Netmask and the Gateway.
3. Verify network connectivity by going to the Maintenance/Tools Menu and select the Ping Utility.
o Enter the IP address of a known node on the network.
4. Execute the Ping and observe the results. If the network interface is working properly, Ping
responses should be received.
Page 18

12 TD220MAX Technical Manual MDS 05-6906A01, Rev R
4.1.2 Telnet Console
NOTE It is not recommended to change the default IP settings via the Telnet interface. Networking
changes should be done locally via the serial console and then deployed in the field. See the
section above on modifying these networking parameters.
On newer computers, the default telnet function on Windows machines may be disabled. This can be
fixed by following step by step instructions located online. To either confirm that the telnet function is
enabled or properly turned on;
1. Use a program that has a telnet function built in or launch a Windows DOS window.
2. Enter the command telnet <radio IP address>.
i. If the connection fails, perform a ping to the radio’s IP address to confirm
connectivity. If pings succeed, the telnet feature may not be enabled.
ii. If pings fail, then use the serial console to check settings and connectivity.
iii. If the telnet functions, login to the radio.
4.2 Initial Startup & Checkout
In-service operation of the transceiver is completely automatic. Once the unit has been properly installed
and configured as described above, operator actions are limited to observing the front panel LED
indicators for proper operation.
If all parameters are correctly set, operation of the radio can be started by following these steps:
1. Apply DC power.
2. Observe the LED status panel for proper indications.
Table 6. LED Status Indicators
LED Name
Description
PWR
• Continuous — Power applied, no problems detected.
• Rapid flash (5 times-per-second) — Alarm indication
ETH
• Flashing/On — Data is being transmitted and received.
• Off — Ethernet signals not detected
TX
When lit, indicates data transfer between the Base and Mobile Radios.
RX
When lit, indicates data transfer between the Base and Mobile Radios.
4.3 Upgrade the Firmware
4.3.1 Introduction
From time-to-time MDS will offer upgrades to the TD220MAX firmware. Uploading new firmware into the
radio does not require that the radio be taken off-line until you want to operate the radio from the new
firmware image.
Page 19

MDS 05-6906A01, Rev. R TD220MAX Technical Manual 13
Firmware images are provided free-of-charge on the MDS Web site at: www.gemds.com. Use the product
lookup to search for TD Series.
4.3.2 Installing TD220MAX Firmware by TFTP
To use this function the user will need:
• A PC with a TFTP server running.
• The IP address of the PC running the TFTP server.
If you do not know your computer’s address on a Windows PC, you can use the RUN function from the
Start menu and enter ipconfig to determine your local PC’s IP address. The IP address of the radio can
be found on the Starting Information Screen (see Page 16).
4.3.3 Reprogramming Procedure
To upload a new firmware file (TDM-krmd-X_Y_Z.mpk) into the TD220MAX unit use the following
procedure:
1. Launch a TFTP server on a PC connected either directly or via a LAN to the Ethernet port (LAN)
of the radio. Set the TFTP server’s outgoing path to the directory containing the firmware image
file.
2. Connect to the radio’s menu system by whichever means is convenient: Telnet via the LAN or
Terminal emulator via the COM1 port.
3. Go to the Reprogramming Menu (See Reprogramming Menu for more detailed information).
4. Fill in the information for the:
o TFTP Host Address – IP Address of the server (host computer) running the TFTP server.
o Firmware Filename – Name of the file (TDM-krmd-X_Y_Z.mpk) to be pulled from the
TFTP server holding the firmware file.
5. Select Retrieve File to start the reprogramming and receive the firmware file through the TFTP
server.
NOTE The uploaded firmware image file replaces the “inactive image” file and will be automatically
verified.
6. Check the FW version shown for the inactive image to verify that the download has completed
successfully
7. Reboot the TD220MAX radio to the inactive image which now contains the newly downloaded
firmware.
8. Test the radio for normal operation.
9. End of procedure.
4.4 Set Up a GPS Base Unit
1. Connect the RS-232 NMEA serial data output from the GPS receiver to the Base Radio via the
radio’s COM2 port. Drive serial data into the radio on DB-25 pin 2.
2. Connect the GPS’s PPS output to the Base Radio. Drive TTL into the radio on DB-25 pin 23.
3. Log in to the radio.
4. Go to the GPS Configuration Menu.
a. Verify/modify the GPS NMEA baud rate and PPS polarity to match the connected GPS.
5. Go to the System Configuration Menu.
a. Set the timing source to GPS and allow the radio to reboot.
6. Logging in again after the reboot, verify that the radio’s Device Status is OPERATIONAL as shown
on the Starting Information Screen. If not, enter ‘A’ to get a list of the current alarms and correct
the alarm condition.
7. Go to the STFP Configuration Menu (Under the System Configuration Menu)
a. Set the STFP radio ID from the default 0 (it’s recommended).
Page 20

14 TD220MAX Technical Manual MDS 05-6906A01, Rev R
b. Set the IP Port on which the base will receive STFP messages from the Communication
Manager.
c. Set the IP Address of the Communication Manager to which timing markers and
messages received from mobiles should be sent.
d. Set the IP Port of the Communication Manager to which timing markers and messages
received from mobiles should be sent.
e. Set the epoch size to match the same value configured on the neighboring radios and
reboot if necessary.
f. Set the STFP slot delay as necessary. This number, multiplied by 125ms, represents the
slot delay allowed from when a timing marker is sent to the Communication Manager to
when a data message must be received from the Communication Manager. For most
cases the default value of 3 should suffice.
8. Go to the Ping Utility Menu (Under the Maintenance/Tools Menu).
a. Verify the Ethernet link using the Ping utility.
9. Begin sending STFP data.
10. Verify the TX LED illuminates and the radio begins transmitting over the air.
4.5 Set Up a PTP Base Unit
1. Install and configure a PTP Grandmaster Clock. The clock must be accessible to the Base Radio
through the Ethernet Link. The base may interface to an external Communication Manager using
the Ethernet Link; therefore, an external switch or router may be required.
2. Log in to the radio.
3. Go to the PTP Configuration Menu.
a. Choose the PTP Profile for the Base to match with the settings on the Grandmaster
Clock.
b. If Telecom profile is selected in step a, set PTP Unicast Master to the IP address of the
Grandmaster Clock.
4. Go to the System Configuration Menu.
a. Set the timing source to PTP and allow the radio to reboot.
5. Logging in again after the reboot, verify that the radio’s Device Status is OPERATIONAL as shown
on the Starting Information Screen. If not, enter ‘A’ to get a list of the current alarms and correct
the alarm condition.
6. Go to the STFP Configuration Menu (Under the System Configuration Menu).
a. Set the STFP radio ID from the default 0 (it’s recommended).
b. Set the IP Port on which the Base will receive STFP messages from the Communication
Manager.
c. Set the IP Address of the Communication Manager to which timing markers and
messages received from mobiles should be sent.
d. Set the IP Port of the Communication Manager to which timing markers and messages
received from mobiles should be sent.
e. Set the epoch size to match the same value configured on the neighboring radios and
reboot if necessary.
f. Set the STFP slot delay as necessary. This number, multiplied by 125ms, represents the
slot delay allowed from when a timing marker is sent to the Communication Manager to
when a data message must be received from the Communication Manager. For most
cases the default value of 3 should suffice.
7. Go to the Ping Utility Menu (Under the Maintenance/Tools Menu).
a. Verify the Ethernet Link using the Ping utility.
8. Begin sending STFP data.
9. Verify the TX LED illuminates and the radio begins transmitting over the air.
Page 21

MDS 05-6906A01, Rev. R TD220MAX Technical Manual 15
4.6 Set Up an OTA Mobile Unit
1. Log in to the radio.
2. Go to the System Configuration Menu.
3. Set the timing source to OTA and allow the radio to reboot (factory-new units default to OTA, so
this step may be skipped).
4. Logging in again after the reboot, verify that the radio’s Device Status is OPERATIONAL as shown
on the Starting Information Screen. If not, type ‘A’ to get a list of the current alarms and correct
the alarm condition.
5. Go to the STFP Configuration Menu (Under the System Configuration Menu)
a. Set the STFP radio ID from the default 0. (It’s recommended.)
b. Set the IP Port on which the mobile will receive STFP messages from the
Communication Manager.
c. Set the IP Address of the Communication Manager to which timing markers and
messages received from bases should be sent.
d. Set the IP Port of the Communication Manager to which timing markers and messages
received from bases should be sent.
e. Set the epoch size to match the same value configured on the neighboring radios and
reboot if necessary.
f. Set the STFP slot delay as necessary. This number, multiplied by 125ms, represents the
slot delay allowed from when a timing marker is sent to the Communication Manager to
when a data message must be received from the Communication Manager. For most
cases the default value of 3 should suffice.
6. Go to the Ping Utility Menu (Under the Maintenance/Tools Menu).
a. Verify the Ethernet Link using the Ping utility.
7. Ensure at least one base is present in the neighborhood of this radio so that it can detect
beacons and synchronize timing.
8. Begin sending STFP data.
9. Verify the TX LED illuminates and the radio begins transmitting over the air.
4.7 Key the Transmitter
1. Log in to the radio on its COM1 console using a serial terminal emulator program.
2. Go to the Maintenance / Tools Menu and then to the Radio Test Menu.
3. Select the frequency for the test transmission.
4. Select the RF Output Power to use.
NOTE Power levels greater than 2 Watts will timeout after a 20-second period by default. Ensure
ventilation with supplemental forced airflow if longer durations are desired.
5. Select the type of test to Force Key.
6. Enable test mode.
7. When finished, disable test mode or escape the test menu.
NOTE When in the Radio Test Menu, all STFP communications to this radio will be temporarily ignored.
STFP communications will resume upon exiting the menu.
4.8 Perform Test Polling
This manual does not cover how to configure and send STFP messages. Please see document STFP
Polling with TD radios in the Support Documents section of the website;
https://www.gegridsolutions.com/app/Resources.aspx?prod=td-series&type=9.
Page 22

16 TD220MAX Technical Manual MDS 05-6906A01, Rev R
5.0 Menu Interface
The menu interface can be reached via two ways; serially via the DB25 connector or by Telnet via the
Ethernet Interface. This section will describe the different menus available on the radio.
Configurable settings are followed by information in brackets. The information includes a commaseparated list of possible values then a semicolon and the default value. For example, a setting followed
by [disabled, enabled; disabled] means the possible values are disabled or enabled and the default value
is disabled.” In some cases, the parameter may be freeform for a customer to enter information. In that
case, the minimum and maximum of characters the parameter can take will be listed.
Login with the administrator user name and password. When logged in, the Starting Information Screen is
displayed.
Figure 10. Starting Information Screen
• Device Name – User-configured name for this radio. Set this from the Device Names menu.
• IP Address – IP address for this radio. Set this from the IP Configuration menu.
• Device Status – This is a display of the status of the radio and can be the following;
• Initializing – appears during startup and/or internal RF deck
reprogramming.
• Operational – when functioning properly.
• Alarmed – when an error condition(s) exists. Click the letter “A” on the
keyboard to view the alarm.
• Location – User-configured location for this radio. Set this from the Device Names menu.
• Serial Number – The manufacturer’s serial number for this radio. Set by the factory and cannot
be changed.
• Uptime – The elapsed time since the radio was started.
• Current Firmware – The version number of the currently operating firmware.
• Current User – The current user’s login level.
Page 23

MDS 05-6906A01, Rev. R TD220MAX Technical Manual 17
5.1 Main Menu
The next screen, the Main Menu is the entryway to all user-controllable features. The transceiver’s
Device Name appears at the top of this and all other screens as a reminder of the unit that is currently
being controlled.
Figure 11. Main Menu
• Starting Information Screen – Select this item to return to the start-up screen.
• Network Configuration – Tools to configure the data network layer of the transceiver.
• System Configuration – Tools to configure the transceiver’s timing source and other application-
specific operating parameters.
• Radio Configuration – Tools to configure the radio’s frequencies, RF power, and other radio
specific parameters.
• GPS Configuration – Tools to configure the radio’s GPS NMEA and PPS connections.
• PTP Configuration – Tools to configure the Precision Time Protocol (PTP) settings.
• Security Configuration – Tools to configure the security services available with the transceiver’s
environment.
• Statistics/Logging – Tools to obtain historical and current statistics about the radio’s payload
performance, and access STFP Logging configuration.
• Device Information – Top level user-specific and definable parameters, such as the device
name.
• Maintenance/Tools – Tools to use configuration files, change firmware and use Authorization
Keys to change unit capabilities.
• Communications Manager – Tools to configure the internal message scheduler.
Page 24

18 TD220MAX Technical Manual MDS 05-6906A01, Rev R
5.2 Network Configuration Menu
Figure 12. Network Configuration Menu
• IP Configuration – Access to set the IP address, netmask, and gateway IP address of the radio.
• SNMP Agent Configuration – Access to set SNMP configuration parameters.
• Ethernet Address – Display only hardware address of the unit’s Ethernet port.
5.2.1 IP Configuration Menu
Figure 13. IP Configuration Menu
• IP Address – The IPv4 address that this radio will use for its Ethernet interface. [Any valid IP
address; 192.168.1.2]
• IP Netmask – The IPv4 local subnet mask. [Any valid IP netmask; 255.255.255.0]
• IP Gateway – The IPv4 address of the gateway that will pass traffic from the radio’s subnet to
nodes on other networks. [Any valid IP Gateway; 0.0.0.0]
NOTE The IP Address and the IP Gateway must be on the same subnet or a Network Interface Error
will occur.
Page 25

MDS 05-6906A01, Rev. R TD220MAX Technical Manual 19
5.2.2 SNMP Agent Configuration Menu
Figure 14. SNMP Agent Configuration Menu
• SNMP Read Community – SNMP community string used for SNMPv1/SNMPv2c read access.
This string can be up to 30 alphanumeric characters.
• SNMP Write Community – SNMP community string used for SNMPv1/SNMPv2c write access.
This string can be up to 30 alphanumeric characters.
• SNMP Trap Community – SNMP community string used for SNMPv1/SNMPv2c trap access.
This string can be up to 30 alphanumeric characters.
• SNMP v3 Auth Password – Authentication password stored in flash. Will be used when Agent is
managing passwords locally or initially for all cases on reboot. This is the SNMPv3 password
used for Authentication. This string can be between 8 and 30 alphanumeric characters.
NOTE Only MD5 authentication is supported for SNMPv3
• SNMP v3 Priv Password – Privacy password stored in flash. Will be used when Agent is
managing passwords locally or initially for all cases on reboot. This is the SNMPv3 password
used for Privacy (DES encryption). This string can be between 8 and 30 alphanumeric
characters.
• SNMP Mode – The mode of operation of the SNMP Agent. Choices are disabled, v1_only,
v2_only, v3_only, v1-v2, and v1-v2-v3. If the mode is disabled, then the Agent will not respond to
any SNMP traffic. If the mode is v1_only, v2_only, or v3_only, then the Agent will only respond to
that version of SNMP traffic. If the mode is v1-v2, or v1-v2-v3, then the Agent will respond to the
specified version of SNMP traffic. [v1_only, v2_only, v3_only, v1-v2, v1-v2-v3; v1-v2-v3].
• Trap Version – This specifies what version of SNMP will be used to encode the outgoing traps.
The different versions of SNMP will include different information in the traps. The choices are
v1_traps, v2_traps, and v3_traps. When v3_traps are selected, v2-style traps will be sent but with
a v3 header. [v1_traps, v2_traps, v3_traps; v1_traps]
• Auth Trap Enable – Indicates whether or not traps will be generated for login events. [disabled,
enabled; disabled]
• SNMP v3 Password Mode – Determines whether v3 passwords are managed locally or via an
SNMP Manager. The different behaviors of the Agent depending on the mode specified here are
described above for Auth and Priv Password. [manager, local; manager]
• SNMP Trap Manager #1 - #4 – Specifies an SNMP Manager on the network that traps will be
sent to. [Any valid IP address; 0.0.0.0]
Page 26

20 TD220MAX Technical Manual MDS 05-6906A01, Rev R
5.3 System Configuration Menu
Figure 15. System Configuration Menu (Base)
Figure 16. System Configuration Menu (Mobile)
• Timing Source – The timing source used by the radio to precisely determine current time and the
start of each second. Mobile radios are configured for OTA to synchronize with a base radio
running GPS and/or PTP. [GPS, PTP, GPS w/ PTP fallback, PTP w/ GPS fallback, OTA; OTA].
• Send OTA Beacon – Base Radios Only – This parameter requests the radio to transmit beacons
in the first timeslot of each second when no message is received from the Communication
Manager for the time slot. Beacons are required to maintain OTA timing of mobiles. [disabled,
enabled; disabled]
• STFP Configuration – Access the STFP Configuration menu to set the STFP operating
parameters.
• Timing Signal Timeout – If the selected timing input is missing for this duration, the radio
asserts an alarm. [2-255 seconds; 60 seconds]
Page 27

MDS 05-6906A01, Rev. R TD220MAX Technical Manual 21
• External Alarm Sense – Configures the external alarm line (see Table 4. DB25 Serial Interface
Pinouts) to be either HIGH or LOW when the radio is in an alarmed state. [Alarm High, Alarm Low;
Alarm High]
• Free Run – Base Radios Only – Allow over the air transmission despite the Time Synchronization
Invalid alarm. This setting is intended for bench testing a radio and is not persistent. It will reset
to disabled upon a reboot. [enabled, disabled; disabled]
5.3.1 STFP Configuration Menu
Figure 17. STFP Configuration Menu
• STFP Radio ID – Uniquely identifies the radio to the Communication Manager. [0-65535; 0]
• STFP Receive Port – This IP Port is used to receive STFP messages from the Communication
Manager. [0-65535; 50011]
• STFP Tx/Mcast Address – This is the IP Address of the Communication Manger. [Any valid IP
address; 192.168.143.19]
• STFP Transmit Port – This is the IP port used by the Communication Manager to receive STFP
messages from the radio. [0-65535; 51011]
• STFP Epoch Size – This is the number of seconds constituting an epoch. Valid values are 1, 2, 3,
4, 5, 6, 10, 12, 15, 20, and 30. The number of timeslots equals 8 times the epoch size chosen.
[default: 6 seconds]
NOTE This parameter must match for all radios communicating.
• STFP Slot Delay – This is the number of slots (125ms each) in advance that the radio will
request data from the Communication Manager. This delay encompasses the time needed for
timing markers to transit the network, processing by the Communication Manager, and resulting
payload messages to transit the network. [0-10; 3]
Page 28

22 TD220MAX Technical Manual MDS 05-6906A01, Rev R
5.4 Radio Configuration Menu
Figure 18. Radio Configuration Menu
• Enable External PA – If enabled, the radio ignores per message power values specified by
STFP and forces transmissions at a lower power level suitable for driving the external PA (around
200 mW). [disabled, enabled; disabled]
• Transmit Frequency – The initial frequency that the radio uses for over the air transmissions
upon booting. [216.00625-221.9875 MHz; 220.106250]
NOTE STFP messages specify the frequency to be used when transmitting. This parameter is ignored
once an STFP message has been received.
• Receive Frequency – The initial that the radio uses for receiving over the air transmissions upon
booting. [216.00625-221.9875 MHz; 220.106250]
NOTE STFP messages specify the frequency to be used when receiving. This parameter is ignored
once an STFP message has been received.
• Output Power – The RF Output Power from which the radio transmits. [2-25 W; 2 W]
NOTE STFP messages specify the power to be used when transmitting. This parameter is ignored
once an STFP message has been received.
• Duty Cycle Power Limit – Maximum output power the radio will transmit in response to a STFP
request. Radio will be able to transmit at equal to or less than the configured power value. [2-25
W; 25 W]
Page 29

MDS 05-6906A01, Rev. R TD220MAX Technical Manual 23
5.5 GPS Configuration Menu
Figure 19. GPS Configuration Menu
• GPS NMEA Baud Rate – This is the baud rate used on the radio port to receive NMEA
sentences. [1200, 2400, 4800, 9600, 19200, 38400, 57600, 115200; 9600 bps]
• GPS PPS Polarity – Indicates if the TTL PPS Pulse is Active High (Positive Pulse) or Active Low
(Negative Pulse). [Negative Pulse, Positive Pulse; Negative Pulse]
• Use Legacy GPS Timing – Enable to allow the radio to work with existing/legacy TD220X or
TD220MAX systems. Disable in new deployments so that GPS Bases will work seamlessly with
PTP units. [enabled, disabled; disabled]
NOTE A mobile radio will transition from a system where the Legacy GPS Timing is enabled to a
system where it is disabled (or vice-versa) without a problem.
5.6 PTP Configuration Menu
Figure 20. PTP Configuration Menu - PTP Profile: None
Page 30

24 TD220MAX Technical Manual MDS 05-6906A01, Rev R
Figure 21. PTP Configuration Menu - PTP Profile: Telecom
• PTP Profile – Choose either None or ITU-T G.8265.1 (Telecom profile) as the PTP profile. None
uses multicast messaging. The ITU-T G.8265.1 (Telecom profile) uses unicast messaging with the
clock specified by PTP Unicast Master. [None, ITU-T G.8265.1 (Telecom profile); None]
• Profile Domain Number –The logical domain the radio should join. [0-255; 0 for None Profile, 4-
23; 4 for ITU-T G.8265.1 (Telecom profile)]
• PTP Unicast Master – the IP address of the PTP grandmaster clock which the radio will send
PTP messages when using the ITU-T G.8265.1 Telecom profile. [Any valid IP address; 192.168.1.1]
• PTP Unicast Lease – The time in seconds for the lease to the grandmaster clock before
requesting a new lease. [60-1000; 300 seconds]
• PTP Unicast Event Rate – Controls how many requests are sent between the grandmaster clock
and the radio. For cases where the network is congested, decreasing this number will help
reduce the number of messages sent over the network. [2, 4, 8, 16, 32 /seconds; 16 /seconds]
• PTP Delay Mechanism – None Profile Only – choose either End-to-End (E2E) or Peer-to-Peer
(P2P) to correspond to your network infrastructure. [End-to-End (E2E), Peer-to-Peer (P2P); End-toEnd (E2E)]
Page 31

MDS 05-6906A01, Rev. R TD220MAX Technical Manual 25
5.7 Security Configuration Menu
Figure 22. Security Configuration Menu
• Telnet Access – If “enabled”, the radio allows user to Telnet to the radio via Ethernet. If
“disabled”, users must manage the radio via SNMP or the serial console. [enabled, disabled;
enabled]
• User Passwords – Menu that allows modification of the admin, guest, and integrator logins.
• SNMP Mode – The mode of operation of the SNMP Agent. Choices are disabled, v1_only,
v2_only, v3_only, v1-v2, and v1-v2-v3. If the mode is disabled, then the Agent will not respond to
any SNMP traffic. If the mode is v1_only, v2_only, or v3_only, then the Agent will only respond to
that version of SNMP traffic. If the mode is v1-v2, or v1-v2-v3, then the Agent will respond to the
specified versions of SNMP traffic. [disabled, v1_only, v2_only, v3_only, v1-v2, v1-v2-v3; disabled].
Page 32

26 TD220MAX Technical Manual MDS 05-6906A01, Rev R
5.7.1 User Passwords Menu
Figure 23. User Passwords Menu
• Change Admin Password – Change the password for the Admin level user. This string can be
between 8 and 30 alphanumeric characters.
• Change Guest Password – Change the password for the Guest level user. This string can be
between 8 and 30 alphanumeric characters. This password can only be changed when logged in
as the admin user.
• Change Integrator Password – Change the password for the Integrator level user. This string
can be between 8 and 30 alphanumeric characters. This password can only be changed when
logged in as the admin user.
NOTE It is recommended to change the default value of the passwords for security. However, once
passwords have been changed, they can never return to the default values unless the radio is
sent back to GE MDS for service.
Console/Telnet Lockout Security
TD220MAX release 1.2.15 introduces a lockout on serial and telnet console logins after repeated
attempts fail. If an invalid login attempt is repeated 3 times on either console type, the console will no
longer display the login prompt for 5 minutes.
During this time, both serial and Telnet console logins are disabled (no matter which console was being
attacked) but existing console sessions will operate normally. If SNMP traps are enabled and/or a Syslog
server is configured, events recording the lockout will be sent to alert personnel to this possible attack.
After 5 minutes, both serial and Telnet consoles present the login prompt once again.
Page 33

MDS 05-6906A01, Rev. R TD220MAX Technical Manual 27
5.8 Statistics/Logging Menu
Figure 24. Statistics / Logging Menu - Base Radio
Figure 25. Statistics / Logging Menu - Mobile Radio
• STFP Logger – Access the STFP Logger Menu.
• Wireless Packet Statistics – Access the Wireless Packet Statistics Menu to view the number of
messages passed over the air.
• Ethernet Packet Statistics – Access the Ethernet Packet Statistics Menu to view the number of
messages passed via Ethernet.
• Event Log – Access the Event Log Menu to view the radio’s log of system events and alarms.
• GPS Status – Base Radio Only – Access the GPS Status Menu to view the satellite fix status
and the radio’s location coordinates.
• Clock Source Status – Base Radio Only – Access the Clock Source Status Menu for details on
the currently active timing source and to manually switch sources if fallback is enabled.
Page 34

28 TD220MAX Technical Manual MDS 05-6906A01, Rev R
5.8.1 STFP Logger Menu
Figure 26. STFP Logger Menu
• STFP Log Enable – If “enabled”, the radio will send UDP messages to a log server. [enabled,
disabled; disabled]
• STFP Log Server – The IP address to send UDP messages for logging STFP traffic. [Any valid IP
address; 192.168.1.1]
• STFP Log Server Port – The IP port number to send UDP messages for logging STFP traffic. [0-
65535; 777]
• Transmitter Serial Number – Enabling this feature will put the serial number of the transceiver
(space permitting) in the over the air message so the receiver can identify the transmitter for each
message via the STFP log. [enabled, disabled; disabled]
Page 35

MDS 05-6906A01, Rev. R TD220MAX Technical Manual 29
5.8.2 Wireless Packet Statistics Menu
Figure 27. Wireless Packet Statistics Menu
• Tx Beacons – The number of beacon messages transmitted over the air. Beacons are messages
sent in the first timeslot of a second that contain no payload. If a message with payload is sent
during the first-timeslot of a second, it is still used by OTA radios to synchronize time, but it is not
included in this statistic.
• Tx Payloads – The number of packets containing payload transmitted over the air.
• Tx Configs – The number of STFP configuration messages processed by the radio. STFP
configuration messages are used to change the radio receive and transmit frequencies.
• Tx Crc Errors – The number of packets to be transmitted over the air that were dropped by the
radio before sending because the STFP CRC did not match.
• Rx Beacons – The number of beacon messages received over the air. Beacons are messages
sent in the first timeslot of a second that contain no payload.
• Rx Payloads – The number of packets containing payload received over the air.
• Rx Errors – The number of packets received over the air for which the radio detected an error
that could not be compensated for using forward error correction. This will match the number of
STFP error messages generated by the radio.
• Tx Last Frequency – The frequency of the last message transmitted.
• Tx Last Power – The power level of the last message transmitted.
• Tx Payload Bytes – The number of bytes for all packets containing payload transmitted over the
air.
• Tx Dropped – The number of packets to be transmitted over the air that were dropped by the
radio before sending. There can be various reasons for this. For example, an STFP message
could not be properly decoded by the radio, or a message could not be transmitted because the
radio is in an alarm state. Reference the “Dropped Packet Statistics Screen” for detailed
information.
• Tx Dropped Dc – The number of packets to be transmitted over the air that were dropped by the
radio before sending for exceeding the Duty Cycle. Make sure that the Duty Cycle Power Limit on
the Radio Configuration Menu is set properly.
• Rx Last Frequency – The frequency of the last message received.
• Rx Payload Bytes – The number of bytes for all packets containing payload received over the
air.
• Rx Last RSSI – The RSSI of the last message received.
• Clear Statistics – Resets all the statistics to zero.
• Dropped Packet Statistics – Access the Dropped Packet Statistics Menu
Page 36

30 TD220MAX Technical Manual MDS 05-6906A01, Rev R
5.8.3 Dropped Packet Statistics Menu
Figure 28. Dropped Packet Statistics Sub Menu
• Tx Dropped – The number of packets to be transmitted over the air that were dropped by the
radio before sending. There can be various reasons for this. For example, an STFP message
could not be properly decoded by the radio, or a message could not be transmitted because the
radio is in an alarm state. Reference below for detailed information.
• Header Bad – The number of packets to be transmitted over the air that were dropped by the
radio due to a bad STFP message header. The message may have a bad version or other invalid
field.
• Invalid Slot – The number of packets to be transmitted over the air that were dropped by the
radio due to a bad Timeslot being specified. Valid timeslot values are 0 to N-1 where N is 8 times
the number of seconds in an epoch.
• Too Long – The number of packets to be transmitted over the air that were dropped by the radio
due to a payload length that was too long. The maximum payload length is 133 without FEC, 117
with FEC.
• Bad Freq – The number of packets to be transmitted over the air that were dropped by the radio
due to an invalid RX or TX frequency. Either the frequency was outside of the frequency range of
the radio (216.00625 to 221.9875 MHz) or the frequency has a bad step size.
• In Alarm – The number of packets to be transmitted over the air that were dropped by the radio
while the radio was in alarm.
• Msg Replaced – The number of packets to be transmitted over the air that were dropped by the
radio due to a later STFP message placing a new payload into that timeslot. This can be done
any time before the payload is queued up for transmission.
• Too Old – The number of packets to be transmitted over the air that were dropped by the radio
because they were older than the configured Max Message Age. (Deprecated in release 1.2.8).
• Force Key – The number of packets to be transmitted over the air that were dropped by the radio
because the radio was in Forced Key mode.
Page 37

MDS 05-6906A01, Rev. R TD220MAX Technical Manual 31
5.8.4 Ethernet Packet Statistics Menu
Figure 29. Ethernet Packet Statistics Menu
• Packets Received – The number of packets received over Ethernet.
• Packets Sent – The number of packets transmitted over Ethernet.
• Bytes Received – The number of bytes for all packets received over Ethernet.
• Bytes Sent – The number of bytes for all packets transmitted over Ethernet.
• Packets Dropped – The number of packets that were dropped due to the Ethernet interface
being busy.
• Receive Errors – The number of messages received over Ethernet that did not decode properly.
• Lost Carrier Detected – The number of times a message could not be sent over Ethernet
because the cable was unplugged.
• Clear Statistics – Resets all the statistics to zero.
Page 38

32 TD220MAX Technical Manual MDS 05-6906A01, Rev R
5.8.5 Event Log Menu
Figure 30. Event Log Menu
• Current Alarms – Displays a list of the alarms currently active within the radio.
• View Event Log – Opens the Event Log to view the historical list of radio events and alarms.
• Clear Event Log – Erase all history of the radio’s events and alarms.
• Send Event Log – Begin a TFTP transfer of the historical list of the radio’s events and alarms
from the last clearing to the present.
• Event Log Host Address – The IP Address of the TFTP server to send the event log to. [Any
valid IP address; 0.0.0.0]
• Event Log Filename – The filename on the server for the event log. [default: eventlog.txt]
• Transfer Options – Access the Transfer Options menu to manage transfer characteristics.
• Syslog Server Address – As events and alarms occur in real time, send them via the standard
SYSLOG protocol (RFC 3164) to the server at this IP Address. [Any valid IP address; 127.0.0.1]
Page 39

MDS 05-6906A01, Rev. R TD220MAX Technical Manual 33
5.8.6 View Event Log Menu
Figure 31. Event Log Submenu
• This screen displays the event number, date and time, and event or alarm for each occurrence.
Besides the cursor keys indicated, the letter keys u, d, p, n, h, and e may be used for navigating
(U)p, (D)own, (P)g-Up, Pg-D(n), (H)ome, and (E)nd.
5.8.7 Transfer Options Submenu
Figure 32. Transfer Options Submenu
• TFTP Timeout – Timeout in seconds for a TFTP connection or transfer operation. [10-120
seconds; 30 seconds]
• TFTP Block Size – Block size in bytes for TFTP transfers. [512, 1024, 2048, 4096, 8192 bytes; 1024
bytes
Page 40

34 TD220MAX Technical Manual MDS 05-6906A01, Rev R
5.8.8 GPS Status Menu (Base Radios Only)
Figure 33. GPS Status Menu
• GPS Fix Status – When the status is “Fix” the information onscreen is up-to-date, otherwise the
information is stale.
• Number of Satellites – Total satellites reported by the GPS receiver.
• Latitude – Current Latitude reported by the GPS receiver.
• Longitude – Current Longitude reported by the GPS receiver.
• Altitude – Current Altitude reported by the GPS receiver
5.8.9 Clock Source Status Menu (Base Radios Only)
Figure 34. Clock Source Status Menu
• Timing Source – The value of the System Configuration -> Timing Source setting.
• Active Timing Source – The currently active timing source.
• Switch Clock Source – When in fallback mode, manually cause a switch between time sources.
Page 41

MDS 05-6906A01, Rev. R TD220MAX Technical Manual 35
5.9 Device Information Menu
Figure 35. Device Information Menu
• Model – The model type of the radio.
• Serial Number – The factory-assigned unique radio serial number.
• Uptime – The number of elapsed hours, minutes, and seconds since the radio last rebooted.
• Date – The date from the active timing source (Base) or real-time clock (Mobile).
• Time – The time from the active timing source (Base) or real-time clock (Mobile).
• Date Format – Change how the date and time are displayed. [Generic, US, European; Generic]
• Console Baud Rate – The serial port rate the console will communicate at. [1200, 2400, 4800,
9600, 19200, 38400, 57600, 115200; 19200 bps]
• UTC Time Offset – The local offset from UTC time; set this to display the time in the event log
and configuration scripts as local time. [-12 to + 12 hrs.; 0 hrs.]
• Device Names – Access the Device Names submenu to modify the user-programmable name
strings for this radio.
Page 42

36 TD220MAX Technical Manual MDS 05-6906A01, Rev R
5.9.1 Device Names Submenu
Figure 36. Device Names Submenu
• Device Name – Free-form field to enter a nickname for this radio. [40 characters max; Device
Name]
• Contact – Free-form field to indicate who to contact in case the radio needs service. [40
characters max; Contact]
• Location – Free-form field to describe the site at which the radio is installed. [40 characters max;
Location]
• Description – Free-form field to enter details describing this radio. [40 characters max;
Description]
Page 43

MDS 05-6906A01, Rev. R TD220MAX Technical Manual 37
5.10 Maintenance/Tools Menu
Figure 37. Maintenance / Tools Menu
• Reprogramming – Access the Reprogramming submenu to upgrade the radio’s firmware.
• Configuration Scripts – Access the Configuration Scripts submenu to save and restore the
radio’s configuration to and from a text file via a TFTP server.
• Ping Utility – Access the Ping Utility submenu to verify Ethernet communications with one or
more hosts.
• Authorization Codes – Access the Authorization Codes submenu to enable certain enhanced
features.
• Radio Test – Submenu for running built-in radio tests like force key or polling.
Page 44

38 TD220MAX Technical Manual MDS 05-6906A01, Rev R
5.10.1 Reprogramming Menu
Figure 38. Reprogramming Menu
• TFTP Host Address – The IP address of the TFTP server from which the new firmware image
will be download. [Any valid IP address; 127.0.0.1]
• Firmware Filename – The filename for the firmware image. This file must exist on the server.
[40-character filename max; firmware.mpk]
• Transfer Options – Access the Transfer Options menu to manage transfer characteristics. See
Transfer Options Submenu for details.
• Retrieve File – Command the radio to request the firmware image from the TFTP server. Note
that the retrieved file will be written to the inactive image.
• Image Verify – Command the radio to perform a check of the firmware image in memory.
• Image Copy – Command the radio to copy the active firmware image to the inactive position.
• Reboot Device – Command the radio to restart to either the active or inactive firmware image.
• Current Firmware – Shows the version number of the installed firmware images and notes the
active firmware.
Page 45

MDS 05-6906A01, Rev. R TD220MAX Technical Manual 39
5.10.2 Configuration Scripts Menu
Figure 39. Configuration Scripts Menu
• TFTP Host Address – The IP address of the TFTP server used for configuration script transfers.
[Any valid IP address; 127.0.0.1]
• Config Filename – The configuration script filename to transfer. [40-character filename max;
cfgscript.txt]
• Transfer Options – Access the Transfer Options menu to manage transfer characteristics. See
Transfer Options Submenu for details.
• Retrieve File – Command the radio to get a configuration file from the TFTP server.
• Send File – Command the radio to send the configuration file to the TFTP server.
Exporting a configuration file saves the radio’s settings as a text file. The file includes some read-only
settings to help identify different radios Password settings are not exported for security reasons but may
be imported. These are not exported for security. Upon import, the radio will parse the configuration file
for changes. Any read-only parameters exported will be ignored on import, even if they are changed.
CAUTION: As noted on the menu screen; changes made to either the Timing Source or STFP Epoch Size
parameters will cause the radio to automatically reboot after the configuration script is retrieved and
processed. Changing these parameters requires a reboot to keep the radio in proper operation.
Page 46

40 TD220MAX Technical Manual MDS 05-6906A01, Rev R
5.10.3 Ping Utility Menu
Figure 40. Ping Utility Menu
• Address to Ping – The IP address of the network host to send test messages. [Any valid IP
address; 127.0.0.1]
• Count – The number of test messages to send. [0-4294967295; 4]
• Packet Size – The number of bytes each test message will contain. [0-65535; 32]
• Ping – Command the radio to begin the ping test.
5.10.4 Authorization Codes Menu
Figure 41. Authorization Codes Menu
• Authorization Key – Enter an alphanumeric key to enable features on this device.
• Authorized Features – The status of the features authorized for this device.
NOTE Contact GE MDS to obtain an authorization key to enable additional features.
Page 47

MDS 05-6906A01, Rev. R TD220MAX Technical Manual 41
5.10.5 Radio Test Menu
Figure 42. Radio Test Menu
• Test State – Enable or disable the test. [disabled, enabled; disabled]
• Test Transmit Frequency – The transmit test frequency. [216.00625-221.9875; 218.25 MHz]
• Test Receive Frequency – The receive test frequency. [216.00625-221.9875; 218.25 MHz]
• Output Power – The test output power. [2-25 W; 2]
• Test to Run – The type of test to run. [Receive, Force Key, Poll Base (Mobile only), Poll Mobile
(Base only); Receive]
• RSSI – Displays the RSSI of the type of test being run.
NOTE All STFP communication with the radio will be ignored while the Radio Test Menu is
displayed. STFP processing will resume when the menu is exited.
Page 48

42 TD220MAX Technical Manual MDS 05-6906A01, Rev R
5.11 Communications Manager Menu
Figure 43. Communications Manager Menu
• CM Version – Access the menu to view the current installed Communications Manager firmware
revision.
• CM Provisioning – Access the menu to manage provisioning files for the Communications
Manager.
• CM Configuration – Access the menu to manage the configuration files for the Communications
Manager.
• CM Process Status – Access the menu to view the status of some of the radio’s processes for
debugging purposes.
• CM Log – Access the menu to view logs from the Communications Manager for debugging
purposes.
Page 49

MDS 05-6906A01, Rev. R TD220MAX Technical Manual 43
5.11.1 CM Version Menu
Figure 44. CM Version Menu
This menu will display the current installed Communication Manager firmware bundled in the radio’s
firmware.
5.11.2 CM Provisioning Menu
Figure 45. CM Provisioning Menu
• TFTP Host Address – The IP address of the TFTP server used for provisioning file transfers.
[Any valid IP address; 127.0.0.1]
• Filename – The filename of the provisioning file to manage. [40 characters long; blank]
• Transfer Options – Access the Transfer Options menu to manage transfer characteristics. See
Transfer Options Submenu for details.
• Manage File – Provides options to manage a file. Options include: Add, Cksum (checksum),
Delete, Send and View.
• CM Provisioning File List – Displays provisioning files installed on the radio.
Page 50

44 TD220MAX Technical Manual MDS 05-6906A01, Rev R
5.11.3 CM Configuration Menu
Figure 46. CM Configuration Menu
• TFTP Host Address – IP address of the TFTP server located on the network. [Any valid IP
address; 127.0.0.1]
• Filename – The filename of the configuration file to manage. [40 characters long; blank]
• Transfer Options – Access the Access the Transfer Options menu to manage transfer
characteristics. See Transfer Options Submenu for details.
• Manage File – Provides options to manage a file. Options include: Add, Cksum (Checksum),
Delete, Link, Rename, Send and View.
• CM Configuration File List – Displays configuration files installed on the radio.
5.11.4 CM Process Status Menu
Figure 47. CM Process Status Menu
This menu shows the state of certain processes that are on the radio. These processes can help assist in
debugging purposes to determine the state of the Communications Manager.
Page 51

MDS 05-6906A01, Rev. R TD220MAX Technical Manual 45
5.11.5 CM Log Menu
Figure 48. CM Log Menu
• TFTP Host Address – IP address of the TFTP server used for log file transfers. [Any valid IP
address; 127.0.0.1]
• Filename – The filename of the log file to manage. [40 characters length]
• Transfer Options – Access the Transfer Options menu to manage transfer characteristics. See
Transfer Options Submenu for details.
• Manage File – Provides options to manage a file. Options include Add, Cksum (Checksum),
Delete, Send and View.
• CM Log File List – Displays the logs available to be viewed to assist in debugging.
Page 52

46 TD220MAX Technical Manual MDS 05-6906A01, Rev R
6.0 Troubleshooting
The following section is used to help determine the root cause of problems and offer a way to fix them.
6.1 Alarm/Event Conditions
The radio contains an alarm and event log to assist in the monitoring and troubleshooting day to day
operation. An alarm is an event that affects performance and requires action. Typically, alarms are
noticed due to the PWR LED blinking. Noted below, some alarms can be corrected by the user (noted
with an asterisk (*)) while others may require returning the unit to GE MDS for diagnostics.
Many alarms and events also have an SNMP trap associated to them for use in applications using SNMP.
For more information on the Alarm and Event Log, see Event Log Menu.
6.1.1 Alarms
Table 7. Alarm Conditions
Alarm Condition Reported
Event Log Entry
SNMP Trap
EVENT_IPADDR*
IP Address Invalid
ipAddress(1)
EVENT_MACADDR
MAC Address Invalid
macAddress(3)
EVENT_SYSTEM_ERROR *
System Error Please
Reboot
systemError(4)
EVENT_BRIDGE
Network Interface Error
bridge(5)
EVENT_RADIO_SYNTH
Radio Synth Out of Lock
radiosynth(12)
EVENT_RADIO_CAL
Radio Not Calibrated
radiocal(13)
EVENT_FREQ *
Setting Frequency Failed
setfreq(15)
EVENT_OTA_SYNC *
OTA Sync Lost
otasync(18)
EVENT_PA_TEMP *
PA Temperature Too HOT
patemp(20)
EVENT_TOD *
Time Synchronization
Invalid:
tod(21)
EVENT_HI_RFLCTD_PWR *
High Reflected Power Set
badswr(22)
6.1.2 Correcting Alarm Conditions
The following table provides insight on the causes of the events that inhibit the unit from operating and
possible corrective actions.
Table 8. Correcting Alarm Conditions
Event Log Entry
Generating Condition
Clearing Condition or Action
IP Address Invalid
The default value of the IP
address is still set.
• Change the IP address from
192.168.1.1.
MAC Address Invalid
Invalid MAC Address
Programmed.
• Contact factory Technical
Services for assistance.
Page 53

MDS 05-6906A01, Rev. R TD220MAX Technical Manual 47
Table 8. Correcting Alarm Conditions
Event Log Entry
Generating Condition
Clearing Condition or Action
System Error Please Reboot
Unit encounters something
that causes a system error.
• Reboot the radio. If condition
continues after reboot, contact
factory Technical Services.
Network Interface Error
Ethernet interface fails to
operate.
• Contact factory Technical
Services for assistance.
Radio Synth Out of Lock
Internal alarm caused by
the radio module.
• Contact factory Technical
Services for assistance.
Radio Not Calibrated
Calibration failure on the
radio.
• Contact factory Technical
Services for assistance.
Setting Frequency Failed
Radio has failed to set
configured frequencies.
• Toggle frequencies or reboot. If
persistent contact Technical
Services for assistance.
OTA Sync Lost
Mobile Radio has lost
synchronization with the
Base Radio.
• Ensure wireless connection is
free of obstacles and antennas
are properly installed.
• Ensure that time
synchronization is valid on the
Base as synchronization lost
on the Base will also cause this
alarm to occur on the Mobile.
• Ensure that STFP messages
traffic is present or beacons are
enabled on the Base.
PA Temperature Too HOT
Temperature of the PA
exceeds limits.
• Ensure radio’s environment is
within specified range.
• Ensure radio is installed with
ventilation to allow for cooling.
Time Synchronization
Invalid:
Radio cannot synchronize
with a time source or
configuration is invalid.
• If this is the first time booting
up the radio, configure the
necessary time source
information.
• Ensure that GPS/PTP
configurations are properly
configured.
• Ensure that Ethernet/RF
connections to the radio are
correct.
High Reflected Power Set
SWR exceeds proper
operational limits.
• Ensure proper antenna and
equipment are installed.
Page 54

48 TD220MAX Technical Manual MDS 05-6906A01, Rev R
6.1.3 Logged Events
The following events allow the transceiver to continue operation but do not make the PWR LED blink.
Table 9. Logged Events
Event Log Entry
Description
SNMP Trap
Time Synchronization Valid:
Displays the valid type of time source that
the radio is actively synchronized to.
tod(21)
System Bootup
Self-explanatory
bootup(34)
User Selected Reboot
Self-explanatory
reboot(35)
Reprogramming Started
Self-explanatory
reprogStarted(36)
Reprogramming Complete
Self-explanatory
reprogCompleted(37)
Reprogramming Failed
Self-explanatory
reprogFailed(38)
Telnet User Logged In/Out
Self-explanatory
telnetLogin(39)
Event Log Cleared
Self-explanatory
logClear(41)
GPS PPS Ok/Not Available
Self-explanatory
gpspps(42)
GPS Signal OK/Inverted
Displays if the GPS signal matches the
configured GPS PPS Polarity (OK) or not
(Inverted)
ppsinverted(43)
NMEA Data – Valid/Invalid
Self-explanatory
nmeadata(44)
Console User Logged Out/In
Self-explanatory
consoleLogin(48)
Parameter Changed
Self-explanatory
parmChanged(50)
Configuration Script
Generated/Received
Self-explanatory
cfgscript(51)
Auth Key Entered –
Valid/Invalid
Self-explanatory
authKey(52)
Internal PTP Trigger
Active/Not Active
Self-explanatory
ptppps(55)
Clock Source set to:
Displays the IP address of the time source
(PTP) or connection to GPS.
clockSource(57)
Image Copy Started
Self-explanatory
imageCopyStarted(59)
Image Copy Complete
Self-explanatory
imageCopyComplete(60)
Image Copy Failed
Self-explanatory
imageCopyFailed(61)
Receiving NMEA True/False
Self-explanatory
rxingnmea(62)
GPS Fix Good/Bad
Self-explanatory
gpsfix(64)
File
Shows actions (add, delete, link, rename)
done to files for the Communication
Manager.
file(65)
Page 55

MDS 05-6906A01, Rev. R TD220MAX Technical Manual 49
Table 9. Logged Events
Event Log Entry
Description
SNMP Trap
Console Access Locked for 5
minutes
Self-explanatory
consoleLockdown(66)
Login Attempt Failed
Self-explanatory
loginFailed(67)
In some cases, along with alarms mentioned in the previous section, additional GPS events may assist in
the corrective methods for proper radio operation.
Table 10. Logged Timing Events
Event Log Entry
Generating Condition
Clearing Condition or Action
GPS PPS Not Available
Either not connected or a
problem exists with the PPS
connected to the radio.
• Ensure connection to
radio/adapter board is correct
• Ensure configuration is correct.
NMEA Data Invalid
Either not connected or a
problem exists with the
NMEA connected to the
radio.
• Ensure connection to
radio/adapter board is correct
• Ensure configuration is correct.
GPS Fix Bad
Despite having the proper
PPS and NMEA
connections, the radio is not
able to synchronize with the
GPS signal.
• Ensure connection to
radio/adapter board is correct
• Ensure configuration is correct.
Page 56

50 TD220MAX Technical Manual MDS 05-6906A01, Rev R
6.2 Technical Specifications
GENERAL
Frequency Range
216-222 MHz, 12.5kHz bandwidth
RECEIVER
Maximum Usable Sensitivity
–114 dBm at 10% PER (FEC enabled, wide deviation)
–109 dBm at 10% PER (FEC enabled, narrow deviation)
TRANSMITTER
Carrier Power
2 – 25 Watts (33-44 dBm)
Note: 2 W max for FCC part 90 with frequencies under 220 MHz
Duty Cycle
25W / 30% Duty
10W / 30% Duty
2W / 100% Duty
Output Impedance
50
FCC ID
E5MDS-TD220MAX
PRIMARY POWER
Voltage
10.0 to 16 VDC (Negative ground only), 13.8 VDC Nominal
TX Supply Current (Typical)
7 A maximum @ 13.8 VDC at 25 W
RX Supply Current (Typical)
300 mA @ 13.8 VDC
ENVIRONMENTAL
Humidity
95%, non-condensing at 40°C
Temperature Range
–40 to 70 degrees C (–40°F to 158°F) (depending on Duty Cycle)
Duty Cycle
25W / 30% Duty: –40 to 60 degrees C (–40°F to 140°F)
10W / 30% Duty: –40 to 70 degrees C (–40°F to 158°F)
2W / 100% Duty: –40 to 70 degrees C (–40°F to 158°F)
Weight (nominal)
2.5 lbs. (1.13 kg)
Transceiver Dimensions
7.2” (18.29 cm) long, 5.2" (13.21 cm) wide, 2.0” (5.08 cm) in height
DIAGNOSTICS/DATA INTERFACE
Connection
Custom DB-25 Female
See Table 4. DB25 Serial Interface Pinouts for details
Product specifications are subject to change without notice or obligation to any party.
Page 57

MDS 05-6906A01, Rev. R TD220MAX Technical Manual 51
7.0 Acknowledgements
TD220MAX incorporates ptpd (https://github.com/ptpd/ptpd):
/* * Copyright (c) 2015 Wojciech Owczarek.
* Copyright (c) 2014 Perseus Telecom.
* Copyright (c) 2013-2014 Harlan Stenn,
* George N. Neville-Neil,
* Wojciech Owczarek,
* Jan Breuer.
* Copyright (c) 2011-2012 George V. Neville-Neil,
* Steven Kreuzer,
* Martin Burnicki,
* Jan Breuer,
* Wojciech Owczarek,
* Gael Mace,
* Alexandre Van Kempen,
* Inaqui Delgado,
* Rick Ratzel,
* National Instruments.
* Copyright (c) 2009-2010 George V. Neville-Neil,
* Steven Kreuzer,
* Martin Burnicki,
* Jan Breuer,
* Gael Mace,
* Alexandre Van Kempen.
*
* Copyright (c) 2005-2008 Kendall Correll, Aidan Williams
*
* All Rights Reserved
*
* Redistribution and use in source and binary forms, with or without
* modification, are permitted provided that the following conditions are
* met:
* 1. Redistributions of source code must retain the above copyright notice,
* this list of conditions and the following disclaimer.
* 2. Redistributions in binary form must reproduce the above copyright
* notice, this list of conditions and the following disclaimer in the
* documentation and/or other materials provided with the distribution.
*
* THIS SOFTWARE IS PROVIDED BY THE AUTHORS ``AS IS'' AND ANY EXPRESS OR
* IMPLIED WARRANTIES, INCLUDING, BUT NOT LIMITED TO, THE IMPLIED
* WARRANTIES OF MERCHANTABILITY AND FITNESS FOR A PARTICULAR PURPOSE ARE
* DISCLAIMED. IN NO EVENT SHALL THE AUTHORS OR CONTRIBUTORS BE LIABLE
* FOR ANY DIRECT, INDIRECT, INCIDENTAL, SPECIAL, EXEMPLARY, OR
* CONSEQUENTIAL DAMAGES (INCLUDING, BUT NOT LIMITED TO, PROCUREMENT OF
Page 58

52 TD220MAX Technical Manual MDS 05-6906A01, Rev R
* SUBSTITUTE GOODS OR SERVICES; LOSS OF USE, DATA, OR PROFITS; OR
* BUSINESS INTERRUPTION) HOWEVER CAUSED AND ON ANY THEORY OF LIABILITY,
* WHETHER IN CONTRACT, STRICT LIABILITY, OR TORT (INCLUDING NEGLIGENCE
* OR OTHERWISE) ARISING IN ANY WAY OUT OF THE USE OF THIS SOFTWARE, EVEN
* IF ADVISED OF THE POSSIBILITY OF SUCH DAMAGE.
*/
Page 59

IN CASE OF DIFFICULTY...
Our products are designed for long life and trouble-free operation. However, this equipment, as with
all electronic equipment, may have an occasional component failure. The following information will
assist you if servicing becomes necessary.
TECHNICAL ASSISTANCE
Technical assistance for GE MDS products is available from our Technical Support Department
during normal business hours (8:30 A.M.–5:00 P.M. Eastern Time). When calling, please give the
complete model number of the product, along with a description of the trouble/symptom(s) that you
are experiencing. In many cases, problems can be resolved over the telephone, without the need for
returning the unit to the factory. Please use one of the following means for product assistance:
Phone: (585) 241-5510 E-Mail: gemds.techsupport@ge.com Web: www.gemds.com
REPAIR SERVICE
Component level repair of this equipment is not recommended in the field. Many components are
installed using surface mount technology, which requires specialized training and equipment for
proper servicing. For this reason, the equipment should be returned to the factory for any PC board
repairs. The factory is best equipped to diagnose, repair and align your unit to its proper operating
specifications.
If return of the equipment is necessary, you must obtain a return authorization number before
shipment. This number helps expedite the repair so that the equipment can be returned to you as
quickly as possible. Please be sure to include the number on the outside of the shipping box, and on
any correspondence relating to the repair. No equipment will be accepted for repair without an
authorization number.
Return authorization numbers are issued online at www.gedigitalenergy.com/Communications.htm.
On the left side of the page, click “Login to my MDS” and once logged in, click “Service Request
Order”. Your number will be issued immediately after the required information is entered. Please be
sure to have the model number(s), serial number(s), detailed reason for return, “ship to” address,
“bill to” address, and contact name, phone number, and fax number available when requesting a
number. A purchase order number or pre-payment will be required for any units that are out of
warranty, or for product conversion.
If you prefer, you may contact our Product Services department to obtain an authorization number:
Telephone Number: 585-241-5540
E-mail Address: gemds.productservices@ge.com
The radio must be properly packed for return to the factory. The original shipping container and
packaging materials should be used whenever possible. All factory returns should be addressed to:
GE MDS, LLC
Product Services Department
175 Science Parkway
Rochester, NY 14620 USA
When repairs have been completed, the equipment will be returned to you by the same shipping
method used to send it to the factory. Please specify if you wish to make different shipping
arrangements. To inquire about an in-process repair, you may contact our Product Services
department using the telephone, Fax, or E-mail information given above.
Page 60

 Loading...