

GE MDS 4790 Series, MDS 4790A, MDS 9790 Series, MDS 4790S, MDS 9790A Installation & Operation Manual
...
Installation & Operation Guide
MDS 05-3438A01, Rev. F
SEPTEMBER 2008
400 MHz/900 MHz
Multiple Address System
Master Station Radio
MDS 4790/9790 Series
(including MDS 4790A/C/E/S, MDS 9790A)
RSPSupply - 1-888-532-2706 - www.RSPSupply.com
http://www.RSPSupply.com/p-8457-MDS-UP-9790X.aspx
QUICK START GUIDE
1. Install and connect the antenna system to the radio (page 9).
• Use an appropriate antenna aimed at the associated station.
• Use low-loss feedline suited for 400/900 MHz. Kee p the feedline as short as possible.
2. Connect the backup battery (page 15).
3. Connect the host computer to the DATA connector on the rear panel (page 23).
4. Verify proper input voltage level and connect power to the radio.
Set the power switch(es) to ON.
5. Configure the data interface baud rate (page 42).
6. Observe front panel indicators for proper operation.
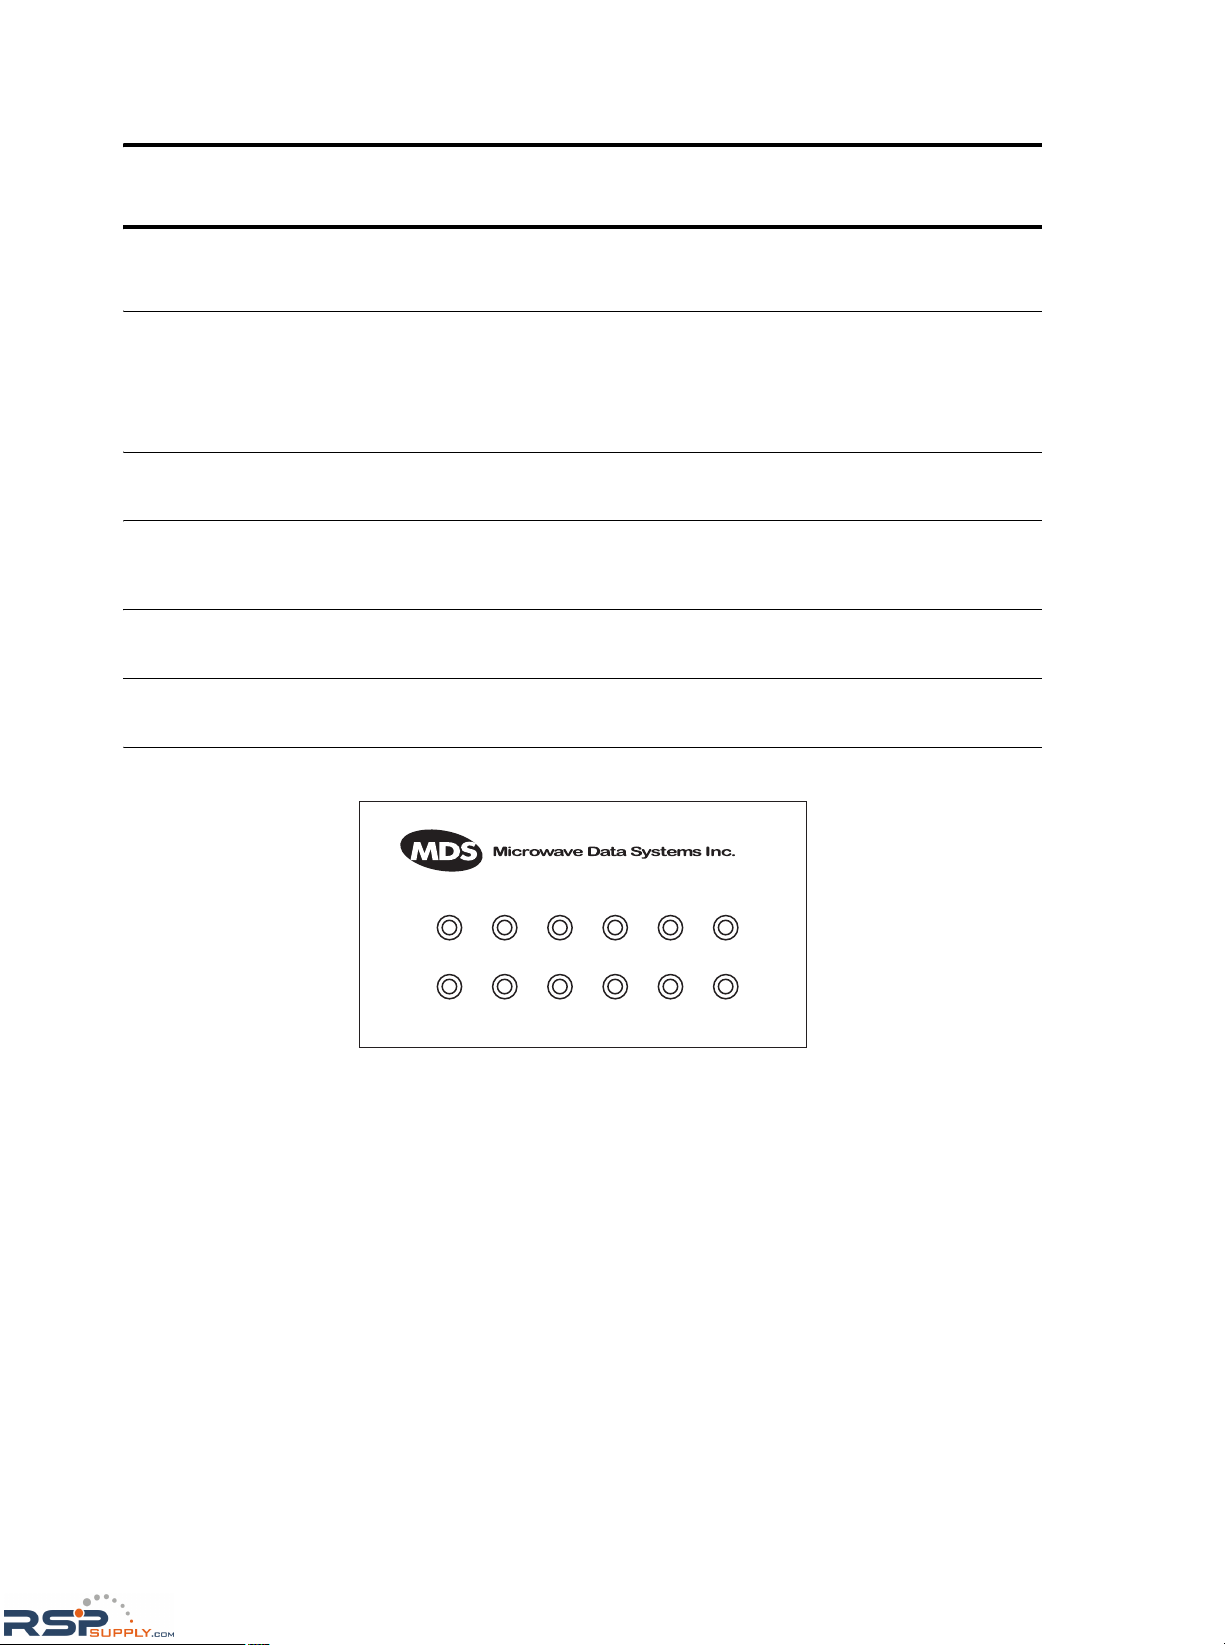
Invisible place holder
ACTIVE (green)—This transceiver board (A or B) is the selected unit.
STBY (yellow)—This transceiver board (A or B) is the standby unit (redun d ant ver s ion on ly) .
ALARM (red)—General fault not covered by the other alarm categories (RX ALR, TX ALR, I/O ALR).
RX ALR (red)—Difficulty receiving. May be due to an antenna problem, receiver fault, or other
condition causing a low received signal level.
TX ALR (red)—Fault with the transmit circuitry.
I/O ALR (red)—The data rate or format of data at the data interface conne ctor is incomp atible with the
radio settings.
A
B
ACTIVE STBY ALARM RX ALR TX ALR I/O ALR
ACTIVE STBY ALARM RX ALR TX ALR I/O ALR
RSPSupply - 1-888-532-2706 - www.RSPSupply.com
http://www.RSPSupply.com/p-8457-MDS-UP-9790X.aspx

MDS 05-3438A01, Rev. F MDS 4790/9790 Series I/O Guide i
TABLE OF CONTENTS
1.0 INTRODUCTION.....................................................................................1
2.0 PRODUCT DESCRIPTION.....................................................................1
2.1 Network-Wide Diagnostics ...............................................................2
2.2 Redundant versus Non-redundant Operation ..................................2
2.3 Applications ......................................................................................3
Basic MAS Master Station Operation................................................3
Repeater and Polling Remote Operation..........................................3
Simplex and Switched Carrier Operation..........................................4
2.4 Features ...........................................................................................4
2.5 Accessories ......................................................................................5
2.6 Model Number Codes ......................................................................6
3.0 INSTALLATION PLANNING....................................................................6
3.1 General Requirements .....................................................................6
Site Selection.................................................................................. ..7
A Word About Interference ................................................ ... .... ... ... ..8
3.2 Antenna and Feedline Selection ....... ... ... .... ... ... ... .... ... ... ... ... .... ... ... ..9
Antenna System................................................................................9
Feedline Selection ............................................................................9
4.0 INSTALLATION PROCEDURES...........................................................10
4.1 Unpacking and Inspection .... .......................................................... 11
4.2 Mounting the Radio ........................................................................11
Rack Mounting................................................................................12
Tabletop Mounting...........................................................................12
Remote Front Panel Mounting—Optional Configuration.................12
4.3 Primary Power ................................................................................13
AC-Powered Units .......................................... ... ... .... ... ... ................14
DC-Powered Units..........................................................................14
4.4 Backup Battery ...............................................................................15
Location of Battery Backup Switch ....................................... .... ......15
Low-Voltage Disconnect Feature....................................................16
Battery Reset Switch (SW1/LVD PCB)........... ... ... ..........................16
4.5 Antenna Installation ........................................................................17
Feedline Installation........................................................................17
4.6 Interface Wiring Connections .........................................................18
TX, Antenna, and RX Coaxial Connectors (Type-N).......................18
Ground Connection.........................................................................21
Diagnostics Connector—J1 ............................... ... .... ... ...................21
4-Wire Audio Connector—J2..........................................................22
RSPSupply - 1-888-532-2706 - www.RSPSupply.com
http://www.RSPSupply.com/p-8457-MDS-UP-9790X.aspx

ii MDS 4790/9790 Series I/O Guide MDS 05-3438A01, Rev. F
Data Interface Connector—J3 ........................................................23
Orderwire Connector—J9...............................................................24
Alarm Contacts—J10......................... ... ... .... ... ... ... .... ... ... ... ... .......... 24
4.7 Post Installation Checks .................................................................26
5.0 START-UP AND OPERATION..............................................................26
5.1 Initial Startup ..................................................................................26
Normal Indications..........................................................................26
Maximizing RSSI............................. ... ... ... .... ... ... ... .... ... ... ... .............26
Coordinating Activities by Orderwire...............................................27
5.2 Front Panel Indicators ....................................................................27
LED Indicators ...... ... ... ................................................................. ...28
Front Panel Display.........................................................................29
6.0 DIAGNOSTICS AND CONTROL ..........................................................30
6.1 PC Connection ...............................................................................30
6.2 PC Command Summaries .............................................................32
Commands and Command Parameters .........................................33
6.3 Detailed Command Descriptions ....................................................37
ALARM............................................................................................37
AMASK [0000 0000–FFFF FFFF]...................................................40
ASENSE [HI/LO].............................................................................41
BATT(ery) [ON/OFF].......................................................................41
BAUD [xxxxx abc]...........................................................................42
BUFF [ON/OFF]................. .............................................................42
CKEY [ON/OFF]..............................................................................43
CTS [0-255]........................... ... .... ... ... ... ..........................................43
DATAKEY [ON/OFF].......................................................................44
DATE [mmm dd yyyy] .....................................................................44
DKEY..............................................................................................45
DLINK [ON/OFF/xxxx].....................................................................45
DMGAP [xx]....................................................................................45
DTYPE [NODE/ROOT/GATE/PEER]..............................................46
EMP [ON/OFF]...................... ... .... ... ... ... ... .... ... ................................46
HREV..............................................................................................46
INIT.................................................................................................46
KEY.................................................................................................47
LOG [CLR]......................................................................................48
MADDR [NONE, 1–255] .................................................................48
MODEL...........................................................................................48
MODEM [NONE/4800/9600/19200/DEFAULT]...............................48
NMASK [0000 0000–FFFF FFFF]...................................................49
OPT.................................................................................................50
OWM [xxxxx]...................................................................................50
OWN [xxxxx]......................... ... .... ... ... ... ..........................................50
PTT [0-255].....................................................................................50
PWR [20–37]...................................................................................51
RADIO [AUTO/A/B].........................................................................51
REPEATER [ON/OFF]....................................................................51
RSPSupply - 1-888-532-2706 - www.RSPSupply.com
http://www.RSPSupply.com/p-8457-MDS-UP-9790X.aspx

MDS 05-3438A01, Rev. F MDS 4790/9790 Series I/O Guide iii
RSSI, RSSI!................................. ... ... .............................................52
RTU [ON/OFF/0-80]........................................................................52
RX [xxx]...........................................................................................52
RXLEVEL [–20 to +3]......................................................................53
RXMUTE [ON/OFF/Time in msec]..................................................53
RXPAD [ON/OFF]...........................................................................53
RXTOT [NONE, 1-1440] .................................................................53
SCD [0-255]....................................................................................54
SER.................................................................................................54
SHOW [DC/PWR/CURRENT/RADIO] ............................................54
SNR, SNR!...................................................... ... ... .... ... ...................55
SREV..............................................................................................55
STANDBY [ON/OFF].......................................................................56
STAT...............................................................................................56
TEMP..............................................................................................57
TIME [hh:mm:ss].......................................................... ... ... ... .......... 57
TOT [ON/OFF, 1-255] ........ ... ... .... ... ... ... ... .......................................58
TX [xxxx].................................. .... ... ... .............................................58
TXGAIN [ON/OFF]............. ... ... .......................................................59
TXLEVEL [–20 to +3, AUTO]..........................................................59
UNIT [10000–65000].......................................................................59
6.4 Configuration and Programming using the Front Panel .................60
Programming and Control Buttons..................................................62
Navigating Through the Front Panel Screens.................................62
Switching the Front Panel Display to Configuration Mode..............63
Use of Control Buttons in Configuration Mode................................63
Changing radio functions...................................... .... ... ... ... ... .... ... ...64
6.5 Screen Descriptions .......................................................................64
Group 1—Startup Screen and Menu Directory (page 69)...............64
Group 2—Configuration Screens (Page 69)... ... ... .... ... ... ...... .... ... ...64
Group 3—Diagnostic Screens (Page 78) . .... ... ... ... .... ......................65
Group 4—Event Log (Page 80) ......................................................65
7.0 LOCAL & NETWORK-WIDE PROBLEM SOLVING..............................79
7.1 Local Problem-Solving ................................................................... 80
Front Panel LEDs............................................................................80
Chassis-Mounted LEDs..................................................................81
Problem Solving Using a Connected PC........................................82
Problem Solving Using the Front Panel Display ....................... ... ...82
System Bench Testing Set-up...... ... ... ... ... .... ... ... .............................83
7.2 Performing Network-Wide Radio Diagnostics ................................84
8.0 REPLACING ASSEMBLIES..................................................................86
8.1 Transceiver Board and Power Supply Assemblies ........................86
8.2 Installation & Removal of Backup Battery
(P/N 28-1575Axx) ................................ ... ... ... ..........................................87
8.3 Front Panel .....................................................................................88
8.4 Operating Frequency Change Considerations ............................ ... 89
MDS 4790—400 MHz Notch-Type Duplexers................................90
RSPSupply - 1-888-532-2706 - www.RSPSupply.com
http://www.RSPSupply.com/p-8457-MDS-UP-9790X.aspx
iv MDS 4790/9790 Series I/O Guide MDS 05-3438A01, Rev. F
MDS 9790—Bandpass-Type Duplexers............... .... ... ... ... ... .... ... ...90
MDS 4790/9790 Simplex Radios—With Antenna Switch Modules.91
MDS 4790/970—Front End Helical Coil Alignment.........................91
8.5 Testing and Removing an Internal Duplexer ..................................91
Testing.............................................................................................91
Removing the Internal Duplexer .....................................................92
8.6 Testing and Removing the Antenna Switch Module .... ... ... ... ..........93
Testing.............................................................................................93
Removing the Antenna Switch........................................................94
8.7 Cooling Fan Maintenance .............................................................95
9.0 RADIO SOFTWARE UPGRADES ........................................................95
9.1 Obtaining New Code ......................................................................95
9.2 Preparing for Download .................................................................96
9.3 Downloading New Code—Procedure ............................................96
10.0 TECHNICAL REFERENCE.................................................................97
10.1 Technical Specifications ...............................................................97
10.2 RF Propagation Planning .............................................................99
Fresnel Zone Clearance ...............................................................100
Earth Curvature............................ ... ... ... ... .... ... ... ...........................101
Fade Margins................................................................................101
Calculating Path Loss.............................. .... ... ... ... .... ... ... ... ... .... ....102
10.3 Formulas for System Planning .................. ................................. 102
Free Space Path Loss...................................................................102
Fresnel Zone Boundary ................................................................102
Theoretical Signal Strength............................. ... ... ........................102
Probability of System Fading........................................................103
10.4 dBm-Volts-Watts Conversion Chart ............................................104
Copyright Notice
This Installation and Operation Guide and all software described herein
are protected by copyright: 2008 GE MDS. All rights reserved.
GE MDS reserves its right to correct any errors and omissions in this
publication.
Operational Safety Notices
The radio equipment described in this guide uses radio frequency transmitters. Although the power level is low, the concentrated energy from
a directional antenna may pose a health hazard. Do not allow people to
come in close proximity to the front of the antenna when the transmitter
is operating.
This manual is intended to guide a professional installer to install,
operate, and perform basic system maintenance on the described radio.
RF Exposure
RSPSupply - 1-888-532-2706 - www.RSPSupply.com
http://www.RSPSupply.com/p-8457-MDS-UP-9790X.aspx

MDS 05-3438A01, Rev. F MDS 4790/9790 Series I/O Guide v
ISO 9001 Registration
GE MDS adheres to this internationally-accepted quality system standard.
Quality Policy Statement
We, the employees of GE MDS, are committed to achieving total customer satisfaction in everything we do.
Total Customer Satisfaction in:
• Conception, design, manufacture, and marketing of our products.
• Services and support we provide to our internal and external
customers.
Total Customer Satisfaction Achieved Through:
• Processes that are well documented and minimize variations.
• Partnering with suppliers who are committed to providing quality
and service.
• Measuring our performance against customer expectations and
industry leaders.
• Commitment to continuous improvement and employee
involvement.
Revision Notice
While every reasonable effort has been made to ensure the accuracy of
this manual, product improvements may result in minor differences
between the manual and the product shipped to you. If you have additional questions or need an exact specification for a product, please contact our Customer Service Team using the information at the back of this
guide. In addition, manual updates can often be found on our Web site
at
www.GEmds.com.
Warning—400 MHz Distress Beacons
In the U.S.A., the 406 to 406.1 MHz band is reserved for use by distress
beacons. Since the MDS 4790 Series radio can transmit in this band,
take precautions to prevent the radio from transmitting between 406 and
406.1 MHz.
ESD Notice
To prevent malfunction or damage to this radio, which may be caused
by Electrostatic Discharge (ESD), the radio should be properly
grounded by connection to the ground stud on the rear panel. In addition,
the installer or operator should follow proper ESD precautions, such as
touching a grounded bare metal object to dissipate body charge, prior to
connecting and disconnecting cables on the front or rear panels.
RSPSupply - 1-888-532-2706 - www.RSPSupply.com
http://www.RSPSupply.com/p-8457-MDS-UP-9790X.aspx

vi MDS 4790/9790 Series I/O Guide MDS 05-3438A01, Rev. F
Environmental Information
The equipment that you purchased has required the extraction and use
of natural resources for its production. Improper disposal may contaminate the environment and present a health risk due to hazardous substances contained within. To avoid dissemination of these substances
into our environment, and to diminish the demand on natural resources,
we encourage you to use the appropriate recycling systems for disposal.
These systems will reuse or recycle most of the materials found in this
equipment in a sound way. Please contact GE MDS or your supplier for
more information on the proper disposal of this equipment.
RSPSupply - 1-888-532-2706 - www.RSPSupply.com
http://www.RSPSupply.com/p-8457-MDS-UP-9790X.aspx
MDS 05-3438A01, Rev. F MDS 4790/9790 Series I/O Guide 1
1.0 INTRODUCTION
This guide presents installation and operating instructions for the
MDS 4790 and MDS 9790 Series Master Station Radio. It begins with
an overall description of radio features and is followed by the steps
required to install the unit and place it into normal operation.
Additionally, the guide contains troubleshooting tips for resolving
system difficulties that you might encounter. After you install the radio,
keep this guide near the radio for future reference.
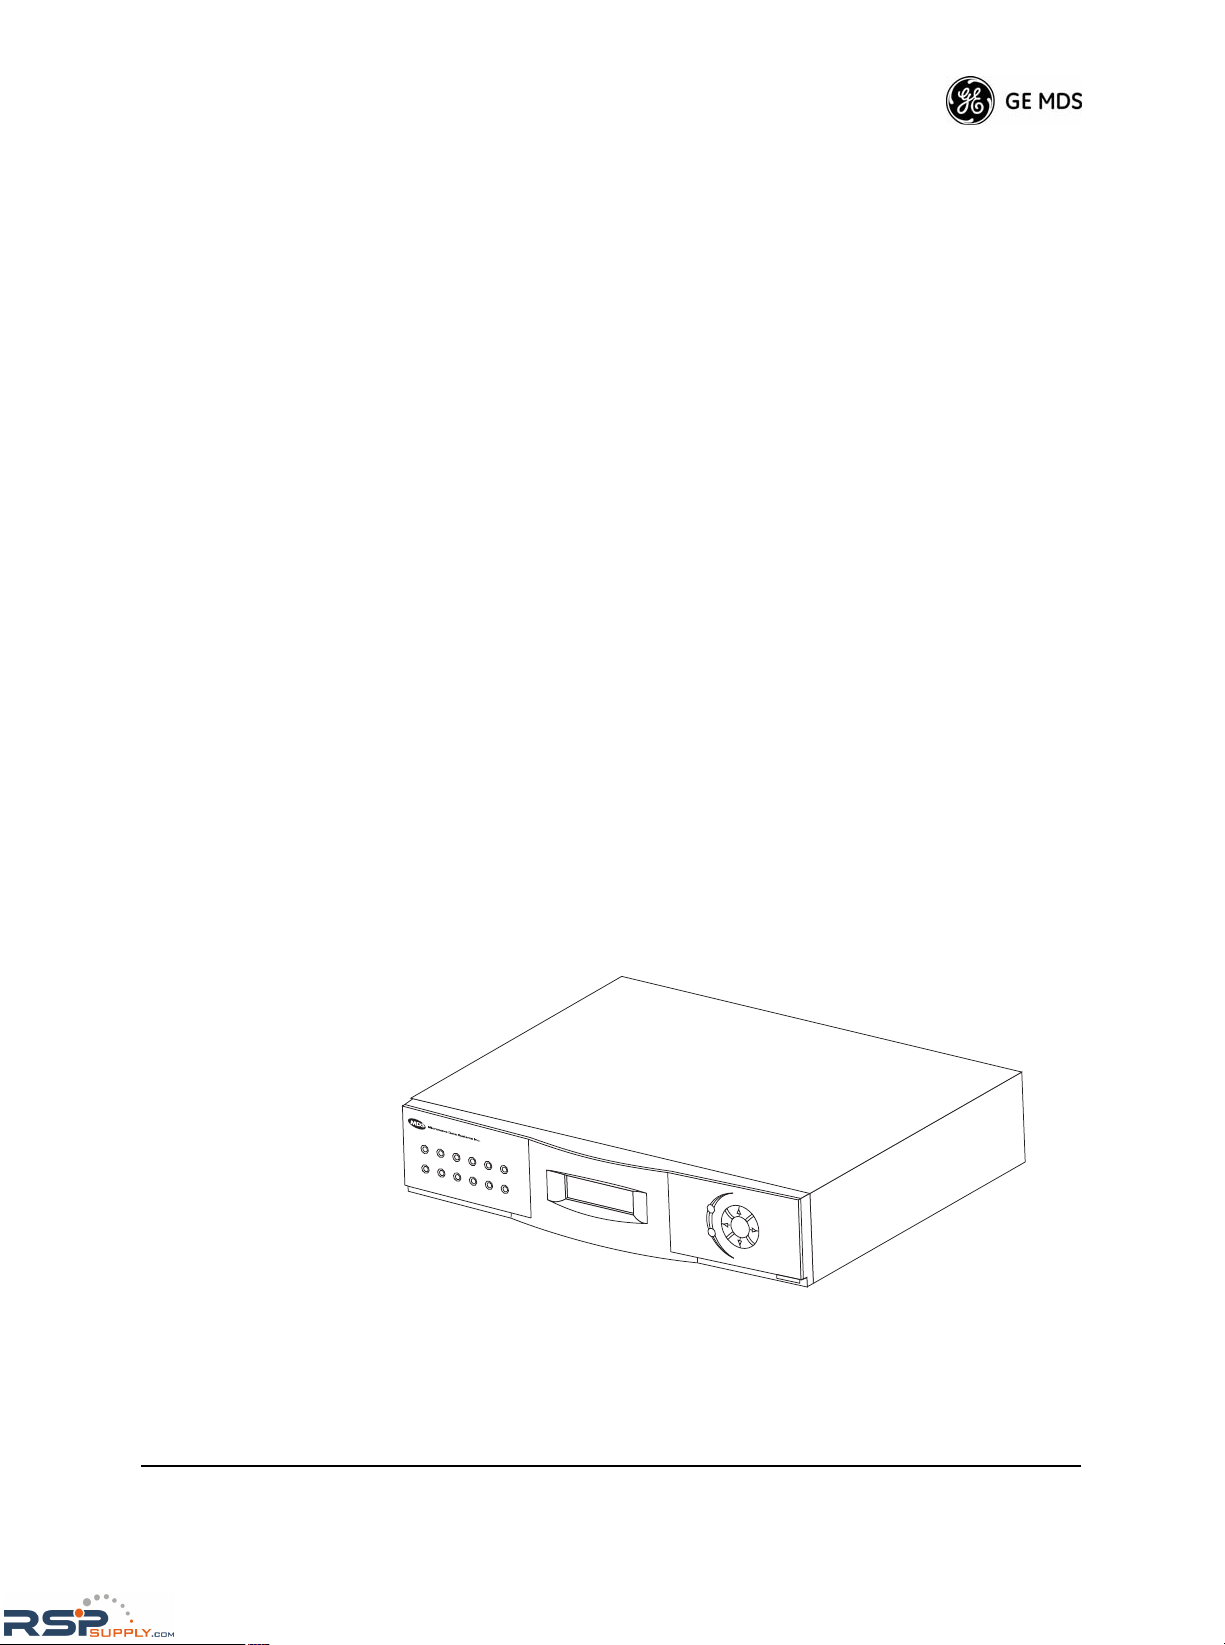
2.0 PRODUCT DESCRIPTION
The master station radio (Figure 1) is a full-duplex data telemetry radio
suitable for use in Multiple Address System (MAS) and Supervisory
Control and Data Acquisition (SCADA) applications. The radio uses
microprocessor control and Digital Signal Processing (DSP) technology
to provide highly reliable communications even under adverse conditions.
The MDS 4790 is intended to be used in systems with compatible
MDS 4710 Series remote radios; it operates in the 400 MHz frequency
band (380 to 512 MHz for A and C models; 400 to 480 MHz for E
models). The MDS 4790S uses an over-the-air data rate of 9600 bps.
The MDS 9790 is used with compatible MDS 9710 Series remote
radios, and it operates between 800 and 960 MHz. Radios are available
in either a redundant configuration or a non-redundant configuration.
Refer to Section 2.2, Redundant versus Non-redundant Operation,
beginning on Page 2 for more information.
Invisible place holder
Figure 1. MDS 4790/9790 Series Master Station
ENTER
ESCAPE
ACTIVE
ACTIVE
STBY
ALARM
RX ALR
TX ALR
STBY
ALARM
RX ALR
TX ALR
LINE
LINE
RSPSupply - 1-888-532-2706 - www.RSPSupply.com
http://www.RSPSupply.com/p-8457-MDS-UP-9790X.aspx

2 MDS 4790/9790 Series I/O Guide MDS 05-3438A01, Rev. F
All assemblies, including the duplexer and power supply, are contained
in the radio’s compact (2RU high) enclosure. The radio’s compact size
allows it to fit into most existing systems, in either tabletop or rack
mounted configurations. Connectors are provided on the rear panel for
easy connection of power, antenna, data, alarm, and diagnostic functions.
2.1 Network-Wide Diagnostics
Newer GE MDS remote and master station radios, including the
MDS 4790/9790 Series, offer network-wide diagnostics capability. Network-wide diagnostics communications is a modern, packetized mode
that has several advantages over DTMF diagnostics communications
(used by older GE MDS radios):
• You can gather diagnostic data over a large radio network without disrupting the system communications flow.
• When required, you can increase diagnostics communications
speed by actively collecting diagnostic data.
• You can access diagnostic data for each radio in the network
from any radio diagnostics port in the network.
• You can broadcast certain messages to all radios in the system
simultaneously.
You can use the MDS 4790/9790 Series Master Station to poll remote
radios in its radio system for diagnostic data. For more information on
the implementation of network-wide diagnostics, refer to the GE MDS
Network-wide Diagnostics Handbook (P/N 05-3467A01).
2.2 Redundant versus Non-redundant Operation
A redundant configuration means that the master station has two complete transceiver boards and power supplies installed in the enclosure. In
the event of a failure in the primary equipment, the controlling logic
switches to the stand-by unit. The stand-by transceiver board is constantly operating and its operational readiness is monitored. However,
the power amplifier in the stand-by board is not operating when it is in
stand-by mode.
In a non-redundant configuration, there is only one transceiver board
installed in the “A” slot of the enclosure, and back-up transceiver board
operation is not possible.
Transceiver boards may be moved from one master station to another,
or an additional transceiver board may be added to a non-redundant
master station. You do not need to specify redundant or non-redundant
operation, or select the active transceiver board. Installing or replacing
RSPSupply - 1-888-532-2706 - www.RSPSupply.com
http://www.RSPSupply.com/p-8457-MDS-UP-9790X.aspx
MDS 05-3438A01, Rev. F MDS 4790/9790 Series I/O Guide 3
a transceiver board causes the boards to communicate
briefly with each other to establish which board will operate as the
active board and which operates as the stand-by. For more information,
refer to “Transceiver Board and Power Supply Assemblies” on Page 86.
2.3 Applications
The MDS 4790/9790 Series radios are designed for point-to-multipoint
data transmission in oil and gas pipeline communications, transactional
systems, and telecommunications systems. A MAS network provides
communications between a central host computer and remote terminal
units (RTUs) or other data collection devices. The operation of the radio
system is transparent to the computer equipment.
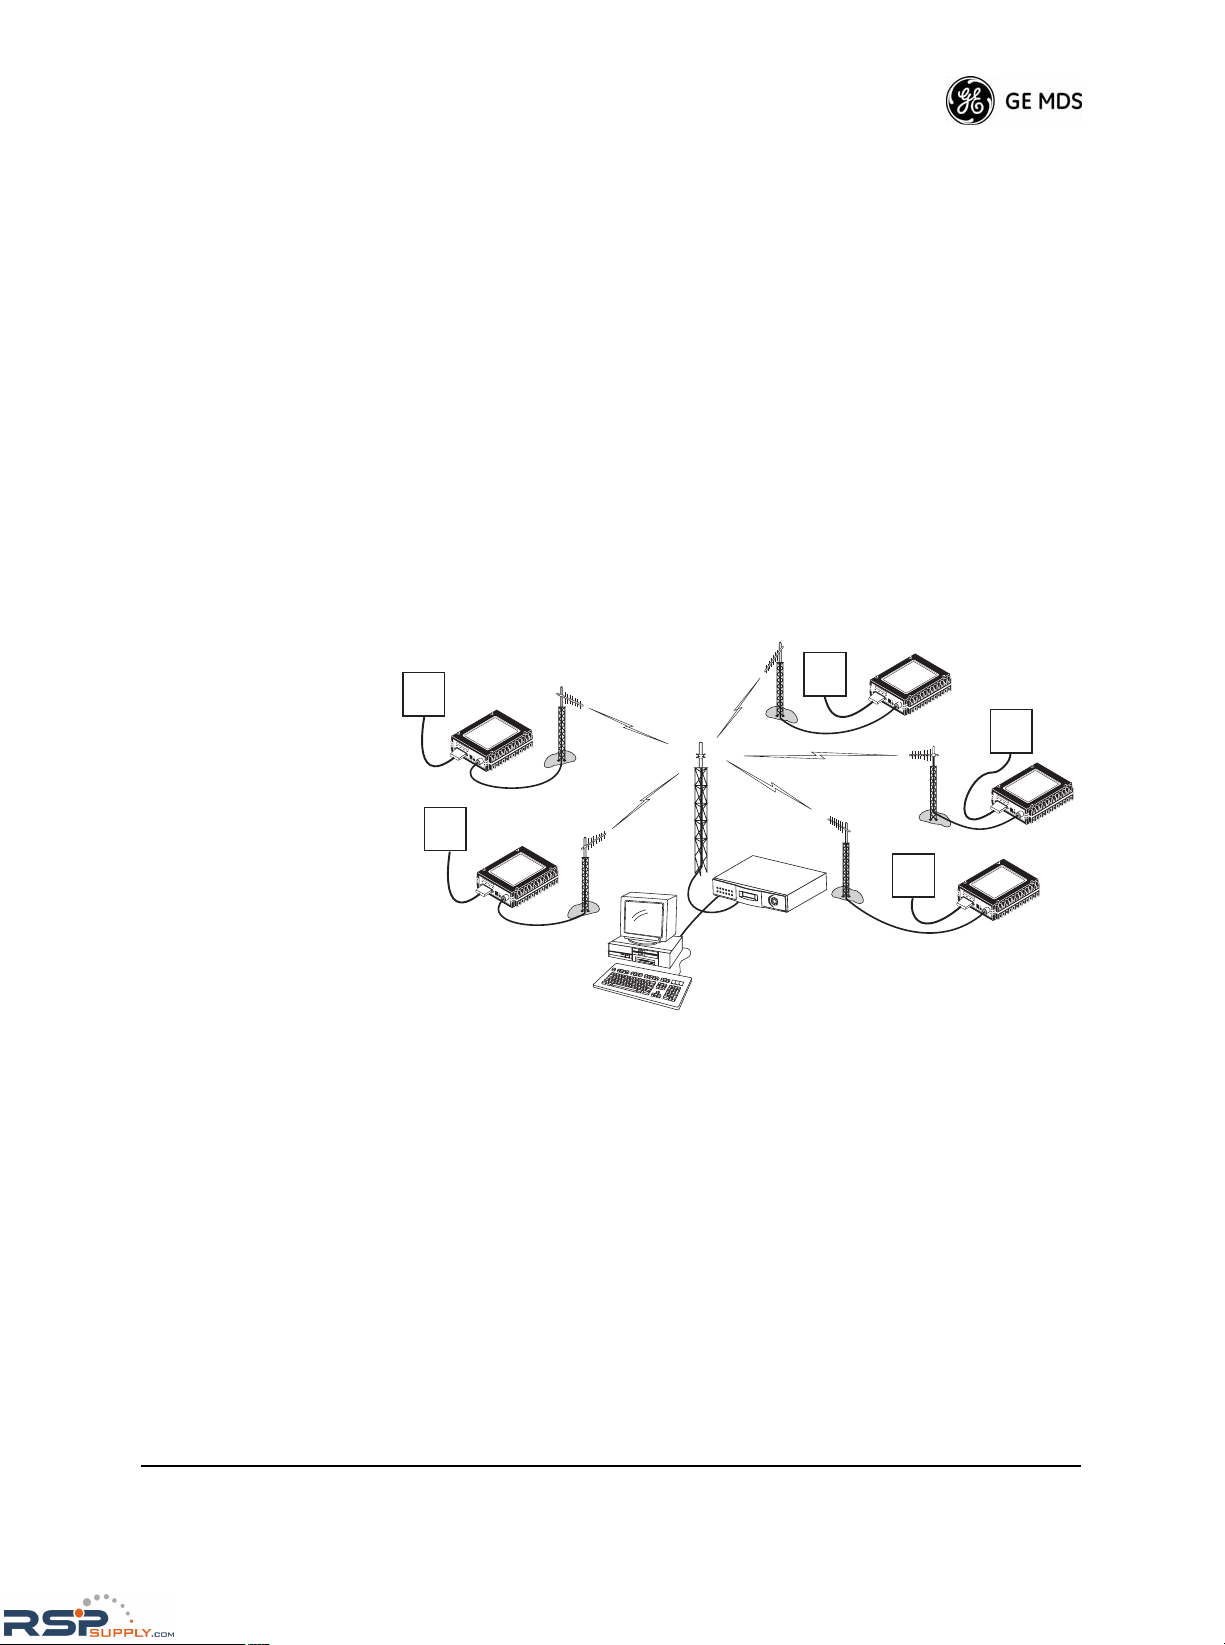
Basic MAS Master Station Operation
Figure 2 shows a typical point-to-multipoint system using an
MDS 4790/9790 Series master station. This is a basic system consisting
of a central master station and several associated remote units.
Figure 2. Typical MAS Network
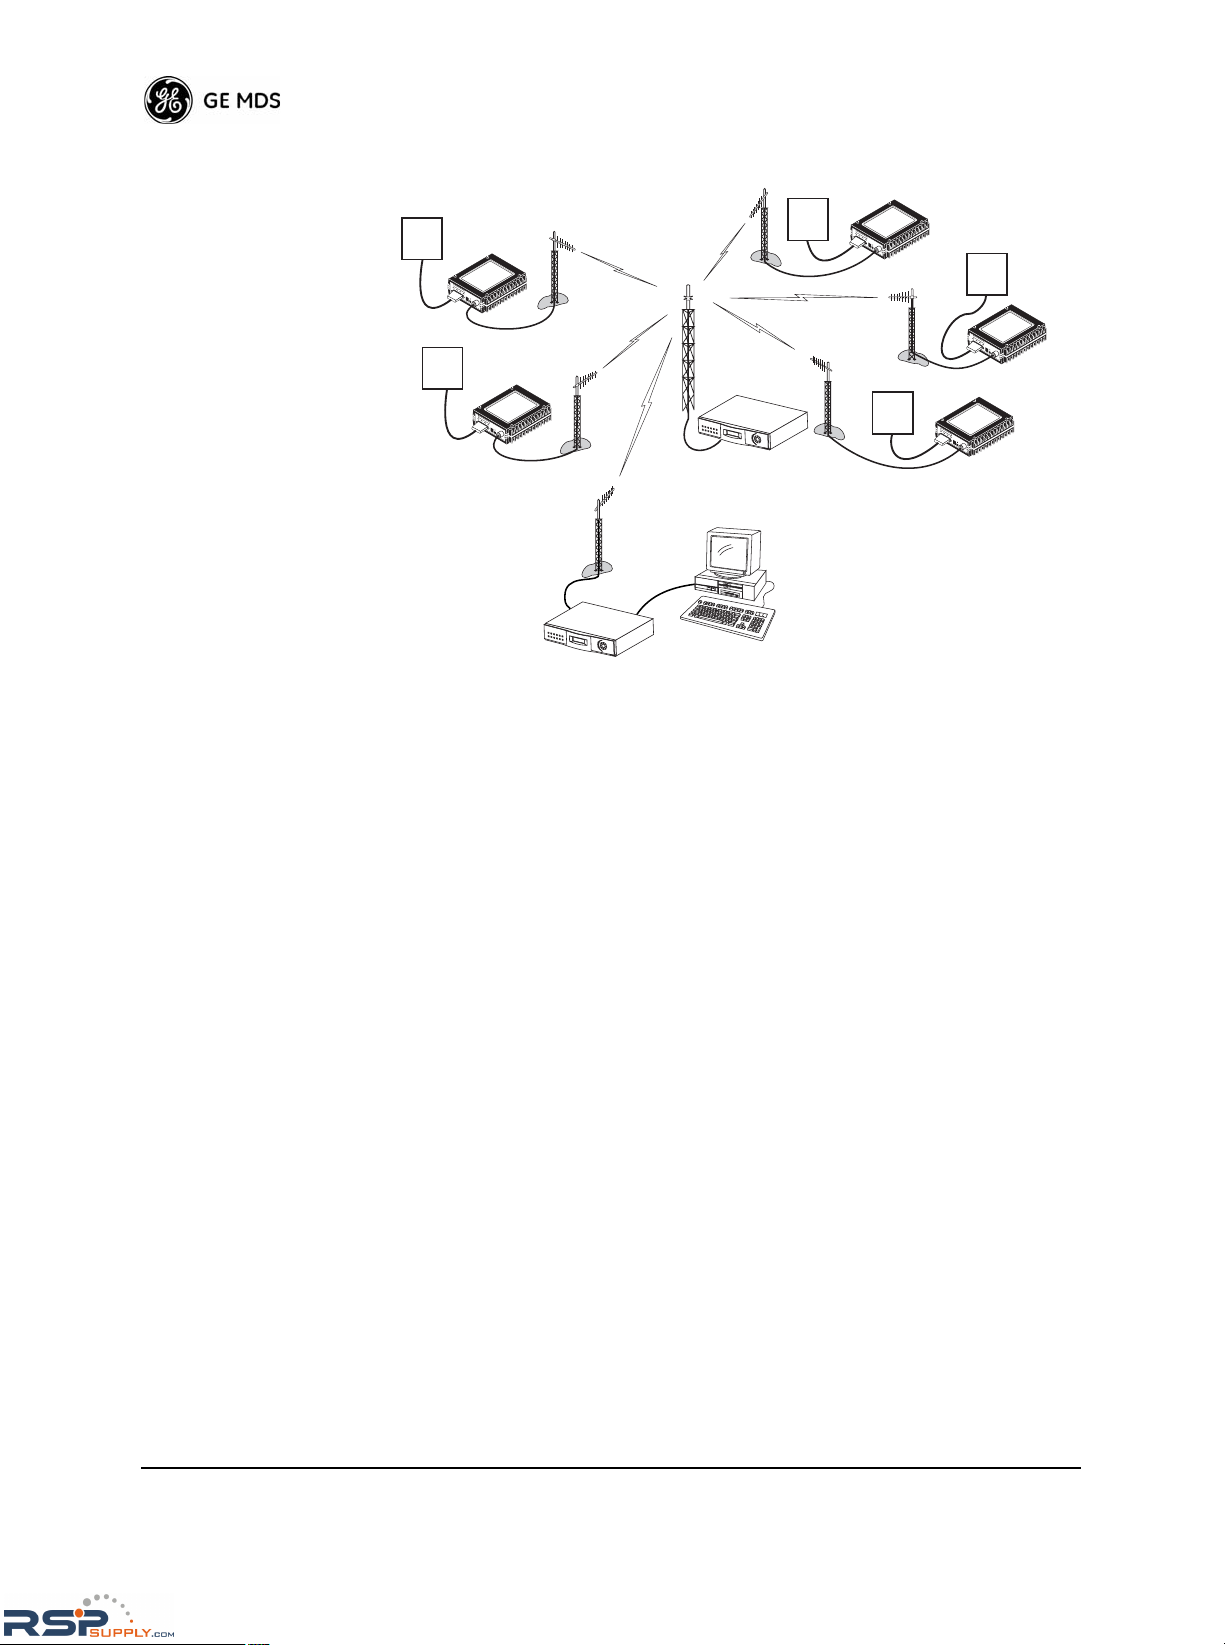
Repeater and Polling Remote Operation
A MAS system using repeater and polling remote radios is shown in
Figure 3 on Page 4. Notice that the polling remote radio operates in
half-duplex mode and the repeater operates in full-duplex mode. Configuring the radio for repeater operation is as simple as typing REPEATER
ON
with a PC connected to the rear panel diagnostic port. Refer to
“DIAGNOSTICS AND CONTROL” on Page 30 for details.
–
I
D
IA
G
13
.
8
VDC
P
W
R
+
–
HOST SYSTEM
REMOTE RADIO
SWC OFF
RTU
RTU
RTU
RTU
–
I
DI
A
G
1
3.8 V
D
C
PW
R
+
–
–
I
DI
AG
13.8
V
DC
P
WR
+
–
–
ID
I
AG
1
3
.8 VDC
P
W
R
+
–
–
I
D
IAG
13.8 V
D
C
PW
R
+
–
RTU
MDS MASTER
STA TION
CONTINUOUSLY
KEYED
REMOTE RADIO
SWC OFF
REMOTE RADIO
SWC OFF
REMOTE RADIO
SWC OFF
REMOTE RADIO
SWC OFF
RSPSupply - 1-888-532-2706 - www.RSPSupply.com
http://www.RSPSupply.com/p-8457-MDS-UP-9790X.aspx
4 MDS 4790/9790 Series I/O Guide MDS 05-3438A01, Rev. F
Figure 3. Typical Repeater and Polling-Remote Network
Simplex and Switched Carrier Operation
System-wide simplex operation is achieved by switching the master station carrier on to transmit, then off to receive. The same frequency is
used for both transmit and receive.
Switched carrier, half-duplex mode works in the same way, except dif-
ferent frequencies are used for transmit and receive.
2.4 Features
Reliability is a hallmark of the MDS 4790/9790 design. The radio
employs a one-piece transceiver board which minimizes RF losses and
eliminates the need for inter-board cabling. This also allows easy
plug-in replacement if servicing is necessary.
In addition, the optional redundant version of the radio includes redundant transceiver boards and power supply modules that automatically
activate if a failure in either of the transceiver boards or power supplies
occurs. This ensures continued operation in the event of most transceiver board failures.
The following list highlights many of the radio’s key features. For a full
listing of specifications, refer to Section 10.1, Technical Specifications,
beginning on Page 97.
–
I
DIAG
13.
8
VD
C
PWR
+
–
HOST SYSTEM
REMOTE RADIO
RTU
RTU
RTU
RTU
–
IDIAG
13
.8 VDC
PWR
+
–
–
IDI
A
G
1
3
.
8
V
D
C
P
W
R
+
–
–
I
DIAG
13.8
V
D
C
P
WR
+ –
–
I
D
IA
G
13.
8 VD
C
PWR
+
–
RTU
CONTINUOUSLY
KEYED
REMOTE RADIO
REMOTE RADIO
REMOTE RADIO
REMOTE RADIO
POLLING REMOTE
REPEATER
HALF-DUPLEX
SWITCHED CARRIER
TX HIGH
RX LOW
TX LOW
RX HIGH
TX LOW
RX HIGH
TX LOW
RX HIG
H
TX LOW
RX HIGH
TX LOW
RX HIGH
TX LOW
RX HIGH
RSPSupply - 1-888-532-2706 - www.RSPSupply.com
http://www.RSPSupply.com/p-8457-MDS-UP-9790X.aspx

MDS 05-3438A01, Rev. F MDS 4790/9790 Series I/O Guide 5
• Primary power options for: 15, 24, 48, or 125
volt DC and 115/230 volts AC sources.
• Configuration, control, and diagnostics from the front panel display or a connected PC.
• Remote diagnostics using a connected PC and radio software.
• Time stamping of alarms and major events.
• Flexible mounting (rack or tabletop); front panel can be (optionally) mounted separately from the radio chassis.
2.5 Accessories
You can use the radio with one or more of the accessories listed in
Table 1. Contact the factory for ordering information.
Table 1. Radio Accessories
Option Description Part No.
Diagnostics and
Control Software
PC-based software for control, diagnostics,
and software upgrades of the radio.
03-3533A01
Diagnostic and
Control Interface
Cable
Allows connection of a PC to the radio for
control and diagnostics (DB-9 to DB-9).
03-2198A17
Front Panel Rack
Mounting Kit
Allows rear-rack mounting of the detachable
front panel. Used in installations where all
controls and indicators must be accessible
from the rear of the radio.
03-3228A01
Orderwire Handset Allows orderwire communications with other
stations in the network.
12-1307A01
Cavity Filter Kit
(For MDS 9790x)
Removes or attenuates interfering 900 MHz
signals from the receiver input. Might be
necessary in areas with high powered
stations nearby, such as paging transmitters.
Available for use with an internal or external
duplexer.
03-3621Axx
RF Combiner
Panel, 9/24 MHz
splits
(MDS 9790x only)
Combines the outputs from two master
stations into one antenna. Designed for
installations where one master uses a 9 MHz
split and the other uses a 24 MHz split.
03-3665Axx
VOX Board Voice-activated transmit board that keys the
transmitter when an audio signal is present
on the radio’s audio input pin.
03-1098A02
Lightning
Protectors
Polyphaser Surge Protector, IS-50NX-C2,
DC blocked, 125 MHz to 1000 MHz, N
female connectors, surface (flange) mount
Polyphaser Surge Protector, IS-B50LN-C2,
DC blocked, 125 MHz to 1000 MHz, N
female connectors, bulkhead mount
97-1680A01
97-1680A05
Redundant Radio
Upgrade Kit
Adds an additional transceiver board and
power supply to a single-radio chas sis.
Operating frequency must be specified when
ordering.
Consult
Factory
RSPSupply - 1-888-532-2706 - www.RSPSupply.com
http://www.RSPSupply.com/p-8457-MDS-UP-9790X.aspx
6 MDS 4790/9790 Series I/O Guide MDS 05-3438A01, Rev. F
2.6 Model Number Codes
The radio model number is printed on the serial number label, which is
affixed to the radio chassis. The alpha-numeric string describes the
unit’s hardware and software configuration as it was shipped from the
factory. This model number is an important reference when speaking
with, or writing to, the factory for assistance.
3.0 INSTALLATION PLANNING
The installation of the radio is not difficult, but it does require some
planning to ensure reliability and efficiency. This section provides tips
for selecting an appropriate site, choosing antennas and feedlines, and
minimizing the chance of interference. Review this material before
beginning equipment installation.
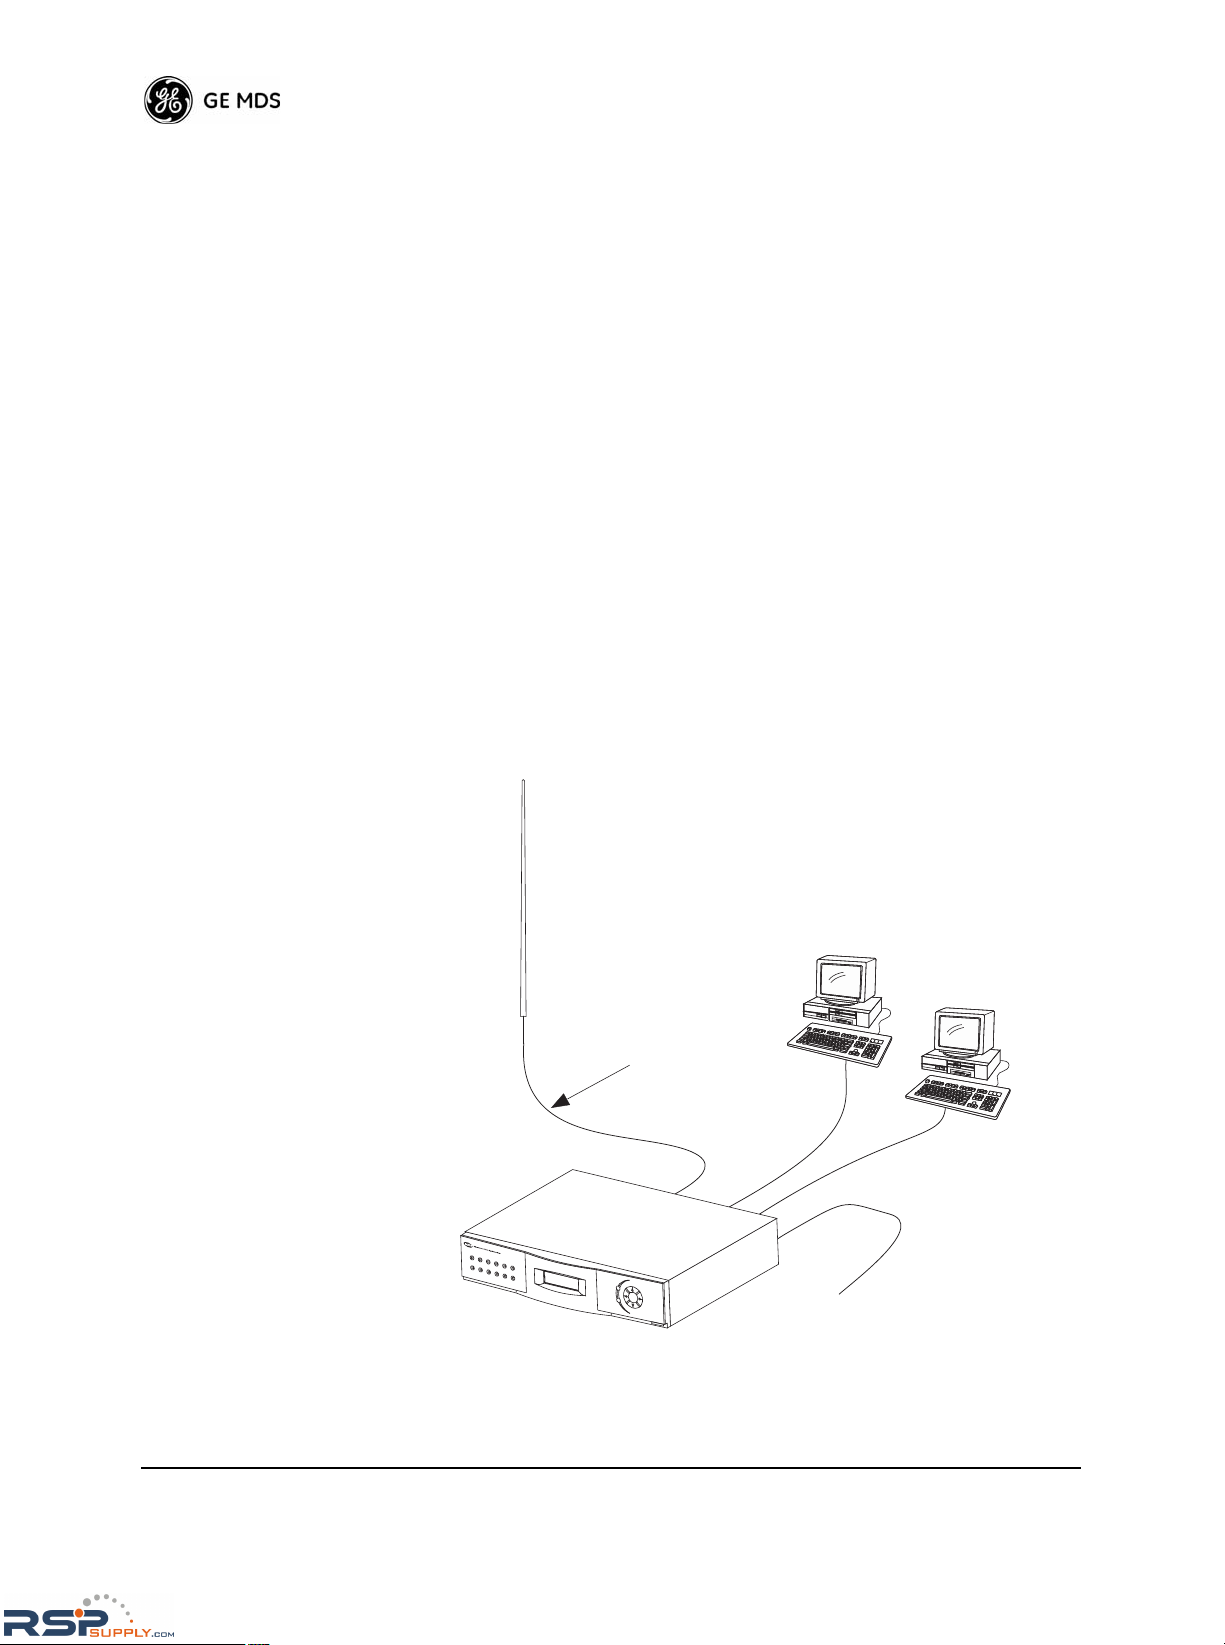
3.1 General Requirements
There are three main requirements for installing the radio—adequate
and stable primary power, a good antenna system, and the correct interface between the radio and the data device. Figure 4 shows a typical station arrangement.
Invisible place holder
Figure 4. Typical Station Arrangement
TO INPUT
POWER SOURCE
LOW LOSS
COAXIAL CABLE
OMNIDIRECTIONAL
ANTENNA
HOST COMPUTER
DIAGNOSTICS
COMPUTER
ENTER
ESCAPE
ACTIVE
ACTIVE
STBY
ALARM
RX ALR
TX ALR
STBY
ALARM
RX ALR
TX ALR
LINE
LINE
RSPSupply - 1-888-532-2706 - www.RSPSupply.com
http://www.RSPSupply.com/p-8457-MDS-UP-9790X.aspx

MDS 05-3438A01, Rev. F MDS 4790/9790 Series I/O Guide 7
Site Selection
For a successful installation, carefully select the site for the master station and the remote radios. Suitable sites offer:
• An antenna location that provides an unobstructed path to all the
remote radios in the system
• A source of adequate and stable primary power
• Suitable entrances for antenna, interface, or other required
cabling.
You can quickly determine these requirements in most cases. A possible
exception is the first item—verifying that an unobstructed transmission
path exists. UHF radio signals travel primarily by line-of-sight, and
obstructions between the sending and receiving stations affect system
performance.
If you are not familiar with the effects of terrain and other obstructions
on radio transmission, the following discussion provides helpful background.
Terrain and Signal Strength
A line-of-sight path between stations is highly desirable and provides
the most reliable communications link in all cases. You can often
achieve a line-of-sight path by mounting each station antenna on a tower
or other elevated structure that raises it high enough to clear surrounding
terrain and other obstructions.
The requirement for a clear transmission path depends on the distance
covered by the system. If the system covers only a limited distance, say
3.1 miles (5 km), then some obstructions in the transmission path might
be acceptable. For longer range systems, any obstruction might compromise the performance of the system, or block transmission entirely.
The signal strength at the receiver must exceed the sensitivity limit by
an amount known as the fade margin to provide reliable operation under
various conditions.
Section 10.2, RF Pr opagation Planning, beginning on Page 99 includes
a detailed discussion of path planning. Review this section before beginning an installation. Computer software is also available for this purpose
that greatly simplifies the steps involved in planning a path.
On-the-Air Test
If you’ve analyzed the proposed transmission path and feel that it is
acceptable, conduct an on-the-air test of the equipment and path. This
not only verifies the path study results, but allows you to see firsthand
the factors involved at each installation site.
RSPSupply - 1-888-532-2706 - www.RSPSupply.com
http://www.RSPSupply.com/p-8457-MDS-UP-9790X.aspx

8 MDS 4790/9790 Series I/O Guide MDS 05-3438A01, Rev. F
The test can be performed by installing a radio at each end of the proposed link and checking the RSSI value reported at the radio’s front
panel display (refer to “Front Panel Indicators” on Page 27). If you do
not obtain adequate signal strength, it might be necessary to mount the
station antennas higher, use higher gain antennas, or select a different
site for one or both stations.
To prepare the equipment for an on-the-air test, follow the general
installation and operation procedures given in this guide and become
familiar with the operating instructions provided in Section 5.0,
START-UP AND OPERATION, beginning on Page 26.
A Word About Interference
Interference is possible in any radio system. However, since the
MDS 4790/9790 Series is designed for use in a licensed system, interference is less likely because geographic location and existing operating
frequencies are taken into account when allocating frequencies.
The risk of interference can be further reduced through prudent system
design and configuration. Allow adequate separation between frequencies and radio systems.
Keep the following points in mind when setting up your radio system:
1. Systems installed in lightly populated areas are least likely to
encounter interference; those in urban and suburban environments
are more likely to be affected by other devices operating on nearby
frequencies.
2. Directional antennas should be used at the remote end of the link.
They confine the transmission and reception pattern to a narrow
beam, which minimizes interference to and from stations located
outside the pattern.
3. If interference is suspected from another system, it might be helpful
to use antenna polarization that is opposite to the interfering system’s antennas. An additional 20 dB (or more) of attenuation to
interference can be achieved by using opposite antenna polarization.
RSPSupply - 1-888-532-2706 - www.RSPSupply.com
http://www.RSPSupply.com/p-8457-MDS-UP-9790X.aspx
MDS 05-3438A01, Rev. F MDS 4790/9790 Series I/O Guide 9
3.2 Antenna and Feedline Selection
Antenna System
The antenna system is perhaps the most crucial part of the system
design. An antenna system that uses poor quality feedline, or is improperly aligned with the companion site, will result in poor performance or
no communication at all.
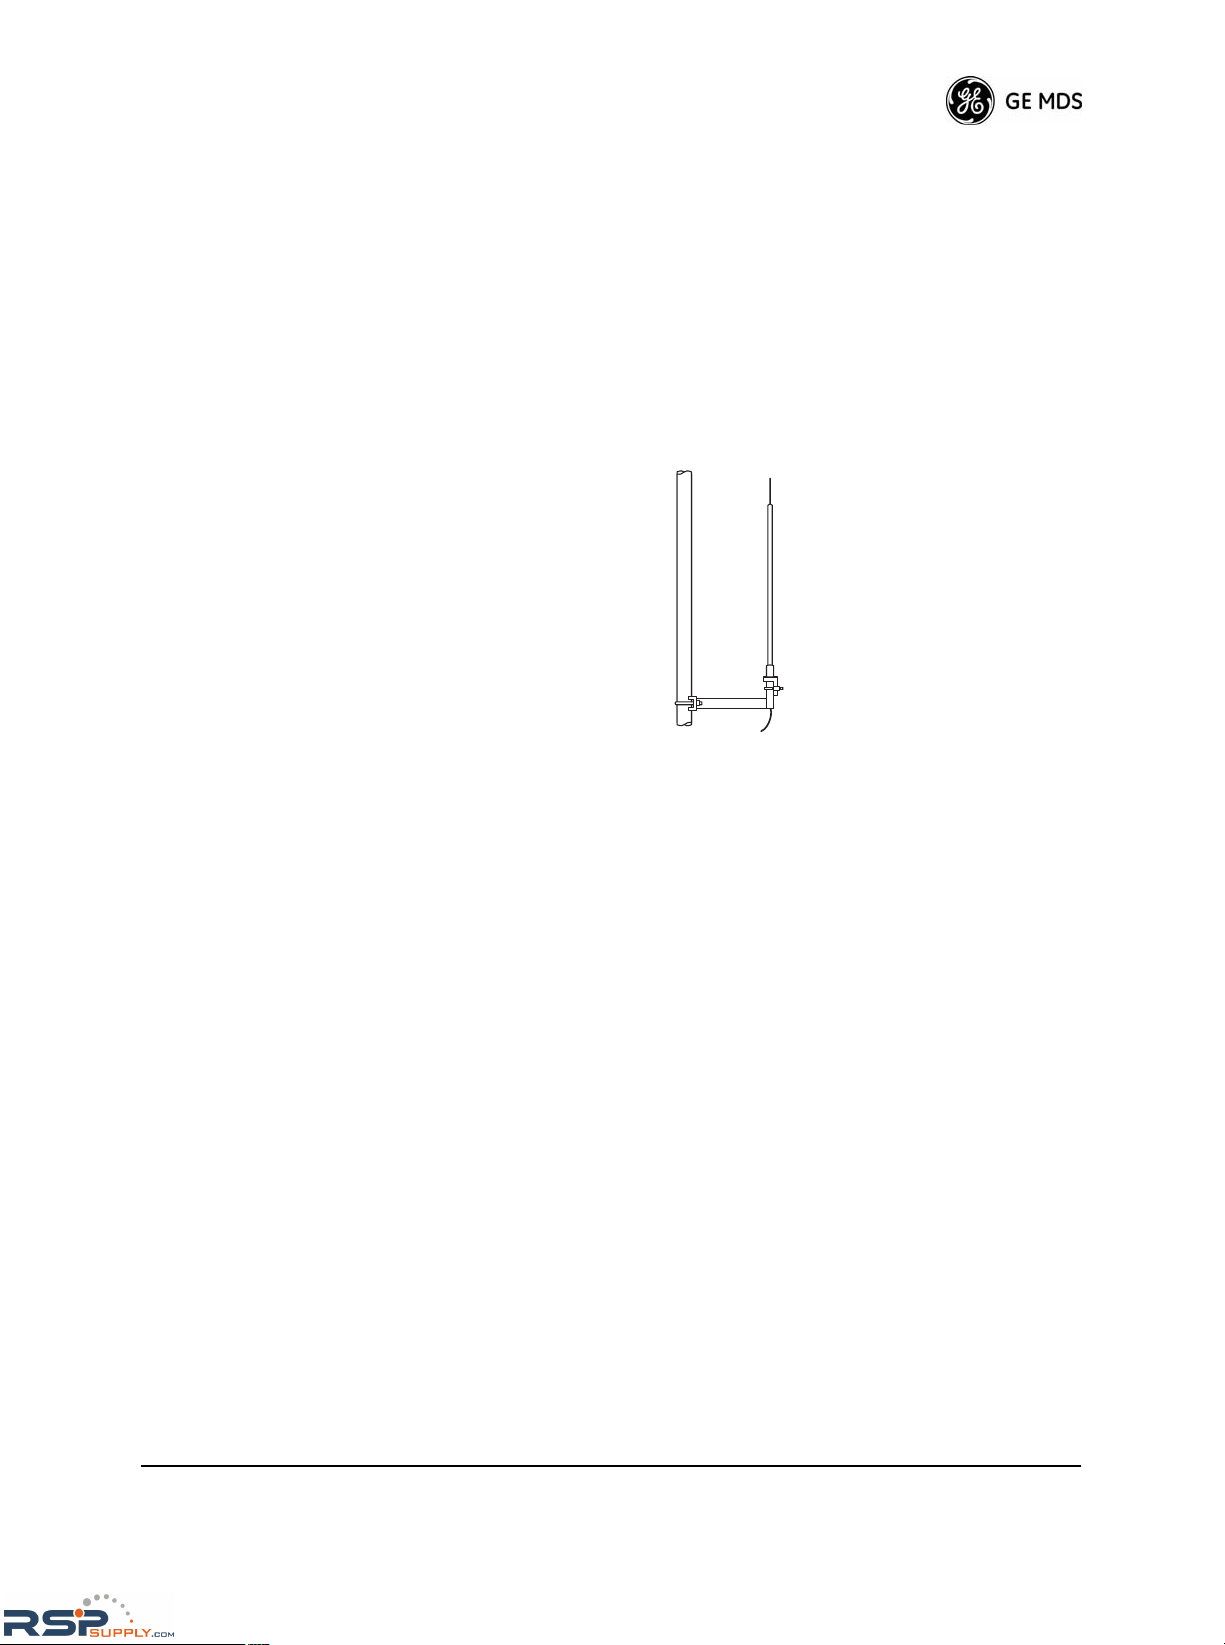
Generally speaking, an omni-directional antenna (Figure 5) is used at
the master station site. This type of antenna provides equal coverage to
all of the remote sites. At remote stations, directional antennas such as
Yagis, are typically used.
Figure 5. Typical Omnidirectional Antenna for Master Station
(Shown mounted to mast)
Feedline Selection
For maximum performance, use a good-quality feedline to connect the
radio to the antenna. For short-range transmission, or where short
lengths of cable are used (up to 8 meters [26 feet]), an inexpensive coax
cable such as Type RG-213 might be acceptable.
For example, 100 feet (30 meters) of RG-58A/U cable (commonly used
for frequencies below 100 MHz) has an insertion loss of 5 dB at
450 MHz. A 5 watt transmitter operating into such a feedline would produce only 1.6 watts at the antenna; a similar loss in receiver sensitivity
would result, and no amount of receiver gain can recover the signal lost
in the feedline.
Conversely, 100 feet (30 meter) of 1-5/8 inch cable has a loss of 0.52 dB
at the same frequency, but its cost is considerably higher than
RG-58A/U.
For systems covering short distances, feedline loss is relatively unimportant, and 6 dB or more of loss might be acceptable. For systems
designed for maximum range, however, each dB of loss directly affects
signal-to-noise ratio at the receiver. It is good practice to keep feedline
RSPSupply - 1-888-532-2706 - www.RSPSupply.com
http://www.RSPSupply.com/p-8457-MDS-UP-9790X.aspx

10 MDS 4790/9790 Series I/O Guide MDS 05-3438A01, Rev. F
losses as low as possible and certainly under 3 dB. Remember that for
each 3 dB of feedline loss, half the transmitter power is lost, and twice
the receive signal power is needed to produce the same signal-to-noise
ratio.
The RG-8A/U cable is a widely available and inexpensive feedline that
is suitable for systems with short ranges or those with short feedlines.
For longer feedlines and lower losses, Andrew HELIAX™ semi-rigid
coaxial cable or similar products are a good choice. Table 2 shows the
length of various types of cable and the resulting degradation in signal
strength.
Mount the antenna and feedline securely to the supporting structure to
avoid damage from wind and ice loading. Follow the instructions provided by the antenna and feedline manufacturers to ensure a safe and
reliable installation.
4.0 INSTALLATION PROCEDURES
This section presents the steps necessary for installing the radio and connecting it to associated equipment. After completing these steps, the
radio is ready for in-service operation.
Table 2. Feedline Loss Chart (450 MHz)
Cable Type
3.05 Meters
(10 Feet)
15.24 Meters
(50 Feet)
30.48 Meters
(100 Feet)
152.4 Meters
(500 Feet)
RG-8A/U 0.51 dB 2.53 dB 5.07 dB 25.35 dB
1/2 in. HELIAX 0.15 dB 0.76 dB 1.51 dB 7.55 dB
7/8 in. HELIAX 0.08 dB 0.42 dB 0.83 dB 4.15 dB
1-1/4 in. HELIAX 0.06 dB 0.31 dB 0.62 dB 3.10 dB
1-5/8 in. HELIAX 0.05 dB 0.26 dB 0.52 dB 2.60 dB
Table 3. Feedline Loss Chart (960 MHz)
Cable Type
3.05 Meters
(10 Feet)
15.24 Meters
(50 Feet)
30.48 Meters
(100 Feet)
152.4 Meters
(500 Feet)
RG-8A/U 0.85 dB 4.27 dB 8.54 dB 42.70 dB
1/2 in. HELIAX 0.23 dB 1.15 dB 2.29 dB 11.45 dB
7/8 in. HELIAX 0.13 dB 0.64 dB 1.28 dB 6.40 dB
1-1/4 in. HELIAX 0.10 dB 0.48 dB 0.95 dB 4.75 dB
1-5/8 in. HELIAX 0.08 dB 0.40 dB 0.80 dB 4.00 dB
RSPSupply - 1-888-532-2706 - www.RSPSupply.com
http://www.RSPSupply.com/p-8457-MDS-UP-9790X.aspx
MDS 05-3438A01, Rev. F MDS 4790/9790 Series I/O Guide 11
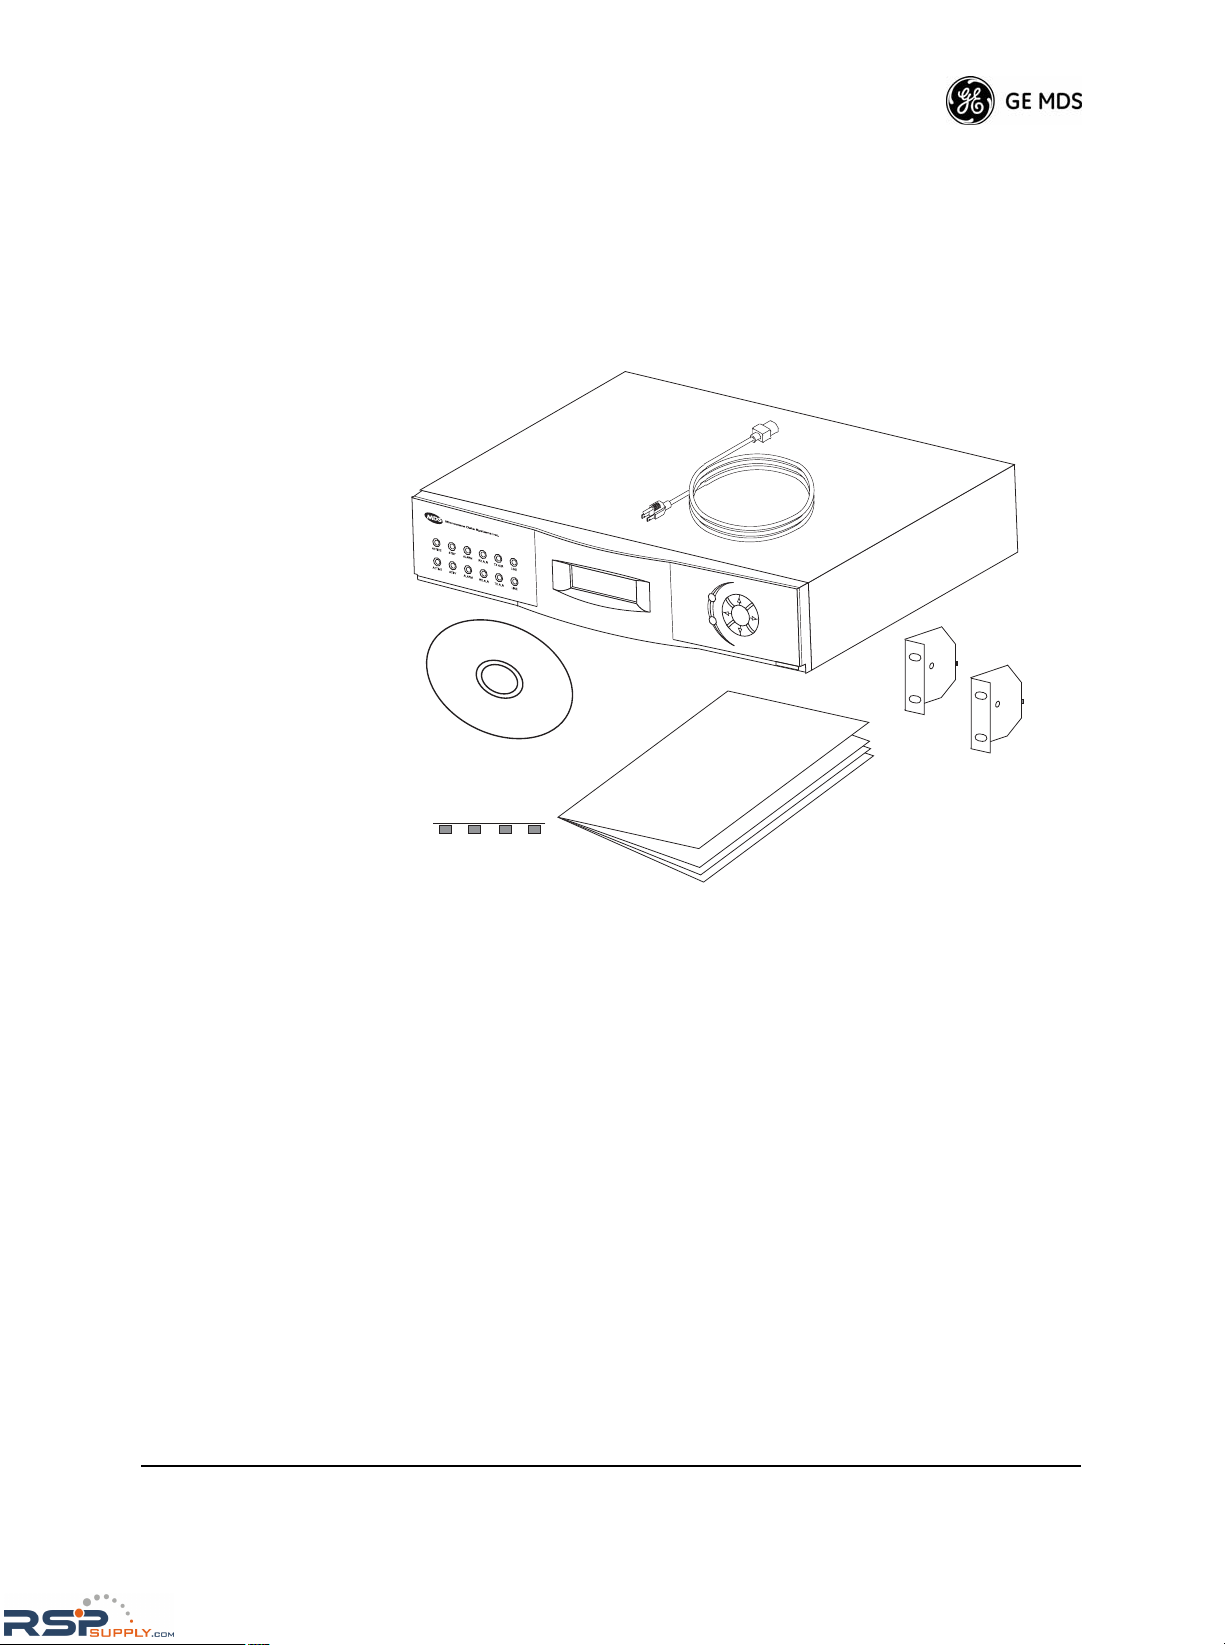
4.1 Unpacking and Inspection
Figure 6 shows a typical radio shipment. Check the contents against the
packing list secured to the outside of the shipping box. Accessories and
spare parts kits, if any, are wrapped separately. Inspect all items for
signs of damage. Save all packing materials in case you need to ship the
radio in the future.
Invisible place holder
Figure 6. Typical Shipment Contents
4.2 Mounting the Radio
Install the radio in a relatively clean, dust-free environment that allows
easy access to the rear panel connectors as well as the front panel controls and indicators. Air must pass freely over the heatsink on the rear
panel.
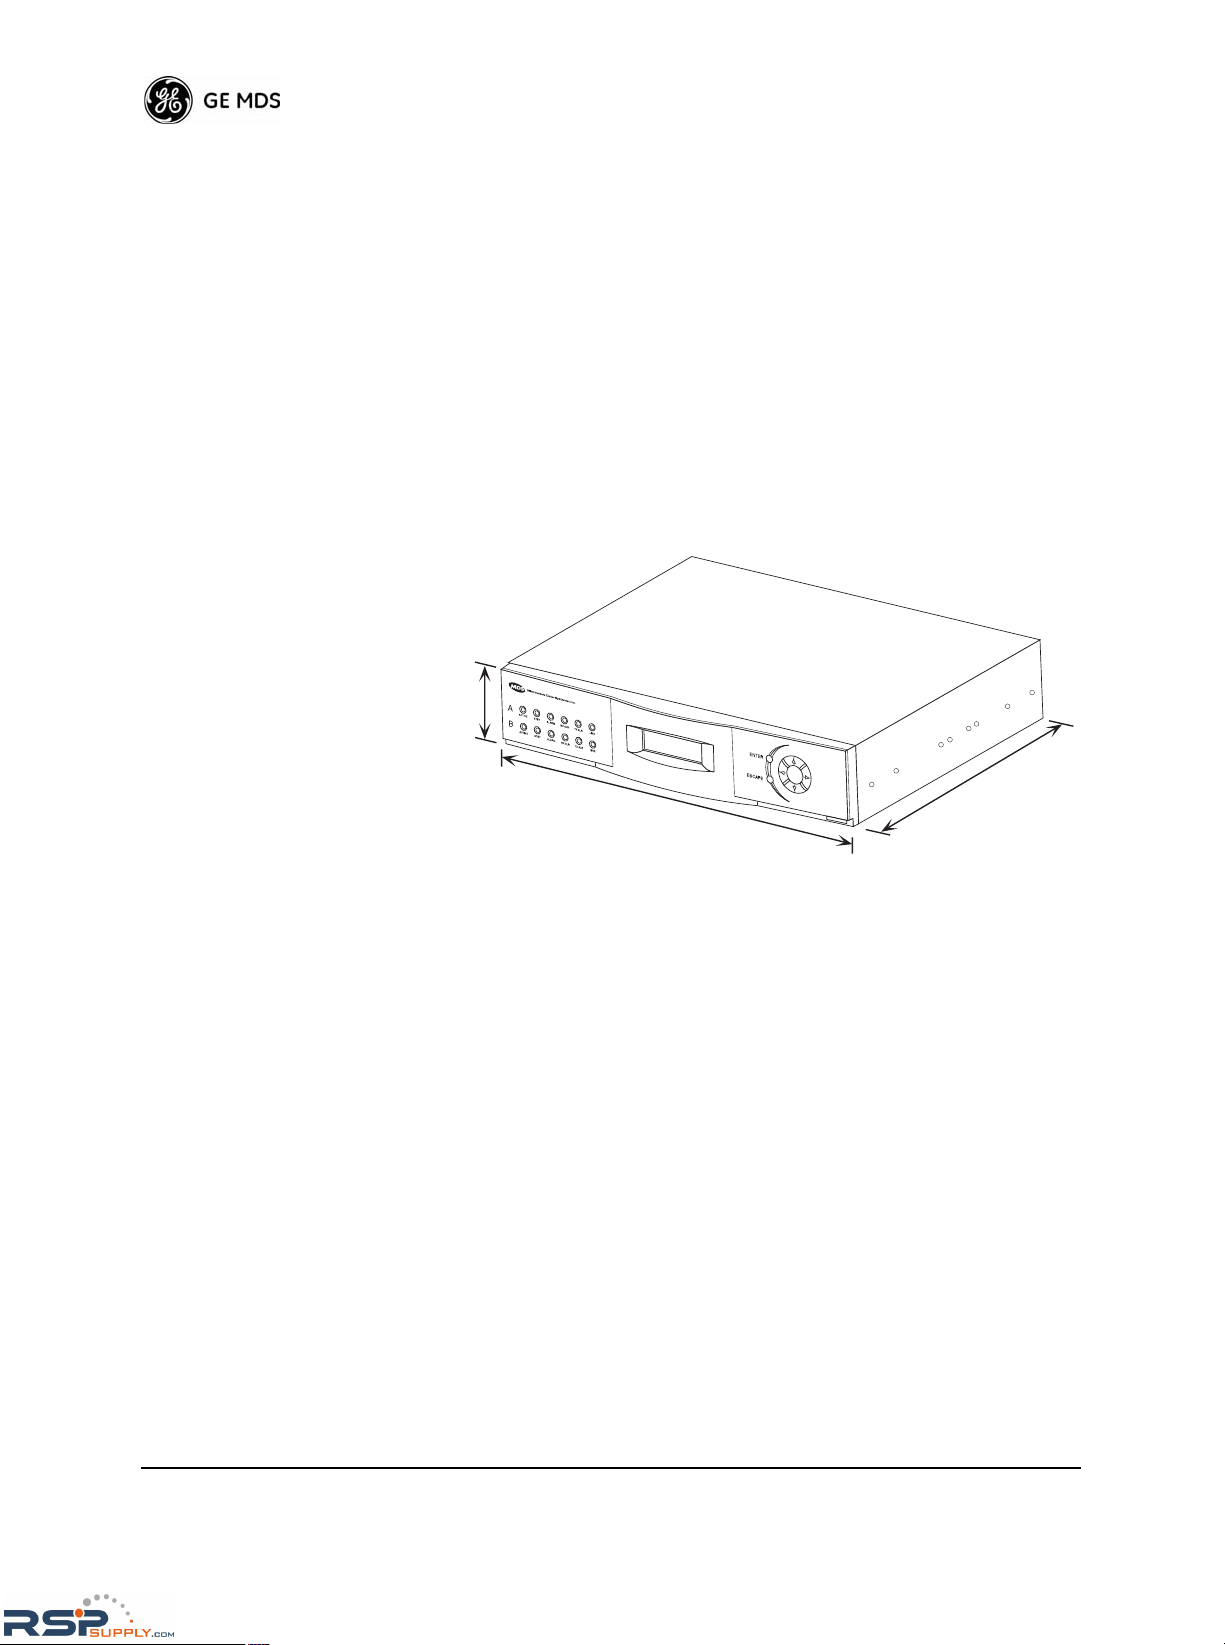
Figure 7 on Page 12 shows the mounting dimensions of the radio. Most
commonly, the radio is installed in a 2U/3.5 inch (88.90 mm)
rack-mount configuration, but you can also install it in a simple tabletop
arrangement if desired.
PC DIAGNOSTICS & CONTROL
CD-ROM (OPTIONAL)
RACK-MOUNT BRACKETS (2
)*
A
B
ESCAPE
ENTER
INSTALLATION
& OPERATION GUIDE
ADHESIVE FEET (4)*
(For tabletop mounting)
POWER CORD
(AC cord shown)
* These items may already be installe
d
on the radio chassis.
RSPSupply - 1-888-532-2706 - www.RSPSupply.com
http://www.RSPSupply.com/p-8457-MDS-UP-9790X.aspx
12 MDS 4790/9790 Series I/O Guide MDS 05-3438A01, Rev. F
Rack Mounting
To rack-mount the radio, use the supplied mounting brackets
(MDS P/N 82-3184A01) to secure the chassis to the rack cabinet.
Attach the brackets at any of four points on the sides of the enclosure—
front, back, middle facing front, and middle facing back (see Figure 7).
This flexibility ensures compatibility with most rack mounting arrangements.
Tabletop Mounting
You can place the radio on any sturdy shelf or tabletop that will support
its weight. Adhesive-backed rubber feet are provided with the radio for
use in tabletop installations. Place the feet under the chassis near each
corner to prevent scratching of the mounting surface.
Invisible place holder
Figure 7. Mounting Dimensions
Remote Front Panel Mounting—Optional Configuration
If desired, you can detach the front panel from the radio and mount it
separately from the radio chassis. This optional kit, MDS P/N
03-3228A01, is intended for rack-mount installations where all connections and control must be performed from the rear of the radio. The Auxiliary Mounting Plate (P/N 82-3189A01) is included in the kit.
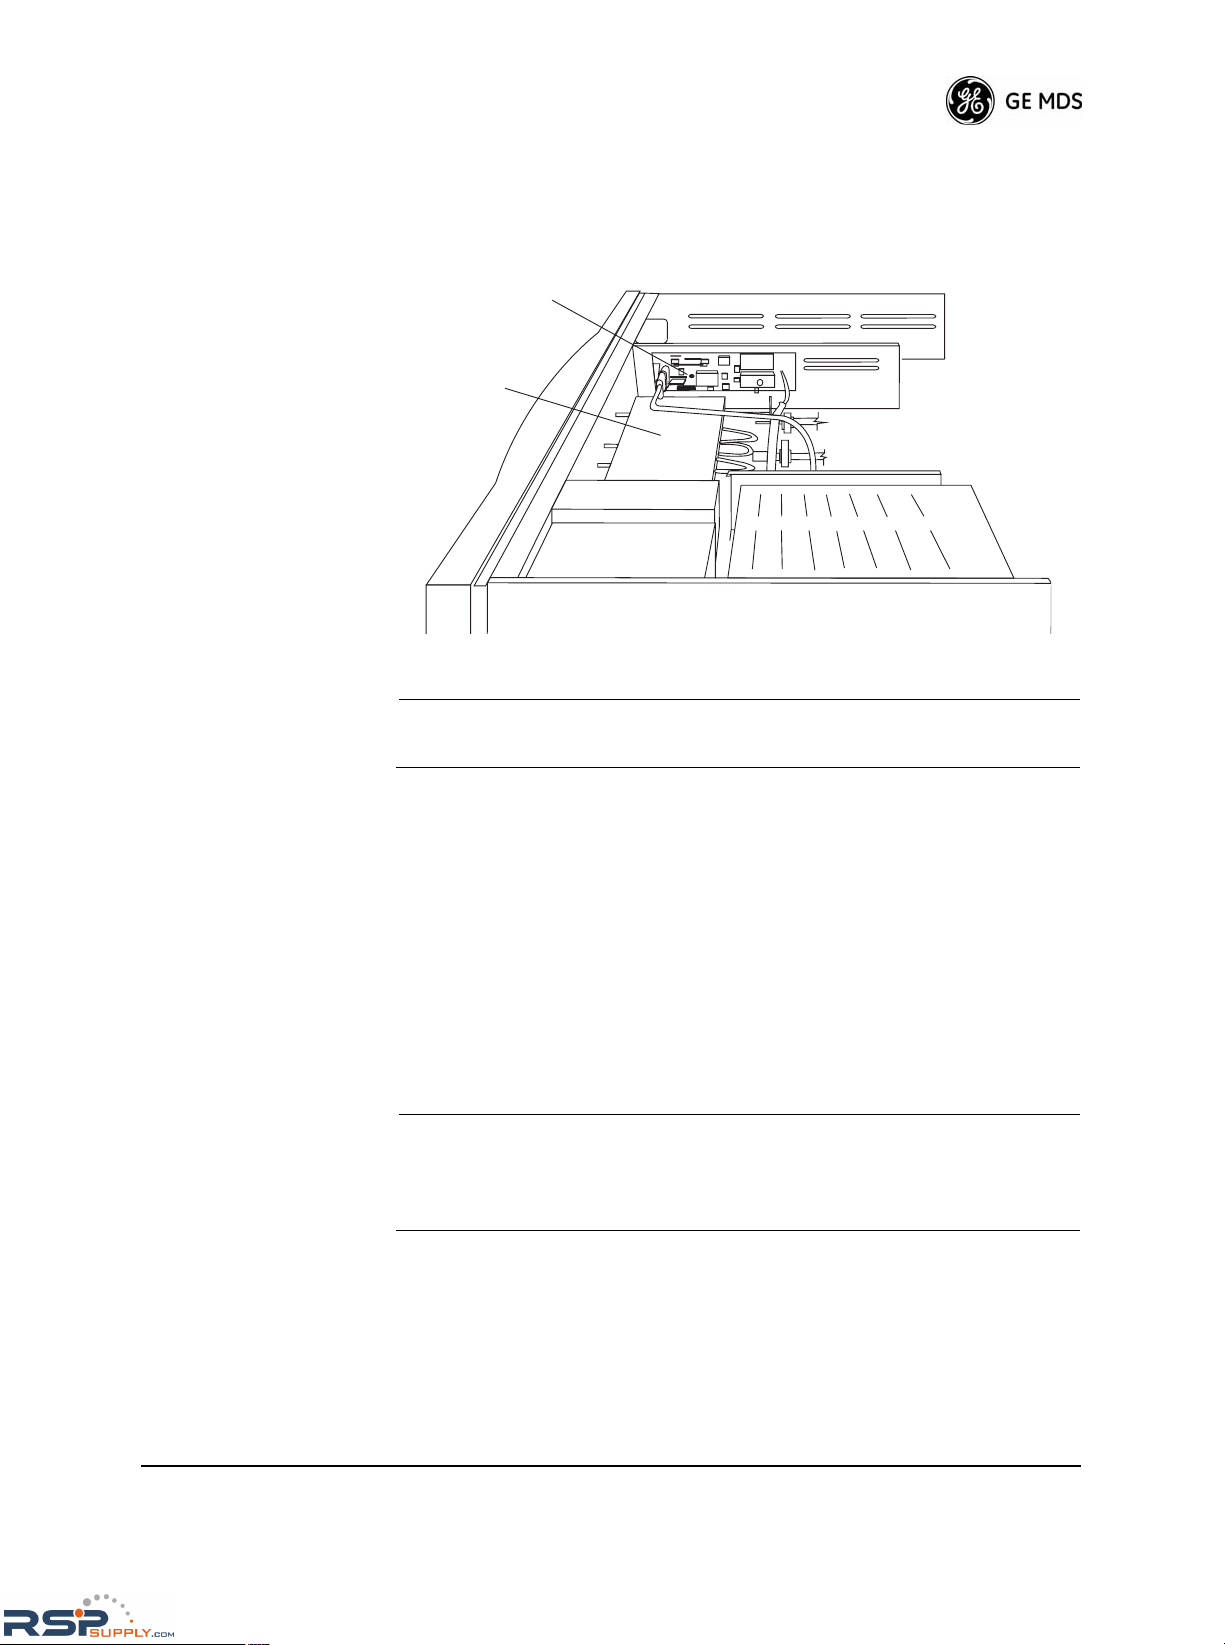
To remove the front panel from the radio and re-mount it to the Auxiliary Mounting Plate, follow these steps:
1. Detach the front panel from the radio by grasping it firmly along its
bottom edge and pulling away from the radio chassis (Figure 8 on
Page 13).
2. Release the modular RJ-11 connector and cable from the back of the
panel.
3
.5 inches
(
88.9 mm)
17.2 inches
(437 mm)
14.29 inches
(363 mm)
RSPSupply - 1-888-532-2706 - www.RSPSupply.com
http://www.RSPSupply.com/p-8457-MDS-UP-9790X.aspx

MDS 05-3438A01, Rev. F MDS 4790/9790 Series I/O Guide 13
3. Plug the RJ-11 connector into an in-line splice connector (P/N 73-1155A09).
4. Plug one end of the RJ-11 to RJ-11 extension cable into the in-line
splice connector and the other end into the front of the chassis at the
square cut-out.
Invisible place holder
Invisible place holder
Figure 8. Front Panel Removal
5. Snap the front panel onto the Auxiliary Mounting Plate in the same
way it was attached to the main radio chassis.
6. Mount the Auxiliary Mounting Plate to the rack cabinet at any convenient location within reach of the 7-foot cable (P/N 03-2198A04)
supplied in the kit.
7. Attach the extension cable between the front panel modular connector and the in-line splice connector on the radio chassis.
4.3 Primary Power
You can power the radio from a variety of standard AC and DC power
sources ranging between 15 and 125 Vdc, or 115/230 Vac. The nominal
input voltage is marked on the module at the rear of the radio or external
power supply unit. See “Technical Specifications” on Page 97 for allowable voltage ranges.
Before connecting a primary power source to the radio, verify
that the source voltage matches the power supply’s operating
range and type of service (AC or DC). Improper voltages
(continuous or transient) might damage the equipment.
A
CAUTION
POSSIBLE
EQUIPMENT
DAMAGE
RSPSupply - 1-888-532-2706 - www.RSPSupply.com
http://www.RSPSupply.com/p-8457-MDS-UP-9790X.aspx
14 MDS 4790/9790 Series I/O Guide MDS 05-3438A01, Rev. F
Redundant units have two identical internal or external power supplies
depending on the option chosen when the order was placed. Non-redundant units have only one internal or external power supply. The 15 Vdc
models have an interface panel and switch on the chassis, but no internal
supply.
AC-Powered Units
AC-powered radios are designed to operate from 115 to 230 Vac
(50-60 Hz). The supply automatically adjusts to match either standard
voltage. However, the supply voltage must be between 90 and 132 Vac,
or 180 to 264 Vac. Operation outside these two ranges might cause
damage to the power supply. A North American-style AC power cord is
supplied with these units. Figure 13 on Page 18 shows the AC power
supply module’s receptacle and switch. Table 4 provides details for the
AC power supply module’s replaceable fuse.
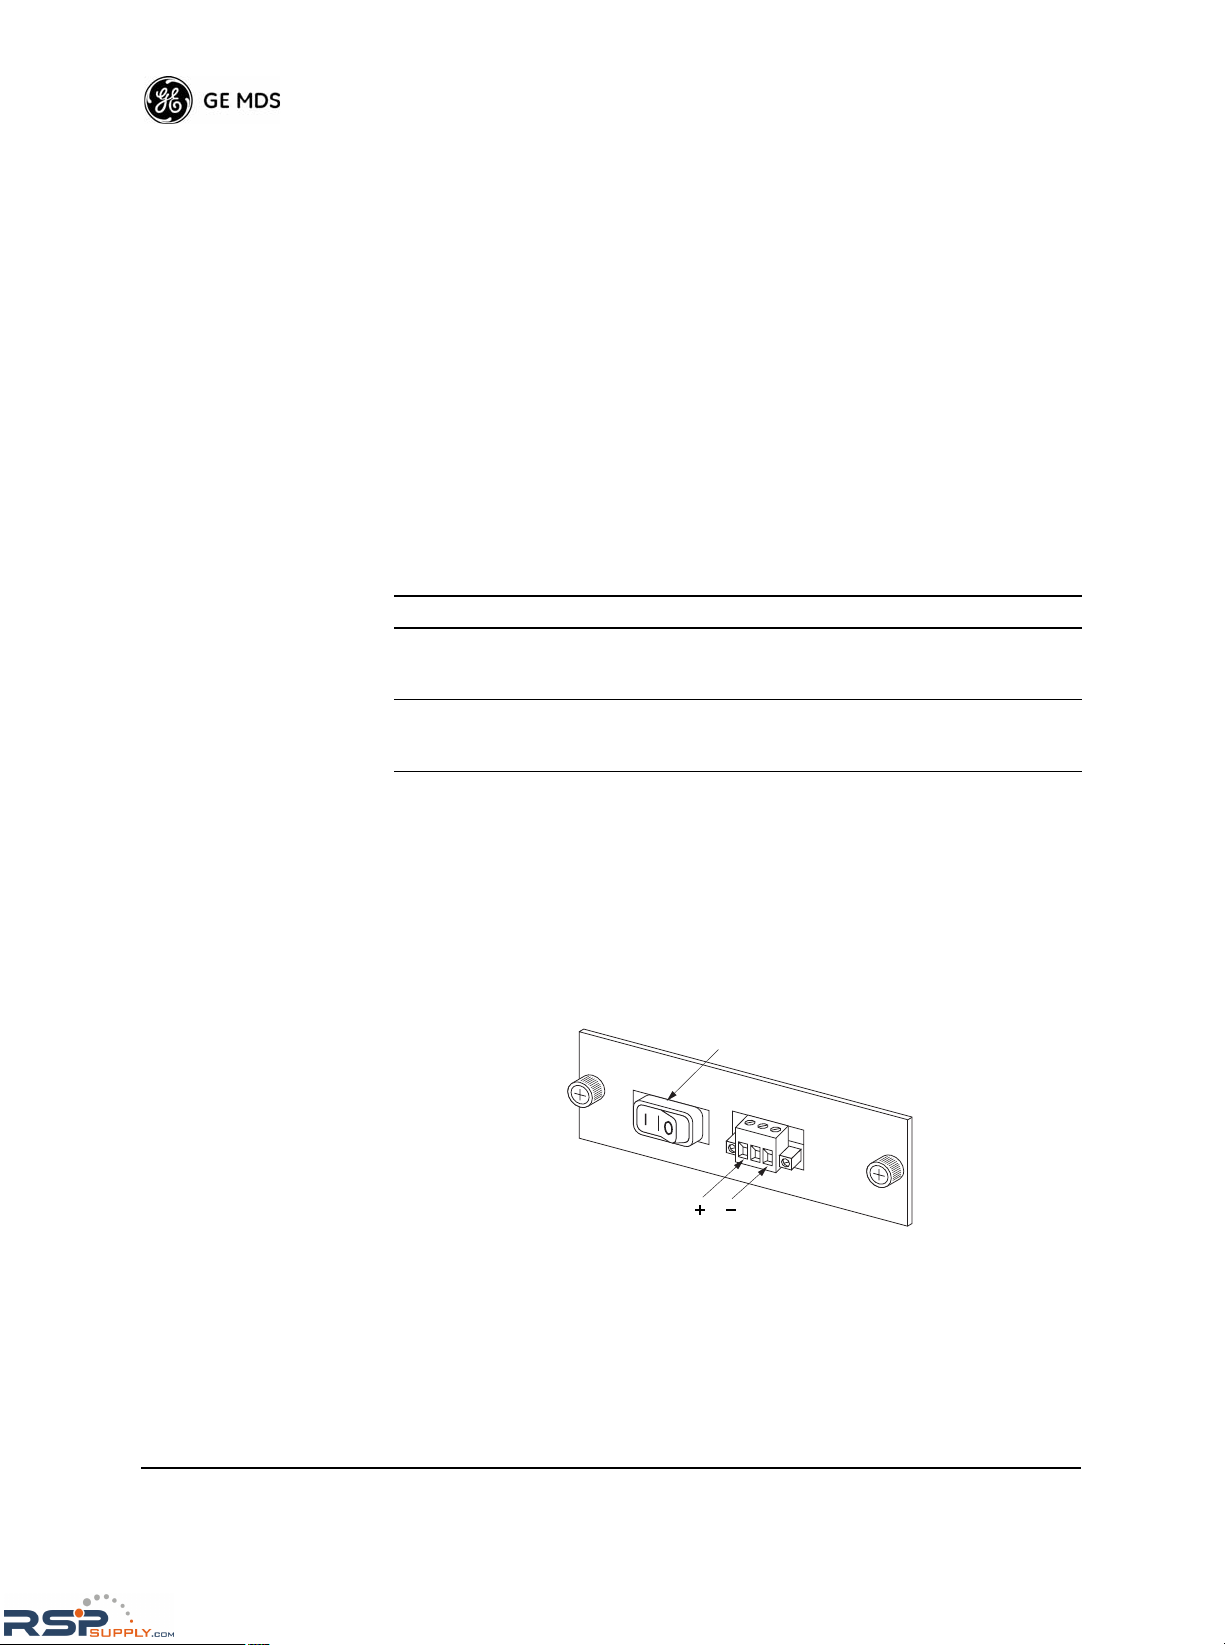
DC-Powered Units
Internal Units Figure 9 shows a rear view of in internal DC power supply. Connection
to the power supply is made with a three-conductor plug-in terminal
strip (Phoenix connector P/N 73-1194A22). The radio operates in either
a positive or negative-ground configuration. The center pin of the
chassis connector is not connected within the radio.
Invisible place holder
Figure 9. Rear View of Master Station, DC Power Input
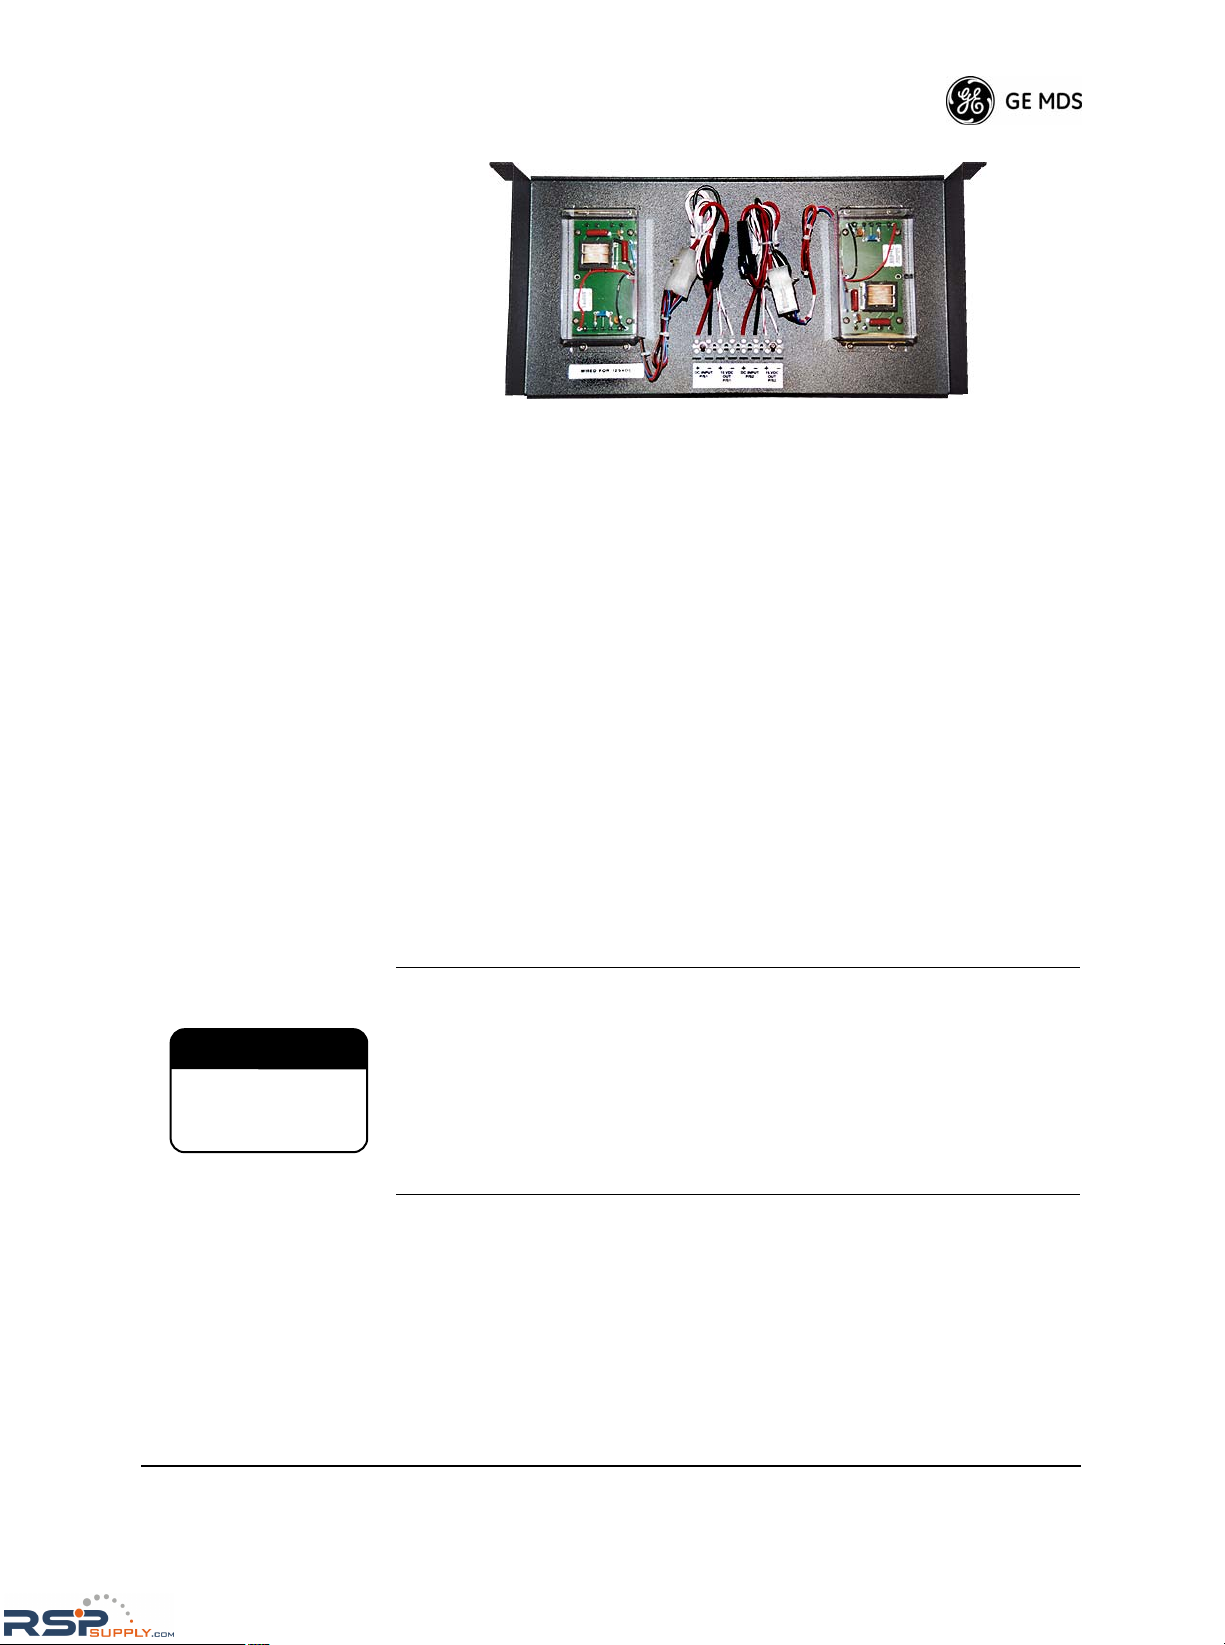
External Units
External DC-power supplies are available as an option (Figure 10 on
Page 15). Two DC-to-DC power inverters are provided on an open rack
shelf. Each inverter is protected from dust and debris by a clear plastic
cover.
Table 4. AC Power Supply Module Fuse
Part Description Part No.
Replaceable Fuse
on AC Power
Supply Module
Fuse, 5x20mm Glass 3.15A 250V 29-2130A06
Replaceable Fuse
on Battery Control
Assembly
Fuse, 3AG Fast .25x1.25 250V 1A 29-1064A06
ON/OFF SWITCH
DC POWER INPUT
RSPSupply - 1-888-532-2706 - www.RSPSupply.com
http://www.RSPSupply.com/p-8457-MDS-UP-9790X.aspx
MDS 05-3438A01, Rev. F MDS 4790/9790 Series I/O Guide 15
Invisible place holder
Figure 10. Typical Rack-Mounted External DC Power Supply
(with dual supplies)
4.4 Backup Battery
A single backup battery is normally installed in AC-powered master stations. To prevent battery discharge during shipment, the radio’s internal
Battery Backup switch is set to OFF at the factory. Set this switch to ON
during installation to activate the radio’s battery-backup feature.
Location of Battery Backup Switch
The BATTERY BACKUP control switch is located behind the front panel
to enable and disable the internal back-up battery. Access the switch by
removing the front panel (see Figure 11 on Page 16).
To remove the front panel, grasp it firmly along its bottom edge and pull
it away from the radio chassis (see Figure 8 on Page 13). Set the front
panel aside, using care not to damage the interconnecting cable.
In most cases, the radio begins transmitting as soon as power
is applied. Be sure that a proper load is attached to the radio’s
RF output connector before applying battery or mains power.
If AC power is disconnected, or the rear panel AC power
switches are set to OFF, the radio continues to operate on
battery power until the battery discharges (approximately
1 hour). When shipping or storing the radio, always set the
BATTERY BACKUP switch to OFF to prevent discharge.
CAUTION
POSSIBLE
EQUIPMENT
DAMAGE
RSPSupply - 1-888-532-2706 - www.RSPSupply.com
http://www.RSPSupply.com/p-8457-MDS-UP-9790X.aspx

16 MDS 4790/9790 Series I/O Guide MDS 05-3438A01, Rev. F
Invisible place holder
Figure 11. Battery Backup Switch Location
(Front Panel Removed)
Low-Voltage Disconnect Feature
The Low-Voltage Disconnect Assembly contains a low-voltage disconnect circuit. This circuit prevents damage caused when the backup battery drops below 10.65 volts, such as during an extended AC power
outage.
When the back-up battery voltage drops to 10.65 Volts (± 0.2 V), the
low-voltage disconnect circuit automatically disconnects the battery
from the radio. This stops operation of the radio and protects the battery
from potential damage. When AC power returns, the battery is automat-
ically connected to the power supply for re-charging, and the radio
resumes normal operation.
Battery Reset Switch (SW1/LVD PCB)
Normally, the operation of the Low-Voltage Disconnect Assembly is
fully-automatic. The only exception is when replacing a discharged battery with a charged battery when AC power is not present. In this case,
it is necessary to press the
BATTERY RESET SWITCH SW1 on the
OFF ON
RSPSupply - 1-888-532-2706 - www.RSPSupply.com
http://www.RSPSupply.com/p-8457-MDS-UP-9790X.aspx
MDS 05-3438A01, Rev. F MDS 4790/9790 Series I/O Guide 17
Low-Voltage Disconnect Assembly after installing the
new battery (see Figure 12). Use a pen or other pointed object to press
the switch. This enables the radio to operate until the new battery is discharged or the AC power is restored.
Figure 12. Location of Battery Reset Switch
NOTE: For replacement of a backup battery, refer to “Installation &
Removal of Backup Battery (P/N 28-1575Axx)” on Page 87.
4.5 Antenna Installation
Follow the antenna manufacturer’s instructions for proper installation of
the antenna. Using the proper mounting hardware and bracket ensures a
secure mounting arrangement with no pattern distortion or detuning of
the antenna.
Regardless of the antenna brand, mount the antenna as far away as possible from obstructions such as buildings, metal objects, and dense
foliage. Choose a location that provides a clear path in the direction of
the associated stations.
NOTE: Strong fields near the antenna can interfere with the operation
of low-level circuits and change the values of the received
data. For this reason, mount the antenna at least 10 feet
(3 meters) from the radio and other electronic equipment.
Feedline Installation
Use a low-loss feedline with the radio. See “Antenna and Feedline
Selection” on Page 9 for suggestions on choosing the correct feedline
for your installation. Whatever cable is used, keep it as short as possible
to minimize signal losses.
Battery Reset Switch
(See Text)
Duplexer
RSPSupply - 1-888-532-2706 - www.RSPSupply.com
http://www.RSPSupply.com/p-8457-MDS-UP-9790X.aspx
18 MDS 4790/9790 Series I/O Guide MDS 05-3438A01, Rev. F
When installing the feedline, do not kink, twist, or stretch the cable.
After installation, fasten the cable securely to the antenna tower or other
supporting structure.
A Type-N connector is required to connect the feedline to the radio.
Install the feedline connectors in accordance with the manufacturer’s
instructions. Follow the manufacturer’s recommendations for weatherproofing connectors that will be installed outdoors.
If large-diameter, semi-rigid coaxial cable is used for the feedline, insert
a short length of 1/4 inch Superflex
TM
Cable (MDS P/N 97-1677A28) or
other low-loss flexible cable between the radio and the feedline. This
flexible interface eliminates tight bends in the feedline and reduces
stresses on the feedline and connectors. The flexible section also allows
you to mount the radio slides, and to pull it out without stressing the
transmission line.
4.6 Interface Wiring Connections
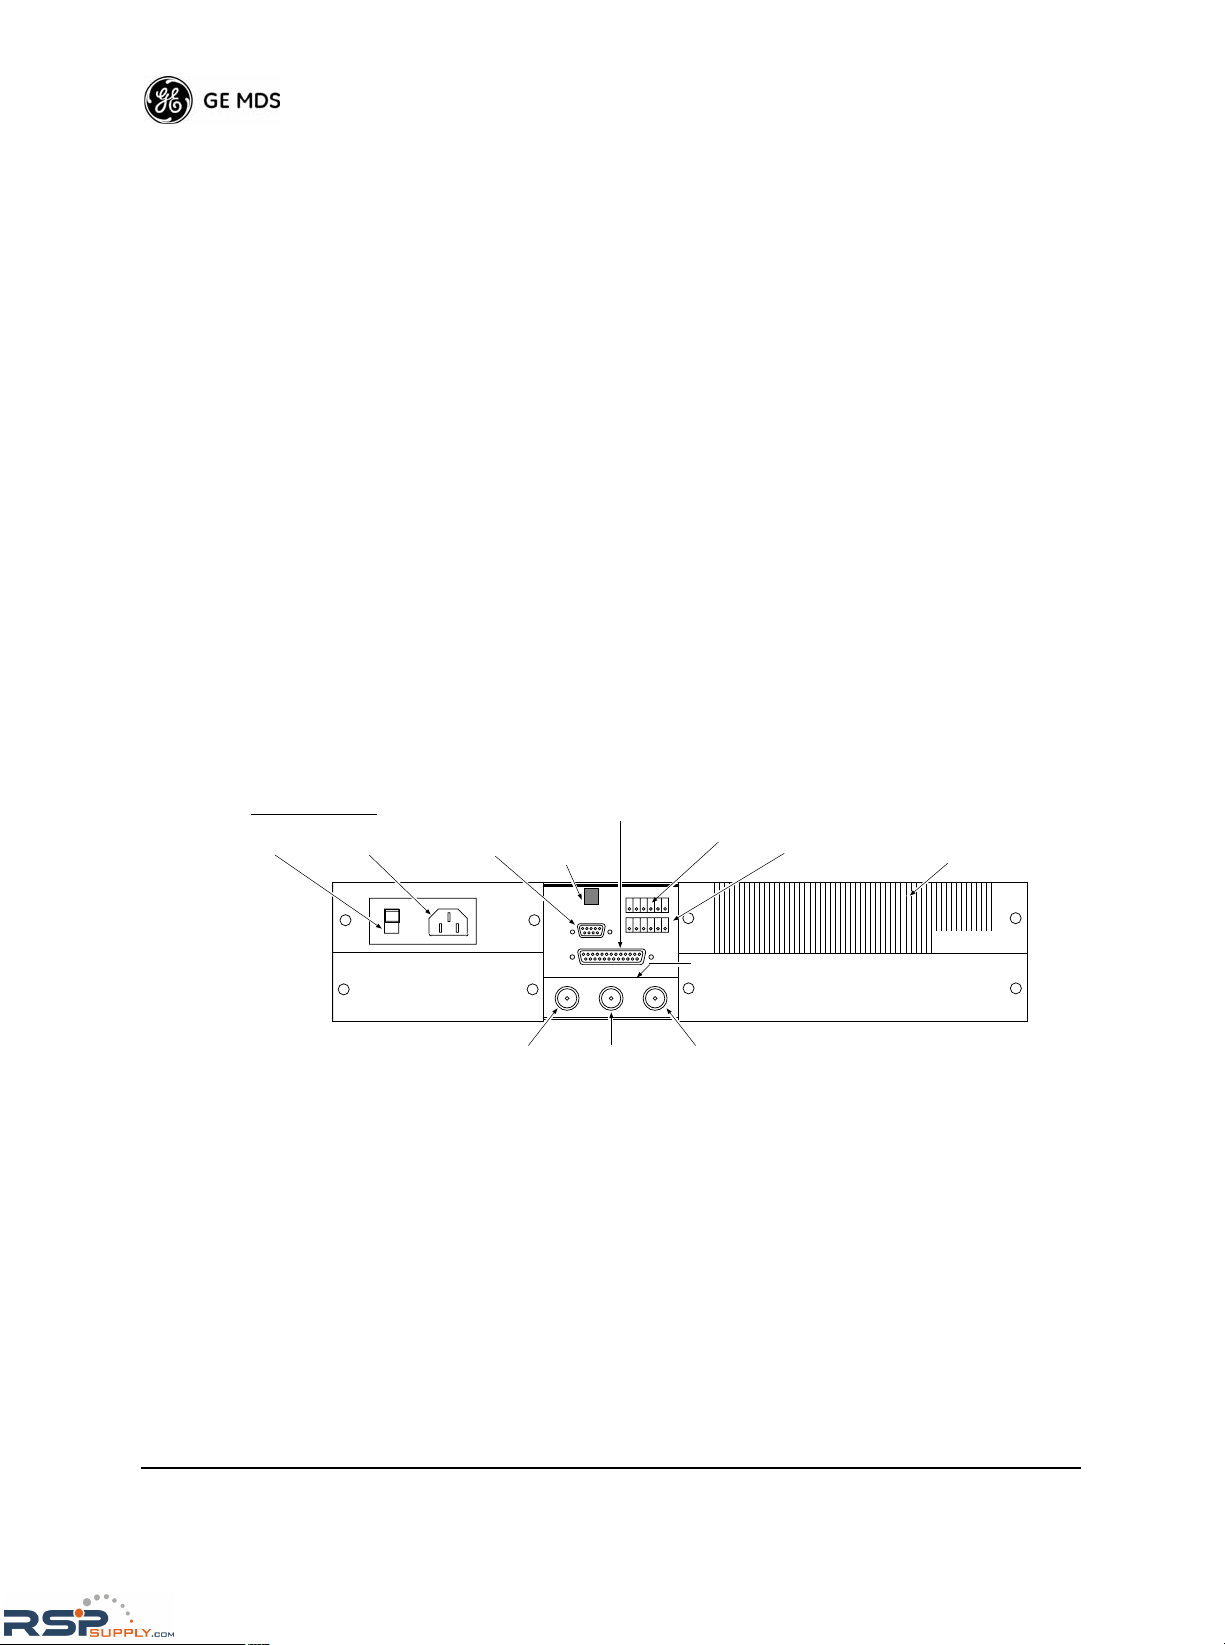
Make all connections to the master station at the rear panel (see
Figure 13). Refer to the following descriptions for specific information
on these connections.
Invisible place holder
Figure 13. Master Station Rear Panel
TX, Antenna, and RX Coaxial Connectors (Type-N)
These are for connection to the station antenna, or external equipment
such as a duplexer or cavity filter. The connectors present depend on
whether the radio was shipped for operation with these external devices.
Application # 1—
No External Devices
The most common arrangement of the master station is to connect
directly to the antenna system. In such cases, only the
ANT connector is
present and the other coaxial connector holes are plugged. Figure 14 on
Page 19 shows a direct antenna connection.
OPTIONAL POWER SUPPLY
(Redundant Models)
ADDITIONAL HEATSINK
(Redundant Models)
HEATSINK
RADIO A
RADIO B
J10 ALARM
J2
4-WIRE AUDIO
J9
RJ-11
ORDERWIRE
J1
DIAGNOSTICS
(DB-9)
Power Supply
POWER
ON/OFF
POWER
INPUT
TX*
J3
DATA
(DB-25)
RX*
ANT
Ground Lug
(Hidden)
* Present when external duplexer or
cavity filter is supplied. Otherwise, holes
are plugged. See text.
Present when internal duplexer is supplied
.
Otherwise, hole is plugged. See text.
†
†
RSPSupply - 1-888-532-2706 - www.RSPSupply.com
http://www.RSPSupply.com/p-8457-MDS-UP-9790X.aspx

MDS 05-3438A01, Rev. F MDS 4790/9790 Series I/O Guide 19
Invisible place holder
Figure 14. Antenna Connection with Internal Duplexer
(Most common arrangement)
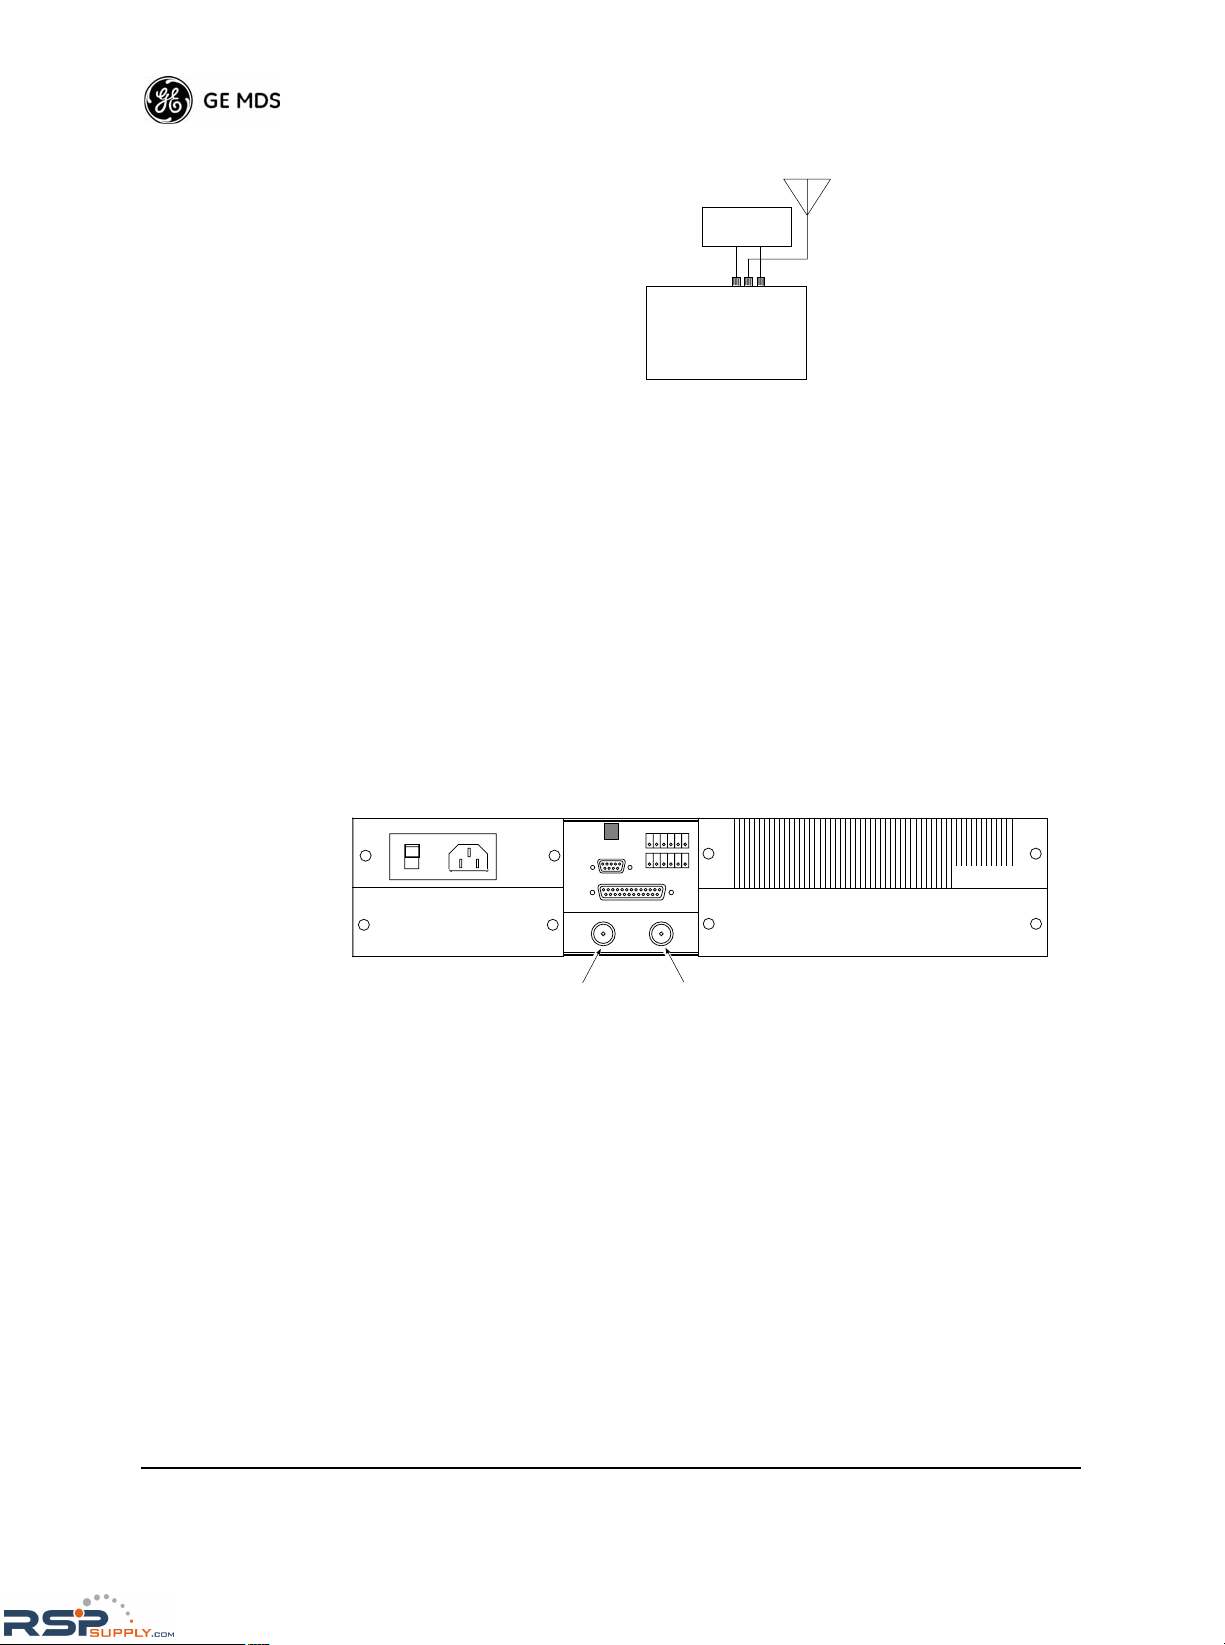
Application #2—
External Duplexer
This arrangement is used in systems where the duplexer is mounted
externally to the radio. The radio’s
TX and RX ports are the only connec-
tors present, and they connect to the duplexer as shown in Figure 15.
Contact the factory for duplexer ordering information.
Invisible place holder
Figure 15. Antenna Connection with External Duplexer
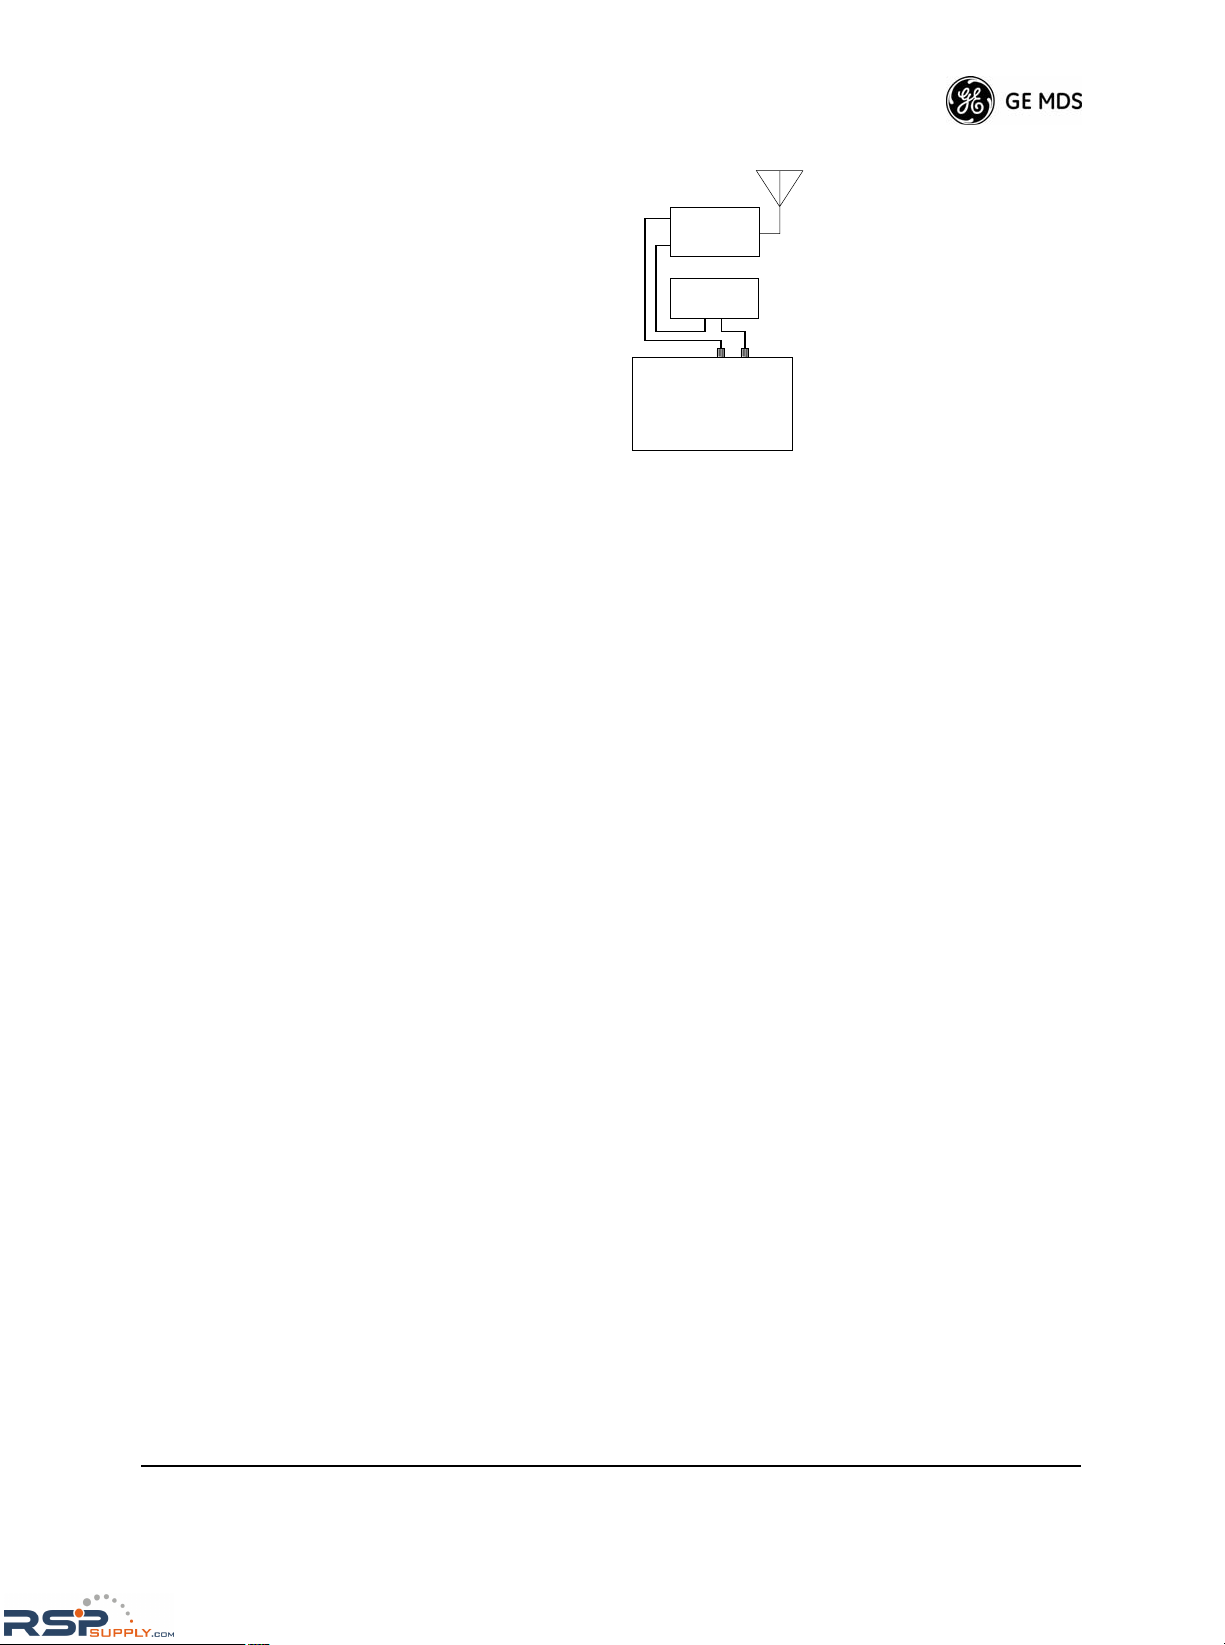
Application #3—
External Cavity Filter
In some areas, interference from strong signals such as paging transmitters might require using a cavity filter. A cavity filter is an externally-mounted device tuned to the frequency of an interfering signal. It
removes or greatly attenuates the unwanted signal before it is detected
by the master station receiver. Contact the factory for filter ordering
information.
Because the cavity filter must be installed inline between the master station receiver and the station antenna, the cabling arrangement in
Figure 16 on Page 20 is required.
ANT
Master Station
RX
Master Station
TX
Ext. Duplexer
RX TX
ANT
RSPSupply - 1-888-532-2706 - www.RSPSupply.com
http://www.RSPSupply.com/p-8457-MDS-UP-9790X.aspx
20 MDS 4790/9790 Series I/O Guide MDS 05-3438A01, Rev. F
Invisible place holder
Figure 16. Antenna Connection with External Cavity Filter
Application #4—
External Duplexer
and/or Cavity Filter
on units shipped
prior to June 1, 2000.
On units shipped prior to June 1, 2000, a maximum of two coaxial connectors are included on the rear panel. If only one connector is present,
it connects directly to the antenna as shown in Figure 14 on Page 19.
If the radio is equipped for use with an external duplexer, a second connector is included (Figure 17). In this case, the right connector acts as
the transmit output (to the duplexer), and the left connector acts as the
receive input (from the duplexer).
Figure 18 on Page 21 shows the required cable connections between the
radio and an external duplexer (and cavity filter, if required).
Invisible place holder
Figure 17. Coaxial Connectors for Older Radios
(For units intended to operate with an external duplexer)
RX
Master Station
TX
Cavity Filter
IN OUT
ANT
OPTIONAL POWER SUPPLY
(Redundant Models)
ADDITIONAL HEATSINK
(Redundant Models)
RADIO A
RADIO B
RX in (from Duplexer) TX out (to Duplexer)
This view applies only to units shipped prior to June 1, 2000
RSPSupply - 1-888-532-2706 - www.RSPSupply.com
http://www.RSPSupply.com/p-8457-MDS-UP-9790X.aspx
MDS 05-3438A01, Rev. F MDS 4790/9790 Series I/O Guide 21
Invisible place holder
Figure 18. RF Interconnections for Older Units
(For units intended to operate with
External Duplexer and/or Cavity Filter)
Ground Connection
A chassis grounding screw is located on the plate directly above the
coaxial connectors. Use this screw to connect the chassis to an Earth
(safety) ground, or other suitable grounding bus for the communications
system. The ground lead should be kept as short as possible.
Connect all rack equipment and associated hardware grounds to the
building’s ground system at the breaker panel for the primary power.
The objective is to create a single-point ground system.
Do not overlook providing a good ground connection for the equipment
attached to the DATA PORT to prevent damage.
Finally, use lightning protectors where the antenna transmission lines
enter the building; bond them to the tower ground, if it is nearby.
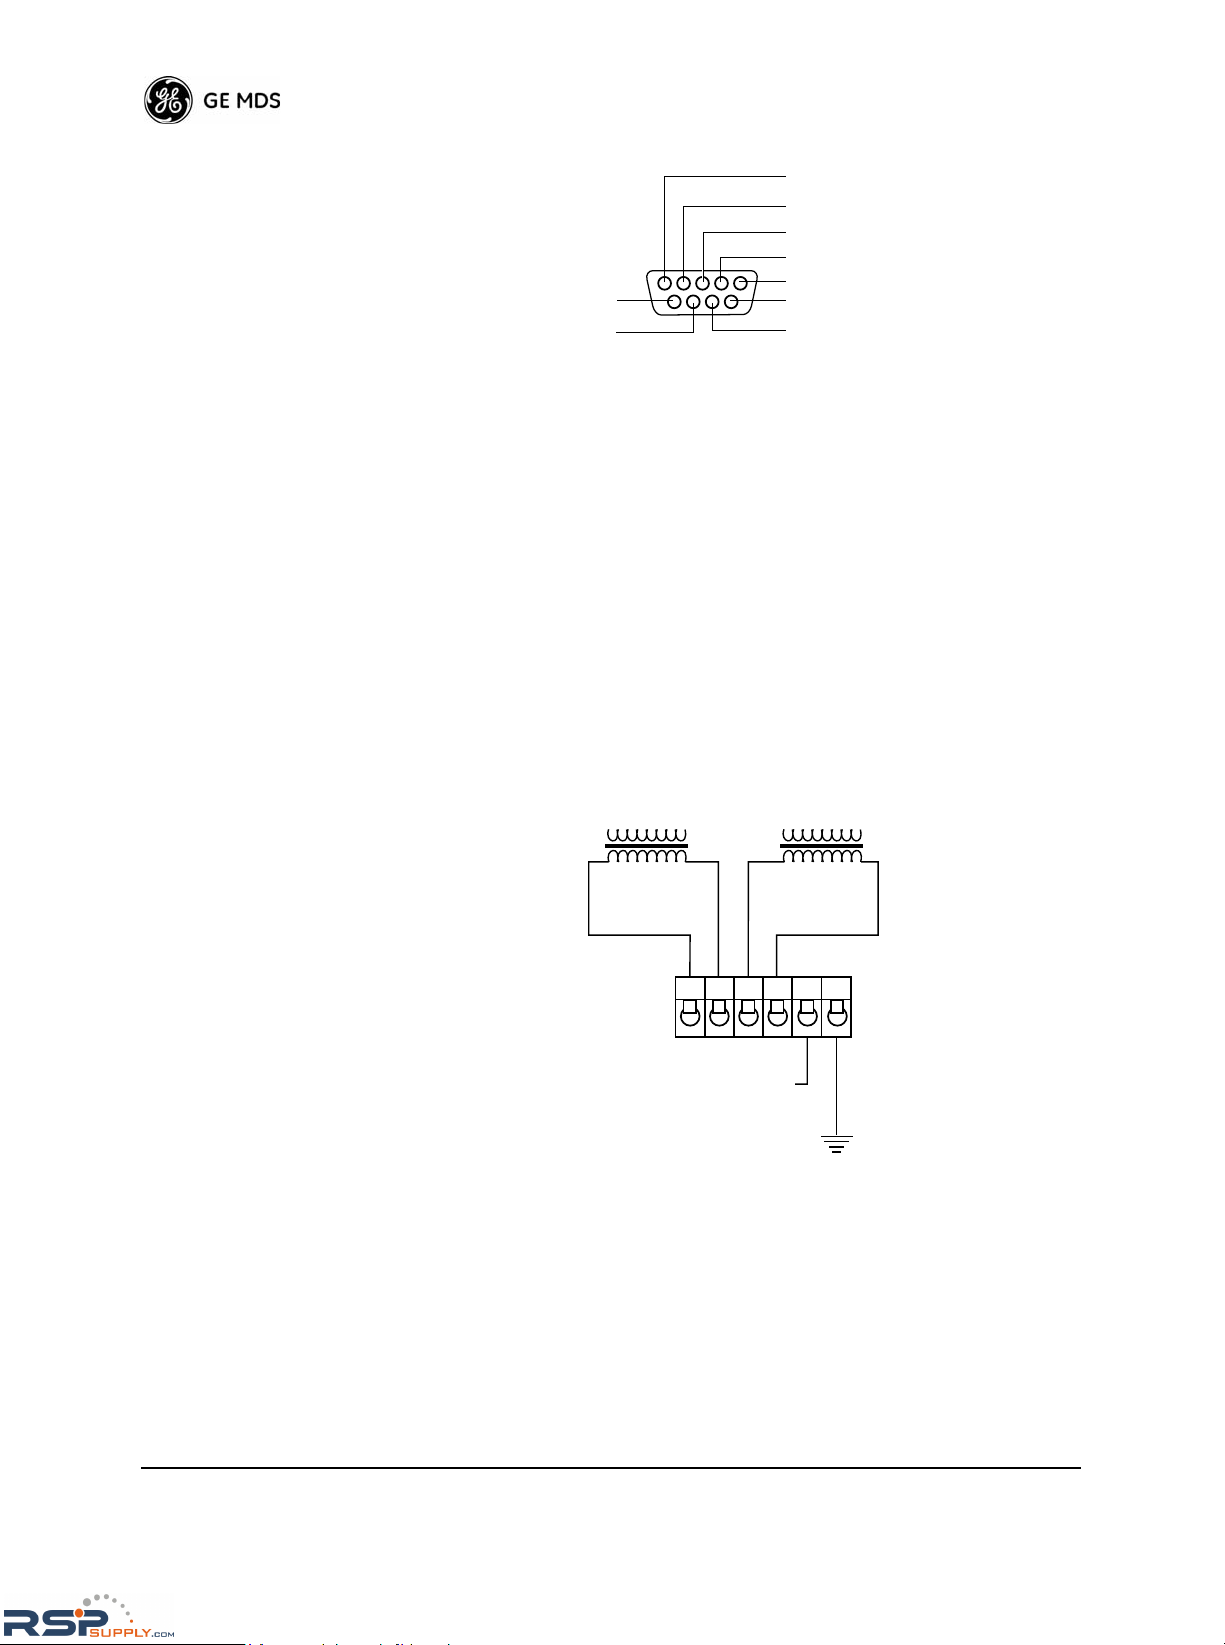
Diagnostics Connector—J1
A DB-9 (9-pin) connector on the rear panel provides system diagnostics
information. The
DIAGNOSTIC PORT is used to control and perform
diagnostics on the radio system from a connected computer. The communication speed between the computer and radio autobauds at 2400,
4800, 9600, 19200, or 38400 bps.
Figure 19 on Page 22 shows the EIA-574 (9-pin EIA-232) pin functions
of the
DIAGNOSTIC PORT as viewed from the radio’s rear panel. Con-
nection to J1 can be made with a DB-9 male connector, available from
many electronics distributors.
RX
Master Station
TX
Cavity Filter
IN OUT
Ext. Duplexer
RX
TX
ANT
RSPSupply - 1-888-532-2706 - www.RSPSupply.com
http://www.RSPSupply.com/p-8457-MDS-UP-9790X.aspx
22 MDS 4790/9790 Series I/O Guide MDS 05-3438A01, Rev. F
Invisible place holder
Figure 19. Diagnostics Port Connector, J1
4-Wire Audio Connector—J2
J2 is a plug-in terminal strip that provides connections for 4-wire audio
circuits. Figure 20 shows the function of each terminal as viewed from
the rear panel.
Terminals 1 and 2 are for transmit audio input with a nominal 600 Ω
impedance. Terminals 3 and 4 provide a receive audio output with a
nominal 600 Ω impedance. Pins 5 and 6 provide an external keying
source. Shorting pins 5 and 6 keys the radio.
Refer to Figure 22 on Page 24 for information on connecting the radio
to a VOX assembly.
Figure 20. 4-Wire Audio Connector, J2
PIN 2— RXD
PIN 3— TXD
PIN 4— +5 Vdc
PIN 5— GROUND
PIN 7— RTS*
* Used when reprogramming the radio firmware with a PC
.
UNUSED
UNUSEDUNUSED
UNUSED
RECEIVE AUDIO
600 OHM
4123 5 6
TRANSMIT AUDIO
600 OHM
EXTERNAL KEYLINE
(GROUND TO KEY RADIO)
RSPSupply - 1-888-532-2706 - www.RSPSupply.com
http://www.RSPSupply.com/p-8457-MDS-UP-9790X.aspx

MDS 05-3438A01, Rev. F MDS 4790/9790 Series I/O Guide 23
Data Interface Connector—J3
The data connector on the radio’s rear panel is the main system data
interface. It typically connects to the host computer. Refer to Figure 21
and Table 5 on Page 23 for pinout details. Refer to Figure 22 on Page 24
for information on connecting the radio to a VOX assembly.
Invisible place holder
Figure 21. Data Interface Connector, J3
Table 5. Data Interface Pinout
Pin
Number
Input/Output Pin Description
1— Shield Connection. Connects to ground (negative
supply potential) on the radio’s PC board.
2IN TXD—Transmitted Data. Accepts TX data from the
connected device.
3OUT RXD—Received Data. Sends received data to the
connected device.
4IN RTS—Request-to-Send Input. Keys the
transmitter when RTS is asserted.
5OUT CTS—Clear-to-Send Output. Active after the
programmed CTS delay time has elapsed.
6OUT DSR—Data Set Ready. Provides a +6 Vdc DSR
signal through a 2.5 kΩ resistor.
7-- Signal Ground. Connects to ground (negative
supply potential) at the radio’s PC board.
8OUT DCD—Data Carrier Detect. Activates when the
radio detects an on-frequency signal.
9 -- No Connection
10 -- No Connection
11 OUT Receive Audio Monitoring Connection (used for
diagnostics). Drives high-impedance load.
12 -- No Connection
13 -- No Connection
14 -- No Connection
15 OUT Do not connect—Reserved for future use.
16 -- No Connection
17 -- Do not connect—Reserved for future use.
1
13
25
14
RSPSupply - 1-888-532-2706 - www.RSPSupply.com
http://www.RSPSupply.com/p-8457-MDS-UP-9790X.aspx

24 MDS 4790/9790 Series I/O Guide MDS 05-3438A01, Rev. F
Figure 22. x790 to VOX Assembly Interconnect Diagram
Orderwire Connector—J9
The radio provides for an orderwire channel to facilitate communications between two associated MDS 4790/9790 radios. The jack accepts
a standard telephone handset with a carbon microphone and an RJ-11
connector-equipped cable. See “Coordinating Activities by Orderwire”
on Page 27 for more information.
Alarm Contacts—J10
J10 is a plug-in terminal strip that provides connections for optional
alarm circuits. Figure 23 shows the function of each terminal as viewed
from the rear panel.
18 -- No Connection
19 OUT 14.0 Vdc Output. Provides a regulated supply
voltage at 1.5 A for low-power accessories.
20 -- No Connection
21 -- No Connection
22 -- No Connection
23 -- No Connection
24 -- Do not connect—Reserved for future use.
25 -- No Connection
Table 5. Data Interface Pinout (Continued)
Pin
Number
Input/Output Pin Description
RSPSupply - 1-888-532-2706 - www.RSPSupply.com
http://www.RSPSupply.com/p-8457-MDS-UP-9790X.aspx

MDS 05-3438A01, Rev. F MDS 4790/9790 Series I/O Guide 25
Terminals 1 and 2 provide solid state relay contacts that
close when a minor alarm is detected. Terminals 3 and 4 provide relay
contacts that close when a major alarm is detected. You can redefine
these relay contacts using the radio’s software (switched from minor to
major alarm outputs, or vice versa). The ASENSE command is used to
change the relay contacts from normally open (
NO) to normally closed
(
NC). The contacts are rated for non-inductive loads up to a maximum
60 Volts (AC or DC) at 1 A.
Invisible place holder
Figure 23. Alarm Relay Connections
MAJOR ALARM
RELAY
(NORMALLY OPEN)
MINOR ALARM
RELAY
(NORMALLY OPEN)
4123 5 6
PINS 5 &6 RESERVED FOR
FUTURE USE—DO NOT CONNECT
RSPSupply - 1-888-532-2706 - www.RSPSupply.com
http://www.RSPSupply.com/p-8457-MDS-UP-9790X.aspx

26 MDS 4790/9790 Series I/O Guide MDS 05-3438A01, Rev. F
4.7 Post Installation Checks
Before applying power to the radio, verify that:
1. All connections are properly wired and secure.
2. The input voltage matches that of the installed power supply.
3. Antenna heading is preset in the direction of the associated station.
This completes the radio installation. Section 5.0, START-UP AND
OPERATION describes the radio’s indicators and provides initial startup
procedures.
5.0 START-UP AND OPERATION
The radio is designed for continuous, unattended operation. Under
normal conditions, the only time operator intervention is required is to
power the unit up or down, or to change an operating parameter. This
section explains the use of the radio’s indicators and provides steps for
initial startup of the equipment.
5.1 Initial Startup
NOTE: The radio is normally continuously keyed, and transmits when
the power is switched on. Ensure there is a suitable load on the
antenna connector before switching the power on.
Operation of the radio can be started by simply connecting primary
power to the unit and setting the rear panel POWER switch to ON.
Normal Indications
When power is first applied, the following events occur in a normally
working unit:
• All front panel indicators light briefly and a beep is emitted
• The front panel display shows the start-up screen, similar to
Figure 26 on Page 29
• The
ACTIVE LED for the selected transceiver board lights. In a
master station configured for redundant operation, the
STBY
LED also lights for the stand-by unit.
Maximizing RSSI
Since the master station almost always uses an omni-directional
antenna, maximizing signal strength is done at the remote sites where
directional antennas are typically used. An RSSI stronger than -90 dBm
is desirable.
RSPSupply - 1-888-532-2706 - www.RSPSupply.com
http://www.RSPSupply.com/p-8457-MDS-UP-9790X.aspx

MDS 05-3438A01, Rev. F MDS 4790/9790 Series I/O Guide 27
Coordinating Activities by Orderwire
The orderwire channel can be very useful in coordinating the set-up and
testing of two MDS 4790/9790 radios set up in a Polling Remote system
configuration. With a telephone handset plugged into the ORDERWIRE
jack (J9) on the radio’s rear panel, technicians can talk to each other
freely by merely speaking into the handset.
You can plug a telephone handset with a carbon microphone element
into J9 on the rear panel to communicate with someone at the radio link.
Handsets suitable for use with the radio are available from GE MDS
(Part No. 12-1307A01).
Normal system operation is unaffected if all you do is listen over the
handset. However, when you speak into the handset, the radio applies
transmit audio to an automatic voice-operated transmit keying (VOX)
circuit, keying the transmitter.
At the same time, the VOX circuit switches off external transmit data,
interrupting the normal flow of data in the system. Transmit audio from
the handset is then applied to the transmitter. Your voice is then heard
through a handset at the remote radio. Since any noise over the handset
interrupts transmission, you should unplug the handset when it is not in
use.
Troubleshooting Tip You can listen to network data activity using the handset. While humans
cannot interpret the data by ear, the normal characteristics of the data
exchanges between the master station and remotes can be learned. Once
you know the “normal” pattern, you can recognize some changes as
abnormal. To prevent the interruption of payload data, remove or disable the handset mouthpiece (microphone element). Using a handset as
an activity monitor is no substitute for electronic test equipment such as
a bite-error (BER) tester.
5.2 Front Panel Indicators
Refer to Figure 24 on Page 28 and the following text for an explanation
of the front panel indicators. The control buttons are described in
Section 6.4, Configuration and Programming using the Front Panel,
beginning on Page 60.
RSPSupply - 1-888-532-2706 - www.RSPSupply.com
http://www.RSPSupply.com/p-8457-MDS-UP-9790X.aspx

28 MDS 4790/9790 Series I/O Guide MDS 05-3438A01, Rev. F
Invisible place holder
Figure 24. Front Panel Controls and Indicators
LED Indicators
You can check the basic operation of the transceiver board(s) by
viewing the LED indicators on the front panel. The top row of indicators
shows the status of the “A” transceiver board; the bottom row shows the
status of the “B” transceiver board. On a redundant radio (spare transceiver board and power supply installed), the references given here
apply to transceiver board A and B equally.
Normally, only the green ACTIVE LED (and, in master stations configured for redundant operation, one of the yellow STBY LEDs) are lit. All
other red LEDs are alarm indicators. If lit, they indicate a potential
problem in the radio system.
Refer to Figure 25, Table 6 on Page 29, and the text that follows for a
detailed explanation of the LED indicators.
Invisible place holder
Figure 25. LED Indicators
ENTER
ESCAPE
LED INDICATORS LCD DISPLAY PROGRAMMING
AND CONTROL KEYS
ACTIVE STBY ALARM RX ALR TX ALR
I/O ALR
ACTIVE STBY ALARM RX ALR TX ALR
I/O ALR
A
B
A
B
ACTIVE STBY ALARM RX ALR TX ALR I/O ALR
ACTIVE STBY ALARM RX ALR TX ALR I/O ALR
RSPSupply - 1-888-532-2706 - www.RSPSupply.com
http://www.RSPSupply.com/p-8457-MDS-UP-9790X.aspx

MDS 05-3438A01, Rev. F MDS 4790/9790 Series I/O Guide 29
NOTE: Additional LEDs are located behind the removable front panel.
They are intended primarily for troubleshooting the radio, and
are not required for basic operation. These LEDs are described
in “Local Problem-Solving” on Page 80.
Front Panel Display
At initial power-up, the front panel display shows the start-up screen
(Figure 26). After a period of time without activity, the front panel display darkens. The display is restored by pressing any of the front panel
buttons.
Invisible place holder
Figure 26. Start-up Screen (typical)
The start-up screen displays the owner’s name and message. Customers
typically use these fields to display the system name and site name.
Other screens, and the use of the control buttons, are described in
Section 6.5, Screen Descriptions, beginning on Page 64.
Table 6. Explanation of Front Panel LEDs
LED Name Color Meaning When Lit
ACTIVE
Green Transceiver board (A or B) is the selected unit.
STBY
Yellow Transceiver board (A or B) is currently in stand-by mode
(functional on master station configured for redundant
operation only).
ALARM
Red A major or minor alarm event has occurred. Use the
front panel’s Active Radio Status screen to list current
alarm events (refer to “Active Radio Status” on Page
77).
RX ALR
Red Difficulty receiving—may be due to an antenna problem,
receiver fault, or other condition causing no or a weak
received signal level.
TX ALR
Red Transmit circuitry fault.
I/O ALR
Red A data framing or parity error has occurred over the data
port.
MDS 4790 MAS Radio
OWNERS NAME
OWNERS MESSAGE
RSPSupply - 1-888-532-2706 - www.RSPSupply.com
http://www.RSPSupply.com/p-8457-MDS-UP-9790X.aspx

30 MDS 4790/9790 Series I/O Guide MDS 05-3438A01, Rev. F
6.0 DIAGNOSTICS AND CONTROL
Configuration, control and diagnostics of the master station is performed by connecting a Windows PC running a terminal program or
other GE MDS diagnostics software to a diagnostic port on the rear of
the unit (Figure 27). If a PC is not available, you can perform many of
the same functions using the front panel interface, described in
Section 6.4, Configuration and Programming using the Front Panel,
beginning on Page 60.
Figure 27. PC Connected to the Master Station
This section explains how to connect a PC to the master station, and
describes the commands you can use for programming and diagnostics.
6.1 PC Connection
1. Set Jumper J15 (on the vertical Interface Board) to “PC.” This
removes 14 V from Pin 6 of the
DIAGNOSTIC PORT
.
TO DB-9
DIAGNOSTICS
CONNECTOR (J1)
TO COMPUTER'S
RS-232 CONNECTOR
COMPUTER
RUNNING INSITE
SOFTWARE
J15
ENSURE JUMPER J15
(INSIDE RADIO) IS SET
TO "PC"
(On Vertical Interface Board)
RSPSupply - 1-888-532-2706 - www.RSPSupply.com
http://www.RSPSupply.com/p-8457-MDS-UP-9790X.aspx

MDS 05-3438A01, Rev. F MDS 4790/9790 Series I/O Guide 31
2. Connect a DB-9 to DB-9 cable (Figure 28) between
the PC and the radio’s rear panel DIAGNOSTIC PORT (Figure 27 on
Page 30).
Figure 28. PC Diagnostic Cable (DB-9 to DB-9)—
MDS P/N 97-1971A04
3. Install a terminal emulation program, such as HyperTerminal™ or
MDS InSite™ software (MDS P/N 03-3533A01), if such a program
is not already installed.
4. Launch the terminal program or diagnostics software.
a. If you are using InSite, follow the instructions given in the pro-
gram’s user guide.
b. If you are using a terminal emulation program:
Press the Space or Esc key several times, at one-second intervals,
until the > prompt is shown, indicating that the command
interface is ready to accept input. The diagnostic interface has an
automatic baud-rate detector which synchronize with your data
rate.
If the unit does not recognize your data interface arrangement,
try the following settings:
• Data Bits = Eight
• Parity = None
• Stop Bits = 1
• Data Rate = 9600 bps
• Flow Control = None
• Terminal Emulation/Mode = ANSI
NOTE: The DIAGNOSTIC PORT supports autobaud at 2400, 4800,
9600, 19200, and 38400 bps baud rates.
DB-9 MALE
CONNECTOR
TO RADIO
DB-9 FEMALE
CONNECTOR
TO PC
RSPSupply - 1-888-532-2706 - www.RSPSupply.com
http://www.RSPSupply.com/p-8457-MDS-UP-9790X.aspx

32 MDS 4790/9790 Series I/O Guide MDS 05-3438A01, Rev. F
5. Type the command, then press ENTER.
Command input is not case sensitive.
Press the Backspace key to delete characters.
The system displays one or more lines of confirmation text. These
responses are listed in Tables 7 through 9 beginning on Page 34.
You can leave the diagnostics software and PC running, or you can exit
from the diagnostics software, power-down the PC, and disconnect the
PC from the radio.
Connecting Multiple
Masters at One Site
If you have more than one master station located at a single site, it is possible to connect all of them to one EIA/RS-232 computer connection for
local diagnostics and control. Support for this “multidrop” service is
built into the radio through the use of the Multiple Address (MADDR)
command. This method is not intended for use in systems where the
radios are not physically connected, such as in a microwave backbone
arrangement.
MDS x790 master stations equipped with version 1.7 or higher firmware
contain a built-in COS (Code Operated Switch). You only need to pro-
gram this switch with a proper Multiple Address (MADDR) to be used
with InSite (version 6.3 software or higher). For a detailed description
of the networking arrangement, refer to the InSite™ NMS software
manual (MDS P/N 05-3696A01). This manual is available for download
from the GE MDS Web site (www.GEmds.com).
Operating Tips • After establishing a connection to the radio, enter the command
DUMP. The response is a complete listing of the current radio config-
uration. This will help you make a quick review of the current settings and help you identify the ones you want to change.
• You can also save this portion of your terminal session for future
reference after you have configured the radio to suit your needs.
6.2 PC Command Summaries
GE MDS radios are preconfigured with operating parameters that enable
them to operate in most situations. Should you need to adjust your radio,
either for a specific situation or to resolve a problem, this section
describes commands for changing radio operating parameters.
Tables 7 through 9 summarize master station commands.
• Table 7 (Page 34) summarizes commands for setting radio
operating parameters and displaying status and other information.
• Table 8 (Page 35) summarizes diagnostic and testing com-
mands.
RSPSupply - 1-888-532-2706 - www.RSPSupply.com
http://www.RSPSupply.com/p-8457-MDS-UP-9790X.aspx

MDS 05-3438A01, Rev. F MDS 4790/9790 Series I/O Guide 33
• Table 9 (Page 36) summarizes commands for
obtaining information about the unit.
Refer to Section 6.3, Detailed Command Descriptions, beginning on
Page 37 for detailed information about these commands.
Commands and Command Parameters
You can use most commands in two ways:
Typing only the command:
For example: REPEATER
displays the current information.
Typing the command, followed by a space and a parameter value:
For example: REPEATER ON
implements a radio parameter change. Parameters and their meanings
are listed in the summary tables, as well in the detailed command
descriptions which follow.
The following conventions are used in the tables:
• Command parameters, if any, are shown in brackets [ ] following the command entry.
• A string of lower-case “x”s in a command parameter stands for
a letter or number key.
• “xxx.xxxxx” stands for a decimal number (the decimal point
position might vary).
• “mm,” “dd,” and “yyyy” stand for month, day and year, respectively (the number of characters used for month and year might
vary).
• “hh,” “mm,” and “ss” stand for hours, minutes and seconds,
respectively.
RSPSupply - 1-888-532-2706 - www.RSPSupply.com
http://www.RSPSupply.com/p-8457-MDS-UP-9790X.aspx

34 MDS 4790/9790 Series I/O Guide MDS 05-3438A01, Rev. F
Table 7. PC Commands—Radio Operation
TERMINAL
COMMAND
FRONT
PANEL MENU
DESCRIPTION
BATT(ery) [ON/OFF]
Details, page 41
Battery Backup
Details, page 73
Enable or disable alarms derived from monitoring the internal back-up battery.
BAUD [xxxxx abc]
Details, page 42
Baud Rate/Format
Details, page 70
Set or display communication attributes for the
data interface port
xxxxx=Baud rate (110, 300, 1200, 2400, 4800,
9600, 19200, 38400)
a=7 or 8 data bits
b=N for none, O for odd, E for even parity
c=1 or 2 stop bits
BUFF [ON/OFF]
Details, page 42
Data Buffering
Details, page 74
Enable or disable received data buffering
ON=Seamless data
OFF=Fast byte throughput
CKEY [ON/OFF]
Details, page 43
Continuous Keying
Details, page 72
Enable or disable continuous keying
ON=Continuous keying enabled
OFF=Continuous keying disabled
CTS [0-255]
Details, page 43
Clear-to-Send D elay
Details, page 70
Set or display CTS delay . Setting a value of 0
keeps CTS normally asserted.
DATAKEY [ON/OFF]
Details, page 44
Key On Data
Details, page 73
Toggle between key-on-data and key-on-RTS
ON=Key-on data
OFF=Key-on RTS
DATE [mmm dd yyyy]
Details, page 44
Set Date
Details, page 77
Set or display the current date
DMGAP [xx]
Details, page 45
None Set the amount of time to wait after receiving a
character before interpreting the next received
character as the start of a new message
EMP [ON/OFF]
Details, page 46
Emphasis
Details, page 70
Enable or disable pre-emphasis and
de-emphasis
INIT
Details, page 46
None Set all operating parameters to default settings
MODEM
[NONE/4800/9600/1920
0/DEFAULT]
Details, page 48
Modem
Details, page 69
Set or display the radio’s modem type, or specify analog input
PTT [0-255]
Details, page 50
Push-to-Talk Delay
Details, page 70
Set or display PTT delay
PWR [20–37]
Details, page 51
Output Power Setting
[37-20]
Details, page 69
Set or display forward power output setting
RADIO [AUTO/A/B]
Details, page 51
Radio Selection
Details, page 78
Set or display the active transceiver board
REPEATER [ON/OFF]
Details, page 51
Repeater Mode
Details, page 71
Enable or disable repeater mode
RXMUTE
[ON/OFF/Time in msec]
Details, page 53
RX Mute Mode
Details, page 72
Set or display RX (receive) Muting status
RSPSupply - 1-888-532-2706 - www.RSPSupply.com
http://www.RSPSupply.com/p-8457-MDS-UP-9790X.aspx

MDS 05-3438A01, Rev. F MDS 4790/9790 Series I/O Guide 35
RX [xxx]
Details, page 52
Receive Frequency
Details, page 69
Set or display receive frequency
RXLEVEL [–20 to +3]
Details, page 53
Receive Level [–20 to
+3]
Details, page 75
Set or display the analog audio receive level in
dBm
RXP AD [ON/OFF]
Details, page 53
Receive Pad
Details, page 75
Enable or disable RX pad
RXTOT [NONE, 1-1440]
Details, page 53
RX Timeout [NONE,
1-1440]
Details, page 71
Set or display the receiver timeout timer
SCD [0-255]
Details, page 54
Transmit Timeout
Details, page 71
Set or display the soft-carrier dekey delay
TIME [hh:mm:ss]
Details, page 57
Set Time
Details, page 77
Set or display the current time
TOT [ON/OFF, 1-255]
Details, page 58
Transmit Timeout
Details, page 71,
Transmit Timeout Duration
Details, page 71
Set or display the timeout timer delay
TX [xxxx]
Details, page 58
Transmit Frequency
Details, page 68
Set or display the transmit frequency
TXGAIN [ON/OFF]
Details, page 59
Transmit Gain
Details, page 75
Enable or disable TX gain
TXLEVEL [–20 to +3,
AUTO]
Details, page 59
Transmit Level [–20 to
+3, AUTO]
Details, page 74
Set or display the analog audio tr ansmit level in
dBm
Table 8. PC Commands—Diagnostics
PC COMMAND
FRONT
PANEL MENU
DESCRIPTION
ALARM
Details, page 37
Active Radio Status
Details, page 77
Display current alarm status in hexadecimal
format
AMASK [0000
0000–FFFF FFFF]
Details, page 40
Alarm Masks
Details, page 75
Set or display the major alarm mask
NMASK [0000
0000–FFFF FFFF]
Details, page 49
None Set or display the minor alarm mask
ASENSE [HI/LO]
Details, page 41
None Set or display the sense of the alarm bits
(active high or active low)
LOG [CLR]
Details, page 48
Event Log
Details, page 79
Clear Logs
Details, page 79
Display or clear the event log
DLINK [ON/OFF/xxxx]
Details, page 45
None
Enable or disable network-wide diagnostics
and set the baud rate at the RJ-11 DIAG port
DTYPE
[NODE/ROOT/GATE/PE
ER]
Details, page 46
None
Set up a radio as a root, node, gate, or peer
radio
KEY
Details, page 47
Manual Key
Details, page 72
Enable the transmitter
Table 7. PC Commands—Radio Operation (Continued)
TERMINAL
COMMAND
FRONT
PANEL MENU
DESCRIPTION
RSPSupply - 1-888-532-2706 - www.RSPSupply.com
http://www.RSPSupply.com/p-8457-MDS-UP-9790X.aspx

36 MDS 4790/9790 Series I/O Guide MDS 05-3438A01, Rev. F
DKEY
Details, page 45
Manual Key
Details, page 72
Disable the transmitter
MADDR [NONE, 1–255]
Details, page 48
Multi-Drop Address
(MADDR)
Details, page 72
Unit address for use with GE MDS’ InSite NMS
software, where multiple master stations are
connected together at one location
RSSI, RSSI!
Details, page 52
Receive Signal
Strength
Details, page 77
Display received signal strength indication
RTU [ON/OFF/0-80]
Details, page 52
None Enable or disable the radio’s internal RTU sim-
ulator for diagnostics, and set the internal RTU
address
SHOW [DC/PWR/CURRENT/RADIO]
Details, page 54
None Display various readings:
SHOW DC ......................DC IN xx.x V
........................................DC OUT x.x V
SHOW PWR................... RF POWER xx DBM
SHOW CURRENT..........LNA xxx mA
........................................TOTAL xxx mA
SHOW RADIO................ RADIO A is active
.......................................RADIO B is not
.......................................equipped
SNR, SNR!
Details, page 55
S/N Ratio
Details, page 78
Display signal-to-noise ratio (from DSP’s channel equalizer)
STAT
Details, page 56
Active Radio Status
Details, page 77
Display current alarm event descriptions
TEMP
Details, page 57
Show Temperature
and Voltages
Details, page 78
Display the internal radio temperature
Table 9. PC Commands—
Owner and Radio Information
PC COMMAND
FRONT PANEL
MENU
DESCRIPTION
OPT
Details, page 50
None
Display a list of available options and the current status of each:
Diagnostics:.....................................OFF
Digital Modem:.................................OFF
OWM [xxxxx]
Details, page 50
Set Owner Message
Details, page 76
Set or display an owner message or the system
name
OWN [xxxxx]
Details, page 50
Set Owner Name
Details, page 76
Set or display the owner name or site name
HREV
Details, page 46
None Display the hardware revision number
MODEL
Details, page 48
None Display the radio’s model number (includes
TX/RX band characteristics)
SER
Details, page 54
Serial Number
Details, page 78
Display the radio’s serial number
Table 8. PC Commands—Diagnostics (Continued)
PC COMMAND
FRONT
PANEL MENU
DESCRIPTION
RSPSupply - 1-888-532-2706 - www.RSPSupply.com
http://www.RSPSupply.com/p-8457-MDS-UP-9790X.aspx

MDS 05-3438A01, Rev. F MDS 4790/9790 Series I/O Guide 37
6.3 Detailed Command Descriptions
This section gives more detailed information for most commands listed
in the previous tables. The commands are cross-referenced to descriptions of corresponding commands entered using the front panel display
and control buttons (see radio graphic at left).
Alarm Summary ALARM
The ALARM and STAT commands report on current alarms. ALARM pro-
vides alarm information in a concise, two-line format. Alarm codes are
summarized in hexadecimal format. STAT (described on Page 56)
includes a text message describing each alarm.
The first line of the response to the ALARM command is a simple message
indicating whether or not alarms are present. The second line is a hexadecimal numeric code representing the system alarm state. Examples of
responses are:
SREV
Details, page 55
Software Revision
Details, page 78
Display software revision information
UNIT [10000–65000]
Details, page 59
Unit Diagnostic
Address
Details, page 59
Display the radio’s unit address
Table 9. PC Commands—
Owner and Radio Information (Continued)
PC COMMAND
FRONT PANEL
MENU
DESCRIPTION
A
B
Data Buffering
screen, Page 74
This graphic points you to the
corresponding front panel
menu
NO ALARMS PRESENT
CODE: 0000 0000
MINOR ALARMS PRESENT
CODE: xxxx xxxx
MAJOR ALARMS PRESENT
CODE: xxxx xxxx
Active Radio Status screen,
Page 77
A
B
RSPSupply - 1-888-532-2706 - www.RSPSupply.com
http://www.RSPSupply.com/p-8457-MDS-UP-9790X.aspx

38 MDS 4790/9790 Series I/O Guide MDS 05-3438A01, Rev. F
Each bit of the hexadecimal response code represents a unique alarm
event. The first 4-digit number indicates major alarm conditions; if there
are no major alarms, this number is 0000. The second 4-digit number
represents minor alarm conditions; if there are no minor alarms, this
number is 0000.
Code values for individual major alarm conditions are given below:
Table 10. Major Alarm Conditions’ Hexadecimal Values
Alarm Code
(HEX)
Alarm Code
(Binary)
Event
Code
Description
4000 0000 0100 0000 0000 0000 0000 0000 0000 0000 1 The hardware configuration disagrees
with the software.
2000 0000 0010 0000 0000 0000 0000 0000 0000 0000 2 The model number is not
programmed.
1000 0000 0001 0000 0000 0000 0000 0000 0000 0000 3 Authorization fault (radio option not
available).
0800 0000 0000 1000 0000 0000 0000 0000 0000 0000 4 One or both of the programmable
synthesizers is reporting an “out of
lock” condition.
0400 0000 0000 0100 0000 0000 0000 0000 0000 0000 13 The transmitter timed out.
0200 0000 0000 0010 0000 0000 0000 0000 0000 0000 6 A/D fault
0100 0000 0000 0001 0000 0000 0000 0000 0000 0000 7 One or more of the radio’s internal
voltage regulators is reporting a
failure. The radio will not work.
0080 0000 0000 0000 1000 0000 0000 0000 0000 0000 8 The system has not been calibrated.
Factory calibration is required for
proper operation of the system.
0040 0000 0000 0000 0100 0000 0000 0000 0000 0000 MCU/DSP
0020 0000 0000 0000 0010 0000 0000 0000 0000 0000 10 The radio was unable to properly
program itself to the appropriate
defaults. There may be a hardware
problem.
0008 0000 0000 0000 0000 1000 0000 0000 0000 0000 12 The receiver timed out.
0001 0000 15 Output power fault.
RSPSupply - 1-888-532-2706 - www.RSPSupply.com
http://www.RSPSupply.com/p-8457-MDS-UP-9790X.aspx

MDS 05-3438A01, Rev. F MDS 4790/9790 Series I/O Guide 39
Code values for individual minor alarm conditions are
given below:
Monitoring Alarms
on the Standby
Radio
There is a limited ability to monitor alarms on the standby radio without
using InSite software. You accomplish this using the command line
interface.
The ALARM, STAT, and SER commands take an optional parameter [A | B]:
• If you enter the command without the parameter, the response
applies to the active radio.
• If you enter the command with the [A] parameter, the response
always applies the the A radio.
Table 11.Minor Alarm Conditions’ Hexadecimal Values
Alarm Code
(HEX)
Alarm Code
(Binary)
Event
Code
Description
0000 8000 0000 0000 0000 0000 1000 0000 0000 0000 16 The unit address has not been
programmed.
0000 4000 0000 0000 0000 0000 0100 0000 0000 0000 17 A data parity fault has been detected
on the DB25. This usually means there
is a parity setting mismatch between
the radio and the RTU.
0000 2000 0000 0000 0000 0000 0010 0000 0000 0000 18 A data framing error has been
detected on the DB25. This
sometimes means there is a baud rate
mismatch between the radio and the
RTU.
0000 0800 0000 0000 0000 0000 0000 1000 0000 0000 20 Configuration error. The modem
setting is incorrect.
0000 0015 21 Unit is running on back-up battery
power.
0000 0016 22 Standby radio hardware not installed
or available.
0000 0040 0000 0000 0000 0000 0000 0000 0100 0000 25 The 10-volt power regulator output is
out of tolerance. If the voltage is too far
out of tolerance, the radio might not
work.
0000 0020 0000 0000 0000 0000 0000 0000 0010 0000 26 The DC input supply voltage is out of
tolerance. If the supply voltage is too
far out of tolerance, the radio might not
work.
0000 0010 27 LNA current fault (LNA current is out of
range).
0000 0008 28 Total board current fault (total board
current is out of range).
0000 0001 0000 0000 0000 0000 0000 0000 0000 0001 31 The radio’s internal temperature is
approaching an out-of-tolerance
condition. If the temperature drifts
outside of the recommended
operating range, the radio might not
work.
RSPSupply - 1-888-532-2706 - www.RSPSupply.com
http://www.RSPSupply.com/p-8457-MDS-UP-9790X.aspx

40 MDS 4790/9790 Series I/O Guide MDS 05-3438A01, Rev. F
• If you enter the command with the [B] parameter, the response
always applies the the B radio.
To determine which radio is the standby, use the SHOW RADIO command,
which indicates which radio (A or B) is ACTIVE. It also indicates if the
opposite slot is INACTIVE or NOT EQUIPPED.
Major Alarm Event
Assignments
AMASK [0000 0000–FFFF FFFF]
Table 10 and Table 11 on Page 39 list the major and minor alarm clas-
sifications. It is possible to reassign alarm outputs (illustrated in
Figure 19 on Page 22) to a different category, and change which alarm
events trigger an automatic switchover in redundant master stations.
However, this should be done rarely, if ever.
The AMASK command and NMASK command (Page 49) reclassify major
and minor alarm events, respectively, changing the alarm output relay
status and switchover conditions. These commands can be used to tailor
a radio’s alarm response. For example, a major alarm at a redundant
master station causes switch-over to the other transceiver board. By
re-configuring a minor alarm as a major alarm, you can force a
switch-over at the occurrence of a (formerly) minor alarm condition.
Reclassifying alarms does not disable alarm notification. The front
panel ALARM LED illuminates, the alarm event is logged, and the ALARM
and STAT commands show the alarm status.
Entering the AMASK command alone displays the current setting of
major alarm events in hexadecimal format. Entering the AMASK command followed by an eight-digit hexadecimal number reassigns each of
the 32 possible alarm events as enabled or disabled, with respect to
major alarm output relay status and switchover criteria.
The hex value for the mask corresponds to the hex value for the ALARM
command (see the
ALARM command description). Each bit represents a
different major or minor alarm. The most significant 16 bits represent
specific major alarms and the least significant 16 bits represent specific
minor alarms. All major and minor alarms are “set” as the default
AMASK.
NOTE: GE MDS does not use all bits. Some bits are reserved for
future use.
The default AMASK is FFFF FFFF, which signals an alarm on the data
port pin 25 for all major and minor alarms. To disable the alarm signal
on pin 25 for a specific alarm, reset the bit associated to the specific
alarm and convert back to hex. Table 10 and Table 11 on Page 39 provide the hex and binary values for each alarm code.
Alarm Masks screen, Page 75
A
B
RSPSupply - 1-888-532-2706 - www.RSPSupply.com
http://www.RSPSupply.com/p-8457-MDS-UP-9790X.aspx

MDS 05-3438A01, Rev. F MDS 4790/9790 Series I/O Guide 41
Example:
To make the x710 signal an alarm on the DB25 for all major alarms and
all minor alarms except when it has a Data Framing Error (event code
18), the AMASK becomes:
AMASK (default)
= FFFF FFFF (Hex)
= 1111 1111 1111 1111 1111 1111 1111 1111 (Binary)
AMASK (new)
= 1111 1111 1111 1111 1101 1111 1111 1111 (Binary)
= FFFF DFFF (Hex)
The only bit that you do not set is specific to the alarm you want to mask.
Contact GE MDS for more information on configuring the alarm
response.
Alarm Sense ASENSE [HI/LO]
The ASENSE command displays or sets the logic characteristics of the
alarm outputs at the ALARM RELAY connector (see “Alarm Contacts—
J10” on Page 24).
Entering the ASENSE command alone shows whether the alarm output is
currently actively high or low.
Entering the ASENSE command followed by HI or LO resets the alarm
output to the normally closed or normally open state.
ASENSE HI= Contact set to be normally open
ASENSE LO = Contact set to be normally closed
The default for a radio with a single transceiver board is normally open
(
ASENSE HI).
Battery Backup
Monitoring & Alarm
BATT(ery) [ON/OFF]
Use the BATT command to configure the monitoring of the internal
back-up battery voltage (condition) and whether the radio sends an
alarm when it is operating from the internal back-up battery, or when the
voltage falls below 13 Vdc.
BATT ON=Enable monitoring and alarm generation
BATT OFF=Disable monitoring and alarm generation
Battery Backup screen,
Page 70 xxxxx
A
B
RSPSupply - 1-888-532-2706 - www.RSPSupply.com
http://www.RSPSupply.com/p-8457-MDS-UP-9790X.aspx

42 MDS 4790/9790 Series I/O Guide MDS 05-3438A01, Rev. F
Data Interface Baud
Rate
BAUD [xxxxx abc]
The BAUD command displays or sets the communication attributes for
the DATA INTERFACE port. The command has no effect on the RJ-11
DIAG(nostics) port.
Entering the BAUD command alone displays the baud rate along with
asynchronous data attributes. Entering the BAUD command followed by
one or more parameters resets the data port attributes.
BAUD xxxxx abc
Example: BAUD 4800 8N1
The first parameter, xxxxx, is the baud rate. Baud rate is specified in
bits-per-second, and must be one of the following rates: 110, 300, 1200,
2400, 4800, 9600, 19200, or 38400.
The second parameter of the BAUD command is a 3-character block specifying asynchronous data attributes:
a = Data bits (7 or 8)
b = Parity (N for None, O for Odd, E for Even)
c = Stop bits (1 or 2)
The factory default setting is 9600 baud, 8 data bits, no parity, 1 stop bit.
NOTE: 7N1, 8O2, and 8E2 are invalid communication settings.
If the data rate is faster than the radio’s baud rate setting, the DATA Port
accepts a minimum of 500 data bytes in a single continuous data transmission. At baud rates of 9600 bps or less, the radio supports unlimited
continuous data transmission. Under this condition, the
DATA Port hand-
shaking (CTS) would keep toggling on/off for a long transmission, or
the buffer might be able to absorb a smaller amount of data. Avoid
mis-matched data rates whenever possible.
Data Interface
Buffering
BUFF [ON/OFF]
This command displays or sets the received data handling mode.
Entering the
BUFF command alone shows whether the mode is seamless
(
ON), or fast byte throughput (OFF). Entering the BUFF command fol-
lowed by a parameter resets the received data handling mode. The ON
parameter sets the radio to seamless data mode. The OFF parameter sets
the radio to fast byte throughput mode. The default is seamless data
mode.
Baud Rate/Format screen,
Page 70
A
B
Data Buffering screen, Page 74
A
B
RSPSupply - 1-888-532-2706 - www.RSPSupply.com
http://www.RSPSupply.com/p-8457-MDS-UP-9790X.aspx

MDS 05-3438A01, Rev. F MDS 4790/9790 Series I/O Guide 43
The setting of this parameter affects the timing of
received data sent from the DATA INTERFACE connector. Data trans-
mitted over the air by the radio is unaffected by the BUFF setting.
If data buffering is set to OFF, the radio operates with the lowest possible
average latency. The radio sends data bytes from the DATA INTERFACE
port as soon as it disassembles an incoming RF data frame. Average and
typical latency are both below 10 ms, but idle character gaps might be
introduced into the outgoing data flow.
If data buffering is ON, the radio operates in a seamless mode. That is,
the radio sends data bytes over the air as quickly as possible, but the
receiver buffers the data until enough bytes have arrived to cover
worst-case gaps in transmission. Data buffering might introduce a 2 ms
delay, but the radio will not create any gaps in the output data stream.
This mode of operation is required for protocols such as MODBUS™,
that do not allow gaps in their data transmission.
NOTE: Seamless mode (BUFF ON) is intended only for applications
where the transmitter’s baud rate is greater than or equal to the
receiver’s baud rate. Enforcement of this rule is left up to the
user.
Continuous
Transmitter Keying
CKEY [ON/OFF]
The CKEY command enables or disables continuous keying. When CKEY
is enabled (ON), the radio is continuously keyed. The CKEY command is
normally enabled when the radio is in a full-duplex master configuration.
Data Interface
Clear-to-Send
Period
CTS [0-255]
This command displays or sets the timer value associated with the CTS
line response. Entering the
CTS (Clear-to-Send) command without a
parameter displays the timer value in milliseconds. Entering the CTS
command with a parameter ranging from 0 to 255 sets the timer value in
milliseconds. The timer value function depends on the radio’s operating
mode (DCE or CTS Key). See the DEVICE command for more information about these operating modes.
When the radio is in DCE mode, the timer specifies how long to wait
after the RTS line goes high before asserting the CTS line. A timer value
of zero means the CTS line will go high immediately following RTS.
Continuous Keying screen,
Page 72
A
B
Clear-to-Send Delay screen,
Page 70
A
B
RSPSupply - 1-888-532-2706 - www.RSPSupply.com
http://www.RSPSupply.com/p-8457-MDS-UP-9790X.aspx

44 MDS 4790/9790 Series I/O Guide MDS 05-3438A01, Rev. F
When the radio is in CTS Key mode, the timer specifies how long to
wait after asserting the CTS before sending data from the DATA INTER-
FACE
port. A timer value of zero means that data will be sent from the
data port without imposing a keying delay. Other delays may be present,
depending on how other operating parameters are configured.
Should you experience problems with repeater operation after changing
the CTS, PTT or SCD values, contact GE MDS.
Transmitter Keyed
on Incoming Data
DATAKEY [ON/OFF]
This command displays or sets the keying mode. In key-on-data mode,
the radio automatically keys itself whenever input data arrives on the
DB25 port. In key-on-RTS mode, the radio only keys in response to an
RTS or PTT signal (or the
KEY command).
Entering the DATAKEY command alone shows whether the keying mode
is key-on-data (ON) or key-on-RTS (OFF). Entering the DATAKEY com-
mand followed by a parameter controls whether or not the radio will
automatically key on receipt of data. The default mode is key-on-data
(ON).
NOTE: Key-on-data mode is only applicable when the input data
source is digital. When the input data source is analog, the
DATAKEY setting is irrelevant.
Event Log Date
Format
DATE [mmm dd yyyy]
This command sets or displays the date. The accuracy of the date and
time are important, because event codes are “stamped” with the date and
time (refer to “TIME [hh:mm:ss]” on Page 57).
Enter the command without any parameters to display the date. Enter the
command in any of the following formats to reset the date:
DATE mmm dd yyyy
DATE mm-dd-yyyy
DATE mm/dd/yyyy
where mmm is a three-character abbreviation of the month:
Jan, Feb, Mar, Apr, May, Jun, Jul, Aug, Sep, Oct, Nov, Dec
dd is a two-digit number from 01 to 31 representing the day, and yyyy is
the year.
Key On Data screen, Page 73
A
B
Set Date screen, Page 77
A
B
RSPSupply - 1-888-532-2706 - www.RSPSupply.com
http://www.RSPSupply.com/p-8457-MDS-UP-9790X.aspx

MDS 05-3438A01, Rev. F MDS 4790/9790 Series I/O Guide 45
Dekey Transmitter DKEY
This command deactivates the transmitter after it has been keyed with
the KEY command. If other keying sources are still active, then the transmitter will not dekey, but the manual key request is removed.
Diagnostics Link DLINK [ON/OFF/xxxx]
This command disables or re-enables network-wide diagnostics at the
local radio, and sets the baud rate at the radio’s RJ-11
DIAG port. Net-
work-wide diagnostics is enabled by default.
Entering
DLINK ON enables network-wide diagnostics. Entering
DLINK OFF disables network-wide diagnostics.
Use the DLINK command locally, at the radio, to enable network-wide
diagnostics functionality as well as set the baud rate at the RJ-11 DIAG
port.
DLINK followed by the baud rate sets the baud rate (bps) of the RJ-11
DIAG port. The following baud rate selections are allowed:
• 2400
• 4800
• 9600
• 19200 (default setting)
Example: DLINK 4800 sets the RJ-11 DIAG port to operate at 4800 bps.
The same baud rate must be entered into the InSite Equipment List’s
BAUD field.
The default setting is DLINK ON.
Diagnostics
Message Gap Time
DMGAP [xx]
The DMGAP command sets the amount of time in milliseconds to wait
after the receipt of a character before interpreting the next received character as the start of a new message. When baud rates are slow, the gap
between characters within a poll might be so long that the radio interprets the next character as the start of a new poll. When diagnostics is
performed using passive rather than active messaging (see “Performing
Network-Wide Radio Diagnostics” on Page 84), use this command to
prevent these errors.
Manual Key screen, Page 72
A
B
RSPSupply - 1-888-532-2706 - www.RSPSupply.com
http://www.RSPSupply.com/p-8457-MDS-UP-9790X.aspx

46 MDS 4790/9790 Series I/O Guide MDS 05-3438A01, Rev. F
Unit Diagnostic
Service
DTYPE [NODE/ROOT/GATE/PEER]
This command configures a radio’s type for network-wide diagnostics.
For most radio systems, it is sufficient to define a radio as a root or node
radio. The root radio is the radio connected to the host computer for
non-intrusive diagnostics functions. Specify only one root per radio network.
The GATE and PEER settings are used for complex radio networks and are
included to accommodate network-wide diagnostics in simplex and special radio network configurations.
Entering DTYPE NODE configures the radio as a node radio. Entering DTYPE
ROOT configures the radio as a root radio. Entering the DTYPE command alone
displays the current setting. The default setting is
NODE.
Refer to Section 7.2, Performing Network-Wide Radio Diagnostics,
beginning on Page 84. Refer to the GE MDS Network-wide Diagnostics
Handbook (P/N 05-3467A01) for a complete explanation of remote
diagnostics.
TX & RX Emphasis EMP [ON/OFF]
Use this command to enable or disable pre-emphasis and de-emphasis
on the analog input and output signals.
Pre-emphasis is a function used in older analog radios where the transmitter’s modulating signal is increased at the higher frequencies to
increase system performance. De-emphasis compensates at the receiver
for a transmitted signal that has had pre-emphasis applied.
ON indicates that pre-emphasis and de-emphasis are enabled, and OFF
indicates that pre-emphasis and de-emphasis are disabled.
Hardware Revision
Level
HREV
This command displays the hardware revision level.
Initialize to Factory
Defaults
INIT
This command resets customer-programmable settings back to factory
defaults:
Emphasis screen, Page 70
A
B
Table 12. Defaults for User-Configurable Parameters
Function Value
Alarm Mask—Major (AMASK) FFFF 0000
Alarm Mask—Minor (NMASK) 0000 FFFF
Alarm Sense—(ASENSE) Active Open (High)
Buffer Mode On
RSPSupply - 1-888-532-2706 - www.RSPSupply.com
http://www.RSPSupply.com/p-8457-MDS-UP-9790X.aspx

MDS 05-3438A01, Rev. F MDS 4790/9790 Series I/O Guide 47
Key Radio
Transmitter
KEY
This command activates the transmitter. See also the DKEY command.
Continuous Key (CKEY) Off
Data Baud Rate A: 9600
C: 19200
E: 4800
Data Format 8N1 (8 data bits, no parity, 1 stop bit)
Device Behavior DTE
Diagnostics Message Gap (DMGAP) 3 ms
Key-on-Data Mode (DATAKEY) On
Modem
Analog:
None (N/A for MDS 4790E)
Digital:
MDS x790A: 9600
MDS 4790C: 19200
MDS x790E: 4800
Owner’s Message “Blank”
Owner’s Name “Blank”
Power Output 37 dBm (5 W)
Pre/De-Emphasis Control Off
PTT Delay 0 msec
Radio Selection Auto
(with redundant hardware installed)
Repeater Mode Disabled
RTS/CTS delay 0 msec
RTU Simulator (RTU) Off
RX Level –10 dB
RX Mute Off
Soft-Carrier Dekey (SCD) 0 msec
Timeout-Timer 30 seconds (ON)
TX Level Auto
Unit Diagnostic Service (DTYPE) Node
Table 12. Defaults for User-Configurable
Function Value
Manual Key screen, Page 72
A
B
RSPSupply - 1-888-532-2706 - www.RSPSupply.com
http://www.RSPSupply.com/p-8457-MDS-UP-9790X.aspx

48 MDS 4790/9790 Series I/O Guide MDS 05-3438A01, Rev. F
Operation Log LOG [CLR]
This command displays or clears a list of the last 800 operating changes,
called “system events.” These events include alarm notifications, as
well as normal operator actions such as turning the power on or off. In
many cases, you can review the events leading up to a failure to help
determine the cause of a problem.
Entering the LOG command without any parameters displays the entire
event history. Entering LOG CLR or LOG CLEAR clears all current events
from the log history.
Multiple-Drop
Address
MADDR [NONE, 1–255]
The radio’s Multi-Drop Address uniquely identifies this radio on an
RS-232 COS (code-operated switch) bus connected to the rear panel’s
DIAGNOSTIC PORT, J1. The unit’s address initially is set as NONE, for a
computer directly connected to the DIAGNOSTIC PORT of one radio.
MADDR addresses can range from 1...255. The master station will ignore
diagnostic messages sent to other Multi-Drop Addresses. With the
MADDR address programmed, MDS’ InSite™ network management
system software can poll master stations through the COS bus to receive
the master unit’s diagnostic information. The MADDR command works
on MDS x790 master stations with software version 1.7 or later
installed. For more details, see “Connecting Multiple Masters at One
Site” on Page 32.
Display Unit Model
Number Code
MODEL
This command displays the radio’s model number. The characters and
numbers, and their position in the code sequence, identifies the product
options and configuration of the radio at the time of manufacture. It is
helpful to have this code and the unit serial number available when communicating with the factory for technical assistance.
Payload Data
Modem
Configuration
MODEM [NONE/4800/9600/19200/DEFAULT]
This command sets the radio’s signal type and modulation mode.
NONE—No modem is installed, or it is desired to use the unit as
an analog transceiver using Transmit Audio Input (Pin 9) and
Receive Audio Output (Pin 11). See “4-Wire Audio
Connector—J2” on Page 22 for 4-WIRE AUDIO INTERFACE
Event Log screen, Page 79
Clear Logs screen, Page 79
A
B
Multi-Drop Address (MADDR)
screen, Page 72
A
B
Modem screen, Page 69
A
B
RSPSupply - 1-888-532-2706 - www.RSPSupply.com
http://www.RSPSupply.com/p-8457-MDS-UP-9790X.aspx

MDS 05-3438A01, Rev. F MDS 4790/9790 Series I/O Guide 49
connector pinouts when the unit uses the digital
modem mode. Review the RXLEVEL command on Page 53 and
the TXLEVEL command on Page 59 for guidance on setting
appropriate levels.
9600—9600 bps modem speed (used for MDS 4790A/E and
MDS 9790A)
4800—4800 bps modem speed (used for MDS 4790E)
19200—19200 bps modem speed (used for MDS 4790C)
DEFAULT—Default modem speed for radio (model dependent)
Minor Alarm Event
Assignments
NMASK [0000 0000–FFFF FFFF]
Table 10 and Table 11 list the major and minor alarm classifications. It
is possible to reassign alarm outputs (illustrated in Figure 19 on
Page 22) to a different category, and to change which alarm events
trigger an automatic switchover in redundant master stations. However,
this should be done rarely, if ever.
The AMASK command (Page 40) and NMASK command reclassify major
and minor alarm events, respectively, changing the alarm output relay
status and switchover conditions. Use these commands to tailor a radio’s
alarm response. For example, a major alarm at a redundant master station causes switch-over to the other transceiver board. By reconfiguring
a minor alarm as a major alarm, a minor alarm condition can force a
transceiver board switch-over.
Reclassifying alarms does not disable alarm notification. The front
panel ALARM LED illuminates, the alarm event is logged, and the ALARM
and STAT commands show the alarm status.
Entering the NMASK command alone displays the current setting of
minor alarm events in hexadecimal format. Entering the
NMASK com-
mand followed by an eight-digit hexadecimal number reassigns each of
the 32 possible alarm events as enabled or disabled, with respect to
minor alarm output relay status and switchover criteria.
The hex value for the mask corresponds to the hex value for the ALARM
command (see the
ALARM command description). Each bit that is a ‘1’
identifies the associated alarm event as a major alarm. Each bit that is a
‘0’ means that the alarm condition will not cause an alarm output relay
to assert, and will not cause a transceiver board switch over.
Contact GE MDS for more information on configuring the alarm
response.
Alarm Masks screen, Page 75
A
B
RSPSupply - 1-888-532-2706 - www.RSPSupply.com
http://www.RSPSupply.com/p-8457-MDS-UP-9790X.aspx

50 MDS 4790/9790 Series I/O Guide MDS 05-3438A01, Rev. F
Options Installed OPT
The OPT command lists each upgradable option and shows whether it is
installed (
ON) or not-installed (OFF). For example:
You can implement several optional features through the use of a software “authorization code” that you can purchase from the factory. The
availability of options depends on what hardware is installed and what
features are permitted by the telecommunications regulatory body in
your country. Please contact the factory for further information.
Owner’s Message OWM [xxxxx]
The OWM command allows for display or entry of an optional text message such as the system name. The entry can contain up to 30 characters
and will appear on the default screen of the front panel interface.
Owner’s Name OWN [xxxxx]
The OWN command allows for display or entry of an optional text message such as the site name. The entry can contain up to 30 characters and
will appear on the default screen of the front panel interface.
Push-to-Talk Keying
Delay
PTT [0-255]
This command sets or displays the amount of time to wait after the radio
receives a keying signal from either the PTT (Push-to-Talk) or RTS
(Request-to-Send) lines before actually keying the transmitter. Entering
the
PTT command without a parameter displays the timer value associ-
ated with the keying delay selection. Entering the PTT command with a
parameter ranging from 0 to 255 sets the timer value in milliseconds. A
timer value of zero means that the radio keys immediately following the
keying signal.
The command is applicable for DCE operation, when the radio is keyed
either by the PTT signal or by RTS. The command is not applicable
when the radio is keyed by the
KEY command.
Diagnostics : ON
Premium Options : OFF
Digital Modem : ON
Set Owner Message screen,
Page 76
A
B
Set Owner Name screen,
Page 76
A
B
Push-to-Talk Delay
screen, Page 70
A
B
RSPSupply - 1-888-532-2706 - www.RSPSupply.com
http://www.RSPSupply.com/p-8457-MDS-UP-9790X.aspx

MDS 05-3438A01, Rev. F MDS 4790/9790 Series I/O Guide 51
Transmitter Power
Output Level
PWR [20–37]
This command sets or displays the master station’s RF forward output
power setting. Entering the PWR command without a parameter displays
the forward output power in dBm. Entering the PWR command with a
parameter ranging from 20 to 37 (verify using the OPT command) sets
the forward output power in dBm. The default setting is 37 dBm, which
is equivalent to 5 watts.
To read the radio’s actual (measured) power output, use the SHOW PWR
command.
NOTE: The RF power output of MDS 4790E ETSI certified radios is
fixed at 5 watts. No adjustment is possible.
Active Radio
Selection
RADIO [AUTO/A/B]
This command sets or displays the transceiver board selection. When
you select RADIO AUTO, automatic switchover is enabled. If a major
alarm is detected and a redundant radio is operational, control automatically switches to the alternate radio. Use the RADIO AUTO setting even if
there is only one transceiver board installed. This allows you to easily
upgrade the master station at a future date by simply inserting another
transceiver board.
Entering the RADIO command without a parameter shows the equipped
active/inactive status for both the A and B radios.
Example: >RADIO
Radio response:RADIO A
RADIO A IS ACTIVE
RADIO B IS INACTIVE
Entering the RADIO command with a parameter of A or B forces the active
transceiver board to the A or B transceiver board and disables standby
redundancy.
RADIO A or RADIO B settings should rarely be used; they are
provided mainly for diagnostic test purposes.
Repeater Mode REPEATER [ON/OFF]
This command sets or displays whether the radio is configured as a
repeater. Entering the REPEATER command without a parameter displays
the current setting (ON = repeater; OFF = not a repeater). Entering the
REPEA TER command followed by ON enables radio operation as a
repeater;
OFF disables operation as a repeater.
Output Power Setting [37-20]
screen, Page 69
A
B
Radio Selection screen, Page 78
A
B
Repeater Mode screen, Page 71
A
B
RSPSupply - 1-888-532-2706 - www.RSPSupply.com
http://www.RSPSupply.com/p-8457-MDS-UP-9790X.aspx

52 MDS 4790/9790 Series I/O Guide MDS 05-3438A01, Rev. F
Received Signal
Strength Indicator
RSSI, RSSI!
These commands display the Received Signal Strength Indication in
dBm units. The output can range from –50 dBm to –120 dBm.
RSSI is a raw signal level indicator, updated in real-time in a 1-second
interval. The RSSI command causes the DIAGNOSTIC PORT to enter an
RSSI update mode. The DIAGNOSTIC PORT provides an updated RSSI
output line with a 2-second refresh rate. The DIAGNOSTIC PORT stays in
this mode until you press the Enter key on the PC.
The RSSI! command provides a one-time reading and display of RSSI at
the diagnostic port.
Remote Terminal
Unit Simulator
RTU [ON/OFF/0-80]
This command enables or disables the radio’s internal RTU simulator,
which runs with GE MDS’ proprietary diagnostics software. The
internal RTU simulator is an optional feature which is not available on
all radios; use the
OPT command to see whether DIAGNOSTICS is ON
(internal RTU simulator was purchased for the radio) or OFF (not available on this radio).
You can also use this command to set the RTU’s address. Use the
internal RTU for testing system payload data and pseudo bit error rate
testing. It can help you isolate a problem to either the external RTU or a
transceiver board.
For more information on using the RTU simulator in a polling environment, refer to Publication 05-3467A01.
Receive Frequency RX [xxx]
This command displays or changes the radio’s receive frequency. Normally, the radio ships to the customer programmed with the customer-specified frequency. If you did not specify the operating
frequency when the radio was ordered, the RX frequency is set to the
center of the radio’s operating band (refer to Section 2.6, Model Number
Codes, beginning on Page 6 for the model’s operating band).
If you change the receive frequency more than 5 MHz from the factory’s
setting, the receiver’s front-end helical filters must be re-tuned. If you
also change the transmitter frequency, review the duplexer guidelines in
Section 8.4, Operating Frequency Change Considerations, beginning
on Page 89 before implementing any change.
Receive Signal Strength screen,
Page 77
A
B
Receive Frequency screen,
Page 69
A
B
RSPSupply - 1-888-532-2706 - www.RSPSupply.com
http://www.RSPSupply.com/p-8457-MDS-UP-9790X.aspx

MDS 05-3438A01, Rev. F MDS 4790/9790 Series I/O Guide 53
Received Data Audio
Level
RXLEVEL [–20 to +3]
The RXLEVEL and TXLEVEL (Page 59) commands control the audio level
settings when the radio is operating in analog mode. When used alone,
the RXLEVEL command displays the receive level in dBm. Entering the
RXLEVEL command followed by a number from –20 to +3 resets the
audio level in dBm.
NOTE: The RXLEVEL and TXLEVEL commands are only available on the
“A”/analog model radios.
Receiver Muting RXMUTE [ON/OFF/Time in msec]
Use this command to set or display the radio’s receive (RX) muting
status. Receive muting might be required when you configure the radio
as a full-duplex polling remote communicating through a repeater. It
prevents the radio from hearing its own transmissions (“echoes”) from
the repeater, which might cause software application errors.
Entering the RXMUTE command without a parameter shows whether the
muting feature is ON (enabled) or OFF (disabled). Entering the RXMUTE
command followed by ON enables muting; entering OFF disables it.
After issuing the RXMUTE ON command, you can specify a receive
muting time. Use the RXMUTE nn command, where nn is a time in milliseconds. This causes the receive muting feature to assert for nn milliseconds following the end of a transmission.
Receive Data
Attenuator
RXPAD [ON/OFF]
This command enables or disables the receive attenuator for the receive
audio level on radios operating in the analog mode. Entering the RXPAD
command without a parameter shows whether the attenuator is
ON
(enabled) or
OFF (disabled). Entering the RXPAD command followed by
ON enables the receive attenuator; entering OFF disables it.
Receiver
Timeout-Timer
RXTOT [NONE, 1-1440]
The
RXTOT command selects or displays the receive timeout timer value
in minutes if the receiver fails in a way that generates no other alarms
(for example, if data is not detected within the specified time). This
timer triggers an alarm (event 12) and forces a switch-over to the
standby transceiver board.
Receive Level [–20 to +3] screen
Page 75
A
B
RX Mute Mode screen,
Page 69
A
B
Receive Pad screen, Page 75
A
B
RSPSupply - 1-888-532-2706 - www.RSPSupply.com
http://www.RSPSupply.com/p-8457-MDS-UP-9790X.aspx

54 MDS 4790/9790 Series I/O Guide MDS 05-3438A01, Rev. F
Entering the RXTOT command without a parameter displays the timer
value in minutes. Entering the RXTOT command with a parameter
ranging from 1 to 1440 resets the timer in minutes. Entering the RXTOT
command with the parameter NONE disables the timer. The default value
is NONE.
Soft-Carrier Dekey SCD [0-255]
The “soft-carrier dekey” command sets or displays the amount of time
to wait after a de-key request before actually de-keying the radio’s transmitter.
Entering the SCD command without a parameter displays the timer value
in milliseconds. Entering the SCD command with a parameter ranging
from 0 to 255 resets the timer in milliseconds. The default setting is 0,
which means that the radio de-keys immediately following removal of a
keying signal (see “Simplex and Switched Carrier Operation” on
Page 4).
If you experience problems with repeater operation after changing the
CTS, PTT, or SCD values, contact GE MDS Technical Support.
Serial Number SER
This command displays the radio’s serial number as recorded at the factory.
Show Selected
Parameters
SHOW [DC/PWR/CURRENT/RADIO]
The SHOW command discloses different types of radio information,
depending on the command parameter entered. These are:
•
DC—Displays DC input/output voltages.
• PWR—Displays the actual (measured) RF power output in dBm.
Unlike the PWR command, this command shows the actual level
measured, not the programmed RF power setting.
• CURRENT—Shows the low noise amplifier and total board current.
• RADIO—Shows the currently active radio (A or B).
Transmit Timeout screen,
Page 71
A
B
Serial Number screen, Page 78
A
B
RSPSupply - 1-888-532-2706 - www.RSPSupply.com
http://www.RSPSupply.com/p-8457-MDS-UP-9790X.aspx

MDS 05-3438A01, Rev. F MDS 4790/9790 Series I/O Guide 55
Signal-to-Noise
Ratio
SNR, SNR!
These commands display the signal-to-noise ratio in dB. GE MDS’ definition of signal-to-noise is based upon the signal level following equalization, for valid data frames only. A valid frame contains no more than
one bit-error, and belongs to a packet addressed for the receiving radio.
SNR is updated and latched for each valid packet received. A filter in
the DSP reduces the effect of any sudden changes in the value.
The output ranges from 10 dB to 33 dB. A value of 10 dB represents a
weak or no signal. A value of 24 dB represents a very strong signal.
The SNR command causes the diagnostic port to enter an SNR update
mode. The DIAGNOSTIC PORT displays an updated SNR output line at
roughly a 2 second interval refresh rate. The diagnostic port stays in this
mode until you press the Enter key at the PC.
The SNR! command provides a one-time reading and display of SNR at
the diagnostic port.
Software (firmware)
Revision Level
SREV
SREV displays the software release number, revision and build date:
Command Input Response
SHOW DC DC IN xx.x V - Power applied to radio
DC OUT x.x V - Regulated output from
U116 (10 V regulator)
SHOW PWR RF POWER xx dBm
SHOW CURRENT LNA xxx mA - Current consumption of
LNA
TOTAL xxx mA - Total radio current
SHOW RADIO B RADIO IS ACTIVE
A RADIO IS [INACTIVE|NOT
EQUIPPED]
S/N Ratio screen,
Page 78
A
B
06-3321A01
1.0.0 ddmmmyyyy
Software Revision screen,
Page 78
A
B
RSPSupply - 1-888-532-2706 - www.RSPSupply.com
http://www.RSPSupply.com/p-8457-MDS-UP-9790X.aspx

56 MDS 4790/9790 Series I/O Guide MDS 05-3438A01, Rev. F
Standby Hardware
Configuration
STANDBY [ON/OFF]
Use the STANDBY command to notify the monitoring processor of the
presence of a second radio assembly within the chassis so that it can
switch to the alternate radio if the primary radio assembly fails.
STANDBY ON = Chassis is equipped with two radio assemblies
STANDBY OFF = Chassis equipped with only one radio assembly
Responses to the STANBY command are:
STANDBY DEFINED = The chassis is equipped with two
radio assemblies
STANDBY NOT DEFINED = The chassis is equipped with only
one radio assembly
Alarm Status
Display
STAT
The STAT command provides a user-friendly, interactive way to view
alarm status (the ALARM command [Page 37] summarizes alarm codes in
hexadecimal format).
If no alarm event conditions are active, the message NO ALARMS
PRESENT is shown. If alarms are present, they are shown in ascending
order starting with the lowest event number:
Major alarms are displayed first, followed by minor alarms.
The command output shows the event number, major/minor status, and
a one- or two-line text message. If additional alarm events are active, the
MORE> prompt is shown.
• Press the Enter key to display the next alarm event
• Enter QUIT, Q, or a period (.) to return to the command prompt
Standby Equipment screen,
Page 73
A
B
Event: 26 (MINOR)
DC input power is not in valid
range
Active Radio Status screen,
Page 77
A
B
RSPSupply - 1-888-532-2706 - www.RSPSupply.com
http://www.RSPSupply.com/p-8457-MDS-UP-9790X.aspx

MDS 05-3438A01, Rev. F MDS 4790/9790 Series I/O Guide 57
The table below gives the text message displayed by the
STAT command for each alarm event.
Unit’s Internal
Temperature
TEMP
This command displays the radio’s internal temperature in degrees Celsius. Note that the radio is designed to operate in a range from –30 C° to
+60 C°, and may fail at temperatures outside this range. This internal
reading might be higher than the outside temperature by several degrees.
Clock Formatting TIME [hh:mm:ss]
This command sets or displays the time in 24-hour format. The accuracy
of the date and time are important because events are logged with the
date and time (see “DATE [mmm dd yyyy]” on Page 44).
Table 13. Text Messages of Alarm Event Codes
Event
Number
Text Message
01 Hardware mismatch
02 Model number not programmed
03 Authorization fault
04 Synthesizer out-of-lock
06 A/D fault
07 Voltage regulator fault detected
08 Radio not calibrated
10 EEPROM write failure
12 Receiver timeout
13 Transmitter timeout
15 Output power fault
16 Unit address not programmed
17 Data parity error
18 Data framing error
20 Configuration error
25 10V regulator output not in valid
range
26 DC input power is not in valid range
27 LNA current is not in valid range
28 Board current not in valid range
31 Internal temperature not in valid
range
Show Temperature and
Voltages screen, Page 78
A
B
Set Time screen, Page 77
A
B
RSPSupply - 1-888-532-2706 - www.RSPSupply.com
http://www.RSPSupply.com/p-8457-MDS-UP-9790X.aspx

58 MDS 4790/9790 Series I/O Guide MDS 05-3438A01, Rev. F
Enter the command without any parameters to display the time. Enter
the command in the following format to reset the time:
TIME hh:mm:ss
where hh is a two-digit number from 00-23 representing the hour (00 is
12:00 am;
12 is 12:00 pm; and 23 is 11:00 pm), mm is a two-digit number
from 00 to 59 representing the minute, and ss is a two-digit number from
00 to 59 representing the second.
Transmit TimeoutTimer
TOT [ON/OFF, 1-255]
The Transmit Timeout Timer limits the time a radio can remain continuously keyed. If a radio remains keyed for longer than the timer duration, the transmitter automatically de-keys. The radio must transition to
the de-keyed state before accepting a new keying request.
The TOT command entered without a parameter displays the timer value
in seconds.
To enable the timer, enter TOT ON. To disable the timer, enter TOT OFF.
The default is TOT ON.
To set the timer value, enter the TOT command followed by a parameter
ranging from 1 to 255 (seconds). The default is 30 seconds.
Transmit Frequency TX [xxxx]
This command displays or changes the radio’s transmit frequency. Normally, the radio ships to the customer programmed with the customer-specified frequency. If you did not specify the operating
frequency when the radio was ordered, the TX frequency is set to the
center of the radio’s operating band (see Section 2.6, Model Number
Codes, beginning on Page 6 for the model’s operating band).
If the transmit frequency is changed more than 100 kHz from the factory’s setting, review the duplexer guidelines in Section 8.4, Operating
Frequency Change Considerations, beginning on Page 89.
Transmit Timeout screen,
Page 71
A
B
Transmit Timeout Duration
screen, Page 71
A
B
Transmit Frequency screen,
Page 68
A
B
RSPSupply - 1-888-532-2706 - www.RSPSupply.com
http://www.RSPSupply.com/p-8457-MDS-UP-9790X.aspx

MDS 05-3438A01, Rev. F MDS 4790/9790 Series I/O Guide 59
Transmit Data Audio
Gain Enhancement
TXGAIN [ON/OFF]
This command enables or disables the transmit audio boost for the
transmit audio level in radios operating in analog mode using J2: 4-WIRE
AUDIO INTERFACE
. Entering the TXGAIN command without a parameter
shows whether the audio boost is ON (enabled) or OFF (disabled).
Entering the TXGAIN command followed by ON enables audio boost;
entering OFF disables it.
NOTE: The RXLEVEL and TXLEVEL commands are only available on the
“A”/analog model radios.
Transmit Data Audio
Level
TXLEVEL [–20 to +3, AUTO]
Use the TXLEVEL and RXLEVEL (Page 53) commands to control the audio
level settings when using the analog mode for equipment connected to
the 4-WIRE AUDIO CONNECTOR (J2). When used alone, the TXLEVEL
command displays the transmit level in dBm. Entering the TXLEVEL
command followed by a number from –20 to +3 (inclusive) resets the
audio level in dBm. Entering the TXLEVEL command followed by AUTO
causes the radio to set the transmit level automatically. The default setting is AUTO.
Evaluate system performance in the AUTO mode. In most cases, this
setting provides satisfactory performance. If it does not, evaluate the
BER at the other settings.
Unit Diagnostic
Address
UNIT [10000–65000]
This command sets or displays the radio’s unit address, which uniquely
identifies a single radio within a network in support of a network management system (NMS) program, such as MDS’ InSite™.
The default unit address is the last four digits of the radio’s serial
number. User-programmable unit addresses can range 10000...65000
(addresses in the 0...9999 range are reserved for use by the factory).
Once you change the default unit address, it cannot be reprogrammed.
NOTE: The Unit Address operates independently from the Multi-Drop
Address (“Multiple-Drop Address” on Page 48).
Transmit Gain screen, Page 75
A
B
Transmit Level [–20 to +3,
AUTO] screen, Page 74
A
B
Unit Address screen, Page 73
A
B
RSPSupply - 1-888-532-2706 - www.RSPSupply.com
http://www.RSPSupply.com/p-8457-MDS-UP-9790X.aspx

60 MDS 4790/9790 Series I/O Guide MDS 05-3438A01, Rev. F
6.4 Configuration and Programming using the
Front Panel
If you cannot connect a PC running GE MDS diagnostics software to the
radio, use the front panel display and controls to review and change
operating parameters and perform diagnostics. This section explains
how to use the front panel controls and screens. Cross-references to the
corresponding PC-based commands are included.
The front panel display has two modes: “safe” mode (display only), and
configuration mode. These modes are changed by defining the user
access level. When the radio is powered on, the front panel display is in
safe mode. The front panel display mode, and the brightness and contrast of the front panel display, are the only changes that can be made to
the radio in safe mode. The front panel display reverts to safe mode after
a period of time has elapsed without a button press, whenever the radio
is powered back on, and whenever a switchover occurs.
Normally, if no button activity occurs for one hour, the LCD display
reverts to a power saving mode. The only exception is the Operating
Status screen. This is a special screen, found under the Diagnostics main
menu. This screen displays key status, RSSI, and SNR (if applicable).
The screen does not time-out, and is preserved during power outages
and radio switchovers.
Changing the front panel display to configuration mode is described in
“Switching the Front Panel Display to Configuration Mode” on Page 63.
Figure 29 on Page 61 provides an overview of the front panel screens.
Each screen displays a single piece of information or radio function. The
screens are divided into configuration, diagnostics, and event log functions. Individual screens are described in more detail in Section 6.5,
Screen Descriptions, beginning on Page 64.
The flowchart shown in Figure 29 is intended to be a feature guide, and
is subject to additions, deletions, or other modifications according to the
software revision installed in the radio.
Table 14. Front Panel Display’s
“Safe” Mode vs. “Configuration” Mode
Changes to... When… Configurable Pa-
rameters
Access
Level
Safe Mode Radio is powered on
A period of time has elapsed
without a button pressed
Display mode
(safe/configuration)
Display brightness
Display contrast
None
Configuration
Mode
Access level is set to “User” All parameters User
RSPSupply - 1-888-532-2706 - www.RSPSupply.com
http://www.RSPSupply.com/p-8457-MDS-UP-9790X.aspx

MDS 05-3438A01, Rev. F MDS 4790/9790 Series I/O Guide 61
Invisible place holder
Figure 29. Front Panel Screen Flowchart
ENTER
ENTER
ENTER
TO CHANGE SETTING:
ENTER
ENTER
TO CHANGE
SETTING:
MDS 4790 MAS Radio
OWNERS NAME
OWNERS MESSAGE
ESCAPE
Clear Logs
CONFIGURATION
SCREENS (CONTINUED)
RADIO START-UP
ENTER
ESCAPE
ESCAPE
ENTER
ENTER
ENTER
TO CHANGE
SETTING:
ENTER
ESCAPE
MDS 4790 MAS Radio
≥Configuration
Diagnostics
Event Log
Unit Address
6682
Standby Equipment
Not Defined
MADDR
231
Battery Backup
Not Defined
Continuous Keyed
Disabled
Manual Keyed
Disabled
Data Buffering
Disabled
Key On Data
Emphasis
disabled
Clear to Send Delay
25 milliseconds
Push to Talk Delay
0 milliseconds
Soft Carrier De-key
0 milliseconds
Transmit Timeout
enabled
Transmit
55 Seconds
RX Timeout
none
Repeater Mode
disabled
RX Mute Mode
disabled
RX Mute Mode
Disabled
Enabled
Diagnostic Link
enabled
DLINK Baudrate
4800
Diagnostic Type
Root
TX Audio Level
-20 dBm
RX Audio Level
-20 dBm
Transmit Gain
disabled
Receive Pad
disabled
Alarm Masks
Major None
Minor None
Alarm Sense is HI
Display Contrast
0 50 100
Backlight Intensity
0 50 100
Set Owner Message
North Master 2
Set Time
11:34:56 PM
June 12, 2003
Set Date
11:34:56 PM
June 12, 2003
Operating Status
TX: dekeyed
RSSI: –60 dBm
S/N: 10 dB
Active Radio Status
no alarms present
S/N Ratio
10 dB
Radio Selection
AUTO
Radio A is Active
Transmitter Status
dekeyed
Show Temp/Voltage
30° Celsius
14.7 Volts Input
10.1 Volts Output
Serial Number
A: 12345678
B: NOT EQUIPPED
Software Revision
06-3321A01
2.2.0 15 Sept 2003
Set Owner Name
OWNERS NAME
Transmit Frequency
457.99375
Set Access Level
User
Receive Frequency
463.49375
Output Power Setting
37 dBm
Modem
9600
Baudrate/Format
9600 8N1
Rx Signal Strength
-60 dBm
MDS 4790 MAS Radio
Configuration
Diagnostics
≥Event Log
MDS 4790 MAS Radio
Configuration
≥Diagnostics
Event Log
LOG 1 OF 1
6/1/2000 12:00:00
System Boot
ENTER
ENTER
MDS 4790 MAS Radio
≥Configuration
Diagnostics
Event Log
NOTE: Chart is for reference only, and may
not reflect the exact configuration of your radio.
RSPSupply - 1-888-532-2706 - www.RSPSupply.com
http://www.RSPSupply.com/p-8457-MDS-UP-9790X.aspx

62 MDS 4790/9790 Series I/O Guide MDS 05-3438A01, Rev. F
Programming and Control Buttons
The programming and control buttons are located at the right side of the
front panel. Use these butons to navigate through the front panel screens
and, when the front panel display is in configuration mode, to make
changes to radio operating parameters. Figure 30 shows a detailed view
of these controls.
Invisible place holder
Figure 30. Programming and Control Buttons
• ENTER—When the start-up screen is shown, pressing this button displays the Menu Directory screen. Otherwise, the ENTER
button has no effect in safe mode. Its use in radio configuration
is described in “Use of Control Buttons in Configuration Mode”
on Page 63.
• ESCAPE—Shows the previous screen in the menu hierarchy
(start-up screen or menu directory). Its use in radio configuration is described in “Use of Control Buttons in Configuration
Mode” on Page 63.
• Up/down arrow buttons ( )—On the start-up screen,
pressing the up or down arrow button shows the menu directory.
On the menu directory screen (Figure 31), the up and down
arrow buttons cycle a selection arrow (->) through the main
menu items. On the individual menu screens, in safe mode,
pressing the up or down arrow buttons shows the menu directory.
• Left/right arrow buttons ( )—The left and right arrow
buttons cycle the display through the selected menu’s screens.
Navigating Through the Front Panel Screens
Figure 29 on Page 61 shows the menu hierarchy, as well as the button
presses used to display the start-up and menu directory screens (navigate
between individual screens with the right or left arrow buttons).
ENTER
ESCAPE
RSPSupply - 1-888-532-2706 - www.RSPSupply.com
http://www.RSPSupply.com/p-8457-MDS-UP-9790X.aspx

MDS 05-3438A01, Rev. F MDS 4790/9790 Series I/O Guide 63
Invisible place holder
Figure 31. Menu Directory Screen
Displaying the menu
directory
To display the menu directory when the start-up screen is shown, press
the ENTER, up, or down arrow button once. The menu directory lists the
three main menus—Configuration, Diagnostics, and Event Log.
Selecting a main
menu item
Pressing the up or down arrow buttons cycles the selection arrow (->)
through the main menu items.
Displaying the
individual menu
screens
When the selection arrow points to the desired menu, press the right or
left arrow buttons to cycle through that menu’s screens. Each button
press shows a new screen, until you have cycled through the entire menu
and the menu directory is shown again.
To return to the menu directory from any menu screen, press the
ESCAPE, up or down arrow button once. Pressing any of these buttons
twice shows the start-up screen.
Switching the Front Panel Display to Configuration Mode
As explained in Table 14 on Page 60, the front panel display has two
modes, safe mode and configuration mode. The front panel display is
normally in safe mode. To activate configuration mode:
1. From the start-up screen, press the down arrow button to show the
menu directory.
2. On the menu directory screen, press the right arrow button to show
the Access Level screen.
3. Press the
ENTER button to initiate a radio operation change.
4. Press the down arrow button to display the other access level, USER.
5. Press the ENTER button to save the change.
Use of Control Buttons in Configuration Mode
In configuration mode, the control buttons provide additional functions:
•
ENTER—Starts and ends a change to radio functionality
(enables arrow buttons you can use for selections instead of navigation).
MDS 4790 MAS Radio
-> Configuration
Diagnostics
Event Log
Selection
arrow
RSPSupply - 1-888-532-2706 - www.RSPSupply.com
http://www.RSPSupply.com/p-8457-MDS-UP-9790X.aspx

64 MDS 4790/9790 Series I/O Guide MDS 05-3438A01, Rev. F
• ESCAPE—Cancels the current radio functionality selection
before you press the ENTER button a second time.
• Up/down arrow buttons ( )—Cycles through the available choices. Pressing the ENTER button when a particular
choice is displayed reconfigures the radio using that setting.
Changing radio functions
1. When an individual menu screen is shown, press the ENTER button.
The message change pending appears at the bottom of the screen.
This indicates that the next series of arrow button presses will make
on-screen selections and will not display menu screens.
2. Most options are either words (“enabled,” “disabled”) or numbers.
The instructions below apply in most situations; if not, the method
for choosing an option is detailed in the screen description.
Word options. To display all choices when the options are words,
press the up or down arrow button.
Numeric options. If the option is more than one digit, first select
the digit to change: press the left or right arrow button to
move the cursor ( _ ) under the digit to change (for example, to
change 30 to 40, move the cusor under the 3). Then press the up or
down arrow buttons to increase or decrease the number, or
hold down the arrow button to scroll through choices more rapidly.
3. Press the ENTER button again when the desired choice is shown (or
press the ESCAPE button to cancel the change). The message done
appears, indicating that the change was successful.
6.5 Screen Descriptions
This section describes each front panel display screen. The commands
refer to the descriptions of corresponding commands entered from a
connected PC using the graphic at left.
These screens are presented in four major groups:
Group 1—Startup Screen and Menu Directory (page 68)
These screens are starting points for all programming and viewing activities.
Group 2—Configuration Screens (Page 68)
Use the Configuration screens to view or define the radio’s operating
parameters.
This graphic points you
to the corresponding PC
command
TX [xxxx] command,
Page 58
RSPSupply - 1-888-532-2706 - www.RSPSupply.com
http://www.RSPSupply.com/p-8457-MDS-UP-9790X.aspx

MDS 05-3438A01, Rev. F MDS 4790/9790 Series I/O Guide 65
Group 3—Diagnostic Screens (Page 77)
The Diagnostic screens display important status information for the
local and remote radio, as well as run several tests useful in locating
system problems.
Group 4—Event Log (Page 79)
The event log lists up to 800 of the most recent operating changes. These
events include system problems, as well as normal operator actions
such as turning the power on or off.
The following table organizes front panel screens in the same way as the
PC commands described earlier in this manual: operating parameters,
diagnostics, and radio information.
Table 15. Front Panel Screens—Configuration Parameters
FRONT P ANEL
SCREEN
TERMINAL
COMMAND
DESCRIPTION
Access Level
Details, page 68
Enable or disable configuration mode.
Alarm Masks
Details, page 75
AMASK [0000
0000–FFFF FFFF]
Details, page 40
NMASK [0000
0000–FFFF FFFF]
Details, page 49
ASENSE [HI/LO]
Details, page 41
Set or show hexadecimal code identifying
whether alarm events cause an alarm output
relay to assert and cause the active radio to
switch over; also displays the alarm sense.
Battery Backup
Details, page 73
BATT(ery) [ON/OFF]
Detailspage41
Enable or disable alarm generation when the
back-up battery falls below 13.0 Vdc.
Backlight Intensity
Details, page 76
Set or show front panel display’s background
brightness.
Baud Rate/Format
Details, page 70
BAUD [xxxxx abc]
Details, page 42
Set or show data interface port communica-
tion attributes.
Clear-to-Send Delay
Details, page 70
CTS [0-255]
Details, page 43
Set or show the time to wait after RTS is
asserted by the host computer before asserting the CTS line.
Continuous Keying
Details, page 72
CKEY [ON/OFF]
Details, page 43
Select continuous or non-continuous keying.
Data Buffering
Details, page 74
BUFF [ON/OFF]
Details, page 42
Enable or disable data buffering.
Display Contrast
Details, page 75
Set or show front panel display’s foreground
character intensity.
Emphasis
Details, page 70
EMP [ON/OFF]
Details, page 46
Enable or disable pre-emphasis and
de-emphasis.
Key On Data
Details, page 73
DATAKEY [ON/OFF]
Details, page 44
Set or show keying behavior (key-on-data or
key-on-RTS).
Multi-Drop Address
(MADDR)
Details, page 72
MADDR [NONE, 1–255]
Details, page 48
Unit address for use with MDS’ InSite NMS
software, where multiple master stations are
connected at one location.
Manual Key
Details, page 72
DKEY
Details, page 45
KEY
Details, page 47
Manually key or dekey the transmitter.
RSPSupply - 1-888-532-2706 - www.RSPSupply.com
http://www.RSPSupply.com/p-8457-MDS-UP-9790X.aspx

66 MDS 4790/9790 Series I/O Guide MDS 05-3438A01, Rev. F
Menu Directory
Details, page 68
Select diagnostic, configuration, or event log
screens.
Modem
Details, page 69
MODEM
[NONE/4800/9600/19200/
DEFAULT]
Details, page 48
Set or show internal modem speed.
Output Power Setting
[37-20]
Details, page 69
PWR [20–37]
Details, page 51
Set or show the transmit power output.
Push-to-Talk Delay
Details, page 70
PTT [0-255]
Details, page 50
Set or show the amount of time to wait after
the host computer asserts RTS b efore keying
the radio and transmitting.
Radio Selection
Details, page 78
RADIO [AUTO/A/B]
Details, page 51
Set or show the active transceiver board;
enable or disable automatic switch-over.
Receive Frequency
Details, page 69
RX [xxx]
Details, page 52
Set or show the receive frequency.
Receive Level [–20 to +3]
Details, page 75
RXLEVEL [–20 to +3]
Details, page 53
Set or show the radio’s audio transmit level
when the radio operates in analog mode.
Receive Pad
Details, page 75
RXPAD [ON/OFF]
Details, page 53
Enable or disable the receive attenuator for
the receive audio level.
Repeater Mode
Details, page 71
REPEATER [ON/OFF]
Details, page 51
Enable or disable repeater mode.
RX Mute Mode
Details, page 72
RXMUTE [ON/OFF/Time
in msec]Detailspage 53
When on, prevents the radio from hearing its
own transmissions. Prevents errors in some
software applications.
RX Timeout [NONE,
1-1440]
Details, page 71
RXTOT [NONE, 1-1440]
Detailspage53
Set or show the amount of time to wait wit hout
data receipt before generating an alarm and
switching to the stand-by transceiver board.
Set Date
Details, page 77
DATE [mmm dd yyyy]
Details, page 44
Set or show the date.
Set Time
Details, page 77
TIME [hh:mm:ss]
Details, page 57
Set or show the time.
Standby Equipment
Details, page 73
STANDBY [ON/OFF]
Details, page 56
Enable or disable the monitoring of standby
equipment within the chassis.
Transmit Timeout
Details, page 71
SCD [0-255]
Details, page 54
Set or show amount of time to wait after a
de-key request before actually de-keying the
radio.
Transmit Frequency
Details, page 68
TX [xxxx]
Details, page 58
Set or show the transmitter frequency.
Transmit Gain
Details, page 75
TXGAIN [ON/OFF]
Details, page 59
Enable or disable the transmit audio boost for
the transmit audio level.
Transmit Level [–20
to +3, AUTO]
Details, page 74
TXLEVEL [–20 to +3,
AUTO]
Details, page 59
Set or show the radio’s audio transmit level
when the radio is in analog mode.
Transmit Timeout
Details, page 71
TOT [ON/OFF,
1-255]
Details page 58
Enable or disable the Transmit T i meout timer
(time to wait before disabling the transmitter
to prevent unnecessary use of the frequency).
Transmit Timeout Duration
Details, page 71
TOT [ON/OFF, 1-255]
Detailspage58
Set or show the Transmit Timeout duration
(time to wait before disabling the transmitter
to prevent unnecessary use of the frequency).
Table 15. Front Panel Screens—Configuration Parameters
FRONT P ANEL
SCREEN
TERMINAL
COMMAND
DESCRIPTION
RSPSupply - 1-888-532-2706 - www.RSPSupply.com
http://www.RSPSupply.com/p-8457-MDS-UP-9790X.aspx

MDS 05-3438A01, Rev. F MDS 4790/9790 Series I/O Guide 67
Table 16. Front Panel Screens—Diagnostics
FRONT P ANEL
SCREEN
TERMINAL
COMMAND
DESCRIPTION
Active Radio Status
Details, page 77
STAT
Details, page 56
Show alarm conditions.
Clear Logs
Details, page 79
LOG [CLR]
Details, page 48
Clear the event log.
Event Log
Details, page 79
LOG [CLR]
Details, page 48
Show events logged by the active transcei ver
board.
S/N Ratio
Details, page 78
SNR, SNR!
Details, page 55
Show the signal-to-noise ratio in dBm.
Show Temperature and
Voltages
Details, page 78
TEMP
Details, page 57
Show the radio’s internal temperature and
voltages.
Start-up Screen
Details, page 68
Show the radio name, owner name, owner
message, and any alarms.
Transmitter Status
Details, page 78
Show the transmitter state (k eyed or
dekeyed).
Table 17. Front Panel Screens—Owner and Radio Information
FRONT P ANEL
SCREEN
TERMINAL
COMMAND
DESCRIPTION
Serial Number
Details, page 78
SER
Details, page 54
Show the active transceiver board’s serial
number (not the radio serial number).
Set Owner Message
Details, page 76
OWM [xxxxx]
Details, page 50
Set or show the owner message or site name.
Set Owner Name
Details, page 76
OWN [xxxxx]
Details, page 50
Set or show the owner name or system name.
Software Revision
Details, page 78
SREV
Details, page 55
Show the internal software part number and
version number.
Start-up Screen
Details, page 68
Show the radio name, owner name, owner
message, and any alarms.
Unit Diagnostic Address
Details, page 59
UNIT [10000–65000]
Details, page 59
Show the radio’s unit address.
RSPSupply - 1-888-532-2706 - www.RSPSupply.com
http://www.RSPSupply.com/p-8457-MDS-UP-9790X.aspx

68 MDS 4790/9790 Series I/O Guide MDS 05-3438A01, Rev. F
GROUP 1—MAIN SCREENS
Start-up Screen When the radio first powers on, or after a period of time has elap sed after the last
button press, the front panel shows the start-up screen. The start-up screen shows
the product model number, as well as the owner’s name and message (typically,
customers use the owner name and message fields to display the system and site
name).
The screen dims after a period of time has elapsed without activity; restore
brightness by pressing any button.
T o change what shows on this screen, see “Set Owner Name” on Page 76 and “Set
Owner Message” on Page 76.
Press ENTER, or the up or down arrow button, to show the Menu Directory screen.
The screen dims after a period of time has elapsed without any activity; restore
brightness by pressing any button.
T o change what shows on this screen, see “Set Owner Name” on Page 76 and “Set
Owner Message” on Page 76.
Press ENTER, or the up or down arrow button, to show the Menu Directory screen.
Menu Directory Use this screen to access three screen display cycles: Configuration,
Diagnostics, and Event Log. The selection arrow (
->) points to the currently
selected menu.
Press the up/down arrow buttons to move the arrow to the desired menu, then
press the right/left arrow buttons to display each of that menu’s screens.
GROUP 2—CONFIGURATION
Access Level Use this screen to set the front panel screen to configuration mode by selecting a
level of access. There are two levels:
NONE—This is the default setting upon power-up (“safe” mode). You can view
all radio settings, change the access level, and change the front panel screen’s
brightness and contrast. All other settings are shown only, and cannot be
changed.
USER—Make changes to any radio parameter (“configuration” mode).
To select the USER access level, press ENTER, press the down arrow button to
display the word “User,” then press ENTER again to make the change.
The radio returns automatically to safe mode (access level: NONE) after a period
of time without a button press, or if the radio is powered off and then on.
Transmit
Frequency
Use this screen to set or show the transmitter frequency.
Normally, the radio ships configured with the customer-specified frequency. If you
did not specify the operating frequency when the radio was ordered, the factory
sets the TX frequency to the center of the radio’s operating band. The range of
frequencies for standard models are provided in Section 10.1, Technical
Specifications, beginning on Page 97.
To change the current frequency, press ENTER, then press the left/right arrow
buttons to select a digit. Use the up/down arrow buttons to increase or decrease
the number. Press ENTER to make the change.
MDS 4790 MAS
Radio
OWNERS NAME
OWNERS
MDS 4790A MAS
Radio
->Configuration
Diagnostics
Event Log
Set Access Level
User
Transmit Frequency
400.00000 MHz
TX [xxxx] command, Page 58
RSPSupply - 1-888-532-2706 - www.RSPSupply.com
http://www.RSPSupply.com/p-8457-MDS-UP-9790X.aspx

MDS 05-3438A01, Rev. F MDS 4790/9790 Series I/O Guide 69
NOTE: Changing the transmitter’s operating frequency may resu lt in degraded or
out-of-specification performance. Review Section 8.4, Operating
Frequency Change Considerations, beginning on Page 89 before making a
change.
Receive
Frequency
Use this screen to set or show the receive frequency.
Normally, the radio ships programmed with the customer-specified frequency. If
you did not specify the operating frequency when the radio was ordered, the factory
sets the RX frequency to the center of the radio’s operating band. The range of
frequencies for standard models are provided in Section 10.1, Technical
Specifications, beginning on Page 97.
To change the current frequency, press ENTER, then press the left/right arrow
buttons to select a digit. Use the up/down arrow buttons to increase or decrease
the number. Press ENTER to make the change.
NOTE: Changing the receiver’s operating frequency may result in degraded or
out-of-specification performance. Review Section 8.4, Operating
Frequency Change Considerations, beginning on Page 89 before making a
change.
Output Power
Setting [37-20]
Use this screen to set or show the transmit power output setting. Set power output
from +37 dBm to +20 dBm.
To change this value, press ENTER, then use the left/right arrow buttons to select
a digit. Use the up/down arrow buttons to increase or decrease the number . Refer
to Table 18 to convert dBm to watts if necessary. Press ENTER to make the
change.
Modem Use this screen to set or show the internal modem speed for compatibility with the
modem in the central host computer.
To change the modem speed, press ENTER, then use the up/down arrow buttons
to show available modem speeds. Press ENTER to make the change.
Review the Receive Level parameter on Page 75 and the Transmit Gain parameter
on Page 75 for guidance on setting appropriate levels.
Receive Frequency
400.00000 MHz
RX [xxx] command, Page 52
Output Power Setting
30 dBm
Table 18. dBm Vs. Watts
dBm Watts dBm Watts
+37 dBm 5.0 watts +27 dBm 500 milliwatts
+35 dBm 3.2 watts +25 dBm 320 milliwatts
+33 dBm 2.0 watts +23 dBm 200 milliwatts
+31 dBm 1.25 watts +20 dBm 100 milliwatts
+29 dBm 800 milliwatts
PWR [20–37] command,
Page 51
Modem
4800
MODEM
[NONE/4800/9600/19200/
DEFAULT] command,
RSPSupply - 1-888-532-2706 - www.RSPSupply.com
http://www.RSPSupply.com/p-8457-MDS-UP-9790X.aspx

70 MDS 4790/9790 Series I/O Guide MDS 05-3438A01, Rev. F
Baud Rate/Format Use this screen to set or show the communication attributes for the DATA
INTERFACE port. For a description of the communication attributes, see
BAUD
[xxxxx abc] command, Page 42.
To change the baud rate, press ENTER, then press the left arrow button to move
the cursor under the baud rate. Use the up/down arrow buttons to select a new
baud rate.
T o change the data format, press ENTER, then press the right arrow button one or
more times to move the cursor (_) under the character to change. Use the up/down
arrow buttons to change the character. Repeat for the other characters in the data
format if necessary. Press ENTER to make the change.
Emphasis Use this screen to enable or disable pre-emphasis and de-emphasis on the analog
input and output signals.
Pre-emphasis is a function used in older analog radios where the modulating signal
is increased (at the transmitter) at the higher frequencies to increase system
performance. De-emphasis compensates (at the receiver) for a signal that has had
pre-emphasis applied.
To enable or disable pre-emphasis and de-emphasis, press ENTER, then use the
up/down arrow buttons to show ENABLED or DISABLED. Press ENTER to make
the change.
Clear-to-Send
Delay
Use this screen to set or show the Clear-to-Send Delay. This specifies the amount
of time to wait after RTS is asserted by the host computer on the data port before
asserting the CTS line. When the delay is 0, data is sent from the data port without
imposing a keying delay.
To change the delay, press ENTER, then use the left/right arrow buttons to select
the digit to change. Use the up/down arrow buttons to increase or decrease the
digit. Repeat for the other digits if necessary. Press ENTER again to make the
change.
Push-to-Talk Delay Use this screen to set or show the Push-to-Talk Delay. This is the amount of time
to wait after RTS is asserted by the host computer before the radio is keyed and
transmits. When the delay is 0, the radio keys immediately following the keying
signal.
To change the delay, press ENTER, then use the left/right arrow buttons to select
the digit to change. Use the up/down arrow buttons to increase or decrease the
digit. Repeat for the other digits if necessary. Press ENTER again to make the
change.
Baudrate/Format
9600 8N1
BAUD [xxxxx abc] command,
Page 42
Emphasis
enabled
EMP [ON/OFF] command,
Page 46
Clear to Send Delay
0 milliseconds
CTS [0-255] command,
Page 43
Push to Talk Delay
0 milliseconds
PTT [0-255] command,
Page 50
RSPSupply - 1-888-532-2706 - www.RSPSupply.com
http://www.RSPSupply.com/p-8457-MDS-UP-9790X.aspx

MDS 05-3438A01, Rev. F MDS 4790/9790 Series I/O Guide 71
Soft-Carrier
De-key Delay
Use this screen to set or show the Soft-Carrier Dekey Delay. This specifies the
amount of time to wait after a de-key request before actually de-keying the radio.
When the delay is 0, the radio de-keys immediately following removal of a keying
signal.
To change the delay, press ENTER, then use the left/right arrow buttons to select
the digit to change. Use the up/down arrow buttons to increase or decrease the
digit. Repeat for the other digits if necessary. Press ENTER again to make the
change.
Transmit Timeout Use this screen to show the Transmit T imeout setting, and to enable or disable this
timer. When you enable this timer, it disables the transmitter after a set period of
time to prevent unnecessary use of the frequency. If you configure the radio for
continuous keying (see “Continuous Keying” on Page 72), the Transmit Timeout
Timer is automatically disabled.
To enable or disable the timer , press ENTER, then use the up/down arrow buttons
to display ENABLED or DISABLED. Press ENTER to make the change.
See the following command to change the timer delay.
Transmit Timeout
Duration
Use this screen to set or show the Transmit Timeout duration. This is the amount
of time to wait before disabling the transmitter to prevent unnecessary use of the
frequency. If you configure the radio for continuous keying (see “Continuous
Keying” on Page 72), Transmit Timeout is automatically disabled.
To change the duration, press ENTER, then use the left/right arrow buttons to
select the digit to change. Use the up/down arrow buttons to increase or decrease
the digit. Repeat for the other digit if necessary. Press ENTER again to make the
change.
RX Timeout
[NONE, 1-1440]
Use this screen to set or show the RX Timeout Timer duration. This is the amount
of time to wait (in minutes) after the last data receipt before switching to the
stand-by transceiver board and generating an alarm.
To change the duration, press ENTER, then use the left/right arrow buttons to
select the digit to change. Use the up/down arrow buttons to increase or decrease
the digit. Repeat for the other digit if necessary. Press ENTER again to make the
change.
To disable the Receive Timeout Timer, set the duration to NONE.
Repeater Mode Use this screen to set or show the radio’s operation as a repeater. When the radio
is set to operate as a repeater, the screen shows “enabled” (repeater mode is
enabled). When the radio is a non-repeater, the screen shows “disabled” (repeater
mode is disabled).
T o change the operating mode, press ENTER, then use the up/down arrow buttons
to select ENABLE (repeater mode) or DISABLE (non-repeater mode). Press
ENTER again to make the change.
Soft Carrier De-key
0 milliseconds
SCD [0-255] command,
Page 54
Transmit Timeout
enabled
TOT [ON/OFF, 1- 25 5]
command, Page 58
Transmit Timeout
30 seconds
TOT [ON/OFF, 1-255]
command, Page 58
RX Timeout
none
Repeater Mode
enabled
REPEATER [ON/OFF]
command, Page 51
RSPSupply - 1-888-532-2706 - www.RSPSupply.com
http://www.RSPSupply.com/p-8457-MDS-UP-9790X.aspx

72 MDS 4790/9790 Series I/O Guide MDS 05-3438A01, Rev. F
RX Mute Mode Use this screen to set or show the radio’s RX (receive) Muting status. RX muting
might be required when the radio is configured as a full-duplex polling remote
communicating through a repeater. RX muting prevents the radio from hearing its
own transmissions (“echoes”), which causes errors in some software applications.
The default RX Mute time is 5 milliseconds. You cannot change this value from the
front panel, but you can change it using RXMUTE nn command from a PC
interface (see icon below).
T o change the RX Mute status, press ENTER, then use the up/down arrow buttons
to select ENABLE (RX Mute on) or DISABLE (RX Mute off). Press ENTER again
to make the change.
Continuous
Keying
Use this screen to set or show the radio’s keying mode (continuous or
non-continuous keying). Typically, set a master station for continuous keying. If
continuous keying is disabled, key the radio with Pin 4 (RTS) of the interface
connector.
T o change the keying mode, press ENTER, then use the up/down arrow buttons to
select ENABLE (continuous keying) or DISABLE (non-continuous keying). Press
ENTER again to make the change.
Manual Key Use this screen to manually key or dekey the transmitter. Show the transmitter
state by selecting Transmitter Status from the Diagnostics menu (Page 78).
T o key the transmitter , press ENTER, then use the up/down arrow buttons to select
ENABLE (manual keying). Press ENTER again to key the transmitter.
To dekey the transmitter, press ENTER, then use the up/down arrow buttons to
select DISABLE (manual de-keying). Press ENTER again to dekey the transmitter.
Multi-Drop
Address (MADDR)
The radio’s Multi-Drop Address uniquely identifies this radio on an RS-232 COS
(code-operated switch) bus connected to the rear panel’s DIAGNOSTIC PORT , J1.
The unit’s address initially is set as NONE, for a computer directly connected to the
DIAGNOSTIC PORT of one radio. MADDR addresses can range from 1 to 255.
The master station ignores diagnostic messages sent to other Multi-Drop
Addresses.
With the MADDR address programmed, MDS’ InSite™ network management
system program can poll master stations through the COS bus to receive
diagnostic information from the master unit itself. The MADDR command works on
MDS x790 master stations with software version 1.7 or later installed. For more
details, see “Connecting Multiple Masters at One Site” on Page 32.
NOTE: The Multi-Drop Address is not the same as the radio’s Unit Address
described below.
RX Mute Mode
disabled
RXMUTE [ON/OFF/Time
in msec] command,
Page 53
Continuous Keying
enabled
CKEY [ON/OFF] command,
Page 43
Manual Key
disabled
KEY command, Page 47
DKEY command, Page 45
MADDR
134
MADDR [NONE, 1–255]
command, Page 48
RSPSupply - 1-888-532-2706 - www.RSPSupply.com
http://www.RSPSupply.com/p-8457-MDS-UP-9790X.aspx

MDS 05-3438A01, Rev. F MDS 4790/9790 Series I/O Guide 73
Unit Address The unit address identifies the radio as a unique unit within a network managed by
MDS’ InSite™ NMS software or similar program. This address is independent of
the Multi-Drop Address (above) and is needed only for local and over-the-air
diagnostics and control services of this unit through an NMS program such as
InSite.
The default unit address is the last four digits of the radio’s serial number.
User-programmable unit addresses can range 10000...65000 (addresses in the 0
to 9999 range are reserved for factory use). Once you change the default unit
address, it cannot be reprogrammed.
NOTE: The Unit Address operates independently from the Multi-Drop Address.
(See “Multiple-Drop Address” above for details).
Standby
Equipment
Use this screen to notify the monitoring processor of the presence of a second
radio assembly within the chassis so that it can switch to the alternate radio unit if
a failure of the primary radio assembly occurs.
To identify the available hardware, press ENTER, then use the up/down arrow
buttons to select:
defined, if the chassis is equipped with two radio assemblies
not defined, if the chassis equipped with only one radio assembly
The unit does not know if there are one or two radio transceiver assemblies
installed. Make sure you know what hardware is installed before making a change.
Battery Backup Use the Battery Backup screen to set or show the monitoring of the internal
back-up battery voltage (condition) and if you want the radio to send an alarm when
the radio is operating from the internal back-up battery or the voltage falls below
13 Vdc.
Battery Backup “not defined” means the battery is not installed or you do not desire
to monitor its condition. “defined” indicates that monitoring is enabled and an alarm
message will be created when the battery voltage is less than 13 Vdc.
T o set the radio to monitor the internal back-up battery, press ENTER, then use the
up/down arrow buttons to select “defined”. Press ENTER again to make the
change. To set the radio to ign ore the battery condition, press ENTER, then use
the up/down arrow buttons to select “not defined”. Press ENTER again to make the
change.
Key On Data Use this screen to set or show the radio’s keying mode (key-on-data, or
key-on-RTS). In key-on-data mode, the radio automatically keys itself whenever
input data arrives on the DB-25 port. In key-on-RTS mode, the radio will only key
in response to an RTS or PTT signal.
To set the radio to key-on-data mode, press ENTER, then use the up/down arrow
buttons to select ENABLE. Press ENTER again to make the change. To set the
radio to key-on-RTS mode, press ENTER, then use the up/down arrow buttons to
select DISABLE. Press ENTER again to make the change.
Unit Address
2067
UNIT [10000–65000]
command, Page 59
Standby Equipment
not defined
STANDBY [ON/OFF]
command, Page 56
Battery Backup
not defined
BATT(ery) [ON/OFF]
command, Page 59
Key On Data
enabled
RSPSupply - 1-888-532-2706 - www.RSPSupply.com
http://www.RSPSupply.com/p-8457-MDS-UP-9790X.aspx

74 MDS 4790/9790 Series I/O Guide MDS 05-3438A01, Rev. F
Note that key-on-data mode only applies when the input data source is digital.
When the input data source is analog, this setting is irrelevant.
Data Buffering Use this screen to enable or disable data buffering. If you enable data buffering, the
radio operates in seamless mode, where the data is sent over the air as quickly as
possible. However, the receiver will buffer (hold) the data until enough bytes have
arrived to cover worst-case gaps in transmission. This mode of operation is
required for protocols such as MODBUS™ that do not allow gaps in their data
transmission.
If data buffering is disabled, the radio operates with the lowest possible data
latency (average). Data bytes are sent from the data port as soon as an incoming
RF data frame is disassembled. Average and typical latency time will both be
reduced, but idle character gaps may be introduced into the outgoing data flow.
To enable or disable data buffering, press ENTER, then use the up/down arrow
buttons to display ENABLE or DISABLE. Press ENTER again to make the change.
DLINK Baudrate Use this screen to set or show the diagnostic baud rate. Allowable selections are:
2400, 4800, 9600 and 19200 bps.
T o change the setting, press ENTER, then use the up/down arrow buttons to show
the desired setting. Press ENTER again to make the change.
Note: This screen is associated with Network-wide Diagnostics. For more
information, refer to the
Network-wide Diagnostics manual (P/N
05-3467A01) available from GE MDS.
Diagnostic Type Use this screen to set or show the radio’s function in a network-wide diagnostics
system. The allowable settings for the radio are Node, Root, Gate, and Peer.
Note: This screen is associated with Network-wide Diagnostics. For more
information, refer to the
Network-wide Diagnostics manual (P/N
05-3467A01) available from GE MDS.
Transmit Level
[–20 to +3, AUTO]
Use this screen to set or display the radio’s audio transmit level when the radio is
operating as an analog device with data passing through the 4-WIRE AUDIO
INTERFACE. Set the audio transmit level from –20 to +3 dBm, or set it to adjust
automatically.
To change the audio transmit level, press ENTER. You do not need to use the
left/right arrow buttons to select a digit. Instead:
To increase the transmit level, press the up or left arrow button ( ).
To decrease the transmit level, press the down or right arrow button ( ).
Press ENTER again to make the change.
DATAKEY [ON/OFF]
command, Page 44
Data Buffering
enabled
BUFF [ON/OFF] command,
Page 42
DLINK Baudrate
4800
DLINK [ON/OFF/xxxx]
command, Page 45
Diagnostic Type
Node
DTYPE
[NODE/ROOT/GATE/PEER]
Transmit Level
-1 dBm
RSPSupply - 1-888-532-2706 - www.RSPSupply.com
http://www.RSPSupply.com/p-8457-MDS-UP-9790X.aspx

MDS 05-3438A01, Rev. F MDS 4790/9790 Series I/O Guide 75
Evaluate system performance in the AUTO mode. In most cases, this setting
provides satisfactory performance. If it does not, evaluate the BER at the other
settings.
Receive Level [–20
to +3]
Use this screen to set or show the radio’s audio receive level when the radio is
operating as an analog device.Set the audio receive level from –20 to +3 dBm.
To change the audio receive level, press ENTER. You do not need to use the
left/right arrow buttons to select a digit. Instead:
To increase the receive level, press the up or left arrow button ( ).
To decrease the receive level, press the down or right arrow button ( ).
Press ENTER again to make the change.
(Operable only on the “A”/analog model radios.)
Transmit Gain Use this screen to enable or disable the transmit audio boost for the transmit audio
level (operable only on the “A”/analog model radios).
Receive Pad Use this screen to enable or disable the receive attenuator for the receive audio
level.
Alarm Masks Use this screen to display hexadecimal codes which specify whether each alarm
event will cause:
• an alarm output relay to assert
• a radio switch-over.
The screen also shows the alarm sense setting. For an explanation, or to change
the alarm masks, see the following PC commands:
Display Contrast Use this screen to set the intensity of the front panel display’s foreground
characters. Making the characters darker might aid the clarity of the front panel
display when viewed from an angle.
The bar display indicates the relative intensity of the foreground characters, with 0
being faint characters and 100 being dark characters.
TXLEVEL [–20 to +3, AUTO]
command, Page 59
Receive Level
-1 dBm
RXLEVEL [–20 to +3] command
Page 53
Transmit Gain
disabled
TXGAIN [ON/OFF] command,
Page 59
Receive Pad
disabled
RXPAD [ON/OFF] command,
Page 53
Alarm Masks
Major FFFF 0000
Minor 0000 FFFF
Alarm Sense is HI
AMASK [0000 0000–FFFF
FFFF] command, Page 40
ASENSE [HI/LO] command,
Page 40
Display Contrast
050100
Й ЙЙЙЙЙЙ
RSPSupply - 1-888-532-2706 - www.RSPSupply.com
http://www.RSPSupply.com/p-8457-MDS-UP-9790X.aspx

76 MDS 4790/9790 Series I/O Guide MDS 05-3438A01, Rev. F
To change the selection, press ENTER, then use the left/right arrow buttons to
move the bar display to the desired setting. The screen changes dynamically to
show the effects of the change. Press ENTER again to set the change.
Backlight Intensity Use this screen to set the brightness of the front panel display’s background.
Making the screen background brighter or dimmer might aid the clarity of the front
panel display when viewed under different light conditions.
The bar display indicates the relative brightness of the screen background, with 0
being dim and 100 being very bright.
To change the selection, press ENTER, then use the left/right arrow buttons to
move the bar display to the desired setting. The screen changes dynamically to
show the effects of the change. Press ENTER again to set the change.
Set Owner Name Use this screen to set or show text (up to 20 characters) that appears on the radio’s
start-up screen, such as the system name.
Press ENTER to show a scrollable line of characters at the bottom of the screen.
Use the cursor (_) to select a character for the owner name (Figure 32). A caret (^)
shows the current character position.
• Press the up arrow button to move the cursor to the left until it is under
the first character of the owner name. As you scroll to the left, the character
under the cursor appears above the caret.
• Press the right arrow button once to move the caret one character
position to the right.
• Press the up or down arrow buttons to move the cursor to the next
character.
• Continue in this way, using the up/down arrow buttons to move the cursor to
a character, then pressing the right arrow button to move to the next character
position.
• Press ENTER to save the owner name.
Figure 32. Setting the Owner Name and Message
Set Owner
Message
Use this screen to set or show text (up to 20 characters) that appears on the radio’s
start-up screen, such as the site name. See the Set Owner Name command and
Figure 32 above for instructions.
Backlight Intensity
050100
n n n n n n n n n n
Set Owner Name
^
_!”#$%&’()*+,-./0123
OWN [xxxxx] command, Page 50
Twenty-character text lin
e
Use up and down
arrow buttons to move
the underscore (_) lef
t
and right
Use left and right
arrow buttons to move
the caret (ˆ) left and right
Set Owner Message
OWM [xxxxx] command,
Page 50
RSPSupply - 1-888-532-2706 - www.RSPSupply.com
http://www.RSPSupply.com/p-8457-MDS-UP-9790X.aspx

MDS 05-3438A01, Rev. F MDS 4790/9790 Series I/O Guide 77
Set Time Use this screen to set or show the time set in the radio. The accuracy of the date
and time are important, because events are logged with the date and time.
To change the time, press ENTER, then use the left/right arrow buttons to select
the hour, minute, second, or AM/PM. Then use the up/down arrow buttons to
increase or decrease the digit, or toggle between AM and PM. Repeat for other
characters if necessary. Press ENTER again to make the change.
Set Date Use this screen to set or show the date set in the radio. The accuracy of the date
and time are important because events are logged with the date and time.
To change the date, press ENTER, then use the left/right arrow buttons to select
the month, day, or year. T hen use the up/down arrow buttons to increase or
decrease the day or year, or set the month. Repeat for other characters if
necessary. Press ENTER again to make the change.
GROUP 3—DIAGNOSTICS
Operating Status This screen displays three key operating conditions of the radio: TX key status,
Received Signal Strength Indication (RSSI), and Signal-to-Noise (S/N) ratio. Unlike
other screens, the information shown on the Operating Status screen is preserved
across power outages and radio switchovers. This screen has no timeout and will
show until changed by an operator.
Active Radio
Status
Use this screen to show alarm conditions, if any. Major and minor alarm events are
listed in Tab le 13 on Page 57.
If there have been alarm events, press ENTER to show the first alarm. To scroll
through the list of alarms, press the right or down arrow button. Pressing
ESCAPE returns the radio to the Active Radio Status screen.
Receive Signal
Strength
This screen displays the received signal strength in dBm.
In a typical master station configuration, the received signal strength is read from
each remote radio that transmits to the master station.
Set Time
12:04:03 AM
May 01 1999
TIME [hh:mm:ss] command,
Page 57
Set Date
12:04:03 AM
May 01 1999
DATE [mmm dd yyyy]
command, Page 44
Operating Status
TX: dekeyed
RSSI: -60 dBm
S/N 10 dB
Active Radio Status
Alarms present
(enter for details)
Event: 20 (MINOR)
Configuration error
STAT command, Page56
Rx Signal Strength
-120 dBm
RSSI, RSSI! command,
Page 52
RSPSupply - 1-888-532-2706 - www.RSPSupply.com
http://www.RSPSupply.com/p-8457-MDS-UP-9790X.aspx

78 MDS 4790/9790 Series I/O Guide MDS 05-3438A01, Rev. F
S/N Ratio This screen shows the current signal-to-noise ratio in dBm.
Radio Selection Use this screen to set or show the transceiver board selection. When you select
AUTO, automatic switchover is enabled. If the master station detects a major alarm
and a redundant radio is operational, control automatically switches to the alternate
radio. Use the AUTO setting even if there is only one transceiver board installed.
This allows you to easily upgrade the master station at a future date by simply
inserting another transceiver board.
The third line on the display shows which radio transceiver board is currently
active.
A selection of A or B forces the active transceiver board to the A or B transceiver
board, and disables standby redundancy. These settings should rarely be used;
they are provided mainly for diagnostic test purposes.
T o change the radio selection setting, press the ENTER key , then use the up/down
arrow buttons to select AUTO, A or B. Press ENTER again to make the change.
Transmitter Status This screen shows the transmitter state. Keyed means the transmitter is set to
transmit; dekeyed means the transmitter cannot transmit. Configure the
transmitter to keyed or dekeyed by selecting Manual Key from the Configuration
menu (Page 72). Use this setting when working on the radio, and the radio must
be keyed to evaluate transmitter output power.
Show Temperature
and Voltages
This screen shows the radio’s internal temperature and voltages. The input voltage
is the voltage that connects to the transceiver board and is unregulated. This
voltage is the output from the power supply assembly. The output voltage is read
after the10 Vdc regulator on the transceiver board.
Serial Number This screen shows the se rial numbers of the transceiver boards. These numbers
will not match the serial number on the radio’s serial number label. If the radio is
not equipped with a second transceiver board, one of the lines reads NOT
EQUIPPED.
Software Revision This screen shows the internal software part number and version number.
S/N Ratio
SNR, SNR! command, Page 5
5
Radio Selection
AUTO
Radio A is active
RADIO [AUTO/A/B]
command, Page 51
Transmitter Status
keyed
Show
Temp/Voltage
37 Celsius
11.2 Volts Input
5.8 Volts Output
TEMP command, Page 57
Serial Number
A: 00755959
SER command, Page 54
Software Revision
06-3321A02
0.0.0 5Aug1998
SREV command, Page 55
RSPSupply - 1-888-532-2706 - www.RSPSupply.com
http://www.RSPSupply.com/p-8457-MDS-UP-9790X.aspx

MDS 05-3438A01, Rev. F MDS 4790/9790 Series I/O Guide 79
GROUP 4—EVENT LOG
Event Log This screen shows the events logged on the active transceiver board. In many
cases, you can review the events leading up to a failure to help determine the
cause of a problem. The event log number, date and time of the event, and a
description of the event are shown.
Press ENTER to review the event log. The most recent log is shown first. Use the
up/down arrow buttons to scroll through the stored history of events.
Clear Logs Use this screen to erase all events from the event log.
7.0 LOCAL & NETWORK-WIDE
PROBLEM SOLVING
Most radio system problems are due to the failure of components outside
of the transceiver—such as a poor or broken feedline or antenna connection. This section will help you determine whether the problem is outside or inside the radio and, if in the radio, how to restore operation as
quickly as possible.
GE MDS does not recommend component-level repairs in the field.
However, you can replace the radio’s major assemblies without using
tools or test equipment. Section 8.0, REPLACING ASSEMBLIES,
beginning on Page 86 covers this in detail.
If you cannot solve a system problem with the information provided
here, technical assistance is also available from the factory. Refer to the
inside back cover of this guide for contact information.
NOTE: Before starting any detailed troubleshooting, check the basic
requirements at both ends of the link: primary power, secure
cable connections, and proper antenna heading. In many cases,
one of these cause poor operation or a complete loss of link
service.
Log 1 of 1
5/ 1/1998 12:00;00
System Boot
LOG [CLR] command, Page 4
8
Clear Logs
Are you sure?
No
LOG [CLR] command, Page 4
8
RSPSupply - 1-888-532-2706 - www.RSPSupply.com
http://www.RSPSupply.com/p-8457-MDS-UP-9790X.aspx

80 MDS 4790/9790 Series I/O Guide MDS 05-3438A01, Rev. F
7.1 Local Problem-Solving
Front Panel LEDs
The first indication of a problem is usually an illuminated ALARM LED
on the front panel. In normal operation, only the green (ACTIVE) LED is
lit (and, in a master station configured for redundant operation, one of
the yellow STBY LEDs).
In a redundant master station, the LEDs show the state of the A and B
transceiver boards. In a non-redundant master station, the LEDs show
the state of the A transceiver board.
Refer to Figure 33 and the text that follows for an explanation of the
LED indicators.
Invisible place holder
Figure 33. LED Indicators
Table 19. Explanation of Front Panel LEDs
LED
Name
Color Meaning When Lit
ACTIVE
Green Transceiver board (A or B) is the selected unit.
STBY
Yellow Transceiver board (A or B) is currently in stand-by mode
(functional on master station configured for redundant
operation only).
ALARM
Red A major or minor alarm event has occurred. Use the front
panel’s Active Radio Status screen to list current alarm
events (see Page 77).
RX ALR
Red Difficulty receiving, possibly due to an antenna problem,
receiver fault, or other condition causing no or a weak
received signal level.
TX ALR
Red Transmit circuitry fault.
I/O ALR
Red A data framing or parity error has occurred over the data
port.
A
B
ACTIVE STBY ALARM RX ALR TX ALR I/O ALR
ACTIVE STBY ALARM RX ALR TX ALR I/O ALR
RSPSupply - 1-888-532-2706 - www.RSPSupply.com
http://www.RSPSupply.com/p-8457-MDS-UP-9790X.aspx

MDS 05-3438A01, Rev. F MDS 4790/9790 Series I/O Guide 81
Chassis-Mounted LEDs
On current production radios, a series of additional LEDs are located
behind the front panel on the chassis. These indicators are primarily for
use in troubleshooting the radio and show important details about the
status of the radio circuitry.
To view the chassis LEDs, remove the front panel by grasping it along
the bottom edge and pulling straight out (see Figure 34).
Invisible place holder
Figure 34. Front Panel Removal
Refer to Figure 35 and the text that follows for an explanation of the
LED functions.
Invisible place holder
Figure 35. Chassis-Mounted LEDs (Front Panel Removed)
A
PWR
MJR ALM
MNR ALM
RTS
CTS
TXD
DCD
RXD
RSPSupply - 1-888-532-2706 - www.RSPSupply.com
http://www.RSPSupply.com/p-8457-MDS-UP-9790X.aspx

82 MDS 4790/9790 Series I/O Guide MDS 05-3438A01, Rev. F
Problem Solving Using a Connected PC
You can determine radio status with a PC connected to the master station. Useful commands for performing diagnostics are listed in Table 8
on Page 35. For instructions on performing diagnostics using a con-
nected PC, see “Performing Network-Wide Radio Diagnostics” on Page
84.
Problem Solving Using the Front Panel Display
The radio includes several useful tools in the
Diagnostics and Event Log
menus that you can use to identify system problems. Brief descriptions
of Event Log commands are given below. Other commands useful for
performing diagnostics are listed in Table 16 on Page 67. Refer to Sec-
tion 6.5, Screen Descriptions, for detailed information about these com-
mands.
Event Log Use the Event Log to identify system problems. The radio stores recent
events, such as turning the primary power on, in a log that you can
review using the
Event Log screen (for a full description, see “Event Log”
on Page 79). In many cases, you can review the events leading up to a
failure to determine the cause of a problem. Event log messages are also
helpful when calling GE MDS for technical assistance.
Table 20. Explanation of Chassis-Mounted LEDs
LED Name Meaning When Lit
PWR Power is applied to the radio.
MJR ALM Major Alarm—Indicates a hardware failure or other abnormal
condition that prevents (or seriously hampers) further operation of
the radio. Factory service might be required.
MNR ALM Minor Alarm—Indicates a condition which, under most
circumstances, will not prevent radio operation. This includes
out-of-tolerance conditions, baud rate mismatches, and so on.
Investigate the cause to prevent system failure.
RTS Request to Send—A logic hi gh is present on Pin 4 of the DATA
INTERFACE connector. The transmitter is keyed.
CTS Clear-to-Send—The programmed CTS delay time has elapsed
and a logic high is present on Pin 5 of the DATA INTERFACE
connector.
TXD Transmit Data—The radio is receiving data at Pin 2 of the DATA
INTERFACE connector.
DCD Data Carrier Detect—The radio is receiving valid data frames from
another station (over the air). Pin 8 of the DATA INTERFACE
connector is at a logic high.
RXD Receive Data—The radio is outputting data at Pin 3 of the DATA
INTERFACE connector.
RSPSupply - 1-888-532-2706 - www.RSPSupply.com
http://www.RSPSupply.com/p-8457-MDS-UP-9790X.aspx

MDS 05-3438A01, Rev. F MDS 4790/9790 Series I/O Guide 83
• Major alarms generally indicate a hardware
failure or other abnormal condition that prevents (or hampers)
further operation of the radio link. Most major alarms trigger a
switch-over of internal transceiver board assemblies on a master
station configured for redundant operation.
• Connections to a relay that actuates with these alarms are provided on the rear panel ALARM connector (see Figure 23 on
Page 25).
• Minor alarms generally will not prevent operation of the radio
link, but may impair performance. This includes out-of-tolerance conditions, low signal-to-noise ratios, and so on. Investigate the cause of a minor alarm and correct it to prevent an
eventual system failure.
• Connections to a relay that actuates with these alarms are provided on the rear panel ALARM connector (see Figure 23 on
Page 25).
System Bench Testing Set-up
Figure 36 on Page 84 shows a sample test setup that you can use to
verify the basic operation of master and remote radios. You can perform
this test with any number of remote radios by using a power divider with
the appropriate number of output connections.
MDS x710A and x790A radios include an internal RTU simulator. Use
the RTU command (see “RTU [ON/OFF/0-80]” on Page 52) to poll
remote radios. The command reports the number of polls sent, polls
received, and the number of errors detected. For more information on
polling with the RTU simulator, refer to Publication 05-3467A01.
It is very important to use attenuation between all units in the test
setup. The amount of attenuation required depends on the number of
units being tested and the desired signal strength (RSSI) at each
transceiver during the test. In no case should a signal stronger than
–50 dBm be applied to any radio in the test setup.
CAUTION
POSSIBLE
EQUIPMENT
DAMAGE
RSPSupply - 1-888-532-2706 - www.RSPSupply.com
http://www.RSPSupply.com/p-8457-MDS-UP-9790X.aspx

84 MDS 4790/9790 Series I/O Guide MDS 05-3438A01, Rev. F
Figure 36. System Bench Test Set-up
7.2 Performing Network-Wide Radio Diagnostics
You can remotely poll radios in a network by connecting a laptop or PC
running MDS InSite diagnostics software to any radio in the network.
Figure 36 shows an example of a setup for performing network-wide
remote diagnostics.
If a PC is connected to any radio in the network, you can perform active
messaging (polling which briefly interrupts payload data transmission).
To perform diagnostics without interrupting payload data transmission,
connect the PC to a radio defined as the “root” radio. You can make a
radio the root radio by using the DTYPE ROOT command (Page 46)
locally, at the radio.
For more information, see the InSite Radio System Management Soft-
ware User’s Guide. You can find a complete explanation of remote
diagnostics in the GE MDS Network-wide Diagnostics Handbook (P/N
05-3467A01). Refer to the handbook for more information about the
basic diagnostic procedures outlined below.
1. Program one radio in the network as the root radio by entering the
DTYPE ROOT command at the radio.
2. At the root radio, use the DLINK ON and DLINK [baud rate] commands
to enable network-wide diagnostics and set the baud rate at the
DIAGNOSTICS port.
3. Program all other radios in the network as nodes by entering the
DTYPE NODE command at each radio.
REMOTE
REMOTE
REMOTE
REMOTE
POWER ATTENUATORS
• Fixed or adjustable
POWER DIVIDER
NON-RADIATING ATTENUATOR
• Install on any unused divider ports
COMPUTER RUNNING
MDS "POLL.EXE" PROGRAM
MASTER STATION
RSPSupply - 1-888-532-2706 - www.RSPSupply.com
http://www.RSPSupply.com/p-8457-MDS-UP-9790X.aspx

MDS 05-3438A01, Rev. F MDS 4790/9790 Series I/O Guide 85
4. Use the DLINK ON and DLINK [baud rate] commands to
enable network-wide diagnostics and set the baud rate at the DIAG-
NOSTICS
port of each node radio.
5. Connect same-site radios using a null-modem cable at the radios’
DIAGNOSTICS ports.
6. Connect a PC on which MDS InSite software is installed to the root
radio, or to one of the nodes, at the radio’s DIAGNOSTICS port (this
PC can be the PC that collects payload data, as shown in Figure 37).
To connect a PC to the radio’s DIAGNOSTICS port, an RJ-11 to
DB-9 adapter (MDS P/N 03-3246A01) is required. If desired, you
can construct an adapter cable from scratch using the information
shown in Figure 38 on Page 86.
7. Launch the MDS InSite software at the PC. See the InSite Radio
System Management Software User’s Guide for instructions.
Invisible place holder
Figure 37. Network-Wide Remote Diagnostics Setup
RTU
RTU
TO
DIAGNOSTICS
PORT
TO DATA
PORT
MASTER STATION
ROOT
DTYPE
ROOT
DIAGNOSTICS DATA
(TO InSite)
HOST COMPUTER
PAYLOAD DATA
RTU
(TO SCADA APPLICATION)
DTYPE
NODE
DTYPE
NODE
DTYPE
NODE
RSPSupply - 1-888-532-2706 - www.RSPSupply.com
http://www.RSPSupply.com/p-8457-MDS-UP-9790X.aspx

86 MDS 4790/9790 Series I/O Guide MDS 05-3438A01, Rev. F
Invisible place holder
Figure 38. RJ-11 to DB-9 Adapter Cable
8.0 REPLACING ASSEMBLIES
GE MDS does not recommend component-level repair of a transceiver
board in the field due to the complex nature of the circuitry and the use
of surface-mount technology throughout the radio. You should return
malfunctioning assemblies to the factory (or authorized service center)
for repair or replacement.
One approach to field-level servicing is to have spare modules available
for the four easily replaced assemblies—the Main Transceiver Board,
Power Supply, Front Panel, and Internal Duplexer. In this way, you can
quickly remove and replace a defective assembly with a working
assembly. The following instructions describe the removal and installation of these assemblies.
Disconnect primary power to the radio before removing or installing
transceiver board or power supply assemblies.
8.1 Transceiver Board and Power Supply
Assemblies
To remove either of these assemblies, loosen the two captive thumbscrews at each side of the module, then slide the module straight out as
shown in Figure 39 on Page 87. There are no cables to disconnect, as the
modules are fitted with in-line connectors.
To replace the AC Power Supply Module’s fuse, use 5x20mm Glass
3.15A 250V fuse (GE MDS P/N 29-2130A06).
To re-install these modules, make sure that the slides are properly
aligned with the guide slots on the chassis, then push straight in. Tighten
the thumbscrews to secure the assembly.
RXD
TXD
GND
2
3
5
DB-9 FEMALE
(TO COMPUTER
)
TXD
RXD
GND
4
5
6
RJ-11 PLUG
(TO RADIO)
RJ-11 PIN LAYOUT
1
6
CAUTION
POSSIBLE
EQUIPMENT
DAMAGE
RSPSupply - 1-888-532-2706 - www.RSPSupply.com
http://www.RSPSupply.com/p-8457-MDS-UP-9790X.aspx

MDS 05-3438A01, Rev. F MDS 4790/9790 Series I/O Guide 87
Invisible place holder
Figure 39. Main Transceiver and Power Supply Removal
8.2 Installation & Removal of Backup Battery
(P/N 28-1575Axx)
To install the backup battery, follow these steps:
1. Make sure AC power is removed and the BATTERY BACKUP switch
is set to OFF (see Figure 11 on Page 16).
2. Remove the 4 Phillips screws on each side of the chassis and
remove the top cover of the radio.
When handling the backup battery, be careful not to short the
terminals on the radio chassis. Doing so can cause damage to
the battery and cause personal injury.
3. Place the battery in the chassis in the area provided (see Figure 40
on Page 88) and secure the battery clamp over the battery. The bat-
tery should be a minimum rating of 4.5 Ah.
POWER SUPPLY
MAIN TRANSCEIVE
R
BOARD
DANGER
PERSONAL
INJURY
HAZARD
RSPSupply - 1-888-532-2706 - www.RSPSupply.com
http://www.RSPSupply.com/p-8457-MDS-UP-9790X.aspx

88 MDS 4790/9790 Series I/O Guide MDS 05-3438A01, Rev. F
4. Locate the battery cable and connect it to the proper terminals on the
battery . The red wire connects to the positive (+) terminal; the black
wire connects to the negative (–) terminal.
Figure 40. Backup Battery Installation
5. Reinstall the top cover of the radio and set the BATTERY BACKUP
switch to ON. If the battery is charged, the radio should begin operating immediately. If it is not charged, you must operate the radio
from an AC power for at least 6 hours before battery backup is
available.
6. This completes the installation of the backup battery. To remove the
battery from the radio, reverse these steps.
8.3 Front Panel
The front panel is secured to the chassis with spring-loaded latches. To
remove the panel, simply pull out at the bottom edge until it is free from
the chassis (Figure 41 on Page 89). You must also disconnect the modular cable from the back of the panel. Reverse these steps to re-install
the front panel on the chassis.
(P/N 28-1575Axx)
Backup Battery
RSPSupply - 1-888-532-2706 - www.RSPSupply.com
http://www.RSPSupply.com/p-8457-MDS-UP-9790X.aspx

MDS 05-3438A01, Rev. F MDS 4790/9790 Series I/O Guide 89
Invisible place holder
Figure 41. Front Panel Removal/Replacement
8.4 Operating Frequency Change Considerations
Changing the radio’s operating frequency through a terminal command
or using the front panel is an easy process. However, there are frequency-sensitive components within the radio that could impact operation on the new frequency—the receiver front-end helical coils and an
internal duplexer, if one is present. These elements have resonant circuits that prevent the transmitter from damaging the radio’s receiver and
interfering with other radios operating on nearby channels. The circuits
also attenuate out-of-band signals that could interfere with receiver
operation.
Changes in transmit operating frequency of granter than 100 kHz from
the factory settings will require retuning of the duplexer. Likewise,
changes in receive operating frequency greater than 5 MHz will require
retuning of the duplexer and/or the receiver’s front-end helical circuits
(see “MDS 4790/970—Front End Helical Coil Alignment” on Page 91).
Retuning of these circuits provides operation with maximum receiver
sensitivity and protection from damage to the radio’s receiver from the
transmitter’s RF output.
The feasibility of large changes in frequency depend on the type of
duplexer installed in the radio, or if there is an antenna switch module
present.
A
RSPSupply - 1-888-532-2706 - www.RSPSupply.com
http://www.RSPSupply.com/p-8457-MDS-UP-9790X.aspx

90 MDS 4790/9790 Series I/O Guide MDS 05-3438A01, Rev. F
MDS 4790—400 MHz Notch-Type Duplexers
You can change the radio’s transmit frequency up to 100 kHz without
re-tuning the duplexer. The duplexers shown in Figure 42 can be aligned
in the field by experienced technicians using high-quality test equipment. For assistance, contact GE MDS Technical Support for additional
details about tuning.
Figure 42. 400 MHz Notch Duplexer
(No adjustment needed for transmit changes up to 100 kHz)
Duplexer alignment is a sophisticated procedure and a
duplexer can be easily damaged if not handled carefully. It is
highly-recommended that you return duplexers needing
re-alignment to GE MDS, or the original duplexer manufacturer, for alignment. In some cases, it may be more economical
to replace the unit than to have it re-aligned.
MDS 9790—Bandpass-Type Duplexers
These duplexers (Figure 43) typically allow the transmitter frequency to
change up to 500 kHz without undesired results. Since this type of
duplexer cannot be re-aligned in the field, we recommend contacting the
GE MDS Technical Support Department if you suspect a duplexer
problem or need one for a different frequency.
Figure 43. 900 MHz Bandpass Duplexer
(No adjustment needed for transmit changes up to 500 kHz)
CAUTION
POSSIBLE
EQUIPMENT
DAMAGE
RSPSupply - 1-888-532-2706 - www.RSPSupply.com
http://www.RSPSupply.com/p-8457-MDS-UP-9790X.aspx

MDS 05-3438A01, Rev. F MDS 4790/9790 Series I/O Guide 91
MDS 4790/9790 Simplex Radios—With Antenna
Switch Modules
Simplex radios do not have a duplexers. In its place, an Antenna Switch
Module is placed to switch the antenna system between the radio’s
transmitter and receiver. The switch does not have any frequency-sensitive elements and covers the radio’s entire operating band. You can program radios equipped with this module to any frequency within their
operating range. However, two things must be considered:
1. The antenna system’s performance might not be satisfactory on the
new frequency. You can quickly check this by measuring the
antenna system’s standing-wave-ratio (SWR) for a ratio of 1.5:1 or
less at the antenna.
2. The receiver’s front-end helical coils will need retuning if the
change in receive frequency is more than 5 MHz.
Figure 44. Antenna Switch Module
MDS 4790/970—Front End Helical Coil Alignment
Changing the radio’s receive frequency by more than 5 MHz requires
re-alignment of the receiver’s front-end helical coil set. Significant degradation in receive bit-error rate (BER) is likely if the coils are not
aligned properly. For assistance, contact GE MDS Technical Support
for details about the tuning procedure.
8.5 Testing and Removing an Internal Duplexer
Testing
If you suspect that the internal duplexer is not functioning properly, perform the following steps to determine if requires replacement:
1. Measure the RF power out of the antenna jack.
If the power registers approximately +37 dBm (5 watts), the internal
duplexer is probably functioning correctly (see Table 21 on Page 103
for dBm-volts-watts conversion chart).
If the power registers significantly less than +37 dBm, proceed with
Step 2 .
2. Open the radio chassis, locate the TX cable, and disconnect the
cable from vertical interface board (Figure 45 on Page 92).
RSPSupply - 1-888-532-2706 - www.RSPSupply.com
http://www.RSPSupply.com/p-8457-MDS-UP-9790X.aspx

92 MDS 4790/9790 Series I/O Guide MDS 05-3438A01, Rev. F
3. Using an adapter, connect the RF power meter to the SMA connector on the vertical interface board, key the radio and measure the RF
power.
• If the power registers +39 dBm, the radio board is functioning
correctly.
• If the power registers less than +39 dBm, proceed with Step 4.
4. Use the front panel to switch to the alternate transmitter and again
measure the RF power output.
• If the alternate transmitter registers +39 dBm, the internal
duplexer probably needs replacing.
5. Before replacing the duplexer, verify that the highest or lowest frequencies marked on the duplexer are the same as radio’s transmit
and receive frequencies or within the nominal operating range:
100 kHz for 400 MHz radios, and 500 kHz for 900 MHz radios.
Removing the Internal Duplexer
To remove the internal duplexer, follow these steps:
1. Disconnect the cables from the back of the duplexer (see Figure 45).
Figure 45. Internal Duplexer Cabling
NOTE: A number of different duplexers can be installed in the radio.
While the physical appearance of the duplexer may vary
slightly, its operation and removal remain the same.
2. Remove the four screws that secure the duplexer to the chassis as
shown in Figure 46 on Page 93.
3. Carefully lift the duplexer out of the chassis.
Duplexer Assy.
TX (Transmit) Cable
Antennna Cable
RX (Receive) Cable
Vertical Interface
Board
RSPSupply - 1-888-532-2706 - www.RSPSupply.com
http://www.RSPSupply.com/p-8457-MDS-UP-9790X.aspx
 Loading...