


ECS
GE ECS, ECD, MCD, MCS, PCD User Manual
...
Use and Care Manual
Classic Wall Oven
For use with ECD, ECS, MCD, MCS, PCD and PCS series models
Part No. 65031 Rev. J
Table of Contents
Important Safety Instructions ............................................. 1-2
Oven Operation ........................................................... 3-11
Care and Cleaning ..................................................... 12-15
Before You Call For Service .......................................... 16-17
Service and Product Warranty ........................................... 18
Notes ........................................................................ 19-20
Place Serial Number Label Here

Im p o r t a n t Sa f e t y In S t r u c t I o n S
INSTALLER: LEAVE THESE INSTRUCTIONS WITH THE
APPLIANCE.
CONSUMER: READ THIS USE AND CARE MANUAL
COMPLETELY BEFORE USING THIS APPLIANCE. SAVE IT
FOR FUTURE REFERENCE. IT CONTAINS IMPORTANT USE
AND CARE INFORMATION. KEEP YOUR SALES RECEIPT OR
CANCELED CHECK IN A SAFE PLACE. PROOF OF ORIGINAL
PURCHASE DATE IS REQUIRED FOR WARRANTY SERVICE.
If you have any questions, call:
Dacor Customer Service
(800) 793-0093 (U.S.A. and Canada)
Monday — Friday 6:00
Web site: www.Dacor.com
Have the complete model and serial number identification of your
appliance ready.
Model Number ________________________________________
Serial Number ________________________________________
Date of Purchase______________________________________
For service and warranty information, see page 18.
Since Dacor is constantly improving the quality and performance
of our appliances, we may need to make changes to the
appliance without revising this manual.
a.m. to 5:00 p.m. Pacific Time
DANGER
IMPORTANT: To avoid the possibility of explosion or fire, do not
store or use combustible, flammable or explosive vapors and
liquids (such as gasoline) inside or in the vicinity of this or any
other appliance. Keep items that could explode, such as aerosol
cans away from the burners and oven. Do not store flammable
or explosive materials in adjacent cabinets or areas.
WARNING
WARNING – NEVER use this appliance as a space heater
to heat or warm the room. Doing so may result in carbon
monoxide poisoning and overheating of the appliance.
WARNING
WARNING - NEVER cover any slots, holes or passages in the
oven bottom or cover an entire rack with materials such as
aluminum foil. Doing so blocks air flow through the oven and
may cause carbon monoxide poisoning. Aluminum foil linings
may also trap heat, causing a fire hazard.
Important Information About Safety
Instructions
The Important Safety Instructions and warnings in this manual
cannot cover all possible problems and conditions that can occur.
Use common sense and caution when installing, maintaining or
operating this appliance.
Always contact the manufacturer about problems or conditions
you do not understand.
Safety Symbols and Labels
DANGER
DANGER – Immediate hazards that WILL result in severe
personal injury or death.
WARNING
WARNING – Hazards or unsafe practices that COULD result in
severe personal injury or death.
CAUTION
CAUTION – Hazards or unsafe practices that COULD result in
minor personal injury or property damage.
READ AND SAVE THESE INSTRUCTIONS
1

Im p o r t a n t Sa f e t y In S t r u c t I o n S
General Safety Precautions
To reduce the risk of fire, electric shock, serious injury or death when using your oven, follow basic safety precautions, including the
following:
WARNING
If you receive a damaged product, immediately contact •
your dealer or builder. Do not install or use a damaged
appliance.
Make sure that the oven has been properly installed •
and grounded by a qualified installer according to the
accompanying installation instructions. Have the installer
show you the location of the fuse or junction box so that
you know where and how to turn off power to the oven.
Do not install, repair or replace any part of the oven unless •
specifically recommended in the literature accompanying
it. A qualified service technician should perform all other
service.
Before performing any type of service, make sure that •
the electrical power to the oven is turned off at the circuit
breaker or fuse box.
Only use the oven for cooking tasks expected of a home •
appliance as outlined in this manual. This oven is not
intended for commercial use.
DO NOT TOUCH THE INTERIOR SURFACES OF THE •
OVEN DURING OR IMMEDIATELY AFTER USE.
Make sure individuals who use the oven are able to operate •
it properly.
Never allow anyone, including children to sit, stand or climb •
on any part of the oven including the door. Doing so may
cause tipping, damage, serious injury or death.
Do not leave children alone or unattended in the area •
around the oven. Do not allow children to play with the
controls, pull on the handle(s) or touch other parts of the
oven. Do not store items of interest to children above the
oven. Children could be burned or injured while climbing on
the appliance.
Do not tamper with the controls.•
To prevent the unit from tipping forward and to provide •
stable installation, make sure the oven is secured to
the cabinet according to the accompanying installation
instructions.
Do not heat unopened food containers such as baby food •
jars and cans. Pressure build up may cause the container
to burst and cause injury.
Do not use water on grease fires. A violent steam explosion •
may result. Smother any flames with a lid, cookie sheet
or flat tray. Use baking soda or a foam extinguisher to
extinguish flaming grease. Be careful to avoid getting
burned.
Keep flammable items, such as paper, cardboard, plastic •
and cloth away from and out of the oven. Do not allow pot
holders to touch hot surfaces.
Do not use towels or bulky cloth as pot holders. Do not •
wear loose or hanging apparel while using the oven. Do not
allow clothing to come into contact with the interior of the
oven and surrounding areas during and immediately after
use.
WARNING
Do not use the oven for storage.•
Clean and maintain the oven regularly as instructed in this •
manual. Keep the entire oven free of grease that could
catch fire. Clean only those parts listed in this manual.
Do not touch the outside surfaces of the oven during the •
self-clean cycle. They will be hot.
Use cookware only for its intended purpose. Check the •
manufacturer’s recommendations before use to determine
if a utensil is suitable for use in an oven. Certain types of
glass, ceramic and earthenware are not suitable for use in
the oven. Personal injury or damage may result from the
improper use of cookware.
Exercise caution when opening the oven door. Let hot air or •
steam escape before looking or reaching inside.
Use extreme caution if adding water to food in the oven. •
The steam can cause serious burns or scalds.
Use only dry pot holders when removing food and •
cookware from the oven. Wet pot holders can cause steam
burns.
For your safety, do not use the oven to cook without the •
convection filter(s) installed. When the filter is not installed,
the spinning fan blades at the back of the oven are
exposed.
Do not allow food to sit in the oven for more than one hour •
before or after cooking. Eating spoiled food can result in
food poisoning.
Do not leave metal objects, such as aluminum foil, the meat •
probe or cookie sheets on the bottom of the oven. Do not
allow the broil elements on the ceiling of the oven chamber
to be covered up. Do not line the oven with aluminum foil or
other materials. Doing so may cause the oven or the items
in it to overheat, creating a fire hazard or causing property
damage.
Non-stick coatings, when heated, can be harmful to birds. •
Remove birds to a separate, well-ventilated room during
cooking.
Before Self-Cleaning the oven, remove the broiler grill and •
pan, oven racks, convection filter and any other utensils,
and wipe up excess spills. DO NOT LEAVE FOOD OR
COOKING UTENSILS, ETC., IN THE OVEN DURING THE
SELF-CLEAN CYCLE.
Do not clean the door gasket, because rubbing, moving •
or in any way damaging the gasket, may eliminate the
required tight door seal.
Do not use commercial oven cleaners or oven liner •
protective coatings on any part of the oven. Do not use
caustic cleaners or detergents on this appliance, as these
may cause permanent damage. Do not use aerosol
cleaners, as these may be flammable or cause corrosion of
metal parts.
Do not allow acids (citrus juices, tomato sauces, etc.) to •
remain on the oven cell surfaces. The porcelain finish may
stain.
2
ov e n op e r a t I o n
Getting Started
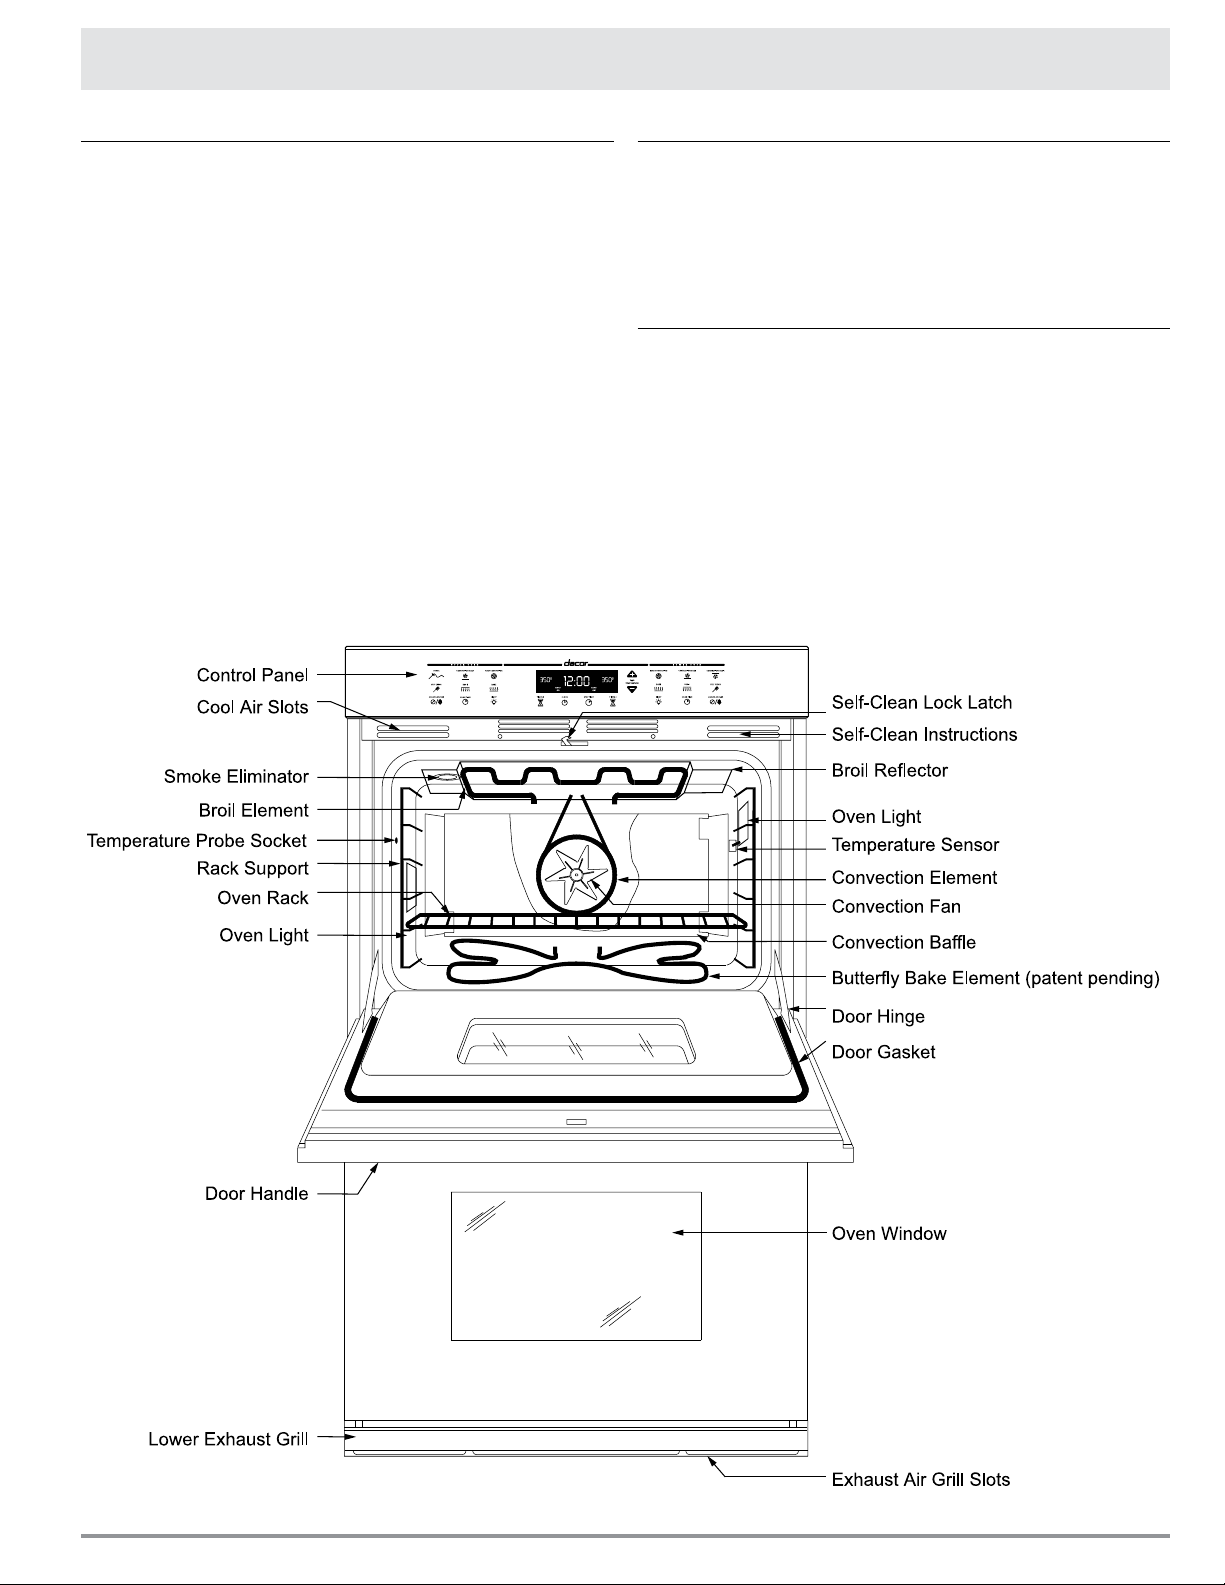
Before using your oven, become familiar with the features and
control panel layout (see pages 4 and 5).
Below the oven mode touch keys are three touch keys
labeled CANCEL • SECURE, LIGHT and COOK TIME. The
CANCEL•SECURE key enables the user to cancel the selection
of an oven mode or delay timed program, or disable the control
panel. The LIGHT key turns the interior oven light on and off. The
LIGHT key will remain functional if the control panel has been
disabled. The COOK TIME key is used to select the length of time
for a cooking process in delay timed cooking mode.
Clock functions are selected by pressing the keys located below
the clock display and oven mode keys. Oven functions are chosen
by pressing the key for the desired mode. Once a clock or oven
function has been chosen, a description of the selection will flash
in the clock display area.
IMPORTANT: After choosing a clock function or oven mode, you
have six seconds to perform the next programming step. If the
next step is not complete within six (6) seconds, the program
selection displayed on the clock will disappear. Should this occur,
just repeat the initial function selection.
Setting The Time Of Day
Follow these two steps to set the correct time of day:
Press the 1. CLOCK key. The time of day will flash, “AM” or
“PM” will be displayed, and “TIME” will flash in the display.
Press the key 2. “+” or “–” until the correct time of day is
displayed and release.
Securing the Controls
To avoid accidentally turning the oven on, activate the secure
feature. Press and hold the CANCEL • SECURE key for
approximately three seconds. Doing so will disable the control
panel and allow cleaning the controls without accidentally starting
any functions. Three beeps will sound and “OFF” will appear in
the display when the control panel has been secured.
To re-activate the control panel, again push and hold the CANCEL
• SECURE key for three seconds. Three beeps will sound and
“OFF” will disappear from the display.
Oven Features
3
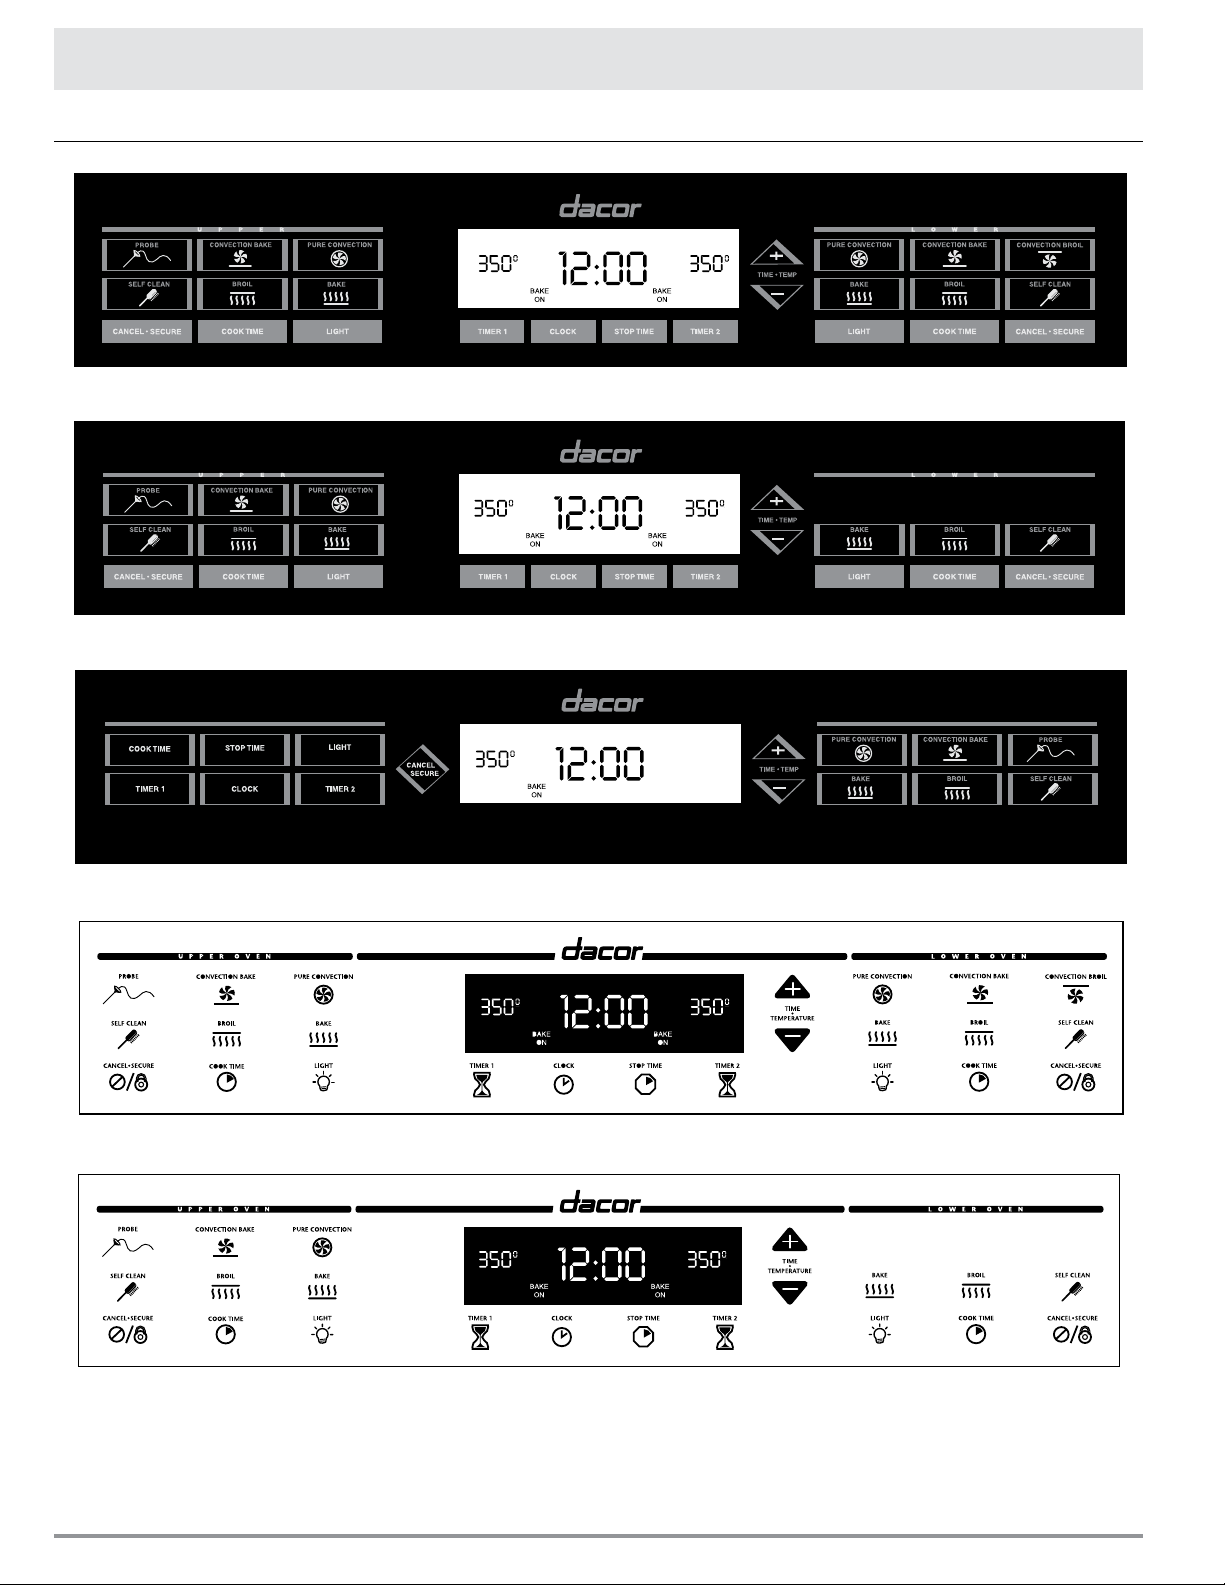
Control Panel
ov e n op e r a t I o n
Control Panel - Epicure® Models ECD227 and ECD230
Control Panel - Epicure® Models ECS227 and ECS230
Control Panel - Epicure® Models ECS127, ECS130 and ECS136
Control Panel - Millennia
Control Panel - Millennia™ Models MCS227 and MCS230
™
Models MCD227 and MCD230
4

ov e n op e r a t I o n
Control Panel - Millennia™ Models MCS127 and MCS130
Control Panel - Preference™ Models PCD227 and PCD230
Control Panel - Preference™ Model PCS230
Control Panel - Preference™ Model PCS130
5
ov e n op e r a t I o n
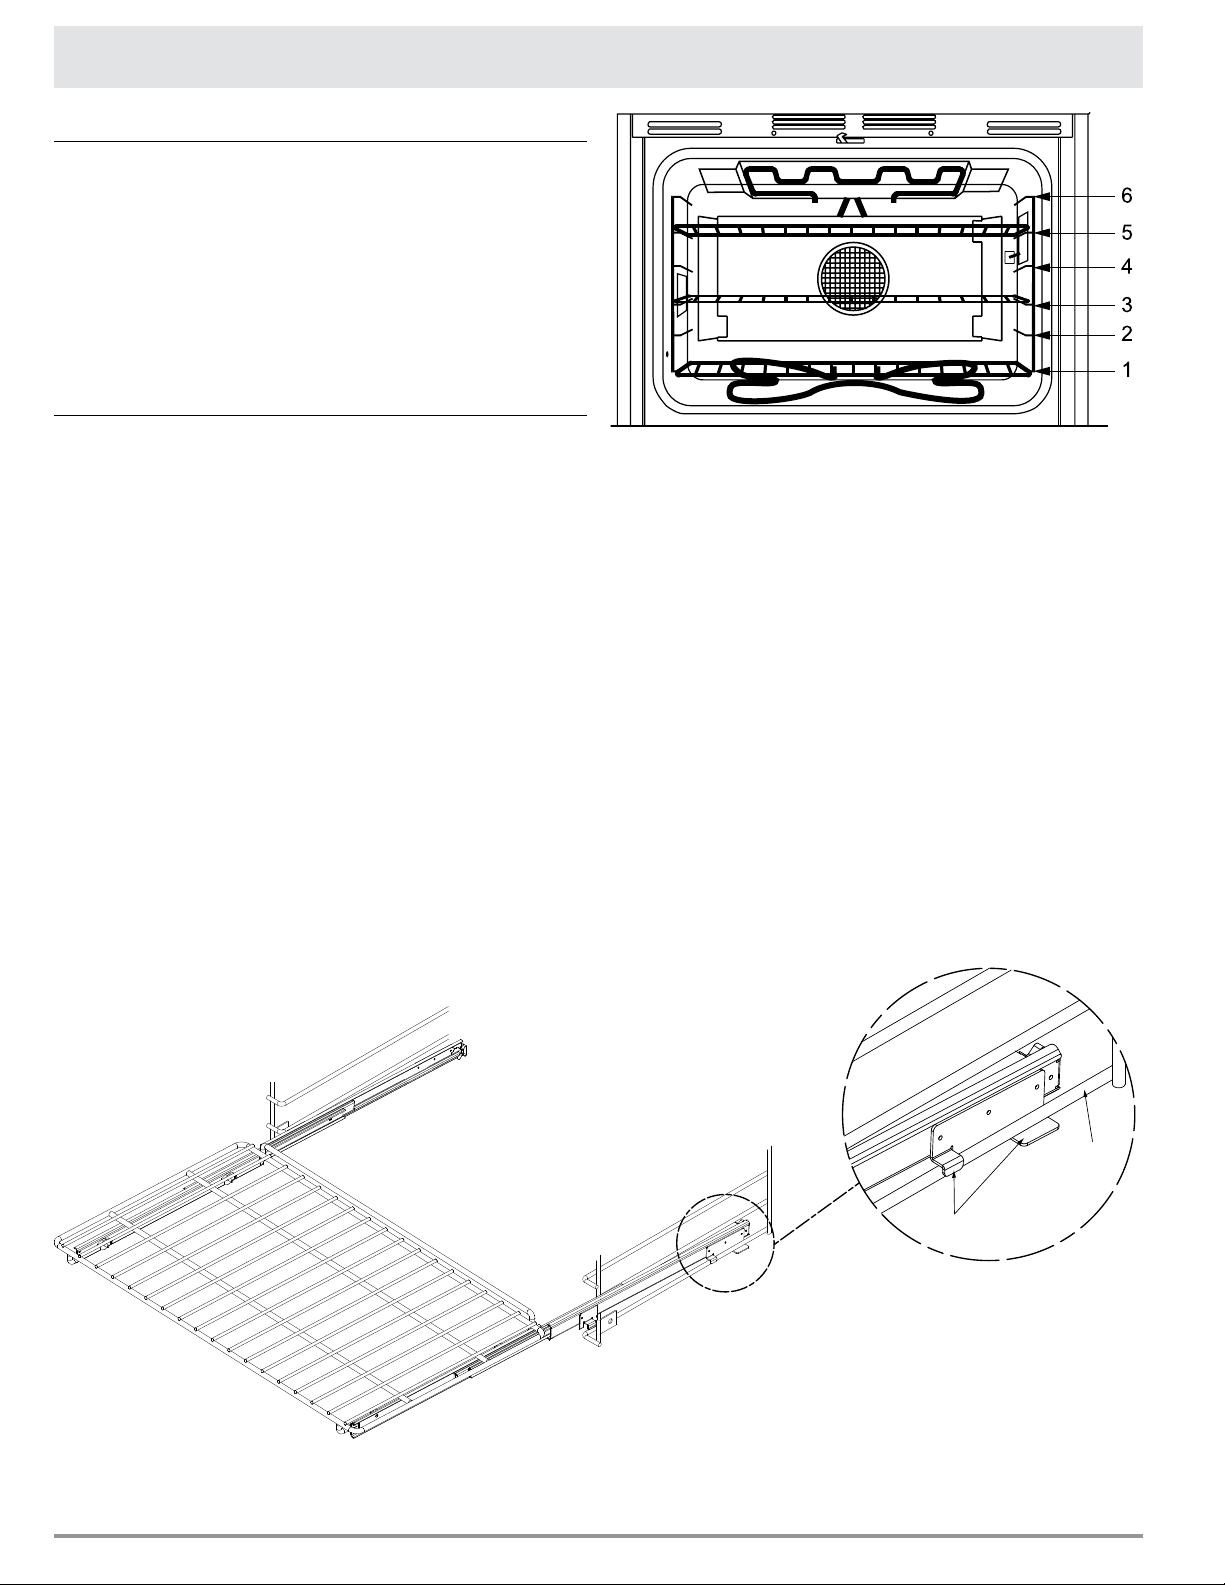
Glide clips
Oven
rack
Oven Racks and Support
Three chrome-plated convection racks are provided in the oven.
Always remember to position the racks prior to heating the oven.
Also, remove the oven racks prior to self-cleaning to prevent
permanent discoloration of the racks.
The porcelain rack supports provide six heights for positioning of
the oven racks.
To install a rack, align the left and right edges of the rack with the
horizontal guide rails of the rack supports, then slide the rack into
the oven.
GlideRack™ Oven Rack
Dacor’s GlideRack oven rack is designed to install effortlessly
and glide at a full extension. The full extension of the rack allows
you to slide pizza on and off with great ease when using Dacor’s
optional pizza stone (model number ABS20). It is also great for
large roasts in large roasting pans. It will also allow you to baste
more easily and check temperatures of the food more safely and
quickly.
NOTE: When fully extending the rack while in the first position,
the rack may rest on the inner door.
Installation:
Fully extend the two side guides. Align the two small clips 1.
on the bottom at the rear of the rack with the black porcelain
rack guides in the oven.
Begin to slide the rack in, then lift up. The GlideRack oven 2.
rack must be in between the two clips on the upper and lower
side of the rack rear.
Push the rack all the way to the back.3.
Grasp the rack in the front center and pull. The rack should 4.
come forward while the side guides remain in place.
Oven Rack Positions
Helpful Hints When Using Your GlideRack Oven Rack
The GlideRack oven rack works particularly well with heavier •
items, but you can use it during any type of baking, broiling or
roasting in your Dacor oven.
The GlideRack racks need to be spaced out when using more •
than one in the oven at a time. For instance, they should be
used in rack positions 1, 3 and 5 or 2 and 4, counting up
from the bottom, instead of positions 2, 3 and 4.
When using the GlideRack rack with Dacor’s ABS20 baking •
stone, use rack position 1 for best results.
Heavier roasting pans and dishes will also cook better on •
rack position 1.
Do not leave any of the racks in the oven during self-clean. •
They may be damaged and/or will become difficult to slide
in and out if self-cleaned. In addition, remove the convection
filter in the back of the oven before self-cleaning.
To clean the racks, use hot, soapy water and the rough side •
of a sponge.
GlideRack Oven Rack
Installation
6
 Loading...