

Page 1

Dishwasher
Lave-vaisselle
OWNER’S MANUAL
MANUEL DU PROPRIÉTAIRE
350A4502P654rev1
Page 2

English
TABLE OF CONTENTS
PAGE
SAFETY PRECAUTIONS . . . . . . . . . . . . . . . . . . . . . . . . . . . . . . . . . . . . . . . . . . . . . . . . . . . . . . . . . . . . . . . 2-4
Before Using Your Dishwasher . . . . . . . . . . . . . . . . . . . . . . . . . . . . . . . . . . . . . . . . . . . . . . . . . . . . . . . . . 3
PARTS AND FEATURES . . . . . . . . . . . . . . . . . . . . . . . . . . . . . . . . . . . . . . . . . . . . . . . . . . . . . . . . . . . . . . . . . 5
Control Panel . . . . . . . . . . . . . . . . . . . . . . . . . . . . . . . . . . . . . . . . . . . . . . . . . . . . . . . . . . . . . . . . . . . . . . . . . 5
START-UP GUIDE . . . . . . . . . . . . . . . . . . . . . . . . . . . . . . . . . . . . . . . . . . . . . . . . . . . . . . . . . . . . . . . . . . . . . . 6
Using Your New Dishwasher . . . . . . . . . . . . . . . . . . . . . . . . . . . . . . . . . . . . . . . . . . . . . . . . . . . . . . . . . . . 6
DISHWASHER LOADING . . . . . . . . . . . . . . . . . . . . . . . . . . . . . . . . . . . . . . . . . . . . . . . . . . . . . . . . . . . . 7-12
Loading Suggestions . . . . . . . . . . . . . . . . . . . . . . . . . . . . . . . . . . . . . . . . . . . . . . . . . . . . . . . . . . . . . . . . . . 7
Loading Top Rack . . . . . . . . . . . . . . . . . . . . . . . . . . . . . . . . . . . . . . . . . . . . . . . . . . . . . . . . . . . . . . . . . . . . . 8
Loading Bottom Rack . . . . . . . . . . . . . . . . . . . . . . . . . . . . . . . . . . . . . . . . . . . . . . . . . . . . . . . . . . . . . . . . 10
Loading Silverware Basket . . . . . . . . . . . . . . . . . . . . . . . . . . . . . . . . . . . . . . . . . . . . . . . . . . . . . . . . . . . 12
DISHWASHER USE . . . . . . . . . . . . . . . . . . . . . . . . . . . . . . . . . . . . . . . . . . . . . . . . . . . . . . . . . . . . . . . . 13-23
Proper Use of Detergent. . . . . . . . . . . . . . . . . . . . . . . . . . . . . . . . . . . . . . . . . . . . . . . . . . . . . . . . . . . . . . 13
Detergent Dispenser . . . . . . . . . . . . . . . . . . . . . . . . . . . . . . . . . . . . . . . . . . . . . . . . . . . . . . . . . . . . . . . . . 13
Rinse Aid Dispenser . . . . . . . . . . . . . . . . . . . . . . . . . . . . . . . . . . . . . . . . . . . . . . . . . . . . . . . . . . . . . . . . . . 15
Cycle Selection Charts . . . . . . . . . . . . . . . . . . . . . . . . . . . . . . . . . . . . . . . . . . . . . . . . . . . . . . . . . . . . . . . 16
Cancelling a Cycle . . . . . . . . . . . . . . . . . . . . . . . . . . . . . . . . . . . . . . . . . . . . . . . . . . . . . . . . . . . . . . . . . . . 18
Changing a Cycle or Setting . . . . . . . . . . . . . . . . . . . . . . . . . . . . . . . . . . . . . . . . . . . . . . . . . . . . . . . . . . 18
Adding Items During a Cycle . . . . . . . . . . . . . . . . . . . . . . . . . . . . . . . . . . . . . . . . . . . . . . . . . . . . . . . . . 19
Option Selections . . . . . . . . . . . . . . . . . . . . . . . . . . . . . . . . . . . . . . . . . . . . . . . . . . . . . . . . . . . . . . . . . . . . 19
Using the Plate Warmer . . . . . . . . . . . . . . . . . . . . . . . . . . . . . . . . . . . . . . . . . . . . . . . . . . . . . . . . . . . . . . 21
Cycle Status Indicatrs . . . . . . . . . . . . . . . . . . . . . . . . . . . . . . . . . . . . . . . . . . . . . . . . . . . . . . . . . . . . . . . . 21
Wash System. . . . . . . . . . . . . . . . . . . . . . . . . . . . . . . . . . . . . . . . . . . . . . . . . . . . . . . . . . . . . . . . . . . . . . . . 22
Drying System. . . . . . . . . . . . . . . . . . . . . . . . . . . . . . . . . . . . . . . . . . . . . . . . . . . . . . . . . . . . . . . . . . . . . . . 22
Overfill Protection Float . . . . . . . . . . . . . . . . . . . . . . . . . . . . . . . . . . . . . . . . . . . . . . . . . . . . . . . . . . . . . . 22
WASHING SPECIAL ITEMS . . . . . . . . . . . . . . . . . . . . . . . . . . . . . . . . . . . . . . . . . . . . . . . . . . . . . . . . . 23-24
DISHWASHER CARE . . . . . . . . . . . . . . . . . . . . . . . . . . . . . . . . . . . . . . . . . . . . . . . . . . . . . . . . . . . . . . . 24-25
Cleaning . . . . . . . . . . . . . . . . . . . . . . . . . . . . . . . . . . . . . . . . . . . . . . . . . . . . . . . . . . . . . . . . . . . . . . . . . 24-25
Drain Air Gap . . . . . . . . . . . . . . . . . . . . . . . . . . . . . . . . . . . . . . . . . . . . . . . . . . . . . . . . . . . . . . . . . . . . . . . . 25
Storing . . . . . . . . . . . . . . . . . . . . . . . . . . . . . . . . . . . . . . . . . . . . . . . . . . . . . . . . . . . . . . . . . . . . . . . . . . . . . . 25
TROUBLESHOOTING . . . . . . . . . . . . . . . . . . . . . . . . . . . . . . . . . . . . . . . . . . . . . . . . . . . . . . . . . . . . . . 26-29
WARRANTY . . . . . . . . . . . . . . . . . . . . . . . . . . . . . . . . . . . . . . . . . . . . . . . . . . . . . . . . . . . . . . . . . . . . . . . . . . 30
CONSUMER SUPPORT . . . . . . . . . . . . . . . . . . . . . . . . . . . . . . . . . . . . . . . . . . . . . . . . . . . . . . . . . . . . . . . . 31
FRANÇAIS . . . . . . . . . . . . . . . . . . . . . . . . . . . . . . . . . . . . . . . . . . . . . . . . . . . . . . . . . . . . . . . . . . . . . . . . . . . 32
1
Page 3

English
SAFETY PRECAUTIONS
Warning! – To reduce the risk of fire, electric shock, or injury to persons, always
exercise basic safety precautions, including the following:
1. Read all instructions before using the appliance.
2. Use the dishwasher only for its intended function.
3. Use only detergents or rinse agents recommended for use in a dishwasher, and keep
them out of reach of children.
4. When loading items to be washed:
1) Locate sharp items so that they are not likely to damage the door seal;
2) Load sharp knives with the handles up to reduce the risk of cut-type injuries.
5. Do not wash plastic items unless they are marked “dishwasher safe” or the
equivalent. For plastic items not so marked, check the manufacturer’s
recommendations.
6. Do not touch the heating element during or immediately after use.
7. Do not operate the dishwasher unless all enclosure panels are properly in place.
8. Do not tamper with controls.
9. Do not abuse, sit on, or stand on the door, lid, or dish racks of the dishwasher.
10. To reduce the risk of injury, do not allow children to play in or on the dishwasher.
11. Under certain conditions, hydrogen gas may be produced in a hot water system that
has not been used for two weeks or more. HYDROGEN GAS IS EXPLOSIVE. If the hot
water system has not been for such a period, before using the dishwasher turn on all
hot water faucets and let the water flow from each for several minutes. This will
release any accumulated hydrogen gas. As the gas is flammable, do not smoke or use
an open flame during this time.
12. Remove the door or lid to the washing compartment when removing an old
dishwasher from service or discarding it.
Remember to record the model and
serial number. They are on a label in the
dishwasher.
Staple your receipt to your manual.
You will need it to obtain warranty
service.
Model number
Serial number
Date of purchase
2
Page 4
English
SAFETY PRECAUTIONS
WARNING
Tip Over Hazard
• Do not use dishwasher until completely installed.
• Do not push down an open door; Doing so can result in
serious injury or cuts.
WARNING
Electrical Shock Hazard
• Electrically ground dishwasher.
• Connect ground wire to green ground connector in terminal box.
• Do not use an extension cord.
• Dishwasher must be supplied with 120V 60 Hz, and connected to
an individual, properly grounded branch circuit protected by a
15 amp circuit.
• Failure to follow these instructions can result in death, fire or
elctrical shock.
This dishwasher must be properly installed and located in accordance with the
Installation Instructions before it is used. If you did not receive installation
instructions with your dishwasher, you can obtain them by visiting our Website at
www.geappliances.ca.
• Install where dishwasher is protected from the elements. Protect against freezing to
avoid possible rupture of fill valve. Such ruptures are not covered by the warranty. See
“Storing” in the “Dishwasher Care” section for winter storage information.
• Install and level dishwasher on a floor that will hold the weight and in an area suitable
for its size and use.
• Remove all shipping plugs from hoses and connectors (such as the cap on the drain
outlet) before installing. See Installation Instructions for complete information.
3
Page 5

English
GROUNDING INSTRUCTIONS
For a grounded, cord-connected dishwasher:
The dishwasher must be grounded. In the event of a malfunction or breakdown, grounding
will reduce the risk of electric shock by providing a path of least resistance for electric
current. The dishwasher is equipped with a cord having an equipment-grounding
conductor and a grounding plug. The plug must be plugged into an appropriate outlet that
is installed and grounded in accordance with all local codes and ordinances.
WARNING: Improper connection of the equipement-grounding conductor can result in a
risk of electric shock. Check with a qualified electrician or service representative if you are
in doubt whether the dishwasher is properly grounded.
Do not modify the plug provided with the dishwasher; if it will not fit the outlet, have a
proper outlet installed by a qualified electrician.
For a permanently connected dishwasher:
The dishwasher must be connected to a grounded metal, permanent wiring system, or an
equipement-grounding conductor must be run with the circuit conductors and connected
to the equipement-grounding terminal or lead on the dishwasher.
DO NOT ATTEMPT TO REPAIR OR REPLACE ANY PART OF YOUR DISHWASHER UNLESS IT
IS SPECIFICALLY RECOMMENDED IN THIS MANUAL. ALL OTHER SERVICING SHOULD BE
REFERRED TO A QUALIFIED TECHNICIAN.
To minimize the possibility of electric shock, disconnect this appliance from the power
supply before attempting any maintenance.
NOTE:
Turning off the dishwasher does not disconnect the appliance from the power
supply. We recommend having a qualified technician service your appliance.
SAVE THESE INSTRUCTIONS
4
Page 6

English
PARTS AND FEATURES
1. Upper Spray
2. Top Rack Track
3. Water Inlet Opening (in tub wall)
4. Lower Spray Arm
5. Bottom Rack
6. Vent System
7. Split Folding Utility Shelf (4)
NOTE:
not all features available on all models.
5
8. Adjustable Top Rack
9. Middle Spray Arm
10. Removable Silverware Basket
11. Overfill Protection Float
12. Heating Element
13. Detergent and Rinse Aid Dispenser
Page 7
English
START-UP GUIDE
Before using your dishwasher, remove all packaging materials. Read this entire Owner’s
Manual. You will find important safety information and useful operating tips.
USING YOUR NEW DISHWASHER
1. Rinse aid is essential for good drying. Be sure to fill the dispenser
before you use your new dishwasher. Each filling will last about 1 to
3 months depending on your usage.
2. Scrape leftover food and hard items (toothpicks or bones) from dishes. You do not
need to pre-rinse your dishes.
3. Properly load the dishwasher. (See “Dishwasher Loading”) Load dishes with space in
between so water will reach the soiled surfaces. Make sure nothing prevents the spray
arm(s) from spinning freely.
4. Add detergent. Always use a quality brand detergent. (See “Dishwasher Use”)
5. Press the desired cycle and option selections. (See “Dishwasher Use”)
For integrated control models, press
lights will glow.
6. Push door firmly closed. The door latches automatically.
NOTE:
For integrated control models, f the dishwasher is not started
before closing the door, the cycle and options will not run.
START/RESET
. The selected cycle and option
6
Page 8

English
DISHWASHER LOADING
LOADING SUGGESTIONS
• Remove leftover food, bones, toothpicks and other hard items from the dishes. To
conserve water and energy and save time, it is not necessary to rinse dishes before
putting them into the dishwasher. The wash module contains a food disposer which will
reduce the size of food items.
NOTE:
If hard items such as fruit seeds, nuts, and eggshells enter the wash module, you
might hear chopping, grinding, crunching, or buzzing sounds. These sounds are
normal when hard items enter the module. Do not let metallic items (such as pot
handle screws) get into the wash module. Damage may occur.
• It is important for the water spray to reach all soiled surfaces.
• Load dishes so they are not too close together, stacked or overlapping if possible. For
best drying results, water must be able to drain from all surfaces.
• Load heavy pots and pans carefully. Heavy items can dent the stainless steel interior of
the door if they are dropped or bumped.
• Make sure pot lids and handles, pizza pans, cookie sheets, etc., do not interfere with the
spray arm rotation.
• Conserve water, energy and save time spent hand-rinsing by running a rinse cycle to
keep dishes moist if you do not plan to wash them soon. Foods such as eggs, rice,
pasta, spinach and cooked cereals may be hard to remove if they are left to dry over a
period of time.
QUIET OPERATING TIPS
To avoid thumping/clattering noises during operation:
• Make sure lightweight load items are secured in the racks.
• Make sure pot lids and handles, pizza pans, cookie sheets, etc., do not touch interior
walls or interfere with the spray arm rotation.
LOAD DISHES SO THEY DO NOT TOUCH ONE ANOTHER.
•
NOTE:
If hard items such as fruit seeds, nuts, and eggshells enter the wash module, you
might hear chopping, grinding, crunching, or buzzing sounds. These sounds are
normal when hard items pass through the food disposer.
7
Page 9

English
LOADING TOP RACK
The top rack is designed for cups, glasses and smaller items. Many items, up to 9” (22 cm),
fit in the top rack. (See recommended loading patterns shown)
NOTE:
The features on your dishwasher rack may vary from the drawings shown.
Cups and Small Dishes
• Place items so open ends face down for cleaning and draining.
• Load glasses and cups in top rack only. The bottom rack is not designed for glasses and
cups. Damage may occur.
• Place cups and glasses in the rows between tines. Placing them over the tines can lead
to breakage and water spots.
Cup and Glass Load
• China, crystal and other delicate items must not touch each other during dishwasher
operation. Damage may occur.
• Load plastic items in the top rack only. Only plastic items marked “dishwasher safe” are
recommended.
• Load plstic items so the force of the spray does not move them during the cycle.
• To avoid chipping, do not let stemware touch other items. Small bowls, pans and other
utensils can be placed in the top rack. Load bowls in the center section for best stability.
8
Page 10
English
SURE-HOLD • UTILITY SHELF
Fold down the extra shelf on the left or right side of the top rack to hold additional cups,
stemware or long items such as utensils and spatulas.
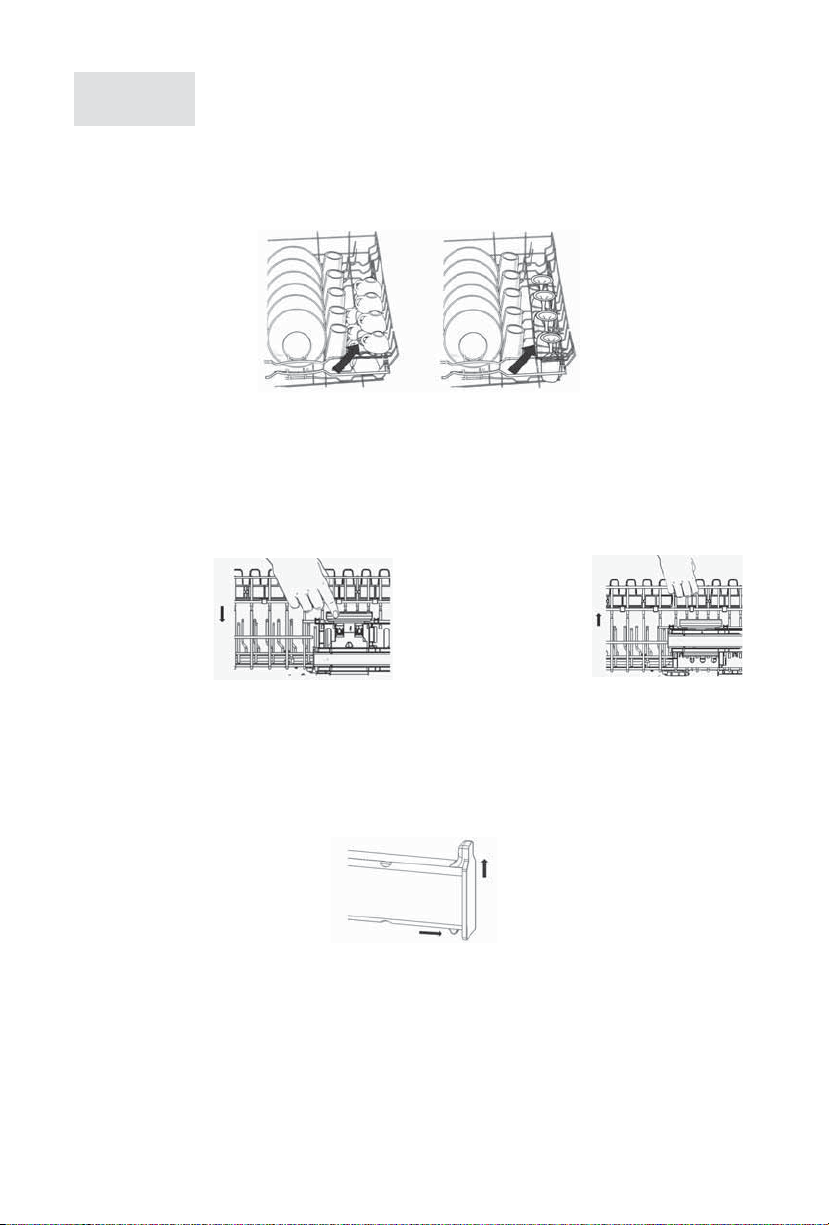
Adjustable 2-position top rack
You can raise or lower the top rack to fit tall items in either the top or bottom rack. Raise
the top rack to accomodate tall items in the bottom rack, or lower the top rack to
accomodate taller glasses or other items in the top rack.
Adjusters are located on each side of the top rack.
Depress blue
handle to lower
the rack.
To remove the top rack
1. Pull the rack forward slightly to access end caps.
2. While pulling the bottom of the end cap, raise it at the same time..
3. After removing both end caps, pull rack out.
(available on some models)
(available on some models)
Raise the rack
directly with handle
(no need to push the
adjuster handle)
To replace the top rack
1. Place the roller on each side of the rack into the rack tracks and push the rack back.
2. Insert end cap into rack.
3. Pull on the end cap to make sure it is locked into place.
4. Repeat on the other side.
9
Page 11

English
LOADING BOTTOM RACK
The bottom rack is designed for plates, pans, casseroles and utensils. Many items, up to
12.2” (31 cm) tall, fit in the bottom rack. (See recommended loading patterns shown)
NOTE:
The features on your dishwasher rack may vary from the drawings shown.
Dish Settings
• Do not load glasses, cups, or plastic items in the bottom rack. Load small items in the
bottom rack only if they are secured in place.
• Load plates, soup bowls, etc. between tines.
• Load soup, cereal and serving bowls in the rack in a variety of ways depending upon
their size and shape. Load bowls securely between the rows of tines. Do not nest bowls
because the spray will not reach all surfaces.
Utensil Load
• Load cookie sheets, cake pans and other large items at the sides and back. Loading
such items in front can keep the water spray from reaching the detergent dispenser.
10
Page 12

English
Mixed Load
• Secure heavily soiled cookware face down in the rack.
• Make sure pot handles and other items do not stop rotation of the spray arm(s). The
spray arm(s) must move freely.
• Do not load items between the bottom rack and the side of the dishwasher tub because
they might block the water inlet opening.
NOTE:
Spin the spray arms. Be sure items in the basket do not stop the rotation of the
spray arms.
Fold Down Rack
You can fold down rows of tines at the back of the bottom rack.
1. Grasp the tip of the tine that is in the tine holder.
2. Gently pull the tine out of the tine holder.
3. Lay the row of tines down in the rack to make room for larger dishes, bowls, pots, pans
or roasters.
11
Fold Down Rack
Page 13
English
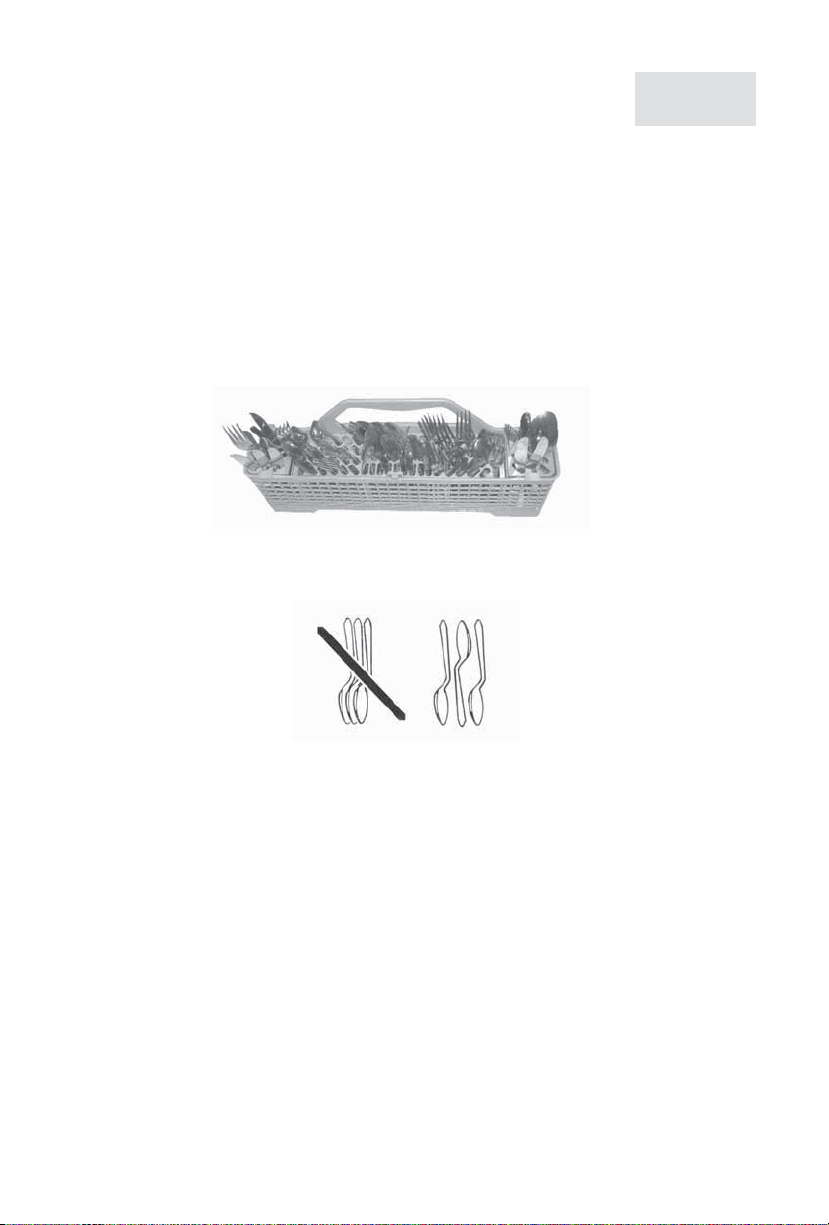
LOADING SILVERWARE BASKET
Load the silverware basket while it is in the bottom rack or remove the basket and place it
on a counter or table for loading. (See recommended loading pattern shown)
NOTE:
Unload or remove the basket before unloading the racks to avoid spilling water
droplets on the silverware.
• Load items with covers down, using the separators to prevent silverware nesting.
• Place small items such as baby bottle caps, jar lids, corncob holders, etc. in the
section(s) with hinged cover(s). Close the cover to hold small items in place.
• When covers are up, mix items in each section of the basket with some pointing up and
some pointing down to avoid nesting. Spray cannot reach nested items.
IMPORTANT: Alsways load sharp items (knives, skewers, etc.) pointing down.
NOTES:
• Do not load silver or silver-plated silverware with stainless steel. These metals can be
damaged by contact with each other during washing.
• Some foods (such as salt, vinegar, milk products, fruit juices, etc.) can pit or corrode
silverware. Run a rinse cycle if you have a full load to wash immediately.
12
Page 14

English
DISHWASHER USE
PROPER USE OF DETERGENT
Use only detergent specifically made for use in dishwashers. Cascade, Cascade Complete
and Finish dishwashing detergents, and Jet-Dry and Cascade Crystal Clear rinse agents
have been approved for use in all GE dishwashers. Keep your detergent fresh and dry.
Don’t put powder detergent into the dispenser until you’re ready to wash dishes.
All wash cycles except
Detergent Dispenser
The detergent dispenser has 2 sections. The small Pre-Wash section empties detergent
into dishwasher when you close the door.
The larger Main Wash section automatically empties detergent into dishwasher during the
wash. (See the “Cycle Selection Charts”)
• Use automatic dishwashing detergent only. Other detergents can produce excessive
suds that can overflow out of the dishwasher and reduce washer performance.
• Add detergent just before starting a cycle.
• Store tightly closed detergent in a cool, dry place. Fresh automatic dishwasher
detergent results in better cleaning.
NOTE:
Do not use detergent with a rinse cycle.
RINSE ONLY
require detergent in the main and pre-wash cup.
1. Wash Cover
2. Main Wash Section
3. Pre-Wash Section
4. Cover
Filling the Dispenser
1. If the dispenser cover is closed, open the cover by pushing the cover latch.
13
Page 15

English
2. Fill the Main Wash section with detergent. See “How Much Detergent To Use”.
3. Fill the Pre-Wash section, if needed.
4. Close the dispenser cover.
It is normal for the cover to open partially when dispensing detergent.
NOTE:
Use both sections for cycles with 2 washes. Use only the Main Wash section for
cycles with 1 wash. See the “Cycle Selection Charts” for more details.
How Much Detergent To Use
• The amount of detergent to use depends on the hardness of your water and the type of
detergent. If you use too little, dishes won`t be clean. If you use too much in soft water,
glassware will etch.
• New detergents formulations are phosphate free. Detergents without phosphates tend
to leave mineral deposits on glassware and other items, leading to poor wash
performance complaints. The deposits are in the form of a white film on glassware and
other items, even the dishwasher tub itself. The easiest way to remove the white film is
to run their glassware and dishware through a dishwasher cycle using citric acid. Please
contact your local parts supplier to purchase kits of citric acid.
The use of a rinse agent may help minimize a repeat build up of film.
14
Page 16
English
Rinse Aid Dispenser
Rinse aids prevent water from forming droplets that can dry as spots or streaks. They also
improve drying by allowing water to drain off the dishes during the final rinse by releasing
a small amount of the rinse aid into the rinse water. Your dishwasher is designed to use a
liquid rinse aid. Do not use a solid or bar-type.
Filling the Dispenser
The rinse aid dispenser holds 4.8 oz (145 mL) of rinse aid. Under normal conditions, this will
last for about three months. Rinse aid is released through an opening in the dispenser. You
do not need to wait until the dispenser is empty to refill it. Try to keep it full, but be careful
not to overfill it.
1. Make sure the dishwasher door is fully open.
2. Open the dispenser by pushing the cover latch.
3. Add rinse aid until the indicator window looks full.
4. Clean up any spilled rinse aid with a damp cloth.
5. Close the cover.
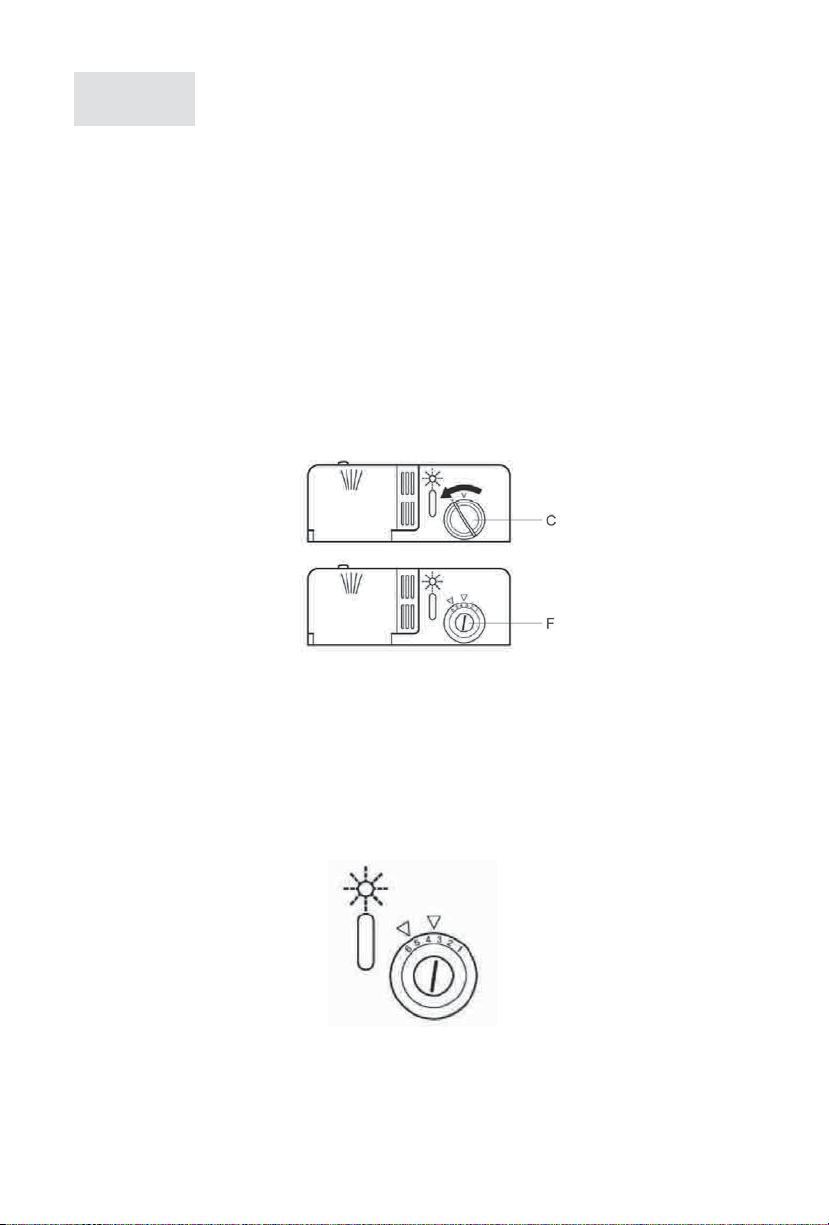
Rinse Aid Setting
The amount of rinse aid released into the final wash can be adjusted. The factory setting is
at 3. For most water conditions, set the adjuster to 2 or 3. If there are rings of calcium
(hard water) spots on dishes, try a higher setting.
To Adjust the Setting
Open the dispenser cover. Turn the adjuster inside the dispenser to the desired setting.
15
Page 17

English
Pre-
Wash
Main
Wash
Rinse Final
Heated
Rinse
Dry Minimum
Time
(min)
Water
Usage
(gal/L)
102*
4.5-9.0/
17-34.2
150°F
(66°C)
160°F
(71°C)
Pre-
Wash
Main
Wash
Rinse
Final
Heated
Rinse
Dry
Minimum
Time
(min)
Water
Usage
(gal/L)
First
Wash
Second
Wash
92*
9.0/34.2
140°F
(60°C)
Pre-
Wash
Main
Wash
Rinse Final
Heated
Rinse
Dry Minimum
Time
(min)
Water
Usage
(gal/L)
81*
4.5-7.5/
17-28.5
130°F
(55°C)
CYCLE SELECTION CHARTS
Select the wash cycle and options desired. If the door is closed, the dishwasher starts
filling once you press the cycle button, unless you select a delay wash. You can select an
option as the machine is filling.
•“ shows what steps are in each cycle. Temperatures indicate where extra heat is
A “
added. Water usage is shown.
®
The model meets the ENERGY STAR
Cycle time excludes dry time. An asterisk (*) by the cycle time indicates the cycle time
might be longer depending on the temperature of the water entering the dishwasher.
On some
models
guidelines for energy efficiency.
Use this cycle for all day-today soil types, including
both normal and heavy soils,
giving you exceptional
cleaning performance
combined with reassuring
sanitization.
Use this cycle for
hard-to-clean,
baked-on cookware
and harder than
normal water
conditions.
Use both
detergent
dispenser
sections.
Use both
detergent
dispenser
sections.
Use this cycle for loads
with normal amounts
of food soil. During the
Main Wash, the wash
action will repeatedly
pause for several
seconds.
Use both
detergent
dispenser
sections.
16
Page 18

English
Pre-
Wash
Main
Wash
Rinse Final
Heated
Rinse
Dry
Minimum
Time
(min)
Water
Usage
(gal/L)
19*
3/11.4
Pre-
Wash
Main
Wash
Rinse Final
Heated
Rinse
Dry
Minimum
Time
(min)
Water
Usage
(gal/L)
41*
4.5/17
130°F
(55°C)
Pre-
Wash
Main
Wash
Rinse Final
Heated
Rinse
Dry
Minimum
Time
(min)
Water
Usage
(gal/L)
11*
1.5/5.7
Use this cycle for
china and crystal. This
cycle uses a light
wash and gentle dry.
During the heated dry,
the heating element
cycles on and off.
Use this cycle for a quick
wash and light dry to
clean up cookware prior
to entertaining. The
sensor adds water and
time to the cycle if
needed for maximum
cleaning. This cycle uses a
shortened dry time. Towel
drying may be needed.
Use main
detergent
dispenser section.
Use main
detergent
dispenser
section.
Use this rinse cycle for
rinsing dishes, glasses
and silverware that will
not be washed right
away.
Do not use
detergent with
this cycle.
• If the incoming water temperature is less than the recommended temperature or food
soils are heavy, the cycle will automatically compensate by adding time, heat and
water as needed.
NOTE:
The sensor in your dishwasher monitors the soil level. Cycle time and/or water
usage can vary from the numbers above as the sensor adjusts the cycle for the
best wash performance.
17
Page 19

English
CANCELLING A CYCLE
Anytime during a cycle, press
a 2-minute drain (if needed). Let the dishwasher drain completely.
CANCELLING A CYCLE
1. Carefully open the door slightly to stop the cycle. Wait for the
2. Press
3. Close the door. The dishwasher starts a 2-minute drain (if needed).
To Stop The Drain
You can press
drain the dishwasher before starting a new cycle.
CANCEL/DRAIN
CHANGING A CYCLE OR SETTING
During The First Fill Of A Cycle
1. Press a new cycle and/or options.
2. Ensure detergent dispensers are full.
After The First Fill Of The Cycle
1. Press
2. Ensure detergent dispensers are full.
3. Press a new cycle and/or options.
(on some models)
(on models with integrated controls)
spraying action to stop before opening the door to access the
control panel.
START/RESET
Let the dishwasher drain completely.
or
START/RESET
CANCEL/DRAIN
needed). Let the dishwasher drain completely.
for 1 second.
(on some models)
. The dishwasher starts a 2-minute drain (if
CANCEL/DRAIN
again to stop the drain. Remember to
. The dishwasher starts
CHANGING A CYCLE OR SETTING
While A Cycle Is Running
1. Open the door.
2. Press
3. Select a new cycle and/or option.
4. Press
5.
6. Check the detergent dispensers. They must be filled properly for
7. Close the door.
START/RESET
START/RESET
START/RESET
the new cycle.
glows.
(on models with integrated controls)
for 1 second.
.
START/RESET
light goes off.
18
Page 20

English
ADDING ITEMS DURING A CYCLE
You can add an item anytime before the main wash starts. Open the door and check the
detergent dispenser. If cover is still closed, you can add items.
To Add Items
1. Lift up the door latch to stop the cycle. Wait for the spraying action to stop before
opening the door.
2. Open the door. If the detergent dispenser is still closed, add the item.
3. Close the door firmly until it latches. The dishwasher resumes the cycle after about a
10-second pause.
OPTION SELECTIONS
You can customize your cycles by pressing an option. If you change your mind, press the
option again to turn the option off. Select a different option if desired. You can change an
option anytime before the selected option begins.
Hi-Temp Wash
Select this option to heat the water during parts of the cycle. Higher
water temperatures help clean tough soils.
with the
the main wash.
This option adds heat, water and wash time to a cycle.
NOTE: HI-TEMP WASH
Sanitize Rinse Option
Select this option to raise the water temperature in the final rinse to
approximately 160°F (71°C). The
and time to the cycle. This high temperature rinse sanitizes your
dishes and glassware in accordance with NSF/ANSI standard 184 for
residential dishwasher. Certified residential dishwashers are not
intended for licensed food establishements.
NOTE: ANTI-BACTERIAL WASH
POTS & PANS
cycles. Always use
or
NORMAL
is an option with the
cycles raises the temperature in
HI-TEMP WASH
(on some models)
SANITIZE RINSE
automatically uses this option.
SANITIZE RINSE
NORMAL
designed to meet the NSF/ANSI requirements.
is an option with the
cycles. Only these sanitization cycles have been
HI-TEMP WASH
POTS & PANS
if you have hard water.
option adds heat
POTS & PANS
combined
and
and
NORMAL
19
Page 21

HEATED DRY
English
Select this option to dry dishes with heat.
The dishes take longer to dry and some spotting can occur. For best
drying, always use a liquid rinse. Some items (such as plastic) may
need towel drying.
NOTE: HEATED DRY
& PANS
is an option with the
wash,
NORMAL
and
ANTI-BACTERIAL WASH, POTS
CHINA
cycles.
CHILD LOCK
To Turn On The Lock
Press and hold the
button while your dishwasher control is locked, the light flashes 3 times and selection is
ignored.
To Turn Off The Lock
Press and hold the
Delay Start
Select this option to run your dishwasher at a later time or during off-peak hours. You can
add items to the load anytime during the delay countdown. After adding items, close the
door firmly until it latches. The delay countdown will not continue if the door is not latched.
You can delay the start of a cycle up to 12 hours. (On integrated control models, you can
delay the start of a cycle up to 24 hours.)
The first time you use
After the first time that you use the delay, the control will start by calling up the last delay
that you entered. You can adjust from there if you want to change it.
(on some models)
Use
CHILD LOCK
can also use the
option changes during a cycle.
When
CHILD LOCK
NOTE:
The dishwasher door can be opened while the controls are
locked.
HEATED DRY
HEATED DRY
(on some models)
DELAY START
to prevent unintended use of the dishwasher. You
CHILD LOCK
is lit, all buttons are disabled.
button for 3 seconds.
button for 3 seconds. The light turns off.
, you will see that the display shows a 1-hour delay.
feature to prevent unintended cycle or
CHILD LOCK
glows. If you press any
20
Page 22

English
To Delay The Start
1. Close the door.
2. Repeatedly press
delay in the display.
When the delay reaches 12 hours (or 24 hours on integrated
control models), the delay turns off. Press
select a new number of delay hours.
3. Select a wash cycle and options.
NOTE:
To cancel the delay and the cycle, press
cycle immediately, press
DELAY START
DELAY START
until you see the desired hours of
DELAY START
CANCEL
. To cancel the delay and start the
until no hours show in the display.
again to
USING THE PLATE WARMER
Use the
NOTE:
PLATE WARMER
option to warm serving dishes or dinner plates.
Do not use the option with cycles.
(on some models)
1. Open the door.
2. Press
PLATE WARMER
, it glows.
3. Allow 8 minutes to heat the dishware.
CYCLE STATUS INDICATORS
Follow the progress of your dishwasher with the
NOTE:
Some models do not have certain cycle status indicators.
Water
Heated
Washing
Turbidity
Sensor Rinsing Drying
Water Heated
Water heated
glows only when the cycle pauses to heat water to a set temperature.
Washing or rinsing continues as water is heated. Once water reaches the set temperature,
the light goes off and the cycle resumes.
Washing
Displayed during pre-wash and main wash periods.
Turbidity Sensor
Sensor glows during the sensing part of the cycle. Your dishwasher senses soil level at the
end of the pre-wash. Washing continues while sensing occurs.
Rinsing
Displayed during rinse periods.
Cycle Status Indicators
Sanitized Add Rinse Aid
Clean
.
21
Page 23

English
Drying
Lights up when the dishwasher is drying after the final rinse.
Clean
Displayed when a wash cycle is complete. The light will remain ON until the door is
opened.
Sanitized
Displayed when the cycle has met sanitization conditions. The light will remain ON until
the door is opened.
Add Rinse Aid
Fill the rinse aid dispenser when
forming droplets that dry as spots or streaks. If the rinse aid dispenser is empty, the light
glows when you select a cycle or while a cycle is running.
Add Rinse Aid
is lit. A rinse aid prevents water from
Wash System
The six-level wash system provides excellent cleaning results. Three levels of filtration and
a soil collector system filter the wash water and prevent food particles from redepositing
on the clean dishes.
• The wash water continuously flows through the filter, trapping food particles.
• Two water jets, located under the spray arm, remove the food particles from the filter.
• A coarse strainer prevents bones, pits and other large objects from entering the pump
system.
NOTE:
Periodically check the coarse strainer and remove any objects on the strainer.
Drying System
During drying, you can see hot vapor escaping through the vent
at the upper left corner of the door. This is normal as the heat
dries your dishes.
IMPORTANT:
The vapor is hot. Do not touch the vent .
Overfill Protection Float
The overfill protection float (in the front right corner of the dishwasher
tub) keeps the dishwasher from overfilling. It must be in place for the
dishwasher to operate.
Check under the float for objects that may keep the protector from
moving up or down.
22
Page 24

English
WASHING SPECIAL ITEMS
If you have doubts about washing a particular item, check with the manufacturer to see if
it is dishwasher safe.
Material
Aluminum
Disposable aluminum
Bottles and cans
Cast iron
China/Stoneware
Crystal
Gold
Glass
Hollow-handle knives
Pewter brass, bronze
Disposable plastics
Dishwasher Safe/Comments
Yes
High water temperature and detergents can affect finish of
anodized aluminum.
No
Do not wash disposable aluminum pans in the dishwasher.
These might shift during washing and transfer black marks to
dishes and other items.
No
Wash bottles and cans by hand. Labels attached with glue
can loosen and clog the spray arms or pump and reduce
washing performance.
No
Seasoning will be removed and iron will rust.
Yes
Always check manufacturer’s recommendations before
washing. Antique, hand-painted or over-the-glaze patterns
may fade, gold leaf can discolor or fade.
Yes
Check manufacturer’s recommendations before washing.
Some types of leaded crystal can etch with repeated
washing.
No
Gold-colored flatware will discolor.
Yes
Milk glass yellows with repeated dishwasher washing.
No
Handles of some knives are attached to the blade with
adhesives which can loosen if washed in the dishwasher.
No
High water temperatures and detergent can discolor or pit
the finish.
No
Cannot withstand high water temperatures and detergents.
23
Page 25

English
Material
Plastics
Stainless steel
Sterling silver or
silver plate
Tin
Wooden ware
Yes
Always check manufacturer’s recommendations before
washing. Plastics vary in their capacity to withstand high
temperatures and detergents. Load plastics in the top rack
only.
Yes
Run a rinse cycle if not washing immediately. Prolonged
contact with food containing salt, vinegar, milk products or
fruit juice can damage finish.
Yes
Run a rinse cycle if not washing immediately. Prolonged
contact with food containing salt, acid or sulfide (eggs,
mayonnaise and seafood) can damage finish.
No
Can rust.
No
Wash by hand. Always check with manufacturer’s
instructions before washing. Untreated wood can warp, crack
or lose its finish.
Dishwasher Safe/Comments
DISHWASHER CARE
Cleaning the exterior
In most cases, regular use of a soft, damp cloth or sponge and a mild detergent is all that
is necessary to keep the outside of your dishwasher looking nice and clean.
Cleaning the interior
Hard water minerals can cause a white film to build up on the inside surfaces, especially
just beneath the door area.
Do not clean the dishwasher interior until it has cooled. Wear rubber gloves. Do not use
any type of cleanser other than dishwasher detergent because it may cause foaming or
create suds.
24
Page 26

English
To clean interior
Make a paste with powdered dishwasher detergent on a damp sponge and clean.
OR
Use liquid automatic dishwasher detergent and clean with a damp sponge.
OR
See the vinegar rinse procedure in “Spotting and filming on dishes” in “Troubleshooting”.
NOTE:
Run a
NORMAL
cycle with detergent after cleaning the interior.
DRAIN AIR GAP
Check the drain air gap anytime your dishwasher isn’t draining well. Some state or local
plumbing codes require the addition of a drain air gap between a built-in dishwasher and
the home drain system. If a drain is clogged, the drain air gap protects your dishwasher
from water backing up into it.
The drain air gap is usually located on top of the sink or countertop near the dishwasher.
NOTE:
The drain air gap is an external plumbing device that is not part of your
dishwasher. The warranty provided with your dishwasher does not cover service
costs directly associated with the cleaning or repair of the external drain air gap.
To Clean The Drain air Gap
Clean the drain air gap periodically to ensure proper drainage of your dishwasher. Follow
the cleaning instructions provided by the manufacturer. With most types: Lift off the
chrome cover. Unscrew the plastic cap. Check for any soil buildup. Clean if necessary.
STORING
Storing For The Summer
Protect your dishwasher during the summer months by turning off the water supply and
power supply to the dishwasher.
Winterizing Your Dishwasher
Protect your dishwasher and home against water damage caused by freezing water lines.
If your dishwasher is left in a seasonal dwelling or could be exposed to near freezing
temperatures, have your dishwasher winterized by authorized service personnel.
25
Page 27

English
TROUBLESHOOTING
Try the solutions suggested here first and possibly avoid the cost of a service call...
DISHWASHER IS NOT OPERATING PROPERLY
• Dishwasher does not run or stops during a cycle
- Is the door closed tightly and latched?
- Is the right cycle selected? Refer to the Cycle Selection Charts.
- Is there power to the dishwasher? has a household fuse blown or circuit breaker tripped?
- Has the motor stopped due to an overload? The motor automatically resets itself
within a few minutes. If it does not restart, call for service.
- Is the water shut-off valve (if installed) turned on?
- It is normal for certain cycles to repeatedly pause for several seconds during the main
wash.
• Dishwasher will not fill
- Is the overfill protection float able to move up and down freely? Press down to release.
• Dishwasher seems to run too long
- Is the water supplied to the dishwasher hot enough? The dishwasher runs longer while
heating water. refer to the “Dishwasher Performance Tips” section. a delay
automatically occurs in some wash and rinse cycles until the water reaches the
proper temperature.
• Water remains in the dishwasher
- Is the cycle complete?
- It is normal to have a small amount of clean water around the outlet in the bottom of
the tub, to keep the water seal lubricated.
• Detergent remains in the covered section of the dispenser
- Is the cycle complete?
- Is the detergent lump-free? Replace detergent if necessary.
• Water residue on the front of the access panel
- Was too much detergent used? Refer to the “Detergent Dispenser” section.
- Is the brand of detergent making excess foam? Try a different brand to reduce
foaming and eliminate buildup.
• Odor in the dishwasher
- Are dishes washed only every 2 or 3 days? Run a rinse cycle once or twice a day until
you have a full load.
- Does the dishwasher have a new plastic smell? Run a vinegar rinse as described in
“Spotting and filming on dishes” later in this troubleshooting guide.
• Condensation on the kitchen counter (built-in models)
- Is the dishwasher aligned with the countertop? Moisture from the vent in the
dishwasher console can form on the counter. Refer to the Installation Instructions for
more information.
26
Page 28

English
DISHES ARE NOT COMPLETELY CLEAN
• Food soil left on the dishes
- Is the dishwasher loaded correctly? Refer to the “Dishwasher Loading” section. Do not
allow dishes to nest too close together. There must be sufficient space between each
dish to allow the wash water to clean the dishes properly.
- Did you choose the cycle that describes the most difficult soil in your dishwasher? If
you have some items with heavier soils, use a heavier cycle.
- Is the water temperature too low? For best dishwashing results, water should be at
least 120°F (49°C) as it enters the dishwasher.
- Did you use the correct amout of fresh detergent? Use recommended dishwasher
detergents only. Refer to the “Detergent Dispenser” section. Never use less than 1 tbsp
(15 g) per load. Detergent must be fresh to be effective. Store detergent in a cool, dry
area. Heavy soil and/or hard water generally require extra detergent.
- Is the air gap or disposer clogged? Clean as required.
- Is detergent caked in dispenser? Use fresh detergent only. Do not allow detergent to sit
for several hours in a wet dispenser. Clean dispenser when caked detergent is present.
- Is the pump or spray arm clogged by labels from bottles and cans? If you wash bottles
and cans in your dishwasher, check for labels clogging the pump or spray arm.
- Are spray arms obstructed by dishes? Re-position dishes to allow spray arms to rotate
freely.
- Is the home water pressure high enough for proper dishwasher filling? Home water
pressure should be 20 to 120 psi (138 to 828 kPa) for proper dishwasher fill. A booster
pump on the water supply can be added if pressure is too low.
- Are high suds slowing the wash arm? Never use soap or laundry detergents. Use
recommended dishwasher detergents only.
SPOTS AND STAINS ON DISHES
• Spotting and filming on dishes
- Is your water hard or is there a high mineral content in your water? Conditionning the
final rinse water with a liquid rinse aid helps eliminate spotting and filming. Keep the
rinse aid dispenser filled. Always use a high-temp option. If your water hardness is
13 grains or above, it is strongly recommended that you install a home water softener.
If you do not wish to drink softened water, have a softener installed onto your hot
water supply.
- Is the water temperature too low? For best dishwashing results, water should be at
120°F (49°C) as it enters the dishwasher.
- Did you use the correct amout of effective detergent? Use recommended dishwasher
detergents only. Refer to the “Detergent Dispenser” section. Never use less than 1 tbsp
(15 g) per load. Detergent must be fresh to be effective. Store detergent in a cool, dry
area. Heavy soil and/or hard water generally require extra detergent.
- Make sure the dishes are loaded as shown in the “Dishwasher Loading” section.
27
Page 29

English
- Is the home water pressure high enough for proper dishwasher filling? Home water
pressure should be 20 to 120 psi (138 to 828 kPa) for proper dishwasher fill. A booster
pump on the water supply can be added if pressure is too low.
• Silica film or etching (silica film is a milky, rainbow-colored deposit; etching is a
cloudy film)
- Sometimes there is a water/chemical reaction with certain types of glassware. This is
usually caused by some combination of soft or softened water, alkaline washing
solutions, insufficient rinsing, overloading the dishwasher and the heat of drying. It
might not be possible to prevent the problem, except by hand washing.
- To slow this process, use a minimum amount of detergent but not less than 1 tbsp (15
g) per load. Use a liquid rinse aid and under load the dishwasher to allow thorough
rinsing. Silica film and etching are permanent and cannot be removed. Do not use
heated drying.
• White spots on cookware with non-stick finish
- Has the dishwasher detergent removed cookware seasoning? Re-season cookware
after washing in the dishwasher.
• Brown stains on dishes and dishwasher interior
- Does your water have high iron content? Rewash dishes, using 1 to 3 tsp (5 to 15 mL)
of citric acid crystals added to the covered section of the detergent dispenser. Do not
use detergent. Follow with a
needed more often than every other month, the installation of an iron removal unit is
recommended.
• Black or gray marks on dishes
- Are aluminum items rubbing dishes during washing? Disposable aluminum items can
break down in the dishwasher and cause marking. Hand wash these items. Remove
aluminum markings by using a mild abrasive cleaner.
• Orange stains on plastic dishes or dishwasher interior
- Are large amounts of tomato-based foods on dishes placed in the dishwasher? It may
be necessary to use a stain removal product to remove stains from your dishwasher.
Stains will not affect dishwasher performance.
NORMAL
wash cycle with detergent. If treatment is
28
Page 30

English
DISHES ARE NOT DRY COMPLETELY
• Dishes are not dry
- Did you load your dishwasher to allow proper water drainage.
- Do not overload. Refer to the “Dishwasher Loading” section. Use a liquid rinse aid to
speed drying.
- Are the plastics wet? Plastics often need towel drying.
- Is the rinse aid dispenser empty? Refer to the “Rinse Aid Dispenser” section
- Did you use an air-dry or energy-saving dry option? Use a heated drying option for
dryer dishes.
DISHES ARE DAMAGED DURING A CYCLE
• Chipping of dishes
- Did you load the dishwasher properly? Load the dishes and glasses so they are stable
and do not strike together from washing action. Minimize chipping by moving the rack
in and out slowly.
NOTE:
Antiques, feather-edged crystal, and similar types of china and glassware might
be too delicate for automatic dishwashing. wash by hand.
NOISES
• Grinding, grating, crunching or buzzing sounds
- A hard object has entered the wash module (on some models). When the object is
ground up, the sound should stop.
- Normal operating sounds include: water entering dishwasher, detergent cup opening,
motor stopping and starting, drain pump sounds during pump out.
- Are dishes rattling? Make sure dishes are loaded properly and not obstructing spray
arms as they rotate.
29
Page 31

CONSUMER WARRANTY
Your appliance is warranted to be free of defects in material and workmanship.
English
How Long
What is covered
All parts
Warranted
(From Date of Sale)
One (1) year
Terms and Conditions:
This warranty applies to appliances purchased
in Canada for domestic use in Canada when the
appliance has been properly installed according
to the instructions supplied by Mabe and is
connected to an adequate and proper utility
service.
Damage due to abuse, accident, commercial
use, and alteration or defacing of the serial plate
cancels all obligations of this warranty.
Service during this warranty must be performed
by an Authorized Mabe Service Agent.
Neither Mabe nor the Dealer is liable for any
claims or damages resulting from any failure of
the dishwasher or from service delays beyond
their reasonable control.
To obtain warranty service, purchaser must
present the original bill of sale. Components
repaired or replaced are warranted through the
remainder of the original warranty period only.
This warranty is extended to the original
purchaser and any succeeding owner for
products purchased for home use within
Canada. In home warranty service will be
provided in areas where it is available and
deemed reasonable by Mabe to provide.
Parts
Repair or Replace
at Supplier’s Option
One (1) year
Labour
One (1) year
What Is Not Covered
• Service trips to your home to teach you how to
use the product.
• Damage to finish after delivery.
• Improper installation – proper installation
includes adequate electrical, plumbing and
other connecting facilities.
• Replacement of house fuses or resetting of
circuit breakers.
•
Replacement of light bulbs.
•
Damage to product caused by accident, fire,
floods or acts of God.
•
Proper use and care of product as listed in the
owner’s manual, proper setting of controls.
•
WARRANTOR IS NOT RESPONSIBLE FOR
CONSEQUENTIAL DAMAGES.
EXCLUSION OF IMPLIED WARRANTIES – Your sole and exclusive remedy is product repair as
provided in this Limited Warranty. Any implied warranties, including the implied warranties of
merchantability or fitness for a particular purpose, are limited to one year or the shortest
period allowed by law.
IMPORTANT
Keep this warranty and your bill of sale as proof of original purchase and purchase date.
Mabe Service is available coast to coast.
To schedule service, call 1.800.561.3344
If further help is needed concerning this warranty, contact:
Manager, Consumer Relations, Mabe Canada, Inc.,
Suite 310, 1 Factory Lane, Moncton, N.B. E1C 9M3
Staple your receipt here.
Proof of the original purchase date is
needed to obtain service under the
warranty.
30
Page 32

CONSUMER SUPPORT
GE Appliances Website
Have a question or need assistance with your appliance? Try the GE Appliances
Website 24 hours a day, any day of the year!
Schedule Service
Expert GE repair service is only one step away from your door. Call 1.800.561.3344
during normal business hours.
GEAppliances.ca
1.800.561.3344
Real Life Design Studio
GE supports the Universal Design concept–products, services and environments that
can be used by people of all ages, sizes and capabilities. We recognize the need to
design for a wide range of physical and mental abilities and impairments. For details
of GE’s Universal Design applications, including kitchen design ideas for people with
disabilities, check out our Website today.
In Canada, contact: Manager, Consumer Relations, Mabe Canada Inc.
Parts and Accessories
Individuals qualified to service their own appliances can have parts or accessories
sent directly to their homes (VISA, MasterCard and Discover cards are accepted). Order
by phone at 1.800.661.1616 during normal business hours.
Instructions contained in this manual cover procedures to be performed by any
user. Other servicing generally should be referred to qualified service personnel.
Caution must be exercised, since improper servicing may cause unsafe operation.
Suite 310, 1 Factory Lane
Moncton, N.B. E1C 9M3
1.800.661.1616
Contact Us
If you are not satisfied with the service you receive from GE, contact us on our
Website with all the details including your phone number, or write to:
Director, Consumer Relations, Mabe Canada Inc.
Suite 310, 1 Factory Lane
Moncton, N.B. E1C 9M3
Register Your Appliance
Register your new appliance on-line–at your convenience! Timely product
registration will allow for enhanced communication and prompt service under the
terms of your warranty, should the need arise. You may also mail in the pre-printed
registration card included in the packing material.
GEAppliances.ca
GEAppliances.ca
Page 33

Français
TABLE DES MATIÈRES
PAGE
MESURES DE SÉCURITÉ. . . . . . . . . . . . . . . . . . . . . . . . . . . . . . . . . . . . . . . . . . . . . . . . . . . . . . . . . . . . . . . . . 33-35
Avant d’utiliser le lave-vaisselle . . . . . . . . . . . . . . . . . . . . . . . . . . . . . . . . . . . . . . . . . . . . . . . . . . . . . . . . . . . . 34
PIÈCES ET CARACTÉRISTIQUES . . . . . . . . . . . . . . . . . . . . . . . . . . . . . . . . . . . . . . . . . . . . . . . . . . . . . . . . . . . . . 36
Tableau de commande. . . . . . . . . . . . . . . . . . . . . . . . . . . . . . . . . . . . . . . . . . . . . . . . . . . . . . . . . . . . . . . . . . . . 36
GUIDE DE DÉMARRAGE . . . . . . . . . . . . . . . . . . . . . . . . . . . . . . . . . . . . . . . . . . . . . . . . . . . . . . . . . . . . . . . . . . . . 37
Utilisation de votre lave-vaisselle . . . . . . . . . . . . . . . . . . . . . . . . . . . . . . . . . . . . . . . . . . . . . . . . . . . . . . . . . . 37
CHARGEMENT DU LAVE-VAISSELLE. . . . . . . . . . . . . . . . . . . . . . . . . . . . . . . . . . . . . . . . . . . . . . . . . . . . . . 38-43
Suggestions de chargement . . . . . . . . . . . . . . . . . . . . . . . . . . . . . . . . . . . . . . . . . . . . . . . . . . . . . . . . . . . . . . . 38
Chargement du panier supérieur . . . . . . . . . . . . . . . . . . . . . . . . . . . . . . . . . . . . . . . . . . . . . . . . . . . . . . . . . . 39
Chargement du panier inférieur. . . . . . . . . . . . . . . . . . . . . . . . . . . . . . . . . . . . . . . . . . . . . . . . . . . . . . . . . . . . 41
Chargement du panier à couverts . . . . . . . . . . . . . . . . . . . . . . . . . . . . . . . . . . . . . . . . . . . . . . . . . . . . . . . . . 43
UTILISATION DU LAVE-VAISSELLE . . . . . . . . . . . . . . . . . . . . . . . . . . . . . . . . . . . . . . . . . . . . . . . . . . . . . . . 44-54
Emploi approprié du détergent . . . . . . . . . . . . . . . . . . . . . . . . . . . . . . . . . . . . . . . . . . . . . . . . . . . . . . . . . . . . 44
Distributeur de détergent. . . . . . . . . . . . . . . . . . . . . . . . . . . . . . . . . . . . . . . . . . . . . . . . . . . . . . . . . . . . . . . . . . 44
Distributeur d’agent de rinçage . . . . . . . . . . . . . . . . . . . . . . . . . . . . . . . . . . . . . . . . . . . . . . . . . . . . . . . . . . . . 46
Tableaux de sélection de cycle. . . . . . . . . . . . . . . . . . . . . . . . . . . . . . . . . . . . . . . . . . . . . . . . . . . . . . . . . . . . . 47
Annuler un cycle . . . . . . . . . . . . . . . . . . . . . . . . . . . . . . . . . . . . . . . . . . . . . . . . . . . . . . . . . . . . . . . . . . . . . . . . . . 49
Changer un cycle ou un réglage . . . . . . . . . . . . . . . . . . . . . . . . . . . . . . . . . . . . . . . . . . . . . . . . . . . . . . . . . . . 49
Ajouter des articles pendant un cycle . . . . . . . . . . . . . . . . . . . . . . . . . . . . . . . . . . . . . . . . . . . . . . . . . . . . . . 50
Sélection des options. . . . . . . . . . . . . . . . . . . . . . . . . . . . . . . . . . . . . . . . . . . . . . . . . . . . . . . . . . . . . . . . . . . . . . 50
Utilisation du chauffe-assiettes . . . . . . . . . . . . . . . . . . . . . . . . . . . . . . . . . . . . . . . . . . . . . . . . . . . . . . . . . . . . 52
Voyants de progression du cycle . . . . . . . . . . . . . . . . . . . . . . . . . . . . . . . . . . . . . . . . . . . . . . . . . . . . . . . . . . 52
Système de lavage. . . . . . . . . . . . . . . . . . . . . . . . . . . . . . . . . . . . . . . . . . . . . . . . . . . . . . . . . . . . . . . . . . . . . . . . 53
Système de séchage . . . . . . . . . . . . . . . . . . . . . . . . . . . . . . . . . . . . . . . . . . . . . . . . . . . . . . . . . . . . . . . . . . . . . . 53
Flotteur de trop-plein. . . . . . . . . . . . . . . . . . . . . . . . . . . . . . . . . . . . . . . . . . . . . . . . . . . . . . . . . . . . . . . . . . . . . . 53
LAVAGE DES ARTICLES SPÉCIAUX . . . . . . . . . . . . . . . . . . . . . . . . . . . . . . . . . . . . . . . . . . . . . . . . . . . . . . . 54-55
ENTRETIEN DU LAVE-VAISSELLE. . . . . . . . . . . . . . . . . . . . . . . . . . . . . . . . . . . . . . . . . . . . . . . . . . . . . . . . . 55-56
Nettoyage. . . . . . . . . . . . . . . . . . . . . . . . . . . . . . . . . . . . . . . . . . . . . . . . . . . . . . . . . . . . . . . . . . . . . . . . . . . . . 55-56
Brise-vide d’évacuation. . . . . . . . . . . . . . . . . . . . . . . . . . . . . . . . . . . . . . . . . . . . . . . . . . . . . . . . . . . . . . . . . . . . 56
Entreposage . . . . . . . . . . . . . . . . . . . . . . . . . . . . . . . . . . . . . . . . . . . . . . . . . . . . . . . . . . . . . . . . . . . . . . . . . . . . . . 56
DÉPANNAGE. . . . . . . . . . . . . . . . . . . . . . . . . . . . . . . . . . . . . . . . . . . . . . . . . . . . . . . . . . . . . . . . . . . . . . . . . . . 57-60
GARANTIE. . . . . . . . . . . . . . . . . . . . . . . . . . . . . . . . . . . . . . . . . . . . . . . . . . . . . . . . . . . . . . . . . . . . . . . . . . . . . . . . . 61
SERVICE À LA CLIENTÈLE. . . . . . . . . . . . . . . . . . . . . . . . . . . . . . . . . . . . . . . . . . . . . . . . . . . . . . . . . . . . . . . . . . . 62
32
Page 34

Français
MESURES DE SÉCURITÉ
Avertissement! – Pour réduire les risques d’incendie, de choc électrique ou de blessures,
assurez-vous d’observer les mesures de sécurité de base, notamment :
1. Lisez toutes les instructions avant d’utiliser l’appareil.
2. Utilisez uniquement le lave-vaisselle aux fins pour lesquelles il est destiné.
3. Utilisez seulement des détergents ou des agents de rinçage recommandés pour votre
lave-vaisselle, et gardez ces produits hors de la portée des enfants.
4. Lors du chargement des articles à laver :
1) Disposez les articles pointus de façon à ce qu’ils ne risquent pas d’endommager le joint
de la porte.
2) Chargez les couteaux tranchants en orientant le manche vers le haut afin d’éviter de
vous blesser lors du déchargement.
5. Ne lavez pas les articles en plastique, à moins qu’ils portent la mention « Résistant au
lave-vaisselle » ou l’équivalent. Pour les articles en plastique ne portant aucune indication,
vérifiez les recommandations du fabricant.
6. Ne touchez pas à l’élément chauffant lors de son utilisation ni immédiatement après.
7. N’utilisez pas votre lave-vaisselle s’il manque des panneaux.
8. N’altérez pas les commandes.
9. Ne vous asseyez pas et ne vous tenez pas sur la porte ni sur les paniers, et n’utilisez pas le
lave-vaisselle de façon abusive.
10. Pour réduire les risques de blessure, ne laissez pas les enfants jouer dans le lave-vaisselle ni
à proximité.
11. Dans certaines conditions, de l’hydrogène peut se former dans un circuit d’eau chaude qui
n’a pas été utilisé pendant deux semaines ou plus. L’HYDROGÈNE EST UN GAZ EXPLOSIF. Si
le circuit d’eau chaude n’a pas été utilisé pendant une telle période, ouvrez tous les robinets
d’eau chaude et laissez l’eau couler pendant plusieurs minutes avant d’utiliser votre lavevaisselle. Ainsi, l’hydrogène accumulé sera évacué du système. Ce gaz étant inflammable,
ne fumez pas et n’utilisez pas d’appareil ou de flamme nue pendant cette opération.
12. Retirez la porte du lave-vaisselle lorsque vous déposez le lave-vaisselle pour le faire réparer
ou le mettre au rebut.
Rappelez-vous de prendre en note le
numéro de modèle et le numéro de série.
Vous trouverez ces numéros sur une
étiquette à l’intérieur du lave-vaisselle.
Agrafez votre reçu au manuel.
Vous en aurez besoin pour profiter des
services de la garantie.
33
Numéro de modèle
Numéro de série
Date d’achat
Page 35

Français
MESURES DE SÉCURITÉ
AVERTISSEMENT
Risque de basculement
• N’utilisez pas le lave-vaisselle avant qu’il ne soit complètement installé.
• N’appuyez pas sur la porte lorsqu’elle est ouverte afin de réduire les
risques de blessures ou de coupures.
AVERTISSEMENT
Risque de choc électrique
• Lave-vaisselle avec mise à la terre électrique.
• Raccordez le fil de mise à la terre avec le connecteur de mise à la
terre vert de la boîte à bornes.
• N’utilisez pas de cordon prolongateur.
• Le lave-vaisselle doit être alimenté par une tension de 120 V, 60 Hz, et
être raccordé à un circuit de dérivation indépendant mis à la terre et
protégé par un disjoncteur de 15 A.
• Le non-respect de ces instructions peut entraîner un choc électrique, un incendie ou
même la mort.
Ce lave-vaisselle doit être installé conformément aux instructions d’installation avant que
vous ne l’utilisiez. Si vous n’avez pas reçu la feuille d’instructions d’installation avec votre
lave-vaisselle, vous pouvez l’obtenir en consultant notre site web : www.electromenagersge.ca
• Installez le lave-vaisselle à un endroit où il sera protégé des éléments. Protégez-le du gel afin
d’éviter la rupture éventuelle du robinet d’arrivée. Les bris de ce type ne sont pas couverts par
la garantie. Consultez la rubrique « Entreposage » de la section « Entretien du lave-vaisselle »
pour obtenir des renseignements sur l’entreposage de l’appareil pendant l’hiver.
• Installez le lave-vaisselle sur une surface plane, de niveau, qui peut supporter le poids de
l’appareil et qui convient à la taille et à l’utilisation de l’appareil.
• Retirez tous les bouchons d’expédition des tuyaux et des connecteurs (comme le bouchon du
tuyau de vidange) avant l’installation. Consultez les instructions d’installation pour un
complément d’information.
34
Page 36

Français
INSTRUCTIONS DE MISE À LA TERRE
Pour un lave-vaisselle avec cordon d’alimentation mis à la terre :
Le lave-vaisselle doit être mis à la terre. En cas de dysfonctionnement ou de panne, la mise à la
terre diminuera le risque de choc électrique en fournissant au courant électrique une
trajectoire de moindre résistance. Le lave-vaisselle est équipé d’un cordon muni d’un
conducteur de terre et d’une fiche de mise à la terre. La fiche doit être branchée sur une prise
appropriée, installée et mise à la terre conformément aux codes et règlements en vigueur.
AVERTISSEMENT : Un raccordement incorrect du conducteur de terre de l’équipement peut
entraîner un risque de choc électrique. En cas de doute quant à la mise à la terre de l’appareil,
consultez un électricien qualifié ou un représentant du service après-vente.
Ne modifiez pas la fiche fournie avec le lave-vaisselle; si elle ne peut être insérée dans la prise,
faites installer une prise appropriée par un électricien qualifié.
Pour un lave-vaisselle raccordé en permanence :
Le lave-vaisselle doit être raccordé à un câblage permanent, métallique, mis à la terre ou un
conducteur de mise à la terre doit être acheminé avec les conducteurs du circuit et raccordé à
la borne ou au fil de terre de l’appareil.
NE TENTEZ PAS DE RÉPARER OU DE REMPLACER UNE PIÈCE DU LAVE-VAISSELLE, SAUF SI
CELA EST SPÉCIFIQUEMENT RECOMMANDÉ DANS CE MANUEL. TOUTES LES AUTRES
RÉPARATIONS DOIVENT ÊTRE CONFIÉES À UN TECHNICIEN QUALIFIÉ.
Pour minimiser les risques de choc électrique, débranchez l’appareil avant de procéder à toute
opération d’entretien.
REMARQUE :
électrique. Nous vous recommandons de faire appel à un technicien qualifié pour réparer votre
appareil.
La mise à l’arrêt du lave-vaisselle ne le déconnecte pas de l’alimentation
35
CONSERVEZ CES INSTRUCTIONS
Page 37

PIÈCES ET CARACTÉRISTIQUES
Français
1. Gicleur supérieur
2. Glissière du panier supérieur
3. Ouverture de l’arrivée d’eau
(dans la paroi de la cuve)
4. Bras gicleur inférieur
5. Panier inférieur
6. Système de ventilation
7. Supports divisés et repliables (4)
REMARQUE :
Certaines caractéristiques ne sont pas disponibles sur tous les modèles.
8. Panier supérieur réglable
9. Bras gicleur central
10. Panier à couverts amovible
11. Flotteur de trop-plein
12. Élément chauffant
13. Distributeur de détergent et d’agent
de rinçage
36
Page 38

Français
GUIDE DE DÉMARRAGE
Avant d’utiliser votre lave-vaisselle, retirez tout le matériel d’emballage. Lisez votre manuel de
l’utilisateur en entier. Vous y trouverez des renseignements utiles sur la sécurité ainsi que des
conseils utiles sur le fonctionnement de l’appareil.
UTILISATION DE VOTRE LAVE-VAISSELLE
1. L’agent de rinçage est essentiel pour assurer le séchage adéquat des
articles. Assurez-vous de remplir le distributeur avant d’utiliser votre
nouveau lave-vaisselle. Chaque remplissage dure entre 1 et 3 mois selon
l’usage de l’appareil.
2. Raclez les résidus d’aliments et les éléments durs (cure-dents ou os) des assiettes. Il n’est
pas nécessaire de rincer la vaisselle avant de la mettre au lave-vaisselle.
3. Chargez adéquatement le lave-vaisselle (consultez la
section « Chargement du lave-vaisselle »). Chargez la
vaisselle en laissant un espace entre chaque article afin
que l’eau atteigne toutes les surfaces souillées.
Assurez-vous qu’aucun article ne compromet la rotation
du bras gicleur.
4. Ajoutez le détergent . Utilisez toujours un détergent de qualité (consultez la section
« Utilisation du lave-vaisselle »).
5. Sélectionnez le cycle et les options voulus (consultez la section « Utilisation du lave-vaisselle »).
Sur les modèles pourvus de commandes intégrées, appuyez sur
du cycle et des options sélectionnés s’allument.
6. Fermez la porte. La porte se verrouille automatiquement.
REMARQUE :
Sur les modèles pourvus de commandes intégrées, si le
lave-vaisselle n’est pas mis en fonction avant de fermer
la porte, le cycle et les options ne s’effectuent pas.
START/RESET
. Les voyants
37
Page 39

Français
CHARGEMENT DU LAVE-VAISSELLE
SUGGESTIONS DE CHARGEMENT
• Enlevez les aliments, les os, les cure-dents et tout autre objet dur collés à la vaisselle. Par
souci d’économie d’eau, d’énergie et de temps, il n’est pas nécessaire de rincer la vaisselle
avant de la mettre au lave-vaisselle. Le module de lavage est doté d’un broyeur d’aliments
qui réduit la taille des résidus d’aliments.
REMARQUE :
• Il est important que le jet d’eau atteigne toutes les surfaces souillées.
• Chargez les assiettes en prenant soin de ne pas les mettre trop près l’une de l’autre, de ne
pas les empiler et faites en sorte qu’elles ne se chevauchent pas. Pour obtenir de meilleurs
résultats, l’eau doit pouvoir s’évacuer facilement de toutes les surfaces.
• Chargez les grosses casseroles avec soin. Les gros articles peuvent endommager l’intérieur
de la porte en acier inoxydable s’ils tombent ou s’ils se déplacent.
• Assurez-vous que les couvercles et les poignées de casserole, les plaques à pizza, les plaques
à biscuits, etc. ne compromettent pas la rotation du bras gicleur.
• Par souci d’économie d’eau, d’énergie et de temps, effectuez un cycle de rinçage afin
d’humidifier les articles si vous prévoyez effectuer le lavage plus tard. Les aliments comme
les œufs, le riz, les pâtes, les épinards et les céréales cuites sont difficiles à enlever s’ils ont
séché pendant une longue période.
Si des éléments durs comme des graines, des noix ou des coquilles d’œuf
pénètrent dans le module de lavage, il se peut que vous entendiez les sons
produits par le broyage. Ces sons sont tout à fait normaux. Assurez-vous
qu’aucun article métallique (comme des vis de poignée de casserole) ne pénètre
dans le module. Dans ce cas, le module pourrait être endommagé.
CONSEILS POUR UN FONCTIONNEMENT SILENCIEUX
Afin d’éviter les bruits extrêmes et dérangeants pendant le fonctionnement :
• Assurez-vous que les articles légers sont rangés solidement dans les paniers.
• Assurez-vous que les couvercles et les poignées de casserole, les plaques à pizza, les plaques
à biscuits, etc. n’entrent pas en contact avec les parois intérieures et ne compromettent pas
la rotation du bras gicleur.
•
CHARGEZ LES ARTICLES EN VOUS ASSURANT QU’ILS N’ENTRENT PAS EN CONTACT
ENTRE EUX.
REMARQUE :
Si des éléments durs comme des graines, des noix ou des coquilles d’œuf
pénètrent dans le module de lavage, il se peut que vous entendiez les sons
produits par le broyage. Ces sons sont tout à fait normaux, ils indiquent que des
résidus solides sont broyés dans le module de lavage.
38
Page 40

Français
CHARGEMENT DU PANIER SUPÉRIEUR
Le panier supérieur a été conçu pour les tasses, les verres et les petits articles. De nombreux
articles d’une taille allant jusqu’à 9 po (22 cm) peuvent être disposés dans le panier supérieur
(consultez l’aménagement recommandé pour ces articles).
REMARQUE :
• Placez les articles de sorte que le côté utile de l’article soit orienté vers le bas pour le lavage
et le rinçage.
• Chargez les verres et les tasses dans le panier supérieur uniquement. Le panier inférieur n’a pas
été conçu pour les verres et les tasses. Dans ce cas, des dommages risqueraient de survenir.
• Placez les tasses et les verres dans les rangées, entre les tiges. Le fait de les placer sur les
tiges pourrait entraîner le bris des verres ou des taches d’eau.
Les caractéristiques du panier de votre lave-vaisselle peuvent différer du panier
illustré.
Tasses et petites assiettes
Chargement des tasses et des verres
• La porcelaine, le cristal et tout autre article délicat ne doivent pas entrer en contact entre eux
pendant le fonctionnement du lave-vaisselle. Dans ce cas, des dommages risqueraient de
survenir.
• Chargez les articles en plastique dans le panier supérieur uniquement. Seuls les articles en
plastique portant la mention « Résistant au lave-vaisselle » sont recommandés.
• Chargez les articles en plastique de façon à ce qu’ils ne puissent se déplacer sous l’action des
bras gicleurs pendant le cycle.
• Pour éviter le piquage, ne laissez pas les verres à pied entrer en contact entre eux. Les bols, les
casseroles et autres ustensiles de petite taille peuvent être placés dans le panier supérieur. Pour
une meilleure stabilité, placez les bols dans la section centrale du lave-vaisselle.
39
Page 41

Français
SUPPORT À PRISE SÛRE
Rabattez le support situé à gauche ou à droite du panier supérieur pour maintenir en place des
tasses, des verres à pied ou de longs articles comme les ustensiles et les spatules.
Panier supérieur réglable à 2 positions
Vous pouvez relever ou abaisser le panier supérieur afin de pouvoir charger des articles en
hauteur dans le panier supérieur ou inférieur. Relevez le panier supérieur pour charger de longs
articles dans le panier inférieur, ou abaissez le panier supérieur pour charger de longs verres ou
autres articles dans le panier supérieur.
Des dispositifs de réglage sont situés de chaque côté du panier supérieur.
Appuyez sur la
poignée bleue pour
baisser le panier.
Pour retirer le panier supérieur
1. Tirez légèrement le panier vers l’avant afin d’avoir accès aux butées de glissière.
2. En tirant sur le bas de la butée, levez-la.
3. Après avoir retiré les deux butées, tirez sur le panier.
(sur certains modèles)
(sur certains modèles)
Relevez le panier
directement en tirant
vers le haut (nul
besoin d'appuyer sur
la poignée bleue)
Pour remettre le panier supérieur en place
1. Insérez les rouleaux dans chaque glissière, puis poussez sur le panier.
2. Insérez une butée de glissière.
3. Tirez sur la butée pour vous assurer qu’elle est bien en place.
4. Répétez la même procédure de l’autre côté.
40
Page 42

Français
CHARGEMENT DU PANIER INFÉRIEUR
Le panier inférieur a été conçu pour les assiettes, les plateaux, les casseroles et les ustensiles.
De nombreux articles d’une taille allant jusqu’à 12,2 po (31 cm) peuvent être disposés dans le
panier inférieur (consultez l’aménagement recommandé pour ces articles).
REMARQUE :
• Ne chargez pas les verres, les tasses et les articles en plastique dans le panier inférieur.
Chargez de petits articles dans le panier inférieur uniquement s’ils peuvent être immobilisés.
• Chargez les assiettes, les bols à soupe, etc. entre les tiges.
• Chargez les bols à soupe, à céréales et de service dans le panier en les disposant
adéquatement selon leur taille et leur forme. Chargez les bols entre les rangées de tiges.
N’emboîtez pas les bols afin de permettre au jet d’eau d’atteindre toutes les surfaces.
Les caractéristiques du panier de votre lave-vaisselle peuvent différer du panier
illustré.
Disposition des assiettes
Chargement des ustensiles
• Chargez les plaques à biscuits, les moules à gâteaux et les autres gros articles dans la partie
arrière et sur les côtés du panier. Le chargement de ces articles dans la partie avant du
panier peut empêcher le jet d’eau d’atteindre le distributeur de détergent.
41
Page 43

Français
Charge mixte
• Placez les ustensiles très souillés en les orientant face vers le bas dans le panier.
• Assurez-vous que les poignées de casserole et d’autres articles n’empêchent pas la rotation
des bras gicleurs. Les bras gicleurs doivent pouvoir tourner librement.
• Ne chargez pas d’articles entre le panier inférieur et la paroi intérieure du lave-vaisselle pour
éviter d’obstruer l’ouverture de l’arrivée d’eau.
REMARQUE :
Panier rabattable
Vous pouvez rabattre les rangées de tiges de la partie arrière du panier inférieur.
1. Saisissez l’extrémité de la tige située dans le porte-tiges.
2. Dégagez légèrement la tige du porte-tiges.
3. Rabattez la rangée de tiges dans le panier pour accroître l’espace de rangement, ce qui
vous permet de placer des articles de plus grande dimension (assiettes, bols, casseroles,
plaques ou rôtissoires).
Faites tourner les bras gicleurs. Assurez-vous que les articles dans le panier
n’empêchent pas la rotation des bras gicleurs.
Panier rabattable
42
Page 44

Français
CHARGEMENT DU PANIER À COUVERTS (COUTELLERIE)
Chargez le panier à couverts lorsque ce dernier repose dans le panier inférieur ou retirez-le,
puis déposez-le sur le comptoir ou la table pour le remplir (consultez l’aménagement
recommandé de ces articles).
REMARQUE :
• Chargez la coutellerie en orientant les articles vers le bas, en utilisant les séparateurs pour
éviter qu’ils ne s’emboîtent.
• Placez les petits articles comme les bouchons de biberon, les couvercles de bocal, les porte-
épis de maïs, etc. dans les sections pourvues d’un couvercle à charnière. Fermez le couvercle
pour maintenir les petits articles en place.
• Lorsque les couvercles ne sont pas fermés, placez les articles dans chaque section du panier
en alternant le sens des articles de coutellerie afin d’éviter de les emboîter. Le jet d’eau ne
peut pas atteindre les articles qui sont emboîtés.
Déchargez ou retirez le panier à couverts avant de décharger le panier afin
d’éviter les déversements d’eau sur la coutellerie.
IMPORTANT : Chargez toujours les articles coupants (couteaux, broches, etc.) vers le bas.
REMARQUES :
• Ne chargez pas la coutellerie en argent ou plaquée argent avec la coutellerie en acier
inoxydable. Ces métaux peuvent être endommagés en entrant en contact l’un avec l’autre
pendant le lavage.
• Certains aliments (sel, vinaigre, produits laitiers, jus de fruits, etc.) peuvent piqueter ou
corroder l’argenterie. Effectuez un cycle de rinçage si vous avez une pleine charge à laver
sur-le-champ.
43
Page 45

Français
UTILISATION DU LAVE-VAISSELLE
EMPLOI APPROPRIÉ DU DÉTERGENT
N’utilisez que du détergent spécialement conçu pour les lave-vaisselle. L’utilisation des détergents
Cascade®, Cascade Complete®et Finish®pour lave-vaisselle automatiques, ainsi que des agents de
rinçage Jet-Dry®et Cascade Crystal Clear a été approuvée pour tous les lave-vaisselle GE. Votre
détergent doit être récent et conservé à l’abri de l’humidité. Ne mettez pas de détergent en poudre
dans le distributeur tant que le lave-vaisselle n’est pas prêt à démarrer.
Tous les cycles de lavage, à l’exception du cycle
que vous mettiez du détergent dans les sections principale et de prélavage du distributeur de
détergent.
Distributeur de détergent
Le distributeur de détergent comporte deux sections. Le détergent de la petite section de
prélavage se déverse dans le lave-vaisselle lorsque vous fermez la porte.
RINSE ONLY (Rinçage seulement)
1. Verrou de couvercle
2. Section principale
3. Section de prélavage
4. Couvercle
, exigent que
Le détergent de la plus grande section se déverse automatiquement dans le lave-vaisselle
pendant le lavage (consultez les « Tableaux de sélection de cycle »).
• Utilisez uniquement des détergents pour lave-vaisselle automatiques. D’autres détergents
peuvent produire trop de mousse qui peut être évacuée du lave-vaisselle et réduire le
rendement du lavage.
• Ajoutez le détergent juste avant de démarrer un cycle.
• Rangez les contenants de détergent bien fermés dans un endroit sec et frais. Un détergent
pour lave-vaisselle automatique frais donne de meilleurs résultats.
REMARQUE :
Remplissage du distributeur
1. Si le couvercle du distributeur est fermé, ouvrez le couvercle en enfonçant le verrou de
couvercle.
N’utilisez pas de détergent lors du cycle de rinçage.
44
Page 46

Français
2. Remplissez la section principale de détergent. Consultez « Quantité de détergent à utiliser ».
3. Remplissez la section de prélavage au besoin.
4. Fermez le couvercle du distributeur.
Il est tout à fait normal que le couvercle s’ouvre partiellement lorsque le détergent est distribué.
REMARQUE :
Quantité de détergent à utiliser
• La quantité de détergent à utiliser dépend de la dureté de votre eau et du type de détergent .
Si vous n’en utilisez pas suffisamment , la vaisselle ne sera pas propre. Si vous en utilisez une
trop grande quantité avec de l’eau douce, les articles de verrerie comporteront des taches
d’eau.
• Les détergents pour lave-vaisselle automatiques sont maintenant sans phosphate. Le
phosphate était ajouté aux détergents pour enlever les minéraux de l’eau et par conséquent
améliorer la performance de lavage. Les détergents sans phosphate ont tendance à laisser
des minéraux sur la verrerie et autres items, ce qui cause des plaintes de performance de
lavage. Les minéraux sont présents sous forme de résidu blanc sur la verrerie et autres items,
et même dans l’intérieur de la cuve. Vous pouvez facilement éliminer le résidu blanc de la
verrerie et de la vaisselle en utilisant de l’acide citrique pendant le cycle de lavage du lavevaisselle. Veuillez contacter votre marchand de pièces local pour obtenir des trousses d'acide
citrique.
Utilisez les deux sections pour les cycles de 2 lavages. Utilisez uniquement la
section principale pour les cycles d’un lavage. Consultez les « Tableaux de
sélection de cycle » pour obtenir plus de détails.
L’utilisation d’un agent de rinçage peut aider à minimiser l’accumulation répétitive du résidu.
45
Page 47

Français
Distributeur d’agent de rinçage
Les agents de rinçage préviennent la formation de gouttelettes qui peuvent former des taches
ou des stries. Ils améliorent également le séchage en favorisant l’écoulement de l’eau sur les
articles lors du rinçage final en laissant s’écouler une petite quantité de produit dans l’eau de
rinçage. Votre lave-vaisselle a été conçu pour utiliser un agent de rinçage liquide. N’utilisez pas
d’agent de rinçage solide ou en pain.
Remplissage du distributeur
Le distributeur d’agent de rinçage contient 4,8 oz (145 ml) de produit. Dans des conditions
normales d’utilisation, cette quantité suffira pour environ trois mois. L’agent de rinçage est
distribué par une ouverture dans le distributeur. Il n’est pas nécessaire d’attendre que le
distributeur soit vide pour le remplir de nouveau. Efforcez-vous de le garder plein, mais veillez à
ne pas trop le remplir.
1. Assurez-vous que la porte du lave-vaisselle est grande ouverte.
2. Ouvrez le distributeur en poussant sur le verrou de couvercle.
3. Ajoutez l’agent de rinçage jusqu’à ce que le regard indique que le niveau maximal est atteint.
4. Essuyez tout produit déversé avec un linge humide.
5. Fermez le couvercle.
Réglage – agent de rinçage
Il est possible de modifier la quantité d’agent de rinçage libéré dans le lavage final. Par défaut,
l’appareil est réglé à 3. Dans la plupart des cas, réglez-le à 2 ou 3. Si la vaisselle présente des
auréoles de calcium (eau dure), optez pour un réglage plus élevé.
Pour effectuer le réglage
Ouvrez le couvercle du distributeur. Réglez le bouton à l’intérieur du distributeur à la position
désirée.
46
Page 48

Français
Pre-
Wash
Main
Wash
Rinse Final
Heated
Rinse
Dry Minimum
Time
(min)
Water
Usage
(gal/L)
102*
4.5-9.0/
17-34.2
150°F
(66°C)
160°F
(71°C)
Pre-
Wash
Main
Wash
Rinse
Final
Heated
Rinse
Dry
Minimum
Time
(min)
Water
Usage
(gal/L)
First
Wash
Second
Wash
92*
9.0/34.2
140°F
(60°C)
Pre-
Wash
Main
Wash
Rinse Final
Heated
Rinse
Dry Minimum
Time
(min)
Water
Usage
(gal/L)
81*
4.5-7.5/
17-28.5
130°F
(55°C)
TABLEAUX DE SÉLECTION DE CYCLE
Sélectionnez le cycle de lavage et les options désirés. Si la porte est fermée, le lave-vaisselle
débute le remplissage dès que vous appuyez sur le bouton de sélection de cycle, à moins que
l’option de lavage différé n’ait été choisie. Vous pouvez sélectionner une option pendant le
remplissage du lave-vaisselle.
Le symbole «
est nécessaire d’avoir une température plus élevée. La quantité d’eau utilisée est indiquée.
Ce modèle de lave-vaisselle est conforme aux exigences relatives au rendement énergétique
ENERGY STAR
La durée du cycle exclut la durée de séchage. Un astérisque (*) à côté de la durée du cycle
indique que la durée du cycle peut être plus longue selon la température de l’eau d’admission.
» indique les étapes de chaque cycle. Les températures sont indiquées lorsqu’il
•
MD
.
Utilisez ce cycle pour le
lavage normal de tous les
Sur certains
modèles
jours (saletés normales et
importantes) pour une
performance de lavage
exceptionnelle et une
désinfection adéquate.
Utilisez ce cycle pour
les casseroles difficiles
à nettoyer comportant
des aliments brûlés.
Utilisez les
deux sections
du distributeur
de détergent.
Utilisez les
deux sections
du distributeur
de détergent.
47
Utilisez ce cycle pour la
vaisselle souillée
normalement. Pendant le
lavage principal, l’action
de lavage s’arrête de
façon répétée pendant
plusieurs secondes.
Utilisez les
deux sections
du distributeur
de détergent.
Page 49

Pre-
Wash
Main
Wash
Rinse Final
Heated
Rinse
Dry
Minimum
Time
(min)
Water
Usage
(gal/L)
19*
3/11.4
Pre-
Wash
Main
Wash
Rinse Final
Heated
Rinse
Dry
Minimum
Time
(min)
Water
Usage
(gal/L)
41*
4.5/17
130°F
(55°C)
Utilisez ce cycle pour la
Pre-
Wash
Main
Wash
Rinse Final
Heated
Rinse
Dry
Minimum
Time
(min)
Water
Usage
(gal/L)
11*
1.5/5.7
vaisselle en porcelaine et en
cristal. Ce cycle propose un
lavage léger et un séchage
en douceur. Pendant le
séchage à l’air chaud,
l’élément chauffant s’arrête
à intervalle régulier.
Utilisez ce cycle pour un lavage
rapide et un séchage léger,
question de nettoyer les
casseroles avant un souper. Le
capteur ajoute de l’eau et
prolonge la durée du cycle au
besoin afin d’optimiser le
lavage. Ce cycle propose une
durée de séchage réduite. Il
peut être nécessaire d’utiliser
un essuie-tout pour assécher
davantage la vaisselle.
Utilisez la section
principale du
distributeur de
détergent.
Utilisez la section
principale du
distributeur de
détergent.
Français
Utilisez ce cycle pour
rincer la vaisselle, les
verres et les pièces
d’argenterie qui ne
seront pas lavés
sur-le-champ.
N’utilisez pas de
détergent avec
ce cycle.
• Si la température de l’eau d’admission est inférieure à la température recommandée ou si la
vaisselle est très souillée, le cycle compense automatiquement en augmentant la durée du
lavage, la température et la quantité d’eau.
REMARQUE :
Le capteur de votre lave-vaisselle contrôle le niveau de saleté de la vaisselle. La
durée du cycle et/ou la quantité d’eau utilisée varient des données illustrées
ci-dessus selon le réglage du cycle par le capteur afin d’optimiser la performance
du lavage.
48
Page 50

Français
ANNULER UN CYCLE
ANNULER UN CYCLE
Pour interrompre la vidange
Vous pouvez appuyer sur
vidange. Rappelez-vous de vider entièrement le lave-vaisselle avant de débuter un autre cycle.
CHANGER UN CYCLE OU UN RÉGLAGE
Pendant le premier remplissage d’un cycle
1. Sélectionnez un nouveau cycle ou une nouvelle option.
2. Assurez-vous que le distributeur de détergent est plein.
Après le premier remplissage d’un cycle
(sur certains modèles)
À tout moment pendant un cycle, appuyez sur
(Annuler/vidange)
besoin). Laissez le lave-vaisselle se vider entièrement.
(sur certains modèles avec commandes intégrées)
1. Entrouvrez légèrement la porte pour interrompre le cycle. Attendez la
fin de la pulvérisation de l’eau avant d’ouvrir la porte pour accéder au
tableau de commande.
2. Appuyez sur
une (1) seconde.
3. Fermez la porte. Le lave-vaisselle vidange l’eau pendant 2 minutes (au
besoin). Laissez le lave-vaisselle se vider entièrement.
CANCEL/DRAIN
1. Appuyez sur
2 minutes (au besoin). Laissez le lave-vaisselle se vider entièrement.
2. Assurez-vous que le distributeur de détergent est plein.
3. Sélectionnez un nouveau cycle ou une nouvelle option.
. Le lave-vaisselle vidange l’eau pendant 2 minutes (au
START/RESET (Mise en marche/réinitialiser)
ou sur
START/RESET
(sur certains modèles)
CANCEL/DRAIN
. Le lave-vaisselle vidange l’eau pendant
CANCEL/DRAIN
pendant
de nouveau pour interrompre la
CHANGER UN CYCLE OU UN RÉGLAGE
commandes intégrées)
Pendant un cycle
1. Ouvrez la porte.
2. Appuyez sur
START/RESET
3. Sélectionnez un nouveau cycle ou une nouvelle option.
4. Appuyez sur
5. Le voyant
6. Vérifiez le distributeur de détergent. Il doit être rempli adéquatement
pour le nouveau cycle.
7. Fermez la porte.
49
START/RESET
s’éteint.
START/RESET
START/RESET
pendant une (1) seconde. Le voyant
.
s’allume.
(sur certains modèles avec
Page 51

Français
AJOUTER DES ARTICLES PENDANT UN CYCLE
Vous pouvez ajouter un article avant le début du lavage principal. Ouvrez la porte et vérifiez le
distributeur de détergent. Si le couvercle est toujours fermé, vous pouvez ajouter des articles.
Pour ajouter des articles
1. Soulevez le verrou de la porte pour interrompre le cycle. Attendez que la pulvérisation d’eau
s’arrête avant d’ouvrir la porte.
2. Ouvrez la porte. Si le distributeur de détergent est toujours fermé, ajoutez l’article.
3. Fermez la porte jusqu’à ce qu’elle se verrouille solidement. Le cycle reprend au bout d’un
délai de 10 secondes.
SÉLECTION DES OPTIONS
Vous pouvez personnaliser les cycles en appuyant sur une option. Si vous changez d’idée,
appuyez de nouveau sur l’option pour l’annuler. Sélectionnez une autre option au besoin. Vous
pouvez changer une option en tout temps avant le début de l’option sélectionnée.
Lavage haute température
Sélectionnez cette option pour chauffer l’eau pendant une période dans
le cycle. L’eau à température élevée permet d’enlever plus facilement les
taches tenaces.
cycles
POTS & PANS (Casseroles)
d’accroître la température de l’eau du lavage principal.
Cette option augmente la chaleur, la quantité d’eau utilisée et la durée du
lavage d’un cycle.
REMARQUE :
Option de rinçage (désinfection)
Sélectionnez cette option pour augmenter la température de l’eau du
rinçage final à environ 160 °F (71 °C). L’option
désinfectant)
rinçage à haute température désinfecte votre vaisselle et vos verres
conformément à la norme NSF/ANSI 184 pour un lave-vaisselle
domestique. Les lave-vaisselle certifiés pour un usage domestique ne
sont pas conçus pour les établissements alimentaires autorisés.
REMARQUE :
Le lavage à haute température
ou
NORMAL (Normal)
La fonction
PANSetNORMAL
votre eau est dure.
augmente la température de l’eau et la durée du cycle. Ce
Le cycle
automatiquement usage de cette option. L’option
RINSE
Seuls ces cycles de désinfection sont conformes aux
exigences de la NSF/ANSI.
HI-TEMP WASH
. Utilisez toujours l’option
(sur certains modèles)
ANTI-BACTERIAL WASH (Lavage antibactérien)
est une option des cycles
, combiné avec les
, permet
est une option des cycles
HI-TEMP WASH
SANITIZE RINSE (Rinçage
SANITIZE
POTS & PANS
et
NORMAL
POTS &
fait
.
si
50
Page 52

Français
SÉCHAGE AVEC CHALEUR
Sélectionnez cette option pour sécher la vaisselle à la chaleur.
La vaisselle prend plus de temps à sécher et elle peut présenter des
taches. Pour un séchage optimal, utilisez toujours un agent de rinçage
liquide. Certains articles (comme le plastique) peuvent devoir être
asséchés avec un essuie-tout.
REMARQUE :
L’option
HEATED DRY (Séchage avec chaleur)
des cycles
ANTI-BACTERIAL WASH (Lavage antibactérien)
POTS & PANS (Casseroles), NORMAL (Normal)
(Porcelaine)
.
est une option
et
CHINA
,
VERROUILLAGE POUR ENFANT
Utilisez l’option
l’utilisation non autorisée du lave-vaisselle. Vous pouvez également
utiliser l’option
d’option pendant un cycle de lavage.
Lorsque le voyant
désactivés.
REMARQUE :
Pour activer le verrouillage
Appuyez sur le bouton
3 secondes. La mention
commandes de votre lave-vaisselle sont verrouillées, le voyant clignote 3 fois et la sélection est
ignorée.
Pour désactiver le verrouillage
Appuyez sur le bouton
s’éteint.
Départ différé
Sélectionnez cette option pour démarrer votre lave-vaisselle à une heure spécifique ou pendant
les heures de faible consommation d’électricité. Vous pouvez ajouter des articles en tout temps
pendant le compte à rebours de la minuterie de départ. Après avoir ajouté des articles, fermez la
porte jusqu’à ce qu’elle se verrouille solidement. Le compte à rebours ne reprend pas si la porte
est mal fermée.
Vous pouvez différer le départ d’un cycle jusqu’à 12 heures (sur les modèles avec commandes
intégrées, vous pouvez différer le départ jusqu’à 24 heures).
La première fois que vous utilisez la fonction
délai d’une heure.
Après la première utilisation, l’affichage indique le dernier délai sélectionné. Vous pouvez toujours
modifier le délai choisi.
HEATED DRY (Séchage avec chaleur)
CHILD LOCK
HEATED DRY
(sur certains modèles)
La porte du lave-vaisselle peut être ouverte lorsque les
commandes sont verrouillées.
et maintenez-le enfoncé pendant 3 secondes. Le voyant
(sur certains modèles)
CHILD LOCK (Verrouillage pour enfant)
CHILD LOCK
CHILD LOCK
s’allume. Si vous appuyez sur un bouton lorsque les
pour éviter les changements de cycle ou
est allumé, tous les boutons sont
et maintenez-le enfoncé pendant
DELAY START (Départ différé)
afin de prévenir
, l’affichage indique un
51
Page 53

REMARQUE :
Pour différer le départ du lave-vaisselle
1. Fermez la porte.
2. Appuyez à plusieurs reprises sur
DELAY START (Départ différé)
ce que le délai en heures voulu s’affiche.
Lorsque le délai atteint 12 heures (ou 24 heures pour les modèles avec
commandes intégrées), le délai revient à zéro. Appuyez de nouveau
sur
DELAY START
pour sélectionner le nouveau délai en heures.
3. Sélectionnez un cycle de lavage et les options désirés.
Pour annuler un départ différé et le cycle, appuyez sur
CANCEL (Annuler)
annuler le délai et démarrer le cycle immédiatement, appuyez sur
(Départ différé)
jusqu’à ce qu’aucune heure n’apparaisse à l’affichage.
Français
jusqu’à
. Pour
DELAY START
UTILISATION DU CHAUFFE-ASSIETTES
Utilisez l’option
REMARQUE :
PLATE WARMER (Chauffe-assiettes)
N’utilisez pas cette option avec un cycle.
(sur certains modèles)
pour réchauffer vos assiettes de service.
1. Ouvrez la porte.
2. Appuyez sur
PLATE WARMER
; le voyant s’allume.
3. Laissez la vaisselle se réchauffer pendant 8 minutes.
VOYANTS DE PROGRESSION DU CYCLE
Suivez la progression du cycle de votre lave-vaisselle grâce aux
REMARQUE :
Certains modèles ne sont pas pourvus de voyants de progression du cycle.
Water
Heated
Washing
Turbidity
Sensor Rinsing Drying
Water Heated (Eau chauffée)
La mention
Water heated (Eau chauffée)
s’allume uniquement lorsque le cycle est interrompu
pour réchauffer l’eau à une température déterminée. Le lavage ou le rinçage continue lorsque
l’eau est réchauffée. Une fois que l’eau atteint la température déterminée, le voyant s’éteint et
le cycle reprend.
Washing (Lavage)
S’affiche pendant le prélavage et le lavage principal.
Turbidity Sensor (Capteur de la turbidité)
Le voyant du capteur s’allume pendant la détection du cycle. Votre lave-vaisselle détecte le
niveau de saleté de la vaisselle à la fin du prélavage. Le lavage continue pendant la détection.
Rinsing (Rinçage)
S’affiche pendant les périodes de rinçage.
voyants de progression du cycle
Sanitized Add Rinse Aid
Clean
.
52
Page 54

Français
Drying (Séchage)
S’allume lorsque le lave-vaisselle procède au séchage de la vaisselle après le rinçage final.
Clean (Propre)
S’affiche lorsqu’un cycle de lavage est terminé. Le voyant demeure allumé jusqu’à ce que la
porte soit ouverte.
Sanitized (Désinfection)
S’affiche lorsque le cycle répond aux exigences de désinfection. Le voyant demeure allumé
jusqu’à ce que la porte soit ouverte.
Add Rinse Aide (Remplir d’agent de rinçage)
Remplissez le distributeur d’agent de rinçage lorsque le voyant
de rinçage)
peuvent former des taches ou des stries. Si le distributeur d’agent de rinçage est vide, le témoin
s’allume lorsque vous sélectionnez un cycle ou pendant un cycle.
s’allume. Les agents de rinçage préviennent la formation de gouttelettes qui
Add Rinse Aid (Remplir d’agent
Système de lavage
Le système de lavage à six niveaux offre des résultats de lavage exceptionnels. Trois niveaux de
filtration et un système de récupération des résidus permettent de filtrer l’eau de lavage et de
prévenir la déposition des résidus d’aliments sur la vaisselle propre.
• L’eau de lavage passe continuellement à travers le filtre qui capte les résidus d’aliments.
• Deux jets d’eau situés sous le bras gicleur enlèvent les résidus d’aliments du filtre.
• Une crépine à mailles grossières empêche les os, les noyaux et d’autres gros objets de
pénétrer dans la pompe.
REMARQUE :
Vérifiez la crépine à intervalle régulier et retirez les gros objets qui pourraient
l’obstruer.
Système de séchage
Pendant le séchage, il est possible de voir de la vapeur s’échapper
d’un évent dans le coin supérieur gauche de la porte. Cela est tout à
fait normal puisque la chaleur assèche la vaisselle.
IMPORTANT :
La vapeur est chaude. Ne touchez pas à l’évent.
Flotteur de trop-plein
Le flotteur de trop-plein (coin avant droit de la cuve du lave-vaisselle)
empêche le remplissage excessif de la cuve. Il doit être installé dans le
lave-vaisselle pour fonctionner.
Vérifiez sous le flotteur afin de vous assurer qu’aucun objet ne l’empêche
de se déplacer librement.
53
Page 55

Français
LAVAGE DES ARTICLES SPÉCIAUX
Si vous avez des doutes sur le nettoyage d’un article en particulier, vérifiez auprès du fabricant
pour savoir si l’article en question peut être lavé au lave-vaisselle.
Matériel
Aluminium
Aluminium jetable
Bouteilles et canettes
Fonte
Vaisselle en porcelaine/grès
Cristal
Or
Verre
Couteaux à manche creux
Étain, laiton et bronze
Plastiques jetables
Résistant au lave-vaisselle/commentaires
Oui
L’eau et les détergents à haute température peuvent
endommager les finis en aluminium anodisé.
Non
Ne lavez pas les assiettes en aluminium jetables au lave-vaisselle.
Ces articles peuvent se déplacer pendant le lavage et marquer
de noir les assiettes et autres articles.
Non
Lavez les bouteilles et les canettes à la main. Les étiquettes
apposées avec de la colle peuvent de détacher et obstruer les bras
gicleurs et la pompe, et réduire le rendement du lave-vaisselle.
Non
Le fini sera retiré et la fonte rouillera.
Oui
Vérifiez toujours les recommandations du fabricant avant le
lavage. Les éléments graphiques antiques, peints à la main ou au
fini glacé peuvent perdre de leur éclat, et l’or en feuille peut se
décolorer ou perdre de son éclat.
Oui
Vérifiez les recommandations du fabricant avant le lavage.
Certains types de cristal au plomb peuvent se décaper après des
lavages répétés.
Non
Les plats de couleur or ont tendance à se décolorer.
Oui
Les verres de lait jaunissent après de nombreux lavages au
lave-vaisselle.
Non
Les manches de certains couteaux sont fixés à la lame avec de la
colle et ils peuvent se détacher s’ils sont lavés au lave-vaisselle.
Non
L’eau et le détergent à haute température peuvent décolorer ou
endommager le fini.
Non
Ils ne conviennent pas aux températures élevées de l’eau et du
détergent.
54
Page 56

Français
Matériel
Plastiques
Acier inoxydable
Argent sterling ou
argenterie
Étain
Casseroles en bois
Résistant au lave-vaisselle/commentaires
Oui
Vérifiez toujours les recommandations du fabricant avant le
lavage. Les plastiques ne supportent pas tous les températures
élevées. Chargez les articles en plastique dans le panier
supérieur uniquement.
Oui
Effectuez un cycle de rinçage si vous ne lavez pas
immédiatement les articles. Un contact prolongé avec des
aliments contenant du sel, du vinaigre, du lait ou du jus de fruit
peut endommager le fini.
Oui
Effectuez un cycle de rinçage si vous ne lavez pas
immédiatement les articles. Un contact prolongé avec des
aliments contenant du sel, des acides ou des sulfites (œuf,
mayonnaise et fruits de mer) peut endommager le fini.
Non
Peut rouiller.
Non
Lavez à la main. Vérifiez toujours les instructions du fabricant
avant le lavage. Le bois non traité peut fléchir, présenter des
craquelures ou perdre de son éclat.
ENTRETIEN DU LAVE-VAISSELLE
Nettoyage de l’extérieur
Dans la plupart des cas, l’utilisation d’un linge doux et humide ou d’une éponge et d’un
détergent doux est suffisant pour préserver l’aspect extérieur de votre lave-vaisselle.
Nettoyage de l’intérieur
Les minéraux contenus dans l’eau dure peuvent favoriser la formation d’un film blanc sur les
parois intérieures, particulièrement dans la zone située au bas de la porte.
Ne nettoyez l’intérieur du lave-vaisselle que lorsque l’appareil a refroidi. Portez des gants en
caoutchouc. N’utilisez pas de nettoyant autre qu’un détergent pour lave-vaisselle car il
risquerait de mousser.
55
Page 57

Français
Pour nettoyer l’intérieur
Formez une pâte à partir de détergent pour lave-vaisselle en poudre sur une éponge et
nettoyez l’intérieur.
OU
Utilisez un détergent pour lave-vaisselle automatique liquide et nettoyez l’intérieur avec une
éponge.
OU
Consultez la procédure de rinçage au vinaigre « Plaques et films sur la vaisselle » de la section
« Dépannage ».
REMARQUE :
Effectuez un cycle
l’intérieur.
NORMAL (Normal)
avec un détergent après avoir nettoyé
BRISE-VIDE D’ÉVACUATION
Vérifiez le brise-vide toutes les fois que l’évacuation se fait mal. Certains codes de plomberie
exigent l’installation d’un brise-vide entre un lave-vaisselle encastré et le système de drainage
domestique. Si un drain est obstrué, le brise-vide protège votre lave-vaisselle des refoulements.
Le brise-vide est habituellement situé sur le dessus de l’évier ou du comptoir à proximité du
lave-vaisselle.
REMARQUE :
Pour nettoyer le brise-vide
Nettoyez le brise-vide à intervalle régulier afin de vous assurer de la vidange adéquate de votre
lave-vaisselle. Observez les instructions de nettoyage recommandées par le fabricant. Pour la
plupart des brise-vides : Soulevez le couvercle en chrome. Dévissez le capuchon en plastique.
Vérifiez la présence de résidus solides. Nettoyez au besoin.
Le brise-vide est un élément de plomberie externe qui ne fait pas partie de votre
lave-vaisselle. La garantie de votre lave-vaisselle ne couvre pas les coûts
d’entretien associés au nettoyage ou à la réparation du brise-vide.
ENTREPOSAGE
Entreposage pendant l’été
Pendant l’été, protégez votre lave-vaisselle en fermant l’arrivée d’eau et en débranchant
l’alimentation de votre lave-vaisselle.
Entreposage pendant l’hiver
Protégez votre lave-vaisselle et votre maison des dommages causés par l’eau qui gèle dans les
canalisations. Si votre lave-vaisselle est installé dans une résidence secondaire ou s’il peut être
exposé à des températures près du point de congélation, faites appel à un personnel
d’entretien qualifié pour l’entreposage hivernal.
56
Page 58

Français
DÉPANNAGE
Tentez de régler le problème en observant les solutions proposées, ce qui pourra vous éviter
des coûts associés à un appel de service...
LE LAVE-VAISSELLE NE FONCTIONNE PAS CORRECTEMENT
• Le lave-vaisselle ne fonctionne pas ou s’arrête pendant un cycle
- La porte est-elle bien fermée avec le loquet?
- Le cycle adéquat a-t-il été sélectionné? Reportez-vous aux Tableaux de sélection de cycle.
- L’alimentation est-elle en fonction? Le fusible est grillé ou le disjoncteur s’est déclenché?
- Le moteur s’est-il arrêté en raison d’une surcharge? Le moteur se réinitialise automatiquement
en quelques minutes. Si le moteur ne redémarre pas, contactez un service de dépannage.
- Le robinet d’arrivée d’eau est-il ouvert (le cas échéant)?
- Il est tout à fait normal que certains cycles soient interrompus pendant plusieurs secondes
lors du lavage principal.
• Le lave-vaisselle ne se remplit pas
- Le flotteur de trop-plein peut-il se déplacer librement? Appuyez sur le flotteur pour le relâcher.
• Le lave-vaisselle semble fonctionner trop longtemps
- L’alimentation en eau au lave-vaisselle est-elle suffisante? Le lave-vaisselle fonctionne pendant
un bon moment pendant le réchauffage de l’eau. Reportez-vous à la section « Conseils sur la
performance du lave-vaisselle ». Un délai survient automatiquement dans certains cycles de
lavage et de rinçage jusqu’à ce que l’eau ait atteint la température voulue.
• Il reste de l’eau dans le lave-vaisselle
- Le cycle est-il terminé?
- Il est tout à fait normal qu’une petite quantité d’eau demeure autour de l’orifice d’évacuation
de la cuve, cela afin de préserver la lubrification du joint.
• Du détergent demeure dans la section couverte du distributeur
- Le cycle est-il terminé?
- Le détergent est-il limpide, sans grumeau? Remplacez le détergent au besoin.
• Résidus d’eau sur la partie avant du panneau d’accès
- Y a-il trop de détergent? Reportez-vous à la section « Distributeur de détergent ».
- Cette marque de détergent produit-elle trop de mousse? Essayez une autre marque de
détergent pour réduire le moussage.
• Odeur dans le lave-vaisselle
- La vaisselle est-elle lavée à tous les 2 ou 3 jours? Effectuez un cycle de rinçage une ou
deux fois par jour jusqu’à ce que la charge dans le lave-vaisselle soit pleine.
- Le lave-vaisselle présente-t-il une odeur de plastique neuf? Effectuez un cycle de rinçage en
utilisant du vinaigre, comme l’indique la section « Plaques et films sur la vaisselle » plus loin
dans la présente section de dépannage.
• Condensation sur le comptoir de cuisine (modèles encastrés)
- Le lave-vaisselle est-il aligné avec le comptoir? De l’humidité provenant de l’évent du
lave-vaisselle peut se former sur le comptoir. Reportez-vous aux Instructions d’installation
pour plus de renseignements.
57
Page 59

Français
LA VAISSELLE N’EST PAS ENTIÈREMENT PROPRE
• Résidus d’aliments sur la vaisselle
- Le lave-vaisselle est-il chargé adéquatement? Reportez-vous à la section « Chargement du
lave-vaisselle ». Ne disposez pas les articles de vaisselle trop près l’un de l’autre. Il doit y
avoir un espace suffisant entre chaque article afin de permettre à l’eau de les laver
adéquatement.
- Sélectionnez-vous le cycle qui permet de déloger les pires saletés? Si vous avez des articles
très souillés, utilisez un cycle plus agressif.
- La température de l’eau est-elle insuffisante? Pour obtenir de meilleurs résultats, la
température de l’eau doit être d’au moins 120 °F (49 °C) lorsqu’elle est admise dans le
lave-vaisselle.
- Avez-vous utilisé la bonne quantité de détergent frais? Utilisez uniquement les détergents
pour lave-vaisselle recommandés. Reportez-vous à la section « Distributeur de détergent ».
N’utilisez jamais moins de 1 c. à table (15 g) par charge. Le détergent doit être frais pour
offrir une efficacité adéquate. Entreposez votre détergent dans un endroit sec et frais. La
saleté importante et/ou l’eau dure requièrent habituellement davantage de détergent.
- Le brise-vide ou le broyeur est-il obstrué? Nettoyez au besoin.
- Le détergent a-t-il durci dans le distributeur? Utilisez un détergent frais uniquement. Ne
laissez pas de détergent tremper dans un distributeur humide pendant une longue période.
Nettoyez le distributeur lorsque le détergent a pris en pain.
- La pompe ou les bras gicleurs sont-ils bloqués par des étiquettes provenant de bouteilles
ou de canettes? Si vous avez lavé des bouteilles ou des canettes dans votre lave-vaisselle,
vérifiez si des étiquettes auraient pu obstruer la pompe ou les bras gicleurs.
- Est-ce que le mouvement des bras gicleurs est compromis par des articles? Replacez les
articles dans le lave-vaisselle afin de permettre aux bras gicleurs de se déplacer librement.
- La pression d’eau domestique est-elle suffisante pour remplir le lave-vaisselle? La pression
d’eau domestique doit se situer entre 20 et 120 lb/po
2
(138 et 828 kPa) pour remplir
adéquatement le lave-vaisselle. Vous pouvez ajouter une pompe auxiliaire à la canalisation
si la pression est insuffisante.
- La mousse formée par l’action de lavage ralentit-elle les bras gicleurs? N’utilisez jamais de
savon ni de savon à lessive. Utilisez uniquement les détergents pour lave-vaisselle
recommandés.
PLAQUES ET TACHES SUR LA VAISSELLE
• Plaques et films sur la vaisselle
- Votre eau est-elle trop dure ou y a-t-il une forte teneur en minéraux dans votre eau?
Conditionnez votre eau lors du rinçage final avec un agent de rinçage qui permet d’éliminer
le plaquage et la formation d’un film sur votre vaisselle. Gardez le distributeur d’agent de
rinçage plein. Utilisez toujours l’option haute température. Si la dureté de votre eau est
supérieure à 13 grains ou plus, il est fortement recommandé d’installer un adoucisseur
d’eau. Si vous ne voulez pas boire d’eau adoucie mécaniquement, installez un adoucisseur
sur votre canalisation d’eau chaude.
- La température de l’eau est-elle insuffisante? Pour obtenir de meilleurs résultats, la
température de l’eau doit être d’au moins 120 °F (49 °C) lorsqu’elle est admise dans le
lave-vaisselle.
58
Page 60

Français
- Assurez-vous de charger la vaisselle comme le montre la section « Chargement du
lave-vaisselle ».
- Avez-vous utilisé la bonne quantité de détergent frais? Utilisez uniquement les détergents
pour lave-vaisselle recommandés. Reportez-vous à la section « Distributeur de détergent ».
N’utilisez jamais moins de 1 c. à table (15 g) par charge. Le détergent doit être frais pour
offrir une efficacité adéquate. Entreposez votre détergent dans un endroit sec et frais. La
saleté importante et/ou l’eau dure requièrent habituellement davantage de détergent.
- La pression d’eau domestique est-elle suffisante pour remplir le lave-vaisselle? La pression
d’eau domestique doit se situer entre 20 et 120 lb/po
2
(138 et 828 kPa) pour remplir
adéquatement le lave-vaisselle. On peut ajouter une pompe auxiliaire à la canalisation si la
pression est insuffisante.
• Film de silice ou traînée (le film de silice est un dépôt laiteux aux couleurs de l’arc-en-ciel;
la traînée est un mince film flou)
- À l’occasion, une réaction chimique entre l’eau et les produits chimiques se produit avec
certains types de verrerie. Cette réaction est habituellement causée par la combinaison
d’une eau douce ou adoucie, de solutions de lavage alcalines, d’un rinçage insuffisant,
d’une surcharge du lave-vaisselle et de la chaleur du séchage. Il est pratiquement
impossible d’éviter ce problème, à moins de laver les articles à la main.
- Pour atténuer la réaction, utilisez une quantité minimale de détergent, soit plus de 15 g
(1 c. à table) de détergent par charge. Utilisez un agent de rinçage liquide et ne chargez
pas trop le lave-vaisselle afin d’optimiser le rinçage. Les films de silice et les traînées sont
permanents et ne peuvent pas être enlevés. N’utilisez pas le séchage avec chaleur.
• Taches blanches sur les casseroles pourvues d’un fini antiadhésif
- Le détergent pour lave-vaisselle a-t-il enlevé le fini de la casserole? Réappliquez un fini à la
casserole après l’avoir lavée au lave-vaisselle.
• Taches brunes sur la vaisselle et sur les parois internes du lave-vaisselle
- Votre eau contient-elle beaucoup de fer? Lavez la vaisselle de nouveau en ajoutant
1 à 3 c. à thé (5 à 15 ml) de cristaux d’acide citrique dans la section couverte du distributeur
de détergent. N’utilisez aucun détergent. Ensuite, effectuez un cycle
NORMAL (Normal)
avec du détergent. Si ce traitement est nécessaire plus d’une fois par mois, l’installation
d’un dispositif de déferrisation est recommandée.
• Marques noires ou grises sur la vaisselle
- Les articles en aluminium sont-ils entrés en contact avec la vaisselle pendant le lavage? Les
articles en aluminium jetables peuvent se briser dans le lave-vaisselle et causer des
marques. Lavez ces articles à la main. Retirez les marques d’aluminium en utilisant un
nettoyant abrasif doux.
• Taches de couleur orange sur la vaisselle en plastique ou sur les parois internes du
lave-vaisselle
- Y a-t-il beaucoup de résidus d’aliments à base de tomates sur la vaisselle? Il peut être
nécessaire d’utiliser un détachant pour nettoyer les taches de votre lave-vaisselle. Ces
taches n’affectent en rien le rendement de votre lave-vaisselle.
59
Page 61

Français
LA VAISSELLE N’EST PAS ENTIÈREMENT SÈCHE
• La vaisselle n’est pas sèche
- Avez-vous chargé le lave-vaisselle de façon à assurer une vidange adéquate de l’eau.
- Ne surchargez pas le lave-vaisselle. Reportez-vous à la section « Chargement du
lave-vaisselle ». Utilisez un agent de rinçage liquide pour accélérer le séchage.
- Les articles en plastique sont-ils humides? Les articles en plastique doivent souvent être
essuyés avec un essuie-tout.
- Le distributeur d’agent de rinçage est-il vide? Reportez-vous à la section « Distributeur
d’agent de rinçage ».
- Avez-vous choisi l’option de séchage à l’air ou de séchage à économie d’énergie? Pour faire
sécher entièrement la vaisselle, utilisez l’option de séchage avec chaleur.
DES ARTICLES SONT ENDOMMAGÉS PENDANT UN CYCLE
• Écaillage de la vaisselle
- Avez-vous chargé le lave-vaisselle adéquatement? Chargez les assiettes et les verres de
façon à ce qu’ils soient stables et qu’ils ne puissent entrer en contact les uns avec les autres
pendant le lavage. Minimisez l’écaillage en tirant et en poussant lentement le panier.
REMARQUE :
BRUITS
• Sons de broyage, de craquement ou de vibration
- Un objet dur a pénétré dans le module de lavage (sur certains modèles). Lorsque l’objet est
broyé, le son devrait cesser.
- Bruits de fonctionnement normaux : eau admise dans le lave-vaisselle, ouverture du
distributeur de détergent, arrêt et démarrage du moteur, fonctionnement de la pompe lors
de l’évacuation de l’eau de lavage.
- Des bruits sont produits par la vaisselle? Assurez-vous de charger la vaisselle
adéquatement afin qu’elle ne compromette pas la rotation des bras gicleurs.
Les articles antiques, à bords amincis ainsi que les articles de type en porcelaine
ou en verre peuvent ne pas convenir au lave-vaisselle; lavez plutôt ces articles à
la main.
60
Page 62

Français
GARANTIE
Votre lave-vaisselle est garanti contre tout vice de matériau ou de fabrication.
Période de garantie
Ce qui est couvert :
Toutes les pièces
(à partir de la
date d’achat)
Un (1) an
Conditions :
Cette garantie ne s’applique que pour un appareil
achété au Canada dans le cadre d’une utilisation
domestique au Canada, lorsque l’appareil a été installé
conformément aux instructions fournies par Mabe et
qu’il est raccordé à une alimentation adéquate.
Les dommages dus à une utilisation abusive, un
accident, une utilisation commerciale, une modification
ou une détérioration de la plaque signalétique rendent
la garantie nulle et non avenue.
Toute réparation dans le cadre de la garantie doit être
effectuée par un réparateur Mabe agréé.
Mabe et le détaillant ne peuvent en aucun cas être
tenus responsables des réclamations ou dommages
dus à la défaillance du lave-vaisselle, ou des délais de
réparation indépendants de leur volonté.
Pour toute réparation couverte par la garantie,
l’acheteur doit présenter le reçu d’origine. Les
composants réparés ou remplacés ne sont garantis que
pendant le reste de la période de garantie originale.
Cette garantie est offerte à l’acheteur initial, ainsi qu’à
tout propriétaire subséquent d’un produit acheté en vue
d’une utilisation domestique au Canada. Le service à
domicile couvert par la garantie sera fourni dans les
régions où il est disponible et où Mabe estime
raisonnable de le fournir.
Pièces (réparation ou
remplacement à la
discrétion du fournisseur)
Un (1) an
Main-d’œuvre
Un (1) an
Ce qui n’est pas couvert
• Toute visite à votre domicile pour vous expliquer le
fonctionnement de l’appareil.
• Tout dommage au revêtement après la livraison.
• Installation inadéquate – par installation adéquate, on
entend une installation adéquate des systèmes
électriques, de la plomberie et de tout raccordement.
• Le remplacement des fusibles ou le réenclenchement
des disjoncteurs de votre domicile.
• Le remplacement des ampoules.
• Tout dommage au produit attribuable à un accident,
un incendie, une inondation ou une catastrophe
naturelle.
• Une utilisation et un entretien non conformes aux
instructions du manuel de l’utilisateur, ainsi qu’un
réglage inapproprié des commandes.
• LE GARANT NE PEUT ÊTRE TENU RESPONSABLE DES
DOMMAGES INDIRECTS.
EXCLUSION DES GARANTIES IMPLICITES - Votre seul et unique recours est de faire réparer le produit dans
le cadre de cette garantie limitée. Toute garantie implicite, incluant la garantie de qualité marchande ou
d’adaptabilité du produit à un usage particulier, est limitée à un an ou à la période la plus courte autorisée
par la loi.
IMPORTANT
Conservez cette garantie et votre reçu comme preuve d’achat d’origine et de date d’achat.
Le service après-vente de Mabe est offert d’un océan à l’autre.
Pour prendre un rendez-vous, composez le 1 800 561-3344
Si vous avez des questions concernant la présente garantie, écrivez à :
Consumer Relations Manager - Mabe Canada Inc.
1 Factory Lane, Suite 310, Moncton, N.-B. E1C 9M3
Agrafez votre facture ici.
Une preuve de la date d’achat
d’origine est requise pour bénéficier du
service de réparation sous garantie.
61
Page 63

SERVICE À LA CLIENTÈLE
Site Web des électroménagers GE
Vous avez une question ou vous avez besoin d’aide concernant votre appareil? Consultez le site
Web des électroménagers GE accessible 24 heures sur 24, tous les jours de l’année!
Demande de réparation
Pour bénéficier du service de réparation expert de GE, il suffit de téléphoner. C’est pratique!
Téléphonez au 1 800 561-3344 durant les heures normales de bureau.
www.electromenagersGE.ca
1 800 561-3344
Centre de conception universelle
Mabe soutient la conception universelle : produits, services et environnements à la portée de tous,
quels que soient leur âge, taille ou capacités mentales et physiques. Nous avons conscience qu’il
est nécessaire d’adapter la conception de nos produits à toute la variété de capacités et
handicaps physiques et mentaux existants. Pour plus de détails sur les applications de conception
universelle de GE, dont la conception de cuisines pour les personnes atteintes d’un handicap,
consultez notre site Web dès aujourd’hui.
Au Canada, écrivez à : Manager, Consumer Relations, Mabe Canada Inc.
Pièces et accessoires
Les personnes ayant les compétences requises pour réparer elles-mêmes leurs appareils peuvent
directement recevoir des pièces ou accessoires à domicile (les cartes VISA, MasterCard et Discover
sont acceptées). Commandez en téléphonant au 1 800 661-1616 durant les heures normales de
bureau.
Les instructions contenues dans le présent manuel comportent des procédures que tout
utilisateur peut effectuer. Les autres types de réparation doivent généralement être confiés à
un technicien qualifié. Usez de prudence, car une réparation ou un entretien mal effectué peut
rendre l’utilisation de l’appareil dangereuse.
Suite 310, 1 Factory Lane
Moncton, N.-B. E1C 9M3
1 800 661-1616
Communiquez avec nous
Si vous n’êtes pas satisfait du service après-vente de GE, communiquez avec nous sur notre site
Web en fournissant tous les détails et votre numéro de téléphone, ou écrivez à :
Director, Consumer Relations, Mabe Canada Inc.
Suite 310, 1 Factory Lane
Moncton, N.-B. E1C 9M3
Enregistrez votre appareil à :
Enregistrez votre nouvel appareil en ligne au moment qui vous convient le mieux!
L’enregistrement de votre produit dans les délais prescrits permet une meilleure communication et
un service rapide, selon les modalités de votre garantie, si besoin est. Vous pouvez également
envoyer par courrier la carte d’enregistrement pré-imprimée qui se trouve dans l’emballage de
votre appareil.
www.electromenagersge.ca
www.electromenagersGE.ca
 Loading...