

Page 1
-j
L
Aluminum Foil
Appliance Registration
Baking/Baking Guide
Broiling/Broiling Guide 12, 13
Care and Cleaning
Clock/Timer
Consumer Services
Electronic Controls
Energy Saving Tips
Features
Installation Instructions
Light; Bulb Replacement
I
Lower Oven Control
Model and Serial Numbers 2
Preheatimz
Problem Solver
II
Roasting/Roasting Guide
Safetv Instructions
12
2
9,10
14-19
7
23
4
5
21,22
14
6, 14
4,9, 10
20
11
2-4
Self-Cleaning Instructions 16-18
II
Shelves
II
Thermostat Adjustment
II
Warranty
II
I
6,9, 15, 18,19
14,18
Back Cover
f?
Page 2
‘-
———————
.7
—
-.-
. *
‘ -
Ik4brewingyourUvq
readthisbook
Itisintended to helpyouoperate
andmaintainyoLJrnewoven
properly.
Keep
it handyforanswerstoyour
questions.
Ifyoudon’tunderstandsomething
or needmore help, write (include
yourphonenumber):
ConswnerRelations
AppliancePark
Louisville,KY40225
writedownthe
Wld $~lid
You’llfindthemon a labelon
thefront oftheovenbehindthe
ovendoor.
Thesenumbersare alsoonthe
ConsumerProduct Ownership
RegistrationCard that camewith
youroven.Beforesendinginthis
card, please write these numbers
here:
Model Number
Serial Number
Usethese numbersin any
correspondenceor service calls
concerningyour oven.
savetimeand.money.
Beforeym requlest
service.a a
ChecktheProblemSolveron
page20.Itlists causesofminor
operatingproblemsthatyoucan
correctyourself.
If you IM?edservice. ..
Toobtain service, see the
ConsumerServicespagein the
backof thisbook.
We’reproudofour serviceand
wantyoutobepleased. If forsome
reasonyouare nothappywith the
serviceyoureceive,here are three
stepstofollowforfurther help.
FIRST,contactthepeoplewho
servicedyourappliance.Explain
whyyouare not pleased. In most
cases, thiswill solvethe problem.
NEXT, ifyouare still notpleased,
writeallthe details-including
yourphonenumber—to:
ConsumerRelations
AppliancePark
Louisville,Kentucky40225
FINALLY,if your problem is still
notresolved, write:
Major Appliance
Consumer ActionPanel
20 North WackerDrive
Chicago,IHinois60606
TheCaliforniaSafeDrinking
WaterandToxicEnforcement
ActrequirestheGovernorof
Californiatopublishalistof
substancesknowntothe state
tocausebirthdefectsorothe~
reproductiveharm, andrequires
businessestowarncustomersof
potentialexposuretosuch
substances.
ThefiberglassinsulationinseM-
cleanovensgivesoffa verysmall
amountofcarbonmonoxide
duringthecleaningcycle.
Exposurecan be minimizedby
ventingwithan openwindowor
using a ventilationfanorhood.
‘ :--
a;co;dance withtheprovided
InstallationInstructions.
p
Page 3
01’m-Mmdedh
er servicing shouldbe
ii$erredtoa
@B&we pel%otig
qualified technician.
‘mm OVEN
SUPPLY ATm
pair
f
your
!&Ny
this book!
anysWvice9
All
s use dy dl”y pothokk’s——
AMoistor clamppotholders on
hotsurfacesmayresultinburns
fromsteam.Donotletpot holders
touchhotheatingelements.Do
notuse a towel& otherbulky
cloth.
@Neveruseyour for
warmingorheatingthemm.
@when cooking pork, foHow
thedirections exactly and always
cookthemeatto an internal
temperatureofat ieast 170”13
Thisassuresthat, inthe remote
possibilitythattrichinamaybe
presentin the meat, itwillbe
killedandthemeatwillbe safe
to eat.
PANELBYREMOVINGTHE
FUSE OR SWITCHINGOFF
THE CIRCUITBREAKER
@Do not leavechildren alone—
Childrenshouldnotbe leftalone
or unattendedin an area where
appliance is in use. They should
never
beallowedto sitor stand
on any part of the appliance.
@llmft allowanyonetoclimb,
standorhang on the door.
Theycoulddamagetheoven.
@CAUTION: ITEMSOF
ER.EST’
ULDrdmBE STORED
m
mcAmNEm ABOVE
OVEN.
INmNG ‘ONTHEOVEN
mREACHITEMS comm
BESERIOUSLYIPm.JRm.
@Neverwearkme-fitthlg or
hanginggarments whik using
the appliance. Becarefulwhen
reachingfor items storedin
cabinetsovertheoven.Flammable
materialcould be ignitedif
broughtin contactwith hot
heatingelementsand maycause
severebums.
@Storageinoronapp!imlce-
Do notstoreflammablematerials
intheoven.
@Keephoodandgrease fihxs
cleantomaintaingoodventing
andto avoidgreasefires.
@Donotlet cooking grease
orother materials
accumulateinorneartheovum.
~Donotuse waterongrease
fires.Flamein oven can be
smotheredbycoqdetdy
closingdoorandpressingoven
CANCELbutton.
@Donottouchheatingelements
or interiorsurfaceof oven.
Thesesurfacesmaybe hot
enoughto burn eventhoughthey
are dark in color. During and
after use, do nottouch, or let
clothingor other flammable
materialscontactanyinterior
area oftheoven;allowsufficient
time for cooling, first. .
Potentiallyhot surfacesinclude
the ovenventopeningsand
surfacesnear the openings,
c~evicesaround the ovendoor
andtheedgesof the doorwindow.
E&umber: The insidesurface
ofthe ovenmay be hot when the
door is opened.
‘oven
@Standawayfromovenwhen
openingovendoor.‘I’hehot air
orsteamwhidnescapescan
burnihads, faceamlh eyes.
@Dmttheatunopenedfood
containersin the oven.Pressure
couldbuildup andthecontainer
could bmW3causinganinjury.
~ Keepovenventduct
a.mokwructed.
@Keepovenfreefrom.grease
@Placeovenshelfindesired
position
shelvesmust be handled when
hot, do notlet potholder contact
heatingunits in the overi.
~ outshelf -toSI-M?Mstop
whileOvenis Cod. If
isa ‘cmvenkmx in heavy
foods.It
againstburnsfromtouching
hotsurfacesofdoor m oven
‘wake
~ VVkn wing codihg or
manufacturer’sdirections.
@DoII-da.lse yourC3’venltodry
newspapers. If overheated,they
can catch fire.
isalso a
bags in OVeE39followthe
(contirwednex[page)
Page 4
ml notdean door gasket
o
M%w’eEWidhg MMM-h3g
onpageXi The
door gasket
is essentialfora good
seal. Care shouldbetakennotto
rub,damageor movethegasket.
@Do not use ow?nCk%m!rseNo
commercialovencleaneror oven
iinerprotectivecoatingofany
kindshouldbeused in or around
anypartof theoven.
e clean only park listed in this
use and care Book.
a Before Seif-ch%mingthe Oven?
removebroiler pan andother
mdkware.
@Listenforfan—afannoise
shouldbe heardsometimeduring
thecleaningcycle.H not, callfor
servicebeforeself-cleaningagain.
(continued)
* ~@19~ torepair
orreplacemy partd your
rangeunlessit is
otherservicingshouldbereferred
!Oa qualifiedtechnician.
inthisbook.All
~Preheatovenonlywhen
necessary.Most foodswillcook
satisfactorilywithoutpreheating.
Ifyoufindpreheatingis necessary,
listenforthe beep,and put foodin
ovenpromptlyJter the-ovenis
preheated.
s Alwaysturn ovenOFF before
removingfood.
~Duringbaking,avoidfrequent
dooropenings. Keepdoor open as
shorta time as possibleif it is
opened..
@Besureto wipeup excessspillage
beforestartingtheself-cleaning
operation. -
@Cookcompleteovenmeals
insteadofjust‘onefooditem.
Potatoes,o~hervegetables,and
somedesserts wiircook together
witha main-dishcasserole, meat
loaf, chickenor roast. Choose
foods that cook at the same
temperaturearidin approximatel~
the sametime.
@LTseresidual heat in the oven
wheneverpossibleto finish
cookingcasseroles, ovenmeals,
etc. Also add rolls or precooked
dessertsto warm oven, using
residualheat to warm them.
-..-
Page 5
—
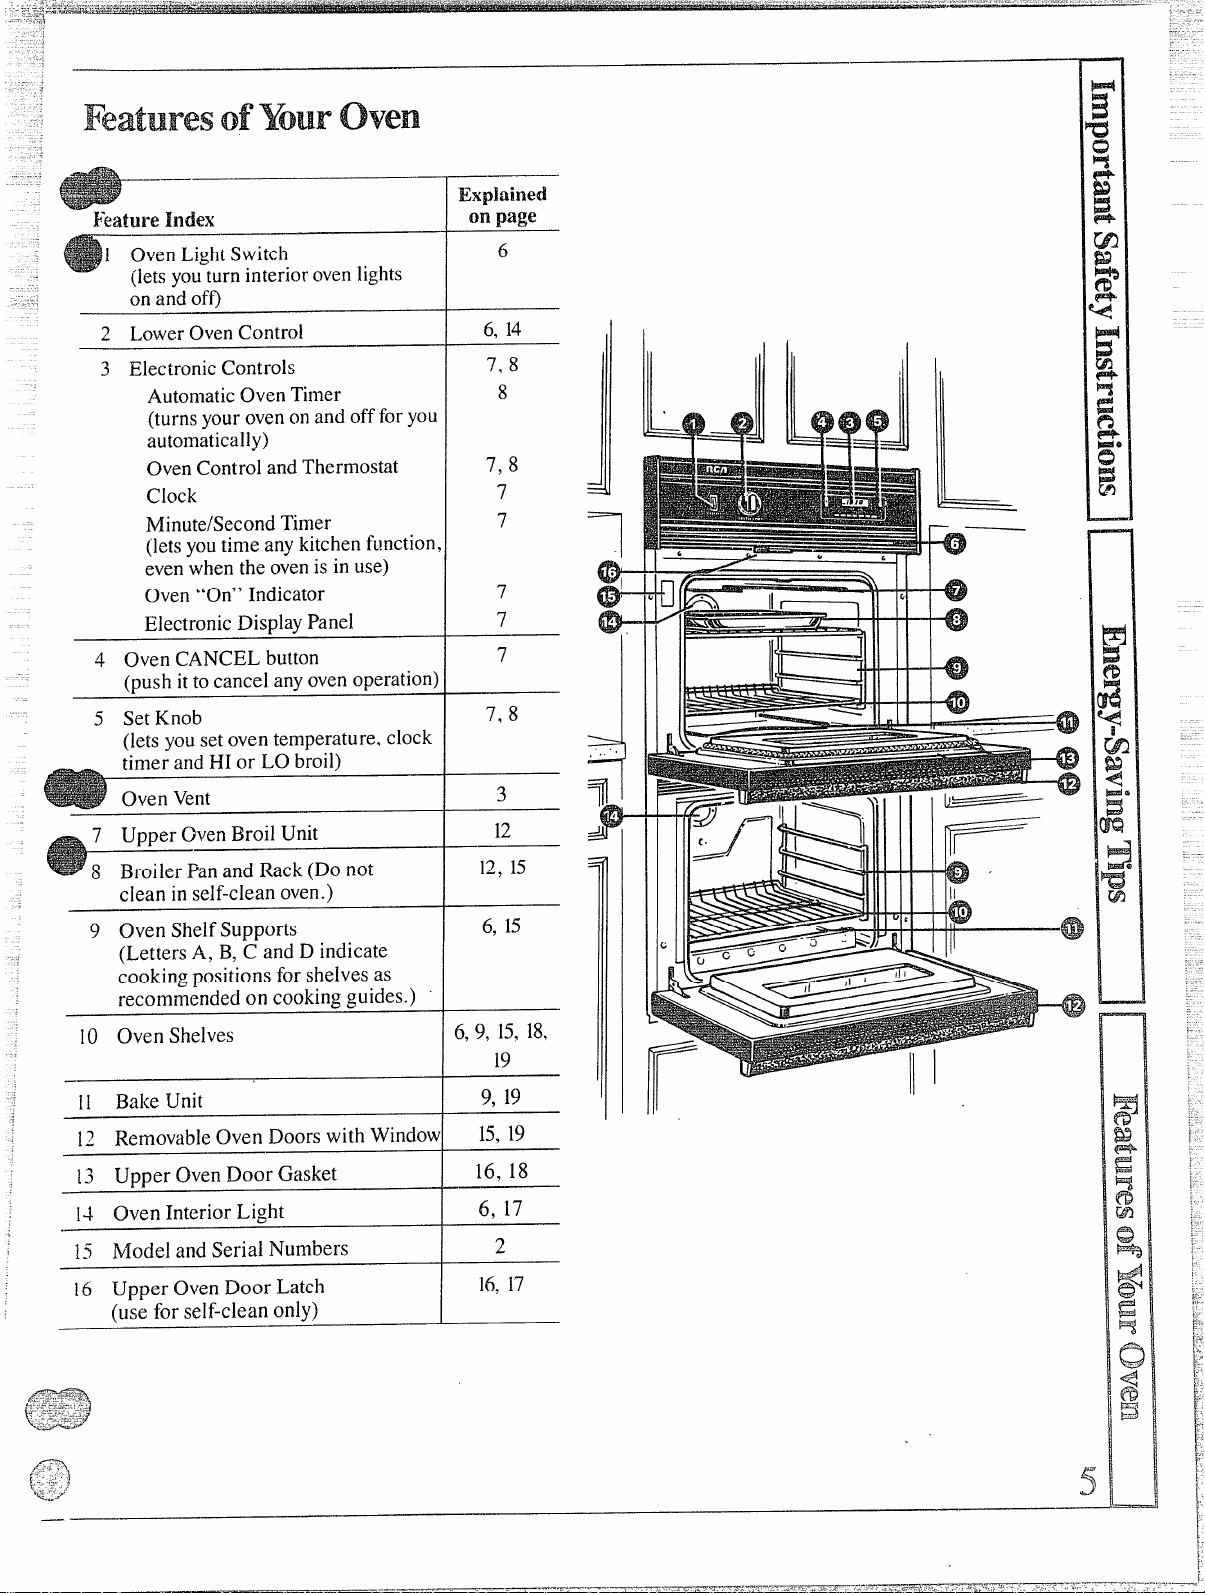
R%.3hn-eIndex
1 Oven LightSwitch
(letsyouturninteriorovenlights
onand off)
2 LowerOvenControl
~ ElectronicControls
AutomaticOven Timer
(turnsyourovenonand offfor you
automatically)
OvenControland Thermostat
Clock
Minute/SecondTimer
(letsyoutime anykitchenfunction
evenwhen the ovenis in use)
Oven “On” Indicator
ElectronicDisplayPanel
4 Oven CANCEL button
(push ittocancel anyovenoperation)
5 Set Knob
(letsyousetoven temperature. clock
timer and HI or LO broil)
Oven Vent
7 Upper OvenBroil Unit
Explained
page
on
6
6, 14
7, 8
8
7,8
7
7
7
7
7
7.8
3
12
I
a3’--
“1
e
.
fiDf-
‘!
,,
J
I rib-+. Ill I
4
P
m
ii!
y
Cf
4
15!F3J4
!=$
m
8 Broiler Panand Rack(Do not
clean in self-cleanoven.)
9 OvenShelfSupports
(LettersA,B,C andDindicate
cookingpositionsforshelvesas
recommendedoncookingguides.) ‘
10 Oven Shelves
11 Bake Unit
IZ Removableoven Doors with window
13 UpperOvenDoorGasket
14 Oven Interior Light
15 Model and Serial Numbers
16 Upper Oven Door Latch
(u;; for self-clean only)
6, 15
6,9, 15,18,
19
9, 19
15,19
16,18
6, 17
2
16,17
* 1“ ‘
L-
*
A
.?
—
—
Page 6
Beforeusing ‘%.bm-oven
—
~
,1
-
‘t,.<
<
k--
=
p
1. Lookat thecontrols.Besure
youunderstandhowto setthem
properly.Readoverthe directions
fortheElectronicControlsand
LowerOvenControlso you
understandhowtousethem.
2. Checkoveninterior.Lookat
theshelves.Takeapractice run at
removingandreplacingthemproperly,
togivesure, sturdysupport.
3. Readoverinformation and tips
thatfollow.
4. Keepthisbookhandy soyou can
refertoit, especiallyduringthe
firstweeksofgettingacquainted
withyouroven.
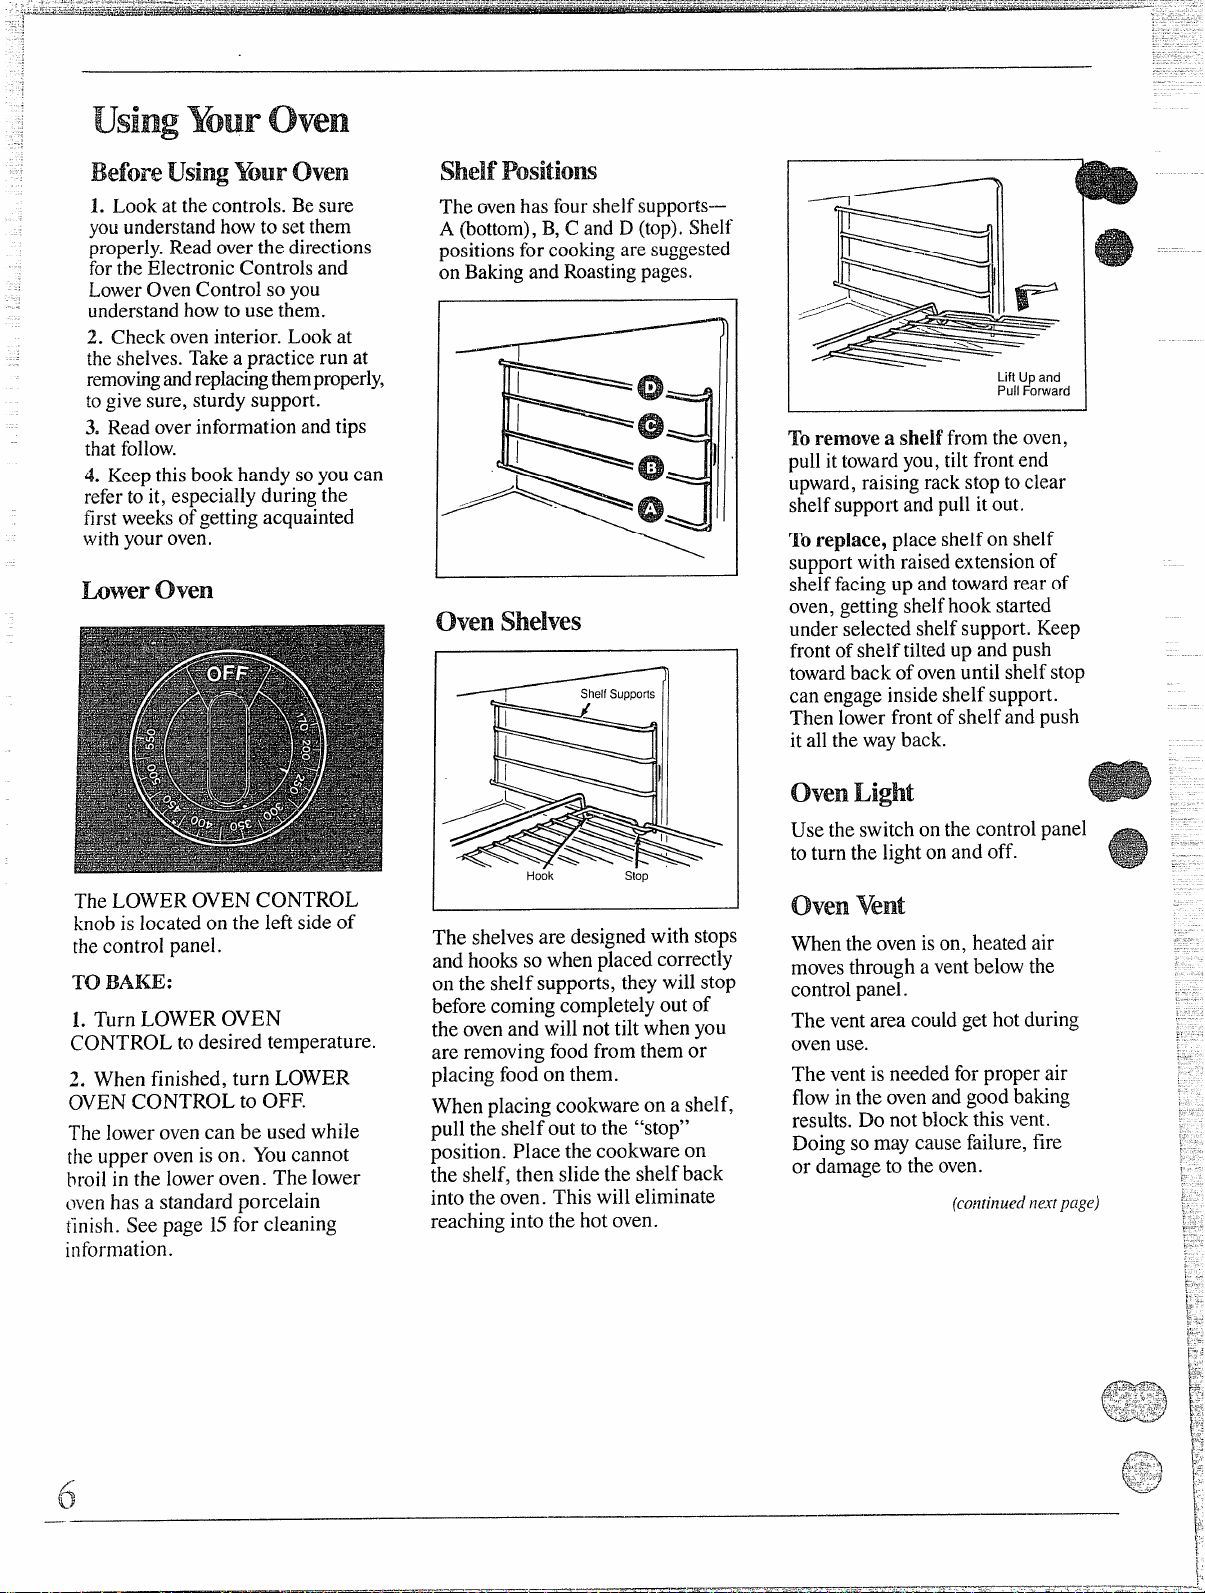
Loweroven
The ovenhasfourshelfsupports-–
A (bottom),B,C and D (top),Shelf
positionsforcookingaresuggested
on BakingandRoastingpages.
i I
oven
shelves
LiftUpand
PullForward
Toremovea shelf fromthe oven,
pullittowardyou, tilt frontend
upward,raisingrackstopto clear
shelfsupportandpullitout.
To
replace,placeshelfon shelf
supportwith raisedextensionof
shelffacingup and towardrearof
oven,gettingshelfhook started
underselectedshelfsupport. Keep
frontof shelftiltedup and push
towardback ofovenuntil shelfstop
can engageinsideshelfsupport.
Then lower frontof shelf andpush
itallthewayback.
.—
.-
The LOWER OVEN CONTROL
knobis located on the left sideof
thecontrol panel.
?’0
BAKE:
1. Turn LOWER OVEN
CONTROL to desired temperature.
2. When finished, turn LOWER
OVENCONTROL to OFF.
The lower ovencan be usedwhile
theupper oven is on. Youcannot
[~f”oilin the loweroven. The lower
oven hasa standard porcelain
tinish. See page 15for cleaning
information.
Hook
slop
The shelvesare designedwith stops
and hooksso whenplacedcorrectly
on the shelf supports, theywill stop
beforecoming completelyout of
the ovenand will not tilt when you
are removingfoodfrom them or
placingfoodon them.
When placing cookwareon a shelf,
puHthe shelf out to the “stop”
position. Place the cookware on
the shelf, then slidethe shelf back
into the oven. This will eliminate
reaching into the hot oven.
ovenLight
Use the switchonthe controlpanel
toturn the lighton and off.
ovenvent
Whentheovenison, heatedair
movesthrougha ventbelowthe
controlpanel.
The ventarea couldget hot during
ovenuse.
The ventisneeded for proper air
flowin the ovenandgood baking
results.Do not blockthis vent.
Doing so may causefailure,fire
or damageto the oven.
(~~~lri~l~~~l
ne.rtpage) ~,-
~,.
;.
g
,.
,.
~.
I
Page 7
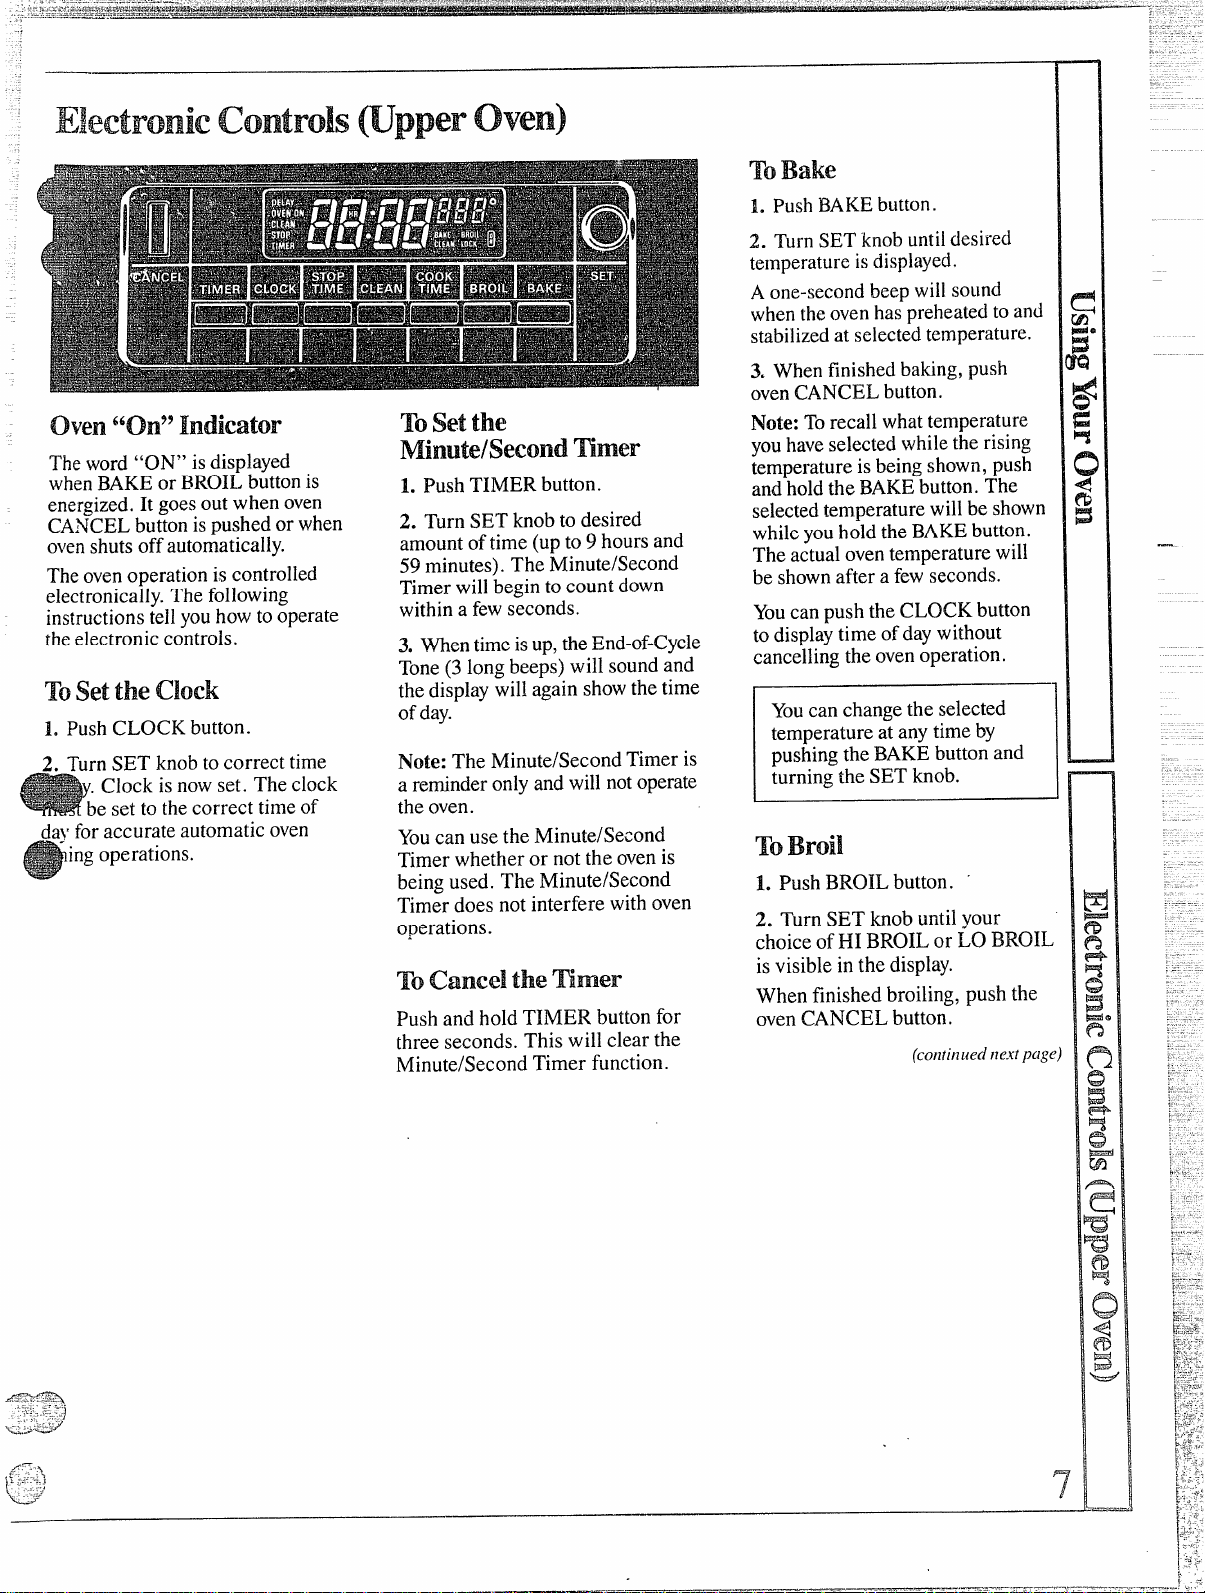
o~en“on”
Theword “ON” isdisplayed
whenBAKEor BROILbuttonis
energized.It goesoutwhen oven
CANCELbuttonispushedor when
ovenshutsoffautomatically.
Theovenoperationis controlled
electronically.Thefollowing
instructionstellyouhowto operate
~heelectroniccontrols.
To set the clock
1. PushCLOCK button.
2. Turn SET knob to correct time
Clock isnowset. The clock
be set to the correct time of
da~rfor accurate automatic oven
ingoperations.
TOsetthe
Timer
L Push TIMER button.
2. Turn SET knob to desired
amountoftime (upto 9 hours and
59minutes).The Minute/Second
Timerwill beginto count down
withina fewseconds.
3. Whentimeisup,theEnd-of-Cycle
Tone(3long beeps)will soundand
thedisplaywillagain showthetime
ofday.
Note: The Minute/SecondTimer is
a reminderonlyandwillnotoperate
the oven.
Youcan usethe Minute/Second
Timer whether or not the ovenis
beingused. The Minute/Second
Timerdoes not interfere withoven
operations.
ToCM-d the!Timer
Push and hold TIMER button for
three seconds. This will clear the
Minute/SecondTimer function.
-.
lb Bake
1. PushBAKEbutton.
2. Turn SET knobuntildesired
temperatureisdisplayed.
A one-secondbeep will sound
whenthe ovenhaspreheatedtoand
stabilizedatselectedtemperature.
3. Whenfinisheclbaking,push
ovenCANCELbutton.
Note: Torecall whattemperature
youhave selectedwhilethe rising
temperatureisbeingshown,push
andholdthe BAKEbutton.The
selectedtemperaturewill be shown
whileyouholdthe BAKEbutton.
The actualoventemperaturewill
be shownaftera fewseconds.
Youcanpushthe CLOCK button
todisplaytime ofdaywithout
canceling the ovenoperation.
Youcan changethe selected
temperatureat any timeby
pushingtheBAKEbuttonand
turningthe SET knob.
??0Broil
1. PushBROIL button. “
2. Turn SET knob untilyour
choiceof HI BROILor LO BROIIisvisiblein the display.
When finished broiling, push the
ovenCANCEL button.
(continued next pag(
7
E
w
w
f%
W>
c
Page 8

(continued)
&;,.
$“.-
ovenmm%
Theoventimerwillautomatically
start and stop yourovencookingor
self-cleaningoperationforyou.
For automaticoven cooking:
1. PushCOOK TIME
2. TurnSET knobto set lengthof
bakingtime.
3. PushBAKEbutton.
4. TurnSET knobto set desired
temperature.
Whencook timeisreached,the
End-of-CycleTonewill soundand
theovenwillturn off.
Duringautomaticcooking:
~Youcanpush the STOP TIME
buttonto find outwhen theEnd-of-
CycleTonewillsoundandtheoven
will turn off.
@Youcan push the CLOCK button
todisplaytimeofday without
canceling the ovenoperation.
bUttO~.
Towhy an
ovum
If a delayed cookingoperation
isdesired:
L Push COOK THvIEbutton.
2. Set lengthofbakingtimewith
SETknob.
3. Push STOPTIME button.
4. Turn SET knobtotime ofday
whenbakingshouldbecompleted.
Do not set a stoptimethatisless
thanthe lengthofcooking time
plusthe current timeofday.
5. Push BAKEbutton.
6. Turn SET knob to desired
temperature.
When stoptime isreached,the
End-of-CycleTonewillsoundand
theovenwillturn off.
Caution:Neverlet foodsitinthe
ovenfor mum than4 hours before
cookingstarts. Roomtemperature
isidealfor the growthofharmful
bacteria. Be sure ovenlightis off
becauseheat from the bulbwill
speed bacteria growth.
Note: Youcan push the STOP
TIME buttonto find out when the
ovenwill turn off. Push and hold
the COOK TIME buttontofind out
when the oven will turn on.
If a delayed self-cleaningoven
operationis desired, seepage 16.
I
1
Howtochange
a Program
When a function has been
entered, you can recallwhathas
been programmed bypushing
the corresponding function
button. The messages in the
displayshowyouwhichfbnction
is currently being displayed.
While the function isdisplayed,
youcan change itwith the SET
knob. Youcan change any
programmed functionat any
time.
Tones
End-of-CycleTone(3 long beeps—
one secondon, onesecondoff):
showsthata timedovenoperation
hasreachedSTOP1’IMEor that
the Minute/SecondTimerhas
counteddown.
Attention Tone(seriesof short
beeps, l/4-secondon, l/4-second
off, untilproper responseisgiven):
wiilsound if ovenhasonly been
partiallyprogrammed.Forexample,
ifyouhaveselecteda cook timebut
no temperature,youwillhear the
AttentionToneuntilyouselecta
temperatureor pushCANCEL.
Notification‘I’one(single,onesecondbeep): indicatesovenhas
stabilizedat selectedtemperature.
KeyTone (single, l/10-second
beep): sounds whenany button
ispushed.
FunctionError Tom (series of
very rapid beeps, W-second on,
l/4-second off): displaywill showa
failurecode. CancelFunctionError
TonebypushingtheCANCEL
button. If the FunctionError Tone “
startsagain(afteraboutk5seconds),
callforservice.Disconnecttherange
electrical supply to stop the tone.
If the function error occurred
while youwere programming the
Electronic Control, push the
CANCEL buttonand try again.
To Cancel the Tone.. .If youdon’t
wantan audibletonewhen youpush
a button, you can eliminatethe Key
Tonebypushing and holding the
CANCEL button untilyou hear a
short beep (in approxi~ately two
seconds).To activatethetoneagain,
push and hold the CANCEL button
bnce
moreuntilyouhearashort
beep.Cancelingoractivatingthe
toneshouldonlybe donewhenthere
isno ovenope~ation programmed.
Pushing the CANCEL button will
clear all functions except the Clock
and Minute/Second Timer.
.-
-.
-----
.
.
.
.
......
. .
:.:
,...
,. -
;.-“
~>
:.-
,,’
1
‘1
— i
i-
Page 9

..-....
l“-
-
i%
;.=
-...—-— =
————.——————
.
Positiontheshelf or shelvesin
eoven.If cookingontwoshelves
atthe sametime, staggerthe
cookwareforbestheatcirculation.
2. Closeovendoor.
3. Push theBAKEbuttonand
turnthe SET knobuntildesired
temperatureisdisplayed.If
preheatingisdesired, do notput
foodinthe ovenuntil a one-second
beepsoundstotellyoutheovenis
preheated.
4. Opendoorand place foodin
ovenon centerof shelf. Allowat
least2 inchesbetweenedgeof
bakewareand ovenwallor adjacent
cookware.
5. Closeovendoor.
6. Check foodfor donenessat
minimumtimeon recipe. Cook
longerif necessary.Push CANCEL
ton and removefood.
ostbakingisdone on the second
shelfposition(B)from the bottom.
Whenbakingthree or four items,
usetwo shelves positioned on the
secondand fourth sets of supports
(B& D) from bottomof oven.
Bakeangelfood cakes on first shelf
position(A) from bottom ofoven.
Baking‘rips’
~Followa testedrecipe and
measurethe ingredientscarefully.
Ifyouare usingapackagemix,
~Donot opentheovendoorduring
abakingoperation—heatwillbelost
and~hebakingtimemightneedto
beextended.Thiscouldcausepoor
bakingresults.Ifyoumustopenthe
door,openit partially–only 3or4
inches--andcloseitasquicklyas
possible.
@Donotdisturb theheatcirculation
intheovenwiththe useofaluminum
foil.Iffoilisused,placeasmall
sheet ofit, about 10by 12inchesat
themost,onalowershelfseveral
inchesbelowthe food.Do not place
foilonthe ovenbottom.
common Baking
and Possible
Pms
Burningmound edges
@Edgesofcrusttoothin.
aIncorrectbakingtemperature.
Bottom crust soggyand unbaked
~AllowCrLlstand/orfillingto
sufficientlybeforefillingpieshell.
~Fillingmaybe toothinorjuicy.
~Fi]lingallowedtostandinpieshell
beforebaking. (Fillpieshells and
bakeimmediately.)
@Ingredientsandpropermeasuring
affectthequalityofthecrust. Use a
testedrecipeandgoodtechnique.
Makesurethere arenotinyholesor
tearsina bottomcrust. “Patching”
apiecrust couldcausesoaking.
Pie filling runs over
@Topandbottomcrustnotwell
sealedtogether.
~Edgesofpiecrust notbuiltup
highenough.
~
TOO much filling.
e“Check sizeofpieplate.
F%stryistough; crust not flaky
~Toomuchhandling.
@Fattoosoftor cutintoo fine.
Rolldoughlightlyandhandleas
littleaspossible.
COO1
~-l
ICAKES
Cakerises higher m oneside
s Batterspreadunevenlyinpan.
~oven shelvesnotlevel.
@Usingwarpedpans.
Cakescrackingontop
oOventemperaturetoohigh.
~Battertoothick,follow
recipe
orexactpackagedirections.
~checkfor
~Checkpansize calledforinrecipe,
~Impropermixingofcake.
Cakefalls
a
TOO much shortening,sugaror
liquid.
@Checkleaveningagent,baking
powderorbakingsodatoassure
freshness.Makeahabit to note
expirationdatesofpackaged
ingredients.
~Cakenotbakedlongenoughor
bakedatincorrecttemperature.
@Ifadding oilto acakemix, make
certaintheoilisthetypeand
amountspecified.
crust ishard
@Checktemperature.
~Checkshelfposition.
Cakehassoggylayerorstreaksat
bottom
@Underminingingredients.
@Shorteningtoosoftfor proper
creaming.
eToomuchliquid.
propershelfposition.
COOK3ESF&BEsmJm3
Doughycenter; heavy cruston
surface
@Checktemperature.
@Checkshelfposition.
@Followbakinginstructions
carefullyasgiveninreliablerecipe
or onconveniencefoodpackage.
@Flatcookie sheetswill givemore
evenbakingresults.Don’tovercrowd
foodson abaking sheet.
~Conveniencefoodsused beyond Q~ ;:
theirexpirationdate.
Browning more noticeable on
one side
Qoven door not closedproperly,
checkgasketseal.
Q Checkshelf position.
W
& ~ !
- :“
s ?
OR
-.
;..
—-
9
Page 10

—
1.Aluminumpans conductheat 2. Darkor non-shinyfinishesand
quickly.Formostconventional glasscookwaregenerallyabsorb
baking,light,shinyfirtishesgivebest
resultsbecausetheyhelpprevent
overbrownirtg.Forbestbrowning
results,werecommenddulibottom
surfacesforcakepans andpieplates.
heat, whichmayresultindry,crisp
crusts.Reduceovenheat25”F.if
lightercrustsaredesired.Rapid
browningofsomefoodscanbe
achievedbypreheatingcastiron
cookware.
Shelf
Food
Bread
Biscuits(k-in. thick)
Coffeecake
Cornbreadormuffins
Gingerbread
.Muffins
Popovers
Quickloaf bread
YkastbreadQ /eaves)
Plainrolls
Sweetrolls .
Cakes
(
withoutshortening)
Angelfood
Jellyroll
Sponge
Cakes
Bundtcakes
Cupfaikcs
Frwtcakes
Layer
Layer,chocoiatc
Loaf
Cookies
Brownies
Drop
Refrigerator
Rolledor sliced
Fruit%
OtherDesserts
Bakedapples
Custard
Puddings,Rice
.indCustard
Pies
F:rozen
llcringuc
One crust
l-wocrust
I%try shell
3Mx?l13neous
R:]kcdpotatoes
Scallopeddishes
souffles
Container
ShinyCookieSheet
ShinyMetalPanwith
satin-finishbottom
CastIronor Glass
ShinyMetalPanwith
satin-finishbottom
ShinyMetalMuffinPans
DeepGlassor CastIron Cups
Metalor G1assLoafPans
e
Metalor GlassLoaf Pans
Shiny(lblongorMuffinPans
ShinyOblongor MuffinPans
41uminumTubePan
MetalJellyRollPan
MetalorCeramicPan
vletalor Ceramic Pan
;hinyMetalMuffinPans
detalorGlassLoafor
‘uhePan
hiny MetalPanwith
atin-finishbottom
hiny Metal Panwith
.itin-tinishbottom
4etalorGlassLoafPans
fetalorGlassPans
‘ookicSheet
ookieSheet
ookieSIwet
lassorMetalPan
lassCustardCupsorCasserole
etinpan of hot water)
kissCustard Cups or
Isserole
)ilPanonCookieSheet
mad tocrust edges
ass or Satin-linish Metal
ass or Satin-tlnish Metal
assorSatin-finishMetal
—
ton Oven Shelf
1ssor N4etalPan
1ss
Position
B,C
B
B
B
B
B
B
A, B
B
B
A
B
A
A, B
B
A, B
B
B
B
B,C
B,C
B,C
B,C
B
B
B
A
B
A, B
B
B
B
B
B
Oven
Tenmerature
400°-4750
350°-4000
400°-4500
350°
40(y..4~5°
375°
350°-3750
375°-4250
375°-4250
350°-3750
325°-3750
375°-4000
325°-3500
32!5°-3500
350°-3750
275°-300”
350°-3750
350”-375°
350°
325°-3500
350°-4000
400°-4250
375°-4000
350°-4000
300°-3500
325°
400°-4250
325°-3500
400°-4250
400°-4250
450°
3~TJ0.4000°
325°-3750
300°-3500
3.Preheatingtheovenisnot always
necessary,especiallyforfoocis
whichcooklongerthart30to40
minutes.Forfo;d withshort
cookingtimes,preheatinggives
bestappearanceandcrispness.
4. Opentheovertdoortocheckfood
aslittle aspossibletoprevent
unevenheatingandtosaveenergy.
—Time,
Minutes Comments
15-20
20..30”
~@40
45-55
20-30
45-60
45-60
45-60
10-25
20-30
30-55
10-15
45-60
45-65
20-25
2-4 hrs.
20-35
25.30
40-60
25-35
10-20
6-12
7-12
30-60
30-60
50-90
45-70
15-25
40-60
40-60
12-15
60-90
30-60
30-75
Canned, refrigeratedbiscuitstake
2to4 minuteslesslime.
Preheatcast ironpan forcrispcrust.
Decreaseabout5 minutes formuffin
mix,orbakeat450”F.for25minutes.
thenat 350”F.for 10to 15minutes.
Dark metalorglass givedeepest
browning.
Forthinrolls,ShelfBmaybeused.
Forthinrolls,ShelfBmaybeused.
Two-piecepanisconvenient.
Linepanwithwaxedpaper.
PaperIinel+sproducemoremoist
crusts.
Use300”F.andShelfBfor smallor
individualcakes.
Barcookiesfrommixuse sametime.
UseShelfC andincreasetemp. ~
?51=Ft. 500F,formore
-.
Reducetemp.to300”F.forlarge
custard. Cookbread or ricepudding
withcustard base 80to90minutes.
Largepies use400”F.and increase
time.
Toqu icklybrownmeringue, use
400°F.for8to10minutes.
Custard fillingsrequirelower
temperature, longertime.
—
browning.
Page 11

‘tingiscookingbydry heat.
er meat or poultrycanbe
roasteduncoveredinyour
oven.
astingtemperatures,which
uldbe lowand steady, keep
spatteringtoa minimum.When
roasting,it is notnecessarytosear,
baste,coveror add waterto your
meat.Roastingiseasy,just follow
thesesteps:
Step 1:Positionovenshelfat
secondfrombottom position(B)
forsmallsize roast (3 to 5 pounds)
andat bottomposition(A) for
largerroasts,
Step 2: Check weightof roast.
Placemeat fat-side-uporpoultry
breast-side-uponroastingrackin a
shallowpan. Themeltingfatwill
baste the meat. Selectapan as
closetothe sizeofthe meatas
possible.(Broilerpanwith rack is a
goodpanfor this.)
Step 3: In upperoven,push BAKE
buttonandturn SET knobuntil
desiredtemperatureisdisplayed.In
loweroven,turnOVENCONTROL
knobtodesiredroastingtemperature.
Checkthe RoastingGuidefor
temperaturesandapproximate
cookingtimes.
Step 4: Mostmeatscontinueto
cookslightly whilestandingafter
beingremovedfromtheoven.
Standingtimerecommendedfor
roastsis 10to20 minutes.This
allowsroaststofirm up and makes
themeasierto carve.Internal
temperaturewill riseabout5° to
10”F.;tocompensatefortemperature
rise, if desired, removethe roast
fromtheovenwhenitsinternal
temperatureis5°to 10”F.lessthan
thetemperatureshowninthe
RoastingGuide.
Frozenmaim
Frozenroastsofbeef, pork,
lamb,etc., canbe startedwithout
thawing,butallow 15to 25 minutes
additionaltime per pound (15
minutesadditionaltimeper pound
forroastsunder5 pounds, more
timeforlargerroasts).
Thawmostfrozenpoultrybefore
roastingtoensureevendoneness.
Somecommercialfrozenpoultry
can be cooked successfullywithout
thawing.Followdirections given
on packer’slabel.
r---
Type
hleat
Tenderc!uts;rib, highquality
sirloin tip, rump or topround*
Lamblegor bone-inshoulder+
Willshoulder, lcg or loin’~
Porkloin, rib m-shoulder+
Hiinl,prc CXXJkd
i-w+’
Ham,
*Ftwbonchx rolled roastsover 6-inches
thick. add 5 to 10minutesper pound to times
ui~cnabove.
Pwiltry
Chicken
or Duck
(’hickenpicccs
—
Oven
Temperature
325°
325°
325”
325°
325°
325°
325°
350°
325”
Doneness
Rare:
Medium:
WellDone:
Rare:
Medium:
WellDone:
WellDone:
WellDone:
ToWarm:
Well Done:
WellDone:
Well Done:
Well Done:
ApproximateRoastingTime
inMinutesper Pound
3to5lbs.
24-33
35-39 22-29
40-45 30-35
21-25 20-23
25-30 24-28
30-35 28-33
35-45 30-40
35-45
minutesper pound (anyweight)
17-20
Under10lbs.
27-35 24-27
3to5lbs.
35-40 30-35
35-40
10to H lbs.
18-25 15-20
6to8lbs.
18-22
30-40
10to 15lbs.
Over5lbs.
over 15Ibs.
Internal
Temperature“F
130°-1400
150°-1600
170°-1850
130°-1400
i50°-160°
170°-1850
170°-1800
170°-1800
115°-1250
170°
185°-1900
185°-1900
thigh:
In
185°-1900
—..—-
Page 12

radiantheatfromtheupperbroil
.
.
??
.
,-
~
AL..,->:-
,.
~
unitintheupper oven.Mostfish
andtendercutsofmeatcanbe
broiled.Followthesestepstokeep
spatteringandsmokingIOa
minimum.
Step1: If meathasfator gristlenear
edge,cutverticalslashesthrough
bothabout2“apart. Ifdesired,fat
maybetrimmed,leavinglayer
about 1/8”thick.
Step2: Placemeaton broilerrack
inbroilerpanwhichcomeswith
oven.Alwaysuseracksofatdrips
intobroilerpan;otherwisejuices
maybecomehotenoughtocatchf~e.
Step3:Positionshelfonrecommended
shelfpositionassuggestedinBroiling
Guide.Mostbroilingisdoneon
Dposition.
Step 4: Leavedoorajara fewinches
(exceptwhenbroilingchicken).
Thedoorstaysopenbyitself, yetthe
propertemperatui”eismaintainedin
theoven.
Step5: Press theBROILbuttonand
turntheSET knobuntiiyourchoice
ofHIBROILor LO BROILis
~~spl~yed. ~Ote: Chickenandham
iir-ebroiled at LO BROIL in order to
cookfoodwithoutoverbrowningit.
Step6:TurnfoodonlyonceduringBroilingiscookingfoodbyintense
cooking.Timefoodsforfirstside
perBroilingGuide.
Turnfood,thenusetimesgivenfor
secondsideasaguide topreferred
doneness.(Wheretwothicknesses
andtimes are giventogether,use
firsttimesgivenforthinnestfood.)
Step 7:Whenfinishedbroiling,
pushthe ovenCANCELbutton.
Servefoodimmediately,andleave
panoutsideoventocoolduring
mealforeasiestcleaning.
/1
L If desired, broiler panmaybe
linedwithfoilandbroilerrack may
becoveredwithfoilforbroiling.
ALWAYSBECERTAINTOMOLD
FOIL THOROUGHLY TO
BROILERRACK, AND SLIT
FOIL TOCONFORM WITH
SLITSINRACK.Broiler rack is
designedtominimizesmokingand
spattering,andto keep drippings
coolduring broiling.Stoppingfat
andmeatjuices from drainingto
thebroiler pan preventsrackfrom
servingitspurpose, andjuicesmay
becomehot enoughtocatchfire.
2. DONOTplacea sheetof
aluminumfoil on shelf. Todo so
mayresult in improperly cooked
foods,damageto ovenfinishand
increasein heaton outsidesurfaces
oftheoven.
& Answers
Q. Whyshould I leavethe door
dosed when broilingchicken?
A. Chickenisthe onlyfood
recommendedfor closed-door
broiling. This is becausechickenis
relativelythickerthanother foods
youbroil. Closingthedoorholds
‘moreheatin the~venwhichallows
chickentocookevenlythroughout.
Q.When ‘broiling,is it.newssary
toalwaysuse a rackin the pan?
A. Yes.Using the rack suspends
the meatoverthepan. As the meat
cooks,the juices fallintothepan,
thuskeepingmeatdrier. Juices
are protectedbytherack and stay
cooler,thuspreventingexcessive
spatterand smoking.
Q.ShouEdI
broiling?
A. No. Saltdrawsout thejuices
and allowsthemto evaporate.
Alwayssalt after cooking.Turn
meat‘withtongs;piercing meat
witha fork also allowsjuices to
escape. When broilingpoultry
or fish, brush each side often
with butter.
Q.Whyare my meats notturning
out as brown as they should?
A.In some areas, the power
(voltage)to the ovenmaybe low.
In thesecases, preheat the broil
unitfor 10minutesbeforeplacing
broiler pan with food in oven.
Check to see if youare using the
recommended shelfposition. Broil
for longestperiod of time indicated
in the BroilingGuide. Turn food
only once during broiling.
AeNo. The broiler rack is designed ~
to reflect broiler heat, thus keeping
the surface cool enough to prevent
meat from stickingto the surface.
However,sprayin~the broiler rack
lightly with a vegetablecooking
spraybefore cooking will make
cleanup easier.
saltthemeatbefore
-:
.,,
.,+!.,.
-,:$;~,, ‘
.-—~, F’.
;..’qc~
<7,
..
.
.
..
,.
—
Page 13

Irdhg
“- l. AlwaysusebroiMpanandrack
thatcomeswithyouroven.It is
designedto minimizesmokingand
spattci”ingbytrappingjuices in the
shieldedlowerpart ofthepan.
2. Ovendoorshouldbeajar forall
foodsexceptchicken;thereisa
specialpositionon door which
holds door open correctly.
3. Forsteaksandchops, slashfat
evenlyaroundoutsideedgesofmeat.
Toslash,cutcrosswisethrough
outerfatsurfacejust to theedgeof
then-teat.Usetongsto turn meat
overtopreventpiercingmealand
losingjuices.
4. If desired, marinatemeatsor
chickenbeforebroiling.or brush
withbarbecuesaucelast5 to 10
minutesonly.
5. Whenarrangingfoodonpan,
donotlet fattyedgeshangover
sides,whichcould soilovenwith
fatdripping.
6. ?3roi1erdoesnotneed to be
preheated.However,for verythin
foods, or to increasebrowning,
preheatifdesired.
‘7.Frozen Steakscanbe
conventionallybroiledby
positioningtheovenshelfatnext
lowestshelfposition and increasing
cookingtime giveninthis guide
~~ timesper side.
Food
Bacon
GroundBeef
WellDone
Beef’Steaks
Rare
Medium
WellDone
Rare
hleciium
BakeryProducts
Bread ~Tbast)or
ToasterPastries
EnglishMuffIns
LobsterTails
(6
Fish
d
Pork chops
WciiDone
LambChops
!Medium
WeliDone
Medium
WeiiDone
———.
Wienersand similar
precookedsaussgcs.
~~~>~~ratwurst
. ,.-.:’-#-----
L
“L:-,
.,-“-’--.-.,
!:$++;.
——
t
((J8-oz. ~ilCh)
Quantityandior
Thickness
Y2lb.(about8
thin slices)
l-lb. (4patties)
‘/2- to %-in. thick
1-inchthick
(1-to IYvlbs.)
1!2-in.thick
[2-to2Yi-lbs.)
1whole
(2- to 2%-lbs.).
SD]it lengthwise
2 to 4 slices
1 pkg. (2)
2 (split)
2-4
i-lb. fiiiets M-to
k-in, thick
-in. thick
2 (X inch)
2 (i-in. tilick)
about i ib.
2 (1inch)
about 10to i~
2 (lYzincil)
about 1ii?.
i-ib. pkg. (10)
I
I
ID I
OZ.
Shelf
Position
D
D HI
D
D’
D
D
D
D
B
D
D
c
c LO 8
D
c
D
D
D
HIor
LOBroil
HI
LO
HI
HI
HI
HI io-12 4-5 Siashfat.
HI
Time,Minutes
c
D
HI
1
II___..J
FirstSide SecondSide
5
8-9 6-7 Up to 8pattiestakeaboutsame time.
9
12-13
13
10
15
25
28-30 18-20
~-y
3-4
13-16
5
i2-13 8-9
8 4-7 Siash fat.
Time,Minutes Comments
2 %
7
6-7
8-9
6-7
9-12
16-18
!/2-1
Do not Cut through back of shell. Spread
turn over. open. Brushwith melted butter
5 Handleandturn very c~refully.
8 Increasetimes5to 10minutesper side
Arrange insinglelayer.Ill
Spaceevenly.
Steakslessthan 1inchcookthrough
beforebrowning,Panfryingis
recommended.
Slash fat.
Reduce times about 5 to 10minutesper
side for cut-upchicken.Brusheachside
with meltedbutter.Broilwithskin
down first and broil with doorclosed.
Spaceevenly.Place Englishmuffins
cut-side-upandbrushwithbutter. if
desired.
beforeandafter half of time.
Brush with iemonbutter beforeand
during cooking if desired. Preheat
broiier to increasebrowning.
for 1%-inchthick or homecured.
10 10
10
17
4-6
~~-14
If desired, spiit sausages in haif
lengthwise; cut into 5 to 6-incil pieces.
1-2
-
Page 14

care
(set?Ckming Guide, page NJ)
Thelightbulbis locatedin therear
wallofeach oven.Beforereplacing
thebulb,disconnectelectricpower
totherangeatthemain fuseor
circuitbreaker panelor unplugthe
rangefromtheelectric outlet.Let
thebulbcoolcompletelybefore
removingit. Do nottouch a hot
bulbwitha damp cloth, If you
do, thebulbwillbreak.
r
Gasket
/
Toremove:
~Removethe 3 screwsin thelamp
cover.
@Detachlampcoverring, crystal
andgasketand removebulb.
Toreplace:
@Put in a new 40-wattappliance
bulb.(Note:A 40-wattappliance
bulbis smaller than a standard
40-watthouseholdbulb.)
@Installlamp cover.Replace3
screwsandtighten, making sure
coverfitsflushwith ovenwall.
@Reconnectelectrical powerto
the range.
IL4wveroven Knob
Theovencontrol knobmaybe
removedforckxming.
Toremoveknob,pullit straight
offthestem. Ifknob isdifficultto
remove,place a thincloth(likea
handkerchief or apiece ofstring
underand aroundtheknobedge
andpullup.
Washknobsin soapand waterbut
donotsoak.
I
Molded Rib
..
.,
.. -Spring Clip
%
Clear
Groove
Toreplaceknob,locatethegroove
ineach sideof theknob stem.One
ofthegroovescontainsa springclip
andtheothergrooveisclear.Locate
themoldedrib insidethe knob.Fit
themolded rib ofthe knob intothe
cleargrooveonthe knob stem.
*
Loweroven
Usethetimegivenona recipe
whencookingthefirsttime.Oven
thermostats,in time, may “drift”
fromthefactorysettingand
differencesin timingbetweentin
oldand a newovenof5 to 10
minutesare notunusual.If youfind
thatyourfoodsconsistentlybrown
toolittleor too much, you may
makeasimpleadjustmentinthe
thermostat(OVENCONTROL)
knob.
~
(
, .-
L-
P@ the knoboff the shaft, look
atthebackof the knobandnote
thecurrentsettingbeforemaking
anyadjustment.The knob is
factorysetwith the top !M.m!w
directlyunderthe pointer.
Toadjustthe thermostat:
1. Pull off the knob.
2. Loosenboth screwson back
ofthe knob.
—--
3. Hold both parts of theknob
andturn so thetop screw movesin
thedesired direction. HOTTER to
increasetemperature, COOLER to
decreasetemperature. Youwill
hear and feel the notches as you
turn the knob. Each notch changes
temperature about 15°.
4. Tightenthe screws.
5. Return the knob to the range.
Recheck ovenperformance before
making an additionaladjustment.
1’
Page 15

Wmshdves
———
Ovenshelvesmaybecleanedwith
amildabrasivecjeanserfollowing
manufacturer’sdirections,After
c[eaning,rinsetheshelveswithclean
wateranddry withacieancloth.
TOremoveheavy,burned-onsoil,
soapymetalpadsmaybeused
followingmanufacturer’sdirections.
Aftersc~ubbing,washwithsoapy
water,rinseanddry.
oven
Toremove shelfsupports,liftthe
frontofthesupportto unhookit
fromtheovenwall.Then pullthe
supportpegsout oftheholesin
theback wallofthe oven.
Toreplace shelf supports, insert
the pegson the end of the shelf
support intothe holes in theoven
back. Then lock the front hook in
the slot in the ovenside.
Ovenshelf supportscan be cleaned
the same wayovenshelvesare
cleaned.
ovenIkm(s)
Theovendoorsareremovableto
maketheovenandbroilermore
accessible.
Toremove, openthe doortothe
broilstopposition and graspthe
door ateach side. Liftupa bit,
thenpullit straighttowardyou.
—
I
I
I
!
~“
I
—
TOreplace, make surethat hinge
arms are in positionB (stop
position).Note: If a hingearm
snapsintopositionA, itmustbe
movedback to positionBbefore
the door can be replaced.
Carefullyinsert thehingearms
throughthe openingsinthe front
frame and push thedoor intoplace
while holdingthe door up. When
the bottomedge ofthedoor is flush
againstthefront frame, allowthe
door to settle intoplace.
..-
Lower oven
Withpropercare, theporcelain
enamelfinishontheinsideofthe
oven—top,bottom,sides,backand
insideofthedoor—willstaynewlookingforyears.
Letovencoolbeforecleaning.We
recommendthatyouwear rubber
gloveswhencleaningthe oven.
Soapandwaterwillnorinallydo
the job. Heavyspatteringor
spilloversmayrequirecleaning
witha mildabrasive cleanser.
Soapy,wetmetalpadsmayalsobe
used. Do notallowfoodspills with
ahighsugaror acidcontent(such
asmilk, tomatoes,sauerkraut,fruit
juicesor pie filling)toremain on
thesurface. They maycause a dull
spotevenaftercleaning.
Householdammoniamaymakethe
cleaningjob easier.Place 1/2cup
ina shallowglassor pottery
containerin a coldovenovernight.
Theammoniafumeswill help
loosentheburned-ongrease and
food.
If necessary,youmayuse a caustic
cleaner.Followpackagedirections.
Broilel” Rn & Rack
.Afterbroiling, remove the broiler
pan and rack and carefully pour off
the grease. Washand rinse the pan
and rack in hot, soapywater,
If foodhas burned on, sprinkle
the rack while hot with detergent
and cover with wet paper towelsor
a dishcloth. That way,burned-on
foodswill soak loose while the
~=%m-nealis being served.
:i-=-.:..
\
..=
‘:
‘:~~-~;JO not store a soiled broiler pan
(
“=-–_andrack in the oven. Do not clean
~“”:-]1~~se~f-~~ea~ing~ven+
L.”’
Page 16

Ckw’e
the
Prqy%mmed awning Time:
3%hmlrs
the
settingthe(h-Ml-ok
Theovenmustbe completelycool
inorderto setthe self-cleancycle.
Step 1:
Removethebroiler pan, broiler
rack, allcookwareand any
aluminumfoil from the oven.
(Ovenshelvesmaybe leftinthe
oven.Note: shelveswill discolor
afterthe self-cleancycle.)
Step2:
Wipeupheavy soilon oven
bottom.If youuse soap, rinse
thoroughly beforeself-cleaning to
preventstaining.
Step 3:
@Cleanspattersor soil on theoven
frontframe (A), under the front
edgeofthe ovenvent, the doorliner
outsidethe door gasket and the
frontedgeofthe oven cavity(about
1“intothe oven). Use detergent
andhot water with a soap-filled
steelwoolpad, thenrinse wellwith
a ~’inegarand watermixture. This
willhelp preventa brown residue
fromforming when the ovenis
heated. Buff these areas with a
dry cloth.
~Clean top, sides and outsidefront
ofovendoor with soap and water.
Do not use abrasivesor oven
cleaners.
Do not let water run down through
openings in the top of the door (B).
Cleanthedoorgasket(C) usinga
cleanspongetosoakthe soiledarea
withhydrogenperoxide.Repeated
soakingmaybeneededdepending
onthe amountofsoil. Frequent
cleaningwillpreventexcessivesoil
buildup. Do not rub the door
gasket—thefiberglassmaterialof
thegaskethas anextremelylow
resistancetoabrasion.An intact
andwell-fittingovendoorgasketis
essential for energy-efficientoven
operationand goodbakingresults.
If younoticethe gasketbecoming
worn, frayedor damagedinany
wayor if it has becomedisplaced
on thedoor,youshouldreplaceit.
Makesure the ovenlightbulbcover
(D) is in place.
I
A
o-
@@
A. Oven Rod Frame
B. openings
C Oven Door Gasket
D. Oven Light Bdku Cover
step 4:
Close the ovendoor and make
sure the ovenlightis off.
Oven shelves may be cleaned in the
self-cleaningoven. However,they
will darken, losetheir luster and
become hard to slide. Wipethe
shelf supports with cooking oil
after self-cleaning to make shelves
slide more easily.
in Door
notme commercialoven
Do
demers oroven~rotectol*sin
ornearthe sdf-deaning oven.
Acombinationofanyofthese
productsplus the highclean-cycle
temperaturemaydamagethe
porcelainfinishoftheoven.
The ovendoormustbe closed
andallcontrolsmustbe set
correctly forthecleancycleto
workproperly.Tohelpyou
understandhowthecleancycle
works,the stagesofthe cycle
are notedbelow.
L Slidethe doorlatchhandle
tothe right.
2. Setthe controls.
3. Thewords“CLEAN TIME”
aredisplayed.Theovenbeginsto
heat,thedoorlocksautomatically
when lockingtemperatureis
reached and the word “LOCK”
isdisplayed.
If the ovendoor is not latched,
the word “DOOR” is displayed
andtheovenbeeps continuously.
Close the door,touchCANCEL
and begin again.
4. When the 3!Ahourclean
cycleisover,the word
“CLEAN” goesout and the
ovenbeginsto cool.
5. When the oventemperature
has fallen belowthe locking
temperature (about20-30
minutesafter the word
“CLEAN” goes out at the end
ofthe clean cycle), the word
“LOCK” goesout, the door
latch handle can be movedto
the left and the door can be
opened.
(continuednextpage)
Page 17

—
3. SlidethedoorLATCHHANDLE
tothe leftas faras it will go.
.A Y.-A \ I
SettheOvenforCkaning
The rangemustbe completelycool
inorder toset the self-cleancycle.
1. SlidetheLATCHHANDLE to
theright as far as it willgo. You
mayneedto slightlypressonthe
doorto get ittolockproperly.
Never force the door latchhandle.
Forcingthehandle may damage
the door lock mechanism.
2. Push the CLEAN button.
The displaywill show “3:30~’
The words “CLEAN TIME” will
bedisplayedonthe left. Within20
seconds, the words “CLEAN
LOCK” will be displayedon the
right.
Note: Youcan find out when the
clean cyclewillbe finishedby
pushingthe STOPTIME button.
The word “DOOR” is displayed
when you try to set a clean cycle
withthe door unlatchedor when
the oventemperature is too high.
‘lbSeta DelayedSW%
SlidetheLATCHHANDLE to
L
therightas far as it will go.
2. PushSTOPTIME button.
3. TurnSET knobto time ofday
whenyou wishcleaningtobe
completed(mustbemorethan
3% hours laterthancurrenttime
ofday).
4. Push the CLEAN button.
The words “DELAYCLEAN”
willbe on in thedisplayuntilthe
cleancyclestarts.After the clean
cyclestarts,the word “CLEAN”
willbeon inthedisplay.
Note:During a delayedself-clean
operationyoucan find out when
the oventurns on by pushingand
holdingthe CLEAN button.
TII $%oP ~
1.
Pressthe CANCEL button.
2. Waituntilthe ovenhascooled
belowlockingtemperature(about
20-30minutes)and the word
“LOCK” is off in the display.
Clean Cycle
Youwillnotbe ableto open the
door right awayunlessthe oven
temperatureis at a safelevel. If
youcannotopenthe ovendoor
immediatelyaftertheword“LOCK’
goesoff, waitoneminuteandtry
After
L When a cleancycleis finished,
the word “CLEAN” willbe off in
the display.
2. Waituntilthe ovenhas cooled ‘ ~
belowlockingtemperature (about
20-30minutes)and the word
“LOCK” isoffinthedisplay.
3. Slide the door LA~H HANDLE
tothe left as far as it will go.
Youwill notbe ableto open the
door unless the oventemperature
isat a safe level. If you cannot open
the ovendoor immediatelyafter the
word “LOCK” goesoff, wait about
one minute and try again.
Youmaynotice somewhite ash
in the oven.Just wipe it up with
a damp cloth.
If white spotsremain, removethem
with a soap-filledsteel wool pad.
Be sure to rinse thoroughly with a
vinegar and watermixture. These
depositsare usually a saltresidue
that can notbe removedby the
clean cycle.
If the oven is not clean after one
clean cycle, repeat the cycle.
II
1-
Page 18

careand
~h~ (continued)
andAmswws
Q.Why won’tmy own dean
immediatelyeventhoughI setthe
controlscorrectly?
A. Checkto be sure the LATCH
HANDLE ismovedto theright.
Q,If’myovenc~ockis not
working,earnI stillself-clean
myoven?
A. No. YourAutomaticOven
Timerusestheclockto helpstart
andstopyourself-cleaningcycle.
Q.CanI use commercialoven
cleanerson any part of my
self-cleaningoven?
A. No cleanersor coatingsshould
beusedaroundanypart of this
oven.Ifyoudo usethem anddo not
wipetheovenabsolutelyclean, the
residuecan scar the ovensurface
anddamagemetalparts the next
timetheovenisautomatically
cleaned.
Q. CanI dean the Woven Gasket
aroundtheovendoor?
A. Yes,butcarefully,and onlywith
a cleanspongeto soak the soiled
areawith hydrogenperoxide.See
page 16.
Q. After havingjust usedthe
own, the LOCKED light came
onand I could not movethe
~A~~.~ HANDLE. Why?
A. After severalcontinuoushigh-
tempemturebakingsor broilings,
theLOCKED lightmay come on.
Theovendoor can’t be latchedfor
self-cleaningwhilethe LOCKED
1iglltis on. If this happens, letthe
oven cool until the LOCKED light
goesoff. Then the oven door can
be latched for self-cleaning.
Q. %Wwdshould 1do if excessive
smoking occurs during cleaning?
A. This is caused by excessivesoil.
Press the CANCEL button. Open
windowstorid room of smoke.Wait
Ulllilthe oven has cooled (about
~()-~ominutes)and the wordLOCK
isoffin the display.Wipe up the
excesssoil and reset the clean cycle.
Q.1sthe “crackling”soundI
hear duringcleaningnormal?
A. Yes.Thisisthesoundofthemetal
heatingandcoolingduringboththe
cookingandcleaningfunctions.
Q. Should therebeanyodor
duringthecleaning?
A. Yes,theremaybe a slightodor
duringthefirstfewcleanings.
Failuretowipe outexcessivesoil
mightalsocausea strongodor
whencleaning.
Q. What causesthe hair-like
linesonthe enameledsurface
ofmy oven?
A. Thisis a normalcondition,
resultingfromheatingandcooling
duringcleaning.Theselinesdo not
affecthowyourovenperforms.
Q. Why doI haveashleft in my
ovenaftercleaning?
A. Sometypesof soil willleave
a depositwhich isash. It can be
removedwithadamp spongeor
cloth.
Q. My ovenshelvesdo not slide
easily.What is the matter?
A. After many cleanings,oven
shelvesmaybecome so cleanthey
do not slideeasily.If youwish
shelvestoslidemore easily,
dampen fingerswith a small
amountofcookingoil and rub
lightlyoversidesof shelf where
theycontactshelfsupports.
Q. My oven shelves havebecome
grayafter the self-dean cycle. h
this normal?
A.Yes.After the self-cleancycle,
the shelvesmay lose some luster
and discolor to a deep gl-aycolor.
upperoval
Thetemperatureinyour newrange
hasbeensetcorrectly at the factory,
sobesureto followthe recipe
temperaturesandtimesthe first few
timesyoubakein yournewoven.
If youthinkthe ovenshouldbe
hotterorcooler,yoLlcan adjustit
yourself.Todecidehowmuchto
changethetemperature,settheoven
temperature25”F.higheror lower
thanthe temperaturein yourrecipe,
thenbake. The resultsofthis test
should give youan idea ofhow
muchthe temperatureshouldbe
changed.
Toadjusttemperature:
1. Push the BAKEbutton.
2. Selecta temperaturebetween
500°F.and550”F.with the SET
knob.
3. Quickly(withintwo seconds,
beforetheBAKEfunctionenergizes)
pushandhold the BAKEbutton for
about5 seconds.The displaywill
showaplusnumber, a minus
number,or 00.
4. Turn the SET knob to adjustthe
temperaturein 5“F.steps. Youcan
raise it until +35°F. showson
displayor lower it until -35°F.
showson display.Ifthe control
beepsand flashes, push the
CANCEL buttonand start over.
5. Whenyou havemade the desired
adjustment, push the CLOCK
buttonto go back to the time of day
displayor to use your oven as you
wouldnormally.
Note: The adjustmentdescribed
abovewill not changethe self-clean
temperature.
Page 19

-Note: Let Ifange/wNItpartscod beforetotidingor handing.
—.—————-—
—. .=—,,-.-..—..-------,. -.,——-7
.—T...-.-.—-.
—
Part
lhke Unitand
BroilUnit
BroilerPanand Rack
ControlPanel
OutsideGlass Finish
Metal, including
ChromeSideTrims
PorcelainEnameland
PaintedSurfaces*
OvenDoor*
Materials to Use
@Soap and Water
o Soap-Filled Scouring Pad
CIPlastic Scouring Pad
~Dishwasher
o lvlild Soap and Water
e Soap and Water
@Soap and Water
a Paper Towel
e Dry Cloth
EISoap and Water
o Soap and Water
GeneralDirections
Do not clean the bakeunit or broil unit. Any soil will burn off when the unit is heated.
NOTE: The bake unit can be lifted gently to clean the ovenfloor. If spillover, residue, or ash
accumulates around the bake unit, gentlywipe around the unit with warm water.
Drain fat, cool pan and rack slightly. (Do not let soiled pan and rack stand in ovento cool.j
Sprinkle on detergent. Fill the pan with warm water and spread cloth or paper toweloverthe
rack. Let pan and rack stand for a fewminutes. Wash;
OPTION: The broiler pan and rack may also be cleaned in a dishwasher.
DO NOT
USE abrasive Wash controlpanelwithsoapand water, using a soft cloth.
cleaners.
Clean outside of cooled black glass door with a glass cleaner that does not contain ammonia.
Washother glass withcloth dampened in soapy water. Rinse and polish with a dry cloth. If
knobs are removed, do not allow water to run down inside the surface of glass while cleaning.
DONOTUSEsteeIWOOE,
——-
scour if necessary. Rinse and dry.
and dry with a soft cloth.
Rinse
Wash, rinse, and then polish with a dry cloth.
abrasives,ammonia,acidsor
commercialovencleaners.
IX) NOTUSE ovencleaners,
cleansingpowdersor harsh
abrasives.
scratch the surface.
These might
DONOTUSEovencleaners,
cleansingpowdersor harsh
abrasives.
If acids shouid spill on the oven while it is hot, use a dry
paper towelor cloth to wipe up right away.When the
surface has cooled, wash and rinse. For other spills, such as
fat smatterings,etc., washwith soap and water when cooled
and then rinse. Polish with a dry cloth.
INSIDE DOOR: Clean ONLY the door liner outside the
gasket. The door is automatically cleaned when the oven is
in the self-cleaning cycle.DO NOT rub or damage gasket.
Avoid getting soap and water on the gasketor in the
openings at the top of the door. Rinse well. NOTE: Soap left
or~liner causes additional stains when oven is reheated.
OU”CSIDEOF DOOR: Use soap and water to thoroughly
clean the top, sides and front of the oven door.
OvenGasket
JHydrogen Peroxide
(UpperOven)
OvenLiner
)Soap and Water
(Self-Cleaning
Upper Oven)
OvenLiner*
(LowerOven)
CAUTION: When in
USC,light bulbs can
become warm enough to
break iftoucheo’ with
moist cloth or towel.
When cleaning, avoid
touching warm lamps
with cleaning cloths if
hmpcover is removed.
Shelvesand ] ~Soap and Water
ISoap and Water
~Soap-Filled Scouring Pad
@ComrncrcialOven Cleaner
—
r
ShelfSupports
(See
Self-Cleaning
Oven Directions)
‘Spillage of’marinades, fruit juices, tomato sauces and basting materials containing acids maycause discoloration. Spillovers should be wiped up
imrncdiately, with care being taken to not touch any hot portion of the oven. When the surface is cool, clean and rinse.
Soak with hydrogen peroxide. Frequent soaking helps prevent soil build-up. Do not rub. See
self-clean section formore information.
Cool before cleaning. Frequent wiping with mild soap and water will prolong the time
between major cleanings.
heavysoiling, use your self-cleaning cycle often.
Cool before cleaning.
FOR LIGHT SOIL: Frequent wiping with mild soap and water (especially after cooking
meat) will prolong the time between major cleaning.
Besure to rinse thoroughlyto avoidadditional staining. For
Rinse thoroughly.NOTE:SoapM on
linercauses additional stains whenovenis reheated.
FOR HEAVY SOIL: Choose a nonabrasive cleaner and follow label instructions, using thin
ayer of cleaner. Use of rubber gloves is recommended. Wipe or rub lightly on stubborn
lpots. Rinse well. Wipe off anyoven cleaner that gets on thermostat bulb. When rinsing oven
dler cleaning, also wipe thermostat bulb.
Your shelves and supports can be cleaned with the self-cleaning function in the upper oven.
For heavy soil, clean by hand and rinse thoroughly.
I
n
m
===7..
Page 20

-...r-+’-k-r:?<”:’”~m~g
‘“’
-—>-
—
--.,----=.-.-’”-
-,
.——.
--
,---
——
s
——-..
=.
=
--———
—-
Use
Pmsmm CLWSEANDmmmr
. .. . . . . . . .-. .—— ,
.
;~ ––
—
OVENWILL
NOTOPERATE
OVENDOES NOT
COOKPROPERLY
CLOCKAND
MINUTE/SECOND
TIMERDON~ WORK
OVENLIGHT DOES
NOTCOME ON
@Difficultymaybeinthemaindistributionpanelofyourhousebyablownovencircuit
&se,atrippedoven
~irc~it br~alter, thernainfusemthemainchwittxeaker,depending
onnatureofthepowersupply.Macircuitbreakerisinvolved,resetit.Ifthecontrcdbox
usesfises,theovenfuse(acartridge-typ@shouldbechangedBUTOhUXBYSOMEONE
FAMILIARWITHELECTRICALCIRCUITS.Ifafterdoingoneoftheseprocedures,
thefuseblowsorcircuitbreakertripsagai~],callforservice.
NOl?E:ApartmenttenantsorcondominiumownersshouldI-equesttheirbuilding
managementtoperformthischeckbeforecallingforservice.
~Oven
@Doorleftinlockedposition aftercleaning.
*Aluminumfoil beingusedimproperlyinoven.
~~ncorre~tcookwarebeingused. Checkeachcookingsectionforcookwaretips.
eElectronicControls or Loweroven Controlsetincorrect~y,Reviewpages6,7 and8.
*Checkcommonbaking,roastingandbroilingproblemsonpages9-13~
aMakesuretheeIectrica~p]ugisp]uggedinto a live,properlygroundedpoweroutlet.
@Checkforpoweroutage.
~Bulbmaybelooseor burnedout.
@Electricalplugmustbepluggediritoalivepoweroutlet.
~Switchoperatingovenlightis broken. Cailforservice.
controls rmtproperly sett
OVENWILLN~
SELF-CLEAN
IOVENWON’T
es~~ TIME mustbe more than 3~zhourslaterthanSTARTTIME.
eoven temperatureistoohight. setself-cleanOperation.Allowtheoven to ~001tOroom
temperatureandreset thecontrols.
~Door LATCHHANDLE notmovedallthewaytotheright.
s oven hasn’tcooled toa safetemperature.
Page 21

—
.
Ovenand CutoutDimensions
Cif’i -1 Recommended
1
Tools Needed
The followingtoolsare neededto
installyour new oven.
@1/8”drillbit
@Electric or hand drill
~Flat bladed and Phillips
screwdrivers
@Pencil
@Ruleror tape measure and
straightedge
~~~–a
_.:=-.=-=.
>,-L~L--..—<-----
,,.-~==.
)
>.;.-
‘“‘“’-jZ.’
L
[Y>)
\
“ \
1
Ai;
&“” Runnerson
I?
Centers
14
“Y-Zo”’”
Location
Cabinetspace must be providedto
enclosethe recessed part ofyour
built-inoven. See Figure 1for all
necessary dimensions. A cutout
2434~~wide by 48~G”highmustbe
made in the cabinet front. It is best
to make a template to ensure
accuratecutting.
Place the bottom of the template
on a levelbase line, 12~”abovethe
floor. This will position the open
ovendoor about 37”abovethe floor.
It is important that the ovenbe
installedat or abovethe minimum
height specified. The unit has been
tested and approved, in accordance
with safety standards, at this height.
The vent area may get hot when the
ovenis in use. Followingthese
installation instructions will move
the vent area out of a range where it
would
likely be touched.bysmall
children.
The ovenmay be supportedby
either a solid bottomor two
runners, on 14”centers. The solid
bottomor two runners shouldbe
12~~~abovethefloor, levelwith the
bottomedgeofthecutoutopening.
Besurethe ovensupport is solid
enoughto support218pounds.
Also, be sure the ovensupport is
leveland straight. There is no way
to levelthe ovenafter installation.
Page 22

Ekdrkal
Werecommendthat you havethe
electricalhookupofyouroven
donebyaqualifiedelectrician.
Havetheelectricianshowyou
whereyourmainovendisconnectis
located.
CallyourElectricCompanyand
askwhichcodesapplyin yourarea.
Iftherearenocodes,youmustfollow
theNATIONALELECTRICAL
CODE, AN-SI/NFPANO.70-1987.
Youcangeta copybywriting:
NationalFire ProtectionAssociation
BatterymarchPark
Quincy,MA02269
Ifyoufailto wire yourovenin
accordancewithgoverningcodes,
Youmaycreatea hazardous
condition.
Youmustuse a three-wire, singlephaseAC 120/240Voltor 208Y/120
Volt,60 Hertz electrical systemto
operateyouroven.H’youconnect
to ahmimm wiring, properly
installedconnectionslistedfor
usewithahminum and copper
wiringmust be used.
Use #12copper wire and 20 Amp
fuseor circuit breaker for 120/240
Voltand208Y/120Voltsystems.
Beforeinstallingthe ovenor
movingitto anotherlocation, have
theelectrician veri~:
@That yourhomeisprovidedwith
adequateelectrical service.
@That the additionofthe ovenwill
notoverloadthehouseholdcircuit
on which it is used.
The ekdrid powertotheoven
suppIylinemustbeshutoff while
lineconnectionsare beingmade.
Failureto do so couldresultin
seriousinjuryordeath.
Install an approvedjunctionboxin
theupper4“oftheverticalcutout
dimensionprojectedto theback
wall(seeFig. 1).
Whenmakingthewire
connections,usetheentirelength
ofconduitprovided (4 feet).
The conduit mustnotbe cut.
The neutraloftheunit isgrounded
tothe framethroughthe bare
groundwire.
UNITS WITH NEUTRAL
TWRE:Framegroundedby
connectionof groundinglead
to neutrallead. H used in a
mobilehome m if localcodes
do not permit grounding
throughneutral, open
connectionandusegrounding
lead to groundunitin
accordancewith localcodes.
Connectneutrallead to
branchcircuit neutral
conductorin usual manner.
ALL UNITS: Whenapplying
set-screw-typeconnectors
care should be takennot to
damageconduit.
Yourbuilt-inovenispackedwitha
shippingbasepad on thebottomof’
theunit. This pad protectsthe
lowerfronttrimandshould notbe
removeduntilyouare readyto
installtheoven.
Beforeinstallingthe oven,youmay
removetheovendoorto lessenthe
weightofthe unitif youwish. See
thecare and cleaningsectionfor
instructions.
Puttheovenintothecabinetand
usea 1/8”drillbit to drill holes in
thecabinet frontthroughtheholes
inthe oventrim. Securetheovenin
thecabinetwiththe screwsprovided.
Seethe care and cleaningsection
forinstructions on howto install
ovenracksand guides.
Page 23

With tie ~urclx3se of’yw-mmw KZl a@iance, receive the
—..
surarKe tiat if yOu ever neecl infOmxMiO~ cmassistmce,
“we’ll
-Jaw
be there. AHyou have to do is call-toll-free!
Our consumer service professionals
1provideexpertrep~irserviceon
ur RCAappliance,scheduledat a
timethat’sconvenientfor you.Many
GEConsumerServicecompanyoperatedlocationsofferyouservice
todayor tomorrow,or at yourcon-
venience(7:00a.m.to 7:00p.m.weekcia~ 9:00a.m.to 2:00p.m.Saturdays).
Our factory-trainedtechniciansknow
your applianceinsideand out—so
mostrepairscanbe handled injust
onevisit.
Consumerswithimpaired hearing or
speechwhohaveaccessto a TDD or a
conventionalteletypewritermaycall
800-TDD-GEAC(800-833-4322)to
requestservice.
Youcanhavethesecurefeelingthat
GEConsumerServicewillstillbe
thereafteryourRCAproductwarrantyexpires.PurchaseaGEcontract
whileyourwarrantyisstillin effect
and you’llreceiveasubstantialdiscount.Witha multiple-yearcontract,
you’reassuredof futureserviceat
today’sprices.
hdiviuhdsqdifid. toservicetheir
ownappliancescanhaveneeded
partsor accessoriessentdirectlyto
theirhome,freeof shipping charge!
Our partssystemprovidesaccessto
over4’7,000GenuineRenewalParts...
and allarefullywarranted.VISA,
MasterCardand Discovercardsare
accepted.
User maintenanceinstructions
containedin thisbookletcoverpmce
du.resintendedto beperformed
anyuser.CMberseMcing generally
shouldbe referredtoqualifiedst3-vke pemmnd. Cautionmustbe
exercised,sinceimproperservicing
maycauseunsafeoperation.
by
Teledmmnmiaxition DevicefortheDeaf
Page 24

‘mm% No’! CYV-EN
Saveproof of original purchase date such as your salesslipor cartcellecicheckto establishwarrantyperiod.
WAT Is
FULL ONE-YEAR WARRANTY
Forone year from date of original purchase, we
willprovide, free of charge, parts arxi service labor
in your home to repair or replace any part ofthe
hen that fails because ofa manufacturing defect.
This warranty is extended to the original purchaser
and any succeeding owner for products purchased
for ordinary home use in the 48 mainland states,
Hawaii and Washington, D.C. In Alaska the
warranty is the same exceptthat it is LIMITED
because you must pay to ship the product to the
service shop or for the service technician’s travel
costs to your home.
FOR
smwa?
WeatRCA strive to provide the highest quality
products and service. Therefore we
GE COPJSUMERSERVICE,a leader in the service
industry, to fulfillyour service needs. Should your
appliance rteed service, during warranty period or
beyond, look in the White or YellowPagesofyour
telephonedirectoryforGE CONSUMER SERVICE
or an authorized RCA APPLIANCE SERVICER.
havedesignated
mf ISrwm
~SeNice tips t. your home to teach You ‘ow
to use the product.
!i@adyour Use m-d Care
my questionsabout operatingtheproduct,please
contactyour dealeror
Vfanager-Consumer Affairs
<CAAppliances
ippliancePark
xmisvil.le,KY40225
@Improperinstallation.
JJ
‘you havean installationproblem,contactyour
d
ealerorinstaller.Youare responsiblefor providing
ciequateelectrical,gas, exhaustingandother
a(
mnectingfacilities.
C(
—
material. Ifyou then have
~Replacementofhousefuses orresettingofcircuit
breakers.
~Failureof the productif it is used forotherthanits
intendedpurpose or used commercially.
@Damagetoproductcausedby accident,fire,
floodsoractsof God.
WARRANTOR.IS NOTRESPONHBLE FOR
CONSEQUENTIALDAMAGES.
[
b
)
I
Ime states do not allow the exclusion or limitation of incidental or
so
nsequential damages, so the above limitation or exclusion may not
co]
ply to you. This warranty gives you specific legal rights, and you
ap
iyaIso have other rights which varyfrom state to state.Toknow
m;
]at your legalrightsarein your state,consult your localor state
wl
wumeraffairsoffice
C(7I
oryourstate’sAttorneyGeneral.
I
(j-w CG
‘Warrantor:RCAAppliances
If tiller help is needed concerning this
VWUY’anty,
Manager—consumer Affai.1’s
RCA
write:
ApplkinceI%&
Louisville,KY
40225
 Loading...