

Page 1
Appliance Registration
Broiling
Care and Cleaning
Cooktop cooking
Electronic Range Control
clock
Oven/Timer Controls
Self-Clean Cycle Controls
Features
Installation
Electrical Supply
9
9
Lweling
Location
Stability Bracket
Light Bulb Replacement
Model and Serial Number
Oven Cooking
Oven Vent
Problem Solver
Recipes
Repair Service
Safety Instructions
Therxnostat Adjustment
4
4
14
8
Your Range
/.
.
‘-A-
--fv_L/$p,j-
Page 2
Help us
help you...
Read this book carefully.
It is intended to help you operate and
maintain your new range properlj
Keep i? handy for answers to your
questions. .
If you don’t understand something or
need more help, write (include your
phone number):
Consumer Affairs
RCA
Appliance PaA
Louisville, KY 40225
Write down the model and
serial numbers.
You’ll find them on a label on the front
of the range behind the lower storage
drawer panel.
Write these numbers into the space
below. Also write the numbers into the
space on the warranty card that came
with your range before you send the
card in.
If you received
a damaged range...
Immediately contact the dealer (or
builder) that sold you the range.
Save time and money.
Before you request
service ..
Check the Problem solver. It lists
causes bf minor operating problems
that you can correct yourself.
Model Number
Serial Number
Use these numbers in any correspon-
dence or service calls concerning your
ranae.
4
i+
i
CNOTO1
Page 3
WARNING
A
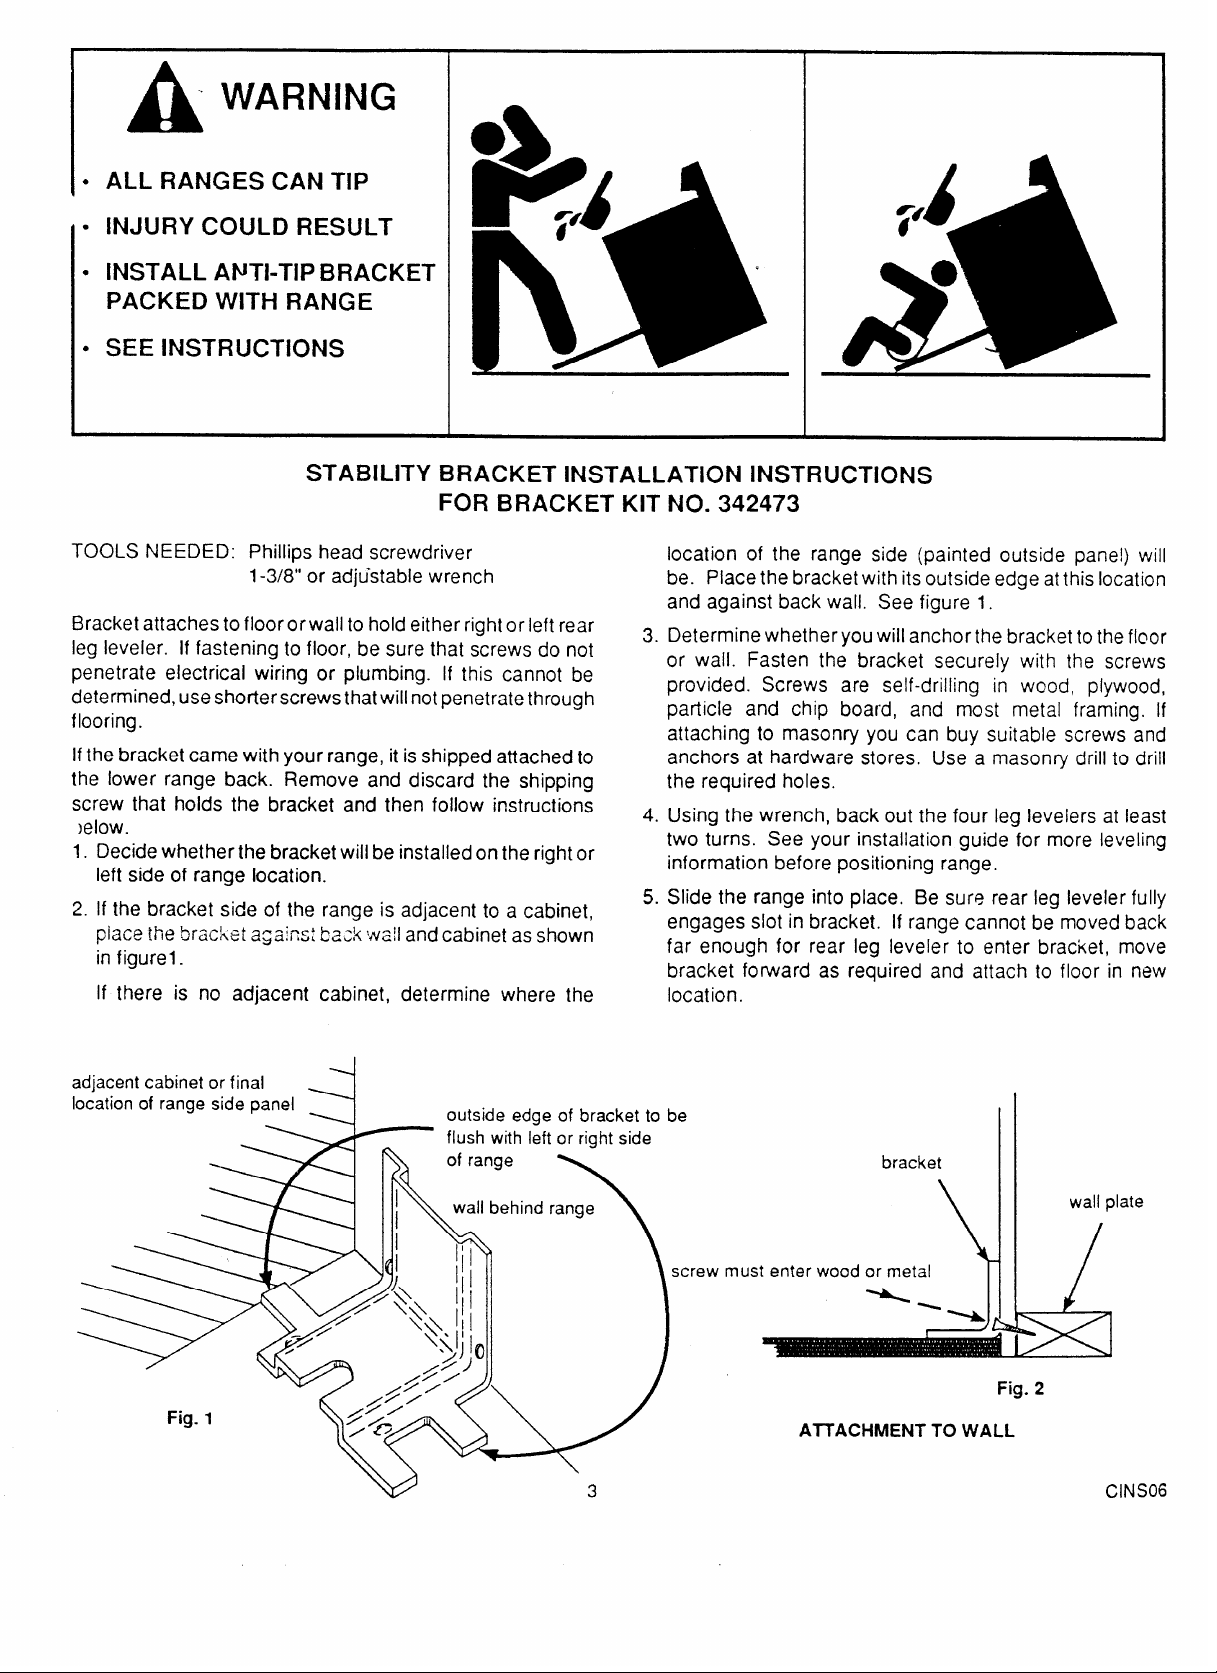
s ALL RANGES CAN TIP
● INJURY COULD RESULT
● INSTALL ANTI-TIP BRACKET
PACKED WITH RANGE
● SEE iNSTRUCTIONS
STABILITY BRACKET INSTALLATION INSTRUCTIONS
FOR BRACKET KIT
NO. 342473
TOOLS NEEDED: Phillips head screwdriver
1-3/8” or adjustable wrench
Bracket attaches to floor or wall to hold either right or left rear
leg leveler. If fastening to floor, be sure that screws do not
penetrate electrical wiring or plumbing. If this cannot be
determined, use shorter screws that will not penetrate through
flooring.
If the bracket came with your range, it is shipped attached to
the lower range back. Remove and discard the shipping
screw that holds the bracket and then follow instructions
)elow.
1.2.Decide whether the bracket will be installed on the right or
left side of range location.
if the bracket side of the range is adjacent to a cabinet,
place the 5racket aga!nst ba;k 4wa!land cabinet as shown
in figurel.
If there is no adjacent cabinet, determine where the
adjacent cabinet
location of range side panel
or final
\
outside edge of bracket to be
flush with left or right side
location of the range side (painted outside pane!) will
be. Place the bracket with its outside edge at this location
and against back wall. See figure 1.
Determine whether you will anchor the bracket to the floor
3.
or wall. Fasten the bracket securely with the screws
provided. Screws are self-drilling in wood, plywood,
particle and chip board, and most metal framing. If
attaching to masonry you can buy suitable screws and
anchors at hardware stores. Use a masonry drill to drill
the required holes.
4.
Using the wrench, back out the four leg levelers at least
two turns. See your installation guide for more leveling
information before positioning range.
Slide the range into place. Be sure rear leg leveler fully
5.
engages slot in bracket. If range cannot be moved back
far enough for rear leg leveler to enter bracket, move
bracket forward as required and attach to floor in new
location.
bracket
Fig. 1
wall plate
screw must enter wood or metal
-x
Fig. 2
ATTACHMENT TO WALL
CINS06
Page 4
INSTALLATION
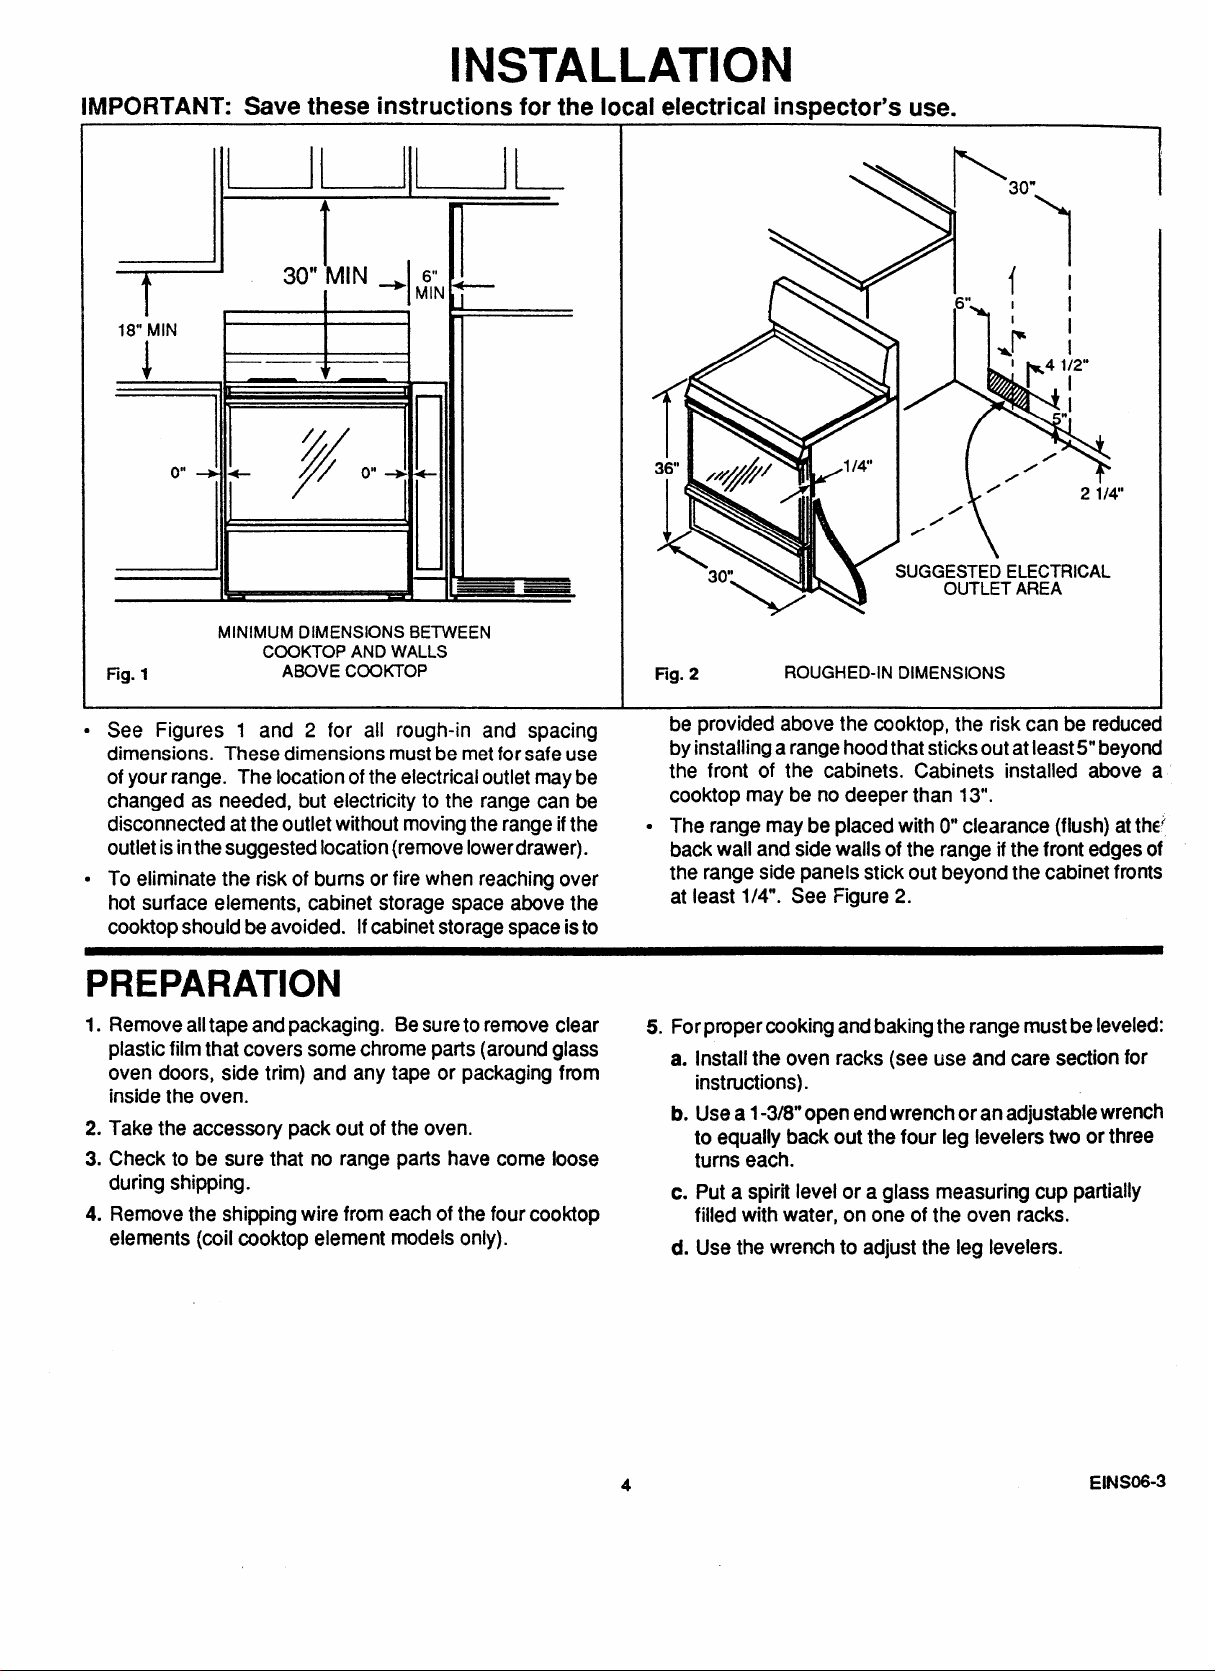
IMPORTANT: Save these instructions for the local electrical inspector’s use.
IIUUIUL
#
18” MIN
1~1
=====11
MINIMUMDIMENSIONSBETWEEN
Fig. 1
9
See Figures 1 and 2 for all rough-in and spacing
dimensions. These dimensions must be met for safe use
of your range. The location ofthe electrical outlet maybe
changed as needed, but electricity to the range can be
disconnected at the outlet without moving the range if the
outlet isinthe suggested location (remove lowerdrawer).
9
To eliminate the risk of bums or fire when reaching over
hot surface elements, cabinet storage space above the
cooktop should be avoided. Ifcabinet storage space is to
,*LN,~—’
1 - I$;N t
I=
COOKTOPANDWALLS
ABOVE COOKTOP
I
1
I
I
I
\\ I
0-
UGGESTEDELECTRICAL
-1
Fig. 2
be provided above the cooktop, the risk can be reduced
by installing a range hood that sticksout at least 5“ beyond
the front of the cabinets. Cabinets installed above
cooktop may be no deeper than 13“.
●
The range may be placed with O“clearance (flush) at W
back wall and side walls of the range if the front edges of
the range side panels stick out beyond the cabinet fronts
at least 1/4”. See Figure 2.
ROUGHED-INDIMENSIONS
. . . .
..
J i
1
I
\
OUTLET AREA
I
I &4 1/2”
2 1/4”
I
a
PREPARATION
1. Remove alltape and packaging. Be sure to remove clear
plastic film that covers some chrome parts (around glass
oven doors, side trim) and any tape or packaging from
inside the oven.
2. Take the accessory pack out of the oven.
3. Check to be sure that no range parts have come loose
during shipping.
4. Remove the shipping wire from each of the four cooktop
elements (coil cooktop element models only).
5. For proper cooking and baking the range must be leveled:
a. Install the oven racks (see use and care section for
instructions).
b. Use a 1-3/8” open end wrench or an adjustable wrench
to equally back out the four leg levelers two or three
turns each.
c. Put a spirit level or a glass measuring cup partially
filled with water, on one of the oven racks.
d. Use the wrench to adjust the leg levelers.
EINS06-3
Page 5
ELECTRICAL CONNECTION
We recommend that you have the electrical hookup of your
range done by a qualified electrician. Have the electrician
show you where your range disconnect is located.
Call your Electric Company and ask which codes apply in
your area. If there are no codes, you must follow the NATIONAL ELECTRICAL CODE, ANS1/NFPA NO. 70-
1987. You can get a copy by writing:
National Fire Protection Association
Battery march Park
Quincy, MA 02269
If you fail to wire your range in accordance with governing
codes, you may create a hazardous condition.
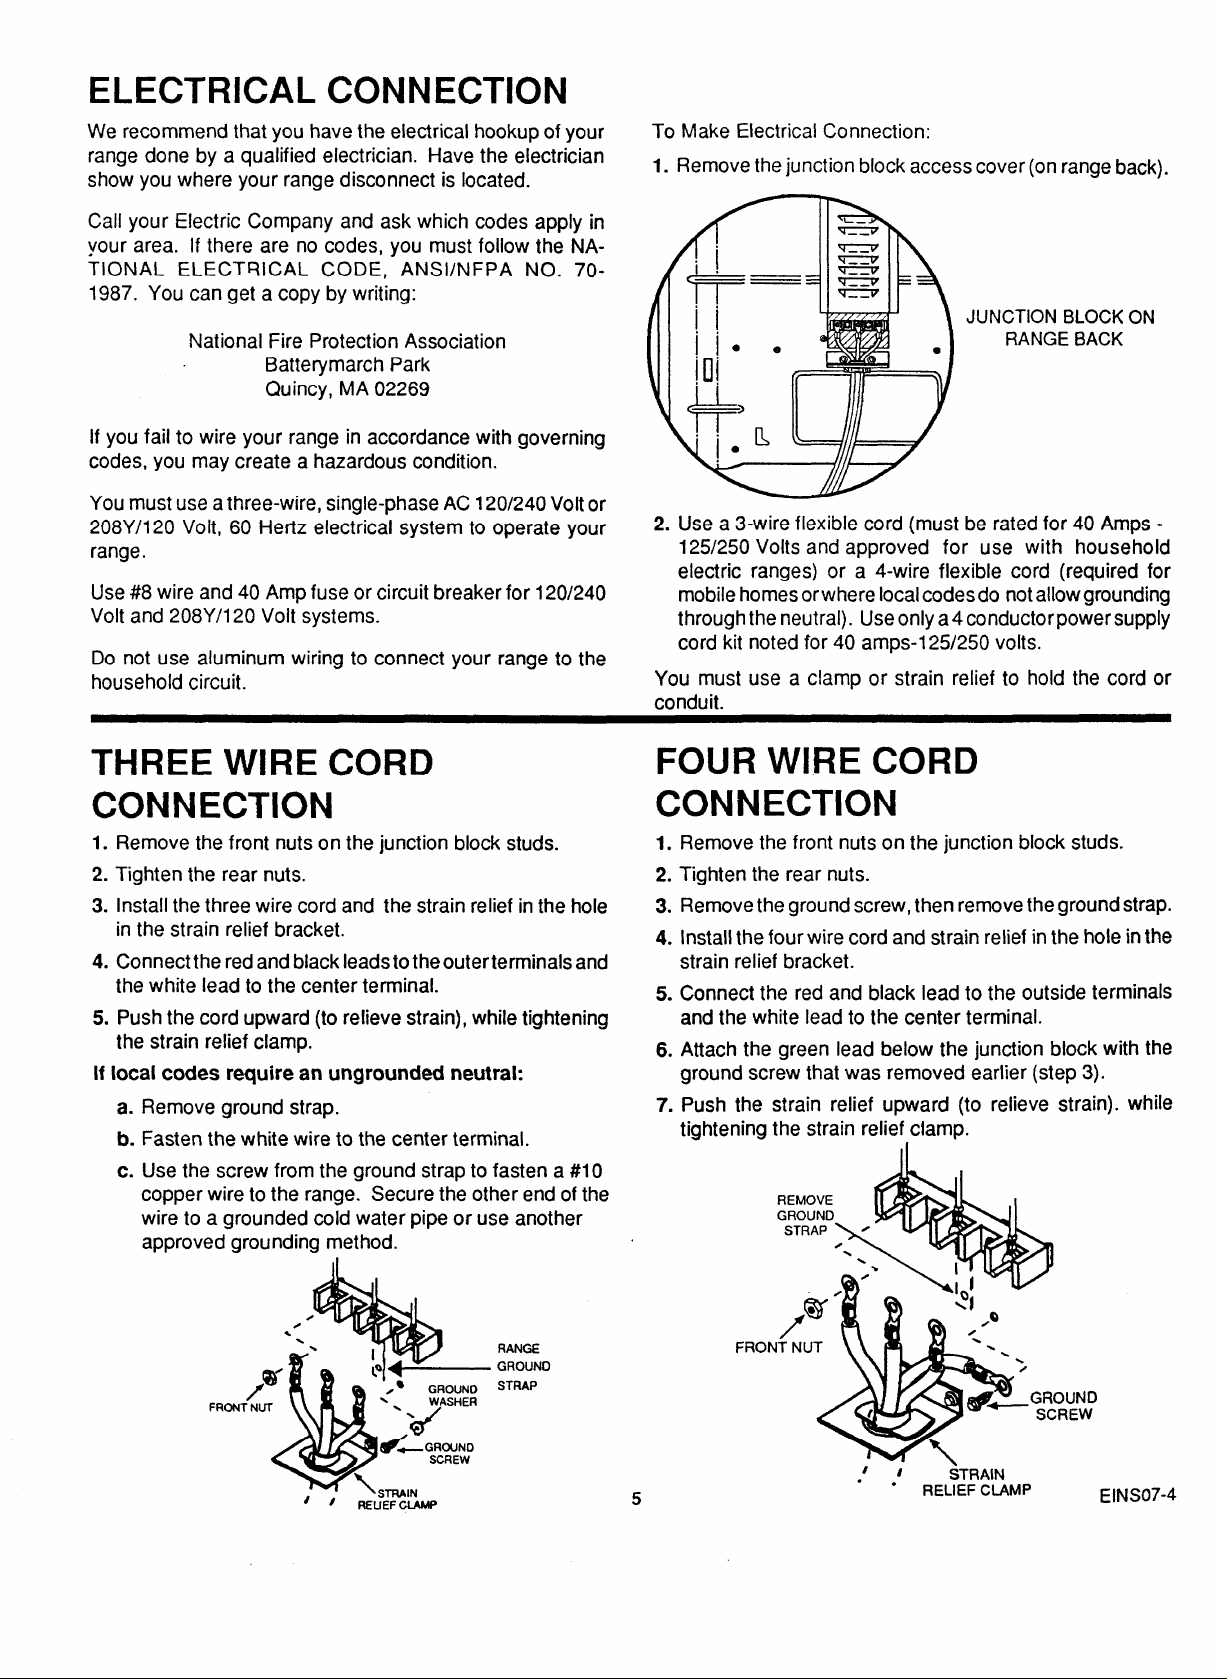
To Make Electrical Connection:
1. Remove the junction block access cover (on range back).
JUNCTION
BLOCK
RANGE BACK
ON
You must use a three-wire, single-phase AC 120/240 Volt or
2t)8Y/120 Volt, 60 Hertz electrical system to operate your
range.
Use #8 wire and 40 Amp fuse or circuit breaker for 120/240
Volt and 208Y/120 Volt systems.
Do not use aluminum wiring to connect your range to the
household circuit.
THREE WIRE CORD
CONNECTION
1.
Remove the front nuts on the junction block studs.
2.
Tighten the rear nuts.
Install the three wire cord and the strain relief in the hole
3.
in the strain relief bracket.
4.
Connect the red and black Ieadstotheouter terminals and
the white lead to the center terminal.
5.
Push the cord upward (to re!ieve strain), while tightening
the strain relief clamp.
If local codes require an ungrounded neutral:
Remove ground strap.
a.
Fasten the white wire to the center terminal.
b.
Use the screw from the ground strap to fasten a #1O
c.
copper wire to the range. Secure the other end of the
wire to a grounded cold water pipe or use another
approved grounding method.
2.
Use a 3-wire flexible cord (must be rated for 40 Amps 125/250 Volts and approved for use with household
electric ranges) or a 4-wire flexible cord (required for
mobile homes or where local codes do not allow grounding
through the neutral). Use only a4 conductor power supply
cord kit noted for 40 amps-125/250 volts.
You must use a clamp or strain relief to hold the cord or
conduit.
FOUR WIRE CORD
CONNECTION
1. Remove the front nuts on the junction block studs.
2. Tighten the rear nuts.
3. Remove the ground screw, then remove the ground strap.
4. Install the four wire cord and strain relief in the hole in the
strain relief bracket.
5. Connect the red and black lead to the outside terminals
and the white lead to the center terminal.
6. Attach the green lead below the junction block with the
ground scr~w that was removed earlier (step 3).
7. Push the strain relief upward (to relieve strain). while
tightening the strain relief clamp.
REMOVE
GROUND
STRAP \“ - WI
/
,
f i
‘~ GROUND
/- -
\
STRAIN
?EUEF CXA&lP
SCREW
RANGE
GROUND
STRAP
t
e
t #-
● ☛
/
%
%#L—
K
iiTRAIN
RELIEFCLAMP
GROUND
SCREW
EINS07-4
Page 6
HVIPC)RTANT VWTRUC7’IONS
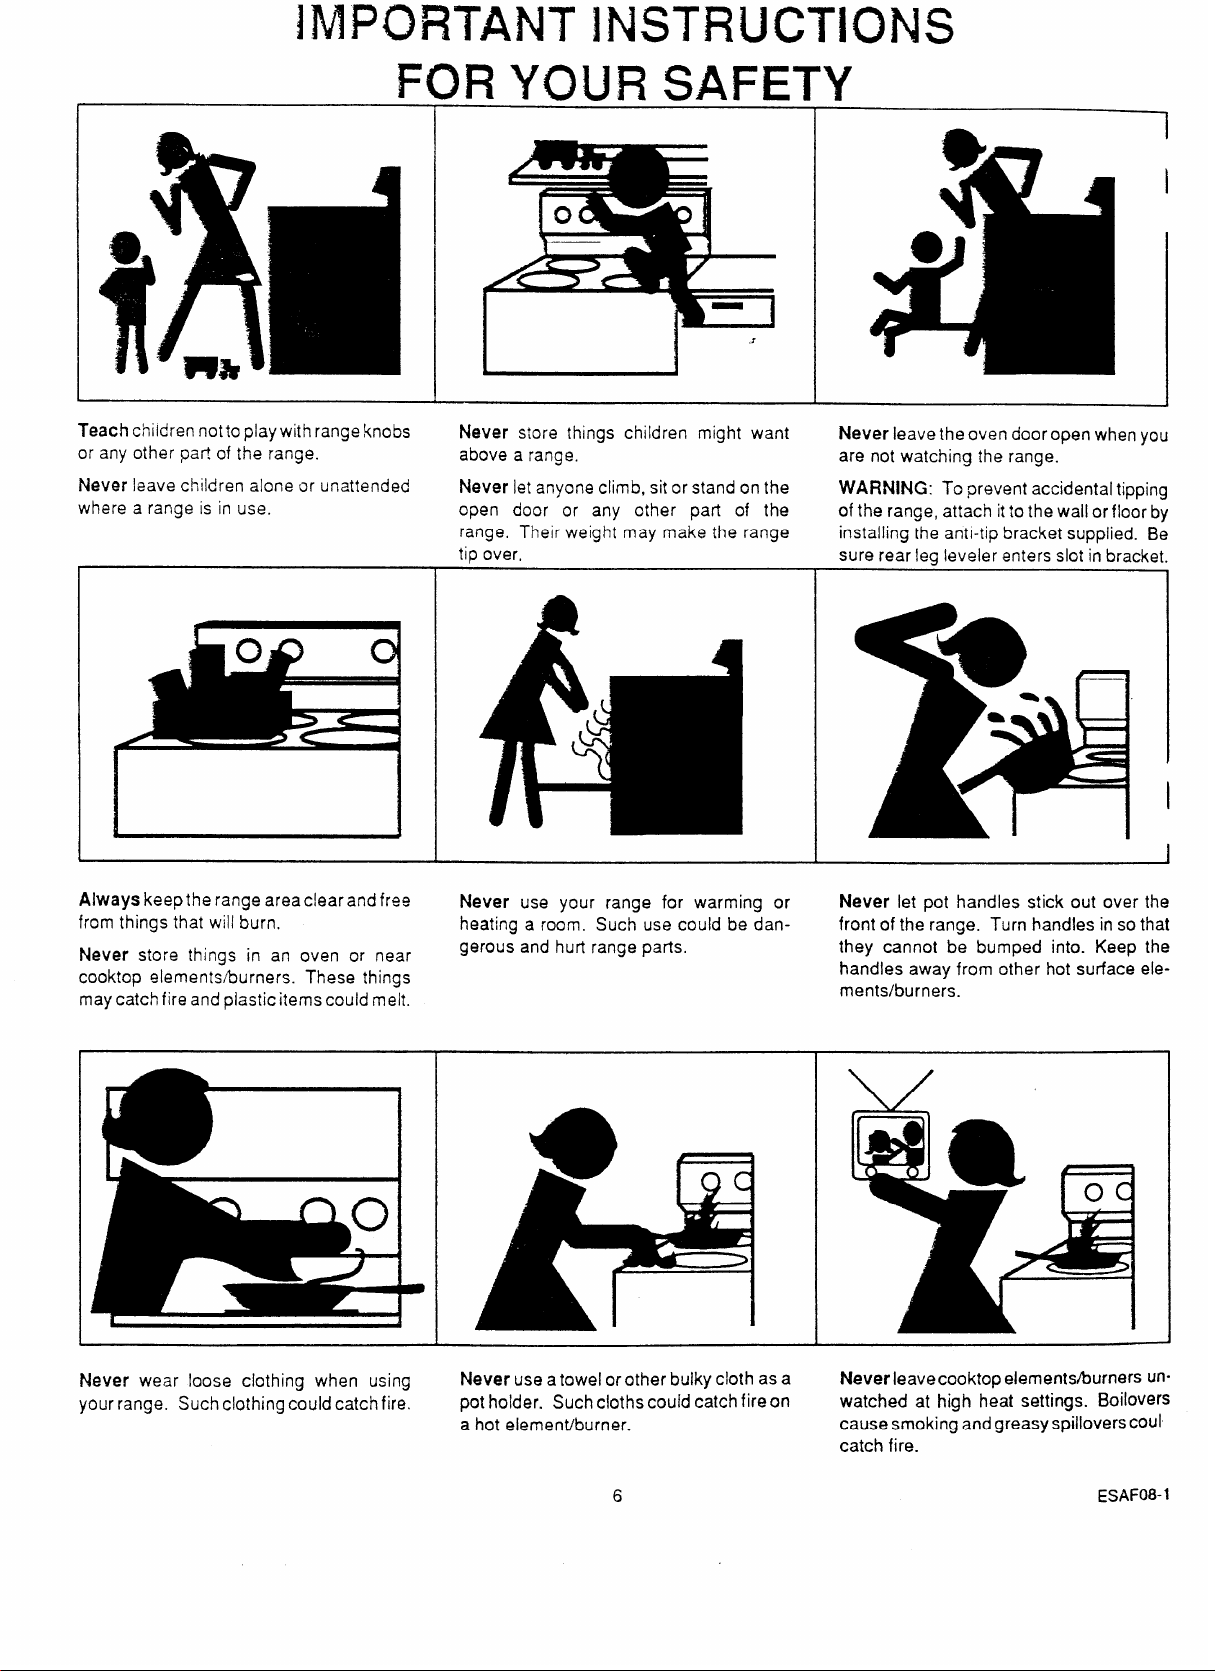
Teach children notto play with range knobs
or
any other pa-! of the range.
Never leave
where a range is in use.
children alone or unattended
FOR
Never store things children might want
above a range,
Never
open
range. Their weight may make the range
ti~ over,
YOUR SAFETY
let anyone climb, sit or stand on the
door or any other part of the
I
I
Never Ieavetheoven door open when you
are not watching the range.
WARNING: To prevent accidental tipping
of the range, attach it to the wall or floor by
installing the anti-tip bracket supplied. Be
sure rear !eg leveler enters slot in bracket.
I
Always keep the range area c!earand fres
from things that will burn.
store things in an oven or near
Never
cooktop elements/burners.
may catch fire and plastic items could melt.
Never wear loose clothinq when usinq
your range. Such clothing c;uld catchfir~
These things
Never use your range for warming or
heating a room. Such use could be dan-
gerous and hurt range parts.
Never use a
pot holder.
a hot element/burner.
towel or other buiky cloth as a
Such cloths could catch fireon
I
J
Never let pot handles stick out over the
front of the range. Turn handles in so that
they cannot be bumped into. Keep the
handles away from other hot surface elements/burners.
Never leave cooktop element shurners un”
watched at high heat settings. Boilovers
cause smoking and greasy spillovers COUI
catch fire.
6
ESAF08-1
Page 7
DO■ ==
DON’T...
Keep this book for later use.
le sure your range is installed
properly.
Choose pots acd pans with flat bottoms, large
enough to cover the entire cooktop element.
will cut down the risk of setting pot holders or
clothing on fire with an uncovered element and
waste less energy.
and grounded
This
Always use care when touching cooktop ele-
ments, areas near cooktop elements, oven heat-
ing elements or inside the oven. tieating ele-
ments could be hot enough to burn you even if they
are dark in color.
door may also become hot during range use.
Only some kinds of glass or ceramic pans can be
used for cooktop cooking. Be
you use will not
elements.
The oven vent duct and oven
sure that the pan
break when heated on the cooktop
Always change oven rack positions while oven is
cool.
Mter broiling, always take the broiler pan out of the
ange and clean it. Leftover grease in
pan can catch on fire next time you use the pan.
the broiler
Always use dry pot holders when removing pans
from the oven orcooktop. Moist or damp potholders can cause steam burns.
Always use care when opening oven door. Let
hot air and steam out before moving food.
Never tryto repair or replace any part of the range
unless instructions are given in this book. All other
work should be done by a skilled technician.
Never heat unopened food containers. Pressure
build up may make container burst and cause
injury.
Never leave jars or cans of fat or drippings on or
near the range. Never let grease build
range. You can keep grease fires from statiing if
you clean up grease and spills after each range
use.
upon your
Never use aluminum foil to line drip bowls or oven
bottoms. Improper use of foil could start a fire.
Never block free airflow through the oven vent.
Never try to move a pan of hot fat, especially a
deep fat
fryer. Wait until the fat has cooled.
Never put removable heating elements in water.
Never use the cooktop without reflector pans or
drip bowls being in place. If these pans or bowls
are not there during cooking, wiring or other range
parts may be damaged (does not apply to ranges
with solid disk cooktop elements).
Never rub, move or damage the door gasket on
self-cleaning ranges. The gasket is essential
good seal. Only clean the gasket by soaking it
with hydrogen peroxide, as described in the selfclean section of the manual.
for a
Always follow cleaning instructions in this book.
Always remove the broiler pan and other utensils
from the oven before a self-clean cycle.
Never use water on a grease fire -it will only
spread the flames.
COOKTOP GREASE FIRE
Never pick up a flaming pan...lnstead:
1.Turn off the element.
2. Smother the fire with a tightly fitting pan
lid, baking soda or an extinguisher.
OVEN FIRE
1.Close oven door and turn controls off.
If fire continues, throw baking soda on the
2.
fire.
ESAF13-1
Page 8
YOUR RANGE
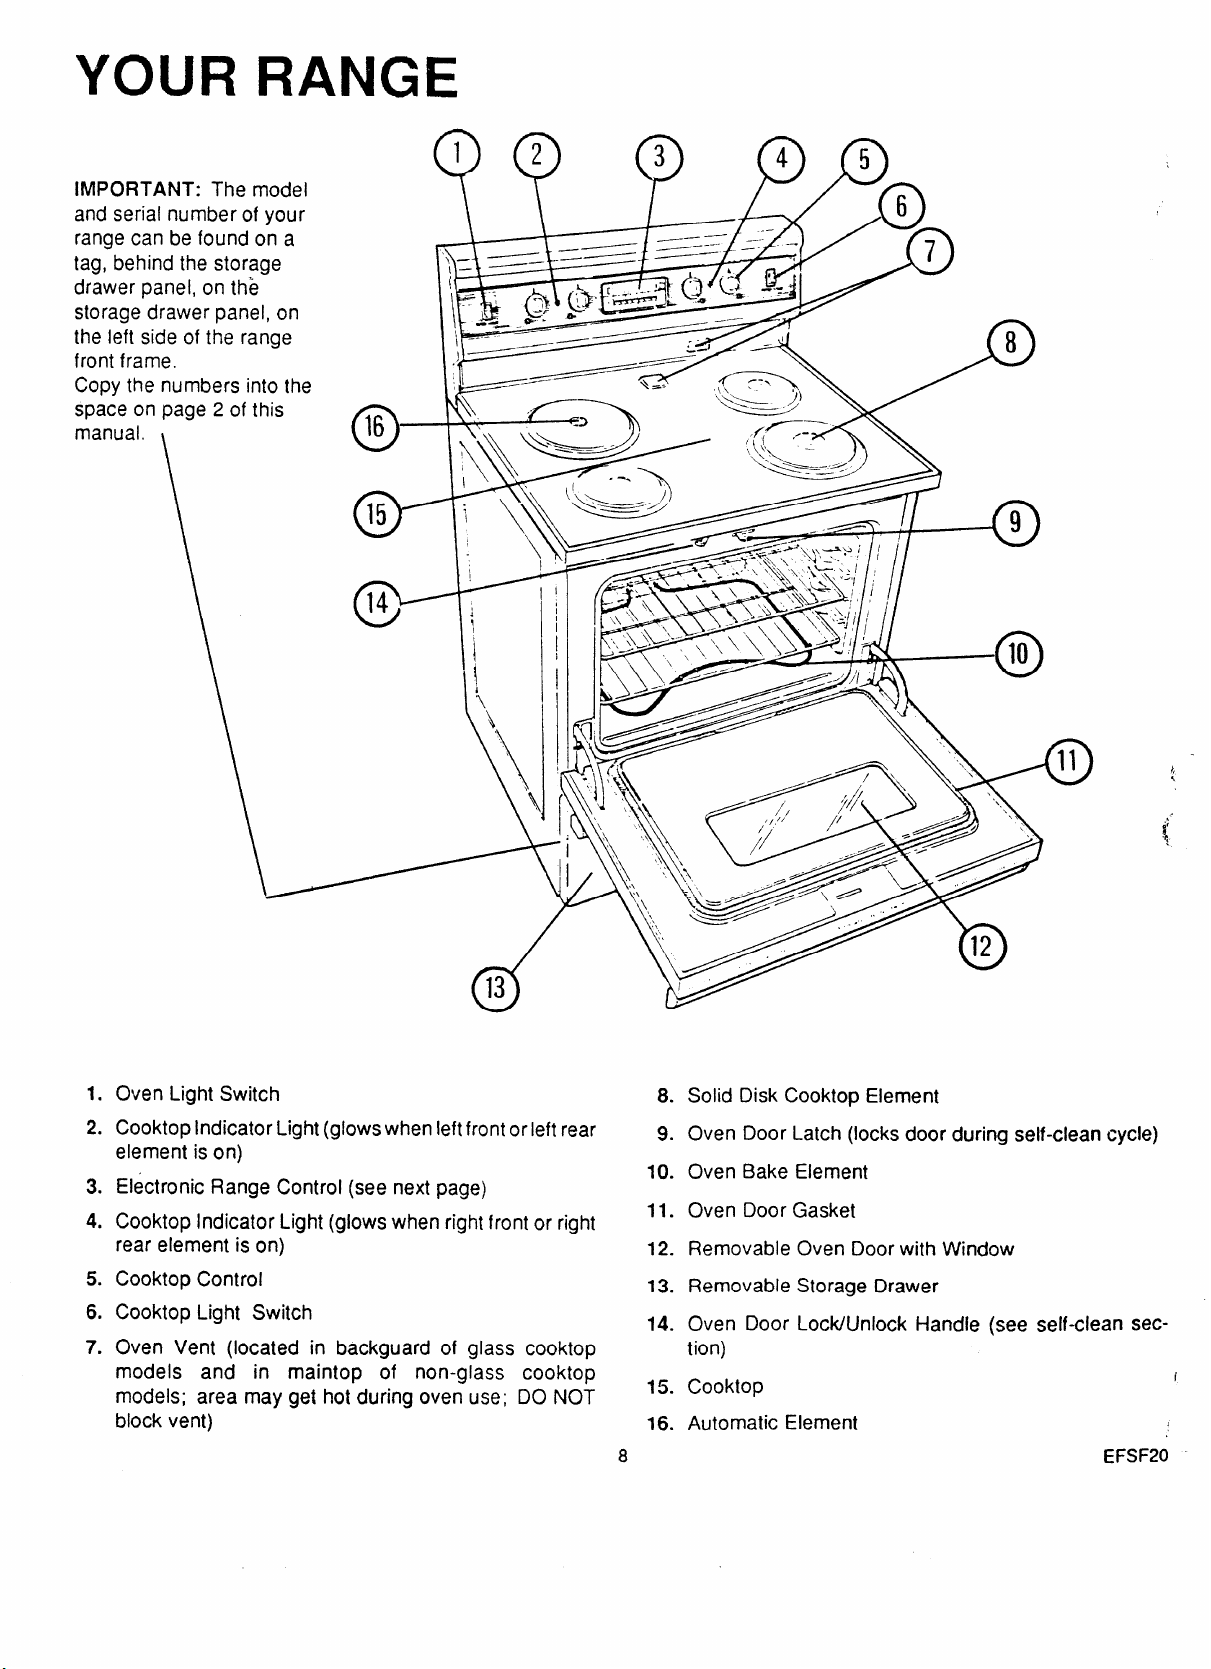
IMPORTANT: The model
and serial number of your
range can be found on a
tag, behind the storage
drawer panel, on the
storage drawer panel, on
the left side of the range
front frame.
Copy the numbers into the
space on page 2 of this
manual.
\
w Pp’m
-r.
I
I
\
13
a
1.
Oven Light Switch
2.
Cooktop Indicator Light (glows when left front or left rear
element is on)
Electronic Range Control (see next page)
3.
4.
Cooktop indicator Light (glows when right front or right
rear element is on)
5.
Cooktop Control
6.
Cooktop Light Switch
7.
Oven Vent (located in backguard of glass cooktop
models and in maintop of non-glass cooktop
models; area may get hot during oven use; DO NOT
block vent)
‘(
8.
Solid Disk Cooktop Element
9.
Oven Door Latch (locks door during self-clean cycle)
10.
Oven Bake Element
11.
Oven Door Gasket
12.
Removable Oven Door with Window
13.
Removable Storage Drawer
14.
Oven Door LocidUnlock Handle (see self-clean section)
15.
Cooktop
16.
Automatic Element
8
EFSF20
(
1
Page 9

The Electronic Range Control
ERC)
1
0-
2
o
\
1.
OVEN CANCEL BUTTON - Cancels everything
except the clock and timer. Push this button to
turn the oven off or to clear everything if you’ve
made a mistake in programming.
5
P
COOK TIME - Push before setting length of
9.
cook time for automatic oven operations.
10.
CLEAN - Push to use self-clean cycle.
DISPLAY INDICATORS - Light up to tell you
2.
what is being shown in the TIME DISPLAY
WINDOW.
TIME DISPLAY WINDOW - Shows the time of
3.
day or the times you set for me timer or auto-
matic oven operation.
4.
OVEN TEMPERATURE AND BROIL DISPLAY
WINDOW - Shows the oven temperature or broil
setting you have selected.
FUNCTION INDICATORS - Light up to show
5.
whether oven is baking, broiling or self-cleaning.
SET KNOB - Turn to set times and tempera-
6.
tures after pushing a function button.
7–13 FUNCTION BUTTONS
BAKE - Push before setting bake temperature.
7.
BROIL - Push before seiecting BROiL setting.
8.
STOP TIME - Push before selecting the time
11.
when you want the oven to turn off for automatic
oven operations.
CLOCK - Push before setting clock or to bring
12.
time of day into the TIME DISPLAY WiNDOW.
TIMER - Push before setting amount of time.
13.
TO SET THE CLOCK
Turn to set ~
time of day
/
CANCEL
@f~
;f:
BI?OL
Q
>
J
BAKE
x
*
\
SET
\
CERC03-3
Page 10

Start Things
Cookingf
Cooktc)p Cooking
Before using the solid disk elements for
A
A
To properly cure the solid elements, heat each element at the
highest setting, without a pan on the element.
There will be some non-toxic smoke and odor and the rings
around the elements will change to a gold color. All this is
normal. Heat the elements for 3 to 5 minutes — until the
smoking stops.
Solid disk elements are made from a flat heavy casting ofthe
same type of material as cast ironskillets. Cast iron reaches
temperature gradually and evenly and holds the heat very
weli.
Cast iron must be kept dry to prevent rust. It is normal for
cast iron to lose its luster as it ages. See the Cleaning Tips
inthis manual for information on cleaning and restoring ap-
pearance of solid disk elements.
the first time, you must cure them to
harden the protective coating for long
life. If the elements are not cured properly, the coating can stick to your pan
and remove some of the finish on the
element. See instructions below.
Do not use decorative element covers on solid disk elements. These covers can trap moisture and promote rusting.
The red dot inthe center of some of the elements isforfactoty
identification only. It can be removed by scouring.
Some cooking processes will differ from those you may be
used to with coil elements. Cooking times for some foods
may change because solid disk elements will take longer to
heat up and cool down. Heat-up and cool-down times will
depend on initial temperature setting, quaiity of utensil and
amount of food being cooked.
Cooking performance Is directly related to the use of
proper pans.
In order to obtain top performance from your solid disk
elements your cookware must be
ofa heavy gauge material. Use atight-fitting lidwhenever
possible. An out-of-shape pan without a
cook with the same speed and evenness as a pan with a flat
bottom and
Heat cannot transfer properly from the element to the pan if
the pan bottom is only near the element. The pan and
element should actually touch each other across the entire
pan bottom.
a tight fitting lid.
flat on the bottom and be
lid cannot possibly
10
EMTC05-4
Page 11

Many pans have a slight depression in the center of the pan
bottom. Some cookware has circular ridges in the pan
bottom. Many older pans have become warped from overheating in the past. None of these pans will give top
performance on any type of electric cooking element be-
cause they do not make contact with the element across the
,ntire pan bottom.
COOKWARE TIPS
●
Pans must have flat bottoms and should have straight
sides and lightweight handles that do not tilt the pans.
●
Pans must cover the entire element to absorb the full heat
output. They should be the same size or slightly larger
(not more than 1” overhang) than the element.
9
Use tight fitting lids to shorten cooking time and allow food
to cook in a minimum amount of liquid.
●
Be sure that specialty pans such as woks, lobster pots,
pressure cookers, french fryers, griddles etc. meet the
same standards as other pans: flat bottom, balanced,
correct size and covered, if applicable. Use only flat
bottomed woks on solid disk elements.
●
Use canners that do not extend more than 1 inch beyond
the solid disk element. Be sure the canner has a flat
bottom. When canners do not meet these standards the
use of the high heat setting may cause the heat to become
excessive and may result in damage to the cooktop.
●
Place pans on the elements before controls are turned on
to conserve energy.
CAUTION
A
cooktop
and the heat retention characteristics of the cast iron
used for the elements, will cause the cooktop to get
hotter than you might be used to with open coil
elements and stay hot Iongerafter the elements have
been turned off.
Please use care when working around your cooktop
when any surface elements are on or when the cooktop
has not had time to cool after surface element use.
I
The cooktop could get hot enough to burn you,
especially during prolonged surface element use.
clamped securely to the cooktop to keep
spills from flowing in to the area below the
as happens with open coil elements. This,
— The solid disk elements are
SETTING COOKTOP CONTROLS
Be sure that the cooktop elements have been cured as
described on previous page, before first use.
The sign near each cooktop control knob shows which
element is turned on by that knob.
00 00 00 00
00 ● 0 00 00
Left Left Right
Rear Front
Rear
Right
Front
Pan Too Small
Warped Pan
CORRECT
Pan Bottom Flat / Pan Sits Level
Pan Covers Entire Element
INCORRECT
Warped Pan
Waqmd Pan
Heavy
Handle
Tilts Pan
To operate cooktop controls:
1. Push to turn. The control knobs for the regular cooktop
element turn in any direction. The knob for the automatic
element turns in the counterclockwise direction only.
2. Set on or between marks for desired heat.
The indicator light will glow when any cooktop element is on
8
7
5
REGULAR ELEMENT COOKTOP CONTROL
(shown here with settings numbered-to be used with chart on next page)
The elements have a built-in temperature protection device
which protects the element and your pan from excessive
(damaging) heat. If the element is left turned on without a
pan, or if a pan boils dry, the excess heat buildup will be
detected and power will be reduced to the element. If your
pans do not have a flat bottom and there is space between
the element and some parts of the pan bottom, this limiter
may detect excessive temperatures and automatically turn
the element down.
EMTC2&l
Page 12

THE AUTOMATIC ELEMENT
The automatic cooktop element (left rear) has a sensor in its
center. The sensor detects the temperature of the pan
bottom and compares itwith yourselected control setting. The
automatic element then supplies heat as needed. The auto-
matic element always begins with full power, no matter
where the cooktop control is set. When the temperature of
your selected setting has been reached, the element cycles
on and off to maintain that temperature, similar to your oven.
In order for the setlsorto work efficiently, you should keep it
clean and free moving.
When the correct setting has been selected, the pan does
not haveto be watched. The automatic element will not burn
food when the correct setting is selected. Food may dry out
The following chart is merely a guide to the suitable control
settings. Consider raising the setting for larger quantities,
uneven pan bottoms or uncovered pans, and for pan mate-
rialstilat are slow to conduct heat (such as cast iron). Lower
the setting forsmaller quantities and pan materials that heat
quickly (such as aluminum).
The regular element supplies heat at a constant power at
each setting. It heats whether the food needs more heat or
not. With the regular element the power is always on, unless
if left too long, but the sensor will
overheat beyond the selected setting.
Using the proper pan and lid, food will cook whether or nc
steam is visible. Cooking time does not depend on visitjt
steam. The automatic element cycles on and off as heat;-
needed. It is normal not to see activity, such as bubbling a,
steaming, during the time that the heat has cycled off.
If you feel that a heat setting should be changed, change it
gradually. Allow time for the element to adjust to the new
setting. Changing settings will be more satisfactory when
the increased setting is within one or two markings on the
control.
the control is turned off. After you start at a higher setting to
bring the food up to cooking temperature, turn the control
down to the lowest setting that will keep the food cooking.
The automatic element will always start with full power
(regardless of your control setting) and will continue to cycle
on and off, holding the temperature at the control setting you
have selected. It adds only the amount of heat necessary to
maintain the setting.
not let the food or the pan
See the illustration @fthe regular element control knob on the previous page. The marks for the knobs have been numbered
so that you can easily find the suggested setting (from chart) on your control knob. The automatic element control knob is
numbered on your range.
AUTOMATIC ‘
ELEMENT
SETTING
5-7
7-9
9-10
8-10
8-10
9-10
LO-3
3-4
LO-2
3-4
OPERATION
BOILING
Large Amounts
(over 1 quart)
Small Amounts
(under 1 quart)
BROWNING
FRYING
SIMMERING
MELTING Chocolate
FOOD
Macaroni Products
Vegetables 7-8
Meats 6-7
Bacon 6-7
Eggs
Meats
Potatoes
Vegetables
Gravies
6utter
REGULAR ELEMENT
SE”rTING TO START
9
4-6
6-7
7-8 7-8
2-3
4-6
1-2
6-7
SETTING TO FINISH
6-7 9-12
7-8
6-7
6-7
4-6
5-6
2-3
3-4
1-2
6-7
12
EMTC21
Page 13

TO BAKE OR ROAST
AUTOMATIC OVEN ON AND OFF
PUSH WHEN
3
FINISHED
9
e
[-
l!
I
CANCEL
\
,[. .–-. —
I
;
I
TIME > /~*:/~/ ~y ~
I
L__ ___ ___ ____________ .___>
I
“MER cLOcK TIME
I-h-m ;, ;
‘Top CLEAN
;::
The red display will show the oven
it rises (in 5° steps).
A tone will sound when the oven is
AUTOMATIC OVEN OFF
TURN TO SET
~:::l::v?
TURN TO *
SET TEMP
— —
PUSH 1
BROIL
“>
BAKE
I
c)
temperature as
ready.
TURN TO
SET LENGTH
OF COOK
TIME
?
\
SET
f
—--
I
,
—..
CANCEL
<–D~LAy
OVEN /- .,STOP :-/
TIME
L.–. _
TURN TO
SET TEMP
.—
j l-l J~rJ”_
● ~/ ~f BAKE !& 1
..~’
TURN TO SET OVEN
TURN OFF
TIME (TIME
OF DAY)
?
SET
I
I
CLEAN ;;;
‘lP*ER cLOcK TIME
J
\
‘Top
I
BROIL BAKE
1
I
J
(l-J@@
PUSH PUSH
When cook time has ended, atone will sound and the oven
will turn off.
TO USE THE TIMER
TURN TO
SET AMOUNT
OF TIME
PUSH
4
I I
BROIL 1 BAKE
/ 1
I
[
!
I
“MER cLOcK
,
! I
‘TopCLEAN ;::
TIME
The ERC will calcula~e when to turn the oven off.
When the stop time is reached, a tone will sound and the
oven will turn off.
INCOMPLETE OR INCORRECT
SETTINGS
1. Attention Tone will sound if oven has only been partially
programmed. For example, if you have selected a cook
time but no temperature, you will hear the Attention Tone
until you select a temperature or push CANCEL.
2. Function Error Tone will sound if there is a problem with
one of the range functions, Cancel the tone by pushing
the CANCEL button. If the tone starts again, call for
service.
RECALLING FUNCTIONS
You may recall any se{ function by pushing the button of that
Jnction.
1
d
:ANCEL
( 1 ) PUSH
TIMER
~
t
BROIL BAKE
(3)
PUSH AND HOLD
SET
J
W 3 SECONDS TO CANCEL
A tone will sound when time is up.
NOTE: Thetimerisa reminderonlyand will not operate
the oven.
CANCELLING TONES
If you prefer that your range not have a tone whenever you
push a button, you can eliminate tones by pushing and
holding the CANCEL button until you hear a beep. Repeat
to activate tones again.
PREHEATING FOR AUTOMATIC OVEN
OPERATIONS
Cookthes programmed for automatic oven operations start
counting down when the oven first comes on, not when it has
reached the set temperatures. It takes 10 tol 5 minutes to
reach the set temperature, thus additional cook time may be
necessary.
13
cCTL04-2
Page 14

..........
....
.... .. .. .
;,:’ .....
.,, . . .
.. . ... . . .. ...
.. . . .
.......
. ..
. .. . . . ... .
Let the oven preheat thoroughly before
cooking baked products. Allow 10-15 min-
utes preheat time.
m
Oven Cooking
●
Always follow recipe carefully.
●
Measure ingredients properly.
●
Use proper pan placement.
●
Place pans on the oven racks with 1% - 2“ of
air space on all sides of each pan.
overcrowding the oven.
Avoid
Avoid opening the door too often to check
the food during baking as heat will be lost
This may result in poor baking results.
Cakes, cookies, muffins, and quick breao.
should be baked in shiny pans — to reflect
the heat
golden crust. Yeast breads and pie crusts
should be baked in glass or dull (non-shiny
pans) — to absorb the heat — because they
should have a brown, crisp crust.
— because they should have a light
9
Pans too close to each other, to oven walls
or to the oven bottom block the
ment of air. Improper air movement causes
uneven browning and
cake layers
2
● Most baking should be done on the second
shelf position from the bottom. When baking
several items, use two shelves placed on the
second and fourth rack positions from the
bottom of the oven. Stagger pans so that no
pan is directly above another.
food cakes on the first shelf position from
the bottom of the oven.
cooking.
4 cake Iayera
free move-
Bake angel
Oven temperatures should be reduced 25
degrees below recommended temperature:
if you use dark pans or oven proof glass.
There may be some odor when the oven !.
first used. This is caused by the heating of
new parts and insulation.
Do not cover the c)ven bottom or an entire
oven rack with foil. The foil can block normal heat flow, cause cooking failures, and
damage the oven interior.
14
CoVcol
Page 15

Broiling
Turn to set
3 Push When
Finished
?
~’!
i\
;ANCEL
Most foods can be broiled at the HI Broil Setting. Select the
LO Broil setting to avoid excessive browning or drying of
foods that should be cooked to the well-done stage (such
as thick pork chops or poultry).
~“,~ “
;
‘
L.. ___ _______ -- -J
“MER cLOcK Tl!/lE
/
:1 “ l-l n:+ ,
It ●f It /6 ROILE !
CLEAN ;:EK
‘Top
BROILING TIPS
●
Your oven door should be open to the broil stop
position while broiling. If the door is closed, the
food will roast and not broil.
●
Use only the broiler pan and grid that came with your
range for broiling. They are designed for proper
drainage of fat and liquids and help prevent spatter,
smoke or fire.
8
Do not preheat when broiling. For even broiling on
both sides, start the food on a cold pan.
.
When broiling frozen meat, use one rack position lower
than recommended and
gested bt-oiling time.
●
Trim the outer layer of fat from steaks and chops. Slit
the fa:;~ ~@es to keep the meat from curiing.
●
For maximum juiciness, salt the first side just before
turning the meat. Salt the second side just before
serving.
●
Brush chicken and fish with butter several times as
they broil When broiling fish, grease the grid to keep it
from sticking and broil with skin side down. It is not
necessary to turn fish.
9
Never leave a soiled broiler pan in the range.
Grease in the pan may smoke or burn the next time the
oven is use.
●
Be sure you know the correct procedure for putting
out a grease fire. See the section on safety.
1A
h
I AA
1~
Do not cover the entire broiler grid
with foil. Poor drainage of hot fat
may cause a broiler fire.
If a fire starts, c!osetheoven door
and turn controls off. If fire continues, throw baking soda on the fire.
Do not put water on the fire.
up to 1 1/2 times the sug-
I
BROIL
\
?
2 HI orLC)
Broil
‘~
SET
BAKE
1 Push
t)
POSITIONING BROILER PAN
Broiling is cooking by direct heat from the broil element.
Tender cuts of meat or marinated meat should be selected
for broiling. For best results steaks should beat least 3/4”
thick.
After placing food on the broiler pan, put the pan on an oven
rack in the proper position. The recommended rack position and cooking time can be found in the chart below
The closer the food is to the broil element, the faster the
meat browns on the outside, yet stays red to pink in the
center. Moving the meat farther away from the element lets
the meat cook to the center while browning outside. Side
one should be cooked 1 -2 minutes longe~ than side two.
Rack
Position Total Time
Food 4 = Highest (minutes)
1 = Lowest
Steak -1” Thick
Rare
Medium
Well Done
Ground Beef Patties
Medium-1” Thick
Medium-1/2° Thick 4
——.—
Lamb Chops -1” Thick
Pork Chops – 1” Thick
.———.—.. ——. ..—..—
Pork Chops 1/2” Thick
Ham Slice - l/2’’Thick
-—
Fish (Fillets)
Chicken ( Pieces)
Frankfurters 3
———
Bacon
This chart is a genera{ guide. The size, weight, thickness,
and starting temperature of the food as well as your own
personaI preference will affect the cooking time. Times in
the chart are based on the food being at refrigerator temperature.
15
—
4 9-11
3
3
3
3
3
3
3
3
2
3
13-15
21-23
16-18
7-9
18-21
27-29
16-18
11-12
11-13
45-55
8-11
9-11
--1
Page 16

Favorite American Recipes
A Collection from Around the Country
LAZY-DAY COFFEE CAKE
3/4 cup margarine, softened
1 cup sugar
2 eggs
1 cup sour cream
2 cups all-purpose flour
1 teaspoon baking powder
1 teaspoon soda
7/2 teaspoon salt
1 teaspoon nutmeg
3/4 cup light brown sugar
1/2 cup chopped pecans
1 teaspoon cinnamon
Cream margarine and sugar until light and fluffy. Add eggs and sour cream; mix well. Combine flour, baking powder, soda,
salt and nutmeg. Add to batter and mix well. Pour batter into greased and floured 13” x 9“ x 2“ baking pan.
Combine brown sugar, pecans and cinnamon; mix well. Sprinkle one half of this mixture over cake batter; swid mixture
through batter. Sprinkle remaining one half mixture evenly over cake batter.
.,
,,.
“A
Cover and chill overnight. Uncover and bake in preheated 350° F oven for 35 to 45 minutes or until cake tests done with
toothpick.
BROCCOLI CASSEROLE
2-10 oz. pkg. frozen chopped broccoli
1 cup mayonnaise
7 cup sharp cheddar cheese, grated
2 eggs, beaten s/ight/y
1 can cream of mushroom soup
2 tablespoons chopped onion
7 cup cheese cracker crumbs
Preheat oven to 375° F. Cook broccoli according to package directions; drain.
Mix with other ingredients. Pour into greased two (2) quart casserole. Sprinkle
with cheese cracker crumbs. Bake at 375° F for 20-25 minutes.
SOUTHERN BRUNSWICK STEW
A delicious quick-to-make hearty stew that will feed a crowd or feed the family. Refrigerate or freeze the remainder for
another day.
1-10 oz. can barbecue beef
1-10 oz. can barbecue pork
1-24 oz. can Brunswick stew
1-5 oz. can boneless chicken
1-12 oz. can vacuum packed corn niblets
1-16 oz. can baby lima beans, drained
2-76 oz. cans stewed tomatoes
1- 14’/2oz. can sliced okra, drained
Drain okra and lima beans. Add to all other ingredients in 4 quart
pan, Heat on medium to serving temperature.
16
CRCPO1-1
Page 17

43
u
5
u
-.
(D
-.
“b
=
4
-.
-.
x
m
:
m
r
m
0
m
02
0
.,,
m
a
-f
w
m
a
o
1-
n
1-
m
c)
1
a
2
s=-’
Page 18

The Self-Clean Cycle
BEFORE A CLEAN CYCLE
1.2.Remove ttlebroilpan andgrid, oven racks, allutensilsand
any foil that maybe inlheoven. Do nottrytoclean utensils
or any other objects in the oven during a self-clean cycle.
Ifoven racks are left in the range during a clean cycle, they
will darken, Ioso their luster and become hard to slide. If
you choose to leave the racks in the oven, you can polish
the edges of the racks with steel wool and apply a small
amount of vegetable oil to the rack edges after the selfclean cycle. This will make the racks easier to slide.
Soil on the oven front frame, under the front edge of the
ccmktop, the door liner outside the door seal and the front
edge of the oven cavity (about 1” into the oven) will not be
cleaned during a clean cycle (see illustration below).
Clean these areas by hand before starting a clean cycle.
Use hot water with a soap-filled steel wool pad, then rinse
well.
FRONT FRAME
.—
I-—_ ---
-----
.
“ ““-”11
4. Clean the door seal by using a clean sponge to soak the
soiled area with hydrogen peroxide.
maybe needed depending on the amount of soil. Frequent
cleaning will help prevent excessive soil build up. DO nOt
rub the door seal. The fiberglass material of the seal h
an extremely low resistance to abrasion. An intact anb
well fitting oven door seal is essential for energy effici’
oven operation and good baking results. If you notice ~.
seal becoming worn, frayed or damaged in any way or if
it has become displaced on the door, YOUshould replace
the seal.
Repealed soaking
AFTER A CLEAN CYCLE
After a clean cycle, you may notice some white ash in the
oven. Just wipe it up with a damp cloth.
If white spots remain, remove them with a soap-filled steel
WOOIpad. De sure to rinse ttloroughly with a vinegar and
waler mixture. These deposits are usually a salt residue that
cannot be removed by the clean cycle.
If the oven is not clean after one clean cycle, the cycle may
be repeated.
ill “ s
1’
-- ._
,,
I /’
Iz!r
1( ~y
—-.. ..—.-—._
~~==--
3. Wipe up heavy spillovers on the oven bottom. Too much
soil may cause smoking during the clean cycle.
-.-*.---—-
--.—
.—=-———--==—
-. .
L
I
r?
I
In
———.
‘X&l!)’!
-- .—
PORCELAIN ENAMELED
BOWLS (some models)
Some ranges have grey porcetain enameled cooktop element bowls. The bowls can be cleaned in the oven during the
self-clean cycfe. Place them on the oven racks.
Do not put the chrome trim rings in the oven. Doing so will
discolor and warp them.
18
ESCLOI-1
Page 19

TO SET SELF-CLEAN CYCLE
TO INTERRUPT A CLEAN
1. Slide door lock handle to the right. You may
need to slightly press
lock properly.
—1
.-
on the door to get it to
o
SE-r
1=
__lE!
2 PUSH
o
The self-clean cycle lasts 3-1/2 hours.
When the oven reaches locking temperature the
word LOCK will be shown in the ERC display.
You can push STOP TIME BUITON to find out
when the cycle will end. Push CLEAN BUTTON
to return to count down.
CYCLE
1 PUSH
?
:ANCEL
Then follow instructions under WHEN A CLEAN
CYCLE IS FINISHED
\
TIMER CLOCK :My
cl ‘-”
J
WHEN A CLEAN CYCLE IS
FINISHED
WAIT UNTIL 1
LOCK GOES OUT
(20-30 minutes)
Q,
2. Slide door lock handle to the left.
After a clean cycle the oven door cannot be
unlocked unless the word LOCK is off in the ERC
display and the oven has cooled.
NEVER force the door iock/unlock
handle. Forcing the
door lock mechanism.
m
“MER CLWK TIME
‘Top
CLEAN T,~
- BROIL BAKE
handle may damage the
?
Q
t
19
CSCL02-1
Page 20

Cleaning Tips
On the following pages, all removable parts on
shown.
r
I
Refer to those pages when cleaning your range.
PART
Control panel knobs
Solid Disk Elements
Detergent, warm water, soft cloth
Scouring powder, Scotch Brite Scour Pad@
CLEANING MATERIALS
your range are
warm,
water. a mild detergent and a soft clo!h are safe lo use on
all
cleanable parls of your rang~.
All purpose cleaners, such as
Fantastlk@, can also be used.
Do not use metal scouring
DO not use abrasive
easier cleaning.
Wipe with damp c]o!h after each use. Use the
mildest cleaning procedure that will dothejob. Rub
in the direction of the circular ridges. Rinse thoroughly and dry completely by heating element at a
medium setting. Cast iron will rust if not dried
completely. To restore appearance if elements
become dull, apply a small amount of salt-free
vegetable out with a paper towel (expect a Iittie
smoking at next use) or use ELCO or ELECTROL
solid element dressing (available at Sears).
pads, except where recommended.
—.——
REMARKS-
cleaners. Knobs pull off for
‘----------+
—.-—
Stainless steel trim rings and
automatic element sensor
Porcelain enameled cooktop
I
Brushed chrome cooktop
I
(some models)
I
I
Glass
I
Stainless steel scourer or baking soda
Detergent, warm water, plastic or nylon scouring pad
Detergent, warm water, soft cloth orachrome
cleaner or Sears Cooktop Cleaning Creme
Tousebaking soda, sprinkle ondampclothormake
paste with water. With normal element use, the trim
rings and
characteristic
performance. The original silver
stored by using a stainless steel scourer.
Clean after each spillover. Soak stubborn soil.
Do not scour chrome tops. Stubborn stains maybe
removed by using Espree tvlagwheel Cleaner@ or
Turtle Wax Polishing Compound~@. To
ger prints on brushed chrome, apply a little baby oil
with
brushed chrome, apply a little baby oil with a paper
towel. Rub in the direction of the brush
marks. Armor All Protestant T can also be used
(after cleaning). E3e sure to clean spills of acidic
foods quickly. Vinegar spills can permanently stain
chrome.
sensor change to a gold color. This is a
of stainless steel and does not affect
color can be re-
— —
remove fin-
a paper towel. Rub in the direction of the
If cleaning methods described above prove ineffective, baked-on food residue or stains on chrome
cooktops can be removed by using p@typeoven cleaners.
arecausticand will damage painted or aluminum surfaces,
Use extreme
such as range sides, backguard or control
caution. Oven cleaners
panes. Do not use spray type oven cleaners. Overspray will damage nearby painted surfaces and
heating elements. Use several layers of newspaper and masking tape to cover surfaces such as the
backguard, control panel,
disk elements), burner bowls, grates, etc. Apply the ~ type ovencleaner evenly to the entire top
range sides, countertops, etc.
Remove
cooktop elements (except solid
surface. The entire top must be cleaned to keep the finish consistent in color. Use extreme caution
to prevent the oven cleaner from coming in contact with any other surface, Let the cleaner remain
on the top for 20-30 minutes. Rinse the top well to remove every trace of oven cleaner. Dry the top
and apply Armor All Protestant@ to protect the finish.
Glasscleaner and paper towels
Remove stubborn soil with paste of baking soda
and water. Do not use abrasive cleaners. Rinse
thoroughly.
Oven interior
I
Oven door gasket
Detergent, warm water and/or soap filled
steel wool pad
Hydrogen peroxide
20
Clean inside the oven need only be done as an
optional touch -up between self -clean cycles. Rinse
oven interior thoroughly after cleaning.
Soak with hydrogen peroxide, using a ‘
sponge. Fequent soaking helps prevent soil build- I
up.
DO not rub. See self-clean section for more
information.
—————— ..—..—.
__–_-J
ECCH12
Page 21

REMWABLE OVEN RACKS
Be careful not to scratch the oven finish when installing
or removing oven racks.
To install:
1. Set the raised back edge of the rack on a pair of rack
guides.
J Push the rack in until you reach the bump in the rack
-.
guide, then lift the front of the rack and push the rack
all
the way in.
To remove:
1. Pull the oven rack out, then up.
REMOVABLE OVEN DOOR
To remove:
1. Open the door to the stop position (see illustration).
2. Grasp the door at each side and lift up and off the
hinges.
NOTE: When the door is removed and hinge arms are at
stop position, do not bump or try to move the hinge arms.
The hinges could snap back causing an injury to the
hands or damage to the porcelain on the front of the
range. Cover the hinges with toweling or empty towel
‘oIIs while working in the oven area.
To replace:
1. Hold the door over the hinges with the slots at the
bottom edge of the door !ir?ed up with the binges The
hinge arms must still be in the stop postion.
2. Slide the door down onto the hinges as far as it will go
and close the door.
REMOVABLE STORAGE DRAWER
This drawer gives you space for keeping cookware and
bakeware. Plastics and flammable material should not be
kept in this drawer.
Do not overload the storage drawer. If the drawer is too
heavy, it may slip off the track when opened. To open the
drawer, grasp the center of the handle and pull straight
out.
To remove: pull drawer straight out and lift over the guide
stops.
To replace: lift over the guide stops and slide drawer into
place.
STOP POSITION
!
/
~,
‘\- : .,,
v
‘NIV
/
/’
* //
.
/’,.
.
GUIDE STOP
h
\
‘%
L
;1
!1
Q.’
21
cMNT(ll-1
Page 22

REMOVABLE KNOBS
All control knobs may be removed for easy cleaning by
pulling the knob straight off the stem. Be sure that the knob
is in the OFF position before removal.
Hint: Slip a thin cloth (such as a handkerchief) or a piece of
string under and around the knob edge and pull up.
Caution: Read these instructions carefully before re-
placing the knobs. Replacing the knobs improperly will
damage the knc~s and the spring clips on the stems. If
this happens, the knovs will fit loosely.
To replace the knob:
1. The knob stem has a groove in each side. The groove on
one side has a spring clip. The other groove is clear (see
illustration).
2. Check the inside of the knob and find the molded rib.
3. Replace the knobby fitting the molded rib inside the knob
into the c!ear groove on the stem.
REPLACING THE OVEN LIGHT
MOLDED
RIB
I CLEAR
GROOVE IN STEM
Be sure that the light switch is in the off position.
Do not touch hot oven bulb. Do not touch bulb with wet
hands. Never wipe oven light area with wet cloth.
Never touch the electrically live metal collar on the bulb
when replacing it.
Electrical power must be shut off if you have to replace
a broken bulb.
1.Remove the three screws and lift off the glass retainer,
glass cover and gasket.
2. Replace the bulb with a 40 watt appliance bulb.
3. Replace the gasket, glass
retainer. Tighten screws securely.
cover and glass
REPLACING COOKTOP LIGHT AND
STARTER
Do not touch the bulb when it is hot or with wet
hands. Never wipe light
power must be shut off if you have to replace
bulb.
To replace bulb:
1. Flip front of the hinged canopy up.
2. Remove bulb. Replace the bulb with one of the same
length and wattage.
3. Lower the canopy.
To replace starter:
1. Open canopy and remove bulb as explained above.
2. Grasp starter, turn it counterclockwise, about one quarter
turn and lift out. Replace with one of the same wattage.
3. Reposition bulb and lower the canopy.
area with a wet cloth. Electrical
a broken
BULB
~
R~~~~R+\
SOCK
/
J
BULB
COLLAR
\
GASKET
s
\ ,\
J
v
BULB
GLASS “
COVER
-. .... . .
22
EMNT18
Page 23

Problem Solver
Gave timeand money --Check this list before you call for service.
eliminate unnecessary service calls. first, read all the instructions in this manual carefully. Then, if you have a problem,
~,ways check this list of common problems and possible solutions before you call for service,
PROBLEM
● Range does not work;
totally inoperative.
● Oven does not heat;
cooktop elements OK
● Cooktop does not work;
oven OK
● Foods do not bake prop-
erly
I
● Oven temperature seems
inaccurate
POSSIBLE CAUSE
“ No power to range.
● Clock set incorrectly (on models
so equipped)
● Oven controls set incorrectly
● Door latch in incorrect position (self-
clean models only)
● Element(s) unplugged
● Improper operation of control
Oven not preheated long enough
Improper rack or pan placement
Oven vent blocked or covered
Improper use of foil
Improper temperature setting
for
utensil used
Recipe not followed
Range and oven rack not Ieve
● Using improper cookware
● Thermostat calibration
DON’T CALL FOR SERVICE
UNTIL YOU CHECK
● Check household circuit breaker or fuse.
● Check powercord to be sure it isplugged
in.
● Check clock instructions
● Check oven control instructions.
. Check self-clean instructions.
s Check element connections by remov-
ing and re-plugging element(s) firmly.
● Be sure knob is pushed in while turning
●
Be sure to pre-heat:
10 minutes below 350 degrees
15 minutes above 350 degrees
●
Maintain uniform air space around pans
and utensils; see cooking hints section.
●
Reflector
bowl must have hole in center
over oven vent.
●
Foil use
●
Reduce temperature 25 degrees for glass
not recommended
or dull/darkeced pans.
●
is recipe tested and reliable?
●
Check the installation section for leveling
instructions (models with leg levelers
only)
● See oven cooking section.
● See adjustments described on the
following page.
23
ESER13-I
Page 24

Before Calling for Service
PROBLEM
D Foods do not broil prop-
erly
● Oven smokes
c Oven or work light does
not work (if equipped)
“ Oven does not clean or
poor cleaning results
(Self clean models only)
● Oven door will not un-
lock (Self clean models
only)
● Tone does not sound
POSSIBLE CAUSE
s Improper rack position
● Oven preheated
“ improper utensil used
s Oven door closed during
broil
s Improper broiling time
● Dirty oven
● Broiler pan containing grease
left in oven
s Light switch in off position
● Light bulb or fluorescent light
starter burned out
● Controls not set properly
● Clean cycle interrupted too
soon
G Oven too dirly
s Clean cycle not complete
● Tone has been eliminated by
pushing and holding CANCEL
button
DON’T CALL FOR SERVICE
UNTIL YOU CHECK
● Check broil pan placement. See broilin~
section.
● Do not preheat when broiling.
● Use broiler pan and grid supplied with range.
● Open door to broil stop position; see remov-
able oven door section.
● Check broiling chart in broiling section.
● Check for heavy spiliover.
● Clean pan and grid after each use.
= Check switch setting; see operating instruc-
tions.
● Check or replace light bulb; see use and care
instructions.
● Check self clean instructions.
● Heavily soiled ovens require a 3 1/2 hour
clean cycle.
● Heavy spillovers should be removed before
settina clean cycle. Repeat clean cycle.
● Oven must cool below lock temperature 1
(approximately 30 minutes after clean cycle if
complete).
s Push and hold CANCEL button to activate
tone.
1
I
I
I
I
● t-teavilysoiled or stained
chrome cooktop cannot
● Spills were not wiped up
promptly
be satisfactorily cleaned
ADJUSTING OVEN TEMPERATURE
The temperature in your new range has been set correctly at
the factory, so be sure to follow the recipe temperatures and
times thefirst few times you bake in your new oven.
If you think the oven should be hotter or cooler, you can
adjust it yourself. To decide how much to change the temperature, set the oven temperature 25’F higher or lower than
the temperature in your recipe, then bake. The results of this
“test” should give you an idea of how much the temperature
should be changed.
To adjust temperature:
1. Push the BAKE button.
2. Select the temperature between 500°F and 550”F with
the SET knob.
Q See the instructions, under Cleaning Tips, for
cleaning chrome cooktops with oven
cleaner. This procedure requires extreme
caution. Read instructions carefully.
3.
Quickly (within two seconds, before the BAKE function
energizes) push and hold the BAKE button.
The display will change to the amount of degrees difference between the original factory temperature setting and
the current temperature setting. If the oven temperature
has the original factory setting, the display will read 00.
4.
The temperature can be adjusted Up to 35°F hotter or
35°F cooler (in 5°F steps), by turning the SET knob. A
minus sign (-) before the number means that the oven will
be cooler by displayed amount of degrees.
When you have made the desired adjustment, push thm
5.
CLOCK button to go back to the time of day display or~
your oven as you would normally.
Note: The self -clean temperature
will not be changed by...~
adjustments described above.
24
ESER04-5
Page 25

f You Need Service
To obtain service, set? your warranty
on the back page of this book.
We’re proud of our service and want
you to be pleased. If for some reason
you are not happy with the service you
receive, here are three steps to follow
for further help.
FIRST, contact the people who serviced your appliance. Explain why you
are not pleased. In most cases, this
will solve the problem.
NEXT, if you are still not pleased, write
all the details-including your phone
number-to:
Manager, Consumer Relations
RCA
Appliance Park
Louisville, Kentucky 40225
FINALLY, if your problem is still not
‘esolved, write:
Major Appliance
Consumer Action Panel
20 North Wacker Drive
Chicago, Illinois 60606
25
CSEROl
Page 26

YOUR RCA RANGE
WARRANTY
Save proof of original purchase date such as your sales slip or cancelled check to establish warranty period.
—.—c
quality products and service.
fulfill your
WHAT IS COVERED
FULL ONE-YEAR WARRANTY
For one year from the date of
original purchase, we will provide,
free of charge, parts and service
labor in your home to repair or
replace any part of the range that
fails because of a manufacturing
defect.
This warranty is extended to the
original purchaser and any succeed-
ing owner for products purchased for
ordinary home use in the 48 main-
land stales, Hawaii and Washington,
D.C.
In Alaska the warranty is the
same except that it is LIMITED
because you must pay to ship the
product to the service shop or for the
service technician’s travel costs to
your home.
— .—-—._________
We at RCA strive to provide the high-
est
Therefore, we have designated
CONSUMER SERVICE, a leader in
the service industry, to
service needs. Should your appliance
need service, during the warranty
period or beyond, look in the White or
Yellow pages of your telephone
directory for GE CONSUMER SERV-
ICE or an AUTHORIZED
ANCE SERVICER.
—.
GE
RCA APPLl-
I
I
WHAT IS NOT COVERED
Some
states do not allow the exclusion or limitation of incidental or consequential damages, so the above
limitation or exclusion may not apply to you. This warranty gives you specific legal rights, and you may also have
other rights which vary from state to state. To know what your legal rights are in your state,
consult your local or state consumer affairs office or your state’s Attorney General.
If further help is needed concerning this warranty, write:
● Service trips to your home to teach
you how to use the product.
Read your Use and Care material.
If you then have any questions
about operating the product,
please contact your dealer or our
Consumer Affairs office at address
below.
● Improper installation.
If you have an installation problem,
contact your dealer or installer. You
are responsible for providing ade-
quate electrical, plumbing and other
connecting facilities.
Warrantor: RCA Appliances
Manager—Consumer Affairs, RCA,
Appliance Park, Louisville, KY 40225
c Replacement of house fuses or
resetting of circuit breakers.
● Failure of the product if it is used ‘
for other than its intended purpose or
used commercially.
● Damage to product caused by
accident, fire, floods or acts of God.
WARRANTOR IS
SIBLE FOR CONSEQUENTIAL
DAMAGES.
NOT RESPON-
—
.—
I
.-
I
L3B355GL (24
~
L3B360GL (2498)
 Loading...