

Page 1
.
,
contents
Aluminum Foil
Anti-Tip Device
Appliance Registration
. .
Canning Tips
Care and Cleaning
Clock/Tin~er
Consumer Services
Energy-Saving Tips
Features
Installation Instructions 24-27
Leveling
Model and Serial Numbers 2
Oven
Baking/Baking Guide 15, 16
~~
18 Control Settings 13,14
3,24 Door Removal 22
2
9 PreIleating 5,15,16
20-23
13 Shelves 12,21,23
31 Problem Solver 28
5 Safety Instructions
6,7
25
12-19
Ligl~t;Bulb Replacement 12,22
Roasting/Roasting Guide 17
—.
Surface Cooking
Control Knobs 8
Cooking Guide 10,11
Cookware Tips 10,11
Warranty
Back Cover
3,4
8-11
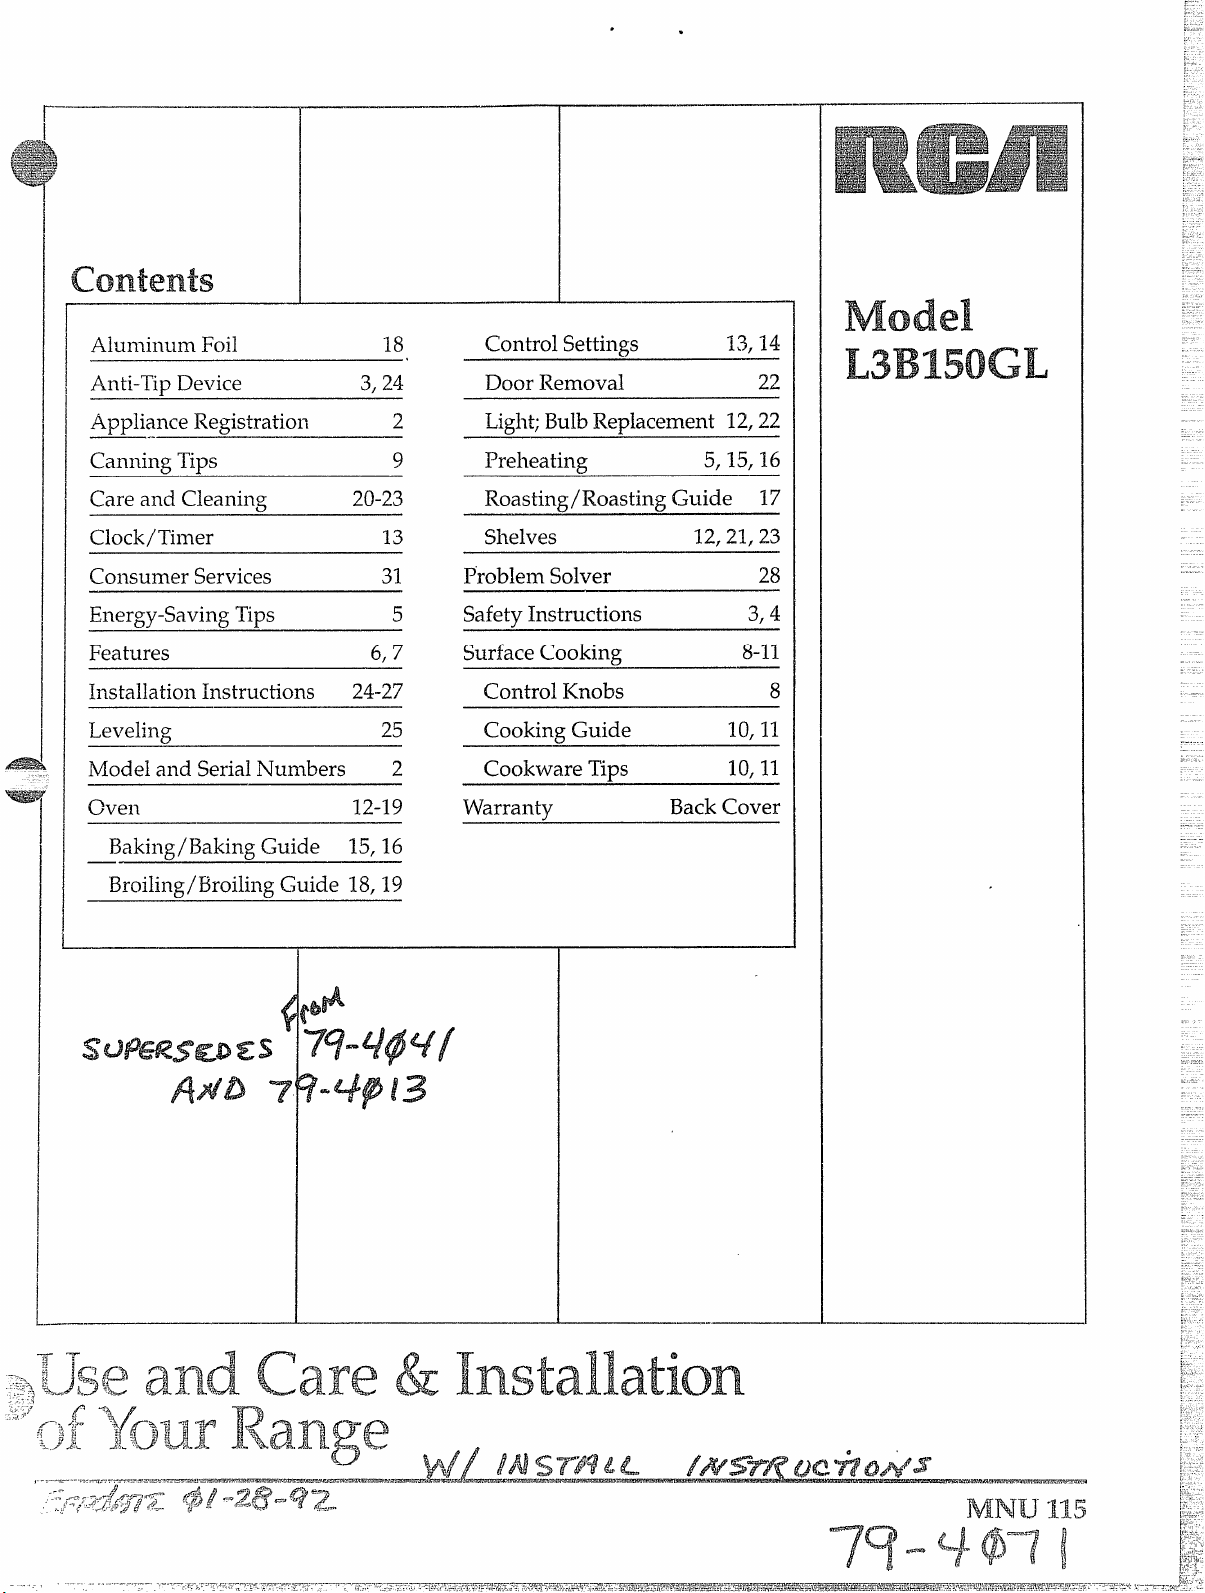
Model
L3B150GL
Broiling/Broiling Guide 18,19
1
I
Installation
Page 2
[[ isintended to help you
:
‘
operate and maintain your new
range properly.
Keep it handy for answers toyour
questions.
If yoLldon’tunderstand something
or need more help, write (include
your phone number):
Consumer Relations
Appliance Park
Louisvi]]e.KY 40225
writedown the mode]
serialnumbers.
and
YoL~’11find them on a label on
the front of the range behind the
storage door.
These numbers are also on the
Consumer Product Ownership
Registration Card that
your range. Before sending in this
card, please write these numbers
here:
came with
If youreceived
a danlaged range...
Immediately contact thedealer (or
builder) that sold you therange.
savetimeand money.
Beforej’ou request
service...
Check the Problem Solverin the
back of this‘book.It listscauses of
minor operating problemsthat you
can co~~ectyourself.
To obtain service, see the
Consumer Services page in the
back of this book.
We’reproud of our service and
want you to be pleased. If for some
reason you are not happy with the
serviceyou receive, here are three
stepsto follow for further help.
FIRST, contact the people who
serviced your appliance. Explain
why you are not pleased. In most
cases, this will solvethe problem.
NEXT, if you are stillnot pleased,
write all the details—-including
your phone number—to:
Consumer Relations
AppliancePark
Louisville, KY 40225
FINALLY,ifyour problem is still
not resolved, write:
Major Appliance Consumer
Action Panel
20 North WackerDrive
Chicago, IL 60606
ModelNumber
SerialNumber
these numbers in any
Use
correspondence or service calls
concerning your range.
...—.-..—-—-.—---------—-—-————-—.-———-—’
——
—— .
. ..——-.
r-:. .
fr. -.,;
~;:
&~’
Page 3
-..—_—
.—
*
.-~*%,..
M
en usingelectrical
appliances, basic safety
precautions
including the following:
*use this appliance Oniyfol”
its in~ended use as described in
this manual.
*Be sure your appliance is
properly btiued and grounded
by
aqualifiedtechnicianin
accordancewiththeprovided
installationinstructions.
eDonytattemptto repair or
replaceanypart ofyollrrange
unlessitisspecifically
recommendedinthis booi(eAll
otherservicingshouldbereferred
toaqualifiedtechnician.
eBeforeperforatingany
service,
MNGE POWER SUPPLY
OR
s-wITcHmG Om THE
CIRCUITBREA~R.
shouldbefollowed,
DISCONNECTTHE
E
youpushtherangeback.
PleaserefertotheAnti-~p
deviceinformationinthisbook.
Failuretotakethisprecaution
couldresultintippingofthe
rangeandinjury.
@~~ ~~~~~~~~~~~~~~~~~~~~*
childrenshouldnotbeleftalone
orunattendedin anareawherean
applianceisinuse.Theyshould
neverbeallowedtositorstand
onanypartoftheappliance.
*Don9tallow
standorhangonthe door9
draweror rangetop.They
Coulddamagetherangeand
eventipit over9causingsevere
personalilljuryo
oCAUTION:ITEMSOF
INTEREST To CHILDREN
SHOULDNOTBE STORED
INCABINETSABOVEA
mNGE OR ONTHE
BACKSPLASHOF A
RANGE—cHILDmN
CLIMBINGON THE RANGE
To mAcH ITEMS COULD
BE SERIOUSLY INJUMD.
~Neverwearloose-fittingor
hanginggarmentsWhileusing
theappliance.
anyoneto cIimb9
Flammable
materialcouldbeignitedif
broughtincontactwithhot
heatingelementsandmaycause
severeburns.
@use onlydry potholders—
moistordamppotholdersonhot
surfacesmayresultinburnsfrom
steam.Donotletpotholderstouch
hotheatingelements.Donotuse
atowelorotherbulkycloth.
eWoryoursafety9neveruse
yourappliancefor warmingor
heatingtheroom.
e~~~~~$$~~~Qr~$~~~~~~~~~~~~
mt2t&riais7gasolineor Oth$r
na!nmablevaporsand liquids
inthevicinity‘ofthisor tnny
Q$llerappliance.
—..—
o Keephoodandgrease filters
cleantomaintaingoodventing
andtoavoidgreasefires.
oDonotletCookinggreaseor
Otherflammablematerials
accumulatein or near the
range.
@Donotusewaterongrease
fires.Neverpickup a flaming
pan.Smotherflamingpanon
surfaceunitbycoveringpan
completelywithwell-fittinglid,
cookiesheetorflattray.Flaming
greaseoutsideapancanbeput
outbycoveringwithbakingsoda
or,ifavailable,amulti-purpose
drychemicalorfoam-typefire
extinguisher.
eDonottouchheating
elementsor interiorsurfaceof
oven.Thesesu~facesmaybehot
enoughtoburneventhoughthey
aredarkincolor.Duringand
afteruse,donottouch,orlet
clothingorotherflammable
materialscontactsurfaceIlnits,
areasnearbysurfaceunitsorany
interiorareaoftheoven;allow
sufficienttimeforCooling,first.
Potentiallyhotsurfacesinclude
thecooktop,areasfacingthe
cooktop,ovenventopening,
surfacesneartheopening,
crevicesaroundtheovendoor,
andmetaltrj.mpartsabovethe
door.Remember:Theinside
surfaceoftheovenmaybehot
whenthedoorisopened.
*Whencookingpork9follow
thedirectionsexactlyandalways
cookthemeattoaninternal
temperatureofatleast1700P.
Thisassuresthat,intheremote
possibilitythattrichinamaybe
presentinthemeat,itwillbe
killedandthemeatwillbesafe
toeat.
(c’(]lltilrl(i’iirIc’.vl~?(tgc)
...- —.
3
Page 4
——.
.
.——— .———
o
.
mIPol?TANTSAFETYmsTRucTIoNs(continued)
o7’en
e Keepoven freefrolngrease
buildup.
e Placeoven She!findesired
position whileoven is coo].If
shelvesmustbehandledwhen
hot,donotletpotholdercontact
heatingunitsintheoven.
‘ Pullingoutsheif tothe shelf
stop
isa convenience inititing
heavy foods. It is also a
precautio~]againstburnsfrom
touchinghot Sutiacesof the
doororoven walls.
9when using Cooldngor
roastingbagsinoven9follow
themanufacturer’sdirections.
QDonotuse your oven todry
newspapers.Ifoverheated,they
cancatchfire.
surfacecooking units
QUse proper pall size—This
applianceisequippedwithoneor
moresurfaceunitsofdifferent
size.Selectcookwarehavingflat
bottomslargeenoughtocover
thesurfaceunitheatingelement.
Theuseofundersizedcookware
willexposeaportionofthe
heatingelementtodirectcontact
andmayresultinignitionof
clothing.P~operrelationshipof
cookwaretoburnerwillalso
improveefficiency.
@Neverleavesurfaceunits
unattendedat Mghheat
settings.Boilovercauses
smokingandgreasyspiliovers
thatmaycatchonfire.
eBeSlnredrip pansandvent
ductsare notcoveredand are
in place.Theirabsenceduring
cookingcoulddamagerange
partsandwiring.
@~Q~~~~$~~~~~j~~~f~~~~~
linedrip
theovenexceptasdescribedin
thisbook.Misusecouldresultin
ashock,firehazardordamageto
therange.
*only ‘certiintypesofglass9
glass/ceramic9earthenwareor
otherglazedcontainersare
suitablefor
othersmaybreakbecauseofthe
sudclenchangeintemperature.
SeethesectiononSurface
Cookingfo~suggestions.
Q~~~ifimize the possibilityof
burns9ignitionofflammable
materials,andspillage,the
handleofacontainershouldbe
turnedtowardthecenterofthe
rangewithoutextendingover
nearbysutiaceunits. ,
~ans oranywherein
range-top service;
—
CoolKware.
o
Keepa~n eye on foods being
fried at HI or MEDIUM HIGH
heat settings.
$To avoid the possibiliq of ‘a
~u~~ or elec~Ticshock9
always
beCerhinthat thecontrolsfor
all surfaceunitsareat OFW
positionand
before attempting to IKt or
remove the Utit.
~ Don9t immerse or
renlovablesurfaceunits.Don9t
put themin a dishw’asbere
@When
under the hood9 turn the
off. The
spread the flame.
~
Alwaysheatfat slowiy~and
all coils are cool
soak
flaming foods are
fan
fan9 if operating? may
watchasitheats.
@Usedeep
wheneverpossible
fat thermometer
toprevent
overheatingfatbeyondthe
smokingpoint.
oFoodsforfrfing shollldbeas
dry aspossible.Frostonfrozen
foodsormoistureonfreshfoods
cancausehotfattobubbleup
andoversidesofpan.
e~s~~~~~]~f~~f~~~fl~~$~v~
shailow or deep-fatfrying.
Fillingthepantoofulloffat
cancausespilloverswhenfood
isadded.
@~ ~~~~~~~~t~~~of~~~~~~
fatswiilbeusedin fFying9stir
togetherbeforeheating,oras
fatsmeltslowly,
SAVETHESE
..
.4=
—.__.._,..___. _.__,
mSTRUCTIONS
——.——.—..—
Page 5
——
__.—.— .—
aluminum, ~lithtight-fitting covers, and flat bottoms which
completely cover the heated
portion of the surface unit.
@Cook fresh vegetables with a
[ninimunlamount of water in a
covered pan.
~Watch foods when bringing them
quickly to cooking temperatures at
high heat. When food reaches
cooking temperature, reduce heat
immediately to lowest setting that
will keep it cooking.
oUse residual heat with surface
cooking whenever possible. For
example, when cooking eggs in
their shells, bring water and eggs
to a boil, then turn control knob to
OFF position and cover cookware
with lid to complete the cooking.
eWhen boiling water for tea or
coffee, heat only amount needed.
. It is not economical to boil a
I
ontainerfull of water for one or
w
———-——.-”-—...4..--——————
ovenCool<ing
*Preheat oven only when
necessary.Most foods willcook
satisfactorilywithout preheating.
If yoLlfind preheating is necessary,
watch the indicator light, and put
food in the oven promptlyafter the
lightgoes out.
~Always turn oven off before
removing food.
~During baking, avoid frequent
door openings. Keep door open
as short a time as possible if it
is opened.
QCook complete oven meals
instead ofjust one food item.
Potatoes, other vegetables, and
some desserts willcook together
with a main-dish casserole, meat
loaf, chicken or roast. Choose
foods that cook at the same
temperature and in approximately
the same amount of time.
QUse residual heat in the oven
whenever possible to finish
cooking casseroles, oven meals,
etc. Also add rolls or precooked
desserts to a warm oven, using
residual heat to warm them.
— . . . . . .
—-.—.——.——.———-__
..—
r.. ..,. -._,.,., ______________
-—
—.-.——-
5
Page 6
—..._
.—
—.
——
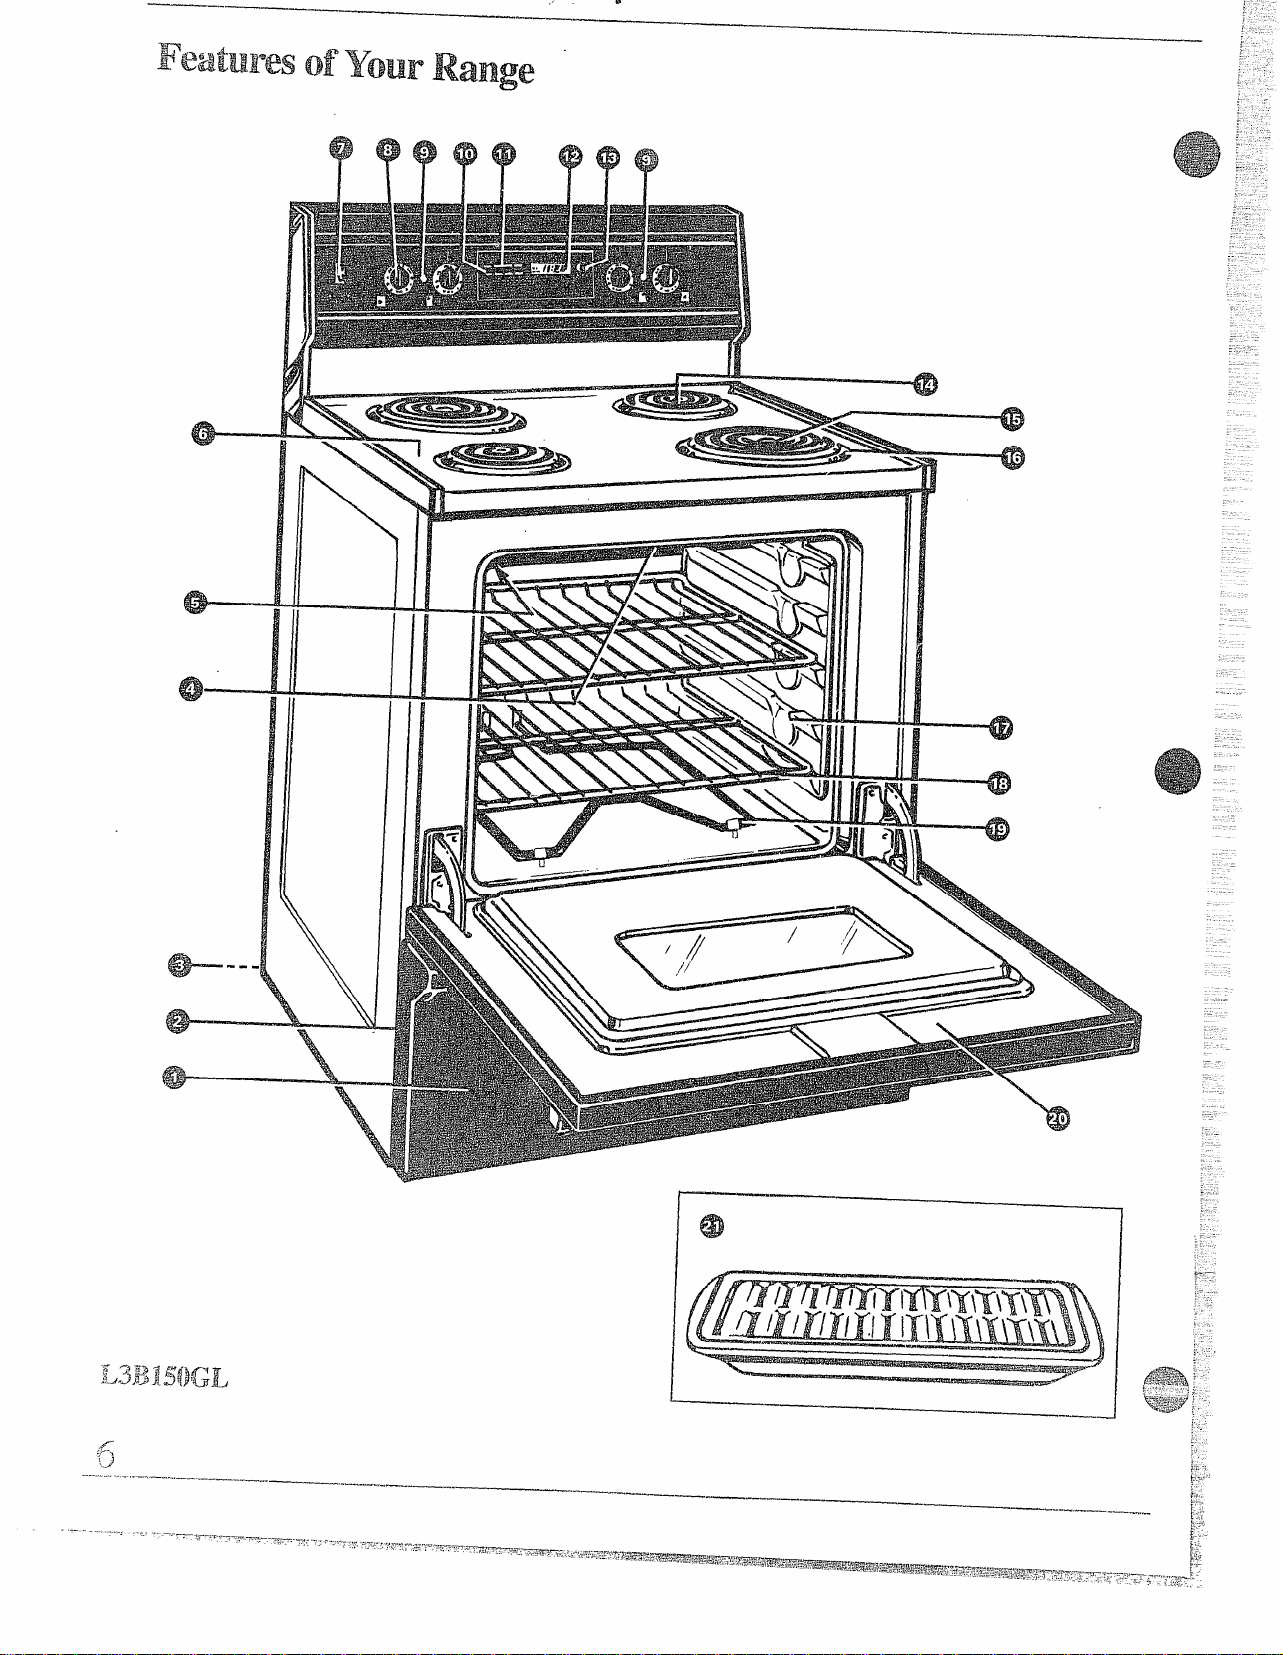
k’eatures ofYourRange
77??????
--—=
,.
u
“—
———
-“——”-”~
r
. .
—
—
I
————————
—-—--—_-..__.
Page 7
——
-— —
——.—
a
——.
,_...-——.
—-,..,—.—
1 Storage Drawer
2 Model and Serial Numbers
3 Anti-Tip Device
4 Broil Unit
5 Oven Interior Light
(located in the upper left corner of the back
of your oven)
6 Lift-Up Cooktop
7 Oven Light Switch
(lets you turn interior oven light on and off)
8 Surface Unit Control Knobs
9 “On” Indicator Light for Surface Units
10 Oven Controls
Automatic Oven Timer
(turns your oven on and off for you automatically)
Oven Control and Thermostat
Clock
Minute/Second Timer
(lets yoL~time any kitchen function, even when
the oven is in use)
22,23
I
2
3,24
I
23
12,22
20
12
8
8
13, 14
14
13, 14
13
13
1i Oven CANCEL button
(pLlshit to cancel any oven operation)
i2 Oven “On” Indicator
13 Set Knob
(lets you set oven temperature, clock timer
and HI or LO broil)
14 Oven ~~ent(located under right rear surface unit)
15 PluQ-inSurface Units
16 Chrome Plated Drio Pans
17 Oven Shelf Supports
18 Oven Shelves
(easily removed or re~ositioned on shelf supports)
20 Removable Oven Door
2I
Broi Ier Pan and Rack
2
13, 14
8,9,20,23
I
20723
I
12,21,23
+
----
Page 8
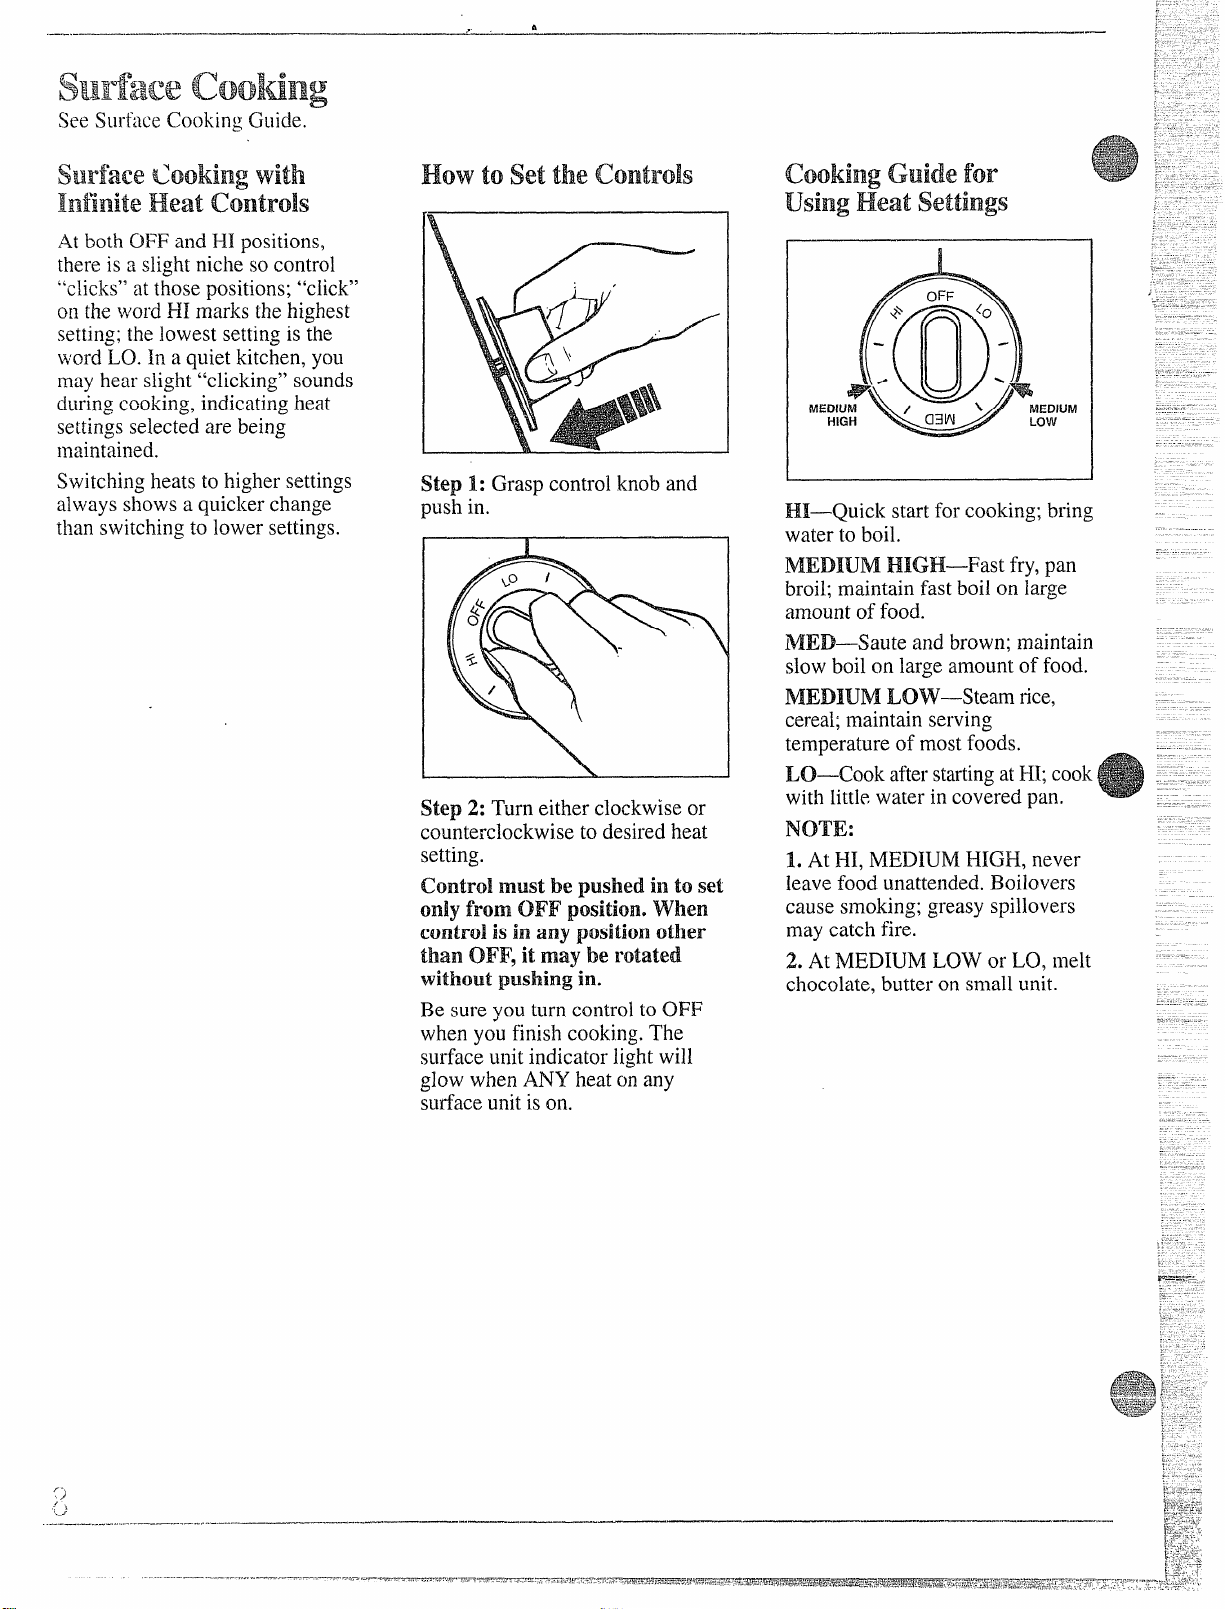
At both OFF and HI positions,
there is a slightniche so control
“clicks” at those positions; “click”
on the word HI marks the highest
setting; the lowest setting is the
word LO. In a quiet kitchen, you
may hear slight “clicking” sounds
during cooking, indicating heat
settings selected are being
maintained.
Switching heats to higher settings
always shows a quicker change
than switching to lower settings.
Step 1: Grasp control knob and
push in.
L
\
Step 2: Turn either clockwise or
counterclockwise to desired heat
setting.
control
must be pushed ill toset
only fromOEF position. when
control
than
without
is ill any position other
OFT,it maybe rotated
pushing in.
Be sure you turn control to OFF
when you finish cooking, The
surface unit indicator light will
glow when ANY heat on any
surfaceunit is on.
Hi—Quick start for cooking; bring
water to boil.
MEDIUM HIGH—Fast fry, pan
broil; maintain fast boil on large
amount of food.
lMED—Sauteand brown: maintain
slow boil on large amount of food.
MEDIUM LOW—Steam rice,
cereal;maintain serving
tem~erature of most foods. .-
I
LO~Cook afterstartingat HI; cook
with little water in covered pan,
NOTE:
1. At HI, MEDIUM HIGH, never
leave food unattended. Boilovers
cause smoking; greasy spillovers
may catch fire.
2. At MEDIUM LOW or LO, melt ‘“
chocolate, butter on small unit.
—-.
—-
.-
-.
Page 9
Questions&<Answers
- May I can foods and
-:se:YEs
A. Yes, but only use cookware
designed for canning purposes.
Check the manufacturer’s
instructions and recipes for
preserving foods, Be sure canner is
flat-bottomed and fits over the
center of the surface unit. Since
canning generates large amounts of
steam, be careful to avoid burns
from steam or heat. Canning should
onIy be done on surfaceunits.
Q.
can I Covermy drip pans
with foil?
A. No. Clean as recommended in
Cleaning Guide.
011 my sllrface tlnits’?
canI use special Cooking
Q.
equipment,like arkoriental WOI<3
on
anysurfaceunit?
Cookware without flat surfaces
A.
is not recommended. The life of
the surface units can be shortened
and the cooktop can be damaged
from the high heat needed for this
type of cooking.
Q. why am I not getting the heat
I need from my
eventhoughI havetheknobson
therightsetting?
After turning surfidceunits off
A.
and making surethey are cool,
check to make sure that your plug-
in units are securely fastened into
the surface connection.
surfaceunits
Q. Wly doesmy Cool<waretilt
when 1
A.
cookware is not flat. Make sure
that the “feet” on your surface
units are sitting tightly in the
cooktop indentation and the drip
pan is flat on the range surfiace.
Q. why is tine porcelain finish 011
my cookwarecomingoffl
A. If you setyour surface unit
higher than required for the
cookware material, and let the
cookware sit too long, the
cookware’s finish may smoke,
crack, pop or burn, depending on
the pot or pan. Also, cooking small
amounts of dry food may damage
the cookwareis finish. -
placeitonthesutiacet]nit?
Because the surface unit or the
=ome Cadng Tips
canning should be done on
surfaceunits Onlye
Irisurface cooking, the use of pots
extending more than one inch
beyonclthe edge of the surface
unit’sdrip pan is not recommended.
However, when canning with a
ivater-bath or pressure ctinner,
large-diameter pots may be used.
This is because boiling water
temperatures (even under pressure)
are not harmful to cooktop surfaces
surrounding the surface units.
observe the Following
Pointsincanning
1. Be sure the canner fits over the
center of the surface unit. If your
range or its location does not allow
the canner to be centered on the
surface unit, L1sesmaller-diameter
pOts fOrgood canning res~~lts.
2. For best results use canners with
flat bottoms. Canners with flanged
or rippleclbottoms (often found in
enamelware) don’t rnak~good
contact with tl~esurface unit and
take a long time to boil water,
3. When canning, use recipes and
procedures from reputable sources.
Reliablerecipesand procedt~resare
available from the manufacturer of
your canner; manufacturers of
glassjars for canning, such as Ball
and Kerr; and the IJnited States
Department of Agriculture
Extension Service.
4. Remember that canning is a
process that generates
amounts of steam. To avoid burns
from steam or heat, be careful
when canning.
NOTE: If your house has low
voltage, canning may take longer
than expected, even though
directions have been carefully
followed. The process time will be
shortened by:
(1) using a ]Iressurecanner, and
(2)
startingwith HOT tapw:~ttrfor
fastest heating of largequantities
of water.
.
large
___,.“.....----------------------------------------------
———
Page 10

control settings‘
i..
,.
cookware Tips
~1—-~ighest setting.
h4EDlUhf ~lG~—Selting
halfway between ~1 and MED.
filED—h!edium setting.
hfEDIUhfI LO%V—Setting
halfway between IMEDand LO.
~0—~owest setting.
Food
cookware
Cereal
Cornmeal,
oatmeal
cocoa
Coffee
grits,
Covered
Saucepan
Uncovered
Saucepan
Percolator
Eggs
Cooked
Fried sunny-side-up
Ftied over easy
Poached
Scrambled or omelets
in shell
Fruits Covered
bleats
Braised: Pot roasts of
beef, ]ambor veal;
pork chops and ste~ks
Covered
Saucepan
Covered
Skillet
Uncovered
Skillet
Covered
Skillet
Uncovered
Skillet
SaLlcepan
Covered
Skillet
[Jncovcrcd
$ki]lct
Directions
arid Settings
toStartCooking
HI.1ncoveredpanbring
water to boil before adding
cereal.
HI. Stir together water or
milk and cocoa ingredients.
Bringjust to a boil.
HI. At first perk, switch
heat to MEDIUM LOW.
HI. Cover eggs with cool
water. Cover pan, cook
until steaming.
N4EDIUMHIGH. Melt butter,
add eggs and cover skillet.
HI. Melt butter.
HI. In covered pan bring
water to a boil.
HI. Heat butter until light
golden in color.
HI. IIIcovered pan bring
fruit and water to boil.
EII.Melt fat, then add meat.
Switch to MEDIUM HIGH to
Drownmeat. Add water or
:)therliquid.
[-il.Preheat skiIlct, then
:rca!>clightly<
1. Use medium- or heavy-weight
cookware. A1uminumcookware
conducts heat faster than other
metals. Cast-iron and coated castiron cookware are slow to absorb
heat, but generally cook evenly at
low to meciiumheat settings. Steel
pans may cook unevenlyif not
combinedwith othermetals.
Directionsand Settings
toComplete Cooking
MEDIUM LOW or LO, then
add cereal. Finish timing
according to package directions.
MED, to cook 1 or 2 minutes
to completely blend ingredients.
MEDIUM LOW to maintain
gentle but steady perk.
MEDIUM LOW, Cook only 3
to 4 minutes for soft cooked;
15minutes for hard cooked.
Continue cooking at MEDIUM
HIGH until whites are just set,
about 3 to 5 more minutes.
MEDIUM LOW, then adcieggs.
When bottoms of eggs have
just set. carefully turn over
to cook other side.
MEDIUM LOW, Carefully add
eggs. Cook uncovered about
5 minutes at MEDIUM HIGH.
MED. Add.egg mixture.
Cook, stirring to desired
doneness.
MEDIUM LOW.Stir occasionally
and check for sticking.
MEDIUM LOW, Simmer until
fork tender.
MEDIUM I+JGHor MED. B].o\vn
al~dcook to desired dor]encss,
turning over as needed.
Cereals bubble and expand as
they cook; use large enough
saucepan to prevent boilover.
Milk boils over rapidly.
Watch as boiling point
approaches.
Percolate 8 to 10minutes for
8 cups, less for fewer cups.
If you do not cover skillet,
baste eggs with fat to cook
tops evenly.
Remove cooked eggs with
slotted spoon or pancake
turner.
Eggs
continuetosetslightly
after cooking. For omelet do
not stir last few minutes.
When set, folciin half.
Fresh fruit: Use 1/4to 1/2
cup water per pound of fruit.
Dried fruit: Use water as
package directs. Time
depends on whether fruit has
been presoaked. If not, allow
more cooking time.
Meat can be seasoned a~~d
floured before it is browned,
if desirecl.Liquid variations
for flavor could be wine, fruit
or tomatojuice or meat broth.
Timing: Steaks 1to 2 inches:
1to 2 hoLlrs.Beef Stew: 2 to
3 hoL1rs.Pot r{oast: 272to
4
hoLlrs.
Pan fryin=~ is best for thiil
steaks and chops. 1f rare is
desired, preheat sl<illet
beforea(idingmeat.
:,.,
[.
Page 11

Wrong
2. ‘~oconscr~’e the most cooking drip pans ranging from blue to
dark grey.
3. Deep Fat Frying. Do not overfill
of
the saucepan to the size of the
..
surface
unit. A pan that extends
more than one inch beyond the
edge of the drip pan will trap heat
c:]usingdiscoloration on chrome
Directionsand settings
tostart Cooking
bleats
Fried Chicken Covered
Pan-fried bacon HI. In cold skillet, arrange
Sauteed: Less tender
thin steaks (chuck.
round, etc.); liver:
thick or whole fish.
Simmered or stewed
meat; chicken;
corned beet smoked
pork; stewing beet
tongue: etc.
Nleltingchocolate,
butter,]narshmal~o~v:
Pancakesor
Frenchtoast
Skillet
uncovered
Skillet
Covered
Skillet
Coverecl
Dutch Oven,
Kettle or
Large
Saucepan
Small
Uncovered
Saucepan.
Use small
surface t]nit
Skillet or
Griddle
P3sta
Noodles t)rspaghetti Large
Pressnre Cooking
Pilddings, sauces,
Candies,Frostings
Covered
Kettle or Pot
Pressure
Cooker or
Canner
Uncovered
Saucepan
HI. Melt fat. Switch to MEDIUM
IHIGHto brown chicken.
bacon slices. Cookjust until
starting to sizzle.
HI. Melt fat. Switch to MED
to brown slowly.
HI. Cover meat with water
and cover pan or kettle.
Cook until steaming.
LO. Allow 10to 15minutes
to melt through. Stir to smooth.
MEDIUM HIGH. Heat skillet
8 to 10 minutes. Grease lightly.
HI. In covered kettle, bring
salted water to a
and add pasta slowly so boiling
does not stop,
131.Heat until first jiggle is heard.
H1.Bring just to boil.
cookware with fiatthat may spill
(>verwhen adding food. Frosty
foods bubble vigorously,Wat~l~
foods frying at high temperatures.
Keep range and hood clean from
accumulated grease.
Directionsand settings
to CompieteCooking
MEDIUM LOW.Cover skillet
and cook until tender.
Uncover last few minutes.
MEDIUM HIGH. Cook, turning
over as needed.
MEDIIJM LOW. Cover and cook
unti1tender,
MEDIUMLOW.Cookuntilforktender.(Watershouldboil slowly.)
For very large amounts, medium
heat may be needed.
Cook 2 to 3 minutes per side. Thick batter takes slightly
boil, uncover
.—
IMEDIUMHIGH. Cook
uncovered until tender. For
large amounts, HI may be needecl
to keep water at rolling boil
throughout entire cooking time.
MEDIUM HIGH for foods
cooking 10minutes or less.
MED for foods over 10 minutes.
“MEDIUMLOW.To finish
cooking.
mm<
Concave Bottom
\ —~
Comments
Forcrisp,drychicken,coveronly
afterswitchingto MEDIUM
LOW for 10minutes.
Uncover and cook, turning
occasionally for 10to 20 min.
A more attention-free method
is to start and cook at MED.
Meat may be breaded or
marinated in sauce before
frying.
Add salt or other seasoning
before cooking if meat has
not been smoked or
otherwise cured.
When melting marshmallows,
add milk or water.
longer time. Turn over
pancakes when bubbles
rise to surface, “
Use large enough kettle to
prevent boilover. Pasta
doubles in size when cooked.
Cooker shouldjiggle 2 to 3
times per minute.
Stir frequently to prevent
sticking.
Rounded Bottofm
Right
rT
WVrong
Covered
Saucepan
Covered
Saucepan
Uncovered
Skillet
.———..,
c~v~red
sallccj7all
HI. Measure 1/2to 1inch
water in satlcepan. Add salt
and prepared vegetable.
In covered saucepan bring
to boil.
HI. Measure water and salt
as above. Add froze[iblock
of vegetable, In covered
saucepan britlg to boil.
HI. In skillet. melt fat.
Fll, i;rinj~ salted waler !() a boil.
.—. _-__.,
MED. Cook 1 poLlnd
10to 30 or more minutes,
depending on tenderness
of vegetable.
MEDIUM LOW.Cook according
to time on package.
MED. Add vegetable,
Cook until (iesired
Iendcrnt?ssisrcachect.
LO, ~OVCI’ :Illd COO](
ac(;ordi ng 1() time,
-—...”-
Uncoveredpan requires more
water and longer time.
Break up or stir as needed
while cooking.
Turn over or s[ir vegetable as
necessary for even browni!lg.
Rice and grits triple in volume
atier cookint<.Timeat LO.
Ilicc: 1CUD;icc and2
waler for
Grits: 1
watsr for ~1(1minutes.
~5minutes, “
cLI~3grits and 4 cups
——
cLlps
11
$
Page 12

LTsirlgYouroven
Before tJsing Your oven
1=Look at the controls. Be sure
j’ouunderstand how to set them
properly. Read over the directions
for the Oven Controls so yOu
understand how to use them.
2. Check oven interior. Look at
the shelves. Take a practice run at
removing and replacing them
properly,togivesure,sturdysupport.
3. Read over information and tips
that follow.
4, Keep this book handy so you
can refer to it, especially during
[hefirst weeks of using your
new range.
ovenshelves
The shelves are designed with
stop-locks so when placed
correctly on the shelf supports,
they will stop before coming
completely out of the oven and
will not tilt when you are removing
food from them or placing food
on them.
When placing cookware on a shelf,
pull the shelf out to the“stop”
position. Place the cookware on
the shelf, then slide the shelf back
into the oven, This will eliminate
reaching into the hot oven.
To remove the shelf from the
oven, pL~llthe shelf toward yoLt,
tilt frontend upward, andpull the
shelfout.
To replace, place the shelf on the
appropriate shelf supportwith stop-
locks (curved extension of shelf)
facing up and toward rear of oven.
Tilt the front end upward and push
the shelf toward back of oven until
it goes past the “stop” on oven
wall. Then lower front of shelf, and
push it all the way back,
shelf Positions
The oven has f’ourshelf supportsA (bottom),B, C andD (top).Shelf
pOSitiOnSfor cooking are s-uggested
on Baking and Roasting pages.
ovenLight
Use the switch on the panel to ~urn
light on and off.
--
-.
. /..
.L
....——-.,.-....,..,,___------
—..————
———— . .
Page 13

,.--;
—“
-1
.”.
. ..-.——..
.
:..;
——_.
~~~~ “on” Indicator
The word “ON” is displayed
when the BAKE or BROIL button
is energized, and goes out when
either the CANCEL button is
pushed or the oven shuts off
automatically.
The oven operation is controlled
electronically.The following
instructionstell you how to operate
the oven controls.
ush the CLOCK button.
~rnthe SET knob to the
correct time of day. The clock is
no~~-set. The clock mLlstbe set to
the correct time of day for accurate
auiomatic oven timing operations.
——...
—..
Tosetthe
Minute/second Timer
1. Push the TIMER button.
2. Turn the SET knob to the
desired amount of time (up to
9 hours and 59 minutes). The
Minute/Second Timer will begin to
count down within a few seconds.
3. When time is up, the
End-of-Cycle Tone (3 long beeps)
will sound and the display will
again show the time of day.
NOTE: The Minute/Second
Timer is a reminder only and will
not operate the oven,
Youcan use the Minute/Second
Timer whether or not the oven is
being used. The Minute/Second
Timer does not interfere with
oven operations.
.—
.—
----
ToBake
1.Push the BAI{Ebutton.
2*Turn the SET knob until the
desired temperature is displayed.
The display will show 100degrees
and then the rising temperatures.
A one-secondbeep will sound
when the oven has preheatedto and
stabilizedattheselectedtemperature.
3. W!len finished baking,push
the CANCEL button.
NOTE: Torecall what temperature
you have selected while the rising
temperature is being shown, push
and hold the BAKE button. The
selected temperature will be shown
while you hold the BAKE button.
The actual oven temperature will
be shown after a few seconds.
Youcan push the CLOCK button
to display time of day without
canceling the oven operation.
Youcan change the selected
temperature at any time by
pushing the BAKE button and
turning the SET knob.
To Broil
-———-——.——---.---...————___
To cancel the Timer
Push and hold TIMER button for
three seconds. ‘rhiswill clear the
Minute/Second Timer function.
1. Push the BROIL button.
2. Turn the SET knob until your
choice of ~1 BROIL or LO BROIL
is visible in the display,
When finished broiling, push the
CANCEL button. “ ‘
(cofztilzuedr~extpage)
Page 14

I’he oven timer will automatically
start and stop your oven cooking
for you.
2. Turn SET’knob to set length of
baking time.
3. Push BAKE button.
4. Turn SET knob to set desired
temperature.
When the end of the cook time is
reached, the End--of-CycleTone
will sound and the oven will
turn off.
Duringautomaticcooking:
~You can push the STOP TIMF.
button to find out when the Endof-Cycle Tone will sound and the
oven will turn off.
@You can push the CLOCK button
to display time of day without
canceling the oven operation.
ToDelaystartiRlg all
Automatic ovenOperation
If a delayedcooking operation
isdesired:
1. Push OVEN TIME button.
2. Set length of baking time with
SET knob.
3. Push STOP TIME button,
4. Turn SET knob to time of day
when baking should be completed.
Do not set a stop time that is less
than the length of cooking time
plus the current time of day.
5. Push BAKE button.
6. Turn SET knob to desired
temperature.
When stop time is reached, the
End-of-Cycle Tone will sound and
the oven will turn off.
NOTE: Foods that are highly
perishable such as milk, eggs,
fish, stuffings, poultry and pork
should not be allowed to sitout
for more than one hour before or
after cooking. Room temperature
promotes the growth of harmful
bacteria. Be sure that the oven
light is off because heat from
the.bulb will speed harmful
bacteria growth.
NOTE: You can push the STOP
TIME button to find out when the
en will turn off.
How tochange a
Program
When a function has been
entered, you can recall what
has been programmed by
pushing the corresponding
function button. The
messages in the display show
you which function is
currently being displayed.
While the function is
displayed, you can change it
with the S~~ knob. YoL~can
change any programmed
funclioll at any time.
End-of-Cycle Tol]e(3 long
beeps—one second on, one
second of~: shows that a timed
oven operation has reached STOP
TIME or that the Minute/Second
Timer has counted down.
Attention Tone (series of short
beeps ufitilproper response is
given): will sound ifoven has only
been partiallyprogrammed.For
example,if you have selected a
cook time but no temperature, you
will hear the Attention Tone until
you select a temperature or push
CANCEL.
Notification Tone (single, onesecond beep): indicatesoven has
stabilized at selected temperature.
Key Tone (single, l/10-second
beep): soundswhen any button
is pushed.
Function Error Tone (series of
very rapid beeps). The display will
show a failure code. Cancel
Function Error Toneby pushing
the CANCEL button. If the
Function Error ‘f’onestarts again
(after about 15 seconds), call for
service. Disconnect the range
electrical sLlpplyto stoptone.
If the function error occu~~ed
while you were programming the
Oven Control, pLlshthe CANCEL
button and try again.
To Cancel the Tone...If you don’t
want an audible tone when you
push a button, yoLlcan eliminate
the tone by pushing and holding
the CANCEL button until yoLlhear
a short beep (in approximately two
seconds). To activate the tone
again, push and hold the CANCEL
button once tnore until yoLlhear a
short beep. Canceling or
activating the tone should only be
done when there is no oven
operation programmed.
Pushing the CANCEL button will
clear all functions except the Clock
and Minute/Second Timer.
Page 15

——___
-—
—— —.——
,.—-—..——.
————
.—
1. Position the shelf or shelves in
the oven. If cooking on two
shelvesat the same time, stagger
the pans for best heat circulation.
2, Close oven door.
3, Push the BAKE button and turn
the SET knob until desired
temperature is displayed. If
preheating is desired do notput
food in the oven unti] a one-second
beep sounds to tell you the oven
ispreheated.
4. Open the door and place food in
o~’enon center of shelf. Allow at
least2 inches between the edge of
the bakeware and oven wall or
adjacent cookware.
5. Close oven door.
6. Check food for doneness at
minimum time shown on recipe.
Cook longer if necessary. Push the
C.%NCELbutton and remove food.
helf Positions
baking is done on the second
Nlust
shelfposition (B) from the bottom.
l~-hen baking three or four items,
use two shelves positioned on the
second and fourth sets of supports
(~ & D) from bottom of oven.
B:l~eange]foOdcakes on firstshelf
pt)sition(A) from bottom of oven.
Baliing Tips
~Follow a tested recipe and
measure the ingredients carefully.
If yoL]are using a packagemix,
follow label directions.
*Do not open the oven door during
a baking operation—heat will be
lost and the baking time might
need to be extended. This could
cause poor baking results. If yoL!
must open the door, open it
partially—only 3 or 4 inches—and
close it as quickly as possible.
Common Baking Problems
and Possiblesolutions
PIES
Burning around edges
~Edges of crust too thin.
@Incorrect baking temperature.
Bottom crust soggy and unbaked
~Allow crust and/or filling to cool
sufficiently before filling ~ie shell.
~Filling may be too thin-orjuicy.
@Filling allowed to stand in pie
shell before baking. (Fill pie-shells
and bake immedia~ely.) “
~Ingredients and proper measuring
affect the quality of the crust. Use
a tested recipe and good technique.
Make sure there are no tiny holes
or tears in a bottom crust.
cCPatc~ling”a pie crust could cause
soaking.
@Top and bottom crust not well
sealed together.
QEdges of pie crust not built up
high enough.
~Too much filling.
@Check size of pie plate.
Pastry is tough; crust not flaky
@Too much handling.
*Fat too soft or cut in too fine.
Roll dough lightly and handle as
little as possible.
CAI<KS
cake riseshigher on one side
~Batter spread unevenly in pan.
@Oven shelves not level.
~Using warped pans.
Cakescrackingontop
oOven temperature too high.
QBatter too thick, follow recipe or
exact package directions.
@Check for p~oper shelf position.
@Checkpan sizecalledfor in recipe.
~Improper mixing of cake.
cake falls
~Too much shortening, sugar
or liquid.
~Check leavening agent, baking
powder or baking soda to assure
freshness. Make a habit to note
expiration dates of packaged
ingredients.
~Cake not baked long enough or
baked at incorrect temperature.
~If adding oil to a cake mix, make
certain the oil is the type and
amount specified.
crust is hard
@Check temperature.
*Check shelf position.
Cakehas soggylayeror streaks
at bottom
oUndermining ingredients.
~Shortening too soft for proper
creaming.
~Too much liquid.
COOKIES & BISCUITS
Doughy ‘center; heavy crust
on surface
~Check temperature.
@Check shelf position.
~Follow baking instructions
careftdly as given in reliable recipe
or on convenience food package.
@Flat cookie sheets will give more
even baking results. Don’t
overcrowd foods on a baking sl~eet.
~Convenience foods used beyond
their expiratiorl date.
Browning more noticeable ORI
one side
@Oven door not closed properly,
check gasket seal.
~Check shelf position.
...—
—.
.—
—
Page 16

j
.--.—.-,-..,.__——
.— ....
...-—__—
-—-
BakiIlgGuide
1. ,~lumirtt!rn pans conduct heat
(luickly.For most conventions]
baking, light, shiny finishes
generally givebest results because
they help prevent overbrowning.
For best browning results, we
recommend du]]bottom surfaces
tor cake pans and pie plates.
Dark or non-shiny f~nishes and
~.
glass cookware generally absorb
heat, which may result in dry,crisp
crusts. Reduce oven heat 25°F.if
lighter crusts are desired. Rapid
browning of some foods cart be
achieved by preheating cast-iron
cookware.
3. Preheatingthe oven is not always
necessary,especially for foods that .
shelf
Food
Bread
Biscuits (1/2 in. thick)
Coffee cake
Corn bread or muffins
Gingerbread
,Muffins
Popovers
Quick loaf bread
Yeastbread (2 loaves)
Plain rolls
Sweet rolls .
Cakes
(without
,+nge]food
Jelly roll
Sponge
Cakes
Bundt cakes
Cupcakes
Fruitcakes
Layer
Layer, chocolate B
Loaf
cookies
Brownies
Drop
Refrigerator
Rolled or sliced
shonening)
cookware
—
ShinyCookie Sheet
ShinyMetal Pan with
satin-finish bottom
Cast-iron or Glass Pan
ShinyMetal Pan with
satin-finish bottom
ShinyMetal Muffin Pans
Deep Glass or Cast-iron Cups
Metal or Glass Loaf Pans
Metal or Glass Loaf Pans
ShinyOblong or Muffin Pans
ShinyOblong or Muffin Pans
Aluminum Tube Pan
Metal Jelly Roll Pan
Metal or Ceramic Pan
Metal or Ceramic Pan
ShinyMetal hluffin Pans
Metal or Glass Loaf or Tube Pan
ShinyMetal Pan with
satin-finish bottom
Shiny Metal Pan with
satin-finish bottom
Metal or Glass Loaf Pans
Metal or Glass Pans
Cookie Sheet
Cookie Sheet
Cookie Sheet
Other1~esserts
Baked app]es
Custard
Puddings, rice
,Indcustard
~ig$
Frozen
?Ileringuc
Glass or Metal Pans
Glass Custard Cups or Casserole
{setin pan of’hot water)
Glass Custard Cups or Casserole
Foil Pan on Cookie Sheet
Spread to crust edges
Glass or Satin-finish Metal Pail
Glass or Satin-finish Metal Pan
Glass or Sati]l-finish Metal Pan
Set oll OverlShelf
Glass or Mcta] Pan
Glass Pal]
Position Temperature
B, C
w
A, B
ABB 275°-3000
B, C
B, C
B, C 400°-4250
B, c
--1----
B, C
B~C
--
1
B,
B, c 325°-3750 30-60
oven
400°-4750 15-20
I
B
B 400°-4500
B
E 375°
B 350”-375”
: 375°-4250
B 350°-3750
B
350°-4000
I
350°
400°-4250
375°-4250
325°-3500
350°-3750
350°-3750
I
350°-3750
B 350°
I
325°-3500
350°-4000
375°-4000
B 300°-3500
B
B
B 400°-4250
B 4500
c 325°-4000
B
350°-4000
325°
I
400°-4250
325°-3500
400°-4250
3000.-3500”
Time,
Minutes
20-30
20-40
45-55
20-30
45-60
45-60
45-60
10-25
20-30
30-55
10-15
45-60
45-65
20.-25
2-4 hrs,
20-35
25-30
40-60
25..35
10-20
6-12
7-12
30-60
30-60
50-90
45-70
15-25
45-60
40-60
12-15
—-—
60-90
30-7s
cook ~onger than 30 to
40 minutes.
For foods with shortcooking times,
preheatinggives bestappearance
and crispness. Althoughpreheating
is not necessary with meats, it is
preferred for baked goods.
4. To ~revent unevenheating and to
u
save ~ner~y,open the oven door as
littleas p~~sibjein checking food.
comments
Canned,refrigerated biscuits take 2 to
4minutes less time,
Preheat cast-iron pan for crisp crust.
Decrease about 5 minutes for muffin
mix,or bake at 450”F.for 25 minutes,
hen at 350”F.for 10to 15 minutes.
Darkmetal or glass give deepest
Jrowning.
Two-piece pan is convenient.
Line pan with waxed paper.
Paper liners produce moister crusts.
Use 300”F.and Shelf B for small or
individua] cakes.
Bar cookies from mix use same time.
Use Shelf C and increase temp. 25°F.
to 50”F. for more browning.
Reduce temp. to 300”F.for large
custard.
Cook bread or rice pudding with
custard base 80 to 90 minutes.
For large pies use 400”F.and more time.
To quickly brown meringue,
use 400”F. for 9 to 1I minutes.
Custard fillings require lower
temperature, longer time.
lncrcase time for larger amount or
size,
—..—. -—,...._ —.._._-._ .....—— —— .———.,_
-.
——.——
.-.—,—-
Page 17

roasted uncovered in your oven.
Roasting temperatures, which
should be low and steady,keep
spattering [o a minimum. When
roasting, it isnot necessary to sear,
baste, cover, or add water to your
meat. Roasting is easy,just follow
~hesesteps:
Step 1. Positionthe oven shelf at
second from bottom position (B)
for small size roast (3 to 5 Ibs.)
and at bottom position (A) for
larger roasts.
Step 2. Check weight ofroast.
Place meat fat-side-up or poultry
breast-side-up on roasting rack in a
shallow pan. Do not cover. Do not
stuff poultry untiljust before
roasting. Use a meat thermometer
for more accurate doneness (do not
place thermometer in stuffing)or
refer to the Roasting Guide for
approximate cooking times, The
melting fat will baste themeat,
Select a pan as close to the sizeof
the meat as possible, (Broilerpan
with rack is a good pan for this.)
Step 3. Push BAKE button and
turn SET’knob until desired
temperature is displayed. Remove
fat and drippings as necessary.
Baste as desired. Check the
Roasting Guide for temperatures
and approximate cooking times.
Step 4. Most meats continue to
cook slightlywhile standing after
being removed from theoven.
Standing time recommended for
roasts is 1.0to 20 minutes.
This allows roasts to firm up and
makes them easier to carve.
internal temperature wiil rise about
5“F.;to compensate for the
temperature increase, if desired,
remove roast from oven sooner
(at 5“F.less than the temperature in
guidebelow).
Frozen
Roasts
Frozen roasts of beef, pork, lamb,
etc., can be started without
thawing, but allow 15to 25
minutesper pound additionaltime
(15 minutes per pound for roasts
under 5 pounds, more time for
larger roasts).
Thaw most frozen poultry before
roasting to ensure even donene~
Some commercial frozen poultry
can be cooked successfully without
thawing. FO11OWdirections given
on package label.
RoastingGuide
Type
.Meat
Tender cuts: rib, high quality
sir]oin tip, rump or top roundt
Lanlb leg or bone-in shouldcrt
Vea]
shoulder,]egor loin~
porkloin, rib or shou~der~
Ham,pre-cooked
[-iarn.raw
l~ouitry
ChickenorDuck
[Uhickenpieces
325°
325°
325°
325°
325°
325°
325°
350°
325°
Doneness
Rare:
Mediuln:
WellJJone:
Rare:
Medium:
WellDone:
Well
DoIle:
Well Done:
To Warln:
Well Done:
WellDone:
Well Done:
Well Done:
ApproximateRoasti~~gTime
in Minutes per Pound
5 Ibsa
3 to
24-33
35-39
40-45
21-25
~5-.3o
30-35
35-45
35-45
6to 8lbs.
18-22
22-29
30-35
20-23
24-28
28-33
30-40
30-40
17-20minutesperlb.(anyweight)
under 10lbso 10to 15lbs.
20-30
3 to 5 lbs,
35-40
17-20
Over 5 lbs.
30-35
35-40
10to 15lbs.
[g.-~5
Over 15lbs.
I5-20
Internal
Temperature‘F
]400-15~o>x
150°-160°
170°-1850
140°-150°’$
150°-1600
170°-1850
170°-180°
170°-180°
115°-1250
170°
185°-1900
185°-190°
In thigh:
185°-190°
—.—
Page 18

-—----——
-“.—
—
——
— —..
~g~~il~ngiScookirl~ food by intense
r:~dia’lthetit from the upper unitin
;I]co~’en.NIostfish and tender cuts
t~fmeat can be broiled. FO11OW
[h~sesteps ~0keep
spattering and
>nlokingto a minimum.
Step 1. If meat has fat or gristle
:~earedge, cu~vertical slashes
~~-,roughboth about 2“ apart. If
.iesired,fat may be trimmed, ,
lea~-inglayer about 1/8”thick.
Ste~ 2. Place meat on broiler rack
inb~-oi]erpanwhich comes with
~ange.Always use rack so fat
dripsinto broiler pan; otherwise
juices may become hot enough to
c~tchfire.
Step 3. Position shelf on
recommended shelf position as
suggested in Broiling Guide.
Step 4. Leave door open to broil
s~t)~position. The
b}itself,
yet the proper temperature
is Inaintained in the oven.
Sfep 5. Press the BROIL button
and turn the SET knob until your
cl~~>iceof ~1 BROIL or LO BROIL
is displayed. NOTE: Chicken and
h:~inare broiled at LO BROIL in
[}r(ierto cook feed wi[fiout
~~~erbrowningit.
door stays open
/ /
Step 6. Turn food only once during
broiling.Time foods for first side per Broiling Guide.
Turn food, then use times given for
second side as a guide to preferred
doneness. (Where two thicknesses
and times are given together, use
first times given for thinnestfood.)
Step 7. When finished broiling,
push the oven CANCEL button.
Serve food immediately, leaving
the broiler pan and rack outside
oven to cool during meal for
easiest cleaning.
Youcan use aluminum foil to line
your broiler pan and broiler rack.
However, yoLlmust mold the foi]
tightly to the rack and cut slits in
itjust like the rack. Without the
slits,the foil will prevent fat and
meatjuices from draining to the
broiler pan. The juices could
become hot enough to catch fire.
lf
yOLI do not cut the slits, yoLlare
frying, not broiling.
Questions& Answers
Q.when broiling,isitnecessary
toalways use a raeltin thepan?
A. Yes.
the meat over the pan. As the meat
cooks, the juices fall into the pan,
thus keeping meat drier. Juices are
protected by the rack and stay
cooler, thus preventing excessive
spatter and smoking.
Q. Should 1 saltthe
broiling?
A. No.
and allows them to evaporate.
Always salt after cooking.Turn
meat with tongs; piercing meat
with a fork allowsjuices to escape.
When broiling poultry or fish,
brush each side often with butter.
Q. Why aremymeaknotturning
outas brownas theyshould?
A. In some areas, the power
(voltage) to the range tnay be low.
In these cases, preheat the broil
unit for 10 minutes before placing
broiler pan with food in oven.
Check to see if yoLlare using the
recommended shelf position. Broil
for longest period of time indicated
in the Broiling Guide. Turn food
only once during broiling.
Q. Do I need to grease my
broi~er rack to preventmeat
fronl Sticlting?
A. No.The broiler rack is designed
to reflect broiler heat, thus keeping
the surface coo}enough to prevent
meat from sticking to the surface.
However, spraying the broiler rack
lightly with a vegetable cooking
spray before cooking will make
cleanup easier.
Using the rack suspends
meat before
Salt draws out the juices
__———..—...._........-...-—--- .,”..— . . . ..—...—.——.———
—- .—
.—.
Page 19

~=~Always use broiler pan and rack
,@*
‘~%scltcomes with your oven. 11is
9 esigned to minimize smoking and
spattering by trappingjuices in the
shielded lower part of the pan.
2. Oven door should be open to the
broil stop position.
3. For steaks and chops, slash fat
evenlyaroundoutsideedgesof meat.
To slash, cLltcrosswise through
outer fat surfacejust to the edge of
the meat. Use tongs to turn n-teat
over to prevent piercing meat and
losingjuices.
4. If desired, marinate meats or
chicken before broiling. Or brush
with barbecue sauce last 5 to 10
minutes only.
S. When arranging food on pan,
do not let fatty edges hang over
sides, which cou]d soil oven with
fat dripping.
6. Broiler does not t-teedto be
preheated. However, for very thin
foods, or to increase browning,
preheat if desired.
7. Frozen steaks can be
conventionallybroiled by
positioningthe oven shelf at next
lowestshelf position and increasing
cooking time given in this guide
1k times per side.
Food
Bacon
Grot~ndBeef 1
;}~ellDone
BeefSteaks
Rare 1in. thick
Medium
}VellDone
Rare
Medium (2 to 2X lbs.)
JVellDone
Chicken 1whole A
BakeryProducb
Bread[Toast)or 2to4 slices
Toaster Pastries 1pkg. (2)
Eng]ishM~Iffins
l.obstei” Tails
Fish
Ham Slices 1in. thick B
(precooked)
Pork ~hO~S
IJ”cIIDone
iamb chops
~~~e~iurn
‘?7’cIIDone about 10to 12oz.
:~lc>dium
W’:11Done about 1 lb,
Qt~aIItity and/or Shelf
Thickness Position ~0 Broil Time,Wlinutes
1/2lb. (about 8
thin slices)
lb. (4 patties)
]/~ to 3/4 in. thick
(1
tO ] X lbs.)
1Xin. thick
(2 to 2X lbs.),
split lengthwise
2 (split)
Z-4
(6 to 8 oz. each)
l-lb. fillets 1/4{o c
I
in. thick
1/2
I
2 (1/2 in.)
2 (1 in. thick).
about 1lb.
2 (1 in. thick)
2 (IX in. thick),
HI
or
First Side
I
c HI 4K
c HI
c HI
c
c
c
c
c1
Lo 35
c
c
B HI 13-16
c
B
c
HI
HI 5
LO
Hi 10
H1
c
c
c
c
H] 6
10
6
8
12
10
15
25
1 X-2
3-4
8
13
~eeondside
Time,Minutes
4%
7 Space evenly.
5
6
11
7-8
14-16
20-25
10-15
Do not
turn over.
5
8 Increase times 5 to 10min. per side for
10
13
9
comments
Arrangeinsinglelayer.
Up to 8 patties take about same time.
Steaks less than 1in. thick cook
through before browning,Pan frying is
recommended. Slash fat.
Reduce time about 5 to 10min. per side
for cut-up chicken. Brush each side with
melted butter. Broil with skin-side-down
first.
Space evenly. Place English mL~ffinscutside-up and brush with butter, if desired.
Cut through back of shell, spread open.
Brush with melted butter before broiling
and after half of broiling time.
I Handleandturn verycarefully. Brushwith
lemonbutter before and duringcooking,if
desired.Preheatbroilerto increasebrowning,
1k in. thick or home-cured ham.
Slash fat.
Slash fat,
10
12
12-14
1-2
If (iesired, split sa~~,lgesin half
lengthwise: cut into 5- to 6-in, pieces.
—-—.—..-....-......---.-----...-,..
.....-..———-.-...._—_____
...-.
—.—..——......
.—
——..-
IQ
,.
Page 20

!)ropercare and cleaning are
i~~~p’ortantso yoL1rrange will give
!C)Uefficient and satisfactory
>crvice.FOI1OWthese directions
carefully in caring for it to help
assuresafe andproper maintenance.
BE SURE ELECTRICAL
POF$TERIS OFF BEFORE
CLEANING ANYPARTOF
THERANGE.
The porcelain enamel cooktop is
sturdybut breakable if misused.
This finish is acid-resistant.
However, any food with a high
acid content spilled (such as fruit
juices. tomato or vinegar), should
no~be permitted lo remain on
the finish.
Plug-In surfaceunits
Clean the area under the drip pans
often. Built-up soil, especially
grease, may catch fire.
To make cleaning easier, the plugin surface units are removable.
Lift a plug-in unit about 1inch-
just enough to grasp it—and pull
it out.
Receptacle
I
I \
Terminals Drip Pan
To replacea plug-in surface unit:
oFirst place the drip pan into the
surface unit cavity found on top of
the cooktop so the unit receptacle
can be seen through the opening in
the drip pan.
~Insert the terminals of the plug-in
unit through the opening and into
the receptacle, guidingunit so it
fits snugly into place.
I
Lift-up Cooktop
Clean the area under the cooktop
often. BLiilt-upsoil,especially
orease, may catch fire.
=
support Rods
Be sure all Sutiace unitsare
turned
cooktop. Raise the cooktop all the
~;ayup until the support rods snap
intoplace at the bottom, They will
hoid the cooktop up while you
clean underneath it.
T{-ilower the cooktop, push the
[-~{~ttomof each rod forward
siightly so that it will slide down
ii:tothe side of the range.
,~’,ftercleaning under the cooktop
v:ithhot, mild soapy water and a
~leancloth, lower the cooktop. Be
~~:!refrrlnol to pinch your fingers.
offbefore raising the
Do
notlift a plug-in unitmore
than 1
lie f~aton the drippan when you
plug it back
Repeated! lifting ofthe plug-in
inch.If you do, it may not
in.
unitmore than 1 inch above the
drip pan can permanently
damage the receptacle.
Cautio~l:Be sure allcontrolsal+e
turned tOOFF and surfaceun~its
are CQO]before
removetheme
After removing a plug-in unit,
remove the drip pan under the unit
and clean it according to directions
given in the Cleaning Guide. Wipe
around the edges of the surface
unit opening. Clean the area below
the surface unit. Rinse all washed
areas with a damp cloth or sponge.
atte~nptingto
C4AUTION
*Do not attempt to clean plug-in
surface units in an automatic
dishwasher.
~Do not immerse plug--insurface
units in liquids of any kind.
*Do not bend the plug-in surface
unit plug terminals.
*Do not attempt to clean, adjust
or in any way repair the plug-in
receptacle.
control Panel
It’s a good idea to wipe the control
pane] clean after each use of the
oven. Clean with mild soap and
water, rinse with clean water and
polish dry with a softcloth.
Do not use abrasive cleansers,
strong liquid cleaners or oven
cleaners on the controlpanel—
they will damage the finish.
Page 21

---
control Knobs
.+-
@*&
a
““~he controlknobsmaybe removed
—
forcleaning.
“~0remove knob, pull it straight off
[hestem. If knob is difficult to
:ernove. place a thin cloth (like a
handkerchief)or a piece of string
under and around the knob edge
and pLl~]Up.
Washknobs in soap and water but
do not soak.
i
Molded Rib I k
.-
- Spring Clip ~ -, ‘
%
[-
, Clear Groove
Toreplace knob, locate the groove
in each side of the knob stern.One
of the grooves contains a spring
clip and the other groove is clear.
Locate the molded rib inside the
knob. Fit the molded rib of the
knob into the clear groove on the
*
Cll
[
‘ v-j
, ‘:\\
——
PoreelaiIl ovenInterior
With proper care, the porcelain
enamel finish on the inside of the
oven-top, bottom, sides, back and
inside of the door—will stay
new-looking for years.
Let range cool before cleaning. We
recommend that you wear rubber
gloves when cleaning the range.
Soap and water will normally do
thejob. Heavy spattering or
spilloversmay require cleaning
with a mild abrasive cleanser.
Soapy,wet metal pads may also be
used. Do not allow food spills with
a high sugar or acid content (such
as milk, tomatoes, sauerkraut, fruit
juices or pie filling) to remain on
the surface. They may cause a dull
spoteven after cleaning.
Household ammonia may make the
cleaningjob easier. Place 1/2cup
in a shallow glass or pottery
container in a cold oven overnight.
The ammonia fumes will help
loosen the burned-on grease
and foocl.
If necessary,you may use a
commercial oven cleaner. Follow
package directions.
Cautions about using spray-on
oven cleaners:
@Do not spray any oven cleaner on
the electrical controls and switches
becauseit couldcause a shortcircuit
and result in sparking or fire.
@Do not allow a fihn from the
cleaner to build up on the
temperature sensor—it could cause
the oven to heat improperly. (The
sensor is located at the top of the
oven.) Carefully wipe the sensor
clean after each oven cleaning,
being careful not to move the
sensor as a change in its position
could affect how the oven bakes.
@Do not spray any oven cleaner on
the oven door, door handles or any
exterior surface of the oven, wood
or painted surfaces. The cleaner
can damage these surfaces,
—
ovenshelves
Oven shelves may be cleaned
with a mild abrasive cleanser
fo~lowingmanufacturer’sdirections.
After cleaning, rinse the.shelves
with clean water and dry with a
clean cloth,
To remove heavy,burned-on soil,
soapy metal pads may be used
following manufacturer’s
directions. After scrubbing, wash
with soapy water, rinse and dry.
(coiltiizL[ecltzext]]age)
-..-----------.—-..——— ..—-—-————-..—-..———
~—. .—.
——.
.,—-—
Page 22

----
.—
—.. ——
-———-
——.
.-
0%’ellLight Bulb
“~htlightbulb is located on the rear
\Yallof the oven, Before replacing
the bulb. disconnectelectrical
power IOtherange at the main fuse
or circuit breaker panel or unplug
the range from the electrical outlet.
Let the bulb cool completely before
removirlgit. Do not to-ucha hot
bulb wi!h a damp cloth.If
bulb willbreak.
the
~Unscrew the cover and remove
the bulb.
To
replace:
~Put in a new 40-watt appliance
bulb.
NOTE: A 40-watt appliance bulb
is smaller than a stand(ard40-watt
household bulb. We recommend
you use an appliance bu~bthat is
no longer than 3Xinches.
~Replace and tighten the cover.
~Reconnect electrical power to
the range.
Do NOT REMOVE SCREWS.
YOUdo,
Removable ovenDoor
Toremove the door, open it a few
inches to the special stop position
that wiil hold the door open. Grasp
firmly on each side and lift the
door straightup and off the hinges.
NOTE: Be careful not to place
hands between the springhinge
and the oven door frame as the
hinge could snap back and pinch
the fingers.
To replace the door9make sure
the hinges are in the “out”
position. Position the slotsin the
bottom of the door squarely over
the hinges. Then lower the door
slowly and evenly overboth
hinges at the same time. If hinges
snap back against the oven frame,
pull them back out.
After broiling,remove the broiler
pan and rack from the oven.
Carefully pour out the grease in the
pan into a proper container. Wash
and rinse the pan and rack in hot,
soapy water.
If food has burned on, sprinklethe
rack, while hot, with detergent and
cover with wet paper towels or a
dish cloth. That way,burned-on
foods will soak loosewhile the
meal is being served.
Do not store a soiled broiler pan
and rack in the oven.
cleaning under the Range
The area under the range can be
reached easily for cleaning by
removing the bottom storage
drawer. To remove, pull the storage
drawer out al] the way, tilt Llpthe
front and remove it. To replace,
insert glides at back of the storage
drawer beyond stop on range
glides. Lift the storagedrawer if
necessary to insert easily. Let front
of the storage drawer down, then
push in to close.
-.
Page 23

Bake unitand
—
BroilUnit
Chron2e-Plated
DripPans under
Piug-InUnits
Co~ltrolKnobs
incl;lding
&leta],
SideTrims
OutsideGlassFinisl~
Oven Door*
—
—
OvenI.iner
.~,..
..?,
.,.:
--]
--
.. ..--.———
—,—..
*
Soap andWJter
Soap-FilleciScouring Pad
~
~CommercialOven Cleaner
(l]seonpan only,~lotrack)
~Dishwasher-Safe
~Soap and Water
oStiff-Bristled Brush
@Sofip-Filled Scouring Pad
~Dishwasher-Safe
0 Mild Soap and Water
~,Soapand Water
@Soap and Water
oSoap and Water
eSoap and Water
0 Soap-FilledScouring Pad
~Commercial Oven Cleaner
@Paper Towel
0 Dry Cloth
0Soap and Water
eSoap and Water
0 ,Soap-filied ScouringPad
*CommercialOvenCleaner
eSoap and Water
GENEItALDIRECTIONS
Do not clean the bake unit or broil unit. Any soil will burnoff when tile unit is heated.
NOTE: The bake unit can be lifted gently to clean the oven floor. If spillover, residue,
or ash accumulates aroundthe bake unit, gently wipe around the unit with warm water.
Drain fat, cool pan and rack slightly. (Do not let soiled pan and rack stand in oven to
cool.) Sprinkle on detergent. Fill the pan with warm water and spread damp cloth or paper
towel over the rack. Let pan and rack stand for a few niinutes. Wash; scour if necessary.
Rinse a!ld dry, OPTION: The broiler pan and rack may also be cleaned in a dishwasher.
Clean in dishwasher. Wipe after each cooking, so unnoticed spatter will not “burn on”
the next time you cook. Toremove “burned-on” spatters, use any or all cleaning
materials mentioned. Rub liglztlywith scouring pad to prevent scratching of surface.
PLIII off knobs. Wash gently but do not soak. Dry and return controls to range.
DO NOT USE
steelwool,
Wash, rinse, and then polish with a dry cloth.
abrasives,a~nmonia,acids
orcommercialovencleaners.
Cleanoutsideofcooledblackglassdoorwitha glasscleanerthatcloesnotcontain
ammonia.Washotherglasswithclothdampenedinsoapywater.Rinseandpolishwith
a dry cloth. If knobs are removed, do not allow water to run down inside surface of
glass while cleaning.
DO NOT USE oven
cieaners~
cleansing position,graspdoorby sides, and lift UPand away from
powdersorharsh
abrasives.
Toremoveoven doorforeasiercleaning:open toBROIL
hinges. Use soop and water to thoroughlyclean both the
insideandoutside
soap and water in the opening at the top of the door.
To repltice: grasp door
ilinges, and push firmly into place.
NOTE:
Soapleftondoorlinercausesadditionalstains
of door. Rinse well. Avoid getting
bysides,lineUPdoor with
whenthe ovenisreheated.
Cool before cleaning.
FOR LIGHT SOIL: Frecluent\viping with mild soap and water (especially after cooking
meat) wi11prolong the time between major cleaning. Wnse
thoroughly.NOTE: Soap
leftonlinercausesadditionalstains wheIIovenis reheated.
FORHEAVYSOIL:Chooseanon-abrasivecleanerandfollowlabelinstructions,
usingthinlayerofcleaner.Useofrubberglovesisrecommended.Wipeorrublightly
onstlibborn
When rinsing oven after cleaning, OISOwipe thermostat bulb.
DO NOT USE oven If acids should spill on the range while it is hot, use a dry
cleaners,cleansing
powders
spots. Rinse well. Wipe off any oven cleaner that gels on thermostat bulb.
papertowelorclothto wipeLIprightaway.When
orharsh surface has cooled, wash and rinse. For other spills,
the
abrasives.Thesemight SUCIIas fat smatterings,etc., \vash with soap and water
scratchthesurface. when coolecl and then rinse. Polish with a dry cloth.
Yourshelves can be cleaned by using any and all mentionedmaterials. Rinse thoroughly
to remove all materials after cleaning. NOTE: Some commercial oven cleaners cause
darkeningand discoloration.When using for first time, test cleaner on small par[ of
shelf and checkfor discolorationbefore completelycleaning.
For cleaning, remove drawer by pu]ling it a]i the way open, tilt
Wipe with damp cloth or sponge and replace. Never use harsh abrasives or scouring pads.
Spatters and spills l~urnaway when the coils are
heated. At the end of a meal, heat soileciunits at Ht.
Let the s(,)ilburn off ‘babcutone lninu[c” and switch
units to OFF. AVOILIgetting cleaning materials on the
coils. Wipe off any cleaning maleriais with a damp
paper towel
[~etsurt’accuml cool conlplctc[y before handiing.
—— .——
l?(:~t-i’Ileiltil]g[he surface unit.
LIpthe front ancllift out.
——
Page 24

..———— —
.—
— —
oALL WNGES CAN TIP
‘ INJURY COULD RESULT
~INSTALL ANTI-TIP
DEVICE PACKED WIT~
UNGE
~SEE lNSTRUCTIONTS
ToolsNeeded
~Phillips head screwdriver
~17s”or adjustable wrench
The device attaches to floor or wall
to hold either right or left rear leg
leveler. If fastening to floor, be
sure that screws do not penetrate
electrical wiring or plumbing. If
thjs cannot be determined, use
shorter screws that will not
penetrate through flooring.
{fthe device came with your
range, it is shipped attached to the
lower rang-eback. Remove and
discard the shipping screw that
holds the cleviceand then follow
the instructions below.
1.Decide whether the devjce will
l~einstalled on the right or left side
of rzingelocation.
Fi
Attachment to wall
Screw must enter wood or metal
Figure2
2. If the device side of the range is
adjacent to a cabinet, place the
device against the back wall and
cabinet as shown in Figure 1,
If there is no adjacent cabinet,
determine where the location of
the range side (painted outside
panel) will be. Place the device
with its outside edge at this
location and against theback wall.
See Figure ],
3. Determine whether you will
anchor the device to the floor or
to the wall as shown in Figure 2.
Fasten the device securely with
the screws provided. Screws are
self-drilling in wood, plywood,
partjcle and chip board, and most
metal framing, If attaching to
x,
masonry,yoL~can buy suitable
screws and anchors at a hardware
store. Use a masonry drill to drill
the required holes.
4. Using the wrench, back out the
four leg-levelers at least two turns.
See yourinstallationguide formore
leveling information before
positioning the range.
5. Slide the range into place. Be
sure rear leg leveler fully engages
slot in device. If range cannot be
moved back far enough for rear leg
leveler to enter the device, move
d~viceforward as required and
attach to tloor in new location.
.—-.—
—
Page 25

.
RangeInstigationInstructions
.——.—— ,m. .
Minimum dimensions between cooktopand walls above cooktop
~See Figures 1and 2 for all rough-in and spacing
dimensions. These dimensionsmust be met for safe use
ofyourrange.Electricityto therangecanbe disconnected
at the outlet without moving therange if the outlet is in
the prefelred location (remove lower drawer).
~To eliminate the risk of burnsor fire when reaching
-t~er hOtsurface elements, cabinet storage space above
-——.
-he cooktop should be avoided. If cabinet storage space
is to be provided above the cooktop, the risk can be
Preparation
1,Remove all tape and packaging. Be sure to remove
clear plastic film that covers some chrome parts
(around glass oven doors, side trim) and any tape or
packaging from inside the oven.
2. Take the accessory pack out of the oven.
3. Check to be sure that no range parts have come loose
during shipping.
/
/
/
/
/
{’
Preferred electrical outlet area
Roughed-in dimensions
reduced by installinga range hood that sticksout at
least 5“ beyond the front of the cabinets. Cabinets
installed above a.cooktop may be no deeper than 13“.
~The range may be placed with O“clearance (flush) at
the back wall and side walls of the range if the front
edges of the range side panels stick outbeyond the
cabinet fronts at least 1/4”.See Figure 2.
5. Level the range. For proper cooking and baking the
range must be leveled:
a. Install the oven racks (see the Using Your Oven
section of this book for instructions).
b. Use a 1%”open end wrench or an adjustable
wrench to equally back out the four leg levelers two
or three turns each.
<2,,
6W
Shipping wire or tape
4, Remove the shippirig wire or tape from each of the
—
.;-:f(>urcooktop elements (coil cooktop element models
/~
c. Put a spirit level or glass measuring cup partially
filled with water on one of the oven racks.
(1.Use the wrench to adjust the leg levelers.
249.,
Page 26

Instigationhstructiom
Electrical connection
Wlerecommend that you have the electrical hookup of
your range’doneby a qualified electrician. Have the
electrician show you where yourrange disconnect is
located.
Call y~ur Electric Company and ask which codes apply
in your area. If there are no codes, you must follow the
N.ATIC)NALELECTRICAL CODE, ANS~FPA NO.
70-Latest Edition. Youcan get a copy by writing:
National Fire Protection
Association
Batterymarch Park
Quincy,.MA 02269
If you fail to wire your range in accordance with
governing codes, you may create a hazardous condition.
YoL~must use a three wire, single-phaseAC 120/240
Voltor208Y/120 Volt,60 Hertz electrical system to
operate your range.
Use #8 wire and 40 Amp fuse or circuit breaker for
120/240Voltand 208Y/120 Volt
The range connector block is approved for copper wire
connection only. If you are connecting to aluminum
house wiring, you must use a special U,L. approved
connector forjoining copper to aluminum.
systems.
If Ioeai codes
a. Removeground strap.
requirean ungrounded neutral:
b.Fasten the white wire to the center terminal.
c. Use a grounding terminal or lead to ground unit in
accordance with local codes.
To Make Electrical CO~ne~tiO1l:
1. Remove thejunction block access cover (on range
back). See Fig. A or Fig. B. Some models will
a one-piecewire
reinstalling the one-piece cover, make sure that
wire does not become pinched between wire cover
and mainback.
cover shown in Fig. B. When
Figure B
have
Jfld Strap
~ndScrew
V’s’rain’e’ie’c’amp
1.Remove the screws on the terminal block.
2. Install the three-wire cord and the strain relief jn the
hole in the strain relief bracket.
3.
connect the outer leads to the outer terminals and the
center lead to the center terminal.
4. Push the cord upward (to relieve strain) while
tightening the strain relief clamp.
2. Use a 3-wire flexible cord kit marked for ranges. If
range is rated between 8,750-16,500 watts, cord must
be rated for 40 Amps-125/250 Volts.If range is rated
between 16,501-22,500 watts, then the cord must be
rated for 50 Amps-125/250 Volts. Mobile homes or
installations where local codes do not allow grounding
through the neutral require a 4-wire flexible cord. The
same cord sizing conditions described above apply.
3. When using a cord rated 40 Amps, remove the next
to outermost knockout (1Yx”diameter) in the connection
plate. Likewise, when using a cord rated 50 Amps,
remove the outermost knockout (1V<’diameter) in the
plate.
4. Terminations shall be either closed loop terminals or
open-end spade lugs with upturned ends.
Younlust use a cla~npor strain relief to hold the cord.
Page 27

Four-wire cord connection
ound Screw
train Relief Clamp
1. Remove the screws on the terminal block.
2. Remove the ground screw, then remove the ground
strap.
3. Install the four-wire cord and strain relief in the hole
in the strainrelief bracket.
4. Connect the red andblack lead to the outside
terminalsand the white lead to the center terminal.
5. Attach the green lead below thejunction block with
the ground screw thatwas removed earlier (step 2).
6. Push the strain relief upward (to relieve strain), while
tighteningthe strainrelief clamp.
Page 28

;--:
~—.
Questions?
~- UseTtis
——
PROBLEM
OVENWILL
NOT WORK
OVEN LIGHT
DOES NOT WORK
FOOD DOES NOT
BROIL PROPERLY
FOOD DOES NOT
ROAST OR BAKE
PROPERLY
POSSIBLE CAUSE
*Plug on range is not completely inserted in the electrical outlet.
~The circuitbreaker in your house has been tripped, or a fuse has been blown.
*Oven controls not properly set.
~Light bulb is loose.
*Bulb is defective. Replace.
*Switch operating oven lightis broken. Call for service.
~Oven
~Door not left ajar as recommended.
*Improper shelfposition being used. Check Broiling Guide.
~Food is being cooked on hot pan.
*Cookware is not suitable for broiling.
~Aluminum foil used on broilpan rack has not been fitted properly and slit
as recommended.
*Oven control not set correctly.
~Shelf position is inco~~ect.Check Roasting or Baking Guide.
*Oven shelf is not level.
ProblemSolver
controlnotsetatBROIL.
r
SU~ACE UNITS
NOT FUNCTIONING
PROPE~Y
CLOCK AND
MINUTE/SECOND
TIMER DO NOT WORK
QIncorrect cookware or cookwareof improper size is being used.
*A foil tent was not used when needed to slowdown browning during roasting.
~Surface units are not plugged in solidly.
*Drip pans are not set securelyin the cooktop.
@Surface unit controls are notproperly set.
*Check for power outage.
28
Page 29

}VIthtiepurchase of your newRW appliance, receive the
.
ssurance that ifyou ever need itiormation or assistance,
dll be there. Allyou have to do is
call—~~11-free!
In”HomeRepair
service
80ME4ARES
(80M32-2737)
OLIrconsumer service professionals
till provide expert repair service on
RC4 appliance,scheduled at a
LIr
timethat’s convenientfor you.Ivfany
GEConsumerServicecompanyoperdtedlocationsofferycuservice
todayor tomorrow,or atyourcon~enience(7:00a.m. to 7:00p.m.weekdays,9:G0a.m.to2:00p.m. Saturdays).
O~~rhctory-trained techniciansknow
yOLIrappliance inside and out-so
most repairs can be hand~ed injust
one visit.
hr ctisf~mers with
lmpairedHeariflg..=
80@8334322
ServiceContracts
800-626-2224
Youcan have the secure feeling that
GEConsumer Service
there afteryourR~ productwarrantyexpires.Purchasea GEcontract
whileyourwarrantyisstillin effect
and you’llreceivea substantialdiscount.Witha multiple-yearcontract,
you’reassuredoffuture serviceat
today’sprices.
willstillbe
kdividtlals
ow appfimces can have needed
parts or accessories sent directly to
their home. Our parts system pro-
vides access to over 4’7,000Genuine
Renewal Parts... and all are fully warranted.
Discovercardsare accepted.
User
contied b tis booldet cover procedwes ~tended tobe perfomed by
my mer. Otier sertickg genertiy
shodd be refereed toqutified service personnel. caution must be
exercised, skce improper serticing
maycause msafe operation.
qutified toservicetieti
VISA,NIasterCardand
mtitenance instictions
(I~)nsumerswith impaired hearing or
speech who have acc:ss to a
~(>nventional
8t10-TDD-CzEAC(800-833-4322)to
I-L’uestservice.
.~
teletypewriter may call
TDDor a
Page 30

YOURRCAMNGE wARMNm
.—
Sa\~eproof of original purchase date such as your sales slip or cancelled check to establish warranty period,
FULL ONE-YEAR WARRANTY FOR SERVICE
For one year from date of original purchase, we
We at RCA strive to provide the highest quality
will provide, free of charge, parts and service labor products and service. Therefore we have designated
in your home to repair or repIace a~~ypati of the GE CONSUMER SERVICE,a leader in the service
Range that fails becatlse of a manufacturing defect. industry,, to fulfill your service needs. Should your
This warranty is extended to the original purchaser
and any succeeding owner for products purchased
appliance need service, during warranty period or
beyond, call 1-800-GE-CARES(1-800-432-2737).
for ordinary home use in the 48 mainland states,
Hawaii and Washington, D.C. In Alaska the
warranty is the same except that it is LIMITED
because you must pay to ship the product to the
service shop or for the service teclmician’s travel
costs to your home.
WHATIs NOT COVERED
@Service trips to your home to teach you how to
use the product.
Read
yourUseand Carematetial. If you then have
any questions about operating the product, please
contact your dealer or
Manager-Consumer Affairs
RCA Appliances
Appliance Park
Louisville, K.Y40225
@Improper installation.
If you have an installation problem, contact your
dealer or installer. YOUare responsible for providing
Some states do not allow the exclusion or limitation of incidental or
consequentialdamages, so the above limitation or exclusionmay not
apply toyou. This warranty givesyou specificlegal rights, and you
may also have other rights which vary from state to state. To know
what your legal rights are in your state, consult your local or state
consumeraffairs CJfficeoryour state’sAttorney General.
adequate electrical, gas, exhausting and other
connecting facilities as described in the Installation
Instructions provided with the product.
~Replacement of house fuses or resetting of circuit
breakers.
@Failure of the product if it is used for other than its
intended purpose or used commercially.
@Damagetoproductcausedbyaccident,fire,
floodsoractsofGod.
WARRANTOR ISNOT RESPONSIBLE FOR
CONSEQUENTWL DAMAGES.
WarrantonRCA Appliances
lf
furtherhelp is needed concerningthis
warran~, write:
Manager—ConsumerAffa~rs
RCA
Appliances
AppliancePark
Louisville,KY 40225
L3B150GL
 Loading...