

Page 1
..
.—
——.. .-
~
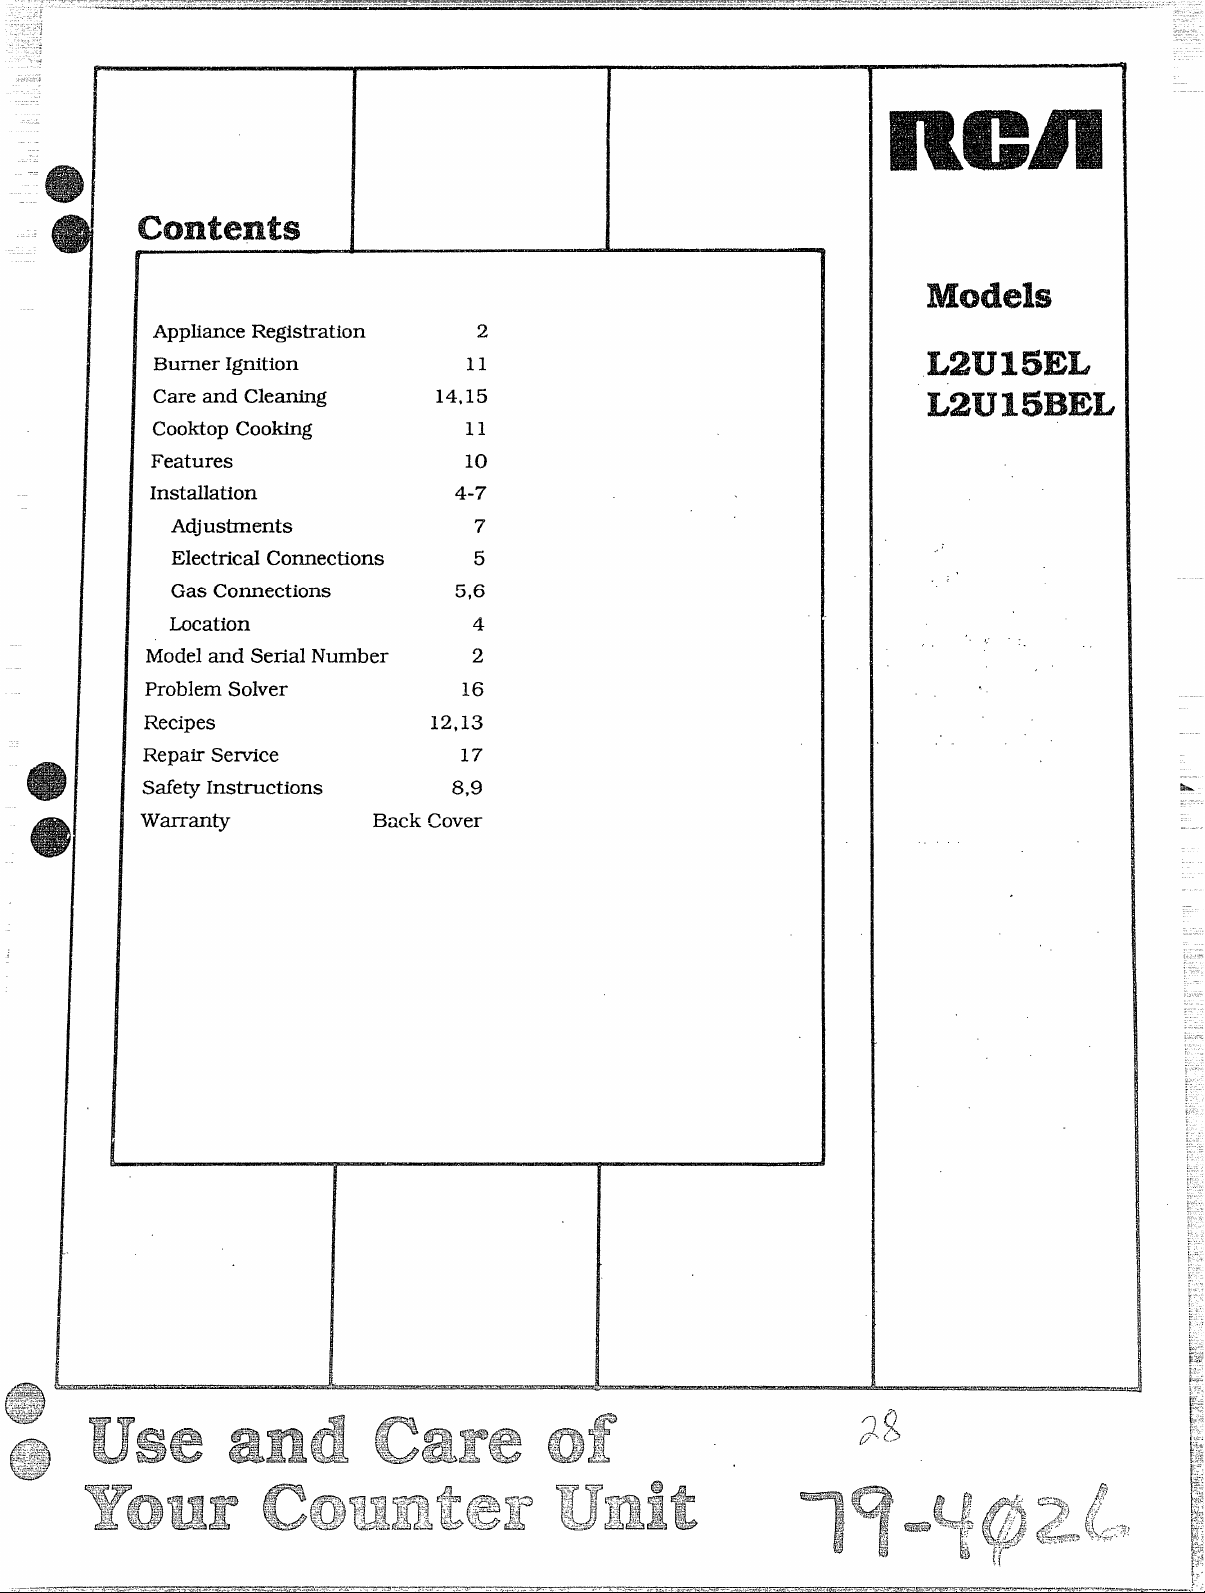
ApplianceRegistration
Burner Ignition 11
Care and Cleaning 14,15
Cooktop cooking 11
Features
10
Installation 4-7
Adjustments
ElectricalConnections
Gas Comections 5,6
Location
Modeland Serial Number 2
ProblemSolver 16
Recipes 12,13
RepairSemice 17
SafetyInstructions 8,9
Wamrlty
Back Cover
u
2
7
5
..
4
. .
%.
Page 2
?-k?lpLls
.—
Readthis book carefully.
His intendedto help youoperateand
maintainyour new counterunit properly Keepithandy for answersto your
questions.
if youdon’t understandsomethingor
need more help, write (include your
phonenumber):
ConsumerAffairs
RCA
AppliancePark
Louisville,KY 40225
Writedown the model and
serialnumbers.
You’llfindthemon alabelintheburner
box,underthe lift-up cooktop.
Writethese numbers inlo the space
below. Alsowritethenumbersintothe
space on th6 warrantycardthatcame
wjthyourcounterunitbeforeyousend
the card in.
youreceived
damagedcounterunit..
Immediately contact the dealer (or
builder)that sold youthe range.
Savetimeandmoney.
Beforeyou request
serVlce...
Check the Problem Solver, It lists
causes of minor operating problems
that you can correctyourself.
ModelNumber
SerialNumber
Use these numbersin anycorrespon-
dence~rservkecallsconcerningyour
counter unit.
Page 3
/
Y
Ifyou smellgas:
1.Openvvimbm.
2. Don’ttouch electricalswitches.
DOnotstoreor usegasolineorother
flammablevapors and liquidsinthe
vicinityofthisoranyotherappliance.
3. Extinguishanyopen flame.
4. knmediatdy callyourgassupplier
\ A
r
M? Burner
.-
Theadjustments inthe Installation Section rm.Jstbe
made before you try to use your range.
Hfyouare using Gas (bottled
gas) all L.f? adjustments inthe Installation Section
must be made before use.
Hyour appliance is not properly adjusted, flames
maybetoo high,orthe appliancemayusetoo much
fuel, release toxic fumes or cook poorly.
Page 4
me
LJs’r
Leavethese with
il’a!epWMw?’rmm’wmmsforfuture
use.
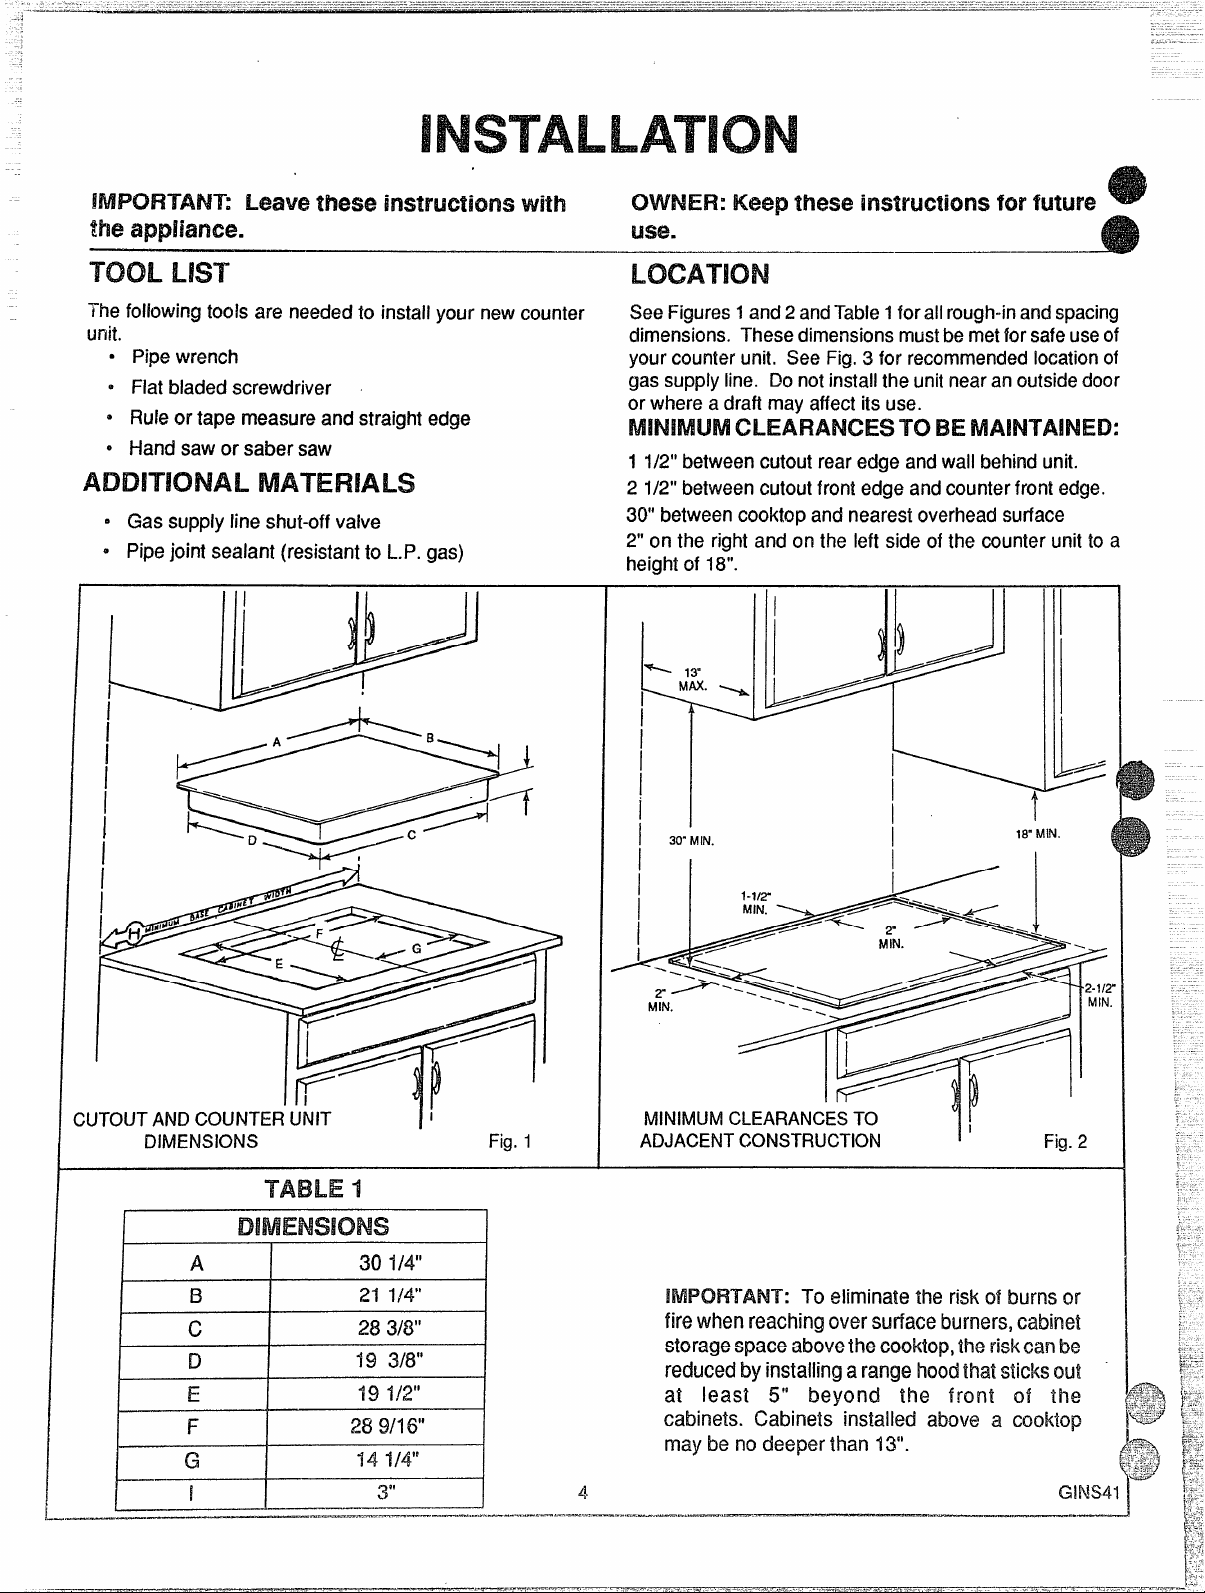
Thefollowing fools are neededto installyour new counter
unit.
● Pipewrench
e Flat Maded screwdriver
o Ruleor tape measureand straight edge
o Hand saw or saber saw
o Gas supply line shut-off valve
o Pipe joint sealant (resistantto L.P.gas)
I
I
I
SeeFigures1and2andTable1for allrough-inandspacing
dimensions. Thesedimensionsmustbemetforsafeuseof
yourcounterunit. See Fig,3 for recommendedlocationof
gassupplyline. Donot installthe unitnearanoutsidedoor
or where a draft may affect its use.
BE
1 1/2” betweencutout rear edge andwallbehindunit.
2 1/2”betweencutoutfront edge andcounterfrontedge.
3(Y’betweencooktopandnearestoverheadsurlace
2“ on the right and on the left side of the counterunitto a
heightof 18”.
I
30” MIN.
[
!
I
18”MN.
(
LJTOUTANDCOUNTERUNIT
DIMENSIONS
I
G
A
I
I
I
c
E
F
1
. . .. ... .. .... ... .... . ......... ..... ............ .... . .. . . .
I
I B
1
ID I
/
~~———~
——.—
1
301/4”
21 1/4”
28 3/8”
19 3/8”
19 1/2”
28!3/16“
14 1/4”
i
I
Fig.1
MINIMUMCLEARANCESTO
ADJACENTCONSTRUCTION Fig.2
‘1
I
1
I
To eliminate the risk of burns or
I
I
1
.4
fire when reaching over surfaceburners,cabinet
storagespaceabovethe cooktop,the riskcan be
reducedbyinstallingarange hoodthat sticks.out
at least 5“ beyond the front of Ihe
cabinets. Cabinets installed above a cooktop
may be no deeper than 13”.
GN’W41
.—-
Page 5
---dequatecounterspacemustbe providedfor the unit. The
- reashouldbe easyto reachandbelightedwithnaturallight
ringthe day.
Seethefirstpagefor cutoutdimensions. Markthe cutouton
thecounter, Usea handor saber sawto makethecut.
-n-E
ml
If you are installingIhe counter unit in a mobilehomeyou
must foliow the MANUFACTUREDHOME CONSTRUCTIONANDSAFETYSTANDARD,TITLE24CFR,Part3280
(formerlythe FederalStandardfor Mobile HomeConstruc-
tionandSafety,Title
notapply,youmustfollowtheSTANDARDFORMANUFACTUREDHOMEINSTALLATIONS1982(ManufacturedHome
Sites, Communities and Set-ups), ANSI A225.1-1984 or
loc@codes. Youcanget acopyofthestandardsbywriting.
Office of MobileHomeStandards
Callyour Eiectric Company and ask which codes apply in
ur area. If there are no codes, you must follow the
ATIONALELECTRICALCODE,ANS1/NFPANO.70-1987.
ou can get a copy of the code by writing:
National Fire ProtectionAssociation
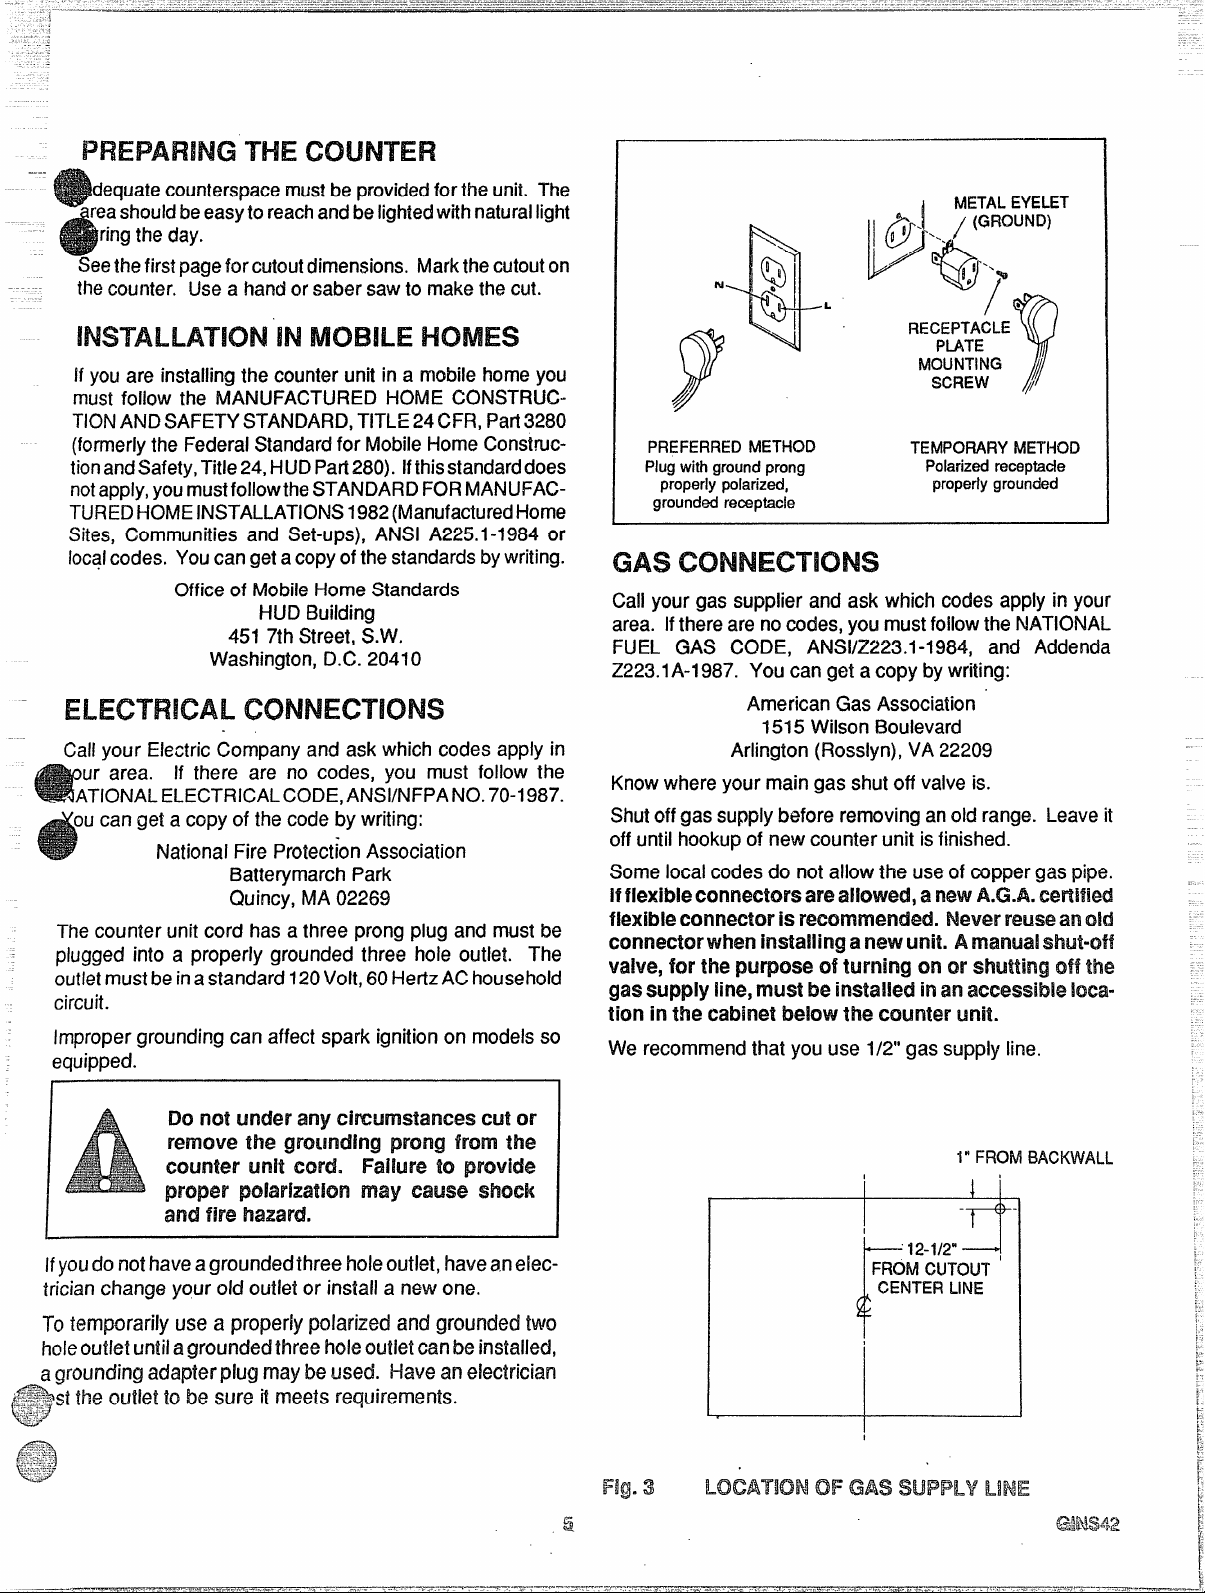
The counter unit cord has a three prong plug and must be
plugged into a properly grounded three hole outlet. The
outletmustbeinastandard120Volt, 60HertzAC household
circuit.
Impropergrounding can affect spark ignition on modelsso
equipped.
24, HUDPar1280).Ifthisstandarddoes
HUD Building
451 7th Street, S.W.
Washington, D.C.
. .
Batterymarch Park
Quincy, MA 02269
20410
i
METALEYELET
(y.../’G~ouND’
/’
V’$!!jj
PREFERREDMETHOD
Plug
withgraundprong
properlypolarized,
groundedreceptacle
Call your gas supplier and ask which codes apply in your
area. Ifthere are nocodes,you mustfoilowthe NATIONAL
FUEL GAS CODE, ANSi/Z223.l-1984, and Addenda
Z223.lA-1987. You can get a copy bywriting:
American Gas Association “
1515 Wilson Boulevard
Arlington (Rosslyn),VA 22209
Knowwhereyour main gas shut off valve is.
Shutoffgassupplybefore removing anoldrange. Leaveit
off until hookupof new counter unit isfinished.
Some local codes do not allow the useof copper gas pipe.
Hfiexibieccmectcm are alicmfed,a newMM.
fiexiblecmnectm is reccmmmled. Never
mnnectorwhen installing anewunit.
waive,W the purpose of turning cmor off the
gassuppiy iine,must be installed inan lcwa-
tion in the cabinet below the counter unit.
We recommend that you use 1/2” gas supply line.
~
s“,%
o
a
RECEPTACLE
MOUNTING
TEMPORARYMETHOD
/
PLATE
/
SCREW //
Polarizedreceptacle
properlygrounded
Y
notfumier any chfwnskmxix cut w
Do
remove the prong
Cxx.mkw’
p’qxw mayWwse SMlci(
I
ifyoudo not haveagroundecfthreeholeoutlet, haveamelec-
changeyouroldoutletorinstalianew one.
trician
Totwnporarilyuseaproperlypolarizedandgroundedbvo
and WJehazard.
unitCOrdo Failure toprovide
fromthe
holeoutletuntilagroundedthreeholeoutletcanbeinstaiied,
agrounding adapter plug may beused. Haveanelectrician
$&@stthfj o~t~~fto ~~ ~Uret meets requirements.
.,;—.-.----
+&
~?
1“FROMBACKVVALL
I
12-1/2”+
FROMCUTOUT
t-
CENTERLINE
f
{
I
Page 6
@m-at.)
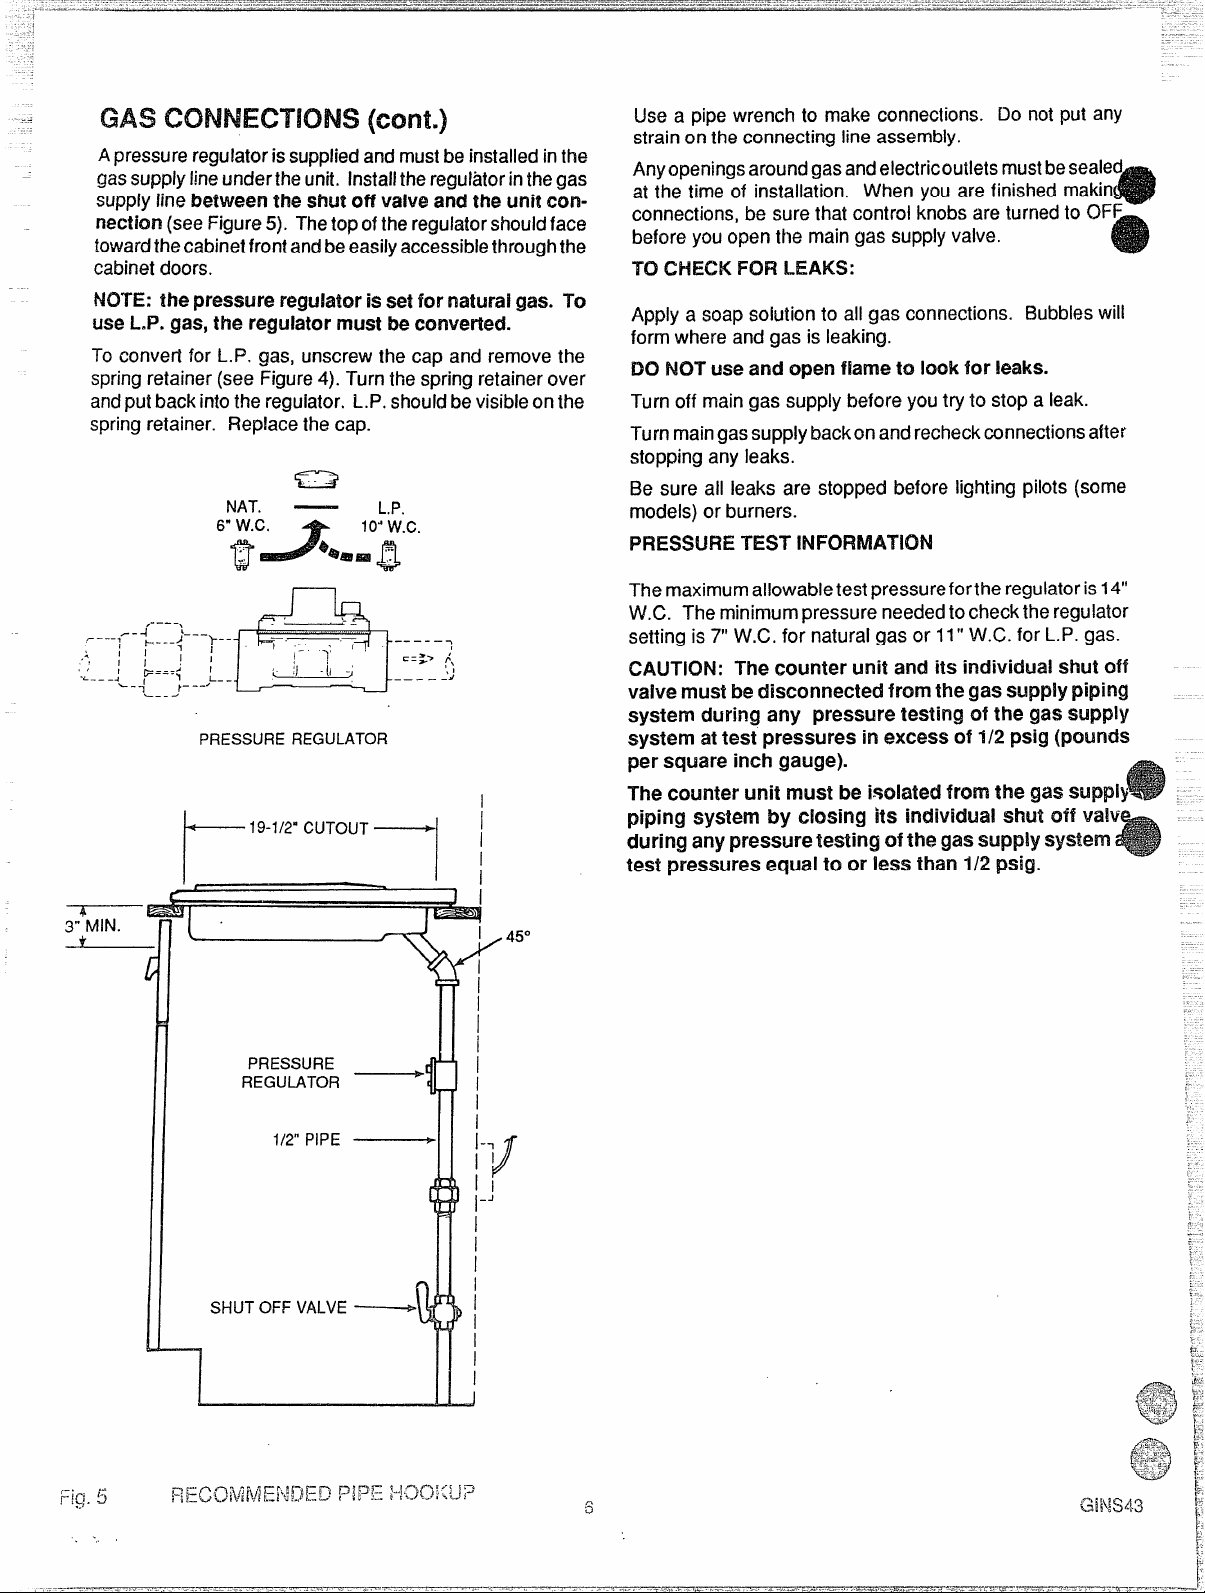
Apressureregulatorissuppliedandmustbe installedinthe
gas supplylineunderthe unit. Installtheregulatorinthegas
supplyline between the shut off valve andtheunitmn-
riectkm(seeFigure5). Thetopof thereguiatorshouldface
towardthecabinetfrontandbeeasilyaccessiblethroughthe
cabinetdoors.
NOTE: the pressureregulatork setfornaturalgas. To
useL.P.gas,the regulatormustbe converted.
To convert for L.P. gas, unscrewthe cap and removethe
springretainer(see Figure4). Turnthespringretainerover
andput backintothe regulator. L.P.shouldbevisibleonthe
springretainer. Replacethe cap.
NAT. —
PRESSUREREGULATOR
t-
19-1/2”CUTOUT~
I
L.P,
i
II
Use a pipe wrench to make connections. Do not put any
strainon the connectinglineassembly.
Anyopeningsaroundgasandelectricoutletsmustbesealed
at the time of installation. When you are finished makin
connections,be sure that control knobsareturnedto OFF
beforeyouopen the maingas supplyvalve.
TO CHECK FOR LEAKS:
Apply a soapsolutionto all gas connections. Bubbleswill
formwhere andgas is leaking.
DO NOT use and open flameto lookfor leaks.
Turnoff main gas supply beforeyoutry to stop a leak.
Turnmaingas supplybackonandrecheckconnectionsafter
stoppinganyleaks.
Be sure all leaks are stopped before lighting pilots (some
models)or burners.
PRESSURETEST INFOFWIATION
Themaximumailowabletest pressureforthe regulatoris14“
W.C. Theminimumpressure neededtocheckthe regu!ator
setting is 7“ W.C. for naturalgas or 11”W.C.for L.P. gas.
CAUTION: The counter unit and its incfividuai shutoff
valvemustbe disconnectedfromthegassupplypiping
system during any pressure testing of the gas supply
system attest pressures in excess of 1/2 psig (pounds
per square inch gauge).
The counter unit must be isolatedfromthe gas supply
piping system by closing its individual shut otf wNv
duringanypressuretesting ofthe gassuppiysystem
test pressuresequal to or less than 1/2 psig.
3“ MIN.
SHUTOFF VALVE~
I
“1
I
1
I
I
I
Page 7

ift the cooktop (grasp at front) and remove the shipping
—
.+--\-
..——-. ————
—.————
crewfrom eachof thefoursurfaceburnerassemblies(see
ig. 7). Thescrewscan bediscarded.
M? GAS
CAUTION: the following adjustments must be
rnadebeforetwmingonthe burner.Failuretodoso
couki result in serious injury. Besure pressure
regulator has been converted as described an
previouspage.
Removethecontrol knobsandthecontrolpanel. Use
a 1/2” open end wrenchto turn the orifice hoodinthe
!-p. cfirecticm. See Figure 8. Turn the orifice hood
about 1 1/2turnsor until snug. Do notovertightenor
you may distortthe orificehoodandneedle.
The unit has been factory adjusted for use with the most
commontypeofnaturalgas. The gasusedinsomepartsof
the country may be different. In order to assuresafe and
energy efficient operation, check adjustments described
below. If you are using L.P. gas, the orifice hoods and
pressureregulator must beconvertedas describedabove,
before making any burner adjustments.
urnallburnersfullon andcheckthe flames. Elurnerfiames
shouldnotf!utterorblow away from the burner. Theyshould
eblue incolorwith no traceof yellow. Foreignparticlesin
egas line may cause an orangeflame atfirst, but this will
soondisappear.
Tomakeadjustments, removethe controlknobs andpanel.
Use pliers to adjust the air shutter. Be sureto keepthe gap
inthe air shutter facing straight up. Be very mrefui notto
bendthe air shutter when using piiers to make adjust-
ments.
~ SHIPPINGSCREW
I
Ifthe flames are yellow or flutter, open the airshuttermore.
If the flames blow away from the burner, close the shutter
more.
Checkthe irmercone of theflame. Hshouldbe about 11/16”
long. Ifthe Iengthofthe innerconeoftheflame isnotcorrect,
usea l/2’’open endwrenchoradjustablejointpliersto adjust
the orifice hood.
Toshorlenthe cones,tighten theorificehoodbyturning inthe
L.P.direction.
Tolengthen the cones, loosenthe orifice hoodbyturning in
Nat.direction.
the
+ llH6- ~
Fig.9
7
INNERCONE
OFFLAME
G!NS44
Page 8

.
1
I
Teachchildrennot to playwithcontrol
knobsoranyotherpartofthecounterunit.
Neverleavechildrenaloneorunattended
whereacounterunit is in use.
I
Alwayskeepthe counterunitareaclear
andfreefromthingsthatwillburn.
Neverstorethingsnearcooktopelements/
burners.Thesethingsmaycatchfireand
plasticitemscouldmelt.
CAUTION!Neverstorethingschildren
mightwantaboveacounterunit.
Neier letanyoneclimb,sitorstandonthe
counterunit.Theymightbecomeseverely
burned.
Neveruseyourcounterunitforwarmingor
heatinga room. Suchusecouldbedangerousanddamagecounterunitparts.
Neverleaveanovendooropenwhenyou
arenotwatchingtherange.
Neverletchildrensitorstandonanopen
ovendoor.
Neverlet pot handlesstickoutoverthe
frontofthecounterunit.Turnhandlesin
sothattheycannotbebumpedinto. Keep
thehandlesawayfromother
ments/
burners.
cooktopele-
r
Never wear loose clothing when using
your counter unit.
catchfire.
Such clothing could
Neveruseatowelorotherbulkyclothasa
potholder.Suchclothscouldcatchfireon
an~lement/burner.
8
NW&wleavecooktop@lQmQnts/burnersunwatchedat highheatsettings.l%iloveif.%~$:
causesmokingandgreasyspikwerscouk.’~’
catchfirQ.
<3
Page 9

o
❑ illif!lm
ep this book for lateruse.
13esureycwrcounterunitisinstaikdandgrounckxl
properlyby a qua!ifkxftechnician.
keepthe counter unit areaclear andfree
from things that will burn, gasoline and other
flammablevapors and liquids.
Only some kindsofglass orceramicpans can be
usedforcooktopcooking. 13esurethatthepanyou
use will not break when heated on the cooktop
burners.
Always use dry pot holderswhen removing pans
fromthe cooktop. Moistor damp potholderscan
causesteam burns.
Always follow cleaning instructions in this book.
Never try to repair or replace any part of the
counter unit unless instructionsare given in this
book. All other work should be done by a skilled
technician.
Never heatunopened food containers. Pressure
build up may make container burst and cause
injury.
Never leavejars or cans offat or drippingson or
nearthecounterunit. NeverIetgreasebuildupon
yourcounter unit. Youcankeepgreasefiresfrom
startingifyoucleanup greaseandspillsaftereach
counter unituse.
Never use aluminum foil to line drip bowls. improper use of foil could start a fire and cause
incompletecombustion.
Never blockthe flowofcombustionandventilation
air to cooktop burners.
Never try to move a pan of hot fat, especially a
deep fat fryer. Wait untilthe fat has cooled.
Fh%d
and Wlderstandthis Now!
youeverneedit, youWWnothave time
forreading.
it
Neverusewater m a grease
fire—
spreadmefkmws.
The CaliforniaSafeDrinkingWaterandToxicEnforcement
ACIrequires the
substancesknowntothe
~z
+f:pusirwsses towarncustomersofpotentialexposuretosuch
.-.
L
‘“substances.(MS appliancescancauseminorexposureto
mree ofthesesubstances,namelybenzene,formaldehyde
&
GovernorofCaliforniato publisha listof
statetocausecancerandrequires
Wiill only
Never pick up a
d.Turn otfthe burner.
2.SBmYther
the firewith a !&Ml lid,
Sxxh
or Vwmla dry or
type
andsoot,causedprimarilybytheincomplete
naturalgasorL.P.fuels. Properlyadjustedranges,indicated
abluishratherthanayellowflame,will minimize incxxm-
by
plete combustion.Exposureb these substancescanbe
minimizedfurlherbyventingwithanopenwindoworusing
aventilationkm or hood.
combustionof
9
C%3AF%8
Page 10

.
Porcelain enameled Burner Grate
1.
Removable Cooktop Burner
2.
Cooktop Controls
3.
I
4
(!)
4. Lift-Up Cooktop
5. Removable Chrome Drip Bowls
.“.
;
, . .
Page 11

.-
—— . —- .-.-———
/--> “
I
C(X)KKW SPARKiGN#TIWW—Whenyouturnthecooktop
knob lo LITE, the spark igniters make a series of electric
sparks(ticking sounds) which lights the burner.
TO OPERATE COfWTWLS—The sign near each cooktop
controlknobshowswhich burner is turned on by that knob.
Light burners before placing utensil on it.
I. Push to turn knob left to LITE,
2. Afterthe burnerlights, tUrnknobtodesiredf lamesetting.
MWORTNW: Do not leave the knob on L!TE after the
burner lights, or life of the spark igniter maybe shortened.
As a safety precaution you should set
cm?rds so flame heats pm bottom only
does notMM pan skfes. Flames
and
Wting pan sides are unsafe and waste
1
If a cooidop burner fails to light within five seconds, turn the
knob to OFF and wait one minute before trying again. Kthe
JVrner still wiH not light, check the service section in this
#’$-~
$.:-’%z+J[~@l,
~;;,
heat.
start
Watchfoods when heating them quicklyon H1.
thefoodreachescooking temperature,turndowntheheat.to
the lowest setting that will keep it cooking
Duringapowerfailurethe burnerswill notlightautomatically.
In an emergency, a cooktop burner maybe lit with a match
by following the steps below.
Lighting gas
dangerous. The fhmes can burn you or
a build-up of gas can explode. You
should match light the ccmktopburners
only in an emergency.
1. Lighta match and ho!dthe flame nearthe bwmeryouwant
to light. Wooden matches work best.
2. Push in and turn the control knob slowly. Be sureyouare
turning the correct knob for the burner you are Iigh!ing.
NOTE: If the burner does not light within five seconck,
turn the knob off and wait one minute before trying again.
burners with a match k
As soonas
.$
-i
1}
Gi’vf”rcl7-1
Page 12

Ame
3!4 cup margarine,softened
cupsugar
1
2 eggs
1
cupsour cream
2cups all-purposeflour
1teaspoonbakingpowder
1teaspoonsoda
li2 teaspOOn
1teaspoon
3/4cup light brownsugar
1:2 cup choppedpecans
1teaspooncinnamon
Creammargarineand sugaruntil lightandfluffy. Add eggsandsourcream;
saltand nutmeg.Add to batter and mix well. Pourbatterinto greasedand floured 13”x 9“ x 2“ baking Pan.
Combine brown sugar, pecansand cinnamon; mix well. Sprinkleone half of this mixture overcake batter;swirl mixture
through batter.Sprinkle remainingone half mixtureevenlyovercakebatter.
Coverand chill overnight. Uncover and bake in preheated350°Fovenfor 35to 45minutesor until caketests done with
toothpick.
salt
nutmeg
mixwell.Combineflour, bakingpowder,soda,
2-10 oz.pkg. frozenchoppedbroccoli
1cup mayonnaise
1cupsharpcheddarcheese,grated
2 eggs,beatenslightly
1can cream of mushroomsoup
2 tablespoonschopped onion
1cup cheese crackercrumbs
Preheatoven to 375°F.Cook broccoli according to packagedirections; drain.
Mix with other ingredients.Pourinto greasedtwo (2)quart casserole.Sprinkle
with cheesecracker crumbs. Bakeat 375°Ffor 2G25 minutes.
Adelicious quick-to-make hearty stew that will feed a crowd or feed the family.
another day.
1-10 oz. can barbecue beef
I -10 oz. can barbecuepork
7-24 oz. can Brunswick stew
“ -5 oz. can boneless chicken/
I -12 oz. can vacuum packed corn niblets
I -76 OZ.can baby lima beans,drained
2-16 oz. cansstewed tomatoes
~41/2Oz, can sliced okra, drained
~-
Refrigerate or freeze the remainder for
Drainokra and lima beans.Add to all other ingredients in 4quart
:xm. Heat on medium to serving
temperature.
Page 13

1/2cup margarine
/4 cup chopped greenpepper
7/3cup chopped onion
eggs,wellbeaten
oz.cancreamstyle corn
17oz.can whole kernel com with liquid
8?/2oz.p~g. corn muffin ‘ix
1cup cheddar cheese,shredded
Preheatovento 350°F. saute greenpeppers
withremainingingredientsexceptcheese,Pour into greasedtwo (2)quart cas-
serole;sprinkle with cheeseand bake45-55minutes in 350°Foven.Letstand 5
minutes beforeserving.
Courtesy:Illinois Cooperative Extension Homemakers
and onionin margarine;combine
2-1 oz.squaressemi-sweet chocolate
1stick margarine
1cup sugar
1/4cup flour
2 eggs
1tsp. vanilla
Dashsalt
1/2 cup chopped pecans
Frozen 9“ pie shell
Preheat oven to 350°F. Melt chocolate and margarine. Add other
ingredients to melted mixture. Pour ir]to unbaked pie shell and
bake 35-40minutes or until pie appears set. Servewarm with ice
cream or whipped cream.
w
1-20 oz. can apple pie filling
1/2cup sugar
1-9 oz. box white cake mix (1 layer size)
1stick margarine, melted
1,’2cup chopped pecans
Preheatovento 350°F. Placein layers in greased 9“ or 10” square baking dish:
apples,sugar, dry cake mix. Pour melted margarine over top of cake mix. Bake
at 350°F for 35 minutes. Sprinkle with pecans. Continue baking 15 minutes.
Servewarm.
.—.-—-?
- ..
.....
approximately 2 tablespoons ccmkor 8“ or 9“ square baking pan. Place
Tilt pan to coat bottom evenly. Mix
“into hot greased pan. Bake 20-25
13
CRCP32-I
Page 14

Referakmtortextpagewhencleartingyourcounterunit.Warm
water,a
cleanableparts of your counter unit. All purposecleaners,
suchas Fantastik~, can also be used (excepton cooktop
burners; see below). Do not use metal scouring pads,
excep$where recommended.
mild detergent mcf a softclotharesafeto useonall
CLEANING MATEFWKS
Cooktopfinisheswill beeitherporcelainenamelorbrushe
chrome. Porcelainenamellooks like a paintedsurfac
13rushecfchromehasa metallicappearance.
I COntrO\panel and knobs
I
Porcelainenameledcooktop,
chrome drip bowls (some
models),areaundercooktop,
burnergrates
Cooktop burners
Brushed chrome cooktop
Detergent,warmwater,softcloth
Detergent, warm water,.plastic or
nylonscouringpad
Detergent, warm water, plastic or
nylonscouring pador boil in Dip-it@
solutionto removestubbornsoil
Detergent,warm water, soft clothor
achromecleaneror specialcooktop
cleaning creme
Donotuseabrasivecleaners. Knobspulioff
for easiercleaning.
Clean after each spillovei, Rub chrome
bowls (some models) gently with scouring
pad. Soak stubborn soil. Bowls can be
removedduringburnerusetokeepcleanand
to avoid discolorationcausedby excessive
heat.
Do not use all-purposecleaners, ammonia,
powder cleansers or oven cleaners. Such
productscanscratchordiscolortheburners.
Touse Dip-it@solution,removeburnersand
boilfor20 minutesin2 Tbsp. Dip-it@granules
per quart of water. Boil with burner head
down. Rinse thoroughly, drain and completely dry burners in a 200°F oven for 1/2
hour. After cleaning or a spiliover, Iighfthe
burners and make sure that no ports are
clogged (see nextpage).
Do not scour chrome tops. Stubborn stains
maybe removedbyusingEspreeMagwheel
Cleaner@ or Turtle Wax Polishing Com-
pound@.Toremovefingerprints on brushed
chrome, apply a little baby oil with a paper
towel. Flub in the direction of the brush
marks. Armor All Protestant@can also be
used (aftercleaning). 13esure to clean spills
of acidic foods quickly. Vinegar spills can
permanently stain chrome.
1
Ifcleaning methodsdescribed above
proveineffective,baked-onfoodresidueorstains
onchromecooktopscanberemovedbyusingpadtypeovencleaners.Useextreme
caution.Ovencleanersarecausticandwilldamagepaintedor aluminumsurfaces,
suchasrangesides,backguardorcontrolpanel.
Donotusespraytypeovencleaners.
Overspraywill damagenearbypaintedsurfacesand heatingelements.IJseseveral
layers of newspaper and masking tape to cover surfacessuchas the backguard,
:ontrolpanel,rangesides,countertops,etc.Applythepadtypeovencleanerevenlyto
theentiretopsurface.Theentiretopmustbecleanedtokeepthefinishconsistenti~
color.Useextremecautiontopreventtheovenclearlerfrom
coming incontact with any
othersurface. Let the cieanerremainonthetopfor20-30minutes.Rinsethetopwell
to
remove everytrace of oven cleaner.Drythe top andapp!yArmor AHProtestant@to
protect the finish.
14
Gcxwl 2
Page 15

Thecooktopcanbe raisedor removedsothe area under-
athcan be c\eaned.
o raise Cooktop:
emovethe burnergrates.
Graspthe cooktopat the front and lift up.
Somemodelshavea cooktopsupport.
FOR MODELS WITH SINGLE SUPPORT IN THE
CENTER—Raisethesupport(asshowninthe illustra-
tion) to holdtop whilecleaning.
Porcelainenamel can chip if dropped. Handle porcelain
enameledcooktopscarefully.
The cooktop burners on your range may be removed for
cleaning. Be sure all cooktop knobs are turned to OFF
andburnersarecool,thenremoveor raisethe cooktop.
If shippingscrewswere not removedfrom the burnerwhen
range was installed, do so now (see your Installation
ction for instructions).
remove burners:
Grasptheburnerheadandtiltittothe rightto releasethe
.
twotabs from the burner support(A in Fig.A).
2. Liftthe endof the burner assembly,then pull awayfrom
thefront of the rangeto free the air shutter from the gas
valve orifice (Fig. B). If they are clogged, use a wire or
needleto clear them.
See the Cleaning Chart
Be careful not to disturb the air shutter setting while
cleaning. If you need to readjust the air shutter, see the
InstallationSection.
TOreplace burners:
1,Slip the air shutter over the gas valve orifice (Fig. A).
2. Lowerthe burner assemblyand hookthe tab in the slots
inthe burner support (Fig. A).
3. Be sure both tabs are in theirslots,that theburnersits
levelandstraightandthattheflash
linefrom the igniter to the burner (Fig.B).
tube forms a straight
Burner
Ports
GasValve
‘tifice\/’
!
Fig. A
hmitor
AirShutter
Page 16

FWCN3LEM
$Cur?-mw
[
Cooktopknobswill notturn.
Cooktopburnerswill notlight.
Pushknobs into turn.
Gassupplynotconnectedor notturnedon.
Counterunit not propedygrounded orpokwized. This
can affect spark ignition. See installationsection.
No electricityto unit; check for trippedfuse or circuit
breaker. Be sure unit is pluggedin.
Soilcloggingholes in burnertop. Removeandclean.
Page 17

IFYoLINeed Service
To obtain service, see your warranty
on thebackpageof this book.
We’reproud of our service and want
youto bepleased. Iffor somereason
youarenothappywiththese?viceyou
receive,here arethree stepstofollow
for furlher help.
FIRST, contactthe people whoservicedyourappliance.-Ex~lainwhyyou
are notpleased. In most cases, this
will solvethe problem.
NEXT,ifyouarestill notpleased,write
the details-includingyour phone
all
number-to:
Manager,Consumer Relations
RCA
Appliance Park
Louisville,Kentucky 40225
LLY, if your problem is still not
MajorAppliance
ConsumerAction Panel
20 North Wacker Drive
Chicago,Illinois 60606
Page 18

YOUR
Saveproofof originalpurchasedatesuchas yoursalessliporcanceiledcheckto establishwarrantyperiod.
I
!s
FULL i3NE=YEARWVARIW!NTY
Forone yearfromthedateof
originalpurchase,wewill provide,
free of charge,partsand service
laborinyourhometo repairor
replaceany par?of the Ccwter
Unit thatfails becauseof a manu-
facturingdefect.Thiswarrantyisextendedto the
originalpurchaserand any succeed-
ingownerfor productspurchasedfor
ordinaryhomeuse in the 48 mainlandstates, HawaiiandWashington,
D.C. In Alaskathewarrantyisthe
sameexceptthat it is LIMITED
becauseyou mustpayto shipthe
producttothe serviceshopor for the
servicetechnician’stravel coststo
your home.
We at RCA striveto providethe hig
estqualityproductsand service.
Therefore,we havedesignatedGE
CONSUMERSERVICE,a leaderin
the serviceindustry,to fulfill your
serviceneeds. Shouldyourappliance
needservice,duringthe warranty
periodor beyond,look in the Whiteor
Yellowpagesof yourtelephone
directoryfor GECONSUMERSERVICEor an AUTHORIZEDRCAAPPLlANCE SERVICER.
Is NcrT
Some states do not allow the exclusionor limitation of incidentalor consequentialdamages, so the above
limitation or exclusion may not applyto you. This warranty givesyouspecific legalrights, and you may also have
other rights which vary from state to state. To know what your legal rights are in your state,
consult your local or state consumer affairs office or your state’s Attorney General.
Hfurther help is needed concerning this warranty, write:
● Servicetrips to your hometo teach
you how to usetheproduct.
Readyour Use and Cart?materiaL
If you then haveanyquestions
about operatingthe product,
please contactyour dealer or our
Consumer Affairs officeataddress
below.
“ Improperki’istallation.
If you havean installation problem,
contact your dealer or installer. You
are responsiblefor providingadequate electrical, plumbing and other
connecting facilities.
Warrantor: RCA Appliances
Manager—Consumer Affairs, FMX,
AppMKX2 Park, KY 40225
o Replacementof housefuses or
resettingof circuitbreakers.
s Failure of the productif it is used
for other than its intendedpurposeo
used commercially.
o Damageto product caused by
accident,fire, floods or acts of God.
WARRANTOR ISNOT RESPONSIBLE FOR CONSEQUENTIAL
DAMAGES.
4
! pafl~() MNLQ55w~zw-z
Pub. No, 79-4026
l--
)
 Loading...