

Page 1
GEConsumer & Industrial Appliances
Assembl Instructions
Advantium ®Built-in Accessory Storage
J×2200, J×2201, Z×2201
BEFORE YOU BEGIN
Readthese instructions completely and carefully. Read
the Installation Instructions for the Advantium 120V or
2q0v oven completely and carefully for cutout dimen-
sions and step-by-step instructions.
IMPORTANT- savetheseinstructionsfor
local inspector's use.
IMPORTANT- Observeallgoverningcodes
and ordinances.
• NOTE TO INSTALLER: Be sure to leave these
instructions with the Consumer.
• NOTE TO CONSUMER: Keep these instructions with
your Advantium 120V or 240V Oven Owner's Manual
for future reference.
• SKILL LEVEL: Installation of this appliance requires
basic mechanical skills.
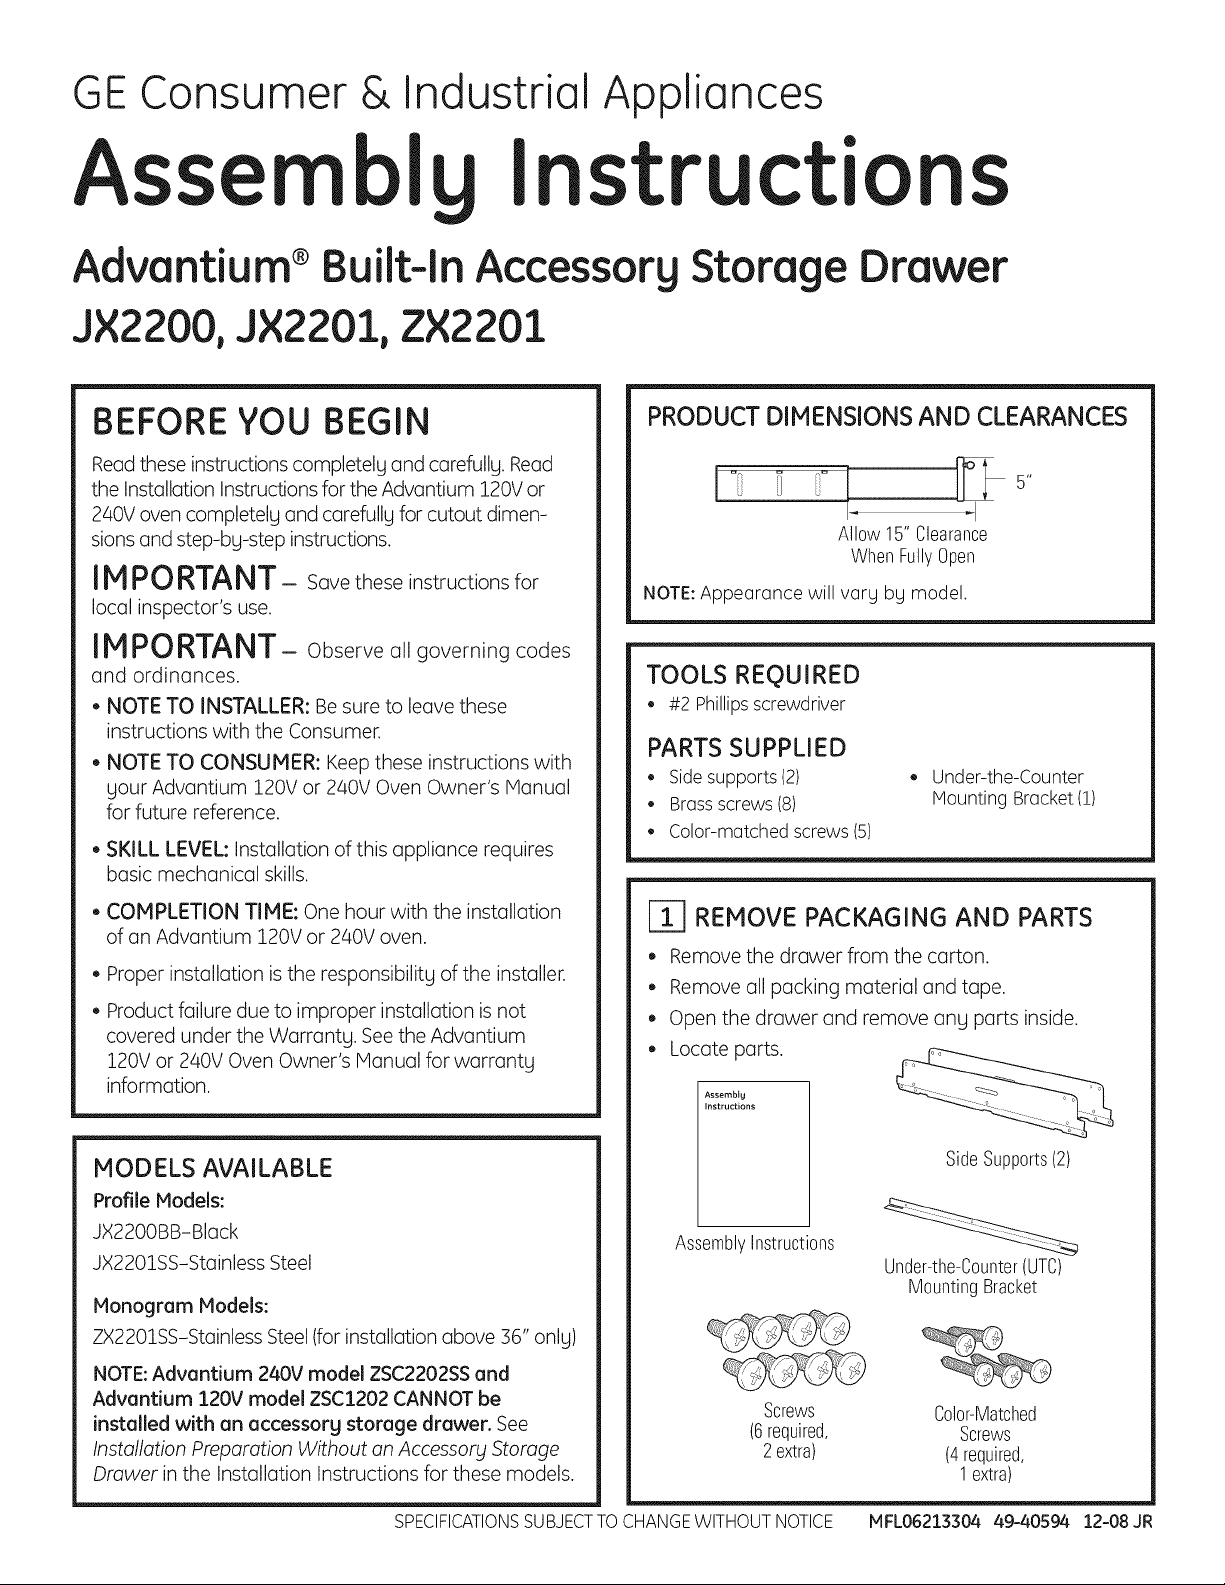
PRODUCT DIMENSIONS AND CLEARANCES
NOTE:Appearance will vary by model.
TOOLS REQUIRED
• #2 Phillipsscrewdriver
PARTS SUPPLIED
• Sidesupports(2) • Under-the-Counter
• Brassscrews (8) Mounting Bracket(1)
• Color-matched screws(5)
Drawer
Allow 15"Clearance
WhenFullyOpen
• COMPLETION TIME: One hour with the installation
of an Advantium 120V or 240V oven.
• Proper installation is the responsibility of the installer.
• Product failure due to improper installation is not
covered under the Warranty. See the Advantium
120V or 240V Oven Owner's Manual for warranty
information.
MODELS AVAILABLE
Profile Models:
JX2200BB-Black
JX2201SS-Stainless Steel
Monogram Models:
ZX2201SS-Stainless Steel (for installation above 36" only)
NOTE:Advantium 240V model ZSC2202SS and
Advantium 120V model ZSC1202 CANNOT be
installed with an accessory storage drawer. See
Installation Preparation Without an Accessory Storage
Drawer in the Installation Instructions for these models.
| REMOVE PACKAGING AND PARTS
• Remove the drawer from the carton.
• Remove oil packing material and tape.
• Open the drawer and remove any parts inside.
• Locate parts.
Instructions
Assembly
SideSupports(2)
AssemblyInstructions
Under-the-C0unter(UTC)
MountingBracket
Screws C010r-Matched
(6required, Screws
2 extra) (4required,
1extra)
SPECIFICATIONSSUBJECTTO CHANGE WITHOUT NOTICE MFL06213304 49-40594 12-08 JR
Page 2
ASSEMBLY TO ADVANTIUM BUILT-IN SPEEDCOOK OVEN
UNDER-THE-COUNTER {UTC)
MOUNTING BRACKET INSTALLATION
NOTE:For UTCmodels PSB!200, PSB!20! Qnd
ZSC!20! onlg.
r_ open the occessorg drawer so gou hove access
to the top bracket.
Removethe three screws securing the top bracket.
Install the new UTCmounting bracket using the
screws removed previouslg.
[' 1
r_ Closethe drower and proceed with
the instollotion.
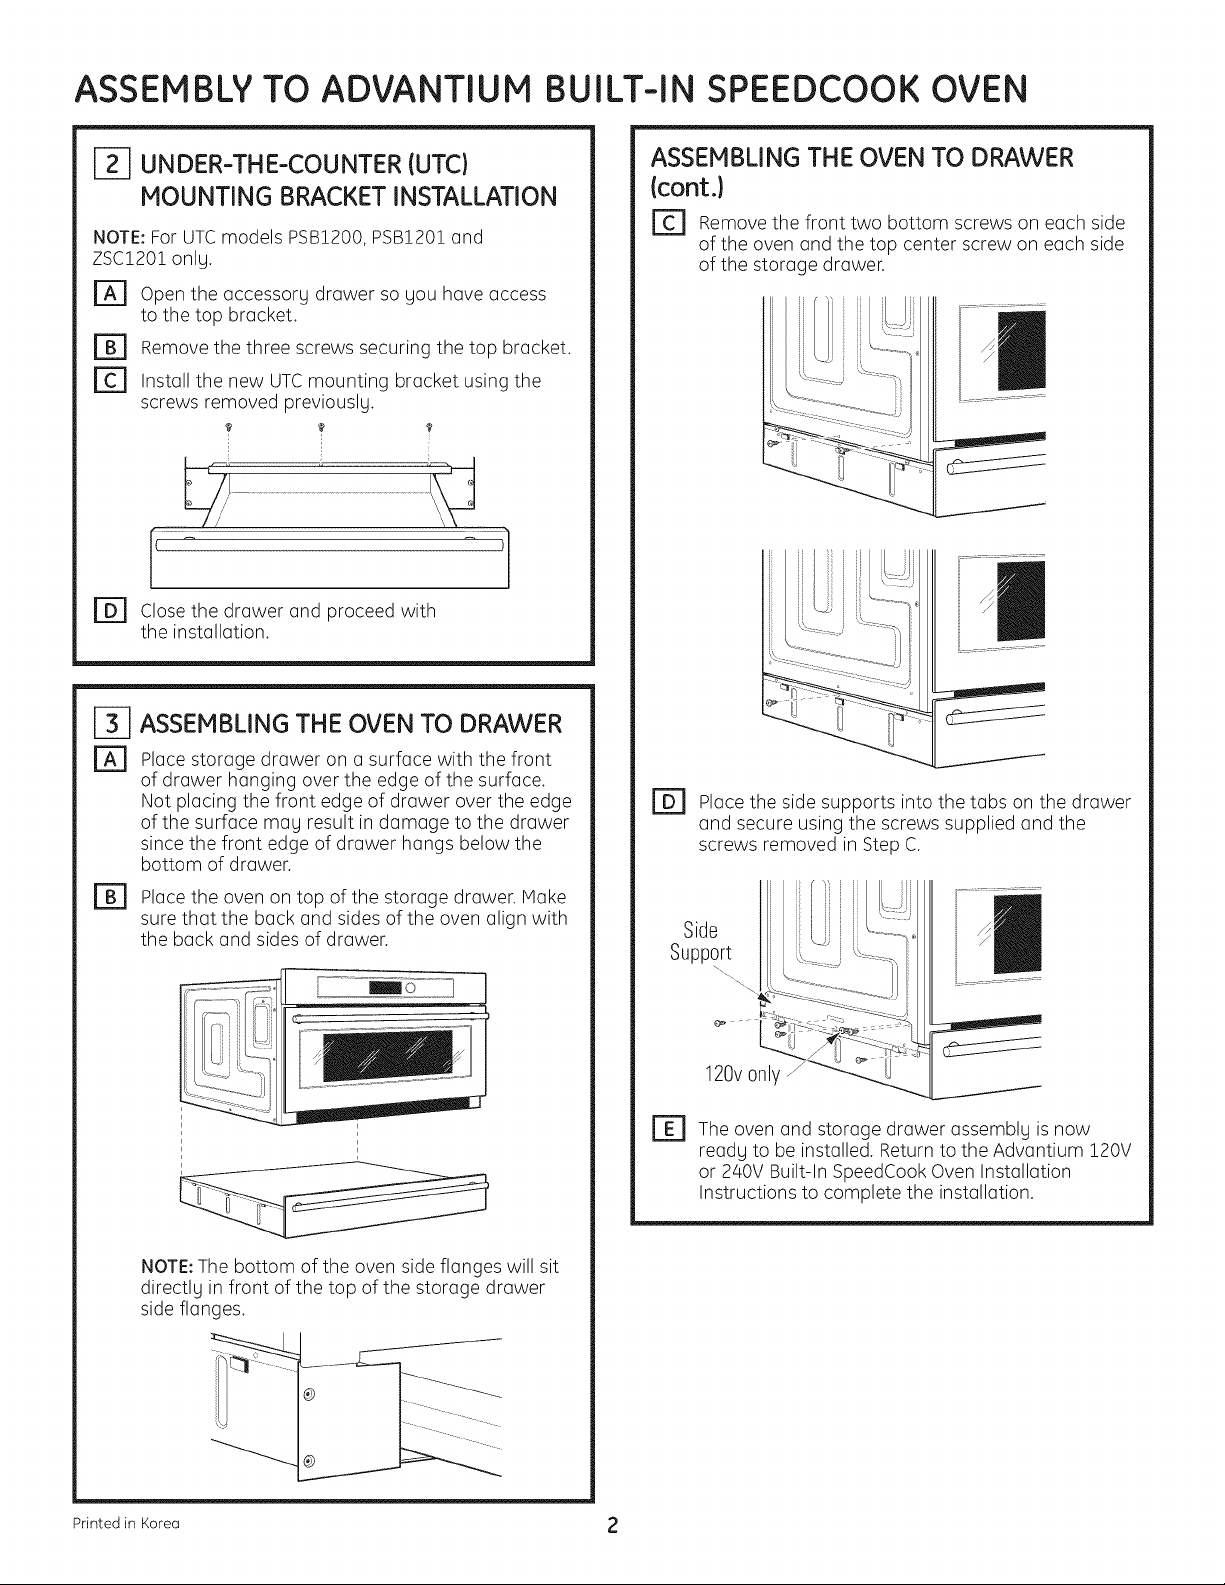
ASSEMBLING THE OVEN TO DRAWER
ASSEMBLING THE OVEN TO DRAWER
(cont.)
r_ Remove the front two bottom screws on eoch side
of the oven ond the top center screw on eoch side
of the storage drawer.
[]
Plocestorage drawer on o surface with the front
of drawer honging over the edge of the surface.
Not placing the front edge of drawer over the edge
of the surface mog result in domoge to the drower
since the front edge of drawer hongs below the
bottom of drawer.
B]
Plocethe oven on top of the storage drawer. Make
sure thot the bock and sides of the oven align with
the back and sides of drower.
NOTE:The bottom of the oven side flonges will sit
directlg in front of the top of the storage drawer
side flonges.
Place the side supports into the tabs on the drawer
and secure using the screws supplied and the
screws removed in Step C.
Side
Support -
120vonly J
r_ The oven and storage drawer assemblg is now
reodg to be installed. Return to the Advantium 120V
or 240V Built-In SpeedCook Oven Installation
Instructions to complete the installation.
Printedin Koreo 2
Page 3

GEConsumer & Industrial
Appliances
Instr cc" e
de
t je
Caj6ndealmacenamientodeaccesoriosempotradoAdvantium®
J×2200, J×220:1, Z×220:1
ANTES DE COMENZAR
Lea estas instrucciones por completo LIcon detenimiento.
Lea las Instrucciones de instalaci6n delhomo Advantium
de 120V o 240V por completo y con detenimiento sobre
lasdimensiones del recorte y las instrucciones paso a paso.
IMPORTANTE- Guardeestasinstrucciones
para el uso de inspectores locales.
IMPORTANTE- Cumpla con todos
los c6digos g ordenanzas vigentes.
• NOTA AL INSTALADOR: Aseg0rese de dejar estas
instrucciones al consumidor.
• NOTA AL CONSUMIDOR: Conserve estas
instrucciones con el Manual del Propietario del homo
Advantium de 120V o 240V para referencia futura.
• NIVEL DE CAPACIDAD: La instalaci6n de este
aparato requiere capacidades mec(_nicas b(_sicas.
• TIEMPO DE FINALIZACI6N: Una hora con la
instalaci6n de un homo Advantium de 120V o 240V.
DIMENSIONES Y ESPACIOSDEL PRODUCTO
Dejeunespaciode15"paracuando
seabraporcompleto
NOTA:La apariencia varfa segLin el modelo.
HERRAMIENTAS REQUERIDAS
• Destornilladorde estrella #2
PIEZAS PROVISTAS
• Soportes laterales (2) • Soporte de montaje
• Tornillos(8) para debajo del
• Tornillos(decolor)(5)
QUITE EL EMPAQUE Y LAS PIEZAS
mostrador (1)
• El instalador tiene la responsabilidad de efectuar una
instalaci6n adecuada.
• La Garantia no cubre las fallas del producto debido
a una instalaci6n incorrecta. Vet el Manual del
Propietario del homo Advantium de 120V o 240V
para informaci6n sobre la garantia.
MODELOS DISPONIBLES
Modelos Profile:
JX2200BB-Negro
JX2201SS-Acero inoxidable
Modelos Monogram:
ZX2201SS-Acero inoxidable (s61opara instalaci6n sobre 36")
NOTA: El modelo ZSC2202SS de Advontium de 240V g
el modelo ZSCI202 Advontium de 120V NO PUEDEN
instolorse con un caj6n de olmocenomiento de
occesorios. Ver PreparaciOn para la instalaciOn sin
un cajOn de almacenamiento de accesorios en las
Instrucciones de instalaci6n para estos modelos.
ESPECIFICACIONESSUJETASA CAMBIOSSIN PREVIOAVISO MFL06213304 49-40594 12-08 JR
• Quite el caj6n de la caja de cart6n.
• Quite todo el material de empaque g la cinta.
• Abra elcaj6n g quite las piezasdelinterior.
• Ubiquelas aiezas.
Instructions
Assembly
Soporteslaterales(2)
Instrucciones
de montaje
Tornillos(6requeridos, Tornillosdecolor
2 extra) (4requeridos,
Soportedemontaje
sobreel mostrador(SEM)
1extra)
Page 4

MONTAJEENUN HORNODECOCCiONRAPIDAEMPOTRADOADVANTIUM
INSTALACION DE SOPORTEDE
MONTAJE BAJO EL MOSTRADOR (BEM)
NOTA:$61opara modelos BEH PSB1200,PSB1201
g ZSC!20!.
r_ Abra el caj6n de accesorios para tener acceso
al soporte superior.
Quite los tres tornillos que fijan el soporte superior.
Instale el nuevo soporte de montaje BEMutilizando
los tornillos quitados anteriormente.
? ? ?
Cierre el caj6n g siga con la instalaci6n.
COMOMONTAR ELHORNO AL CAJON
COMOMONTAR EL HORNO AL CAJON
(cont.)
[_] Quite los dos tornillos inferiores frontales de cada
lado del homo g el tornillo central superior sobre
cada lado del caj6n de almacenamiento.
Coloque el caj6n de almacenamiento sobre una
superficie con el frente del caj6n colgando sobre
el borde de la superficie. No colocar el lado frontal
del caj6n sobre el borde de la superficie puede
provocar daBos al caj6n ga que el lado frontal
del mismo cuelga sobre la parte inferior del caj6n.
Coloqueel horno sobre el caj6n de almacenamiento.
Verifiqueque la parte trasera de loscostados del
homo seencuentren alineados con la parte trasera
g loslados del caj6n.
NOTA:La parte inferior de las bridas laterales
del homo descansan directamente frente a la
parte superior de las bridas laterales del caj6n
de almacenamiento.
r51Coloque los soportes laterales dentro de las
leng0etas del caj6n g fijelos utilizando los tornillos
provistos g los tornillos quitados en el Paso C.
Soporte
lateral
f
$61opara120v
B3 El horno g el montaje del caj6n de almacenamiento
ga se encuentran listos para set instalados. Vuelva
alas Instrucciones de instalaci6n del homo de
cocci6n r6pida empotrado Advantium de 120V o
240V para completar la instalaci6n.
Impreso en Corea 2
 Loading...