

Page 1
‘,
Oven
.
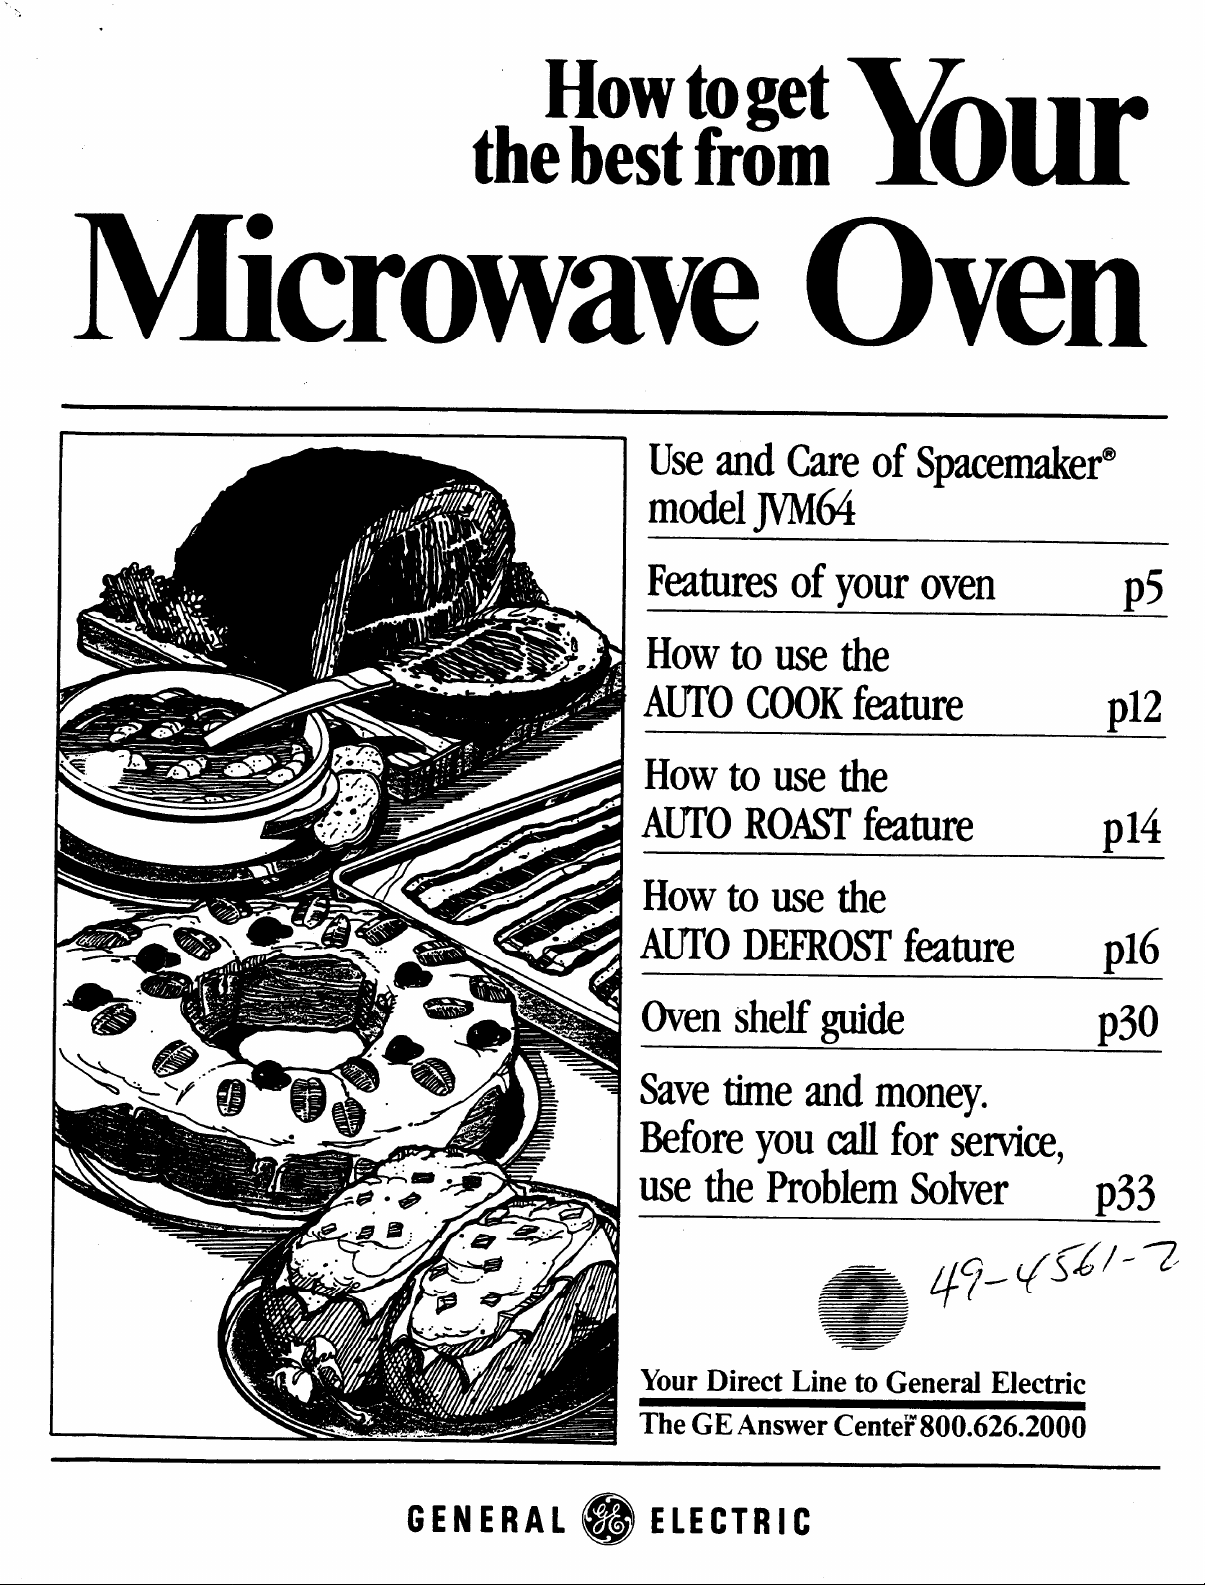
Howtoget
thebestfrom Otll?
Y
UseandCareof Smemaker”
modelJVM64
Featuresofyouroven
Howto use the
AUTOCOOKfature
.&
D12
Howto usethe
A~O ROASTfature
Howto usethe
AUTODEFROSI’fmture
Ovenshelfguide
Savetimeandmoney.
Beforeyoucallfor semke,
usetheProblemsolver
D14
1)16
p30
P33
Your Direct Line to General Electric
The GE Answer CenteF800.626.2000
GE NE RAL@EIECTRIC
Page 2
Help Us
PRECAUTIONS
Help You. . . ~
Read this book cafiefully
H will help you operate and ain-
tain your new Microwave Ov n
properly.
Keep it handy for answers to our
questions.
If you don’t understand some hing
or need more help. . .
Call, toll free:
The GE Answer Center’” ~
800.626.2000
consumer information service
or write: (include your phone
number);
Consumer Affairs
General Electric Company
Appliance Park
Louisville, KY 40225
Write down the model a d
serial numbers.
You’ll find them on a label insi e
the oven on the upper left sid .
These numbers are also on th’
Consumer Product Ownershi
Registration Card that came ith
your Microwave Oven. Before
sending in this card, please w ite
these numbers here:
Model No.
Serial No.
Use these numbers in any
correspondence or service ca Is
concerning
your Microwave ven.
j
~
\
I
q
r
i
~
,
4
Be sure your Microwave
Oven is registered.
Itis important that we, the manu-
facturer, know the location of your
Microwave Oven should a need
occur for adjustments.
Your supplier is responsible for
registering you as the owner.
Please check with
be sure he has done so: also send
in your Consumer Product Ownership Registration Card. If you move,
or if you are not the original purchaser please write to us, stating
model and serial numbers. This
appliance must be registered.
Please be certain that it is.
Write to:
General Electric Company
Range Product Service
Appliance Park
Louisville, KY 40225
your supplier to
If you received a damaged
oven. . .
immediately contact the dealer (or
builder) that sold you the Microwave Oven.
Save time and money.
Before you request semice, check
the Problem Solver on page 33. It
lists minor causes of operating
problems that you can correct
yourself.
The electric output of this
microwave oven is 600 Watts.
TO AVOID
POSSIBLE
EXPOSLJRE TO
EXCESSIVE
MICROWAVE
ENERGY
(a) Do Not Attempt to operate this
oven with the door open since open
door operation can result in harmful
exposure to microwave energy. It is
important not to defeat or tamper
with the safety interlocks.
(b) Do Not Place any object
between the oven front face and the
door or allow soil or cleaner residue
to accumulate on sealing surfaces.
(c) Do Not Operate the oven if it is
damaged. It is particularly important
that the oven door close properiy
and that there is no damage to the:
(1) door (bent),
(2) hinges and iatches (broken O,
ioosened),
(3) door seals and seaiing surfaces.
(d) The Oven Should not be
adjusted or repaired by anyone
except properly quaiifieci service
personnei.
This microwave oven is UL li~ted for installation over electric
and gas ranges.
Optional Accessory
Avaiiable at extra-cost from y ur General Electric supplier.
JX80 Charcoal Filter Kit ‘
Add for non-vented in$tallati n.
?
4
.
2
Page 3

Contents
Before Microwaving . . . . . . . . . . . .
Sate
lntro~~ction to Your Oven . . . . . . .
Set the Clock . . . . . . . . . . . . . . . . . .
Touch Control Panel . . . . . . . . . 6,
Time Cook . . . . . . . . . . . . . . . . . . . .
Manual Defrosting . . . . . . . . . . . . .
Temp Cook . . . . . . . . . . . . . . . . . . . 1
Hold/Timer . . . . . . . . . . . . . . . . . ..1
Automatic Cooking . . . . . . . . . 12,1
Automatic Roasting
Automatic Defrosting . . . . . . . . . . 1
Automatic Cooking
Automatic Cooking Chart... 24,2
The Exhaust Feature . . . . . . . . . . 2’
Care of Your Oven . . . . . . ...28.2!
Spacemaker@ Microwave Oven
Grou~-’:ng instructions . . . . . . . . 3;
The F. ~Jem Solver . . . . . . . . . ..3;
Consumer Services . . . . . . . . . . . . 3!
WarrantY . . . . . . . . . . . ..Back Cove
nstructions . . . . . . . . . . . . .
&Chart . . . . . . . . . . . . . . . ..l4.l
Recipe Guide . . . . . . . . . . . . . . . 1
Meats . . . . . . . . . . . . . . . . . ..l8. 1
Vegetables . . . . . . . . . . . ...20.2
Desserts . . . . . . . . . . . . . ...22. 2
Shelf Guide . . . . . . . . . . . ..3O.3
Microwaving Tips
● Make sure all utensils used in
your microwave oven arelab$led
%uitableformicrowaving”. Check
your Cookbook for specific test
to determine ’’microwave-safe”
utensils.
a paper towels, waxpaper, and
plastic wrap can beused tocover
dishes in order to retain moisture
and prevent spattering.
● Some microwaved foods require
stirring, rotating, or rearranging.
Check your Cookbook forspecific
instructions.
● Some foods such as unshelled
eggs and hotdogs must be pierced
toallow steamto escape during
cooki
IMPORTANT SAFETY INSTRUCTIONS
Read all instructions before using this appliance.
When using electrical appliances
basic safety precautions should
be followed, including the
following:
WARNING—TO reduce the risk
of burns, electric
shock, fire,
injury to persons or exposure to
excessive microwave energy:
● Use this appliance only for its
intended use as described in this
manual.
● Read and follow the specific
“PRECAUTIONS TO AVOID
POSSIBLE EXPOSURE TO
EXCESSIVE MICROWAVE
ENERGY” found on page 2.
● This appliance must be
grounded. Connect only to
properly grounded outlet. See
“GROUNDING INSTRUCTIONS
found on page 32.
● For best operation, plug this
appliance into it own electrical
outlet, to prevent flickering of
lights, blowing of fuse or tripping of circuit breaker.
● Install or locate this appliance
only ‘inaccordance with the provided installation instructions.
● Do not cover or block any
openings on the appliance.
● Do not use outdoors.
● Do not immerse power cord
or plug in water.
● Keep power cord away from
heated surfaces.
● Do not let power cord hang
over edge of table or counter.
● Do not operate this appliance
if it has a damaged power cord
or plug, if it is not working properly, or if it has been damaged
or dropped.
● This appliance should be ser-
viced only by qualified service
personnel. Contact nearest
authorized service facility for
examination, repair or
adjustment.
● As with any appliance, close
supervision is necessary when
used by children.
● See door cleaning instruc-
tions on page 28.
● To reduce the risk of fire in
the oven cavity:
—Do not overcook food. Care-
fully attend appliance if paper,
plastic, or other combustible
materials are placed inside the
oven to facilitate cooking.
—Remove wire twist-ties from
paper or plastic bags before
placing bag in oven.
—Paper towels and napkins,
waxpaper. Recycled paper
products can contain metal
flecks which may cause arcing
or ignite. Paper products con-
taining nylon filaments should
be avoided, as they may also
ignite.
—Do not use your microwave
oven to dry newspapers.
—Do not pop popcorn in your
microwave oven unless in a spe-
cial microwave popcorn accessory or unless you use popcorn
labeled for use in microwave
ovens.
—Do not operate the oven while
empty to avoid damage to the
oven and the danger of fire. If by
accident the oven should run
empty a minute or two, no harm
is done. However, try to avoid
operating the oven empty at
times—it saves energy and prolongs life of the oven.
—If materials inside the oven
should ignite,keep oven door
closed, turn oven off, and disconnect the power cord, or shut
off power at the fuse or circuit
breaker panel.
● Some products such as
whole eggs and sealed containers—for example, closed
glass jars-may explode and
should not be heated in this
oven.
(continued next page)
all
—
3
Page 4
IMPORTANT ‘SAFETY INSTRUCTIONS (continued)
● Avoid heating baby food in
glass jars, even
lids; especially meat and
without their
egg
mixtures.
● Don’t defrost frozen Nver-
in narrow necked bottles;
ages
especially carbonated ones.
Even if the container is opened,
pressure can build up. This can
cause the container to burst,
resulting in injury.
● Use metal only as dire@ed in
Cookbook Metal strips a$ used
on meat roasts are helpful when
used as shown in Cookbook.
TV dinners may be cooked in
metal tfays but when usinp shelf
they must be replaced in their
box. However, when using metal
in microwave oven, keep metal
(other than metal shelf) at least
l-inch away from sides of oven.
● Cooking utensils may
become hot
because of heat
transferred from the heated
food. This is especially true if
plastic wrap has been covering
the top and handles of the
utensil. Potholders may be
needed to handle the uten~il.
● Sometimes, the oven fl@r
can become too hot to touph.
Be careful touching the floor
during and after cooking.
● Do not use any thermometer
in food you are microwaving
unless that thermometer is
designed or recommended for
use in the microwave oven.
● Remove the temperature
probe from the oven when not
using it to cook with. If you leave
the probe inside the oven without
inserting it in food or liquid, and
turn on microwave energy, it can
create electrical arcing in the
oven, and damage oven walls.
● Plastic Utensils—Plastic
utensils designed for microwave
cooking are ve~ useful, but
should be used carefully. Even
microwave plastic may not be as
tolerant of overcooking co~ditions as are glass or ceramic
materials and may soften or
char if subjected to short p$riods
of overcooking. In longer exposures to overcooking, the faod
and utensils could ignite. For
these reasons: 1) Use micro-
wave plastics ‘only “and use
them” in strict compliance with
the utensil manufacturers
recommendations. 2) Do not
subject empty utensils to microwaving. 3) Do not permit children
to use plastic utensils without
complete supemision.
● When cooking pork follow
our directions exactly and
always cook the meat to at least
170°. This assures that, in the
remote possibility that trichina
may be present in the meat, it
will be killed and meat will be
safe to eat.
● Boiling eggs (in and out of
shell) is not
recommended for
microwave cooking. Pressure
can buiid up inside egg yolk and
may cause it to burst, resulting
in injury.
● Foods with unbroken outer
“skin” such as potatoes, hot
dogs or sausages, tomatoes,
apples, chicken livers and other
giblets, and eggs (see above)
should be pierced to allow
steam to escape during cooking.
● “Boilable” cooking pouches
and tightly closed plastic bags
should be slit, pierced or vented
as directed in Cookbook. If they
‘are not, plastic could burst dur-
ing or immediately after cooking,
possibly resulting in injury. Also,
plastic storage containers should
beat least partially uncovered
because they form a tight seal.
When cooking with containers
tightly covered with plastic wrap,
remove covering carefully and
direct steam away from hands
and face.
● Use of the shelf accessory.
(See your Cookbook for proper
use.)
—Remove the shelf from oven
when not in use.
—Do not store or cook with
shelf on floor of oven. Product
damage may result.
—Use potholders when handling
the shelf and utensils. They may
be hot.
—Do not use microwave
browning dish on shejf. The
shelf could overheat. Use of
shelf with Automatic Cooking
feature is not recommended.
THE HOOD:
● Have it installed and properly
grounded by a qualified installer.
See the special installation book.
let packed with the microwave
oven.
● The vent fan in your Space-
maker@ oven will operate
automatically under certain
conditions (see Automatic Fan
Feature, page 7). While the fan is
operating caution is required to
prevent the starting and spread-
ing of accidental cooking fir=
while the vent fan is in use.
this reason:
—Never leave
unattended at
Boilover causes smoking and
greasy spillovers that may ignite
and spread if vent fan is operating. To minimize automatic
operation, use adequate sized
utensils and
tings only when necessary.
—In the event of a grease fire,
smother flaming pan on surface
unit by covering pan completely
with well-fitting lid, cookie sheet
or flat tray.
—Never flame foods under the
oven with the vent fan operating
because it may spread the
flames.
—Keep hood and grease filters
ciean, according
on pages 27 and 29, to maintain
good venting and avoid grease
fires.
SAVE THESE
INSTRUCTIONS
For
surface unib
high heat settings.
fan
use high heat set-
.
to instructions
4
Page 5
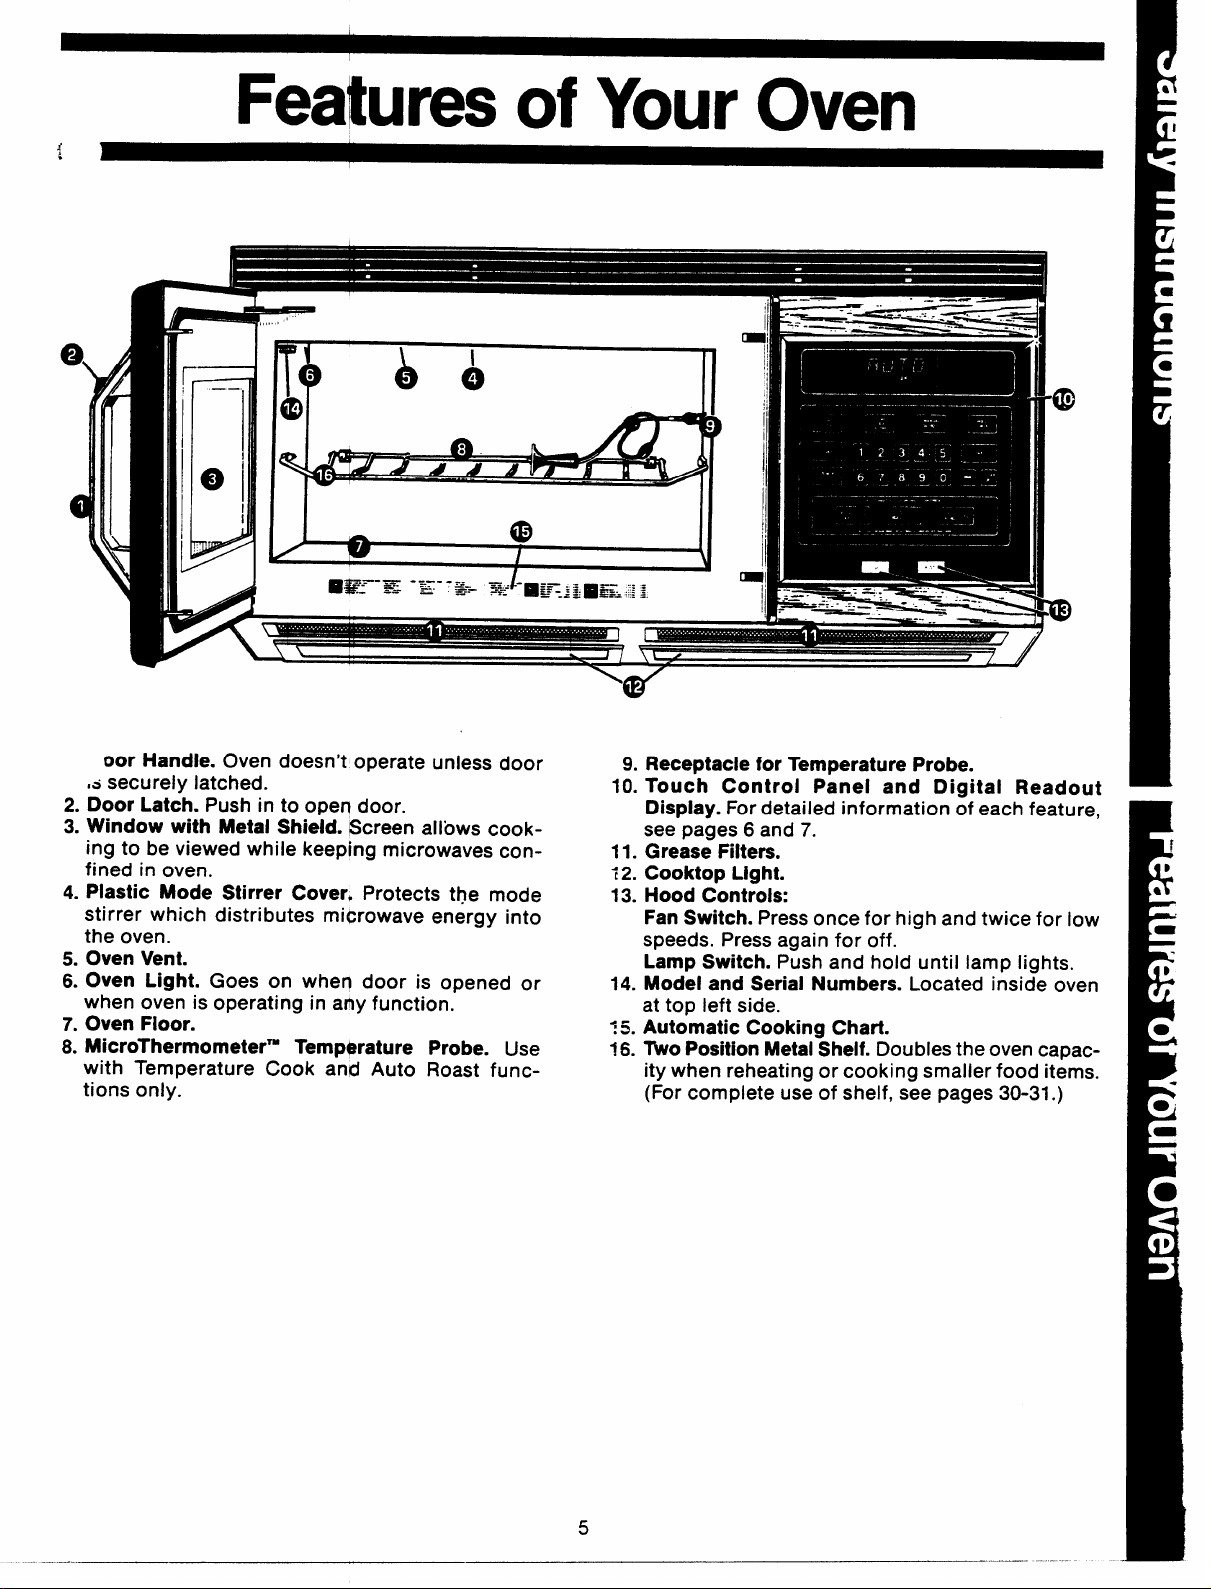
Features of Your Oven
m
—.
Q
I
oor Handle. Oven doesn’t operate unless door
,S securely latched.
Door Latch. Push in to opeq door.
2.
Window with Metal Shield. Screen allows cook-
3.
ing to be viewed while keeping microwaves confined in oven.
Plastic Mode Stirrer Cover, Protects the mode
4.
stirrer which distributes microwave energy into
the oven.
Oven Vent.
5.
Oven Light. Goes
6.
when oven is operating in a~y function.
Oven Floor.
7.
MicroThermometerw
8.
with Temperature Cook a-rid Auto Roast functions only.
on when door is opened or
Temperature Probe. Use
m
‘
\
(P’
Receptacle for Temperature Probe.
9.
Touch Control Panel and Digital Readout
10.
Display. For detailed information of each feature,
see pages 6 and 7.
Grease Filters.
11.
Cooktop Light.
?2.
Hood Controls:
13.
Fan Switch. Press once for high and twice for low
speeds. Press again for off.
Lamp Switch. Push and hold until lamp lights.
Model and Serial Numbers. Located inside oven
14.
at top left side.
4-
Automatic Cooking Chart.
:3.
TWOPosition Metai Sheif. Doubles the oven capac-
1s.
ity when reheating or cooking smaller food items.
(For complete use of shelf, see pages 30-31.)
5
——
Page 6
1
Features of Your Micro~
al
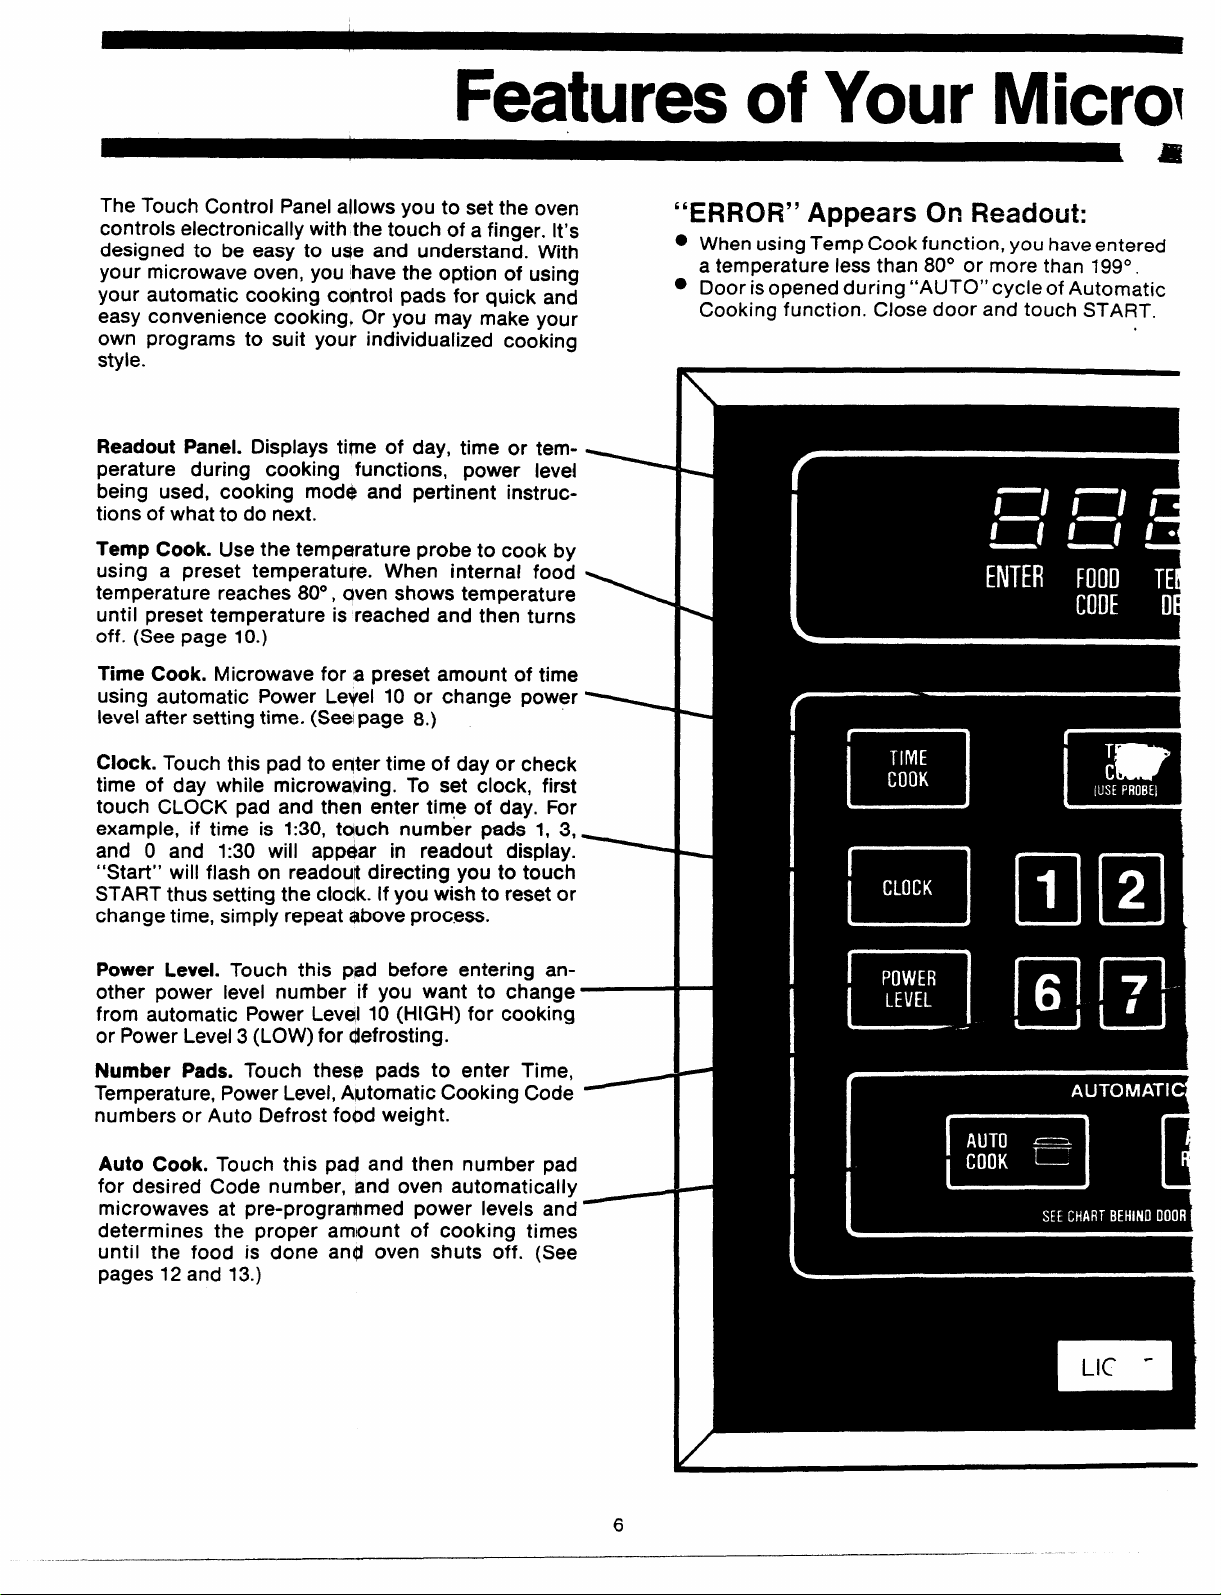
The Touch Control Panel allows you to set the oven
controls electronically with the touch of a finger. It’s
designed to be easy to uae and understand. With
your microwave oven, you have the option of using
your automatic cooking control pads for quick and
easy convenience cooking, or you may make your
own programs to suit your individualized cooking
style.
Readout Panel. Displays time of day, time or temperature during cooking functions, power level
being used, cooking mod~ and pertinent instructions of what to do next.
Temp Cook. Use the temperature probe to cook by
using a preset temperature. When internal food
temperature reaches 80°, aven shows temperature
until preset temperature is reached and then turns
off. (See page 10.)
Time Cook. Microwave for a preset amount of time
using automatic Power Leyel 10 or change power
level after setting time. (Sea
Clock. Touch this pad to eqter time of day or check
time of day while microwaving. To set clock, first
touch CLOCK pad and then enter tim,e of day. For
example, if time is 1:30, tcnuch number pads 1, 3,
and O and 1:30 will appear in readout display.
“Start” will flash on readout directing you to touch
START thus setting the
change time, simply repeat above process.
page 8.)
cloak. If you wish to reset or
“ERROR” Appears On Readout:
● When using Temp Cook function, you have entered
a temperature less than 80° or more than 199”.
● Door is opened during “AUTO” cycle of Automatic
Cooking function. Close door and touch START.
Power Level. Touch this p+ad before entering another power level number if you want to change I
from automatic Power Levd 10 (HIGH) for cooking
or Power Level 3 (LOW) for defrosting.
Number Pads. Touch these pads to enter Time,
Temperature, Power Level, Avtomatic Cooking Code
numbers or Auto Defrost food weight.
Auto Cook. Touch this pac# and then number pad
for desired Code number, and oven automatically
microwaves at pre-progranhmed power levels and
determines the proper amount of cooking times
until the food is done and oven shuts off. (See
pages 12 and 13.)
—.—
6
—.. .-
Page 7
we Touch Control Panel
I
1
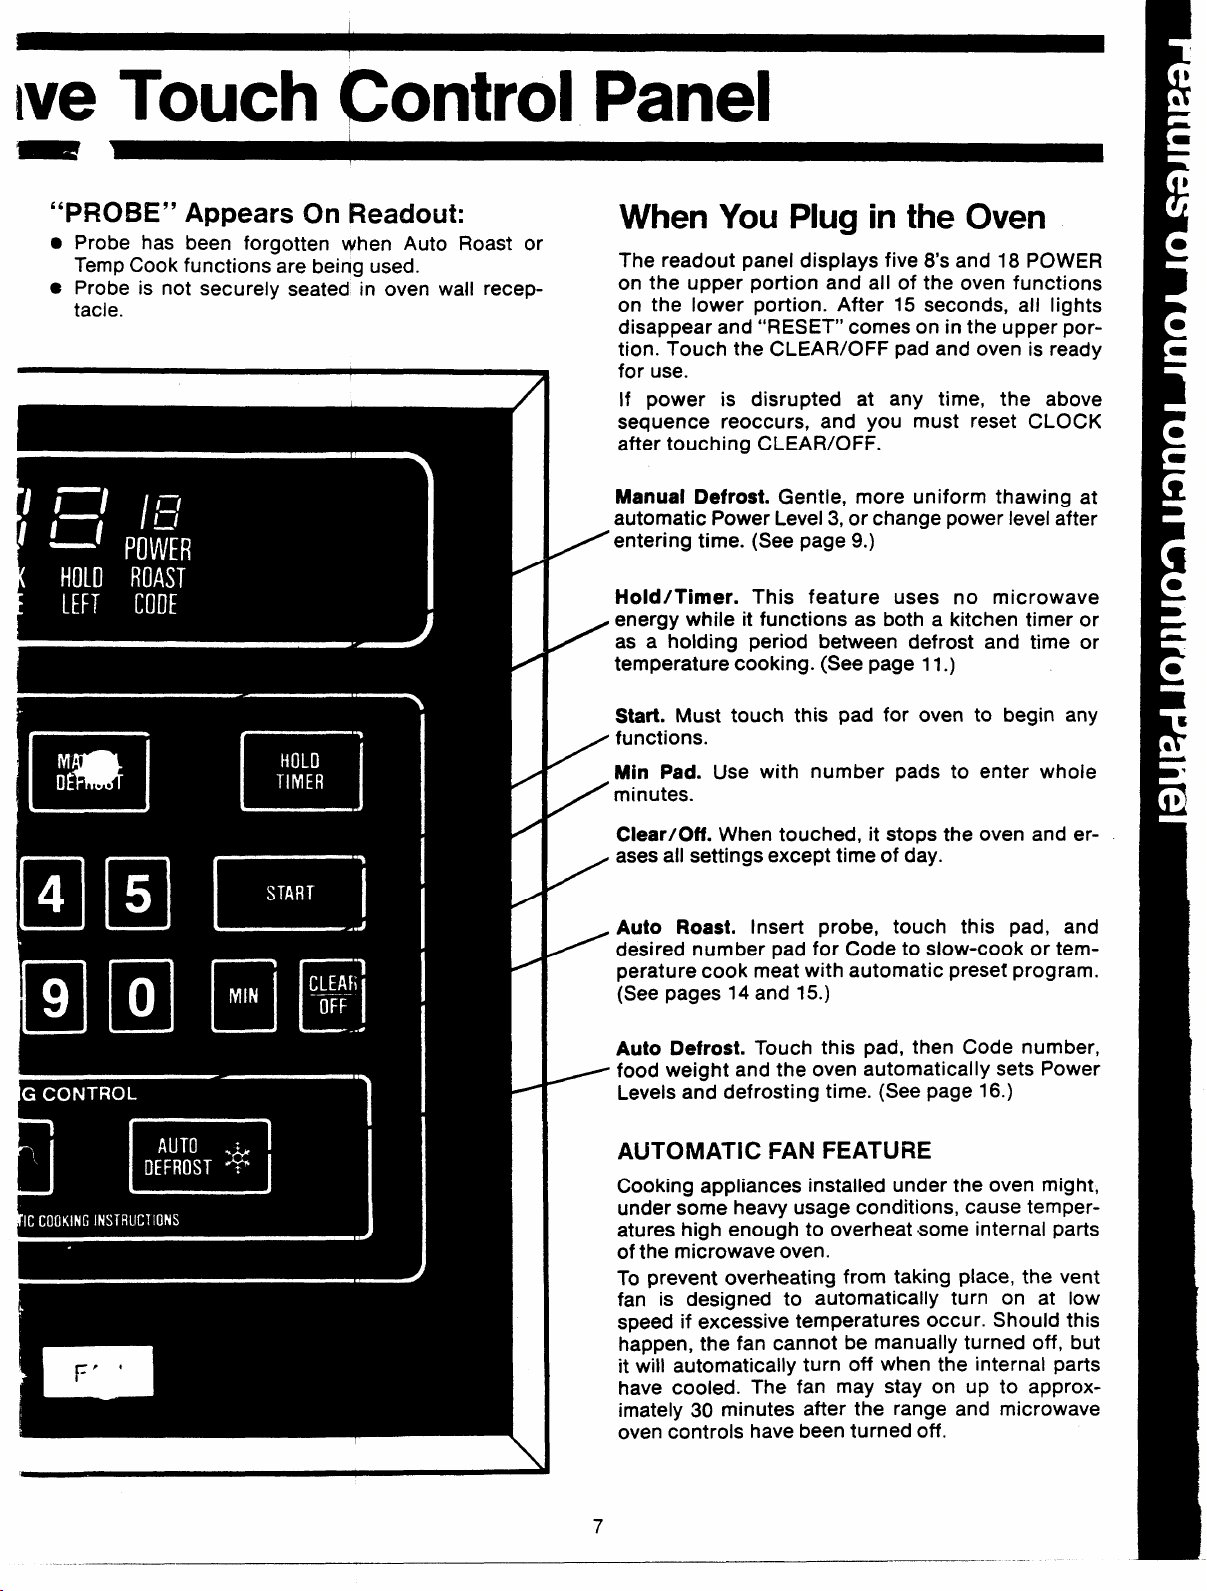
“PROBE” Appears On Readout:
● Probe has been forgotten when Auto Roast or
Temp Cook functions are being used.
@ Probe is not securelv seated in oven wall rece~-
tacle.
. .. . .. . ...- .. .. .
When YOU Plug in the Oven
The readout panel displays five 8’s and 18 POWER
on the upper portion and all of the oven functions
on tne lower portion. Atter 15 seconds, all
disappear and “RESET” comes on in the upper portion. Touch the CLEAR/OFF pad and oven is ready
for use.
If power is disrupted at any time, the above
sequence reoccurs, and you must reset CLOCK
after touching CLEAR/OFF.
Manual Defrost. Gentle, more uniform thawing at
automatic Power Level 3, or change power level after
/entering time. (See page 9.)
Hold/Timer. This feature uses no microwave
energy while it functions as both a kitchen timer or
as a holding period between defrost and time or
/
temperature cooking. (See page 11.)
Start. Must touch this pad for oven to begin any
functions.
/
Min Pad. Use with number pads to enter whole
minutes.
/
Clear/Off. When touched, it stops the oven and erases all settings except time of day.
/
Ilghts
Auto Roast. Insert probe, touch this pad, and
Z desired number pad for Code to slow-cook or tem-
perature cook meat with automatic preset program.
(See pages 14 and 15.)
Auto Defrost. Touch this pad, then Code number,
~ food weight and the oven automatically sets Power
Levels and defrosting time. (See page 16.)
AUTOMATIC FAN FEATURE
Cooking appliances installed under the oven might,
under some heavy usage conditions, cause temper-
atures high enough to overheat some internal parts
of the microwave oven.
To prevent overheating from taking place, the vent
fan is designed to automatically turn on at low
speed if excessive temperatures occur. Should this
happen, the fan cannot be manually turned off, but
it will automatically turn off
have cooled. The fan may stay on up to approximately 30 minutes after the range and microwave
oven controls have been turned off.
when the internal parts
7
Page 8

Cooking by Time
The TIME COOK feature allows
you to preset the cooking time.
The oven shuts off automatically.
Power Level 10 is automatically set
for time cooking, but you may
change this for more flexibility.
See your Cookbook.
To become better acquainted with
TIME COOK function, make a cup
of coffee by following the steps
below.
II
‘+’
/
~
J* ~
Step 1: Fill a cup 2A full of water
and add 1 teaspoon of freeze dried
coffee. Use a cup that has no metal
decoration. Place cup in oven and
close door.
\
Step 3: Select your time. Touch 1,
2, and O for a minute and 20 seconds. “Cook Time”, Power 10, and
1:20 appear on the display. if another Power Level is desired to”uch
POWER LEVEL and the number although Power Level 10 (HIGH) is
preferred for this cup of coffee.
Step 4: Touch START. “Cook Time
Left”, Power 10,
down show on display.
Step 5: When time is up, ove ~ “
sounds 3 times. Display flashes
“END”. Oven, light, and fan shut
off.
and time counting
Step 2: Touch TIME COOlk. The
read-out panel shows :0 and
Power 10. “Enter Cook Time”
flashes.
Questions
and Answers
Q. I set my oven for the time called
for in the recipe but at the end of
the time allowed, my dish wasn’t
done. What happened?
A. Since house power varies due
to time or location, many Time
Cook recipes give you a time range
to prevent overcooking. Set the
oven for minimum time, test the
food for doneness, and cook your
dish a little longer, if necessary.
Q. i want to cook my dish on a
Power Level other than HIGH. what
do I need to do?
A. To change the Power Level,
touch the POWER LEVEL pad.
“Enter Power” flashes on the display panel.
number.
Q. Can I interrupt my Time Cook
function to check the food?
A. Yes. To resume cooking, simply
close the door and touch START.
NOTE: Microwave power will not
come on until you are ready. You
must touch START for cooking to
begin.
Enter the desired
8
~. ! touched the number pads and
selected my power level. When I
touched START, however, my oven
didn’t come on. Why not?
A. The TIME COOK pad must be
touched before setting the number
pads or else your oven will not begin cooking.
.
Page 9
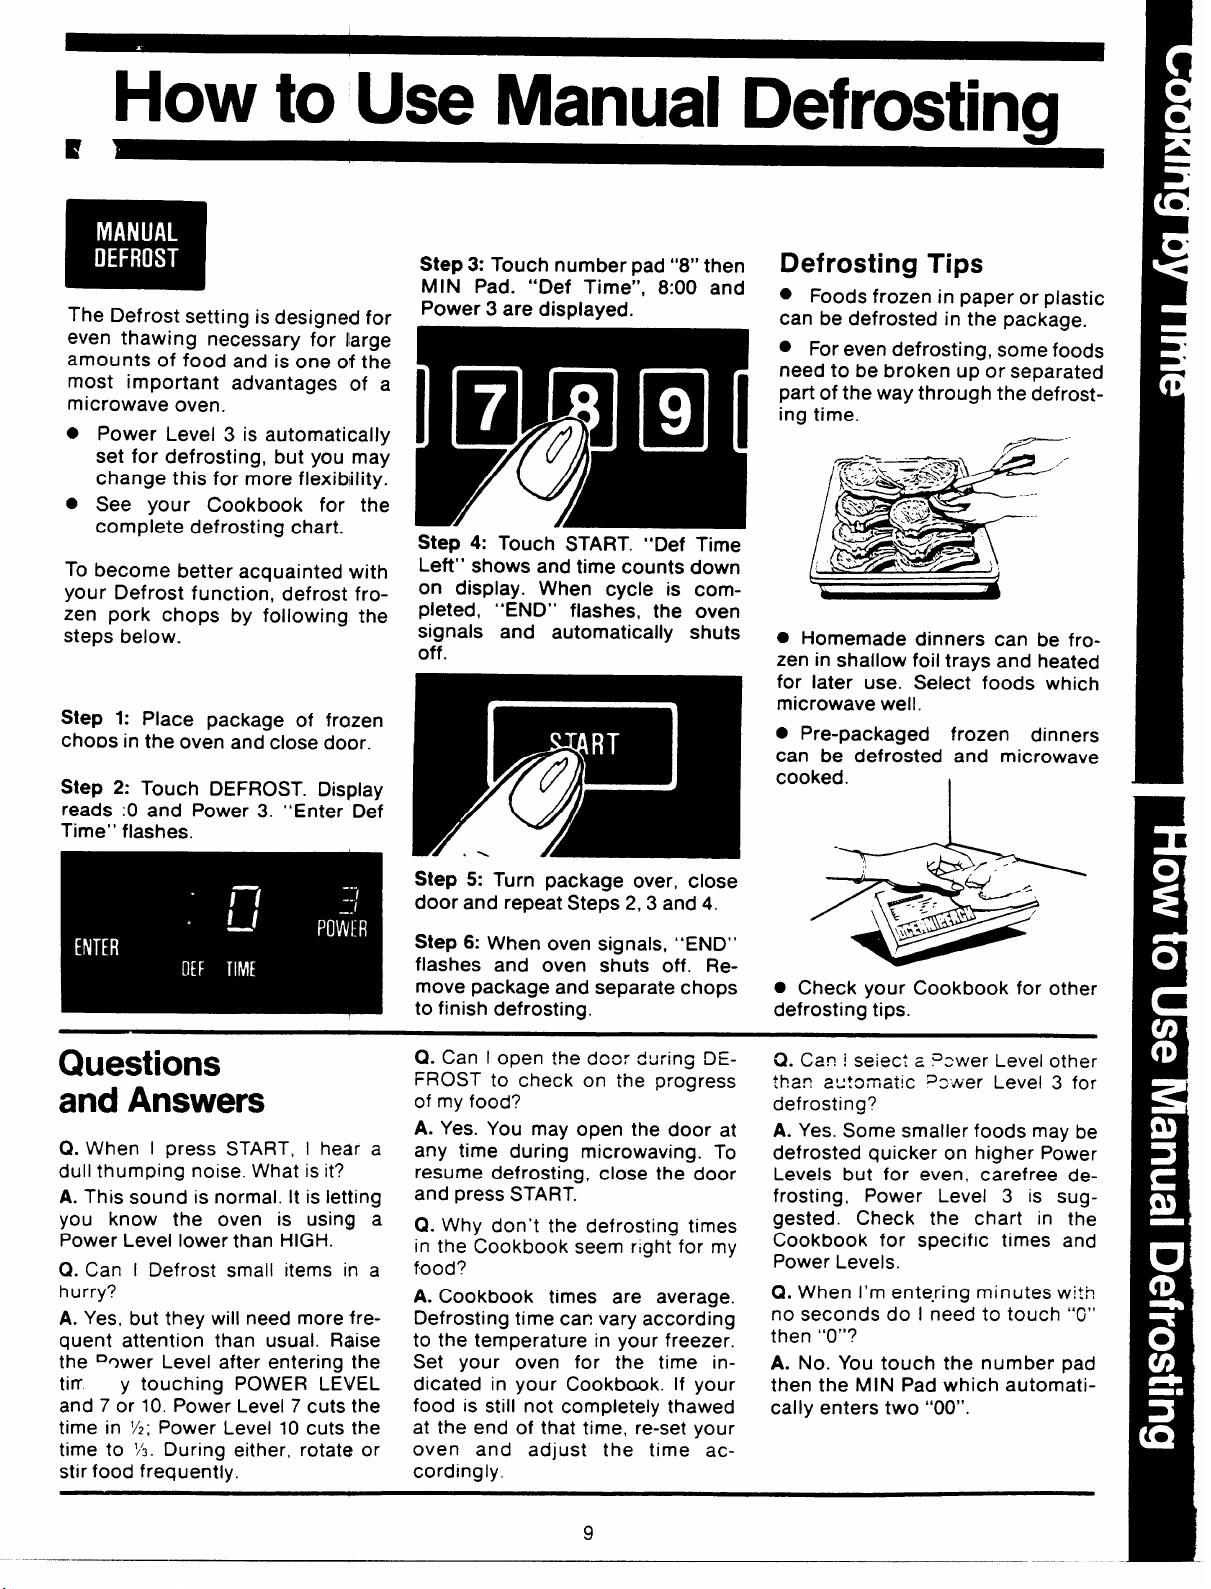
How to Use Manual Defrosting
c
The Defrost setting is designed for
even thawing necessary for large
amounts of food and is one of the
most important advantages of a
microwave oven.
●
Power Level 3 is automatically
set for defrosting, but you may
change this for more flexibility.
●
See your Cookbook for the
complete defrosting chart.
To
become better acquainted ‘with
your Defrost function”, defrost frozen pork chops by following the
steps below.
Step 1: Place package of frazen
choos in the oven and close door.
Step 2: Touch DEFROST. Display
reads :0 and Power 3. “Enter Def
Time” flashes.
Step 3: Touch number pad “8” then
MIN Pad.
Power 3 are displayed.
Step 4: Touch START. “Def Time
Left” shows and time counts down
on display. When cycle is com-
pleted,
signals and automatically shuts
off.
“Def Time”, 8:00 and
“END” flashes, the oven
Defrosting Tips
● Foods frozen in paper or plastic
can be defrosted in the package.
● For even defrosting, some foods
need to be broken up or separated
part of the way through the defrosting time.
f+---
● Homemade dinners can be fro-
zen in shallow foil trays and heated
for later use. Select foods which
microwave well.
● Pre-packaged frozen dinners
can be defrosted and microwave
cooked.
I
Questions
and Answers
When I press START, I hear a
Cl.
dull thumping noise. What is it?
A. This sound is normal. It is letting
you know the oven is using a
Power Level lower than HIGH.
Q. Can I Defrost small items in a
hurry?
A. Yes, but they will need more frequent attention than usual. Raise
the ‘ower Level after entering the
tifi
and 7 or 10. Power Level 7 cuts the
time in ~z; power Level 10 cuts the
time to lA. During either, rotate or
stir food frequently.
y touching POWER LEVEL
Step 5: Turn package over, close
door and repeat Steps 2,3 and 4.
Step 6: When oven signals, “END”
flashes and oven shuts off. Re-
move package and separate chops
to finish defrosting.
Q. Can I open the dcor during DEFROST to check on the progress
of my food?
A. Yes. You may open the door at
any time during microwaving. To
resume defrosting, close the door
and press START.
Q. Why don’t the defrosting times
in the Cookbook seem right for my
food?
A. Cookbook times are average.
Defrosting time can vary according
to the temperature in your freezer.
Set your oven for the time indicated in your Cookbook. If your
food is still not completely thawed
at the end of that time, re-set your
oven and adjust the time accordingly.
● Check your Cookbook for other
defrosting tips.
O. Can ! seiect a ?swer Level other
than au?omat!c %wer Level 3 for
defrosting?
A. Yes. Some smaller foods may be
defrosted quicker on higher Power
Levels but for even, carefree defrosting, Power Level 3 is suggested. Check the chart in the
Cookbook for specific times and
Power Levels.
Q. When I’m entering minutes with
no seconds do I need to touch “O”
then “O”?
A. No. You touch the number pad
then the MIN Pad which automatically enters two “00”.
9
_——
Page 10
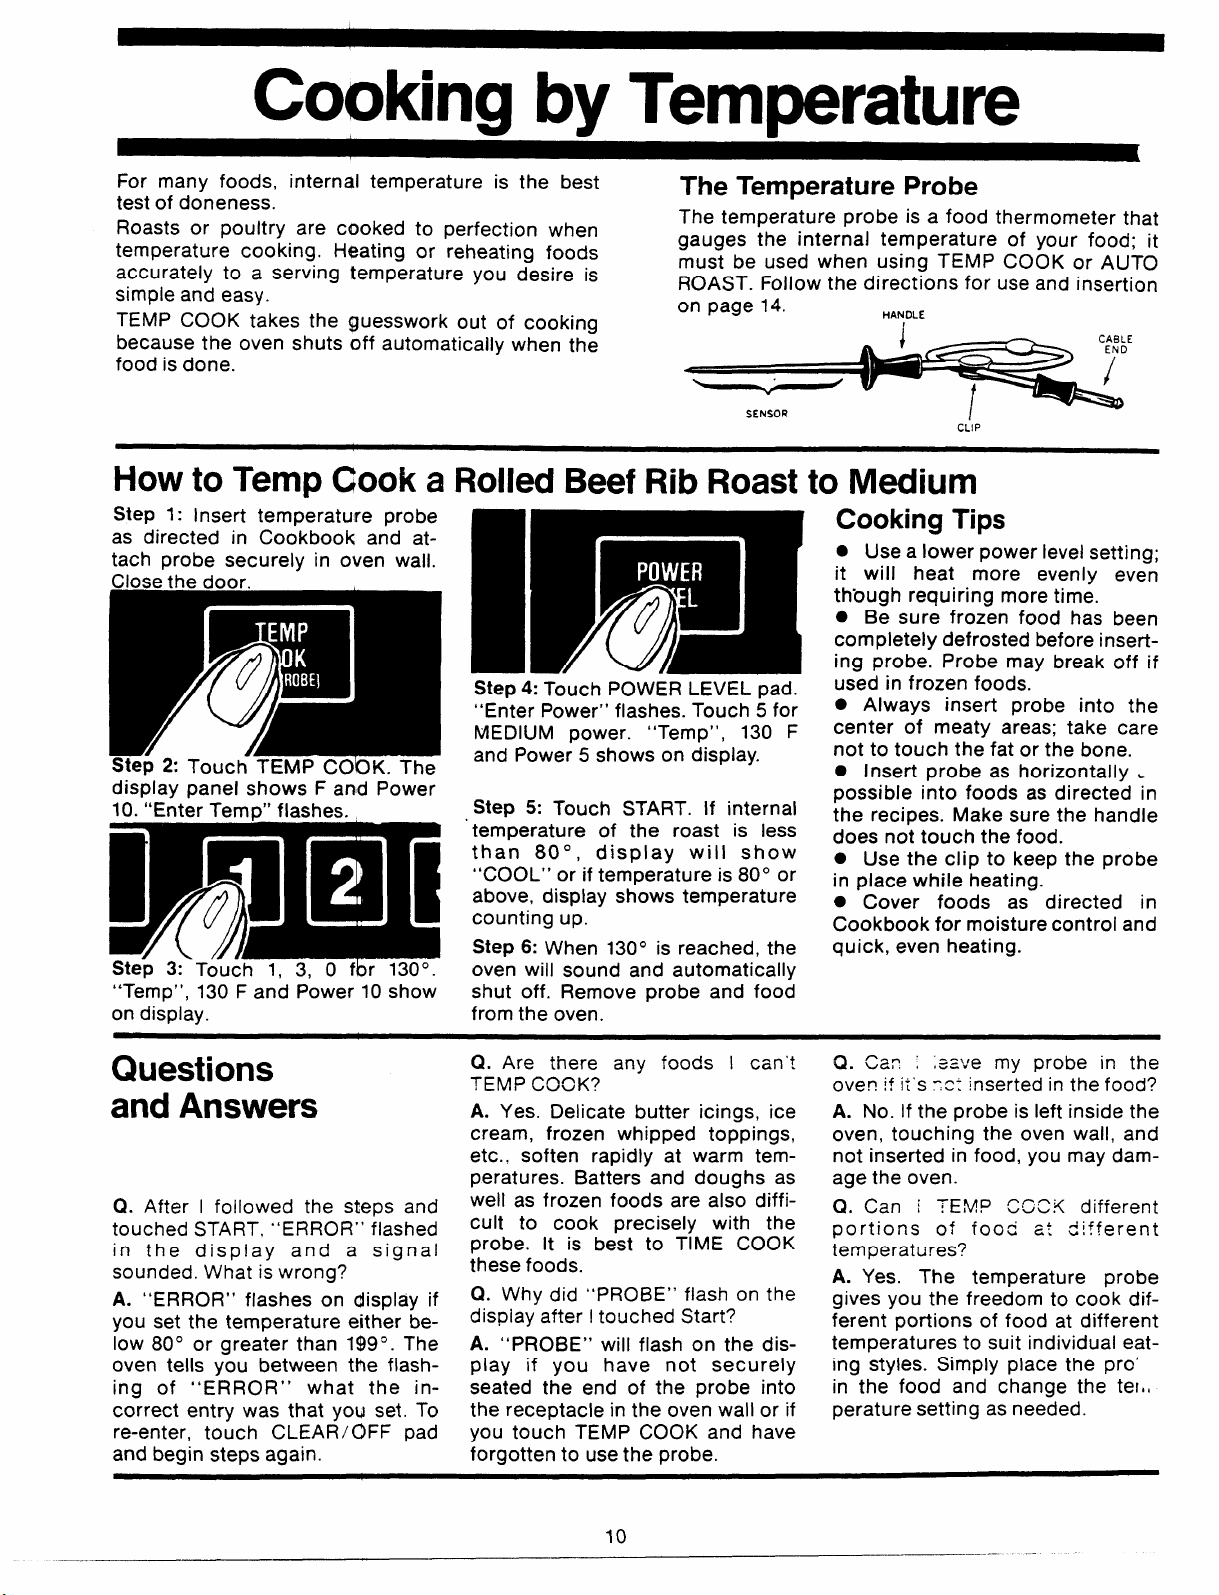
Cooking by Temperature
For many foods, internal temperature is the best
test of doneness.
Roasts or poultry are cooked to perfection when
temperature cooking. Heating or reheating foods
accurately to a serving temperature you desire is
simple and easy.
TEMP COOK takes the guesswork out of cooking
because the oven shuts off automatically when the
food is done.
The Temperature Probe
The temperature probe is a food thermometer that
gauges the internal temperature of your food; it
must be used when using TEMP COOK or AUTO
ROAST. Follow the directions for use and insertion
on page
14.
SENSOR
HANDLE
How to Temp Cook a Rolled Beef Rib Roast to Medium
Step 1: Insert temperature probe
as directed in Cookbook and attach probe
display panel shows F and Power
10. “Enter Tem~” flashes.
“Temp”, 130 F and Power 10 show
on display.
securely in oven wall.
4: Touch POWER LEVEL pad.
Step
“Enter Power” flashes. Touch 5 for
MEDIUM power. “Temp”, 130 F
and Power 5 shows on display.
Step 5: Touch START. If internal
temperature of the roast is less
than 80°, display will show
“COOL” or if temperature is 80° or
above, display shows temperature
counting up.
Step 6: When 130° is reached, the
oven will sound and automatically
shut off. Remove probe and food
from the oven.
Cooking Tips
● Use a lower power level setting;
it will heat more evenly even
th’bugh requiring more time.
● Be sure frozen food has been
completely defrosted before inserting probe. Probe may break off if
used in frozen foods.
. Always insert probe into the
center of meaty areas; take care
not to touch the fat or the bone.
. Insert probe as horizontally .
possible into foods as directed in
the recipes. Make sure the handle
does not touch the
● Use the clip to keep the probe
in place while heating.
● Cover foods as directed in
Cookbook for moisture control and
quick, even heating.
CLIP
food.
Questions
and Answers
Q. After I followed the steps and
touched START, “ERROR” flashed
in the display
sounded. What is wrong?
A. “ERROR” flashes on display if
you set the temperature either be-
low 80° or greater than 1$9°. The
oven tells you between the flash-
ing of
correct entry was that you set. To
re-enter, touch CLEAR /C)FF pad
and begin steps again.
“ERROR” what the in-
and a signal
Q. Are there any foods I can’?
TEMD CO~K7
A. Yes. Delicate butter icings, ice
cream, frozen whipped toppings,
etc.. soften rapidly at warm temperatures. Batters and doughs as
well as frozen foods are also difficult to cook precisely with the
probe. It is best to TIME COOK
these foods.
Q. Why did “PROBE” flash on the
dispiay after I touched Start?
A. “PROBE” wili fiash on the dis-
play if you have not securely
seated the end of the probe into
the receptacle in the oven wail or if
you touch TEMP COOK and have
forgotten to use the probe.
10
C2. c%? :
oven if it’s ‘c: inserted in the food?
A. No. If the probe is left inside the
oven, touching the oven wall, and
not inserted in food, you may damage the oven.
Q. Can \
portions of food at different
temperatures?
A. Yes. The temperature probe
gives you the freedom to cook different portions of food at different
temperatures to suit individual eat-
ing styles. Simply place the pro’
in the food and change the tell,
perature setting as needed.
,==.e my probe in the
“--,,
TEMP CCC< different
_—-.—
Page 11
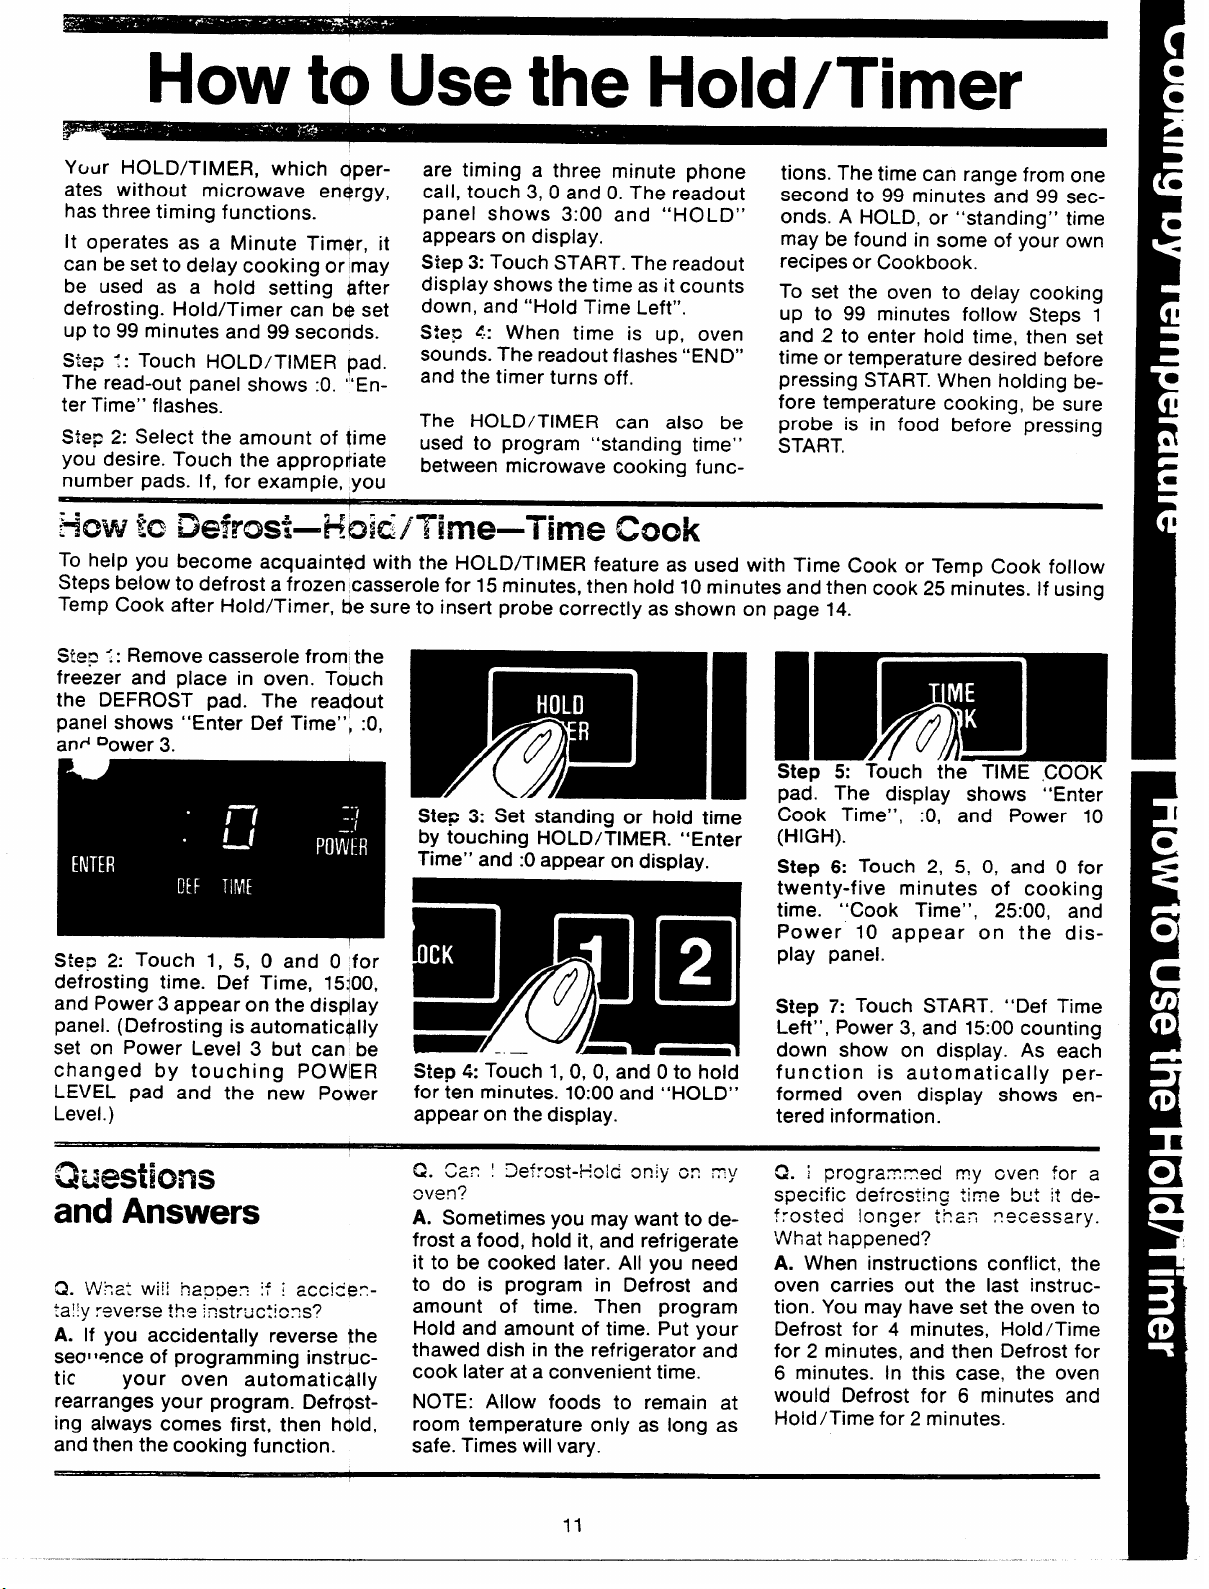
How tcpUse the Hold/Timer
L
L
Your HOLD/TIMER, which qperates without microwave enqrgy,
has three timing functions.
It operates as a Minute Tim$r, it
can be set to delay cooking or may
be used as a hold setting after
defrosting. Hold/Timer can b@set
up to 99 minutes and 99 secorids.
step ~: Touch HOLD/TIMER pad.
The read-out panel shows :0. “’Enter Time” flashes.
Step 2: Select the amount of ~ime
you desire. Touch the appropriate
number pads. If, for example, you
i!%! %2De?rosi—Hoiti/Time-Time cook
To help you become acquainted with the HOLD/TIMER feature as used with Time Cook or Temp Cook follow
Steps below to defrost a frozen casserole for 15 minutes, then hold 10 minutes and then cook 25 minutes. if using
Temp Cook after Hold/Timer, be sure to insert probe correctly as shown on page 14.
I
1’
are timing a three minute phone
call, touch 3, 0 and O.The readout
panel shows 3:00 and “HOLD”
appears on display.
Step 3: Touch START. The readout
display shows the time as it counts
down, and “Hold Time Left”.
Step <.: When time is up, oven
sounds. The readout flashes “END”
and the timer turns off.
The HOLD/TIMER can also be
used to program “standing time”
between microwave cooking func-
tions. The time can range from one
second to 99 minutes and 99 seconds. A HOLD, or “standing” time
may be found in some of your own
recipes or Cookbook.
To set the oven to delay cooking
up to 99 minutes follow Steps 1
and 2 to enter hold time, then set
time or temperature desired before
pressing START. When holding before temperature cooking, be sure
probe is in food before pressing
START.
s@ ::
freezer and place in oven. Touch
the DEFROST pad. The readout
panel shows “Enter Def Time”, :0,
and Dower 3.
Step 2: Touch 1, 5, 0 and O ,for
defrosting time. Def Time, 15]00,
and Power 3 appear on the dis~lay
panel. (Defrosting is automatically
set on Power Level 3 but can be
changed by touching POWIER
LEVEL pad and the new Power
Level.)
Remove casserole from the
GkEstims
and Answers
C). WVhatW;!! happe- !f ; ~cc~~~::a!!v rwe. se ... -,4,
A. ‘If you accidentally reverse the
seol tence of programming instructic your oven automatically
rearranges your program. Defrcpsting always comes first, then hc$ld,
and then the cooking function.
n tha iacJ~:~c~j~~s7
r
Step 3: Set standing or hold time
by touching HOLD/TIMER. “Enter
Time” and :0 appear on dispiay.
Step 4: Touch 1, 0, 0, and O to hold
for ten minutes. 10:00 and “HOLD”
appear on the display.
Q. Can ! 3ekost-Ho!ci oniy on T.y
7
Sverl .
A. Sometimes you may want to de-
frost a food, hold it, and refrigerate
it to be cooked later. All you need
to do is program in Defrost and
amount of time. Then program
Hold and amount of time. Put your
thawed dish in the refrigerator and
cook later at a convenient time.
NOTE: Allow foods to remain at
room temperature only as long as
safe. Times will vary.
lum~
Step 5: Touch the TIME COOK
pad. The display shows “Enter
Cook Time”, :0, and Power 10
(HIGH).
Step 6: Touch 2, 5, 0, and O for
twenty-five minutes of cooking
time. “Cook Time”, 25:00, and
Power 10 appear on the display panel.
Step 7: Touch START. “Def Time
Left”, Power 3, and 15:00 counting
down show on display. As each
function is automatically performed oven display shows entered information.
n;
u. 1 prograx-eci
Spedfic defrosting time but it def:~sted lon~er t’nan necessary.
What happened?
A. When instructions conflict,
oven carries out the last instruction. You may have set the oven to
Defrost for 4 minutes, Hold/Time
for 2 minutes, and then Defrost for
6 minutes. In this case, the oven
would Defrost for 6 minutes and
Hold/Time for 2 minutes.
my even for a
the
———
11
_———
Page 12

Automatic Cooking
I
1
I
it
m
sensing the steam which escapes as food microwaves, this feature automatically adjusts the oven’s
cooking time to various types and amounts of food.
Because cooking containers must be covered, this
feature is best with foods which you wish to steam oven door can be opened for stirring or rotating food.
or to retain moisture. Foot@ which are best microwaved uncovered or only li~htly covered should be
cooked using time or tempfwature settings.
After touching the Auto Cook pad, and pressing
Start, you will see the word AUTO on the readout,
which indicates that the sensor has been activated
The Auto Cook pad may be used
to elim[nate your need to look
up cooking time in the Cookbook, dr guessing how long to
set coc+king time. By actually
to sense steam from the food. To prevent the es-
cape of steam from the ovdn, do not open the door
while the word AUTO is on the readout. If door is
opened, ERROR appears. Close door and touch
START immediately.
Setting 1, which is designed for easy reheating of
foods, automatically turns the oven off as soon as
MATCH THE AMOUNT OF GOOD TO THE SIZE OF THE CONTAINER. FILL CONTAINERS AT LEASI’ Y2FULL.
BE SURE THE EXTERIOR 0$ THE COOKING CONTAINER AND INTERIOR OF MICROWAVE OVEN ARE DRY.
ALWAYS COVER FOOD COI$TAINERS FOR AUTO COOK AND STIR OR ROTATE AFTER BEEPING SIGNAL.
the sensor detects steam from the foods. Other
Auto Cook control settings, which are for fresh or
frozen foods, need additional time after steam has
sensed. For these foods, the oven determines
been
the amount of additional time needed, then auto-
matically switches the oven to Time Cook for the
necessary cooking time remaining. Oven beeps
when it switches to Time Cook (AUTO on readout is
replaced by numbers indicating cooking time), and
Be careful of steam when removing tight covers.
When you remove cover, direct the steam away
from hands and face.
sure the exterior of the cooking container and
Be
interior of microwave oven are dry.
Always cover food
wrap. Plastic wrap should be loose over food to
allow for expansion. Seal by pressing plastic wrap
firmly around edges. For best results, never stretch
plastic wrap tightly over food, or use tight-sealing
plastic lids.
Always stir or rotate after beeping signaL
NOTE: Use of wire shelf with Automatic Cooking is
not recommended.
containers using lids or plastic
,a ,
.
Use microwave-safe casseroles or
bowls for entrees and vegetables.
Cover with Iidsthatfit. If Iidsare not
available, use plastic wrap. Plastic
wrap should be loose over food to
allow for expansion. Seal by pr$ssing
plastic wrap firmly around edges.
Do not use paper plates with auto-
matic cooking. Use microwav&safe
plates or bowls for reheating. Cover
with plastic wrap (you can still
use paper plates with regular Time
Cooking, Defrosting, etc.).
Use oblong or square containers
for chicken or corn on the cob.
Plastic wrap covering should be
loose over food to allow for
expansion. Seal by pressing plastic
wrap firmly around edges.
Slit plastic pouches l-inch as
shown above. Break food up tho-
roughly after oven signals. For alternate pouch method see page 20.
12
Frozen Entrees in Paperboard Tray:
Do not remove film over tray; remove tray from box. Thick entrees
may need longer time. See chart
on page 24. Frozen Food in Metal
Tray: Remove top foil, reinsert into
box and close ends.
I
Follow control panel or Automat
Cooking Chart settings for casseroles. Cover casserole meat and
vegetables with sauce. Cool hot
ingredients or sauces. If not, use
TIME COOK.
—. —
I
Page 13

Example of How to Use Automatic Cooking
Place covered food in
oven. Touch Auto Cook
pad. “Enter Code” flashes
on readout.
Tcbuch number pad for
desired code. Code 2
shows and “Start” flashes
on readout. Touch START.
Understanding Au@matic Cooking
Automatic cooking codes 1 thftough 9 are designed to
give you easy automatic res@ts with a number of
foods.
Codes are arranged in lowest to highest amount of
pos”fer. For example, Code 1 gives
.ing power, Code 2 gives more power than Code
c
1, Code 3 increases power ovelr Code 2 and so on.
The Preference Colntrol “
Another feature to give you nlore flexibility in Automatic Cooking is the preference control, which can be
used to “fine tune” the power of Codes 2 through 9. By
simply adding a 1 after a Code, you can set the oven to
cook using 20°h less time thar( the code would regularly deliver. For example, if Code 4 cooks your vege-
least microwave
Word AUTO shows on
readout, indicating steam
sensor is activated. DO
NOT OPEN DOOR. MAY
AFFECT COOKING PERFORMANCE.
Beep sounds when steam
is sensed and AUTO is
replaced by cook time.
Rotate or stir food. When
done, oven beeps and
stops.
Codes & Preference Control
Code 1, which has the least power, is used for quick
reheating jobs while the longer cooking foods like
stew or chili use higher codes. A Cooking Chart and
recipes, starting on page 17 give many tested uses for
automatic cooking codes. Remembering that you can
adjust the power up or down by increasing or decreasing the Code will give you added flexibility.
tables more done than you like them, set Code 41 next
time and you will get 20°/0 less cooking time.
Likewise, if you wish slightly more time than a code
delivers, add a 9 after the Code. For the vegetables in
the example above, Code 49 would provide 20°A more
time for cooking than would the regular Code 4.
Touch number pads 4 and 1 in that
order. Code 4 shows and “Start”
flashes on readout.
13
Touch START. AUTO shows on
readout display. DO NOT OPEN
DOOR until first oven signal, then
rotate dish 1/2 turn. Close door and
touch START to finish cooking.
.-
Page 14

Automatic Roasting
b
I
.1,
m
uses up to 3 power settin~s which automatically
switch during roasting, thus providing even tender
cooking results without overcooking.
Auto R@ast uses the ternperature pfiobe to cook to the
desired $erving temperature. Unlike Terhp Cook, which uses a
single flower level, Auto Roast
Just as in conventional roasting, only tender roasts
should be Auto Roasted until specified internal
temperatures are reached. Less tender roasts
should be microwaved by time, according to the
Cookbook which comes with your oven. Complete
information on preparing roasts for microwaving is
in your Cookbook.
Preparing Roasts for Auto Roasting
Place tender beef roasts orl trivet
in microwave safe dish. Insert
probe from front horizontally into
center meaty area not toq~hing
bone or fat. Cover with wax gaper. book.) Insert probe into center
Poultry, pork or ham roasts need
no trivet. Add Yzcup water to roast sert cable end of probe firmly into
dish, cover with plastic wrap. (For
cooking bag method, see cook-
meaty area.
* ,
Place meat with probe in oven. ln-
receptacle on oven wall.
t
How to Auto Roast Beef to Rare
1. Touch AUTO ROAST Pad. Readout flashes “Enter
Roast Code”.
Flashes. Touch START. Readout shows
2. At 80°, readout switches tb show meat’s internal
temperature.
Touch number pad 2.
I
“START” tally switching to lower power as meat’s tempera-
AUTO.
3. Oven monitors internal temperature, automati-
ture
rises. This prevents toughening or overcooking.
4. After temperature is reached, oven switches t~
HOLD for 1 hr., then shuts off. Hold prevents ovei
cooking while keeping meat warm.
——.——
..
.
14
—....
Page 15

Auto Roast Chart
● Use containers and coverings as directed at left. Place probe correctly in roast before cooking.
t
‘urn over when 80° (except pork) has been reached.
Beef
Tender Roast
Rare
Medium
Well 4
Meatloaf
(loaf or round)
Pork
Loin Roast
Precooked Ham
Poultry
Whole Chicken 5
(31b.)
Turkey Breast
(Insert probe horizontality into meatiest area.)
*Recommended standing time before serving.
2
3
4
4
1
4
80°
80°
80° 170°
No Turn
Over
120°
80° 115°
80°
80°
125°
140°
170°
170°
190°
170°
12-14
14-16
17-18
30-40
18-20
17-19
13-15
13-15
5-1o
10-15
30
5-10
20
5-1o
20
20
Automatic
Your Cookbook has a chapter on Automatic Simmering, including charts and recipes. Refer to this
chapter for additional techniques and cooking time.
$immer (Auto Roast Code 6)
Oven switches to HOLD at 180°
until you remove food and turn off
oven. if stirring is recommended,
you can reset oven by retouching
START. Touch CLEAR/OFF after
cooking.
Totai time inciudes time to bring food to 180 c and
hold at that temperature untii done.
Automatic Simmer
(Auto Roast Code 6)
Beef
Pot Roast*
Stew
Chiii
Chicken*
Stewing
Broiier/Fryer
Ham or Pork
Roast
soup
Stock/Vegetable 3-6
SDlit Pea
“For frozen, add 2 to 3 hours.
6-8
6-8
11-13
11-12
4-6
4-6
13-15
15
Page 16

Aptomatic Defrosting
With the Auto Defrost feature, When the oven reaches half of the total defrosting
4
I
I
‘1 0
61m3
for the food you are defrosting, then enter the food
weight in pounds and tenths of a pound (see Conversion Chart below) and tbuch START. The oven is
designed
changes Power Levels during defrosting to give
even defrosting results.
to calculate toe defrosting time and
the ov n automatically sets the
defrost ng time and Power Levels turn food over and will not continue defrosting until
T
for yoq. You choose the appro- door is opened and “Start” is touched again.
priate code number from 1 to 6
How to Set Autd Defrost
NOTE: Before you begin, qheck the Auto Defrost chart located at the bottom of the oven when you open the
door. This chart shows minlimum and maximum food weights for each Code number. You will need to know your
food weight and corresponding Code before beginning. NOTE: If “ERROR” appears after entering food weight,
check the Code Chart to mpke sure that weight corresponds to the Code number entered.
Step 1. Remove frozen inept from
package and place in mic~owavesafe dish. Place in oven and close
door.
time, the readout flashes “TURN”, telling you to
After defrosting time is complete, the oven automaticaily goes into a holding period as shown on the
Automatic Defrosting Chart on this page. This
holding period is necessary to finish the defrosting
the interior of the food.
of
Step 3: Enter selected Codp from
Chart. For example, Ground Beef
calls for Code 3.
Step 5: Touch START pad. Defrost
time begins counting down on
readout.
Step 8: When defrosting time is
completed, oven automatically:
switches to a HOLD period of 5
minutes for Code 3. “HOLD” shows
in readout. When holding time is
finished oven signals, “END”
flashes: and oven turns off.
Conversion Chart
Step 6: When% the defrosting time
is completed, the oven signals and
“TURN” flashes in readout instead
of time counting down. Open door
and turn package over.
Step 7: Close door and touch the
START pad. Readout shows remaining defrosting time counting
down.
If the weight is stated in pounds and
ounces, the ounces must be converted to tenths (.1) of a pound.
1
Automatic Defrosting Chart
Ounces
1-2
3
4-5
6-7
8
9-10
11
12-13
14-15
Pounds
.1
.2
.3
.4
.5
.6
.7
.8
I
.9
I
touch number pad 3 and O for
weight of 3 tbs. Display shows 3.0,
Code 3 and “Start” flashes.
CODE WEIGHT
;
3
4
;
MIN.-MAX.
Ibs.
.5—4.9
.5—3.9 Ibs. 5 min.
.5—5.9 Ibs.
3.0—5.9 Ibs.
3.0—5.9 Ibs. 20 min.
.5—3.9 Ibs.
16
HOLO
TIME*
5 min.
5 min. Ground Beef
20 min.
5 min. Steaks and Chops
RECOMMENDED
FOODS
Chicken pieces
Fish
Roasts, Bone In
Roasts, Boneless
“In Auto Defrost, it is
necessary to allow the
meat to stand during
holding time. You may
take the meat out of
the oven if you prefer.
————.
I
Page 17

Automatic Cooking Recipe Guide
.omatic Cooking Control is a fully automatic
&lectronic control system thatt lets your microwave
oven do the cooking for you. The charts and
recipes in this section are designed to help you
make the most of this truly new feature.
Standard cooking techniques require setting the
oven for a specified cooking ~ime or a selected finished temperature. And that means looking up
recipes in a cookbook. . .t~ing to convert old
recipes for microwave cookirtg. . .or just resorting
to guesswork. This control method works on an
entirely different basis—with a special electronic
sensor that detects steam fram cooking food. The
oven “knows” how the food is cooking; so it can
automatically set the correct cooking time and
maintain the proper power level for different types
and amounts of food. And it’s adjustable to suit
your individual taste.
Easy to Use
Simply touch two control pads—AUTO COOK and
the desired Code number—and then START. A
chart on the oven control panel gives a complete
list of Codes for frequently prepared foods. The
readout display shows AUTO until steam is sensed
and then signals, and displaystime counting down.
P“ -ing AUTO, oven should not be opened, but
v. n oven signals, most foo@ should be turned,
stirred, or rotated. Check the Automatic Cooking
Chart for suggestions.
Appropriate containers and coverings help assure
good cooking results. Containers should match in
.
size to the size of the food being cooked. Coverings
such as plastic wrap secured on all sides, the lid
that came with the container, or microwave-safe
plastic domes are ideal. For examples of containers
and coverings, see page 12 and the following recipe
section of this book.
Preference Control
With Preference Control, you can adjust the Auto-
matic Cooking Feature .to your individual taste by
adding either “l” or “9” after Code number. If after
trying the suggested Code, you would prefer less
cooking time, simply add the number “1” after the
Code and the oven automatically lessens the cooking time by 200A. If you wish more cooking time, add
“9” after the Code to increase cooking time by
20W0.
Automatic Roasting
Automatic Roasting uses the temperature probe
rather than the electronic sensor to cook meats
evenly to the desired degree of doneness. The oven
continually monitors the food’s internal temperature. Unlike ordinary Temperature Cooking, the
oven changes power levels two or three times
depending on the degree of doneness during cooking to give you the best results automatically. Meat
is cooked evenly, without toughening because lower
power Ieveis are used as the meat temperature rises
thus cooking meats eveniy whiie retaining the naturai juices. After cooking, the oven switches automatically to Hoid for an hour. Food stays warm
without overcooking.
Foods Recommended
A wide variety of foods inciuding meats, fish, casseroles,
vegetables, leftovers, and convenience foods can be Auto
Cooked. Match container size with the food, cover
secureiy, and do not open door during AUTO cycie.
V“ ‘n oven signais, turn, rotat$ or stir as recommended in
C .(book or chart on pages 24 and 25.
Foods Not Recommended
Recipes and foods which must be cooked
uncovered, or which require constant attention, or adding ingredients during cooking
shouid be microwaved by TiME COOK. For
foods that microwave best using temperature
probe, use TEMP COOK or AUTO ROAST.
Foods requiring a dry or crisp surface after
cooking cook best with TiME COOK.
..
...——
17
Page 18

Automatic Cooking Meats and Main Dishes “’!
“4
The benefit is automatic setting and control of cooking, but just like conventional microwaving you must
check the food after the AUTO cycle (oven beeps and cook time begins to count down on display) and turn,
rotate or stir as recommended.
To Automatic Cook Meats
-
For meat and fish loaves use either
the round or loaf microwave-safe
containers. Fish loaves made with
precooked or canned fish use Auto
Cook Code 4. Beef loaf uses Auto
Cook Code 8. Cover with plastic
wrap and rotate % turn after oven
signals. See the chart on following
page for recipes.
Fish fillets, whole fish or seafood
pieces’ should be in single layer in
flat pie plate or oblong dish to fit.
Cover with plastic wrap or con-
tainer lid. Use Auto Cook Code 6
for fillets and Auto Cook Code 1
for seafood pieces.
.
Whole Chioken, chicken breasts
and pieces, or turkey parts should
be placed in a microwave-safe 8-
in. square dish, 12 x 8 x 2-in. dish
or 3 qt. casserole. Cover securely
with plastic wrap or container lid.
If cooking bag is used for whole
chicken, shield breast bone with
small strip of foil. Rotate dish %
turn when oven signals. Use Auto
Cook Code 4.
h
1 !
Chuck or rump roasts shcluld be
placed in a cooking bag with %
cup water or marinade (see mari-
nade recipes on page 98 in
Cookbook) and placed in a microwave-safe dish. Cut bag to fit close
to the size of the roast and tie open
end securely. Cut a 1-1 %“ slit near
the tie. Use Auto Cook Code 9 for
cooking.
Pork chops automatically cook well
in 8 x 12-X 2-in. dish, covered with
plastic wrap. Add barbeque sauce
or other sauce on each chop.
Microwave using Auto Cook Code
49 which is Code 4 with the added
digit 9 giving the Code 20°A more
time. (See page 17.)
i
Spare ribs and brisket should be
automatically cooked in round
glass container with lid or plastic
wrap. Make sure liquid covers meat.
After oven signals, turn over or
rearrange meats often.
How to Adapt Miurowave Casserole Recipes
Use the following step-by-step instructions and tips when adapting your casserole recipes for Automatic
Cooking.
1:
Select recipes that do not require adding ingredients at different stages during cooking or
recipes that require extra attention, stirring
or rotating.
2
Use microwave-safe containers that are appropriate in size to the food almount. Use 3 qt. con-
tainers or less.
3:
For saucy casseroles, cover container with lid or
plastic wrap. (No vents.) For cheese or crumb-
—..._.——.
18
topped casseroles, remove cover after oven signals and add topping, then continue cooking
uncovered.
4:
Allow precooked ingredients or hot sauces tr
cool slightly before adding other ingredients.
5:
Meats and vegetables should be submerged in
liquid.
6:
After oven signals, rotate dish % turn and stir
covering all ingredients with liquid.
Page 19

Meat or Main Dish Recipes
MEXICAN MEATBALL CASSEROLE
Auto Cook Code 6 (Approx. Cooking Time—35 min.)
1 lb. ground chuck
1/2 cup dry bread crumbs
1/8 teaspoon pepper
1/2 teaspoon salt
1 teaspoon chili powder
2 tablespoons d@yminced onions
1 egg
1/2 cup regular rice
1 can (15% oz.) kidney beans
(undrained)
1 can (16 oz.) tomatoes, chopped signals and time remaining appears on readout.
and undrained
1 tablespoon chili powder
. . . . . . . . . . . . . . In large mixing bowl, place meat, bread crumbs, pepper, salt, chili
powder, onion and egg. Mix well and form into 12 balls. Arrange balls
in a circle in 2 qt. casserole. Set aside.
. . . . . . . . . . . . . . . In small mixing bowl place rice, beans, tomatoes and chili powder.
Mix well and pour in center of casserole and over meatballs. Cover
and microwave at Auto Cook Code 6. Rotate 1/2 turn when oven
CHICKEN TERIYAKI
Auto Cook Code 4 (Approx. Cooking Time-29 min.)
l/4cup soysauce . . . . . . . . . . . . . . . . .
1/3 cup honey
1/3 cup sherry
4 teaspoons cornstarch
1 whole chicken (about 3 lb.)
‘If breast bone seems prominent, a 1” strip of foil may be placed over bone to prevent splitting of wrap.
In 2-cup glass measure, place soy sauce, honey and sherry. Stir until
blended. Add cornstarch; mix well.
3-1/2 minutes, stirring every minute until thickened. Tie chicken legs
and place in 12x8x 2-in. microwave-safe dish, breast side up. Brush
with half of sauce (reserve half for later use.) Cover with plastic wrap,
no vent. Microwave on Auto Cook Code 4. When oven signals and
time remaining appears on readout, apply remaining sauce, recover
and continue cooking.
Microwave at HIGH (10) for 3 to
Makes 6 to 8 Servings
Makes 4 Servings
CHICKEN AND RICE ‘
Auto Cook Code 7 (Approx. Cooking Time-1 hr. 15 min.)
1 can (10-1/2 OZJ condensed
cream of mushroom soup
1-1/4 cups milk (1 soup can full)
3/4 cup regular rise, uncooked
1 can (4 oz.) mushrooms, stems
and pieces
1 pkg. (1-1/2 oz.) dry onion soup mix
1 cutup chicken (about 3 lb.)
. . .In small mixing bowl mix soup and milk; reserve 1/2 cup of the
mixture. Blend remaining soup mixture, rice, mushrooms and half of
the onion soup mix. Pour into 12 X 8 x 2-in. glass dish.
. . .Place chicken pieces on rice mixture, arranging with meatiest pieces
to outside of dish. Pour reserved soup mixture over chicken and
sprinkle with remaining soup mix. Cover with plastic wrap, no vent.
Microwave at Auto Cook Code 7, rotate 1/2 turn when oven signals
and time remaining appears on readout.
Makes 6 Servings
Also try these recipes from the Microwave Guide and Cookbook
Recipe Page No.
Classic Ham Loaf
Basic Meat Balls
Sauerbraten Beef Ring
Basic Meatloaf
Crumb Coated Chicken
Pork Chops Rosado
Casserole of Beans &
Sausage
112
84
92
91
140
118
131
“Auto
cook”
Code
8
5
2
8
4
6
5
Recipe
Sweet & Sour Ham
Chicken & Dressing
Round Salmon Loaf
Beef Burger Stroganoff
BBQ Franks
Cheese Stuffed Meatloaf
Polynesian Swiss Steak 97
Chow Mein 119
Page No.
121
140
164
131
91
“Au&o~~k”
82 7
5
4
4
2
8
8
6
....-—
19
———
Page 20

Automatic Cooking Vegetables
Automatic Cook Vegetables
Fresh or Canned V6geWes
Whole or large halves of veg@a-
such as cauliflower or squash
bles
use Auto Cook Code 5. Use round
or square container close to the
size of vegetable. Add % cup water.
Cover with lid or plastic wrap. Turn
cauliflower over after oven signals.
For other vegetables, rotate % turn
when oven signals.
FrozenVegetab&
Pieces or slices of vegetables
require % to % cup of waler. Use
appropriate size covered container.
Stir or rotate after oven signals.
Use Auto Cook Code 5. -
Precooked/canned vegetables
should be placed in round con-
tainer similar in size to amount
being cooked (at least half full).
Cover and stir well after AUTO
cycle. Use Auto Cook Code 1.
Block or loose pieces of frozen
vegetables shouid be placed in
suitabie size container (at le~t
half fuil) covered with lid or plastic
wrap. Add 1 or 2 tablespoons
water. Stir after oven signais. Use
Auto Cook Code 3.
Pouches of frozen vegetables
should be slit 1” in center before
placing directly on oven floor. Use
Auto Cook Code 4. After oven signals, rearrange vegetable and rotate
pouch ?4turn.
20
~iternateiy, frozen vegetables in
pouches can be slit with an “X”
shaped slit and placed in glass
container with “X’ downward. After
cooking, pick up pouch and empty
food into dish through “X” opening.
Page 21

Vegetable Recipes
STIR FRY VEGETABLES
Auto Cook Code 5 (Approx. Cooking Time-16 min.)
l tablespoon oil . . . . . . . . . . . . . . . . . . .
1 tablespoon soft butter
3 medium onions, quartered
1 small green pepper, cut in
l/4-in. wide
2 cups thinly-slice@ cabbage
2/3 cup carrots, slic$d diagonally
1/4 cup (1 bunch) sllced green onions
1 cup broccoli flowerets
1 cup cauliflower fiowerets
2 stalks celery, sliced diagonally
sttfps
VEGETABLE lpASAGNA
Auto Cook Code—Pksta 1 (Approx. Cooking Time—13 min.)
Spinach 1 (Approx. Cooking Time-5 min.)
L@sagna2 (Approx. Cooking Time-25 min.)
lasagna noodles (1/3 pkg.)
6
4
cups water
1
tablespoon vegetable oil
pkg. (10 OZ) fro~en chopped
1
spinach microwave on Auto Cook Code 1. Drain well.
. . . . . . .Place noodles, water and oil into a 13 X 9 X 2-in. dish. Cover with
Toss vegetables with oil and butter in 2 qt. microwave-safe casserole.
Cover. Microwave on Automatic Cook Code 5 stirring well when oven
signals and time remaining appears on readout. Serve immediately.
plastic wrap. Microwave on Auto Cook Code 1. Allow to stand while
preparing remaining ingredients.
. . . . . Remove paper wrapping from box. Place unopened box into oven and
Makes 4 Servings
Makes 6-8 Servings
can (8 oz.) tomato sauce . . . . . . . . . In large bowl mix together tomato sauce, tomato paste, mushrooms,
1
1
can (8 OZ) tomato paste
jar (4 OZ) sliced mushrooms
1
(drained)
cup chopped onion
1/4
teaspoon leaf oregano ‘ ‘
1
teaspoon basil
1
teaspoon salt
1
1/4
teaspoon garlic powder
2
cups (l-pt.) small curd cottage
cheese
oz gmted mozzarella cheese Sprinkle mozzarella cheese over top. Cover with plastic wrap. Micro-
8
onion, oregano, basil, salt and garlic powder.
. . .In a 13 X 9 X 2-in. dish layer well drained lasagna noodles, 1 cup
cottage cheese, 1/2 pkg. spinach and 1/2 of tomato sauce. Repeat.
wave on Auto Cook Code 2. Rotating and removing wrap when oven
signals and remaining time appears on readout.
GREEN RICE
Autocookcode-s@e
lpkg. (lOoQ frozen . . . . . . . . . . . . . .
chopped spinach
1/2 Oup
1/4 cup butter, melted Mix well. Cover and microwave at Auto Cook Code 2. Rotate 1/4 turn
1/4 cup finely chopped onion
1/2 teaspoon salt
ragular doe
1 cup water
1 cup milk
1 egg, beaten
1 cup shredded cbddar cheese
Recipe (Approx. Cooking Time-22 to 25 min.) Makes 4-6 Servings
Place box of spinach in microwave oven and partially cook on Auto
Cook Code 1. Remove from box and drain well. Set aside. In
2 qt. casserole place rice and water. Cover. Microwave at Auto Cook
Code 6. To cooked rice, add butter, onion, milk, egg, salt and cheese.
when oven signals and time remaining appears on readout. Let stand
5 minutes covered before serving.
Also try these recipes from the Microwave Guide and Cookbook
1
Recipe Page No.
Eggplant ltaliano
Corn Pudding
220 5
219
“Au~o~@”
4
Recipe Page No.
Cabbage Rolls Italian Style 82
Stuffed Peppers
21
83
“Auto
cook”
Code
2
5
/
*
Page 22

Automatic
Cooking Fruits and Desserts
How to Automatic Cook Fruits
Pineappie Casserole is a tangy
dessert or meat accompaniment.
In 12 x 8 x 2-in. dish spread 2 cans
(20 oz. ea.) drained pineapple
chunks, 1 cup sugar and % cup
flour. Cover and microwave on
Auto Cook Code 2. When oven
signals and time remaining appears
on readout, remove covering and
top with mixture of 2 cups buttteryflavored cracker crumbs and %cup
melted butter. Do not recover.
Touch “Start” and finish cooking.
Baked Appies automatic cook well
using Auto Cook Code 2. Match
number of appies to size of micro-
wave-safe covered container (see
page 246 in Microwave Guide and
Cookbook). Use Auto Cook Code
2 for Baked Pears and Applesauce
also.
Stewed Fruit and Fruit Compotes
shouid bestirred well before microwaving, especially if sugar is added.
Coveu use Auto Cook Code 2 and
stir once or twice after oven signals and time appears on readout.
Touch “Start” and finish cooking.
How to Automatic Cook Desserts& Breads
After preparing the ingredient for the individual recipe as shown below the picture, follow these steps
for cooking.
Step 1: Cover with plastic wrap and use Auto Cook
Code 3.
Step 2 When oven signals and time remaining
appears on readout, remove covering and rotate dish
% turn.
Step 3: When cooking is finished, turn out (upside
down) the Nut Cake and Cornbread. Invert Caramel
Biscuit Ring and let dish stand over ring a few
minutes before serving.
\
Nut Topped Cakes are easy to cook
automatically. Grease bofiom and
sides of microwave-safe fluted cake
container and sprinkle bottom etien-
Iy with 1/3 cup chopped nuts or
coconut. Carefully pour batter from
one box (2-layer size) cake mix over
nuts, cover with plastic wrap. see
Steps above for Automatic Cooking.
.—— —.—
Caramel Biscuit Ring uses Auto
Cook Code 3. Spread% cup melted
butter and % cup brown sugar in
8-in. round glass dish. Sprinkle
with cinnamon and % cup chopped
nuts if desired. Arrange 1 can
(10 oz.) refrigerated biscuits around
edges and place drinking glass,
open end up, in center. See Steps
above for Automatic Cooking.
22
Bacon and Cheese Topped Cornbread Distribute % cup chopped
crisp fried bacon and 1 tablespoon
Parmesan cheese in greased 8-in.
round giass dish. Carefuily pour
batter from 1 pkg. (8% oz.) cornbread mix or use batter from cornbread ring page 232 in The
Microwave Guide and Cookbook,
over above ingredients. See Steps
above for Aut~matic Cooking.
Page 23

“ EASY CHOCOLATE CAKE
Auto Cook Code 3 (Approx. Cooking Time—18 min.)
1 pkg. (2-layer size)
fudge cake mix
2 eggs
1 teaspoon vanilla extract
2/3 cup cooking oil
1-1/4 cups water
1/4 cup finely chopped pecans
. . . . . . . . . . . . . in large bowl place cake mix, eggs, vanilla, oil and water. Blend on
medium speed of mixer, about 2 minutes, until smooth and creamy.
. . . . . Lightly grease a 16 cup plastic microwave fluted or straight-sided ring
mold. Sprinkle chopped nuts evenly over bottom. Pour batter over
nuts.
Cover with plastic wrap and microwave on Auto Cook Code 3. Rotate
dish 1/4 turn and remove wrap when oven signals and remaining time
appears on readout. Touch “Start” and continue cooking. Let stand in
dish 5 minutes before turning out.
Makes 1 (lO-in.) Tube Cake
CHERRY COBBLER
Auto Cook Code 3 (Approx. Cooking Time-16 min.)
1 can (20-22 oz.) prepared
.
cherry pie fiiiing
2 cups dry yeilow or white
cake mix (1 pkg. [9. oz.] or
1/2 pkg. [17.
1/4 cup meited butter
1/2 cup coarseiy chopped nuts
1 teaspoon ground cinnamon
OZ.])
. . . . . . . in 8-in. square glass dish, spread pie filling.
. . . . . . . In small bowl, mix together cake mix, butter, nuts, and cinnamon until
crumbly. Sprinkle evenly over cherries or, in three rows so cherries
are visible. Cover with plastic wrap.
Microwave on Auto Cook Code 3 rotating dish 1/2 turn and removing
. plastic wrap when oven signals and remaining time appears on
readout. Touch “Start” and continue cooking.
Makes 6 to 8 Servings
PINEAPPLE UPSIDE DOWN CAKE
Auto Cook Code 3 (Apptox. Cooking Time-10 min.) Makes 1 (8-in. round) Cake
1/4 cup butter . . . . . . . . . . . . . . . . . . ..ln 8 in. round dish place butter. Microwave at HIGH (10) for3/4 to 1
1/3 cup brown sugar {packed)
1 can (8-1/4 o=) pineapple siices liquid) on paper towels and arrange in dish. Decorate with cherries.
4 maraschino or candied Piace a 2“ diameter drinking glass (4” tall) open side up in center of
minute untii melted. Sprinkle sugar over butter.
cherries, cut in haif dish.*
3/4 cup aii purpose fiour
1/2 cup sugar ening, egg, liquid and vanilla. Beat 3 minutes on lowest mixer speed,
1-1/2 teaspoons baking powder
1/4 teaspoon sait
1/4 cup soft shortening Cook Code 3. Rotate 1/4 turn and remove wrap when oven signals
1 egg and time remaining appears on readout. Touch “Start” and continue
iiquid from pineappie (1/3 c.)
3/4 teaspoon vaniiia extract
. . . . . . . . . . In small mixer bowl place flour, sugar, baking powder, salt, short-
scraping bowl constantly first 1/2 minute. Carefully spread batter over
fruit in dish. Cover with plastic wrap—no vent. Microwave on Auto
cooking.
●Tip: Use a smal/ drinking glass like the type you buy containing
cheese spreads.
Also try these recipes from the MicI
Recipe
I
Cherry Caramel Ring
Pillsbury Yeliow-Bundt
‘illsbury German Choc. -
Bundt
Applesauce
Stewed Dried Fruit
(AppJe-Apricot)
Page No.
I
234
272
272
246
248
“Au$o~~ok”
I
3
3
3
9
2
~waveGuide and Cookt
Recipe
I
Basic Bread Pudding
Steamed Pudding
Streuseled Apples
Cornbread Ring
Steamed Brown Bread
Drain pineapple (save
Page No.
I
253
280
246
232
232
“Auto Cook
Code
3
4
2
3
7
23
Page 24

Automatic Cooking Control Chart’
●
Do not open oven door during AUTO cycle. May
effect cooking performance. After first beeping
signal (time appears on readout for codes except
Code 1), stir or rotate
●
Match the amount of the food to the size of the
food.
container. Fill containers at least M full.
●
Add K-% cup water to fresh vegetables. Stir or
turn over vegetables and meats after first beeping
signal.
*Auto
Food
Cook”
Code
Container
Rotmatina and Frozon Foods
CannedFo6ds
Room Temp. or thin (small
amounts at refrig. temp.)
Refrig. temp. or thick (large
amounts at room temp.)
Deli Foods
Entrees
Frozen
Thin (under l“)
Thick (over l“) 10 oz.
21 oz.
Leftovers
TV Dinner (10-12 oz.)
Cooking
Bacon
(4 slices)
Casseroles
Precooked ingredients
Raw meats & PouNrv 45-55 min.
Chicken
Breasts (4)
Casserole
Pieces
Whole ( 3 tbs.)
Chuck Roast
(UPtO5 lb.)
Fish
Fillets (1 lb.)
Fruit
Baked Apples (4)
Baked Pears (4)
IF AFTER COMPLETION OF
FOOD AND USE AUTO COC
1
Microwave-safe con-
matchedtosize
tainer
of food.
2
1 Microwave-safe con-
tainer matched to size
of food.
3
Cook in container.
(see comments)
4
Cook in container.
(see comments)
4
1 Microwave-safe
container matched to
size of food.
4
Cook in container.
(see comments)
12 x 8 x 2-in. glass
5
dish lined with paper
towels. Cover with
plastic wrap.
2 qt. casserole with lid
6
or cover with plastic
wrap.
7
12 x 8 x 2-in. glass
41
dish. Cover with
plastic wrap.
NOTE: Make sure
meat doesn’t touch
covering.
7
4
12 x 8 x 2-in. glass
4
dish or cooking bag.
Cover with 2 pieces of
overlapping plastic
wrap.
13x 9 x 2-in. glass
9
dish. Put in cooking
bag and secure with
tie. Slit bag 1” at top
near tie.
12 x 8 x 2-in. glass
6
dish. Cover with
cdastic wrao.
2 qt. casserole with
2
lid.
2
,,
,,
,,
,#
,,
UTO COOK CYCLE FOOD NEEDS ADDITIONAL WARMING, SIMPLY RECOVER
CODE #1.
nA
L+
●
Use microwave-safe plates or casseroles, except
DO NOT USE PAPER PLATES with Automatic
Cooking.
●
Be sure the exterior of the cooking container
and interior of microwave oven are dry.
●
Stir or rotate after oven signals and time appears
on readout.
●
Use of Automatic Cooking feature with wire
shelf is not recommended.
Approx.
Time
min.fcup
2-3
4 min./cup
12-14 min.
16-18 min.
25-35 min.
2-3 min./cup
17-19 min.
6-8 min.
35-45 min.
Comments
Cover with
2 or more servings are considered large
amounts. Cover with plastic wrap or lid.
Cover with
Cook in own container, or for quicker cooking,
in glass container. NOTE If entree is in aluminum pan, remove from box, remove lid and put
back in original closed box. If entree is in papefi
board container, remove from box and microwave with original plastic covering.
Use bowl with plastic wrap or cover plate with
microwave-safe plastic dome.
Remove foil too and Dut back in box. If dinner <
has cake or brownies, remove before cooking.
When oven signals, rotate % turn.
Make sure liquid covers all ingredients. When
oven signals, stir well.
plasticwrapor lid to dish.
plasticwrapor lid to dish.
,,
22-26 min.
60-70 min.
2-4 min./piece
42-44 min.
1 hr. 30 min.-
1 hr. 40 min.
20 min.
14-18 min.
14-18 min.
No additional liquid needed. When oven signals, rotate % turn. Note the preference control
1 is used with breasts to decrease cooking time
for best results.
When oven signals, stir well and rotate 1Aturn.
No additional liquid needed. When oven
signals, rotate M turn.
Put on trivet and sit as straight as possible.
Rotate % turn when oven signals.
Add % cup water. When oven signals, rotate
% turn.
Baste with butter and lemon juice. When oven
signals, rotate % turn.
Core apples. No water needed. When oven
signals, rotate % turn.
Core pears. No water needed. When oven
signals, rotate
——.—- —.-.—— ---
‘/2 turn.
.
Page 25

Automatic Cooking Control CIIWII @xIWINJed)
iamburger
Casserole
Meatloaf (1% lb.)
Patties (4-5)
Pork
Sausage Patties
(%” thick+)
Chops
(?4-1” thick)
Spare Ribs
(UPto 3 lb.)
Rice
Instant (Minute-1% cups)
Raw (1 cup)
Seeiood
Pieces
[1 lb. Shrimp or scallops)
Casserole
SwissSteak
[1% lb. round steak)
egetables
Fresh
Artichokes
(up to 4 med.)
Carrots (1 lb. sliced)
Cauliflower (1 med. head)
Asparagus (1 lb. cut spears)
Brussel Sprouts (1 lb.)
Potatoes
1
3
Frozen 810ck (10 oz.)
Broccoli
Brussel Sprouts
Leaf Spinach
Mixed Vegetables
Frozen Pouch
Baby Limas
Corn
Peas
Spinach
I
“Auto
cook
code
7
8
5
5
49
9
2
6
1
6
7
2
5
5
5
5
5
5
31
3
3
3
4
4
41
4
Conteiner
2 qt. glass dish with
lid.
Glass loaf dish. Cover
with plastic wrap.
8“ square dish. Cover
with plastic wrap.
8“ glass square dish.
Cover with plastic
wrap.
12 x 8 x 2-in. glass
dish. Cover with
plastic wrap.
2 qt. glass dish. Cover
with lid or plastic
wrap.
2 qt. glass dish with
lid.
1% qt. glass dish with
lid.
2 qt. casserole with lid
or cover with plastic
uram
3qt. casserole with
id.
2qt. glass dish with
id.
12x 8 x 2-in. glass
~ish. Cover with
Mastic wrap.
I% qt. glass dish with
id.
I qt. glass dish with
id.
?qt. glass dish with
id.
I% qt. glass dish with
id.
,,
,,
##
,0
.ay pouch in
nicrowave-safe dish.
Uo cover needed.
,,
,,
,,
Approx.
Time
45-55 min. Make sure liquid covers all ingredients. When
30-40 min.
12-14 min.
8 min.
33-38 min.
1 hr. 30 min.1 hr. 50 min.
9 min.
24 min.
5-6 min.
35-45 min.
55-60 min.
10-12 min.
13 min.
15 min.
14 min.
11 min.
6-9 min.
14-16 min.
18-20 min.
16-18 min.
11-13 min.
10-12 min.
8-10 min.
8-10 min.
8-10 min.
10-12 min.
Comments
oven signals, stir well and rotate % turn.
When oven signals, rotate % turn.
When oven signals, rotate % turn.
When oven signals, rotate % turn.
Baste with 1 tbsp. barbeque sauce/chop. When
oven signals, rotate % turn.
NOTE: The Preference Control 9 is used for
chops to increase cooking time for better
results.
Meat must be covered with liquid. When oven
signals, rearrange meat making sure it is sub-
merged in liquid. It may be necessary to rearrange another time during final cooking.
Follow instructions on package. Cover. When
oven signals, stir. ~
Use 1 cup rice & 2 cups water. When oven sig-
nals. rotate % turn.
When oven signals, rotate % turn.
Make sure liquid covers all ingredients. When
oven signals, rotate % turn or stir.
Cut into pieces. Make sure liquid covers all
meat. When oven sianals. stir & rotate % turn.
Place artichokes in dish stem side down. Add
% cup water. Rotate dish % turn after oven
signals.
Add % cup water. When oven signals, stir well.
No water needed. Start cooking stem side
down. At signal turn over.
Add % cup water. When oven signals, rotate
% turn.
,,
When oven signals, rotate % turn. NOTE: Watch
hot dish & steam!
Add 2 tbsp. water. When oven signals, stir well.
NOTE: The Preference Control 1 is used for
broccoli to decrease cooking time for better
results.
Add 2 tbsp. water. When oven signals, stir well.
Make a 1” slit in pouch. When oven signals,
break up frozen center, and rotate % turn.
NOTE: Watch for hot steam.
Make a 1” slit in pouch. When oven signals,
break up frozen center, and rotate % turn.
NOTE: Watch for hot steam. NOTE: Preference
Control 1 is used for peas
time for best results.
Make a 1” slit in pouch. When oven signals,
break up frozen center, and rotate% turn.
NOTE: Watch for hot steam.
,,
,8
#r
,,
to decrease cooking
●Excessively dry potatoes may not release enough moisture to activate sensor. Be sure potatoes are fresh not old
and dried-out.
25
——
——-———-—.
Page 26

Questions and Answers
I
Q. Why does my oven automaitieally cut off after the
AUTO cycle when using Auto Cook Control Code 1
when itdoes not for other settings?
A. When using Code 1, there is no second phase of
minutes counting down. All the cooking is completed in the first phase or AUTO.
Q. if my food is not completely cooked after using
the suggested Auto Cook Controi Code, what
should [ do?
A. Thick starchy or dense foads may require some
additional time cooking. Use TIME COOK and
Power Level 10 for a few minuies until completion.
Q. Do ail fresh or frozen vegetables require a
standing period after cooking with AUTO COOK?
A. Most vegetables are cooked to a crisp state during Auto Cook, just as in t’egular microwaving.
Therefore, it is recommended that you let the vege-
tables stand for up to 5 minutes depending on size
and density of pieces. This shnding time also enhances the overall flavor and appearance of most
vegetables.
Q. What if i don’t fully cover the dish in Auto
Cook?
A. Oven senses steam too quickly which shortens
the cooking time thus leaving undercooked dish.
Recover tightly and reset Auto Cook.
Q. Do the shapes and sizes af food make a cfifference when using
A. Yes, in some cases, larger pieces will require additional Time Cooking. Be sur@ to check suggested
arrangement of pieces in the dish, since proper ar-
rangement is often a successful tip in regular micro-
waving.
Q. Shouid ! use Auto Cook to cook pudding or
sa~~es~
A. Most pudding and sauce recipes require stirring
many time9 during cooking; therefore, Time Cook is
recommended since you shoqld not open the door
during the AUTO phase of caoking without affecting end cooking results.
Q. My scalloped potatoes were not completely
cooked when I removed the dish after Auto Cook.
What is wrong?
A. If you prepared the sauce in the oven prior to
combining the sauce with potatoes, there may have
been too much remaining moisture in the oven.
Make sure you dry the oven completely before using Auto Cook since this function operates properly
by sensing steam in the oven. Aiso, starting Auto
Cook with hot foods creates s~eam in the oven too
soon, and decreases the first sensing cycle.
Q. Are there any other foods which are best Time
Cooked, rather than Auto Cooked?
A. Bakery foods, candies, melted chocolate or
foods when a dry or crisp sudace is desirable, are
cooked best by Time Cook.
Auto Cook?
Q. Do fresh or frozen vegetables require water
when using Auto Cook?
A. Yes. Add water as recommended on chart to the
vegetables and cover well for even, complete
cooking.
Q. Would my plastic containers with very tight fit-
ting lids be appropriate for Automatic Cooking?
A. No, most types of plastic storage dishes, butter
tubs, etc. with tight fitting lids are not recommended
for microwaving. Also tight fitting plastic lids may
prevent adequate steam from escaping and food
may not cook properly during Automatic Cooking.
Q. I tried to warm some chow mein aood{es using
Auto Cook. Why didn’t this work?
A. Food must have some moisture in order to create
steam which helps the auto sensor function.
Extremely dry foods such as chow mein noodles,
potato chips and other such foods do not have
enough moisture.
Q. May 1use Auto Cook when I am cooking many
foods in more than one dish or casseroie?
A. No, because of different food densities, attention
needed during cooking, and food amounts, itk best
to use TiME COOK when cooking many foods.
Q. Why was my roast not fuiiy cooked even though
the temperature on the readout was correct and
Auto Roast completed?
A. When cooking with Auto Roast, the temperature
probe must be inserted properiy as fuiiy described
in the Cookbook.
Q. Are there any particular trivets that work better
than others?
A. Yes, fiat giass trivets such as lids or dish covers
give more even cooking resuits than piastic trivets.
Aiso, ceramic ridge-bottomed roasting dishes work
weii. Plastic trivets require meat to be turned over
more frequently because the grid design and iegs
aiiow the bottom of the meat to stay cooier as it
cooks, than giass trivets do.
Q. Why doesn’t the rcas~ continue cooking during
the standing or holding time?
A. The oven automatically reaches finished temperature and then decreases to a iower power Ievei to
prevent overcooking. Thus an even temperature is
maintained.
Q. I entered Auto Defrost Code f, then :5s :u=2s?
4 for 4 ibs. of chicken. The readout fiashed “Star:”
but when 1touched Start “ERROF?” fiashed. Why?
You must enter 4 and O denoting 4 Ibs. Touch
A.
CLEAR/OFF and begin again. “ERROR” will aiso
fiash if an improper weight for that particular code
has been entered.
26
Page 27

The Exhaust Feature
:--’
I
IJ
\
The exhaust hood feature cm your GE microwave
oven is equipped with a metal ‘filter which collects provi~ed venting to the outside. The hood also has a
grease. When the fan is operated, air is drawn up light for illuminating the counter surface.
L-–-’._.
H
N-
throuqh the filter and is then discharged through
d
/
//
I
I
Jill
To remove grease filter, grasp the “finger hold” on
the filter and push to the rear. The filter will drop out.
To replace grease filter, insert the filter in the top
f~-me slot on the back of the opening. Push to the
t
and upward to snap into place.
Soak, then agitate filter in hot detergent solution.
Don’t use ammonia or other alkali because it will
darken metal. Light brushing
inbedded dirt. Rinse, shake and remove moisture before replacing. Filters should be cleaned at least
once a month. Never operate your hood without the
filter in place. In situations where flaming might
occur on surfaces below hood, filter can retard entry
of flames into the unit.
27
can be used to remove
Page 28

Care for Your Microwave Oven
Your New Microwave Oven is a Valuable Appliance,
Protect It From Misuse By Following These Rules:
. Keep your oven clean and sweet-smelling.
Opening the oven door a few minutes after cooking
helps “air-out” the interior. An occasional thorough
wiping with a solution of baking soda and water
keeps the interior fresh.
. Don’t use sharp-edged utensils with your oven.
The interior and exterior oven walls can be
scratched. The control panel can be damaged.
. Don’t remove the cover over the “stirrer” at the
top of the oven (microwave feature 4 on page 5).
You will damage the oven.
BE CERTAIN POWER IS OFF BEFORE CLEANING ANY PART OF THIS OVEN.
How to Clean the Inside
Walls, floor and plastic cover. Because there is little
heat except in the food, or sometimes in the utensils, spills and spatters are easy to remove. Some
spatters can be removed with a paper towel, others
may require a damp cloth. Remove greasy spatters
with a sudsy cloth, then rinse and dry. Do not use
abrasive cleaners on oven walls. NEVER USE A
COMMERCIAL OVEN CLEANER ON ANY PART
OF YOUR MICROWAVE OVEN.
Automatic Temperature Probe. Probe is sturdy, but
care should be taken in handling. Do not twist or
bend; avoid dropping temperature probe.
Clean as soon after using as possible. To clean,
wipe with sudsy cloth, then rub lightly with plastic
scouring ball if necessary. Rinse and dry. (Or wash
in dishwasher.)
r; A f===a
/
Door-inside. Glass: Wipe up spatters daily, wash
when soiled, with a minimum of sudsy warm water.
Rinse thoroughly and dry.
Metal and plastic parts on door: Wipe frequently
with a damp cloth to remove all soil. DO NOT USE
ABRASIVES, SUCH AS CLEANING POWDERS OR
STEEL AND PLASTIC PADS. THEY MAY MAR THE
SURFACE.
Special note when using Brown ‘N Sear Dish: High
heat generated on bottom of Brown ‘N Sear Dish
can cause scorched appearing stains to bake onto
the oven floor if grease is present. These may be
removed with Bar Keepers Friend@ Cleanser by
SerVaas Laboratories, Inc.
After using Bar Keepers Friend@ Cleanser, rinse
and dry thoroughly, following instructions on can.
Do not use Bar Keepers Friend@ Cleanser on the
painted surfaces such as the walls. It may scratch
the paint.
Bar Keepers Friend@ Cleanser is sold in many
grocery, hardware, and department stores.
How to Clean the Outside
Case. Clean the outside of your oven with soap and
water, then rinse and dry. The outer pane of the
window is glass. Just wipe clean with a damp cloth.
Chrome trim is best wiped with a damp cloth and
then with a dry towel.
Control Panel. Clean the control panel of your micro-
wave only with lightly dampened cloth. DO NOT
USE cleaning sprays or large amounts of soap and
water. These can cause problems with the control
mechanisms.
Door Surface. When cleaning surfaces of door and
oven that come together on closing the door, use
only mild, non-abrasive soaps or detergents
applied with a sponge or soft cloth.
___.. .—_—
.——.—
28
———
.——
Page 29

L
I \\ ei
1
To replace hood lamp, first disconnect power at
main fuse or circuit breaker panel or
Remove 2 screws from each side of lower panel and
3 screws from front edge. Lower panel until it rests
on range below. Be sure bulb to be replaced is cool
pull plug.
Fa+-
before removing. Remove bulb or bulbs and replace
with 40 watt appliance bulbs. Raise lower panel and
replace screws. Connect electrical power to micro-
wave oven.
To replace your oven lamp, first disconnect power at
main fuse or circuit breaker or pull plug. Remove the
top grill by taking off
Next, remove the single screw on top left that
secures lamp housing. (On models so equipped.)
Open oven door for easier removal of the lamp hous-
ing assembly. Then grasp tab and pull out and up to
clear door hinge and front lip of oven. To remove
bulb, push it inward gently
outward from socket.
25T8DC.
#
% not attempt to operate the oven unless the grill is
place.
2 screws which hold it in place.
and turn to left, then pull
Replace with GE Lamp
.—..
Clean off the grease and dust on
often. Use a warm detergent solution. About 1 tablespoon of ammonia may be added to the water. Take
care not to touch the filters and enameled surfaces
with this. Ammonia will tend to darken metal.
90
La
hood surfaces
Page 30

Guide to Use of the
—_ —_______
Spacemaker@Shelf
The two-position wire shelf is specifically designed for added capacity
heating and reheating in your Spacemaker@ microwave oven. Now heat-
ing and reheating, which are the most popular uses of microwave ovens,
may now be done in multiple quantities, so several foods are ready to
serve at the same time.
When microwaving with the oven shelf, some techniques will differ from
the cookbook which came with your oven. It is important to arrange foods
properly, and this is shown on the next page. Utensil size is important;
select from among the suggestions below. Also, food size should be considered; foods over 3% inches high, or 3 pounds are not recommended for
shelf cooking.
Batters and dough foods and also foods for oven meals using scratch
recipes should be cooked without the oven shelf, following cookbook
directions.
.,,
* DO not store or cook with metal shelf on floor of oven,
Product-damage may result.
~ Use .p@hoidegs when handling metai shelf and utensils.
: They maybe hot.
* Do not use rnlcrowave browning dish on “metal sheif.
Use potholders when handling
foods heated together with your
oven shelf, especially when heating
larger amounts of food in 8 inch
square or other 2 quart size casseroles. Extra steam generated from
multiple food cooking may make
utensils hotter than with regular
microwaving.
Utensils for Shelf Heating and Reheating
Before placing food in the dishes you plan to use for shelf microwaving, check to see that they will fit together on
or under the shelf. Also, be sure utensils are microwave safe.
Casseroles for heating or reheating
include 1 cup measuring cup,
8x4x3-inch loaf dishes, 9x5x3-inch
loaf dishes or 9-in. pie plates.
Leftovers may be placed in small
individual ceramic or plastic bowls
or divided plates.
—
Use wax paper or plastlc wrap
instead of lids on casseroles. Lids
may add too much height to dish.
Shelf Positioning
To insert shelf, tip back slightly
and fit into shelf supports on back
oven wail. Set front of shelf on side
SUDDOttS as shown.
,,. —––-— — –
.. —....
-. .. .
3nen nas two posmons. Use [n low
position when heating two casseroles or reheating frozen TV dinners or entrees.
... . . . .
30
The high shelf position more
evenly spaces the area above and
below shelf. Use this position for
heating plates of leftovers.
—.—.-..—-.
Page 31

How To Heat or Reheat Similar Types of Food
/-jsq
Two plates of leftovers may be re-
heated together. Arrange thick or
dense foods to outside edges of
plate and cover with piastic wrap.
Microwave at HIGH (10) for3 minutes. Reverse position of plates
(top to bottom) and rotate % turn.
Continue microwaving at HIGH
(10) for 3 to 4 minutes. Continue
heating, if necessary, until hot.
Reheating two casseroles (height
should be less than 3% inches) is
now possibie. Cover with piastic
wrap. Use staggered arrangements
of food, piacing food on right side
of sheif and ieft side of fioor. Refer
to Heating or Reheating Guide (see
inside front cover of cookbook) for
suggested microwave time per
casseroie and add together the
times. Microwave at HiGH (10),
reversing position of foods (top to
bottom) after haif of time. Aiso,
heat severai smaiier bowis of ieftovers this way, stirring and reversing positions after haif of time.
Two frozen individual entrees (5 to
7 oz. ea.) or two TV dinners (10 to
12 oz. ea.) are both ready to serve
at the same time. Remove batter
foods; cook these conventionally.
Return foii trays containing food
to boxes in which they were pur-
chased. Piace in oven with one TV
dinner on right sheif and the second dinner on ieft fioor. Micro-
wave at HiGH (10) for 6 minutes.
Reverse positions (top to bottom)
and rotate foods % turn. Continue
microwaving at HiGH (10) for 6 min-
utes. Check dinners for heating. if
one dinner seems iess done than
desired, return it to the box and
continue heating on sheif 1 to 2
more minutes.
JWTo Reheat Several Different Types of Foods Together
When heating severai different
types of food together, foods
which shouid be served hot must
be piaced on the oven sheif, whiie
foods which are oniy warmed
shouid be piaced on the fioor. This
is because microwave energy
enters the oven from the top oniy.
Aiso, it is important to remember
that foods absorb microwave
energy at different rates. Rates can
be affected by the size of the food,
and its starting temperature.
Because of the varying rates you
may need to start reheating a iarge
or dense food a few minutes ahead
of time, then add other smaiier or
iess dense foods. Alternately, if
one of the severai foods you are
heating seems under cooked but
the others are heated satisfactorily, iet the underheated food
continue cooking.
Heat or reheat different types of
food at HiGH (10). To determine
heating times, add together times
for aii foods. (see heating guide
inside front cover of cookbook)
After haif of time, stir or rearrange
foods (do not reverse positions).
Check foods (top sheif especiaiiy)
after 3/4of totai time and remove
any which are done. Continue
cooking others.
Place on shelf large or dense foods
which need the most heating, such
as ieftover fried chicken, casseroles
of canned or ieftover vegetables,
rice or pasta. Piace on oven fioor
those foods which need oniy be
warmed, such as bakery pies, roiis,
muffins or breads.
\
31
Page 32

GROUNDING INSTRUCTIONS
This appliance must be grounded.
In the event of an electrical short
circuit, grounding reduces the risk
of electric shock by providing an
escape wire for the electric current.
This appliance is equipped with a
power cord having a grounding
wire with a grounding plug. The
plug must be plugged into an outlet
that is properly installed and
grounded. (Fig. 1)
WARNING—lmproper use of the
grounding plug can result in a risk
of electric shock.
I
1
.
Q
:
tiijm
Fig.1
Consult a qualified electrician or
serviceman if the grounding instructions are not completely understood, or if doubt exists as to
whether the appliance is properly
grounded.
\
INSURE PROPER GROUND
EXISTS BEFORE USE
Where a standard two-prong wall
receptacle is encountered, it is your
personal responsibility and obligation to have it replaced with a properly grounded three-prong wall
receptacle.
Do Not Under Any Circumstances Cut or Remove the
Third (Ground) Prong From
The Power Cord.
Do Not Use an Adapter Plug
With This Appliance.
Do Not Use an Extension
Cord With This Appliance.
All These Things Are Normal on Your Microwave Oven:
1. Steam or vapor escaping from around the door.
2. Light reflection around door or outer case.
3. Dimming oven light and change in blower sound
may occur while operating at power levels other
than high.
.—.—..—.—.——
4. Dull thumping sound while operating at power
levels other than high.
5. Some TV-Radio interference might be noticed
while using your microwave oven. It’s similar to the
interference caused by other small appliances and
does not indicate a problem with your oven.
32
—— --
Page 33

The Problem Solver
To Save lime and Money—
before you request service,
heck the Problem Solver
if
you have a problem, it may be
minor. You may be able to correct
it yourself. Just use this Problem
Solver to locate your problem and
then follow the suggested
recommendations.
PROBLEM
OVEN WILL NOT COME ON
CONTROL PANEL LIGHTED,
YET OVEN WILL NOT START
“ERROR” APPEARS
ON READOUT
POSSIBLE CAUSE AND REMEDY
A fuse in your home may be blown or the circuit breaker tripped.
Replace fuse or reset circuit breaker.
Make sure 3-prong plug on oven is fully inserted into wall receptacle.
Door not securely closed.
START must be touched after entering cooking selection.
Another selection entered already in oven and CLEAR/OFF not touched
to cancel it.
Make sure you have entered cooking time after touching TIME COOK.
CLEAR/OFF was touched accidentally. Reset cooking program and
touch START.
Temperature probe not inserted properly or not being used during Auto
Roast or Temp Cook.
Make sure you have entered desired finished temperature after touching
TEMP COOKMOLD.
sure you entered a code number after touching AUTO COOK,
Make
AUTO ROAST or AUTO DEFROST.
When using Temp Cook, a temperature less than 80° or more than 199°
has been entered.
Door isopened during “AUTO” cycle of Auto Cook function. Close door
and touch START.
Weight is incorrect for Auto Defrost code on chart. It is necessary to
reset oven.
“PROBE” APPEARS
ON READOUT
FOODS ARE EITHER OVER-
COOKED OR UNDERCOOKED
Probe has been forgotten or not seated properly in oven wall when
using Auto Roast or Temp Cook functions.
Cooking times may vary because of starting food temperature, food
density or amount of foods in oven. Touch TIME COOK and additional
cooking time for completion.
Incorrect Power Level entered. Check Cookbook for recommended
Power Level or changing levels during cooking if necessary.
Dish was not rotated, turned or stirred. Some dishes require specific
instructions. Check Cookbook or recipe for these instructions.
Too many dishes in oven at same time. Cooking time must be increased
when cooking more than one food item. Check Cookbook for recommendation on increasing time.
Dish not completely covered as directed during Auto Cook.
Previous microwaving left humidity or moisture in oven, thus lessening
the cooking time in Auto Cook function.
Certain vegetables need a standing time after using Auto Cook. Check
Automatic Cooking Chart.
Oven door was opened during “AUTO” cycle of Auto Cook function.
Probe not inserted properly into meat or dish when
Auto Roast functions. Check Cookbook or Auto Roast section of this
book for specific instructions.
33
——.—
——-—-—-—-
using Temp Cook or
Page 34

{
Notes
34
— .——
Page 35

1
_________
●
Our Consumer Servicesare designed with your needs and wants in mind.
Warranty Protection
Before your new appliance left the factory, it went
through rigorous tests to detect manufacturing defects.
And you have a written warranty to protect you. See the
warrant y on the back page of this book for details.
Convenient Service
Whether your appliance is in or out of warranty, you’re
just a phone call away from our nationwide network of
Factory Trained Service professionals.
Simply call our GE service organization. Look in the
White or Yellow Pages of your telephone directory for
GENERAL ELECTRIC COMPANY, GENERAL
ELECTRIC FACTORY SERVICE, GENERAL
ELECTRIC-HOTPOINT FACTORY SERVICE or
GENERAL ELECTRIC CUSTOMER CARE”
SERVICE.
Service can normally be scheduled at your convenience
and the technician drives a fully-stocked parts service
truck so that, in most cases, the repair can be completed
in one visit.
We’re proud of our service and want you to be pleased,
but if for some reason you are not happy with the service
you receive, here are three steps to follow for further help.
FIRST, contact the people who serviced your appliance.
Explain why you are not pleased. In most cases, this will
the problem.
solve
NEXT, if you are still not pleased write all the
details-including your phone number to:
Manager, Consumer Relations
General Electric
Appliance Park
Louisville, Kentucky 40225
FINALLY, if your problem is still not resolved, write:
Major Appiiance Consumer Action Panel
20 North Wacker Drive
Chicago, Illinois 60606
3
●
Service Contracts
For trouble-free service beyond
the written warranty period.
If you prefer to budget your repair expenditures
instead of being surprised by them, GE offers
service contracts for varying lengths of time on
all GE major appliances. With a contract, we’ll
keep your appliance in good operating condition
during the contract period at no additional
charge.
The Quick F@ System
You can save money and time
by doing it yourself.
For do-it-yourselfers who would prefer to fix .
GE major appliances themselves . . . GE offers
an industry f~st, the Quick F~” System.
{
Help For You By Phone
Should you need help in the selection and
purchase of new appliances, or have questions
about the operation of the GE appliances you
now own—or have any other questions about
GE consumer products or services, you are
only a TOLL FREE call away.
----=-=-=--.
—--—-
.,:-=-s-—
U
m
.—
e..-
*-irim:.. : .~
@
Service contracts let you pay today’s prices for
service a month, a year, or several years from
now. And, you’ll receive service from GE
trained service technicians using only genuine
GE parts. If you have any questions about
Service Contracts, call TOLL-FREE
800.626.2224. (In Kentucky, call 800.292 .2057.)
A
program for do-it-yourself appliance repair,
the system includes step-by-steprepairmanuals
for refrigerators, most non-microwave electric
ranges, dishwashers, and standard and large
capacity washers and dryers, plus speciaffy
packaged replacement parts, and technical help
~ with a tollfree 8(Mnumbec
The GE Answer CenterTM consumer
information service is open 24 hours a day,
seven days a week.
Our staff of experts stands ready to assist you
anytime.
—
Your Direct Line to General Electric
m
~- The GE AnswerCenteY800.626.2000
——..—..—
—.——————-
Page 36

YOUR GENERAL ELECTRIC MICROWAVE OVENIRANGE ~
WARRANTY
Save proofof orlgmal purchase date such as your sales SIIP or cancelled check to establish warranty period.
.
ti
If
6
9
,4- .?(
WHAT IS COVERED
WHAT IS
Some states do not allow the exclusion or limitation of incidental or consequential damages, so the above limitation or exclusion
may not apply to you. This warranty gives you specific legal rights, and you may also have other rights which vary from state to state.
To know what your legal rights are in your state, consult your local or state consumer affairs office or your state’s Attorney General.
NOT COVERED
FULL ONE-YEAR WARRANTY
For one year from date of original
purchase, we will provide, free of
charge, parts and service labor in
your home to repair or replace any
part of the microwave ovenhange
that fails because of a manufacturing defect.
LIMITED ADDITIONAL
FOUR-YEAR WARRANTY
For the second through fifth year
from date of original purchase,
we will provide, free of charge, a
replacement magnetron tuba if the
magnetron tube fails because of a
manufacturing defect. You pay for
the service trip to your home and
service labor charges.
● %rvice trips to your home to
teach you how to use the product.
Read your Use and Care material.
If you then have any questions
about operating the product,
please contact your dealer or our
Consumer Affairs office at the
address below, or call, toll free:
The GE Answer CenterTM
800.626.2000
consumer information service
. Improper installation.
If you have an installation problem,
contact your dealer or installer.
You are responsible for providing
adequate electrical, exhausting
and other connecting facilities.
This warranty is extended to the
original purchaser and any succeed-
ing owner for products purchased
for ordinary home use in the 48
mainland states, Hawaii and
Washington, D.C. In Alaska the
warranty is the same except that it
is LIMITED because you must pay
to ship the product to the service
shop or for the service technician’s
travel costs to your home.
All warranty service will be provided
by our Factory Service Centers or
by our authorized Customer Care@
servicers during normal working
hours.
Look in the White or Yellow Pages
of your telephone directory for
GENERAL ELECTRIC COMPANY,
GENERAL ELECTRIC FACTORY
SERVICE, GENERAL ELECTRIC-
HOTPOINT FACTORY SERVICE or
GENERAL ELECTRIC CUSTOMER
CARE” SERVICE.
● Replacement of house fuses
or resetting of circuit breakers.
. Faiiure of the product if it is
used for other than its intended
purpose or used commercially.
c Damage to product caused
by accident, fire, floods or acts
of God.
WARRANTOR IS NOT RESPONSIBLE FOR CONSEQUENTIAL
DAMAGES.
&
,
!3
&
$$
.;
.
-t
i
t
\
Manager—Consumer Affairs, General Electric Company, Appliance Park, Louisville, KY 40225
, Part No. 862A725 P79 Rev. 2
No. 49-4561-2
Pub.
Warrantor: General Electric Company
If further help is needed concerning this warranty, contact: ‘
2/85
GENEll AL@ EIECTRIC
.——
—.— ..—.—...—-—. ——-. .-...-. --
.’
B
.
.
-i
 Loading...