

Page 1
Page 2
R T U a C B
..——..——-.—.——_——
—. —.
Take the time to read this book and learn how to enjoy
your new Microwave Oven. It contains detailed operating instructions and recommended maintenance, as
well as handy tips to help you gain maximum benefits
from your Microwave Oven. Once you have read the
book, keep it handy to answer any questions you may
have.
If you have any additional questions concerning the
operation of your Microwave Oven, write—including
yourphonenumber—to:
ConsumerAffairs
GeneralElectricCompany
AppliancePark
Louisville,Kentucky40225
IF
YOU RECEIVED A DAMAGED OVEN, immediately
contact the dealer (or builder) from
chasedit. They have been informed of the proper
procedure to take care of such matters and can
handleitforyou.
whom you pur-
ReY O
It is ‘importantthat we, the manufacturer,know the
location of
for adjustments,
Please check with
registeredyou as the owner;alsosendin your i%JrchaseRecordCard If you move,or if you arenotthe
original purchaserpleasewrite to us, stating model
and serial numbers.This appliancemustbe regk-
tered.PleasebecertainthatHh.
yourMicrowaveOvenshoulda needoccur
your supplier to be sure he has
Write to:
General Electric Company
RangeProductService
AF!H?1O
AppliancePark
Louisville,Kentucky
40225
a
Your Microwaveoven has a nameplateon which is
stamped the model number and seriai number,
(Seepage5 for location.)
Model and serial numbersare also on the Purchase
RecordCardwhich camewith your MicrowaveOven,
Recordthe numbersin thespacesbelow.
Pleasereferto both modeland serialnumbersin any
future correspondenceor product servicecalls concerningyour MicrowaveOven.
ModelNumber.... . ...... .... .----------- ..... .. .. .
SerialNumber. ...... . . .. .... . ... .. .. ...-.-.—--------
DatePurctwwd .... . .. ... . .. .. . ... ..... ..... ....
KEEPPUFU-M$E RECEIPTWITH THIS BOOKTO
ESTABLISHTHEWARRANTYPERIOD,
B Y C f S
Check“The ProbiemSoiver”section.(Seepage20.)
it lists many minor causesof operating probiems
that you can correct yourseif and maysaveyou an
unnecessaryservicecaii.
I Y N S
in many cities, there’s a General Eiectric Factory
ServiceCenter. Caii, and a radio-dispatched truck
wiii come to your home by appointment—morning
or afternoon. Charge the work, if you iike. Aii the
centers accept both Master Card and Visa cards.
(Seeinside BackCover.)
Or iook for Generai Eiectric franchised Customer
Care@servicers. You’J!find them in the
Pagesunder “GENERAL ELiZCTf3iCCUSTOMER
CARE@SEFWiCE” or
HOTPOINTCUSTOMERCARE@SERVICE”.
If you need swvlce literature,partslists,partsor
accessories,contact one of the Factory Service
Centers,a franchised Customer Care” Servicer or
yourQeneraiElectricdeaier.
ExtendedServiceContracts:Thetermsof your war-
ranty provide free servicecovering failures due to
manufacturingdefectsfor a definiteperiodof time.
After this warrmty expires you may purchasean
ExtendedServic@Contract which will enableyou to
budget your service neads,This coveragebeyond
warrantyisavailablefromour FactoryServiceCenters
andfrom manyfranchisedCustomerCare(@}servicers.
it isagood ideatoapplyfor thiscoveragebeforeyour
warrantyexpires.
‘IGENERAL ELECTRiC–
YeJiow
S t F f F H
Fht,-contact the people who servicedyour micro-
waveoven.Expiainwhy you aredissatisfied.in most
cases,thiswill soivethe problem,
~e~t?if
includingyour phonenumber—to:
Finally,ifyourproblemis stili not resolved,write:
This panel, known as MACAP,is a group of independentconsumerexpertsunderthesponsorshipof
severalindustry associations.Its purposeis to study
practicesand advisethe industry of waysto improve
customerservice,BecauseMACAPisfreeof industry
control and influence, it is abl~ to make impartial
recommendations,consideringeach caseindividually,
YOUarestilidissatisfied,write W thedetails–
Manager,ConsumerRelations
GeneralEiectricCompany
WCE-312
AppliancePark
Louisville,Kentucky40225
MajorApplianceConsumerActionPanel
20NorthWackerDrive
Chicago,illinois60606
@19w &fwai Eiectric Co.,U,S.A,Aii rights reserved
Page 3

BeforeMicrowaving .****..*****. ********..***.*.
Grounding Instructions & Precautions..... ..... ..
SafetyTips . ...... . ..... . . ......
Introduction to Oven ... ...... ...
TouchControl Panel . ...... .....
Setthe Clock . ...... . . .... . . ....
Automatic Cooking
● .,..** ● ***.*
Automatic Roasting&Chart .....
Defrost
● .****** ● ******** ● *O*****
Cook Code’” Control ....... .....
Time Cook ... .... . . .... . . ......
TempCook ..... . . .... . ...... ...
Hold/Timer. .... . ...... ...... ...
The ExhaustFeature .. ...... ....
Careof YourOven .... ...C.....
The ProblemSolver ... ...... ....
Automatic Cooking RecipeGuide
Meats ******9*
Vegetables
Desserts9,******
● *nm*e9**● **9*9*
● O******● *******S ***
● ******** ● *e**
Automatic Cooking Chart..... ...
FactoryServiceCenters .... .....
Warranty
● *.** **4***** 9***9*****
****.*********.*
. *.*********.*.*
. ***....*.******
● ✎✎☛✎✎☛✎✎☛☛☛☛☛☛☛
✎ ✎ ✎ ✎ ✎ ✎ ✎ ✎☛✎☛☛☛☛☛ ●
● ☛☛✎☛☛☛ ● ☛☛✎☛☛☛☛ ●
☛☛☛☛☛☛☛☛ ● ☛☛✌✌☛☛☛
*a******
● ****O** ● ******O
********
****
******9* ● ***,*,,
*9****** *****S**
O
******** *****O**
● ******* ● *******
● ******* 9-009990
● ******* ● *******
● ******* ● ***8***
●
****● ***
● ☛☛☛ Inside Back
● ******* ● **
****
● ***
Back
2
● ☛☛☛
3
.***
4
● ***
.*.. 5
,.0.
6
6
● ***
8,9
;Q, 11
● ** 13
*** 13
.*, 14
**. 15
.,. 16
● O,17
18,19
*** 20
...21
22,23
24,25
26,27
28,29
Cover
Cover
For personalsafety,this appliancemustbe properly
grounded.
a thfee=prcmg(gcxmxling)plugwhich mateswith a standard
Wm2e=prcmg(gf9undin@wali feceplacie:(Seepicture, iefl.)
To mm~mmthe
hazardtramIhls
K@ptacie and rwcuif chmioxi by a quaikl eieclrmmnto
makesufethefeceptacie
Wtww a standardtwo-prongwali receptacleisencountered,
ii isthe personairespcms~blillyandobigationOtthecustomer
to have a
groundedlhfee=prcmgwallrwx?ptacie,
Thepowercordof thisapplianceisequippedwith
pcd s o f eiectricshock
appiiance,ihecmslomershcwidhavethewaii
IS properlygrounded,
cwaMIed eiech’man repimx it with a properiy
Donot,underanycircumstances,cutorremovethethird
(ground)prongfromthepowercord.
,,
3
Page 4

1, For personalsafetythe oven must be properly
—
grounded.See grounding instructionson Page3
this book.
Cooking utensilsmay becomehot because of
2.
heat transferred from the heated food. This is especially true if plastic wrap has been covering the top
and handles of the utensil. Pot holders may be
needed.
Sometimes,the ovenshelfcanbecometoohotto
3.
touch.
after cooking.
4.
plasticbagsshodd beslit, pricked or vented as
Be careful when touching the shelf during and
“Boilable”cooking pouchesand tightly closed
d
rected in Cookbook, If they are not, plastic could
burst during or immediately after cooking, possibly
resulting in injury, Also, plastic storage containers
should be at least partially uncovered ixicause they
form a tight seal. When cooking with containers
tightly covered with plastic wrap, remove covering
carefully and direct steam away from hands and
face.
5. Don’tdefrostfrozenbeveragesin narrow necked
bottles especiallycarbonatedones.
Even if the con-
tainer is opened, pressure can build up. This can
causethe containerto burst,resulting
in injury,
6. Don’t overcook. Excessiveovercookingdehydratespotatoes,and maycausethemto catchfire
causingdamage.
7. If food should ever ignite, keep the oven door
closed. Turn off the power immediately.Touch
CLEAR/OFF or disconnect power cord or shut off
poweratthefuse or circuit breakerpanel,
8, Removethe twnperatureprobe from the oven
whennotusingit
inside the oven without inserting it in food or liquid
tocook with, If you leavetheprobe
andturn on microwaveenergy,itcancreateelectrical
arcing in the oven,anddamageovenwalls or shelf,
9i Ftemove wire twist-tieson paper and plastic
bags before placing in oven. Twist-ties sometimes
causebagto heat,and maycausefire.
10, Boilingeggs(in oroutoftheshell)isnotrecom-
mendedfor microwave cooking, Pressurecan build
up inside egg yolk and cause it to burst, resulting in
injury,
11,Do not pop popcornin your microwaveoven
unless in a special microwavepopcorn accessoryor
unless you
use popcorn in a package labeled for
microwavo ovens, Because of the heat generated,
without theseprecautions,the containercouldcatch
fire,
12. Use metalonlyas directedin cookbook,tvletal
strips as used on meat roastsare helpful in cooking
food when
for
TV dinners, However, when using metal in the
microwave oven,
usedas directed,Metaltraysmaybe used
keep metal at ieast l-inch away
fromsidesofmicrowaveoven.
of
13. Do not use any thermometerin food you are
microwaving
recommended for use in the microwave oven.
Do not store flammablematerialsin an oven.
14.
Also, do not use flammable fluids in the vicinity of
your oven.
unless that thermometer is designed or
15. DO not use yourmicrowaveoven to dry newspapers.If
16,
microwave cooking are very useful, but should be
overheated, they can catch fire.
Piastic Utensils–Plasticutensils designed for
usedcarefully.Evenmicrowaveplasticmaynot be as
tolerant of overcooking conditions as are glass or
ceramic materials and may soften or char if subjectedto short periods of overcooking, In
posures to overcooking, the
food and utensils may
longer ex-
even ignite. For these reasons: 1) Use microwave
plasticsonly and use them in strict compliance with
the utensil manufacturer’s recommendations.2)
subjectempty utensilsto microwaving,3) Do not
not
permit children to use plastic utensils without completesupervision,
17, Don’toperatethe ovenwhileemptyin order to
prolong the life of the oven and save energy,
accident,the ovenshould runemptyaminut~or two,
noharmisdon~,
18,Whencookir~gpark either conventionally or in
the microwave oven, follow our directions exactly
and aiways cook the meat to
at least 170°. This
assuresthat, in the remote possibility that trichina
maybepresentin the meat,it will be killed and meat
will besafeto eat.
TWEHo(x):
1, Haveitinstalkxtandproperlygroundedbya qualified installer,See the speciai installation booklet
packedwith themicrowaveoven,
2. ‘T’heventfan in yourSpacemakerovenwill operate automaticallyunder certain conditions (see
AutomaticFanFeature,
eratingcaution is requiredto preventthe starting
andspreadingof accidentalcookingfireswhiiethe
ventfanisinuse.Forthisreason:
A, Never leave surfaceunitsunattendedat high
heatsettings.Boilovercausessmokingand greasy
spilloversthat may ignite and spread if vent fan is
operating. To minimize automatic fan operation,
useadequatesizedutensilsand usehigh heatsettingsonlywhennecxwsary,
B, in the event of a greasefire,smother flaming
pan on surface unit by covering pan completely
withwell-fittinglid,cookiesheetor flat tray.
C, Neverflamefoodsundertheovenwiththe vent
fanoperatingbecauseit mayspreadtheflames,
D. Keephood andgreasefiltersclean,according
to instructions on pages 17 and 19, to maintain
goodventingandavoidgreasefires.
4
page 7). Whilethefanisop-
Do
If, by
+
Page 5
@f
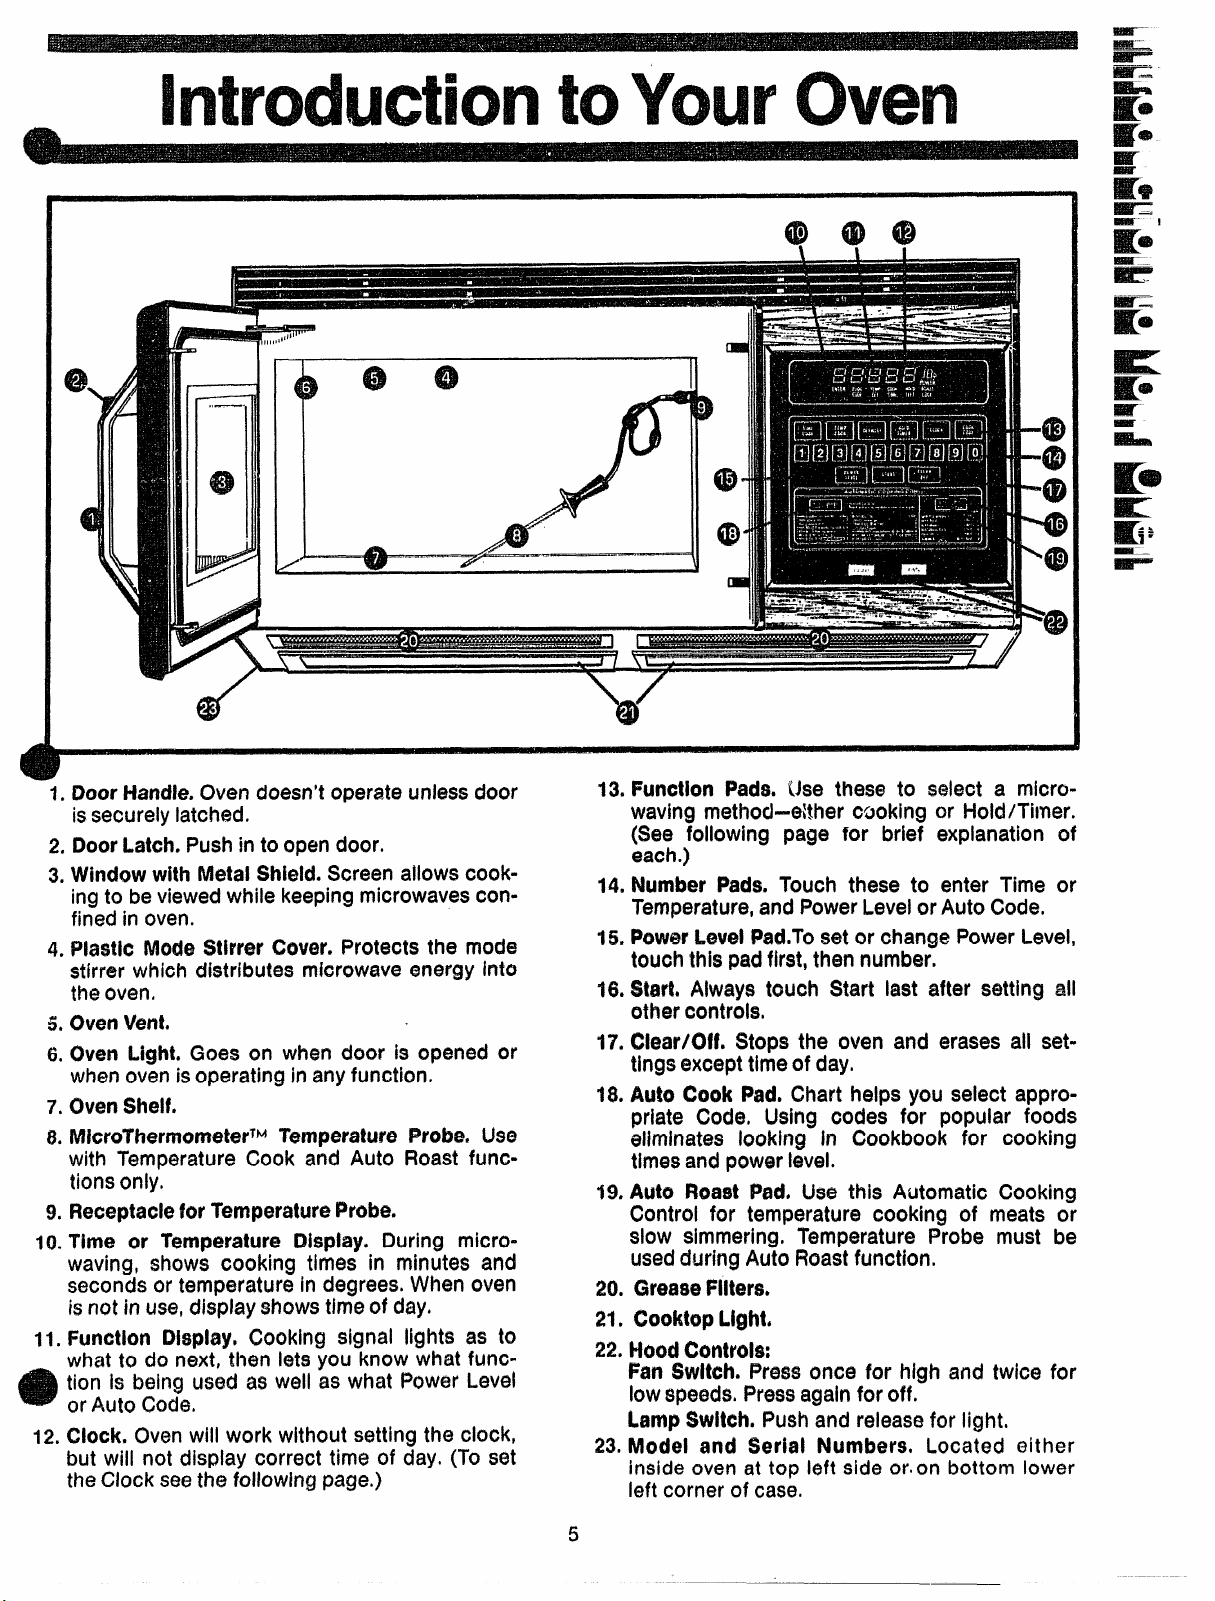
DoorHandle,Ovendoesn’toperateunlessdoor
1,
is securelylatched.
DoorLatch.Pushinto opendoor.
2,
WindowwithMetalShield.Screenailowscook-
3.
ingto beviewedwhile keepingmicrowavesconfinedinoven.
PlasticMock StirrerCover.Protects the mode
4.
stirrer which distributes microwave energy into
the
OVCN?,
(Mm Vent.
5.
Oven Light.Goes on when door is opened or
&
whenovenis operating inanyfunction.
OvenShelf.
7*
iWcro7herrnometer~MTemperaturePrdx. Use
8.
with Temperature Cook and Auto Roast functionsonly.
?leceptacleforTemperatureProbe.
9$
Time or TemperatureIDisplay.During micro-
10.
waving, shows cooking times in minutes and
seconds or temperature@in degrees.Whenoven
is not In use, di$piay shows time of day.
Function Display,Cooking signal lights as to
11.
what to do next, then lets you know what function is being used as weil SSwhat Power Level
orAuto Code.
Hock. Ovenwiil work without setting the clock,
12.
but wiii not dispiay correct time of
day. (To set
theClock seethe foilowing page.)
FunctionPads. tJse these to select a micro-
13,
waving method-either cooking or iiold/Timer.
(See foiiowing page for brief explanation of
each.)
Number Pads. Touch these to enter Time or
14.
Temperature,and PowerLeveiorAuto Code.
PowerLevelFW.TOset or change PowerLevei,
15,
touchthis padfirst,then number.
Wart.Always touch Start iast after setting ali
t6.
othercontrols.
Clear/Off. Stops the oven and erases all set-
17.
tingsexcepttimeof day.
Auto Cook Pad. Chart helps you seiect appro-
18.
priate Code, Using codes for popuiar foods
Wninates Iooklng In Cookbook for cooking
timesand powerievei.
Auto Roast Pad. Use this Automatic Cooking
19.
Controi for temperature cooking of meats or
siow simmering. Temperature Probe must be
usedduring AutoRoastfunction.
GreaseFilters.
20,
21,
CX)oktopLight.
HoodControls:
22*
Fan Switch.Pressonce for high and twice for
lowspcmeis,Pressagainfor off.
LampSwitch.Pushand reieasefor iight,
23.
Model and Serial Numbers, Located either
inside oven at top ieft side or.on bottom lower
left corner of case.
5
Page 6
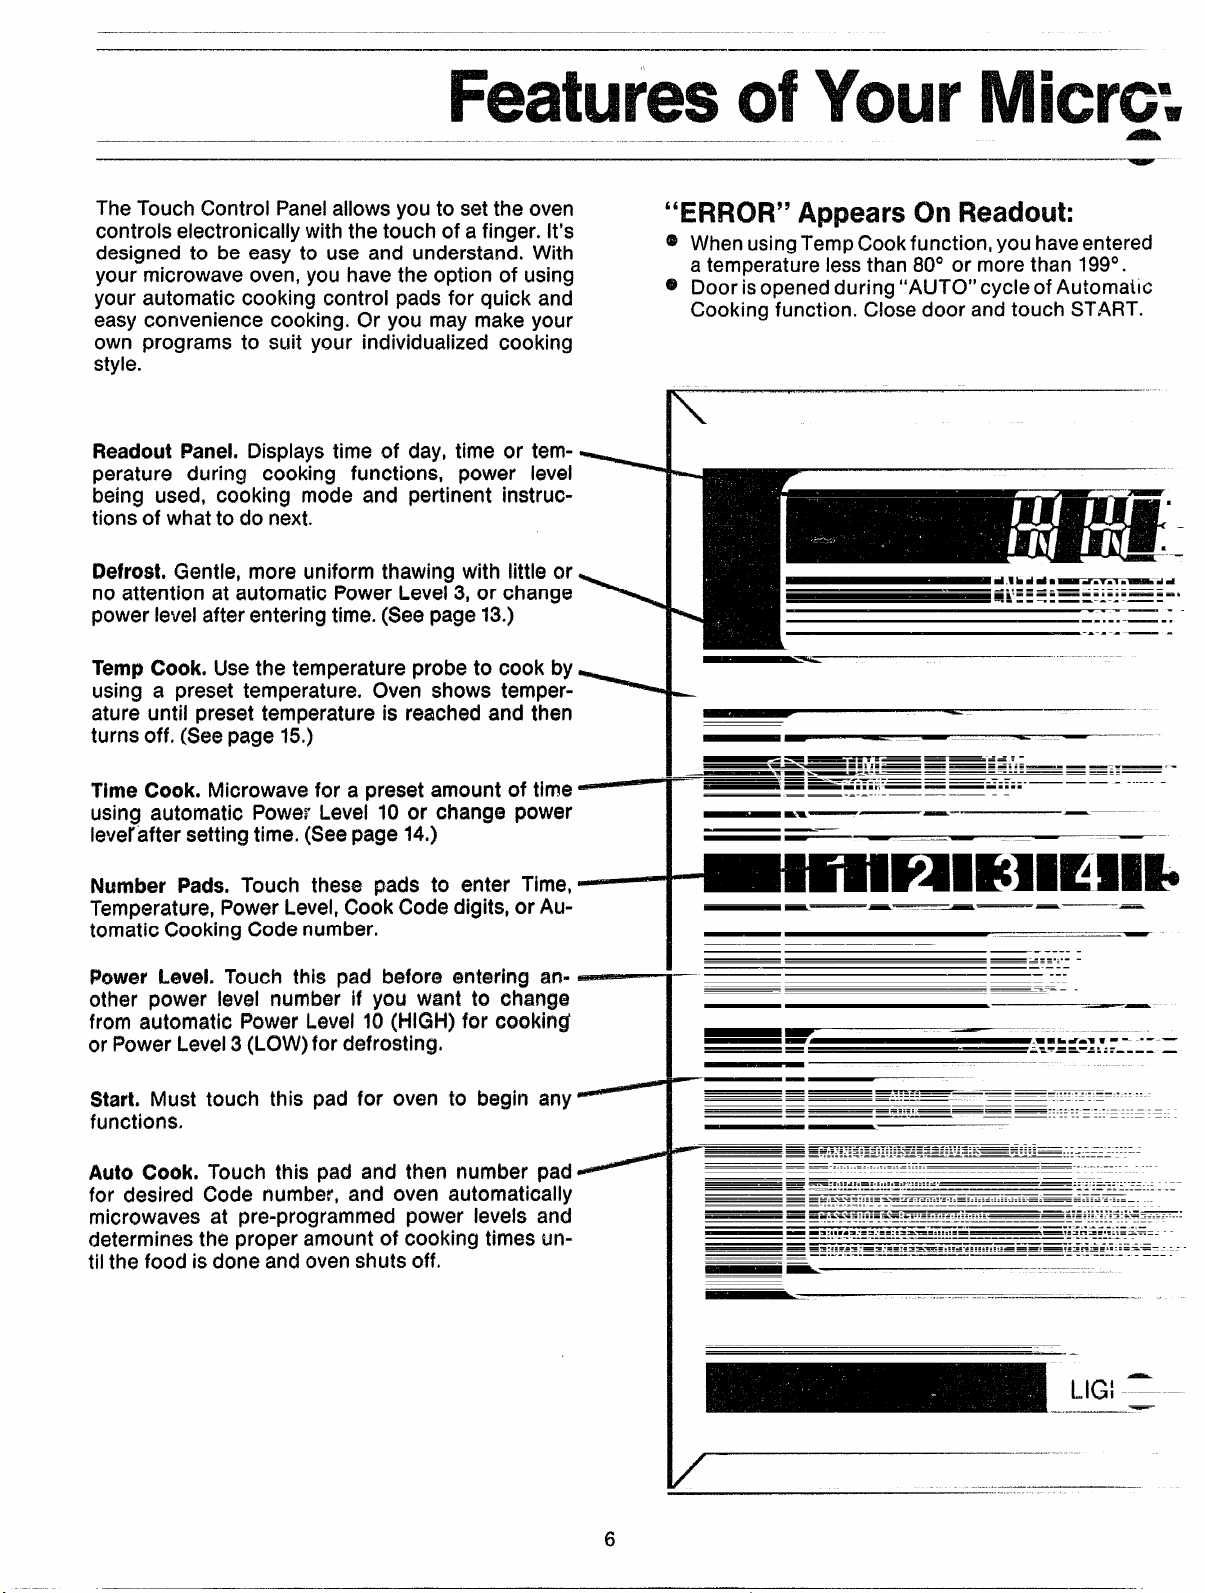
TheTouchControl Panelallowsyou to setthe oven
controls electronicallywiththetouch of a finger. It’s
designed to be easy to use and understand. With
your microwaveoven,you havethe option of using
your automatic cooking control pads for quick and
easyconvenience cooking. Or you may makeyour
own programs to suit your individualized cooking
style.
ReadoutPanel.Displaystime of day, time or temperature during cooking functions, power level
being used, cooking mode and pertinent instructions of whatto do next.
K)efrost.Gentle, more uniform thawing with little or
no attention at automatic Power Level3,or change
power levelafterenteringtime.(Seepage13.)
TempCook. Usethe temperatureprobe to cook by
using a preset temperature. Oven shows temperature until preset temperatureis reachedand then
turns off. (Seepage 15.)
TimeCook. Microwavefor a preset amount of time
using automatic Powe?Level 10 or change power
levet’aftersettingtime.(Seepage 14.)
“lEFlF10Fl$5 Appears CM FM3adout:
@WhenusingTempCookfunction,youhaveentered
atemperaturelessthan 80° or morethan 199°.
@Doorisopenedduring “AUTO” cycleofAutomailc
Cooking function. Closedoor and touch START.
\
-.. ..-— ..
-----. — -
——-.-—
..= —.. ..-- ——=-=:-
——
— -
——— ---..————.
——-—— ....,-
. -.——=!=!= --
.——
,. — —.—.—.-——— .
— ——- ----..-——
—mm— —
— —-=; ;=—. ———.— --
.--.— — —-.—
—-. -=--.—
. . . . . .
— - . - -
---
—
Number Pads. Touch these pads to enter Time,
Temperature,PowerLevel,Cook Codedigits,or Automatic Cooking Codenumber.
PowerLevel. Touch this pad before entering an=
other power level number if you want to change
from automatic Power Level10&ilGH) for cookin$
or PowerLevel3(LOW)for defrosting,
Start. Must touch this pad for oven to begin any
functions.
Auto Cook. Touch this pad and then number pad
for desired Code number, and oven automatically
microwaves at pre-programmed power levels and
determinesthe proper amount of cooking times until the food isdoneandovenshuts off.
—— — ——
—
-— - ———
——
-—
— = -.,,....,..:..:,. =-.,,,:,,=
-
- —.---.——— ——....... .-—.....
— —-——
- --...——— -......—. ..—
— ————
——--. ...-
—-- . ....===.;=::::=—-—:;====;:::—--:-———-
——--------——-_-—-—— ——
—
——.---...—....—--—.
———.-——......———.. ......... ...... ........ .
————
——.--...-—..-.—-—.—-----...
—--,
— . - --- - —--.. — — —
——-...-.--.—.—.—-—
—
———...--—.——.--.-———-.-.. ....
——-------—--- -.—.--...--........:==——#-,.—.=-=.,.-.
. — — . ——- - — — . — . . — - .
~ —-.-— . - . - .
—-----——----
— ----—.- -.
s-..—a. . ... . ... . . .. . . . .. . . . —
--—
———— —
—
— -.--.,.-.
—— ---
—---
——
—
—
_--..- .---—.... ..
.——
—...—_...-
—........ ...... .
- . .
.—.....+-----.-
—...--.,..,=——=—
—.-—-.—-
——-.——.. ... ---—- —
-.- -----.
. - . . .. . . . .
. . . . . .
...——..—-
-
e — - -
.. . .- —-.-..-—.-———.. .
—
~-
——... .
——
6
Page 7
—.—— .—— .——
--————
—
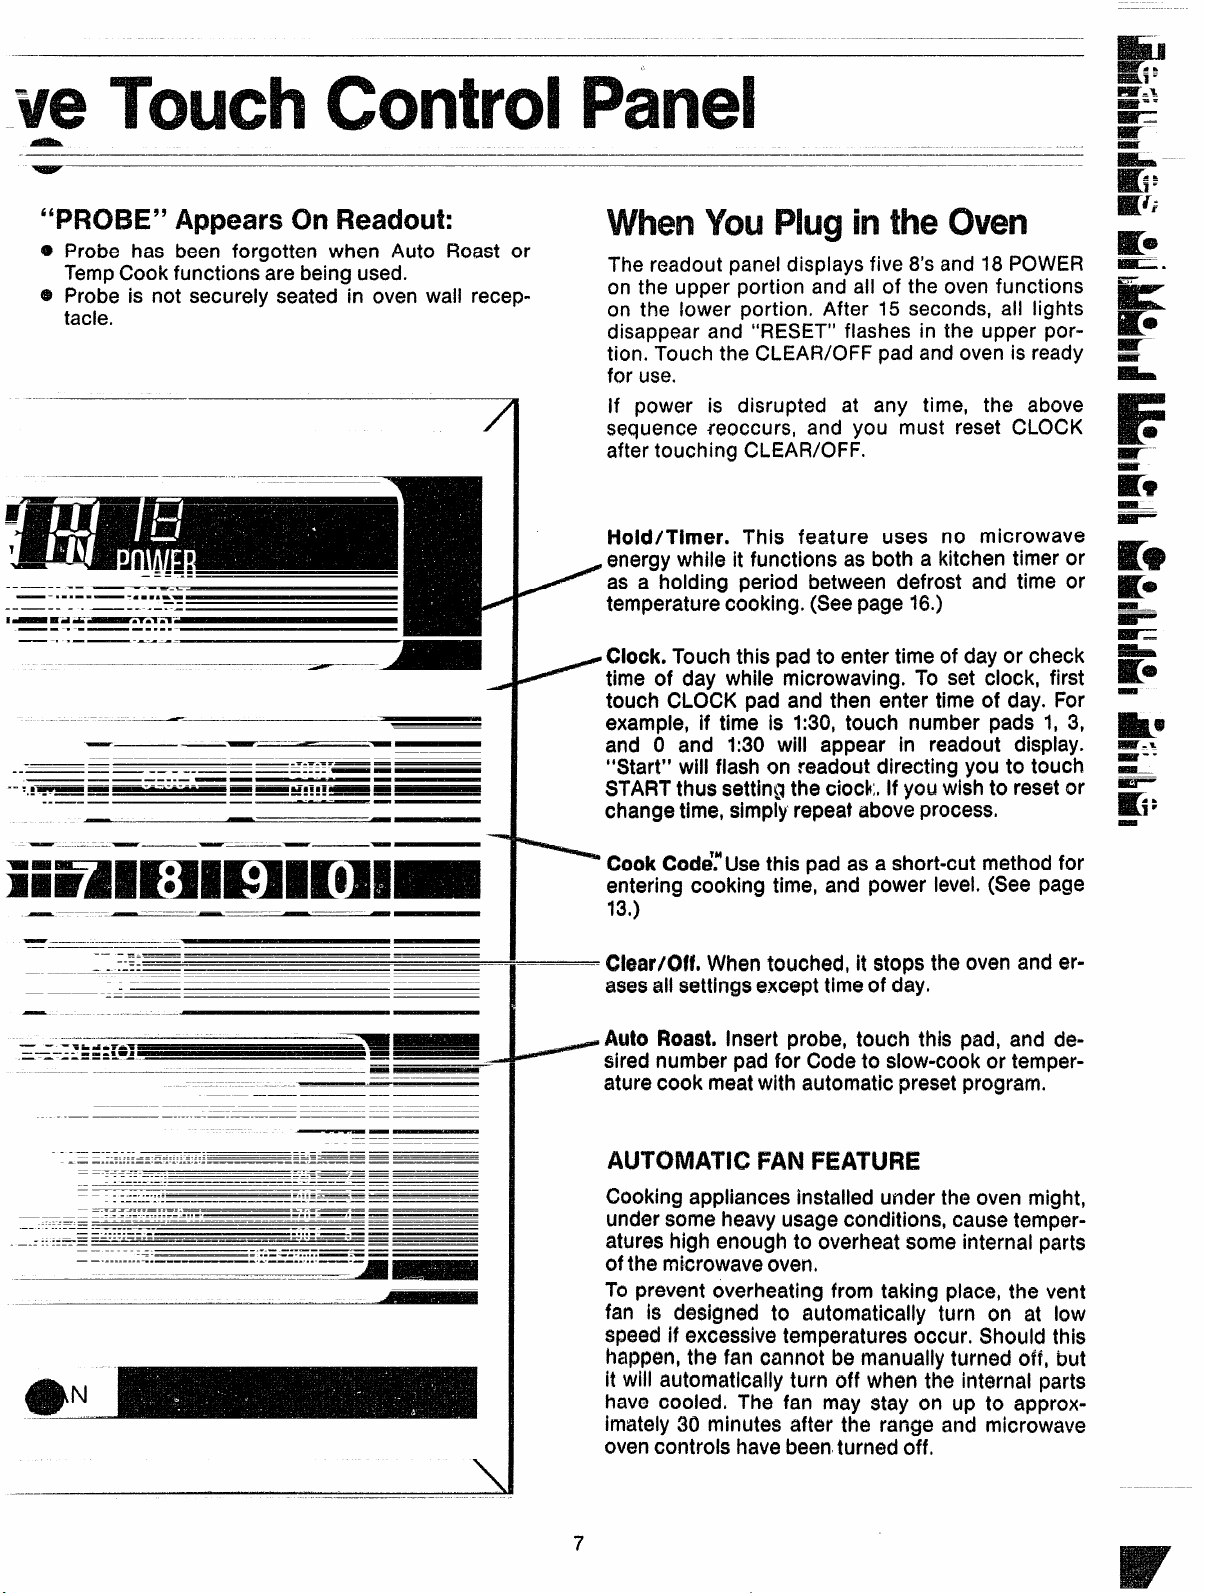
‘TTKN3E”AppearsonIt%eaciout:
@ PIW@ has been forgotten when AU~ORoast or
TempCook functions are being used.
@
Probe is not securely seated in oven wall receptacie.
-.
——
—.
——.... ..
.. —-- - . —.. .-
-...lm—.
x--
——..=—-.-—.—=———
- -—
—
.. —— -—- .. ——— —....
—
———-. .——— -—
..—-— —
——..— ——
-..—
~—”
——-— —- —
- - .-——
— —
/+
YOLR intheC)veriI
—
The readout panel displays five8’sand 18 POWER
on the upper portion and all of the oven functions
on the iower portion+ After 15 seconds, all lights
disappear and “RESET” flashes in the upper portion. Touch the CLEAFUOFFpad andovenis ready
for use.
If power is disrupted at any time, the above
sequence reoccurs, and you must reset
after touching CLEAR/OFF.
CLOCK
iiold/Timer. This feature uses no microwave
energy while Hfunctions as both a kitchen timer or
as a holding period between defrost and time or
temperature cooking. (See page 16.)
Clock.Touch this pad to enter time of day or check
time of day while microwaving. To set clock, first
touch CLOCKpad and then enter time of day. For
example, if time is 1:30,touch number pads 1, 3,
and O and 1:30 will appear in readout display.
“Start” will flash cmreadout directing you to touch
STARTthus settingtheciock:,Ifyou wishto resetor
changetime,simplyrepeataboveprocessi
~-
K
@
— ——.—....—-.-————.
— - -.. ..-- –qlmmmmmm
———--
.—- -----
—-....-——.--—.-.—
-...-————
———
.—- ~_-——————
_.=-—
—. .---—
———
.—-.......-——
-------
-m.=
——
—
— .——L—— m -
—
. — — ---.-.—.- — —
— —..-....-—-.—. . ......
.- .— ——
.-.-—.-..
-—-—---——————————-——————
-- ..--—..—. ——
.- -.-==-=. —.——=.-.:
——.-.-.——
———....—---
——
———-.—————
—
————
------..—-———
. ..--. -.....— .—
—
—
——- ——
— ——
_...- ——
—
-—— ——
..... —.——
—..- .——
—.——
= CookCodd; Usethis pad as a short-cut method for
entering cooking time, and power level.(Seepage
13,)
–—-- (2hw/OfL Whentouched, it stops the oven and er-
asesallsettingsexcepttimeof day.
~ Auto Roast.Insert probe, touch this pad, and de-
sired number pad for Codeto slow-cookor temperaturecook meatwith automaticpreset program.
FANFEATURE
Cookingappliancesinstalledunder the oven might,
undersomeheavyusageconditions, causetemperatureshigh enoughto overheatsomeinternalparts
ofthe microwaveoven.
To preventoverheating from taking place, the vent
fan is designed to automatically turn on at low
speedif excessivetemperaturesoccur, Should this
happen,the fan cannot be manuallyturned of?,but
it will automaticallyturn off when the internal parts
have cooled, The fan may stay on up to approximately30 minutes after the range and microwave
ovencontrols havebeenturnedoff,
\
7
Page 8
The Auto Cook pad maybe used to eliminate your the sensor detects steam from the foods. Other
need to look up cooking time in the Cookbook,or
guessing how long to set cooking time.
sensing the steam which escapes as food microwaves, this feature automatically adjusts the oven’s
cooking time to various types and amounts of
Because
cooking containers must be covered, this
By actually
food.
feature is best with foods which you wish to steam
or to retain moisture. Foodswhich are best micro-
waveduncoveredor only lightly coveredshould be
cooked usingtimeor temperaturesettings,or Cook
Code’” control.
After touching the Auto Cook pad, and pressing
Start, you will see the word AUTO on the readout,
which indicates that the sensorhas been activated
to sense steam from the food. To prevent the escape of steamfrom the oven, do not open the door
while the word AUTO is on the readout. If door is
opened, ERRORappears, Close door and touch
STARTimmediately.
Setting 1,which is designed for easy reheating of
foods, automaticallyturns the oven off as soon as
Auto Cook control settings, which are
frozen foods, need additional time after steam has
been sensed,
the amount of additional time needed, then auto-
Forthesefoods, the oven determines
matical!yswitches the oven to Time Cook for the
necessary cooking time remaining. Oven
whenit switchesto Time Cook (AUTOon readout is
replaced
by numbers indicating cooking time),and
oven door can be opened for stirring or rotating
food,
Be careful of steam when removing tight covers,
When you remove cover, direct the steam away
fromhandsandface.
Be sure the exterior of the cooking container and
interiorof microwaveoven aredry.
Always cover food containers using lids or plastic
wrap. Plastic wrap should be loose over food to
allow for expansion. Seal by pressing plastic wrap
firmly around edges,For best results,neverstretch
plastic wrap tightly over food, or use tight-sealing
plastic lids,
for fresh or
beeps
Alwaysstir or rotateafter beepingsignal.
MATCHTHEAMOUNTOFFOODTOTHEESEE OFTHECONTAINER, FILLCONTAINERSATLEAST%FULL.
SESURETHEEXTERIOROf=THECOOKINGCONTAINERAND\l’4?’Ef?iOROFMICROWAVEOVENARE!INN(.
ALWAYSCOVERFOODCONTAINERSFORAUTOCOOKAN@t3STIRORROTATEAFTER13EEPI!W3SK3NAL. ~
. .—--
..
-.
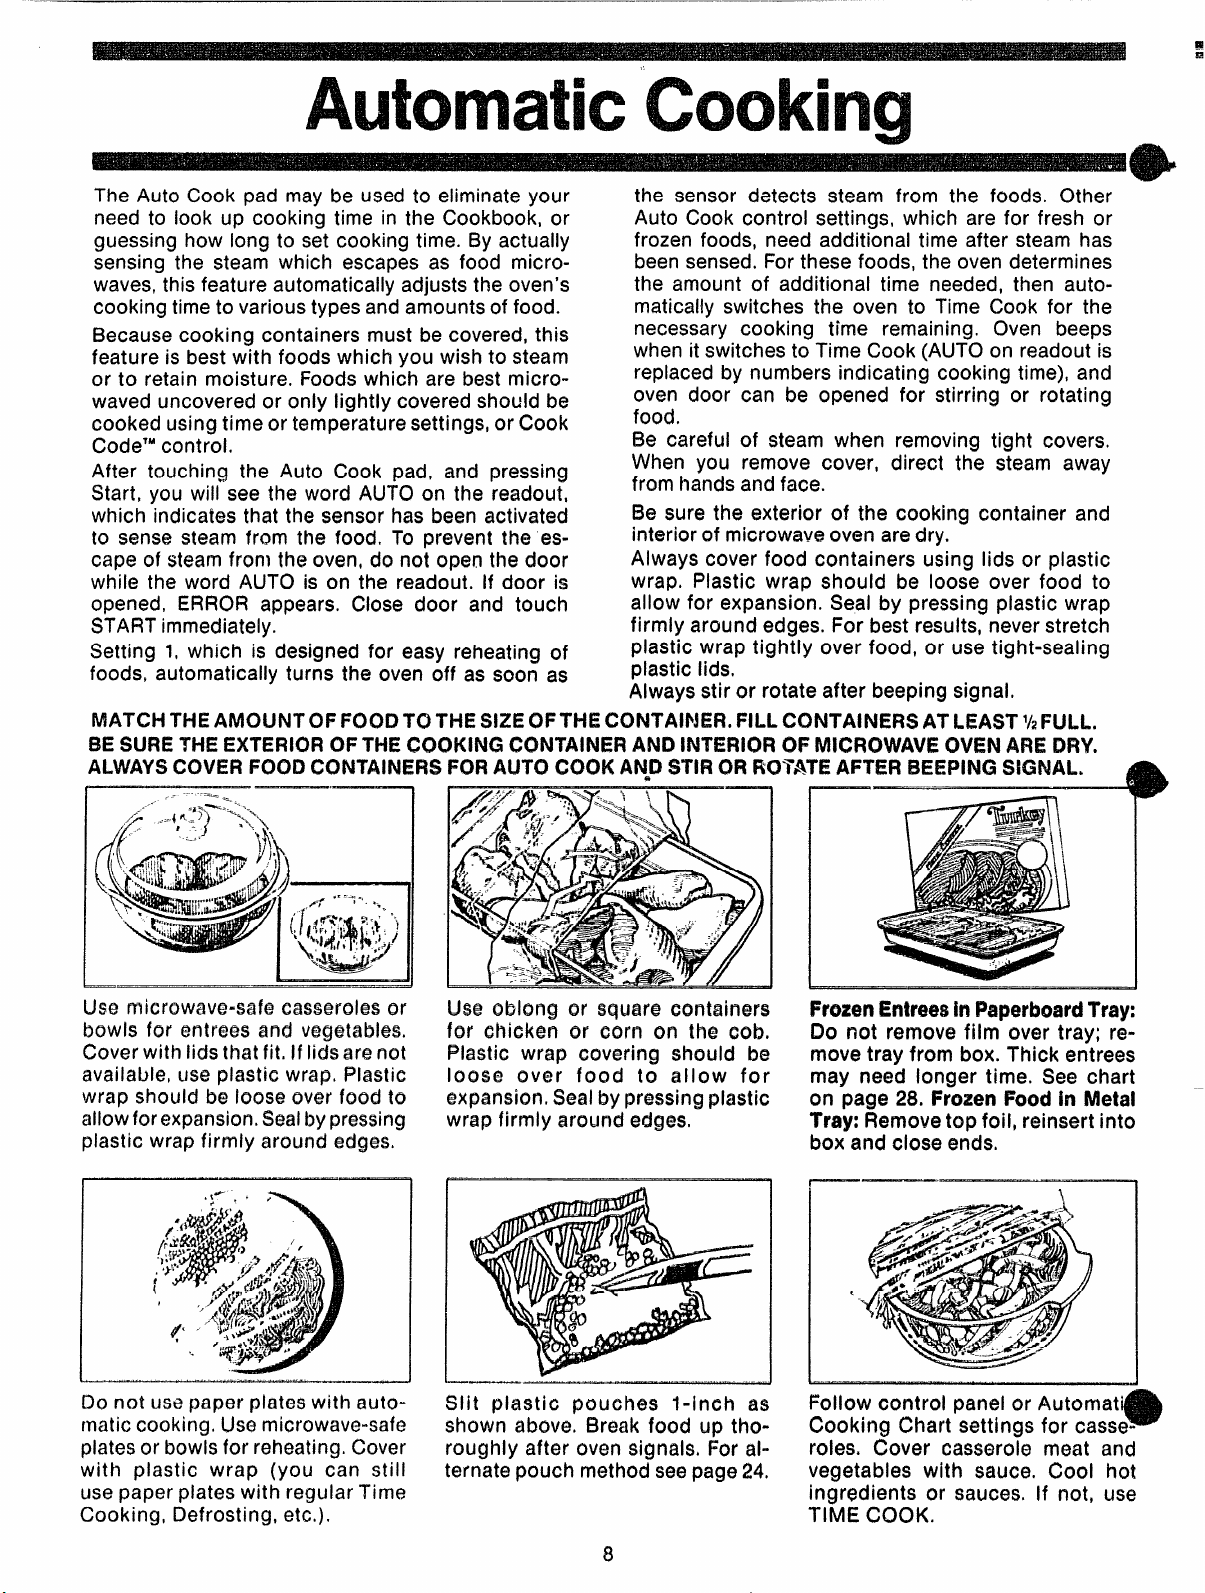
IJsQmicrowave-safecasserolesor
bowls for entrees and vegetables,
Coverwith lidsthatfit, Iflidsarenot
available, useplastic wrap, Plastic
wrap should be loose over food to
allowforexpansion.Seal
bypressing
plastic wrap firmly around edges.
Do not usepaper plateswith automaticcooking,Usemicrowave-safe
platesor bowlsfor reheating.Cover
with plastic wrap (you can still
usepaperplateswith regular Time
Cooking, Defrosting, etc.).
Use oblong or square containers
for chicken or corn on the cob.
Plastic wrap covering should be
loose over food to allow for
expansion.Sealbypressingplastic
wrap firmly around edges.
.—
Slit plastic pouches l-inch as
shown above. E3rcmkfood up thoroughly after oven signals, Foralternatepouch methodseepage24.
8
FrozenEntreeshaPaperboardTray:
Do not remove film over tray; removetray from box.Thick entrees
may need longer time. See chart
on page 28. FrozenFoodin Metal
Tray: Removetop foil, reinsert into
box_andcloseerids,
Follow control panel or Automat
Cooking Chart settings for casseroles, Cover casserole meat and
vegetables with sauce. Cool hot
ingredients or sauces, If not, use
TIME COOK.
4
Page 9
of t+3Wto fihe
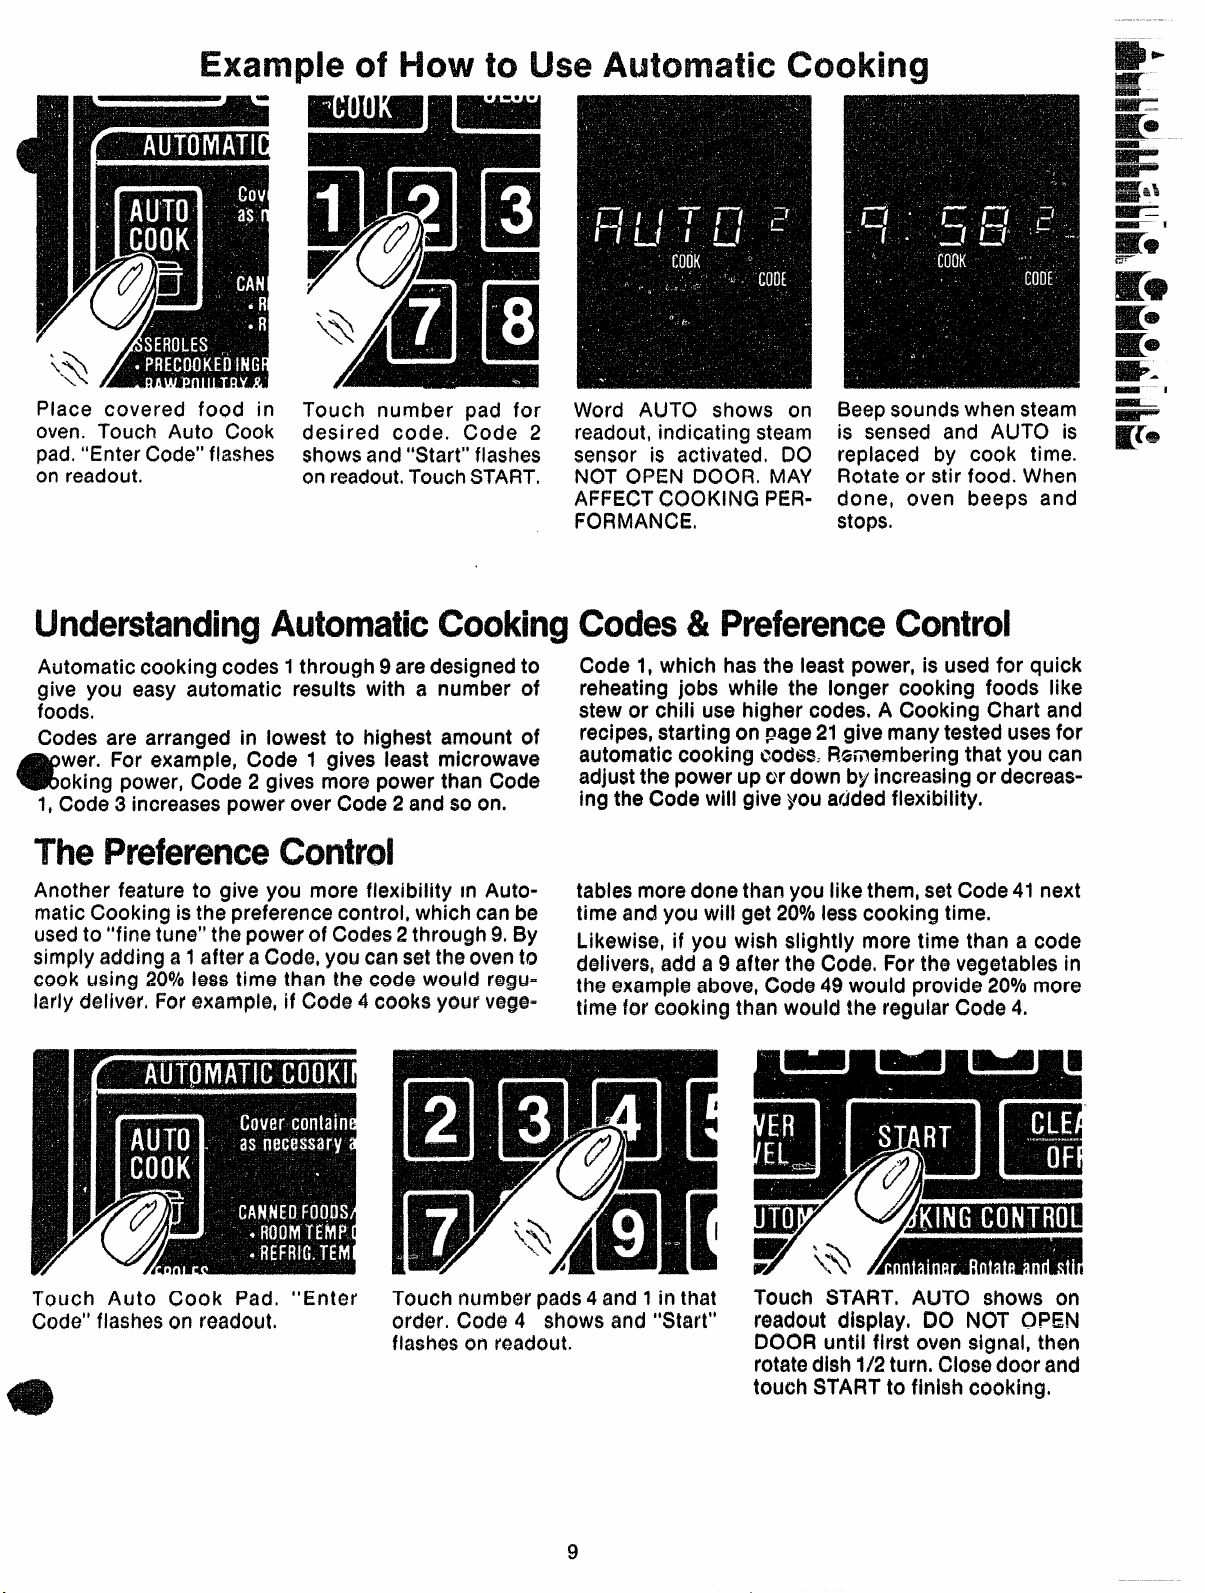
Place covered food in
oven. Touch Auto Cook
pad.“Enter Code”flashes
on readout.
Automatic cooking codes 1through 9aredesignedto
give you easy automatic results with a number of
foods,
Codes are arranged in lowest to highest amount of
wer. For example, Code 1 gives least microwave
eking power, Code 2 gives more power than Code
1,Code 3 increasespower over Code 2 and so on.
The
Another feature to give you more flexibility m Auto-
maticCooking isthe preferencecontrol, which can be
usedto “fine tune” the powerof Codes2through 9. By
simply adding a1afler aCode,you cansettheovento
cook using 20%less time than the code wouid regu=
Iarly delivcw,Forexample,if Code4cooks your vege=
Word AUTO shows cm
readout,indicating steam
sensor is activated, 00
NOT OPEN DOOR. MAY
AFFECTCOOKINGPER-
FORMANCE,
Beepsoundswhen steam
is sensed and AUTO is
replaced by cook time.
Rotateor stir food. When
done, oven beeps and
stop%
Codes& PreferenceControl
Code 1,which has the least power, is usedfor quick
reheating jobs while the longer cooking foods like
stew or chili use higher codes.A Cooking Chart and
recipes,starting on page21givemanytested usesfor
automatic cooking cochim-I%membering that you can
adjustthe powerupordown by increasingor decreasing the Code will give you atided flexibility.
tablesmoredonethanyou like them,setCode41next
time andyou will get 209’olesscooking time.
Likewise, if you wish slightly more time than a code
delivers,adda9 after the Code. For the vegetablesin
the exampleabove,(lode 49 would provide 20Y0more
time for cooking than would the regular Code 4,
Touch Auto Cook Pad, “Enter
Code” flasheson readout,
Touch number pads4 and 1in that
order. Code 4 shows and “Start”
flasheson readout.
Touch START, ALJTO shows on
readoutdisplay. DO NOT OPEN
D(X3R until first oven sigjnal,then
rotatedish 1/2turn, Closedoor and
touch STARTto finish cooking,
Page 10

Auto Roastusesthe temperatureprobeto cook to
thedesiredservingtemperature.UnlikeTempCook,
which uses a single power level, Auto Roast uses
up to 3 power settings which automatically switch
during roasting,thus providingeventendercooking
result; withou~overc60king. -
PreparingRoastsforAuto
Justas in conventionalroasting,only tender roasts
shouldbeAuto Roasteduntilspecifiedinternaltemperatures are reached. Less tender roasts should
bemicrowavedbytime,accordingto the Cookbook
which comes with your oven. Completeinformation
on preparing roasts
Cookbook.
for microwaving is in your
1
Place tender beef roasts on trivet
in microwave safe dish. Insert
probe from front horizontally into
center meaty area not touching
boneor fat.Coverwithwaxpaper.
Poultry, pork or ham roasts need
no trivet. Add %cup waterto roast
dish, cover with plastic wrap. (For
cooking bag method, see cookbook.) Insert probe into center
meatyarea.
II-lowto Beefto
Touch AUTO ROAST Pad.Readoutflashes ‘Enter
RoastCode”.Touch numberpad2.“START”flashes.
Touch START.ReadoutshowsAUTO.
Placemeatwith probe in oven. In-
sert cable end of probe firmly into
receptacleonovetiwall.
At 80e, readout switches to show meat’s internal
temperature. Turn roast over and restart oven by
touching START.
OvemrnordtorsInternal temperature, automatically
switching to lower power as meat’s temperature HOLDfor 1 hr,, then shuts off, Hold prevents over
rises.This preventstoughening or overcooking,
After temperature is reached, oven switches to
cookingwhile keepingmeatwarm.
10
Page 11

AutoRoastChart
@Usecontainers and coveringsasdirected at left. Place probe correctly in roastbeforecooking.
Turnoverwhen80° (exceptpork) hasbeenreached,
Beef
Tender Roast
Rare
Medium 3
Well
Meatloaf
(loaf or round)
...”....-—,
2
4 80° 170”
4
.——.
Pork
Loin Roast
Precooked l-lam
..---..... . --------— .—
4 120°
1 80”
-.—-- . .
Poultry
Whole Chicken 5
(31b.)
(Insert probe into meatiest area of inner thigh
Turkey Breast
(!nsert probe horizontally into meatiest
... —=----
‘Recommended standing time before serving.
———. .. —.,...
4
area.)
—.-. ..
80° 1
80°
No Turn 170”
Over
--
—
80’
from below endand parallelto leg.) “
80”
25° 12“14
140” 14-16 10”15
17-18
30-40
170” 18-20 20
115“
190° 13-15 20
1
70° 13-15
17”19 5-1o
—-
5-1o
30
5-1o
20
Your Cookbook has a chapter on Automatic Simmering,including charts and recipes. Referto this
chapterfor additional techniquesand cookingtime,
Set Auto Simmer like Auto Roast,
example left. Readout shows
AUTO until food is 80°, then
switches to show food temperatureuntil 180~s
Oven switches to HOLD at 1$0°
until you removefood and turn off
oven. If stirring is recommended,
you can reset oven by retouching
START.Touch CLEAR/OFF after
cooking.
( R C 6
Totaltime includes time to bring food to 180° and
holdatthat temperatureuntildone.
Beef
Pot Roast’
Stew
chili
Chicken*
Stewing
Broiler/Fryer
soup
Stock/Vegetable
SDlitPea
‘Forfrozen,add
2to3hours,
6-8
6“8
11-13
11”12
4-6
4-6
3-$
13-15
11
Page 12

Q.Whydoesmyovenautomatically cutoffafterthe
———
AUTOcyclewhenusingAutoCook ControlCode1
whenitdoesnotforother settings?
A.
When using Code 1, there is no second phaseof
minutes counting down.
All the cooking is com-
pletedin the first phaseor AUTO.
Q. If myfoodis not completelycookedafterusing
the suggested Auto Cook Control Code, what
shouldIdo?
A. Thick starchy or dense foods may require some
additional time cooking. Use TIME COOK and
PowerLevel10for afewminutesuntilcompletion.
*
Q. Da all fresh or frozen vegetables require a
standingperiodaftercookingwithAUTOCOOK?
A. Mostvegetablesare cooked to a crisp statedur-
ing Auto Cook, just as in regular microwaving.
Therefore,it is recommendedthat you let the vegetables stand for up to 5 minutes depending on size
and density of pieces. This standing time also enhances the overall flavor and appearance of most
vegetables.
Q. What if I don’t fully cover the dish in Auto
Cook?
A. Oven sensessteam too
quickly which shortens
the cooking time thus leaving undercooked dish,
Recovertightly andresetAuto Cook.
Q. Do the shapesand sizesof food makea diHer-
encewhenusingAuto(XX)k?
A.Yes,in somecases,larger pieces will require ad-
ditional Time Cooking. Be
sure to check suggested
arrangementof pieces in the dish, since proper arrangementis often asuccessfultip in regular mlcro-
wavingc
~.
~t’iOU!d I UW3 Auto Cook to cook Pudd6n9or
sauces?
A, Most pudding and sauce recipes require stirring
manytimes during cooking; therefore, TimeCook is
recommendedsince you should not open the door
during the AUTO phase of cooking without affectingend cooking results.
Q. My scalloped potatoes were not completely
cookedwhen ! removedthe dish after AutoCook.
Whatiswrong?
A. If you prepared the sauce in the oven prior to
combining the sauce with potatoes, there may have
been too much remaining moisture in the oven.
Makesure you dry the ovon completely before us=
ing Auto Cook since this function operates properly
by sensing steam in the oven, Also, starting Auto
Cook with hot foods creates steam in the oven too
soon,anddwm?asesthefirstsensing cycle.
G?.Are there any other foods whichare best Time
Cooked,rathtwthanAutoCooked?
A. t3akery foods, candies, melted chocolate or
foods when a dry or
crisp surface is desirable, are
cookedbest byTimeCook.
Q. Do fresh or frozen vegetablesrequire water
whenusingAutoCook?
A. Yes.Add water as recommendedon chart to the
vegetables and cover well for even, complete
cooking.
Q. Wouldmyplasticcontainers withverytight fit-
tinglidsbeappropriateforAutomatic Cooking?
A. No,
most types of plastic storagedishes,butter
tubs,etc.withtight fitting lids arenotrecommended
for microwaving. Also tight fitting plastic lids may
prevent adequate steam from escaping and food
maynot cook properly during Automatic Cooking.
Q. I triedto warmsomechowmeinnoodlesusing
Auto Cook. Whydidn’tthiswork?
A. Foodmusthavesomemoisture in ordertocreate
steam which helps the auto sensor function.
Extremely dry foods such as chow mein noodles,
potato chips and other such foods do not have
enough moisture.
Q. MayI useAutoCookwhenI am cookingmany
foodsin morethanonedishorcasserole?
A. No,bqcauseofdifferent fooddensities, attention
neededduring sooking, andfood amounts,itk best
to useTIME CO(X
w!wm cooking many foods.
Q.Whywasmyroastnotfullycookedeventhough
the temperatureGti the readoutwas correct and
AutoRoastcompleted?
A. When cooking with Auto Roast,the temperature
probe must be inserted properly as fully described
in the Cookbook, After turning meat over or rotating, the probe should be checked to makesure it
hasn’tslippedorchangedposition,
Q. Last
tkm IusedAutoRoastI removedthe roast
fromtheovento turnNover.WhenI replacedroast
In oven and reconnectedthemeat probe, AUTO
reappeared.Why’?
A. The oven and roast may have cooled to below
80”, or probe may have been repositioned. Con-
tinue roasting and numberswill soon reappear.
Ct.Arethereany particulartrivetsthat work better
thanothers?
A. Yes,flat glass trivets such as lids or dish covers
give more even cooking results than plastic trivets.
Also, ceramic ridge-bottomed roasting dishes work
well. Plastic trivets require meat to be turned over
more frequently becausethe grid design and iegs
allow the bottom of the meat to stay cooler as it
cooks,than glasstrivets do.
Ct.Whycioe$n?the roastcontinuecookingduring
thestandingorholdingthne?
A. The oven automatically reachesfinished temper-
ature and then decreasesto a lower power level to
prevent overcooking, Thus an even temperature is
maintained,
12
Page 13

&
l-lowk) u
CookCOCWMControl
Cook CodeTMis a short-cut control for entering time
and the Power Level on your microwave oven. Be
sure to check your Cookbook for specific codes
specific recipes.
To understandthe Cook Code control, it is impor-
tant to know what the numbers meanand what the
sequence is. The first and second numbers, if setting a 3 digit Cook Code, indicate the amount of
fimeyou desire;the last control entry number is al-
ways the Power Level, For example, 125means 12
minutes at Power
only be programmedto 99 minutes when using the
Howt
The Defrost setting is designed for
even thawing necessary for large
amounts
most important advantages of a
-microwave oven, making defrost~quick andeasywith little atten-
=ont PowerLevel3 is automatically
set
change this for more flexibility, See
your Cookbook for the
defrostingchart,
To become better acquainted with
your Defrost function, defrost frozen pork chops by following the
stepsbelow.
Step 1: Place package of frozen
chopsin theovenandclosedoor,
of food and is one of the
for defrosting, but you may
Level 5. NoTIE: Your oven can
Step 2: Touch DEFROST.Display
reads :0 and Power 3. “Enter 13ef
Time” flashes.
Step3:Touch8,0, and Ofor 8 minutes. ‘*DefTime”, 8:00 and Power
3aredisplayed.
Step 4: Touch START.“Def Time
Left” shows and time counts down
on display. When cycle is completed,
complete
signals and automatically shuts
off .
Step 5: Turn package over, close
door and repeatSteps2,3 and4.
Step& Whenovensignals,“END”
flashes and oven shuts off. Re=
movepackageand separatechops
tofinishdefrosting,
Cook Code control and the highest Power Level is
10 which is represented by “0”. When setting a 2
digit Cook Code control entry, the first is time, the
secondis powerlevel.
Step 1: Touch COOK CODE. “Enter Cook Code”
for
“END” flashes, the oven
flasheson readout.
Step2: Enterthe proper code into Cook Codecon-
trol. For example, a recipe calling for 12 minutes
cooking time atPowerLevel10would be120.Code
numberappearsand“START” flashes immediately
after entering a 3-digit code, but when a 2-digit
code is used, there is a delay before “START”
flashes,
Step 3:
counting down and Power 10” show on display.
Touch START, “Cook Time Left, time
Deft’oSting Tips
@Foodsfrozen in paperor plastic
can be defrosted in the package.
e Forevendefrosting,manyfoods
needto beturned over,rotated,or
broksn up part of the way through
thodefrostingtime.
@Homemadedinners can be frozeninshallowfoiltraysaridheated
later use. Select foods which
for
microwavewell,
e Pre-packaged frozen dinners
can be defrosted and microwave
cooked.
~ Check
defrostingtips.
your Cookbook for othe’r
a
Q.When I press START, I hear a
dutlthumpingnoise Whatisit?
A.This sound is normal.Itisletting
you know the oven is using a
PowerLevellowerthan HIGH.
Ct.Can I Defrost small items in a
hurry?
A.Ye%but they will ne~dmoro
quent attention
e Power Levelafter entering the
me by touching POWERLEVEL
and7or 10.PowerLevel7cuts the
time in %;PowerLevel 10cuts the
~ilneto IA.
stirfoodfrequently.
than usual Raise
During either, rotate or
fre-
Q.C&mI open the door during DEFIWX5Tto
of myfood?
A. Ye!%You may open the door at
any time during microwaving. To
resume defrosting, close the door
andpressSTART,
Q.Why don’t the defrosting times
in the Cookbook seem right for my
food?
A, Cookbook times are average,
Defrostingtimecanvaryaccording
to the tomperatum in your freezer,
Set your oven for the time indicated
food is still not completely thawed
at the end of that time, r~-setyour
oven and adjust the time accordingly,
check on the progress
in your Cookbook. If your
Q.WhenIenterthe fourth digit using Cook Code control, nothing
happens.Whatwentwrong?
A. The oven will take only 2 or 3
numbers. [f more are prqssed,
oven does not respond. Touch
CleartOff and beginagain.
Q. CanIselectaPowerLevelother
than automatic Power Level 3 for
defrosting?
A. Yes,Somesmallerfoods maybe
defrosted quicker on higher Power
Levels but for even, carefree de=
fros!ing, Power Level 3 is suggested, Check the chart in the
Cookbook for specific times and
PowerLevels.
Page 14

Time Cooking, or cooking your food according to a predeterminedamount of time, is probably familiarto you from
conventionalcooking. With your microwaveoven, however,
youpresetthetimeandthe oventurns off automatically.
(king YourOventoTimeCook
Followthe cooking steps belowto
help you learn to Time Cook
properly.
Step 1:
and1teaspoonof freezedried coffee,
decoration. Placecup in oven and
closedoor.
Step 2: Touch TIME COOK. The
read-out panel shows :0 and
Power 1(.3s
flashes,
Fill a cup % full of water
Use a cup that has no metal
*’Enter Cook Time”
Step3: Select your time. Touch 1,
2, and Ofor a minute and 20 seconds. “Cook Time”, Power10,and
1:20appear on the display. If another PowerLevelisdesiredtouch
POWERLEVELandthe numberalthough Power Level 10 (HIGH) is
preferred for this cup of coffee,
Step4: TouchSTART,‘kCookTime
Left”, Power10,andtimecounting
downshowon display.
Step 5:
sounds.
Oven,light, andfan shut off.
Microwaving
s Make sure all utensils used in
your microwave oven are lab’eled
“suitable for microwaving”. Check
your Cookbook for specific test to
determine “microwave-safe” utenSi!s.
e Paper towels, wax paper, and
plastic; wrap can be used to cover
dishes in order to retain moisture
andpreventspattering.
@Most microwaved foods require
stirring, rotating, or rearranging.
Check your Cookbook for specific
instructions for the food you are
microwaving.
s Some foods such as unshelled
eggs and hot dogs must be
pricked to allow steam to escape
during cooking.
When time is up, oven
Display flashes
‘IENCY1,
T
a
Q. Iset my oven for the time called
for
in the recipe but at the end of
the time allowed, my dish wasn’t
Whathappened?
done.
A, Since house power varies due
to time or location, many Time
Cook recipw giveyouatimerange
to prevent ovwcooking. Set the
oven for minimum time, test the
food for doneness, and cook your
disha little longer,if necessary.
Q. I want to cook’ my dish on a
PowerLevelothw thari HIGH,what
do 1needto do?
A. To change the Power Leve!,
touch the POWER LEVEL pad.
“Enter Power” flashes on the display panel. Enter the desired
number,
Q. Can I interrupt my Time Cook
function to checkthe food?
A. Yes, To resumecooking,simply
close the door and touch START,
NOTE: Microwave power will not
come on until you are ready. You
must touch STARTfor cooking to
begin.
14
Q. Itouched the number pads and
seisctecfmy power level. When I
touched START,however,myoven
didn’t comeon.Why not?
A. The TIME COOK pad must be
touched beforesettingthe number
pads or elseyour oven will not begin cooking,
Page 15

For many foods, internal temperature is the best gauges the internal temperature of your food; it
testof doneness.
Roasts or poultry are cooked to perfection when
temperature cooking. Heating or reheating foods
accurately to a serving temperature you desire is
simpleand easy.
TEMP COOK takes the guesswork out of cooking
because the oven shuts off automatically
food
is done.
when the
Tk Temperature P
The temperature probe is a food thermometer that
must be used when using TEMPCOOK or AUTO
ROAST. Toutilizeyour temperatureprobe properly,
follow the directions for use and insertion in this
bookinthesectionentitled“How to Auto Roast”.
HANDLE
SENSOR
CLIP
Howto TernpCooka R E3eefRibRoastto Medium
Step 1: Insert temperature probe
as directed in Cookbook and attach probe securely in oven wall.
Closethe door.
display panel shows F and Power
10.“Enter Temp” flashes.
Step 3: Touch 1, 3, 0 for 130”.
“Temp”, 130F and Power 10show
on display.
Step4: TouchPOWERLEVELpad.
“Enter Power” flashes,Touch5for
MEDIUM power, “Temp”, 130 F
and Power5showson display.
Step 5: Touch START. if internal
temperature of the roast is less
than 80°, display will show
“COOL” or if temperatureis80° or
above, display shows temperature
counting up,
Step6: When 130@is reached,the
oven will sound and automatically
shut off, Remove probe and food
fromtjw oven.
c -
e Where you have a choice of
PowerLevels,usea lower setting;
it will heat more evenly even
thoughrequiringmoretime.
@Be sure frozen food has been
completely defrosted before insertingprobe.Probemaybreakoff
if usedin frozenfoods,
@A!ways insert probe into the
center of mealy areas; take care
nattotouchthefatorthebone.
o Ins@rtprobe as horizontally as
possible into foods as directed in
the recipes, Makesurethe handle
doesnottouchthefood.The probe
is easiest to use when inserted
from the front.
@Usethe clip to keepthe probein
placewhileheating.
o Cover foods as directed in
Cookbookfor moisturecontrol and
quick,evenheating,
a
Q. After I followed the steps and
touchedSTART,“HWWX3”flashed
in the displ ay and a signal
sounded’Whatiswrong?
A. “ERF?0f3”flashes on display if
you set the temperature either below 80q or greater than 199{),The
en tells you between the flash-
“EWROR” what the incorrect entry was that you set. To
re-enter, touch CLEAR/OiW pad
andbegin stepsagain.
Q. Are there any foods I cm’t
TEMPCOOK?
A. Yes$Delicate butter icings, ice
cream, frozen whipped toppings,
etc., soften rapidly at warm temperatures. Batters and doughs as
well as frozen foods are also difficult to cook precisely with the
probe. It is best to TIME COOK
thesefoods.
Q, Why did “F%CX3E” flash on the
displayafterItouched Start?
A, “PRCN3E”will flash cmthe dis-
play if you have not securely
seated the end of the probe into
the receptacle in the ovenwallor if
you touch TEMP C(XIK and have
forgotten to usethe probe.
15
Q, Can I leave my probe in the
ovenifit’s not insertedin thefood?
A, No.Ifthe probe is left inside the
oven, touching the oven wall, and
not insertedin food,you may damagethe oven.
Q. Can I TEMP COOK different
portions of food at different
temperatures?
A. Yes, The temperature probe
givesyou the freedom to cook different portions of food at different
temperaturesto suit individualeating styles,Simply p[ace the probe
in the food and change the temperaturesetting asneeded,
Page 16

Your l-K3LD/TIMER, which oper-
ates without microwave energy,
hasthreetimingfunctions.
It operates as a Minute Timer, it
canbesetto delay cooking or may
be used as a hold setting after defrosting. Hold/Timer can be set up
to99minutes.
Step 1: Touch tIK3LD/TIMERpad.
The read-out panel shows :0,4*EnterTime” flashes.
Step2: Select the amount of time
you desire. Touch the appropriate
number pads. If, for example,you
are timing a three minute phone
call, touch 3,0 andO.
panel shows 3:00 and “HOLD”
appearson display.
Step3:TouchSTART.Thereadout
displayshowsthetimeasit counts
down, and “tiold Time Left”.
Step
4: When time is up, oven
sounds.Thereadoutflashes“END”
andthetimer turns off,
The HOLD/TIMER can also be
used to program “standing time”
betweenmicrowavecooking func-
The readout
tions.Thetimecan rangefromone
secondto 99 minutesand 99 sec-
o A HOLD,or “standing” time
maybefound in someof
recipes or Cookbook.
To set the oven to delay cooking
up to 99 minutes follow Steps 1
and 2 to e’nterhold time, then set
timeortemperaturedesiredbefore
pressingSTART.Whenholding before temperaturecooking, be sure
probe is in food before pressing
START.
your own
t DefrC
To help you become acquainted with the PK3LIYTIMERfeature as used with Time Cook or Temp Cook
follow Stepsbelow to defrostafrozencasserolefor 15minutes,thenhold 10minutesandthencook 25minutes.
If using Temp Cook after Hold/Timer, be sure to insert probe correctly as shown in Automatic Roasting
sectionof this book.
Step1:Removecasserolefrom the
freezer and place in oven. Touch
the DEFROST pad. The readout
panel shows “Enter 13efTime”, :0,
andPower3.
Step 2: Touch 1, 5, 0 and O for
defrosting time, Def Time, 15:00,
arid Power3appearcmthedisplay
panel’ (Defrosting is automatically
set on Power Level 3 but can be
changed by touching POWER
LEVEL pad and the new Power
Level,)
Step 3: Set standing or hold time
by touching l+OLD/TIMEFL“Enter
Time”and:0 appearon display,
Step4:Touch 1,0,0, and Oto hold
for ten minutes.10:00and4’HOLD”
appearcmthedisplay.
I
I
$tefj 5: Touch the TIME COOK
pad. The display shows “Enter
Cook Time”, :0, and Power 10
(HIGH),
Step 6: Touch 2, 5, 0, and O for
twenty-five minutes of cooking
time. “Cook Time”, 25:00, and
Power 10 appear on the dis-
play panel,
Step 7: Touch START. “Def Time
Left”, Power3,and 15:00counting
down show on display. As each
function is automatically performed oven display shows entered information.
a
Q. What will happen if I acciden-
tallyreversethe instructions?
A, If you mxkfentally reverse the
sequenceof programming iiistructions, your oven twtomatically
rearrangesyour program, Defrosting always comes first, then hold,
andthenthecooking function,
CL Can I Defrost+fold only on my
oven?
A. Sometimssyou maywant
frost afood, hold it, and refrigerate
it to be cooked later. All you need
to do is program In Defrost and
amount of time. Then program
l-foldand amount of time, Put your
thawed dish M the refrigerator and
cook laterataconvenienttime.
NOTE: Allow foods to remain at
room temperature only as long as
safe.Time$will vary,
tode-
Q. 1 programmed my oven for a
specific defrosting time but it defrosted longer than necessary,
Whathappened?
A. When instructions conflict, the
oven carries out the IesgimNruction, You may havesettho oven to
Defrost for 4 minutes, Hold/Time
for 2 minutes,and then Defrost for
6 minutes. In this case, the oven
would S)efrostfor 6 minutes and
Hold/Time for 2 minutes.
Page 17

I I II
J
I
k
The exhaust hood feature on your GE microwave
oven is equipped with a metal filter which collects
grease. When the fan is operated, air is drawn up lightfor illuminatingthecounter surface.
through the filter and is then discharged through
providedventing to the outside.The hood also has a
JII II
TOremovegreasefilter,grasp the “finger hold” on
thefilter andpush to the rear,The filterwilldropout,
replace grease filter, insert the filter in the top
me slot on the back of the opening. Push to the
rearand upwardto snap into place.
Soak, then agitate filter in hot detergent se!ut!on.
Don’t use ammoniaor other alkali because it will
darkenmetal,Light brushing mm be used to remove
inbeddeddirt. Rinse,shakeand removemoisturebefore replacing, Filters slw)uldbe cleaned at least
oncea month.Neveroperateyour hoodwithoutthe
filter in place. In situations ‘where flaming might
occur on surfacesbelow hood,filter can retard entry
offlamesintothe unit.
17’
Page 18

YourNewMicrowaveOvenisa ValuableAppliance,
ProtectHFromMisuseByFollowingTheseRules:
@ Keep your oven clean and sweet-smelling.
Opening the ovendoor afew minutesaftercooking
helps“air-out” the interior.
%)
wiping with a solution of baking soda and water
keepsthe interiorfresh.
@Don’tusesharp~ecfgedutensilswithyouroven.
The interior and exterior oven walls can be
scratched. The control panelcanbedamaged.
@Don’tremovethecoveroverthe “stirrer”at the
top of the oven (microwavefeature 4 on page 5).
Youwill damagethe oven.
An occasional thorough
.
WECERTAINPOWERISOFFEIEFCNW
H t C t
Walls,floorandplasticcover.Becausethere is little
heat
except in the food, or sometimesin the uten-
sils, spills and spatters are easy to remove.Some
spattersare easyto remove,Somespatterscan be
removedwith a paper towel, others may require a
damp cloth, Removegreasyspatters with a sucfsy
cloth, then rinse and dry. Do not use abrasive
cleaners on oven walls. NEVER USE A COMMERCIAL OVEN CLEANER ON ANY PART OF
YOURMICROWAVEOVEN.
Door-inside.Glass: Wipe up spatters daily, wash
when soiled,with a minimumof sucfsywarmwater.
Rinsethoroughly anddry.
Metal and plastic parts orI door: Wipe frequently
, with a damp cloth to removeall soil. DO NOT LJSE
ABRASIVES,SUCHAS CLEANINGPOWDERSOR
STEELAND PLASTICPADSrTHEYWILL MARTHE
SURFACE,
SpecialnotewhenusingBrown‘N SearDish:High
heat generated on bottom of Brown ‘N Sear Dish
can causescorched appearingstainsto bake onto
the ovenshelfifgreaseis present.Thesemaybe re=
moved with Deletep Polishing Cleanser by the
DrackettProduc~sCo,
After usingDelete,rinseand dry thoroughly, follow-
ing instructions on can. Do not use Delete on the
painted surfaces such as walls. It will scratch the
paint.
CLEANINGANYPARTOFTHIS(NW.
Deletemay be purchased from your local dealer or
from your Authorized Service Center. Check the
“yellow pages” for location and phone number.
Deletemay be sold M gracery or hardware stores,
or in the housewaressemion of some department
stores,
AutomaticTemperatureProbe.Probe i~sturdy, but
care should be taken in handling. Do not twist or
bend;avoiddroppingtemperatureprobe.
Clean as soon after using as possible. To clean,
wipe with sudsy cloth, then rub lightly with plastic
scouring ball if necessary.Rinseand dry.(Or wash
indishwasher,)
t C t
Case.Cleanthe outsideof your oven with soap and
water, then rinse and dry, The outer pane of the
window is glass,Just wipe clean with a damp cloth.
Chrome trim is best wiped with a damp cloth and
thenwith adry towei,
Conlrol F%MMLCleanthe control panelofyourmicrowave only with lightly dampened cloth. DO NOT
USEcleaning spraysor large amounts of soapand
water, These can cause problems with the control
mechanisms.
18
Page 19

To replace hood lamp, first disconnectpower at beforeremoving. Removebulb or bulbs and replace
—-. ..—.-.—--.-.—--.-—- ——-.——-——-.—.—-.. .
main‘fuseor circuit breaker panel or ~ull plug.
Remove2 screws from each side of lower paneland
3 screws from front edge. Lowerpanel until it rests
cmrange below. Be sure bulb to be replacedis cool
t’)
—
with 40watt appliance bulbs.Raiselower panel and
replace screws.Connect electrical power to microwaveoven.
“ --O-?~
Toreplaceyourovanlamp,firstdisconnect powerat
mainfuseorchcuitbreakerorpullplug.Removethe
top grill by taking off 2 screwswhich hold it in place.
Next, remove the single screw on top left that
secures lamp housing. (C)n models so equipped.)
Openoven door for easierremovalof the lamphousing assembly.Then grasptab and pull out and up to
clear door hinge and front lip of oven. To remove
bulb, push it inward gentiy and turn to left, then pull
outward from socket. Replace with GE Lamp
z 25T8DCv
Donotattempttooperateth~ovenunlessthegrillIs
piacxh - -
Clean off the grease and dust on hood surfaces
often. Usea warm detergent soiution. About 1 tablespoon of ammoniamaybe added to the water, Take
care not to touch the filters and enameled surfaces
withthis.Ammoniawill tend to darkenmetal,
19
Page 20

S t a mo
Pa
—
b y c f s c t
fcdbwing:
( W N C (
Main circuit breaker is tripped.
*
@ one of house fuses
@3-prong plug isn’t
tacle.
CXxWd
hasblown.
fully inserted into wall recep-
LiY C W
N St
Make sureyoutouchedSTARTbutton.
Doorisnotsecurelyclosed.
You have already entered another program and
nottouched CLEAR/OFFto cancelit.
Temperature Probe not inserted properly or not
beingusedduring Auto Roastor TempCook.
Youhavenot enterednumbersafterTimeCook.
You have not entered desired finished temperatureafterTempCook.
CLEAR/OFFwasctouchedaccidentally.
After touching Cook Code, Auto Cook, or Auto
Roast pads, n~ code number was entered.
AponIF
@WhenusingTempCookfunction,youhaveentered
a temperaturelessthan 80°
Door isopcmedduring “ALJTO’’cycleofAutomatic
*
Cooking function. Closedoor andtouch START.
or more than 199°.
Foods A E o o
Un
Not enough time set when using Time Cook func-
tion because of variance of starting food temperatures.
The density and amount of foods will vary and
thusmayneedmoretimefor completion.
Dish not completelycovered as directed for Auto
Cook.
Previousmicrowaving left humidity or moisture in
oven thus lessening the cooking time in Auto
Cookfunction.
Certain vegetables that are cooked using Auto
Cookneeda standingperiodaftercooking. Check
AutomaticCookingChart,
Probe not inserted properly into meat or dish.
Check Cookbook and Auto Roastsection in this
bookforspecificprobeplacement.
IncorrectCookCodenumbersentered.
IncorrectPowerLevelentered.
Dishwasnot rotated,turned or stirred if theseinstructionsweregivenin recipe.
Ovenwas ~pened during “AUTO” cycle of Auto
Cookfunction.
Toomanydishesin ovenat sametime.
“Rf o R
@ There has been a power interruption. Touch
CLEAR/OFFand oven is readyfor use.
6$ Whenovenisfirst plugged
and then Resetflashes.Touch CLEAR/OFF.
i all the readout is lit
C
@Probe has been forgotten when Auto Roast or
l’e~p Cookfunctions arebeingused.
@Probe is not securely seated in oven wall recep=
tacle,
All on Oven:
1. Steamor vspor escapingfrom around the door,
2, Light reflection around door or outer cas~,
~, D!mm~ngoven light and change in b[~w~r~~u~d SOSOme
may occur while operating at power levels other w~i~$u~in9Yourmicrowaveoven!It’ssimiiar to the
than high,
4. Dull thumping sound while operating at power
levelsother than high,
T’v-F?adlol~~erfer~ncflrnl~htbenoticed
interference caused by other small appliances and
does not indicate a problem with your oven,
20
Page 21

Automatic Cooking Control is a fully automatic
—.—.——.—.-.————
electronic control systemthat lets your microwave
oven do the cooking for you. The charts and
recipes in this section are designed to help you
makethe mostof this truly new feature.
Standard cooking techniques require setting the
oven for a specified cooking time or a selected finished temperature.
recipes
recipes
in a cookbook. . trying to convert old
for microwave cooking. . .or just resorting
And that means looking up
to guesswork. This control method works cman
entirely different basis—with a special electronic
sensorthat detects steamfrom cooking food. The
oven “knows” how the food is cooking; so it can
automatically set the correct cooking time and
maintain the proper power levelfor different types
and amounts of food. And it’s adjustable.to suit
your individual taste.
Easyto I&M!
Simply touch two control pads–AUTO C0C3Kand
the desired Code number—and then START. A
chart on the oven control panel gives a complete
list of Codes for frequently prepared foods. The
readout display shows AUTCluntil steamis sensed
andthen signals,anddisplaystime counting down.
During AUTO, oven should not be opened, but
when oven signals, most foods should be turned,
stirred, or rotated. Check the Automatic Cooking
Chartfor suggestions.
Appropriate containers and coverings help assure
good cooking results. Containers should match in
sizeto the sizeof the food being cooked.Coverings
such as plastic wrap secured on all sides,the lid
that came with the container, or microwave-safe
plastic
and coverings,seepage8andthefollowing
section of this book. ~ÿ
domesare ideal.Forexamplesof containers
recipe
With PreferenceControl, you can adjust the Automatic Cooking Featureto your individual taste by
adding either “l” or “9” after Code number.Ifafter
trying the suggested Code, you would prefer less
cooking time, simply addthe number “1” after the
Codeandtheovenautomaticallylessensthecookingtime by 209’o.Ifyouwish morecookingtime,add
“9” afterthe Codeto increasecooking time by
2
Automatic Roasting uses the temperature probe
rather than the electronic sensor to cook meats
evenlyto thedesireddegreeof doneness.Theoven
continually monitors the food’s internal temperature. Unlike ordinary Temperature Cooking, the
cwen changes power levels two or three times
depending on the degree@donenessduring cooking to give you the bestrewlts automatically.Meat
iscookedevenly,withouttoughening becauselower
powerlevelsareuseda~themeattemperaturerises
!hus cooking meatsevenlywhile retaining the natural juices. After cooking, the oven switchesautomatically to Hold for an hour, Food stays warm
without overcooking.
-—-———-.=-!=+.
~,. ;---
A wide variety of foods including meats,fish, casseroles,
il~g~tables,ttiftovers,and convenience
. .. .
.,y
foods G(NI beA~lto
Cooked. Match contain~r siz~ with the food, cover
‘ecLJrely, and do not open door during AUTO cycie.
Whenovensignals, turn, rotateor stir asrecommendedin
Cookbook or chart on pages28 and 29.
N
Recipes and foods which must be cooked
uncovered,or which require constant attenticm, or adding ingredients during cooking
should be microwaved by TIME COOK. For
foods that microwaveIxxd usingtemperature
probe, use TEMP CXX3Kor AUTO ROAST.
Foods requiring a dry or crisp surface after
cooking cook bestwith TIME CA30K.
——-
Page 22

The benefit is automatic setting and control of cooking, but just like conventional microwaving you must
r
check the food after the AUTO cycle (oven beepsand cook time beginsto count down on display) andturn,
rotateor stir as recommended.
Formeatandfishloavesuseeither
the round or loaf microwave-safe
containers, Fish loavesmadewith
precookedor cannedfish useAuto
Cook Code 4. Beef loaf usesAuto
Cook Code 8. Cover with plastic
wrap and rotate %turn after oven
signals,Seethechart on following
pagefor recipes.
——..—
Fish fiiiets,wholefish or seafood
pieces should be in single layer in
flat pie plate or oblong dish to fit,
Cover with plastic wrap or container lid, Us@Auto Cook Code 6
for fillets and Auto Cook Code 1
for’seafood pieees,
Whole Chicken, chicken breasts
and pieces,or t~rkey parts should
be placed in a microwave-safe 8irt. square dish, 12x 8 x 2-in, dish
or 3 qt. casseroie, Cover se~urely
with plastic wrap or container lid,
If cooking bag is used for whole
chicken, shield breast bone with
small strip of foil, Rotate dish %
turn when oven signals, UseAuto
Cook Code4.
Chuck or rump rmwtsshould be
placed in a cooking bag with %
cup water or marinade (see mari= glass container with lid or p!astic
nade recipes OH page 98 irI
Cookbook) and ptawxf in a micro- After oven signals, turn over or
wave-safedish. Cut bagto fit close
to the sizeof the roastand tie open
end s~curely, (XJta f-l %“slit near
the tie, UseAuto Cook Code 9 for
cooking.
Porkchopsautomaticallycookwell
in 8x 12x 2-in, dish, coveredwith
plastic wrap. Add barbeque sauce
or other sauce on each chop.
Microwaveusing Auto Cook Code
49which is Code4 with the added
digit 9 giving the Code
time. (See
Spare ribs and brlskoishould be
automatically cooked in round
wrap.Makesureliquidcoversmeat.
rearrangemeatsoften.
page 9.)
2 more
t
LJsethe following step-by-step instructions and tips when adaptingyour casserolerecipes for Automatic
Cooking.
1:
Select recipes that do not require adding ingre-
dients at different stages during cooking or
W@ipesthot require extra attention, stirring
or rotatirig,
Use containers that are appro-
2:
priate in sizeto the food amount, Use3 qt. con-
tainers w less,
For saucy easswdes, cover ccmtairwr
3:
plastic wrap. (No vents.) For cheese or crurnb-
.
.—
with lid or
22
topped txwwoles, remove cover after oven sig-
nals and add topping, then continue ncoking
uncovered,
Allow precooked Ingredients or hot sauces t
4:
cool slightly beforeadding other ingredkmtsi
Meats and vegetables should be submerged in
5:
liquid.
6:
After oven $ignais, rotate dish % turn and stir
covering ail ingredients with liquid,
..
Page 23

CA
—..
Auto CookCode6(Approx.Cooking Thne--35 min.)
1 lb.groundchuck.. ... .... ... ..
cup dry breadcrumbs powder,onion andegg.Mix well andform into 12balls.Arrange balls
1/2
1/$ teaspoonpepper
In large
in a circle in 2 qt.casserole.Setaside.
mixing bowl, place meat, bread crumbs, pepper, salt, chili
1/2 teaspoonsalt
1teaspoonchilipowder
2 tablespoorw$rymincedonions
1egg
1/2 cupregularrice
1can(15%
OZkidneybeans
(undrained)
1 can(16 oz.)tomatoes,choppedsignalsandtime remainingappearson readout.
... .... .... ... .In small mixing bowl place rice, beans,tqmatoes and chili powder.
Mix well and pour in center of casserole and over meatbaik Cover
and microwave at Auto Cook Code & Rotate 1/2 turn when oven
andundrained
1 tablespoonchilipowder
Makes 6 to 8 Servings
AutoCookCode4 (Approx.CookingY’ime-29 min.)
Makes4Servings
1/4 cupsoysauce....... s,.. ..... . In 2-CUPglass measure,place soy sauce,honeyandsherry.Stir until
1/3 cuphoney
1/3 cupsherry
4 teaspoonscornstarch
blended. Add cornstarch; mix well. Microwave at HIGH (10)for 3 to
3-q/z minutes,stirring every minute until thickened. Tie
chicken legs –
and place in 12x8x2-in. microwave-safedish, breastside up. Brush
with halfof sauce(reservehalf for lateruse,)Coverwith plastic wrap,
1 wholechicken(about3 M&)
no vent. Microwave on Auto Cook Code 4. When oven signals and
time remaining appearson readout, apply remaining sauce,recover
and continue cooking.
‘If breastboneseemsprominent, a1“ strip of foil maybe placedover boneto preventsplitting of wrap.
A F?KXS
AutoCookCode7 (Approx.Cook\ng“f’[me--lhr.1!$mkt.)
1can[10-1/2 oz.)condensed
creamof mushroomsoup
1-1/4 CXIpSmilk(1 soupam full)
,. ,In small mixing bowl mix soup and milk; reserve 1/2 cup of the
mixture. Blend remaining soup mixture, rice, mushrooms and half of
the onion soup mix. Pour into 12X 8 x 2-in. glassdish.
3/4 cupregulardce,uncooked
1can(4 02.) rnushroorns,stenw
aridpieces
1pkg.(1-1/2 o~.)dryonkmsouprnh
1cut
Up chfcken(flbOUt 3 lb.)
,,. Placechicken pieceson rice mixture, arranging with meatiestpieces
to outside of dish. Pour reserved soup mixture over chicken and
sprinkle with remaining soup mix. Cover with plastic wrap, no vent.
Microwave at Auto Cook Code 7, rotate 1/2 turn when oven signals
andtime remainingappearson readout.
Makes6 Servings
Recipe PageNo.
Classic Ham Loaf
BasicMeatBalls
Fmuerbrateni%mfRing
BasicMeatloaf
Crumb CmatwfChicken
Pork Chops f%mdo
Qxww+oleof Beans&
84
92
91
140
1$6
131
Sausage
.-—————
——.
“Au&oo~~ok”
b
8
5
2
8
4
6
5
Recipe
Sweet& Sour Ham
Chicken & Dressing
RoundSalmon
Loaf
BeefBurger Stroganoff
13i3QFranks
Cheese Stuffed Meatloaf
PolynesianSwissSteak
Chow Mein
1
140
1$4
82
131
91
!37
119
5
q
4
7
2
8
8
6
Page 24

l%es~Or Canned Vegdables
—
..
E
I
.
.“-<.
.
Whole or large halvesof vegeta=
Mm such ascauliflower or squash
useAuto Cook Code 5.Useround
or square container close to the
sizeofvegetable.Add %cupwater.
Coverwith lid or plastic wrap.Turn
cauliflower overafterovensignals.
Forother vegetables,rotate %turn
whenovensignals.
l%oz~~
Vegetables
Pieces or slices of vegetables Precooked/canned vegetables
require H to %cup of water. Use
appropriatesize
Stir or rotate after oven sicmals.
UseAuto Cook Code5. -
covered container.
should be placed in round container similar in size to amount
being cooked (at least half full).
Cover and stir well after
cycle. UseAuto Cook Code 1.
AUTO
Mock or loom Dleem of frozen
vegetablesshoujd be placed in
suitable size container (at Ieaqt
halffull) coveredwithlidorplastic
wrap, Add 1 or 2 tablespoons
water. Stir after oven signals, Use
Auto Cook Code 3,
Pouches of frozen vegetables
should be slit 1“ in center before
placing directly on ovenfloor. Use
Auto Cook Code 4,After ovensig-
rmis,rearrangevegetableandrotate
pouch $$turn,
Alternately,frozen vegetables in
pouches can be slit with an “X”
shaped slit and placed in glass
containerwith “X” downward.After
cooking, pick up pouch andempty
food intodishthrough“Xi’opening,
Page 25

~
S FRY
AutoCookCode5 (Approx.CookingTime—16min.)
tablespoonoil. .... ...... ... ... ..Toss vegetables with oil and butter in 2 qt. microwave-safe casserole.
1
tablespoonsoftbutter
1
mediumonions,quartered
3
smallgreenpepper,cutin
1
t/4-in. widestrips
2 cupsthinly-slicedcabbage
2/3 cupcarrots,slicedcfiagonaliy
f/4 cup(1 bunch)slicedgreenonions
~cupbroccoliflowerets
1cupcauliflowerflowerets
2 stalkscelery,sliceddiagonally
AutoCookCode—Pasta1 (Approx.Cooking Time—13min.)
Spinach1(Approx.Cooking?’ime=-5min.)
Lasagna
lasagnanoodles (fl/3pkg.)... ....Place noodles, water and oil into a 13 X 9 X 2-in. dish. Cover with
6
cups water
4
tablespoonvegetableoil
1
pkg.(f10oz.) frozenchopped
1
spinach
can(8 oz.) tomatosauce
1
can(8 oz.) tomatopaste
1
1 jar (4 oz.) slicedmushrooms
(drained)
1/4 cupchoppedonion
1 teaspoonleaforegano
1 teaspoon basil
1 teaspoonsalt
1/4 teaspoon garlicpowder
2 cups(l-pt.) smallcurdcottage
cheese cottagecheese,1/2 pkg.spinach and 1/2 of tomato sauce. Repeat.
8oz.gratedmozzarellacheese
w
2 (Approx.CookingTime–25 min.)
... ... ...In large bowl mix together tomato sauce,tomato paste,mushrooms,
Cover. Microwave on Automatic Cook Code 5 stirring well when oven
signals and time remaining appears on readout. Serve immediately.
plastic wrap. Microwave on Auto
preparing remaining ingredients.
.....Removepaperwrappingfrom box.Placeunopenedbox into ovenand
microwaveon Auto Cook Code 1.Drain well.
onion, oregano, basil,saltand~arlic powder.
.../n a
13 X 9 X 2-in. dish layer well drained lasagna noodles, 1 cup
Sprinkle mozzarellacheeseovertop. Cover with plastic wrapt Micro-
waveon Auto Cook Code 2,Rotating and rernovlngwrap when oven
signalsand remaining time appearson readout.
Cook Code 1.Allow to stand while
. .
Makes 4 Servings
Makes 6-8 Servings
N’ ‘
AutoCook Code–See Recipe(Approx.CookingTime-22 to 2!5min.)
1pkg.(10 oz.) frozen. ... .i... . . ...
choppedspinach Cook Code 1. Remove from box and drain well. Set aside. In
1/2 cupregularrice
1cup water Code 6.Tocookedrice,add butter, onion, milk, egg,saltand cheese,
1/4 cup butter,melted
cupfinelychoppedonion
1/4
1 cupmilk 5 minutes coveredbefore serving.
1egg, bmten
1/2 teaspoonsalt
1 cupshreddedcheddarcheese
Eggplant Itaiiano
Corn Pudding 219
I
I
220
Placebox of spinach in microwaveovenand partially cook on Auto
2
qt.casseroleplacerice and water. Cover. Microwaveat Auto Cook
Mix well. Coverand microwaveat AutoCook Code 2. Rotate
when ovensignalsandtime remaining appearson readout. Let stand
5
I
4
CabbageRolls Italian Style
Stuffed F%pmiws
I
I
25
—
.-—.————-————
Makes4-6Servings
I ;: I
1/4 turn
2
5
I
Page 26

Pineapple Casserole is a tangy BakedApple$ automatic cook well
dessert or meat accompaniment. using Auto Cook Code 2. Match
In 12 x 8 x 2-in. dish spread2 cans number of apples to sizeof micro(20 oz. ea.) drained pineapple
chunks, 1 cup sugar and % cup
flour. Cover and microwave on
Auto Cook Code 2. When oven
signalsandtime remainingappears
wave-safe covetwdcontainer (see
page246in Microwave Guide and
Cookbook). Use Auto Cook Code
2 for Baked PearsandApplesauce
also.
Stewed Fruit and Fruit Compotes
shouldbestirred well beforemicrowaving,especiallyifsugarisadded.
Cover:useAuto Cook Code2 and
stir once or twice after oven sig-
nalsand time armearson readout.
Touch“Start” andfinish cooking.
on readout, remove covering and
top with mixture of 2cups butteryflavoredcracker crumbsand %cup
melted butter. Do not recover.
Touch “Start” and finish cooking,
After preparing the ingredients for the individual recipe asshown belowthe picture,follow thesesteps
for cooking,
Step1:Coverwith plastic wrap and useAuto Cook
Code3.
Step 2: When oven signals and time remaining
appearsonreadout,removecoveringandrotatedish
Step3: Whencooking is finished, turn out (upside
down) the NutCakeandCornbread.InvertCaramel
Biscuit Ring and let dish stand over ring a few
minutes beforeserving.
%turn,
NutTWXXMICakeswe easyto cook
autom~~icaliy,Grease bottom and
sidesof microwave-safeflutedcake
containerandsprinklebottomevenly with 1/3 cup chopped nuts or
coconut.C%rofullypour batterfrom
onebox (248yersize)cakemixover
nuts, cover with plastic wrap. See
StepsaboveforAutomaticCooking.
—
Cook Code3.Spread~ cup melted
butter and %cup brown sugar in
$in. round glass dish. Sprinkle
with cinnamon and Mcup chopp%d
nuts if desired. Arrange 1 can
(10oz.)refrigeratedbiscuitsaround
edges and place drinking glass,
open end up, in center, SeeSteps
abovefor Automatic Cooking.
26
-.—
—
bread: 13istribute1/2cub chopped
crispfried baconand 1tsb!espt?on
Parmesancheese in greased !Hn.
round glass dish. Carefully pou
batter from 1 pkg. (8% oz.) corn
breadmix or usebatter from corn”
bread ring page 232 in The
Microwave (Wide and Cookbook,
over aboveingredients, SeeSteps
abovefor Automatic Cooking.
Page 27

AutoCookCode3 (Approx.CookingThne–18 min.)
t pkg.(2-layersize)... .... ... ...
fudgecakemix
In large bowl place cake mix, eggs, vanilla, oil and water. Blend on
mediumspeedof mixer, about 2 minutes,until smoothandcreamy.
2 eggs
1 teaspoonvaniilaextract
2/3 cupcooking oii
1-1/4cupswater
1/4 cupfineiychopped pecans.. ...
Lightiy greasea 16cup plastic microwavefluted orstraight-sidedring
mold. Sprinkle chopped nuts evenly over bottom. Pour batter over
nuts.
Coverwith plastic wrapand microwaveonAuto
dish 1/4 turn and removewrap when ovensignalsandremainingtime
appearscmreadout.Touch “Start” andcontinue cooking. Letstandin
dish 5 minutes beforeturning out.
Makes 1 (lO-in.) TubeCake
Cook Code3.Rotate
AutoCookCode3 (Approx.CookingTime-16 min.)
1can(20-22oz.) prepared
.,.,.,. in 8-in. squareglassdish, spreadpiefilling.
Makes 6 to 8 Servings
cherrypiefiliing
2 cupsdryyelloworwhite... ....in small bowl, mix together cake
mix, butter, nuts, and cinnamon until
cakemix(1 pkg.[9. oz.] or crumbly. Sprinkle evenly over cherries or, in three rows so cherries
1/2pkg.[17.
02,]) are visible. Cover with plastic wrap.
‘f/4 cup meltedbutter
1/2 cupcoarselychoppednuts Microwave on Auto Cook Code3 rotating dish 1/2turn and removing
1 teaspoongroundcinnamon
plastic wrap when oven signals and remaining time appears on
readout,Touch “Slart” and contitwe cooking.
AutoCookCode3 (Approx.CookingTime-10 min.)
1/4 cupbutter
1/3 cupbrownsugar(packed)
..; .;;........,., .-..in 8 in. round dish place butter. Microwave at HIGH (10)for 3/4 to 1
minute until meitedtSprinkie sugaroverbutter, Drain pineapple (save
Makes1(8-in.round) Cake
‘f can(8-1/4oz.)pineappleslices iiquid) on paper towels and arrange in dish. Decoratewith cherries.
4 maraschinoorcandied
Placea 2“ diameterdrinking glass (4” tail) open side up in center of
cherries,cut inhalf dish.’
3/4 cupallpurposeflour
1/2 cup$3Ugm’
1=1/2teaspoonsbakingpowder
3/4 teaspoon salt
1/4 cupsoftshortening
1egg
liquidfromjplneapple(1/3 c.)
,,,, ,.,,, ,Ii small mixer bowi piace fiour, sugar, bakingpowder,salt,short-
erling, egg, liquid and vanilla. EM@3 minutes on iowe$t mixer $Peedt
scraping bowi cmnstantiyfirst 1/2minute.Carefuily spreadbatterover
fruit in dish, Cover with plastic wrap—-novent. Microwave on Auto
Cook Code 3. Rotate 1/4 turn and remove wrap when oven signals
and time remaining appears on readout. Touch “Start” and continue
cooking.
3/4 teaspoonvaniilaextract
*7’ip: (Jw a small drinking glass like the type you buy containing
cheese spreads.
e
Recipe
ChQrry CaralIIQi Ring
Pillsbury Yollow=li!lundt
Pillsbury German Ghf~c,-
Bundt
Applesauce
Stewed Dried Fruit
{Apple-Apricot)
e
Page?+40.
234
272?
272 3
246 9
240
“Au;oo;~ok”
3
3
2
v
Recipe
Basic BreadPudding
SteamedPudding
StreuseledApples
Cornbread Ring
SteamedBrown 5read
w
w
PageNo.
253
280
246
232
232
4
2
3
7
Page 28

QDo not open overt door during AUTOcycle.May
Ro
effect cooking performance. After first beeping
signal(timeappearson readoutfor codes except
Code 1), stir or rotate food.
@ Match the amount of the food to the size of the
container. Fill containers at least 1Afull.
$S Add %% cup water to fresh vegetables. Stir or
turn over vegetables and meats after first beeping
signal.
a Usemicrowave-safeplatesor casseroles,except
DO NOT
Cooking.
Be sure the exterior of the cooking container
@
and interior of microwave oven are dry.
@ Stir or rotate after oven signals and time appears
on readout.
USE PAPERPLATESwith Automatic
“Auto
Fo
Cook”
C Con
RoheatlngandFrozenFoods:
CannedFoods 1 Microwav~-saf~con-
RoTeo th{stamat s
amoa refteo fo
Refteo th(l
amoa rote
DeFo
fit
Fro
Th(unl
Th(o1 1 O 4
2 o 4
Left
W Din(10oz
Cooking:
Ba
[ sli
hmer
~r~cingre
% mw& Pcm7
31’@(
%mw
‘ie4
Vh(3Ib4 1 x8x 2=gl
:h
floa$t
Up to ~ i ) diP i co
~G41-- ‘- - “
‘ii(1II)
— .. ,
‘r
)akApp(
IaPe(
——..-.
2
1
Micrcwmwmfe ccm-
tamat s
o fo
C i con
3
( com
C i con
( com
1 Micr2 mi
conmat
s o fo
4
C i con
( com
1 x Ex2=gl6 m
5
d liw ?a
toCow
piwr
2C ca$w i
6
o cow pi
wr
1 x 8x % gi
4
di(lw n r %t N t p c
plwr
NOM s f b re
m doto
cov
7
d o cob
Cow 2 pio
overpl
wr
1 x9 x-g~-
Z“---
b a sew
t S b 1 a t
--- -— ----- - -----
n t
1 x8x 2=gl2 r B w b a l j W o
o
diCowiSir %t
plwr
2 2 q casw
l sir ‘ t
2
—
(
*
*
I
,
Approx,
T
Z3min.leup Covwwithplasticwraporiidto
4 mi
1 m
1 m
2 m w w o p c
1 r R f t a p b i b I d
3 m M s i c a i W
4 m
2 m
6 m
$ mi
4 m
l ~ m
1h 4 m
. --
1 m
1 m
Co
d
2o m s a c l
amC w p w o i
C w p w o i t d
C i o coo f q c
i g coN I e i i a
i p r f b r i a p
b i orc b i e i i p
b cor f b a m
U b w
I micp d
I c o brr b c
W o s r %t
o sis w
N adi n W o s
1i u w b t d c t
W o s s w a r %t
N adl n W o
sir ‘ t
P
~ t a s a s a p
A ? c w W o ~
%t
C a N w n W o
C p N w n W w
sir ~ t
plasticwrapo c p w
#
%t w o s
-
.
4
IF AFTER COMPLETION OF AUTO C@OK CYCLE FOOD NEEDSAdditional WARMING, SIMPLY RECOVER
FOOD APJ13USE AUTO COC)K CODE #’l.
28
Page 29

“A
an
Co
Co
Hamb
Casserole 7 2q gid w
fdea( lb
Pat(4
Po
SauPat5 8 glsqdi
( thicCow pl
Ch
(%thi
Con
i
Gil diCo3 m
8
w plwr
5 8 sqdiCo
w plwr
wr
4 1 x8x 2-gl3 m
diCow
plwr
Ap
T Co
4 m M s l c a inW
1 m W o sir I t
8 m W o sir
o sis w a r %t
W o sir
B w 1t b saW
o sir
N ThePrC 9i u f
;Jinc t f b
1/2t
1/2t
1/2turn.
SpRi9
(Up to 3lb
Ri
Ins(fvliV cu
R ( cu6 ‘ “
Sea
Pie
( i Shro scal1
Cass6
titl@tlbi@8
%e
4rtic
:UP to 4 me
Gvrots(1lb.sliced) 5
Cauli( mehe
Aspa( l c spo!
13ruSpr( lb
Pota“
1
3
2q gldiCo
w l o pl
wr
2 2#.gid w
1I q gid w
i
2q casw i 3 m
o cow pi
wr
7 j casw
2
.
figid w
In
5
1 8 x 2-gl1 m
diCow
plwr
1f q g d w
5
lid.
1q gid w $ m
!
l
2 gid w
5
8
1h 3 m
1h 5 m sirem m s i I s
9 m
2 m
5 m
5 m
1 m
13min. Add%
1 m N w n S c s s
1 m
1 m
M m b c w i W o
m i i i m b n t r
ar
F ino p C W
o sis
U 1c r c w W o s
n r %t
W o sir t
M s i c a inW
o sir Y t o s
C i p M s l c a
m~attWhenovens}~nalststir&rot~te%turn.
P ari d s s d A
I c w R d %
t d f c
turnaft~roven
signais.
c w W o s s w
d
Ats t o
; c w W o s r
*
#
W o sir t N W
hotd &s
#
~roHi( Oz
%oc
3ruSpr
.eSpi
AixVege3
%oPo
3aLi4
>o
‘@
I
;pim
~ ~
3
3
~
4
4
4
gi~s~d w
i
b
*
#
La poi 8 m
microdib u f c a r t
N con$N W f h s
1
8
I
1 m
1 r A 2t w W o s s w
1 r
1 m
8 m
8 r M
10m M a 1 s I p W o s
A 2t w W o $ s w
N T PrC 1 i u f
brt dec t f b
re
M a 1 s i p W o $
a1$’$ilti p W o $
b u f c a r t
N W f h s N P
Co1i u f p t d c
t f
b u f c a r t
N W f h s
bestre
#
#
#
qExcessivelydry potatoes may not releaseenough moistureto activatesensor.E3esure potatoesarefresh not old
and dried-out.
29
Page 30

~ Yof GeElFaS C i a t c
-4
(t3riwrd
ALABAMA
Birmin-35
25CrestBoule
(205) 956-0333
(Decatur-Hu
I-turrt-35
12PutDri
(20S30-
Mob-36
11i3eltHighSo
(20471-
ARIZONA
Phoa-65
2 Sou51Ave
90X 142
P.
(60272-
Tuc-85
20NorForBiv
Sui11
(80623-
ARKAN
LitRo-72
84NeBenHw
(50568-
CALIFORNIA
San 8ernardino-Rivor8ide)
L Ioomington -92316
10121 Cactus Avenue
(714) 877.3434
(San ~fanckco)
E3urimgamo-94010
1649Adrian Road
(415) 981.6760
Frosno -93727
16NorHeStr
(20255-
LoAnge-90
28Ea48Str
(21586-
Sacram-95
17SeStr
ettEtoul
San Joso- 05123
5761.S Wlnfi@d t31vcL
(40$} 620-3500
VaNu-91
68LanAvo
(213} 989=5710
COLORAOO
ColorudoSprings -80909
1665 N Acedomy. Suito B
(303) 597-8492
bor=80207
E#t5t39th Avonuo
5300
(303} 320=3301
CONNt!CTIGU1’
ENkl esort =06804
$15 t?oWa@tlAv
(2038?”5311
f%wtHartf00108
265 ~fosti @Park, Pio2
!
(20528i
DELAW
UlMIiPA= 19342
fLt3 *2, Box 210
(215) 358.1600
OISTWC7 OF COLUMt3fA
+3$WJP.MO=20704=0110
8201 Stayton Drive
PLO Etox12?
(301) $53”0130
i%OtWA
Fort twdofdato -33309
1tot West McNab Road
(305} 974+708
Fort A%yofa- 33’201
1010 Courtney
(81938-
MWilmin
Dr.
J@cksQn-32
(Pornbwn&W. P@n E@Mh)
Lak@Worth
18Madrid Avanue
(306) !355”
● 33450
C f%CHAAddra telnu!w3mchA r (Xo I { nuc c y
IwbooLoi t WhPaun“GEELECOO “GELF S
Mi-33
32N.1IOStr
(3665-
Ori-32
65EaColoD
(3273Talla-32
12SoAdS
(9222-
Ta-33
32S WestBl
B 137InteSta
(8637-
GEORGIA
Atlanta -30325
1695 Marietta Blvd.
P,O. Box 19917
(404) 352.6000
,S~vannah.31406
211 Television Circle
(912) 925-0445
HAWAII
Honolulu. 96813
404 Cooke Street
(806) 533.7462
IDAHO
(Boise)
Garden City -83704
5250 Chinden Blvd.
(2378
ILLINOIS
t2hampaif#t -61620
1205 North Hagen
(217) 356-4088
Chicago- 60636
5600 West 73rd Street
(312) 584-2424
Elk Grove Village -60007
10 KinBStreet
(312) 593-2525
Lombard =60148
637-B35 Weslmore Av@,
(312) 628-0010
Peoria -61614
7706 North CrmNlino Drlvo
(309) 6$2=5070
Rockforo -01107
401 North 2nd $trmrt
(015) t192-7200
Sprin field- 62702
2252 ~oultf 15ttt Stremt
(217) 753-8088
INDIANA
EvansvWo-47714
101S WehtAv
(Q476=
FoWa=48
Nflway ORoad
4632
(219) !381=253/’
Indirwtapolls= 4t12i9
6283 ElrookvlllaFhMd
(317) 35s-8661
South Bond -46613
1002 MhtrnlStreet
(2!9) 25&0685
IOWA
t20dw RR ids-62405
(310) 38WW7$
Dmmnport. 52802
1074 SOultt ?3ittmof
P,O, BOX3108
(310) 32&5tOi
DOSMoines. 503?3
1837 N,E, tMth Avenue
(516) 286-2101
Wfiterioo -50703
2629 Falls Avonuo
(310) 236-1363
KAN$AB
Krinmt$City
2$49 (3hryalor
(913) 371=2242
0%(210) 484s!3 5
!i18 First treot, N,W,
● 66115
f’iOfd
Wic-6
8 EaIndianapolis
(3267
KENTUCKY
Let -4
F11IoDr
(6255
Loui-4
44BiLa
BOX32130
P.
(502) 452-3511
LOUISIANA
BaRouge -70814
2935 Crater Lake t3riva
(504) 926-5062
[New Orieans)
Harahan -70123
701 Edwards Avenue
(504) 733.7901
Shreveport -71102
1430 Ralzell Street
(318) 425-8654
MA
South Portland -04106
54 f3arlirrgAvonu6
(207) 775.6365
MARYLAND
Saliabury -21601
Twiii ConIre
329 ~ivic Avenue
(301) 742-3800
jessup -20784-0110
8201 Stayton Drive
P,O,
80X 127
(301) 953-9130
MASSACHUSETTS
(Cape Cod)
H anniti - 02601
8JEnterprirIo =Unit 11
(617) 771”5905
Pittsfield =01201
14
EastStrew
(413) 488=4391
(Eloston=Souih)
W%tdwood=
3
(617) 328=12*
(130rMon=Norlh)
Woburn =01801
57 Commorco Way
(617) 944-7500
MICHIGAN
Grand F3ttpids-49508
350 2&h Strom, S.E,
(616) 452+764
L6tffsirt$=4tttM2
1004 E, Michigan Ave,
(517) @34’2t3$l
Tro =48084
1I&l&F%nkin
{313) 563=1616
W@wtds 4$1$5
tW3 Martuktcturet’s t3riv@
{313) 5644180
RlNd?4Et3mA
7450 Moire Etoulwmrd
(6835
tiif)
Jackaon =!$9208
325 Industrial Ofiv@
(601) 352=3371
ti18SOUf31
Kfrnm%sCity, KSs 80115
2(t4&hysler Ffoad
(913) 371=2242
EMLoukr-63178
1355 WarBonRoad, No.
P,o, Box 14550
(3993-6200
Sprin fioid= 65807
1334 txtt9urtslt!rrfr
(417) tt31*05tl
NWMtAUHA
Lintroln-66503
lt4$ No47S
(4464*
02
Univorsit Avcmuo
&
Om-6
6 * Street
(402) 331-4045
NEVADA
L Ve-6
::HigD
(7733
R -8
6 S VirSt
(7852
NEW JERSEY
Mount Holly -06060
Route 36& Easlick Ave.
(t309)261-3500
North Caldweli. 07006
5 Fairfield Road
(201) 2S8-8650
(APa
Oakhurst -07712
2111 Highway 35
(201) 493021OO
Vineland. 08360
749 North DolotraDrive
(609) 68&1608
Ml
NEW
Albufn,mrque=87107
3334 Princeton Dr., NE.
(505) 864=1861
NEW YORK
Albany - !2205
2 interstate Avenue
(518) 438.3571
Brooklyn -11234
5402 Avtrnue“N”
(212) 253*6181
f3uffislo-14225
3837 Union Road
(716) 66&2268
Weslr?hosterCo, AroQ)
Imsford. 10523
L
t%rlrvitrw!ndus!rial Pk.
Route frt3+
(014) $92”4330
ilusttin =11354
#133=30 !JIhAvwtue
(212) 8ttS@300
(Binghamton)
Joftrwon City= 13760
278 Mairt$lroot
(607) 7284248
(Naa&u.Suffolk County)
Molvlllo-11747
338 South $ervico Rend
(516) 2W%0790
(014) MM’2000
Roeha@lar=14$22
1800 Ftid i3Fto&dEasl
t
[710) 54 =7W0
ftonk@nkoma* 11779
7$ Union Avontm
(51$) 4$7=7700
9 fflcutm- 13204
015 WwN Qwwxroo$troot
(3if3) 471=9121
NOtiTH ~Af?OLINA
Cftarloito= 20234
?66 Tuekosae
Pat), Et13x
(704) 372s8810
(?wansboro
2018 Baltic Avfntutr
(919) 272~7153
RfIIoi h -27804
Church Road
(919) $76=5803
OH10
Akron. 443M)
22829. AriingjlonRoad
(216) 773-03$1
ttWkiO~ll
&2013
343&
00 ROtld
● 27408
Cin1 AlR
( 74
Cl
2 ShR
( 36
Co-4
1 W F A
( 29
Da-4
5 WeS
( 89
To-4
3 SuS
( ‘7
CIKLAf40MA
Oklahoma City -73118
3228 North Santa Fe
BOX18669
P,O.
(405) 628.2381
Tulsa-74112
6913 East 13th
(916) 635w9526
&tfiGON
(Portland Area)
$eaverfon =97005
14305 S,W, Miliikan Way
(503) 646-1176
Eugene-97402
1492 West SixthStreet
(503) 342.7285
PENNSYLVANIA
(Brandywifie-Wilmington)
Glen Mlils -19342
60X 210
R.D, #2,
(215) 368-1500
Johnstown -15805
214 Weatwood Shopping PI.
(614) 255-6721
+fftrrioburfj
b
amp t+!l =17011
213S Mark~! Str@ei
(717) 701=8185
Monr&trvilio- 15146
1 S R
Monroevt;!s !%!uttrial Park
(412) 685s3700
i%iltitdphill-10115
9800 Qlobal Road
(215) 69@3270
(Allfmtown)
● 18052
Whitohali
1805 MncAfthur Road
(215) 437-S671
hHOfX l$LANf3
f%$t Providttrrce=02914
IOlti WcmermwrAvonura
(401) 438WO0
2tQUTH CAflOLINA
Columbtf3=28002
$25 Bluff Road
1210
t
( 77
Myrl10$tmett =28577
702 Soa fitOWdStroat
f30af30tW fndustrittfPark
(803) 626=7411
N, Chsrlaaton =29405
A990citl10 ~tiVO
7326=23
F%
efdan Induntrhli Park
(8# 5S2-61Q3
t3fe0nviito
iL
aylofs =2...87
25 Hampton Vilkqo
(803)292=0830
if!
Chattwtooga -37403
813 East Ilth $troot
(f315)265-8598
Johnson Gil .37801
(615) 282M4545
Knoxvillo•37$tt3
32fi0 M nhttSlreot, N,W,
(616) $14”7571
h2912 E)flNol ighway
M 3 S P
( 3
Na3
3 T
( 6
TEXAS
A 2 S F S
( 4
C C 3 A S
[ 6
O -
8949 Diplomacy Row
P,O,
BOX47801
(214) 631-1360
Paso -79925
El
7600 Boeing Drive
(915) 778-5361
(Brownaviile)
Hariin en -78550
81204 orfh Seventh
(512) 423-1204
Houston -77207
P.O.
BOX26837
2425 Broad Street
(713) 641.0311
Lubbock- 78480
4623 Loop269 West
BOX16268
P.0,
(806) 783-1620
(Odessa)
Midland -79701
BOX6288
P,O,
Midland Terminal
(915) 563-3463
San Antonio-78216
7822 Jortes.Mait8borger
(812) 227*7531
UTAH
Salt Lake City ● 84125
2428 South S00 We8t
P,(3,Box 30994
(601) 074=4600
VIRtitNIA
Fairfax -22031
2810 Dorr Avonuo
(703) 26&2020
Norfolk -23502
4552 E. Princesa Anno Dr.
(804) 857-5937
Richmond -23228
%LO#&;Tlspring ‘d’
ti
Tri=City)
I(
ennowick -$9336
Union $ uars
3
2
suite
101 North Union SRroot
U 703=?403
98188
& =
401 Tukwiltr Parkway
(206) 575-2711
. .
W“nii%%lofyst.
(509) 926-$5$2
WE*T Vif?f31NlA
~tlttf:o;f:] ~5704
3-1217 A amgAvenue
$OX 7518
P’.O>
(304) 628=3307
Wheeling -26003
137 Norm River Road
(304) 263-6611
wl$coN81f4
A loton.54811
3#W, Wiscormln Ave.
(414) 731=f1514
ti-
1 W S S Rd.
(4t4) 492=922!3
31
Page 31

(inmiccocea o
Savepro oripurdatesuchasy s s o cancelledcheckto establishwarrantyperiod.
——
WHATISCOVERED
FULLONE=YEARWARRANTY
Foroneyear
purw w pr
f d o or
charge, parts and service labor in
y h t reo reany
part of themicrowaveoven/range
that fails because of a manufacturing defect.
LIMITEDADDITIONAL
FCNIR+EARWARRANTY
Forthe second
through fifth year
fromdateof original purchase,
we will provide,freeof charge,a
replacementmagnetron
magnetrontubefails becauseof a
manufacturingdefect.Youpayfor
the servicetrip to yourhomeand
servicelaborcharges.
WHATIS NOTCc)VERE~ eServicetrips to yourhometo
teachyouhow to usetheproduct.
ReadyourUseandCarematerial.
If you then haveanyquestions
aboutoperatingthe product,
pleasecontact yourdealeror our
ConsumerAffairs office at the
addressbelow.
. Improperinstallation.
if you havean installation problem,
-,.-...——=———,.
Sostad n alt exco limo inco condas t a lior exclusion ~:’
maynot
appt yoT warrgiy speleria y m a h o r w v f s t s ~
TOknwhyoferiga i y stcoy l o s coafo o y s A G ,
Manaf!jer-Corwurner Affah%, General Electric Company, Appliance Park, Louisville, KY 40225
———.......——-——
h
contact
Youareresponsiblefor providing
adequateelectrical,exhaust~ng
and otherconnectingfacilities.
Warrantor:General Electric Company
If further help Is needed concerning this warranty, contact:
—
—.——...
your dealeror installer.
—————
free of
tube if the
—.—... ...
....————
This warranty is extended to the
original purchaser and
ing
o f p p
anysucceed-
forordinaryhomeusein the48
mainiandstates,Hawaii and
Washington,D.C.InAlaskathe
warrantyis thesameexceptthat it
is LIMITEDbecauseyoumust pay
to ship the productto the service
shopor for the servicetechnician’s
travelcosts to yourhome.
All warrantyservicewill beprovided
byour FactoryServiceCentersor
byourfranchisedCustomerCarea
servicersduringnormalworking
hours.ChecktheWhite Pagesfor
GENERALELECTRICCOMPANY
or GENERALELECTRICFACTORY
SERVICE.Look in theYellow
Pagesfor GENERALELECTRIC
CUSTOMERCARE@SERVICEor
GENERALELECTRIC-HOTPOINT
CUSTOMERCARE@SERVICE.
@Rep!acernentof housefuses
resettingof circuit breakers.
w
QFailureof the product if it is
usedforotherthanits intended
purposeor usedcommercially.
@Damageto productcaused
byaccident,fire,floods or acts
of G(XL
WARRANTORISNOTRESPONSIBLEFORCONSEQUENTIAL
DAMAGES,
“.-....-.————————
=
. 9—%-—
8
j
,..
1=
!-
,S
a
I
*-
‘
,.
...
I
,
~
>
,, ,
,,
::s
,..
!
{..
\
::-
,,
,,.
,,—
,..
!:.
,,
,, -
,,
,,.
,,
,..
..-
11 -
,,.
i:a
,,
,.
,.
r..
,,
,,
,,.
*,
,..
,,L
Ila
z,
:, ,
,,
,*.
I
!
z
,
;
,.,
1!:
,,.
114
:1
,,,
r.
t..
,.
‘.,
“Part No. 862A72!5P35
~Pub.No. 49-4508
E
1/82
J
E
. ........
 Loading...