

GE JVM6175, LVM6177, JVM6177 Owner's Manual
0
GEAppliances.com
Safety Instructions ........ 2-9
fl)
>
0
fl)
>
[3
Operating Instructions
Auto Features .................. 19
Microwave Terms .............. 28
Oven Features .............. 10-12
Other Features .............. 25-26
Power Levels ................... 13
Sensor Features ............. 20-22
Time Features ............... 14-18
Care and Cleaning ...... 27-29
Troubleshooting Tips ...... 3o
Things That Are Normal ........ 30
Consumer Support
Consumer Support ...... Back Cover
Warranty ...................... 31
JVM6175
JVM6177
LVM6177
Espafiol
For a Spanish version of this manual, visit
our Website at GEAppliances.com.
Para consultar una version en espa_ol de
este manual de instrucciones, visite nuestro
sitio de internet GEAppliances.com.
0
LP
Write the model and serial
numbers here:
Model #
Serial #
Youcan find them on a label inside the
oven.
49-40700 05-13 GE
IMPORTANT SAFETYINSTRUCTIONS.
READ ALL INSTRUCTIONS BEFOREUSING.
WARNING!
To reduce risk of burns, electric shock, fire, personal injury or exposure to excessive microwave energy.
PRECAUTIONS TOAVOID POSSIBLEEXPOSURE
TO EXCESSIVEMICROWAVE ENERGY
(a) Do Not Attempt to operate this oven with the door
open since open-door operation can result inharmful
exposure to microwave energy. It isimportant not to
defeat or tamper with the safety interlocks.
(b) Do Not Piece any object betweenthe oven front
face and the door or allow soilor cleaner residueto
accumulate on sealingsurfaces.
Do Not Operate the oven ifit isdamaged. It is
particularly important that the ovendoor close properly
and that there is no damage to the:
(!) door (bent),
(2)hinges and latches (broken or loosened),
(3)door sealsand sealing surfaces.
(d) TheOvenShould Not be adjusted or repaired by
anyone except properly qualified servicepersonnel.
IMPORTANT SAFETYINSTRUCTIONS.
Usethisapplianceonly for its intendedpurposeas describedinthis Owner'sManual.
Whenusing electricalappliancesbasicsafety precautionsshould befollowed,including the following:
[] Read and follow the specific precautions in the
PRECAUTIONSTO AVOID POSSIBLEEXPOSURETO EXCESSIVE
MICROWAVE ENERGY section above.
[] Thisappliance must be grounded. Connectonly to aproperly
grounded outlet. Seethe GROUNDINGINSTRUCTIONSsection
on page 8.
[] Installor locate this appliance only in accordance with the
provided installation instructions.
[] Becertainto place the front surface of the door 3"or more
back from the countertop edge to avoid accidental tipping of
the appliance innormal usage.
[] Thismicrowaveoven isnot approved or tested for marine use.
[] Donot mount this appliance over asink.
[] Donot operate this appliance if it hasa damaged power
cord or plug, if it is not working properly,or if it has been
damaged or dropped.
[] Donot cover or block any openings on the appliance.
[] Usethis appliance only for its intended useasdescribed in
this manual. Donot use corrosivechemicals or vapors in this
appliance. Thismicrowave oven isspecificallydesigned to
heat, dry or cookfood, and isnot intended for laboratory or
industrial use.
[] Donot store this appliance outdoors. Donot usethis
product near water-for example, in a wet basement, near a
swimming pool,near asink or in similar locations.
[] Donot let cord hang overedge of table or counter.
[] Donot store anything directly on top of the appliance when
it is in operation.
[] Keep power cord away from heated surfaces.
[] Do not immerse power cord orplug inwater.
[] Toreduce the riskoffire in the oven cavity:
- Do not overcook food. Carefully attend appliance when
paper, plastic or other combustible materials areplaced
insidethe ovenwhile cooking.
- Removewire twist-ties and metal handlesfrom paper or
plastic containers before placing them in the oven.
- Do not usethe ovenfor storage purposes.Do not leave
paper products, cooking utensilsor food inthe oven when
not inuse.
- Ifmaterials insidethe oven ignite, keep the oven door closed,
turn the oven off and disconnectthe power cord, or shut
off power at the fuse or circuit breaker panel.If the door is
opened,the fire may spread.
[] Seedoor surface cleaning instructions inthe Careand
cleaning of the microwave oven section of this manual. Do
not usecleanerswith ammonia oralcohol on the microwave
oven. Ammonia and alcohol can damage the appearance of
the microwave.
[]
GEdoesnotsupport any servicingofthis microwaveoven,
exceptasdescribedbythe ConsumerSupportsectionsof
this manual. Donot attempt to servicethe microwave oven
yourself. Ifserviceisdesired,this applianceshould beserviced
onlyby qualifiedservice personnel.Contact the nearest
authorizedservicefacility for examination,repairoradjustment.
[]
Aswith any appliance, closesupervisionisnecessary when
used by children.
2 SAVETHESEINSTRUCTIONS
INSTRUCCIONES IMPORTANTES DE SEGURIDAD.
LEA PRIMERO TODA LASINSTRUCCIONES. GEAppliances.com
AiPRECAUCI6N!
Par su seguridad, la informacidn contenida en este manual debe seguirse para minimizar el riesgo de incendio, explosidn,
descarga eldctrica, exposicidn a energfa microondas.
PRECAUCIONES PARA EVITAR POSIBLE EXPOSICION A
UNA EXCESIVA ENERGIA DE IvlICROONDAS.
(a) No Intente operar este homo con la puerta abierta ya
que esto podr[a resultar en unaexposici6n a energ[a
microondas dahina. Esimportante no cancelar ni
manipular deforma indebida losdispositivosde
seguridad.
(b) No Sit_e ning0n objeto entre la parte frontal delhomo
y la puerta ni permita que seacumule suciedad o
residuos limpios en las gomas decierre herm@ico.
(d No Use el homo siest6 da_ado. Esespecialmente
importante que la puerta del homo secierre
correctamente y queno sedahe:
(!) la puerta (doblada),
(2)bisagras y pasadores (rotoso sueltos),
(3)sellosde la puerta y gomas decierre herm@ico.
(d) El homo no deberia ajustarse ni repararse par nadie
que no sea personal de servicio adecuadamente
calificado.
INSTRUCCIONES IMPORTANTES DESEGURIDAD.
Use este dectrodomdstico s6!o para su propdsito origina!, coma se describe en e! Manua! de! Propietario.
AI usar artefactos eldctricos se deberdn seguir los precauciones bdsicas de seguridad, incluyendo Io siguiente:
III Leay obedezcalasprecaucionesespedficasen lasecci6n
de PRECAUCIONESPARAEVITARPOSIBLEEXPOSICIONA UNA
ENERG[AEXCESIVADEMICROONDASdearriba.
I Esteelectrodom@sticodebeestarconectadoa tierra.Con@ctelo
s61oa una toma de corrientecontoma de tierra.Vealasecci6n
de INSTRUCCIONESDETOMADETIERRAen la p6gina 9.
I Instaleocoloqueesteelectrodom@sticosiguiendos61olas
InstruccionesdeInstalaci6nprovistas.
m Aseg0resedecolocar lasuperficiefrontal de la puertaY' om6s
arrasdel extremode labase,a fin deevitarcafdasaccidentales
del electrodom@sticoduranteun usanormal.
m Estehornomicroondasno est6aprobado ni evaluadopara usa
naval.
I No monte el electrodom@stico sabre un lavabo.
m Nousaresteelectrodom@sticosiel cabledecorrienteo el
enchufe bansufrido alg0nda_o, si nofunciona correctamente
o si ha resultadoda_ado oseha cafdo.
I Nobloqueeni cubra cualquieraberturadel electrodom@stico.
m D@a esteelectrodom@sticoel usapara elcualfue
dise_ado0nicamente,coma sedescribeeneste manual.
Nouseproductos qufmicoscorrosivosni vaporeseneste
electrodom@stico.Estehomo microondasfue dise_ado
especfficamenteparacalentar,secaro cocinarcomida,y no
parausa industrialo enlaboratorio.
m Nouseesteproducto cercadel agua;parejemplo,en un
s6tano h0medo,cercade una piscina,cercade un lavabo o en
ubicacionessimilares.
m Nopermitaque elcablesesostengasabreel extremode la
mesada
m Noguardenada directamentesabrela superficiedel homo
microondascuando el mismoseencuentrefuncionando
I Noguarde esteelectrodom@sticoal aire libre.
m iVtantengael cable de corrientealejadodesuperficiescalientes.
m Parareducirel riesgode incendioen laapertura delhomo:
- Nococinedemasiadola comida.Presteatenci6ncuidadosa
al electrodom@sticocuandosecolocapapel,pl6sticou otro
materialcombustibleenel homo mientrasse cocina.
- 9uite lascintasde cierrecon metaly lasasasmet61icasde los
recipientesdepapelo pl6sticoantes deintroducirlosenel horno.
- Noalmacenecosasenel horno.Nodeje productosde papel,
utensiliosdecocinar ni comidaen el homo mientrasno Ioest@
usando.
- Siseincendiaraalg0nmaterialdentro,mantenga la puerta
del homo cerrada,apague elhomo y desconecteel cablede
corrienteel@ctrica,o apague la corrienteen elfusibleo paneldel
diferencial.Sise abre lapuerta elfuegopodrfaexpandirse.
m Lealasinstruccionesde limpiezade la superficiede lapuerta
en la secci6nde Cuidadoy limpiezadel homo microondasde
este manual.Nouselimpiadoresque contengan amonfacos
o alcohol en el homo microondas.Elamonfacoo el alcohol
puedenda_ar elaspectodelhomo microondas.
I GEno respaldaning0n serviciot@cnicosabreestehomo
microondas,exceptocoma se describeen lasseccionesde
Soporteal Consumidordeestemanual. Nointentereparar
el homo microondasusted mismo.Siesnecesariorepararel
electrodom@stico,entoncesel serviciodeber6set realizadopar
una persona calificadadel serviciot@cnico.Comunfquesea una
sucursalautorizadadel serviciot@cnicopara realizarcualquier
control,reparaci6no ajuste.
m AIigualque concualquierelectrodom@stico,sedeber6realizar
una supervisi6nde cercasiesusadopar ninos.
GUARDE ESTASINSTRUCCIONES s
IMPORTANT SAFETYINSTRUCTIONS.
READ ALL INSTRUCTIONS BEFOREUSING.
A WARNING!
IMPORTANT SAFETYINSTRUCTIONS.
[] Donot clean with metal scouring pads. Piecescan burn off the
pad and touch electrical parts involving riskof electricshock.
[] Thismicrowave oven is UL listed for installation over both gas
(lessthan 60,O00BTUtand electric ranges.
ARCING
If you see arcing, press the Cancel/Off pad and correct the
Arcing isthe microwave term for sparksin the oven.Arcing is
caused by:
[] Metal or foil touching the sideof the oven.
[] Foilnot molded to food.
[] Platesor disheswith metallic trim orglaze with a metallic
sheen.
FOODS
[] Donot pop popcorn in your microwave oven unless ina special
microwave popcorn accessoryor unlessyou use popcorn
labeled for usein microwave ovens.
[] Some products such as whole eggs and sealedcontainers-for
example,closedjars-ore able to explode and should not be
heated inthis microwave oven. Suchuse of the microwave
oven could result in injury.
[] Donot boil eggs in a microwave oven.Pressurewill build up
insideegg yolk and will cause it to burst, possiblyresulting in
injury.
[] Operating the microwave with nofood inside for more than a
minute or two may causedamage to the oven and could start
a fire. Itincreasesthe heat around themagnetron and can
shorten the life of the oven.
[] Foodswith unbroken outer "skin"such as potatoes, hot dogs,
sausages,tomatoes, apples, chicken liversand other giblets
and egg yolks should be pierced to allow steam to escape
during cooking.
[] Avoid heating baby food inglassjars, even
with the lid off. Make sureall infantfood isthoroughly cooked.
Stirfood to distribute the heat evenly.Be careful to prevent
scalding when warming formula. Thecontainer may feel cooler []
than the formula really is.Always test the formula before
feeding the baby. []
[] Don'tdefrost frozen beverages in narrow-necked bottles
(especiallycarbonated beverages).Evenif the container is
opened, pressurecan build up. This can cause the container to
burst, possiblyresulting in injury.
[] Thisover-the-range oven is designed for use over ranges no
wider than 36". It may be installed over both gasand electric
cooking equipment..
_roblem.
[] Metal,such as twist-ties, poultry pins orgold-rimmed dishes,in
the microwave.
[] Recycledpaper towels containing small metal pieces being
usedin the microwave.
[]
SUPERHEATEDWATER
Liquids,such as water, coffee or tea areable to beoverheated
beyondthe boiling point without appearing to beboiling.Visible
bubbling or boiling when the container is removed from the
microwave oven is not always present.THISCOULDRESULT
IN VERYHOTLIQUIDSSUDDENLYBOILINGOVERWHENTHE
CONTAINERISDISTURBEDORA SPOONOROTHERUTENSILIS
INSERTEDINTOTHELIQUID.
To reducethe riskof injury to persons:
- Donot overheat the liquid.
- Stirthe liquid both before and halfway through heating it.
- Donot usestraight-sided container with narrow necks.
- After heating, allow the container to stand inthe microwave
oven for ashort time before removing the container.
- Useextreme care when inserting aspoon or other utensil
into the container.
[]
Hot foods and steam can cause burns.Becareful when
opening any containers of hot food, including popcorn bags,
cooking pouches and boxes.To prevent possibleinjury, direct
steam away from hands and face.
Donot overcook potatoes.Theycould dehydrate and catch
fire, causing damage to your oven.
Cookmeat and poultry thoroughly-meat to at least an
INTERNALtemperature of 160°Fand poultry to at least
an INTERNALtemperature of 180°F.Cookingto these
temperatures usually protects against foodborne illness.
4 SAVETHESEINSTRUCTIONS
INSTRUCCIONES IMPORTANTES DE SEGURIDAD.
LEA PRIMERO TODA LASINSTRUCCIONES.
iPRECAUCION!
INSTRUCCIONES IMPORTANTES DE SEGURIDAD.
[] Nolimpie con almohadillas met61icaspara fregar. Laspiezas
podr6n quemar la almohadilla y tener contacto con partes
el6ctricas y producir riesgo de descargas el6ctricas
[] Estehomo de microondas est6 listado par ULpara set
instalado sabre estufas electricas y degas (memos de 60,000
BTU).
FORh4ACION DE ARCO EL 'CTRICO
Si ve que seforman areas eldctficos,presione el bot6n Cuncel/Off (borrar/apagado)y resuelvael problema.
Arco eldctfico es Io que, en la terminologia delosmicroondas,
describelaschispasen elhomo.
[] Ha},un metal o papel de aluminio tocando el lateral delhorno.
[] Elpapel de aluminio no est6envolviendo bien la comida.
[] Platoso lavajillas con bordes met61icoso con una capa de
brillo met61ico.
COMIDAS
[] Estehomo puede instalarse encima de la cocina y est6
disefiado para su usa sabrecocinas encimeras no m6s
anchas de 36". Puedeinstalarse sabreequipos paracocinar
de gas o el6ctricos.
[] Hay algOnmetal, coma cintas de cierrecon metal, pinchos de
polio,o platos con decoraci6n de orodentro del microondas.
[] Seest6 usando papeltoalla reciclado que contienen pequehas
porciones de metal en
el microondas.
GEAppliunces.com
[] Nohagarosetasopalomitasde maizenelmicroondasanoser
queest@usandounaccesorioespecialparaprepararlaso queest@
empleandorosetaso palomitasdemaizqueindiquenservOlidas
paraelusadehornosmicroondas.
[] Algunos productos tales coma huevosenteros y envases
sellados - par ejemplo:tarros devidrio cerrados - pueden
explotar y par estono se debencalentar en el homo
microondas. Dicho usa del horno microondas podr6 producir
lesiones.
[] Nohiervahuevosdentrodeunhomo microondas.Segenerar6
presi6ndentrodelayemadelhuevoquecausar6queexpiate
pudiendo,posiblemente,da_araalguien.
[] Siseponeenmarchael microondassintenercomidaensuinterior
par m6sdeun minutoo dospodriancausarseda_osalhomo
y podriaempezarunfuego.Estohaceaumentarlatemperatura
alrededordelmagnetr6nypuedereducirel periododevidaOtildel
homo.
[] Lascomidascocinadasen Ifquidos(comala pasta)puedentener
ciertatendenciaa hervirm6sr@idamentequelosalimentos
quecontenganmenoshumedad.Siestoocurre,reviselasecci6n
deCuidadoy limpiezadelhomo microondasdondeencontrar6
instruccionesencuantoa lalimpiezadelinteriordelmicroondas.
[] Nocalientelacomidadelbeb@enjarrasde cristal,inclusosi est6n
destapadas.AsegOresedequelosalimentosdelosni_osest@nbien
cocinados.Remuevalacomidaparadistribuirelcalor deforma
pareja.Tengacuidadodequeel ninonosequemealcalentarla
lechedef6rmula.Elcontenedorpuedeparecerm6sfriode Ioque
realmenteest6laf6rmula.Pruebesiemprelaf6rmulaantesde
d6rselaalbeb@.
[] Nodescongelebebidascongeladasenbotellasdecuelloestrecho
(especialmentebebidascarbonatadas),tnclusoconelcontenedor
abierto,podrfagenerarseun aumentodepresi6n.Estopuedecausar
queelcontenedorexpiate,IocualpodriaproducirdaBospersonales.
[] AGUASOBRECALENTADA
Uquidos,talescomoagua,cold,0td,sepodrfansobrecalentarmds
did de/puntodeebullici6nsinparecerqueestdnhirviendo.Nosiempre
habrdburbujas0 evidenciadequeelIfquidoestdhirviendocuandose
extraeelenvaseconelffquidode/microondas.ESTOPODRfARESULTAR
ENLfQUfDOSMUYCALIENTESDEREPENTECOMENZANDOAHERVIRY
A REBOSARSECUANDOELENVASEESMOVIDO0 SIUNACUCHARAU
OTROUTENSILIOSELEINTRODUCEALLfQUIDO.
Parareducirelriesgodelesionespersonales:
- Nosobrecalientelosliquidos.
- Muevaelliquidotantoantescomoa mediadosdeltiempode
calentamiento.
- Nouseenvasesdeladosrectosconcuellosestrechos.
- Despu@sdelcalentamiento,permitaqueelenvasepermane7caenel
microondasporuntiempocortoantesderemoverelenvase.
- Usecuidadoextremocuandoinserteunacucharauotto utensilioen
elenvase.
[] Losalimentoscalientesy elvaporpuedencausarquemaduras.
Tengacuidadoalabrircualquiercontenedorconcomidacaliente,
inclusobalsasderosetasopalomitasdemaiz,balsaso cajasde
cocinar.Paraprevenirposiblesda_ospersonales,mantengaelvapor
alejadodesusmanosy rostra.
[] Nococinedemasiadolaspapas.Podrfandeshidratarseeincendiarse,
causandoda_osa suhomo.
[]
Cocinelacamey elpoliopar completo-la came hastaquealcance
unatemperaturaminimaINTERIORde 160%y elpoliohastauna
temperaturatNTERNAminimade 180°F.Cuandosecocinana
estastemperaturasse evitalacontracci6ndeenfermedadespar
intoxicaci6n.
GUARDEESTAS INSTRUCCIONES s
IMPORTANT SAFETYINFORMATION.
READ ALL INSTRUCTIONS BEFORE USING.
A WARNING!
Make sure all cookwure used inyour microwave oven is
suitable for microwuving. Mostglass casseroles,cooking dishes,
measuring cups, custard cups,pottery or china dinnerware which
does not have metallic trim or glazewith a metallic sheen can be
used.Somecookwure is labeled "suitable for microwuving."
[] Ifyou are not sure if u dish ismicrowave-safe, usethis test:
Placein the oven both the dishyou are testing and u glass
measuring cup filled with I cup of water-set the measuring
cup either in or next to the dish. Microwave
30-/45secondsat high. Ifthe dish heats,it should not beused
for microwuving.
If the dish remains cool and onlythe water inthe cup heats,
then the dishis microwave-safe.
[] Ifyou use u meat thermometer while cooking, make sure it is
safe for use in microwave ovens.
[] Do not use recycledpaper products. Recycledpaper towels,
napkins and waxed paper can contain metal fleckswhich may
cause arcing or ignite.Paper products containing nylon or
nylon filaments should be avoided, us they may alsoignite.
[] Somefoam trays (likethose that meat is packagedon)
have a thin strip of metal embedded inthe bottom. When
microwaved, the metal can burn the floor of the oven or ignite
a paper towel.
[] Do not usethe microwave to dry newspapers.
[] Not all plasticwrap is suitable for usein microwave ovens.
Checkthe package for proper use.
[] Papertowels, waxed paper and plasticwrap can beusedto
cover dishes in order to retain moisture and prevent sputtering.
Besure to vent plastic wrap so steam can escape.
[] Cookwure may become hot becauseof heat transferred from
the heated food. Potholders may beneeded to handlethe
cookwure.
[]
"Bailable"cooking pouches and tightly closed plastic bags
should beslit,piercedor vented usdirected by package. If they
are not, plastic could burstduring or immediately after cooking,
possiblyresulting in injury.Also,plastic storage containers
should beat least partially uncovered becausethey form a
tight seal.When cooking with containers tightly covered with
plasticwrap, remove covering carefully and direct steam away
from hands and face.
[]
Usefoil only usdirected inthis guide. TVdinners may be
microwuved infoil trays lessthan 3//4"high;remove the top
foil cover and return the tray to the box.When using foil in the
microwave oven, keepthe foil at least 1"away from the sides
of the oven.
[]
Plasticcookwure-Plustic cookware designedfor microwave
cooking is very useful,but should be usedcarefully. Even
microwave-safe plastic may not beus tolerant of overcooking
conditions usare glass or ceramic materials and may soften
or char ifsubjected to short periodsof overcooking. Inlonger
exposuresto overcooking,the food and cookwure could ignite.
Follow these guidelines.
1. Usemicrowave-safe plastics only and usethem in
strict compliance with the cookware manufacturer's
recommendations.
2. Donot microwave empty containers.
3. Donot permit children to use plastic cookware without
complete supervision.
THE VENT FAN
Thefan will operate automatically under certain conditions (see
Automatic Fanfeature). Take careto prevent the starting and
spreading of accidental cookingfires while the ventfan isin use.
[] Cleanthe underside of the microwave often.
Donot allow grease to build up on the microwave orthe fan
filters.
[] Inthe event of a greasefire on the surface unitsbelow the
microwave oven, smother aflaming
pan on the surface unit by coveringthe pan completely with a
lid,a cookiesheet or a flat tray.
6 SAVETHESEINSTRUCTIONS
[]
Usecare when cleaning the vent fan filters. Corrosivecleaning
agents,such as lye-based oven cleaners,may damage the
filters.
[]
When preparing flaming foods under the microwave, turn the
fan on.
[]
Never leave surface units beneath your microwave oven
unattended at high heat settings. Boiloverscause smoking and
greasy spillovers that may ignite and spread ifthe microwave
vent fan isoperating. To minimize automatic fan operation, use
adequate sizedcookware and use high heat on surface units
onlywhen necessary.

INSTRUCCIONES IMPORTANTES DE SEGURIDAD.
LEA PRIMERO TODA LAS INSTRUCCIONES.
kiPRECAUCISN!
AsegOrese de que todos los utensilios de cocina que use en su
homo sean aptos para microondas. Puedenusarse la mayor[a
de las cazuelas,platos para cocinar,tazas de medir,tazas de
flanes y bates decristal,o lasvajillas de porcelana que no tienen
decoraciones metalicas o barnicescon brillo metalico.Algunos
utensiliostienen lasiguiente inscripci6n:"puede usarseen
microondas."
[] si no est6 seguro de que un plato pueda usarseen el
microondas, haga estaprueba: Coloqueel plato queest6
probando y un vasode medir con 237ml (! taza) de agua en
el homo - ponga la taza de medir dentro oal ladodel plato.
Pongael microondas en marcha, a maxima potencia, durante
30-45 segundos. Siel plato secalienta no deber[a usarse en el
microondas.
Siel plato semantiene frio y s61osecalienta la taza, entonces
el plato puede usarsede forma segura en el microondas.
[] Siusa un term6metro de came al cocinar con microondag,
aseg0rese de que sea apto para set usado enmicroondas.
[] Nouse productos de papel reciclado. Elpapel toalla, las
servilletasy el papelde cera reciclados pueden contener
motas met61icasquepodr[an causar laformaci6n de
arcos el6ctricos o incendiarse. Los productos de papel que
contengan nil6n ofilamentos de nil6ntampoco deber[an
usarseya que se podr[an incendiar de igual modo.
[] Somefoam trays (likethose that meat ispackaged on)
have a thin strip of metal embedded in the bottom. When
microwaved, the metal can burn the floor of the oven or ignite
a paper towel.
[] Donot usethe microwave to dry newspapers.
[] Not all plastic wrap issuitable for use in microwave ovens.
Checkthe package for proper use.
[] Algunas bandejas de pl6stico (como en las que seempaqueta
la came) tienen unacinta fina demetal incrustada en elplato.
AIponerseen el microondas, el metal puede quemar elsuelo
del homo o incendiar un papel toalla.
[] Podr[ancalentarse losutensiliospar elcalor transferido par los
alimentos calientes.Puede necesitar usar manoplas cecocina
para manejar los utensilios.
AIutilizar con el microondas balsasde cocinar "que puedan
hervir",as[coma cualquier balsa deplastico firmemente
cerrada, deberan cortarse, perforarse o proveer cualquier tipo
de ventilaci6n segOnindique el paquete. Encaso contrario,
el plastico podrfa explotar mientras secocina odespu_s,
pudiendo causar da_os ffsicos.Ademas, losrecipientes
de plastico deber[an permanecer,al menos,parcialmente
destapados ya que pueden sellarsefuertemente. Cuando
cocine con recipientesfirmemente cubiertos confilm plastico,
retire la cubierta con cuidado y mantenga el vapor alejado de
sus manos y rostra.
Usepapel dealuminio s61ode la forma detallada en este
manual. Cuando use aluminio dentro de un homo microondas,
mantenga el aluminio,al menos,a una pulgada dedistancia
de los laterales del homo.
Utensiliosde pl6stico--Los utensiliosde pl6stico dise_ados
para su usa en microondas son muy practicos,pero deben
usarse con cuidado. Inclusoaquellos utensilios autorizados
para su usa en microondas podr[an noset tan tolerantes
coma el cristal o los materiales de ceramica encondiciones
de sobrecalentamiento y podr[an ablandarse o carbonizarse
al someterlos a perfodoscortos de sobrecalentamiento. En
exposiciones mas largas a sobrecalentamiento, lacomida y los
utensilios podr[an incendiarse.
Sigaestas normas:
1. Usesolamente plasticos aptos para microondas y
2. Nointroduzca en el microondas recipientes
3. Nopermita que los niBosusen utensilios de pl6stico sin
GEAppliunces.com
Oselossiguiendoestrictamente lasrecomendaciones del
fabricante de losutensilios.
ratios.
completa supervisi6n.
EL VENTILADOR EXTRACTOR
Elventilador sepondr6 enfuncionamiento de forma autom6tica
bajo ciertas circunstancias (vetfunci6n de Ventilador Autom6tico).
Prevengael que empiece alg0n fuego al cocinar y quese
extienda mientras elventilador del respiradero est6 en marcha.
[] Limpiea menudo la parte inferior del microondas. No permita
que se acumule grasa enel microondas oen los filtros del
ventilador.
[] Sila grasa seincendiara en las unidadesde
la cocina (fogones)bajo el homo microondas, sofoque
cualquier sart@nen llamas dela unidad de cocina por
completo con una tapa, una bandeja degalletas o cualquier
otra bandeja plana.
GUARDE ESTASINSTRUCCIONES
[] Tenga cuidado al limpiar losfiltros del ventilador extractor. Los
productos de limpieza corrosivos,como loslimpia-hornos a
basede lejfa, pueden dahar losfiltros.
[] Ponga enmarcha el extractor cuando
est6 cocinando comidas con llama bajo el microondas.
[] Nunca dejelas unidades de la cocina
(fogones)bajo su microondas sin atenci6n cuando se est6
trabajando a altas temperaturas. Cuando la comida entra
en ebullici6n segeneran humosy sederraman grasas
que pudieran incendiarsey propagarse si el ventilador
del microondas estcifuncionando. Para minimizar el
funcionamiento del extractor autom6tico, use utensilios de
cocina de tama_o adecuado y useel fuego r@ido en las
unidades de la cocina (fogones)s61ocuando sea necesario.
IMPORTANT SAFETYINFORMATION.
READ ALL INSTRUCTIONS BEFORE USING.
GROUNDING INSTRUCTIONS
,& WARNING-Imnr°mruseofthegroundingnagconresultinoriskofelectricshock.
Thisappliance must be grounded. In the event of an electrical Ifthe outlet is a standard 2-prong wall outlet, it is your personal
short circuit, grounding reduces the risk of electric shock by responsibilityand obligation to have it replaced with a properly
providing anescape wire for the electric current, grounded 3-prong wall outlet.
Thisappliance isequipped with a power cord having a grounding
wire with a grounding plug.Theplug must be plugged into an
outlet that isproperly installed and grounded.
Consulta qualified electrician or servicetechnician if the
GROUNDINGINSTRUCTIONSare not completely understood,or if
doubt existsasto whether the appliance isproperly grounded.
ADAPTER PLUGS
Donot underany circumstances cut or remove the third (ground)
prong from the power cord.
We do not recommend using an extension cord with this
appliance. If the power cord istoo short, hove a qualified
electrician orservicetechnician install an outlet near the
appliance. (SeeEXTENSIONCORDSsection.)
Forbest operation, plugthis appliance into its own electrical
outlet to prevent flickering of lights,blowing of fuse or tripping of
circuit breaker.
Usage situations where appliance's power cord will be disconnected infrequently.
Becauseof potential safety hazards under certain conditions,
we strongly recommend against the use of an adapter plug. However,ifyou stillelect to
use an adapter, where local codes permit, a TEMPORARYCONNECTION may be made to a
properly grounded wall receptacle bythe useof a UL listed adapter which is available at most
local hardware stores.
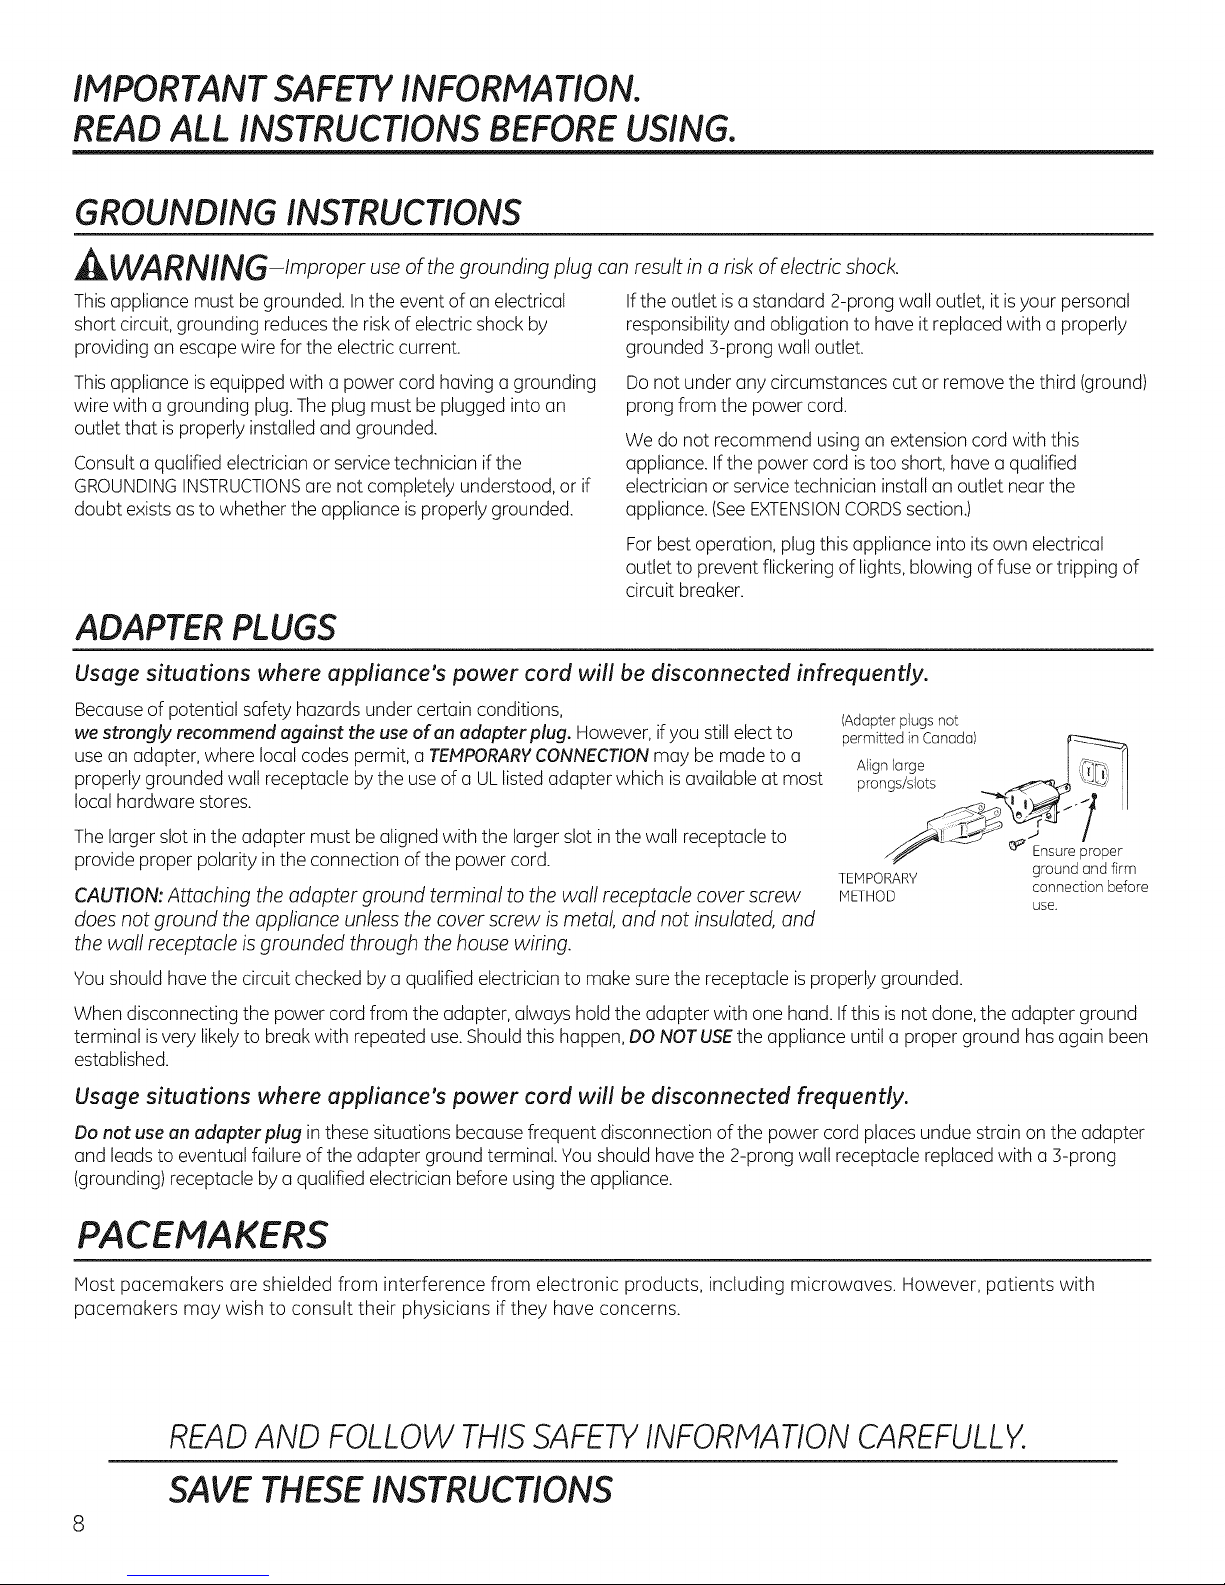
Thelarger slot in the adapter must be aligned with the larger slotin the wall receptacle to
provide proper polarity inthe connection of the power cord.
CAUTION: Attaching the adapter ground terminal to the wall receptacle cover screw
does not ground the appliance unless the cover screw is metal, and not insulated, and
the wall receptacle is grounded through the house wiring.
Youshould havethe circuit checked by a qualified electrician to make surethe receptacle is properly grounded.
When disconnecting the power cord from the adapter, always hold the adapter with one hand. Ifthis isnot done,the adapter ground
terminal isvery likelyto break with repeated use.Should this happen, DO NOT USEthe appliance until a properground hasagain been
established.
(Adapter plugs not
permitted in Canada)
Alignlarge r% _]
prongs/slots f<¢"_ _ _""_ I
J_" _ Ensure proper
TEMPORARY ground and firm
METHOD
connection before
use.
Usage situations where appliance's power cord will be disconnected frequently.
Do not use an adapter plug in these situations becausefrequent disconnection of the power cord places unduestrain onthe adapter
and leads to eventual failure of the adapter ground terminal. You should have the 2-prong wall receptacle replacedwith a :3-prong
(grounding) receptacle by a qualified electrician before usingthe appliance.
PACEMAKERS
Most pacemakers are shielded from interference from electronic products, including microwaves. However, patients with
pacemakers may wish to consult their physicians if they have concerns.
READ AND FOLLOW THISSAFETYINFORMATION CAREFULLY.
SAVETHESEINSTRUCTIONS
INSTRUCCIONES IMPORTANTES DE SEGURIDAD.
LEA PRIMERO TODA LASINSTRUCCIONES. GEAppliances.com
INSTRUCCIONESDE TONIADE TIERRA
AiADVERTENCIA!
El usa indebido del enchufe de tierra puede resultor en riesgo de descarga el_ctrica..
Esteelectrodom6stico debe estar conectado a tierra.Sise
produjera un cortocircuito, la toma de tierra reduce elriesgo
de descarga el6ctrica al proveer un cable de escape para la
corriente el6ctrica.
Esteelectrodom6stico est6 equipado con un cable decorriente
que dispone de un hilo para toma de tierra con un enchufe con
toma de tierra. Elenchufe debeestar conectado a una toma de
corriente que est6debidamente instalada y con salida a tierra.
Consultecon unelectricista cualificado o un t6cnico de
reparaciones si no entiende completamente las instrucciones
sabre la toma de tierra,o situviese alguna duda sabre sisu
aparato est(_debidamente conectado a tierra.
Sila toma de corriente es un modelo est6ndar dedos clavijas,es
ADAPTADORES DE ENCHUFE
su responsabilidad personal y su obligaci6n el reemplazarla par
una toma adecuada para tres clavijas con conexi6n a tierra.
Bajoninguna circunstancia debe cortar o quitar latercera clavija
(tierra)del cable de corriente.
Nouse un enchufe adaptador con este electrodom6stico.
Nouse un cable extensor de corriente con
este electrodom6stico. Siel cable de corriente esdemasiado
corto, haga que unelectricista cualificado o unt6cnico
de reparaciones instalenuna toma de corriente cerca del
electrodom6stico.
Paraun mejor funcionamiento, enchufe esteelectrodom6stico
en una toma de corriente exclusiva para evitar parpadeos deluz,
fusiblesquemados o que salte eldiferencial.
Situaciones deusa en que el cable decorriente del electrodom6stico ser6 desconectado con poca frecuencia.
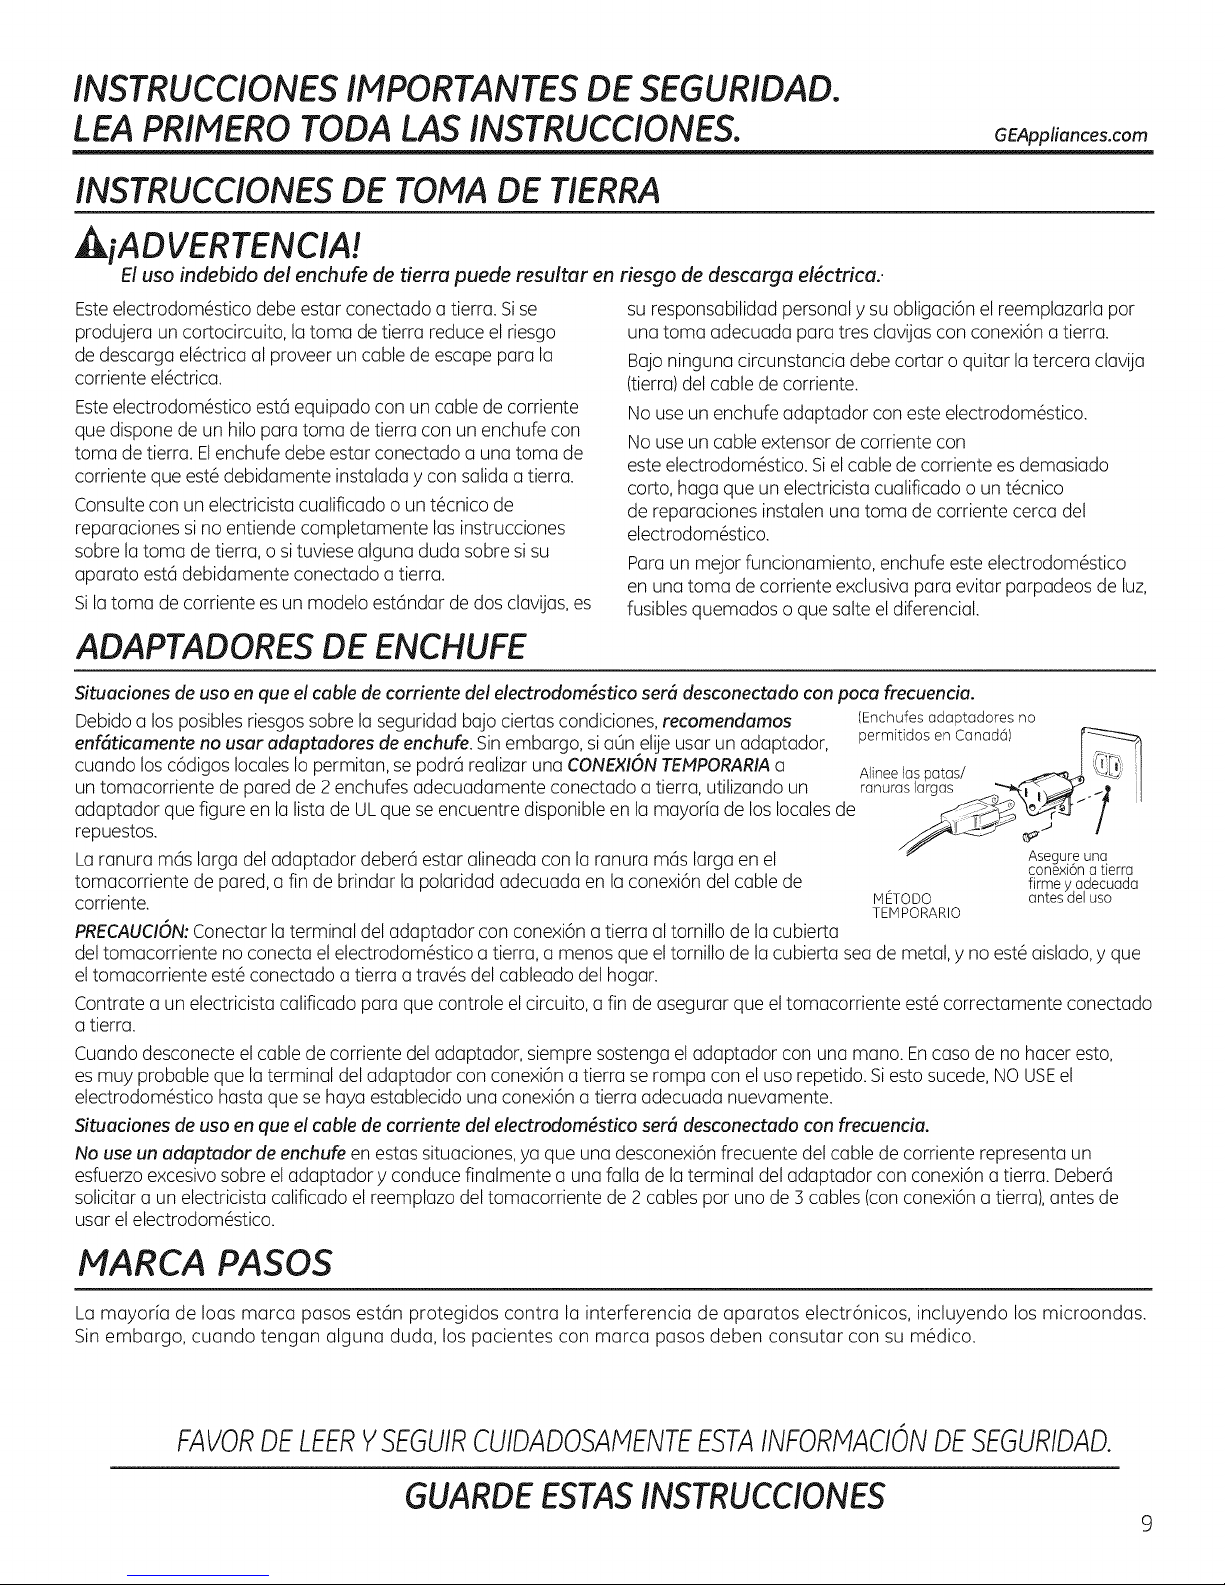
Debidoa los posibles riesgossabre la seguridad bajociertas condiciones, recomendamos (Enchufesadaptadoresno
enfdticamente no usar adaptadores de enchufe. Sin embargo, si aOn elije usar un adaptador, permitidosen Canad6) r___]
cuando losc6digos locales Io permitan, se podr5 realizar unaCONEXION TEMPORARIA a Alineelasparas/ __,_-..<_!, ',LL,L,'_ :l
un tomacorriente de paredde 2 enchufes adecuadamente conectado a tierra, utilizando un ranuras largas ._.,,_<_. i_ I
adaptador que figure enla lista de UL que se encuentre disponible en la mayor[a de los localesde /f
repuestos. _-_¢ _-A._-- _-> !
Laranura m6s larga del adaptador deber6 estaralineada con la ranura m6s larga en el _ Asegufeuna
tomacorriente de pared,a fin debrindar la polaridad adecuada en la conexi6n del cable de firme y adecuada
corriente, METODO antes del usa
PRECAUCION:Conectar la terminal del adaptador con conexi6n a tierra al tornillo de la cubiertu
del tomacorriente no conecta elelectrodom6stico a tierra, a menos que el tornillo de la cubierta sea de metal,y no est6 aislado,y que
el tomacorriente est6 conectado a tierra a trav6s del cableado delhogar.
Contrate a un electricistacalificado para que controle elcircuito, afin de asegurar que eltomacorriente est6 correctamente conectado
a tierra.
Cuando desconecte elcable de corriente deladaptador, siempre sostenga el adaptador con una mano. Encaso deno hacer esto,
es muy probable quela terminal del adaptador con conexi6n a tierra se rompa con el usa repetido. Siesto sucede, NO USEel
electrodom6stico hasta que sehaya establecido una conexi6na tierra adecuada nuevamente.
Situaciones deusa en que el cable de corriente del electrodom_stico serd desconectado con frecuencia.
No use un adaptador de enchufe enestas situaciones,ya que una desconexi6n frecuente delcable de corriente representa un
esfuerzoexcesivo sabre el adaptador y conduce finalmente a unafalla de la terminal del adaptador con conexi6n a tierra. Deber6
solicitar a un electricista calificado el reemplazo del tomacorriente de 2 cables par uno de 3 cables (con conexi6n atierra),antes de
usar el electrodom6stico.
TEMPORARIO
conexlonatierra
NIARCA PASOS
La mayorfa de Ioas marca pasos est6n protegidos contra la interferencia de aparatos electr6nicos, incluyendo los microondas.
Sin embargo, cuando tengan alguna duda, los pacientes con marca pasos deben consutar con su m6dico.
FAVORDELEERYSEGUIRCUIDADOSAMENTEESTAINFORMACIONDESEGURIDAD.
GUARDE ESTASINSTRUCCIONES
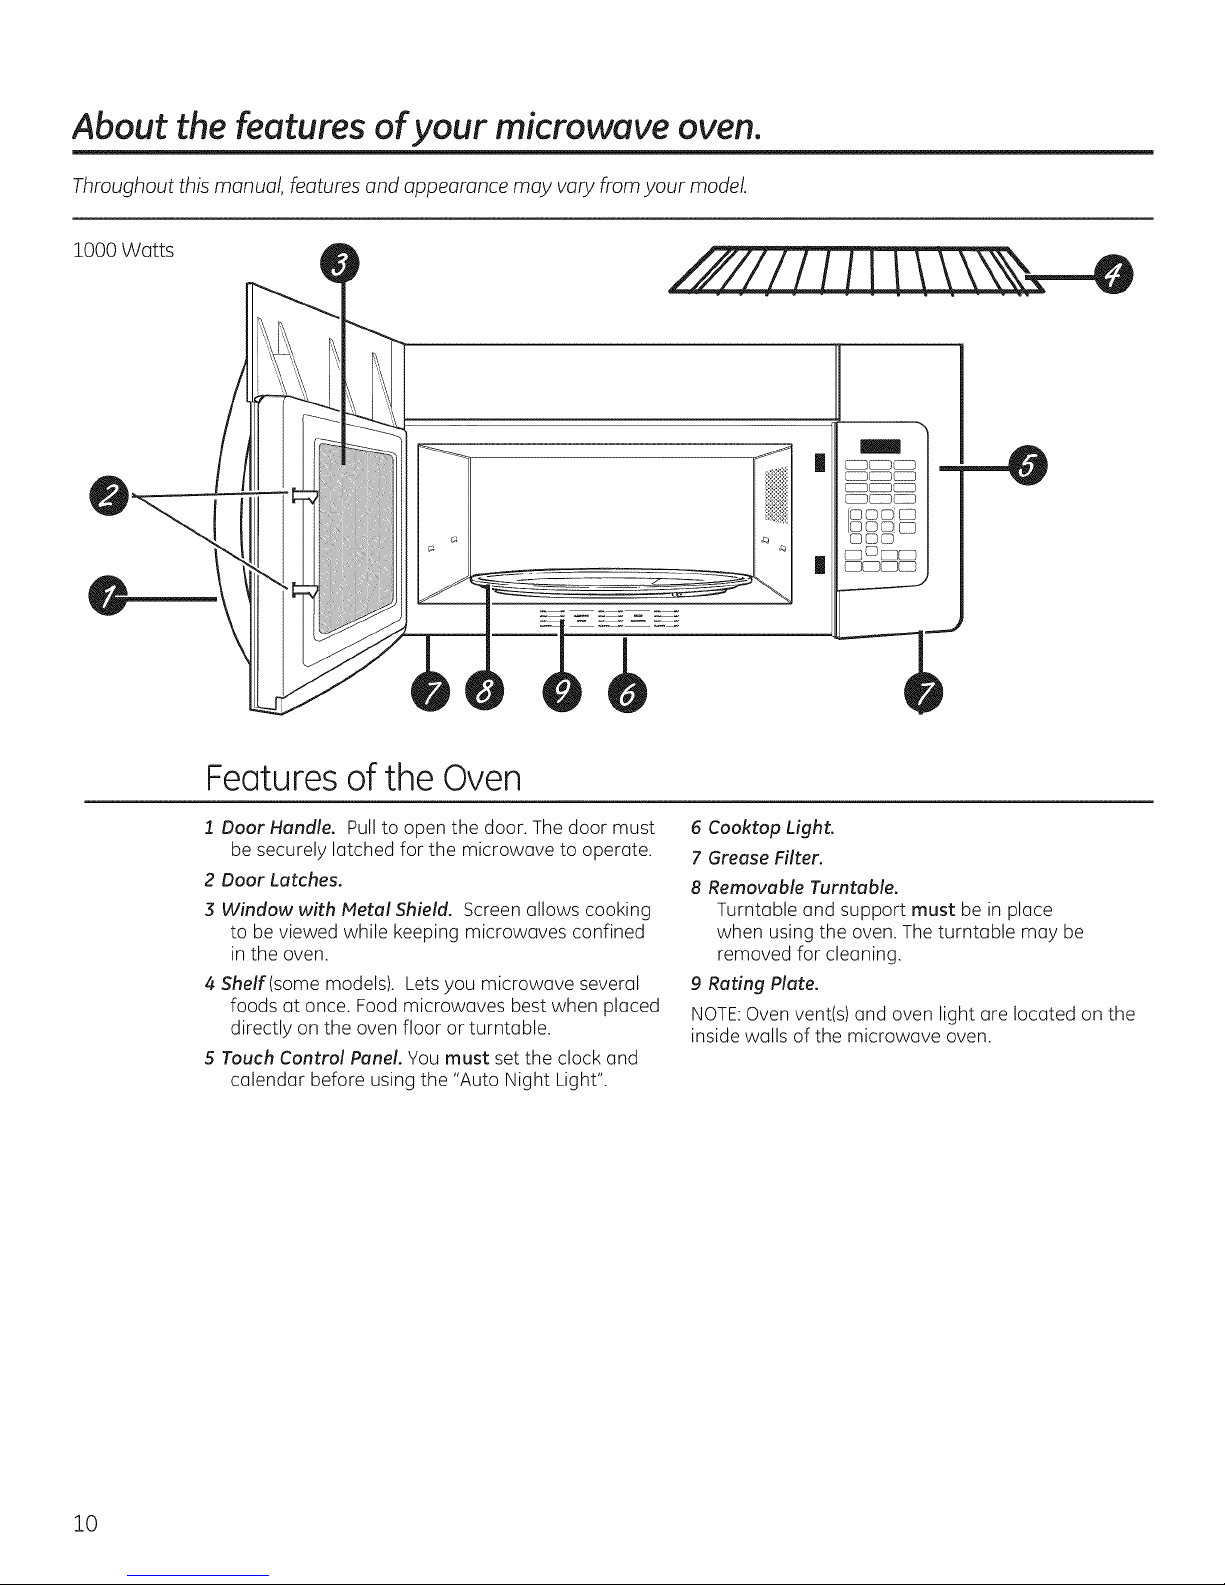
About the features of your microwave oven.
Throughout this manual, features and appearance may vary from your model.
1000 Watts
m
m_CZEZ3_
Featuresof the Oven
1 Door Handle. Pullto open the door. The door must
be securely latched for the microwave to operate.
2 Door Latches.
3 Window with Hetal Shield. Screen allows cooking
to be viewed while keeping microwaves confined
in the oven.
4 Shelf(some models). Lets you microwave several
foods at once. Food microwaves best when placed
directly on the oven floor or turntable.
5 Touch Control Panel. You must set the clock and
calendar before using the "Auto Night Light".
6 Cooktop Light.
7 Grease Filter.
8 Removable Turntable.
Turntable and support must be in place
when using the oven. The turntable may be
removed for cleaning.
9 Rating Plate.
NOTE:Oven vent(s) and oven light (]re located on the
inside walls of the microwave oven.
10
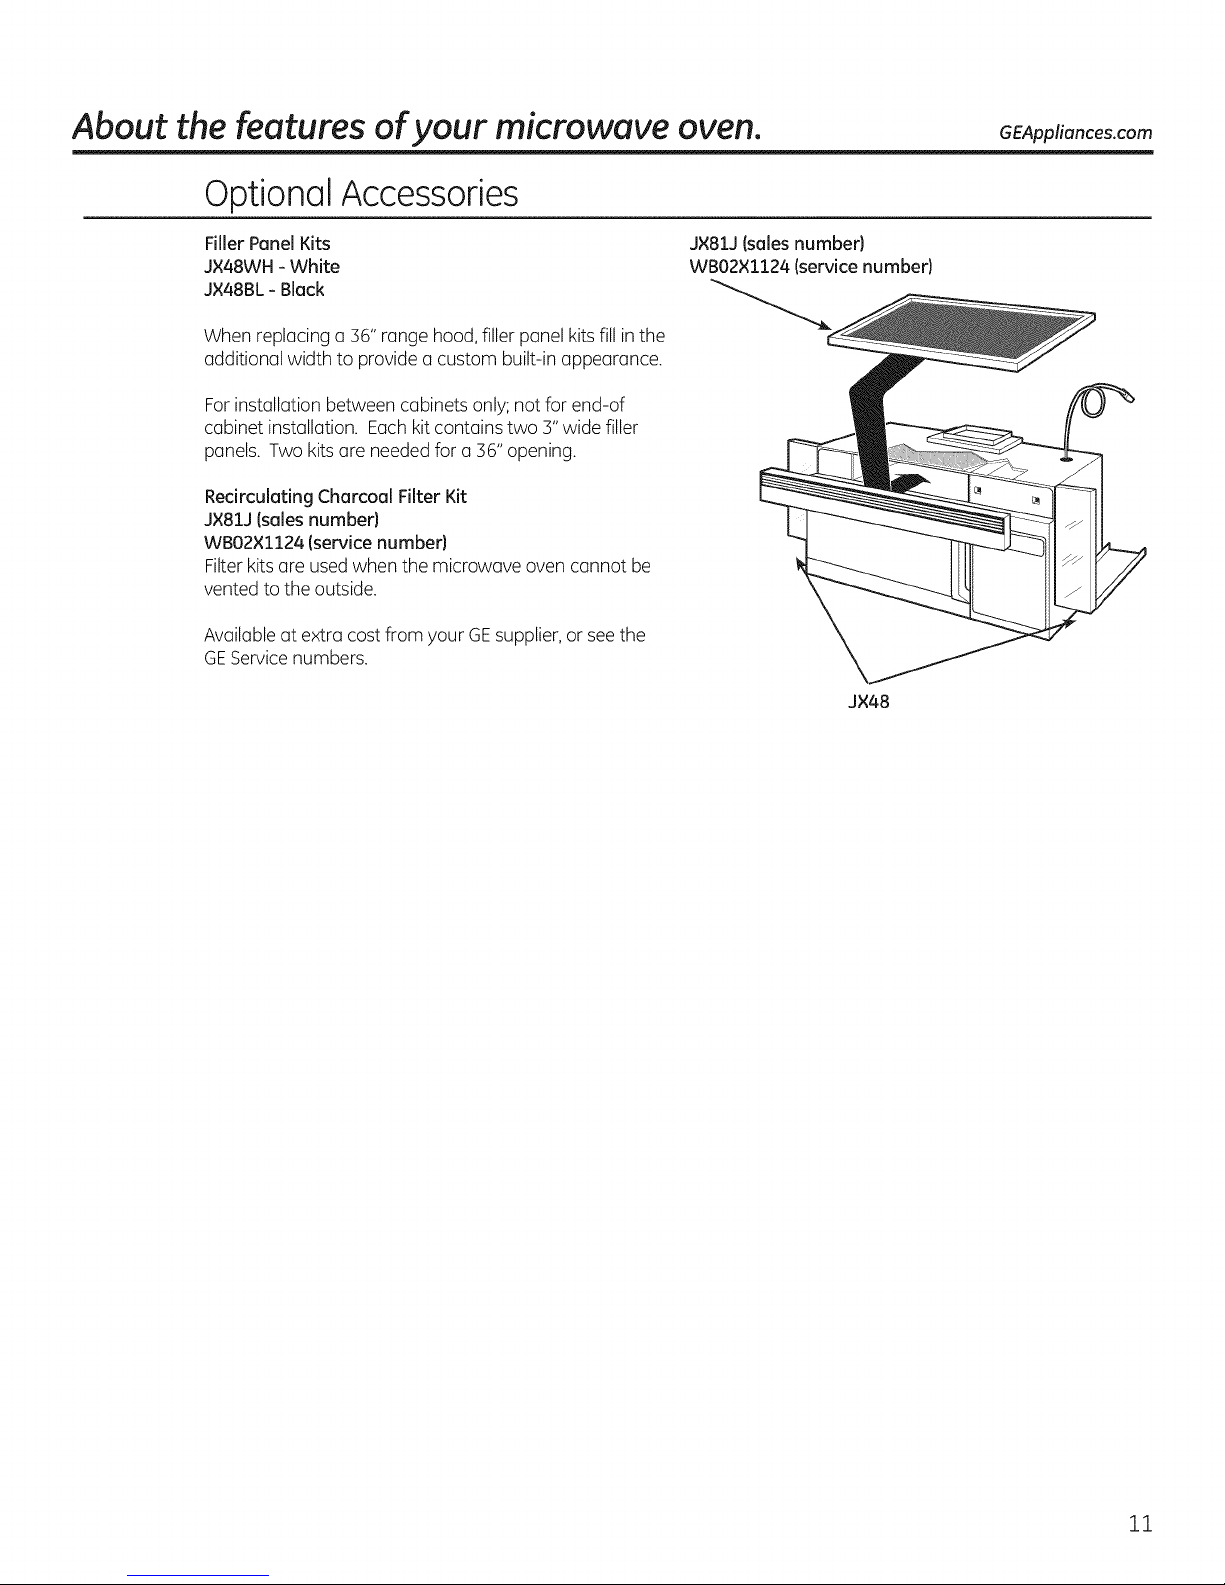
About the features of your microwave oven. GEApUionces.com
Optional Accessories
Filler Panel Kits
J×48WH - White
J×48BL- Black
When replacing a 36" range hood,filler panel kitsfill in the
additional width to provide a custom built-in appearance.
Forinstallation between cabinets only; not for end-of
cabinet installation. Each kit contains two 3" wide filler
panels. Two kitsare needed for a 36"opening.
Recirculating Chamoal Filter Kit
J×81J(sales number)
WB02×1124 (service number)
Filterkits are usedwhen the microwave oven cannot be
vented to the outside.
Availableat extra cost from your GEsupplier,or seethe
GEServicenumbers.
J×81J (sales number)
WB02×1124 (service number)
JX48
11
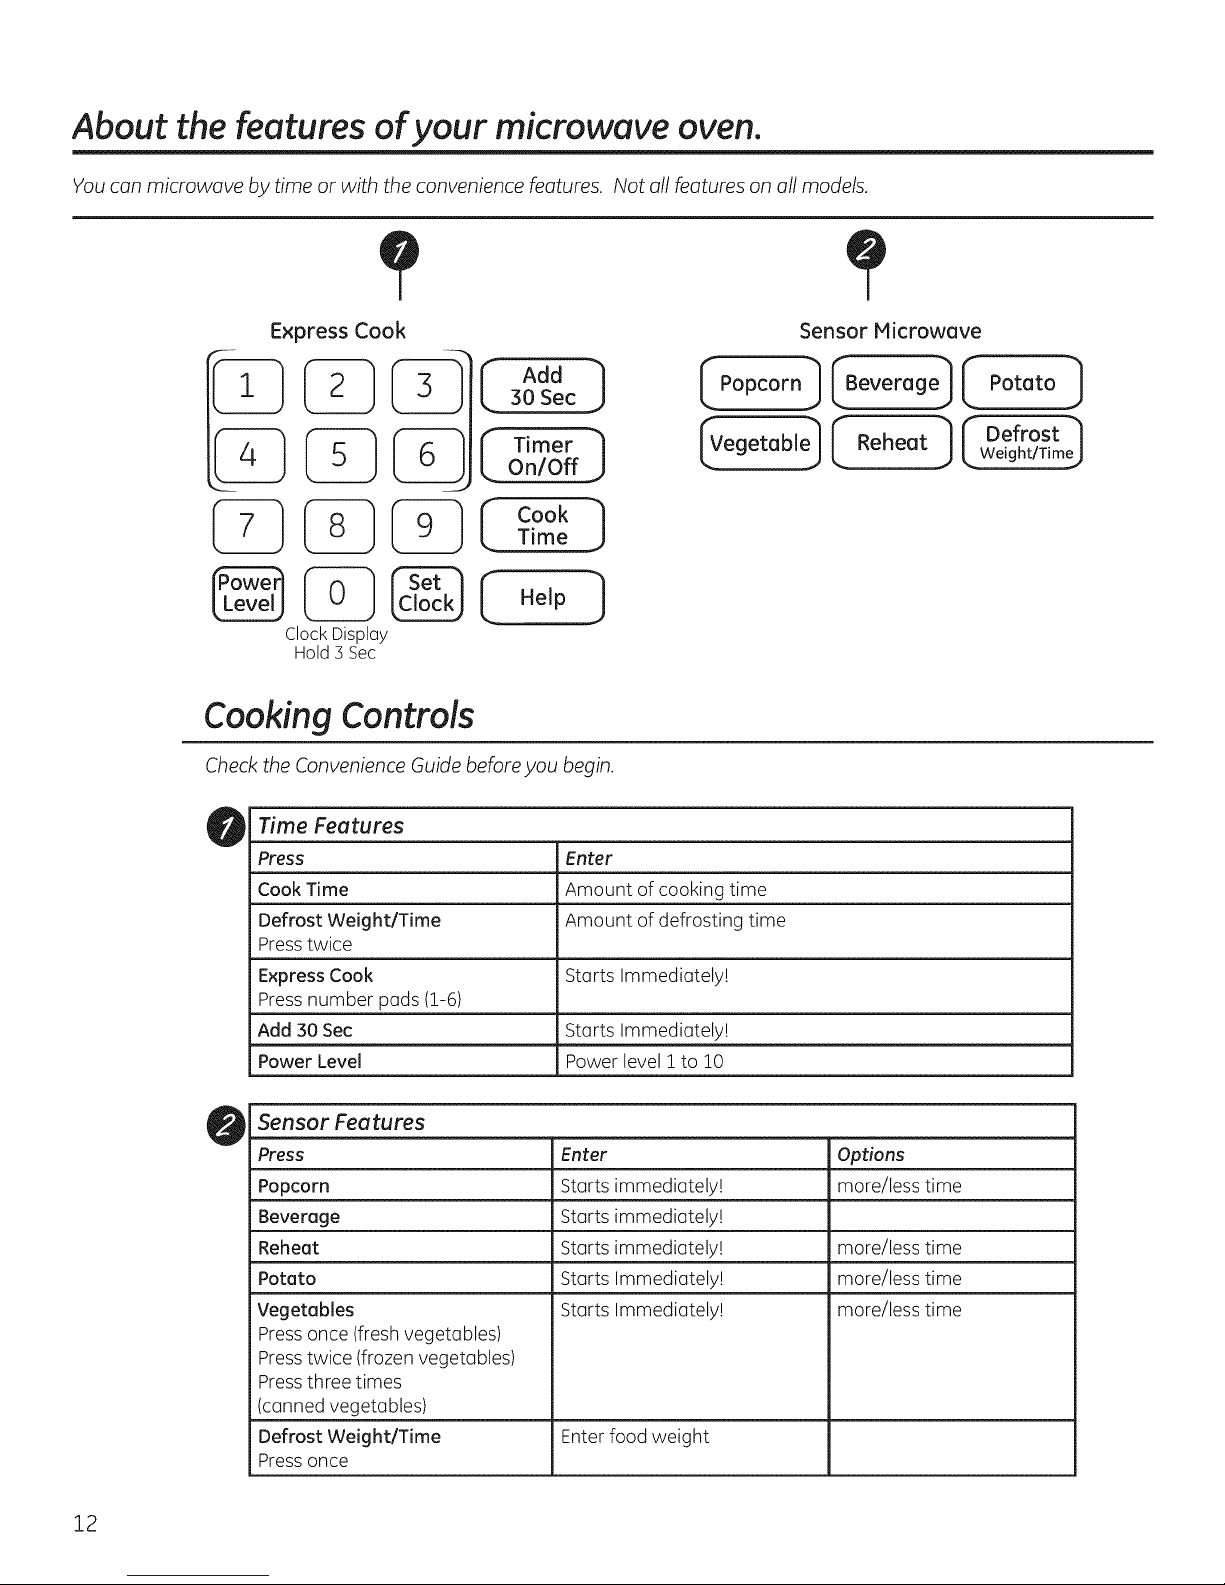
About the features of your microwave oven.
You can microwave by time or with the convenience features. Not all features on all models.
Express Cook
k 30SecJ
L Time J
ClockDisplay
Hold3 Sec
Cooking Controls
Check the Convenience Guide before you begin.
Time Feetures
Press
Cook Time
Defrost Weight/Time
Press twice
Express Cook
Press number pads (1-6)
Add 30 Sec
Power Level
Enter
Amount of cooking time
Amount of defrosting time
Starts Immediately!
Starts Immediately!
Power level i to 10
Sensor Microwave
0ovo o0o
_Vegetob,e__ Reheat] r De'rost],Weight/TimeJ
Sensor Features
Press Options
Popcorn more/less time
Beveroge
Reheot
Pototo
Vegetables
Pressonce (fresh vegetables)
Presstwice (frozen vegetables)
Pressthree times
(canned vegetables)
Defrost Weight/Time
Pressonce
12
Enter
Starts immediately!
Starts immediately!
Starts immediately!
Starts Immediately!
Starts Immediately!
Enter food weight
more/less time
more/less time
more/less time
GEAppliances.com
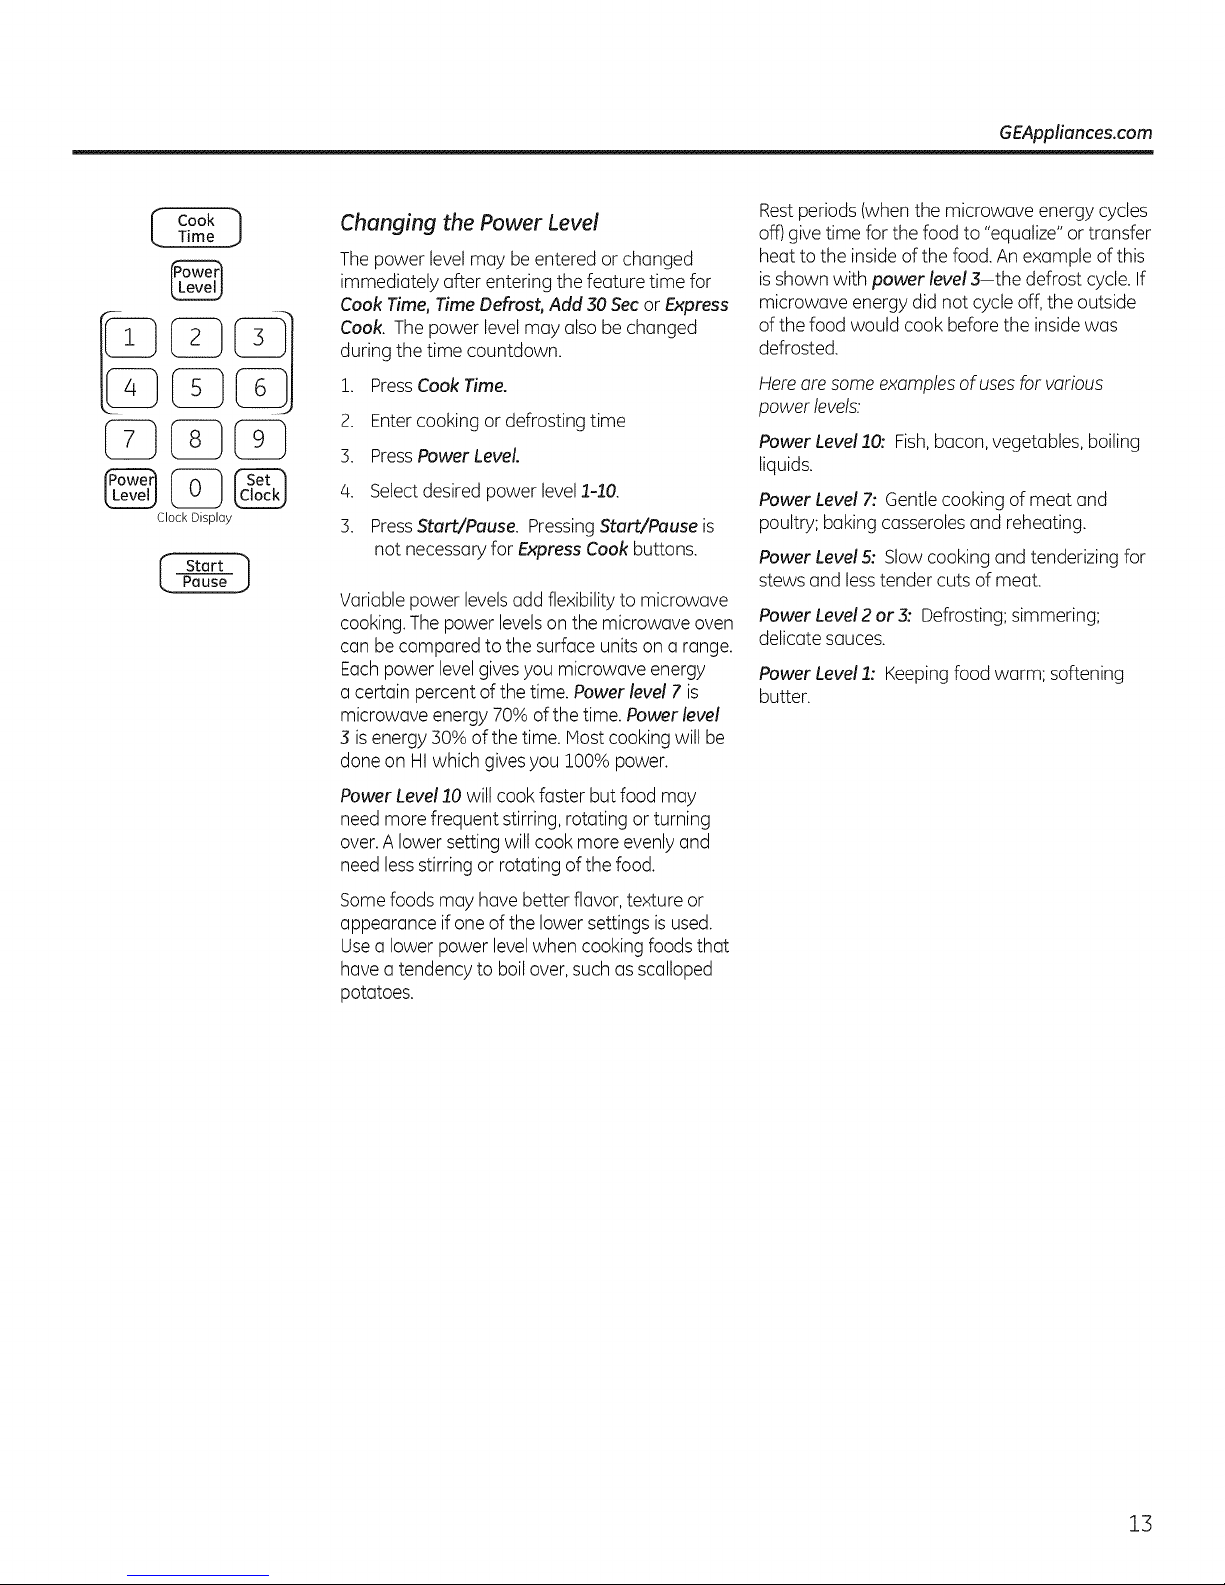
@
Clock Display
Changing the Power Level
The power levelmay be entered or changed
immediately after entering the feature time for
Cook Time, Time Defrost, Add 30 Secor Express
Cook. Thepower level may alsobe changed
during the time countdown.
1. Press Cook Time.
2. Enter cooking ordefrosting time
3. PressPower Level.
4. Selectdesired power leveli-i0.
3. PressStart/Pause. PressingStart/Pause is
not necessary for Express Cook buttons.
Variable power levelsadd flexibility to microwave
cooking.The power levelson the microwave oven
can be compared to the surface unitson a range.
Eachpower levelgivesyou microwave energy
a certain percent ofthe time. Power level 7 is
microwave energy 70% of the time. Power level
3 isenergy30% of the time. Mostcooking will be
done on HIwhich givesyou 100%power.
Power Level10will cook faster but food may
need more frequent stirring,rotating or turning
over.A lower setting will cookmore evenly and
need lessstirring or rotating of the food.
Somefoods may have better flavor, texture or
appearance if one of the lower settings isused.
Usea lower power level when cooking foods that
have a tendency to boilover, such as scalloped
potatoes.
Restperiods(whenthe microwave energy cycles
off) give time for the food to "equalize"or transfer
heat to the insideof the food. An example of this
isshown with power level 3-the defrost cycle.If
microwave energy did not cycleoff, the outside
of the food would cook before the insidewas
defrosted.
Hereare some examplesof usesfor various
power levels.
Power Level10: Fish,bacon,vegetables, boiling
liquids.
Power Level 7: Gentlecooking of meat and
poultry; baking casserolesand reheating.
Power Level5: Slowcooking and tenderizing for
stews and lesstender cuts of meat.
Power Level2 or 3: Defrosting;simmering;
delicate sauces.
Power LevelI:Keepingfood warm; softening
butter.
13
About the time features.
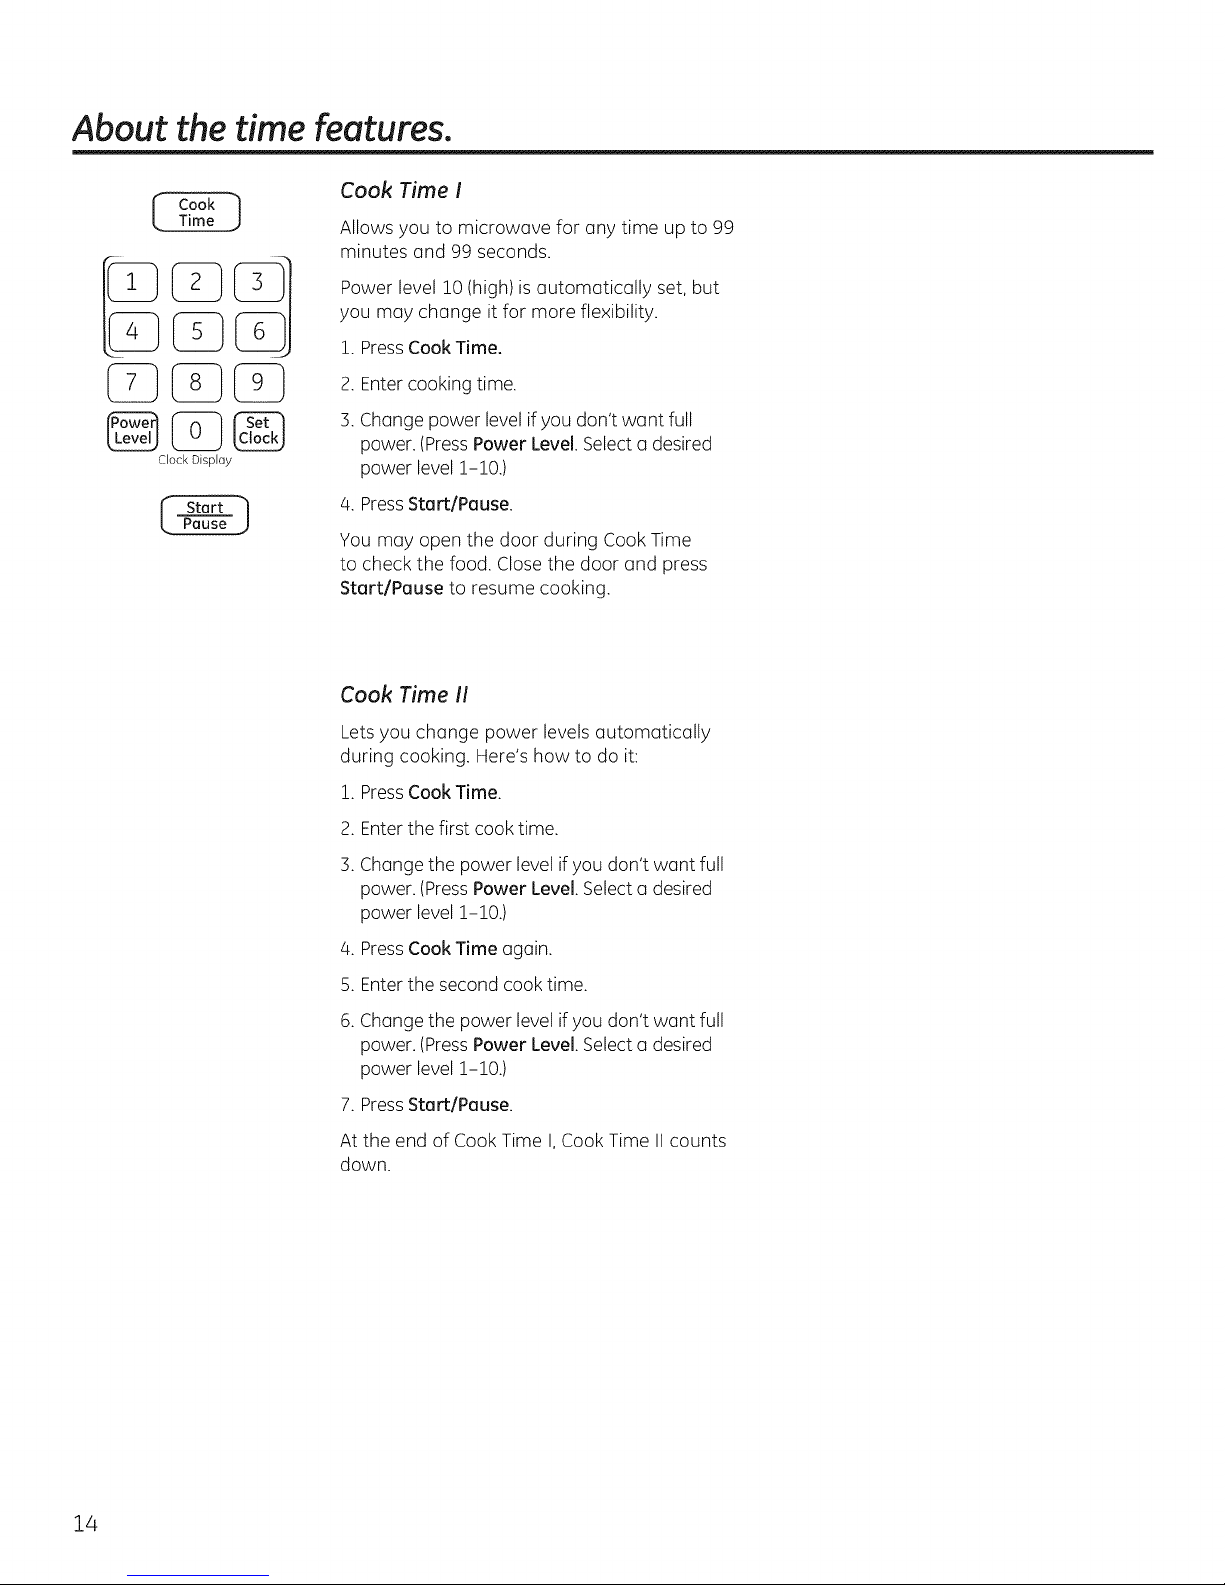
Cook Time !
Allows you to microwave for any time up to 99
minutes and 99 seconds.
Power level !0 (high)is automatically set, but
you may change it for more flexibility.
!. PressCook Time.
2. Enter cooking time.
3. Change power level if you don't want full
Clock Dis@ay
power. (PressPower Level. Selecta desired
power level !-!0.)
4. Press Start/Pause.
You may open the door during Cook Time
to check the food. Close the door and press
Start/Pause to resume cooking.
Cook Time II
Lets you change power levels automatically
during cooking. Here's how to do it:
!. PressCook Time.
2. Enter the first cook time.
3.
Change the power level ifyou don't want full
power. (PressPower Level. Selecta desired
power level !-!0.)
4.
PressCook Time again.
5.
Enterthe second cook time.
.
Change the power level ifyou don't want full
power, (PressPower Level. Selecta desired
power level !-!0.)
7. Press Start/Pause.
At the end of Cook Time I,Cook Time II counts
down.
14
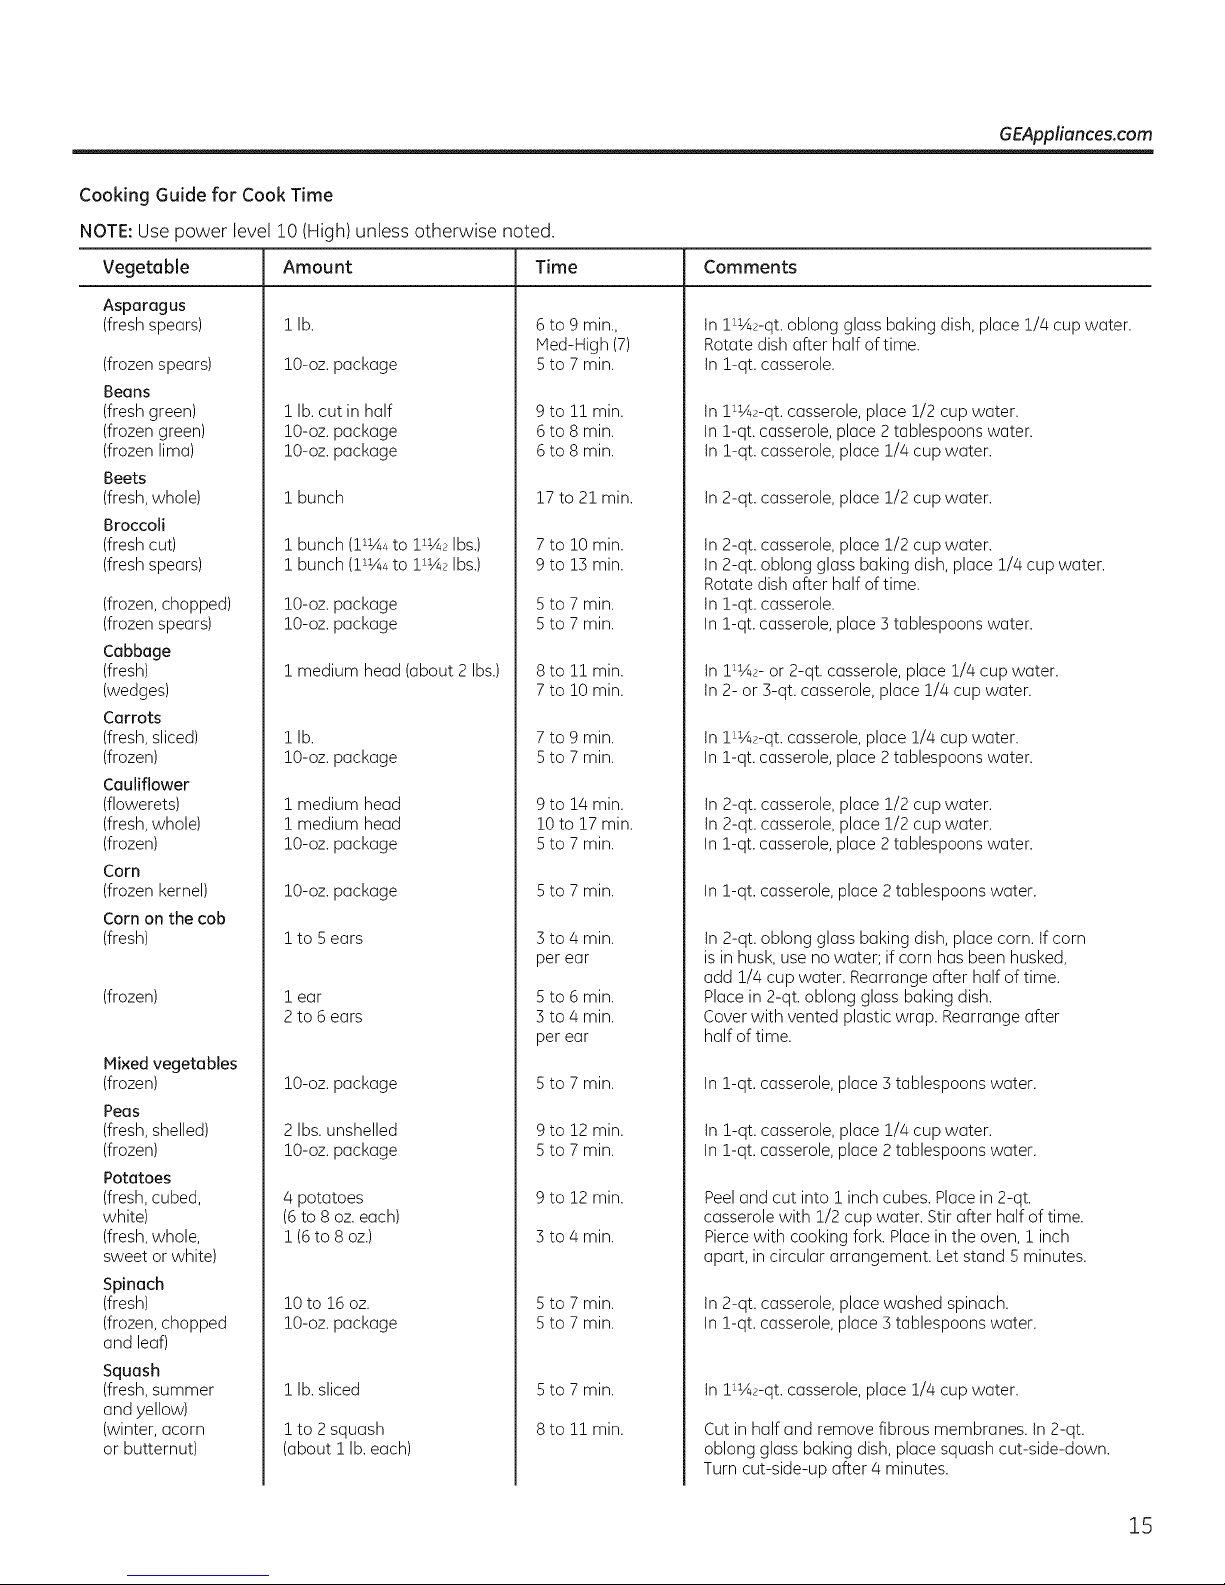
Cooking Guide for Cook Time
NOTE:Use power level 10 (High) unless otherwise noted.
Vegetable Amount Time Cornrnents
GEAppliances.com
Asparagus
(fresh spears)
(frozen spears)
Beans
(fresh green)
(frozen green)
(frozen lima)
Beets
(fresh, whole)
Broccoli
(fresh cut)
(fresh spears)
(frozen, chopped)
(frozen spears)
Cabbage
(fresh)
(wedges)
Carrots
(fresh, sliced)
(frozen)
Cauliflower
(flowerets)
(fresh, whole)
(frozen)
Corn
(frozen kernel)
Corn on the cob
(fresh)
(frozen)
Mixed vegetables
(frozen)
Peas
(fresh, shelled)
(frozen)
Potatoes
(fresh, cubed,
white)
(fresh, whole,
sweet or white)
Spinach
(fresh)
(frozen, chopped
and leaf)
Squash
(fresh, summer
and yellow)
(winter, acorn
or butternut)
!lb.
!0-oz. package
! lb. cut in half
10-oz. package
10-oz. package
1 bunch
! bunch (11144 to !11A_Ibs.)
1 bunch (11144to 111A_Ibs.)
lO-oz, package
lO-oz, package
1 medium head (about 2 Ibs.)
llb.
lO-oz, package
! medium head
! medium head
!O-oz. package
lO-oz, package
! to 5 ears
i ear
2to 6 ears
lO-oz, package
21bs.unshelled
lO-oz, package
4 potatoes
(6 to 8 oz. each)
! (6 to 8 oz.)
!Oto 16 oz.
lO-oz, package
! lb. sliced
i to 2 squash
(about i lb. each)
6 to 9 min.,
Heal-High (7)
5to 7 min.
9 to 11 min.
6 to 8 min.
6 to 8 min.
17 to 21min.
7 to 10 min.
9 to 13 min.
5 to 7 min.
5 to 7 min.
8 to 11 min.
7 to 10 min.
7 to 9 min.
5 to 7 min.
9 to 14 min.
10 to 17 min.
5 to 7 min.
5 to 7 min.
] to 4 min.
per ear
5 to 6 min.
3 to 4 min.
per ear
5 to 7 min.
9 to 12 min.
5 to 7 min.
9 to 12 min.
3 to 4 min.
5 to 7 min.
5 to 7 min.
5 to 7 min.
8 to 11 min.
In lUA2-qt oblong glass baking dish, place 1/4 cup water.
Rotate dish after half of time.
In 1-qt. casserole.
In lUA2-qt casserole, place 1/2 cup water.
In 1-qt. casserole, place 2tablespoons water.
In 1-qt. casserole, place 1/4 cup water.
In 2-qt. casserole, place 1/2 cup water.
In 2-qt. casserole, place 1/2 cup water.
In 2-qt. oblong glass baking dish, place 1/4 cup water.
Rotate dish after half of time.
In 1-qt. casserole.
In 1-qt. casserole, place 3tablespoons water.
In 11145- or 2-qt. casserole, place 1/4 cup water.
In 2- or 3-qt. casserole, place 1/4 cup water.
In 11142-qt.casserole, place 1/4 cup water.
In 1-qt. casserole, place 2tablespoons water.
In 2-qt. casserole, place 1/2 cup water.
In 2-qt. casserole, place 1/2 cup water.
In 1-qt. casserole, place 2tablespoons water.
In 1-qt. casserole, place 2tablespoons water.
In 2-qt. oblong glass baking dish, place corn. If corn
is inhusk, use no water; if corn has been husked,
add 1/4 cup water. Rearrange after half of time.
Place in 2-qt. oblong glass baking dish.
Cover with vented plastic wrap. Rearrange after
half of time.
In 1-qt. casserole, place 5tablespoons water.
In 1-qt. casserole, place 1/4 cup water.
In 1-qt. casserole, place 2tablespoons water.
Peeland cut into 1 inch cubes. Place in 2-qt.
casserole with 1/2 cup water. Stir after half of time.
Piercewith cooking fork. Place in the oven, 1 inch
apart, in circular arrangement. Let stand 5 minutes.
In 2-qt. casserole, place washed spinach.
In 1-qt. casserole, place ] tablespoons water.
In 11142-qt.casserole, place 1/4 cup water.
Cut in half and remove fibrous membranes. In 2-qt.
oblong glass baking dish, place squash cut-side-down.
Turn cut-side-up after 4 minutes.
15
About the time features.
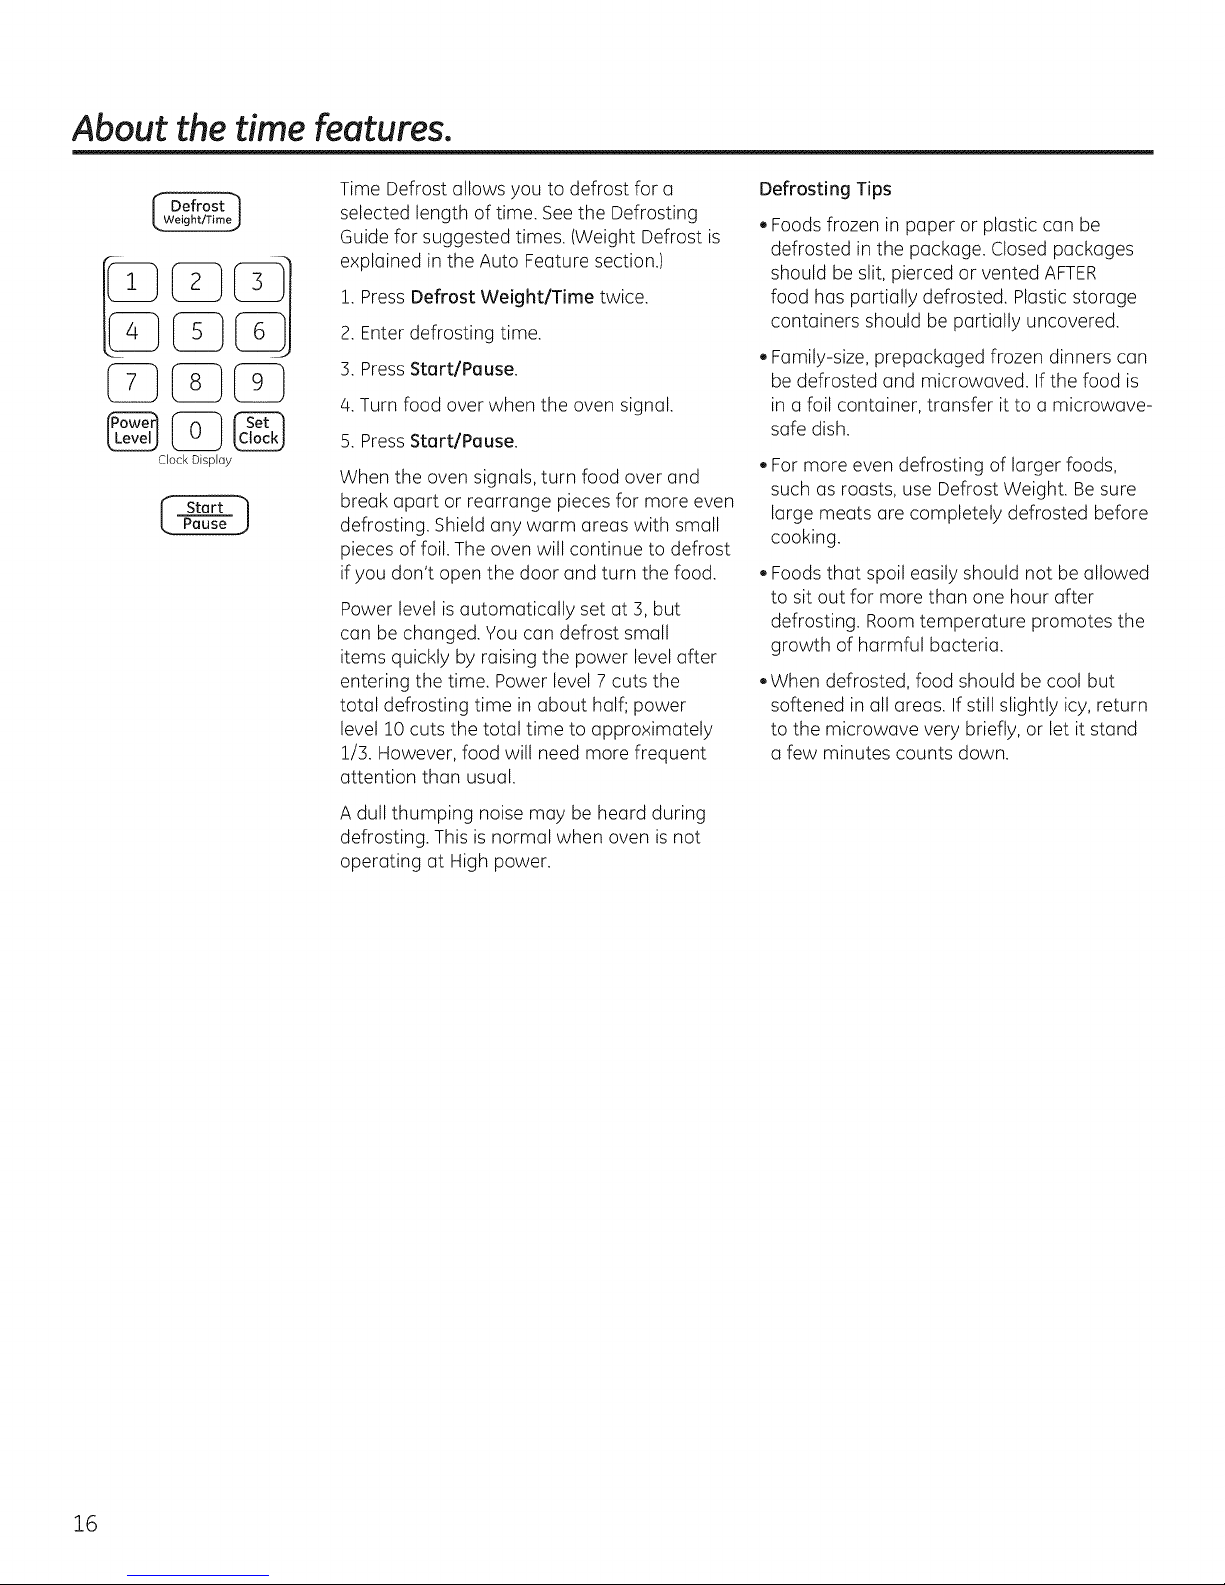
Clock Display
Time Defrost allows you to defrost for a
selected length of time. Seethe Defrosting
Guide for suggested times. (Weight Defrost is
explained in the Auto Feature section.)
!. Press Defrost Weight/Time twice.
2. Enter defrosting time.
3. Press Start/Pause.
4.Turn food over when the oven signal.
5. Press Start/Pause.
When the oven signals, turn food over and
break apart or rearrange pieces for more even
defrosting. Shield any warm areas with small
pieces of foil. The oven will continue to defrost
if you don't open the door and turn the food.
Power level isautomatically set at 3, but
can be changed. You can defrost small
items quickly by raising the power level after
entering the time. Power level 7 cuts the
total defrosting time in about half; power
level 10cuts the total time to approximately
1/3. However, food will need more frequent
attention than usual.
Defrosting Tips
, Foods frozen in paper or plastic can be
defrosted in the package. Closed packages
should be slit, pierced or vented AFTER
food has partially defrosted. Plastic storage
containers should be partially uncovered.
, Family-size, prepackaged frozen dinners can
be defrosted and microwaved. Ifthe food is
in a foil container, transfer it to a microwave-
safe dish.
, For more even defrosting of larger foods,
such as roasts, use Defrost Weight. Be sure
large meats are completely defrosted before
cooking.
, Foods that spoil easily should not be allowed
to sit out for more than one hour after
defrosting. Room temperature promotes the
growth of harmful bacteria.
,When defrosted, food should be cool but
softened in all areas. If still slightly icy, return
to the microwave very briefly, or let it stand
a few minutes counts down.
A dull thumping noise may be heard during
defrosting. This is normal when oven is not
operating at High power.
16
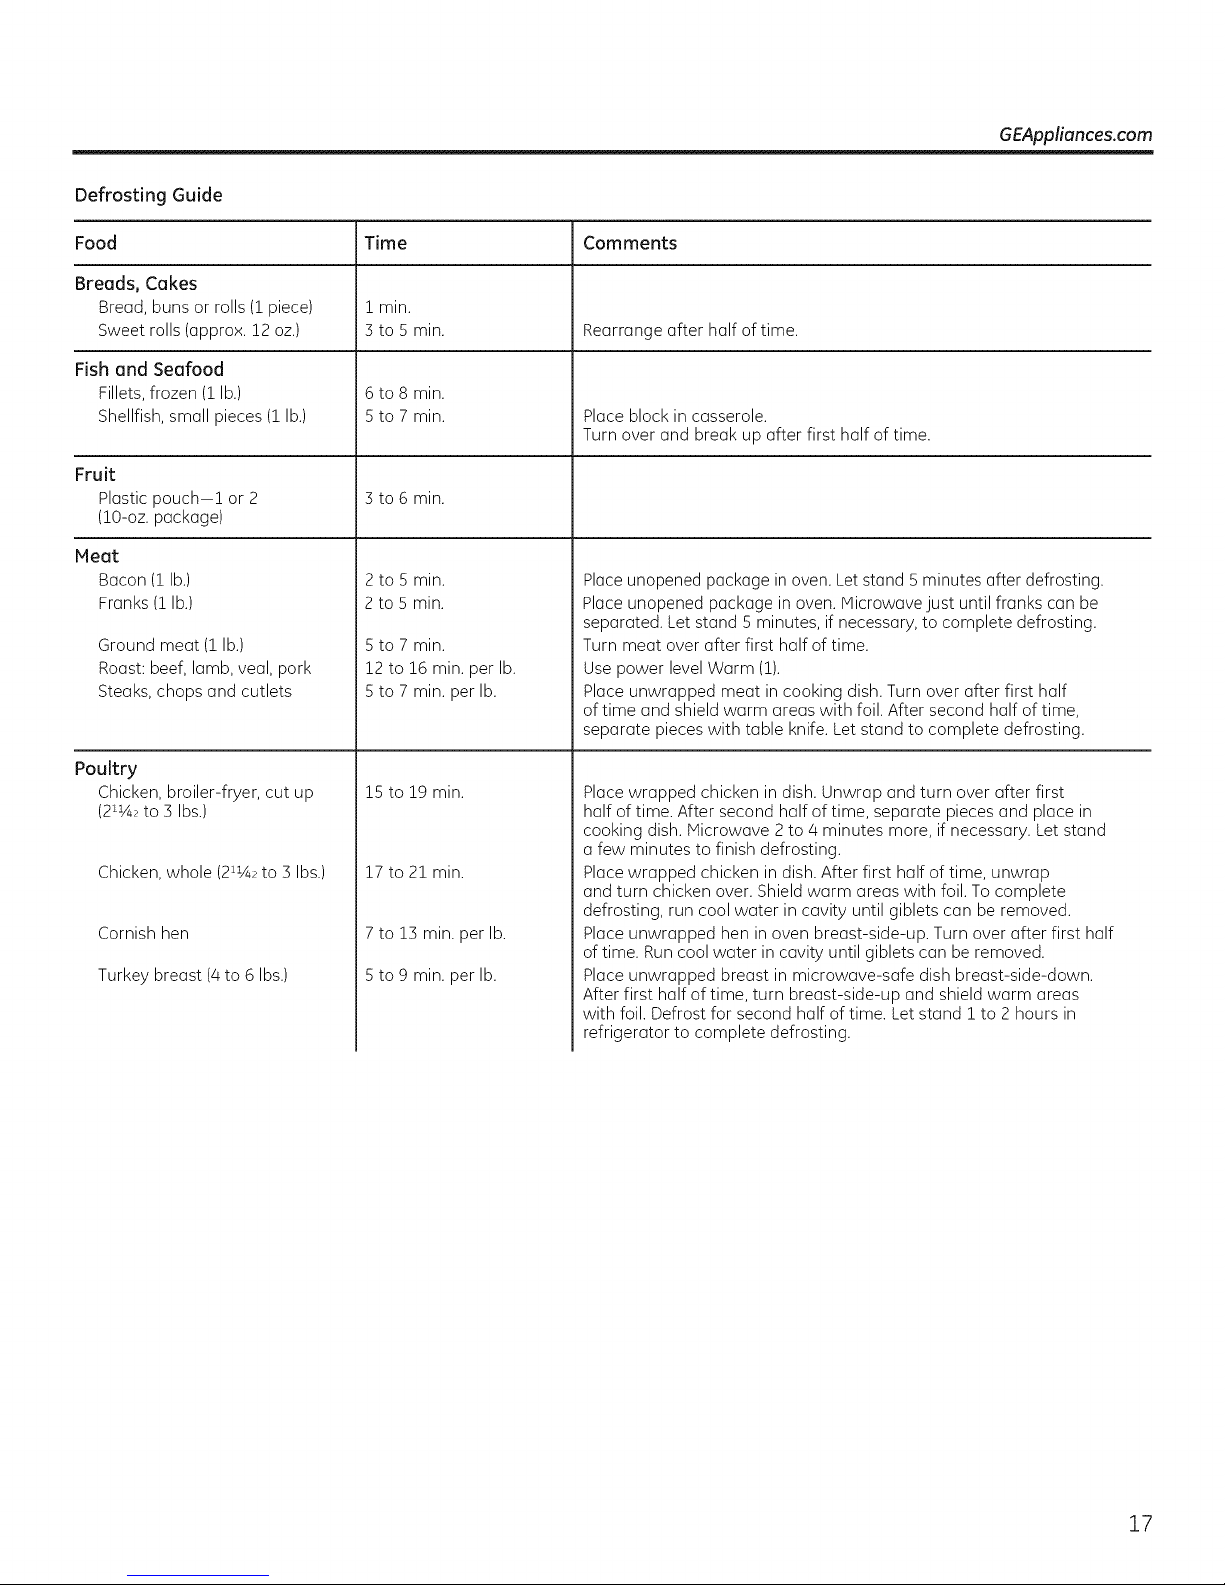
Defrosting Guide
GEAppliances.com
Food
Breads, Cakes
Bread, buns or rolls (1 piece)
Sweet rolls (approx. 12 oz.)
Fish and Seafood
Fillets, frozen (1 lb.)
Shellfish, small pieces (1 lb.)
Fruit
Plastic pouch-1 or 2
(lO-oz. package)
Meat
Bacon (1 lb.)
Franks (1 lb.)
Ground meat (1 lb.)
Roast: beef, lamb, veal, pork
Steaks, chops and cutlets
Poultry
Chicken, broiler-fryer, cut up
(211Aeto 3 Ibs.)
Chicken, whole (211A2to 3 Ibs.)
Cornish hen
Turkey breast (4 to 6 Ibs.)
Time
1 min.
] to 5 min.
6 to 8 min.
5 to 7 min.
] to 6 min.
2 to 5 min.
2 to 5 min.
5 to 7 min.
12 to 16 min. per lb.
5 to 7 min. per lb.
15 to 19 min.
17 to 21 min.
7 to 13 min. per lb.
5 to 9 min. per lb.
Comments
Rearrange after half of time.
Place block in casserole.
Turn over and break up after first half of time.
Place unopened package in oven. Let stand 5 minutes after defrosting.
Place unopened package in oven. Microwave just until franks can be
separated. Let stand 5 minutes, if necessary, to complete defrosting.
Turn meat over after first half of time.
Use power level Warm (1).
Place unwrapped meat in cooking dish. Turn over after first half
of time and shield warm areas with foil. After second half of time,
separate pieces with table knife. Let stand to complete defrosting.
Place wrapped chicken in dish. Unwrap and turn over after first
half of time. After second half of time, separate pieces and place in
cooking dish. Microwave 2 to 4 minutes more, if necessary. Let stand
a few minutes to finish defrosting.
Place wrapped chicken in dish. After first half of time, unwrap
and turn chicken over. Shield warm areas with foil. To complete
defrosting, run cool water in cavity until giblets can be removed.
Place unwrapped hen in oven breast-side-up. Turn over after first half
of time. Runcool water in cavity until giblets can be removed.
Place unwrapped breast in microwave-safe dish breast-side-down.
After first half of time, turn breast-side-up and shield warm areas
with foil. Defrost for second half of time. Let stand i to 2 hours in
refrigerator to complete defrosting.
17
About the time features.
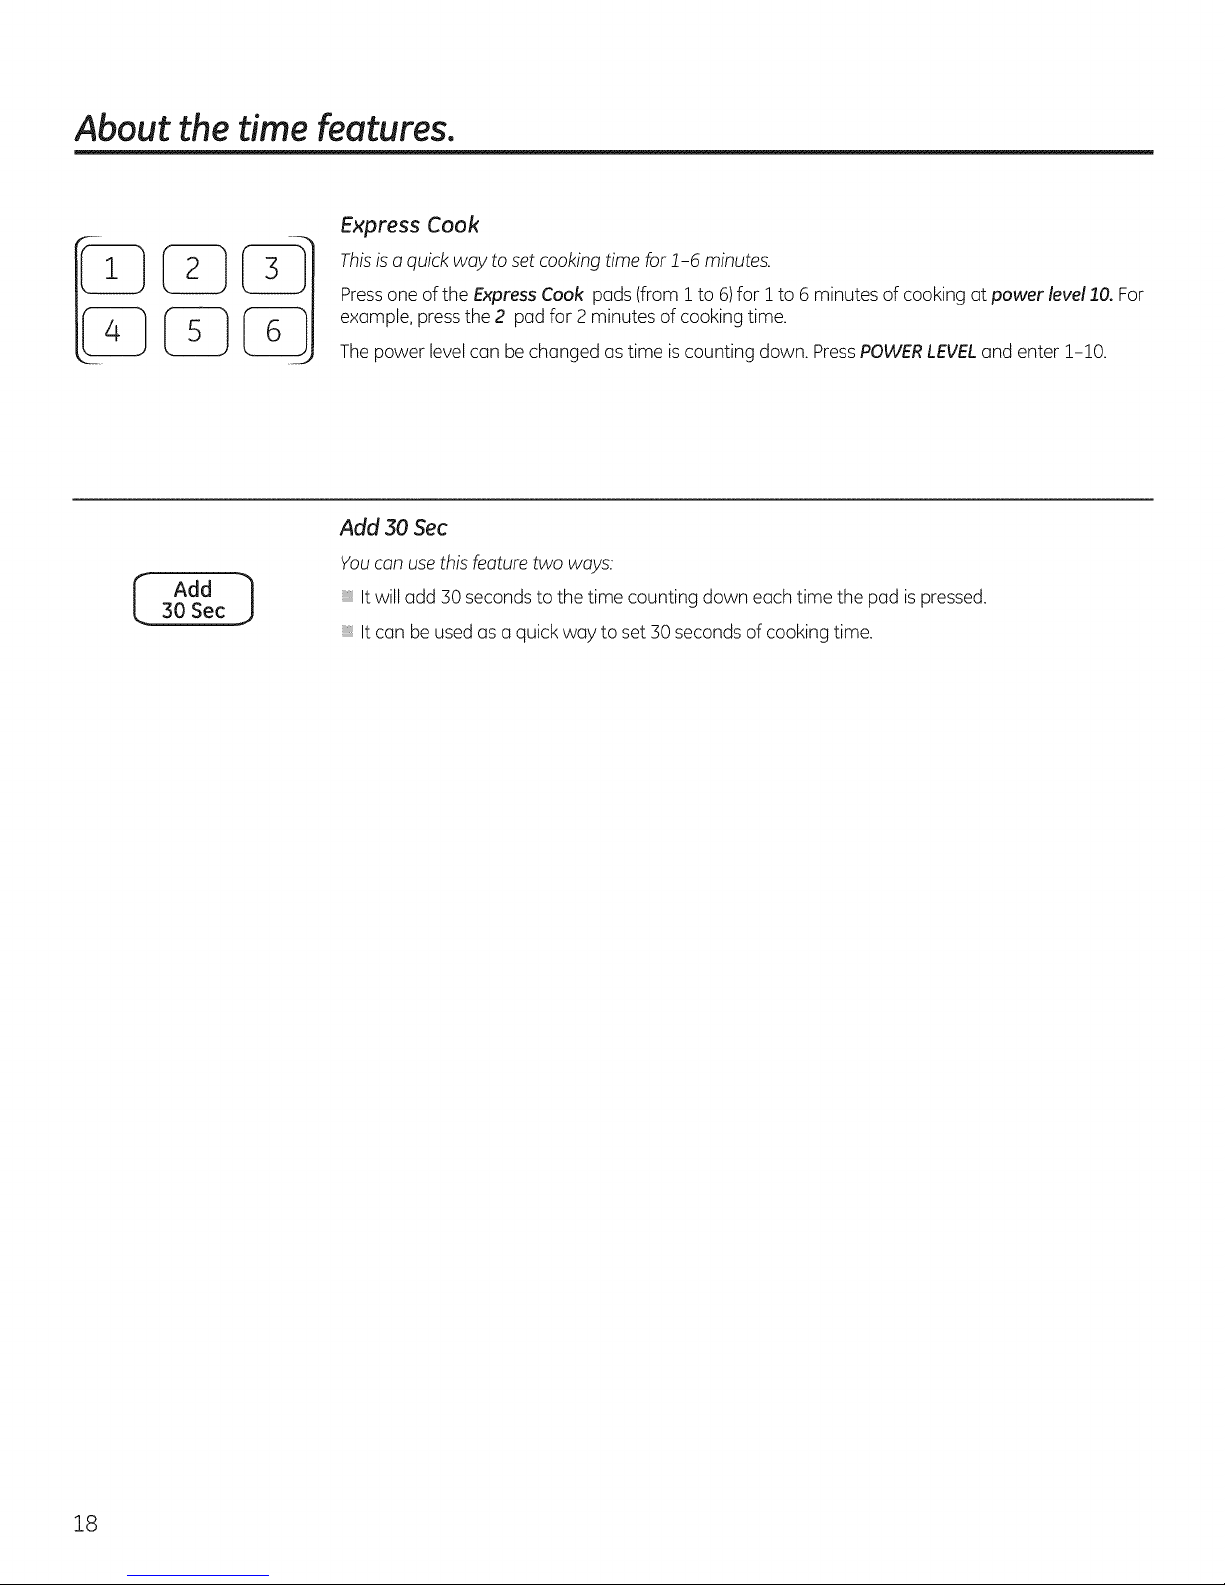
Express Cook
Thisis a quick way to set cooking time for !-6 minutes.
Pressone of the Express Cook pads (from ! to 6)for ! to 6 minutes of cooking at power level .1.0.For
example, pressthe 2 pad for 2minutes of cooking time.
The power levelcan be changed astime iscounting down. PressPOWERLEVELand enter !-10.
Add 30 Sec
You can use this feature two ways:
Add
3osec J
Itwilladd 30 seconds to the time counting down each time the pad is pressed.
Itcan be used as a quick way to set 30 seconds of cooking time.
18
 Loading...