

Page 1
Page 2
Page 3
“.
3
--
Contents
Grounding instructions ................................................................................3
Safety Tips to FolIow While Microwaving ......................................................4
Before You Start ..........................................................................................5
Whatthe Touch Control Panel Does .............................................................6
What Your Microwave Oven Can Do .............................................................8
Howto``Tell' 'the Oven What to Do ..............................................................9
Howto Usethe Power Levels .....................................................................l O
Howto Defrost .....................................................
Howto Time Cook .....................................................................................l2
Howto Temp Cook ................................................................................
The Temperature Probe .............................................................................
Howto Use’’Simmer ‘N Cook” TM Feature ...................................................l5
How to Temp Hold
Defrost as a Cooking Function .........
Automatic Step-By-Step Cooking
Howto Delay Cooking Automatically ..........................................................l9
Howto Setthe Oven for Freezer to Table Time Cooking ..............................2O
The Exhaust Feature ..........
Cleaning and Caring for Your Oven
Before You Call for Service
Questions and Answers
Special Message .........
MACAP Information ........
Warranty ........................i ............................................................Back Cover
...........................
.......................................................................
........................................................................
.............................................................................
..............................................................................
..........................................................................
..........................................................
..........................................................
...............................................................
............................................................
....................................,11
.....l3
14
16
17
18
21
22
24
25
26
26
Grounding Instructions
r
,-
.-. .
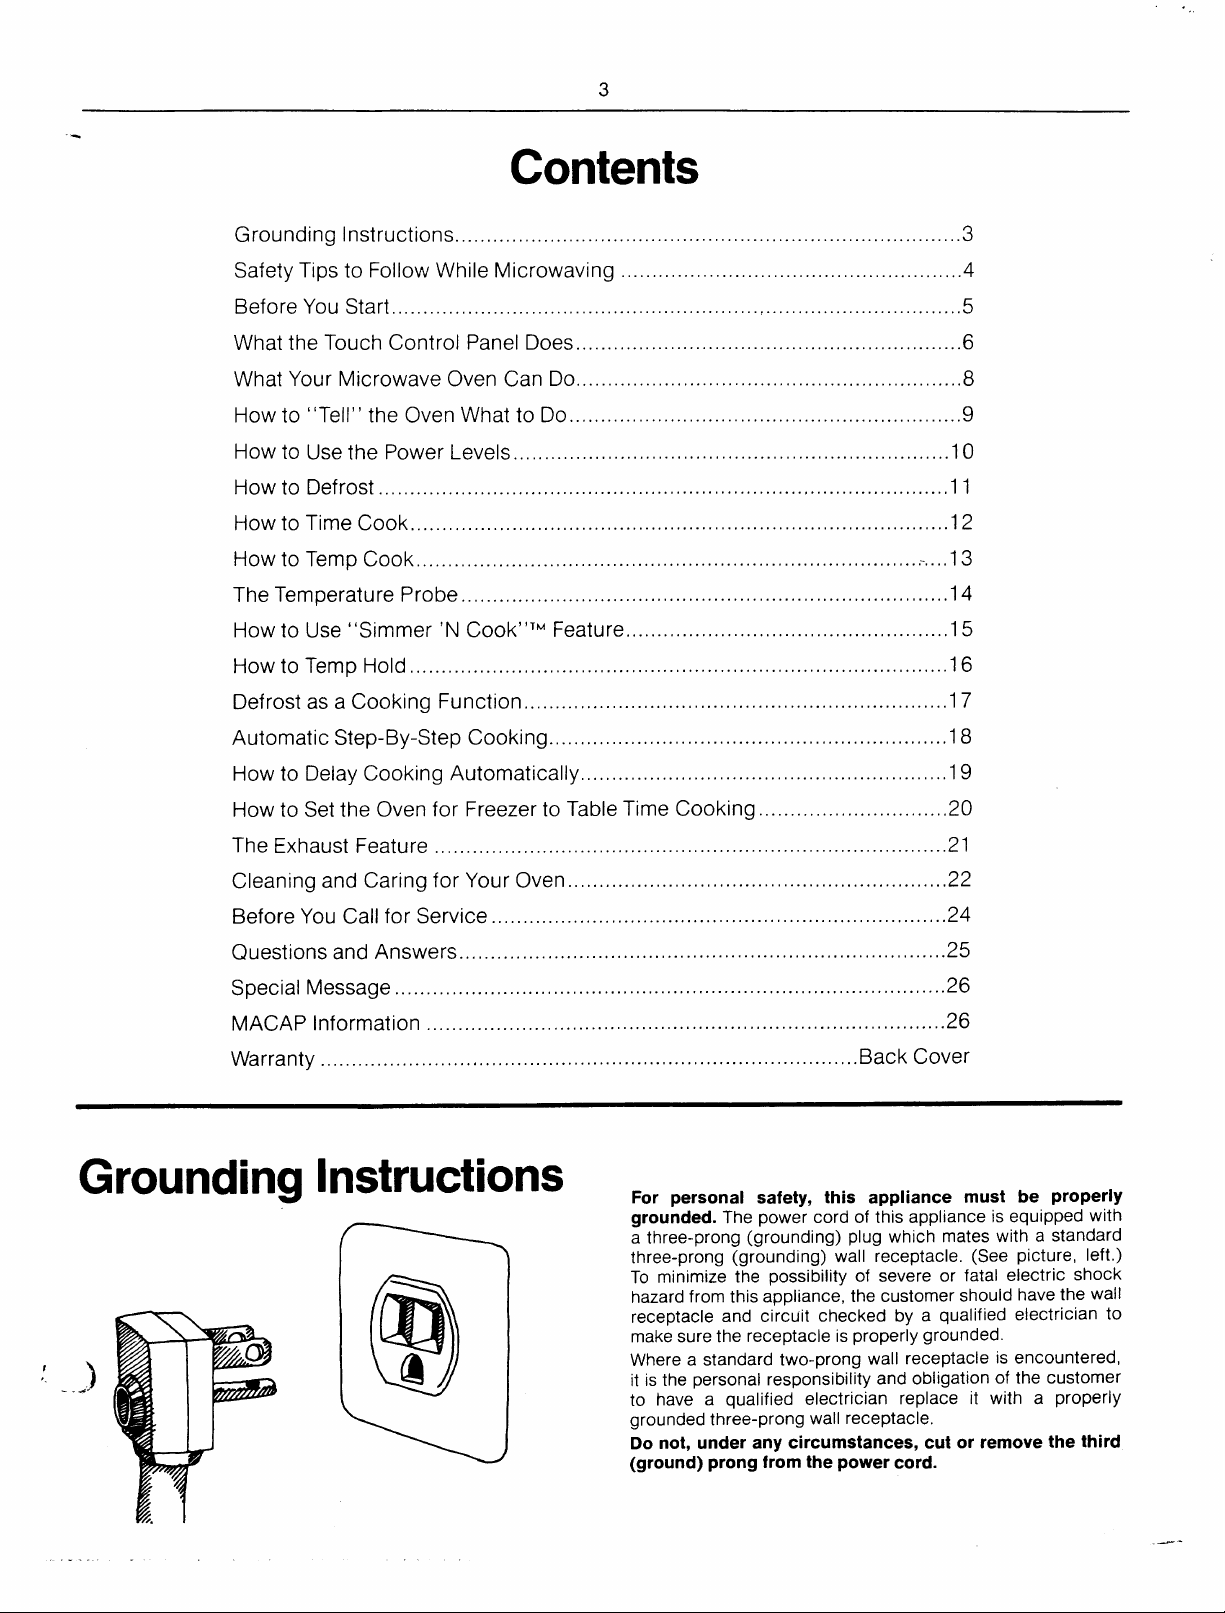
For personal safety, this appliance must be properly
grounded.
a three-prong (grounding) plug which mates with a standard
three-prong (grounding) wall receptacle. (See picture, left.)
To minimize the possibility of severe or fatal electric shock
hazard from this appliance, the customer should have the wall
receptacle and circuit checked by a qualified electrician to
make sure the receptacle is properly grounded.
Where a standard two-prong wall receptacle is encountered,
it is the personal responsibility and obligation of the customer
to have a qualified electrician replace it with a properly
grounded three-prong wall receptacle.
Do not, under any circumstances, cut or remove the third
(ground) prong from the power cord.
The power cord of this appliance is equipped with
—-
Page 4

4
Safety Tips to Follow While Microwaving
1. For personal safety the oven must be properly
grounded. See grounding instructions on Page 3 of
this book.
2. Cooking utensils may become hot
heat transferred from the heated
cially true if plastic wrap has been covering the top
and handles of the utensil. Pot holders may be
needed.
3. Sometimes, the oven shelf can become too hot to
touch. Be careful when touching the shelf during and
after cooking.
4. Don’t heat unopened food containers or nonvented plastic-covered dishes in the oven. Pressure
building up can cause the container or plastic cov-
ering to burst, resulting in injury.
5. Don’t defrost frozen liquids–especially carbonated ones in narrow necked containers. Even if the
container is opened, pressure can build up. This can
cause the container to burst, resulting in injury.
6. Don’t overcook food excessively. Food dries out
and can even ignite in some cases.
7. If food should ever ignite, keep the oven door
closed. Turn off the power immediately. Touch
CLEAR/OFF or disconnect power cord or shut off
power at the fuse or circuit breaker panel.
8. Remove the temperature probe from the oven
when not using it to cook with. If you leave the probe
inside the oven without inserting it in food or liquid
and turn on microwave energy, it can create electrical arcing in the oven, and damage oven walls or
shelf.
9. Remove wire twist-ties on paper and plastic
bags before placing in oven. Twist-ties sometimes
cause bag to heat, and may cause fire.
10. Boiling eggs (in or out of the shelt) is not recommended for microwave cooking. Pressure can build
up inside egg yolk and cause it to burst, resulting in
injury.
11. Do not pop popcorn in your microwave oven
unless in a special microwave popcorn accessory or
unless you use popcorn in a package labeled for
microwave ovens. Because of the heat generated,
without these precautions, the container could catch
fire.
12. Use metal only as directed in cookbook. Metal
strips as used on meat roasts are helpful in cooking
food when used as directed. Metal trays maybe used
for TV dinners. However, when using metal in the
microwave oven, keep metal at least l-inch away
from sides of microwave oven.
13. Do not use any thermometer in food you are
microwaving unless that thermometer is designed or
recommended for use in the microwave oven.
food. This is espe-
because of
14. Do not store flammable materiajs in an oven.
do not use flammable fluids in the vicinity of
Also,
your oven.
15. Do not use your microwave oven to dry news-
papers. If overheated, they can catch fire.
16. Plastic Utensils–Plastic utensils designed for <’
microwave cooking are very useful, but should be
used carefully. Even microwave plastic may not be as
tolerant of overcooking conditions as are glass or
ceramic materials and may soften or char if sub-
jected to short periods of overcooking. In longer ex-
posures to overcooking, the food and utensils may
even ignite. For these reasons: 1) Use microwave
plastics only and use them in strict compliance with
the utensil manufacturer’s recommendations. 2) Do
not subject empty utensils to microwaving. 3) Do not
permit children to use plastic utensils without com-
plete supervision.
17. Don’t operate the oven while empty in order to
prolong the life of the oven and save energy. If, by
accident, the oven should run empty a minute or two,
no harm is done.
THE HOOD:
Have it installed and properly grounded by a qual-
1.
ified installer. See the special installation booklet
packed with the microwave oven.
2, The vent fan in your Spacemaker oven will oper-
ate automatically under certain conditions (see
Automatic Fan Feature, page 7). While the fan is opcrating caution is required to prevent the starting
and spreading of accidental cooking fires while the
vent fan is in use. For this reason:
A. Never leave surface units unattended at high
heat settings. Boilover causes smoking and greasy
spillovers that may ignite and spread if vent fan is
operating. To minimize automatic fan operation,
use adequate sized utensils and use high heat settings only when necessary.
B. In the event of a grease fire, smother flaming
pan on surface unit by covering pan completely
with well-fitting lid, cookie sheet or flat tray.
C. Never flame foods under the oven with the vet.. ~
fan operating because it may spread the flames.
D. Keep hood and grease filters clean, according
to instructions on pages
good venting and avoid grease fires.
21 and 23, to maintain
&
1
&d.
I
F
I
1
(
\
)
Page 5
“-’deforeYou Start:
5
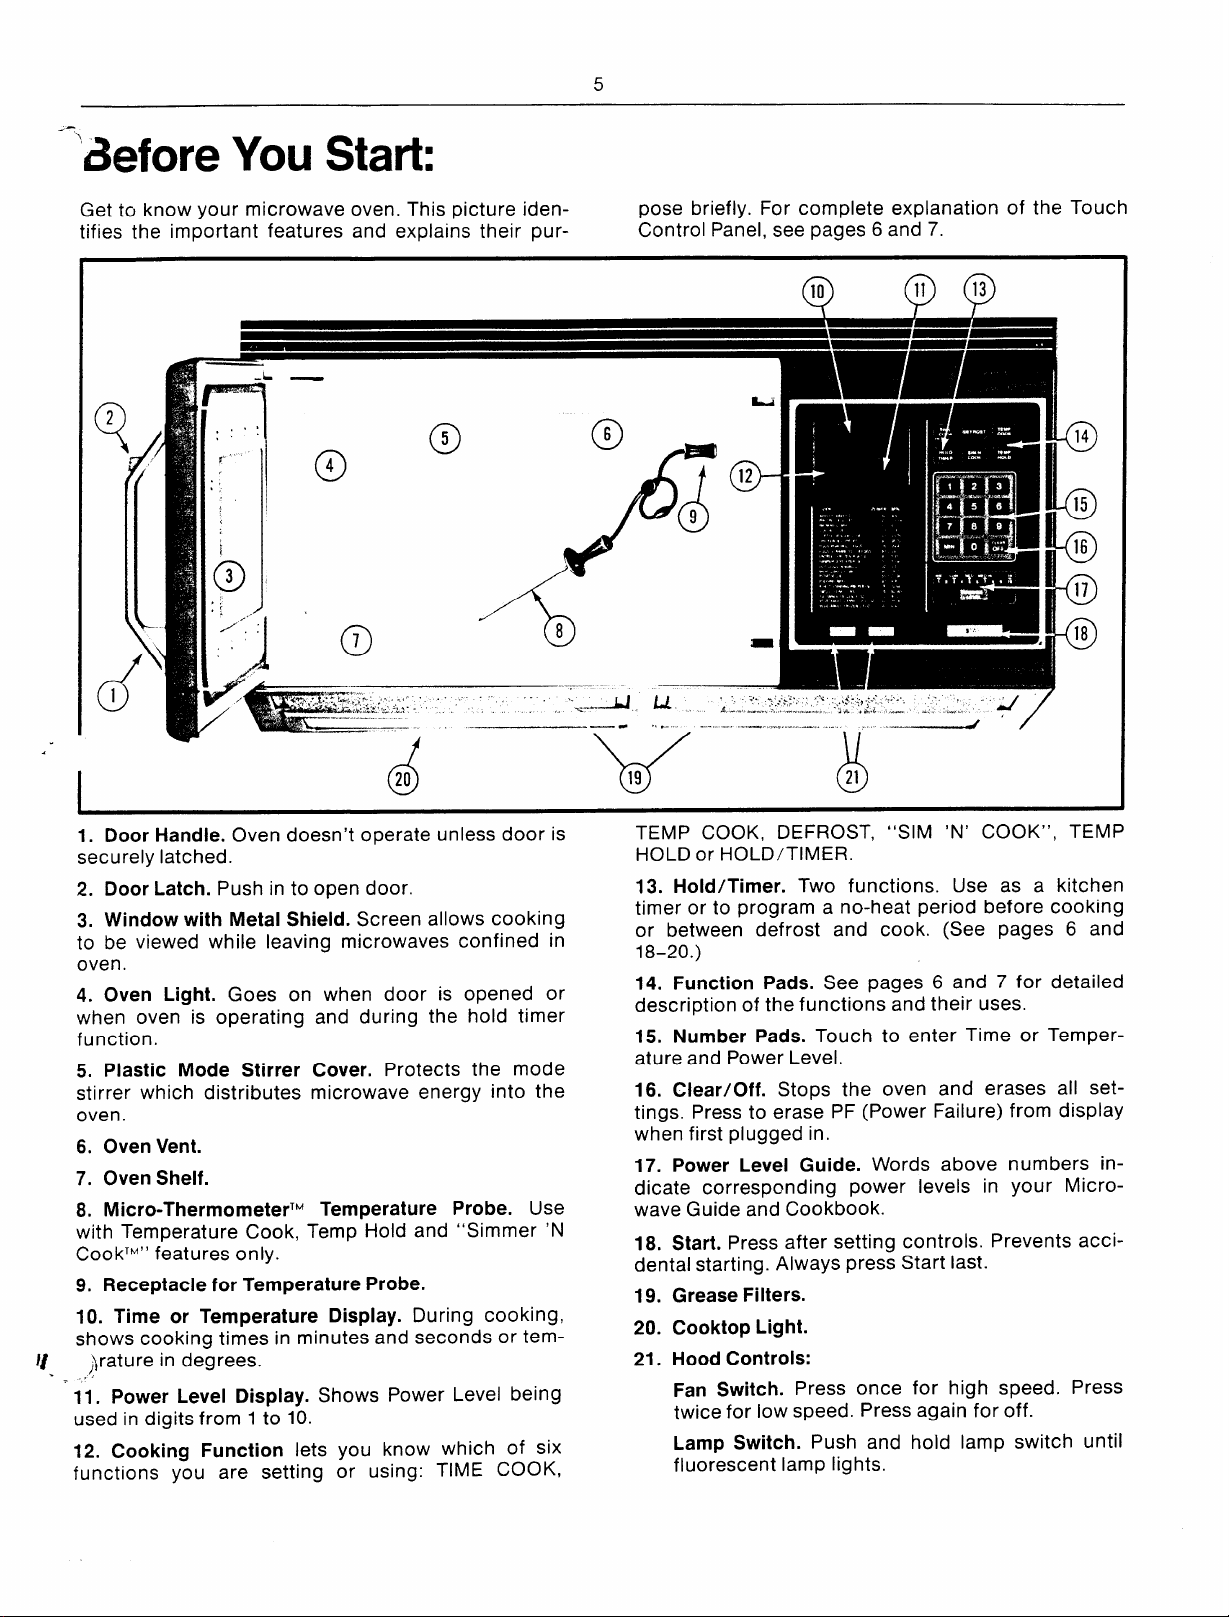
Get to know your microwave oven. This picture identifies the important features and explalns their pur-
.L
..’:
7
,.
$“
,,
1
3
0
.,
,,
“1
. .
/“. :
,.
J
4
0
7
0
I
1. Door Handle. Oven doesn’t operate unless door is
securely latched.
2. Door Latch. Push in to open door.
3. Window with Metal Shield. Screen allows cooking
to be viewed while leaving microwaves confined in
oven.
4. Oven Light. Goes on when door is opened or
when oven is operating
function.
5. Plastic Mode Stirrer
stirrer which distributes
oven.
6. Oven Vent.
7. Oven Shelf.
8. Micro-ThermometerTM
with Temperature Cook, Temp-Hold and “Simmer ‘N
CookTM” features only.
9. Receptacle for Temperature Probe.
10. Time or Temperature Display. During cooking,
shows cooking times in minutes and seconds or tem-
1/
)rature in degrees.
.
.,
11. Power Level Display. Shows Power Level being
used in digits from 1 to 10.
12. Cooking Function lets you know which of six
functions you are setting or using: TIME COOK,
and during the hold timer
Cover. Protects the mode
microwave energy into the
Temperature Probe. Use
20
0
5
0
/
/
‘“b
8
pose briefly. For complete explanation of the Tout
Control Panel, see pages 6 and 7.
10
0
6
o
12
o-
9
J
\/
19
u
TEMP COOK, DEFROST. “SIM ‘N’ COOK”. TEMP
HOLD or HOLD/TIMER. ‘
13. Hold/Timer. Two functions. Use as a kitchen
timer or to program a no-heat period before cooking
or between defrost and cook. (See pages 6 and
18-20.)
14. Function Pads. See pages 6 and 7 for detailed
description of the functions and their uses.
15. Number Pads. Touch to enter Time or Temper-
ature and Power Level.
16. Clear/Off. Stops the oven and erases all settings. Press to erase PF (Power Failure) from display
when first plugged in.
17. Power Level Guide. Words above numbers indicate corresponding power levels in your Microwave Guide and Cookbook.
18. Start. Press after setting controls. Prevents accidental starting. Always press Start last.
Grease Filters.
19.
20.
Cooktop Light.
Hood Controls:
21.
Fan Switch. Press once for high speed. Press
twice for low speed. Press again for off.
Lamp Switch. Push and hold lamp switch until
fluorescent lamp lights.
II
21
0
4
Page 6
6
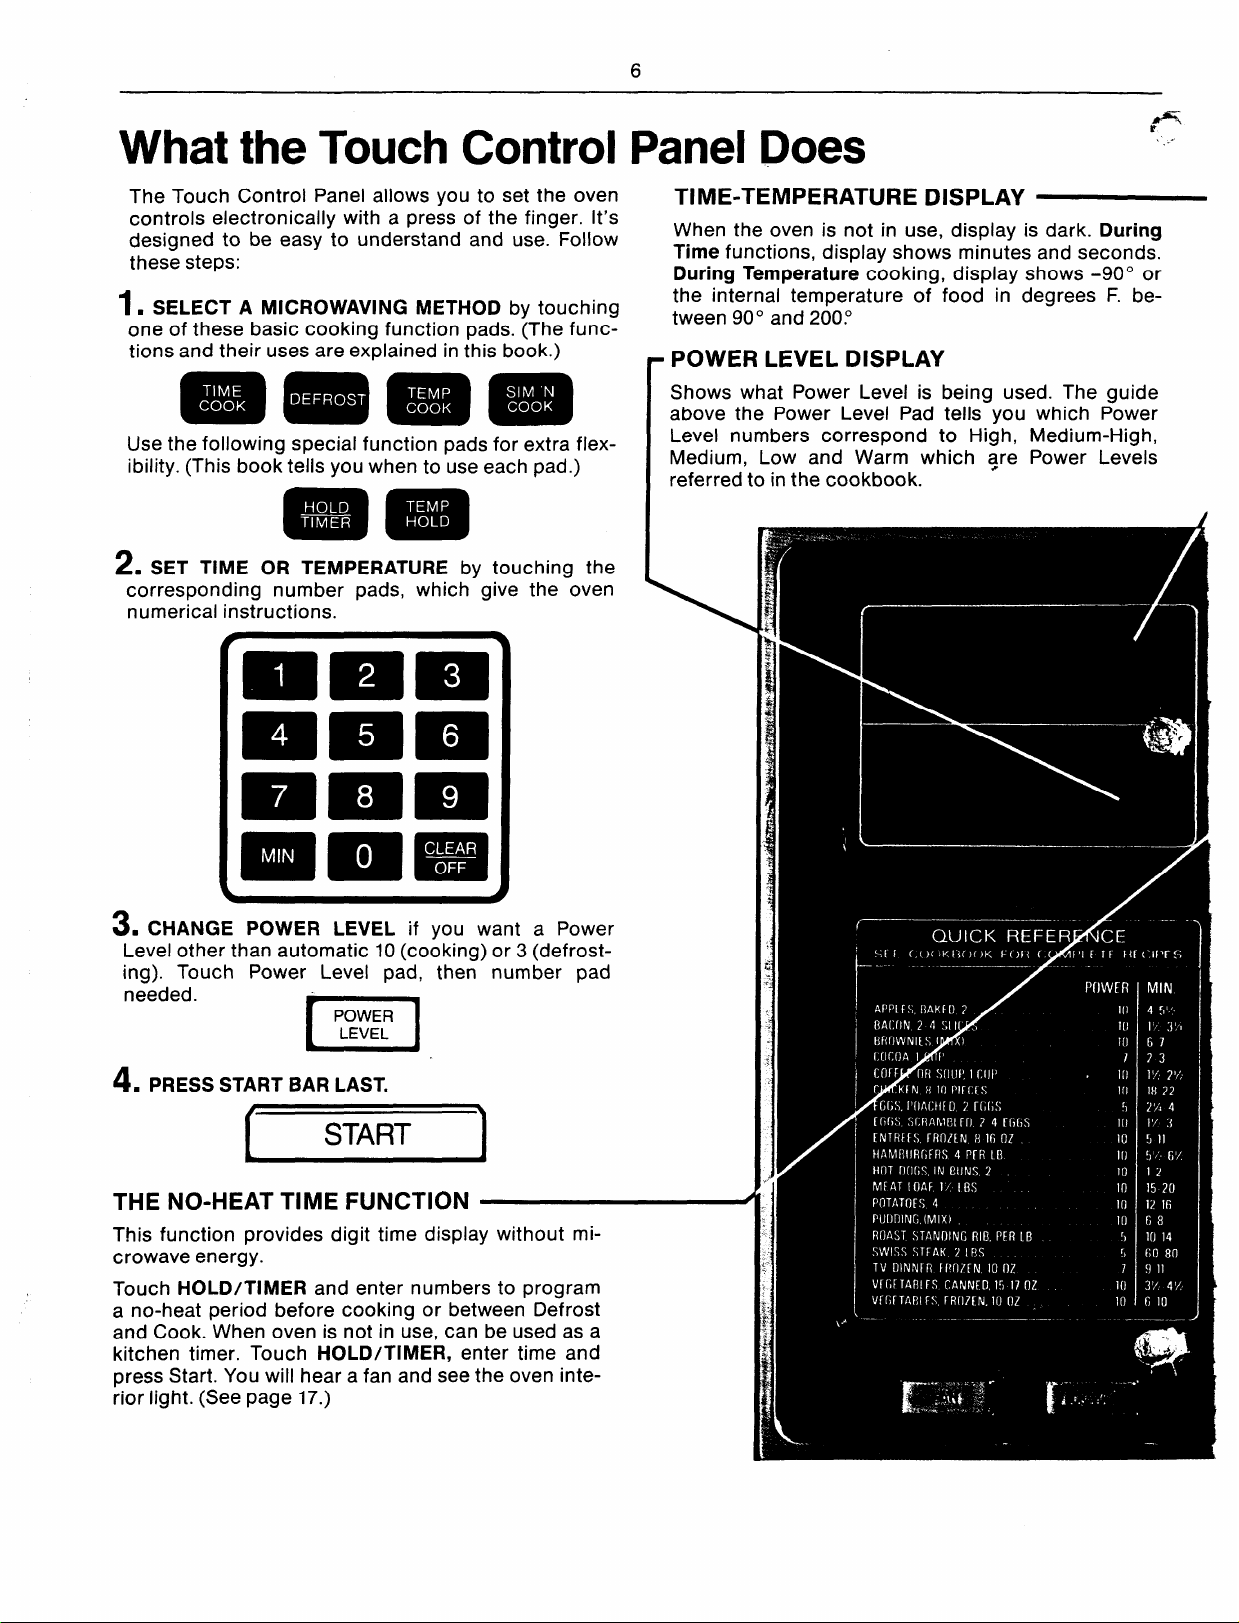
What the Touch Control Panel Does
. .-
The Touch Control Panel allows you to set the oven
controls electronically with a press of the finger. It’s
designed to be easy to understand and use. Follow
these steps:
1. SELECT A MICROWAVING METHOD by touching
one of these basic cooking function pads. (The functions and their uses are explained in this book.)
Use the following special function pads for extra flexibility. (This book tells you when to use each pad.)
z. SET TIME OR TEMPERATURE by touching the
corresponding number pads, which give the oven
numerical instructions.
TIME-TEMPERATURE DISPLAY
When the oven is not in use, display is dark. During
Time functions, display shows minutes and seconds.
During Temperature cooking, display shows -90° or
the internal temperature of food in degrees F. between 90° and 200.”
-
POWER LEVEL DISPLAY
Shows what Power Level is being used. The guide
above the Power Level Pad tells you which Power
Level numbers correspond to High, Medium-High,
Medium, Low and Warm which qre Power Levels
referred to in the cookbook.
\
s. CHANGE POWER LEVEL if you want a Power
Level other than automatic 10 (cooking) or 3 (defrosting). Touch Power Level pad, then number pad
needed.
POWER
LEVEL
n
4. PRESS START BAR LAST.
I
START
THE NO-HEAT TIME FUNCTION
This function provides digit time display without microwave energy.
Touch HOLD/TIMER and enter numbers to program
a no-heat period before cooking or between Defrost
and Cook. When oven is not in use, can be used as a
kitchen timer. Touch HOLDITIMER, enter time and
press Start. You will hear a fan and see the oven inte-
rior light. (See page 17.)
I
Page 7
7
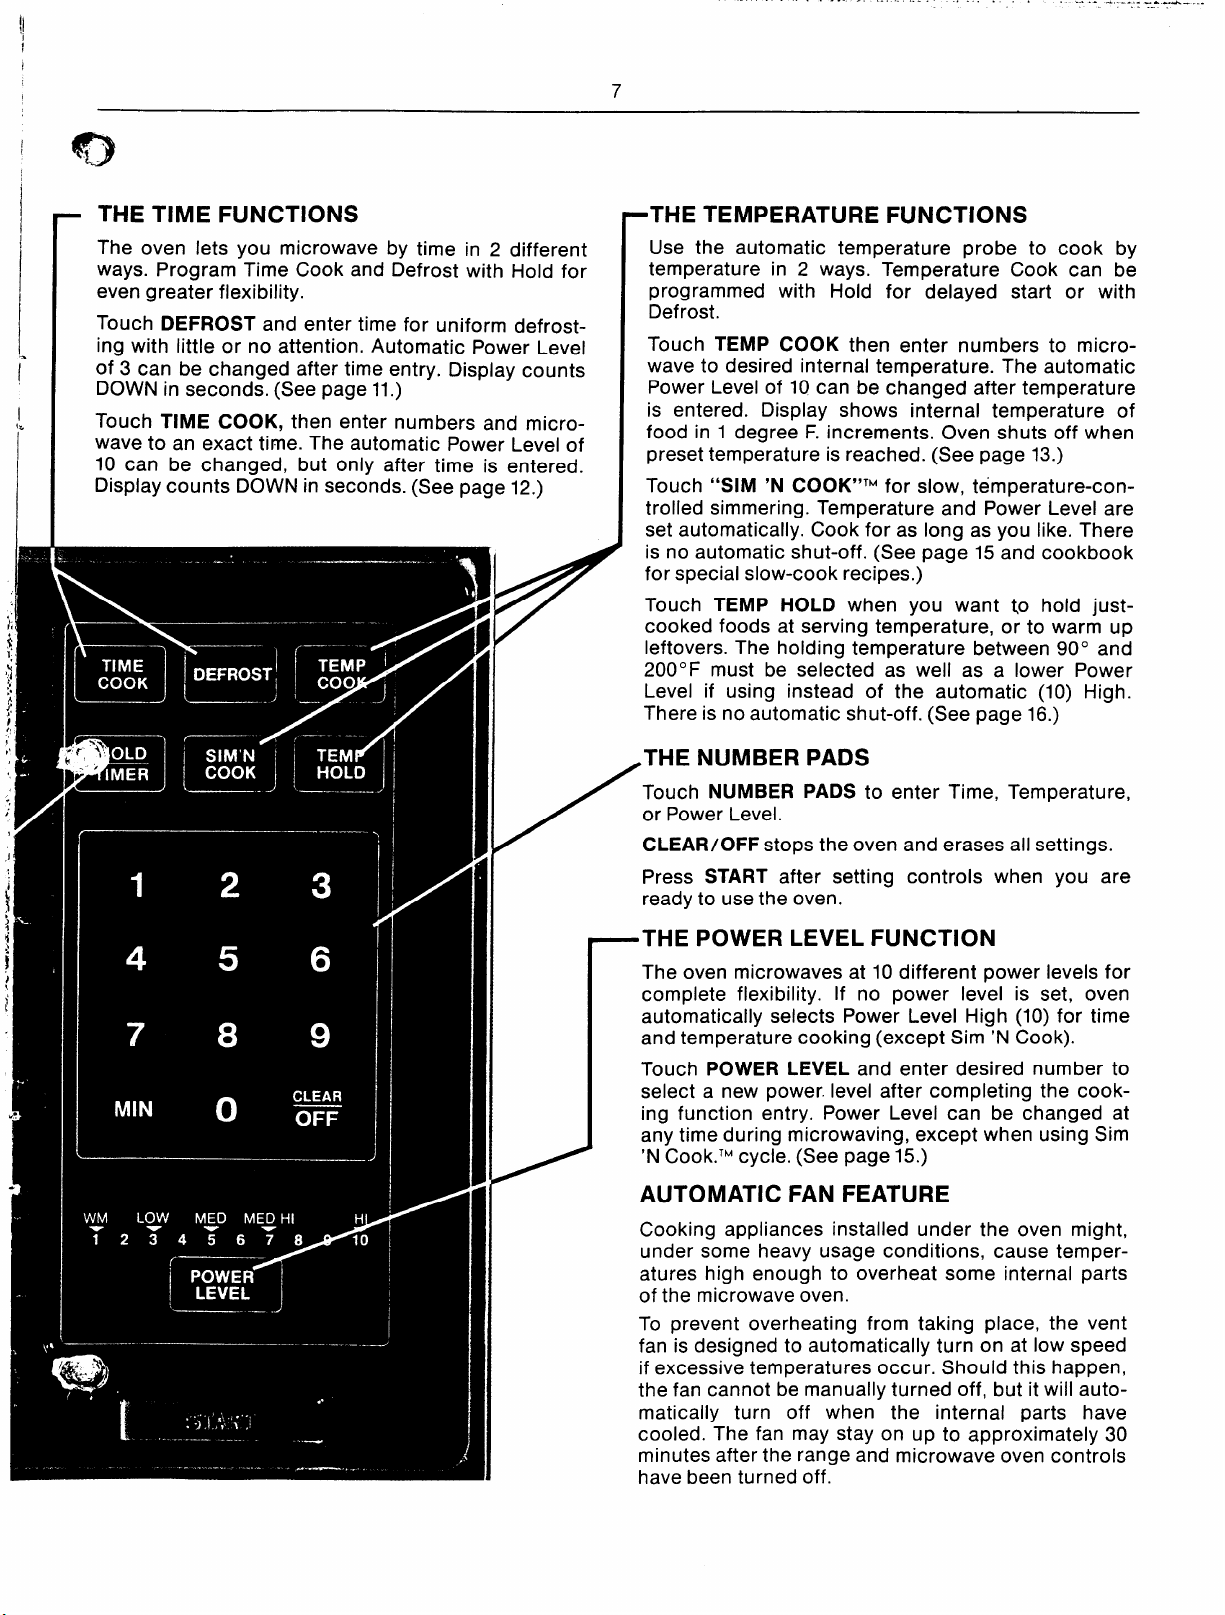
- THE TIME FUNCTIONS
The oven lets you microwave by time in 2 different
ways. Program Time Cook and Defrost with Hold for
even greater flexibility.
Touch DEFROST and enter time for uniform defrost-
ing with little or no attention. Automatic Power Level
of 3 can be changed after time entry. Display counts
DOWN in seconds. (See page 11.)
Touch TIME COOK, then enter numbers and microwave to an exact time. The automatic Power Level of
10 can be changed, but only after time is entered.
Display counts DOWN in seconds. (See page 12.)
-THE TEMPERATURE FUNCTIONS
Use the automatic temperature probe to cook by
temperature in 2 ways. Temperature Cook can be
programmed with Hold for delayed start or with
Defrost.
Touch TEMP COOK then enter numbers to micro-
wave to desired internal temperature. The automatic
Power Level of 10 can be changed after temperature
is entered. Display shows internal temperature of
food in 1 degree F. increments. Oven shuts off when
preset temperature is reached. (See page 13.)
Touch “SIM ‘N COOK”TM for slow, temperature-con-
trolled simmering. Temperature and Power Level are
set automatically. Cook for as long as you like. There
1
is no automatic shut-off. (See page 15 ‘and cookbook
for special slow-cook recipes.)
Touch TEMP HOLD when you want Lo hold just-
cooked foods at serving temperature, or to warm up
leftovers. The holding temperature between 90° and
200° F must be selected as well as a lower Power
Level if using instead of the automatic (10) High.
There is no automatic shut-off. (See page 16.)
,THE NUMBER PADS
Touch NUMBER PADS to enter Time, Temperature,
or Power Level.
CLEAR/OFF stops the oven and erases all settings.
Press START after setting controls when you are
ready to use the oven.
ITHE POWER LEVEL FUNCTION
The oven microwaves at 10 different power levels for
complete flexibility. If no power level is set, oven
automatically selects Power Level High (10) for time
and temperature cooking (except Sim ‘N Cook).
Touch POWER LEVEL and enter desired number to
select a new power. level after completing the cooking function entry. Power Level can be changed at
any time during microwaving, except when using Sim
‘N Cook.’” cycle. (See page 15.)
AUTOMATIC FAN FEATURE
Cooking appliances installed under the oven might,
under some heavy usage conditions, cause temperatures high enough to overheat some internal parts
of the microwave oven.
To prevent overheating from taking place, the vent
fan is designed to automatically turn on at low speed
if excessive temperatures occur. Should this happen,
the fan cannot be manually turned off, but it will auto-
matically turn off when the internal parts have
cooled. The fan may stay on up to approximately 30
minutes after the range and microwave oven controls
have been turned off.
Page 8
What Your New
Microwave Oven
Can Do for You
8
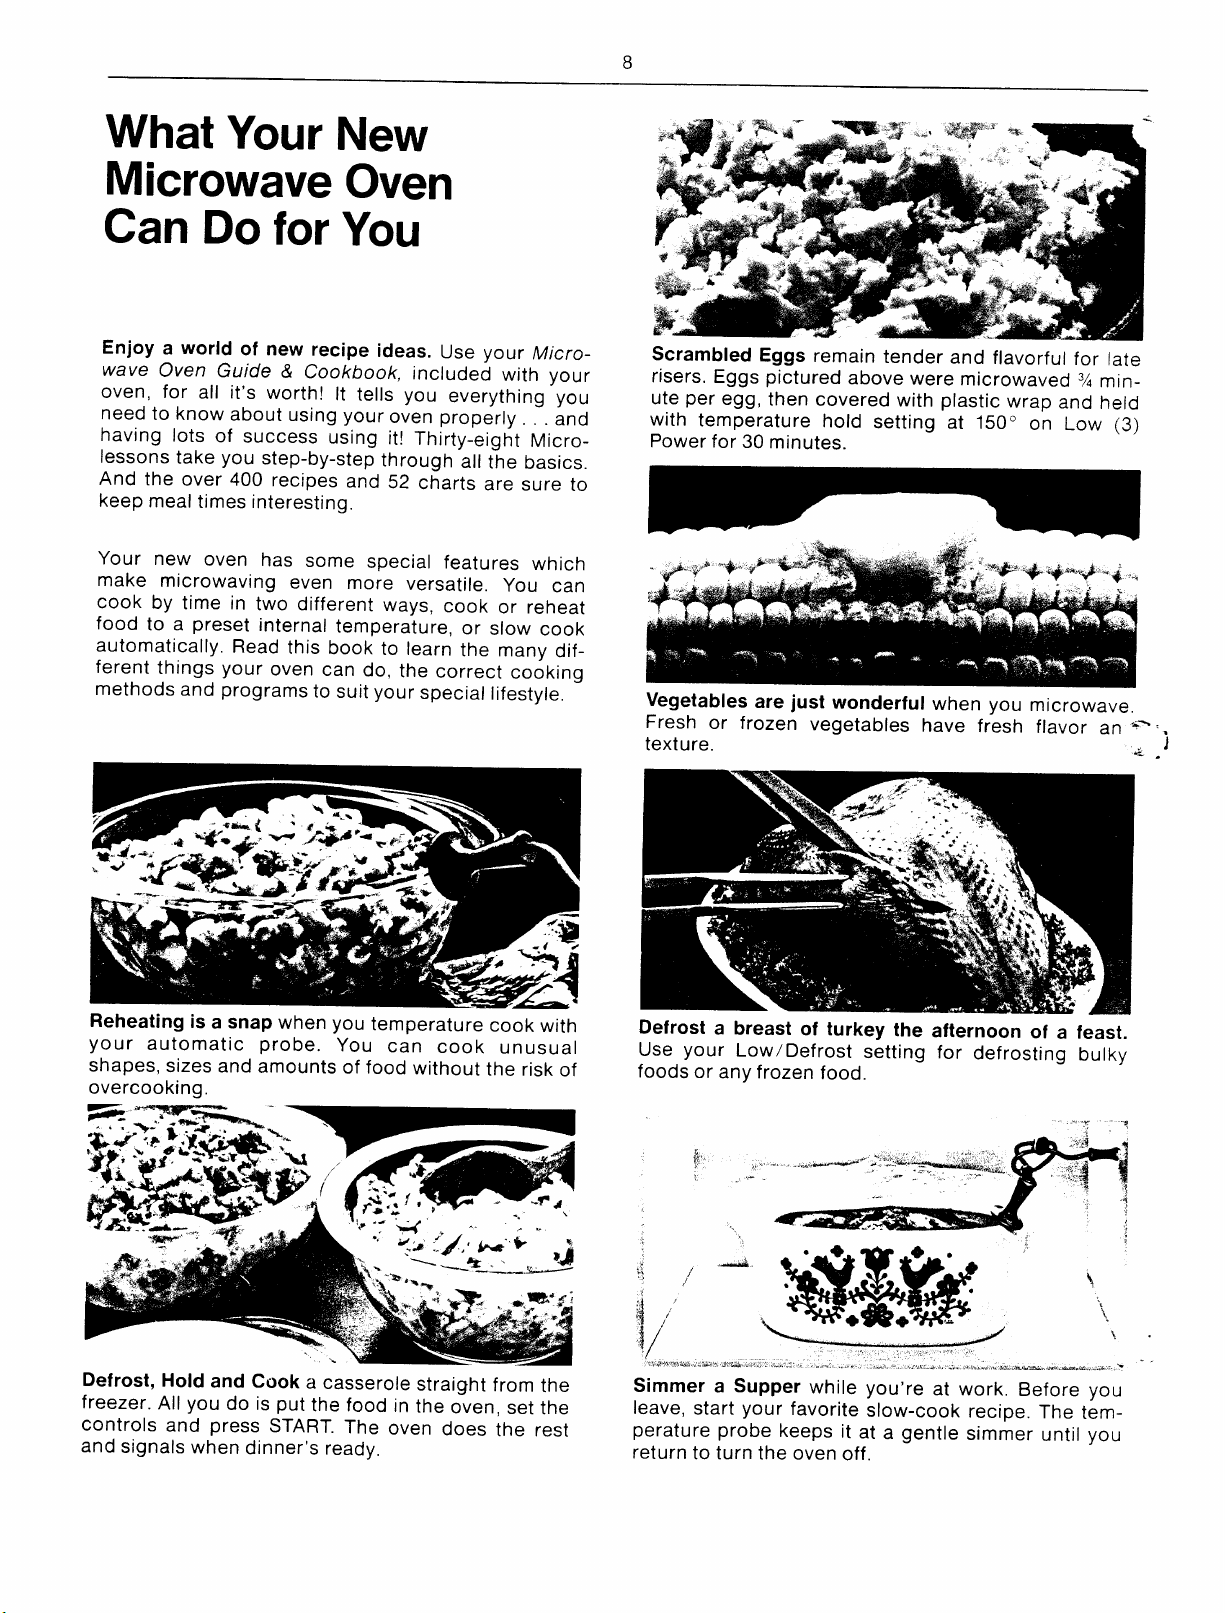
Enjoy a world of new recipe ideas. Use your Micro-
wave Oven Guide & Cookbook,
oven, for all it’s worth! It tells you everything you
need to know about using your oven properly . . . and
having lots of success using it! Thirty-eight MicroIessons take you
And the over 400 recipes and 52 charts are sure to
keep meal times interesting.
Your new oven has some special features which
make microwaving even more versatile. You can
cook by time in two different ways, cook or reheat
food to a preset internal temperature, or slow cook
automatically. Read this book to learn the many different things your oven can do, the correct cooking
methods and programs to suit your special lifestyle.
step-by-step through all the basics.
included with your
Scrambled Eggs remain tender and flavorful for late
risers. Eggs pictured above were microwaved 3A min-
ute per egg, then covered with plastic wrap and held
with temperature hold setting at 150° on Low (3)
Power for 30 minutes.
Vegetables are just wonderful when you microwave.
Fresh or frozen vegetables have fresh flavor an +=.
texture.
J
.
Reheating is a snap when you temperature cook with
your automatic probe. You can cook unusual
shapes, sizes and amounts
overcooking.
Defrost, Hold and Cook a casserole straight from the
freezer. All you do is put the food in the oven, set the
controls and
and signals when dinner’s ready.
press START. The oven does the rest
of food without the risk of
Defrost a breast of turkey the afternoon of a feast.
Use your Low/Defrost setting for defrosting bulky
foods or any frozen food.
Simmer a Supper while you’re at work. Before you
leave, start your favorite slow-cook recipe. The temperature probe keeps it at a gentle simmer until you
return to turn the oven off.
Page 9
‘)dow to “Tell”
the Oven What To Do
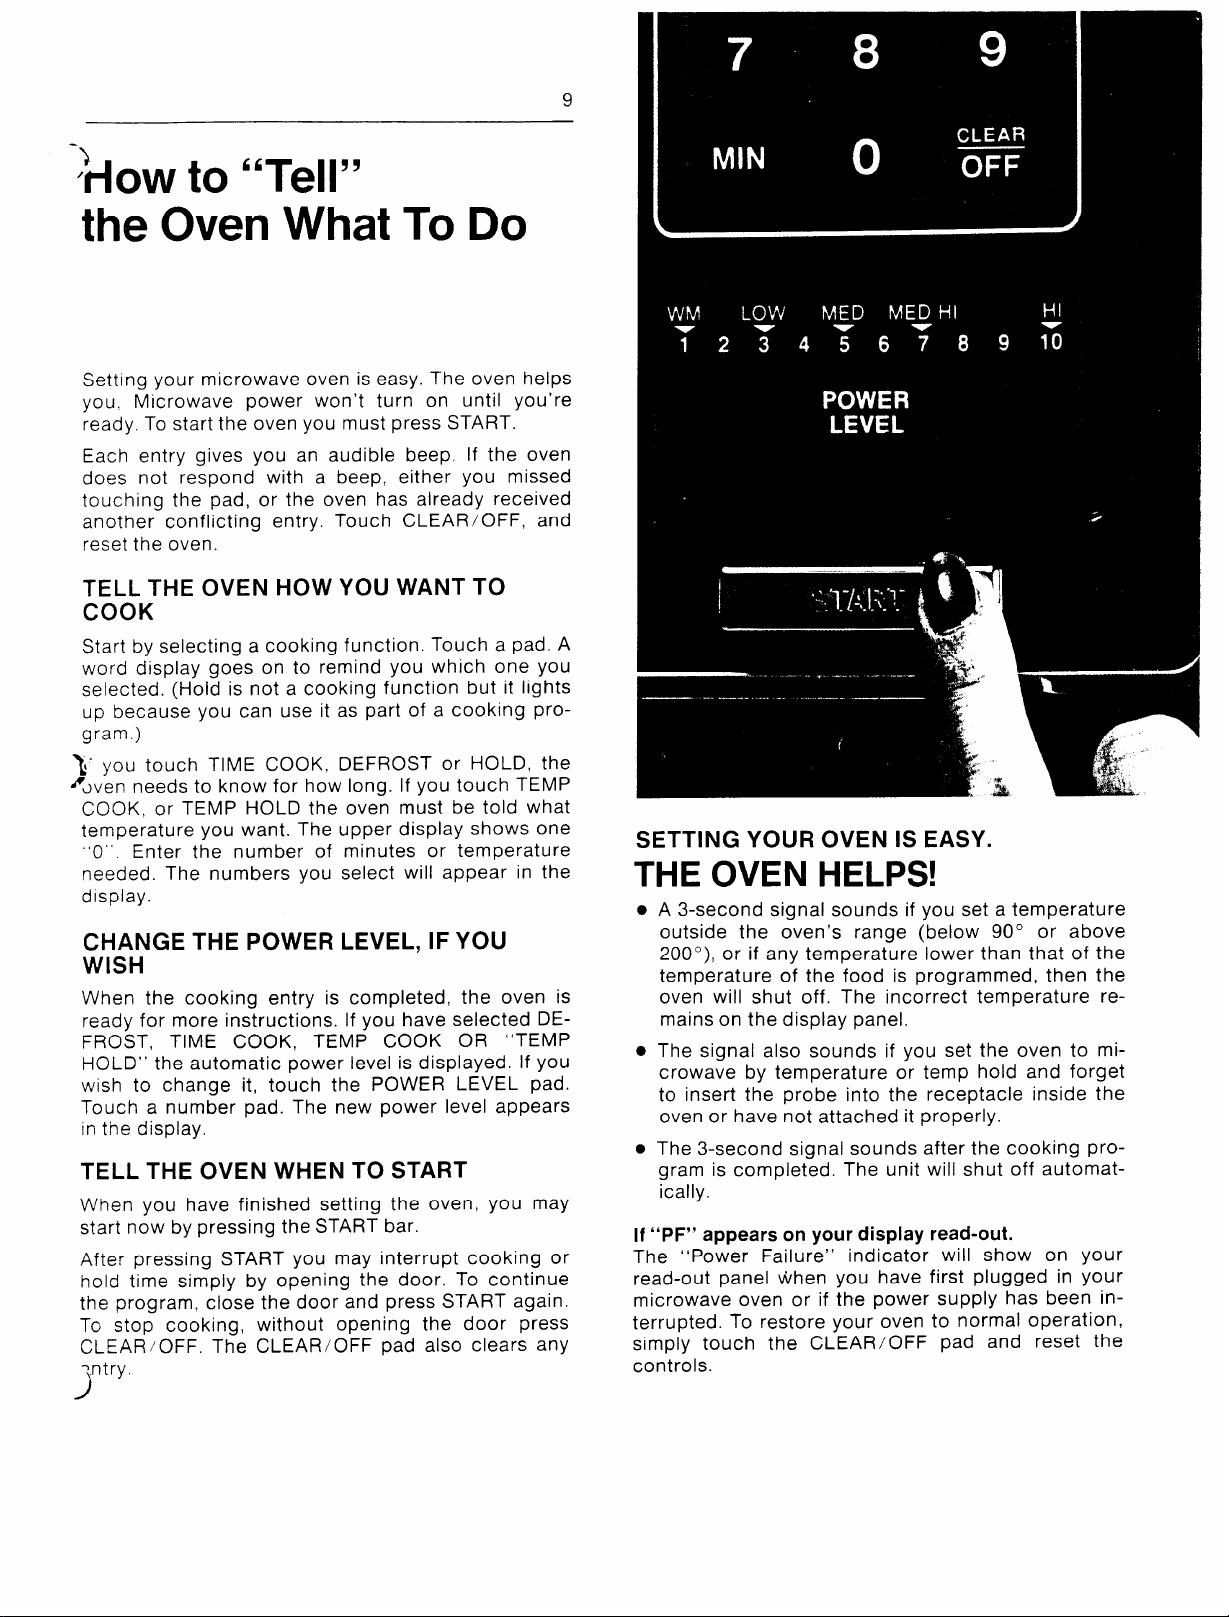
Setting your microwave oven is easy. The oven helps
you, Microwave power won’t turn on until you’re
ready. To start the oven you must press START.
Each entry gives you an audible beep. If the oven
does not respond with a beep, either you missed
touching the pad, or the oven has already received
another conflicting entry. Touch CLEAR/OFF, and
reset the oven.
TELL THE OVEN HOW YOU WANT TO
COOK
Start by selecting a cooking function. Touch a pad. A
word display goes on to remind you which one you
selected. (Hold is not a cooking function but it lights
up because you can use it as part of a cooking pro-
gram, )
]“ you touch TIME COOK, DEFROST or HOLD, the
‘~ven needs to know for how long. If you touch TEMP
COOK, or TEMP HOLD the oven must be told what
temperature you want. The upper display shows one
“’O”, Enter the number of minutes or temperature
needed. The numbers you select will appear in the
display.
CHANGE THE POWER LEVEL, IF YOU
WISH
When the cooking entry is completed, the oven is
ready for more instructions. If you have selected DEFROST, TIME
HOLD’” the automatic power level is displayed. If you
wish to change it, touch the POWER LEVEL pad.
Touch a number pad. The new power level appears
In the display.
TELL THE OVEN WHEN TO START
When you have finished setting the oven, you may
start now by pressing the START bar.
After pressing START you may interrupt cooking or
hold time simply by opening the door. To continue
the program. close the door and press START again.
To stop cooking, without opening the door press
CLEAR/OFF The CLEAR/OFF
=.ntry.
)
COOK, TEMP COOK OR “TEMP
pad also clears any
9
SETTING YOUR OVEN IS EASY.
THE OVEN HELPS!
● A 3-second signal sounds if you set a temperature
outside the oven’s range (below 90° or above
2000), or if any temperature lower than that of the
temperature of the food is programmed, then the
oven will shut off. The incorrect temperature remains on the display panel.
● The signal also sounds if you set the oven to mi-
crowave by temperature or temp hold and forget
to insert the probe into the receptacle inside the
oven or have not attached it properly.
● The 3-second signal sounds after the cooking pro-
gram is completed. The unit will shut off automat-
ically.
If “PF” appears on your display read-out.
The “Power Failure” indicator will show on your
read-out panel when you have first plugged in your
microwave oven or if the power supply has been
terrupted. To restore your oven to normal operation,
simply touch the CLEAR/OFF pad and reset the
controls.
in-
Page 10

How to Use
the Power Levels
The oven provides 10 different power levels to meet
every cooking situation. For
ing functions are preset at the levels most frequently
used. After you have completed a cooking function
entry you may select a new power level before or
during cooking. The exception is when using the Sim
‘N CookTM cycle, which cannot be changed from its
automatic power level.
The display shows what Power Level is being used.
The
Power Level guide has words printed above the
numbers to indicate corresponding power levels in
The A4jcrowave
tings may be used when you want a little more or less
power. Use the following suggestions for selecting
Power Levels.
Guide & Cookbook. The other set-
WHAT THE POWER LEVELS MEAN
l(Warm). Use for softening butter, raising yeast
doughs, keeping heated foods warm up to 1 hour.
2-3( Low). Use
late, cooking icings, glazes, simmering stews, soups,
dried peas.
4-5( Medium). Use for cooking egg and cheese
dishes, dessert and vegetable custards, some
cookies, temperature cooking some meats, heating
sour cream and cheese-based dips.
6-7( Medium-High). Use to reheat large portions of
refrigerated leftovers, heat TV dinners, frozen foods,
temperature cooking some meats, cook large vegetables, quick breads, some mix cakes.
8-9. Use for partial cooking of delicate foods, like
custard, scalding
nut, reheating single portions of refrigerated left-
overs.
10(High).
hamburgers, fish, small
melting butter, bring food
Sear dish.
for most defrosting, melting choco-
milk, hurry up defrosting 1 dough-
Use for most
your convenience, cook-
cooking: chicken pieces,
vegetables, bar cookies,
to a boil, preheat Brown ‘N
10
HOW TO CHANGE POWER LEVEL FROM 10 TO 5
1. Display shows automatic 10
after cooking entry is completed.
2. Touch
Beep sounds.
POWER LEVEL pad.
3. Enter Power Level by touching
the pad =5. Power Level display
shows 5.
Page 11

11
‘;~ow to Defrost
Defrosting is one of the most important advantages
of a microwave oven. Your new oven makes defrosting even easier and better. It’s microwave-fast, but
gentle enough to defrost uniformly with a minimum of
attention. The
too, with step-by-step instructions for defrosting all
types of food.
The Defrost setting gives you an automatic power
level of 3, which is best for most defrosting. You may
change it if you wish, which makes Defrost a versatile
function. Power Level can be changed, but only after
time is entered. (See page 17 for other uses for Defrost setting.)
You may open the door at any time during microwavtng. ‘To” resume defrosting, - close the door and
ress START.
‘
‘1
#
Microwave Guide & Cookbook helps
TIPS FOR DEFROSTING
Foods frozen in paper or plastic can be defrosted
right in the package. The
book gives
and freezing foods which will be used in automatic 3step cooking programs, described on page 20 of this
book.
For even defrosting, many foods need to be turned
over, rotated or broken up part way through the defrosting time. Let the oven remember for you. If you
set the oven for the first time period, it will signal
when food needs attention. Always start with minimum defrosting time.
you special instructions for packaging
Microwave Guide & Cook-
“HURRY-UP” DEFROSTING
With “Hurry-Up” defrosting, food will need less time
but more frequent attention. If you want to defrost
small items in a hurry, you can raise the Power Level
after entering time by touching POWER LEVEL pad
and 7 or 10.
To defrost at Power Level 7 (Medium-High), cut total
defrosting time to Yz. Rotate, turn over or stir food after M of the new total time.
To defrost at Power Level 10 (High), cut total defrost-
Rotate, turn over or stir food fre-
ing time to
quently.
‘/3
HOW TO DEFROST 2 POUNDS OF PORK CHOPS
1. Touch DEFROST. The function
legend lights up.
.—
.-
3. Press START. When oven shuts
off, turn package over.
4. Touch
DEFROST.
5. Enter Time. Touch 8 and O ,
0 . Display shows 8:00.
6. Press
off, separate pieces. Let stand to
complete defrosting.
START. When oven shuts
Page 12

How to Time Cook
12
Time cooking is familiar to you from conventional
cooking, but with the microwave oven, you preset the
time and the oven turns off automatically.
Use Time Cook for simple jobs, like cooking vege-
tables, hamburgers or baked potatoes. Use it for deli-
cate foods, like cakes, which require timing in seconds, or puddings which need to be stirred. (Set the
oven for short time periods to remind you when it’s
time to stir. )
Many Time Cook recipes give you a time range, such
as 6 to 8 minutes. This prevents overcooking, because house power differs from one part of the coun-
try to another, or from one time of day to another. Set
the oven for the minimum time, test food for done-
ness and cook a little longer, if necessary.
Time Cook gives you an automatic Power Level of 10.
After entering the time, you may change Power Level
before starting to cook or during cooking. While microwaving, you may interrupt cooking to check the
food. To resume cooking, close the door and press
START.
TURNING AND STIRRING IN TIME
COOKING
Some foods require attention during cooking to help
them cook evenly. The recipe gives you the microwave time in bold type, then tells you when to stir or
turn the food. Let the oven help you remember. If you
program the oven to stop when it’s time to stir or
turn, the oven will signal that food needs attention.
HOW TO USE A TYPICAL TIME COOK
RECIPE
In The Microwave Guide & Cookbook, microwaving
times and Power Levels are printed in bold type. so
you can see them at a glance. The Power Level
Guide on your oven tells you what numbers correspond to the words in the cookbook. When a recipe
is cooked on High, no change in Power Level IS
needed.
CHILI PORK CHOPS
POWER LEVEL:Medium (5)
MICROWAVE TIME: 35 to 45 min., total
4
pork chops, l-in. thick ...
4
onion slices, ‘/4 to
%-in. thick
4
green pepper rings,
1/4to %-in. thick
1
bottle (12-02.) chili top of chops. Pour chili
sauce (1 ‘/2 cups)
——-—
Score fat on chops and
arrange in 3-qt. casserole so “tails” are in
center. Place onion and
green pepper slices on
sauce over top. Cover,
Microwave at Medium
35 to 45 Minutes,
ing dish M turn after 2LJ J
minutes.
Makes 4 servings
rotat T I,
HOW TO TIME COOK CHILI PORK CHOPS
2. Enter Time. Touch 20:00 and
Display shows 20:00. (20 minutes)
4. Push START. When signal
sounds and cooking is completed,
rotate the pork chops % turn.
5. Touch TIME COOK. Enter Time.
Touch 15:00. Display shows 15:00.
Set Power Level 5.
3. Touch POWER LEVEL, touch 5
to change from automatic 10
(High) to Power Level Medium (5)
6. Press
nals, test pork chops for
doneness.
START. When oven sig-
Page 13

-How to Temp Cook
For many foods, temperature cooking (Temp Cook) is
the most accurate method. Use it for cooking meatloaf, roasts and other foods where internal temperature is the best test of doneness. Use it to heat or
reheat foods to precise serving temperature. It takes
the guesswork out of cooking, because the oven
shuts off automatically when food reaches the preset
temperature.
Temperature Cook gives you an automatic Power
Level of 10. After entering the temperature, you
change power level. (See page 10.)
The oven helps you with temperature cooking. If
after you press START, the oven gives a 3-second
signal, it means you selected a temperature lower
than that of the food.
If you set a temperature lower than 90’ or higher
than 200’
%hows you the incorrect figure so you can recognize
‘~jur mistake and reset.
Y
If you forget the probe or have not attached it to the
oven correctly, or if probe needs service, the oven
gives a 3-second signal and then shuts off. All you
have to do is attach the probe and press START.
HOW TO USE A TEMPERATURE COOK
RECIPE
Temperature Cook recipes tell you where to place
the probe and attach the cable. Temperature and
power level are printed in bold type so you can read
them at a glance. Be sure to touch TEMP COOK before touching the number pads. If
change the power level, do so after you have entered
the temperature.
the oven gives a 3-second signal and
YOU need to
may
13
—
Ibs. ground chuck .......
11/2
beef
3/4
cup chopped onion
cup fine dry bread
‘/2
Mix together beef, on-
ion, crumbs, egg, ketchup,
sonings. Mold into a
milk and sea-
crumbs rounded, flat loaf in 9-in.
1
egg pie plate.
2
tablespoons
ketchup
cup milk
1
teaspoon salt
1
‘/4
teaspoon pepper
‘/8
teaspoon paprika
tablespoons ketchup.,
2
Insert temperature probe so tip is in center of loaf.
Cover tightly with plastic wrap, arranging loosely
around probe to vent. Attach cable end into recep-
Microwave at High. Set Temp, Set 170°.
tacle.
When oven signals, remove meatloaf and let stand
about 10 minutes to firm before serving. Serve in
wedges.
Spread ketchup evenly
over top of loaf.
Makes 6 servings.
I
HOW TO TEMPERATURE COOK BASIC MEATLOAF
Insert Probe and insert
;-able end into
receptacle.
Touch TEMP COOK.
2. Enter Temperature.
7and0.
Touch
1 ,
Display shows 170.
Level shows 10. No
change needed.
Power
3. Press
shows –90 until temperature reaches 90°. Then
it displays temperature of
food in degrees until 170°
is reached.
START. Display
4. Finished temperature
reached. A 3 second signal sounds and the oven
shuts off automatically.
Page 14

14
THE MICRO-THERMOMETERTM PROBE LETS YOU COOK TO ACCURATE TEMPERATURE. “
The Micro-Thermometer probe is essential when us- the probe cable doesn’t interfere with door seal. Do
ing both the Temperature Cook and Sim ‘N Cook not leave the probe in the oven if it is not inserted in
controls. When temperature cooking, insert the
probe at least one inch into the food which you are
cooking. When
using the probe with the Sim ‘N Cook
setting, insert the probe into the liquid portion of the
food.
Place food with probe in oven and insert the cable
end into receptacle on oven wall. If you forget the
probe or do not attach it correctly, the oven will
sound a 3-second signal
The oven will not start.
when you press START.
When needed, loop the cable and use the clip to hold
it in place. This prevents the probe from slipping out
of position. If the probe does slip out of position dur-
ing cooking, reposition the probe, press START and
continue cooking. When closing the door, make sure
food; this could cause damage to the oven.
FOODS NOT RECOMMENDED FOR USE WITH THE
TEMPERATURE PROBE.
Delicate butter icings, ice cream, frozen whipped
toppings, etc., soften rapidly at warm temperatures.
Lowest setting on temperature probe is 90:. Time
cook these heat sensitive foods.
Most frozen foods. The probe should not be inserted
into hard foods. Defrost roasts, casseroles or con-
venience foods, then cook or heat them with the
probe to precise serving temperature.
Batters and doughs should be observed during bal-$ ,
ing and tested for doneness. They may also requl, ‘ ‘
turning of the dish. Time cook these foods.
HOW TO POSITION THE PROBE IN TYPICAL FOODS FOR TEMPERATURE COOKING
Plates of Food. Insert probe as
horizontally as possible, so tip is in
center of largest item, but not
touching a bone. Heat to 160°.
Meatloaf. Insert probe as horizon-
tally as possible, so that tip is in
center of the loaf. Set temperature
for 170°.
Soups and Beverages. Use the clip
to hold the probe tip in the center
of the food off the bottom of cup
Heat cream soups to 140”, waterbased soups to 150° to 160’.
Dips. Insert probe so tip is in ten- x.
terof dip. Use clip to hold it in
place. Heat sour cream dips to 90’
and cheese dips to 120’
Page 15

‘%OW to Use
“Sire ‘N Cook”
Feature
15
,.
-1
I
I
Setting the oven to use the “Sire ‘N Cook” function is
easy. You don’t enter time because it is a temperature function. You don’t enter temperature or power
level because the oven does that automatically.
There is no automatic shut-off.
The “Sire ‘N Cook” feature lets you slow-cook foods
which need long, gentle cooking to tenderize or develop flavor. Food is brought to a simmer rapidly,
then the temperature probe maintains simmering at
about 180° for as long as you want. Choose this setting for pot roasts, stews, or any favorite slow-cook
recipe.
If, after you press start, a 3-second signal sounds
and the oven shuts off, it means you have forgotten
the probe or
correctly.
@
Casserole
Automatic
Your Cook Book recipes specify size of casseroles
needed for simmering certain foods. A summary of
dish sizes for a variety of foods which automatically
simmers with excellent results is listed below.
Be sure to use the amount of water called for in the
recipe, and to cover the food. Covering retains the
steam which helps soften and tenderize the food during microwaving.
Covering the food tightly to retain steam is so impor-
tant that we recommend that you use plastic wrap,
stretching over the top of the casserole. Gather it
have not attached it to the oven
Suggestions
for
Simmering
loosely around the probe, allowing some space for
venting (see pictures in your cookbook). Do not use
the lids to your casseroles.
Alternately, check department stores housewares
sections for plastic or stoneware accessories designed for automatic temperature cooking. These
pots have lids designed with slots cut out so the temperature probe can be inserted from the outside of
the casserole through the lid directly into the food.
FOOD
Chuck Roast (5 lb.)
Beef Stew (2 lb. beef
cubes) 4-qt. heat-tempered glass
Chicken, Stewing or 4 to 5-qt. casserole or
Simmering 4-qt. heat-tempered glass
Chili, and other Saucy 5-qt. casserole
Hamburger Mixtures
Dried Beans or Peas 3 to 4-qt. casserole or
soup
Pork Chops Oblong 13 x 9 x 2-in. dish
MICROWAVE
OVENPROOF
UTENSIL
Oblong 13 x 9 x 2-in. dish
or12x10x2-in. dish
3 to 4-qt. casserole or
mixing bowl
mixing bowl
4-qt. heat-tempered glass
mixing bowl
5-qt. casserole
HOW TO “SIMMER ‘N COOK” A STEW
Insert Probe as
‘-- Irected in cookbook.
4)
Always loop cable and
fasten with the clip so it
stays put during long
cooking.
—-—..—-..
2. Attach Cable End at
Receptacle. Make sure
cable doesn’t get caught
in the door.
,
3. Touch “SIM ‘N
COOK”. The function
legend lights up.
4. Press START. Cooking
continues until you open
the door or clear the program by touching
CLEAR/OFF.
Page 16

16
How to Use
Temp Hold Feature
Temp Hold is an especially handy feature of your microwave oven. It lets you hold foods at serving temperature, keeping them “just-cooked” hot and fresh.
With the Temp Hold feature:
1. You can select a holding temperature between
90° and 200°F.
2. You can select any Power Level you want.
Because foods tend to stay moist and tender during
microwaving, Temp Hold is the perfect way to keep
vegetables, casseroles, and even scrambled eggs
piping hot and ready to serve. Roasts, ham and
poultry, too, may be kept juicy and table ready with
this feature.
You can even warm up leftovers!
If you wish, you can set your oven to automatically
defrost, hold, time or temperature cook, and then
Temp. Hold. You must be sure, when you combine
Time Cook and Temp Hold, that the temperature
probe is placed in the food before starting the
microwave oven.
For temperature cooking and holding, you can
choose one finished temperature and power level
the cooking and if you want another temperature and
power level for the Temp Hold cycle. Temp Hold does
not turn off automatically so you can control the
holding time. (Allow foods to hold only as long as
safe. Times vary depending on food type and
amount.)
for
Things to remember when setting
your oven to microwave
Temp Hold.
●
To prevent spoilage, do not hold foods except
solid roasts at temperatures below 150° for more
than 2 hours.
●
Solid (not rolled) roasts may be held below 150°.
However, during the microwave roasting process,
a great amount of heat is stored in the roast. Keeping the roast in the warm oven cavity during
TEMP/HOLD can cause a greater increase in internal temperature than when allowing the roast to
stand outside the oven on a kitchen counter. Temperatures of up to 20° to 30° above the TEMP/
HOLD setting are possible. Because of this heat
storage, it is not possible to hold roasts at a rare
degree of doneness.
is suggested that you first remove the roast from
It
the oven and let it stand, uncovered, for about 10 to
15 minutes before returning to TEMP/HOLD. Or, if
you know before cooking that you intend to hold a
solid roast at serving temperature, you may compensate for the stored heat by undercooking the
roast. See your Cookbook for details.
How to speed up
Automatic Simmer recipes
The Automatic Simmer recipes in the Microwave
Guide and Cookbook were especially developed for
long slow cooking. However, you can speed up the
cooking process by using the Temp Hold feature and
following the instructions as given in the cookbook.
You can cut the time in half for most simmer-cooking
recipes with no risk of toughening because with the
temperature probe you do not exceed the recommended temperature.
6-
.
I@]
HOW TO TEMPERATURE HOLD
1. Insert probe in food
and attach probe to oven.
(If you have just Temp Select the holding temCooked your food, steps perature. Oven will
one and two are already automatically microwave
done) the food until it reaches
2. Touch TEMP HOLD.
Read out displays: O .
pre-set temperature, then
maintains temperature.
3. Select POWER LEVEL.
Oven will automatically
use High unless you
select another level. See
cookbook for suggested
power levels.
4. Press START. The
oven will not shut off until
you touch the CLEAR/ , ~”
OFF Pad.
G
<“
\
Page 17

17
‘~dowto Use Defrost as
a Cooking Function
In any program, information entered in Defrost al- You can start cooking dried beans at High, then simways comes first, and the Time Cook entry comes
last. Since you can change the Power Levels of both
Defrost and Time Cook, you can use the Defrost settlng as a cooking function. Here are a few examples:
HOW TO SET THE OVEN TO START AT HIGH, THEN COOK AUTOMATICALLY AT MEDIUM.
mer them until tender at Medium.
You can microwave a meatloaf by time at Medium
High and program standing time so the oven signals
when the meatloaf is ready to serve.
.
2. Touch POWER LEVEL. Touch
1 and O Display changes to
10 (High).
3. Touch
Touch
(Medium). Press
POWER LEVEL. Touch
5. Display changes to 5
HOW TO SET THE OVEN TO MICROWAVE AT MEDIUM HIGH, THEN HOLD
1. Touch DEFROST. Enter time.
2. Touch
7 Display changes to 7 (Medium
High).
POWER LEVEL. Touch
3. Touch
Time. Press
SETTING YOUR OVEN TO HOLD TIME
The HOLD TIMER setting is a solid-state timer. No micro~vave power is used. So you can use it for other
thlnqs around the kitchen, like timing a 3-minute long
dlst~nce phone call.
You can also use HOLD TIMER combined with microwave cooking, when recipes call for standing time.
(To use with microwave cooking, see pages 18, 19 &
20.)
TIME COOK. Enter Time.
START.
I
HOLD/TIMER. Enter
START.
2. Select amount of time. Touch
the number pads. The read-out
panel tells how much time you set.
Don’t select a Power Level.
3. Push
fan and see the oven interior light.
A 3 second signal tells you when
time is up.
START. You will hear a
Page 18

Automatic
Step-By-Step Cooking
18
The oven can be set to perform several cooking
steps, one after the other. Enter the entire sequence,
press START, the oven does the rest. When it completes one step, it goes on to the next. You don’t
even have to be there.
Some programs use the Hold/Timer. This function
allows you to set a no-heat waiting time of up to 99
minutes and 99 seconds after defrosting, or before
Time or Temperature cooking. To use, touch HOLD/
TIMER and enter the time by touching the number
pads.
The oven performs functions in a preset sequence. If
you accidentally reverse the sequence while setting
instructions, the oven automatically rearranges your
program. In a Time Cooking sequence, Defrost al-
ways comes first, then Hold, then Cook.
In a Temperature Cooking sequence, Hold comes
first, then Temperature Cook. In either sequence, if
you set the oven to Cook, then Hold, it will Hold first,
then Cook.
THINGS YOU CAN DO
It’s 4:00. You want to start cooking at 5:00, but you
have to leave now to take the children to a music lesson. Set the oven to Hold for 60 minutes, then Time
or Temperature Cook. (Allow foods to remain at room
temperature only as long as is safe. Times vary.)
You want to defrost food, then refrigerate immediately after standing time. Set the oven to Defrost,
then Hold. It will signal when it’s time to refrigerate,
Your frozen casserole needs to defrost and stand before it can be cooked. You’d Iike to start now and forget it. Set the oven to Defrost, Hold, Time Cook.
You can Cook then Hold if you cook at Defrost setting but change the power level. (See page 17.)
You want to start food on High Power, then temper-
ature cook at medium. Touch DEFROST, enter the
time; touch Power Level and enter 10. Then. touch
TEMP COOK, enter the final temperature, and
change the Power Level to 5. Remember to insert the
probe into your food.
You want to defrost a loaf of frozen bread and heat It
to serving temperature. Touch DEFROST and enter
time; touch TEMP COOK and enter 90° to 110 Frozen bread is usually porous enough so you can
sert the probe.
in-
THINGS YOU CAN’T DO
The “Sire ‘N Cook” function cannot be combined ‘“
with any other function.
Hold, then Defrost. Defrost always comes first. If you
want the oven to Hold then defrost, set the oven to
Hold, then Time Cook at Power Level 3.
.-
j
HOW TO SET HOLD FOR 90 MINUTES & TIME COOK FOR 45 MINUTES
2. Enter time. Display shows holding time selected. Because Hold is
a no-heat setting, no Power Level
is displayed.
5. Press
off. HOLD/TIMER comes on. Display counts DOWN Hold Time.
START. TIME COOK goes
3. Touch
shows :0.
6. Hold Time is up. TIME COOK
comes on. Displays show time to
cook and Power Level. Cooking
begins automatically.
TIME COOK. Display
Page 19

‘How to Delay
Cooking Automatically
The oven can be set to delay cooking for up to 99
minutes and 99 seconds. If you can’t
it’s time to start dinner, the oven can start without
you. Just put
gram, press START and leave. (Allow foods to remain
at room temperature only as long as is safe. Times
vary depending on food type and amount. )
The sequence is always Hold, first, then Cook. If you
accidentally reverse instructions, the oven will rearrange them. You cannot set Temperature Cook,
then Hold (unless Temp Hold function is used). You
cannot set Time Cook, then Hold unless Defrost is
used as a cooking function by selecting an appropri-
ate power level. (See page 17. )
To set Hold/Time Cook, select Hold Time needed
(up to 1 Y! hrs.), then the length of Time Cook wanted.
(See page 18.)
To set Hold/Temp Cook, insert the probe into the
food and attach the cable to the oven. Tell the oven
‘~ hold for as long as you need (up to 1‘A hrs.), then
~emperature Cook to the internal temperature you
want.
the food in the oven, enter your pro-
be home when
19
Standing Rib Roast
HOW TO SET THE OVEN TO HOLD-TEMPERATURE COOK
2. Enter Holding Time. Display
shows Holding time. Because Hold
is a no-heat setting, no Power
Level is displayed.
5. Press
goes out. HOLD comes on. Display
counts DOWN Hold Time.
START. TEMP COOK
3. Touch
shows O.
f
6. Hold Time’s up. TEMP COOK
comes on, display shows Power
Level and food temperature,
TEMP COOK. Display
Page 20

How to Set the Oven
for Freezer to Table
Time Cooking
Many frozen foods need to be defrosted, then held
for a while to equalize temperature before they can
be cooked. You can set your microwave oven to perform all 3 steps, one after the other. If you don’t want
to cook, omit Time Cook. If food doesn’t need to
stand between defrosting and cooking, skip Hold
Time.
Microwave Guide and Cookbook has micro-
The
Iessons for the new techniques developed for
automatic freezer to table microwaving.
FROZEN CHICKEN PIECES MICROWAVED
ITALIAN STYLE
POWER LEVEL: DEFROST, HOLD/TIMER and HIGH
MICROWAVE TIME: 48to 50 min.
20
1
chicken (21/2to 3 lb.) ......
cut up and frozen in
individual pieces::
‘/4
cup oil ............................
Garlic Powder
Parsley flakes,
fresh or dried
Paprika
Cover dish with wax paper. Place in microwave oven
Microwave at Defrost 18 Minutes. Hold 10 min-
and
utes.
attention to the food is necessary during cooking.
dish and freeze well covered.
Time Cook (High) 20 to 22 Minutes. No
‘for when you plan to use chicken soon, arrange in
In 13x9x2-in. dish
arrange chicken with
the thickest pieces to
outside of dish.
Drizzle with oil and
sprinkle with garlic powder, parsley
paprika.
Makes 4 to 6 servings
and
SETTING DEFROST-HOLD-COOK
1. Touch DEFROST. 2. Touch HOLD/TIMER.
Enter time. Enter time.
3. Touch
Enter time. Change
Power Level if needed.
TIME COOK.
4. Press
START.
,- -
Page 21

Jrhe Exhaust Feature
/.
F .“.
., -,,
~- ..>.%
21
The exhaust hood feature on your GE microwave
oven is equipped with a metal filter which collects
grease. When the fan is operated, air is drawn up
through the filter and is then discharged through
provided venting to the outside. The hood also has a
light for illuminating the counter surface.
Soak, then agitate filter in hot detergent solution.
Don’t use ammonia or other alkali because it will
darken metal. Light brushing can be used to remove
in bedded dirt. Rinse, shake
fore replacing. Filters should be cleaned at least
and remove moisture be-
once a month. Never operate your hood without the
filter in place.
occur on surfaces below hood, filter can retard entry
of flames into the unit.
In situations where flaming might
Page 22

22
Cleaning and Caring
for Your
Microwave Oven
YOUR NEW MICROWAVE OVEN ISA VALUABLE
APPLIANCE. PROTECT IT FROM MISUSE BY
FOLLOWING THESE RULES:
Keep your oven clean and sweet-smelling. Opening
the oven door a few minutes after cooking helps “airout” the interior. An occasional thorough wiping with
a solution of baking soda and water keeps the
interior fresh.
Don’t use sharp-edged utensils with your oven. The
interior and exterior oven walls can be scratched.
The control panel can be damaged.
Don’t remove the cover over the “stirrer” at the top
of the oven (microwave feature 5 on page 5). You will
damage the oven.
BE CERTAIN POWER IS OFF BEFORE CLEANING ANY PART OF THIS OVEN
HOW TO CLEAN THE INTERIOR
Walls, floor and plastic cover. Because there is little
heat except in the food, or sometimes in the utensils,
spills and spatters are easy to remove. Some spatters
can be removed with a paper towel, others may require a damp cloth. Remove greasy spatters with a
sudsy cloth, then rinse and dry. Do not use abrasive
cleaners on oven walls. NEVER USE A COMMERCIAL OVEN CLEANER ON ANY PART OF YOUR
MICROWAVE OVEN.
Door-inside. Glass: wipe up spatters daily, wash
when soiled, with a minimum of sudsy warm water.
Rinse thoroughly and dry.
Metal and plastic parts on door: Wipe frequently with
a damp cloth to remove all soil. DO NOT USE ABRASIVES, SUCH AS CLEANING POWDERS OR STEEL
AND PLASTIC PADS. THEY WILL MAR THE
SURFACE.
Special note when using Brown “N Sear Dish: High
heat generated on bottom of Brown ‘N Sear Dish can
cause scorched appearing stains to bake onto the
oven shelf if grease is present. These may be re-
moved with Delete” Polishing Cleanser by the
Drackett Products Co.
After using Delete, rinse and dry thoroughly, following instructions on can. Do not use Delete on the
painted surfaces such as walls. It willl scratch the
paint.
Delete may be purchased from your local dealer or
from your Authorized Service Center. Check tb =
“yellow pages” for location and phone number.
Delete may be sold in grocery or hardware stores. or
in the housewares section of some department
stores.
HOW TO CLEAN THE EXTERIOR
Case. Clean the outside of your oven with soap and
water, then rinse and dry. The outer pane of the window is glass. Just wipe clean with a damp cloth.
Chrome trim is best wiped with a damp cloth and
then with a dry towel.
Control panel. Wipe with a damp cloth. Dry thor-
oughly. Do not use abrasives or sharp objects on the
panel. They can damage it.
Cord. If the cord becomes soiled, unplug and wash
with damp cloth. For stubborn spots, sudsy water
may be used, but be certain to rinse and dry thor-
oughly before plugging cord into outlet.
Automatic temperature probe. Probe is sturdy, but
care should be taken in handling. Do not
bend it; avoid dropping temperature probe.
Clean as soon after using as possible. To clean. wipe
with sudsy cloth, then rub lightly with plastic scour
ing ball if necessary. Rinse and dry. (Or wash
dishwasher.)
twist or
Page 23

23
.
To replace
main fuse or circuit breaker panel or pull plug.
move 2 screws from each side of lower panel and 3
screws from front edge. Lower panel until it rests on
range below. Place fingers on top near each end of
~mp. Press down and roll top of lamp gently toward
/
hood lamp, first disconnect power at
Re-
—-
To replace your oven lamp, first disconnect power at
main fuse or circuit breaker or pull plug.
top grill by taking off 2 screws which hold it in place.
Next, remove the single screw on top left that
secures lamp housing. Open oven door for easier removal of the lamp housing assembly. Then grasp tab
and pull out and up to clear door hinge and front lip
of oven.
Turn to left, then pull outward from socket. Replace
~h GE Lamp =25T8DC.
To remove bulb, push it inward gently and
Remove the
~o not attempt to operate the oven unless the grill is
in place.
front until it stops. Remove. Replace with same type
and wattage lamp. Hold lamp near each end and insert prongs in sockets. Gently roll top of lamp toward
rear of range until it stops. Raise lower panel and
replace screws.
Clean off the grease and dust on hood surfaces
often. Use a warm detergent solution. About 1 tablespoon of ammonia may be added to the water.
Take
care not to touch the filters and enameled surfaces
with this. Ammonia will tend to darken metal.
If dust accumulation becomes a problem, wipe surface of the outer
dishpan detergent (2 teaspoons detergent
of water). BE CAREFUL NOT TO SCRATCH THIS
SURFACE.
pane with a weak solution of liquid
per quart
Page 24

24
Before You Call For Service
Problem: The oven doesn’t seem to work at all.
Solution: Make sure power is on. Check first to see
that the 3-prong plug is inserted firmly into a proper
outlet. Is the wall outlet working properly or has it
failed and won’t work until a fuse is replaced? You
can check that easily at the control box.
If power is on, then the oven is not accepting your instructions. You may already have entered a program
which was not used or cancelled, or you may have
programmed functions which cannot be combined,
or you may have made a numerical entry before a
function entry. Touch CLEAR/OFF.
Problem: The control panel lights up and beeps
sound when I set the oven but it won’t turn on when I
touch Start.
Solution: Check to be certain the door is securely
closed. If a dish touches the door when the door
seems closed, it actually may not be firmly closed.
Unless the door is closed to engage the safety interlocks, the microwave energy cannot come into the
oven.
Problem: When I touch the Touch Control panel, I
get no response and nothing happens, even though
it’s obvious that the display is working.
Solution: Touch CLEAR/OFF. Your control panel
probably was locked into a previously set program
which had not been used or cancelled.
Problem: If “PF” appears on your display read-out.
Solution: The “Power Failure” indicator will show on
your read-out panel when you have first plugged in
your microwave oven
been interrupted. To restore your oven to normal op-
eration, simply touch the CLEAR/OFF pad and reset
the controls. -
Problem: Microwave energy has gone off before set
time has elapsed.
Solution: Check to be certain the fuse or circuit-
breaker protecting the outlet into which cord is
plugged is operating. If the fuse has not blown and
unit won’t operate, this signals a problem, so call a
serviceman.
Problem: My oven displayed -90 when I was Temperature Cooking. Why?
Solution: Because the internal temperature of the
food you were cooking was below 90°. When the
—or if the power supply has
. . .
temperature reaches 90°, internal temperature of
food is displayed as it increases until oven shuts off
automatically.
Problem: My oven light has burned out. Can I still
use my oven?
Solution: See page 23 regarding replacement. The
oven can be operated without light, but it should be
replaced for convenience in seeing oven interior. For
safety’s sake the socket should not be left open.
General Electric service does not stock these lights.
Problem: Hood fan isn’t working right.
Solution: If it doesn’t work at all, check the main fuse
or circuit breaker. If it works but is faster than usual,
the filter may need cleaning, If fan goes on and off,
it’s probably overheating or if fan is on and can’t be
turned off, see page 7 about the Automatic Fan
Feature.
Problem: My oven displayed the “temperature set”
and a 3 second signal sounded even though 1
thought I set it right.
Solution: Be sure probe is in place in oven and con-
nected at the receptacle end. If Temperature Cook
and Probe are properly set, and food temperature }$’+.
above 10” F, yet a 3 second signal still sounds,
for service and indicate that you probably have a
problem with a probe or a wiring defect.
Problem: I have my oven set for Temperature Cook.
Immediately after I touch Start, a 3 second signal
sounds, and the oven turns off. I’ve rechecked
everything and 1have set the oven properly.
Solution: You have probably set an end temperature
which is lower than the present temperature of the
food. For example, if you set oven to heat your cup of
coffee to 150° but your coffee is already 155°, the
oven turns off because the temperature you set has
been reached.
Problem: I have some TV and radio interference
while operating my microwave oven. Is anything
wrong?
Solution: Some TV and radio interference might be
noticed while operating the microwave oven. It is
similar to the interference caused by other small appliances such as vacuum cleaners, mixers, etc. It
does not indicate a problem with your oven.
c&’&.Y
All these things are normal with your microwave
oven:
1. Steam or vapor escaping from around the door
2. Light reflection around door or outer case
3. Dull thumping sound while cooking at powert:
I.evels other than high
4. Flickering light under low voltage conditions
Q“
Page 25

:~/jkJESTIONS AND ANSWERS
When the recipe calls for rotating dish after %
Q.
time, can I set the oven for the full time?
A. Yes, if you remember to rotate dish and press
START to resume cooking.
Q. Can I use Hold/Timer to remind me to rotate
dish?
A. No. The Hold/Timer function cannot be used for
this purpose during microwaving.
Q. What happens if I accidentally leave the probe in
the oven and then set Time Cook?
A. Nothing, if the probe is in food. If the probe is left
inside, touching an oven wall, and not inserted in
food you may damage the oven.
Q. The oven gives a 3-second audible signal when I
try to set temperature and press START.
A. You are setting a temperature outside the oven’s
range of 90° to 200° or have not connected the
probe.
Q. Can I change power levels while cooking?
A. Yes, except for Sim ‘N Cook cycle. Touch POWER
LEVEL pad, then enter the number for the new power
level.
,1 -.
.,.
I forgot what temperature I set. Can I check it
J
during cooking?
A. Yes. Hold your finger on TEMP COOK and the dis-
play will show the temperature you selected.
Q. Can 1 change to a new temperature while
cooking?
A. If you must change to a new temperature, touch
CLEAR/OFF or open door. The oven will turn off and
you can start again. Touch TEMP COOK, enter the
new temperature and change Power Level if needed.
Then press START and cooking will resume.
Q. The defrosting times in the cookbook don’t seem
to be right for my food.
A. Cookbook times are averages based on 30%
power. Defrosting time can vary according to the
temperature in your freezer. Foods from freezers set
at the coldest settings may take longer to thaw.
Foods stored in the freezer section of some singledoor refrigerators may be at a higher temperature.
They may take less time to defrost.
Q. Can I “Hurry-Up” Defrost by using Time Cook?
A. Yes. Follow instructions on page 11 for defrosting
at Power Level 10 (High). You will not need to change
the Power Level, since Time Cook gives you an
= ,{tomatic 10.
\ ..
J
25
Q. Can I use the Defrost function for functions other
than Defrost?
A. Yes. Since any Power Level may be set after
touching Defrost. You may program the oven with
Defrost and Time or Temp Cook functions for automatic step-by-step cooking. (See pages 17 and 18.)
Q. Can 1 open the door to check the food when
using the SIM ‘N COOKTMfunction?
A. Yes. To resume cooking, close door, touch the
“SIM ‘N COOK” pad and press START.
Q. Can I check the temperature while using the
~tSIM ‘N COOK” feature?
A. Yes. Hold your finger on the “SIM ‘N COOK” pad.
Display will show temperature.
Q. When using the “Sire ‘N Cook” feature can I set
the oven to turn off automatically?
A. No. You must open the door or touch CLEAR/
OFF to stop cooking.
Q. Can I get the same results as with the “Sire ‘N
Cook” feature by putting food in a stoneware casserole and using Low Power?
A. No. Time Cook is limited to 99 minutes and 99
seconds and does not control food temperature.
Temperature Cook shuts off automatically when the
preset temperature is reached. “Simmer ‘N Cook”
maintains temperature until you turn it off.
Q. Can I change power level when using the “Sire
‘N Cook” feature?
A. No. This cycle automatically maintains a Medium
(5) Power Level as well as a 180° temperature.
Q. Can i cook with the Temp Hold cycle?
A. Yes. You can use it to automatically simmer foods
at a temperature and/or power level other than the
180° temperature and Medium (5) Power Level used
by the automatic “Sire ‘N’ Cook” cycle.
Q. If the oven door is opened during cooking, do I
have to reset the oven?
A. No. Simply close the door and press START. The
oven takes up the cooking cycle where it left off.
When the “Sire ‘N Cook” cycle is used, you must reset your oven.
.
-,—
.,
Page 26

26
A Special Message
General Electric wants you to be pieased with your
new GE appliance. Part of our commitment to keeping you pleased is providing the best possible service
we can.
Should your GE appliance need servicing, call your
local dealer. He may provide the service himself, or
refer you to a qualified servicer in your area.
If you do not have a servicing dealer, call the Factory
Service office in your area. A list of these offices and
telephone numbers is included with your appliance.
If the service you receive is not to your satisfaction,
here are three steps you should follow to make it
right:
1. First, contact the people who serviced your GE
appliance. Explain why you are displeased. In most
cases, the first step will solve most problems.
2. If you still have not resolved your problem, write
ail details, including your telephone number and the
model and serial number, to General Electric direct.
The address
Manager–Customer Relations
General Electric Co.
Watterson City East 312
Appliance Park, Louisville, KY 40225
3. If you are dissatisfied with the action taken, the
final step would be to send full information to:
Major Appliance
Consumer Action Panel
20 North Wacker Drive
Chicago, IL 60606
This panel, known as MACAP, is a group of independent consumer experts under the sponsorship of
several industry associations. It’s purpose is to study
industry practices and to advise the industry of ways
to improve customer service.
Free of industry control and influence, MACAP is
able to make impartial recommendations, considering each case individually.
is:
Page 27

Page 28

 Loading...