

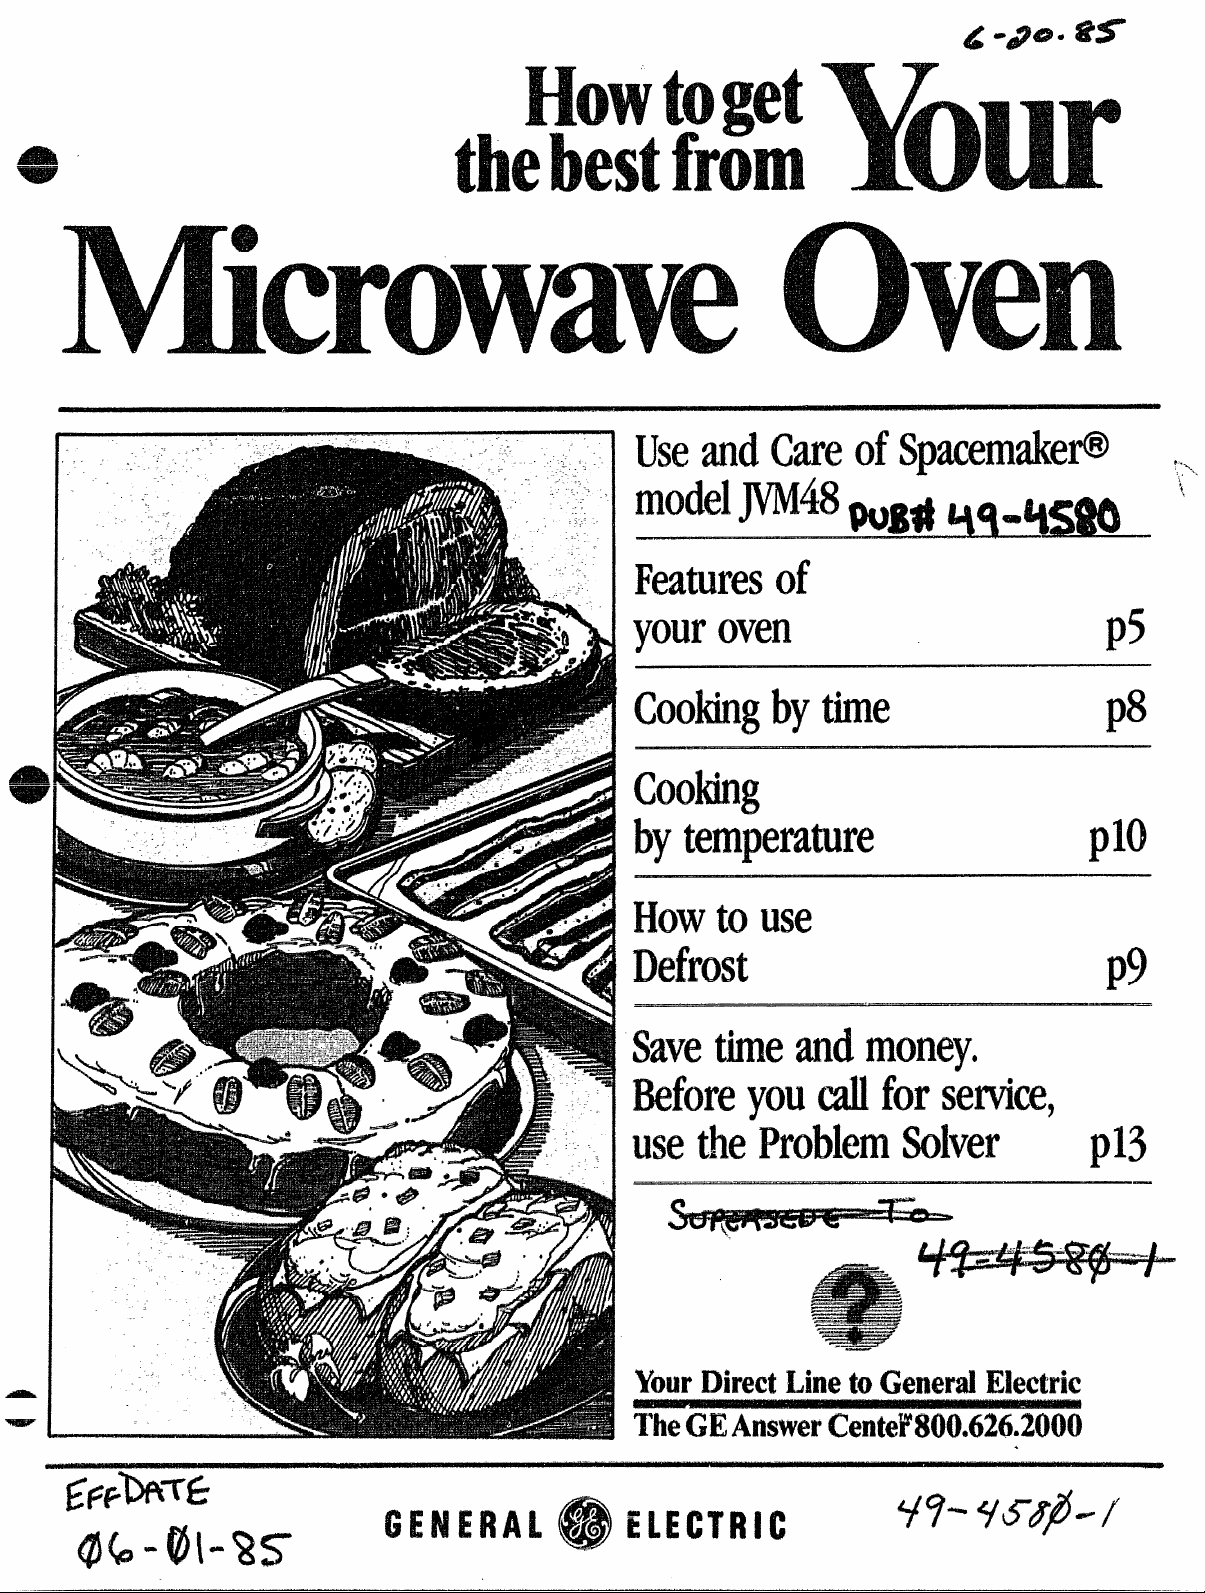
Page 1
——
UseandCareofSpacemaker@..
model
Featuresof
youroven
Cookingbytime
cooking
bytemperature
Howtouse
Defrost
Savethe andmoney.
‘
p5
p8
plo
p9
Beforeyoucallforservice,
usetheProblemSolver
-..
YourDirectLinetoGeneralElectric
TheGEAnswer
.
p13
Page 2
,
,
.
,
..
Fhxi3dthis
It will help you operate and maintain your new Microwave Oven
properly.
Keep it handy for answers to your
questions.
If you don’t understand something
or need more help. . .
Call, toll free:
TW?GE AnswerCXM3+’M
consumer information service
or writ(?:(include your phone
rnkm.);
nu
Consumer Affairs
General Electric C33mpany
Appliance Park
Louisville, KY 40225
E%?sureyour
oven k
It is important that we, the manufacturer, know the location of your
Microwave Oven should a need
occur for adjustments.
Your supplier is responsible for
registering you as the owner.
Pleasecheck with your supplier to
be sure he has done so: also send
in your Consumer Product C)wnership Registration Card. If you move,
TO
.
~~
‘-
..
.
Page 3
Before Microwaving ... , . . . . .. . . 2
SafetyInstructions........... 3,4
Featuresof YourOven..... . . . .. 5
TouchControl Panel . ........ 6,7
Howto TimeCook ......... . ... 8
Howto Defrost . . . ............ . 9
HowtoTempCook
GroundingInstructions........ 11
CareofYourOven ......... 12,13
TheProblemSolver ... . ....... 13
TheExhaustFeature....... ... 14
IfYouNeedService . . . . . . ..... 15
Warranty...... . . .. .., f3ackCover
e Makesureallutensilsusedin
yourmicrowaveovenarelabeled
“suitablefor microwaving”.Check
yourCookbookforspecifictest
todetermine“microwave-safe”
utensils.
* Papertowels,waxpaper,and
plastic wrapcanbeusedto cover
dishesinorderto retainmoisture
andpreventspattering.
@Somemicrowavedfoodsrequire
stirring,rotating,or rearranging.
Checkyour Cookbookfor specific
instructions.
@Somefoodssuchasunshelled
eggsand
toallowsteamto escapeduring
cooking,
hotdogs mustbepierced
.0....,. ...
Whenusingelectricalappliances
basicsafetyprecautionsshould
befollowed,includingthe
following:
WAFINIIW3-TOreducethe risk
of burns,electricshock,fire,
10
injury to personsor exposureto
excessivemicrowaveenergy:
@Usethis appiiarweonly for its
intendeduseas describedin this
manual.
@Readand
“PRECAU?7CXWTO AVOID
FQSSIBLE EXFKMJFE TO
ENERGY”
follow thespecific
found cmpage2$
a Thisappliancemustbe
grounded,Connectonlyto
properlygroundedoutlet.See
found Qnpage~1.
s Forbest
appkmx ktta its own ekdrical
QUth3?t,to p@&3nt flickeringof
operation, plugthis
lights, of fuseor trip=
ping of circuit breaker.
!nstallorkxxte thisappliance
4
only
in mxmrdancewithths pr43-
vicieclinstallation
@Do notcoveror Mockany
amth43
a CM)not L&%3
4sCMnot powercord
CXplug in water.
a Keeppowercord awayfrom
heatedsur%M%3EL‘
43Do not letpowercord hang
overedgeof tableor counter,
a Donot operatethisappliance
if it hasa powercord
or pltig, Hit is ncdworking prop=
erly,or if it hasbeendamaged
or dropped.
@Thisapplianceshould be$xwvicedcmlyby service
personnel, nearest
Wm4cefa~ility for
exarnin~tio?l,repairor
@Seedoorcleaninginstruc-
tionscmpage12.
s Toreducethe riskof fire in
theovencavity:
—Donotovercook
fully attendappiianceif paper,
food.Care-
plastic,or othercombustible
materialsarepiacedinsidethe
ovento facilitatecooking.
—Removewire twist-tiesfrom
paperor plasticbagsbefore
placingbagin oven.
---Donot useyour microwave
ovento dry newspapers.
-Paper towelsand napkins,
waxpaper.l%~ycledpaper
productscancontainmetal
fleckswhich maycausearcing
or ignite.Paperproductscontaining nylonor nykmfilaments
SIMX.Mbeavoided,asthey may
alsoignite.
-!343no!pop Inyour
avenunlessin aspecial microwave~pcorn acx.x3ssoryor unles youusepopcmrn
labeledfor use;,nmicrowave
ovens.
—00 notqwwa!ethe awn whlk
empty!03VM damagetothe
avenandthe offkw.Hby
acxkkmtthe ovenshouldrun
empty43minuteor two,no harm
isclone,F+3wever,try to avoid
opsratingtheovenemptyat all
times—itsavesenergyand proIcmgslife ofthe oven.
-if materialsinsidetheoven
shouldignite,keepcwendoor
closed,turn ovenoff,anddisconnectthepowercord,or shut
off poweratthefuseOrcircuit
breakerpanel,
@Someproductssuchas
wholeeggsand
sealed cmn-
tainem+=+xexample,closed
glassjars–may explodeand
shouldnut Beheatedin this
oven.
..
As withmy appliance,close
@
supervisionisrwcessar’ywhen
usedbyahildren.
3
Page 4
...—
~—
4
a Add heating baby k)ocfin
glassjars,evenwithout their
lids; especiallymeatandegg
mixtures.
@ E’bn’t
defrostfrozenbever-
agesin narrowneckbottles;
especiaHycarbonatedones.
Evenifthe containerisopened,
pressurecanbuild up.This can
causethecontainerto burst,
resultingin injury.
~ Usemetal only asdirectedin
CCNMXM.
Metalstripsasused
on meat,roastsarehelpfulwhen
usedasshownin Cookbook.
TV dinners may becookedin
metaltrays.I-k3wever,when
usingmetalin microwaveoven,
keepmefa!al least‘t+lch away
fromsidesd mm.
* Cookingukmsilsmay
hot
becauseof heat
transferredfromthe heated
food.Thisisespeciallytrueif
plasticwrap
has beencovering
thetop andhandlesof the
utensil.Potholdersmaybe
neededto handlethe utensiL
@ theC$Vmlfhxw
can too hot !0 tauch.
Becarefultouching thefloor
duringand
S ml not $,&wany
aftercooking,
in foodyouaremicrowaving
unlessthat is
or for
useifl the oven.
63 the
themlmm $MM
Hto cookwith. If you leave
theprobeinsidettw CMWIwithout
irfsertirlgit in focalor liquid,and
turnon microwaveenergy,it can
createelectricalarcing inthe
cwen,anddamageovenwalls.
e PlasticIJterwMv-+%3stic
utensilsdesignedfor microwave
cookingareveryuseful,but
shouldbeusedcarefully.EverI
microwaveplasticmaynot beas
tolerantofovercookingconditionsasareglassor ceramic
materialsand maysoftenor
charif subjectedto shortperiods
of overcooking.In longerexpo-
suresto overcooking,thefood
andutensilscould ignite.For
thesereasons:1)Usemicro-
waveplasticsonly “and use
them” instrict compliancewith
the utensilmanufacturer’s
2) Donot
subjectemptyutensilsto rnicrowavirfg,3)Donot permitchildren
to useplasti~utensilswithout
completesupervision.
e cC@drigpark follow
our diredions exactlyand
alwayscookthe meatto at least
170°.Thisassuresthat,inthe
remotepossibilitythattrichina
maybepresentin themeat,it
will be killedand meatwill be
safeto eat.
@ eggs(in andCM$M
shell)!$3not f(lf’
microwavecooking.Pressure
canbuild up insideeggyolk and
maycauseit to burst,resulting
in injury,
@ with CMJter
‘W@%”Swci-1aspQ&3iCE$%hat
dogsor 5EM3agQs,
apples}chickenliversand other
giblets,andeggs (Sx33abcwe)
shm.dcibepiercedto allow
steamto escapeduring cx30kif4g.
Is
and Chw%?d 138Q51
shouldbealit,piercedor vw%ed
ciirecteciiri Cookbook If they
as
arenot, pk3sticcmulciburstduringor aftercooking,
possiblyresultinginInjury.Also,
plastic storagecontainersshouid
beat ieast
becausetheyform atight seai,
Whencooking witin
lightiy coveredwith piasticwrap,
remove03verif3gcaf’efuiiyarlci
diwmtsteamawayfrom hands
and&Kx3.
groundedby a .
See
thespeciaiinstallationbookietpack$dwith the microwave
oven.
-Newer
kxwe WC&X3unik3
athighhw3tsettings.
130ilcwercausessmokingand
greasyspilkwersthat mayignite
andspreadif ventfan isoperating.Tominimizeautomaticfan
operation,useadequatesized
utensiisand usehigh heatsettingsonly whennecessary.
-In thementof43fpwasefirs,
smotherfiarningpanon surface
unit by coveringpwl completely
with !M,cookiesheet
or fiattray.
—Never kmchunderthe
ovenwithmeventfan
because
it mayspreadthe
frames,
--4@q3 h@Qdm?t!$&wwn
dmn9 wxxxding W instructions
WI p$3g3!313WKi14,to
good
fires,
and avoid grease
maintain
Page 5
-..,
Ir,=ilr’i%e@
ill u illl I I
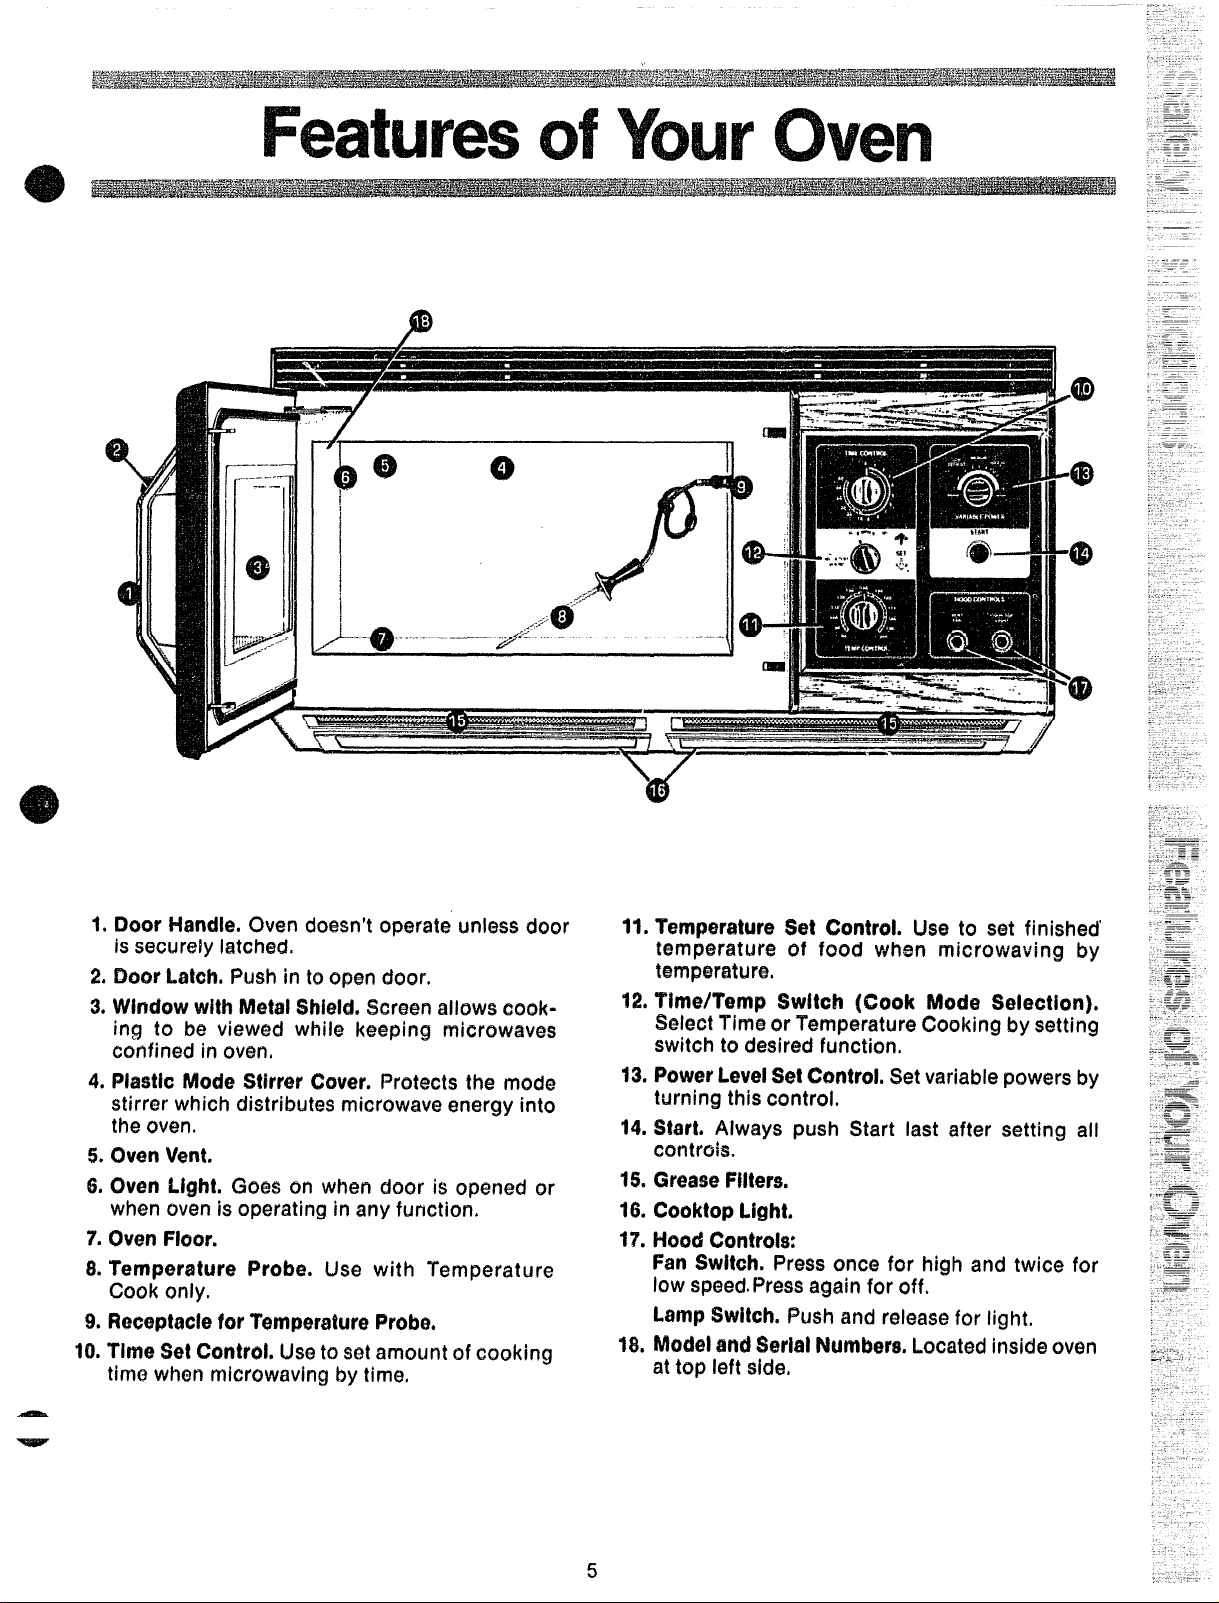
1.DoorHandle, (Mm doesn’toperate unless door
issecurely latched.
2. Door Latch. PushInto open door,
3.WindowwithMetalShield,Screenallows cook=
irtg to be viewed while keeping microwaves
confined in overt,
4.
MasticMode SthwwCover.Protectsthe rrmcle
stirrer which distributes microwaveenergy into
the oven.
5. OvenVent.
& (Mm
7.OvenFioor,
& Temperature Probe. Use with Temperature
9
10
Time
timo when rnlcrowavingby time,
Light.Goes on when ckxx is opened or
when ovenisoperating in artyfunction.
Cook only,
ReceptacleforTernperstureProbe,
W CXmtroLUsetosotamount of cooking
7-
&4?z?z
16.
17.
18.
11,
Ternp4watureSet G2ntrol. Useto set finished’
temperature of food when microwaving by
temperature,
T’hne/Temp $wltch [Cook Mode Selection).
12.
SelectTimeor TemperatureCooking by setting
switch to desiredfunction.
PowerLevd SetControl.Setvariablepowers by
13.
turning this control.
Start, Aiways push Start last after setting all
14.
controis.
150
Greasei%tem.
CooktopLight,
HoodControls:
FanSwMh. Press once for high and twice for
lowspeed.Pressagainfor off.
LampSwitch.Pushand releasefor light,
ModelandSerialNumbers.Locat@dinsideoven
attop left side,
5
Page 6

~..............
.—
-..-=—-.-..--..-—-:----——.——.—--—----- ---- —-
TIME CONW?(’)L
Yourmicrowaveovenhasa circular timer that canbe
rotated manually. The timer indicatcwmovestoward
“O” only when the oven is cooking or defrosting with
microwaveenergy.
When the timer reaches “O” a bell will sound to tell
you that cooking is completed and the power, interior light and fanareshut off automatically.
Remember, if you open the door before the timer
reaches “O”,cooking or defrosting will stop. When
you close the door and pressSTART,cooking starts
again whereyou left off,
. ....... .. ,...-....... ........ -.—. .
.
-.
~:—-. - . . .. . ---
m~m
....
:J=~,~=,--
— .—
-— --
TIME/TEMP SWITCH
To cook by Time, turn to the left, settimer. To cook
by Temperature, turn to the right and set tempera=
ture dial.
TEYvIPERATUFECONTROL
Insert temperature probe into food and place Inte
oven.Insertcableend hMoreceptacle on ovenwall,M
ovenwill notstartwhenSTARTis pushed,recheckto
makesurethe probe issecwely attached,
Dialthe finishedtemperaturefollowing the recipe directions.NOTE:If the actual temperatureof the food
hI the oven is higher than the temperatureyou dial,
the oven will not start. Check temperature again to
makesureyou’vesetthedial correctly. If not,resst.If
so,the food in the oven hasalready r~achedthe de=
sired finished temperature and no more heating is
fieeded,
When preset internal temperature is reached, oven
automatically turns off to signal that cooking has
stopped.Removethe cableendof the probe from re-
ceptacle,takefood andprobeout together,
❑
———
I
——
~
1
I
.-=—=-—-—
—--
—
___
—
—
\=,=. -
b ;
—.
/!=
—.
T—
— ——— —
+
SET
—--
-“---
.
—---—
———-
——— —
-—— —
—.——
——
—
NOTE: The actual temperature of the food during
cooking may be determined by turning the TEWW
CX?NTFK)Ldial to a lower setting until the oven turns
off. (Before restarting, open and close oven door to
resetcontrol)
.——----.
6
Page 7

-.
—4 .- —..
—.
-.
—-—-
-.—
~+-~.~
..-.A=.*l
—.
.- --—.
—
.
.....
-.
?latisiizalzz%%
.-a.
— . . - —. —
. .- .--—
—
—
.-.
-.-—-.
-—.—-—-
.-..-..
START
@
Z
.— ..,:-*-===::
—-—
VARIAEME
POWERCONTROL
Your new microwave oven allows you a complete
selection of microwave power levels from which to
choose. Always check with The Microwave Guide
and Cookbook to find out which power level is
-
recommendedfor the food you’re cooking,
The Variable Power Control is marked with 10 settings. However,you can adjust the power level to
selectsettingsbetweenthe numbersmarkedorIcontrol, to fit the type,amount and kind of food you are
cooking. Inthis way,you havecomplete control over
the amount of microwave power used for cooking
your food and, you haveflexibility to cook all food
types,becausepowercan he edjusted,
HOODCONT’RCMJ3
FanSwitch,Pressonce for high speed.Presstwice
for low speed,Pressagainfor off.
/
LampSwitch.Pushand releasefor light,
/
AU’KNVIA?VCFM FEATURE
Cooking appliances installed under the oven might,
under someheavy usagecond~?ions,cwse temperatures high enough to overheat someinternal parts
ofthe microwaveoven.
To prevent overheating from taking place, the vent
fan is designedto automaticallyturn on at low speed
if excessivetemperaturesoccur. Shouldthis happen,
thefancannot be manuallyturned off, but it wil{auto=
maticallyturn off when the temperature is reduced,
Thefan may stay on up to approximately3(I minutes
after the range and microwave oven controls have
beenturned off.
-
7
Page 8

Thetimecookingfeatureallows
youto presetthecookingtime.
Theovenshuts off automatically.
PowerLevel10is recommendedfor
mosttimecooking,butyoumay
changethisfor moreflexibility.
SeeyourCookbook.
Tobecomebetteracquaintedwith
timecooking,makeacupof coffee
byfollowingthestepsbelow.
id!!!
Step1:Fillacup2/3full ofwaterand
add 1 teaspoon of freeze dried
coffee.Usea cup that hasno metal
decoration.Placecup
close
door.
Step 2:
to HIGH*
Turn PowerLevel Control
inoVenand
Step4:Turn TimeSetto 1%or halfway between1and 2 for a cooking
timeof 1minuteand30seconds.
Srmr
Step% PushSTART.Whenovenis
cooking,interiorlightcomeson,and
a fan starts to operateto tell you
ovenisoper%ing.
Step6:Whentime is up, oven sig-
nalsandshutsoff automatically.
NOTE:When setting a time of less
than 1 minute, rotate timer %turn
and then back to desired time
setting.
Step%Turn Tirne/TempSwitchto
the leftto TIME.
t% Isetmyoven forthetimecalled Q. Can I interrupt my Time Cookfor in the recipe but at the end of
the time allowed, my dish wasn’t
done. Whathappened?
(% i want to cook my dish cm a
PowerLevelother thanHIGH,what
do I needto do?
A. To changethe PowerLevel,turn
the Variable Power Level Control
to Power Leveldesired. dish a little longer, if necessary,
A. Since house power varies due
to time or location, many Time
Cook recipesgiveyouatime range
to prevent overcooking Set the
owm for minimum time, t~st the
food for doneness,and cook your
8
ing to check the food?
A. Yes. If there is time remaining
ontheTimer,simply closethedoor
and push START,
NOTE: Microwave power will not
come on until ym.Jare ready. You
must push START for cooking to
begin.
Page 9

The Defrostsetting is designed
for eventhawing necessaryfor
largeamountsof food and is one
of the most important advantages
of amicrowaveoven.
e PowerLevel3 is recu,mmencied
for mostdefrosting, but you may
changethis for moreflexibility.
o Seeyour Cookbook for the
completedefrosting chart.
Tobacomebetter acquaintedwith
thedefrostfunction,defrostfrozen
pork chops by following the steps
below.
Step 1: Placepackageof chops in
the oven and turn Variable Power
LevelControlto3(LOW/C)EFROST).
Step3.Turn TimeSetto 8minutes,
START
I
Step4: PushSTART.Interior light
comes on and a fan starts telling
you ovenis operating.
Step % When oven
shuts
close
off, turn package over and
door.
signals and
Tips
o Foodsfrozenin paperor plastic
can be defrostedinthe package.
@ Forevendefrosting,manyfoods
needto bebroken up or separated
partofthewaythrough thedefrost-
ing time.
I
@ Hamemacfedinnerscanbefrozen
in shallow foil trays and heatedfor
lateruse.Selectfoodswhich microwavewelL
o Pre-packaged frozen dinners
can be defrosted and microwave
cooked.
I
/53=----
,-f
./’
TIME’@
i ~\ft/&::::~fl
Coowtw
I.——.—
Step2,Turn Tirne/Temp Switchto
theleft to TtME.
~ e TEMP
and
C).Can I Defrost small Items in a
hurry?
A, Yes,
~ breadsandrolls,andsmall portions
~ offrozenfoods maybe microwaved
~thigh~rpow~r.Chockthe “HOWto
ConvertDefrostTimes”Chartinthe
Cookbook for the amount of time
savedwhenusinghigherpowers.
small porous foods like
Step&Turn TimeSetto8minutes,
f
andpushSTART,Whenoven shuts
off,separatepiecesandletstandto
Qompletedefrosting.
Q.WhenI cWMedthe door, I heara
dullthumpingnoise.Whatisit?
A. This soundisnormal,Itis letting
youknowtheoven is usinga Power
LevellowerthanI-KM-t,
Q.Can I open the door during
defrostingto checkontheprogress
of myfood?
A. Yes.You may open the door at
any time during microwaving. To
resumedefrosting,close the door,
ovenbeginsoperatin$jif time is left
on timer.If not,resettimer.
4) Check your Cookbook for other
defrosting tips.
C?.Whydon’tthedefrostingtimesin
the Cookbook seem right for my
food?
A. Cookbook times are average.
Defrostingtime can vary according
to the temperaturein your freezer.
Setyour ovenfor thetime indicated
inyourCookbook, if yourfood isstill
notcompletelythawedat the end of
that time, re-set your oven and
adjustthetimeaccordingly.
-—
—
9
Page 10

~.
— — ——— —— . ——.— ..— —-— ——. ———.
.-.
.
For many foods, internal temperature is the best
testof doneness.
Roasts or poultry are cooked to your preference
when temperature cooking. Heating or reheating
foods accurately to a serving temperature you
desireis simpleandeasy.
TEMP COOK takes the guesswork out of cooking
becausethe ovenshutsoff automatically whenthe
food is done,
HowtoTemperatureCookBasic
Step 1. Insert temperature probe
as directed in Cookbook and attach probe securely in oven wall,
Closethe door.
SELECT
TIMEORTEMP
Coolaffi
Step2. Turn Time/Tem~Switch to
Step4,TurnTemperatureSetto 170.
START
-fHiLtw”
I($ .f~m
Step5. Push STAR7’butkn Inte=
rior light and fan come cmto tell
Step3. Turn Variable Power Level
Control to 10(HIGH),
you oven is operating.
The
The temperatureprobe is a food thermometer that
gauges the internal temperature of your food; it
mustbe usedwhen using TEMPCOOK.
Temperature Probe
HANDI E
SENSOR
CLIP
Step 6. When temperature is
reached, the oven will automatically shut off. Remove probe and
food from the oven.
CookingTips
@ Usealower power levelsetting;
itwill heatmoreevenlyeventhough
requiring moretime.
@ Be sure frozen
completelydefrostedbeforeinserting probe. Probe may break off if
usedin frozenfoods.
I
@ Always insert probe into the
I
center of meaty areas; take care
not to touch the fat or the bone.
. Insert probe as horizontally as
possible into foods as directed in
the recipes, Makesure the handle
doesnot touch the food.
@ Use the clip to keep the probe
in placewhile heating,
. Cover *foods as directed in
Cookbookfor moisturecontrol and
quick, evenheating.
food has been
Q.
CanIleavemyprobeintheoven
if it’s not inserted in the food?
A. No,Ifthe probe isleft insidethe
oven, touching the oven wall, and
not insertedinfood,you maydama-
ge theoven.
(2. Are there any foods I can’t
TEMPCOOK?
A. Yes,13cdicatebutter icings, ice
cream, frozen whipped toppings,
etc., soften rapidly at warm temperatures+Gatters and doughs as
well as frozen foods are also difficult to cook precisely with the
probe, It is best to TIME CC)(3K
thesefoods.
Q. i-low do I know what temperature to set?
A, Your
tions on all types of foods showing
the temperatures needed to cook
the foods to different degrees
of doneness, For reheating, refer
to Reheating Charts in the front
of the Cookbook for specific
temperatures.
Cookbookcontains sec-
10
Q. Oven would
Idialedthetemperaturecorrectly.
iJSwrcmg?
What
A. If you havenot securely seated
the end of the probe into the
receptacle in the oven wall, or if
youhaveforgottento usetheprobe
or if the actualfood temperature is
higher than set temperature, oven
will not start.
not startalthough
Page 11

Thisappliancemustbegrounded.
Intheeventof anelectricalshort
circuit,groundingreducestherisk
ofelectricshockby providingan
escapewirefor theelectriccurrent.
Thisapplianceisequippedwitha
powercord havingagrounding
wirewith agroundingplug.The
plugmustbepluggedintoanoutlet
thatisproperlyinstalledand
grounded.(Fig,1)
Whereastandardtwo-prongwall
receptacleisencountered,it isyour
personalresponsibilityandobligationto haveit replacedwith a properlygroundedthree-prongwall
receptacle,
00 iUOt
Wmes CutorRemovethe
Third(Ground)ProngFrom
ThePowerCord.
UnderAnyCkcum-
WARNING—improperuseof the
groundingplugcan
ofeiectricshock,
.
fiJJJ-1
Fig,1
Consulta qualifiedelectricianor
servicetechnicianif the grounding
instructionsarenotcompletely
understood,or if doubtexistsasto
whethertheapplianceisproperly
grounded.
resultinarisk
‘t
Q
6
\
INSUREPROPERGROUND
EXIST’S BEFOREUSE
DoNotthe anAdapterPlug
WithThisAppliance.
00 NotUseanExtension
CardWithThisAppliance.
———
11
Page 12

YourNewMicrowaveOvenisa
ValuableAppliance,ProtectUFrom
MisuseByFollowingTheseRules:
e Keepyourovencleanand
sweet-smelling.Openingthe oven
doorafewminutesaftercooking
helps“air-out”the interior.An
occasionalthoroughwipingwith a
solutionof bakingsodaandwater
keepstheinteriorfresh.
e Don’tusesharp-edgedutensils
withyouroven.Theinteriw andex-
teriorovenwallscanbescratched.
Thecontrolpanelcanbedamaged.
6?Don’tremovecoveroverthe
‘Ww#’ atthetop oftheoven(micro-
wavefeature4 cmpage5).Youwill
damagetheoven.
BECERTAINPOWERB OFF
BEFORECLEANINGANY
PARTOF“1’’I”M$OVEN*
Door-inside.Glass:Wipeupspatters
daily,washwhensoiled,with a minimumofsudsywarmwater.Rinse
thoroughlyanddry.
Metaland plasticpartson door:
Wipefrequentlywitha dampcloth
to removeallsoil.DONOTUSE
ABRASIVES,SUCHAS CLEANING
POWDERSORSTEELANDPLASTIC PADS.THEYMAYMARTHE
SURFACE.
Howto(Mm theOutside
Case.Cleantheoutsideof your
ovenwithsoapanddampcloth,
thenrinseanddry,The outerpane
of thewindow is glass.Justwipe
cleanwith adampcloth.Chrome
trim isbestwipedwith a dampcloth
andthenwith a drytowel.
ControlPanel.Wipewith a damp
cloth.Drythoroughly.Donot use
abrasivesor sharpobjectsonthe
panel.Theycandamageit.
i%mrSurface.Whenc!~aningsur-
facesof door andoventhatcome
togetheron closingthe door,use
only mild,non-abrasivesoapsor
detergentsappliedwith asponge
c?rSOftcloth.
SpeeialnotewhenusingBrown‘N
Sear131sh:High heatgeneratedon
bottomof Brown‘NSearDishcan
causescorchedappearingstainsto
bakeontotheovenfloorif greaseis
present.Thesemayberemoved
with Bar KeepersFriend@Cleanser
bySerVaasLaboratories,Inc.
using~arKeepersFriend@
After
Cleanser,rinseanddry thoroughly,
followinginstructionsoncan.Do
notuseBarKeepersFriend@
Cleanseronthepaintedsurfaces
suchasthe walls.Itmayscratchthe
paint.
BarKeepersFriend@Cleanseris
soldin manygrocery,hardware,
anddepartmentstores.
AutomaticTemperatureProbe.
Probeissturdy, butcareshouldbe
takenin handling.Donottwistor
bend;avoiddroppingtemperature
probe.
Cleanassoonafterusingaspos-
sible.‘b clean,wipewithsudsy
cloth,thenrub!lghtlywith plastic scouringbaiiif necessary.Rinse
anddry.(Orwashin dishwasher,)
to Clean theInside
How
Walls,floorandpkwtlccover.!%=
thereis little heatexceptin
cause
thefood,or sonwtimesin the utensils,spillsand spattersareeasyto
remove.Somespatterscanberemovedwith apapertowel,others
mayrequirea dampcloth.Fierrtove
greasyspatterswithasudsycloth,
thenrinseand dry. Do not use
abrasivecleanerscmovenwalls.
NEVER USEA COMMERCIAL
OVENCLEANERONANYPART
OFYOURMICROWAVEOVEN.
12
—
..
Page 13

To replace hood iamp, first disconnectpower at
main fuse or circuit breaker panel or pull plug.
Remove2 screws from eachside of lower paneland
3 screws from front edge. Lower panel until it rests
on range below. Be sure buih to be replaced is cool
before removing. Removebulbor bulbs and replace
with 40 watt appliance bulbs. Raiselower panel and
replace screws.Connect electrical power to micro-
waveoven.
0
Toreplaceyour ovenlamp,first disconnectpewerat
mainfuseorcircuitbreakerorput{ptug.Removethe
top grill by takingoff 2 screws which hoid it in piace.
Nexti remove the single screw on top left that
secures lamp housing. (On models so equipped,)
Openovendoor for easierremovalof thelamp hous-
ing assembly.Then grasptab and pull out and up to
clear door hinge and front lip of oven, To remove
bulb, push it inward gently and turn to left, then puii
outward from socket. Replace with GE Lamp
= 25T8DC,
Do
notattempttooperatetheovenualessthegdli[s
inplace,
L.—-==LL-.---JL-3__----J
Clean off the grease and dust on hood surfaces
often. Usea warm detergent solution. About f tablespoon of ammonia maybe added to the water. Take
—
care not to touch the filters and enameled surfaces
—
withthis. Ammoniawill tendto darken metal.
SWe time and money=. .bekxe you
cd forSWWb, check the
Probiem:The ovendoesn’tseemto work at all.
Solution:Checkfirst to seethat the 3-prong plug is
inserted firmly into the proper receptacle. Next,
checkto seeif afuseneedsreplacingatcontrol box.
Problem:Ovenwon’tstart whenusingtemperature
probe,
Solution:Checkto makesureTime/Tempswitch is
set at TEMP. Make
“seated” into ovenreceptacleand thattemperature
set on dial is higherthanactualtemperatureof food.
I%obk?rn:Hoodfan isn’t working right.
Solution:If it doesn’t work at aii, check the main
fuseor circuit breaker.If it works but is fasterthan
usuai,the fiiter may needcleaning. If fan goes cm
and off, it’s probabiy overheating. Check to make
sure the cable end is securely
surethefilter is ciean.if it is,caiifor service.Iffanis
on and can’tbe turnedoff, seepage7 about the
automaticfanfeature.
Problem:Microwavepowerwon’t comeon.
Solution:Check to be sure the door is securely
ciosed and the timer set. if a dish is touching the
doorwhen it seemsto beciosed,it actuaiiy maynot
befirmiy ciosed.
Problem:Ovengoesoff beforesettime haselapsed.
Solution:Check to be certain the ‘fuseprotecting
the receptacle into which
ating,if fuse Hasnot biown andpowerstiii does not
function, caii for service.
c~id is plugged is oper-
AllTheseThingsAre
onYour Oven:
1. Steamor vapor escapingfrom around the door.
2. Light refiectkm around door or outer case.
3. Ouil thumping sound while operating at power
ieveisother than high.
4. Dimming oveniight andchangein biower sound
may occur whiie operating at power levels other
than high.
5. Some TV-Radio interference might be noticed
while usitig your microwaveoven.it’ssimilar to the
interferencecausedby other smail appliances and
doesnot indicate a probiemwith your oven.
13
Page 14

m
*
/
J
--
*
I
The exhaust hood feature on your GE microwave
oven is equipped with a metal‘filter which collects
grease, When the fan is operated, ah’ is drawn up
To removegreasefiiter,grasp the “finger hold” on
thefilter andpushto MOrear.The filterwill drop out,
To repiace grease filter, irwart the filter in the top
frame slot cmthe back of the opening. Push to the
rearand upwardto smapintoplace.
through the filter and is then discharged through
providedventingto the outside.The hood also has a
lightfor illumina~ingthe countersurface.
Soak, then agitate fiiter in hot detergent soiution.
Don’t use ammcmla or other alkali because it will
darkenmetal. Light brushing cm be usedto wwnuve
embedded dirt, Rinse, shake and remove moisture
before replacing.
oncea month.Neveroperateyourhoodwithoutthe
filter In phwe.
occur cmsurfacesbelow hood, filter wili retard entry
of fiamos into the unit.
Filtersshouldbe cleanedatkmt
in situations where flaming might
14
Page 15

Iif
To obtainservice,seeyourwarranty
onthebackpageofthisbook.
We’reproudofourserviceand
wantyoutobepleased.Ifforsome
reasonyouarenot happywiththe
serviceyoureceive,herearethree
stepstofollowforfurtherhelp,
FIRSTcontactthepeoplewho
servicedyourappliance.Explain
whyyou arenotpleased.Inmost
cases,thiswillsolvetheproblem.
NEXT,ifyouarestillnotpleased,
writeallthedetails—-includingyour
phonenumber—to:
Manager,ConsumerRelations
GeneralElectric
AppliancePark
Louisville,Kentucky40225 ,
FINALLY,ifyourproblemisstillnot
resolved,write:
MajorAppliance
ConsumerActionPanel
20NorthWackerDrive
Chicago,Illinois60606
—
*
15
Page 16

- WHATISCOVERED
I
FULLONE=YEARWARRANTY
Foroneyearfromdateof original
purchase,wewill provide,freeof
I
charge,partsandservicelaborin
1 yourhometo repairor replace
# i
. !
,
I
:
1
,
1
,
%
,
part of the microwave ovenkange
thatfails becauseofa manufac”
turingdefect.
LIMITEDADf31T10hiAL
FOtNIOYEAf?WARRANTY
Forthesecondthroughfifth year
4
>
, ,
fromdateof originalpurchase,
wewill provide,freeof charge,a
replacement
magnetron tube if the
magnetrontubefails becauseofa
manufacturingdefect.Youpayfor
theservicetripto your
servicelaborcharges.
———
any
homeand
--
——.-..-..—”..—...—
Thiswarrantyisextendedto the
originalpurchaserandanysucceedingownerforproductspurchased
forordinaryhomeusein the48
mainlandstates,Hawaiiand
Washington,D.C.inAlaskathe
warrantyis thesameexceptthat it
is LIMITEDbecauseyoumustpay
to shiptheproductto the service
shopor fortheservicetechnician’s
travelcoststo yourhome.
All warrantyservicewillbeprovided
byourFactoryServiceCentersor
byourauthorizwlCustomerCare@
servicersduringnormalworking
hours.
Lookin the WhiteorYellowPages
of yourtelephonedirectoryfor
GENERALELECTRICCOMPANY,
GENERALELECTRICFACTORY
SERVICE,GENERALELECTRIC-
, ,
,
. ~
i CARE@SERVICE.
: --
:!
WHATIS NOT @Servicetripstoyour hometo
—
—.
——
—.
------ - ..=”.=-.--—~::——==”.. .... ...,- . .-
teachyouhowto usetheptoduct.
t
1
i
~
$
{
I
1
Readyew UseandCarematerial,
Ifyouthenhaveanyquestions
aboutoperatingtheproduct,
pleasecontactyourdealerorour
ConsumerAffairsofficeatthe
addressbelow,orcall,toll free:
TheGEAnswerCenter~M
MXI*626JKEXI
consumerinformationservice
5s7i—;
9$ ~
...—-—
I
*=.==i
—.~
I
——
x=~j~
xl!
a.;-—,~1
->- If
IUG1!
..L--., Youareresponsibleforproviding
--==”1:
afi-aal
D>::}:
=~1}
----q!! = . ,...,—---
Kz=I*-
::~1
A-&&
=y:!
—--—.
-,-,
-~”%11
-=.1
::&%l
.—.
SLal,
B>.:I
-,-’
—. —..
%xnestatesdoml allowIIwexclwiionorlimitationof
may not apply to you. This warranty gives you specific
To know what your legal rights are in your state, consult your Iocai or state consumer affairs office or your state’s Attorney General.
~Improper
If youhaveaninstallationproblem,
contactyourdealeror installer.
adequateelectrical,exhausting
andotherconnectingfacilities.
incidental or comwquentialdamages,sothe above iimikdion or exclusion
legalright!3,and you may also have other Aght$ which vary from state to state. -
Warrantor:General Electric Company
HOTPOINTFACTORYSERVICEor
GENERALELECTRICCUSTOMER
—.-..——
@Replacementof housefuses
orreswttingof circuitbreakers.
~F\?ilureof the productif it is
usedfor(itherthan its intended
purposeor usedcomrnercialiy.
s Damageto product caused
byaccident,fire,fioodsoracts
Of God.
WARRANTORISIV(27RESPON=
S@LEFORCONSEQUENTIAL
DAMAGES,
.:q
::=!~
-.-l Z
==:1:
in.-,:
-=s-,ll
tVianagsr-Cmwwner Affairs, General Electric Company, Appliance Park, Louisville, KY40225
If further help k rwweiecicomxwning this warranty, contact:
—.—.
... , .-, .,...-——
1“
;
i
1:
1‘-~:
*:-
~ ‘
, ., ~
$
‘
,
—
,
.
.=—.W—@-q*–a—m-----#’&w<-% P.w@v#>m#i’,WJW%mmNuqwuw-..WHqp~’xJ=#’#vk’xm.3#h*w&m>>wF\’K.A-3T@ww@&:7V>>ww~x-mx’~lbr<x-x-m~qr~xVW.&’#
1
Part
NO. 862A725P98%V, 1
Pub.
NO. 49-4580-1
6-85
-u -- *-. -–
 Loading...