

Page 1
ge.com
E3
0
U
0_
Safety Instructions .............. 2-7
Operating Instructions
Auto Features ..................... 16-22
Auto Defrost ........................ 21
Chicken ............................. 16
Chicken Chart ...................... 19
Melt ................................ 17
Melt Chart .......................... 20
Metal Rack ......................... 22
Popcorn ............................ 16
Quick Defrost ....................... 21
Soften .............................. 17
Soften Chart ........................ 20
Time Defrost ........................ 22
Control Panel ........................... 9
Cooking Guide .................... 24-28
Cookwure ............................. 23
Features of Your Oven .............. 8, 9
Microwave Oven Functions ....... 10-14
Changing Power Level ............. 14
Child Lock ........................... 11
Clock ................................ 10
Cooking at High Power Level ....... 12
Cooking at Lower Power Levels ..... 13
Cooking with More
Than One Cook Cycle ............... 1:3
Hold Warm ......................... 11
Light ................................ 10
More/Less ........................... 12
Settings ............................. 12
Timer ................................ 10
Vent Fan ............................ 10
Microwave Terms .................... 36
Sensor Features ............... 15-16, 18
Sensor Cook ........................ 15
Sensor Cook Chart ................. 18
Sensor Reheat ...................... 16
Sensor Reheat Chart ............... 18
Write the model and serial numbers here:
Model #
Care and Cleaning
Charcoal Filters ......................... 32
Inside ................................... 29
Outside ............................... 29
Replacing the Light Bulbs ............. 30
Stainless Steel ......................... 29
Vent Filters ............................ 31
Troubleshooting Tips ........ 33,34
Things That Are Normal
With Your Microwave Oven .......... 35
Consumer Support
Consumer Support .......... Back Cover
Optional Kits ........................... 7
Product Registration .............. 37, 38
Warranty .............................. B9
JVM2052
Serial #
Youcan find them on a label when
the door is open.
MFL57007001 49-40586
09-08 JR
Page 2
IMPORTANT SAFETY INSTRUCTIONS.
READ ALL INSTRUCTIONS BEFORE USING.
WARNING!
Toreducetherisk of burns,electricshock,fire,injury to persons,or exposureto excessivemicrowaveenergy:
PRECAUTIONS TO AVOID POSSIBLE EXPOSURE
TO EXCESSIVEMICROWAVE ENERGY
[a) Do NotAttempt to operate this ovenwith the door [c)
open, sinceopen-door operation can result in harmful
exposure to microwave energy. It is important not to
defeat or tamper with the safety interlocks.
[b) Do Not Place any object between the oven front
face and the door or allow soilor cleaner residue
to accumulate on sealing surfaces.
Readand follow the specific precautions in the Precoudons
toAvoid PossibleExposureto ExcessiveMicrowave Energy
section above.
This appliance must be grounded. Connect only
to a properly grounded outlet. Seethe Grounding
Instructionssection on page 6.
Installor locate this appliance only in accordance
with the provided installation instructions.
This microwave oven is ULlistedfor installation over
electric and gas ranges.
This microwave oven is not approved or tested
for marine use.
This over-the-range oven is designed for use over ranges
no wider than 36:' Itmay beinstalledover both gasand
electric cooking equipment.
Donot operate this appliance if it hasa damaged power
cord or plug, if it isnot working properly, or if it hasbeen
damaged or dropped. If the power cord is damaged,
it must be replaced by General ElectricServiceor an
authorized service agent usinga power cord available
from General Electric.
Do Not Operate the oven if it isdamaged. It is
particularly important that the oven door close
properly and that there isno damage to the:
(1)door (bent),
(2)hingesand latches (brokenor loosened),
(3)door sealsand sealingsurfaces.
TheOven Should Not be adjusted or repaired by
anyone except properly qualified servicepersonnel.
To reduce the riskof fire in the oven cavity:
Do not overcookfood. Carefully attend appliance when
paper,plastic or other combustible materials are placed
insidethe oven while cooking.
Removewire twist-ties and metal handlesfrom paper
or plasticcontainers before placing them in the oven.
Do not usethe ovenfor storage purposes.Do not leave
paper products, cooking utensilsor food in the oven
when not in use.
Do not pop popcorn in your microwave oven unlessin
a special microwave popcorn accessory or unlessyou
use popcorn labeled for use in microwave ovens.
If materials insidethe oven ignite, keepthe oven door
closed,turn the oven off and disconnect the power cord,
or shut off power at the fuse or circuit breaker panel.
If the door is opened,the fire may spread.
Do not usethe SensorFeatures twice in succession
on the same food portion. If food is undercooked after
the first countdown, useCook Time for additional
cooking time.
Do not cover or block any openings on the appliance.
Usethis appliance only for its intended useas described
in this manual. Donot usecorrosive chemicals or vapors
in this appliance. Thismicrowave oven is specifically
designedto heat, dry or cook food, and is not intended
for laboratory or industrial use.
2
Page 3
IMPORTANT SAFETY INSTRUCTIONS.
ge.com
Thermometer--Do not use regular cooking or oven
thermometers when cooking by microwave. Themetal
and mercury in these thermometers could cause
arcing and possibledamage to the oven. Do not use
a thermometer in food you are microwaving unless
the thermometer is designedor recommended
for use in the microwave oven.
Donot clean with metal scouring pads. Piecescan burn off
the pad and touch electrical parts involving risk of electric
shock.
Donot store any materials, other than our recommended
accessories,inthis ovenwhen not in use.
Donot store this appliance outdoors. Donot usethis
product near water-for example,in a wet basement,
near a swimming pool,near a sink or in similar locations.
Keeppower cord away from heated surfaces.
Donot immerse power cord or plug in water.
WARNING!
Some productssuchaswholeeggsand sealed
containers-forexample,closedjars-areabletoexplode
andshouldnotbeheatedinthismicrowaveoven.
Suchuseofthemicrowaveovencouldresultininjury.
It is important to keep the area clean where the door
sealsagainst the microwave. Useonly mild, non-abrasive
detergents applied with a clean sponge or soft cloth.
Rinsewell.
Thisappliance must only be serviced by qualified service
personnel.Contact nearest authorized servicefacility
for examination, repair or adjustment.
Aswith any appliance, closesupervision is necessary when
used by children.
Donot store anything directly on top of the microwave
oven surface when the microwave oven is in operation.
Donot mount this appliance over a sink.
SAVETHESEINSTRUCTIONS
ARCING
If you see arcing, press the Clear/Off pad and correct the problem.
Arcing is the microwave term for sparksin the oven.
Arcing is caused by:
Themetal rack not installed correctly so it touches
the microwave wall.
Metal or foil touching the side of the oven.
Turntable ring support not installedcorrectly.
Foilnot molded to food (upturned edgesact
likeantennas).
Metal,such astwist-ties, poultry pins
or gold-rimmed dishes,inthe microwave.
Recycledpaper towels containing small metal
pieces being used inthe microwave.
Page 4
IMPORTANT SAFETY INSTRUCTIONS.
READ ALL INSTRUCTIONS BEFORE USING.
WARNING!
FOODS
Donot pop popcorn in your microwave oven
unless in a special microwave popcorn accessory
or unlessyou use popcorn labeled for use
in microwave ovens.
Donot boil eggs in a microwave oven. Pressurewill
build up insideegg yolk and will cause itto burst,
possibly resulting in injury.
Operating the microwave with no food inside for
more than a minute or two may cause damage
to the oven and could start a fire. It increases the
heat around the magnetron and can shorten
the life ofthe oven.
Foodswith unbroken outer "skin"such as potatoes,
hot dogs, sausages,tomatoes, apples,chicken livers
and other giblets, and egg yolksshould be pierced
to allow steam to escape during cooking.
Superheated water
Liquids, such as water, coffee, or tea, are able to
be overheated begond the boiling point without
appearing to be boiling. Visiblebubbling or boiling
when the container is removed from the microwave
oven is not alwags present. This could result in verg
hot liquids suddenlg boiling over when the container
is disturbed or a spoon or other utensil is inserted
into the liquid.
Toreduce the riskof injury to persons:
- Do not overheat the liquid.
- Stir the liquid both before and halfway through
heating it.
Foodscooked in liquids(such as pasta) may tend
to boil more rapidly than foods containing less
moisture. Shouldthis occur,refer to the Care
and cleaning of theoven sectionfor instructions
on how to clean the insideof the oven.
Avoid heating baby food in glassjars, even with
the lidoff. Makesureall infant food isthoroughly
cooked.Stir food to distribute the heat evenly.
Be careful to prevent scalding when warming
formula. The container may feelcooler than
the formula really is.Always test the formula
before feeding the baby.
Don't defrost frozen beveragesinnarrow-necked
bottles (especially carbonated beverages).Even
if the container isopened, pressurecan build up.
This can cause the container to burst, possibly
resulting in injury.
Hot foods and steam can cause burns. Becareful
when opening any containers of hot food, including
popcorn bags,cooking pouches and boxes.To
prevent possibleinjury, direct steam away from
hands and face.
Do not overcook potatoes. They could dehydrate
and catch fire, causing damage to your oven.
Cook meat and poultry thoroughly-meat to
at least an INTERNALtemperature of 160°F
and poultry to at leastan INTERNALtemperature
of 180°F.Cookingto these temperatures usually
protects against foodborne illness.
- Do not use straight-sided containers with narrow
necks.
- After heating,allow the container to stand inthe
microwave oven for a short time before removing
the container.
- Useextreme carewhen inserting a spoon or other
utensil into the container.
4
Page 5
ge.com
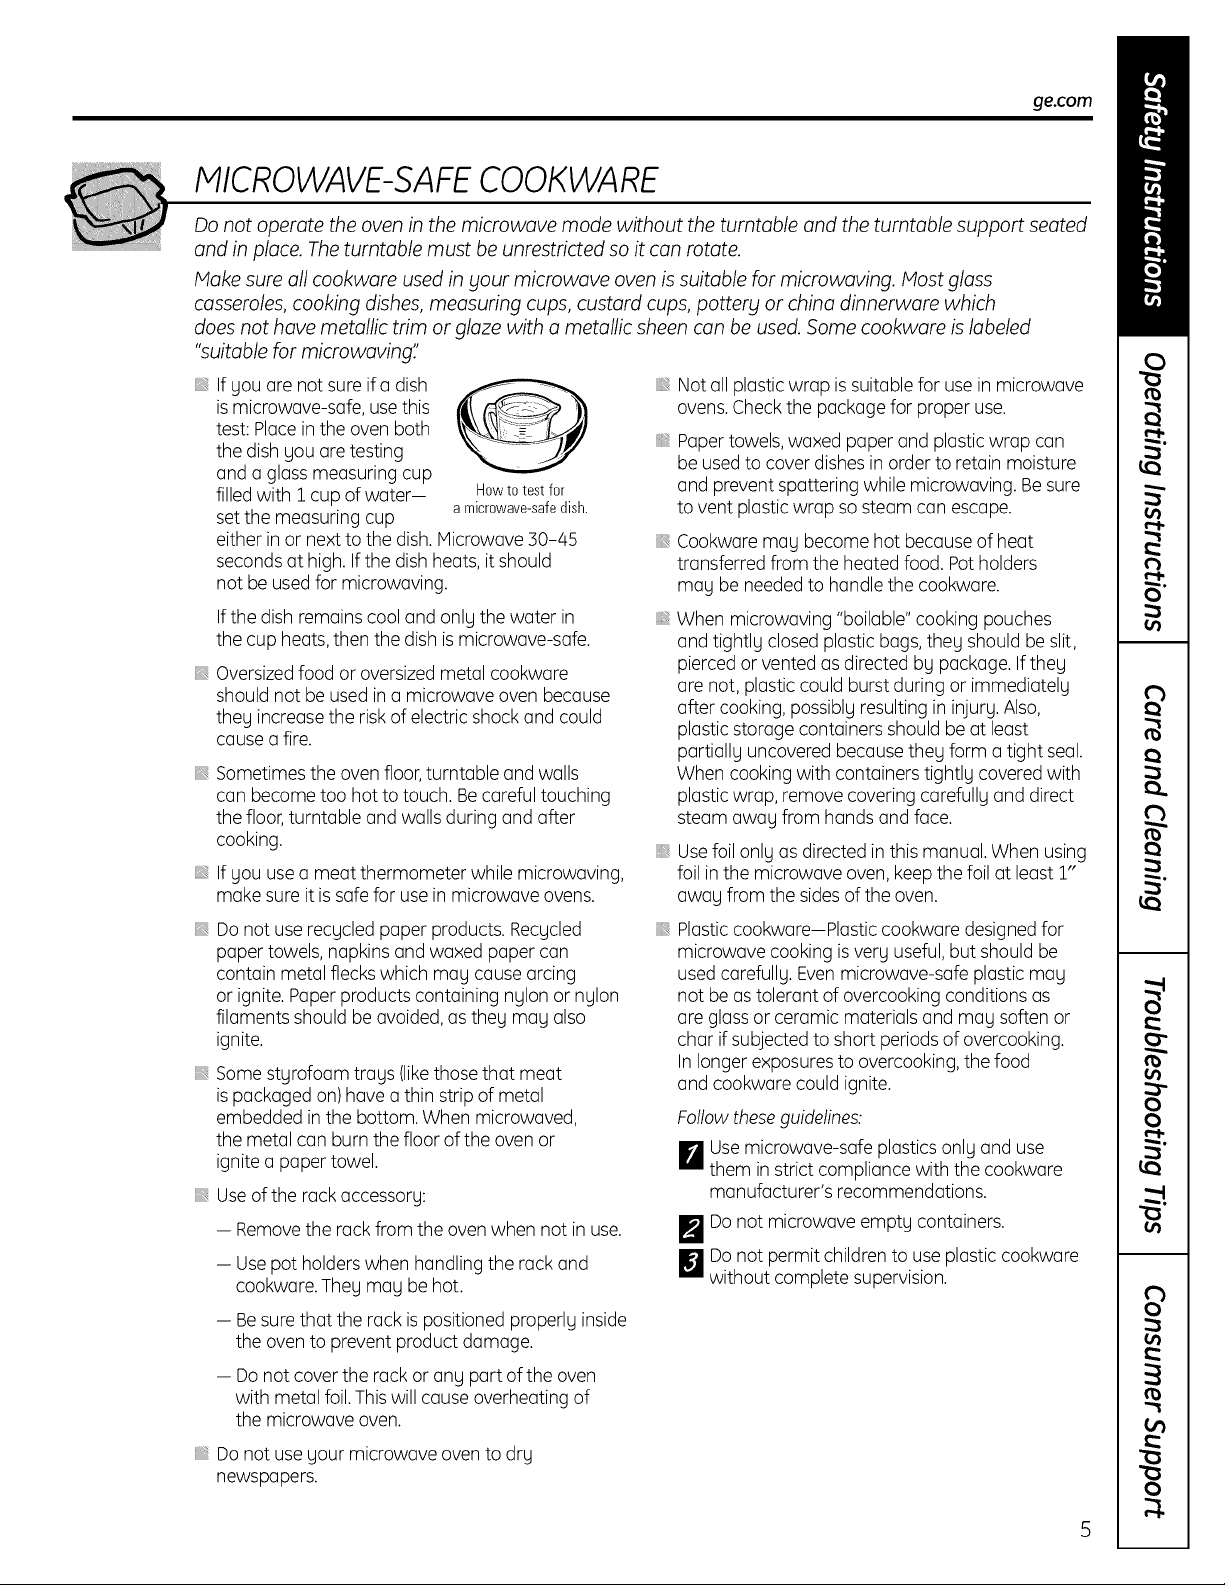
MICROWAVE-SAFE COOKWARE
Do not operate the oven in the microwave mode without the turntable and the turntable support seated
and in place. The turntable must be unrestricted so it can rotate.
Make sure all cookware used in your microwave oven is suitable for microwaving. Most glass
casseroles, cooking dishes, measuring cups, custard cups, pottery or china dinnerware which
does not have metallic trim or glaze with a metallic sheen can be used. Some cookware is labeled
"suitablefor microwaving:'
If you are not sure if a dish
ismicrowave-safe, usethis
test: Placein the oven both
the dish you are testing
and a glass measuring cup
filledwith i cup of water-
set the measuring cup
Howtotest for
a microwave-safedish.
either in or next to the dish.Microwave 50-45
secondsat high.If the dish heats, it should
not be used for microwaving.
If the dish remains cool and only the water in
the cup heats,then the dish ismicrowave-safe.
Oversizedfood or oversizedmetal cookware
should not be usedin a microwave oven because
they increase the risk of electric shock and could
cause a fire.
Sometimes the oven floor,turntable and walls
can become too hot to touch. Becareful touching
the floor,turntable and walls during and after
cooking.
If you use a meat thermometer while microwaving,
make sure it issafe for usein microwave ovens.
Do not userecycled paper products. Recycled
paper towels, napkins and waxed paper can
contain metal flecks which may cause arcing
or ignite.Paper products containing nylon or nylon
filaments should be avoided,as they may also
ignite.
Somestyrofoam trays (likethose that meat
ispackaged on) hove o thin strip of metal
embedded in the bottom. When microwaved,
the metal can burn the floor ofthe oven or
ignite a paper towel.
Useof the rack accessory:
-- Removethe rock from the oven when not in use.
-- Usepot holders when handling the rack and
cookware.They may be hot,
-- Besurethat the rack ispositioned properly inside
the oven to prevent product damage.
- Do not cover the rack or any part of the oven
with metal foil.Thiswill cause overheating of
the microwave oven.
Not all plastic wrap issuitable for usein microwave
ovens.Checkthe package for proper use.
Papertowels,waxed paper and plastic wrap can
be usedto cover dishesin order to retain moisture
and prevent spattering while microwaving. Besure
to vent plastic wrap so steam can escape.
Cookware may become hot because of heat
transferred from the heated food. Pot holders
may be neededto handle the cookware.
iiiilDiiii
When microwaving "bailable" cooking pouches
and tightly closed plastic bags,they should be slit,
pierced or vented as directed by package. Ifthey
are not, plasticcould burst during or immediately
after cooking, possibly resulting in injury. Also,
plastic storage containers should be at least
partially uncovered becausethey form a tight seal.
When cooking with containers tightly covered with
plastic wrap, remove covering carefully and direct
steam away from hands and face.
Usefoil only as directed in this manual. When using
foil in the microwave oven, keepthe foil at least 1"
away from the sides of the oven.
iiiilDiiii
Plasticcookware-Plastic cookware designed for
microwave cooking isvery useful, but should be
used carefully. Even microwave-safe plastic may
not be as tolerant of overcooking conditions as
are glossor ceramic materials and may soften or
char if subjected to short periodsof overcooking.
Inlonger exposures to overcooking,the food
and cookware could ignite.
Follow theseguidelines:
[] Usemicrowave-safe plastics only and use
them in strict compliance with the cookware
manufacturer's recommendations.
F_Do not microwave empty containers.
_JDo not permit children to useplastic cookware
without complete supervision.
Do not useyour microwave oven to dry
newspapers.
Page 6
IMPORTANTSAFETYINFORNIAT/ON.
READALL INSTRUCTIONSBEFOREUSING.
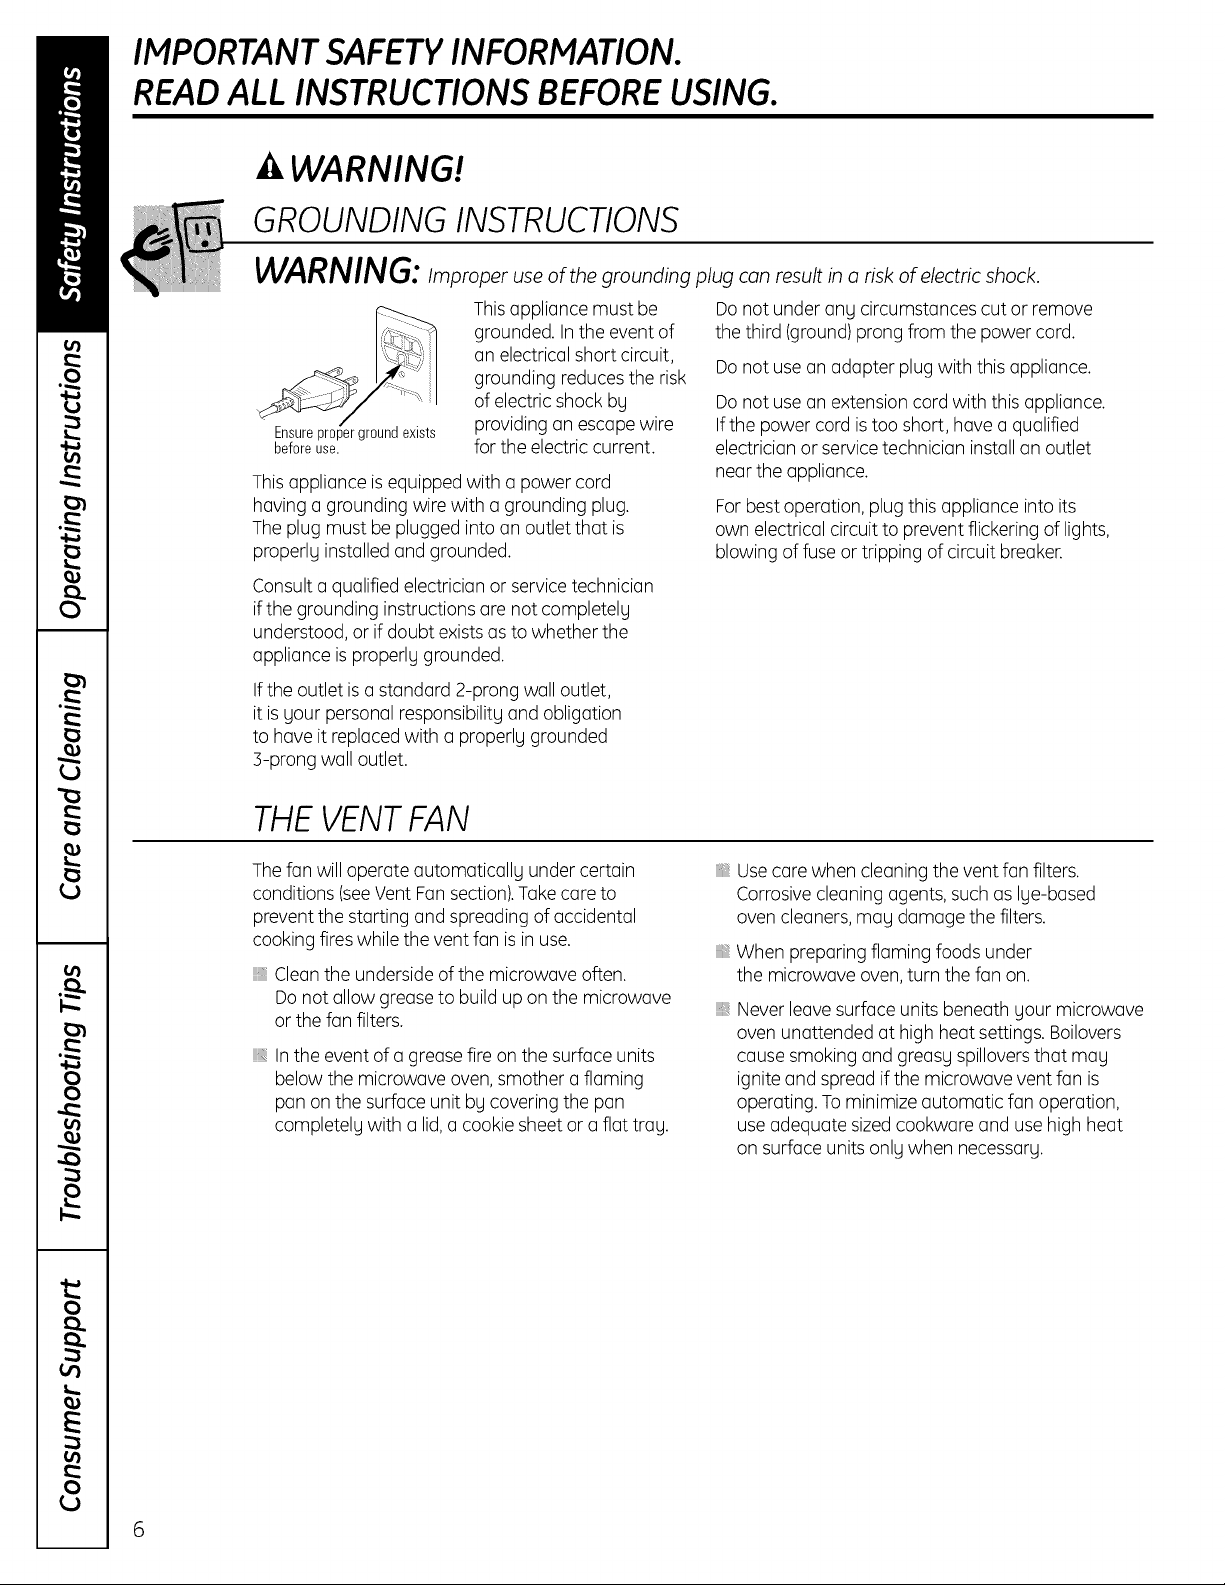
WARNING!
GROUNDING INSTRUCTIONS
Thisappliance must be
grounded. In the event of
an electrical short circuit,
grounding reduces the risk
,,-,
Ensure proper ground exists
beforeuse.
Thisappliance is equipped with a power cord
having a grounding wire with a grounding plug.
Theplug must be plugged into an outlet that is
properly installed and grounded.
Consulta qualified electrician or servicetechnician
ifthe grounding instructions are not completely
understood, or if doubt existsas to whether the
appliance is properly grounded.
If the outlet is a standard 2-prong wall outlet,
it is your personal responsibility and obligation
to have it replaced with a properly grounded
3-prong wall outlet.
of electric shock by
providing an escape wire
for the electric current.
THE VENTFAN
Thefan will operate automatically under certain
conditions (seeVent Fan section).Take care to
prevent the starting and spreading of accidental
cooking fires while the vent fan is in use.
Cleanthe underside of the microwave often.
Donot allow grease to build up on the microwave
or the fan filters.
Inthe event of a grease fire on the surface units
below the microwave oven,smother a flaming
pan on the surface unit by covering the pan
completely with a lid,a cookie sheet or a flat troy.
Donot under any circumstances cut or remove
the third (ground)prong from the power cord.
Do not use an adapter plug with this appliance.
Donot usean extension cordwith this appliance.
Ifthe power cord is too short, have a qualified
electrician or service technician installan outlet
near the appliance.
Forbest operation, plug this appliance into its
own electrical circuit to prevent flickering of lights,
blowing of fuse or tripping of circuit breaker.
Usecare when cleaning the vent fan filters.
Corrosivecleaning agents,such as lye-based
oven cleaners, may damage the filters.
When preparing flaming foods under
the microwave oven,turn the fan on.
Never leavesurface units beneath your microwave
oven unattended at high heat settings. Boilovers
cause smoking and greasy spilloversthat may
ignite and spread if the microwave vent fan is
operating. Tominimize automatic fan operation,
useadequate sizedcookware and use high heat
on surface units only when necessary.
6
Page 7
PACEMAKERS
ge.com
All microwave ovens must meet Federal DHHS
and FCCrequirements. However,the operation
of some pacemakers may be affected by microwaves.
Cognizantof this problem, most pacemaker
manufacturers have taken stepsto minimize
the susceptibility of their products to external
interference, including microwaves. Most new
pacemakers (1982and later)are now protected
from microwave interference. However,prior
to using your microwave oven it is recommended
that personswith pacemakers consult the
manufacturer of the device for additional information
and/or their physician to ensuretheir pacemaker
will not be affected by microwaves.
READANDFOLLOWTHISSAFETYINFORMATIONCAREFULLY.
SAVETHESEINSTRUCTIONS
Optional kits
Available at extra cost from blour GE supplier.
Filler Panel Kits
JX4OWH--White
JX41--Black
When replacing a 36" range hood,filler panelkits
fill inthe additional width to providea custom built-in
appearance.
Forinstallation between cabinets only; not for
end-of-cabinet installation. Each kit contains
two 3" wide filler panels.
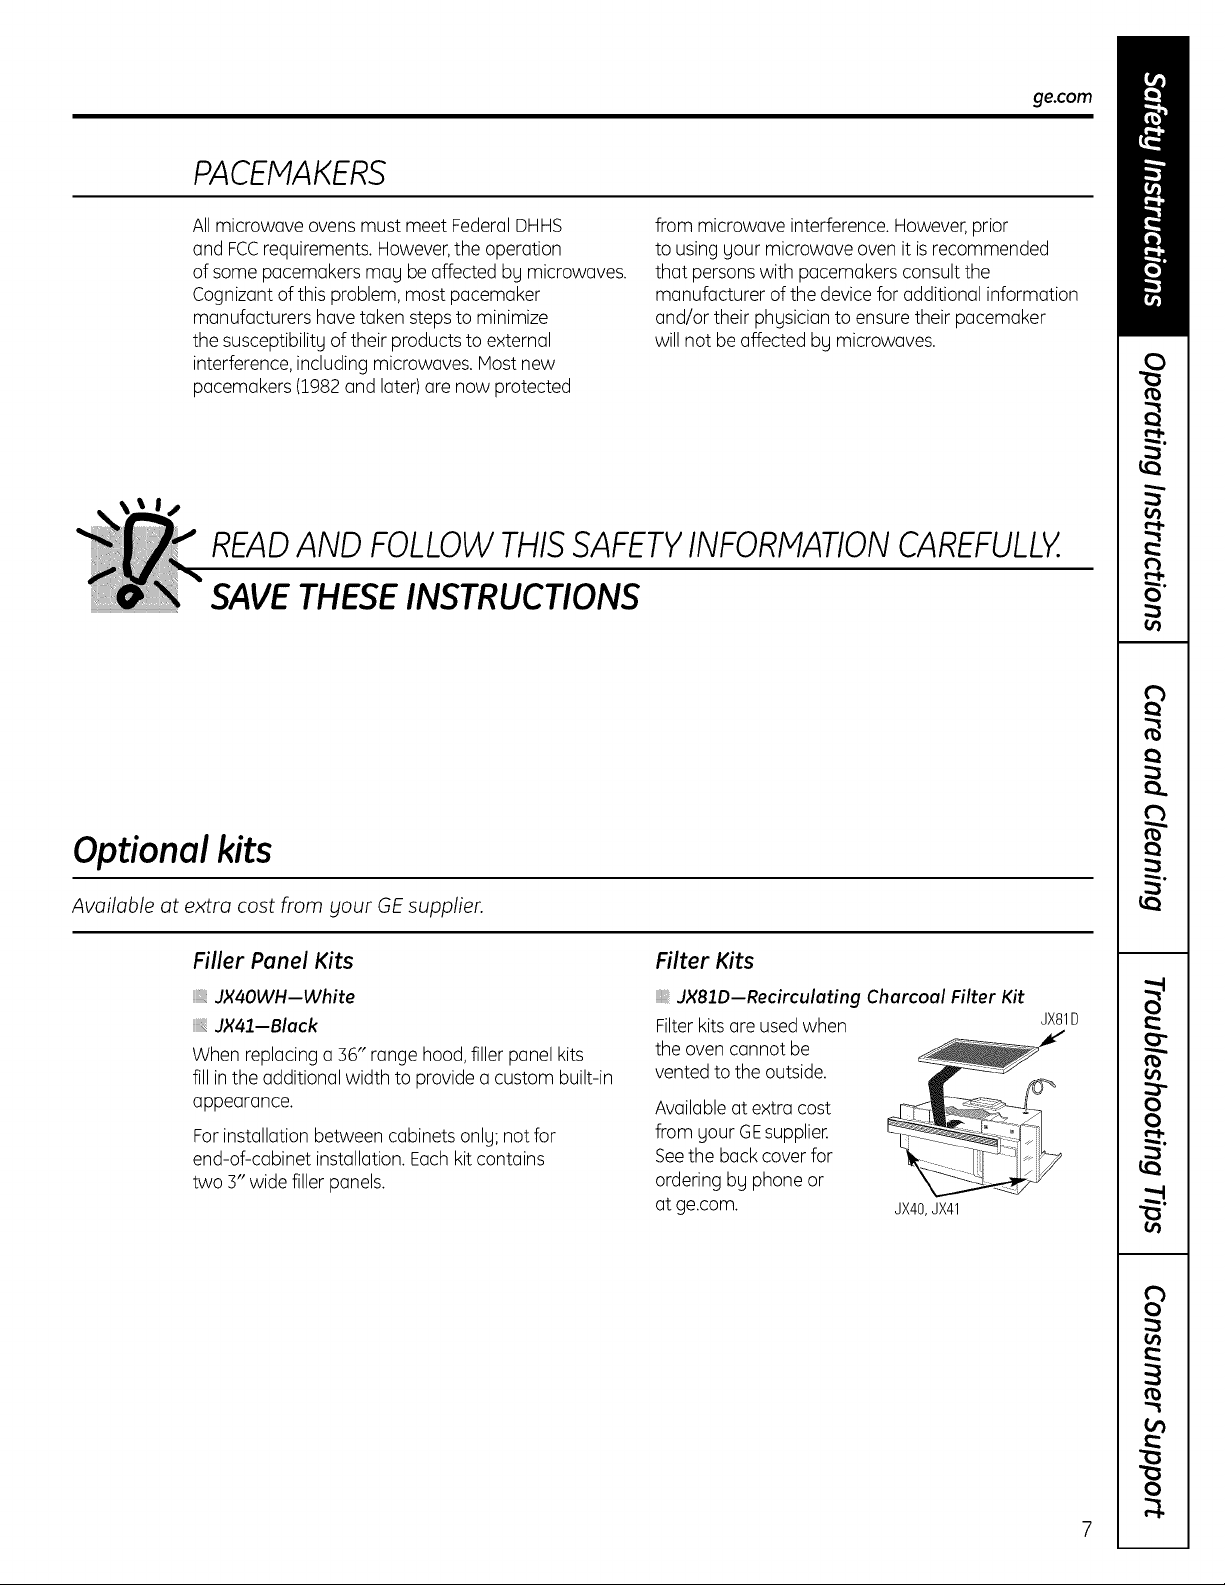
Filter Kits
JX81D--Recirculating Charcoal Filter Kit
Filterkitsare used when JX81D
the oven cannot be __
vented to the outside.
from your GEsupplier.
Availableat extra cost
Seethe back cover for
ordering by phone or
at ge.com.
JX40,JX41
Page 8
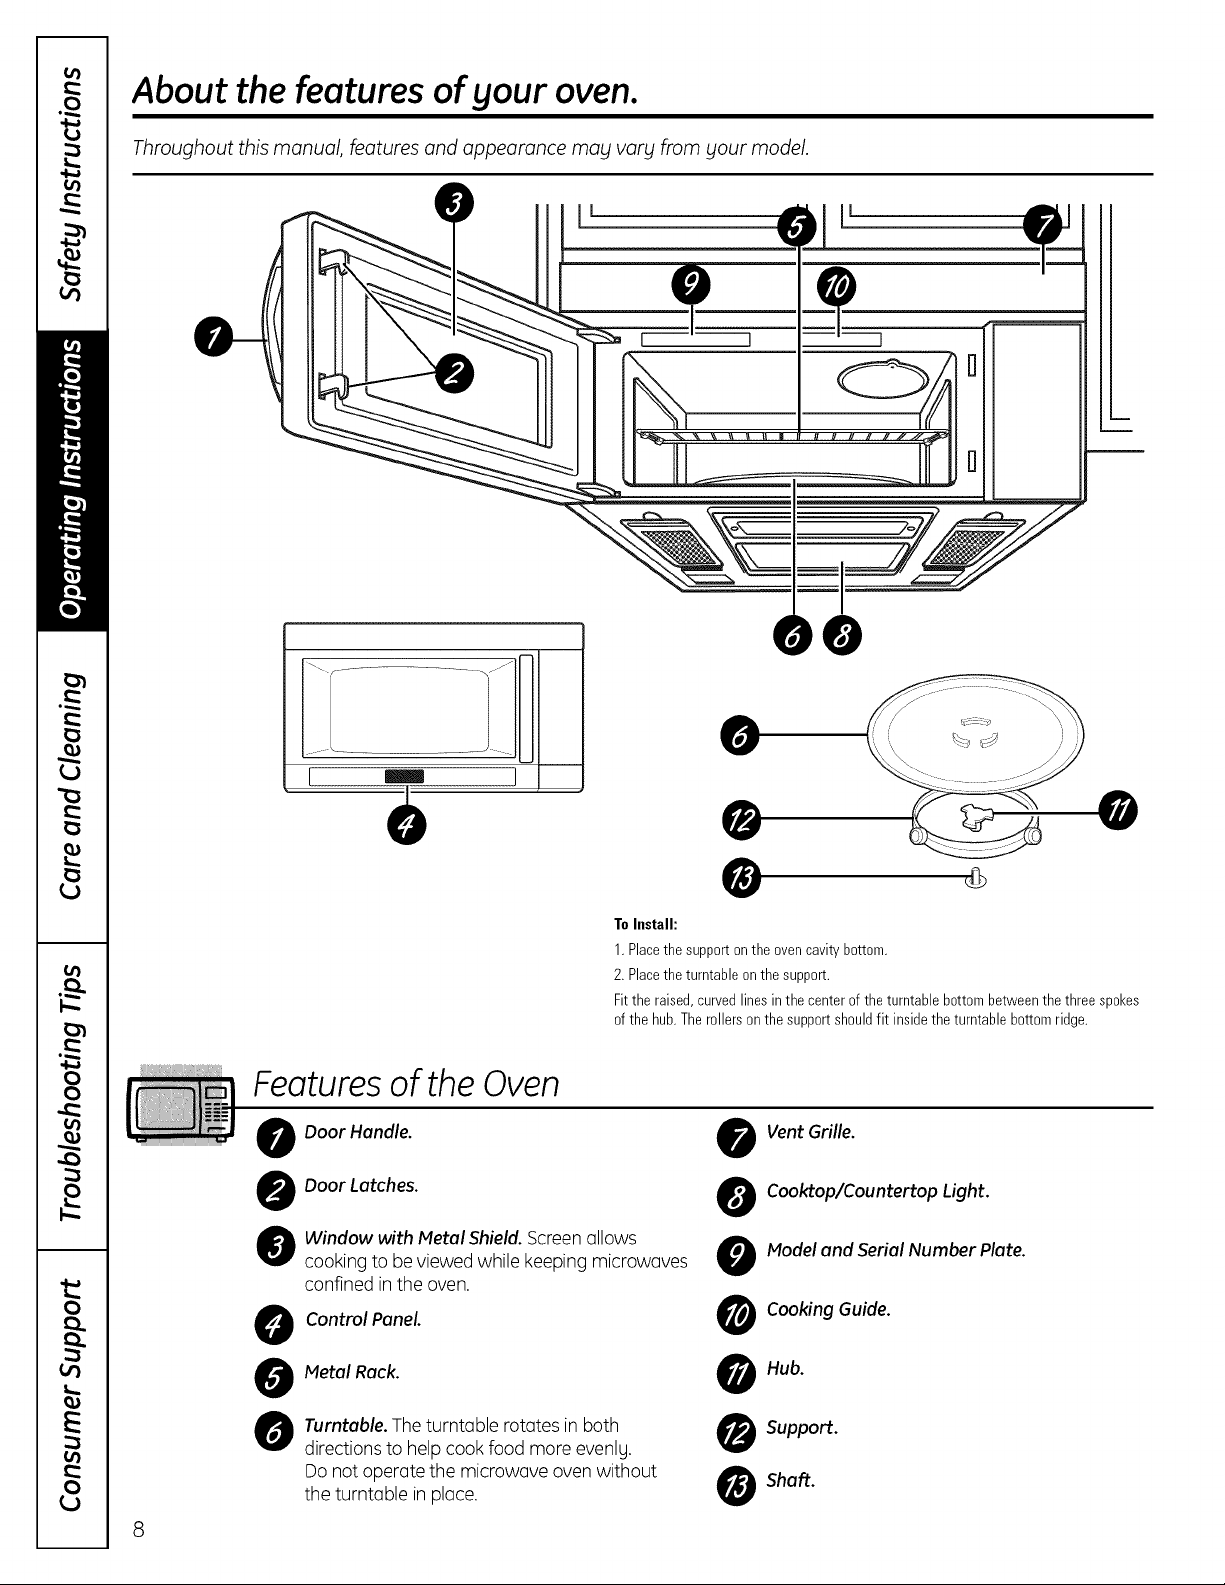
About the features of your oven.
Throughout this manual, features and appearance may vary from your model.
I
jJJi
m
m
Features of the Oven
0
Door Handle. 0
0
Door Latches. 0
Window with Metal Shield.Screen allows
@
cooking to be viewed while keeping microwaves
confined in the oven.
Control Panel. 0
0
O
• G
To Install:
1.Placethesupporton the ovencavitybottom.
2. Placetheturntable onthe support.
Fitthe raised,curvedlinesin thecenter of the turntablebottombetweenthe threespokes
ofthe hub.Therollersonthe supportshouldfit insidethe turntable bottomridge.
Vent Grille.
Cooktop/Countertop Light.
Model and Serial Number Plate.
U
Cooking Guide.
Metal Rack.
0
Turntable. The turntable rotates in both
0
directionsto help cook food more evenlg.
Do not operate the microwave oven without
the turntable in plGce.
8
O Hub.
O Support.
O Shaft.
Page 9
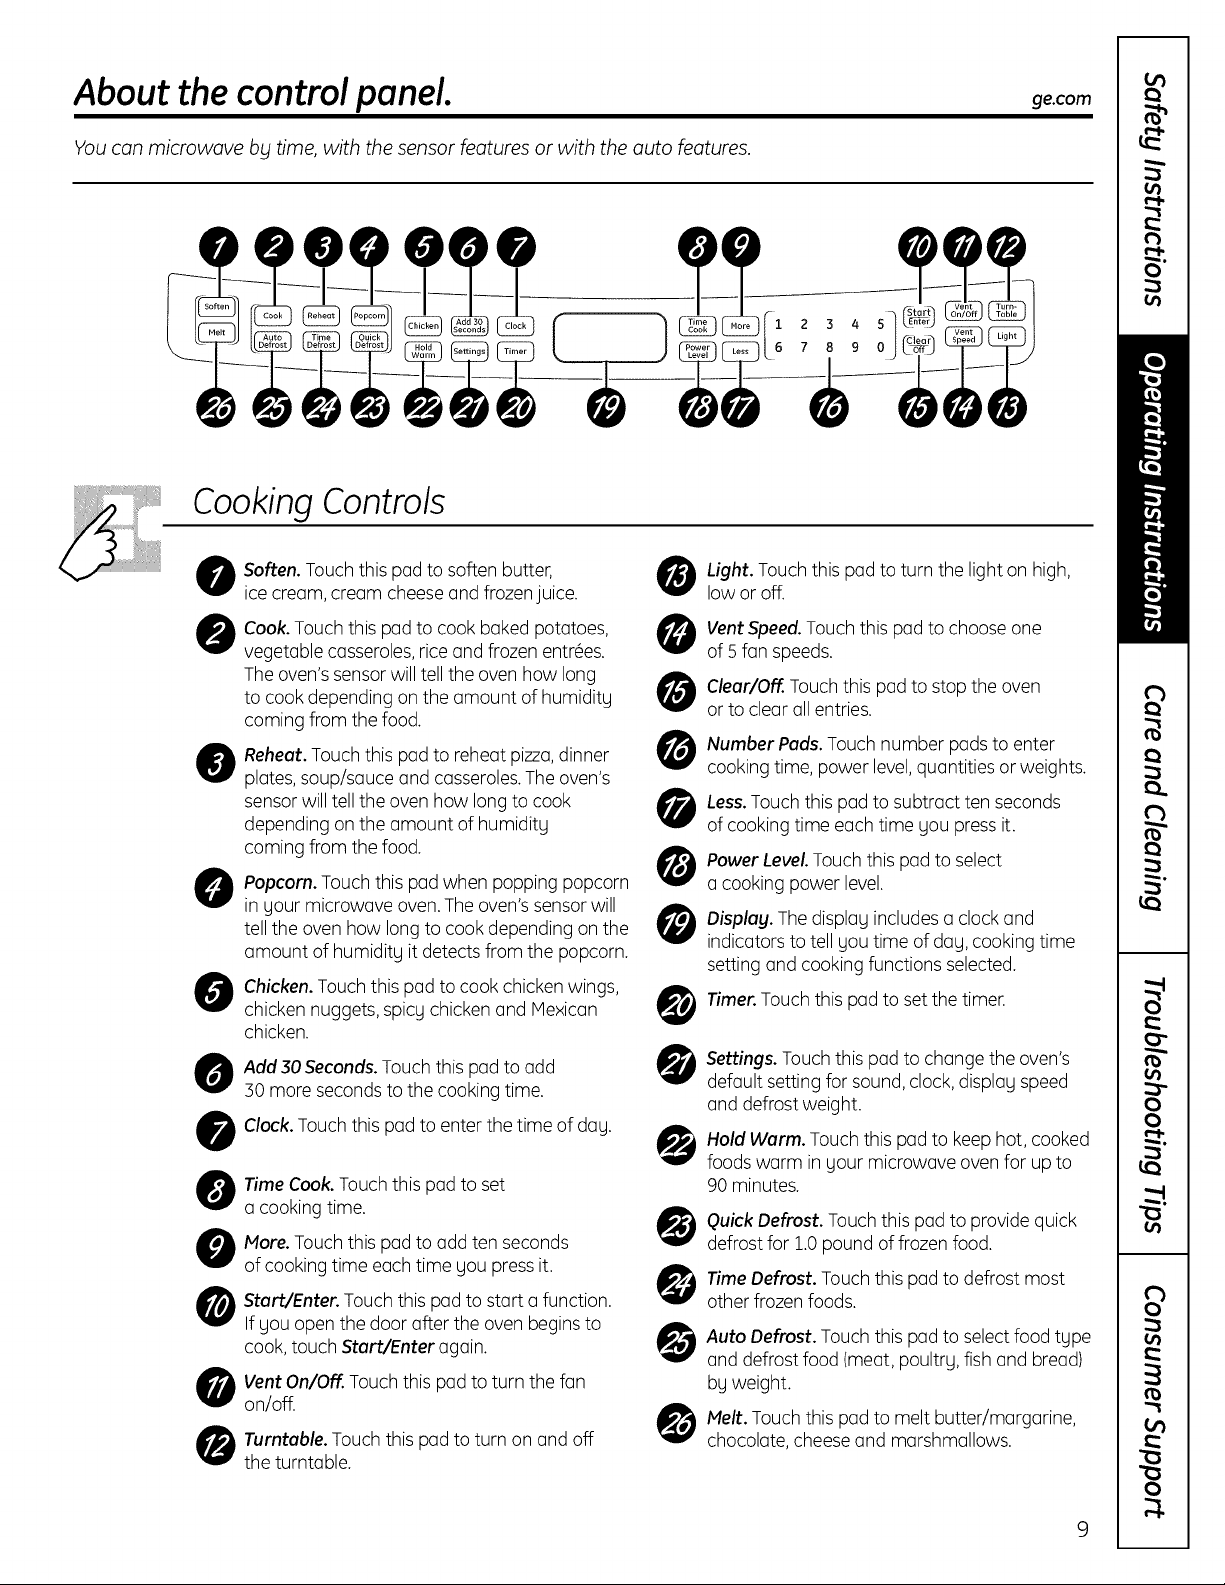
About the controlpanel, ge.com
Youcan microwave by time,with the sensorfeatures or with theauto features.
3 4 5-
1 2
6 7
8 9 0
CookingControls
Soften. Touch this pad to soften butter,
ice cream, cream cheese and frozenjuice.
Cook.Touch this pad to cook baked potatoes,
vegetable casseroles,rice and frozen entr@es.
The oven'ssensorwill tellthe oven how long
to cook depending on the amount of humidity
coming from the food.
Reheat.Touch this pad to reheat pizza,dinner
@
plates,soup/sauce and casseroles.Theoven's
sensorwill tell the oven how long to cook
depending on the amount of humidity
coming from the food.
Popcorn. Touch this pad when popping popcorn
@
in gour microwave oven. Theoven'ssensorwill
tellthe oven how long to cook depending on the
amount of humidity it detects from the popcorn.
Chicken.Touch this pad to cook chicken wings,
0
chicken nuggets, spicy chicken and Mexican
chicken.
Add 30 Seconds.Touch this pad to add
0
30 more seconds to the cooking time.
Clock.Touch this pad to enter the time of dag.
@
Time Cook.Touch this pad to set
O
a cooking time.
More. Touchthis pad to add ten seconds
0
of cooking time each time you pressit.
Start/Enter. Touch this pad to start a function.
@
If you open the door after the oven beginsto
cook,touch Start/Enter again.
Vent On/OFF.Touch this pad to turn the fan
on/off.
Turntable. Touch this pad to turn on and off
the turntable.
Light. Touch this pad to turn the light on high,
@
low or off.
VentSpeed.Touch this pad to choose one
@
of 5 fan speeds.
Clear/Off. Touch this pad to stop the oven
0
or to clear all entries.
Number Pads.Touch number pads to enter
@
cooking time, power level,quantities or weights.
Less.Touch this pad to subtract ten seconds
@
of cooking time each time you pressit.
PowerLevel.Touchthis pad to select
@
a cooking power level.
Displag. The display includes a clockand
@
indicators to tell gou time of daU,cooking time
setting and cooking functions selected.
Timer.Touch this pad to set the timer.
Settings. Touch this pad to change the oven's
default setting for sound,clock, displag speed
and defrost weight.
Hold Warm. Touch this pad to keep hot, cooked
foods warm in gour microwave ovenfor up to
90 minutes.
Quick Defrost. Touch this pad to providequick
@
defrost for 1.0pound of frozen food.
Time Defrost. Touch this pad to defrost most
@
other frozen foods.
Auto Defrost. Touch this pad to select food tgpe
@
and defrost food (meat, poultrg, fish and bread)
bg weight.
Melt. Touch this pad to melt butter/margarine,
@
chocolate, cheese and marshmallows.
Page 10
About microwave oven functions.
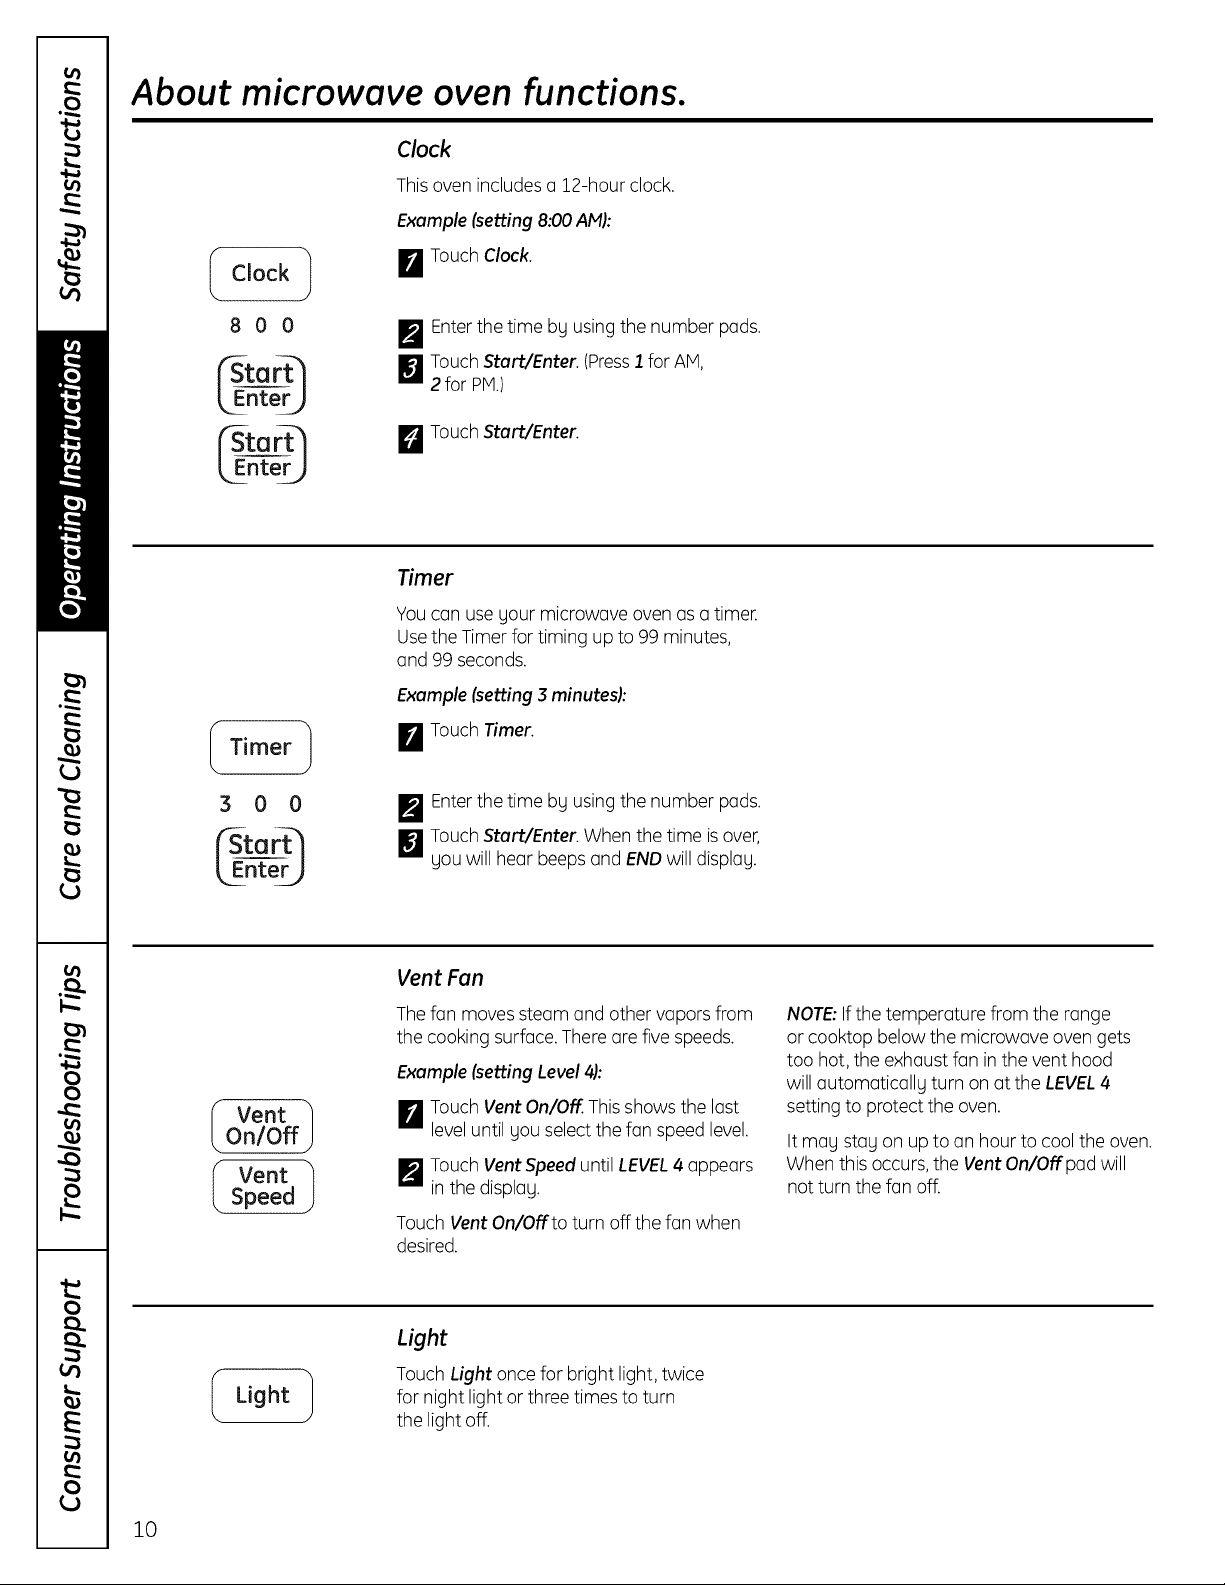
Clock
Thisoven includes a 12-hour clock.
Example (setting 8:00 AM):
I Clock 1
8OO
¢s-to
LEnterj)
I Timer 1
300
LEnter_
B TouchClock.
F_ Enterthe time by using the number pads.
[]Touch Start/Enter (PressI for AM,
2 for PM.)
_J TouchStart/Enter
Timer
Youcan use your microwave oven asa timer.
Usethe Timer for timing up to 99 minutes,
and 99 seconds.
Example (setting 3 minutes):
[]Touch Timer.
F_ Enterthe time bg usingthe number pads.
[]Touch Start/Enter When the time is over,
Uouwill hear beepsand END will displau.
10
I VentOn/Off !
I VentSpeed I
Light I
Vent Fan
Thefan moves steam and other vapors from
the cooking surface.There are five speeds.
Example (settingLevel 41:
B Touch VentOn/Off. Thisshows the last
leveluntil gou selectthe fan speed level.
F_ Touch VentSpeed until LEVEL4 appears
in the displag.
Touch Vent On/Off.to turn off the fan when
desired.
Light
Touch Light once for bright light, twice
for night light or three times to turn
the light off.
NOTE:Ifthe temperature from the range
or cooktop below the microwave oven gets
too hot, the exhaustfan in the vent hood
will automaticall g turn on atthe LEVEL4
setting to protect the oven.
It mag stag on up to an hour to cool the oven.
When this occurs, the Vent On/Off.pad will
not turn the fan off.
Page 11
LEnte
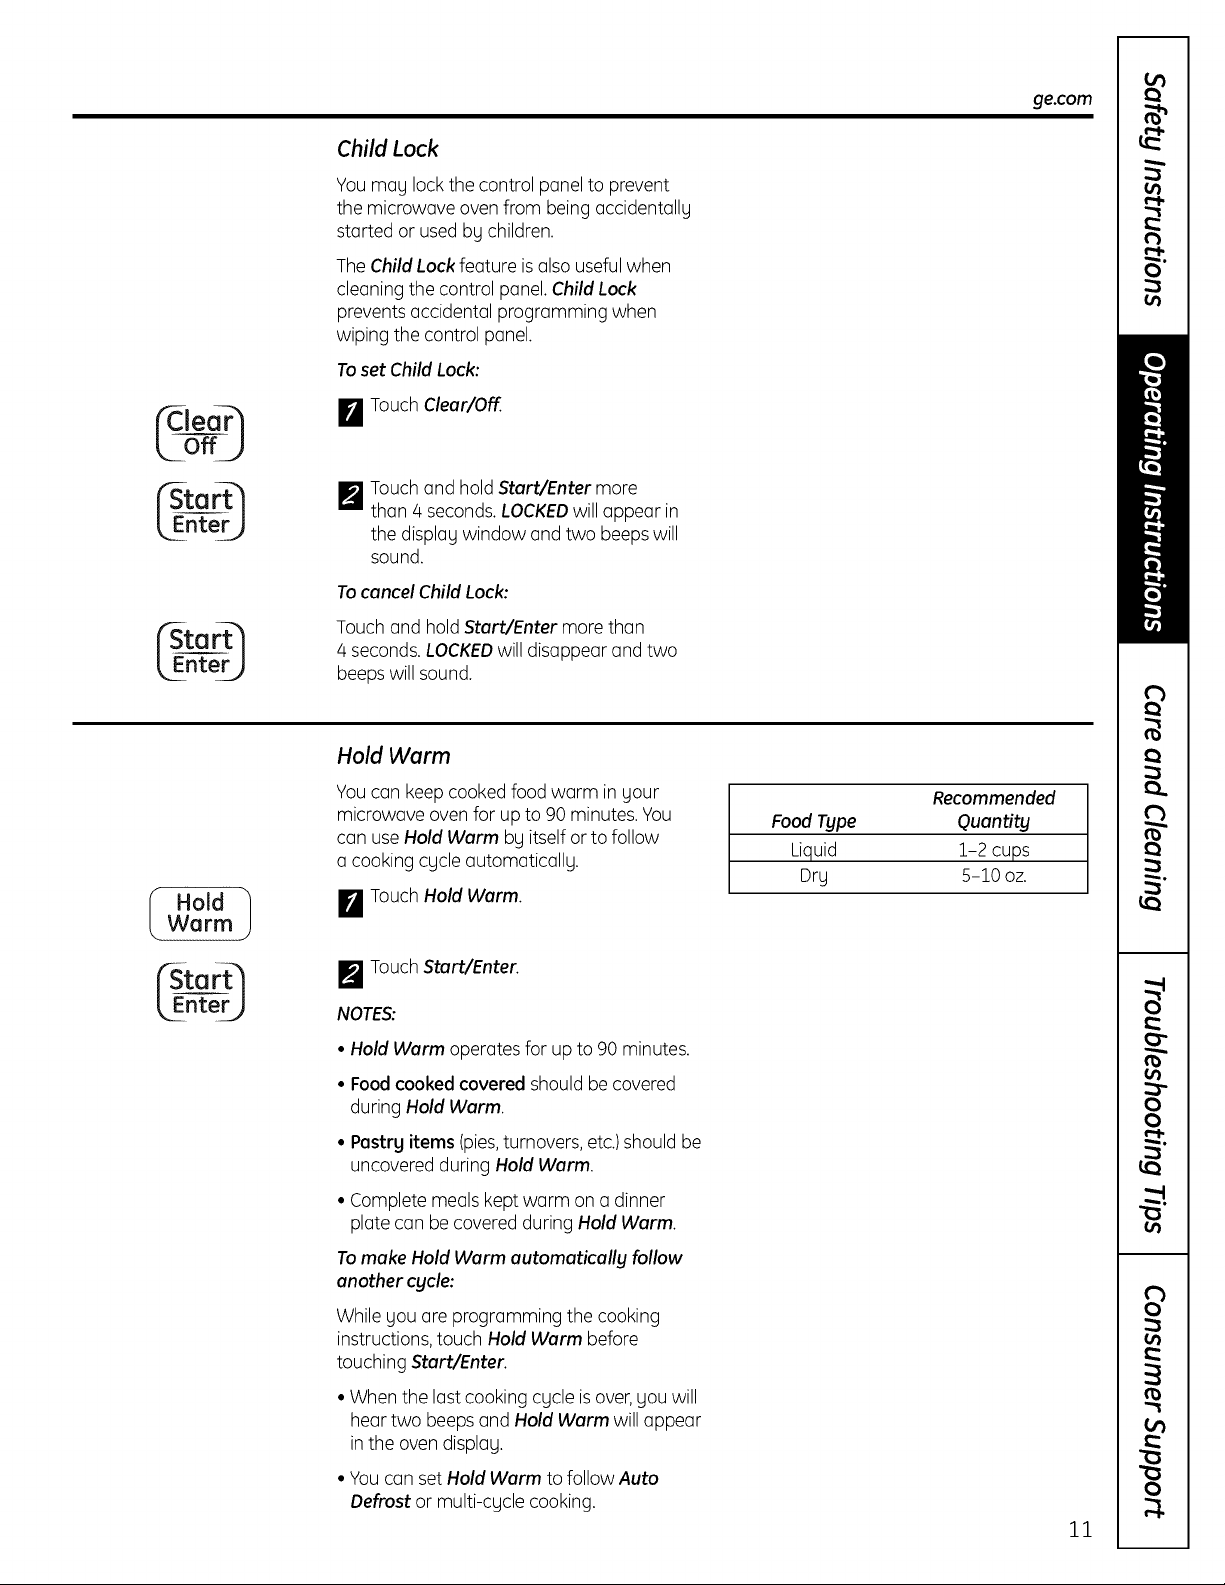
Child Lock
Youmay lock the control panel to prevent
the microwave oven from being accidentally
started or used by children.
TheChild Lock feature is also useful when
cleaning the control panel. Child Lock
prevents accidental programming when
wiping the control panel.
Toset Child Lock:
IrA TouchClear/Off.
I_ Touchand hold Start/Enter more
r,_
than/4 seconds.LOCKEDwill appear in
the display window and two beeps will
sound.
Tocancel Child Lock:
Touch and holdStart/Enter more than
/4seconds.LOCKEDwill disappear and two
beepswill sound.
ge.com
I HoldWarm !
Start
LEnter_
Hold Warm
Youcan keep cooked food warm in your
microwave oven for up to 90 minutes. You
can use Hold Warm by itself or to follow
a cooking cycle automatically.
I_ TouchHold Warm.
I_ TouchStart/Enter.
NOTES:
• Hold Warm operates for upto 90 minutes.
• Foodcooked covered should becovered
during Hold Warm.
• Pastry items (pies,turnovers,etc.)should be
uncovered during Hold Warm.
• Complete meals kept worm on a dinner
plate con be covered during Hold Warm.
Tomake Hold Warm automaticall Ufollow
another cucle:
While you ore programming the cooking
instructions, touch Hold Warm before
touching Start/Enter.
Food Type
Liquid
Dry
Recommended
Quantity
1-2cups
5-10 oz.
• When the lostcooking cycle isover,you will
hear two beepsand Hold Warm will appear
in the oven display.
• Youcon set Hold Warm to followAuto
Defrost or multi-cycle cooking.
11
Page 12
About microwave oven functions.
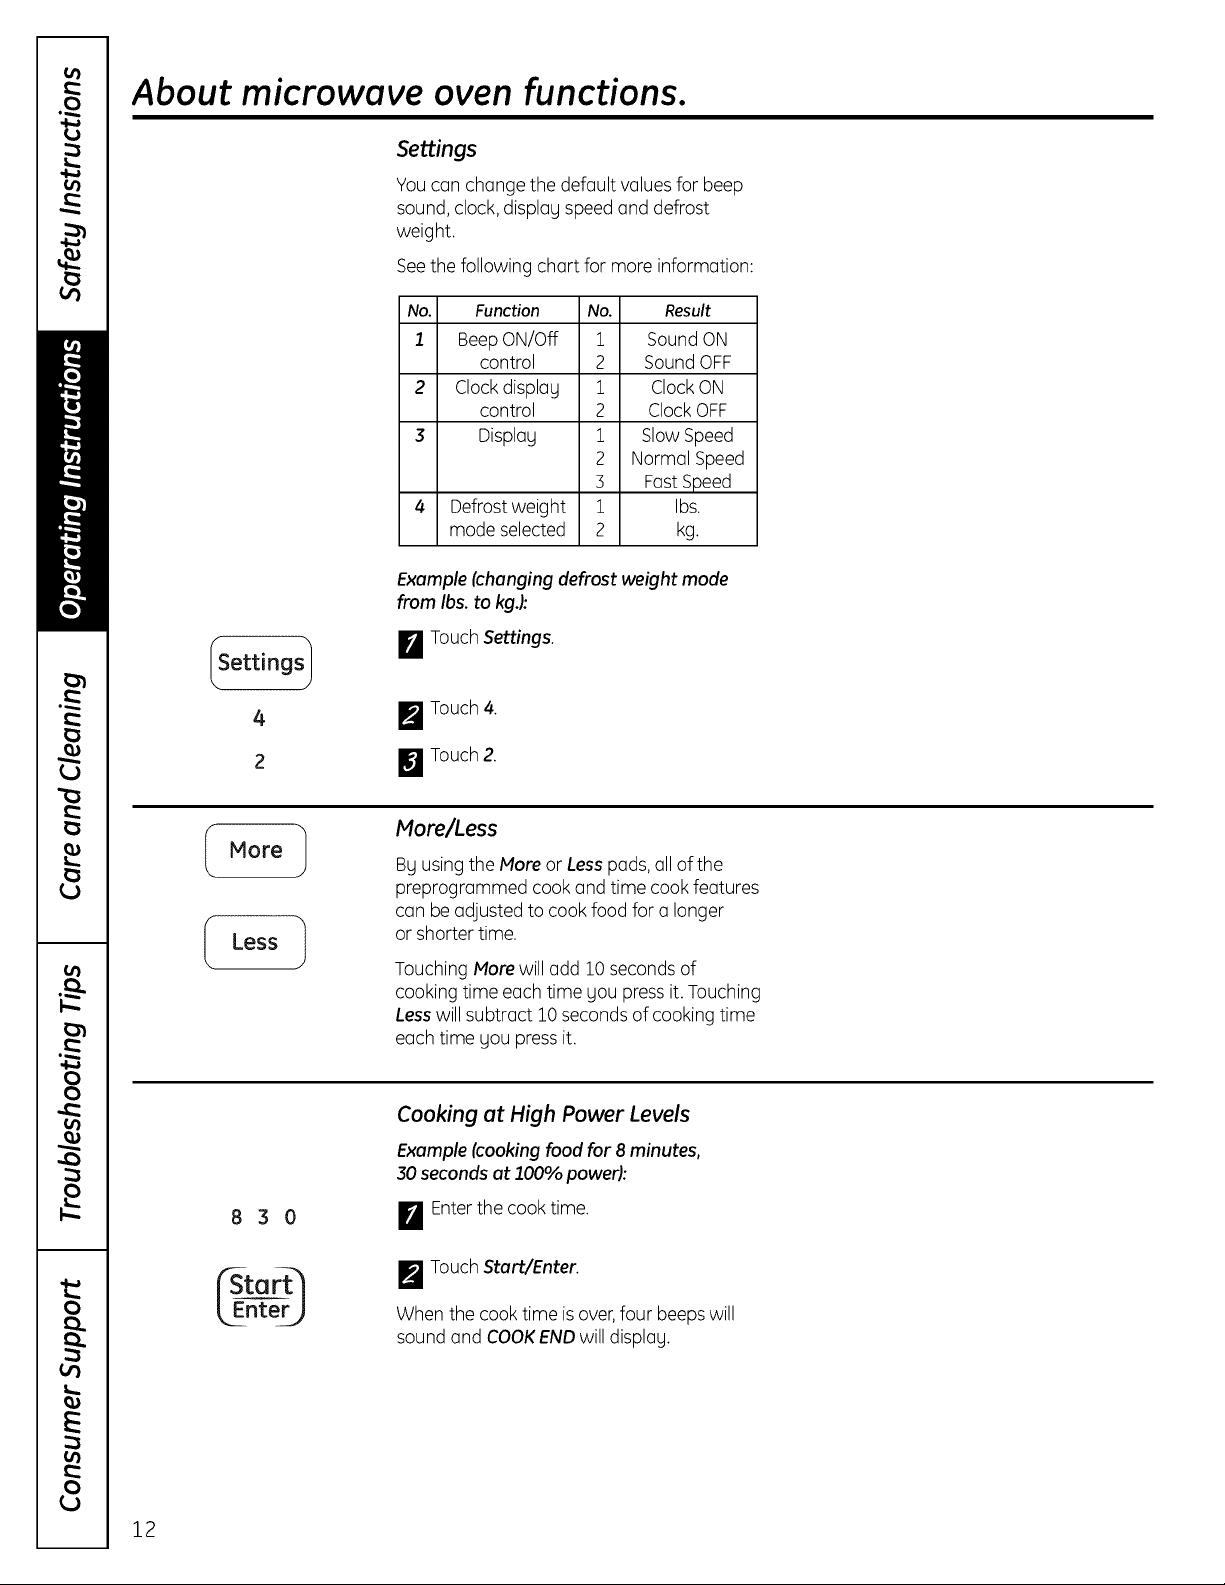
Settings
Youcan change the default valuesfor beep
sound, clock,display speedand defrost
weight.
Seethe following chart for more information:
No. Function No. Result
.l BeepON/Off 1 Sound ON
control 2 SoundOFF
2 Clockdisplay 1 ClockON
control 2 ClockOFF
3 Display 1 Slow Speed
2 Normal Speed
3 Fast Speed
4 Defrostweight 1 Ibs.
mode selected 2 kg.
Example (changingdefrost weight mode
from Ibs.to kgJ:
B TouchSettings.
4
2
More
Less
830
F_ Touch4.
[]Touch 2.
More/Less
Byusing the More or Lesspads, all of the
preprogrammed cook and time cook features
can be adjusted to cook food for a longer
or shorter time.
)
Touching Morewill add 10 seconds of
cooking time each time you pressit. Touching
Lesswill subtract 10seconds of cooking time
each time you press it.
Cooking at High Power Levels
Example (cooking food for 8 minutes,
30 seconds at ]00% power):
F_ Enterthe cook time.
F_ TouchStart/Enter.
12
When the cook time isover,four beepswill
sound and COOKENDwill display.
Page 13

730
I PowerLevel 1
ge.com
Cooking at Lower Power Levels
HIGHpower cooking does not olwogs give
gou the best resultswith foods thot need
slower cooking, such os roosts,boked goods
or custords.
Youroven hos I0 power settings in oddition
to HIGH.
Example (cooking food for 7minutes
30 seconds at 70% power]:
[]Enter the cook time.
F_ Touch Power Level.
7
_.Enter_
3 0 0
[]Enter the power level.
_J TouchStart/Enter.
When the cook time isover,four beepswill
sound ond COOKENDwill displog.
Seethe CookingGuidefor Lower Power Levels
on the next poge.
Cooking with More Than One
Cook Cgcle
Forbest results,some recipes coil for one
Power Levelfor o certoin length of time, ond
onother Power Levelfor onother length of
time.Your oven con be set to chonge from
one to onother outomoticollg, for up to three
cgcles if the first heoting cgcle is defrost.
Example (cooking food for 3 minutes
at 100% power and then 70% power
for 7minutes 30 seconds):
[]Enter the first cook time.
Cook 1
Time
730
I PowerLevel 1
7
l_Enter_
F_ Touch Time Cook,
[]Enter the second cook time.
_J TouchPower Level.
_j Enterthe power level.
r_ TouchStart/Enter.
When the cook time isover,four beepswill
sound ond COOKENDwill displog.
13
Page 14

About microwave oven functions.
Cooking Guide for Lower Power Levels
The10 power levelsin addition to HIGHallow you to choosethe best power levelfor the food you are cooking. Beloware listed
all the power levels,examples of foods best cooked at each level and the amount of microwave power you are using.
ii _i_ii_ _!!_ _ i i Microwave Output Use
100%
Boilwoter.
Cookgroundbeet
Mokecondy.
Cookfreshfruitsondvegetobles.
Cookfishond poultry.
Preheotbrowningdish.
Reheotbeveroges.
_1Boconslices.
• 9 .
: 8 :
7 70%
6 60%
4
3
2
1
0
9O%
8O%
5O%
40%
30% :Thaw meat, poultry and seafood.
20% Soften butter and cream cheese.
10% Soften ice cream.
0% ,1Standing time.
Reheot meot slices quickly.
Soute onions,celery ond green pepper.
All reheoting.
Cook scrambled eggs.
Cook breads and cereal products.
Cook cheesedishes,veal.
Cook cakes,muffins, brownies, cupcakes.
Cook pasta.
Cook meats, whole poultry.
Cook custard.
Cookwhole chicken,turkey, spare ribs,rib roast,
sirloin roast.
Cook less tender cuts of meat.
Reheatfrozen conveniencefoods.
Cook small quantities of food.
,1 Finishcooking casseroles,stew and some sauces.
,1 Heat small amounts of food.
,1 Raiseyeast dough.
14
Page 15

About the sensor microwave features, ge.com
Humidity Sensor
What happens when using the SensorFeatures:
TheSensor Featuresdetect the increasing humiditg releasedduring cooking.The oven
outomoticollg adjusts the cooking time to various tgpes and amounts of food.
Donot usethe SensorFeaturestwice in successionon the some food portion-it mog result in
severelgovercooked or burnt food. Iffood is undercooked after the countdown, use Time Cook
for additional cooking time.
NOTE:Sensor featureswill not operate when the ovenis hot. If one of the sensor cooking
pads is touched when the temperature inside theoven isgreater than 200°F,"OVENTOO
HOTFORSENSORCOOKING---USINGALTERNATEMETHOD"will be disploged.The ovenwill
automaticollg changeto cookbg time (follow the directions in the displog)or once the oven
iscool enough,the sensorfeatureswill function normallg.
The proper containers and covers ore essential for best sensor cooking.
Covered
i Always usemicrowave-safe containers and cover them with lidsor vented plastic wrap,
Never usetight sealing plastic containers-theg can prevent steam from escaping and
cause food to overcook.
Vented
Dryoffdishessothey don't mislead
thesensor.
(Cook 1
6
Besurethe outside of the cooking containers and the insideof the microwave oven
ore drg before placing food inthe oven. Beadsof moisture turning into steam con mislead
the sensor.
Sensor Cook
UsingSensor Cook lets gou heat common
microwave-prepared foods without needing
to program times and Cook Powers.Sensor
Cook has preset Cook Power for 7food
categories.
Example (cooking rice):
Touch Cook.
F_ Choosethe food cotegorg,
Sensor Cook Chart
BakedPotato
FreshVegetable
FrozenVegetable
CannedVegetable
Casserole
Rice
FrozenEntr_e
Touch Pod
Number Amount
1 i-4 each
2 i-4 cups
3 1-4 cups
4 1-4 cups
5 1-4 cups
6 1/2-2 cups
7 10-21oz.
When the cook time isover,four beepswill
sound and COOKENDwill displog.
15
Page 16

About the sensor and auto microwave features.
Sensor Reheat
Sensor ReheatChart
Pizza Slice 1 1-3 slices
Dinner Plate 2 1-2 servings
Soup/Sauce 3 1-4cups
Casserole 4 1-4 cups
When the reheat time is over,four beeps will
sound and COOK ENDwill displag.
Reheat
1
UsingSensor Reheat lets you heat common
microwave-prepared foods without needing
to program times and power levels.
Example (reheating 2 slices of pizza):
B Touch Reheat.
[]Choose the food category.
Chicken
Touch Pad
Number Amount
Chicken
1
Popcorn
Useonly with prepackagedmicrowave
popcornweighing1.75to 3.5 ounces.
NOTE:Do notuse thisfeature twice
in successioneelthe same food
portion--it may resultin severely
overcookedor burntfood.
Theoven useslow power to cook poultry
(chickenwings, chicken nuggets, Spicy
chicken and Mexican chicken).Seethe
ChickenChart.
Example (cooking 6 oz. chicken wings):
B TouchChicken.
F_ Choosethe food category, Touch I for
chickenwings.
[]Choose the amount by touching
I for 6 oz,
_J TouchStart/Enter.
Popcorn (Donotusetherackwhenmicrowave
cooking.)
Popcornletsgoupop3.0and3.5ouncebags
d commerciallgpackagedmicrowavepopcorn.
Poponlgonepackageata time.Ifgouareusinga
microwavepopcornpopper,followmanufacturer's
instructions.
TouchthePopcornpad.Whenthecooktime is
over,fourbeepswillsoundandCOOK ENDwill
displag.
Recommended amounts: 3.0-3.5oz.
Tocook a snack sizebag (1.75oz.)place
the bag in the oven.Setthe oven to cook for
2minutes at full power.LISTENfor the popping
to slow down. When the popping slows to one
pop per second, stop the oven.Make a note
of how much time it took and usethat setting
in the future.
Chicken Chart
TouchPad
Amount
ChickenWings 1
ChickenNuggets 2
SpicgChicken 3
MexicanChicken 4
6,12oz.
4,8oz.
2,4servings
2,4servings
When the cook time isover,four beepswill
sound and COOK ENDwill displag.
NOTE: See recipes on page 19.
CAUTION:
DONOTleavethemicrowaveovenunattended
whilepoppingpopcorn.
Whenpoppingcommerciallgpackagedpopcorn,
removethe rackfromthe oven.Donot placethe
bagof microwavepopcornontherackor under
therack.
16
Page 17

I Soften !
2
2
_tart_
LEnter_
Soften
Theoven useslow power to soften foods
(butter,ice cream, cream cheese and frozen
juice).Seethe Soften Churt.
Example (softeninga quart of ice cream):
I_Touch Soften.
I_ Choosethe food category. Touch 2 for
Ice cream.
I_]1 Choosethe amount. Touch 2for quart.
I_ TouchStart/Enter.
Melt
ge.com
Soften Chart
Touch Pad
Number Amount
Butter ..... 1 1, 2,5 sticks
Ice Cream ...... 2 Pint,Quart,
Half Gallon
Cream Cheese 3 3,8 oz.
FrozenJuice 4 6, 12,16 oz.
When the heating time is over,four beeps will
sound and COOKENDwill display.
I Melt )
2
2
_"Stort_
_ Enter _
Theoven useslow power to melt
foods (butter or margarine, chocolate,
mGrshmGIIowsor processed cheesefood).
Seethe Melt Chart.
Example (melting 8 oz.of chocolate):
I_ TouchMelt.
Choosethe food category. Touch 2 for
m
chocolate.
Choosethe amount. Touch 2for 8 oz.
m
TouchStart/Ente_
D
Melt Chart
TouchPad
....,,,umberAmoun,
Butter/Margarine 1 1,2,3sticks
Chocolate 2 4,8oz.
Cheese..... 3 8,16oz.
Marshmallows 4 5,10oz.
When the heGtingtime is over,four beeps will
sound and COOKENDwill display.
17
Page 18

About the sensor and auto microwave features.
SensorCook Chart
Baked Potato
Vegetables
i i
Vegetables
• i i
Direction
Pierce each potato with a fork and place onthe oven tray
around the edge, at least one inch apart.
Prepare as desired, wash and leave residual water
on the vegetables. Place in an appropriatelg sized microwave
container, cover with plastic wrap and vent.
Remove from package, rinse off frost under running water.
Place in an appropriatelg sized microwave container, cover
with plastic wrap and vent.
Remove from the outer displag can. Place inan appropriatelg
sized microwave container, cover with plastic wrap and vent.
After cooking, stir and allow to stand for 5 minutes.
Assemble the ingredients per the recipe in a 1-2 quart
casserole. Cook with plastic wrap and vent. After cooking,
stir and allow to stand for 5 minutes
Add twice the amount of water as rice. Use a microwave
container large enough to prevent water from boiling over dish.
Cover with plastic wrap or lid.
Remove from outer display package. Slit cover. If not in
microwave-safe container, place on plate, cover with plastic
wrap and vent.
Amount
1-4 medium approx.
8-10 oz. each
1-4 cups
1-4 cups
1-4 cups
1-4 cups
1/2-2 cups
10-21 oz.
Sensor Reheat Chart
Pizza Slice ............
k ( ( ( ( ( ( ( (
k ( ( ( ( ( ( ( (
Casserole
Direction
This is a reheat function for leftover pizza,
Place on a paper towel on a microwave-safe plate.
Place on o low plate.
Cover with vented plastic wrap.
Let stand 3 minutes.
Place in a shallow microwavable casserole.
Cover with vented plastic wrap.
After cooking, stir and let stand S minutes.
Cover the dish containing the casserole with plastic wrap
and vent. After cooking, stir and allow to stand for Sminutes.
Amount
1-3 slices
(]-5 oz. each)
1-2 servings
i-4 cups
i-4 cups
18
Page 19

ChickenChart
: ,i __ / Direction Amount
Chicken Wings Place in o single layer around the edge of o dinner plate 6 or 12 oz.
(frozen, precooked) or serving plotter.
Chicken Nuggets Place in o single lager around the edge of o dinner plate. /4or 8 oz.
(frozen, precooked)
2 or/4 servings
2 or/4 servings
i i
Mexican Chicken
- 2 servings (double the ingredients for/4 servings)
1V2pounds skinless chicken pieces
1 teaspoon cogenne pepper
1V2tablespoon paprika
1/2 teaspoon pepper
1/2 cup hot sauce or 1 tablespoon Tabasco sauce
1/2 cup barbecue sauce of choice
Mix evergthing in on 8 X 8-inch gloss dish or similar dish
and cover with plastic wrap. Cook on Spicy chicken.
Stir and serve as is or place under o broiler for o few minutes
for additional browning.
- 2 servings (double the ingredients for/4 servings)
1/2 medium onion, chopped
1/2 green bell pepper, diced
1/2cup frozenpeas
1/2 cup long grain rice
1 cup water
1/2cup salsa
IV2poundsskinlesschickenpieces,legs,thighs,breasts,
wingsorcombinationofall
i teaspooncumin
Saltand peppertotaste
1/2cup greenolivesw/pimentos
Placeonionsand peppersinon 8 X 8-inchglassdishorsimilar
containerand microwavefor3 minutes.Add peas,rice,water,
salsa,chickenand cumin.Seasonwithsaltand pepper.Cover
withplasticwrap and cook on Mexicanchicken.Stirintheolives
and serveasisorplaceundero broilerforo few minutestoodd
additionalbrowning.
ge.com
19
Page 20

About the sensor and auto microwave features.
Soften Chart
Butter
Ice Cream
Cream Cheese ......
•Frozen Juice
Direction
Unwrap and place in a microwavable container. Butter will be
at room temperature and ready for use in the recipe.
Place the container in the oven. Icecream will be soft enough
to make scooping easier.
Unwrap and place in a microwavable container. Cream cheese
will be at room temperature and ready for use in the recipe.
Remove the top. Place in the oven. Frozenjuice will be soft
enough to mix easily with water.
Amount
1,2 or 3 sticks
Pint, Quart,
Half Gallon
3 or 8 oz.
6, 12 or 16 oz.
Melt Chart
_i Direction Amount
' Butter or Margarine ' 1,2 or 3 sticks
Marshmallows
Unwrap and place in a microwavable container. No need to cover
the butter. Stir at the end of cooking to complete melting.
Chocolate chips or squares of baking chocolate may be used.
Unwrap the squares and place in a microwavable container.
Stir at the end of the cycle to complete melting.
Use processed cheese food only. Cut into cubes. Place ina single
layer in a microwavable container. Stir at the end of cooking
to complete melting.
Large or miniature marshmallows may be used.
Place in a microwavable container. Stir at the end of the cycle
to complete melting.
A or 8 oz.
8 or 16 oz.
5 or 10 oz.
20
Page 21

I Auto "]
Defrost t
i
1 2
LEnter)
Auto Defrost
Fourdefrost choices are preset inthe oven.
Thedefrost feature provides you with the
best defrosting method for frozen foods,
because the oven automatically sets the
defrosting times for each food item according
to the weight you enter.
Foradded convenience,AutoDefrost
includes a built-in tone mechanism that
reminds you to check, turn over,separate or
rearrange the food during the defrost cycle.
Fourdifferent defrosting options are provided:
Meato
Z
Poultry
3.
Fish
4.
Bread
After touching Auto Defrost once, select
the food category. Availableweight ranges
for Heat, Poultry and Fishare 0.1to 6.0 Ibs.
Theavailable weight range for Bread is
0.1to 1.0lb.
Example (defrosting1.2Ibs of meat):
B TouchAuto Defrost.
[]Choose the food category.
[]Enter the weight.
I_ Touch Start/Enter.
NOTE:Afteryou touch Start/Enter, the
display counts down the defrost time.The
oven will beep once during the Defrostcycle.
Atthis time, open the door and turn, separate,
or rearrange the food as needed. Remove
any portions that have thawed, then return
frozen portions to the ovenand touch
Start/Enter to resume the defrost cycle.
Theovenwill not stop during the Beep
unless thedoor is opened.
ge.com
For best results:
iiiiiiiiii
Removefish, shellfish,meat and poultry
from itsoriginal closed paper or plastic
package (wrapper).Otherwise, the wrap
will hold steam andjuice close to the
foods,which can causethe outer
surface of the foods to cook.
Form the meat into the shape of
a doughnut before freezing.When
defrosting, scrape off thawed meat when
the beep sounds and continue defrosting.
Placefoodsinashallowglossbakingdish
ora on a microwaveroostingrocktocatch
drippings.
Foodsshouldstillbesomewhat icyin
thecenterwhen removedfromtheoven.
Auto Defrost Chart
Food
Beef
0.1to 610Ibs Ground beef,Roundsteak,
........ Cubesfor stew,Tenderloin
steak, Potroast, Ribroast,
Rump roast,Chuck roast,
Hamburger patty
Lamb
Chops(1-inch thick),
Rolledroast
Pork
Chops(1/2-inch thick),Hot
........ dogs,Spareribs,Country-style
ribs, Rolledroast, Sausage
Pou!trg Poultry
0.1to 6.0 Ibs Whole (under 4 Ibs),Cut up,
Breasts(boneless)
Cornish Hens
Whole
........ Turkey
Breast(under 6 Ibs)
Fish Fish
0.1to 610Ibs Fillets,Whole steaks
Shellfish
........ Crab meat, Lobstertails,
Shrimp,Scallops
Muffins
0.1to1.0 Ibs Roll Cake
I Quick
Defrost
LEnter)
Quick Defrost
TheQuick Defrost feature provides
a rapid defrost for 1.0pound frozen food.
Theoven automatically sets the defrosting
time for ground beef.
Example (defrostingI lb. of ground beefl:
B Touch Quick Defrost.
F_ Touch Start/Enter.
21
Page 22

About the auto microwave features.
Time Defrost
This feature allows gou to choose the time
gou wont to defrost.
Example (defrostingfor 2 minutes):
I Time
DefrostJ
200
[]Touch Time Defrost.
F_ Enterthe defrosting time gou want.
[]Touch Start/Enter. Defrost starts.
When the defrost time is over,four beeps will
sound and Cook End will displag.
Defrost Tips
iiiilDiiii
When using Auto Defrost, the weight to
be entered is the net weight in pounds and
tenths of pounds (theweight of the food
minus the container).
UseAuto Defrost onlg for row food. Auto
Defrost gives best resultswhen food to
be thawed isa minimum of 0°F(token
directly from a true freezer).If food has
been stored in a refrigerator-freezer that
does not maintain a temperature of 5°F
or below,always program a lowerfood
weight (fora shorter defrosting time)
to prevent cooking the food.
If the food isstored outside the freezer
for up to 20 minutes, enter a lower food
weight.
Theshape of the package alters the
defrosting time. Shallowrectangular
pockets defrost more quickly than
a deep block.
Separate piecesas theg begin to defrost.
Separated piecesdefrost more easilg.
Youcan use small piecesof aluminum foil
to shield foods likechicken wings, legtips
and fish tails,but the foil must not touch
the side of the oven. Foilcauses arcing,
which con damage the oven lining.
Shieldareas of food with small pieces
of foil iftheg start to become worm.
For better results,a preset standing time
is included in the defrosting time.
For best results,elevate food to be
defrosted on a microwave-safe roosting
rock.This prevents the possibilitg ofworm
meat juices cooking food during defrost.
A DEFROSTPLATEisprovided for
complete defrosting of larger food items.
Placethe defrost plate on the glosstrog
plastic side down. Placethe item to be
defrosted directlg on the defrost plate.
22
Metal Rack
CAUTION:
To avoid riskof propertg damage:
Do not use rack to pop popcorn.
Rackmust be on the four plastic supports
when used.
Usethe rack onlg when cooking food
on rack position.
Donot cookwith rackonflooroftheoven.
The metal rack gives gou extra space
when cooking in more than one container
at the same time.
To use rack:
I_ Placethe rack securelg in the four plastic
supports.
The rack MUSTNOTtouch metal walls
or the back of the microwave oven.
Placeequal amounts of food both
ABOVEAND BELOWthe rock.
Theamount of food must be
approximatelg the same to balance
out cooking energg.
Page 23

Cookwo reo ge.com
Microwave Utensil Guide
Use Do Not Use
OVENPROOF GLASS:
(treated for high intensity heat):
Utility dishes, loaf dishes, pie plates, cake plates,
liquid measuring cups, casseroles and bowls
without metallic trim.
CHINA:
Bowls, cups, serving plates and platters without
metallic trim.
PLASTIC:
Plastic wrap (as a cover)--Iay the plastic
wrap loosely over the dish and press it
to the sides. Vent plastic wrap by turning
back one edge slightly to allow excess steam
to escape. The dish should be deep enough
so that the plastic wrap will not touch
the food. As the food heats, it may melt
the plastic wrap wherever the wrap touches
the food. Use plastic dishes, cups, semirigid
freezer containers and plastic bags only
for short cooking times. Use these with cure
because the plastic may soften from the heat
of the food.
PAPER:
Papertowels, waxed paper,paper napkins
and paper plates with no metallic trim or
design. Look for the manufacturer's label
for use in the microwave oven.
METAL UTENSILS:
Metal shields the food from microwave energy and produces uneven
cooking. Also avoid metal skewers, thermometers or foil trays. Metal
utensils can cause arcing, which can damage your microwave oven.
METAL DECORATION:
Metal-trimmed or metal-banded dinnerware, casserole dishes, etc.
The metal trim interferes with normal cooking and may damage
the oven.
ALUMINUM FOIL:
Avoid large sheets of aluminum foil because they hinder cooking
and may cause harmful arcing. Use small pieces of foil to shield
poultry legs and wings. Keep ALL aluminum foil at least 1 inch
from the side walls and door of the oven.
WOOD:
Wooden bowls and boards will dry out and may split or crack
when you use them in the microwave oven. Baskets react
in the same wag.
TIGHTLY COVERED UTENSILS:
Be sure to leave openings for steam to escape from covered utensils.
Pierce plastic pouches of vegetables or other food items before
cooking. Tightly closed pouches could explode.
BROWNPAPER:
Avoid using brown paper bags.
They absorb too much heat and could burn.
FLAWED OR CHIPPED UTENSILS:
Any utensil that is cracked, flawed or chipped may break
in the oven.
METAL TWIST TIES:
Do not use recycled paper products in the microwave oven.
They may contain impurities that cause sparks to occur.
Remove metal twist ties from plastic or paper bags.
They become hot and could cause a fire.
2B
Page 24

Cooking Guide.
Getting the Best Cooking Results
Toget the best results from gour microwave oven,
read and follow the guidelines below:
Storage Temperature: Foodstaken from the freezer
or refrigerator take longer to cook than the same foods
at room temperature.
Thetime for recipes in this book is based on the normal
storage temperature of the food.
Size:Smallpieces of food cook faster than large ones,
pieces similar in sizeand shape cook more evenlg. Foreven
cooking, reduce the power when cooking large pieces
of food.
Natural Moisture: Verg moist foods cook more evenlg
because microwave energg isattracted to water
molecules.
Stir foods such as casserolesand vegetablesfrom the
outside to the center to distribute the heat evenlgand
speedcooking. Constant stirring isnot necessarg.
Turn overfoods like pork chops, baking potatoes, roasts
or whole cauliflower halfwag through the cooking time
to expose all sidesequallg to microwave energg.
iii;Place delicate areas of foods,such as asparagus tips,
toward the center of the dish.
iii;Arrange unevenlg shapedfoods, such as chicken pieces
or salmon steaks,with the thicker,meatier parts toward
the outside of the dish.
iii;Shield, with small pieces of aluminum foil, parts of food
that mag cook quicklg, such aswing tips and leg ends
of poultrg.
iii,;LetIt Stand: After gou remove the food from the
microwave, cover food with foil or casserole lid and let it
stand to finish cooking in the center and avoid overcooking
the outer edges.The length of standing time depends
on the densitg and surface area ofthe food.
iii,tWrapping in waxed paper or paper towel:
Sandwichesand mang other foods containing prebaked
bread should bewrapped prior to microwaving to prevent
drging out.
Fish and Shellfish
Cooking Fish and Shellfish:
General Directions
Preparethe fish for cooking.
- Completelg defrost the fish or shellfish.
- Arrange unevenlg shaped pieceswith thicker parts
toward the outside of the dish.Arrange shellfish in a single
lager for even cooking.
- Thetgpe of cover gou use depends on how gou cook.
Poachedfish needs a microwavable lid or vented
plasticwrap.
Fish and Shellfish Cooking Chart
Fish Fillets ......
Fish Steaks ......
WholeFish ......
Power Level
HI
HI
7
Cooking Time
3Y2-4Y2minutes
4Y2-gY2minutes
4Y2-6 minutes
- Bakedfish, coated fish or fish insauce needsto be
covered lightlg with waxed paper to keepthe coating crisp
and sauce from getting waterg.
- Alwags set the shortest cooking time. Fishisdone when
itturns opaque and the thickest part beginsto flake.
Shellfishisdone when the shellturns from pinkto red
and the flesh is opaque and firm.
Directions
Arrange fish in a single lager with thickest portion
toward outside edge of 1V2quart microwavable baking
dish. Brushwith melted butter and season, if desired.
Cook covered with vented plasticwrap. Let stand
covered 2 minutes. If gou are cooking more than i lb.
of fish, turn the fish halfwag through cooking.
Shrimp, shelled
24
HI
HI
3Y2-5 minutes
3Y2-5 minutes
Arrange in a single lager,Prepareas directed
above, except stir instead of turning the shellfish.
Page 25

Appetizers/sauces/soups
Cooking Appetizers: Tipsand Techniques
Recommended
Crispcrackers,such as melba toast, shredded wheat and
crisp rge crackers are best for microwave use.Wait until
partg time to add the spreads. Placea paper towel under
the crackers while theg cook in the microwave ovento
absorb extra moisture.
Arrange individual appetizers in a circle for even cooking.
Stirdips to distribute heat and shorten cooking time.
Cooking Sauces:Tipsand Techniques
Usea microwavable casseroleor glassmeasuring cup
that isat least 2 or 3 times the volume of the sauce.
Saucesmade with cornstarch thicken more rapidlg than
those made with flour.
Cooksauces made with cornstarch or flour uncovered so
gou mag stir them 2 or 3 times during cooking for a smooth
consistencg.
Toadapt a conventional sauce or gravg recipe,reduce
the amount of liquid slightlg.
ge.com
Cooking Soups: Tipsand Techniques
Cooksoups in a microwavable dish which holds double
the volume of the recipe ingredientsto prevent boil-over,
especiallgif gou use cream or milk in the soup.
Generallg,cover microwaved soupswith VENTEDplastic
wrap or a microwavable lid.
Coverfoods to retain moisture. Uncoverfoods to retain
crispness.
Avoid overcooking bg usingthe minimum suggested time.
Add more time, if necessarg,onlg after checking the food.
Stirringoccasionallg will help blend flavors, distribute heat
evenlg,and mag even shorten the cooking time.
When converting a conventional soup recipeto cook in
the microwave oven, reduce the liquid, salt and strong
seasonings.
Not Recommended
Appetizerswith a crisp coating or puff pastrg are best done
in a conventional oven with drg heat.
Breaded products can be warmed in the microwave oven,
but will not come out crisp.
Pleat
Cooking Meat: General Directions
Preparethe meat for cooking.
- Defrost completelg.
- Trim off excessfat to avoid spattering.
- Placethe meat, fat side down, on a microwavable rack
in a microwavable dish.
- Useoven cooking bag for lesstender cuts of meat.
- Arrange the meat so that thicker portions are toward
the outside of the dish.
- Cover the meat with waxed paper to prevent spattering.
Tendthe meat as it cooks.
- Drainjuices as theg accumulate to reducespattering
and keepfrom overcooking the bottom of the meat.
- Shieldthin or bong portions with strips of foil to prevent
overcooking.
NOTE:Keepthe foil at leastI inch from the oven walls,
and do not cover more than one-third of the meat with foil
at ang one time.
Letthe meat stand covered with foil 10-15 minutes after
gou remove it from the oven.The internal temperature
of the meat mag rise from 5-10° F during standingtime.
TheMeat Cooking Chart on the next page providesdetailed
directions, PowerLevel,and CookingTime settings for most
cuts of meat.
25
Page 26

Cooking Guide.
Meat Cooking Chart
Power level Cooking time Directions
Hamburgers
Fresh or defrosted
(4oz. each)
i pattg
2 patties
/4patties
sirloin tip roast
(3_/4Ibs.)
,
Lomb roost, rolled
boneless 3-/4 Ibsl
Bacon slices
2 slices
4 slices
6 slices
10 slices
chops
(5'70Z, each)
2 chops
Loin Roast,
rolled, boneless
(3V2-/4Y2Ibs.)
sausage linkSl
Fresh or Frozen;
defrosted
1,2 oz.each)
2 links
/4 Links
6 links ..............
10 links
HI
HI
HI
1-1V2minutes
1V2-2minutes
2V2-3V2minutes
8-10 minutes
per pound
RARE(135°F)
11-13 minutes
per pound
MEDIUM(155°F)
11-12 minutes
per pound
RARE(135°F)
12-13 minutes
per pound
MEDIUM(145°F)
13-1/4minutes
per pound
WELL(155°F)
1V2-2minutes
2-3 minutes
4-5 minutes
7-8 minutes
18-20 minutes
per pound
15-17 minutes
per pound
25-27 minutes
per pound
(165°F)
45-60 seconds
1-1V2 minutes
1V2-2 minutes
13/4-2minutes
Form patties with a depression in the center of each. Place
on a microwavable roasting rack. Brush with a browning
agent, if desired. Cover with waxed paper. Turn over
halfway through cooking. Let stand covered 1 minute.
Place the roast-fat side down on a microwavable roasting
rack. Add desired seasonings and cover with waxed paper.
Turn meat over halfway through cooking and shield
if necessary. Remove the roast from the microwave oven
when the desired temperature is reached. Let stand covered
with the foil 15 minutes. (Temperature may rise about IO°F.)
Placethe roast fat-side down on a microwavable roasting
rack. Brush lamb with marinade or desired seasonings such
as rosemary, thyme or marjoram. Coverwith waxed paper.
Turn the roast over after 15 minutes,and again after 30 minutes.
Shield if necessary.
Removethe roast from the microwave when the desired
temperature is reached. Letstand coveredwith foil 15 minutes.
(Temperature may rise about IO°F.)
Place bacon slices on a microwavable roasting rack.
Cover with paper towels.
After cooking, let stand 1 minute.
Place chops in a microwavable baking dish.
Add desired seasonings and cover with vented plastic wrap.
Cook until no longer pink or until internal temperature
reaches 170°F.Turnthe chops over halfway through cooking.
Let stand covered 5 minutes.
(Temperaturemay rise about IO°F.)
Place the roast in a cooking bag in a microwavable dish.
Add seasonings and browning agent if desired. Closethe
bag loosely with microwavable closure or string. After
cooking, let stand in bag 15 minutes. (Temperature may
rise about IO°F.)The internal temperature of pork should
reach 170°F before serving.
Pierce the links and place on a microwavable roasting rack.
Cover with waxed paper or paper towel.
Turn over halfway through cooking.
After cooking, let stand covered 1 minute.
26
Page 27

Chicken Cooking Chart
Chicken
Cooking Poultry: Generol Directions
Preparethe poultry for cooking.
- Defrost completely.
- Arrange poultry pieceswith thicker pieces
at the outside edge of the baking dish.
When cooking legs,arrange them like
the spokes of (] wheel.
- Coverthe baking dishwith waxed paper
to reduce spattering.
- Use(] browning (]gent or cook with (]
sauce to give (] browned appearance.
Power level
Cooking time
ge.com
Watch the poultry as it cooks.
- Drainand disc(]rdjuices asthey
accumulate.
- Shieldthin or bony pieces with small strips
of aluminum foil to prevent overcooking.
Keepfoilet leest 1 inch from the oven
walls and other pieces of foil.
Poultry isdone when it is no longer pink
and thejuices run clear.When done,
the temperature in the thigh meat
should be 180-185°K
Letthe poultry stand after cooking covered
with foil for 10 minutes.
The Poultry CookingChart below provides
detaileddirections, Power Level,and Cooking
Time settings for most cuts and types
of poultry.
Directions
Chicken pieces
(2V_-3Ibs.)
Chicken whole
Cornish Hens
whole
1-1V2Ibs.each
HI
HI
HI
4V2-SV2minutes
per pound
12-13 minutes
per pound
6-7 minutes
per pound
Before cooking, wash pieces and shake the water off.
Place pieces in (] single layer in (] microw(]v(]ble baking
dish with thicker pieces to the outside. Brush with butter
or browning (]gent and seasonings if desired. Cover with
waxed paper. Cook until no longer pink andjuices run
clear. Let stand covered 5 minutes.
Before cooking, wash and shake off water. Place bre(]st-side
down on (] microw(]v(]ble roasting rack. Brush with butter
or browning (]gent and seasoning if desired. Cover with
waxed paper. Cook 1/3 of estimated time. Turn breast
side up, brush with butter, or browning (]gent. Replace
waxed paper. Cook 1/3 of estimated time again. Shield if
necessary. Cook remaining 1/3 of estimated time or until
no longer pink and juices run clear. Let stand covered
with foil 10 minutes. (The temperature may rise (]bout 10°F.)
The temperature in the thigh should be 180°F-185°F when
the poultry is done.
Before cooking, wash and shake the water off.
Tie wings to body of hen and the legs to tail. Place hens
breast side down on (] microw(]v(]ble rack. Cover with
waxed paper.Turn bre(]st-side up halfway through cooking.
Shield bone ends of drumsticks with foil. Remove and
discard the drippings. Brush with butter or browning (]gent
and seasonings if desired. Cook until no longer pink and
juices run clear. Remove the hens from the microwave oven
when they reach the desired temperature. Let stand covered
with foil 5 minutes. (The temperature may rise (]bout 10°F.)
The temperature in the breast should be 170°F before
serving.
27
Page 28

Cooking Guide.
Pasta Cooking Chart
/4Cups water
Add 8 oz. spaghetti
B cups water
Add 2 cups macaroni
4 cups ware r
Add 8 oz. lasagna noodles
noodles
6 Cups water
Add 4 cups noodles
Pasta and Rice
Microwave cooking and conventional cooking
of pasta, riceand cereal require about the
same amount of time; but, microwave
cooking isa more convenient method
because you can cook and serve in the same
dish.Thereis no stirring neededand leftover
pasta tastes just likefresh cooked when
reheated in the microwave oven.
Power Level Cooking Time Directions
Combine hot tap water and salt, if desired.
HI
5
HI
5
HI
5
HI
5
9-10 minutes
7V2-8V2 minutes
6-7 minutes
5V2-6V2 minutes
7-8 minutes
11-12 minutes
8-10 minutes
5V2-6V2 minutes
Use a 2-quart microwavable baking dish
and cover with vented plastic wrap for
spaghetti and lasagna noodles.
Use microwavable lid or vented plastic
wrap for macaroni and egg noodles.
Cook as directed in the chart or until the water boils.
Stir in the pasta; cook covered as directed in the
chart or until tender. Drain in a colander.
Cooking Pasta and Rice:Tips and
Techniques
If you are planning to userice or pasta
in a casserole,undercook it so it is stillfirm.
Allowfor standing time with rice, but not
for pasta.
The Pastaand RiceCooking Charts below
provide specific directions,with Power
Leveland cooking time settings for most
common types of pasta and rice.
Rice CookingChart
2V4cups water
Add i cup rice
2V_cups water
Add i cup rice
wild rice mix
2V3cups water
Add 6 oz. package
1 cup water
Add i cup rice
Power Level Directions
Cooking Time
Combine hot tap water and salt, if desired,
HI
5
4V2-5V2 minutes
14 minutes
in 2 quart microwavable casserole.
Cover with microwavable lid or vented plastic
wrap.
Cook as directed in the chart or until water boils.
HI
5
4V2-5V2 minutes
28 minutes
Stir in rice and any seasonings.
Cook covered as directed in the chart or until
water is absorbed and rice is tender.
HI
4-5 minutes
5
2/4 minutes
Let stand covered 5 to 10 minutes.
Fluff with a fork.
Cook water until it boils.
HI
2-3 minutes
Stir rice into boiling water and let stand, covered
5 to 10 minutes or until water isabsorbed and
rice is tender.
Fluff with a fork.
28
Page 29

Careand cleaning of the oven. ge.com
Helpful Hints
An occasional thorough wiping with a solution of baking soda and water keeps
the insidefresh.
For best performance and safety, keep the oven clean inside and outside.Take special care
to keep the inner door panel and the ovenfront frame free of food or grease build-up. Never
use rough powder or pads. Wipe the microwave oven insideand out, including the hood
bottom cover,with a soft cloth and a worm (not hot)mild detergent solution.Then rinseand
wipe dry. Usea chrome cleaner and polishon chrome, metal and aluminum surfaces.
Wipe spatters immediately with a wet paper towel, especiallyoffer cooking chicken or bacon.
Cleonyour ovenweekly or more often, if needed.
Besurethe power isoff beforecleaning any part of thisoven.
How to Clean the Inside
Walls, Floor,Inside Window, Metal and Plastic Parts on the Door
Somespatters can be removed with a paper towel; others may require a damp cloth.
Removegreasy spatters with a sudsy cloth,then rinsewith a damp cloth. Do not use
abrasive cleaners or sharp utensils on ovenwalls.
Never use a commercial oven cleaner on any part of your microwave oven.
Removable Turntable and Turntable Support
To prevent breakage,do not place the turntable into water just after cooking. Wash it
carefully in warm, sudsy water or in the dishwasher.Theturntable and support can be broken
if dropped. Remember,do not operate the oven in the microwave mode without the turntable
and support seated and in place.
Rack
Cleanwith mild soap, water and a soft or nylon scrub brush or in the dishwasher.
Dry completely. Do not use abrasive scrubbersor cleaners to clean the rack.
Do notcleanina self-cleaningoven.
How to CleantheOutside
We recommend against using cleaners with ammonia or alcohol, as they con damage
the appearance of the microwave oven. If you choose to use a common household
cleaner, first apply the cleaner directly to a cleon cloth, then wipe the soiled area.
Case
Cleanthe outside of the microwave oven with a sudsy cloth. Rinseand then dry.
Wipethe window cleanwith a damp cloth.
Control Panel
Wipewith a damp cloth. Dry thoroughly. Donot usecleaning sprays, large amounts of soap
and water, abrasives or sharp objects on the panel-they can damage it. Somepaper towels
can also scratch the control panel.
Door Panel
Beforecleaning the front door panel, make sure you know what type of panel you have.
Referto the eighth digit of the model number.%" isstainlesssteel,"L"is CleanSteeland "B",
"W" or "C"are plastic colors.
StainlessSteel
The stainlesssteel panel can be cleanedwith StainlessSteelMagic or a similar product using
a clean, soft cloth. Apply stainlesscleaner carefully to avoid the surrounding plastic parts.
Do not useappliance wax, polish, bleach or products containing chlorine on StainlessSteel
finishes.
29
Page 30

Careand cleaning of the oven.
CleanSteel
Usea clean,soft, light and lightly dampened cloth, then dry thoroughly. Donot useappliance
wax, polish,bleach or products containing any chemical agent on the CleanSteelsurfaces.
PlasticColor Panels
Usea clean,soft, lightly dampened cloth, then dry thoroughly.
Door Seal
It'simportant to keepthe areaclean where the door sealsagainst the microwave. Useonly
mild, non-abrasive detergents applied with a clean sponge or soft cloth. Rinsewell.
Bottom
Cleanoff the greaseand dust on the bottom often. Usea solution of warm water
and detergent.
Replacing the light bulbs.
Removescrew.
Cooktop Light/Nite Light
_ WARNING!
Toavoid personal injury or property damage,
wear gloveswhen replacing light bulb.
I_ Unplugthe oven or turn off power
at the main power supply.
I_ Removethe bulb cover mounting screws.
Oven Light
I_ Unplugthe oven or turn off power
at the main power supply.
Removethe vent cover mounting screws
[]
(2middle screws).
Tip the cover forward, then lift
!l
out to remove.
Liftup the bulb holder.
IJ
lg Replacebulb(s)with 20 watt appliance
bulb(s).
I_ Replacebulb cover and mounting
screws.
!_ Turn the power back on at the main
power supply.
Replacebulb with a 30 or/40watt
D
appliance bulb.
Replacethe bulb holder,if damaged.
[]
Slidethe bottom of the vent cover into
li
place. Pushthe top until it snaps into
place. Replacethe mounting screws.
Turn the power back on at the main
power supply.
BO
Page 31

ge.com
Charcoalfilter (onsomemodels)
V
Reusablevent filters
(onall models)
Vent Fan
Thevent fan hastwo metal reusable vent
filters.
Hodels that recirculate air back into the room
also use a charcoal filter.
Reusable Vent Filter
Themetal filters trap grease releasedbg
foods on the cooktop, Theg olso prevent
flames from foods on the cooktop from
damaging the insideof the oven.
Removing and Cleaning the Grease Filters
Thegrease filters should be removed and
cleaned often, at least once a month.
Forthis reason,the filters must alwags be
in place when the hood is used.Thevent
filters should be cleaned once a month,
or as needed.
I_To reinstallthe filters, slidethem into
the back slots,then push up to lock.
Disconnectpower or unplug the
microwave oven.
Toremove the grease filters,slide
the filters to the back.Pullthe filters
downward. The filters will drop out.
Soakthe greasefilters in hot water and
tl
a mild detergent. Scruband swish to
remove embedded dirt and grease.
Rinsewell and shake to drg. Do not cleon
filterswith ammonia, corrosive cleaning
agents such as Ige-basedoven cleaners,
or placethem in a dishwasher.The filters
will turn block or could be damaged.
!_ Reconnect power or plugin the
microwave oven.
NOTE:Do not operate the hood without
the filters in place.
Toreplace, slide the filters into the frame
slotson the back of each opening. Pressup
and to the front to lock into place.
31
Page 32

Careand cleaning of the oven.
Charcoal Filter
Thecharcoal filter cannot be cleaned.
It must be replaced. Order Part No.
WB????????from your GEsupplier.
If the model isnot vented to the outside,
the air will be recirculated through a
disposable charcoal filter that helps
remove smokeand odors.
To Remove the Charcoal Filter
i
Remove2 grillescrews
to removethe grille.
WARNING!
Toavoid personal injury or property damage,
do not operate oven hood without filters
in place.
F_ Unplugthe oven or turn off power
at the main power supply.
F_ Removethe two vent grille mounting
screws (2middle screws).
[]Tip the grilleforward, then liftout
to remove.
Thecharcoal filter should be replacedwhen it
is noticeably dirty or discolored (usually after
6 to 12 months, depending on usage).See
"Optional Kits,"page 7,for more information.
_J Removethe old filter.
To Install the Charcoal Filter
WARNING!
Toavoid personal injury or property damage,
do not operate oven hood without filters
in place.
F_ Slidea new charcoal filter into place.
Thefilter should rest at the angle shown.
F_ Slidethe bottom of the grille into place.
Pushthe top until it snaps into place.
Replacethe mounting screws.Turn
the power back on at the main power
supply and set the clock.
32
Page 33

Before you call for service.., go.cam
Troubleshooting Tips
Save time and moneg! Review the charts on the following
pages first and gou mag not need to call for service.
Possible Causes What To Do
Ovenwill not start A fuse in gour home mag be • Replacefuse or resetcircuit breaker.
blown or the circuit breaker
tripped.
Power surge. • Unplugthe microwave oven, then plug it back in.
Plug not fullg inserted into wall * Hakesurethe 3-prong plug onthe oven isfully inserted
outlet, into wall outlet.
Door not securelgclosed. • Openthe door and closesecurelg.
Control panel lighted, Door not securelgclosed. • Open the door and closesecurelg.
get oven will not start
Start/Enter pad not touched * TouchStart/Enter
offer entering cooking selection.
Another selectionentered • TouchClear/Of
alreadg in oven and Clear/Of
pad not touched to cancel it.
Cooking time not entered offer * Hake sure you haveentered cooking time after touching
touching Time Cook. Time Cook.
Clear/Offwas touched • Resetcooking program and touch Start/Enter
accidentally.
Foodweight not entered after * Makesure you have entered food weight after selecting
selectingAuto Defrost or Auto Defrost or Quick Defrost.
Quick Defrost.
Foodtgpe not entered after • Hake sure gou have entered a food tgpe.
touching Cook.
CONTROLLOCKED Thecontrol has been locked. * Touch and hold Clear/Off for about 5 seconds
appears on displag to unlock the control.
OVEN TOO HOT FOR
SENSOR COOKING---
USING ALTERNATE
METHOD appears
on displag
Floor of the oven is warm
even when the ovenhas
not been used
Youhear an unusual You have tried to change • Hang of the oven'sfeatures are preset and cannot
low-tone beep the power levelwhen it is be changed.
Oveninterior light does The light bulb is loose * Tighten or change the light bulb.
not work or defective.
Oventakes longer than ThePower Level isnot * Resetthe Power Level.
normal to cook or cooks programmed properlg.
too rapidlg
One of the sensor cooking
pads was touched when the
temperature inside the oven
was greater than 200°1:.
Thecooktop light is located
below the oven floor. When
light is on, the heat it produces
mag make the oven floor get
warm.
not allowed.
• Thesefeatures will not operate when the oven ishot.
Theoven will automatically change to cook by time
(follow the directions in the display)or once the oven is
cool enough, the sensor features will function normallg.
• Thisis normal.
33
Page 34

Before you call for service...
Troubleshooting Tips
Possible Causes What To Do
Timeofday clockdoes not The power cord is not fully * Fullyinsert the power cord.
always keep correct time inserted into the outlet receptacle.
There is another appliance * Hakesure the microwave oven has itsown electrical
on the electrical circuit, circuit.
Foodcooks unevenly Thefood isnot evenly shaped.
Thefood isnot completely * Completely defrost the food.
defrosted before cooking.
Checkthe placement
of aluminum foil strips used
to prevent overcooking.
Foodis undercooked The recipedirections (amount, * Checkthe recipe.
time and power levels)were not
correctly followed.
The microwave oven is not on * Hake surethe microwave oven has its own electrical
a separate circuit, circuit.
Thefood is not completely • Completely defrost the food.
defrosted before cooking.
Foodis overcooked The recipe directions (amount, • Checkthe recipe.
time, power levels and size of dish)
were not correctly followed.
Arcing (sparks)occurs Microwavable disheswere • Useonly microwavable dishes.
not used.
Wire twist ties were used. • Removeallwire twist ties.
Theoven was operated when • Hakesure there isalways food in the microwave oven
empty, when in use.
If the metal rack was used, it was • Makesure the rack isproperly seated on the four
not properly installed on the four supports.
supports.
Display shows a time The door is not firmly closed. • Pushthe door closed until it clicks.
counting down, but
theoven is not cooking of a cookingfunction.
Vent fan comes on The vent fan automatically turns • Thisis normal.
automatically on to protect the microwave oven
SENSORERRORappears When using a Sensorfeature, • Donot open door until steam is sensedand time
on the display the door was opened before isshown counting down on the display.
Thetimer was started instead • Resetthe control to a cookingfunction.
if it sensestoo much heat rising
from the cooktop below.
steam could be detected.
Steam was not detected in a • UseTime Cook to heat for more time.
maximum amount of time.
B4
Page 35

Things That Are Normal With Your Microwave Oven
Moisture on the oven door and walls
while cooking. Wipe the moisture off
with a paper towel or soft cloth.
Moisture between the oven door panels
when cooking certain foods. Moisture
should dissipate shor% after cooking
is finished.
,tSteam or vapor escaping from around
the door.
Light reflection around door or
outer case.
Dimming oven light and change in
the blower sound at power levels other
than high.
Dullthumping sound while oven
is operating.
,tThe vent fan operating while the
microwave oven is operating. The vent
fan will not go off nor can it be turned
off until the microwave oven is off.
,tTV-radio interference might be noticed
while using the microwave oven. Similar
to the interference caused bu other
small appliances, it does not indicate
a problem with the microwave oven.
Plug the microwave oven into a different
electrical circuit, move the radio or TV as
far away from the microwave oven as
possible or check the position and signal
of the TV/radio antenna.
ge.col_
35
Page 36

Microwave terms.
Definition
Arcing Arcing isthe microwave term for sparks in the oven.Arcing iscaused by:
,,""the metal rock being installed incorrectlg and touching the microwave walls.
metal or foiltouching the sideof the oven.
. foilthat is not molded to food (upturned edgesoct likeantennas).
_i_ _ii ii _ i ii
ill iiii
Covering Covers hold in moisture, allow for more even heating and reduce cooking time. Venting plasticwrap or
...... coveringwith wax paper allows excesssteam to escape.
Shielding In a regular oven,gou shield chicken breasts or baked foods to prevent over-browning. When microwaving,
............ gou usesmall strips of foil to shield thin ports, such asthe tips of wings and legs on poultrg, whichwould
...... cook before larger parts.
Standing Time When gou cook with regular ovens,foods such asroosts or cokes ore allowed to stand to finish cooking
............ or to set. Standing time is especiallg important in microwave cooking. Note that a microwaved coke isnot
...... placed on a cooling rack.
Venting After covering a dish with plastic wrap, gouvent the plastic wrap bg turning back one corner so excess
metal such as twist-ties, poultrg pins,gold-rimmed dishes.
recgcled paper towels containing small metal pieces.
the turntable ring support being installed incorrectlg.
steam con escape.
B6
Page 37

GE Service Protection Plus TM
GE,a name recognized worldwide for quality and dependability together with Assurant Solutions,
offers you Service Protection PlusTM--comprehensive protection on your appliances.*
Benefits Include:
• Prompt, reliable service from GEAuthorized Servicers
• Convenient hours designed to suit your busy schedule
• Quality replacement parts
• The dependability of GE,a name recognized and trusted worldwide
• Askabout our interest-free payment plans
With Service Protection Plus gou can expect:
• An extended service plan that limits unexpected repair bills
• Service coverage for most major brands
• Unlimited service calls for the length of your contract, or credit toward a replacement product
• Service coverage for covered operating parts and labor on appliances and home electronics that fail during normal
single family household use
• Yoursatisfaction is our goal. We strive to provide you with excellent service ina professional and timely manner.
Place gour confidence in GE and call us in the U.S. toll-free at 1.800.626.2224 for more information.
*Most brands covered up to 15 gears old in the continental U.S.
SPP is a trademark of General Electric Compang.
Please place in envelope and mail to:
General Electric Company
Warrantg Registration Department
P.O.Box 32150
Louisville,KY 40232-2150
_.C._t.ht_...........
37
Page 38

Consumer Product Ownership Registration
Dear Customer:
Thank you for purchasing our product and thank you for placing your confidence in us.
We are proud to have you as a customer!
Follow these three steps to protect your new appliance investment:
Complete and mail
your Consumer
Product Ownership
Registration today.
Have the peace
of mind of knowing
we can contact you
in the unlikely event
of a safety modification.
After mailing the
registration below,
store this document
in a safe place. It contains
information you will need
should you require service.
Our service number is
800.GECARES
(800.432.2737).
Model Number Serial Number
Important: If gou did not get a registration card with gour
product, detach and return the form below to
ensure that gour product is registered, or register
online at ge.com.
Consumer Product Ownership Registration
Read your Owner's
Manual carefully.
It will help you
operate your new
appliance properly.
.b_-______e:e.....
Model Number Serial Number
@
Hr.[ Hs.[ Hrs.J Hiss]
First I I Last l
Name I I I I I I I I I Name I I I I I I I I I I I
Street I
Address I I I I I I I I I I I I I I I I I I I I I I I
Apt.# I I I I I I I I I E-mailAddress*
City I
Date Placed
in Use J
Month
i I I I I I I I I I I I I State, , J Code'
oayl, I Yearl, I Phone
GE Consumer & Industrial
Appliances
General Electric Company
Louisville, KY/40225
ge.com
Please provide your e-mail address to receive, via e-mail, discounts, special offers and other
important communications from GEAppliances (GEA).
Check here if you do not want to receive communications from GEA'scarefully selected partners.
FAILURETOCOMPLETEAND RETURNTHIS CARD DOESNOT DIMINISHYOURWARRANTYRIGHTS.
For more information about GEA'sprivacy and data usage policy, go to ge.com and click on
"Privacy Policy" or call 800.626.2224.
I I Zip/ I
i I I
Numberl I, I-I,, I-I , ,
38
Page 39

GE Microwave Oven Warrantg.
All warranty service provided by our Factory Service Centers,
or on authorized Customer Core®technician. Toschedule service,
on-line, visit us at ge.com, or call 800.GE.CARES(800.432.2737).
Please have serial and model numbers available when calling
for service.
GE Will Replace:
OneYear Ang part of the microwave oven which failsdueto a defect inmaterials or workmanship.
From the date of the During this limited one-year warranty, GEwill also provide, free of charge, all labor and related
original purchase serviceto replacethe defective part.
Five Years
Fromthe date of the
origina!purchase .........
Service trips to gour home to teach gou how to use
the product.
Improper installation, deliverg or maintenance.
Product not accessible to provide required service.
Failure of the product or damage to the product if it is
abused,misused (for example, cavitg arcing from wire
rack or metal/foil), or used for other than the intended
purpose or used commerciallg.
Themagnetron tube, if the magnetron tube fails due to a defect in materials or workmanship.
During this five-year limited warranty, you will beresponsiblefor any labor orin-home
servicecosts.
Replacement of house fuses or resetting of circuit
breakers.
Damage to the product caused bg accident, fire, floods
or acts of God.
Incidentalor consequential damage caused bg possible
defectswith this appliance.
Damage caused after deliverg.
Staple Four receipt here.
Proof of the original purchase
date is needed to obtain service
under the warrant F.
Replacement of the cooktop light bulbs.
EXCLUSION OF IMPLIED WARRANTIES--Your sole and exclusive remedy is product repair as provided
in this Limited Warranty. Any implied warranties, including the implied warranties of merchantability
or fitness for a particular purpose, are limited to one gear or the shortest period allowed by law.
This warranty is extended to the original purchaser and any succeeding owner for products purchased
for home use within the USA. If the product is located in on area where service by a GE Authorized Servicer
is not available, you may be responsible for a trip charge or you may be required to bring the product to
on Authorized GEService Location for service. In Alaska, the warranty excludes the service coils to your home.
Some states do not allow the exclusion or limitation of incidental or consequential damages. This warranty
gives you specific legal rights, and you may also hove other rights which vary from state to state. To know
what your legal rights ore, consult your local or state consumer affairs office or your state's Attorney General.
Warrantor: General Electric Company. Louisville, KY40225
39
Page 40

Consumer Support.
GEAppliances Website
Have a question or need assistancewith your appliance?Try the GEAppliances Website 24 hours a day,
any day ofthe year! Forgreater convenience and faster service,you can now download Owner's Manuals,
order parts or evenschedule service on-line.
Schedule Service
Expert GErepair service is only one step away from your door.Get on-line and schedule your service at
your convenience any day of the year! Or call 800.GE.CARES(800.412.2717)during normal businesshours.
ge.com
ge.com
Real LifeDesign Studio ge.com
GEsupports the UniversalDesignconcept-products, services and environments that can be usedby
people of all ages, sizesand capabilities.We recognizethe need to design for a wide range of physical and
mental abilities and impairments. For details of GE'sUniversalDesignapplications, including kitchen design ideas
for people with disabilities,check out our Website today. Forthe hearing impaired, please call 800.TDD.GEAC
(800.8]].4122).
Extended Warranties
ge.com
Purchasea GEextended warranty and learn about special discounts that are available while your warranty
isstill in effect. You can purchase it on-line anytime, or call 800.626.222/4during normal business hours.
GEConsumer Home Serviceswill still be there after your warranty expires.
Ports and Accessories
Individualsqualified to service their own appliances can have parts or accessoriessent directly to their homes
(VISA,HasterCard and Discovercards are accepted).Orderon-line today, 24 hours every day or by phone
at 800.626.2002during normal businesshours.
Instructions contoined in this munuul coverprocedures to be performed by uny user. Other servicing
generully should be referred to quulified service personnel. Cuution must be exercised,since improper
servicing muy cuuseunsofe operation.
Contact Us
If you are not satisfiedwith the service you receive from GE,contact uson our Website with all the details
including your phone number,or write to: General Hanager,Customer Relations
GEAppliances,Appliance Park
Louisville,KY/40225
ge.com
ge.com
ge.com
Register your new epplience on-line--et your convenience! Timely product registration will allow for
Register YourAppliance
enhanced communication and prompt serviceunder the terms of your warranty, should the needarise.
..........................................................................Youmay also mail inthe pre-printed registration card included in the packing material.
Printed in China
 Loading...