

Page 1
Microwave/ConvectionOven
Contents
Aluminum Foil 4 Auto Defrost 23
Appliance Registration 2 Cooking by Temperature 26
Auto Start 25 Cooking by Time 25
Care and Cleaning 36 Defrosting by Time 24
Clock 6 Microwaving Tips 3
Combination Cooking Power Level 24.26
Auto Roast 31, 32 Precautions 2
Cooking by Temperature 30 MinutefSecond Timer 11
Cooking by Time 29 Model and Serial Numbers 2
Convection Cooking Probe 26, 28, 30, 31, 32
Broiling 33 Problem Solver 38, 39
Cooking by Temperature 28 Repair Service 39
Cooking by Time 27 Safety Instructions 3°5
Preheating 27 Touch Control Panel 6, 7
Cooking Reference Guide 34 Warranty Back Cover
Cookware and Accessories 10
Exhaust Fan 6, 35
Extension Cords 37
Features 8
Grounding 37
Microwave Cooking
Auto Cook 12, 13
Auto Cook Recipe Guide 14-19 GEAnawer Center_
Automatic Cooking Guide 20,2t 800.626.2000
ModelJVM190
The electric output
of this microwave oven
is 675 watts.
GEAppliances
Page 2

Help us help you...
Before using your oven,
read this book carefully.
It is intended to help you operate
and maintain your new microwave
oven properly,
Keep it handy for answers to your
questions_
If you don't understand something
or need more help, write (include
your phone number):
Consumer' Affairs
GE Appliances
Appliance Park
Louisville, KY40225
Write down the model
and serial numbers.
You'll find them on the left side
wall of the control panel seen when
door is open.
These numbers are also on the
Consumer Product Ownership
Registration Card that came with
your microwave oven.. Before
sending in this card, please write
these numbers here:
Model Number
Serial Number
Use these numbers in any
corTespondence or service calls
concerning your microwave oven,
Be sure your microwave
oven is registered.
it is impoitant that we know the
location of your oven should a need
occur for adjustments
Your supplier is responsible for
registering you as the owner.
Please check with :/our supplier
to be sure he has done so; also send
in your Consumer Product Ownership
Registration Card. If you move, or
if you are not the original purchaser
please write to us, stating model
and serial numbers_
This appliance must be registered.
Please be certain that it is.
Write to:
GE Appliances
Range Product Service
Appliance Park
Louisville, KY40225
If you received a
damaged oven...
Immediately contact the dealer
(or builder) that sold you the
microwave oven°
Save time and money.
Before you request service...
check the Problem Solver on
pages 38 and 39° It lists causes
of minor operating problems that
you can correct yourself.
This microwave oven is
UL listed for installation over
electric and gas ranges
PRECAUTIONS
TO AVOID
POSSIBLE
EXPOSURE TO
EXCESSIVE
MICROWAVE
ENERGY
(a) Do Not Attempt to operate
this oven with the door open since
open door operation can result in
harmful exposure to microwave
energy It is important not to
defeat or tamper with the safety
interlocks
(b) Do Not Place any object
between the oven front face and
the door or allow soil or cleaner
residue to accumulate on sealing
surfaces,
(c) Do Not Operate the oven
if it is damaged It is palticularty
important that the oven door close
properly and that thele is no
damage to the:
(1) door (bent)
(2) hinges and latches (broken or
loosened)
(3) door seals and sealing surfaces_
(d) The Oven Should Not be
adjusted or repaired by anyone
except properly qualified service
personnel.
Optional Accessory
available at extra cost from
your GE supplier°
jX81 Charcoal Filter Kit for
non-vented installation.
Page 3
Microwaving Tips
o Make sure all cookware used in
your microwave oven is suitable for
microwaving_ Most glass casseroles,
cooking dishes, measuring cups,
custard cups, pottery or china
dinnerware which does not have
metallic trim or glaze with a metallic
sheen can be used_ Some cookware
is labeled "suitable for microwavingY
If you are unsure, use this dish test:
Measure 1 cup water in a glass cup.
Place in oven on or beside dish°
Microwave 1 minute at High. If
water becomes hot, dish is microwave
safe° If dish heats, it should not be
used for microwaving
o Paper' towels, wax paper' and
plastic wrap can be used to cover
dishes in order to retain moisture
and prevent spattering.
• Some rnicrowaved foods require
stirring, rotating or reazranging
Check your cookbook
o Steam builds up pressure in foods
which are tightly covered by a skin
or membrane. Pierce potatoes, egg
yolks and chicken livers to prevent
bursting.
IMPORTANT SAFETY TSTRUCTION$
Read all instructions before using this appliance.
When using electrical appliances
basic safety precautions should be
followed, including the following:
WARNING-To reduce
the risk of burns, electric shock,
fire, injury tOpersons or exposure
to excessive m_crowaveenergy:
o Use this appliance only for its
intended use as described in
this manual.
"Read and follow the specific
"PRECAUTIONS TO AVOID
POSSIBLE EXPOSURE TO
EXCESSIVE MICROWAVE
ENERGY" on page 2,
* This appliance must be
grounded. Connect only to
properly grounded outlet. See
"GROUNDINGINSI_UCTIONS"
on page 37.
,, This microwave/convection
oven is specifically designed to
heat or cook food, and is not
intended for laboratory or
industrial use.
o For best operation, plug this
appliance into its own electrical
outlet, to prevent flickering of
lights, blowing of fuse or tripping
of circuit breaker.
o Install or locate this appliance
only in accordance with the
provided installation instructions.
_,Do not cover or block any
openings on the appliance.
• Do not use outdoors.
,, Do not immerse powercord
or plug in water.
• Keep powercord away from
heated surfaces.
o Do not let power cord hang
over edge of table or counter.
,, Do not operate this appliance
if it has a damaged power cord
or plug, if it is not worldng
properly, or if it has been
damaged or dropped.
o See door surface cleaning
instructions on page 36.
o This appliance should be
serviced only by qualified service
personnel. Contact nearest
authorized service facility for
examination,repair or adjustment.
oAs with any appliance, close
supervision is necessary when
used by children.
o To reduce the risk of fire in
the oven cavity:
--Do not overcook food. CarefuUy
attendapplianceif paper,plastic,
orothercombustible materials are
placedinside the ovento facilitate
cooking.
--Remove wire twist-ties from
paperor plasticbagsbefore
placingbags inoven.
--:Donot use your microwave/
convection oven to dry
newspapers.
--Do not use recycled paper
products. Recycledpaper towels,
napkins and wax paper can contain
metal flecks which may cause
arcing or ignite_Paper products
containing nylon or nylon
filaments should be avoided, as
they may also ignite.
--Do not operate the oven in
microwave or combination
modes while empty to avoid
damage to the oven and the
danger of fire. If by accident the
oven should run empty a minute
or two, no harm is done. However,
try to avoid operating the oven
empty at all times--it savesenergy
and prolongs the life of the oven.
--Do not pop popcorn in your
microwave oven unlessin a special
microwave popcorn accessory or
unless you use popcorn labeled for
use in microwave ovens.
[ (comim_ed next page)
Page 4
INSTRUCTIONS (continued)
keep oven door closed, turn
whole
Avoidheating baby food in
lids;
mixtures.
the convection or
functions,
exterior and of
use
containersof
asbroil
: 7:? ::::_
beverages
carbonated beverages),
container is opened,
Call
burst,
in
may be
,sless than
cover
acct
rthan
at least
ofoven.
transferred
heated food. Pot holders
Sometimes, the oven floor and
walls can become too hot to
touch. Be careful touching the
floor and walls during and after
cooking.
• Foods cooked in liquids (such
aspasta) may tend to boil over
more rapidly than foodscontaining
less moisture. Should this occur,
refer topage 36 for instructionson
how to clean the inside of the oven.
o Do not use regular cooking
or oven thermometers when
cooking by microwave or
combination. The metal and
mercury in these thermometers
could cause "arcing" and possible
damage to oven.
o Remove the temperature probe
from the oven when not using it
to cook with. If you leave the
probe inside the oven without
inserting it in food or liquid, and
turn on microwave energy, it can
create electrical arcing in the
oven, damage oven walls and
damage the temperature probe.
o Plastic utensils--Plastic utensils
designedfor microwave cooking
are very useful, but should be
used carefully. Even microwave-
safe plastic may not be as tolerant
ofovercooking conditions as are
glassor ceramic materials and may
soften or char if subjected to short
periods of overcookingoIn longer
exposures to overcooking, the food
and utensils could ignite° For
these reasons: 1)Use microwave-
safe plastics only and use them in
strict compliance with the utensil
manufacturer's recommendations,
2) Do not subject empty utensils to
microwaving. 3) Do not permit
children to use plastic utensils
without complete supervision,
oWhen cooking pork, follow
the directions exactly andalways
cook the meat to an internal
temperature of at least 170°E
This assures that, in the remote
possibility that trichina may be
present in the meat, it will be
killed and meat wilt be safe to eat_
o Boiling eggs is not
recommended in a microwave
oven. Pressurecan build up
inside eggyolk and may cause
it to burst, resulting in injury,
• Foods with unbroken outer
"skin" such as potatoes,
sausages, tomatoes, apples,
chicken livers and other giblets,
andegg yolks (see previous
caution) should be pierced to
allow steam to escape during
cooking_
• "Boilable" cooking pouches
and tightly closed plastic bags
should be slit, pierced or vented
as directed in cookbook° If they
are not, plastic could burst during
or immediately after cooking,
possibly resulting in injury. Also,
plasticstorage containers should be
at least partially uncoveredbecause
they form a tight seal. When
cooking with containers tightly
covered with plastic wrap, remove
coveringcarefully and direct steam
awayfrom hands and face.
o Spontaneous boiling--Under
certain special circumstances,
liquids may start to boil during or
shortly after removal from the
microwave oven, To prevent burns
from splashing liquid, stir the
liquid briefly before removing the
container from the microwaveoven.
Page 5
oUse of the oven metal
accessory rack. (See your
cookbook for proper use.)
--Remove the rack from oven
when not in use.
Use pot holders when handling
the rack and utensils. They may
be hot.
--Do not use microwavebrowning
dish on rack. The rack could
overheat. Use of rack with
Automatic Cooking feature is not
recommended.
Do not use the drip pan or
spatter shield while
microwaving.
THE EXHAUST HOOD
o Have it installed and properly
grounded by a qualified installer.
See the special installationbooklet
packed with the microwave oven_
o The exhaust fan in your oven
will operate automatically under
certainconditions (see Automatic
Fan Feature, page 6). While the
fan is operating, caution is
required to prevent the starting
and spreading of accidental
cooking fires while the exhaust
fan is in use. For this reason:
--Never leave surface units
unattended at high heat settings.
Boilovercauses smokingand greasy
spilloversthatmay igniteandspread
if exhaust fan is operating. To
mi_mize automatic fan operation,
use adequate sized utensils and
use high heat only when necess_wy.
--In the event of a grease fire,
smother flaming pan on surface
unit bycovering pan completely
with well-fitting lid, cookie sheet
or flat tray,
--Never flame foods under
the oven with the exhaust fan
operating because it may svead
the flames.
--Keep hood and grease filters
clean, according to instructions on
pages 35 and37,tomaintain good
venting and avoid grease fires.
SAVE THESE
INSTRUCTIONS
Page 6
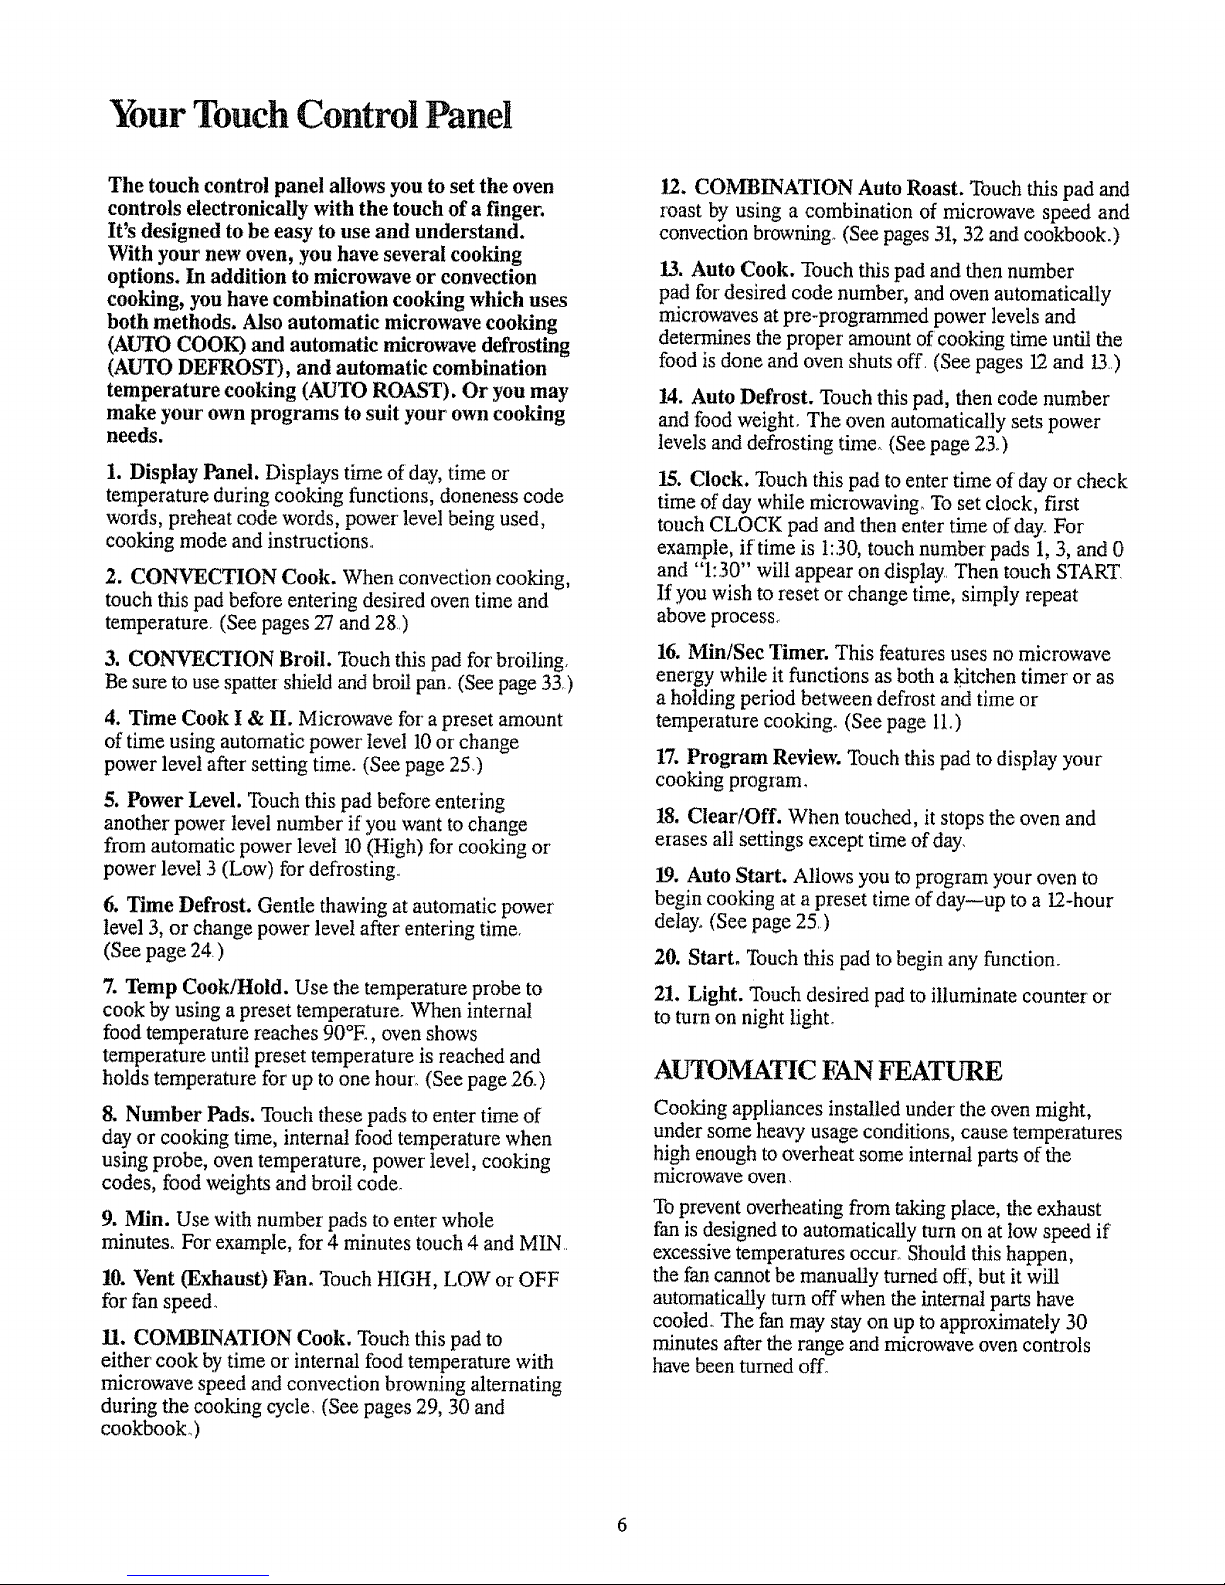
Your Touch Control Panel
The touch control panel allows you to set the oven
controls electronically with the touch of a finger.
It's designed to be easy to use and understand.
With your new oven, you have several cooking
options. In addition to microwave or convection
cooldng, you have combination cooking which uses
both methods. Also automatic microwave cooking
(AUTO COOK) and automatic microwave defrosting
(ALTO DEFROST), and automatic combination
temperature cooking (AUTO ROAST). Or you may
make your own programs to suit your own cooking
needs.
1. Display Panel, Displays time of day, time or
temperature during cooking functions, doneness code
words, preheat code words, power level being used,
cooking mode and instructions
2. CONVECTION Cook. When convection cooking,
touch this pad before entering desired oven time and
temperature. (See pages 27 and 28)
3. CONVECTION Broil. Touch this pad for broiling.
Be sure to use spatter shield and broil pan. (See page 33 )
4. Time Cook I & II. Microwave for a preset amount
of time using automatic power level 10 or change
power level after setting time. (See page 25)
5. Power Level. Touch this pad before entering
another power level number if you want to change
from automatic power level 10 (High) for cooking or
power level 3 (Low) for defrosting
6. Time Defrost. Gentle thawing at automatic power
level 3, or change power level after entering time
(See page 24)
7. Temp Cook/Hold. Use the temperature probe to
cook by using a preset temperature. When internal
food temperature reaches 90°E, oven shows
temperature until preset temperature is reached and
holds temperature for up to one hour_ (See page 26.)
8. Number Pads. Touch these pads to enter time of
day or cooking time, internal food temperature when
using probe, oven temperature, power level, cooking
codes, food weights and broil code.
9. Min. Use with number pads to enter whole
minutes° For example, for 4 minutes touch 4 and MIN
10. Vent (Exhaust) Fan. Touch HIGH, LOW or OFF
for fan speed_
U. COMBINATION Cook. Touch this pad to
either cook by time or internal food temperature with
microwave speed and convection browning alternating
during the cooking cycle_ (See pages 29, 30 and
cookbook°)
12. COMBINATION Auto Roast. Touch this pad and
mast by using a combination of microwave speed and
convection browning_ (See pages 31, 32 and cookbook.)
13. Auto Cook. Touch this pad and then number
pad for desired code number, and oven automatically
microwaves at pre-programmed power levels and
determines the proper amount of cooking time until the
food is done and oven shuts off (See pages 12 and 13..)
14. Auto Defrost. Touch this pad, then code number
and food weight° The oven automatically sets power
levels and defrosting time_ (See page 23°)
15. Clock. Touch this pad to enter time of day or check
time of day while microwaving_ To set clock, first
touch CLOCK pad and then enter time of day. For
example, if time is 1:30, touch number pads 1, 3, and 0
and "1:30" will appear on display Then touch START
If you wish to reset or change time, simply repeat
above process
16. Min/Sec Timer. This features uses no microwave
energy while it functions as both a kitchen timer or as
a holding period between defrost and time or
temperature cooking. (See page 11°)
17. Program Review. Touch this pad to display your
cooking program.
18. Clear/Off. When touched, it stops the oven and
erases all settings except time of day.
19. Auto Start. Allows you to program your oven to
begin cooking at a preset time of day--up to a 12-hour
delay. (See page 25)
20, Start. Touch this pad to begin any function_
21. Light. Touch desired pad to illuminate counter or
to turn on night light,
AUTOMATIC FAN FEATURE
Cooking appliances installed under the oven might,
under some heavy usage conditions, cause temperatures
high enough to overheat some interna! parts of the
microwave oven,
To prevent overheating from taking place, the exhaust
fan is designed to automatically turn on at low speed if
excessive temperatures occur_ Should this happen,
the fan cannot be manually turned off', but it will
automatically turn off when the internal parts have
cooled,. The fan may stay on up to approximately 30
minutes after the range and microwave oven controls
have been turned off_
Page 7

"PROBE" Appears on Display:
e Probe has been forgotten when Combination Auto
Roast or Temp Coo!-dHold are being used.
• Probe is not securely seated in oven wall receptacle,
o Probe remained in wall receptacle and you
programmed a function that doesn't need the probe.
Page 8
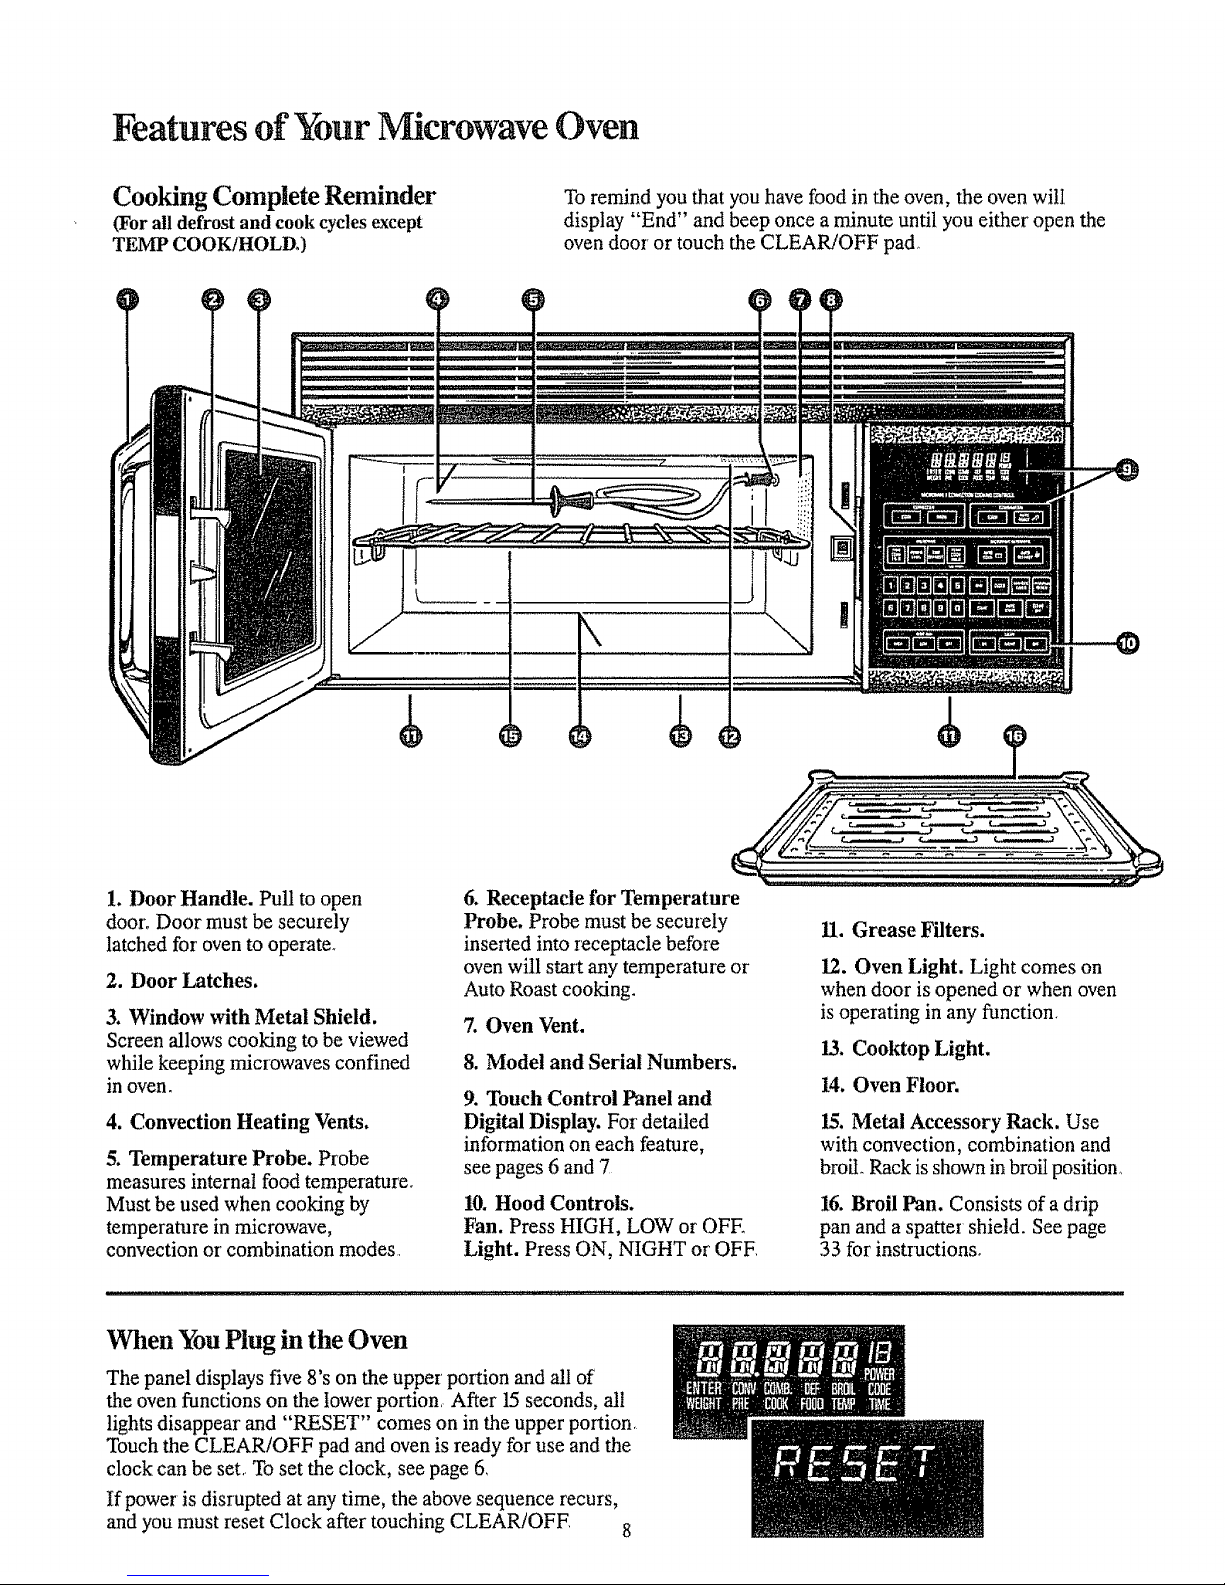
Features of Your MAcrowaveOven
Cooking Complete Reminder
(For all defrost and cook cycles except
TEMP COOK/HOLDo)
To remind you that you have food in the oven, the oven wilI
display "End" and beep once a minute until you either open the
oven door' or touch the CLEAR/OFF pad
1. Door Handle. Pull to open
door° Door must be securely
latched for oven to operate,
2. Door Latches.
3. Window with Metal Shield.
Screen allows cooking to be viewed
while keeping microwaves confined
in oven.
4. Convection Heating Vents.
5. Temperature Probe. Probe
measures internal food temperature_
Must be used when cooking by
temperature in microwave,
convection or combination modes
6. Receptacle for Temperature
Probe, Probe must be secuIely
inselted into receptacle before
oven will sta_ any temperature or
Auto Roast cooking.
7. Oven Vent.
8. Model and Serial Numbers.
9. Touch Control Panel and
Digital Display. For detailed
information on each feature,
see pages 6 and 7
I0. Hood Controls.
Fan. Press HIGH, LOW or OFE
Light. Press ON, NIGHT or OFE
11. Grease Filters.
12. Oven Light. Light comes on
when door is opened or when oven
is operating in any function,
13. Cooktop Light.
14. Oven Floor.
15. Metal Accessory Rack. Use
with convection, combination and
broil° Rack is shown in broil position
16. Broil Pan. Consists of a drip
pan and a spatte_ shield. See page
33 for instructions,
When You Plug in the Oven
The panel displays five 8's on the upper portion and all of
the oven functions on the lower portion, After 15 seconds, all
lights disappear and "RESET" comes on in the upper portion,
Touch the CLEAR/OFF pad and oven is ready for use and the
clock can be set,, To set the clock, see page 6,
If power is disrupted at any time, the above sequence recurs,
and you must reset Clock after touching CLEAR!OFF, 8
Page 9
What YourOven Can Do
Cooking with your new oven
offers a wide variety of food
preparation options. Microwave
cooking uses very short, high
frequency radio waves. The
movement of the microwaves
through the food generates heat
and cooks most foods faster than
conventional methods, while
retaining their natural texture
and moisture. Microwave
cooking heats food directly, not
the cooking utensil or the interior
of the oven. Reheating is easy
and defrosting is particularly
convenient because less time is
spent in food preparation.
Convection cooking constantly
circulates heated air around the food,
creating even browning and sealed-
in flavor by the constant motion of
hot air over the food surfaces,
Your new oven also offers the
option of combination cooking,
using microwave energy along with
convection cooking.. You cook with
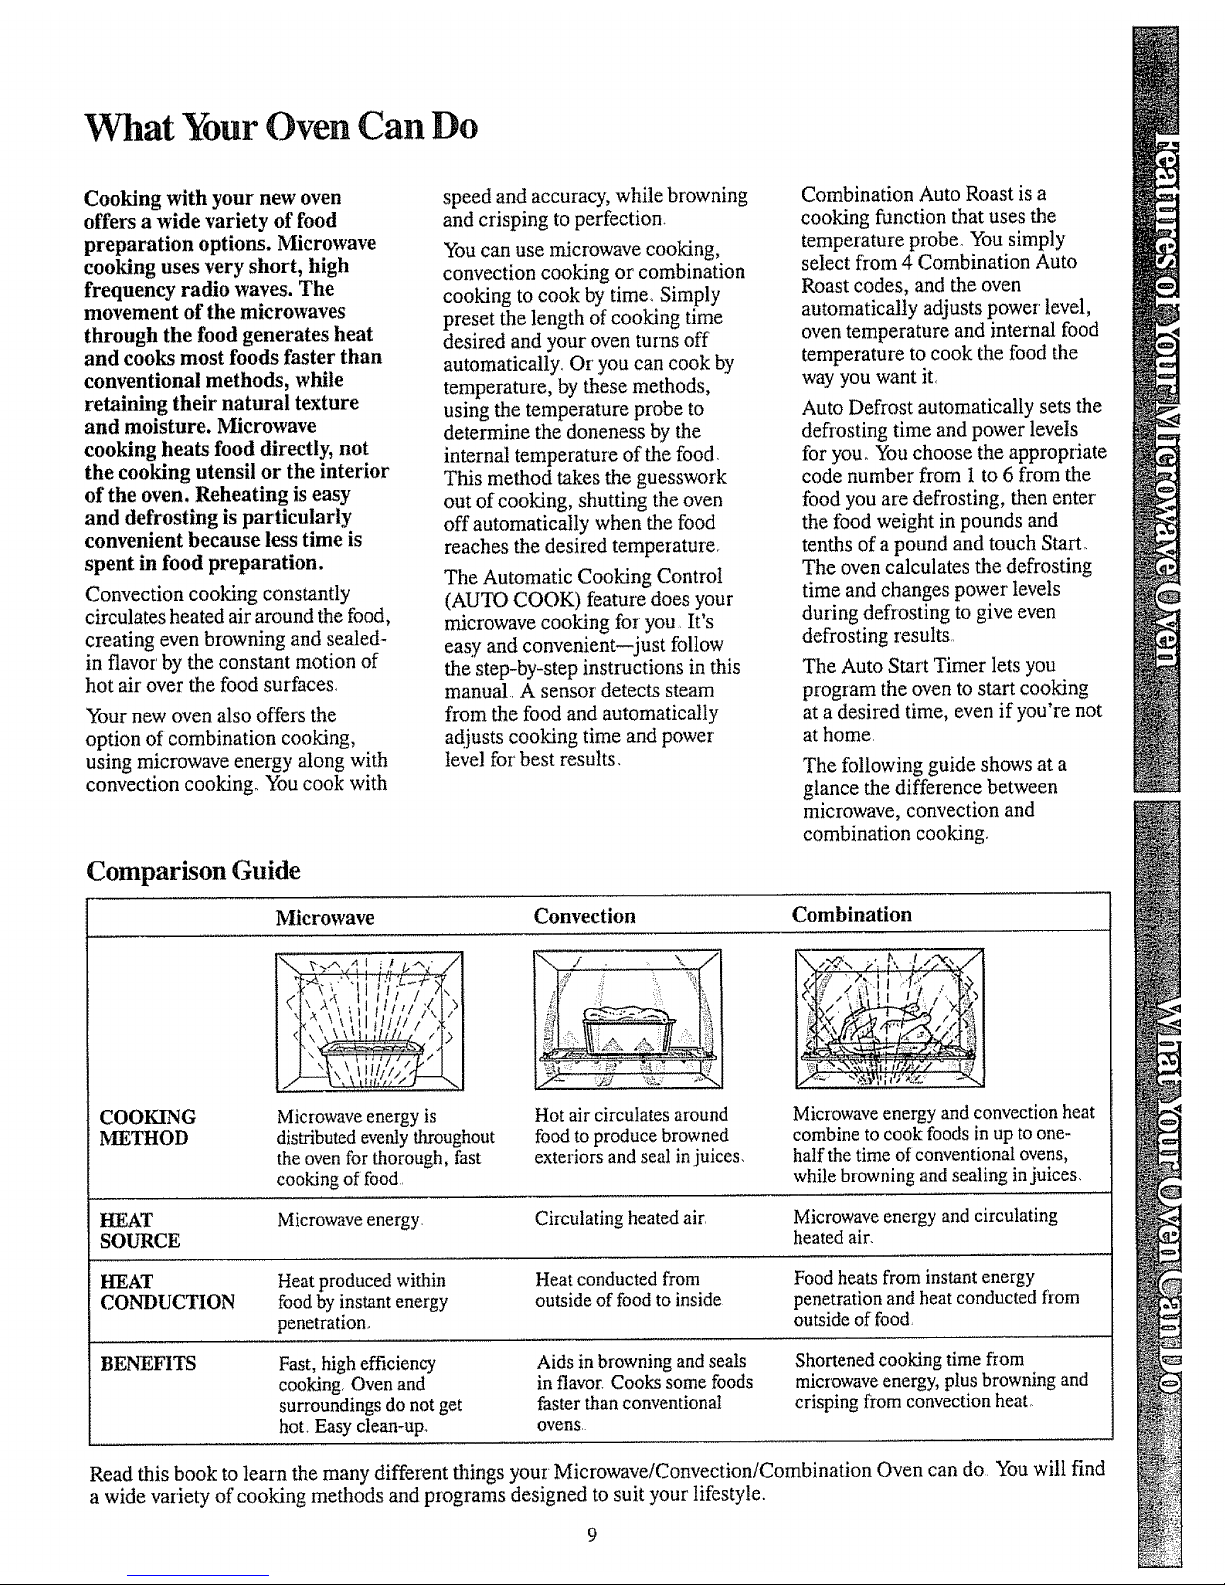
Comparison Guide
speed and accuracy, while browning
and crisping to perfection
You can use microwave cooking,
convection cooking or combination
cooking to cook by time. Simply
preset the length of cooking time
desired and your oven turns off
automatically. Or you can cook by
temperature, by these methods,
using the temperature probe to
determine the doneness by the
internal temperature of the food.
This method takes the guesswork
out of cooking, shutting the oven
off automatically when the food
reaches the desired temperaturer
The Automatic Cooking Control
(AUTO COOK) feature does your
microwave cooking for you,. It's
easy and convenient--just follow
the step-by-step instructions in this
manual.. A sensor detects steam
from the food and automatically
adjusts cooking time and power
level for best results.
Combination Auto Roast is a
cooking function that uses the
temperature probe. You simply
select from 4 Combination Auto
Roast codes, and the oven
automatically adjusts power level,
oven temperature and internal food
temperature to cook the food the
way you want it,
Auto Defrost automatically sets the
defrosting time and power levels
for your You choose the appropriate
code number from I to 6 from the
food you are defrosting, then enter
the food weight in pounds and
tenths of a pound and touch Start_
The oven calculates the defrosting
time and changes power levels
during defrosting to give even
defrosting results,.
The Auto Start Timer lets you
program the oven to start cooking
at a desired time, even if you're not
at home.
The following guide shows at a
glance the difference between
microwave, convection and
combination cooking.
Microwave Convection Combination
COOFdNG
METHOD
HEAT
SOURCE
.... ix, /t :! -'%"
| % _' I!! i / A\
[ ql\ ,d,.,i,ll,/ .,'i_
[ ";_x.\'_!]l ;ll/l/_,_'
[)2a;,12ii,<;':
Microwave energy is
distributed evenly throughout
the oven for thorough, fast
cooking of food,
Microwave energy,
i" ' 7 '), ::t
_L2 A
Hot air circulates around
food to produce browned
exteriors and seal in .juices.
Circulating heated air,
_?._' , b I l"w,.t
Microwave energy and convection heat
combine to cook foods in up to one-
half the time of conventional ovens,
while browning and sealing in juices,
Microwave energy and circulating
heated air.
HEAT
CONDUCTION
BENEFITS
Heat produced within
food by instant energy
penetration,
Fast, high efficiency
cooking, Oven and
surroundings do not get
hot. Easy clean-up_
Heat conducted from
outside of food to inside
Food heats from instant energy
penetration and heat conducted from
outside of food
Aids in browning and seals
in flavor, Cooks some foods
faster than conventional
ovens,
Shortened cooking time from
microwave energy, plus browning and
crisping from convection heat,
Read this book to learn the many different things your Microwave/Convection/Combination Oven can do You wilt find
a wide variety of cooking methods and programs designed to suit your lifestyle.
Page 10
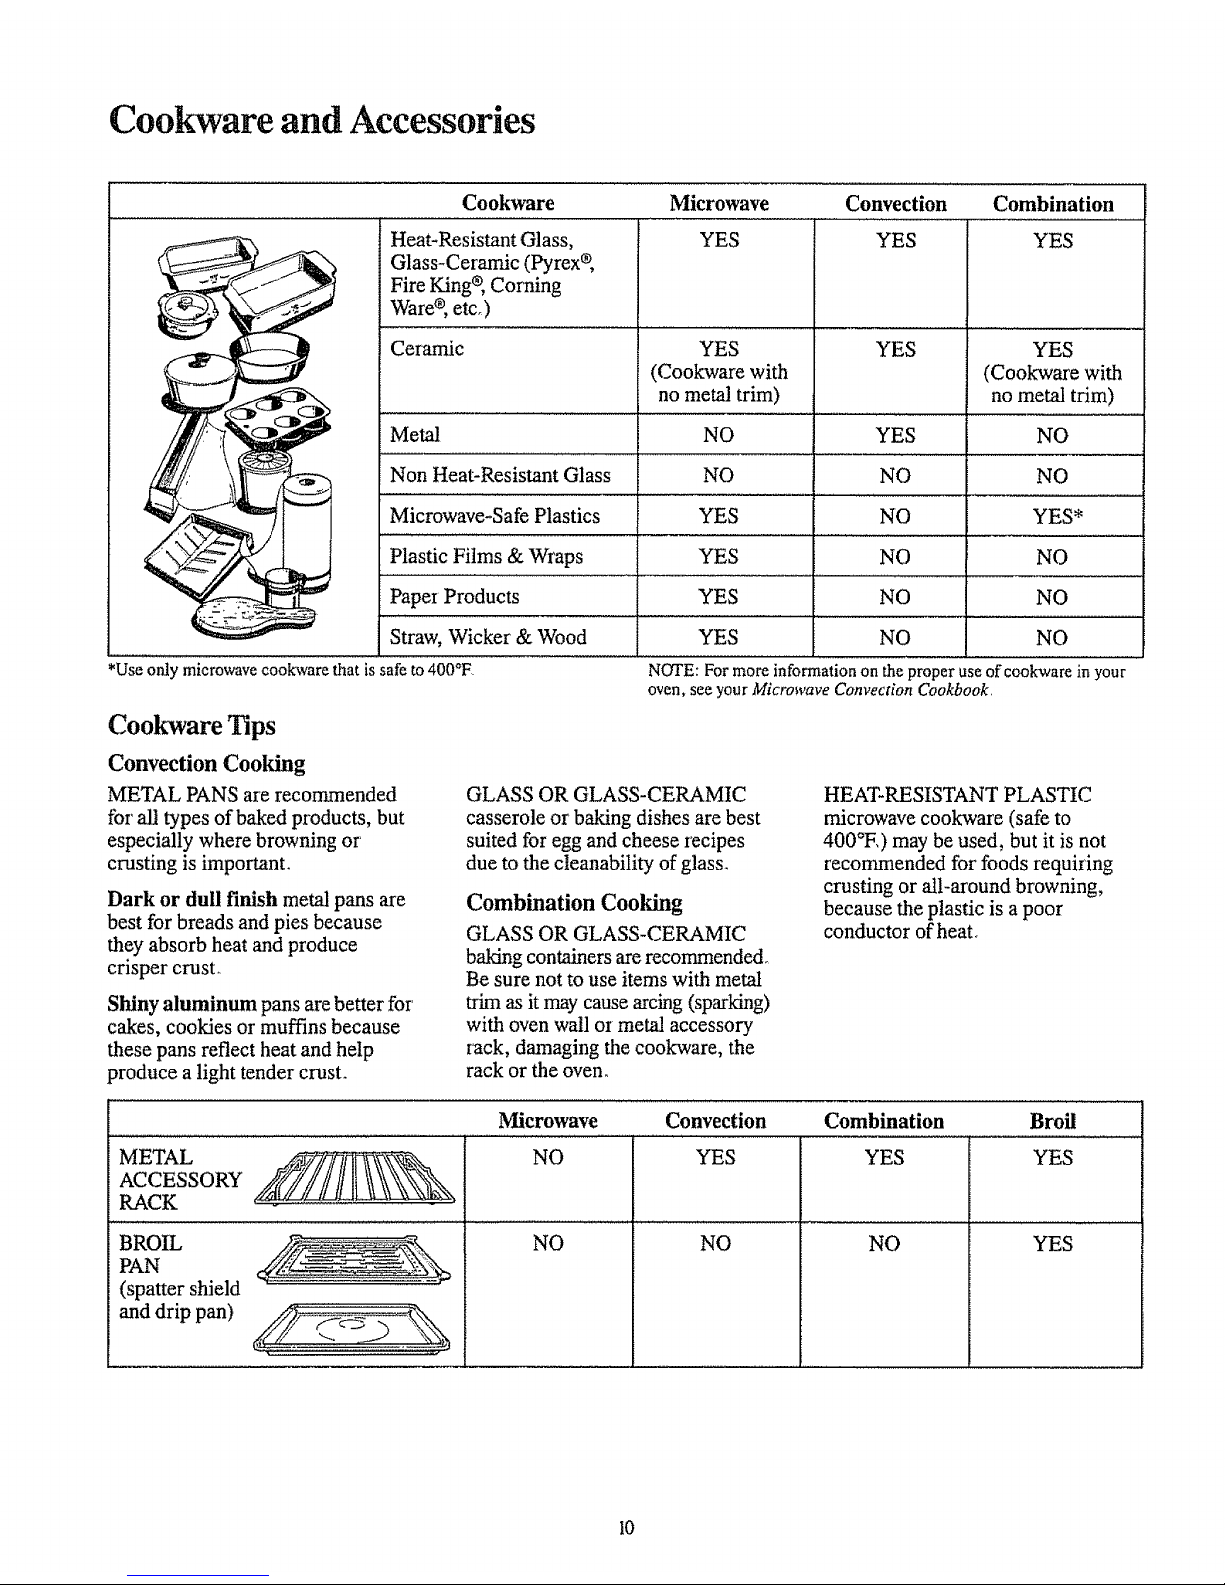
Cookware and Accessories
Heat-Resistant Glass,
Glass-Ceramic (Pyrex _,
Fire K.ing_, Coming
Ware etc )
Cookware Microwave Convection Combination
YES YES YES
Ceramic YES YES YES
(Cookware with (Cookware with
no metal trim) no metal trim)
Metal NO YES NO
Non Heat-Resistant Glass NO NO NO
Microwave-Safe Plastics YES NO YES*
Plastic Films & Wraps YES NO NO
Papei Products YES NO NO
Straw, Wicker & Wood YES NO NO
*Use only microwave cookware that issafe to 400°F
NOTE: For more information on the proper use of cookware in your
oven, see your Microwave Convection Cookbook,
Cookware Tips
Convection Cooking
METAL PANS are recommended
for'all types of baked products, but
especially where browning or
crusting is important.
Dark or dull finish metal pans are
best for breads and pies because
they absorb heat and produce
crisper crust_
Shiny aluminum pans are better for'
cakes, cookies or muffins because
these pans reflect heat and help
produce a light tender crust.
GLASS OR GLASS-CER_AMIC
casserole or baking dishes are best
suited for egg and cheese iecipes
due to the cleanability of glass.
Combination Cooking
GLASS OR GLASS-CERAMIC
baking containers are recommended
Be sure not to use items with metal
trim as it may cause arcing (sparking)
with oven wall or metal accessory
rack, damaging the cookware, the
rack or the oven_
HEAT-RESISTANT PLASTIC
microwave cookware (safe to
400°F,) may be used, but it is not
recommended for foods requiring
crusting or all-around browning,
because the plastic is a poor
conductor of heat_
METAL __
ACCESSORY
RACK - -
BROIL
PAN
(spatter shield
and drip pan)
Microwave Convection
NO YES
NO
NO
Combination Broil
YES YES
NO YES
I0
Page 11

How to Use the Minute/Second Thner
The lVlIN/SEC TIMER has three
timing functions:
e It operates as a minute timer.
• It can be set to delay cooking.
o It can be used as a hold setting
after defrosting.
The MIN/SEC TIMER operates
without microwave energy.
How to Time a 3-Minute
Phone Call
1. Touch MtN/SEC TIMER pad
The display shows ": 0" and
"ENTER TIME" flashes,
2. Touch number pads 3 and MIN
(for 3 minutes and no seconds).
Display shows "3:00" and "TIME"
3. Touch START Display shows
time counting down_
4. When time is up, oven signals,
flashes "End',' and display shows
time of day.
Programming a HOLD
TIME
The Minute/Second Timer can also
be used to program "hold time"
between microwave cooking
functions_ The time can range from
one second to 99 minutes and 99
seconds° A HOLD, or "standing"
time may be found in some of your
own recipes or cookbook.
Programming Delayed
Cooking
To delay cooking up to 99 minutes
and 99 seconds, touch the pad for
the desired cooking function. For
example, touch TIME COOK and
enter cook time,_ Touch MIN/SEC
TIMER and enter number of minutes
to delay cooking. Touch START.
Timer will count down to zero and
cooking will begin° When delaying
a temperature cooking function
which uses the temperature probe,
be sure probe is in food before
pressing START.
How to Defrost, Hold and
Time Cook
Let's say you want to defrost a frozen
casserole for 15 minutes, hold for
10 minutes and then Time Cook for
25 minutes. Here's how to do it:
Step 1: Take casserole from freezer
and place in oven.
Step 2: Touch TIME DEFROST
The display shows ": 0" and
"POWER 3'.' "ENTER DEF
TIME" flashes.
Step 3: Touch pads 1, 5, and MIN
for 15 minutes defrosting time
"15:00" appears on display
Defrosting is automatically set on
power level 3 but can be changed to
any power level from 1 0owest) to
10 (highest) by touching the
POWER LEVEL pad and the
desired power level.
Step 4: Set standing or hold time
by touching MIN/SEC TIMER.
The display shows ": 0" and
"ENTER TIME" flashes.
Step 5: Touch 1, 0 and MIN to hold
for ten minutes "10:00" appears
on display and "TIME" flashes_
Step 6: Touch TIME COOK I & 1I
pad. The display shows ": 0" and
"1 ]' "ENTER COOK TIME"
flashes°
Step 7: Touch 2, 5 and MIN for
twenty-five minutes of cooking
time "COOK TIME',' "25:00"
and "POWER i0" appear
on display.
Step 8: Touch START. "DEF TIME"
and "15:00" counting down show
on display. As each function is
automatically performed oven
display shows instructions entered
and the function.
Step 9: When time is up, the oven
signals and flashes "EndY
II
Using the MINiSEC
TIMER While Running
Another Program
The MIN/SEC TIMER can be used
while another program is running_
Filst set up the other program and
touch START° Then touch the
MIN/SEC TIMER pad° Enter the
amount of time you want by pressing
the number pads, Do not touch
START', the thner will automatically
begin within three seconds.
Note: The MIN/SEC TIMER will
not work while AUTO START,
Combination AUTO ROAST,
AUTO DEFROST or AUTO
COOK are running_
Questions and Answers
Q. What will happen if I
accidentally reverse my defrost,
hold and cook instructions?
A. The oven will automatically
rearrange your' program. Defrosting
will always come first, then hold,
and then the cooking function.
Q. Can I defrost and hold only?
A. Yes Sometimes you may only
want to defrost a food, hold it, and
cook it later, All you need to do is
program in Defrost and amount of
time_ Then program Hold and the
amount of time Be sure to put the
thawed dish in the refrigerator
promptly,
NOTE: Let foods remain at room
temperature only as long as safe_
Times wit1 vary,
Q. I programmed my oven for
a specific defrosting time but it
defrosted longer than necessary.
What happened?
A. When instructions conflict,
the oven carries out the last
insWaction. You may have set the
oven to Defrost for 4 minutes,
Hold/Time for 2 minutes, and then
Defrost for 6 minutes° In this case,
the oven would Defrost for 6 minutes
and Hold/Time for 2 minutes.
Page 12
Automatic Cooking
The Auto Cook feature may be
used to eliminate your need to look
up cooking time in the cookbook or
guess how long to set cooking time
By actually sensing the steam
that escapes as food microwaves,
this feature automatically adjusts
the oven's cooking time to various
types and amounts of food.
Because most cooking containers
must be covered during automatic
cooking, this feature is best with
foods that you want to steam or
retain moisture
Note: [
Use of the metal accessory rack ]
with Automatic Cooking is I
NOT recommended. 1
Foods Recommended
A wide variety of foods including
meats, fish casseroles, vegetables,
leftovers and convenience foods
can be Auto Cooked.
Foods Not Recommended
Foods that must be cooked uncovered,
foods that require constant attention,
foods that require addition of
ingredients during cooking, and
foods calling for a dry look or crisp
surface after cooking should not be
Auto Cooked It is best to Time
Cook them
Foods that microwave best using
the temperatule probe should be
Temp Cooked or Auto Roasted.
Easy to Use
Simply touch three control pads--
AUTO COOK, desired CODE, and
START The word "AUTO" appears
on the display and the sensor is
activated to sense steam from food
Keep Door Closed
Do not open the oven door while
the word '_UTO" is displayed--
steam escaping from the oven can
affect cooking perfoimance_ if the
door is opened, close the door and
touch START immediately.
Automatic Cooking Codes
Automatic cooking codes 1through
8 are designed to give you easy
automatic results with a number
of foods.
Code i, designed for reheating
foods quickly, turns the oven off
automatically as soon as the sensor
detects steam from the foods_
When codes 2 through 7 are
selected, the oven automatically
determines how much more cooking
time is needed after steam is sensed_
Oven signals and switches to TIME
COOK. The word "AUTO" on the
display is replaced by the remaining
cooking time.
Auto Cook recipes and a cooking
control guide can be found on
pages !4 through 21.
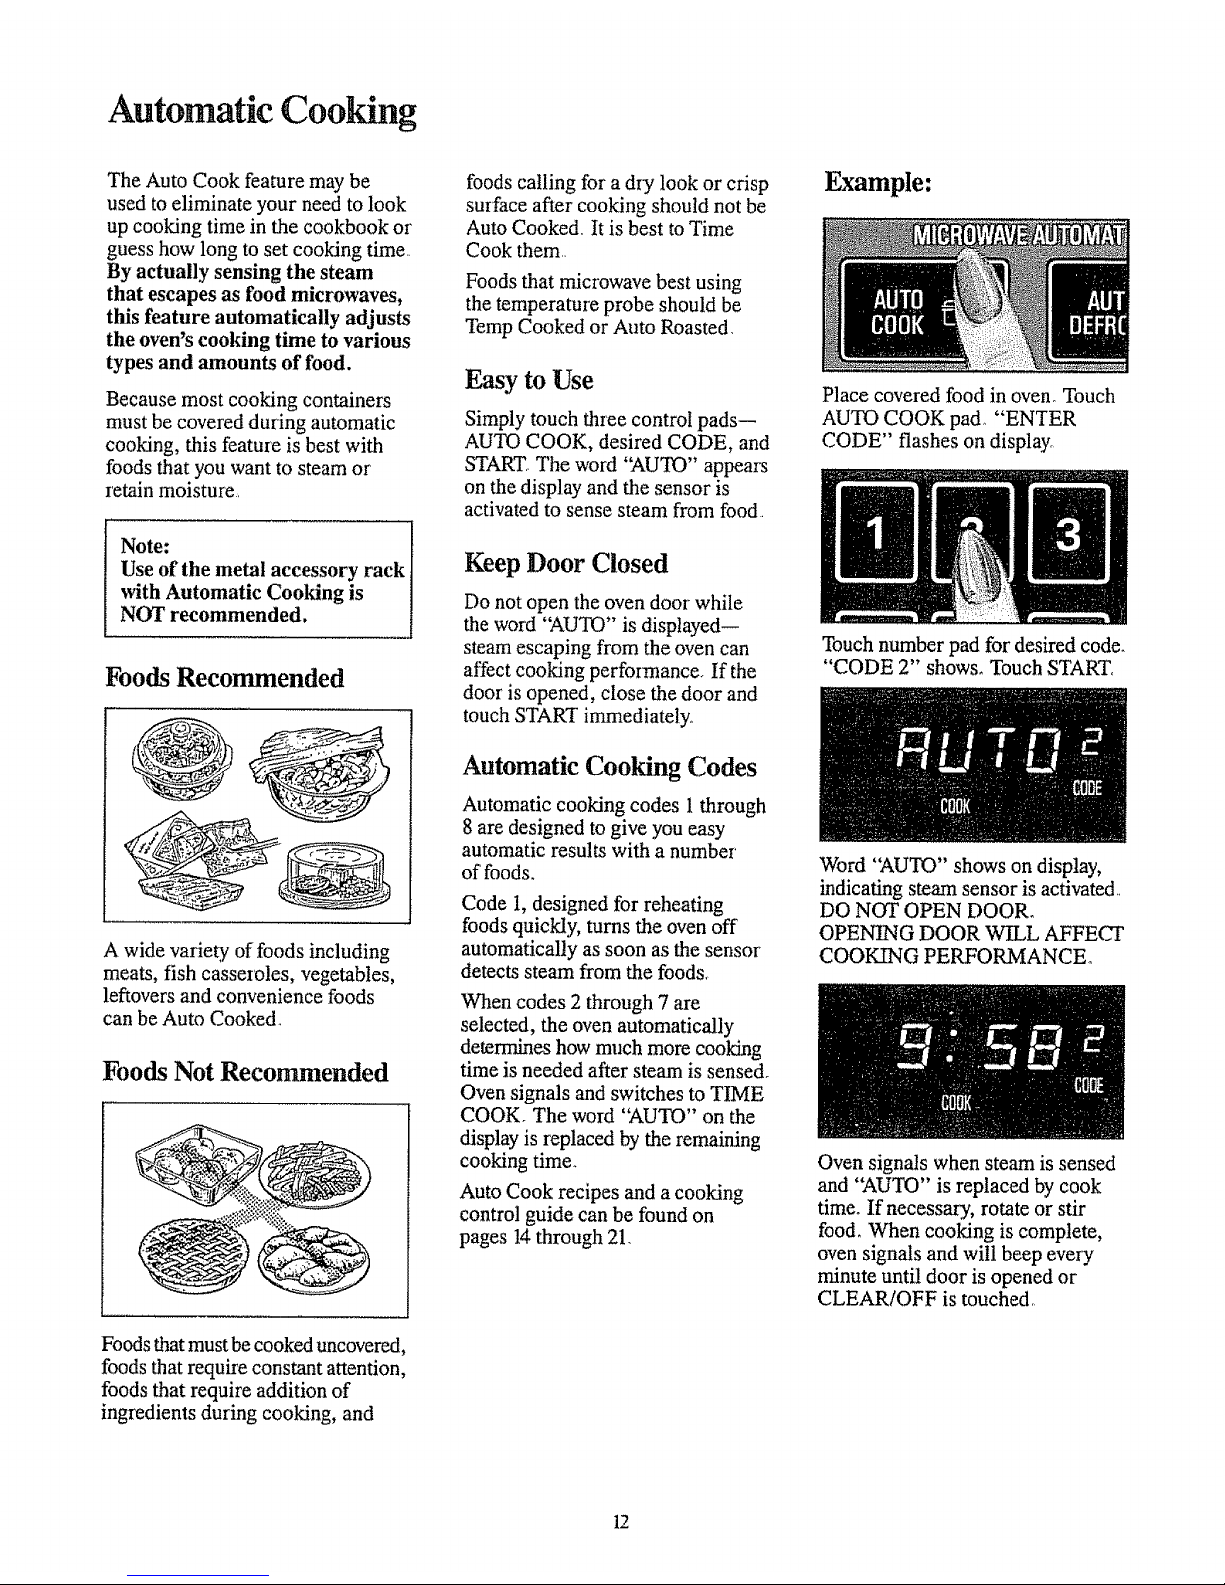
Example:
Place covered food in oven_ Touch
AUTO COOK pad. "ENTER
CODE" flashes on display°
Touch number pad for desired coder
"CODE 2" shows. Touch START,
Word '_,UTO" shows on display,
indicating steam sensor is activated
DO NOT OPEN DOOR.
OPENING DOOR WILL AFFECT
COOFJNG PERFORMANCE°
Oven signals when steam is sensed
and '_UTO" is replaced by cook
time. If necessary, rotate or stir
food. When cooking is complete,
oven signals and will beep every
minute until door is opened or
CLEAR/OFF is touched
12
Page 13

How toAdjust
AUTO COOK Codes
ToSuit YourTaste
By simply adding a t after' any
AUTO COOK code number, you can
set the oven to cook for approximately
20 % less time than the code would
regularly provide.
For example, if CODE 4 cooks your
chicken more done than you like it,
set CODE 41 next time and you'll
get 20 % shorter cooking time,
If you want a longer cooking time
than a code provides, add a 9 after
the code,
For the chicken in the example
above, CODE 49 would provide
approximately 20% longer cooking
time than the regular CODE 4
would provide.
Example:
Touch AUTO COOK pad, "ENTER
CODE" flashes on display,
Touch number pads 4 and i in
that order. "CODE 4" shows on
disptay_
Containers and covers
Appropriate containers and coverings
help assure good cooking results.
* Always use microwave-safe
containers and cover them with
lids, wax paper or plastic wrap.
Wonder if it's microwave-safe? Put
it to the test described on page 3.
* Never use tight-sealing plastic
covers--they can prevent steam
from escaping and cause food to
overcook.
• Match the amount of food to
the size of the container. Fill
containers at least half ful! for best
results,
o Be sure the outside of the
cooking container and the inside
of the microwave oven are dry
before placing food in the oven°
Beads of moisture turning into
steam can mislead the sensor.
o Some foods may require
stirring or rotating after first
signal. See Automatic Cooking
Control Guide and recipes on
the following pages.
Use microwave-safe casseroles or'
bowls for entrees and vegetables.
Cover' with lids that fit. If lids are
not available, use plastic wrap or'
wax paper. Plastic wrap should be
vented to allow for escaping steam.
For frozen foods in metal trays,
remove foil covering and baked
goods, reinsert tray into box and
close ends of box.
Slit plastic pouches 1 inch as
shown above. Break food up after
first signal.
Use oblong or square containers for
chicken or corn on the cob. Plastic
wrap covering should be vented to
allow for escaping steam,
Paper plates--while they may be
used for Time and Temperature
Cooking and Defrosting, do not
use them with automatic cooking.
Use microwave-safe plates or bowls
for reheating. Cover with plastic
wrap or' wax paper.
Touch START. "AUTO" shows on
display. DO NOT OPEN DOOR
until first oven signal, then rotate
dish 1/2 turn if necessary, Close
door and touch START to finish
cooking,.
For frozen entrees in paperboard
trays, remove tray from box but do
not remove film over tray Thick
entrees may take longer to cook--
see guide on page 20.
13
Follow Automatic Cooking Control
Guide setting for casseroles. Cover
casserole meat and vegetables with
sauce. Cool hot ingredients or sauces.,
if they are not cool, use TIME
COOK.
Page 14

Automatic Cooldng Main Dishes
The benefit is automatic setting
and control of eooMng, but just
like conventional microwaving
you must check the food after the
Auto cycle (oven beeps and cook
time begins to count down on
display) and turn, rotate or stir
as recommended.
Meat, Fish & Poultry
For meat loaves use a round
microwave-safe container. Beef
loaf uses Auto Cook code 6, Cover
with plastic wrap and rotate 1/4
turn after oven signals.
-. t, "*/
Whole Chicken, chicken breasts
and pieces, should be placed in a
microwave-safe 8-ino square dish,
2-quart oblong glass baking dish or
3-qt, casserole.. Cover securely
with wax paper or container lid_ If
cooking bag is used for whole
chicken, shield breast bone with
small strip of foil. Rotate dish 1/2
turn when oven signals. Use Auto
Cook code 6.
Pork Chops automatically cook
well in 2-quart oblong glass baking
dish, coveted with vented plastic
wrap. Add barbeque sauce or other
sauce on each chop_ Microwave
using Auto Cook code 8.
Fish fillets should be in single layer
in flat pie plate or oblong dish to fiL
Cover with plastic wrap or container'
lid. Use Auto Cook code 59
Swiss steak should be cut into
serving pieces 1/4 thick and placed
in a 2-quart oblong glass baking
dish. Make sine liquid covers all
meat. Cover with plastic wrap and
rotate 1/4 turn when oven signals.
Use Auto Cook code 7_
Spare ribs should be automatically
cooked in a 2-quart oblong glass
baking dish or 3-qt. casserole_
Make sum liquid covers meat.
Cover with plastic wrap or container
lid.. After oven signals, turn over
and rearrange meats° Use Auto
Cook code 7.
How to Adapt Microwave
Casserole Recipes
Use the following step-by-step
instructions and tips when adapting
your casserole recipes for'
automatic cooking,
1: Select recipes with precooked
ingredients that do not requke
adding ingiedients at different
stages during cooking or iecipes
that require extra attention, stirring
or rotating.
2: Use miclowave-safe containers
that are appropriate in size to the
food amount., Use 3-qL containers
or smallen
3: For saucy casseroles, cover
containei with lid or plastic wrap.
(No vents.) For cheese or crumb-
topped casseroles, remove cover
after oven signals and add topping,
then continue cooking uncovered.
4: Allow precooked ingredients or
hot sauces to cool slightly before
adding other ingredients.
5: Meats and vegetables should be
submerged in liquid.
6: After oven signals, rotate dish
and stir, covering all ingredients
with liquid.
14
Page 15

Meat or Main Dish Recipes
Mexican Meatball
Casserole
Auto Cook Code 6
Approx. Cooking Time--35 min.
Makes 6 to 8 Servings
I lb. ground chuck
1/2 cup dry bread crumbs
1/8 teaspoon pepper
1/2 teaspoon salt
i teaspoon chili powder
3 tablespoons dry minced onions
1 egg
3 tablespoons ketchup
1/2 cup instant rice
1 can (15I/2 oz.) kidney beans,
undrained
1 can (141/2oz.) tomatoes,
chopped and undrained
1 tablespoon chili powder
In large mixing bowl, place meat,
bread crambs, pepper, salt, chili
powder, onion, egg and ketchup.
Mix well and form into 12 balts_
Arrange balls in a circle in 2-qt.
casserole. Set aside
In small mixing bowl, place rice,
beans, tomatoes and chili powder.
Mix well and pour in center of
casserole and over meatballs.
Cover with lid. Microwave on Auto
Cook code 6_When oven signals,
stir' casserole,
Sweet Tart Franks
Auto Cook Code 2
Approx. Cooking Time--13 rain.
Makes about 80 hors d'oeuvres
1 jar (10 oz.) currant jelly
1 jar (6 oz.) prepared mustard
2 lbs. frankfurters, cut into
1-in. pieces
in 3-qto casserole, stir together jelly
and mustard until well blended.
Add frankfurters, stirring to coat
each piece. Cover with lido
Microwave on Auto Cook code 2,
Chicken Teriyaki
Auto Cook Code 8
Approx. Cooking Time--38 min.
Makes 4 Servings
1/4 cup soy sauce
1/3 cup honey
1/3 cup orange juice
1 whole chicken (about 3 lbs.)
1 tablespoon water
2 tablespoons cornstarch
In small cooking bag, mix soy
sauce, honey and orange juice. Add
chicken to bag and tie with plastic
tie, Turn chicken on its side in
12 x 8 x 2-in. dish Marinate 1
hour on each side,. Place bird breast
side up in dish_ Slash bag near
c!osure. Microwave on Auto Cook
code 8. When oven signals, remove
chicken and prepare Teriyaki
sauce, In 1-pt glass measuring cup,
stir together' water and cornstarch.
Cut off one corner of cooking bag
with scissors and drain juices into
cup. Microwave at High (10) 1
minute. Remove chicken from bag
to serving platter. Pour sauce over
chicken just before serving.
Classic Ham Loaf
Auto Cook Code 8
Approx. Cooking Time--38 min.
Makes 6 Servings
I lb. ground cooked ham
1/2 lb. ground fresh pork
1/2 cup soft bread crumbs
1/2 cup water
2 tablespoons instant minced
onion
1/4 teaspoon pepper
Mix ground ham and pork
thoroughly with crumbs, water,
onion and pepper, Mold into fiat
loaf in 9-in, pie plate,, Cover with
plastic wrap_ Microwave on Auto
Cook code 8
Chicken and Rice
Auto Cook Code 4
Approx. Cooking Time--25 min.
Makes 6 Servings
I can (10% oz.) condensed
cream of mushroom soup
1-1/4 cups milk (1 soup can full)
3/4 cup instant rice
I can (4 oz.) mushrooms,
stems and pieces, drained
I pkg. (P/2 oz.) dry onion
soup mix
I cut up chicken (about 3 lbs.)
In small mixing bowl, mix soup
and milk; reserve 1/2 cup of' the
mixture. Blend remaining soup
mixture, rice, mushrooms and half
of the onion soup mix_ Pour into a
12 x 8 x 2-in. glass dish.
Place chicken pieces on rice
mixture, arranging with meatiest
pieces to outside of dish. Pour
reserved soup mixture over chicken
and sprinkle with remaining dry
soup mix, Cover with wax paper
and tuck securely under' dish.
Microwave on Auto Cook code 4
Swiss Steak
Auto Cook Code 7
Approx. Cooking Time--55 min.
Makes 6 Servings
1-1/2 lbs. round steak, 1/2-in.
thick, tenderized or
pounded with meat mallet
1/4 cup flour
1-1/2 teaspoons salt
1/8 teaspoon pepper
I medium onion, sliced thin
1 can (141A oz.) tomatoes
Cut meat in 6 pieces and coat with
mixture of flour, salt and pepper,
Place in 2-qL oblong glass baking
dish, Cover with onion,, Break up
tomatoes with fork and pour over
top,, Cover with wax paper,
Microwave on Auto Cook code Z
15
Page 16

Automatic Cooking Vegetables
Fresh or Canned Vegetables
Whole or large halves of
vegetables, such as cauliflower or
squash, use code 4, For potatoes,
use Auto Cook code 6. Match
size of container to quantity of
vegetables. Cover with lid or
plastic wrap, Some vegetables may
require stirring or"rotating when
oven signals,
Vegetable spears or pieces
require 1/4 to 1/2 cup of water_
Salt vegetables after cooking or
put salt in the water before adding
vegetables. Use appropriate size
covered container. Stir after oven
signals. Use Auto Cook code 4.
Precooked!canned vegetables
should be placed in round
container similar in size to amount
being cooked (at least half fullL
Cover with lid or plastic wrap. Use
Auto Cook code 2.
Frozen Vegetables
Block or loose pieces of frozen
vegetables should be placed in
suitable size container (at least half
flail). Add 2 tablespoons water.
Cover with lid or plastic wiap. Stir
after oven signals. Use Auto Cook
code 2..
Pouches of frozen vegetables
should be slit !" in center. Place
pouch on microwave-safe plate.
Use Auto Cook code 3.. After oven
signals, reaI_ange vegetables
moving center portion to outside
edge of pouch.
Alternately, frozen vegetables in
pouches can be slit with an "X"
shaped slit and placed in glass
container with "X" downward,
After cooking, pick up pouch and
empty food into dish through
opening,
t6
Page 17

Vegetable Recipes
Stir Fry Vegetables
Auto Cook Code 31
Approx. Cooking Time--15-18 min.
Makes 4 Servings
I tablespoon oil
I tablespoon soft butter
3 medium onions, quartered
1 small green pepper,
cut in 1/4-in. wide strips
2 cups thinly-sliced cabbage
2/3 cup carrots, sliced diagonally
1/4 cup (1 bunch) sliced green
onions
I cup broccoli flowerets
2 stalks celery, sliced
diagonally
Toss vegetables with oil and butter
in 3-qt.. microwave-safe casserole.
Cover' with tido Microwave on Auto
Cook code 31, stirring well when
oven signals and time remaining
appears on display. Serve
immediately.
Summer Garden Stew
Auto Cook Code 6
Approx. Cooking Time--40 min.
Makes 6 to 8 Servings
1 medium zucchini, cubed
2 large potatoes, peeled and
cubed
2 large carrots, coarsely grated
1 small onion, cut in pieces
1/4 small head of cabbage, sliced
I can (103A oz.) cream of
mushroom soup
1 block (8 oz.) pasteurized
processed cheese, cubed
1 can (4 oz.) mushroom pieces
1/2 pound smoked sausage, sliced
in 1-inch pieces
In a 3-qt,, casserole dish, mix all
ingredients together until well
blended, Cover° Microwave on
Auto Cook code 6, Stir well when
oven signals,,
Eggplant Italiano
Auto Cook Code 5
Approx. Cooking Thne--20-25 n-tin.
Makes 4 to 6 Servings
I medium eggplant
2 cans (8 oz. each) tomato
sauce
I to 2 teaspoons oregano
1/2 cup shredded sharp
cheddar cheese
1 pkg. (6 oz.) Mozzarella
cheese slices
Peel eggplant; slice 1/8-in_ thick.
Spread 2 tablespoons tomato sauce
in bottom of 2-qt.. casserole. Layer
half of eggplant, 1 can tomato
sauce, half of oregano and half of
shredded cheese, Repeat layers..
Cover. Microwave on Auto Cook
code 5o Add Mozzarella cheese
and microwave at High (t0) 1 to 2
minutes, until cheese has melted.
Corn Pudding
Auto Cook Code 3
Approx. Cooking Time--14 min.
Makes 4 Servings
1 egg
1/2 cup milk
1 tablespoon sugar
1 can (16 oz.) cream-style corn
3/4 cup crushed crackers
2 tablespoon butter, cut
in pieces
paprika
Place egg in 1V2-qt. casserole and
beat well with fork Stir in milk,
sugaL corn, crackers and butter.
Cover, Microwave on Auto Cook
code 3_When done, center will be
just barely set. Sprinkle with
paprika before serving.
Cheesy Broccoli
Auto Cook Code 3
Approx. Cooking Time--25 min.
Makes 4-6 Servings
1 pkg. (10 oz.) frozen
chopped broccoli, defrosted
I cup instant rice
1 can (103A oz.) condensed
cream of chicken soup
1 cup milk
1jar (8 oz.) processed cheese
spread
1/4 teaspoon salt
1/8 teaspoon pepper
1/4 cup onion, chopped
1/2 cup celery, chopped
In a 2-qL casserole, combine
broccoli, rice, chicken soup, milk,
cheese spread, salt, pepper, onion
and celery° Mix well. Cover with
lid. Microwave on Auto Cook code
3. Let stand 5 minutes, covered,
before serving.
Country Style "x_llow Squash
Auto Cook Code 5
Approx. Cooking Time--29 min.
Makes 4 to 6 Servings
1 teaspoon salt
2 pounds yellow squash, diced
1/4 cup onion, chopped
1/4 cup butter, melted
1/4 teaspoon pepper
1/4 teaspoon basil
3 slices fresh bread, cubed
1/2 cup shredded cheddar cheese
I cup sour cream
8 strips crisply cooked,
crumbled bacon
In 2-qt. glass dish, mix together all
ingredients; using 1/2 of crumbled
bacon. Cover. Microwave on Auto
Cook code 5. Stir when oven
signals and sprinkle top with
remaining crumbled bacon,
17
Page 18

Automatic Cooking Fruits and Desserts
Fruits
Pineapple Casserole is a tangy
dessert or meat accompaniment.
In 2-quart oblong glass baking dish
spread 2 cans (20 oz. ea.) drained
pineapple chunks, 3/4 cup sugar
and I/2 cup flour. Cover and
microwave on Auto Cook code 2.
When oven signals and time
remaining appears on display,
remove covering and top with
mixture of 2 cups buttery-flavored
cracker crumbs and 1/2 cup melted
butter Do not recover.. Touch
"START" and finish cooking°
Baked Apples/Pears automatically
cook well using Auto Cook code 2,
Match number of apples or pears to
size of microwave-safe covered
containei:
Stewed Fruit and Fruit Compotes
should be stirred welt before
microwaving, especially if sugar is
added_ Cover; use Auto Cook code
4 and stir once or twice after oven
signals and time appears on display
Touch "ST,a_T '' and finish cooking,
Desserts & Breads
After preparing the ingredients for
the individual recipe as shown
below the pictures follow these
steps for cooking,
Y
Nut Topped Cakes are easy to
cook automatically. Grease bottom
and sides of microwave-safe fluted
cake container and sprinkle bottom
evenly with 1/3 cup finely chopped
nuts or coconut. Carefully pour
batter from one box (2-layer size)
cake mix over nuts, cover with wax
paper. Microwave on Auto Cook
code 69. When oven signals, rotate
dish 1/2 turn. Let stand 15 minutes
before inverting to coo!.
Step 1: Cover with plastic wrap
and use Auto Cook code 3.
Step 2: When oven signals and
time remaining appears on display,
rotate dish 1/4 turn.
Caramel Biscuit Ring uses Auto
Cook code 3. Spread 1/4 cup
melted butter and 1/2 cup brown
sugar in 8-in. round glass dish°
Sprinkle with cinnamon and 1/2
cup chopped nuts if desired_
Arrange 1 can (10 ozj refrigerated
biscuits around edges and place
drinking glass, open end up, in
center. See steps above for
automatic cooking_
Step 3: When cooking is finished,
turn out (upside down) the Nut
Cake and CornbIead. Invert
Caramel Biscuit Ring and let dish
stand over ring a few minutes
before serving.
Bacon and Cheese Topped
Cornbread: Distribute 1/2 cup
chopped crisp fried bacon and 1
tablespoon Parmesan cheese in
greased 8-in_ round glass dish.
Carefully pour batter from 1 pkg.
(8-1/2 ozj cornbread mix over
above ingredients. See steps above
for automatic cooking, Remove
covering after signal. Refer to steps
1-3 above for automatic cooking.
18
Page 19

Dessert Recipes
Chocolate Chip Bars
Auto Cook Code 6
Approx. Cooking Timem9 min.
Makes 24 bars
1/2 cup butter, melted
3/4 cup light brown sugar,
firmly packed
2 eggs, beaten
3/4 teaspoon vanilla
1/4 teaspoon almond extract
3/4 cup walnuts, chopped
I cup sembsweet chocolate
chips
314 cup all-purpose flour
1 teaspoon baking powder
powdered sugar
In medium mixing bowl, combine
butter, brown sugar', eggs, vanilla
and almond extract_ Stir until
blended., Add walnuts, chocolate
chips, flour and bakSng powder_
Mix well. Pour batter into 8-in.
square glass baking dish. Cover
with plastic wrap and Microwave
on Auto Cook code 6.
Mexican Bread Pudding
Auto Cook Code 59
Approx. Cooking Time--15 rain.
Makes about 6 servings
4 cups bread cubes, lightly
packed into cup
1/2 cup brown sugar
112 teaspoon cinnamon
1/4 teaspoon salt
1/2 cup raisins
1/4 cup chopped walnuts
1/4 cup slivered almonds
1/4 cup Jack cheese, cubed
1/2 chopped apple (314 to 1 cup)
1-3/4 cups milk
1/4 cup butter
2 eggs, beaten
Spread bread cubes evenly in
8-inch round dish Mix sugar;
cinnamon, salt, raisins, walnuts,
almonds, cheese and apple
together. Sprinkle evenly over
bread cubes..
Measure milk into 1-qt. measuring
cup° Add butter, Microwave at
High (10) 4 minutes, until butter is
melted° Rapidly stir in eggs with a
fork and mix well, pour over bread
n'fixture. Cover with wax paper.
Microwave on Auto Cook code 59.
Cherry Cobbler
Auto Cook Code 3
Approx. Cooking Time--14 min.
Makes 6 to 8 Servings
1 can (20-22 oz.) prepared
cherry pie filling
2 cups dry yellow or white
cake mix (1 pkg. [9 oz.] or
1/2 pkg. [17oz.])
1/4 cup melted butter
1/2 cup coarsely chopped nuts
1 teaspoon ground cinnamon
In 8-ira square dish, spread pie
fi!ling,.
In small bowl, mix together' cake
mix, butter, nuts, and cinnamon
until crumbly. Sprinkle evenly
over cherries or in three rows so
cherries are visible, Cover with
plastic wrap.
Microwave on Auto Cook code 3
rotating dish 1/4 turn and removing
plastic wiap when oven signals and
remaining time appears on display.
touch "START" and continue
cooking.
Streuseled Apples
Auto Cook Code 2
Approx. Cooking Time--9 min.
Makes 6 to 8 Servings
6 cups sliced, peeled apples
3/4 cup brown sugar
1/2 cup all-purpose flour
1/3 cup brown sugar
1/3 cup quick-cooking oats
1/4 cup butter
1/2 teaspoon cinnamon
In 8-inch square dish place apples
and 3/4 cup sugar.
With pastry blender mix flour,
1/3 cup sugar, oats, butter and
cinnamon until crumbly° Sprinkle
over top of apples. Cover with
plastic wrap Microwave on Auto
Cook code 2
19
Pineapple Upside
Down Cake
Auto Cook Code 69
Approx. Cooking Time--8 min.
Makes I (8-in. round) Cake
114 cup butter
1/3 cup brown sugar (packed)
1 can (8-1/4 oz.) pineapple
slices
4 maraschino or candied
cherries, cut in half
3/4 cup all-purpose flour
1/2 cup sugar
1-1/2 teaspoons baking powder
1/4 teaspoon salt
1/4 cup soft shortening
I egg
1/3 cup liquid from pineapple
3/4 teaspoon vanilla extract
In 8-in. round dish place butter.
Microwave at High (10) 3/4 to 1
minute until melted. Sprinkle sugar
over butter. Drain pineapple (save
liquid) on paper' towels and arrange
in dish. Decorate with cherries.
Place a 2" diameter drinking glass
(4" tall) open side up in center of
dish_*
In small mixer bowl place flour;
sugar, baking powder, salt,
shortening, egg, liquid and vanilla.
Beat 3 minutes on lowest mixer
speed, scraping bowl constantly
first I/2 minute_ Carefully spread
batter over fruit in dish° Cover with
plastic wrap--no vent.. Microwave
on Auto Cook code 69_ Rotate I/4
turn and remove wrap when oven
signals and time remaining appears
on display° Touch "START" and
continue cooking°
*Tip: Use a small drinking glass
like the _.pe you buy containing
cheese spread_.
Page 20

Automatic Cooking Control Guide
o Do not open oven door during
Auto cycle, May affect cooking
performance, After beeping signal
and time appears on display, stir or
rotate food°
o Match the amount of the food
to the size of the container_ Fill
containers at least 1/2 flail,
o Add 1/4-1/2 cup water to fresh
vegetables_ Stir or turn over
vegetables and meats after first
beeping signal°
"Use microwave-safe plates or
containers° DO NOT USE PAPER
PLATES with Automatic Cooking.
*'Be sure the exterior of the
cooking container and interior
of' microwave oven are dr/.
o Stir or rotate after oven signals
and time appears on display,
NOTE: Oven will not accept "Auto Cook" code if the oven is hot. If the word "Hot" appears, you must C0o! the I
i
oven before using Auto Cook or you may choose to use time or temperature microwave cooking.
I
Approximate
Time Comments
"Auto Cook"
Food Code Container
............ i .... i
Reheating Food:
Canned Foods
RoomTemp or thin (small
amounts at refrig temp )
Refrig temp or thick (large
amounts at room temp.)
De!l Foods
Entrees
Frozen 5
(under I" deep)
Leftovers 2
t
TV Dinner (I0-I2 oz ) 5
1 Microwave-safe container
matched to size of food
2 Microwave-safe container
matched to size of food.
t Microwave-safe container
matched to size of food
Cook in container
(see comments)
Microwave-safe container
matched to size of food.
Cook in container
(see comments)
Cooking:
Casseroles
Precooked ingredients 4
Chicken
Breasts (4) 6 t7-25 rain
Pieces
Whole (3 Ibs )
3-4 rain/cup Cover with plastic wrap or lid to dish
5 rain/cup 2 or more servings are considered large amounts
Cover with plastic wrap or lid.
Cover with piastic wrap or 1idto dish
8-10 win Cook in own container, or for quicker cooking, in glass
container NOTE: If entree is in aluminum pan, remove
from box, remove lid and put hack in original closed
box If entree is in paperboard container, remove from
box and microwave with original pIastic covering
2-4 rain/cup Use bowl with plastic wrap or cover plate with
microwave-safe plastic dome
9-tl rain After completion of the cooking cycte, it may be
necessary to stir dense foods, such as potatoes, and
Microwave COOK on High (10) an additional I to 2
minutes See also Frozen Entree Comments
2-qt. casserole with lid or 25-35 min Make sure liquid covers all ingredients When oven
cover with plastic wrap. signals, stir well.
2-qt oblong glass baking
dish. Cover with plastic wrap_
NOTE: Make sure meat
doesn't touch covering.
2-qt. oblong glass baking
dish. Cover with plastic wrap.
NOTE: Make sure meat
doesn't touch coveting
2-qt. oblong glass baking
dish or cooking bag Cover
with 2 pieces of overlapping
plastic wrap.
2-4min/piece
30-36 min
Fish
Fillets (I lb ), Defrosted 59 2-qL oblong glass baking 8-!2 rain
dish Cover with plastic
wrap..
No additional liquid needed When oven signals, rotate
i/2 turn Note the preference control l is used with
breasts to decrease cooking time for best results
No additional liquid needed. When oven signals, rotate
I/2 mrn
Tie wings and [egs and place on trivet If breast bone
seems prominent, a I-inch strip of foil may be placed
over bone to prevent splitting of wrap Rotate 112turn
when oven signals.
Baste with butter and lemon juice
2O
Page 21

"Auto Cook" Approximate
Food Code Container' Time Comments
Fruit
Baked Apples (4) 2 2 qt casserole with lid 8-10rain Core apples No water needed
Baked Pears (4) 2 2 qt. casserole with lid, 8-10min. No water needed,
" .............................. i ....
Hamburger"
Casserole, Convenience 6 2 qt. glass dish with lid 13-18rain
Meat Loaf (PA lb)
Patties (4-5)
Pork
Sausage Patties
(1/2" thick--4)
Chops
(3/4-1" thick)
Spareribs
(up to 3 lb )
6
4
4
8
Glass pie plate Cover with
plastic wrap
8" square dish
8" glass square dish
2-qt oblong glass baking
dish Cover with plastic
wrap and vent
3 qt, oblong glass baking
dish Cover tightly with
plastic wrap
40-45 rain
9-I0 min Cover with plastic wrap
6-8 min
20-25 rain
lhr 30rain to
! hr 45 min,
Precook ground beef Drain, Make sure liquid covers
all ingredients When oven signals, stir wet! and rotate
1/4 turn
When oven signals, rotate 1/4 turn
Cover with plastic wrap,
Baste with ! tablespoon barbecue sauce per chop,
Meat must be covered with liquid When oven signals,
rearrange meat, making sure it is submerged in liquid
It may be necessary to rearrange another time during
final cooking
Seafood
Pieces 5 IV: qt glass dish 7-9 rain Cover with fidtodish
(1lb. shrimp or scallops)
Swiss Steak
(Ilk lb, round steak) 7 2-qt oblong glass baking 50-55 rain Cut into pieces, Make sure liquid covers all meat
dish, Cover with plastic wrap, When oven signals, turn over and rearrange meat.
Vegetables
Fresh
Artichokes
(up to 4 reed )
Carrots (t lb. sliced)
Cauliflower (1 reed head)
Asparagus (t tb cut spears)
Brussels Sprouts (t lb. )
Potatoes, Baked*
2-4 (6-8 oz each)
Frozen Block (I0 oz.)
Broccoli
Brussels Sprouts
Leaf Spinach
Mixed Vegetables
Frozen Pouch
Baby Limas
Corn
P_as
Spinach
4
4
4
4
6
2
2
2
2
2 qt casserole with lid
2 qt glass dish with lid
2-qt glass dish with lid.
2-qt oblong glass baking
dish, Cover with plastic wrap,
1_hqt, glass dish with lid,
8-in square glass dish
Cover with plastic wrap
Pk qt glass dish with lid
PAqt, glass dish with lid
t*Aqt glass dish with lid
Pk qt glass dish with lid
lay pouch in microwave-
safe dish No cover needed
Lay pouch in microwave-
safedish No coverneeded,
lay pouch in microwave-
safe dish No cover needed
Lay pouch inmicrowave-
safe dish No cover needed
12-15min
t0-I5 men
12-15rain,
7-10rain
11min
20-25 rain
8-10rain
8-I0min
8-I0rain
8-10rain
6-9 rain
10-12rain,
6-9 rain
6-9 rain
Place artichokes in dish stem side down, Add I/4 cup
water Rotate dish 1/2 turn after oven signals
Add t/2 cup water When oven signals, stir well
No water needed Start cooking stem side down
Add 1/4cup water, When oven signals, rotate 1/4 turn
Add !14cup water. When oven signals, rotate I/4 turn,
Prick potatoes with fork When oven signals, rotate t12
turn NOTE: Watch hot dish and steam!
Add 2 tablespoons water When oven signals, stir well
Add 2 tablespoons water When oven signals, stir well
Add 2 tablespoons water When oven signals, stir well
Add 2 tablespoons water, When oven signals, stir weft
Make a 1" slit in pouch When oven signals, break up
frozen center, and rotate 112turn NOTE: Watch for
hot steam
Make a 1°'slit in pouch, When oven signals, break up
frozen center, and rotate 1/2 turn_ NOTE: Watch for
hot steam
Make a l" slit in pouch When oven signals, break up
frozen center, and rotate 1/2 turn, NOTE: Watch for
hot steam
Make a i" slit in pouch, When oven signals, break up
frozen center, and rotate 112turn, NOTE: Watch for
hot steam.
*Excessively dry potatoes may not release enough moisture to activate sensor Be sure potatoes are fresh and not old and dried-out
If after completion of Auto Cook cycle food needs additional warming,
simply re-cover food and use Auto Cook code 1.
21
Page 22

Automatic Cookhng (continued)
Questions & Answers
Q. Why does my oven automatically
cut off after the Auto cycle when
using Auto Cook Control Code 1
when it does not for other settings?
A. When using Code 1, there is no
second phase of minutes counting
down. All the cooking is completed
in the first phase during which
'%_U'ID" is displayed°
Q. If my food is not completely
cooked after using the suggested
Code, what should I do?
A. Use Time Cook I and Power
Level 10for a few minutes until
completion,
Q. Do all fresh or frozen vegetables
require a standing period after
cooking with Auto Cook?
A, Most vegetables are cooked to
a crisp state during Auto Cook,
just as in regular microwaving.
Therefore, it is recommended that
you let the vegetables stand for up
to 5 minutes depending on size and
density of pieces,, This standing
time also enhances the overall
flavor and appearance of most
vegetables°
Q. What if I don't fully cover the
dish in Auto Cook?
A. Oven senses steam too quickly
which shortens the cooking time
thus leaving undercooked food,
Cover tightly and reset Auto Cook,
Q. Do the shapes and sizes of
food make a difference when
using Auto Cook?
A. Yes, in some cases, larger
pieces will require additional
Time Cooking, Be sure to check
suggested arrangement of pieces in
the dish, since proper' arrangement
is often a successful tip in regular
microwaving.
Q. Do fresh or frozen vegetables
require water when using Auto
Cook?
A. Yes° Add water as recommended
on guide to the vegetables and cover
well for even, complete cooking_
Q. Should I use Auto Cook to
cook pudding or sauces?
A. Most pudding and sauce recipes
require stirring many times during
cooking; therefore, Time Cook is
recommended,
Q. My scalloped potatoes were
not completely cooked when I
removed the dish after Auto
Cook. What is wrong?
A. If you prepared the sauce in the
oven prior to combining the sauce
with potatoes, there may have been
too much remaining moisture in
the oven, Make sure you dry the
oven completely before using Auto
Cook since this function operates
properly by sensing steam in the
oven. Also, starting Auto Cook
with hot foods creates steam in the
oven too soon, and decreases the
first sensing cycle,
Q. Are there any other foods
which are best Time Cooked,
rather than Auto Cooked?
A. Bakery foods, candies, melted
chocolate or foods when a dry or
crisp surface is desirable, are
cooked best by Time Cook°
Q. Would my plastic containers
with very tight fitting lids be
appropriate for Automatic
Cooking?
A. No, most types of plastic
storage dishes, butter' tubs, etc
with tight fitting lids are not
recommended for microwaving_
Also tight fitting plastic lids may
prevent adequate steam from
escaping and food may not cook
properly during Automatic
Cooking.
Q. I tried to warm some chow
mein noodles using Auto Cook.
Why didn't this work?
A. Food must have some moisture
in order to create steam which
helps the auto sensor function.
Extremely dry foods such as chow
mein noodles, potato chips and
other such foods do not have
enough moisture.
Q. May I use Auto Cook when i
am cooking many foods in more
than one dish or casserole?
A. No, because of different food
densities, attention needed during
cooking, and food amounts, it is
best to use Time Cook when
cooking many foods,
22
Page 23

Automatic Defrosting
With the Auto Defrost feature,
the oven automatically sets the
defrosting time and power levels
for you. You choose the appropriate
code number from I to 6 for the
food you are defrosting, then enter
the food weight in pounds and tenths
of a pound (See Conversion Guide
at right) and touch START. The oven
calculates the defrosting time and
changes power levels during
defrosting to give even defrosting
results.
When the oven reaches approximately
half of the total defrosting time, the
display flashes "TURn;' telling you
to turn food over and will not
continue defrosting until door is
opened and START is touched
again.
After defrosting time is complete,
the oven automatically turns off.
How to Set Auto Defrost
NOTE: Before you begin, check
the Automatic Defrosting guide for
minimum and maximum food
weights for each code number'.
You will need to know your food
weight and corresponding code
before beginning.
Step 1: Remove frozen meat from
package and place in microwave-
safe dish. Place in oven and close
door,
Step 3: Touch number pad 4.
"DEF" and "CODE 4" show on
display. "ENTER WEIGHT"
flashes.
Step 4: Touch number pad 3 and
0 for weight of 3 Ibs. Display shows
"3.0" and "CODE 4Y
Step 5: Touch START pad. Defrost
time begins counting down on
display.
Step 7: Close door and touch the
STAKI' pad Display shows remaining
defrosting time counting down.
Step 8: When defrosting time is
completed, oven signals, "End"
flashes, and oven turns off.
Conversion Guide
If the weight is stated in pounds
and ounces, the ounces must be
converted to tenths (, 1) of a pound,,
Ounces Pounds
1-2
.3
4-5
6-7
8
9-10
11
t2-13
14-15
,1
2
.3
4
5
.6
.7
.8
_9
Step 2: Touch AUTO DEFROST
pad° "AU'IO" appears on the display
and "ENTER DEF CODE" flashes°
Step 6: When t/2 the defrosting
time is completed, the oven signals
and "TURn" flashes on display
instead of time counting down.
Open door' and turn package over.
Automatic Defrosting Guide
MIN.-MP_'K. HOLD
CODE WEIGHT TI_IE*
1 5--49 lbs none
2 5--39 lbs t0 rain
3 5--5 9 tbs t0 rain
4 30--5 9 tbs 20 min
5 3 0--5 9 lbs 20 min
6 ,5--3,9 lbs. none
RECOMMENDED
FOOD
Chicken pieces
Fish
Ground Beef
Roasts, Bone in
Roasts, Boneless
Steaks and Chops
* InAuto Defrost, it is necessary
to allow the meat to stand during
holding time Youmay take the meat
out oftheoven if you prefer Allow a
longer hold time for larger cuts of
meat.
2,3
Page 24

Defrosting by Time
Time Defrost is designed
for speedy thawing of frozen food
and is one of the great advantages
of a microwave oven.
Use Time Defrost to quickly
thaw foods such as bread, rolls,
vegetables, fruits and frozen
dinners. Auto Defrost is preferred
for meat and poultry because the
oven sets the defrosting time and
power levels for you.
• Power level 3 is automatically set
for defrosting, but you may change
this for more flexibility
o See your cookbook for defrosting
help.
To become better acquainted with
Time Defrost, defrost a 10-oz.
package of flozen strawberries by
following the steps below_
Step 1: Place package of frozen
strawberries in the oven and close
door. Be sure package contains
no metal.
Step 2: Touch TIME DEFROST,
Display shows ": 0" and "POWER
3Y "ENTER DEF TIME" flashes.
Step 3: Select one half of the total
defrosting time recommended in
your cookbooks For example, touch
4 and MIN for 4 minutes. Display
shows "4:00" and "POWER 37'
"DEF TIME" flashes
How to Change Power Level
After setting defiosting time,
touch POWER LEVEL pad,
then touch desired number for
new power level
Step 4: Touch START. "DEF TIME"
shows and time counts down on
display_ When cycle is completed,
the oven signals and flashes "End,"
then automatically shuts off
Step 5: Turn package over, close
door and tepeat Steps 2 and 3 to set
remaining half of defrosting time
and touch START.
Step 6: When oven signals and
flashes "End;' open door, remove
package and separate strawberries
to finish defrosting.
Defrosting Tips
o Foods frozen in paper or plastic
can be defrosted in the package
• For even defrosting, some foods
need to be broken up or separated
part of the way thiough the
defrosting time.
• Family-size pre-packaged
frozen entrees can be defrosted and
microwaved_ If the food is in a foil
container, transfer it to a microwave
safe dish_
• Check your cookbook for other
defrosting tips.
24
Questions and Answers
Q. When I press START, I hear
a dull thumping noise. What is it?
A. This sound is normal It is
letting you know the oven is using a
power level lower than 10 (High)_
Q. Can I defrost small items in
a hurry?
A. Yes, but they will need more
frequent attention than usual° Raise
the power leve! after entering the
time by touching the desired power
level pad° Power level 7 cuts the
total defrosting time about in 1/2;
power level I0 cuts the total defrosting
time to approximately 1/3. During
either, rotate or stir food frequently,
Q. Why don't the defrosting
times in the cookbook seem right
for my food?
A, Cookbook times are averages.
Defrosting time can vary according
to the temperature in your freezer.
Set your oven for the time indicated
in your cookbook if your food is
still not completely thawed at the
end of that time, reset your oven
and adjust the time accordingly°
Q. Should all foods be
completely thawed before
cooking?
A. Some foods should not be
completely thawed before cooking.
For example, fish cooks so quickly
it is better to begin cooking while it
is still slightly frozen,,
Q. Can I open the door during
T_hffleDefrost to check on the
progress of my food?
A. Yes°You may open the door at
any time duringmost microwaving
TOresume defrosting, close the
door and press START_The oven
begins operating if time is left on
timer. If not, reset timer.
Page 25

Cooking by Time
The time cooking feature allows
you to preset the cooking time.
The oven shuts off automatically°
Power level 10 (High) is
recommended for most cooking,
but you may change this for more
flexibility See your cookbook_
To become better acquainted with
time cooking, make a cup of coffee
by following the steps below
Step 1: Fill a cup 2/3 full of water,
add 1teaspoon of instant coffee and
stir to dissolve,, Use a cup that has
no metal decoration and is microwave
safe (see Microwaving Tips on
page 3). Place cup in oven and
close door.
Step 2: Touch TIME COOK i & 1I.
Display shows ": 0" and "lY
"ENTER COOK TIME" flashes°
Step 3: Select your time Touch
1, 2 and 0 for a minute and 20
seconds. Display shows "!:207
"POWER 10" and "COOK TIMEY
Because automatic power level 10
is recommended for this cup of
coffee, there is no need to change
the power level, (If power level 10
is not appropriate, see "How to
Change Power Level" at right )
Step 4: Touch START, "COOK
TIME," "POWER t0',' and time
counting down show on display.
Step 5: When time is up, the oven
signals and flashes "End'? Oven,
light and fan shut off.
Step 6: Open the door
Using the Time Cook II
Feature
The Time Cook II feature lets you
set two time cooking functions
within one program. This is ideal
when you want to change power
levels during your cooking
operations_ Here's how to do it
Step h Place food in oven in
microwave-safe container and close
the door
Step 2: Touch TIME COOK I & II
pad. Display shows ": 0" and "1'.'
"ENTER COOK TIME" flashes.
Step 3: Select your cooking time° For
example, touch 2, 1 and 5 for two
minutes and t5 seconds Display
shows "2:15" and "POWER 10Y
"COOK TIME" flashes,
Step 4: Touch TIME COOK i & II
pad.
Step 5: Set your cooking time,
How to Change Power Level
After setting cooking time,
touch POWER LEVEL pad,
then touch desired number for
new power level
Step 6: Touch START.
Step 7: "POWER 10" is displayed
and Cook Time 1 is shown counting
down,
Step 8: At the end of Cook Time I,
the second power level is displayed
and Cook Time 2 is shown counting
down.
Step 9: When time is up, the oven
signals and flashes "End" The
oven, light and fan shut off.
Step 10: Open the dooL
25
How to Use Auto Start
Auto Start allows you to program
your oven to begin cooking at a
preset time of day--up to a 12
hour delay.
To Use Auto Start
Step 1: Be sure the microwave oven
clock shows the correct time of day
Then enter your desired program.
Step 2: Touch AUTO START pad
(instead of START pad)
Step 3: Enter time of day for oven
to start. For example touch number
pads 5, 0 and 0 to star_ at 5:00
Step 4: Touch START pad. The
oven will automatically start at
the desired time.
Questions and Answers
Q. I set my oven for the time
called for in the recipe, but at the
end of the time allowed, my food
wasn't done. What happened?
A. Since house power varies due
to time or location, many time
cooking recipes give you a time
range to prevent overcookingo Set
the oven for minimum time, test the
food for doneness, and cook your
food a little longer, if necessary_
Q. I touched the number pads
and selected my power level. When
I touched START, however, my
oven didn't come on, Why not?
A. The TIME COOK i & 11pad
must be touched before setting the
number pads or else your oven will
not begin cooking.
Q. I want to cook on a power
level other than High. What do I
need to do?
A. To change the power level,
touch the POWER LEVEL pad,
then touch desired number for new
power level.
Q. Can I interrupt Time Cook to
check the food?
A. Yes. To resume cooking,
simply close the door and press
the START pad. The timer must be
reset for cooking to resume unless
time is remaining on timer,
Page 26

Cooking by Temperature
Internal temperature is the best
test of doneness for many foods.
Temp Cook/Hold takes the
guesswork out of cooking because
the oven automatically switches to
Hold setting after reaching the preset
food temperature from 90_E to 199_E
and maintains that temperature for
up to one hour or until you touch
the CLEAR/OFF pad
The Temperature Probe
SENSOR HANDLE
CABLE
END
The temperature probe is a food
thermometer that gauges the internal
temperature of your food Use the
probe when you want to Convection
Cook or Combination Cook to a
preferred internal food temperature
You must use the probe when using
Temp Cook/Hold or Combination
Auto Roast, To utilize your probe
properly, follow directions for use
and insertion below.
How toUse the
Temperature Probe
Place probe so that point rests in
center of the thickest meaty part of
roast, or into the cut end or meatiest
part of boneless ham or lamb, Point
should not touch bone, fat or gristle,
For bone-in ham or lamb, insert
probe into center of lowest large
muscle orjoint_
Insert probe into meatiest part of
inner thigh, below and parallel to
the leg of a whole turkey,
For dishes such as meatloaf or
casserole, insert probe into center,,
How toTemp Cook a Rolled
Beef Rib Roast to Medium
Step 1: Insert temperature probe
and attach probe securely in oven
wall_ Close the door,,
Step 2: Touch TEMP COOK/
HOLD The display panel shows
"F" and "10:' "POWER" and
"ENTER FOOD TEMP" flash.
Step 3: Touch I, 5, 0 for 150°F.
"/50F" and "10" show on display.
"POWER" and "FOOD TEMP"
flash
Step 4: Touch POWER LEVEL
pad, "ENTER POWER" flashes.
Touch 5 for medium power,
"FOOD TEMP_' "150F" and
"POWER 5" show on display,
Step 5: Touch START. If internal
temperature of the roast is less than
90°F., display will show "COOL" or
if temperature is 90°E or above,
display shows temperature
counting upo
Step 6: When 150°F, is reached,
the oven will sound and display
"HOLd". The oven will then hold
the temperature,,
Step 7: Touch the CLEAR/OFF
pad to stop the cycle.
Step 8: Remove probe and food
from the oven°
Cooking Tips
• Use a lower power level; it will
heat more evenly even though
requiring more time°
o Be sure frozen food has been
completely defrosted before inserting
probe_ Probe may break off if used
in frozen foods,
* Cover foods loosely for moisture
control and quick, even heating.
Questions and Answers
Q. Are there any foods I can't
Temp Cook?
A. Yes. Delicate butter icings, ice
cream, frozen whipped toppings,
etc_ soften rapidly at warm
temperatures Batters, doughs and
frozen foods are also difficult to
cook precisely with the probe_ It's
best to time cook these foods,
Q. Why did "PROBE" flash on
the display after I touched the
START pad?
A. "PROBE" may flash if you
don't seat the cable end of the probe
securely into the receptacle in the
oven wall or if you touch the TEMP
COOK/HOLD or Combination
AUTO ROAST pad and forget to
use the probe
Q. Can I leave my probe in the
oven if it's not inserted in food?
A. No, if it touches the oven wall,
you may damage the oven°
Q. Can I Temp Cook different
portions of food at different
temperatures?
A. Yes° The temperature probe
gives you the freedom to cook
different portions of food at
different temperatures to suit
individual eating stiles, Simply
place probe in food and change
temperature setting as needed.
26
Page 27

Convection Thne Cooking
During convection cooking, a
heating element is used to raise
the temperature of the air inside
the oven. Any oven temperature
from 225°E to 450°E may be
programmed. A fan gently
circulates this heated air
throughout the oven, over and
around the food, producing
golden brown exteriors and rich,
moist interiors. Because the
heated air is kept constantly
moving, not permitting a layer of
cooler air to develop around the
food; some foods cook faster than
in conventional oven cooking.
NOTE: For information on
suggested cookware, see page 10,
HowtoConvection
Preheatand ThneCook
Step 1: Touch Convection COOK
pad_ Time of day disappears from
the display "F" appears and
"ENTER CONV TEMP" flash_
Step 2: Enter the oven temperature
by touching the number pads that
correspond with the desired oven
temperature. For example, touch
number pads 2, 7, and 5 for 275°E
The selected temperature is shown
in the display and "ENTER CONV
TIME" flashes. Do not enter
convection cook time now.
Proceed to Step 3.
Step 3: Touch START. "PRE"
appears in large letters and "CONV
PRE" is displayed_ When preheating
is complete, oven will signal
"READY" and "CONV PRE" will
flash. If you do not open the door
within 30 minutes the oven will
turn off automatically.
Step 4: Open the oven door,
"HOT" appears on the display to
remind you that the oven is hot and
care should be used when placing
the food in the oven.
Step 5: Close the oven door_
"ENTER CONV TIME" will
appear on the display
Set the desired cooking time
in hours and minutes by touching
number pads in sequence. For
example, to set 2 hours and 30
minutes, touch number pads 2, 3,
and 0 in that oider. This time
appears in the display as "2H:30Y
To enter time less than one hour, for
example, 30 minutes, touch 3 and
O Display shows "H:30" until
Start is touched°
Step 6: Touch START pad° The
display shows remaining cooking
time_ If time is less than 1 hour
display shows minutes and seconds°
If longer, time counts down minute
by minute until 59 minutes remain,
then switches to display minutes
and seconds_ When cooking is
completed, the display shows "End"
and the oven signals and turns off.
How to Convection Time
Cook Without Preheating
Step i: If your recipe does not
require preheating, touch the
Convection COOK pad° "ENTER
CONV TEMP" flashes_
Step 2: Enter the oven temperature
by touching the number pads that
correspond to the desired oven
temperature. For example, touch
number pads 2, 2 and 5 for 225°E
"ENTER CONV TIME" flashes.
Step 3: Set the desired cooking
time in hours and minutes by
touching number pads in sequence,
For example, to set 2 hours and 30
minutes, touch number pads 2, 3
and 0, in that order° This time
appears in the display as "2H:30'.'
To enter time less than one hour,
for example, 30 minutes, touch 3
and 0oThe display shows "H:30"
until Start is touched,
Step 4: Touch START pad°
Cooking begins and cooking time
counts down as described above.
27
Page 28

Convection Temperature Cooking
You can also convection cook
with the temperature probe, to
assure that foods are cooked
precisely to the degree of doneness
desired, while the constantly
circulating hot air assures even
cooking and delicious browning.
The temperature probe monitors
the internal temperature of the
food and turns the oven off
automatically when the desired
temperature is reached.
How to Convection
Temperature Cook
Step 1: Insert probe in food as
directed in cookbook or in this
manual. Plug other end of probe
securely into wall receptacle.
Step 3: Enter oven temperature by
touching the number pads that
correspond with the desired oven
temperature. For example, touch 2,
2, 5 for 225°E 225 appears on
display and "ENTER CONV FOOD
TEMP" flashes.
Step 4: Touch the appropriate
number pads in sequence to enter
the desired food temperature. Any
food temperature from 90°F, to
1990E may be programmed° For
example, touch 1, 8 and 0, in that
order, for 180°E The temperature
selected is shown on the display.
Questions and Answers
Q. After I preheated my oven,
I tried to set cooking time, but
nothing happened. What is the
problem?
A. Until you open the oven door or
touch the CLEAR/OFF pad, the
oven remains in the preheat mode
and no fUliher instructions can be
entered, After 30 minutes oven
automatically turns off.
Q. Can I check during the
cooking cycle to be sure that
I have set the correct oven
temperature?
A. Yes If you touch the Convection
COOK pad at any time during cooking,
the selected oven temperature is
displayed on the display,,
Q. Can i store the probe in the
oven when it is not in use?
A. Leaving the probe in the oven is
not recommended. If you forget
and leave it in during cooking,
without having inserted it in food,
damage to the probe or to the oven
may result.
Step 2: Touch Convection COOK
pad° Time of day disappears from
the display_ "F" is displayed and
"ENTER CONV TEMP" flashes_
Step 5: Touch START pad. The
display shows "COOL" until the food
temperature reaches above 90°F.,
then it shows actual food temperature
as it rises_ When food reaches
preselected temperature, display
shows "End" oven signals and
turns off,,
28
Page 29

Combination xne Cooking
Combination cooking offers
the best features of microwave
energy and convection cooking.
Microwaves cook food fast and
convection circulation of heated
air browns foods beautifully.
Four combination cooking codes
make it easy to set your oven for
combination cooking_ Just enter
one digit to automatically set both
oven temperature and microwave
power level,
How to Combination
Time Cook
Step 2: Select a combination
cooking code by touching a number'
pad from one to four. The selected
code appears in the display and
"ENTER COMB COOK TIME"
flashes_
Step 1: Touch Combination COOK
pad° The time of day disappears
from the display and "ENTER
COMB CODE" flashes,_
Step 3: Enter desired cooking time
in hours and minutes by touching
number pads in sequence For
example for 1 hour' and 20 minutes,
touch i, 2 and 0 Display shows
"IH:20Y To enter time less than
one hour', for example, 30 minutes,
touch 3 and 0, Display shows
"H:30" until Start is touched
Combination Codes
The following guide shows the oven temperature and microwave power (watts)
that are automatically set when using that particular code number_ You must
set the cooking time or internal food temperature as shown above and on page
28, Check your' cookbook for specific food instructions
MICROWAVE POWER
CODE OVEN TEMP (Watts)
1 250 ° E 220
2 275° E 220
........ 3 ................. 300°F, .............. 22o "
4 350" E 220
29
Step 4: Touch START, Cooking
time begins to count down_ When
time reaches less than 60 minutes,
display shows minutes on left of
colon and seconds on right, When
time is completed, oven signals,
flashes "End" and turns off.
Questions and Answers
Q. May I use my metal roasting
pan to Combination Cook a roast?
A. Nor Do not use metal
cookware when using Microwave
or Combination cooking Place
metal accessory rack on floor of
oven, Then place roast in a glass
dish on the rack,
Q. Can I switch from one
Combination code to another
during cooking?
A. No, The selected Combination
code may not be changed during
the cooking operation, but you may
reprogram the complete cooking
instructions if you wish,
Q. Is it necessary to place a glass
dish on the oven floor when
Combination cooking?
A. No For best roasting results,
place meat in a glass dish Place dish
on the oven rack on floor of oven.
Remember:
, Check page 10 of' this book and
your cookbook for collect cookware
when Combination cooking.
• For best roasting and browning
results, whole roasts and poultry
should be cooked in a dish placed
directly on the oven rack on floor
of oven_
,, Place meat in a glass dish on a
trivet to collect juices and prevent
spattering_ See Convection preheat
instPactions on page 26.
o Some recipes call for preheating.
Page 30

Combination Temperature Cooking
With this function of your new
oven, you can enjoy the benefits
of combination cooking with the
precision of the temperature
probe. Four combination codes
are shown on the guide on page
29 to make it easy to program
microwave power level and oven
temperature with only one entry.
The probe makes it simple to
cook to the exact degree of
doneness desired, by monitoring
the internal temperature of the
food. This function is exactly like
combination time cooIOng except
you set internal food temperature
desired instead of cooking time.
How to Combination
Temperature Cook
Step 1: Insert the temperature
probe into food as directed in this
manual or in the cookbook_ Plug
the other end securely into the oven
wall receptacle_
Step 2: Touch Combination COOK
pad, "ENTER COMB CODE"
flashes and the time of day
disappears from the display,
Step 3: Select the combination
code by touching a number pad
from 1 to 4 depending on oven
temperature needed° The code
entered is shown on the display and
"ENTER COMB FOOD TEMP"
flashes.
Step 4: Enter the desired finished
food temperature by touching the
number pads in sequence, Any
food temperature from 90°E to
t99°E may be programmed, For
example, to set 180°E, touch 1, 8
and 0 in that order_ The selected
temperature is shown on the
display.
Step 5: Touch START to begin
cooking. The selected food
temperature disappears and the
display shows "COOL" until internal
food temperature reaches 90°F.
Then display shows actual food
temperature as it rises_ When food
reaches the selected temperature,
the display shows "End" and the
oven signals and turns off.
For information on cookware for
combination temperature cooking,
refer to page 10,
30
Page 31

Combination Auto Roast
Combination Auto Roast is similar
to combination temperature
cooking, using both microwave
and convection cooking in
conjunction with the temperature
probe. However, the Combination
Auto Roast feature eliminates
most of the steps necessary to
program combination temperature
cooking. Instead, you can set the
entire cooking program by
selecting just one Combination
Auto Roast code.
The food is placed in a glass dish
on a trivet for cooking during
Combination Auto Roast° To select a
code from 1 to 4, see the
Combination Auto Roast Guide
below.
How to Combination
Auto Roast
Step 1: Insert temperature probe into
the meat and plug the probe fmnly
into the oven wall receptacle_
Step 2: Touch the Combination
AUTO ROAST pad°
'Auto" replaces the time of day on
the display and "ENTER CODE"
flashes.
Step 3: Enter the desired
combination Auto Roast code by
toucb.ing a number pad from 1 to 4.
For example, touch number pad 2
for Beef, medium
Step 4: Touch START.
In this example, "MEd',' "COMB"
and "CODE 2" are displayed.
If you want to see the actual food
temperature, press the Combination
AUTO ROAST pad.
The probe temperature wilt be
displayed as long as the pad is
pressed.
When the food reaches the
programmed temperature for
proper degree of doneness, the
display shows "End" and the
oven signals and turns off_
Combination Auto Roast Guide (UseProbe)
Doneness
Food Temp, Code Display
Beef, Rare 160°E 1 RARE
Medium 170°E 2 MED
Well 190°E 3 WELL
Lamb, Medium 170°E 2 MED
Well 190°E 3 WELL
Pork 190°E 4 WELL
Chicken, whole 190°F. 4 WELL
(continued next page)_
31
Page 32

Combination Auto Roast (continued)
Questions and Answers
Q. When I cook poultry, the thin,
small areas like legs and wings
often overcook before the rest of
the bird is thoroughly cooked.
How can I prevent this?
A. Thin, uneven portions of poultry
may be shielded with aluminum
foil during cooking+ Do not allow
foil to touch metal accessory rack
or oven sides, arcing may occur.
Q. Usually my temperature probe
gives very accurate results, but this
time it didn't. What happened?
A, If the temperature probe is
positioned touching fat or bone, an
inaccurate reading may result. Be
sure to place the probe in solid
muscle, usually the thickest,
meatiest part of the roast or
poultry, or in the center of a
meatloaf or casserole,.
Q. Meats often take longer than
indicated in the guides to reach
the desired internal temperature.
Why?
A. If the meat is recently defrosted
and still very cold or icy inside, it
will require a longer cooking time
than meat which has been merely
refrigerated. Times shown in the
guides are usually for meats that
are refrigerator temperature,.
Q. When I tried to program
nay oven for Combination Auto
Roast, it beeped and flashed
"PROBE" What did I do wrong?
A. Combination Auto Roast
cannot be programmed without the
temperature probe connected to fine
oven wall receptacle. To eliminate
the "PROBE" display and continue
programming the oven, just securely
insert the probe into the receptacle..
Q. Do most meats require standing
time after Combination Auto
Roasting?
A. You may want to let meats stand
briefly, to allow easier carving and
serving. Most meat roasts continue
to cook for a few minutes after
removing fiom the oven Check the
cookbook for specific instructions,
32
Page 33

Convection Bro ag
Broiling is cooking food by
intense heat from the upper unit
in the oven. Most fish and tender
cuts of meat can be broiled.
Follow these steps to keep
spattering and smoking to a
minimum.
Step 1: If meat has fat or gristle
near edge, cut vertical slashes
through both about 2" apart. If
desired, fat may be trimmed,
leaving layer about 1/8" thick.
Step 2: Insert spatter shield onto
drip pan° Always use spatter shield
so fat drips into drip pan; otherwise
juices may become hot enough to
catch fire Aluminum foil may be
used to line drip pan and spatter
shield_ But, be CERTAIN to cut
openings in foil, to correspond with
slots in the spatter shield so fat
drips into pan below.
Step 3: Touch Convection BROIL
pad° "ENTER BROIL CODE"
flashes.
Step 4: Touch number pad 1 or 2
for desired Broil Code. Code 1
broils at 450°E Code 2 broils at
425°E Use Code I for thinner cuts
of meat. "ENTER BROIL TIME"
flashes on display but usually it is
recommended that you preheat to
pmpmgrammed broiling tempemtumo
(See Step 50
Step 5: Touch START pad, "PRE"
appears on the display in large
letters and "PRE:' "BROIL" and
] Forbroiling time and procedures, refer tochart in cookbook.
"CODE" are displayed in
small letters. When preheating is
completed, the oven will signal and
display "R_EADYY
Note: Oven will hold
preprogrammed temperature for
30 minutes and then shut off unless
you open the oven door.,
Step 6: Open the door. "HUt"
wilt appear on the display to
remind you the oven is hot and that
care should be taken when placing
food in the oven° Place food on
broil pan assembly_ Pull out metal
accesso_ rack to the stop position
mid set the broil pan on it. Carefully
push rack back into oven and close
the door°
Step 7."Close the oven door.
"ENTER BROIL TIME" will
appear on display.
Enter broiling time by touching
number pads in sequence, For 25
minutes, touch 2, 5, 0 and 0,
Step 8: Touch START pad. "BROIL"
and "TIME" show on display and
broiling time counts down.
Step 9: When broiling is completed,
oven signals and flashes "End:'
Oven, light and fan shut off,
Questions and Answers
Q. May I use aluminum foil to
line the drip pan and spatter
shield?
A. Yes, if you mold the foil
thorougl-dy to the spatter shield
and slit it to conform to the slots
in the shield. Slots permit proper
drainage of meat juices into drip
pan, minimizing smoking and
spattering and preventing possibility
of fire from overheated drippings.
Q. When broiling, is it necessary
to always use the spatter shield in
the pan?
A. Yes. Using the spatter shield
suspends the meat over the pan. As
the meat cooks, the ,juices fall into
the pan, thus keeping meat drier,
Juices are protected Toythe shield
and s_y cooler, thus preventing
excessive spatter and smoking,
Q. Should I salt the meat before
broiling?
A. No. Salt draws out the juices
and allows them to evaporam
Always salt after cooking. Turn
meat with tongs; piercing meat
with a fork also allows juices to
escape. When broiling poultty or
fish, brush each side often with
butter°
Q. Why are my meats not
turning out as brown as they
should?
A. In some areas, the power
(voltage) to the oven may be low.
In these cases, preheat the broil
unit for 10 minutes before placing
broiler pan assembly with food in
oven. Turn food only once during
broiling.
Q. Do I need to grease my broiler
spatter shield to prevent meat
from sticking?
A. The spatter shield is designed to
reflect broiler heat, thus keeping
the surface cool enough to prevent
meat sticking to the surface°
However, spraying the shield
lightly before cooking with a
vegetable cooking spray will make
cleanup easier_
33
Page 34

Cooking Reference Guide
This is a Quick Reference to guide
you in selecting the best method of
cooking. Specific recipes can be
adapted to any method of cooking,
FOODS
Appetizers
Dips & Spreads
Pastry Snacks
Beverages
Sauces & Toppings
Soups & Stews
Meats
Defrosting
Roasting
Poultry
*--Best Method
A --Alteinate
N --Not Recommended
MICROWAVE
"k
A
COMBINATION
N
"k
CONVECTION
N
N
A
N
_r N N
.......... .__ ...... ...._..
_: A N
N
A
A
N
_r
Defrosting . N N
Roasting A * A
._. e : ......... , , .....
Fish & Seafood
Defrosting . N N
Cooking _ A A
Casseroles A * A
Eggs & Cheese
Scrambled, Omelets -k N N
Quiche, Souffle A A _-
..... ........ ..__ ._
Vegetables, Fresh * N N
Breads
Quick A A Sr
Yeast N A 4t
Muffins, Coffee Cake A _- A
Desserts
Cakes, Layer & Bundt A A *
Angel Food & Chiffon N N _r
Custard & Pudding -/r N N
Bar Cookies A -k A
Fruit _ N N
Pies & Pastry N A *
Candy _- N N
Blanching Vegetables . N N
........ t ,,
Frozen Convenience Foods _: A A
34
Page 35

The Exhaust Feature
METAL METAL
FILTER FILTER
COOKTOP/NtGHT LIGHT
The exhaust hood feature on your'
microwave oven is equipped with
two meta! filters which collect
glease. When the fan is opetated,
air is drawn up through the filters
and is then discharged through the
provided venting to the outside.
The hood also has a light for
illuminating the counter space°
When NIGHT LIGHT pad is
touched, the hood light operates
at a lower intensity for use as
a night light_
To remove grease filter, grasp the
"finger hold" on the filter and slide
to the rear.
Then pull filter downward and to
the front. The filter will drop out.
To replace grease filter, slide the
filter in the frame slot on the back
of the opening.
Pull filter upward and to the front
to lock into place.
To clean grease filter, soak, then
agitate filter in hot detergent
solution° Don't use ammonia or
other alkali because it will darken
metal. Light brushing can be used
to remove embedded dirt. Rinse,
shake and remove moisture befoie
replacing Filters should be
cleaned at least once a month.
Never operate your hood without
the filter in place. In situations
where flaming might occur on
surfaces below hood, filter will
retard entry of flames into the unit°
35
Page 36

Care of Your Oven
Your new microwave/convection
oven is a valuable appliance,
protect it from misuse.
Follow these simple care rules:
1. Keep inside of oven clean,
Food spatters or spilled liquids will
absorb microwave energy and reduce
efficiency of oven° Wipe up when
they are still warm.
2. "When cleaning surfaces of door
and oven that come together on
closing the door, use only mild,
non-abrasive soaps or detergents
applied with a sponge or soft cloth_
3. A browning dish is designed only
for use on the Microwave setting.
When microwaving, preheat browning
dish or grill only on ceramic oven
floor, Do not use dish with the
metal accessory rack.
4. Always follow manufacturer's
suggestions when using browning
dish or accessories,
5. Follow manufacturer's instructions
when using microwave utensils or
accessories_
Oven Cleaning Chart
PART MATERIALS TO USE
Stainless Steel Oven Interior Damp Cloth
--Side Walls Only Plastic Scouring Ball
--Ceiling Non-abrasive
Scouting Powder
(brush-on type)
Ceramic Oven Floor Non-abrasive
Nylon Mesh
Scouting Ball
Non-abrasive Cleanser
Metal Accessory Rack Soap and Water
Soap-Filled Scouring Pad
Broil Pan (spatter Soap and Water
shield and drip pan) Soap-Filled Scouring Pad
1
Inside Oven Door
and Window
Outside Oven Surfaces
Touch Control Panel Soft Cloth
..................... r.........................................
Temperature Probe Plastic Bali
Soft Cloth
Mild Detergent
Mild Detergent
Soft Cloth
DIRECTIONS
Clean with mild detergent and water, then rinse well with well wrung
out cloth, If desired, acontainer ofwater can be boiled in the oven using
microwave energy. This will help loosen soil. For hard-to-remove soil,
clean gently with scouring ball, Do not use abrasive cleaners which
could scratch or mar surface. For excessive soil, use a chemical cleaner,
preferably the brush-on type. Apply madremove according to directions.
Use on stainless steel parts only.
Wash floor with warm sudsy water
Remove rack and clean with one ofthe recommended materials.
Then rinse and dry thoroughly, Some commercial cleaners may cause
darkening or discoloration. When using for the first time, test cleaner
on small portion of rack, Do not use commercial oven cleaners
Drain fat, cool drip pan and spatter shield slightly, (D° not let soiled drip pan
and spatter shield stand in oven to cool), Sprinkle on detergent. Fill the pan
with warm water and let pan and spatter shield stand for a few minutes Wash;
scour if necessary Rinse and dry Do not use commercial oven cleaners
otrrlON: The drip pan and spatter shield may also be cleaned in a
dishwasher
Wipe offspitls or spatters while they are still warm Use mild detergent
andwater, then rinse with clear water and dry with soft cloth
Clean with mild detergent and water, rinse and dry with soft cloth
Clean chrome trim with damp cloth and polish immediately with
adry cloth
, ..... ,,,, ,,,, .....................................................
Open oven door before cleaning to prevent oven from accidentally
starting, Wipe with damp cloth followed immediately by adry cloth
Clean as soon after using as possible Toclean, wipe with sudsy cloth,
then rub lightly with scouring ball if necessary_ Rinse and dry,
Note: If steamaccumulates insideor aroundoutside ofovendoor, wipewith soft cloth Thismayoccur whenoperating the ovenunder highhumidity conditions
36
Page 37

Cooktop Light/Night Light
REMOVESCREW
To replace combination cooktop
light/night light, first disconnect
power at main fuse or circuit
breaker panel or pull plugo
Remove screw on right side of light
compartment cover and lower cover
until it stops.
t Jl
Be sure bulbs to be replaced are
cool befoie removing. Break the
adhesive seal by gently unscrewing
the bulbs, Replace with 40-watt
incandescent bulbs (WB02X4253)
available from your GE supplier.
High intensity 40-watt bulbs
(40SllN/1) which are available in
supermarkets and hardware stores
may also be used for replacements.
Paise light compartment cover and
replace screw° Connect electrical
power to microwave oven,
Oven Light
To replace your oven light, first
disconnect power at main fuse
or circuit breaker or pull plug.
Remove the top grill by taking out
3 screws that hold it in place
Next, remove the single screw
located above door near center of
oven that secures light housing
Replace burned-out bulb with a
30-watt GE bulb (WB02X4235)
available from your GE supplier_
Clean off the giease and dust on
hood surfaces often _Use a warm
detergent solution° About t
tablespoon of ammonia may be
added to the water Take care not
to touch the filters and enameled
surfaces with this, Ammonia will
tend to darken metal
G1/.OUND1NG
INSTRUCTIONS
This appliance must be grounded_
In the event of an electrical short
circuit, grounding reduces the risk
of electric shock by providing an
escape wire for the electric current°
This appliance is equipped with a
power cord having a grounding
wire with a grounding plug. The
plug must be plugged into an outlet
that is properly installed and
grounded. (Fig. 1)
VCARNING-Improper
use of the grounding plug can result
in a risk of electric shock,
IN_SUREPROPER
GROUNDEXISTS
Fig 1 BEFOREUSE
Consult a qualified electrician or
service technician if the grounding
instructions are not completely
understood, or if doubt exists as to
whether the appliance is properly
grounded,
Where a standard two-prong wall
receptacle is encountered, it is
your personal responsibility and
obligation to have it replaced with
a properly grounded three-prong
wall receptacle_
Do not under any circumstance
cut or remove the third (ground)
prong from the power cord.
Do not use an adapter plug with
this appliance.
Do not use an extension cord with
this appliance.
Page 38

". i_ii ii i ;
Questions?
Use This Problem Solver
PROBLEM POSSIBLE CAUSE AND REMEDY
:-Afusein: your home may be blown or the Circuit breaker tripped. Replace fuse or :
ireset circuit breaker.: :: :: i:
* Unplug your micr0waveiconvecfion oven, then p!ug it back in.
::::QMak e sure 3-prong piug on oven is fuily inserted into wali receptacle, i
:i'i 'D0or:notsecureiy:idosed.: i :i_ : i i
::LIGHTED;::YETOVEN: DSTARTmustbe:touchedafterentefing:ovenseiection. : ....
::i::_E:NO_:START::: i:::: :,An0ther:selection entered already in oven and CLEAR/OFF no t touched to cancel it.
Sure yoil haveeniered Cooking time or temperature after touching cook pads.
i*CLEARiOFF:was touched accidentallY. ReSe t Cooking program and touch START.
,Temperature probeiiot inserted properly or not being used during Combination Auto
RoastorTemp Co°k/H°]d.: i:: :i : : : :
you:have entered a desired finished food temperature or oven temperature
after setting t_mperature €0oking programs. ::: : :
:iiMake Sureyou eniered a Cbde number after touching Auto Cook, Auto Defrost,
ComNnatio n Auto R0ast, Combination time: Cooking or Combination temperature
cooking. :: : : i:: : :
:::FoODs_ times may :_,arybecause of starting food temperature, food density
::OVERCOOKED OR i:: ::0r:amount of foods in oven. Touch TIME COOK I & II and additional cooking :
time:for:Completion: ::::: : : : "
::::;:? i::::: :i:i!i::_:::::_ InCorreCt power level entered. Check cookbook for recommended power .....
i ::i_:::!:::::::,::: ::level; or Changing levels during cooking if necessary. :
ii directed when using Auto Cook.:: i: :
i, Dish was not rotatedl turned or stirred. Sonie dishe s require specific instructions.
::i:i_ ::::i:::!::i_::i::_:I:::::_:i_::: :Check :cookbook or recipe for instructions. : _: :
::::::: dishes in oven at same time. Cooking time must be increased
i:::: ' when:cooi_ing morethan one food item. Check cookbook for recommendation on
:::iii:i i:i::_:i:::::i :increased time.: ::: : i :
:- Incorrect €ode number emered after Auto Cook, Combination Cook or Combination
AutoRoasL : : ;: : : : :
:::::::i i:::::::;:::: ::::e Probe not inserted properly into meat or dish when using Temp Cook/Hold or
:: : i :::_ :Combination Auto Roast functions. Check cookbook or Cooking by Temperature
:::::_ :::: i secti0n of this book for specific instructions. : :: :
:_!-Check Cookbo0k for correct accessories such as racks and food placement on them.
;: ::::::::: _: .:: :i: :::: !:- Incorrect finished temperature entered with temperature-controlled functions._
_:i:: ::(:_i ::,, Fi0w of air blocked with Convection or combination cooking functions. :
38
Page 39

PROBLEM
;!IiPROgE!
:ON D ISPLAY: ::::Z[ :: ::_::::::i:::[:
If you need more help.., call, toll free:
GE Answer Center ®
800.626.2000
consumer information service
POSSIBLE CAUSE AND REMEDY
If You Need Service
To obtain ser-cice, see your' warTanty
on the back page of this booL
We're proud of our service and
want you to be pleased,, If for some
reason you are not happy with the
service you receive, here are three
steps to follow for' fmther helpo
FIRST, contact the people who
serviced your appliance° Explain
why you are not pleased,, In most
cases, this will solve the problem
NEXT, if you are still not pleased,
write all the details--including
your phone number--to:
Manager, Consumer Relations
GE Appliances
Appliance Park
Louisville, Kentucky 40225
FINALLY, if your problem is still
not resolved, write:
Major Appliance
Consumer Action Panel
20 North Wacker Drive
Chicago, Illinois 60606
39
Page 40

YOUR GENERAL ELECTRIC MICROWAVE OVEN/RANGE
WARRANTY
Save proof of original purchase date such as your sales slip or cancelled check to establish warranty period,
WHAT tS COVERED
FULL ONE:YEAR WARRANTY
Forone year from date of original
purchase, we will provide, free of
charge, parts and service labor
in your home to repair or replace
any part of the microwave
oven/range that fails because of a
manufacturing defect..
LIMITED ADDITIONAL
NINE-YEAR WARRANTY
For the second through tenth
year from date of original purchase,
we will provide, free of charge, a
replacement magnetron tube if
the magnetron tube fails because
of a manufacturing defecL You pay
for the service trip to your home
and service labor charges..
This warranty is extended to
the original purchaser and any
succeeding owner for products
purchased for ordinary home use
in the 48 mainland states, Hawaii
and Washington, DC, In Alaska the
warranty is the same except that it is
LIMITED because you must pay to
ship the product to the service shop
or for the service technician's travel
costs to your home.
All warranty service will be provided
by our Factory Service Centers or
by our authorized Customer Care ®
servicers during normal working
hours.
Look inthe White or Yellow Pages
of your telephone directory for
GENERAL ELECTRIC COMPANY,
GENERAL ELECTRIC FACTORY
SERVICE, GENERAL ELECTRIC*
HOTPOINT FACTORY SERVICE or
GENERAL ELECTRIC CUSTOMER
CARE® SERVICE.
WHAT IS NOT COVERED
= Service trips to your home to
teach you how to use the product,.
Read your Use and Care material.
If you then have any questions
about operating the product,
please contact your dealer or our
Consumer Affairs office at the
address below, or call, toll free:
GE Answer Center ®
800,626.2000
consumer information service
= improper installation.
tf you have an installation problem,
contact your dealer or installer
You are responsible for providing
adequate electrical, gas, exhausting
and other connecting facilities,.
e Replacement of house fuses or
resetting of circuit breakers_
• Failure of the product if it isused
for other than its intended purpose
or used commercially_
. Damage to product caused
by accident, fire, floods or acts
of God,
WARRANTOR IS NOT RESPONSIBLE
FOR CONSEQUENTIAL DAMAGES.
Some states do not allow the exclusion or limitation of Incidental or consequential damages, so the above limitation or exclusion
may not apply to you, This warranty gives you specific legal rights, and you may also have other rights which vary from state to state
To know what your legal rights are in your state, consult your local or state consumer affairs office or your state's Attorney General
Warrantor: General Electric Company
if further help is needed concerning this warranty, write:
Manager--Consumer Affairs, GE Appliances, Louisville, KY 40225
PartNo. 164D1352P179 i
PubNo. 49-4963 I
8,89
JVM190
Printed in Korea
 Loading...