

Page 1
ge.com
D
©
L.)
Sa]bOl Instructions .... 2-9
Operating Instructions
Auto Features ......... 20
Care and
Cleaning .......... 33, 34
Changing the
Power I ,e\'el .......... 13
Cooking Guide ..... 15, 16
Deti'osting Guide .... 18
Exhaust Feature . .37, 38
Features of Your
Microwave Oven . .11, 12
Microwave Temps ...... 32
Other Features .... 95-31
Replacing Bulbs .... 35, 36
Sensor Features .... 91-24
Time FeattH'es ...... 14-19
7}rmbleshoodng Tips ...39
Things That Are
Nomml _'\ith Your
Microwaxe Oxen ....... 4(1
Consumer Support
Consumer
Support ...... Back Cover
Optional Kits ......... 10
Product
Registration ....... 41, 42
X_hrrantv ............. 43
Espa_d
For a Spanish version
ot this manual,
visit our _,Vebsite at
ge.colll.
PaI'a COiiS/lltai" tlIla
ve_ion en espafiol
de este manual
de instrucciones,
visite nuestro sitio
de internet ge.com.
,[VM l850
,IVM l85 l
,[VM 1860
,Ira4lS6l
,]VM 1870
,/VM1871
,[VM2050
Write the model and serial numbers here:
Model #
Serial#
Find lhese numbers on a label inside
tile o\en.
49-40395-1 O&05Jfl
Page 2
IMPORTANTSAFETYINFORMATION.
READALLINSTRUCTIONSBEFOREUSING.
WARNING!
For your safety the information in this manual must be
foflowed to minimize the risk of fire or explosion, electric
shock, or to prevent property damage, personal injury,
or loss of life.
PRECAUTIONSTOAVOID
POSSIBLEEXPOSURETO
EXCESSIVEMICROWAVEENERGY
ii_?iiiii!+++;;iii!li_+¸
_: Do Not Attempt to operate
this ()\ell with the door open
Sill((' op('//-dooF op('l_Hioll
(an r('suh in hm:mflfl
e×posure to lHi( rOW_lV('
energ}. It is important not
to (te_('_t or umlper _itl/
the s_d('tv intcrhxks.
_: Do Not Place any object
b('tw('('H th(' o\('11 [_'()111
{i_(e and tl/e door or allow
soil or cleaner residue to
t_((umulate on setding
St tFJitC('S+
Do Not Operate the ov(,n if it
is damaged. It is particulady
importam that the oven door
(lose propcrb+ _and that tile)'('
is no damage to thc:
(,oo1(,is,.>.
h.lg(+.,l(__..h(+
.........................(broken or loosened),
(.,o1-s(++,_+.lids(+.,,l+
.........................Stll?t_t( (!S+
The Oven Should Not be
a(!jtlste(| or repaired by
qu_difi('d s('r\'i((" t)er._oml('l.
SAFETYPRECAUTIONS
When using electrical appfiances, basic safety
precautions should be followed, including the following:
J} Re_d an(I i()llow tl)e i_: Install or lo(_te this
specific precautions ill
the Precautions to Avoid
Possible Exposure to
Excessive Microwave
Energy se(doH above.
J} This t_t)pli_ul( e must be
grounded. Conne(t only
to a t)ropcrb, ' grounded
outlet. See the Grounding
InstFuctZons Se(tiOl/ Oil
page 8.
appliance only in
accordance with tile
t)rovided [nstMlation
h/swtl( tl()l/S.
i;i;This l/li(row_l_e ()veil is
intended/or household use
ml(t is UI listed lbr
installation over elc(-tri(
and g_s rmlges.
ii::This microwave oven is
not approved or tested/or
marine use.
Page 3
Use this appfiance only for its intended purpose as described in this
Owner's Manual
_5}Do not lnount this al)t)limace over a
sink.
J? This ovel-d/e-rm/ge oven _a_s (tesiglled
ti)r use over ranges no wider allan 36"
It mm be installed o\er both g_s and
elecuJc cooking equipment.
J? Do not ot)erate this appliance if it has
a (Imnaged power cord or plug, if it is
not working llrOp( fl}. or if it has been
damaged or dropped. If the power
(ord is damaged, it must be replaced
l)vGeneral Ele(tri( Service or an
at_thofized service agent using a
power cord a\ ailable tix)m C,eneral
Ele(t)Jc.
_: 1)o not c(wer or block any openings
on the at)plim/(e.
_: List, this at)tllian(e only/L)r its
intended else as described in riffs
manual. Do not use corrosive
chemicals or vapors in this appliance.
This microwave o\en is specifically
designed to heat, (tI'_ r or (ook fi.)o(I,
and is not intended t_)r laboratory or
ind usnJal use.
J? Do not store this appliance outdoors.
Do not use this product near wate_--
tDr ex_tlIlple, ill _t wet b_tselI/ellt, I/e_tr
a swimming pool, near a sink or in
similm: lo(adons.
_: Keel/power cord awa}/ix)m heated
Stlr/itces+
_: 1)o not immerse power cord or plug
ill w_ltel3
J? Do not store anyihing (tirecdy on toll
of the illiCt'ow;4\ e ()\ell S/ll?tilee when
the lllicl'ow_\ e O\ell is ill ot)el_ltiOll.
J? To reduce the risk of fire in the ()\el/
- Do not over(ook/k)od. Carefltllv
auend at)lllian(e when pallet; plastic
or other combusdble materials are
placed inside the o\en while cooking.
- Renlo\e wire twist-ties and metal
handles/i'om paper or lllasue
containers 1)elk)re placing them in
the oven.
I)o not use the (wellIL)r storage
puqloses./)o not lea\ e paper
products, cooking utensils or t[)od in
the oven when not in use.
- If materkds inside the (wen iglfite,
kee t) tl/e oven door closed, turn the
oven off and disconnect the l)ower
cord, or shut off power at the fitse or
circuit breaker panel. It the door is
ot)ened, the tire _lyr spread.
- Do not use the Sensor Features
tvdce in succession on the same ti)od
pordon. If/L)od is undercooked after
the/irst countdown, use 711lieCook t_)r
additional cooking ume.
N See door surti_ce cleaning
insmmtions ill die Care and cleaning
of the microwave oven section of this
manual.
_: This appliance should be serviced
only t1}' (tualitied service persom/el.
Conta(t nearest authorized selMce
/imility tot examination, repair or
a(!iustment.
J_ ,ks with rely allplian( e, (lose
Stll)eI'vJsion is llecessarv when/ised l)_
(hildtx'n.
_e.com
!li/ii,il! ,iiilii
iiiiiiii!ilili +!!iiiiiii+iiiii
3
Page 4
IMPORTANTSAFETYINFORMATION.
READALLINSTRUCTIONSBEFOREUSING.
WARNING!
ARCING
If you see arcing, press the CLEAR/OFFpad and correct
the problem.
Arcing is the ini_ rowave ternl
Ior sparks in the oven. Arcing
is caused Iv:
N The metal shelf not
installed correctly so it
touches the n/ierowa_e wall.
_: Metal or fi)il touching the
side of tile oven.
FOODS
i;i;Foil not molded to fi)od
(upturned edges act like
_llltel/ll_lS).
+;i:Metal, smh as twist-ties,
t/ouhry pins, or gold-
rinmled dishes, ill the
lllit rowave.
ii::Recycled paper towels
containing small metal
pieces being used ill the
nlicrowave.
_: l)o not t_ot / l/opeorn ill
Your mi_ rowave oven unless
ill a special lnit ro_,,ave
t/ot)t orn a(t essory or mlless
you use pOl/COrn labeled
ti)r use ill lnit rowave ovens.
_: Son/e llro/hlcts such as
whole eggs and sealed
( ont ainers--/k)r exal//l)le ,
eh)sed.jarslare at/le to
exlflode and should not be
heated ill this mi_ rowave
oven. Such use o/ tile
nlicrowave oven could
resuh ill il_ju W.
_? l)o not boil eggs ill a
lllicrowave oven. Pressllre
will build u 11inside egg yolk
and will cause it to burst,
t/ossibly resulting ill il_.j_?r.
()perating tile microwave
with no/ood inside tor
nlore than a minute or two
lIl_l_' ca/Ise (tal/lage to the
oven _lll(I Co/lld s|2117t a lift'.
It increases tile heat around
the n/agnetron and tan
shorten tile liti' of the oven.
Foods with untlroken outer
"skill" sHth as t)ot:atoes, hot
dogs, sausages, ton/aloes,
apples, chicken li_ers and
other gJt)lets, and egg yolks
should tie pierced to allow
stealil to escape (lilting
cooking.
Page 5
_e.com
SUPERHEATEDWATER
Liquids, such as water,
coffee or tea are able to be
overheated beyond the
boiling point without
appearing to be boiling.
Visiblebubbling or boiling
when the container is
removed from the microwave
oven is not always present.
THISCOULDRESULTIN VERY
HOTLIQUIDSSUDDENLY
BOILINGOVERWHENTHE
CONTAINERIS DISTURBED
ORA SPOONOROTHER
UTENSILISINSERTEDINTO
THELIQUID.
To red uce die risk of illi mT
to peFsons;
-- Do not overheat the liqui(t.
-- Stir tile liquid bodl betbre
and halt\vay dlrough
heating it.
--Do not use straight-sided
(omainers with narrow
necks.
-- After heating, alh)w tile
cont_liner to st_*.nd ill tile
microwave oven tk)r a short
ti]ne betk)re removi]lg the
contuine_t
-- Use extrelile C_tre when
inserting a st)oon or ()tiler
utensil imo the (ontaine_t
ii::A_oid heating baby tbod in
glass jars, even with tile lid
o/E Make sure all in/hnt
/hod is dloroughly cooked.
Stir/t)od to distrit)me tile
heat evenh. Be carefill to
prevent scal(ling when
w_rl/ling /t)rl//Hl_ ()r bre_tst
milk. The (ontainer may
/vel cooler than tile milk
really is. Alwa_t'_ test the
milk heir)re/eeding tile
hal )_r.
i;i;Don't (te/i'ost/i'ozen
beverages in narrow-necked
boules (espe(ially
(arbonated beverages).
E_en if tile container is
o])ened, 1)ressm:e can build
ut). This can (raise tile
container to burst, 1)ossibly
resulting in iqiuvy.
ii:;Itot /oo(ts and steam (an
cause bm:ns. Be careflll
WlleI/ opening ;-uly
containers of hot tt)o(I,
in(luding t)op_ orn bags,
(()()king pouches and
boxes. To t)revent t)ossible
illjm T, direct steam _r_'
/i:om hands and/h(e.
i;i;Do not overcook t)otatoes.
They could dehydrate and
(at(h fire, (ausing damage
to your o_en.
i;i;Cook meat and poultr}
thoroughly--meat to at
least an INTERNAl,
tenq)eratm:e of 160°F
and poultt +}to at least an
INTERNAl teml)eramre
of 180°E Cooking to these
teml)erat iires llSllally
protects against /ood-
borne illness.
iiiiiiiiii!iii!iiii!!H!
'
5
Page 6

IMPORTANTSAFETYINFORMATION.
READALLINSTRUCTIONSBEFOREUSING.
A WARNING!
MICROWAVE-SAFECOOKWARE
ii iiiiii!iii[iii!li i¸
Make sure all cookware used
in yore" microwa_ e oven is
suitable lk)r microwa_ing.
Most glass casseroles, cooking
dishes, measuring cups,
cllstard cllps, t)otter_ or china
dinn(rware which do(s not
ha_e metallic trim or glaze
with a metallic sheen can be
used. Sore( cookwar( is
lallek d "suital/le lot
microwaving."
N If you are not sure if a dish
is mierowave-sa/i,, use dlis
test: Place ill the oven both
the dish you are testing and
a glass measuring cut) filled
with 1 cu l) of watetmset tile
measm:ing cup either in or
next to the dish. Microwave
30-45 seconds at high. If
the dish heats, it should not
be used/i)r microwaving.
If tile dish remains cool
and only tlle wateY ill the
cup heats, then the dish is
microwave-sale.
i;i;If you use a meat
thermometer while
(()()king, make sure it is
saJ(' t()r IIse ill H/i(rowave
ovel/s.
_? Do not use recycled paper
products. Recycled t)at)er
towels, napkins and waxed
t)aper can contain metal
flecks which mm cause
arcing or ignite. Pat)er
prod uets containing nvlon
or talon filaments should
be avoided, as they ma_
also ignite.
_: Sol//e stvl'o/();-illl tl';-ivs
(like dlose dlat mea{ is
t)a(kaged on) have a thin
strip of metal emt)edded
ill the t)ottom. When
IIIi(IX)W;-IV,_'d, the lIl('tal (all
burll tile floor of tile ovell
or ignite a t)at)er towel.
_} I)o not use tile lili(row_lve
tO (IT _} I/evvst)at)el's.
N Not all plastic wrap is
suitable/or use ill
microwave ovens. Check
die package/i)r t)roper use.
_!}Paper towels, waxed 1)aper
and plastic wrap can be
used to cover dishes ill
order to retain moisture
and prevent spattering.
Be sure to vent t)las{ic wrap
so steam can escape.
+_} (',ookware l//Wv" t)econ/e hot
because o/heat mms/i'rred
fl:om tile heated too(t. Pot
holders may be needed to
handle tile (ookware.
Page 7
_e.com
+_?"Boilal)le" cooking pouches
and tightly closed t)las6c
bags should be slit, pierced
or vented as dire(ted b_
t)aekage. If they are not,
t)lasue (ould burst during
or imme(tiamlv alter
cooking, t)ossibly resulting
in i_iury. Also, plastic
storage containers should
be at least tmrtially
uncovered t)e(ause they
torm a tight seal. When
looking with containers
tightly co_ered with t)lastic
wYat) , Fel//OVe eoveril/g
eareflfilv and direct steam
away t_:om hands and fi_ce.
_: Llse loll only as directed in
this manual. TV dinners
may be microwaved in loll
u:ms less than 3/4" high;
remove the top loll eo_er
and return the tray to the
box. When using/i)il in the
microwave ovetl, kee t) the
foil at least 1" awm/i'om
the sides of the oven.
ii::Plastic cookware - Plastic
cookware designed fi)r
microwave cooking is very
useful, but should be used
(arefl_lh. E_en microwave-
sa/i' plastic may not t)e as
tolerant Of overcooking
conditions as are glass or
ceramic materials and may
soften or char if sut)jected
to short t)eriods of
over(ooking. In h)nger
ext)ostlreS to overcookillg,
the/ood and cookware
(ould ignite.
Follow thoso ouidolinos:
Use microwaxe-safe
t)last cs only an(
use them in strict
eomt)lianee with
the eook\_ aFe
lllal//l/_tc| IIY(W_S
l'eeOllll//ell(t_lt ioI/s+
I)o not mierowaxe
el/it)t" }' (ol/t_'tillel?s.
:13'!Do.(,t t,e n it,hild :e ,
to use t)lasue (ookware
\vithom comt)lete
supervision.
!li/ii,il! ,iiilii
iiiiiiii!ilili !!iiiiiii+iiiii
7
Page 8
IMPORTANTSAFETYINFORMATION.
READALLINSTRUCTIONSBEFOREUSING.
WARNING!
Improper use of the grounding plug can result in a risk of
electric shock.
GROUNDINGINSTRUCTIONS
This appliance must be grounded, h_, the event of all electrical
short circuit, grounding- reduces the risk of (lectric shock by
llroviding - un escupe wire lot the (lectric curr(nt.
This >tppliance is equipped with a l)ow(r cord l'Lu_,ing u
grounding wire with _l grounding plug. The plug must be
l/lugged into _m outlet th>u is i/roi/(rly inst_dled _md grounded.
Consult u qualified ele( tri(iun or s(rvi('e teclmi(iui] il th(
grounding instructions are not completely understood, or if
doubt exists as to whether the ai/l/liance is l)rOl)( rly grom]ded.
If the outlet is a standard 2-prong wall omlet, it is yore: personal
resl)onsibility and obligation to have it replaced with a ln'Ol/erly
grounded 3-prong wall outlet.
Do I/or/l]l(lel? any (il?c/ll//stall( es (lit o17 rei/love the third
(gr(mnd) prong fl:om the pow(r cord.
Do not use >m _(l>q_ter plug with this >q_lllium'e.
Do not use un extension cord with this al/plium'e. I1 tile power
cord is too short, have a qualitied el(ctrieian or service
technician install an outlet near tile appliance.
For best operadon, plug this al)pliance into its own el(etrical
outlet to prevent flickering of lights, blowing of fl_se or tripping
of circuit l/reaker.
Page 9
ge.COIgl
THEVENTFAN
The tml will operate automatically under certain condi6ons
(see Automatic Fan teature). Take care to prevem the starting
and spreading of accidemal cooking fres while tile veil| t_lll
is in use.
ii::Clean tile mlderside of die microwave often, l)o n()t allow
grease to build ut> on tile microwave or the/hn tilte_
ii::[n tile e_em of a grease fre on the sur/ace units below tile
microw_o..e oven, smother a/lalllillg [)all Oil tile stlrl_€e tlllit
by covering the pan completely with a lid, a cookie sheet or
a/lat tl?_.
i_i;Use care when cleaning tile veto/ira filter. Corrosi_v cleaning
agents, such as lye-based oven cleaners, may damage tile tilte_
N When preparing flaming/oods under tile microwave, turn
the/hn on.
ii::Never leave surthce milts beneath your nlicrowave oven
unattended at high he_t settings. Boilovers (m_se sn/oking
and greasy spillovers thin 1raft ignite mid spread if the
n/icrowa_e veto /an is operming. "Ik>minimize autoln_tic tml
operation, use adequate-sized cookware and use high heat
on sm:tilce units only when ne< essarv.
READANDFOLLOWTHISSAFETY
INFORMATIONCAREFULLY.
SAVETHESEINSTRUCTIONS
i_iiiiiii,,,,,,,,,iiiiiiii
9
Page 10
Aboutoptionalkits.
iii!iiiiii','_iiiiiiiililiiiiiiii!iii
OPTIONALKITS
Filler Panel Kits
JX52WH- White
JX52BL - Black
JX52CT- Bisque
When rel)l_cing _ 36" rmlge hood,/ilh'r panel kits fill in the
additioHal width to provide a €ustom built-in appearan€e.
For installation between cabinets only; not ff)r en(l-ot2cabinet
installation. Each kit comains two 3"-wide filler panels.
Filter Kits
JX81B - Recirculating Charcoal Filter Kit (1800Series models)
JX81H- Recirculating Charcoal Filter Kit {2000Series models)
Filter kits are used _r_l_'_l t_l_' llli(row_lve OVell (_1]11/0| be v('l/ted
iO the Olltsi(Ie.
A_ailable at extra cost fi'om your GE supplier.
ii ,l !iiii!iiiiii!!
7O
Page 11
Aboutthefeaturesofyour
microwaveoven.
Throughout this manual, features and appearance may vary from
your model.
///////l!!!\\\k_x
0
iiif_iiiiiiii!i!;!il,ii:i!iii/i
ge.com
iiiiiiiiii_iili
Featuresof the Oven
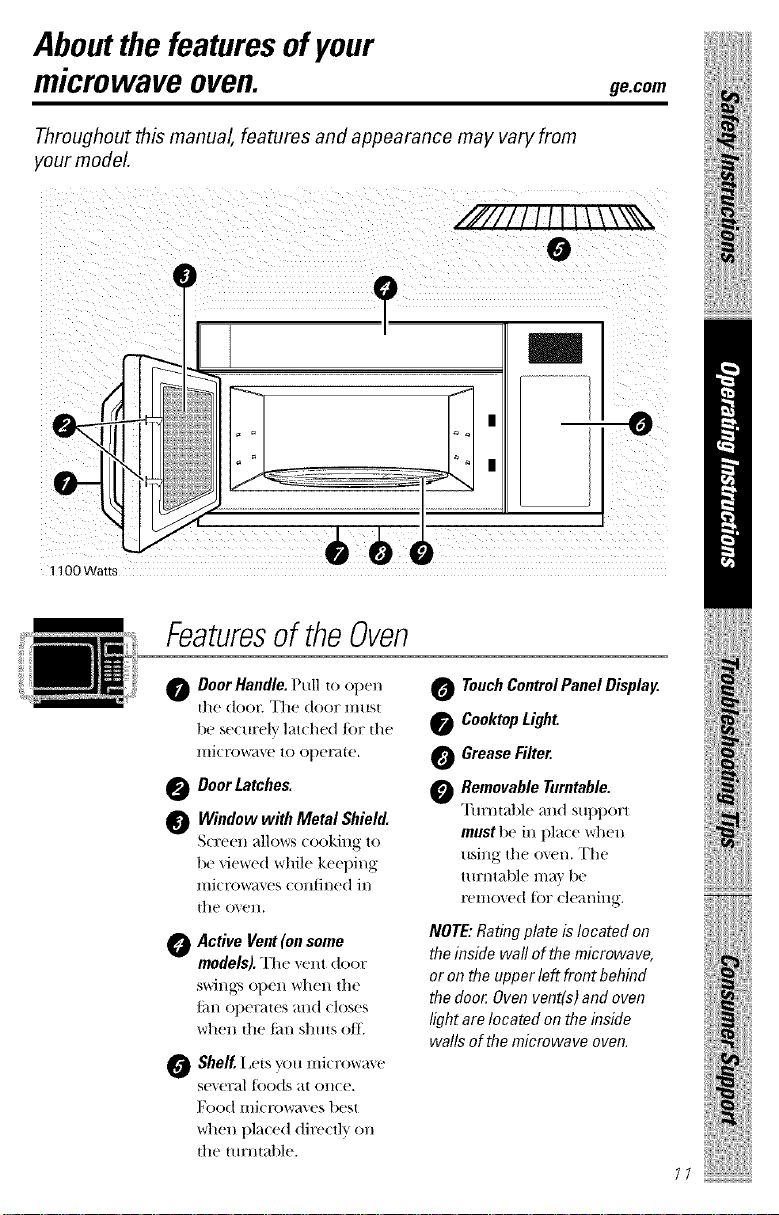
O Door Handle. Pull to open
the door. The door must
be securely latched Jar tl/e
mict'o_+avc to ot)et_te.
Door Latches.
Window with Metal Shield.
S(1;('('n ;_lll/)ws ( ooking to
1)1' Vi('W('(| while kccl)ing
IIIiCI'OWOV('S conIined ill
the ()_ell.
_ Active Vent (on some
models). The _ent door
SWil/gN op('n wh('n till'
Jill/ ol)era[es _tlld €loses
when die tim shuts oJtl
O Shelf. Lets you microwave
sc\eral [()o(ts _t[ once.
Food microwm es best
\qlen placed dir(,ctlv on
the turntable.
O Touch ControIPanel Display.
0 Cooktop Light.
O Grease Filter.
O Removable Turntable.
Turntable _md sul)l)ort
using till' o\cn. The
ttu:nt:able 1rim' be
t'emo_'d tbr cleaning.
NOTE: Rating plate is located on
the inside wail of the microwave,
or on the upper left front behind
the dooc Oven vent(s) and oven
light are located on the inside
walls of the microwave oven.
iiiiiiii!ilil,i__!!iiiiiii_iiiii
11
Page 12
iIiii'ii'i' ii iii
Aboutthefeatures of yourmicrowave oven.
Youcan microwave bytime, with the sensor features or with the auto features.
0 0
CookingControls
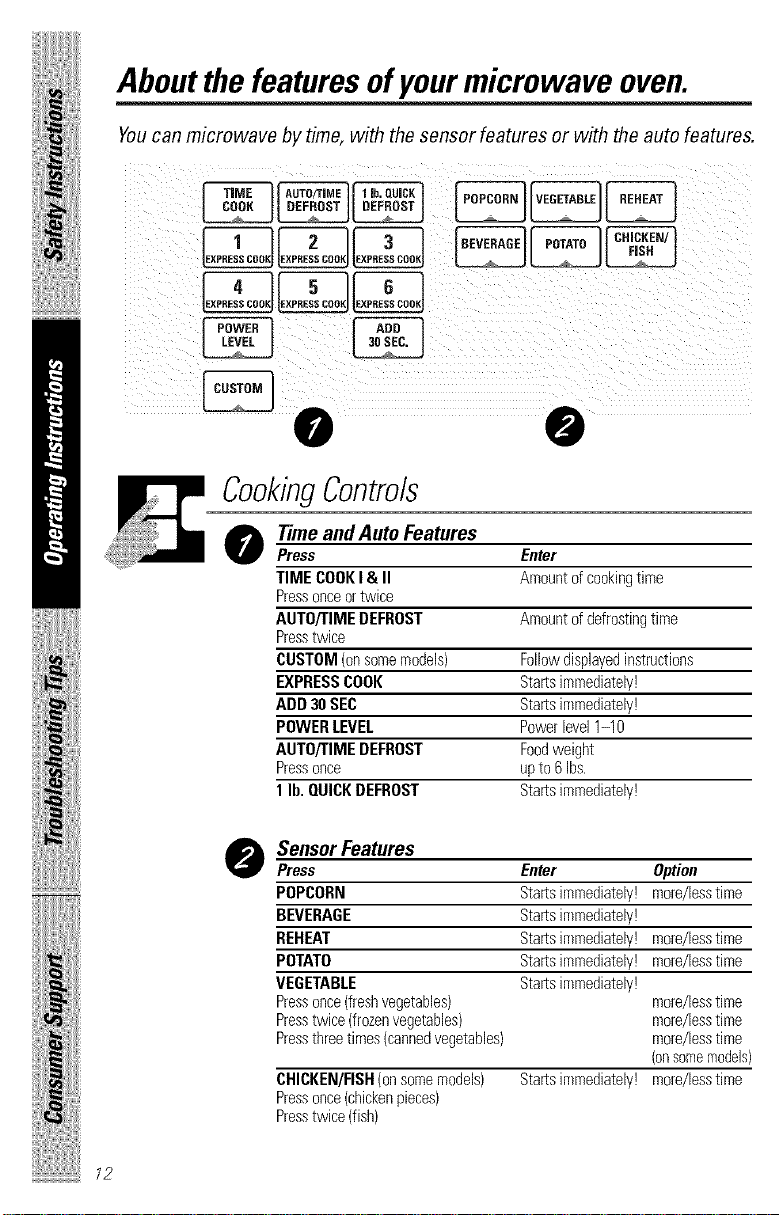
O Timeand AutoFeatures
Press Enter
TIME COOKI & II Amountof cookingtime
Pressonceor twice
AUTO/TIME DEFROST Amountof defrostingtime
Presstwice
CUSTOM (onsome models) Followdisplayed instructions
EXPRESSCOOK Starts immediately!
ADD 30 SEC Starts immediately!
POWER LEVEL Powerlevel 1-10
AUTO/TIME DEFROST Foodweight
Pressonce upto 6 Ibs.
1 lb. QUICKDEFROST Starts immediately!
12
O Sensor Features
Press Enter Option
POPCORN Starts immediately! more/lesstime
BEVERAGE Starts immediately!
REHEAT Starts immediately! more/lesstime
POTATO Startsimmediately! more/lesstime
VEGETABLE Startsimmediately!
Pressonce(freshvegetables) more/lesstime
Presstwice (frozenvegetables) more/lesstime
Pressthreetimes (cannedvegetables) more/lesstime
CHICKEN/FISH(onsomemodels) Starts immediately! more/lesstime
Pressonce(chickenpieces)
Presstwice (fish)
(onsomemodels)
Page 13
Aboutchangingthe
power level. ge.com
ii+/ili+++++{+!iiii+++/+++/iii
_oo AuTo/rlm_
+ 2
4 ........
]EB
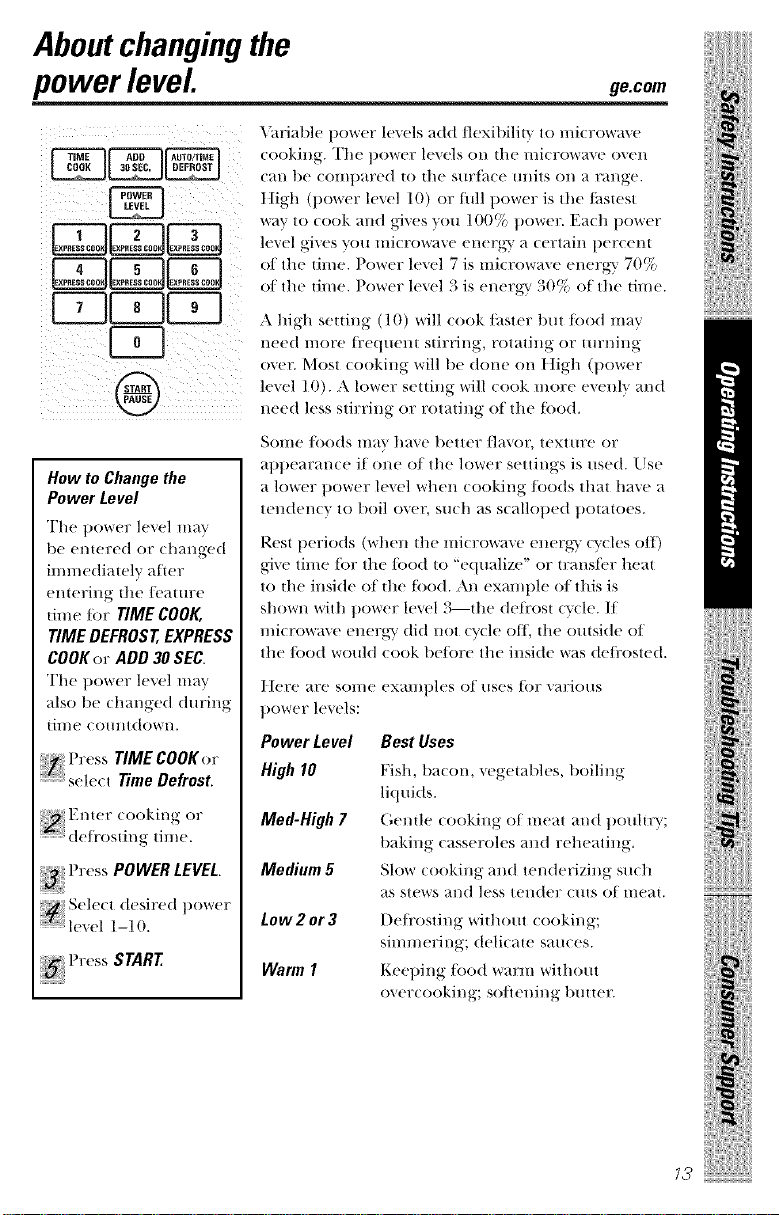
How to Change the
Power Level
The power level may
be entered or (hanged
innnediatelv atter
entering tile/('ature
tinle tot TIME COOK,
TIME DEFROST, EXPRESS
COOK or ADD 30 SEC.
The t)oweF hweI may
also be changed during
time cotmtdown.
:>'" * ) S
++_'I++l _e, s TIME COOKor
sele(t Time Defrost.
++ P _ss POWER LEVEL
le'_el 1-1 l).
X_triable power levels add flexibility to microwave
cookill}g ++Wh( ])owe1? lexels on the l/li(l?OWa'_e o_en
c}tn t)e ( OIl/t)}tYed to the StlYt_l(( tlllits on }t F}tnge+
tIigh (power level 10) or tull power is the/ilstest
way to cook and g+ves you 100% power. Each t}ower
level gives you microwave energ-y a certain percem
of the time. Power level 7 is microwave energ-y 70%
ot tile tin/e. Power level 3 is energy 30% of the time.
A high setting (10) vail (ook faster but tood may
need more fi:equent stirring, rotating or tm:ning
over. Most cooking v¢ill 1)e done on } ]igh (t)ovcer
le'_el 10). A 1Ovvrel7setting will cook nlore e'_enl}' and
need less stirring or rotating of the tood.
Some/oods ma} have better flavor, texture or
appearance if one of tile lower settings is used. Llse
a lower power level when cooking/oods that have a
tendency to boil ovec such as scalloped potatoes.
Rest lleriods (when tile microwave energ} Qcles o/t)
give time tot tile/ood to "equalize" or transti'r heat
to tile inside of tile tood. All example of this is
shown with power level 3--the deti'ost cycle. If
microwaxe energy did not cycle oil, the outside of
tile/ood would cook be/ore tile inside was de/i'osted.
Itere are some examples of uses tor various
power levels:
Power Level Best Uses
High 10 Fish, bacon, vegembh's, boiling
liquids.
Med-High7 (',emle cooking of meat and poultry;
baking casseroles and reheating.
Medimn 5 Slow cooking and tenderizing such
as stews and less tender cuts of meat.
Low2or3 De/i'osting without cooking;
simmering; delicate sauces.
Warm 1 Keeping/ood warm without
overcooking; softening butter.
iiiiiiiiiiiiiiiiiiiiiiiiiiiiiiiiiiiii
iiiiiiii!ilii+i i+!!iiiiiii+iiiii
73
Page 14
ii!l;
iIiii'ii'i' ii iii
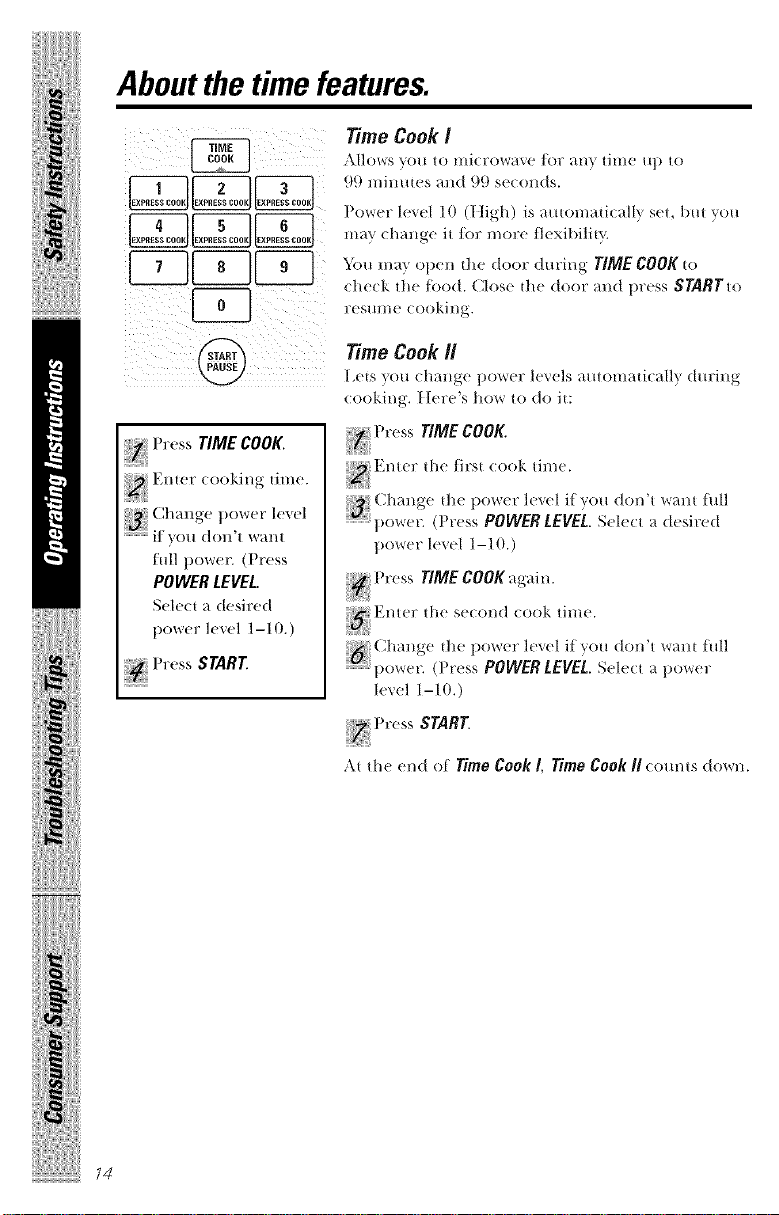
Aboutthetimefeatures.
Time Cook /
,\llo_s _o/l 10 illi(rowa_e for _'tl/} lillle /t l) lo
99 minutes and 99 s((onds.
Power lexel 10 ([tigh) is _/ oma i( _ ly sel, lml ?_'ou
in_}. chmlge it li)r more fl(xibilit\..
Y(m m m open the door d m:ing TIME COOK to
check the li)o(t. Clos( the door _md l)r(ss STARTto
resume cooking.
Pr( ss TIME COOK.
t'ull t)owei'\ (Press
POWER LEVEL.
S(,h,(-t _ desired
t)owel" level 1-10.)
...... Press START
1
I,(ts you eh_mge pow(r h'vels mHom_ticMly dm'ing
cooking. Her( 's how to do it:
P ess TIME COOK
I
Enter _he first (ook time.
....... l)o_er. (Press POWER LEVEL. S(lecl a desired
power lex(1 1-10.)
P ess TIME COOK again.
El/leT lhe se(ol/d (ook li_//e.
!i!i&iiii_il
...............l)o_er. (Press POWER LEVEL. S(lec_ a po_er
level 1-10.)
Press START
N
A_ _he end of Time Cook I, Time Cook II c(mn_s do_,_/ll.
Time Cook II
Page 15

Cooking Guide for -timeCookI and -time Cook II
NOTE."Use power level High (10) unless otherwise noted.
Amount Time Comments
Asparagus
(fi-esl_ spears) l lb. 6 to 9 rain.,
Med-t tigh (7)
(ti'ozen spears) lO-oz pa(kage 5 to 7 rain.
Beans
(fi'esh green ) 1 lb. (ut in halt 9 to 1 1 rain.
(l¥ozert green ) lO-oz t)a(kage 6 t778 rain.
(li'ozen lima) 11)-77zt)ackage 6 t778 117i1/.
(fi'esh, whole) 1 lmn(h 17 t7721 rain. In 2-(it. ( asserole, t)lace
In 11/__-(lt.ot)l(mg glass 1)aking
dish, t)la(e 1/4 cu t) water.
117 1-qt. (asserole.
In 1 ½-qt. casserole, place
1/2 cup water.
In 1-(it. casserole, place
2 tal)lest)oolTs water.
In 1-qt. casserole, place
1/4 cup ,,vate+_
1/2 (u l) water.
ii+/iiiiiiii{+!iiiiiii/iii/iii
ge.com
(fi'esh Cut) l tmn(h 7 to 10 rain.
(1V+ t77 1½ lbs.)
(!iesh Spears) 1 t)un(h 9 t77 13 rain.
(tiozen, lO-oz t)a(kage 5 t77 7 rain.
chopped)
(fi'ozen spears) lO-oz package 5 t() 7 rain.
Cabbage
(fl'esh)
(wedges)
(ffesh_ sliced) 1 lb. 7 to 9 rain.
(ti+ozen) ll)-oz t)a(kage 5 to 7 rain.
Caufiflower
(flowerets)
(fresh, whole)
(fi-0ze n)
(1V+ t77 1½ lt)s.)
1 me(lim_, 17ead 8 t() 1 1 mi_,.
(al)77ut 2 lbs.)
7 u7 10 rain.
1 me(tim_, head 9 to 14 mi_,.
1 medimnhead lOt() 17rain.
1()-77z t)a(kage 5 t77 7 rain.
In 2-(it. casserole, t)lace
1/2 cup water.
In 2-qt. 77t)17mg glass baking
dish, place 1/4 cup water.
In 1-(tt. casserole.
117 ]-qt. (asserole, t)la(e
[al)lesl)()()77s wa[er.
In 1V2-77r 2-(it. casserole, place
1/4 cut) water.
In 2- 77r 3-qt. casserole, place
1/4 cup ,,vate+_
In 1 I/e-qt. casserole, place
1/4 cup water.
In 1-(it. casserole, place
2 tal)lesl)OTmS water.
In 2-(it. ( asserole, t)la(e
1/2 cu 1) water.
In 2-qt. casser771e, place
1/2 cu 1) wateT:
In 1-(it. casserole, t)lace
2 tal)lesl)OTmS water.
'
/5
Page 16

ii!l;
iIiii'ii'i' ii iii
Aboutthetimefeatures.
Corn
(fi'ozen kernel lO-oz pa(kage 5 to 7 rain. /n l-ql. (assero|e. t)la(e
Corn on the cob
(ti'esh)
(Jrozell
Mixed
vegetables
(fi'ozen lO-oz pa(kage 5 to 7 rain. /n 1-qt. (assero|e. t)la(e
Peas
fi'esh, shelled' 2 lbs. m_shelled 9 to 12 rain. /n 1-qt. (assero|e. t)la(e
(fi'ozen 10-oz package 5 lo 7 rain. In 1-ql. casserole, t)lace
Potatoes
(lresh. cubed. 4 pouuoes 9 to 12 rain.
white. ,6 to 8 oz each)
_Ii'esh. whole. ] m _/) b oz_ 3 to 4 rain.
sweet or while,
Spinach
(li'esh)
(fi'ozen.
chopped
and leaf
Squash
[I'estl. _ tllltllleI"
and yello_ !
(wime_, acorn,
l)t/tlerllllt)
16
:: :::::_i Amount Time Comments
] [0 _) ears 3 to 4 rain.
t)er ear
] ear 5 to 6 min.
2_to 6 ears 3 to 4 miu.
t)er ear
10 _, 16 oz 5 to 7 rain.
lO-oz package 5 to 7 rain.
l lb. sliced 5 to 7 min.
l to 2 squash _; to 11 min.
abottt 1 lb. each)
In 2-qt. oblong glass baking
dish, place corn. If corn is ill
husk, else no water; if corn has
been husked, add 1/4 cut/
water. Rearrange a/ler half
of lime.
Place in 2-qu oblong glass
baking dish.
Cover widl vented plastic wrat).
Rearrange alter half of _ime.
1/4 cut) water.
2 lal)|eSl)OOllS water,
Peel an(t cut into 1 inch cut)es.
Place ill 2-qt. casserole with
1/2 cup water. Stir a/ler half
of dine.
Pierce widl cooking tork.
Place ill center of the oven.
I,et stand 5 mimues.
Ill 2-qt. casserole, t/lace washed
spinach.
Ill 1-<it. casserole, place
3 tal)lesl)oolls watec
Ill 1½-qt. casserole, place
1/4 cup water.
Cut in half and remove fibrous
membranes. Ill 2-qt. oblong
glass baking dish, place squash
cut-side-down. "Ihrn cm-si(te-u t)
alter 4 lllill/lIes.
Page 17

Time Defrost
__ 9e.cor
A]|OWS you to de/i'osl toT the length of lime you
___ select. See the [)el]x)stiug (',tilde (or suggested tittles.
clnmge this toT more tlexil)ilitv. +_>tt m_-lv det_x>st
small items more quickly by r;,isiv, g the t)ower level
_d]erentering the time.11owexer, they willneed
more l]x'qtteut ;ittelltiOll t]|_lll ttMl;+i|.
@
Press AUTO/TIME
DEFROST twi(e.
Emer detir)sti,lg
:: :::::::::tillle+
::: Press START
Power level 7 cuts the total det]'osting time in
about half; power level 10 cuts the total time to
approximately 1/3. Rotate or stir/ood/i'equentl}.
A dull tlmmping noise mm be heard d m:ing
det_'osting. This sotmd is normal when the oven
is not operating at Iligh t)ower.
Defrosting Tips
_: For l)est results, I)l_ce {oDd (/ire<tlv on the
(te/ir)st rack and place the rack on the turntable.
J? Foods/i'ozen in paper or plastic can be det_:osted
in the package. Tightly closed packages should
be slit, pierced or vented AFTER/oDd has
partially det]:osted. Plastic storage containers
should be at least partially tmcovered.
N Family-size, 1)repackaged t_'ozen dinners (an be
de/i'osted and microwaved. If the/oDd is in a/oil
container, trans/cr it to a microwave-sale dish.
_: Foods that spoil easily, such as milk, eggs,
fish, stu/lings, poultry and l)ork should not l>e
allowed to sit ()lit t()r IIlore thall ()lie hotlr a/ler
(te/i'osting. Uoolll tel//t)erattlre t)rolnotes the
growth of harnfful bacteria.
_: For more e_en (/e/i'osting of larger/oDds, such
as beck lamb and _eal roasts, use Auto Defrost
J? Be sure large meats are comt)letely de/i'osted
be/ore ( ooking.
J? When (te/i'osted,/oDd should be (ool but
so/tened in all areas. If still slightly icy. return
to the mi(rowaxe vet+),' briefly, or let it stand a
/i'w minutes.
17
Page 18

ii!l;
iIiii+ii+i+ ii+iii
1'+
Aboutthetimefeatures.
Defrosting Guide
Breads, Cakes
Bread, buns or rolls (1 piec(`_ 1 rain.
Sweetrolls tapprox. ]2 oz 3 t(_ 5 rain.
Fish and Seafood
Fillets, frozen ( 1 lb3 t; to 8 mhL
Shelffish, smallpieces (1 lb3 5 to 7 mhL Plat(' t)lock iu (ass('rol('. Turn o\('r
Fruit
Plastic pooch- I to2 :4 to 6 rain.
(lO-oz packag_
Meat
Bacon (1 lb.) 2 to 5 rain. Pla((' UUOl)(`n('d t>a(kag( • in o_(`/L
Franks(] lbA 2 to 3 mill
Groondmeat (1 lb.
Roast:beef, lamb, veal, pork
Steaks, chops and cutlets
Time Comments
mid br('ak ul) afl('r ha|f tl_(' tim('.
f *'t stm ld 5 mi;lut('s a/i('r d('/i'osting +.
Pla((' tmOl)('n('d t)ackag(` in ov('n.
Mi(ro_a_('just until Jr'miLs (m_ be
S('l)arat('d. I.(`t staud 5 Hli/Htl(`s, J|
]I(,C(,SS_IF_, 10 CO/II])|('t(" (|(`]i'oMJl/_.
5 to 7 min.
12 to 16 min.
l)(,r lb.
5 to 7 min.
per lt)
Turn m(,at o\('r att(,r half lh(' lil//('+
|Is(' t)ow(,r 1(,_(,1 l.
Plac(' mlwrapl)(,d meat in cookh/g
dish. Turn ov(`r alter hall fl_e ume
Poultry
Chicken,broiler-fryer
cutup _2!_ _o 3 lbs,
Chicken,whole
(2½to 3lbs.
Cornish hen 7 to 13 mhL
Torkeybreast (4 to 6 f )s. 5 to 9 rain.
73
15 to 19 min.
17 to 21 min.
p(`r It)
p(`r lt)
When finish(,(I, s(,1)amt(, t)i(,c(`s and
let stand to (Onll)l(,t(, (t(,/i'osting.
Place wrapt)(,d chicken in dish.
UllW]_at ) al/(I ttlFtl OV(`I" alt('l"
half the tim(`. When tinished,
s(,t)arat(, 1)i(,c(,s and microwav(,
2 to 4 nlinut(,s more, if n(,c(,ssarv.
Let stand to tinish d(,l_:osting.
Place wrat)l)(,d chicken in dish.
Alter half the time, tmwra l) and
turn (hick(,n o\(,r. Shield warm
areas with loll. Finish d(,li'osting.
[t n(,c(,ssarv, Frill cold vmt(,r ill the
(a_i[_' until" gJl)l(`ts (ml 1)(` r(`mov(`(1.
Plac('/IHwr_+q)l)('d h(`n ill th(` o_+_'n
br('ast-.qde-up. Ttm/ov('r _O(,r half
the tim(`. Rm_ cool _t(,r in the
(avitv until gJbl(,ts can Lie remo\ed.
Place unwral)l)(,d breast in dish
br(`ast-.sid(,-down. A[i(,r half the
tim(`, turn o\er and shield warm
ar(,a_, with/oil. Finish deti'osting.
I *'t stand 1 to 2 hours in r(`/i'ig(,mtor
to COml)l(,t(, d(,/i'osting.
Page 19

___ _his is a quick way to set cooking time for l-6 minutes
___ t ress onc ot thc Express Cook p_,ds (ti'om 1|(>6) "
for I to 6 mhmtcs o£ cooking _t power level I0.
For example, press the 2 t)ad tor 2 mmutc._ ot
• • " S •
( ookiv, g time.
"Fh(! pOVvT!F 1(!_,(_1 (_tl/ 1)(_ (h_lllg(!d _ls fillip is (oHlltin_
down. Press POWERIEVEI _md enter 1-10.
Add 30 Seconds
You can use this feature two ways:
_: It will add 30 so(on(Is to the time ((mining down
ea(h dine the t)_(] is pressed.
J} It (an be used _s _ qui(k r_y' to set 30 se(onds of
cooking dine.
ii_iiiiiiiiiii_!iiiiiii/iii/iii
19
Page 20

ii!l;
iIiii'ii'i' :i iii
Abouttheauto features.
iiii%iil !!i£;J¸
E /, 11.1
l're_sAUTO/TIME
DEFROSTonce _br
AutoDefrost
al riuht, eHler/ood
weiuhl. For cxample.
press ]_a(ls 1 and 2
ior 1.2 t)olmds
1 |)O/ll/d. _ Ollll(-(_
Emer weight utt l()
_ l)omMs fi)r Auto
Defrost
I're._sSTART
(;uide
Auto Defrost
Auto Defrost automati(allv sets till' dcfi:osthlg tim('s
and p()/_re]7 lexels to gixe exert (teti'osting results tot
meats, t)ouhv} and fish weighillg u t) |o six p(mnds.
_< For Llest results, remove todd fi'om die pa(kage,
pla(e tbod directly on the de/i'ost ra(k and pla(e
the rack on dw turntable.
_:; "I\dce during Auto Defrost, the oven signals Turn
Food Over. At ea/h signal, turn the food oxen
P.emoxe det_'osted meat or shield warm _'{lPeas
with small pieces of/oil.
i+i;Atter defix)sting, most meats need to stand
5 minutes to complete defi'osting. I,arge roasts
should stand lor about 30 retinues.
Conversion Guide
ff tile weight of fbod is stated in potmds and
ounces. _lle ounces must be conver/ed to wmhs
.1') of>l poulld.
Weight of Enter Food
Food in Weight
Ounces (tenths of
apound)
1-2 .1
3 .2
4-5} .3
6-7 .4
8 .5
Weight of Enter Food
Foodin Weight
Ounces (tenths of
a pound)
9-10 .6
11 .7
12-13 .8
14-15 .9
¸(¸¸¸¸¸2: > <
2O
I lb. Quick Defrost
I lb. Quick Defrost aulom:_ti( ally sets lhc dcfi'osung
um,.'s and ])ov_(,r h,vcls {br {hods weighing one
t)omM.
Pr('ss I lb. Quick Defrost. Th(, ov('n starts
alltOmatJ(allv. When the ovl'll sig11als, till'l]
{hod men
;_?For 1)est results, remoxe todd fl_om die package,
pla/e too(1 (tire/tl_ (m the (leti'ost talk and pla/e
the ra/k Oll Ille Iiirllta|)le.
Page 21

ii+iiiii+++++i+!iiii+++/+++/iii
Aboutthesensorfeatures.
Humidity Sensor
What happens when using the Sensor Features:
The Sensor ];eattlres dete(t the in(re;_sing humidity
released dm:ing (ooking. The oven automati(alb
Covered
Vented
Dry off dishes so they
don't mislead the sensor.
at!justs the cooking time to various t'_])es and
_tlt/O/IIItS of ti>od.
Do llOt rise the Sellsor Fe_tttlres twice ill StlCCeSSIOI/
on the same food portion--it ntay resuh in severely
overcooked or btN:nt ti>od. It food is mtdercooked
after the (otmtdown, use Time Cook for additional
( ooking tim('.
r]l(' ])FO])(']? (Ol/t_till('rs _ll(t (O_('FS _]?1' ('sSelltl_t] It)I"
])(!St S(?I/S()F (ooking.
Alwa)s Hso iili(1;owav(+-s_tf(? (OlH_til/ors _tl/(t (()V(+l _
them with lids or xented plastit wrap. Never use
tight sealing plasti( (ontainers--they (an prexent
S " S " _ " " "
_teatll [FOIII e_caplltg arid (arise toed to over(ook.
Be sm:e the outside ot the cooking containers and
the inside of the nticrowa_e oven are (Irx be/bre
placing tbod in the oven. Beads of ntoistttre
ttlrtling illtO stealil C_tl/ mislead the sel/sor.
ge.com
NOTE:Do not use
this feature twice in
succession on thesame
food portion--it may
result in severely
overcooked or
burnt foo_L
Beverage
Press BEVERAGEonte to heat _,_ 8-10 oz (u t) oI
(ofJ't_(+ OF ()th('F |)ex (?l?_tg(+.
Drinks heated with the Beverage feature maybe very
hot. Remove the container with care.
_{f {(to(1 is tllld('r(ook(+d _tflel? th(' (Ottl/t(tOWll list'
Time Cook for additional cooking time.
iiiiiiii!ilili +!!iiiiiii+iiiii
21
Page 22

iIiiiiii ii iii
Aboutthesensorfeatures.
Popcorn
Howto Use thePopoornFeature
Usa only with prepackaged
microwave popcorn weighing
3.0to 3.5 ounces.
NOTE:Do not use the
metal shelf when using
the Popcorufeature.
NOTE:Do not use this
feature twice in
succession on the same
food portion--it may
result in severely
overcooked or burnt
food.
i_ the p_t(kFtge is less tl/all _.00llll(es or l_wger
thml 3.5 oml_es. PI_ e the p_ kage of tx_p_orn
ill the (ellter o/Ill(' l//i(row_l_e.
Press POPCORN tor a regular size (3.0 to 3.5 oz)
bag oI t)ot)(orn. The oxen starts immediawly.
If you open the door while POPCORN is displayed,
an error message will appear. Close the door and
press START.
I//ood is underl ooked a/ler the (oilntdown line
Tithe Cook tot additional cooking time.
How to Adjust the Popcora Program to Provide a
Shorter or Longer Cook Time
I/you lind that d_e brand o/t_op(or'n you use
m_derl)Ol)S or overeooks consistentl}, you can
add or sut)u'act 20-.30 seconds lo the amomatic
t)ot)t)ing tin/e.
Toadd time:
After 1)ressing POPCORN, t)ress 9 within Ill(! firm
30 seconds a/let the oven starts/or an extra
20 seconds.
Press 9 again to add another 10 seconds (total
30 seconds additional time).
Tosubtract time:
,\tier pressing POPCORN. press I within tile first
30 seconds afwr tile o_en star_s lot 20 seconds less
cooking time.
Press I again to red uce cooking dine another
10 seconds Qotal 30 seconds less dine).
, Ti,.eCook
22
Page 23

!iiiiiiii@ i!!iiii iiii iiiii
Eorreheating single servings
of previously cooked foods or
a plate of leftovers.
NOTE: Do not use the
metal shelf when using
the Reheat feature.
NOTE: Do not use this
feature twice in
succession on the same
food portion--it may
result in severely
overcooked or
burnt food.
How to Use the Reheat featnre:
Reheat ge.com
_ Pla(e the (up of li( uid or (oxered food in die
f ) S S
0"_011. } F(?S,_ REHEAT 01/(0, I'Wi( (? OF three tillle,L
The oxen starts immediately.
PI_OSS 011((! {()1" a plate of lefmxers.
Pl_(!ss twi((! for pasta (8-12 oz).
Press tilt'(!(! lilll(!s fol _ "_(_ota|)](?s ( 1 ,/2 to 2 (lips).
:::::::::lil//e FelIlaillil/g |)OgJl/s (Olllllil/g ([OWll.
Do not open the oven door m_iil time is co/rating
down. If the door is opened, close il and press
STARTimmedialeh'.
After removing food from the oven, stir, ff possible, to
even out the temperature, Reheated foods may have
wide variations in temperature. Some areas may be
extremely hot.
If tbod is no{ hot enough after die corm{down use
TimeCook/or additional reheating time.
How to Changethe AutomaticSettings:
Toreduce time by 10%:
Pn'ss I Wii]lil/ 30 s('(ol/ds alter pressing the
REHEATpad.
Toadd I0% to cooking time:
Pn'ss 9 Wit]lil/ 30 s('(ol/ds alter ])rcssing the
REHEATpad.
SomeFoodsNotRecmnmendedForUseWith Reheat'.
It is 1)cst Io use TimeCooklot dwsc/oo(ts:
_?;Bread products.
i_:!Foods dlat must be reheated uncovered.
i_i,Foods that need to be stirred or rotated.
N Foods calling/or a dry look or crisp sur/hce
alter reheating.
iiiiiiiiiiiiii_!iiiiiii/iii/iii
iiiiiiii!ilili !!iiiiiiiiiiii
22
Page 24

ii!l;
Aboutthesensorfeatures.
iIiii'ii'i' ii+iii
ONE TOUCH SENSOR
ii_ i ii i i _ iii i
Sensor cooking givesyou
easy,automatic Jesuitswith
avariety of foods (seethe
Cooking Guide below).
Sensor Cooking (onsomemodels)
Vegetables, Potatoes, Fish, Chicken Pieces
t)l_l(e coxered toed in the oxen. Press the
[: food pad. For xegetables, press the VEGETABLE
pad once Ji)r Ji'esh vegetables, twice {or
/i:ozen vegetal)les, or three {imes {or (mined
vegetables. For chicken or/ish, press the
CHICKEN/FISH1)ad once/or chicken pie(es or
twice tbr tish. The oven starts immediateh'.
ii iiiiii!iii+iL iii !li i¸
NOTE:Do not use the
metal shelf with Sensor
Cooking.
NOTE:Do not use this
feature twice in
succession on thesame
food portion--it may
result in severely
overcooked or
burnt foocL
The oxen signals _r]_ steam is sensed and dw
:: :::::'_tilIl(' rel//_tillil/(g |)('gil/s (O/ll/tillg dowI/. "Ftlrl/ or
stir the food it ne(essar_.
Do I/O| o])(!11 |11(_ o'_(?1/dool;/tntil til//e is (O/tlltil/g
dovqlJ. If the door is opened, (lose it and press
STARTimmediatel_.
If Jbod is tmdercooked after the comlt(town use
Time Cook tbr additional cooking time.
How to Change the Automatic Senings (automatic
senings for canned vegetables cannot be adjusted
on some models):
"_bu (_m a(!just th(' cooking tim(' lot all toods to
suit y'om: ])('rsolml tast('.
To reduce time by 10%:
Press I withill _0 s('(ollds Mt('r pr('ssing th('
tbod pad.
To add 10% to cooking time:
Press 9 withill _0 seconds a(ter pressing the
tbod pad.
CookingGuide
Amount
CannedVegetables 4-1 (i OZ CO'_(_F with lid OF "_(_l/[(!d pblsti( wrap.
Frozen Vegetables 4-11i oz ]_ollow pa(kage instru(tions for adding
Fresh Vegetables 4-16 oz Add 1/4 (u 1) water per serving.
Potatoes 8-32 oz Pier(e skin with tork. I la(e t)omtoes
Fish 4-16 oz Cover with xented plastic wry'q).
Chicken Pieces 2-8 t)iec(_s Coxer with "_ellt(!(t t)lasti(wry'q).
24
Comments
W_I|(!I'. (_(1"_(_1" With lid (11"xellted t)lasti(WI'_I[).
Cover with lid or vented t)lasti( wrap.
)
(11/ |11(! ttWlltable.
Page 25

Otherfeatures your
ii_iiiiiiiiii[_!iiiiiii/iii/iii
model mayhave.
ii_i_d)(_iii_i_(_iiliiii_
[[_[iii_[ iii_iiiiiill__i[__
ge.com
Custom(on some models)
Tlw CUSTOM l)_d _lllows VOIl to s_l`+'t' VOIll" IllOSt
li'equently used settings. (Sensor (ooking settings
('minor be saved.)
To set and saxc a setting:
Press hc CUSTOM t)_(t.
;t
Set the am(rant of cooking time.
[[i!.iH;iii
S('t _]'(_ t)(''_r_'" 1(_' (_1, i_" 't(_Si'_''t. (V'']l 1)(''%r(_': "ril 1
_++/itOllli_ltJ('i_ll][_ 11(' S('t if y'Oti (to 11Ot (]l_++ng(3 it.)
) S
t res. the CUSTOMt)ad.
Your (:ustom sctting `+`+'illbc remembered t+or ttutNrc
one tou(]l us(!.
"['o (lcar the (ttstom scHing, t)rcss and hold the
CUSTOMpad tOT2 scconds.
Help
The HELPt)ad disl)lays t_atm:c int+orm_i+tionand
hclt)ful hints. Press HELP;thcn sclc(:t a t+catm:c trod.
Cooking Complete Reminder
To rcmind v(m thou vott haxc [hod in the oxen,
the oxen ,+*'illdisplay FOOD IS READY and bec 1) (m(c
_t 1//11111|(' /IHtil Vo/l (_itl't(_i" O1)(_11 th(_ ox+(_ll (loof oY
press CLEAR/OFE
Clock
Prcss CLOCKto sct the time of (t_+++,;.
_; ] _c, s CLOCK.
O:+ l:+ntcr thc time of day.
or PM.
l)r( ss START
To (hc(k dw time of day whi]c mk row;_xing,
prcss CLOCK.
iiiiiii[!ilili__!!iiii[ii_iiiii
25
Page 26

iIiii'ii'i' ii iii
Otherfeatures yourmodel may have.
___AUTO/TIME 1lb.QUICK
Delay Start
Delay Start allows you to set the n/i(rowme to delay
(ooking up to 24 hours.
Select fl_e cooking or defi'osting t_ature you wish
to dela}; then enter the ((Joking or (let_xJsting time.
?i14 Enter the tilne "}'ou vvr_tI/t tile ()'_,(,l/ to start.
4_ (Be StllTe tile J//i(rowaxe (lo(k shows tile ((Jrre(t
tin/e of day.)
The start time will be displayed and will ren/ain until
the oven autonmtiealh starts at the delayed thne.
The time ot day may be displayed b)pressing CLOCK.
Timer
Timer operates as a minute timer and (an be used
at ally till/e, e'_el/ wllel/ tile (J'_ell is (JpeFatill_.
_iilli_!14[_ !iii_;2!
2_
Press TIMER.
t res. TIMER to start.
TO ])a/lse tile co/ll/t(towll, press TIMER.
When tinle is up, tile o_en will signal. To turn off
tile tinier signal, press TIMER.
NOTE: The timer indicator will be lit while tile timer
is operating.
To cancel the tinlec press and hold tile TIMER pad
tOT 2 seconds.
Page 27

ii iI !iii iii !i
ge.com
Reminder
The Reminder t_ature (_m l)e used like _m alarm
(lo(k, _tnd (_-111 l)(' /Is('d _tt _tn?' tilll(', e_,ell whe]l th(_
o',en is ot)erating. The Reminder time (an be set nt)
to .24 hours later.
_' Press REMINDER.
;_ Enter the time you _r_t tl_ (_ (_ t(_ remind
?'_:_::_)on. (P,e sm:e the llli(?lTOW_lv(._clock sho/srs the
correct time of day.)
Select AM or PM.
i Press REMINDER. When Reminder signal occm:s,
press REMINDER to mrn it oil'. The Reminder
time may be displayed tU pressing REMINDER.
NOTE: The REM indicator will remain lit to show that the
Reminderis sot, 7-oclear the Reminderbefore it occurs,
#ross and hold the REMINDER oad for 2 seconds,
Start/Pause
Ill addluon to ,_tartln_ man'_ t/m(uons,
START/PAUSEallows _ou to stop cooking witho/lt
opening the door or clearing the display'.
ii_liiiiiiiii_!iiiiiiiliiiliii
Child Lock-Out
_t_)/I ]//_t'}' lo(k tl/(' (ontl?ol 1)_ll(_l to t)Fe'_el/t ill('
|l/i( l'o/_r_t'_(._tl_Olll being a((identally' started or used
BV children.
To lock or unlock tile controls, press and hold
CLEAR/DfFti)r about three seconds. When the
control panel is locked, CONTROL LOCKED or
LOCKED will be dist)laved.
iiiiiiii!ilili !!iiiiiii iiiii
27
Page 28

ii!l;
iIiii+ii+i+ ii+iii
Otherfeatures yourmodel may have.
iii;!ii!i_ i_ !
1'+
i_ii_iiii(i_!i!(71_iii_
Turntable
For best cooking resuhs, leave the tm:ntal)h' on.
It can be turned o/1/or large dishes. Press
TURNTABLEu) ttlrll lhe turntable on or off.
Sometimes the turntable can become too hot to touch.
Be carelul touching die turntal)le dm:ing and after
(ooking.
VentFan
The vent [_HI rellloves stealll all(t other vapors ]l'oH/
sm:th( e cooking.
Press VENTFANome tor high Jim speed, twke for
1lie(till1//t_111 spe(!d, a third time for low fan spee(t,
or a fourth time to {Ilrn the fan off.
Press the VENTFANBOOSrpad {br extra {ml speed.
Automatic Fan
An alltOlllatl( {_tn ]('atllre prote( is {tie IIlitTOWa\e ]i'Olll
too much heat rising [i'om Ill(' (ooktop 1)elow it. h
_lIltOlllat](_lllv tIlrllS Oll i{ it SellSeS tOO lllIl(h |legit.
1] VO/I ]l_l\ e ttlrned the _illl Oil, }_()/l l//}iy, |ill(| that VO/I
cmmot mrn it oil The tin/will amomaticallv mrn off
\_]lell [lie illternal parts are cool. It l//_w st_i_ o11 {()17
._40 Illillllles or lllore a][( 17tile cooktop and llliCFOW_l\ e
COlltrols al'(' [[Irlled ()|t]
Surface Light
Press SURFACE LIGHT on(e tot bright |ighL twi(e tot
the night light, or three times to turn the light of/.
28
Page 29

_i ii iiii i
ii_iiiiiiiiiii_!iiiiiii/iii/iii
_e.com
Options
Press the OPTIONS t)_l(t multiple times to (v(le
through the a'_ailable options.
Auto Nite Loht
The Auto Nite Light (an be set to (ome (m and go
oit" at desired times.
'Ib set the timer:
:* Pr( ss 1.
Select,MorPM
P (ss the OPTIONS pad.
Enwr file time of day tor file light to go off'.
P _( ss the OPTIONS pad.
To review the nite light, settings, press 2 aJler
sele( ring file Auto Nite Light option.
To turn the nite light oil\ press 0 aJler selecting
the Auto Nite Lightoption.
Beeper Volume
The beeper s(mnd level can be _(/juste(t. Choose
0-3 ]or mute to loud.
Charcoal Filter Reminder
The Charcoal Filter Reminder is a 180-day timer to
remind you whell 1o (hange the (har(o_l/ilte_
Press 0 to turn fl_e reminder off. Press 1 to set fl_e
reminder. Press 2 to reset the reminder.
Display Language
The language tbr th( scrolling (/is])l_}' may be set at
either English or Spanish.
Press 1 tbr English or 2/i)r Spanish.
Display On/Off
You can choose to turn the (lo(k (/ist)l_ _' on or ()11_
Press 0 to turn t]'..' dist)l_ _' o/]i Press 1 to turn the
display on.
Display Speed
The scroll speed oI the dispk_y can be changed.
Select 1-5 Ibr slowest to Ihstest s(roll speed.
iiiiiiii!!iiiii, iiii!iiii!
29
Page 30

iIiiiiii ii iii
Otherfeatures yourmodel may have.
t'
How to Use the Sheff
When Microwaving
J? Make sure tile shelf is
positioned properly
inside the microwave
to pre_ent damage to
tile o_en trom arcing.
NDonotusea
microwave browning
dish on the shelK The
shelf could overheat.
_; [)0 llOt IIse the o_,en
with the shelf on the
microwa_ • floor.
This could damage
the lllicrow_we.
Shelf
]_'ood lIli(£ow_l_,es |)est when p]a(ed on the
turlltable or on the shelf in the ]OWeF position.
()nl) use the shelf when reheating on more
than one le'_el. Do not store tilt: shell inside
the o_,12n cavity,
For best results
Uneven results
2-level reheating
_: Llse pot holders when
handling the shell
it may be hot.
J? I)o not use the shelf
when cooking
])o])corn.
J? I)o not use the shelf
with Sensor Cooking
or Reheat
30
Page 31

Switch places after 1/2 time
Switch places after 1/2 time
ii_iiiiiiiiiii_!iiiiiii/iii/iii
_e.COlTI
Shelf and Reheating
_S'Toreheat on 2 levels
OR
_ Toreheat2 dishes on the lower levee
Multiply' reheat time by. 11/2.<
SWit(h pla< es after l/2 the dine.
;_: Toreheat on 3 levels:
"l_m:n the turntable ott'.
)
::9 Double the reheating dine.
Switch places twice
13,! Swit(h pla(es twi(e and gi'_e the dishes a
1/2 tm:n during reheadng. (Place dense foods,
or t]lOSC that re(luire a long(?r (ook tiliic, Oll
the upper shelf tirst.)
;lii!
31
Page 32

iIiii'ii'i' ii iii
Microwave terms.
Arcing .\rcin_, is the l//ic1x)_*/_l'_e[ell// tiJr sparks in die oxen..\reing, is
f''
Oe,ini,ioe
caused l>v:
!;:i dw metal shelf being installed ineorre(tly and |ou(hing
the lllJ(t'(Jwaxe walls.
Z_
i ii il 171
ii i i i i
Covering
Shielding In a regular o',en, you shield dfi(ken breasts or baked tbods uJ
Standing Timo When _ou cook with regular oxens, foods such as roasts or (akes
Venting _ier e(Jxerillg a dish ,*'ill] 1]lastie VVrlT_tl], "}'(J/|"_ell[ the t,lasti( wrap
_2 metal or/oil touching tile side of tile oven.
t_)il that is not molded to t_)od (utmlrned edges act like
_ll lteIll IllS).
_:_ metal such as twis|-|ies, t)ouluT pins, gold-rimmed dishes.
_: recycled paper towels (ontaining small metal pie(es.
C(J_q:'_ hold in moisture, _dlow for more even heating and reduce
(ooking time. Xi']lti]lg t)lasti( wrap or cox eri]lg with wax t)aper
allows eX( eSS s|e_llll t(J es(;-it)e.
pre'_el]t o, el=l)F(JV¢llillg. _]]ell 1]li(FOVca'_l]_, }!OH/,se Sl/lall SIIJl)S
of foil tO shield dfin parts, sud] as die tips of wing:, and legs on
t)ouhry, whi(h w(JHld (o(Jk 1)e{(Jre larger parts.
are allowed t(J stand to finish cooking or to set. Standing time is
(st)eci_dly imt]ortant ill II]ierovca'_e ((Joking. Note that a
]ni(rowa_ed (ake is ll(Jt t]la(ed oil a ((J(Jlillg _(k.
t)_' HI171]il]_" 1)_t( k ()lle ((Jill/el" S() ex(ess ste_ll/] (_tl] es( _tt)(!.
Page 33

Care and cleaning of the
microwave oven.
Helpful Hints
An o(_ _lsionM thorough wi|)ing with ;+1solution ot
baking so(|_t _t1/(| W_ttel7 keel)s the inside/i'esh.
NOTE: Be certain the power is off before cleaning any
part of this oven.
How to Clean the Inside
Walls, Floor, Inside Window, Metal and Plastic Parts
on the Doer
others may rc(ttfirc a damp (loth. Rcmo_c grca._y
spatters with a sudsy cloth; then rinse with a damp
(loth. Do not use abrasive cle_mers or sharp
utensils on oven walls.
Never use a commercial oven cleaner onaey part of
your microwave.
Removable Turntable and Turntable Support
To ])revent l)t'('_k_g(', do not ])la(e the tttrnt_d)]c
into w;+lter.j/lst after (()()king. \V_lsh it (re:chilly
in w_u:ln, sudsy water or in the dishwasher. The
ttlrntable and stq)l)ort (_111be broken if dropped.
1+_o1//(+111b1'17, do not o})1+17_tt1 + 1]11 +ovcn x+vit]lOtlt ill('
turntable and stqlllort in place.
Sheff
C]('_ln with mild soap and vvr_{C171)17in the dishwasher.
Do not clean in a self-cleaning oven.
Defrost Rack
C]('_m with mild so,q) _md w_m'r or in the top ra(k
of the dishwash,.'i'_
ii_iiiiiiiiiii_!iiiiiii/iii/iii
ge.com
iiiiiiii!ilil,i !!iiiiiii iiiii
33
Page 34

ii!l;
iIiii+ii+i+ ii+iii
Care and cleaning of the microwave oven.
1'+
How to Cleanthe Outside
We recommend agaiest usieg cleaners with ammonia
or alcohol, as they can damage the appearance of the
microwave oven.If you chooseto use a commonhousehold
cleaner, firstapply the cleaner directly to aclean cloth,
then wipe thesoiled area.
Bottom
(:lean off th(' grease alld (]list on the bottom ellen. Us(' a
sohttiOl/o_ _,al'l//water and ([('t('l\_('l/t.
Case
Clean tile outside of the microwa\e with a sudsy cloth.
Rinse and then dr}. Wipe the window (:leal/with a damp
cloth.
ControlPanel andDoor
Wip(, _ith a (tamp (loth. Dr? thorot@d}. Do not us('
(:leaning sprays, larg_' amo/mts of soap al/d x_+at('r,
abrasives or sharl) el)jeers on the panel--they can
damage it. Some paper towels can also scratch the
control panel.
Door Seal
It's important to kee l) tilt' area (l('an _h('re the (leer
seals against tlt_ microwave. Lse only mild, non-abrasive
(letergents apl)lied widt a (lean sponge or soil (lodt.
Rinse well.
Staie/ess Steel (on some models)
Donot usea steel-wood pad;it will scratch thesurface,
"]'t) ('lean the sta]nl('ss steel s/tr/ilce, tlse a hot, (la///]) cloth
with a mild detergent suitable [-i>rstainless steel surthc_ s.
Lse a cl_ an, hot, damp cloth t() remove soap. Dr} with a
dry, dean cloth.
If food soil remains, tr} a general kitchen (leaner.
For hard-t()-cl_ an soil, use a standard stainless steel
e]eal/er, s/[eh as gol/_\I//i _ Of Galileo ®+
Apply (;lean(r widt a damp sponge. Use a clean, hot,
damp cloth to remove eleanel; Dry with a dry, dean
cloth. Always scrub lightly ill the direcd(m of tlte grain.
Afier elealling, use a stainless steel p(dish, such as
Stainless Steel Magi(:"! Revere Copper and Stainless Steel
Cleal/er ®or Wenol M1 Ihtrpose Metal Polish _>.Follow tile
]trodttet instrttctions ]i)t"(leaning tile stainless steel
sllrJi_(e.
Page 35

Replacing the light bulbs. ge.com
Cooktop Light/Night Light
On models JVM1850 and JVM1851, replace the
burned-out bulb with a 4g-watt incandescent bulb
(WB36X10003), available from your GE supplier.
Remove screw
On models JVM1860, JVM1861, JVM1870 and JVM2O50
replace the burned-out bulb with a 120 volt, 20-watt
halogen bulb (WB36X10213), available from your GE
supplier.
"[_,,_p_ eme1,/,_l)(s),_,st dis(ollne_tthe
)(,wer _lt the 1//_1 11 _ttse (,1" (iF(tilt bFe_ikeF _)_tl/e]
or ])ull th(' ])lug.
Remo'_e the s( t'_x_r _t the left edge of the light
:: :::::'_(()'_el _ _tn( p/lsh (,11 [he righi e( ge (,t |he ((,_,el _
to open.
Be sure the bulb(s) t(, be repla(ed are cool
1)ef()re removing. \fret breaking the adhesi'_e
seal, remove the bulb t)v either gently turning
(ii)r models VVM1850 _md ]VM1851) or pulling
str_light out ([i)r models.]VM1860, ]VM1861,
JVM1870 and JVM2050). Replace wittl the same
size and type bulb.
ii_iiiiiiiiiii_!iiiiiii/iii/iii
Raise the light shield and repla(e the s( _'(_ r.
(;onne(t ele(tri(al power to the o',en.
i !iiiiliiiiiiiit iii
35
Page 36

ii!l;
iIiii+ii+i+ ii+iii
Replacing the light bulbs.
" _ Replace the burned-out bulb with a 120 volt, 20-wan
Oven Light
1'+
II,L k:z=_lL_=v_l],m@lflI
Light cover
! GEsupplier.
g t co e
Onsome models
f -
On some models
halogen bulb (WB36X10213), available from your
;7_To ret)lace the o',ell light, tirst (tis(:om_ect the
+l)ower _it the IIl_lill ]use or (iF(flit)re_++ker l)_illel
or pttll the 1)lug.
sliding the grille to the le/] (opening the door
n/akes grille removal easier).
N Nex,,re,,lo,e,heUgh,,o,er
On seine models, the light coxer is lo(ate(t
ill the eetlter o/the top ot)l'nillg. ReHlo_e the
s(rew that se(ures the light (over alld li/] the
€over o11.
On seine models, tile light cover is located at tile
le/] of the lop ot)ening. I,i/t the cover o/ll
; Pill(h the (lips thai hol(t the light so(kel ill
t)la(e alld lift the so(ket ()lit.
Remove the liulll Ilion/ the light so(ket 1)v
ii}_i _ s s " s
t)tllhllg _tr_tlgtlt ()lit. Repl_t(e _wlth the ;_tlIle ;1ze
an(t type t)ttlt), then replace the light socket all(t
cover.
:: Rel)la(e the grille all(t scre_x*+rs.ConIle(t electrical
::::::%power to the ()_,,'el/.
ii_?iiiii!++,L;;iii_!li_+¸
Page 37

ii_/iiiiiiiii_!iiiiiii/iii/iii
Abouttheexhaustfeature.
Charcoal Filter
(on some models)
Reusable Grease Filter
(on all models)
The Vent Fan
The v('Ht/_m h_ls _ m('t_fl r('tts_ll)](' gr('_ls(' filt('r.
Models theft r('circl_k_te air back imo the room also
use a charcoal filt('_
Reusable Grease Filter
THe r('ttsabl(' g+r('_s(' filter traps grease released by
fi)o(ts OH the cooktol). It _flso t)rt'v('ltts fl_In('s from
/()O(tS (Ill the cookto t) {l'OlIl (]_llIl_lgilt_," flit' illsid(' o{
th(' ttticF(IW_ 1'.
For this reason, the filter must AI,W,\YS lie in t)la(e
v_rh(!n the hood is tzsed. The gre_lse filter shotdd lie
(le_lt(_d oft((' _ mottth, or _s He(_ded.
Removing and Cleaning the Filter
To remove, slide it to the side using the ml).
Ptd] it (town ;utd out.
ge.com
To clean the grease filter, soak it and theH swish it
_trottnd ill hot wat('r alt(t (t('tt'l:g('nt. Dolt't use
ammonia or ammonia prod u(ts be(ause it will
darken the metal. Iiglu brushing (_ut be used t(/
remove embedded dirt.
Rinse, shake and let it dry befiire replacing.
To replace, slide the filter iH the fl:_nte slot _zt the
side of the ot)ening. Pull u t) and in to lock
imo t)la( e.
iiiiiiii!ilili !!iiiiiii iiiii
37
Page 38

iIiii+ii+i+ :i+iii
Abouttheexhaustfeature.
Charcoal R/ter (on some models)
The charcoal filter cannot he cleaned. It must he
replaced.
For JVM1800 Series models, order Part No. WB2XI0733
from your GE supplier.
For JVM2000 Series models, order Part No. WB2XIO956
from your GE supplier.
If tile model is not vented to the outside, the air
will be recirculated through a disllosable charcoal
lilter that helps remov_ smoke and odors.
The charcoal filter should be replaced when it is
noticeably dirt}, or discolored (usually afier 6 to
12 months, dep(nding on hood usage).
ii_?iiiii!+++;!li{+¸
v
Remove grille screws
to remove the grille.
/¸
ToRemove Charcoal Filter
To remove the (llmxoal tiher, disconnect t)o_er
at the main filse or circuit breaker panel or pull
the plug.
Remove tile top grille 1>}removing tile screws on
top of tile grille that hold it in place and sliding tile
grille to tile lefi (opening tile door makes grille
removM e_sier). Slide tile filter towards tile t_'ont
o/tile oven mM remove it.
ToInstall Charcoal Filter
To install a ne_ tilter, remove l)l_sti( mM other
outer wral)lfing from the new filter+
Insert the Jilter into the toll opening of the oven as
shown. It will rest at an angle on 2 side sut)l/ort tatls
and in/i'ont of the right rear tab. Replace the grille
and screws.
3_
Page 39

Beforeyou call for service.., ge.oom
Troubleshooting -tips
Save time andmoney! Review the charts onthe following pages
first and you may not need to call for service.
PossibleCauses
Oven will not start A fuse hi your home may
be blown or the circuit
breaker tripped.
Powers_ge.
Plug not fully
hlto wall oudet.
Floor of the oven is warm, The cooktop light is
even when the oven has located below the oven
notbeen used floor. When the light is
on, the heat it produces
may make die oven floor
get warm.
"CONTROL LOCKED" The control has been
or "LOCKED"appears on locked.
the display
"SENSOR ERROR"appears When ushN a Sensor
on the display feature, the door was
opened before stemn
could be detected.
Stemn was not detected
ill lllaXilllUnl mnotmt
of _ne.
Youhear anunusual,
low-tonebeep
Food amount too large Sensor Reheat is for
for Sensor Reheat sillgle servh_gs of
You have tried to start
the Reminder without
a valid time of day.
You have tried to start
the Auto Nile Light
without a valid thne of
day entered for die on4flne
mid off-_ne.
You have tried to chatxge
the power level when it is
not allowed.
recouunended foods.
hlserted
What ToDo
Repla(c _IISC OF FeSet
(it( uit bre_&e_:
ili!iiii/iii/ii!iiiii/iiiiii_i
Llnl)lug the lIlicrow_l_e
oven; then ])lug it ba(k in.
Make sure the 3-prong
t)lug on the oven is tully
inserted into wall omlct.
This is n(mnal.
Pre._s and hold CLEAR/OFF
]i)r about 3 s('(on(ts to
tmlo(k th(' (ontrol.
Do not ol)en door mltil
steam is sensed and time
is shown cotmting down
on the (tispla}.
' Use TimeCookto heat
]or more time.
Start oxer ;4lid el/tel7 a
xalid time of dav.
Start oxer all(] en[el7 a
_alid time of day.
Many of the o_en's t('at ores
are preset and cannot be
changed.
Use Time Cook ti)r large
al//O[I1HS of J()O(t.
39
Page 40

i iiiiiiiiH+i iiiiii+i
Beforeyou call for service...
ThingsThatAre Normal With YourMicrowave Oven
_? Moisttm' on the o\cn door and w_llls whil(' cooking. Wit)c the
moisture off with a pal)er towel or soti cloth.
+_)Moisture between the oven door panels when cooking certain
toods. Moisture shotfid dixql/ate shortly atier cooking is finished.
N Steam or vapor escaping t+'om arom/d the <loot:
N IJght reflection arom/d door or outer case.
N Dimnfing o\en light and change in the blower sotmd at
power l+.'_+_'lsother thin/high.
N Dtdl tlmmping sotmd while o\en is ot_emting.
N TV/radio intertbrence might be noticed while using tile
microwm e. Similm: to the interlbrence caused by other small
al/plim/ces, it does not indicate a problem with the microwav('.
Plug the microwm e into a (tiffS'rent electrical circuit, move the
radio or TV as tilr _l_r_l_'ti'_)_ tile mictx)wm e as possible, or check
the position and signal of the TV!radio antenna.
N The Active '_i'nt door (on some models) will open dm'ing
ot)emtion, and remain open while the mict'owm e is rtmning,
to keep the electronics cool. It is also normal to hear a clicking
noise as the _'nt door opens and closes.
40
Page 41

GE Service Protection Plus TM
(;E, a name recognized worldwide tor quality and dependat)ility,
ot]'ers x_()ll SCIF'_JCe ProtectiOl/ Phlsr_--(?oH/l)rellellsive ])rote(tiOll Oll
all yore: applian( es--No Matter What Brand!
Benefits Include:
• Backed by GE
• All brmlds covered
• Unlilnited service calls
• All parts mid labor costs hlcluded
• No out-of-pocket expenses
• No lfidden deductibles
• One 800 number to call
xJ_)ll will be completely satisfied vddl our serxice prot(cdon or you ma'_ request your
lilOlleV ba(k Oll tlle relllaillil/g vallle of vo/tr (Olltra(t. No (l/iestiol/s asked. It's that silIll)le.
Prowct your refl:igerator, dishwasher washer and dr}e_; range, "I"_iVCR and much more--
rely brmld! Plus dlere's no extra charge tor emergency service and low mombly financing
is a_ailable. Even icemaker coverage and |ood spoilage prowction is oili'red. 51m can rest
easy, knowing that all your valuable household products are protected against expensive
repairs.
Place xour confidence in (;E and call us in the U.S. toll-fi_ee at 800.626.2224
ti)r more information.
*-kll ])lands cOX(le(l, tip Io _0 y(}_ll'S old, in 113(! (?l)ntil/(!ntal [[._.
We'll CoverAny Appliance.
Anywhere. Anytime.*
.p.,_..q_._,:,.:.....
Please place in envelope and mail to:
General Electric Company
Warranty Registration Department
P.O. Box 32150
Louisville, KY 40232-2150
41
Page 42

Consumer Product Ownership Registration
I)em: Customer:
Thank you tor purchasing our t)rod uct and thank you for t)lacing yore: confidence in us.
_;'c are tlrotld to l/axe VO/l as a (tlStOl/ler!
Follow these three steps to protect your new appliance investment:
your Consmner die registration
/ +ell+l--
Product O'_merslfip behm r,store ttlis
Registration today, do(mnent in a sati?
t ]axe the t/ea(e of t/lace. It ((retains
mind of kl_owing in[brnmtion you will
we call COlltact VOtl lleed shouht you
ill the tmlikelv require service.
e_em of a sa/etv Our selMce lmmber
modilication, is 800.(',E.C,\RES
(800.432.2737).
Manual (arehllh.
It will help 7mu
ot)erate VOIII _ I/(_V_'
atltlliall( e properlT_.
Model Number Serial Number
I I l l I I l l I l I III I I I I l I I I
hnportant: If you did not get a registration card with your product, detach
mid return the form below to ensure that your product is
registered, or register online at ge.com.
Consumer Product Ownership Registration
I ........... I I,, ,,,, ,I
@ Model Number Serial Number
First II_astI I
Name I I I I I I I I I Nalne I I I I I I I I I I I I I
.Nil-.[] Ms. [] Mrs. [] Miss []
Strect I I
\ddl'ess I I I I I I I I I I I I I I I I I I I I I I I I I I
+,l,t.+I , , , , , , , IE-mailAddress'+L
I I I,l_il/ I I
(;it_ I I I I I I I I I I I I I State Code I I I I
GECo.somer&h_dtsstrial fl'Olll (;EA's car(fully s(h tie({ p_/l-lll(_l-S+
Appli_llcos
General ElectricCompany
Looisville, KY40225
ge, com
42
l)at( Pla(ed it] [s(
Pholle 1 1 1 ]-] I I I-I l l l I
(]iSCOI/IItS_+p((ial <)ft_'l'Sand olher illlI)Ol-[_/ll[ (OlllllllllliC_lliOllS
* Pleas( provid( your e-mail ad(lr(ss to receive, xia c-mail,
PLY B_f;
uct*VV+mnces Che(k here if you (Io not want lo r( ((ire (onnnuni(alions
from (;E Applianc(s (GEA).
Page 43

GEMicrowave OvenWarranty.
All warranty service provided by our Staple your receipt here.
Factory Service Centers, or an authorized Proof of the original
Customer Care _ technician. To schedule purchase date is needed
service, on-fine, 24 hours a day, visit to obtain service under
us at ge.com, or call the warranty
800.GECARES (800.432.2737).
GE Will Replace:
One Feat
From the date of the
original purchase
Second Through Tenth Year
From the date of the
original purchase
Anypart o/the lilJ(l'()w21\e o\eH whirlÁ tidls due to a
(te/b( t in lnateri_ds or workmanshil). During this full
one-year warrant, GE will also pro\'ide, free of charge,
all labor and related servk e costs to repair or repla(e
the (te/b(ti_' part.
Themagnetrontube,if the ln_.g,llewon tube tifils due to
a (leDct in mam]_als or workmaushit). During this
additional nine-year limited warranty, you will be
reSl)Onsibh' t_)r any labor or related service costs.
iiJ iiiiiHiiii,-iiiiiii
_ Service trips to your home to teach
you how to use the product.
_ Improper h_tallafion, delivery or
lllaintenallce.
_}Failure of the product if it is
abused_ misused, or used for other
thin1 the hltended purpose or used
colmnercially.
_}Replacement of the cooktop light
bulbs.
Thiswarranty is extended to the original purchaser andany succeediegowner for products purchased
for ordinary home use within the USA.le Alaska, the warranty excludesthe cost of shipping or service
calls toyour home.
Some states donot allow the exclusioeor limitation of incidental or consequential damages,so the
above limitatioe or exclusioemay not apply to you. This warrantygives youspecific legal rights, and
you may also haveother rights which vary from state tostate. Toknow what your legal rights are,
coesult your local or state consumeraffairs office or your state's Attorney General
_}Replacement of house fuses or
reset_g of circuit breakers.
_}Dmnage to the product caused by
accident, fire, floods or acts of God.
_ Incidental or consequential damage
caused by possible defects with tliis
applimlce.
_ Damage caused after delivery.
Warrantor:GeneralElectricCompany.Louisville,KY40225
43
Page 44

ConsumerSupport.
GEAppliancesWebsite 9e.co,,
Have a question or n(_d assistance with your appliance? "Iiy the GE Appliant es Websiw
24 hours a tla 5 ally t/a} of 111(:year! For greater t OllVt'lli( lice and thster self, it e, }/Oll C[lll
now (/Owlllo_ld ()WlleY'S Manuklls, OI'(]eI" parts, talalogs, iti ev(ll st hedule selvi( e on-Ill1( .
_)_tl can also ",\sk Otlr "I;'am of Expert2"" your questilms, and sit nulch nlor_....
ScheduleService
Expert GE repair s(rvic( is only one sttp away tiom your doon Get on-line and
s(ht thlle VOll[ serxi( e al VOlli conveili( n( 1:24 hOllYS anv tl_:tV of tht veaY! ( )1" tall
800.(;E.(L\RES (800.432.2737) dllYillg I1OI"I11albusint ss hours.
RealLifeDesignStudio
GE supports the I Tnivcrsal Design t onceptmprodut Ls, ser'dt es and emironnlenL', that
tan be used by people of all ages, sizes and capabilities. D,\_ ret ognize the need to
design tor a wide range of ph?:sical and mental abilities and inlpairnlents. For details
of GE's I hliversal Design applications, including kitchen design ideas tor people with
disabilities, check out our l;,bbsite toda}; For tile hearing impaired, please call
800.TDD.GEAC (800.833.4322).
ExtendedWarranties
Purchase a GE extended warranl_ and learn about special discount.s that are available
while v(mr wanantv is still in etib_ t. You can purl hase it on-line anytinle, or call
800.626.2224 during nomlal business hours. GE Consunler Itonle SelaJt es will
still be there alwr your warranty expires.
PartsandAccessories
Indhiduals qualified to ser'dce their own appliances can have [)arts or accessork s
sent directly to their honles (VISA, MasterCard and Dist over lards are at t epmd).
Order on-line to(la B 24 hours eveW (lay or b? phone at 800.626.2002 during normal
business hours.
Instructionscontainedin this manualcover procedures tobe performed by any user. Other
servicing generally should he referred toqualified service personnel. Cautionmust he
exercised, since improperservicing may cause unsafe operation.
ge.com
ge.com
ge.com
ge.com
DE68-O2560A
ContactUs go.ore
If you ar_ not satisfied with the servit e you r_t eivt fionl (;E, tontat t us on our Websiw
with all tile details int luding your phone nunlber, or write m:
RegisterYourAppliance
Register your new appfiance on-line---at your convenience! Tinmly product registration
will allow flu" enhant ed t omnulnit ation and prompt servit e under tile ternls of your
warranty, should tile need arise. You nla'_ also nlail ill the pre-primed registration card
included in the packing material.
Gen_ ral Manager; Customer Relations
GE Appliant es, Appliant e Park
Louisville, KY 40225
ge.com
Puntedlil Malaysia
 Loading...