

GE JVM1740SMSS01, JVM1740SM2SS, JVM1740DMWW01, JVM1740DMCC01, JVM1740DMBB01 Owner’s Manual
...Page 1
Model:
Spacemaker Microwave Oven
Owner'sManual
2
5
_8
H
N
28
24
2_
JVM1730
JNM1731
JVM1740
lUl
m
[]
[]
Helpful Information
If SomethingGoes Wrong
8F Se_vige ga_gau_a_
Writethe modelaad serialam.hers here:
Model#
Serial#
Find fl_c_e llUlllber.s Oll a label inside the oven,
GEAppliances
m
49-40536
DE68-03329A]
09-06 JR
Page 2
READ ALL SAk_2TY
INFORMATION BEFORE USING
,_ WARNING!
Foryoursafety,theinformationinthis manualmustbe followed tominimize the risk offire or
explosion, electric shock,or topreventpropertydamage,personal injuryorloss oflife.
For your safew, tile intbrmmioll in this mmmal
musl be Ibllowed to minimize /he risk of fire
or explosion or to prevem propert:y dmnage,
PRECA UTYONS personal inj uLw or loss of lite.
TO AVOID Oo Not Attempt Oo Not Operate ,he oven
EXPOSURE operm,on (nn resul, ('lose properly and
to operate dlis oven ifil is dmnaged. 1/is
with the door open particularly importam
since open<loot that the oven door
TO EXCESSIVE in harnfful exposure thal dlere is no
]o iHicrowave ellergw, dalllage to the:
MICROWA_ l_ is illlpori_tllr i1o/ to IdooI ben,).
ENERGY ,hesaii*iy interlo_ ks.
(leti_al or tamper with 2 hinges and lalehes
,broken or loosened).
Do Not Place any object 3 door seals and sealing
betweeH lhe overt [i'Oll/ St/Fleeces
thee and the door or The Oven Should Not
allow soil or elemle_ be adjusted or repaired
residue to aecumulaw by alwone excepl
on sealing surthees
properly qualified
servlce persolllle].
Page 3
I,.I
This microwave oven is
UL listed for installation
over electric and gas
ranges,
This microwave oven is
not approved or tested
for marine use,
• Read and tblh)w the
specific "Precautions to
A\ old Possible Exposure
to Excessive Microwave
Energ)" on [)age 2.
• This appliance must be
grounded. Com)ect only
to properly gr(mnded
outlet. See (;rom)ding
IHstructions section OH
t)_ge 9.
• Do not m(mm this
at)l)liam e over a sink.
• Install or lo(_w this
apl)liam e only in
21ccor(t_ll/ce with the
provided Installation
11 IstrllctiOl/S.
• This ove)_the-range oven
was designed fi)r use over
ranges no wider d)ml 362'
It m_v be installed over
bod) g_ls mid ele(u:i(
(()()king equit)ment.
• I)o not operate this
appliance if it has a
damaged power cord or
plug, if it is not working
t)roperly or if it has been
damaged or drol)ped.
If the power (ord is
damaged, it must t)e
rel)la(ed by Gelleral
Electric Service or an
authorized service agent
using a power cord
available t_'om (;eneral
Ele(tric.
• Use this appliance only
/or its linen(led use as
described in this mmmal.
[)O IIOt IlSe corrosive
chemicals or vapors in
this appliance. This
microwave o_en is
sl)eci/ically designed to
heat, dr_ ror cook/ood,
and is not intended
/or laboratory or
industrial use.
Page 4
t@2AD ALL SAb 2TY
INFORMATION BEFOtK2 USING
®Do not co_er or block am,
openings on tile apIflianc(.
®Do not store this applian(e
outdoors. 1)o not use this
plxId/l(t nero:water [br
exan/ple, in a wet
[)as( 111eI/t, ileal" a
swi111111illgpool, near a
sink or in sin/Jim: locations.
'_Keep l/ower co_xl awa}
fi_om heated sm:lim(s.
®Do not innnerse power
co_xl or plug in water.
o 'Ib reduc( the risk (if fir(
ill the ovell cm'ity:
-- [)(1not oxe_vook Ibod.
Car(/illb attend
appliance _hen ilape_;
plastic or other con/-
bustible lnatelJals ar(
placed insid( tile ox(n
while cooking.
--Remove wire twist-lies
and inetal handles
_'roIl/ i/aper or plastic
containers belbre placing
theul in th( o_en.
-- [)(1 not use th( ox(n
fiIr storage purposes.
[)(1 not leme paper
products, (ooking
ulensils or lood in the
<)veil wh(ll I/or in/Ise.
-- If inate_ffals insid( (}xei/
ignite, ke(p tile oven
door closed, turn the
OXell (11/ aI/d discoI/lleet
the power cord, or shut
off power at the fi*se or
circuit breaker panel.
If the door is oil(ned, the
fire ma} spr(ad.
-- Do not use tile
Sensor Features lwice in
succession on the same
lood portion. If Iood is
under cooked al_er the
flint {ountdowll,/lse
77moCooklor additional
cooking tin/e.
®See door surlhce cleaning
instructions in the Care
and Cleaning s( ction Is)
(if this manual.
'_This appliance must only
be serviced b}. qualified
se_Mce personnel. Contact
nearest atllhoriz(d service
liteili V lot examination,
repair or a(!justlnent.
®.ks with any appliance,
close supervision is
necessary when used
1iv children.
" Do not store an}.thing
directly on top of the
l/licrow_l\ e O\ell s_lrlhce
whei/the iIliC1xI*A;l've (/xeI/
is in operation.
SAVE TIqE\SE INSTRUCTIONS
Page 5
I!1
SPECIAL NO 7 AB 0 UI" MICR 0 WAV1NG
Arcing is the microwa\ e
terlIl lot sparks ill the o_,en,
Arcing is caused by:
• The metal shelf (if
included) not installed
correctly so it to/iches the
microwa_ e wall.
• The tel//l)eratlll'e
t)robe (if included) in the
IIIiCFowovc t)/H no| inserted
in the tood.
• Metal or/oil touching the
side of the o_'n.
• I)o not pop t)otmorn in
your microwmv o_vn
mfless in a special
micro_'ave popcorn
ac(essorv or mfless _)u use
t)OlXorn labeled/or use in
lIliCFOWdVe ovens.
• SolIle t)l'o(IH(ts S/Ich _1_,
whole eggs and sealed
comainers tk)r example,
closed jars--are able to
explode and should
not be heated in this
microwave o_en. Such
use of the microwave oven
could result in iqjurv.
• Do not boil eggs in a
micro_'ave oven. Pressm:e
will build u 1)inside egg
yolk and will cause it to
b/lrst, t)osobly resulting
in il,ju m
• Foil not rooMed to tk)od
(Ul)turned edges act like
antemms).
• Metal, such as twist-ties,
poulU 3 pins or gold-
rimmed dishes, in the
microwa\ e.
• Recycled t)aper towels
comaining small metal
pieces being used in
the l//iCFOWa\ e.
• ()t)emting tile microwave
with no R)od inside for
l//ol'e ill,Ill a lIlinHte or two
l//_ly (_Hlse (fill/lage to tl/e
o\en and could start a
fire. It in(teases the heat
around the magnetron
and can shorten tile liic
of the o_'n.
• Foods with unbroken
outer "skin" su(h as
t)otatoes, hot dogs,
sausages, tomatoes, apples,
(hicken livers and other
gil)lets, and egg yolks
should be pierced to allow
stealIl to escape (hllJng
cooking.
Page 6
SPECIAL NO 7T2SAB 0 171"MICR 0 VIAV1NG
SAFETY
FACT
SUPERHEATED WATER
Liquids, such as water,
coffee or tea, are able to
be overheated beyond
the boiling point without
appearing to he boiling.
Visible bubbling or boiling
when the contahler
is removed from the
microwave oven is not
always present. THiS
COULD RESULT IN VERY
HOT LIQUIDS SUDDENLY
BOILING OVER WHEN THE
CONTAINER iS DISTURBED
OR A SPOON DR OTHER
UTENSIL iS iNSERTED
INTO THELIQUID.
To red u(e the risk ol i]]jury
tO persoI/s:
-- Do not overheat tile
liquid.
-- Stir th( liquid both
be/bre and hall\ray
through heating it.
-- Do not use straight-
sided containers with
narrow necks.
-- Alter heating, allow tile
contain(r to stand in
the microwu_( o_en
Ior a short time belbre
rel//oving tile coi/taille]2
-- Use extre]/le car( when
i]lsertillg a spooll or
()tile]" utensil into the
contain(r.
6
o ,&old heating Ilabx Ibod
in glass jars, ev(n with
the lid off. Make sure all
inlhnt lood is thoroughly
cooked. Stir Ibod to
distribme tile heat evenly.
Be careful to tlre_(nt
scalding when warming
lbrmula or llr(ast milk.
The container iil}l}' Ibel
cooler than the milk
really is. Always test tile
milk be/bre lb(ding
tile baby.
o Don_t d(l]'ost li'ozen
bexerages ill narrow-
necked bottles (especially
carbonated beverages).
Even if tile container is
Op(lled, pressilre C_lll
build up. This can cause
tile container to burs[,
possibly r(sulting in
in jm).
* }lot loods and steam
can cause burns. Be
earefld when opening
allY coI/tai]leYs of hot
tbod, inchlding potleorn
b_tgs, {ooking i/omhes
and l)oxes. To prev(nt
possible il{jur}, dir(ct
s[ea]/I aw}l} ]i?Ol]l hallds
and Ihce.
® Do l]ot overcook
potatoes. They could
(l(hvdrate and catch
Ih:e, causing damage
to vom: ov(n.
®Cook me;u ;rod i)ouhr)
thoroug]ll}--meut to
at leust an 1NTERNAI,
temperature of 160'F
and poultry to at least an
INTERNAl, temperatmPe
of 180'K Cooking to
these temperatmPes
usually protects against
Ibodt)orne illness.
Page 7
m.
Make sure all cook_are
used in your microwave
oven is suitable tor
n/icrowaving. Most glass
casseroles, cooking dishes,
l//easlll?il/g ClltIS , Cllstard
cups, potter} or china
dilnlerware which does not
have lnemllic u:im or glaze
with a metallic sheen can
be/lsed. Sortie cook_are
is labeled "suitable {or
microwm'ing."
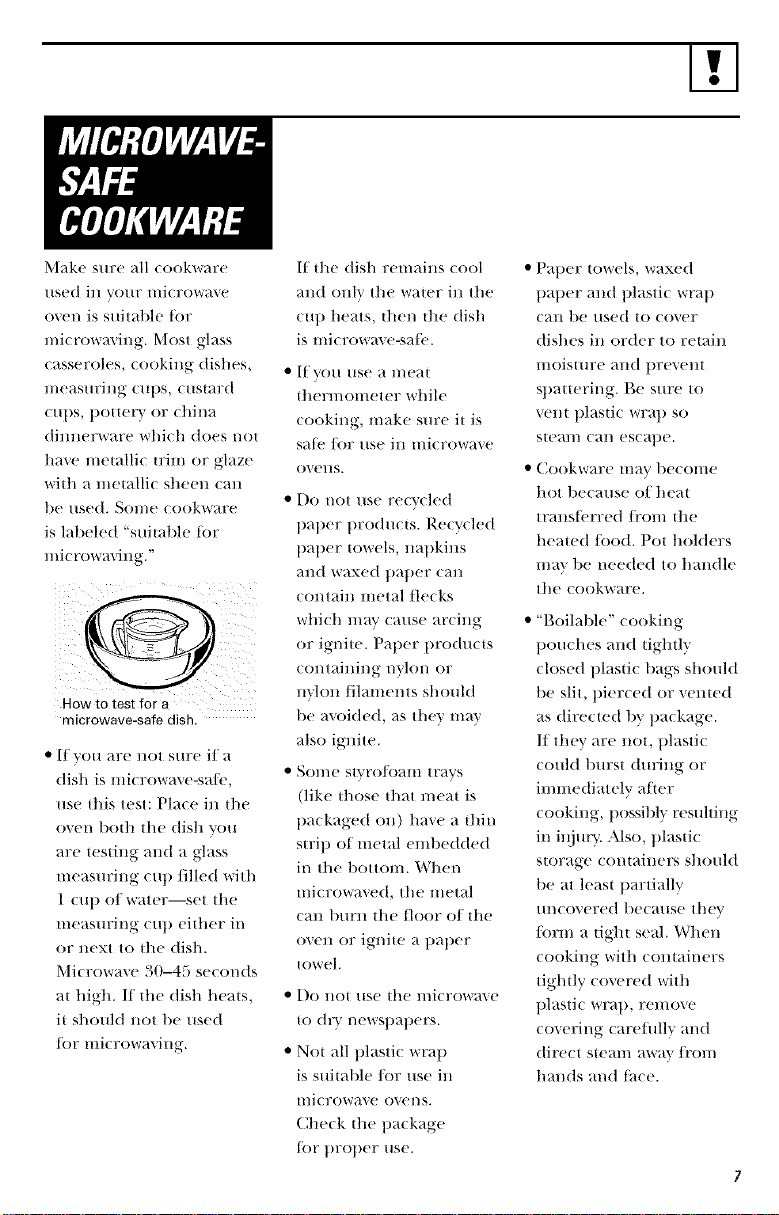
How to test for a
microwave-safe dish.
• If you are not sure if a
dish is microwave-sale,
use fills test: Place in the
o_en both the dish you
are testing and a glass
nleasllriilg ctq) filled with
1 cup of water--set the
measm:ing ctq) either in
or Hext to the dish.
Microwave 30-45 seconds
at high. If the dish heats,
it should not tie used
tor microwaving.
If file dish remains cool
and only the water in the
CUll heats, then the dish
is microwa_ e-sati'.
• If VO/l /lse a l/lear
thermometer while
cooking, make sm:e it is
sat(' /k)r/lse ill lilicrowave
()VeilS.
• Do not use recycled
paper t/roducts. Recycled
paper towels, napkins
and waxed tlatler Call
contaill metal flecks
which mav cause arcing
or ignite. Paper products
contaiifing nyh)n or
mloll filaments should
be avoided, as they may
also ignite.
• Sol//e stvro/();-illl tr;-ivs
(like fllose that meat is
tia(kaged on) have a fllin
strip of metal enlt)edded
in the t)ottom. When
mi(ro_aved, the metal
(an bum the floor o/the
oven or ignite a paper
towel.
• I)o HOt use the mi(rowa_e
{o dr} newstlatli'rs.
• Not all tllastic wrap
is suitable/ill: use in
nficrowave ovens.
Check the tlackage
{or tlrotier use.
• Patler towels, waxed
tlat/er and t/lastic wrap
can tie used to (over
dishes in order to retain
l/loistllre aIld lirevellt
stlattering. Be sure to
veto l/lasdc wratl so
steal// Call escalle.
• Cookware lilav becolile
hot because of heat
transti'rred/i'om the
heated/i)od. Pot holders
may be needed to handle
the cookware.
• "Boilable" cooking
t)ouches and tightly
closed plasdc bags should
be slit, t)ierced or _eHted
as (tire(te(t tiy t)a(kage.
If they are not, plastic
could burst (turillg or
immediately alter
(ookillg, 1)ossibly resulting
in iqjury. Also, t)lasti(
storage (ontainers should
be at least partially
m/covered because they
/i)rm a tight seal+ When
cooking with COlmfiners
tightly covered _*ith
t)lasti( wrap, remove
(overing (arehlllv and
dire({ sieal// aw_lv/i'Ol//
hallds and {hce.
Page 8
SPI£CIAL NO 7 AB 0 1_71"MICR 0 WAV1NG
'_[Ise li)il only as directed in
this nlamtal. When using
li)il ill the inicrowav_
oven, ke(p the li)il at least
1" awa} Irom the sides of
the o_ en.
The Ihn will op_ rate
a/nomati(allv m/(ler
certain (onditions (see
Amomatic Fan li'ature).
T_ke care to i)reven[ the
starting and spreading of
accidental cooking lires
while the _em t_m is in use.
®Cleall the ml(terside of
the l//ic17ow_t\e o]]ell.
Do not allow grease
to build /_I) on the
microwave or the
tim lilters.
* Plastic cook\_are--Plastic
cookware designed li)r
microwave cooking is
vet) usefl_l, blot should
be :lsed carefllllv. E\_n
microwa_ e-sati' plastic
I/l_l}' not l)e as tol(rant of
ov_ rcooking conditions
as are glass or (el:aiilic
materials and may sot_en
or char if sul!jected
to short periods of
o_ rcooking. /n longer
¢.'XI)OS/IFCS tO Ow.'l_
cooking, the li)od and
cookware co/_ld igllite.
o [11 [lie e',en[ of a gl?ease
life oll th( S/ll?l;lce milts
below the microwa\e
OV(II, SIllothel7 a []aiIliI/g
l)a_l o:1 the s/iFl;_ce mlit
lV co_ ring the pan
COml)letely with a lid, a
cookie she(t or a fiat tray.
* [Ise care when clealling
the vent lira tilters.
Corrosive cleaning
agents, su(h as lye-based
OVell (leaners, l/l_t}
damage the tilters.
Follow these guidelines:
I Use microwa_e-satk'
l)lastics only and /_s_
them in StlJCt comt)limlce
with the cookware
l/lan/llilc[ ul;el;'S
17( coI//Illei/d a[iolls.
2 Do not inicrowa_e emply
contaillers.
3 Do not t)ermit (hildren
to/ise plastic cool€walT(
without coml)lete
SUl)( Fvision.
®When preparing
flami:_g li)ods trader
the microwave, turn
the t_m on.
®Never le_t_e S/llTlktce [li/i[s
ben(a[h VO/lF illicrowave
oven m_atlen(led at high
heat settings, goilovers
cause smoking and greas}
sl)illo_ers that ma ignite
and spread if the
:/licFow_t\ e v(Ht t_ti/ is
operating. To mi_imize
a/ltOlIla[ic t_l]l Ol)(ration,
_*se a(t((l_*ate sized
cook_are a:_(1 use high
heat Oil StlFl;_€e mlits
o_lly when n_ cessaF}.
Page 9

I'.1
6R 0 UNDIN6 INSTRUC7YONS/OFIYONALKMS
Ensure proper ground
exists before use.
[, WARNING
hnproper use ofthe
groundingplugcanresult
in a risk of electric shock,
This appliance must be
gromaded. In the event of
an ele(trical short circuit,
grom_ding reduces the
risk of electric shock by
providing an escape wire
/or the elec0:ie era:rent.
This appliance is equipped
with a power cord having
a grom_ding wire with a
gr(mnding plug. The plug
must be plugged into an
outlet that is properly
installed and gr(mnded.
Consuh a qualified
electrician or service
technician if the grounding
instructions are not
eoml)letely mlderstood,
or if doubt exists as to
whed_er tl_e appliance
is properly grom:ded.
If the outlet is a standard
2-prong wall outlet, it is
yore: personal responsibility
and obligation to ha_ it
replaced with a properly
grom:ded 3-t)rong wall
Otltlet.
I)o not m_der any
circumstances cut or
remove the third (grolmd)
prong/i'om the power
cord.
1)O llOt /Ise all ;-I(I;-It)ter
plug with dfis appliance.
I)o not use an extension
cord with this appliance.
If the power cord is too
short, ha_e a qualified
elecu:ician or service
technician install an outlet
near the appliance.
For best ol)eration, plug
this al)t)li_mce into its owH
ele(tri(al outlet to t)revent
flickering of lights, blowing
of fuse or tripping of
(ir(uit breaker.
Filler Panel Kits
dX48WH--White
dX48BL--Black
When replacing a 36"
range hood, filler" panel
kits fill in the additional
width to t)rovide a custom
built-in al)l)earam e.
For installation bet_een
cabinets only; not tor
en(t-o/_( _d)inet install_uion.
Each kit contains t_so
3"-wide filler panels.
dXSIO, JXSIK-- Recimulating
Charcoal Filter Kit
Fiher kits are used whell
the microwave o_en cannot
be vented to the outside.
A\ ailable at extra cost trom
your GE supplier, or see
GE Service Nmnbers. 5bur JX48
seriM mmfl)er _ill be
needed to identiiV the
(orrect kit for _otlr oxel/.
JX81D, JX81 K
Page 10
////!///11! \\\
I
_i i iii
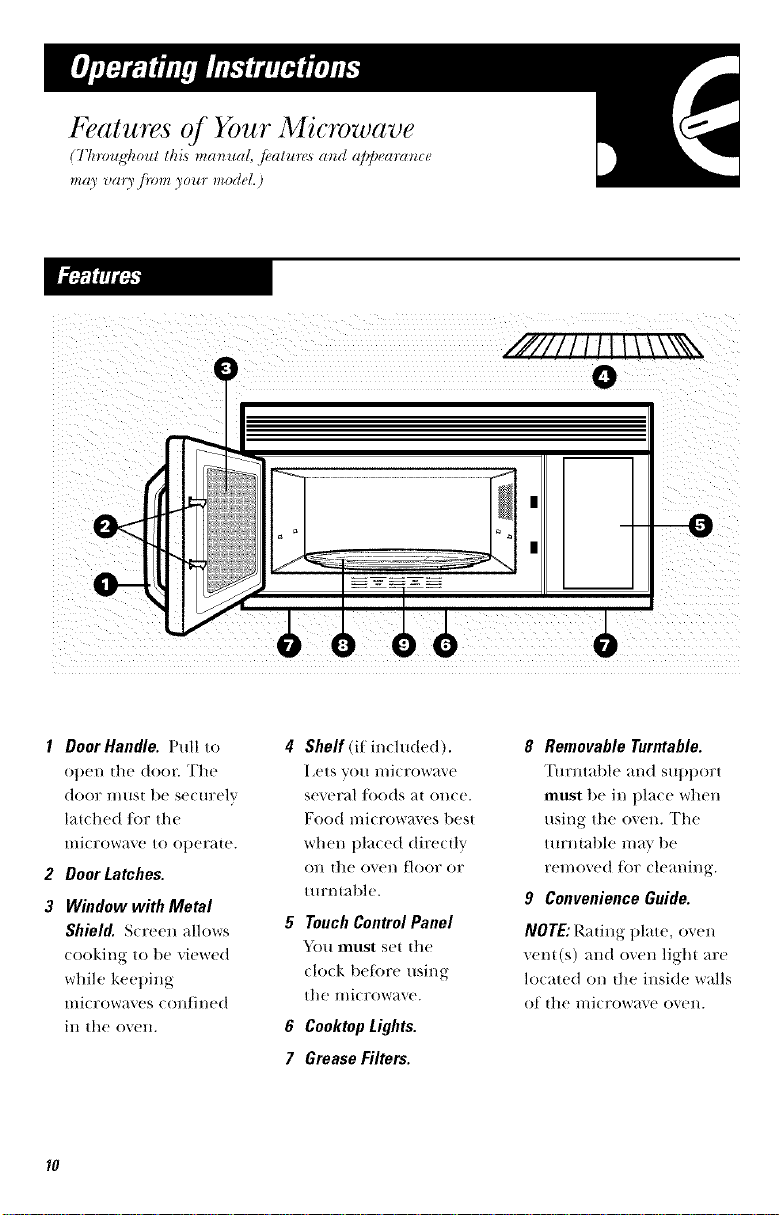
1 DoorHandle. Pull to
ot)en tlle (too_ The
door must be secm:elv
latched/or the
microwave to operate.
2 Door Latches.
3 Window with Metal
Shield. Screen _,llows
(ooking to t)e viewed
while keel)lag
microwaves confined
in the oven.
4 Sheff(ifineluded).
I x'ts veil i//ierow_l_e
several leeds at once.
Food microwaves best
when placed directly
on the oven [leer or
tilrntal)le.
5 Touch Control Panel
}_()H lllUSt set the
(lo(k belore using
the lllicrowave.
6 Coolaop Lights.
7 Grease Filters.
8 Removable Turntable.
Turntable and SUl)l)ort
must t)e in place when
using the oven. The
turntable mm t)e
removed/or cleaning.
9 Convenience Guide.
NOTE: Rating plate, oven
vent(s) and oven light are
located on the inside walls
of the microwave o_en.
Page 11
The Controls on Your Microwave Oven
(Th_vugq_oul this ma_ua!, ./ialun'._ and al)l)earanc_ ma) va_3ji_)m )our modeL)
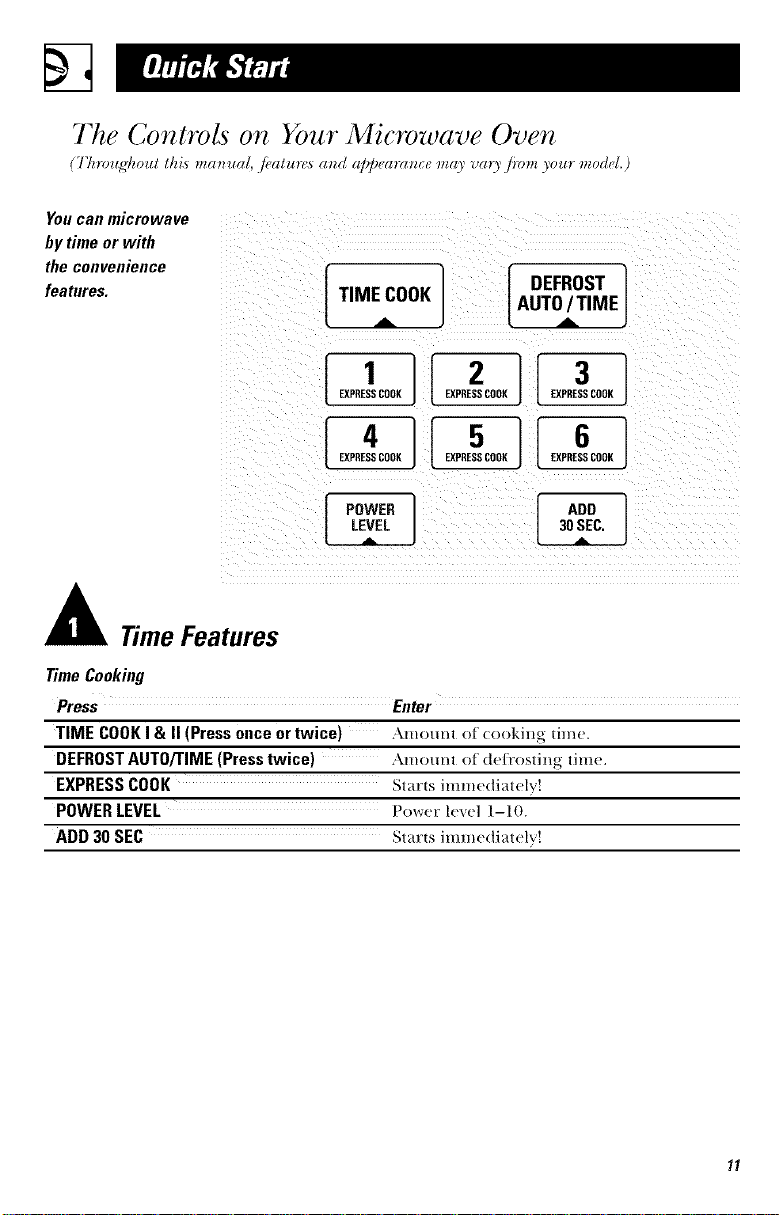
You can microwave
by time or with
the convenience
features.
[:,M_COOK] [ ._.osT
J[lEJ oo,l!Jcoo
r _owE.1 r ,oo ]
Time Features
TimeCooking
Press Enter
TIME COOKI & II (Pressonceortwice) \mount of (ookh:g tinw.
DEFROSTAUTO/TIME(Presstwice) Amount of defi'osting ti_:le.
EXPRESSCOOK St_'a'tsiHllll(!(liat_!lv!
POWERLEVEL t_(_r_r lexel 1-10.
ADD 30 SEC St_ii"tsJllllll(!(lJ_it(31v!
Page 12

@ ....,=,
n
HELP(on some mode ls) GODEON MICROWAVE GUIDE!;IN BOOK
Press _S pad and any Before you begin_ check =Cooking
feature pad for usage the guide located on the * _. _
z_structions and tips. msld e front 0f the oven
when you 0Pen the door. *Reheat
!_ .Snacks
llIJle IJe_rost
POTATO
r
DEFROST
AUTO/ TIME
ConvenienceFeatures
Press Enter Option
POPCORN Starts immedialelv! more!less time
Press once 3.5 oz.
Press twice 3.0 oz,
BEVERAGE Starts immediately! 1-3 s(!r'_ings
COOK (on some models) Food lyt)e 1-9 + weight
REHEAT (See Reheat Guide) Food type 1-6
POTATO Starts immediately!
VEGETABLE Starts imme(liateB !
1-3 serxings
1-4 potatoes
food tyt)e,/serving size
DEFROST AUTO/TIME Food weight
(Press once)
Page 13

PowerLevel
The p0'_ver level may be
e,!tered Or change{!
immediately after
emeli!,g tile ii_atul"e i
time i'or TIME COOK,
_'IMEV DEFROST 0r ,
Exep sscooK.The
power level m>/y als0 be
changed duri!!g time
{ co uI).tdowik {
1Press TIME COOK0€
select TimeDefrost.
2 Entercookingor +
defrostingtime.
3 PressPOWERLEVEL.
4 Se!ectdesiredpower
level 1-10.
SPressSTART.
\_triable Rowel _levels _dd
t]exibililv 1o mic _owa',,e
¢ookiug. The I)owe__levels
Oil lhe //liCFr.)wa\e ()Veil
call be comp;lred to the
Stt]_J_tce Ul/itS ell _t Fallg+e.
l{igt_ (power level 10) or
tttll power is the t_lstest
w_} to cook _Hd gi+es y()tt
100% po\_,er. Each i)owel _
le\el g{ves yott//liCl_owa\e
ellergy' _i cel"l_lil/ i)el"Cel/t 0]"
to "eqtl_lize" or |r}tl/S/('r
he_t to the inside of the
tiled. An ex_m_ple of this
is shown with power level
B--the (/e/t'ost cycle. If
micl'o-w_e energ-y did not
cycle oil, the outside of the
t_)od would cook bet_)re
the inside w_s de/t'oste(t.
t ]et'e }tI'e SOII/e ex_tn/l)les
of/tses for "__riotts pov_er
levels:
the till/e. Dowel" lexel 7 is
mi(-row_we eHerg-y 70% of
the time. Power le\el 3 is
Power Level Best Uses
High 10 Fi+,h. b_,cotL
eHerg-}' 30% of the time.
A high settiug (10) will
cook t;IsteF t)/ll /()od l/l_lg
I/eed l//ol"e /]_eqtlel/t
Med-High 7 Gentle cooking
stirt'iug, rotating oi_ttll+Hing
oxe++.Most cooking \+ill be
d(me OH /ligh (t>owel+lexel
10). A lower setting \viii
cook //IOFe evel/1v _+l/(t
Medium5 Nowcooking
need less stilting or
rotatiug of the R)od.
So/tie /()()ds t/l_l'v" ]|_lve
t)ellel _ /l_l_Ol _, text tilde OF
Low 2 or 3 Defi'osfing
;,t)t)e;,rance if one of the
lower settings is used. Use WarmI
_+lOWeT" ])owe1 +]eve] x+]_eH
(ookiHg t()ods theft h;_ve ;+
telldel/(_ to 1)oil oxel _, Stlch
_iS sc_ilIol)ed i)ol_ttoes.
l,_est t)eriods (v_rhell the
l//i( l'OW_t'_e ellel__ ' ('_(les
ott) gixe time t'o__the food
,+-,,gel_bles.
boilitJg liqt ids.
o[" ule;_t _ttid
poultry;b:tki_g
c_lsselx>k_, nd
reheating.
:,_Jd tt,nderizing
sudl :ts s|<'w% _llld
lessl__.ll(lt-rCtltS
_-Ifmeat.
wilhoul cookillg;
$1111111t_l'lllg;
<-ldicatt, _,mIces.
Kt'epingfood
wglrln wilholl|
ovcrcooking;
sofi___ningbutt_.i:
Page 14

77me Features
@
I Press TIME COOK.
2 Enter cooking time.
3 Change power level
ff you don't want full
power. (Press POWER
LEVEL.Select a
desiredpower level
I-Io3
4 Press START.
Time Cook I
Allows }'o/1 to Illi('l'O_lve
Jot any time up to 99
minmes and 99 seconds.
Pow(r level 10 (High) is
automatically set, hilt you
inay change it ]or iilOlPe
fl( xibility.
_lk)ll ill}l}, open the door
d m:ing Time Cook to
check the Iood. Close die
door and press STkRT to
r( S/lille cooking.
Time Cook II
I,ets y(m chang-_ i)ower
kvels automatically during
cooking. }tere's how to
do it:
I Press TIME C()()K.
2 Emer lhe firsl ((}ok time.
3 Change the power level
if you don't warn full
power. (Press P()WER
11{VEI. Select a desir( d
power lexel 1-10.)
4 Press TIME COOK
again.
5"Emer the second (ook
time.
0 Chai]ge the power l(vel
if y(m don't warn full
power. (Press P()WER
I ff_2VEI, Select a power
level 1-10.)
7 Press ST,\R'E
,\I lhe end of Time (2)ok I,
Time Cook II (oums doD,rl/.
Page 15

Cooking Guide for Time Cook I & II
NOTE."Usepower level High (10)unlessotherwise noted.
Vegetable Amount Time Comments
Asparagus
(fi'('s h spears)
(fi'ozen spears) llt-oz, package
1 lb.
Beans
(li'es h green) 1 lb. cut in half
(fiozen green) 10-oz. pa(kage
(li'ozen lima) ll)-oz, package
Beets
(fresh, whole) 1 bm*(h
6 to 9 mi+_,.,
Med-I {igh (7)
5 to 7 min.
9 to 11 min.
6 to 8 rain.
6 to 8 mi+_,.
17 to 21 min.
In 17_,-qt.ot)loJ,_,gglass baking dish,
place 1/4 cut) water.
In 1-(V. casserole.
In 1h,-(tt, casserole, place 1, 2 (u l) v_rateE
In 1-qt. (asserole, pla(e 2 tal)lesl)oons
W_lt er.
In 1-(V. (asserole, t)la(e 1/4 (u t) water.
In 2-qt. casserole, pla(e 1/2 cup _ater.
(fi-esh cut) l tmmh
(l*/u) P/ll)s.)
(fi'esh spears) 1 trench
(1./to 1'/lbs.)
(fi'ozen, 1O-oz. package
chopped)
(li'ozen spears) 10-oz. package
Cabbage
(fresh)
(wedges)
Carrots
(li'esh, sliced) 1 lb.
(frozen) 1tt-oz, package
Cauliflower
(flowerets) 1 me(titan head
(liesh, whole) l mediunl head
(frozen) 1t)-oz, package
1 medimn head
(about 2 lbs.)
7 to 10 min.
9 to 13 min.
5 to 7 min.
5 to 7 min.
8 to 1 1 mi+_,.
7 to 10 min.
7 to 9 min.
5 to 7 min.
9 to 14 mim
10 to 17 min.
5 to 7 mi+_,.
In 2-qt. casserole, place 1/2 cut) ware1:
In 2-qt. oblong glass baking dish, place
1/4 cup water.
In 1-qt. casserole.
In 1-qt. casserole, place 3 tablespoons
water.
In 17:- or 2-(V. casserole, pla(e 1/4 cut)
VQIt er.
h_, 2- or 3-qt. (asserole, t)la(e 1+/4 (u t)
W_lt er.
In 1K,-qt. (asserole, t)lace 1/4 (u l) water.
In 1-(V. (asserole, pla(e 2 ml)lest)oons
water.
In 2-qt. casserole, 1)la(e 1/2 cu l) water.
In 2-qt. (asserole, pla(e 1/2 (u l) vQiter+
In 1-(V. (as.;erole, t)la(e ,2ml)lest)oons
VQIt er.
S •
Page 16

Cooking Guide for 1Tree Cook I & II
Coru
di'ozen kernel, ] O-oz. t)a(kage 5 to 7 rain. In l-qt. (asserole. t)la(e 2 tab|esl)OOn.S
Corn on the cob
(Ii'esh 1 u)5 ears
(] rOZell }
3 to 4 rain.
)er e_ll?
5 to 6 rain.
3 to 4 rain.
)er e_ll7
Mixed
vegetables
tt_ozen_
] O-oz. package
5 to 7 rain.
Peas
(ti'esh. shelled) 2 lbs. unshelled
(fi'oze*l_ ]O-oz. package
9 to 12 rain.
5 to 7 rain.
Potatoes
(fi'esh. cubed. 4 t)ouuoe.s
9 to 12 rain.
white, +_to 8 oz. each
(ti'esh. whole. ] +_t() 8 oz.)
3 to 4 rain.
sweel or while,
Spinach
(Ii'esh) ]0 to 16 oz.
(fi'ozen. 10-oz. t)ackage
5 to 7 rain.
5 to 7 rain.
chopped
and leal J
Squash
,2i'csh. Stlllilller ] lt). sliced
5 to 7 rain.
alld yellow
_will:er. acorn ] to 2 s(ltl;l.sh
8 to 11 rain.
butlermu J qabout 1 lb. eachl
W_ler.
In 2-qt. oblong glass baking dish, t)lace
corn. If corn is in husk, use no water;
if corn has been husked, add 1/4 cup
water. Rearrange after half of time.
Place in 2-qt. oblong glass baking dish.
Cover with vented plastic wrat).
Rearrange atter half of time.
In 1-qt. casserole, t)lace 3 tablespoons
water.
In 1-qt. casserole, t)lace 1/4 cup water.
In 1-qt. casserole, t)lace 2 tablesl)oons
water.
Peel and cut into 1 inch cubes. Place in
2-qt. casserole with 1/2 cu l) water. Stir
a/ler half of time.
Pierce with cooking tork. Place in
center of the o_eH. I _et stand 5 minutes.
In 2-qt. casserole, [)lace washed spinach.
In 1-qt. casserole, place 3 tablespoons
water.
In 17>(tt. casserole, t)lace 1/4 cup water.
Cut in half and remo_e fibrous
membranes. In 2-qt. oblong glass
baking dish, 1)la(e squash (m-side-
down. "Ihrn cut-side-u t) atler 4 mim_ms.
Page 17

Time Features
1 Press DEFROST
AUTO/TIME twice.
2 Enter defrosting time.
3 Press START
4 Turnfood over when
the oven signals,
5 Press START
(Auto Defrost explained
in the section on
Convenience Features.)
.k]l/)ws yott t() defi'ost [i)r the
length of time \ou select. See
tile I)efl'osting Gl6de tot
suggested times.
Power level 3 is a/m)m_lticallv
set, but }ou m_} change this
till" more flexibilit}. "_)tt Ilia}
/leti'ost small items more
quickl} t)} raising tile power
lexvl atier entering tile time.
Itowered; tile} will need n/ore
ti'equent attention than usual.
Power level 7 ctlts tile total
de[i'osting time ill about hall:.
power level l0 cots tile total
time t() approximately 1/3.
Rotate or stir [i)od ti'equentl}.
At one half of selected
defi'osting time, the/)_vn
signals TUI_.N. At this time,
turn til/Id /l_er mid break
apart or rearrange pieces li)r
more e_vn de/i'osting. N/ield
ally warl//areas with slnall
pieces of tk)il.
A dull thumping noise m_l} be
heard dltring de[i'osting. This
s/)/lll(l is 1//)lTI//al whel/the
oven is not operating at Itigh
ll/)we_;
DefrostingTips
• I_oo(ls [i'ozell ill p_lper or
plastic call be deii'osted ill
the pack_g-e. Tightly closed
packages should be slit,
pierced or _ented AFTER
lilod has partially deii'osted.
Plastic st()r_ge containers
shottld be at least partiall}
itl/co\rered.
• I;_unil_,-size, prepack_lged
li'()Zell ([iI/l/eFS Call be
de/iosted and inicrow_l\vd.
If the [i)od is ill a loll
containei; transient it it) a
micr/)w;l\v-sati._ dish.
• Foods that spoil easil}, such
as milk, egg,s, fish, stuffings,
pouhry and pork, sholtld
not be allowed t() sit out
lilt more them one hotll7
_dier de/i'osting. Room
tel/lpel'_l[lll'e pFoII/OteS the
grolvth/)] harmlhl b_wteria.
• I_'()l" I/IOl'e evell de[i'osting
()I l_wger ti)ods, such as heel
l_lI/ll) alld \K'kl] 1X)klStS, rise
Attt() Defl:ost.
• l_e StlFe ]k|F_e Illeats k|l?e
completely de[i'osted betiwe
cooking.
• When de/i'osted, [i)od
shottld be cool but sottened
ill _ll m:e_s. If still slightly i(?,
l_et(ll?II t() the lI/icl-o\v_lve \x'F}
briet]L or let it stand a ii_,w
l/liI//lteS.
Page 18

Defrosting Guide
Food Time Comments
Breads, Cakes
Bread. buns or rolls !] piece' 1 rain.
Sweetrolls approx. 12 oz.. 3 I(, ", rain.
Fish and Seafood
Fillets, frozen _1 lb., 6 ,, _ rain.
Shelffish, smaRpieces (1 lb.t 5 to 7 rain. P|a(e b|o(k in (-a.sserole. Turn over and
break u]) a/]er half dm t]/lle.
Fruit
Plastic pouch--1 to2 ".4u, +_rain.
(]0-oz. package)
Meat
Bacon 1 lb.)
Franks (1 lbA
Groundmeat 1 lb.t
Roast:beef, lamb, veal, pork
Steaks, chops and cutlets
Poultry
Chicken,broiler-fryer
cut up, 2½1o 3 lbs.,
Chicken, whole
_2½ Jo 3 lbs.}
Cornish hen
Turkey breast. 4 +o 6 lbs.,
18
.;-)io 7 l/Ill/.
1,2 Io 16 rain
per lb
:5 io 7 min.
per Ill
15 to 19min
17 to 21 min
Place unot)ened package in oven.
Iet stand 5 minutes after deflx)sting.
Place unopened package in ()veil.
Microwave just until/i'anks can be
sel)arated, let stand 5 minutes, if
necessary, to complete de/i'osting.
Turn Hleat over after half tl/e time.
Use power level 1.
Place unwrapped meat in cooking dish.
Turn over after half die tillle and shield
warm areas with R)il. When th_ishe(t,
separam pieces and let stand to complete
de/i'osting.
Place wrapped chicken in dish. Unwrap
and turn over a/ler half tfte time. When
finished, sel)arate pieces and microwaxe
2-4 minutes more, if necessary. I,et stand
to tinish (tet_:osting.
Place wrapped ehi(ken in dish. AJler half
tile tilIle, /lnwra I) alld tllrll cllicken over.
Shield warm areas widl toil. Nnisft
de/i'osting. If ne(essavy, run cold water in
tile cavity until giblets can be removed.
Place unwrapped hen in tile oven breast-
side-up. Tm:n over after ftalt tile time.
Run cool water in tile (avity until gJt)lets
can l>e removed.
Place unwral)l)ed breast in dish breast-
side-down. After half tile time, turn over
and shield warm areas witft/i)il. Finish
deti'osting. Eet stand 1-2 hours in
ret_'igerator to eoml)lem de/i'osting.
Page 19

Time Features
iI
30 SEC,
A
This is a quick wayto set
cooking time for 14 minutes.
Press one of the Express
Cook pads (fi:om 1 to 6)
/_)r ] to () minutes of
cooking at power level 10.
For examl)le, press the 2
t)ad/i)r 2 minmes of
cooking time.
You can use this feature
two ways:
•/i will add )0 s((o ads to
the tillle (otlnting down
ea(h time the pad is
t)ressed.
The 1)ower level can be
(:hanged as time is
COllll|ing (tOWll. Press
P()WER I,EVEI, and
enter 1-10.
• It (an be used as a (tui(k
way to se{ 30 se(onds ot
(()()king time.
Page 20

Convenience Features
(lesstime) (more time)
Use only with prepacKaged
microwave popcorn weighing
3.0 to 3.5 ounces.
How to Use the Popcorn
Feature
I Follow package
instructions, using Time
Cook it th( i)a(knge is
less them 3.0 oumes or
l_u:ger thml 3.5 omwes.
Pl_t(e th( 1)ack_tge of
l)Ol)COrH ii/ the center
of the l//icrow>t\ e.
2 Pr(ss POPCORN. The
O'_ ( II starts imiilediatelv.
'I'_q) P()PCORN to select
the bag size you at(
cooking.
How to Adjust the Popcorn
Program to Provide a Shorter
or Longer Cook Time
It ()/_ lind th_tt the brand ot
l)Ol)(orf/ },()/l rise Ilf/(l(l_)()l)S
or o_ercooks (onsisteml}.,
you can add or subtract
20-30 seconds to the
amomatic l)Opl)ing time.
To add time:
,\tier pressing P()PC()RN,
pr(ss 9 immediat(ly al_er
the o_en starts lor an extra
20 s(conds.
Press 9 again to add am)ther
10 seconds (total 30 seconds
_tdditiomtl time).
To subtract time:
Alier pressing I)()P( ()RN,
l)ress 1 iminediately after
th( oven starts Ior 20
s(comls less cooking tim(.
Pr(ss I ag_dn to re(hme
cooking tim( another
] 0 se< ends (tot_tl 30 se(onds
less time).
2O
The Bexerage feature
heats 1-3 sewings of
3 Press t_EVEILk(;E.The
_,m lÂexer_,ge.
ox, ell s[arts immediately.
The serving size is
amomaticallv set a{ 1, but
can be changed by pressing
2 or 3 right alter pressing
BI_;VI_;I_LkGE.
Drhlks heated with the
Beverage feature lllay be
very hot. Remove the
container with care.
Page 21

The Reheat/camre reheats
1 t() 3 servings of many
t)reviously cooked toods.
I Press I).EtIEAT.
2 Select tood type 1-6 for
ono serving (see Reheat
Guide below).
3 Press 2 or 3 to reheat 2 or
3 servings.
4 Press S%\RI2
NOTE:Theservingsizemay
be changedor addedafter
pressing STARTPress
numberpad 2 or 3.
Reheat Guide
Food Type Comments
I Pasta Coxer wi|h lid or xente(t t)lasti(wrat).
2 Meats, casseroles,pizza Coxer /_ri{]llid or Xellte(t t)lasti(wrat).
3 Fruitsand vegetables Coxer /_ri|tl lid or xented ])lasti(_r_'_t).
4 Beverages,8-10oz. Works best witll wide lllO/lth l//[Ig'--do not (o'_er.
5Sauces andgravies Coxer/_ri|]l lid or xented t)lasti( /_rr_lt ).
6 Plate of leftovers (;oxer v_ritl'tvented [)lPIs|i( wrap.
(2 to3 foods,4 oz. each)
[v;G: 8!E1
The Potato ti'ature cooks
u1) |o fore: 8-10 ounce
potatoes.
Press POT\TO on((' ft)r
()lie potato, |wice ft)r two
t)otatoes, three times tor
The \'egetable/catm:e
all|omaticallv se|s |lie
(ooking tilIleS al/d t)ower
lmels |o cook flx_sh, fl_ozen
or canlle(t ge_e[Dbles.
I Press X_GE'I'\BI E.
'%ele(t \'eggie tyt)e 1-3"
will be displayed.
2 Select ft)o(t type 1-3
(see chart at right).
3 Enter weight in OUllces
(see (hart at right).
three t)otatoes and tbur
times lot lout l)otatoes.
The oven will start
immediawlv after
P()TAT() is t)ressed.
4 "['tie (/'_en star|s
automati(allx.
Food
Code Food Weight
1 (;am/ed 4-20 oz.
2 Frozen 4-20 oz.
3 Fresh 4-16 oz.
21
Page 22

Convenience Features
(On some models)
The Cook/i'ature
atltol//aticallv sets the
cooking tittles and power
levels R)r a variety of leeds.
I Press C()()K.
2 Select/ood type 1-9 (see
die Cook (;uide below).
Cook Guide
FoodType
I Canned Vegetables 4 to 20 oz. Use micrt,\<_ve-sat(' casserole or bo_,l.
Co\er witl/lid or vented plastit _r_'_t).
2 Frozen Vegetables 4 to 20 oz. [)st, micr(mave-sal;v casserole or 1)in,,1.
Follow t)at kage iusu'ut tions tor adding
_ater. Cover \,,ith lid or venwd
plastic wrap.
3 Fresh Vegetables 4 to l (; oz. Use l/licr(.l\'¢;ive-sal;t' casserole or 1)ovvrl.
Add 2 lablesl)oous _r_C]" R)]" ea(h serxing.
Coxer with lid or vented plastic wrap.
4 Potatoes 8 to 40 oz. Pierce skin with/ork. Place t)otatoes on
o'_en tloor OF ltlrlll;tb|e.
5 Fish 4 to 16 oz. Use obhmg, square or round dish. Coxer
with \cured plastic wrap or wax t)al)et_
6 Chicken Pieces 4 to 40 oz. list' obhmg, square or round dish. (2oxer
with \ented ttlastic \vrat).
7 GroondMeat 8 to 48 oz. Use round casserole dish. (',rlllIll)le l/lear
(hoof, pork, torkeD imo dish. Co\er \,,ith lid or \el/ted plastic
wrap. Drain mid stir at signal.
8 Bacon 2 to 10 oz. [,a}er stril)s ou a t)late, 4 to a last't:
Cover each la_er with a palter to\_e].
9 Pizza 4 to 16 oz. Follow package instructions to t)rel)are
(frozen, microwaveable) t)izza/or mi(=r'()_r_ i] _g.
22
3 Ellter weight in O[llltes.
4 Press S'['M).'E
Hint: Press and hold tile
C()()K pad dm:ing cooking
to display the/i)/)(t t}])e
and rentaining cook tittle.
Page 23

DEFROST "
AL_O/TIME
,@
I Press DEFROST
AUTO/TIME once.
2 Using the Conversion
Guide at right, enter
food weight. For
example, press pads 1
and 2 for 1.2pounds
(1 pound, 3 ounces).
3 Press START
(Time Defrost is
explained in the 77me
Features section.)
The I)e/i'ost Auto/Time
tbature gives you two ways
to (tet_:ost/i'ozeH/i)o(ts.
Press DEFR()ST
ALIT()/TIME once tor
Auto Del+'ost or twi(e
[or Time I)e/i'ost.
Use Auto I)el_'ost/_)r meat,
t)ouhvy and fish. Use Time
De/i'ost lot most other
fi:ozen/i)ods.
Auto I)efl:ost amomati(allv
sets the (h'li'osting times
and power levels to give
even det_:osting results tor
meats, poulu:y and tish
weighing u t) to 6 p()tmds.
There is a handy guide
located on the inside fi'ont
of the oveIl.
Guide
Conversion Guide
!f the weight of food is
stated i!:t pot/rids and
O/lliCeS_ the OtllICeS lnust
be converted to tenths
(A) of a potmd.
Weightof EnterFoed
Foodin Weight
Ounces (tenths of
a pound)
1-2 ' :1
3 .2
4-5 .3
6-7
8 .5
9-10 16
11 ' 17
12-13 .8
14-15 .9
• Rel//o+_e IIle}tt i]?Olll
t)ackage and t)lace on
n/ierowax e-sat_! dish.
• ]\vice during de/i'ost,
the oven signals TURN.
At each TURN signal,
ttlrll the toed over.
Remove de/i'osted meat
or shield warm areas
with small t)ie(es of/oil.
•Atter det_'osting, most
meats Deed to stand
5 minutes to complete
(tet_'ostiHg. Large roasts
should stand tor about
30 mimues.
23
Page 24

Other Features Your Model May Have
(On some models)
The t tEI,P pad displays
[_ature infi)rmadon arid
hell)tiff hints. Press t tEI P,
then select a/bamre pad.
To remilld you that you
have/i)od ill the oven, the
oven will display "F()()[) IS
I),II_A[)'_" and beep once a
minute mHil you either
open the oven door or
press CI I%\R!()FE
Press to elite]; the [iH/e of
day or to check the time
ot (tax while mi(rowaving.
1 Press CI_()CK.
2 Enter dine of (tax.
3 Select AM or PM.
4 Press ST\RT or CI_()CK.
24
Page 25

[ AM/PM,,_
SCROLL SPEED
The scroll speed of the
display can be changed.
Press and hold the
AM!PM pad about
.'4seconds to bring ut)
the display. Select [-5 tor
sh)w to last scroll stIeed.
i/° I
[DISPLAY ON/OFF]
To turn the (lock distIlay
off, press and hold 0 for
al)ollt ._4 se(olldS.
Delay Start allows you to
S(_t the ii/i(ro'¢v_l_,e to del_l_,
cooking ut) to 24 hours.
1 Press DEI ,AY STAP.T
2 Enter tlle time you
w_l+ntthe o_en to start.
(Be sure tlle microwave
(lo(k shows the correct
time of da},;)
3 Select AM or PM.
"[b redistilay the do(k,
repeat.
4 Select any combination
of Det+'ost Auto!Time
or Time Cook I & II.
5 Press S'EM).I'.
The Delay Start time will
be displa}_'d t)lus "DS."
The oven will automatically
start at the delmed time.
The time of day may be
displayed by tiressing
CI+()CK.
25
Page 26

Other Features Your Model May Have
i__ F_ ¸
Tinier ()n!Off operates as
a nlinute tinier and Call be
used at any tin/e, e_el/
when the o_en is otlerating.
/ Press TIMER ()N!t)FF.
2 Ellter time VO/l want to
count down.
3 Press TIMER ()N!()FF
to start.
In addition to starting
illally ] _11 lctiolls,
S'I'M_T
TURNTABLE
[ }
.=
Yo{I Ill,IV lock Ille COlIH:Ol
})alle] to prevent the
microwave/i'om being
accidemallv started or
used b_ children.
(Onsome models)
For best (ooking resuhs,
lea_e die ttlrlltable 011.
It cm_ be Htru, ed off
tbr large dishes. Press
TURN'IABI E to turn
tl'te turu, table ou, or ott.
"Ik)lock or mflock the
controls, press and hold
CI,EAR!()FF/or about
three seconds. When the
control panel is locked,
an "I2' will be displayed
to the extreme riglu.
When die turntable is o/1.
rotate the dish 1/2 turn
after half the time lot
best res/llts.
Sometimes the turntable
cml become too hot to
touch. Be (areful toudling-
tile turntable during and
a/ler cooking.
[ SURFACE ]
[ LIGAHT
BRIRHT-NIRHT
OFF
Press tO tllrl/ Ill(! Sllri_l(e
light on or off.
()n some models, there is
a night light opdon.
Press SLIRFACE I,IGI IT
once/or bright light, twice
/or tile night light or tl_ee
times to turn the light off.
27
Page 28

Other Features Your Model May Have
(On some models)
The 1)eel)er sound level
[ BEEPER
t VOLUME J
can be a(!justed. Press
BEEPER V()I,UME.
Choose 0-3/or llltl|e
to loud.
HI-LO-OFF
The "_el/t f_tl/ 17elllO'_es
steaIll }tl/(t otheF _at)oYs
fi:om sm:t_l( e looking.
All a/ltOlllatic t_lll /('a|tll;e
t)ro|ects the l//iCFOWaVe
t+'om too nmch heat rising
t+'ow, tile cooktop beh)w it.
It _ltltOlilatlcallv ttlFllS Oil
if it Sellses too llltlch heal.
Press X_2N'I"FAN once for
high tml speed, twice tor
low [hn sl)eed or a thir(t
time to turv, till' thn off.
If you ha_e turned tile /hn
on you mm find that you
(mmot mrn it o/E The/an
will automati(allv mrn oil
when tile internal 1)arts are
cool. It lll_lV StHV Oil 1()17
_0 1//ill/lieS O17 IIIOYe _t/lel"
the cookto t) arid microwa\e
comrols are tin:ned o/E
28
Page 29

How to Use the Shelf
When Microwaving
////111 / I I I\ \ \\_',\
• Make sure the shelf is
posiuoned properly
i/tside file illlcrovcave
/o prevelJd dmnage Jo
die oven ti'om arcing.
• Do 110/ rise kt
microwave brownixlg
dish oll the shelf.
The shelf could
overhea/.
• Do not use tile ovell
wifll file shelf on tim
microwave floon This
could damage lhe
llllerowave,
• Use pot holders when
handling tile shelf -
it may be hot.
• Do ltOt use tile shelf
_ hen cooking
popcorn.
• Do not use tim shelf
wifll Sensor Cookil tg
or Reheat.
(On some models)
Food l//icFowa\es best when
placed on tl_e mrmable.
Only use the shelf when
1;elleatillg on l//OFe Ill,ill
one level. Do not store the
shelf inside tile oven cavity.
For best resu]ts
2-1eve!reheating
Switch places after !/2 tim_.
• To reheat on 2 levels
or
• To reheat 2 dishes on the
lower level:
I Muhit)l _ reheat time
b_ 1V.,.
2 Switch places alter 1/2
the time.
Switch places after 1/2time.
29
Page 30

Microwave Terms
Term Definition
Arcing
Covering
Shielding
Standing Time
Venting
Ar<ing is the l//i(F()v_r}t_e term tk)r sparks in the o'_en. Ar(ing is
c_t[ised 1)'_:
• metal or/i)il touching the side of the oven.
• ti)il that is not molded to ti)od (upturned edges act like
antennas).
• metal such as twist ties, t)oultry pins, gold-rimmed dishes.
• recycled paper towels containing small metal pieces.
Co_ers hold in moisture, allow/i)r more even heating and reduce
cooking time. Xi'nting plastic wrap or covering with wax paper
allows excess steam to escape.
In a regular oven, you shield chicken breasts or baked ti)o(ts to
prevent ovel_browudls, g. When lu, icrowaving, you use small strips of
ti)il to shield tt'dn parts, such as the tips of wi_s,gs and legs ou,
t)ouhr}, wt'd(h would (ook beti)re larger t)arts.
W]len vo[i cook with regular o_ens, ]i)o(Is S[IC]I _tS 17()aS|S O17 cakes are
allowed to stand to finish cooking or to set. Standing time is
especially important in microwave cooking. Note that a microwaved
(ake is u,ot placed on a cooling rack.
Aller covering a dish with plastic wrap, you vent the plastic wrap b}
mru, ing back one coru, er so ex(ess steam can esc_q)e.
3O
Page 31

Care and Cleaning
All o((asio]la] thoro/lgh
"wi )ino with a solution of
baking soda and wawr
keeps die inside ti'esh.
Walls, Floor, Inside Window,
Metal and Plastic Parts on
the Door
So]//e spatters (_lll be
relilove(] with a paper
towel, others may require
a damp cloth. Remove
greasy spatters widl a sudsy
cloth, then rinse with a
damp cloth, l)o not use
abrasive cleaners or sharp
iltensils on oven walls.
Never use a colmnercial
oven cleaner on rely part
of your microwave.
Shelf (if included)
Clean wiIh mild soap and
water or ill tile dishwasher.
Do not clean in a self-
cleaning oven.
NOTE:Be certainthepower
is offbeforecleaningany
part ofthis oven.
Removable Turntable and
Turntable Support
To prevent breakage,
do not place die turntable
into water just alter
cooking. Wash it carefully
ill warI//, sudsy water or ill
the dishwasher. The
tm:ntable and support
can be broken if dropped.
Remember, do not operate
the oven without the
turntable and support
in place.
TemperatureProbe
(if included)
Clean immediawlv afler
using. To clean, wipe with
a sudsy clodl, dlen rub
lightly with a plasti(
scom:ing ball if necessary.
Rinse and dye. The probe
can also be washed in the
dishwasher.
31
Page 32

%
Care and Cleaning
We recommendagainst
usingcleanerswith
ammoniaoralcohol,
astheycan damage
theappearanceofthe
microwave oven.Ifyou
choosetouse a coinlnon
householdcleaner,first
applythecleaner directly
toa clean cloth,then
wipe thesoiledarea.
Case
Clean tile outside of file
microwave with a sudsy
cloth. Rillse and then dry.
Wil)e the window clean
with a damp clofll.
Control Panel
Wipe with a dam 1) ch)th.
I)ry thoroughl}. Do not
use cleaning sprays, lm:ge
amounts of sea l) and water,
abrasives or shar t) ok!iects
Ol/file panel--riley Call
damage it. Some paper
towels Call also s('ratch
tlle control t)anel.
Door Panel
Betore cleaning the fi:om
door 1)ariel, make sure you
know what t}])e of panel
you h_e. Re/cr to tile
eighfll digit of tlle model
mmlbett "S" is staiHless
steel, "(;" is (;rat)hire, "I,"
is CleanSteel and "B', "W"
or "C" are plastic colors.
Stainless Steel
blea(h or t)rod/l(ts
(ontaining (hlorine on
Stainless Steel finishes.
CleanSteel or Graphite
Use a (h'an, soil light and
lightly damt)ened cloth,
then dry {horoughl}. Do
I/Ot /ISe apl)liallce w_lx,
t)olish, bleach or 1)rod u(ts
containing any chemical
agem on the CleanSteel
or (',ral)hite surlaces.
Plastic Color Panels
Use a clean, soft, lightly
(taml)eHed cloth, fllen (tvv
thoroughly.
Door Seal
It's important to keep the
area clean where the door
seals ag_finst tile microw_ve.
Use onl} rail(t, non-abrasive
detergents al)l)lied with a
clean sponge or so/t cloth.
Rinse well.
Bottom
The stainless steel panel
can be cleaned with
Stainless Steel Magic or
a similar product using
a clean, soft cloth. At)ply
stainless cleaner caretullv
to a\oid the sin:rounding
plastic t)arts. Do not use
32
at)t)li_m(e wax, t)olish,
Clean off the grease and
(hlst Ol/ [tie bottom o/lell.
Use a solution of warm
water and detergem.
Page 33

Bulb] @laceme,+t Ill
Replace the burned-out
bulb itha volt,
30-watt incandescent
bulbiwe36XlOOOZ,,
available from your
GE supp!ier. ,
Replace the burned-out
bulbwithaI20volt,
30-watt incandescent
bulbiWea_x_o_s,
available frm. your
GE SupPlier.
1 "Ib replace the bulb(s),
first disc(mnect the t)ower
at the main fllse or circuit
1)reaker panel or t)ull
the plug.
2 Remove the screw at the
fl:ont of the light cow:r
and lower the cow:r.
t J
Remove screw
1 "Ib repla(e the oven light,
first discom_ect the power
at the main fl_se or circuit
breaker panel or pull
the plug.
2 Remove the top grille by
taking out the ,2 screws
that hoM it in place.
3 Be sure the lmll>(s) to be
rel)la(ed are (OO1 before
removing. Al+ter breaking
tile adhesive seal, relilove
the t)tllt) by gemly turning.
Replace with the same size
and t}_)e l>ull>.
4 Raise the light shield
and rel)la(e the s(rew.
Comlect ele(trical ])ower
to the o_+en.
x
4 Remove the light cover
located near the cellter
of the oven that holds
the t)tflb. Remove the
bulb by gently turning.
Replace with the same
size and type bulb.
............................................................................
3 Remove the charcoal
fiher (ift)resent) to
access the light cover
(see Remove Charcoal
Iqlter section).
5 Replace the light cover
and charcoal filter
(if present).
6 Replace the grille and
screws. Com_ect electrical
power to the oven.
23
Page 34

%
The Exhaust Feature
Charcoal Filter
'on some models)
Reusable Grease Filters
(on all models)
The '_ent fan has 2 metal
r_ usable grease fillers.
The metal fihers u:a l)
grease released by toods
on the cooktop. They also
t)revem flames fi'om toods
on the cookto l)/rom
damaging the insi(h' of
the l//icrow_l_ e.
Models that re(ircuh'ae air
ba(k in[o the ]?OO]// _-Ilso
use a char€ oal fiher.
For this reason, the filters
must AI ;_XW_'S be in place
when the hood is used.
The grease fihers should
be cleaned on(e a montlL
or as lleede(t.
To remove, slide it to the
rear using the tab. Ptdl it
(]OWn and out,
To clean the grease filter,
soak it and then swish it
arotmd in hot water and
detergent. Don't use
ammonia or ammonia
t)rod ucts because they will
darken the metal. I Aght
brushing can be used to
remme embedded dirt.
34
Rinse, shake and let it (trx
betore replacing.
To replace, slide the filter
in the/i'ame slot on the
back of the opening. Pull
u l) and to the/i'ont to lock
into lilac,.'.
Page 35

AJ
mustbereplaced. Order
Part Nol WBO2X10943
ii cannotbecleaned. It
frmnyour OEsupplier.
Remove 2 grille screws
to remove the grille.
If the model is not vented
to the outside, the air will
be re(ir(ulated through a
disposable (har(oal tiher
dlat helps remo_e smoke
;-I] l(t o(tol's.
To remove the charcoal
[iher, discom_ect power
at the main fllse or circuit
breaker panel or pull
the plug.
The charcoal tilmr should
be replaced when it is
noticeably (lirtv or
discoh)red (usually at'mr
6-12 momhs, depending
on hood usage). See
"()ptional Kits," page 9,
/i)r more in/i)rmation.
Remove the top grille by
removing the 2 screws that
hold it in place. Pull the
Jilter at the t)ottom until it
c()mes t_:ee of the locking
tabs. Slide the tiher down
and out.
To install a new filter,
remove plastic and ()tiler
outer wrapping/i'om the
new/iher.
I Insert the top of the filter
u t) and into the gTOOVes
on the inside of the top
opening.
IIIII1
2 Push the bottom of the
filter in until it snaps
into [)lace behind tile
locking tabs.
IIIIIIII IIIIlU
35
Page 36

Before You Call For Service
Problem PossibleCause Whatto Do
Oven will not
start
A fuse in your home
may be blown or the
circuit breaker tripped.
Power surge.
Plug not fully inserted
into wall outlet.
Door not securely closed.
Floor of the oven is
warm, even when
the oven has not
been used
The cooktop light is
located below the oven
floor. When the light
is on, the heat it
produces may make the
oven floor get warm.
"LOC" appears The conlrol has been
on display locked.
Vent fan will not The vent fro1
turn off automatically turns on
to cool hlternal parts
wlfile the microwave
is on.
"BAD PROBE" The probe has not been
appears On display completely inserted into
the oven wall outlet.
The probe is defective.
• Rel)lace tuse or reset circuit breaker.
• Lint)lug the HliCrOW_tve ovell, thell plug
it ba(k in.
• Make sm:e the 3-1)tong plug on the
oxen is ftdlv inserted imo wall outlet.
• ()pen the (toor an(t close seem:ely.
• This is normal.
• Press and hold CI]LAR/OFF tot
abom 3 secon(ts to mflock the coHtrol.
• "Fl/e VCH[ t_lll (_11111()[ be [HrHc(I oil
while the mi(ro_a_e is ot)er_ting.
Tlfis is norm_d. W_fit for tl_e mi(-row_ve
to turn off m:d the tbn will eidler go
off mttomati(allv or you will need to
turn it off 1)5 pressing die Vent Fan
pad after the mi(rowave is o/E
Illser{ the t)rol)e t)rol)erly into the
ovell wall otltlet.
• Ret)lace the t)robe,
"PLEASEINSERT Probe has been
PROBES' appears forgotten or not
on display inserted properly.
"SENSOR ERROR" When ushlg a Sensor
appears on display feature, the door was
opened before steam
could be detected.
Steaul was not detected
in maxhntun mnotmt
of time.
36
• Insert the 1)robe 1)rot)erl) imo die
ox,eH wall oHtlet.
I)O llOt ot)eH door tllltil s{e_-illl is
sel_se(1 alld |il//(_ is stl()wH c()H]ltil/_
down on (tist)la).
Use Time Cook |o beat tk)r more |ime.
Page 37

I.,I
• Mois[/ll e oH the overt
door and walls while
cooking. Wipe tile
moisture off with a paper
towel or sol1 cloth.
• Moisture bemeen tile
OVe/l door panels wheI/
cooking certain toods.
Moisture should dissipate
shortly atier cooking is
linished.
• Steam or vapor escaping
li'Ol/l gtFOtllld file door.
• Light reflection arom/d
door or outer case.
• Dinm/illg oven light and
change in the blower
somld at power levels
other than high.
• Dull thumping sound
while oven is operating.
• The vent t;m operating
while tl/e microwave is
operating. The vent/;m
will not go off nor can it
be turned off m/til tile
H/icrowa\ e is oft.
• TV-radio imerl_rence
might be noticed while
/lSillg tile l//icFow?l\e.
Similar to the imerf_'rence
caused l)x other small
appliances, it does not
indicate a i)roblem with
the micr(/w_x e. Plug tile
microwave into a difJerent
electrical circuit, move the
radio or TV as lbr _m_,y
]FOI/I the l/licrowilve as
l)ossible or check file
l_ositi(m and signal ot
tile "IY/'radio antenna.
37
Page 38

We?lBe
ge.com
ge.com
800.GE.CARES
(800.432.2737)
ge.com
800.TDD.GEAC
(800.833.4322)
t ]a\e a question or need
assistance with wmr
appliance? Try tile GE
A1)l)liances Website ,24 hours
a (lay; any da} of _he year!
Exl)ert GE repair selMce is
Olllv ol/e ste t) (l_r(l_' ]i'()II l
}\mr do(m Get on-line and
schedule your service m
VO/lr COllVelliellce 24 h!)/ll'S
any day of tile }ear!
(;E sapports tfte {lnivc_:_al
Design concel)t--l)roducts '
se_Mces arid eHvir(mments
that can be used 1)}l)eot)le
of all ages, sizes and
capabilities. We re_ oglfize
tile need to (lesigal tor a
M(te range of t)h}Mcal and
mental abilities and
For gTeater COllVelliel/ce aH(t
_ster Sel_ce_ _)ll Call IIOW
download Owner's Mmmals,
order l)aHs or ('\ell sched/lle
service Oil-lille.
()r call 8t)0.GE.(; \RES
(800.432.27.37) dm{l_g
I/OrlIl;41 1)llSil/ess l/()lll'.s,
impaimlents. For details
of GE's Uni\ers:d Design
at)l)licafions, including
kitclmn design kteas/or
t)eople widl disabilities,
d_eck out oar W('bsite rodin'.
For the fteat-[ng lint)aired ,
please call 800.'II)D.(',EAC
(800.833.4322).
Purchase a GE extended
waJ;'ralll} an(l ]e;4rD abo_lt
special discoums dlat are
a\ ailable while yore: wan:am'_
is still in etli'ct. '_im can
t)urcftase it on-line anytime,
38
or call 800.626.2224 during
t_ormal busi_ess homes. GE
Consumer Itome Services
will still be there after your
warranty exl)ires.
Page 39

m
ge.com
800.626.2002
ge.com
Individuals qualified
to service their own
_ll)l)liances cml have
t)m;ts or accessories Sellt
directly to their home.
(VISA, MasterCm:d and
Discover (ards are
accepted.)
()rder on-line to(tay,
_4 hO/II?S every day or
b} phone at 800.628.2002
d m:ing normM business
hoIIrs.
Register your new
appliance on-lhle--
at your conve_dence!
Timely t)rod uct registration
will allow/or enhan(ed
{Oil/Ill [uli(a|ioll all(]
t)rol//t)t service/ll/der the
terms of your warranty,
should the need arise.
51)u may also mail in the
t)re-t)rinted registration
cm:d imluded in die
t)_wking m_terial.
Instructions contained
in this manual cover
procedures to be
performed by may user.
Other servichlg generally
should be referred
to qualified service
personnel. Caution must
be exercised, shlce
improper servichlg may
cause tmsafe operation.
39
Page 40

S/aplesah_5_l!p or ca_cdh, d clu,cl¢ lu'_v,. Pma a ori._q_al
purdmse daie it _teeded goobiain service under warra_tly.
LIMFI_Z_ ONE-Yk_ WARRANTtY
I?or ()11(' v('_'tl" _i'Ol//(]?it(' o{" OlJ_Jl/a] pHr(h_ls¢',
GE _fill r(pla_( any part in th_ micmwm (
own that fi_ilsd/te to a <lct_(t in materials or
_orkmauship.Duringdfislimitedone,war wc_-raaty,
(;Ewillpro@le,j%eofchrome,alllaborand rda1_d
SClMcecos_iol'eplacedledelecd_ part.
All _an'mw se_Mc( will b_ provided b_ our Factory
Se_Mce CentePs or 1)_our authorized Customer
Care _ servicers during normal working hours.
Shouk/)our applianc( ue(d ser_ic_, dining
w_lr_Tau|_ period or lx3ond, call 800.(',E.CARES
(800.432.2737).
Please hm_ serial and model nmul_ers a_ailable
_lle//calling lbr se_@ (.
• Service trips to your home to teach you how to
use the product.
• Improper installatiou, delivery or maintenance.
If you have an installation problem, contact
your dealer or instal|er. You are responsible for
providing adequate electrical, exhausting and
other commcfiug facilities.
• Product not accessible to provide required
service.
• Replacement of house fuses or resetting of
circuit breakers.
• Replacement of the cooktop light bulbs.
• Failure of the product or damage to
the product if it is abused, nfisused (for
example, cavity"arcing from wire rack or
metal/foil), or used for other than the intended
purpose or used commercially;
• Dan_age to product caused by"accident, fire,
floods or acts of God.
• lncideut_ or consequential dan_age caused by"
possible defects with this appliance.
• Dan_age caused after delivery.
EXCLUSION OFIMPLIED WARRANTIES--Your sole and exclusive remedy isproduct
repair as provided in this Limited Warranty. Any implied warranties, including the implied
warranties ofmerchantability orfitness for a particular purpose, are limited to one year or
the shortest period allowed by law.
This w:_mmW is extended to the original purchaser and any s_,,:ceeding o_ ner for pl_ducts pm_'hased for home
use within the USA. ff me product is loomed in an m_eawhel_ selfice by a GE Aufllorized Selwice_ is not a_tilable.
you may be responsible tbr a trip chapge or }_u ram' be _*_quhvd m bring the product to an Authorized GE
Sel_@e D)calion for service. In Alaska. the wanvmtv excludes tile sep@€ cnl/s to your holnc.
Some states do not allow the exc]usion or limitation of incidental or consequential damage,, so the abmv
limitation or exclusion mW nor apply to xou. Th£ warl-anty gixvs you specitic legd rights, and you ma) also have
other rights _hich va_ fi'om state to state. To knm_ what your legal rights mv m your st:ire, consult your local or
state COllSUlner a_;lils o_ice o1"votlr sDIte's Attorney beneral.
Wm'raraor: C,_teral Eled_@ Company. Louisoille, KY 40225
Printed in Malaysia
 Loading...