

Page 1
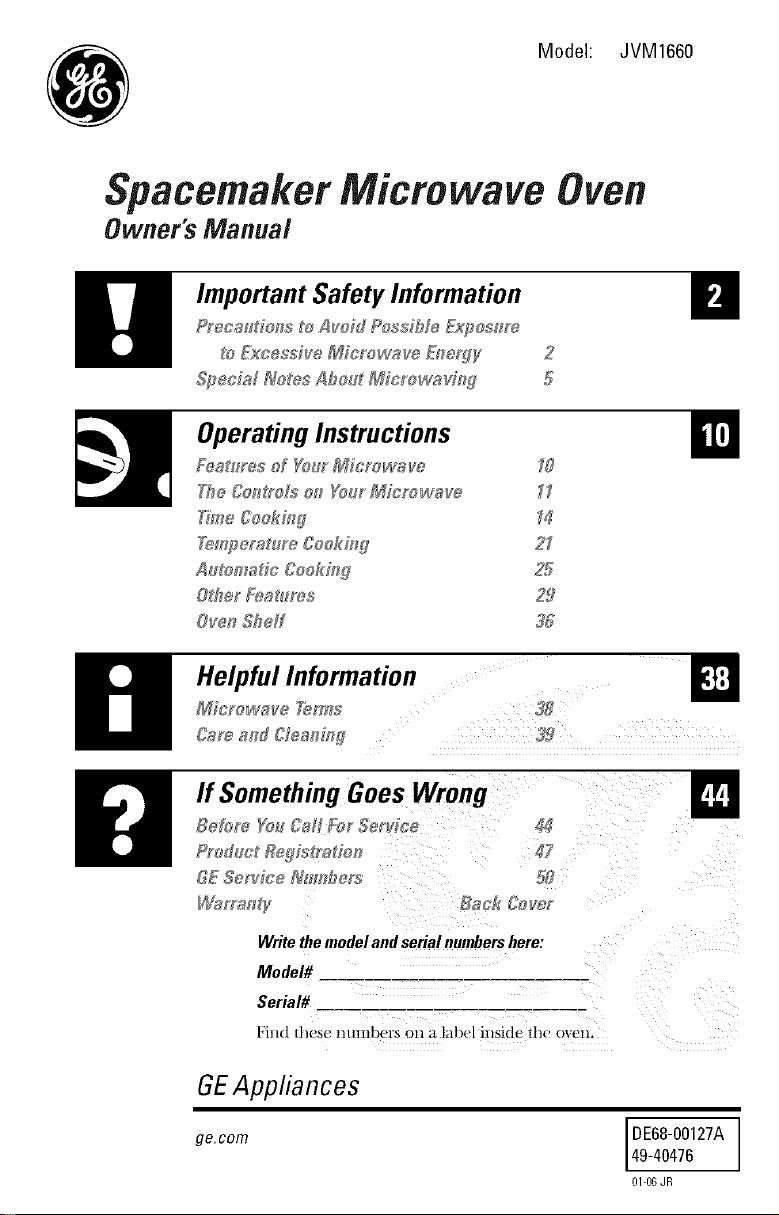
Model: JVM1660
Spacemaker Microwave Oven
Owner's Manua/
H
[]
2
5
Operating Instructions
F_,a#_r_3d Yo_rMicrowaw_
1I
7)#_eC_okh_,q
[]
Helpful Information
_4
21
25
36
If SomethingGoes Wrong
o,,_ ==,,_÷
Write the model and serial nmnbers here:
Model#
Serial#
Find th('s( lltllll])elNo11a l;H)elinside the oven,
GEAppliances
ge.com
DE68-OO127A
49-40476
01-06 JR
Page 2
READ ALL SAk_2TY
INFORMATION BEFORE USING
,_ WARNING!
Foryoursafety,theinformationin this manualmustbe followed tominimize therisk offire or
explosion, electric shock,or topreventpropertydamage,personal injury orloss oflife.
For your safew, tile intbrmmioll in this mmmal
musl be Ibllowed to minimize /he risk of fire
or explosion or to prevem propert:y dmnage,
PRECA UTYONS personal inj uLw or loss of lite.
TO AVOID Oo Not Attempt Oo Not Operate ,he oven
EXPOSURE operm,on (nn resul, ('lose properly and
to operate dlis oven ifil is dmnaged. 1/is
with the door open particularly importam
since open<loot that the oven door
TO EXCESSIVE in harnfful exposure thal dlere is no
]o iHicrowave ellergw, dalllage to the:
MICROWA_ l_ is illlpori_tllr i1o/ to IdooI ben,).
ENERGY ,hesaii*iy interlo_ ks.
(leti_al or tamper with 2 hinges and lalehes
,broken or loosened).
Do Not Place any object 3 door seals and sealing
betweeH lhe overt [i'Oll/ St/Fleeces
thee and the door or The Oven Should Not
allow soil or elemle_ be adjusted or repaired
residue to aecumulaw by alwone excepl
on sealing surthees
properly qualified
servlce persolllle].
Page 3
I!1
This microwave oven is
intended for household
use and is ULlisted for
installation over electric
and gas ranges.
This microwave oven is
not approved or tested
for inarine use.
• Read and tbllow the
specilic "Precautions to
Axoid Possible Exl)osure
t() Excessive Microwave
Energ-y" on page 2.
• This appliance must be
grounded. C(mnect only
to properly groin,(ted
outlet. See (',rom_(ling
Instructions se(tion on
page 9.
• Do not mount this
at)plian(e o_er a sink.
• Install or locate this
appliance only in
accol:(t_+.l_ce witl't the
provided Installation
hlstl?llctions,
• This over-the-range oven
was designed for use over
ranges no wider than 36."
It lnav be installed over
both gas and elecu:ic
cooking equipment.
• Do not operate this
appliance if it has a
damaged power cord or
plug, if it is not working
properly or if it has been
damaged or dropped.
• Do not cover or block
_tl/y openillgS on Ill('
appliance.
• Use this appliance only
/i)r its intended use as
described in this manual.
1)0 no{ rise corrosive
chemicals or vapors in
this appliance. This
microwave men is
speci/ically designed to
heat, (h_ roF cook/i)o(t,
and is not intended
/i)r laboratory or
industrial /Ise.
Page 4
READ ALL SAb 2TY
INFORMATION BEFORE USING
® Do not store this
appliance outdoors.
Do not use this product
near wa[er--tbr example,
in a wet llasemeilt, near
a swillllIliI/g pool, near
a sink or ill similar
locations.
® Keep I/()w( 17cord a_l}.
l_'om hearted sm:th(_ s.
® Do I/or il/lI//(rs( power
((/rd or phlg in _ter.
* "Ib re(h/ce tile risk of fire
in tile oven cavity:
-- Do not overtook ti)od.
C_r_ hilly attend
_lpi/li_m(e when p_q)(r,
plastic or ()tiler
combustible materials
are placed insid( tile
o_en while cooking.
-- Remoxe wire twist-li(s
and m_tal handles li'onl
paper or plastic
containers l/elDr( placing
them in the ox(n.
-- Do not /lse tile ()_n
ti)r storage purpos_ s.
Do not leave paper
products, cooking
utensils or li)od in the
oven when not in use.
-- If materials insid_ th_
oxen ignite, keep tile
oxell door closed,
t{lrI/ tile ()Veil oil alld
disconn(ct tile power
cord, or slmt off power
at tile li_se or cir(uit
breaker panel. If tile
door is opened, tile
lire mm' spread.
-- Do not /lse th_ Sensor
Features twi(e in
succession on tile saln_
li)od portion. If Iood is
mldercooked atler tile
lirst c(/ui/tdown, /lse
rimoCookfl)r additional
cooking tinle.
o Se_ door surlhce
cl_ aning instructions in
the Care and Cleaning
section(s) of this manual.
"This appliance must only
be serviced by q/lalitied
service person_lel.
Contact nearest
amhorized servic_ ih(ility
Ior examination, repair
or adj/lstment.
®As with any appliance,
close supervision is
n(cess_tr} wheil/ised
by children.
* Do not store anything
directly on top of the
l/licrowav( ()Veil S/lr_ilC(
when the microwave ()veil
is in op_ ration.
SAVE TFIESE INS TR UC770NS
4
Page 5
I!1
SPECIAL NO TES AB 0 lfl" MICR 0 WAV1NG
Ardllg is the microwa'_e
term tor sparks ill the
the CLEAR/OFFpad and o'_en. Ar(ing is (aused t)v:
correct the problem.
• The tel//tlel;_ttllFe tlrol)e
ill the H/i(Fow_t'_e hill I/()t
inserted ill tlle tood.
• The metal shelt not
installed correcth'
SO it to/l(hes the
7lliCl/Owave wall.
• Metal or foil tou(hing
the side ot the ()veil+
• I)() not tlOl / l>Ollcorn ill
your microwave oven
unless ill _1st/e(iM
micl:owave pOtlCOl:n
accessory or unless you
use l/Otlcorn lat/eled tor
use ill microwave ovens.
• Some l/roducts such as
whole eggs and sealed
(Ol/t_lil/eFS /()l? ('x_++lllt)le,
closed ,jars--m'e al)le to
exlllode and should not
be he_m'd ill d/is
lili(-Fow;4_,_, ovel/, S/l(h HSC
O/the lIli(lx)W_lVe ()_+ell
could result ill il+jury.
• I)() not boil eggs ill a
IIIi(YowHvc OVel/, PFCSS/IF('
will kluil(I ut) inside egg
yolk and will cause it to
burst, possibly resuhing
ill il+jury.
• Foil not molded to tood
(Ullturned edges act like
antemms).
• Metal, such _s t_ist-ties,
tloultry pins or gold-
rimmed dishes, ill the
microwave.
• Recycled l/al/er towels
containing small metal
pieces being used ill the
microwave.
• ()l/erating the microgroove
with no tood inside tor
more than _ minute or
tWO 1//_1_' (_I/ISC (l_llIl_tge to
tile oven and (ould stal:t _
/il:e. It in(reases tile heat
around the magnetron
and ('m/ shorten the li{('
of tile oven.
• Foods with unklroken
outer "skill" S/l(h _ts
t)otatoes, hot dogs,
S_I/IS_Iges, tOIIl_ttoes,
atlples, chicken liw'rs
and other giblets, and
egg yolks should be
tlierced to allow steam
to cscal/e dul:ing
cooking.
Page 6
SPECIAL NO 7 AB 0 UT MICR 0 WAV1NG
SAFETYFACT
SUPERHEATED WATER
Liquids, such as water,
coffee or tea, are able to
be overheated beyond
the boiling point without
appearing to be boiling.
Visible bubbling or boiling
when the container is
removed from the microwave
oven is not always present.
THIS COULD RESULT
IN VERY HOT LIQUIDS
SUDDENLY BOILING OVER
WHEN THE CONTAINER IS
DISTURBED ORA SPOON
OR OTHER UTENSIL IS
INSERTED INTO THE LIQUID.
To reduc( the risk ol il_jury
tO persons:
I Do not overheat tile
liquid.
I Stir tile liquid both
be/ore and hall\ray
through heating it.
I Do not use straight-
si(kd containers with
narrow necks.
-- Al_er heating, allow
tile (ontailler to stand
ill tile microwave ()veil
lot a sh(/rt time belore
rel//oving tile contaillelL
I I lse extreme car( when
inserting a StlOOn or
other/ltensil into tile
container.
6
o A\ oid heating t)abx Io(/d
ill glass jars, ev(n with
tile lid off. Make Slit( all
inlhnt li)od is thoroughly
cooked. Stir Iood to
distribme tile heat e_enl\..
Be careful to llrex(m
scaMing when warnling
li)rln/lla or breast milk.
The container iil;i} Joel
cooler than tile milk
r(allv is. Always test tile
milk belore lbe(ling
tile baby.
o Don't (tefl'ost li'ozen
beverages ill nm:row-
n(lked bottles (esl)eciall V
(arbonated beverages).
Even if tile contain( r is
op(ne(t, l)ress/lre C_lll
[mild ut). "Ellis can caus(
tile co]it>liner to burst,
l)ossibly r(s/flting ill
iII j/lr}.
o I]Ot li)o(ls and steanl
call ca/lse burns. B(
carelill when opening
ally (oi/taillers of hot
tood, inchlding popcorn
bags, cooking pouches
and boxes. 'Ik) pr(vent
l)ossible il{im:}, direct
steam awa V fl:on/ hands
and Ihce.
® Do llOt overtook
potatoes. Thev co/fld
(l(hvdrate and catch
lire, causing danlage
to vour ov(n.
®Cook meat and t)o/fltr}
thoro/lghl} Iineat to
at least all INTERNAI_
temperature of 160'F
and l)oultr} , to at least all
INTERNAI _ temperatm:e
of 180'E Cooking to
these temlleratm:es
/lsuall V protects against
Ioodt)orne ilh/ess.
Page 7
m.
Make sure all cook_al:e
used ill Your microwave
oven is suitable tor
n/i(rowaving. Most glass
casseroles, cooking dishes,
l//easlll?il/g ClltlS , Cllsiar(t
CUllS, potter} or china
dinnerware which does not
have metallic u:im or glaze
with a metallic sheen call
be used. Some cookware is
labeled "suitable lot
microwaving."
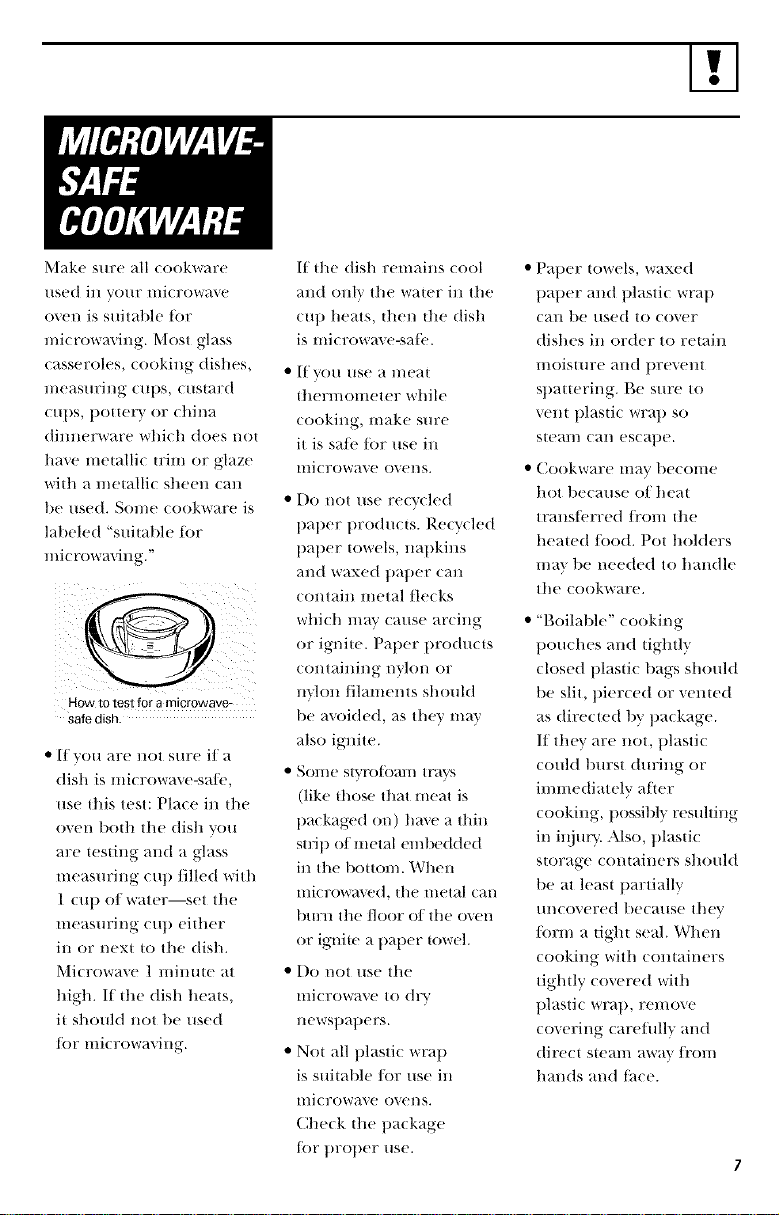
How to test for a microwave-
safe dlSn
• I|vou are uol s/Ire ila
dish is/llicrowa\e-s;ll('.
use lifts test: Place il lh(
oven 1)oth the dish you
are testing aud a glass
uleasln'iug cup/+l|ed with
1 ell t) of water--set the
uleasuril+g cup either
in or next to the dish.
Microwa+e 1 l//illtlte ;tt
high./f the dish he;+ts.
it shouht not be tl+ed
{or lnicrowa_illg.
If die dish remains cool
and only the water ill the
cup heats, then the dish
is microwa_ e-sati'.
• If VO/l /lse a l/lear
dlermometer while
cooking, make sm:e
it is sale {or use ill
microwave ovens.
• Do not use recycled
llaller tlroducts. Recycled
llaller towels, napkins
;-in(t waxe(t t)a])er can
contain metal flecks
which may cause arcing
or ignite. Pal/er products
containing nylon or
talon/ilaments should
be avoided, as they may
also ignite.
• Sol//e stvl'o{()_ll// tr_lvs
(like those that meat is
tlackaged on) haxe a thin
stlJ t1 of metal embedded
ill the bottom. When
lllierowa_._'d, the lllet:al call
burn tile floor of tile oven
or ignhe a tlaller towel.
• Do not use the
microwave to dry
newstmpers.
• Not all plastic wrap
is suitable/or use ill
nficrowave ovens.
Check the package
tor t)rot/er use.
• Pat)er towels, waxed
t)at/er and t/lastic wrap
call tie used to (over
dishes ill order to retain
l/loistllre and llrevent
stmttering. Be sure to
vent l/lasdc wrap so
steal// can eseal)e.
• Cookware lilav becollle
hot because of heal
transti'rred/i'om the
heawd/ood. Pot holders
may be needed to handle
the cookware.
• "Boilable" cooking
pouches and lightly
closed t/lasdc bags should
be slit, pierced or vented
as direcwd by package.
If they are not, t)lastic
could burst during or
immediately alter
cooking, l)ossibly resuhing
ill illjury. Also, t)lastic
storage containers should
be at least partially
uncovered because they
/orn/ a tight seal. When
cooking with containers
tightly covered with
plastic wrap, remove
co_ering carefllllv and
direct s{eal// aw_lv ]i'Ol//
hands and {hce.
Page 8
SPECIAL NO 7 AB 0 1_71"MICR 0 WAV1NG
®Use loll only as
dir< eted in this manual.
When using loll in th_
mierowav_ o_<n, ke_p tile
loll at kast l" m_ay I}:onl
tile sides of tile oven.
The ]_ti/will op_ rate
a/Hoinaticallv under
certain (onditions (see
Automatic Fan lbamre).
"E_k( care to prevent tile
starting and spreading of
accidental cooking liras
while tile x(nt lml is in use.
®Clean tile mlderside of
tile l//icrowkt\e o]iell.
Do not allow grease
to build up on tile
microwav( or the
thn lilter.
o Plastic cookwar_ Plastic
(ookware &signed Ibr
microwave cooking is very
us_ fill, but should be used
carefully, lh _n microwave-
sate plastic nlm. not be as
tolerant of o_ ercooking
conditions as are glass or
ceraulic ulaterials mid
ma}. soften or (har if
sul)iected to short
periods of ov_ rcooking.
Ill longer exposures to
overcooking, file lood
and cookware could
ignite.
o [11 [lie exen[ of a grease
tire Oll th( s/lrl;lce milts
below tile microwave
OV( 11, Sillother a IIaiIliI/g
1)all o_1 tile s/lrl;_ce mitt
lV co_ ring tile pan
eonlpletely wifll a lid, a
cookie sheet or a/lat tray.
o Use care when cleaning
tile vent Ihn tilter.
Corrosive cleaning
agents, su(h as lye-based
OVell (leaners, l/l_t}
damage the tilter.
Follow th_se guidelines:
I Use microwa_e-salb
plastics onl\. and us_
them in StlJCt comi/limlce
with the cookware
l/laI//llil( t {irer_s
re( Ol/lIIl( nd atiolls.
2 Do not microwax'e empty
contain_ rs.
3 Do not i/ermit chiMren
to use plastic cookware
without comlllete
S[ll/ervision.
®When preilaring
flaming loods raider
the i/li(rowave, tllr_l
tile vent ti_l on.
®Never lea_e s/lrl_tee {lI/i[s
t)en(a[h yo/lr illicrowave
oven unatlended at high
heat settings, goilovers
cause snloking and
greasy spillo_ers that nlay
ignite and spread if the
l/licrow_t\ e v(llt t_ti/ is
ollerating. To ininimize
a/ltOlIla[ic t_l]l oil(ration,
use ad_ quate sized
co()k_are and use high
heat Oil Stlrl;_€e mlits
only whell n_ eessar}.
Page 9
I!1
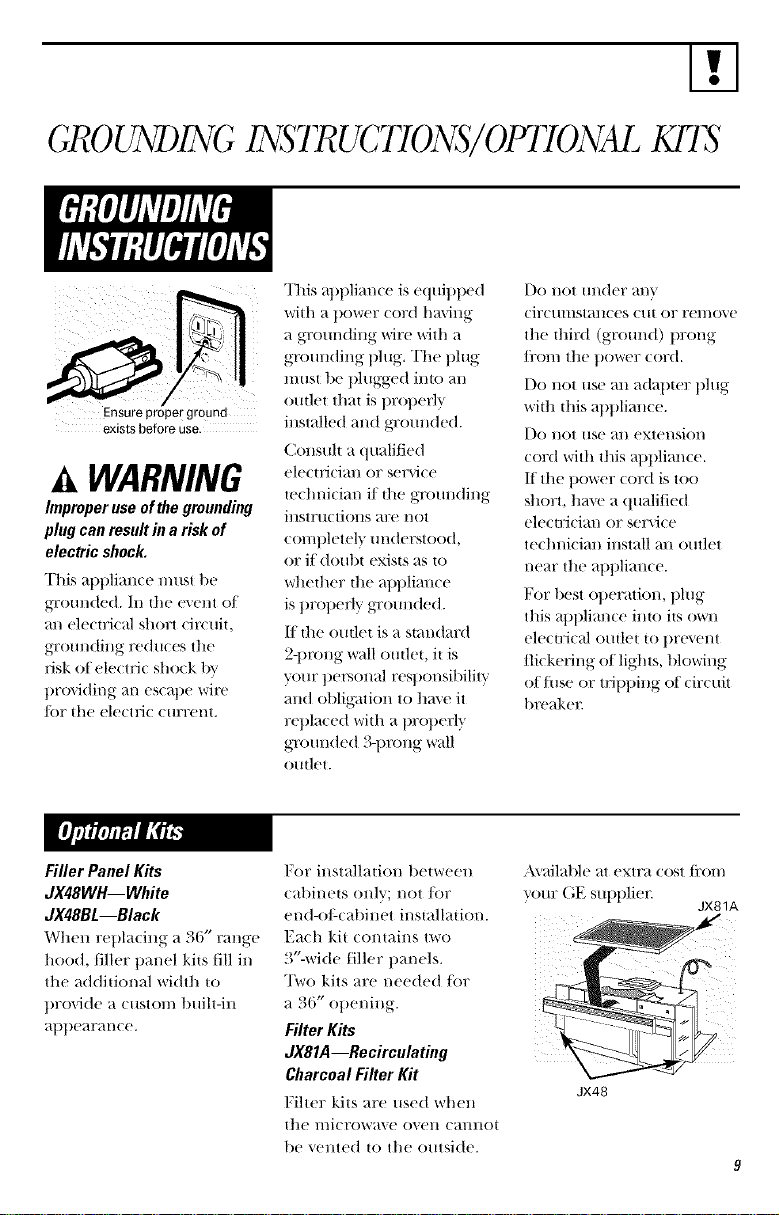
6R 0 UNDIN6 INSTRUC7YONS/OFIYONALKMS
Ensure prope[ ground
existsbeforeuse.
A WARNING
hnproper use of the grounding
plug can result in a risk of
electric shock.
This at)t)lian(e must t)e
g-romMed. In the e\ ent of
an electrical short circuit,
gromMing re(hues the
risk of ele(td_ shock by
providing an escape wife
for tile ele(tlJ( era;rent.
This appliance is equipl)ed
with a t)()wel? (ord hming
a grounding wire with a
gromMing t)lug. The plug
must t)e t)lugged imo an
outlet that is l)rot)erl'_
installed and gTounded.
Consult a qualified
electliCiall or selMce
te(lmicim_ if the gtx)mMing
iHstructions are not
completely m_derstood,
or if doubt exists as to
whedmr die appliance
is t)rol)erly gTounded.
1/the outlet is a standard
2-1)rong wall omlet, it is
your personal responsibility
and obligation to ha\ e it
replaced with a 1)rol)erly
gromMed 3-t)rong wall
o/ltlet.
Do not m_(ler any
circumstances cut or remo\ e
the dfird (gr(mnd) prong
/i'om the power cord.
Do not use an adal)ter plug
with tl/is at)t_liance.
I)o llot use ml extension
(ord with this al)plian(e.
If the t)ower (ord is too
short, have a qualified
electrician or servi(e
te(lmiciaH iHstall aH outlet
near the at)t)liance.
For best ot)eration, plug
this al)l)liance imo its own
electrical outlet to 1)re\ el/t
flickering of lights, blowing
offl_se or trit)t)ing of circuit
b_x'ake*t
Filler Panel Kits
dX48WH--White
dX48BL--Black
When replacing a 36" range
hood, tiller panel kits till in
the addidonal width to
provide a custom built-in
at)t)e_lr_ll/ce.
For installation betweeH Ax_dlable at extra cost fi'oln
cal)inets only; not/or your GE supplie_t
end-old( abinet installation .....................
Each kit _omains two
3"-wide filler panels.
Two kits are needed/or
a 36" opening.
JX81A
FilterKits
dXBIA--Recirculating
Charcoal Filter Kit
Fiher kits are used when
the l/li(rowa_+e o_.ell CalmOt
be veHted to tile outside.
JX48
Page 10
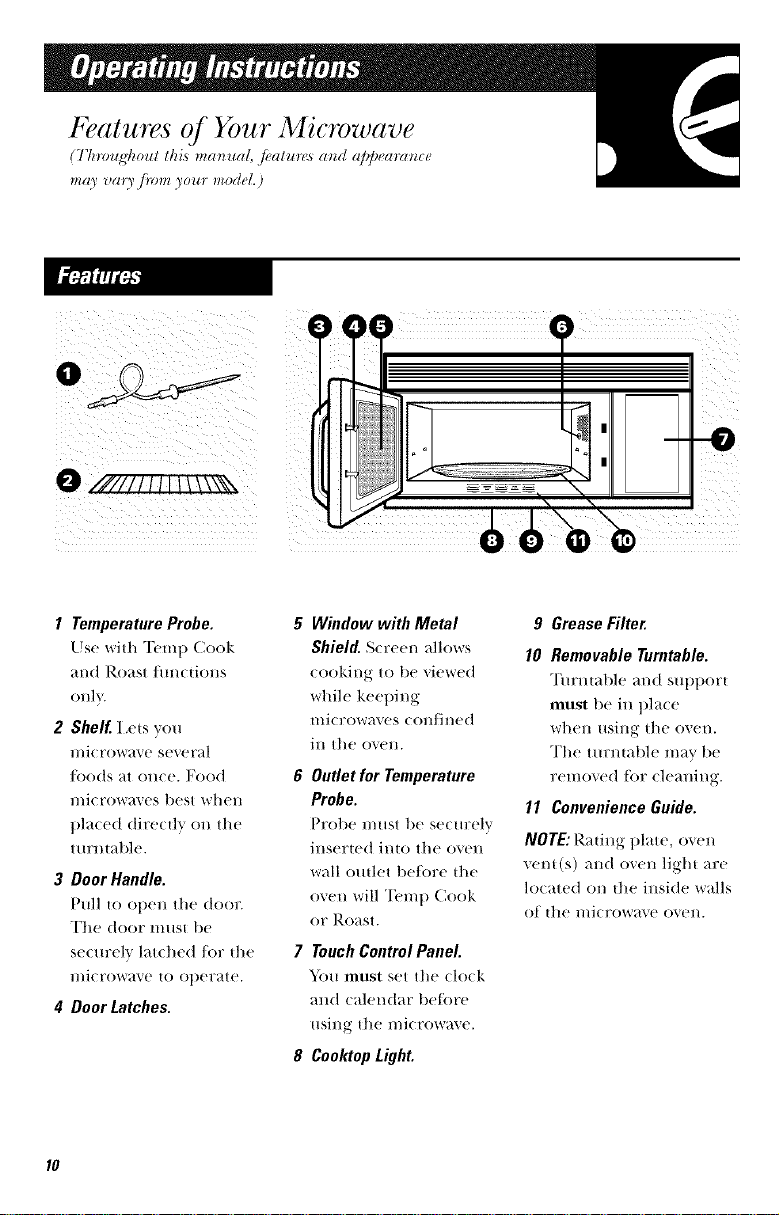
Features of Your Microwave
(Througt_out thi._ manual, .fi.atun'_ a?td appeara?tce
may vary/i.m your modeL)
O .#777777TITWNN
1 Temperature Probe.
Llse with Tom t) Cook
and Roast/im(tions
only.
2 Shelf. I cts you
mi( rowavc several
/i)o(ts at on(c. Food
HIi(TOW'd_('S best wh('n
t)la(ed dire(tly on the
turntable.
3 Door Handle.
Pull to Ol)('n th(' (too+_
Th(' door must bc
sc(urclv lat(hcd /i)r the
microwave to ot)erate.
4 Door Latches.
5 Window with Metal
Shield. Screen alh)ws
cooking to be viewed
while keet)ing
microwaves confined
in the oven.
6 Outletfor Temperature
Probe.
Prot)(' must l)(' s('( [I]TC1v
inserted into the oven
wall outlet 1)eli)re the
oven will Tern t) Cook
or Roast.
7 TouchControlPanel.
You must set the (lock
and calendar belore
using the mi(rowave.
8 CooktopLight.
9 Grease Filter.
10 RemovableTurntable.
Turntabh' and supl)ort
must 1>1'in t)la(c
when using the oven.
The turnlal>le lnav be
removed tor cleaning.
II ConvenienceGuide.
NOTE: Rating plate, oven
veto(s) and oven light are
located on the inside walls
of the mi(rowave oven.
Page 11
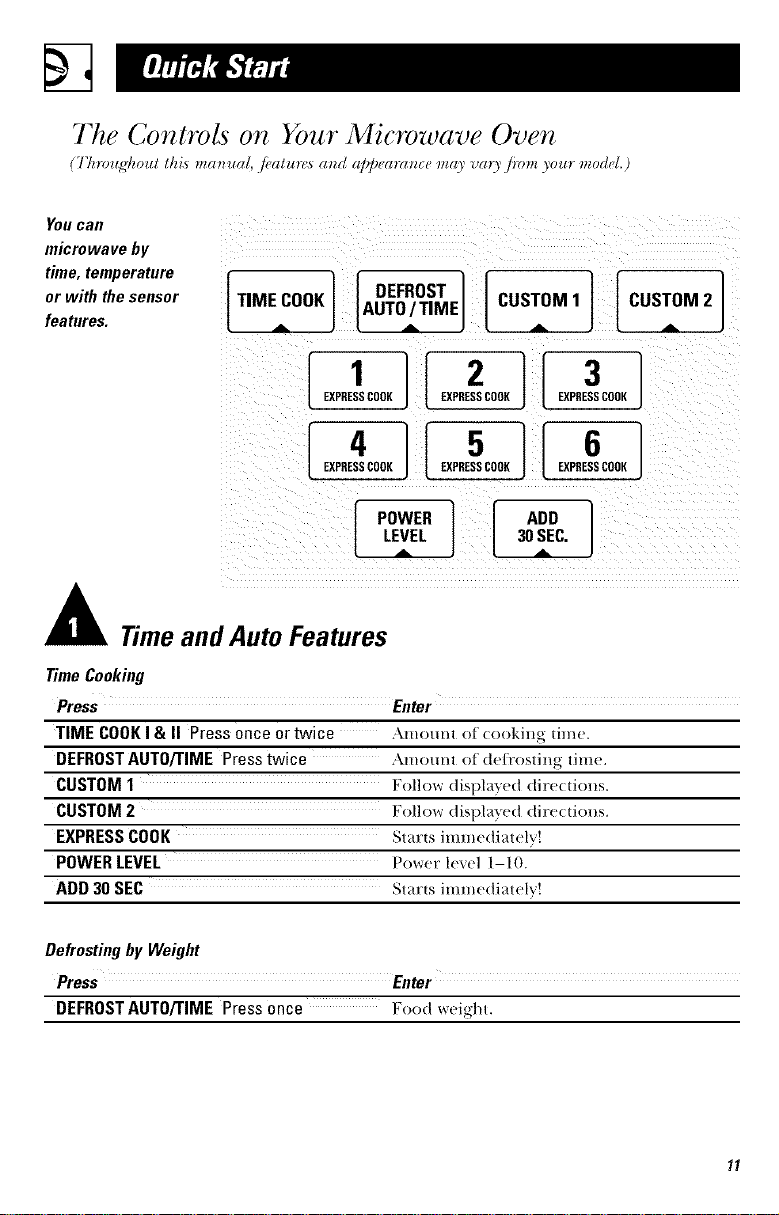
The Controls on Your Microwave Oven
(Tlnvug'houl this ma_ua!, .fi_alun'._a_zd a])])earmzcema) vm3 ji_>m)our model.)
You Call
microwave by
time,temperature
or with thesensor
features.
TIM OOK AUTO/TIME CUSTOM 1 CUSTOM 2
[:] I ][ ]
LEVEL
POWER ]
"DD1
30SEC.
Timeand AutoFeatures
TimeCooking
Press Enter
TIME COOKI & II PressOnceor twice \too/mr of (ooking dine.
DEFROSTAUTO/rlME Presstwice Amom_t ofdeh'osting time.
CUSTOM1 Follow displayed dive(tions.
CUSTOM2 Follow (tispla_ed dire(dons.
EXPRESSCOOK Starts immediately!
POWERLEVEL [_()_r_"le_,el 1-10.
ADD 30 SEC Starts imme(liatelv!
Defrostingby Weight
Press Enter
DEFROSTAUTO/rIME Pressonce Food '¢,reigl'd.
Page 12
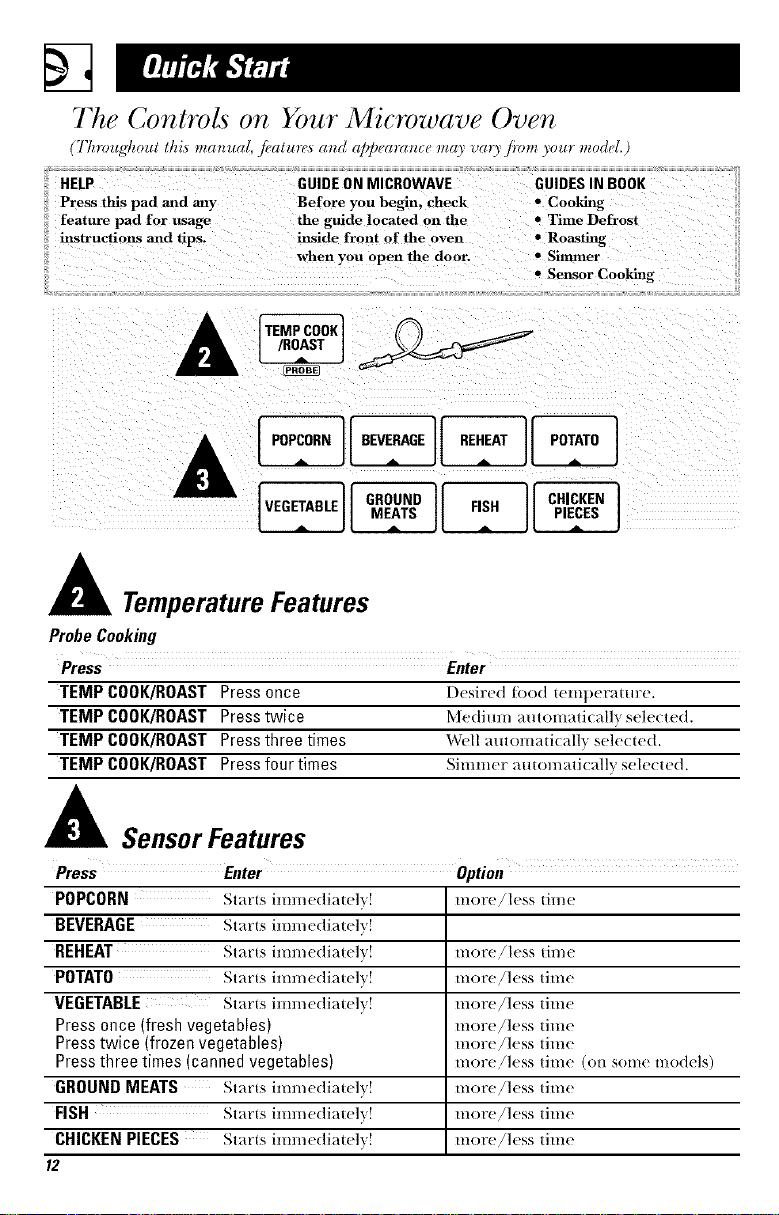
The Controls on Your Microwave Oven
(Tkro,_4muli16smm, uM,j&,/ure_m_d ap/_earm,cetonyvm 3'ji_mzyour modH.)
HELP GUIDEON MICROWAVE GUIDESIN BOOK
Press this pad and any Before you begin, check • Cooking
feature pad for usage the guide located on the • Time Defrost
instructions and tips. inside front of the oven • Roasting
when you open the door. • Simmer
_TEMPCOOK
• Sensor Cooking
1
Temperature Features
Probe Cooking
TEMP COOK/ROAST Press once Desired _o(t teml)erau_re,
TEMP COOK/ROAST Press twice Me(tiuu_ _utomati(_ll_ sele(te(t.
TEMP COOK/ROAST Press three times Well autom_lti(_lll_ s_lc(t_'(t.
TEMP COOK/ROAST Press four times Simmer _'tutol_ati(allv s_'le<ted.
A SensorFeatures
Press Enter Option
POPCORN Starts immc(liawh'! m(_re,/less d_w
BEVERAGE Starts imm(:(ti_lt(4_ !
REHEAT Starts i_m_e(li_lt('l_! _lore,/less time
POTATO Starts i_lu_(_(tiat(_lv! _lore,/l(_ss time
VEGETABLE Starts imu_e(ti_t('l_! _ore/less ti_e
Press once (fresh vegetables) moral/less tim(_
Press twice (frozen vegetables) m(we!l('ss tiH_('
Press three times (canned vegetables) morc!l('ss time (oH sore(mo(l(ls)
GROUND MEATS Starts iHlu_(_(liat(!]'_[ Hlore/l(_ss tiHl(_
FISH St_XZ_'tSiHln/(!(tJ_'d(!lv[ HIOZ_'(!,/](!SS tJHI(!
CHICKEN PIECES Starts imme(tiat(4_! m(_re,/less tiHl(_
12
Page 13
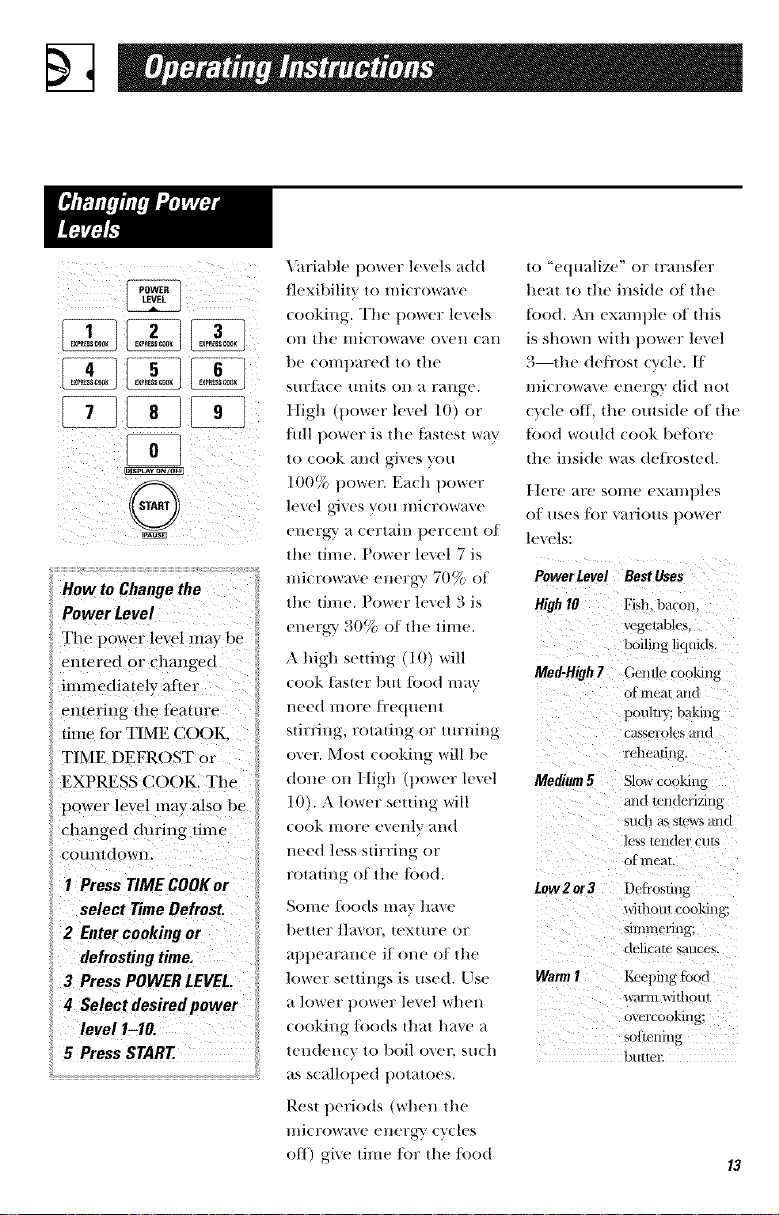
PewerLevel
The power lew'l may be _
entered or ch>lIlged
immediately after
entering tile fi__ature
time tbr TIME CO()fL
TIME DEFROST or )
EXP_SS CO()K. T1}e
power leYe! may also
cl_anged dt_fing time
;ountdown.
I Pres* TIME COOKer
_! select Time Defrost. ,
2 Enter Cooking Or
defrosting time.
3 Press POWERLEVEL.
# Se!ect desiredpower
level1 1o.
5PressSTARt
\_triable power levels add
tlexibililv lo microwaxe
cookiug. The power levels
Olt lhe microwaxe oven cau
lie cOm]l;_red lo l]/e
SUl'Jkl(e tIl/ils ()ll ;l Fallge.
High (power level 10) or
tidl [lower is tile t_lslesl x_r(l_r
It) COOk _ll/d _ives Veil
100% t)owei:: Each power
le\cl gives yell /lliCFo\'v;-i\e
elteFg_: ;1 Cel'l}lil/ i)eFgell[ t)]
Io '(-qlt;llize" (IF |F;II/SleF
]|e;ll It) |]te inside ol Ill(
lo(id. \l) exmn])lc ()l lhis
iS sho\a, rl| Wil]t ])()W('F hw(q
3 the deli'os) c' (h'. I
tltl(Tt)F4_lVe ('l/('l'_'_ (lid l/()l
(-_(-|e (111. I])e ()tllsi(|e ol [lie
[k)()(] Wollld (()(lk b('Ior('
dw iusi(h' \_as d('li'oswd.
t]eF(' ;IFe SOllte ex;lt/ ])]es
O] tines t(lY _arioub lxmer
levels:
the lime. Power lc\el 7 is
t//icrow;lve etteFgy 70% of
the ume. PoweF lexel 3 is
PowerLevel BestUses
HighlO Fish. bacon.
energy 30% of the tiule.
A high seuiug (10) will
cook t;is|er t)/ll ]()t)(t I/KIV
I/eed l//ol'e ]i'e(|/lel/[
Med-High7 Gentk_ cooking
stirtJltg, rotating or lttrl)il)g
oxer. Most cooking will be
done tm/ligh (power lmel Medium5
10). A lower seuing will
cook /llOFe evel/lv ;ll/d
need h'ss stirring or
rotafiug of the/cod.
tow 2 or3
Some Ik)ods may have
]/elleF ]l_wor, texl tll°e OF
a]lllearalt(e i[ one ol lhe
lo_veF seltings is used. Use Warn)I
(ookiug foods d}al have a
teuden(_ Io lloil o\er such
as scalh)lled i)olatoes.
Rest periods (*&rhelt the
t/ticr()wa_e ettet_-_ ' (_(les
off) gixe time for the food
vcgelables.
looiling liqukls.
Of ttll-';/t arid
poultry; baking
casseroles _tltd
reheating.
Slow cooking
nnd H_'fldeFiZlilg
Stlctt HS Sk'WS aitd
less It ildel' tills
of meaT.
Defi'osting
"i\dthot/1 cookitlg;
Mllllll( rlttg;
delicate sauces.
Keeping fbod
WatTn wit hol/l
ovcrcooking;
sofh_'nin_
butteJ
Page 14
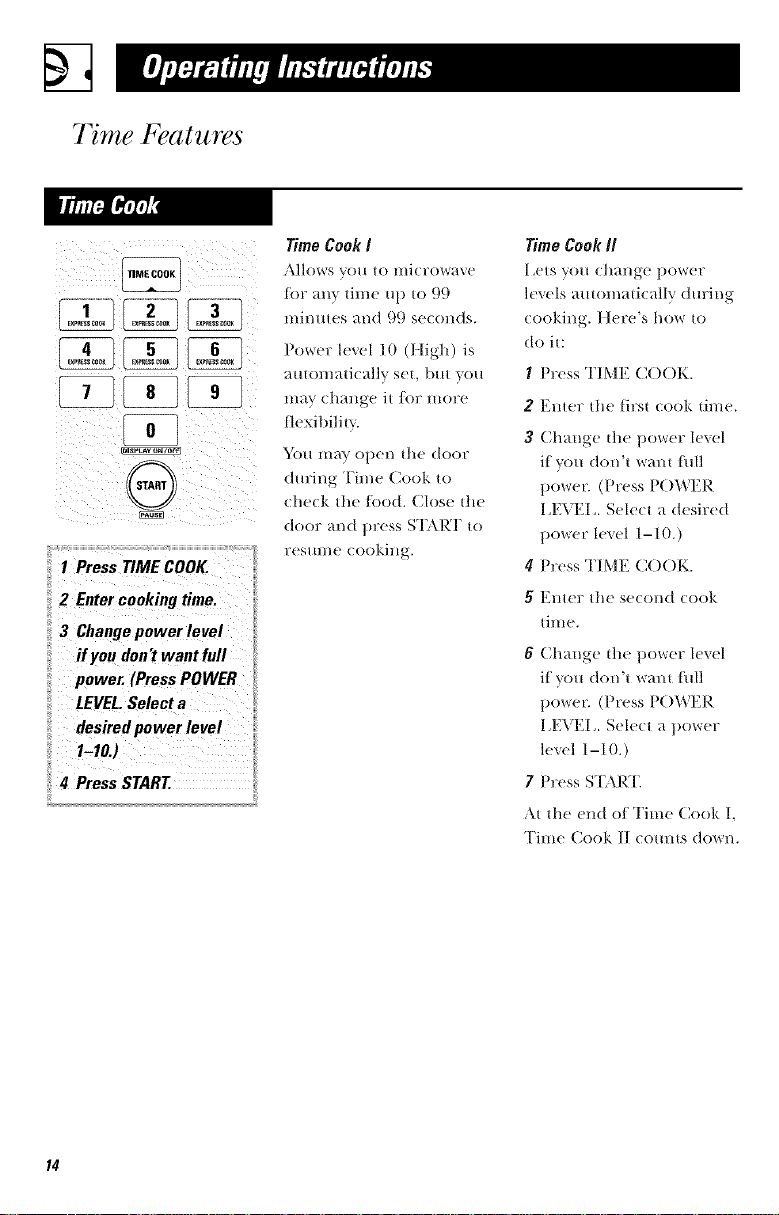
Time Features
1 Press TIME COOK.
2 Enter cooking time.
3 Change power level
if you don't want full
power. (Press POWER
LEVEL.Select a
desiredpower level
I-I0.)
4 Press START.
Time Cook I
_\]l()l,_,r_ _O1.[ |O l't}i(i]'ov_a'_e
lot an} time uI) to 99
illil//tles al/d (.)t.) secollds.
Power level 10 (High) is
autonlatically set, l)/lt you
inay change it ]or iilOl?e
fl( xibility.
_lk)ll ill}l}, open the door
d m:ing Time Cook to
check the Iood. Close die
door and press STkP.T to
r( S/lille cooking.
Time Cook II
I x'ts you chang-_ i)ower
kvels automatically during
cooking. }tere's how to
do it:
I Press TIME C()()K.
2 Emer lhe firsl (,.),:)k lime.
3 Change the power level
if you don't want full
power. (Press POWER
I,EVEI. Select a desir_ d
power lexel 1-10.)
4 Press TIME COOK.
5 Enter the second cook
time.
6 Change the power kvel
if you don't want full
power. (Press P()WER
I _EVEI. Select a power
level 1-10.)
7 Press STAP,'I_
,\I lhe end of Time Cook 1,
Time Cook II (xmms do'wl/.
Page 15
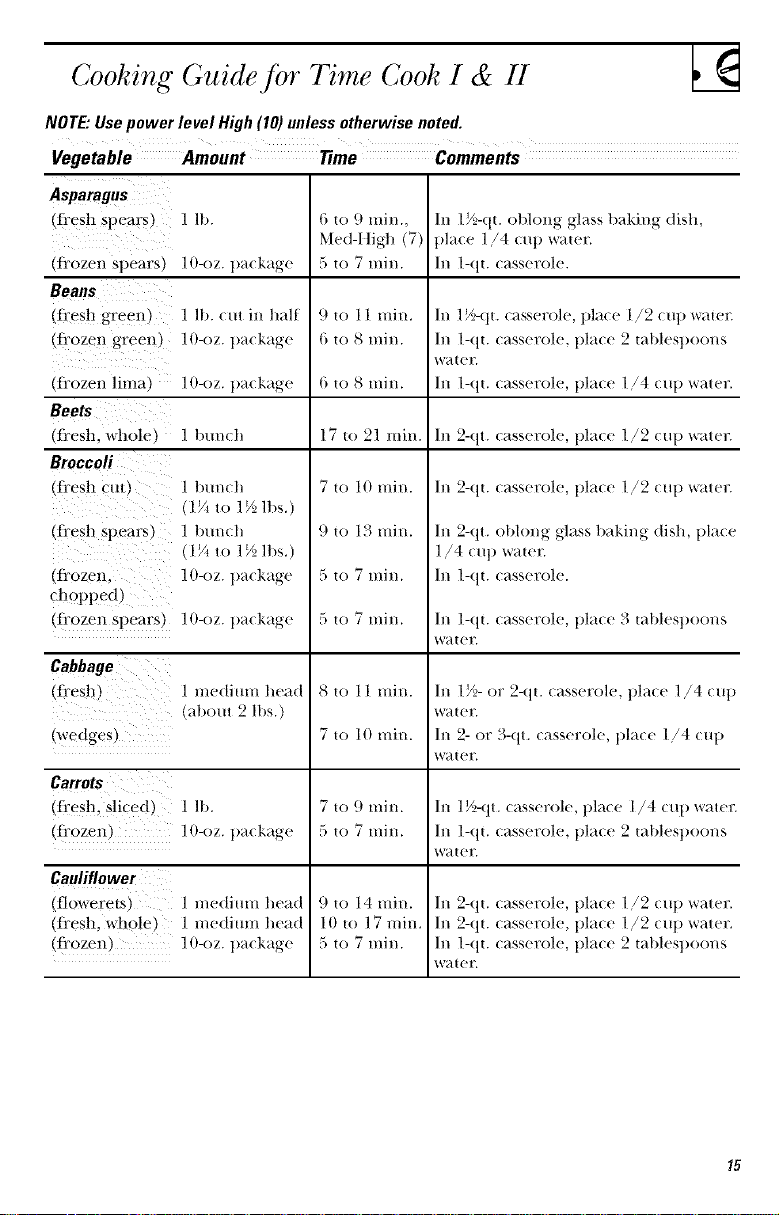
Cooking Guide jot Time Cook I & II
NOTE."Usepower level High(10)unlessotherwise noted.
Vegetable Amount Time Comments
Asparagus
(fi'es h spears)
(li'ozen Spears) ll)-oz, t)ackage
Beans
(li'esh green) ] lb. (ut ill half
(fiozeI ! green) ]O-oz. pa(kage
(li'ozen lima) llt-oz, pa(kage
Beets
(fresh, whole) 1 bun(h
Broccoli
(fresh cut) 1 btm(h
(fiesh spears) ] btmch
] lb.
(1_ to 1__, lt)s.)
(1 to lt)s.)
(fi'ozen, ] O-oz. package
clmpped)
(fi'ozen spears) ]O-oz. package
Cabbage
(fresh) 1 medimn head
(wedges)
Carrots
(fi'esh, sliced) 1 lb.
(li'ozen) ] O-oz. t)ackP.+ge
Cauliflower
(flowerets) 1 me(titan head
(liesh, whole) l medittln head
(frozen) ] O-oz. t)ackage
(about 2 lbs.)
6 to 9 rain.,
Med-I tigh (7)
5 to 7 min.
9 to 11 min.
6 to 8 rain.
6 to 8 rain.
17 to 21 min.
7 to 10 nfin.
9 to 13 nfin.
5 to 7 n}in.
5 to 7 n}in.
8 to l 1 min.
7 to 10 min.
9 to 14 min.
10 to 17 min.
5 to 7 ++}fin.
In 17_,-qt.ot)long glass baking dish,
t)la(e 1/4 (tq) water.
In 1-qt. casserole.
In 1_/_,-(tt. casserole, lllace 1, 2 {tt])_'_ratel_
In 1-qt. (asserole, pla(e 2 tal)lesl)oons
W;4ter.
In 1-qL (asserole, pla(e 1/4 (u t) water.
In 2-qt. casserole, t)la(e 1/2 cup _%ater.
In 2-qt. casserole, place 1/2 cut) ware1:
In 2-qt. obhmg glass baking dish, place
1/4 cup water.
In 1-qt. casserole.
In 1-qt. casserole, place 3 tablespoons
water.
In 17_,-or 2-qt. casserole, pla(e 1/4 cu l)
W;4ter.
In 2- or 3-qt. (asserole, pla(e 1+/4 (u t)
W;4ter.
In 17_,-qt. (asserole, place 1/4 {u l) water.
In 1-(it. (asserole, t)la(e .2 ml)lesl)oons
W;4ter.
In 2-qt. casserole, l)la(e 1/2 cu l) watel7.
In 2-qt. ( asserole, pla(e 1/2 {u t) tv;-iter+
In 1-qL (asm;erole, pla(e 2 mblesl}oons
W;4ter.
[M
/c
S •
Page 16
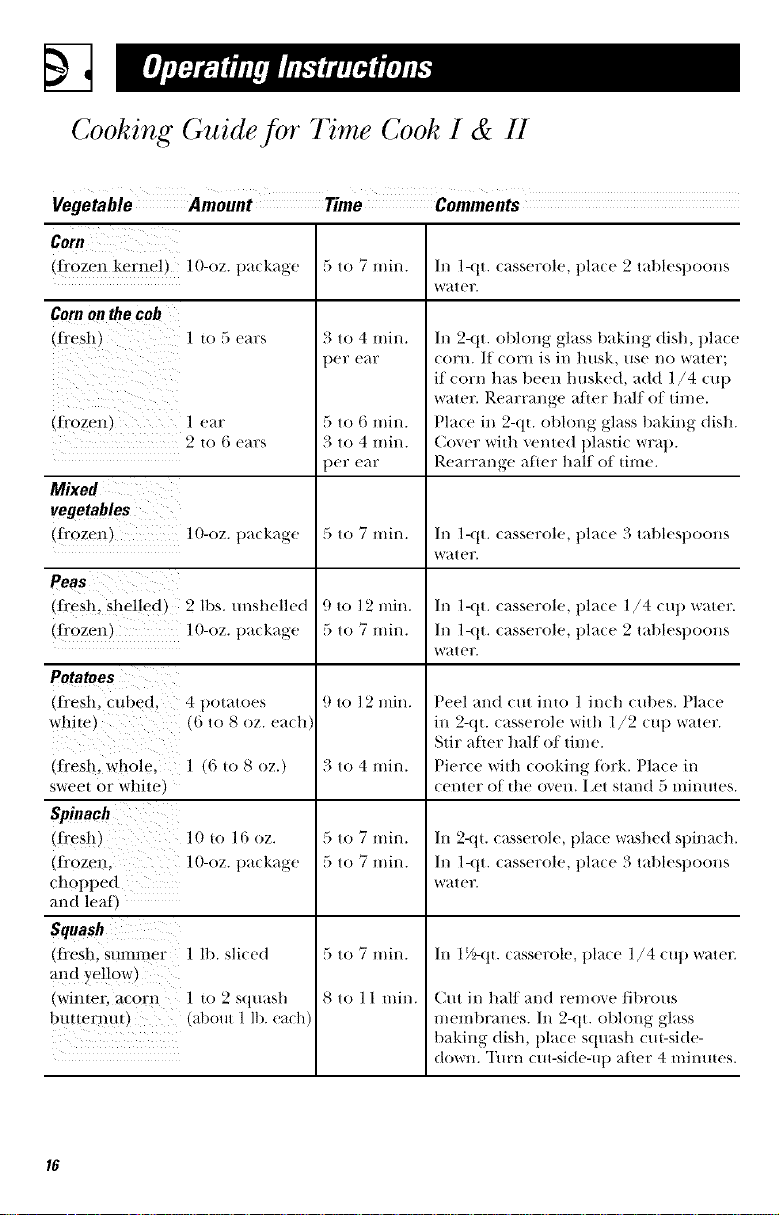
Cooking Guide for 71me Cook I & II
Coru
di'ozen kernel, ] O-oz. t)a(kage 5 to 7 rain. In l-qt. (asserole. t)la(e 2 tab|esl)OOn.S
Corn on the cob
(Ii'esh 1 u) 5 ears
(] rOZell }
3 to 4 rain.
)er e_ll?
5 to 6 rain.
3 to 4 rain.
)er e_ll7
Mixed
vegetables
tt_ozen_
] O-oz. package
5 to 7 rain.
Peas
(ti'esh. shelled) 2 lbs. unshelled
(fi'oze*l_ ]O-oz. package
9 to 12 rain.
5 to 7 rain.
Potatoes
(fi'esh. cubed. 4 t)ouuoe.s
9 to 12 rain.
white, +_to 8 oz. each
(ti'esh. whole. ] +_t() 8 oz.)
3 to 4 rain.
sweel or while,
Spinach
(Ii'esh) ]0 to 16 oz.
(fi'ozen. 10-oz. t)ackage
5 to 7 rain.
5 to 7 rain.
chopped
and leal J
Squash
,2i'csh. Stlllilller ] lt). sliced
5 to 7 rain.
alld yellow
_will:er. acorn ] to 2 s(ltl;l.sh
8 to 11 rain.
butlermu J qabout 1 lb. each)
W_ler.
In 2-qt. oblong glass baking dish, t)lace
corn. If corn is in husk, use no water;
if corn has been husked, add 1/4 cup
water. Rearrange after half of time.
Place in 2-qt. oblong glass baking dish.
Cover with vented plastic wrat).
Rearrange atter half of time.
In 1-qt. casserole, t)lace 3 tablespoons
water.
In 1-qt. casserole, t)lace 1/4 cup water.
In 1-qt. casserole, t)lace 2 tablesl)oons
water.
Peel and cut into 1 inch cubes. Place
in 2-qt. casserole with 1/2 cup water.
Stir atter half of time.
Pierce with cooking tork. Place in
center of the o_eH. I _et stand 5 minutes.
In 2-qt. casserole, [)lace washed spinach.
In 1-qt. casserole, place 3 tablespoons
water.
In 17>(tt. casserole, t)lace 1/4 cup water.
Cut in half and remo_e fibrous
membranes. In 2-qt. oblong glass
baking dish, 1)la(e squash (m-side-
down. "Ihrn cut-side-u t) atler 4 mim_ms.
Page 17

Time Features
_aus_
1 Press DEFROST
AUTO/TIME twice.
2 Enter defrosting time.
3 Press START
4 Turnfood over when
the oven signals,
5 Press START
(Auto Defrost explained
in the section on
Convenience Features.)
Allows you to defl:ost tor
the length of time you
sele(t. See the l)e/i'osting
Guide tor suggested times.
Power level 3 is
automatically set, but you
lna} change this/or more
flexibility. You ma', de/i'ost
small items more quickly
by raising the power level
a/ler entering the time.
However, they will need
more fi'equent attention
than usual.
Power level 7 cuts the
total de/i'osting dine in
about half; power level
l0 cuts the total time to
at)proximately 1/3. Rotate
or stir tood tre(tueml }.
At one half of selected
delkosting time, the oven
signals TURN. At this time,
turn tood over and break
at)art or rein:range t)ie(es
/or more even de/i'osting.
Shield any warm areas widl
small t)ieces of toil.
A dull tlmmt)ing noise
mw_' be heard dm:ing
detkosfing. This s(mnd
is normal when the
oven is not operating
at IIigh t)ower.
Defrosting Tips
• Foods fi'ozen in paper or
t)k, stic can be (lefix)swd
in the package. Tightly
closed packages should
be sliL pierced or vented
AFTER tood has partially
de/koswd. Plasdc storage
(ontainers should be at
least parfiMly m_(overed.
• Fmnily-size,
t)rel)ackaged fi:ozen
dimmers can t)e de/i'osted
and microwaved. If
the/ood is in a loll
COlltainer transliw it
to a mierowa_e-sati' dish.
• Foods that spoil easil},
such as milk, eggs, fish,
sm/lhlgs, poultry and
pork, should not be
Mlo_,ed to sit out/or
more thml one horn:
Mter de/rosting. Room
temperat m:e promotes
the growth of harmfitl
bacteria.
• For more even detrosting
of larger toods, such as
bee/, lamt) and _eal
roasts, use Auto De/i'ost.
• Be sure large meats are
( omt)letely de/i'ost ed
betore cooking.
• When de/ix)sted,/k)od
should be cool 1)m
sotiened in all areas. If still
slightly ic}, return t() tl_e
lilicrow;-_ve very bdefl}, or
let it stand a tow mim_ws.
Page 18

Defrosting Guide
Breads,Cakes
Bread,bunsorrolls I ] lliecc ,
Sweetrolls approx. 12 oz..
Fishand Seafood
Fillets, frozen_1lb._
Shelffish,smallpieces (1lb.
Fruit
Plastic pouch--1 to 2
(lO-oz. package)
Meat
Bacon (1 lb.
Franks (] lbA
Groundmeat ] lb.)
Roast."beef,lamb, veal,pork
Steaks, chops and cutlets
Poultry
Chicken, broiler-fryer
cutup (2_-, to 3 lbs.J
Chicken,whole
t2'/-, Io 3 lbs. J
Cornish hen
Turkey breast (4 lo 6 lbs.,
18 z z z z z z z z z z z z z z z z z
7) 1o 7 mill
12 to |6 ||fin
per lb
:_ io 7 min.
per lb
15 1o 19 ||fin
17 t() 21 min
7 to ] _ /llil/.
per lb
Place block in casserole. Turn over and
break u I) after half file time.
Place unotlened package in oven.
I,et stand 5 minutes after deflx)sting.
Place unotlened package in oven.
Microwave just until R'anks can be
separated. Iet stand 5 minutes, if
necessal), to eolnlllete de/i'osting.
Turn 1neat over after half tile tin/e.
Use power level 1.
Place unwrallped meat in cooking dish.
Turn over after half tile time and shield
warm areas wifll/i)il. When tinished,
sel)aram pieces and let stand to complete
de/i'osting.
Place wrapped chicken ill dish. Unwra I)
and turn over a/ler half file time. When
th/isfted, separate pieces and nlicrowa\ e
2 to 4 nlinmes more, if necessary.
I+et stand to tinish det_'osfing.
Place wrapped ( hicken in dish. AJler half
|lie tiiile,/lnwra I) and tllrll ellicken over.
Shield warn/areas wifll toil. Finish
de/i'osting. If necessary, run cold water in
tile cavity until git)lets call t)e removed.
Place unwrapped hen in the oven tlreast-
side-up. Turn over after half the tin/e.
Run cool water in tile cavity m/til gJt/lets
Call be relilOVe(I,
Place unwrat)ped breast in (lisft breast-
side-down. After tlalf tile time, turn over
mid shield warm areas wifll/i)il. Finish
deti'osting. I,et stand 1 to 2 hours ill
refi'igerator to (on/l)lete (te/i'osting.
Page 19

Time Features
ADD
30 SEC.
This is a quick way to set
cooking 6me for I-6 minutes,
Press one ot the Expl"ess
Cook pads (l?om 1 to 6)
tor 1 to 6 minutes of
cooking at power level 10.
For example, press the
2 pad Ik)r 2 milmtes of
cooking time.
You can use this feature
two ways:
• It s_rilladd 30 seco_l(ts to
tile time corn/ring (h)wn
each time tile pad is
pressed.
The t)owe_: level can be
changed as time is
comning down, Press
POWER 1_E_2I _and
enter 1-10.
• It can be used as a quick
cooking time.
19
Page 20

Auto Feature
+
1 Press DEFROST
AUTO/TIME once.
2 Using the Conversion
Guide at right, enter
food weight. For
example, press pads 1
and 2 for 1.2pounds
(I pound, 3 ounces).
3 Press START.
(Time Defrost is
explained in the _me
Features section.)
2O
The Deli'ost Auto!Time
teamre gives you two ways
to defl:ost/i'ozen/oods.
Press DEFR()ST
ALIT()!TIME once tot
Auto Defl:ost or twice lot
Time De/t'ost.
Use Auto Defl:ost/_)r meat,
t)otdtv} and fish, Use Time
De/i'ost tot lIlOSt odler
fl:ozen /oods.
Auto Defl:ost automati(allv
sets the defl:osting times
mid t)ower levels to give
even defl:osting results tot
meats, poultry and fish
weighing u t) to six t)omads.
There is a handy guide
located on the inside fi'om
Ot the ovell.
Guide
Conversion Guide
IS the weight 0f tood is
stated in pounds and
ouIIces_ tile outlces lllHS[
be com'erted to tenths
(:1) of a pound.
Weight of Enter Food
Foadin Weight
Ounces (tenths of
a pound)
1-2 ' A
3 .2
4-5 .3
6-7 14
8 ' 15
9-10 16
11 ' .7
12'13 .8
14-15 .9
• Rel//o'_e l/le_:t i]?()lll
package and place on
mierowax e-sat_! dish.
• "I\vice during de/i'ost,
the oven signals TURN.
At each TURN signal,
turn the tood over.
Remove de/i'osted me_lt
or shieM warm areas
with small pieces of/oil.
•Atter det_:osting, most
merits need to stand
5 minmes to (Oml)lete
del_'osting. I,arge forests
should stand tor _ff>out
30 mimnes.
Page 21

Temperature P atures
CaNe Handle
End
Sensor_,,,_
Appearance may vary
What happens when you
use the probe..,
Cooking widl the
probe allows you/o
heat lood/o a certain
temperature. This is
tile best way 1o cook
many fbods.
The Temperature Probe
NOTE: "I'll(' turntabh' will
not ttIFn when the t)]'ol)e
is in use.
The tenq)erature probe i.s
_1 t()od ther//IO//leleF t]Kit
l/IOl/itOFa tl/e lel[ll)eFattlFe
of tile/ood. The probe
l/lllat |)e tl.sed wl/el/ tlbil/g
"l)mt> Cook or Ro;t.sl.
The probe is not
l'e(-ol/l//lel/ded I()F batters,
doughs, t_x>zen/bodb ;ill(|
leeds which are diJlicuh
to cook precise|y 1V
\
tel//l)el?atttlX?+ [Is(? the
Time Cook setting for
these toods.
• Make sure the cable end
is inserted all the way
into the o'_en wall Otlllet.
• Insert the probe into tile
center of the food. Make
sure tile handle does v,ot
tou(h the tood or tilt' top
or sides of the oven.
CookingTips
• Do not twist, drop or
bend Ill(' t)robe.
• Be sure/i'ozen tood
has been coml)letely
(tel_'osted be/ore
inserting the probe.
The probe ma} t)reak off
if used in/i'ozen leeds.
• Cover fi)ods loosely fi)r
moisture control and
quick, even heating.
• Use a lower l)ower level
with the probe;/oo(ts will
take h)nger to cook but
thev x+ill heat more
ev('nlv+
• Do not leave tile probe
in the oven if it's not
inserted in toed. If it
touches the oven wall,
it ma} damage the oven.
21
Page 22

Temperature Features
@
::!) Youselectt!!e
ii tenlperature you want.
i 2) Tile mmperamie is
: autonmtically Selected
for medimn or well
Three Ways to Use the "romp
Cook/Boast Feature
I You set the temperature
you want.
Press TEMP COOK!
R()AST once. This is
good lot Ioods surh as
so{lps, ( assero/es and
l)ev( rages.
2 Temperature is
automatically selected
for eooMng roasts
medium or well.
Roast Medimn--Pr< ss
TEMP COOK!RO XST
mice. Roast W< ll--Press
TEMP ( OOK!RO _ST
thr_ tim_ s.
See the Roasting (;uid(
lot suggestions.
3 Temperature is
automatically selected
for slow cooking of
foods (simmer).
Simmer--Press TEMP
C()()K!ROAST 4 times.
See the Simmer (',/fid_
tot sl)ecilic directions.
How to Use the Probe aed
Set the Temperature Yourself
I Insert the temperatm'e
probe in the center of
a casserok and attach it
secur_ ly in the oven
wall omlet.
2 Press TEMP C()()K!
R() KST once.
3 Emer the desired tood
temperature.
4 Change power Imel if
you don't want full
power. (Press POWER
I _I_VEI_. Select a power
level 1-10.)
5 Press ST, kR'E
6 When th_ temperature is
rea_ hed, the iilicrowave
will signal. Food will be
held at this temperatur_
lot 60 illii/lltes. The oxen
beeps when the hold
time is complete.
3) A simm er tempera-
i rare is automatically
Selected.
22
Page 23

il What happens when
youusetheprobe
i forroastingL.
: For the/wo Roast
iisettings, tile probe _:
{iitemperature is
preprogrammed.
iiFood will be held at
i this temperature tot
60 irlintltes, The O_,:ell
}
iibeeps when !lold time
} .
roasting, on!y tender
roasts shotfld be roasted
i!{ iiii
iiby using the probe. !,_ss ;:
tender roasts Should be
!_microwaved by time.
RoastingGuide
How to Use the Probe with
the Roast Settings
Outlet
1 Insert the probe iH the
roast mid attach it
securely ill tile ()_'ll
wall outlet.
2 Roast Medium--Press
TEMP CO()K/R(IAST
twice. Roast Well--Press
TEMP CO()K/R(IAST
three times.
3 Press S'IART.
q The microwave signals
when it's tillle to t/lrll tile
roast ovelL _\lter _)[I t/lrI/
tile roast, close tile door
and press S'I)\RT.
NOTE: The oven continues
to cook after the signal
whether or not roast is
turned over.
Preparing Meats for
Roasting
• Place a tellder beef roast
ill a (()()king 1)ag on a
tri'_et ill a llli(rowaxe-sa{(_
dish. (Refer to package
illS[l?lI( iioI/S fOl? t)rol)el7
/tse of the cooking bag.)
I
• Insert the probe
through tile (()()king
bag horizontally into
tile eemer n/eatv area
not touching bone or tht.
Make sm:e the handle
does not touch tile tood
or top or sides o/the
()V('I/.
• When using the probe in
chicken, ulrkev or other
poultr}, insert tile prot)e
horizomallv iron the
meatiest area.
FoodType Selection (mleutesperpound)
Beef(5 lbl max,)
Tender Roast Medi/un 1r'--23
Well 23-30
Pork (5 lb. lnax, )
Loin Roast Well 23-30
Poultry (6 lb, maxJ
Turkey Breast Well 16-19
23
Page 24

Tem[)erature Features
Press TEMP COOK/ROAST
4 times to select Simmer.
How to Use the Probe to
Simmer
The Silnmer Ibatm'e heats
tbod to 180'F. and holds it
at that temperature up to
12 hours or/!i/til yotl
r(move it and press
CI E,\R! ()FF.
I Insert tile temperature
prob( into tile lood,
resting it on tile side
of tile dish. Attach it
se(tlr(ly ill tile ()\ell
wall outlet.
2 Press TEMP COt)K!
ROAST 4 dines to select
Simmer.
3 Press ST\RE If you need
to stir the lood, restart
tile oxen IV pressing
START again.
When the sinnner
temperature is reached,
tile o_en holds tile Ibod
at that temt/eratm:e until
CI ,EAR!OFF is pressed.
SimmerGuide
FoodType
Beef
Pot Roast 5-7
Chili -,-_
Chicken
Stewing 4-6
Broiler/Fryer 3-4
Ham/Pork
Roast 4-6
Soup
Stock/Vegetable 7-10
Split Pea 5-7
*Total time includes time to bring food to 180°F and hold at that temperature until done.
Hours* Comments
Add enough liquid to just cover meat.
If adding vegetables, make sure they are
conq)letely covered 1)} liquid.
Precook meat. Stir a/ier 3 hem:s, if possible.
Add 4 cups liquid. Insert probe into
meatiest area o/thigh/i'on/t/elow end and
parallel to leg. Tm:n over atier 1/2 ot time.
S_lllle _t+s _t+bove.
Add 4 cups liquid.
Make sure that vegetables and meat are
co_ered by liquid. Stir every 3 hours.
Add enough liquid to cmer peas at least 27
Stir after 3 hours.
24
Page 25

Sensor Features
iiduring cooking. T!!e
iioven automatically
adjusts tile cooking
iitime to various types
{iand amonnts _tf fbod.
Do not use tile Sensor
i Features twice in
iisuccession On tile Same
:: ibod port!onmit may
{ restflt in severely
iT
overcooked or burnt
tood. Iftood is
ii undercooked atier tile
::countdown, use T/hie ....
ii Cook tilr additional
{ cooking time.
Co_ered
• The tlroper (Olltainers
alld covel?s are essel/ti_'tl
for best sensor cooking.
Vented
• Always/lSe l//icrowa_e-
sati' containers and co_er
diem with lids or vented
plasdc wrap. Never use
ught sealing plastic
containers--they can
prevent steam t_:oln
escaping and cause ti)od
to o_ ercook.
Dry off dishes so they don't
mislead the sensor.
• P,e sure tile outside of
tile cooking (ontainers
and tile inside of tile
microwave oven are dr_
be/i)re placing ti)od in
the oven. Beads of
l//OiSlHl?e {H17ning illtO
Ste_tl// C_tl/ nlislead tile
sensoE
25
Page 26

Sensor Features
_xpmsce0K;
leSS llme more Ilrlle
Use 0nly wl_l/prepaokagea
microwave eopcorn weighing
1.7 5 to 3.5 ounces
NOTE."Do not use the
!:,n tsl whencooking:
i:popcor..
::NOTE: Be not use this i:
: feature twice in
succession on the same
:foodpo io.--it,.uv
result in severely :
How to Use the Popcorn
Feature
I Follow package
instructions, using Tiule
Cook if the pa(kage is
l(ss thai 1.75 ounces or
larger than 3.50/l]lCeS.
Place tile package of
pol)corll in tile center
ot the microwk_\e.
2 Press POPCORN. "File
()\ell starts il_/l_lediatel},.
If you open tile door while
"P()PCORN" is displa?.,ed,
"SEN S()R ERR()R" will
apilear. Close tile doo_;
press CI IL\R!()lq _ and
begin again.
Ii tbod is under( ooked
_llier the (glint(town, /ISC
Time Cook Ior addition_d
( ooking time.
How toAdjust the Popcorn
Program to Provide a Shorter
or Longer Cook Time
Ilyou I]n(l that ill( brand el
popeoril you ilse underpolls
or overcooks collsistei/tl},,
VO/I Call add or subtract
20 seconds t/) tile a/ltomatic
pol)ilil:lg time.
To add time:
,\lier pressing P()PCORN,
press 9 immedialdy after
tile ()x( 11 starts Her an (xtra
20 seconds.
Press 9 again to add another
10 seconds (total 30 seconds
additional time).
To subtract time:
•\liar pressing POP(:()RN,
press 1 imn/e(liatel} alkr tll_
_en starts Jot 20 seconds
less cooking tilne.
Press 1 again to re(h:_ e
cookilg tin/e another
10 seconds (total 30 seconds
less time).
il feature twice in
succession on the same
:: foodportion--itmay _:
result in severely *
o ercookedorbur food.
,,, , ,,
26
Press BFY_II*L\GE to heat
a cup of cotti.,e or ()tiler
beverage.
If hod is undercooked
atier tile countdown, use
Time Cook Jot additional
cooking time.
Drinks heated with the
Beverage feature lna V
be very hot. Remove
the container with care.
Page 27

aess nmel (more time
For reheating single servings
of previously cooked foods or
a alate of leftovers.
How toChange the Automatic
Settings
Toreducetime by 10%:
Prtss I dier dm tbaUlre pad.
Toadd 10%to cooking time:
Press 9 _d_crthe t_amr( pad.
feature twice in
.....s.ocessio,o.thesame
How to Use the Reheat
Feature
1 Place covered Jbod in
d_e oven. Press REt ]EAT.
The oven starts
immediately.
2 The oven signals when
sleam is sensed and the
dine remaining begins
CO/llltillg dow11.
Do not open the oven
door tmtil tim(' is (otmting
down. If the door is
opened, close it and press
S'EM/T imme(lia_elv.
After removing food from
the oven, stir, ff possible,
to even out the temperature.
Reheated foods may have
wide variations in
temperature. Some areas
may be extremely hot.
I{'{ood is not hot cnough
Mt('r fl_(' comudown, us('
Time Cook/i)r additional
rch('ating tim,.'.
Some Foods Not
Recommended For Use
With Reheat
It is t)('st to use Tim(' Cook
/or these/oo(|s:
• Bread products.
• Foods that must be
t'('h (';-_t ('d /11 ICOV('rt'd,
• Foods that need to be
stirred or romte(t.
• Foods calling tbr a dry
look or crisp sur/i_ce
a/ler reheadng.
27
Page 28

Sensor Features
POTATO
Sensor Cooking gives y0u easy,
automaticresultswith avanet
offooes,seetheCooking Guide
BelOW,
NOTE: Do not use the
metal shelf with Sensor
Cooking.
NOTE: Do not use this
feature twice in
succession on the same
food portion---it may
result in severely
overcooked or burnt food.
CookingGuide
Vegetable, Potato, Fish,
Chicken Pieces, Gmmld Meats
I Pkwe covered Jbod ill
dw o_('u. Press the loud
I)_M For vegetables,
press lhe \]'_(;EKEBI.E
pad once lot I]'esh
',e£e|_d))es, lwice _br
Irozen _egel_d)les, or
thrc_" [il/leS 1(}1" CHlll/ed
_e_-elaJ)les.) ]['he overt
sl;lrla immcdialclv.
2 "I'h( o_cu siguals when
swum is sensed and lime
remmuiug is totalling
down. Turn or slit lhe
tbod d uecessur}.
[)O 11OI el)ell lhe ()\ell
door mHil dme is comHing
down. /f lhe door is
opened, close it _111(Ipress
S'I'+\RT immedialclx,.
If toed is mldercook(d
after the comltdown, use
Time Cook lot additiomd
cooking time.
How to Change the
Automatic Settings
(automatic settings for
caroled vegetables cannot
he adjusted on some models)
i ii
(lesstime) (moretime)
'_bu can a(ljust tile cooking
time lor all leeds to suit
VO/lr ilerson_d t_lste.
Reduce time bg 10%:
Press 1 aJler tile lood pad.
Add 10% to cool(ing time."Press
9 al]er th( lood pad.
FoodType Amount Comments
Canned Vegetables 4-16 oz. Coxer with lid or xented t/lasti(wr_tl).
Frozen Vegetables 4-16 OZ. ]701]0'¢,r pa(kage instru(tions ti)r adding/%r_ter+
C()_,(!r with lid or xented t)l_lsti(wr_tl).
Fresh Vegetables 4-16 oz. Add 1,/4 (up water tier serxing.
Cover widl lid or vented plasd( wrap.
Potatoes 1/2-2 lbs. Pier(e skin with fork. Pla(e l)Omtoes
Oil the ttlrl/t}tble.
Fish 4-16 oz. Cov(!r wi|h xemed l)lasd( wrap.
Chicken Pieces 1-8 Coxer widl xemed l)lasd(wr}tl).
t/ie(es
Ground Meats 1/2-3 lbs. Use r(mnd (asserole dish. Crmnble meat
(Beef, Pork, Turkey) into dish. Coxer with lid or xemed t)lasti(
28
wrap. Drain and sdr at signal.
Page 29

Other Features
The CUST()M 1 and 2
pads allow you to save two
of yore: most fi:equently
used settings. ('Ii'mpenmm'
and sensor cooking
seuings cannot be saved.)
To sel and save a setting:
I Press and hold the
CUST()M 1 or CLIST()M
2 pad tor two seconds.
2 Set the amount of
cooking time.
3 Set the power level if
desired. (Full power will
automatically be set if
you do not change it.)
4 Press S'IART.
31>ur (ustom setting will be
relilel//t)ered tor tllHll?e
one Io/l(h /lse.
The MESSAGE t}ad alh)ws
you to record a short
st)oken message.
I Press MESSA(',E.
2 Speak Ioward Ill(? (OllIrol
t)allel ill a clear, llOrl//al
voice.
3 Press MESSAGE again
to save [lie IIleSsage
immediately or allow the
time to count down to
sa_e il aulomaticallv.
To cancel a message
d m:ing record, t)ress 0.
To erase a recorded
message, press 0 during
pla}back.
29
Page 30

Other Features
The }]EI,P pad displm,s
t_,amre inlbmlation and
helpf'/ll hil/tS. Press }tEl _P,
thell select a Ibature pad.
"1"oremind you that you time food in the oxen, the oxen will
disl)la" _ "FO()D IS I@L\I)Y" and beep ()nee a minute tmtil you
either open the oxen door or t)r_ ss (I _EAR/()FF.
_tLSPEEO
Press CI,()CK to set tile time
of din' and (/ate.
I Press CI ()CK.
2 Enter tile thne of din.
.3 Select AM or PM.
4 Press ST,\P.T or CI ,()CK.
S Enter tile month, d m and
year. Example: 031699
(March 16, 1999)
6 Press ST,\P.T or CI ()CK.
"['o check the time ot (two'
while mi(rowaving, press
(;1 ()(;K.
To check tile date while
microwm'ing, press and hold
CI ()CK tot about three
seconds.
30
Page 31

SCROLL SPEED
The scroll speed of the
display can be changed.
Press and hold the
AM!PM pad about
3 seconds to bring u t)
the display. Select 1-5 tor
sh)w to thst scroll st)eed.
[DISPLAY ON/OFF]
SCRO_EE0
To turn the (lo(k dist)lay
off, press and hold 0 ti)r
abom three se(ollds,
Delay Start allows you to set
the microwave {o (telax
cooking u t) to 24 hours.
1 Press DEI _AY START
2 Enter the time you
want the o_eH to start.
(Be sure the microwave
clock shows the correct
time of day'.)
3 Select AM or PM.
To redist)lay the clo(k,
ret)e_tt,
4 Select any combination
of Defrost Amo!Time
or Time Cook I & II.
5 Press S'I;_\RT.
The l)elav Start time will
be displayed plus "DS."
The o_,en will automaticalh'
start at the delayed time.
The time of day mm be
dist)lmed 1)); t)ressing
CI ,()CK.
31
Page 32

Other Features
Tinier ()n!()ff operams as
a nlinute timer and can be
used at any time, e_en
when the o_en is operating.
/ Press TIMER ()N!()FF.
2 Ellter tin/e VO/l want to
COmlt down.
3 Press TIMER ()N!()FF
to start.
hi addition t(:, starm/g
Illall} finlctions,
ST\RT!I_kU SE allows volt
to stop _ooking witho/tl
,:)l)elling the (]oor (/r
_learing the displa}.
When time is up, the oven
will signal. To turn off the
timer signal, press TIMER
()N/()FF.
NOTE: The tinier indicator
will be lit while the timer
is operating.
The Reminder/bature call
be used like an alarn/clock
and call be used at anv
time, even when the oven
is ot)erating. The
Renlinder time can be set
Ul) to 24 hours later.
Enter the time 7_ou want
ttle/,,en.,rel//i.dVo/,.
(Be sure the microwave
clock shows the correct
time of da}.)
32
3 Select AM or PM.
4 Press I/EMINDER. When
Reminder signal occurs,
press RI_2MINI)ER to tm:n
it ott_ The Ren/inder
time lllm, be displayed by
pressing I_,EMI NDER.
NOTE: The REM indicator
will remain lit to show that
the Reminder is set. "Ib
clear the Reminder betore
it occurs, press I_2MINDER,
then 0. The REM indicator
will no longer be lit.
Page 33

OFF
YOtl Ill,IV lock the eOlltrol
})alle] to prevent the
microwave/i'om being
accidemallv started or used
b_ children.
"Ib lock or unh)ck the
controls, press and hold
CI,EAR!()FF/or about
three seconds. When {he
control panel is locked,
an "I2' will be displayed to
the extreme right.
TURNTABLE
[ ];
[ VENTFAN ]
HI-LO-OFF
For 1)est ( ooking resuhs,
le_++x+e {lie ttlrllt_++ble o11.
[t tan be turned off for
large dishes. Press
TLIRN'[_:\BI E to tm:n
the ttlrlltal)le oil or off.
The "_el/t fall relllo'_es
s|ealll al/d o|]ler "_al)()rs
from sm:taee cooking.
An _+./lt()matic t_111/('aHire
[)rotects tile microwave
t+'om too nmch heat rising
t+'om the cookto l) beh)w it.
It automatically turHs on
at low speed if it senses
too much beat.
Sometilnes the turntable
cml become too hot to
touch. Be carehfl touching
tilt' tm:ntabh' during m_d
after cooking.
Press +_)2N'I" IVAN once for
high tml speed, twice tor
low {ml speed or a third
time to turn tilt' tml off.
If you have turned the/hn
Oil VO/I 1//_1V /ill(t thH| VO/l
tmmot turn it olE The/an
will amomaticallv mrH off
whel/ the imernal parts are
cool. It l//av Sta_ Oil {()r
30 n/inures or more a/ier
tile (ookto t) and mitrowa_e
tontrols are tin:ned o/E
33
Page 34

Other Features
BRIGHT-NIGHT
OFF
Press SU RI:ACE 1 I(;HT
once lot bright light, twice
lot the night light or three
times to mrn the light ol]_
The 1)eel)er so/ll/d Ie_,el
iI I ++++++VOLUME BEEPER_ V()[, .UME.
i) !iii il)ii 3
(,hoos(()-_) tor mt t_
to loud.
YOtl can set tile night
light to turn on and off
ntltOl//athallv ;+it_IIlV til//e
you want.
1 Press AUT() NITE
I +I(;It'I'.
2
Ellter the tilile VOH W;411t
the light to ttlrn on.
Sele(t AM or PM.
Press AUT() NITE
IJ(;IIT again and enter
tile time you want tile
light to turn oil Select
AM or PM.
Press AUT() NITE
1+[(;I IT.
NITE will stay lit to remind
gO/l that tile/i.,ature is set.
Vou can review tile Auto
Nite I Jght settings by
pressing ALl'F() NITE
I ,I(;I tT.
"Ik) erase your settings
al/(t ttlrll ()It tile a/lton/atic
/eature, press AUT() NITE
I,I(;It'I; then 0.
34
Page 35

A_O_TMEm
S_EOUL_
You can use the microwave
to remind you of upcoming
appointments.
At midnight, the _r
betbrc your scheduled
allpoil/tlllel/t , all asterisk
will appear ill tile display.
Two hom:s be/ore all
aplloil/tlllel/t, tile ()veil
will signal alld tile
appoil/tlllel/t will scroll ill
tile displa}. It will cominue
to signal and scroll mltil
you press APPOINTMENT!
SCItEDUI ER to cancel it.
Toset an appointment:
1 Press APP()IN'IMENF!
SCI/I:_[)UI ER.
2 Enter tile month and dm
Of VO/lr appoilltl//ellt.
3 Enter tile tin/e of _)ur
appoil ltl//el/t.
4 Select AM or PM.
g Press APPt)IN'IMENT!
SCI tEDUI ER.
6 Enter tile appointment
type:
1 AUTO
2 DENTIST
3 DOCTOR
# HAIRCUT
5 SCHOOL
6 SOCIAL
7 SPECIAL
8 FINANCE
9 WORK
7 Press APP()INTMENT!
SCt ]EDUI,EI ). or press
"0" to set it as a re( tlrlJllg
appoil/tl//ellt.
()nee - Daily
"I\_,iee - Weekly
Three tin/es - Momhlv
8 Press APP()INTMENT!
SCt ]EDU[,ER.
NOTE: Recurring
appointments must be reset at
the beginning of a new year.
To Review appointments:
1 Press and hold
APPOINTMENT/
SCt ]EI)UI ,ER about
three secolldS+
2 Press 1-12 tOT tile n/omh
VO[I Wal/t tO review,,.
3 Press appoinmlent again.
ToQuit the Review Process:
Pr( ss ( [,EAR/( )FF.
To cancel a scheduled
appointment:
1 Recall the appointment
_)ll wal/t to Callcel, /lSil/g"
tile review pro(ess above.
2 Press and hold "0" tOT
about 3 seconds.
NOTE: The appointment
scheduler can record about
25 appointments.
35
Page 36

Other Features
How toUse theShelf
WhenMiemwaving
If//I I / / I I\ \ \\_\
• Make sure tile shell
is positioned proper]_
inside file microwave
/o prevell! damage/o
tile oven ti'oln arcing.
• Do 11ol use a lniero_ave
browmng dish on file
shel£ File shelf could
oveI'lleat.
• DO no| nlse tile ovell
widl tim shelf on the
microwave lloor. This
could dmnage Wine
llllCrowaYe,
• Use po/holders when
handlillg tile shelf
it may be hot,
• Do noJ use the shel[
when cooking pOI/COrlL
• Do nol use the shell
widl Sensor Cooking
or Reheat.
]Q)od innic1x)'waxes bes[
wlnell l)laced oln line
tllrlllable ()r oln Ihe slnelf
inndie In)'w(n"position.
Onh ntse tlne slnelf/vheln
17elnea|ilng onl ]//o1R} Itlaln
one lexel. Do not slore |lne
shelf i_*side the o_en n ax_ty.
Forbest results
i
Uneven results
Tim slnelf gives yam tile
oi/tion to relneat iino£e
than one dish of lood
at tile saille tillle.
24evel reheating
36
Page 37

Switch places after 1/2 time.
Switch places after 1/2 time.
Switch places twice
• To reheat on 2 levels
or
• To reheat 2 dishes on the
lower level:
/ Muhipl[_ reheat time
b_ 1½.
2 Swite]l pla(es after 1/2
tlle tilIle+
• To reheat on 3 levels
I I)ouble the reheating
til//e.
2 Switch places twice _++_,:t
give the dishes a 1/2
tm:n during reheating.
(Place dense/i)ods, or
those that require a
longer cook time, on the
tlt)t)er shelf first.)
37
Page 38

Microwave 7 ms
Arcing Arciu_ i_ the ]llJ(Fo\_ra_',e[eFttl lot sparks in the o',en..\]_+`ingis
(;_ttsed 1)_
• Ill+ + |ell pel'_ttttre |)robe st_i_'+tlg ill lit+., o_,elt bttt ttol itlsel'ted ill
the R)od.
• the metal shell being iustalled iucorrectly and tottching the
t/licFowa\e walls.
• metal or loll touchit/g the side of the oven+
• toil that is/lot utohted to R)od (tt])tttrned edges act like
alllOlll/as
• metal such as twist ties. pottltl T pins, gold-rimmed dishes.
• re( vcled paper towels co]i,t_dti, ili,g Slnall metal pieces.
Covering (_overs hoht ilt motsun_e, _lllow for more men healiug aud redtt(e
cookina time. '_'ntit tg plastic wrap or +`oxering \vilh wax paper
_ll]o\*+rs UX+` ess sle_o// to es+`a])e.
Shielding In _*rq'_ular o\ett. _ou shield (-hickel* breasts or baked Reeds to
t)rexent oxe+q>rowning. \_hen l//iCFowavJng, VOlt rise sinai] strips
o| R)il to shield thin parts, such as the tips of wiugs and legs on
poultr+,. \vhich wottld cook beR)re lm+ger parts.
Standing Time _rhel| you cook with l'egttlar ovens,/oods such asroasts or cakes
are allowed to stand to [inish cooking or to set. Standing time is
,'-,1)eciallv ill poFlal/t in l/lie` Fox++'a+xe +`ooking. Note that a till+`rox'vrave0
cake is not t)laced on a cooling rack.
Venting \lter coverin_ a dish will/ ])lasti+` _r]_t]), }'(_t_ \ent Ill+`'])lasti+` _r]_t]) 1>}
tttFlllllg back one corner so excess steam can escape.
38
Page 39

Care and Cleaning
An o((asional thorough
"_,lt)ll_g with a sohltion of
baking soda and water
keeps the inside ti'esh.
_ r" "
Walls,Floor,Inside Window,
Metal and PlasticPartson
the Door
Some Sl)atters can be
removed widl a paper
rowel, others ma} require
a dam l) cloth. Remove
grea.s} spatters with a sudsy
cloth, thell rinse with a
damp cloth. Do Hot use
abrasive cleaners o17sharp
utensils on oven walls.
Never use a colmnercial
oven cleaner on any part
of your microwave.
NOTE: Be certain the power
is off before cleaning any
part of this oven.
Removable Turntable and
Turntable Support
To prevem breakage, do
not pla(e the turntabh' into
_atel:.just a/ier cooking.
\'gash it carefully in warm,
stldsv water or iH the
dishwasher. The turntable
_t+l/d S[ll)l)Ol;[ c_t+ll be l)rokell
if dropped. Remember,
do not operate the oven
withom the tm:nt:d)h' and
support in place.
Temperature Probe
Ch'an immediawlv after
using. To (leall, Wipe with
sudsy cloth, then 17111)
lightly with plasti( scouring
ball if necessalx. Rinse and
dry. The probe can also be
washed in the dishwasher.
Shelf
Clean with mild soatl and
water or in the dishwasher.
Do not cleau hJta self-
cleaning oven.
39
Page 40

%
Care and Cleaning
We recommendagainst
usingcleanerswith
ammoniaoralcohol,
astheycan damage
theappearanceofthe
microwave oven.If you
choosetouse acoinlnon
householdcleaner,first
applythecleaner directly
toa clean cloth,then
wipe the soiledarea.
Case
Clean tile outside of file
microwave with a sudsy
cloth. Rillse and then dry.
Wil)e the window clean
with a damp clofll.
Control Panel
Wipe with a dam 1) ch)th.
I)ry thoroughl}. Do not
use cleaning sprays, lm:ge
amounts of soa l) and water,
abrasives or shar t) ok!iects
Ol/file panel--riley Call
damage it. Some paper
towels Call also s('ratch
tlle control t)anel.
Door Panel
Beti)re cleaning the fi:om
door 1)ariel, make sure you
know what t}])e of panel
you h_e. Re/cr to tile
eighfll digit of tlle model
mmJ,1)ei_t "S" is st_fi_Jdess
steel, "I," is CleanSteel and
"B', "W" or "(7' are plastic
colors.
Stainless Steel
blea(h or t)rod/l(ts
(ontaining (hlorine on
Stainless Steel finishes.
CleanSteel
Use a clean, soft, light and
lightly damt)ened cloth,
then dry {horoughl}. Do
I/Ot /ISe apl)liallce w_lx,
t)olish, bleach or 1)rod u(ts
containing any chemical
agem on the CleanSteel
sllrlktces.
Plastic ColorPanels
Llse a clean, soft, lightly
(taml)eHed cloth, fllen (tvv
thoroughly.
Door Seal
It's important to keep the
area clean where file door
seals ag_finst tile microw_ve.
Llse onl} rail(t, non-abrasive
detergents al)l)lied with a
clean sponge or so/t cloth.
Rinse well.
Bottom
4O
The stainless steel panel
can be cleaned with
Stainless Steel Magic or a
similar product using a
clean, so/t clofll. Apply
stainless cleaner caretullv
to a\oid the sin:rounding
plastic t)arts. Do not use
at)t)li_m(e wax, t)olisl'L,
Clean off the grease and
(hlst Ol/ [tie bottom o/lell.
Use a solution of warm
water and detergem.
Page 41

LightBub t placeme t Ill
bulb (we36x10003),
{iiavailabl e frm" your ii
!_eE supplier.
I "Ib replace the bulb(s),
first disconnect tile t)ower
at tile main rise or circuit
breaker panel or pull
the plug.
2 Remove tile screw at tile
left of the light cover
HIId ]OWeF tile cover.
REMOVE SCREW
1 "Ib replace the oven light,
first disconnect tile power
at tile main fl_se or circuit
breaker panel or pull
the plug.
2 I_emo_,v the top grille by
taking out the 2 st rev, s
that hoM it irt place.
• S
3 Be sure the bulb(s) to 1)e
replated are tO01 before
remoxing. AJ'ler breaking
tile adllesixe seal, r{!lllO'_e
the bull) by gently turning.
# Repla(e the strew.
(_Ollllett ele_ trJca] power
to tile o'_en,
3 Next, remove the screw
located above the door
I/ear tile center of tile
oven that secur_ s the
light housing.
Ii, ......
I,I 11
4 Replace the st reD, r.
COlllle(t elettrk al power
tO tilt' ovt'n.
41
Page 42

%
Care and Cleaning
Charcoal Filter
on some models)
Reusable Grease Filter
(on all models)
The vent fan has a nlemI
r( usable grease filler.
The reusable grease filter
u:aps grease released by
t()ods on tile ¢ooktol). It
also prevents ]lall/es ]l'Ol//
toods o11 tile ¢ookto I) ['rOlll
damaging tile inside of
tilt' l//ierow_l_ e.
Models lhat r(circulaie air
ha(l( il/[O |he rool/l [_ilso
use a (har(oal fiher.
For this reason, tile filter
must AI,WAYS be in place
when tile hood is used.
The grease tiher should be
cleaned once a momh, or
as needed.
To remove, slide it to the
side using the tab. Ptdl it
down and ()lit.
To clean the grease filter,
soak it and then swish it
aromld in hot wawr and
detergent. Don't use
ammonia or ammonia
t)roducts because it
will darken tile metal.
42
l,iglu brushing can be used
to remo'_e eml)edded diru
Rinse, shake and let it dvv
betore replacing.
To replace, slide tile filter
in tile /i'aule slot on tile
lett side of tile opening.
Pull up and to tile right
to lock into t)lace.
Page 43

The Exhaust Feature
Part No. WBO2X9883
frm, your GE supplier.
Remove 2 grille screws to
remove the grille.
If the n/odel is not vented
to the outside, the air will
be re(irculated through a
disposable charcoal filter
that helps retnove smoke
and odors.
To remove the charcoal
filter, disconnect power at
the n/ain fllse or circuit
breaker panel or pull
die plug.
The charcoal fiher should
be relilaced when it is
noticeably dirty or
discoh)red (usually' alter
6-12 momhs, depending
on hood usage). See
"Optional Kits," page 9,
]()r l/lore inJ()rl//_ttion.
Retnove the top grille bv
removing the 2 screws that
hold it in t)la(e. Slide the
Jilter tow_t.r(Is the/i'ont of
the ()Veil alld relilove it.
To install a new filter,
remove t/lastic and other
outer wrapping/i'om
the new filter.
Insert the fiher into the
top oliening of the oven
as shown. It will rest at an
angle on 2 side support
tabs and in/i'ont of the
right rear tat). Replace
the grille and 2 screws.
43
Page 44

Before You Call For Service
Problem PossibleCause Whatto Do
Oven will not A fuse in your home
start may be blown or the
circuit breaker tripped.
Power surge.
Plug not fully inserted
into wall outlet.
• Replace fl_se or reset circuit breaker.
• Unplug the microwave oven, then plug
it back in.
• Make sm:e the 3-prong plug on the
oven is riffle inserted into wall outlet.
Door not securely closed. • ()pen tile door ;rod close secm_elv.
"PLEASEINSERT Probe has been • Insert the probe properly into the
PROBE"appears forgotten or not o,en wul| oHllel.
on display inserted properly.
"SENSORERROR"
appearson display
Floor of the oven is
warm, even when
the oven has not
been used
When ushlg a Sensor
feature, the door was
opened before steam
could be detected.
Stemn was not detected
in ulaxhnum mnount of
thne.
The cooktop light is
located below the oven
floor. When the light
is on, the heat it
produces may make the
oven floor get warm.
• I)o not open door mnil steam is
sensed m)(t time is shown c(muting
down on display.
• Use Time Cook to heat ]or more time.
• This is normal.
"BAD PROBE" The probe has not been • Insert the t)robe t)rol)erl'} into tile
appears on display completely inserted into o\ e)l \v;l|l outh't.
"LOCKED" appears Tile conWol has been • Press ;rod hold C[ .EAR/( )FF tbr
on display locked, ul)out 3 se(onds to mido(-k Ill(' (-ol)tro].
Food amoont too Sensor Reheat is for • Use Time ('ook tbr |m'ge ml)o(mts
large for Sensor shNle servhlgs of of tbod.
Reheat recouunended foods.
44
the oven wall outlet.
Tile probe is defective. • Replace tile probe.
Page 45

Problem PossibleCause Whatto Do
Youhear an
unusual,low-tone
beep
You have tried to start
the Remhlder without
a valid time of day.
You have tried to turn
the turntable on when
the probe is in use.
You have tried to cllange
the power level when it
is not allowed.
You have tried to start
the Auto Nite Light
without a valid time
of day entered for
the on-thne and off-time.
• Start over and enter a valid time
of da).
• Tlle turntable will not operate when
the probe is in use.
• Many of ttle ()Veil'S tk'atul'eS are preset
and cannot be changed.
• Start over and enter a valid time
of day.
I'.l
45
Page 46

Before You Call For Service
fl'()l/l alT()t_l/d _]le dooF.
o l,igh_ reflection _ro/md
door o17 ()tlI_!F (:_ls_t.
" Dimming oven light and
change in the bl(/w<r
s(}tmd at power lev( ls
other than high.
,DDull thulnping sound
while own is operating.
o T\_radio interlbr< rice
might be noticed while
/ISillg [he lniCI"OW_/\ _..
Similar to tile in [erfbrenc<
caused by oth<r small
applianc< s, it do<s not
indicate a problem with
the lnicrow;_ve. Plug tile
microwave into a dill< rent
el<ctrical circuit, move tile
radio or TV as lilt mva}
]lTO//Ith< nlic170*&;IV_. _I_S
possible, or ch_ck the
position and signal of
tile TViradio antemm.
46
Page 47

GE Service Protection Plus TM
(;E, a name recognized worldwide tor quality and dependat)ility,
ot]'ers x_()ll Ser'_ice Protectiol/ Phlsr_--coH/l)rellellsive ])rote(tiOll Oll
all yore: applian( es--No Matter What Brand!
Benefits Include:
• Backed by GE
• All brmlds covered
• Unlilnited service calls
• All parts mid labor costs hlcluded
• No out-of-pocket expenses
• No lfidden deductibles
• One 800 number to call
xJ_)ll will be completely saHsfied vddl our serxice prot(cdon or you ma'_ request your
lIIOlleV ba(k Oll tlle relllaillil/g vallle of vo/tr (Olltra(t. No (l/iestiol/s asked. It's that silIll)le.
Prowct your refl:igerator, dishwasher, washer and dr}e_; range, "I"_iVCR and much
more--a W brand! Plus there's no extra chm:ge |or emergency service and low momblv
{inan(ing is available. Even icemaker (overage and {ood spoilage prote(tion is otli'redl
him can rest easy, knowing that all vom: _aluable household prod ucts are protected
against expensive repairs.
Place xemr confidence in (;E and call us in the U.S. toll-fi_ee at 800.626.2224
ti)r more information.
*-_dl ])lands cOX(le(l, tip Ii) _0 y(_ll'S old, in 113(! (?l)ntil/(!ntal ([._.
We'll CoverAny Appliance.
Anywhere. Anytime.*
.p.,_..q_._:,.:.....
Please place in envelope and mail to:
General Electric Company
Warranty Registration Department
P.O. Box 32150
Louisville, KY 40232-2150
47
Page 48

Consumer Product Ownership Registration
I)ear Customer:
Thank you tar purchasing our prod uct and thank you for placing yam: confidence in us.
_;'c arc prolld to haxc vo/| as a (llStOl/ler!
Follow these three steps to protect your new appliance investment:
your Consmner the registration
Product Ownerslfip below, store dfis
Registration today, do(inherit in a sat_
t ]axe the pea(e of place. It (ontains
mind o/knowing intbrmation you _ill
we can (onta_ t you need should you
in the mflikeh require service.
e_em of a sati,tv ()ur selMce nmnt)er
moditication, is 80().(;E.C,\I_ES
(800.432.2737).
Manual carehdlv.
It will help you
Read your Owner's
operate VOllr ll(!*&'
applian(e properl" 5.
Model Number Serial Number
I I I I I I I I I I I III I I I I I I I I
hnportant: If you did not get a registration card with your product, detach
mid return the form below to ensure that your product is
registered, or register online at ge.com.
Consumer Product Ownership Registration
I ........... I I,, ,,,, ,I
Nil-. [] Ms. [] Mrs. [] Miss []
First Il'astI I
Name I I I I I I I I I Name I I I I I I I I I I I I I
Model Number Serial Number
Strect] I
\(HFeSS I I I I I I I I I I I I I I I I I I I I I I I I I I
Apt. # I I I I I I I I IE-mail Address*.
I I I,I I I
Cit_ I I I I I I I I I I I I I State (_odc I I I I
48
l)at( Phl(ed [n [s(
PhollC ] I I ]-U__l._-I I I I I
GE Consumer & Industrkfl * Please provide your e-lnail address to receive,
Appliances xia e-mail, discounts, special otlbrs and other important
General Electric Company communications from GE Appliances (GEA).
Louisville, K¥ A0225 Check here ityou do not want to receive
ge.com
commmfications ti-om GEAs (ardhlly seh,_ ted
partm,rs.
Page 49

Notes
49
Page 50

We lBe l ew!
ge.com
ge.com
800.GE.CARES
(800.432.2737)
ge.com
800.TDD.GEAC
(800.833.4322)
} ]a_e a q/lestioll or need
assistallce _ttl V()IIF
at)l)lian(e? Try the
(;E At)l)lian( es Websiw
24 hours a (kly, any din,'
ot the ",,'ear[
Expert GE tel)air service is
only one step awry} ti'om
VOIIr dool'. Get on-line and
schedule your service at
',rout convenience 24 hours
aw, r(tt_,,rof the year!
GE supports the Universal
Design concept--products,
servi(es and enviromnems
that can be used tV people
of all ages, sizes and
c_q)abilities. We recognize
the need to design/or a
wide t_lnge O/physical ;rod
memal abilities and
imt)airmems. For details
For greater convellience
all(I _tstel? se_ce, yoll Call
now download Owner's
Manuals, order parts,
catalogs, or e\ en schedule
service on-line. *1_)/1 call also
"Ask Our "Ibam of Experts .....
VO/IF q/lestiolls, an(t so H//lch
l//OFe...
()r ( all 800.(,k.( _\I_S
(800.432.2737) during
I/OI'lilal 1)llSilleSS ho/ll?S.
of GE's [lniversal l)esig,m
al)l)lications, including
kitchen desigll kteas tot
t)eople witll disabilities,
check out our \Vebsite
to(t_U. For tile headng
lint)aired, t)lease (_111
800.TI)D.GIL_\C
(800.8:43.4322).
Purchase a GE extended
ge.com
800.626.2224
50
warranty and learn about
special (tis(tmnts that m:e
av;lilat)le while your warranty
is still in e/t('ct. "_bu can
tmrchase it on-line anytime,
or call 800.626.2224 during
nonn_d business hom:s. GE
(]OllS/llllel? I {()Ill(' Sel'\'i(es
_ill still be there alter your
w_wranty expires.
Page 51

ge.com
800.626.2002
ge.com
Individuals qualified
to service their own
al)l)lbuwes can ha_e
t)arts or _((essories sent
dire(tlv to their home.
(VIb_\, MasterCard _md
Dis(over (m:(ts are
a((et)te(t.)
()rder on-line to(ta}.
24 hom:s every (ta} or
by phone at 800.626.2002
during normal business
ho/lrS+
Register your new
appliance on-line--
at your convenience!
Timely' 1)ro(tuct registr_tion
will allow/or enhanced
COlIll/l/lllicatioll al/(]
t)rolilt)t service illl(ter the
terms of your warranty,
should the need arise.
3_)tl max also mail in the
t)re-l)_J nted registration
card included in the
packing material.
Instructions contained
in this manual cover
procedures to be
performed by any user.
Other servicing generally
should be referred
to qualified service
personnel. Caution
must be exercised, since
improper servicing may
cause unsafe operation.
51
Page 52

S/aple sah_5 _l!p or ca_cdh, d du, cb lu'_v,. Pma a ori._q_al
purdmse daie it _teeded goobiain service under warra_tly.
LIMFI_Z_ ONE-Yk_ WARRANTtY
I?or oil(' v('_'tl" ti'olU (]?it(' o{" OlJgJl/a] pHr(h_lse,
GE _fill r_pla_¢ any part in th_ microwm
own that fi_ilsd/te to a <lct_t t in materials or
_orkmauship.l)ufiugdfislimitalone,war wc_Taaty,
(;Ewillpro@le,j%eofchrome,alllaborand rda1_d
selMcecos_ iol'eplacedledelecd_ part.
All _an'mw se_Mc_ will b_ provided b_ our Factory
Se_Mce CentePs or 1)_our authorized Customer
Care _ servicers during normal working hours.
Shouk/)our applianc( need ser_ic_, dining
W_II'mU|_ period or lx3ond, call 800.(',E.CARES
(800.432.2737).
Please hm_ serial and model nmnbers a_ailable
_dmn calling lot sc_@_.
• Service trips to your home to teach you how to
use the product.
• hnproper installatiou, delivery or maintenance.
If you have an installation problem, contact
your dealer or iostaller. You are responsible for
providing adequate electrical, exhausting and
other commcfiug facilities.
• Product not accessible to provide required
service.
• Replacement of house fuses or resetting of
circuit breakers.
• Replacement of the cooktop light bulbs.
• Failure of the product or damage to
the product if it is abused, ufisused (for
example, cavity"arcing from wire rack or
metal/foil), or used for other than the intended
purpose or used commercially;
• Dunnage to product caused by"accident, fire,
floods or acts of God.
• Incidental or cow,sequential dunnage caused by
possible defects Mth tlfis appliance.
• Dunnage caused after delivery.
EXCLUSION OF IMPLIED WARRANTIES--Your sole and exclusive remedy isproduct
repair as provided in this Limited Warranty. Any implied warranties, including the implied
warranties of merchantability orfitness for a particular purpose, are limited to one year or
the shortestperiod allowed by law.
This w:ua_mtv is extended to rile original purchaser and any succeeding owner for products purchased tbr home
use within the USA. ifthe produo is located in an area _here seivice by a GE Authorized Se_Mce] k no_ mailable.
you ma} be responsible tbr a trip thane or you ram' be requh'ed to bring the product to an Authorized GE
Se]_Jce [Jgcafion tbr service. In A1;tsk,. tile wawantv excludes rile selwk¢ calls to xour home.
Some states do not allow the exclusion or limimtk.n of incidental or consequenfiM dmnag_, so rile above
limitation or exclusion may not appb' a, you. This warranty gives you specific leg d fights, mad you ma) also ha\e
other rights which va_x trors stAtteto st;ae. To know whDt }our legal rights are m your stare, consult your local or
state consumer all,riB ot_ice o_ _'our state's Attornm (ienerM.
Wmvmaor: C.oleral Ela_qc Company. Louisoille. KY 40225
Prh_tedin Malaysia
 Loading...