

Page 1
1900Watts
Model: JVM1660
JVM1661
Profile
SpacemakerXLMicrowave Oven
Owner'sManual
Important Safety Information
Operating Instructions
7 _ • ....
Helpful Information
If Something GoesWrong
zuz
2
C
!i
2_
]%
GEAnswer Center®
800.626.2000
GEAppliances
www.geappliances, corn
PartNo.164D3370P107]
Pub.No.49-40110
02-00 (JR)
I
Page 2
READ ALL SAFETY
INFORMATION BEFORE USING
For your sale/v lhe in/brmation in lifts manual
mus| be fbllowed/o minimize die risk of fire or
PRE CA TrTIONS e_plosionor,opreven_propertydamage.
/_ !.A. (J ,_,x _,_, personal injmT or loss of life,
TO AVOID ooNo,A.e,n..o OoNo,O.e..,e,heoven
:POSSIBLE
TO EXCESSIVE
operale dlis oven wit1 if il is damaged. 11is
lhe door open since particularly importam
open<loot operation thai lhe oven doo_
can resuh in harmtill close properly and that
exposure to microwave there is no damage m
energy, it is important the:
MICROWAVE n°t t° defl_at °r/amper I door (bemL
ENER GY ir.eriocks. _brokeno_loosened,.
with file satety 2 hinges and latches
Do Not Place any object 3 door seals and scaling
belween lhe oven J[i'onl SUflacc_.
faq e and the door ur The Oven Should Not
allow soil or cleaner
residue to accumulate by anyone except
orl sealing surii_ces.
be adjusted or repaired
properly qualified
service personnel.
Page 3

Welcome to the GE _amilw
We're proud of our qualit3
prodn(ts and we believe
in dependable servi(e.
YotFlI see it in this eas}-to-
use Ulalltlal alld '_o1.1'11 hear
it in tile l_'iendl)voices of
()Ill" consllFiler service
department.
Start Here!...B@re using your Microwave
Best of alI, you'll
experience these values
each time you use your
microwave. Th at' s
importam, because your
new microwave wilI be part
o_ }ou[" famil} tot a lonp£
time,
Write down themodeland
are on a label inside tile
_ _ serial numbershere.The?
oven,
Model number
Serial number
Date of purchase
Readthismanual.
It/Orltaixls ixlstrtlctiorrs to
Help lzs
help you
help you use and maintain
your microwave properly.
If you received a damaged
oven...imrnediately / (intact
800. 626. 2000
the dealer (or builder) that
sold you tile oven,
Save timeandmoney.
Before you call tor service,
there are a tew things )ou
carl do to help us serve you
better.
Check the se/tion titled
"If Something Goes
Wron_,-" before calliw,-
This section helps you
solve common problems
that might occur.
Staple your receipt to the
inside back cover of this
manual. You will need it to
obtain service under
warranty.
If you do need service,
)ou can relax knowing help
is only a phone call away.
A list of toll-t]'ee customer
service numbers is
included ill the back ot
this manual. Or call the
GE Answer CenteF at
800,626.2000, 24 hours
a day, 7 clays a week.
Page 4
READ ALL SAFETY
INFORMATION BEFORE USING
Thismicrowave ovenis
ULlistedfor installation
overelectric andgas
ranges.
Thismicrowave ovenis
notapprovedor tested
formarine use.
• Read and follow the
specific "Precautions to
Avoid PossiMe Exposure
to Excessive Microwave
Enerov"_. on page 2.
• This appliance must be
grounded. Coru-lect oMv
to properl} grounded
outlet See (;roundiw,-
Instrtlctions section Oil
page 10.
• Do not mount this
appliance over a sink.
• Install or locate this
appliance only in
accordance with the
provided Installation
Instructions.
This over-the-range oven
was designed for use over
ranges no wider than 42
inches. It may be installed
over both gas and electric
cooking equipment.
• I)o not operate this
appliance if it has a
(tamaoed power cord or
plug, if"it is not working
properly, or if it has been
damaoed or dropped.
• I)o not cover or block
allY, oI)enino-so, on tile
appliance.
• Use this appliance only
for its intended use as
described in this manual.
I)o not use corrosive
chemicals or vapors in
this appliance. This
microwave oven is
specificall} designed to
heat, dry or cook tood,
and is not intended
for laboratory or
industrial use.
Page 5
L!I.
• Do not store this
appliance outdoors. Do
not use this product near
water-fl_r example, in a
wet basement, near a
swimming pool or near
a sink.
• Keep power cord away
t_'om heated surtaces.
• Do not immerse power
cord or plug in water.
• To reduce tile risk of fire
in the oven cavity:
- I)o not overcook tood.
Caretiflly attend
appliance if paper,
plastic or other conl-
bustible materials are
placed inside the oven
while cookir N.
-- Renlove wire twist-ties
and metal handles ti'om
paper or plastic con-
tainers betore placir_g
them in tile oven.
-- I)o not use tile oven
for storage purposes.
I)o not leave paper
products, cooking
utensils or ti)od in the
oven when not in use.
-- 1t materials inside oven
should ignite, keep ttle
oven door closed, turn
the oven off and
disconnect the power
cord, or shut oil power
at the ti.lse or circuit
breaker panel. If the
door is opened, the fire
may spread.
• See door surface cleaMng-
instructions in the Care
and CleaMng section (s)
of this manual.
• This appliance should
be serviced only by
qualified service
personnel. Contact
nearest authorized
service t_lcility tor
examination, repair
or a(!jusunent.
• As with any appliance,
close supervision is
necessmT when used
by children.
SAVE THESE INSTRUCTIONS
Page 6
SPECIAL NOTES AB O UT MICR O WA V1NG
iii__U__i¸¸ !_!!_!_!!_!_r_7_+_ _!_!_!_!_!_!_!_!_!VlT!_ii_
il If yousee arcing,press
the CLEAR/OFFpad and
correct theproblem.
Arcing is the microwave
term tor sparks in the oven.
Arcing is caused b?:
• The temperature probe
in the microwave but not
inserted in the tood.
• The metal shelf not
installed correctly so it
touches the nlicrowave
wall.
• Metal or foil touching the
side ot the oven,
• Do not pop popcorn in
your microwave oven
unless in a special
microwave popcorn
accesso_ T or unless you
use popcorn labeled tor
use in microwave ovens.
• Some products such as
whole e_,-_g_,-sand sealed
containers-tor example,
closed jars will explode
and should not be heated
in this microwave oven.
Such use of the microwave
oven could result in i_ljury.
• I)o I1Otboil eggs in a
nlicrowave ovei1. Pressure
will build up inside egg
yolk and will cause it to
burst, possibl} resulting
in injul3-,
• Foil not molded to tood
(upturned edges act like
alltellnas).
• Metal, such as twist-ties,
poult_) pins, or gold-
rimmed dishes, in the
Illicrowave,
• P.ecyded paper towels
containing small metal
pieces being used in the
microwave,
• ()perating the microwave
with no ti)od inside for
more than a mimlte or
t_tx)may cause damage to
the oven and could start a
tire. It increases the heat
around the magnetron
and can shorten the lite
ot the oven.
• Foods with unbroken
outer "skin" such as
potatoes, hot dogs,
sausa¢es tomatoes.
apples, chicken livers
and other giblets, and
egg yolks should be
pierced to allow steam
to escape during cooking.
Page 7

I!1
SAFETY
FACT
SUPERHEATEDWATER
Microwaved water and
other liquids do not
always bubble when
they reach the boiling
point. They can actually
get superheated and not
bubble at all.
Superheated liquid will
bubble up out of the cup
when it is moved or
when something like a
spoon or tea bag is put
into it.
Toprevent this frmn
happening and causing
injury, do not heat any
liquid for more than 2
minutes per cup. After
heating, let the cup
stand in the microwave
for 30 seconds before
moving it or putting
anything into it.
Avoid heating baby food
ln¢l S "
• g ais lars, even with the
lid off. Make sure all
infaru food is thoroughly
cooked. Stir food to
distribute the heat
evenly. Be careful to
prevent scaldirlg when
warming [ornmla or
breast milk. The container
may teel cooler than the
milk really is. Always test
ttle milk before teediw,-
tile baby.
Spormmeous boilirlg--
Under certain special
circumstances, liquids
may start to boil during
or shortly atier removal
ii'oin the microwave oven.
To prevent burns t_'om
splashing liquid, we
recommend the tollowing:
before removing tile
container ti'orn the oven,
allow the container to
stand in the oven t0r 3(1
to 40 seconds atier the
ovell has shHt off. Do ilot
boil liquids in narro_
necked containers such
as sott drink botdes, wine
flasks and especially
narro_necked cottee
cups. Even if the
container is opened,
excessive steam can build
up and cause it to burst
or overflow.
• Don't defl'ost t_'ozen
bevera_,-es in Ilarrow-
necked bottles (especially
carbonated beverages).
Even if the container is
opened, pressure can
build up. This can cause
the container to burst,
possibly resuhing in
injm3.
• Hot i6ods and steam
can cause btlrns. Be
careful when opening
ally containers of hot
food, includino_l )o t)c°rn
bags, cooking pouches
and boxes. To prevent
possible i_jury, direct
steanl away ti'orn hands
and titce.
• I)o not overcook
potatoes. They could
dehydrate and catch
fire, causing damage to
your oven.
• Cook meat and poult D-
thoroughl}-meat to at
least an INTERNAL
temperature of 160°F.
and poultry to at least nil
INTERNAL temperature
ot 180°1 `. ('ookino to
these temperatures
usually protects against
t0odborne illness.
Page 8
SPECIAL NOTES AB OUT MICR OWA V1NG
Make sure all cookware
used in yollr microwave
oven is suitable tor
microwavir_g. Most glass
casseroles, cooking dishes,
measuring cups, custard
/_lps, pottery or china
dinneiavare which does not
have metallic trim or glaze
with a metallic sheen can
be used. Some cookware is
labeled "suitable t0r
microwavirlg."
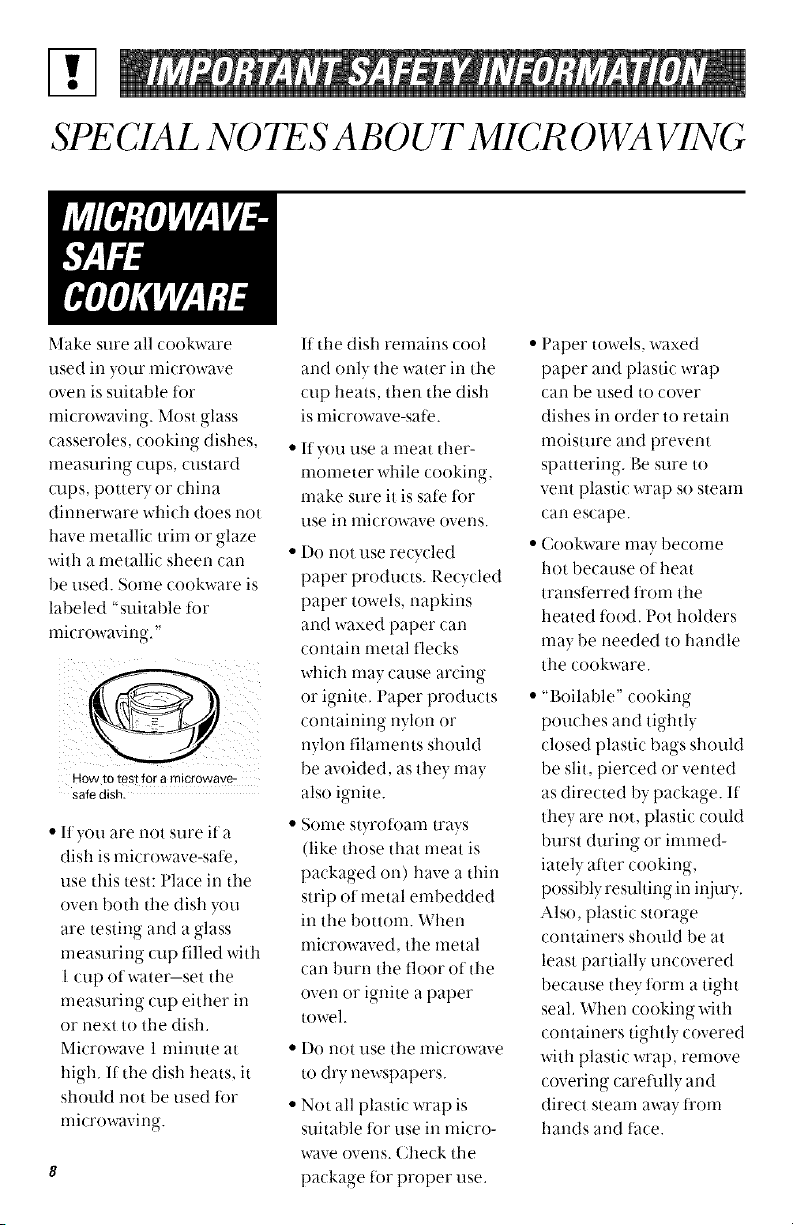
How to test for amicrowave-
safe dish.
• Ityou are not sure ifa
disll is microwave-safe,
use tllis test: ['lace in the
oven both tile dish you
are testinc and a olass
measuring cup filled with
1 cup of water-set tile
measuring cup either in
or next to the dish.
Microwave 1 minute at
high. If tlle dish heats, it
should not be used t0r
1-11icrowavi ng.
If tile dish remains cool
and only tile water in tile
cup heats, then the dish
is microwave-sate.
If you llse a meat tiler-
mometer while cookin ,
make sure it is safe for
llse in microwave ovens.
• Do not use recycled
paper products. Recycled
paper towels, napkins
and waxed paper can
contain metal flecks
which ma} cause arcing
or ignite. Paper products
containing nylon or
nylon filaments should
be avoided, as they may
also ignite.
• Some St}Totoam trays
(like those tllat meat is
packaged on) have a thin
strip ot metal embedded
in tile bottom. When
nficrowaved, tile metal
can burn ttle floor of tile
oven or ignite a paper
towel.
Do not use tile microwave
to dry newspapers.
Not all plastic wrap is
suitable t0r use in micro-
wave ovens. Check the
package for proper use.
• Paper towels, waxed
paper and plastic wrap
can be used to cover
dishes in order to retain
moisture and prevent
spattering. Be sure to
vent plastic wrap so steam
can escape.
• Cookware may become
hot because of heat
transterred fl'om tile
heated food. Pot holders
may be needed to handle
tile cookware.
• "Boilable" cookirw
0
pouches and tightl}
closed plastic bags should
be slit, pierced or vented
as directed b? package. If
they are not, plastic could
burst during or immed-
iately atier cooking,
possibly resulting in injuly.
Also. plastic storage
containers should be at
least partially uncovered
because they form a tight
seal. When looking with
containers tightl} covered
with plastic wrap, remove
covering careflllly and
direct steam away t_'om
hands and tace.
Page 9
1!1.
• Use foil only as directed
in this manual. TV
dinners may be
nlicrowaved in toil trays
less than 3/4" high;
remove ttle top fifil cover
and return the tray to tile
box. When using toil in
the nlicrowave oven,
keep ttle foil at least
1 inch away t]'om ttle
sides of ttle oven.
Tile f'an Mll operate
automatically tinder
certain conditions (see
Automatic Fan feature).
Take care to prevent the
starting, and spreading of
accidental cooking" fires
while the vent fan is in use.
• (;lean the underside of
tile microwave often. I)o
not allow grease to build
up oil tile microwave or
the tiul filters.
o
• Plastic cookware--Plastic
cookware designed for
microwave cooking is vei T
usetill, but should be used
carefiflly. Even microwave-
salt plastic may not be as
tolerant of overcookino
conditions as are glass or
ceranlic materials and
may soften or char if
subjected to short periods
of overcooking. In longer
exposures to over-
cooking, the tood and
cookware could ignite.
• Ill tile event of a grease
fire on tile surl_tce units
below tile microwave
oven, snmther a flaming
pan on tile SUl'fate unit
bv c( ver w,- tile pan
completely with a lid, a
cookie sheet or a flat tray.
• Use care when cleanin_r
the vent tiul filters.
Corrosive cleaning
agents, such as lyed)ased
oven cleaners, may
danlage ttle filters.
Follow these guidelines:
I Use microwave-safe
plastics only and use
thenl in strict compliance
with ttle cookware
nlal-lUf _lCtl_lrer's
o
reconmlendations.
2 l)o not nlicrowave erupt}
containers.
3 l)o not permit children
to use plastic cookware
without complete
supervision.
• When preparing
flaming foods under
ttle microwave, ttlrn tile
vent fan oil.
• Never leave surt_lce units
beneath your microwave
oven unattended at high
heat settings. Boilovers
cause smoking and greasy
spillovers that may ignite
and spread if tile
nlicrowave Veil[ f_ll-i is
operating. To minimize
automatic Pan operation,
use adequate sized
cookware and use high
heat on surt_tce units only
when necessaD-.
Page 10
GR0 b VD1NG1NSTR UCTIONS/Ot IONAL KITS
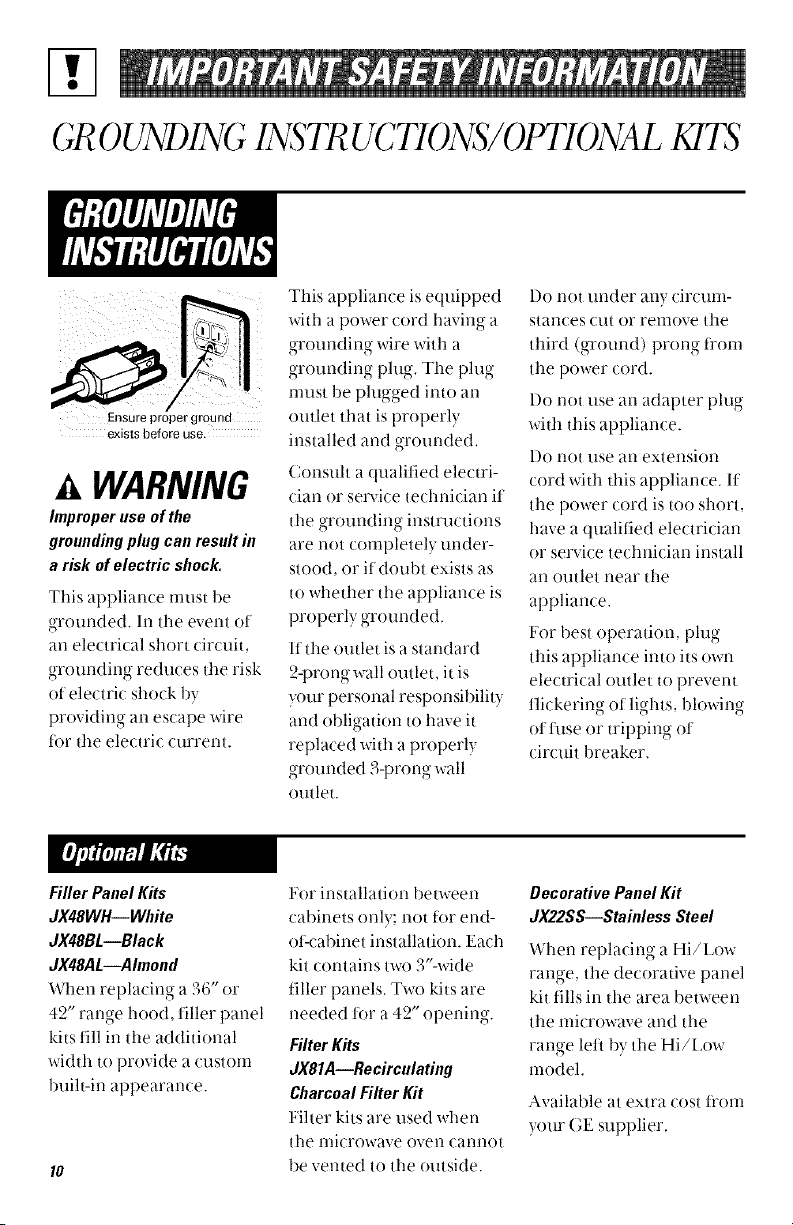
Ensure proper ground
exists before use.
A WARNING
hnproper use of the
grounding plug can result in
a risk of electric shock.
This appliance must be
grounded. In the event ot
an electrical short circuit,
groundinc reduces the risk
, o
of electric shock by
providing an escape wire
for the electric current.
This appliance is equipped
with a power cord having a
grounding wire with a
grounding phtg. The phtg
nmst be plugged into an
outlet that is properly
installed and grounded.
Consuh a qualified electri-
cian or service technician it
the grounding instructions
are not completely under-
stood, or it doubt exists as
to whether the appliance is
properly grounded.
If the outlet is a standard
2-prong wall outlet, it is
ymr personal responsibility
and obligation to have it
replaced with a properly
grounded 3-prong wall
outlet.
l)o not under any circum-
stances cut or remove the
third (ground) prong fl'om
the power cord.
I)o not use an adapter phtg
with this appliance.
I)o not rise ai1extension
cord with this appliance. It
the power cord is too short,
have a qualified electrician
or service technician install
an outlet near the
appliance.
For best operation, phtg
this appliance into its own
electrical outlet to prevent
t]ickeriw,- of lights, blowir_g
ot fltse or tripping ot
circuit breaker.
o , ,
Filler PanelKits
JX48WH--White
JX48BL--Black
JX48AL--Ahnond
When replacing a 36" or
49"_range, hood, filler panel
kits fill in the additional
width to provide a custom
built-in appearance.
For installation bem-een
cabinets only; not tor end-
ot<'abinet installation. Each
kit contains t_x) 3'%vide
filler panels. Two kits are
needed fi_r a 42" opening.
FilterKits
JX81A--Recirculating
CharcoalFilter Kit
lqher kits are used when
the nlicrowave oven cannot
be vented to the outside.
DecorativePanel Kit
dX22SS--Stainless Steel
When replacing a Hi/Low
ranoye the decorative panel
kit fills in the area between
the microwave and tile
ranoe left by the Hi/Low
model.
Available at extra cost ti'om
your GE supplier.
Page 11
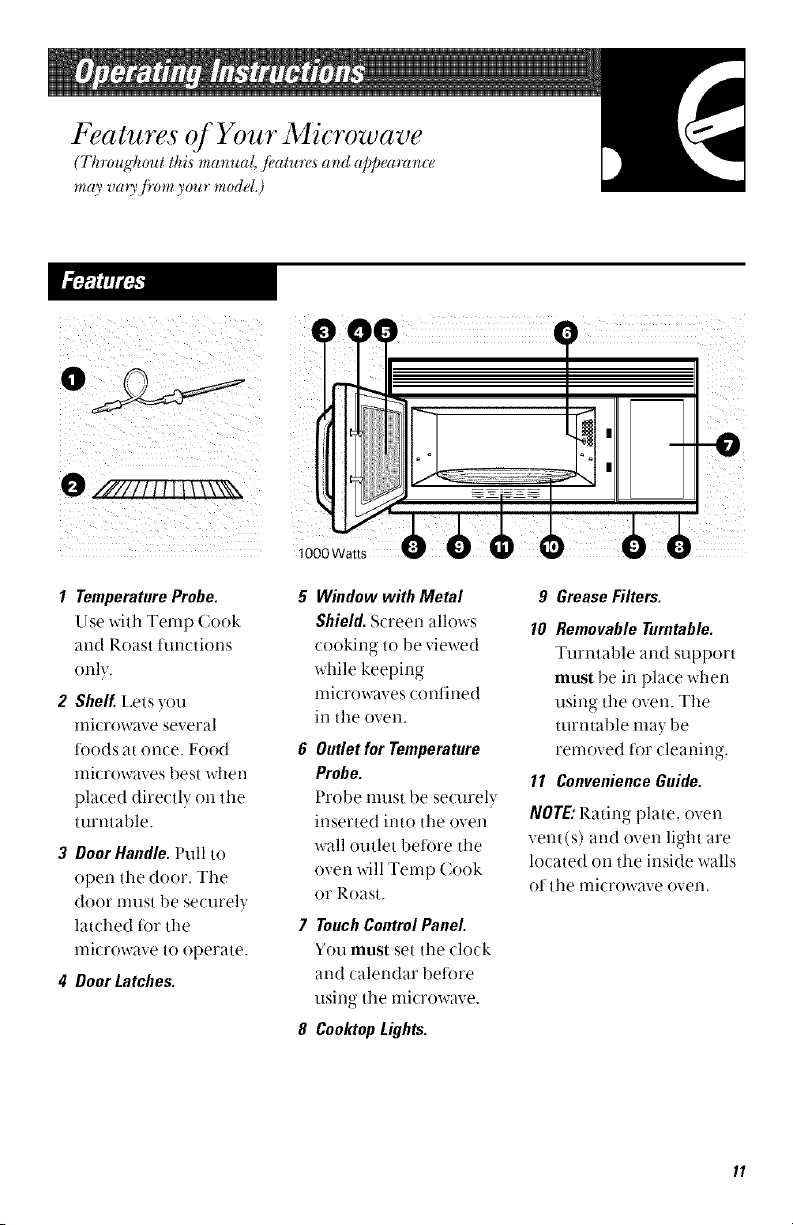
Features of Your Microwave
(Throughout this manual,/kat'ures arid a]Jpea_m'lce
may vau fiwn yo'm modal.)
0
O /7277777yvv_
1 TemperatureProbe.
Use with Temp Cook
and Roast functions
only.
2 Shelf, Lets you
nlicrowave several
toods at once. Food
microwaves best when
placed directly on tile
turntable.
3 Door Handle. Pull to
open the door. Tile
door nmst be securely
latched tor the
microwave to operate.
4 Door Latches.
5 Window with Metal
Shield. Screen allows
cooking to be viewed
while keeping
nlicrowaves conthled
in tile oven.
6 Outletfor Temperature
Probe.
Probe nmst be se/mely
inserted into the oven
wall outlet betiwe the
oven will Temp Cook
or Roast.
7 TouchControlPanel
You must set tile (lock
and calendar betore
using the microwave.
8 CooktopLights.
9 Grease Filters.
10 RemovableTurntable.
Turntable and support
must be in place when
using tile oven. Tile
turntable nlay be
removed tor cleaning.
11 ConvenienceGuide.
NOTE:Rating plate, oven
vent(s) and oven light are
located on the inside walls
ot tile lnicrowave oven.
Page 12
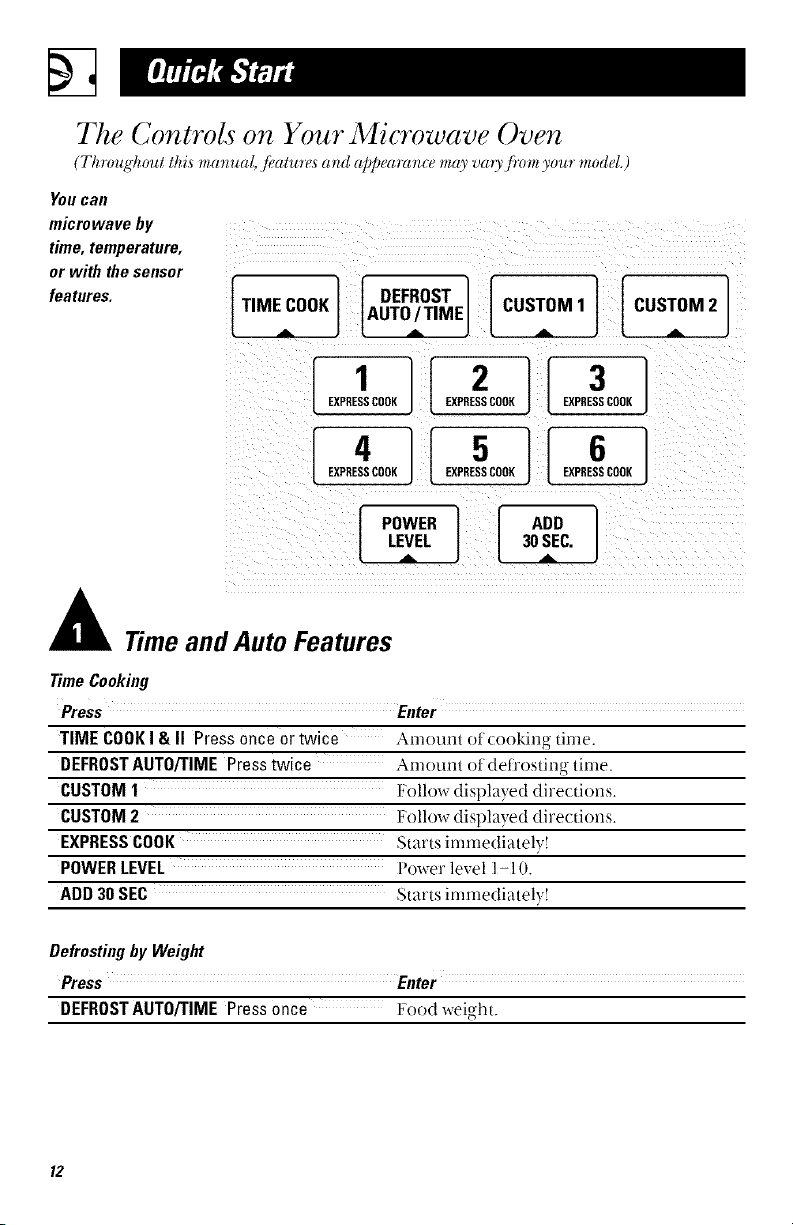
The Cont_rols on Your Microwave Oven
(Th_mghout this manual, J_atu_s arid appeamrlce may vao'Jmm your modal.)
You Call
microwave by
time, temperature,
or with the sensor
features.
[TIM, rOOK] [ DEFROST
I I,DT_t,ME COSTOM1COSTO._
P°w,.1[,°°1LEVEL 30 SEC.
Time and Auto Features
Time Cooking
Press Enter
TIME COOK I & II Press once or twice Amount of cooking time.
DEFROSTAUT0/TIME Press twice Amount ()f defi'()sth-lg time.
CUSTOM 1 Follow displayed dire(tions.
CUSTOM 2 Follow displayed directions.
EXPRESS COOK Starts immediately!
POWER LEVEL Power level ]-] 0.
ADD 30 SEC Starts immediately!
Defrosting by Weight
Press Enter
DEFROST AUTO/TIME Press once Food weight.
Page 13
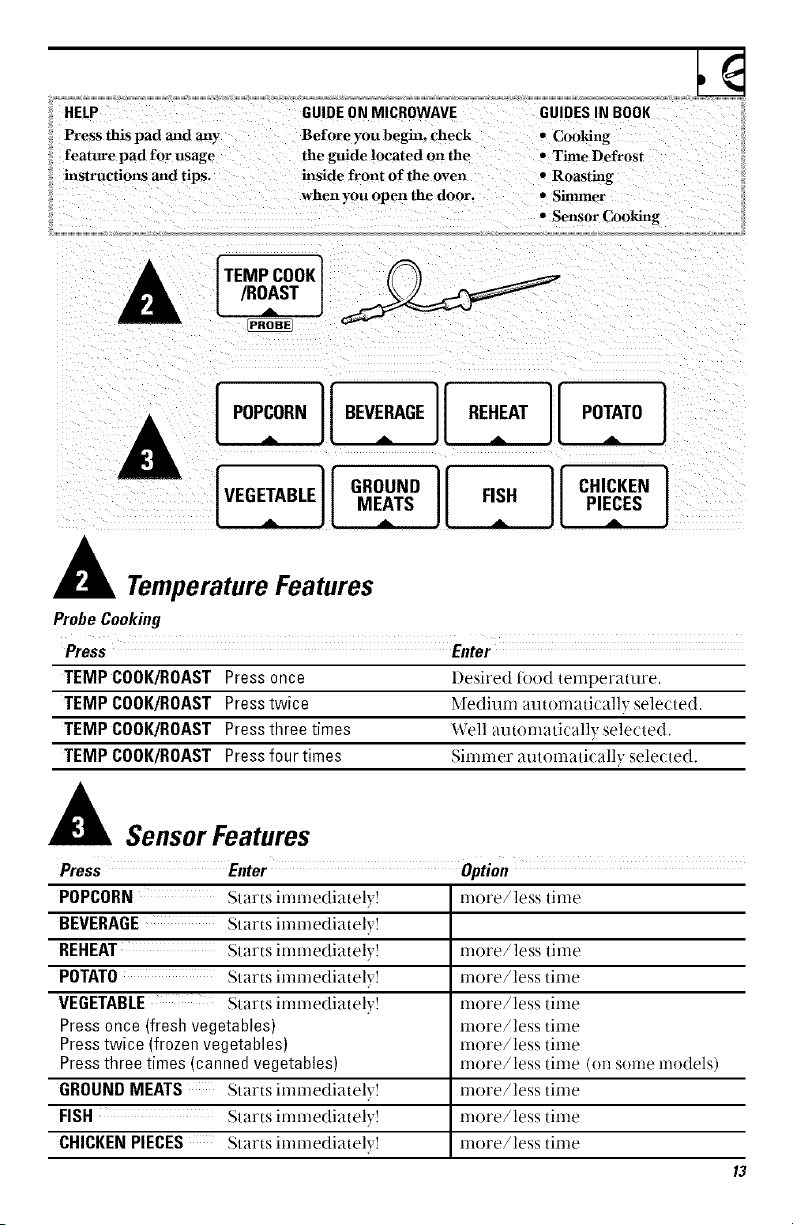
HELP
Press this pad and any
feature pad for usage
instructions and tips.
GUIDE ON MICROWAVE
Before you begin, check
the guide located on the
inside front of the oven
when you open the door.
GUIDESIN BOOK
• Cooking
• l_imeDefrost
• Roasting
• Simmer
• Sensor Cooking
f'EMPCOOK1
I 'ooR'_IIoEw.o _l RE"Eo_1I,o,A,o_I
[VEO_O.E]1O000,OoEA,S_
[ FISH CHICKEN ]
PIECES
Temperature Features
ProbeCooking
TEMP COOK/ROAST Press once Desired food temperature.
TEMP COOK/ROAST Press twice Medium automaticall;, selected.
TEMP COOK/ROAST Press three times Well autornaticall} selected.
TEMP COOK/ROAST Press four times Simmer automati(ally sele(ted.
SensorFeatures
Press Enter Option
POPCORN Starts inunediatel} ! more/less time
BEVERAGE Starts immediatel} !
REHEAT Starts immediatel} ! more/less time
POTATO Starts immediatel} ! more/less time
VEGETABLE Starts immediatel} ! more/less time
Pressonce (fresh vegetables) more/less time
Presstwice (frozen vegetables) more/less time
Pressthree times (canned vegetables) more/less time (on some models)
GROUNDMEATS Starts immediatel) ! more/less time
FISH Starts immediatel} ! more/less time
CHICKENPIECES Starts immediatel} ! more/less time
13
Page 14
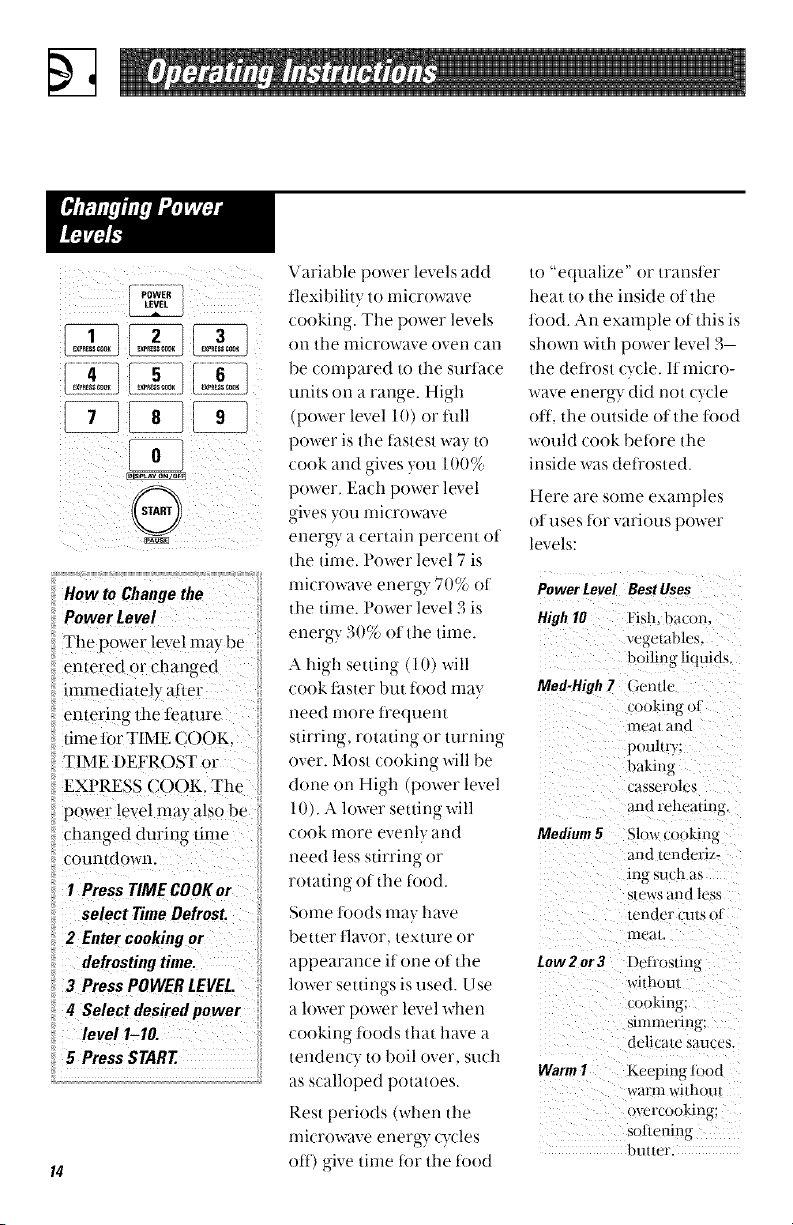
: i>i ill
entering the feature
time 10r TIME COOK,
TIME DEFROST 0r
EXPRESS coo K , The
power !evel may also be
changed during time
countdmvn. }
1 Press TIMECOOKor
select TimeDefrost.
i12 Ente_cookingor :
ii defrostingtime.
113Press POWERLEVEL.
ii4 Select desiredpower
level 1--10. :_
ii 5 PressSTART
Variable power levels add
tlexibility to microwave
cooking. The power levels
on the microwave oven can
be compared to tt_e surfi_ce
units on a ranoe High
(power level 10) or t_fll
power is the titstest way to
cook and gives )ou 100%
power. Each power level
gives }ou microwave
energ T a certain percent of
to "equalize" or transl_'r
heat to the inside olthe
10od. An example ot this is
shown with power level 3
the deti'ost cycle. 1t micro-
wave energy did not cycle
off. the outside of the 10od
would cook beti)re die
inside was det_'osted.
Here are some examples
O1 uses l{ir variollS power
levels:
the time, Power level 7 is
microwave energ T 7(1% of
the time. Pox_wrlevel 3 is
energ T 30% of the time.
_,liioh setting (10) will
cook filster but tood may
need more t_'equent
stirrino rotating or turning
over. Most cooking will be
done on High (power level
10). A lower setting will
cook more evenly and
need less stirring or
rotating of the food.
Some foods ilia}, have
better t]avor, texture or
appearance it one of the
lower settings is used. Use
a lower power level when
cooking l()ods that have a delicate sauces.
tendertcy to boil over, such
as scalh)ped potatoes. Warm I Keeping Iood
Rest periods (wherl the ,,vercookinu:
lilicrowave el-terg)" cycles soncnin_
ott) give tirne tor the tood
' " " ])litter.
Power Level Best Uses
High10 [ish, bacon,
vegetables.
boilin_ li_uids.
Med-High7 I ,cnflc
cooking ol
mcJl and
poulnT;
bakint_
ca,,_croles
and reheatinu.
Medium5 Sl,)wcookin_
and/ende_iz-
in_ such a.,
Stt_WS alld less
lellder cu/s Ol
ltle}//.
tow2 or3 l)eli'ostin_
withom
c//okina
_mi]lel'in_:
warm wi@tou
Page 15
Time Features
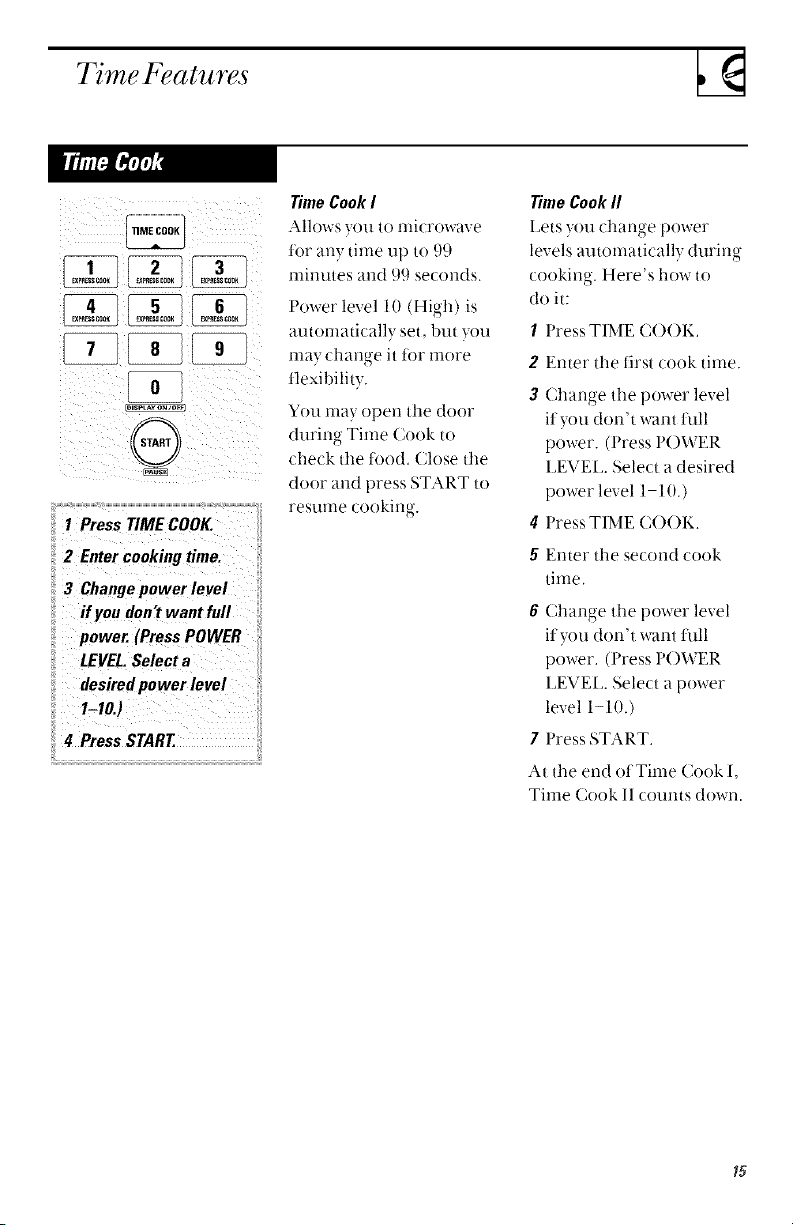
1 Press TIME COOK.
2 Entercookingtime.
3 Changepower level
ifyou don'twant full
power. (PressPOWER
LEVEL.Select a
desiredpower level
I-I0.1
14 PressSTART.
TimeCookI
Alh)ws you tonlicrowave
tor any time up to 9,',)
minutes and ,',t9seconds.
Power level 10 (High) is
automatically set, but you
may change it tor more
flexibility.
You may open the door
durir_o_Time Cook to
check the t()o(t, Ch)se tile
door and press START to
resume cooking.
TimeCookII
Iets you chano-e power
' , o
levels automatically durino
• o
cooking. Here's how to
do it:
1 Press TIME C()()I<..
2 Enter tile tirst cook time.
3 Change the power level
ityou don't want full
power. (Press POWER
LEVEL. Select a desired
power level 1 10.)
4 Press TIME COOK.
5 Enter tile second cook
time,
6 Char_ge the power level
ityou don't want full
power. (Press P()WER
LEVEL. Select a power
level 1-10.)
7 Press START,
At the end ot Time Cook l.
Time Cook II counts down.
Page 16
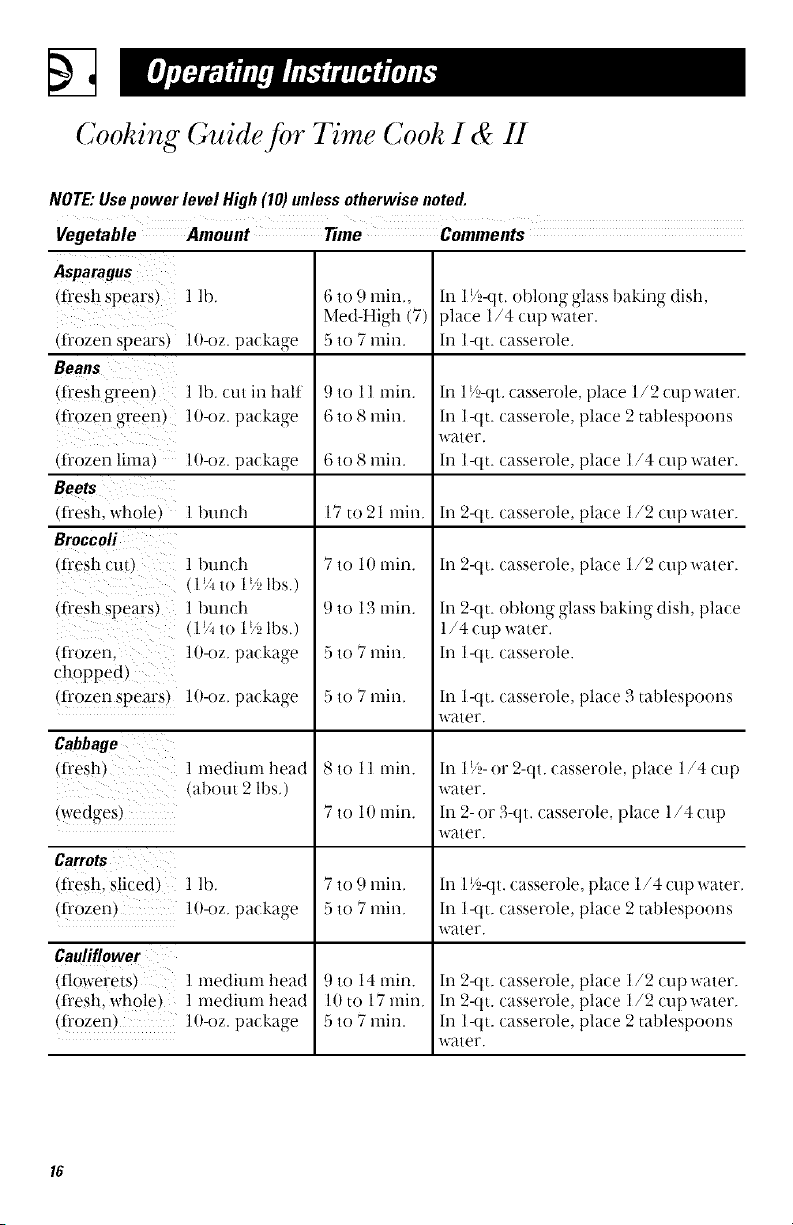
Cooking Guide for Time Cook I & II
NOTE:Usepower level High(10)unlessotherwise noted.
Vegetable Amount Time Comments
Asparagus
(fi'esh spears_ 1 lb.
(fi'ozen spears_ ]0-oz. packatre
Beans
(fi'esh green l 1 lb. (ut in halt
(fi'ozen_reem lO-oz, patkatre
,fi'ozen lima,
Beets
,t]'esh, whole,
Broccoli
,fi'esh cut
l O-oz. packwre
] bunch In 2-qt. casserole, place 1/2 cup water.
1 bunch
1¼ to 1½ lbs.)
(flesh spears
1 bma(h
l V*to 1½ lbs.)
,fi'ozen. 1O-oz.packatre
chopped}
(fi'ozen spears_ IO-oz. packatre
Cabbage
(tl"esia
1 medium head
al)out 2 lbs,)
(wedgeb_
Carrots
(fi'esh. sliced) 1 lb.
(fi'ozen, 1O-oz.packatre
Cauliflower
(flowerets) ] medium head
(fi'esh, whole J 1 medim-n head
(irozen • l O-oz. packatre
6 to 9 rain,,
Med-High (7)
5 to 7 mira
9 to 11 nfin.
6 to 8 rain.
6 to 8 rain,
17 to 21 rain.
7 to 10 min.
9 to 13 rain.
5 to 7 rain.
m
5 to 7 rain.
m
8 to 11 nfin.
7 to 10 rain.
7 to 9 min,
5 to 7 rain.
m
9 to 14 nfin.
10 to 17 rain.
5 to 7 rain.
In 19t,-(lt, oblong glass baking dish,
)late 1/4 tup water.
In l-qt. casserole.
In 115-qt, casserole, place 1/2 cup water,
In l-(l t. casserole, place 2 tablespoons
water.
In l-(tt, casserole, place 1,/4 cup water,
In 2-qt. casserole, place 1/2 cup water.
h) 2-qt. oblong glass baking dish, place
1/4 cup water.
In l-qt. casserole.
In l-qt. casserole, place 3 tablespoons
water.
In 1 !_)-or 2-qt. casserole, place 1,/4 cup
water.
In 2- or 3-qt. casserole, [)lace 1/4 cup
water.
In I i'}-(lt. casserole, place 1,/4 cup water,
In 1-(lt. casserole, place 2 tablespoons
water.
In 2-qt. casserole, place 1/2 cup water.
h) 2-qt. casserole, place 1/2 cup water.
In l-qt. casserole, place 2 tablespoons
water.
Page 17

Vegetable Amount Time Comments
Coru
,fi'ozen kernel, [0-oz. pa(kage 5 to 7 rain. In l-qt. casserole, place 2 tablespoons
ware[`,
Cornon thecob
(fi'e-;h) 1 to 5 ears
(fi'ozem l ea_
2 to l; ears
Mixed
vegetables
(fi'ozen)
Peas
(fi'esh. shelled} 2 lbs. unshelled
(fi'ozen) 10-oz. package
Potatoes
,fi'esh. cubed. 4 potatoes
whi_e_ (t; to 8 oz. ea(h)
10-oz. package
(fiesh, whole, l (6 to 8 oz.)
sweel or while 1
Spinach
(fi'esh 10 to 16 oz.
,fi'ozen, l0-oz. package
chopped
and leaf_
Squash
,Ii'esh, summer [ lb. sli(ed
and yellow)
,winter, acorn [ to 2 squash
bmternut _ abnm 1lb. each)
3 to 4 rain.
)el, eai,
5 to (5 nfin.
3 to 4 nfin.
tel" ear
5 to 7 nfin.
9 to 1,2 rain.
5 to 7 nfin.
9 to 12 rain.
3 to 4 min.
.5 to 7 min.
5 to 7 min.
5 to 7 min.
S tO ] ] nlill.
In 2-qt. oblong glass baking dish. place
corn. If corn is in husk, use no water; if
corn has been husked, add 1/4 cup
water. Rearrange after half of time.
Place in 2-qt. oblong glass baking dish.
Cover with vented plastic wrap.
Reai`i,anoe after half of time.
In 1-qt, casserole. [)lace 3 tablespoons
water.
In l-(tt, casserole, place 1/4 cup water.
In 1-qt. casserole, place 2 tablespoons
water.
['eel and cut into 1 inch cubes. ['lace in
2-qt. casserole with 1/2 cup water. Stir
altei, halt ot time.
Pierce with cooking fork. Place it)
centei` of the oven. I_et stand 5 minutes,
It) 2-qt. casserole, place washed spinach.
In 1-qt. casserole, place 3 tablespoons
ware),,
In 19,_air.casserole, place 1/4 cup water.
Cut in half and remove tibi,ous
membranes. In 2-qt. oblong, ,glass,
baking dish, place squash cut-side-
down. Turn (ut-side-up after 4minutes.
Page 18

Time Features
DEFROST
AUTO/TIME
1 Press DEFROST
AUTO/TIME twice,
2 Enter defrosting time.
3 Press START
4 Turnfood over wheu
the oven signals.
5 Press START
(Auto Defrost explained
in the section on
Convenieuce Features.)
Allows you to defl'ost tot
the length ot time you
select. See ttle l)efl'ostin_,-
Guide for suggested times.
Power level 3 is automati-
cally set, but you may
change this ior more flexi-
bility. You may defl'ost
small items more quickly
by raising tile power level
atter entering the time.
However, they will need
more fl'equent attention
than usual.
Power level 7 cuts the total
defl'osting time in about
hall; power level 10 cuts
the total time m approxi-
mately l/3. Rotate or stir
tbod li'equently.
At one hall of selected
defl'osting time. the oven
signals TU RN. At this time.
turn tood over and break
apart or rearrange pieces
for more even deirosting.
Shield any "warm areas with
small pieces ot foil.
A dull thlmll)ino-., noise_ max,
be heard durino- (lefl'ostiw,-
This sound is normal when
the oven is riot operating at
High power.
Defrosting Tips
• Foods fl'ozen ill paper or
plastic can be defl'osted
in the 0ackage. Tightl}
closed packages should
be slit, pierced or vented
AFTER food has partially
deti'osted. Plastic storage
containers should be at
least partially uncovered.
• Famil_,-size. prepackaged
fl'ozen dinners call be
det_'osted and micro-
waved. If the food is ill a
toil container, transfer it
to a microwave-sate dish.
• Foods that spoil easily,
such as milk, eggs, fish,
stuflirl_s poult D and
pork, should not be
allowed to sit out lot
more than one hour
after defl'osting. Room
temperature promotes
the growth of harnfful
bacteria.
• For more even defl'ostino-
ot larger foods, such as
beef, lamb and veal
roasts, use Auto l)efl'ost.
• Be sure large lneats are
completely defl'osted
before cookino
• When deti'osted, tood
should be cool but
sot'tened ill all areas. Ifstill
slightl} ic?, return to the
microwave vexT briefly, or
let it stand a tew minutes.
Page 19

Defrosting Guide
Food Time Comments
Breads,Cakes
Bread,bunsorrolls (1 piece)
Sweet rolls (approx. 12 oz.
Fishand Seafood
Fillets, frozen (1lb._
Shellfish,small pieces (1 lb.)
Fruit
Plastic pouch--1 to2
(1 O-o;, package)
Meat
Bacon (l lb.)
Franks (1 lb ,
Ground meat ( 1 lb.
Roast"beef, lamb, veal, pork
Steaks, chops and cutlets
Poultry
Chicken, broiler-fryer
cutup (27_ to 3 lbs.,
Chicken,whole
(2V__,/()3 lbs,,
Cornishhen
Turkey breast (4 to 6 lbs.)
I ll]11"1.
3 to 5 rnin
6 to 8 rain
5 to 7 rain. Place })lock in casserole. Turn over and
break tip after half the time.
3 to 6 rain
2 to 5 min.
Place urloperled package in ()yen. Let
stand 5 minutes after defi'osting.
2 to 5 min.
Place unopened package in oven.
Microwave just until fi'anks can be
separated. Let stand 5 minutes, if
necessary, to complete defi'osting.
5 to 7 rain
l 2 to 16 nfin.
Turn meat over after half the time.
Use power level 1.
per lb.
5 to 7 min.
per lb.
Place unwrapped meat in cooking dish.
Turn over af(er half the time and shield
warm areas with foil. When finished,
separate pieces and let stand to complete
lSto 19nfin.
defi'ostin ,
Place wrapped chicken in dish. Unwrap
o"
and turn over af(er half the time. When
finished, separate pieces and microwave 2
to 4 minutes more, if necessal T. Let stand
to finish def['ostino
17 (o 21 nfin.
Place wrapped chicken in dish. Af(er half
the time, unwrap and turn chicken over.
Shield warm areas with tbil. Finish
defi'osting. If necessary, run cold water in
the car[t)tmtil giblets can be removed,
7 to 13 min
per lb.
Place unwrapped hen in the oven breast-
side-up. Turn over after half the time.
Run cool water in the car[t? until giblets
can be removed.
5 to 9 rnin.
per lb.
Place unwrapped breast in dish breast-
side-down. Atier half the time, turn over
and shield warm areas with fi)il. Finish
deti'ostirlg. Let starid 1 to 2 hours in
refi'igerator to complete defi'osting.
Page 20

Time Features
This is a quick way to set
cooking time for 1-6 minutes.
Press oile of the Express
Cook pads (t]:om l to 6)
tot 1 to (; minutes ot
cooking at power level 10.
For example, press the 2
pad tor 2 minutes oI
cookir)g time.
You can use this feature
two ways:
• It will add 30 seconds to
the time counting down
each time the pad is
pressed.
The power level can be
changed as time is
counting down. Press
I'()WEP. LEVEL and
enter I 10.
• It can be used as a quick
wa} to set 30 seconds of
cookino time,
0
2O
Page 21

A u to Fea ture
I PressDEFROST
AUTO/TIMEonce.
rthe Conversion
Guideat right, enter
foodweight.For
example,presspads 1
and 2for 1.2pounds
(1pound,3 ounces).
3 PressSTART
(TimeDefrostis
explainedin the77me
Featuressection.)
The l)eflost Auto/Time
feature gives yoll t_,vo v_:a} s
to defl'ost ti'ozen toods.
Press DEFROST
AUT()/TIME once tor
Auto Deflost or twice t0r
Time Dett'ost.
Use Auto Defl'ost ibr meat,
pouhry and fish. Use Time
Dett'ost t0r most other
i]'ozen t0ods.
Auto Defl'ost automatically
sets the defl'osting times
and power levels to give
even deti'osting resuhs t0r
meats, poult D-and fish
weighing up to six pounds.
There is a hand} guide
located on the inside t]'()nt
of the oven.
6uide
ConversionGuide
if din weight ot l-0od is
stated in pounds and
ounces, tl]e ounces must
be converted to tenths
(.1) of a pound.
Weightof EnterFood
Foodin Weight
Ounces (tenthsof
apound)
1-2 ' .1
3 .2
4-5 :3
6-7 ' .4
8 ' i5
9-10 ' .6
11 ' .7
12-13' i8
14-15 .9
• Remove l-neat tI'()II]
package and place on
mk rowave-sate dish.
• Twice during defl'ost, the
oven signals TURN. At
each TURN signal, turn
the tood over. Renlove
det]'osted meat or shield
warm areas with small
pieces ot t0il.
• After defl'ostino most
meats need to stand 5
minutes to complete
defi'osting. Large roasts
should stand t0r about
30 minutes.
21
Page 22

Tempera ture Fea tures
Cable Handle
Enu
Sens0r_al_
Appearance may vmv
What happens when you
use the probe...
Cooking with/he
probe Mlows you lo
heat food _o a certain
mmperature. This is
/he best way 1o cook
manv foods.
TheTemperature Probe
NOTE:The turntable will
[let turn when the probe is
in use.
The temperature probe is
alood thermometer tltat
monitors the temperature
of file ti)od. The probe
mr]st be used when t]sin ,
Temp Cook or Roast.
The probe is not
recommended li)r batters.
doughs, ti'ozen li)ods and
t()ods which arc dillicult
to cook precisely by
temperature. Use the
Time Cook setting tot
these foods.
• Make sure the cable end
is inserted all the way into
the oven wall outlet.
• Insert the probe into the
center of the toed. Make
sure the handle does not
touch the ti)od or the top
or sides ot the oven.
CookingTips
• I)o not twist, drop or
bend the probe.
• Be sure ti'ozen ti)od has
been completely
del_'osted 1)eti)re
inserting the prol)e. The
probe may break otl it
used in ti'ozen ti)ods.
• Cover t(_ods loosely ti)r
moisture control and
quick, even heating.
• Use a lower power level
with the probe; toods will
take longer to cook but
they will heat more
evenly.
• Do not leave the probe
in the oven if it's not
inserted in t0od. If it
touches the oven wall, it
nla} danlage the ovell.
22
Page 23

@
v
Whathappenswhen you
TempCook/Roastusing
theprobe...
This pad otlel"s 3
op,ions:
: 1_ You select/he
temperature you wan1.
) The lemperamre is
automatically selecled
lor medium or well
done roasts.
3_A simmer temt_era-
rare is aulomaticallv
selecled.
Three Ways to Use the Temp
Cook/Roast Feature
1You set the temperature
you want.
Press TEMP C()()K/
ROAST ome. This is
good for foods sudl as
soups, casseroles and
bexera_res
2 Temperature is
automatically selected
for cooking roasts
medium or well.
Roast Medium-Press
TEMP CO()K/ROAST
twice. Roast Well-Press
TEMP CO()K/ROAST
three tinles.
See the Roasting (;uide
tor suggestions.
3 Temperature is
automatically selected
for slow cooking of
foods (simmer).
Simmer--Press TEMP
C()()K/R()AST 4 times.
See the Simmer Guide
tor specific directions.
How to Use the Probe and
Set the Temperature Yourseff
I Insert the temperature
probe in the center ot a
casserole and attach it
securely in the oven
wall outlet.
2 Press TEMI' C()()K/
R()AST once.
3 Enter the desired ti)od
temperamre.
4 Change power level it
you don't want full
power. (Press POWER
LEVH_. Select a power
level 1 10.)
5 Press START.
6 When the temperature is
reached, the nlicrowave
will signal. Food will be
held at this temperature
t0r 60 minutes. The oven
beeps when the hold
time is complete.
23
Page 24

Tempera ture Fea tures
+bathao.eos +; Rowto e, eProbew,,
you use theprobe the RoastSettings
for roasting... Outlet _ I
For the two Roast
temperature is
preprogramnaed.
settings, the probe
Food will be held a/dlis
temperalure for 60
minules. The oven ++ 1 Insert the probe in tile
beeps when hold time roast and attach it
is complete+ securely irl tile oven
Just as in regular : wall outlet.
roasting', only 1ender ::: 2 Roast _ledium Press
roasts sl''_ould be roasted TEM P (;( )( )K/R( )AST
byusing tl_e probe. Less :i: twice. Roasl Well Press
tender roasts should be TEMI' {;( )( )K/R( )AST
microwaved by time. three umes,
3 Press START.
4 Tile microwave signals
when it's time to turn tile
roast over. Alter you turn
the roast, close the door
and press START.
NOTE:The ovencontinues
tocook after thesignal
whetherornot roastis
turnedover.
Preparing Meats for
• Place a tender ])eel roast
• Insert tile probe
• When using tile probe in
RoastingGuide
Roasting
in a / ookin_ bao£ oil a
trivet ill a microwave-safe
dish Reter to package
insm)ctions ti)_ proper
llSe otHle cooking bag.)
throuuh tile cookinu
bau horizomallv into
the center meaty area
not touching bone or l_tt.
Make sure tile handle
does not touch the ti)od
or top or sides ol the
{Well+
chicken, turkey or ()tiler
pouhD-, insert tile probe
horizontally into the
meatiest area.
Food Type Selection (minutesper pound)
Beef(5 lb+ max.)
TenderRoast I\ledimn 15-23
Well 23 30
Pork (5 lb. maxy
LoinRoast Well 23 30
Poultry (6 lb. max.)
TurkeyBreast Well 16-19
24
Page 25

Press TEMP COOK/ROAST 4
times to select Simmer.
How to Use the Probe to
Simmer
The Simmer teamre heats
tood to 180°E. and holds it
at that temperature tip to
12 hours or until you
remove it and press
CI+EAR/()FF.
I Insert the temperature
probe into the tood,
restino-it on the side of
O
the dish. Attach it
securely in the oven wall
outlet.
2 Press TEMP C()OK/
ROAST 4 times to select
Simmer.
3 Press START. Ityou need
to stir the i0od, restart the
oven by pressing START
again.
When the simmer
temperature is reached,
the oven holds the tood
at that temperature until
CI J_%AR/()FI_is pressed,
SimmerGuide
Food Type
Beef
PotRoast 5-7
Chili 5
Chicken
Stewing 4-(;
Broiler/Fryer 3 4
Ham/Pork
Roast 4-(;
Soup
Stock/Vegetable 7 l, ,
Split Pea 5 7
*Total time includes time to bring food to 180°1:..and hold at that temperature until done.
Add enough liquid to just cover rneat. 11
adding vegetables, make sure they are
completely covered by liquid,
Precook meat. Stir Mter 3 hours, if possible.
Add 4 cups liquid. Insert probe into
meatiest area ol thigh li'om below end and
parallel to leg. Turn over atter 1/2 ot'time.
bame as above,
Add 4 cups liquid.
Make sure that vegetables and meat are
covered by liquid. Stir every 3 hours.
Add enough liquid to cover peas at least
2 inches. Stir Mter 3 hours.
25
Page 26

Sensor Features
What happenswhen
using the Sensor
Features._
T!_e Sen_or Features
detect t!m increasing
humidil}' released
during cooking: T!_e
oven amomatical>
adjusts tl_e (o0king
time io various types
and amounts of fbod.
Covered
• The proper containers
and covers are essential
tor best sensor cooking.
Vented
• Always use microwave-
sat_' containers and cover
them with lids or vented
plastic wrap. Never use
tight sealing plastic
containers--they can
prevent steam ti'Olll
escaping and cause tood
to overtook,
iii _ ii ¸)
i¸
D_ off dishes so they don't
mislead the sensor.
• Be sure the outside ot
the cooking containers
and the inside ot the
microwave oven are dry
before placim,-food in
o
the oven. Beads ot
moisture turning into
steam can mislead the
seI1SOF,
26
Page 27

I_SS l!! J)_, J _more rune
USe OI!]V w_l_h pre[it_cKd_eu
J!crowtdv@ })opcom we!_JHl/g
.75 to 3.5 ounces¸
NOTE:Donot usethe
metalsheff whencooking
popcorn.
How to Use the Popcorn
Feature
I l_ollow package
instructions, using Time
Cook it the package is
less than 1.75 ounces or
larger than 3.5 ounces.
Place the package of
popcorn in the center ot
the microwave.
2 Press P()PC()RN, Tile
oven starts immediately.
If you open the door while
"POPCORN" is displayed,
"SENSOR I_IRR()R '' will
appear, Close the door,
press CLEAR/OFF and
beo-in again,
Haw toAdjustthePopcorn
Programto Providea Slmrter
or LongerCookTime
lfyou find that the 1)rand ot
popcorn }xm use underpops
or overcooks consistently,
you can add or subtract
20-30 seconds to the
automatic popping time.
To add time:
Alter pressing I'OI'C()F.N,
press 9 immediately after
the ovell starts for an extra
20 seconds.
Press 9 again to add anotller
10 seconds (total 30
seconds additional time).
To subtract time:
After pressing P()PC()RN,
press 1 immediately atter
the oven starts t0r 20
seconds less cooking time,
Press 1 again to reduce
cooking time another 10
seconds (total 30 seconds
less time).
Press BEV ERA(;E to heat a
cup ot cott'ee or other
beverage.
Drinks heated with the
Beverage feature may be
very hot. Remove the
container with care.
27
Page 28

Sensor Features
(less tlrrlel (more time)
For reheating stogie servings
of previously cooked foods or
a elate of leftovers.
How to Change the Automatic
Settings
Toreduce time by 10%:
Press I alter the teatnre pad.
Toadd 10%to cooking time:
Press 9_d_.erthe te_mwepad.
iiiNOTE: Do not use the
i metalsheff wheu using
the Reheat feature.
How to Use the Reheat
Feature
1 Place covered t()()d in
tile ()veil. Press
REHEAT. Tile oven
starts immediately.
2 The oven signals when
steam is sensed and tile
time remaining begins
counting down.
Do not open tile oven door
until time is counting
down. If the door is
opened, close it and press
START immediately.
After removing food from the
oven, stir, if possible, to even
out the temperature. If food
is not hot enough, use Time
Cook to reheat for more time.
Reheated foods may have
wide variations in
temperature. Some areas
may be extremely hot.
SomeFoodsNot
RecommendedForUse With
Reheat
It is best to use Time Cook
tor these ti)o(ts:
• Bread products.
• Eoods that must be
reheated uncovered.
• Foods that need to be
stirred or rotated.
• Foods calling ti)r a dr?."
look or crisp surtace after
reheating.
28
Page 29

__COICI{EN POTATO
Sensor Cookin 9 gwes you easy
8utooqatlC results with a varlet_
o7 looos _dee the CooMn 9 Guide
NOTE:Donot use the
metalsheff withSensor
Cooking.
CookingGuide
Vegetable, Potato, Fish,
Chicken Pieces, GroundMeats
1 Place covered todd in
the oven. Press the _6od
pad. (F'or vegetal)les.
press the VEGETABI JE
pad once tot fl'esh
vegetables, twice for
fl'ozen vegetables, or
three times t6r canned
vegetables,) The oven
starts immediately,
2 The oven signals when
steam is sensed and time
remaining is counting
down. Turn or stir the
t0od if necessau,
Do llot open the oven door
until time is counting
down. If the door is
opened, close it and press
START immediately.
NOTE:If the food is not
done enough, use Time
Cook to cook for more time.
How to Change the
Automatic Settings
(automatic settings for
canned vegetables cannot
be adjusted on some models)
(less time) (more time)
You can adjust the cookino
time tor all toods to suit
your personal taste.
Reducetime by 10%:
Press 1 after the food pad.
Add I0% to cooking time.
Press 9 atler the food pad.
Food Type Amount Comments
Canned Vegetables 4-16 oz. Cover with lid or vented plastic wrap.
FrozenVegetables 4-16 oz. 1_ollow -_ackaoe instructions for adding water,t _
Cover with lid or vented plastic wrap.
FreshVegetables 4-16 oz. Add 1/4 cup water per serving.
Cover with lid or vented plastic wrap,
Potatoes 1/2 2 lbs. Pierce skin with R)rk. Place potatoes
on the turntable.
Fish 4 It) oz. Cover wit h vented plastic wrap.
ChickenPieces l 8 Cover with vented plastic wrap.
pieces
GroundMeats 1/2 3 lbs. Use round casserole dish. Crumble meat
(Beef,Pork, Turkey) into dish, Cover with lid or vented plastic
wrap. l)rain and stir at signal.
29
Page 30

Other Features
Tile CUST()M I and 2
pads allow you to save m-o
of your most ii'equently
used settings. (Temperature
arid sensor cooking
settings cannot be saved.)
To set and save a settin r.
o"
I Press and 11o1(1the
CUST()M 1 or CUSTOM
2 pad t0r two seconds.
2 Set the amount of
cooking time.
3 Set the power level iI
desired. (Full power will
automatically be set it
you do not chano-e it )
• o "
4 Press START.
Your custom setting will be
rememl)ered for tmure
one touch use.
3O
The MESSAGE pad allows
you to record a short
spoken message.
I Press MESSAGE.
2 Speak toward the control
panel in a clear, normal
voice.
3 Press MESSAGE again to
save tile nlessaoe
immediately or allow the
time to count down to
save it automatically.
To cancel a message
during record, press 0.
To erase a recorded
message, press 0 during
playback.
Page 31

TheHEI_Ppaddisplays
_eatureintormationand
helpfulhints.PressHELl',
thenselectateaturepad.
Toremindyouthatyouhavetoodintheoven,theoven
willdisplay"FOODISREAI)Y"andbeeponceaminute
untilyoueitheropentheovendoororpress
CLEAR/OIq_'.
CLOCK
L_,JLs.........I{g_l
AM/PM
SC_mLS_.C
@
Press CI_OCK to set the
time of day and (late.
I Press CIJOCK.
2 Enter the time ot day.
3 Select AM or PM.
4 Press START or CI_()CK.
5 Enter the month, (lay
and year. Example:
031699 (March 16, 1999)
8 Press START or CI_()CK.
To check the time ofda}
while microwaving, press
CI _()C 14...
To check the date while
microwaving, press and
hold CI_()CI 4.for about
three seconds.
31
Page 32

Other Features
[ AM/PM ]
A
SCROLL SPEED
Ttle scroll speed of the
display can be dlanged.
Press and hold tile AM/PM
pad about 3 seconds to
bring up the display,. Select
I 5 t0r slow to t_tst scroll
speed.
[DISPLAY ON IOFFj
DELAY
START
AM/PM
s_Ro_sP_
To turn ttle clock display
oil press and hold 0 for
about three seconds,
I)ela} Start allows Hm to set
tile microwave to dela}
(ookirzg up to 24 hours.
1 Press I)EIAY START.
2 Enter tile time you want
tile oven to start. (Be sure
tile nlicrowave clock
shows tile correct time
oI clay.)
3 Select AM or PM.
To redisplay tile clock,
repeat.
4 Select any combination
of I)efl'ost Auto/Time or
Time Cook 1 &-II.
5 Press START.
Tile Delay Start tinle will be
displayed plus "DS." Ttle
oven will autonlatically
start at ttle delayed time.
The time ot day may be
displayed )v rwess no-
CI_OCK.
32
Page 33

Tinier ()n/Off operates as
a minute timer and can be
used at an)- time, even
when tile oven isoperating.
I Press TIMER ()N/()FF.
E'nter time volt want to
COltnt down.
3 Press TIMER ON/()FI _
to start.
In addition to starting
many flmctions,
START/I'A USE allows you
to stop cooking without
openino tile door or
clearing the displa}.
When tinle is up, tile oven
will signal. To turn off tile
timer signal, press TIMER
()N/()FE.
NOTE:The timer indicator
will be lit while tile tinier
is operatino
o"
SCROtLS_EEO
Tile Reminder teature can
be used like an alarm clock
and can be used at any
time, even when tile oven
is operating. The
Reminder time can be set
tip to 24 hours later.
I Press REMINDER.
2 Enter tile time you want
tile ()veil to renlind you.
(Be sure the nlicrowave
clock shows the correct
time of day.)
3 Select AM or PM.
q Press REMINDER. When
Renlinder sional occurs.
• o
press REMINDER to turn
it ott'. Tile Reminder
time may be displayed by
pressing REMINI)ER.
NOtE:The REM indicator
will remain lit to show that
the Reminder is set. To
clear (tie Reminder betore
it occurs, press REMINDER,
then 0. The REM indicator
will no longer be lit.
33
Page 34

Other Features
OFF
HI-LO-OFF
You may lock tile control
j
panel to prevent tile
microwave _]?()I1]l)ein_,-
accidentally started or used
by children.
0
To lock or unlock the
controls, press and hold
CI JEAR/OFF ti)r about
three seconds. When the
control panel is locked, an
"I," will be displayed to tile
extreme right.
For best cooking resuhs,
leave tile turntable on.
It can be turned ott'for
lar_-edishes. Press
TURNTABLE to turn
Sometimes the turntable
can become too hot to
touch. Be careflfl touching
tile turntable durino and
after cookim,-
tile turntable on or oil,
Tile vent t_ln removes
steam and ()tiler vapors
tl'oill surtace cookino"
Press VENT FAN once for
high tan speed, twice for
low tan speed or a third
time to turn tile fan off.
An automatic tan teature
protects tile nlicrowave
trom too much heat rising
from tile _ooktop below it.
It atltomati(ally turns on at
low speed flit senses too
nmch heat.
If you have turned tile tim
on you may find that you
cannot turn it off. Tile tan
will automatically turn oil
when the internal parts are
cool. It may stay on ti)r 30
minutes or more a_'_ertile
cooktop and microwave
controls are turned oil.
34
Page 35

l LIG2T 1
BRmNT-NmNT
OFF
:I 1VOLUME
Press SU RFACE IAGHT
once for bright light, twice
for the night light or three
times to turn tile light off.
Tile beeper sound level
can be a(!justed. Press
BEEPER V()IJUME.
Choose 0-3 for mute
to loud.
IN_E_I_HT i
sc_o_sP_D
You can set the nioht
light to turn on and oft
automatically at any time
yotl want.
1 PressAUT() NITE
I AGHT.
2 Enter tile time }ou want
tile light to turn on.
Select AM or PM.
3 Press A U T() NITE
LI(;HT again and enter
the time you want tile
light to turn off. Select
AM or I'M.
4 Press AUT() NITE
LIGHT.
NITE will stay lit to remind
you that the teature is set.
Yotl can review the AtltO
Nite Light settin s b_
pressing AUT() NITE
IAGHT.
To erase }our settings
and turn off the automatic
teature, press AUT() NITE
LIGHT, then ().
35
Page 36

Other Features
I°, i
scHo_sPt_
You can use the microwave
to remind you of upcoming
appointments.
At rnidrfight, the da}
betore your scheduled
appointment, an asterisk
will appear in the display.
Tx_x) hours bet0re an
appoimment, the oven
will signal and the
appoinunent will scroll in
the display. It will continue
to signal and scroll until
you press APPOINTMENT/
SCHEI)ULER to cancel it.
7 Press APP()INTMENT/
SCHEI)UI_ER - or press
'0" to set it as a recurring
appointment.
()nce- Daily
Twice - Weekly
Three times - Monthly
8 Press APPOINTMENT/
SCHEI)UI_ER.
NOTE:Recurring
appointmentsmustbe resetat
thebeginningofa new year.
ToReviewappointments:
1 Press and hold
Toset an appointment:
1 Press APP()INTMENT/
SCHEI)UI_ER.
Enter tile nlolldl and (lay
of)our appointment.
APP()INTMENT/
SCHEI)ULER about
three seconds.
2 Press 1-12 t(_r the month
you want to review,
3 Press appoinunent again.
Enter the time of)our
appomunent.
Select AM or PM.
5 Press APP()INTMENT/
SCHEI)U I_ER.
6 Enter the appointment
type:
1 AUTO
2 DENTIST
3 DOCTOR
4 HAIRCUT
5 SCHOOL
6 SOCIAL
ToQuit the Review Process:
Press CI_EAI_./()FF,
Tocancel a scheduled
appointment:
1 Recall the appointment
y)u want to cancel, using
tim review process above.
2 Press and hold '0" tot
about 3 seconds.
NOTE: The appointment
scheduler can record about
25 appointments.
7 SPECIAL
8 FINANCE
36
9 WORK
Page 37

[!ir[3table or o[3 [he shelf
it_ the lower position.
////////II !\\ \\N\
• Make sure 1he shelt is
posilioned properly
inside the microwave
_o prevem damage _o
the oven from arcing.
• Do nol use a
microwave brown-
ing dish on the shelg
The shelf could
overheat.
• Do no! use the oven
wilh dm shelf on/he
microwave floor. Thi_
could damage 1he
microwave.
• Use pol holders when
handling the shelf it
may be hoL
• Do nol use the shelf
when cooMng
pop{ orn.
• Do no1 use the shelf
with Sensor CooMng
or Reheat.
remo_ e the shelf u_less _ou
are reheating on more than
otle ie_el.
For best results
Uneven results
The shelf gi_es )ou the
opdo[l to reheat more
that! one dish of food at
the same time.
24evel reheating
37
Page 38

OtherFeatures Your Model May Have
* To reheat on 2 levels
or
* To reheat 2 dishes on the
lower level:
Switch places after 1/2 time. I Muhipl} reheat time
by LV,.
2 Sv,.hch plates after l ,,'2
the time.
Switch places after 1/2 time.
* To reheat on 3 levels
_/Double _he reheating
t i Fi!e.
2' Switch places twice and
Switch places twice
give the dishes a 1/2 mrn
(lurh_g reheati_'% (Pla(e
dense ii)t)ds, or those
that require a lo_ger
cook time, on the upper
shelf first.)
38
Page 39

Microwave Terms
Arcing
ii iii
5rcinc is the microwave term tbr sparks in the oven. Arcing is
caused )v:
• the ternperamre probe staying in the oven but not inserted in
U i i i i i
g
the food.
• the metal shelf being installed incorrectly and touching the
nlicrowave walls.
• metal or toil touclfing the side ot tile oven.
• foil that is not rooMed to tbod (upturned edges act like
ante)lnas).
• r)letal Stlch as twist ties. potl ItIS. p')rls:, go 1d-rimmed" (hshes."
• rec}cled paper towels containing srnall metal pieces.
Covering Covers hold in moisture, allow tot more even heating arm reduce
cooking time. V eating plastic wrap or covering with wax paper
allows excess ste_tm to escape,
Shielding In a regular oven, )on shield chicken breasts or baked foods to
prevent over-browning,. When rnicrowavin_, ',on. use small strips ot
fbil to shieM thin parts, such as the tips of wings and legs on poulu),
which wouM cook before larger parts.
Standing time When )on cook with regular ovens, foods such as roasts or cakes are
allowed to stand to finish cooking or to set. Standing time is
especiall} important in rnicrowave cooking. Note that a rnicrowaved
cake is not placed oil a coolino rack
Venting Atter covering a dish with plastic wrap. }on vent the plastic wrap b}
ttlr)ling back ()tie corner so excess steam Call escape.
39
Page 40

and Cleaning
Open the oven door a tew
rnitll.ltes after cooking to
air out the inside. An
occasional thorough
wiping with a solution ot
baking soda and water
keeps the inside fresh.
Walls,Floor,Inside Window,
Metal and PlasticPartson
the Door
Some spatters can be
removed with a paper
towel, ()tilers may require
a damp cloth. Remove
_,-reasvsoatters _ th a stlds'_
o , 't '.
cloth, then rinse with a
damp cloth. Do not use
abrasive cleaners or sharp
utensils on oven walls.
Never use a commercial
oven cleaner on any part
of your microwave.
NOTE:Be certainthe power
is offbefore cleaning any
part ofthis oven.
RemovableTurntableand
TurntableSupport
To prevent breakaoe do
not place the turntable into
water just a_ter cooking.
Wash it caretially in warm,
sudsy water or in the
dishwasher. The turntable
and support can be broken
it dropped. Remember, do
not operate the oven
without the turntable and
support in place.
TemperatureProbe
Clean immediately atier
using. To clean, wipe with
sudsy cloth, then rub
lightl) with plastic scouring
ball if necessap,'. Rinse and
(hT. The probe can also be
washed in the dishwasher.
Shelf
4O
Clean Mth mild soap and
water or in the dishwasher.
Do not clean in a self-
cleaning oven.
Page 41

I;I
alcohol onthe
ii microwave oven.
ii Ammonia oralcohol can
i: dalnagethe appearance
ofthe tnicrowave.
Case
(;lean the outside of the
microwave with a sudsy
ch)th. Rinse and then dry.
Wipe the window clean
with a damp cloth.
ControlPanel andDoor
Wipe with a damp cloth.
I)ry thoroughl), l)o not use
deaning spra) s, large
amounts of soap and
water, abrasives or sharp
ol)jects on the panel--they
can damage it. Some paper
towels can also scratch the
control panel.
Door Surface
It's important to keep the
area clean where the door
seals against the micro-
wave. Use only mild, non-
abrasive detergents
applied with a clean sponge
or sott cloth. Rinse well.
Stainless Steel
To clean the surtace use
hot soapy water, then rinse
and dry. Do not use steel
wool pads or other abrasive
cleaners. They will scratch
the surtace.
Bo_om
Clean otl the grease and
dust on the bottorn often.
Use a sohltion ot warnl
water and detergent.
41
Page 42

FC
Light Bulb Replacement
(WB36X10003),available "i
frmnyour GEsupplier.
(WB36X10003), available }
froin your GE suppfier.
I To replace the bulb(s),
first disconnect the power
at the main ti_se or circuit
breaker panel or pull the
phlo
9"
2
Renlove the screw at the
fl'oru of tile light cover
and lower the cover.
REMOVE SCREWS
To replace tile oven light,
first disconnect tile power
at tile main tiase or circuit
breaker panel or pull the
phlo"
9"
2
Remove tile top grille by
taking out the 2 screws
that hold it in place.
3 Be sure tile bulb(s) to be
replaced are cool betore
rernovir_g. Atter ])reaking
the adhesive seal, remove
tile bull) l)ygently turning.
4 Replace the screw.
Connect electrical power
to the oven.
3 Next, renlove tile screw
located above tile door
near tile center of tile
oven that secures tile
light housing
4 Replace the screw.
Connect electrical power
to tile oven.
42
Page 43

Charcoal Filter
(on some models)
Reusable Grease Filters
(on all models)
The vent fan has 2 metal
reusaMe grease tilters.
Models that recirculate air
back into the room also use
a char(oal filter,
The metal fihers trap
grease released by t0ods on
the cooktop. They also
prevent flames tiom t0ods
on the cooktop t_'om
dama_,iw,- the inside ot the
microwave,
To remove, slide it to the
rear usim,- tile tab. l'ull it
do_? and (lilt,
To clean the grease filter,
soak it and then swish it
around in hot water and
detergent, l)on't use
anllnollia or allllJlOllia
products because they will
darken the metal.
For this reason, the filters
must ALWA\'S be in place
when the hood is used.
The grease filters should
be cleaned once a month,
or as needed.
Light brushing can be used
to remove embedded dirt.
Rinse, shake and let it (h)-
)etbre reDlaciw
To replace, slide the tilter
in the l_'ame slot on the
back of the opening. Pull
up and to the fl'ont to lock
into place.
43
Page 44

The Exhaust Feature
ii cannotbe cteaned.It i_
tnustbe replaced. Order
::p.. Nolweozxgss3
fromyour OEsupplier.
Remove 2 grille screws to
remove the grille.
If the model is not vented
to the outside, the air will
be recirculated through a
disposable charcoal filter
that helps remove smoke
and odors.
To remove tile charcoal
filter, disconnect power at
the main fllse or circuit
breaker panel or pull the
plug.
The charcoal filter should
be replaced when it is
noticeably dirty or dis-
colored (usually atter 6 to
12 months, depending, on
hood usage).
Remove tile top grille by
removing tile 2 screws that
hold it in place. Slide the
fiher towards the fl'ont of
the oven and renlove it.
To install a new iiher,
remove plastic and ()tiler
new fiher.
outer wrapping fl'orn tile
Insert tile filter into tile
top ()petting of tile over_ as
shown. It will rest at an
angle on 2 side support
tabs and in fl'ont ot the
right rear tab. Replace
the grille and 2 screws.
44
Page 45

Befi)re You Call For Service
Problem Possible Cause What to Do
Oven will not A fuse in your home
start may be blown or the
circuit breaker tripped.
Power surge.
Plug not fully inserted Make sure the 3-prorlg plug on tile
into wall outlet, oven is hdly inserted into wall omlet.
"PLEASE INSERT Probe has been • Insert the probe properly into the
PROBE" appears forgotten or not oven wall outlet.
on display inserted properly.
"SENSOR ERROR" •
appears on display
When using a Sensor
feature, the door was
opened before steam
• Replace fllse or reset circuit breaker
Unplug- tim microwave oven then Dluo
o .... _ f o
it back in.
I)o not open door until steam is
sensed and time is shown counting
down on d splax,
could be detected.
Steam was not detected
Use Time Cook to heat tk)rmore time.
in maximum amount of
time.
Floor of the oven is
warm, even when
the oven has not
been used
"BAD PROBE" The probe has not been • h>ert the probe properly into tlm
appears on display completely inserted into oven wall outlet.
The cooktop light is
located below the oven
floor. When the light
is on. the heat it
produces may make the
oven floor get warm.
the oven wall outlet.
The probe is defective. • Replace the probe.
• Tiffs is normal.
"LOCKED" appears The control has been • Press and lurid CI J_AR/( )FF ti)r
on display locked, al)out 3 seconds to unlock the control.
Food amount too Sensor Reheat is for • Else Time Cook tor large amounts
large for Sensor single servings of of ti)o(t.
Reheat recommended foods.
45
Page 46

Before You Call For Service
Problem Possible Cause What to Do
Youhear an You have tried to star!
unusual, low-tone the Reminder without
beep a valid time of day.
You have tried to start
the Auto Nile Light
without a valid time of
day entered for the
on-time and off-time.
You have tried to turn
the turntable on when
the probe is in use.
You have tried to change
the power level when it is
not allowed.
• Start over an(l enter a valid til-ne
of day
• Start over and enter a valid til-ne
of (tax.
• Tile turntable will not operate when
tile probe is in use.
• Man} of tile oven's features are preset
and cannot be changed.
48
Page 47

I.,I
• Steam or vapor escaping
trom around tile door.
• l.ight reflection around
door or outer case.
• Dimnlir_g oven light and
chanoe irl tile blower
SOl_llldat power levels
other than high.
• I)ull thunlping sound
while oven isoperating.
• TV-radio intertbrence
might be noticed while
using tile nlicrowave.
Sinlilar to the interterence
caused bv other snlall
appliances, it does not
indicate a problem with
tile microwave, l'lug tile
microwave into a ditterent
electrical circuit, move the
radio or TV as Par away
ti'onl tile nlicrowave as
possible, or check tile
position and signal of tile
TV/radio antenna.
47
Page 48

No te,_
48
Page 49

No te,_
49
Page 50

800.626.2000
We'U Be There/
()pen 24 hours ada}.
7 days a week.
800-GE-CARES
(800-432-2737)
800.626.2000
800-TDD-GEAC
(800-833-4322)
800-626-2224
We provide expert repair
service, scheduled at a
time that's convenient
tor you.
GE oflers Braille controls
tot a variety of GE
appliances, and a brochure
to assist in plato-ring a
barrier-ti'ee kitchen tor
persons with limited
mobility.
With a service contract GE
Consumer Service will still
be there aher your
warranty expires.
()ur t_lctor}_trained
technicians know your
appliance inside and out--
so most repairs can be
handled in just one visit.
With a multiple-year
contract, you're assured of
futtlre service at today's
prices.
5O
Page 51

800-626-2002
Individuals qualified
to servke their OWll
appliances can have
parts or accessories sent
directly to their home.
(VISA, MasterCard and
Discover cards are
accepted.)
If tot some reason you are
not happy with the service
you receive, here are steps
to tollow tot further help.
First contact the people
who serviced your
appliance. Explain why
you are not pleased.
Next, ffyou are still not
pleased, x_Titeall the
details-including
your phone number-to:
Customer Relations
GE Appliances
I_ouisville, KY 40225
Instructions contained
in this manual cover
procedures to be
performed by any user.
Other servicing generally
should be referred to
qualified service
personnel. Caution
must be exercised, since
improper servicing may
cause unsafe operation.
51
Page 52

Staple sales slip or _art_elled _heck here, P_vqf of offg4_al
pu _'chase date is rteeded to obta i _ sere ice u _der warm _ ty.
FULL ONE=YEAR WARBANTY
For one year fl'om date of original
pmthase, we will provide fl'ee of t barge,
parts and servi( e labor ill Your home it)
repair or replate a_l)'/_al'l oi #_e mio_owavt ,
OVg_l that fails ])ecatlse of a llia[ltl_acD.ii'itl_"
detect.
LIMITED ADDITH)NAL
2%72k_'oYEAR WARRA)VfY
For the sectmd thrtmgh the tenth }ear
from the date of original purchase, we
will provide, fl'ee of charge a replacement
mag_netr+mtub<,if tile magnetrotl tube tails
because ot a I)la_tlufactuFing defect. _ou
pay tor the service trip to your home and
service labor ch asges.
Warrantor is not responsible for consequential damages.
This warramv is extended to the original
purchaser and any succeeding owner lbr
products purchased lop ordinary home use
in tile 48 mainland states, Hawaii and
Washington, I).C. in Alaska the warramv is
the same except that it is IJMITEI) because
you must pay to ship tile product to tile
service shop or fop the servile tech nitian's
m_vel costs to }our home.
All warranty service will be provided by our
Factory Service Centers or b} our
authorized Customer Care" servicers
dm'it!g normal worki_lg h<mPS.
Should ?our appliance need service,
during warranty period or beyond, call
800-GE-CAR ES (800=i32-2737).
• Service trips to your home to teach you
how to use tile product.
Read your Owner's Manual. Ifyou then
have any questions about operating the
product, please contact your dealer or
our Customer Relations oflice at the
address below, or call, toll t_'ee:
GE Answer Center '_
800.626.2000
consumer inti)rmation service
• hnproper installation.
Some states do not allow ti!e exclusion or limitation of incidental or consequentia! damages, [
so the abo_e limitation o_ exc!usion may not appl} to you. This warranty gkes you specitic lega! [
rights, and you may als 0 hm e other rights which _'mYti'om state to state. To kno_ 5dmt your [
legal rights are in your si!!e, consult you r !oca! 0 r state c!msmner atthirs o!!ice _r y_mr statels [
Attorney General. [
Warrantor:G_,wralEleetricCompany Iffurtl_,rhelpisneededconconingthiswarran_,_ite:
[ Manag_w-CustonwrRelations, GEAppliances, Louisville, KY40225 [
If you have an installation problenl, contact
your dealer or installer. You are responsible
tor providing adequate electrical,
exhausting and other connecting thcilities.
• Replacement of house ftlses or resettino
ot cirt_lit breakers.
• l_'ailure of the product itit is misused, or
used ti)r other than the intended purpose
or used commercially.
• l)amage to product caused by accident,
fire, floods or acts of God.
Printed in Korea
 Loading...