

Page 1
ge.com
Safety Im_ructions .... '2-4
Operating Iratructions
Clock and Timer ....... 10
Controls .............. 6, 7
Oven ................. 8, 9
Power Outage ........... 7
Sabbath Feature ..... 11, 12
Special Features ........ 11
Surface Units ............ 5
Thermostat ............ 12
Care and Cleaning
Control I_lobs ......... 13
Drip Pans .............. 17
Heating Elements ....... 13
i,ift-Off Oven Door ..... 15
i Jft-Up Cooktop ........ 17
i,ight .................. 16
Oven Interior .......... 15
Shelves ................ 14
Storage Drawer ......... 16
Surface Units .......... 17
Vent .................. 14
Troubleshooting
Tips .............. 18, 19
Iss2s
Accessories. ........... 20
Consumer Support
(_OllSunler
Support ....... Back Cover
Product
Re_stration ........ 21, 22
Warranty .............. 23
Write the model and serial
numbers here:
Model #
Serial #
You can find them on a label
behind the storage drawer on
the front of the range frame.
49-80533 04-08 JR
Page 2
IMPORTANTSAFETYINFORMATION.
READALLINSTRUCTIONSBEFOREUSING.
WARNING!
For your safety, the information in this manual must be followed to minimize the risk of fire, electric
shock, or to prevent property damage, personal injury, or loss of life.
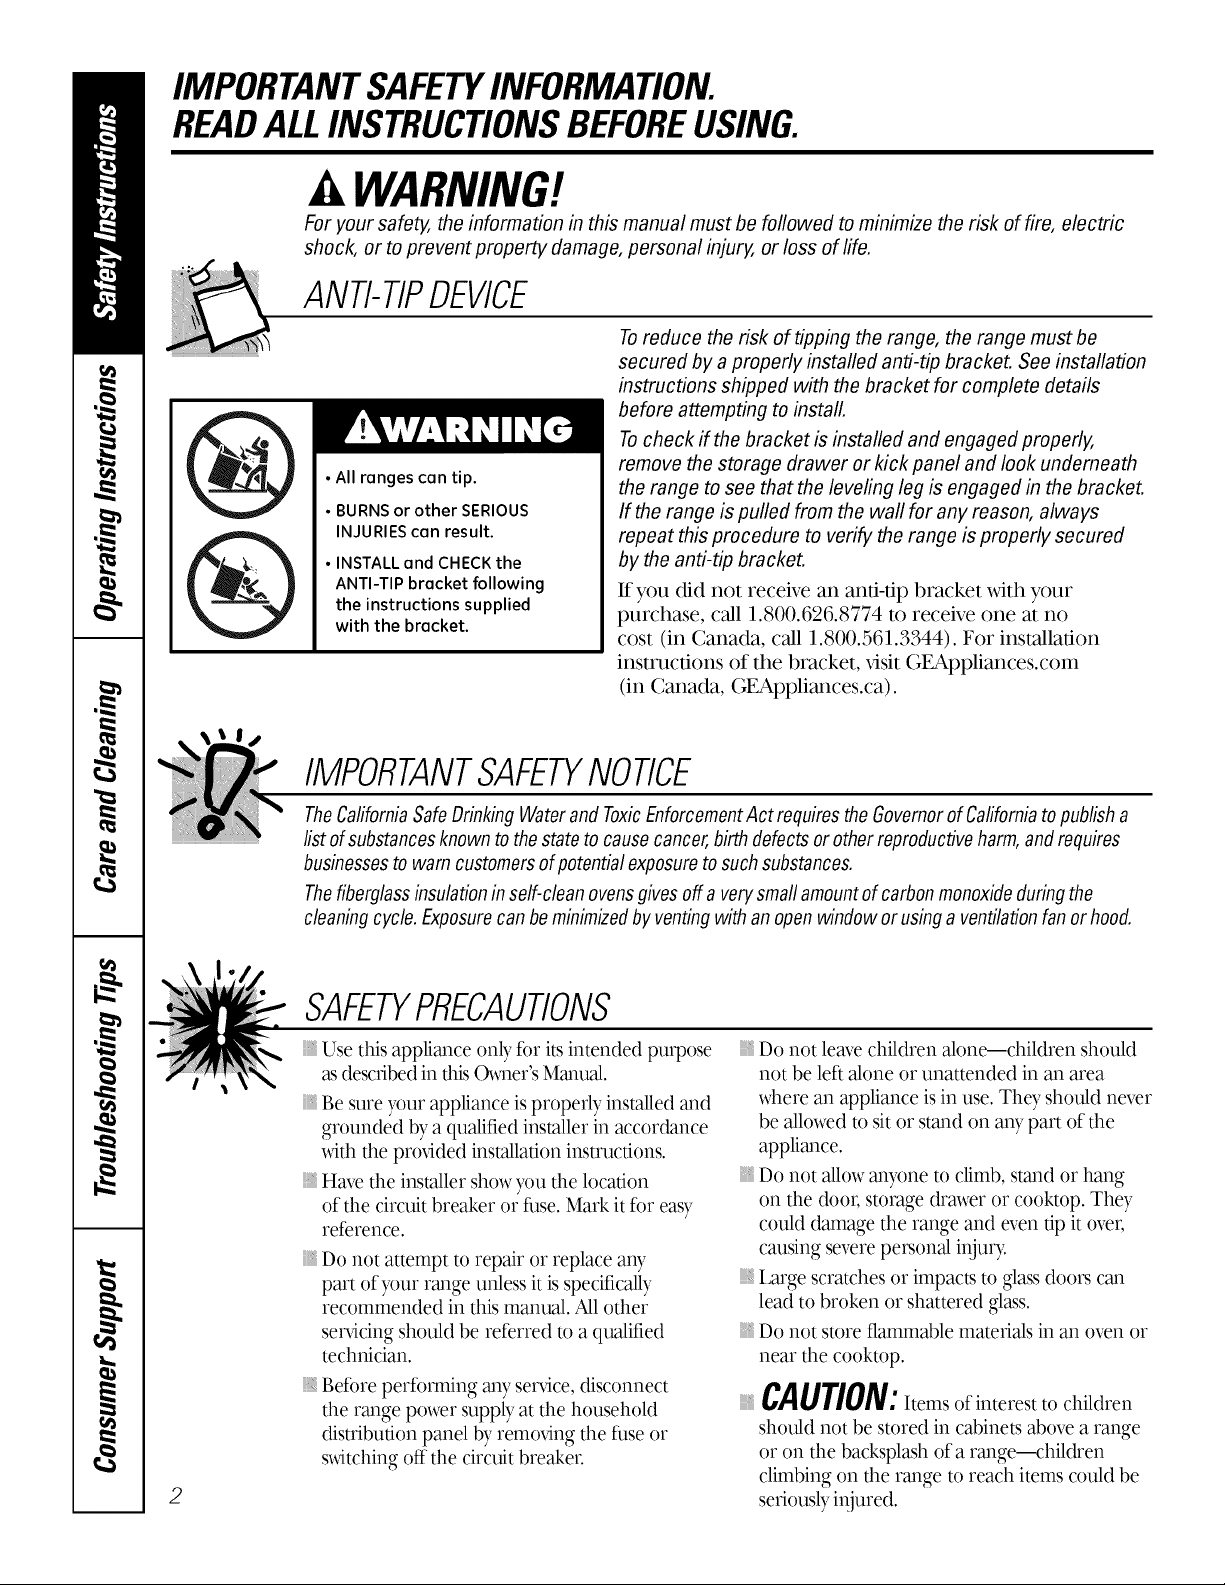
ANti-TIPDEVICE
Toreduce the risk of tipping the range, the range must be
secured by a properly installed anti-tip bracket. See installation
instructions shipped with the bracket for complete details
before attempting to install.
Tocheck if the bracket is installed and engaged properly,
• All ranges can tip.
• BURNS or other SERIOUS
INJURIES can result.
• INSTALL and CHECK the
ANTI-TIP bracket following
the instructions supplied
with the bracket.
remove the storage drawer or kick panel and look underneath
the range to see that the leveling leg is engaged in the bracket.
If the range is pulled from the wall for any reason, always
repeat this procedure to verify the range is properly secured
by the anti-tip bracket.
If you did not receive an anfi-dp bracket with your
purchase, call 1.800.626.8774 to receive one at no
cost (in Canada, call 1.800.561.3344). For installation
instructions of the bracket, x,isit GEAppliances.com
(in Canada, GEAppliances.ca).
IMPORTANTSAFETYNOtiCE
TheCaliforniaSafeDrinkingWaterand ToxicEnforcementAct requiresthe GovernorofCaliforniatopublisha
list of substancesknown to the state to causecancer,birth defectsor otherreproductiveharm,andrequires
businessesto warncustomersof potentialexposuretosuchsubstances.
Thefiberglassinsulationinself-cleanovensgives off a verysmaflamountof carbonmonoxideduringthe
cleaningcycle.Exposurecanbe minimizedbyventingwithan openwindow or usinga ventilationfanorhood.
SAFETYPRECAUtiONS
Use this appliance only fbr its intended purpose
as described in this Owner's Manual.
Be sure your appliance is properly installed and
grounded by a qualified installer in accor¢'tance
with the prtMded installation instructions.
Have the installer show you the location
of the circuit breaker or fhse. Mark it for easy
reference.
Do not attempt to repair or replace any
part of your range unless it is specifically
recommended in this manual. All other
ser_4cing should be referred to a qualified
technician.
geff)re perff)mdng an), serxdce,disconnect
the range power supply at the household
distribution panel by remodng the fhse or
s_dtching off the circuit breaker.
2
Do not leave children alone---children should
not be left alone or unattended in an area
where an appliance is in use. The), should never
be allowed to sit or stand on any part of the
appliance.
Do not allow anyone to climb, stand or hang
on the doo_; storage drmver or cooktop. They
could damage the range and even tip it over,
causing severe personal injur>
Large scratches or impacts to gla_s doors can
lead to broken or shattered glass.
Do not store flammable materials in an oven or
near the cooktop.
CAUTION: temsofinterestto chiMren
should not be stored in cabinets above a range
or on the back@ash of a range--children
climbing on the range to reach items could be
seriously injured.
Page 3
A WARNING!
SAFETYPRECAUTIONS
ge.com
}}14Neverwearloose-fittingor hanging gamlents while
usingtileappliance.Be carefftlwhen reaching fbr
itemsstored overfilerange. Hammablematerial
couldbe ignited ifbrought in contact_dthhot
surfaceunits or heating elementsand maycause
severebums.
Use only d U pot holders--moist or ¢_np pot
holders on hot surfaces may result ill bums fi'om
steam. Do not let pot holders touch hot surface
units or heating dements. Do not u_
a towel or ()tiler bulky doth in place of pot holders.
For your safel3_never use your appliance for
wamdng or heating file room.
Teach children not to play _dth tile controls or any
()filer part of tile range.
:_Alwass keep dish towels, dish doff/s, pot holders
and ()tiler linens a safe distance fiom your range.
_,Alwass keep x_s)odenand plastic utensils and
canned ff)od a s_e dis_/ce fi_m >)ur range.
_Alwass keep combustible wallcoverings, curtains or
drapm as'afedistance flom >)ur range.
Do not let cooking _ease or ()tiler flammable
materials accumulate in or near tile range.
Keep tile hood and _ease filters dean to maintain
good venting and to avoid _ease files.
Do not use water on gease fires. Never pick up a
flaming pan. Turn tile controls off: Smother a
ranting pan on a surface unit by covering file pan
completely xdflla well-fitting lid, cookie sheet or flat
tmS_Use a multi-purpom dU chemical or if)am-
_pe fire exting-uisher.
Flanfing grease outside a pan car/be put out t)5'
covering it x_itt/baking so_h or, ffm_ilable, t)5,using
a multi-purposedU chelxtical or
fbanr-gpe file extinguisher
Fhme in die oven can be smothered completelyt)5'
dosing the oven door and turning file oven offor
t)5'using a multi-purpose d U chentical or fbam-_pe
file extinguisher
Do not touch file surface m/its, file heating
elements or the interior surface of the oven. These
surfaces may be hot enough to burn even though
fl/eyare _'larkin color. During and after use, do not
touch, or let dotting or other flammable materials
conLactthe smfhce units, areas nearby file surface
units or any interior area of the oven; allow
suffident time for cooling first.
Potentially hot surfaces include the cooktop, areas
facing file cooktop, oven vent opening, surfaces
near the opening, crex,icesaround the oven &)or
RE/I/IE/I/IBER:The inside surface of die oven may be
hot when the door is opened.
Do not store or use combttstible materials, gasoline
or ()filer flammable xapors and liqukls ill tile
x,icinilyof this or any ()tiler appliance.
COOKMEATANDPOULTRYTHOROUGHLY...
Cookmeatandpoultrythoroughly--meattoat leastanINTERNALtemperatureof 160°Fandpoultrytoatleastan
INTERNALtemperatureof 180°ECookingtothesetemperaturesusuallyprotectsagainstfoodbomeillness,
SURFACECOOKINGUNITS
Useproperpansize--select cookwarehavingflat bottomslargeenoughto cover thesurfaceunitheating
element.Theuseofundersizedcookwarewill exposea portionof the surface unit to direct contactandmay
resultin ignitionof clothing.Properrelationshipof cookwareto surfaceunitwill alsoimproveefficiency.
Never leave the surface units unattended
at high heat settings, goilovers cause smoking
and greasy spillovers that may catch on fire.
Do not use aluminum foil to line the drip pans
or anywhere in the oven except as described in
this manual. Misuse could result in a shock, fire
hazard or damage to the range.
Be sure the drip pans and the vent duct are not
covered and are in place. Their absence during
cooking could damage range parts and xdring.
Only certain types of glass, glass/ceramic,
earthem_are or other glazed containers are
suitable for cooktop service; others may break
because of the sudden change in temperature.
To minimize the possibility of burns, ignition of
flammable materials and spillage, the handle of
a container should be turned toward the center
of the range xdthout extending over nearby
surface units.
}}14Ahvays turn the surface units off before 3
removing cookware.
Page 4
IMPORTANTSAFETYINFORMATION.
READALLINSTRUCTIONSBEFOREUSING.
SURFACECOOKINGUNITS(cont.)
iiiiiiiiiiiii!Do not immerse or soak the removable
surf.ace units. Do not put them in a
dishwasher
When preparing flaming foods under
the hood, turn the fan on.
To avoid the possibility of a burn or
electric shock, always be certain that the
controls fk)r 'all surface units are at the
OFFposition and all coils are cool befk)re
attempting to lift or remove a unit.
Clean the cooktop with caution. If a wet
sponge is used to wipe spills on a hot
cookmp, be careful m avoid steam burns.
Keep an eye on foods being flied at high
or medium high heat settings.
Foods for flying should be as dU as
possible. Frost on flozen foods or moisture
on flesh fk)ods can cause hot f.at to bubble
up and over the sides of the pan.
Use little fat f_r elfective shallow or deep
fat flying. Filling the pan too full of f.at can
cause spillovers when fk)od is added.
If a combination of oils or f.ats will be used
in flTing, stir together before heating, or as
fats melt slowly.
Always heat fat slowly, and watch as it heats.
Use a deep f.at thermometer whenever
possible to prevent overheating f.at beyond
the smoking point.
WARNING!
OVEN
Stand away from the range when opening the oven door. Hot air or steam which escapes can cause
bums to hands, face and/or eyes.
Do not heat unopened food containers.
Pressure could build up and the container
could burst, causing an in,ju U.
Keep the oven vent unobstructed.
Keep the oven flee flom _ease buildup.
Place the oven shelf in the desired position
while the oven is cool. If shelves must be
handled when hot, do not let pot holder
contact the heating elements.
Pulling out the shelf m the stop-lock is a
convenience in lifting hea\ T foods. It is 'also
a precaution against burns flom touching
hot surf.aces of the door or oven walls.
When using cooking or roasting bags
in the oven, follow the manuf.acturer's
directions.
Do not use the oven to dry newspapers.
ff overheated, they can catch on fire.
Do not use the oven fi)r a storage area.
Items stored in an oven can ignim.
Do not leave paper products, cooking
utensils or f_od in the oven when not
in use.
Do not use aluminum fk_il to line
oven bottoms. Improper installation
of aluminum foil may result in a risk
of electric shock or fire.
READANDFOLLOWTHISSAFETYINFORMATIONCAREFULLY.
SAVETHESEINSTRUCTIONS
4
Page 5
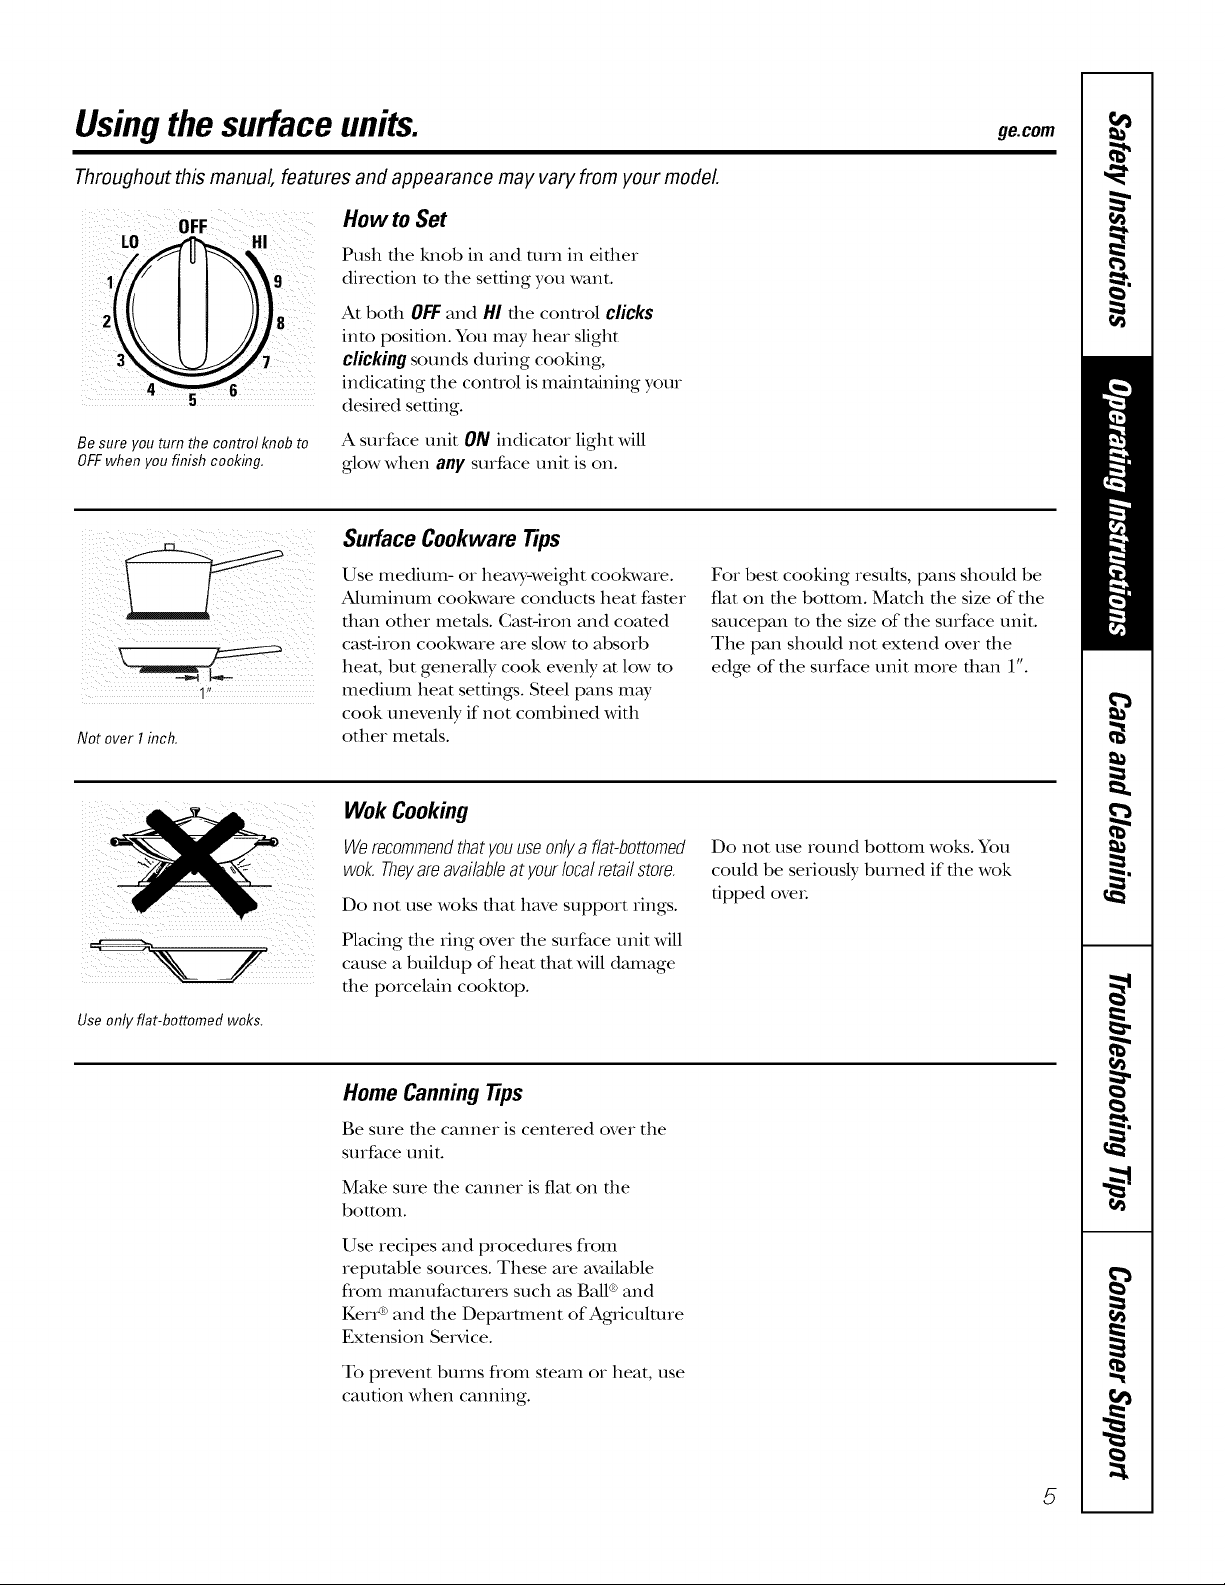
Usingthesurface units, geoom
Throughout this manual, features and appearance may vary from your model
How to Set
Push tile Mlob in and ulrn in ekher
i /1 9
Be sure you turn the control knob to
OFFwhen you finish cooking.
direction to the setting you want.
At bodl OFFand HI tile control clicks
into position. You may hear slight
clickingsounds dudng cooking,
indicating the control is maintaining your
desired setting.
A surface unit ON indicator light will
glow when any surface unit is on.
Surface Cookware Tips
¸1¸"¸¸¸
Not over I inch.
Use only flat-bottomed woks.
Use medium- or heavy-weight cookware.
Aluminum cookware conducts heat faster
than other metals. Gast-iron and coated
cast-iron cookware are slow to absorb
heat, but generally cook evenly at low to
medium heat settings. Steel pans may
cook unevenly if not combined with
other met_fls.
Wok Cooking
Werecommendthat youuseonly a flat-bottomed
wok. Theyareavailableat yourlocalretail store.
Do not use woks dlat have support rings.
Placing tlle ring over the surface unit will
cause a buildup of heat that will damage
tile porcelain cookmp.
Home Canning Tips
Be sure tile canner is centered over the
surface unit.
For best cooking results, pans should be
fiat on the bottom. Match the size of the
saucepan m the size of the surface unit.
The pan should not exmnd over the
edge of the surface unit more than 1".
Do not use round bottom woks. You
could be seriously burned if tile wok
tipped ove_.
Make sure tile canner is fiat on tile
bottom.
Use recipes and procedures flom
reputable sources. These are available
flom manufacturers such as Ball ®and
KerI _ and the Deparunent of Agriculture
Exmnsion Se_Mce.
To prevent burns flom steam or heat, use
caution when canning.
5
Page 6
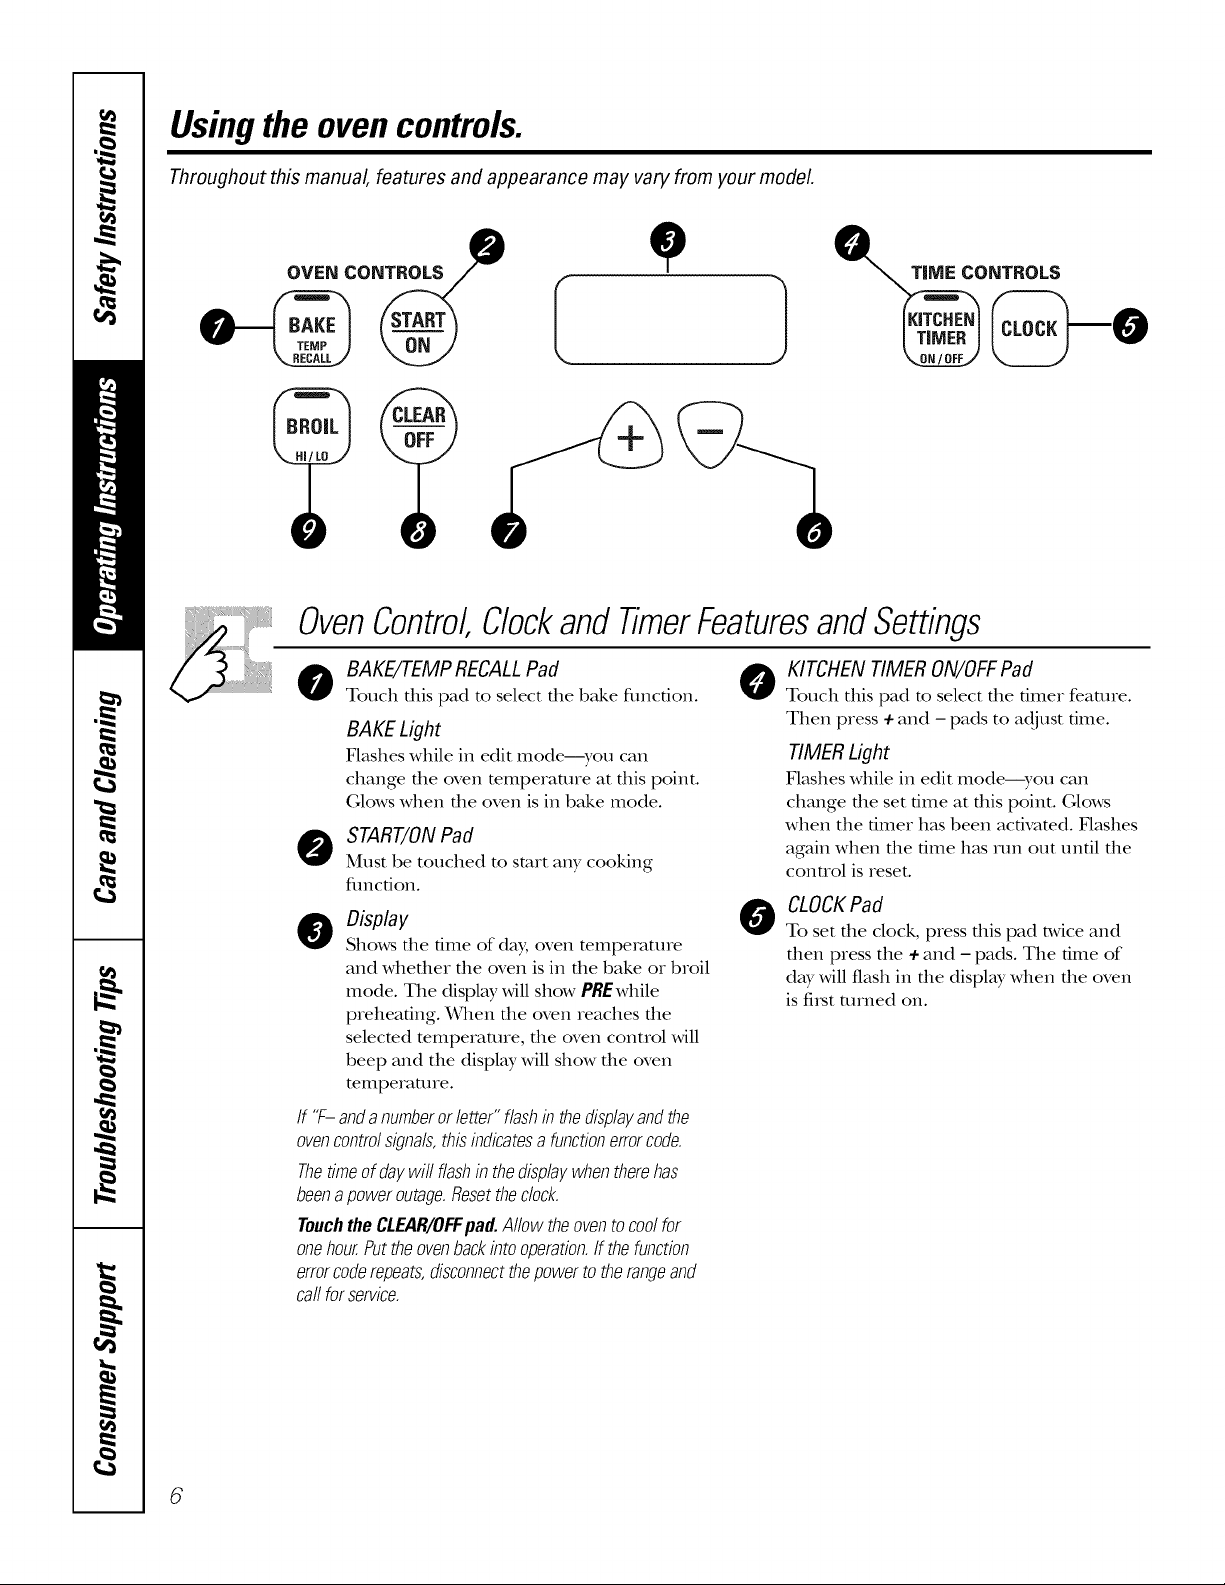
Usingtheoven controls.
Throughout this manual, features and appearance may varyfrom your model
OVEN CONTROLS e
OvenControl Clockand TimerFeaturesandSettings
o BAKE/TEMP RECALLPad 0
Touch this pad to select the bake fimcfion.
BAKE Light
Flashes while in edit mode---you can
change the oven temperature at this point.
Glows when the oven is in bake mode.
O START/ONPad
Must be touched to start any cooking
flmcdon.
0 Display
Shows file dine of day, oven tempe_mre
and whefller file oven is in file bake or broil
mode. The displ W will show PREwhile
preheating. When file oven reaches file
selected temperature, file oven connol will
beep and the display Mll show file oven
temperature.
If "F-andanumberor letter"flashin thedisplayandthe
ovencontrolsignals,thisindicatesa functionerrorcode.
Thetimeofdaywit flashin thedisplaywhentherehas
beenapoweroutage.Resettheclock.
TouchtheCLEAR/OFFpad.Allowtheoventocoolfor
onehour.Puttheovenbackintooperation.If thefunction
errorcoderepeats,disconnectthepowertotherangeand
ca//forservice.
KITCHEN TIMER ON/OFFPad
Touch this pad to select the timer feature.
Then press + and - pads to adjust time.
TIMER Light
Flashes while in edit mode--you can
change the set time at this point. Glows
when the timer has been activated. Flashes
again when the time has run out until the
control is reset.
CLOCKPad
0
To set file clock, press tiffs pad n,vice and
fllen press the + and - pads. The time of
day will flash in die display when file oven
is fi_st turned on.
6
Page 7
OvenControl Clockand TimerFeaturesandSettings
ge.com
- Pad
Short taps to this pad will decrease the time
or temperature by smaU amounts. Touch
and hold the pad to decrease the time or
temperature by larger amounts.
O +Pad
Short taps to dfis pad will incre_tse die time
or mmpemmre by smaU amounts. Touch
and hold the pad to increase the time or
temperature by larger amounts.
Power Outage
If aflashingtimeisinthedisplay,youhave
experiencedapowerfailure.Resetthedock.
o LEAR/OFFPad
Touch this pad to cancel ALLoven
operations except the clock and fimeL
o BROILHI/LO Pad
Touch this pad to select the broil function.
BROILLight
Flashes while in edit mode--you can s_dtch
from HIto LOBROILat this point. (;lo_ \allen
the oven is in broil mode.
To reset the clock, touch the CLOCKpad.
Enter the correct time of day by touching
the + or - pads. Touch the START/ON pad.
Page 8

Usingtheoven.
Toavoid possible bums, place the shelves in the desired position before you turn the oven on.
Before you begin...
The oven has 7 shelf positions.
The sheNes have stop-locks, so that when
placed correctly on the shelf supports (A
through G), they willstop before coming
complemly out, and will not flit.
When placing and removing cookware,
pull the shelf out m the bump on the
shelf support.
Toremovea shelf,pull it toward you, flit
the front end up and pull it out.
TOreplace, place the end of the shelf
(stop-locks) on the support, flit up the
CAUTION:Whenyouareusingthe
shelfinthelowestposition(A),youwillneedto
usecautionwhenpuffingtheshelfout.We
recommendthatyoupulltheshelfoutseveral
inchesandthen,usingtwopotholders,pull the
shelfoutbyholdingthesidesof it. Theshelfis
lowandyoucouldbeburnedifyouplaceyour
handin themiddleoftheshelfandpullall the
wayout.Beverycarefulnottoburnyourhand
onthedoorwhenusingtheshelfin thelowest
position(A).
front and push the shelf in.
How to Set the Oven for Baking or Roasting
Yourovenis notdesignedfor open-doorcooking. _]
[] Touch the BAKEpad.
[_] Touch the + or-pads until the
desired temperature is displayed.
[] Touch the START/ONpad.
The oven willstmt automafi_dl): The display
willshow PREwhilepIeheafing. _]len the
oven Ieachm die selecmd tempemmIe, die
oven conuol willbeep severalflmes mid die
displaywillshow die o_en mmpemture.
TochangetheoventemperatureduringBAKE
Type of Food Shelf Position
Frozenpies(oncookiesheet) CorD
Angelfoodcake A
Bundtorpoundcakes BorC
Biscuits,muffins,brownies, CorD
cookies,cupcakes,
layercakes,pies
Casseroles CorD
cycle,touchtheBAKEpadandthenthe+ or-
padstogetthenewtemperature.
Turkey A
Touch the CLEAR/OFFpad when
baking is finished and then remove
the food flom the oven.
Center baking pans in the oven.
8
[_] Check.food for donene._ at minimum
nine on redpe. (kK_k longer if nec_uy.
Preheating and Pan Placement
Preheat the oven if die recipe cMls for it.
Preheating is necessary for good results
when baking cakes, cookies, pastry and
breads.
TheDisplaywillshow"PRE"whilepreheating.
Whentheovenreachestheselectedtemperature,
theovencontrolwill beepandthedisplaywill
showtheoventemperature.
Aluminum Foil
Donotusealuminumfoilonthebottom
of theoven.
Never enflrely cover a shelfwifli
ahlminum foil. This will disturb the heat
circulaflon and result in poor baking.
Baking results will be better if baking
pans are cenmred in die oven as much
as possible. If baking with more than one
pan, place the pans so each has at least
1 m 1½" of air space around it. If baking
four cake layers at the same flme, place
two 1wets on rack B and two 1wets on
rock D. Stagger pans on the rack so one
is not directly above the ethel
A smaller sheet of foil may be used to
catch a spillover by placing it on a lower
shelf several inches below the food.
Page 9

ge.com
How to Set the Oven for Broiling--Close the oven door
!
Z] Place the meat or fish on a broiler
grid in a broiler pan designed
for broiling.
Use LOBroil to cook foods such as
poultry or thick cuts of meat thoroughly
without ove_q)rowning them.
Theoven door must be closed
during broiling.
The size, weight, thickness,
stuffing temperature
and your preference
of doneness will aff>ct
broiling times. This guide
is based on meats at
refligerator temperature.
I' The {LS. De[mrhne_t q/
Agriculhm, so's 'Wmv b_'q/is
pokulm; but you skouhl k_ow that
co&ing it to o_6' 140 P means
some /bod poi_oni_g" o_g'anisms
mO' survive. " (Sourc_v _b I4,od
Book. _bur Kitche_ Gui&'. { %DA
t'_-v.,/u_e 1985.)
[] Follow suggested shelf positions in
the Broiling Guide.
r-_ The oven door mustbe closed
during broiling.
If yourrangeisconnectedto208volts,raresteaks
maybebroiledbypreheatingthebroilerand
positioningtheovenshelfonepositionhigher.
Broiling Guide
Shelf*
Position
E
E
E
D
D
D
C
C
B
E
D
D
D
Food
GroundBeef
Well Done
Beef Steaks
Rarer
Medium
Well Done
Rarer
Medium
Well Done
Chicken Breasts
LobsterTails
Fish Fillets
Pork Chops
Well Done
SahnonSteaks
Salmon Fillets
Quantityand/
orThickness
1 lb.(4 patties
IZto ¾" thick)
1" thick
1to 1V2Ibs.
1W' thick
2to 272Ibs.
BoneIn
Boneless
2-4
lOto 12oz.each
IAto Z" thick
2(IZ" thick)
2(1" thick)about 1 lb.
2(1" thick)
2(IZto 1" thick)
[] Touch the BROILHI/I.Opad once
for HI Broil.
To change to I,O Broil, touch the
BROILHI/LOpad again.
Touch the START/ONpad.
@
_rhen broiling is finished, touch the
%
CLEAR/OFFpad.
FirstSide
Time(rain.)
9-11
7-9
10-12
12-14
12-14
17-19
19-21
25-30
18-20
25-30
6-8
6-8
13-15
10-12
25-27
SecondSide
Time(rain.)
5-7
7-9
8-10
9-11
8-10
13-15
15-17
8-10
10-15
Donot
turn
oveL
4-6
3-5
6-8
8-10
Donotturn oven
Comments
Spaceevenly.Upto
8 pattiestake about
thesametime.
Steakslessthan 1"
thick cookthrough
beforebrowning.
Panfryingis
recommended.
Slashfat at edges.
Broilskin-side-down
first.
Cutthroughbackof
shell. Spreadopen.
Handleandturnvery
carefully.
Slashfat at edges.
Greasepan.
Placeskin-side-down.
Theoven has 7shelf positions.
*See illustration for description of shelf positions.
9
Page 10

Usingthe clock and timer.
Not all features are on all models.
To Set the Clock
[Z] Touch the CLOCKpad twice.
[] Touch the + or - pads.
If file 4-or - pads are not touched wifllin
one minum after you much file CLOCK
pad, tile displ W reverts m tile original
setting. If this happens, much the CLOCK
pad twice and reenter tile time of day.
r3] Touch tile START/ONpad until tile
time of day shows ill tile display: This
enters file time and starts file clock.
To Turn Off the Clock Display
If you have several clocks ill your kitchen,
you may wish to turn off tile time of day
clock display on your range.
[Z] Touch tile CLOCKpad once to turn
off tile time of day display: Although
you will not be able to see it, tile
To Set the Timer
Tocheckthetimeofdaywhenthedisplayis
showingotherinformation,simplytouchthe
CLOCKpad.Thetimeofdayshowsuntilanother
padistouched.
clock maintains tile correct time
of day:
Touch tile CLOCKpad twice to recall
[]
tile clock display.
TheCLEAR/OFFpad does not affect
the timer.
7O
Thetimerdoesnotcontrolovenoperations.
Themaximumsettingonthetimeris9 hours
and59minutes.
Touch tile KITCHENTIMERON/OFF
%
pad.
Touch tile 4-or-pads until tile
alnount of time you want shows in
tile display. Tile maximum time that
call be entered ill minutes is 59.
Thnes more than 59 minums should
be changed m hours and minums.
To Reset the Timer
If file display is sdll showing file time
remaining, you may change it by touching
tile KITCHEN TIMER ON/OFF pad, then
touching the 4-or - pads until tile time
you want appea_s in the displw:
To Cancel the Timer
Touch tile KITCHENTIMERON/OFF
pad twice.
Ifyoumakea mistake,touchtheKITCHEN
TIMERON/OFFpadandbeginagain.
Touch tile START/ONpad. Tile time
%
will start counting down, although
tile display does not change until
one minute has passed.
x_qlen tile timer reaches .'0/7,tile
control will beep 3 times followed by
one beep every 6 seconds until tile
KITCHENTIMERON/OFFpad is
touched.
If file remaining time is not ill file display,
recall it by touching file KITCHEN TIMER
ON/OFFpad and then touching tile 4- or -
pads to enter tile new dine you want.
Page 11

Special featuresofyourovencontrol ge.oom
Yournew touch pad control has additional features that you may choose to use. Thefollowing are the features and
how you may activate them.
Thespecial feature modes can only be activated while the display is showing the time of day. They remain in the
control's memory until the steps are repeated.
When the display shows your choice, touch the START/ONpad. Thespecial features will remain in memory after
a power failure.
NOTE: The Sabbath feature and the Thermostat Adjustment feature are also Special Features, but they are addressed
separately in the following sections.
12 Hour Shut-Off
Touch the CLOCKpad. The display
will show ON(12 hour shut-off).
Touch the CLOCKpad repeatedly
until the display shows OFF(no
shut-off).
Touch the START/ON pad to activate
the no shut-off and leave the control
set in this special features mode.
ii i i i iii!iiI
Withthisfeature,shouldyouforgetandleavethe _-]
ovenon,thecontrolwillautomaticallyturnoffthe
ovenafter 12hoursduringbakingfunctionsorafter
3 hoursduringabroilfunction.
If you wish to mrn OFFthis feature, follow
the steps below, r-_
[7] Touch the BAKEand BROILHI/tO
padsat the _mle time for 3seconds
until the display shows SE
Usingthe SabbathFeature.(onsomemodels)
(Designed for use on the Jewish Sabbath and Holidays)
The Sabbath feature can be used for baking/roasting only. It cannot be used for broiling.
NOTE: The oven light comes on automatically (on some models) when the door is opened and goes off when the
door is closed. Thebulb may be removed. See the Oven Light Replacement section. Onmodels with a light switch
on the control panel, the oven light may be turned on and left on.
How to Set for Baking/Roasting
@+@
@
%
When the display shows D the
oven is set in Sabbath. When the
display shows D C the oven is
baking/roasting.
NOTE:Tounderstandhowtheovencontrol
works,practiceusingregularbaking(non-Sabbath)
beforeenteringSabbathmode.
Makesurethedockshowsthecorrecttime
ofdayandtheovenis off.
Touch and hoM boththe BAKEand
BROILHI/tO pads, atthesametime,
until the display shows SE
[] Tap the CLOCKpad tlllfil SAb
appeaxs in the display:
[] Touch the START/ONpad and D will
appear in the displw:
[-_ Touch the BAKEpad. No sigmalwill
be given.
[_ The preset starting temperature will
automatically be set to 350. ° Tap the
4-or - pads to increase or decrease
file temperature in 25 ° increments.
The temperature can be set between
170° and 550. ° No sigmal or
temperature will be gdven.
Touch the START/ONpad.
%
AtYer a random delay period of
approximately 30 seconds to 1
minute, D C will appear in the
display indicating that the oven is
baking/roasting. If D C doesn't
appear in the display, start again
at Stop 4.
To adjust the oven mmperamre, touch
the BAKEpad and mp the 4-or - pads m
increase or decrease the temperature in
25 ° increments. Touch the START/ONpad.
NOTE:The CLEAR/OFFand COOKING TIME
pads are active during the S_fl)bath feature.
To exit Sabbath feature, see next page.
11
Page 12

Usingthe SabbathFeature.
(Designed for use on the Jewish Sabbath and Hofidays) (on some models)
How to Exit the Sabbath Feature
Touch the CLEAB/OFFpad.
%
If the oven is cooking, wait
[]
for a random delay period of
approximamly 30 seconds m
1 minum, until only D is in the
display.
Touch and heM both the BAKE and
%
BROILHI/LO pads, at the same time,
until the display shows SE
Adjust the oven thermostat--Do it yourself/.
Youmay find that your new oven cooks differently than the oneit replaced. Use your new oven for a few
weeks to become more familiar with it. If you still think your new oven is too hater too cold, you can adjust
the thermostat yourself.
[_] Tap the CLOCK pad un61 ONor OFF
appeaas in the display: ON indicates
that the oven will automatically mrn
offJter 12 hems. 0FFindicams that
the oven will not automatically man
off: See the SpecialFeaturessection
for an explanation of the 12Hour
Shut-Offfeature.
[_] Touch the START/ONpad.
NOTE:If apower outageoccurredwhile the oven
wasinSabbath,theovenwi// automaticallyturn
offandstayoffevenwhenthepowerreturns.
Theovencontrolmustbereset.
Do not use thermometers, such as those found in grocery stores, to check the temperature setting of your oven.
These thermometers may vary 20-40 degrees.
NOTE: Thisadjustment will not affect the broiling temperatures. The adjustment will be retained in memory after
a power failure.
To Adjust the Thermostat
[] Touch the BAKE and BROILHI/LO _-_
pads at the same time for 2 seconds
until the display shows SF.
Touch the BAKEpad. A two-digit
number shows in the display.
The oven temperature can be
%
adjusted tap to (+) 35°F hotter or (-)
35°F cooleL Touch the + pad to
increase the temperature in 1-degree
increnlents.
Touch the - pad to decrease the
temperature in 1-degree increnlents.
X_qlenyou have made the
adjusunent, touch the START/ONpad
to go back to the time of day display:
Use your oven as you would
nornmll):
NOTE:Thisadjustmentwill notaffectthebroiling
temperatures.It willberetainedinmemoryafter
apowerfailure.
Thetypeofmargarine will affect bakingperformance!
Most recipes for baking have been developed using high-fat products such as butter or margarine (80% fat). If you
decrease the fat, the recipe may not give the same results as with a higher-fat product.
Recipe failure can result ff cakes, pies, pastries, cookies or candies are made with low-fat spreads. Thelower the fat
content of a spread product, the more noticeable these differences become.
Federal standards require products labeled "margarine" m contain at least 80% fat by weight. Low-fat spreads,
on the other hand, contain less fat and more WamL The high moisture conmnt of these spreads affects the
mxture and flavor of baked goods. For best results with your old favoaim recipes, use margarine, butter or
stick spreads containing at least 70% vegetable oil.
72
Page 13

Careand cleaning ofthe range, g,oom
Be sure all controls are off and all surfaces are cool before cleaning any part of the range.
If your range is removed for cleaning, servicing or any reason, be sure the anti-tip
device is re-engaged properly when the range is replaced. Failure to take this
precaution could result in tipping of the range and cause injury.
How to Remove Protective Shipping Film and Packaging Tape
Groove Stem
Molded rib
Careflllly grasp a corner of the protective
shipping fihn widl your finge_ and slowly
peel it from the appliance surfi_ce. Do
IIOt use any shaIp items to remove file
fihn. Remove aU of the film before using
the appliance for the first time.
Control Knobs
Thecontrolknobsmayberemovedforeasier
cleaning.
Make sure tile knobs are in tile OFF
positions and pull diem straight off the
stems for cleaning.
Control Panel
To assure no damage is done m file
finish of the product, file safest way to
remove the adhesNe flom packaging tape
on new appliances is an application of a
household liquid dishwashing demrgent.
Apply with a soft cloth and allow m soak.
NOTE:Theadhesivemustberemovedfromall
parts.Itcannotberemovedif it is bakedon.
The knobs can be cleaned in a
dishwasher or flley may also be washed
Mill soap and wateL Make sure file insides
of file knobs are dry before replacing.
Replace tile knobs in tile OFFposition
to ensure proper placement.
It's a good idea to Mpe die conuol panel
after each use of die oven. Use a damp
clod1 to clean or rinse. For cleaning, use
mild soap and water or a 50/50 solution
of vinegar and wateL For rinsing, use
clean wamL Polish d_y with a soft cloth.
Oven Heating Elements
Donotcleanthebakeelementor thebroil
element.Anysoftwill bumoff whenthe
elementsareheated.
Do not use abrasNe cleansers, strong
liquid cleaners, plastic scouring pads or
oven cleaners on the conuol panel--
they will damage the finish.
To clean tile oven floor, gently lift
tile bake element. Clean widl warn1
soap), wateL
13
Page 14

Careand cleaning ofthe range.
Oven Shelves
Glean file oven shelves Mill an abrasive
cleanser or scouring pad. M_er cleaning,
rinse the sheNes Mth clean water and dry
with a clean cloth.
Porcelain Enamel Cooktop
The porcelain enamel finish is sturdy but
breakable if misused. This finish is aci&
resistant. Howevei, any acidic foods
spilled (such as fruit juices, tomato or
vinegar) should not be permitmd to
remain on the finish.
Painted Surfaces
Painted surfaces include the sides and
the d_m,ver flont.
Glean these with soap and wamr or
a vinegar and wamr solution.
To make the sheh'es slide more easily,
apply a smaU amount of vegetable oil
m a paper towel and wipe the edges of
the oven sheh'es with the paper towel.
Do not spIW with Pmn®or other
lubricant sprays.
If acids spill on file cookmp while it is
hot, use a dry paper towel or doff1 m
wipe it up right away. When the surface
has cooled, wash with soap and wamL
Rinse well.
For other spills such as fat spatte_ings,
w_tshwith soap and water or cleansing
powde,s after the surface has cooled.
Rinse well. Polish with a d_T cloth.
Do not use commerciM oven cleaners,
cleaning powders, steel wool or hmsh
abrasives on any pMnted surface.
14
Oven Vent
The oven is vented through an opening
under the left rear surface unit.
Thisareacouldbecomehotduringovenuse.
It is nomlal for steam to come out of file
vent and moisture may collect underneath
the coilswhen the oven is in use.
The vent is important for proper Mr
circulation.
NeverblockDis ventwithaluminumfoil.
Page 15

Porcelain Oven Interior
ge.com
Wifll proper care, file porcelain enamel
finish on file inside of file oven--top,
bottom, sides, back and inside of file
doori-will stay new-looking for yeats.
I.et tile range cool before cleaning. We
recommend that you wear rubber gloves
when cleaning tile range.
Soap and water Mll nomlally do thejob.
Heaxy spatmfing or spillovets may
require cleaning with a mild abrasNe
cleaner. Soap> wet meted pads may also
be used.
DonotallowfoodspillswithahighsugaroracU
content(suchastomatoes,sauerkraut,fruitjuices
orpiefilling)toremainonthesurface.Theymay
causeaduffspotevenaftercleaning.
Household ammonia may make tile
cleaningjob easier. Place 1/2 cup in
a shallow glass or pottery container in
a cold oven overnight. Tile ammonia
fimles Mll help loosen tile burned-on
grease and food.
If necessary, you may use an oven cleaner.
Follow tile package directions.
_,Donotsprayovencleanerontheelectrical
controlsandswitchesbecauseit couldcause
a shortcircuitandresultinsparkingorfire.
Donotallowa filmfromthecleanertobuiU up
onthetemperaturesensor--it couldcausethe
oventoheatimproperly.(Thesensoris located
at thetopoftheoven.)Carefullywipethe
sensorcleanaftereachovencleaning,being
carefulnotto movethesensorasachangein
itspositioncouldaffecthowtheovenbakes.
Donotsprayanyovencleanerontheoven
door,handlesoranyexteriorsurfaceof the
oven,cabinetsorpaintedsuffaces.Thecleaner
candamagethesesurfaces.
Hingelock
Pull hinge locks down to unlock.
1(7 /
i[ _ , i }ii_i
Removal position
Lift-Off Oven Door
Thedooris veryheavy.Becarefulwhen
removingandliftingthedoor.
Toremovethedoor:
Fully open tile door.
%
Pull tile hinge locks down toward
tile door flame, to tile unlocked
position. A tool, such as a small
fiat-blade screwdriver; may be
required.
Firmly grasp both sides of tile door
%
at tile top. Donotlift thedoorbythe
handle.
(;lose door to file door removal
position, which is hMfivay between
tile broil stop position and fidly
closed.
[_] Lift (loot up and out until tile hinge
arm is cleat of the slot.
Toreplacethedoor:
[Z] Firmly grasp both sides of tile door
at tile top. DOnotlift thedoorbythe
handle.
_&qth tile Bottom
door at tile edge
same angle as N
file removal
position, seat file
notch stop of
tile hinge aml
into tile bottom
edge of tile hinge slot. The notch in
tile hinge ann must be dilly seared
into tile bottom of tile slot.
Ful b, open tile door until it is
%
parallel to tile floor. If tile door will
not fldly open, tile notch stop is not
seated correctly in tile bottom edge
of the slot. Repeat step 2 if necessary.
Push tile hinge locks tap against tile
flont flame of tile oven cavib_to tile
locked position.
Hinge.,_
arm
Hinge
ofslot
Hingearm
Pushhinge locks up to lock.
(;lose tile oven (loot. 75
Page 16

Careand cleaning ofthe range.
Oven Light Replacement
il Stopguide
CAUTION:Beforereplacingyour
oven light bulb, disconnect the electrical
power to the range at the main fuse or
circuit breaker panel
Be sure to let the light cover and bulb
cool complemly:
Toremove the cover:
[_] Twist lens counterclockwise about a
quarter turn to remove.
Do not removeanyscrews toremovethecover.
[_ Replace bulb widl a 40-watt
appliance bulb or two-prong
halogen bulb, as appropriam.
Storage Drawer Removal
Toremovethedrawer:
[] Pull the drawer out until it stops.
[_ Lift the flont of the (hmver until the
stops clear the guides.
_] Remove the (hawe_.
Toreplacethecover:
-77 I,ine up tabs of lens in front of tabs
on housing and rotate clockwise to
engage.
Toreplace the drawer:
[77 Place the drawer _vdlson the guides.
[_ Push the drawer back until it stops.
[_ I_iftthe flont of the drawer and
push back until the stops clear the
guides.
_-_ Lower the flont of the drawer and
push back until it closes.
16
Page 17

Be sure the controls are turned to OFFand the surface units are cool before attempting to remove them.
Surface Units
ge.com
Cooktop
tab rim
When properly seated, the locking tab
should lock onto the cooktop rim
through the notch in the drip pan.
To clean the surface units, turn the
control to the highest setting for a
minute. The coils will burn off" any soil.
Toremovea surfaceunit:
To remove the drip pans for cleaning,
the surface units [_lttstbe removed first.
[] Push the surface unit back toward
the receptacle to fiee the locking
mb fiom the cooktop.
Receptacle
[] I,ifl the surface unit about 1 inch
above the drip pan and pull it out.
Do not lift the surfaceunit more than I inch.
If youdo, it may notlie flat on the drip pan
when youplug it backin.
NOTE."Repeated lifting of the surface unit
more than 1 inch above the drip pan can
permanently damage the receptacle.
Toreplacea surfaceunit:
Replace the chip pan into the recess
%
m the cooktop. Make sure the
opening in the pan lines up with
the receptacle.
Insert the terminals of the surface
D-1
unit through the opening in the
drip pan and into the receptacle.
Lockingtab
[] Push the surface unit in and down
to lock the tab in place so it rests
evenly in the cooktop.
Donotimmersethesurfaceunitsinliquidsof
an}/kind.
Donotcleanthesurfaceunitsina dishwasher.
Donotbendthesurfaceunitplugterminals.
Donotattempttoclean,adjustorinan}/way
repairtheplug-inreceptacle.
Supportrod
Be sure all surface units are turned
off before raising the cooktop.
Drip Pans
Remove the surface units. Then lift out
the ddp pans.
Place them in a covered container. Add
1/4 cup ammonia and let soak several
hours or overnight. Wash, rinse well
and dtT:
The drip pans may also be cleaned in
a dishwasher.
Lift-Up Cooktop
Cleantheareaunderthecooktopoften.Built-up
soil,especiallygrease,maycatchfire.
To make cleaning easier; the entire
cooktop may be lifted up and supported
in the up position.
Be sure aU the surface units are unned
off before rMsing the cooktop. The
surface units and drip pans do not need
m be removed; however; you m W remove
one m make raising file cookmp easier.
Clean file area under file drip pans
often. Built-up soil, especiaUy gnease,
may catch fire.
Donot coverthedrippanswithfoil.Usingfoilso
closetothereceptaclecouldcauseshock,fire or
damagetotherange.
A support rod will hold the cooktop tap
while you clean underneath it.
After cleaning under die cookmp Mth
hot, soapy water and a clean cloth, lower
the cooMop. Be carefltl not m pinch
your fingers.
17
Page 18

Beforeyoucall forservice...
Troubleshooting -tips
Save time and money! Review the charts on the following
pages first and you may not need to call for service.
! PossibleCauses
Surface unitsdo not The surface units are
work properly not plugged in solidly.
The surface unit controls • Check to see the correct control is set for the surface
improperly set. unit you are using.
The drip pans are not set • With the controls off, check to make sure the drip
securely in the cooktop, pan is in the recess in the cooktop and that the
Control signals after You forgot to enter a • Press the BAKE pad and desired temperature.
entering cooking time bake temperature.
Fooddoes notbake Oven controls improperly set. • See the Using the oven section.
orroast properly Shelf position is incorrect • See the Using the oven section.
or the shelf is not level.
cookwarelnc°rrectcookwareofimproper°r • See the Using the oven secdon.
size being used.
Oven thermostat needs • See the Adjust the oven thermostat--Do it yourself]
adjustment, sec tio11.
What ToDo
• \Vith the controls ell check to make sure the surface
unit is plugged completely into the receptacle.
opening in the pan lines up with the receptacle.
Clockandtimerdo Plug on range is not completely • Make sure electrical plug is plugged into a live, properly
not work inserted in the electrical outlet, grounded oudet.
A fuse in your home may • Replace the fllse or reset the circuit breakeL
be blown or the circuit
breaker tripped.
Oven controls improperly set. • See the Using the clock and timer section.
Ovenlight does Light bulb is loose or defective. • Tighten or replace the bulb.
not work
Switch operating light • Call for service.
is broken.
Fooddoes not Oven door not closed. • See the Using the oven section.
broilproperly Oven controls improperly set. • Make sure you press the BROILHI/£O pad.
Improper shelf position • See the Broiling Guide.
being used.
Cookware not suited • For best results, use a pan desigmed for broiling.
for broiling.
In some areas the power • Preheat the broil element for 10 minutes.
(voltage) may be low. • Broil for the longest period of time recommended in
the Broiling Guide.
18
Page 19

ge.com
Possible Causes What ToDo
Oven temperature too Oven thermostat * See the Adjust the oven thermostat--Do it yourself!
hot or too cold needs adjustment, section.
Oven willnot work Plug on range is not * Make sure electlical plug is plugged into a live,
completely inserted in properly g_ounded outlet.
the electrical outlet.
A fuse in your home may • Replace the fi_se or reset the circuit breakeL
he blown or the circuit
breaker tripped.
Oven controls improperly set. • See the Using the oven section.
Storage drawer Rear drawer support is • Reposition the drawer. See the Storage Drawer
is crooked on top of the guide rail. Removal instrucfions in the Care and cleaning of your
range section.
Storage drawer Power cord may be • Reposition the drawer and power cord. See the
won't close obstructing drawer Storage Drawer Removal instructions in the Care and
in the lower back cleaning of your range section.
of the range.
Rear drawer support is • Reposifion the drawer. See the Storage Drawer
on top of the guide rail. Removalinstrucfions in the Care and cleaning of your
range section.
"Crackling" or This is the sound of the • This is normal.
"popping"sound metal heating and cooling
during the cooking functions.
"F- anda number You have a function • Press file CLEAR/OFFpad. Put file oven back into
or letter" flash error code. operation.
in the display If the function code repeats. • Disconnect all power to the range for at least 30
seconds and then reconnect power. If the flmcfion
error code repeats, call for service.
Displayflashes "bAd" The installed connection • Contact installer or elecuician to correct miswire.
then "linE" with a from the house to the unit
loud tone is miswired.
Display goes blank A fuse in your home may be • Replace the fi_se or reset the circuit breakeL
blown or the circuit
breaker tripped.
The clock is turned off from • See the Using the clock and timer secdon.
showing in the display,
Displayflashes Power failure. • Reset the clock.
Unable toget the Oven control pads were • The BAKE and BROIL HI/LO pads must be pressed
display to show "SF" not pressed properly, at the same time and held for 3 seconds.
Power outage, Power outage or surge. • Reset the clock. If the oven was in use, you must reset
clock flashes it by pressing the CLEAR/OFFpad, setting the clock
and resetting any cooking flmction.
/9
Page 20

Accessories.
Looking For Something More ?
You can find these accessories and many more at ge.com, or call 800.626.2002
(during normal business hours). Have your model number ready.
ii ii i i i i i i ii
ii_i!i_i_(_i;_i!__iLi _:i____ii_7__iii_i_ii i_
_ IM M M M M M M M M I
iiiiiiiii
Ill!IT _ir/#/IrtIi I !I/t x_x'_\_\'_\\_)
Surface Elements & Drip Pans
Oven Elements Knobs
Tired of discolored racks? Wishing you had extra-heaxf-duly oven racks?
OvenRacks BroHerPan
NOWAVAI1.ABLEIbryour range:
GE's innovative porcelain-coated oven racks!
• Heaxy Duly
• Durable
2O
Visit ge.com tot more intonnafion.
Page 21

GE Service Protection Plus TM
GE, a name recognized worldwide ff)r quality and dependability, offers you
Service Protection Plus"*--comprehensive protection on all your appliances--
No Matter What Brand!
Benefits Include:
* Backed by GE
* All brands covered
* Unlimited service calls
* All parts and labor costs included
* No out-of-pocket expenses
* No hidden deductibles
* One 800 number to call
You will be completely satisfied with our service protection or you may request your money back
on the remaining value of your contract. No questions asked. It's that simple.
Protect your refligerato_, dishwasher, washer and drym, range, TV, VCR and much more--any brand!
Plus there's no exua charge for emergency service and low monthly financing is available. Even icemaker
coverage and food spoilage protection is oft>red. You can rest easy, knowing that all your valuable
household products are protected against expensive repairs.
Place your confidence in GE and call us in the U.S. toll-free at 800.626.2224
for more information.
_%11brands covered, up Io 20 wars old, in lhe condnemal U.S.
We71 CoverAnyAppfiance.
Anywhere. Anytime.*
..................
Please place in envelope and mail to:
General Electric Company
Warranty Registration Department
P.O. Box 32150
Louisville, KY 40232-2150
27
Page 22

Consumer Product Ownership Registration
Dear Customer:
Thank you for purchasing our product and thank you for placing your confidence in us.
We are proud to have you as a customer!
Follow these three steps to protect your new appliance investment:
Complete and mail
your Consumer
Product Ownership
Registration today.
Have the peace of
mind of knowing we
can contact )ou in
the unlikely event of a
satet} modification.
Afer mailing the
registration bel(m,
store this document
in a sate place. It
contains intormation
)ou will need should
)ou require service.
Our service nmnber is
800.(;E.(;ARES
(800.432.2737).
Model Number Serial Number
I I I I I I I I I I I I I I I I I
Important: If you did not get a registration card with your
product, detach and return the form below to
ensure that your product is registered, or register
online at ge.com.
Consumer Product Ownership Registration
Read }our Owner's
Mamml carefully.
It will help )ou
operate }otlr ilew
appliance properly.
,_,1_ Cut here
Model Number
I I I I I I I I I I I
Mr.{i Ms.::i ! Mrs.::i ! Miss ]
First
Name I I I I I I I I
Street
Address I I I I I I I I I I I I I I I I I I I I I I I
Apt. # I l l l l I l l I E-mail Address*
I)at< Pla<(d
'"_'1 _ I Da,I _ I X>arl _ I Phone
Mort th
* Please provide your e-mail address to receive, via e-mail, discotmts, special offers and other important
commtmications fi'om GE Appliances (GEA).
Check here if you do not _mt to receive commtmications fi'om GEA's carefifll) selected partners.
Appliances
e E Consumer & Industrial
General Electric Compang
Louisville, K¥ 40225
ge.com
22
FAILURE TO COMPLETE AND RETURN THIS (ARD DOES NOT DIMINISH YOUR
_,_SKRRANTY RIGHTS.
For more information about G_'s privacy and data usage policy, go to ge.com and click on
"Pfivac) Polic)" or calm 800.626.2224.
I ,astName I , , , , , , , , , ,
_.mberl I, I-I,, I-I , ,
Serial Number
I I I I I I I
Page 23

GEElectricRange Warranty.
All warranty service provided by our Factory Service Centers,
or an authorized Customer Care® technician. Toschedule service,
on-line, visit us at ge.com, or call 800.GE.CARES(800.432.2737).
Please have serial number and model number available when
calling for service.
GE Will Provide:
i i
Anypartof file range which fails due to a defect in matcIials or workmanship.
Fromthedate ofthe
original purchase
Service trips to your home to teach you how to use
the product.
Improper installation, delivery or maintenance.
Failure of the product if it is abused, misused, or used
for other than the intended purpose or used
commercially.
Replacement of house fuses or resetting of circuit
breakers.
During dfis limitedone-year warranty, (;E will also provide, free of charge, all labor
and in-home se_ice to replace the defective part.
Staple your receipt here.
Proof of the original purchase
date is needed to obtain service
under the warranty.
Damage to the product caused by accident, fire, floods
or acts of God.
Incidental or consequential damage caused by possible
defects with this appliance.
Damage caused after delivery.
Product not accessible to provide required service.
Warranty.Any impfied warranties, including the implied warranties ofmerchantability or fitness for a particular purpose,
EXCLUSIONOFIMPLIED WARRANTIES--Your sole and exclusive remedy is productrepa# as provided in thisLimited
are limited to one year orthe shortestperiod allowed bylaw.
This warranty is extended to the original purchaser and any succeeding owner for products purchased for
home use within the USA. If the product is located in an area where service by a GEAuthorized Servicer is not
available, you may be responsible for a trip charge or you may be required to bring the product to an Authorized GE
Service location for service. In Alaska, the warranty excludes the cost of shipping or service calls to your home.
Some states do not allow the exclusion or limitation of incidental or consequential damages. This warranty
gives you specific legal rights, and you may also have other rights which vary from state to state. Toknow
what your legal rights are, consult your local or state consumer affairs office or your state's Attorney General
Warrantor: General Electric Company.Louisville,KY40225
23
Page 24

ConsumerSupport.
GEAppliancesWebsite
Have a ques0on or need assistance with your appliance? TD_the GE Appliances Website 24 hours a day,
any day of the year! Fox greater convenience and fz,tster service, you can now download Owner's Manuals,
order parts ox even schedule sex_qceon-line.
ge.com
ScheduleService ge.com
Expert GE repair service is only one step away fiom your dooL Get ondine and schedule your sex_ice at
your convenience any day of the year! Or call 800.GE.GARES (800.432.2737) dux-ing norm_d business hours.
RealLifeDesignStudio
GE supports the Universal Design concept--products, services and environments that can be used by
people of aUages, sizes and capabiliues. We recognize the need m design for a wide range of physical and
mental abili0es and impaixments. Fox details of GE's Univexsal Desigm applica0ons, including kitchen
design ideas for people with disabili0es, check out our Website today. Fox the hearing impaired, please call
800.TDD.GEAG (800.833.4322).
ExtendedWarranties
ge.com
ge.com
Purchase a GE extended warranty and learn about special discounts that are available while your warranty
is still in effect. You can purchase it on-line anytime, or call 800.626.2224 during nomlal business houx_.
GE Gonsumer Home Sex_qceswill still be there _ffteryour warranty expires.
PartsandAccessories
IndMduals qualified to service their own appliances can have parts or accessox-iessent directly to their
homes (VISA, MasterGard and Discover cards are accepted). Order on-line today, 24 houxs every day or
by phone at 800.626.2002 during normal business hours.
Instructionscontainedinthismanualcoverprocedurestobeperformedbyanyuser.Otherservicing generally
shouldbereferredtoqualifiedservicepersonnelCautionmustbeexercised,sinceimproperservicingmaycause
unsafeoperation.
ContactUs
If you are not satisfied wifll die service you receive flom GE, contact us on our Website wifll all die details
including your phone numbex, or wx-imm: General Managex, Gusmmer Relations
GE Appliances, Appliance Park
Louisville, KY40225
RegisterYourAppliance
ge.com
ge.com
ge.com
Register your new appliance on-line--at your convenience! Timely product regism_fion will allow for
enhanced communica0on and prompt sexMce under the temls of your war_anty, should the need arise.
You mW also mail in the pre-prinmd regism_fion card included in the packing mamx-ial, or detach and use
the form in the Owner's Manual.
Printed in the United States
 Loading...