

Page 1
~s&athide
;?,
,’,..,..... .,,,,’,,,, ,,
,,.,,.,.,,,
.:,
ElectricSfide=in
Safety Instructions ...................4-7
Anti-Tip Device... .....................................4,46
Operating Instructions, Tps
Aluminum Foil...... ................. ... 6,28,32, 34
ClockandTimer...................................24, 25
Features. ......................................................8,9
Oven...................... ..... .........................26-39
Bating ........................... ..... .......... .... ...27-29
Broiling,BroilingGuide..... ..............34,35
Conmlsattings.....27,29,30,32,34,37,38
Light BulbReplacement................ 26,43
Roasting,RoastingGuide............ ...32,33
Self%leaning Instructions....... ......36-39
Shelves. ............
Timed Baking
Surface Module Cooking................... 10-23
Canning Tips.................. ...... ........ ...... ....... 23
CoilSurfaceUnit Module
ControlSettings....................................... 11
CooktopComparison ............ ...... ........... 10
GriddleAccessory...... ...................... 20-22
GrillModule........ ............................... 17-19
Module Cover.................. .................. ..........3
Modules andAccessories.......... ..... .........3
RadiantModule..,..,.......................... 14-16
5,26-28,32,34-36,43
..... ...............................
.... ...........
29,30
12,13
Range
Problem solver ......................56-58
Thermostat Adjustment–
Do It Yourself..... ....... ......... ....................... 31
More questions?..,call
GEAnswerCenteP8(J0.626.2000
Care and Cleaning ...................4G45
CoilSurface Unit Module
Door Removal........ ............................... .......44
GriddleAccessory........ ...............................42
GrillModule .. ................. ....... ........................
Radiant Module ...........................................41
Vent System..........................................43,45
... .......................
Preparation ...........................................7
Anti-Tip Device..... ...................................4,46
FlooringUnder the Range...... .....................7
Leveling... ....................................... ...... ............7
Installation .................................47-55
Consumer Services ..................59
Appliance Registration... ..............................2
Important Phone Numbers....................... 59
Model and Serial Numbers .........................2
Warranty ..... ................... ........ ....... BackCover
40
42
GEAppliances
Model: JSP69
164D2966P163
Page 2
HELP USHELP YOU...
Beforeusingyourrange,readthis
guidecarefully.
It is intended to help youoperateandmaintainyour
newrangeproperly.
Keepit handyfor answerstoyourquestions.
Ifyoudon’tunderstandsomethingorneedmorehelp,call:
GEAnswerCenter@
800.626.2000
24hoursa day,7 daysa week
If youreceiveda damagedrangeor
modularcomponents...
Immediatelycontactthedealer(orbuilder)thatsold
youtherange.
Savetime andmoney.
Beforeyou requestservice...
ChecktheProblemSolverinthebackof thisguide.
It listscausesof minoroperatingproblemsthatyou
cancorrectyourself.
Writedownthemodelandserialnumbers.
You’llfindthemona labelbehind the storage drawer.
Thesenumbersarealsoonthe ConsumerProduct
OwnershipRegistrationCardthatcamewithyour areavailableatextracostfromyourGE Appliance
range.Beforesendinginthiscard,pleasewritethese
numbershere:
ModelNumber
SerialNumber
Usethesenumbersinanycorrespondenceor service
callsconcerningyourrange.
Accessories
Toaddversatilitytoyourmodularrange,accessories
dealer.SeetheModulesandAccessoriessection.
IF YOUNEEDSERVICE...
Toobtainservice,seetheConsumerServicespagein
thebackof thisguide.
We’reproudofour serviceandwantyouto be
pleased.If for somereasonyouarenothappywith
theserviceyoureceive,herearethreestepsto follow
for furtherhelp.
FIRST,contactthepeoplewho servicedyour
appliance.Explainwhyyouarenotpleased.In most
cases,this willsolvetheproblem.
NEXT,ifyouare stillnotpleased,writeallthe
details-including yourphonenumber—to:
Manager,ConsumerRelations
GEAppliances
AppliancePark
Louisville,KY40225
FINALLY,ifyourproblemisstillnotresolved,write:
MajorApplianceConsumerActionProgram
20NorthWackerDrive
Chicago,IL60606
2
Page 3

MOD~ES Am ACCESSO~S
—
A full selection of modules is available for the range cooktop. The modules
can be interchanged quickly and easily. Each module has an electrical plug
which fits into a receptacle in the side of the well nearest the center of the
cooktop. Some modules are inserted and removed differently than others.
See each module section for specific instructions for installing and
removing that module.
To purchase, contact your nearest GE Appliances dealer or service center.
If you need assistance in finding your nearest GE dealer, contact the GE
Answer Center@at 800.626.2000.
General Information
Careof Modules
Someof the modulesmust be curedor preconditioned
before using them for the first time.
Modules and accessories should be cleaned after
each use. The longer a soil remains, the harder it is
to clean. See each module section in this guide for
specific instructions. Never immerse any module
in water.
When not in the cooktop, modules and accessories
shouldbe stored in a clean, dry place.Alwaysbe careful
notto dropthe moddes ortheycouldbe damaged.
Modulesand Accessories
Coil Surface Module
Part Number JXGC53B (black)
JXBC53W (white)
This module has one 6“ and one 8“ coil
surface unit. The surface units and drip
pans are removable for cleaning.
UsingElectricSurfaceUnit Modules
Youmust consider heat up and cool down times for
the surface units when determining cooking times.
Heat up and cool down times depend on the initial
temperature settings, the type of cookware used and
the amount of food being cooked.
Start cooking at a higher setting to heat the surface
unit faster, then turn to a lower setting to finish
cooking. Remember, cooking continues after the
surface unit is turned off.
Grill Module
Part Number JXGG50
With this module you can char-broil
meat indoors all year long.
Radiant Module
Part Number JXGR63B (black)
JXGR63W (white)
This module has two 7“ coils beneath a
smooth glass surface. The two surface
units are shown by the outlines on the
glass. This module provides fast heat,
energy efficient operation and is easy
to clean.
—
Griddle Accessory
Part Number JXGL90
You must have the grill module to
use the griddle accessory.
Thisgriddle sitsdirectly over the grill
heatingelement with the grill module
removed.Fat and meat drippingswill
collectin the reservoir at one end of
the ~tiddle.
D
3
Page 4
!
U
WORTAm SME~ mSTRUC~ONS
Rwd d imtmctiom beforewing t~ appfiance.
I~ORTANT SAFETYNOTICE
● TheCWornia SafeDrinkingWaterand Toxic
EnforcementAct requirestheGovernorof
Californiato publisha listof substancesknownto
thestateto causebirthdefectsor otherreproductive
harm,andrequiresbusinessestowarncustomersof
potentialexposureto suchsubstances.
● The flber~ass insulationin self-cleanovens
givesoff a very small amountof carbon
monotide during the cleaningcycle.Exposure
can be minimizedby ventingwith an open
windowor using a ventilation fan or hood.
men usingelectricalappliances,basic safety
precautionsshouldbe followed,includingthe
following:
● Usethis applianceonlyforitsintendeduse
as describedin this guide.
● Havethe instiller showyou the locationof the
circuitbreakeror fuse.Markit for easyreference.
● Besure your appfianceis properlyinsta~ed and
groundedby a qualifiedtechnicianin accordance
withtheprovidedinstallationinstructions.
● Do not attemptto repairor replaceany
part of yourrange unless it is specifically
recommendedinthis guide.All other servicing
shouldbe referred to a qualifiedtechnician.
● Beforeperformingany service,DISCONNECT
THERANGE POWERSUPPLYATTHE
HOUSEHOLDDISTRIBUTIONPANELBY
REMOVNG ~E FUSE OR SWTCHING OFF
THE CIRCU~ BREA~R.
● Do not leavechtidrendon~hildren should
notbe left aloneor unattendedin an area where an
appliance is in use.They shouldnever be allowed
to sitor standon any part of the appliance.
● Do not a~ow anyoneto climb,stand or hang
on the dooror cooktop.Theycoulddamage
the range and even tip it over,causing severe
personalinjury.
● CAU~ON: ITEMSOF ~TEREST TO
CHKDREN SHOULDNOT BE STORED~
CAB~ETS ABOVEA RANGEOR ON THE
BAC=PLASH OF A RANG&C~LDREN
CL~B~G ON THE RANGETO REACH
ITEMSCO~D BESENOUSLY IN~mD.
4
WAMING–A1lranges >
can tip and injurycould result.
Topreventaccidentaltipping of
the rangefrom abnormalusage,
attachit to the wall or floor by
installingthe Anti-Tipdevice
supplied.Tocheckif the deviceis
installedandengagedproperly,open
the lower compartmentand inspect
the device. Makesure the stability
bracketand stabilitymountingdevice are in place.
If youpull therange out from the wallfor any
reason, makesure the deviceis properlyengaged
before you push the range back againstthe wall.
If it is not, thereis a possiblerisk of the range
tippingover and causinginjury if you or a child
stand,sit or leanon an open door.
Pleaserefer to the Anti-Tipdevice informationin
this guide.Failureto takethis precautioncould
resultin tippingof therange and injury.
● Teach childrennot to play with the controls
or any other part of the range.
● Alwayskeep combustiblewall coverings,
curtainsor drapesa safe distancefrom
your range.
cDo not storeflammablematerialsin anoven
or near the cooktop.
● Neverwearloose-fittingor hanginggarments
whileusing the appliance.Be carefulwhen
r~ching for items storedover the range.
Hammable materialcouldbe ignitedif brought
in contactwith hot surfaceunits or heating
elementsandmay causesevere burns.
● Useonly dry pot holders—moist
or damp potholders on hotsurfaces
B
may result in bums from steam.
Do not let pot holders touch hot surfaceunits or
heatingelements.Do not use a towel or other
bulkycloth.Such clothscan catch fire on a hot
surfaceunitor heatingelement.
● Alwayskeepdish towels,dish cloths, pot
holdersand other finensa safe distance away
fromyour range.
● Always keep woodenand plasticutensfls
andcannedfood a safe distanceaway from
yourrange.
● Foryour safety,neveruse your appliancefor
warmingor heatingthe room.
b
;4
d
,.4
A
E
—
Page 5
!
●
D
DONOT STOREOR USE COMBUSTWLE
●
MATERIALS,GASOL~E OR OTHER
FLAWBLE VAPORSAND LIQ~S ~
- VIC~I~ OFT~S OR ANT OTnR
APPLIANCE.
● Keepthehoodandgreasefalterscleanto maintain
good venting andto avoidgrease fires.
● Do not let cookinggreaseor other flammable
materi* accumulatein or near the range.
● Do not obstructthe vent airflow gfls.
Do not putanythingin them or allow anythingto
spillover into them.
● Keepthe gri~ pan clean to reducesmoking and
avoidgreasefwes.
● Keepthe cooktopvent @k and the oven
ventunobstructed.
4
e
- Do notuse wateron greasefires.
‘J
Neverpick up a flaming pan.
Turnthe controlsoff. Smothera
flamingpan ona surface unitby coveringthe
pan completelywith a well-fittinglid, cookie
sheetor fiat tray.Use a multi-purposedry
chemicalor foam-typefire extinguisher.
flaming greaseoutside a pan can be put out
by covering with baking s~a or, if av~lable,
a multi-purposedry chemicrdor foam-type fire
extinguisher.
Hame in the ovencan be smotheredcompletely
by closing the ovendoor and turning the oven
off or by using a multi-purposedry chemicalor
foam-typefire extinguisher.
● Donot touch the modde surface units,
heatingelementsor the interiorsurfaceof the
oven.Thesesurfacesmay be hot enoughto burn
eventhough theyare dark in color,During and
after use?do nottouch,or let clothingor other
flammablematerialscontactthe modulesurface
units,areas nearby the module surfaceunits or
any interior area of the ovem allow sufficienttime
for cooling first.
Potentiallyhot surfacesincludethe grillgrates,
griddle,cwktop and ar@ facingthe cooktop.
oven vent opening,stiaces near the opening,
crevicesaroundthe ovendoor,the edgesof the
door window and metal trim parts above the door.
Remember: The inside surfaceof the oven may
be hot when the door is opened.
● Whencooking pork, follow the directions
exactlyand always cook the meatto an intemd
temperatureof at least 170°F.This assuresthat,
in the remote possibilitythat trichina maybe
presentin the meat, it will be killed and the meat
willbe safeto eat.
Oven
● Standaway from the range when openingthe
ovendoor.Hot air or steam which escapes can
causebums to hands, face andor eyes.
● Do notheatunopened food containers.
Pressurecould build up and the containercould
burst,causing an injury.
● Keepthe ovenvent unobstructed.
● Keepthe ovenfree from greasebuildup.
● When using cooking or roastingbagsin the
oven,follow the manufacturer’sdirections.
● Placethe oven shelf in the desired position
whilethe oven is cool. If the shelvesmust be
handledwhenhot, do not let potholders contact
the heatingelements.
● Pnl~ng out the shelf to theshelf stop is a
conveniencein #iftingheavyfoods. It is dso
a precautionagainstburns from touchinghot
surfacesof the door or oven walls.
● Do notuse your ovento dry newspapers.
If overheated.they can catch fire.
● Do not usethe oven for a storage area.
Items stored in an oven can ignite.
● Do not leavepaper products,cooking utensils
orfood in the oven when not in use.
● .4fterbrofing, always take the broiler pan out
of the range and clean it. Leftovergrease in the
broilerpan can catch fire the next time you use
the pan.
*Never Ieavejars or cans of fat drippingson or
nearyour range.
● Never leavethe oven door open when you are
notwatchingthe range.
● Theoven door must be dosed during broiling.
Open door broiling will cause the controlpanel to
get very hot.
(cotltinued tl<~.rtpage)
5
Page 6
● Ody c- typesof* gbs/@ra*
Mrthenwareorother*ed mntiers m
~tible fmcooktoptiee; othersmay
-We of the suddenchangein tempera~.
~ the
.To
offlammablemateriak,andspfiage,$e Me
ofamntainershodd be-ed towardtherenter
ofthe
range withoutextendingover thenearby
Stia tits.
* Mways h thernoddemtrok offbefore
remotig the mkw-
poss~tityofbins, ignition
break
● Du nottierse orsoaktheremovnble
rnoddesad da~ *. M
notpmthem
inadishwasher.Dono%seE+Ieanthemoddes
intheovem
6
Page 7
● If a combinationofoils or fats will be used
in frying, stirtogetherbeforeheating, or as fats
melt slowly.
● Always heat fat slowly,and watch as it heats.
● Usea deep fat thermometerwhenever
possibleto prevent overheatingfat beyondthe
smokingpoint.
*Never try
tomove a panof hot fat, especially
a deepfat fryer.Waituntilthe fat is cool.
● NEVER USE WATER ON A GREASE FIRE.
● Use care when touchingthe cooktop.
Theglass surface of the cooktopwill retain heat
afterthe controlshave beenturned off.
“Neverleave the surfaceunits unattendedat
highheat settings. Boiloverscause smokingand
greasy sPilIoversthat
● Donot operatethe radiantsurface units if
may catch on fire.
.
the ghtssis broken. Spilloversor cleaning
solutionmay penetratea broken cooktop and
createa risk of electricalshock.Contact a
qualifiedtechnicianimmediatelyshouldyour
glasscooktopbecomebroken.
● Avoidscratchingthe glass cooktop surface.
The cooktopcan be scratchedwith items such
as sharpinstruments,or ringsor otherjewelry
and rivets on clothing.
● Neveruse the glasscooktop surface as a
cuttingboard.
● Do not placeor store items on top of the glass
cooktopsurfacewhen it is not in use.
● Be carefulwhen placing spoons or other
stirringutensils on glass cooktop surface
whenit is in use. They may become hot and
could cause burns.
● Do not standon the radiant glass cooktop.
The weightmay causethe top to bend.
SAW T~SE
~S~UCTIONS
I
L
PWPAMTION
FlooringundertheRange
Yourrange, likemany other householditems, is
heavyand can settleinto softfloor coveringssuch
m cushionedvinylor carpeting. Whenmovingthe
rangeon thistypeof flooring,it shouldbe installedon
a 1/4-inchthicksheetofplywood(or similarmaterial)
asfollows:
of therange,
built up withplywoodto the samelevelor higherthan
thefloorcovering.Thiswillallowtherangeto be
movedfor cleaningor servicing.
Whenthefloor coveringendsatthefront
theareatherangewillreston shouldbe
LevelingtheRange
Usea 1X“openendor adjustablewrenchto equally
backoutthefourlegs.The flanges(rims)belowthe
sidesofthecooktopmustberaisedabove thetopof
thecounter.Carefullyslidetherangeintoits
installationspace.Observethatit is clearingthe
countertop.Thenplacea spiritlevelor aglass
measuringcuppartiallyfilledwith wateron oneofthe
ovenshelvestocheckfor levelness.If usinga spirit
level.taketworeadings,withthe levelplaced
diagonallyfirst in onedirectionand thenthe other.
Adjustthefourlegscarefully.The rangelegsshould
restonthe floor.Therangemust not hang fromthe
counter.
I
7
Page 8
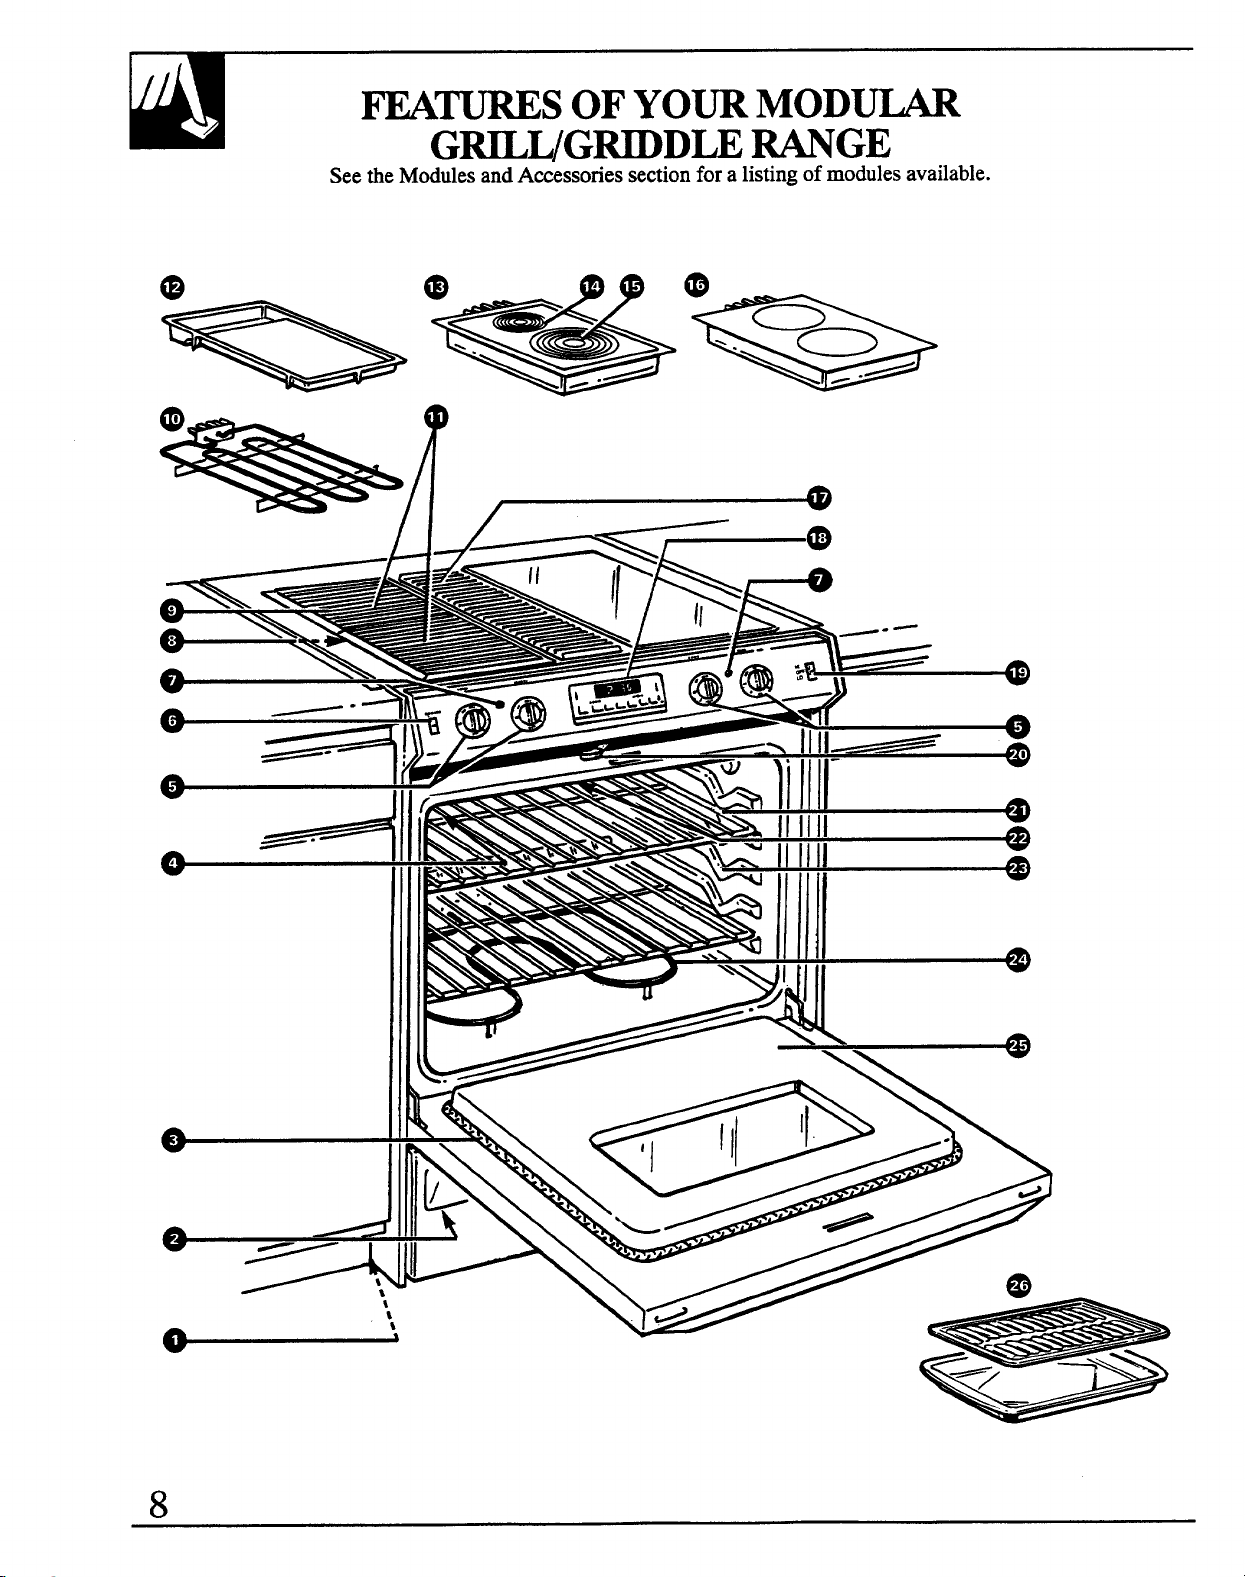
~mS OFYOm MODW
G-uG~Dm WGE
Seetie ModulesandAwessoriessectionfor a listingof modulesavailable.
—
%111111@
7/=, ,
Page 9
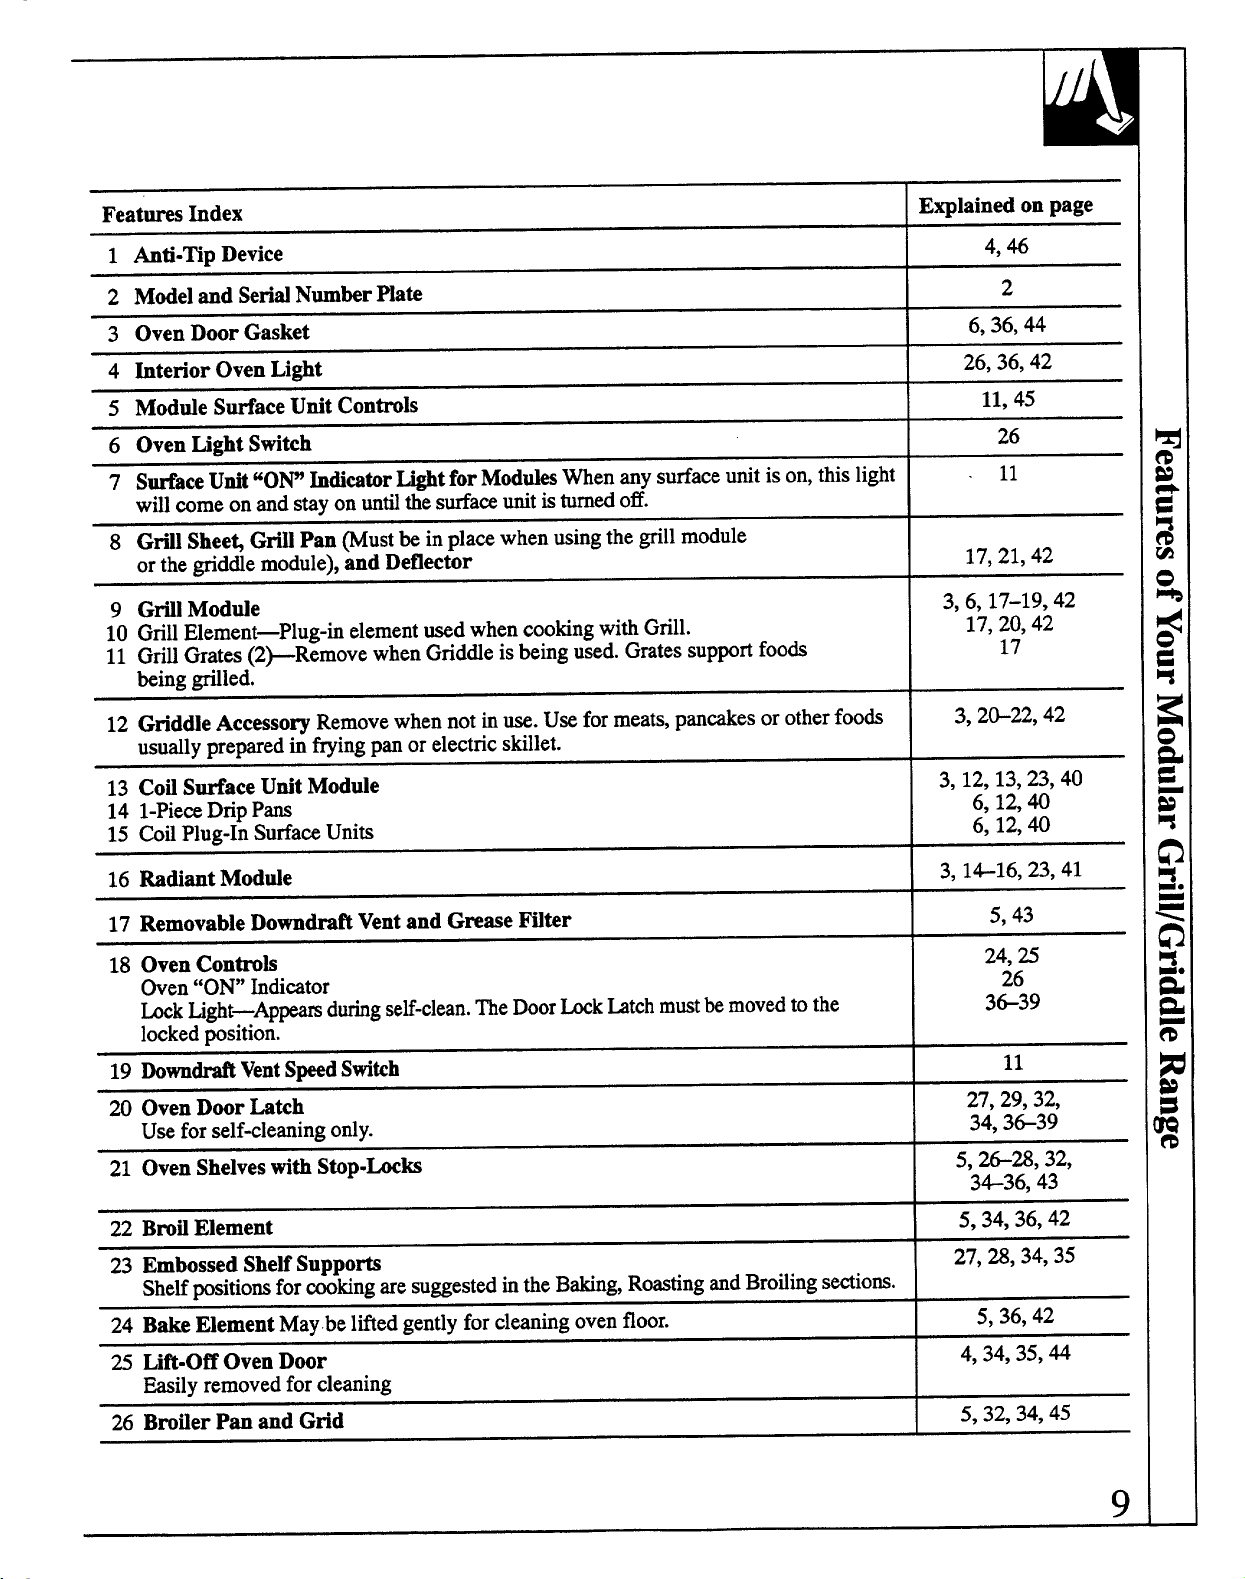
Featureshdex
Explainedonpage
Anti-MpDevice
1
2 ModelandSerkdNumberP1ati
3 OvenDoorGasket
4 htenor OvenLight
5 Modde SurfaceUnitControls
6 OvenLightSwitch
7 SurfaceUnit“ON hdicatorLightfor Moddesmen anysurfaceunitis on,thislight
willcomeonand stayon unti thesurfamunitisturnedoff.
8 Gfll Sheet GriUPan must bein placewhenusingthegrillmodule
orthegridde module),andDeflector
9 Gfil Modtie
10 GrillElement—Plug-belementusedwhencookingwithGrill.
11 GriHGrates(2>Remove whenGndde isbeingused.Gratessupportfoods
being@led.
12 GriddleAccessog Removewhennotin use.Usefor meats,pancakesorotherfoods
usurdlypreparedinfryingpanor electricskillet.
13 CoflSurfaceUnitModule
14 l-Piee DripPa
15 ~fl Plug-InSurfawUnits
4,46
2
6,36,44
26,36,42
11,45
26
11
17.21,42
3,6,17-19,42
17,20,42
17
3, 2&22,42
3,12,13,23,40
6,12,40
6,12,40
16 Radiant Modde
17 RemovableDowndraftVentand GreaseFtiter
18 OvenControh
Oven“ON hdi~tor
bk Ught—Appearsduringseti-clean,me Doorkk htch mustbemovedtothe
lockedposition.
19 Downti VentSpeedSwitch
20 OvenDoortitch
Useforself-cleaningordy.
21 OvenShelveswithStipkks
22 BrotiElement
23 EmbossedSheUSupports
Shelfpositionsfor cookingaresuggestedintheBaking,RoastingandBrodingsections.
24 BakeElementMaybe liftedgentlyfor cleaningovenfloor.
25 Lift-OffOvenDoor
Easilyremovedforcleaning
26 BrotierPanandGrid
3,1616,23,41
5,43
24,25
26
3639
11
27,29,32,
34,3639
5,2628,32,
3*36, 43
5,34,36,42
27,28,34,35
5,36,42
4,34,35,44
5,32,34,45
9
Page 10
HOW DOEST~S COOKTOP COmAW
TO YO~ OLDOm?
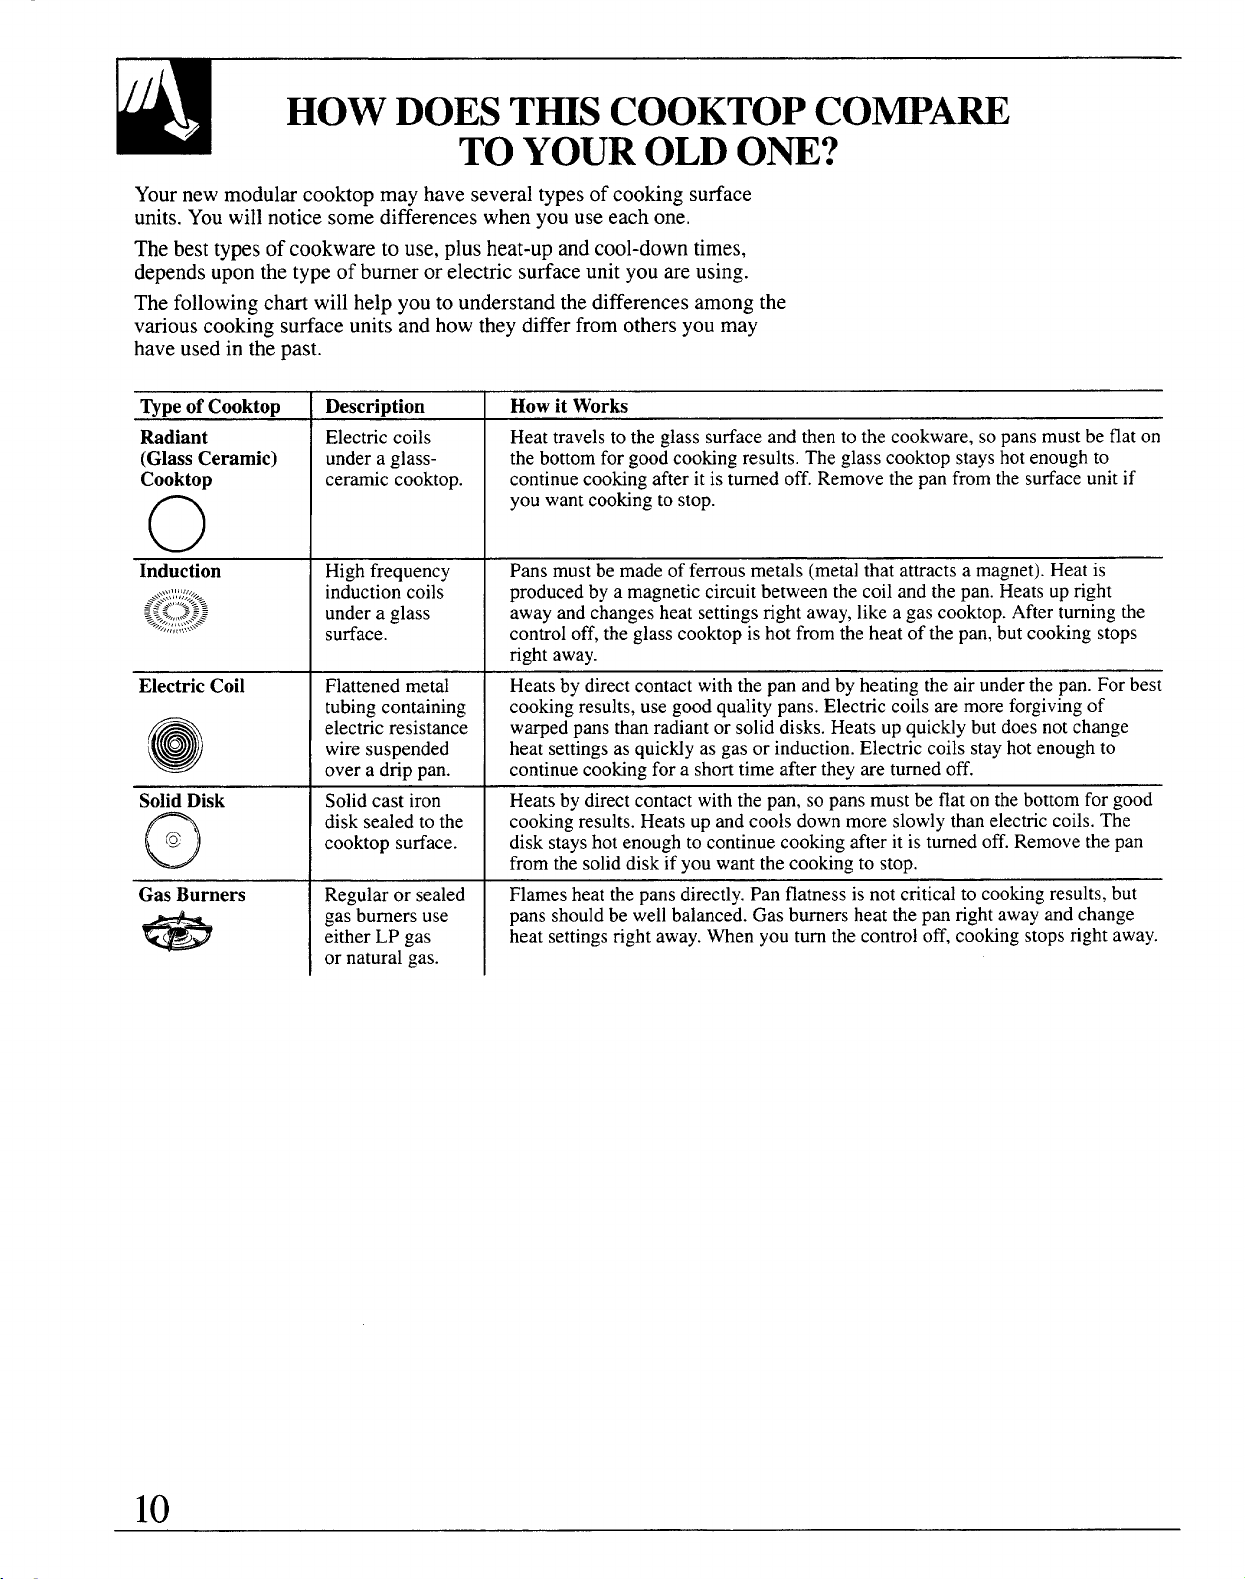
Yournewmodularcooktopmayhaveseveraltypesof cooking surface
units.Youwillnoticesomedifferenceswhenyouuseeachone.
Thebesttypesofcookwareto use,plusheat-upandcool-downtimes,
dependsuponthetypeofburnerorelectricsurfaceunityou areusing.
Thefollowingchartwillhelpyouto understandthedifferencesamongthe
variouscookingsurfaceunitsandhowtheydifferfromothersyoumay
haveusedin thepast.
~pe ofCooktop
Radiant
(GlassCeramic)
Cooktop
o
Induction
ElectricCoil
o
@
SolidDisk
‘,
@
o
GasBurners
Description
Electriccoils
underaglassceramiccooktop.
Highfrequency
in~uctioncoil;
underaglass
surface.
Flattenedmetal
tubingcontaining
electricresistance
wiresuspended
overa drippan.
Solidcastiron
disksealedtothe
cooktopsurface.
Regularor sealed
gasburners use
eitherLPgas
ornatural gas.
HowitWorks
Heattravelstotheglasssurfaceandthentothecookware,sopansmustbeflaton
thebottomforgoodcookingresults.Theglasscooktopstayshotenoughto
continuecookingafterit isturnedoff.Removethepanfromthe surfaceunitif
youwantcookingtostop.
Pansmustbemadeofferrousmetals(metalthatattractsa magnet).Heatis
producedby a magneticcircuitbetweenthecoilandthepan.Heatsupright
awayandchangesheatsettingsrightaway,likea gascooktop.Afterturningthe
controloff,theglasscooktopishotfromtheheatof thepan,butcookingstops
right away.
Heatsbydirectcontactwiththepanandby heatingtheairunderthepan.Forbest
cookingresults,usegoodqualitypans.Electric coilsaremoreforgivingof
warpedpansthanradiantor soliddisks.Heatsupquicklybutdoes notchange
heatsettingsasquictiy as gasor induction.Electriccoilsstayhotenoughto
continuecookingfora shorttimeaftertheyareturnedoff.
Heatsbydirect contactwiththepan,sopansmustbe flatonthebottomforgood
cookingresults.Heatsupandcoolsdownmoreslowlythanelectriccoils.The
diskstayshotenoughtocontinuecookingafterit is turnedoff.Removethepan
fromthesolid diskifyouwantthecookingto stop.
Flamesheatthepans directly.Panflatnessisnotcriticaltocookingresults,but
pans shouldbewellbalanced.Gasburnersheatthepanrightawayandchange
heatsettingsrightaway.men youturnthecontroloff,cookingstopsrightaway.
10
Page 11
S~ACE CONTROLS
AtbothOFFand HI thecontrol“clicks”intoposition.Whencookingin a
quiet kitchen,you mayhearslight“clicking”sounds—anindicationthatthe
heatsettings you selectedarebeingmaintained.
Switchingheatsto highersettingsalwaysshowsa quickerchangethan
switchingto a lowersetting.
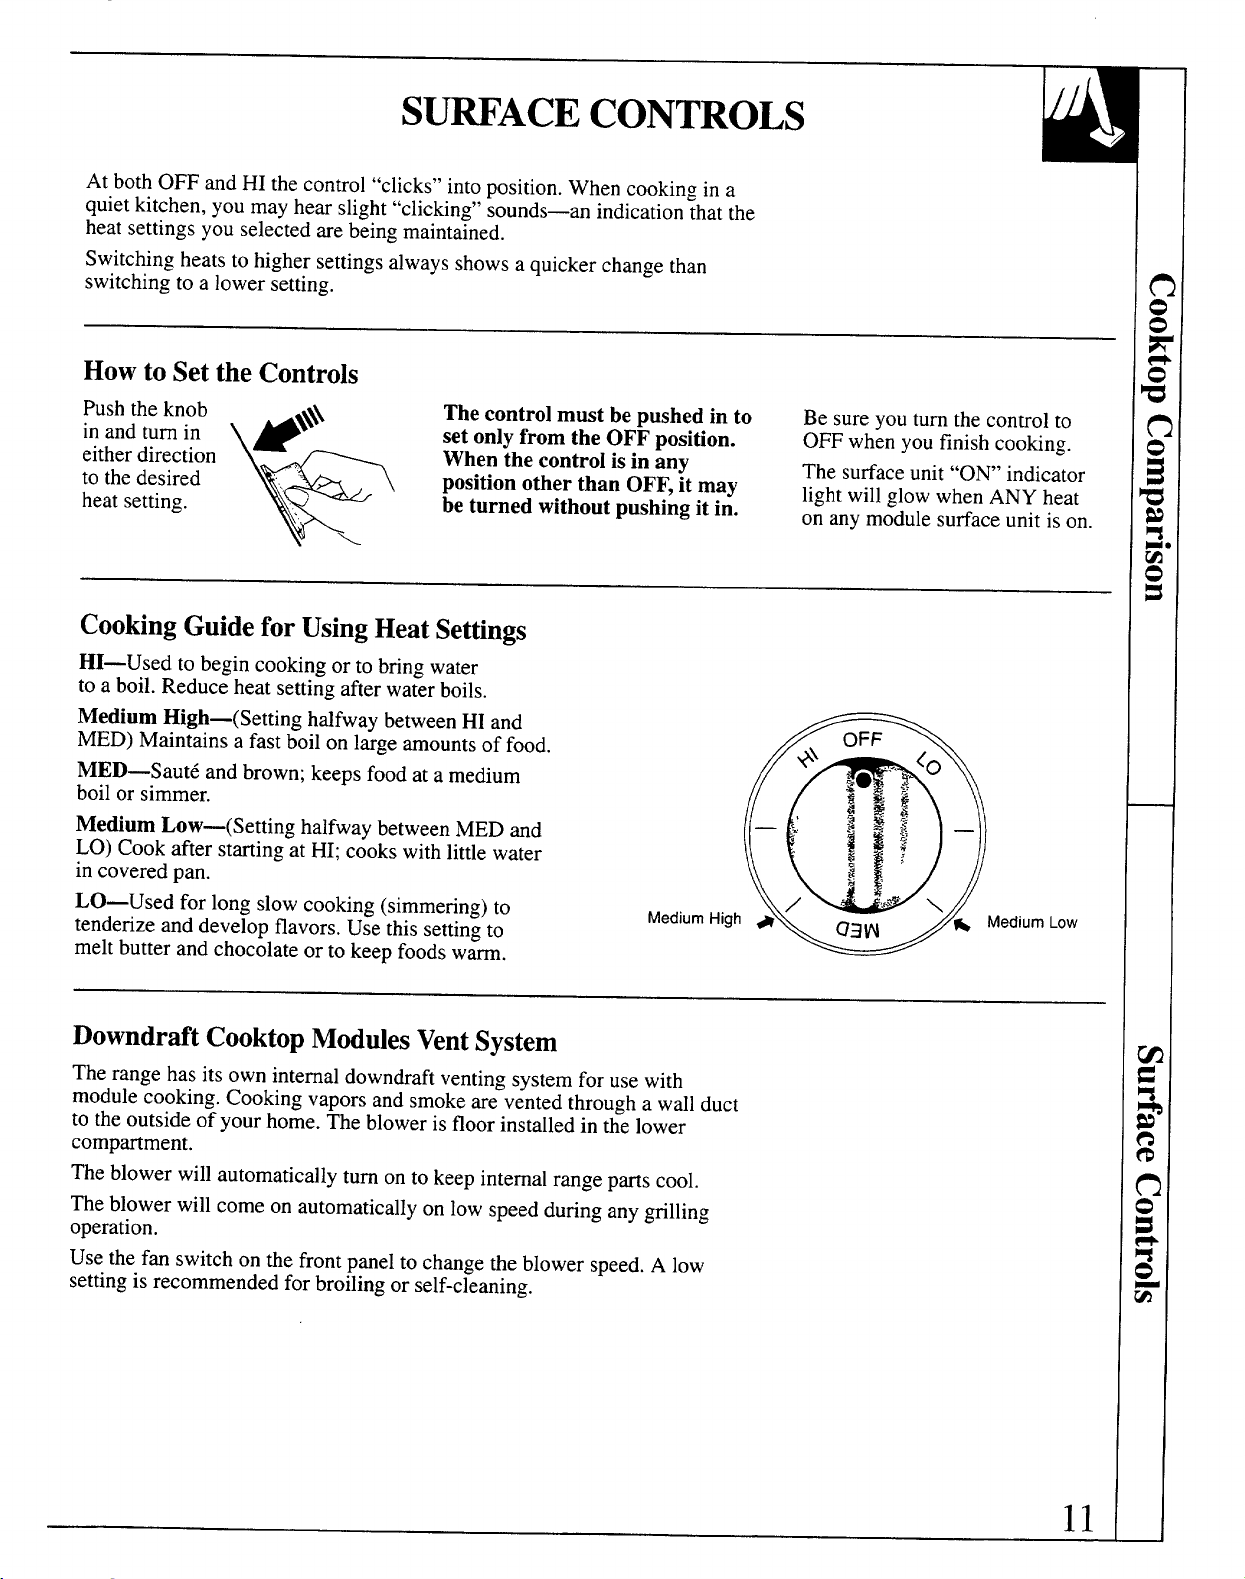
Howto Set the Controls
Pushtheknob
in and turn in
eitherdirection
*
to thedesired ,, heatsetting.
k
+*
\
Thecontrolmustbepushedin to
set onlyfrom the OFFposition.
When the control isin any
positionother than OFF, it may
beturned without pushingit in.
CookingGuidefor UsingHeat Settings
HI—Usedto begincookingorto bringwater
to a boil.Reduceheat settingafterwaterboils.
Medium High—(SettinghalfwaybetweenHIand
MED)Maintainsafastboilon largeamountsoffood.
MED—Saut&andbrown; keepsfoodat a medium
boilor simmer.
Medium Low—(SettinghalfwaybetweenMEDand
LO)Cookafter startingat HI;cookswithlittlewater
incovered
LO—Usedfor long slowcooking(simmering)to
tenderizeanddevelopflavors.Usethissettingto
meltbutterand chocolateorto keepfoodswarm.
Dan.
.
sure you turn the control to
Be
OFFwhenyoufinishcooking.
Thesurfaceunit“ON’ indicator
light willglowwhenANY heat
on anymodulesurfaceunitis on.
OFF
+\ .. (~
~o: ~
— <w
m
~gg
~g~ –
~’
f
a’
DowndraftCooktopModulesVentSystem
Therangehasits owninternaldowndraftventingsystemforusewith
modulecooking.Cookingvaporsandsmokearevented througha wallduct
to theoutsideof yourhome.Theblowerisfloorinstalledin the
compartment.
Theblowerwillautomaticallyturnonto keepinternalrangepartscool.
Theblowerwillcomeonautomaticallyonlowspeedduringanygrilling
operation.
Usethefan switchonthe frontpanelto changetheblowerspeed.A low
settingis recommendedfor broiling or self-cleaning.
lower
11
Page 12
Howto Insertthe Module
1.Be surethecontrolsareturnedto OFF.Toinstall
themodule,positiontheelectricalplugto face
therearwallof thecooktopopening.Thereyou
willseetheelectricalreceptacle.(Areceptacleis
availablein eithercooktopopening.)Letthe
leadingcomersof themodulerestonthe cooktop
surface.
2.Carefullyslidethemoduleplugtowardthe
receptacleuntil plugis engagedcompletely
in receptacle.Allowthemoduleto fit intothe
cooktopopening.
3. Lowertheinsideedgeofthemoduleinto
thecooktopopeninguntilit is flushwiththe
cookingsurface.
Howto Removethe Module
.
Besuretheentiremodulesurfaceis coolbefore
attemptingto removethemodule.Thecoilsofthe
modulewillretainheatafterthecontrols havebeen
turnedoff.Becarefulnotto getburnedon a module
thathas nothadsufficienttimeto coolafteruse.
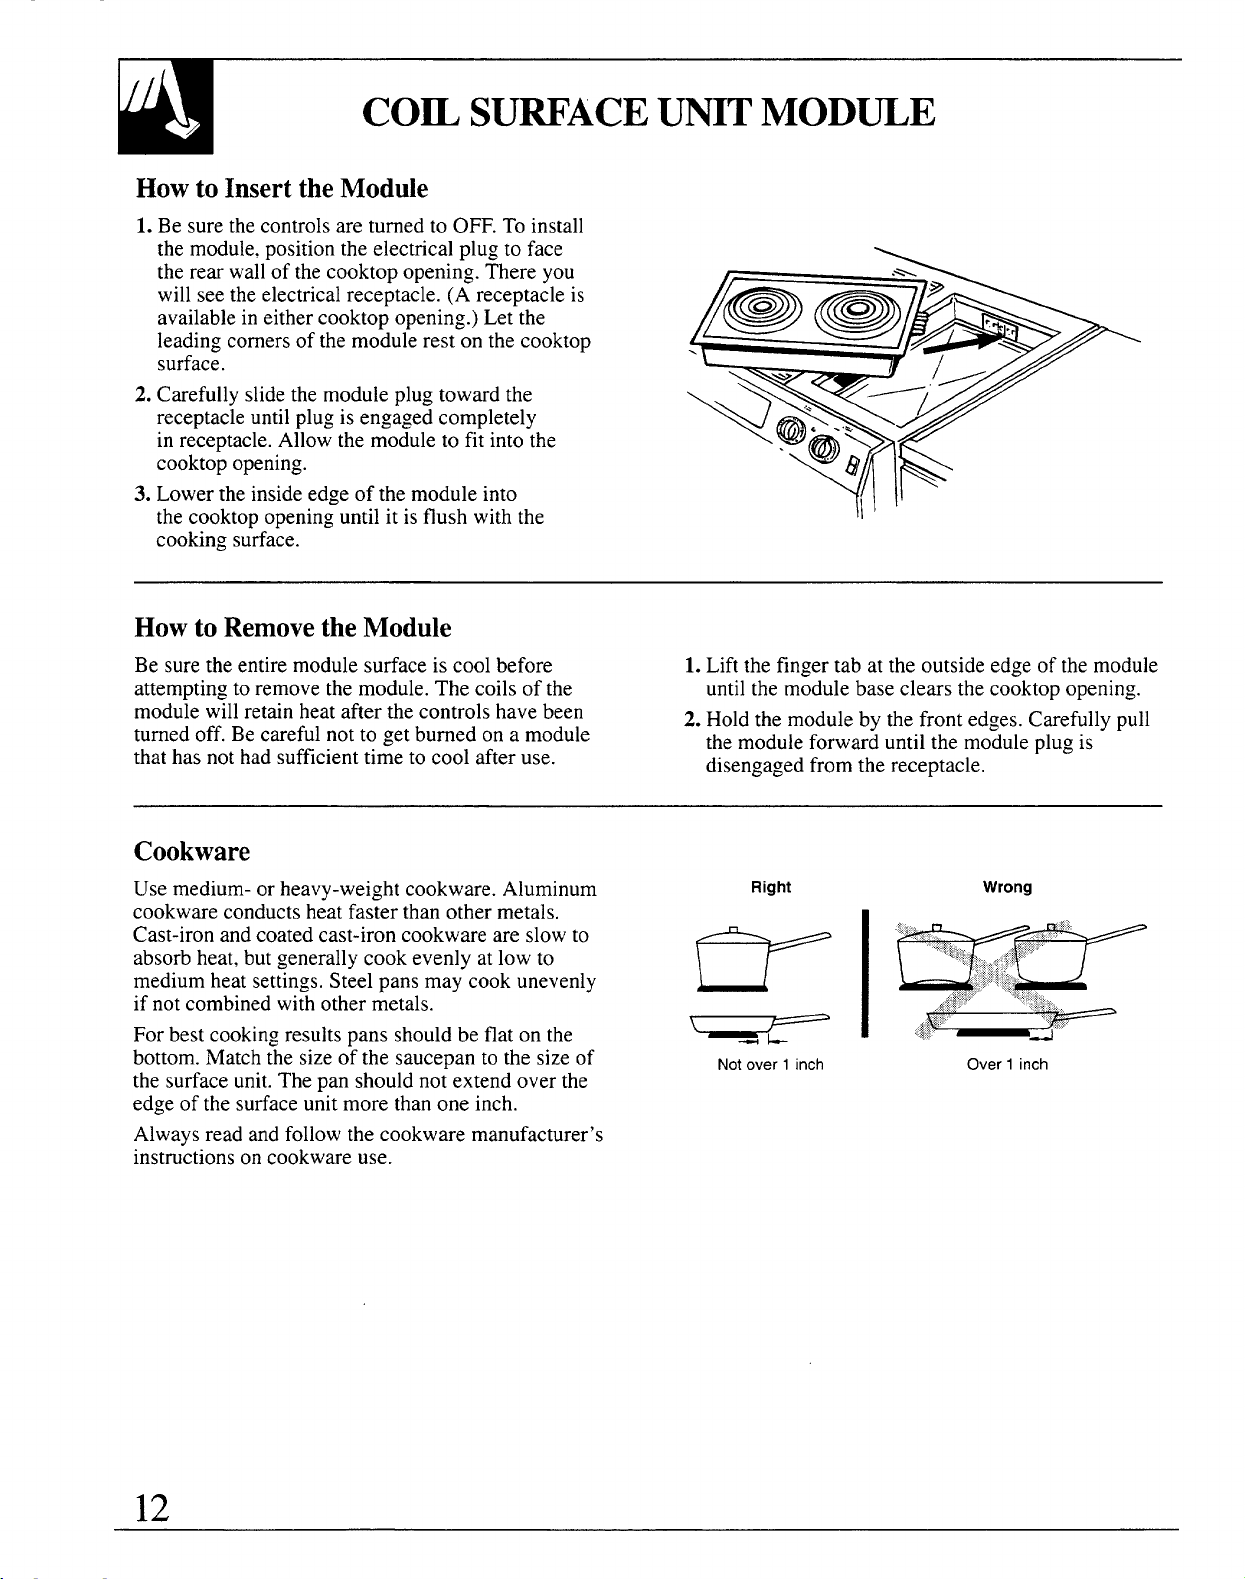
Cookware
Usemedium-orheavy-weightcookware.Aluminum
cookwareconductsheatfasterthanothermetals,
Cast-ironandcoatedcast-ironcookwareareslowto
absorbheat,butgenerallycookevenlyat lowto
mediumheat settings.Steelpansmaycookunevenly
if notcombinedwithothermetals.
Forbestcookingresultspansshouldbeflaton the
bottom.Matchthesizeofthe saucepanto thesizeof
thesurfaceunit. Thepan shouldnotextendoverthe
edgeof the sufiaceunitmorethanoneinch.
Alwaysreadandfollowthecookwaremanufacturer’s
instructionsoncookwareuse.
1.Liftthefingertab at theoutsideedgeof themodule
until themodulebaseclearsthecooktopopening.
2. Holdthe moduleby thefrontedges.Carefullypull
themoduleforwarduntilthemoduleplugis
disengagedfromthereceptacle.
Right
Notover1inch
Wrong
Over1inch
12
Page 13
Deep Fat Frying
Donotovetilllcookwarewithfat thatmay spilloverwhenaddingfood.
Frostyfoodsbubblevigorously.Watchfoodfryingat hightemperatures.
Keeptherangeandhoodcleanfromgrease.
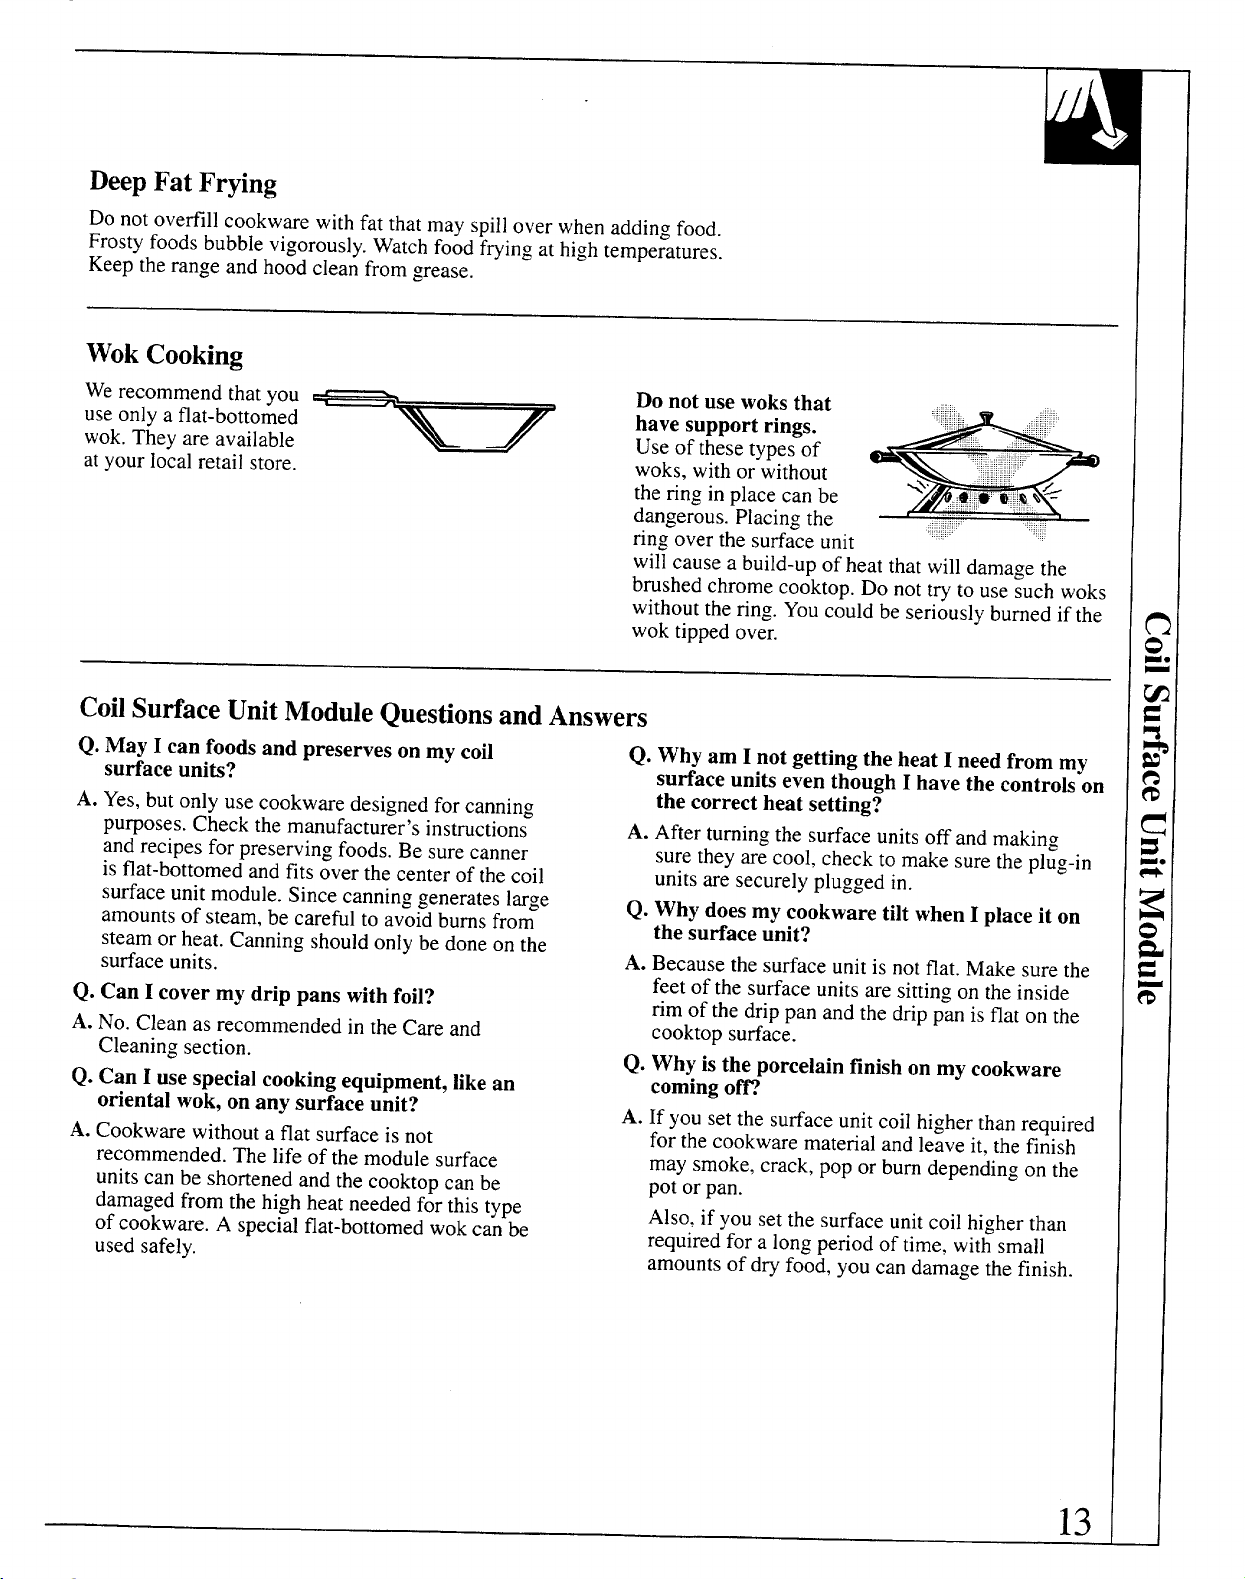
WokCooking
Werecommendthatyou
useonlya flat-bottomed
wok.Theyareavailable
atyourlocalretailstore.
CoilSutiace Unit Module Questionsand Answers
Q. May I can foodsand preserves on my coil
surface uni~?
A. Yes,butonlyusecookwaredesignedforcanning
purposes.Checkthemanufacturer’sinstructions
andrecipes forpreservingfoods.Besurecanner
is flat-bottomedandfits overthecenterof thecoil
surfaceunitmodule.Sincecanninggenerateslarge
amountsofsteam,be careful to avoidbumsfrom
steamor heat.Canningshouldonlybedoneon the
surfaceunits.
Q. CanI covermy drip pans with foil?
A.No.Cleanas recommendedin the Careand
Cleaningsection.
Q. Can I use specialcookingequipment, likean
oriental wok,on any surface unit?
A.Cookwarewithouta flat surfaceis not
recommended.Thelife of the modulesurface
units can be shortenedandthe cooktopcanbe
damagedfromthehighheatneededfor thistype
of cookware.A specialflat-bottomedwokcanbe
usedsafely.
Donot use woksthat
have support rings.
Useofthesetypesof
woks,withorwithout
theringin placecanbe
dangerous.piacingthe
ringoverthe su~aceunit
willcauseabuild-upof heatthatwilldamagethe
brushedchromecooktop.Do nottryto usesuchwoks
withoutthering.Youcouldbeseriouslyburnedif the
woktippedover.
Q. Whyam I not getting the heat I need from my
surface units even though I have the controls on
thecorrect heat setting?
A. Afterturningthesurfaceunitsoffandmaking
suretheyarecool,checkto makesuretheplug-in
unitsare securelypluggedin.
Q. Why doesmy cookwaretilt when I place it on
the surface unit?
A. Becausethesurfaceunitis notflat.Makesurethe
feetofthesurfaceunitsare sittingon theinside
rimof thedrippanandthedrippan isflat on the
cooktopsurface.
Q. Why isthe porcelain finish on my cookware
comingo~
A. If yousetthe surfaceunitcoilhigherthanrequired
for thecookwarematerialandleaveit, thefinish
maysmoke,crack,popor bumdependingonthe
potorpan.
Also,if you setthe surfaceunitcoilhigherthan
requiredfora long periodof time,withsmall
amountsofdryfood,youcan damagethefinish.
*
,::*:*~.:QN’<
..—
,..
13
Page 14
WDWNT MODULE
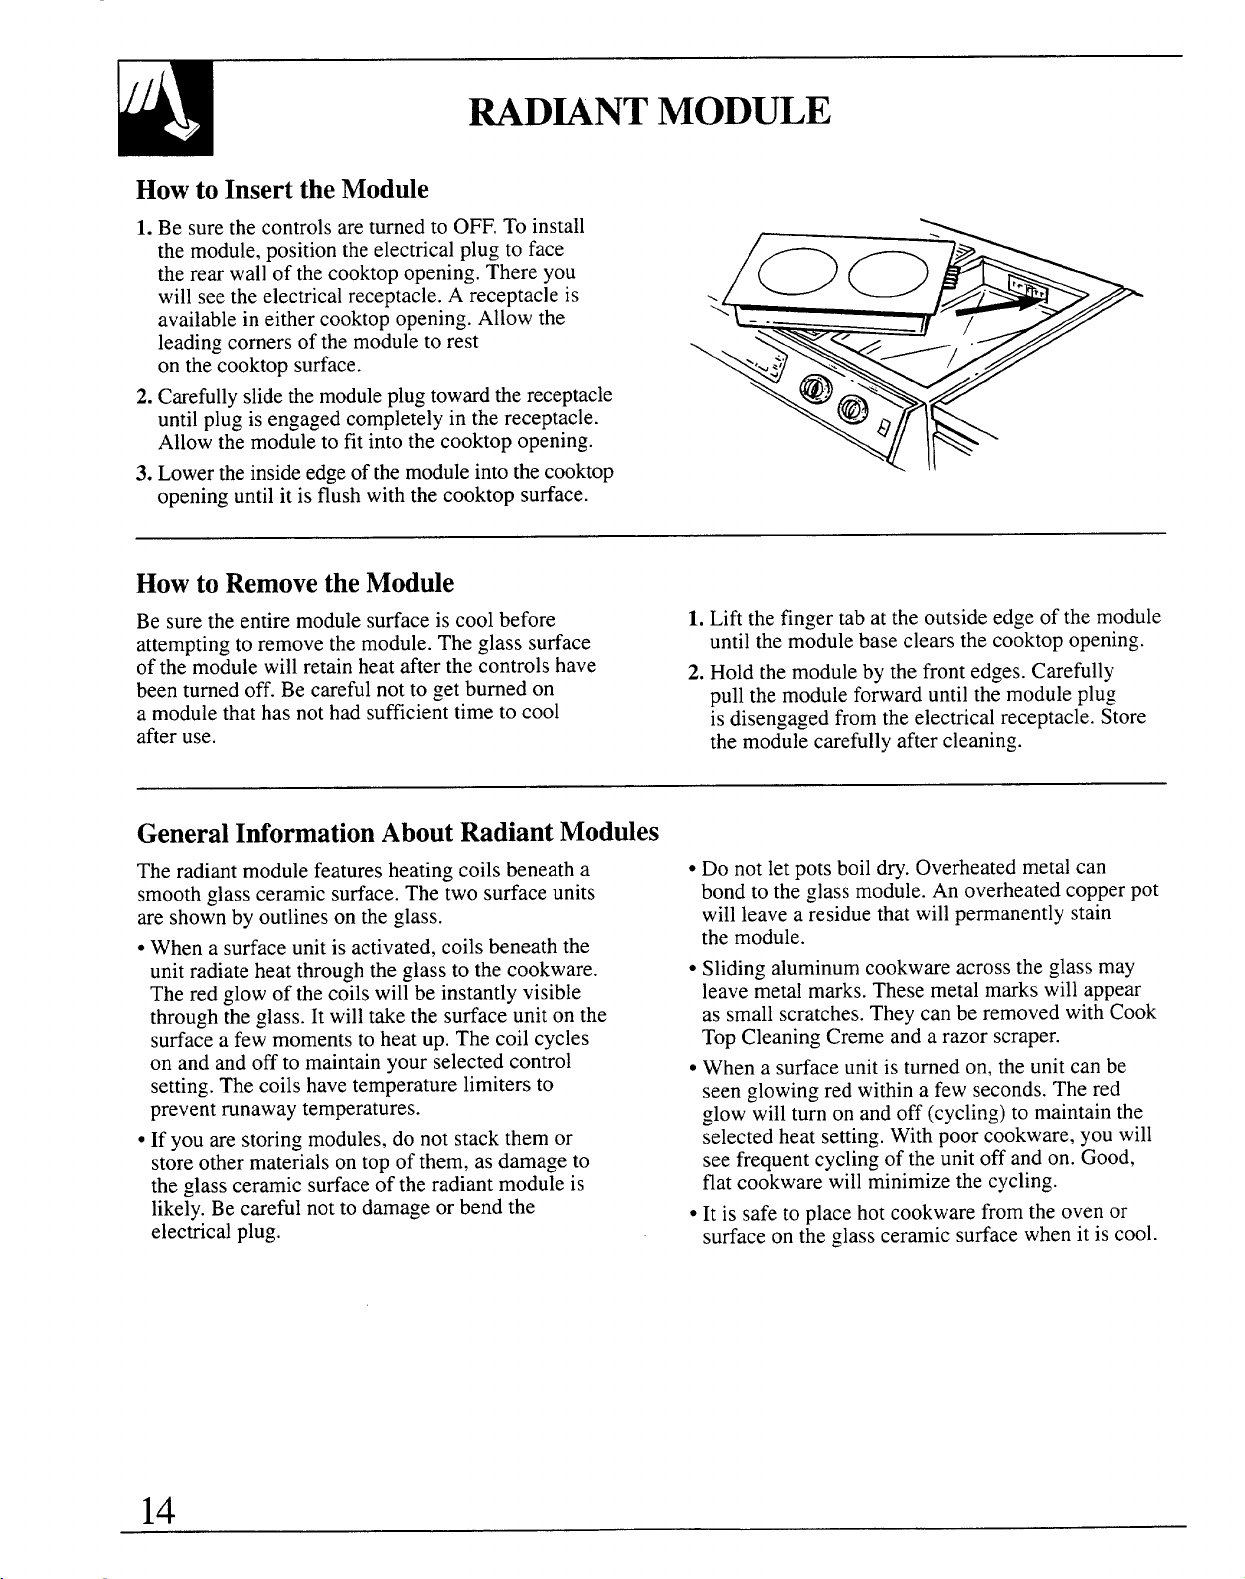
Howto Insertthe Module
1.Besurethe controlsareturnedto OFF.To install
themodule,positiontheelectricalplugto face
therearwallof thecooktopopening.Thereyou
willseetheelectricalreceptacle.Areceptacleis
availableineithercooktopopening.Allowthe
leadingcornersofthemoduletorest
onthecooktopsurface.
2.Carefullyslidethemoduleplugtowardthereceptacle
untilplugisengagedcompletelyin thereceptacle.
Allowthemoduleto fitintothecooktopopening.
3. Lowertheinsideedgeofthemoduleintothecooktop
openinguntilit is flushwiththecooktopsurface.
Howto RemovetheModule
Besuretheentiremodulesurfaceis coolbefore
attemptingto removethemodule.Theglasssurface
ofthemodulewillretainheatafterthecontrolshave
beenturnedoff.Becarefulnotto getburnedon
a modulethathasnothadsufficienttimeto cool
afteruse.
1.Liftthefingertabat the outsideedgeof themodule
untilthemodulebaseclearsthecooktopopening.
2.Holdthemodulebythefrontedges.Carefully
pullthemoduleforwarduntilthemoduleplug
isdisengagedfromtheelectricalreceptacle.Store
themodulecarefullyaftercleaning.
GeneralIMormationAboutRadiantModules
Theradiantmodulefeaturesheatingcoilsbeneatha
smoothglassceramicsurface.Thetwosurfaceunits
areshownby outlinesontheglass.
● Whena surfaceunitis activated,coilsbeneaththe
unitradiateheatthroughtheglassto thecookware.
Theredglowof thecoilswillbeinstantlyvisible
throughtheglass. It willtakethe surfaceuniton the
surfacea fewmomentstoheatup.The coilcycles
on and andoff to maintainyourselectedcontrol
setting.Thecoilshavetemperaturelimitersto
preventrunawaytemperatures.
● If you arestoringmodules,donotstackthemor
storeothermaterialsontopof them,as damageto
theglassceramicsurfaceofthe radiantmoduleis
likely.Becarefulnotto damageorbendthe
electricalplug.
● Do notletpotsboildry.Overheatedmetalcan
bondto theglassmodule.An overheatedcopperpot
willleavea residuethatwillpermanentlystain
themodule.
● Slidingaluminumcookwareacrosstheglassmay
leavemetalmarks.Thesemetalmarkswillappear
as smallscratches.Theycanbe removed withCook
TopCleaningCremeanda razorscraper.
● Whena surfaceunitis turnedon,theunitcanbe
seenglowingredwithina few seconds.Thered
glowwillturnon andoff (cycling)to maintainthe
selectedheatsetting.Withpoorcookware,youwill
seefrequentcyclingoftheunitoffandon.Good,
flatcookwarewill minimizethecycling.
● It is safeto placehotcookwarefromtheovenor
surfaceon theglassceramicsurfacewhenitis cool.
Page 15
~pes of Cookware
Thefollowinginformation willhelp you choose
cookwarewhich willgivegoodperformance.
StainlessSteel:
Especially goodwith a sandwichcladbottom.The
highly recommended
sandwichbottomcombinesthebenefitsof stainless
steel(appearance,durability,andstability)withthe
advantagesof aluminumorcopper(heatconduction,
evenheatdistribution).
Aluminum:
heavy weight recommended
Goodconductivity.Aluminumresiduessometimes
appearasscratchesonthecooktop,butcanbe
removedif cleanedimmediately.Becauseof its
lowmeltingpoint, thinweightaluminumshouldnot
beused.
Glass-ceramic:
Usable, but not recommended.
Poorperformance.Mayscratchsurface.
Howto CheckPan Performance
Useof correct cookwarecan affectthe cooking
performance and cleaningofyour cooktop.
Thecorrectcookwarereducesthetemperatureof
thecooktopsurfaceandminimizesthechanceof
spilloversburningontothecooktop.
Youmust use pans with perfectly flat bottoms.
Somepansmayhavecurvedor roundedbottomsor
maybe warped.If youare unsureof theflatnessof
your pansyoumaydo thisquicktest.
Turnyour pan upside
downon thecountertop,
placea rulerflatagainst
thepan surface.The
bottomofthepanand the
straightedgeof theruler
e
shouldfitflushagainsteachotherall thewayacross.
Turnthemler a full360degrees,checkingforany
spacebetween
the rulerandthebottomof thepan.
m
Stoneware:
Usable, but not recommended.
Poorperformance.Mayscratchsurface.
Cast Iron:
Usable, but not recommended.
Poorperformance.Mayscratchsurface.
Copper Bottom:
Goodperformance,butcopper may leaveresidues
whichcanappear as scratches.Theresiduescanbe
removed,aslongasthe cooktopiscleaned
immediately.However,donotletthesepotsboildry.
Overheatedmetalcanbondto glasscooktops.
Anoverheatedcopperpot willleavea residuethat
willpermanentlystainthe cooktop.
Porcelaidenamel:
Goodperformanceonly witha thick,flat,smooth
bottom.Avoidboilingdry,as porcelaincanmeltand
fusetothe surface.
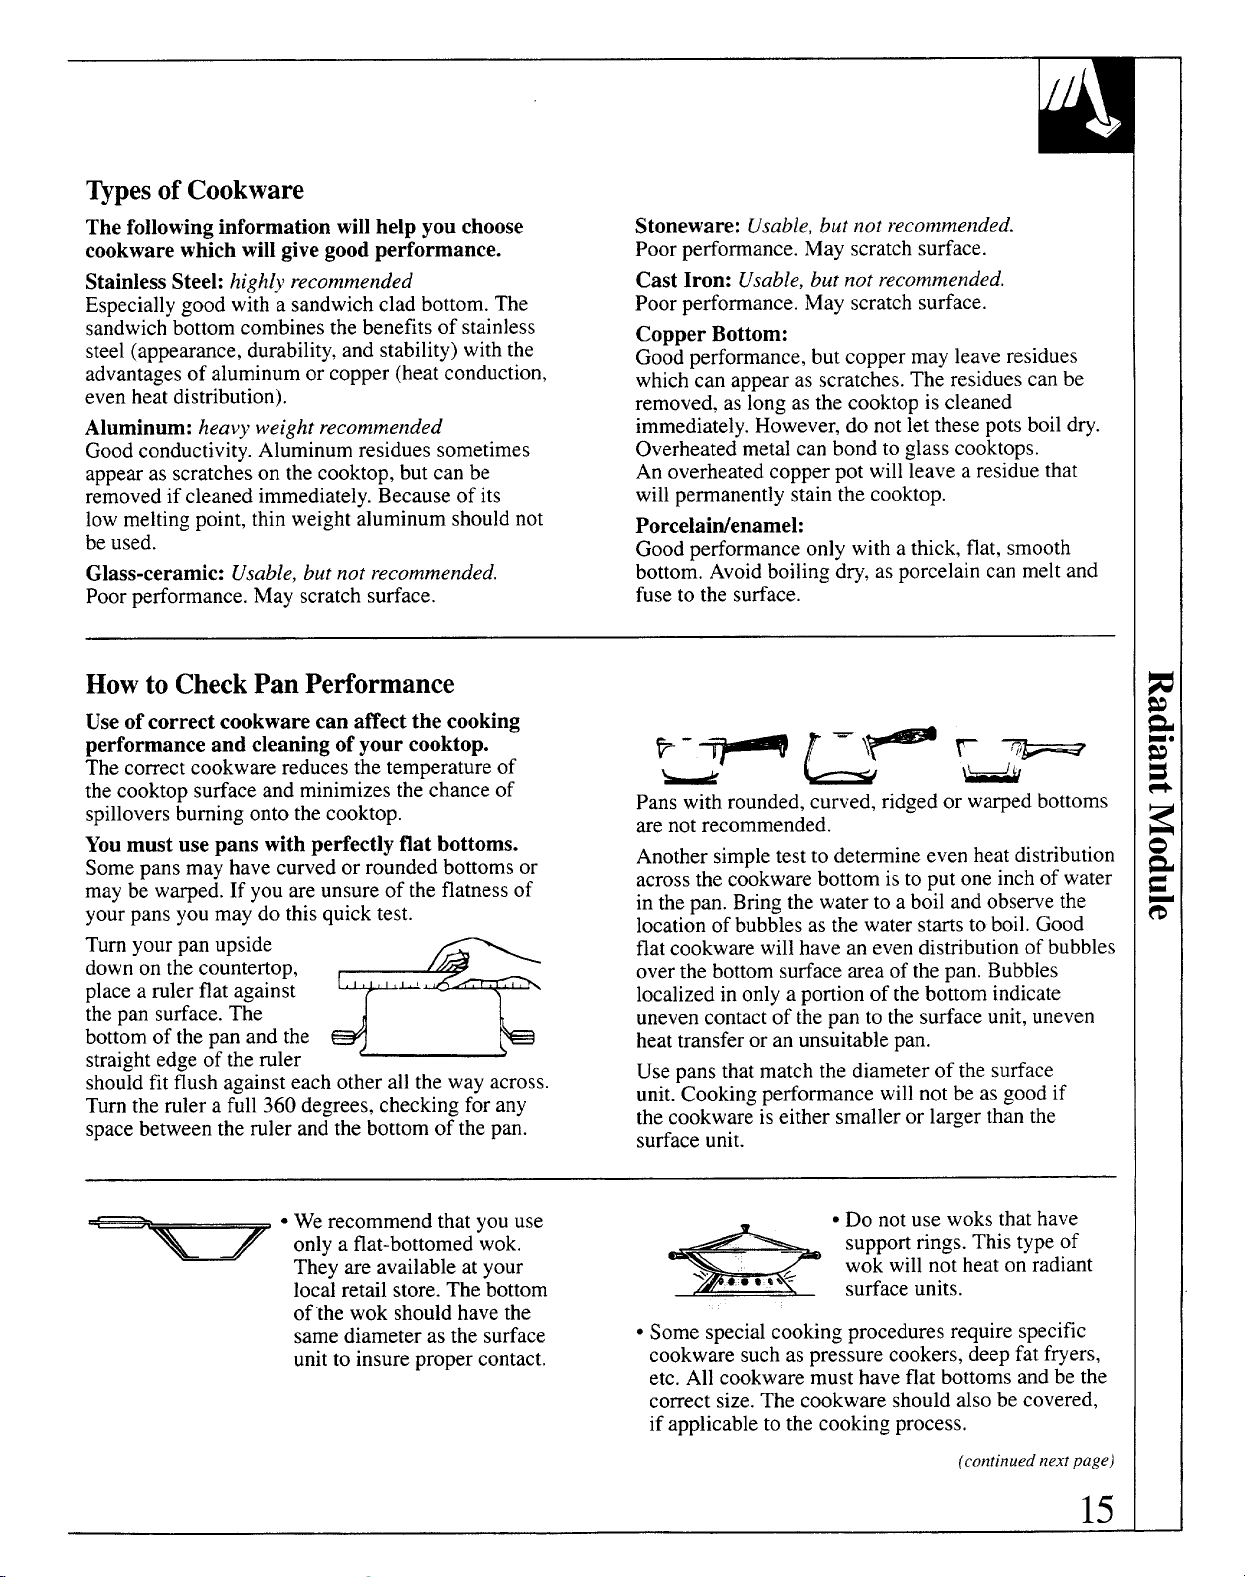
-’ e-
Panswithrounded,curved,ridgedor warpedbottoms
arenotrecommended.
Anothersimpletestto determineevenheatdistribution
acrossthecookwarebottomisto putoneinchof water
inthepan.Bringthewaterto a boilandobservethe
locationofbubblesasthewaterstartstoboil.Good
flatcookwarewillhaveanevendistributionofbubbles
overthebottomsurfaceareaof thepan.Bubbles
localizedin onlya portionof thebottomindicate
unevencontactofthepanto thesurfaceunit,uneven
heat transferor anunsuitablepan.
Usepansthatmatchthediameterof thesurface
unit. Cookingperformancewillnot beas goodif
thecookwareiseithersmalleror largerthanthe
surfaceunit.
+- ● Werecommendthatyouuse
onlya flat-bottomedwok.
Theyare availableatyour
local retailstore.Thebottom
of‘thewokshouldhavethe
samediameterasthe surface
unitto insurepropercontact.
● Do notusewoksthathave
supportrings.Thistypeof
wokwdl notheaton radiant
= surfaceunits.
● Somespecialcookingproceduresrequirespecific
cookwaresuchas pressurecookers,deepfat fryers,
etc.Allcookwaremusthaveflatbottomsandbethe
correctsize.The cookwareshouldalsobe covered,
if applicableto thecookingprocess.
(continued next page)
15
Page 16
WDWNT MOD~E
(continued)
CAUTION
● Nevercookdirectlyon theglass.Alwaysusecookware.
● Alwaysplace the panin thecenterofthe surfaceunityouarecookingon.
● Do not slidecookwareacross thecooktopbecauseit can scratchtheglass.
Theglassis scratchresistant,notscratch-proof.
● Donotusethe surfaceas a cuttingboard.
Plasticand SugarySpillovers
Sugaryspillovers(suchasjellies,fudge,candysyrups)
ormelted plasticscancausepittingofthe surfaceof
Specialcareshouldbe takenwhenremovinghot
substances.Followthe instructionsin theCareand
your module (notcoveredbythe warranty)unlessthe Cleaningsectioncarefully.
spillisremoved whilestillhot.
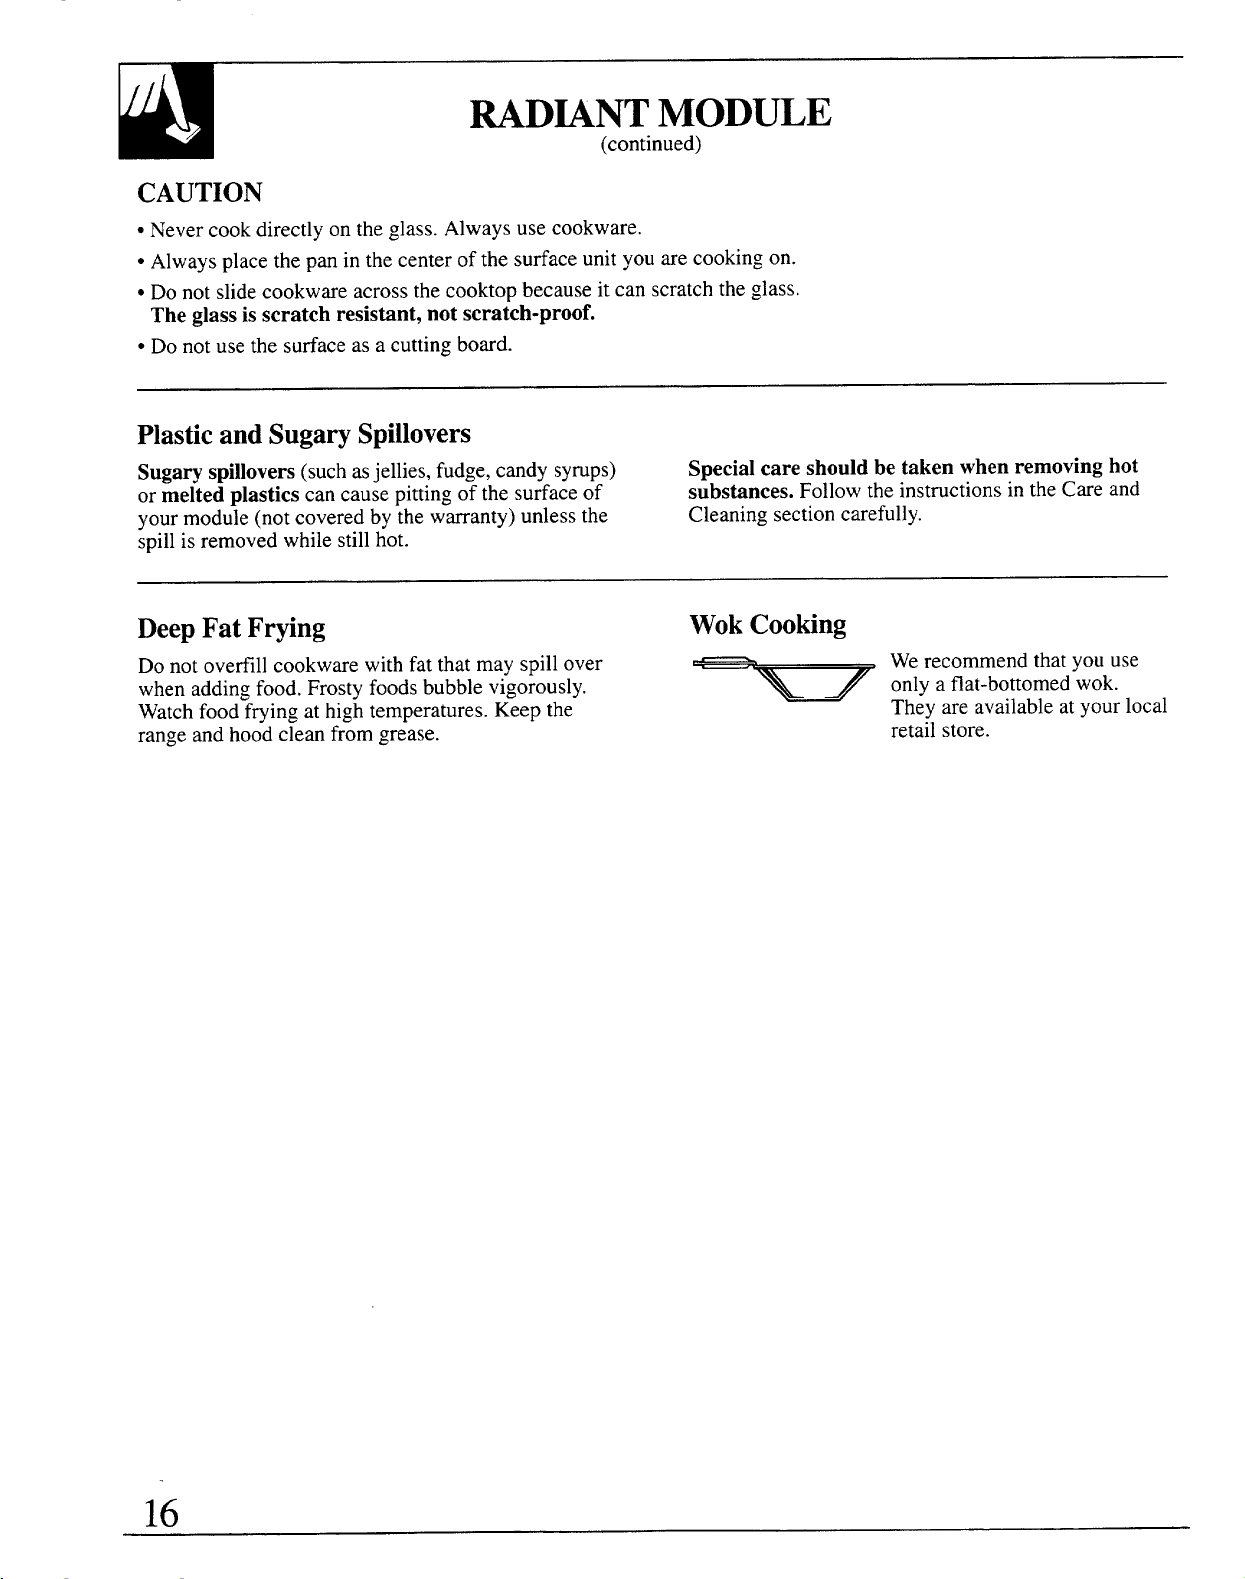
DeepFat Frying WokCooking
Donotovetilllcookwarewithfat thatmayspillover
whenaddingfood.Frostyfoodsbubblevigorously.
Watchfoodfryingat hightemperatures.Keepthe
rangeandhoodcleanfromgrease.
We recommendthatyouuse
onlya flat-bottomedwok.
Theyare availableatyourlocal
retailstore.
16
Page 17
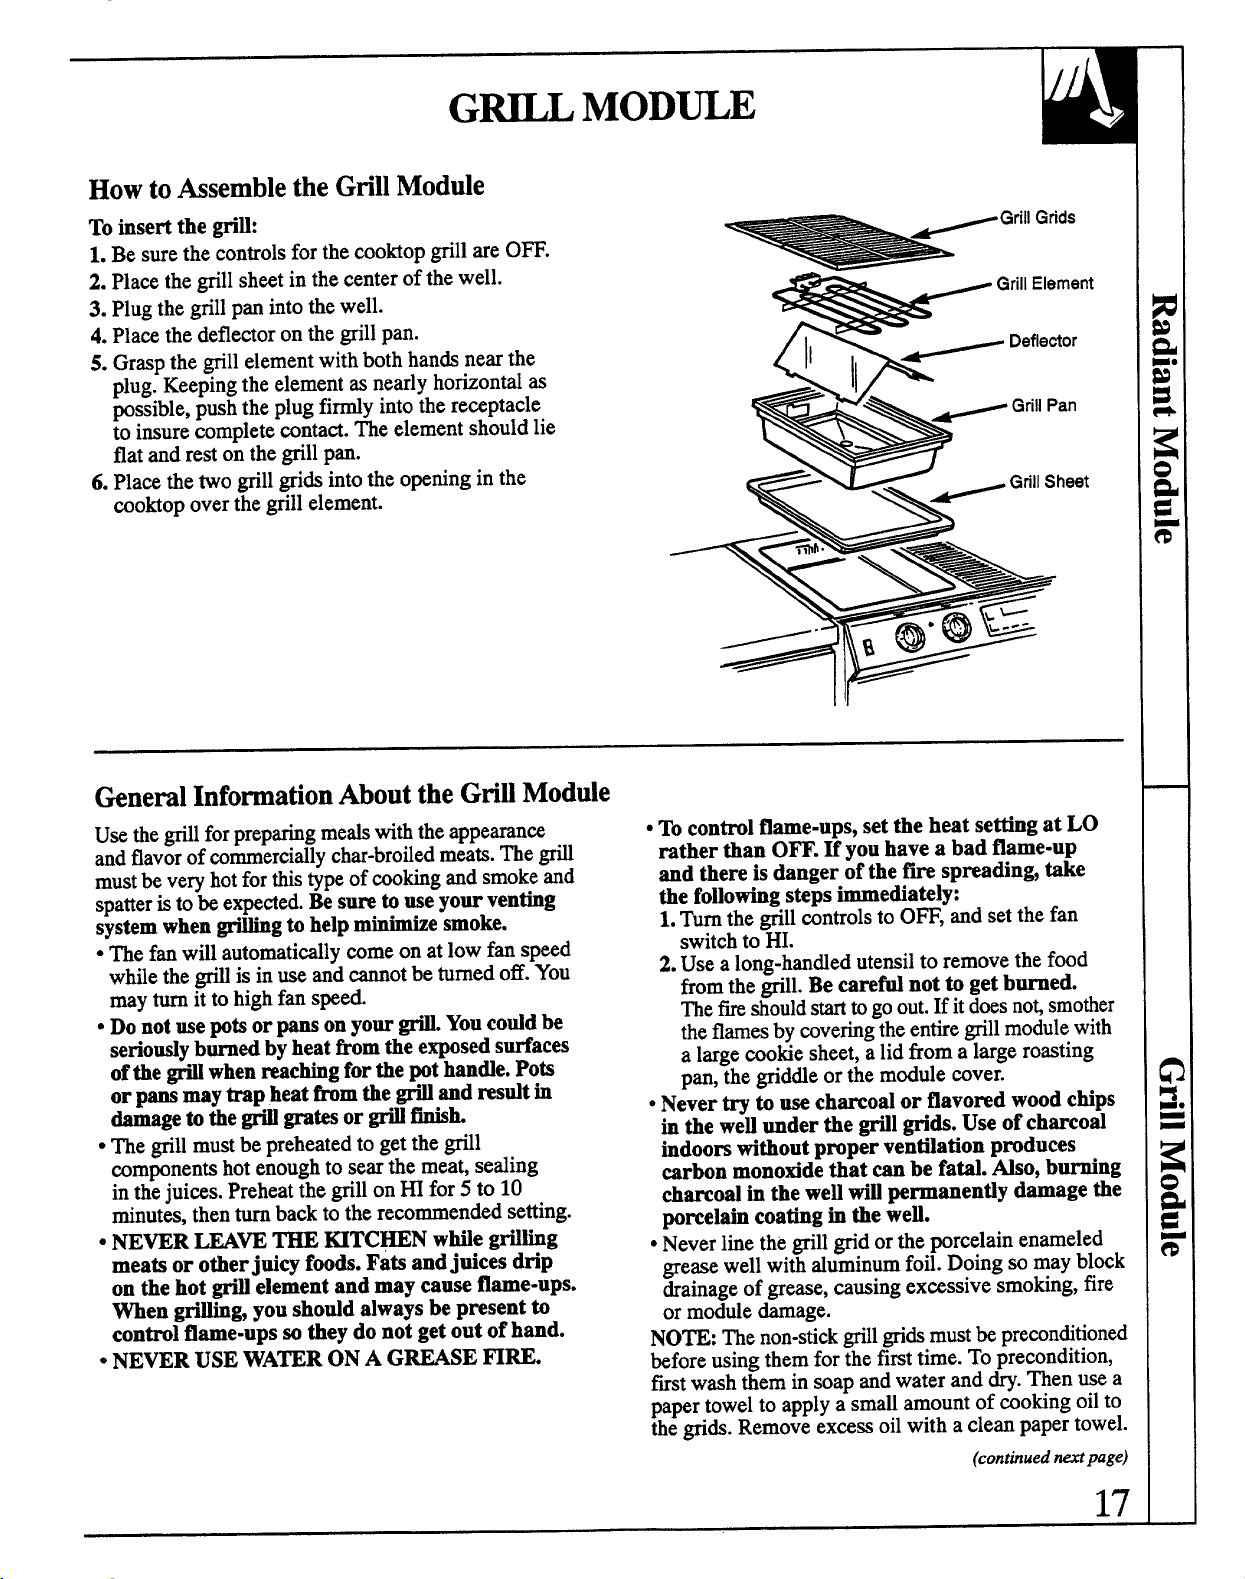
HowtoAssemblethe Gtill Module
Toinsertthe gri~:
1.Besurethecontrolsforthecooktopgrillare0~.
2. Placethegrillsheetin thecenterofthewell.
3. Plugthegrillpanintothewell.
4.Placethedeflectoronthegrillpan.
5. Graspthegrillelementwithbothhandsnearthe
plug.Keepingtheelementas nearlyhotiontal as
possible,pushtheplugfidy intothereceptacle
to insurecompletecontact.Theelementshouldlie
flatandrestonthegrillpan.
6. Placethetwo grillgridsintotheopeningin the
cooktopoverthe grillelement.
I
/ [$
Geneml InformationAbout the Gtill Module
Usethegrill forpreparingreedswiththeappearance
andflavorofcommerciallychar-brotiedmeats.The@l
mustbeveryhot forthistypeofcookingandsmokeand
spatteristo beexpected.Besuretouseyourventing
systemwhengri~g to helpm-e smoke.
● Thefan willautomatidly comeon at lowfan speed
whflethegri~isin useandcannotbeturnedoff.You
mayturn itto highfan speed.
● Donotusepotiorpansonyour@. Youcotidbe
seriourdyburnedbyheatfromtheexposedsurfaces
ofthe@ whenreachingforthepothande. Pots
orpansmaytrapheatfromthe@ andresdt in
_etitie@~@sor@~k
● Thegrillmustbe preheatedto getthe@l
componentshotenoughto searthemeat,sealing
inthejuices.Preheatthegrillon ~ for5 to 10
minutes,thenturnbacktotherecommendedsetting.
cNEVER LEAVE= ~TC~N w~e gtihg
meatsorotherjuicyfoods.Fatsandjuices drip
onthehot@ elementandmaycauseflame-ups.
Whengrihg, youshodd alwaysbepresentto
controlflame=upsso tiey do notgetout of hand.
● NEVERUSEWATERONA GREASEHRE.
● Tocontrolflame-ups,set theheatsettingatLO
ratherthanOFF.fi youhavea bad flame-up
andthereisdangerof thefm spreading,take
thefollowingstepsimmediately:
1.Turnthegrillcontrolsto0~, andsetthefan
switchto HI.
2.Usealong-handedutensilto removethefood
fromthegrill.Be careti notto getburned.
Thefi shouldstarttogoout.Ifit doesno~smother
the flamesbycoveringtheentiregrillmodulewith
a largecookiesheet,a lid froma largeroasting
pan,thegridde or themodulecover.
● Never try to usecharcoal or flavoredwoodchips
inthewe~ underthe @l grids.Useof charcoal
indoomwithoutproperventilationproduces
carbonmonoxidethatcanbe fati. Mso, burning
charcoalin thewe~ winWrrnanentiydamagethe
Wrcelti coatinginthewe~.
● Neverlinethegrillgridorthe porcelainenameled
greasewellwithaluminumfoil.Doingso mayblock
drainageofgrease,causingexassive smoking,fire
or moduledamage.
NOTE:Thenon-stick@l gridsmustbepreconditioned
beforeusingthem for thefirsttime.Toprecondition,
firstwashthemin soapandwateranddry.Thenusea
papertowelto applya smallamountof cookingoilto
thegrids. Removeexcess oilwith a cleanpapertowel.
(conthued ntipage)
17
Page 18
G~L MOD~E
(continued)
NOTE:It is recommendedthatyouhavea dry chemical,foamor Halon
type fire extinguisherwhereyoucaneasilyreachit in caseofa cooking
fire.NEVERUSEWATERON A GREASEFIREas it is likelyto spread
theflames.Readtheinstructionsontheextinguisheraheadof timeandbe
preparedtofollow themin caseof a cookingfire.
GrillTips
● Do not leavethegrillunattendedwhileitis in use.
● Removeaccumulatedgreasefromthegrillpanafter
eachuseto lessensmokingandodors.Greasebuildup
canbecomea firehmard.
● Thegratesshouldbe oiledor sprayedwitha
non-stick,salt-freevegetableoilbeforecooking
to preventsticking.
● Preheatthegrillfor5-10minutesatHI heatsetting,
thenturnto thedesiredsettingfor cooking.
GrillQuestionsand Answers
Q.Whencookingmanyindividualfoods,whatcan
I doto insurethatfoodswillcookevenly?
A.Whencookingfoodsof varioussizesand
thicknesses,startlarger or thickerpiecesfirst
andaddquickercooking,smallerpieceslater.
Pressthe meatlightlyto lie flatonthegrill.
Slashthefaton theedgesof steaksand chops
to prevent curling.Breakthejointsof split
chickenssotheywilllie flat.
Q.My grilled meatssometimescomeout
drierthantheyshould.WhatcanI do
to helppreventthis?
A. Seasonmeatsaftercookingratherthanbefore—
saltcan drawoutjuices anddryoutmeat.Use
tongs to turnandrearrangemeatson thegrill;
forkswillpierce the meatandreleasejuices.
Q.I followthecookingtimessuggested,butmy
foodsdon’tgetdoneproperly.Is there
somethingwrongwithmygrill?
A. Probablynot.Suggestedcookingtimesshouldbe
usedonlyas a generalguide.Variablesin foodcan
changecookingtimesrequired.
● Trimthefat frommeatsbeforeplacingthemonthe
grill.Thiswillreducesmokingandlessengrease
buildupinthe greasewell.
● Allowspacebetweenfoodswhenplacingthemon
thegrill.Airneedsto circulatearoundthefoodfor
bestcookingresults.
● Occasionallyrearrangefoodson thegrillto prevent
stickingandprovidebetterbrowning.
● Seasonmeatsaftercookingratherthanbefore—
saltcandrawoutjuicesanddry outmeat.Usetongs
to turn andrearrangemeatsonthe grill;forkswill
piercethemeatandreleasejuices.
Q.HowcanI keepbarbecuedmeatsfrom
developinganunattractiveburnedlook
andtaste?
A. Saucescontainingsugarwilloftenburnif used
duringtheentirecookingtime.If yourfavorite
saucecontainssugar,try addingit onlyduring
thelast 15to 20minutesof cookingtimefor
bestresults.
Q.Canmy grillbeswitchedtothe otherside
ofthe range?
A. Yes.Theseinterchangeablemodulescanbe used
oneithertherightor leftsideof thecooktop.
Wheninsertingorremovinga module,takecare
notto forcetheconnectionorexertundue pressure
whichcoulddamagetheelectricalcontacts.
Additionalmodulescanbepurchasedfromyour
dealerto doubleyourgril~griddlecapacityor to
addtwo morecoilsurfaceunits.
Q. Foodscookedon mygrill are not browning as
much as I wouldlike.Whatcouldcausethis?
A. A longerpreheatingand grilltimemaybe
necessarytoachievethedesiredresults.
Page 19

Donot leaverangeunattendedduring“preheat”
@ohs turnedto “~”) oranytimethebobs are
turned to “HI” with food on the Grill or Griddle.
1.Preheatat HI setting for 5 minutesbeforegrilling.
Turnto the heatsettingin theguideor your
cookbookforthe foodyouaregrilling.
2.Trimexcessfat fromthe meat.
3.Beforecookingsteaks,slashfataroundthe edges
topreventcurlingof meat.
4.Suggestedcookingtimesshouldbe usedonly
asa guide,sincevariablesinfoodmn change
cookingtimes.
5.If yourrangeis connectedto 208volts,these
cookingtimesmayneedtobeextended.
Foti
BeefCubs (1inch) ] HI
BeefSte@ tender
Suggested
Set@
(31: 1inch)
HI
Medium HI
Well
HI
Cticken
PieeesorQuarters HI
Halves HI
H&:qers (3/4 inch)
Medium
Well
Hmn
Steaks(1to 1%inch) HI
HotDogs HI
mhohs
Meat
m
HI
m
HI
17–20
5-7 per side
= perside
*1O ~r side
5M0 (total)
7M0 (toti)
1s20
17-20
&7 perside
%9 perside
lW1l perside
%10perside
7-9 (total)
2S30
1G15
%10perside
1S17 perside
Comments
Marinatelesstenderbeefbeforegrilling.
Ifsaua is desired,bastelast15 to 20minutes,turnmd rearrangeoften.
Brushwithmeltedbutter.
Ifstuffe~add6 minutestototaltime.Covertopwiti foil.
h overafterhalfofeootig time.
For lesstendervegetablessuchas tomatoes,redueetime4 to 6 minutes.
6B0 (toti)
Parbofl5 minutesbeforegrilling.Rearrangeandturnoverfrequently.
Bastewithsauw last 10minutes,asdesired.
19
Page 20

G~DLE ACCESSORY
Yournon-stickcoatedgriddleprovidesanextra-largecookingsurface
formeats, pancakesorotherfoodsusuallypreparedina fryingpan or
electricskiUet.Youcanalsousethegridde as a warmingtrayby using
a low-heatsetting.
HowtoAssemblethe GtiddleAccesso~
1.Besurethe controlsareOFF.
2. Plugthegrillpanintothewell.
3. Graspthe grillelementwithbothhandsnearthe
plug.Keepingtheelementasnearlyhortionti as
possible,pushtheplugf~y intothereceptacle
to insurecompletecontact.Theelementshouldlie
flatandrestonthegrillpan.
4.Placethegndde intotheopeninginthecooktop
withthereservoirattheback.Thegndde willrest
ontheledgeofthe grillpan.
Foodsplacedatthebackof thegridde maycook
fasterthanthose at thefront.Thisisbecausethe
gridde is designedtoslope towardstheresemoir
placingit closerto theheating elementattherear.
NO~: men properlyplaced,thegndde sits
slightlyabovethecooktop.This,andthe open
spaceson thesides and rearofthegridde, prevent
temperaturesfromgettingtoohigh.
-
Usingthe Gtiddle
Thenon-stick@d@e mti bepmonditionedbefore
usingit forthe fmt time.Topreconditionfirstwash
thegridde insoapandwaterand dry.Thenusea
papertowelto applya smallamountof cookingoilto
thegridde. Removeexwssoilwitha cleanpapertowel.
Preheatthe gridde as recommendedintheGridde
tioking Guide.Mer preheatingfortherecommended
amountoftime,applya smallamountofoil orbutter.
Howto Removethe GtiddleAccesso~
Besurethecontrohare0~ md thegridde iscool.
Toremovethe gridde:
1.Liftthefrontedgeof thegridde a bit to letany
excessfat or oildraintotheback.
2. Removethegridde.
Donot overheatthegriddle.having thegriddle
at ~ for more than 10minutes without food can
damage the non-stick coating.
Thefanwillautomaticallycomeonatlowfan speed
whilethegridde is in useandcannotbeturnedoff.
Youmayturnit to highfan speed.
3. Gr=p theelementwithbothhandsoneitherside
oftheplug.
4.Raise theoppositesideof theelementjustenough
to clearthewell,thenpullawayfromthereceptacle.
Theelementwillnotsitlevelwhenreplacedifit is
forcedtoo farupwardwhenremoved.
5. Removethegrillpan.
Page 21

GtiddleTips
● Conditionor “season”the gndde before ● Foodswhicharehighin naturalfat,suchasbacon
first-timeuse. orsausage,maybestartedon a coldgridde.
● Mostgridded foodsrequirecookingona preheated
surfaw,whichmaybe greasedlightlybeforeadding
food.Preheatthe @d&e 5 minutesatHI heatsetting,
urdessotherwiseindicatedintheGndde Cooking
Guide,thenswitchtothe recommendedcooksetting.
● Foodstobewarmedmaybeplaceddirectlyonthe
gridde; a highdomedmeti @ver,suchas an
invertedkettle,placedoverthemwillhelpstorethe
heat.Foodsincovereddishesorpans maydso be
● Make surethegrillpan is cleanbeforeusinggriddle.
● Topreservethefinish,useordyTeflon”coate~
nylonor woodenspatulasandspoons.Neveruse
thegriddlesurfaceas a cuttingboard.
. Overa periodof time,minorscratchesandsome
discolorationmayappearin thenon-stickcoating.
Thiswillnotaffectthe cookingperformanceorthe
non-stickfinish.
warmedonthegridde. Useheat-resistantdishesordy.
Gtid~e Questionsand~swem
Q.HowshouldI storemygriddlewhenitisnot
inuse?
A. Toavoidmarringthenon-stickfinish,storethe
gridde uprightontheedgewiththeterminalsup
to avoiddamage.Hit isnecessarytostoreit flat,
avoidplacingotherpansor cookwareontop.
Q. Howlongcanfoodsbekeptwarmwiththe
grid~e withoutlosingtheirappeal?
A. Nolongerthan2 hoursis recommended,to assure
goodf~odqualityandpreventspoilage.“Delicate
foods,suchaseggs,shouldnotbekeptmorethan
15to 30 minutes;entreesandcasserolesmaybe
warmedfor 30to 60 minutes.Horsd’oeuvreswill
stayhotfor servingupto 1 or 1%hours.Rearrange
orstirfoodsoccasionally,ifpossible.
Q.Canmy gridde be stitched to the otherside
ofthefinge whereit wotid bemoreconvenient
forme?
A. N1 interchangeablemodties canbe usedon either
therightorleftsideofyourcooktop.Simplylift
outthemodules,takingcarenotto damagethe
electricrdcontactsbyjerkingor forcingthem.
Q.Mygriddleis cookingfasteriutherearthanin
thefront Is theresomethingwrong?
A No.Sin& thegridde is designedtoslopeslightly
sothatthe greasewillcollectinthereservoir,the
rearof thegridde setscloserto theelement,which
maycausefoodsto cookmorequic~y.
Q.my aren’tmyfoodsdoneeventhoughthey
havecookedthefuntime?
A Preheatthegndde for a longertimeandleave
foodsonthegridde longerto attainthe desired
degreeof browning.
Q. Do I need specialcookwarefor use with my
gridde?
A Avoidusingmetalcookwarewithsharppoints
orroughor sharpedgeswhichmightdamagethe
non-stickcoatedgridde surface.Do notcutfoods
onthegridde. Useordyheat-resistantdisheswhen
foodsincontainersareto bewarmedonthe@dde.
Forfurtherinformationon tig for yourgridde’s
surface,seetheCareandCleaningsection.
Q.Canprolongedperiodsofhighheatdamage
mygriddle’ssurface?
A. A briefpreheatingperiodis oftennecessaryfor
bestresultswithmanyfoods,butleavingthe
gridde on M heatsettingformorethan 10minutes
withoutfoodcandamagethenon-stickmating.
Aways be suretoturnthecontrolknobsto OFF
whenwoking iscompleted.
(continued n-page)
Page 22

G~DLE ACCESSORY
(continued)
Donotleavethe rangeunattendedduring“preheat”
(knobsturnedto “H~) or anytimetheknobsare
turnedto “H~ withfoodon theGrillor Gridde.
1.Suggestedcookingtimesshouldbe usedonlyasa
guidesincevariablesinfd maychangecooking
tima.
2.Preheatthegridde 5 minutesunlessotherwise
indicatedinguidebelow.Add oilorbutteratthe
endofthepreheattime.Additiondod or butter
maybeneededduringcookingtime.
G~DLE COOmG GmE
Food
Bacon(1lb.)
Chow Por~mh
(1/4to12inch)
Eggs
Fried MED
Scrambled
F~h Ftiets andSteaks
(1/4to 1inch) m 17–24
FrenchToast
HamandCanadian
BaconStiees
(1/4tolE inch)
Hamburgers
(3/4inch 4 perlb.)
Medium
Well ~D M
Pan*=
SausagePatties,Uiks,
2oz.each) H
(1to
(4oz.each) H
WarmingandHottiy m
Suggested
Setting CookTime
HI 11-14
m 2-3
m
m
I
MED~ l&18
H 2-3
>3%perside
I
Deli=te foods:
1>30 minutes
~trees, mseroles
andhorsd’oeuvres
I
Up to 1hour
65
&lo
1%21
*1O
2&22
3. Rearrangeorturnfoodsoverasneededto insure
evencooking.
4. Gridde settingsmayneedtobe adjustedif the
gridde is usedforan emendedtime.
5.Avoidusingmetalutensilswithsharppointsor
roughorsharpedgeswhichmightdamagethe
non-stickcoatedgridde surface.Do notcutfoods
onthegridde. Useonlyheat-resistantdisheswhen
foodsin containersaretobe warmedonthegndde.
6. If yourrangeisconnectedto 208volts,these
cookingtimesmayneedto beextended.
Comments
Do notpreheat.
Griddleupto 6eggs.
Turnoveroften.
Ifbreadis frozen,piermwiti forkseveraltimestoabsorbeggmixture.
Turnoverordyonce.Avoidpressingdownwithspatulatoretainjuices.
Preheat10mkutes.
ti andrearrangeasneeded.
Toretainmoisture,roverwithfoflormetal lid,orplaw foodin
heat–resistantcontainersongriddle.
22
Page 23

CanningshouldbedoneontheCoilSurfaceUnits
ortheRadiantUnitsonly.
Potsthatextendbeyond1inchofthesurfaceunitarenot
recommendedformostsurfacecooking.However,when
canningwithawater-bathorpressurecanner,largerdiametercookwaremaybeused.Thisisbecauseboiting
watertemperatures(evenunderpressure)arenot
harmfultocooktopsurfacessurroundingthesurfaceunit.
ObserveFolloting Poinfi in Canning
1.Besurethecannerfitsoverthecenterofthesurface
unit.Hyourcooktoporitslocationdoesnotallowthe
cannertobecenteredonthesurfaceunit,usesmdler-
diametercannersforgoodcanningresults.Besurethe
cannerorotherlargedlarneterpansdonottouchthe
controlknobsortheventgrille.The knobsandthevent
grillewillbedamagediftouchedbyhotcookware.
2. ~at-bottomedcannersmustbe used.Donot use
cannerswithflangedorrippled bottoms(often
foundin enamelware)becausetheydon’t make
enoughcontactwiththe surfaceunitandtake a
longtimeto boilwater.
Flat-bottomedcannersarerecommendedfor
electriccoilsurfaceunits.Theyare
glasscooktops.
required for
HOWEVER,DONOTUSELARGEDIAMETER
CANNERSOROTHERLARGEDIAMETERPOTS
FORFRYINGORBOILINGFOODSOTHER
THANWATER.Mostsyrupor saucemixtures—and
alltypesof frying-cook at temperaturesmuchhigher
thanboiling water.Suchtemperaturescould
eventuallyharmcooktopsurfacessurroundingthe
module surface units.
3. Whencanning,userecipesandproceduresfrom
reputablesources.Reliablerecipesandprocedures
areavailablefromthemanufacturerofyourcanner;
manufacturersofglassjarsforcanning,suchas
Bdl and Kerr;andtheUnitedStatesDepartmentof
AgricultureExtensionService.
4. Rememberthat canningis a processthatgenerates
largeamountsof steam,Toavoid burnsfrom steam
or heat,be carefulwhencanning.
NOTE:If yourhousehaslowvoltage,canningmay
takelonger thanexpected,eventhoughdirections
havebeencarefullyfollowed.
Theprocess timewillbeshortenedby:
(1) usinga pressurecanner,and
(2) startingwithHOTtapwaterforfastest
heatingof largequantitiesof water.
CAUTIONS:
Safemnningrequiresthatharmfd microorganisms
are destroyedandthatthejarsaresealed
com~ietelv.Whencanningfoodsin a water-bath
m
canner,a ~entlebutstead~boilmustbemaintained
continuouslyfor therequiredtime.Whencanning
foodsin a pressurecanner,thepressuremustbe
maintainedcontinuouslyfor therequiredtime.
Afteryouhaveadjustedthecontrols,itis very
importanttomakesuretheprescribedboilor
pressurelevelsaremaintainedfortherequiredtime.
RADMNTGLASS CAU~ONS:
Glasssurfaceunitshavetemperaturelimitersthathelp
preventthemfromgettingtoohot.If thebottomof
yourcannerisnotflat,thesurfaceunitcanoverheat,
triggeringthetemperaturelimiterstoturntheunitoff
foratime.Thiswillstoptheboilorreducethe
pressureinthecanner.
Sinceyoumustmakesureto processthecanningjars
fortheprescribedtime,withnointerruptioninprocessing
time,youcannotcanonglasssurfaceunitsif the
bottom of yourcanneris notflatenough.
mat is a TemperatureLimiter?
EveryradiantsurfaceunithasaTemperatureLimiter.
The TemperatureLimiterprotectsthe glass-ceramic
surfacefromgettingtoohot.
TheTemperatureLimitermayturnoffthe
surfaceunitsifi
● Thepanboilsdry.
● Thepanbottomis notflat.
● The panis off center.
● Thereis nopan ontheunit.
23
Page 24

FEATURESOF YOUROWN CONTROL
&
1.CLEAWOFF.Pressthispad to cancelall
ovenoperationsexceptclockandtimer.
2.PROGRAM STATUS.Wordslightupin the
displayto indicatewhatis in timedisplay.
Programmedinformationcanbe displayedatany
timebypressing thepad of theoperationyouwant
to see.For example,youcan displaythecurrent
timeof daywhilethetimeris countingdownby
pressingtheCLOCKpad.
3. T~E DISPLAY.Showsthetimeofday,thetimes
setfor thetimeror automaticovenoperation.
4. OVENTEMPEWTURE ANDBRO~
DISPLAY.Showstheoventemperatureor the
broilsettingselected.
5.FUNCTION INDICATORS.Lightsup to
showwhethertheovenis in thebake,broilorself-
cleanmode.
6.INCREASE. Shorttapsto thispadincreasethe
timeor temperaturebysmallamounts.Pressand
holdthepadto increasethetimeor temperatureby
largeramounts.
7. T~R ON/OFF.Pressthispadto selectthetimer
function.The timerdoesnotcontrolovenoperations.
Thetimercantime up to 9 hoursand55minutes.
Tosetthetimer,firstpresstheTIMERON/0~
pad.Thenpressthe+ or– padto changethetime.
Tocancelthetimer,pressandholdtheTIMER
ON/0~ paduntiltheword “TIMER’disappears
fromthedisplay.
8. CLOCK. Pressthispadbeforesettingtheclock.
Tosettheclock,firstpresstheCLOCKpad.
Thenpressthe+or – padto changethetimeof
day.PresstheCLOCKpadto start.
9. STOP TIME. Use thispad alongwiththeCOOK
T~E or theCLEANpadto settheovento stop
automaticallyat a timeyouselect.
10.COOKTIME.Pressthispadfor TimedBake
operations.
11. AUTOSELFCLEAN.Pressthispad to select
theself-cleaningfunction.SeetheOperatingthe
Self-CleaningOvensection.
12.BROIL. Pressthispadto selectthebroilfunction.
13.BAKE.
14.
DECREASE.Shorttapstothispaddecrease
thetimeor temperatureby smallamounts.
Pressandholdthepadto decreasethetimeor
temperatureby largeramounts.
h
If“F-and a number”flashin thedisplayand
theovencontrolsignals, thisindicatesfunction
errorcode.If thefunctionerrorcode appears
duringtheself-cleaningfunction,checktheoven
doorlatch—thelatchhandlemayhavebeen
moved,evenif onlyslightly,fromthelatched
position.Makesurethe handleisto therightasfar
asit willgo.PresstheCLEAWOFFpad.Allow
theovento coolfor onehour.If functionerror
coderepeats,disconnectthepowerto therange
andcdl for service.
Press this pad to select the bake function.
24
Page 25

OWN CONTROL,CLOCKAm T~R
Clock
Theclockmustbe setfor the
automaticoventimingfunctions
toworkproperly.Thetimeof day
cannotbechanged duringa Timed
Bakingor a Self-Cleaningcycle.
Timer
Thetimeris a minutetimeronly.
Thetimerdoesnot control
ovenoperations.Themaximum
settingonthetimeris 9 hoursand
55minutes.
ToSetthe Clock
1.PresstheCLOCKpad.
CLOCK
D
ToSetthe Timer
1.PresstheTIMER
T~$~~
n
[Al
@
A
ON/OWpad.
2. Pressthe+ or – pad to
setthe amount of time
ontimer.
e
v
2. Pressthe+ or– padto
setthetimeof day.
@
A
e
v
3. PresstheCLOCKpadto start.
Thetimerwillstartautomatically
withina fewsecondsofreleasing
thepad.
Thetimer,as youare settingit,
willdisplaysecondsuntil1minute
isreached.
Thenit willdisplayminutes
andsecondsuntil 59 minutes
isreached.
After59 minutes,itwilldisplay
hours(“HR’ now appemsin
display)andminutesuntilthe
maximumtimeof 9 hoursand
55minutesisreached.
ToResetthe Tmer
If“TIMER”is displayed,pressthe+ or– pad
untilthe desiredtimeis reached.
If“TIMER”is notdisplayed,presstheTIMER
ON/0~ pad first, thenfollowthe instructionsabove
to setthetimer.
PowerOutige
Aftera poweroutage,whenpower
isrestored, the displaywillflash
andtimeshownwillno longerbe
correct-for exarnpIe,aftera 5-
minutepowerinterruptionthe
clockwillbe 5 minutesslow.
Allotherfunctionsthatwerein
operationwhenthe powerwentout
willhaveto be programmedagain.
Endof CycleTone
Theendof cycletoneis a series
of 3 beepsfollowedby 1beep
every6 seconds.If youwouldlike
toremove the signalthatbeeps
every6 seconds,pressandholdthe
CLENO~ padfor 10seconds.
Toreturnthesignalthatbeeps
every6 seconds,pressandholdthe
CLEAWO~ padfor 10seconds.
ToCancelthe Timer
PresstheTIMERON/OW paduntiltheword
‘TIMER’ disappearsfromthedisplay.
DisplayMessages
U “door”appearsinthedisplay,
thedoorlatch handleis notmoved
allthewayto theright.Movethe
latchhandleandcleaningwill
start.If “LOCK’appearsinthe
display,theovendooris in the
lockedposition.BAKE,BRO~
andCOOKTIMEcannotbesetif
thedooris in thelockedposition.
25
Page 26

BeforeUsingYourOven
1.Lookatthecontrols.Besureyouunderstand
howto setthemproperly.Readoverthedirections
fortheOvenControlssoyouunderstandhowto
usethem.
2.Checktheoveninterior.Lookat theshelves.
Takea practicerunatremovingandreplacing
themproperlytogivesure,sturdysupport.
3. Readovertheinformationandtipsthatfollow.
4. Keepthisguidehandysoyoucanreferto it,
especiallyduringthefirstweeksof usingyour
newrange.
OvenShelves
Theshelvesared=ignedwith
stop-lockssothatwhenplaced
correctlyontheshelfsuppoti,
theywillstopbeforecoming
completelyoutfromtheoven,and
willnottiltwhenremovingfood
fromorplacingfoodonthem.
Whenplacingcookwareona shelf,
pulltheshelfouttothebumponthe
shelfsupport.Placethecookware
ontheshelf,then slidetheshelf
backintotheoven.Thiswill
eliminatereachingintothehotoven.
Toremoveashelffromthe oven,
pullit towardsyou,tiltthefront
endupwardandpullit out.
Toreplace,placethe shelfonthe
shelfsupportwiththe stop-locks
(curvedextensionofthe shelo
facingup towardtherearof the
oven. Tiltup thefrontandpush
theshelftowardthebackofthe
ovenuntil it goespastthebump
ontheshelfsupport.Thenlower
thefrontofthe shelfandpushit
allthewayback.
ShelfPositions
The ovenhas5 shelfsupportsas identifiedin this
illustrationas A (bottom),B, C, D andE (top).
Shelfpositionsforcookingaresuggestedinthe
Baking,RoastingandBroilingsections.
Bump
7
* II
‘ ‘G,;
–\//
))11
6
7
a
r
‘all>’
4
/’/
!,
OvenLight
Usetheswitchon thecontrolpanelto turnthe light on andoff. ovENLIGHT
o
PI
Page 27

BA~G
Donotlockthe ovendoortith thelatchduring
baking.The latch isusedforself-cleaningonly.
Youroventemperatureiscontrolledveryaccurately
usingan ovencontrolsystem.Werecommendthat
youoperatetherangefor a numberof weeksusingthe
timegivenonrecipesas a guidetobecomefamiliar
withyournew oven’sperformance.
Howto Set YourRangefor Bating
Toavoidpossibleburns,placethe shelvesinthe
correctpositionbeforeyouturntheovenon.
1.~ess theBA~ pad.
BAKE
n
(AJ
2.Pressthe+ or – pad.
Thelastovensettemperatureappearsin the
display.Continuepressinguntilthedesired
temperatureisdisplayed.
If youthinkan adjustmentis necessary,seetheAdjust
theOvenThermostatsection.It giveseasyDoIt
Yourse~instructionsonhowto adjustthethermostat.
NOTE: Whentheovenishot,the top andoutside
surfacesoftherangegethot too.
Theovenwillstartautomatically.Theword“ON”
and“100°”willbe displayed.AstheovenheatsUP,
thedisplaywillshowthe changingtemperature.
Whentheovenreachesthetemperatureyouset,a
tonewill sound.
3. PresstheCLEAWO~ padwhenbtilng isfinished
andthenremove the foodfromthe oven.
Tochangethe oventemperature during the
BA~ cycle,pressthe BA~ padandthenthe
+ or– padto getthenewtemperature.
OvenShelves
kange theoven
shelfor shelvesin
thedesiredlocations
whiletheovenis
cool.Thecorrect
shelfposition
dependsonthekind
offoodandthe
browningdesired.
Asa generalrule,
place-mostfoodsin the middleof theoven, on either
shelfpositionsB orC. Seethechartfor suggested
shelfpositions.B willbe usedmorethanC.
Preheating
Preheattheoveniftherecipecallsforit.Preheatmeans
bringingtheovenupto thespecifiedtemperature
beforeputtingtie foodin theoven.Topreheat,setthe
ovenatthecorrecttemperature-selectinga higher
temperaturedoesnotshortenpreheattime.
Preheatingis necessaryforgoodresultswhenbaking
cakes,cookies,pastryandbreads.
TypeofFood
hgel foodcake
Biscuitsormuffins
Cookiesorcupcakes
Brownies
Layercakes
.
Bundtor poundcakes
Piesorpie shells
~
Formostcasserolesandroasts,preheatingis not
necessary.Forovenswithouta preheatindicatorlight
or tone,preheat10minutes.Afterthe ovenis
preheated,placethefoodin theovenasquicklyas
possibletopreventheatfromescaping.
ShelfPosition
A
Bor C
Bor C
Bor C
Bor C
Aor B
Bor C
(continued next page)
27
Page 28

BA~G
(continued)
BakingPans PanPlacement
Usetheproperbakingpan.me typeoffinishonthe
pandeterminestheamountofbrowningthatwilloccur. enoughroomfor aircirculationin theoven.Baking
“Dark,roughordullpansabsorbheatresultingin a
browner,crispercrust.Usethistypefor pies.
● Shiny,brightandsmoothpansreflectheat,resulting
in a lighter,moredelicatebrowning.Cakesand
cookiesrequirethistypeofpan.
● Glassbaking dishesalsoabsorbheat.Whenbaking
inglassbakingdishes,thetemperaturemayneedto
bereducedby25°F.
Forevencookingandproperbrowning,theremustbe
resultswillbe better if bakingpansare centeredas
muchas possibleratherthanbeingplacedto thefront
or to thebackof theoven.
Pansshouldnottoucheachotheror the wallsof the
oven.Allow 1-to 1‘A-inchspacebetweenpansas well
as fromthebackoftheoven,thedoorandthesides.
If youneedto usetwo shelves,staggerthepansso
oneisnotdirectlyabovethe other.
BakingGuides
Whenusingpreparedbakingmixes,followpackagerecipeor instructions
forthebestbakingresults.
Cookies
Whenbakingcookies,flat
cookiesheets(without
sides)producebetterlookingcookies.Cookies
bakedin ajelly rollpan
(shortsidesallaround)
mayhavedarkeredges
andpaleor light
browningmayoccur.
Donotusea cookiesheetso largethatit touchesthe
wallsor thedoorof theoven. Neverentirelycovera
shelfwitha largecookiesheet.
Forbestresults,use onlyonecookiesheetin theoven
at a time.
AluminumFoil
Neverentirelycovera
shelfwithaluminum
foil.~is willdisturb
theheatcirculationand
resultin poorbaking.A
smallersheetof foil
maybeusedto catcha
spilloverby placingit
on a lowershelfseverrd
inchesbelowthefood.
Pies
Forbestresults,bakepiesin dark,roughor dullpans Whenbakingcakes,warpedor bentpanswillcause
to produce a browner,crispercrust.Frozenpiesin foil
pansshouldbeplacedon analuminumcookiesheet
forbaking sincethe shinyfoilpanreflectsheataway
fromthepiecrust;thecookiesheethelpsretainit.
Cakes
unevenbakingresultsandpoorlyshapedproducts.
A cakebakedin apan largerthantherecipe
recommendswillusuallybecrisper,thinneranddrier
thanit shouldbe.If bakedin a pan smallerthan
recommended,itmaybeundercookedandbattermay
oveflow. Checktherecipeto makesurethepan size
usedistheonerecommended.
28
Page 29

Don’tPeek
u
Setthetimerfor theestimatedcookingtimeanddo
notopenthe doorto lookatyourfood.Mostrecipes
provideminimumandmwimum bakingtimessuch monitorcookingprogress.Openingtheovendoor
as“bake 30-40minutes.”
DONOTopenthedoorto checkuntil theminimum
time.Take advantageofthe“BigView”windowto
frequentlyduringcookingallowsheatto escapeand
makesbakingtimeslonger.Yourbakingresultsmay
dso beaffected.
T~D BA~G
Howto TimeBake
Donotlockthe ovendoorwiththelatch NOTE:Beforebeginning,makesuretheovenclock
during Timed Baking.The latchis usedforself- showsthecorrecttimeofday.
cleaningonly.
Yourovencanbe setto turnon andoff automatically.
Howto Set ImmediateStiti andAutomaticStop
Toavoid possibleburns,placethe shelvesin
thecorrectpositionbeforeyouturntheovenon.
Theovenwillturnon immediatelyandcookfor a
selectedlengthof time.Atthe endoftheCookTime
theovenwillturnoffautomatically.
1.PresstheBAKEpad.
BAKE
n
LJ
\
2. Pressthe+ or– paduntilthedesired
temperatureis displayed.
@
A
3. Pressthe COOKTIMEpad.
Cf$K
n
LAJ
Tosettheclock,firstpresstheCLOCKpad. Pressthe
+or– paduntilcorrecttimeofdayis displayed.Press
theCLOCKpadto start.
4. Pressthe+ or– paduntilthedesiredlengthof
bakingtimeisdisplayed.
Theovenwillstartautomatically.Theword “ON’
and”100°”willbe displayed.TheCookTimewill
beginto countdown.As theovenheatsup,the
displaywillshowthechangingtemperature.men
theovenreaches thetemperatureyouset,a tone
willsound.The ovenwillcontinuetocookforthe
programmedamountof time,then shutoff
automatically.
5. At theend ofTimedBaking,thedisplaywillshow
“OHR:OOCOOKTIME’andtheovenwillturnoff.
Theend of cycletonewillsound.
6.Bess theCLEAWOFFpad to clearthedisplayif
necessary.Removethefoodfromtheoven.
Remember,foodsthatareleftin theovencontinue
cookingafterthecontrolsareoff.
NOTE: Foodsthatspoileasily suchasmilk,eggs,
fish,stuffings,poultryandporkshouldnotbeallowed
to sitformorethanonehourbeforeor aftercooking.
Roomtemperaturepromotesthegrowthof harmful
bacteria.Besurethat theovenlightis offbecauseheat
fromthebulbwillspeedharmfulbacteriagrowth.
I
(continued next page)
Page 30

HD BA~G
(continued)
Howto SetDelay Stirt andAutomaticStop
QuickReminder
1.PresstheBA~ pad.
2. Pressthe+ or– padto select theoven
temperature.
3. PresstheCOOKTIMEpad.
4. Pressthe+ or– padto setthelengthof
CookingTime.
5.PresstheSTOPTIMEpad.
6.Pressthe+ or – paduntilthedesiredStopTime
appearsin thedisplay.
Toavoid possibleburns,placethe shelvesin the
correctpositionbeforeyouprogramtheoven.
Youcan settheovencontrolto delay-stti theoven,
cookfor a specificlengthof timeandthenturnoff
automatically.
1.PresstheBAKEpad.
BAKE
n
(AJ
2.Pressthe+ or – paduntil“325°”
is displayed.
@
A
e
v
3.PresstheCOOKTIMEpad.
C##K
n
4.Pressthe+ paduntil“3HR:W’ appearsin
thedisplay.ACookTimeof 3 hoursnow
@
A
appearsinthe display.
5.Pressthe STOPTIMEpad.Thedisplay
s;:~
n
ThecontrolautomaticallysetstheStopTimeby
addingtheCookTimeto thetimeof day.In this
example,thetimeofdayis 2:00andthe Cook
Timeis 3 hours.Adding 3 hoursto thetimeof day
equals5:00.
@
A
At4:00,theovenwillturnonautomatically.The
word“ON’ and“100°”willbedisplayed.TheCook
Timewillbeginto countdown.Astheoven heats
up,thedisplaywillshowthechangingtemperature.
Theovenwillcookfortheprogrammedthreehours
andshutoffautomaticallyat7:00.
7.At theendof TimedBaking,thedisplaywillshow
“OHR:OO
Theendof cycletonewillsound.
C*R
o
NOTE:Foodsthatspoileasilysuchas milk,eggs,
fish,stuffings,poultryandporkshouldnotbe allowed
to sitfor morethanonehourbeforeoraftercooking.
Roomtemperaturepromotesthegrowthofharmful
bacteria.Besurethattheovenlight is offbecauseheat
fromthebulbwillspeedharmfulbacteriagrowth.
promptsyouto settheStopTimeyou
want.It alsoshowstheearliestStopTime
youcanset.In thisexample,“5:O@’and
“STOP TIME’ appearinthedisplay.
6.ChangeStopTimefrom5:00to 7:00
bypressingthe+ paduntil“7:00’and
StopTimeappearin thedisplay.The
words“DELAYTIMEDBAW’ appear
inthedisplay.
COOK TIME’ and the oven will turn off.
8.PresstheCLEAWOFFpadtoclearthe
displayifnecessary.Removethefood
fromtheoven.Remember,eventhough
the ovenshutsoffautomatically,foods
continuecookingafterthecontrolsareoff.
30
Page 31

ADJUST THE OVEN THERMOSTAT—
DO ZTYOURSELF!
Youmayfindthatyournewovencooksdifferently
thanthe oneit replaced.Werecommendthatyou
useyournewovenfora fewweeksto becomemore
familiwwithit, followingthetimesgivenin your
recipesas a guide.
~ youthinkyournewovenis toohot ortoocold,
youcanadjustthethermostatyourself.Ifyouthink
it is toohot,adjustthethermostattomakeit cooler.If
youthink it is toocool,adjustthethermostatto make
it hotter.
Wedo not recommend the use of inexpensive
thermometers, suchas those foundin grocerystores,
tocheckthetemperaturesettingof yournewoven.
Thesethermometersmayvary2M0 degrees.
Y
ToAdjustthe Thermostat:
1.Pressthe BA~ pad.
BAKE
n
lAJ
2. Selectan oventemperaturebetween500°F.
and550°F.
3. Immediately,before“ON’ appears,pressand
holdtheBA= pad for about4 seconds.Thetime
displaywill changeto theovenadjustmentdisplay.
4.Theoventemperaturecanbe adjustedupto (+)
35°F.hotteror (–)35°F.cooler.Usethe+ or– pad
to selectthedesiredchangein thedisplay.
5.Whenyouhavemadetheadjustment,pressthe
CLEAWOFF padto go backto the timeof day
display.Useyourovenas youwouldnormally.
NOTE:Thisadjustmentwill notaffectthebroilingor
theself-cleaningtemperatures.It willbe retainedin
memoryaftera powerfailure.
31
Page 32

ROAST~G
Donotlocktheovendoorwiththelatchduring
roasting.Thelatchis usedforself-cleaningonly.
Roastingiscookingbydryheat.Tendermeator
poultrycanberoasteduncoveredinyouroven.
Roastingtemperatures,whichshouldbelowand
steady,keepspatteringto a minimum.
Roastingisreallyabakingprocedureusedfor meats.
Therefore,ovencontrolsare setforBakingor Timed
Baking.(Youmayheara slightclicklngsound,
indicatingtheovenis workingproperly.)Timed
Bakingwillturntheovenon andoffautomatically.
1.Placethe shelfin A orB position.Nopreheating
is necessary.
2.Checkthe weightof the
meat.Placeit, fat sideup,
(orforpoultry,breastside-up)ona roasting
gridii a shallowpan.The
meltingfatwillbastethe
meat.Selecta panas
closeto the sizeofthemeatas possible.
(Thebroilerpanwithgrid is a goodpanfor this.)
3.Press the BA~ pad.
BAKE
n
y,,
#-
-Jll
~~>
e Ill
-’
c-
0
@
Most meats continue to cook slightly while standing,
after being removed from the oven. Standing time
recommended for roasts
allowsroaststo firmup andmakesthemeasierto
carve.Internaltemperaturewillriseabout5°to 10°F.;
to compensatefortemperatureincrease,if desired,
removethe roastfromtheovensooner(at 5°to 10°F.
lessthanthetemperaturein theRoastingGuide).
Rememberthatfoodwillcontinuetocookinthe hot
ovenandthereforeshouldberemovedwhenthe
desiredinternaltemperaturehasbeenreached.
4. Pressthe+ or– pad.Thelastovenset
temperatureappearsin thedisplay.
@
A
e
v
C#R
Continuepressinguntilthe desired
temperatureis displayed.
Theword“ON’ and“100°”willbe
displayed.As theovenheatsup,the
displaywillshowthechanging
temperature.men the ovenreachesthe
temperatureyou set,a tonewillsound.
5.PresstheCLEAWOFFpadwhenroasting
is finished.
is 10to 20minutes.This
o
Use ofAluminm Foil
Youcanuse aluminumfoilto linethebroilerpan.
Thismakes clean-upeasierwhenusingthepan for
marinating,cookingwithfruits,cookingheavily
curedmeatsorbastingfoodduringcooking.~ess
thefoiltightlyaroundtheinsideof thepan.
Tochangetheoventem~ra~ duringroastig,
pressthe BA~ padandthenthe+ or– padto get
thenewtemperature.
32
Page 33

Questionsand Answers
Q.Is it necessaryto check for donenesswith a
meat thermometer?
A. Checkingthefinishedinternaltemperatureat
thecompletionof cookingtimeis recommended.
Temperaturesare shownin theRoastingGuide.
Forroastsover8 lbs,,checkwiththermometer
at half-hourintervalsafterhalfthecookingtime
haspassed.
Q. Why is my roast crumbling when I try to
carve it?
A. Roastsareeasierto sliceif allowedtocool 10to
20minutesafterremovingthemfromtheoven.
Besureto cutacrossthe grainof themeat.
ROAST~G G~E
For FrozenRoask
Frozenroastsofbeef,pork,
withoutthawing,butailow 10to 25 minutesper
pound additionaltime(10minutesperpoundfor
roastsunder5pounds,moretimefor largerroasts).
lamb,etc.,canbe started
Q. DoI need to preheat my oveneachtime I cook
a roast or poultry?
A. It is notnecessarytopreheatyouroven.
Q. When buying a roast, are there any specialtips
that wouldhelp me cookit more evenly?
A. Yes.Buyaroastas evenin thicknessaspossible,
or buyrolledroasts.
Q. CanI serdthe sidesof my foil“tent” when
roasting a turkey?
A. Sealingthefoilwillsteamthemeat.Leavingit
unsealedallowstheairto circulateandbrown
themeat.
Makesureuoulm isthawedbefore roasting.
Unthawed~oult~ oftendoesnotcookeve~ly.
Somecommercialfrozenpoultrycanbecooked
successfullywithoutthawing.Followthedirections
givenonthepackagelabel.
Type
Temperature
Doneness
Meat
Oven
Tendercuts;rib,highquality
sirlointip,romportopround*
Lamblegor bone-inshoulder*
Vealshoulder,legor loin*
Porkloin,rib or shoulder*
Ham,precooked
325° Rare: 2633
Medium: 35-39
WellDone: 4W5
325° Rare: 21-25
Medium: 25-30
WellDone:
325°
325° WellDone:
325° ToWarm: 17-20minutesperpound(anyweight)
WellDone:
Podtry
ChickenorDuck
Chickenpieces
Turkey
*Forbonelessrolledroastsover6 inchesthick,add5 to 10minutesperpoundtotimesgivenabove.
~TheU. S.Departmentof Agriculturesays“Rarebeefispopular,butyoushouldknowthatcookingit toonly140°F.meanssome
foodpoisoningorganismsmaysurvive.”(Source:SafeFoodBook.—YourKtchenGuide.USDARev.June1985.)
325°
350°
325° Well Done:
WellDone:
WellDone:
Approximate Roasting Time
inMinutesperPound
3to5 lbs.
3G35 28–33 170°–1850
3545 3M0 170°–1800
3545
3 to 5 Ibs.
3540 3&35
3540
10to 15lbs.
18-25
6to8lbs.
18–22 140°–1500+
22-29 150°–1600
3&35 170°–1850
20-23 140°–1500?
2628 150°–1600
3W0 170°–1800
Over 5 Ibs.
Over 15lbs.
15-20 185”–190°
Internal
Temperature‘F.
115°–1200
185°–1900
185°–1900
In thigh:
Page 34

BROm~G
Donot locktheovendoorwiththelatchwhile
broiting.The latch is used for se~-cleaningonly.
Broilingis cookingfoodby intenseradiantheatfrom
theupper broilelementinthe oven.Mostfish and
tendercutsof meatcan bebroiled.Followthese Turnthefoo~ thenusethetimes
directionstokeepspatteringandsmokingtoaminimum. givenforthesecondsideasa
1.If themeathasfator gnsde aroundtheedge,cut
verticalslashesthroughbothabout 2 inchesapart.
If desire~ thefat maybe trirnrne~leavinglayer
about1/8inchthick.
2. Placethemeatonthebroilergridinthebroilerpan.
Aways usethegridsothe fat dripsintothebroiler
pan;otherwisethejuicesmaybecomehotenough
to catchonfire.
3. Positiona shelfontherecommendedshelfposition
as suggestedintheBroilingGuide.
4. Closethe doorAways brotiwiththedoorclosed
Turnthefoodody onceduring
broiling.Timethefoodsforthe
firstsideaccordingto the
BroflingGuide.
guide to thepreferreddoneness.
5.PresstheBROILpad.
6.PresstheINCREASEpadoncefor LOBroilor
pressthe INCREASEpadWicefor HI Broil.
Tochange tim ~ Broilto LO Broil,pressthe
DECREASEpad once.Tochangebackto HIBroil,
pressthe INCREASEpadonce.
7.Whenbroiling is finishe~pressthe CLENOFF
pad.Servethefoodimmediately,and leavethe
panoutsidetheovento coolduringthe mealfor
easiestcleaning.
Useof MuminumFofl
Youcanuse durninumfoilto lineyourbroilerpan
andbrofiergrid.However,youmustmoldthe fofl
tightlyto thegridandcutslitsin itjustlikethegrid.
Withoutthesli~, thefotiwdl preventfatandmwt
juicesfromdrainingto thebroilerpan.Thejuices
cotid becomehotenoughto wtch on fire.Ifyou do
notcuttheslits,you arefrying,notbroiling.
Questionsandhswem
DoI needtogreasemybroilergridto prevent
Q.
meatfromsticking?
A. No.Thebroilergridis designedtoreflectbrotier
hea; thuskeepingthesurfacecoolenoughtoprevent
meatfromstickingtothesurface.Howeveqspraying
thebroilergridIighdywitha vegetablecooking
spraybeforerookingwillmakeclean-upeasier.
Q. Shodd I saltthemeatbeforebroiting?
A. No. Sdt drawsoutthejuicesand allowsthemto
evaporate.Aways dtafter cooking.Turnmeat
withtongq piercing meatwith a forkdso allows
juicesto-e~pe. Whenbroilingpoultryor fish,
brusheachsideoftenwithbutter.
Q.Whyaremymeatinotturningout as brown
astheyshotid?
A In someareas,thepower(voltage)tothe range
maybelow.In the;e cases,preheatthebroil
elementfor 10minutesbeforeplacingbroilerpan
withfoodin oven.~eck to see if you areusing
therecommendedshelfposition.Broilfor longest
periodoftimeindicatedintheBroilingGuide.
Turnfoodordy onceduringbroiling.
~. Whenbrofling,is it necessaryto always
usea gridinthe pan?
A Yes.Usingthegridsuspendsthemeatoverthepan.
As themeatcooks,thejuicesfdl intothe pan,thus
keepingmeatdrier.Juicesareprotectedby the grid
andstaycooler,thuspreventingexcessivespatter
andsmoking.
34
Page 35

BROE~G G~E
me doorshotid alwaysbeclosed.
Nways usea broilerpanandgrid.~ey aredesigned
to minimizesmokingandspatteringbytrapping
juicesin the shieldedlowerpartofthepan.
If desire~ marimtemeatsorchickenbefore
broiling,orbrushwithbarbecuesaucelast5
to 10&nutes ordy.
●
Whenarrangingfoodonthepan,donot let
fattyedgeshangoverthesides.~ese couldsoil
theoven.
Frozensteakscanbe broiledbypositioningthe
ovenshelfat next lowestshelfpositionand
increasingcookingtimegivenin thisguide
1%timesper side.
UseLOBroilto cookfoodssuchas poultryorthick
porkchopsthoroug~ywithoutover-browningthem.
Quantityandor
Food
GroundBeef
WellDone D
Thickness
1lb.(4 patties)
1/2
to 3/4inchthicl
Shelf
Positiol
BeefSteaks
Rare
Medium
1inchthick
(1to 1%lbs.)
WellDone
Chicken
1whole
(2to2%lbs.),
splitlengthwise
Piems
BakeryProducts
Breadcoast)or
EnglishMuffIns
2to4slices
2(split)
Dor E
Dor E
LobsterTails
~6<o8oz.each)
Fish
HamShces
@recooked)
Pork
Chops
WellDone
l-lb. fillets1/4 to
1/2inchthick
1inch thick D
2(1/2inchthick)
2(1 inchthick),
about1lb.
LambChops
Medium
WellDone
Medium
WellDone
2(1 inchthick),
about10to12oz.
2(1%inch
about1lb.
thick),
D
D
D
B
c
c
D
D
c
D
D
D
c
First Side
Time,Minutes
10
6
8
12
35
20
1Y*2
24
1>16
6
6
10
13
10
12
14
17
~
5 Steakslessthan1inchthickcook
Upto8pattiestakeaboutsametime.
6
11
l&15 I Brusheachsidewithmeltedbutter.
1/2
Donot
turnover.
4
throughbeforebrowning.Panfrying
is
recommended.
,
Broilskin-side-downfirst.
Spaceevenly.PlaceEnglishmuffins
cut-side-upandbrushwithbutter,
ifdesired.
Cutthroughbackof shell.Spread
open.Brushwithmeltedbutterbefore
broilingandafterhalfof broilingtime.
Hande andturn verycarefully.
withlemonbutterbeforeandduring
cooking,ifdesited.Preheatbroilerto
increasebrowning.
4
7
Increasetime5to 10minutes~r
for1’Ainchthick or homecuredham.
Slashfat.
10
I
Slashfat.
:
10
l&12
Brush
side
35
Page 36

OPEWT~G T~ SELF-CLEA~G OWN
Norrnd CleaningTime:3 hours
QuickReminder:
1.Latchthedoor.
2. PresstheAUTOSELFCLEANpad.
3. PresstheINCREASEorDECREASEpad
to settheCleanTime.
2.To avoidheavysmokeinthekitchenduringselfcleaning,wipeup heavysoilontheovenbottom.
(Ifyouuse soap,rinsethoroughlybeforeselfcleaningto preventstaining.)Theenamel gridand
broilerpanmaybecleanedin the self-cleanoven.
However,to helppreventheavysmokecausedby
self-cleaningthegreasysoilinthe pan,you must
firstcleanofftheexcessgrease.
Beforea CleanCycle
CAUTION:Toavoidtheriskof personalinjurydo
nottouchthe ovenventsor areasaroundthevents
duringself-cleaning.Theseareascanbecomehot
enoughto causebums.
Ov
Ov
‘oorLocWked
Unlocked
Therangemustbecompletelycoolin orderto set
theself-cleancycle. Youmayhaveto allowtheoven
tocoolbeforeyoucan slidethedoorlatch.
Werecommendventingwithan openwindowor
usinga ventilationfan orhoodduringthefirstself-
cleancycle.
1.Removeallcookwareandanyaluminumfoilfrom
theoven—theycannotwithstandthehighcleaning
temperatures.
NOTE:Theovenshelvesmaybecleanedin the
self-cleaningoven.However,theywilldarken,lose
theirlusterandbecomehardto slide.
3.Cleanspattersor spillson the ovenfrontframe,
andtheovendooroutsidethegasketwitha
dampenedcloth.Theovenfrontframeandthe
ovendooroutsidethegasketdonot getcleanedby
theself-cleancycle.On theseareasusedetergent
andhotwateror a soap-filledsteelwoolpad.Rinse
wellwitha vinegarandwatersolution.Thiswill
helppreventa brownresiduefromformingwhen
theovenis heated.Bufftheseareaswitha dry
cloth. Do notcleanthe gasket.
Do notuseabrasivesorovencleaners.Clean
thetop,sidesandoutsidefrontoftheovendoor
withsoapandwater.
Makesuretheovenlightbulbcoveris in place.
Donot rubor cleanthe doorgasket—
thefiberglassmaterialofthegasket has an
extremelylowresistanceto abrasion.Anintactand
well-fittingovendoorgasketis essentialfor
energy-efficientovenoperationandgoodbaking
results.If younoticethegasketbecomingworn,
frayedor damagedinanywayor if it has become
displacedonthedoor,you shouldhaveit replaced.
4. Closethe doorandmakesuretheovenlightis off.
If the ovenlightis notturnedoff,thelifeof thebulb
will be shortenedor it maybumoutimmediately.
Donot usecommercialovencleanersoroven
protectorsinornearthe self-cleaningoven.
A combinationof anyof theseproductsplusthehigh
cleancycletemperaturesmaydamagetheporcelain
finishof theoven.
Area inside
gasket
ight
Areaoutside
gasket
36
Page 37

Howto Set the Ovenfor Cleaning
QuickReminder:
1.Latchthedoor.
2. PresstheAUTOSELFCLEANpad.
3. Pressthe+ or– padto settheCleanTime.
L
If theovenis toohotandyou startto seta clean
cycle,theword“0~’ will appearinthe display.
Allowadditionaltimeforcoolingbeforeyoutry to
setthe cycle.
1.Followthedirectionsto preparethe oven
forcleaning.
2.Slidethe latchhandle to the~
rightas far as it willgo.
Neverforce the latch
handle.Forcingthe
handlewilldamagethe
doorlockmechanism.
—~ 3.
AUTOSELF
CLEAN
Press the AUTO SELF CLEAN pad.
&
4. Pressthe+ or- pad untildesired
CleanTimeis displayed.
@
A
e
v
CleanTimeisnormally3 hours.Youcan changethe
CleanTimetoanywherebetween2 and4 hours,
dependingon howdirtyyourovenis.
Theself-cleancyclewillautomaticallybeginafter
“CLEAN”is displayedandthetimefortheclean
cycleis set.Thewords“ON’ and“LOCK’will
appearin thedisplay.It willnotbepossibleto open
theovendooruntilthetemperaturedropsbelowthe
locktemperatureandtheLOCKlightgoesoff.
5.WhentheLOCKlightis off, slidethelatchhandle
to theleft asfar as it willgoandopenthedoor.
Theword“door”willbedisplayed,theword“LOCK’
willflashandtheovencontrolwill signalif youset
thecleancycle or forgetto closetheovendoor.
Aftera CleanCycle
Aftercleaningiscomplete,thedoorlatchmustbe
retumedto its originalpositionbeforeyoucanusethe
oven. Theovendoorwillstaylockeduntiltheoven
cools.If youcannotslidethelatcheasilyto unlockthe
door,allowadditionaltimeforcooling.
Neverforce the latch handle. The latch slides
easily.Forcing the latch handle may damage the
door lock.
Youmay noticesomewhite ash in the oven.Just
wipeit up withadampclothafterthe ovencools.
If whitespots remain, removethemwith a soapfilledsteelwoolpad.Besureto rinsethoroughly
withavinegarandwatermixture.Thesedeposits
areusuallya saltresiduethatcannotberemovedby
thecleancycle.
E the ovenis not cleanafter one clean cycle,
repeatthe cycle.
If the shelveshavebecomehardto slide,wipethe
shelfsupportswithcookingoil.
NOTE: No functionscanbeprogrammedbeforethe
doorautomaticallyunlocks.
ToStopa CleanCycle
1.PresstheCLEAWOFFpad.
2.WhentheLOCKlightgoesoff andthe ovenhascooledbelowthe
lockingtemperature,openthedoor.
(continued next page)
37
Page 38

OPEWmG T~ SELF-CLEA~G OWN
Howto SetDelayStati of Cleaning
(continued)
QuickReminder:
1.Latch thedoor.
2. PresstheAUTOSELFCLEANpad.
3. Pressthe+ or– paduntildesiredClean
Timeappears.
4. PresstheSTOPTIMEpad.
5. Pressthe+ or– paduntilthedesiredStop
Timeappearsinthedisplay.
DelayStart is settingtheoventimerto startmeclean
cycleautomaticallyata latertimethanthepresent
timeof day.
NOTE: Beforebeginning,makesuretheovenclock
showsthecorrecttimeofday.
1.Follow stepsto preparetheovenfor cleaning.
2. Slidethelatchhandleto the
rightas far as it willgo.
Neverforce the latch
handle. Forcing the handle
willdamagethe door lock
mechanism.
3. PresstheAUTOSELFCLEANpad.
AUOSELF
CLEAN
*
.-
‘i
D
4. Pressthe+ or– padto enterthe
CleanTime.
@
A
u
5. PresstheSTOP~E pad.“STOP
s;:?
n
TheearliestStopTimewillbetheCleanTime
selectedplusthetimeof day. For example: If the
CleanTimeis 3hoursandthetimeof day is 6:00,the
StopTimethatappearsinthedisplaywillbe9:00.
@
A
Theself-cleancyclewill automaticallybeginafter
“CLEAN’is displayedandthetimefor cleancycle
is set.Thewords“ON’ and“LOCK’willappear
onthedisplay.Itwillnot bepossibleto openthe
ovendooruntilthetemperaturedropsbelowthe
locktemperatureandtheLOCKlightgoesoff.
7. WhentheLOCKlightis off,slidethe latchhandle
tothe leftas faras it willgo andopenthedoor.
~E’ andthe earliestStopTimeyou
can setwillappearin the display.
6. Pressthe+ padto changetheStopTime
to a latertimeof dayif desired.For
example:If yousetStopTimeat 11:00,
ovenwillstartcleancycleat 8:00andend
at 11:00.Thedoorlatchesautomatically.
Page 39

QuestionsandAnswers
Q.If myovenclockisnotsetto the correcttimeof
day,canI stillself-cleanmyoven?
A.If theclockis not setto thecorrecttimeofday
youwillnotbe ableto seta delaycleantoend at a
specifictime.
Q. Can I use commercialovencleaners onany part
of my self-cleaningoven?
A. No cleanersorcoatingsshouldbeused around
anypartof thisoven.Ifyou dousethemanddo
notthoroughlyrinsetheovenwithwater,wipingit
absolutelycleanafterwards,theresiduecanscar
theovensurfaceanddamagemetalpartsthenext
timetheovenis automaticallycleaned.
Q. What shodd I do if excessivesmokingoccurs
duringcleaning?
A.Thisis causedby excessivesoil.Pressthe
CLEAWO~ pad.Openthewindowsto ridthe
roomof smoke.Waituntilthe ovenhascooledand
theword“LOCK’isoffin thedisplay.Wipeup
theexcess soilandresetthecleancycle.
Q. Is the “crackling” or “popping”sound I hear
during cleaningnormal?
A. Yes.Thisis the soundofthemetalheating
andcoolingduringboththe cookingand
cleaningfunctions.
Q. Should there be any odor during the cleaning?
A. Yes,therewillbe an odorduringthefirstfew
cleanings.Failureto wipeoutexcessivesoilmight
dso causea strongodorwhencleaning.
I
,
Q.Whatcausesthehair-likelinesontheenameled
surfaceofmyoven?
This is a normalcondition,resultingfromheating
A.
andcoolingduringcleaning.Theselinesdo not
affecthowyourovenperforms.
Q. Whydo I haveash leftinmyovenaftercleaning?
A. Sometypesofsoilwillleave a depositwhichis ash.
It canbe removedwitha dampspongeor cloth.
Q. My ovenshelvesdo not slideeasily.What is
the matter?
A. The self-cleancyclecausesthe ovenshelvesto
losetheirlusterandbecomehard to slide.Tomake
shelvesslidemoreeasily,wipetheshelfsupports
withcookingoil.
Q. My ovenshelveshave become gray after the
self-cleancycle.Is this normal?
A. Yes.Aftertheself-cleancycle,theshelveswill
losesomelusterandchangeto adeepgraycolor.
Q. Can 1cookfood on the cooktopwhilethe oven
isself-cleaning?
A.Yes.Whiletheovenis self-cleaning,you can
usethecooktopjust as younorrndly do.
Q. The word “door” appeared in the display when
I selectedtheclean cycle.What’swrong?
The door latch handle must be moved all the
A.
way to the right. Move the latch handle and
cleaning will start.
39
Page 40

Propercareandcleaningareimportantsoyourrange
willgiveyouefficientandsatisfactoryservice.Follow
thesedirectionscarefullyin caringfor itto helpassure
safeandpropermaintenance.
BE SUREELEC~CAL POWER 1SOFF AND
ALL SU~ACES ARE COOL BEFORE
CLEANING- P~T OF T~ RANGE.
CareofModules
Someofthemodulesmustbecuredorpreconditioned
beforeusingthemforthefirsttime.Modulesand
accessoriesshouldbecleanedaftereachuse.The
longera soilremains,theharderitisto clean.Seeeach
modulesectioninthisguide for specificinstructions.
Neverimmerseanymoduleinwater.Men notinthe
maintop,modulesandaccessoriesshouldbestoredin
a clean,dryplace.Aways beweful notto dropthe
modulesortheycouldbedamaged.
CoflModuleSurfaceUnik
Tocleanthesurfaceunits,turnthecontroltothehighest
settingfor a minute.Thecoilswillbumoff anysoil.
CAUTfON
● Be sured] thecontrolsareturnedto OFFand
thesurfaceunitsarecoolbeforeattemptingto
removethem.
● Do notimmersethesurface unitsorthe module
inliquidsof anykind.
● Do notcIeanthesurfaceunitsorthemodule
in a dishwasher.
● Do notbendthesurfamunitplugterrninds.
● Do not attempttoclean,adjustor inanyway repair
theplug-inreceptaclesorthe module.
Toremoveasurface unit:
Toremovethedrippansfor cleaning,thesurfaceunits
mustbe removedfirst.
SutiaM UnR
Receptacle
DripPan
Liftthe surface unitabout1 inchabovethedrippan
andpullit out.
Donotlift thesurfaceunitmorethan1 inch.If you
do,it maynotlieflatonthe drippanwhenyou
plugit backin.
Repeatedlitig ofthe surfaceunitmorethan 1
inchabovethe drippancanpermanentlydamage
thereceptacle.
PomelainEnameledGrillPan& Deflector
Cleanaftereveryuse.Porcelainenamelcancrack
orchipwithmisuse.It canstainif spilloversof foods
witha highacidcontent(suchas tomatoesor lemon
juice)are notcleanedupquictiy.
Toreplacea surfaceunit:
● Replacethedrippan intotherecessin the
cooktop.Makesure theopeninginthe panlines
upwiththereceptacle.
● Inserttheterminalsofthesurfaceunitthroughthe
openinginthedrippanandintothereceptacle.
● Guidethe surfaceunitintoplaceso it restsevedy.
DripPans
Removethesurfaceunits.Thenliftoutthe drippans.
Forbestresdti, cleanthedrippansby hand.
Placethemina coveredcontainer(ora plasticbag)
with 1/4cupammoniatoloosenthesoil.Thenscrub
withasoapfilledscouringpadif necessary.Rinse
withcleanwaterandpolishwith a cleansoftcloth.
Thedrippansmayalsobe cleanedin the dishwasher.
Blackdrippans(onsomemodels)maybe cleanedin
a self-cleaningovenaftertheyhavebeen thoroughly
rinsed.However,self-cleaningthemmaycausethem
to losetheiroriginallusterandshine.
Cleantheareaunderthedrippansoften.
Built-upsoil,especiallygrease,maycatchon fire.
Donotcoverthedrippanswithfoil.Usingfoil
so closeto thereceptaclecouldcauseshock fire or
damagetotherange.
Page 41

RadiantModul*Glass CeramicCooktopCleaning
Cleaningofglassceramiccooktopmodulesis
differentfromcleaninga standardporcelainfinish.
Tomaintainandprotectthesurfaceof yournewglass
ceramicmodulefollowthesebasicsteps.
Beforeyouusethemoduleforthefirst time,clean
itwithCookTopCleaningCreme.Thishelpsprotect
thetop andmakescleaningeasier.
DAILYCLEANING: Useonly CookTop Cleaning
Creme on GlassCeramic.
For normal, lightsoil:
1.Rub a fewdrops(lessisbetter)ofCookTopCleaning
Cremeontothesoiledareausingadamppapertowel.
Wipeuntilallsoilandcremeareremoved.Frequent
cleaningleavesaprotectivecoatingwhichisessential
inpreventingscratchesandabrasions.
2.CleanthesurfacewithCookTopCleaningCreme
aftereachuse.
For heavy,burned on soil:
1.Applya fewdropsof CookTopCleaningCreme
to the (cool)soiledarea.
2.Usinga damppapertowel,rub cremeintothe
burnedon area.Aswithanyburnedon spill,this
mayrequiresomeeffort.
3.Carefullyscraperemainingsoilwiththerazor
scraper.Holdthescraperat a 30°angleagainstthe
ceramicsurface.
4.If anysoilremains,repeatthestepslistedabove.
Foradditionalprotection,afterallsoilhasbeen
removed,polishtheentiresurfacewiththeCook
TopCleaningCreme.
5. Buffwithadry papertowel.
NOTE:
● Usinga razorscraperwillnotdamagethe surface
if the 30°angleis maintained.
● Be suretousea new,sharprazor scraper.
Do notusea dullor nickedblade.
● Store the razor scraper out of reach of ch]ldren.
SpecialCare:
Sugaryspillovers(suchasjellies,fudge,candy
syrups)ormelted plasticscancausepittingofthe
surfaceofyourmodule(notcoveredby thewarranty)
unlessthe spillisremoved whilestillhot.Special
care should be takenwhenremovinghot
substances.Followtheseinstructionscarefullyand
removethesoilwhilethe spillis stillhot.
1.Turnoffallthe surfaceunitsaffectedbythe
spillover.Removehotpans.
2.Wearinganovenmitt,holdtherazor \
scraperat a 30°~gle tothe module –~ .~<:~’
andscrapethehotspillto a coolareaoutsidethesurfaceunit.
3.Withthespillina coolarea,usea drypapertowelto
removeanyexcess.Anyspilloverremainingshould
beleftuntilthesurfaceof themodulehascooled.
Donotcontinueto usethesoiledsurfaceunituntildl
ofthespilloverhasbeenremoved.Followthesteps
underHeavySoiltocontinuethe cleaningprocess.
General Information:
AstheCookTopCleaningCremecleans,it
leavesa protectivecoatingon themodulesurface.
Thiscoatinghelpsto preventbuild-upofmineral
deposits(waterspots)and willmakefuturecleaning
easier.Dishwashingdetergentsremovethisprotective
coatingandthereforemake themodulemore
susceptibleto staining.
Toconvenientlyorder more creme an~or
scrapers for cleaningyour radiant module,
pleasecall our tollfree number:
NationalPam Center
Creme10oz.
Scraper
Cremeandscraperkit
\ ,,+~,~!{::”,;;
e
800-626-2002
# WB02X8273
# WX5X1614
# WB64X5027
PRECAUTIONS
● Mostcleanerscontainarnmoni~chemicalsandabrasives
whichcandamagethesurfaceof yourmodule.Use
ody the Cook Top Cleaning Creme for proper
cleaningandprotectionofyour~ass ceramicsurface.
● If you slidealuminum or copper cookwareacross
thesurfaceofyourmodule,theymay leavemeti
markings whichappear as scratches. If thisshould
happen,usetherazorscraperandCleaningCremeto
removethesemarkings.Failureto removethese
residuesimmediatelymayleavepermanentmarks.
● Waterstains(rninerddeposits)areremovableusing
CookTopCleaningCremeorml strengthwhitevinegar.
● If potswith a thinoverlayof aluminum, copper,or
enamelare allowedto boil dry,the overlaymay bond
with the glassceramic and leave a black discoloration.
This shouldbe removed immediatelybeforeheating
againor the discolorationmay be permanent.
● Use of window cleaner may leave an iridescent
film on the module. Cook Top Cleaning Creme will
remove this discoloration.
Read and follow all instructions and warnings
onCookTopCleaningCremelabels.
(continued next page)
41
Page 42

CM N CL~
(continued)
G
Gtil Module
Cleantheml module
aftereveryuse.Do
not~uttheelement
.
intowater.It cleans
itselfwhenheated
duringnormaluse.To
removeanycharred
soil,cleanwitha dry,
stiffbrushwhenthe
elementis cool.Never
use
steelwoolor
metalscouringpads
becausetheymay
damagetheouter
casingoftheelement.
Donotuse abrasivecleaningprodu~s.
Fromtimetotime,youshodd reconditionthegrids
withcookingoilasexplainedinthe GrillModule
sectionof Surfaw Cooking.
Washthenon-stickgrids in the sinkin soapandwarm
water.Use a non-meti scouringpad if necew.
Washthe deflector,grillpan & grillsheetin thesink
in soapandwarmwateroryou mayputthemin the
dishwasher.Soakstubbornstainsthenrubgentlywith
a non-metalscouringpad.
-’E’ement
-
*
-sheet
Deflector
~Gfill Pan
GtiddleAccesso~
Aftercookinga
greasyfoo~ wipe
thenon-stickgridde
whileit is stillwarm
witha@ Pawr
towel.B; ~~efulnot
tobum yourfingers.Whencool,washthe gridde at
thesinkin soapandwater.Usea non-metalscouring
padif necessary.
Donotuseabrasivecleaningproducts.Do notwash
inthedishwasher.Fromtimetotime,reconditionthe
gridde withcookingoilasdescribedinthe Gridde
AccessorysectionofSurfaceCooking.
It is a goodideato storethegridde ononeedge.
If youlay itflat,pansor othercookwaremaybe
putontopandscratchthenon-stickcoating.
Q
OvenHeatingElements
Donot cleanthebake elementorthebroilelement
Anysoilwillburnoffwhenthe elementsareheated.
Thebakeelementcanbe liftedgentlyto cleanthe
ovenfloor.If spillovers,residue or ashaccumulate
aroundthebakeelementgently wipearoundthe
elementwithwarmwater.
OvenLightBulb
NO~: The @asscover
shouldberemovedordy
whencold.Wearing
latex#eves mayoffera
L ..!:?” J ,
OQ
bettergrip.
Thelight bulbis locatedon thebackwrdlofthe o;en.
Beforereplacingthebulb,disconnectelectricrdpower
to therangeatthemainfuseor circuitbreaker panel
orunplug the rangefromthe electrial outlet.Ut the
bulbcoolcompletelybeforeremoving it. Foryour
safety,donottoucha hotbulbwith a dampcloth.If
youdo,thebulbwillbreak.
~,\;’.+,
)
,;j:-
J
- ‘{
BroilElement
BakeElement
/
Toremove Unscrewthecover and removethebtib.
DONOTREMO~ - SCREWSTOREMOW
THECO~R OR REPLACETHELIGHTBULB.
Toreplace: Put in a new40-wattappliancebdb.
NO~:
● A 40-wattappliancebulbis smallerthan
a standard4@watthouseholdbtib.
● Instrdlandtightenthecover.
● Reconnectelectricalpowerto therange.
42
Page 43

RemovableDowndraftVentand GreaseFtiter
Downdraft vent and filter shouldbe cleaned
frequently—after every use is best.
Toremove:Liftoffthe ventgrillandthealuminum
greasefilter.
Toclean:Cleanthe greasefilterin hotsoapywater.
It mayalsobe cleanedin a dishwasher.
OvenShelves
Cleantheshelveswithan abrasivecleanseror
steelwool.Aftercleaning,rinsethe shelveswith
cleanwateranddrywitha cleancloth.
NOTE:Theovenshelvesmaybecleanedin selfcleaningoven.However,theywilldarken,losetheir
lusterandbecomehardto slide.Wipethe shelf
supportswithcookingoilafterself-cleaningto make
theshelvesslide moreeasily.
I
I
BroilerPan andGrid
Afterbroiling,removethebroilerpanfromtheoven.
Removethegridfromthe pan.Carefullypourout
greasefromthepanintoa propercontainer.Washand
rinsethebroilerpanandgridin hotwaterwitha soapfilledor plastic scouringpad.
Iffoodhas burnedon, sprinklethegrid with
detergentwhile hot andcoverwithwetpapertowels
or a dishcloth.Soakingthe panwillremoveburned
onfoods.
Thebroilerpanmaybe cleanedwith acommercial
ovencleaner.Do notuse an ovencleaneron the grid.
Boththebroiler pan andgridcandso be cleanedin
thedishwasher.
Do notcleanthebroilerpan orgrid in the self-
cleaningoven.
Do not storea soiled broilerpanandgrid anywhere
intherange.
43 I
Page 44

CAW Am CLEA~G
,w’:eG
Ltit-OffOvenDoor
Theovendoor is removable,
but it is heavy. You may need
help removing and replacing
the door. Do not lift the door by
the handle. This can cause the
glass to break or can cause
damage to the door.
Toremovethedoor,openit a
fewinchesto thespecialstop
positionthat willholdthedoor
open. Graspfirmlyoneachside
andliftthedoorstraightupand
offthehinges.
NOTE:
● Be carefulnotto placehands betweenthehinge
andtheovendoorframeasthehinge couldsnap
backandpinchfingers.
● Whileworkingin theovenarea,coverthehinges
withtowelsor emptypapertowelrollstoprevent
pinchedfingersandchippingthe porcelainenamel
ontheframe.
Toreplace the door, makesurethe hingesarein the
specialstopposition.Positiontheslotsinthebottom
of thedoorsquarelyoverthe hinges.Thenlowerthe
doorslowlyandevenlyoverbothhingesatthe same
time.If hingessnapbackagainsttheovenframe,pull
thembackout.
(continued)
TOCLEANTHE DOOR:
Insideofthedoor:
● Becausetheareainsidethe gasketis cleanedduring
theselfcleancycle,youdo notneedto cleanthisby
hand. Any soaplefton thelinercausesadditional
stainswhenthe ovenisheated.
● Theareaoutsidethegasketcanbe cleanedwitha
soap-filledscouringpad.
● Do notrubor cleanthe doorgasket—thefiberglass
materialofthegaskethasan extremelylow
resistanceto abrasion.Anintactandwell-fitting
ovendoorgasketis essentialforenergy-efficient
ovenoperationandgoodbakingresults.If you
noticethegasketbecomingworn,frayedor damaged
in any way-orif it has bec~me displaced on the door,
you should have it replaced.
NOTE:Thegasketis designedwitha gapat the
bottomto allowforproperaircirculation.
ACAUTION
Toavoidpersonalinjuryorpropertydamage,
handletheovendoorwithcare. Do notlift
theovendoorusingthedoorhandle.The
dooris heavyandan be damagedifit is
dropped.
Donot placeyourhandsin the hingearea
whenthedooris removed.Thehinge can
snapshutandpinchyourhands.
Thedoorcontainstemperedglass.If theglass
isscratched,chipped,twistedor impactedit
maybreaksuddenly.If the doorglass
appearsdamagedit shodd be replaced
immediately.
Outsideofthe door:
● Use soap and water to thoroughly clean the top,
sides and front of the oven door.Rinse well. You
may also use a glass cleaner to clean the glass on
the outside of the door.
● Spillage of marinades, fruitjuices, tomato sauces
and basting materials containing acids may cause
discoloration and should be wiped up immediately.
When surface is cool, clean and rinse.
● Do not use oven cleaners, cleansing powders or
harsh abrasives on the outside of the door.
Page 45

OvenVentDuct
Theovenis ventedintothedowndraftventductin the
middleofthecooktop.Donotobstructthisopening.
Keeptheventclean.Cleantheassociatedfilterafter
eachuse.
ControlPaneland Knobs
It’sa goodideato wipethe controlpanelaftereach
use.Cleanwithmildsoapand wateror vinegarand
water,rinsewithcleanwaterandpolishdrywitha
cleancloth.
Do not use abrasive cleansers, strong liquid cleansers,
plastic scouring pads or area cleansers on the control
panel—they will damage the finish. A 50/50 solution
of vinegar and hot water works well.
Thecontrolknobsmaybe removedfor cleaning.
CleaningUnderthe Range
Theareaundertherangecanbe reachedeasilyfor
cleaningby removingthestoragedrawer.
Do notusethe areainthiscompartmentfor storage.
Neverplace combustibleor flammableitemsinside or
neartherange.
Beforeremovingtheknobsfor cleaning,pleasenote
thattheknobsontheleft sideandtheknobson the
rightsideare in theproper0~ position.When
replacingtheknobs,checkthe OFFpositionto insure
properalignment.
Toremovethe knob,pullit straightoffthecontrolshaft.
Washtheknobsin soapand waterbut donotsoak.
Drytheknobsas muchas possiblewitha cleancloth.
Shakethewateroutof theknobstem.
Toreplacetheknob,pressiton theshaftmaking
sureto matchtheflatareaontheknobto theflat area
ontheshaft.
PaintedSutiaces
Paintedsurfacesincludethesidesanddrawerfront.
Cleanthesewithsoapandwateror a vinegarand
watersolution.
Do not use commercialovencleaners, cleansing
powders, steelWOOIor harsh abrasives on any
painted surface.
Removingthe StorageDrawer
Thestoragedrawercanbe removedforcleaningorto
makeiteasierto cleanundertherange.
ToRemovetheDrawer:
Pull the drawer out to the first stop. Lift the front of
1.
the drawer and pull it out to the second stop.
2. Let the drawer rest on the floor. Place
towardthebackof thedrawerandliftit out.
yourhands
GlassSuflaces
Toclean the outsideoftheovendoor,usea glass
cleaner.Rinseandpolishwithadrycloth.
Donot allow the water or cleaner to run down
insidethe openingsin the top ofthe ovendoor
whilecleaning.
ToReplacetheDrawer:
1.Place the setof rollersonthe
drawerbehindtherollers on
therange.
2. Alignthe guidesonthe drawer
withtheguides on therange
andpushthedrawerbackinto
position.
45
Page 46

A
● All ranges can tip.
● Injury could result.
. M the Anti-tip device
packed with the range.
. See the Instigation
Instructions.
● The Anti-tip device must
remain engaged.
WAmING
StabilityDeviceInstillation Instructions
1.Onthe rightsideof thecutoutor installation 3.If mountingintowoodflooring,drill3/32”holesas
locationmeasure5ti”fromthebackwallforward marked.If mountingintoconcrete,usea masonry
andmarka point.Repeatontheleft-handside,then drillbit anddrill3/16” holes.Insertplasticanchors
drawa straightline betweenthepoints.
2. If installing the unit against cabinet(s): Placethe
insideedge-ofthebrac~et(s)againstthe”lineandthe 4. Leveltherangeusingthelevelinglegs.Therange
endofthebracket(s)againstthecabinetside.See mustbe levelto assureuniformcookingandbaking.
theillustrationbelow.Marktheholelocations. A levelshouldbeplacedon an ovenrack oron top
Anti-fip Bracket Location Wth Cabinets
11,11
intoconcreteholes.Positionthebracketandmount
itusingthe suppliedscrews.
oftherangetolev~ltheunit.Verifythattheleveling
legs are extended at least 1/4”and are engaged with
the anti-tip bracket.
5.me rangemaynowbe pushedintoposition.
Removethestoragedrawerandcheckthattheleg
hasengagedtheanti-tipbracket.If it hasnot,the
bracketmustberelocatedto ensureengagementof
thelevelinglegintothebracket.
Installingtheunitwithoutcabinets:Position the
range as it would be installed. Draw a reference
line on the floor from front to back along one side
of the range. Place the inside edge of the
brackets(s) flush with the line drawn in Step 1 and
the end of the bracket(s) flush with the line you
havejust drawn. Mark the hole locations.
Anti-~p Bracket Location Wthout Cabinets
RearWall
M
I
I
i
I ~ ReferenceUneFor ~ I
I
Anti-~pBracket
RangePlacement
I
I
i
I
A
If therangeismovedfor cleaning,
servicing or any reason, be sure the
anti-tip device is re-engaged properly
when the range is replaced. Failure to
take this precaution could result in
tipping of the range and cause injury.
Page 47

BEFOREYOU BEGIN
Step 1
Read these instructions completelyand carefu~y.
WORT~ Savethese instructions for the
lod electricrdinspectors use.
~PORT~ OBSERVE ~ GOVE-G
CODES ~ ORDIN~C~.
N~ ~ ~ST-R have these instructions
with the appfianceafter initiation is completed.
N~ TO CONSUMER Keep tils Use and
Care Guide and Ins~ation Instructions for
future use.
N~. This apptiancemust be properlygrounded.
TOOLSYOUWILL NEED
. kge
● Channellockpfiersorsmallratchetwrench
(forlevehg range)
● l/4inch hexheadnutdriver
bladescrewdriver
ELECTRIU REQUIREMENTS
W~ON—POR PERSON~ ~
DO NOTUSE ~ -NSION CORD
= ~S ~P~CE.
CHOOSEM lNSTMMT!OHLOUTIOW
Choosea ltim based on the foU* *H:
1. The range is designed to be vented outdoors.
2. The electrid rating is 14.7~, 120/240V,
60W.
3. Drafts caused by home heating and ~
conditioningand or open doors or windows can
disrupt the ventilationair pattern. The range
should not be instied near windows or doors.
4. The unit cannotbe instied in a tunnel type
WWopening.M currents movingthrough the
tunnel m disrupt the ventilation air pattern.
5. The range can either be ducted through the
wd or through the floorto the outside.
6. Make sure there is adequate space for proper
initiation.
7. Removeprotectivepacking materials from the
range. Tape residue can be cleaned with a soft
cloth and alcohol.
8. Carefu~yread d instructions before
beginning initiation.
(continuednti)age)
This apptice must be supptiedwith the proper
voltage and frequency, and connected to an
individud, properly grounded branch circuit
protected by a circuit breaker or time delayfuse,
as noted on the rating plate.
Wtig must conformto Natioti Electrid Codes.
Hthe electric service provided does not meet the
above spectications, it is recommended that a
ticensed electrician insti an approved outiet
Because the range terminals are not accessible
after the range is in position, a flexibleservice
conduit or cord must be used.
47
Page 48

Repare theCaMnetOpening
Therange
born the
shouldetiend approtiately 1%”
cabinetfronttothe ovendoorhandle.
Removeventing kitfrom the storage drawer.
Using the dimensions belowand the special
countertop conditions in these hstiation
Instructions, prepare the cabinet opening,
r I
I
-e ~mensions:
Width-2gl%b”
Depth-28”
Height—36”
_um Clearances to timbustible
S-ces:
● Minimum clearance to the rear w~ is O“
c Minimum clearace to avertical right or left
side WWis 3“
● Minimum clearance to the countertop/cabinet
in each side is O
s Mtium of 30”between the top ofthe
cooking surface and the bottom ofan
unprotected wood or meti cabinet
StandardCatinetandtiunte~p
Wdl
1“~::.--2
Height
\
[
4
35”
v
Specialtiunh~p Conditiom
Irr_ Ubinet and Countertop Hei@ts
Countertopssuch as ceramic tie tops wi~cause
the ~binet and countertop to be higher than 36”.
Fo~owthese instructions when the countertop is
higher than 36”.
1. Raisethe levekg legs to the mtium level.
2. Measure from the floorto the side trim. E the
measurement is less than the height of the
countertop the floor must be shimmed.
3. Shim the floor using a piece ofplywoodthe
same ske as the range openhg. Secure the
plywoodto the floor.The plywoodmust be as
secure as the originalflooring.
4. Insti the anti-tipbracket and sfide the range
intoplace.
Ishd or Peninstia hstition
Islandorpeninsulainitiations with24”deep
base~binets mustuse flush back cabinets with
no rear toe space to avoidrange interference.
Ha rear toe space is desired, use 27”or deeper
base cabinets.
SEde-~ bstiation
W~G. To avoidthe risk of
A
burns or tie by reaching over the
surface units, cabinetstorage space
l~ted abovethe rangeshodd be avoided.
48
Fora manufacturedmuntetiop,
withorwithouta backsplash,
makethecutoutkeepingthe
reardmensionas illustrated.
ne backrailontie backofthe
rangewillslideoverthe
manufatired countenop
creatingatightfi.
i
Page 49

Sfide-k hstiation in a Formed
,.4 \,
Countertop with a Backsphsh
7. %d d ductjointstigh@ using ducttape.
Openingsleftin ductig d dow smoke and odor
to e=pe insidethe house.
Toensureproperventition, the ductwork
S.
must not exceed 60equivalentfeet
9. For best performance,do notuse overthree
W“ elbows.
10. me 6“transitionductprovidedmust be
mechanidy secured h the exhaust blower ouflet
Securetie transitionductusing the two screws
provided.
~~ce for Ducdng hto tie Wd
mooring Under the Range
Your range, me many other household
items, is heavy and can setie into soft
floor cov~rings such as cushioned vinyl
or -e
thistype
a
1/4 inch thick sheet ofpl~ood (or stiar
matend) as foflows
men
range, the
be built up witi pl~ood to the same level or
higher than the floorcovering.This ~ dow
the range to be movedfor cleaning or servicing.
Shp
DU~IHG REQUIREMENTSMD LO~llOH
thefloor covering ends at the front of the
2
1. The
. men movingthe rangeon
Y
of ooring,itshouldbe ins~ed on
areathattherangetil rest on should
ductshodd be 6“roundmeti ducting.
Islandpeninsulainitiations mayrequire
3%”X 10”duct
2. Curvedfittingsshouldnotaccountformore
than5Wofthe ductlength.
3. men usingflexibleduct onefootis equalto
2feetofmeti duct =R USEP~C ~E
DRYER
4. Do not vent intoan atticor crawlspace. Duct
the range outside.
5. Hexible duct elbowsare equalto Mm as
DU~G.
manY
feetassmoothmeti elbows.
6. Neverins@twoelbowfittingsnW toeach
other.Twoelbowsinstied togetherti create
apoorventpathandinsticient ventilation.
7
+
II I
,,
~
Cut Duct Opening in Wd
1. bcate the studsinthewd.
2. Measure and cut an openingforthe thimble as
shownabove.The cutout should be 6Wdiameter.
Ductig fl be completedinthe “MakeFmd
3.
AsLen
DuctConnection”section.
I
2. Measureandcutanopeningforthe floor
transitionpieceasUustratedabove.The cutout
shouldbe7%”x 7%”square.Ethe openingisnot
correcgtignment problemswifloccur.
3. Ductingti be completedin“MakeFiid
DuctConnection”section.
I II
~
(continuedn&page,
4Y
Page 50

TMLE 1
CalculateTotalEquhalentDu-ork Len@h
EquivalentNumber
)uct Pieces Length*x Used
5“ round
2.7 X ( R.)i=
D
Q
a
@
@
Q
%
*
;:::;d
straight
o“
3X” x 1
str~ght
\
5“,No
elbow
6“,%0
elbow
5“,45”
elbow
6“,45”
elbow
Flexible
MetalOffset (14
Adapter
3WX1O”
90°elbow
3WX1O”
45°elbow
3TX1O”
W“ flat elbow
5“ round
to 3B” x 1o“
transition
6“ round
to 3%” x 1
transition
o“
1
1
37 fi. x( )= ft
15fi. x (
18fi. x( )=
9fi. x( )= ft
(—
16fi. x( )= ft
5fi. x( )= fi
18fi. x( )=
3fi. x( )=
7ti. x (
SubtotalColumn1 = ft
x ( fi.)t=
x ( fi.)t=
ti. perinch)x
in.offset) =
Equivalentlengthsofductpiecesare based
onactualtes~ andreflectrequirementsforgood
ventingperformancewithanydowndraftcooktop.
~Measureandfistfeetofstraightductused.
Countandtistthe quantityofd otherduct
piecesforthe “NumberUsed”ofeachtype.
IMWRTMT
Formaximumefficiency,usethe shortest and
straightestductrun possible,withasfewfittings
aspossible.
theduct runshodd notexceed60feet
qtient len~.
Forsatisfactoryperformance,
Ventingperformanceisimprovedbyusing
largerdiameterducL
EquNalent
= Length
)=
)=
ft
fi
ft
fi
ft
ft.
ft
ft
R
EquivalentNumber Equivalent
)uct Pieces Length*x Used = Length
5“ round
to 35” x
transition
90°elbow
6“ round
Q
a
%
.
m
&
D
=
9
e
H
to 3%” x lo”
transition
90°elbow
3%”x 1o“
to 6“ round
transition
3%”x 1o“
to 6“ round
transition
90°elbow
Tapered
5“ round
to 6“ round
transtion
5“roundcollar
to 6“ round
captransition
5“ round
wallcap
withdamper
6“ round
?; 7&per
3%”x 1o“
wdl cap
withdamper
6“ round
roofcap
6“ round
roofvent
flexiblemeti ductingisused,d the equivalent
10”
37 fi. x( )= R.
2ofi. x( )=
5fi. x (
12 fi. x( )=
)=
6fi. X( )= ft.
13fi. x( )=
84 fi. x( )= ft.
21ti. x( )= ft!
27 fi. x( )= ft.
20X()= ft.
24x()= ft.
SubtotalColumn2 = ft.
SubtotalColumn1 = ft.
TOTALDUCWORK=
Should not exceed60 feet.
feetvaluesinthetableshouldbedoubled.me
flexiblemeti ductshouldbe straightandsmooth
andextendedasmuchaspossible.
DO N~ usefitible plasticduc~.
Ventins~ation shouldnotexceed60feet
equivalentlength.
Blowerisratedat300 Cm at0.1inchofwater
backpressure.
ft.
ft.
ft.
R.
ft.
I
50
Page 51

Step3
LINEVOLTAGEAKDOUTLETLOUTION
Clearance for Electrid tinnection
=
me tie voltage mustnotexceed the rated
voltage.tie voltageless thanthe ratedvoltage
W resultin slowheating.Thewiringsystem
conformstotheUnderwritersLaboratories,hc.
standardsad the NationalElectrid Code.The
initiation mustconformto dl led, municipal
andstatebtiding codes, NECandlocrdutifity
regulations.Thisrangemustbe connectedonly
to a supplycircuitasspecifiedonthe nameplate
locatedonthe frontframeofthe range.The
outietmustbe mountedonthe floororWW
withinshadedarea.See the Uustrationabovefor
the electrid connectionclearancearea.
5“
Reqtiements for Power Cords
N~: Onlyapowercordsuitableforuse with
rangesmaybe used. For instigation in a mobfle
home, or area where localcodes do not permit
grounding tiough the neutral terrnind, a Awire
cord must be used.
Power cord must be U.L.fisted and meet NEC
and MobileHome Manufacturers Association
Standards. The cord must be rated at a minimum
250V40AM~ equipped with a plug configuration
in accordance with NEMAand conductors must
end with closed loop (ring) terminals at the
range. ~ee conductor cord plug NE~
l&50P dewed for residentid) @our conductor
cord plug NEMA l&50P allowedfor most
mobilehome instigations but can be used for
residentid)
The range has been grounded at the factory to
the center (nickelplated) terminal ofthe
terminal block in accordance with the National
Electrid Code (section 2560).men a separate
ground is required by localcode, disconnect the
grounding strap from the terminal block, (see
the below~ustration). Ground the frame
by
connectinga groundingwiretothe rangeframe
usingONLYthegroundingscrewremovedfrom
thegroundingstrap.
Term
step 4
WIRE~WER CORDTOTEWIU BLOCK
beating the Range Termti Block
me connectionblockis lo=ted attie bottomrear
ofthe rangebehindthe rearcoverpanel.Remove
the rear coverscrew.Directiybelowthe terminal
blockis aholeforapowersupplyservicecord,not
suppfiedwiththe range.
we @_. block is a ro~&fr~pper
we connetion ody,
wiring. Haluminumhouse wiringis tobe
connected,thefo~owingprocedureis suggested.
1. Connectthelen
the rangeterminal lockwithringterminals.
2. Spticethecopperwirestothealuminum~g
usingconnectorswhicharedesignedcertifiedby
UnderwritersLaboratoriesandrecomd for
joiningcopperto aluminum.FOUOWthe connector
manufactured recommendedprocedure.
3. The wireused, locationandenclosureof
spficesmustconformto lod codes.
#&
ofcopperbtiding wireto
P
GrountingStiap
(continuedndpage)
51
Page 52

Step5
Step
6
INSTWLIN6A*WIRE ~WER CORD
Connedonsfora3-Wre PowerCord
(240or208 voh bothsides) Strap
1. Removetherearwirecover.
NeutralTermin+
Conneotwirewith
2. Placethe strainretief(wingedclamp)inthe
cordaccessholebelowtheterminalblock.Pkce
thewingsthroughthehole,enteringfromthe
bottom.Thescrewholesinthe clampshouldbe
belowthemountingpanel.
3. Placethe cordthroughthe strainretief
Attachthe neuti (center)orthe whitewireto
the centerterrnindblock.
4. Attachthepowerlead,redtie orblackwire
to the leftside powerterminal.
5. Atich thepowerlead,redwireorblackwire
tothe rightsidepowerterminal.
6. Afterthewireshavebeenplacedonthe
terminrds,attachwiththehex nutsprovided.
Ftiy tightentoinsureproperelectrid
connection.
7. Placethe screwtirough the strainrefiefand
tighten.
8. Replacetherearwirecover.
IHSTWLIH6A*WIRE HWER CORD
Connationsfor a4Wlre PowerCord
Pow
tih
and
d
PowerTerminals
(240or208 voltsbothsides)
1. Removethe rearwirecover.
v
NeutralTerminaL
Connedwirewith
d
insulationand
brassterminal
2. Placethe strainrefief(wingedclamp)h the
cordaccessholebelowtheterminalblock.Place
tie wingsthroughthehole,enteringfromthe
bottom.Thescrewholesinthe clampshouldbe
belowthemountingpanel.
3. Removethegroundingstrapa~ched tothe
centerterminalontheterminalblockThe strapis
notneededforthisinitiation. Nso removethe
greengroundscrewandretainitforlateruse.
4. Place the cord through the strain refief.
Attach the cord neuti (center) or white wire to
the center terminal on the terrnind block.
5. Atich the power lead, red wire or black wire
to the left terminal.
6. Attachtie powerlead,redwire orblackwire
tothe rightterminal.
7. A~ch the greenor barewire to the backof
therangeusing the greengroundscrew
previouslyremoved.
8. Attachthe wireswiththehex nuts provided.
Piiy tightento insureproperelectrid
connection.
9. Hate the screwtiough the strainretiefand
tighten.
10. Replacethe rearwirecover.
52
W~G: Toavoidthe riskof
severeelectrid shockor deaththe
A
groundwiremustbe atiched tothe
frameofthe rangeusingthe ground
screwprovided.The groundwiremust
notconhct anyotherterminal.
Page 53

Step 7
Step 8
CONVERTINGFROMA+WIRETOA&WIRE
HWER CORD
1. Removethe rear wire cover.
2. Removethe bottom strain refiefscrew and
retain it for further use.
3. Removethe screw/hex nuts from the
terminal block and retain them for further use.
4. Remove~ Swire or cable leads from the
terrnind block and proceed to remove the power
cord fromthe unit by pu~g in a downward
motion so that the cord is removed born the
strain retiet
5. Removethe grounding strap attached to the
center terminal on the terminal block.The
groundhg strap is not needed for this
initiation. Mso remove the green ground screw
and retain it for future use.
6. To ins~ the 4wire cord, fo~owSteps 4
through 9 of“hs-g a 4Wire Cord”.
7. Rekstil the rear cover and secure it with tie
screw removed eartier.
~ electrid connections should be inspected
before poweris turned on, to make certain that
they are tight.
INSTWLTHESIDETRIM(optional)
Udesired, the optionalside trim provided can be
kstiled on the range. The side trim must be
instiled abovecountertop leveland tapped
down into place.
The side trim can be mounted in several
different positions depending on the countertop
opening,cabinet structure and range features,
Frees~@ tith
Backpbsh
Tomounttrimflushwiththe frontofthe
countertop,usenumber3trimholesand‘N
rangeholes.
4“ BacW
Tomountthe trimflushwiththe front of the
countertop,use number3 trimholes and‘An
rangeholes.
Optiod Montig
‘Amrangeholes Wowanextra3/8 forward
adjustment.Trimholes number1,2 and3 allow
a 1/2”adjustment.me trimm be mountedin
anydesiredlocationusingthe holesprovided.
andBacksplash
Ii I
Ifthewuntefiopfrontisroll
\
*
Sfide.in Installation with Roll Fomad Countertop
formed,notchthecounterto
allowforoverlappingtrim,
SideTrim
SideTrim
(continuedn&page)
53
Page 54

Step9
~imble (aRati totie wdl orfloor)
FlexDud
Blowe
L~Ho” C’amp
>*
Scr
1. Removethe screw in the front of the blower
transition separating the blower transition from
the blowerhousing.
2. Placethe hose clamp around the round end of
the blowertransition. Attach the flex duct to the
blowertransition using the hose clamp.
3. With the anti-tipbracket properly instied in
the floor,place the long end ofthe thimble hto
the wd and screw it into place using the four
screws provided,one in each corner.
4. Placethe hose clamp provided around the
short end ofthe thimble. Attach the opposite end
ofthe flex duct to the short end ofthe thimble
using the hose clamp.
5. Plug the range into the wd.
6. CarefuUypush the range back into position.
Avoidpinchingthe transition piece or flex duct
7. Using the guide screw to locate the hole in
the rear ofthe blower housing, position the
transitionhside the blowerhousing.Rotatethe
transitionunti the holeinthefrontoftheblower
housingistigned. Securethe transitionwiththe
screwprovided.
8. Sedauductjointswithducttape.
9. Checkundertherangetobe surethelevehg
legisfullyengagedintheanti-tipbracket
10. hsti the storagedrawer.
Blower
Fii Duct Connection tiou@ the moor
1. Attachthe rubbergasket
aroundthe edge ofthe
\
/“\.
e
--
transitionpiece.me flatside
ofthe rubbergasket should
be onthe underside ofthe
transitionpiece.
2. Placetheroundendtransitionpieceintothe
floor.Securethetransitionpieceusingthe 8
screwsprovidedintie kit YoumustM the edge
ofthe rubbergaskettoinstallthescrews.Make
surethe roundedgeofthegasketisfacingup.
3. Insertthefloorelbowductintothe transition
piece.me tide flze must face
front of the -e. Attach the floor elbow duct
to ductplate using the two screws provided.
Tighten only the front screw.
4. Attach the floor elbow duct to the blower
using the 8 screws provided.me floor elbow
duct should be inside the blower.
5. Plug the range into the wd.
FloorElbow
Duet\
TranstionPie@
\ FloorPlate
towardthe
Blower
/
6. Pushthermge intoposition.Makesure
thatthefloorelbowductisdirectiyoverthe
transitionpieceandrubber gasket me rubber
gasketfi provideased be~een the floor
elbowandthetransitionpiece.Seethe above
Uustration.
7. hosen thefrontscrewattachingthefloor
elbowductplateandthefloorelbowduct Sfide
thefloorelbowductplatedowntightagainstthe
rubbergasketandtightenthe screw.
8. Sed thejointbetweentheblowerandelbow
trmsitionpiecewithducttape.Checkunderthe
rangeto ensurethe anti-tipbracketis engaged.
9. Insti thestoragedrawer.
tape,
54
Page 55

TROUBLESHOOTINGGUIDE
Ethe ventilationsystem is not operating
correcfly check the fo~owingitems.
1. Do the ductig pieces lookWe the examples
in the Duct kn@ Chart?The system should be
constructed using the examples shown in the
Duct hngth Chart The ductwork should not
exceed W equivalentfeet.
2. Were two elbows used together to get around
a floorjoist or w~ stud?Two elbows should not
be insta~ed together. They willcreate a poor
vent path.
3. Hcookingodors are fikefig back into the
house, answer the fo~owingquestions. Wasthe
system vented outside?Was the system vented
into the attic or a crawl space?me system must
be vented outside.Are dl ofthe ductjoints
sealed with duct tape?Mljoints must be sealed
with duct tape.
4. Was flexibleducting used in the initiation?
flexible plastic ducting should not be used. E
flexiblemeti ducting is used, each bend should
be counted as two meti duct elbows.A flexible
meti duct must be cddated as twicethe length
ofstraight 6“meti
duct
5. Doestheske ofthe ductig change?M
ductingshouldbethe samesk.
6. Isthe ductingclearofd foreignmatter?
Clearentireducting.Foreignmatterinducting
W restrictairflow.
7. Hasa pieceofductingcollapsed?Replace
damagedducting.
8. Isthere a draftinthe rangearea?Tryto
e~ate thedraftandcheckthe operation.
9. Howhighabovethegroundis thewdl cap?H
thecapistooclosetotheground,airvelocity
d bounceoffthe groundandreturnintothe
WMcap,restrictingtheexhaustflow.
-OVN MD REPUCEMENTOF~GE
Disconnectthe electricalsupplyatthe house
1.
circuitbreaker.
2. Disconnectthe rangeventing.
3. Unplugthepowersupplycord.
4. Removethe anti-tipbracket
5. Insti theanti-tipbracketintothe
locationusing the instructions provided with
the bracket
6. To replace the range foflowthe hstilation
hstructions.
new
55
Page 56

QUESmONS?
USETHISPROBLEMSOLVER
PROBLEM
“F-AND A_ER=
MH ~ THEDISPLAY
FOODDOES
NOT
BROLPROPEWY
POSS~LE CAUSE
● Hthetimedisplayflashes% anda nmber,wyouhavefunctione~or *.
E thefunctionerrorcodeappearsdtig these~deting cycle,checkmeoven
doorlatch Thelatchmayhavebeenmov~ evenifody sli@tly,fromthe
latchedposition.me surethelatchis
Pressthe
CWOFF p~ Alow the ovento-1 for onehour.
movedto therightasfar wit til go.
Puttheovenbacktito operatiom
● Disconnectti powerto therangefor5 minutes=d thenrecomect powsr.
Uthe ~we - re= thencallfor servim.
*Theplugonthe rangeisnotcompletelyinsertedinthe electrid outiet.
● Thecircuitbreakerin yourhousehasbeentrip- ora ti hasbeenblown.
● The ovencontrolsarenotproperlyse~
*Thedoorleftin thelockedpositionaftercleaning.
● Thelightbtib islooseor defhve. ~ghten or replace.
● Theswitchoperatingtheoveniightis broke~ ~ forservice.
● me ovenis notsetatBRO&
● Thedoorwasnotshutas reeo-ended
● bproper she~ positionbeing d SeetheBroflingGuide.
● Foodisbeinginked onhot~
● @kware is notsuitedfor brofiin&
broflpangridb notbeenfittedproperly
FOODDOWNOT
ROASTORB&
PROPERLY
o= TEMP~
TOO HOTORTOOCOLD
OWN DOOR
IS ~00~
● me ovenisnotsetatB-.
● SheMpositionis incorrect.Seethe RoastingorBakingsections.
● The ovenshelfnotleveL
● Inmrrect cookwareorcookwareofimpropersti isbeing-
● A fofitentwas notusedwhenneededto slowdownbrowningduringroasting.
● Theoventhermostatn- adj-en~ Seethe AdjusttheOven
Thermostat-DoJt Yome~sectio&
*Theoven thermostatneedsad-ent Seethe Adjust&e Oven
ThermosMo It YWe~sectio&
*we surethe electri~ pm is pluggedintoalive, properlygrounded
poweroutiet
*-k forpowerowge.
● Reviewtie Oven~atrol ~ock andTrier section of thisguide.
*Theoventemperatureistoohightosetself+lean operatiomN1owtherangeto
coolto roomtemperature=d resetthemtroh
● me doorktch Wde not movedti thewayto Weright.
. Pressthe ~0~ @ Mow therange
andreset the controls.
● Becausetheovendooris mmovab}e,it sometimesgetsoutof positionduring
=ation. Tostraightenthedoor,ptrshdownon thetigh mmez
tocool10roomtemperature
56
Page 57

PROBLEM
POSSIBLECAUSE
OWDOOR WLL
NOTUNLOCK
OH NOTCLEAN
-R CLEAN~~
*TheovenmustcoolbelowtheI&g ternpera~e.
*Theovencontrolsarenotset properly.
*HeavEysofiedovemmayneedtoseu+la againor for a Iongerperi~
*Heavyspitioversshotid beclaed beforestartingdean cycle.
● Theself<ieancyclehasbeenseleti but thelatchhan~e was notmoved
~1the wayto theri@t Movethebtch han~e.
. Thelatchhande wasmovedto therightbutanotherprogramotherthan
se~wleanwas seIectd MoveMch haude to the rightody whensetting
self~ean cycle.
● Thisis remindingyouto entera We temperature.
● Youmustusepanswhichare absolutelyfla~E lightcanbeseenbetween
thepanbottomanda straightedge,theradiantsurfaceunitsti nottransfer
beat properly.
● -roper coo&are betig - Panbottomsshouldbefl~ fairlyheavyweigh?
andthe samediameteras thesurfaceunitsel@ed.
*ticoti dtig methodshavebeen~ cootiare withroughbottoms
hasbeenuses orcoarseparticles
(At or sand)werebetweenthecoo-e
andthes- ofthecooMop.Userecommendedcleaningprocedur~ be sw
coobare bottomsandcoohare are cleanbeforeuse,and& cookare with
smoothbottoms.Tinysratches arenotremovablebutti becomelessvisl%le
intimeasa redt of cleantig.
~ OF
DISCOLO~ON
coomoP
ON
● DWdty maybe inthe maindistributionprmelof yourhousecawd bya
blowncircuit~ a trippedcirtit br~r, themain& or the~ circuit
br- ending on natureof thepowersupply.Ifa cirmit Mer is
involv@resetit.If the controlboxusesfuses,the circuitfise (a mrtridge-type)
shodd be changd BUTONLYBYSOMEONEFMW WTH
E~CAL ~-.x afterperfo~g oneoftheseprocedure%
theb blowsorcircuitbre~r tripsa- dl forservice.
NO~: Apartmenttenantsorcondominiumownersshodd requesttheirbuilding
managementto performthischd beforeMing for service.
● @n&ok arenotproperlysetor wrongcontrolisset forthe modde or surface
tit youareusing.
. Entiremodde isnot@uggedin propedy.
● E =y modse - toh~t-itch thern~e totheothersideof coo&op.
Hit operatesonthatsik thenswitchmaybe atfatik Hit doesnoth~
indi~ons arethatthereisa dfunctiotig componentinthe m~e.
● Mark from&m’num md qper pausaswellas mineti deposits fr~m
wateror W canbe removedwiththecleaningaearn.
(continued nmpage)
57
Page 58

~ PROBLEM SOLVER
(continued)
PROBLEM
~& ~GS
(mayappearas~tdes)
G~L ORG~DN
MODULEIS NOT
FUN~ONNG PROPEWY
POSS~LE CAUSE
● karrm dtig rnateri*have beenm enmed bofioversorgrease
spattemremainm thesurfam. Usea mor -per and mmmended
cleaningprtim.
● Surf-units arenotpluggedin soti~y.
● S-unit Qntrok are notpropedysetor thewrongS*W unitantrol
knobset forthesurfamunityouareusing.
*Heatingelementisnotpluggedin solidy.
, - or gri~e mntrok arenotproperlyset.
*GriWe wasnotpre-seasonedbefore~ use.
● Heatsetig istoohi~
● O-g ofgridde has~ damagedby useof sharptients or
abrasivedeanse~
“B~G” OR“Omr
ODOREMmG
OW -
FROM
TURNEDON
STRONGODOR
W SYSW BLOWER
DOESNOT WOW
If you
needmorehelp...~ to~free:
GEAnswer Center@
800.626.2000
consumerkforrnation sefice
● A_@tied greaseon pte is~using exeesssmoke.
● F* nottrimmedfiornmess priorto eootig.
*Thisis no- b a newovenandWI diwppearintime.Tospeedthepr~ss,
seta seif+l- ~de fora minimumof 3 hem. SeetheOpera&g the
SeIf-~eaning Ovense~ion.
*Anodorfromthe Hation around& insideof h ovenis noti fur the
firstfewtirnesthe ovenisti~is temporary.
● The-t breakerin yourhousehasbeentrix or a * hasbeenblom
● E them~es operatebuttheblowerdoesn’~thefadt maybe in theblower
mntrolswitchorblowerwiringmnndons. Besureto -nnti powerto
tbemge atthe ho~hold ti%ution panelbefore~mpting toservim tie
bioweryouBE.
58
Page 59

WdllBeThere
WiththepurchaseofyournewGEappliance,receivetie assurancethatifyoueverneed
informationorassistancehornGE,wdUbethere.AllyouhavetodoiscaII–toil-free!
GEAnswerCentep
Whateveryour question about anyGE major appliance, GE AnswerCenter@
information serviceisavaiIableto help. Yourcall-and your question-till be
answered prompdy and courteously.And youcan callany time. GEAnswer
Center@setice is open 24hours a day, 7 daysaweek.
AGEconsumer service professional will provide expert repair service,
scheduled at a time that’s convenient for you. ManyGE Consumer Service
company~perated locations offer you sefice todayor tomorrow, or atyour
convenience
Our facto~-trained techniciansknowyour appfiance inside and out+o most
repairs can be handed injust one visit.
(7:00a.m. to 7:00 p.m. weekdays,9:00a.m. to 2:00p.m. Saturdays).
ForCustomerWti SpecialNeeds...
80~6262000
Consumerswithimpairedhearingorspeechwhohave
accesstoaTDDoraconventionalteletypewritermay
cdl 80&TDBGEAC(800#3W322)torequest
—-----
-—-. —. . ...
~
Uponrequest,GEwillprovide
BraillecontrolsforavarietyofGE
appliances,andabrochureto
assistinplanningabarrier-free informationorsetice.
kitchenforpersonswithlimited
mobfiity.Toobtaintheseitems,
freeofcharge, cdl 800.626.2000.
SemisCon&a&
8aM2&2224
Youcan have the secure feeling that GE Consumer Servicewillstillbe there
&er your warranty expires. Purchase a GEcontract whileyourwarranty isstill
in effect and you’llreceivea substantial discount. With a multipleyear contract,
you’reassured offiture sefice at today’sprices.
bdividti q-led to service tieir own app~ances
can have parts or accessories sent direcdy to their home. cover procedmes intended to be performed byanyuser.
The GEparts system provides access to over
par~...and all GEGenuine Renewal
warranted. VISA,MasterCard and Discovercards
are accepted.
Partsare fully
47,000
Usermbtenmce ktictions contained in this @de
Otier servi~ gene~y shodd he referred to qu~led
servicepersonnel. Caution must be exercise~ since
improper serncing maycause unsafe operation.
Page 60

YOUR GE ELECTRIC RANGE
WARRANW
Staplesales slip or cancelledcheck
here. Proofof originalpurchase date
is neededto obtain se~ice
I
I
underwarranty.
t
WHATISCOVERED
WMT ISNOTCOVERED
FULLONE-YEARWARRAN~
Foroneyearfromdateoforiginal
purchase,we will provide,freeof
charge, patis and service labor in
your
hometo repairor replace
anypati of therangethatfails
becauseofa manufacturingdefect.
Thiswarrantyisehended to the
originalpurchaser
and any su-eding
ownerfor productspurchasedfor
ordina~homeuseinthe48 mainland
states,HawaiiandWashington,D.C.
InAlaskathewarrantyisthesame
exce~tthatit isLIMITEDbecause
youmustpayto shipthe productto
theserviceshopor forthe service
technician’stravelcoststoyourhome.
Allwarrantyservicewill beprovided
byourFactoryServiceCentersor by
ourauthorizedCustomerCar@
servicemduringnormalworkinghours.
Shouldyourapplianceneedservice,
duringwarrantyperiodor beyond,
call800-GE-CARES(800-2-2737)
● Servicetripsto yourhometo
teachyouhowtousetheproduct. contactyourdealeror installer.
ReadyourUseandCarematerial.
Ifyou then haveanyquestions
aboutoperatingthe productplease
contactyourdealeror our
ConsumerAffairsofficeatthe
addressbelow,orcall, tollfree:
GEAnswerCenteP
800.626.2000
consumerinformationservice
● Improperinstallation.
Ifyouhavean installationproblem,
Youare responsiblefor providing
adequateelectri~, gas,exhausting
andother connectingfacilitiesas
describedintheInstallationInstructions
providedwiththe product.
● Replacementof housefusesor
resettingofcircuitbreakers.
● Failureofthe productif it is used
forotherthan its intendedpurpose
orusedcommercially.
● Damageto productcausedby
accident,fire,floodsor actsof God.
WARRANTORISNOTRESPONSIBLE
FORCONSEQUENTIALDAMAGES.
Somestatesdonotallowtheexclusionorlimitationofincidentdor consequentialdamages,sothe~ove limitationorexclusion
maynotapplytoyou. ~s warrantygivesyouspecificIegdrights,andyoumay dso haveotherrightswhichvaryfromstatetostate.
Toknowwhatyourlegalrightsareinyourstate,consultyourIod orstateconsumeraffairsofficeoryourstate’sARorneyGeneral.
Warranto~GeneralElectricCompany
Iffurtherhelpisneededconcerningthiswarranty,write:
Manager<onsumer Affairs,GEAppliances,Louisville,N 40225
PrintedintheUnitedStates
JSP69
 Loading...