

Page 1
P_,
6.
W(I,)
2
a
-0
I
GEAppliances.com
Safety Instructions ............................ 2-5
Operating Instructions
Kitchen Timer .......................................... 21
Oven ............................................... 14-35
Adjust Oven Thermostat .............................. 22
Baking or Roasting .................................... 17
Broiling, Broiling Guide ................................ 18
Controls ........................................... 14, 15
Convection Oven .................................. 23-26
Lower Oven Drawer ................................... 35
Preheating ............................................ 17
Probe ................................................. 20
Sabbath Feature ...................................... 33
Self-Cleaning ...................................... 29, 30
SlowCook,Warming and Proofing Features ........... 27, 28
Special Features .................................. :31-32
Timed Baking and Roasting ........................... 19
Warming Drawer ..................................... :34
Surface Units ........................................ 6-1:3
Cookware .............................................. 7
Griddle ............................................ 12, l:B
Knob-Controlled Models ........................... lO, 11
Touch Pad-Controlled Models ........................ 8, 9
Quick Set V,
Quick Set VI and
Next Step Control
om
m
Care and Cleaning
Control Knobs ......................................... 36
Control Panel .......................................... 36
Glass Cooktop ..................................... 42, 43
Lift-Off Oven Door ................................. 37, 38
Light ............................................... 40, 41
Oven Floor ............................................. :39
Oven Heating Elements ................................ 41
Racks .................................................. :38
RemovableWarming Drawer/Lower OvenDrawerPan ..... :39
Storage Drawer ........................................ :39
Surfaces ............................................... :36
Vent ................................................ :37,:39
Troubleshooting Tips ......................... 44-48
Accessories ......................................... 5o
Consumer Support
Consumer Support .................................... 52
Warrantg ..............................................51
Write the model and serial
numbers here:
Model #
Serial #
In Canada:
www.GEAppliances.ca
You can find them on a label
behind the drawer or behind the
lower oven door on the front of
the range frame.
Printed on
Recgcled Paper
49-80575-i 05-09JR
Page 2
IMPORTANTSAFETYINFORMATION.
READALL INSTRUCTIONSBEFOREUSING.
I-AWARNING I
Read all safety instructions before using the product. Failure to follow these instructions may result in fire, electric
shock, serious injury or death.
ANTI-TIP DEVICE
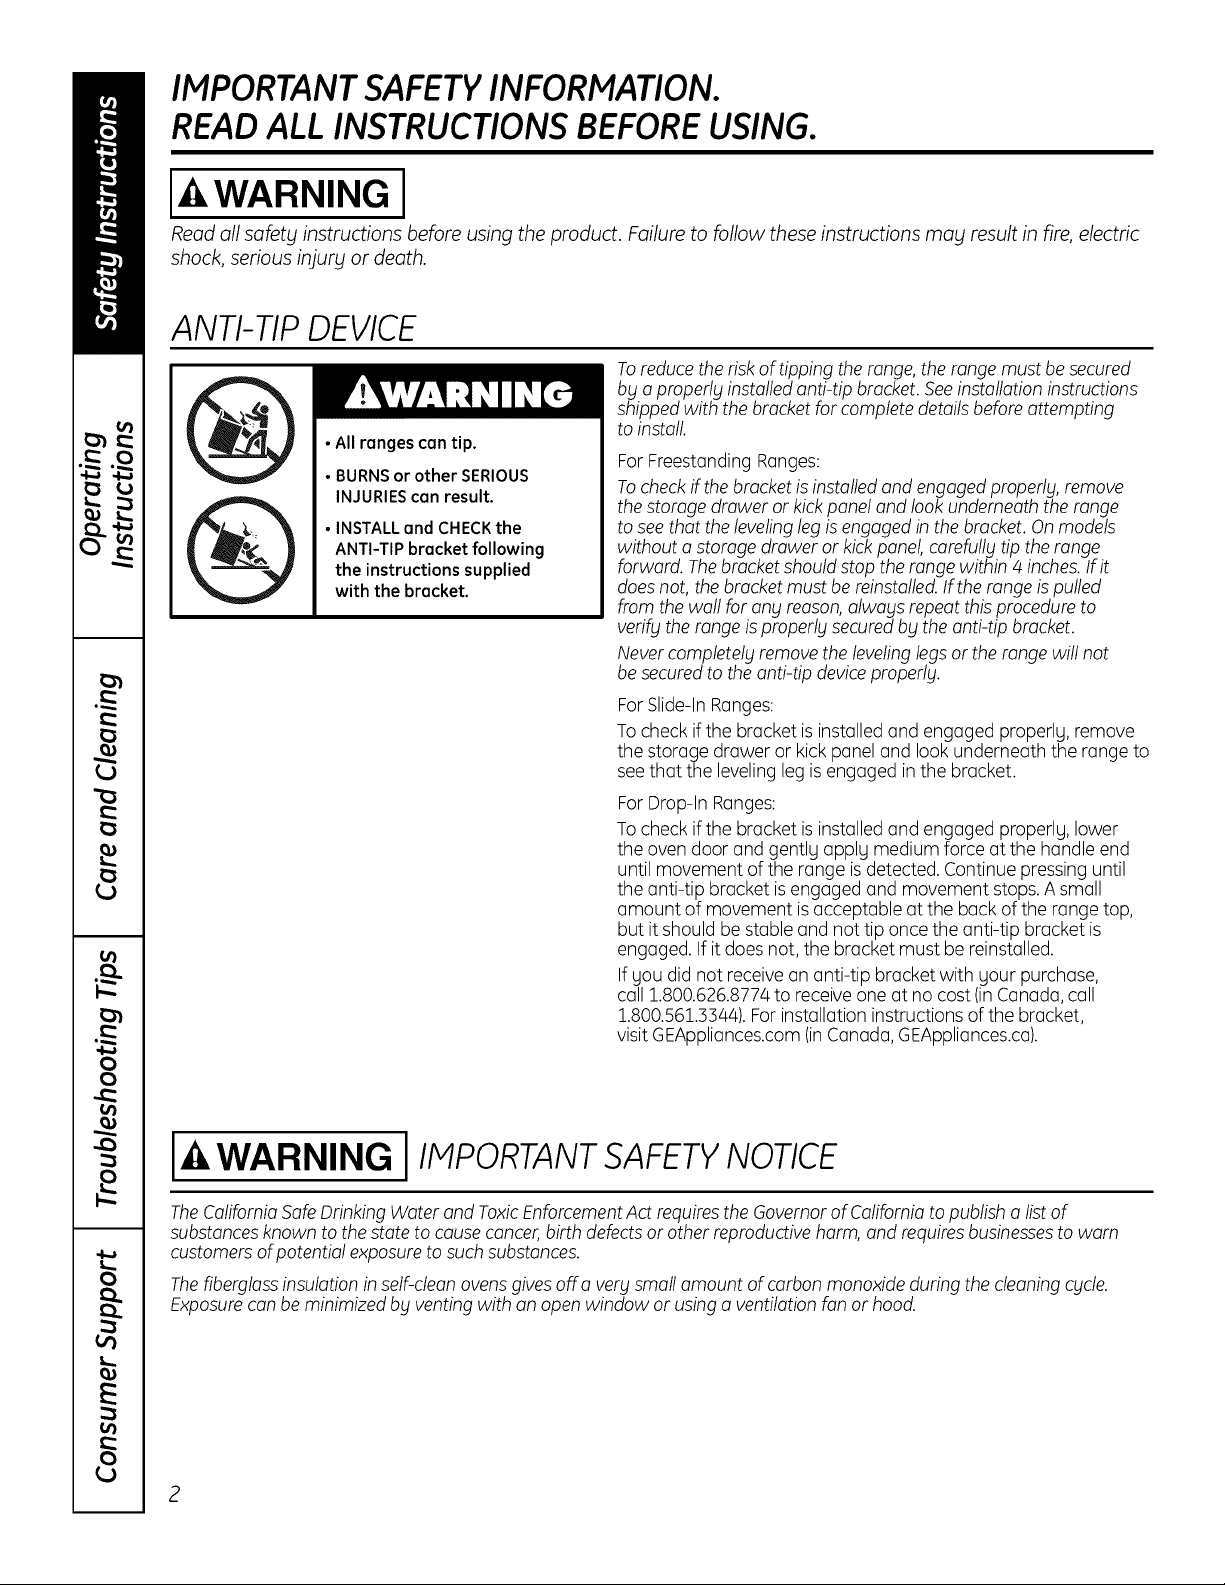
Toreducetherisk of tipping the range, the range must be secured
bblo properlblinstalledanti-tip bracket.Seeinstallation instructions
shippedwith the bracket for complete details beforeattempting
• All ranges can tip.
• BURNS or other SERIOUS
INJURIES can result.
• INSTALLand CHECKthe
ANTI-TIP bracket following
the instructions supplied
with the bracket.
to install
ForFreestandingRanges:
Tocheckifthe bracketis installedand engagedproperly, remove
the storage drawer or kickpanel and lookunderneath the range
to seethat the leveling leg isengaged in the bracket. Onmodels
without o storage drawer or kick panel, carefully tip the range
forward. Thebracket should stop the range within 4 inches.If it
doesnot, the bracket must be reinstalled.If therange is pulled
from the wall for any reason,always repeat this procedure to
verify the range is properly securedby theanti-tip bracket.
Nevercompletely removethe levelinglegsor the range will not
be securedto the anti-tip deviceproperly.
ForSlide-In Ranges:
Tocheck ifthe bracket isinstalled and engaged properlg, remove
the storage drawer or kickpanel and look underneath the range to
seethat the leveling leg is engaged in the bracket.
ForDrop-In Ranges:
Tocheck ifthe bracket isinstalled and engaged properlg, lower
the oven door and gentlg opplg medium force at the handle end
until movement of the range isdetected. Continue pressing until
the anti-tip bracket is engaged and movement stops.A small
amount of movement isacceptable at the back of the range top,
but it should be stable and not tip once the anti-tip bracket is
engaged. If it does not, the bracket must be reinstalled.
If gou did not receive on anti-tip bracket with gour purchase,
call 1.800.626.8774to receive one at no cost (inCanada,call
1.800.561.3344).Forinstallation instructions of the bracket,
visit GEApplionces.com(inCanada, GEApplionces.co).
WARNING IIMPORTANTSAFETYNOTICE
TheCaliforniaSafeDrinking Water and ToxicEnforcementAct requiresthe Governorof Californiato publisho listof
substancesknown to the state to causecancer,birth defectsor other reproductive harm, and requires businessesto worn
customersof potential exposure to suchsubstances.
Thefiberglass insulation in self-clean ovensgivesoff avery smallamount of carbon monoxideduring the cleaning cycle.
Exposurecon be minimized bblventing with on open window or usingo ventilation fan or hood.
2
Page 3
WARNING I GENERALSAFETYINSTRUCTIONS
GEAppliances.com
, Usethis appliancefor its intendedpurposeas describedinthis
Owner'sManual.
, Besureyourapplianceisproperly installedandgrounded
by a qualified installerin accordancewith the provided
installationinstructions.
, Do notattempttorepairorreplaceany partofyourrange
unlessitisspecificallyrecommended inthismanual.All
otherservicingshouldbetransferredtoa qualified
technician.
, Beforeperforming anyservice,unplugthe rangeor
disconnectthepowersupply at thehouseholddistribution
panelby removingthe fuseor switchingoff the circuit
breaker.
, Donotleavechildrenalone-children shouldnot be left
alone or unattendedin anareawherean applianceisin use.
Theyshouldneverbe allowedto climb,sit or standon any
partof theappliance.
CAUTION:Do not store itemsofinterestto children
abovea range or onthe backguardof a range-children
climbingon the rangeto reachitems could beseriously
injured.
Useonlydry potholders-moist or damp pot holderson
hotsurfacesmay resultin burnsfrom steam.Donotlet pot
holderstouch hotsurfaceunitsor heatingelements.Donot
usea towel or otherbulky cloth in placeof pot holders.
Neveruseyourappliancefor warming or heating the room.
, Do not touch the surfaceunits,the heating elementsor
the interiorsurface of the oven.Thesesurfacesmay be
hot enoughto burneventhoughthey aredark incolor.
Duringand after use,do not touch,or let clothingor other
flammablematerialscontact thesurfaceunits,areas nearby
thesurfaceunitsor any interiorareaof the oven;allow
sufficienttime for coolingfirst. Othersurfacesof the
appliancemay becomehot enoughto causeburns.
Potentiallyhot surfacesincludethe cooktop,areasfacing
thecooktop,ovenventopening,surfacesnear the opening
and crevicesaroundtheovendoor.
Donot heatunopenedfood containers.Pressurecouldbuild
up andthe containercould burst,causingan injury.
Donot usealuminum foilto linethe drip pansor anywhere
intheoven,except asdescribedinthis manual.Misusecould
resultin damage to the rangeandshockor firehazard.
Avoidscratchingor impacting glassdoors,cooktopsor
control panels.Doingsomay leadto glassbreakage.Do not
cook on a productwith brokenglass.Shock,fireor cutsmay
occur.
, Cookmeat and poultry thoroughly-meat to at leastan
internaltemperature of 160°Fand poultryto at leastan
internaltemperature of 180°RCookingto these
temperaturesusuallyprotectsagainstfoodborneillness.
I-&WARNING I KEEPFLAMMABLE MATERIALSAWAY FROM
THE RANGE.
Donotstore or useflammablematerialsin anovenor near
the cooktop,includingpaper,plastic,potholders,linens,wall
coverings,curtains,drapesand gasolineor otherflammable
vaporsand liquids.
, Neverwear loose-fittingor hanginggarmentswhileusing
the appliance.Thesegarments may igniteifthey contact hot
surfaces,causingsevereburns.
Donot let cookinggreaseor otherflammablematerials
accumulate inor nearthe range.Greaseinthe ovenoron
the cooktopmay ignite.
, Cleanventilatinghoodsfrequently.Greaseshouldnot be
allowedto accumulateon the hoodor filter.
Itl, WARNING I IN THE EVENT OFA FIRE,TAKETHEFOLLOWING
STEPSTO PREVENTTHE FIREFROM SPREADING:
Donot usewater on greasefires.Neverpick upa flaming
pan.Turnthe controlsoff.Smothera flaming panon
a surface unit by coveringthe pancompletelywith a
well-fitting lid,cookiesheetor flat tray. Usea multi-purpose
dry chemicalor foam-type fire extinguisher.
If there is afire inthe ovenduring baking,smotherthe fire by
closingthe ovendoorand turningthe ovenoff orby usinga
multi-purposedry chemical or foam-type fire extinguisher.
, Ifthere isa firein the ovenduring self-clean,turnthe oven
off and wait for the fire to go out. Do not force thedoor
o_en.Introductionoffreshair at self-cleantemperatures
may leadto a burstof flamefrom the oven.Failuretofollow
thisinstructionmay resultin severeburns.
3
Page 4
IMPORTANTSAFETYINFORMATION.
READALL INSTRUCTIONSBEFOREUSING.
I-&WARNING I COOKTOPSAFETY'INSTRUCTIONS
Never leave the surface units unattended at
medium or high heat settings. Boilovers cause
smoking and greasy spillovers that may catch
on fire.
Never leave oil unattended while frying. If allowed
to heat beyond its smoking point, oil may ignite,
resulting in fire that may spread to surrounding
cabinets. Use a deep fat thermometer whenever
possible to monitor oil temperature.
To avoid oil spillover and fire, use a minimum
amount of oil when shallow pan-frying and avoid
cooking frozen foods with excessive amounts of ice.
Use proper pan size-select cookware having flat
bottoms large enough to cover the surface heating
element. The use of undersized cookware will
WARNING I
(some models)
Use care when touching the cooktop. The glass
surface of the cooktop will retain heat after the
controls have been turned off.
Do not cook on a broken cooktop. If glass cooktop
should break, cleaning solutions and spillovers may
penetrate the broken cooktop and create a risk of
electric shock. Contact o qualified technician
immediately.
Avoid scratching the glass cooktop. The cooktop
con be scratched with items such as knives, sharp
instruments, rings or other jewelry and rivets on
clothing.
Do not place or store items that can melt or catch
fire on the glass cooktop, even when it is not being
used. If the cooktop is inadvertently turned on, they
RADIANT COOKTOPSAFETY INSTRUCTIONS
expose a portion of the surface unit to direct
contact and may result in ignition of clothing.
Proper relationship of cookware to surface unit
will also improve efficiency.
Only certain types of glass, glass/ceramic,
earthenware or other glazed containers are suitable
for cooktop service; others may break because of
the sudden change in temperature.
To minimize the possibility of burns, ignition of
flammable materials and spillage, the handle of a
container should be turned toward the center of the
range without extending over nearby surface units.
When preparing flaming foods under a hood, turn
the fan on.
may ignite. Heat from the cooktop or oven vent
after it isturned off may cause them to ignite also.
Use CERAIVIABRYTE® ceramic Cooktop Cleaner and
CERAIVIABRYTE®Cleaning Pad to clean the cooktop.
Wait until the cooktop cools and the indicator light
goes out before cleaning. A wet sponge or cloth
on a hot surface can cause steam burns. Some
cleaners can produce noxious fumes if applied to
a hot surface. NOTE: Sugar spills are an exception.
They should be scraped off while still hot using an
oven mitt and a scraper. See the Cleaning the gloss
cooktop section for detailed instructions.
Read and follow all instructions and warnings on
the cleaning cream label.
I WARNING I
(some models)
Do not immerse or soak the removable surface
units. Do not put them in a dishwasher. Do not self-
clean the surface units in an oven. Doing so may
cause them to fail, presenting a burn or fire hazard.
To avoid the possibility of a burn or electric shock,
always be certain that the controls for oil surface
COIL COOKTOP SAFETYINSTRUCTIONS
units are at the OFFposition and all coils are cool
before attempting to lift or remove a coil surface unit.
Be sure the drip pans are not covered and are in
place. Their absence during cooking could damage
range parts and wiring.
Page 5
WARNINGIOVENSAFETYINSTRUCTIONS
GEAppliances.com
Stand away from the range when opening the oven
door. Hot air or steam which escapes can cause
burns to hands, face and/or eyes.
Keep the oven vent unobstructed.
Keep the oven free from grease buildup. Grease
in the oven may ignite.
Place oven racks in desired location while oven
is cool. If rack must be moved while oven is hot,
do not let pot holder contact hot heating element
in oven.
When using cooking or roasting bugs in the oven,
follow the manufacturer's directions.
WARNING I
(Some models)
The self-cleaning feature operates the oven at temperatures high enough to burn away food soils in the
oven. Follow these instructions for safe operation.
SELF-CLEANING OVEN SAFETY INSTRUCTIONS
i Beforeoperating the self-clean cycle,remove pans,
shiny metal oven racks and other utensilsfrom the
oven.Only gray porcelain-coated oven racksmay
beleft in the oven.Do not useself-cleanto clean
other parts,such asdrip pans or bowls.
Before operating the self-clean cycle, wipe grease
and food soils from the oven. Excessive amount of
grease may ignite, leading to smoke damage to
your home.
Pull the oven rack to the stop-lock position when
loading and unloading food from the oven. This
helps prevent burns from touching hot surfaces
of the door and oven walls.
Do not leave items such as paper, cooking utensils
or food in the oven when not in use. Items stored in
an oven can ignite.
Do not use aluminum foil to line the oven bottom.
Foil may trap or reflect heat, leading to a shock or
fire hazard.
If the self-cleaning mode malfunctions, turn the
oven off and disconnect the power supply. Have it
serviced by a qualified technician.
Do not clean the door gasket. The door gasket is
essential for a good seal. Care should be taken not
to rub, damage or move the gasket.
iiiiiiiiiiiii!
Do not use oven cleaners. No commercial oven
cleaner or oven liner protective coating of any kind
should be used in or around any part of the oven.
I-4,WARNING I WARMINGDRAWER/LOWEROVENDRAWER
SAFETYINSTRUCTIONS(somemodels)
The purpose of the warming drawer is to hold hot
cooked foods at serving temperature. Bacteria will
grow in food while it is below 140°F. Do not put cold
food in warming drawer. Do not heat food for more
than 2 hours. Failure to follow these instructions
may result in foodborne illness.
Do not leave paper products, plastics, canned food
or combustible materials in the drawer. They may
ignite.
Do not touch the heating element or the interior
surface of the drawer. These surfaces may be hot
enough to cause burns.
iiiiiiiiiiiii!
Use care when opening the drawer. Open the
drawer a crack and let hot air or steam escape
before removing or replacing food. Hot air or
steam that escapes can cause burns to hands,
face and/or eyes.
iiiiiiiiiiiii!
Do not use aluminum foil to line the warming
drawer. Foil is an excellent heat insulator and
will trap heat beneath it. This will upset the
performance of the drawer and potentially
cause a fire hazard.
5
Page 6
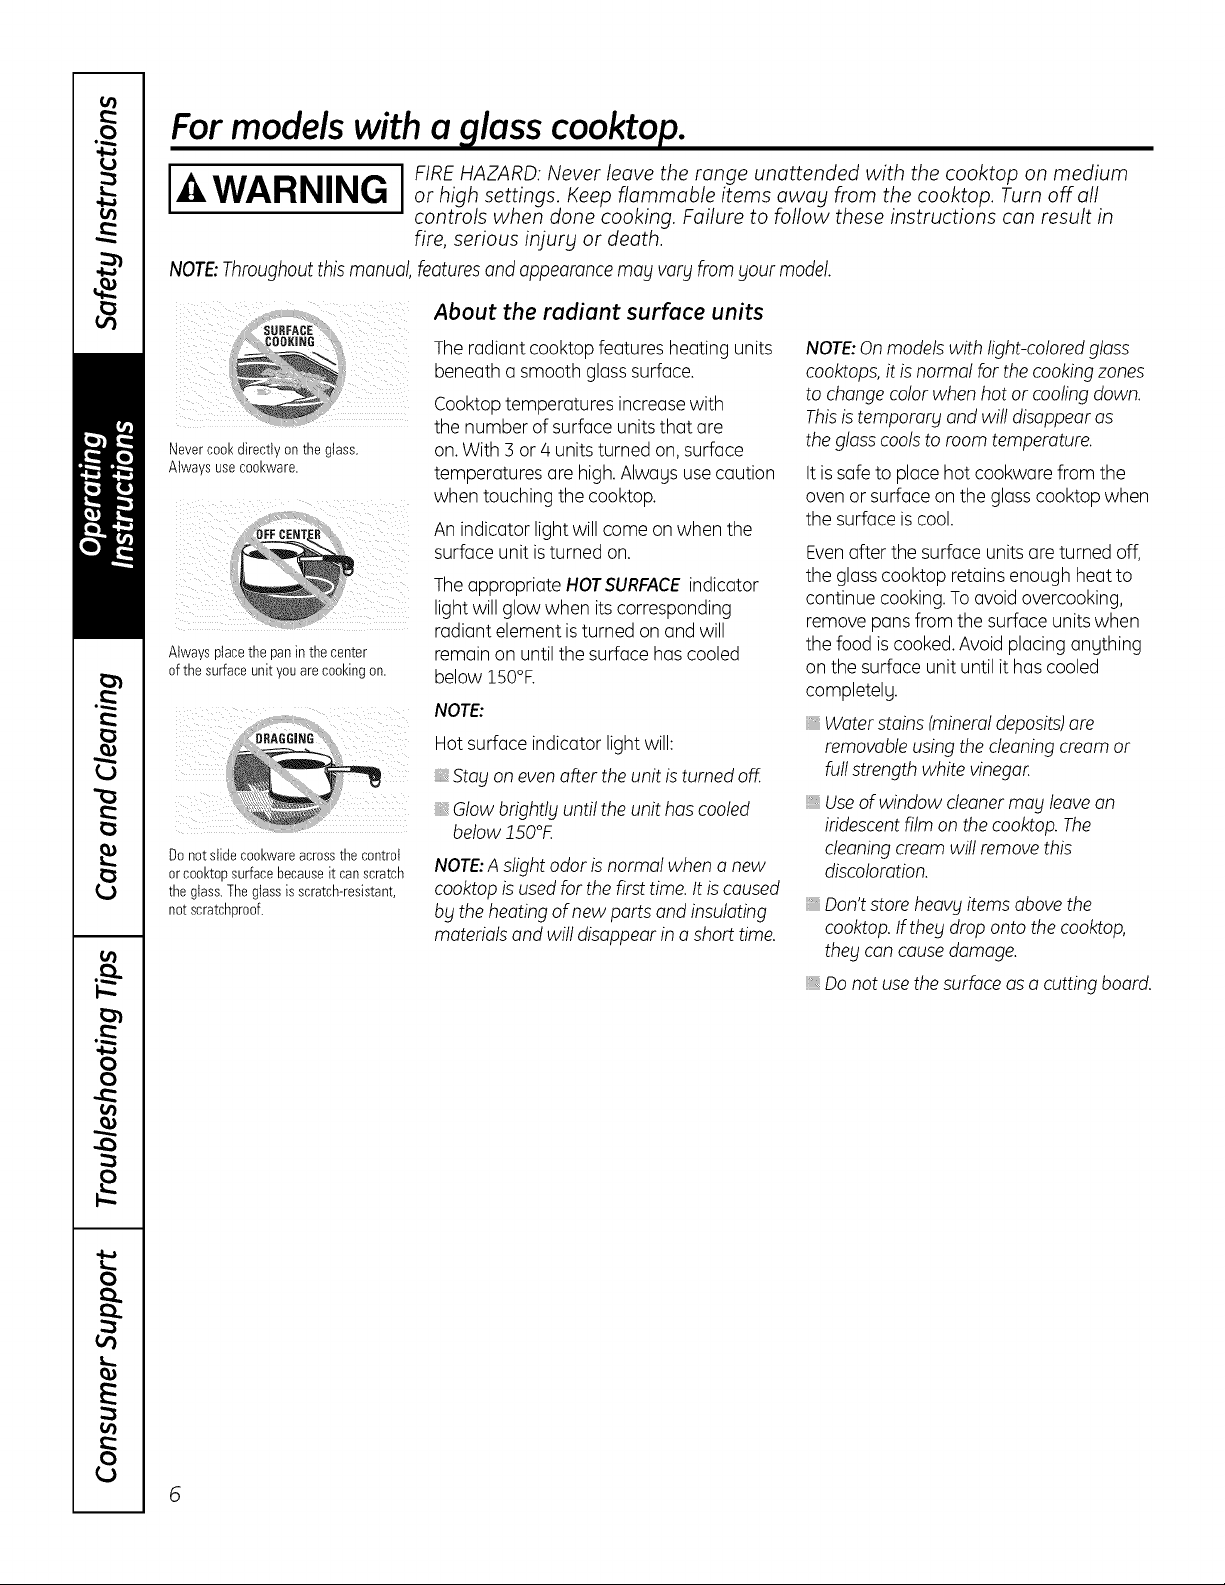
For models with a glass cooktop.
I,_ I FIREHAZARD: Never leave the range unattended with the cooktop on medium
WARNING IorhighsettingsKeenflammableitemsawayfromthecooktonTurnoffal1
controls when done cooking. Failure to follow these instructions can result in
fire, serious injurg or death.
NOTE:Throughoutthis manual, features and appearancemag varg from gout model.
About the radiant surface units
CeOKING
Nevercookdirectly onthe glass.
Alwaysusecookware.
Alwaysplacethe panin the center
ofthe surfaceunit youarecookingon.
Donotslide cookwareacrossthe control
orcooktopsurfacebecauseit canscratch
theglass.Theglassis scratch-resistant,
notscratchproof.
The radiant cooktop features heating units
beneath a smooth glasssurface.
Cooktoptemperatures increasewith
the number of surface units that are
on.With 3 or 4 units turned on, surface
temperatures are high.Always usecaution
when touching the cooktop.
An indicator light will come on when the
surface unit isturned on.
The appropriate HOTSURFACEindicator
light will glow when its corresponding
radiant element is turned on and will
remain on until the surface has cooled
below 150°R
NOTE:
Hot surface indicator light will:
_,Stag on evenafter the unit is turned off.
_,Glow brightlg until the unit has cooled
below 250°F.
NOTE:A slight odor isnormal when o new
cooktop isusedfor thefirst time. It is caused
bg the heating of new parts and insulating
materialsand will disappear in o short time.
NOTE:Onmodels with light-colored glass
cooktops,it isnormal for the cookingzones
to changecolor when hot or cooling down.
Thisistempororg and will disappear as
the glasscools to room temperature.
It is safe to placehot cookware from the
oven or surface on the glasscooktop when
the surface iscool.
Evenafter the surface units are turned off,
the glasscooktop retains enough heat to
continue cooking. To avoid overcooking,
remove pans from the surface unitswhen
the food iscooked.Avoid placing angthing
on the surface unit until it has cooled
completelg.
Water stains (mineraldeposits)ore
removable using the cleaning cream or
fullstrength white vinegar.
, Useof window cleanermag leaveon
iridescentfilm on the cooktop. The
cleaningcream will removethis
discoloration.
_,Don'tstore heavg items abovethe
cooktop.If theg droponto thecooktop,
theg concause damage.
_,Do not use the surface as a cutting board.
Page 7
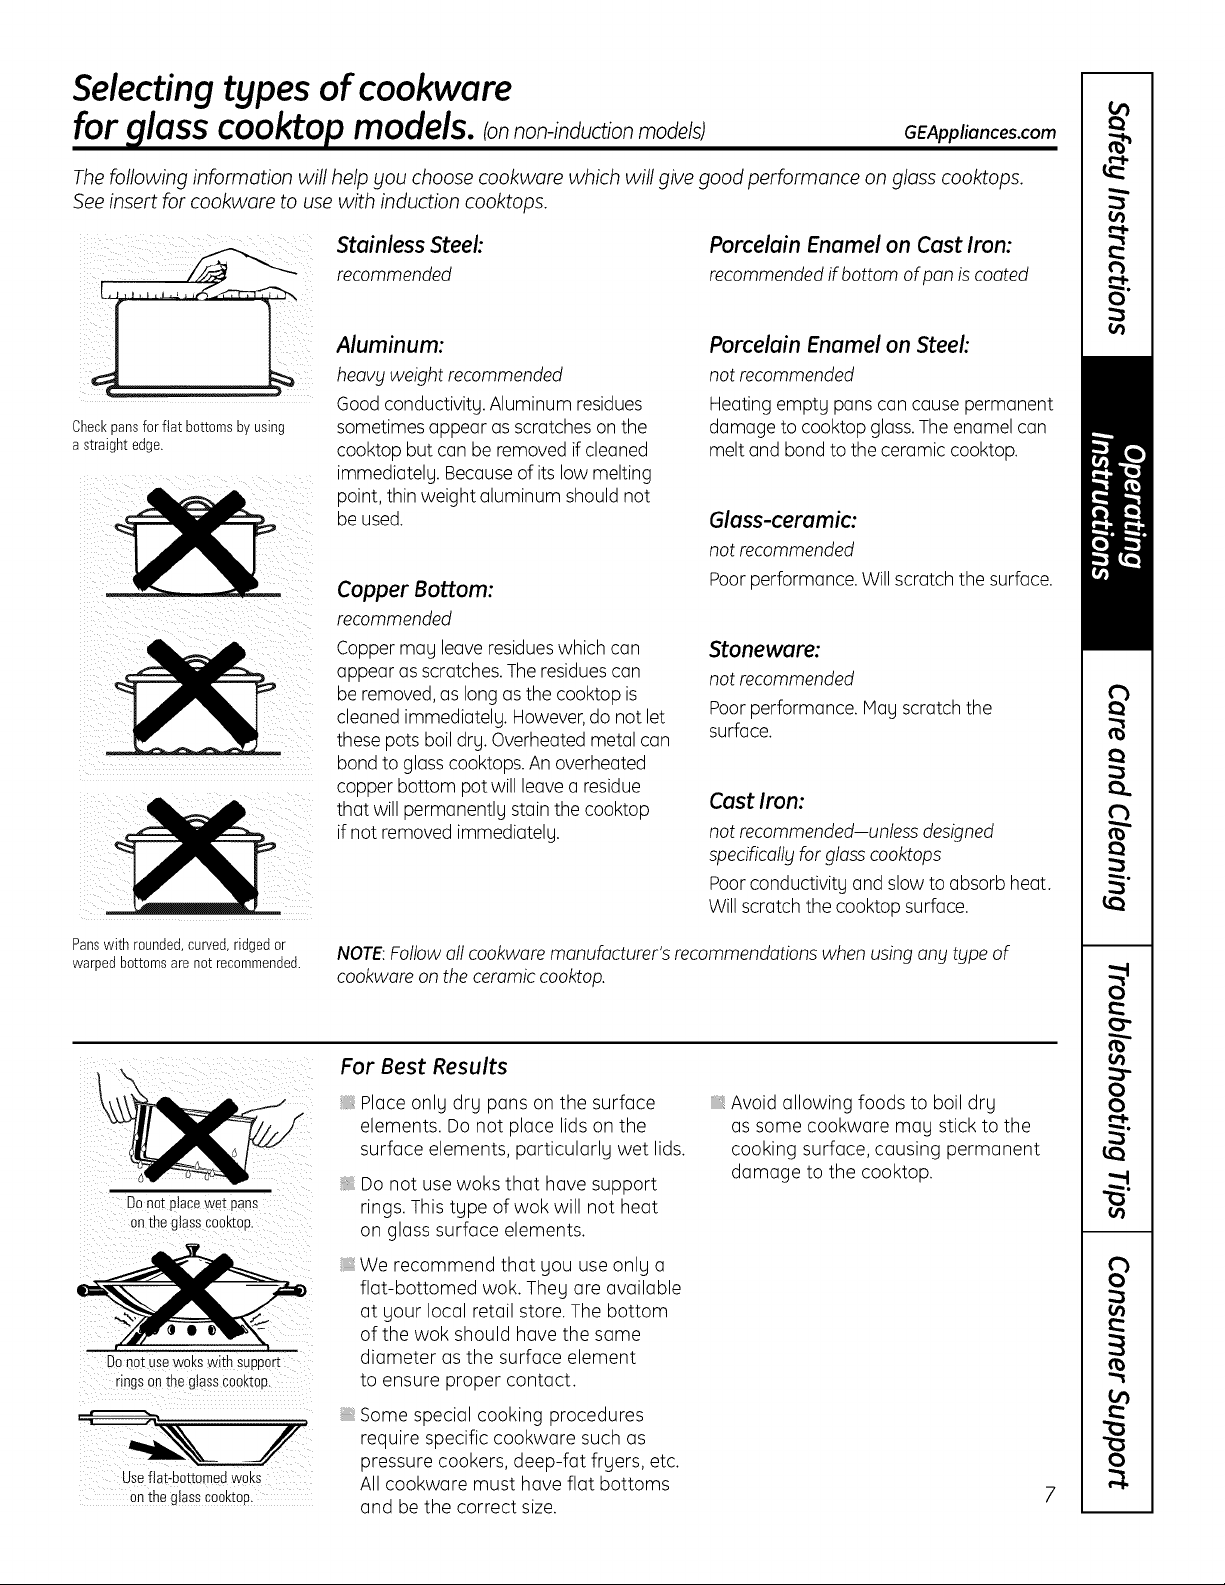
Selectingtypesof cookware
for glass cooktopmodels, ionnon-/nduct/onmode sI
The following information will help you choose cookware which will give good performance on glass cooktops.
See insert for cookware to use with induction cooktops.
Checkpansfor flat bottomsby using
astraight edge.
Stainless Steel:
recommended
Aluminum:
heavy weight recommended
Good conductivity. Aluminum residues
sometimes appear as scratches on the
cooktop but can be removed if cleaned
immediately. Because of its low melting
point, thin weight aluminum should not
be used.
Copper Bottom:
recommended
Copper may leave residues which can
appear as scratches. The residues can
be removed, as long as the cooktop is
cleaned immediately. However, do not let
these pots boil dry. Overheated metal can
bond to glass cooktops. An overheated
copper bottom pot willleave a residue
that will permanently stain the cooktop
ifnot removed immediately.
Porcelain Enamel on Cast Iron:
recommended if bottom of pan is coated
Porcelain Enamel on Steel:
not recommended
Heating empty pans can cause permanent
damage to cooktop glass. The enamel can
melt and bond to the ceramic cooktop.
Glass-ceramic:
not recommended
Poor performance. Willscratch the surface.
Stoneware:
not recommended
Poor performance. Hay scratch the
surface.
Cast Iron:
not recommended-unless designed
specificoll_jfor gloss cooktops
Poor conductivity and slow to absorb heat.
Willscratch the cooktop surface.
GEAppliances.com
Panswith rounded,curved,ridgedor
warpedbottomsarenot recommended.
DOnot place wet Pans
onthe glasscooktop.
Donot USewoks with Support
ringsan the glass€ooktop,
Useflat-bottomedwoks
On the glass€ooktop 7
NOTE:Followoil cookwore manufacturer's recommendationswhen usingany type of
cookwore on the ceramic cooktop.
For Best Results
i Place only dry pans on the surface
elements. Do not place lids on the
surface elements, particularly wet lids.
Do not use woks that have support
rings. This type of wok will not heat
on glass surface elements.
We recommend that you use only a
flat-bottomed wok. They are available
at your local retail store. The bottom
of the wok should have the same
diameter as the surface element
to ensure proper contact.
Some special cooking procedures
require specific cookware such as
pressure cookers, deep-fat fryers, etc.
All cookware must have flat bottoms
and be the correct size.
Avoid allowing foods to boil dry
as some cookware may stick to the
cooking surface, causing permanent
damage to the cooktop.
Page 8
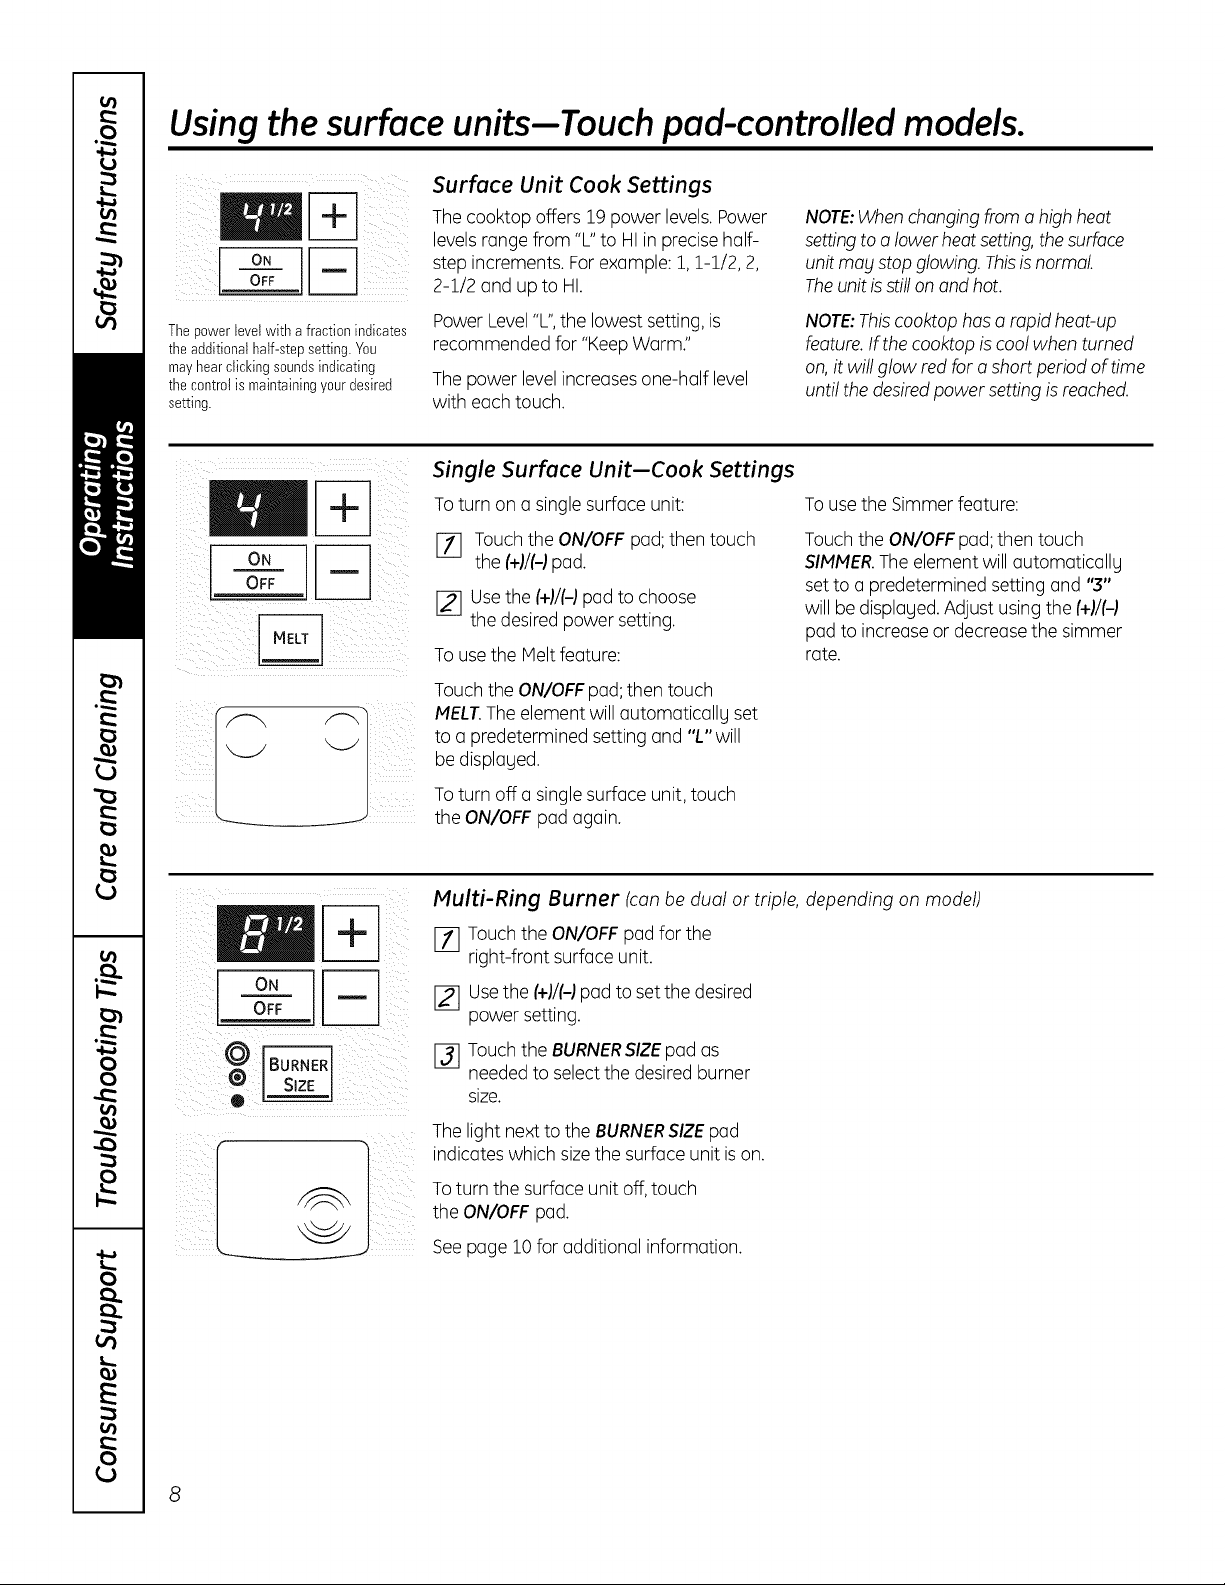
Usingthe surface units--Touch pad-controlled models.
Surface Unit Cook Settings
Thecooktop offers 19 power levels. Power
levelsrange from "L"to HIin precise half-
step increments. For example: 1, 1-1/2, 2,
2-1/2 and up to HI.
NOTE:Whenchangingfrom a high heat
settingtoa lower heat setting,thesurface
unit mogstop glowing. Thisisnormal.
Theunit isstill onand hot.
Thepowerlevelwith a fractionindicates
theadditional half-stepsetting.You
mayhearclickingsoundsindicating
thecontrotis maintainingyourdesired
setting.
ON
OFF
Power Level"L",the lowest setting, is
recommended for "KeepWorm."
Thepower levelincreases one-half level
with each touch.
NOTE:Thiscooktop has a rapid heat-up
feature.If the cooktop is cool when turned
on,it will glow red for o short period of time
until the desiredpower setting is reached.
Single Surface Unit-Cook Settings
Toturn on a single surface unit:
[_ Touchthe ON/OFF pad;then touch
the (+)/(@pad.
[_ Usethe (+)/(@pad to choose
the desiredpower setting.
To usethe Meltfeature:
Touch the ON/OFFpad;then touch
MELT.The element will automatically set
to a predetermined setting and "L" will
be displaged.
Toturn off a singlesurface unit, touch
the ON/OFF pad again.
Tousethe Simmer feature:
Touchthe ON/OFFpad; then touch
SIMMER.The element will automatically
set to a predetermined setting and "3"
will be displayed. Adjust usingthe (+)/(@
pad to increase or decrease the simmer
rate.
Multi-Ring Burner (canbe dual or triple, depending on model)
ON i
FT] Touch the ON/OFF pad for the
right-front surface unit.
[_ Usethe (+)/(-)pad to setthe desired
power setting.
[_] Touch the BURNERSIZEpad as
needed to select the desired burner
size.
Thelight next to the BURNERSIZEpad
indicates which sizethe surface unit ison.
Toturn the surface unit off, touch
the ON/OFF pad.
Seepage 10for additional information.
Page 9
GEAppliances.com
I WARNING
000
©@
WARMING ZONE
II
SELECT
ON
OFF
i i iiiii
ON / OFF
SETWARMING ZONE
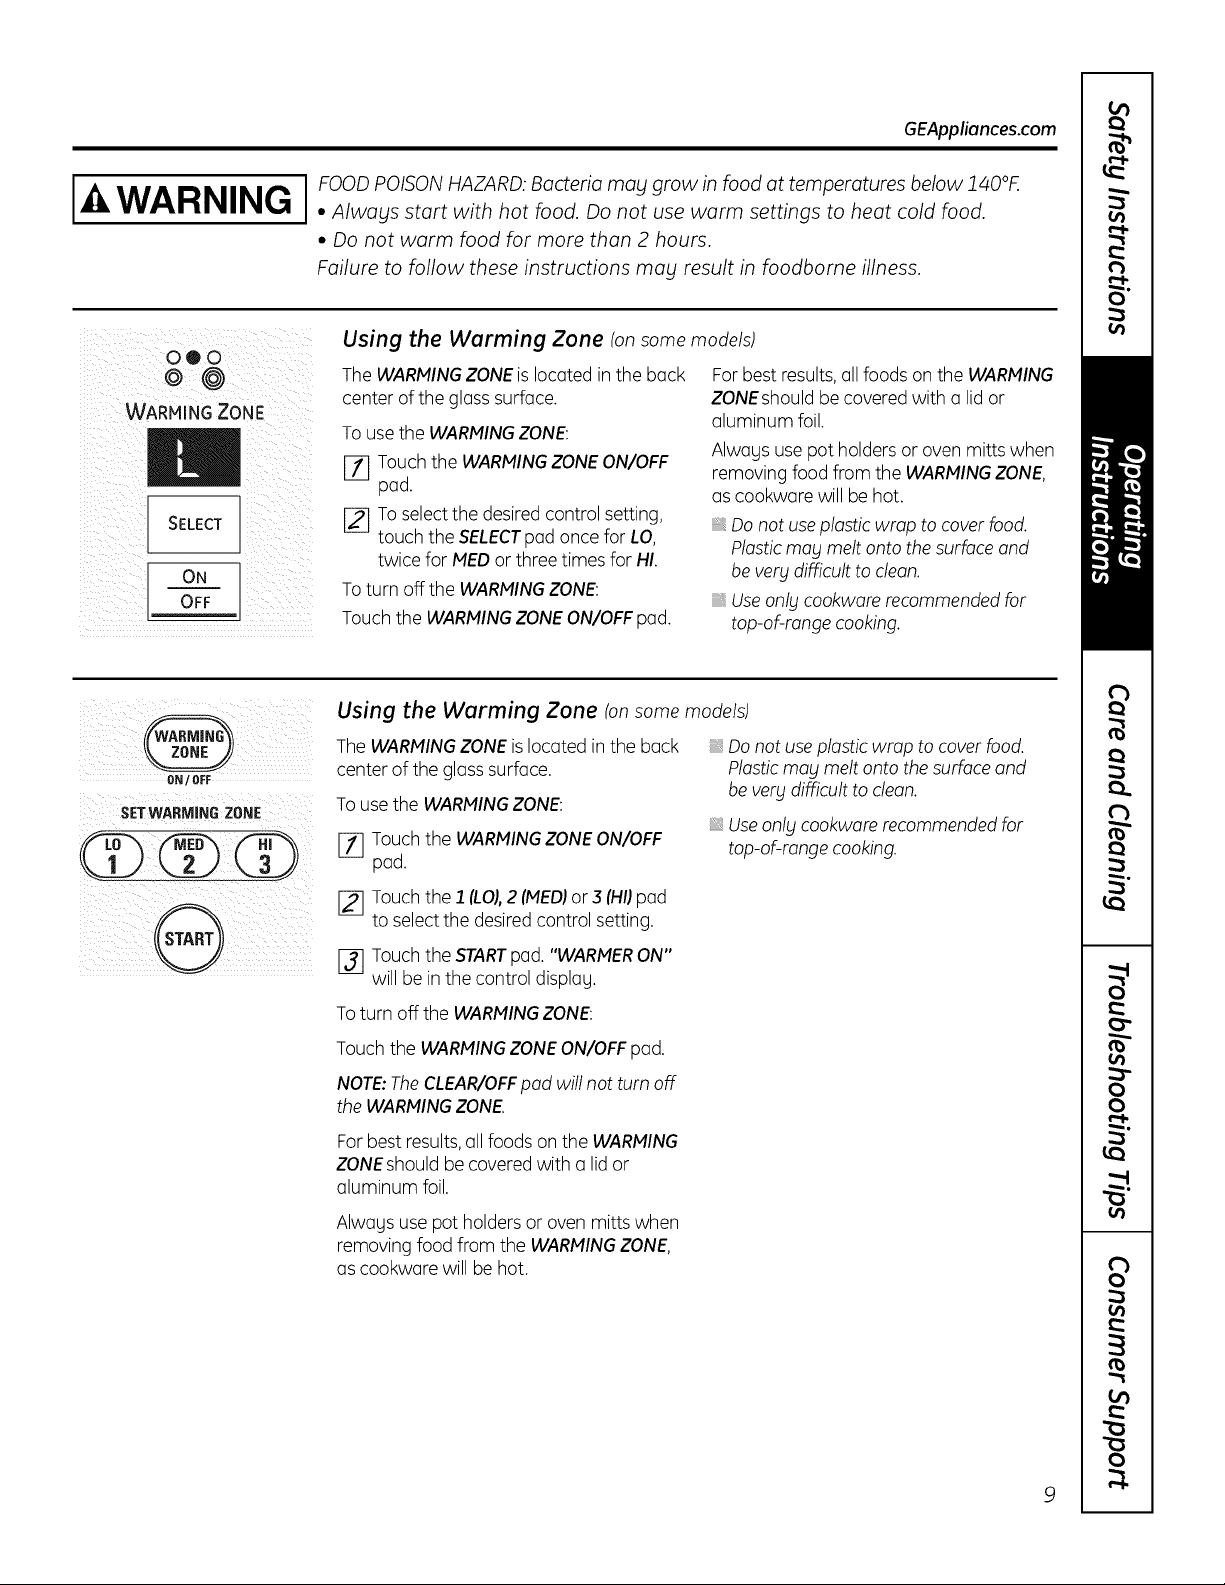
I OOD POISONHAZARD: Bacteria may grow in food at temperatures below 140°F.
• Always start with hot food. Do not use warm settings to heat cold food.
• Do not warm food for more than 2 hours.
Failure to follow these instructions may result in foodbome illness.
Using the Warming Zone (onsome models)
The WARMINGZONEis located in the back
center of the glass surface.
To usethe WARMINGZONE:
[7] Touch the WARMINGZONEON/OFF
pad,
[_ Toselectthe desiredcontrol setting,
touch the SELECTpad once for LO,
twice for MEDor three times for HI.
Toturn off the WARMINGZONE:
Touch the WARMINGZONEON/OFFpad.
Forbest results,all foods on the WARMING
ZONEshould be covered with a lid or
aluminum foil.
Alwogs use pot holders or oven mitts when
removing food from the WARMINGZONE,
as cookwore will be hot.
Donot useplastic wrap to cover food.
Plasticmay melt onto the surfaceand
be very difficult to cleon.
Useonly cookwore recommended for
top-of-range cooking.
Using the Warming Zone (onsomemodels)
TheWARMINGZONEis located in the back
center of the glass surface.
Tousethe WARMINGZONE:
[_ Touch the WARMINGZONEON/OFF
pad.
Do not use plastic wrap to cover food,
Plastic mog melt onto the surface and
be verg difficult to cleon.
_,Useonlg cookwore recommendedfor
top-of-range cooking.
[_ Touch the ] (LO),2 (IVIED)or 3 (HI]pad
to selectthe desiredcontrol setting.
F3l Touch the STARTpad. "WARMERON"
will be in the control displog.
Toturn off the WARMINGZONE:
Touch the WARMING ZONE ON/OFF pad,
NOTE: The CLEAR/OFF pod will not turn off
the WARMING ZONE.
Forbest results,all foods on the WARMING
ZONEshould be covered with a lid or
aluminum foil.
Alwags use pot holders or oven mitts when
removing food from the WARMINGZONE,
as cookware will be hot.
9
Page 10
Using the surface units-Knob-controlled models.
Throughout this manual, features and appearance may vary from your model.
OFF
ill
AtbothOFFandHI thecontrolclicks
intoposition.Youmayhearslightclicking
soundsduringcooking,indicatingthe
controlismaintainingyourdesiredsetting.
Besure youturnthe control knobto OFF
whenyoufinish cooking.
SMALL LARGE
BURNER BURNER
OFF
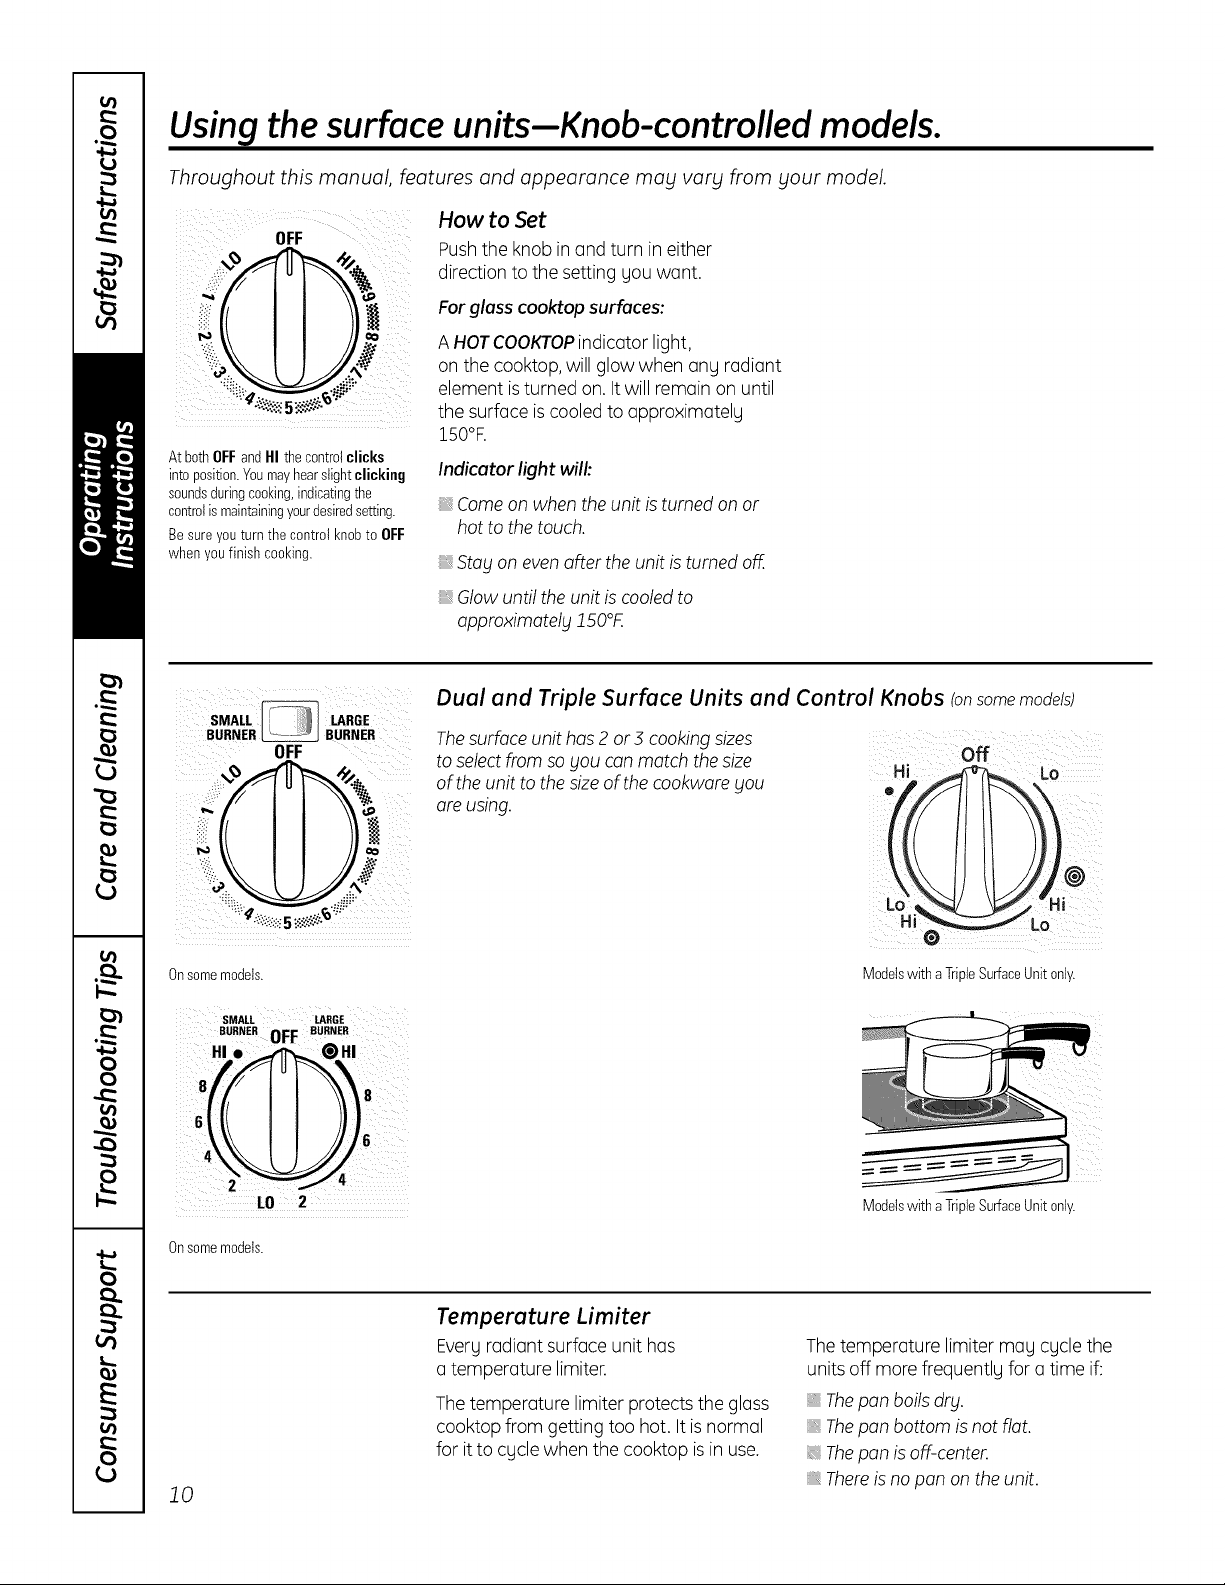
How to Set
Pushthe knob in and turn in either
i
direction to the setting you want.
Forglass cooktop surfaces:
A HOTCOOKTOPindicator light,
on the cooktop, will glow when ang radiant
element isturned on. It will remain on until
the surface iscooled to approximatelg
150°R
Indicatorlight will:
Comeon when the unit isturned on or
hot to the touch.
Stay on evenafter the unit is turned oË..
, Glow until the unit is cooled to
approximately 150°K
Dual and Triple Surface Units and Control Knobs (onsome moddsl
Thesurface unit has 2 or3 cooking sizes
to selectfrom soyou canmatch thesize
of theunit to thesizeof the cookworeyou
are using.
Hi LO
off
Onsomemodels.
SMALL LARGE
BURNER OFF BURNER
HI. _,_ @HI
LO 2
Onsomemodels.
10
_:. -"._-_:
Temperature Limiter
Evergradiant surface unit has
a temperature limiter.
Thetemperature limiter protectsthe glass
cooktop from getting too hot. It is normal
for it to cgcle when the cooktop is in use.
ModelswithaTripleSurfaceUnitonly.
ModelswithaTripleSurfaceUnit only.
Thetemperature limiter mag cgclethe
units off more frequentlg for a time if:
Thepan boilsdry.
Thepan bottom isnot flat.
Thepan isoff-center.
Thereisno pan on theunit.
Page 11
Throughout this manual, features and appearance may vary from your model.
GEAppliances.com
Modelswitha BridgeBurneronly:
LO LO
FRONT
f
I t
J
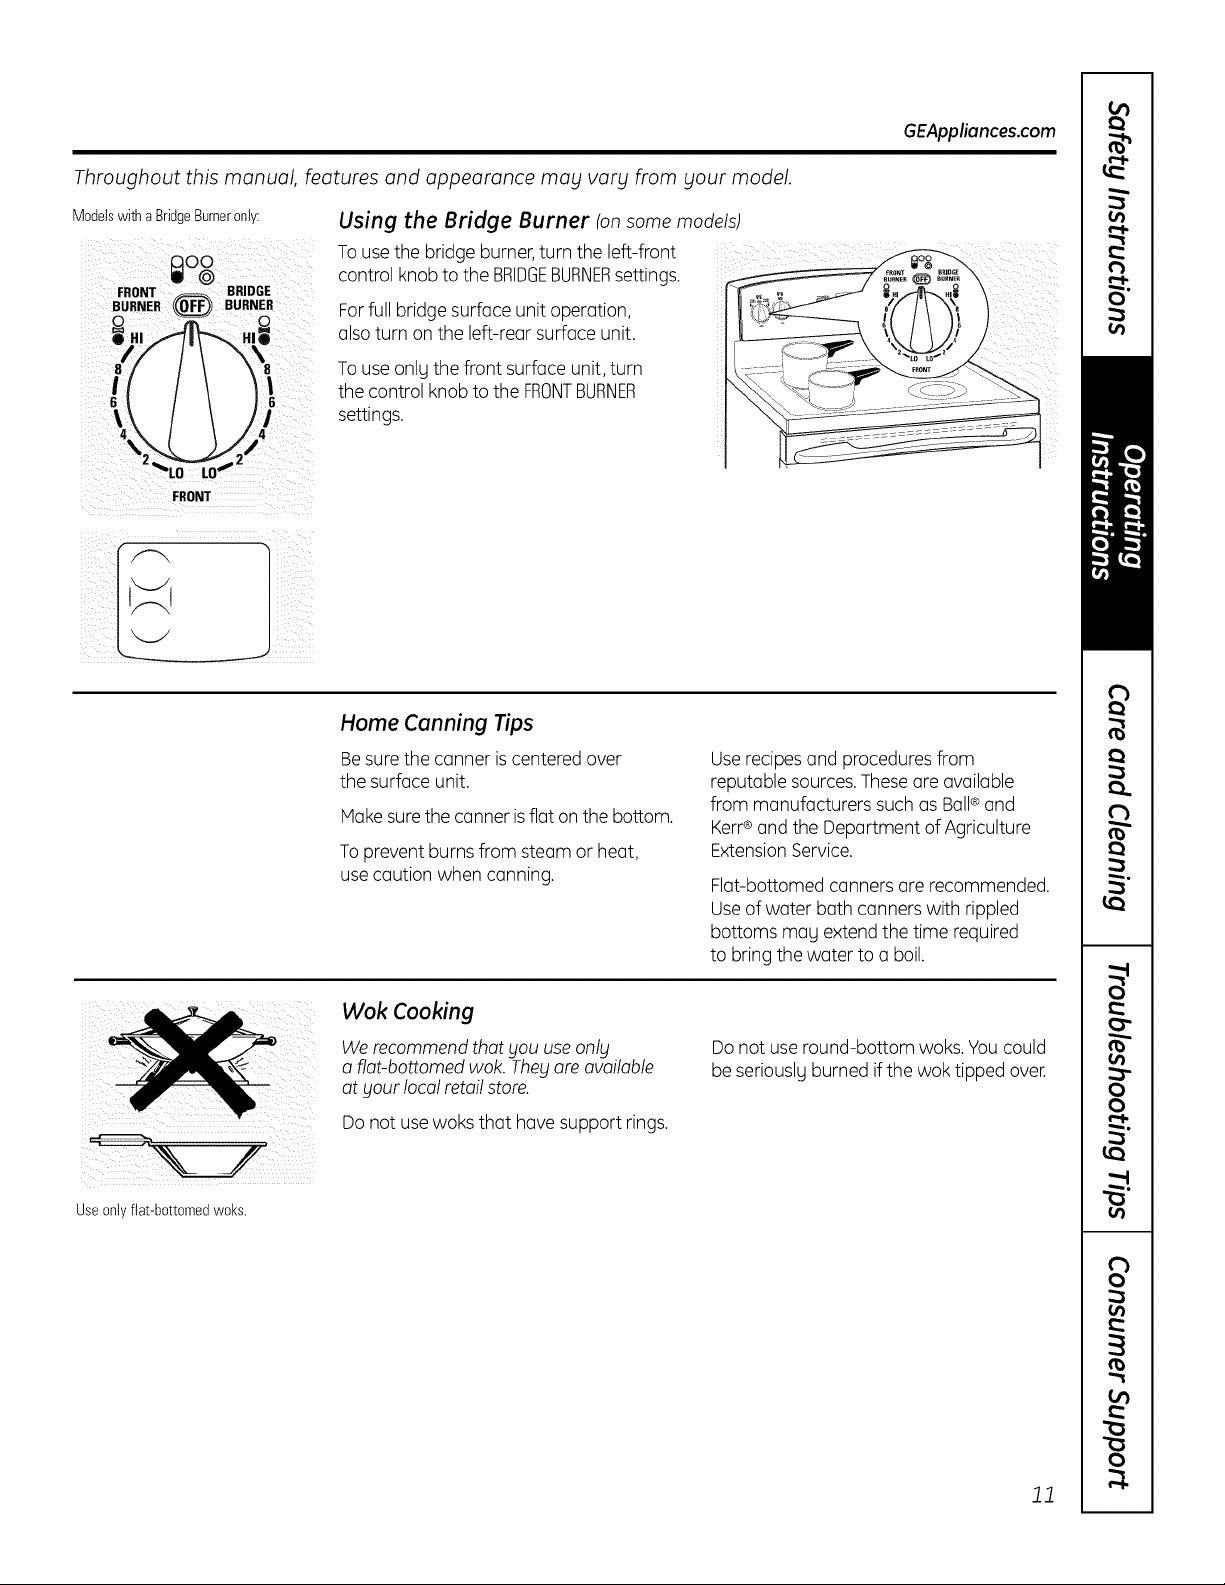
Using the Bridge Burner (onsome models)
To use the bridge burner, turn the left-front
control knob to the BRIDGEBURNERsettings.
Forfull bridge surface unit operation,
alsoturn on the left-rear surface unit.
Touse onlg the front surface unit, turn
the control knob to the FRONTBURNER
settings.
Home Canning Tips
Besurethe canner iscentered over
the surface unit.
Makesurethe canner isflat on the bottom.
Toprevent burns from steam or heat,
usecaution when canning.
Userecipesand proceduresfrom
reputablesources.Theseareavailable
frommanufacturerssuchasBall® and
Kerr®and the Department of Agriculture
ExtensionService.
Flat-bottomed canners are recommended.
Useof water bath canners with rippled
bottoms mag extend the time required
to bring the water to a boil.
_ii_ilii_:ii__i_i!i:!_i_i__ _!_!i_]iii_iii
Useonly flat-bottomedwoks.
Wok Cooking
We recommend that gou use onlg
a fiat-bottomed wok. They are available
at gour local retail store.
Do not usewoks that have support rings.
Donot use round-bottom woks. Youcould
be seriouslg burned if the wok tipped over.
11
Page 12
Usingthe griddle.
CAUTION afteruse andremovethegriddlewhenitis oo/ando//surfaceunitsore
I_1_ I BURN HAZARD: Griddle surfaces may be hot enough to cause burns during and
off Use oven mitts if you will touch the griddle while hot. Failure to do so ton
result in burns.
Beforeusing this cookware for the first
time,wash it to make sure it isclean.Then
season it lightlg, rubbing cooking oil onto
the nonstick surface.
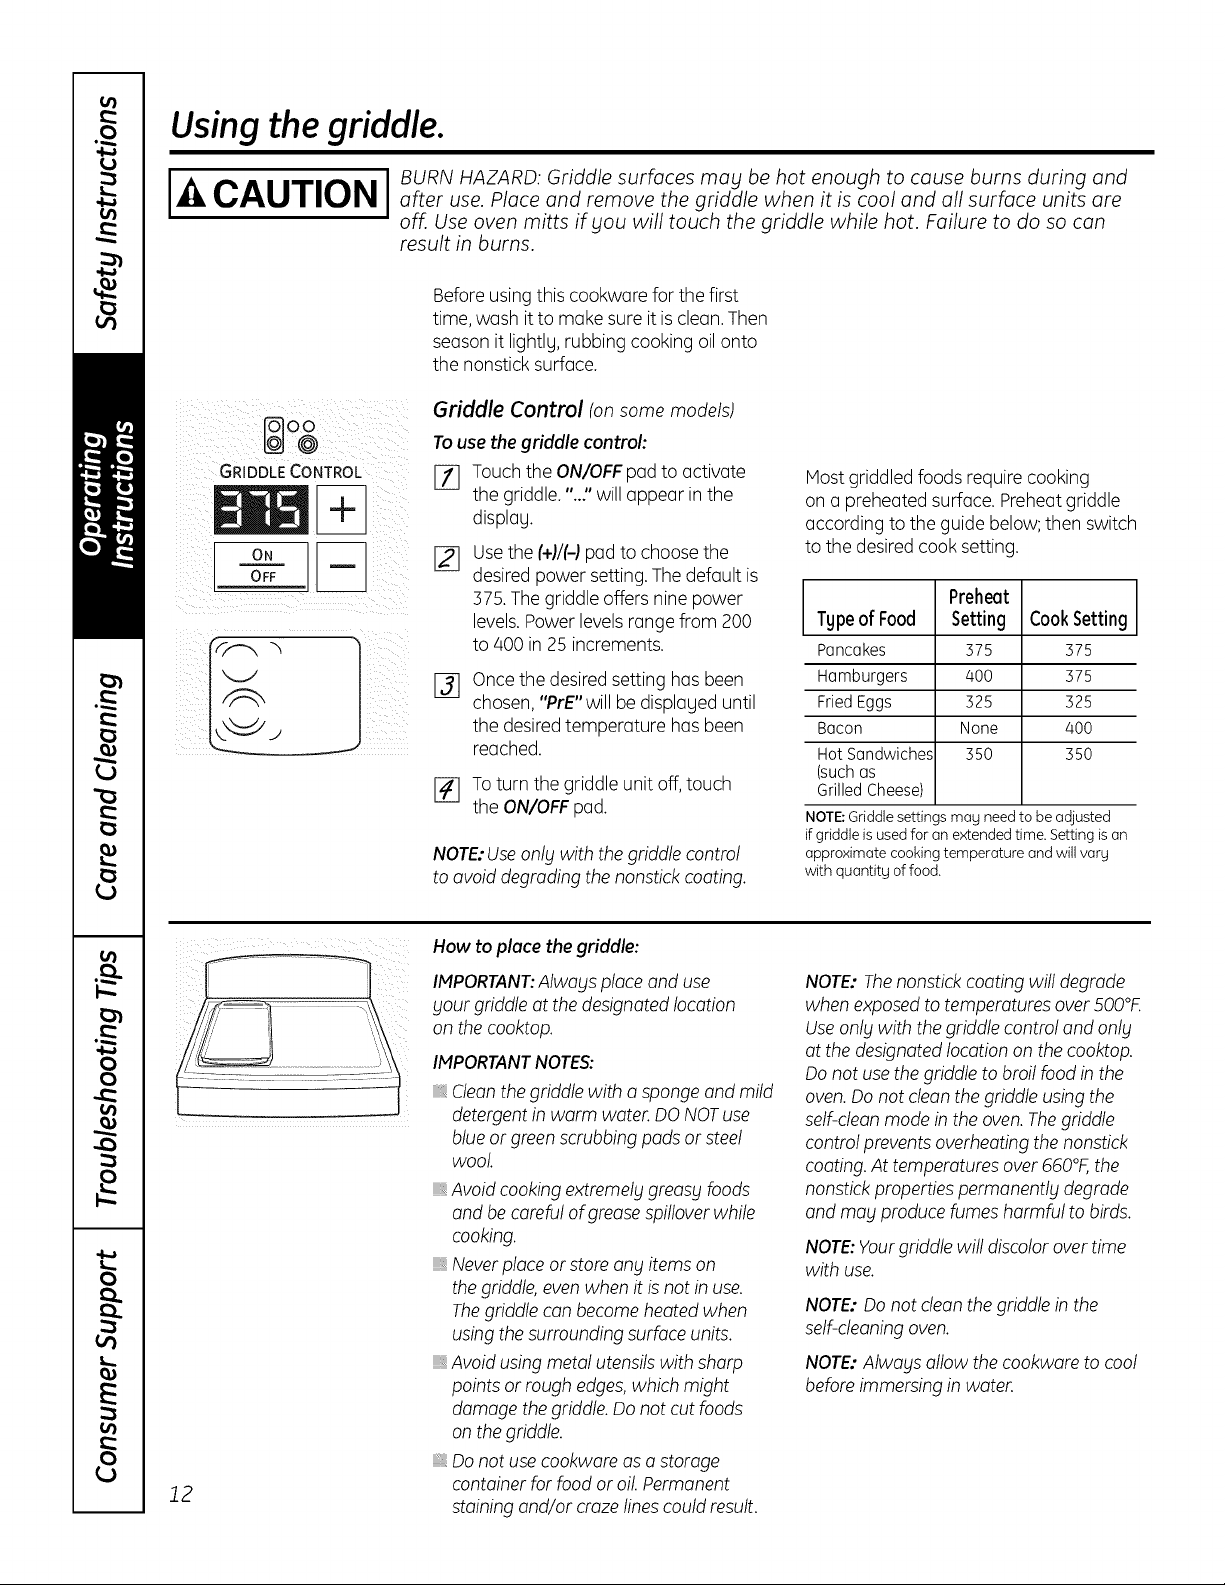
Griddle Control (onsomemodels)
Touse thegriddle control:
GRIDDLE CONTROL
OFF
o.
[_ Touch the ON/OFFpad to activate
the griddle."..:' will appear in the
displag,
[_ Usethe (+)/(-)pad to choose the
desiredpower setting.Thedefault is
375.Thegriddle offers nine power
levels.Power levels range from 200
to 400 in 25 increments.
Oncethe desired setting has been
chosen, "PrE"will be displaged until
%
the desiredtemperature has been
reached.
[] Toturn the griddle unit off,touch
the ON/OFFpad.
NOTE:Useonly with thegriddle control
to avoid degrading the nonstick coating.
Host griddled foods require cooking
on a preheated surface. Preheatgriddle
according to the guide below; then switch
to the desired cook setting.
L Preheat J
TgpeofFood Setting CookSetting
Pancakes 375 375
Hamburgers 400 375
FriedEggs 325 325
Bacon None 400
HotSandwiches 350 350
(suchas
GrilledCheese)
NOTE:Griddle settings mag need to be adjusted
if griddle is usedfor an extended time. Setting is an
approximate cooking temperature and will varg
with quantitg of food.
12
How to place the griddle:
IMPORTANT:Always place and use
your griddle at the designated location
on the cooktop.
IMPORTANTNOTES:
, Cleanthegriddle with a sponge and mild
detergentin warm water. DONOTuse
blueor greenscrubbing pads or steel
wool
Avoidcooking extremely greasy foods
and be careful of grease spilloverwhile
cooking.
, Neverplace or store any items on
thegriddle,evenwhen it isnot in use.
Thegriddle con becomeheated when
usingthe surroundingsurface units.
, Avoid using metal utensilswith sharp
points or rough edges,which might
damage thegriddle.Donot cut foods
on the griddle.
, Donot usecookwore aso storage
container for food or oil Permanent
staining and/or crazelinescouldresult.
NOTE: Thenonstickcoating will degrade
when exposed to temperatures over500°F.
Useonly with thegriddle control and only
at the designated location on the cooktop.
Donot usethe griddle to broil food in the
oven.Donot cleanthegriddle usingthe
self-dean mode in the oven.Thegriddle
control prevents overheating the nonstick
coating.At temperatures over 660°F,the
nonstick propertiespermanently degrade
and may producefumes harmful to birds.
NOTE:Yourgriddle will discolor over time
with use.
NOTE:Do not dean the griddle in the
self-cleaningoven.
NOTE:Always allow thecookware to cool
beforeimmersing in water.
Page 13
GEAppliances.com
Preparing Ouality Steak, Easy as 1, 2,3:
1. Bringsteakto room temperature.
NOTE:Always usesafe food practiceswhen handling meat.
2. Seasonboth sidesto taste and coat with oliveoil or similar.
3. Preheatthe ovento BAKEat 425°,with the oven rack in center position "C."
4. Place your griddle on the designated area of the cooktop and then preheat the griddle
to 400°R
CAUTION:Thegriddle will be VERYHOT!Useoven mitts.
5o
Searsteak on each sidefor 2 minutes or until the desired browning is achieved.
NOTE:Therewill be "smoke";ensurethere isproper ventilation.
6.
Insertthe meat probe that came with your range into the center of the steak, making sure
that the tip of the probe isin the center of the steak.
7.
Plugthe probe into the outlet (located onthe upper front sideof the oven),slidethe rack back
into the oven and closethe door.
8.
PressPROBE on your control,enter the desiredinternal temp, and pressSTART.
°
Allow steak to finish cooking in the oven.The range control will beep and turn off when
the steak reachesthe desiredinternal temperature.
NOTES:
After searing, your steakcould possiblyalready be at the desired temperature, depending
on size,cut and desireddoneness.
Forthinner steaks it may not be possibleto achieve a Rareor Hedium Raredoneness.
By first searing your meat with a verblhigh heat, blouare creating a browning reaction known as the Maillard
Reaction. This reaction unlocks the fuller,more intense flavor from the meat, which occurs when cooking meat
at a high heat.
13
Page 14
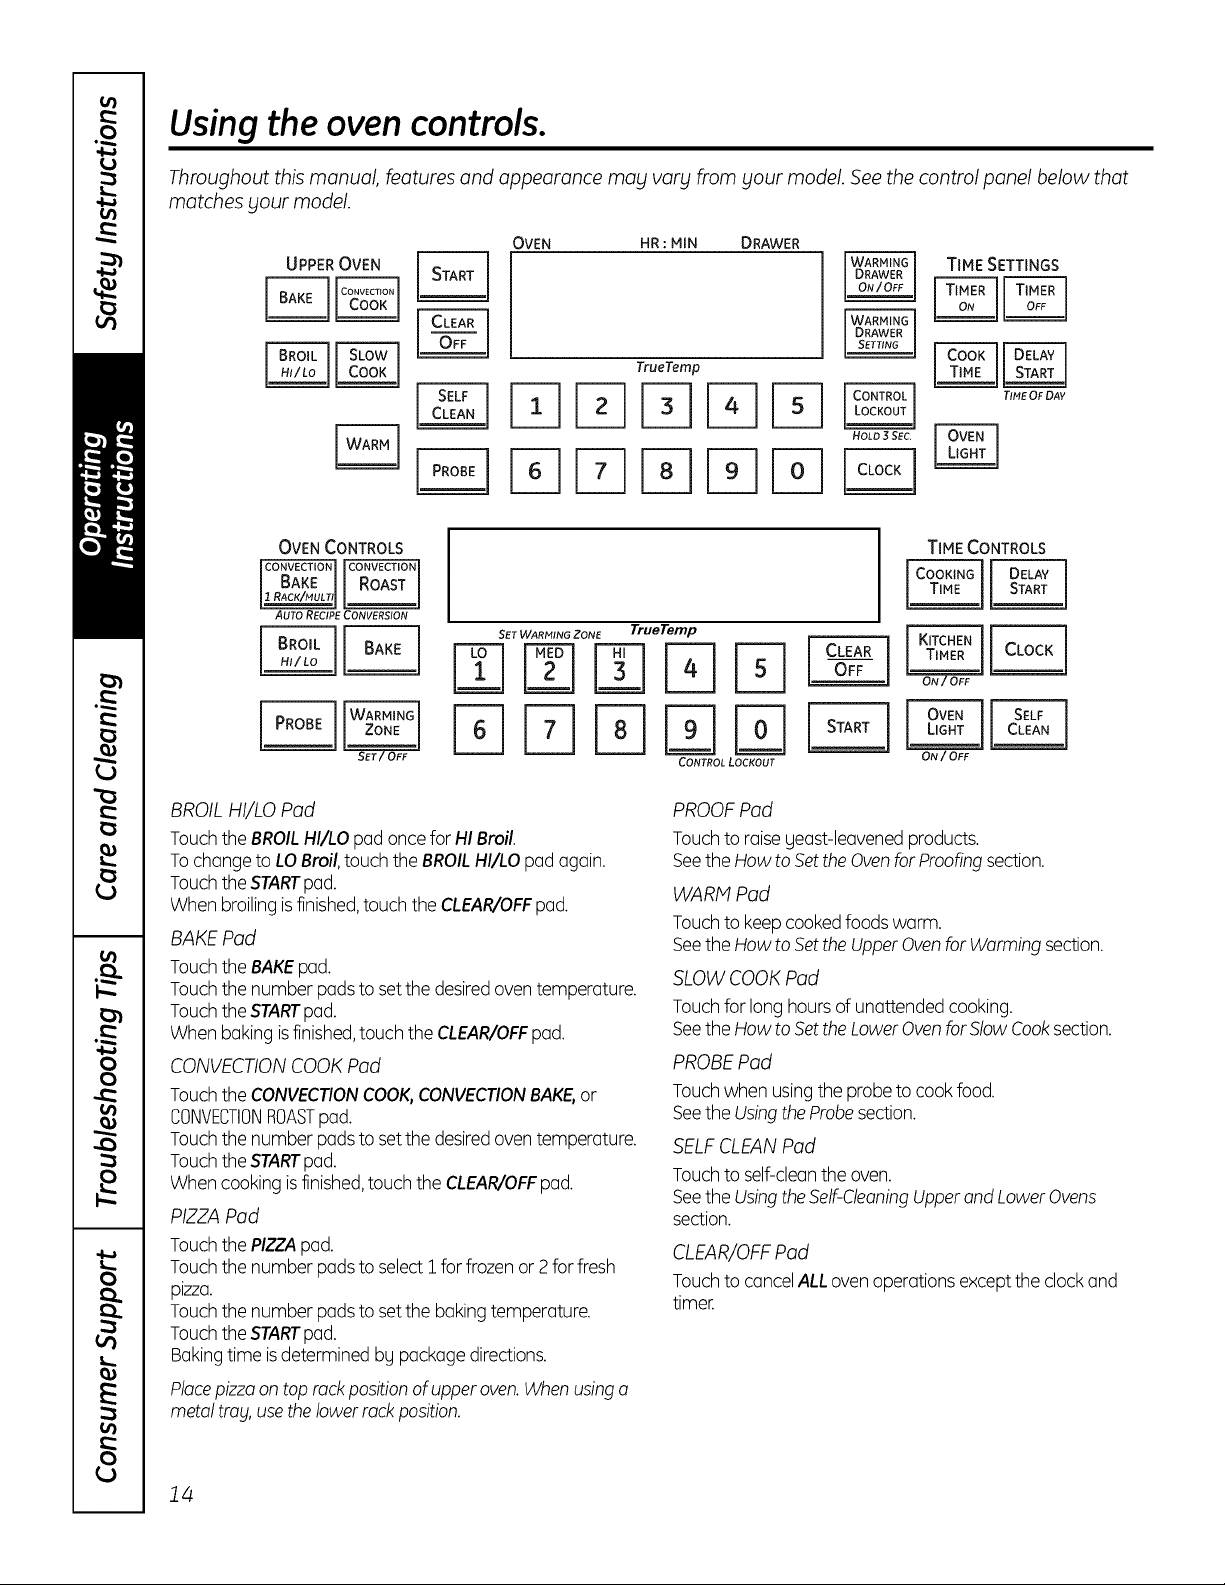
Using the ovencontrols.
Throughout this manual, features and appearance mag varg from gour model. See the control panel below that
matches gour model.
OVEN HR : MIN DRAWER
TIME SETTINGS
TrueTemp
PqPq
OVEN CONTROLS
AUTO RECIPE CONVERSION
SET WARMING ZONE TrueTemp
BROIL HI/LO Pod
Touchthe BROILHI/LOpad oncefor HI Broil.
Tochangeto LOBroil,touch theBROILHI/LOpad again.
Touchthe STARTpad.
Whenbroilingisfinished,touchthe CLEAR/OFFpad.
BAKE Pod
Touchthe BAKEpad.
Touchthe number padsto setthe desiredoventemperature.
Touchthe STARTpad.
Whenbakingisfinished,touchthe CLEAR/OFFpad.
CONVECTIONCOOKPod
Touchthe CONVECTIONCOOK,CONVECTIONBAKE,or
CONVECTIONROASTpad.
Touchthe number padsto setthe desiredoventemperature.
Touchthe STARTpad.
Whencooking isfinished,touch theCLEAR/OFFpad.
PIZZAPod
Touchthe PIZZApad.
Touchthe number padsto selectI forfrozen or2 forfresh
pizza.
Touchthe number padsto setthe baking temperature.
Touchthe STARTpad.
Bakingtime isdetermined bg packagedirections.
Placepizzaon top rackpositionof upper oven.Whenusinga
metal trog,usethe lower rock position.
TIME CONTROLS
CONTROL LOCKOUT
ON/OFF
PROOFPad
Touchto raiseyeast-leavenedproducts.
Seethe How to Set the Ovenfor Proofingsection.
WARM Pad
Touchto keepcookedfoodswarm.
Seethe How to Set the UpperOvenfor Warmingsection.
SLOWCOOKPad
Touchfor long hours of unattended cooking.
Seethe How to Set the LowerOvenforSlow Cooksection.
PROBEPad
Touchwhen usingthe probeto cook food.
Seethe UsingtheProbesection.
SELFCLEANPad
Touchto self-cleanthe oven.
Seethe UsingtheSelf-CleaningUpperand LowerOvens
section.
CLEAR/OFFPad
Touchto cancelALLovenoperationsexceptthe clockand
timer.
14
Page 15
GEAppliances.com
STARTPod
Mustbe touchedto startany cooking or cleaningfunction.
OVENLIGHTPod
Touchto turn the ovenlightson or off.
TIMERON/OFF Pod(s)/KITCHENTIMERPod
Touchto set the kitchentimer.
Seethe UsingtheKitchenTimersection.
COOKTIME/COOKINGTIMEPod
Touchthis padand then touchthe number padsto setthe
amount of time gouwant gourfood to cook.Theoven will
shut offwhen thecookingtime hasrun out.
DELAYSTARTPod
Usealongwith the COOKTIMEorSELFCLEANpads to set
the ovento start and stop automaticallg at a time gou set.
CLOCKPod
NOTE:Whensettingtimes,you oresetting hours and minutes
only. Thelowesttimeyou consetis oneminute.
Touchthe CLOCKpad.
Touchthe number pads.
Touchthe STARTpad.
Theclockmustbeset tothe correcttimeof dogfor the
automatic oventiming functionstowork properly.Thetime of
dog cannotbe changedduring otimed baking orself-deoning
cycle.
Ifyour oven was set for a timed oven operation and a
power outage occurred, the clock and allprogrammed
functions must be reset. The time of day will flash in the
display when there has been a power outage.
CONTROLLOCKOUTPod
Yourcontrol willallow you to lock out the touch pads and the
cooktop so they cannot be activated when touched
Tolock thecontrols and cooktop:
Touchand holdthe CONTROLLOCKOUTpad for 5seconds.
Theoven displaUwill show "on Locon."
Tounlock the controls:
Touchand holdthe CONTROLLOCKOUTpad for 5seconds.
TheCONTROLLOCKOUTmodeaffectsalltouch pods.
Notouchpods willwork when thisfeatureisactivated
WARMING DRAWER
The warming drawer willkeep hot, cooked foods at serving
temperature. Alwogs start with hot food.
Touch the WARMING DRAWER pad. "WARMERON"and "1"
are lit on thedisplaUand "Set"beginsto blink.Onthe number
pads,touch 1for Low,2 for Mediumor 3for High.The displag
"1"changescorrespondingto the number pad selected.The
warming drawer starts automaticallg after gou touch l, 2 or 3.
"WARMERON"and the number remain lit."Set"stopsblinking.
Onsome models,pressSTART.
Onsomemodels- togglebetweensettingsbg touchingthe
WARMINGDRAWERpod.
Tocancel,touch the WARMINGDRAWERpad.
NOTE:Touchingthe CLEAR/OFFpad doesnotturn off the
warming drawer.
WARMING ZONE
Touchto keephot, cookedfood warm. Seethe Usingthe
WormingZonesection.
15
Page 16
Using the oven.
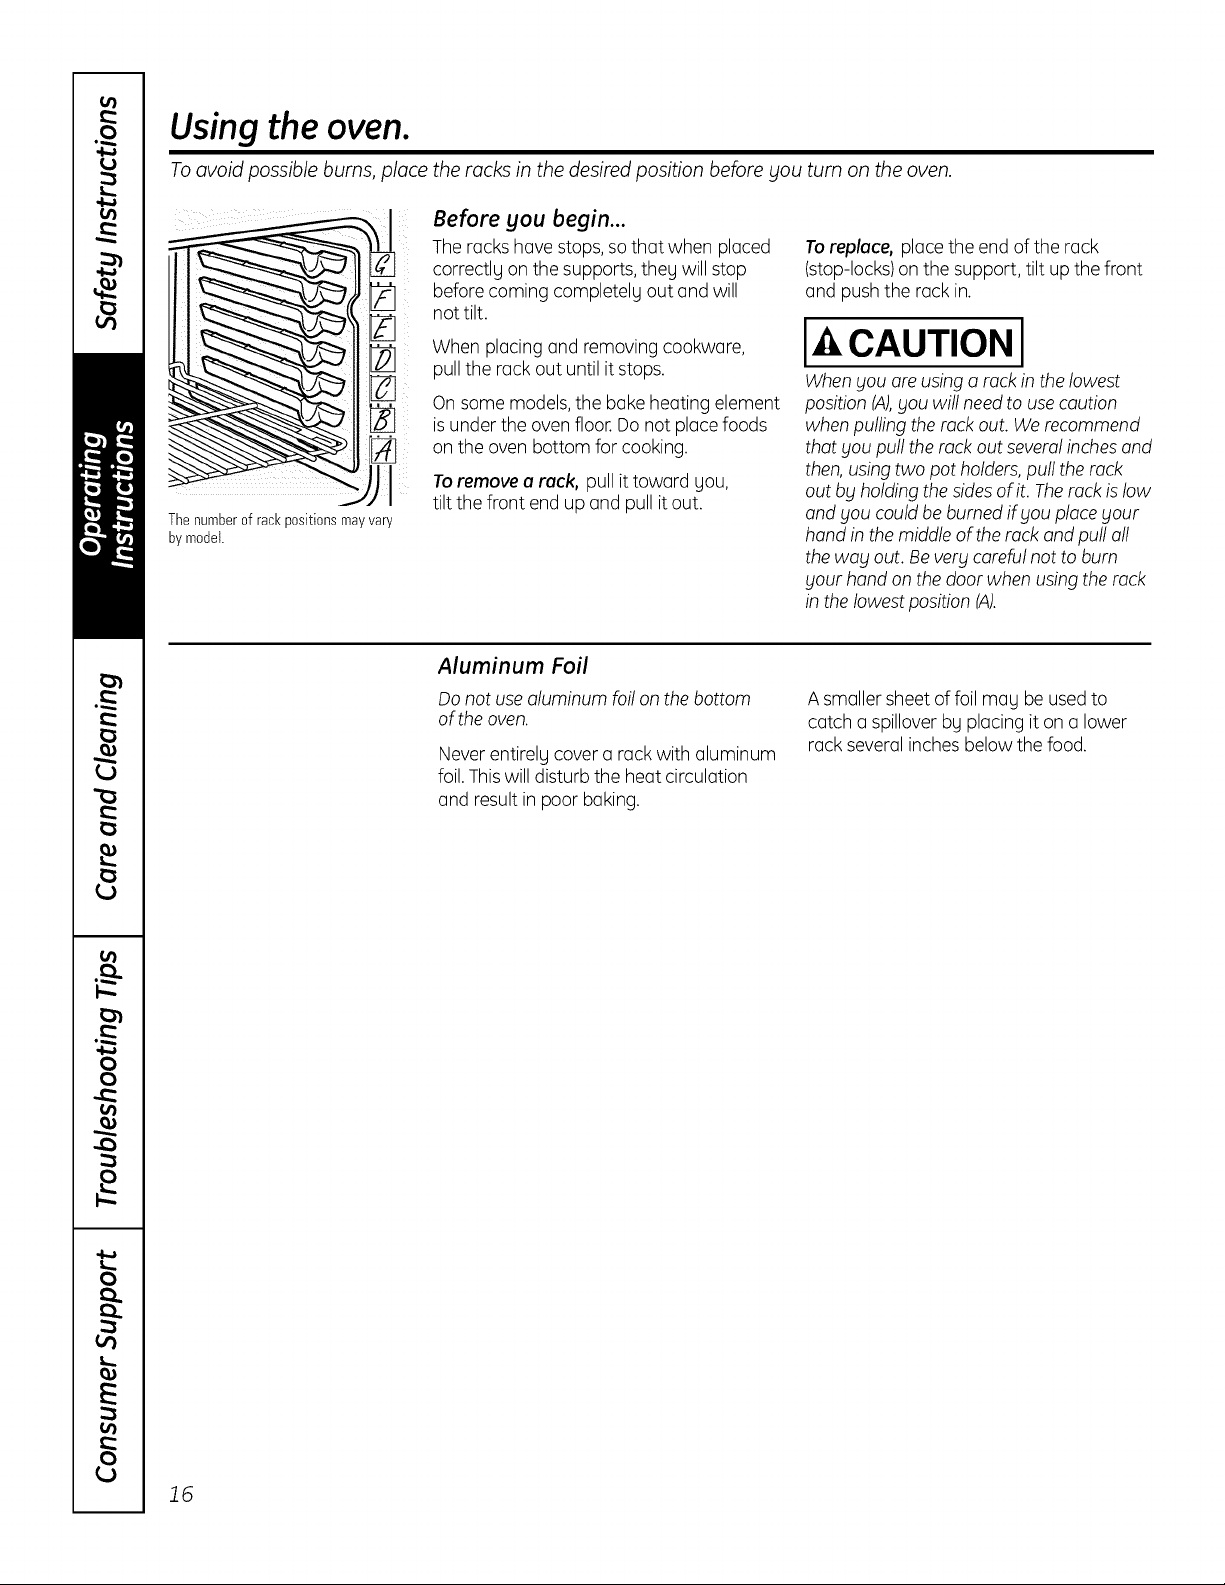
To avoid possible burns, place the racks in the desired position before you turn on the oven.
Before you begin...
Theracks havestops, so that when placed
correc% on the supports, theu will stop
before coming completelu out and will
not tilt.
Toreplace, place the end of the rack
(stop-locks)on the support, tilt up the front
and push the rack in.
Thenumberof rackpositionsmayvary
by model.
When placing and removing cookware,
pull the rack out until it stops.
On some models,the bakeheating element
isunder the oven floor.Do not placefoods
on the oven bottom for cooking.
Toremove a reck, pull it toward Uou,
tilt the front end up and pull itout.
Aluminum Foil
Donot usealuminum foil on the bottom
ofthe oven.
Never entirely cover a rack with aluminum
foil. Thiswill disturb the heat circulation
and result in poor baking.
I-4,CAUTION I
Whengou ors using a rack in the lowest
position (A),gou will need to use caution
when pulling the rock out. We recommend
that gou pull the rock out severalinchesand
then, using two pot holders,pull the rock
out bg holding thesides of it. Therock islow
and gou could be burned ifgou place gout
hand in the middleof the rock and pull oil
the wag out. Beverg careful not to bum
gout hand on the door when using the rock
in the lowest position (A).
A smaller sheet of foil may be used to
catch a spillover by placing it on a lower
rack several inches below the food.
16
Page 17
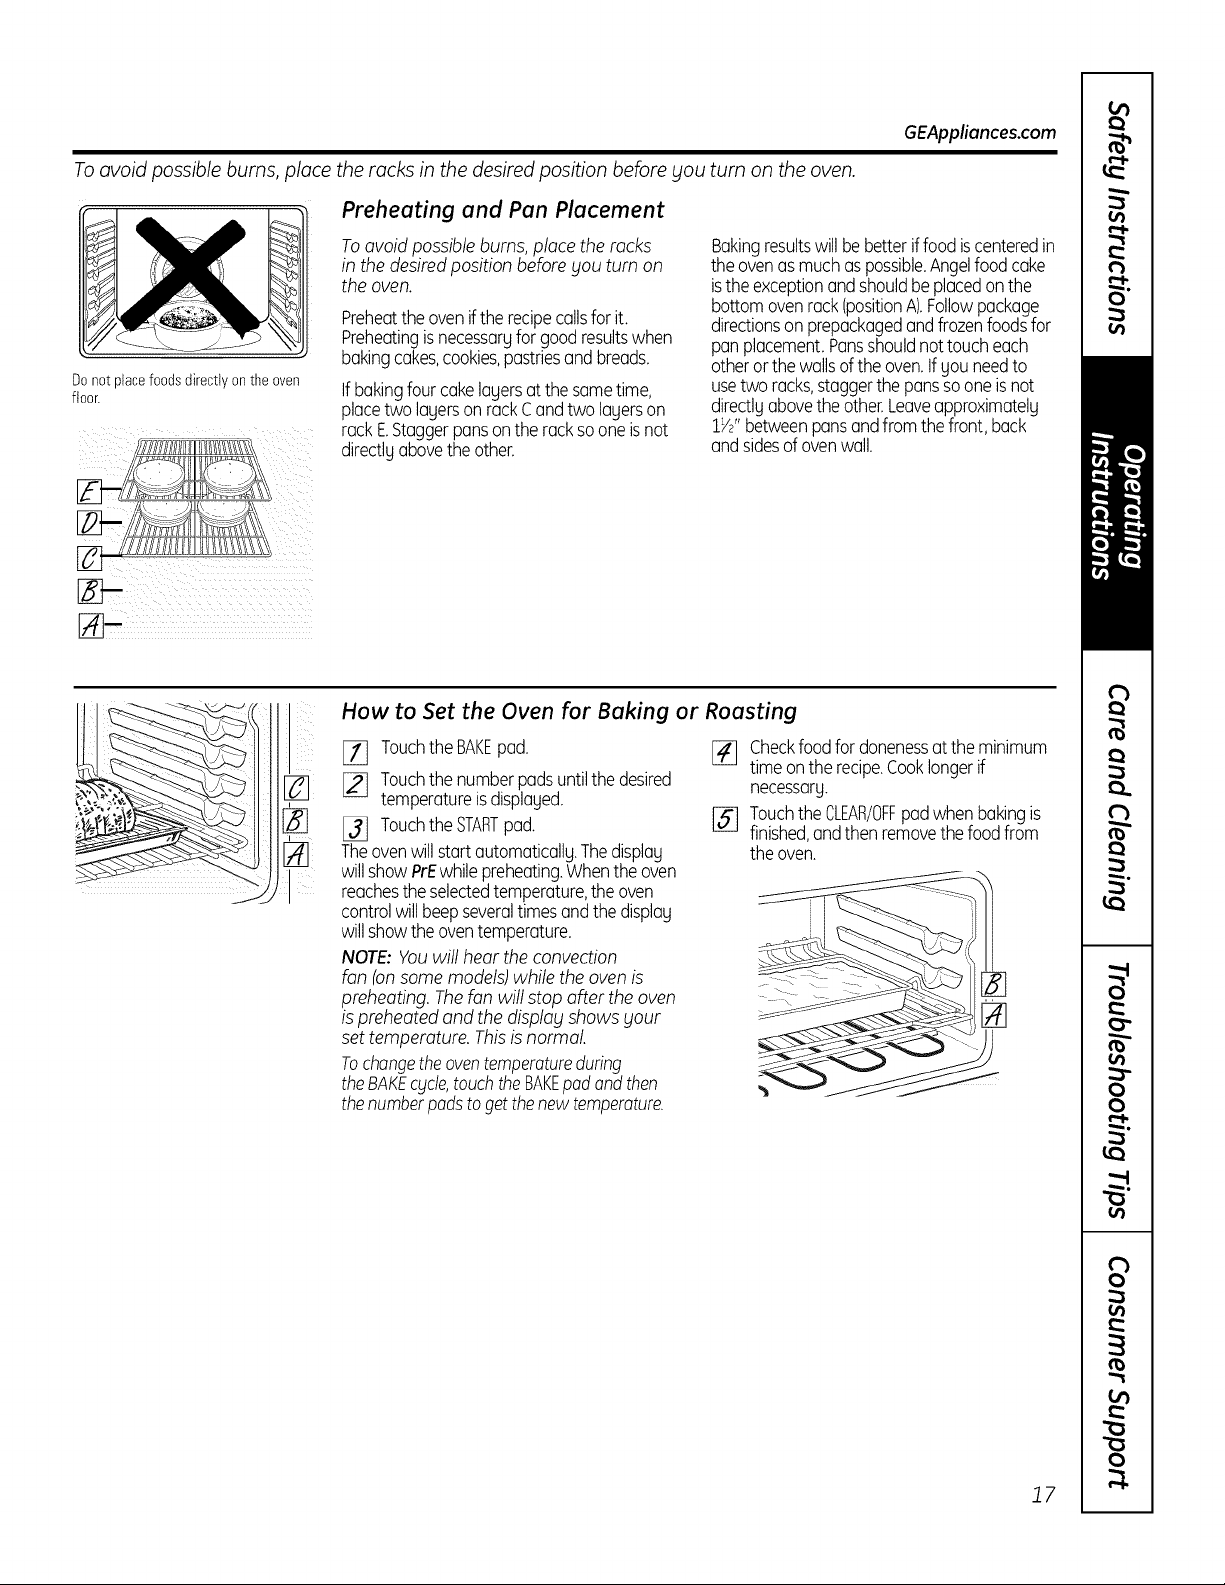
Toavoid possible burns, place the racks in the desired position before you turn on the oven.
Preheating and Pan Placement
Donot placefoodsdirectlyon theoven
floor.
Toavoid possible burns,placethe racks
in the desired position beforegou turn on
the oven.
Preheatthe ovenifthe recipecallsforit.
Preheatingis necessaryfor goodresultswhen
bakingcakes,cookies,pastriesandbreads.
Ifbakingfourcakelagersatthe sametime,
placetwo lagerson rackCandtwo lagerson
rackE.Staggerpansontheracksooneisnot
directlyabovetheother.
Bakingresultswillbe betteriffoodiscenteredin
theovenasmuchaspossible.Angelfoodcake
isthe exceptionandshouldbeplacedonthe
bottomovenrack(positionA).Followpackage
directionson prepackagedandfrozenfoodsfor
panplacement.Pansshouldnottoucheach
otherorthewallsoftheoven.If youneedto
usetworacks,staggerthepanssooneis not
directlyabovethe other.Leaveapproximately
lye"betweenpansandfrom thefront,back
andsidesd ovenwall.
How to Set the Oven for Baking or Roasting
[] TouchtheBAKEpad.
[] Touchthenumberpadsuntilthedesired
temperatureisdisplayed.
131 TouchtheSTARTpad.
Theovenwillstart automatically.Thedisplay
willshowPrEwhilepreheating.Whentheoven
reachestheselectedtemperature,theoven
controlwillbeepseveraltimesandthedisplay
willshowtheoventemperature.
NOTE:Youwill hear the convection
fan (onsome models)while the ovenis
preheating. Thefan will stop after theoven
ispreheated and the displag shows gout
set temperature. Thisisnormal.
Tochangetheoventemperatureduring
theBAKEcgcle,touchtheBAKEpodandthen
thenumberpadstogetthenewtemperature.
r_] Checkfood for donenessat the minimum
ILJ_J
timeonthe recipe.Cooklongerif
necessary.
[_ Touchthe CLEAR/OFFpadwhenbakingis
finished,andthen removethefoodfrom
theoven.
GEAppliances.com
[]
17
Page 18
Using the oven.
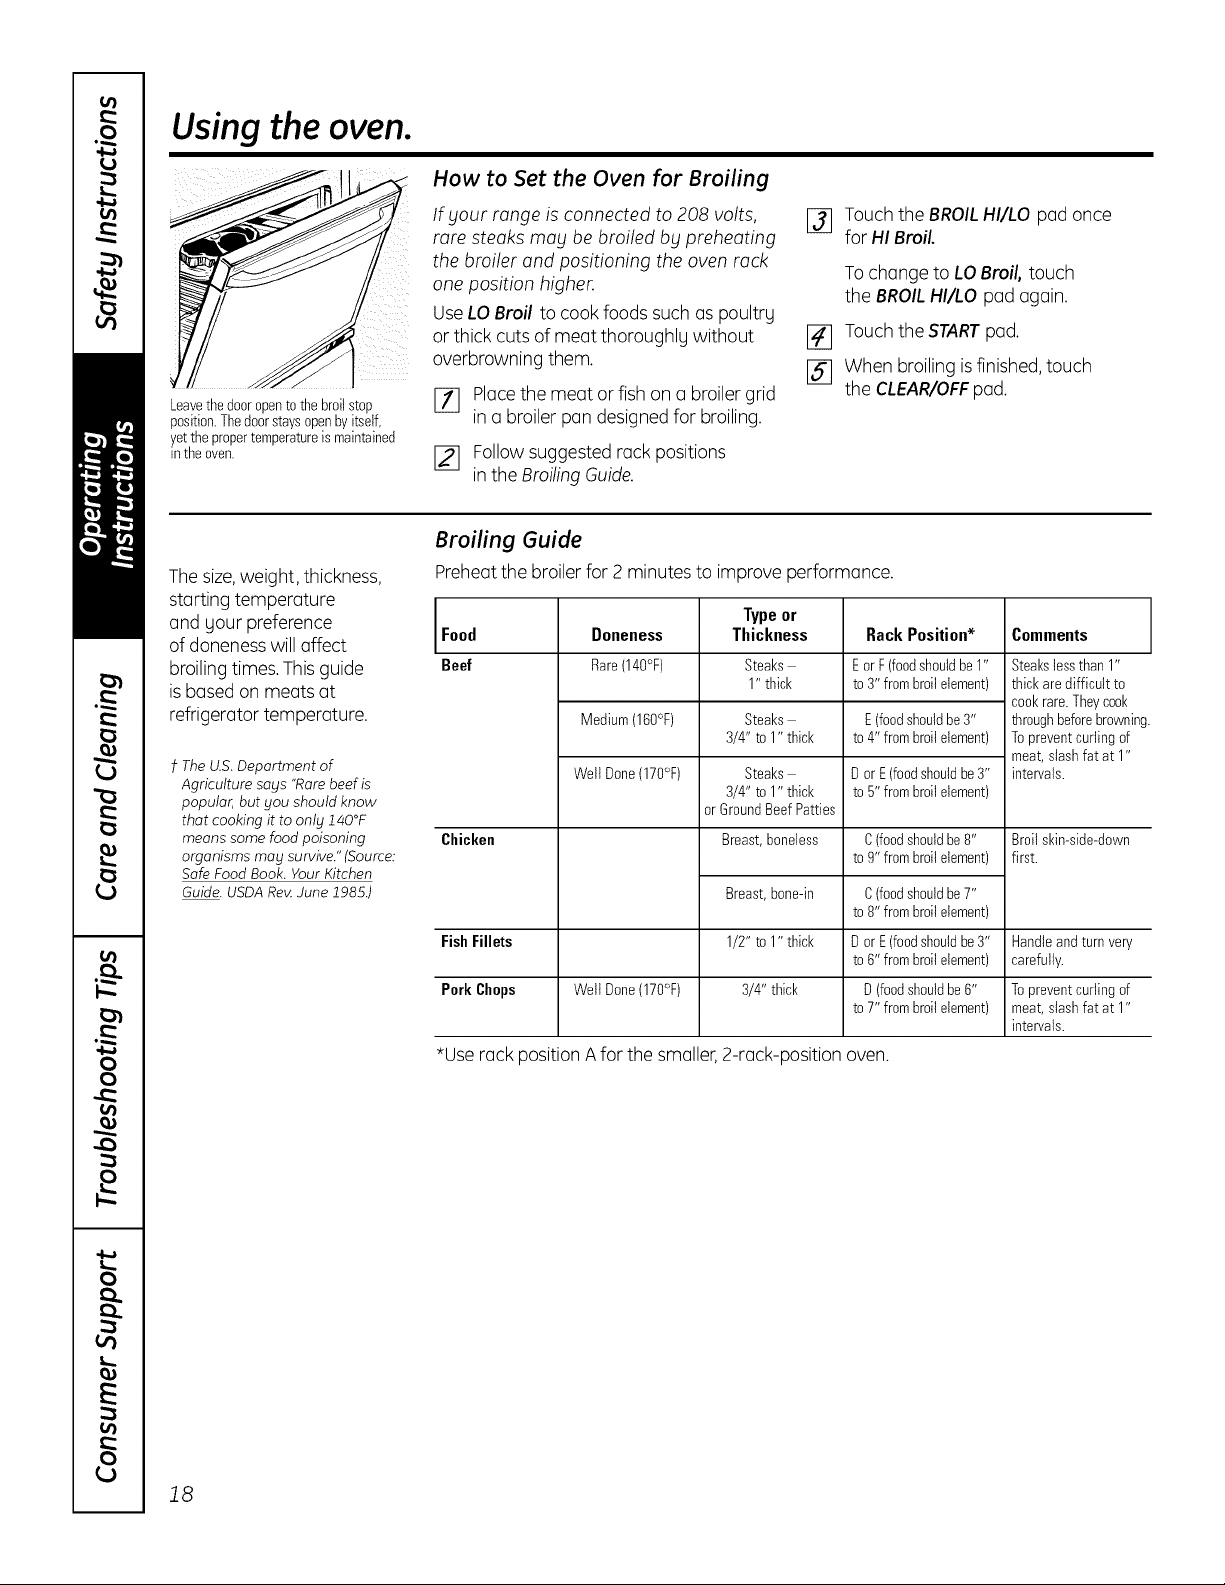
How to Set the Oven for Broiling
Leavethedooropento thebroitstop
position.Thedoorstaysopenbyitself,
yetthe propertemperatureis maintained
inthe oven.
Thesize,weight, thickness,
starting temperature
and gour preference
of doneness will affect
broiling times. Thisguide
is basedon meats at
refrigerator temperature.
t The U.S.Department of
Agriculture sags "Rarebeef is
popular, but you should know
that cooking it to only ff40°F
means some food poisoning
organisms may survive." (Source:
Safe Food Book. Your Kitchen
Guide.USDARe_ dune 19BB.)
Ifgout range is connected to 208 volts,
rare steaks mog be broiled bg preheating
the broiler and positioning the oven rack
one position higher.
[_ Touch the BROILHI/LO pad once
for HI Broil.
To change to LO Broil, touch
the BROILHI/LO pad again.
Use LO Broil to cook foods such as poultrg
or thick cuts of meat thoroughlg without
overbrowning them.
Placethe meat or fish on a broiler grid
[_ Touchthe STARTpad.
[] When broiling isfinished,touch
the CLEAR/OFF pad.
[_ in a broiler pan designedfor broiling.
[_ Follow suggested rack positions
in the Broiling Guide.
Broiling Guide
Preheatthe broiler for 2 minutes to improve performance.
Food Doneness Thickness Rack Position* Comments
Beef Rare(140°F) Steaks Eor F(foodshouldbe1" Steakslessthan1"
Medium(160°F) Steaks E(foodshouldbe3" throughbeforebrowninc
Welt Done(170°F) Steaks Dor E(foodshouldbe3" intervals.
Chicken Breast,boneless C(foodshouldbe8" Broilskin-side-down
Fish Fillets Dor E(foodshouldbe3" Handleandturnvery
Pork Chops Welt Done(170°F) D (foodshouldbe6" Topreventcurling of
Type or
1" thick to3" frombroilelement) thick aredifficult to
3/4" to 1" thick to4" frombroilelement) Topreventcurling of
3/4" to 1" thick to5" frombroilelement)
orGroundBeefPatties
tog" from broilelement) first.
Breast,bone-in
1/2" to 1" thick
3/4" thick
C(foodshouldbe7"
to8" from broilelement)
to6" from broilelement) carefully.
to7" from broilelement) meat,slashfat at 1"
cookrare.Theycook
meat,slashfat at 1"
intervals.
*Userack position A for the smaller, 2-rack-position oven.
18
Page 19
Usingthetimedbakingandroastingfeatures,ionsomemode sIGEApp,onces.com
NOTE: Foods that spoil easil_l-such as milk, eggs, fish, stuffings, poultr_l and porkishould not be allowed to sit
for more than 1 hour before or after cooking. Room temperature promotes the growth of harmful bacteria.
Be sure that the oven light is off because heat from the bulb will speed harmful bacteria growth.
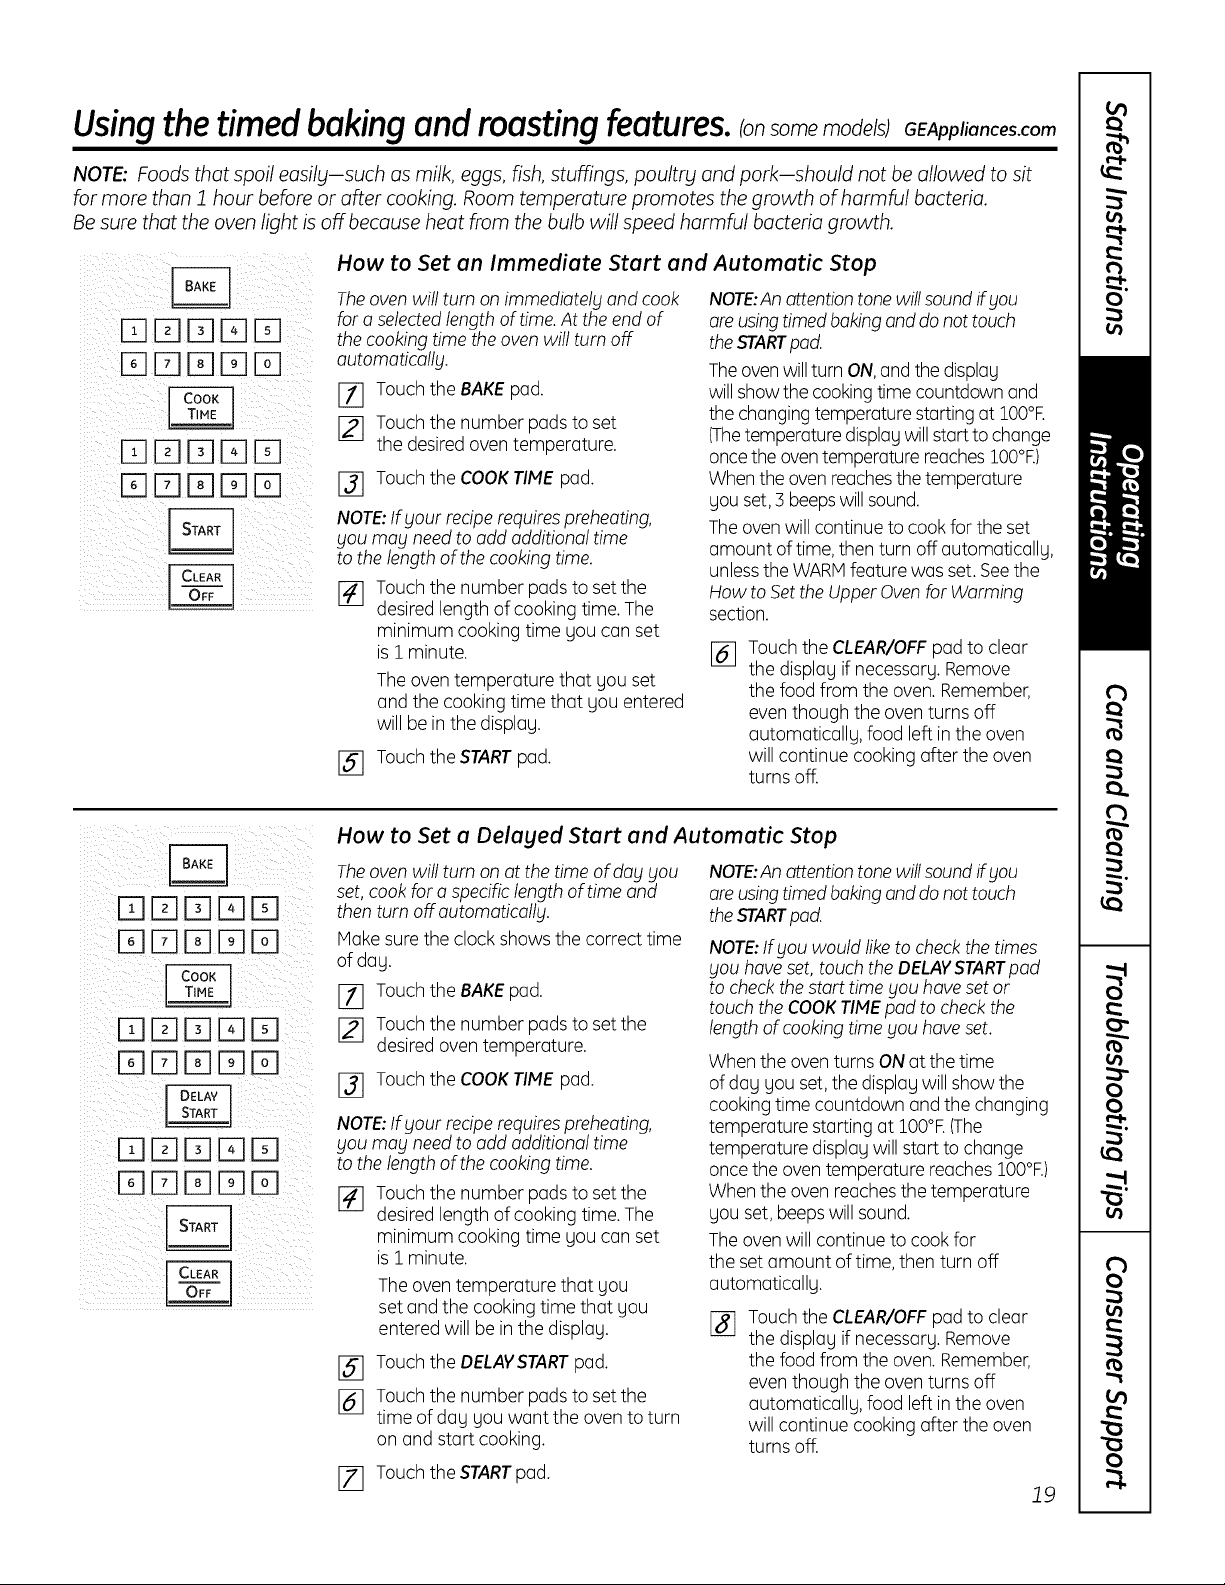
How to Set an Immediate Start and Automatic Stop
Theoven will turn on immediately and cook NOTE:Anattentiontone will soundifyou
for a selectedlength of time.At the end of
the cooking time the ovenwill turn off
outomoticollg.
171 Touch the BAKEpad.
[_ Touch the number pads to set
the desiredoven temperature.
131 Touch the COOKTIME pad.
NOTE:Ifgout reciperequirespreheating,
gou mag need to add additional time
to the length ofthe cooking time.
[_ Touch the number pads to setthe
desiredlength of cooking time. The
minimum cooking time gou can set
is 1 minute.
Theoven temperature that gou set
and the cooking time that gou entered
will be inthe displag.
[_] Touchthe STARTpad.
areusingtimedbaking and do nottouch
theSTARTpad.
Theoven will turn ON,and the displag
willshow the cookingtime countdown and
the changingtemperaturestarting at lO0°R
(Thetemperaturedisplagwill startto change
oncethe oventemperature reacheslO0°R)
Whenthe ovenreachesthe temperature
gou set, 3 beepswill sound.
Theovenwill continue to cook for the set
amount of time, then turn off automaticallg,
unlessthe WARMfeature was set. Seethe
How to Set the Upper Ovenfor Warming
section.
[_ Touch the CLEAR/OFFpad to clear
the displag if necessarg.Remove
the food from the oven. Remember,
eventhough the oventurns off
automaticallg, food left in the oven
will continue cooking after the oven
turns off.
DDD[]D
D[]DDD
DDD[]D
DDDDD
DDD[]D
DDDDD
How to Set a Delayed Start and Automatic Stop
Theoven will turn on at the time of dog gou
set,cook for a specific length of time and
then turn off automaticallg.
Make sure the clock shows the correct time
of dag.
171 Touch the BAKEpad.
[] Touch the number padsto setthe
desiredoven temperature.
[] Touch the COOKTIME pad.
NOTE:Ifgout reciperequirespreheating,
gou mag need to add additional time
to the length ofthe cooking time.
[_ Touch the number pads to setthe
desiredlength of cooking time. The
minimum cooking time gou can set
is 1 minute.
The oventemperature that gou
set and the cooking time that gou
entered will be in the displag.
Touch the DELAVSTARTpad.
%
Touch the number pads to set the
%
time of dag gou want the oven to turn
on and start cooking.
17] Touch the STARTpad.
NOTE:Anattentiontonewill soundifgou
areusingtimedbaking and do nottouch
theSTARTpad.
NOTE:Ifgou would like to check the times
gou have set, touch the DELAVSTARTpod
to checkthestart time gou haveset or
touch the COOKTIMEpad to check the
length of cooking time gou have set.
Whenthe oventurns ON at the time
of dag gou set,the displagwill show the
cooking time countdown and the changing
temperature starting at lO0°R(The
temperature displagwill start to change
oncethe oventemperature reaches lO0°R)
Whenthe oven reachesthe temperature
gou set, beeps will sound.
Theovenwill continue to cook for
the set amount of time, then turn off
automaticallg.
[] Touch the CLEAR/OFFpad to clear
the displag if necessarg.Remove
the food from the oven. Remember,
eventhough the oventurns off
automaticallg, food left in the oven
will continue cooking after the oven
turns off.
19
Page 20
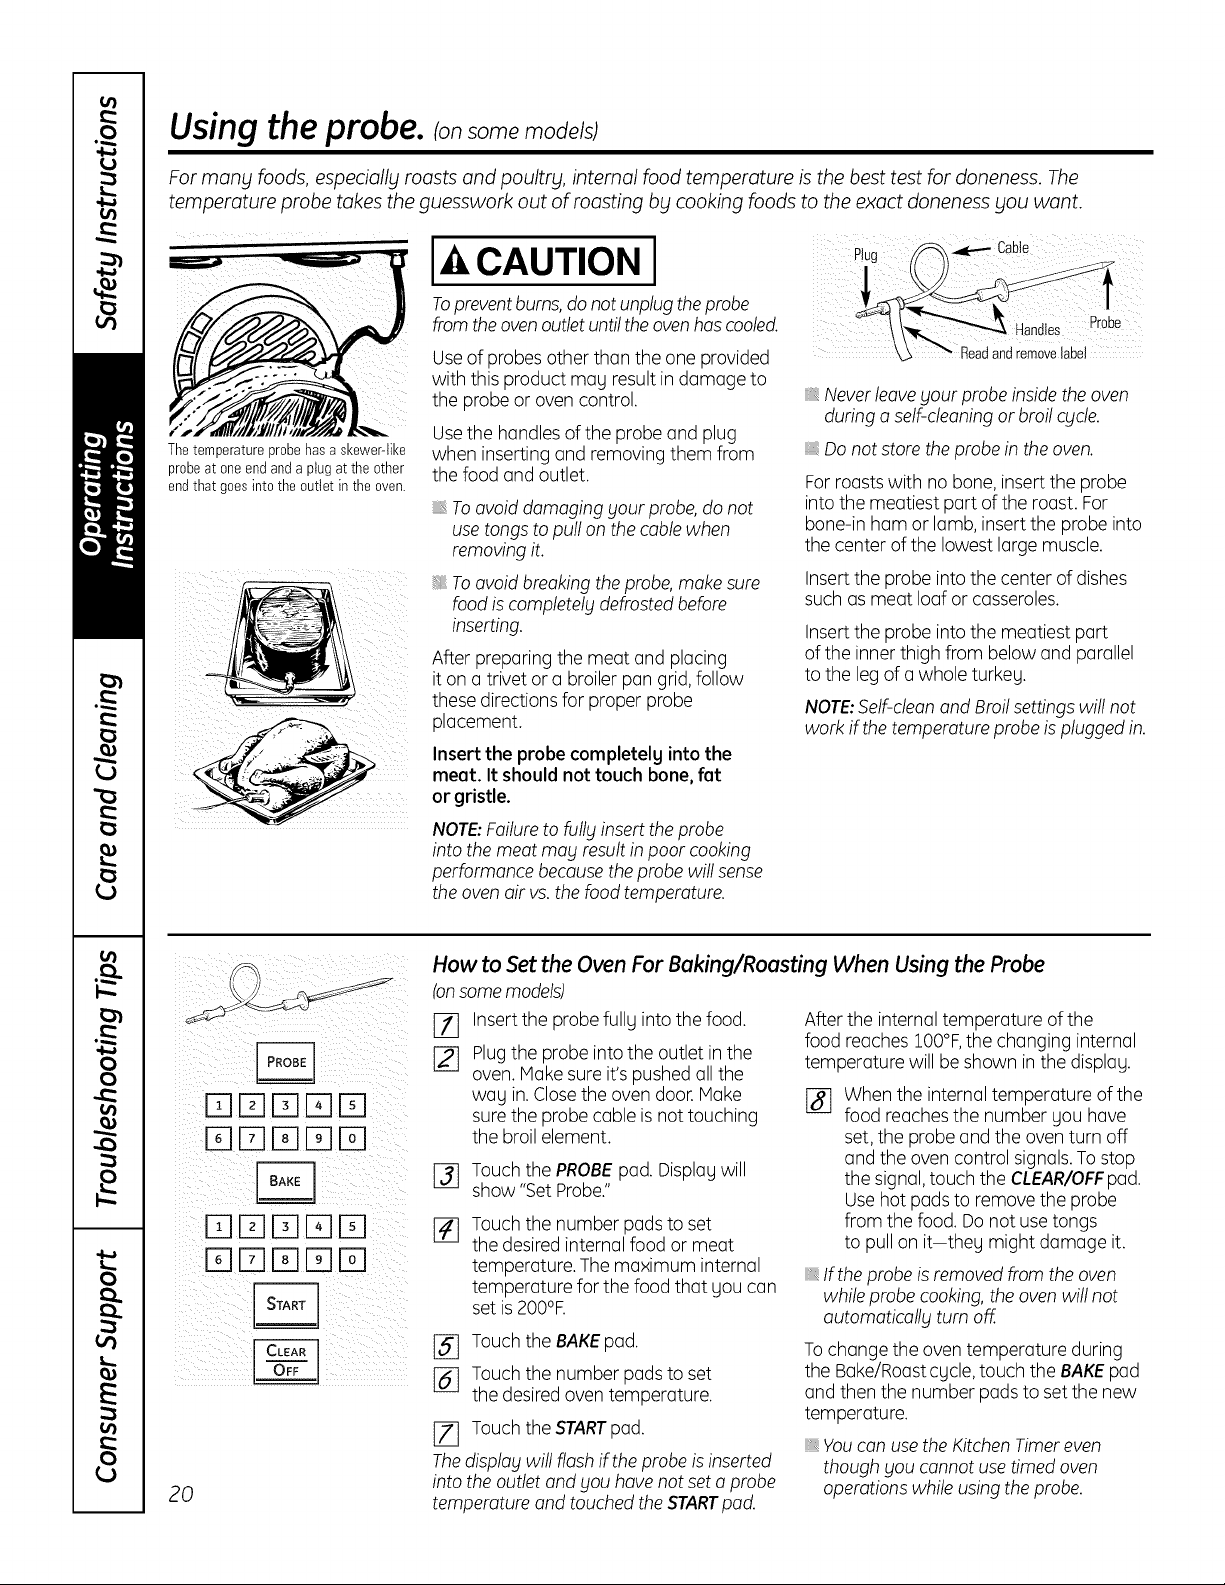
Using the probe, ionsomemode sj
For many foods, especially roasts and poultry, internal food temperature is the best test for doneness. The
temperature probe takes the guesswork out of roasting by cooking foods to the exact doneness you want.
J-&CAUTION I c0,,,
Topreventburns,donotunplugtheprobe
from the ovenoutlet untilthe ovenhascooled.
Useof probes other than the one provided _ _ Readandremovelabel
The temperature probe has a skewer-like
probe at one end and a plug at the other
end that goes into the outlet in the oven.
with this product may result indamage to
the probe or oven control.
Usethe handlesof the probe and plug
when inserting and removing them from
the food and outlet.
Toovoid damaging gout probe, do not
use tongs to pull on the cable when
removing it.
i Toovoid breaking the probe, make sure
food iscompletely defrosted before
inserting.
After preparing the meat and placing
it on a trivet or a broiler pan grid,follow
these directions for proper probe
placement.
Insert the probe completelg into the
meat. It should not touch bone, fat
or gristle.
NOTE:Failureto fully insert the probe
into the meat may result in poor cooking
performance because the probe will sense
the oven air vs. the food temperature.
_,Neverleavegout probe insidethe oven
during o self-cleaningor broil cycle.
Do not store the probe in the oven.
Forroastswith no bone,insert the probe
into the meatiest part of the roast. For
bone-in ham or lamb, insert the probe into
the center of the lowest large muscle.
Insertthe probe into the center of dishes
such as meat loaf or casseroles.
Insertthe probe into the meatiest part
of the inner thigh from below and parallel
to the leg of a whole turkey.
NOTE:Self-cleon and Broilsettings will not
work if the temperature probe is plugged in.
20
How to Set the Oven For Baking/Roasting When Using the Probe
Ionsomemodels)
Insertthe probe fully into the food.
Plugthe probe into the outlet in the
[]
oven. Hake sure it's pushedall the
way in. Closethe oven door.Hake
surethe probe cable is not touching
the broil element.
[_ Touch the PROBEpad. Displaywill
show "Set Probe."
Touch the number pads to set
the desiredinternal food or meat
temperature. The maximum internal
temperature for the food that you can
set is 200°F.
[_ Touch the BAKEpad.
[_ Touch the number pads to set
the desiredoven temperature.
[Z] Touch the STARTpad.
Thedisplay will flash if the probe is inserted
into the outlet and you have not set o probe
temperature and touched the STARTpod.
After the internal temperature of the
food reaches 100°F,the changing internal
temperature will be shown in the display.
[] When the internal temperature of the
food reaches the number you hove
set,the probe and the oven turn off
and the oven control signals.To stop
the signal,touch the CLEAR/OFFpad.
Usehot padsto remove the probe
from the food. Donot usetongs
to pull on it-they might damage it.
Ifthe probe is removed from the oven
while probe cooking, the oven will not
automatically turn off.
Tochange the oventemperature during
the Bake/Roostcycle, touch the BAKEpod
and then the number pods to set the new
temperature.
You con use the Kitchen Timer even
though you cannot use timed oven
operations while using the probe.
Page 21

Usingthe kitchentimer. OEApp,i°nces.com
To Set the Kitchen Timer
(on some models)
TIMER TIMER
I
ON OFF
(onsomemodels)
TheKitchen_meris in hoursandminutes.
TheKitchenTimerdoesnotcontroloven
operations.Themaximumsettingonthe
KitchenTimeris9 hoursand59minutes.
Touch the KITCHENTIMERON/OFFor
%
TIMERONpad (depending on model).
Touch the number pads until the
[]
amount of time gou want shows
in the display. Forexample,to set
2 hours and 45 minutes,touch 2, 4
and 5 inthat order. If gou make a
mistake,touch the KITCHENTIMER
ON/OFFor TIMEROFFpad (depending
on model) and begin again.
_] Touch the START pad.
To Reset the Kitchen Timer
If the display isstill showing the time
remaining, gou mag change it bg
touching the KITCHENTIMERON/OFFor
TIMERON pad (depending on model),then
touch the number pads until the time gou
want appears in the displGg.
After touching theSTARTpod, SET
disappears;this tellsgou the timeis
counting down, although the displog does
not change until one minute has passed.
Secondswill not beshown in thedisplog
until the last minute iscounting down.
[_ Whenthe kitchentimer reaches:00,
the control will beep 3 times followed
by one beep every 6 seconds until
the KITCHENTIMERON/OFFor
TIMEROFFpad (dependingon model)
istouched.
The&second tone canbe cancelledby
following the steps in theSpatial features
of your oven control section under Tones
at the Endof o TimedCycle.
If the remaining time isnot in the displ%
(clock,delag start orcooking time are in
the displag),recallthe remaining time bg
touching the KITCHENTIMERON/OFFor
TIMERON pad (depending on model) and
then touching the number pads to enter
the new time gou want.
(onsomemodels)
I TIMER TIMER
ON OFF
(onsomemodels)
To Cancel the Kitchen Timer
Touchthe KITCHENTIMERON/OFFor
TIMERONpad (depending on model) twice
or touch TIMEROFF.
21
Page 22
Adjust the oven thermostat--Do it yourself!
You may find that your new oven cooks differently than the one it replaced. Use gout new oven for a few weeks
to become more familiar with it. If blou still think your new oven is too hot or too cold, you can adjust the
thermostat yourself.
Do not use thermometers, such as those found in grocery stores, to check the temperature setting of blour oven.
These thermometers mabl varb120-/40 degrees.
NOTE: This adjustment will only affect baking and roasting temperatures; it will not affect broiling or self-cleaning
temperatures. The adjustment will be retained in memorbl after a power failure.
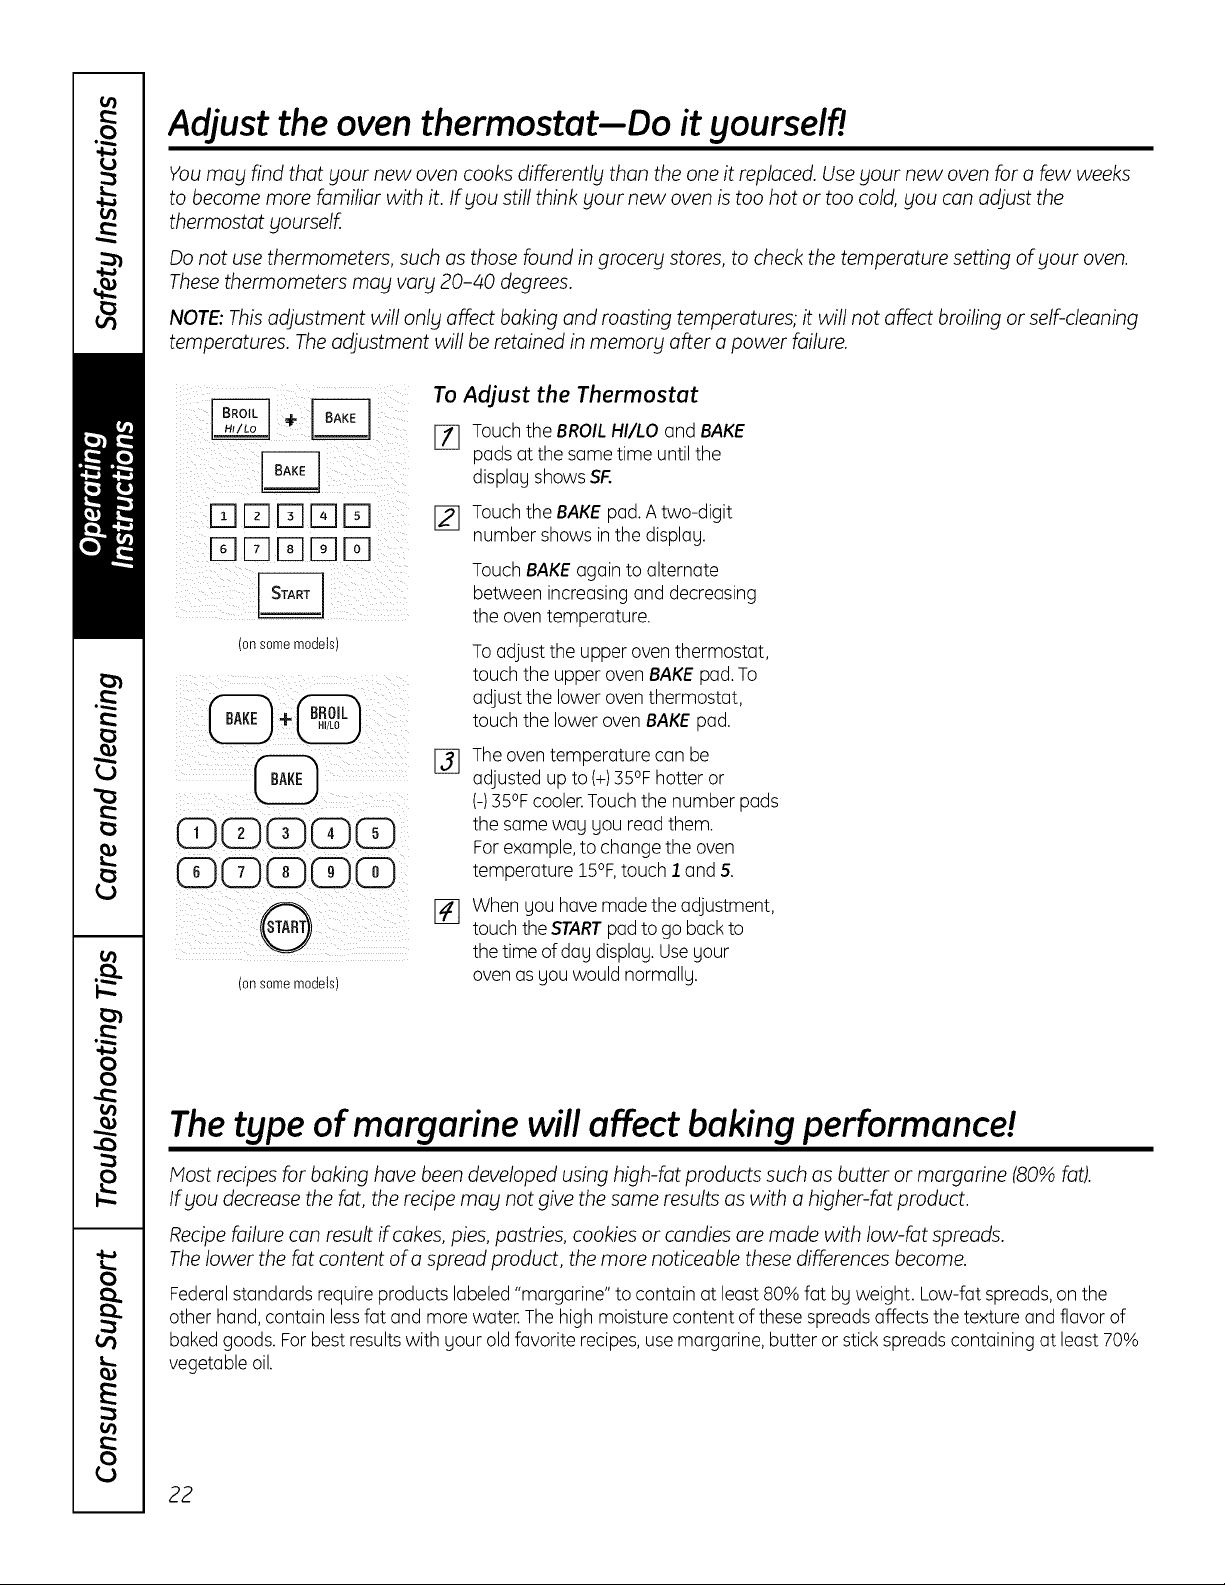
To Adjust the Thermostat
[_ Touch the BROILHI/LO and BAKE
pads at the same time until the
_ii!_ii i_i_iII!E_]_ _ :_i_!i_
i:(16-1E] F1F] F1i: ¸
(onsomemodels)
display shows SR
12] Touch the BAKEpad.A two-digit
number shows in the display.
Touch BAKEagain to alternate
between increasing and decreasing
the oven temperature.
To adjust the upper oven thermostat,
touch the upper oven BAKEpad.To
adjust the lower oven thermostat,
touch the lower oven BAKE pad.
The oventemperature can be
adjusted up to (+)35°Fhotter or
(435°F cooler.Touch the number pads
CDEDEDEDEE)
CE)EDEE)EDED
(onsomemodels)
the same way you read them.
Forexample,to change the oven
temperature 15°F,touch 1 and 5.
When you havemade the adjustment,
touch the STARTpad to go backto
the time of day display. Useyour
ovenas you would normally.
Thetype of margarine will affect baking performance!
Most recipes for baking have been developed using high-fat products such as butter or margarine (80% fat).
If blou decrease the fat, the recipe mabl not give the same results as with a higher-fat product.
Recipe failure can result if cakes, pies, pastries, cookies or candies are made with low-fat spreads.
The lower the fat content of a spread product, the more noticeable these differences become.
Federalstandards require products labeled "margarine" to contain at least 80% fat by weight. Low-fat spreads,on the
other hand,contain lessfat and more water.The high moisture content of these spreads affects the texture and flavor of
baked goods. For best resultswith your old favorite recipes,use margarine, butter or stick spreads containing at least 70%
vegetable oil.
22
Page 23
Usingtheconvectionoven. somemode sj
GEAppliances.com
CONVECTION
Multi-rack position.
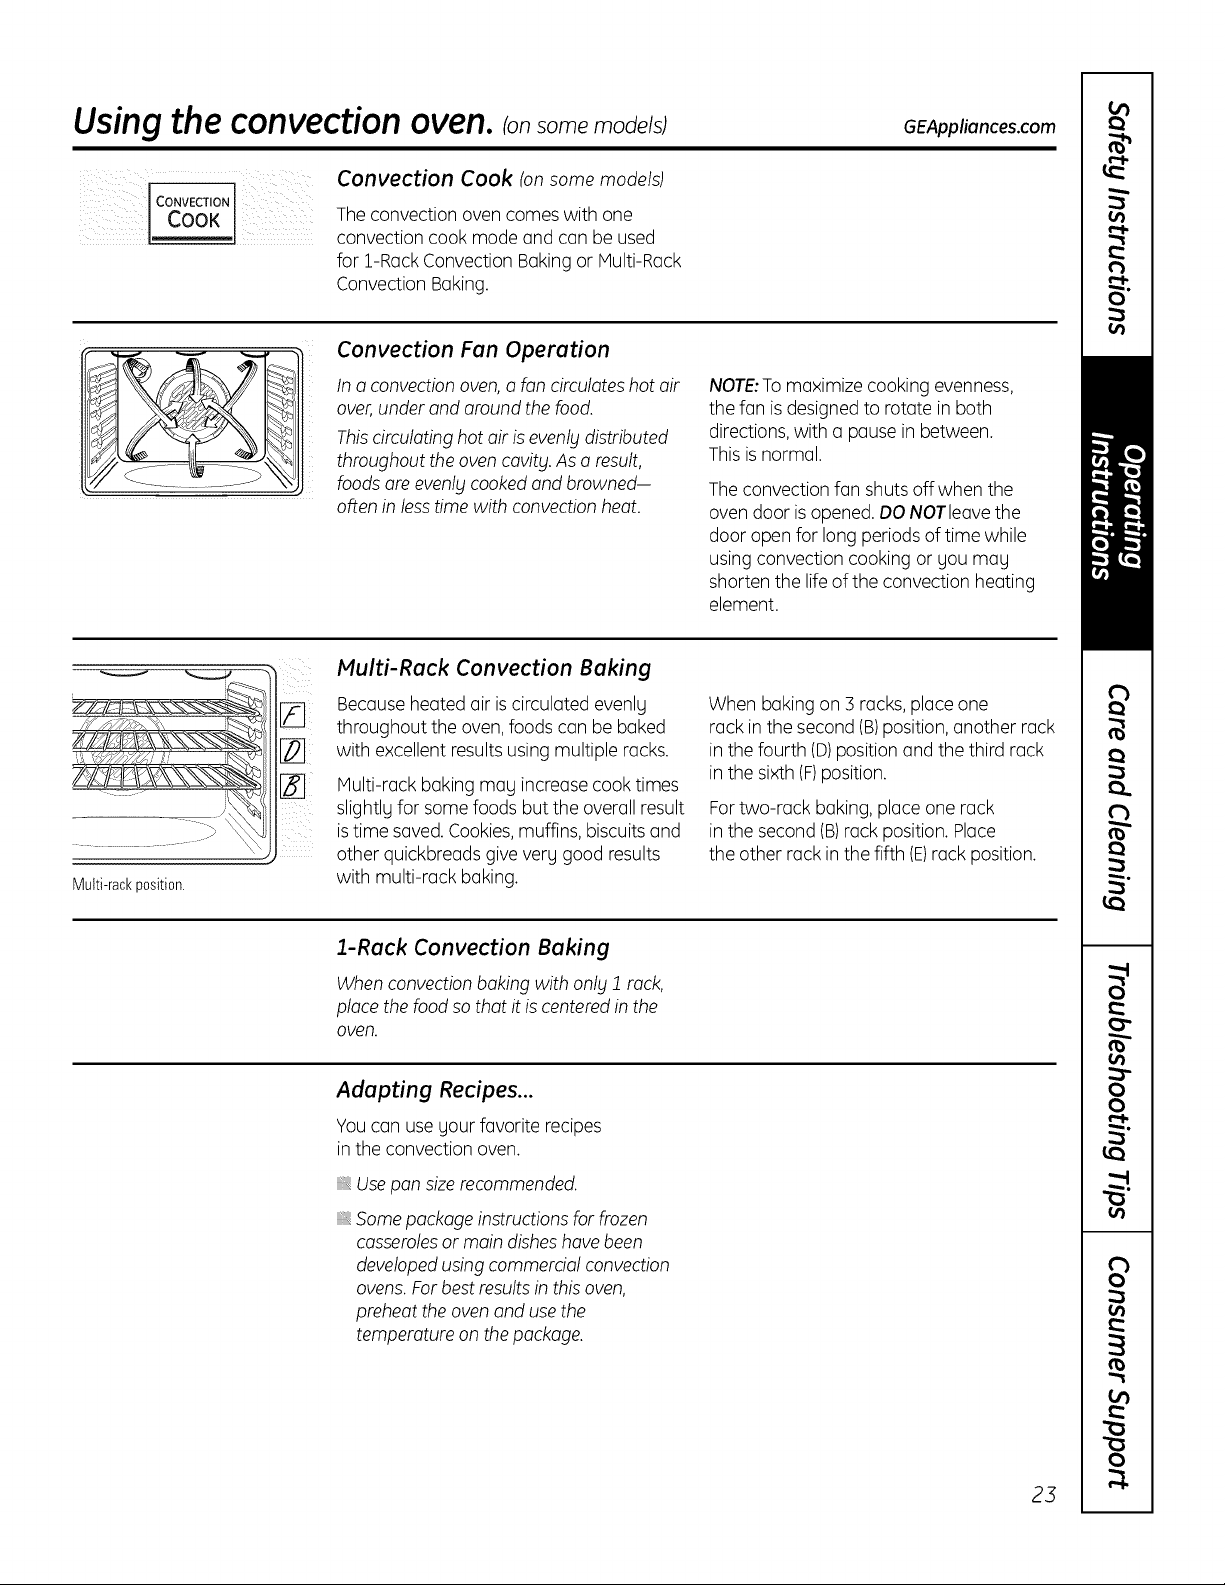
Convection Cook (on some models)
Theconvection oven comes with one
convection cook mode and can be used
for 1-RackConvection Bakingor Multi-Rack
Convection Baking.
Convection Fan Operation
In a convection oven, a fan circulates hot air
over, under and around the food.
This circulating hot air is evenlg distributed
throughout the oven cavity. As a result,
foods are evenlg cooked and browned-
often in less time with convection heat.
Multi-Rack Convection Baking
Because heated air iscirculated evenly
throughout the oven, foods can be baked
with excellent results using multiple racks.
Multi-rack baking may increase cook times
i_ L
slightly for some foods but the overall result
i(
istime saved. Cookies,muffins, biscuitsand
other quickbreadsgive very good results
with multi-rack baking.
NOTE:To maximize cooking evenness,
the fan isdesignedto rotate in both
directions,with a pause in between.
Thisisnormal.
Theconvection fan shuts offwhen the
oven door is opened. DO NOTleave the
door open for long periods of time while
using convection cooking or you may
shorten the life of the convection heating
element.
When baking on 3 racks, place one
rack in the second (B)position, another rack
in the fourth (D)position and the third rack
in the sixth (F)position.
Fortwo-rack baking, place one rack
in the second (B)rack position.Place
the other rack in the fifth (E)rack position.
I-Rack Convection Baking
When convection baking with only 1 rack,
place the food so that it is centered in the
oven.
Adapting Recipes...
Youcan useyour favorite recipes
in the convection oven.
Usepan sizerecommended.
Some package instructions for frozen
casseroles or main dishes have been
developed using commercial convection
ovens. Forbest results in this oven,
preheat the oven and use the
temperature on the package.
23
Page 24
Usingtheconvectionoven. somemode sJ
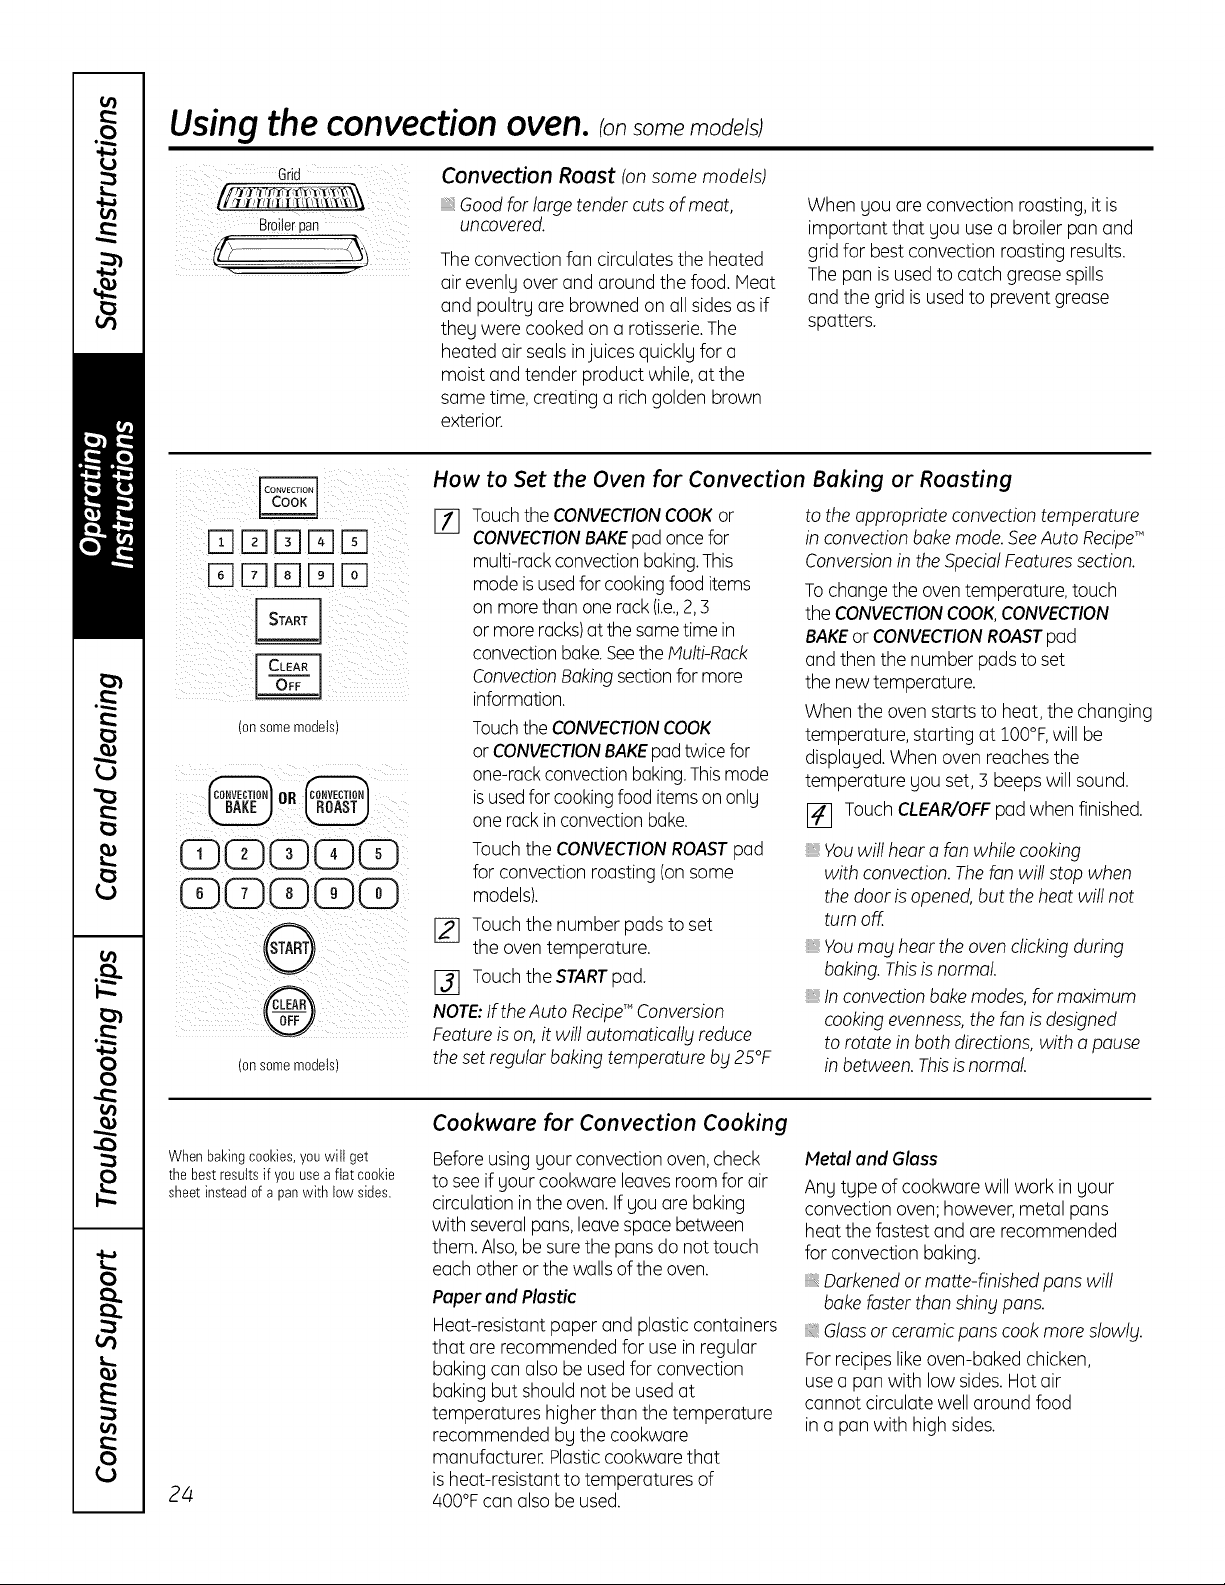
Convection Roast tonsomemodels)
(onsomemodels)
GCDCD(Z)G
(onsomemodels) theset regular baking temperature bg 25°F
Good for large tender cutsof meat,
uncovered.
Theconvection fan circulates the heated
air evenly over and around the food. Meat
and poultry are browned onall sidesasif
they were cooked on a rotisserie.The
heated air sealsinjuices quickly for a
moist and tender product while,at the
some time, creating a rich golden brown
exterior.
How to Set the Oven for Convection Buking or Rousting
Touchthe CONVECTIONCOOKor
%
CONVECTIONBAKEpad oncefor
multi-rack convectionbaking.This
mode isusedfor cookingfood items
on more than one rack(i.e.,2,3
or more racks)atthe sametime in
convectionbake.SeetheMulti-Rock
ConvectionBakingsectionfor more
information.
Touchthe CONVECTIONCOOK
or CONVECTIONBAKEpadtwicefor
one-rackconvectionbaking.Thismode
isusedfor cookingfood itemson only
one rackin convectionbake.
Touch the CONVECTIONROASTpad
for convection roasting (onsome
models).
I_ Touchthe number padsto set
the oven temperature.
13] TouchtheSTART p:d.
NOTE:fftheAutoRecipeConversion
Featureison,it will automatically reduce
When you are convection roosting,it is
important that you use a broiler pan and
grid for best convection roosting results.
Thepan is used to catch grease spills
and the grid isused to prevent grease
spotters.
to the appropriate convection temperature
in convection bakemode.SeeAuto Recipe'"
Conversionin the SpecialFeaturessection.
Tochangethe oventemperature, touch
the CONVECTIONCOOK,CONVECTION
BAKEor CONVECTIONROASTpad
and then the number pads to set
the new temperature.
When the oven starts to heat, the changing
temperature, starting at IO0°F,will be
displayed.When oven reaches the
temperature you set, 3 beepswill sound.
[] Touch CLEAR/OFFpad when finished.
, Youwill hear a fan while cooking
with convection.Thefan will stop when
thedoor is opened,but theheat will not
turn off.
Youmag hear the oven clicking during
baking.Thisis normal.
Inconvectionbakemodes,for maximum
cookingevenness,the fan isdesigned
to rotate in both directions,with apause
in between. Thisis normal.
Whenbakingcookies,youwill get
thebest resultsif youusea flat cookie
sheetinsteadof apan with low sides.
24
Cookware for Convection Cooking
Beforeusingyour convection oven,check
to seeif your cookware leavesroom for air
circulation inthe oven.If you are baking
with severalpans,leavespace between
them.Also,be surethe pans do not touch
each other or the walls of the oven.
Paper and Plastic
Heat-resistant paper and plastic containers
that are recommended for use in regular
baking can also be used for convection
baking but should not be used at
temperatures higher than the temperature
recommended by the cookware
manufacturer. Plasticcookware that
isheat-resistant to temperatures of
400°Fcan also be used.
Metal and Glass
Any type of cookware will work in your
convection oven;however,metal pans
heat the fastest and are recommended
for convection baking.
Darkenedor matte-finished panswill
bake faster than shiny pans.
Glass or ceramic pans cook more slowlg.
Forrecipes like oven-baked chicken,
usea pan with low sides. Hot air
cannot circulate well around food
in a pan with high sides.
Page 25
Usingthe timed features
for convectioncooking,ronsomemode sj GEAppliances.com
You will hear a fan while cooking with these features. The fan will stop when the door is opened, but the heat
will not turn off.
NOTE: Foods that spoil easily-such as milk, eggs, fish, stuffings, poultry and porkishould not be allowed to
sit for more than 1 hour before or offer cooking. Room temperature promotes the growth of harmful bacteria.
Be sure that the oven light is off becouse heat from the bulb will speed harmful bacteria growth.
i ¸ : : :
CONVECTION
CONVECTION
cook
How to Set an Immediate Start and Automatic Stop
Pressdesired convection function. Proceed to
step2 of Howto Setan ImmediateStartand
AutomaticStopinUsingthe timed bakingand
roastingfeaturessection.
How to Set a Delaged Start and Automatic Stop
Pressdesiredconvectionfunction.Proceedto
step 2 of How to Set a OelagStart and
Automatic Stop inUsing the timed baking and
roasting features section.
25
Page 26
Usingtheconvectionoven. somemode sj
How to Set the Oven for Convection Roasting when Using the Probe
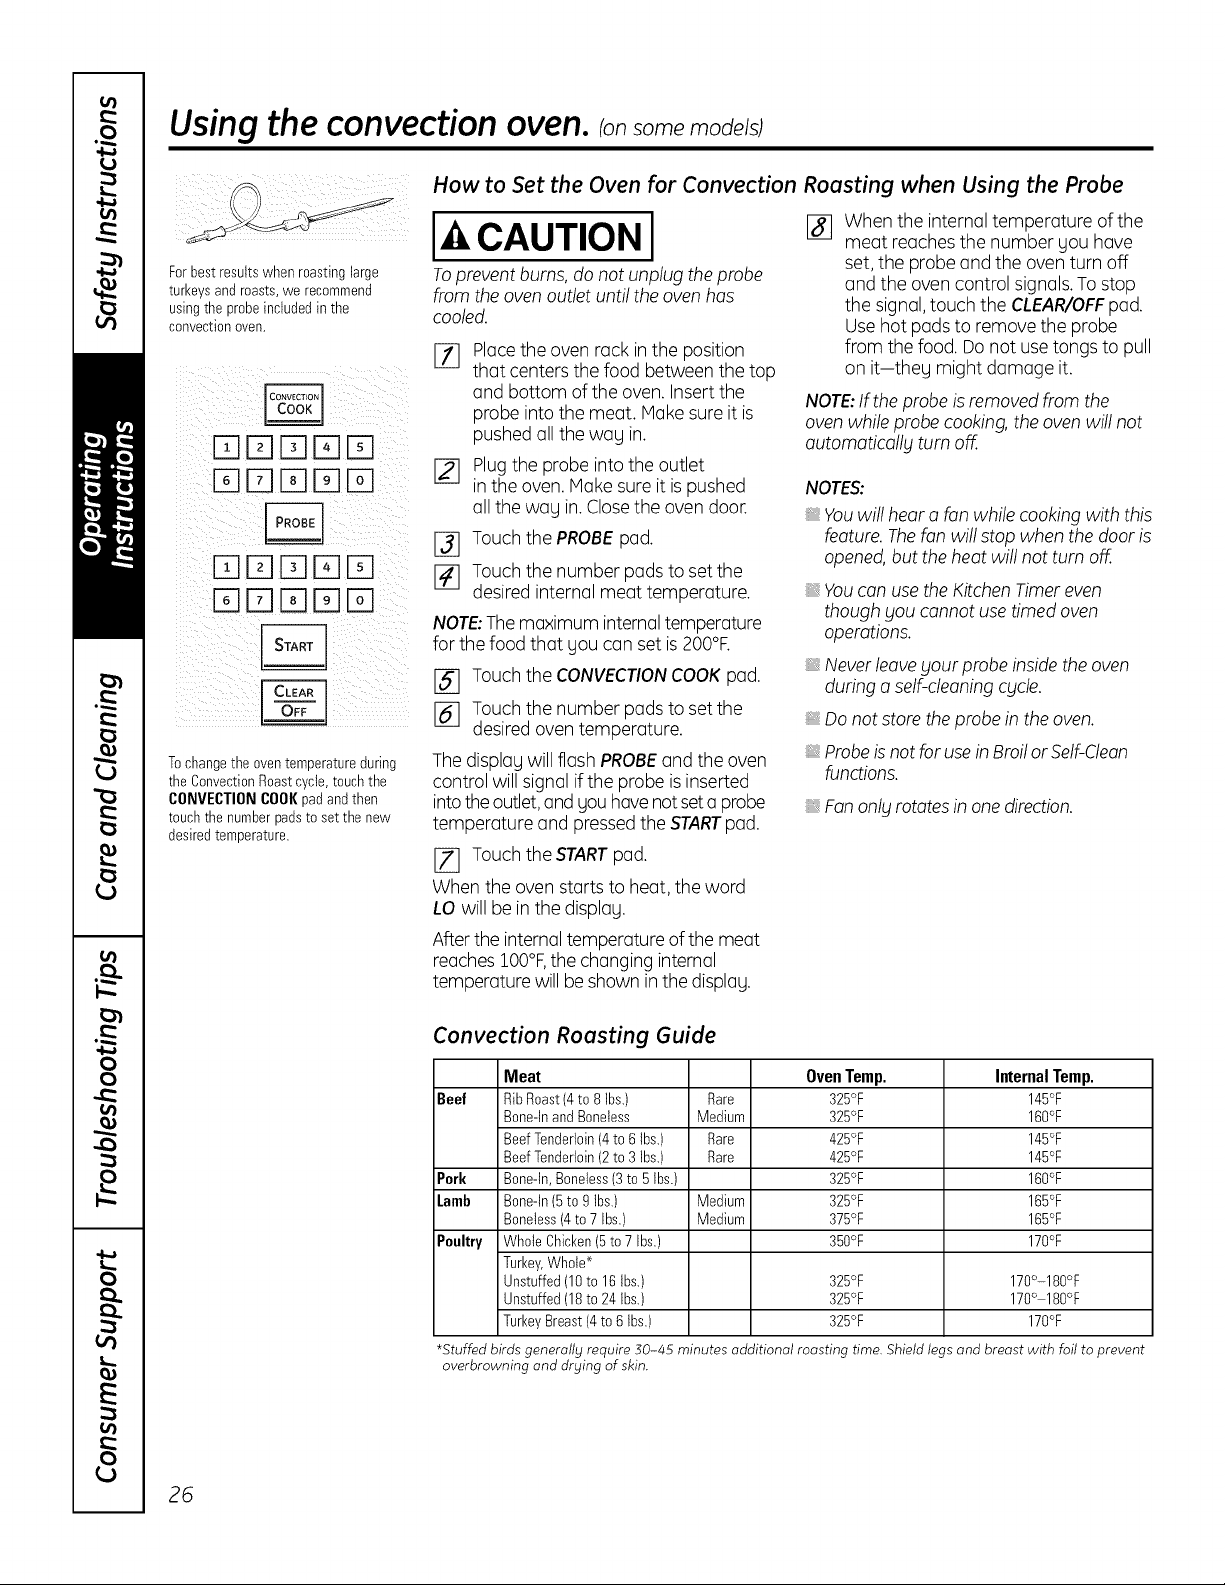
Forbestresults when roastinglarge
turkeysand roasts,we recommend
usingthe probeinctudedin the
convectionoven.
DD[]DD
DD[]DD
DD[]DD
DDDDD
Tochangetheoventemperatureduring
theConvectionRoastcycle,touchthe
CONVECTIONCOOKpad andthen
touchthenumberpadsto set thenew
desiredtemperature.
CAUT,ONI When the internal temperature of the
Toprevent burns, do not unplug the probe
from the oven outlet until the ovenhas
cooled.
Placethe oven rack inthe position
%
that centers the food between the top
and bottom of the oven. Insertthe
probe into the meat. Make sureit is
pushed all the way in.
Plugthe probe intothe outlet
[]
in the oven. Make sure it is pushed
all the way in.Closethe oven door.
[_] Touch the PROBEpad.
[] Touch the number padsto setthe
desiredinternal meat temperature.
NOTE:Themaximum internaltemperature
for the food that you can set is200°F.
meat reaches the number you have
set,the probe and the oven turn off
and the oven control signals.To stop
the signal,touch the CLEAR/OFFpad.
Use hot pads to remove the probe
from the food. Donot usetongs to pull
on it-they might damage it.
NOTE:If theprobe is removed from the
ovenwhile probe cooking, the oven will not
outomoticoll_lturn off.
NOTES:
Youwill hear a fan while cooking with this
feature.Thefan will stop when thedoor is
opened,but the heat will not turn off.
, Youcon use the KitchenTimer even
though _lOUcannot usetimed oven
operations.
, Neverleave your probe insidethe oven
I-_ Touch the CONVECTIONCOOKpad.
[_ Touch the number pads to setthe
desiredoven temperature.
Thedisplay will flash PROBEand the oven
control will signal if the probe isinserted
intotheoutlet,and you havenotseta probe
during a self-cleaningc_Icle.
Donot store the probe in the oven.
, Probeisnot forusein Broilor Self-Cleon
functions.
, Fanonl_lrotatesin one direction.
temperature and pressedthe STARTpad.
[_ Touch the STARTpad.
When the oven starts to heat, the word
LO will be in the display.
Afterthe internaltemperature ofthe meat
reaches 100°F,the changinginternal
temperature will be shown inthe display.
26
Convection Roasting Guide
Meat Oven Temp.
Beef
Pork
Lamb
Poultry
*Stuffed birds generally require 30-45 minutes additional roasting time. Shield legs and breast with foil to prevent
overbrowning and drying of skin.
RibRoast(4to 8 Ibs.) Rare 325°F
Bone-InandBoneless Medium 325°F
BeefTenderloin(4to 6Ibs.) Rare 425°F
BeefTenderloin(2to 3Ibs.) Rare 425°F
Bene-tn,Boneless(3to 5Ibs.) 325°F
Bone-ln(5to gIbs.) Medium 325°F
Boneless(4to7 Ibs.) Medium 375°F
Whole Chicken(5to 7 Ibs.) 350°F
Turkey,Whole*
Unstuffed(10to 16 tbs.) 325°F
Unstuffed(18to 24 Ibs.) 325°F
TurkeyBreast(4to 6 Ibs.) 325°F
Internal Temp.
145°F
160°F
145°F
145°F
160°F
165°F
165°F
170°F
170°-180°F
170° 180°F
170°F
Page 27
Using the slow cook pizza, warming
and proofing features.
IA WARNING I OOD POISON HAZARD:Bacteria ma_j grow in food at temperatures below 140°£
• Always start with hot food. Do not use warm settings to heat cold food.
GEAppliances.com
• Do not warm food for more than 2 hours.
Failure to follow these instructions may result in foodborne illness.
How to Set the Lower Oven For Slow Cook
l-qFqlTlrq
rTlPql-qF-l%
E]FqE3FqEb3
Slow Cook Guide
Food
Beef
ChuckRoast
BeefRibs
Poultry
WholeChicken
ChickenPieces
Pork
BonelessBlade
Roast
CountryStyle
PorkRibs
PorkChops
Soup
VegetableBeef
Soup
Chili
Quantity Position Setting (Hours)
3 31AIbs. C 2-Meats HI5-6 hrs.
31A 41bs. C 2-Meats HI 3-4 hrs.
4 Ibs.
8 pieces
(appr0x.3 Ibs.)
3_4Ibs.
31A 4Ibs.
44 Ibs.
4 quarts
4 quarts
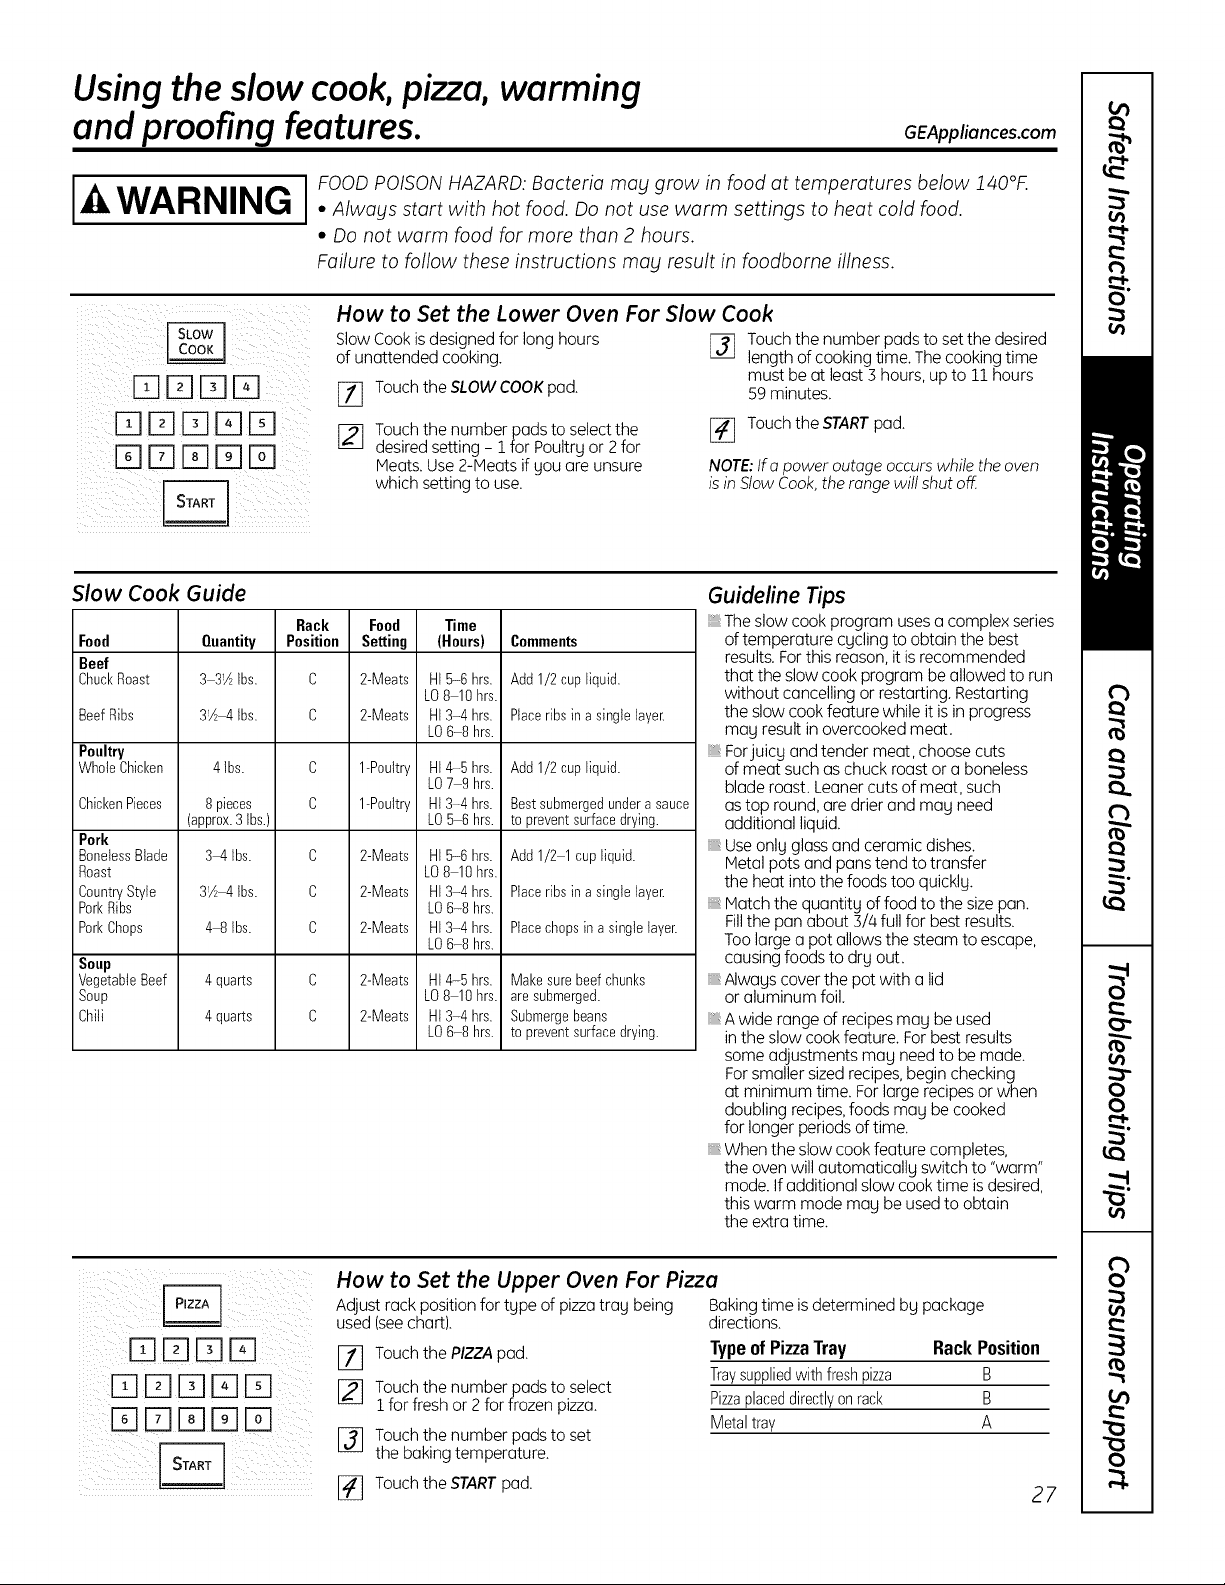
SlowCook is designed for long hours
of unattended cooking.
[_] Touch the SLOWCOOK pod.
[_ Touchthe number pods to select the
desired setting - 1for Poultrg or 2for
Heats. Use 2-Meats if SOUare unsure
which setting to use.
Rack Food Time
LO8 10 hrs.
LO6-8 hrs.
C
1-P0ultry HI4-5 hrs.
C
1-P0ultry HI3-4 hrs.
C
2-Meats HI5-6 hrs.
C
2-Meats HI3-4 hrs.
C
2-Meats HI3-4 hrs.
C
2-Meats HI4-5 hrs.
C
2-Meats HI3-4 hrs.
LO7 9 hrs.
LO5 6 hrs.
LO8 10 hrs.
LO6-8 hrs.
LO6-8 hrs.
LO8 10 hrs.
LO6-8 hrs.
Comments
Add 1/2cupliquid.
Placeribsin a single layer.
Add 1/2cupliquid.
Bestsubmergedunderasauce
to preventsurfacedrying.
Add 1/2 1cup liquid.
Placeribsin a single layer.
Placechopsina singlelayer.
Makesure beefchunks
aresubmerged.
Submergebeans
to preventsurfacedrying.
Touch the number pods to set the desired
length of cooking time. The cooking time
must be at least 3 hours, up to 11 hours
59minutes.
[_ Touchthe STARTpad.
NOTE:Ira power outage occurs while the oven
isin Stow Cook,the rangewilt shut off
Guideline Tips
The slow cook program useso complex series
oftemperature cycling to obtain the best
results.Forthis reason,it isrecommended
that the slow cook program be allowed to run
without cancelling or restarting. Restarting
the slow cook feature while it isin progress
may result in overcooked meat.
Forjuicy and tender meat, choose cuts
of meat such as chuck roost or o boneless
blade roost. Leanercuts of meat, such
astop round, ore drier and may need
additional liquid.
Useonly glossand ceramic dishes.
Metal pots and puns tend to transfer
the heat into the foods too quickly.
Hutch the quontitg of food to the sizepan.
Fillthe pan about 3//4full for best results.
Too large o pot allows the steam to escape,
causingfoods to dry out.
Always coverthe pot with o lid
or aluminum foil.
Awide range of recipes may be used
in the slowcook feature. For bestresults
some adjustments may needto be mode.
Forsmaller sized recipes,beginchecking
at minimum time. For large recipesor when
doubling recipes,foods may be cooked
for longer periods of time.
When the slow cook feature completes,
the oven will automatically switch to "worm"
mode. If additional slow cook time isdesired,
this worm mode may be usedto obtain
the extra time.
iiiii ill i i/}!! ii
How to Set the Upper Oven For Pizza
Adjust rock positionfor tgpe of pizzatrag being Bakingtime isdetermined bg package
used(seechart), directions.
[_ Touchthe PIZZApad.
[_ Touchthe number pods to select
1for fresh or 2for frozen pizza.
[] Touchthe number pods to set
the baking temperature.
[_ Touchthe STARTpod.
Type ofPizza Tray Rack Position
Traysuppliedwith freshpizza B
Pizzaplaceddirectlyonrack B
Metaltray A
27
Page 28

Using the slow cook, pizza, warming and proofing features.
How to Set the Upper Oven For Warming
iii [ iiiii_i_
START
L
PROOF l
The WARM feature keeps cooked
foods hot.
Thisfeature isnot designed to reheat
cold food.
Tousethe WARMfeature, touch the WARM
pad and then the STARTpad.
To use the WARM feature after Timed
Baking, follow these steps:
E_ Touch the bake mode of cooking.
[_ Touch the number pads to set
the oven temperature.
E_ Touch the COOKTIMEpad.
[_ Touch the number pads to set
the desired length of cooking time.
[] Touch the WARMpad.
[_ Touch the STARTpad.
How to Set the Oven For Proofing (on some models)
The proofing feature maintains o worm environment useful for rising
yeast-leavened products.
NOTE:Plasticcontainers,lids or plastic
wrap will melt if placed in the oven.Melted
plasticmag not be removableand is not
coveredunder gout warrantg.
START
TIMER
I ON
[ CLEAR
(onsomemodels)
(onsomemodels)
'
E_ Placethe covered dough ina dish
in the oven on rack Bor C.
NOTE:Forbest results, cover the dough
with a cloth or with greased plastic wrap
(the plastic mag need to be anchored
underneath the container so the oven
fan willnot blow it off).
[] Touch the PROOFpad and then
the STARTpad.
Thedisplagwill read PrF (proof).
Theoven interior light turns on and remains
on during proofing.
Theproofing feature automaticallg
provides the optimum temperature for
the proofing process,and therefore does
not havea temperature adjustment.
E_] Set the Timer for the minimum
proof time.
[] When proofing isfinished,touch
the CLEAR/OFFpad.
Toavoid lowering the oven temperature
and lengthening proofing time, do not
open the oven door unnecessarilg.
_,Checkbreadproducts earl_lto ovoid
overproofing.
NOTES:
, Donot usetheproofing mode for
warming food or keepingfood hot.
Theproofing oven temperature is
not hot enough to hold foodsat safe
temperatures.Usethe WARMfeature
to keepfoodworm.
Proofing will not operate when oven
is above 225°E "HOT" will show
in the display.
28
Page 29
Using the self-cleaning upper and lower ovens.
Before a Clean Cycle
Donot cleanthegasket.Thefiberglassmaterial
oftheovendoorgasketcannotwithstand
abrasion.It isessentialforthegasketto remain
intact.Ifyou noticeit becomingwornorfrayed,
replaceit.
Makesuretheovenlightbulbcoveris
inplaceandtheovenlightisoff.
IMPORTANT:Thehealthofsomebirdsis
extremelysensitiveto the fumesgivenoff
duringtheself-cleaningcycleofanyrange.
Movebirdstoanotherwell-ventilatedroom.
DoubleOvenand CanadianModelsOnly:
Thesurfaceunitsareautomaticallydisabled
duringtheself-cleancycle.Makesurethat all
surfaceunitcontrolsareturnedoff at alltimes
duringtheself-cleancycle.Anysurfaceunitthat
issettoan "on"positionwhiletheself-clean
cycleisoperatingwillautomaticallycomeon
aftertheself-cleancycleisfinished,andcould
resultinan "on"unattendedsurfaceunit.Wait
untilthe self-cleancycleisfinishedtosetand
usethesurfaceunits.
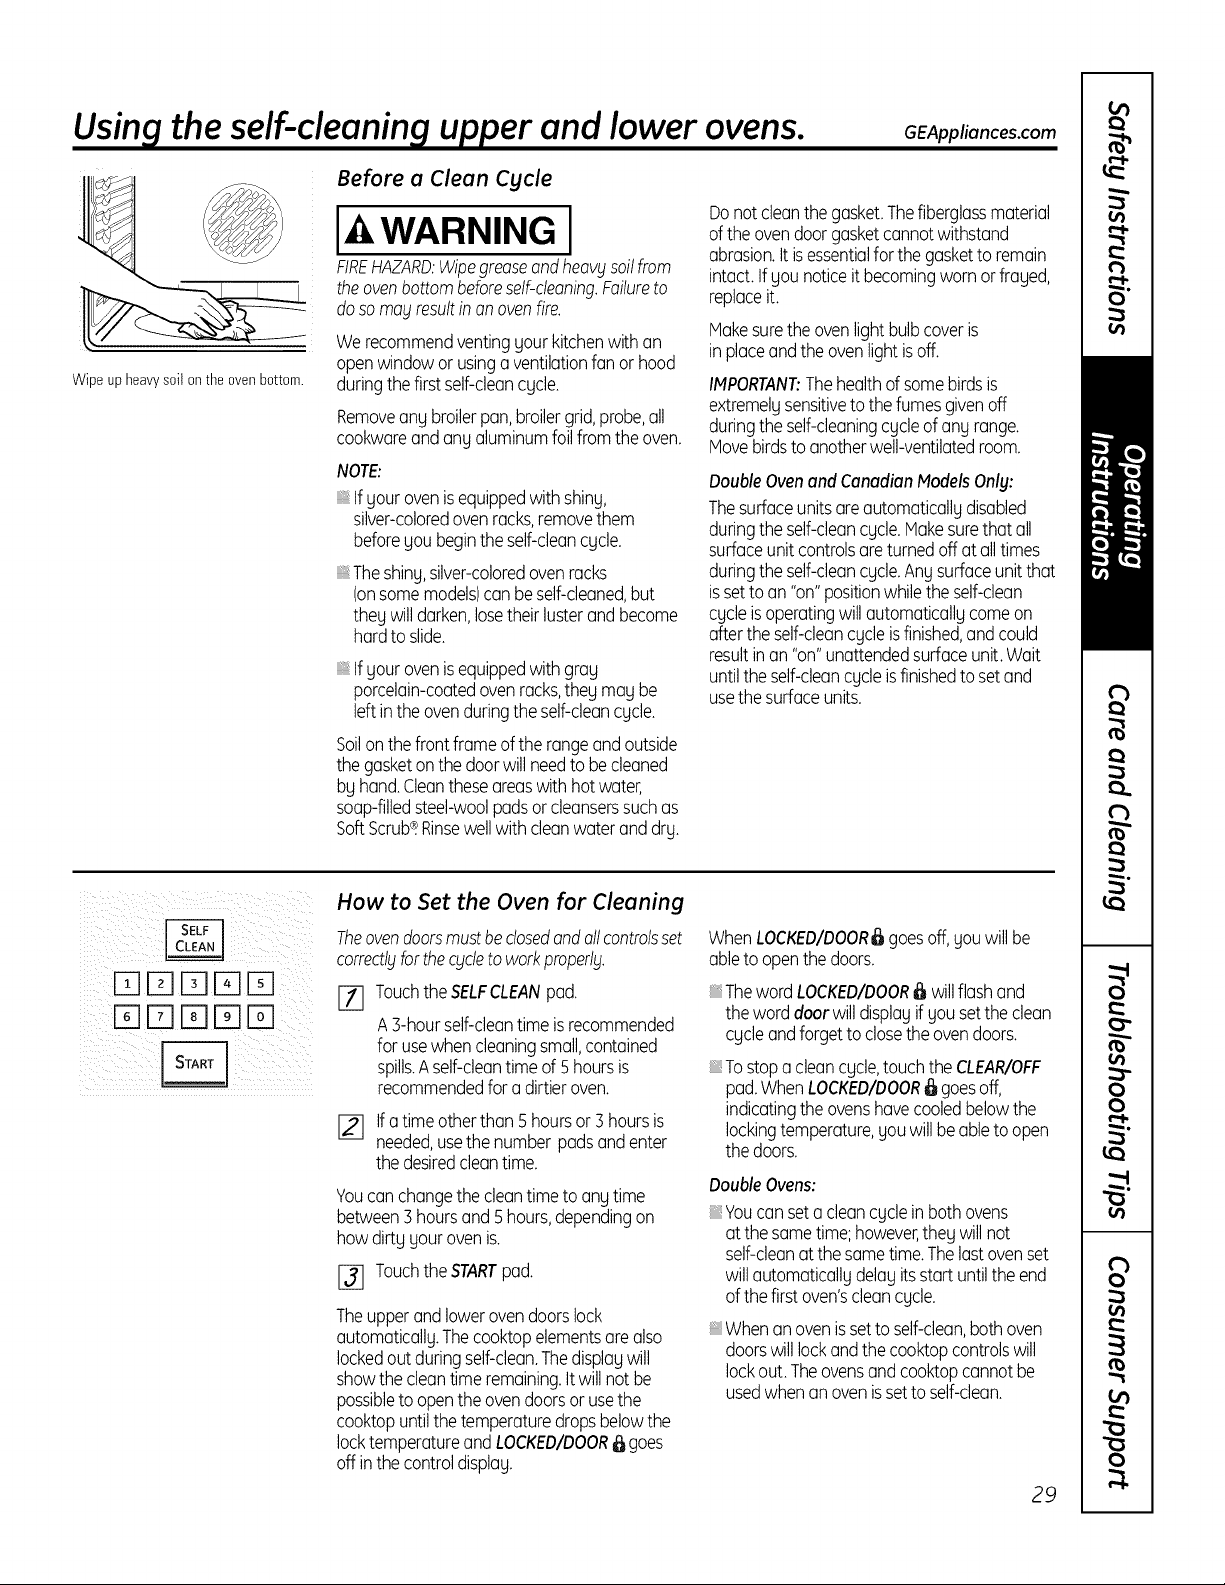
Wipe up heavysoil onthe ovenbottom.
I WARNING I
FIREHAZARD:Wipegreaseandheavblsoilfrom
theovenbottombeforeself-cleaning.Failureto
dosomoblresultinonovenfire.
Werecommendventingyour kitchenwith an
openwindowor usinga ventilationfan or hood
duringthefirst self-deancycle.
Removeany broilerpan,broilergrid,probe,all
cookwareandanyaluminumfoil fromtheoven.
NOTE:
Ifyourovenisequippedwithshiny,
silver-coloredovenracks,removethem
beforeyou begintheself-cleancycle.
Theshiny,silver-coloredovenracks
(onsomemodels)canbeself-cleaned,but
they willdarken,losetheirlusterandbecome
hardtoslide.
Ifyourovenisequippedwithgray
porcelain-coatedovenracks,theymay be
left intheovenduringtheself-cleancycle.
Soilonthefrontframeofthe rangeandoutside
thegasketonthedoorwill needtobecleaned
byhand.Cleantheseareaswithhotwater,
soap-filledsteel-woolpadsorcleanserssuchas
SoftScrub®.Rinsewellwith cleanwateranddry.
GEAppliances.com
I--qFql-flI-ql-q
D rq IZ]rq IT1
How to Set the Oven for Cleaning
Theovendoorsmustbeclosedandallcontrolsset
correctlblforthecycleto workproperlbl.
[] TouchtheSELFCLEANpad.
A 3-hourself-cleantimeisrecommended
forusewhencleaningsmall,contained
spills.Aself-cleantimeof 5hoursis
recommendedfor a dirtieroven.
[_ Ifatimeotherthan Shoursor3 hoursis
needed,usethenumber padsandenter
thedesiredcleantime.
Youcanchangethecleantimetoanytime
between3 hoursand5hours,dependingon
howdirtyyourovenis.
[_ Touchthe STARTpad.
Theupperandlowerovendoorslock
automatically.Thecooktopelementsarealso
lockedout duringself-clean.Thedisplaywill
showthecleantimeremaining.It willnot be
possibleto opentheovendoorsorusethe
cooktopuntilthetemperaturedropsbelowthe
locktemperatureandLOCKEDIDOOR_ goes
off inthe controldisplay.
WhenLOCKED/DOOR6goesoff,youwillbe
abletoopenthedoors.
ThewordLOCKED/DOOR_ willflashand
theworddoor willdisplayif you setthe clean
cycleandforgetto closethe ovendoors.
Tostop a clean cycle,touch the CLEAR/OFF
pad. When LOCKED/DOOR_ goes off,
indicating the ovens have cooled below the
locking temperature, you will be ableto open
the doors.
DoubleOvens:
Youcanseta cleancycleinbothovens
atthesametime;however,they will not
self-cleanat the sametime.Thelastovenset
willautomaticallydelay itsstart untiltheend
ofthefirstoven'scleancycle.
Whenanovenissetto self-clean,bothoven
doorswilllockandthe cooktopcontrolswill
lockout. Theovensandcooktopcannotbe
usedwhenanovenissettoself-clean.
29
Page 30
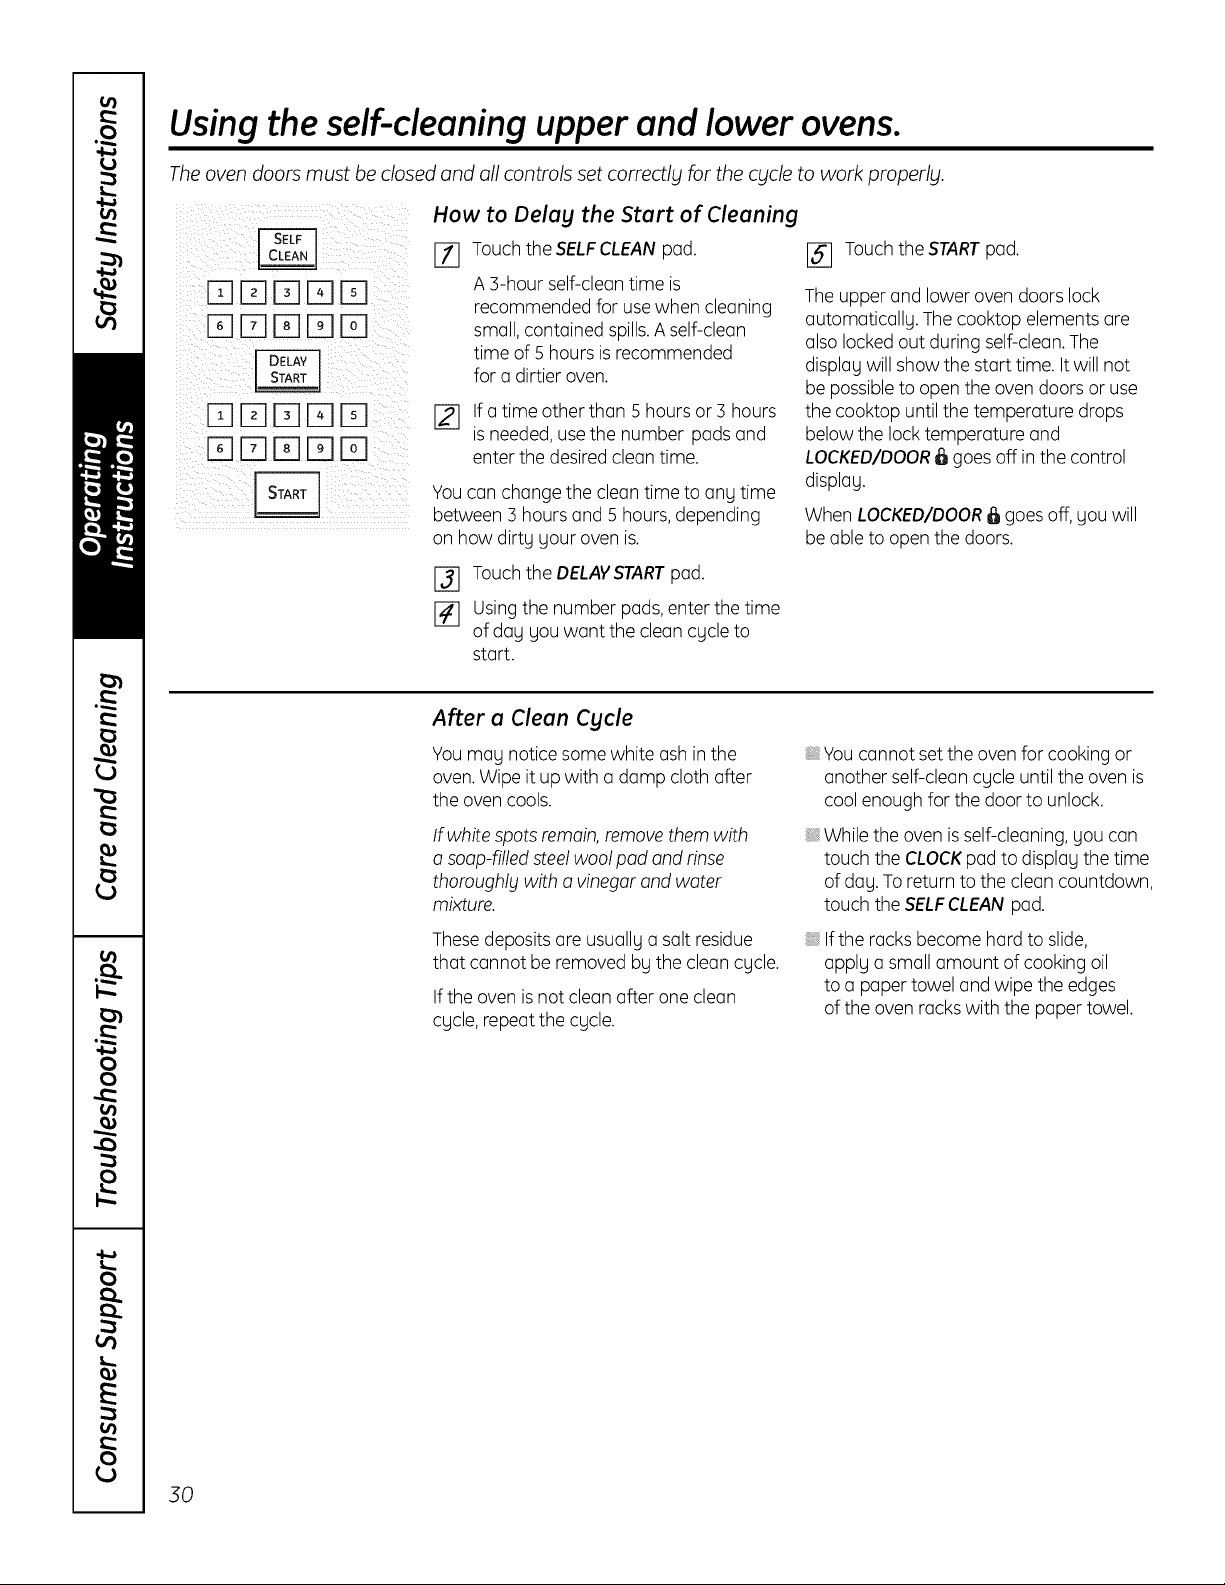
Using the self-cleaning upper and lower ovens.
The oven doors must be closed and all controls set correctly for the cycle to work properly.
How to Delag the Start of Cleaning
[]DD[]D
DDDD
I71 Touch the SELFCLEANpad.
A ]-hour self-cleantime is
recommended for usewhen cleaning
small, contained spills,A self-clean
time of 5 hours isrecommended
for a dirtier oven.
If a time other than 5 hours or 3 hours
is needed,use the number pads and
enter the desired cleantime.
Youcan change the cleantime to angtime
between 3 hoursand 5 hours,depending
on how dirtg gour oven is.
E_ Touchthe DELAVSTARTpad.
E_] using the number pads,enter the time
of day you want the clean cycle to
start.
After a Clean Cycle
Youmau notice some white ash inthe
oven.Wipe it up with a damp cloth after
the oven cools.
If white spotsremain, remove them with
a soap-filled steelwool pad and rinse
thoroughly with a vinegar andwater
mixture.
Thesedepositsare usuallua salt residue
that cannot be removed bu the cleancycle.
If the oven is not clean after one clean
cucle,repeat the cucle.
[] Touchthe STARTpad.
Theupper and lower oven doors lock
automaticallu. Thecooktop elements are
also locked out during self-clean.The
display will show the start time. It will not
be possible to open the oven doors or use
the cooktop until the temperature drops
below the lock temperature and
LOCKED/DOOR_ goes off in the control
display.
When LOCKED/DOOR_ goes off, you will
be able to open the doors.
You cannot set the oven for cooking or
another self-clean cycle until the oven is
coolenough for the door to unlock.
While the oven isself-cleaning, Uoucan
touch the CLOCKpad to displau the time
of day. To return to the clean countdown,
touch the SELFCLEAN pad.
Ifthe racks become hard to slide,
applu a small amount of cooking oil
to a paper towel and wipe the edges
ofthe oven rackswith the paper towel.
30
Page 31

Special features of gour oven control. GEApp,°.cescom
Your new touch pad control has additional features that gou may choose to use.The following are the features
and how blOUmay activate them.
The special feature modes can only be activated while the display is showing the time of dabl.Theblremain
in the control's memory until the steps are repeated.
To enter a special feature for either oven, you must first touch the upper oven BRO/L H//LO and BAKE pads
at the same time. Thelower oven BRO/L H//LO and BAKE pads will not activate special features.
When the display shows your choice, touch the STARTpad. Thespecial features will remain in memory after
a power failure, except for the Sabbath feature, which will have to be reset.
12-Hour Shutdown
I DELAYI
With this feature, should gou forget
and leave the oven on, the control will
automaticallg turn off the oven after
12 hours during baking functions
or after 3 hours during a broil function.
If gou wish to turn OFFthisfeature, follow
the steps below.
[77 Touch the upper oven BROILH//LO
and BAKEpads at the same time until
the displag showsSF.
Fahrenheit or Celsius Temperature Selection
Yourovencontrol isset to use the
Fahrenheittemperature selections,
but gou mog change this to use
the Celsiusselections.
[] Touch the upper oven BROILHI/LO
and BAKEpads at the same time until
the displag showsSF.
[_ Touch the DELAVSTARTpad
until no shdn (noshut-off) appears
in the displag.
[_] Touch the STARTpad to activate
the no shut-off and leave the control
set in this specialfeatures mode.
[_ Touch the COOK TIME and BROIL
HI/LO pads at the same time. The
displag will show F (Fahrenheit).
[31 Touch the COOK TIME and BROIL
HI/LO pads again at the same time.
The displag will show C (Celsius).
[_ Touch the START pad.
(onsomemodels)
(onsomemodels)
Tones at the End of a Timed Cgcle
At the end of a timed cgcle,3 short beeps
will sound followed bg one beepeverg
6 seconds until the CLEAR/OFFpod is
touched.Thiscontinual 6-secondbeep
mog be cancelled.
Tocancel the 6-second beep:
Touch the upper oven BROILHI/LO
and BAKEpads at the same time until
the displag showsSF.
[_ Touch the BROILpad.Thedisplag
showsCONTIBEEP(continuousbeep).
Touch the BROILpad again.The
displagshowsSINGLEBEER(This
cancelsthe one beepeverg6 seconds.)
OR
Touch the KITCHENTIMERON/OFF
pad.Thedisplag shows CONBEEP
(continual beep).Touch the KITCHEN
TIMERON/OFF pad again. The
displag showsBEER(Thiscancels
the one beep everg6 seconds.)
[_ Touch the START pad.
31
Page 32

Special features ofyour ovencontrol.
Tone Volume (onsome models)
I cook J
iiii_i_ilili____ _i] ii _i__!I_
_i_ii_ _iII_I!
This feature allows you to adjust the tone
volumes to a more acceptable volume.
Thereare threepossiblevolume levels.
_f] Touch the upper oven BROILHI/LO
and BAKEpads at the same time until
the display shows SF.
[_ Touch the COOKTIMEpad.
The display will show 2 BEEP.
This is the middle volume level.
Touch the COOKTIMEpadagain.
Thedisplay will show 3 BEEP.This
isthe loudest volume level.
12-Hour, 24-Hour or Clock Blackout
Your control is set to use a 12-hour clock.
If you would prefer to have a 24-hour
military time clock or black out the clock
display,follow the steps below.
[_ Touch the upper oven BROILHI/LO
and BAKEpads at the same time until
the display shows SF.
[_ Touch the CLOCKpad once.The
display will show 12 hr. Ifthis isthe
choice you want, touch the START
pad.
Touch the COOKTIMEpadagain.
Thedisplay will show 1 BEEP.Thisisthe
quietest volume level.
Foreach time the levelischanged,
a tone will sound to provide an
indication of the volume level.
Choosethe desiredsound level
(1BEER2BEER3 BEEP).
Touch the STARTpad to activate
the levelshown.
Touchthe CLOCKpad againto change to
the 24-hour military time clock.Thedisplay
will show 24 hr. Ifthis isthe choice you
want, touch the STARTpad.
Touchthe CLOCKpad againto black out
the clock display.Thedisplay will show
OFF.Ifthis isthe choice you want, touch
the STARTpad.
NOTE:Ifthe clock is in the black-out mode,
you will not be able to use the Delay Start
function.
iiiii__ilii__ii _i_ ___!_!__iiiiiii___ii_i!i__iii_i
iii_ / i ii _ :_ii!i
32
Auto Recipe TM Conversion (onsomemodels)
Whenusing convectionbake,the
Auto RecipeT"Conversionfeature will
automatically convert enteredregular
bakingtemperatures to convectionbaking
temperatures.
Thisfeature is activated so that the display
willshow the actual converted (reduced)
temperature. For example, if you enter a
regular recipe temperature ofg50°F and
touch the STARTpad, the display willshow
CON and the converted temperature of
325°E
Todeactivate the feature:
%
[]
[_ Touch the STARTpad.
Toreactivate the feature, repeat steps
1-3 above but touch the STARTpadwhen
CONONis inthe display.
Cook and Hold (onsomemodels)
Yournew control has a cook-and-hold
feature that keepscooked foodswarm for
up to 3 hours after the cooking functionis
finished.
Toactivate this feature, follow the steps
below.
[_] Touch the COOKINGTIMEpad.
%
_-_ Touch the BAKEand BROILHI/LO
padsat the same time untilthe
display shows SF.
Touch the upper oven BAKEand
BROILHI/LO pads at the same time
until the display shows SF.
Touch the CONVECTIONCOOKpad.
Thedisplay will show CONON.Touch
the CONVECTIONCOOKpad again.
Thedisplay will show CONOFF.
Thedisplay will show Hid OFF.
Touch the COOKINGTIMEpad again
to activate the feature. The display will
show Hid ON.
Touch the STARTpad to activate
the cook-and-hold feature and
leavethe control set in this
special features mode.
Page 33

Usingthe Sabbath feature. Cunnerondlowerovens
(Designedfor useon theJewishSabbathand Holidays) (onsome models) GEAppliances.com
TheSabbath feature can be used for baking/roosting only. It cannot beused for convection,broiling,self-cleaning or
DelayStart cooking.
NOTE:Theoven light comes on automatically (on some models) when the door is opened and goes off when the door is closed. The bulb may be
removed. See the Oven LightReplacement section. On models with a light switch on the control panel, the oven light may be turned on and left on.
Whenthedisplayshows -m, the
ovenis set in Sabbath.Whenthe display
shows-m E, the ovenisbaking/r0asting.
i ILII I
Whenthedisplayshows -m, the
ovenis set in Sabbath.Whenthe display
shows-q E, theovenis baking/r0asting.
,o ,o o,,or,o u,orOo ,n
Hakesurethec/ockshowsthecorrectt me%
of da£and the ovenis off
E_ Touch and hold both the upper oven
BROILHI/LO and BAKEpads,at the some
time, untilthe display shows SF.
NOTE:If bake or broil appears in the
display, the BROILHI/LO and BAKEpads
were not touched at the sametime. Touch
the CLEAR/OFFpad and begin again.
Tapthe DELAVSTARTpad until SAb bAtH
appears in the display.
Touch the STARTpad and -nwill appear
in the display. Bothovens are now in
Sabbath mode.
[_ Touchthe BAKE pad on the upper or lower
oven. No signal will be given.
Usingthe number pads, enter the desired
temperature between 170°Fand 550°F.
No signal or temperature will be given.
Thereis no default temperature.
Touch the STARTpad on the
%
corresponding oven.
After a random delay period of
%
approximately 30 seconds to i minute,
-mE will appear inthe display indicatingthat
the oven is baking/roasting. If -_ E doesn't
appear in the display, start again at Step 4.
[_To bake in the other oven, start at Step4
(onsome models).
Toadjust the oventemperature, touch
the BAKEpad, enter the new temperature using
the number pads and touch the STARTpad.
NOTE:TheCLEAR/OFFand COOKTIMEpads
are active during the Sabbath feature.
How to Set for Timed Baking/Roasting--Immediate Start and Automatic Stop
Hake surethe clockshows the correct time [Z] Touch the BAKEpad. No signal will be
of da£and the ovenis off given.
Touch and hold both the upper oven
%
BROIL HI/LO and BAKE pads, at the some
time, until the display shows SIC..
NOTE: Ifbake or broil appears in the
display, the BROIL HI/LO and BAKE pads
were not touched at the same time. Touch
the CLEAR/OFF pad and begin again.
Tapthe DELAVSTARTpad until SAb bAtH
appears in the display.
Touch the STARTpad and -nwill appear
%
in the display. Bothovens are now in
Sabbath mode.
Touch the COOKTIME padon the upper or
[]
lower oven. Nosignal will be given.
Touch the number pads to set the desired
%
length of cooking time between 1 minute
and 9 hours and 99 minutes.
Touch the START pad.
%
I-_ Usingthe number pads,enter the desired
temperature. Nosignal ortemperature will
be given.There isno default temperature.
r_ Touch the STARTpad on the
corresponding oven.
I-_ After a random delay period of
approximately 30secondsto i minute,
q E will appear in the display indicating
that the oven is baking/roasting.If m E
doesn't appear in the display, start again
at Step7.
Toadjust the oventemperature, touch the BAKE
pad,enter the new temperature using the
number pads and touch the STARTpad.
When cooking isfinished, the display will
change fromm r- to -mand 0:00will appear,
indicating that the oven hasturned OFFbut is
stillset inSabbath. Remove the cooked food.
CLEAR
OFF
DELAY I
How to Exit the Sabbath Feature
F_] Touch the CLEAR/OFFpad.
i/ i
[] Ifthe oven iscooking, wait for a
random delay period of approximately
30 seconds to i minute, until only -mis
in the display.
I-_ Touch and hold both the BROILHI/LO
and BAKE pads, at thesome time,until
the display shows SF.
[_Tap the DELAVSTARTpad until/2 shdn
or no shdn appears inthe display.
Choose12 shdn, indicating that the oven
will automatically turn off after 12 hours
or no shdn, indicating that the oven will
not automatically turn off after 12 hours.
PressSTARTwhen the option that you
want is in the display (/2 shdn or no shdn).
NOTE:Ifa power outage occurred while the
oven was in Sabbath,the oven will automatically
turn off and stay off evenwhen the power
returns.Theoven control must be reset. Some
modelswill resume Sabbathmode; however,
opening the door will activate the oven light.
33
Page 34

Using the warming drawer, somemode/sj
I_k I FOODPOISONHAZARD:Bacteria may grow in food at temperatures below 140°F.
WARNING ,•AlwaysstartwithhotfoodDonotuse warm settings toheatcoldfood.
The warming drawer will keep hot, cooked foods at serving temperature. AIwags start with hot food.
Do not use to heat cold food other than crisping crackers, chips or drg cereal.
WARMINGDRAWER
MED
• Do not warm food for more than 2 hours.
Failure to follow these instructions may result in foodborne illness.
To Use the Warming Drawer
Push and turn the control knob to ang
desired setting.
Thewarmingdrawerwillkeephot,cooked
foodsatservingtemperature.Alwa_jsstartwith
hotfood.
Touchthe WARMINGDRAWERpad."WARMER
ON"and'T' arelitonthe displayand"Set"
beginsto blink.Onthe numberpads,touch1
forLow,2for Mediumor 3forHigh.Thedisplay
"1"changescorrespondingto the numberpad
When Using the Warming Drawer
Thewarmingdrawerwillkeephot,cooked
foodswarm.Alwaysstartwith hot food.Donot
useto heat coldfoodotherthancrisping
crackers,chipsordrycereal.
Donot linethewarming drawer orpan
withaluminum foil Foilisan excellentheat
insulator and willtrap heat beneath it. This
willupset the performance of the drawer
and could damage the interior finish.
Allow approximately 25 minutes for the
warming drawer to preheat.
, Donotputliquidor waterinthewarming
drawer.
selected.Thewarmingdrawerstarts
automaticallyafteryoutouch1,2or 3.
"WARMERON"andthenumber remainlit."Set"
stopsblinking.OnsomemodelspressSTART.
Onsomemodels- togglebetweensetdngsby
touchingthe WARMINGDRAWERpad.
Tocancel,touchtheWARMINGDRAWERpad.
NOTE:TouchingtheCLEAR/OFFpaddoesnot
turnoffthewarmingdrawee
, Allfoodsplacedinthewarmingdrawer
shouldbecoveredwith a lidoraluminumfoil.
Whenwarming pastriesor breads,thecover
shouldbeventedto allowmoistureto
escape.
, Foodshouldbekepthotinitscooking
containeror transferredto a heat-safe
servingdish.
NOTE:Plasticcontainersorplasticwrapwill
meltifindirectcontactwiththe drawer,pan ora
hotutensil,iVleltedplasticma_jnotberemovable
andisnotcoveredunder_jourwarront_j.
, Removeservingspoons,etc.,beforeplacing
containersinwarmingdrawer.
34
Temperature Selection Chart
Tokeepseveraldifferentfoodshot,setthe
controlto the foodneedingthehighestsetting.
Thetemperature,tgpe and amountof food,
and the time heldwillaffectthe qualitg of
thefood.
Repeatedopeningofthe drawerallows
the hotairto escapeandthe food to cool.
With largeloadsit mag be necessarg
to usea higherwarming drawersetting
and coversome ofthecookedfooditems.
To Crisp Stale Items
Place food in low-sided dishes or pans.
Preheaton LOll setting.
To Warm Serving Bowls and Plates
I-4,CAUTIONI
Disheswillbehot. Usepot holdersormitts
whenremovinghot dishes.
Towarm servingbowls andplates,setthe
control onLOll.
, Donot useplastic containers orplasticwrap.
FoodType ControlSetting
Casserole MEDi2
Chili HI/,3
Pizza MEDi2
Potatoes,baked HI/3
TortillaChips LOi1
Waffles LOi1
, Checkcrispnessafter/45minutes.Addtime
asneeded.
Useonlg heat-safe dishes,
If gouwont to heat fine chino,pleasecheck
with the manufacturerof thedishesfor
theirmaximum heat tolerance.
, Youmag warm emptg servingdishes
whilepreheatingthe drawer.
Page 35

Using the lower oven drawer, ionsome models) GEAppliances.com
The lower oven drawer may be used to bake foods using the same times and temperatures as a standard oven.
Foods ideal for baking in the lower oven drawer include pizza, frozen foods, casseroles, biscuits, rolls and many
desserts.
LOWER
OVEN
o
3GtJ • 350 • 400
NEAIJNG
®
Pushin andturn thelower ovendrawer
knobtoanydesiredsetting.
To Use the Lower Oven Drawer
I]_ Pushin andturn the lower oven
drawer knobto ang desired setting.
[_ Allowthe loweroven drawer to
preheat.
TheONsignallight islocated above the
knoband glows when the knob isinthe
ONposition. Itremains ON until the knob
ismoved to the OFFposition.
The"Heating"signal light islocated below
the knoband glows when the heating
elementsore active. Preheatis complete
offer the "Heating" signal has turned
off for the first time offer the knob is
turned on.
Thelower oven drawer useslessenergy than the upper oven.
Allowthe following approximate times for preheating:
Desired Lower Preheat
Oven Temperature Time
WARM 10 minutes
NOTES:
Alwags usethe included drawer rack
when usingthe lower oven drawer.
_,Thelower ovendrawer cannot beused
during a self-dean cgcleof the upper
oven.
_,Do not put food, foil or cookware directly
on the bottom of the lower oven drawer.
Alwags usethe included drawer rack.
_,If foodsrequire acover,useonlg
foilor lids ableto withstand baking
temperatures.Donot useplastic.
Maximum height of foods that con be
baked in the lower oven drawer is 31/2".
Do not put liquid or water in the lower
oven drawer.
_,Neverplaceplastics,paper, canned foods
or combustible material in thelower oven
drawer.
350°1: 15 minutes
425°F 25 minutes
When Using the Lower Oven Druwer Worm Setting
The WARM SETTINGof the lower oven
drawer can be used to keep hot, cooked
foods at serving temperatures. Alwags start
with hot food. Do not use the WARM
SETTINGto heat cold food other than
crisping crackers, chips or drg cereal.
NOTE:The beginning temperature of the
food, the amount of food, the type of food,
the container and the amount of time the
food is in the drawer will affect the qualitg
and ending temperature of the food.
Pushin and turn the control knob
to the worm setting.
35
Page 36

Care and cleaning of the range.
Be sure all controls are off and all surfaces are cool before cleaning any part of the range.
IA WARNING
How to Remove Protective Shipping Film and Packaging Tape
Carefullygraspa corneroftheprotective Toensurenodamageisdonetothefinish
shippingfilmwithyourfingersandslowlypeel oftheproduct,thesafestway to remove
itfrom theappliancesurface.Donot useany theadhesivefrompackagingtape on new
sharpitemsto removethe film.Removeall appliancesisan applicationofa household
ofthefilm beforeusingtheappliance liquiddishwashingdetergent.Applywitha soft
forthefirsttime. clothandallowtosoak.
I f_lour range is removed for cleaning, servicing or any
reason,be surethe anti-tip device is reengaged properly
when the range is replaced. Failureto take this precaution
could result in tipping of the range and cause inju&l.
NOTE:Theadhesivemustberemovedfromall
parts.Itcannotberemovedif it isbakedon.
Control Knobs
Thecontrolknobsmayberemovedforeasier
cleaning.
Hakesuretheknobsareinthe OFFpositions
and pullthemstraightoffthestemsfor
cleaning.
Theknobscanbecleanedinadishwasheror
they mayalsobewashedwith soapandwater.
Hakesuretheinsideoftheknobsaredry
beforereplacing.
Replacethe knobs,intheOFFpositionto
ensureproperplacement.
Control Panel
Ifdesired,thetouchpadsmaybedeactivated
beforecleaning.
SeetheControlLockoutinformationinthe Using
theclock,kitchentimerandcontrollockout
sectioninthismanual.
Cleanupsplatterswitha dampcloth.
Youmayalsouseaglasscleaner.
Removeheaviersoilwithwarm,soapywater.
Donot useabrasivesofany kind.
Reactivatethetouch _adsaftercleaning.
36
Painted Surfaces
Paintedsurfacesincludethe sidesd the range
andthedoor,top ofcontrolpanelandthe
drawerfront.Cleanthesewithsoapandwater
or a vinegarandwatersolution.
Stainless Steel Surfaces tonsome models)
Do not use a steel wool pad, it will
scratch thesurface.
To cleanthe stainlesssteel surface,use
warm, sudsy water or a stainlesssteel
cleaner or polish.Always wipe the surface
in the direction of the grain. Follow the
cleaner instructions for cleaning the
stainlesssteel surface.
Porcelain Enamel Cooktop Ionsomemodels)
The porcelainenamel finish is sturdy
but breakableif misused.Thisfinish is
acid-resistant. However,any acidic foods
spilled(suchasfruit juices, tomato or
vinegar) should not be permitted to
remain on the finish.
If acids spillon the cooktop while it is hot,
usea dry paper towel or cloth to wipe it up
Donot usecommercialovencleaners,cleaning
powders,steelwoolor harshabrasivesonany
paintedsurface.
Toinquire about purchasing stainlesssteel
appliance cleaner or polish or to find the
location of a dealer nearest you, please
call our toll-free number:
National Parts Center 1.800.626.2002
GEAppliances.com
right away. When the surface hascooled,
wash with soap and water. Rinsewell.
Forother spillssuch as fat spatterings,
wash with soap and water or cleansing
powders after the surface hascooled.
Rinsewell. Polishwith a dry cloth.
Page 37

i
Thegasketisdesignedwith agapatthe
bottomtoallowforproperair circulation,
Donotruborcleanthedoorgasket it has
anextremelylowresistancetoabrasion,
Ifyounoticethegasketbecomingworn,
frayedordamagedinanywayorif it has
becomedisplacedonthedoor,youshould
haveit replaced,
Cleaning the Oven Door
Toclean the inside of the door:
!i!i!iiiiii_ii_ii_i
Becausetheareainsidethegasketis
cleanedduringthe self-cleancycle,
youdonotneedtocleanthisbyhand.
Theareaoutsidethe gasketandthedoor
linercanbecleanedwitha soap-filled
orplasticscouringpad,hotwaterand
detergent.Rinsewellwitha vinegar
andwatersolution.
Tocleonthe outsideof the door:
Usesoapandwaterto thoroughlycleanthe
top,sidesandfrontoftheovendoor.Rinse
well.Youmayalsousea glasscleanerto
cleantheglassontheoutsideofthe door.
Donot let waterdripintotheventopenings.
Lift-Off Oven Door (on some models)
GEAppliances.com
Ifany stainonthedoorventtrimis
persistent,useasoftabrasivecleaner
andasponge-scrubberforbestresults.
Spillageof marinades,fruitjuices,tomato
saucesandbastingmaterialscontaining
acidsmaycausediscolorationandshould
bewipedupimmediately.Whensurfaceis
cool,cleanandrinse.
Donot useovencleaners,cleaningpowders
orharshabrasivesonthe outsideofthedoor.
Siot._ _
Pullhingelocks downto unlock.
!
........ iii
Removalposition
The door is very heavy. Be careful when
removing and lifting the door.
Do not liftthe door bg the handle.
To remove the door:
[_ Fullyopenthedoor.
[_ Pullthe hingelocksdowntowardthe door
frame,totheunlockedposition.Atool,
suchasa smallflat-bladescrewdriver,
may berequired.
_] Firmlygraspbothsidesofthedoor
atthetop.
[_ Closedoorto thedoorremovalposition,
whichishalfwaybetweenthebroilstop
positionandfullyclosed.
Liftdoorupandoutuntilthe hingearm
[_ isclearoftheslot.
Toreplacethedoor:
[_ Firmlygraspbothsidesofthedoor
atthetop.
Withthe Bottom t | | Hingearm
[]
doorat the edgeof |I_.L _!
sameangle st°L
asthe removal
position,seatthe .4_q i
indentationofthe
hingearmintothe
bottomedgeof the
hingeslot.Thenotchinthe hingearm
mustbefullyseatedintothebottomof
theslot.
Fullyopenthedoor.Ifthedoorwillnot
%
fully open,the indentationisnotseated
correctlyinthe bottomedgeof the slot.
Pushthe hingelocksupagainstthefront
[]
frameoftheovencavitytothe locked
position.
Hinge,
lock
arm _
Pushhingelocksupto lock.
Closetheovendoor.
VL_
37
Page 38

Careand cleaning of the range.
Lift-Off Upper Oven Door (onsomemodels)
To remove the door:
Oven
frame
[]_] Fullyopen the door.
[] Lift up on the hinge locktoward the
oven frame until they stop.
r_ Closethe door to 45 degrees (youwill
feelthe door stop).The hinge lock will
contact the oven frame.
[] On both sidesof the door,pressdown
on the release buttons on each hinge.
Toreplace thedoor:
[_ Pullthe hingesdown away from the
oven frame to the fully open position.
[_ Lift up on the hinge lockstoward
the ovenframe until they stop.
r3] The hinges will releaseto the
45-degree position.The hinge locks
will contact the oven frame.
[_ Slidethe door back onto the hinges.
Hake sure the buttons pop back out.
iiii_
Handles
Usethe rackwith the two front handles
in theupper oven.
Usethe rackwithout the two front
handlesin the lower oven.
[_] Liftdoor up until it isclear of the hinge.
[_] Pullon hinge arms slightly to relieve
pressure on the locking tabs.
[Z-] Pushthe hinge locksdown onto
the hinge.
[_ Pushthe hinges in toward the unit
sothey are closed.
Oven Rocks
All oven racks may be cleaned by hand
with an abrasive cleaner or steel wool. After
cleaning, rinse the rocks with cleon water
and dry with o cleon cloth. Grogporcelain-
coated oven rocks may remain in the oven
during the self-cleaning cycle without being
damaged. The nickel-plated oven rocks
may remain in the ovenduring the
[_ Fullyopen the door.
[_ Pushthe hinge locksdown onto
the hinge.
[Z] Closethe oven door.
self-cleaning cycle, but they will losetheir
luster and become hard to slide.It will be
necessary to grease all oven rack side
edgeswith a light coating of vegetable oil
after cleaning them by hand or in the oven.
Thiswill help maintain the easeof sliding
the rocks in and out of the oven.
38
Page 39

Pressdown and pull out.
Removable Oven Floor (onsome models)
To remove the oven floor:
Removethe oven door using the
%
instructions in the Lift-OffOvenDoor
section.
[_ Pressdown and pull out the
removable oven floor.
Oven Vent on Radiant Glass Cooktops
Theovenventislocatedbehindtherightrear
surfaceunit.Ondoubleovens,theupperoven
ventisbehindtheleftrearsurfaceunit.
GEAppliances.com
[_ Cleanthe oven floor with warm soapy
water.
[] When reinstallingthe oven floor, be
sure to slideit all the wag to the back
of the oven.
IMPORTANT:Always replace the
removable floor before the next use.
Itisnormal for steam to come out of the vent,
and moisture may collect underneath it when
the oven is in use.
il Stopguide
Ondoubleovens,theupperovenventisbehind
theleftrearsurfaceunit.
Thisareacouldbecomehotduringovenuse.
Theventisimportantforproperaircirculation.
Neverblockthisvent.
Oven Vent (onsomemodels)
Theoven vent isabovethe left side of the
door.
This area could become hot during
oven use.
It is normal for steam to come out of
the vent.
Thevent is important for proper air
circulation. Never block this vent.
Storage Drawer Removal (on some models)
Toremove the drawer:
[_] Pullthe drawer out until it stops.
[_ Lift the front of the drawer until
the stops clearthe guides.
F3] Removethe drawer.
To replace the drawer:
IZ] Placethe drawer rails on the guides.
121 Pushthe drawer back until it stops.
I-_ Liftthe front of the drawer and push
back until the stops clear the guides.
Lowerthe front of the drawer and
push back until it closes.
Removable Warming Drawer/Lower Oven Drawer Pan tonsomemodels)
NOTE:Formodels with an electric
warming drawer or lower oven drawer,
before performing any adjustments,
cleaning or service, disconnect the range
electrical power supplg at the household
distribution panel bg removing the fuse or
switching off the circuit breaker. Make sure
the drawer heating element is cool.
NOTE:Allow warming drawer or lower oven
drawer to coolbeforeremoving pan.
NOTE:Wipe spills promptlg offer each use.
_, Never place,useor self-clean the drawer
pan inthe upper oven.
Warming drawer or lower oven drawer
hasa removable pan for easy cleaning,
Cleanwith hot, soapywater and a
spongeor dish towel. Dry with a clean
cloth. Replacethe pan in the warming
drawer or lower oven drawer.
39
Page 40

Careand cleaning of the range.
I I SHOCK OR BURN HAZARD: Before replacing oven light bulb, disconnect
-&WARNING, theelectricalpowertotherangeatthemainfuseorcircuitbreakerpanel
Failure to do so may result in electric shock or burn.
CAUTION
Receotacle Socket
G6.35Bulb I_
/
Glass cover
(onsomemodels)
I BURN HAZARD: The glass cover and bulb should be removed when cool.Touching hot glass with bare hands or a damp cloth can cause burns.
Oven Light Replacement (onsome models)
To remove:
IT1 Turn the gloss cover counterclockwise
Toreplace:
[Z] Useo new 120/130-volt halogen bulb,
[]
i
1/4 turn until the tabs of the glass
cover clear the grooves of the socket.
Wearing latex gloves may offer
o better grip.
Using glovesor a dru cloth, remove
the bulb by pulling it straight out.
not to exceed 50 watts. Replacethe
bulb with the some type of bulb that
was removed. Yourmodel will hove
one of the two types shown on
the left. Todetermine the correct
replacement bulb,checkthe bulb
terminals. Bulbswith 2 straight pin
terminals ore G6.35bulbs. Bulbs
with 2 looped terminals ore G9bulbs.
(Donot interchange.}Besure the
replacement bulb is rated 120 volts
or 130 volts (NOT12 volts).
Using glovesor o dru cloth, remove
the bulb from its packaging. Do not
touch the bulb with bore fingers.Oil
from skin will damage the bulb and
shorten its life.
Pushthe bulb straight into the
%
receptacle oilthe wou.
Placethe tabs of the gloss cover into
the grooves of the socket. Turn the
glosscover clockwise 1/4 turn.
Forimproved lighting inside the oven,
cleon the gloss cover frequently using
o wet cloth.Thisshould be done when
the oven iscompletely cool.
I_] Reconnectelectrical power to
the oven.
Glasscover
(onsomemodels)
Wire coverholder
40
% /
Oven Light Replacement (on some models)
Be sure to let the light cover and bulb cool
completelu.
Toremove the cover:
Holdo hand under the cover so
%
itdoesn't foil when released.With
fingers ofthe same hand, firmlu push
back the wire cover holder.Lift off the
cover.
Donot removeang screwsto remove
the cover.
[_ Replacebulb with o40-watt
appliance bulb.
Toreplace the cover:
%
I_ Connectelectrical power to the range.
Placeit into groove ofthe light
receptacle. Pullwire forward to the
center of the cover until itsnaps into
place.
Page 41

GEAppliances.com
I,_ I SHOCKORBURN HAZARD:Before replacing oven light bulb, disconnect the
WARNING I electrical power to the range at the main fuse or circuit breaker panel. Failure to
do so may result in electric shock or burn.
Oven Light Replacement (onsome models)
Besureto let the light cover and bulb cool To replace the cover:
I/,.......................
completelg.
Toremove the coven
_7_ Twist lens counterclockwise about
a quarter turn to remove.
Donot removeang screwsto remove
thecover
[_ Replacebulbwith a 40-watt
appliance bulb or two-prong halogen
bulb,as appropriate.
Oven Heating Elements (onsome models)
_i!iii
Donot clean thebakeelement or the broil
element.Any soil will burn off when the
elementsore heated.
i_iii
jT] Lineup tabs of lensin front of tabs
on housing and rotate clockwise
to engage.
Toclean the ovenfloor,gentlg lift
the bake element. Cleanwith warm,
soaps water.
Wipe up heavysoil onthe ovenbottom.
Oven Heating Elements (onsome models)
Donot clean the broil element. Any soil will
burn off when the element is heated. Clean
the oven floor with warm, soaps water.
On some models, the bake element is
not exposed and is under the oven floor
If spillovers,residueor ash accumulate on
the ovenfloor, wipe up beforeself-cleaning.
Ifthe element is above the oven floor,gentlg
lift the bake element and clean with warm,
soaps water
41
Page 42

Cleaning the glass cooktop,consomemode/s;
Normal Daily Use Cleaning
ONAW use CERAMABRYTE®Ceramic
Cooktop Cleaneron the glass cooktop.
Other creams nag not be as effective.
To maintain and protect the surface of
gour glass cooktop, follow these steps:
Beforeusingthe cooktop for the
first time,clean it with CERAMA
BRYTE®CeramicCooktop Cleaner.
Cleanyourcooktopafter
eachspill. UseCERAMA
BRYTE®CeramicCooktop
Cleaner.
This helps protect the top and makes
cleanup easier.
[_ Dailg useof CERAMABRYTE®Ceramic
CooktopCleanerwill help keep the
cooktop lookingnew.
Burned-On Residue
Shakethe cleaning cream well.
%
Applg a few drops of CERAMABRYTE®
Ceramic CooktopCleanerdirectlg
to the cooktop.
Usea papertowel or CERAMA
[]
BRYTE®Cleaning Padfor Ceramic
Cooktopsto clean the entire cooktop
surface.
[] Use adrg cloth or paper towel
to remove all cleaning residue.
No need to rinse.
NOTE:It is verg important that gou DO
NOT heat the cooktop until it has been
cleaned thoroughlg.
Usea CEFIAMABBYTE®CleaningPadfor
CeramicCo@tops.
TheCEFIAMABFIYTE®CeramicCooktop
Scraperandall recommendedsupplies
areavailablethrough ourPartsCenter.
Seeinstructionsunder"To OrderParts"
sectiononnextpage.
NOTE:Do notusea dull or
nickedblade.
NOTE:DAMAGEto Four glass surface
roof occur if gou use scrub pads other
than those recommended.
[7] Allow the cooktop to cool.
[_ Spread a few drops of CERAMA
BRYTE®CeramicCooktop Cleaneron
the entire burned residue area.
Using the included CERAMABRYTE®
%
Cleaning Padfor CeramicCooktops,
rub the residue area, applging
pressure as needed.
Heavy, Burned-On Residue
Allow the cooktop to cool.
[]
Use a single-edge razor blade
scraper at approximatelg a 45°
angle against the glass surface and
scrape the soil. It will be necessarg
to applg pressure to the razor
scraper in order to remove
the residue.
After scraping with the razor
%
scraper, spread a few drops of
CERAMABRYTE®CeramicCooktop
Cleaneron the entire burned residue
area. Use the CERAMABRYTE®
CleaningPadto remove ang
remaining residue.
If ang residue remains, repeat
the steps listed above as needed.
For additional protection, after all
%
residue has been removed, polish
the entire surface with CERAMA
BRYTE®CeramicCooktop Cleaner
and a paper towel.
Foradditional protection, after all
residue has been removed, polish
the entire surface with CERAMA
BRYTE®Ceramic Cooktop Cleaner
and a paper towel.
42
Page 43

Metal Marks and Scratches
[]_] Becareful not to slide pots and
pans across gour cooktop. It will
leave metal markings on the
cooktop surface.
These marks are removable using
the CERAP1ABRYTE®Ceramic
Cooktop Cleanerwith the CERAP1A
BRYTE®CleaningPadfor Ceramic
Cooktops.
j_j If pots with a thin overlag of
aluminum or copper are allowed
to boil drg, the overlag nag leave
black discoloration on the cooktop.
Cooktop Seal
To clean the cooktop seal around the
edges of the glass, lag a wet cloth on it
GEAppliances.com
This should be removed
immediatelg before heating
again or the discoloration
mag be permanent.
NOTE: Carefully check the bottom of
pans for roughness that would scratch
the cooktop.
for a few minutes, then wipe clean with
nonabrasive cleaners.
Glasssurface--potential for permanent damage.
Sugaryspillovers(suchas
jellies, fudge,candy,syrups)
or meltedplasticscancause
pittingofthesurfaceof your
cooktop(notcoveredbythe
warranty)unlessthespill
isremovedwhile still hot.
Specialcare shouldbe
takenwhenremovinghot
substances.
Besureto usea new,sharp
razorscraper.
Donotusea dullornicked
blade.
Damage from Sugary Spills and Melted Plastic
Ell Turn off all surface units. Remove
hot pans.
[] Wearing an oven mitt:
a. Use a single-edge razor
blade scraper (CERAMABRYTE®
Ceramic Cooktop Scraper)
to move the spill to a cool
area on the cooktop.
b. Remove the spill with paper
towels.
[]_] Any remaining spillover should be
[] Don't use the surface units again
NOTE:If pitting or indentation in the
glass surface has already occurred, the
cooktop glass will have to be replaced.
In this case, service will be necessarg.
To Order Parts
To order CERAMABRYTE®Ceramic
CooktopCleanerand the cooktop
scraper, please call our toll-free number:
National Parts Center
800.626.2002
CERAMABRYTE®Ceramic
Cooktop Cleaner ......... #WX10X300
CERAMABRVTE®Ceramic
Cooktop Scraper .......... #WX!0X0302
Kit ....................... #WB64XS027
(Kitincludes cream and cooktop scraper)
CERAMABRVTE®Cleaning Pads for
Ceramic Cooktops ....... #WXlOX350
left until the surface of the cooktop
has cooled.
until all of the residue has been
completelg removed.
43
Page 44

Before Vou Call For Service...
Troubleshooting Tips
Save time and money! Review the charts on the following
pages first and you may not need to call for service.
Possible Causes What To Do
Surface units will not
maintain a rolling boil
or cooking is not
fast enough (voltage) mug be low.
Surface units do A fuse in gour home meg be • Replacethe fuse or reset the circuit breaker.
not work properly blown or the circuit breaker
Surface unit stops This isnormal. The unit
glowing when turned isstill on and hot.
to a lower setting
Scratches (may appear Incorrect cleaning • Scratches arenot removable.Tins scratches will become
as cracks)oncooktop methods being used. lessvisible in time as a result of cleaning.
glass surface Cookware with rough bottoms • Toavoid scratches, usethe recommended cleaning
Areas of discoloration Food spillovers not cleaned • See the Cleaning the gloss cooktop section.
on the cooktop before next use.
Plastic melted to Hot cooktop came into • See the Gloss surface potential for permanent damage
the surface contact with plastic placed section in the Cleaning the gloss cooktop section.
Pitting for indentation) Hot sugar mixture spilled • Call a qualified technician for replacement.
of the cooktop on the cooktop.
Frequent cycling Improper cookware • Use only flat cookware to minimize cycling.
off and on of beingused.
surface units
Improper cookware
being used.
In some ureas, the power • Cover pan with a lid until desired heat is obtained.
tripped.
Cooktop controls • Check to see the correct control is set for the surface
improperly set. unit you are using.
being used or course particles procedures.Makesure bottoms of cookware are clean
(suit or sand) were between beforeuse,and use cookware with smooth bottoms.
the cookware and the surface
of the cooktop.
Cookware has been slid
across the cooktop surface.
Hot surface on a model • This is normal. The surface may appear discolored
with a light-colored cooktop, when it is hot. This istemporary and will disappear
on the hot cooktop.
• Usepans which are flat and match the diameter of
the surface unit selected.
as the glass cools.
Ovenlight does Light bulbis loose. • Tighten or replacethe bulb.
not work
Oven will not work Plugon range is not completelg • Hake sure electrical plug is plugged into a live,properly
A fuse in gour home mag • Replacethe fuse or reset the circuit breaker.
inserted in the electrical outlet, grounded outlet.
be blown or the circuit
breaker tripped.
Oven controls improperlg set. • See the Using the oven section.
Oven too hot. • Allow the oven to cool to below locking temperature.
44
Page 45

GEAppliances.com
Possible Causes What To Do
Fooddoes not bake Oven controls improperlg set. • Seethe Usingthe oven section.
or roast properly
Rackposition is incorrect • Seethe Usingthe oven section.
or the rack is not level.
Incorrect cookware or • Seethe Usingthe oven section.
cookware of improper
size being used.
Oven thermostat needs • See the Adjust the oven thermostat Do it yourself!
adjustment, section.
Fooddoes not Oven controls improperlg set. • Hake sure you touch the BROILHI/LO pad.
broil properly Improper rack position • Seethe BroilingGuide.
being used.
Cookware not suited • Forbest results,usea pan designedfor broiling.
for broiling.
The probe is plugged • Unplugand remove the probe from the oven.
into the outlet in the oven.
(on some models)
In some areas the power • Preheatthe broil elementfor 10 minutes.
(voltage) meg be low.
• Broilfor the longest period of time recommended
in the Broiling Guide.
Oven temperature Oven thermostat • See the Adjust the oven thermostat Do it yourself!
too hot or too cold needs adjustment, section.
Storage drawer
iscrooked
Rear drawer support is
on top of the guide rail.
• Reposition the drawer. Seethe Storage Drawer
Removal instructions in the Coreand cleaning of the
range section.
• Check to make sure drawer is properlg seated
if removed.
Storagedrawer
won't close
Power cord mag be
obstructing drawer
in the lower back
• Repositionthe drawer and power cord.Seethe
StorageDrawer Removal instructions in the Coreand
cleaningof the range section.
of the range.
Rear drawer support is
on top of the guide rail.
• Reposition the drawer. Seethe Storage Drawer
Removal instructions in the Coreand cleaning of the
range section.
Ovendoor is crooked
The door is out of position. • Becausethe oven door is removable, it sometimes gets out
of position during installation.Tostraighten the door,push
down on the high corner.
45
Page 46

Before YouCall ForService...
Troubleshooting Tips
Possible Causes
Clock and timer do
not work
Ovenwill not self-clean Theoven temperature is • Allow the range to cool and reset the controls.
"Crackling" ar This isthe sound of the • This is normal.
"papping"sound metal heating and cooling
Excessivesmoking Excessivesoil. • Touch the CLEAR/OFFpad. Open the windows to
during a clean cycle rid the room of smoke. Wait until LOCKED/DOOR
Plug on range is not completely
inserted in the electrical outlet.
Afuse in your home • Replacethe fuse or reset the circuit breaker.
may be blown or the
circuit breaker tripped.
Oven controls improperly set. • See the Using the kitchen timer section.
too high to set a self-clean
operation.
Oven controls improperly set. • Seethe Usingtheself-cleaningupper and lower ovens
The probe is plugged into • Remove the probe from the oven.
the outlet in the oven.
Ion somemodels}
during both the cooking and
cleaning functions.
What To Do
• Hakesure electrical plug is pluggedinto a live,properly
grounded outlet.
section.
goes off. After the oven cools, wipe up the excess soil
and reset the clean cucle.
Oven door will not Oven too hot. • Allow the oven to cool below locking temperature.
openafter a cleancycle
Ovennot clean after a Ovencontrolsnot properly set. • Seethe Usingthe self-cleaning upper and lowerovens
clean cycle section.
Oven was heavily soiled. • Clean up heavu spillovers before starting the clean
cycle. Heavily soiled ovens max need to self-clean
again or for a longer period of time.
"LOCKED"flashes The self-clean cgcle has been • Close the oven door.
in the display selected but the door is not
closed.
"LOCKED"is on The oven door is locked • Touch the CLEAR/OFFpad. Allow the oven to cool.
when you want because the temperature
to cook insidethe oven has not
dropped below the
lockingtemperature.
"F-"andanumber You have a function error code. • Disconnect all power to the range for at least
ar letter flash 30 seconds and then reconnect power. If the function
in the display error code repeats, coil for service.
46
Page 47

GEAppliances.com
Possible Causes What To Do
Range Locked or LOC The controls have • Seethe Control Lockoutsection to unlock.
Onappears in the oven been locked.
display or LC appears
in the surface display
Control signals after Youforgot to enter a • Touch the BAKE pod and desired temperature or
entering cooking time bake temperature or the SELFCLEAN pod and desired clean time.
or start time cleaning time.
Display goes blank A fuse in gour home mag be • Replacethe fuse or resetthe circuit breaker.
Displag flashes Power failure. • Resetthe clock.
Unable to get the Oven control pads were • The BROIL HI/LO and BAKE pods must be touched at
displag to show "SF" not touched properlg, the same time and held for 3 seconds.
"Probe" appears in This is reminding gou to • Enter a probe temperature.
the displag enter a probe temperature
(onsome models) after plugging in the probe.
Power outage, Power outage or surge. • Resetthe clock. If the oven was in use,you must reset
clock flashes it bu touching the CLEAR/OFFpad, setting the clock
Steam from the vent When using the ovens, • This isnormal.
blown or the circuit
breaker tripped.
The clock is in the • See the Special features of your oven control section.
black-out mode.
and resetting anu cooking function.
it is normal to see steam
coming out of the oven
vents. As the number of racks
or amount of food being
cooked increases, the amount
of visible steam will increase.
"Burning'or "oily" This is normal in a new oven • To speed the process, set a self-clean cgcle for a
odor emitting from and will disappear in time. minimum of 3 hours. See the Using the self-cleaning
the vent upper and lower ovens section.
Strong odor An odor from the insulation • This istemporarg.
around the inside of the oven
is normal for the first few times
the oven is used.
Fan noise Aconvection fan meg • This isnormal. To maximize cooking evenness,
automaticallg turn on the fan is designed to operate in both directions,
and off. with a pause in between.
• The convection fan will operate during preheat
of the bake cycle. The fan will turn off after the oven
is heated to the set temperature. This is normal.
A cooling fan mag • This isnormal. The cooling fan will turn off and on
automaticallg turn on and off. to cool internal ports. It may run after the oven is
turned off.
47
Page 48

Before Vou Call For Service...
Troubleshooting Tips
Possible Causes
Oven rocks are
difficult to slide
Drawer does not slide The drawer isout • Fully extend the drawer and push it all the way in.
smoothlg or drags of alignment. See the Core and cleaning of the range section.
Warming drawer or A fuse in your home may be • Replace the fuse or reset the circuit breaker.
lower oven drawer blown or the circuit breaker
will not work tripped.
Excessivecondensation Liquid in drawer. • Remove liquid.
in the drawer
Fooddries out in the Moisture escaping. • Cover food with lid or aluminum foil.
worming drawer
Griddle is not hot Griddle overloaded. • Turn griddle off.
enough Griddle removed from burners • Touch + and together for 3 seconds.
The shiny, silver-colored
rockswere cleaned in a
self-cleon cycle.
Drawer is over-loaded or • Reduce weight. Redistribute drawer contents.
load is unbalanced.
Controls improperly set. • See the Using the worming drawer section.
Uncovered foods. • Cover food with lid or aluminum foil.
Temperature setting too high. • Reduce temperature setting.
Drawer not fully closed. • Push drawer in until latch engages.
during operation. After the beep, restart the griddle.
What To Do
Applu a small amount of vegetable oil to a paper
towel and wipe the edges of the oven racks with
the paper towel. Do not spray with Pan ®or other
lubricant sprays.
48
Page 49

Notes.
GEAppliances.com
Q
0"_"
49
_o
v
0
0
_o
tO
"o
"o
0
Page 50

Accessories.
Looking For Something More?
You can find these accessories and many more at GEAppliances.com (U.S.)
or www.GEAppliances.ca (Canada), or call 800.626.2002 (U.S.) or 800.661.1616
(Canada) (during normal business hours). Have your model number ready.
Grates SurfaceBurnerHeadsandCaps SurfaceElementsandDripPans Knobs
Griddle OvenRanks OvenElements
LightBulbs
Experience these other great products to keep your kitchen looking great!
_ '_"*_" CleaningKit: CleaningWipes AppliancePolish
scraperandpad
[__ Includescleaner, Wipes
_'_ ....... CeramicCooktop _ CeramicCooktop _ StainlessSteel
WXlOX117GCS WXIOX305 WXIOXIO001
StainlessSteel
Appliance
Cleaner
PM10X311
Get the most out of your Broiler Pan! (Not for use with Broiler Drawer modelsJ
Useyour pan and grid coverto broil hamburgers, seafood,steaks,vegetables, bacon, chops and so much
morel The pan below catches the excessfats and oils.
• GenuineGEPart
• EasyTo Cleon
• One-YearWarranty ..
Limited Time Offe!! Free Shipping!
When you order your broiler pan within 30 days of purchasing your GEcooking product.
Small
U.S. Part # WB48XlO055
Canada Part # 222D2097GO01
Dimensions 8-3/4" W x 1-1/4" H x 13-1/2"D
Price US$10.50
Plusapplicable state solestax (PST/HSTand GST)
* Thelarge (standard)broil pan doesnot fit in 20'/24" ranges.
** The XL pan does not fit in 24" watt ovens, 27" drop-ins or 20'/24" ranges.
Toplace your order,call800.626.2002 (U.S.),800.661.1616 (Canada)or mail this form to:
In the U.S.:GEParts, PO.Box221027, Memphis,TN 38122-1027. In Canada: GEParts,1 Factory Lane, Moncton, N.B.EI C9M3
12-3/4"Wxl-1/4"Hxlg-1/2"D 17"Wxl-1/4"Hxlg-1/4"D
Large* XL**
WB48X10056 WB48X10057
222D2097G002 N/A
US$14.50 _ US$16. 75
50
Quantity
Model Number
First Name
Address
City
Phone
Credit Card
Visa
Exp. Date: Month
MasterCard
Check
Broiler Pan Order Form
Part Number
Serial Number
Money Order
Discover AmEx
Veer
Brand Date of Purchase
Last Name
State Zip Code
E-Mail
Credit Curd #
Signature:
Page 51

GE Hectfic Range Warrantg. GEAppliances.com
All warranty service provided by our Factory Service Centers,
or on authorized Customer Core®technician. To schedule
service, visit us on-line at GEApplionces.com, or call
800.GE.CARES(800./432.2737).Please have serial number
and model number available when calling for service.
Staple Four receipt here.
Proof of the original purchase
date is needed to obtain service
under the warrant F.
GE Will Provide:
OneYear Any part of the range which fails dueto a defect in materials or workmanship.
Fromthe date of the Duringthis limited one-gear warranty, GEwill also provide,free of charge,all labor
originalpurchase and in-home serviceto replacethe defective part.
Servicetrips to gour home to teach gou how to use
the product.
installation, deliverg or maintenance.
Failure of the product if it is abused, misused,
or used for other than the intended purpose
or used commerciallg.
Damage to the glass cooktop caused bg use of
cleaners other than the recommended cleaning
creams and pads.
Replacement of house fuses or resetting of circuit
breakers.
Damage to the product causedbg accident, fire, floods
or actsof God.
Incidental or consequential damage caused bg possible
defects with this appliance.
Damage caused after deliverg.
Product not accessible to provide required service.
Damage to the glass cooktop caused bg hardened
spills of sugarg materials or melted plastic that
are not cleaned accordingto the directions in
the Owner's Manual.
EXCLUSION OF IMPLIED WARRANTIES--Your sole and exclusive remedy is product repair as provided in this Limited
Warranty. Any implied warranties, including the implied warranties of merchantabilitg or fitness for a particular
purpose, are limited to one year or the shortest period allowed by law.
This warranty is extended to the original purchaser and any succeeding owner for products purchased for
home use within the USA. If the product is located in on area where service by o GEAuthorized Servicer is not
available, you may be responsible for o trip charge or you may be required to bring the product to on Authorized
GEService location for service. In Alaska, the warranty excludes the cost of shipping or service coils to your home.
Some states do not allow the exclusion or limitation of incidental or consequential damages. This warranty
gives you specific legal rights, and you may also hove other rights which vary from state to state. To know
what your legal rights ore, consult your local or state consumer affairs office or your state's Attorney
General.
Warranton General Electric Compang. Louisville, KV 40225
51
Page 52

Consumer Support.
GEAppliances Website GEAppliances.com
Have a question or need assistance with your appliance?Try the GEAppliancesWebsite 24 hours a day,
any day ofthe year! For greater convenience and faster service,you can now download Owner's Manuals,
order parts or even schedule service on-line.
Schedule Service GEAppliances.com
Expert GErepair service isonly one step away from your door.Geton-line and schedule your service at
your convenience any day of the year! Or call 800.GE.CARES(800.432.2737)during normal business hours.
Real Life Design Studio GEAppliances.com
GEsupports the UniversalDesignconcept-products, servicesand environments that can be usedby
people of all ages, sizesand capabilities.We recognizethe need to design for a wide range of physical and
mental abilities and impairments. For details of GE'sUniversalDesignapplications, including kitchen design ideas
for people with disabilities,check out our Website today. Forthe hearing impaired, pleasecall 800.TDD.GEAC
(800.833./4322).
Extended Warranties
Purchasea GEextendedwarranty and learn about special discounts that are available while your warranty
isstill in effect. You can purchase it on-line anytime, or call 800.626.222/4during normal businesshours.
GEConsumer Home Serviceswill still bethere after your warranty expires.
PartsandAccessories
Individualsqualified to servicetheir own appliances can have parts or accessoriessent directly to their homes
(VISA,MasterCordand Discovercards ore accepted).Orderon-line today, 24hours every day or by phone at
800.626.2002during normal businesshours.
Instructions contained in this manual cover procedures to be performed by any user. Other servicing
generally should be referred to qualified service personnel. Caution must be exercised, since improper
servicing may cause unsafe operation.
Contact Us
If you are not satisfiedwith the service you receivefrom GE,contact uson our Website with all the details
including your phone number,or write to: General Manager,Customer Relations
GEAppliances,Appliance Park
Louisville,KY/40225
GEAppliances.com
GEAppliances.com
GEAppliunces.com
Register gour new appliance on-line--at gour convenience! Timely product registration will allow for
l Register Your Appliance GEAppliances.com
enhanced communication and prompt service under the terms of your warranty, should the need arise.
Youmay alsomail inthe pre-printed registration card included inthe packing material.
Printed in the United States
Page 53

0
o.
€l)
8
O)
€l)
O)
o.
GEAppliances.com
Instrucciones de Seguridad ................... 2-5
Instrucciones de Operaci6n
Homo .............................................. 1/4-35
Ajuste de1 termostato de1 homo ...................... 22
Asado, Guia de asado ................................. 18
Auto-limpieza ..................................... 29, 30
Coj6n calentador ...................................... 3/4
Caj6n de1 homo inferior ............................... 35
Caracter[sticas de cocci6n lenta, calentamiento
y leudado .......................................... 27, 28
Caracteristicas especiales ........................ 31-32
Controles .......................................... 14, 15
Funci6n Sabbath ...................................... 33
Horneado o rostizado ................................ 17
Horneado y rostizado con temporizador ............. 19
Homo de convecci6n ............................. 23-26
Precalentamiento ..................................... 17
Sonda ................................................. 20
Temporizador de cocina ............................... 21
Unidades de superficie .............................. 6-13
Modelos controlados por botones de toque ......... 8, 9
Modelos controlados por perilla .................. 10, 11
Plancha ........................................... 12, l:B
Recipientes de cocci6n ................................ 7
Cuidado y limpieza
Bandejas .............................................. 38
Caj6n calentador desmontable/Recipiente
del caj6n del homo inferior ............................. :39
Caj6n de almacenamiento ............................ 39
Elementos calentadores del homo .................... 41
Estufa de vidrio .................................... 42, 43
Luz ................................................. 40, 41
Panel de control ....................................... 36
Perillas de control ..................................... 36
Piso del homo .......................................... 39
Puerta del horno desmontable .................... 37, 38
Superficies ............................................. 36
Ventilaci6n ......................................... 37, 39
Control Quick Set V,
Quick Set Vl y
Next Step
En Canadd:
www.GEAppliances.ca
lmpmso en los Estados Unidos
8
ld
Consejospara la identificaci6n
y soluci6n deproblemas .................... 44-48
Accesorios .......................................... 5o
Apoyo al cliente
Apogo al cliente ....................................... 52
Garantia............................................... 51
Escriba los n6meros de modelo y de serie aquk
Modelo #
Serie #
Puede encontrarlos en una etiqueta ubicada
detr6s del caj6n o detr6s de la puerta del horno
inferior en el frente del marco de la cocina.
Impreso en
papel reciclado
49-80575-1 05-09 JR
Page 54

INFORMACION IMPORTANTEDESEGURIDAD.
LEA TODAS LAS INSTRUCCIONES ANTES DE SU USO.
ADVERTENCIA I
Lea todas los instrucciones de seguridod antes de utilizar este producto. No seguir estas instrucciones puede
generor un incendio, uno descorgo el@ctrico,lesiones corporoles o Io muerte.
DISPOSITIVOANTI-VOLCADURAS
Para reducir el riesgode volcar la cocina, 4sta debesujetarse
medionte un soporte onti-volcadums con uno adecuadoinstalodOn.
Vetlos instrucciones de instolociOnenviadosconel soporte pore
• Todaslas cocinas pueden volcarse.
• Pueden provocarse QUEMADURAS
u otras LESIONESGRAVES.
, INSTALEy CONTROLEel soporte
ANTI-VOLCADURASsiguiendo los
instrucciones suministradas con
el soporte.
obtener detallescompletos antesde inidor lo instolociOn.
Paracocinas independientes:
Paro verificar que el soporte sehoya instalado y sujetodo
correctamente,quite el cojOnde olmocenomientoo panel de
protecciOng mire debojo de la cocinopore contmlor que lo poto de
niveloci6nseencuentre engonchado alsoporta Enlosmodelos sin
cojOnde almacenomiento o panel depmtecciOn,incline la cocino
hocia adelontecon mucho cuidodo.Elsoporte debedetener
lo cocinodentro de los 4 pulgodos. Si no Io hace,el soporte debe
reinstalarsa Sila cocinosesepam de lo pared par cualquier motivo,
siempre repita esteprocedimiento pore verificor que lo coma est@
bien sujeto medionte el soporte onti-volcoduros.
Nunca quite los potas de nivelaciOnpar completo go que lo cocino
no quedor4 bien sujeto ol dispositivoonti-volcodums.
Cocinosempotrobles:
Poroveriflcor que el soporte sehayainstolodo y sujetodo
correctamente, quite elcoj6n de almacenamiento o el panel de
protecci6n g mire debojo de la cocina para controlar que la pata
de nivelaci6n seencuentre enganchada al soporte.
Cocinosencostrobles:
Poraveriflcor siel soporte seha instolodo g sujetodo
correctamente, boje la puerto del homo g con cuidado aplique
una presi6n media sabre el extremo de la manija hasta que
sedetecte movimiento de la cocina. Siga presionando hasta que
el soporte anti-volcaduras se accione g el movimiento se detenga.
Unpequeflo movimiento resulta aceptable en la porte trasera
de la porte superiorde la cocina,pero debe serestable g no
inclinarse una vezque seenganche el soporteanti-volcaduras.
Sino Iohace, el soporte debe reinstalarse.
Siusted norecibi6 un soporte anti-volcaduras con su compra,
Ilame al 1.800.626.8774para recibiruno sin costa alguno
(enConod6,Ilame ol 1.800.561.3344).Poroconsultor instrucciones
de instoloci6n del soporte,visite GEAppliances.com(enCanad(i,
GEApplionces.ca).
I-&ADVERTENCIA INOTIFICACIONIMPORTANTEDESEGURIDAD
Loley de Californiasabre oguospotables g t6xicos exigeque el Gobemodorde Californiapublique uno listo de sustoncios
que segOnel estadoprovoquen cdncer,defectos cong@nitosu otms da_os reproductivos,g exigea losempresasque
odvierton o losclientessabre lo exposiciOnpotential o dichossustoncios.
Loaisloci6n defibro de vidrio delosboreas outo-limpiantes emiteuno peque_ocontidad demon6xido de carbono dumnte
el ciclode limpiezo. Lo exposiciOnpuede minimizorse ventilondo con uno ventono obierto o usondo uno compono o
ventilodor.
2
Page 55

GEAppliances.com
I ADVERTENClA I INSTRUCCIONE5GENERALE5DESEGURIDAD
Useesteaparato s61ocon elobjetivopara elquefue creado,
como sedescribeeneste ManualdelPropietario.
, AsegOresedeque unt@cnicocalificadorealiceuna correcta
instalaci6ng puestaa tierradel artefacto de acuerdocon
lasinstruccionesdeinstalaci6nprovistas.
, Nointenterepararo cambiar ninguna piezadesucocina
a menosqueest@especificamenterecomendadoen este
manual.Cualquierotro serviciodeberealizarlount_cnico
calificado.
, Antesde realizarcualquierclasede reparaci6n,
desenchufela cocinao desconecteelsuministroel@ctrico
desdeel panelde distribuci6ndom_sticoquitando elfusible
o desconectandoel interruptorde circuitos.
, Nodejea losnifiossolos;@stosno debenquedarsolososin
atenci6n enun 6rea dondeun aparatoest@en uso.Nunca
debe permitirsequese suban,sienteno parenen cualquier
partedeesteaparato.
PRECAUCION:NoaImaceneelementos
de inter@spara ninossobreuna cocinao en la protecci6n
trasera deuna cocina:losninosquesetrepan a la cocina
paraalcanzarelementospuedenresultargravementeheridos.
, %1ouseagarraderassecas:lasagarraderash0medas
o mojadascolocadasensuperficiescalientespueden
provocarquemadurasde vapor.Nopermita quelas
agarraderasentrenen contacto con unidadesde superficie
o loselementoscalentadorescalientes.Noutilicetoallas
u otrastelasgruesasen lugarde unaagarradera.
Nuncausesuelectrodom_sticopara calentarla habitaci6n.
, Notoque lasunidadesdesuperficie,loselementos
calentadoreso lasuperficieinteriordelhomo. Estas
superficiespuedenestar Iosuficientementecalientespara
quemaraOncuandotenganun color oscuro.Duranteg
despu@sdeluso,notoque o dejequesu vestimenta u otros
materialesinflamablesentrenencontacto conunidades
desuperficie,6reascercanasalas unidadesdesuperficie
o cualquier6rea interiordel homo;dejepasarun tiempo
prudencialpara queseenfrfen.Otrassuperficiesdel aparato
puedencalentarseIosuficientecomo para provocar
quemaduras.Lassuperficiespotencialmentecalientes
inclugenla estufa,las6reasorientadashacia la estufa,
la abertura deventilaci6ndelhomo,lassuperficiescercanas
a la aberturag las hendidurasubicadasalrededorde la
puertadel homo.
, No calienterecipientescerradosdealimentos.Podrfahaber
una acumulaci6nde presi6nen elrecipienteg_ste podrfa
explotar,provocandolesiones.
, Noutilicepapeldealuminiopara revestirlasbandejas
colectoraso ningunaparte delhomo,conexcepci6nde
Iodescriptoen estemanual.Unusoinadecuadopuede
provocardafios a la cocinag una descargael@ctrica
o un riesgodeincendio.
, Tratede no ragar ogolpear las puertas,estufaso paneles
de controlde vidrio.SiIohacepodrfaromperseel vidrio.No
cocinesiun productotiene unvidrioroto. Puedeprovocarse
unadescarga,un incendioo heridas.
, Cocinecarnesde resg deavepor completo:Lascarnes
de res hastaalcanzarunatemperatura internade por
Iomenos 160°F(71°C)g lascarnesde avea una
temperatura internadepor Iomenos180°F(82°C).
Lacocci6na estastemperaturasgeneralmenteprotege
de enfermedadestransmitidaspor losalimentos.
kADVERTENClA I MANTENGALOSMATERIALES
INFLAMABLESALEJADOSDELA COCINA.
, Noalmaceneo utilicematerialesinflamablesdentrode
un homo o cercade laestufa,talescomo papel,pl6stico,
agarraderas,telas,recubrimientosdepared,cortinas
g gasolinau otrosvaporesg liquidosinflamables.
, Nuncausevestimentasholgadaso amplias mientrasutilice
el aparato.Estasvestimentaspuedenprendersefuegosi
entranen contacto consuperficiescalientes,provocando
quemadurasgraves.
ADVERTENCIA I
EN CASO DE INCENDIO, SIGA LOS
SIGUIENTE5 PASOSPARA EVITAR
LA PROPAGACION DEL FUEGO:
, Noutiliceagua enincendiosdegrasa.Nuncalevanteuna
sart@nenllamas.Apagueloscontroles.Apague unasart_n
en llamassobreuna unidadde superficiecubriendo
la sart_npor completo con unatapa que ajustebien,
una plancha para galletaso una bandejaplana.Utilice
un quimicosecomultiusoo unextintorde incendios
de espuma.
, Sihag un incendioenel homo duranteel horneado,
ap6guelocerrandola puertadelhomo g apagando
, Nopermitaque lagrasade la cocci6nuotros materiales
inflamablesseacumulendentrode lacocina o ensu
cercania.Lagrasadentrodelhomo o sobrela estufa
puedeencenderse.
, Limpielas campanas deventilaci6ncon frecuencia.
Nodebe permitirselaacumulaci6nde grasaen lacampana
o en elfiltro.
el controlo usandoun quimicosecomultiusoo un extintor
de incendiosde espuma.
, Sihag un incendioenel homo durante laauto-limpieza,
apagueel homo gesperea que elincendioseconsuma.
Noabra la puertadel homo a la fuerza.Elingresodeaire
frescoa temperaturasde auto-limpiezapuedeprovocar
una explosi6nde llamasdesdeel horno.No seguiresta
instrucci6npuedeprovocarquemadurasgraves.
3
Page 56

INFORMACION IMPORTANTE DE SEGURIDAD.
LEA TODAS LAS INSTRUCCIONES ANTES DE SU USO.
I-4,ADVERTENCIA I INSTRUCCIONESDESEGURIDADDELAESTUFA
Nunca deje las unidadesde superficie sin atenci6n
en configuraciones de calor media o alta. Los alimentos
que hierven g sederraman pueden provocar humo g
derrames grasosos que pueden prenderse fuego.
Nunca deje aceite sin atenci6n mientras fife. Sisedeja
calentar m6s all6 del punto de humeo, el aceite puede
encenderse,provocando un incendio que podrfa
propagarse a los gabinetes cercanos. Utilice un
term6metro para grasa cuando sea posible para
controlar la temperatura del aceite.
Para evitar el derrame de aceite g un incendio,utilice una
cantidad mfnima de aceite cuando frfa en sartenes poco
profundas g evite la cocci6n de alimentos congelados
con una cantidad excesiva de hielo.
, Utiliceel tamano de recipienteadecuado: EIUarecipientes
con bases planas Io suficientemente grandes para cubrir
el elemento calentador de superficie. La utilizaci6nde
I-4,ADVERTENCIA I
INSTRUCCIONESDE SEGURIDAD DE LA
ESTUFARADIANTE lalgunosmodelosl
Tengacuidado al tocar la estufa. Lasuperficie de vidrio
de la estufa retendr(i calor despu_sde queloscontroles
se hagan apagado.
Nococine sobre una estufa rota. Sila estufa se rompe,
lassolucionesde limpieza Ulosderrames pueden
penetrar en la estufa rota Ucrear un riesgode descarga
el@ctrica.Comuniquesecon un t_cnico calificado de
inmediato.
Eviteragar laestufa de vidrio.Laestufa puede ragarse
con elementos tales como cuchillos, instrumentos filosos,
anillosu otrasjogas, g remachesde la ropa.
No coloque o almacene elementos que pueden derretirse
o prenderse fuego sobre la estufa de vidrio, aLincuando
no la est_ usando.Si la estufa seenciende en forma
accidental, pueden prendersefuego. Elcalor proveniente
de la estufa o de la ventilaci6n del homo tambi@npuede
prenderlosfuego, a0n siel aparato est(i apagado.
recipientesm6s peque_os dejar6 expuesta una porci6n
de la unidad de superficie al contacto directo,Ioque
puede provocar el encendido de susvestimentas.
Unarelaci6n adecuada del recipiente con la unidad
de superficie tambi_n mejorar(i la eficiencia.
S61ociertos tipos de recipientesde vidrio,vidrio/cer6mico,
cer6mica, u otros recipientesvidriados pueden utilizarse
sobre la estufa; otros pueden romperse debido al cambio
repentino de temperatura.
Para minimizar la posibilidadde quemaduras,
el encendido de materiales inflamables g los derrames,
la manija de los recipientesdeben girarse hacia el centro
de la cocina sin extenderse sobre ninguna unidad
de superficie cercana.
Siflambea alimentos bajo la campana, encienda
el ventilador.
Useel limpiador deestufas cer(imicas CERAMABRYTE®
g la esponjillade limpieza CERAMABRYTE®para limpiar
la estufa. Esperehasta que la estufa seenfrfe g la luz
indicadora se apague antes de limpiar.Unaesponja
o un paBo h0medos sobreuna superficie caliente pueden
provocar quemaduras de vapor.Algunos limpiadores
pueden producir humos t6xicos si se los aplica a una
superficiecaliente. NOTA:Losderrames de az0car son
la excepci6n. Estosdeben quitarse mientras est6n
calientes utilizando una agarradera g un raspador.Para
instrucciones detalladas,ver la secci6n Cd)molimpior
la estufo de vidrio.
LeaUcumpla con todas lasinstrucciones Uadvertencias
de la etiqueta de la crema de limpieza.
I-4,ADVERTENCIA I
INSTRUCCIONESDE SEGURIDAD DE LA
ESTUFADE BOBINAS Iolg_o_moddos)
Nosumerja o remoje las unidadesde superficie
desmontables. No lascoloque en el lavavajillas.
Nocoloque lasunidadesde superficie dentro del homo
cuando realice la auto-limpieza. SiIohace pueden Ilegar
a fallar,provocando un peligro de quemaduras o de
incendio.
Paraevitar laposibilidadde una quemadura odescarga
el@ctrica,siempreverifiqueque loscontrolesde todas
lasunidadesde superficieseencuentrenen la posici6n
OFF(apagado)g que todas las bobinasest_n frfasantes
de levantaro quitar una unidad de superficiede bobinas.
AsegOresede que las bandejas colectoras no est_n
cubiertas g se encuentren en su lugar.Suausencia
durante la cocci6n podrfa daBar las piezasg elcableado
de la cocina.
Page 57

GEAppliances.com
ADVERTENCIA I INSTRUCCIONESDESEGURIDADDELHORNO
lant@ngasealejadode lacocinacuandoabra
lapuertadelhorno.ElaJregelvaporcalJentesquesalen
de lacocJnapuedenprovocarquemadurasenmanos,
rostro y/o ojos.
Mantengasinobstrucciones laventilaci6n delhomo.
Mantenga el homo libre de acumulaciones de grasa.
La grasa dentro del homo puede prenderse fuego.
Siemprecoloque lasbandejas del homo en la posici6n
deseada mientras el homo est_ fifo. Sila bandeja debe
quitarse cuando el homo todavfa est6 caliente, no
permita que la agarradera toque el elemento calentador
del horno.
Cuando utilice balsasde cocci6n o de asado en el homo,
siga lasinstrucciones del fabricante.
,Tire de la bandeja del homo hasta la posici6n de tope
de detenci6n cuando cargue o descargue alimentos
del homo. Estoaguda aevitar quemaduras par tocar
superficies calientes de la puerta g las paredesdel horno.
Nodeje productos coma papel,utensiliosde cocina
o alimentos en el homo cuando no Ioest6 usando.
Loselementos guardados en el homo pueden prenderse
fuego.
Noutilice papel de aluminio para revestirel piso
del horno. Elpapel de aluminio puede atrapar o reflejar
el calor,provocando una descarga el_ctrica o un peligro
de incendio.
ADVERTENCIA I INSTRUCCIONESDE SEGURIDAD DEL
HORNO AUTO-LIMPIANTE (olg. o mod lo )
ka caracteristica de auto-Iimpiezo funciona en el homo a temperoturos Io suficientemente elevodos como poro
quemar los restos de alimentos que quedaron dentro del homo. Siga estas instrucciones para una operaci6n segura.
Antes de iniciarel ciclo de auto-limpieza, quite lasalias,
bandejosdel homo de metal brillante g otros utensilios
del homo. S61opueden dejarseen el horno las bandejus
revestidasde porcelana gris.No utilice la auto-limpieza
para limpiar otras piezas,coma bandejas colectoras
o tazones.
Antes de utilizar el ciclo de auto-limpieza, limpie la grasa
g los derrames de alimentos del horno. Unacantidad
excesivade grasa puedeencenderse,generando
dafios par el humo en su hogar.
Siel modo de auto-limpieza no funciona, apague
el homo g desconecte el suministro de energfa. Llame
a un t_cnico calificado para solicitar el arreglo.
No limpie la empacadura de lapuerta. Laempacadura
de la puerta esesencial para un buen sellado. Debe
tenerse cuidado de no refregar,danar o mover la
empacadura.
No utilice limpiadores de homo. Nodebe utilizarse ningOn
limpiador comercial o revestimiento protector de ninguna
clase dentro o alrededor de ninguna pieza del horno.
.tl,ADVERTENCIA I CAJONCALENTADOR/CAJONDELHORNO
INFERIORINSTRUCCIONE5 DE 5EGURIDAD
(olgunos modelos)
Elobjetivo del caj6n calentador es mantener alimentos
cocidos calientes a la temperatura de servicio.Pardebajo
de los 1/40°F(60°C)puede producirse crecimiento de
bacterias en los alimentos. Nocoloque alimentos fr[os
en el caj6n calentador.No caliente alimentos par m(_s
de 2 horas. No seguir estas instrucciones puede provocar
enfermedades transmitidas par los alimentos.
Nodeje productos de papel,pl(_sticos,comida enlatada
o materiales combustibles en el caj6n. Puedenprenderse
fuego.
Notoque el elemento calentador o la superficie
interna del caj6n. Estassuperficies pueden estar
Iosuficientemente calientes coma para provocar
quemaduras.
Tenga cuidado al abrir el caj6n. Abra un poco el caj6n
g deje salirel aire caliente g el vapor antes de quJtaro
volver a colocar los alimentos. Elaire g el vapor calientes
que salen pueden provocar quemaduras en manos,
rostra g/o ojos.
No utilice papel de aluminio para revestirel caj6n
calentador.Elpapel metcilicoesun excelenteaislante
de calor g atrapar6 el calor debajo de 61.Estoalterar(i
el desempe_o del caj6n g potencialmente podrfa
provocar un riesgode incendio.
5
Page 58

Para modelos con una estufa de vidrio.
I,_ IPELIGRO DE INCENDIO: Nunca deje la cocina sin atenci6n con
ADVERTENCIA,/o e t. oen/o con ig.rocionesmediaoo/toMontengolose/ementos
inflamables alejados de la estufo. Apague todos los controles cuando
haga terminado de cocinar. No seguir estas instrucciones puede
provocar un incendio, una lesi6n grove o la muerte.
NOTA:A Iolargo de estemanual, loscorocterfsticosg oporienciopueden serdiferenteso los desu modelo.
Sobre las unidades de superficie radiantes
ii :i¸ jj_ _iiii!i L
i_i__il li _i_i_i_
Nuncacocinedirectamentesabreet vidrio.
Siempreutilice recipientesdecocci6n.
Siemprecotoqueetrecipienteenel centro
dela unidadde superficiesabreta que
est_cocinando.
ARRASTRE
_!_i!_i_iii_ii_! i!!!!i!'!"i_i_i_;ii/i_i_i
No@slicelosrecipientesde cocci6n
atrav6sdet controly la superficiede
la estufaporquepuederayar etvidrio.
Elvidrioes resistentea losrayones,
peronoa pruebadelosmismos.
Laestufa radiante cuenta con unidades
calentadoras debajo de una superficie lisa
de vidrio.
Lastemperaturas de laestufa aumentan
con Iocantidad de unidades de superficie
que se encuentran encendidas.Con3 o/4
unidades encendidas,lastemperaturas de
la superficie son elevadas. Siempretenga
cuidado al tocar la estufa.
Una luzindicadora se accionar6 cuando
la unidad de superficie se encuentre
encendida.
Lacorrespondiente luzindicadora
HOTSURFACE(superficie caliente)
seencendercicuando suelemento
radiante correspondiente est_ encendido
g permanecer6 accionada hasta que la
superficiese haua enfriado par debajo
de 150°F(66°C).
NOTA:
La luz indicadora de superficiecaliente:
Quedar4 encendida aunque sehoblo
apagado la unidad.
Brillar4 hasta que la unidad se hoblo
enfriado par debojo de 150°F (66°C).
NOTA:Unligero olaf esnormal cuando
una estufo nuevo se utiliza par primem vez.
Espmvocodo par elcalentamiento
depiezas nuevasblmaterialesaislantes
bldesaparecer4en poco tiempo.
NOTA:En modeloscon estufasde vidrio
de color clam, es normal que loszonas
de cocd6n cambien de color cuando estdn
calienteso enfridndose.Estoestemporal
bldesaparecer4a medida que el vidrio
seenfriea temperature ambiente.
Esseguro colocar recipientesde cocci6n
calientes desdeel homo o superficiesabre
la estufa de vidrio cuando la superficie
estcifrfa.
Aunque las unidades de superficie
se hagan apagado, la estufa de vidrio
retiene suficiente calor para continuar
la cocci6n. Paraevitar lasobrecocci6n,
quite lasaliasde las unidades de superficie
cuando losalimentos est_n cocidos. No
coloque nada sabre la unidad de superficie
hasta que sehaga enfriado par completo.
Los manchas de agua (dep6sitos
minerales) pueden quitarse utilizando
crema limpiadora o vinagre blanco
sin diluir.
_,Elusade limpiador de ventanas puede
dejar una peffculairidiscentesabre
la estufa.Lo crema limpiadora quitar4
esta decoloraci6n.
No almaceneelementospesadossabre
la estufo.Sicaensabre la estufo,podrfon
pmvocor da_os.
, No utificela superficiecoma una tabla
pare carrot.
Page 59

Elecci6ndelostiposde recipientesdecocci6n
para modelosdeestufade vidrio.(moddossininducci6nlGEAppliances.com
La siguiente informaci6n Io ayudard a elegir los recipientes de cocci6n que brindan un buen desempefio
en estufas de vidrio. Ver el folleto sabre recipientes para usar con estufas de inducci6n.
Verifiqueque losrecipientestengan
basespianosutilizandounaregla.
Nose recomiendanrecipientescon
basesredondeadas,curvadas,con
rebordeso torceduras.
Acero inoxidable:
Recomendado
Aluminio:
Serecomienda decapa gruesa
Buena conductividad. Losresiduos de
aluminio a veces parecen ragones sabre
la estufa pero pueden quitarse sise los
limpia de inmediato. Debido a su bajo
punto de fusi6n, no debe utilizarse aluminio
de capa fina.
Base de cobre:
Recomendado
Elcobre puede dejar residuosque pueden
parecer rauones. Los residuospueden
eliminarse,siempre g cuando la estufa
se limpiede inmediato. Sin embargo, no
permita que estasalias hiervan en seco.
Elmetal sobrecolentodo puedeadherirse
alas estufas devidrio. Sino se elimina de
inmediato, una alia con la base de cobre
sobrecalentado dejar(i un residuoque
manchar(i la estufa en forma permanente.
NOTA:Sigatodas los recomendacionesdel fobricante de recipientescuando utilicecualquier
close de recipiente de cocci6n sabre la estufo cerdmica.
Esmalte de porcelana sobre hierro
fundido:
Serecomiendasila basede la alia
seencuentra revestida
Esmalte de porcelana sobre acero:
No se recomienda
Calentar recipientes vacbs puede provocar
danos permanentes al vidrio de lasestufas.
Elesmalte puede derretirse g adherirse
a la estufa cer(imica.
Vidrio-cer6mico:
No se recomienda
Desempe_o pobre. Raga la superficie.
Cer6mica:
No se recomiendo
Desempe_o pobre. Puede ragar
la superficie.
Hierro fundido:
Noserecomienda,a menos que
seencuentreespedficamente dise_ado
paro estufosde vidrio
Pobreconductividad y lentitud para
absorber el calor.Ragala superficie
de Io estufa.
No coIoquerecipientesmojadassabre
laestufadeVidrio
NoUsew0ks conanil!osde s0porte
sabreta estufa devidrio.
Utilics wQksde bass plana sabre
la estufa de Vidrio,
Para mejores resultados
Coloque s61orecipientes secos
sabre los elementos de superficie. No
coloque topos sabre los elementos de
superficie, en especial topos mojodos.
i No use woks con anillos de soporte.
Esta clase de wok no se calienta sabre
elementos de superficie de vidrio.
Recomendamos el usa de woks de
base plana solamente. Se encuentran
disponibles en su negocio minorista
local. La base del wok debe tener
el mismo di6metro que el elemento
de superficie para asegurar un
contacto adecuado.
Algunos procedimientos de cocci6n
especiales requieren recipientes
de cocci6n especfficos, coma alias
a presi6n, freidoras, etc. Todos
los recipientes de cocci6n deben
tener bases planas g ser del tama_o
correcto.
No permita que los alimentos hiervan
en seco ga que los recipientes de
cocci6n pueden adherirse a la
superficie de cocci6n, provocando
daBos permanentes a la estufa.
Page 60

C6mo usar las unidades de superficie--
Modelos controlados por botones de toque.
Configuraciones de cocci6n de las unidades de superficie
La estufa ofrece 19 nivelesde energfa. NOTA:Cuandosecombio de una
Losnivelesde energfa van des@ "L" (baja) configurod@ de coloralto a una bojo,
hasta "HI"(alta)en precisosaumentos de Iounidad desuperfide puededejor de
medio paso.Porejemplo: 1,1-1/2, 2,2-1/2 resplondecer.Estoes normal.Lounidad sigue
Y hasta HI. encendidablcoliente.
El nivet de energia con una fracci6n
indica la configuraci6n adicional de
medio paso. Usted puede oir chasquidos
que indican que el control est_
manteniendo su configuraci6n deseada.
OFF
Serecomienda elnivelde energfa de"L",
la configuraci6n m6s baja, para "mantener
caliente".
Elnivelde energfaaumenta de a medio
nivelcon cada toque.
Unidad de superficie (mica-Configuraciones de cocci6n
Para encender una unidad de superficie
unlca:
[7] Presioneel bot6n ONIOFF
(encendido/apagado);luego presione
el bot6n (+l/(d.
[_ Utiliceel bot6n (d/(d para elegir
la configuraci6n de energfa deseada.
Para utilizar la caracterfstica "Melt"
(derretir):
Presioneel bot6n ON/OFF
lencendido/opogodo);luego presioneMELT
(derretir).Elelemento autom6ticamente
quedar6 en una configuraci6n
predeterminada YpodrOverse "L".
NOTA:Estaestufo cuenta conuna
camcter£tico de colentamiento r@ido.
Sila estufo est4fifo cuando se la enciende,
resplandecer4dumnte unperfodo corto
hasto que seolconce la configumci6n
de energfo deseada.
Para apagar una unidad de superficie
Onica,presioneel bot6n ON/OFF
(encendido/opogodo)de nuevo.
Para utilizar la caracterfstica "Simmer"
(fuegolento):
Presioneel bot6n ON/OFF
lencendido/opogodo);luego presione
SIMMER(fuegolento).Elelemento
autom6ticamente quedar6 en una
configuraci6n predeterminada y podr6
verse "3". Ajuste utilizando el bot6n (+)/(-)
para subir o bajar el nivelde fuego lento.
Quemador de anillos m(Ntiples (puede ser doble o triple,dependiendo del modelo)
Presioneel bot6n ON/OFF
%
(encendido/opogodo)para la unidad
de superficie frontal derecha.
Utiliceel bot6n (d/(d para elegir
la configuraci6n de energfa deseada.
Presioneel bot6n BURNERSIZE
(tomato de quemodor)para
seleccionarel tamano de quemador
deseado.
La luz ubicada al lado del bot6n BURNER
SIZE(tomato de quemodor)indica
el tama_o de la unidad de superficie.
Para apagar (OFF)launidad de superficie,
presioneel bot6n ON/OFF
(encendido/apogado).
Ver la p6gina lO para informaci6n
adicional.
Page 61

ADVERTENCIA I
GEAppliances.com
RIESGODEINTOXICACIONALIMENTARIA:Per debojo de los
140°F (60°0 puede producirse crecimiento de bacterias en los alimentos.
• Siempre empiece con alimentos calientes. No utilice configuraciones
de mantener caliente para calentar alimentos fries.
• No caliente alimentos per mds de 2 heros.
No seguir estas instrucciones puede provocar enfermedades
transmitidas per los alimentos.
0®0
o@
WARHING ZONE
SELECT
ON
OFF
ON / OFF
SETWARMING ZONE
C6mo user le zone de celentemiento (en algunos modelos)
LaZONA DECALENTAMIENTO
seencuentra en la parte trasera central
de la superficie de vidrio.
Para utilizar laZONA DECALENTAMIENTO:
_] Presionela tecla WARMINGZONE
ON/OFF(zonade ca/entamiento
encendido/opagado).
[] Paraseleccionar la configuraci6n
de control deseada,presione el bot6n
SELECT(seleccionor)una vez para LO
(baja),dos veces para MED (media)o
tres veces para HI (olto).
Paraapagarla ZONADE
CALENTAMIENTO:
Presionela tecla WARMINGZONEON/OFF
(zonade calentamiento encendido/opogado).
CGmo user le zone de calentamiento (en algunos modelos)
La ZONA DE CALENTAMIENTO
se encuentra en la parte trasera central
de la superficie de vidrio.
Para utilizar la ZONA DE CALENTAMIENTO:
Presionela tecla WARMINGZONE
ON/OFF(zonade calentamiento
encendido/apagado).
Presionelos botones ] (LO)(boja),
2 (IVIED)(medio)o3 (HI)(olto)para
seleccionarla configuraci6n de control
deseada.
I_ Presioneel botGnSTART(iniciar).
Enla pantalla decontrol aparecer6
"WARMERON"(calentadorencendido).
Para apagar laZONA DE CALENTAMIENTO:
Presionela tecla WARMINGZONEON/OFF
(zonadecalentamientoencendido/apagado).
Paramejores resultados,todos
los alimentos de la ZONADE
CALENTAMIENTOdeben cubrirse con
una tapa o con papel de aluminio.
Siempreutilice agarraderas o guantes de
cocina cuando quite alimentos de laZONA
DECALENTAMIENTO,ga que los
recipientes estarGncalientes.
Noutilice envoltorios pldsticospara
cubrir alimentos.Elpldstico puede
derretirseen lasuperficieg ser4
mug diffcillimpiorlo.
, UtilicesGlorecipientesde cocino
recomendodospore cocdGnsobre
estufos.
NOTA: Elbot6n CLEAR/OFF(borror/opagado)
no opogo lo ZONA DE CALENTAMIENTO.
Para mejores resultados,todos los
alimentos de laZONA DECALENTAMIENTO
deben cubrirse con una tapa o con papel
de aluminio.
Siempreutilice agarraderas o guantes
de cocina cuando quite alimentos
de la ZONADECALENTAMIENTO,ga que
losrecipientesestarGncalientes.
No utilice envoltoriospldsticos para cubrir
alimentos. Elpldsticopuede derretirse
en la superficieg ser4mug diffcillimpiorlo.
UtilicesGlorecipientes de cocina
recomendados pare cocci6n sobre estufos.
9
Page 62

C6mo usar las unidades de superficie-
Plodelos controlados par perillas.
A Io largo de este manual, los caracteristicas bl apariencia pueden ser diferentes alas de su modelo.
OFF
EnOFF(apagado)y HI (alta)etcontrol
setrabaensu posici6nconun"clio".
Ustedpuedeair ligeroschasquidos
durantelacocci6n,queindicanque
etcontrolestBmanteniendesuconfiguraci6n
deseada.
AsegOresede girarlaperiiladecontrol
aOFF(apagade)cuandeterminedecocinar.
SMALL _ LARGE
BURNER BURNER
OFF
C6mo utilizarlo
Presionela perilla hacia adentro y gfrela
en la direcci6n de la configuraci6n que
desee.
Para superficies de estufade vidrio:
La luz indicadora HOTCOOl(TOP(estufo
caliente),sabre la estufa, resplandecerd
cuando se enciendacualquier elemento
radiante. Permanecer6encendida hasta
que la superficiebaje latemperatura hasta
aproximadamente 150°F(66°C).
La luz indicadora:
Se accionar4 cuando la unidad
se encienda o est_ caliente al tacto.
Ouedar4encendidaaunque se haga
apagado la unidad.
Resplandecer4hastaque la unidad bale
la temperatura hasta aproximadamente
150°F (66°C).
Unidades de superficie dobles y triples y perillas de control
(enatgunosmodetos)
Lounidad desuperficiecuenta con2 o3
tornados de cocci6ndiferentespara poder
adecuarel tomato de la unidad al tomato
del recipientede cocci6n.
Off
Enatgunosmodetos.
LO 2
Enalgunosme@los.
20
Limitador de temperatura
Todas las unidades de superficieradiantes
cuentan con un limitador de temperatura.
Ellimitador detemperatura evita que
la estufa de vidrio se caliente demasiado.
Esnormal que se encienda y apague
cuando la estufa est(i en usa.
Modeloscons61ounaunidadde
superficietriple.
Modetoscons61ounaunidadde
superficietriple.
Ellimitador detemperatura puedeapagar
las unidades m6s frecuentemente durante
un tiempo si:
Elrecipiente hierve enseco.
Lobasedel recipienteno es piano.
Elrecipiente no est4 centmdo.
, Nohag unrecipienteen la unidad.
Page 63

GEAppliances.com
A Io largo de este manual, las caracteristicas y apariencia pueden ser diferentes a los de su modelo.
Modetosconun soloquemadorpuente:
LO LO
FRONT
f
J
CGmo usar el quemador puente (enolgunos modelos)
Para utilizar el quemador puente, gire
la perilla de control frontal izquierda
a las configuraciones BRIDGEBURNER
(quemadorpuente).
Para un funcionamiento total de la unidad
de superficie puente,tambi_n encienda
la unidad de superficie trasera izquierda.
Para utilizar s61ola unidad de superficie
frontal, gire la perilla de control alas
configuraciones FRONTBURNER
(quemadorfrontal).
Consejos para realizar conservas en casa
AsegOresede que la olla seencuentre
centrada sobre la unidad de superficie.
Verifiqueque la ollatenga una base piano.
Para evitar quemaduras de vapor o color,
tenga cuidado al realizar conservas.
Utilicerecetas g procedimientos
provenientesde fuentes confiables.
Fabricantes como Ball®and Kerr®g
el Serviciode Extensi6n del Departamento
de Agricultura losponen a sualcance.
Serecomiendan ollas paraconservas
con bases planas. Eluso de ollas para
conservas con ba_o de maria con bases
ondeadas puede prolongar eltiempo
requerido para hervir el agua.
UtiticesGtowoksde baseplana.
CocciGn en wok
Recomendamos el uso de woks de base
piano solamente. Se encuentran disponibles
en su negocio minorista local.
No usewoks con anillosde soporte.
Noutilice woks con bases redondas. Usted
podrfa sufrir groves quemaduras si el wok
sevuelco.
11
Page 64

C6mousar la plancha.
I PRECAUCI, N iu I L/GRoQUmA URAS-Lo de/oUon "on.edenIo suficientemente calientes coma para provocar quemaduras durante
g despu4s del usa. Coloque g quite la plancha cuando est4 fria g todas
los unidades de superficie est4n apagadas. Utilice agarraderas si toca
la plancha cuando estd caliente. No hacerlo puede provocar
quemaduras.
Antes de utilizar este recipiente de cocci6n
par primera vez, 16velopara asegurarse de
que est_ limpio. Luegoc0relo ligeramente,
frotando aceite de cocci6n sabre la
superficie antiadherente.
Control de la plancha lenalgunos modelos)
Para utilizar elcontrol de la plancha:
GRIDDLE CONTROL
OFF
o.
Presioneel bot6n ON/OFF
%
(encendido/apagado)para activar la
plancha. '1.."aparecer6 en la pantalla.
Utiliceel bot6n (+)/(-)para elegir
[]
la configuraci6n de energfadeseada.
La predeterminada esde 375.
La plancha cuenta con nueve niveles
de energfa. Losniveles de energfa van
desde 200 a 400 en aumentos de 25.
Una vezque seha seleccionado
%
la configuraci6n deseada, aparecer6
"PrE" hasta que la temperatura
deseada sehaga alcanzado.
Para apagar (OFF)laplancha, presione
I_ elbot6nON/OFF(encendido/opagado).
NOTA:Utilices6Iocon elcontrol de la
plancha pare no arruinar el revestimiento
antiadherente.
La mauorfa de los alimentos para plancha
requieren una cocci6n sobre una superficie
precalentada. Precalientela plancha
de acuerdo con la siguiente gala; luego
cambie a la configuraci6n de cocci6n
deseada.
Configuraci6nde Configuraci6n
Tipode orecalentamientodecocci6n
alimento °F/°C °F/°C
Panqueques 375/191 375/191
Hamburguesas 400/204 375/191
Huevosfritos 325/163 325/163
Tocino Ninguna 400/204
S6ndwiches 350/177 350/177
calientes
(coma queso
asado)
NOTA:Quiz6s deban ajustarse las configuraciones
de la plancha si 6sta se utiliza durante un periodo
prolongado. La configuraci6n es una temperatura
de cocci6n aproximada g varia con la cantidad
de alimentos.
12
C6mo colocar la plancha:
ItfPORTANTE:Siemprecoloque g utilice
la plancha en lo ubicaci6n designadasabre
la estufo.
NOTAS IMPORTANTES:
kimpie la plancha conuna esponja g
detergentesuaveen agua tibia. NOutilice
esponjillasde fregar azuleso verdeso
lona de acem.
Nococinealimentos extremadamente
gmsosos g tenga cuidado con los
derramesde gmsa mientms cocina.
, Nuncacoloqueo almacene elementos
sabrela plancha, aOncuando no estden
usa.Loploncha puede calentarsecuando
seutilizan los unidades de superficie
cercanas,
, Nouseutensiliosmetdlicoscon puntas
afiladas o hordes4spemsporque pueden
da_ar la plancha. No carte alimentos
sabrela plancha.
, Nouserecipientesde cocciOnpare el
almacenamiento de alimentos o aceite.
Puedenprovocarsemanchas g/o grietas
permanentes.
NOTA:Elrevestimiento antiadherente
sedegmdard si Ioexponea temperatures
superioresa 500°F(260°C).Uti#celosolo con
el control de la plancha g solo en la
ubicaciOndesignadasabrela estufa.No
utilice la plancha pare asar alimentos en
el homo. Nolimpie la plancha utilizando
el modo auto-limpiante en el homo.
Elcontrol dela plancha evitael
sobrecalentamientodel revestimiento
antiadherente.A temperatures superiores
a 660°F/349°O, lospmpiedades
antiadherentessedegmdan en farina
permanente g puedenprodudr humos
dominospare losayes.
NOTA:kaplancha ir6 perdiendo el color
con eltiempo debidoal usa.
NOTA:No limpie lo plancha en el homo
auto-Iimpiante.
NOTA:Siempreespere a que el recipiente
de cocci6n se enfrfeantes de sumergirlo
en agua.
Page 65

C6mo preparar un filete de calidad,
tan f6cil coma 1, 2,3:
.
Lleveel filete a temperatura ambiente.
NOTA"Siempreutilice pr6cticas seguras enel manejo dela carne.
Condimente ambos lados a sugusto g recubra con aceite de olivao similar.
iiiii]iiiiiiiiiiiiiiiiiiii_i_!_i_iiiiiiiiiiiiiiiiiiiiiiiiiiiiii_ii _"
i 2.ii
Precalienteelhorno enBAKE(hornear)a 425° (218°F),con la bandejadelhorno enla posici6n
3
central"C'
4
Coloquela plancha en el 6rea designada de la estufa g luego precaliente la plancha
a 400°F (204°C).
PRECAUCI(_N: La plancha estar6 MUY CALIENTE.Utilice agarraderas.
5. Selleelfilete de cada lado durante 2 minutos o hasta alcanzar el dorado deseado.
NOTA;Seproducir6 "humo"; aseg0resede que haga una ventilaci6n adecuada.
6. Introduzca la sonda de carne provista con su cocina dentro del centro del filete,verificando
que la punta de la sonda seencuentre en el centro del filete.
7. Introduzca la sonda en la boca de salida(ubicada en el lado frontal superior del homo),
deslicela bandejadentro del horno g cierra la puerta.
8. PresionePROBE(sondo)en su control, ingrese la temperatura interna deseada g presione
START(inidar).
GEAppliancescom
.
Dejeque el filete termine de cocinarse en el homo. Elcontrol de la cocina emitir(i un pitido
y seapagarci cuando el filete alcance latemperatura interna deseada.
NOTAS"
Despu@sdel sellado,sufilete puedehallarse en la temperatura deseada,dependiendo
del tamaBo, carte y grado de cocci6n deseado.
Parafiletes m(is finos,puede no ser posible alcanzar losgrados de cocci6njugoso o poco
cocido.
AIrealizar elselladode sucame con un color mug alto, seest4cmando una reacci6n conodda coma
la Reacd6n Maillard.Estareacd6n bloquea elsabor mds pronunciado e intenso de la came, que ocurre cuando
secocinacame auna temperatura elevada.
13
Page 66

C6mousar los controles delhomo.
A Io largo de este manual, las carocterfsticas g apariencia pueden ser diferentes alas de su modelo.
Busque el panel de control que corresponde a su modelo.
OVEN HR : MIN DRAWER
TIME SETTINGS
TrueTemp
OVEN CONTROLS
AUTO RECIPE CONVERSION
SET WARMING ZONE True Temp
%Fq%E]
Bot6n BROIL HI/LO (asar alto/bajo)
Presioneelbot6n BROILHI/LO(osaralto/bojo)unavezpara
HI Broil (asaralto).
Paracarnbiara LOBroil (asarba]o),presioneelbot6n BROIL
HI/LO(asaralto/bajo)de nuevo.
Presioneelbot6n START(iniciar).
Cuandohagafinalizadode asar,presioneelbot6n CLEAR/OFF
(borror/opogado).
Bot6n BAKE (homear)
Presioneelbot6n BAKE(homear).
Presionelosalmohadillas num6ricaspara conflgurar
la temperatura deseadadel horno.
Presioneelbot6n START(iniciar).
Cuandohagafinalizadode hornear,presioneelbot6n
CLEAR/OFF(borror/opogado).
Bot6n CONVECTIONCOOK (cocci6n par convecci6n)
Presioneelbot6n CONVECTIONCOOK(cocci6npar
convecci6n),CONVECTIONBAKE(homeadopar convecci6n),
o CONVECTIONROAST(rostizadopar convecci6n).
Presionelasalmohadillas num6ricaspara configurar
la temperatura deseadadel homo.
Presioneelbot6n START(iniciar).
Cuandohagafinalizado lacocci6n,presioneelbot6n
CLEAR/OFF(borror/opogado).
TIME CONTROLS
CONTROL LOCKOUT
Bot6n PIZZA
PresionelaalmohadillaPIZZA.
Presionelasalmohadillasnum@icaspara seleccionar
1 para pizzacongeladag 2para pizzafresca.
Presionelasalmohadillasnum6ricaspara configurar
la temperatura de horneado.
Presioneelbot6n START(iniciar).
Eltiempo de horneadoest6 determinadopor
lasinstruccionesdelpaquete.
Coloquelopizzaenla posici6ndebande]asuperior
delhomo superior.Cuandoutiliceun recipientedemetal,
utiliceloposici6nde bande]ainferior.
Bot6n PROOF(leudar)
Presioneparalevarproductosconlevadura.
Verla secci6nCamoconfigurarelhomopara leudar.
Bot6n WARM (calentar)
Presioneparamantener calienteslosalimentoscocinados.
Verla secci6nCamoconfigurarelhomosuperiorpara
mantenercaliente.
Bot6n SLOWCOOK (cocci6nlento)
Presioneparaobtenervariashorasde cocci6nsinatenci6n.
Verla secci6nC6moconfigurarelhomo inferiorpara
cocci6nlenta.
Bot6n PROBE(sonda)
Presionecuandoutilicela sondapara cocinur.
Verla secci6nC6mousarlo sonda.
ON/OFF
14
Page 67

GEAppliances.com
Bot6nSELFCLEAN (auto-limpieza)
Presioneparala auto-limpiezadel homo.
Verlasecci6n Camouserloshomosauto-Iimpiantessuperior
einferior.
Bot6n CLEAR/OFF(borrar/apagar)
PresioneparacancelarTODA9lasoperacionesdelhomo,
con excepci6ndelrelojg eltemporizador.
Bot6n START(iniciar)
Debepresionarseparainiciarcualquierfunci6nde cocci6n
o de limpieza.
Bot6n OVENLIGHT (luz del homo)
Toqueestebot6nparaapagaro encenderlaslucesdelhorno.
Botones TIMERON/OFF (temporizador
encendido/apagado)/Bot6n KITCHEN TIMER
(temporizador de la cocina)
Presioneparaconfigurar eltemporizadorde la cocina.
Verlasecci6n C6mousorel temporizodorde Iococino.
Bot6n COOK TIME/COOKINGTIME(tiempo de cocciOn)
Presioneestebot6n g luegopresionelasalmohadillas
num@ricaspara configurareltiempo de cocci6n que desea
parasus alimentos.Elhomo seapagar(i cuando se haga
terminado eltiempo decocci6n.
Bot6n DELAYSTART(inicio retardado)
Utilfcelojuntoa los botonesCOOKTIME(tiempodecocci6n)
o SELFCLEAN(outo-limpiezo)para configurarel inicio g
apagado automcitico delhomo en eltiempo establecido.
Bot6n CLOCK(reloj)
NOTA;Cuondoconfigurelostiempos,seconfigurons61o
loshorosg losminutos,komenorcontidodde tiempoque
sepuedeconfigumresun minuto.
Presioneelbot6n CLOCK(reloj).
Presionelasalmohadillas num@ricas.
Presioneelbot6n START(inicior).
Elrelojdebeestorconfigumdo enlo horo correctopore que
losfuncionescontemporizodordelhomo fundonen
odecuodomente.Lohoro no puedemodificorseduronte
losciclosde homeodocontemporizodoro deouto-Iimpiezo.
Si su homo rue configurado para una operaci6n de homo
temporizada gocurri6 un corte de energia el_ctrica, elreloj
y todaslasfuncionesprogramadasdeberOnreconfigurarse.
La horu destellur(_ en lu puntallu cuando huge ocurrido
un corte de energia.
Bot6n CONTROL LOCKOUT (bloqueo de control)
Su control lepermitird bloqueor los botones de toque
g lo estufo poro que no puedon octivorse ol presionoflos.
Para bloquear los controles g la estufa:
Presione g sostengo el bot6n CONTROLLOCKOUT(bloqueo
de control)durante 3 segundos.
Enla pantalladel homo podr(iverse "on Locon"
(bloqueooctivodo).
Pure desbloquear los controles:
Presione g sostengo el bot6n CONTROLLOCKOUT(bloqueo
de control)durante 5 segundos.
Elmodo CONTROLLOCKOUT(bloqueode control)ofecto todos
losbotones de toque. Cuondo esto corocterfstico est4 octivodo,
no funcionord ningOnbot6n de toque.
WARMING DRAWER(caj6n de calentamiento)
Elcoj6ncolentodormontendr4olimentoscolientesgcocidos
o uno tempemturo deservicio.Siempreempiececonolimentos
colientes.
Presioneelbot6n WARMINGDRAWER(coj6ncolentodor).
"WARMERON"(calienteencendido)g"1"seenciendenen
la pantalla g "Set"(configuraci6n)comienzaa destellar.Enlas
almohadillasnum@ricas,presione1 para Bajo,2 para Medio
o 3 para Alto.Lapantalla"1"cambia deacuerdocon
la almohadilla num@ricaseleccionada.Elcaj6ncalentador
seiniciaautomciticamente despu@sde presionar1,2 o 3.
"WARMERON"(calienteencendido)gel nOmeropermanecen
encendidos."Set"(configuraci6n)deja dedestellar.Enalgunos
modelos,presioneSTART(inicior).
Enolgunosmodelos- oltemeentre configurociones
presionondo el bot6n WARMINGDRAWER(coj6ncolentodor).
Para cancelar, presione el bot6n WARMING DRAWER (caj6n
colentodor).
NOTA:Presionarel bot6nCLEAR/OFF(borror/opogodo)
no apaga el caj6n calentador.
ZONA DE CALENTAMIENTO
Presioneparamantener calienteslosalimentoscocinados.
Verla secci6nCamouserla zone decalentamiento.
15
Page 68

C6mo usar el homo.
Para evitar posibles quemaduras, coloque las bandejas en la posici6n deseada antes de encender el homo.
Antes de comenzar...
Lacantidaddeposicionesde tabandeja
puedevariarenretaci6nal modelo.
Lasbandejas tienen topes,de modo
que cuando se las coloca correctamente
en los soportes se detendr6n antes
de salirse del todo, y no se volcar6n.
Cuando coloque o quite recipientes
de cocci6n, tire de la bandeja hasta que
sedetenga.
Enalgunos modelos,el elemento
calentador para horneado se encuentra
debajo del pisodel homo. No coloque
alimentos en el pisodel horno.
Para quitar una bandeja, tire de ella,
incline elextremo frontal hacia arriba
y s6quela.
Para volver a colocarla, deposite el
extremo de la bandeja (topesde detenci6n)
sabreel soporte, incline elfrente hacia
arriba y presione la bandeja hacia adentro.
I-APRECAUCION I
Cuandoutilice la bandeja en la posici6n
m4s boja (A),necesitar4 tenet cuidado
cuando Ioquite. Recomendamosque
desliceIobondejo voriospulgodos g luego,
utilizando dos agorrodems, Io quite
sosteniendode ombos lodos.Lo bandejo
seencuentm mug abajo gusted puede
quemorse si coloco la mona en Io mitod
de Io bondejo g tira hocio afuem. Tengo
mucho cuidado de no quemarse Iomona
con Iopuerto cuondo utilice Io bondejo
en Io posici6n mds bojo (A).
Papel de aluminio
Nout/l/cepopel dealuminio en elpiso
del homo.
Nunca cubra una bandeja par completo
con papel de aluminio. Estointerrumpir6
la circulaci6n de calory provocar6
un horneado incompleto.
Puedeutilizarseuna 16minade papel
de aluminio m6s pequefla para retener
losderrames coloc6ndola en una bandeja
m6s baja varias pulgadas debajo de
losalimentos.
16
Page 69

GEAppliances.com
Para evitar posibles quemaduras, coloque los bandejas en la posici6n deseada antes de encender el homo.
Precalentamiento y colocaci6n de recipiente
Nocotoquealimentosdirectamente
sabreet pisodet horno.
Poro evitor posibles quemaduras, coloque
los bondejos en lo posici6n deseodo antes
de encender el homo.
Precalientedelhomosiasi Ioindicalareceta.
Elprecalentamientoesnecesarioparaobtener
buenosresultadoscuandohorneepasteles,
galletas,pastelitosy panes.
Sivaa hornearcuatrocapasdepastel
al mismotiempo,coloquedoscapasen
la bandejaCy doscapasenlabandejaE.
Distribuyalosrecipientesdemodoqueno
quedendirectamenteunoencimadelotro.
Losresultadosde horneadoser6nmejoressi
losalimentossecentranbiendentrodelhorno.
Elpastel"Angelfood"eslaexcepci6ny debe
colocarseen labandejainferiordelhomo
(posici6nA).Sigalasinstruccionesdelpaquete
dealimentospreempaquetadosocongelados
paralaubicaci6ndelosrecipientes.Los
recipientesnodebentocarseentresiotocar
lasparedesdelhorno.Sinecesitautilizardos
bandejas,distribuyalosrecipientesdemodo
quenoquedendirectamenteunoencima
delotro.OejeaproximadamenteIYJ'(3,8cm)
entrerecipientesydesdeelfrente,partetrasera
y ladosdelasparedesdelhorno.
EE-
C6mo configurur el homo pure horneudo o rostizudo
[_ Presioneel bot6nBAKE(homear).
[_ Presionelasalmohadillasnum6ricashasta
queaparezcalatemperaturadeseada.
Presioneel bot6nSTART(iniciar).
Elhomoseiniciar6autom6ticamente.
Lapantallamostrar6PrEmientrasrealiza
el precalentamiento.Cuandoelhomoalcanza
latemperaturaseleccionada,elcontrol
delhomoemitir6variospitidosy la pantalla
mostrar6latemperaturadelhorno.
NOTA:Ustedescuchar4el ventilador
de convecci6n(enolgunosmodelos)mientros
el homo realiza elprecolentomiento.
El ventiladorsedetendr4 cuando el homo
sehoga precolentodo g lo pantallo
mostror4 la temperature configumda.
Estoesnormal.
ParacambiorIotemperaturadelhomoduronte
elcidoBAKE(hornear),presioneelbot6nBAKE
g luegolosolmohodillosnum_ricosporo
configurarlanuevotemperaturo.
Verifiqueelniveldecocci6nde
ii i
losalimentoscuandohayaalcanzado
eltiempominimaindicadoenlareceta.
Cocinelosm6ssi fuesenecesario.
Presioneelbot6nCLEAR/OFF
(borrar/apagado)cuandosehaya
finalizadoelhorneadoy luegoquite
losalimentosdelhorno.
.....\
.... \
17
Page 70

C6mo usar el homo.
C6mo configurar el horno para asar
Dejelapuertaabiertaen la posici6n
dedetencbndeasado.Lapuertaqueda
abierta,y aOnasisemantiene
latemperaturaadecuadaenethomo.
EltamaBo, peso,grosor,
temperatura inicial g
el punto de cocci6n preferido
afectar6n lostiempos
de asado. Estagala est6
basada en carnes a
temperatura de refrigerador.
t Et Ministefio de Agficuttura de
tos EE.UU. afirma: "ta came de res
jugosa es popular, pero debe
saberse que at cocinada a s6to
140°F (60°C) atgunos organismos
que provocan intoxicaci6n
atimentafia pueden sobrevivir't
(Fuente: Safe Food Book. Your
Kitchen Guide. USDA Re_
Junio 1985J
Si su cocina estd conectada a 208 voltios,
pueden asarse filetes jugosos precolentando
el asador £ colocando la bandeja del
homo en una posici6n m4s elevada.
UtiliceLO Broil (osarbajo)paracocinar par
completo alimentos coma aves o cortes
Presioneel bot6n BROILHI/LO (osor
%
alto/bajo) una vez para configurar
HI Broil (asaralto).
Para cambiar a LOBroil (asar bojo),
presioneel bot6n BROILHI/LO
(asaralto/bajo) de nuevo.
gruesos de came sin dorarlos de m6s.
Presioneel bot6nSTART(iniciar).
Coloquelacame opescadosabreuna
ii i
asadera dentro de una rejilladiseBada r_
para asar.
Cuando haga finalizado de asar,
presioneel bot6n CLEAR/OFF
(borrar/apagado).
[_ Siga las posiciones de las bandejas
sugeridas en la Guiode asado.
Guia de asado
Precalientela asadera durante 2 minutos para mejorar el desempe_o.
Alimento
Carnede res
Polio
Nivel
de coccion
Jugosa
140°F(60°C)
A punto
160°F(71°0)
Biencocida
170°F(77°C)
Tipo o grosor
Filetes
Grosorde 1"(2,5cm)
Filetes
3/4" a 1" (1,9cma
2,5cm)degrosor
Filetes
3/4" a 1" (1,9cma
2,5cm)degrosoro
8tties decamepica@
Pechuga,sin hueso
Posicion
de la bandeja*
Eo F(losalimentos
debenestar1"a 3"
[2,5cma7,6cm]det
elementodeasado)
E(losalimentosdeben
estarde3" a4"
[7,6cma 10,2cm]del
etementodeasado)
Do E(losalimentos
@benestarde3" a5"
[7,6cm a 12,7cm]det
elementodeasado)
C(los alimentos@ben
estarde8" a9"
[20,3cma22,9cm]del
elementodeasado)
Comentarios
Esdificilcocinarfiietes
demenosdela1" (2,5
cm)degrosoryque
quedenjugosos.Se
cocinanparcompteto
antesdedorarse.
Paraevitarque la
carnase enrosque,
cartela grasaa
intervalosde1" (2,5cm)
Asarsabreel lado
dela piel primero.
18
Filetes de
pescado
Chuletas
de cerdo
Biencocida
170°F(77°C)
Pechuga,conhueso
1/2" a 1" (1,3cma
2,5cm)degrosor
3/4" (1,9cm)
degrosor
C(los alimentos@ben
estarde7" a8"
[17,8cma20,3cm]det
etementodeasado)
Do E(losalimentos
@benestar3" a6"
[7,6cm a 15,2cm]det
elementodeasado)
D (losalimentos@ben
estarde6" a7"
[15,2cma17,8cm]det
etementodeasado)
Manipuiey girecon
muchocuidado.
Paraevitarquela carna
se enrosque,carte
la grasaaintervatos
de1" (2,5cm).
*Utilice la posici6nde bandejoA parael homo m6s peque_o con posici6nde 2 bandejos.
Page 71

C6moutilizarlascarocteristicas de homeado
rostizado con temporization o g nosmode os
NOTA:Los alimentos que se echan a perder con facilidad-como leche, huevos, pescado, rellenos, came de ave g cerdo-no
deben dejarse reposar par mas de 1 hora antes _jdespuds de la cocci6n, ka temperatura ambiente promueve el crecimiento
de bacterias dafiinas. Verifiqueque la luz del homo estd apagada porque el color proveniente de la bombilla puede acelerar
el crecimiento de bacterios.
GEAppliances.com
C6mo configurur un inicio inmediuto y un upugudo uutom4tico
Elhomo se enciende inmediatamente NOTA:Sonora untono de atencian si usted
FOFOEEEE
D D D EE
mmDD
l-qF1EliEli
y.cocino los alimentos durante un periodo
de tiempo seleccionado.AIfinalizar el
tiempo dRcocci6n,el homo seopogo
outomat_comente.
[_ Presioneel bot6n BAKE(homeor).
[_ Presionelas almohadillas num@ricas
para configurar la temperatura
deseada del homo.
[_] Presioneel bot6n COOKTIME
(tiempo decoccian).
NOTA:Sisurecetorequiereprecolentomiento,
puede necesitar agregor tiempo adicionol
ol tlempo de cocc/Sn.
[_ Presionelas almohadillas num@ricas
para configurar el tiempo de cocci6n
deseado. Eltiempo de cocci6n mhimo
que usted puede configurar es
1 minuto.
Latemperatura del horno que ha
configurado y el tiempo de cocci6n
ingresado aparecer6n en la pantalla.
[] Presioneel bot6nSTART(inicior).
esta utilizando homeado con temporizador
_jno presiono el baton START(iniciar).
Elhomo se encenderci (ON),g la pantalla
mostrar6 la cuenta regresiva del tiempo
de cocci6n g el cambio de temperatura
que comienzaen 100°F(38°C).(Lapantalla
de temperatura comenzar6 a cambiar
cuando latemperatura del homo Ileguea
los100°F[38°C]).Cuandoel hornoalcanza la
temperatura configurada,sonar@n5 pitidos.
Elhorno continuar6 cocinando par
el tiempo programado, luego seapagar@
de manera autom@tica,a menosque
seconfigure la caracterfsticaWARH
(calentar).Verla secci6nC6moconfigumr
el homo superiorpore montenercoliente.
[_ Sifuera necesario,presioneel bot6n
CLEAR/OFF(borrar/apagado) para
borrar Io pantallo. Quite losalimentos
del homo. Recuerde,aunque el homo
seapago autom6ticamente, los
alimentos que se dejen en el homo
seguir6n cocin6ndose despu_s
de apagado el mismo.
DDD[]D
D[]DDD
DDD[]D
DDDDD
DDD[]D
DDDDD
C6mo configurur un inicio returdudo y un upugudo uutom6tico
Elhomo seencenderaen elhoratio gue
usted haga configurado,cocinar6 alimentos
durante un perfodo de tiemRoespedfico
y luego se opogor6 automotlcomente.
Aseg0resede queel relojmuestre la hora
correcta.
171 Presioneel bot6n BAKE(homeor).
Presionelas almohadillas num@ricas
para configurar la temperatura
deseada del homo.
_l Presioneel bot6n COOKTIME
(tiempo de coccian).
NOTt_:Sisurecetorequiereprecalentomiento,
puede necesitar agregor tiempo adicionol
ol tiempo de cocc/bn.
[_ Presionelas almohadillas num@ricas
para configurar el tiempo de cocci6n
deseado. Eltiempo de cocci6n
mfnimo que usted puede configurar
es 1 minuto.
Latemperatura del horno que ha
configurado y el tiempo de cocci6n
ingresado aparecer@nenla pantalla..
[_ Presioneel bot6n DELAYSTART
(inicioretordado).
I_ Presionelas almohadillas num@ricas
para configurar la hora en quedesea
clueel horno se encienda g comience
lacocci6n.
Presioneel bot6n START(inicior).
NOTA:Sonora untono de atencian si usted
esta utilizando homeado con temporizodor
_jno presiona el bot6n STARTliniciar).
NOTA:Sidesea verificar los horarios que
ha configumdo, presioneel bot6n DELAY
START(inicioretordodo)pore contmlor
lo horo de inicio configumdo o presione
el baton COOKTIMEItiempode coccian)
pore verificor lo extensionde cocdan que
ha configumdo.
Cuandoel horno seenciende(ON)en
el hororio que ha configumdo, la pantalla
mostmr6 Io cuenta regresivadeltiempo
de cocci6n y la nuew temperature
comenzando en 100°F(58°C).(Lapantalla
de temperature comenzar6 a cambiar
cuondo la temperature del horno Ileguea
los 100°F[38°¢].)Cuondo elhorno alcanza
la temperature configumdo, sonar6npitidos.
Elhorno seguir6 cocinando dumnte un
perfodo de tiempo determinodo y luego
seapagar6 autom6ticamente.
[_ Sifuem necesario,presione el bot6n
CLEAR/OFF(borrar/apagado) pora
borrar la pantalla. Quite los alimentos
del homo. Recuerde,aunque el homo
seopogo autom6ticamente, los
alimentos que se dejen en el homo
seguir6n cocin6ndose despu_s
de apagado el mismo.
19
Page 72

C6mo usor Io sondo. (en algunos modelos)
Enmuchos alimentos, especialmenteasadosy carnes deave,la temperatura interna delosalimentos esla mejor prueba
para verificar el grado de cocd6n.Mediante la sonda de temperatura se evita tenerque adivinar elgrado de cocci6n
_IseIogra elpunto de cocci6nexacto.
'-I PRECAUCION I %"'°
Paraevitarquemaduras,nodesenchufetosonda
Lasondadetemperaturacuentacon una
sondasimilara un pinch0en un extremo
y unenchufeen et0tr0 oxtremoquoso
introduceonta bocade saiidadet homo.
detaboca desatidadethomo hastaquedste .. Sonda
sehaga enfriado.
Eluso de sondasdistintas a las provistas
con este producto puede provocarles da_os
alas mismas o al control delhorno.
Utilicelas manijas de la sonda y elenchufe
cuando las introduzca y quite de los alimentos
y de la boca de salida.
Paraevitar dahos ata sonda,no utiticepinzas
para tirar detcable cuando toquite.
Parano romper tosonda, verifique que
losatimentos estdntotatmente descongetados
antesde introducirta.
Despu_sde preparar la came g colocarla
en un posafuenteso sobrela rejillade la asadera,
sigaestas instrucciones para una colocaci6n
adecuada de la sonda.
Introduzca la sonda completamente
en la came. No debe tocar hueso,grasa
ocartilago.
NOTA:Noinsertar por completo to sonda dentro
detacamepuede provocar unpobre desempeho
de cocciOnporque to sonda detectardetaire
dethomo g no tatemperatura de los atimentos.
Nunca dejeta sonda dentro dethomo durante
un cictode auto-timpieza o de asado.
No guarde tosonda dentro det homo.
Paraasados sin hueso,introduzca la sonda
dentro de la parte m6s carnosa. Parajam6n
ocordero con hueso,introduzca lasonda
en elcentro del mOsculogrande m6s bajo.
Introduzca la sonda en elcentro de platostales
como pan de came oestofados.
Introduzca la sonda dentro de la parte m6s
carnosa del muslo interno desde abajo gen
forma paralela a la pata de un pavo entero.
NOTA:Nose podrdn utitizartasconfiguraciones
de auto-timpieza ni de asado sitosonda
de temperatura seencuentra enchufada.
yquitelaetiquota
as
iii Fql-qFqFql-qi ¸
20
C6moconfigurar elhomo para horneado/rostizado cuando usa la sonda
(enalgunos moddos)
[7] Introduzca lasonda por completo
en los alimentos.
Enchufela sonda dentro de la boca
de salida delhorno. Verifiqueque est_
introducida hasta el fondo. Cierrela puerta
del horno. Verifique que elcable de
la sonda no toque el elemento asador.
Presioneel bot6n PROBE(sonda).
%
Lapantalla mostrar6 "SetProbe"
(sondaconfigurada).
Presionelas almohadillas num_ricas
para configurar latemperatura interna
deseada de losalimentos ode lacarne.
Latemperatura interna m6xima a la que
pueden configurarse los alimentos es
200OF(93°C).
I_ Presioneel bot6n BAKE(homear).
I-x-] Presionelasalmohadillas num@ricas
para configurar latemperatura deseada
del horno.
[]7] Presioneel bot6n START(iniciar).
Lapantatta destettardsi tasonda seencuentra
enchufada dentro de ta boca de satida g usted
no ha configurodo una temperatura desonda
gpresionado el bot6n START(iniciar).
Despu_sde que la temperatura interna
de los alimentos alcance los IO0°F(38°C),
la temperatura interna cambiante podr6
verseen la pantalla.
Cuando la temperatura interna de
[]
losalimentos alcanza la cifra que usted
ha configurado, la sonda y el horno
se apagan y los controles del homo
comienzan a destellar.Para detener
el destello, presioneel bot6n CLEAR/OFF
(borrar/apagado). Utiliceguantes de cocina
para quitar la sonda de los alimentos.
No utilice pinzas para quitarla, porque
podrian da_arla.
Si ta sondase quitadet homo mientras
seestaba cocinando, el homo no seapagard
automdticamente.
Paracambiar latemperatura del homo
durante el ciclo de horneado/rostizado, presione
el bot6n BAKE(homear)y luego las almohadillas
num_ricas para configurar la nuevatemperatura.
Puede utilizar ettemporizador decocina
aunque nopueden usarse operaciones
det homo con temporizador mientras se utitice
ta sonda.
Page 73

C6mousar el temporizadordecocina. GEAppliances.com
! f i¸
(enatgunosmodetos)
TIMER TIMER
I
ON OFF
(enalgunosmodelos)
Eltemporizadordecocinautitizahoras
y minutos.
Eltemporizadordecocinanocontrota
lasoperacionesdethomo.Laconfiguraci6n
m_salta dei temporizadorde cocina
esde g horasy59minutos.
C6mo configurar el temporizador de cocina
Presione los botones KITCHENTIMER
%
ON/OFF (temporizador de cocina
encendido/apagado) o TIMER ON
(temporizador encendido)
(dependiendo del modelo).
Toque lasalmohadillas num@icas
Pq
hasta que aparezca en la pantalla
el tiempo que desea.Porejemplo,
para configurar 2 horas U45 minutos,
presione2,4 USen eseorden.
Sicomete un error,presione el bot6n
KITCHENTIMERON/OFF
(temporizador de cocina
encendido/opagado) o TIMER OFF
(temporizador apagado) (dependiendo
del modelo) g comience de nuevo.
Presioneel bot6nSTART(iniciar).
%
C6mo reconfigurur el temporizudor de cocinu
Sila pantalla todada muestra el tiempo
restante, usted puede cambiarlo
presionando el bot6n KITCHENTIMER
ON/OFF(temporizodorcocino
encendido/opogado) o TIMERON
(temporizadorencendido)(dependiendo
del modelo),luego presione las
almohadillas num@icashasta que
aparezca en la pantalla eltiempo que
desee.
Despudsde presionarel bot6n START
(iniciar),SETdesaparece;estole indica
que hob/uno cuento regresivo,aunque
Iopontolla no combia hosto que hoblo
pasodo un minuto. Lossegundos no
podrdn verseen la pontallo hosta alconzor
Iocuento regresivodel Oltimominuto.
Cuandoeltemporizador alcanza:00,
el control sonar63 veces seguidode
un pitido cada 6 segundoshasta que
sepresioneel bot6n KITCHENTIMER
ON/OFF(temporizodorcocino
encendido/opogodo)o TIMEROFF
(temporizadoropogodo)(dependiendo
del modelo).
Eltono de 6segundos puedecancelarse
siguiendolospasos incluidosen la secci6n
Camcteristicasespecialesdeloscontroles
del homo bajo "Seholessonoms ol finolizor
un cido con temporizodor't
Siel tiempo restante no aparece en
la pantalla (en la pantalla aparecen el reloj,
el inicio retardado Uel tiempo de cocci6n),
Osteaparecer6 presionandoel bot6n
KITCHENTIMERON/OFF (temporizador
codna encendido/apogodo)o TIMERON
(temporizadorencendido)(dependiendo
del modelo) g luego presionando
lasalmohadillas num@icas para ingresar
el nuevo tiempo que desee.
(enalgunosmodelos)
I TIMER TIMER
ON OFF
(enalgunosmodelos)
C6mo canceler el temporizudor de cocinu
Presione los botones KITCHENTIMER
ON/OFF (temporizador de cocina
encendido/opagado) o TIMER ON
(temporizador encendido) (dependiendo
del modelo) dos veces o presione TIMER
OFF(temporizador apagado).
21
Page 74

iAjuste el termostato del horno usted mismo!
Esposible que su nuevo homo cocine de manera diferente a la que usted se encuentra acostumbrado.
Utilicelo durante algunas semanas para familiarizarse con sus funciones. Si luego de este periodo considera
que la temperatura del homo es demasiado baja o demasiado alto, usted puede regular el termostato.
No utilice term4metros, coma los que se venden en los tiendas, para verificar la configuraci4n de temperatura
del homo. Esos term4metros pueden variar entre 20-40 grados.
NOTA:Este ajuste s41oafecta los temperaturas de homeado g rostizado; no afecta los temperaturas de asado
o de auto-limpieza. El ajuste se conservard en la memoria aOn despu4s de un carte de energia.
C6mo ajustar el termostato
[_ Presione los botones BROIL HI/LO
(asaralto/bajo) g BAKE(hornear)
al mismo tiempo hasta que
en la pantalla pueda verseSF.
Presioneel bot6n BAKE(homear).
Enla pantalla sever6 un nOmero
de dos dgitos.
PresioneBAKE(hornear)de nuevo
(enalgunosmodetos)
ED@DEDQG
GGEDGED
®
(enalgunosmodelos)
para alternar entre subir g bajar
la temperatura del horno.
Para ajustar eltermostato del horno
superior,presioneel bot6n BAKE
(homear)del horno superior.Para
ajustar el termostato del homo
inferior,presioneel bot6n BAKE
(homeor)del horno inferior.
La temperatura del horno puede
%
subirse en (+)35°F(19°C)o bajarse
en (-)35°F(19°C).Presionelas
almohadillas num@icasde lamisma
manera en que laslee.Parejemplo,
para cambiar latemperatura del
horno 15°F(8°C),presione I y 5.
Cuandohaga finalizadoel ajuste,
[]
presioneel bot6n START(iniciar)para
volvera lapantallade lahora.Utilice
el homo de la manera normal.
iEItipo de margarina utilizado modifica elhorneado!
Lo mayoria de los recetas de homeado inclugen productos de alto contenido graso tales coma la manteca
o la margarina (80% de grasa). Si se reduce el contenido de grasa, el resultado final puede ser diferente
al esperado.
Si se utilizan productos de bajo contenido graso en tortas, pasteles, masas, galletas o dulces, la receta puede
ffacasar. A menor contenido graso, m%lores diferencias en el resultado final.
Lasnormas federales exigen que los productos con denominaci6n de "margarina" tengan un contenido graso de al menos
80% en relaci6n al peso. Losproductos de bajo contenido graso contienen menos grasa Um6s agua. Elelevado contenido
de humedad de estosproductos afecta latextura y el sabor de los alimentos horneados. Para obtener los mejores
resultados con sus recetas tradicionales favoritas, utilice margarina u otros productos con un contenido de par Iomenos
70% de aceite vegetal.
22
Page 75

C6mousar el homodeconvecci6n. GEAppliances.com
CONVECTION
iill i!
........ jj_
Posici6ndebandejasmOItiples.
Cocci6n por convecci6n (enalgunos modelos)
Elhorno deconvecci6n vienecon
un modo de cocci6n por convecci6n
g puede utilizarsepara horneado
por convecci6n de 1 bandeja u horneado
por convecci6n con bandejas mOItiples.
Funcionamiento del ventilador de convecci6n
Enun homo deconvecd6n, unventilador
hacedrculor aire calientesobre,pot debojo
g olrededor de los olimentos.
Estacirculoci6nde oirecalientese distribuge
de monem parejo a tmv@sde Io cavidad
del homo. Como resultado,losolimentos
secocinon g domn en formo porejo,
o menudo en menos tiempo.
Horneado por convecci6n con bandejas m(lltiples
ii I
Debidoa que el aire caliente circula
en forma pareja entodo el homo,
[_ losalimentos pueden hornearse
[_ con excelentesresultados usando
bandejas mOItiples.
Elhorneado con bandejas mOItiples
puede incrementar un poco lostiempos
de cocci6n de algunos alimentos, pero
el resultado total es el ahorro de tiempo.
Lasgalletas,muffins, bizcochos g otros
panes r6pidos Iogran resultados mug
buenos con el horneado con bandejas
mOItiples.
NOTA:Parapotenciar al m6ximo
una cocci6n pareja, el ventilador est6
dise_ado para girar en ambas direcciones,
con una pausa entre elias.Estoes normal.
Elventilador deconvecci6n seapaga
cuando seabre la puerta de homo. NO
DEJEla puerta abierta durante perfodos
prolongados mientras utiliza la cocci6n por
convecci6n ga que puede acortar la vida
Otildel elemento calentador de convecci6n.
Cuando hornee con 3 bandejas,
coloque una en la segunda (B)posici6n,
otra en la cuarta (D)posici6n g la tercera
en la sexta(F)posici6n.
Para horneado con dos bandejas,coloque
una en la segunda (B)posici6n.Coloque
la otra bandeja en la quita (E)posici6n.
Horneado por convecci6n con 1 bandeja
Cuando realice un homeado por convecci6n
con s6Io 1 bandeja, coloque los alimentos
en el centro del homo.
C6mo adaptar recetas...
Usted puede utilizar sus recetas favoritas
en el homo de convecci6n.
Utiliceeltomato de recipiente
recomendado.
Algunas instrucciones en paquetes de
estofados congelados o platos principales
ban sido desarrollados utilizando homos
de convecci6n comerciales. Para mejores
resultados, precaliente el homo g utilice
la temperatura para homeado comOn
indicada en el paquete.
23
Page 76

C6mousar el homodeconvecci6n, mod o ;
Rostizado par convecci6n (enolgunos modelos)
Asadera
9Frorararq¸El¸¸¸¸¸¸¸¸¸¸¸¸¸¸¸¸¸¸¸¸¸
t _ii!_i_i__ii_ iii!_i_iii_!iiiiiii_I
(enalgunosmodelos)
@
/ i i ii i
i(Z)GGGG
iG(Z)(Z)QG:
(enalgunosmodelos)
Buena para gmndes cortes de came
tiemo, sin cubrir.
Elventiludor de convecci6n huce circular
el uire culiente en forma pureju sabre g
ulrededor de losulimentos. Luscurnes de
resg de ave sedorun par completo coma
sise hubiesencocinodo con un rostizudor
girutorio. Eluire culiente sellu Iosjugos
r6pidumente puru Iogrur un producto
jugoso g tierno mientrus, ol mismo
tiempo, secreu unu ricu cupu externu
murr6n dorudu.
C6mo configurar el horno para horneado o rostizado par convecci6n
I_ Presione el bot6n CONVECTIONCOOK /a temperatura de convecci6n apropiada
(cocci6nparconvecci6n)o CONVECTION en e/ modo de homeado par convecci6n.
BAKE(homeado par convecci6n) una Vet la Conversi6n Autom4tica de Recetos'"
vezporo horneodopar convecci6nde
bondejosm01tiples.Estemodose utilizo
para cocinor alimentosen m6sde una
bandejo (esdecir,2,3 o m6s bondejos)
ol mismo tiempo en horneodopar
convecci6n.Porom6s informoci6n,
verIosecci6nHomeadopar convecci6n
conbandejosmOltiples.
Presioneel bot6nCONVECTIONCOOK
(cocci6nparconvecci6n)o CONVECTION
BAKE(homeadopar convecci6n)dos
vecesporo horneodoparconvecci6n
en uno bondejo.Estemodoseutilizo
poro cocinorolimentosen s61ouno
bandejoen horneodoparconvecci6n.
Presioneelbot6nCONVECTIONROAST
(rostizadopar convecci6n)para
rostizado par convecci6n (enalgunos
modelos).
Presionelas almohodillos num_ricas
[]
para configurar la temperatura
del horno.
Presioneel bot6nSTART(iniciar).
NOTA:Sila caracterfstica de Conversi6n
Autom4tica de Recetas'" se encuentra
activada, reducird en forma autom4tica
la temperatura de homeado regular
configurada en 25°F H3,5°C) hasta
Cuando est_ rostizando par convecci6n,
resulta importante que utilice la asadera
9 la parrilla para mejores resultados de
rostizadopar convecci6n. Laasadera
se utiliza para retener losderrames
de grasay laparrillaseus(]para
prevenirsalpicadurasde grasa.
en la secci6nde Comcterfsticosespedoles.
Paracambiar la temperatura del homo,
presioneel bot6n CONVECTIONCOOK
(cocci6nparconvecci6n),CONVECTIONBAKE
(homeadopar convecd6n)o CONVECTION
ROAST(osodopar convecd6n)g luego
lasalmohadillas num@ricaspara configurar
la nueva temperatura.
Cuando el horno comienza a calentar,
podr6 verse la temperatura cambiante,
comenzando a 100°F(38°C).Cuando el
horno alcanza latemperatura configurada,
sonar6n 3 pitidos.
[] Presioneel bot6n CLEAR/OFF
(borror/opogodo)cuando haga
flnolizodo.
, Mientmscocinepar convecci6nseoir4
un ventilador. Elventilador se detendr4
cuandoseabra la puerto peru el color
no se apagard
, Dumnte el homeado,pueden escucharse
chasquidospmvenientes del homo.
Estoesnormal.
_,En los modos de homeado par
convecci6n, g pore potenciar ol m4ximo
una cocci6n porejo, el ventilador
est4 dise#ado paro giror en ambas
direcciones, con una pausa entre elias.
Estoesnormal.
24
Page 77

Cuandohorneegalletas,obtendr_
mejoresresuitadossi usauna plancha
planaparagalletas en lugarde un
recipientede ladosbajos.
Recipientes para cocci6n por convecci6n
Antesde utilizarel hornode convecci6n,
verifique que suselementos de cocci6n
dejen espaciosuficiente para la circulaci6n
de aire en el homo. $iva a hornear con
varios recipientes,deje un espacio entre
ellos.Adem6s,asegOresede que los
recipientesno se toquen entre sfo
toquen lasparedesdel horno.
Papelg pl(_stico
Losrecipientesde papel g pl6stico
resistentesal calor recomendados para
utilizar en horneado normal tambi6n
pueden utilizarse para horneado por
convecci6n,pero no deben utilizarse
a temperaturas m6s elevadasque
la temperatura recomendada por
elfabricante de loselementos de cocci6n.
Tambi6n pueden utilizarseelementos
de cocci6n pl6sticos resistentes
a temperaturas de 400°F(204,4°C).
Metal g vidrio
Cualquiertipo de recipiente de cocci6n
funciona en su horno de convecci6n;
sinembargo, los recipientes de metal
secalientan m6s r6pidamente g se
recomiendanpara horneadopor convecci6n.
Losbondejososcums o con ocobodo
mote horneon olimentos mds rdpido
que los brillontes.
Losrecipientesde vidrio o cerdmico
cocinon rods despocio.
Para recetas como polio horneado, utilice
un recipienteconladosbajos.Elairecaliente
no puede circular bien alrededor de los
alimentos en un recipiente de ladosaltos.
GEAppliances.com
C6mo usar las caracteristicas con temporizador
para cocclon por convection. (endgunos modelos)
Mientms cocine conestoscomcterfsticosseescuchor6un ventilodor.Elventilodor se detendrd cuondo seohm Io puerto pero
el color no se opogord.
NOTA:Losolimentosque seechon o perder con focilidod-como leche,huevos,pescodo,rellenos,come deoveg cerdo-
no deben dejorsereposorpot rods de 1 horn ontesg despu_sde Io cocdOn.Lotemperature ombiente promueve
el crecimientode bocterios dominos.Verifiqueque Ioluzdel homo est_opogodo porque el colorproveniente
de Io bombillo puede ocelemr el credmiento de bocterios.
CONVECT,ON
, COOK
CONVECTION
COOK
C6mo configurar un inicio inmediato y un apagado autom6tico
Presionela funci6nde convecci6ndeseada.
Contin0econel paso 2de COmoconfigurar
un inicioinmedioto_junopagodoautomdtico
de lasecci6nCOmoutilizorloscoracterlsticos
dehorneado_jrostizodocontemporizodor.
C6mo configurar un inicio retardado _1un apagado autom6tico
PresJonela funcJ6nde conveccJ6ndeseada.
ContJnOeconel paso2de C6moconfigurar
un inicioretardado_junopagodoautom6tico
de lasecci6nC6moutilizorloscoracteristicos
dehorneado_jrostizadocontemporizador.
25
Page 78

C6mousar el homodeconvecci6n, oU no mod o ;
C6mo configurar el horno para rostizado por convecci6n cuando
se usa la sonda
Paramejoresresuitados,cuandorostice
pavosy asadosgrandes,recomendamos
etusode la son@inciuidaen ethomo
deconvecci6n,
DD[]DD
DD[]DD
DD DD
DDDDD
Paracambiarla temperaturadet horno
duranteetciclo derostizadopor
convecci6n,presioneetbot6n
CONVECTIONCOOK(cocci6npor
convecci6n)y luegopresionelas
almohadiilasnum@icasparaconfigurar
la nuevatemperaturadeseada.
PRECAUCKSNI
Paraevitarquemaduras,nodesenchufe
la sondadela bocadesalidade!homohasta
quedstesehaya enffiado.
I_ Coloquelabandejadelhomo
en la posici6nquecentra losalimentos
entrela parte superiore inferior
delhomo. Introduzcalasonda
en lacame.AsegOresede que haga
entradopor completo.
121 Enchufelasondadentrode laboca
desalidadelhomo.Verifiqueque est_
introducidahastaelfondo. Cierre
la puerta del homo.
Presione el bot6n PROBE(sonda).
%
Presionelas almohadillasnum@icas
para configurarla temperatura interna
deseadadela carne.
NOTA:Latemperaturainternam6xima
a laquepuedenconfigurarselosalimentos
es 200°F(93°C).
r51 Presione el bot6n CONVECTIONCOOK
(cocci6npor convecci6n).
r_ Presionelas almohadillasnum@icas
para configurarla temperatura deseada
delhomo.
La pantalladestellar6PROBE(sonda)
g el controldel homoindicar6si lasonda
seencuentraenchufadadentrode laboca
de salida,gsi ustedno haconfigurado
una temperatura desonda g presionado
el bot6n START_iniciar).
rT] Presioneel bot6nSTART(iniciar).
Cuandoel homocomienzaa calentar,
la palabraLO(baja)aparecer6en lapantalla.
Despu@sdeque latemperaturainterna
de lacamealcancelos:)_O0°F(38°C),
latemperaturainternacambiantepodr6
verseenla pantalla.
[_ Cuandolatemperatura interna
de lacame alcanzala cifraque usted
ha configurado,lasondag elhomo
seapagan g loscontrolesdelhomo
destellan.Paradetenereldestello,
presioneelbot6nCLEAR/OFF
(borrar/apagado).Utiliceguantes
decocina paraquitar la sonda de
losalimentos.Noutilicepinzaspara
quitarla,porquepodrfandaflarla.
NOTA:Si la sonda se quita de! homo mientras
se estaba cocinando, e!horno no se apagard
automdticamente.
NOTAS:
, h'lientras cocine con esta caracteristica
se escuchard un ventilador. E! ventilador
se detendrd cuando se abra la puerta pero
e!calor no se apagard.
, Puede usarse e! temporizador de la cocina
aunque no pueden utilizarse las operaciones
de homo con temporizador.
, Nunca deje lasonda dentro de! homo
durante un cic!o de auto-limpieza.
, No guarde la sonda dentro de! homo.
, La sonda no debe utilizarse en las funciones
de asado b!de auto-limpieza.
, E!ventilador s6!o gira en una direccian.
26
Guia de rostizado por convecci6n
Came
Carne Asado de costilla (4 a 8 Ibs. [1,8 a 3,6 kg])
de res Cony sin hueso
Sotomillo de came de res
(4 a 6 Ibs [1,8 a 2,7 kg])
Sotomillo de came de res
(2 a 3 Ibs. [0,9 a 1,4 kg])
Cerdo Conhueso, sin hueso (3a 5 Ibs.[1,4 a 2,3 kg])
Cordero Con hueso (5 a g Ibs. [2,3 a 4,1 kg])
Sin hueso (4 a 7 Ibs. [1,8 a 3,2 kg])
Carne Potlo entero (5 a 7 Ibs.[2,3 a 3,2 kg])
de ave Pavo, entero*
Sinretleno(t0 a16 Ibs [4,5a7,3kg]) 325°F(163°C)
Sinrelleno(18a24 Ibs.[8,2a10,gkg]) 325°F(163°C)
Pechugade pavo(4a6 Ibs.[1,8a2,7kg]) 325°F(163°C)
*Las ayes rellenas generalmente requieren 30-45 minutos de tiempo adicionales de rostizado. Cubra las paras
y la pechuga con papel met61ico para evitar que la came se oscurezca demasiado o se seque.
Jugosa 325°F(163°C)
Apunto 325°F(163°C)
Jugosa 425°F(218°C)
Jugosa 425°F(218°C)
Apunto 325°F(163°C)
Apunto 375°F(191°C)
Temp.homo
325°F(163°C)
350°F(177°C)
Temp. interna
145°F(63°C)
160°F(71°C)
145°F(63°C)
145°F(63°C)
160°F(71°C)
165°F(74°C)
165°F(74°C)
170°F(77°C)
o o o o
170-180 F(77-82 C)
o o o o
170 180 F(77 82 C)
170°F(77°C)
Page 79

C6mousar las caracteristicas decocci6nlenta,
pizza,calentamientoy leudado.
RIESGODE INTO,WICACI6NALIMENTARIA: Por debajo de los 140°F (60°C) puede
ADVERTENCIAI
IT1EZ]IT1E]
DIZIEZ]FIlT1
IT1F1EE]FIlT1
Guia de cocci6n lenta
Posicion Config.
Alimento
Came de res
Asadodecuarto
delantero
Costitlas
Came de ave
Polioentero
Trozosde potlo
Cerdo
Asadodepaleta
sin hueso
Chuletasdecerdo
estitodecampo
Chuletasdecerdo
Sopa
Sopade came
vegetal
Chile
Cantidad bandeja alimentos (Horas) Comentarios
3 3_AIbs. C 2-Carnes
(1,4 1,6 kg)
3!_-4 Ibs. C 2-Carnes
(1,6-1,8 kg)
4 Jbs.(1,8kg)
8trozos
(aprox.3Ibs.
[1,4kg])
3-4 Ibs.
(1,4 1,8 kg)
3!A-4 Ibs.
(1,6-1,8kg)
4d3 lbs.
(1,8-3,6 kg)
4cuartos
degalen
(3,8liters)
4cuartos
degai6n
(3,8liters)
de la de los Tiempo
C6mo configurar el homo inferior para cocci6n lenta
Lacocci6nlentaest6disefladapara perbdos [_ Presionelas almohadillasnum@icas
prolongadosdecocci6nsinatenci6n, paraconfigurareltiempo de cocci6n
_TJ Presioneel bot6nSLOWCOOKIcocci6n serde porIomenos3 horas,hasta
[]
producirse crecimiento de bacterias en los alimentos.
• Siempre empiece con alimentos calientes. No utilice configuraciones
de mantener caliente para calentar alimentos frios.
• No caliente alimentos por mds de 2 horas.
No seguir estas instrucciones puede provocar enfermedades tmnsmitidas
por los alimentos.
lenta), un m6ximo 11 horas59minutos.
Presionelas almohadillasnum@icas
paraseleccionarlaconfiguraci6n
deseada:1 para came de ave g 2 para
carnes.Utilice2-Carnessi nosabebien
qu@configuraci6nutilizar.
1-Carne
deave
1-Carne
deave
2-Carnes
2-Carnes
2-Carnes
2-Carnes
2-Carnes
HI(alta)
5-6 hrs.
LO(baja)
8-10 hrs.
HI(atta)
3-4 hrs.
LO(baja)
6-8 hrs.
HI(alta)
4-5 hrs.
LO(baja)
7 9hrs.
HI(aita)
3-4 hrs.
LO(baja)
5 6hrs.
HI(alta)
5-6 hrs.
LO(baja)
8-10 hrs.
HI(atta)
3-4 hrs.
LO(baja)
6-8 hrs.
HI(atta)
3-4 hrs.
LO(baja)
6-8 hrs.
HI(alta)
4-5 hrs.
LO(baja)
8-10 hrs.
HI(alta)
3-4 hrs
LO(baja)
6-8 hrs.
Agregue1/2 tazade I[quido.
Cotoquelascostiltasen
unasob cap&
Agregue1/2 tazade I[quido.
Mejor cotoquebajounasalsa
paraqueno se seque.
Agregue1/2 1tazade I[quido.
Cotoquelascostiltasen
unasob cap&
Cotoquelaschuletasen
unasob cap&
AsegOresedeque lostrozos
decameest_nsumergidos.
Sumerjalosfrijotes paraque
nosesequen.
GEAppliances.com
deseado.Eltiempo de cocci6ndebe
141 Presione el bot6n START(iniciar).
NOTA:Si ocurre un corte de energia durante
la cocci6n lenta, la cocina se apagard.
consejos sobre la guia
ElprogramadecoccJ6nlentautJlJza
unaseriecomplejadeciclosdetemperatura
para obtener los mejoresresultados.
Porestaraz6n,serecomiendaque
el programa decocci6nlentafuncione
sincancelacionesni reiniciaciones.Si
sereiniciala caracteristicade cocci6n
lentamJentrasseencuentra enprogreso,
la came puedecocinarsedem6s.
, Paracarnejugosa gtierna,elijacortes
decame comoasadodecuarto delantero
o un asadode paletasinhueso.Loscortes
decame m6smagros,como elcuarto
traserosuperior,son m6ssecosg pueden
necesitarliquidoadicional.
, Utilices61oplatosde vidrio o cer6mica.
Lasollasg sartenesde metaltienden
atransferirel calora losalimentos
demasiador6pido.
, Ajustela cantidadde alimentosal tamafio
delrecipiente.LleneelrecipientehastasA
para mejoresresultados.Unaolla mug
grandedejaescaparelvapor,Ioqueseca
losalimentos.
, Siemprecubrala ollacon unatapa o con
papeldealuminio.
, Puedeusarseuna gama mdsamplia
derecetascon lacaracteristicadecocci6n
lenta.Paramejoresresultados,deben
realizarsealgunosajustes,para recetas
detamafios mdspequefios,comience
a controlaren eltiempo mfnimo.Para
recetasm6sgrandeso cuando doble
lascantidadesde lasrecetas,losalimentos
puedencocinarsepot perfodosm6s
prolongados.
, Cuandolacaracteristicadecocci6nlenta
finaliza,el hornocambiaautom6ticamente
elmodo "warm"(mantenercaliente).Sise
deseatiempoadicionalpara cocci6nlenta,
estemodode mantenercalientepuede
utilizarseparaobtenertiempo extra.
27
Page 80

C6mousar las caracteristicas decocci6nlenta,
pizza,calentamiento y leudado.(cont.)
C6mo configurar el horno superior para pizza
Ajustela posici6nde la bandejapara eltipo
de recipientepara pizzaqueseest6 usando
(vertabla).
[_ Presioneel bot6nPIZZA.
Presionelas almohadJllasnum6ricas
paraseleccionar1 para pizzafresca
g 2 para pizzacongelada.
Presionelas almohadillasnum6ricas
para configurarla temperatura
de horneado.
[_ Presione el bot6n START(iniciar).
Eltiempo de horneado est6 determinado
por las instrucciones del paquete.
"[ipode recipiente Posici6n de
de pizza la bandeja
Reripienteton pizzafresra B
Pizzacolocadadirertamente B
sobrelabandeja
Recipientedemetal A
i ZZZZZZZZZZ ¸¸
i [
WARM
[
START
PROOF ]
i_i_/::! _' _ i:_!iii_I
START
TIMER
oN
CLEAR
[
OFF
(Enatgunosmodelos)
C6mo configurar el horno superior para mantener caliente
La caracterfstica WARM (caliente)mantiene
calientes los alimentos cocidos.
Esta caracterfstica no est6 disenada para
recalentar alimentos fibs.
Para utilizar la caracterfstica WARM (caliente),
presione el bot6n WARM g luego el bot6n
START(iniciar).
Para utilizar la caracterfstica WARM (caliente)
despu6s de horneado por temporizador, siga
estos pasos:
Presione el modo hornear.
I-9---IPresione las almohadillas num6ricas
para configurar latemperatura del horno.
C6mo configurar el horno para leudar (enalgunosmoddog
La caracteristica de leudado mantiene un medio caliente Oti!para leudar productos con levadura.
_] Coloque la masa cubierta Para evitar bajar la temperatura de!homo
en un recipiente dentro del homo y pro!ongar e!tiempo de leudado, no abra
en las bandejas B o C. la puerto de! homo innecesariamente.
NorA: Para mejores resultados, cubra
la masa con un paho o un envoltorio pldstico
enmantecado (e!pldstico puede co!ocarse
debajo de! recipiente para que e! ventilador
de! homo no !o desplace).
Presioneel bot6nPROOF(leudar)
r_l
g luegoel bot6n START(iniciar).
Enla pantallapodr6versePrF(leudar).
La luzinternadelhomo se enciende
g contin0a encendidadurante el leudado.
Lacaracterfsticade leudado
autom6ticamente brindalatemperatura
6primapara el procesode leudado,g por
Iotanto no existeun ajustedetemperatura.
Configureeltemporizadorpara
I_] eltiempo de leudadomfnimo.
[_ Presione el bot6n COOK TIME
(tiempo de cocci6n).
Presione las almohadillas num@icas
para configurar el tiempo de cocci6n
deseado.
j_j Presione el bot6n WARM (caliente).
Presione el bot6n START(iniciar).
%
NOTA:Los recipientes, tapas o envoltorios
pldsticos se derretirdn si se !os co!oca en
e! homo. E!pldstico derretido no puede
removerse b!esto no se encuentra cubierto
por la garantia.
Verifique antes de tiempo los productos
panificados para que no leuden de mds.
NOTAS:
, No utilice e! modo leudar pare calentar
alimentos o para mantener los calientes.
La temperature de leudado de! homo
no es !o suficientemente caliente pare
conservar alimentos a temperatures
segums. Use la camcteristica WARM
(caliente)para mantener los alimentos
calientes.
, E!leudado no funciona cuando e! homo
tiene una temperatura mab!or a 125°F
(51,7°C).Enla pantalla podrd verse "HOT"
(caliente).
28
(Enalgunosmodelos)
I_ Cuandohaya finalizadode leudar,
presioneelbot6nCLEAR/OFF
(borrar/apagado).
Page 81

C6mousar los hornos auto-limpiantes
superior einferior.
Antes de un ciclo de limpieza
DEINCENDIO:Limpiela grasabl
• ad rebel@dd piso dd homo antes
lo auto-limpiezo.Nohocerlopuedeprovocar
incendioenelhomo.
Recomendamosventilarsu cocinacon
Limpieconunpaholosdesechos una ventanaabierta o utilizando unventilador
rebetdesacumuladosenetpisodethomo. ocampana durante el primercido de
auto-limpieza.
0uite la asadera,rejilla,sonda,todos
losrecipientesde cocci6ngcualquiertrozo
de papelde aluminiodelhorno.
NOTAS:
Sisu homo est6equipadocon bandejas
para homo plateadasbrillantes,quite las
antesde comenzar elciclo deautolimpieza.
iii,Lasbandejaspara homo plateadas brillantes
(enalgunosmodelos)puedendejarsedurante
la auto-limpieza,peroseoscurecer6n,perder6n
el brillog ser6dificildeslizarlas.
iii,Sisu homo est6equipadocon bandejas
revestidasdeporcelanagrispueden dejarse
dentrodel homodurante elciclode
autolimpieza.
Lasuciedadubicadaen el marcofrontal de
la cocina g fuera delajunta de la puertadeber6
limpiarsea mona. Limpieestas6reascon agua
GEAppliances.com
caliente,esponjillasdelanadeaceroembebidas
enjab6nolimpiadorestalescomaSoftScrub®.
Enjuaguebienconagualimpiagseque.
No limpielajunta. Elmaterialde fibradevidrio de
lajunta de la puertadel homo noresisteproductos
abrasivos.Esesencialquelajunta semantenga
intacta.Siusted nota que est6 desgastada,
reempl6cela.
Verifiqueque latapa de la bombilladeluz
delhomo est_en sulugar g que la luzdel homo
est6apagada.
IMPORTANTE:Lasemanacionesproducidaspar
el ciclodeautolimpiezadecualquierhomo afectan
la saludde algunasayesdemanera notoria.
ProcureIlevarsusayesa otra habitaci6n bien
ventilada.
Horno dobley modeloscanadiensessolamente:
Lasunidadesdesuperficiese desactivan
autom6ticamentedurante el cido de
auto-limpieza.Verifiquequetodos loscontroles
de unidadesdesuperficieest@napagados
entodo momenta duranteel ciclode auto-limpieza.
Cualquierunidaddesuperficieconfigurada
en unaposici6n"on"(encendido)mientras
funcionael cido deauto-limpieza se accionar6
autom6ticamentedespu@sdeterminado el ciclo,
g puedeprovocarel encendidodeuna unidad
desuperficieg quedarsin atenci6n.Esperehasta
quetermineel cido deauto-limpieza para
configurarg usarlasunidadesdesuperficie.
D F] ITIE]I33
IT1E]ITIE] D
C6mo configurar el horno para una auto-limpieza
Lospuertas delhomo debe estar cerradas g todos
los controles @ben estar correctamente configurados
para que el ciclofuncione en forma adecuada.
I_] Presioneel bot6n SELFCLEAN
(auto-limpieza).
Serecomiendaunciclode] horaspara
limpiarderramespequehosg contenidos.
Serecomiendaunciclodeauto-limpieza
de5horasparaunhomom6ssucio.
[_ Sinecesitaunciclo diferentede5 o 3 horas,
utilicelasalmohadillas num@icaseingrese
el tiempo de limpiezadeseado.
Eltiempo de limpiezapuedeconfigurarseentre
3horas g 5 horas,de acuerdoconel grado
desuciedaddel horno.
[_ Presioneel bot6n START(iniciad.
Laspuertasdelhomo superioreinferior
sebloqueanautom6ticamente. Loselementos
de laestufa tambi6n se bloqueandurante
la limpieza.Lapantallamostrar6 eltiempo
de limpiezarestante.No podr6n abrirse laspuertas
delhomo o utilizarla estufa hastaque
la temperatura desciendapar debajo de
la temperatura de bloqueogseapague
LOCKED/DOOR_ (puertabloqueada)de
la pantalla decontrol.
CuandoseapagueLOCKED/DOOR
(puertobloqueada),ustedpodr6abrir laspuertas.
iii,Siustedconfigura elciclode limpiezag
seolvidadecerrar laspuertas del homo,
destellar6LOCKED/DOOR_ (puerta
bloqueada)gla palabradoor (puerto)
aparecer5en lapantalla.
iii,Paradetenerelciclodelimpieza,presione
elbot6nCLEAR/OFF(borrar/apagado).
CuandoseapagaLOCKED/DOOR_ (puerto
bloqueada),indicandoquelatemperatura
deloshornoshadescendidopardebajode
latemperaturadebloqueo,ustedpodr6abrir
laspuertas.
Homosdobles:
Ustedpuedeconfigurar unciclode limpieza
enambos homos al mismo tiempo;sin
embargo,noefectuar6n laauto-limpieza
al mismo tiempo. ElOltimohomo
enconfigurarseretardar6 su inicio
autom6ticamente hastalafinalizaci6n
delciclode limpiezadel primer horno.
iii,Cuandose configure unhomo para
la auto-limpieza,las dospuertasdel homo
glos controlesde laestufase bloquear6n.
Loshornosg la estufano puedenusarse
cuando un homo est6configurado para
la auto-limpieza. 29
Page 82

C6mo usar los hornos auto-limpiantes superior e inferior.
Los puertas del homo debe estar cerradas bltodos los controles deben estar correctamente configurados para
que el ciclo funcione en forma adecuada.
C6mo configurar un inicio retardado de limpieza
[]DD[]D
[]DDDD
DDDD []
Eltiempo de limpieza puedeconfigurarse
entre 3 horas g 5 horas, de acuerdo con
el grado de suciedad del homo.
F_] presioneel bot6n DELAVSTART
[_ Hediante las almohadillas num@icas,
Presioneel bot6n SELFCLEAN
(outo-Iimpiezo).
Se recomienda un ciclo de 3 horas
para limpiar derrames pequeflos g
contenidos. Se recomienda un ciclo
de auto-limpieza de 5 horas para
un homo m6s sucio.
Sinecesita un ciclodiferente
de 5 o 3 horas, utilice lasalmohadillas
num@icase ingreseeltiempo
de limpieza deseado.
(inicioretardado).
ingrese la hora en que desea iniciar
el ciclo de limpieza.
I_ Presioneel bot6n START(iniciar).
Laspuertas del horno superior e inferior
se bloquean autom6ticamente.
Loselementos de la estufa tambi@n
se bloquean durante la auto-limpieza.
La pantalla mostrar6 la hora de inicio.
No podr6n abrirse las puertas del homo
o utilizarse la estufa hasta que
la temperatura descienda por debajo
de la temperatura de bloqueo g seapague
LOCKED/DOOR _ (puerto bloqueado)
de la pantalla de control.
Cuando seapague LOCKED/DOOR
(puertobloqueado),usted podr(i abrir
las puertas.
Despu_s de un ciclo de limpieza
Puedenquedar cenizas blancasen
el homo. Limpielascon un paso hOmedo
despu_s de que se enfrie el homo.
Siquedan monchos bloncos,quite los con
uno esponjillode lono de ocemembebida
enjab6n b/enjuoguebien con unamezcla
de vinagre b/agua.
Engeneral,estos dep6sitosson restos
de sal que no pueden eliminarse durante
el ciclo de limpieza.
Siel homo noqueda limpio despu@s
de un ciclo de limpieza,repftalo.
No puede configurarse el homo
para cocinar o para otro ciclo de auto-
limpieza hasta que @stese encuentre
Iosuficientemente frio para que
sedestrabe la puerta.
Mientrasel homo se encuentra en
el proceso de auto-limpieza, usted puede
presionarel bot6n CLOCK(reloj)para que
seyea la hora. Paravolver a la cuenta
regresivade limpieza,presioneel bot6n
SELFCLEAN(outo-Iimpiezo).
, Siresulta dificil deslizarlas bandejas,
coloque una peque_a cantidad de aceite
de cocina en una toalla de papel g frote
losextremos de lasbandejas.
30
Page 83

Caracteristicasespecialesdeloscontrolesdelhomo. GEAppliances.com
Los nuevos controles con botones de toque cuentan con camcteristicas adicionales. Los siguientes
son los caroctefisticas bl la manera en que usted puede activarlas.
Los modos de caractefisticas especiales s41opueden activarse mientms la pantalla muestm la ham. Seconservan
en la memoria de los controles hasta que se repitan los pasos.
Pare ingresar una camctefistica especial en uno de los dos homos, usted debe primero presionar los botones
BROIL HI/LO (asar alto/ba]o) g BAKE (homear) del homo superior al mismo tiempo. Los botones BROIL HI/LO
(asar alto/ba]o) blBAKE (homear) del homo inferior no activan camctefisticas especiales.
Cuando la pantalla muestra su opci4n, presione el bot4n START(iniciar). Los caractefisticas especiales
se conservardn en la memoria despu4s de un carte de energia, con excepci4n del Sabbath, que debe reconfigumrse.
Apagado luego de 12 horas
Presioneel bot6n DELAYSTARTlinicio
retardado)hasta que aparezca no
shdn (noapagado)en la pantalla.
Presioneel botGnSTART(iniciar)
para activar la caracterfstica de
no apagado g dejar el control
configurado en este modo
de caracterfsticas especiales.
DELAY i
Con esta opci6n, en caso de dejarse []
el homo encendido accidentalmente,
el control Ioapaga en farina automdtica
luego de 12 horas durante funciones
de homeado o despu_sde 3 horas []_]
durante la funciGnde asado.
Sideseaapagar (OFF)esta funci6n,
siga lospasos siguientes,
Presionelos botones BROILHI/LO
(asaralto/bajo) g BAKE(hornear)del
homo superior al mismo tiempo hasta
queen la pantalla pueda verse SF.
: !ii!ii ! !ii iiiii i
:!i;: I START
(Enalgunosmodetos)
zzzz
(Enalgunosmodelos)
SelecciGn de temperatura en Fahrenheit o Celsius
Sucontrol dehomo est4 configumdo
pare utilizar losseleccionesde temperature
Fahrenheit,pero puede modificarse
pare usar selecdones en Celsius.
Ell Presionelos botones BROILHI/LO
(asaralto/bajo) g BAKE(hornear)
del homo superior al mismo tiempo
hasta queen la pantalla pueda
verseSF.
121 Presione los botones COOK TIME
(tiempo de cocci6n) g BROIL HI/LO
(asar alto/bajo) al mismo tiempo.
En Io pantalla podr6 verse
F(Fahrenheit).
[_ Presionelos botones COOKTIME
(tiempo de cocci6n) g BROIL HI/LO
(osar alto/bojo) de nuevo al mismo
tiempo. En la pantalla podr6 verse
C(Celsius).
Presioneel bot6n START(iniciar).
BE
SeSales sonoras al finalizar un ciclo con temporizador
AI finalizar un ciclo con temporizador
seescuchan3 pitidos cortos seguidos
par un pitido coda 6 segundoshasta
que se presione elbotGnCLEAR/OFF
(borrar/apagado).Estepitido continua
de 6 segundospuede cancelarse.
Para cancelar el pitido continua
de 6 segundos:
Presionelos botones BROIL HI/LO
%
(asaralto/bojo) g BAKE (hornear)del
homo superior al mismo tiempo
hasta queen la pantalla pueda
verseSF.
Presioneelbot6n BROIL(osar).
La pantalla muestra CONTIBEEP(pitido
continua).Presioneel bot6n BROIL
(osar)de nuevo.Lapantalla muestra
SINGLEBEEP(pitidoOnico).(Esto
cancela el pitidocada 6 segundos.)
0
presione el bot6n KITCHENTIMER
ON/OFF (temporizador de la cocina
encendido/apagado).Lapantalla
muestra CON BEEP(pitidocontinua).
Presioneel bot6n KITCHENTIMER
ON/OFF(temporizadorde lacocina
encendido/opagado)de nuevo.
La pantalla muestra BEEPfpitido).
(Estocancela el pitido cada 6
segundos.)
Presione el bot6n START (iniciar).
%
31
Page 84

Caracteristicas especiales de los controles del homo.
Volumen del tono (en algunos modulus)
I cook I
_i_ii__i_ill _i iiiI
Estu caracter/stica permite regular et votumen
de los tonos para tograr un votumen rods
uceptubte. Existen tres nivetes de votumen
diferentes.
[_ Presione los botones BROILHI/LO
(usar atto/bajo) y BAKE(hornear) del homo
superior al mismo tiempo hasta que
en la pantalla pueda verse SF.
[_ Presioneel bot6n COOKTIME(tiempo
decocci6n).Enlu puntullu podr6 verse
2 BEEP(2pitido).Estees el nivel de
volumen medio.
Presioneel bot6n COOKTIME(tiempode
coccidn)de nuevo. Enla pantulla podr6
12 horus, 24 horus o bloqueo del reloj
5us controtes estdn configurodos para usar Presione el botGn CLOCK(retoj)de nuevo
un retoj de 12 horus, puru cumbiur ul reloj estilo militur de 2/4horus.
Siprefiere tener un relojde estilo militur
de 2/4horus o unular la visuulizaciGndel reloj,
siga lossiguientes pusos.
[_ Presionelos botones BROILHI/LO
(usar otto/bajo) y BAKE(homear) del homo
superior al mismo tiempo hastu que
en la puntulla pueda verse SF.
[21 Presione el botGn CLOCK(retoj)unu vez.
En la puntullu podr6 verse 12 hr. Si estu
es la opciGn que deseu, presione el botGn
START(iniciar).
verse3 BEEP(5pitido). Estees elnivel
de volumen mGsalto.
Presioneel botGnCOOKTIME(tiempo
de cocciGn)de nuevo. En la pantallu podr6
verseI BEEP(1pitido). Esteesel nivel
de volumen mGsbajo.
Cada vez que se modifica el nivel
de volumen, se escucha un ejemplo
del volumen de luserial sonora.
Seleccioneel nivel de volumen deseudo
%
(1BEEP,2BEEP,3 BEEP).
Presioneel bot6n START(iniciar)
[]
para activar el nivelelegido.
Enla puntulla podr6 verse 24 hr Siestu es
la opciGn que deseu, presioneel botGnSTART
(inicior).
Presioneel botGnCLOCK(retoj)de nuevo pura
anular la visuulizaciGndel reloj.Enla pantulla
podr6 verse OFF(opogodo).Siestu es luopciGn
quedeseu, presione el botGnSTART(iniciar).
NOTA:5iet retoj se encuentra enet modo sin
visuolizuciGn,usted no podrd utitizar tafunciGn
de inicio returdodo.
_ilii__ii _i_ ___!_!__iiiiiii___ii_i!i_ii_iii_i
_i ___i_ _iiii!!ilTMi _:
ii___i __ ii!i_ii_II!_i_!i!_'_iili_iiii_!
32
ConversiGn AutomGtica de Recetas TM (enolgunos modulus)
Cuandose utitiza ethomeado por
convecdGn,ta funciGndeAutoRecipeTM Conversion
(ConversiGnautomdtico derecetas)reemplaza
automdticamente lostemperoturosdehomeodo
trodicionolesingresodos pot los temperaturos
dehomeodo pot convecciGn.
Estacorocter/sticase octivaporo que
tapontotta muestre tatemperatura convertida
real(reducida).Pot ejemplo,sise ingresa
uno temperaturo de receta trodicionot
de550°F (177°C)gse presiona et botGnSTART
(inicior),tapantolta mostrord ta tegendaCON
(conversiGn)g tuegota temperatura convertida
a325°F(163°C).
Cocinur y muntener culiente (en olgunos
5u nuevo control posee una caracteristica
de cocinor g esperorque montiene catientes
los otimentos cocidos hasta 5 horus despuds
de finatizoda tafunciGnde cocciGn.
Paraactivar esta caracteristica, siga los
siguientes pasos.
[-_ Presionelos botones BAKE(hornear)
tLZ_J
g BROILHI/LO (asar atto/bajo) al mismo [_1
tiempo hasta queen la pantalla pueda
verseSF.
Para desactivar la funci6n:
I-_ Presionelos botones BAKE(homear)
tLZ_J
g BROILHI/LO (osorotto/bajo) del homo
superioral mismo tiempo hasta que
en la pantalla pueda verse SF.
f_l Presioneel bot6n CONVECTIONCOOK
(cocciOnpot convecciOn).Enla pantalla
podr6 verse CONON (conversiOnoctivoda).
Presioneel bot6n CONVECTIONCOOK
(cocciOnpot convecciOn)de nuevo.
Enla pantalla podr6 verse CONOFF
(conversiGndesactivada).
I_ Presioneel bot6n START(iniciar).
Parareactivar esta caracteristica, repita
los pasos de 1-5 peru presione el bot6n
START(inicior)cuando en la pantalla aparezca
CONON(conversiGnoctivoda).
modulus)
Presioneel botGnCOOKINGTIME(tiempo
de cocciGn).Enlu puntulla podr6 verse
Hid OFF(mantener apogodo).
Presioneel botGnCOOKINGTIME(tiempo
de cocciGn)de nuevo puru activur estu
cumcteristica. Enlu puntullu podr6 verse
Hid ON (mantenerencendido).
Presioneel botGnSTART(inicior)puru
activurla caructeristicu cocinury muntener
y dejar el control configumdo en este
modo de caracteristicas especiales.
Page 85

C6mo usar la funci6n Sabbath. Chomoss per o e/nfe /o
(Disehadapara utilizarseduranteel Sabbathu otrasFiestasJudias) (enalgunosmoddos) GEAppliances.com
Lafunci6n Sabbath sotamentepuede utitizarsepara homear/rostizar. No esposibteutitizarta para convecd6n, asado, auto-timpieza
ococci6n con inicio retardodo.
NOTA:Latuzinteriordet homo seenciendeautomdticomente (enotgunos modetos)cuondo seabre tapuerto g se opogo cuandose
tacierro. Puedequitorseto bombiltade tuz.Verta secci6n deReemplazode bombiltade tuz.Enlos modetoscon interruptor de tuz en
etpond de control to luz del homo puede encenderseg dejarse asL
C6mo configurar horneado/rostizado comunes7_
Aseg(Jresede que elrelojmuestrelo horocorrecto Mediantelasalmohadillasnum6ricas,ingrese
gqueel homo estdopogodo. _ la temperatura deseadaentre 170°F(77°C)
ii ITll7--1ITIFI ITIf( ¸
CuandoJapantaitamuestra7, ethomo
estBconfiguradoparaSabbath.Cuando
la pantallamuestra-7 r-, el homoestB
horneando/rostizando.
Presioneg sostenga losbotonesBROILHI/LO g 550°F(288°C).Nosedar@ninguna serTal
(osorolto/bojo)gBAKE(homeor)al mismo
tiempo hasta queen lapantalla pueda
verseSF.
NOTA:Sienla pantallaaparecenBake
(hornear)o Broil(asar),losbotonesBROIL
HI/LO(osorolto/bojo)g BAKE(homeor)
no sepresionaronal mismotiempo. Presione
el bot6n CLEAR/OFF(borror/opogodo)
gcomiencede nuevo.
Presioneelbot6nDELAVSTART(inicio
[]
retordodo)hastaqueaparezcaSAbbAtH
en la pantalla.
Presioneelbot6nSTART(iniciar)g-7
%
aparecer6en lapantalla.Amboshornos
seencuentranahora enel modo Sabbath.
Presioneelbot6nBAKE(homeor)enelhomo
[]
superioroinferior.Nosedar6una sepal.
o temperatura. No hag una temperatura
predeterminada.
[_ resione el bot6n START(inicior) en el homo
correspondiente.
[_ espu6s de un periodo aleatorio de
aproximadamente 30 segundos a 1 minuto,
-7 r- aparecer6 en la pantalla indicando
que el homo est6 horneando/rostizando.
Si -7 E no aparece en la pantalla, comience
de nuevo en el paso/4.
[_ Para hornear en el otro homo, comience
en elpaso 4 (en algunos modelos).
Para ajustar la temperatura del homo, presione
el bot6n BAKE (homear), ingrese la nueva
temperatura usando las almohadillas num6ricas
g presione el bot6n STARTflnicior).
NOTA: Los botones CLEAR/OFF (borror/opogodo)
g COOK TIME (tiempo de cocci6n) se encuentran
activos durante la funci6n Sabbath.
Cuandoiapantaitamuestra -m, ethomo
est_configuradoparaSabbath.Cuando
la pantallamuestra-7 r-, el homoest_
horneando/rostizando.
J CLEARJi
OFF
C6mo configurar horneado/rostizado con temporizador: Inicio inmediato
y apagado autom6tico
Aseg(Jrese de que el reloj muestre lo horo correcto [_ Presione el bot6n BAKE (homeor). No se dar6
g que el homo estd opogodo.
[_ Presione g sostenga los botones BROIL HI/LO Presione los almohadillas num6ricas
(osor olto/bojo) g BAKE (homeor) al mismo [_ para configurar la temperatura deseada.
tiempo hasta que en la pantalla pueda verseSF.
NOTA: Si en la pantalla aparecen Bake
(hornear) o Broil (asar), los botones BROIL
HI/LO (osor olto/bojo) g BAKE (homear)
no sepresionaron al mismo tiempo. Presione
el bot6n CLEAR/OFF (borror/opogodo)
g comience de nuevo.
[_ Presione el bot6n DELAVSTART(inicio
retardodo) hasta que aparezca SAb bAtH
en la pantalla.
[_] resione el bot6n START(inicior) g m
aparecer6 en la pantalla. Ambos hornos
se encuentran ahora en el modo Sabbath.
[_ Presione el bot6n COOK TIME (tiempo
de cocci6n) en elhomo superior o inferior.
No se dar6 una sepal.
t_q Presione las almohadillas num6ricas para
configurar eltiempo deseado de cocci6n
entre 1 minuto g 9 horas g 99 minutos.
[_ Presione el bot6n START(inicior).
una serTal.
No se dar6 ninguna serTalo temperatura.
No hag una temperatura predeterminada.
[_ resione el bot6n START(inicior) en el homo
correspondiente.
[_ Despu6s de un periodo aleatorio de
aproximadamente 50 segundos a I minuto,
-7 r- aparecer6 en la pantalla indicando que
el homo est6 horneando/rostizando. Si -7 r-
no aparece en la pantalla, comience de
nuevo en el paso 7.
Para ajustar la temperatura del homo, presione
el bot6n BAKE (homeor), ingrese la nueva
temperatura usando los almohadillas num6ricas
g presione el bot6n START(inicior).
Cuando se haga terminado la cocci6n, la pantalla
cambiar6 de-7 r- a -7 g aparecer6 0.'00,indicando
que elhomo se ha apagado (OFF)pero sigue
configurado en Sabbath. Retire los alimentos
del horno.
C6mo desactivar la funci6n Sabbath
Presioneel bot6n CLEAR/OFF(borror/opogodo).
[]
Siel homo est6cocinando,espere
unperiodoaleatoriodeaproximadamente
30 segundosa 1minuto, hastaque s61o-7
aparezcaenla pantalla.
[_ Presioneg sostenga losbotonesBROIL
HI/LO (osorolto/bojo)g BAKE(homeor)
al mismo tiempo hastaque en la pantalla
puedaverseSF.
j_j Presioneel bot6n DELAVSTART(inicio
retordado)hastaque12shdn o noshdn
aparezcanen la pantalla.
[_ Elija12shdn, indicandoque el homo
seapagar6 autom6ticamente despu6s
de 12 horas o no shdn, indicando que
el homo no se apagar6 autom6ticamente
despu6s de 12 horas.
[_ Presione START(iniciar) cuando la opci6n
deseada aparece en la pantalla (12shdn
o no shdn).
NOTA: En caso de corte de energia con la funci6n
de Sabbath activada, dicha funci6n se apagar6
autom6ticamente aQn cuando vuelva la energia.
Elcontrol del homo debe volver a configurarse.
Algunos modelos continuar6n el modo Sabbath;
sin embargo, si se abre la puerta, se activar6
la luz del horno.
33
Page 86

C6mousar el caj6n calentador, oU no mod /o ;
ADVE RTENCIA I
• Siempre empiece con atimentos catientes. No utitice configuraciones de mantener
catiente pora cotentar atimentos frios.
• No catiente atimentos por mds de 2 horas.
No seguir estas instrucciones puede provocar enfermedodes transmitidas por los olimentos.
El caj6n calentador mantendr6 alimentos calientes g cocidos a una temperatura de servicio. Siempre empiece con alimentos
calientes. No Io use para calentar alimentos frios, con excepci6n de secar galletas, papitas g cereal.
WARMINGDRAWER
NED
C6mo usar el caj6n calentador
Presione g gire la perilla de control a la configuraci6n
deseada,
Elcaj6n calentador mantendr6 alimentos calientes y
cocidos a una temperatura de servicio, Siempre empiece
con alimentos calientes.
Presioneel bot6n WARMINGDRAWER(caj6n
calentado4 "WARHERON"(calienteencendido)g "T'
se encienden en la pantatlag "Set"(configuraci6n)
comienza a destellar.Enlas almohaditlas num@icas,
presione] para Bajo,2 para ledio o 3 para Alto.
Lapantalla 'T' cambia deacuerdo con laalmohadilta
num@icaseleccionada. Etcaj6n catentador seinicia
autom6ticamente despu@sde presionar 1 2 o3.
Cuando use el caj6n calentador
Elcaj6n calentador mantendr6 alimentos calientes
g cocidos a unatemperatura de servicio.Siempre
empiece con alimentoscalientes. No Io usepara
catentar alimentos frios,con excepci6n desecar
galletas,papitas gcereal.
No recubra el caj6n calentador o recipiente de
cocci6n con papel met(_lico. Elpapel met(_lico es un
excelente aislante de calor g atrapur(_ el calor debajo
de _1.Esto alterar(_ el desempeFto del caj6n g podria
daFtar el acabado interior.
Permita que el caj6n calentador se precaliente
durante aproximadamente 25 minutos.
_ No coioque liquido o agua en et caj6n calentador,
"WARHERON"(calienteencendido) gel n0mero
permanecen encendidos."Set"(configuraci6n) dejade
destetlar.Enalgunos modelos, presioneSTART(inicia4
Enalgunos modelos - alteme entreconfiguraciones
presionando el bot6n WARMING DRAWER (caj6n
calentador).
Para cancetar, presione et bot6n WARMING DRAWER
(caj6ncalentadorL
NOTA:Presionarel bot6n CLEAR/OFF(borrar/apagado)
no apaga etcaj6ncalentador.
:_Todos losalimentos quese cotoquenen elcaj6n
calentador deben cubrirsecon una tapa o papel
met61ico.Cuando caliente pastelitos g panes,latapa
debecontar con unaventilaci6n para permitir
la salida de humedad.
:_Losatimentos deben mantenerse en surecipiente
caliente o traspasarse a un plato de servicio
resistente atcalor.
NOTA:Losrecipientespldsticoso losenvoltorios
pldsticossederfiten si entran encontacto diredo con
elcaj6n, recipientedecocci6no utensiliocaliente.
Etpldsticoderretido no puede removerseblesto
nose encuentracubierto pot la garantD.
;_Quite las cucharasde servicio,etc.antes de colocar
recipientesen el caj6ncalentador.
34
Tabla de selecci6n de temperatura
Paramantener calientesdiferentestiposdealimentos,
establezcaelcontrol con la configuraci6nm6s elevada.
_, La temperatura, tipo, cantidad de alimentos g
eltiempo en que se mantengan dentro del homo
afectan la calidad de los alimentos.
_, AI abrir el caj6n enforma reiterada, el airecaliente
se escapar6 g los alimentos se enfriar6n.
_, Con grandes cargas, puede ser necesario utilizar
una configuraci6n del caj6n calentador m6s
elevada g cubrir algunos de losalimentos cocidos.
_, No utilicerecipientesoenvoltoriospl6sticos.
Tipodealimento decontrol
Chile HI/3
Estofado MEDi2
Papasal horno HI/3
Pizza MEDi2
Totopos LOi1
Wafles L0i1
Configuracion
Para volver crujientes productos no frescos
:_ Cotoque los atimentos en platos obandejas :_ Despu_s de 45 minutos, verifique siest6n
de lados bajos, crujientes. Agregue tiempo si fuese necesario.
:_ Precatiente en la configuraci6n LOP.
Para calentar tazones y platos de servicio
Utilice s61orecipientes resistentes al calor.
PRECAUCiONI
Los platos estardn catientes. Utilice agarraderas
o guantes cuando quite platos calientes.
Para catentar tazones g platos de servicio,configure
el control en LO/1.
:_Si desea caientar porcelana fina, consulte
al fabricante de lavajilla sobre su toterancia
m6xima al calor.
:_ Usted puede calentar platos de servicio vacios
mientras precatienta el caj6n.
Page 87

C6mousar elcaj6n delhorno inferior, lenoUunosmode/os;GEAppliances.com
El caj6n del homo inferior puede usarse para homear alimentos utilizando los mismos tiempos bltemperaturas
de un homo comOn. Los alimentos ideales para homear en el caj4n del homo inferior son pizza, alimentos
congelados, estofados, galletas, bollitos dulces bl una variedad de postres.
LOWER
OVEN
o
300 _ 350 - 400
HEA'TJNG
®
_111111 ..
Presioneygirela perilladet caj6ndet
homoinferiora taconfiguraci6ndeseada.
Para usar el caj6n del homo inferior
[_ Presione y gire la perillo del caj6n
del homo inferior a la configuraci6n
deseudu.
[_ Dejeque el cuj6n del homo inferior
se preculiente.
Lo luz de seflulizuci6n de encendido (ON)
seencuentru sabre lu perillu y resplundece
cuondo Io perillo est6 en Io posici6n ON.
Permunece encendidu basra que lu perillu
se mueve u lu posici6n OFF(upugudo).
. Lo luz de seflulizuci6n de "Heating"
(culentumiento) se encuentru debujo
de lu perillu y resplundece cuundo
los elementos de culentumiento est6n
uctivos. El preculentumiento se ha
completudo despu_s de que lu serial
"Heating" se upugu par primeru vez
despu_s de huber encendido lu perillu.
Elcaj6ndel homo inferior utilizamenosenergiaque elhomo superior.
Dejepasarlossiguientestiemposaproximadosparaelprecalentamiento:
Temperaturadeseada
delhorno inferior
Tibia 10 minutos
350°F (177°C) 15 minutos
425°F (218°C) 25 minutos
NOTAS:
Siempreuti!icela bandejade!caj6n cuando
haga usode!caj6nde!homoinferior.
, E!caj6nde!homo inferiorno puede
utilizarseduranteuncic!odeauto-Iimpieza
de!homo superior.
, No co!oquealimentos,pape!dealuminio
o utensiliosdecocinaen e!pisode!caj6n
de!homo inferior.Siempreutilicela bandeja
de!caj6n incluida.
, _Silosalimentosmquierenunatapa,
s6!outilicepape!dealuminiootapas que
soportenlastemperaturasdehorneado.
Noutilicepldstico.
, Laalturamdximade losalimentosque
puedenhornearseene! caj6nde!homo
inferiores3W' 18,9cm).
, No co!oqueliquidoo agua ene!caj6n
de!homo inferior.
, Nuncaco!oquepldsticos,pape!,alimentos
enlatadoso materialcombustibleen
e!caj6n de!homoinferior.
Tiempode
precalentamiento
Cuando utilice la configuraci6n de mantener caliente
del caj6n del horno inferior
La configuraci6n WARN (mantener caliente)
de! caj6n de! homo inferior puede utilizarse
para mantener calientes alimentos a
temperaturas de servicio. Siempre empiece
con alimentos calientes. No la use para
calentar alimentos frios, con excepci6n
de secar galletas, papitas y cereal.
NOTA:La temperatura inicial de los alimentos,
la cantidad y e! tipo de alimentos, e! recipiente
y e! tiempo en que los alimentos estdn en
e!caj6n afectardn la calidad g la temperatura
final de la comida.
Presioney girela perillade control a la
configuraci6nWARM(mantenercaliente).
35
Page 88

Cuidadog limpieza de la cocina.
AsegOresede quetodos!ascontrolesestdnapagadosb!quelassuperficiesestdnfriasantesde limpiarcualquierpartedela cocina.
I ADVERTENCIAI sequ tatac°c napar°dectu°runat mp eza'
reporacionesocuatquierafro raz6n,verifique que
etdispositivo anti-volcaduras secotoquede manera
adecuoda cuando vudvo ainstolarse la cocino.
Si no toma estaprecoucidn, lacocina puede volcarse
g provocar tesiones.
C6mo quitar el envoltorio de protecci6n y la cinta de embalaje
Concuidado,tome unapunta delenvoltorio
deprotecci6ncon susdedosg lentamente quitelo
dela superficiedel aparato. Nouseelementos
filosospara quitar elenvoltorio.Quitetodo
elenvoltorioantes de usarel aparatopar
primeravez.
Paraasegurarsedeno daflar elacabadodel
producto,la mejorforma dequitar el pegamento
de la cinta deempaque de losaparatosnuevos
consisteen aplicar detergentepara vajillasIfquido.
Apliqueconun patiosuave y deje remojar.
NOTA:Oeberetirarseel adhesivodetodas
lospartes.Sisecalienta,serdimposibledequitar.
Perillas de control
Parauna Iimpiezomds sencilla,losperillas
decontrolpuedenquitarse.
Verifiqueque las perillasest6nen laposici6n
OFF(apagado)gshquelasdelosvhstagospara
la limpieza.
Lasperillaspuedenlimpiarseenellavavajillas
otambi@npuedenlavarseconjab6ny agua.
Aseg0resedequelaparteinternadelasperillas
est@secaantesdevolveracolocarse.
Vuelvaacolocarlasperillasenlaposici6nOFF
(apagado)paraasegurarunacolocaci6ncorrecta.
Panel de control
SiasiIo@sea,puededesactivarlosbotones
detoqueantesdelalimpieza.
Verlainformaci6nsabreBloqueodecontroles
enlasecci6nC6mousarelrdoj,eltemporizador
blelbloqueodecontrolesdeestemanual.
Limpielosderramesconunpatioh0medo.
Tambi@npuede utilizarunlimpiador devidrios.
Quitesuciedadesm@srebeldescon aguatibia
jabonosa.No utiliceabrasivosde ningunaclase.
Vudvoa activarlos botonesdetoquedespuds
de lalimpieza.
36
Superficies pintadas
Lassuperficiespintadasincluyen loslados de
la cocina y la puerta,la parte superior delpanel
decontroly elfrentedelcaj6n.Limpielasconjab6n
y agua o con unasoluci6nde agua yvinagre.
Superficies de acero inoxidable (en algunos modelos)
Noutilice almohadillas de aceroporque
ragan la superficie.
Paralimpiarlasuperficiede aceroinoxidable,
utiliceaguatibiajabonosa o un limpiadoro
lustradorde aceroinoxidable.SiempreIimpie
la superficieen direcci6nde la veta.Siga
lasinstruccionesdelproducto para Iimpiar
la superficiede acero inoxidable.
Estufa de esmalte de porcelana (en
Elacabadode esmaltede porcelanaes
resistenteperopuederompersesiseutiliza
incorrectamente.Esteacabadoes resistente
al 6cido.Sinembargo,no debepermitirse
quealgunosalimentos6cidosque
sederraman(comojugosdefruta,tomate
o vinagre)permanezcanenel acabado.
Sisederraman6cidosen laestufa mientras
est6caliente,utiliceunatoalla de papelo
Noutilicelimpiadoresde hornocomerciales,
polvoslimpiadores,esponjillasdeaceroo
abrasivospotentessabrecualquiersupefficie
pintada.
Para consultar sabre la compra
de limpiadores o lustradores de aparatos
de acero inoxidable, o para encontrar
la ubicaci6n del distribuidor mds cercano
asu domicilio, Ilame a nuestro n0mero gratuito:
Centro nacional de repuestos
GEAppliances.com
algunos modelos)
un panosecospara limpiarloenel momenta.
Cuandolasuperficiesehaya enfriado,
limpiecon aguajabonosa. Enjuaguebien.
Enel casode arrasderrames,coma
salpicadurasdegrasa,etc.,limpieconagua
jabonosa o polvoslimpiadorescuando
lasuperficiesehauaenfriado.Enjuaguebien.
Pulaconun patio seco.
1.800.626.2002
Page 89

Lajuntaest_disefiadaconunespacioen
laparteinferiorparapermitkunaadecuada
circulaci6ndeaire.
Nofroteolimpielajuntade lapuertaporque
fieneunaresistenciamuybajaalaabrasi6n.
Siseadvbrtequelajuntaest_desgastada,
ra[dao da_ada,osisehadesplazadodesu
lugar,seladebereemplazar,
Ranura
Trabadela
bisagra
Tirelastrabasdela bisagrahaciaabajo
paradestrabar.
Posini6nde remocion
C6mo limpiar la puerta del homo
Paralimpiarlaparte interna de la puerta:
Debidoa queel6reaqueseencuentra
dentrodelajuntaselimpiaduranteelciclode
autolimpieza,noesnecesariolimpiarlaa mano.
iii,El6rea quese encuentrafuera delajunta
g el burletede la puerta puedenlimpiarsecon
unaesponjillapl6sticaconjab6n, aguacaliente
gdetergente.Enjuaguebiencon unasoluci6n
deagua gvinagre.
Paralimpiarlaparte externa de la puerta:
iii,Utilicejab6ny agua para limpiar
cuidadosamentela parte superior,loslados
gelfrente dela puerto del horno. Enjuague
bien.Tambi6nes posibleutilizorunlimpiador de
vidriospara limpiar la porteexteriorde
lapuerto. Nopermita que caiga aguasobre
losaberturasdeventilaci6n.
Puertu del homo desmontuble (an algunos modelos)
Lapuertaesmaypesada.Tengacuidado
alquitarylevantarlapuerta.
Nolevantelapuertode lamanija.
Parequitarla puerta:
AbroIopuerto porcompleto.
%
Presionelastrabas de la bisagrahacia
[]
abajoen direcci6ndelmarco de la puerto
hastadestrabarlas.Puedenecesitarseuna
herramienta,como un destornilladorpiano
pequeho.
Tomeconfirmezoombosladosdelapuerto
%
deIoportesuperior.
Cierrela puertohasta la posici6n
[]
deremoci6nde puerto,que esa mitad
decamino entre la posici6ndeasadog
la puertocerrada.
[_ Levantelapuertahastaqueelbrazo
delabisagrahagasalidodelaranura.
Para velver a celocar la puerta:
[_ Tome con firmezo ombos lados de la puerto
de la porte superior.
iii,Siqueda alguna mancha persistenteen
lasecci6ndeventilaci6nde lapuerta,utilice
unlimpiador abrasivosuave g una esponja
paraobtener losmejores resultados.
iii,Lossalpicadurasde salsas,jugos de frutas,
solsosde tomote gjugos de olimentosque
contienen6cidospueden decoloror Io
superficie,por Io que sedebeenjuagorlos
de inmediato.Cuondola superficieest6fifo,
limpieg enjuague.
iii_,Noutilicelimpiadorespara hornos,polvos
limpiodoresoabrasivospotentesenla porte
externade la puerto.
Conla puerto Extremo
enel mismo inferiorde
6ngulode la laranura
posici6nde \
remoci6n,introduzca
Iomuescadelbrazo
dela bisagra dentro
delextremoinferior de
la ranura de la bisogra.
Laranura delbrazode la bisagradebe
estarbiencolocada enla porte inferior
dela ranura.
Abra la puertopor completo.SiIopuerto
%
nose abre porcompleto,la muesco noest6
biencolocadaen el extremoinferior de
la ranura.
Presionelastrabas de labisagra hacia
[E
arribacontra el marcofrontal de lacavidad
delhomo,hasta alcanzar laposici6nde
bloqueo.
Trabade
labisagra
Brazede
la bisagra
GEAppliances.com
Brazedeia
I | | bisagra
ue
Presionelastrabasdela bisagra
haniaarribaparabtoquear.
[_] Cierre la puerto del horno.
37
Page 90

Cuidadog limpieza de la cocina.
Puerta del horno superior desmontable (enolgunos modelos)
Para
quitar la puerta:
Marco
la pu_
j._--
J
Botonesde
liberaci6n
iilk
Abra la puerta por completo.
Levante la traba de la bisagra hacia
el marco del homo hasta que
se detenga.
Cierre la puerta en/45 grados
%
(se sentir6 el tope de la puerta).
La traba de la bisagra har6 contacto
con el marco del horno.
[] Sobre ambos lados de la puerta,
presione hacia abajo sobre los botones
de liberaci6n de cada bisagra.
j_j Levante la puerta hacia arriba basra
que se salga de la bisagra.
j_] Tire de los brazos de la bisagra
suavemente para liberar presi6n sobre
las lengOetas de bloqueo.
JZJ Presione las trabas de labisagra hacia
abajo dentro de labisagra.
[] Presione lasb!sagras hacia la unidad
para que se clerren.
Para volver a colocar la puert:a:
j_j Tire de lasbisagras hacia abajo en
sentido contrario del marco del homo
hasta alcanzarla posici6nabierta total.
r_q Levantelastrabas dela bisagrahacia
elmarcodelhomohastaquesedetengan.
j_j Las bisagrasseliberanen la posici6n
de45 grados.Lastrabasde la bisagra
har6n contacto conel marcodel homo.
I-_ Deslicela puerta dentro de lasbisagras.
ILLJ
AsegOresedeque los botonesvuelvan
a salir.
[] Abrala puerta porcompleto.
Presionelastrabas de labisagrahacia
abajodentro de labisagra.
Cierrelapuertadel horno.
/LL_]
Bandejaplana
Utilice la bandejade lasdosmanijas
frontalesenet homosuperior.
Utilice la bandejasin lasdos manijas
frontalesen el homoinferior.
Manijas
38
Bandejas del horno
Todaslasbandejasdelhomo pueden
limpiarsea mano con un limpiadorabrasivo
o una esponjilladeacero.Despu@sde limpiar,
enjuaguelasbandejascon agualimpiag
s@uelasconun paso limpio.Lasbandejas
revestidasdeporcelanagrispueden
permanecerenel homo duranteelciclode
auto-limpiezasinsufrir da_os.Lasbandejas
del homo de niquelpuedenpermanecer
en el homo durante el ciclo de auto-limpieza,
pero perder6n el lustre g resultar6 dificil
deslizarlas. Ser6 necesario engrasar todos
los extremos de las bandejas con una capa
de aceite vegetal suave despu_s de limpiarlas
a mano o en el horno. Esto agudar6
a mantener el f6cil deslizamiento de
las bandejas.
Page 91

Piso del homo desmontable (enalgunos modelos)
GEAppliances.com
k_
Presionehaciaabajoy quite.
Para quitar el piso del homo:
[_ Quite la puerta del homo utilizando
las instrucciones de la secci6n Puerta
de! homo desmontable.
[_ Presione hacia abajo g quite el piso
del homo desmontable.
E_ Limpie el piso del horno con agua tibia
jabonosa.
[] Cuando vuelva a colocar el piso del
homo, asegOrese de deslizarlo bien
hasta la parte trasera del horno.
IMPORTANTE" Siempre vuelva a colocar
el piso desmontable antes clelpr6ximo uso.
Ventilaci6n del horno en estufas de vidrio radiantes
Loventilaci6ndelhomo seencuentradetrdsde la
unidaddesuperficietraseraderecha.Enloshomos
dobles,la ventilaci6ndelhomosuperiorseencuentra
detrds de la unidad de supefficie trasera izquierda.
Enlos homos dobles, la ventilaci6n del homo
superior se encuentra detrds de la unidad
de superficie trasem izquierda.
Esta6reapuedecalentarseduranteel usodel horno.
Ventilaci6n del horno ((enalgunos modelos)
Loventilaci6n delhomo se encuentra
encima del lado izquierdo de la puerto.
Esta6rea puedecalentarseduranteel usa
delhorno.
Esnormalquesalgavapordelaventilaci6n
y puedejuntarsehumedaddebajodelamisma
cuandoelhomoest6enusa.
Lo ventilaci6n es importante para lograr una
adecuada circulaci6nde aire. Nunca bloquee esta
ventilaci6n.
Resultanormal quesalgavapor
de la ventilaci6n.
La ventilaci6n es importante para Iograr
una adecuada circulaci6n de aire. Nunca
bloquee esta ventilaci6n.
_1 Guiadetope
Remoci6n del caj6n de almacenamiento (enalgunos modelos)
Para quitar el caj6n:
_j Tire delcaj6nhaciafuerabasraque
sedetenga.
Levanteelfrente delcaj6nhasta que
lastrabas salgandelasguias.
[] Retireel caj6n.
Para volver a colocar el caj6n:
17] Coloquelosrielesdel caj6nen lasguias.
r21 Empujeelcaj6nhastaquese detenga.
[_ Levanteelfrente delcaj6nUempuje
hastaquelastrabas superenlasgalas.
j_ Bajeelfrente delcaj6nUempuje hacia
abajo basraque cierre.
Coj6n calentador desmontable/Recipiente del coj6n
del homo inferior (enalgunos modelos)
NOTA:Enlos mode!asconcaj6ncalentador Nunca coloque,utilice o limpie mediante
e!dctricoo caj6nde homoinferior,antesde recipiente del caj6n en el homo superior.
realizarcualquierclasedeajuste,limpiezao
reparaci6n,desconectela conexi6ne!dctrica Elcaj6n calentador o elcaj6n del homo
dela cocinadesdee!pane!de distribuci6n inferior cuentan con un recipiente
domdsticoquitandoe! fusibleo desmontable para una limpieza f6cil.
desconectandoe!interruptordecircuitos. Limpie con agua jabonosa caliente U
Verifiquequee!elementocalentador
de!caj6n estdfrio.
NOTA:Deje que el caj6n calentador o
el caj6n del homo inferior se enfrfen antes
de quitar el recipiente.
NOTA:Limpie los derromes rdpidamente
despu_s de coda usa.
la caracterfstica de auto-limpieza el
una esponja o repasador.Sequecon un
pano suave Ulimpio.Vuelva a colocar
el recipiente en el caj6n calentador o
elcaj6n del homo inferior.
39
Page 92

Cuidadog limpieza de la cocina.
PELIGRODE DESCARGAELECTRICA0 QUEMADURAS:Antes de reemplazar
ADVERTENCIA I
la bombilla del homo, desconecte la alimentaciOn de energfa al homo desde
el panel principal de fusibles o del interruptor de circuitos. No hacerlo puede
provocar una descarga el@ctricao una quemadura.
PRECAUCION IpEL'GR°°EQuEMAouRAs:Latapav, r,ou,a, mparaUzse eber n
retirar cuando est@nfrfas. Tocar el vidrio caliente sin protecci6n en los manos
o con un trapo hFJmedopuede ocasionar quemaduras.
Receptaculo
PortalamDamReemplazo de la bombilla del horno (enolgunos modelos)
Para retirar:
F_I Gire lacubierta de vidrio en sentido
i/i
contrario a las manecillas del reloj
1/4 de vuelta basra que las lengOetas
de la cubierta de vidrio liberen los
_ Bombilta
aeG&35
surcos del portal6mparas. Colocarse
guantes de 16texpuede brindar
un mejor agarre.
I_ Utilizando guantes o un patio seco,
remueva labombilla jalcindola en linea
recta.
Parareemplazar:
ien algunasmodelos
Receut_culo Portat_muara
(enalgunasmodetos)
[Z] Utiliceuna nuevabombilla hal6gena
de 120/130voltios,no exceda50vatios.
Reemplacela kimpara de luzcon el
mismotipo de kimpara queseretir6.
Ensumodelocorresponderciunode
losdos tiposque figuran a la izquierda.
Paradeterminarcu61esla Idmpara
correcta,controlelasterminalesde
la16mpara.Las16mparascon 2terminales
conclavijasrectassonIdmparasde
G6.35.Las16mparascon2terminales
conclavijascon curvassonIdmparas
deG9.(Nolas intercambieJAsegOrese
alreemplazarlakimpara queseade
120voltso Z30volts(NOde12volts).
I_ Utilizandoguanteso un patioseco,
remuevala bombillade supaquete.
Notoque la bombillaconlosdedos
desnudos.Elaceitepara pieldafiar(i
Empuje la bombilla en linea recta dentro
del receptciculo hasta el tope.
Coloque las lengOetas de la cubierta
de vidrio dentro de los surcos
del portakimparas. Gire la cubierta
de vidrio en sentido de las manecillas
del reloj 1/4 de vuelta.
Para una mejor iluminaci6n dentro
del homo, limpie frecuentemente
la cubierta de vidrio utilizando
un patio hOmedo. Esto deberfa hacerse
cuando el homo est(i completamente
fifo.
I-_ Conecte nuevamente elsuministro
el@ctricoal horno.
la I(imparag acortar(i sutiempo
de duraci6n.
5 /()/(/)
Soportede la tapa decanes
40
Reemplazo de la bombilla del horno (enalgunos modelos)
Verifiquequelatapa de lakimpara U
la bombillasehauan enfriadoporcompleto.
Para quitar la tapa:
[_] Coloque una mano debajo de la tapa
para que no se caiga cuando la liberen.
Con los dedos de la misma mano,
presione firmemente sabre el soporte
de la tapa de loscables. Levante
9 quite la tapa.
No quite ningOn tomillo para sacar la tapa.
[_ Reemplace la bombilla con una unidad
de 40 ratios.
Para volver a colocar la tapa:
171 Col6queladentro dela ranura
del receptciculodelabombilla.Tire
del cable hacia adelanteen direcci6n
del centrode la tapa hastaquesetrabe
en su lugar.
121 Conectela energiael@ctricahacia
lacocina.
Page 93

ADVERTENCIA I
Reemplazo de la bombilla del horno (en algunos modelos)
Verifique que la tapa de la 16mpara
y la bombilla se hayan enfriado par
completo.
i
i
I_.......................
Paraquitar la tapa:
E_] Haga girar la lente en 1Ade vuelta
en sentido antihorario para quitarla.
Noquite ningOntomillo para sacarla tapa.
[_ Coloqueuna bombilla de 40 ratios
o una bombilla hal6gena de dos
espigas,seg0n corresponda.
Elementos calentadores del horno (enalgunos modelos)
_i!iii
No limpie el elemento para homear o
el elemento para asar. Los suciedades
se quemard_n cuando se calienten
los elementos.
i_iii
GEAppliances.com
PELIGRODE DESCARGAELECTRICA0 QUEMADURAS:Antes de reemplazar
la bombilla del homo, desconecte la alimentaci6n de energfa al homo desde
el panel principal defusibles o del interruptor de circuitos. No hacerlo puede
pmvocar una descarga eldctrica o una quemadura.
Para volver a colocar la tapa:
E_] Alinee lasleng0etas de la lente frente
a las leng0etas de la carcasa y gire
en sentido horario para trabar.
Para limpiar el pisodel homo, levante con
cuidado el elemento para hornear. Limpie
con agua tibia jabonosa.
Limpieconun paholosdesechos
rebeldesacumuladosen el pisodet homo.
Elementos calentadores del horno fen algunos modelos)
Nolimpie el elemento para asar.
Lassuciedades se quemar6n cuando
se caliente el elemento. Limpieel piso
del horno con aguu tibia jabonosa.
En algunos modelos, elelemento pare
hornear no se encuentm expuesto g
sehallo debajo del piso del homo. Si
seacumulan derromes, residuoso cenizas
sabreel piso del homo, limpielos antes
de efectuar lo auto-limpieza.
Si el elemento se encuentm sabre el piso
del homo, levante con cuidado el elemento
para homear bllimpie con agua tibia
aiabonosa.
41
Page 94

C6molimpiar la estufa de vidfio, mod /o
Limpieza normal de uso diario
J
Limpiela estufadespues
decadaderrame,Utilice
el limpiadorde estufas
ceramicasCERAMABRYTE®.
SOLOutilice el limpiador de estufas
cer(imicas CERAMABRYTE®en la estufa
de vidrio. Otras cremas pueden no ser tan
efectivas.
Paramantener g proteger Io superficie
de su estufa de vidrio, siga estos pasos:
Antes de usar la estufa por primera
%
vez,Ifmpiela con el limpiador de
estufas cer6micas CERAMABRYTE®.
Estoaguda a proteger la estufa
g hace la limpieza m(is sencilla.
Eluso diorio dellimpiudor de estufas
[]
cer6micas CERAMABRYTE®agudar6
a que la estufa quede como nueva.
Residuos pegados
[_ Agite bien la crema de limpieza.
Aplique unas gotas del limpiador de
estufas cer(_micasCERAMABRYTE®
directamente sobre la estufa.
Utiliceuna toalla de papel o un pano
[]
de limpieza CERAMABRYTE®para
estufas cerdmicas para limpiar toda
la superficie de la estufa.
Use un pano seco o una toalla
%
de papel para quitar los restos
del limpiador. No hace falta
enjuagar.
NOTA:Es mug importante que NO
CALIENTEla estufo hasta que la haga
limpiodo pot completo.
Utitice unpaBodelimpiezaCERAMA
BRYTE®para estufascerBmicas.
ElraspadordeestufascerBmicas
CEFIAMABFIYTE®ytodoslosinsumos
recomendadosseencuentran
disponibtesennuestroCentro
de Flepuestos.Ver instruccionesbajo
la secci6n"Parasolicitarrepuestos"
enla pBginasiguiente.
NOTA:No utitice hojasdesafiladas
odaBadas.
NOTA:Usted puede DANAR la superficie
de vidrio si utilizo esponjillos que no seon
los recomendodos.
Deje enfriar la estufa.
Coloque unas gotas del limpiador
de estufas cer6micas CERAMA
BRYTE®sobre toda el (irea de
residuospegados.
Utilizando el pano de limpieza
%
CERAMABRYTE®para estufas
cerdmicas incluido,frote eldrea sucia
aplicando presi6nsegQnsea
necesario.
Residuos pegados rebeldes
Deje enfriar la estufa.
%
Utilice el raspador de filo 0nico
a un cingulo aproximado de 45
degrees contra la superficie del
vidrio g raspe la suciedad. Puede
ser necesario aplicar presi6n al
raspador para quitar la suciedad.
Despu@sde utilizar el raspador,
%
coloque unas gotas de limpiador
de estufas cer6micas CERAMA
BRYTE®sobre toda el 6rea de
suciedad quemada. Utilice el pano
de limpieza CERAMABRYTE®para
quitar la suciedad restante.
Para protecci6n adicional, despu@s
de haber quitado todos los restos,
pula toda la superficie con
limpiador de estufas cer6micas
CERAMABRYTE®g una toalla
de papel.
Siquedan restos, repita los pasos
indicados con anterioridad.
Para protecci6n adicional, despu@s
de haber quitado todos los restos,
pula toda la superficie con
limpiador de estufas cer6micas
CERAMABRYTE®g una toalla
de papel.
z_2
Page 95

Marcas de metal g ragones
[_ Tengacuidado de no deslizar ollas
g sartenes a tray,s de su estufa.
Dejar6 marcas de metal sobre
la superficie de la estufa.
Estasmarcas pueden quitarse
utilizando limpiador de estufas
cer6mJcasCERAMABRYTE®con
el patio de IJmpiezaCERAMABRYTE®
para estufascer6micas.
[] Sise permite que ollascon una capa
fina de aluminio o cobre hiervan
en seco, la capa puede dejar una
decoloraci6n negra en la estufa.
Estodebe quitarse de inmediato
antes de calentar de nuevo
o la decoloraci6n puede Ilegar
a ser permanente.
NOTA:Verifique con detenimiento que
la base de las ollas no sea dspera para
no rayar la estufa.
Sellado de la estufa
Para limpiar el sellado de la estufa
alrededor de los bordes de vidrio, coloque
un patio hQmedosobre los mismos
durante unosminutos y luego limpie con
limpiadores no abrasivos.
Superficie de vidrio: posibilidades de da o permanente.
GEAppliances.com
Losderramesazucarados
(comegelatines,deice,
caramelo,jarabes)e plasticos
derretidospuedenmercer
lasuperficiedela estufa
(nocubiertoperla garantia)
a menosqueel derramese
quitemientrasestacaliente.
Debetenersemachocuidado
al removersustancias
calientes.
Asegt_resedeutilizer
unraspadornuevoy afilado.
Noutilicehojasdesaflladas
odafiadas.
DaFms por derrames azucarados g
F_] Apague todas las unidades de
superficie. Quite las ollas calientes.
[_] Utili7andoun guante de cocina:
a. Useun raspador de filo 0nico
(raspador para estufas cer6micas
CERAMABRYTE¢) para desplazar
el derrame a un 6tea fria de
la estufa.
b. Quite el derrame con toallas
de papel.
Para solicitar repuestos
Parasolicitar el limpiador de estufas
cer6micas CERAMABRYTE®g el raspador
de estufas, Ilame a nuestro n0mero
gratuito:
Centro nacional de piezes
800.626.2002
Limpiador de estufas cerSmicas
CERAMA BRVTE® ........... #WX10X300
Raspador de estufas cerSmicas
CERAMA BRVTE® ........... #WXIOX0302
pl6stico derretido
[_ Cualquierderrame restante debe
dejarsehasta que lasuperficie
de la estufa sehaga enfriado.
r_ No use las unidades de superficie
de nuevo hasta que todos los restos
se hagan eliminado por completo.
NOTA:Sila superficie de vidrio b!aha
sufrido mamas o hendiduras, e! vidrio
dela estufadeberdcambiarse.Enesecaso,
serd necesaria la atenci6n de un tdcnico.
Kit ......................... #WB64XS027
(E!kit inclub!ela crema b!e! mspador de estufas)
Pe_os de limpieze CERAMA BRVTE®pare
estufas cerSmicas ........ #WXl OX350
43
Page 96

Antes de Ilamar al servicio t cnico...
conssjos para identificaci6n y soluci6n de problemas
iAhorre tiempo y dinero! Lea los tobias de los siguientes
pdginas y quizds no necesite Ilamar al servicio t4cnico.
Causas posibles Ou_ hacer
Losunidades de
superficienomantienen
unhervorconstonteo
Iococci6n eslento En algunas regiones la energia. Cubra el recipiente con una tapa hasta obtener el calor
Loselementos de Elfusible puede haberse • Cambie elfusible ovuelva a configurar el interruptor
superficie no funcionan quemado o el interruptor de de circuitos.
bien circuitospuede haber saltado.
La unidad desuperficie Estoes normal. La unidad sigue
deja de resp/andecer encendidagcaliente.
cuandose cambia a
unaconfiguraci6nrnenor
Ragones(puedenparecer Seest6n usando m_todos • Losr%onesnopuedenremoverse.Losrayonesm6spequeflos
coma roturas) en la de limpieza incorrectos, sevolver6nmenosvisiblescomoresultadodela limpieza.
superficie de vidrio
de la estufc Seest6n usando recipientes • Paraevitar rayones, use losprocedimientos de limpieza
Areas de decoloraci6n Nose limpiaron los derrames • Ver la secci6n C6mo/impior/a estufa de vidrio.
en la estufa de alimentos antes delusa
Pl_stico derretido La estufa caliente entr6 • Ver la secci6n Superficie de vidrio: posibilidodes de dafio
sabre la superficie en contacto con pl6stico permanente en la secci6n C6mo limpiar la estufo
larcas [o hendiduras) Se ha derramado una mezcla • Llame a un t_cnico calificado para el reemplazo.
en la estufa azucarada caliente en la estufa.
Lasunidadesdesuperficie Se est6n utilizando recipientes • Use s61orecipientes de base plana para minimizar
seenciendeng apagan de cocci6n inadecuados, el encendido y apagado.
conmuchafrecuencia
Laluz del homo Labombilla de luz est6 floja. • Ajuste ocambie la bombilla.
no funciona
Elhomo no funciona Elenchufe de la cocina • Verifiqueque elenchufe el_ctrico est6 conectado
44
Se est6n utilizando recipientes • Use recipientes de base plana y que se ajusten
de cocci6n inadecuados, al di6metro de la unidad de superficie elegida.
(voltaje) puede ser baja. deseado.
Loscontroles de la estufa • Verifique que se haya configurado el control correcto
est6n mal configurados, para el elemento de superficie que est5 utilizando.
con bases6speras o hag recomendados.Verifique que las basesde losrecipientes
particulas gruesas (salo arena} est_n limpias antesdel uso,y utilice recipientescon bases
entre el recipiente y la superficie lisas.
de la estufa.
Seha deslizado un recipiente a
trav_s de la superficie de la estufa.
siguiente.
Superficie caliente en • Esto es normal, ka superficie puede parecer decolorada
un modelo con una estufa cuando est6 caliente. Estoestemporal y desaparecer6
de color claro, a medida que se enfrfa el vidrio.
colocado sobre la misma, de vidrio.
no est6 introducido del todo a un tomacorriente con tensi6n y adecuada conexi6n
en el tomacorriente, a tierra.
Elfusible puede haberse • Cambie el fusible o vuelva a configurar el interruptor
quemado o el interruptor de de circuitos.
circuitospuede haber saltado.
Loscontroles del homo est6n • Ver la secci6n C6mo usor el homo.
mal configurados.
El horno est6 mug caliente. • Dejeque el homo se enfrfe por debajo
de la temperatura de bloqueo.
Page 97

GEAppliances.com
Causes posibles
Losafimentosno
sehornean o rostizan
correctamente
Losalimentos no Loscontrolesdel hornoest6n • Aseg0resede presionar el bot6n BROILHI/LO
seasan de manera mal configurados. (asaralta/bajo).
adecuada
Loscontroles del horno est6n
mal configurados.
La posici6n de labandeja es
incorrecta o no est6 nivelada.
Seest6n utilizando recipientes
de cocci6n incorrectos o
de tamafio inapropiado.
El termostato del horno debe • Ver la secci6n Ajuste el termostoto del homo usted
ajustarse, mismo.
Seest6 usando una posici6n • Verla Galade asado.
de bandeja inadecuada.
Los recipientes no son •Para mejoresresultados,utilice un recipiente dise5ado
adecuados para asar. para asado.
La sonda est6 enchufada • Desenchufeg quite lasonda del horno.
dentro de lasalida del homo
(en algunos modelos).
Enalgunas regiones la energia • Precalienteel elemento para asar durante 10 minutos.
(voltaje) puede ser baja. • Ase par el perfodo de tiempo m6s prolongado que
Qu_ hacer
• Verla secci6nC6mo user el homo.
• Verla secci6nC6mo usor el homo.
• Verla secci6nC6mo usor el homo.
se recomiende en la Gufo de osodo.
La temperature El termostato del horno debe • Ver la secci6n Ajuste el termostato del homo usted
del homo es mug alto ajustarse, mismo.
o mug baja
El caj6n de El soporte de caj6n trasero
almacenamiento seencuentra sabre el riel
est6 torcido de la guia.
Elcaj6n de Elcable deenergia puede •Cambie la ubicaci6n del caj6n g del cable de energfa.
almacenamiento ester obstrugendo el caj6n Verlas instrucciones de Remoci6ndel caj6n de
no cierra en la porte trasera inferior almacenamiento en la secci6n Cuidadog limpieza
de la cocina, de Io cocino.
El soporte de caj6n trasero • Vuelva a colocar el caj6n. Ver las instrucciones de
se encuentra sabre el riel RemociOndel colOnde olmacenomiento en la secci6n
de la guia. Cuidodo g limpiezo de Io cocino.
La puerta del homo La puerta no est6 bien
est6 torcida alineada.
• Vuelva a colocar elcaj6n. Ver las instrucciones de
Remoci6n del caj6n de almacenamiento en la secci6n
Cuidado g limpieza de la cocina.
• Verifique que el caj6n est6 bien colocado si se Io quita.
• Dadoque la puerta del horno esdesmontable, a veces
sedesequilibra durante la instalaci6n. Para enderezar
la puerta, presionehacia abajo sabre la esquina superior.
45
Page 98

Antes de Ilamar al servicio t@cnico...
Consejos pare identificaci6n y soluci6n de problemas
Causas posibles Ou@hacer
Elre/ojg eltemporizador
no funcionan
El homo no realize Latemperatura del horno est6 • Dejequa la cocina seenfrfe g vuelva a configurar
la auto-limpieza mug elevada para configurar loscontroles.
Ruido de "crujidos" Esel sonidodel metal • Esto es normal.
o "chasquidos" celent6ndose g enfri6ndose
Humo excesivo Sucieded e×cesive. • Presione el bot6n CLEAR/OFF(borror/opogodo).
en el homo durante Abru los ventonos pure qua solgo el humo. Espere
el ciclo de limpieza hasta qua se apague LOCKED/DOOR _. Despu_s
La puerta del homo Elhorno est6 mug celiente.
no se abre despu@sc/el
un cic/o de/impieza
Elhomo no est6 limpiD
despu@sde un ciclo
delimpieza
La luz de bloqueo
("LOCKED")destella
en la pantalla
del homo
La luz de b/oqueo
("LOCKED")est6
encendida cuando
desea cocinar
"F--" g un n(lmero
o letra destellan
enla pantalla
z_6
Elenchufedelacocinanoest6 • Verifiqueque elenchufe el#ctrico est# conectado a un
introducidodeltodoeneltomacorriente, tomacorriente con tensi6n gadecuada conexi6n a tierra.
Elfusible puede heberse • Combie elfusible ovuelva a configurar el interrupter
quemado o el interrupter de circuitos.
de circuitospuede habersaltado.
Loscontroles del horno est6n • Ver la secci6n C6mo user el temporizador de cocina.
real configurados.
le funcibn de euto-limpieze.
Loscontroles del homo est6n • Ver Iosecci6n C6mo udlizorlos homes outo-limpiontes
mel configuredos, superiore interior.
Le sonde est6 enchufede • Quite Iosondu del horno.
dentro de le boca de selide
del horno. (an elgunos modelos)
durente los funciones
de cocci6n g limpieze.
de qua se enfrfe el homo, limpie el exceso de suciedod
g vuelvo o configuror el ciclo de limpiezo.
• Dejequa el homo se enfrfe per debajo
de la temperatura de bloqueo.
Loscontroles del horno no est6n • Ver Iosecci6nC6mo utilizerloshomes outo-Iimpiontes
configurados correctamente, superior e inferior.
El horno estebe mug sucio. Limpie los derromes m6s rebeldes antes de inicior
el ciclo de limpiezu. Loshornos mug sucios pueden
necesitur unu nuevu uuto-limpiezu o unu limpiezu
m6s prolongodu.
Se he seleccionedo el ciclo
de euto-limpieze pero
le puerto no est6 cerrede.
LQpuerto del horno
est6 bloqueede porque
le temperature dentro
del mismo no he descendido
debejo de le temperature
de bloqueo.
Hog un c6digo deerror
de funci6n.
• Cierre Iopuerto del horno.
• Presione el bot6n CLEAR/OFF(borror/opogodo).
Dejeenfrior el horno.
• Desenchufe el horno par Io menos 30 segundos g luego
vuelvo o enchuforlo. Si el c6digo de error de funci6n
se repite, llama el servicio t@cnico.
Page 99

GEAppliances.com
Causas posibles Ou_ hacer
Aparece"RangeLocked"
(cocinabloqueada o
Los controles se han
bloqueado.
• Verla secci6nBloqueo de control para desbloquearlos.
"LOC On" (bloqueo
activado) en la pantalla
delhornoo "LC"enla
pantalladesuperficie
El control emite una Olvid6 ingresar • Presione el bot6n BAKE (hornear) g la temperatura
seSaldespu_s de ingresar un temperature de horneado deseada o el bot6n SELF CLEAN (auto-limpieza)
un tiempo de cocci6n o un horario de limpieza, g el tiempo de limpieza deseado.
o de inicio
Lo pantalla queda Elfusible puede haberse quemado • Cambie el fusible o vuelva a configurar el interrupter
en blanco o el interrupter de circuitos de circuitos.
puede haber saltado.
El reloj se encuentra en • Ver la secci6n de Caracteristicas especiales de
el mode sin visualizaci6n, los controles del homo.
Lo pantalla destella Carte de energia. • Reconfigure el reloj.
La pantalla no Los botones de control del horno • Los botones BROIL HI/LO (asar alto/bajo) y BAKE
muestra "SF" no se presionaron correctamente. (hornear) deben presionarse al mismo tiempo
g sostenerse durante 3 segundos.
Aparece "Probe" Esto le recuerda de ingresar • Ingrese una temperatura de sonda.
(sonde)en la pantalla una temperatura de sonda
(algunosmodelosJ despu_s de enchufarla.
Carte de energia, Carte de energia o subida • Reconfigure el reloj. Si el homo estaba en use, usted
el reloj destella de tensi6n, debe reconfigurarlo presionando el bot6n CLEAR/OFF
(borrar/apagado), configurando el reloj g
reconfigurando cualquier funci6n de cocci6n.
Emisi6n de vapor Cuandoseutilizanloshornos, • Esto es normal.
desde la ventilaci6n esnormalver unaemisi6ndevapor
de la ventilaci6n del horno. A medida
que el nOmero de bandejas o
la cantidad de alimentos a cocinar
se incrementa, la cantidad de vapor
visible se elevar6.
Un olor a "quemado"
o "aceitoso" sole
de la ventilaci6n
Esto es normal en un horno
nuevo g desaparece con
el tiempo.
• Paraacelerar el proceso, configure un cicIo de
auto-limpieza durante un mfnimo de 3 horas. Ver
la secci6n C6mo utilizar los barnes auto-limpiantes
superior e inferior.
Olor penetrante
Las primeras veces que
• Estoestemporal.
se utiliza el horno es normal
sentir un olor proveniente
del aislante que recubre
la parte interne del horno.
Seage un ventilador
Un ventilador de convecci6n
puede encenderse g apagarse
automOticamente.
• Estoes normal. Para potenciar al m6ximo una cocci6n
pareja, el ventilador est6 diseflado para girar en ambas
direcciones, con una pausa entre elias.
• Elventilador de convecci6n funciona durante el
precalentamiento del ciclo de horneado. Elventilador
se apagar6 despu_s de que el horno haga alcanzado
la temperatura configurada. Estoes normal.
Un ventilador de refrigeraci6n
puede encenderse g apagarse
autom6ticamente.
• Estoes normal. Se encenderO Uapagar6 un ventilador
de refrigeraci6n para enfriar las piezas internas. Puede
funcionar aOn despu@sde que el homo se haua
apagado.
47
Page 100

Antes de Ilamar al servicio t cnico...
Consejos para identificaci6n y soluci6n de problemas
Causas posibles
Resulta dificil deslizar
las bandejas del homo
El cajan no se desliza Elcaj6n no est6 bien • Extienda el caj6n por completo y presi6nelo hasta
bien o hag que tirar alineado, el fondo. Ver la secci6n Cuidado _jlimpieza de la cocina.
de _1
No funcionan el caj6n Elfusible puede haberse • Cambie el fusible o vuelva a configurar el interruptor
calentador o el cajSn quemado o el interruptor de de circuitos.
del homo inferior circuitos puede haber saltado.
Condensaci6nexcesiva Liquido en el caj6n. • Quite el Ifquido.
enelcaj6n Alimentos sin cubrir. • Cubra los alimentos con una tapa o con papel
Losalimentos se secan La humedad se escapa. • Cubra los alimentos con una tapa o con papel
enelcaj6n calentador de aluminio.
Las bandejas color plata
brillantes se limpiaron en
un ciclo de auto-limpieza.
Elcaj6n est6 mug cargado • Reduzca el peso. Redistribuya el contenido del caj6n.
o la carga no est6 equilibrada.
Loscontroles est6n mal • Ver la secci6n C6mo usar el caj6n calentador.
config urados.
La configuraci6n de • Reduzca la configuraci6n de la temperatura.
temperatura est6 mug alta.
Elcaj6n no est6 totalmente • Presione el caj6n hacia adentro hasta que el sujetador
cerrado, enganche.
Qu_ hacer
• Aplique una pequeBa cantidad de aceite vegetal en
una toalla de papel y frote los bordes de las bandejas
del homo. No rode con Pam®u otro lubricante
en spray,
de aluminio.
La plancha no est_
Io suficientemente
caliente
48
La plancha est6 sobrecargada.
La plancha se quit6 de
los quemadores durante
el funcionamiento.
• Apague la plancha.
• Presione + y -al mismo tiempo durante 3 segundos.
Despu_s del pitido, vuelva a encender la plancha.
 Loading...