

Page 1
ge.com
"e"4
c]3
r,,.o
Safety Instru_tions ... 9-4
Operating In_lru_ions
Clock and Timer . ...... ] 0
Conuols ............. 6, 7
()yen ................ 8, 9
Power Outage .......... 7
Sabbath Feaune ..... 13, 14
Self-Cleaning ....... 15, 16
Special Feaun_es ........ 19
SurPace Units ........... 5
Thermostat ........... ] 4
Timed Baking and
Roasting Features ...... 11
Care and Cleaning
Control I{a_obs ......... 17
Drip Pans ............. 91
Heating Elements ...... 17
I,ift-Off Oven Door ..... 19
Lift-Up Cooktop ....... 21
LiOlt ................. 20
Shelves ............... 18
Storag_ Drawer . ....... 20
Surface Units .......... 21
Vent ................. 18
Troubleshooting
Tips .............. 22-24
Accessories ........... 30
Consumer Support
Consumer
Support ...... Back Coxer
Product
Registration ........ 95, 96
Wanantv ............. 31
ysPs9
Write the model and serial
numbers here:
Model #
Serial #
You can find them on a label
behind the storage drawer on
the fl'ont of the range fl'ame.
49-80482 07-07JR
Page 2
iMPORTANTSAFETYiNFORMATiON.
READALLiNSTRUCTiONSBEFOREUSING.
Foryour safety,theinformationinthis manualmustbefollowed tominimizetherisk of fire,electric shock,or to
preventpropertydamage,personalinjury,orlossoflife.
A WARNINGANti-TIPDEVICE
All rangescantip andinjurycouldresult
Topreventaccidental tippingoftherange, attachitto thewaftandfloor by installingtheAnti-tip devicesupplied.
If theAnti-tip device suppliedwiththerangedoesnotfit this application,usethe universa/Anti-Tipdevice
WB2X7909.
Tocheck ifthe deviceisinstalledand engagedproperly,removethestoragedrawer andinspecttherear
levelingleg. Makesureit fitssecurely into theslot.
Ifyou pull tile range out from tile wall for any reason, make suie tile defice is properly engaged when
you push the range back against the wall. If it is not, theie is a possible risk of tile range tipping over
and causing injuU if you or a child stand, sit or lean oil an open door.
Please *efer m the Ami-Tip defice infbmlation shipped with the device and in this manual. Failme to
rake this precaution could result in tipping of tile range and inj/n>
IMPORTANTSAFETYNOtiCE
TheCaliforniaSafeDrinkingWaterand ToxicEnforcementAct requiresthe GovernorofCaliforniatopublisha
fistofsubstancesknownto the stateto cause cancer,birth defectsor otherreproductiveharm,andrequires
businessesto warn customersofpotentialexposureto suchsubstances.
Thefiberglassinsulationinself-cleanovensgives off a verysmallamountofcarbonmonoxideduringthe
cleaningcycle. Exposurecanbeminimizedbyventingwithan openwindow or using a ventilationfan or hood.
SAFETYPRECAUtiONS
Whenusing electricalappliances,basicsafeS/precautionsshouldbe followed,includingthefollowing:
!?:Use this appliance only %r its intended propose
asdesc,ibed in this O_vner's Manual.
!?:Be sure your appliance is prope,t)installed and
grounded b} a qualified installer in accordance
with tile provided installation instructions.
iJi;:iHm_etile installer show xou tile location
of the circuit breaker or fllse. Mark it for easx
ief_Tence.
Do not attempt to repair or replace any
part of)our range/mless it is specificall_
recommended in this manual. All other
servicing should be referred to a qualified
technician.
iJii:iBefore perfmming any serfice, disconnect
the range power supply at the household
distribution panel by removing the fuse or
switching off the ci,vuit breaker
_: Do not leave children alone---children should
not be left alone or unattended in an area
where an appliance is in use. They should never
be allowed to sit or stand oil any part of tile
appliance.
2
iJii:iDo not allow anyone to climb, stand or hang
oil tile dooI; storage drawer or cooktop. They
could damage tile i('angeand even tip it oveI,
causing severe pe,._onal injur>
_: [aige scratches or impacts to glass doo,5 can
lead to broken or shattered glass.
;_:Do not store flammable materials in an oven or
near tile cooktop.
_ CAUTION:[[eIl]S Of in[eies[ [o chi](lien
should not be stored in cabinets above a range
or oil the backsplash of a range--children
climbing oil the range to reach items could be
seiiously injured.
iJii:iNever wear loose-fitting or hanging garments
while using the appliance. Be carefid when
reaching fbr items stored over tile ,vmge.
Flammable mateiial could be ignited if brought
in contact with hot surfilce units or heating
eleinents and inav cause severe btlIns.
_: Use only dU pot holde*._--moist or damp pot
holdeIs oil hot surfi/ces may result in burns
flom steam. Do not let pot holdei._ touch hot
surfilce units or heating dements. Do not use
a towel or other bulky cloth in place of pot
holde,s.
Page 3
A WARNING!
SAFETYPRECAUTIONS
ge.com
_: For your safety, never use your appliance %r
wa,ming or heating the morn.
_: Teach children not to play with the controls or
any other part of the range.
_: .MwayskeeI) dish towels, dish cloths, pot holde*s
and other linens asafe distance flom your
i'ange.
iJii:i.MwayskeeI) wooden and plastic utensils and
canned fbod a safe distance fiom
yO/lI" I_]Ilge.
iJii:i_MwayskeeI) combustible wall coxerings,
cu**ains or drapes a safe distance fiom your
i'ange.
_: Do not let cooking grease or other flammable
mateiials accumulate in or ileal the iange.
_: Keep the hood and grease filte,s clean to
maintain good venting and to avoid grease fires.
_: Do not use water oil grease fires. Never pick up
a flaming pan. Turn the controls ofi_ Smother a
flaming pan oil a surfilce unit by cove,ing tile
pail completely with a well-fitting lid, cookie
sheet or flat u'a> Use a multi-pu,pose d,w
chemical or fbam-rype fire extinguisher
Flaming g,ease outside a pan can be put out by
cove,ing it with baking soda o*, if available, by
using a muld-puipose dU chemical or fioain-
type fire extinguisher
Flame in the oven can be smothe,ed completely
by closing the oven door and turning the oven
off or by using a multi-pu,pose dU chendcal or
fbamWpe fire extinguisher.
iJii:iDo not touch tile surfi/ce units, tile heating
dements or tile inteiior surfilce of tile oven.
These surfilces may be hot enough to burn
even though they are dark in color Du,ing and
after use, do not touch, or let clothing or other
flammable materials contact tile surfilce units,
areas nearby the surfilce units or am' inte,ior
area of tile oven; allow sufficient time fbr
cooling fi,st.
Potentially hot surfilces include the cooktop,
areas fi_cing tile cooktop, oven vent opening,
surfilces near the opening, crevices around the
oven door
REMEMBER:Tile inside surfi_ce of tile oven may
be hot when the door is opened.
_: Do not store or use combustible materials,
gasoline or other flammable vapois and liquids
in tile vicinity of this or aW other appliance.
COOKMEATANDPOULTRYTHOROUGHLY...
Cookmeatandpoultrythoroughly--meattoat/eastanINTERNALtemperatureof 160°Fandpoultrytoat/eastan
INTERNALtemperatureof I80°ECookingtothesetemperaturesusua//yprotectsagainstfoodbomei//ness.
SURFACECOOKINGUNITS
Useproperpansize--select cookwarehavingflatbottomslargeenoughtocoverthe surfaceunitheating
element.Theuseofundersizedcookwarewill exposea portionofthe surfaceunitto direct contact andmay
resultinignitionof clothing.Properrelationshipof co&ware to surfaceunitwill alsoimproveefficiency.
iJii:iNever leave tile surfi/ce units unattended
at high heat settings. Boilove,s cause smoking
and gieasy spillove,s that may catch oil fire.
_: Do not use alundnum fbil to line the &ip pails
or anywhere in the oven, except as desc*ibed in
this manual. Misuse could result in a shock, file
hazard or damage to the ,'ange.
iJi;:iBe sure the &ip pans and the vent duct are not
coxered and are in place. Their absence du,ing
cooking could damage ,'ange parts and wi,ing.
iJii:iOnly ce,min t}pes of glass, glass/ce,amic,
earthenware or other glazed containe,s are
suitable fbr cooktop service; otheis may break
because of the sudden change in temperature.
_: To minimize the possibility of burns, ignition of
flmnmable materials and spillage, the handle of
a container should be turned toward tile center
of the ,'ange without extending over nearby
surfi/ce units.
iJii:i.Mwaysturn tile surfi/ce units off befbre
removing cookware.
3
Page 4
IMPORTANTSAFETYINFORMATION.
READALLINSTRUCTIONSBEFOREUSING.
SURFACECOOKINGUNITS(cont.)
iJii:iDo not imme,se or soak the removable suifi]ce
units. Do not put them in a dishwasher. Do not
self clean the surfi, ce units in the oven.
iJii:iWhen preparing flaming foods under the hood,
tuin the rim on.
To axoid the possibility of a burn or electric
shock, always be certain that the controls fbr all
surfi,ce units are at the OFFposition and all coils
are cool befbre attempting to lift or remove
a unit.
iJii:iClean the cooktop with caution. If a wet sponge
is used to wipe spills on a hot cooktop, be
carefld to avoid steam burns.
iJii:iKeeI) an eye on foods being fl_Jedat high or
medium high heat settings.
iJii:iFoods f_orflying should be as dU as possible.
Frost on flozen fbods or moisture on flesh
foods can cm,se hot fi,t to bubble up and over
the sides of the pan.
iJii:iUse little fi*tfar effective shallow or deep fi*t
flying. Filling the pan too fldl of lilt can cause
spilloveL_when food is added.
_: If a combination of oils or fi_tswill be used in
flTing, stir together befbre heating, or as fi)ts
m elt slowl_'.
i_ii"Always heat fi,t slowly, and watch as it heats.
iJii:iUse a deep fi)t them_ometer whenever possible
to prevent overheating fi*tbeyond the smoking
point.
A WARNING!
OVEN
Standawayfromthe range whenopeningtheovendoor.Hotairor steamwhich escapescancauseburnsto
hands,faceand/oreyes.
_: Do not heat unopened fbod containers.
Pressure could build up and the container
could buL_t, causing an inju,>
iJii:iKeeI) the oven vent unobstructed.
_: KeeI) the oven flee flom grease buildup.
_: Place the oven shelf in the desired posi6on
while the oven is cool. If shelxvs must be
handled when hot, do not let pot holder
contact the heating elements.
_: Pulling out the shelf to the stop-lock is a
convenience in lifting heaw fbods. It is also a
precaution against burns flom touching hot
surfi)ces of the door or oven walls.
_: When using cooking or roasdng bags in the
oven, fiollowthe manufi)cturer's directions.
iJii:iDo not use the oven to dU newspape,s.
If overheated, they can catch on fire.
_: Do not use the oven fbr a storage area. Items
sto,ed in an oven can ignite.
_: Do not leave paper products, cooking utensils
or fbod in the oven when not in use.
_fi:.:Do not use aluminum fbil to line oven bottoms.
hnproper installation of aluminum fbil ma,
result in a risk of electric shock or fire.
SELF-CLEANINGOVEN
Donot useovencleaners.No commercialovencleaneror ovenlinerprotective coatingof anykind shouldbe
usedin or aroundanypart ofthe oven.Residuefromovencleanerswill damagethe insideof theoven when the
self-cleancycleis used.
iJii:iDo not clean the door gasket. The door gasket
is essential far a good seal. Care should be
token not to rub, damage or move the gasket.
_: Befb,e self cleaning the oxen, remove shiny,
silxer-colored oven shelves (on some inodels)
and all other cookwa,e.
iJii:iBe sure to wipe up excess spillage befbre
sta,ting the self cleaning operation.
iJii:iIf the self cleaning mode malflmctions, mrn the
oven off and disconnect the power supply Have
it serficed by a qualified technician.
_: Clean only parts listed in this Owner's Manual.
READANDFOLLOWTHISSAFETYINFORMATIONCAREFULLY.
SAVETHESEINSTRUCTIONS
4
Page 5
Usingthe surface units, ge.com
Throughout this manual, features and appearance may vary from your model.
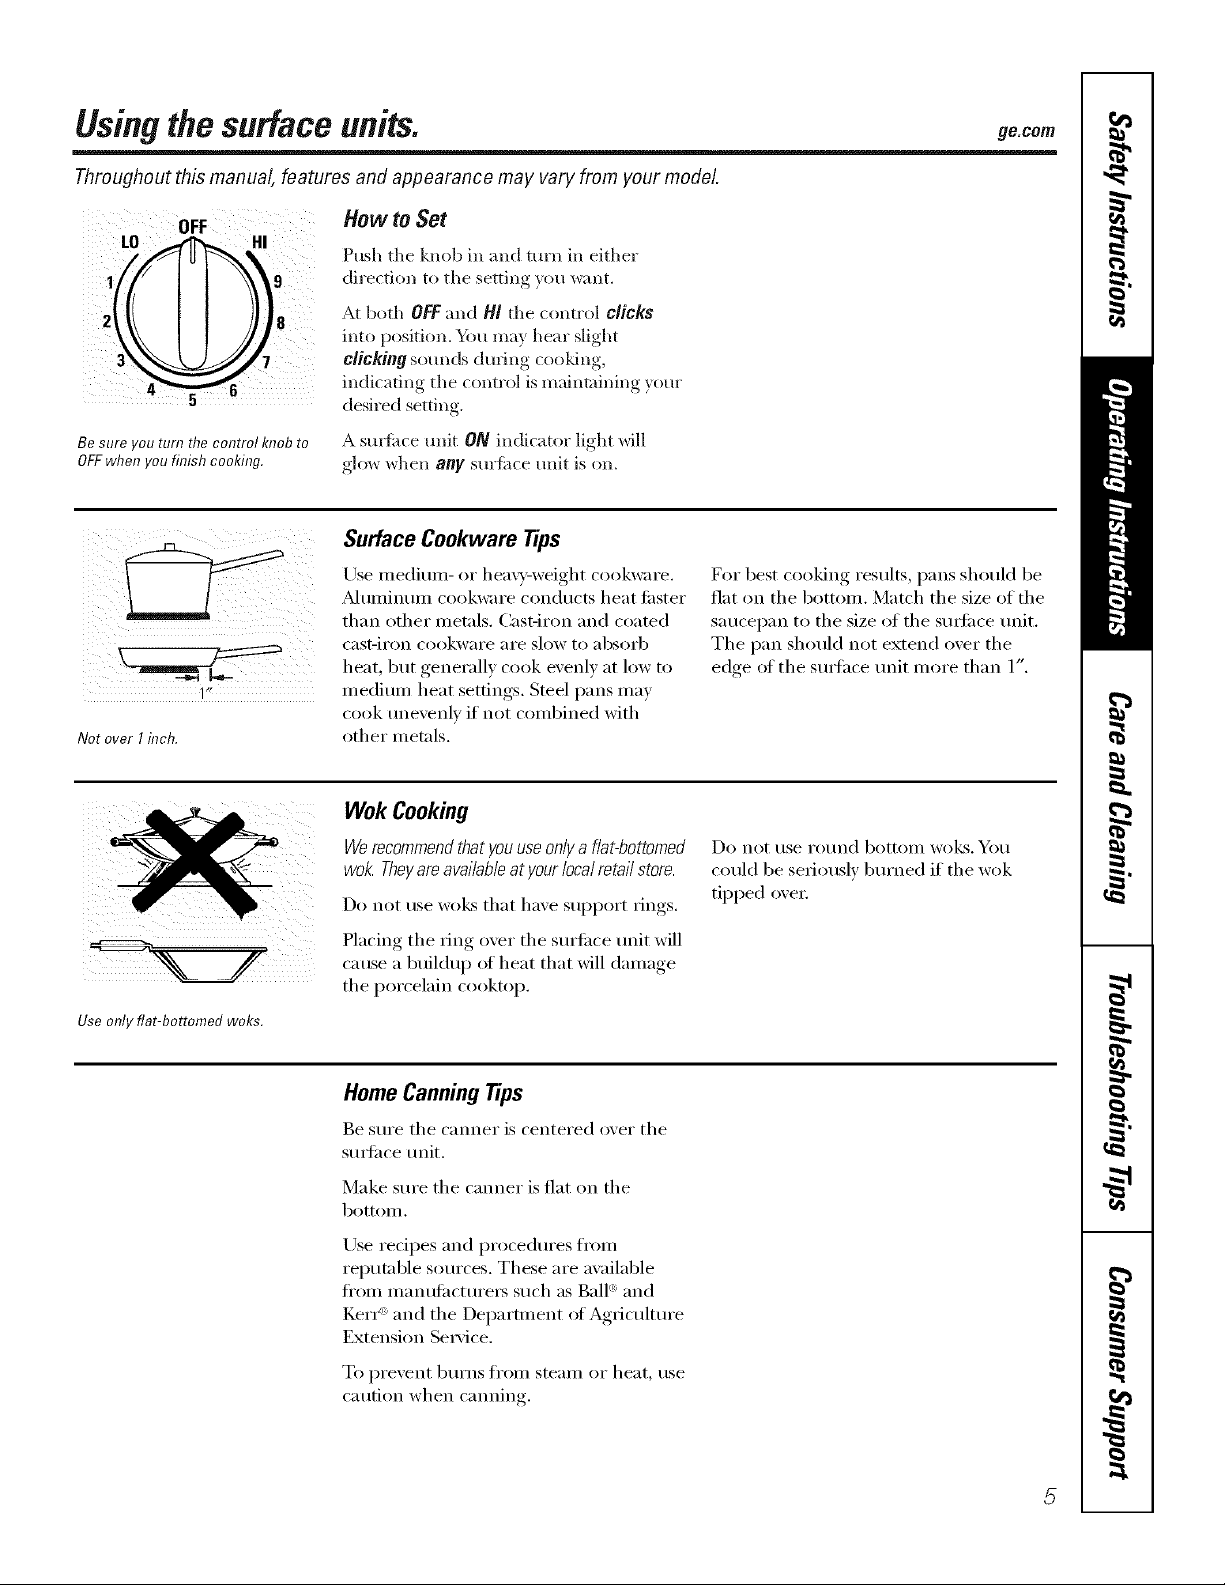
How to Set
Push the knob in and turn in either
direction to the setting you want.
At both OFF and H! the control clicks
into position. _tl may hear slight
clicking som_ds during cooking,
3
indicating the control is maintaining yore"
desired setting.
Be sure you turn the control knob to
OFFwhen you finish cooking.
1"*
Notover I inch.
I
Use only flat-bottomed woks.
A sm_time refit ON indicator light will
glow when any surtime unit is on,
Surface Cookware tips
Use medimn- or hea\_v-weight cookware.
_kdtlIllintlIll cookware condtlcts heat fi_ster
than other metals. Cast-iron and coated
cast-iI'on cookwai'e aI'e slow to _lbsoi'b
heat, but generally cook evenly at low to
medium heat settings. Steel pans may
cook tmevenlv if not combined with
other metals.
Wok Cooking
Werecommendthat youuseonlya flat-bottomed
wok. Theyareavailableatyour localretail store.
Do not rise WO]CSthat have support rings.
Placing the ring over the surtilce unit will
cause a buildu I) of heat that will damage
the porcelain cooktop.
For best cooking results, pans shouM be
fiat on the bottom. Match the size of the
saucei)an to the size of the sm_i_ce trait.
The pan should not extend over the
edge ot the sm_hce trait more than 1".
Do not t/se I'ot/nd bottolll Wo]cs. Yell
could be seriously bm'ned if the wok
tipped oxer.
Home CanningTips
Be sm'e the canner is centered o_er the
sm_i_ce trait.
Make sure the canner is fiat on the
bottom.
Use redpes and procedm'es fl'om
reputable sources. These are awfilable
fl'om manufi_cture_ such as Ball '_and
IZerI_'_and the Department ot Agricultm'e
Extension Service.
To pi'e'_ent btli'ns fi'Olll steaill or heat, rise
caution when camfing.
Page 6
Usingthe ovencontrols.
Throughout this manual, features and appearance may vary from your model.
e
CON'[ :_OL LOCK/U_ LOC_%
S + @ H ECONDS
TIME CONTROLS
OvenControl,Clockand TimerFeaturesandSettings
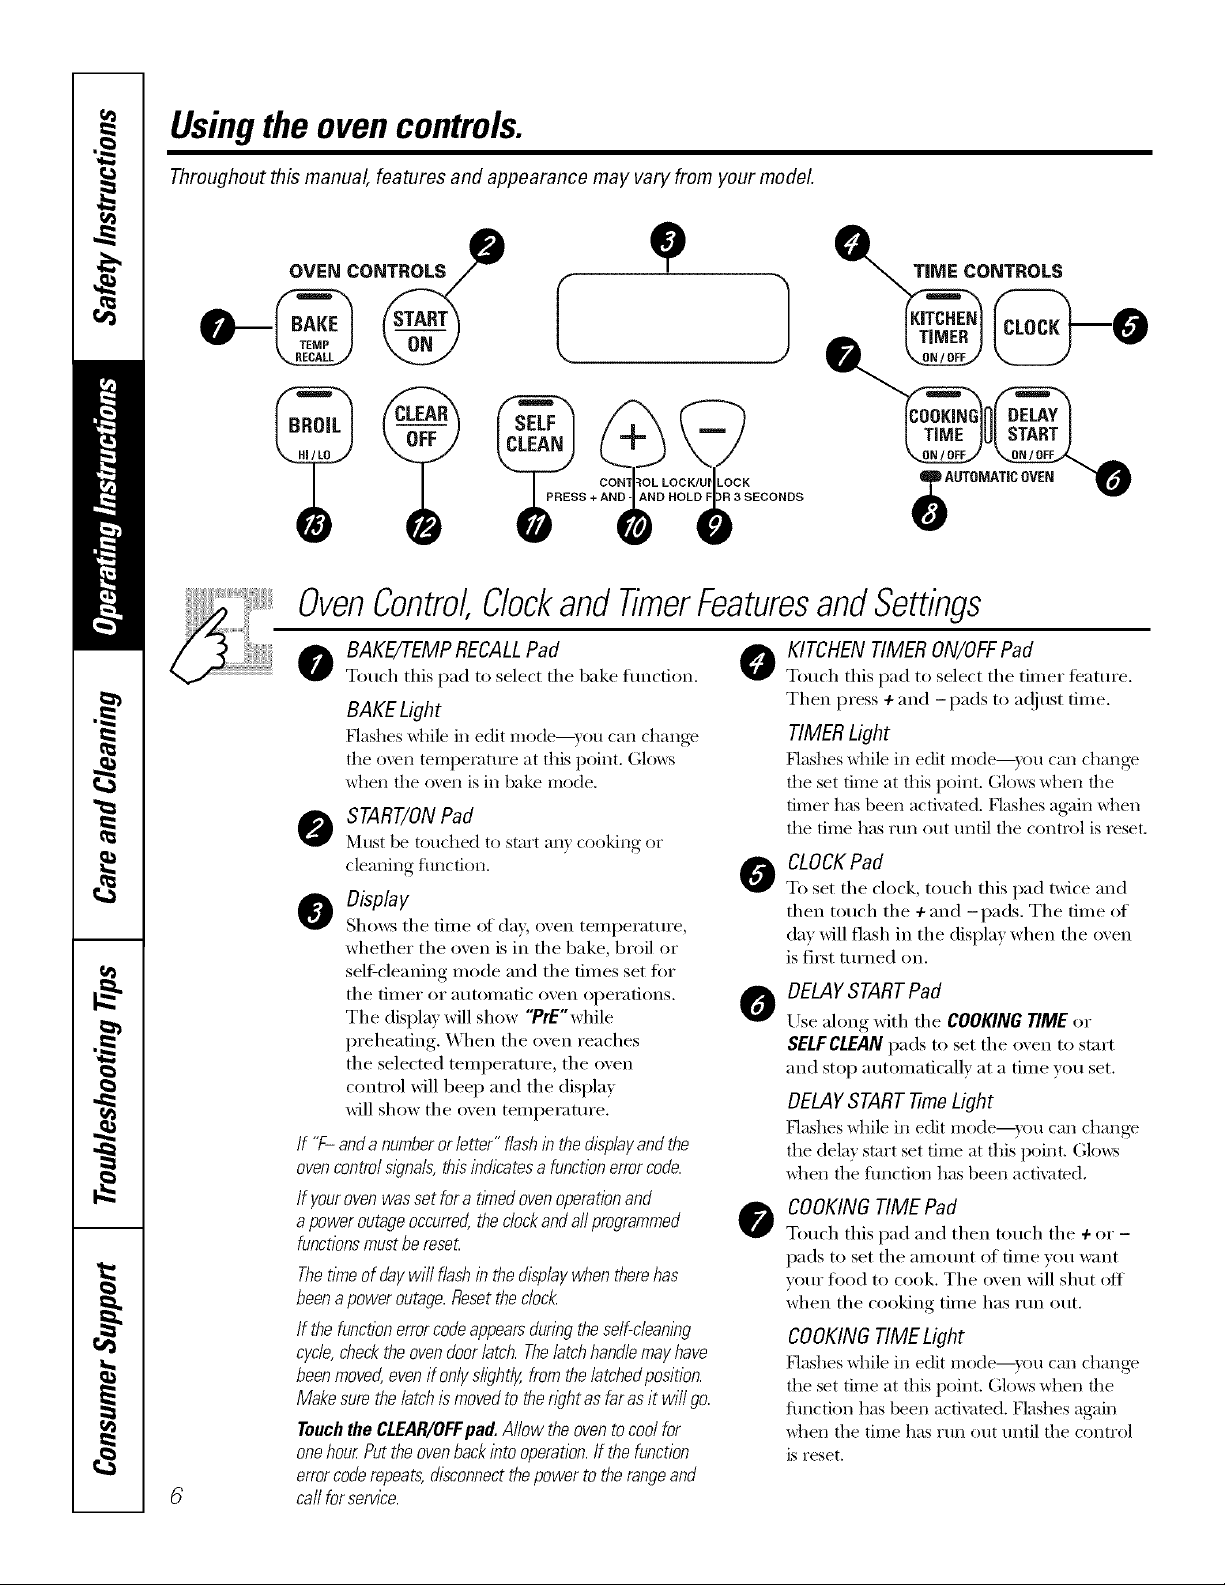
o BAKE/7-EMPRECALLPad 0
Touch tiffs pad to select tile bake flmcfion.
BAKE Light
Flashes while in edit mode--)ou can chang_
tile o\re[] temperatm'e at this point. Glo_s
when the o\en is in bake mode.
O START/ONPad
Nltlst be touched to start aI]} cooking or
cleaning function,
O Display
Shows the tiI]le of day, oven tei]lpei'attli'e,
whether the oven is in the bake, broil or
self:cleaning mode and the times set for
the tii]ler or atltoi]/atic oven ol)ei'atioi]s.
The display will show "PrE'while
preheating. When the oven reaches
the selected temperature, the oven
control will beep and tile display
will show tile oven mmperamre.
/f '7- and anumberor/otter" f/ashin the displayandthe
ovencontro/ signals, thisindicatesa functionerrorcode.
If yourovenwas set fora timedovenoperationand
apower outage occurred,the dock and a//programmed
functionsmustbe reset
Thetime of day wi// f/ash in the dlsp/aywhen therehas
beenapower outage.Resetthe c/oc/_
If the function errorcodeappears during the se/f-c/eanlbg
cyc/e,checkthe oven door/atch. The/atchhand/e mayhave
beenmoved,evenif on/ys/lght/y,from the/atchedposition.
Makesure the/atch ismoved to thewht as far asit wi// go.
Touch the CLEAR/OFFpad. A//ow theoven tocoo/for
onehour Put the ovenback into operation.If the function
errorcoderepeats, disconnectthepower to the rangeand
ca//for service.
KITCHEN TIMER ON/OFFPad
Touch this pad to select tile timer teatm'e.
Then press 4-and -pads to at!just time.
TIMERLight
Hashes _dfile in edit mode--y_)u can changv
the set time at this point. Glows when the
timer has been activated, Flashes again _dlen
the time has run out until the control is reset.
CLOCK Pad
0
To set tile clock, tOtlcb tiffs pad twice aI]d
then touch the + and -pads. The time of
day will flash in the display when the oven
is fi_t turned on.
DELAYSTARTPad
0
Use ahmg with tile COOKING TIME or
SELFCLEAN pads to set the oven to start
and stop automatically at a time wm set.
DELAYSTART -timeLight
Hashes _dfile in edit mode--you can changv
the delay start set time at this Ix)int. Glo_vs
when the flmction has beet] acti\ramd,
COOKINGTIME Pad
0
Touch tiffs pad and then touch tile 4-or -
pads to set tile aillOtli]t of time you want
wmr fl)od to cook. The oven will shut off
when the cooking time has run out.
COOKINGTIME Light
Hashes _dfile in edit mode--y_)u can changv
the set time at this point. Glows when the
flmction has been activated. Flashes again
when the time has run ()hit tmtil the control
is reset.
Page 7
OvenControl,Clockand TimerFeaturesandSettings
ge.com
AUTOMATIC OVENLight
O
This lights anytime the oven has been
programn_ed using the COOKING TIME or
DELAYSTARTfimcdons.
- Pad
Short raps to this pad _dll decrease the time
or teinperature by small amotmts. Touch
and hold the pad to decrease the time or
teinl)erature by larger ainounts.
+ Pad
Short trips to this pad will increase the time
or temperature 1U small amo/mts. Touch
and hold the pad to increase the time or
temperatm'e by linger amotmts.
O SELFCLEANPad
Touch this pad to select tile selfMeaning
traction. See the Using the self-cleaning
oven section.
CLEANLight
Flashes _ddle in edit mode--)ou can change
tile length of time fbr the self,lean c) cle at
this ix>int. (;lows when tile oven is in the self=
dean c)cle. After the selfq lean cycle, the lig]lt
will ttlrI1 ofI_Unlatch the docn:
CLEAR/OFF Pad
Touch this pad to cancel ALL oven
operations except tile clock and time_:
BROILHI/LO Pad
Touch this pad to select the broil traction.
BROILLight
Flashes while in edit mode---you can switch
fl'om HI to tO BROILat this point. Glows when
the ()veil iS iI1 broil mode.
Indicator Lights (on some pads)
EBITmode lastsseveral seconds after the
last pad press, BELAY START ON/OFFand
COOKINGTIME ON/OFFwill be the only pads
lit if either of these options is selected.
(Example: OELAYSTARTis selected with
BAKE tile DELAYSTARTpad will remain
lit until the clock reaches the programmed
time, at which point it will mm off and the
BAKE/TEMPRECALLpad lig_lt will light up),
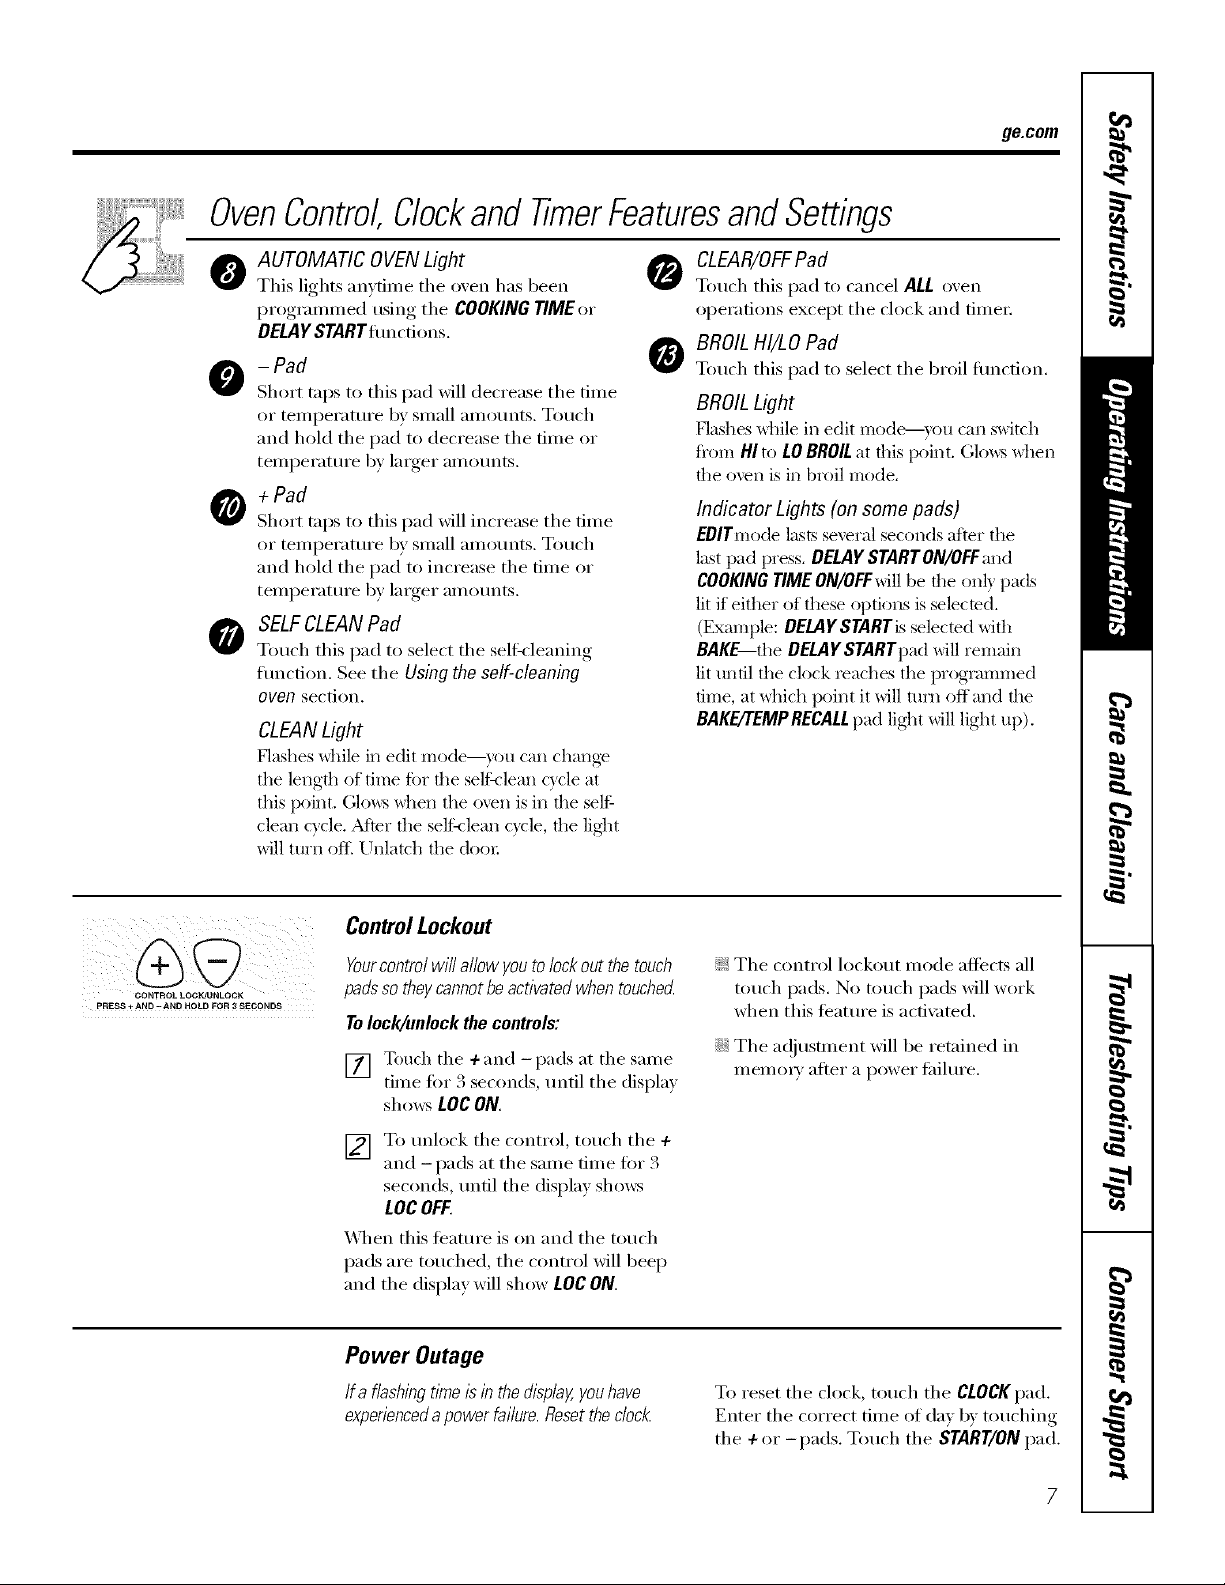
Control Lockout
t Yourcontrol will allow youto lock out the touch
CONTROL LOCI'UU N LOCK
PRESS + AND -AND HOLD FOR 3 SECONDS
padsso theycannot beactivated when touched
Tolock/unlock the controls:
[] Touch the +and -pads at the same
time fin" 3 seconds, tmtil tile (lispla,_
sho_s LOgON.
] To mflock the control, touch the +
and -pads at tile same time for 3
seconds, tmtil the displa) shows
LOCOFF.
"X_/en this teatm'e is on and the touch
pads are touched, the control will beep
and tile display will show LOCON.
Power Outage
Ifa flashing tl_neIsin the display,youhave
experiencedapower failure. Resetthe clod<
};?:Tile control h)ckout mode affects all
touch pads. No touch pads will work
when this teatm'e is actix _ted.
iJi::Tile a(!iusnnent _dll be retained in
memoi T after a power fifilure.
To reset the ch)ck, touch the CLOCKpad.
Enter the correct time of (la) b) touching
the + or-pads. Touch the START/ONpad.
Page 8
Usingthe oven.
Toavoid possible bums, place the shelves in the desired posifion before you turn the oven on.
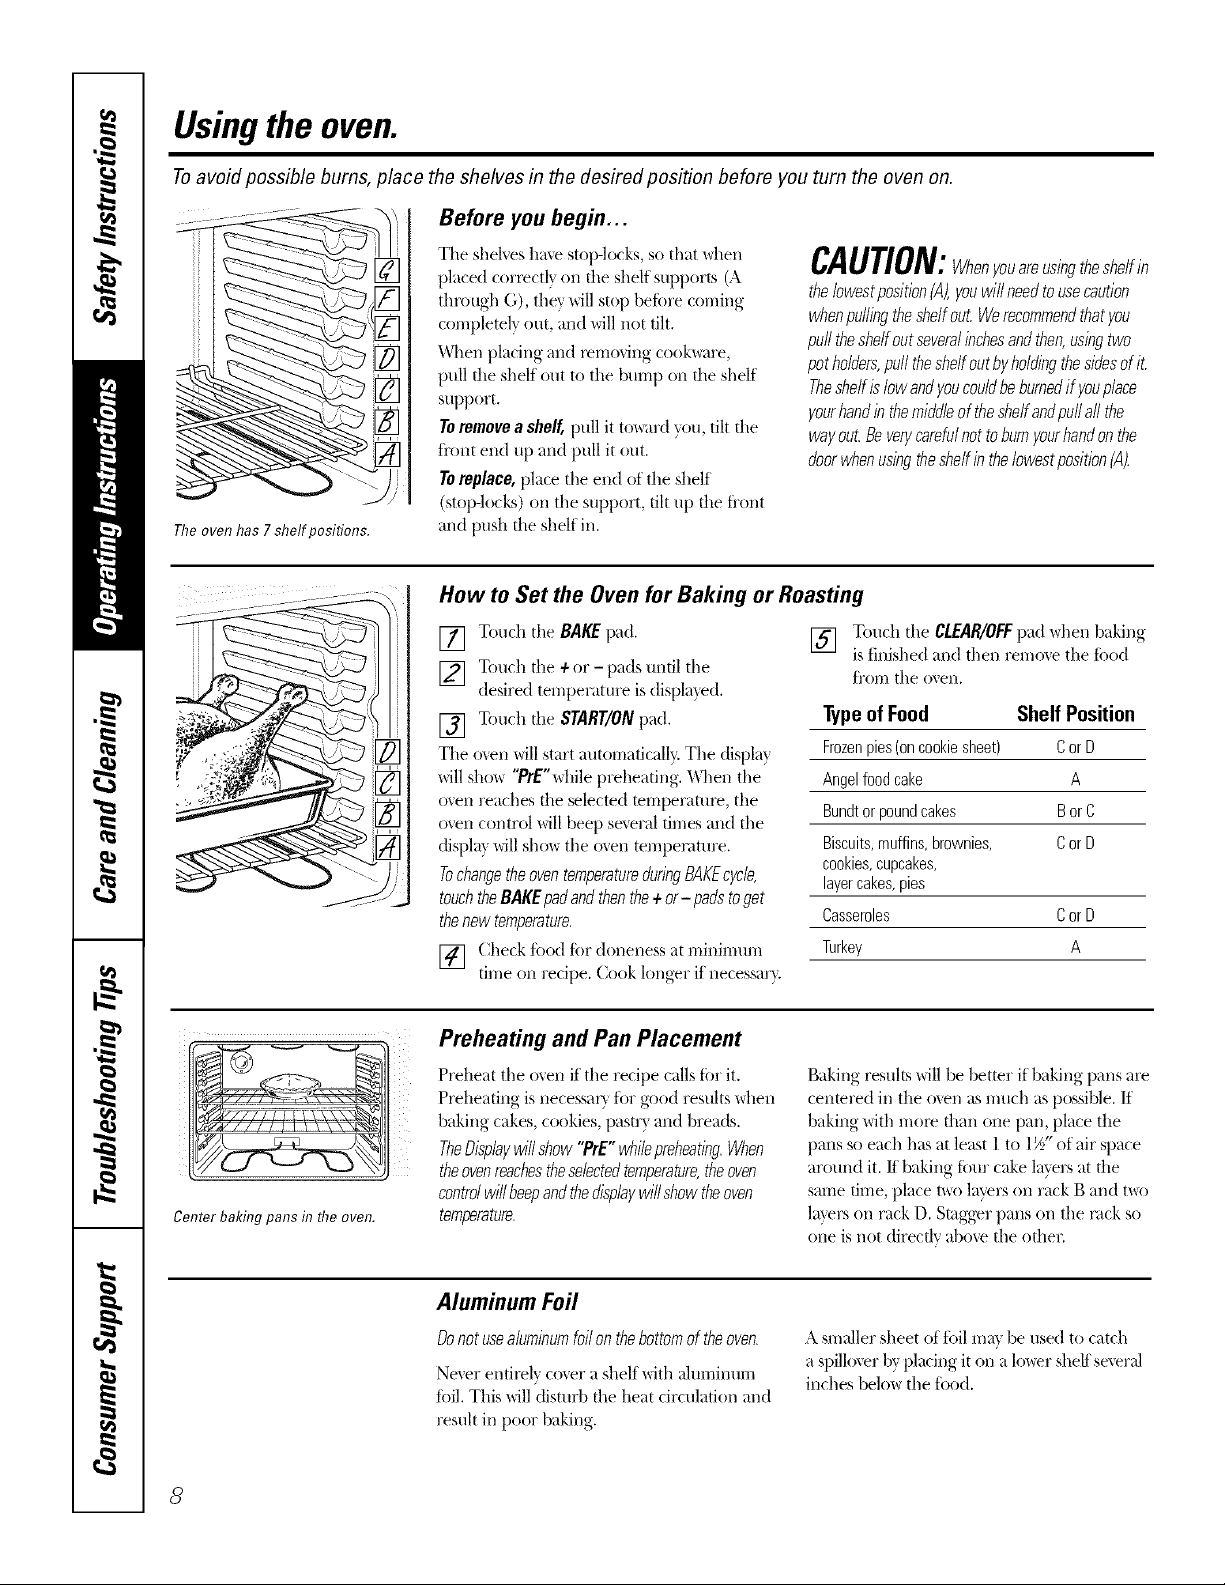
Before you begin...
The oven has7 shelf positions.
T]le shelves ha\'e stop-locks, so that \dlen
pla.ced corx_ctl) on file shelf supports (A
through G), they will stop before coming
completely out, and will not tilt.
When placing and removing cook\_are,
pull file shelf ()tit to the N*mp on file shelf
support.
Toremovea shelf,pull it tox_mdyou, tilt file
fi'ont end up and pull it out.
Toreplace,place the end o_the shelf
(stop-lo(ks) (m the support, tilt up die fi'ont
and push the shelf in.
CAUTION:Whenyouareus/ngtheshelfin
thelowestposition(A),youwillneedtousecaution
whenpullingtheshelfout.Werecommendthatyou
pulltheshelfoutseveralinchesandthen,usingtwo
potholders,pull theshelfoutbyholdingthesidesofit.
Theshelfislowandyoucouldbeburnedif youplace
yourhandinthemiddleof theshelfandpullall the
wayout.Beverycarefulnottoburnyourhandonthe
doorwhenusingtheshelfin the/owestposition(A).
How to Set the Oven for Baking or Roasting
[] Touch the BAKEpad.
] Touch tile +or- pads until the
desired temperature isdispla_ed.
[] Touch the START/ONpad.
The o_en willstart atttomaticallv The displa_
willsho_ '`prE"\Jdle preheating. _Altenthe
oxen reaches file selected mmperature, the
oven control willbeep several times and the
(tispl_gwillsho_ the oven temperature.
TochangetheoventemperatureduringBAKEcycle,
touchtheBAKEpadandthenthe+or- padstoget
thenewtemperature.
[] (.:heckfood for doneness a.tminimum
nine on recipe. Cook longer if necessat>
[] Touch the CLEAR/OFFpad when baking
TypeofFood Shelf Position
Frozenpies(oncookiesheet) CorD
Angelfoodcake A
Bundtorpoundcakes BorC
Biscuits,muffins,brownies, CorD
cookies,cupcakes,
layercakes,pies
Casseroles CorD
Turkey A
is finished and then remo_e tile _i_od
from the oven.
Center baking pans in flTeoven.
8
Preheating and Pan Placement
Preheat the oven it the recipe calls for it.
Preheating is necessa U tbr good results \dmn
baking cakes, cookies, pastrx and breads.
TheDisplaywillshow",°rE"whilepreheating.When
theovenreachestheselectedtemperature,theoven
controlwillbeepandthedisplaywillshowtheoven
temperature.
Aluminum Foil
Donotusealuminumfoilonthebottomoftheoven.
Ne_er entirely (o_er a shelf with alumimm-i
toil. This will (fisturb file heat circulation attd
result in poor baking.
Baking resuhs willbe better if baking pans are
cenmred in tile o_en as much as possiNe. If
baking with more than one pan, place tile
pans so each has at least 1 to 1½"of air space
around it./f baking fi_urcake 1wers at the
same time,place t\_olavecs on rack B att(t t\_o
lmecs on rack D. Smgger pans on the rock so
one isnot direc0v above the oflmc
A smaller sheet of toil may be used to catch
a spilloxer by placing it on a lower shel_'sexeral
inches below the tood.
Page 9
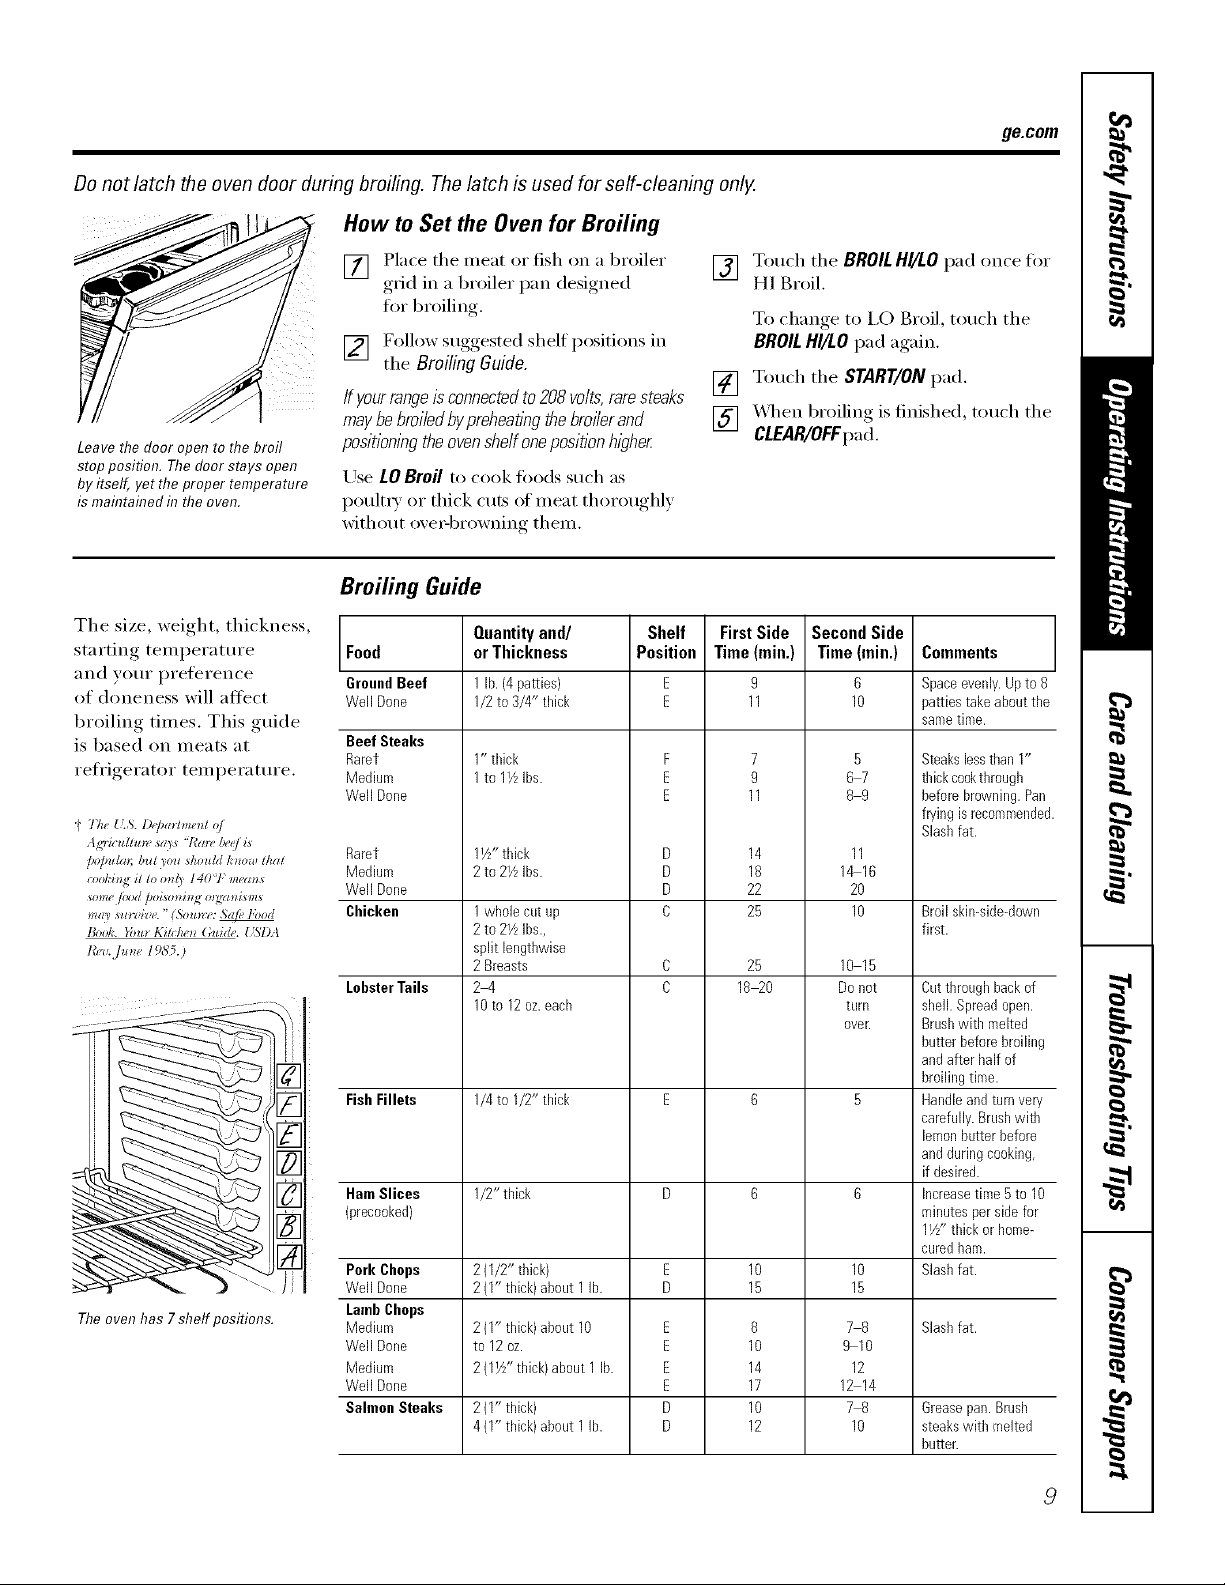
Donot latch the oven door during broiling. The latch is used for self-cleaning only.
How to Set the Oven for Broiling
ge.com
[] Place tile meat or fish on a broiler
,grid in a broiler I)an designed,
for broiling.
[] Follow suogested shelf )ositions in
tile BroilingGuide.
If your range is connected to 208 voits, rare steaks
may be broiied bypreheat/)_gthe broiier and
Leave the door open to the broil
stop position. The door stays open
by itself, yet the proper temperature
is maintained in the even.
positionl)_gthe oven shelf one positionhigher
Use LOBroil to cook foods such as
poult_ 7 or thick cuts of meat thoroughly
without ove_q)rowning them.
Broiling Guide
Tile size, weight, thickness,
starting temperature Food
aild VO/li" prelereIlce GroundBeef
of doneness will altect Well Done
broiling times, This guide
is based on Illeats at Beef Steaks
reti'igerator temperature. Medium
(' The {LS.i)(J_a*/me_¢o/
Agriculhm, sa)_ "/'a_, &e/i*
/_l)lm/m;b*zt_o_zsko*t/d/,'_*o,l!tkat
_>ol,'i_git to o_*{_I40<1,`m_'m_s
_ome /ood hoiso_*kN o_;gzmism*
m_U s*lrzize." ('_o*mw _e lbod
1_oo1,'.}'o_t_l_ih:lw)_Guid('.{_ST)A
t',_,,./._** 1985.)
Theovenhas 7shelf positions.
Rarer
Well Done
Rarer
Medium
Well Done
Chicken
LobsterTails
FishFillets
HamSlices
(precooked)
Pork Chops
Well Done
LambChops
Medium
Well Done
Medium
Well Done
Salmon Steaks
Quantityand/
orThickness
1lb.(4patties)
1/2to 3/4" thick
1" thick
1to 11/,Ibs.
1VZ'thick
2to 2YLIbs.
1whole cut up
2to 2VLIbs.,
split lengthwise
2 Breasts
2-4
10to 12oz.each
1/4to I/2" thick
1/2"thick
2(1/2" thick)
2(I" thick) about 1 lb.
2(1" thick)about 10
to 12oz.
1
2(I YZ'thick)about1 lb.
2(1" thick)
4(I" thick) about 1 lb.
Shelf
Position
F
E
E
D
D
D
C
E
E
E
E
D
D
[] Touch tile BROIL HI/LO pad once fi)r
HI Broil.
To change, to 1,0 Broil, touch tile
BROILHI/tO pad again.
[] Touch tile START/ON pad.
[] X._q/en broiling is finished, touch tile
CLEAR/OFFpad.
FirstSide
Time(min,)
11
11
14
18
22
25
25
18 20
10
14
17
10
12
Second Side
Time (rain.)
9
7
9
8
6
10
5
67
89
11
1_16
20
10
10 15
Donot
turll
ovelt
10
15
78
9 10
12
12 14
78
10
Comments
Spaceevenly.Upto 8
pattiestakeaboutthe
sametime.
Steakslessthan 1"
thickcookthrough
beforebrowning.Pan
fryingis recommended.
Slashfat.
Broil skin-side-down
first.
Cutthroughbackof
shell. Spreadopen.
Brushwith melted
butter beforebroiling
andafter half of
broilingtime.
Handleandturnvery
carefully.Brushwith
lemonbutterbefore
andduringcooking,
if desired.
Increasetime5 to 10
minutesper sidefor
11/z"thick orhome-
curedham.
Slashfat.
Slashfat.
Grease pan. Brush
steaks witll melted
butter.
Page 10
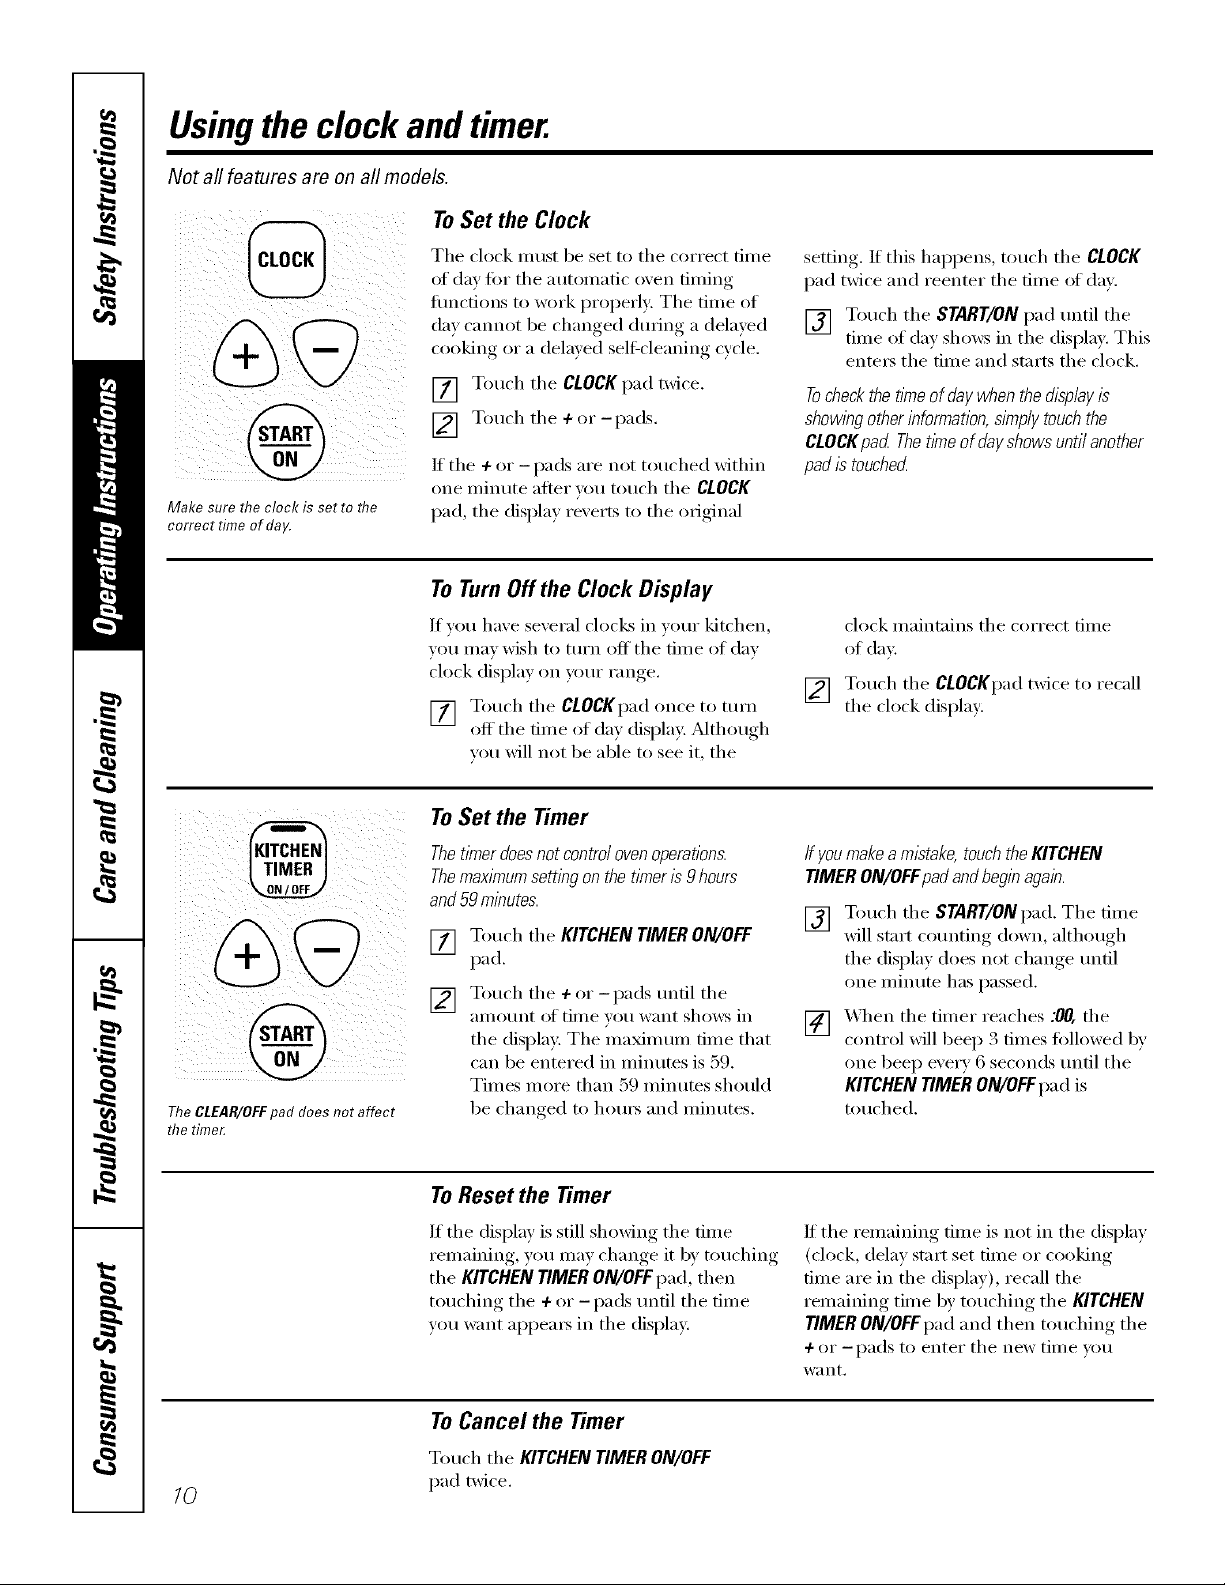
Usingthe clock and timer.
Not all features are on all models.
To Set the Clock
Make sure the clock is set to flTe
correct time of day.
The clock must be set to the correct time
of day fin" the atmnnatic oxen tinting
flmcfions to work properly: The time of
da} cmmot be changed dm_ing a dela}ed
cooking or a delmed seltXcleaning cycle,
[] Touch the CLOCKpad twice,
[] T°uch the + °r -IXMS"
If the 4- or - pads are not touched within
one minute after xou touch the CLOCK
pad, the displa) rexerts to the original
ToTurn Offthe Clock Display
If you have several clocks in yore" kitchen,
you may wish to mrn off the time of day
clock display on yore" range.
[] Touch the CLOCKpad once to turn
off the time of da) display. Mthough
wm will not be able to see it, the
To Set the Timer
setting, If this hal)pens, touch the CLOCK
pad twice and reenter the time of din.
[] Touch the START/ON pad until the
time of day shm_s in the display. This
ente_ the time and starts the clock.
Tocheckthetkneofdaywhenthedisplayis
showlbgotherinformation,simplytouchthe
CLOCKpad Thet/meofdayshowsuntilanother
padistouched
clock maintains the correct time
of day.
Touch the CLOCKpad twice to recall
[]
the clock display:
TheCLEAR/OFFpad does not affect
the time£
Thet/Ynerdoes not contro/ ovenoperations.
ThemaxlYnumsetting on the timeris 9 hours
and59 minutes
Touch the KITCHEN TIMER ON/OFF
[]
I)ad.
Touch the + or-pads tmtil the
[]
_ll//ot/n[ ()l_ ti/ue VOt/W}lllt shows ill
the display. The maxim um time that
can be entered ill minutes is 59.
Times more than 59 minutes should
be changed to hem5 and minutes.
To Reset the Timer
If the display is still showing the time
remaining, you may change it by touching
the KITCHENTIMERON/OFFpad, then
touching the + or -pads tmtil the time
you _mlt al)l)ea_ in the display.
ToCancel the Timer
ffyoumakea mistake, touch the KITCHEN
TIMER ON/OFFpadandbeginagain.
[] Tou('h the START/ON pad. The time
will start ('otmting down, althotwh
the display does not change tmtil
one minute has passed.
[] _4qmn the timer reaches :00, the
control will beep 3 times followed by
one beep every 6 seconds tmtil the
KITCHEN TIMER ON/OFFpad is
touched.
If the remaining time is not in the display
(clock, delay start set time or cooking
time are in the display), recall the
remaining time by touching the KITCHEN
TIMER ON/OFFpad and then touching the
+or -pads to enter the new tim e you
want,
( 0
Touch the KITCHEN TIMER ON/OFF
/0
pad twice.
Page 11

Usingthetimedbakingandmastingfeatures.(onsomemodels) gecom
Donot lock the oven door with the latch during timed cooking. Thelatch is used for self-cleaning only.
NOTE: Foods that spoil easily--such as milk, eggs, fish, stuffings, poultry and pork--should not be allowed to s# for
more than 1hour before or after cooking. Room temperature promotes the growth of harmful bacteria. Be sure that
the oven light is off because heat from the bulb will speed harmful bacteria growth.
How to Set an Immediate Start and Automatic Stop
Theoven will turnon immediatelyandcookfor a [] Touch tile START/ON pad.
selectedlengthof time. At the endof thecooking
tkne,the oven WlT/turnoffautomatica//g Tile display shows either tile oven
[] Touch tile BAKEpad.
] Touch the ÷or -pads to set the
o_en teillpei'attli'e.
[] Touch tile COOKING TIME pad.
NOTE."If yourreciperequirespreheating,youmay
need toadd additional time to the length of the
cookingtime.
] Touch tile ÷ or -pads to set tile
baking tim e.
Tile cooking time that you entered
will be displayed. (If you select Cooking
Time fi_st and then a(!just the Bake
Telnl)erature, tile oxen telnperature
will be displayed instead).
temperature that you set or tile cooking
time countdown. (The display starts with
"PrE"if showing tile oven temperature.)
Tile oven will con[intle [O cook tor tile
programmed alllO/Int of tii/le, then [tlYn
off automaficallv,
[] Touch tile CLEAR/OFFpadto clear
tile displa) if necessary:
Removethe food from theoven.Remember,even
thoughthe ovenshutsoff automaflcally, foods
continuecookingaftercontrolsare off
TEMP
@
@
How to Set a Delayed Start and Automatic Stop
Theoven will turn on at the t/Yneof dayyouset,
cookfora specihclength of time and then turnoff
automatically
Make StlI'e tile clock shows tile ('ori'e('t
time oI day,
[] Touch tile BAKEpad.
] Touch tile 4-or -pads to set tile
oven telllpei'att ii'e.
[] Touch tile COOKINGTIME pad.
] Touch tile 4-or -pads to set tile
desired length of cooking free.
[] Touch tile DELAYSTARTpad.
] Touch the + or _i)ads to set the tim e
of (lax _Otl want tile o_,en to ttlYn on
and start cooking.
[] Touch the START/ON pad.
NOTE."An attention tone wi// soundif you are
using flYnedbaking anddonot touchthe
START/ON pad
NOTE."If you would like to check tile times
you have set, touch tile BELAYSTARTpad
to check tile delay start set time you have
set or touch tile COOKINGTIME pad to
check the length of cooking time you
have set.
_4l/en tile oven turns on at tile time of day
wm have set, the display will show "PrE"
until it reaches tile selected temi)erature,
then it will display tile oven teml)erature.
At the end of cooking time, the oven
will turn off and the end-el:cycle tone
will sound.
[] Touch the CLEAR/OFFpad to clear
tile displa) if necessar).
Removethe foodfrom the oven. Remember,even
thoughthe ovenshutsoff automatlcally, foods
continuecookingafter controlsare off
@
1/
Page 12

Special featuresofyourovencontrol
Yournew touch pad control has additional features that you may choose to use. Thefollowing are the features and
how you may activate them.
Thespecial feature modes can only be activated while the display is showing the time of day. They remain in the
control's memory until the steps are repeated.
When the display shows your choice, touch the START/ONpad. The special features will remain in memory after
a power failure.
NOTE: TheSabbath feature and the Thermostat Adjustment feature are also Special Features, but they are
addressed separately in the foflowing sections.
12Hour Shut-Off
With thisfeature, should youforgetand leave the
ovenon, the control will autornatlcallyturnoff the
ovenafter 12hoursduringbakbg functionsor
after 3 hoursduring a broil function.
If you wish to turn OFF this te'attlI'e, t(_l]OW
the stops below.
Touch the BAKE and BROILHI/LO
pads at the same time fin" 3 seconds
until the display sho_:s SE
[] Touch the CLOCKpad. The displa}
will show ON (l 2 hour shut-off).
Touch the CLOCKp'ad repeatedly
tmtil the display shows OFF(no
sh tlt-OlCD.
[] Touch the START/ON pad to actixate
the no shut-off and leaxe the control
set in this special teatures mode.
/2
Page 13

Usingthe SabbathFeature.
(Designed for use on the Jewish Sabbath and Holidays) (on some models)
The Sabbath feature can be used for baking/roasting only.It cannot be used for broiling, self-cleaning or
Delay Start cooking.
NOTE,"Theoven light comes on automatically (on some models) when the door is opened and goes off when the
door is closed. Thebulb maybe removed. See the Oven Light Replacement section. Onmodels with a light switch
on the control panel, the oven light may be turned on and left on.
How to Set for Regular Baking/Roasting
i@ i I
ii@ ( )ii!!
i {i i
NOTE: Tounderstandhow theoven control works,
practice using regular baking (non-Sabbath)before
entering Sabbath mode.
Make sure the clockshows the correct time of day
and the oven is off,
] Tou(h and hold both the BAKE and
BROIL HI/LO pads, at the same time,
until the dislllay shows SE
] "]h11the CLOCK pad tmdl BAhatltleat_
in the dist)lay.
[_] "lbuch the START/ONtlad and D will
atlpear in the distlla }
] "lbu(h the BAKE tlad. No sigllal will
be aixell.
[_ "lbu(h the START/ON pad.
[_ After a random delay tleliod of
atll)roxinlately 30 se(onds to 1 minme,
D C will apt)ear in the displa? in(ti(ating
that the ovt'n is baking/roasting. It D c
doesn't atlpear in the distlla}, start again
at Sie t1 4.
"Ib adjust the oven ten/l)erature, touch the
BAKEt)ad and tal) the 4. or -t)a(Is to increase
o): decrease tile tel/ll)el_lttll?e ill 2[; °
in(remems. "Ibu(h the START/ONt)ad.
NOTE:The CLEAR/OFF and COOKING TIME tlads
are a(ti_' (luring the Sal)l)ath t('attlFe.
"Ib exit Sabbath t?.';-itul'e s('e next t)age.
ge.com
When the display shows D the
oven is set in Sabbath. When the
display shows D c the oven is
baking/roasting.
@
When the display shows D the
oven is set f17Sabbath. When the
display shows D c the oven is
baking/roasttag.
] The t)reset smrdng mmtleramre will
automatically l)e set to 5'50. ° Tat/the 4.
or -])ads to increase or decFease tile
telIlllelTatllFe ill 25 ° il/crel//el/tS. Tlle
mmperamre can be set between 170 °
and 550.° No sigllal or temt)erature
will be given.
How to Set for Timed Baking/Roasting--Immediate Start and Automatic Stop
NOTE: Tounderstandhow theoven control works,
practice using regular (non-Sabbath) Immediate Start
andAutomatic Stop before entering the Sabbath mode,
Make sure the clockshows the correct time of day
and the oven is off,
] "['o/u:h and hold both the BAKE and
BROIL HI/LO pads, at the same time,
until die disllla _ sh(lws SE
] "[:all the CLOCK t)ad m/til SAb al)tlears
in the dist)lay.
] "['ou(h the START/ONtlad and D will
atlllear in the (tisllla _
[_] "[km(h the COOKING TIMEpad.
] "['ou(h the 4. or -pads to set the (tesired
length oI looking tin/e between 1
n/inme and 9 hours and 5(.)mim_ws.
The looking time that you emered will
be distllaT_ed.
[_ Tou(h the START/ON tlad.
] Tou(h the BAKEtlad. No signal will
be ai_ell.
] The preset starting Wmlleramre will
autonlati(allv be set to 350. ° Ta t) die 4-
or -t)ads to increase or decrease the
mmperamre ill 25 ° incren/ents. The
mm[leratm'e can be set between 170 °
and 550. ° No signal or tenltlemulre
will be g@en.
[_ "lbu(h the START/ONllad.
[_ After a ran(lore delay t)elio(t of
allproxinlatelT_ 30 se(onds to 1 minute,
D C _ill apt)ear in the (tisl)la } in(li(adng
that tile oven is baking/roasting. II'D c
doesn't allpear in tile distllay, start again
at Step 7.
"Ib adjust the o'_en teml)erature, touch the
BAKEI)ad and mt) die 4-or -])ads to in(Tease
or decrease tile tenll)emture in 25 °
increments. "Ibu(h tile START/ONpad.
When cooking is/inished, tl/e disllla } will
change ti:on/D C to D indicating that tile
oven has turned OFF bm is still set in Sabbad/.
I{en/ov(' tile cooked tood.
73
Page 14

Usingthe SabbathFeature.
(Designed for use on the Jewish Sabbath and Holidays) (onsome models)
How to Exit the Sabbath Feature
[] Touch the CLEAR/OFFpad.
]
dela} period ot approxhnatel_ 30
se(onds to 1 minute, until only D is in
the displa}:
] "[buch and hold both the BAKE and
BROIL HI/LO pa(ls, at the same time,
m_til the display SI_()_rsSE
] "lhp the CLOCK pad m_til ONor OFF
apt)ears in the display. ON indi(ams that
the ov('n will automati(allv turn off alier
1,2 hours. OFFindicams dlat the oven
will not automatically turn oil See
die Special Features section lot an
explanation of the 12Hour Shut-Off
{('at tll?e.
[] "lbud_ the StaRT/ONpad.
NOTE:fro power outage occurred while the oven was
in Sabbath, the ovenwill automaticafly turn off and stay
off even when thepower returns, Theoven coetro/
must be reset.
Adjust the oven thermostat--Do it yourself!
Youmay find that your new oven cooks differently than the one it replaced. Use your new oven for a few
weeks to become more familiar with it. If you still think your new oven is too hot or too cold, you can adjust
the thermostat yourself.
Do not use thermometers, such as those found in grocery stores, to check the temperature setting of your oven.
These thermometers may vary20-40 degrees.
NOTE,"This adjustment will not affect the broiling or the self-cleaning temperatures. The adjustment will be
retained in memory after a power failure.
To Adjust the Thermostat
[] Touch the BAKEand BROILHI/LO
pads at the same time for 2 seconds
until the display shows SF.
[] Touch the BAKEpad. A two.digit
numl)er shows in the display:
[] X4q_en }ou haxe made the
a(!jusm/ent, touch the START/ONpad
to go 1)ack to the dine of (la_ displa).
Use x, OHI" o'_en ;:Is veil wotfld
noiillallx,.
NOTE."Thisadjustmentwillnotaffectthebroiling
[] The oxen telnperature can be
a(!justed u l) to (+) 35°F hottei oi (-)
55°F coolei: Touch the + pad to
increase the temi)erature in l<legree
inci'ei//ents.
Touch the -pad to decrease the
telnl)erature ill l-deoTee_ increlnents.
orself-cleaningtemperatures.It wi//beretained
inmemon/afterapowerfailure.
Thetype ofmargarine will affect bakingperformance!
Most recipes for baking have been developed using high-fat products such as butter or margarine (80% fat). If you
decrease the fat, the recipe may not give the same results as with a higher-fat product.
Recipe failure can result ff cakes, pies, pastries, cookies or candies are made with low-fat spreads. Thelower the fat
content of aspread product, the more noticeable these differences become.
Federal standards require products labeled "nmrgaline" to contain at least 80% ti_t 1))' _vight. ixmqht spreads,
on the other hand, contain less ti_t and more watei: The high moisture content (ff these spreads aflb'cts the
texture and flavor (ff baked goods. For best results with w)ur old taVOlite recipes, use nmlgaline, butter or
stick spreads containing at least 70% vegetable oil.
74
Page 15

Usingthe self-c/caning oven. gecom
Never force the latch handle. Forcing the handle will damage the door lock mechanism.
Before a Clean Cycle
Wipe up heavy soil on the oven
bottom.
%
_A,'el'ecoi/llllelld venting your ldtchen
with all open window 05"using a
ventilation tim or hood durhlg tile
first self:clean cycle.
Remove shel``es, broiler pan, broiler
grid, :511cook_;ire and ally aluminum
fifil fl'om tile (well.
Tile shiny, silve>colored oven shelves
(on some models) can be self:cleaned,
but tile}' will darken, lose their hlster
and become hard to slide.
Soil oil the fl'ont fl'ame ot the rlmge and
(sutside the gasket 5m tile d(sor will need
to be cleaned bv hand. Clean these areas
with h(st watel; soap-filled steel w(sstl pads
or cleanseis such as Soft Scmb<_ Rinse
well with clean water and (h y.
How to Set the Oven for Clean&g
Follow tile directions ill tile Before a
Clean Cycle section.
[] I,atch tile dos)I:
NOTE:Never force tile latch. If tile oven is
too hot, you will not be able to slide the
latch..Mhsw tile oven to cool.
[] Touch tile SELFCLEAN pad.
[] Touch tile + or - pads until tile
desired Clean Tilne is displa)ed.
TheCleanT/meis normally4 hours.Youcan
changetheClean hknetoanyt/knebetween 3
and5 hours,depending onthe amountof soil in
youroven.
[] Touch tile START/ON pad.
Tile sell:clean cycle will autolnaticallv
begin after CLEAN is displayed and tile
tilne countdown appeai_ ilk tile display.
D(/not clean tile gasket. Tile fiberglass
material (If tile o``en door gasket cannot
withstand abrasion. It is essential for tile
gasket to remain intact. If you notice it
becoming worn (st flzlyed, replace it.
Wipe up any hem T spillo``w_ on tile oven
b(stt(sI//.
Make sm'e tile oven light bulb co``vr is ill
place and the oven light is off:
IMPORTANT'. The health of some birds
is extremely sensitive to the fimles ghen
off during tile self:cleaning cycle of any
hinge. Me`` e birds to another well-
``vntilated room.
While tile oven is sell:cleaning, you can
touch tile CLOCKpad to display tile tilne
of day. To return to tile clean countdown,
touch tile SELFCLEANpad.
Tile oven shuts off autonmticallv when
the clean cycle is complete, and 0:00 will
flash ill tile display
[] Slide the latch handle to the left as
tisI"as it will go and open tile door.
It will not be possible to unlatch tile O,,'elK
door until tile telnperature drops below
tile lock telnperamre and tile LOCKED
door light goes off.
When tile LOCKEDdoor light is oil
unlatch tile dooI:
15
Page 16

Usingthe self-cleaning oven.
How to Delay the Start of Cleaning
Make sure tile clock shows tile CoITect
time ot day.
] I_ach tile dooi:
[] Touch tile SELFCLEAN pad.
] [)sing tile + (IT- pads, enter tile
desired clean tin/e.
TheCleanT/nTeisnormally 4 hours.Youcan
change the CleanT/nTeto any t/Thebetween 3
andShours,dependl)_gon theamount of soil i)_
youroven.
[] Touch tile DELAY STARTpad. Tile
earliest deJa_ Stal_t time _ou can set
@
@
will appear in tile display.
] [)sing tile 4- (w - pads, enter tile
time of <lax _ou _ant the clean c_cJe
to staYt,
[] Touch the START/ON pad.
The display will show the delay sml_t set
time. It will not be possible to mflatch the
oven door tmtil the temperature drops
below the lock temperature and the
LOCKEDdoor light goes oil
When the LOCKED door light is oil
mflatch the dooI'_
ToStop a Clean Cycle
Totuh the CLEAR/OFFpad.
Wait until the oven has cooled below the
locking temperature to unlatch the (loo_:
You will not be able to open the door
right away mlless the oven has cooled
below the locking temperature.
After a Clean Cycle
You max notice some white ash in the
oxen. _ii)e it up with a damp ch)th alier
tile ()veil cools,
If white spotsremain,removethem with a soap-
filledscouringpadand rinse thoroughly with
a w)_egarand water ml)_ture.
These deposits are usually a salt
residue that cannot be remoxed b_
the clean cycle.
If the oven is not clean after one clean
c}cle, repeat the cxcle.
!i_:You cannot set the oven fiw cooking
until the oven is cool enough fi)r the
door to be unlatched.
_ While the oven is sel6cleaning, you
can press the CLOCKpad to display
the time of day. To return to the
clean countdown, press the COOKING
TIME pad.
_Ji::Apply a small amount (ff vegetable oil
to a paper towel and wipe the edges of
the oven shelves with the paper towel.
Do not spray with PanI e_or other
lubricant spra D.
16
Page 17

Careand cleaningofthe range, gecom
Be sure all controls are off and all surfaces are cool before cleaning any part of the range.
If your range is removed for cleaning, servicing or any reason, be sure the anti-tip
device is re-engaged properly when the range is replaced. Failure to take this
precaution could result in tipping of the range and cause injury.
How toRemoveProtectiveShippingFilmand Packaging Tape
\ Clear
GrooveStem
\
Carefldly grasp a corner of the protective
shipping fihn with your finge_ and sh)wlv
peel it from tile appliance surfime. Do
not use any shaq) items to remove tile
fihn. Remove all of tile fihn heft)re using
tile appliance fi)r tile fi_st time.
Control Knobs
ThecontrolknobsmaVbe removedfor easier
cleaning.
Make sure tile knobs are ill tile OFF
positions and pull tl/em straight off tile
stems t0r cleaning.
Control Panel
To aSS/lI'e no daIllage is done [o tile
finish oI tile product, tile satest way to
remove tile adhesive fl'()m packaging tape
on new appliances is an application ot a
household liquid dishwashing detergent.
Apply with a soft cloth and allow to soak.
NOTE: Theadhesivemustberemoved fromall
parts, it cannotbe removedif it isbakedon.
Tile knobs can be cleaned ill a
dishwasher or they may also be washed
with soap and water. Make sure tile insides
of tile knobs are dry before replacing.
Replace tile knobs ill tile OFFposition
to ens/li'e proper placei/lent.
It's a good idea to wipe tile control panel
after each use of tile ()veil. Use a (lanq)
cloth to clean or rinse. For cleaning, use
mild soap and wamr or a 50/50 solution
(ff vinegar and wateI: For rinsing, rise
clean water. Polish dry with a soft cloth.
Oven Heating Elements
Do not clean thebakeelementor thebroil
elemen_Anysoil will burn off when the
elementsare heated
Do not use abI'asive cleanseiN_ strong
liquid cleanei_, plastic scouting pads ()r
(iven cleanei3 on tile control panel--
they will (lmnage tile finish.
To clean tile oven flo(m genfl) lilt
tile bake element. Clean with wmm
soap} water,
17
Page 18

Careand cleaningofthe range.
Oven Shelves
Clean the oxen shelxes with an abrasixe
cleanser or steel wool. _Mter cleaning,
rinse the shelves with clean water and dry
with a clean cloth.
NOTE."Theshiny,silver-coloredovenshelves
(onsomemodels)may be cleanedlb theself-
cleaningoven.However,the shelveswill darken
in color,losethek lusterandbecomehardto slide
if cleaneddunw the self-cleaningcycle.
Porcelain Enamel Cooktop
The porcelain enamel finish is sturdy but
breakable if misused. This finish is acid-
resistant. However, anv addic foods
spilled (such as fl'uitjuices, tomato or
vinegar) should not be pemfitted to
remain on the finish.
Painted Surfaces
To make the shelves slide more easily,
apply a small amotmt of vegetable oil
or cooking oil to a paper towel and wipe
the edges of the oven shelves with the
paper towel.
If acids spill on the cooktop while it is
hot, use a (liT paper towel or cloth to
wipe it up fight away. XA]_en the surli_ce
has cooled, wash with soap and wam_:
Rinse well.
For other spills such as tilt spatterings,
wash with soap and water or cleansing
i)owde_ atter the sm_hce has cooled.
Rinse well. Polish with a (hw cloth.
Painted sm'fi_ces include the sides and
the drawer ti'ont.
Clean these with soap and water or
a \'inegar and water sohltion.
Oven Vent
The oven is vented through an opening
trader the lett rear sm_hce trait.
Thisarea couldbecome hot dunng ovenuse.
It is nomml for steam to come out of the
vent and moisture may collect tmdemeath
the coils when the oven is in use.
Do not rise COlI/IIleI'cial oven cleanei3_
cleaning powde_, steel wool or ha_h
abrasives on any painted sm_lhce.
The vent is important fi_r i)_x_per air
drculafion.
Neverblock this vent with aluminum foil.
78
Page 19

Do not rub or clean the door gasket--
it has an extremely low resistance to
abrasion.
If you notice the gasket becoming worn,
frayed or damaged inany way or if it has
become displaced on the door, you
should have it replaced.
Cleaning the Oven Door
To clean the inside of the door:
_5 Because tile area inside tile gasket is
cleaned durh_g tile self_'lean c',cle you
do not need to clean this b_ hand.
_: Tile area outside tile gasket and
tile door liner can be cleaned with a
soap-filled or plastic scotwing pad,
hot wamr and dem_gent. Rinse well
with a vinegar and water solution.
Toclean the outside of the door:
iJi::Use soap and water to thoroughly
clean tile top, sides and fl'ont of tile
oven door. Rinse well. You may also use
a glass cleaner to clean the glass
on tile outside of tile dora: Do not let
water drip into tile vent openings.
Lift-Off Oven Door
ge.com
If any stain on tile door vent trim is
persistent, use a soft abrasive cleaner
and a sponge-scrubber tot best results.
Spillage el marinades, fl'uitj uices,
tomato sauces and basting materials
containing acids may cause
discoloration and should be wiped
up immediately. _4]/en sm'ti_ce is cool,
clean and rinse.
Do not t/se o_,en cleanei3, cleaning
powde_ or l/a_h abrasixes on tile
outside of tile doo_:
Hinge JCK
Pull hinge Iocl_s down to unlock.
Removalposition
U/
The door is very heavy. Be careful when
removing and lifting thedoor.
Toremove the door:
[] Fully open tile door.
[] Pull tile hinge locks down toward
tile door frame, to tile tmlocked
position. A tool, such as a small
fiat-blade screwdriver; may be
required.
[] Fimfl) grasp both sides of tile door
at the top. Do not/fit the door by the
handle.
Ch)se door to tile door i'elllO_, i1
[]
position, which is halfwa) between
tile broil stop position and flfllv
closed.
[] l.ifi door up and ()lit tmtil tile hinge
am/is clear of the slot.
Toreplace the door:
[] Firefly grasl) b°th sides °f the d°°r
at tile top. Donot lift the door by the
handle.
X&qtl/tile Bottom [ ] | Hingearm
[]
door at tile edge I]_ _ J/l|
SaII/e angle as \
tile remox d
position, seat the
notch stop of
the hinge am/
into the bottom
edge of the hinge slot. The notch in
the hinge am/m ust be fifllv seated
into the bottom of the slot.
Fully open tile door tmfil it is
[]
parallel to the floo_: If the door will
not fiflly open, the notch stop is not
seated correctly in the bottom edge
of the slot. Repeat step 2 if
necessa i'v,
Push tile hinoe_ locks up against, tile
[]
front fl'ame of tile oxen caxitv to tile
ofslot
1
locked position.
Hinge4
arm /l
Hingelock
Close tile oven dora:
[]
Pushhinge locks up to lock.
19
Page 20

Careand cleaningofthe range.
Oven Light Replacement
CAUTION:Beforereplacingyour
oven light bulb, disconnect the electrical
power to the range at the main fuse or
circuit breaker panel
Be StlI'e to let the light cox, er and bulb
cool completely.
Toremove the cover:
[] Twist lens counterclockwise about a
qt/arter ttlFn to i'ell/O'_e.
Do not removeany screws to remove thecove_
[] Replace bulb with a 404vatt
appliance bulb or two-l)rong,
halogen bulb, as appropriate.
Storage Drawer Removal
Toremove the drawer:
Toreplace the cover:
[] I,ine up tabs of lens in fl'ont ot tabs
on housing and rotate clockwise to
engage.
Toreplace the drawer:
I Stopguide
[] Pull the drawer out tmtil it stops.
V_ i,ifl the ti'ont of the drawer tmtil the
stoI)s clear the ,guides.
F_q Remoxe the drawer
IOl
[] Place the drmver rails on the guides.
[] Push the drawer back tmtil it stops.
[] lift the ti'ont of the drawer and
push back tmtil the stops clear the
guides.
[] I,ower the ti'ont of the drmver and
push back tmfil it closes.
2O
Page 21

Be sure the controls are turned to OFFand the surface units are cool before attempting to remove them.
Surface Units
Drip
Lockingtab rim
Cooktop
When properly seated, the locking
tab should lock onto flTecooktop rim
through the notch in flTedrip pan.
To clean tile surfi_('e units, turn tile
control to tile highest setting tot a
minute. Tile coils will burn off' any soil.
Toremove a surface unit:
To remove tile dil I) pans for cleaning,
tile surtilce units nlust be removed fit_t.
[] Push tile surfi_ce unit back toward
the receptacle to fl'ee the locking
tab fl'om file cooktop.
Toreplace a surface unit:
[] ]_epla('e tile drip pan into tile recess
in tile cooktop. Make stlre tile
opening in the pan lines up with
the receptacle.
] Insert tile temfinals of tile smqfi_ce
unit through the opening in the
dil I) i)an and into the receptacle.
Locking tab
ge.com
Receptacle
[] i,ifl tile SUltilce unit about 1 inch
aboxe tile drip pan and pull it out.
Do not lift thesurface unit more than I inch.
If youdo, it may not//e flat on the drip pan
when youplug it backin.
NOTE: Repeated lifting of tile surIh(e unit
more than 1 inch above tile drip pan can
pemmnently damage tile receptacle.
Drip Pans
Remove tile stmfi_('e units. Then lift out
tile dil I) pans.
Place them in a covered containe_: Add
1/4 cup ammonia and let soak several
hom_ or overnight. Wash, rinse well
and dry.
Tile drip pans max also be cleaned in a
dishwasher:
[] Push tile surtilce unit in and down
to h)ck tile tab in place so it rests
evenly in tile cooktop.
Do not/?nmersethesurface unitsin lkTu/dsof
anyk/bcL
Do not dean thesurfaceunits in a dishwasher
Do not bend thesurface unit plug terminals.
Do not attempt todean, adjust or in any way
repairthe p/ug-/breceptacle.
Clean tile area under tile drip pans
often. Built-up soil, especially grease,
may catch fire.
Donotcoverthe drippans with foil. Usingfoil so
close to the receptaclecould causeshock,fire or
damageto the range.
Supportr0d
Be sure all surface units are turned
off before raising the cooktop.
Lift-Up Ceoktep
Cleantheareaunderthe cooktopoften Built-up
soft,especiallygrease,maycatch fire.
To make cleaning easiel; the enthe
cooktop may be lifted up and supported
in tile up position.
Be sure all tile smtime traits are turned
off befiwe raising tile cooktop. The
smtime units and drip pans do not need
to be I'elllO; ed; howeveL you may remove
one to make raising tile cooktop easiel:
A support rod will hold the cooktop up
while you clean underneath it.
_Mker cleaning under tile cooktop with
hot, soapy water and a clean cloth, lower
tile cooDop. Be careful not to pinch
your fingel_.
2/
Page 22

Beforeyoucall forservice...
Troubleshooting -tips
Save time and money/.Review the charts on the following
pages first and you may not need to call for service.
Possible Causes
Surfaceunitsdonot
workproperly
Controlsignals after You forgot to enter a • Press the BAKEpad and desired temperature or the
The surface milts axe
not plugged in solidly.
The surface unit controls
improperly set.
The drip pans are not set
securely in the cooktop.
What ToDo
• With the controls off, check to make sure the surii_ce
unit is plugged completely into the receptacle.
• Check to see the correct control is set fin" the SUlSfilce
unit wm are using.
• TVith the controls off, check to make stlre the drip
pan is in the recess in the cooktop and that the
opening in the pan lines up with the receptacle.
enteringcookingtime bake temperature or SELFCLEAN pad mad desired clean time.
or delay start clemfing time.
Fooddoes not bake Oven controls improperly set. • See the Using the oven section.
orroastproperly
Clock and timer do Plug on range is not completely • Make sure electrical l)lug, is I)lugged,, into a live, properly
not work inserted in the electrical outlet, grotmded outlet.
Shelf position is incorrect • See the Using the oven section.
or the shelf is not level.
Incorrect cookwaxe or • See the Using the oven secti_m.
cookware of improper
size being used.
Oven thermostat needs • See the Adjust the oven thermostat--Do it yourself[
adjustment, section.
A fuse ha your home may • Replace the fuse or reset the circtdt breakeL
be blown or the circuit
breaker tripped.
Oven controls improperly set. • See the Using the clock and timer section.
Ovenlightdoes Light bulb is loose or defective. • Tighten or replace the btflb.
not work
Fooddoes not Door not open to the broil stop • See the Using the oven section.
broilproperly position as recommended.
Switch operating light • Call h>r service.
is broken.
Oven controls improperly set. • Make stu'e you press the BROIL HI/LO pad.
Improper shelf position • See the Broiling Guide.
being used.
Cookware not suited • For best restdts, use a lam] designed, fi>r broiliu_
for broiling.
ha some areas the power
(voltage) may be low.
• Preheat the broil element fi>r 10 minutes.
• Broil for the hmgest period of time recommended in
the Broiling Guide.
22
Page 23

re.corn
Possible Causes
Oventemperaturetoo
hot ortoocold
Oven will not work Plug on range is not • Make sure electrical phtg is plugged into a live,
Storage drawer Rear drawer support is • Reposition tile drawer. See the Storage Drawer
Oven thermostat
needs adjustment.
completely inserted ha properly grounded outlet.
the electrical outlet.
A fuse ha your home may • Replace the fl/se or l'eset the circuit breaker.
be blown or the circuit
breaker tripped.
Oven controls improperly set. • See the Using the oven section.
Door left ha the locked position. •/f ]secessary, allow the oven to cool; then uuhlck tile
What ToDo
• See tile Adjust the oven thermostat--Do it yourself!
section.
d ( )( )1",
is crooked on top of the guide rail. Removalinstructions in the Careand cleaning of your
range section.
Storage drawer Power cord may be • Rellosifiou the drawer and power cord. See the
won't close obstructing drawer Storage Drawer Removal iustrucfious in the Care and
in the lower back cleaningof your range section.
of the range.
Rear drawer support is • Repositiou tile drawer. See the Storage Drawer
on top of the guide rail. Removaliustructious in the Care and cleaning of your
range section.
Oven will notself-clean The oven temperature is • _Adlow the oven to cool to rooui teuilleratt/i'e aud
too high to set a self-clema reset the coutrols.
operation.
Oven controls improperly set. • See the Using the self-cleaning oven section.
Oven door is not ha the locked • Make sure you move the door latch hauclle all tile
position, way to the right.
"Crackfing" or This is the sound of the • This is noI'uial.
"popping" sound metal heating and cooling
during both the cooking mad
cleaning functions.
Excessive smoking Excessive soil. • Press the CLEAR/OFFpad. Open the windows to
during a clean cycle rid tile roolu of smoke. Wait until the light ()Is tile
SELFCLEANpad goes oil. Wipe rill tile excess soil and
reset the cleau cycle.
Oven door will not Oven too hot. • Allow tile oven to cool below locking temllerature.
unlock
Oven not clean after Oven controls not properly set. • See the Using the self-cleaning oven secti()n.
a clean cycle
Oven was heavily soiled. • Clean till heavy spillovers before starting the clean
cycle. Heavily soiled ovens may need to sell:clean
agaiu or for a louger period of time.
23
Page 24

Beforeyoucall forservice...
Troubleshooting tips
Possible Causes
"F- anda number
orletter"flash
in thedisplay
Display flashes "bAd" The installed cmmection • (:ontact installer or electrician to correct miswire.
then "linE" with a from the house to the unit
loud tone is miswired.
You have a function
error code.
If the function code repeats.
What ToDo
• Press the CLEAR/OFFpad. Put the o_en back into
operation.
• Disconnect all power to the range tot at least 30
seconds and then reconnect power. If the flmction
error code repeats, call for service.
• On sell=cleaning models, if a flulction error code
appears during the sell=cleaning cycle, check the oven
door latch. The latch may have been moved, if only
slightl> fl'om the locked position. Make sure the latch
is moved to the right as tar as it will go. Press the
CLEAR/OFFpad. Mh)w the o'_en to cool tot one houx:
Put the oven back into operation.
Displaygoesblank A fuse in your home may be • Replace the fi/se or reset the circuit breaker;
blown or the drcuit
breaker tripped.
The clock is turned off from • See the Using the clock and timer section.
showing in the display,
Displayflashes Power failure. • Reset the ch)ck.
Unable to get the Oven control pads were • The BAKE and BROIL HI/LOpads must be l)ressed
displayto show "SF" not pressed properly, at the same time and held fol 3 seconds.
Power outage, Power outage or surge. • Reset the clock./f the oven was in use, you must reset
clock flashes and resetting any cooking flmction.
it by, l)ressin_r' _ the CLEAR/OEEpad, ,settiu_*_ the clock
"Burning" or "oily" This is normal in a new • To speed the process, set a sell=clean cycle for a
odor emitting from oven and will disappear minimum ot 3 hours. See the Using tho self-
the vent in time. cleaning oven section.
Strong odor An odor from the insulation • This is tellll)Ol'al'y.
around the inside of the
oven is normal for the first
few times the oven is used,
24
Page 25

GE Service Protection Plus 'M
GE, a name recognized worldwide fbr quality and dependability, offers you
Service Protection Plus'_'--comprehensive protection on all yore appliances--
No Matter What Brand!
Benefits Include:
* Backed by GE
* All brands covered
* Unlimited service calls
* All parts and labor costs included
o No out-of-pocket expenses
o No bidden deductibles
o One 800 number to call
You _dll be completel) satisfied with our service protection or )ou ma) request )our mone) back
on the remaining value of your contract. No questions asked. It's that simple.
Protect yore" refrigerator, dishwasher, washer and dryer, range, TV_ VCR and much more--a_y brand!
Plus there's no extra charge flw emergency service and low monthly financing is available. Even icemaker
coverage and toed spoilage protection is offered. You can rest easy, knowing that all your valuable
household products are protected against expensive repairs.
Place ,our confidence in GE and call us in the U.S. toll-free at _UU._Z_.ZZZ_
for l//Ol'e infol'I//atiOll.
:_,_*]1 hi}in(Is (o_.{!l_{!(L tip t(t _0 ){!iris Ill(I, ]11 the (on[lllenl tl [.S.
We TICover Any Appliance.
Anywhere. Anytime.
.n_ ( Jill here
Please place in envelope and mail to:
GeneralElectricCompany
Warranty Registration Department
P.O. Box 32150
Louisville, KY 40232-2150
25
Page 26

Consumer Product Ownership Registration
Deal Customer:
Thank you for purchasing our product and thank you for placing your confidence in us.
V(e are proud to haxe you as a customer'.
Follow these three steps to protect your new appliance investment:
Complete and mail
yOILIr Consunler
Product Ownership
Registration today.
ttave tile pcacc of
mind of knowing w_
call colltact VOl/ hi
the unlikely _vcnt of a
satbty modification.
After mailing tile
registration below,
store this dOClltllellt
ill a sati' place. It
contains inlonnation
you will need should
yOll require service.
Our selwice number is
800.GE.CARES
(800.432.2737).
Model Number Serial Number
I I I I I I
Important: If you did not get a registration card with your
product, detach and return the form below to
ensure that your product is registered, or register
online at ge.com.
Consumer Product Ownership Registration
Read your Owner's
Manual carefilllv.
It will help you
operate yOllF llew
appliance properly.
, I
._,,,,_ Cut here
Model Number Serial Number
M_ Ms. Mrs. Miss
Firsl I I Lastl
Name I I I I I I I I I Name I I I I I I I I I I I I
StI-( (!1 [
Addr,_ ss I I I I I I I I I I I I I I I I I I I I I I I I
Apt. # J I [ I I J [ I J E-mail Address*
Zip
lille Placed
_,_o.,l I-I , II , , I
* Please pr_xide your e-mail address to rcceive, via e-mail, discounts, special o{tbr,, and other important
communications from (;E Appliances ((;ILk).
[ Check heru if you do not wmlt to receixe COlnmmfications flom G1LVs cawflllly selecto:l paltrier,,.
Appliances
General Electric Compang
GE Consumer & IndustrioJ
Louisville,K¥40225
ge.com
FAILI JRE T() COMPLETE AND RETI RN TIIIS C_\RI) D()ES NOT DIMINISII _4)t R
"_,)_/l_ \N'IY RI(;I ITS.
For In(re' intin-malion about G1LVs privaQ" and dala usage poli_3, go to ge.com and click on
"Privacy Policy" or call 800.626.2224.
Nulnber [ [ I I I
I
I
26
Page 27

Notes.
ge.com
I
m
m
m
m_
27
w
w
m
m
5.
Page 28

Notes.
,0
q_
1
---
1
1
_rJ
m
r --
I
28
Page 29

Notes.
ge.com
I
m
m
m
m_
29
w
w
m
m
5.
Page 30

Accessories.
Looking For Something More?You can find these accessories and many more at ge.com, or call 800.626.2002
(during normal business hours). Have your model number ready.
Surface Elements & Drip Pans Oven Racks Broiler Pan
Oven Elements
Tired of discolored racks? WMdng you had exu'Mleavy-duty oven racks?
Light Bulbs
Knobs
NOW AVAILABLE for your range:
(;E's innovative, selfk:leanable porcelain-coated oven racks!
• Hea_ T Duty
• Dtmd)le
• Able to be cleaned in a self-cleaning oven
Visit ge.com for more infbnnadon.
3O
Page 31

GEElectricRange Warranty.
All warranty service provided by our Factory Service Centers,
or an authorized Customer Care® technician. Toschedule service,
on-line, 24hours a day, vis# us at ge.com, or call 800.GE.CARES
(800.432.2737).Please have serial number and model number
available when calling for service.
GE Will Provide:
Any part of the range which tifils due to a (lefect in materials or worlunanship.
Fromthedateofthe
origina!purchase
_: Service trips to your home to teach you how to use
the product.
iJi::Improper installation, delivery or maJntenm_ce.
::Ji::Failure of the product if it is abused, misused, or used
for other than the intended purpose or used
commercially.
_: Replacement of house fuses or resetting of circuit
breakers.
Durh_g this limited one-year warranty, GE will also provide, free of charge, all labor
and in-home se_'i('e to replace the defective part.
Staple your receipt here.
Proof ofthe original purchase
date is needed to obtain service
under the warrantz
!i?:Dmnage to the product caused by accident, fire, floods
or acts of God.
::Ji::IncidentaJ or consequential dmnage caused by possible
defects with this appliance.
iJi::Dmnage caused after delivery.
!i?:Product not accessible to provide required service.
Warranty. Any implied warranties, including the implied warranties of merchantabilily or fituess for a particular purpose,
I XCLDSION OFIMPLIED WARRANTIES--Your sole and exclusive remedy is productrepa# as provided hi this Limited
are limited to oneyear or theshortestperiod allowed by law.
This warranty is extended to the original purchaser and any succeeding owner for products purchased for
home use within the USA. If the product is located in an area where service by a GEAuthorized Servicer is not
available, you may be responsible for a trip charge or you may be required to bring the product to an Authorized GE
Service location for service. In Alaska, the warranty excludes the cost of shipping or service calls to your home.
Some states do not allow the exclusion or limitation of incidental or consequential damages. This warranty
gives you specific legal rights, and you may also have other rights which vary from state to state. Toknow
what your legal rights are, consult your local or state consumer affairs office or your state's Attorney General.
Warrantor: General Electric Company.Louisville,KY40225
3/
Page 32

ConsumerSupport.
Haxe a question or need assist;race with your appliance? Try the GE Al)pliances _ ebsite 24 hom_ a day,
q
"J GEAppliancesWebsite ge.com
any da)of the year'. For greater comenience and faster serx'ice, you can now download Owner s Manuals,
., order parts or e;en schedule serxice on-line.
ScheduleService
Expert (;E repair service is (ml x one step awa} fl'om your do(n: Get on-line and schedule your service at
your. {'Oll;elliell{'e 24 hotu_ am {lax of the xear! Or {'all 800.(;E.(_ARES (800.432.2737) during n{mnal
business hou_.
ge.com
RealLifeDesignStudio ge.com
GE SUl)ports the Uni\'e_al Design concel)t--products, services and environments that can be used by
people of all ages, sizes and capabilities. _,Ve recognize the need to design for a wide range of physical and
mental abilities and impaim_ents. For details of GE's Universal Design applications, including kitchen
design ideas for people with disabilities, check ()tit Otli" X*\'ebsim today. For the hearing impaired, please call
800.TDD.GEAC (800.833.4322).
ExtendedWarranties ge.com
Purchase a (;E extended warrant_ and learn about special discounts that are axailable while _our, warranty
is still in effect. You can purchase it on-line an) time, or call 800.626.2224 during nomml business horus.
GE Consumer Home Serxices will still be there afier your warran_ expires.
PartsandAccessories
ge.com
Individuals qualified to setMce their own appliances can have parts or accessories sent direcflv to their
homes (VISA, MasterCard and Discover cards are accepted). Order onqine today, 24 hou_ every day or
by phone at 800.626.2002 during nomml business hou_.
Instructions contained in thismanual cover procedures to be performed by any user. Other servicing generally
should be referred to qualified service personnel Cautionmust be exercised, since improper servicing may cause
unsafe operation.
ContactUs
If you are not satistied with the service you receive fl'om GE, contact us on our Website with all the details
including your phone numbe_; or write to: General Manage_; Customer Relations
GE Appliances, Appliance Park
I,ouisville, KY 40225
Register your new applim_ce on-lhae--at your convenience! Timelx, l)r°duct registrati(, m will allow fin"
, enhanced communication and prompt service under the terms of your warranty, should the need arise.
l RegisterYourAppliance
You max also mail in the pre-printed registration card included in the packing material.
ge.com
ge.com
Printed in flTeUnited States
 Loading...