

GE JS998TK1WW, JS998SK1SS, JS998BK1BB Owner’s Manual
www.GEAppliances.com
Safe_In_rue6ons ...... 2-8
Operating Instructions
Canning ................ ] 2
Clock, Timer and
Control I,ockout .......... 17
Controls ............. 14-16
Convection ........... 29-32
Cookware ............ 11, 12
Defrost .............. 24, 25
Introduction ............. 13
Oven ................... 18
Oven Thermostat ......... 39
Proofing ................ 34
Rack Placement .......... 23
Recipes ................. 33
Sabbath Feaulre ....... 40, 41
Self-Cleaning Oven ..... 35, 36
Settings .............. 37, 38
Speedcook ............ 19-22
Speed Baking/
Speed Roasting ........ 20-22
Speed Broiling ........ 22, 23
Surface Units .......... 9, 10
Timed Baking
and Roasting ............. 27
Traditional
Baking/Roasting .......... 26
Traditional Broiling Guide . .28
_'a rming ................ 34
Care and Cleaning
Broiler Pan & Grid ....... 45
Cleaning Oven Door . ..... 43
Control Knobs ........... 42
Control Panel ........... 42
Glass Cooktop ........ 46, 47
Oven Light .............. 44
Oven Vent .............. 42
Packaging Tape .......... 42
Racks .................. 44
Stainless Smel Surfaces ..... 45
Storage Drawer . ......... 45
Troubleshooting
Tips ................ 48-52
Consumer Support
Consumer
Support ......... Back Coxer
Product Registration . . . 53, 54
Warranty ............... 55
_S'998
Write the model and serial
numbers here:
Model #
Serial #
You can lind them on a label
behind the open oven door
on the lower left corner of the
range fl'ame.
164D4290P336-2 49-80180-2
!0-03 JR
IMPORTANTSAFETYINFORMATION.
READALLINSTRUCTIONSBEFOREUSING.
WARNING!
For your safe_, the information in this manual must be followed to minimize the risk of fire or
explosion, electric shock, or to prevent property damage, personal injury, or loss of life.
PRECAUTIONSTOAVOIDPOSSIBLEEXPOSURETOEXCESSIVE
MICROWAVEENERGY
Do not attempt to operate this oxen with
tile door open since ope,l-door operation
can result in hal3nfll] exposure to
microwaxe energ?'. It is importantnotto
defeat or tamper with the safety interlocks.
Do not place any ol)ject between the oxen
front lace and the door or allow soil or
cleaner residue to accumulate on sealing
snrf;.tces.
The oxen should not be adjusted or
repaired by anyone except properly
qualified service personnel.
Do not operam file oven if it is damaged.
It is particularly important that tile oxen
door close properly and that there is no
damag_ to tile:
[] door (bent),
[] hinges and latches (broken or
loosened),
[] door seals and sealing suri_tces.
IMPORTANTSAFETYNOTICE
The California Safe Drinking Water and ToxicEnforcement Act requires the Governor of California
to publish a list of substances known to the state to cause cancer, birth defects or other reproductive
harm, and requires businesses to warn customers ofpotential exposure to such substances.
The fiberglass insulation in self-clean ovens gives off a very small amount of carbon monoxide during
the cleaning cycle. Exposure can be minimized by venting with an open window or using a ventilation
fan or hood.
2
w_w.GEAppliances,com
WARNING!
For your safe_ the information in this manual must be followed to minimize the risk of fire, electric
shock, or to prevent propert V damage, personal injury, or loss of life.
• ,WARNINGANTI-TIPDEVICE
All ranges can tip and injury could result.
Toprevent accidental tipping of the range, attach it to the wall and floor by installing the Anti--tip
device supplied.
Tocheck if the device is installed and engaged properly, remove the storage drawer and inspect the
rear leveling leg. Make sure # fits securely into the slot.
[['yOU pull tile range Otlt fronl file wall for any reason, make stlre tile device is properly
engaged when you push the range back agvdnst tile wall. If it is not, there is a possible risk of
tile rang_ tipping ox_r and causing il_juW if you or a child stand, sit or lean on all open door
Please Iefer to file Anti-Tip device information ill this manual. Failule m take this piecaufion
cou]d resuh ill tipping of tile rang> and injm T.
SAFETYPRECAUtiONS
When using electrical appliances, basic safe_/ precautions should be followed, including the following:
Use this appliance only %r its intended
pu_l)ose as described in this )wner s
Manual.
Be sure your appliance is properly
installed and grounded by a qualified
installer ill accordance with tile provided
installation instructions.
Hme tile installer show you tile location of
tile circuit breaker or fllse. Mark it tbr easy
reference.
Do not attempt to repair or replace ally
part of your range unless it is specifically
recon/mended in this manual. All other
set\icing should be referred to a qualified
technician.
Do not coxer or block any openings
on tile appliance.
(
Before performing any service, disconnect
tile range power supply at file household
distribution panel by removing the fllse or
switching off tile ciIvuit breakei:
Do not leax> children alone---children
should not be left alone or unattended in
an area where all appliance is ill rise. They
should nex>r be allowed to sit or stand on
any part of tile appliance.
Do not allow anyone to climb, stand
or hang on tile dooi; storag_ drawer or
cooktop. They could damag_ tile rang_
and exen tip it ox_i; causing sex.re
personal injui T,
3
READALLfiVSTRUCTiON$BEFOREU$1N&
a, WARNING'!
SAFETYPRECAUTIONS
•iiiiiii............
Do not operate the oven or cooktop controls if the glass is broken. Foodsplatter or cleaning solution
may penetrate a broken control panel or cooktop and create arisk of electrical shock. Contact a
qualified technician immediately should your glass control panel or cooktop become broken.
Do not store flammable materials in an
oxen or near the cooktop.
Do not let cooking grease or other
flammable materials accumulate in or
near the range.
CAUTION: temsofinterestto
children should ,lot be stored in cabinets
aboxe a range or on the back of a range--
children climbing on the range to reach
items could be seriously injured.
iiiiiiiiiiii_iii
Never wear loose-fitting or hanging
garments while using file appliance.
Be carefld when reaching %r items stored
oxer tile rang_. Flammable material could
be ignited if brought in contact with hot
surface units or heating elements and may
canse se\_re bnins.
Use only dly pot holders--moist or damp
pot holders on hot snr/_aces may result in
burns fiom smam. Do not let pot holders
touch hot sur/_ace units or heating
elements. Do not use a towel or other
bulky cloth in place of pot holders.
iiiiiiiiiiii_iii
Do not use water on grease fires. Never
pick up a flaming pan. Turn the controls
off. Smother a flaming pan on a surface
unit 1)ycoxering tile pan completely with
a well-fitting lid, cookie sheet or fiat uW.
Use a mulfi-puq)ose d U chemical or
foam-type fire extinguisher
Flaming grease outside a pan can be put
out 1)y co\>fing it with baking soda o_,
if available, by using a mulfi-pulpose dU
chemical or foam-type fire extinguisher
I_]ame in die ox>n can be smothered
complemly by closing die oxen door
and turning the oven off or by using
a mulfi-puq)ose &Y chemical or
foam-type fi_e extinguisher:
For your safety, nexer use your appliance
for warming or heating the room.
Do not touch the surface units, rite
heating elements or tile inmfior sur/_ace
of tile oven. These sur/_aces m W be hot
enough to 1)urn even though they ate
dark in color Dining and after use, do not
much, or let clothing or other flammable
materials contact rite surface units, areas
nearl)y the surface units or any interior
area of the oxen; allow sufficient time tbr
cooling fi rst.
Potentially hot surPaces include the
cooktop, areas Pacing tile cooktop, oxen
xent opening, sniJ_aces near the opening,
crevices around the oven doon
REMEMBER:Tile inside surface of die oxen
may be hot when the door is opened.
Do not store or use combustible materials,
gasoline or other flammable vapors and
liquids in the vicinity of this or any other
appliance.
iiiiiiiiiiii_iii
Kee I) tile hood and grease filters clean
to maintain g_od xenting and to axoid
grease fires.
iiiiiiiiiiii_iii
Teach children not to play with tile
controls or any other part of the range.
Always kee I) dish towels, dish cloths, pot
holders and other linens a safe distance
fiom your range.
Always kee I) wooden and plastic utensils
and canned food a safe distance fiom
your range.
Always kee I) combustible wall coxefings,
curtains or drapes a safe distance from
yonr range.
COOKMEATANDPOULTRYTHOROUGHLY...
Cookmeat andpoultrythoreughly--meat toat least an INTERNALtemperatureof 160°Fandpoultry
toat leastanINTERNALtemperatureof 180°ECookingto thesetemperaturesusuallyprotects against
4
foodbomeillness.
www.GEAppliances.com
SURFACEUNITS
Use proper pan size--select cookware having flat bottoms large enough to cover the surface unit
heating element. The use of undersized cookware will expose a portion of the surface unit to direct
contact and may result in ignition of clothing. Proper relationship of cookware to surface unit will
also improve efficiency.
Nex.er leax.e file surfi_ce units unatmnded
at high heat seuings. Boilox.ers cause
smoking and greasy spillo_.ers that m W
catch on fire.
Only certain wpes of glass, gtassAeramic,
earthenware or other glazed containers are
suitable for cooktop service; others m W
break because of the sudden chang.e in
temperature.
To minimize the possibili U of burns,
ig)lifion of flamnlable materials and
spillag.e, tile handle of a container
should be turned toward the center of
the rang.e wifltottt exmnding ox.er nearby
sur/_ace units.
Always uml fire surfi_ce units off before
removing cookware.
_4]len preparing flaming %ods under
the hood, uml the fan on.
Use care when touching the cooktop. Tile
glass sur_ace of rite cooktop will retain heat
after the controls hax.e been mined off;
Kee I) an eye on %ods being flied at high
or medium high heat settinKs.
Foods for flying should be as dry as
possible. Frost on fiozen foods or moisutre
on flesh foods carl cause hot lht to bubble
up and ox.er the sides of the pan.
Use little _t for efl_cfi_.e shallow or deep
tilt flTing. Filling the pan too fltll of/_at carl
cause spillox.ers when food is added.
If a combination of oils or/_ats will be
used in flTing, stir tog.ether before heating,
or as/_ats meh slowly.
Always heat fi_tslowly, and watch as it heats.
Use a deep t:at tltem/ometer whenever
possible to piex.ent overheating/_at beyond
rite smoking point.
Avoid scratching tile glass cooktop. The
cooktop can be scratched Mill items such
as shaq) insmm_ents, ring_ or other
jeweh> and rix.ets on clothing.
Larg.e scratches or impacts to glass
doors or cooktops carl lead to broken
or shattered glass.
Do not operate tile radiant surface units if
the glass is broken. Spillo_.ers or cleaning
solution m W penetrate a broken cooktop
and cream a risk of electrical shock.
Contact a qualified mchnician immediamly
should your glass cooktop become broken.
Nex.er use tile glass cooktop sur/_ace as a
cutting board.
Do not place or store imms that can melt
or catch fire on file glass cooktop, ex.en
when it is not being used.
Be careflrl when placing spoons or other
sfin_ing utensils on glass cooktop sur_ace
when it is in use. They m W become hot
and could cause bums.
Clean file cooktop Mill caution. If a wet
sponge or cloth is used to wipe spills on a
hot snr_ace unit, be carefitl to avoid steam
burns. Some cleaners carl produce
noxious flmtes if applied to a hot surfi_ce.
NOTE."h:e recommend dlatyou moid
wiping any surface unit areas until they
hax.e cooled and the indicator light has
g_ne off: Sugar .spills are the exception
m this. Please see the gleaning the glass
cooktop section.
When the cooktop is cool, use only tile
CERAMA BRYTE ¢_Ceramic Cooktop
Cleaner and the CERAMA BRYTE
Ceramic Cooktop Cleaning Pad to clean
rite cooktop.
To ax_id possible damag.e to file cooking
sur/_ace, do not apply cleaning cream to
the glass sur/_ace when it is hot.
Mter cleaning, use a dry cloth or paper
towel to remox.e all cleaning cream residue.
Read and follow all instructions and
warnings on the cleaning cream labels.
5
IMPORTANTSAFETYINFORMATION.
READALLINSTRUCTIONSBEFOREUSING.
TRIVECTIO MOVEN
Read and follow the specific "Precautions toAvoid PossibleExposure to Excessive Microwave Energy"
section in this manual
Toreduce the risk of fire in the ovencavity:
Do not overtook food. Carefully attend
appliance if pat)el, plastic or other
combustible mamfials are placed irrside
die ox>n to facilitam cooMng.
In deflost mode, Iemox> wire twist-ties
flom paper or plastic containers before
placing bags in tile oxen.
()\'err Cooking Bags--Do not use file wire
twist-fie to close tile bag.
Do not use paper rowels.
Do not use your o\_n m dU newspapers.
Do not oxeivook potatoes. They could
dehydram arrd catch file, causing damag_
m your ox>n.
Do not operam file oven while empff m
ax_id damag_ to tile ox>n arrd tile danger
of file.
Do not use die oven for storag_ purposes.
Do not ]eax_ paper products, cooking
umnsils or food in die oven when not
in use.
If mamfials irrside the oven should ignim,
kee I) the oxen door closed, tm-n tile oxen
off and shut off power at Ore flrse or circuit
breaker panel. If tile door is opened, tile
fire may spread.
Some products such as whole eggs arrd
sealed corrtainers for example, closed
jars will explode arrd should not be
heated in fills oxen. Such use of tile oven
could Iesult in irljm-y.
Do not boil eg_:s ira this oxen. Pressure will
build up irrside file egg yolk and will cause
it m burst, possibly iesulting ira injm-y.
Do not pop popcorn ira your o_en.
Foods widl unbroken outer "skin" such as
potatoes, sausag>s, tomatoes, apples, egg
yolks, chicken li_el_ and odler giblets
should be pierced to allow steam to escape
dining cooking.
Don't deflost flozen bex>rages ira nan_ow -
necked bottles (especially carbonated
beverages). Even if the container is
opened, plessme can build up. This can
cause fire container m burst, possibly
resulting in irljnI T.
Hot foods and steam can cause bums.
Be careflfl when opening any corrtainers
of hot tbod, cooking pouches and boxes.
To prevent possible injury, direct steam
away flom hands arrd face.
:ks with arty appliance, close supeiMsion is
necessa U when used by children.
This oxen is not approxed or msmd for
nlarine use.
vvww.GEAppliances.com
ALLTHESETHINGSARENORMALWITHYOURTRIVECTIO__OVEN
Steam or xapor escaping from around
tile dooI:
Dimming of tile oven light and chang.e
in tile blower sound may occur.
Tile microwm.e fan m W operam with both
ox.ens oft: It is cooling tile control and will
mrn itself oft:
Some TV-radio inte.rference might be
noticed while using your o\.en. It is
similar to tile inmrference caused by other
small appliances and does ,lot indicam a
problem with your o_.en.
ARCING
If you see arcing, open the door and correct the problem.
Arcing is themicrowave term for sparks in the
oven.Arcing is causedby:
Metal or foil touching tile side of tile o_.en.
Foil *lot molded to tbod (uptui_rled edg.es
act like antennas).
Metal, such as twist-ties, poulu T pins or
gold-iimmed dishes in tile oven.
ReQ'cled paper towels containing small
metal pieces being used in tile ox.en.
SUPERHEATEDWATERANDSPONTANEOUSBOILING
Liquids such as wam_; coffee or tea are able
to be ox.erheated beyond tile boiling point
without appeming to be boiling. Visible
bubbling or boiling when tile container is
remo\.ed flom tile microwm.e o\,en is ,lot
always present. THISCOULD RESULTIN VERY
HOTLIQUIDSSUDDENLYBOltING OVERWHEN
THECONTAINERIS DISTURBEDORA UTENSIL
IS INSERTEDINTO THELIQUID.
IMPORTANTSAFETYINFORMATION.
READALLINSTRUCTIONSBEFOREUSING.
WARNING'!
OVEN
Stand away from the range when opening the oven door. Hot air or steam which escapes can cause
bums to hands, face and/or eyes.
Do riot heat unopened food containers.
Pressure could build up and tile container
could burst, causing an inju W.
Kee I) file oxen x_nt unobstructed.
Kee I) file oven flee flom grease buildup.
Place rim ox>n shelf in file desiied position
while tile oxen is cool. If sheh>s must be
handled when hot, do not let pot holder
contact tile heating elements.
When using cooMng or roasting bags
in tile oven, follow tile manufltcturer's
directions.
Pulling out tile shelf to the stoI>lock is a
comenience in lifting heax T foods. It is also
a precaution against burns from touching
hot sm_hces of tile door or oven walls.
Do not use the oxen to dlT newspapers.
If oxerheated, they can catch on fire.
Do riot use the oxen for a storage area.
Items stored in an oxen can ignite.
Do riot leme paper products, cooking
utensils or food in tile oxen when riot
in use.
Do riot use ahuninum foil to line oxen
bottoms, except as suggested in this
mannal. Improper installation of
aluminum foil may result in a risk
of electric shock or fire.
SELF-CLEANINGOVEN
Do not use oven cleaners. No commercial oven cleaner or oven liner protective coating of any kind
should be used in or around any part of the oven. Residue from oven cleaners will damage the inside
of the oven when the self-clean cycle is used.
Do not clean the door gasket. Tile door
gasket is essential %r a good seal. Care
should be token riot to rub, damag_ or
mow file gasket.
Before self-cleaning the oven, remo_e
tile racks, broiler pan, gild arid other
cookware.
Be sure to Mpe up excess spillage be%re
starting tile self-cleaning operation.
If die self-cleaning mode malfimcdons,
mrn the oven off arid disconnect tile
power supply. Haxe it secviced by a
qualified mchnician.
Clean only parts lismd in fills Owner's
Manual.
Listen %r fim--A tan noise should be
heard sometin/e duiing the cleaning Q'cle.
If not, call a secx@eman before self-
cleaning again.
READANDFOLLOWTHISSAFETYINFORMATIONCAREFULLY.
SAVETHESEINSTRUCTIONS
8
Usingthe surface units, www.GEAppliances.com
NOTE: Throughout this manual, features and appearance may vary from your model.
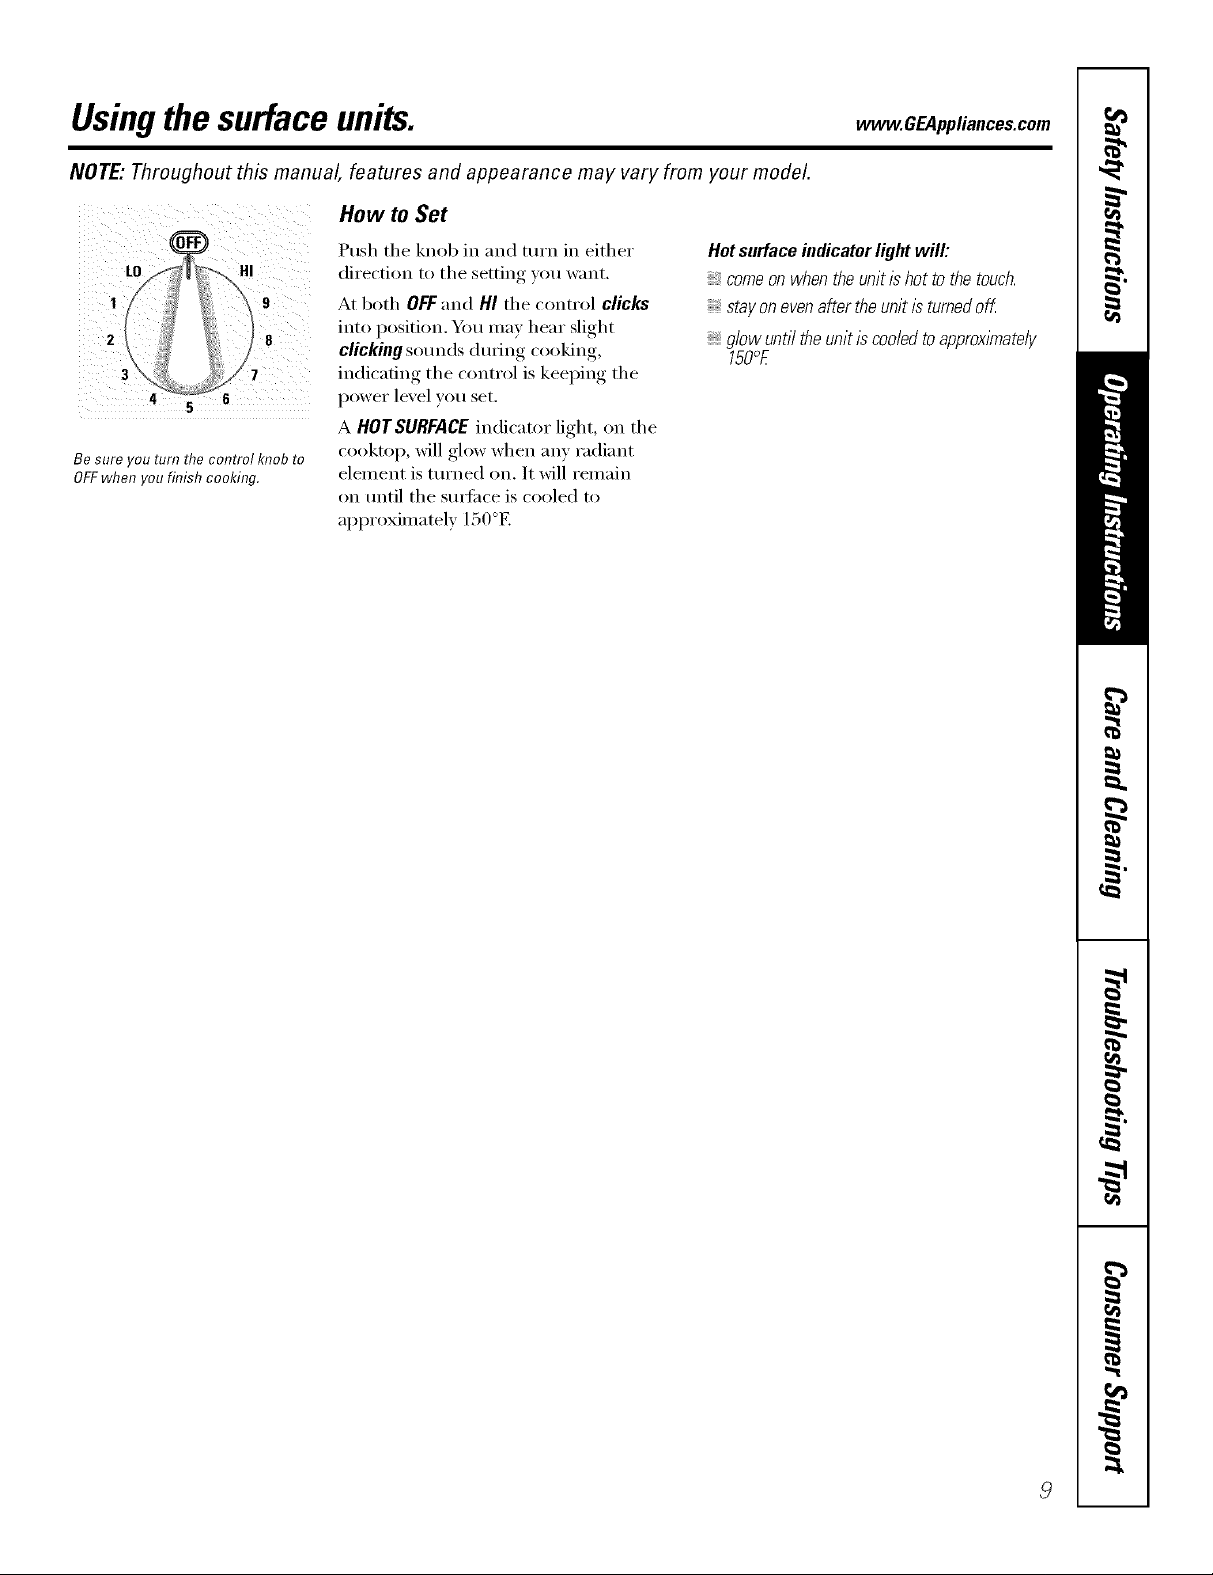
How to Set
1
2
Be sure you turn the control knob to
OFFwhen you finish cooking.
9
8
Push the knob in and turn in either
direction to the setting you want.
At both OFFand HI the control clicks
into position. Ym may hear slight
clicking som_ds during cooking,
indicating the control is keeping the
power level you set.
A HOTSURFACE indicator light, on the
cooktop, will glow when any radiant
element is turned on. It will remain
on until the smti_ce is cooled to
approximately 150°E
Hotsurfaceindicator lightwill:
,_comeonwhentheunitishottothetouch.
stayonevenaftertheunitisturnedoff.
glowunti/theunitiscooledtoapproxlmate/y
150c_E
Usingthesurface units.
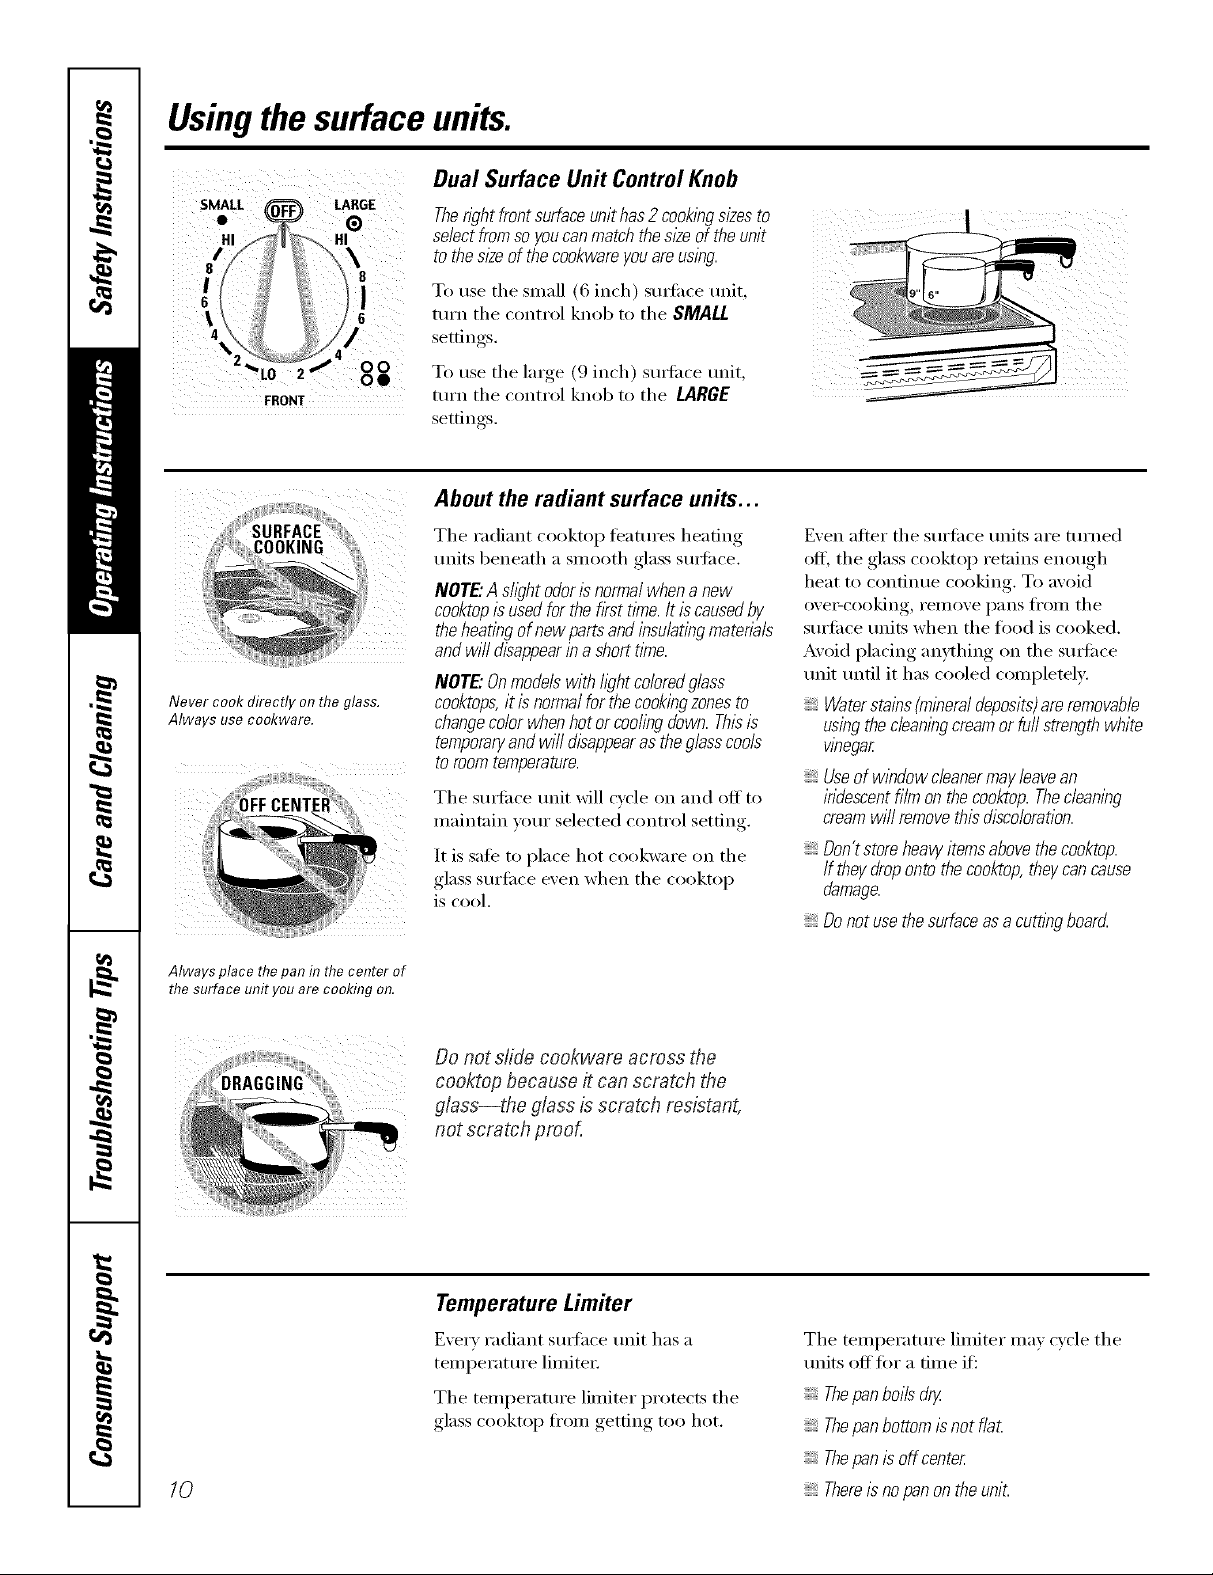
Dual Surface Unit Control Knob
Theright front surfaceunit has 2cookingsizesto
select fromso youcanmatch the sl_eof the unit
to the sl2eof thecookware youareusing.
To use the small (6 inch) stntilce unit,
turn the control knob to the SMALL
settin rS
To use the large (9 inch) surfi_ce trait,
FRONT
ttlrn the control knob to the LARGE
settin ,s
About the radiant surface units...
Never cook directly on the glass.
Always use cookware.
Always place thepan in thecenter of
the surface unit you are cooking on.
The radiant cooktop features heating
units beneath a smooth glass smti_ce.
NOTE."Asfl)ht odorIsnormal when anew
cooktopis usedfor the first tithe.It is causedby
the heatingof new partsand insulating materiab
andwill disappearina short time.
NOTE"Onmodelswithfightcoloredglass
cooktops,itis normal for the cookingzonesto
changecolorwhen hot orcooling down. Thl2is
temporaryandwill disappearas theglasscools
to room temperature.
The sudi_ce unit Mll c)cle on and off to
maintain _otu" selected control settin ,
It is sale to place hot cookware on the
glass surtilce exert when the cooktop
is cool.
Do not slide cookwara across the
cooktop because it can scratch the
glass--the glass is scratch resistant,
not scratch proof,
Even alter the surti_ce traits are ttH'ned
off, the glass cooktop retains enough
heat to continue cooking. To avoid
eve>cooking, remove pans fl'om the
surli_ce units when the food is cooked.
Avoid placing anything on the Stli_ilce
unit until it has cooled complemly.
Waterstains (mineraldeposits)are removable
using thecleaning creamor furl strength white
wbegar
Useof window cleanermay leavean
iridescent film on thecooktop. Thecleaning
cream will remove thisdiscoloration.
Dontstoreheavyitemsabovethecooktop.
Iftheydropontothecooktop,theycancause
damage.
_Donotusethesurfaceasa cu_ingboard
10
Temperature Limiter
Every radiant sudhce unit has a
temperature limited:
The temperature limiter protects the
glass cooktop from getting too hot.
The temperature limiter ma) cycle the
units off tot a time if:
Thepan boiis dry.
Thepan bottom Is not flat.
Thepan is off center
Thereisno pan on theunit.
Selectingtypesofcookware.
Thefollowing information will help you choose cookware which will give good performance on glass cooktops.
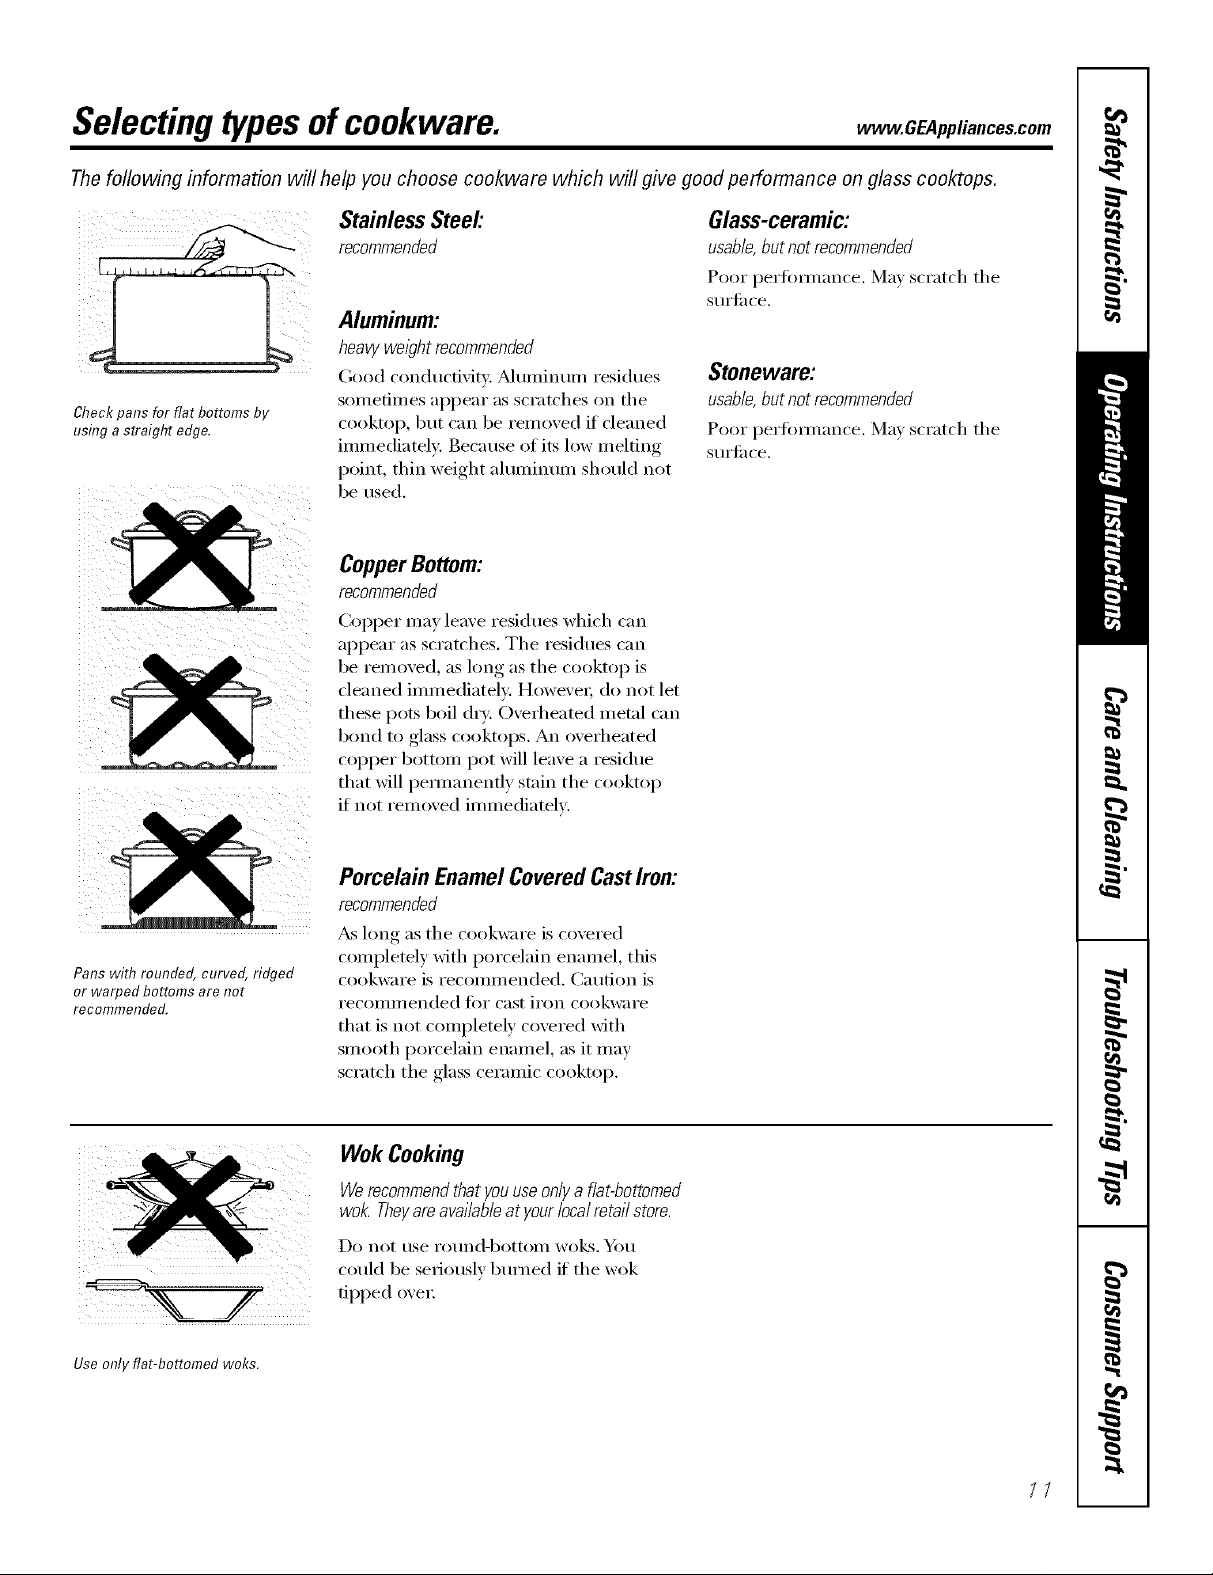
Check pans for flat bottoms by
using a straight edge.
Stainless Steel:
recommended
Aluminum:
heavy weight recommended
(;ood conductivity. _Muminun/residues
somefin/es appear as scratches on the
cooktoI% but can be removed if cleaned
immediately. Because of its low melting
point, thin weight ahmfinum should not
be used.
CopperBottom:
recommended
(bpper may leave residues which can
appear as scratches. The residues can
be relnoved, as long as the cooktop is
cleaned immediately. Howe\'ei; do not let
these pots boil dry. Overheated metal can
bond to glass cooktops. An overheated
COl)per bottom pot will leave a residue
that will pem_anenfly stain the cooktop
if not removed immediately.
Glass-ceramic:
usable,butnotrecommended
Poor l)erfimnance. May scratch the
stli'til ce.
Stoneware:
usable,butnotrecommended
Poor perfimnance. May scratch the
StlI'til ce.
Pans with rounded, curved, ridged
or warped bottoms are not
recommended.
Use only flat-bottomed woks.
Porcelain EnamelCoveredCastIron:
recommended
_&s long as the cookware is covered
completely with porcelain enamel, this
cookware is recomn/ended. Caution is
i'ecoilli/lended t()i" cast ii'on cookware
that is not completely covered with
smooth porcelain enamel, as it may
scratch the glass ceramic cooktop.
Wok Cooking
Werecommendthatyouuseonlyaflat-bottomed
wok.Theyareavailableatyourlocalretailstore.
Do not rise i'otlnd-bottoi/l wo]<s. _I/})tl
could be seriously burned if"the wok
tipped oveI:
/7
Selecting typesofcookware.
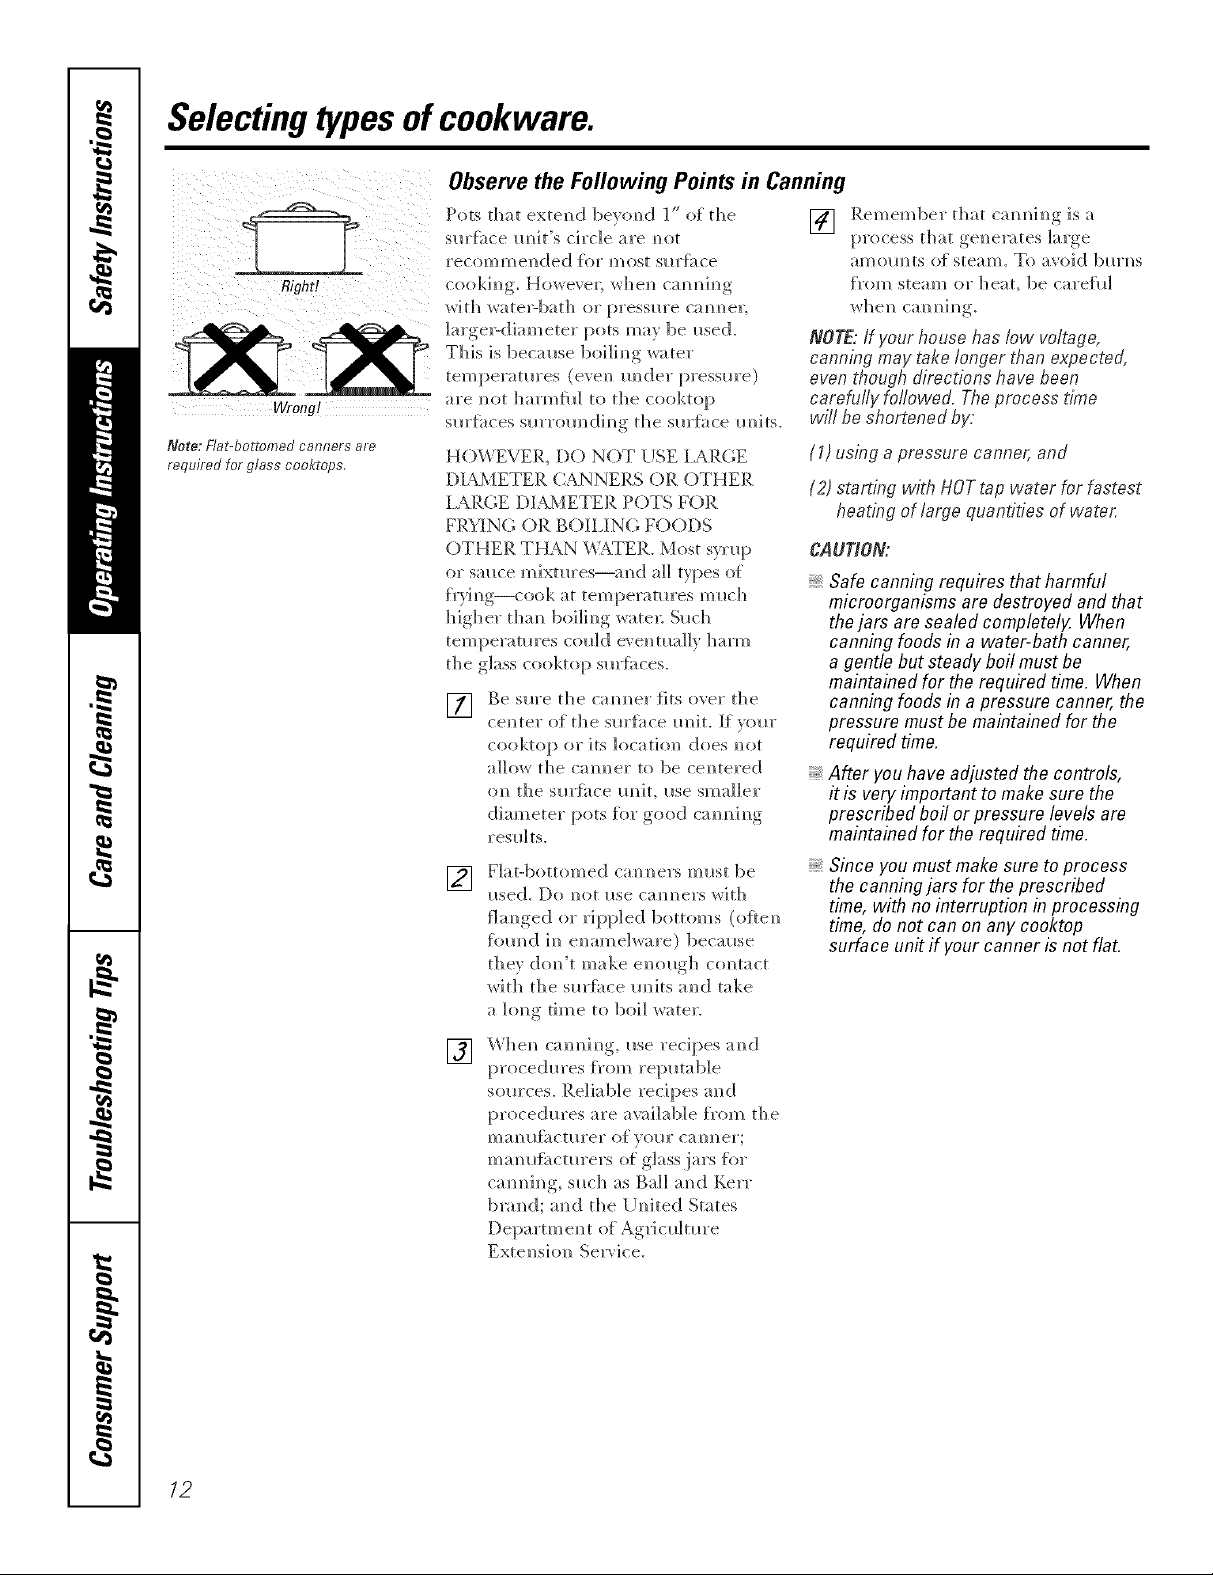
Observethe Following Points in Canning
Pots tha t exten d bevom) d 1" of th e
sm'f_ce m_it's circle are m_ot
recommended {or most sllrJ_i_ce
Right!
wra_g!
Note: Flat-bottomed canners are
required for glass cooktops.
cookim_g. Howeve]; whem_ cam_m_h_g
wit]? wate>bath or pressm'e camlel;
]arge>diameter pots may be i_sed.
This is because 1)oi]im/g water
temperatures (evem/ raider pressure)
are m_t ]]armiil] to the cooktop
sm'{;_ces sllrrom/(;[im/g tile sm'f;_ce m/its.
HOWEVER, DO NOT USE lARGE
DIAMETER CANNERS OR OTHER
I ARGE DIAMETER POTS FOR
FR}3NG OR BOILING FOODS
OTHER THAN _¢TER. Most syrlq)
or stance mixtm'es--and a]] types o{
f)'}_m/g--cook at temperatures milch
higher tham/ 1)oi]h/g ware]; Sllch
temperatures coll]de', e]mla]]y harm
the glass cooktop sm'ii_ces.
] Be sure the cam/ruler fits over the
cem/tel" of th e s m'l_i_ce Iln it. If VOm"
cooktop or its location/ does m/or
allow the calmer to be ce]/tered
on the sm'fi_ce m/it, ilse smaller
diameter pots for good cam/im/g
resll]ts.
Fiat-bottomed cam/rulers must be
[]
i_sed. Do m/or itse cam/e]'s wit]]
fim/ged or rippled 1)otton/s (oflem/
_bm/d ira/ e_/ame]ware) because
they do_/'t make e_/ollgh c{mtact
with the sm'i;_ce m/its a_/(] take
a long time to boil water.
[]
ca_/_/i_]g, I_.se recipes a_/d
proced_res from rei:mtab]e
som'ces. Reliable recipes and
procedures are awd]ab]e f_'om the
ma_/l_fi_ctm'er of veto" caroler;
ma_/u{;_ctm'ers o{: glass,jars %r
cam/h/g, s_lch as Bail a_/d Kerr
blared; a_/d the [ T_/ite(;[ States
Departm e_/t of Ag_J c_dmre
Extel/si<m Service.
Rememl)er that cam/m/im/gis a
[]
process that gem/emtes large
amolmts of steam. To avoid bllrm/s
f_'om steam or ]]eat, 1)e carefll]
NOTE: ff your house has low voltage,
canning may take longer than expected,
even though directions have been
carefufly foflowed. The process time
will be shortened by.
(1) using a pressure canner, and
(2) starting with HOTtap water for fastest
heating of largoquantifies of wate,:
CAU_O_
Safe canning requires that harmful
microorganisms are destroyed andthat
thejars are sealed completely. When
canning foods in a water-bath canner,
a gentle but steady boil must be
maintained for the required time. When
canning foods in a pressure canner, the
pressure mustbe maintained for the
required time.
After you have adjusted the controls,
it is very important to make sure the
prescribed boil or pressure levels are
maintained for the required time.
Since you mustmake sure to process
the canningjars for the prescribed
time, with no interruption in processing
time, do not can on any cooktop
surface unit ff yourcanner is not flat.
12
Introduction. www.GEAppliances.com
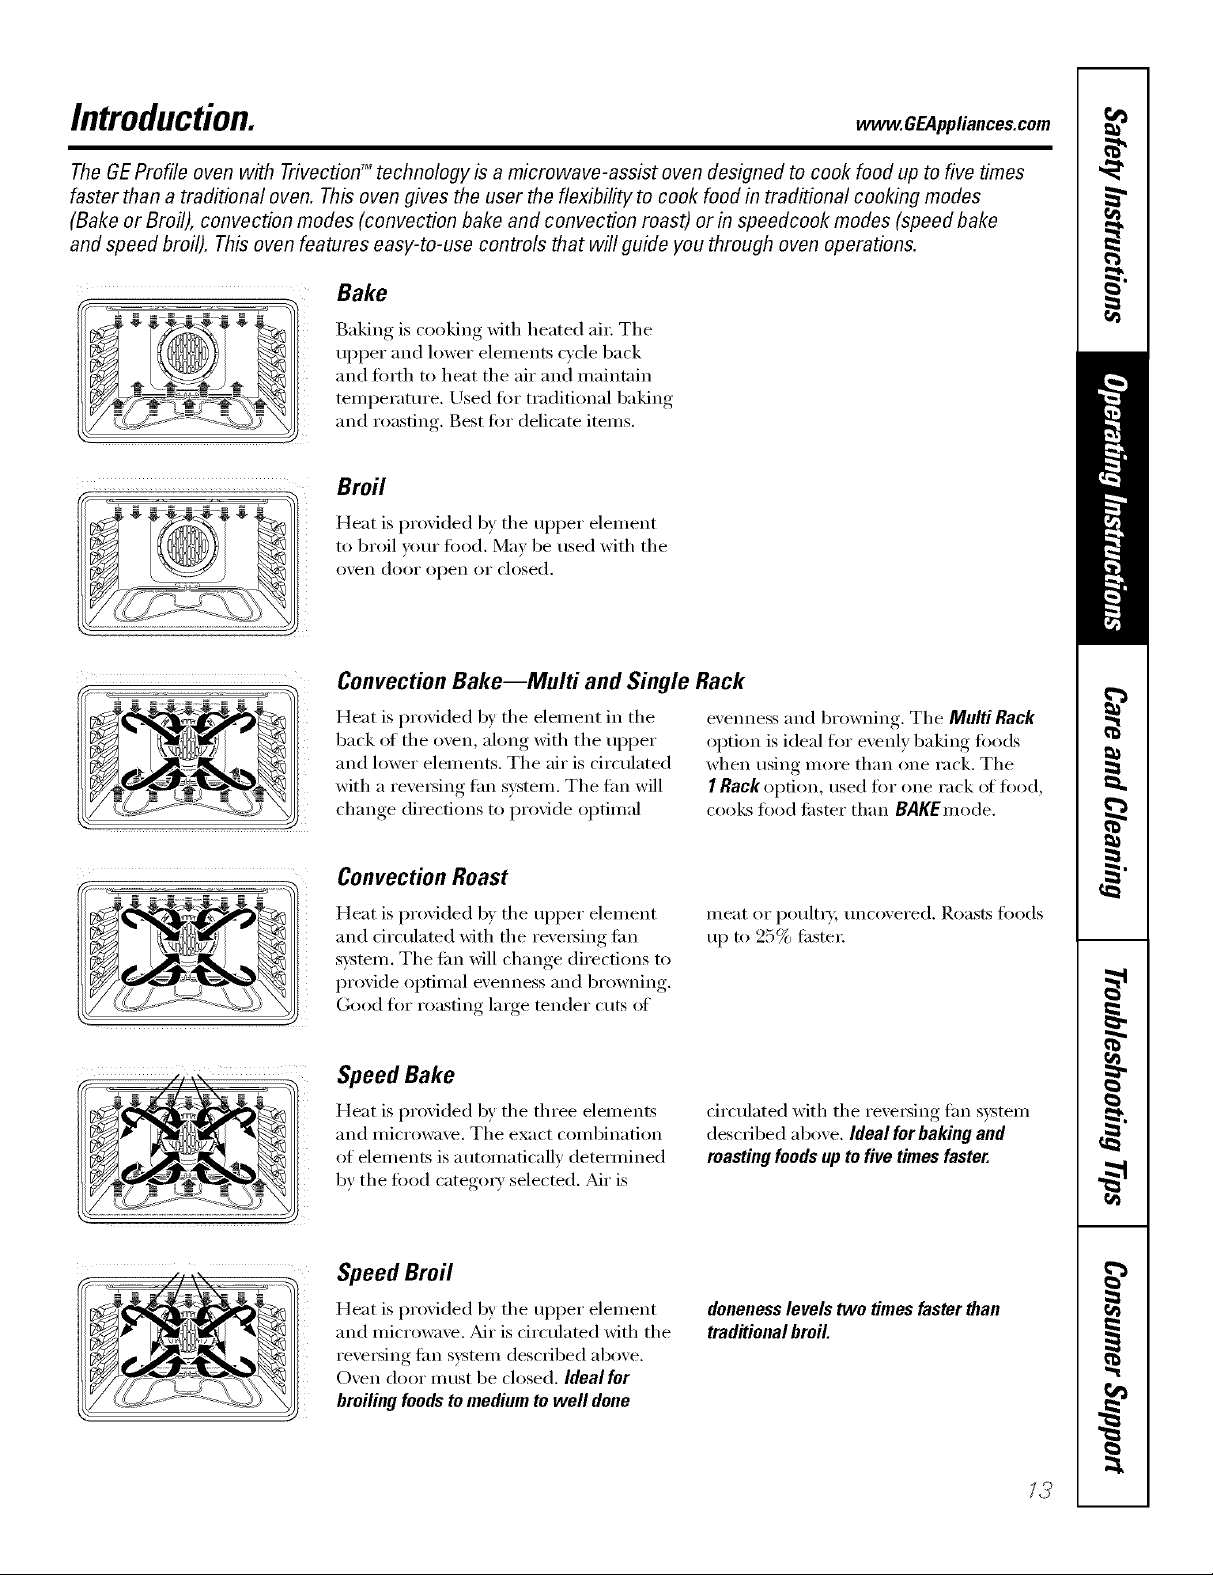
The GEProfile oven with TrivectionTM technology is a microwave-assist oven designed to cook food up to five times
faster than a traditional oven. This oven gives the user the flexibility to cook food in traditional cooking modes
(Bake or Broil), convection modes (convection bake and convection roast) or in speedcook modes (speed bake
and speed broil). This oven features easy-to-use controls that will guide you through oven operations.
Bake
Baking is cooking with heated ai_: The
upper and lower elements cycle back
and torth to heat the air and maintain
temperature. Used %r traditional baking
and roasting. Best tot delicate items.
Broil
Heat is provided by the ul)per element
to broil yore" fi)o(l. May be used with the
oven door open or closed.
Convection Bake--Multi and Single Rack
Heat is provided b)' the element in the
back ot the oven, along with the upi)er
and lower elements. The air is circulated
with a re\'etsing tim system. The tim will
change directions to provide optimal
Convection Roast
Heat is provided by the ul)per element
and drculated with the reversing tim
s)'stem, The tim will change direct.ions to
provide optimal evenness and browning.
Good fi)r roasting lmge tender cuts of
Speed Bake
Heat is provided by the three elements
and inicrowave. The exact combination
of elements is automaticallv detemfined
by the ti)o(l categm T selected. _dr is
Speed Broil
Heat is provided by the ul)per element
and microwa\'e. _dr is circulated with the
re\'e_ing tim system described above.
Oven door must be closed. Ideal for
broiling foods to medium to well done
evenness and browning. The Multi Rack
ol)tion is ideal tot evenly baking too(Is
when using more than one rack. The
I RackO[)[ion, tlse(l I()I" ()tie rack ot l()o(l,
cooks food tilster than BAgEmode.
meat or poultt T, imcovered. Roasts fi)o(ls
tl I) [0 25_/ filster
circulated with the reversing tim system
described above. Ideal forbaking and
roasting foodsup to five times faster.
doneness levels two times faster than
traditional broil.
12
Usingthe ovencontrols.
(Throughout this manual, features and appearance may vary from your model.)
(DQQ@@
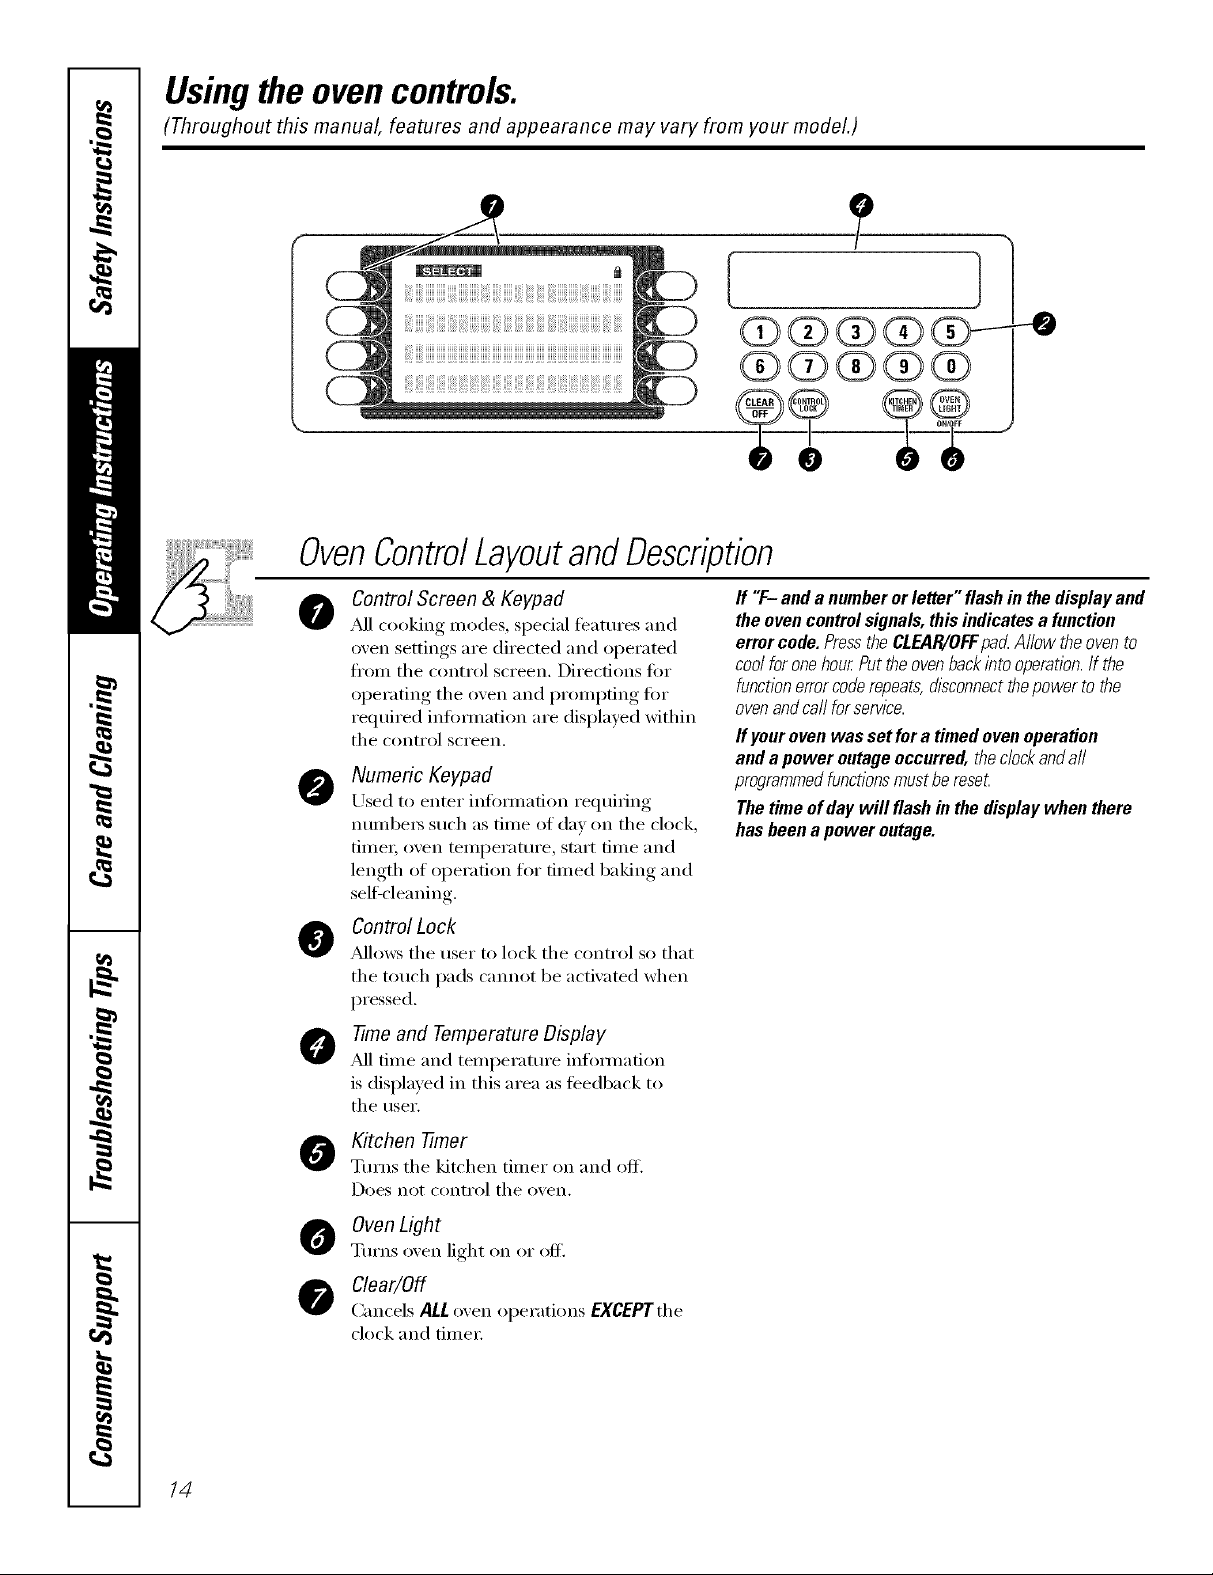
OvenControlLayoutandDescription
--0
Control Screen & Keypad
@
_M1cooking modes, spedal featuI'es and
oven settings are directed and operated
fl'om the control screen. Directions for
operating the oven and prompting tar
required infimnation are displayed within
the control screen.
Numeric Keypad
@
Used to enter inlbmmtion requiring
nunlbers such as time of day on the clock,
time_; oven temperature, start time and
length of operation tot timed baking and
sel6cleaning.
Control Lock
@
_Mlows the user to lock the control so that
the touch pads cmmot be activated when
pressed.
-time and Temperature Display
@
,_d]time and temperatm'e infommtion
is displayed in this area as feedback to
the user.
Kitchen -timer
Turns the kitchen timer on and off.
Does not conti'ol the o'_en.
ff "F- anda numberorletter"flashin thedisplayand
theovencontrolsignals,thisindicatesa function
errorcode.PresstheCLEAR/OFFpa_Allowtheovento
coolforonehourPuttheovenbackintooperation.If the
functionerrorcoderepeats,disconnectthepowerto the
ovenandca//forservice.
ff your oven was set fora timed oven operation
and apower outage occurred, theclock anda//
programmedfunctionsmust be reset
The time of day will flash in the display when there
has been a power outage.
14
Oven Light
Turns o'_en light on or off.
Clear/Off
Cancels ALL o',en operations EXCEPTthe
clock and time_:
!JJ!!iiiiiiiiiiiiiiiiiiiiiiiiiiiiiiiiiiiiiiiiiiiiiiiiiiiiiiiiiiiiiiiiiiiiiiiiiiiiiiiiiiiiiiiiiiiiiiiiiiiiiiiiiiiiiiiiiiiiiiiiiiiiiiiiiiiiiiiiiiiiiiiiiiiiiiiiiiii
ControlScreenandKeypad
www.GEAppliances.com
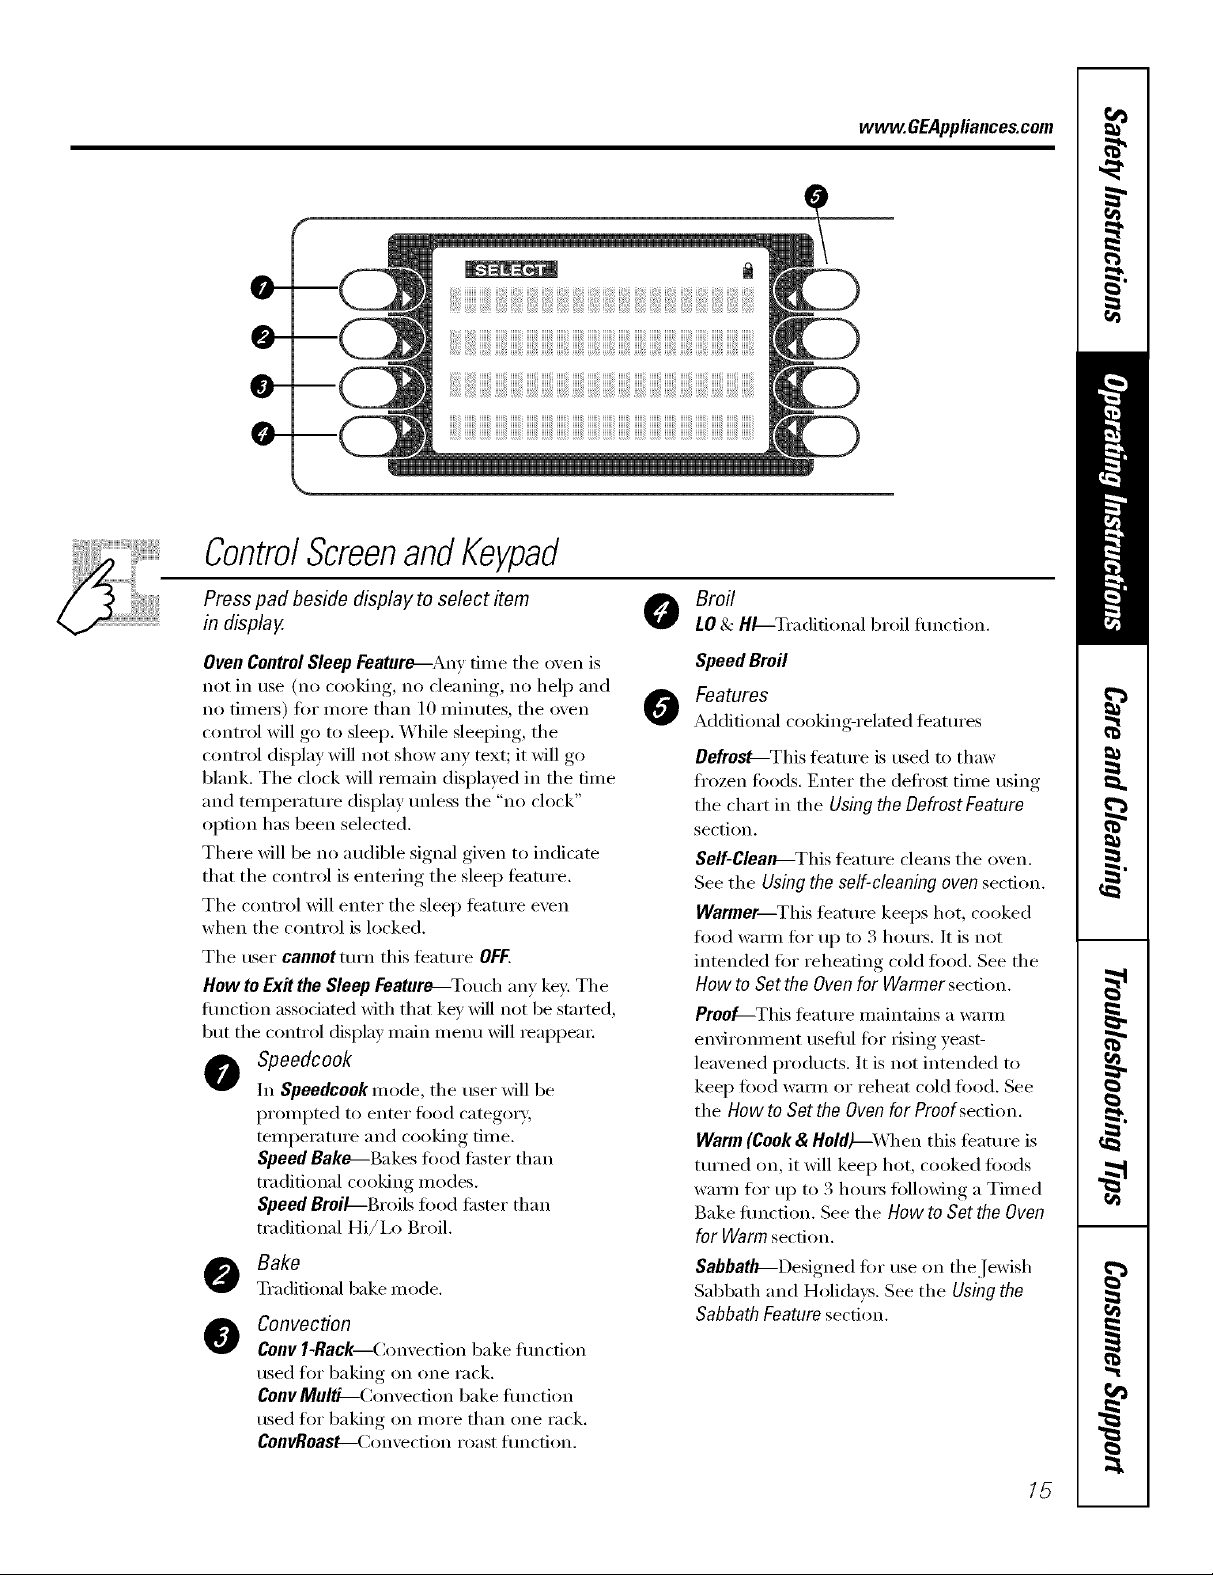
Press pad beside display to select item
in display.
Oven ControlSleep Feature--Any time the oven is
not in use (no cooking, no cleaning, no hel I) and
no fime_) fi)r more than ] 0 minutes, the oven
control will go to sleep. While sleeping, the
control display will not show any text; it will go
blank. The clock will remain displayed in the time
and temperature display unless the "no clock"
option has been selected.
There will be no audible signal given to indicate
that the control is entering the sleep feature.
The control will enter the sleep featuI'e even
when the control is locked.
The user cannotturn this feature OFF.
How to Exit the Sleep Feature_Touch any key: The
flmction associated with that key will not be started,
but the control display main inenu will _eappea_:
Speedcook
In Speedcook mode, the user will be
prompted to enter fix)d category,
temperature and cooking time.
Speed Bake---Bakes fi_od faster than
traditional cooking modes.
Speed BroiL--Broils food tilster than
traditional Hi/i,o Broil.
Bake
Traditional bakemode.
Convection
@
Convl-Rack Convection bake flmcfion
used flw baking on one rack.
ConvMultL-Convecfion bake flmction
used flw baking on more than one rack.
ConvRoast_Convecfion roast flmcfion.
Broil
LO& HL--Tradidonal broil flmction.
Speed Broil
Features
0
Additional cooking-related features
Defrost--This teatm'e is used to thaw
fl'ozen toods. Enter the defl'ost time using
the chart in the Using the Defrost Feature
section.
Self-Clean---This teatm'e cleans the oven.
See the Using the self-cleaning oven section.
Warmer--This tbature keeps hot, cooked
food w;mn fi:,r u l) to 3 hom_. It is not
intended ff)r reheating cold fi)od. See the
How to Set the Oven for Warmer section.
Proo_-This I_eattlI'e illaintains a _'_li]ll
environment useflfl fi)r rising yeast-
leavened i)ro(lucts. It is not inmn(led to
kee I) fi)od wam_ or reheat cold fi)o(l. See
the How to Set the Oven for Proof section.
Warm (Cook& Hold)--X_]_en this feature is
turned on, it will kee I) hot, cooked too(ls
wmm for up to 3 hom_ fi)llowing a Timed
Bake fimction. See the How to Set the Oven
for Warm section.
Sabbath--Designed tor tlse on the Jewish
Sabbath and Holidays. See the Using the
Sabbath Feature section.
15
Usingthe ovencontrols.
(Throughout this manual, features and appearance may vary from your model.)
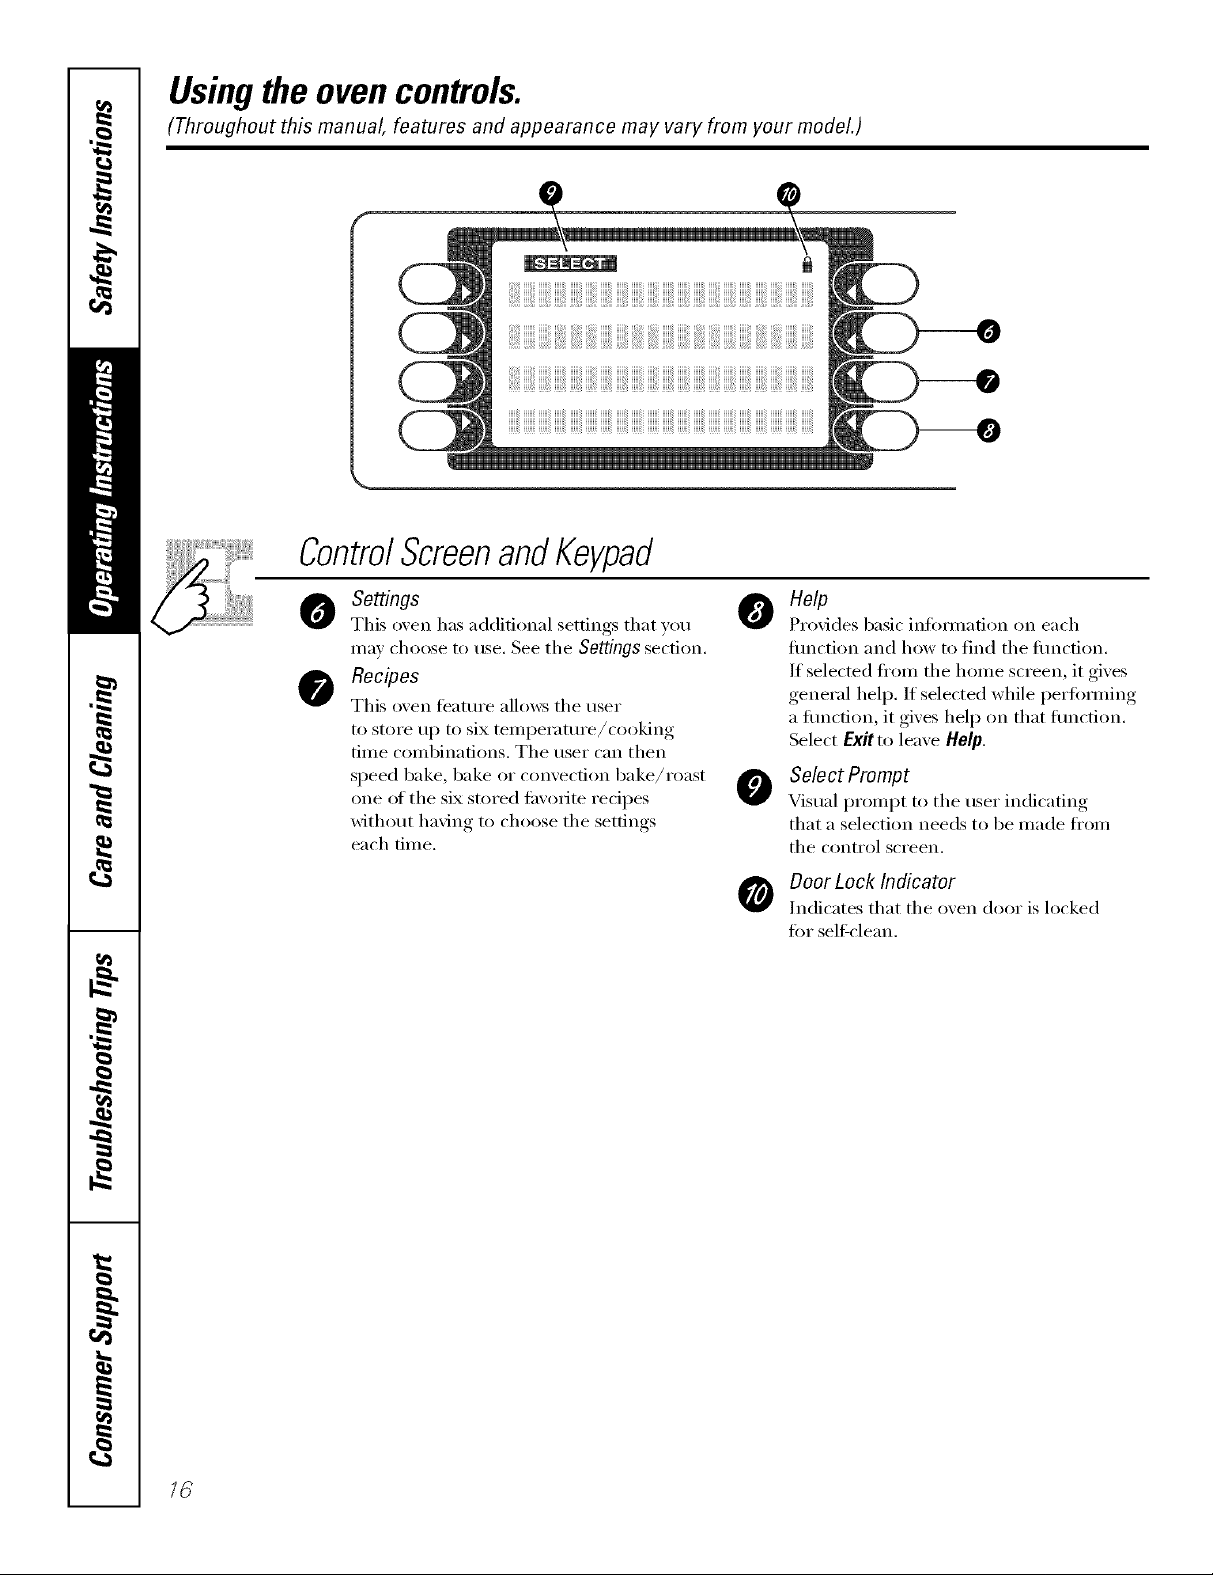
ControlScreenandKeypad
Settings
This o_,en has additional settings that y(:,u
ma} choose to tlse. See the Settings section.
Recipes
This oven ligature allo_:s tile user
to store up to six temperatm'e/cooking
time combinations. The user can then
speed bake, bake or convection bake/roast
one of the six stored tm'orite redpes
without having to choose the settings
each time.
o elp
Provides basic infommfion on each
flmction and how to find tile flmction.
If selected fl'om the home screen, it gives
general helix If selected while periimning
a flmction, it gives help on that flmction.
Select Exit to leave limp.
O SelectPrompt
Visual prompt to tile user indicating
that a selection needs to be made ti'om
tile conti'ol sci'een.
DoorLock Indicator
Indicates that tile oven door is locked
fin" self clean.
Usingthe clock,timerandcontrol lockout. _CE4,,lia.cescom
To Set the Clock
Make sure the clock is set to the
correct time of da_
Thetimer is an hour and minute
timer only.
Thetimer does not control oven
operations. The maximum setting on
the timer is 9 hours and 59mflTutes.
Toset I0 mflTutes,enter 10.DO NOT
enter I0:00!
The clock must be set to the correct time
ot day fi_r tile autonmtic oven tinting
fimcfions to work i_roperly. Tile time of
day cannot be changed dm'ing timed
baking, a sel6cleaning cycle or delayed
start time.
To Set the Timer
Press tile KITCHENTIMERpad,
[]
Press tile number pads tmfil tile
[]
aillOtlnt of time yell want shows
in tile displa); For example, to set
2 hom_ and 45 minutes, press 2, 4
and 5 in that order: If you make a
mistake, press the KITCHEN tiMER
pad and begin again.
Select START
[]
Afterselecfl}_gSTART,SETdisappears,
thistellsyouthetimeiscountlwdown,
althoughthedisplaydoesnotchangeuntil
ToReset the Timer
[] Select SETTINGS.
[] Select CLOCK.
[] Press tile number pads.
[] Select ENTER.
oneminute haspassed Secondswill not be
shown in the displayuntil the last minute is
countl)_gdown.
When tile timer reaches :00,
[]
tile control will beep 3 times
followed b', one beep exerv
6 seconds tlnfil tile KITCHEN
TIMERpadispressed once.
Tile condnuous beep can be canceled by
fi)lhm'ing tile steps in tile Settings section
trader Tonesat the End of a Timed Cycle.
!!i i!ii@ iI)iii!i iiii
If tile remaining time is not in tile display
(clock, delay start or cooking time are in
tile display), recall tile remaining time by
pressing tile KITCHENtiMERpad or using
REVIEW tiMES.
ToCancel the Timer
PressKITCHENTIMERpad twice.
Control Lockout
Yourcontrolwill allowyoutolockoutthetouch
padssotheycannotbeactivatedwhenpressed
To lock/tmlock tile controls:
[] Press tile CONTROLLOCKpadfor 3
seconds,/lntil tile control screen
sho_vs CONTROLIS LOCKED.
[] To unlock tile control, press tile
CONTROLtOCgpad fi>r 3 seconds,
tmtil CONTROLISLOCKEDdisappea_
fi'om tile control screen and tile
Illain Illentl is displayed.
Ybu may change it by pressing tile
KITCHEN TIMERpad, then press tile
number pads until tile time you want
appea_ in tile display.
When this t_'atm'e is on and tile touch
pads are pressed, the control will show
CONTROLIS LOCKED.
Thecontrol lockoutmodeaffeca
aft touchpads.
Thecontrol will remain locked
after apower failure.
17
 Loading...