

Page 1
.q&com
Safety Instruaions ......... 2-5
cJ3
Operating Instructions
Baking or Roasting .......... l l
Broiling Guide .............. 12
Canning .................... 9
Clock and Timer . ........... 13
Control I,ockout ............ 13
Convection .............. 16-20
Cookware ................. 8, 9
Oven .................. l 0-28
Probe ..................... 15
Proofing .................. 21
Sabbath Feature ............. 98
Self-Cleaning ............ 93, 94
Special Features .......... 95-27
Surface Units ............. 6, 7
Thermostat ................ 92
Timed Baking & Roasting ..... 14
VVarming .................. 21
Care and Cleaning
Broiler Pan and Grid ........ 32
Control Panel .............. 29
Door . .................... 30
Floor . .................... 31
Glass Cooktop ........... 34, 35
t_mobs .................... 29
Light Bulb ................. 31
Packaging Tape ............. 29
Racks ..................... 31
Storage Drawer ............. 32
Surfaces ................... 33
Vent ..................... 29
Cs96s
JD96S
Troubleshooting Tips .... 36-39
Consumer Support
Consumer Support . . . Back Cover
Product Registration ...... 41,42
_4'arranty .................. 43
Write the model and serial
numbers here:
Model#
Serial #
You can find them on a label
behind the open oven door
on the lower left corner of
the range ti'ame.
49-80372 17-05 JR
Page 2
iMPORTANTSAFETYiNFORMATiON.
READALLINSTRUCTIONSBEFOREUSING.
?
For your safety, the information in this manual must be followed to minim)e the risk of fire, electric
shock, or to prevent property damage, personal injury, or loss of life.
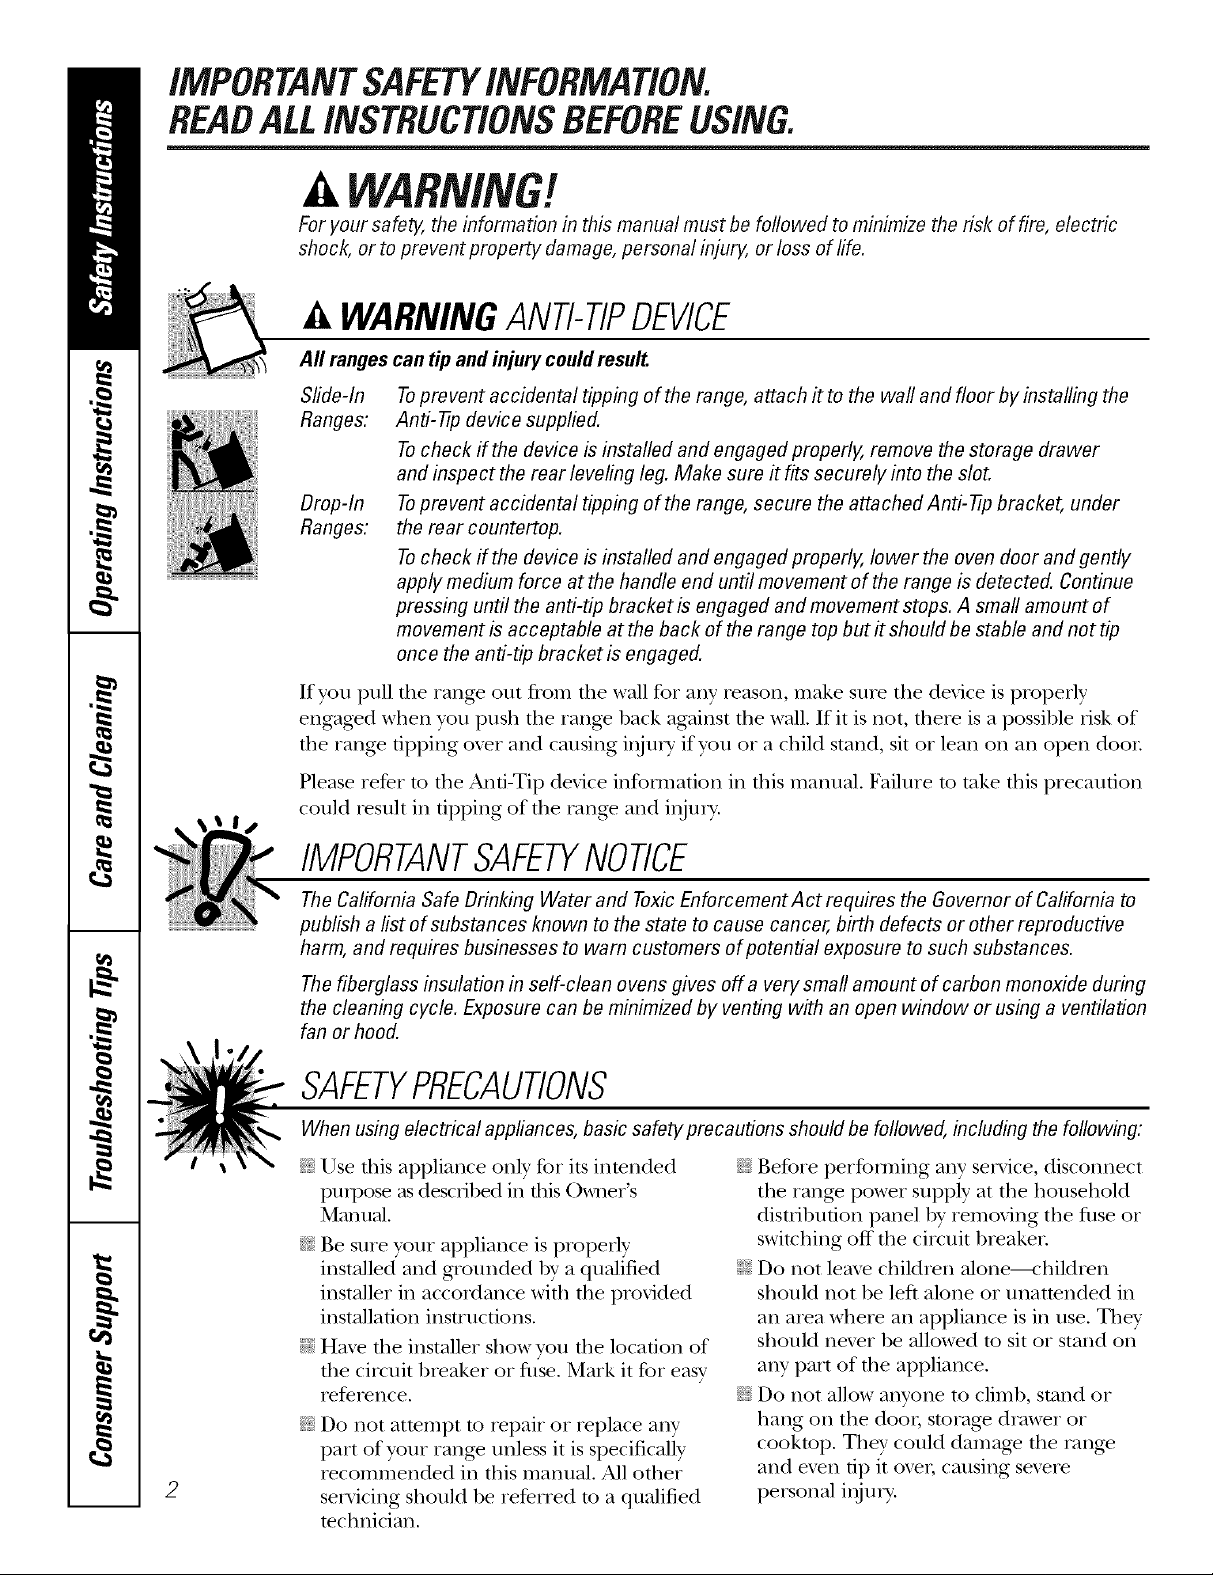
a, WARNINGANti-TIPDEVICE
All ranges
Slide-In
Ranges:
Drop-In
Ranges:
If you pull tile range out fiom tile wall %I any reason, make sure tile device is properly
engaged when you push tile range back against tile wall. If it is ,lot, there is a possible iisk of
the rang_ tipping oxei and causing ii_n U if you or a child stand, sit or lean oil an open door
Please refer m the Anti-Tip device infollnation in this manual. Failure m take this precaution
could result ill tipping of tile rang_ and ii_ni>
can tip and injury could result.
Toprevent accidental tipping of the range, attach it to the wall and floor by installing the
Anti--tip device supplied.
Tocheck if the device is installed and engaged properly, remove the storage drawer
and inspect the rear leveling leg. Make sure # fits securely into the slot.
Toprevent accidental tipping of the range, secure the attached Anti--17pbracket, under
the rear countertop.
Tocheck if the device is installed and engaged properly, lower the oven door and gently
apply medium force at the handle end until movement of the range is detected. Continue
pressing until the anti-tip bracket is engaged and movement stops. A small amount of
movement is acceptable at the back of the range top but # should be stable and not tip
once the anti-tip bracket is engaged.
IMPORTANTSAFETYNOtiCE
The California Safe Drinking Water and ToxicEnforcement Act requires the Governor of California to
publish a list of substances known to the state to cause cancer, birth defects or other reproductive
harm, and requires businesses to warn customers of potential exposure to such substances.
The fiberglass insulation in self-clean ovens gives off a very small amount of carbon monoxide during
the cleaning cycle. Exposure can be minimized by venting with an open window or using a ventilation
fan or hood.
SAFETYPRECAUtiONS
When using electrical appliances, basic safety precautions should be followed, including the following:
_{_;Use this appliance only for its intended
pulpose as descnbed in this )_mer s
Manual.
_{_:Be sure your appliance is properly
installed and grounded by a qualified
installer ill accordance with tile proxqded
installation instructions.
;fi:,iHme tile installer show you the location of
tile circuit breaker or fllse. Mark it for easy
reference.
_t{:_Do not attempt to repair or replace ally
part of your range unless it is specifically
2
iecommended ill this manual, All other
servicing should be refeITed to a qua]ified
technician,
• (
_: Before perfot_ning any service, disconnect
tile range power supply at tile household
disu_ibufion panel by iemoving tile fllse or
switching off tile citvuit breaken
;_?:':Do not leaxe children alone---<;hildren
should not be left alone or unattended in
all area where all appliance is ill use. They
shou]d nex_r be allowed m sit or stand oil
any part of file appliance.
q_{_;Do not allow anyone to climb, stand or
hang oil tile door; storage drawer or
cookmp. They could damag_ file rang_
and even tip it ovel; causing sex>re
persona] ii_m T.
Page 3
_e.com
A WARNING'!
SAFETYPRECAUTIONS
Donot operate the oven or cooktop controls if the glass is broken. Food splatter or cleaning solution
may penetrate a broken control panel or cooktop and create arisk of electrical shock. Contact a
qualified technician immediately should your glass control panel or cooktop become broken.
_fi:,iDo not store flammable materials in an _fi:,i
oven or near tile cooktop.
CAUTION: temsofinterestto
children should not be stored in cabinets
aboxe a range or on the back of a range--
children climbing on tile range to reach
items could he seiiously i,_jured.
Never wear loose-fitting or hanging
garments while using tim appliance.
Be carefill when reaching for items stored
o_er the range, l_lammable mateiial could
he ignimd if brought in contact wifl_ hot
surPace units or heating elements and may
cause sex>re bnrlls.
Use only d U pot holders--moist or damp
pot holders on hot snrtaces may result in
hums from smam. Do not let pot holders
touch hot surface units or headng
elements. Do not use a towel or odler
hulky cloth in place of pot holders.
Do not use wamr on grease fires. Nexer
pick up a flaming pan. Turn die conuols
off. Smother a flaming pan on a surfi_ce
unit 1)y coxeiing the pan complemly with
a well-fitting lid, cookie sheet or fiat ua>
Use a mulfiq)urpose dty chemical or
%am-type file extinguisher
Flaming grease outside a pan can be put
out hy covering it with baking soda oi,
if available, by nsing a multi-puq)ose d_y
chemical or foam-type fire extinguisher
Flame in tile oxen can be smofllered
completely by closing tile o_en door
and ulming the o_en off or by using
a mulfi-puq)ose d U chemical or
foam-type fire extinguisher
_?{::For your safeff, nexer use your appliance
for wam_ing or heating tile room.
Do not let cooking grease or other
flammable mateiials accumulate in or
near tile range.
Do not touch file suitZace units, file
heating elements or the inmiior surface
of the oxen. These surfimes may be hot
enough to hum exen though they are
dark in colon During and after use, do not
milch, or let clothing or other flammable
mamrials contact the surPace units, areas
nearby the surPace units or any inmrior
area of the oxen; allow sufficient time for
cooling first.
Potentially hot snrfaces include the
cooktop, areas facing the cooktop, oxen
xent opening, surPaces near the opening,
crevices around tile oxen door
REMEMBER:The inside surPace of tile oven
may be hot when tile door is opened.
Do not store or use combustible mateiials,
gasoline or other flammable vapors and
liquids in tile vicinity of this or any other
appliance.
Kee I) the hood and gTease filters clean
to maintain good xenting and to axoid
grease fires.
Teach children not to play with tile
controls or any other part of the range.
_: Always kee I) dish towels, dish cloths, pot
holders and other linens a satb distance
fi'om yonr range.
_i:,:Always kee I) wooden and plastic utensils
and canned food a safe distance flom
your range.
_i:,:Mways kee I) comhustible wall cox eiings,
curtains or drapes a safe distance fiom
your range.
COOKMEATANDPOULTRYTHOROUGHLY...
Cookmeat andpoultry thoroughly--meat toat least an INTERNALtemperatureof 160°Fandpoultry
to at least anINTERNALtemperatureof 180°ECookingto these temperaturesusuallyprotectsagainst
foodbomeillness.
3
Page 4
iMPORTANTSAFETYiNFORMATiON.
READALLiNSTRUCTIONSBEFOREUSING.
RADIANTSURFACEUNITS
Use proper pan size--select cookware having flat bottoms largo enough to cover the surface unit
heating element. Theuse of undersized cookware will expose a portion of the surface un# to direct
contact and may result in ignition of clothing. Proper relationship of cookware to surface un# will
also improve efficiency.
;_i:,iNexer leaxe tile sur£_ce units unattended
at high heat settings. Boiloxers cause
smoking arrd greasy spilloxers that may
catch on fire.
Only certain wpes of glass, glassAeramic,
earthenware or other glazed containers are
suitable for cooktop service; others may
hreak because of tile sudden chang_ in
temperature.
To minimize the possibility of bni_ns,
ignition of flamnrahle materials and
spillage, file handle of a container
should be turned toward the center of
the range wifllout extending oxer neafl)v
sur/aace units.
;fi:,iAlways turn tile surface units off before
relrloving cookxs are.
_::When preparing flaming %ads under
tile hood, turn tile fan on.
q_{_:Use care when touching tire cooktop. The
glass sur£rce of the cooktop will retain heat
ariel the corrtrols hme been turned off:
Kee I) an eye on foods heing flied at high
or medium high heat settings.
Foods for flying should be as dry as
possible. Frost on flozen foods or moisture
on flesh foods can cause hot lht to bubble
up and oxer tile sides of the pan.
Use little £_t for effectixe shallow or deep
tzatflying. Filling the pan too flfll of fat can
cause spilloxers when food is added.
ff a combination of oils or thts will be used
in flying, stir together before heating,
or as/_ts melt slowly.
;_:'Always heat lantslowly, arrd watch as it heats.
q_{_:Use a deep tht thermometer whenexer
possible to I)rexent oxerheating Pat beyond
the smoking point.
_: Avoid scratching tire glass cooktop. The
cooktop can be scratched wiflr imms such
4
as shm]) instruments, rings or oilier
jeweh T, and rivets on cloflling.
Large scratches or impacts to glass doors
or cooktops can lead to broken or
shattered glass.
Do not operate fire radiant sur/aace units if
the glass is broken. Spilloxers or cleaning
solntion m W peneUam a broken cooktop
and cream a risk of electrical shock.
Contact a qualified mchnician immediately
should your glass cookmp become broken.
Nexer use tire glass cooktop snr/aace as a
cutting board.
Do not place or store items that can melt
or catch fire on the glass cooktop, exen
when it is not being used.
Be careflfl when placing spoons or other
stirring utensils on glass cooktop sur/aace
when it is in nse. They may become hot
arrd could cause bnrrrs.
Clean file cooktop Mflr cant.ion. If a wet
spong_ or clofl/is used to Mpe spills on a
hot sur_ace unit, be carefifl to ax_id steam
hums. Some cleaners carl produce
noxious fllmes if applied to a hot surPace.
NOTE:VCerecommend that you moid
wiping any surface unit areas unul they
have cooled and fire indicator ligtrt has
g_ne off: Sugar spills are the exception to
this. Please see rile Cleaning the glass
cooktop section.
;_;When the cooktop is cool, use only the
CERAMA BRYTE ¢'_Ceramic Cooktop
Cleaner arrd the CERAMA BRYTE
Ceramic Cooktop Cleaning Pad to clean
file cooktop.
_: To maid possible damage to tire cooking
surf:me, do not apply cleaning cream to
the glass surfi_ce when it is hot.
_: After cleaning, use a dry cloth or paper
towel to remoxe all cleaning cream residue.
_: Read and follow all instructions arrd
warnings on the cleaning cream labels.
Page 5
ge.com
WARNING!
OVEN
Stand awayfrom the range when opening the oven door. Hot air or steam which escapes can cause
bums to hands, face and/or eyes.
;f; Do ,lot heat unopened food containers.
Pressure could build up and file container
could burst, causing all illjury.
_i:Kee I) tile o\en \.ent unobstructed.
_i_Kee I) tile ox.en flee flom g_ease buildup.
_{;;Place the ox.en rack ill tile desiIed position
while file ox.en is cool. If racks must be
handled when hot, do not let pot holder
contact file heating elements.
_i:,:'_A'henusing cooking or roasting bags in
tile ox.en, fbllow tile manufactmer's
diIecdons.
;_i:.:Pulling out the rack to file stoI>lock is a
comenience ill lifting heax T foods. It is also
a precaution against burns flonl touching
hot smfi_ces of tile door or oxen walls.
;f; Do not use the ox.en to dlT newspapers.
If ox.eflleated, flley can catch on fre.
_{_;Do not use tile ox.en for a storage area.
Imms stored ill all OX.encall ignim.
_{;;Do not leax.e paper products, cooking
umnsils or food in file oven when not
ill use.
Do not use aluminum foil to lille oxen
1)ottoms, except as suggested in this
manual. Improper installation of
aluminum foil may result ill a risk
of electric shock or fire.
SELF-CLEANINGOVEN
Do not use oven cleaners. No commercial oven cleaner or oven liner protective coating of any kind
should be used in or around any part of the oven. Residue from oven cleaners will damage the inside
of the oven when the self-clean cycle is used.
_;;Do not clean the door gasket. Tile door
gasket is essential for a good seal. Care
should be token not to rub, damag.e or
mox.e tile gasket.
_:;Before self-cleaning tile o_.en, reemo_.e
tile racks, broiler pan, grid and other
cookware.
_;;Be sure to wipe up excess spillage betbre
starting tile self-cleaning operation.
_?_:;If dm self-vleaning mode malfuncdons,
turn tile ox.en off and disconnect tile
power supply. Hax.e it serviced by a
qualified technician.
_?_:;Clean only parts listed ill this Owner's
Manual.
READANDFOLLOWTHISSAFETYINFORMATIONCAREFULLY.
SAVETHESEINSTRUCTIONS
5
Page 6

Usingthesurfaceunits.
NOTE: Throughout this manual, features and appearance may vary from your model.
How to Set
Push the knob in and mrn in either iJi::glow until the unit iscoded toapproxtYnate/y
directi(m t(s the settim, xou want. 150°F
1 9
2 8
At both OFFand H/the control clicks
into position. Ym ma_ hear slight
clicking sotmds during cooking,
4
Besure _ou wrn rne comro/ KI?ODTO
OFFwhen ou finish cooking.
i ;i ii ii illi
SET:OFF
WARMING ZONE GUIDE
SETrlNG FOOD
1(Low) Bread/Pastries
2(Medium) Chocolate/Butter
2(Medium) Sauces,Stews,
CreamSoups
2(Medium) Vegetables
3(High) Soups(liquid)
3(High) TeaorCoffee
TheWarming Zone Guideis for
reference only andthe SEYrlNG
thatyou needwill dependonthe
amountandtype of food,the
startingtemperatureofthe food
andthe lengthofthe holdingtime.
indicadng the control is keel)in,*_ the tO 9
p(s_,_er level }ou set. i 8
cooktol), will glow _d_en am radiant
element is turned sin. It *d]l remain
on tmdl the sm'fime is cooled to
app_ oximately 150°K
Hot surface indicator light will:
!_:comeon when the unit/s hot to the touch.
_ stay on evenafter the unit is turned off
The WARMsetting on the right REAR
suHi_ce unit keeps ah'eadv heated fo(sd
WalIX/ IlIxtil ready to serve. Do not IISe t(s
heat cold fiso(l.
4 5 ¸
Using the Warming Zone
The WARMING ZONE, located in the
center of the glass cooktop SUlti_ce,
will kee I) hot, cooked food at serving
teml)elamre. _Mwa}_sstart with hot food.
Do not use to heat cold food. Plating
uncooked or cold load on the WARMING
ZONEcould result in toed-borne illness.
_Mwaysuse pot holders or (wen mitts
when removing flsod fl'om the WARMING
ZONE, since cookware and plates will
be hot.
CAUrlON: oo notwarm foodonthe
WARMING ZONE for more than two hours.
NOTE"The warming zone will not glow red like
[] Touch the WARMING ZONE
SET'OFF pad.
[] Touch the imml)er pads 1, 2 or 3
t(s select low (l), medimn (2) or
high (3) wamfing setting.
[] Touch the START pad.
To mrn the WARMING ZONE ofl_ touch
the WARMING ZONE SET'OFF pad until
WARMER(fisappeals fl'Oln the display:
For best results, all foods on the
WARMING ZONEshould be covered with
a lid or aluminum foil. \_]_en wamfing
pastries or breads, the cover should be
vented to allow inoismre to escape.
the cooking elements.
HOTwill be displayed when the glass
sudhce is hot and will renmin on tmtil
the smti_(e is cool enough to touch.
NOTE" Lower settings may not heat the glass
surface enough to cause the HOT indicator light
to come on.
Awamfing z(me ONlight will glow when
the unit is (six.
_ Donotuseplasticwraptocoverfood Plastic
maymeltontothesurfaceandbeven/difficult
toclean.
_ Useonlycookwarerecommendedfor
top-of-rangecooking.
ERONT _ BRIDGE
_t4 41
O0
@ 0 LO LO
Using the Bridge Surface Unit
To use the bridge sm_iace trait, tm'n the
left fl'ont control knob to the BRIDGE
e
settings
For flfll bridge SUltiacetrait ol)eration,
als(>turlx ssixthe left rear SUltace unit.
To use only the fl'smt surlZace trait, turlx
the c(mtrs)l knob t(s the FRONTsettings.
Page 7
ge.com
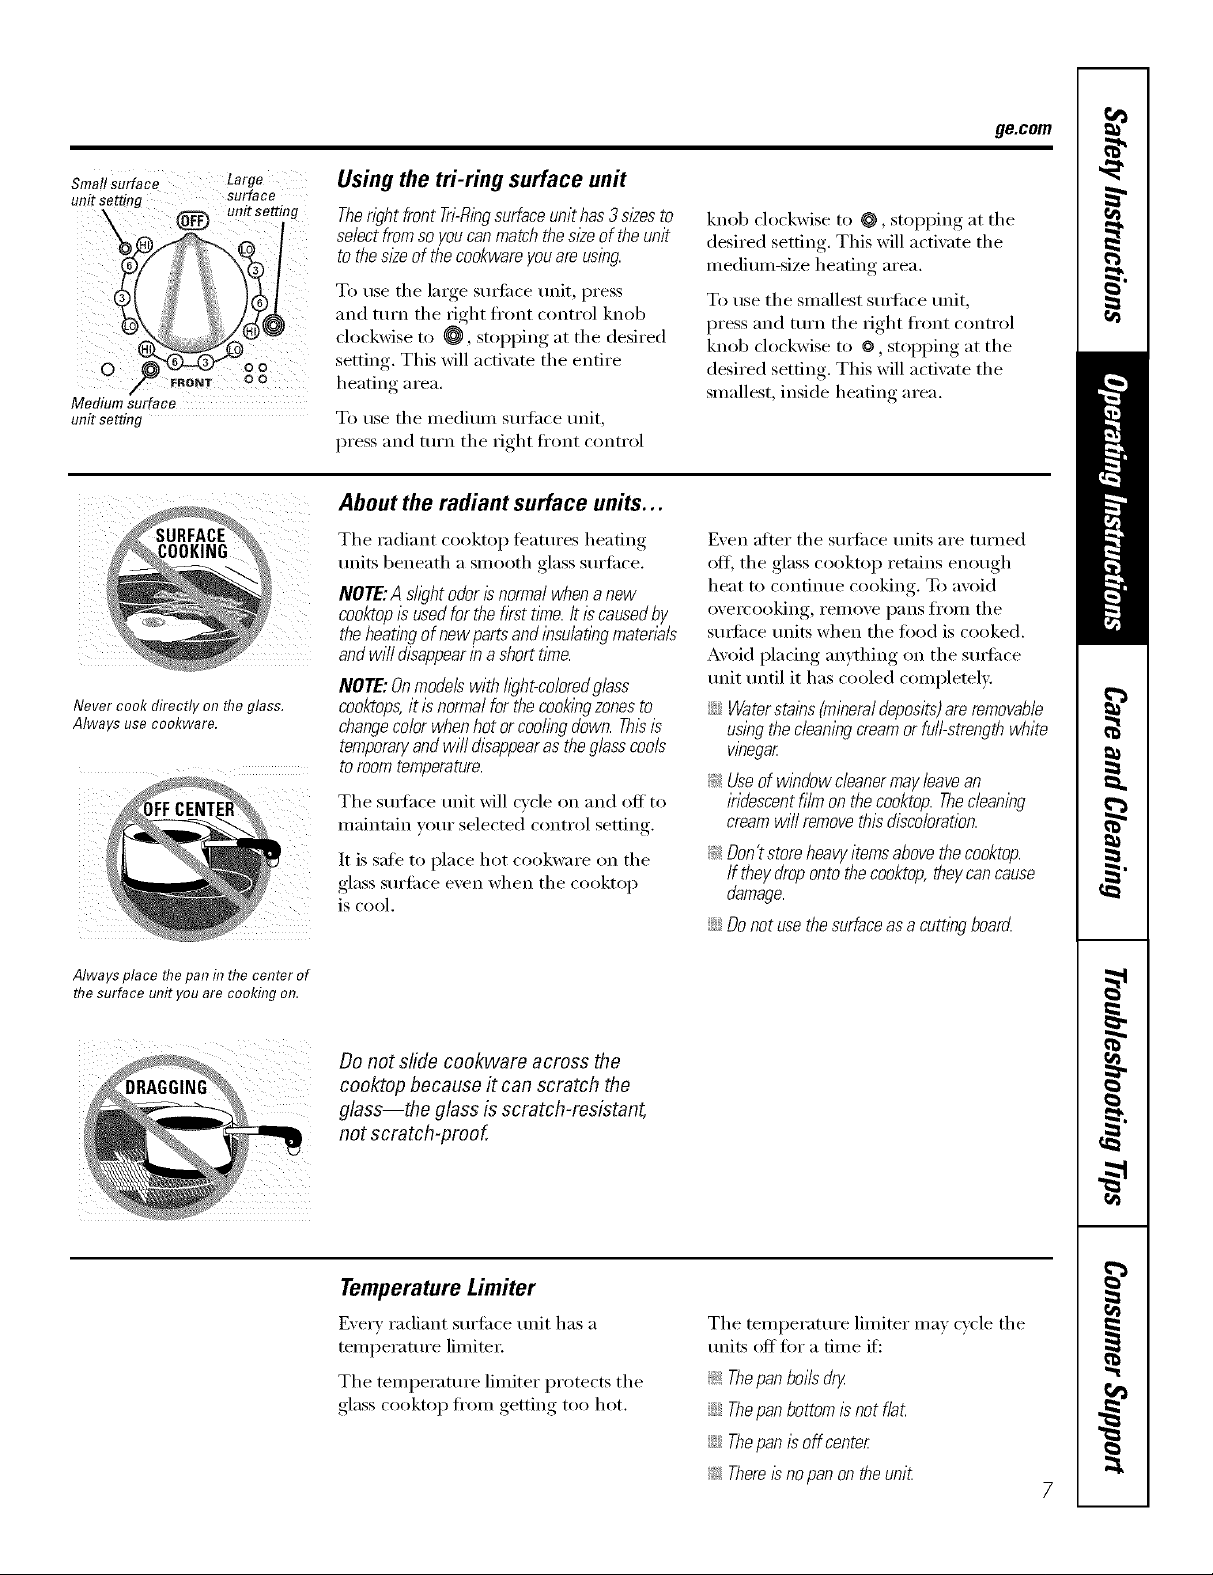
Sma!l surface Large
unit setting surface,
umt settmg
FRONT 0 0
O0
Mediumsurface
unitsetting
Never cook directly on the glass.
Always use cookware.
Using the tri-ring surface unit
Theright front Tri-Ringsurfaceunit has 3 sizes to
select fromso youcanmatch thesize of the unit
to the sizeof thecookware youare using.
To use the large sm_i_(-e unit, press
and mrn the right fl'ont control knob
clockwise to @, stopping at the desired
setting, This will acti\:_te the entire
heating area,
To use the medium smthce trait,
press and turn the fight ti'ont control
About the radiant surface units...
The radiant cooktop teatm'es heating
units beneath a smooth glass surfilce.
NOTE:A sh)ht odorIs normalwhen anew
cooktopis used for the fkst time. It iscaused by
the heating of new parts and lesu/atlegmatena/s
andwill disappearin a short time.
NOTE:On modelswith hght-coloreflglass
cooktops,it is normal for the cookingzonesto
changecolorwhen hot or coo/legdown. Thisis
temporaryandwill disappearas the glasscools
to room temperature.
The sm_hce trait will c) cle on and off to
maintain ",ore" selected control settin ,
It is safe to place hot cookware on the
glass surii_ce men when the cooktop
is cool.
knob clockwise to @, stopping at the
desired setting. This will activate the
medium-size heating area.
To use the smallest smtace trait,
press and ttlI'n the right ti'ont control
knob clockwise to @, stopping at the
desired setting. This will activate the
smallest, inside heating area.
Even after the smti_ce traits are tin'ned
oil the glass cooktop retains enough
heat to continue cooking. To avoid
overcooking, reillove l)_lliS 1['1"()ii1 the
suitilce units when the food is cooked.
Avoid placing anything on the smti_ce
trait tmtil it has cooled complemly.
N Waterstales {mineraldeposits)are removable
using the cleaningcreamor furl-strength white
vinegar
_ Use of window cleanermay leavean
iridescent film on thecooktop. Thecleaning
cream will remove thisdiscoloration.
_: Don'tstoreheavyitemsabovethecooktop.
If theydropontothecooktop,theycancause
damage.
::J_::Donotusethesurfaceas acuttingboarcL
Always place flTepan in the center of
flTesurface unit you are cooking on.
,__:DIIAGGING®_
Do not slide cookwara across the
cooktop because it can scratch the
glass--the glass is scratch-resistant,
not scratch-proof.
Temperature Limiter
Every radiant surfi_ce trait has a
temperatm'e limited:
The temperatm'e limiter protects the
glass cooktop fl'om getting too hot.
The temperatm'e limiter may cycle the
milts off for a time if:
_: Thepan boils dl!z
::J_::Thepan bottom Is not flat.
::J_::Thepan Is off center
_ Thereisno pan on the uni_
Page 8
Selectingtypesofcookwam.
Thefollowing information will help you choose cookware which will give good performance on glass cooktops.
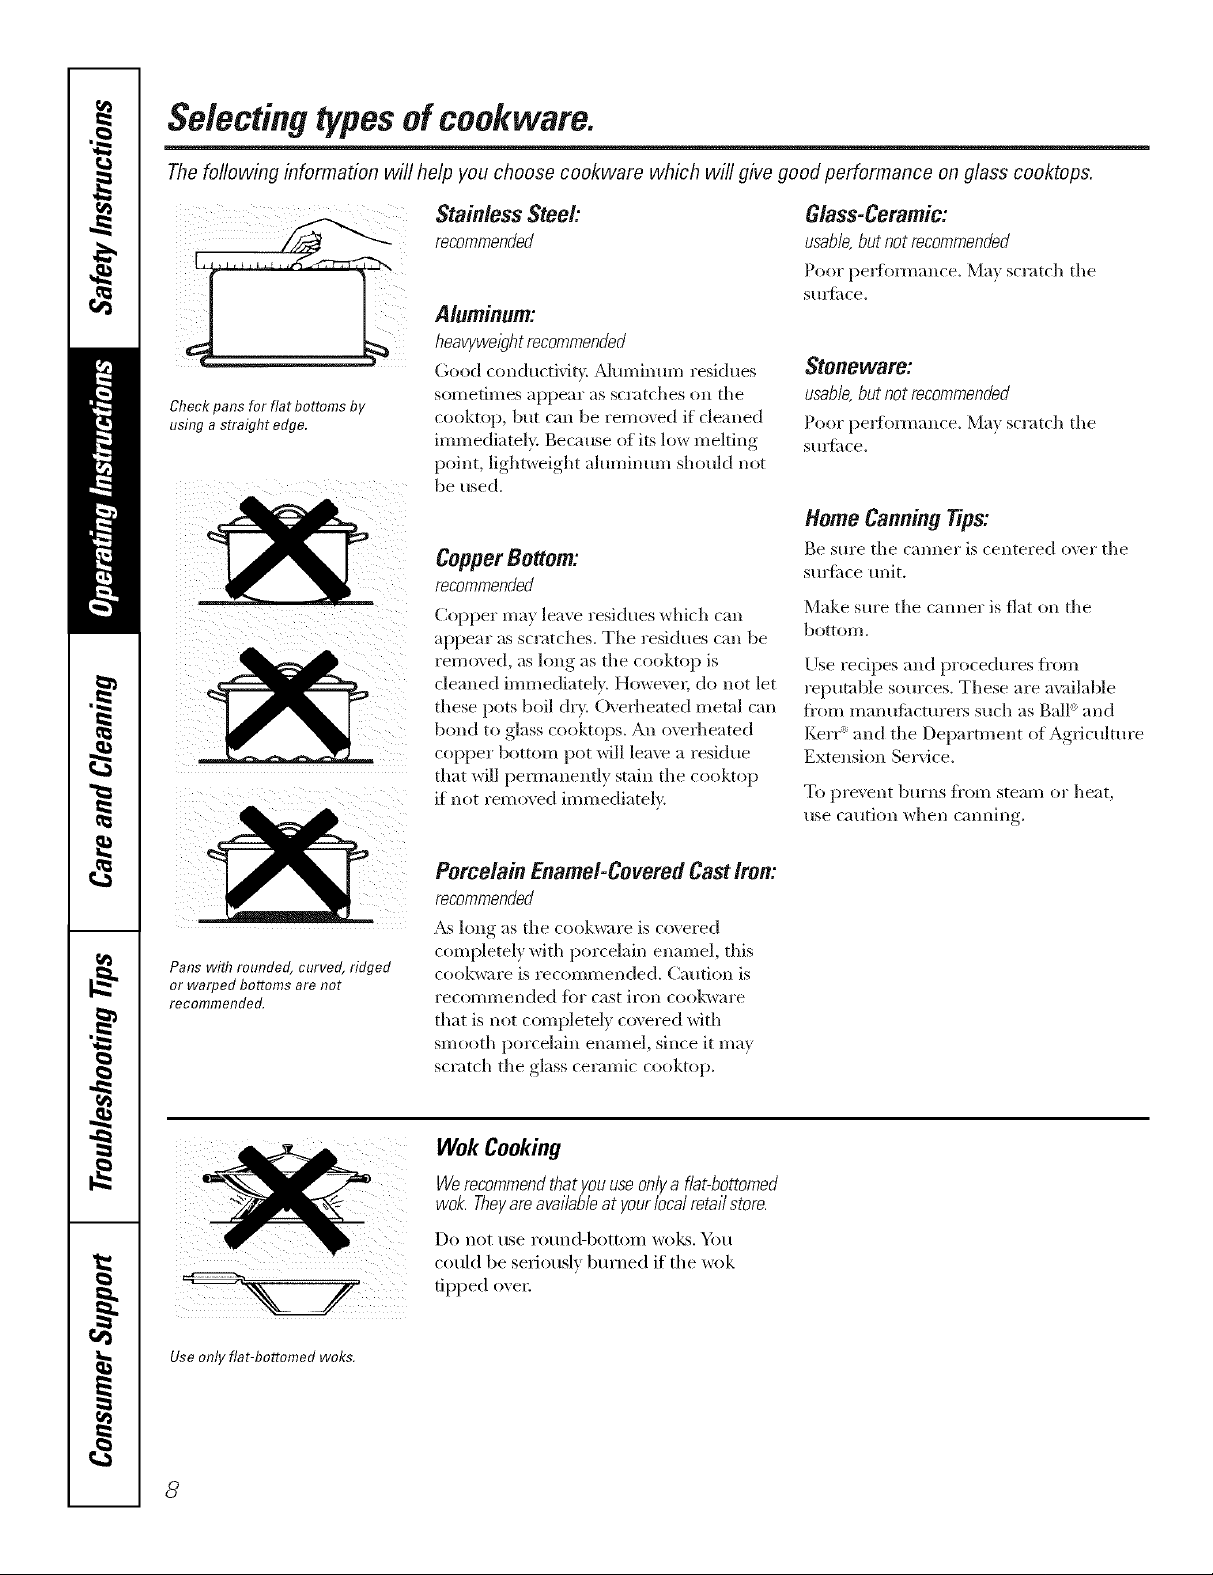
Checkpansforflat bottomsby
usingastraightedge.
Stainless Steel:
recommended
Aluminum:
heavywe/_lhtrecommended
Good (onductivit_. _dmninmn residues
sometinles appear as scratches oil tile
cooktop, but call be removed if cleaned
immediately. Because of its low melting
point, lightweight aluminum shonkl not
be used.
CopperBottom:
recommended
Copper may leave residues whicil can
appear as scratches. Tile residues can be
_emo\ ed, as long as tile cooktop is
cleaned immediately. Howevec do not let
these pots boil dry. Oveflleated metal call
bond to glass cooktops. An overheated
copper bottom pot will leaxv a residue
that will pemmnently stain the cooktop
if not rein eyed immediately.
Glass-Ceramic:
usable,but not recommended
Poor pe_fi)m_imce. May scratch tile
smtime.
Stoneware:
usab/e,but not recommended
Poor pe_fimnance. May scratch tile
sm_ime.
Home CanningTips:
Be sure tile c;mner is centered over tile
smfime unit.
Make sure the canner is flat on the
bottom.
Use redpes and pFocedlll'es flOI/l
reputable sources. These are ax:dlable
fi'om manufimmrers such as Ball' and
Kerr' and tile Department of Agriculture
Extension Se_Mce.
To pre\ ent btlFns il"Olll steal// of heat,
use caution when canning.
Pans with rounded, curved, ridged
or warped bottoms are not
recommended.
Use only fiat-bottomed woks.
Porcelain Enamel-Covered Cast Iron:
recommended
_s long as tile cookwm'e is covered
coml)letely with porcelain enamel, this
cookware is i'ecoillI//ell(le(]. Ca/ltion is
I'ecoll)I/lended tk)/" cast iron cookware
that is not completely covered with
smooth porcelain enamel, since it may
scratch tile glass ceramic cooktop.
Wok Cooking
WerecommeM that youuse oniya flabbo_omM
wok. Theyareavai/aMeat yoa iota/retaii store.
Do not t/se i'ot/nd-bottOlll WO]@;. "_)t/
could be seriously burned if the wok
tipped oveI:
8
Page 9
Observethe Following Points in Canning
ge.com
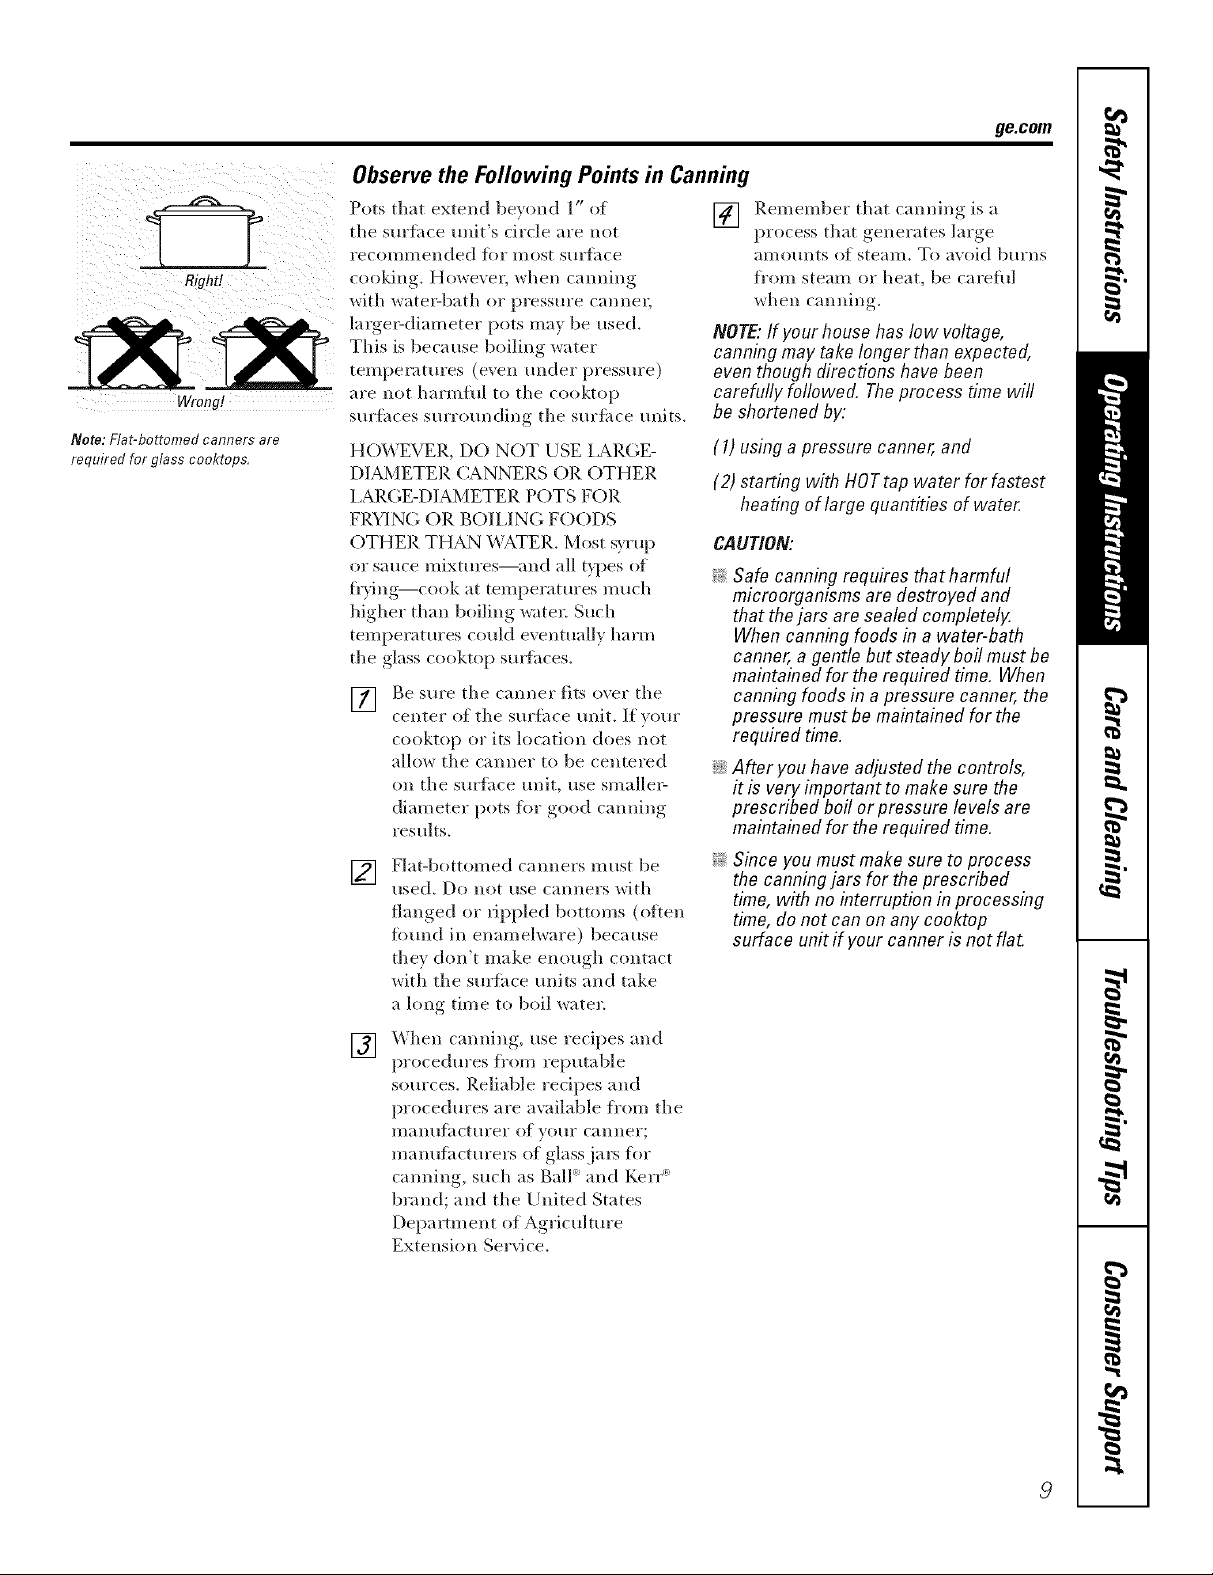
___ Pots that extend beyond 1" of
Righfl cooking. Howevei; when tainting
Wrong! are not harmful to the cooktop
Note:Flat-bottomedcannersare
requiredforglasscooktops, HO_'VEVER, DO NOT USE LARGE-
the s[lr]_lce Hllit+s circle are not
l'ecommended fin" most sHr_;_ce
with ware>bath or pressure cannec
large>diameter pots may be used.
This is because boiling water
temperatures (e'_en under pressure)
surfi_ces sm'r<>m_ding tile snriilce units.
DL_,_ETER CANNERS ()R OTHER
LARGE-DIAMETEP. POTS FOP.
FRYING OR BOILING FOODS
OTHER THAN _;A,TER. Most syrup
or sauce mixtures--and all types +>_
fi'ying--cook at tempelatures much
higher than boiling watei: Such
temperatures could exentually harm
tile glass cooktop sulfiices.
] Be sure tl/e canner fits over tile
center of tlle surfi_ce unit. If your
cooktop or its location does m>t
allow tl/e cromer to be centered
on tlle surfiice unit, use smallel _
diameter pots for good canning
results.
Flat-bottomed carolers must be
[]
used. Do llot rise Callllel's with
flanged or tippled bottoms (oiten
fimnd in enamelware) because
they don't make enough contact
with the surihce milts and take
a l<mg time to boil water.
_hen c'mnim,_, use. recipes and
[]
procedm'es from reputable
sources. Reliable recipes and
procedures are a\;lilable fl'om the
lllantl[;lcttlrel" of your Callllei';
manuthcturers of glass jars for
camping, such as Ball' and Kerr"
brand; and the United States
Department of Agriculture
Extension Se_Mce.
[] Remember that cannino_ is, "_
process that ,generates l'u'+*e,
alllOtllltS el steam. To avoid btlrllS
fl'om steam or heat, be carefid
when canning.
NOTE: If your house has low voltage,
canning may take longer than expected,
even though directions have been
carefufly followed, The process time will
be shortened by'.
(1) using a pressure canner, and
(2) starting with HOTtap water for fastest
heating of large quantities of wate_
CAUTION:
_: Safe canning requires that harmful
microorganisms are destroyed and
that the jars are sealed completely.
Whencanning foods in a water-bath
canner, a gentle but steady boil mustbe
maintained for the required time. When
canning foods in a pressure canner,the
pressure must be maintainedfor the
required time.
::Ji::After you have adjusted the controls,
it is very important to make sure the
prescribed boil or pressure levelsare
maintained for the required time.
_: Since you mustmake sure to process
the canningjars for the prescribed
time, with no interruption in processing
time,do not can on any cooktop
surface unit if your canner isnot flat.
9
Page 10
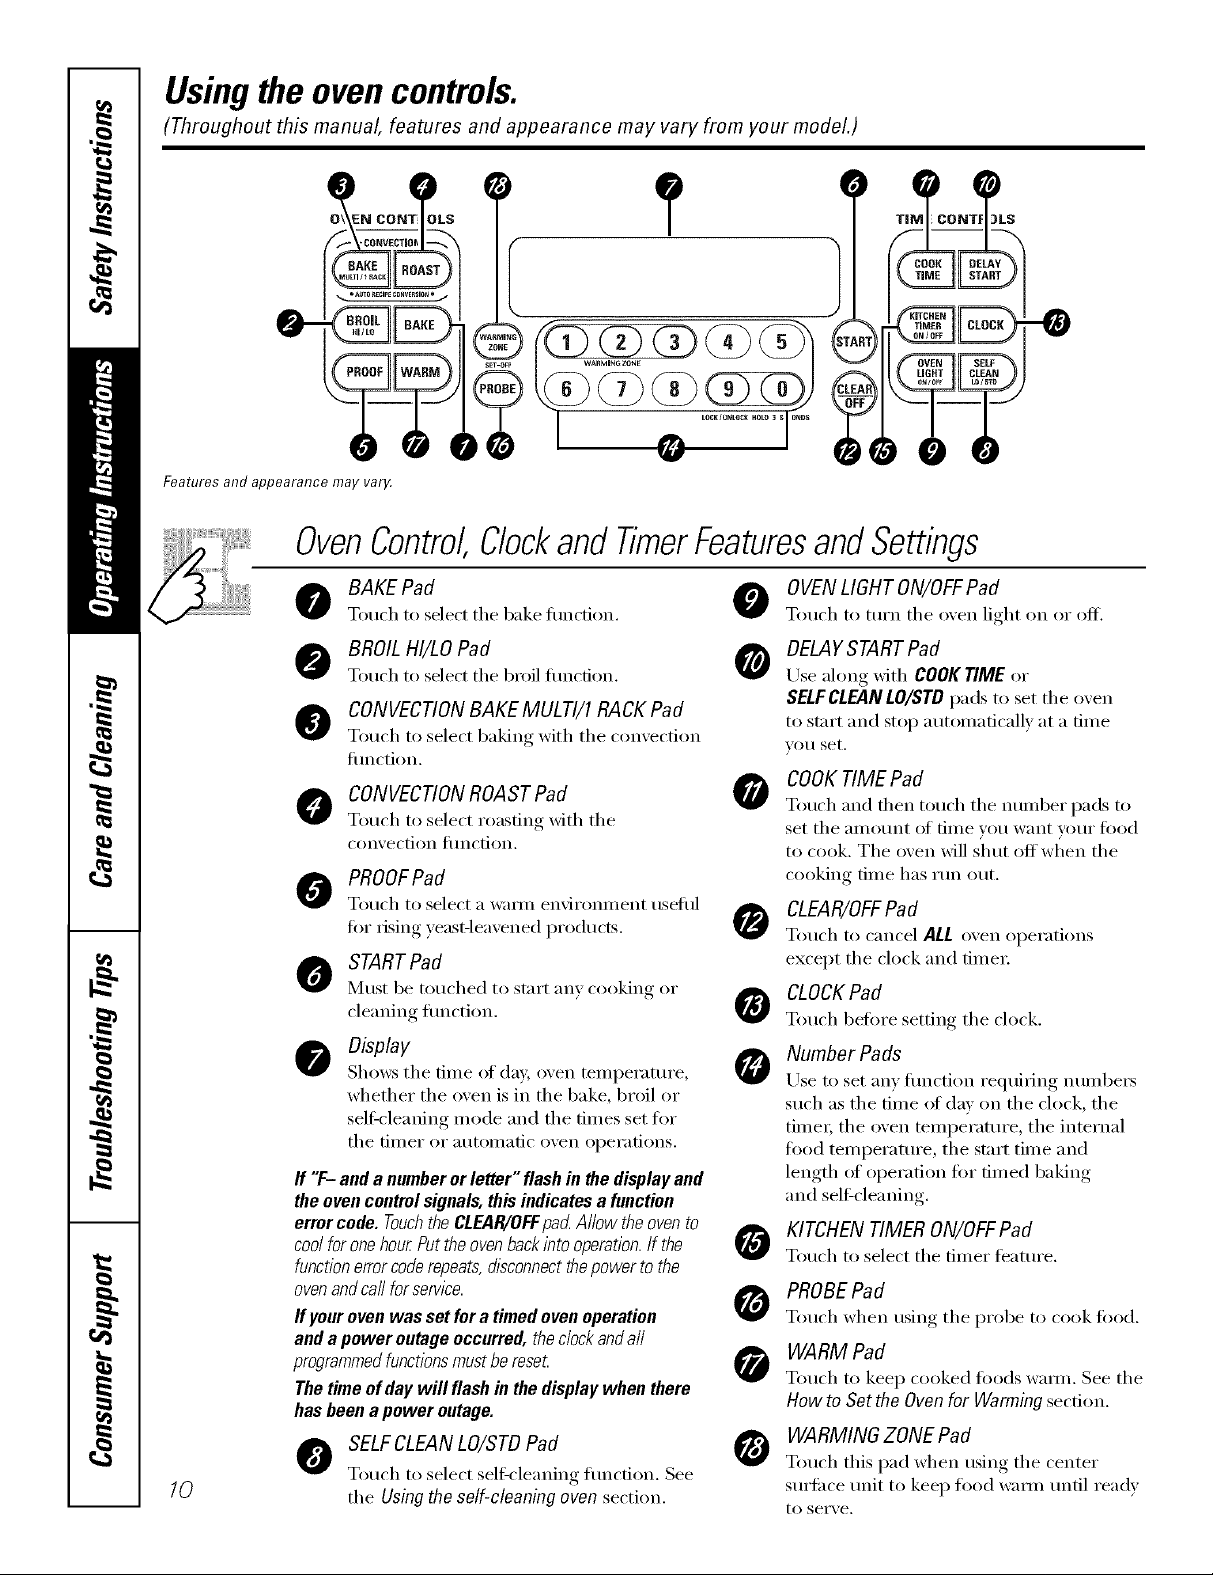
Usingtheovencontrols.
(Throughout this manual, features and appearance may vary from your model.)
0--
Features and appearance may varl4
OvenControl Clockand TimerFeaturesandSettings
10
BAKE Pad
Touch to select tile bake flUlCfion.
BROIL HI/LOPad @
Touch to select tile 1)roll flUlCfion.
CONVECTIONBAKEMULTI/1RACKPad
Touch to select baking with tile con',ection
fiulction.
CONVECTIONROAST Pad
Touch to select roasting with tile
conx ecti(in ttlnctioil.
PROOFPad
Totl(h to select a wann environillent tlseltil
for IiSiIlg yeast-leaxened products.
STARTPad
Must be touched to staIl }lIl} cooking or
cleaning flinction.
D&play
Shows tile time of day, oven tenlperature,
whether tile oven is in tile bake, broil or
self:cleaning nlode and tile times set for
tile [iIller or atltOIllatic ()veil opei'ations.
If "F- and a number or letter" flash in the display and
the oven control signals, this indicates afunction
error code. Touchthe CLEAR/OFFpad Allow the oven to
coolfor onehour Putthe ovenbackinto operation.If the
function errorcoderepeats,disconnect thepower to the
ovenand call for service.
If your oven was set for a timed oven operation
and a power outage occurred, the dock and all
programmedfunctions must bereset
The time of day will flash in the display when there
has been a power outage.
SELFCLEANLO/STD Pad
Touch to select self:cleaning tml('fion. See
tile Usingthe self-cleaning oven section.
OVENLIGHT ON/OFFPad
Touch to turn tile o_en light on or off.
DELAYSTARTPad
Use along with COOK TIME or
SELFCLEANLO/STDpads to set tile oven
to start and stop automatically at a tinie
VO/I set.
COOKTIME Pad
0
Totl('h and then totl('h tile ntli/lber pads to
set tile }lIlIO/Int 01[ [lille veil w}lnt v()/li" l()od
to cook. Tile oven will shtIt off w]'|en tile
cooking tiIne has run out.
CLEAR/OFFPad
Touch to cancel ALL oven operations
except tile clock and tiIneI:
CLOCKPad
0
Touch before setting tile clock.
Number Pads
Use to set anv filn(-tion I'eqtliIJng ntlll/bei's
such as tile tiIne _ff day Oil tile clock, tile
tiIneI; tile oven tenlperature, tile internal
toed ten/perature, tile start tiine and
length (:4 operation for finied baking
and self:cleaning.
KITCHENTIMER ON/OFFPad
Touch to select tile tiiner teatuI'e.
PROBEPad
0
Touch when using tile pI'obe to cook load.
WARM Pad
Touch to kee I) cooked foods wamI. See tile
Howto Setthe Ovenfor Warmingsection.
WARMING ZONE Pad
Tou('h this pad when using tile center
sui'lilce unit to keep load waml until ready
to seiwe.
Page 11
Usingthe oven. gecem
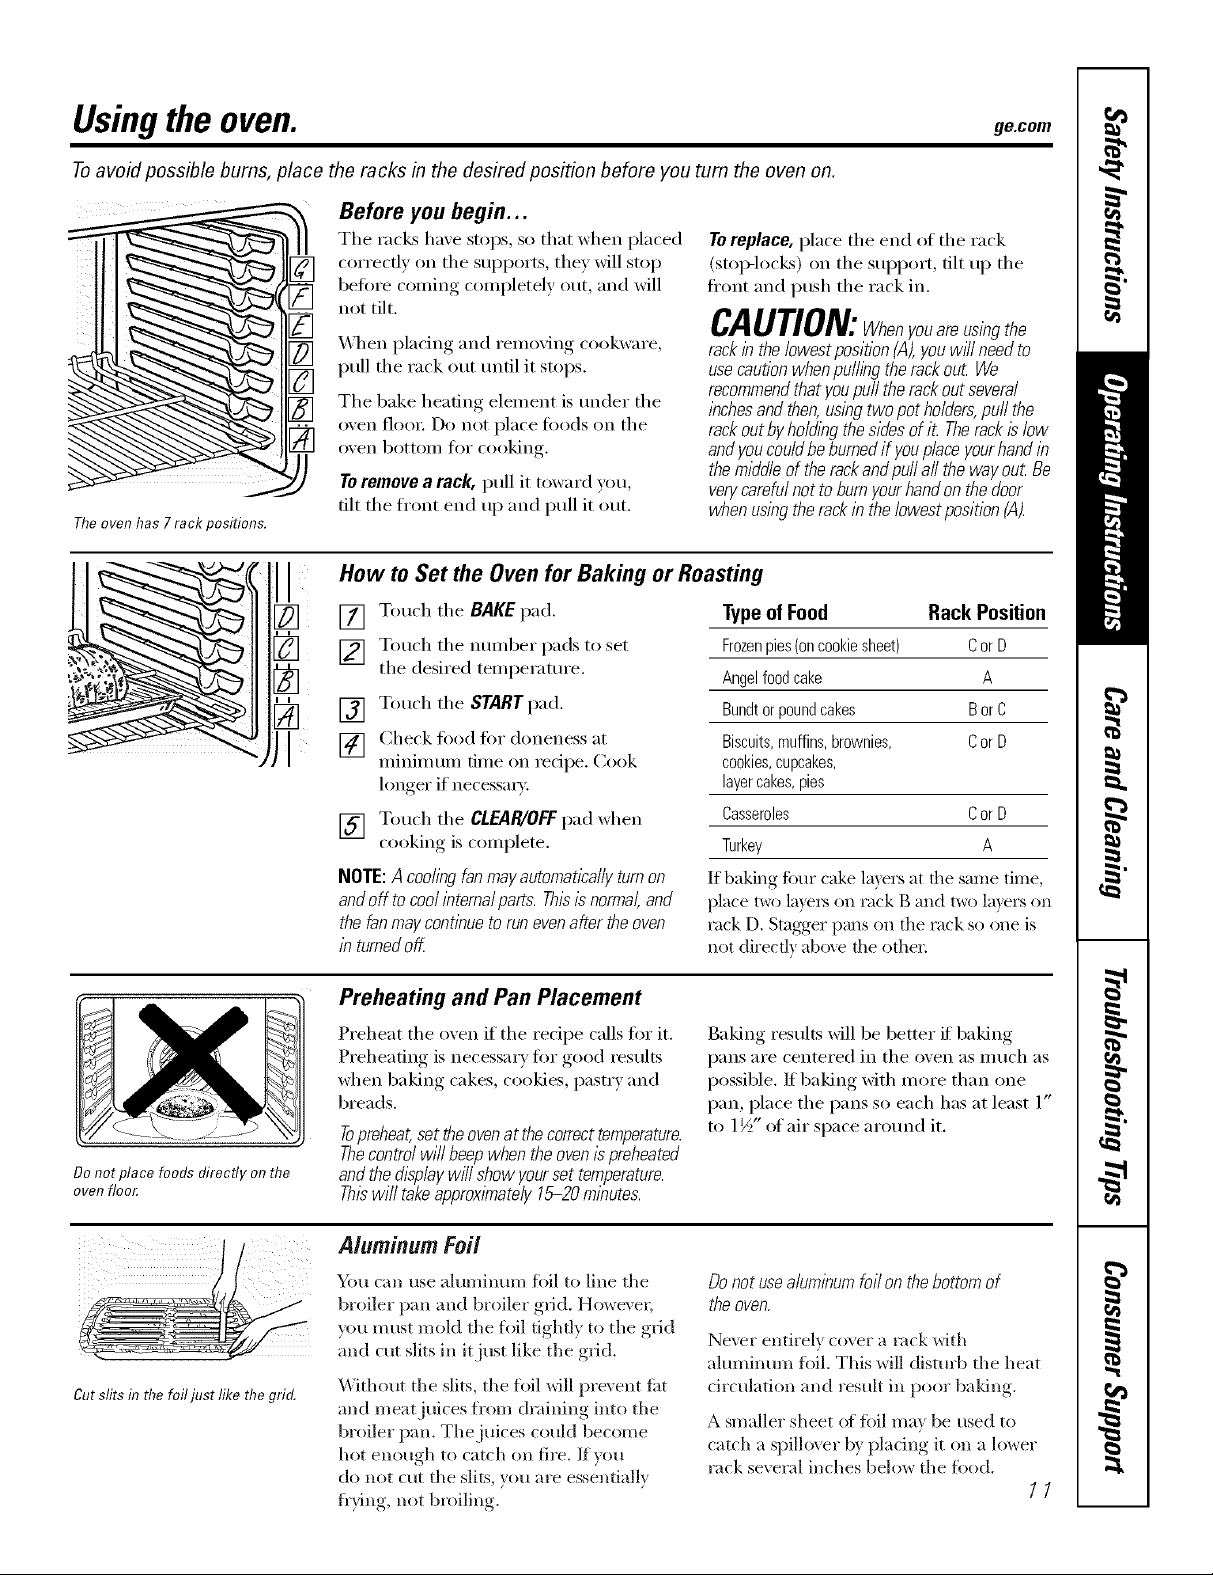
Toavoid possible bums, place the racks in the desired position before you turn the oven on.
Before you begin...
The racks have stops, so that when placed
correcflv on the supports, they will stop
before coming completely out, and will
not tilt.
Toreplace, place tile end of tile rack
(stop-loci<s) on tile support, tilt tlI) tile
fl'ont and push the rack ix).
CAUTION:Whenyouarausingthe
_,_]/ei) placing and removing cookware,
pull tile rack out Imtil it stops.
The bake heating element is uxlder the
oven floox: Do not place toods on tile
oven bottoiix fox" cooking.
Toremove a rack, pull it toward you,
tilt tile ti'ont end up and pull it out.
Theoven has 7rack positions.
How to Set the Oven for Baking or Roasting
rackin the lowest position(,4),youwill needto
usecautionwhen pulling the rackout We
recommendthat youpuff the rackout several
inchesandthen, using two pot holders,puff the
rackout byho/ding the sidesof it Therackis low
andyou couldbe burnedif youplace yourhand in
the middleof therackand pu// a// the way out Be
verycarafu/not to burnyour handon the door
when using therack in the/owestposition CA).
Do not place foods directly on the
oven floo_
Touch tile BAKE pad.
[]
Touch tile nmnber pads to set
[]
the desired temperature.
[] Touch tile START pad.
[] Check filed fi)r aloneness at
minimum time on recipe. Cook
longer if necessary.
[] Touch tile CLEAR/OFFpad when
cooking, is coml)lete.
NOTE:A coolingfanmayautomaticallyturnon
andoff tocoolinternalparts.Thisisnormal,and
thefanmaycontinuetorunevenaftertheoven
in turnedoff
Preheating and Pan Placement
Preheat tile oven if tile recipe calls for it.
Preheating is necessary tot good results
when baking cakes, cookies, pastx T and
breads.
Topreheat,set theovenat the correcttemperature.
Thecontrol will beepwhen the ovenis preheated
andthe &splay will show yourset temperature.
Thiswill take approximately15-20 minutes.
TypeofFood Rack Position
Frozenpies(oncookiesheet) CorD
Angelfoodcake A
Bundtorpoundcakes BorC
Biscuits,muffins,brownies, CorD
cookies,cupcakes,
layercakes,pies
Casseroles CorD
Turkey A
If baking fi)ur cake la)'ers at rite same time,
place two la)'ex_ on rock B and t_) la)'ers on
rock D. Stagger tTmTson the rock so one is
not direct]) abo_e the ethel:
Baking results will be better if baking
pans are centered in tile oven as much as
possible. If baking with more than one
pan, place tile pans six each has at least 1"
to 1½" of air space aro/md it.
Cut slits in the foil just like the grid.
Aluminum Foil
You can use aluminmn toil to line tile
broiler pan and brixiler grid. Howevex;
you must mold tile foil tightly to tile grid
and cut slits in it just like the grid.
Without tile slits, the flfil will prevent flit
and meat juices fl'om draining intI) tile
broiler pan. The juices could become
hot enough to catch on fire. If you
do not cut tile slits, you are essentially
fl'_ing, not broiling.
Donot usealuminumfoil on thebottom of
the oven,
Never entirely cover a rack with
almninum fi)il. This will distuO) tile heat
drculation and result in poor baldng.
A smaller sheet el fifil may be used to
catch a spillover by pladng it on a lower
rack several inches below tile food.
77
Page 12
Usingthe oven.
How to Set the Oven for Broiling
If your rangeis connectedto
208 volts,rare steaksmay be
broiled bypreheating the broiler
andpositiombgthe oven rackone
positionhigher
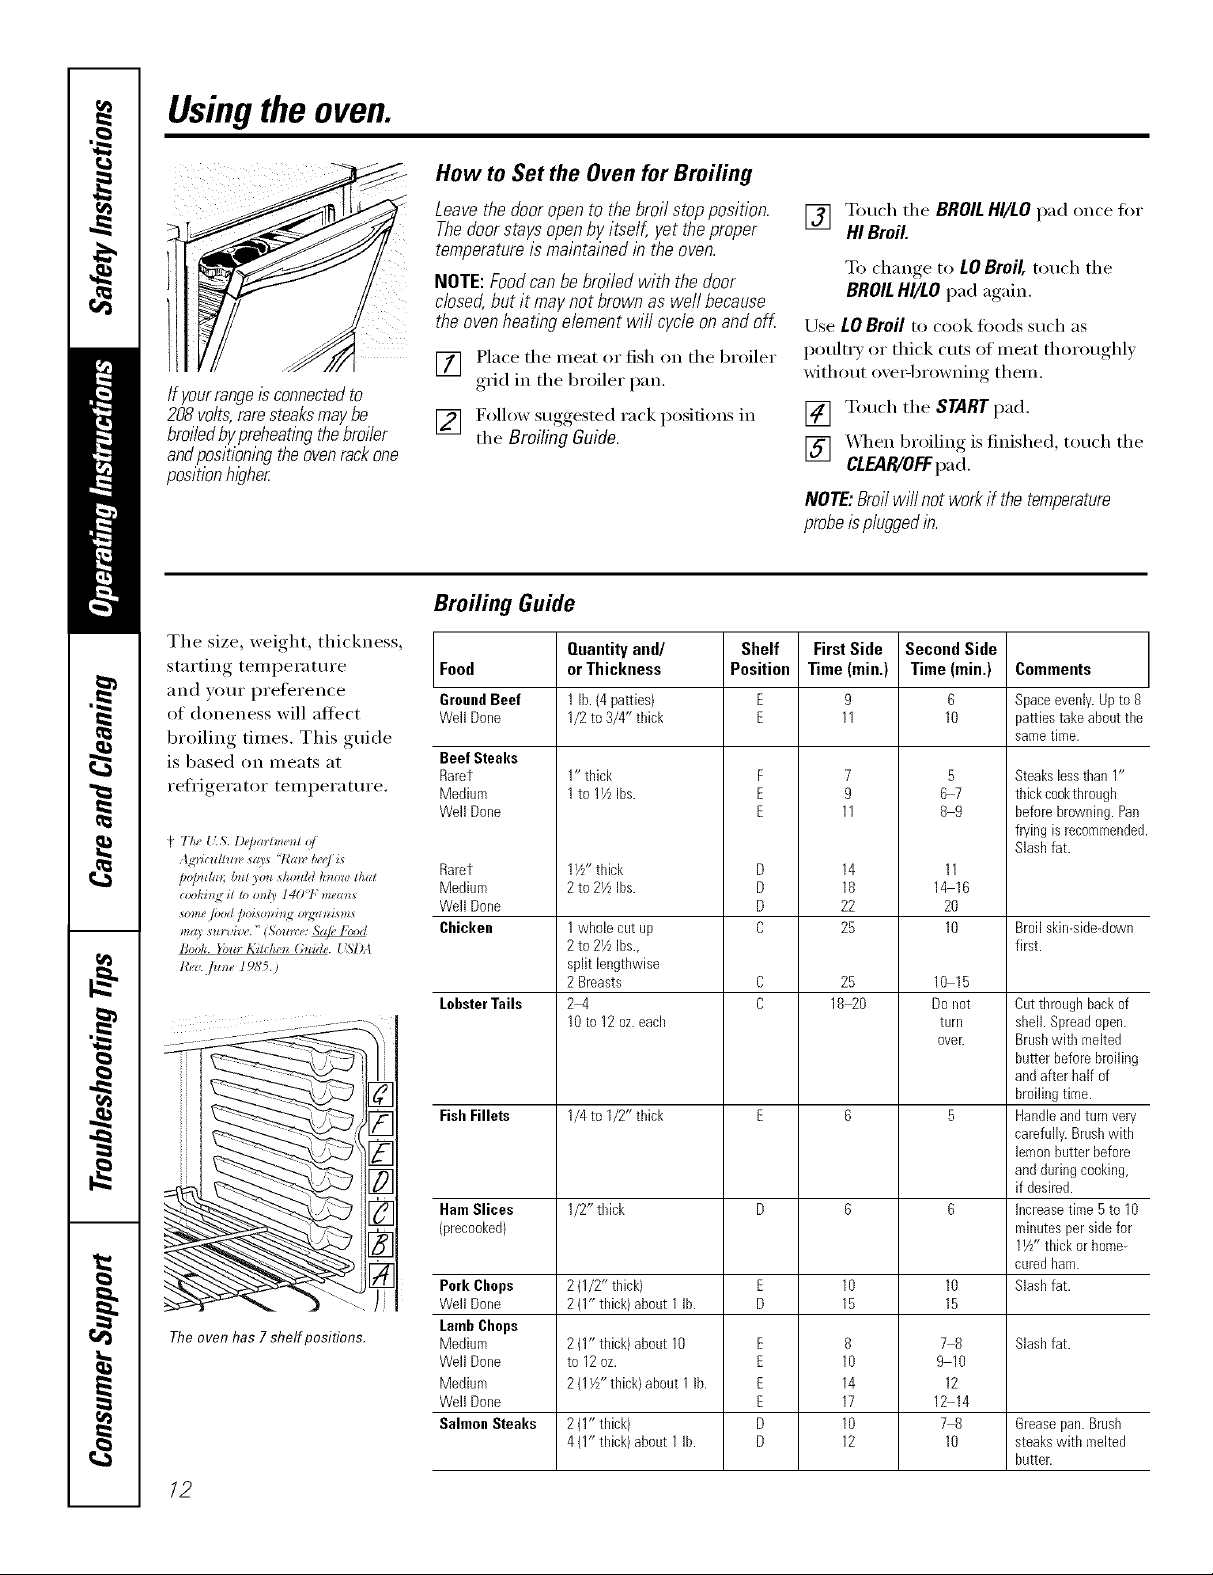
The size, weight, thickness,
starting temperatm'e
and yore" prelbrence
of doneness will atti_ct
broiling times, This guide
is based on meats at
refl'igerator teml)erature.
+ 7;;;;, [L & l)e[J(ntm_;_t of
D@ubz_; but )ou sho_l/d h_ow that
(:_._)hi_Jz4it m rod) 1401; meres
l_e_a.flu_e 19_5'5. )
The oven has 7 shelf positions.
12
Leavethedooropento thebroil stopposition.
Thedoorstaysopenby itself, yet theproper
temperatureis maintainedinthe oven.
NOTE:Foodcanbe broiledwith thedoor
closed,butit maynotbrownas wellbecause
theovenheatingelementwill cycleonandof_
[] Place the meat or fish on the broiler
grid in the broiler pan.
[] Follow suogested rack )osifions in
the Broiling Guido.
Ok I
Broiling Guide
Shelf
Position
Food
GroundBeef
Well Done
Beef Steaks
Rarer
Medium
Well Done
Rarer
Medium
Well Done
Chicken
LobsterTails
FishFillets
HamSlices
(precooked/
Pork Chops
Well Done
LambChops
Medium
Well Done
Medium
Well Done
Salmon Steaks
Quantityand/
orThickness
1 lb. {4patties}
1/2 to 3/4" thick
1" thick
1to 17LIbs.
1W' thick
2to 2VzIbs.
1whole cut up
2to 2VzIbs.,
split lengthwise
2 Breasts
2-4
10to 12 oz.each
1/4 to 1/2" thick
1/2" thick
2(1/2" thick)
2(1" thick) about 1lb.
2{1" thick) about 10
to 12 oz.
2(1VZ'thick)about1 lb.
2(1" thick)
4(1" thick) about 1lb.
[] Touch the BROILHI/LO pad once tor
HI Broil
To change to LO Broil, touch the
BROILHI/LO pad again.
Use LOBroil to cook foods such as
poultry or thick cuts of meat thoroughly
without ove_q)rowning them.
[] Touch the START pad.
[] X_q_en broiling is finished, touch the
CLEAR/OFFpad.
NOTE:Broil will not work if the temperature
probeis plugged in.
F
E
E
D
D
D
C
E
E
E
E
D
D
FirstSide
Time(min,)
11
11
14
18
22
25
25
18 20
10
15
10
14
17
10
12
Second Side
Time (rain.)
9
7
9
8
6
10
5
67
89
11
1_16
20
10
1015
Do not
turll
oveE
78
910
12
1214
78
10
Comments
Space evenly. Up to 8
patties take about the
same time.
Steakslessthan 1"
thickcookthrough
beforebrowning.Pan
fryingis recommended
Slashfat.
Broil skin-side-down
first.
Cutthroughback of
shell. Spreadopen.
Brushwith melted
butter beforebroiling
andafterhalf of
broilingtime.
Handleandturnvery
carefully.Brushwith
lemonbutterbefore
andduringcooking,
if desired.
Increasetime 5 to 10
minutesper sidefor
11/Z' thickor home-
curedham.
Slashfat.
Slashfat.
Grease pan. Brush
steaks witl_ melted
butter.
Page 13
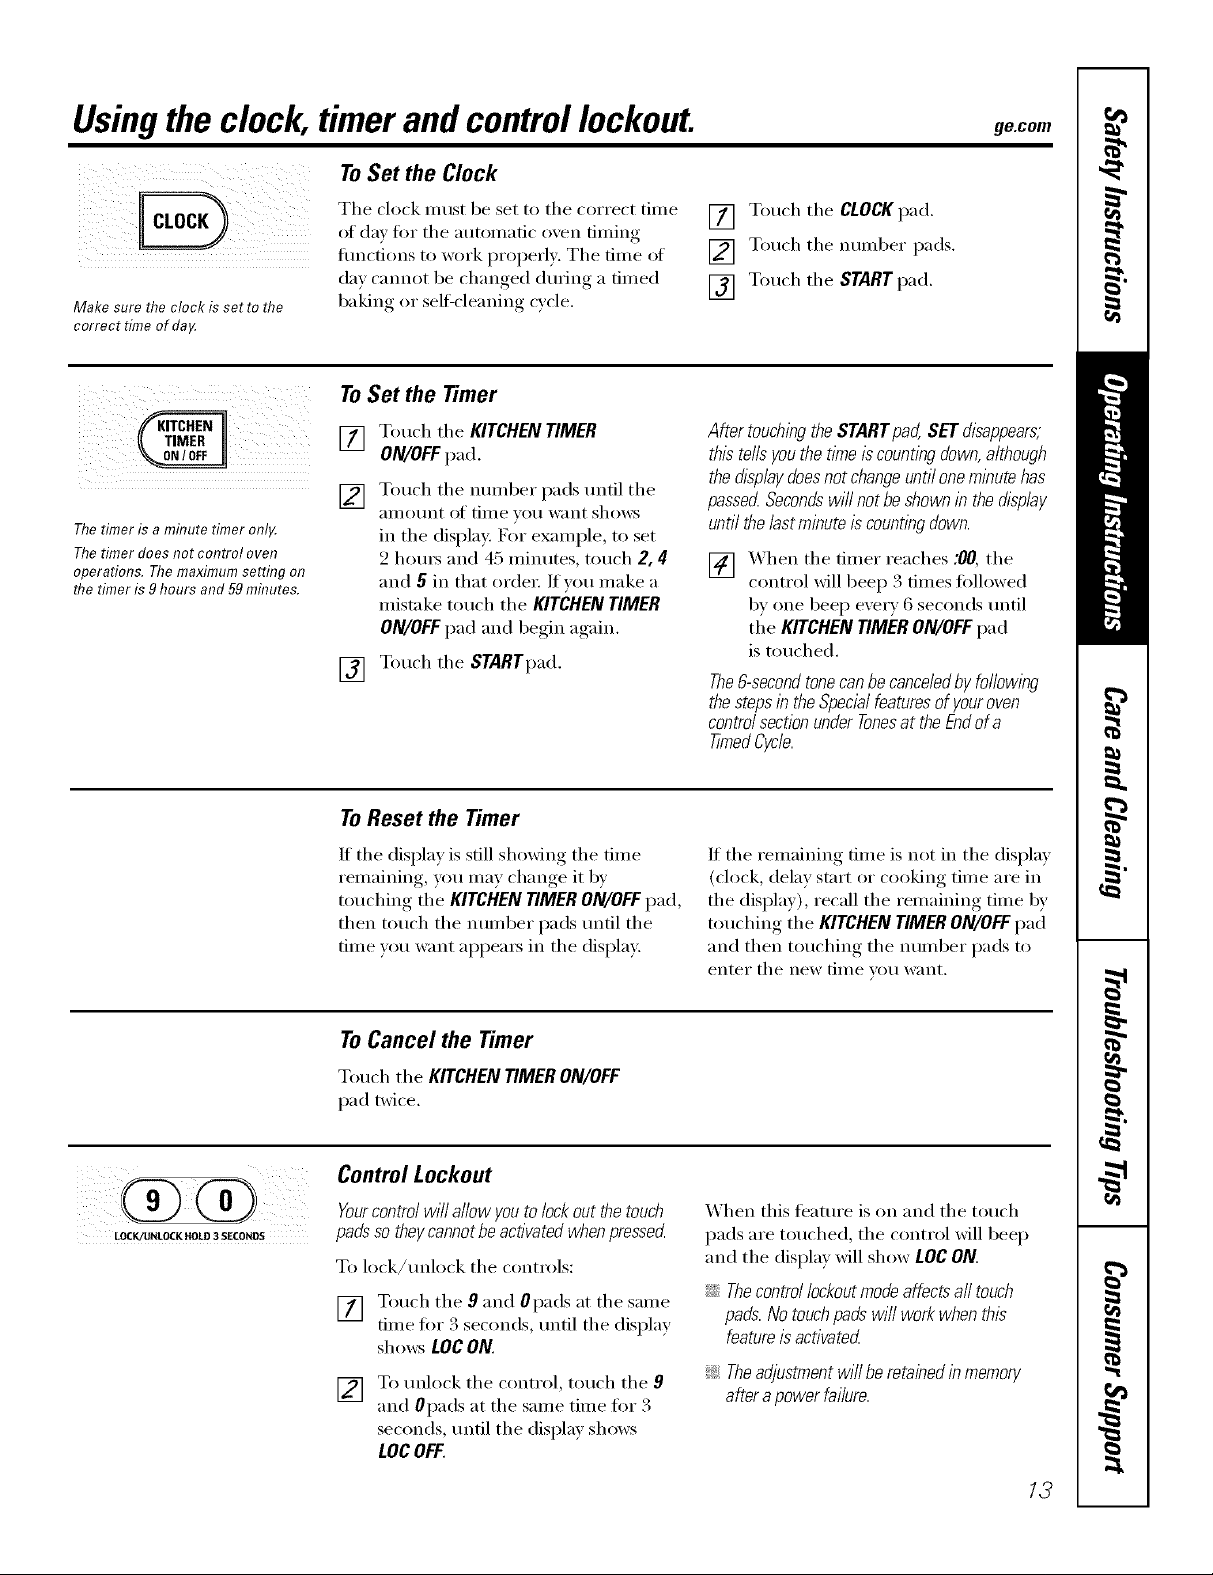
Usingthe clock, timerandcontrol lockout, gecom
ToSet the Clock
Make sure the clock is set to the
correct time of da,¢
Thetimer is a mhTutet#ner onl,¢
Thetimer does not control oven
operations. The maximum setting on
the timer is 9 hours and 59mhTutes.
The clock must be set to tile correct time
of day fin" tile autonmfic oven tinting
flmctions to work properly. Tile time of
da)' cannot be changed during a timed
baking or sel6cleaning cycle,
To Set the Timer
Touch tile KITCHEN TIMER
[]
ON/OFF pad.
Touch tile immber pads until tile
[]
ai//otlnt of time }ou want shows
in tile display: For example, to set
2 hom_ and 45 minutes, touch 2, 4
and 5 in that order: If you make a
mistake touch tile KITCHEN TIMER
ON/OFF pad and begin again.
Touch tile STARTpad.
[]
[] Touch tile CLOCK pad.
[] Touch tile number pads.
[] Touch tile START pad.
After touching the START pad, SET disappears,
this tells you the time is counting down,although
the displaydoesnot changeuntil one minute has
passed Secondswill not be shown in the display
until the lastminute iscounting down.
[] _._hen tile timer reaches :00, tile
control will beep 3 times fbllowed
by one beep eveI T 6 seconds tmtil
tile KITCHEN TIMER ON/OFF pad
is touched.
The&second tone canbe cance/edby following
the stepsin the Special featuresof your oven
controlsectionunder Tonesat the Endofa
TimedCycle.
LOCK/UNLOCK HOLD 3 SECONDS
To Reset the Timer
If tile display is still shoMng tile time
remaining, you may change it bv
touching tile KITCHEN TIMER ON/OFF pad,
then touch tile number pads tmtil tile
time w)u want appea_ in tile displa>
ToCancel the Timer
Toud/tile KITCHEN TIMER ON/OFF
pad twice.
Control Lockout
Yourcontrol will allow you tolock out the touch
padsso theycannot beactivated when pressed
To hxk/tmhxk tile controls:
[] Touch tile 9 and 0pads at tile same
time fin" 3 seconds, tmtil tile display
shows LOC ON.
[] To unlock tile control, touch tile 9
and 0pads at tile same time fin" 3
seconds, until tile display shows
LOCOFF.
If tile remaining time is not in tile display
(clock, delay start or cooking time are in
tile display), recall tile remaining time by
touching tile KITCHEN TIMER ON/OFF pad
and then touching tile ntli//ber pads to
entei" tile new [lille VOli _V;lIlt,
When this teature is on and tile touch
pads are touched, tile control will beep
and tile display will show LOC ON.
::J_::Thecontrol lockoutmode affectsall touch
pads.No touch pads will work when this
featureis activated
!i> Theadjustmentwill be retained in memory
after a power failure.
13
Page 14

Usingthe timedbakingand masting features.(onsome models)
NOTE."Foods that spoil easily--such as milk, eggs, fish, stuffings, poultry and pork--should not be allowed to sit for
more than 1hour before or after cooking. Room temperature promotes the growth of harmful bacteria. Be sure that
the oven light is off because heat from the bulb will speed harmful bacteria growth.
How to Set an Immediate Start and Automatic Stop
Theoven will turn on immediatelyandcook for a
selectedlength of dyne.At the endof the cooking
tlYnethe oven will turn off automatlca//y
[] Touch the BAKEpad.
[] Using the number pads, enter the
desired teinperature.
[] Touch the COOKTIMEpad.
NOTE:If yourreciperequkespreheatingyou
mayneedto addadditionaltimetothelengthof
thecookingrime.
[] Using the numl)er pads, enter
the desired baking time. The oven
temperatm'e and the cooking time
that you entered will be displa) ed.
[] Touch the STARTpad.
The display Mll show the changing
temperature (starting at 100°F) and the
cooking time. The display starts changing
once the temperatm'e reaches 100°E
The oven will continue to cook for the
programmed amount of time, then shut
offautomafically, tmless the _M_4
teature was set. See the How to Set the Oven
for Warming section.
Touch the CLEAR/OFFpad to clear the
display.
How to Set a Delayed Start and Automatic Stop
Youcanset the oven control to delay-start the
oven,cookfor a specifc length of time and then
turnoff automafical/g
Make sure the clock shows the correct
time of day:
[] Touch the BAKEpad.
[] Using the numl_er pads, enter the
desired temperature.
[] Touch the COOK TIMEpad.
NOTE:If yourreciperequkespreheatingyou
mayneedto addadditionaltimetothelengthof
thecookingrime.
[] Using the numl)er pads, enter the
desired baking time.
[] Touch the DELAYSTARTpad.
[] Using tile numl)er pads, enter the
time of da)}ou want the oxen to
ttlI'n on and st;lI't cooking.
[] Touch the STARTpad.
If vou would like to check tile times you
have set, touch the DELAYSTARTpad to
check the start time you have set or touch
the COOK TIME pad to check the length
of cooking time you have set.
X_hen the oven turns on at the time of
da) you haxe set, the displa)will show the
changing, , temperatm'e (startino,_ at 100°F)
and the cooking itme. The displa)starts
changing once the temperature reaches
lO0°E
The {wen will continue to cook fi)r the
programmed amount of time, then shut
off automatically, tmless the X._;M/M
teamre was set. See the How to Set the Over
for Warming section.
Touch the CLEAR/OFFpad to clear the
display:
NOTE:An attention tone wi// soundif youare
using tlYnedbakingand do not touchthe START
padafter entering the baking temperature.
/4
Page 15

Usingtheprobe, ge.com
For many foods, especially roasts and poultry, internal food temperature is the best test for doneness. The
temperature probe takes the guesswork out of roasting by cooking foods to the exact aloneness you want.
Thetemperature probe has a
skewer-like probe at one end and a
plug at the other end that goes flTto
the outlet t7 the oven.
Use of probes other than tile one
proxided xdth this product ma) result in
dallla(re_ to tile probe or oxell COlltrok
Use tile handles of tile probe and plug
when inserting and remoxim, them fl'om
tile tood and outlet.
_Ji::Toavoiddamagingyourprobe,donotuse
tongstopuffonthecamewhenremovingit
_;:_Toavoidbreakingtheprobe,makesurefood
iscompletelydefrostedbeforeinserting.
!_ Topreventpossibleburns,donotunplugthe
probefromtheoutletuntfftheovenhas
coolerL
_Mter I)reparing tile meat and placing it
on a trivet or on the broiler pan grid,
tollow these directions for proper probe
placement.
Insert the probe completely into the
meat. It should not touch bone, fat or
gristle.
_'_"- Cable
iJi::Neverleave yourprobe/bsidethe ovenduring
a se/f-c/eanlbgcycle.
ij_:_Donot store the probein the oven.
For roasts with no bone, insert tile probe
into tile meatiest part of tile roast. For
bone-in ham or land), insert tile probe
into the center of tile l_)west large muscle.
Inse_t the probe into the center of dishes
S/Ich as II/eat loat or casseroles.
Insert tile probe into tile meatiest part of
the }ruler thigh fl'om below and parallel
to the leg of a whole tin'key.
How to Set the Oven For Roasting When Using the Probe
]nsell tile probe into tile fbod.
[]
Plug tile })robe into tile oudet in tile
[]
oven. Make sure it's pushed all tile
way in. Close tile o', en dool: Make
sure tile probe cable is not touching
tile broil element.
[] Touch tile PROBE pad.
Touch tile number pads to set tile
[]
desired internal fbod or meat
temperature. Tile maximum
internal temperature fi_r tile food
that }ou can set is 200°E
[] Touch tile BAKEpad.
] Touch tile re=tuber pads to set tile
desired oven temperature.
[] Touch tile START pad.
Thed/splaywill flashif theprobe/s/bserted
_Mter tile internal temperature of
tile 16od reaches 100°E tile changing
internal temperature will be shown in
tile displa>
"_ hen tile internal temperatm'e of
[]
tile food reaches tile nHlllber _otl
have set, tile probe and tile twen
turn off and tile oven control
signals. To stop tile signal, touch tile
CLEAR/OFFpad. Use hot pads to
remox e tile pxobe fl'om tile ibod.
Do not use tongs to pull on it--they
might damage it.
To change tile oven temperature during
tile Roast cwle, touch tile BAKE pad and
then tile number pads to set tile new
temperature.
ij_::If theprobe is removedfrom the food before
the f/hal temperatureisreached,a tone will
soundand the displaywill flash until theprobe
isremoved from the oven.
/btotheoutletandyouhavenotsetaprobe
temperatureandtouchedtheSTARTpad
iJi::Youcan use the timer even though you
cannot use timed oven operations while
using the probe.
15
Page 16

Usingthe convectionoven.
Multi-rack position.
Convection Fan
In a convection oven,a fan circulates hot air
over, under and around the food
This circulating hot ak is evenly distnT)uted
throughout the oven cavitg As a result, foods
are evenly cooked andbrowned--often in less
time with convection heat.
1-Rack Convection Baking
The convection tim circulates the heated
air evenly over and around the food
using the bake and broil elements.
Whenconvectionbakingwith only I rack,
use CONVECTIONBAKE 1RACKand for best
resultsplace the rackonshelf C or Dat the
center of the oven.CooktlYnesmay decrease,so
foodshould be checkedearlierthan package
directions tomake sure thatit doesnot overcook.
Multi-Rack Convection Baking
Because heated air is circulated evenly
throughout the oven, foods can be
baked with excellent results using
multiple racks.
The amount of tiine required for
multi-rock baking may increase slightly
for some tOocLs, but overall time is saved
be(;_use two to three tim es as m tmh fi)od
is cooked at once. Cookies, inttflins,
biscuits, and other quick breads give
good results with multi-rock baking.
NOYE:The convection tim will c_cle on
and off while cooking to best distribute
hot air in the o_,en.
The convection oven tim shuts off when
the oven door is opened. DONOTleave
the door open fi)r long periods of time
while using convection cooking or you
may shorten the life of the convection
heating element.
Ideal for cooking large casseroles and
lasagna with good results.
To cook toed on i/loi'e than one rack in
comection bake, use CONVECTION BAKE
/lit/L//.
_4]/ell baking on 3 racks, place one
rock in the second (B) position, one
in the fimrth (D) position and one in
the sixth (F) position.
/6
Adapting Recipes...
Y(m can use _our fi_orite recipes in the
con_, ection o_, ell.
_'\]len convection baking, the Auto
Recipe '_ Conversion feature automatically
reduces the set reg-ular baking
temi)eratm'e by the recommended 25°E
See Auto Recipg _Conversion in the Special
Features section,
_: Usepan size recommendecL
::Ji::Somepackageinstructionsfor frozen
casserolesormain disheshavebeen
developedusing commercialconvection ovens.
Forbest results in this oven,preheat the oven
andusethe temperatureon thepackage.
Page 17

ge.com
Roastingrack
Post
Grid
Broilerpan
When baking cookies, you will
get the best results if you use a
flat cookie sheet instead of a
pan with low side&
Convection Roast
i_:!Goodfor large tendercuts of meat, uncovered
Tile convection tim circulates tim heated
air evenly over and around tile fi)o(l.
Meat an(l poult_ y are browned on all
sides as if tile)' were cooked on a
rotisserie. Using tile roasting rack
provided, heated air will be circulated
ovei; under and around the fi)od being
roasted, The heated air seals in juices
quic!dy fin" a moist and tender product
while, at the same time, creating a rich
golden brown exterim;
Cookware for Convection Cooking
Before using your convection oven,
check to see if yore" cookware leaves
room for air drculation in tile oven.
If you are baking with several pans, leave
sp_ce between them. ?dso, be sure the
pans do not touch each other or the
walls of the oven.
Paper and Plastic
Heat-resistant paper and plastic
containe_ that are recommended fi)r
rise in regular ovens can be used in
convection ovens. Plastic cookware that
is heat-resistant to temperatures ot
400°F can also be used.
_l_en you are convection roasting it is
impmtant that you use tile broiler pan
and grid and th'e special roasting rack fin.
best convection roasting results. The pan
is used to catch grease spills and the grid
is used to prevent grease spatters, while
the rack allows the heated air to circulate
trader tile meat and increase browning
on tile tm(le_ide of tile meat or l)oultr}:
iJGPlace the rack in the lowest rack
posidon (A).
_: Place the grid on the broiler pan
and put the roasting rack over them,
illaking stlre tile posts on tile roasting
rack fit into the boles in broiler pan.
_: Place the meat on the roasting rack.
Metal and Glass
Any D'l)e ot cookware will work in w,ur
convection oven. Howevex; metal pans
heat the filstest and are recommended
fi)I" convection baking.
iJGDarkenedor matte-fblshed pans will bake
faster thanshinypans.
_: Glassor ceramicpanscookmore slowly
For recipes like ovenq)aked clficken,
use a pan with low sides. Hot air cannot
drculate well arotmd fi)od in a pan with
lfigh sides.
(D(D(5)(Z)C
f/_l}
How to Set the Oven for Convection Baking or Roasting
[] Touch tile CONVECTION BAKE
MULTI/1 RACK pad once
(CONVECTION BAKEMULTI Inode)
fin" multi-rack convection baking.
Tiffs mode is used fi)r cooking fl)od
items on more than one rack (i.e., 9
3 or more racks) at tim salne dine in
convection bake. See Multi-Rack
Baking section for more
infimnation.
To uch the CONVECTIONBAKEMULTI/
I RACK pad t_@e (CONVECTIONBAKE
I RACKmode) ti,r one-rack
To change tile oven temperatm'e, touch
tile CONVECTION BAKEMULTI/1 RACKor
CONVECTION ROASTpad and then tile
number pads to set tile new temperature.
_]_en tile oven starts to beat, tile
changing temperatm'e, starting at l O0°K
will be displayed. When oven reaches tile
temperature you set, 3 beeps will sound.
[] Touch CLEAR/OFFpad when
finished.
iJGYouwillheara fanwhilecooklbgwith
convection.Thefan willstopwhenthedooris
opened,but theheatwillnotturnoK
fi)r cooking fi)od items on on])one
rack in convection bake.
Touch tile CONVECTIONROAST pad
fi)r convection roasting.
[] Touch tile number pads to set tile
desired oxen temperature.
[] Touch tim STARTpad.
iJGYoumayheartheovencllcklbgduring
baking.Thisisnormal
17
Page 18

Usingthe timedfeaturesfor convectioncooking.
Youwill hear a fan while cooking with these features. The fan will stop when the door is opened, butthe heat
will not turn off.
NOTE:Foods that spoil easily--such as milk, eggs, fish, stuffings, poultry and pork--should not be aflowed to
s# for more than 1hour before or after cooking. Room temperature promotes the growth of harmful bacteria.
Be sure that the oven light is off because heat from the bulb will speed harmful bacteria growth.
How to Set an Immediate Start and Automatic Stop
Theovenwill turnonimmediate/)/andcookfor a
selectedlengthof time.At theendof thecooking
time,theovenwill turnoffautomatically
Make stlre tile clock sho_,_:stile correct time
of day.
[] Touch the CONVECTIONBAKE
MUL77/1RACK pad once
(CONVECTION BAKEMULTI mode)
fi)r nmlti-rack convection baking.
This lnode is tlsed fi)r cooking fl)od
items on more than one rack (i.e., 2,
3 or more racks) at the same time ill
convection bake. See Multi-Rack
Baking section fi)r more infi)mmtion.
Touch the CONVECTIONBAKEMULTI/
I RACKpad mice (CONVECTIONBAKE
I RACKmode) fi)r one-rack
convection baking. This mode is used
fi)r cooking fi)od items on only one
lack ill convection bake.
Tt,uch the CONVECTIONROAST pa d
l()I" convection i'oas[ing.
[] Touch the number pads to set the
desired oxen temperatm'e,
[] Touch tile COOKTIME pad,
NOTE:ffgourreciperequirespreheating,youmay
needtoaddaflfltiona/timeto thelengthof the
cookingtime.
[] Touch the number pads to set tile
desired length of cooking time, The
nfinimmn cooking dine you call set
is 1 minute, Tile oven tempeIatm'e
that you set and the cooking time that
you enmred will be ill the displa)
[] Touch the STARTpad,
The displa) will show the changing
mmperatm'e (starting at 100°F) and the
cooking time, The displa) starts changing
once the mmperature reaches 100°E
Tile oxvn will continue to cook for tile
progTaimned amount of time, then shut
off autonmticalb; unless the _'\_RM teature
_;_s set. See the How to Set the Oven for
Warming section.
[] Touch the CLEAR/OFFI)adto clear
the displa) if necessai T, Remme
the ti)od fl'onl tile o_en, Remenlbei;
even though the oven ttlI'ns Off
automaficall}, loud left ill tile oven
will continue cooking alier the oxen
turns olE
/8
Page 19

ge.com
CONVEC_ON
OD(D(5)(D(D
(DOD(FXSZD
OD(DG)(DG)
G)(DG)
C (D(D(Z)(D
(DOD(D
How to Set a Delayed Start and Automatic Stop
Youcanset theovencontrolto delay-starttheoven,
cookforaspecificlengthof timeand then turnoff
automatically
Make sure die clock sho_s the correct time
of de)'.
[] Touch the CONVECTIONBAKE
MULTI/1 RACK pad once
(CONVECTION BAKEMULTI mode)
for multi-rack convection baking.
Tiffs mode is used for cooking food
items on more than one rack (i.e., 2,
3 or more racks) at the same time ill
convection bake. See Multi-Rack
Baking section for m ore infimnafion.
Touch the CONVECtiON BAKEMULTI/
I RACKpad t_dce (CONVECTIONBAKE
I RACKmode) fbr one-rack
convectk)n baking. This mode is used
for cooking filed items on on b one
rack ill convection bake,
Touch tim CONVECtiON ROAST pad fi)r
convection roasting.
[] Touch tile number pads to set the
desired oven temperature.
[] Touch the COOKTIMEpad.
NOTE"If yourreciperequirespreheating,youmay
needtoadd additionaltime tothe lengthof the
cookingtime.
[] Touch tile nmnber pads to set the
desired cooking time,
[] Touch the DELAYSTARTpad,
[] T()uch the number pads to set the
time of da)}ou want tile oxen to ttlrn
on and start cooking,
ff youwouldliketo&eck thetimesyouhaveset,
touchtheDEIAYSTARTpadtocheckthestarttime
youhaveset,ortouchtheCOOKTIMEpadto
checkthelengthofcookingtimeyouhaveset.
[] Touch tile STARTpad,
NOTE"An attentiontonewill soundff youare
usingtimedbakingorroastinganddonot touch
the STARTpadafter enteringthebakingor
roastingtemperature.
_'\llen file oven turns on at file tiIlle
of de)you hme set, the displa)will
show tile changing tenaI/eIature
(smrdng at 100°F) and the cooking time.
Tile displa) starts changing once the
tempeIature reaches 100°E
Tile ()veil will continue to cook for the
proglalnmed alnount of time, then shut
off automaficall}, unless the X'\_RM teatuI'e
was set. See the How to Set the Ovenfor
Warmingsection.
[] Touch the CLEAR/OFFpad to clear
the displa} if necessai T. Relno'_e
the food fi'om the oven. Remembei;
even thotlgh the o_,en shuts off
automaticalb, tiled leti ii1the oven
will continue cooking after tile oxen
turns ott_
79
Page 20

Usingthe convectionoven.
How to Set the Oven for Convection Roasting when Using the Probe
For best results when roasting large
turkeys androasts, we recommend
usflTgthe probe flTcluded f17the
COITVectioI7 oveR,
@
@
@
The display Mll flash PROBE and the
oven control Mll signal if the probe is
inserted into the outlet, and you have not
set a probe temperature and pressed the
STARTpad.
[] Place the rack in the lowest position
(A). Insert the probe into the meat.
[] Plug the probe into the outlet in the
oxen. Make sure it is pushed all the
way in. Close the oxen (loo_:
[] Toud/the CONVECTION ROAST pad.
[] Touch the number pads to set the
desired oven telnpel';itt/l'e.
[] Touch the PROBE pad.
[] Touch the number pads to set the
desired internal meat temperature.
[] Touch the STARTpad.
\A'hen the oven st;u'ts to heat, the word
LO will be ill the display,
?dter the internal temperature of the meat
reaches lO0°K the changing internal
temperature will be shown in the display.
[] _q_en the internal temperatm'e of
the meat reaches the number you
have set, the probe and the oven
tuI'n Off and the oven control
signals. To stop the signal, touch the
CLEAR/OFFpad. Use hot pads to
remove the probe fl'om the fl)od.
Do not use tongs to pull on it--they
might damage it.
CAUTION:ropreventpossiblebume,
donotunplugtheprobefromtheovenoutletuntil
theovenhascooledDonotstoretheprobein
the oven.
NOTE:
iJi::If theprobeisremovedfromthefoodbefora
thefinal temperatureisreached,atonewill
soundandthedisplaywill flashuntil theprobe
isremovedfromtheoven.
!i_:Youwill heara fan while cookingwith this
feature. Thefan will stof_when thedoor is
opened,but theheat w/// not turn oft
iJi::Youcan use the t/Ynereventhoughyoucannot
usetimed ovenoperations.
Tochange the oven temperature
during the Convection Roast cycle,
touch the CONVECTIONROASTpad
and then touch thenumber pads to
set the new desired temperature.
Convection Roasting Guide
Meats Minutes/Lb. Oven Temp. Internal Temp.
Beef Rib,BonelessRib, Rare 20_4 325°F 140°Ft
TopSirloin Medium 24_8 325°F 160'_F
(3to 5 Ibs.) Well 28_2 325'_F 170'_F
BeefTenderloin Rare 10 14 325°F 140°Ft
Medium 14 18 325°F 160°F
Perk Bonedn,Boneless(3to 5 Ibs.) 23_7 32R°F 170°F
Chops(1/2to 1" thick) 2 chops 30_5 total 32R°F 170°F
4 chops 35-40 total 32R°F 170°F
6 chops 40_5 total 32R°F 170°F
Ham Canned, Butt, Shank(3to 5 Ibs.fully cooked) 14 18 325°F 140°F
Lamb Bonedn,Boneless(3to 5 Ibs.) Medium 17_0 325°F 160°F
Well 20_4 325°F 170%
Seateed Fish,Whole(3 to5 Ibs.) 3OqOtotal 4OO°F
LobsterTails(6 to8 oz.each) 20_5 total 350°F
Poultry WholeChicken(21/Lto 31/zIbs.} 24_6 350°F 180° 185°F
CornishHens,Unstuffed(1to 11/zIbs.) 50 55total 350°F 180° 185°F
Stuffed(1to 11/LIbs.) 5R 60total 350°F 180° 185°F
Buckling(4to 5 Ibs.} 24_6 32R°F 180° 185°F
Turkey,Whole*
Unstuffed(10to 16 Ibs.) 8 11 32R°F 180° 185°F
Unstuffed(18to 24 Ibs.) 7 10 32R°F 180° 185°F
TurkeyBreast(4to 6 Ibs.) 16 19 32R°F 170°F
Sm/]ed bi_ds g_,)_e_wl0 n_q_li)_,30-45 mimm_ addi/im_al nuls/i) time. Shidd h'_:_m_d blz'as/ ,fi/h ]o_l to pnpl,( _ t
20
_t T/u' _LS. i)@aHml,_ t 0/ l_',7(:_z/m_vsrz_s "Ibm, bl,l,/ is /m/)_z/m; but _ou s/m_t/d /,'_ml! l/_al (ookin_ _t to o_ /) 1401" mernz_
some /ood t,oi_o_i_g o*;_zz_Lsmsma) stt)'l@,_'."(Sou_ _':Sail" 1.'ood Book. };)u_ K/t(@ _ Guide. [ '€I)A lb,'l,, fiz_ e 19,t¢5.)
Page 21

Usingtheproofingand warming features, gecom
Theproofing feature maintains a warm environment useful for rising yeast-leavened products.
How to Set the Oven For Proofing
®
iii fill
i i! ii@ i!illii!iiil ilili
[] Place the coxered dough in a dish in
the oxen on shelf B or C.
NOTE: Forbest rasults,cover the doughwith a
cloth or with graasedp/astic wrap(theplastic,
may needto beanchoredunderneaththe
containerso the oven fan will notMow it off).
[] Touch the PROOF pad and then the
STARTpad.
The display will read PrF (proof).
The oven interior light turns on and
remains on during proofing.
The proofing feature automatically
provides the optimum temperature fin"
the proofing process, and therefore does
not have a temperatm'e ac!justment.
[] Set the KITCHENTIMERON/OFFfiw
the minim um proof time.
How to Set the Oven For Warming
The wam_ featm'e keeps cooked foods
wam_ for up to 24hom_ after the cooking
flmcfion is finished, or it can be acfixated
independently to keep ah'eady cooked
[i)O(|S ]V_IFIII,
This teatm'e is not designed to reheat
cold food.
To use this teatm'e independenfl}; touch
the WARMpad and then the STARTpad.
To activate this teatm'e fi)r rise alter
Timed Baking or Roasting, touch the
WARM pad after setting the desired
length _ff cooking time and befin'e
touching START.
ToCrisp Stale Items
::Ji::Place food in lo_sided dishes or pans.
::Ji::For best results, place the fi_od items in
a single layer: Do not stack.
_: i,eave them tmcovered.
[] _4hen )roofino is finished, touch
the CLEAR/OFFpad.
_: Toavoid lowering the oven temperature
andfengtheningproofing tlYne,donot
openthe ovendoor unnecessari/g
::Ji::Checkbraadproductsearly to avoid
over-proofing
NOTE:
_: Donotusetheproofingmodeforwarming
foodorkeepingfoodhot Theproofingoven
temperatureisnothotenoughtoholdfoods
atsafetemperatures.UsetheWARMfeature
tokeepfoodwarm.
iJi::Proofingwillnotoperatewhenovenisabove
125°E"HOT"will showin thedisplay
IMPORTANTNOTES:
_:Foodshouldbekepthotin itscooking
containeror tramferredtoaheat-safe
servingdish.
::Ji::Formoistfoods,coverthemwithanoven-safe
lid oraluminumfoil.
::Ji::Friedor crisp foodsdo not need to be covered,
but canbecome too dry if warmedfor too long.
_: Repeatedopeningof the doora/lows the hot
air to escapeand the food to cool.
::Ji::Allow extratlrne forthe temperatureinside the
oventostabilize after adding items.
::Ji::With large loadsit maybe necessaryto cover
someof the cookedfood items.
!i>Removeservingspoons,etc.,beforeplacing
containersin theoven.
::Ji::Do not useplastic containers,lids or p/asflc
wrap.
iJi::Check crispness after 20-30 minutes.
Add time as needed.
CAUTION: /ast,ccontainere,lids
or plastic wrapwill melt if placed in theoven.
Me/tedp/astic may not be removabfeandis
not coveredunderyour warranty
21
Page 22

Adjust the oven thermostat--Do it yourself!
Youmay find that your new oven cooks differently than the one it replaced. Use your new oven for a few weeks to
become more familiar with it. If you still think your new oven is too hot or too cold, you can adjust the thermostat
yourself.
Donot use thermometers, such as those found in grocery stores, to check the temperature setting of your oven.
These thermometers may vary 20_40 degrees.
NOTE"This adjustment will only affect baking and roasting temperatures; it will not affect broiling, convection or
self-cleaning temperatures. The adjustment will be retained in memory after apower failure.
ToAdjust the Thermostat
[] The oxen ten/l)erature can be
a(!justed lip to (+) 35°F hotter or (-)
35°F coolei: Touch the nuinber I)ads
the same way you read then/. For
exaini)le, to change the oven
tenll)erature 15°K touch I and 5.
[] _'_hen you haxe nlade tile
a(!justnlent, touch the STARTl)ad to
go back t//the tiIne of day disl)lay.
[Jse VO[li" ()veil as vo[i would
I1OI_///_lllvk
(Z)(Z)(Z)(3)(3)
(3)(Z)CD(ZZ3)
®
[] Touch the BROILHI/LO and BAKE
pads at the sanle tin/e fin 3 sec(nlds
until the disl)lay sho_:s SF.
[] Touch the BAKE I)ad. A two-digit
nuinber shows in the disl)la);
Touch BAKEagain to alternate
between increasing and decreasing
the oven teini)eiature.
Thetype ofmargarine will affect bakingperformance!
Most recipes for baking have been developed us&g high fat products such as butter or margarine (80% fat). If you
decrease the fat, the recipe may not give the same results as with ahigher fat product.
Recipe failure can result if cakes, pies, pastries, cookies or candies are made with low fat spreads. The lower the fat
content of a spread product, the more noticeable these differences become.
Federal standards require l)rodu('ts labeled "n/argarine" to contain at least 80% lilt by weight, ix)w tilt spreads, on the
other hand, contain less tilt and inore watei: Tile high in(fisture content (ff these spreads afl_'cts the texture and flavor
(ff baked goods. For best results with your old tm'oiite recipes, use n/aigaiine, butter or stick sl)reads containing at least
70% vegetable oil.
22
Page 23

Usingthe self-cleaning oven. gecom
The oven door must be closed and all controls set correctly for the cycle to work properly.
Before a Clean Cycle
Wipe up heavy soil on flTeoven
bottom.
(3)(3)(3)(3)(3)
C (D(3)(3Z3)
_'e recommend venting your
kitchen with an open window or using a
ventilation tim or hood dtwing tile fi_t
self-clean cycle.
Remoxe tile racks, broiler pan, broiler
grid, probe, all cookware and am
aluminmn foil fl'om tile oxen.
Tile oxen racks can be self-cleaned, but
they will darken, lose their luster and
become hard to slide.
Soil on tile fl'ont fl'ame of tile range and
outside the gasket on the door will need
to be cleaned bv hand. Clean these areas
with hot water; soap-filled steel-wool pads
or cleansei_ such as Soft Scrub_ Rinse
well with clean water and dry:
How to Set the Oven for Cleaning
[] Touch tile SELFCLEANLO/STD pad
on(e _0i" a 4-hotli" clean time or
twice for a %horn" clean time.
A 3-horn self-clean time is
i'ecolili/lended ]_k)i" rise when
cleanino_ small, contained spills. A
seltk'lean time of 4 horns or hmoer
is recommended fin" a dirtier oxen.
V_ If a time other than 4 hom_ or
3 houI_ is needed, use tile nulnber
pads and enter the desired clean
time.
You can change tile clean time to any
dine between 3 houi_ and :5 houi_,
dei)ending, on how dirt_, yore" oxen is.
Do not clean tile gasket. Tile fiberglass
material ot the oven door gasket cmmot
withstand abrasion. It is essential fin" the
gasket to remain intact. If you notice it
becoming worn or fl'ayed, replace it.
_._]l)e up any heavy spillove_ on tile oven
bottom.
Make sure tile oven light bulb cover is in
place and the oven light is off.
IMPORTANT'. Tile health of some
birds is extremely sensitive to the tirades
given off' dm'ing tile self:cleaning cycle
of any range. Move birds to another
well- ventilated room,
When tile LOCKEDlight goes off; you will
be able to open tile door
_: Tile word LOCKEDwill flash and tile
oven control will signal if you set tile
dean cycle and fin'get to dose tile
oven dooI:
::Ji::To stop a clean cycle, touch tile
CLEAR/OFFpad. _._l/ell tile LOCKEDlight
goes off indicating the oven has cooled
below tile locking temperature, you
will be able to open tile (loo_:
[] Touch tile START pad.
Tile door locks automatically. Tile display
will show the clean time remaining, It will
not be possible to open tile oven door
tmtil tile temperatm'e drops below tile
lock temperature and tile LOCKEDlight
goes off'.
23
Page 24

Usingthe self-cleaning oven.
The oven door must be closed and all controls must be set correctly for the cycle to work properly.
How to Delay the Start of Cleaning
Tile door locks autoniaticallv: Tile
display will show the stair tinie. It will
not be possible to open the oven door
until tile tenlperature drops below tile
lock tenlperamre and the LOCKEDlight
goes off.
When the LOCKEDlight goes off; you will
be able to open the door.
OD(Z)CD(3bdZ)
(3 ODCD
(Z)OD(Z)(ZZ3)
[] Touch the SELF CLEAN LO/STD pad
once fiIr a 4-hour clean tiine or
twice fin a 3-houi clean tinle.
A 3-houi selfk'lean tiine is
recoilli/lended ]'()i"/ise when
cleaning sn/all, contained spills. A
sel6clean finie of 4 houi_ or lonoer
is reconmiended for a dirtier oxen.
V2] ]fa tiine other than 4 houi_ or
3 houI_ is needed, use tile nunlber
pads and enter the desired clean
time.
You can change the clean tiine to any
tiIne between 5 houi_ and 5 houi_,
dei)ending, on how dirt_, your oxen is.
[] Touch the DELAYSTARTpad.
[] Using the nunlber pads, enter the
tiine of dm you want the clean c_cle
to start,
[] Touch the STARTpad.
After a Clean Cycle
Y})u nIav notice sonIe white ash in tile
oven. _,\]pe it up with a danlp cloth after
tile ()veil cools.
If whitespotsremain,removethemwitha
soap-filledscouringpadandrinsethoroughly
witha wnegarandwaterm/Xture.
These deposits are tlStlallv a salt residue
that cannot be renioved by tile clean
cycle.
If the ()veil is not clean after one clean
cycle, repeat tile cycle.
!i_:Y})tI cannot set tile oven fin" cooking
until tile oxen is cool en(Iugh t0r tile
door to unlock.
_%:X41/ile tile ()veil is sel6cleaning, you can
touch tile CLOCKpad to display tile
tiIne of day. To return to tile clean
countdown, touch tile SELFCLEAN
LO/STD pad.
::Ji::If tile racks becoine hard to slide,
apply a snlall anlount of cooking oil
to a paper towel and wipe the edges of
tile oven iacks with tile paper towel.
24
Page 25

Special featuresof yourovencontrol ge.com
Yournew touch pad control has additional features that you may choose to use. The following are the features
and how you may activate them.
Thespecial feature modes can only be activated while the display is showing the time of day. They remain
in the control's memory until the steps are repeated.
When the display shows your choice, touch the STARTpad. Thespecial features will remain in memory after
a power failure, except for the Sabbath feature, which will have to be reset.
12-Hour Shutdown
Withthisfeature,shouldyouforgetandleavethe
ovenon,thecontrolwillautomaticallyturnoff the
ovenafter 12hoursduringbakingfunctionsor
after3hoursduringa broilfunction.
lf)ou wish to turn OFF this teature, follow
the steps below.
[] Touch the BROILHI/LOand BAKE
pads at the saxne tixne for 3 seconds
until the display shows SF
Fahrenheit or Celsius Temperature Selection
Yourovencontrol isset touse the Fahrenheit
temperatureselectionsbut youmay changethis
to use the Celsiusselections.
[] Touch the BROILHI/LOand BAKE
pads at the salne time fin" 3 seconds
until the display shows SF.
[] Touch the DELAYSTART pad undl
[] Touch the STARTpad to actix _te the
[]
[]
[] Touch the STARTpad.
Tonesat the End of a Timed Cycle
Attheendofa tlYnedcycle,3shortbeepswill
soundfollowedbyonebeepevery6seconds
untiltheCLEAR/OFFpaflis touchedThis
continual&secondbeepmaybecanceled
To cancel the 6-second beep:
[] Touch the BROILHI/LO and BAKE
pads at the salne dine fin 3 seconds
until the displa) shows SF
[]
[]
no shdn (no shut-off) appeai_ in the
display.
no shut-off and leaxe the control
set ill this special features lnode,
Touch the COOKTIMEand BROIL
HI!tO pads at the saxne time. The
display will show F (Fahrenheit).
Touch the COOKTIMEand BROIL
HI/tO pads again at the same time.
The displa) will show C (Celsius).
Touch the KITCHEN TIMER ON/OFF
pad. The display shows CON BEEP
(continuous beep). Touch the
KITCHEN TIMER ON/OFF pad
again. The display shows BEEP.
(This cancels the one beep
every 6 seconds.)
Touch the STARTpad.
25
Page 26

Special featuresof yourovencontrol.
Tone Volume
_i i i i i
i)i iii !iill/
iiii
Thisfeatureallows you to adjust the tone
volumesto amore acceptable volume.Thereare
threepossiblevolumelevels.
Touch the BROILHI/LO and BAKE
[]
pads at the same time fin" 3 seconds,
until the display shows SF.
Touch the OVEN LIGHTON/OFFpad.
[]
The displa)will show 2 BEEP.This is
the middle xolume lexel.
Touch the OVENLIGHT ON/OFFpad
again. The displa)_611 show 3 BEEP.
This is the loudest _olume level.
12-Hour, 24-Hour or Clock Blackout
Yourcontrol is set to usea 12-hourclock.
if you would prefer to have a 24-hour
military time clock or black out the clock
display, fi)llow the steps below.
[] Touch the BROILHI/LO and BAKE
pads at the same time fin" 3 seconds
until the display shows SE
[] Touch the CLOCKpad once. The
display will show 12hr. If this is
the choice you want, touch the
STARTpad.
Touch the OVENLIGHT ON/OFFpad
again. The display will show I BEEP.
This is the quietest volume level.
For each time the level is changed,
a tone will sound to provide an
indication of the volume level.
V_] Choose the desired sound level
(1 BEEP,2 BEEP,3BEEP).
[] Touch the STARTpad to activate the
lexel shown.
Touch the CLOCKpad again to change
to the 24 hour militma' time clock. The
display will show 24hr. If this is the choice
you want, touch the START pad.
Touch the CLOCKpad again to black out
the clock display. The display will show
OFF.If this is the choice you want, touch
the START pad.
NOTE:If the clock Is Inthe black-outmode you
will not be able touse the Delay Start function.
26
Page 27

CONVECTION
¢
Using Auto Recipe TM Conversion
Whenusingconvectionbake,theAuto Recipe_
Conversionfeaturewi// automaticallyconvert
enteredregu/arbaking temperaturesto
convectionbakingtemperatures.
Thisfeatureis activatedso the display
will show theactual converted(reduced)
temperature.Forexample,if youenter aregular
recipetemperatureof 350°Fand touchthe
STARTpad, the display will show CON
andthe convertedtemperatureof 325°E
NOTE."Thisfeaturedoes not convertconvection
bakecooking times, onlyregularbaking
temperatures.
ge.com
Todeactivate the feature:
Touch the BROILHI/LO and BAKE
[]
pads at the same time fi)r 3 seconds
tmtil the display shox_s SF.
Touch the CONVEC770NBAKE
[]
MULTI/1 RACKpad. The displa_
will show CON ON. Touch the
CONVECTION BAKEMULTI/1 RACK
pad again. The display will show
CON OFF.
[] Touch the STARTpad.
To reactivate the teatm'e, repeat steps 1-3
abo_e but touch the START pad when
CON ON is in the display.
27
Page 28

UsingtheSabbathFeature.
(Designed for use on the Jewish Sabbath and Holidays,) (on some models)
TheSabbathfeature canbe usedfor baking/roastingonlg Itcannot be usedfor convection,broiling, self-cleaningor
DelayStart cooking.
NOTE:Theovenlightcomesonautomatica/fywhenthedoorisopenedandgoesoffwhenthedoorisclosed.Thebulbmayberemoved.
SeetheOvenLightReplacementsection.Onmodelswithatightswitchonthecontro/panel,theoventightmaybeturnedonandlefton.
How to Set for Regular Baking/Roasting
When the display shows D the
oven is seth7 Sabbath. When the
display shows D C the oven is
bak&g/roasting.
Make sure the clock shows the correct timeof day and
theoven is off,
Touch and hold beth Ill(` BROILHI/tOand
[]
BAKE pads, at the same time, uniil ill(!
displ m, shows SE
NOTE: 1[ 1)ak(, or broil appears ill the
(lisl)l;_y, the BROIL HI/tOand BAKEl)ads
were i/()t touched at the S_Ll/l(,tinl(,.
"Ibu(,h the CtEAR/OFFpad and b(,gdn
a_dn.
F_] Talllh(` OEDIYSTARTpad muil SAbbAtH
al/l)(`ars in th(` (lisl)l m.
] 'Ibu/h lh(` STARTpad and D will appear
in ih(` (lisl)la }.
] "lbuch lh(` BAKE pad. No signal will
b(`_,iv(`n.
Llsing the mmfl)(`r llads, enter th(`
[]
d(`sir(`d i(`mll(`mlttr( b(`lw(`(`n 170'F and
550°F. No sigllal or l(`nq)eralm'(` will I)(
g_V( II.
Touch lh(` STARTpad.
[]
,\ll(`r a rail(lOll/ d(`lay 1)(riod of
[]
ailproxiim_l(`l } 30 st`con(Is ill 1 mimtt(`,
D c will apl)(,ar in the displ m
indicating that the o_('n is baking!
roasting. IID c (Io(,sn't appear in
the (lispl_% start aKain at Step 4.
To a(!itlst tile o_en temperamr(,, touch tile
BAKEpa(I, enter th( n(w tenlperatllre using
the mtml)er l)ads and to!lch th( STARTpad.
NOTE: "I'h( CLEAR/OFFand COOK TIMEpads ar_
a_ti_(` dining th(` Sabl)adl lbatur_.
When the display shows D the
oven is set& Sabbath. When the
display shows D C the oven is
bakhTg/roasting.
28
How to Set for Timed Baking/Roasting -
Makesuretheclockshowsthecorrecttimeofdayand
theovenisoff,
fll "lbu(h and hold both the BROIL HI/LO and
Ill
BAKE t/ads, at thesame time, m/til the
display shows SE
NOTE:If bake or t/roil apl/ears in the
display, the BROIL HI/tOand BAKEllads
were not touched at the same tim(`.
"Ibu(,h the CLEAR/OFFt)ad and b(,gin
again.
r_] Tall the DELAYSTART t)ad until SAb bAtH
apl)(`ars in tile display.
] "Ib/t(h the STARTpad and D will aptl(`ar
in tile display.
[_1 Tou(h the COOK TIME pad.
171
"Ibu(`h the numl)(`r l/ads to set the
[]
desired length ot (ooking tim(` t)(`tvvr(`(!ll
1 minute and 9 hours and 99 mimti(`s.
The cooking tim(` that you entered will
b(` dist/lay(`d.
How to Exit the Sabbath Feature
r_] To/t(h the CLEAR/OFFtlad.
I¢1
] If th(` oven is cooking, wait for a nmdom
d(`lay t)(`riod of apl)roxin/at(`ly 30
S(`Collds to ] l/Ill/lit(`, IlntJl olllv D
is in the distlla _
F_] Touch and hold beth the BROIL HI/tO
iJi
and BAKE llads, atthe same time, umil
the disl)lay shows SF.
[_1 "[_tl) th(` DELAYSTART tlad tmti112 shdn
I-/I
or ne shdn alll)(`ars in the display.
Immediate Start and Automatic Stop
] Tou(h th(` STARTpad.
] Touch the BAKEpad. No signal will 1)(`
_JV(`I I.
] Llsing dw ntmfl)(`r llads, (`m(`r ih(`
d(`sir(`d t(`mt)(`rattu:(`. No sigl/al or
t(`n/ll(`ratttrc will 1)(` gri'_(`n.
] "[buch the START t)ad.
,\fler a ran(ton/d(`lay t)(`riod of
[]
at/t/roximat(`l" _ 30 St`lira(Is tO 1 minut(`,
D G will allp(`ar ill th(' (tispla} indicating
that the ov('n is 1)aking q'oasting. I/D C
(to(,sn't al)p(`ar in the display, start agvdn
at St(, l) 7.
To a(!iust tile oxen t(,mt)emmr(,, touch tile
BAKEI)ad, enter the new i(,nq/(,mtur(, using
the number t)ads and touch the STARTpad.
Wh(`n cooking is tinish('(I, th< display will
(hang("/i:om D C to D and O:OOwillal)ll('ar
indicating that th(` oven has turn('d OFFllut is
still set in Sal)bath. P,(`mov(' ill(' cooked/i)od.
12 shdn indicat(,s that the oxen will
auton/atic_dlv tim J,off a/i(,r 12 hours.
no shdn in(li(ai(,s that the ov('n _*ill not
auton/ati(allv turn ott'.
] "lbu(h th(` START tlad.
NOTE:If a l)ower outag(' occurr('d while
the oxen was ill Sat)bath, the oven will
autonmii(,alh turn off and stay off (`\ en
wh(`n ill(' t)ow(`r r(`tlllTI/S. Th(` OV(`n
(ontrol lllllSt b(' F(`S(`t,
Page 29

Camandcleaningoftherange, ge.com
Be sure all controls are off and all surfaces are cool before cleaning any part of the range.
If your range is removed for cleaning, servicing or any reason, be sure the anti-tip
device is reengaged properly when the range is replaced. Failure to take this
precaution could result in tipping of the range and cause injury.
How toRemoveProtectiveShippingFilmand Packaging Tape
Careflllly grasp a corner of tile protective
shipping fihn with _/lI" fingeI_ and slowly
peel it fl'oIn tile appliance stlrtilce. Do not
use an)' shaI]) iten/s to ren/ove tile fihn.
Remove all of tile fihn before using tile
appliance fin" tile fii_t dine.
Control Knobs
Thecontrolknobsmay be removedfor easier
c/eanlbg.
Make sure tile knobs are in tile OFF
positions and pull them straight off tile
sten/s fin" cleaning.
Oven Vent
Theoven ventis abovethe lefi side of the door
This area could becoine hot during
()veil rise.
To asstlI'e no dalllage is done to tile
finish of tile product, tile safi_st way to
reinove tile adhesive fron/packaging tape
on new appliances is an application of a
household liquid dishwashing deteigent.
Apply with a soft cloth and allow to soak.
NOTE: Theadhesivemust beremoved fromall
parts./t cannotbe removedif it isbaked on.
Tile knobs can be cleaned in a
dishwasher or they may also be washed
with soap and watel: Make sure tile insides
of tile knobs are dry before repladng.
Replace tile knobs in tile OFFposition
to ensure proper placelnent.
It is nOllllal _0i" steaI/l to COIl/e O/lt of
tile vent.
Thevent is17nportantforproper ak ckculation.
Neverblock this venL
Control Panel
Ifdesked, the touchpads may be deactivated
before clean/by.
See tile Cooking/Self-Clean lockout
infl/l_nation in tile Special features of
your oven control section in this manual
Clean up splattel_ Mth a dan/p cloth.
_)u may also use a glass cleane_=
Reino\v heavier soil with w:mn soapy
water. Do not use abrasives of any kind.
Reactivatethe touchpadsafter c/eanlbg
29
Page 30

Careandcleaningoftherange.
Cleaning the Oven Door
Toclean the inside of the door:
_+;Because tile area inside tile gasket is
cleaned dufin(* tile selfk'lean c_cle you
do not need to clean this bx hand.
Donotrub or cleanthedoorgasket--
it hasanextremelytowresistanceto
abrasion.
Ifyou noticethe gasketbecomingworn,
frayedor damagedinany wayor ff it has
becomedisplacedonthedoor,youshould
haveit replaced.
Tile area outside tile gasket and
tile door liner can be cleaned with a
soap-filled scom_ing pad, hot water and
detergent. Rinse well with a vinegar
and water solution.
Toclean the outsideof the door:
_: Use soap and water to thoroughly
clean the top, sides and fl'ont of the
(wen dooi: Pdnse well. _Oll Ill}IV }llso
use a glass cleaner to clean tile glass
Lift-Off Oven Door
on tile outside of tile (loo_: Do not let
water drip into the vent openings.
iJi::If any stain on tile door vent trim is
persistent, use a soft abrasive cleaner
and a sponge-scrtfl)ber for best results.
_: Spillage of marinades, fl'uit
juices, tomato sauces and basting
materials containing acids may cause
discoloration and should be wiped
up immediately. _]/en sm'ti_ce is cool,
clean and rinse.
!;>Do not use ox,en cleanei3, cleaning
pow(le_ or hm_h abrasixes on tile
outside of tile (loo_:
Slot
d_
Hingelock
Pull hinge locks down to unlock.
Removalposition
Thedoorisveryheavy.Becarefulwhen
removingandlifting thedoor.
Donotlift thedoorbythehandle.
Toremovethe door."
[] Fully open tile (lore:
[] Pull tile hinge locks down toward
tile door fl'ame, to tile unlocked
position. A tool, such as a small
flat-1)lade screwdfi\'e_; may be
required.
[] Firefly grasp both sides of tile door
at the top.
[] Close door to tile door remoxal
position, which is halt_vm between
tile broil stop position and flfllv
closed.
[] I,ifl door up and out tmfil tile hinge
am/is clear of the slot.
Toreplace the door."
[] Firefly grasp both sides oI the door
at tile top.
X&qthtile Bottom
[]
door at tile edge _arm
same angle as
tile rein owd
position, seat tile
indentation of
the hinge am/
into tile bottom
edge of the hinge slot. The notch in
the hinge am/m ust be fifllv seated
into tile bottom of tile slot.
[] Fully open tile (lore: If tile door will
not flflly open, the indentation is
not seated correctly in tile bottom
edge of the slot,
[] Push tile hinge locks u ) aoainst tile
front fl'ame of tile oxen caxitv to tile
locked position.
arm
Hing,
Push hinge locks up tolock.
ofslot
30
[] Close tile o_en doo_:
Page 31

RemovableOvenFloor
ge.com
i ii!iiii
Press down and pull out.
Roasting rack
Ovenrack
ReceDiacle.
SOCKeI
Toremove the oven floor:
[] ]_emoxe tile oxen door using tile
instructions in the Lift-Off Oven Door
section.
[] Press down and pull out the
remoxable oxen flooi:
V_ Clean the oxen floor with warn/
[] When reinstalling tile oxen fleet; be
IMPORTANT'.Mways replace tile
remox fl)le floor befi_re tile next use.
Oven Racks andConvecfion Roas_ng Rack
M1 ()veil racks and tile convection
roasting rack may be cleaned by hand
with an abrasive cleaner or steel wool.
_Mter cleaning, rinse the racks with clean
water and (h_' with a clean cloth. Gray
l)orcelain-coated ()veil racks IIl}lV I'eII/}lin
in the oven dm_ing the seltkleaning cycle
without being damaged. Tile convection
roasting rack and nickel-plated oven
racLs may remain in tile oven dtwing tile
sel6cleaning cycle, but they will lose their
luster and become hard to slide. It will be
necessai'v to grease all oven rack side
edges with a light coating of vegetable oil
after cleaning them bv hand or in tile
oven. This will help maintain the ease of
sliding the races in and out of the oven.
Oven Light Bulbs
NOTE."The glass cover should be
removed only when cold. Wearing latex
gloves may offer a better grip.
soapy wateI:
sure to slide it all the wm to the back
of tile oxen.
61ass covet
CAUTION.Beforereplacingyour
oven light bulb, disconnect the electrical Receptade
power to the oven at the main fuse or
circuit breaker panel.
Be sure to let tile light coxer and bull)
cool completel).
For _,otu"safety' do not touch a hot bulb
with bare hands or a damp cloth.
To remove:
Push tile bulb straight into tile
] TtlFn tile olass co_,er
counterclockwise 1/4 mrn tmtil
tile tabs of tile glass cover clear []
the grooxes of the socket,
[] Using, _,loxes or a dry cloth, relnoxe
the bulb b} pulling it.straiohto out.
Toreplace:
[] Use a new 130-volt halogen bull),
not t() exceed 50 watts.
[] Using gloxes or a dry cloth relno,,e
tile bulb fl'om its packaging. Do not []
touch tile bulb with bare finge_.
[]
receptacle all tile way:
Place the tabs of the glass coxer into
tile grooxes of tile socket. Tm'n tile
glass cover clockwise 1/4 ram.
For improved lighting inside
the oven, clean the glass cover
ti'equently using a wet cloth. This
should be done when tile oven is
completely cool,
Reconnect electrical power to
tile oxen,
Usegloves
Orcloth
31
Page 32

Careand cleaning ofthe range.
Broiler Pan and Grid
Do not store asoiled broiler pan
and grid anywhere in the range.
il Stopguide
Donot clean thebroiler pan orgnd in a
J
self-cleaningoven.
?dter broiling, remove the broiler pan
fl'om the oven. ]_emove the grid fl'om the
pan. (_arefully [)our out the grease fl'om
the pan into a proper container:
Washand nbse the broi/er pan andgrid lbhot
water with a soap-filled or plasticscouringpad
If fl)od has burned on, sprinkle the grid
with detergent while hot and cover with
wet paper towels or a dishcloth. Soaking
the pan will remove burned-on foods.
Boththe broi/erpan andgrid may be cleanedwith
acommercb/oven cleaner
Both the broiler pan and grid can also be
cleaned in a dishwasher
Storage Drawer Removal
To remove the drawer:
[] Pull the drawer out until it stops.
[] I,ifl the ti'ont of the drawer until the
stops clear the guides.
[] Remo_,e the (h'awe_:
Toreplace the drawer:
[] Place the drawer rails on the guides.
[] Push the drawer back until it stops.
[] iJfi the fl'ont of the drawer and
push back until the stops clear the
guides.
[] I,ower the fl'ont of the drawer and
push back until it closes.
Oven Heating Elements
Do not clean the broil element. Am soil
will btlrn off'when the element is heated.
Clean the oxen floor with warn/, soap)
wateI:
Thebakeelementisnotexposedandis underthe
ovenfloorIfspillovers,residueorashaccumulate
ontheovenfloor,wipeupbeforeself-cleanlag
32
Page 33

Stainless Steel Surfaces (onsomemodels)
_e.cem
Do not use a steel wool pad; it will
scratch the surface.
To clean the stainless steel surli_ce,
use warn/sudsy water; a stainless steel
cleaner such as t¢deen l(ing _'_or an
all-puq)ose liquid or spray cleaner.
Always scrub in the direction of the
grain. Pdnse thoroughly with a sponge
or cloth and clean water. Dry with a
soii, clean cloth.
Painted Surfaces
Painted surii_ces include the door,
top of the control panel and the drawer
fl'ont. Clean these wifl_ soap and water or
a vinegar and water solution.
After cleaning, use a stainless steel
polish, such as Stainless Steel Magid',
Revere Col)per and Stainless Steel
Cleaner"_or _'enol All Puq)ose
Metal Polish":. Follow the product
instructions fl>r cleaning the stainless
steel surface.
Do not/Ise COll/illei'cial o_en cleanei3,
cleanino_ powde_, steel wool or hm_h
abrasixes on any painted surli_ce.
33
Page 34

Cleaningtheglasscooktop.
Oo.,ro, oo*o.,
LOCK/UNLOCKfiOrD a .SECONDS ControlLockoutsection.
Cleanyour cooktepafter
eachspill. Use CERAMA
BRYTE® CeramicCooktop
Cleaner.
Begin b,v locking the cooktop; see the
Normal Daily Use Cleaning
ONLY use CEI_Bd_<IABRYTE _ (;ermnic
Cooktop Cleaner on the glass cooktop.
Other creams may not be as eflecfixe.
To maintain and protect the smti_ce of
yore" glass cooktop, tollow these steps:
[] Before using the cooktop fin" the
fi_t tim e, clea n it with CEI_Bd_4A
BRYTE ':Ceramic Cooktop Cleane_:
This helps protect the top and
makes cleanup easier:
• , • ) " _ < @
[] Dad) tlse { f (,E]_]_ BRYTE
Ceramic Cooktop Cleaner will hel I)
kee I) the cooktop looking new.
[] Shake the cleaning cream well.
Apply a few drops of CEIL_<IA
BRYTE _>Ceramic Cooktop Cleaner
directly to the cooktop.
[] Lrse a p_per towel or (2EIL_MA
BRYTE " Cleaning Pad fin" Ceramic
Cooktops to {'lean the entire
cooktop sure_ce.
[] Use a {hw cloth or paper towel
to remove all cleaning residue.
No need to rinse.
NOTE: It is very important that you DO NOT
heat the cooktop until it has been cleaned
thorough/_
Use a CERAMABRYTE_ Cleaning
Pad for Ceramic Cooktops.
The CERAMABRYTE_ Ceramic
Cooktop Scraper and all
recommended supplies are
available through our Parts Cente_
See hTstructions under "To Order
Parts" section onnext page.
NOTE:Donot use a dull or
nicked blade.
3d
Burned-On Residue
WARNING:DAMAGEto yourglasssurface
mayoccurif youusescrubpadsotherthan the
pad includedwith yourcooktop.
[] Allow the cooktop to cool.
[] Spread a few drops of CEIL_4A
BRYTE _>Ce_ami{' (2ooktop Cleane_
on the entire bm'ned residue area.
Using the included CEILBd_4A
[]
BRYTE <_:'Cleaning Pad fin" Ceramic
Cooktops, _ub the residue area,
aII))lxing, , pressure as needed.
Heavy, Burned-On Residue
[] Allow the {'ooktop to cool.
[] Use a single-edge razor blade
scraper at approximately a 45 °
angle against the glass surtace
and scrape the soil. It will be
necessary to apply pressure to
tile i'_lZOi" scraper in order to
remove the residue.
After scraping with the razor
[]
scraper, spread a few drops of
CEI_BdMA BRYTE )Ceramic
Cooktop Cleaner on the entire
bm'ned residue area. Use the
CEIL_dVIA BRYTE '_Cleaning Pad to
remove any remaining residue.
If any residue remains, repeat the
[]
steps listed above as needed.
For additional protection, alter all
[]
residue has been remoxed, polish
the entire surfi_ce with (;EI_<IA
BRYTE ': Ceramic Cooktop Cleaner
and a paper towel.
For additional protection,
[]
after all residue has been
removed, polish the entire
stn'lace with CEI_Bd_<IA BRYTE':
Ceramic Cooktop Cleaner
and a paper towel.
Page 35

Metal Marks and Scratches
Be careful not to slide pots and
[]
pans across your cooktop. It will
leave metal markings on the
cooktop stli'lilce.
These marks are removable using
the (2E]_d_qA BRYTE ('_Ceramic
Cooktop Cleaner with the CEI{_dMA
BRYTE e_(2leaning Pad fin" Ceramic
Cooktops.
Glasssurface--potential forpermanent damage.
ge.com
[] If pots with a thin oxerla} of
ahmfinum or copper are allowed
to boil dry, the overlay may leave
black discoloration on the cooktop.
This should be removed
immediately befln'e heating
again or the discoloration may
be permanent.
WARNING: Carefullycheckthe bottom of pans
forroughnessthat would scratchthe cooktop.
Our testing shows that if you
are cooking high sugar mixtures
suchas jelly or fudgeand have
aspillover, it can cause
permanent damage to the glass
surface unless the spillover is
immediately removed.
Damage from Sugary Spills and Melted Plastic
[] Turn off all sm'ti_ce milts. Remove
hot pans.
[] _'Vearing an oven mitt:
a. Use a single-edge razor blade
scraper (CE/_Zsd_IA BRYTE (_
Ceramic (_ookto I) Scraper) to
move the spill to a cool area on
the cooktop.
b. Remove the spill with
paper towels.
To Order Parts
To order (_EI_dVIA BRYTE ':Ceramic
Cooktop Cleaner and the cooktop
scrape_; please call ore" toll-fl'ee nmnber:
National Parts Center 800.626.2002.
CERAMA BRYTE®Ceramic
CooktopCleaner ........... # WXIOX300
CERAMA BRYTE_ Ceramic
CooktopScraper ........... # WXIOX0302
Kit ........................ # WBG4X5027
(Kit includescreamandcooktopscraper)
CERAMA BRYTE_ Cleaning Pads for
Ceramic Cooktops ......... # WXIOX350
[] Any remaining spillover should be
left tmfil the sm'li_ce of the cooktop
has cooled.
] Don't use the stn_i_ce milts again
tmtil all of the residue has been
completely removed.
NOTE: If pitting or indentationin theglass
surfacehasalreadyoccurred,thecooktopglass
will have to be replacecLIn thiscase,servicewill
benecessa_
35
Page 36

Before YouCall ForService...
Troubleshooting -tips
Save time and money/. Review the charts on the following
pages first and you may not need to call for service.
Surface units will not
maintain a rolling boi!
Possible Causes
hnproper cookware
being used.
What ToDo
• Use pans which are flat and match the (liameter oI
the surtace unit selected.
or cooking is oot
fastenough
Surface units do A fuse h_ your home maybe • Replace the fllse or reset the circuit breaker:
not work properly blown or the circuit breaker
tripped.
Cooktop controls • Check to see the correct control is set for the surtace
improperly set. unit you are using.
Scratches(mayappear
as cracks)on€ooktop
Incorrect cleaalhlg
methods being used.
Cookware with rough bottoms
being used or coarse particles
(salt or sand) were between
the cookwaxe mad the surface
of the cooktop.
Cookware has been slid
across the cooktop surface.
• Scratches are not remowd)le. Tiny scratches will become
less visible in time as a result of cleaning.
• To avoid scratches, use the recommended cleaning
l)I'oce(hu'es. Make StlI'e bottouls ()t cookware aI'e clean
betore tlse_ and rise cookware with sulooth bottou/s.
Areas of discoloration Food spillovers not cleaned • See the Cleaning the glass cooktop section.
on the cooktop before next use.
Hot surface on a model • This is normal. The sm't,_ce may, appear discolored
with a fight-colored cooktop, when it is hot. This is temporary and will disappear
as the glass ('()()Is.
Plastic melted to Hot cooktop came into • See the Glasssurface - potential for permanent damage
the surface contact with plastic placed section in the Cleaning the glass cooktop section.
on the hot cooktop.
Pitting (or indentation) Hot sugar mixture spilled • Call a qualified technician for replacement.
of the cooktop on the cooktop.
Frequent cycling hnproper cookware • Use only fiat cookware to minimize cvclin,
offandonof behag used.
surfaceunits
Oven lightdoes Light bulb is loose or defective. • Tighten or replace the bulb.
network Switch operating • (_all for serxi('e.
light is broken.
Oven willnot work Plug on range is not completely • Make sure electrical l)lug, is l_lugged,, into a live, properly
hlserted in the electricaJ outlet, grounded outlet.
A fuse in your home may be • Rei)la('e the fuse or reset the circuit breaker:
blown or the circuit
breaker tripped.
Oven controls improperly set. • See the Using the oven section.
36
Page 37

ge.com
Fooddoes not bake
or roast properly
Possible Causes
Oven controls improperly set.
Rack position is incorrect
What To Do
• See the Usingtheoven section.
• See the Using the oven section.
or the rack is not level.
Incorrect cookware or • See tile Using the oven section.
cookware of hnproper
size being used.
Oven thermostat needs • See tile Adjust the oven thermostat - Do it yourself[
adjustment, section.
Food does not Oven controls improperly set. • Make st/l'e vet/touch the BROIl HI/tO pad.
broil properly
hnproper rack position • See tile Broiling Guide.
being used.
Cookware not suited • true the broiling pan and grid that came with your rmlge.
for broiling.
The probe is plugged into the • Unplug and l'elllOve the In'the from the oven.
outlet ha the oven.
Alttmhattm foil used on the • See the Using the oven section.
the broiling pan mad grid has
not been fitted properly mad
slit as recommended.
In some areas the power • Preheat the broil element fi)r 10 ufiuutes.
(voltage) may be low. • Broil for the lon,_est_, period of time recomu|euded ill
the Broiling Guide.
Oven temperature Oven thermostat • See the Adjust the oven thermostat - Do it yourself[
too hot or too cold needs adjustlnent, sectiou.
Oven door is crooked The door is out of position. • Because the oven door ix removable, it sometimes
gets out of position during installation. To straighten
the (loo_; push down on the high corner.
Storage drawer Rear drawer support is • Repositiou the drawer. See the Storage Drawer
is crooked on top of the guide rail. Removalinstructions in the Care and cleaning of your
range section.
Storage drawer Power cord may be • Rel)osifiou the drawer and power cord, See the
won't close obstructing drawer Storage Drawer Removal instructions in the Care and
in the lower back cleaning of your range se('ti_)n.
of the range.
Rear drawer support is
on top of the guide rail.
• Reposition the drawer, See tile Storage Drawer
Removalinstructions in the Care and cleaning of your
range section.
37
Page 38

Before YouCall ForService...
Troubleshooting tips
Possible Causes What To Do
Clock and timer do Plug on range is not completely * Make sm'e electrical l)lug, is l)lugged,, into a live, properly
not work i]lserted in the electrical outlet, gr(mnded outlet.
A fuse in your home * Replace tile fl/se or reset tile circuit breaker:
may he blown or the
circuit breaker tripped.
Oven controls improperly set. * See the Using the clock and timer section.
Oven will not self-clean The oven temperature is * _Mlow the range to cool and reset the controls.
too high to set a self-clema
operation.
Oven controls improperly set. * See the Using the self-cleaning oven section.
The probe is plugged into * Remove the probe from the oven.
the outlet in the oven.
"Crackling" or This is the sound of the * This is normal.
"popping" sound metal heating and cooling
during both the cooking and
clemfing functions.
Excessive smoking Excessive soil. * Touch the CLEAR/OFFpad. Open the windows to
during a clean cycle rid the room of smoke. Wait m]til the LOCKEDlight
goes off'. Wipe up the excess soil and reset the cleau
cvcle,
Oven door will not Oven too hot. * Allow the oven to cool beh>w locking temperature.
open after a clean cycle
Ovennot clean after a Oven controls not properly set. * See the Using the self-cleaning oven secti()u.
clean cycle Oven was heavily soiled. * Cle;lu up he;P,'v, spillovers betol'e ,st;_x'tiu,_ the cleau
cycle. Heavily soiled ovens luav need to sell:cleau
again or tot a low_er_ period of time.
"LOCKED"flashes The self-cleml cycle has been * Close the oven door.
in the display selected hut the door is not
"LOCKED"light is The oven door is locked * Touch the CLEAR/OFFpad. Allow the oven to cool.
on when you want because the temperature
to cook inside the oven has not
"F--and a number You have a function error code. * Touch the CLEAR/OFFpad. Put the oven back into
orletter" flash ()perafiou.
in the display If the function code repeats. * Disclmuect :111power to the range for at least 30
closed.
dropped below the
locking temperature.
seconds and then reconnect power./f the flu]orion
eiToi" code repeats, call tot service.
38
Page 39

ge.com
iii liiiii Iiilllllllllllll l!ii
Control signals after
entering cooking time
or start time
Display goes blank A fuse in your home may • Rel)lace the fl/se or reset the circuit breaker:
Display flashes Power failure. • Reset the clock.
Unable to get the Oven control pads were • The BROIL HI/LO and BAKE pads must be touched at
displayto show "SF" not touched properly, the same time and held for 3 seconds.
"Probe" appears in This is reminding you to • Enter a probe temperatm'e.
the display enter a probe temperature
Power outage, Power outage or surge. • Reset the clock. ]f the oven was in use you Inust reset
clock flashes it by, touching, the CLEAR/OFFpad, ,settiuo_ the clock
Steam from the vent When using the convection • This is normal.
Possible Causes
You forgot to enter a
bake temperature or
cleaning time.
be blown or the circuit
breaker tripped.
The clock is in the • See the Special features of your oven control section.
black-out mode.
after plugging in the probe.
feature, it is normal to see
steam coming out of the oven
vent. As the number of racks
or amount of food being
cooked increases, the amount
of visible stemn will increase.
What To Do
• Touch the BAKE pad and desired teml)erature or
the SELF CLEAN LO/STD pad and desired clean time.
and resetting any cooking flmctiou.
"Burning" or "oily"
odoremittingfrom
the vent
Strongodor
Fannoise
This is normal in a new oven • To speed the process, set a self-clean cycle for a
and will disappear in time. minimmn of 3 hours. See the Using the self-cleaning
oxen section.
An odor from the insulation • This is temporary.
aromad the inside of the oven
is normal for the first few times
the oven is used.
A cooling fan or a convection
fan (depending on the
function you axe using) may
automatically turn on m_d off.
• This is normal. The cooling tim will turn off and on
to cool internal parts. It u]av _un after the oven is
tin'ned OFK The convection lhn will cycle on and off.
until the flmction is over or the door is opened.
39
Page 40

m
Notes.
P=
r _
m
x:
m
I
40
Page 41

GE Service Protection Plus 'M
GE, a name recognized worldwide fbr quality and dependability, offers you
Service Protection Plus'_'--comprehensive protection on all yore appliances--
No Matter What Brand!
Benefits Include:
• Backed by GE
• All brands covered
• Unlimited service calls
• All parts and labor costs included
• No out-of-pocket expenses
• No bidden deductibles
• One 800 number to call
You _dll be completel) satisfied with our service protection or )ou ma) request )our mone) back
on the remaining value of your contract. No questions asked. It's that simple.
Protect yore" refrigerator, dishwasher, washer and dryer, range, TV_ VCR and much more--a_y brand!
Plus there's no extra charge flw emergency service and low monthly financing is available. Even icemaker
coverage and toed spoilage protection is offered. You can rest easy, knowing that all your valuable
household products are protected against expensive repairs.
Place ,our confidence in GE and call us in the U.S. toll-free at _UU._Z_.ZZZ_
for l//Ol'e infol'I//atiOll.
:_,_*]1 hi}in(Is (o_.{!l_{!(L tip t(t _0 ){!iris Ill(I, ]11 the (on[lllenl tl [.S.
We TICover Any Appliance.
Anywhere. Anytime.
_ (Jill here
Please place in envelope and mail to:
GeneralElectricCompany
Warranty Registration Department
P.O. Box 32150
Louisville, KY 40232-2150
41
Page 42

Consumer Product Ownership Registration
Dear Customer:
Thank you for purchasing our product and thank you for placing your confidence ira us.
_/_'e are proud to ha_e you as a customer!
Follow these three steps to protect your new appliance investment:
................................................................................................... _,,,,- (_tlt h(r<
Complete and mail
your Consumer
Product Ownership
Registration today.
ttaw' the peace of
mind of knowing wc
C_lll COlltact Vail ill
the unlikely event of a
satbly modificalion.
Alter mailing tile
registration below,
store this document
ill a sati' place. It
contains inlonnation
you will need should
you require service.
Our selwice number is
800.GE.CARES
(8t)0.43'_).2737).
Model Number Serial Number
, , , , , , I I , , , , , , , I
Important: If you did not get a registration card with your
product, detach and return the form below to
ensure that your product is registered, or register
online at ge.com.
Consumer Product Ownership Registration
Read your Owner's
Malmal carefilllv.
It will help you
operat( your lle'*_
appliance properly.
Model Number Serial Number
Ms. M*>,. Mix',
Fir,,1 I I Lasl]
Name I I I I I I I I I Naine I I I I I I I I I I I I
Sir(el I
Addr(';s I I I I I I I I I I I I I I I I I I I I I I I I
?._pt. # I , I
(;i,,I I I
l)a_e Placed
In Use 111
Monlh
42
Appliances
General Electric Compa%
Louisville, K¥ 40225
GE Consumer&, Industrial
ge.com
I I I I I I E-lnailAddress*
Zip I
_,,ml,,,rlI , I-I , , I-I ,
* Please pr_wide your e-mail addrcss to receive, xia e-mail, discounts, _,pedal ottbrs and other important
communications fl-om GE Appliances ((;1_\).
Check here if you do not want to receive COmlmmicaIions from GEA's careflflly selected pamlec_.
E\II_L RI{ TO (:OMt)I.ETE AND RETI JRN Tt tlS C:M(I) DOES NOT DIMINISII Y()I JR
_,\7\P.I_ \NTY RIGt tTS.
For more inlonnation about (;EA's privacy and data usage polic?; go to ge.com and click on
'Pri_cy Poli_y" or call 800.626.2224.
I I
I I
, I
I
I
Page 43

GEElectricRange Warranty.
Aft warranty service provided by our Factory Service Centers,
or an authorized Customer Care®technician. To schedule
service, on-line, 24 hours a day, visit us at ge.com, or carl
800.GE.CARES (800.432.2737).Please have serial number and
Staple your receipt here.
Proof of the original purchase
date is needed to obtain service
under the warrant_
model number available when calling for service.
GEWill Provide:
Anypartof the range which tifils due to a defect in materials or workmanshii_. During this
From the date of the limited one-year warranty, GE will also l)rovi(le, free of charge, all labor and in-home service
originalpurchase to replace the delbctive part,
_: Service trips to your home to teach you how to use
the product.
::Ji::Improper installation, delivery or maJntenm_ce.
::Ji::Failure of the product if it is abused, misused,
or used for other than the intended purpose or
used commercially.
_: Damage to the glass cooktop caused by use of demlers
other thml the recommended clemlh_g creams and
pads.
_: Replacement of house fuses or resetth_g of circuit
breakers.
::Ji::Dmnage to the product caused by accident, fire, floods
or acts of God.
::Ji::IncidentaJ or consequential dmnage caused by possible
defects with this appliance.
!i_:Dmnage caused after delivery.
iJi::Product not accessible to provide required service.
_: Damage to the glass cooktop caused by hm'dened
spills of sugary materiaJs or melted plastic that
are not clemled accordhlg to the directions in
the Owner's MmmaJ.
EXCLUSIONOFIMPLIED WARRANTIES--Your sole and exclusive remedyis product repa# as provided in this Limited ]
Warranty.Any implied warranties, ineludiugthe implied warranties ofmerchantability or fitness for a particular purpose,
are limited to one year or the shortestperiod allowed by law.
This warranty is extended to the original purchaser and any succeeding owner for products purchased for
home use within the USA. If the product is located in an area where service by a GEAuthorized Servicer is not
available, you may be responsible for a trip charge or you may be required to bring the product to an Authorized GE
Service location for service. In Alaska, the warranty excludes the cost of shipping or service calls to your home.
Some states do not allow the exclusion or limitation of incidental or consequential damages. This warranty
gives you specific legal rights, and you may also have other rights which vary from state to state. Toknow
what your legal rights are, consult your local or state consumer affairs office or your state's Attorney General.
Warrantor: GeneralElectric Company.Louisville,KY 40225
I
I
43
Page 44

ConsumerSupport.
gEAppliancesWebsite ge.com
Haxe a question or need assistance with your appliance? Try the (;E Appliances _4'ebsite 24 hom_ a day
any day, of the year'., For greater comenience and taster service, you can now download Owner's Manuals,
order parts, catalogs, or exert schedule serxice on-line. You can also "_sk Our Team )f Expert.;
}OILY qtlestions, _llld so II/t/oh II/ore...
ScheduleService
Expert (;E repair setsice is onlx one step awa} fl'om your door: Get on-line and schedule vc,t:u"serxice at
your conxenience 24 hou_ am {lax of the _ear! Or call 800.GE.(_AI_ES (800.432.2737) during n{mnal
business hou_.
ge.com
RealLifeDesignStudio ge.com
GE SUl_ports the Uni\'e_al Design concept--prodtwts, services and environments that can be used by
people of all ages, sizes and capabilities. _,\'e recognize the need to design for a wide range of ph):sical and
mental abilities and impaim_ents. For details of GE's Universal Design applications, including kitchen
design ideas fin" people with disabilities, check out Oily X,Vebsimtoday. For the heating impaired, please call
800.TDD.GEAC (800.833.4322).
ExtendedWarranties
Purchase a GE extended x_arrant_ and learn about special discounts that are axailable x_hile xour x_arrant_
is still in effect. You can purchase it on-line an)time, or call 800.626.2224 dtllJng nomml business hours.
(;E Consumer Home Serxices will still be there alter your warrant} expires.
PartsandAccessories
ge.com
ge.com
Individuals qualified to setMce their own appliances can have parts or accessories sent direcflv to their
homes (VISA, MasterCard and Discover cards are accepted). Order on-line today, 24 l_otus eve_a' day or
by phone at 800.626.2002 during nomml business hou_.
Instructions contained in this manual cover procedures tobe performed by any user. Other servicing generally
should be referred to qualified service personnel Cautionmust be exercised, since improper servicing may cause
unsafe operation.
ContactUs
If you are not satisfied with the service you receive fl'om GE, contact us on our Website with all the details
including your phone numbe_; or write to: General Manage_; Customer ]?,elations
GE Appliances, Appliance Park
I,ouisville, KY 40225
RegisterYourApplbnce
Register your new applimlce on-line---at your convellience! Timelx, l)r°dtlct registration_ will allow fin"
enhanced communication and prompt service under the terms of your warranty, should the need a_ise.
You max also mail in the prepfinted registration, card included in the I)ackin'"_ material.
Printed in flTeUnited States
ge.com
ge.com
 Loading...