

Page 1
: ,c_::5
(i ,_ ,!iI:>°ii ....:=::
7")
GEAppliances
!::5_
"_i Part No. 164D3333P145-! Pub No 49-89t0-t 7-98CG(JR)
Page 2

Congratulations!
SafetyInformation
Safely Precautions 3,4
Oven , 4
Operating Instructions
Usingthe Oven ..... 5-12
Usingthe Clockand timer 10
TimedBaking& Roasting ,11
OvenThermostat ..... 12
Care and Cleaning
Shelves ................ 13
Lift-Off OvenDoor ..... 13
OvenLightBulb ....... I3
Broiler Panand Grid , 14
PorcelainOvenInterior !4
YouAre Now Partof theGEFamily.
Welcome to the GE family We're proud of our quafit-f products and we are
committed to prox_ding dependable sendce You'll see it in this easy-to-use Owner's
Manual and you'll hear it in d_e friendly voices of our customer sen,ice department,
Best of all, you'll experience d_ese _lues each dme you use ),our oven That's
importan t, because your new oven will be part of' your family for many yem's
And we hope you will be part of ours for a long time to come
We daank you for buying GE We appreciate your purchase, and hope you _dll
continue to rely on tts whenever you need qualit 7 appliances for your home
GE& Vou,A ServicePartnership.
IMPORTANT!
Fill out and return d_e Consumer Product Registration Card fl_atis
packed Mth this product. If you cmanot find it, please send in file
duplicate card printed in fine back of this manual
FORYOURRECORDS
Write the model and serial numbers here:
#
#
You can find them on a label on the front of the oven behind d_e
oven door..
TroubleshootingBps
BeforeYouCall
ForService 15,16
Customer Service
ProductRegistration t7
Warranty..... t9
ServiceTelephone
Numbers , , BackCover
Staple sales slip or'cancelled check here,
Proof of the original purd_ase date is needed to obtain sen_ice undez
the warrant.
READTHISMANUAL
Inside you will find many helpful hints on how to use and maintain
3,our oven properly ,Just a little preventive care on your part can save
you a great deal of time and money over the life of your oven
You'll find many answers to common problems in fl_e Before YouCall
ForService section, If'you review our chart of Troubleshooting_ps
first, you may not need to call for service at all
IFYOUNEEDSERVICE
If you do need service, you can relax knowing help is only a phone
call mvay.A list of tolbfree customer smMce numbers is included
in the back section of finismanual Or you can always call the
GE Answer Center ° at 800 626.2000, 24 hours a da}; 7 da}_ a week.
2
Page 3
IMPORTANTSAFETYINFORMATION.
READALLINSTRUCTIONSBEFOREUSING.
A WARNING!
Foryoursafety,theinformationin thismanualmustbefollowedtominimizetherisk of fire or
explosion,electric shock,or topreventproperty damage,personalinjury,orlossof fife
SAFETYPflECAUTiONS
When using electrical appflances, basic safety precautions should be followed, including the fof/owing:'
Use this applim_ce only for its intended
purpose as described in d_is Ovmer's
Manual_
Be sure yore" appliance is properly
installed and grounded by a qualified
technicim_ in accordance with tl_e
pro'tided installation instructions°
Do not attempt to repair or replace any
part of ),our oven unless it is specifically
recommended in this mmluaL All other
servicing should be refened to a quaIified
technician.
i::::'Have the installer show you the location of
the circuit breaker or fuse Mark it for easy
reference,.
Before performing any service, disconnect
fl_eoven power supply at the household
disuibution panel by removing fl_e fflse or
s_Mtching off the circuit breaker..
Do not leave children None--children
should not be left alone or unattended in
an area where ar_ applimace is in use. They
should never be allowed to sit or stmad on
any pmt of the appliance.
_L:II
Do not allow anyone to climb, stmad or
hm_g on fl_e dool: They could damage the
oven, or cause severe personal injury_
Be sure the oven is securely installed in a
cabinet fl-_atis firmly attached to the house
structure. Never allow mayone to climb, sit,
starM or hang on the oven door,
Never leave d_e oven door open when you
are not watching the oven.
Ahvays keep combttstible _all covering,
curtains or drapes a safe distance from
your oven,
Always keep dish towels, dish clod, s, pot
holdeps and od_er linens a safe distmace
from your oven,,
Ahvays keep wooden and plastic utensils
arm cm_ned food a safe distance away from
your overL
Teach children not to play wid_ d_e
controls or m_y other part of the oven,,
Do not store flammable materials in
art ovel-I o
CAUTION: Items of interest to children
should not be stored in cabinets above m_
oven; children climbing on the oven to
reach items could be seriousl), injm'ed.
Never wear Ioose4itdng or hanging
garments while using the applim_ce. Be
careful when reaching for items stored in
cabinets over the oven. Ftmnmabte
material could be ignited if brought in
contact with hot surfaces or heating
elements and may cause severe bums.
Use only &3' pot holders_rnoist or damp
pot holders on hot surfaces may result in
btm_s from steam. Do not let pot holders
touch hot heating elements, Do not use
a towel or oilier bulky clod_,
!i::i_i
For your safety, never use your appliance
for wm-ming or heating the room°
:?'::2
Do not let cooking grease or other
flammable materials accumulate in or
near the oven.
.!::::::_iDo not use water on _ease fires. Never pick
up a flaming pan. Tuna the controls off
Flame in the oven cm_be smothered
completely by closing the oven door and
turning the oven offor by using a multi-
purpose dry chemical or foam-type fire
extinguisher,
Do not store or' use combustible materials,
gasoline or other flmaqmable vapors and
liquids in flae _dcinity of this or any oflaer
applimace°
3
Page 4
iMPORTANTSAFETYiNFORMATION.
READALLiNSTRUCTiONSBEFOREUSING
A WARNING!
COOKMEATANDPOULTRYTHOROUGHLY...
Cookmeat andpoultry thoroughly--meat toat leastan INTERNALtemperatureof lfiO°£ andpoultry to at least
an INTERNALtemperatureof 180°ECookingto thesetemperaturesusuaflyprotectsagainst foodbomeillness
SAFETYPRECAUtiONS
Do not touch the heating elements or the :;:
interior surface of the oven. These surfaces
may be hot enough to bum even though
they are dark in colon During mad after
use, do not touch, or let clothing or other
flammable materials contact any interior
area of the oven; allow sufficient time for
cooling first.
Potentially hot surfaces include oven vent
openings, surfaces near the openings,
crevices around the oven door, the edges
of die vAndow and metal trim pm-ts above
flae door
REMEMBER: The inside surface of dae oven
may be hot when flae door is opened
Stmad mvay from the oven when opening
the oven doon Hot air or steam which
escapes can cause bums to hmads, face
mid!or eyes.
:,::':Do not heat unopened food container& _'
Pressure could build up and the contahaer
cotfld burst, catksing m_ injur):
;':: Keep the oven vent unobm'ucted.
:': Keep flae oven free from grease buildup,
:": Place the oven shelf in the desired position
while die oven is cool. If shelves must be
hm-Jdted when hoq do not let pot holder
contact the heating elements,,
When using cooNng or roasting bags in
the oven, follow the mmaufacturer's
directions.
Pulling out the shelf to flte stop-lock is a
convenience in lifting hea W foods° It is also
a precaution against bums from touching
hot surfaces of the door or oven walls,
Do not use the oven to dry newspapers.
K overheated, they can catch on fire.
i?:
Do not use the oven for a stol-age area.
Items stored in an oven cm_ igmiteo
Do not leave paper products, cooking
utensils or food in the oven when not
in use.
After broiling, ahvays take the broiler pma
out of flae oven mad clean iL Leftover
grease in the broiler pma can catch fire
next time you use the pan..
Never leavejm-s or cans of fat drippings in
or rlear "),our oven
Clean only parts listed in dais Use mad
Care Manual.
Do not use aluminum foil to line oven
bottoms, except as suggested in this
mm_ual., h_proper installation of
alumirmm foil may result in a risk of
electric shock or fire.
ReadandfollowthisSafetyInformationcarefully.
SAVETHESEINSTRUCTIONS
4
Page 5
Usingtheovencontrols.
Throughout this manual, features and appearance may vary from your model
OVEN
{
&, &&
TEMP HOUR MIN
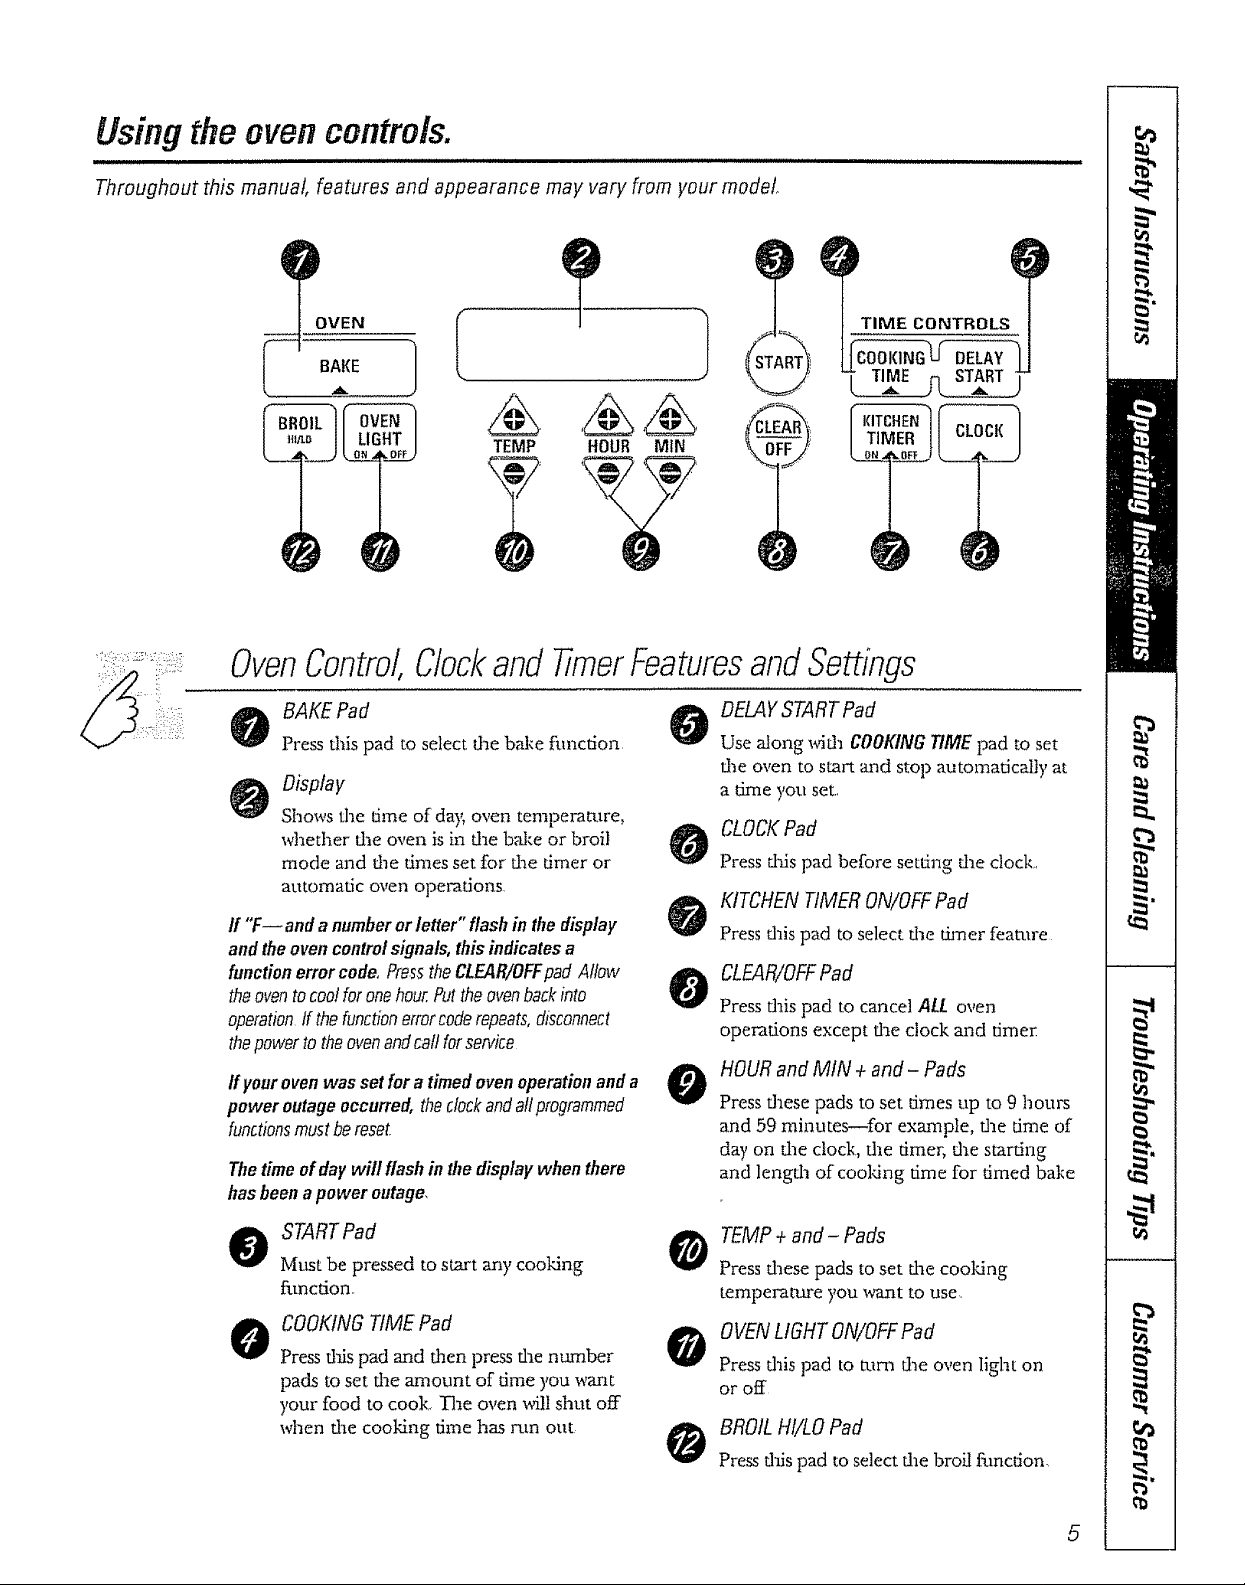
OvenControl,Clockand timerFeaturesandSettings
BAKEPad
Press this pad to select d_e bake function,
Display
Shows fl_e dme of da); oven temperaatre,
whether d_e oven isin d_e bN_e or broil
mode and die times set for the timer or
automatic oven operations
If "F-- and anumberor letter" flashin the display
and theoven control signals,this indicatesa
functionerrorcode°PresstheCLEAR/OFFpad Allow
theoventocoo!foronehour.Puttheovenbackinto
operationIf thefunctionerrorcoderepeats,disconnect
thepowertotheovenandcarlforservice
Ifyourovenwas setfora timedovenoperationand a _
power outageoccurred, theclockandallprogrammed
functionsmustbereset.
Thetimeofday wilt flash in thedisplaywhenthere
hasbeenapower outage,
STARTPad
Mtkstbe pressed to start an), cooking
ffmcdon,
COOKINGTIME Pad
0 •
Press this pad and d_en press d_e ntmaber
pads to set the amount of time you want
your food to cook, The oven will shut off
when dm cooking time has run out
DELAYSTART Pad
Use along with COOKINGTIMEpad m set
fl_e oven to start and stop automadcally at
a time you set.,
CLOCKPad
Press d_Aspad before setting the clock.,
KITCHEN TIMER ON/OFFPad
Press daispad to select tt_e th:ner featm'e
CLEAR/OFFPad
Press dlis pad to cancel ALL oven
operations except fl_e clock m_d timei:
A
HOURand MIN + and- Pads
Press these pads to set dmes up to 9 hours
and 59 minutes_for example, d_e Lime of
day on die clock, file timer, Ll_estarting
and lengd_ of cooldng time for timed bake
TEMP + and- Pads
Press d_ese pads to set d_ecooking
temperatm"e you want to use,
OVENLIGHT ON/OFFPad
Press dais pad to mm d_e oven light on
or off
BROILHI/LO Pad
Press dais pad to select dm broil function,
5
Page 6
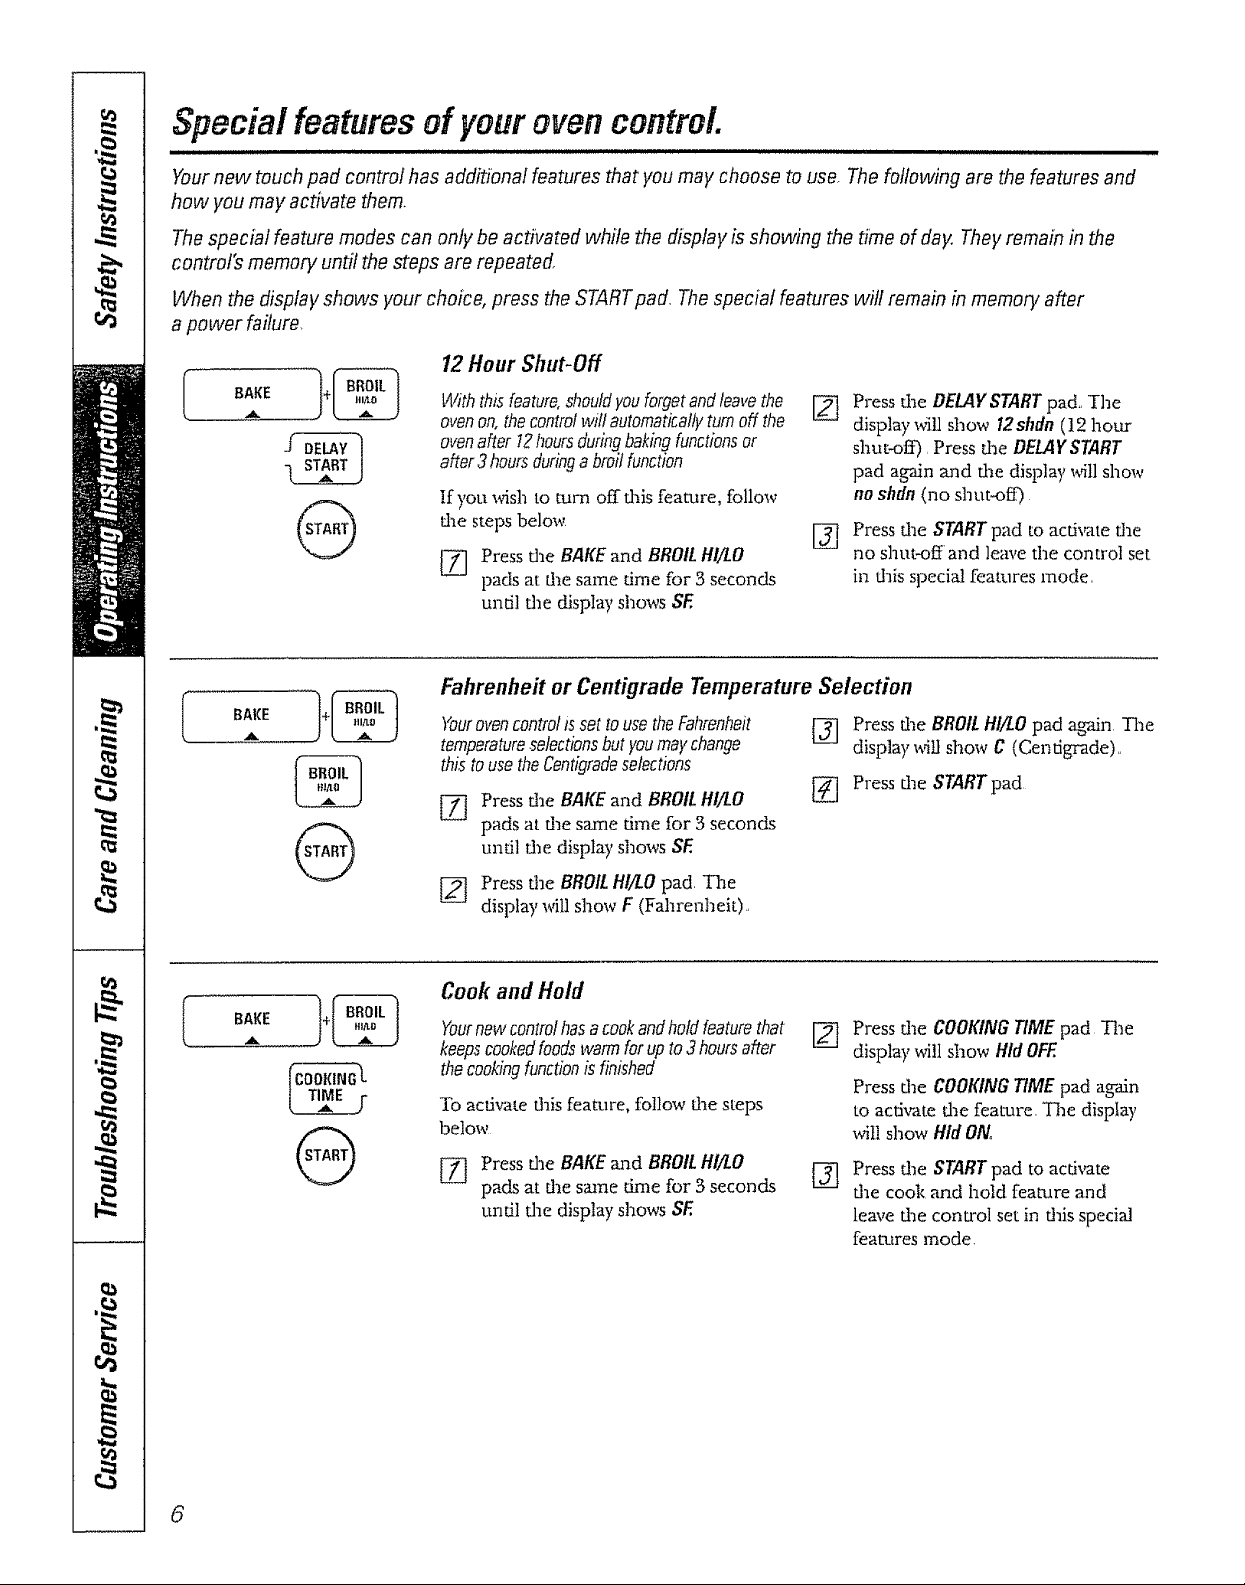
Special featuresofyour oven control
Yournew touch pad control has additional features that you may choose to use, The following are the features and
how you may activate them.
Thespecial feature modes can only be activated while the display is showing the time of day. They remain in the
control's memory until the steps are repeated,
When the display shows your choice, press the STARTpad. The special features will remain in memory after
a power failure
12Hour Shut-Off
BAKE
"_" ovenon,thecontrolwillautomaticallyturnoffthe
j+_ Withthisfeature,shouldyouforgetandleavethe [_
after3hoursduringa broilfunction
ovenafter I2 hoursduringbakingfunctionsor
If you wish to turn off fl_is feature, follow
fl_e steps below
[_ Press dae BAKE and BROILHI/LO [_
pads at the same dme for 3 seconds
undl flae display shows SE
Fahrenheit or Centigrade Temperature Selection
BAKE.A !+_
Yourovencontrolis setto usetheFahrenheit
temperature.selectionsbutyoumaychange
thistousetheCentigradeselections
Press dae BAKE and BROILHI/LO
%
pads at d_e same dme for 3 seconds
undl Oaedisplay shows SE
Press dae DELAYSTARTpad,, The
display Will show 12shdn(!2 hour
shut-off), Press dae BELAYSTART
pad again mad the display will show
noshdn(no shut-off)
Press the STARTpad to activate the
no shut-off and leave the control set
in this special features mode,
Press the BROILHI/LOpad again The
display will show C (Centigrade),,
Press dae STARTpad
I ...........
G
[_ Press dae BROILHI/LOpad. The
display will show F (Fahrenheit),
Cook and Hold
Yournewcontrolhasacookandholdfeaturethat
keepscookedfoodswarmforupto3 hoursafter
thecookinqfunctionis finished
To activate dais feature, follow the steps
below
[_ Press dae BAKEand BROILHI/LO
pads at dae same dine for 3 seconds
undI dae display shows SE
Press dae COOKINGTIMEpad -t-he
display will show H/d OFF.
PressrJaeCOOKINGTIME pad again
to acd_rate d_e feature, The display
will show Hid ONo
Press die STARTpad to activate
dae cook and hold feature and
leave dae conu'oI set in this special
features mode,
6
Page 7

Tones at the End of a Timed Cycle
I,
@
At theendofa timedcycle,3shortbeepswill
soundfollowedbyonebeepeven/6secondsuntil
tt_eCLEAR/O£FpadiSpressedThiscontinuous6
secondbeepmaybecanceled
To cm_cel fl_e 6 second beep:
[_ PressdaeBAKEmid BROILHI/LO
pads at file same time for 3 seconds
until file display shows SE
12Hour, 24 Hour or Clock Black-Out
Yourcontrolissettousea 12hourcte_k
If you would prefer to hm,e a .94 hour
military time clock or black-out the clock
display, follow file steps below,
[Z] Press fl_e BAKE and BROIL HI/LO
pads at fl_e same time for 3 seconds
until the display shows SE
Press the CLOCKpad once. The
g]
display v_21show I2 hr,If fais is dae
choice you want press the START pad..
Press dze KITCHEN TIMER ON/OFF
[]
pad, lqae dJspla), shows CON BEEP
(continuous beep) Press the
KITCHEN TIMER ON/OFF pad
again,, The display shows BEER
(This cancels file one beep evm-),
6 seconds )
[_ Press the STARTpad
Press the CLOCKpad again to change
to the .94 hour military time clock. The
display will show 24hr. If this is dae choice
you want press tim STARTpad,
Press fl_e CLOCKpad again to black-
out flae clock display The display will
show OFF.K this is the choice you want
pressthe STARTpad,
NOTE"If theclockisin thebtacboutmodeyou
willnot beabletouse theDelayStartfunction
[ BARE_ 1+_
@
Changing the Speed of the + or - Pads
Asyouusethe+or- padswhensettinga time
ortemperature,youmaynoticethedisplay
changesslowly,Thisspecialfeaturealfow`syouto
changethespeedTosetthespeedyouprefer,
followthestepsbelow,
Press d_e BAKE and BROILHI/LO
%
pads at the same time for 3 seconds
until the display shows SE
[_ Press file + pad, The display ,rill show
you a set speed between 1 and 5
[_ Press dm+ pad to increase tile
speed up to die nmnber 5,
Press d_e - pad to decrease dae
speed down to the number 1,
[_1 Press START to acrid,ate dae setting
and leave file conu-ol set in dais
special features mode
7
Page 8

Usingtheoven.
i J unHu.,ul ..
Toavoid possible bums, place the shelves in the desired position before you turn the oven on,
Before you begin...
Theoven ha_ 4sheff positions
The shelves have stopqocks, so that when
placed con'ectiy on the supports, they will
stop before coming completely out, and
will not I_L
_(_en placing and remo_dng cookware,
pull the shelf out to tiae bump on the
shelf support
How to Set the Oven for Baking or Roasting
[]]] Press the BAKE pad.
[_ Press the rEMP+ or - pads to set
the desired temperature
Press the STARTpad,,
%
Check food for doneness at
@
minimum time on recipe Cook
longer ifnecessary,
[_] Press dae CtEAR/OFFpad when
cooking is complete,
NOTE:A coolingfanmayautomaticallyturnon
andofftocoolinternalpans Thisisnormal,and
thefanmaycontinuetorunevenaftertheovenis
turnedoff.
Toremove ashelf, pull it toward you, tilt
d_e fi"ont end up and pull it out.
Toreplace, place the end of the shelf
(stop-!ocks) on d_e support, tilt up the
front and push d_e shelf in.
Type of Food Shelf Position
Frozenpies(oncookiesheet) BorC
Angelfoodcake. A
bundtorpoundcakes
Biscuits.muffins,brownies, BorC
cookies,cupcakes.
layercakes,pies
Casseroles BorC
__.,/-tx ~_;-_v. ,_
gut slits in the fail just like the grid
8
Preheating and Pan Placement
Preheat the oven if dae recipe calls for it.
To preheat, set flae oven at the correct
temperature, Preheating is necessary for
good results when baking cakes, cooldes,
pastry and breads.
Forovenswithoutapreheatindicatorlightor
tone,preheat10minutes
Aluminum Foil
You can use aluminum foil to line fl_e
broiler pan mad broiler grid° However,
you must mold the foil tightly to tiae grid
and cut slits in itjust like the grid.,
Aluminumfoilmayalsebeusedtocatcha
spillover.
Baking results will be better if baking pans
are centered in the oven as much as
possible, Pans should not touch each
other or the walls of die oven, Kyou need
to use two shelves, stagger dae pans so one
is not directly above dae adler, and leave
approximately 1W' between pans, from
d_e front, back and sides of the wall,,
Never endrel) co_er a shelf_tia
alumimlm foil This wilt disturb flae heat
drculation and result in poor baking
A smaller sheet of foil may be used to
catch a spiltover by placing it on a lower
shelfse_eral, inches below fl_e food,
r
Page 9

How to Set the Oven for Broiling
Leave the door open to the broil
stop position Tiredoor stays open
by itself, yet the proper temperature
is maintained in _lreoven
[_ Place d_emeat or fish on fl_ebroiIer
grid in fl_ebroiler pan
[_ Follow suggested shelf positions in
Lhe Broiling Guide
Ifyourovenisconnectedto208volts,raresteaks
maybebroiledbypreheating_hebroilerand
positioningtheovensheffonepositionhigher.
Broiling Guide
Shelf First Side Second Side
Position Time [rain,.) "lime (rain.) Comments
C 4Yz 4V_ Arrangeinsinglelayer
c
C
C
c
C
c
A
B t3-15
C
............I
B
C 10
B 13
C
c
C
B
Ground Beet
WellDone
Bee| Steaks
Rare
Medium
Well Done
Rare
Medium
Welt Done
Chicken
LobsterTails
Fish Fillets
Ham Slices
(precooked)
....._OrliCimps
Weft Done
LambChops
Medium
Well Done
Medium
Well Done
Quantityand/
or Thickness
1/2lb
,(ab£_!8thinstices}.........
t Ib (4patties) C
1t2to 3/4" thick
t" thick
I tot½ Ibs
1½" thick
2to 2½ Ibs
t whole
2to 2Vzlbs.
split lengthwise
2-4
5 to Boz each
114to t12" thick
+"th++k....
2 (1t2" thick)
2 (1" thick} about1 Ib_
2 (1" thick} about!0
to 12oz
2 (1½"thick)about1 +b
[_ Press flae BROIL HI/LO pad once for
H! Broil,
To change to LOBroil press flae
BROIL HI/LO pad again
[_ Press fl_e START pad
[_ When broiling is finished, press d_e
£LEAB/OFF pad,
10
t0
15
25
35
_2
6
8
5
S
11
7+B
14-!6
20-25
10-i5
Do not
turn
OVer'
lO
Spaceeventy Up to
8patties take about
the sametime+
Steakslessthan1"
thickcookthrough
beforebrowning Pan
fryingisrecommended
Slashfat,
Reducetime about 5
to 10 minutesperside
_orcut-upchicken
Brusheachside with
meltedbt_tte_Broil
skin+side-downfirst.
Cutthroughbackof
shel_Spreadopen
Brushwith meIted
butler before broiling
an_after hal| ot
broi+ingtime.
Handleandtomvery
careiu+!yBrushwith
lemonbutterbefore
an_during cooking
if desired Preheat
broiler to increase
browning,
Increasetime 5 to 10
minutespers{defor
1½" thickor home+
curedham,
S_ashfat
13
10
12
t4
17
9
10
!2
_2-t4
SIashfat
9
Page 10

Usingthe clockandtimer.
i
To Set the Clock
Make sure the clock is set to the
correct time of flay.
I KITCHEN ]
|TIMERI
_J
Thetimer is a minute timer on/},.
Thetimer does not control oven
operations Themaximum setling on
the timer is 9hours anti 59minutes
The clock must be set to the correct time
of day for the automatic oven timing
functions to work properly, The time of
day cannot be changed during thned
baking..
ToSet the Timer
[Z] Press the KITCHENTIMER
ON/OFFpad,
[_ Press the HOURand MIN+ or
- pads until the amount of
time you want shows in d_e display
If you maim a mistake, press
KITCHENTIMERON/OFFand
begin again.
[_ Press the STRRTpad
AfterpressingtheSTARTpad,SETdisappears,
thistellsyouthetimeiscountingdown.although
thedisplaydoesnotchangeuntilonemihutehas
passed
[_ Press the CLOCKpad,
[_ Press the HOURand MIN+ or -
pads to set die time of day
[_ Press the STARTpad
_qlen the timer reaches :00, d_e
conu'ol will beep 3 times followed
by one beep every 6 seconds unti!
the KITCHENTIMERON/OFFpad is
pressed.
flTe6secondtonecanbecanceledbyfollowing
thestepsin theSpecialfeaturesofyouroven
controlsectionunderTonesattheEndofa
timedCycle
To Reset the Timer
K the display is still showing d_e time
remaining, you may change it by pressing
d_e KITCHENTIMERON/OFFpad, d_en
press d_eHOUR and MIN+ or - pads
until d_e time you want appears in dae
display,
ToCancel the Timer
Pressd_eKITCHENTIMERON/OFF
pad adce.
If the remaining time is not in Odedisplay
(clock, delay start or cooking time are in
die display), recall die remaining time by
pressing d_e KITCHENTIMERON!OFFpad
and then pressing the HOURand MIN+
or - pads to enter d_e new dine you
want
I0
Page 11

Usingthe timedbaring androasting features,
NOTE:Foods that spoil easily-such as milk, eggs, fish, stuffings, poultry and pork-should not be allowed tosit for
more than I hour before or after cooking Room temperature promotes the growth of harmful bacteria, Be sure that
the oven light is off because heat from the bulb will speed harmful bacteria growth,
How to Set an Immediate Start and Automatic Stop
BARE
&
TEMP
HOUR MIN
]
Theovenwd!turnonimmedlate!yandcook fora
selectedlengthoftime At theendof thecooking
timetheovenwillturnoffautomatically.
Make surefl_e clock,showstl_e correct
time of da_:
[_ Press tI_e BAKE pad..
[_] Using the TEMP+ or - pads,
enter the desired ternperamre.
[2_] Press the COOKINGTIMEpad
NOTE:Ifyourreciperequirespreheating,you
mayneedtoaddad&tionaltimetothelength
ofthecookingtime
[_[] Using die HOUR and MtN + or -
pads, enter the desired baking dme.
The oven temperature and fl_e
cootdng time d_at you entered
will be displayed
[_] Press the STARTpad
The display shows d_e oven temperature
that you set and the cooking time
countdown, 1"he display starts changing
once d_e temperature reaches I O0°E
The oven xdll continue to cook for dee
programmed amotmt of time, daen
shut off atttomadcally,
Press d_e CLEAR/OFFpad to clear
the display,
BAKE
TEMP
HOUR MIN
HOUR MIN
]
How to Set a Delayed Start and Automatic Stop
YOucansettheovencontroltodelay-startthe
oven,cookfora specificlengthoftimeandthen
turnoffautomatically,
Maim sm'e fl_e clock shows fl_ecorrect
time of day,
[_ Press the BAKEpad
Using the TEMP+ or- pads, enter
the desired temperature,
Press the COOKINGTIMEpad
NOTE'If yourreciperequirespreheaong,you
mayneedtoaddadditionaltimeto thelength
ofthecookingtime
[]_] Using d_e HOURand MIN+ or -
pads, enter die desired baking time.
Press dee OELAYSTART pad
[_] Using dm HOUR and M/N + or-
pads, enter fl_e time of day you
want die oven to turn on and
start cooking
NOT_An attenoontonewillsoundif youare
usingtimedbakinganddonotpresstheSTART
padafterenteringthebakingtemperature
If you would like to check d_e times you
have set press d_e DELAYSTART pad to
check dee start time you have set or press
flee COOKINGrIME pad to check the
lengda of cooking time you have set.
ISq_en the oven turns on at the time
of day you have set, fl_e display wilt
show d_e changing temperature
(starting at IO0°E) and die cooking
time countdown
At dee end of timed baking, die oven
will turn off The end of cycle tone xsdtl
sound,
Press the CLEAR/OFFpad to clear file
display.
[Z] Press flee STARTpad.
1!
Page 12

Adjust the oven thermostat--Be it yourself!
Youmay find that your new oven cooks differentlythan the one it repfaced. Use your new oven for a few
weeks to become more familiar with i_ If you still think your new oven is too hot or too cold, you can adjust
the thermostat yourself.
Do not use thermometers, such as those found in grocery stores, to check the temperature setting of your oven.
These thermometers may van/20-40 degrees.
NOTE:This adjustment will not affect the broiling temperature The adjustment wilt be retained in memory after
a power failure.
ToAdjust the Thermostat
BAKE t+_
I BAKE l
TEMP
Press d_e BAKE and BROILHI/I.O
pads at fl_e saune Limefor 3 seconds
undl the display shows SF.
[_ Press the BAKE pad, A ave di_t
number shows in the display,
The oven ten_pei-ature can be
@
adjusted up to (+) 35°E hotter or
(-) 35°F. coolec Tap fl_e TEMP + pad
to increase tt_e temperat'ure in
1 degree increments Tap the
TEMP- pad to decrease the
temperature in 1 degree increments
When you have made fl_e
%
adjustment, press the STARTpad
to go back to flae time of day display
Use your oven ,asyou would
normally,
Thetype of margarine will affect baitingperformance/.
Most recipes for baking have been developed using high fat products such as butter or margarine (80% fat). If you
decrease the fat, the recipe may not give the same results as with a higher fat product.
Recipe failure can result ff cakes, pies, pastries, cookies or candies are made with low fat spreads. The lower the fat
content of a spread product, the more noticeable these differences become
Federal standards require products labeled "margarine" to contain at least 80% fat by weight, Low fat spreads, on the
other hand, contain tess fat and more watel: The high moisture content of fl_ese spreads affect the texture and flavor
of baked goods, For best resvdts with your old favorite recipes, use margm'ine, butter or stick spreads containing at least
70% vegetable oil
I2
Page 13

Careandcleaningoftheoven.
Be sure electrical power is off and all surfaces are cool before cleaning any part of the oven,
How to RemovePackaging Tape
The oven door is removable for
eager access to Ihe light bulb
Lib the door straight up and off
the hinges
Donot fig*the door by the handle
To assure no damage is done to the finish
of flae product, the safest way to remove
flae adhesive left from packaging tape on
new appliances is an application of a
household liquid dishwashing detergent,
mineral oil or cooking eli,
Lift-Off Oven Boor
Toremovethedoer,open it to d_e broil
stop position, Grasp firmly on each side
and lift the door straight up and off the
hinges,,
Donotplacehandsbetweenthehingeandthe
ovendoorframe
Toreplacethedoor, maim sure the hinges
are in d_e broil stop position, Position die
slots in the bottom of the door squarely
over fl_e hinges and slowly lower it over
bod_ hinges
Toclean tl_einsideofthedoor.
Soap and water _I normally do the
job Hem), spauerh_g or spillove_smay
requh-e cleaning with a mild abrasive
clemaer, Seat>filled steel wool pads may
also be used
Donetallowfoodspillswithahighsugaroracid
content[suchastomatoes,sauerkraut,fruitjuices
orpiefilling)toremainonthesurfaceTheymay
causeadullspotevenaftercleaning
Apply xdth a soft ctofla and allow to soak
Wipe dry and Oxen apply an appIiance
polish to thoroughly clean and protect
fl_eam'face
NOTE:Theplastictapsmustberemovedfromaft
chrometrimItcannotberemovedif it isbakedon
ifnecessargyoumayuseanovencleaner.Follow
thepackagedir.ectlons
7 Clean the inside of the oven _dndow
widl a mild non-scratching cleaner and
a dmnp clofl_
Tocleanthe outsideofthedoor:
i:' Use soap and water to thoroughly
clean the top, sides mad front of flae
oven dean Rinse well, You may also use
a glass cleaner to clean the glass on the
outside of tlae door. Do not let water
drip into flae vent openings
7, Spillage ofmarinades, fruit juices,
tomato sauces and basdng materials
con mining acids may cause discoloration
and should be wiped up immediately,
t_q_en mfface is cool, clean and rinse,
": Do not use oven cleTmers, cleaning
powders or harsh abrasives on the
outside of d_e door_
®
Oven Shelves
Clean d_e oven sheh,es wid_ an abrasive
cleanser or steel wool,
Oven Light
Before replacing the bulb, disconnect
elecu-ical power to the oven at the main
fuse or circuit breaker panel
Painted Surfaces
Clean _dth soap mad water or a vinegar mid
x_ter solution,
Donotusecommeroalovencleaners,cleansing
powders,steelwoolorharshabrasivesonan)/
paintedsurface
After cleaning, rinse file sheDes with
dean water mad dry witt_a dean clofla
Let the bulb cool completely before
remo_g it, Replace dae bulb wifl_a
40-watt appliance bulb only Do not touch
a hot bulb wifl_ a damp cloth because the
bulb will break
13
Page 14

Careandcleaningoftheoven.
ImU
Broiler Pan & Grid
After broiling, remove the broiler
pan from the oven
After broiling, remove fl_e broiler pan
from tlae oven Remove fl_egrid from the
pan Carefiflly pour out Ltaeoreease from
fl_e pan into a proper container
Wash and rinse the broiler pan and grid
in hot water _4fl_a soap-filled or plastic
scouring pad
Control Panel
It's a good idea to wipe tl_e control panel
after each use Clean _4th mild soap and
water or vinegar m_d water, rinse wifll
clean water and polish dt3, Mfla a soft
ctoda
Oven Heating Elements
Donotcleanthebakeelementorthebroil
elementAnysoilwill burnoffwhentheelements
areheated
tf food has burned on, sprinkle die grid
_s4thdetergent while hot and cover witt_
wet paper towels or a dishclod_ Soaking
the pan will remove burned-on foods
Bod_ die broiler pan and gn-idmay be
cleaned widl a commercial oven cleaner,
Both fl_ebroiler pan and _-id can also be
cleaned in a dishwasher,,
Donotstoreasoiledbroilerpanandgrid
anywhereintheoven
Do not use abrasive cleansers, strong
liqtfid cleansers, plastic scouring pads or
oven cleansers on flaeconu-oI panel_daey
will damage fl_e finish A 50/50 solution
of vinegar and hot water worldswell,
To clema dae oven floor, gently lift file
bake element, Clean wit1 warm soapy
watec,
Porcelain Oven Interior
Wid_ proper care, flae porcelain enamel
finish on dae inside of dae oven_top,
bottom, sides, back and inside of flae
door--will stay new-looldng for years
Let the oven cool before cleaning, We
recommend dlat you wear rubber gloves
when cleaning file oven
Soap and water Mlt norma_y do ttae
job Hea_3,spattering or spil!ove_3 may
require cleaning with a mild abrasive
cteaner, Soap-filled steel wool pads
may also be used
Donotallowfoodspiltswitha highsugaroracU
content(suchastomatoes,sauerkraut,frufljuices
orpie filling)toremainonthesurfaceTheymay
causeadullspotevenaftercleaning
If necessar); you may use an oven cleaner
Follow flae package directions
:::Donotsprayovencleanerontheelectrical
controlsandswitchesbecauseit couldcausea
shortcircuitandresultInsparkingorfire
Donot allowa himfromthecleanertobuildup
onthetemperaturesensor--itcouldcausethe
oventoheatImproperl)<(Thesensoris located
at thetopof theoven}Carefullywipethe
sensorcleanaftereachovencleaning,being
carefulnottomovethesensorasa changein
itspositioncouldaffecthowtheovenbakes
Donot .sprayanyovencleanerontheoven
door,handlesoranyexteriorsurfaceof the
oven,cabinetsorpaintedsurfacesThecleaner
candamagethesesurfaces
Household ammonia may make fl_e
cleaningjob easiel: Place 1/2 cup in a
shallow glass or potter), container in a
cold oven overnight The ammonia
fumes _{1fhelp loosen dae burned-on
gn'e_se and food
t4
Page 15

BeforeYouCallForService...
_ Troubleshooting "tips
{: :,€'_i'J Save time and money! Review the charts on the following
._pages first and you may not need to carl for service.
.,,\_
Possible Causes What ToDo
Control signals after Yon forgot to enter a bake * Press the BAKE pad and desired temperature
enteringcooking time temperature_
or delaystart
Food does not hake Oven controls hnproperiy set. • See fide Using the oven section
or roast properly Shelf position is hmorrect • See flae Using the oven section
or the shelf is not level,.
Incorrect cookw_,me or • See fide Using the oven section
cool.rare of improper size
beh]g used.,
Oven thermostat needs * See the Adjust the oven thermostat_Do it yourself!
adjustment, section
Food does not Door not open to the • See the Using the oven section
broil properly broil stop position as
recommended,
Oven contT'ols improperly seL ° Make sure you press die BROIL ttl/LO pad
hnproper _helf position * See the Broiling Guide,
being used.
Food beh_g cooked ° Use tim broiling pan and grid fl_at came _dth ),our oven
ha a hot pan. Make sure it is cool.
Cook-ware not suited * Use flae broiling pan and grid flaat came wifla your oven
for" broilh_g.
Almnhlum foil used on the ° See the Using the oven section,
the broiling pail m:td grid has
not been fltted properly m_d
slit as recommended.
In some areas the power
(voltage) may be lova
° Preheat the broil element for 10 minutes
° Broil for the longest period of time recommended
in the Broiling Guide..
Clockand timer A fuse in your home may be . Replace dae fuse or reset dae circuit breaker,
do not work blown or' fide ch-cuit breaker
tripped.
Oven controls improperly set. ° See the Using the clock and timer section
Oven light does Light bulb is loose or' defective, * Tighten or replace the bulb
not work Pad operating light is broken. ° Call for service
15
Page 16

BeforeYouCallForService...
O Troubleshooting tips
Possible Causes I/'that To Do
Oven temperature too Oven thermostat • See the Adjust the oven thermostat--Do it yourself/.
hot or too cold needs adjustment_ section
Oven willnot work A fuse in your home may • Replace flae fuse or reset the circtfit breaker
be blo_a or the circuit
breaker tripped.
Oven controls improperly set, " See the Using the oven section
"F--anda number You have a fm_cdon ° Press the CLEAR/OFFpad Allow the oven to cool for
orletter"flash error code. one houc Put the oven back into operation,
in the display If the function code "Disconnect all power to the oven for at least
repeats. 30 seconds and then reconnect power If the
function error code repeats, call for serxdce,
Display goes blank A fuse in your home may be * Replace flae fuse or reset the circuit breaker°
Display flashes Power failure. ° Reset the clock.,
Unable to get the Oven control pads were not ° The BAKE and BROIL HI/LO pads must be pressed at
display to show '°SF" pressed properly, the same time and held for 3 seconds
blown or the circuit
breaker tripped.
The clock is in the * See the Special features of your oven control section,
black-out mode,
Power outage, Power outage or surge. * Reset the clock if the oven was in use. you must reset
clock flashes it by pressing the CLEAR/OFF pad, setting the clock
and resetting any cooking function
Strong odor An odor f_rom the insulation * This is temporary,
around the inside of the
oven is normal for the first
few times the oven is used.
Fannoise
A cooling fan may
automatically turn on and
off to cool internal parts.
° This is normal, The cooling fan will turn off and on.,
/6
Page 17

GE Service Protection Plus'"
GE, a name recognized worldwide for quality and dependabiliry, offers you Set-vice
Protect.ion Plus --comprehensv, e protection on all ),our appliances--No Matter
_i4rhat Brmld!
Benefits Include:
* Backed by GE
. All brands covered
. Unlimited service calls
o All parts m_d labor costs included
- No out-of:pocket expenses
° No hidden deductibles
* One 800 number' to call
You wilt be completely satisfied with our service protection or you may request your money back
on the remaining value of your contract No questions asked.. It's that simple
Protect ),our refrigerator, dishwashel; washer and dryer, range, F'¢, VCR and much more_any brmad!
Plus daere's no extra charge for emergency serxdce and tow mondaly financing is available Even icemaker
coverage and food spoilage protection is offered You can rest easy knowing that all your valuable
household products are protected against expensive repairs
Place "yore confidence in GE and call us in the U,S, toll-free at 800-626-2224
for more infbrmation
We'll CoverAny Appliance.
Anywhere.Anytime.*
_'AI| bnmds CO\q_lrcd. ttp IO 20 yt;_l'N I.)ICl_ ill _[]_1_ continental U S
....................................................................................................................................................................................._-@.t_)gY?_................
Please place in envelope and mail to:
General Electric Company
Wm-ranty Registration Depm-tment
P.O. Box 34070
Louisville, KY 402324070
t7
Page 18

Consumer Product _ersbJp Registration
Dear Customer:
Thank you for purchasing our product and fl_ank you for placing 3,our
confidence in us. We are proud to have you as a custorner!
Follow these three steps to protect your new appliance investment:
Complete and
mail your Consumer
Pr'oduct Ownmship
Registration today.
Have the peace of
mind of knowing we
can contact you ir_
the unlikely event of
a safety modification
After mailing
the 1egistradon
below, store this
document in a safe
place, tt contains
information you
will need should
you require service.
Our service number
is 800-GE-C/_dLES
(800-452-2737)
Read your Owner's
Manual carefully,
h MIt help you
operate your new
appliance properly.
If you have questions,
or need more infor-
mation call the
GE Answer Cente_
800626 2000
Modal Number Serial Number
]hnportmlt: If you did not get a re ' trafion card with your product,
detach and return the_'_rm below to ensm'e that yore"
product is registered.
Consumer Product Ownership Registration
__._ Model Nm_ber Serial Number
M*:D M_ D Mrs D MissD
First]' I ! t t ! ! I I t I_
Name
Last
I !
_amoL__t_ J _ I I 1 _ I _ _ _ L _ I I _ _ m I
S_eet[ I
Address I I I ._L__ t I I I I I_ i • J l I I
Apt#I _ i i i f _ I I
L.__L_ A 1 J i ' I I It L! ! i I I
atyl., ., , , , ., , , , , , , ° , ,, , , , , , , , I
State _ ZipCodcl l I _ , I
Dau Placed
l,,u_! I Day [---L--J Year[_-J
Month
Phone
N.muorl, , l-l,, l-_
ltOTPOINT rich1
GenBmlElectric Company
loui_41t_ gentucky 402Z5
t8
GEAppliances
,!
Page 19

GEBuilt-inElectric OvenWarranty.
Aft warranty service provided by our Factory Service Centers
or an authorized Customer Care_ technician, For service,
call 80&GE-CARES.
........... : ' "!'"" _'
For The Period Of,': GE Will Replace, At No Charge To You:
OneYear
Fromthedate of the
originalpurchase
Ser_4ce trips to your home to teach you how to use
the producL
hnproper installation.
::Failure of the product if it is abused, misused, or used
for other thma the httended purpose or used
commercially°
Anypartof the oven which fails due to a defect in materials or workmanshil).
During fl_is fullone-year warranty, GE will also provide, free of charge, all labor
and in4aome ser_dce to replace dee defective pm-t
Replacement of house fuses or resetting of ch cult
breM_.erso
Dmnage to the product caused by accident, fire, floods
or acts of God.
hacidentat or consequential damage to personal
property caused by possible defects with this appliance.
This warranty is extended to the original purchaser and any succeeding owner for products purchased for
home use within the USA In Alaska, the warranty excludes the cost of shipping or service calls to your home_
Some states do not aflow the exclusion or limitation of incidental or consequential damages. This warranty
gives you specific legal rights, and you may also have other rights which vary from state to state Toknow
what your legal rights are, consult your local or state consumer affairs office or your state's Attorney General.
Warranter:.General Electric Company.Louisville,KY 40225
79
Page 20

Service TelephoneNumbers.
GEAnswerCenter®800.628.2000
Ttle GE Answer Center e is open 24 hours a day, 7 days a week.
In-HomeRepairService800-GE-CARES(800432-2737)
Expert GE repair sen_ce is only a phone call m_y
SpecblNeedsService800.626.2000
800-TDD-GEAC(800-833-4322)
GE offers, free of charge, a brochure to assist in planning a barrier-fiee Idtchen for persons
wit1 limited mobility
ServiceContracts800-626-2224
Purchase a GE service contract while your warrm_ty is sdlt in effect and you'll receive a
substantial discounL GE Consumer Service wil! still be there after your wan-anty expires.
PartsandAccessories800-626-2002
IndMduals qualified to ser_dced_eir own appliances can have parts or accessories sent directly
to fl_eir homes (VISA, MasterCard and Discover cards are accepted)
Instructionscontainedinthismanualcoverprocedures tobe performedbyany user.Otherservicing
generally should bereferredto qualifiedservice personnel Cautionmustbeexercised,since
improperservicing may causeunsafeoperation°
ServiceSatisfaction
If you are not sadsfied ,adth dae service you receive from GE:
First,contact dae people who sen,iced your appliance,
Next,if you are still not pleased, write all the details---including your phone ntLmber--to:
Manager, Constuner Relations
GE Appliances
Appliance Park
Louisx_dte, tC_'40225
Finally,i_),our problem is sdll not resoh,ed, write:
Major Appfiance Consumer Acdon Program
20 Nord_ Wacker Drive
Chicago, IL 60606
20 Printed in LaFayette, 6A
 Loading...