

GE JRP28BJ1BB Owner’s Manual
0
ge.com
Safety Instructions ....... 2-4
Operating lns_tructions
Clock and Timer . ........... 8
Oven .................. 5-1 7
Sabbath Feature ......... 13, 14
Self'Cleaning ........... 16, 17
Special Feanlres ......... l 0-I 2
Thermostat ............... 15
Timed Baking and
Roasting ................... 9
Care and Cleaning
Control Panel ............. 21
Door . ................... 18
(;lass Surfaces ............. 21
Heating Element ........... 20
Knob .................... 21
I,ifl-Off Oven Door . ........ 18
l[,igh t .................... 20
Oven Interior. ............. 20
Painted Surfaces ........... 21
Shelx es ................... 19
Stainless Steel Surfaces ...... 21
JRP28
Troubleshooting Tips .... 22-24
Consumer Support
Consmner Support... Back Cover
Product Registration ...... 25, 26
_\hrranty' ................. 27
Write the model and serial
numbers here:
Model #
Serial#
You can find them on a label on
the front of the lower oven behind
the oven door.
49-80479 O&07 JR
iMPORTANTSAFETYiNFORMATiON.
READALLiNSTRUCTiONSBEFOREUSING.
For your safeN the information in this manual must be followed to minimize the risk of fire or
explosion, electric shock, or to prevent property damage, personal injury, or loss of fife.
IMPORTANTSAFETYNOtiCE
The California Safe Drinking Water and Toxic Enforcement Act requires the Governor of California to
publish a list of substances known to the state to cause cancer, birth defects or other reproductive
harm, and requires businesses to warn customers of potential exposure to such substances.
The fiberglass insulation in self-clean ovens gives off a very small amount of carbon monoxide during
the cleaning cycle. Exposure can be minimized by venting with an open window or using a ventilation
fan or hood.
SAFETYPRECAUtiONS
When using electrical appflances, basic safely precaufions should be followed, including the following:
_{_:Use this appliance only tbr its intended
purpose as described in this Owner's
Manual.
_t_::Be snre your appliance is properly
installed and grounded by a qualified
mchnician in accordance ,vith tile
provided installation insunctions.
_{::Do not atmmpt to iepair or replace any
part of your oven unless it is specifically
recommended in this manual. All other
servicing should be refeiTed to a qualified
mchnician.
_fi:,:Ha_e the installer showyou die location
of tile circuit breaker or fllse. Mark it for
easy reference.
_fi:,:Before performing any service, disconnect
the oven power supply at tile household
disuibudon panel by removing the fllse or
switching off tile circuit breaken
_:_Do not leaxe children alone---children
should not be left alone or unatmnded
in an area where an appliance is in use.
They should nexer be allowed m sit or
stand on aW part of tile appliance.
_{_Do not allow anyone to climb, stand or
hang on the doon They could damag> die
o_en, or cause se_ie personal iI_jm>
q?{:_Be snle the ox>n is securely installed in a
cabinet that is firmly attached to the house
struculre. Nexer allow anyone to climb, sit,
stand or hang on tile ox>n door
_:_Nexer leaxe the oven door open when you
are not watching tile oxen.
_fi:,:Alwws kee I) combnsfible wall cox_ring,
curtains or drapes a safe distance flom
vonr o\_n.
_?{:_Alwws kee I) dish towels, dish cloths, pot
holders and oilier linens a sad distance
fron] vonr oxen.
_{_Always kee I) wooden and plastic umnsils
and canned food a safe distance away from
vonr oven.
_?{:_Teach children not to p]W with file
controls or any oilier part of die oxen.
_fi:,ii,arge scratches or impacts m glass doors
can lead to broken or shatmied glass.
2
WARNING!
SAFETYPRECAUTIONS
ge.com
_; Do not store flammable mateiia]s in
an o'_en.
_ CAUTION:Items of interest to
children should not be stored in cabinets
above an oven; children climbing on the
oven to reach items could be seiiouslv
ii_nred.
_; Never wear loose-fitting or hanging
gamlents while nsing die appliance.
Be careflll when reaching for imms stoied
in cabinets o_er file oven. Flamnlable
mateiia] could be ignited if brought ill
contact with hot surt_aces or heating
elements and may cause se\ere bnfns.
E:,IUse only d W pot holders--moist or damp
pot holders on hot snilaaces ii_ay iesult in
bums from smam. Do not let pot holders
touch hot heating elements. Do not use
a towel or other bulky cloth.
_t{;_For your safely, nexer use your appliance
for wam/ing or heating the ioom.
_t{;_Do not let cooking grease or other
flamnlable materials accumulate in
or ileal the oxen.
_{;:Do not use x_ater on gTease fires.
Nexer pick up a flaming pan.
Turn the controls off:
Flame in die oven call be smothered
completely by closing the oven door and
turning the oven off"orby nsing a mulfi-
pm])ose d U chemical or foam-type fire
extinguisher
r o
_]{;_Stand away from the oven when opening
the oxen doon Hot air or smam which
escapes can cause burrls to hands, lace
and/or eyes.
E:,IDo not heat unopened food containers.
Pressure could build up and the container
could burst, causing an irljni>
E:,IKee I) the oxen lent unobstrncted.
E:,IKee I) the oven flee flom gTease buildup.
E:,IPlace dm oxen shelf in the desired position
while the oven is cool. If shelxes must be
handled when hot, do not let pot holder
contact file heating elements.
E:,:SAllen using cooking or roasung bags in
the oven, fbllow the manufacturer's
diIecfions.
@
Do not touch die heating elements or the
interior surPace of die oven. These surPaces
may be hot enougtl to burn even thougtl
they are dark in colon Duling and after
use, do not touch, or let clothing or other
flammable materials contact any inteiior
aiea of the oxen; allow sufficient time for
cooling first.
Potentially hot surfaces inchlde oven lent
openings, surPaces near the openings,
crevices around the oxen dooi, the edges
of the window and metal trin/parts above
tile door
REMEMBER: Tile inside surPace of tile oxen
may be hot when the door is opened.
E:,INever leaxejars or cans of fi_t drippings
in or near vonr oxen.
_;:Do not store or use combustible mamrials,
gasoline or other flammable vapors and
liquids ill the vicinity of this or any other
appliance.
3
IMPORTANTSAFETYINFORMATION.
READALLINSTRUCTIONSBEFOREUSING.
WARNING!
SAFETYPRECAUTIONS
Pulling out the shelf to the stoi>lock is
a com.enience in lifting hemy' %ods.
It is also a precaution against bmns flom
touching hot snrfaces of the door or
ox.en walls.
Do not use the oxen to d_T newspapers.
[t'oxerheated, they can catch on fire.
Do not use the oxen foi a storage area.
Items stored in an oxen can iga_ite.
Do not leme paper products, cooking
utensils or food in the oxen when
not in use.
q_{::'After broiling, always rake any broiler pan
out of the oven and clean it. Leftover
gTease in a broiler pan can catch rit.e
next time you use the pan.
_{::Clean only parts listed in this Owner's
Manual.
;f; Do not use aluminum foil to line
oxen bottoms, hnproper installation
of ahm/inum foil may resuh in a risk
of electric shock or fire.
COOKMEATANDPOULTRYTHOROUGHLY...
Cookmeatandpoultrythoroughly--meat to at leastan INTERNALtemperatureof 160°Fandpoultry
toat least anINTERNALtemperatureof 180°ECookingto thesetemperaturesusuallyprotectsagainst
foodboroeilbess.
SELF-CLEANINGOVEN
_ Do not clean die door gvtsket. The door
gasket is essential for a good seal. Care
should be taken not to rub, damag.e or
mox.e the gasket.
E:.IDo not use ox.en cleaners. No comme,vial
ox.en cleaner or oven liner protective
coating of any kind should be used in or
around any part of die ox.en. Residue from
ox.en cleaners will damag> the inside of the
ox.en when the self-clean cycle is used.
q_:;Before self-cleaning the oxen, remoxe
shiny, siher-colored oxen shelxes (on some
models) and all other cookware.
_t{:;Be sure to wipe up excess spillag.e be%re
starting the self-cleaning operation.
;_i:,:If the self-<'leaning mode malfunctions,
mrn the ox.en off and disconnect
die power supply. Have it serviced by
a qualified mchnician.
READANDFOLLOWTHISSAFETYINFORMATIONCAREFULLY.
SAVETHESEINSTRUCTIONS
4
Usingthe ovencontrols, gecom
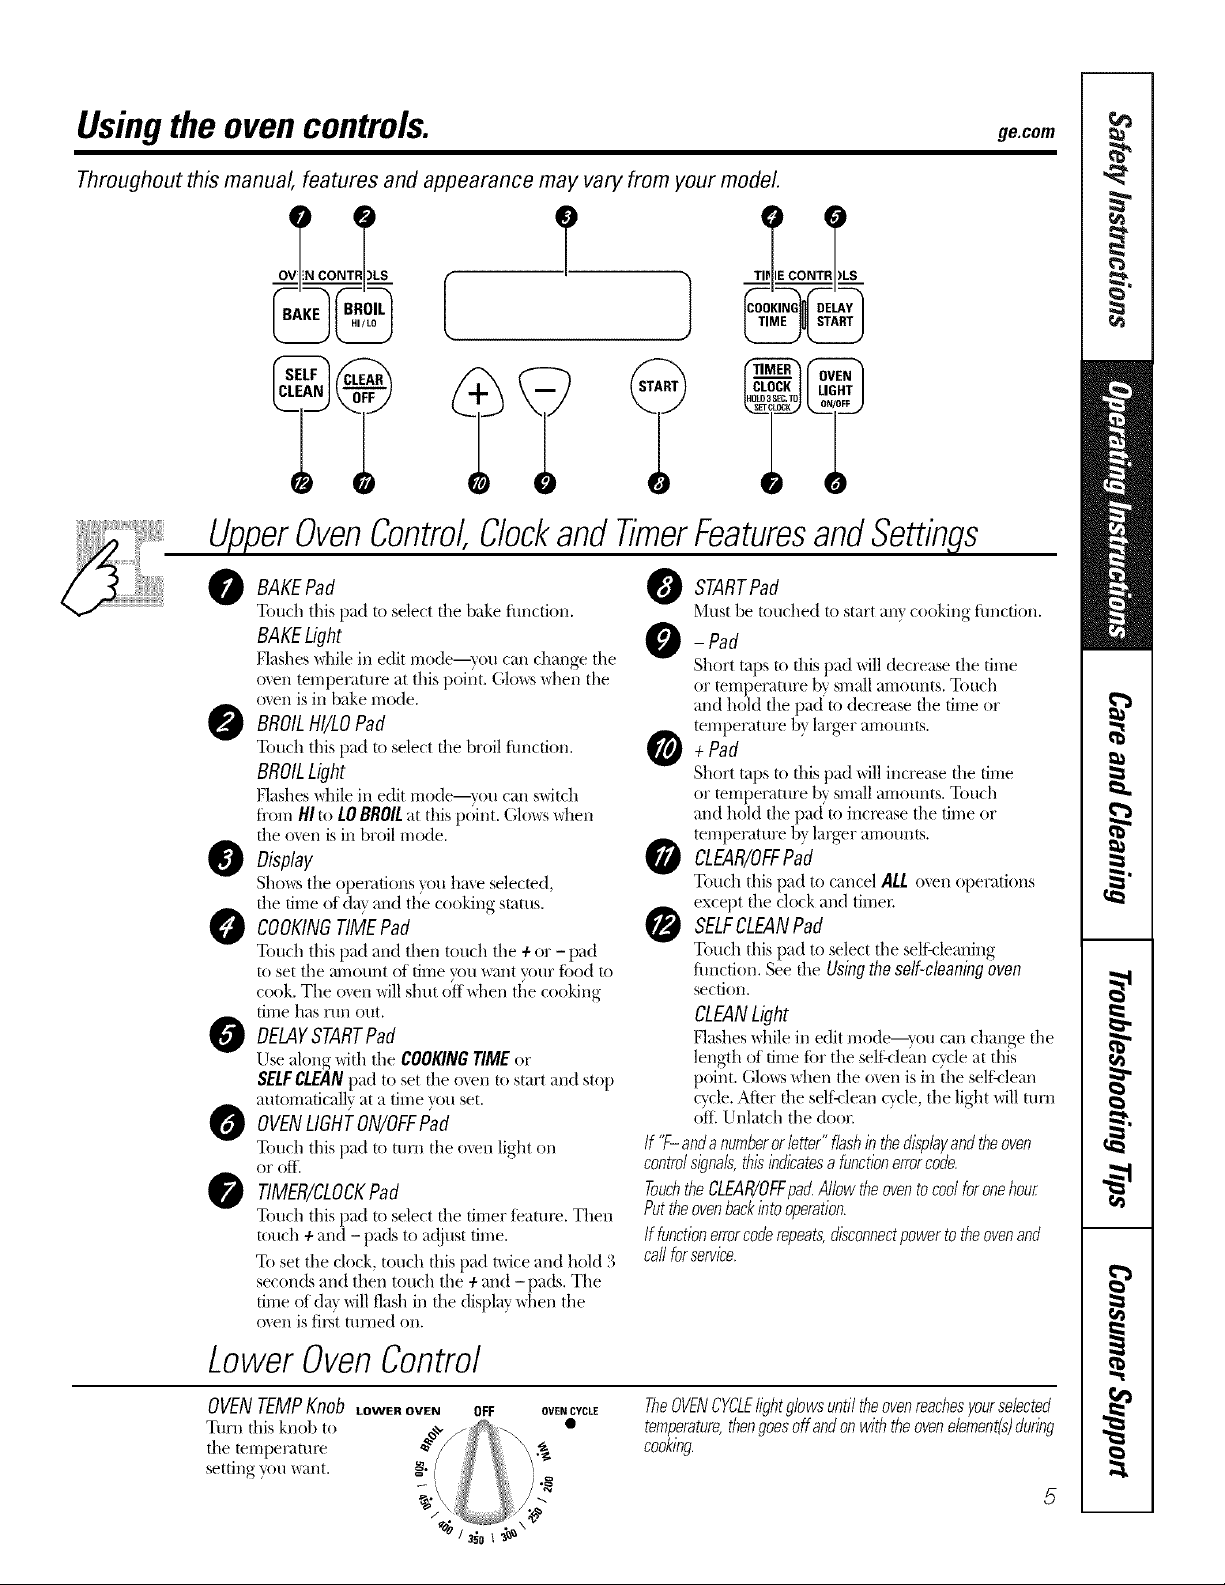
Throughout this manual, features and appearance may vary from your model.
BAKE BROIL
??
UpperOvenControl,ClockandTimerFeaturesandSettings
BAKEPad
Touch this pad to select the bake fimcfion.
BAKELight
Flashes \dlile ill edit mo(le--_ou can change tile
o_en temperatul_ at this poi_m Glo_:s when tile
o_en is ill bake nlode.
BROILHI/LOPad
Touch this pad to select file broil function.
BROILLight
Flashes \dlile iI1 edit 1T|odeI\Oll c}lI/switch
fl'on/HI to LOBROILat this p(hnt. Glo_s \d_en
file o_en is ill broil mode.
O Display
Sl/o_:s the open_fions you have selected,
the time of dat and tile cooking slams.
COOKINGTIMEPad
Touch this pad and then touch tile + or - pad
to set tile kll//otlnt of time you want your toed to
cook. Tile oven will shut off \_hen tf/e cooking
time has run out.
O DELAYSTARTPad
Use along with tile COOKINGTIME or
SELFCLEANpad to set file o_en to start and stop
automatically at a tin/e you set.
O OVENLIGHTON/OFFPad
Touch this pad to turn tile ()\ell light on
or O___
O TIMER/CLOCKPad
Touch this pad to select the timer teatul_. Titan
touch +and - pads to at!jUst tin/e.
To set tile clock, touch this pad t\Jce and hold 3
seconds and then touch tile +and - pads. Tile
time of dm will flash ill fl_e display \allen tile
o_en is fil_t turned on.
O STARTPad
MtlSt be touched to start an} cooking _'t/I/('dOI/.
- Pad
Short taps to this pad will decrease tile fin/e
or temperature b_ small amount.s. Touch
and hold the pad u/decrease file time or
tel// l)erature bx, larger, alllOtllltS
O +Pad
Short taps to fllis pad will increase fl_e dine
or mmperaulre b? small amount.s. Touch
and hold tile pad u/increase tile fin/e or
[el// })erature bx, larger, alllOUil[s
O CLEAR/OFFPad
Touch this pad to cancel ALL men operations
except the clock and timel:
SELFCLEANPad
Touch this pad to select tile seltkleaning
fimcfion. See fl_e Usingtheself-cleaning oven
section,
CLEANLight
Iqashes \dlile ill edit n/ode--?ou can change tile
length of time tar the selL:clean cycle at this
point. Glo_:s when the o_en is ill tl/e sell:clean
cycle. After d_e seltMean wcle, the light will turn
(;ttl Unlatch the door
If % anda numberorletter" flashinthedisplayand theoven
controlsignals,thisindicatesafunctionerrorcode.
TouchtheCLEAR/OFFpad.Allowtheoventocoolforonehour
Puttheovenbackinto operation.
If functionerrorcoderepeats,disconnectpowerto theovenand
callforservice.
Lower OvenControl
OVENTEMPKnob LowE.OWN
Turn dlis knob to
fl_e temperatulv
setting you want. =_.
_ob
OFF OVEN CYCLE
TheOVENCYCLElightgbwsuntiltheovenreachesyoursebcted
temperature,thengoesoffandonwiththeovenelement,s)during
cooking.
Usingthe oven.
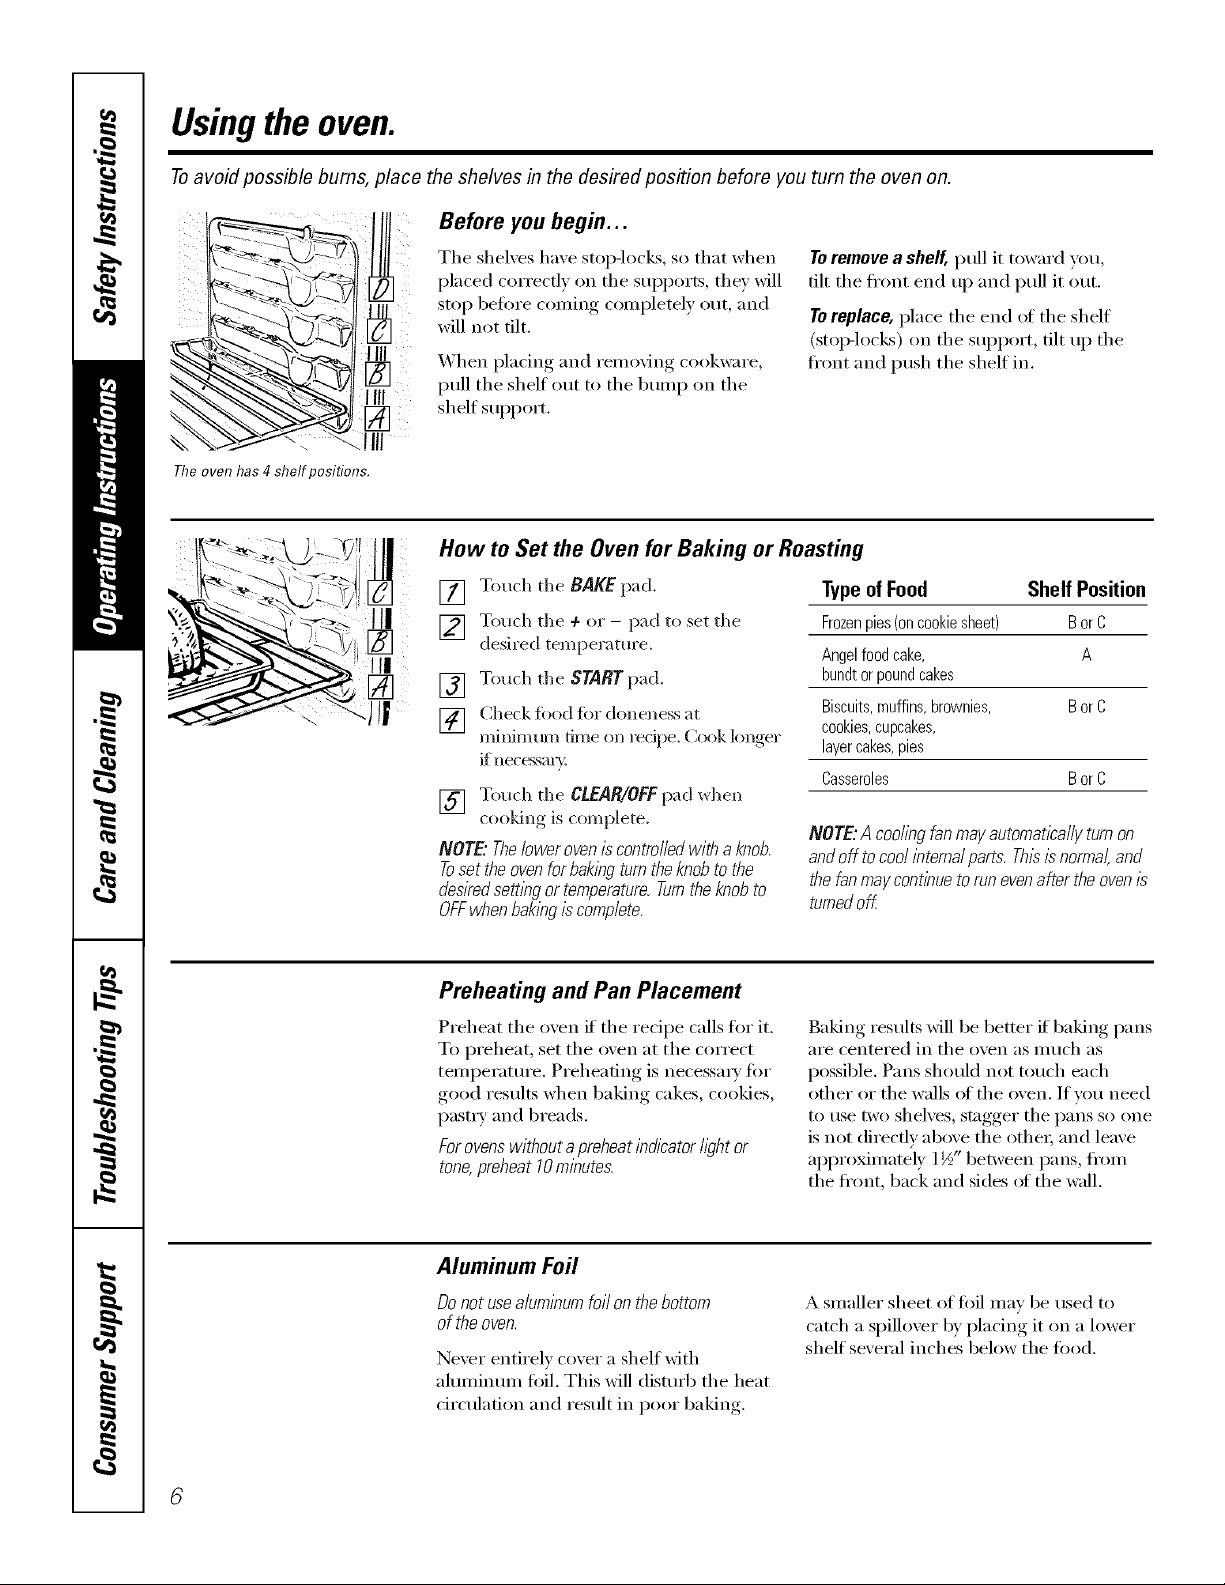
Toavoid possible bums, place the shelves in the desired position before you turn the oven on.
Before you begin...
The shelves have stop-locks, so that when
placed correctly on the supports, they will
stop before coining conlpletely out, and
will not tilt.
_._hen placing and reino_ing cookware,
pull the shelf ()/it to the bunlp on the
shelf support.
Illl
The oven has4 shelf positions.
How to Set the Oven for Baking or Roasting
To remove a sheff, pull it towaM you,
tilt the fl'ont end up and pull it out.
To replace, place the end of the shelf
(stoi>locks) on the support, tilt up the
fi'ont and push the shelf in.
[] Touch the BAKE pad.
] Touch tile ÷ or - pad to set tile
desired temperature.
[] Touch tile START pad.
[] Check fi)od for aloneness at
minim tall time (m recil _ " ( ;o( )k l( )nger
if necessm):
[] Touch tile CLEAR/OFFpad when
cooldng is complete.
NOTE"Theloweroven is controlled with aknob.
Toset theovenforbaklbgturn theknobto the
desiredsett/bgor temperature,fiJrntheknob to
OFFwhen baklbgi_ complete.
Preheating and Pan Placement
Preheat tile ()veil if tile recipe calls for it.
To preheat, set tile oven at tile correct
teinperature. Preheating is necessaiw for
good results when baking cakes, cookies,
pastI T and breads.
Forovenswithout a preheatindicator fl)ht or
tone,preheat 10minutes.
Typeof Food Shelf Position
Frozenpies(oncookiesheet) BorC
Angelfoodcake, A
bundtorpoundcakes
Biscuits,muffins,brownies, BorC
cookies,cupcakes,
layercakes,pies
Casseroles BorC
NOTE:A cool/#gfanmayautomatballyturnon
andofftocoolbterna/parts.This/snornTal,and
thefanmaycent/huetorunevenaftertheoven/_
turnedoff.
Baking results will be better if baking pans
aI'e centei'ed in tile ()veil as Illtlch _lS
possible. Pans should not touch each
other or tile walls of tile oven. If you need
to use two shelves, stagger the pans so one
is not directly above tile otheI; and leave
approMniately 1½" between pans, fl'oni
the ti'ont, back and sides (ff the wall.
Aluminum Foil
Do not usealuminum foilon thebottom
of the oven.
Never entirely cover a shelf with
ahmlinuni foil. This will disturb tile heat
circulation and result in poor baking.
A sinaller sheet of ti)il nlav be used to
catch a sl)illox er bv,l)lacing, it on a lower
shelf several inches below the toocl.
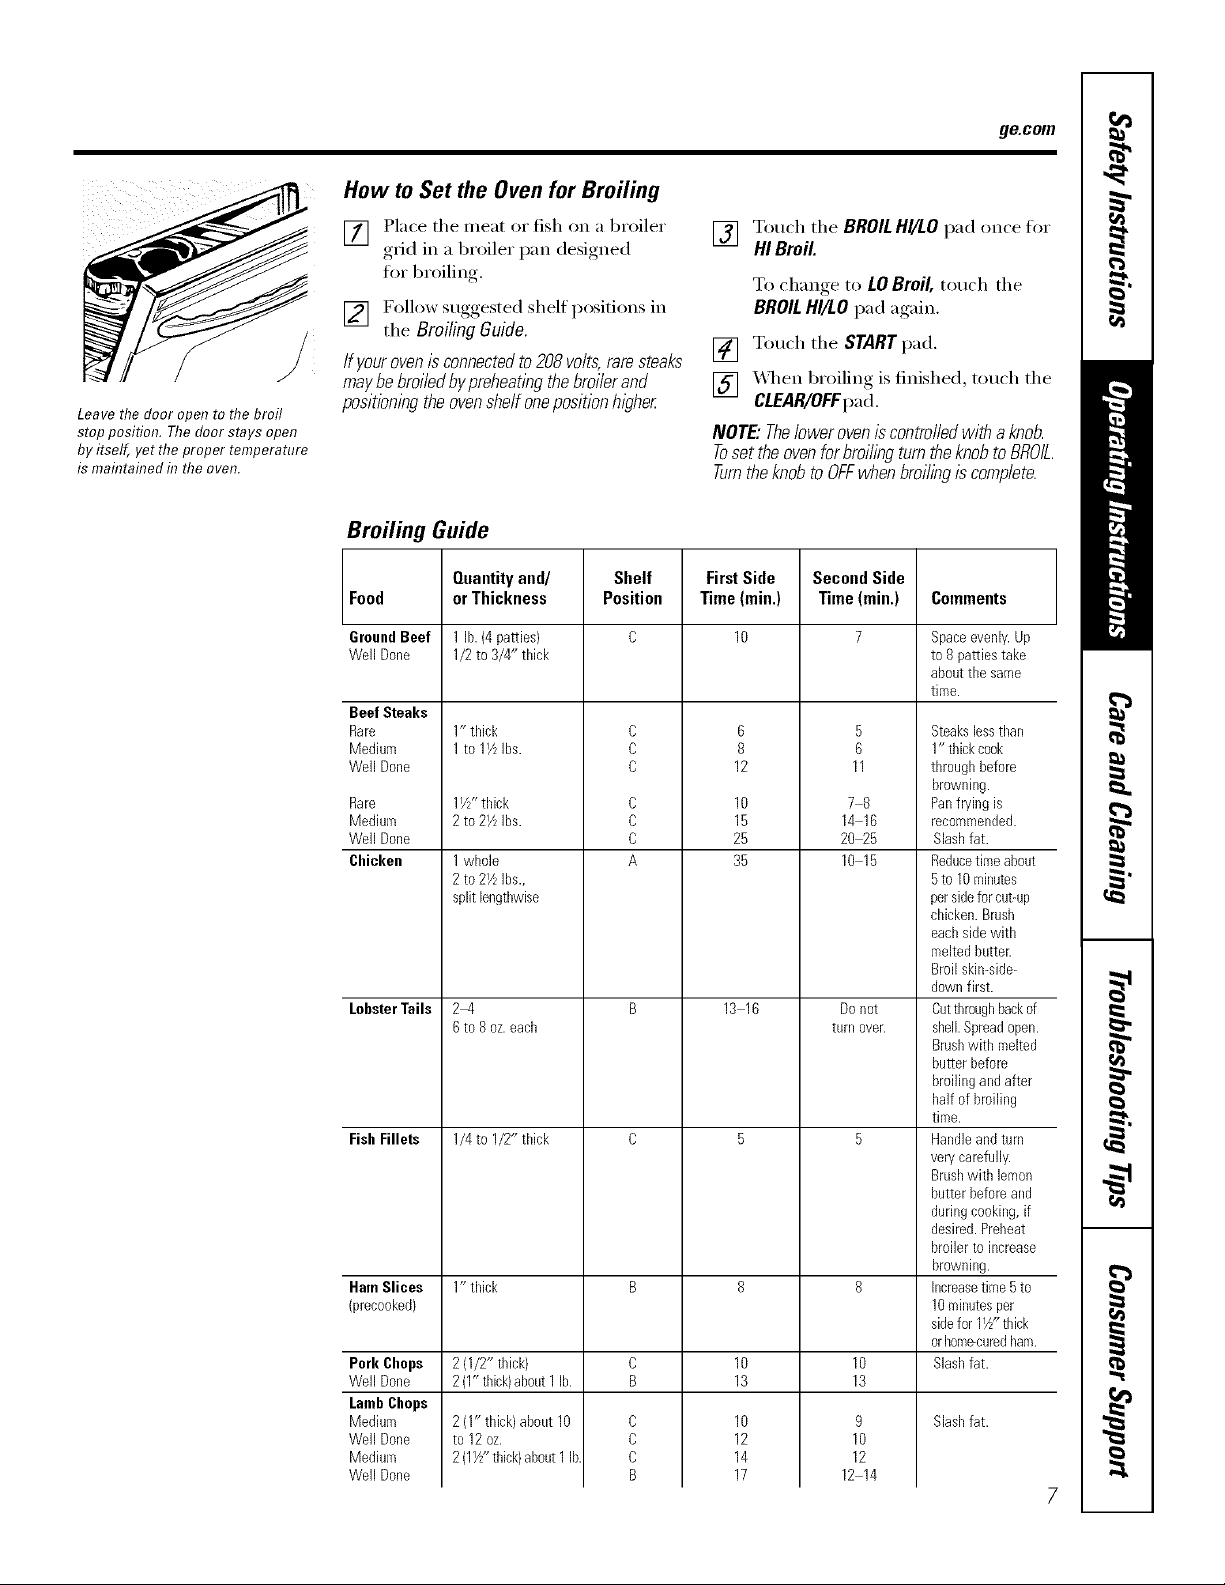
How to Set the Oven for Broiling
ge.com
Leave the door open to the broil
stop position. The door stays open
by itself, yet the proper temperature
is maflTtaflTedf17the oven.
[] Place the meat or fish on a broiler
,grid in a broiler I)an designed,
for broiling.
[] Follow suggested shelf positions in
the Broiling Guido.
If your oven is connected to 208 volts,rare steaks
may be broiled bypreheatingthe broiler and
pos/tioning the oven shelf one pos/t/on higher
[] Touch the BROILHI/LOpad once for
HIBroil
To change, to LO Broil, touch the
BROIL HI/LO pad again.
Touch the START pad.
[]
_4_en broiling is finished, touch the
[]
CLEAR/OFFpad.
NOTE."Theloweroveniscontrolledwithaknob.
TosettheovenforbroilingturntheknobtoBROIL.
TurntheknobtoOFFwhenbroilingis complete.
Broiling Guide
Food or Thickness Position Time (rain.) Time (min.) Comments
GroundBeef 1 lb.(4 patties) C 10 7 Spaceevenly.Up
Well Done 1/2 to 3/4" thick to8 pattiestake
Beef Steaks
Rare
Medium
Well Done
Rare
Medium
Well Done
Chicken
LobsterTails
Fish Fillets
Ham Slices 1" thick B 8 8
(precooked)
Pork Chops
Well Done
LambChops
Medium
Well Done
Medium
Well Done
Quantity and/ Shelf First Side Second Side
1" thick
1to 11/LIbs.
1I/2"thick
2to 21/LIbs.
1whole
2to 2½ibs.,
splitlengthwise
24
6to Boz.each
1/4to I/2" thick
2(1/2" thick) C 10 10
2(1"thick)about1lb. B 13 13
2{1" thick)about10
to 12oz.
1
2(1½"thick)about1lb.
C
C
C
C
C
C
A
C
C
B
6
8
12
10
15
25
35
1316
10
12
14
17
5
B
11
78
14 16
20_5
10 15
Donot
turn over.
9
10
12
12 14
aboutthe same
time.
Steakslesstitan
1" thickcook
throughbefore
browning.
Panfryingis
recomroended.
Slashfat.
Reducetimeabout
5to 10minutes
persideforcut-up
chicken.Brush
eachsidewith
meltedbutter.
Broilskin-side-
downfirst.
Cutthroughbackd
shell.Spreadopen.
Brushwith melted
butter before
broilingandafter
half of broiling
time.
Handleandturn
verycarefully.
Brashwith lemon
butterbeforeand
duringcooking,if
desired.Preheat
broilerto increase
browning.
Increasetime5to
10minutesper
sidefor 1½"thick
orhomemuredham.
Slashfat.
Slashfat.C
Usingthe clock and timer.
Not all features are on all models.
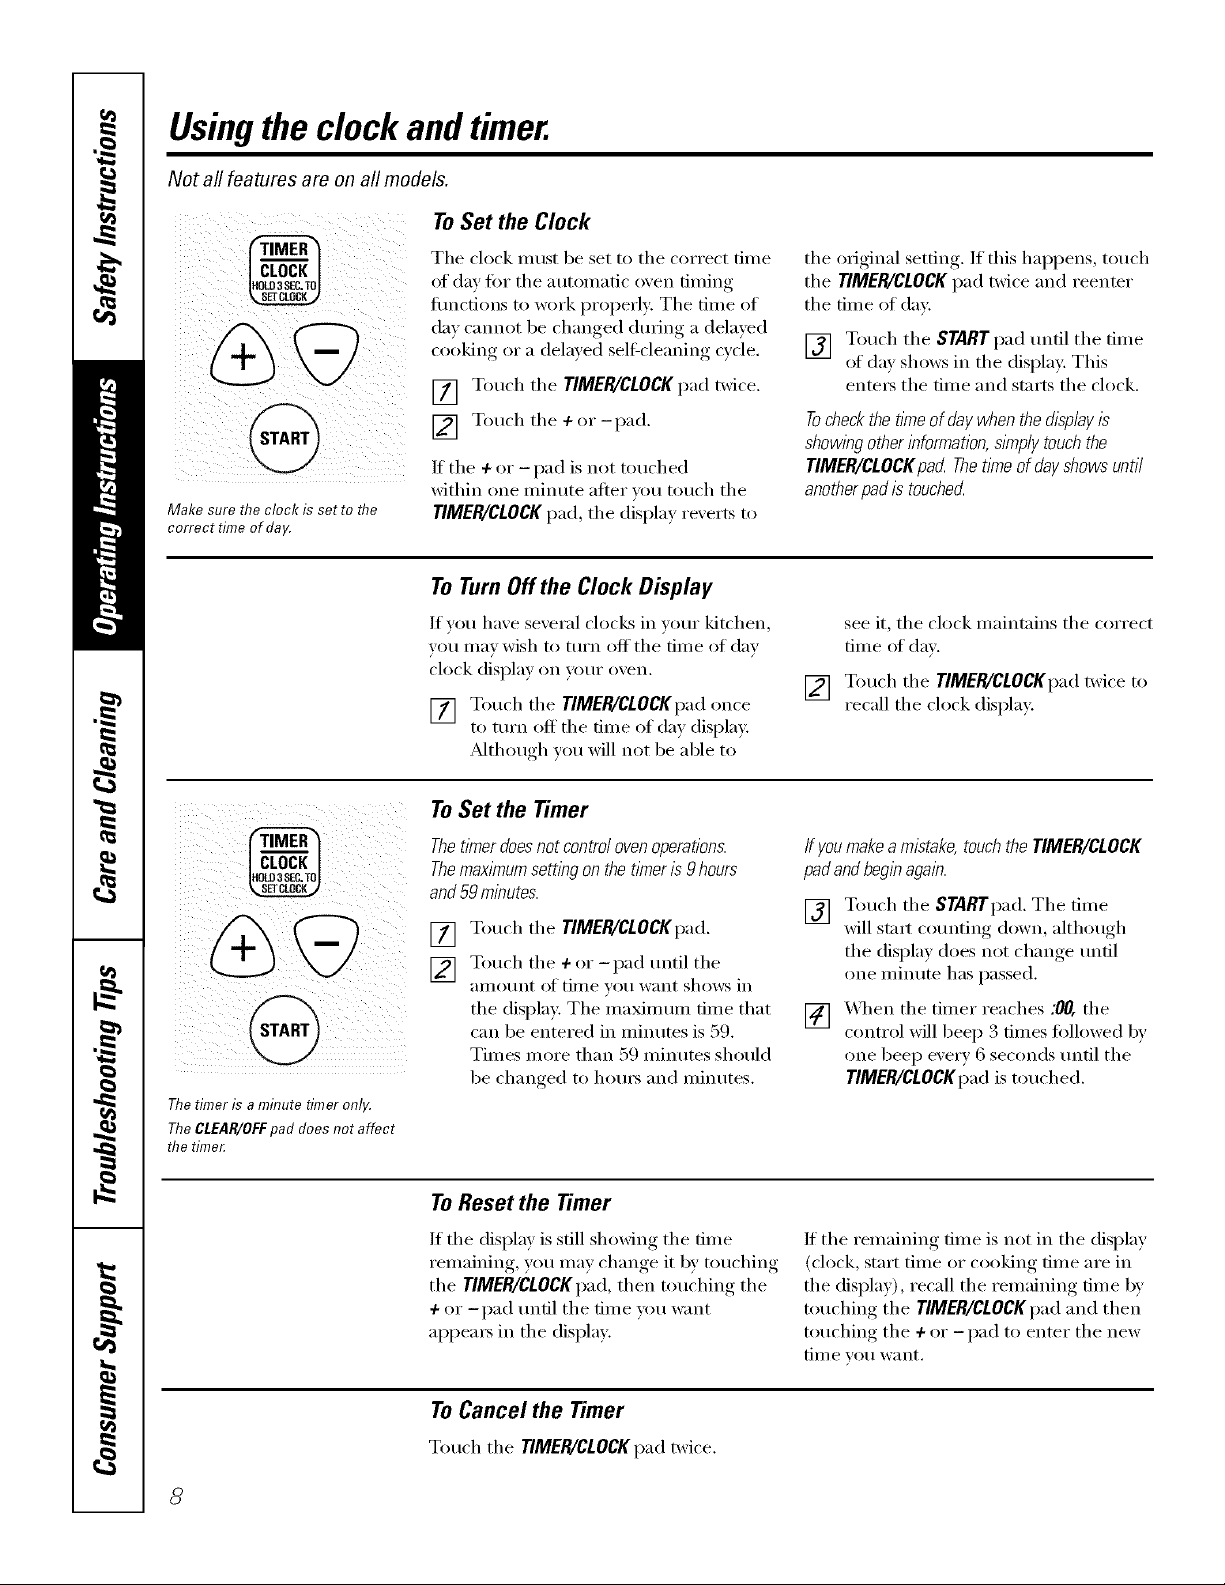
To Set the Clock
Make sure the clock is set to flTe
correct time of day.
Tile clock must be set to tile correct time
of day fin" tile autonmtic oven tinting
timcfions to work properly: Tile time of
day cannot be changed durhlg a delayed
cooking or a delayed self-cleaning cycle.
[] Touch tile TIMER/CLOCKpad twice.
[] Touch tile ÷ or-pad.
If tile + or - pad is not touched
within one minute after )ou touch tile
TIMER/CLOCKpad, tile display rexerts to
ToTurn Offthe Clock Display
If you have several clocks in yet:u" kitchen,
you may wish to turn off tile dine of day
clock display on your oven.
[] Touch tile TIMER/CLOCKpadonce
tO ttlI'n off tile time of day display.
Mthough you will not be able to
To Set the Timer
tile original .settin ,_ If this happens, touch
tile TIMER/CLOCKpad t\dce and reenter
tile time of day.
[] Touch tile START pad until tile time
of day shows in tile display: This
ente_ tile time and starts tile clock.
Tocheckthetimeof daywhenthedisp&yis
showl))gotherinformation,simplytouchthe
TIMER/CLOCKpad Thetimeofdayshowsuntil
anotherpadis touched
see it, tile clock maintains tile correct
time of din.
[] Touch tile TIMER/CLOCKpad twice to
recall tile clock display:
Thetimer is a minute timer only.
TheCIEAR/OFFpad does not affect
the time_
ThetlYnerdoes notcontrol ovenoperations.
ThemaxlYnumsemng onthe timeris 9 hours
and59 minutes.
Touch tile TIMER/CLOCKpad.
[]
Touch tile + or-pad until tile
[]
_lIllO/lnt Ol_ tiIlle FOil W_lIlt shows in
tile display. Tile maximum time that
can be entered in minutes is 59.
Times more than 59 minutes should
be changed to hom_ and minutes.
To Reset the Timer
If tile display is still showing tile time
remaining, you may change it by touching
tile TIMER/CLOCKpad,then touching tile
+ or -pad until tile time um want
appea_ in tile display:
ToCancel the Timer
Ifyoumakeamistake,touchtheTIMER/CLOCK
padandbeg1))agalk
Touch tile STARTpad. Tile time
[]
will staxt counting down, althouoh
tile displa) does not ch'ln,,e,_ tmtil
one minute has passed.
X4q/en tile timer reaches :00, tile
[]
control will beep 3 times tollowed by
one beep exer_ 6 seconds tmfil tile
TIMER/CLOCKpad is touched.
If tile remaining time is not in tile display
(clock, start time or cooking time are in
tile display), recall tile remaining time by
touching tile TIMER/CLOCKpad and then
touching tile + or -pad to enter tile new
[iII/e vo/i w_l nt.
Touch tile TIMER/CLOCKpad twice.
8
Usingthe timedbakingand mastingfeatures.
(These features are not available for the lower oven.) (on some models)
ge.com
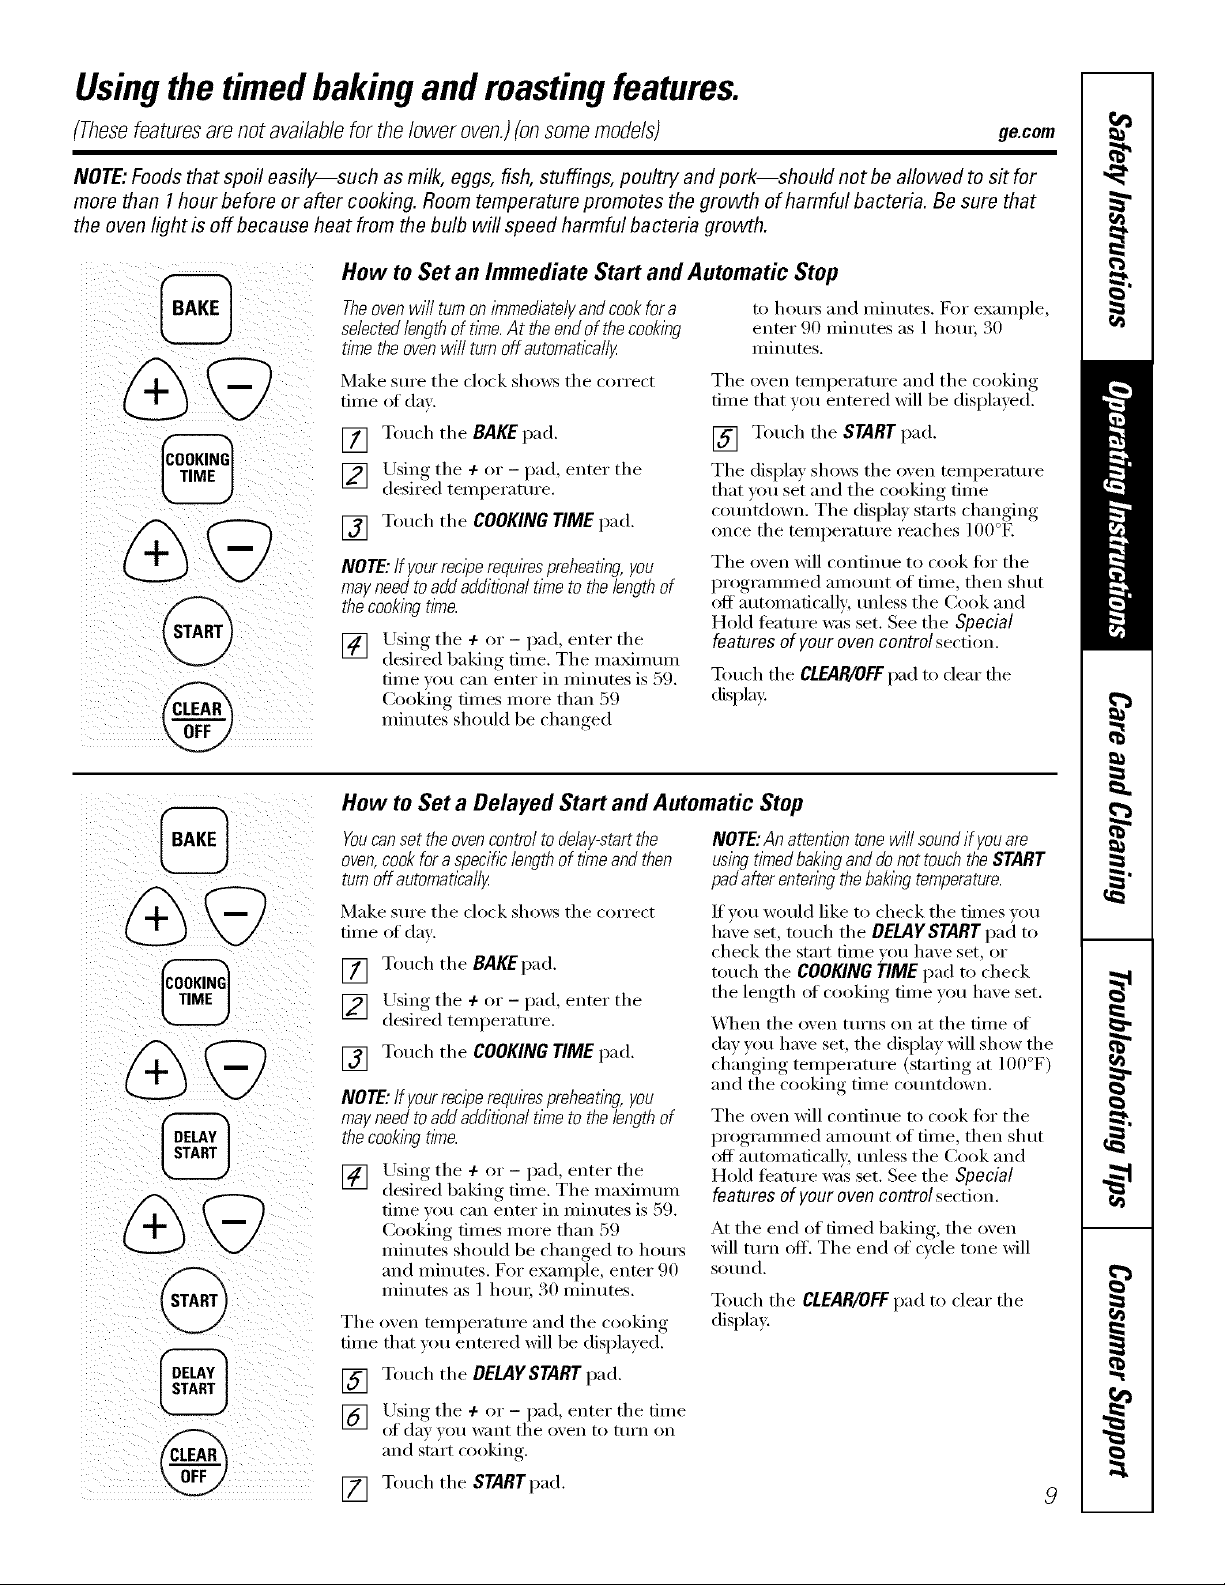
NOTE:Foods that spoil easily--such as milk, eggs, fish, stuffings, poultry and pork--should not be allowed to sit for
more than 1hour before or after cooking. Room temperature promotes the growth of harmful bacteria. Be sure that
the oven light is off because heat from the bulb will speed harmful bacteria growth.
How to Set an Immediate Start and Automatic Stop
Theoven will turnon lYnmediatelyand cookfor a
selectedlengthof tlYne.At the endof thecooking
time the ovenwill turn off automatically
Make sm'e the clock shows the correct
time of day.
[] Touch the BAKEpad.
[] Using the + or - pad, enter the
desired temperatm'e.
[] Touch the COOKING TIME pad.
NOTE:If yourreciperequkespreheatl)_g,you
mayneedto addadditionaltimeto thelengthof
thecookingtime.
Llsing the 4-or - pad, enter the
[]
desired baking time. Tile maximmn
time _ou can enter in minutes is 59.
Cooldm, times more than 59
minutes should be chan,,ed
to hom_ and minutes. _%r example,
enter 90 minutes as 1 hem, 30
minutes.
The oven temperatm'e and the cooking
time that w_u entered will be displayed.
[] Touch the START pad.
Tile display sho_vs tile oven temperatm'e
that you set and tile cooking time
co/mtdown. The display starts changing
once tile temperatm'e reaches lO0°E
Tile oven will confintle to cook for tile
programmed alnount of tilne, then shut
off automatically; tmless the Cook and
Hold teattu'e was set. See the Special
features of your oven control section.
Touch tile CLEAR/OFFpad to clear die
display:
How to Set a Delayed Start and Automatic Stop
Youcanset theoven control to delay-startthe
oven,cook for a specific lengthof time andthen
turnoff automatlca//g
Make sm'e tile clock shows tile correct
time of day.
[] Touch tile BAKEpad.
Using tile 4- or - pad, enter tile
[] desi_2ed temperatm'e.
[] Touch tile COOKINGTIME pad.
NOTE:If yourreciperequkespreheatl)_g,you
may need to add addiflona/timeto the length of
the cookl))gtime.
Using tile 4- or - pad, enter tile
[]
desired baking time. Tile maximmn
time xou can enter in minutes is 59.
Cook]n,, times more than 59
minutes should be changed to hom_
and minutes. For example, enter 90
minutes as 1 horn; 30 minutes.
Tile oven temperature and tile cooking
time that _ou entered will be displayed.
[] Touch tile DELAYSTART pad.
NOTE:An attention tone will soundif youare
using timed bakinganddo nottouch the START
padafter enten))gthe bakl))gtemperature.
If you would like to check tile times you
haxe set, tot Ich th e DELAg START I)',1d t()
check tile start time _ou haxe set, or
touch tile COOKING TIME pad to check
the length of cooking time you haxe set.
"_3/en tile oven turns on at tile time of
da) )ou haxe set, tile displa) will show tile
changing temperatm'e (starting at 100°F)
and tile cooking time co/mtdown.
Tile oxen will continue to cook for tile
l)I'Ogl'alllI//, ed all/o/Int of till/e, th ell sh tit
off automaticall), tmless the Cook and
Hold teatm'e was set. See tile Special
features of your oven control section.
At tile end of timed baking, tile oven
will tm'n off. Tile end of c',cle tone will
So//nd,
Touch tile CLEAR/OFFpad to clear tile
display.
[] Using tile 4- or - pad, enter tile time
of (lay _o/I _V}lIlt tile o_en to tllI'n on
and start cooking.
[] Touch tile STARTpad.
9
 Loading...