

!
❑
Induction Cooktop
●
Safety instructions ....................3, 4
p
Problem
More questions
,,
GE Answer Center” 800.626.2000
soker...............................l6
?...call
Q!!l
..&j@:
;,. :..<-,.
. .
‘,
,
El!
Operating Instructions, Tips
+
Control Panel
,.,, ,,, ,,$..
Cookware .........................................................8
Features ........................................................5, 6
.
Induction Cooking .....................................5, 7
,.
Vent Grille . . . . . . . . . . . . . . . . . . . . . . . . . . . . . . . . . . . . . . . . . . . . . . . . . . . . . . . 10
...................................................6
~,~$~
Care and Cleaning
❑
@
a
Installation . . . . . . . . . . . . . . . . . . . . . . . . . . . . . . . . . . . .
11-15
Consumer Services
Model and Serial Number Location ...........2
Warranty ........................................Back Cover
Models JP392R
JP393R
............................m
JP692R
JP693R
...................l9
-.
GE Appliances
HELP US HELP YOU...
Before using your cooktop,
read this book carefully.
It
is intended to help you
operate and maintain your new
cooktop properly.
Keep it handy for answers to
your questions.
If you don’t understand something
or need more help, write (include
your phone number):
Consumer Affairs
GE Appliances
Appliance Park
Louisville, KY 40225
IF YOU NEED SERVICE...
To obtain service, see the
Consumer Services page in the
back of this book.
We’re proud of our service and
want you to be pleased. If for some
reason you are not happy with the
service you receive, here are three
steps to follow for further help.
Write down the model
and serial numbers.
You’ll find them on a label
on the bottom of the cooktop.
These numbers are also on the
Consumer Product Ownership
Registration Card that came with
your cooktop. Before sending in
this card, please write these
numbers here:
Model Number
Serial Number
Use these numbers in any
correspondence or service calls
concerning your cooktop.
FIRST, contact the people who
serviced your appliance. Explain
why you are not pleased. In most
cases, this will solve the problem.
NEXT, if you are still not pleased,
write all the details-including
your phone number—to:
Manager, Consumer Relations
GE Appliances
Appliance Park
Louisville, KY 40225
If you received
a damaged cooktop...
Immediately contact the dealer (or
builder) that sold you the cooktop.
Save time and money.
Before you request
service...
Check the Problem Solver in the
back of this book. It lists causes of
minor operating problems that you
can correct yourself.
FINALLY, if your problem is still
not resolved, write:
Major Appliance Consumer
Action Panel
20 North
Chicago, IL 60606
Wacker
Drive
2
When using
the
following:
●
Use thiseooktoponly foritsintended
described in this Use
* Be sure your appliance
ekwtrical
appliances,
and
basic
safety
useas
Care guide.
is
properly installed and
grounded by a qualified technician in accordance with
the provided installation instructions.
●
This cooktop uses electromagnetic energy
can
interfere with the operation of some
pacemakers.
pacemaiwr near
s
Do not bring items that are sensitive to magnetism
close
to the cooking unit when it is in operation.
Items such
magnetic tapes may be damaged by the induction
coils used inside.
* Do not operate an AM radio or
TV set near your cooktop.
produce interference in a radio or interfere with the
operation of a wireless remote control. They may
cause ceiling fans to slow down.
●
Do not operate the cooktop if the glass is broken.
Call for service immediately if this happens.
lkfor~ using the
it
has
adequate interference
as watches, credit cards, tickets and
cooktop, make
remcite-controlhd
The induction coils may
which
sure any
prot~ctiom
also
* Do
not
leave
children
the
cooktop utitiwhopration.
seriously burned.
* To
prevent
the cook$op
accidentally, it is a good idea to use
feature
when you
are finished cooking.
e Do not aIlow anyone
the
cooktop.
@
CAUTION: ITEMS OF INTEREST TO
CXDLDREN
SHOULD NOT BE
CABINETS ABOVE THE
alone
or unattended where
from being
to
climb
or stand
COOKTCIP-CHILDREN
T’beycouldbe
turned
the
lockout
on
STORED
IN
on
CLIMBING ON THE COOKTOP TO REACH
THEM
COULD BE SERIOUSLY INJURED.
●
Do not allow water or other
iiquids or
grease to
remain on the cooktop or control panel.
●
Do not
place
any spoons or other stirring utensils,
especially metal ones, on a cooking surface when it
is in use. They
may become hot and could cause burns.
Coating
●
Do not
assume that you know how to operate all
parts
of the cooktop.
differently from your previous cooktop.
Induction cooking may work
*Do
not
place or store items on top of the cooktop
when it is not in use.
*As
the
cooking pan
the
cooking surface.
the
surface-they may melt or warp. And do not touch
the surface until it has cooled.
gets
hot, it transmits heat to
Do not
placo
plastic materials
cm
Q
Use proper cookware type and size. See
section.
●
Never wear loose-fitting or hanging garments while
using the
ignited if brought in contact with hot surfaces and may
cause severe burns,
Q
Use
on
hot
use a towel or other bulky cloth in place of a pot holder.
●
Do
●
To minimize the
flammable materials, and spillage,
should be turned toward the
without extending over nearby cooking surfaces.
●
Do not obstruct the rear airflow grills. Do not
put anything in
over into them.
●
Carefully watch foods being
appIiance.
only
dry potholders-moist or damp potholders
surfaces may
not
place
FlammabIe
result
material could be
in
burns from steam, Do not
cookware on the touch
possibility
them or allow anything to spill
of
burns,
container handles
canter
of the cooktop
fried
at high setting.
(continued
Cookware
mmtrol
panel.
ignition of
nextpczge)
IMPORTANT SAFETY INSTRUCTIONS
(continued)
●
Foods
for
frying
should be as dry as possible, Frost
on
frozen foods or moisture on
hot fat to bubble up and
●
Use least possible
over
amount
shallow or deep-fat frying.
fat
can
cause spillovers when food is added,
#
If a combination of
frying, stir together
oils or
before
melt slowly,
●
Always heat fat slowly, and watch as it heats.
s
Use deep-fat thermometer whenever possible to
prevent overheating fat beyond the
●
Do not use water on grease fires.
Never
power, then smother flaming pan by
covering pan completely with well-fitting lid, cookie
sheet or flat tray.
put
out
by covering with baking soda or, if available,
a multi-purpose dry
extinguisher.
●
When flaming foods, turn the exhaust fan off.
pick up a framing pan. Turn
Fknning grease
chemicai
The fan, if operating, may spread the flame.
*
Don9t
heat unopened food containers on
cooktop. Pressure could
could burst causing an injury.
*
Do not use aluminum foil or aluminum cookware
on the cooktop. Use only
in this book.
●
When cooking pork,
internal temperature of at least
always
that, in the remote possibility that trichina maybe
present in the meat, it will be killed and the meat will
be safe to eat.
fresh foods
sides of pan.
of fat
Filikg
fats
for
will be
can
effective
the
pan too full of
used
heating, or as fats
smoking
point,
outside a pan
or foam-type fire
your
build Hp and
coakware that
the container
is
deseribed
cook the meat to an
170°F,
This assures
cause
in
off
can
be
your cooktop unless it is specifically recommended
in this book.
a
Before perfkmming any
THE
HOUSEHOLD DISTRIBUTION PANEL BY
REMOVING THE FUSE OR SWITCHING
THE
●
replacing any parts.
Cleaning
.
Clean
e Keep coob’ng unit ciean
of grease or
*
Before cleaning, lock the control panel to prevent
the
accidentally.
oniy
parts
listed
in this Use and Care guide.
spiilovers
which may ignite.
and free of
accmnulations
induction coils from being activated
See
Features section.
* Clean
cooking
Heat from hot cookware may have
transferred
surfaces with caution.
to the coaktop.
If a
wfit
sponge or cloth is used to wipe spills on a hot cooking
area, be careful to avoid burns from steam. Some
cleansers can produce noxious fumes if applied
a
hot
surface.
u
Do
not
scratch cooktop or control panel or use
any abrasives on
them,
to
IfYau Need Service
●
Read
‘6 The Problem
●
Don’t
attempt to repair or replace any part of
All other servicing should be referred to
quaiified
technician.
C(XIKTOP
CIRCUIT
BREAKER.
Allow the cooktop to cool
Solver”
in
this book.
service, DISCONNECT
POWER SUPPLY AT THE
CWF
before
removing or
●
Never leave cooking unit unattended at high
heat setting.
Boikwer
causes smoking and greasy
spillovers. Boil-dry situations can cause permanent
damage to cookware.
SAVE THESE
INSTRUCTIONS
—
—
When you press ON, select a power level and
center a cast iron or steel pan on the cooking
surface, the induction coil circuit detects the
pan and allows the induction coil to be activated.
This high-frequency coil, located just below the
cooking surface, produces a magnetic field that
causes the electrons in the ferrous metal pan to
vibrate, which produces heat.
The pan begins to heat immediately and, in turn,
heats the contents of the pan.
The cooking surface itself does not heat. The only
heat produced is that which is transferred from the
cooking pan, and no heat is generated unless a pan
is placed on the cooking surface.
FEATURES OF YOUR COOKTOP
The power comes on right away, for precise
cooking control. No time is lost waiting for the
cooking unit to heat. And no cool-down time is
required after cooking.
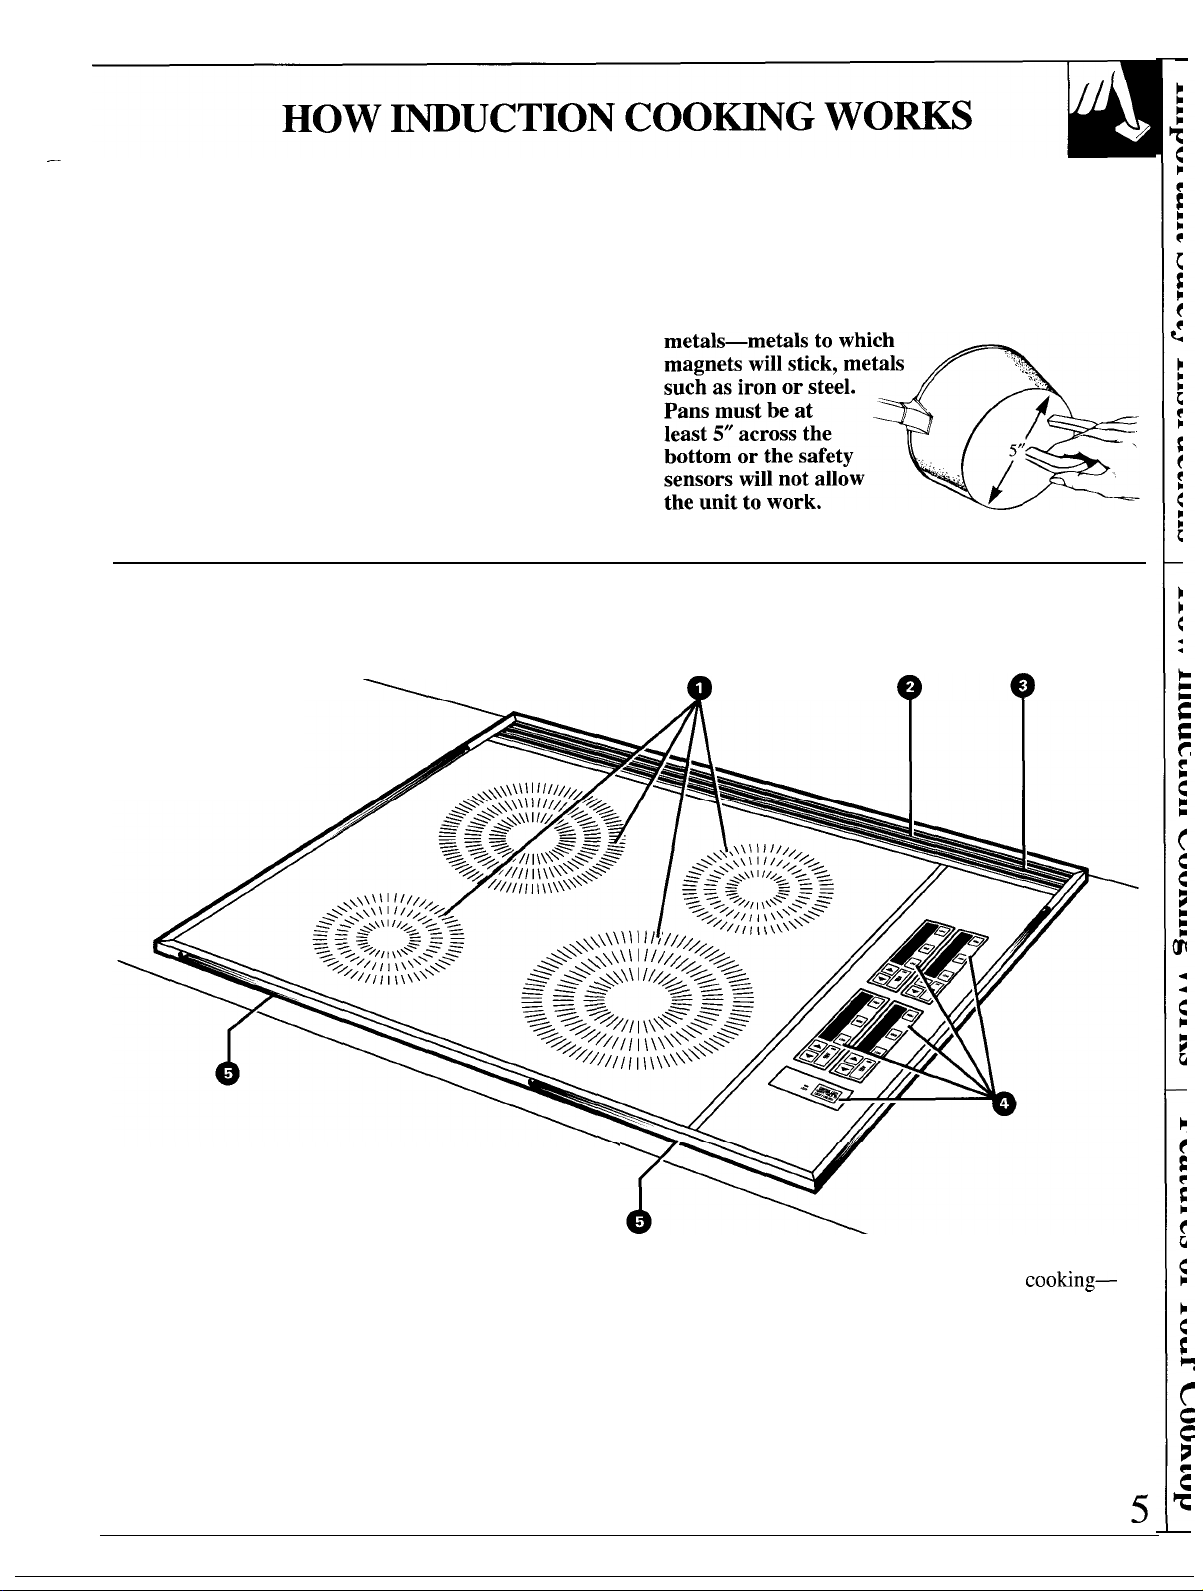
Remember, magnetic induction cooking
requires the use of cookware made of ferrous
Q
Q@
—
1. Cooking Surfaces—one 9-inch unit,
one 8-inch unit and two 6-inch units.
2. Air Vents at rear of cooktop.
circulating under the cooking surfaces flows in and
out of the cooktop through these vents.
3. Model and Serial Numbers.
4. Touch Control Panel. Each cooking surface
has its own control. Controls
are located at the rear of the panel. Controls for the
two front units are located at the front of the panel.
5.
Air Intake Openings on the underside
cooktop allow air to circulate under the cooking
surfaces to keep the induction coils cool when
cooking.
The cooling air
for the two rear units
of the
NOTE: You’ll hear a slight noise when
the sound
cooling air. Fans go off automatically when
cooking units are turned off.
of the automatic fans circulating the
cooking—
FEATURES OF YOUR TOUCH CONTROL PANEL
When the cooktop is first connected, or when power
is restored after a power failure, the light next to
“CONTROL LOCK” lights up to let you know that
the cooktop is locked. The cooktop controls remain
locked until the CONTROL LOCK pad is pressed
twice within 3 seconds.
%.
-CONTROL
LOCK
L%K
TOUCH TWICE TO
LOCK / UNLOCK
You can lock the control panel to keep children from
turning it on. You can also use this feature to prevent
the cooking surface from turning on accidentally
when you clean the control panel.
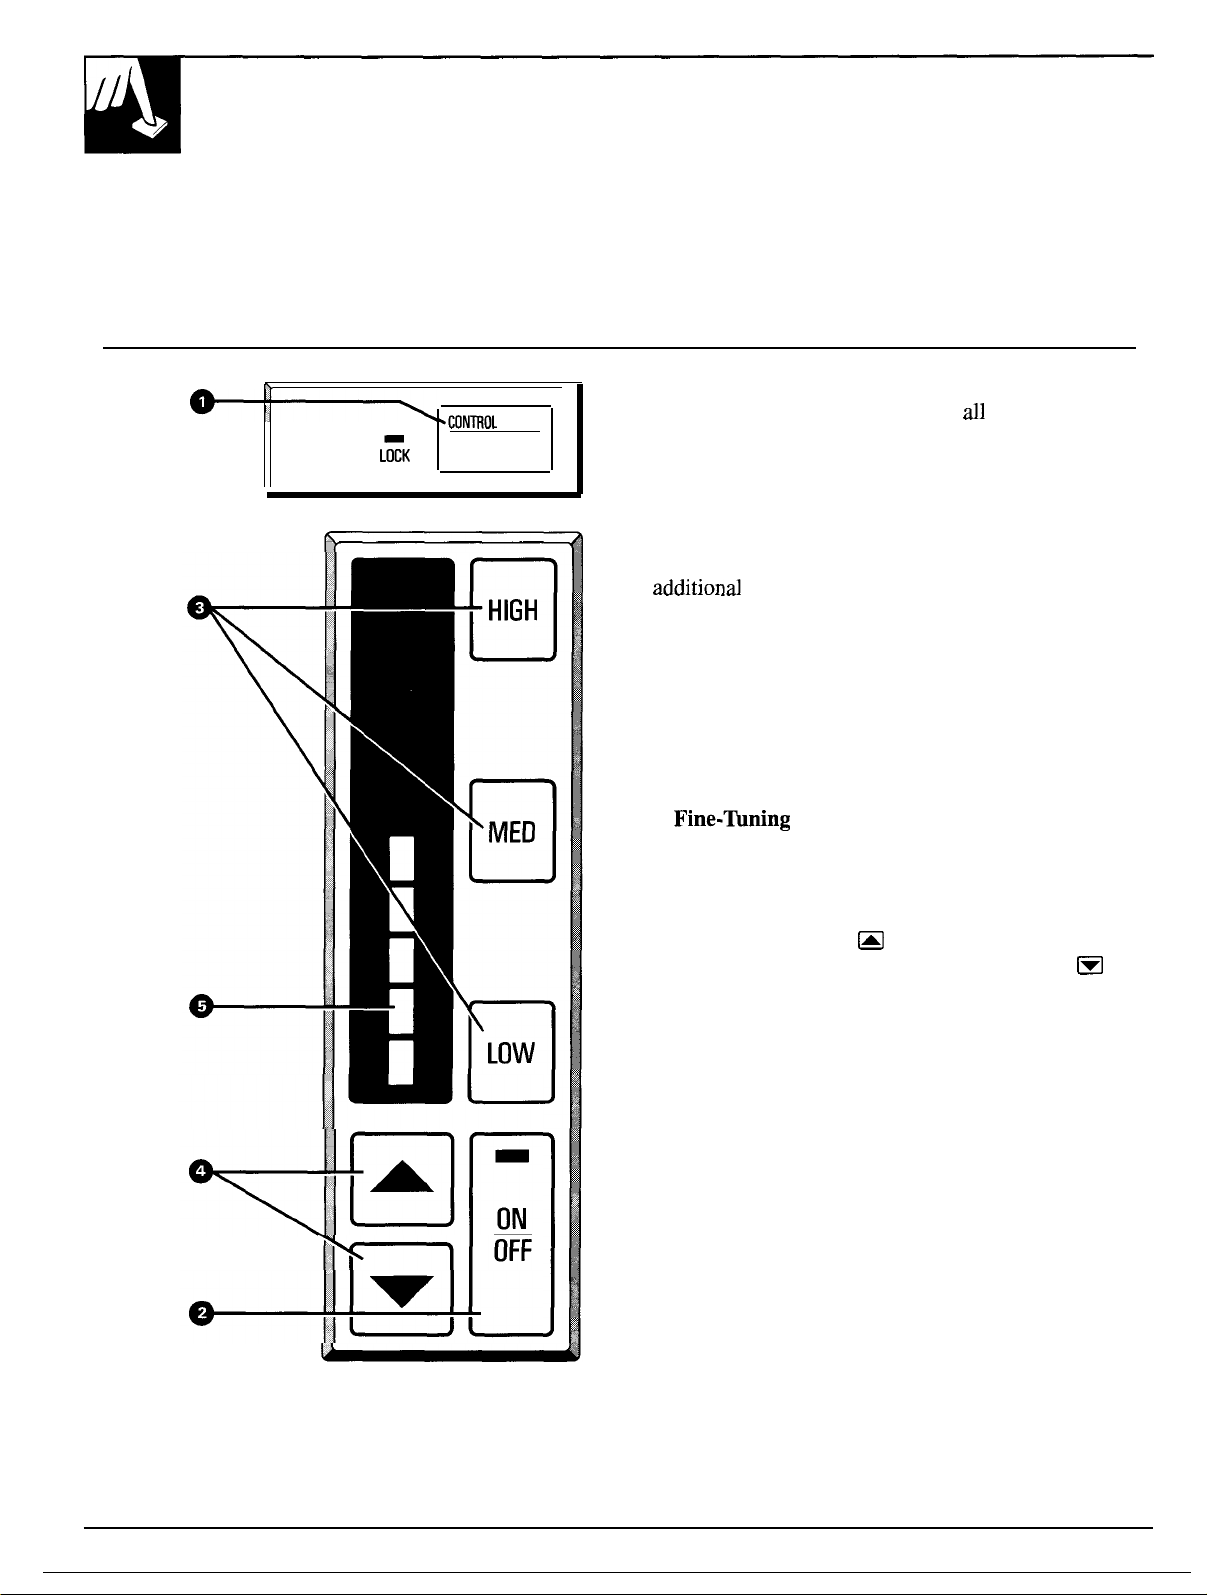
1. Control Lock Pad. Press the CONTROL LOCK
pad twice within 3 seconds to lock
all
of the control
pads. The light next to “CONTROL LOCK” lights
up. No cooking surface can be turned on until the
lock is released.
To unlock the control panel, press the CONTROL
LOCK pad twice within 3 seconds.
2. ON/OFF. Press this pad before making any
additiond settings. If no heat setting is made within
15 seconds, the induction control automatically
shuts off.
To turn the induction coil off after cooking, press
the ON/OFF pad and remove the pan from the
cooking surface.
3. Power Control Area. Each cooking surface has its
own power level pads that let you select LOW, MED,
or HIGH heat.
4.
Fine-llming Pads. Each cooking surface has its
own pads that let you fine-tune heat settings between
LOW, MED and HIGH. When you press and hold one
of these pads, cooking heat will change one step at a
time and the color bar will show the exact heat setting,
To raise the heat, press
reached on control display. To lower heat, press
~
pad until exact heat is
~
pad until desired heat shows on control display.
5. Control Display Bar. Colored bar lights and shows
heat setting in use. When new setting is pressed, bar
changes to indicate new setting.
6

—
HOW TO OPERATE
YOUR INDUCTION COOKTOP
Example:
How to Boil and Simmer
Step 1: Unlock the cooktop. See
Features section.
Step 2: Place a pan of water on the
center of the cooking surface.
Step 3: Press ON/OFF pad. You now
have 15 seconds to select a cooking
power level. If a heat setting is not
entered by then, the cooktop will
automatically turn off and you must
Step 5: Bring water to boil on HIGH
setting.
Step 6: To reduce heat to a simmer, you
can press the LOW, MED or
The control display bar will show the
heat setting you select.
Step 7: Press the ON/OFF pad. Power
to the induction coil will shut off and
the control display light will go out.
press the ON/OFF pad again.
Step 4: Press HIGH pad. The control
display bar will show color all the
way up to HIGH pad, telling you the
cooktop is now on and the selected
heat setting is HIGH.
If you remove a pan or move it off center from a
If you press the ON/OFF pad within one minute
cooking surface before you turn it off, the cooktop of the time you remove the pan, flashing and
will beep, the control panel will flash, and power to beeping will stop, the control display light will
—
the induction coil will shut off.
If you put the pan back on or center it on the
cooking surface within one minute, flashing and
go
out, and power to the induction coil will shut
;ff. To start-cooking again, you will have to press
the ON/OFF pad and select a heat setting.
beeping will stop and cooking will continue.
CAUTION: To help prevent scratching, do not
slide cookware across the cooktop surface.
~
pads.
—
Type of Cooktop
Induction
,,,111///,,,,
...+!!%,,..,
=.-...
...,, l,,,,,..=-=
>>=.
---
+,,’ ’~~...-...-
---
%,,,,,,.
‘%/,,,, ),,
Electric Coil
e
Solid Disk Element”
0
o
Radiant
ceramic) Cooktop
(glass-
o
Gas Burners
(
*
Description
High frequency
induction coils
under a glass
surface.
Flattened metal
tubing containing
electric resistance
wire suspended
over a drip pan.
Solid cast iron
disk sealed to the
cooktop surface.
Electric coils
under a
ceramic cooktop.
Regular or sealed
gas burners use
either LP gas
or natural gas.
glass-
How it Works
Pans must be made of ferrous metals (metal that attracts a magnet). Heat is produced
by a magnetic circuit between the coil and the pan. Heats up right away and changes
heat settings right away, like a gas cooktop. After turning the control off, the glass
cooktop is hot from the heat of the pan, but cooking stops right away.
Heats by direct contact with the pan and by heating the air under the pan. For best
cooking results, use good quality pans. Electric coils are more forgiving of warped
pans than induction or solid disks. Heats up quickly but does not change heat settings
as quickly as gas or induction. Electric coils stay hot enough to continue cooking
for a short time after they are turned off.
Heats by direct contact with the pan, so pans must be flat on the bottom for good
cooking results. Heats up and cools down more slowly than electric coils. The disk
stays hot enough to continue cooking after it is turned off. Remove the pan from
the solid disk if you want the cooking to stop.
Heat travels to the glass surface and then to the cookware, so pans must be flat on
the bottom for good cooking results. The glass cooktop stays hot enough to continue
cooking after it is turned off. Remove the pan from the surface unit if you want
cooking to stop.
Flames heat the pans directly. Pan flatness is not critical to cooking results, but pans
should be well balanced. Gas burners heat the pan right away and change heat settings
right
away. When
YOU
turn the control off, cooking stops right away.
7

COOKWARE TO USE
Some of your pots and pans will probably give good results on the
induction cooktop. Which ones? Find out this way:
Put a small amount of water in the pan and center it on one of the cooking
surfaces. Press the ON/OFF and HIGH pads. If the pan is suitable, it will
heat in seconds. If the pan is not suitable, the control display will flash on
and off and the pan will not heat.
For information and specific brands of induction cookware, call the
GE Answer Center” at 800-626-2000.
Suitable New Cookware
When you shop for suitable new cookware, take a
magnet along and test before you buy.
Look for cookware made from magnetic stainless
steel, cast iron, enameled steel and combinations of
these materials.
Do not use aluminum, or aluminum-clad cookware,
copper or copper-clad cookware, aluminum foil,
glass/ceramic cookware and some stainless steel
that will not attract a magnet.
The bottom of the pan need not be perfectly flat.
Although pans with rims or slight ridges are
acceptable, flat-bottomed pans give best results.
Enamel-coated steel or cast-iron cookware may
also be used.
Pan Size
The cooking unit is
surface when the unit is on—items such
as steel spatulas, cooking spoons, knives and other
small utensils.
Some steel pans have a layer of aluminum in the
bottom. Test them carefully with a magnet before
you buy. Some can be used in induction cooking.
Others cannot.
Round pans give best results. Square or rectangular
pans do not heat evenly.
*
..,
:,,
We do not recommend frying pans over 10%” in
diameter for foods that are not stirred or moved
around in the skillet while frying—foods such as
fried eggs, French toast or pancakes. The outer edges
of an oversize skillet develop less heat than areas
within the
may be undercooked.
However, foods that are stirred like scrambled
eggs, or moved around like chicken, can be cooked
successfully in skillets up to 12” (10%” across the
bottom) because the heat evens out when you stir or
move the food around while it is cooking.
10!A”
center and foods in the outer area
,::,
8

—
Q. If I do not select a heat setting, what will
happen?
A. Fifteen seconds after you press the ON/OFF pad,
the unit will automatically shut off if you have not
selected a heat setting. Press the ON/OFF pad again
and then select the desired heat setting to begin
cooking.
Q. May I change heat settings more than once
during cooking?
A. Yes, as many times as you wish.
Q. Must I add water to my foods before cooking
them?
A. Yes, in some instances such as defrosting frozen
vegetables, more water may be needed. Since
induction heats the bottom of the pan first and then
the sides, the water might tend to evaporate slightly
faster.
Q. Is it necessary to have a pan on the unit before
setting the controls?
A. No. However, the control will beep and the
display will flash for a minute or until you (a) place
proper cookware correctly on the unit or (b) press
ON/OFF pad.
—
Q. Should I use a cover when bringing foods to
a boil?
A. Yes, lids help reduce heat loss and shorten cooking
time.
Q. Will my food continue to cook after the unit is
turned off?
A. Boiling stops quickly when a unit is turned off
because there is no surface unit or burner to retain
heat.
Q. Does the shape of the pan affect cooking
results?
A. Yes. Only round pans are recommended since
square or rectangular pans do not heat evenly. The
induction coils generate heat on the surface of the
pan, and round pans match best with the round coil
of the unit.
Q. Will I hear any sound during cooking?
A. You may hear a slight fan noise after the unit is
turned on—the sound of cooling air flowing through
the cooktop. The noise may also be caused by some
types of cookware. It may be lessened by moving it
slightly. Some pans produce a slight “pinging” or
“buzzing” noise as food is cooking.
Q. What if the cooking surface is accidentally
turned off during cooking?
A. You must reset. Press the ON/OFF pad, then
select the desired heat setting and the unit will
resume cooking.
Q. What will happen if I cook with a large pan that
covers two cooking surfaces-for example, a large
griddle?
A. Heat distribution
cook satisfactorily.
will be uneven, and food may not
9

Cooktop Surface
CARE AND CLEANING
The smooth glass surface of your induction
cooktop requires very little care to keep it glossy
and new looking.
n
Before using the cooktop for the first time,
clean it thoroughly
from the packing material. Use a smooth-cooktop
cleaner/conditioner and follow package directions.
to remove any dirt or dust
The cooking surfaces may get hot enough
spills and boilovers to stick. Spills and spatters wipe
off with a damp cloth or sponge. Heavier soil may be
removed with warm, soapy water, the cooking unit
cleaner/conditioner, or baking soda. Plastic pads may
be used
Avoid use of abrasive materials such as metal pads,
cleansing powders and soap-filled pads which may
scratch the surface. Do not use harsh chemicals such
as bleach or chemical oven cleaners.
Clean the cooktop regularly to avoid discoloration
and stains from soil buildup. Wiping before each use
will remove tiny, coarse particles of dust, sugar or salt
that may cause scratches if caught between cooking
unit and pan. Regular use of a good cooking unit
cleaner/conditioner will build a coating to protect the
surface from scratches and make it easier to clean.
gently
Control Panel
Lock the cooktop (see Features section) to prevent the induction surface
from being activated accidentally while cleaning.
Clean up any spills or spatters with a damp cloth. Remove heavier soil
with warm, soapy water.
Clean touch pads with a mild liquid dish detergent and soft cloth. Rub touch
pads lightly. CAUTION: DO NOT USE ANY ABRASIVE MATERIAL
OF ANY KIND ON THE CONTROL PANEL TOUCH PADS—the
lettering on the pads is sensitive to abrasives and pressure.
to cause
for really stubborn spots.
Drip Trays
Two drip trays are mounted under the unit at both ends of the vent grille
to catch grease. They can be cleaned by using a paper towel.
Air Vent Grille
The air vent grille at the rear of the cooktop can be cleaned in place using
a damp cloth, or a small brush such as an old toothbrush. It can also be
removed by snapping it out of place.
10

BEFORE YOU BEGIN
Read these instructions completely and carefully.
IMPORTANT: Save these instructions for the
local electrical inspector’s use.
IMPORTANT: OBSERVE ALL GOVERNING
CODES AND ORDINANCES.
NOTE TO INSTALLER: Leave these instructions
with the appliance after installation is completed.
NOTE TO CONSUMER: Keep this Use and
Care Guide and Installation Instructions for
future use.
NOTE: This appliance must be properly
grounded.
—
~RTS
● Two
● Two clips
● Cooktop
. Two drip trays
. Two 1/2” mounting screws
TOOLS AND
● Junction box with
c
● Carpenter square
● Pencil
● Ruler or tape measure and straight edge
● Sabre saw
LIST
214°
hold-down screws
~RTS
112”
connector
Phillips screwdriver
YOU WILL NEED
flexible conduit
STEP 1
INSTALLER-PLEASE FILL IN MODEL
AND SERIAL NUMBERS
model and serial numbers of your cooktop
The
are found on a tag on the underside of your
cooktop. They are also located under the air vent
grille, on the right side. Copy the numbers for
future reference.
MODEL NO.
SERIAL NO.
ELECTRICAL REQUIREMENTS
CAUTION: FOR PERSONAL SAFETY
REMOVE HOUSE FUSE OR OPEN
CIRCUIT BREAKER BEFORE BEGINNING
INSTALLATION.
WARNING: The cooktop
has the frame grounded by
A
lead for use with a three conductor
branch circuit as shown in Step 5.
If used in a mobile home or if local
codes do not permit grounding
through the neutral reconnect as a
four conductor branch circuit as shown
in Step 6.
This appliance must be supplied with the proper
voltage and frequency, as noted on rating plate and
connected to an individual, properly grounded
branch circuit.
time delay
bottom of the cooktop chassis.
Wiring must conform to the requirements of
the National Electric Code. If the electric service
provided does not meet the above specifications,
call a licensed electrician.
connection of grounding
(green) lead to neutral (white)
rx-otected bv
fuse:
The rating-plate is located on the
a circuit breaker or
—
11

Minimum Clearances to Adjacent Construction.
DIMENSIONS
‘“W
(Wtout
and
Cookto~
Dimensions. See chart below.
A
B
c
D
E
F
G
H
T
KI
30”
Models
(JP392R,
30”
20%”
28’%4’
19%”
19 %“
29 %“
14’?42”
5%”
2“
JP393R)
7“
36” Models
(JP692~ JP693R)
35%”
20 %“
34%6”
19%”
19
1%6”
34%”
17%”
55”
2“
I
7“
12

STEP 2
STEP 4
PREWRING FOR INSTALLATION
When choosing a location, consider the
following:
. This cooktop is not approved for installation
over built-in ovens.
. The cooktop should be easy to reach and
lighted with natural light during the day.
● Select a countertop capable of supporting
230 pounds.
. Avoid placing cabinets above cooktop unit, if
possible, in order to reduce the hazard caused
by reaching over heated surface unit.
● If cabinetry is used above cooktop, allow a
minimum 30” clearance between the cooking
surface and the bottom of the unprotected
cabinet.
● If clearance between cooktop and cabinetry is
less than 30”, cabinet bottom must be protected
with flame retardant
thick, covered with 28 gauge steel or 0.020”
thick copper. Clearance between cooktop and
—
protected cabinetry must NEVER BE LESS
THAN 24”.
● The hazard can be further reduced by
millboard
at least 1/4”
installing a range hood that projects horizontally
a minimum of 5“ beyond the bottom of the
cabinets.
● Working areas adjacent to the cooktop should
have a 15” minimum clearance between
countertop and bottom of cabinet. If clearance is
less than 15”, adjacent cabinets should beat least
2“ from side edge of cooktop.
● Be sure to position cooktop so that vent grille
will not be blocked.
ELECTRICAL CONNECTIONS
Note to Electrician:
The power leads supplied with this appliance are
U.L. recognized for connection to larger gauge
household wiring. The insulation of these leads
is rated at temperatures much higher than the
temperature rating of household wiring. The
current carrying capacity of a conductor is
governed by the wire gauge and also the
temperature rating of the insulation around
the wire.
Aluminum Wiring:
WARNING: IMPROPER CONNECTION OF
ALUMINUM HOUSE WIRING TO THE
COPPER LEADS CAN RESULT IN SERIOUS
PROBLEMS.
Attach copper wires to aluminum wiring using
special connectors designed and U.L. approved
for joining copper to aluminum. Follow the
manufacturer’s recommended procedure closely.
Install Junction Box:
IMPORTANT: FOR PERSONAL SAFETY,
REMOVE THE HOUSE FUSE OR OPEN
CIRCUIT
BREAKE
INSTALLATION.
Install an approved junction box with 1/2”
conduit connector inside cabinet as shown below.
Run conductors from residence wiring to
junction box according to local, electrical codes.
Be sure this cut does not interfere
R BEFORE BEGINNING
STEP 3
PREHIRING THE COUNTERTOP
Figures 1 and 2 and Dimensions chart for
See
all rough-in and spacing dimensions. These
dimensions must be met for safe use of your
cooktop. To insure accuracy, it is best to make
a template when cutting the opening in the
counter.
Cut out opening as shown in Figure 2. Measure
—
carefully when cutting countertop, making sure
sides of opening are parallel and rear cut is
exactly perpendicular to sides.
Suggested mounting of
an approved junction box.
+i
i
13

STEP5
STEP 7
CONNECT THE ELECTRICAL LEADS
Read the following instructions carefully, and
connect cooktop leads to junction box according
to local codes and type of branch circuit.
Improper connection of service wires will burn
out cooktop power supply. DO NOT CUT OFF
FLEXIBLE POWER CABLE.
NOTE: The frame of this appliance is grounded
to neutral.
3-Conductor Branch Circuit
When connecting cooktop to a three-conductor
branch circuit, connect the red lead to the branch
circuit red
lead, and the black lead to the branch
circuit black lead. Connect the green conductor
and the white lead of the cooktop to the branch
circuit neutral lead, which is white or gray.
COOKTOP
RED
120V Ac
NEUTRAL
-+
120VAC
1
BRANCH CIRCUIT
RED
WHITE OR
GRAY
BLACK BLACK
DRIP TRAY INSTALLATION
Before inserting the cooktop in the counter,
install the two drip trays as follows:
● Remove two drip trays that were mounted
on the rear of the unit for shipment and install
as follows.
. Install the largest drip tray under the right rear
corner (behind touch control) of the cooktop as
shown in the illustration below. First insert the
tab of tray under housing tab and drive screw
through hole in enclosure into tray tab.
● Install the smallest drip tray under the left rear
corner of the cooktop using the same procedure
as above.
STEP
4-CONDUCTOR BRANCH CIRCUIT
6
When connecting cooktop to a four-conductor
branch circuit, connect the red lead to the
branch circuit red lead, and the black lead to
the branch circuit black lead. Break connection
between the cooktop white lead and the green
conductor. Connect the cooktop white lead to
the branch circuit neutral lead, which is white or
gray. Ground the unit by connecting the green
conductor of the cooktop to the branch circuit
bare or green lead (ground lead).
COOKTOP
RED
WHITE
BLACK
GREEN
-7&--
NEUTRAL
+
120VAC
BRANCH CIRCUIT
RED
WHITE OR
GRAY
BLACK
BARE OR
GND
GREEN
INSERT TAB OF TRAY UNDER HOUSING
TM
AND RETAIN BY DRMNG SCREW THROUGH
HOLE IN ENCLOSURE INTO TRAY TAB.
14

STEP
8
STEP 9
COOKTOP INSTALLATION
WARNING: Do not install the cooktop if the
glass ceramic cooking surface is broken or
mounting trim is damaged.
NOTE: a non-hardening caulking compound
may be applied to countertop around cutout
in order to form a water tight seal. Remove
any excess compound from countertop after
installation.
Position cooktop over cutout opening and lower
into place. Press gently and evenly, to firmly seat
the cooktop flush with the countertop.
Insert the two clips into slots on cooktop side.
Insert hold-down screws into clips from beneath.
Tighten with Phillips screwdriver until screws
push against the countertop bottom.
CAUTION: Screws should be hand tight only.
Over-tightening will place stress on glass
cooktop surface and may cause breakage.
—
~>””n’e””p
I
I
Clip
~z
%
f,
2
!Z4’’Screw
CHECKING OPERATION
When the cooktop is first connected, or when
power is restored after a power failure, the light
next to “CONTROL LOCK” lights up to let you
know that the cooktop is locked. The cooktop
controls remain locked until the CONTROL
LOCK pad is pressed twice within 3 seconds.
To unlock the control
panel, press the CONTROL
LOCK pad twice within
3 seconds. See the Features
L%K
CONTROL LOCK
TOUCH TWICE TO
LOCK / UNLOCK
n
of Your Touch Control Panel section on how to
operate your cooktop.
%11-/-
5/1 6“ x
on Side of Cooktop Case
/“
5/8”
Opening
!
Should it become necessary to remove the
cooktop, simply back out the two hold-down
screws, remove the two clips and lift cooktop.
15

QUESTIONS?
USE THIS PROBLEM SOLVER
PROBLEM
COOKTOP WILL
NOT OPERATE
(DISPLAY OFF)
COOKTOP WILL
OPERATE BUT SETTING
CANNOT BE CHANGED
COOKTOPCONTROL
DISPLAYTURNSOFF
BYITSELF
CONTROLDISPLAY
FLASHINGAND
COOKTOPBEEPING
POSSIBLE CAUSE
*
Ccwktop
● Turn circuit breaker off and then back on.
● Check the circuit breaker or fuse box
is locked. Press CONTROL LOCK pad two times. SW Features section.
in
your home, Reset the circuit breaker
or replace the fuse. CAUTION: ONLY SOMEONE FAMILIAR WITH
ELECTRICAL CIRCUITS SHOULD CHANGE THE FUSE.
●
Press
the CONTROL LOCK pad and/or the ON/OFF pad.
● Turn circuit breaker off and then back on again. Press the
ON/CIFF
pad, and then
select the desired heat setting.
● You failed to select a heat setting
Press the
● Pan removed or off center of cooking surface for more than one minute. Replace
ON/CIFF
pad again, and then
within
15 seconds of pressing the ON/OFF pad.
sekct
the desired heat setting.
or center it. Press the ON/OFF pad and then select the desired heat setting.
● Cooktop turns off after display flashes and cooktop beeps for one minute unless
condition that caused flashing and beeping is corrected.
● Pan removed while cooktop was in operation. See Features and Induction Cooking
sections.
● Glass top too hot. Remove pan and
● Pan too small. See Cookware section.
allow
cooktop to cool. Then re-start cooktop.
—
GLASS TOP
CRACKED
AMRADIO
INTERFERENCE
PANS MAKE
A-PINGING”
OR’’BUZZING”
NOISE
If you need more
GE Answer
help...call, toll free:
Center@
800.626.2000
consumer information service
● Pan off center. See How to Operate Your Induction Cooktop section.
●
Ncm-magnetic
● Turn off circuit breaker. Call for service.
● If radio is in use near the
cookware in use. See Cookware section.
cookt~p
you may notice some AM radio interference.
This is normal and does not indicate a problem with the cooktop.
● Sometimes the use of two different types of pans may cause a “ping” or “buzzing”
noise. This is normal and there is no reason for concern. To reduce the noise, move
the pans slightly or change to a different surface.
16

NOTES
17

NOTES
18

Wdll
Be There
With the purchase of your new GE appliance, receive
assurance that if you ever need information or assistance
—
from GE, we’ll be
tiere.
All you have to do is call–toll-free!
tie
In-Home Repair
Service
8olwE$AREs
(80U32-2737)
AGE consumer service professional
will provide expert repair service,
—
scheduled at a time that’s convenient
for you. Many GE Consumer Service
company-operated locations offer
you service today or tomorrow, or at
your convenience (7:00 a.m. to
weekdays,
days). Our factory-trained technicians
know your appliance inside and
so most repairs can be handled in just
one visit.
9:00 a.m. to 2:00 p.m. Satur-
7:00
p.m.
out–
Service Contracts
80&62&2224
You can have the secure feeling that
GE Consumer Service will still be
there after your warranty expires. Purchase a GE contract while your warranty is still in effect and you’ll receive
a substantial discount. With a multiple-
year contract, you’re assured of future
service at today’s prices.
GEAnswer
Center
a
817t1621i2000
Whatever your question
major appliance, GE Answer Center
information service is available to
help. Your call–and your
will be answered promptly and
courteously. And you can call any
time. GE Answer Center@ service is
open 24 hours a day, 7 days a week.
Telecommunication Device for the Deaf
ab;ut
any
question–
G
c
Parts andAccessories
80&1626-2002
Individuals
own appliances can have needed
parts or accessories sent directly to
their home.
vides access to over 47,000 parts... and
all GE Genuine Renewal Parts are
fully warranted. VISA, MasterCard
and Discover cards are accepted.
User maintenance instructions
contained in this booklet cover procedures intended to be performed by
any user. Other servicing generally
should
vice personnel. Caution must be
exercised, since improper
may cause unsafe operation.
qualified to service their
The GE parts system pro-
be referred to qualified ser-
semicing
kr
Customers With
Special Needs...
8ilI1621i2000
Upon request, GE will provide
controls for a variety of GE appliances
and a brochure to assist in planning a
barrier-free kitchen for persons with
limited mobility. To obtain these
free of charge, call 800.626.2000.
Consumers with impaired hearing
or speech who have access to a TDD
or a conventional
call
800-TDD-GEAC
to request information or service.
teletypewriter may
(800-8334322)
Brailh
items

YOUR COOKTOP
11
Save proof of original purchase date
WHAT IS COVERED
WHAT IS NOT COVERED
WARRANTY
such
as your
FULL ONE-YEAR WARRANTY
For one year from date of original
purchase, we will provide, free of
charge, parts and service labor
in your home to repair or replace
any part of the cooktop
because of a manufacturing defect.
●
Service trips to your home to teach
you how to use the product.
Read your Use and Care material.
If you then have any questions
about operating the product, please
contact vour dealer or our
Consum’er
address below, or call, toll free:
GE Answer Center”
800.626.2000
consumer information service
●
Improper installation.
If you have an installation problem,
contact your dealer or installer.
You are responsible for providing
adequate electrical,
sales slip or
that fails
Affairs office at the
gas;
exhausting
cancelled
check to establish warranty period.
This warranty is extended to
the original purchaser and any
succeeding owner for products
purchased for ordinary home use in
the
48
mainland states, Hawaii and
D.C.
Washington,
In Alaska the
warranty is the same except that it is
LIMITED because you must pay to
ship the product to the service shop
or for the service technician’s travel
costs to your home.
All warranty service will be provided
by our Factory Service Centers or
by our authorized Customer
servicers during normal working
hours.
Should your appliance need
service, during warranty period
or beyond, call 800-GE-CARES
(800-432-2737).
and other connecting facilities as
described in the Installation
Instructions provided with the
product.
●
Replacement of house fuses or
resettina of circuit breakers.
●
Failure of the product if it is used
for other than its intended
or used commercially.
● Damage to product caused
by accident, fire, floods or acts
of God.
WARRANTOR IS
/VOTRESPONSIBLE
FOR CONSEQUENTIAL DAMAGES.
Care”
rxumose
‘
‘
II
Some states do not aHow the exclusion or limitation of incidental or consequential damages, so the above limitation or exclusion
may not apply to you. This warranty gives you specific legal rights, and you may also have other rights which vary from state to state.
To know what your legal rights are in your state, consult your local or state consumer affairs office or your state’s Attorney General.
Part No. 164 D2588P073
No.
Pub.
8-92
49-8269
GG
Warrantor: General Electric Company
If further help is needed concerning this warranty, write:
Manager—Consumer Affairs, GE Appliances, Louisville, KY 40225
JP392R JP692R
JP393R
JP69C
-
 Loading...