

Page 1
Howtoget
thebest from
Your
Grill
GriddleCooktiq
Use and Care of
model
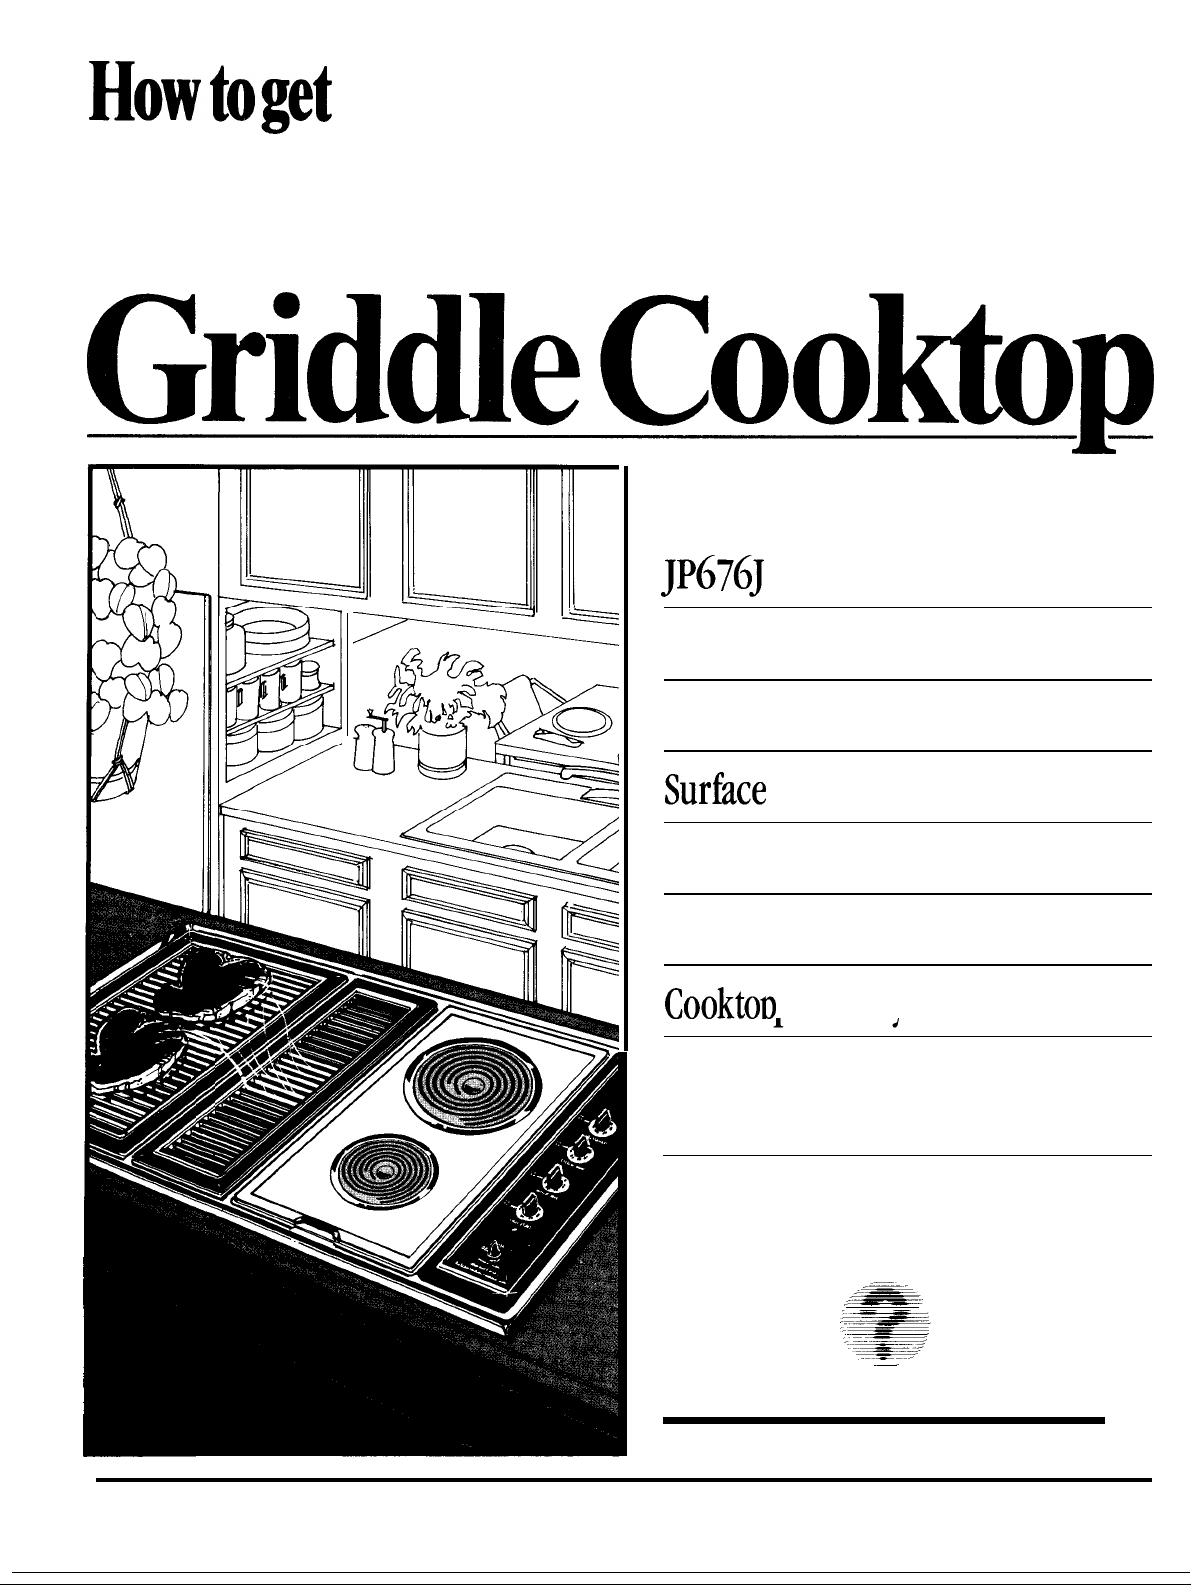
JP676J
Energy-saving tips
Features
Surfhce
Cooking
p4
p5
p6
The Grill
The Griddle
Cooktot)
Questions?
Use the Problem Solver
Your Direct Line to General Electric
The GE Answer Center 800.626.2000
vent svstem
~
~~..
,_—.
...—
..:-—
.-. ——-
...—~:.==
.–-
.—
plo
p13
p16
p18
A Quality Product of GENERAL ELECTRIC COMPANY
Page 2
Help us
Contents
Before Using Your Cooktop .. ...2
Safety Instructions . .........3,4
Energy-Saving Tips . . . ........4
Features . . . . . . . . . . . . ........5
Surface Cooking . . . . . ........6
Home Canning. . . . . . . ........7
Surface Cooking Guide
Grill . . . . . . . . . . . . . . .
Grill Tips . . . . . . . . . . .
Grill Cooking Guide. . .
Griddle . . . . . . . . . . . . .
Griddle Tips . . . . . . . . .
Griddle Cooking Guide
Cooktop Vent System . .
Accessory . . . . . . . . . . .
Cleaning Guide. . . . . . .
The Problem Solver . . .
If You Need Service . . .
Warranty . . . . . . . . . . .Back Cover
. . . . .
. . . . . . .
. . . . . . .
. . . . . . .
. . . . . . .
. . . . . . .
. . . . . . .
. . . . . . .
. . . . . . .
. . . . . . .
. . . . . . .
. . . . . . .
8,9
10
11
12
13
14
15
16
16
17
18
19
help You...
*
Before using your Cooktop,
read this book carefully.
It is intended to help you operate
and maintain your new cooktop
properly.
Keep it handy for answers to your
questions.
If you don’t understand something
or need more help, write (include
your phone number):
Consumer Affairs
General Electric Company
Appliance Park
Louisville, KY 40225
Write down the model
and serial numbers.
You’ll find them on a nameplate on
the back wall under the module on
right side of the cooktop.
These model and serial numbers
are also on the Consumer Product
Ownership Registration Card that
came with your cooktop. Before
sending in this card, please write
these numbers here:
If you received
a damaged cooktop . . .
Immediately contact the dealer (or
builder) that sold you the cooktop.
Save time and money.
Before you request
service . . .
Check the Problem Solver on
page 18. It lists causes of minor
operating problems that you can
correct yourself.
Optional Accessories
To add versatility to your cooktop, the
following accessories are available
at extra cost from your dealer.
JX36–Surface Unit Module
JXG3—Grill
JX56—Glass
JXR5–Rotisserie Module
03-6022—Griddle
Module
Ceramic Module
Model Number
Serial Number
Use these numbers in any
correspondence or service calls
concerning your cooktop.
2
Page 3
IMPORTANT SAFETY INSTRUCTIONS
Read all instructions before using this appliance.
When using electrical
basic safety precautions should
be followed, including the
following:
c
Use this appliance only for its
appliances,
intended use as described in this
manual.
●
Be sure your appliance is
properly installed and grounded
by a qualified technician in
accordance with the provided
installation instructions.
●
Don’t assume that you know
how to operate all parts of the
cooktop. Some features may
work differently from those on
your previous cooktop.
●
Don’t attempt to repair
or replace any part of your
cooktop unless it is specifically
recommended in this book. All
other servicing should be referred
to a qualified technician.
●
Have the installer show you
the location of the circuit
breaker or fuse.
Mark it for
easy reference.
● Before performing any
service, DISCONNECT THE
COOKTX)P
POWER SUPPLY
AT THE HOUSEHOLD
DISTRIBUTION
P~L
BY REMOVING THE FUSE
OR SWITCHING OFF THE
CIRCUIT BREAKER.
Q
Do
not
leave children
alone—
children should not be left alone
or unattended in an area where an
appliance is in use. They should
never be allowed to sit or stand
on any part of the appliance.
●
Don’t allow anyone to climb,
stand or hang on the cooktop.
Q
CAUTION: ITEMS OF
TO
INTEREST
SHOULD
IN
CABINE’IS
CHILDREN
NCYI’
BE S’lWIED
ABOVE A
COOKIX)P-CHILDREN
CLIMBING ON THE
TO
COOKTOP
REACH
ITEMS COULD BE
SERIOUSLY INJURED.
●
Never wear loose-fitting or
hanging garments while using
the appliance.
Fl
ammable
material
could be ignited if brought in
contact with hot heating elements
and may cause severe burns.
● Use only dry
potholders—
moist or damp potholders on
hot surfaces may result in burns
from steam. Do not let potholders
touch hot heating elements. Do
not use a towel or other bulky
cloth in place of a potholder.
●
Never use your appliance for
warming or heating the room.
● Do not store flammable
materials near the cooktop.
●
Keep vent grill and grease
filters clean
to maintain good
venting and to avoid grease fires.
c
Do not let cooking grease
or other flammable materials
accumulate on the cooktop.
● Do not use water on grease
fires. Never pick up a flaming
pan. Smother flaming pan on
surface unit by covering pan
completely with well-fitting lid,
cookie sheet or flat tray.
Flaming grease outside a pan
can be put out by covering with
baking soda or, if available, a
multi-purpose dry chemical
or foam type extinguisher.
●
Do not touch heating elements.
These
surfaces may be hot enough
to burn even though they are
dark in color. During and after
use, do not touch, or let clothing
or other flammable materials
contact surface units or areas
nearby surface units; allow
sufilcient time for cooling, first.
Potentially hot surfaces include
the cooktop and areas facing the
Coolctop.
● When cooking pork, follow
our directions exactly and always
cook the meat to at least
170°F,
This assures that, in the remote
possibility that trichina may be
present in the meat, it will be
killed and the meat will be safe
to eat.
● Use proper pan size-This
appliance is equipped with two
surface units of different size.
Select utensils having flat
bottoms large enough to cover
the surface unit heating element.
The use of undersized utensils
will expose a portion of the
heating element to direct contact
and may result in ignition of
clothing. Proper relationship of
utensil to burner will also
improve efficiency.
●
Never leave surface units
unattended at high heat s&iugs.
Boilover
greasy
causes smoking and
spillovers
that may catch
on fire.
● Be sure drip pans are not
covered and are in place.
Their
absence during cooking could
damage range parts and wiring.
I
3
Page 4
IMPORTANT SAFETY
(continued)
●
c
Don’t use aluminum foil to
line reflector pans, grill or
griddle.
Misuse could result in a
shock, fire hazard or darnage to
the cooktop.
Q
Only certain types of glass,
gkisdceramic, earthenware or
other glazed containers are
suitable for cooktop service;
others may break because of the
sudden change in temperature.
s
To minimize the likelihood of
burns,
ignition of flammable
materials, and spillage, the
cookware handles should be
turned toward the center of the
cooktop without extending over
nearby surface units.
● Keep grill pan, grill spatter
shield and grease collector
clean.
Be sure the drain hole
in the grill pan is open. If it is
clogged, a fire can occur.
Q
Don’t immerse or soak
removable surface units or
other modules. Don’t put them
in a dishwasher.
● Always turn heating unit
to OFF before removing
cookware.
●
Keep an eye on foods being
fried at HIGH or medium
high heats.
●
To avoid the possibility
of a burn or electric shock,
always be certain that the
controls for all heating units
are at OFF position and all units
are cool before attempting to
lift or remove them.
Foods for frying should be as
dry as possible.
Frost on frozen
foods or moisture on fresh foods
can cause hot fat to bubble up
and over sides of pan.
● Use little fat for effective
shallow or deep-fat frying.
Filling the pan too full of fat can
cause
spillovers
when food is
added.
● If a combination of oils or
fats will be used in frying,
stir
together before heating, or as fats
melt slowly.
c
Always heat fat slowly,
and
watch as it heats.
● Use deep fat thermometer
whenever possible
overheating
tit
to prevent
beyond the
smoking point.
● Use cookware of medium weight
aluminum, with tight-fitting covers,
and flat bottoms which completely
cover the heated portion of the
surface unit.
s
Cook fresh vegetables with a
minimum amount of water in a
covered pan.
. Watch foods when bringing them
quickly to cooking temperatures at
HIGH heat. When food reaches
cooking temperature, reduce heat
immediately to lowest setting that
will keep it cooking.
. Use residual heat whenever
possible. For example, when
cooking eggs in the shell, bring
water to boil, then turn to OFF
position to complete the cooking.
. Always turn surface unit OFF
before removing cookware.
●
Use correct heat for cooking task:
HIGH—to start cooking (if time
allows, do not use HIGH heat to
start).
7-8—quick browning.
5-6—slow frying.
3-4—finish cooking most
quantities.
WARM—double boiler heat, finish
cooking, and special for small
quantities.
. When boiling water for tea or
coffee, heat only amount needed.
It is not economical to boil a
container full of water for one
or two cups.
● Preheat griddle only when
necessary. Foods high in natural
fat, such as bacon or sausage, can
be started on a cold griddle.
4
Page 5
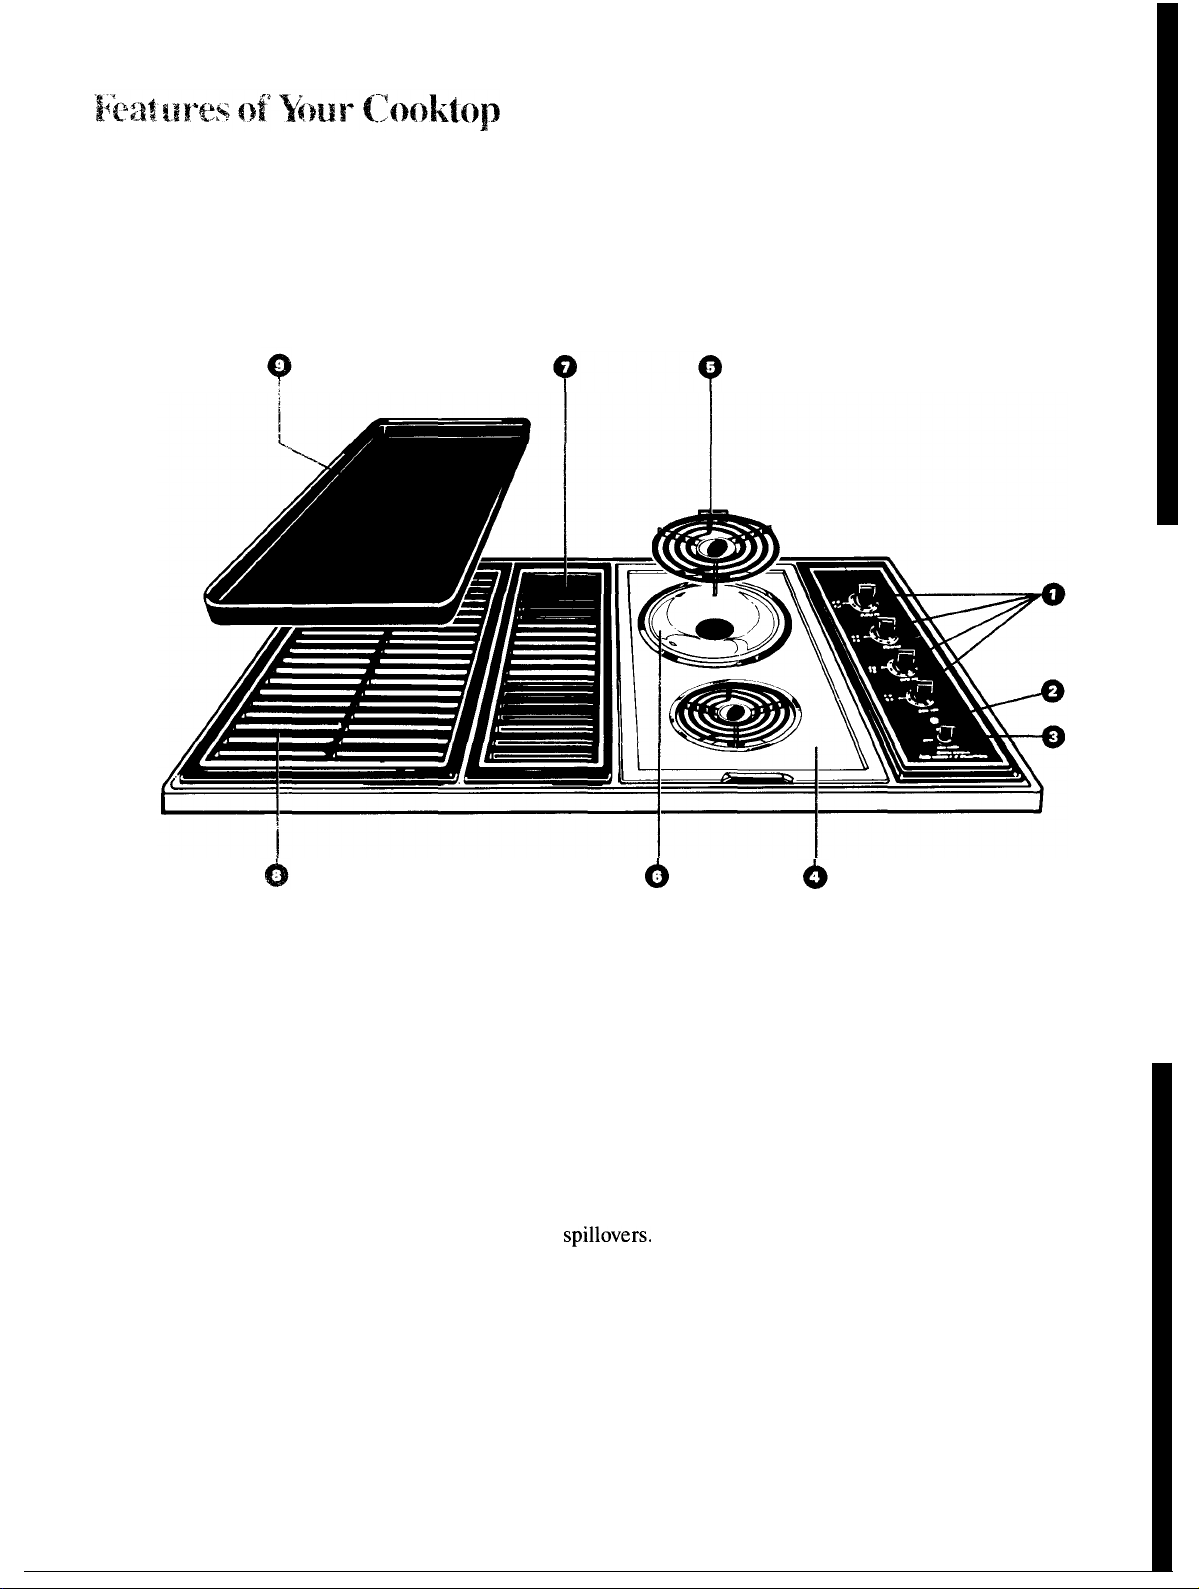
1. Surface Unit Controls. Push in
to set Surface Units from WARM to
HIGH, grill or griddle. Left and
Right Front Controls operate Grill
and Griddle.
2. Indicator Light. Lights when
any unit of the cooktop is turned on.
3. Exhaust Fan Switch. The
exhaust fan will automatically
turn on when the grill, griddle, or
rotisserie modules are used. Manual
operation is required when other
modules are in use.
4. Surface Unit Module. The
entire module plugs into the
cooktop and can be easily removed
for cleaning.
5. Plug-In Surface Unit. Units
may be easily removed to clean
reflector pans beneath each coil.
Do not submerge plug-in units in
water.
6. Chrome-Plated Reflector Pan.
Used to catch
spillovers.
Remove
for cleaning.
5
Vent System.
7.
Blower vents
smoke down and out of kitchen and
house. Vent filters (located under
vent grill) should be cleaned often.
See page 16 for further explanation.
8. Grill Module. Entire module
removes easily. For assembly and
explanation of each part of grill,
see page 10.
9. Griddle.
Remove two grill grates
and place over heating element.
For further explanation of griddle
cooking, see page 13.
Page 6
Surface Cooking
—
See Surface Cooking Guide on pages 8 and 9.
Surface Cooking with
Infinite Heat Controls
Your surface units and controls
are designed to give you an infinite
choice of heat settings for surface
unit cooking.
At both OFF and HIGH positions,
there is a slight niche so control
“clicks” at those positions; “click”
on HIGH marks the highest setting;
the lowest setting is between the
words WM and OFF. In a quiet
kitchen, you may hear slight
“clicking” sounds during cooking,
indicating heat settings selected
are being maintained.
Switching heats to higher settings
always shows a quicker change than
switching to lower settings.
How to Set the Controls
Control must be pushed in to set
only from OFF position. When
control is in any position other
than OFF, it maybe rotated
without pushing in.
Be sure you turn control to OFF
when you finish cooking. An
indicator light will glow when
ANY heat on any surface unit is on.
Goking Guide
for
tJsing
HI
7-8
5-6
3-4
WM
Heats
Quick start for cooking;
bring water to boil.
Fast fry, pan broil; maintain
fast boil on large amount of
food.
Saute and brown; maintain
slow boil on large amount
of food.
Cook after starting at
HIGH; cook with little
water in covered pan.
Steam rice, cereal; maintain
serving temperature of most
foods.
Step 2:
receptacle in rear of cooktop until
plug is engaged completely in
receptacle.
Slide module toward
11
I
Step 1:
push in.
Step 2:
counterclockwise to desired heat
setting.
Grasp control knob and
-
t
Turn either clockwise or
EIow-
to Assemble ~loduie
Step 1:
to OFF. To install module, position
plug to rear.
Be sure controls are turned
Step
3: Lower the front end of
module into cooktop until it is flush
with cooking surface.
How to Disassemble
Module
Step 1:
before attempting to remove module.
Step 2:
module until base clears the
opening at the front of cooktop.
Step 3:
the side edges and slide toward front
of cooktop. Lift out when unplugged.
Step
do not stack them or store other
materials on top of them. This could
damage or mar surface of modules.
Be sure surface units are cool
Lift up tab at front of
To unplug, hold module by
4: If you are storing modules,
-
6
Page 7

&
.4mwvers
Q. May I can foods and preserves
on my surface unit coils?
A. Yes,
designed for canning purposes. Check
the manufacturer’s instructions and
recipes for preserving foods. Be
sure canner is flat-bottomed and
fits over the center of your surface
unit coil. Since canning generates
large amounts of steam, be careful
to avoid burns from steam or heat.
Canning should only be done on
surface units.
Q.
foil?
A. No. Clean as recommended in
Cleaning Guide.
Home
but only use cookware
Can I cover my drip pans with
Canning Tips
Q. Can I use special cooking
equipment, like an oriental wok,
on any surface units?
A. Utensils without flat surfaces
are not recommended. The life of
your surface unit can be shortened
and the range top can be damaged
from the high heat needed for this
type of cooking.
Q. Why am I not getting the heat
I need from my units even though
I have the knobs on the right
setting?
A. After turning surface unit off
and making sure it is cool, check to
make sure that your plug-in units
are securely fastened into the
surface connection.
Q. Why do my utensils tilt when I
place them on the surface unit?
A. Because the surface unit is
not flat. Make sure that the “feet”
on your surface units are sitting
tightly in the indentation and the
reflector ring is flat on the cooktop
surface.
Q. Why is the porcelain finish on
my cookware coming off?
A.
If you set your surface unit
coil higher than required for the
cookware material, and leave it, the
finish may smoke, crack, pop, or
burn depending on the pot or pan.
Also, a too high heat for long
periods, and small amounts of dry
food, may damage the finish.
Canning should be done on
surface unit coils only.
In surface cooking of foods other
than canning, the use of
diameter utensils (extending more
than l-inch beyond edge of trim ring)
is not recommended. However,
when canning with water-bath or
pressure canner, large-diameter
utensils may be used. This is
because boiling water temperatures
(even under pressure) are not
harmful to cooktop surfaces
surrounding heating unit.
HOWEVER, DO NOT USE
LARGE DIAMETER CANNERS
OR
~HER
UTENSILS FOR FRYING OR
BOILING FOODS OTHER
THAN WATER. Most syrup or
sauce mixtures—and all types of
frying—cook at temperatures much
higher than boiling water. Such
temperatures could eventually
harm cooktop surfaces surrounding
heating units.
LARGE DIAMETER
large-
Observe Following Points
in Canning
1.
Bring water to boil on HIGH
heat, then after boiling has begun,
adjust heat to lowest setting to
maintain boil (saves energy and
best uses surface unit.)
2. Be sure canner fits over center
of surface unit. If your range does
not allow canner to be centered on
surface unit, use smaller-diameter
containers for good canning results.
3. Flat-bottomed canners give best
canning results. Be sure bottom of
canner is flat or slight indentation
fits snugly over surface unit.
Canners with flanged or rippled
bottoms (often found in enamelware)
are not recommended.
RIGHT
WRONG
4. When canning, use recipes from
reputable sources. Reliable recipes
are available from the manufacturer
of your canner; manufacturers of
glass jars for canning, such as Ball
and Kerr; and the United States
Department of Agriculture
Extension Service.
5. Remember, in following the
recipes, that canning is a process
that generates large amounts of
steam. Be careful while canning to
prevent burns from steam or heat.
NOTE: If your cooktop is being
operated on low power (voltage),
canning may take longer than
expected, even though directions
have been carefully followed. The
process may be improved by:
(1)
using a pressure canner, and
(2) for fastest heating of large
water quantities, begin with
HOT tap water.
7
Page 8

Surface Cooking Guide
Cookware Tips
1.
Use medium-or heavy-weight
cookware. Aluminum cookware
conducts heat faster than other
metals. Cast iron and coated cast
iron cookware is slow to absorb
heat, but generally cooks evenly at
LOW or MEDIUM settings. Steel
pans may cook unevenly if not
combined with other metals.
Food
Cereal
Cornmeal, grits,
oatmeal
Cocoa
Coffee
Eggs
Cooked in shell
Fried sunny-side-up Covered
Fried over easy Uncovered
Poached
Scrambled or omelets
Fruits
Meats, Poultry
Braised: Pot roasts of
beef, lamb or veal;
pork steaks and
chops
Parr-fried: Tender
chops; thin steaks up
to 3/4-inch; minute
steaks; hamburgers;
franks and sausage;
thin fish fillets
Cookware
Covered
Saucepan
Uncovered
Saucepan
Percolator
Covered
Saucepan
Skillet
Skillet
Covered
Skillet
Uncovered
Skillet
Covered
Saucepan
Covered
Skillet
Uncovered
Skillet
Flat ground
Pyroceram”
saucepans fitting lids. Match the size of the
or skillets coated on the bottom saucepan to the size of the surface
with aluminum generally cook
evenly. When cooking on surface
unit coils, use glass saucepans with
unit. A pan that extends more than an
inch beyond the edge of the trim ring
tmps
heat which causes discoloration
heat-spreading trivets available for ranging from blue to dark gray
that purpose.
2. To conserve the most cooking
on chrome trim rings and module
surfaces.
energy, pans should be flat on the
bottom, have straight sides and tight
Directions and Setting
to Start Cooking
HI. In covered pan, bring
water to boil before adding
cereal.
HI,
Stir together water or
milk, cocoa ingredients.
Bring just to a boil.
HI,
At first perk, switch
heat to 3.
HI.
Cover eggs with cool
water. Cover pan, cook
until steaming.
5. Melt butter, add eggs
and cover skillet.
HI. Melt butter. 3, then add eggs. When
HI. In covered pan, bring
water to a boil.
HI. Heat butter until light
golden in color.
HI.
In covered pan, bring
fruit and water to boil.
HI. Melt fat, then add meat
Switch to 8 to brown meat.
Add water or other liquid.
HI. Preheat skillet, then
grease lightly.
Setting to Complete
Cooking
3, then add cereal.
Finish timing according
Dackmze
to
4, to cook 1 or 2 minutes
to completely blend ingredients
3, to maintain gentle but
steady ~erk.
3.
minutes for soft cooked;
15 minutes for hard cooked.
Continue cooking at 5 until
whites are just set, about
3 to 5 more minutes.
bottoms of eggs have just set,
carefully turn over to cook
other side.
3. Carefully add eggs.
Cook uncovered about 5
minutes at 5.
4. Add egg mixture.
Cook, stirring to desired
doneness.
3. Stir occasionally and
check for sticking.
3. Simmer until fork tender.
6,
desired doneness, turning
over as needed.
directions.
Cook only 3 to 4
Brown and cook to
Comments
Cereals bubble and expand as
they cook; use large enough
saucepan to prevent
Milk boils over rapidly. Watch as
boiling point approaches.
Percolate 8 to 10 minutes for
8 cups, less for fewer cups.
If you do not cover skillet, baste
eggs with fat to cook tops evenly.
Remove cooked
spoon or pancake turner.
Eggs continue to set slightly after
cooking. For omelet, do not stir
last few minutes. When set, fold
in half.
Fresh fruit: Use 1/4 to 1/2 cup
water per pound of fruit.
Dried fruit: Use water as package
directs. Time depends on whether
fruit has been presoaked. If not,
allow more cooking time.
Meat can be seasoned and floured
before it is browned, if desired.
Liquid variations for flavor could
be wine, fruit or tomato juice or
meat broth.
Timing: Steaks 1 to 2-inches: 1 to
2 hours. Beef Stew: 2 to 3 hours.
Pot Roast:
Pan frying is best for thin steaks
and chops. If rare is desired,
preheat
e~s
2%
to 4 hours.
skiflet
before adding meat
boilover.
with slotted
—
8
Page 9

3. Deep Fat Frying. Do not overfil
kettle with fat that may spill over
when adding food. Frosty foods
bubble vigorously. Watch foods
frying at HIGH temperatures and
keep
cooktop,
vent grill and filters
clean from accumulated grease.
RIGHT
OVER 1“
Food
Fried Chicken
Pan
broiled bacon
Sauteed: Less tender
thin steaks (chuck,
round, etc.); liver;
thick m whole fish
Simmered or stewed
meat; chicken; corned
beef; smoked pork;
stewing beef; tongue;
etc:.
Melting chocolate,
butter, marshmallows
Pancakes or
French toast
Pasta
Noodles or spagbetti
Pressure Cooking
Pnddings, Sauces,
Candies, Frostings
Vegetables
Fresh
Frozen
Sauteed: Onions;
green peppers;
mushrwms;
Rice and Grits
celery;
etc.
Cookware
Covered
Skillet
Uncnvered
Skillet
Covered
Skillet
Covered
Dutch Oven,
Kettle or
Large
Saucepan
Small
Covered
Saucepan.
Use small
surface unit
Skillet
or
Griddle
Covered
Large kettle
or Pot
Pressure
Cooker or
Canner
Uncovered
Saucepan
Covered
Saucepan
Covered
Saucepan
Uncovered
Skillet
Covered
Saucepan
Directions and Setting
Cookirw
to Start
HI. Melt fat. Switch to 8
to brown chicken.
HI. In cold skillet, arrange
bacon slices. Cook just
until starting to sizzle,
HI. Melt fat. Switch to 4
to brown slowly.
HI. Cover meat with water
and cover pan or kettle.
Cook until steaming.
WM.
Alkmv
melt through. Stir to smooth.
7. Heat skillet 8 to 10
minutes. Grease lightly.
HI.
salted water to a boil, uncover
and add pasta slowly so
boiling does not stop.
HI.
heard.
HI. Bring just to boil.
H1.
water in saucepan, Add
salt and prepared vegetable
In covered saucepan bring
to boil.
HI. Measure water
as above. Add frozen block
of vegetable. In covered
saucepan bring to boil.
HI. In skillet melt fat.
HI. Bring salted water to a
boil.
10 to 15 minutes to
In covered kettle, bring
Heat until first jiggle is
Measure 1/2 to 1 inch
and
salt
Setting to Complete
Cooking
3. Cover skillet and cook
until tender. Uncover last
few minutes.
7. Cook, turning over
as needed.
3. Cover and cook
until tender.
3. Cook until fork
tender. (Water should
slowly boil). For very large
loads, medium heat may
be needed.
Cook 2 to 3 minutes px side.
7. Cook uncovered until
tender. For large amounts,
HI maybe needed
keep water at rolling
boil throughout entire
cooking time.
7. For foods cooking
10 minutes or less. 4 for
foods over 10 minutes.
3.
To finish cooking
4.
Cook 1 pound 10
to 30 or more minutes,
depending on tenderness
of vegetable.
3. Cook according
time on package.
4. Add vegetable.
Cook until desired
tenderness is reached
WM. Cover and cook
according to time.
to
to
Comments
For crisp dry chicken, cover
only after switching to 3 for 10
minutes. Uncover and cook, turning
occasionally 10 to 20 minutes.
A more attention-free method
to
start and cook at 4.
is
Meat may be breaded
marinated in sauce before frying.
Add salt or other seasoning .
before cooking if meat bas not
been smoked or otherwise
cured.
When melting marshmallows, add
milk or water.
Thick batter takes slightly longer
time. Turn over pancakes when
bubbles rise
Use large enough kettle
prevent
in size when cooked.
Cooker should jiggle 2 to 3 times
per minute.
Stir frequently to prevent
sticking.
Uncovered pan requires more
,water
Break up
cooking.
Turn over or stir vegetable as
necessary for even browning.
Triple in volume after cooking.
Time
2
cups water—25 minutes. Grits:
I
cup grits and 4 cups
40 minutes.
to
boilover.
and longer time.
or stir as needed while
at
WM.
or
surface.
Pasta doubles
Rice: 1 cup
water—
to
rice and
9
Page 10

(kill
—
—
See Grill Cooking Guide on page 12.
You can enjoy delicious grilled
food year ‘round, prepared in the
convenience of your own kitchen.
H
OW
to
Assthdc
the
[jrill
Grills
,(2
piece
grates)
*
Step
3: Place Grill Spatter Shield
in bottom of Grill Pan. This shield
prevents spattering and flash fires
during grilling.
Removing
When removing the parts of the
Grill module to clean, be sure all
switches are in the OFF position
and unit is cool. Remove the 2 Grill
Grates and then slide the Heating
Unit to the front until unplugged.
Remove Grill Spatter Shield, Grill
Pan and Grease Collector.
HOW
to
The control knob must be pushed
in to start; this prevents heating unit
from being
Push the knob in only when it is in
the OFF position. When the knob
is in in any other position, it can be
turned without pushing it in.
(.;rili
%4
Grill
tur~ed on
Element
(3mtrols
accident~lly.
Step 1:
Collector in the cooktop burner
box space provided. Remove
grease from Grease Collector after
each use.
Step
over Grease Collector. The hole in
center of Grill Pan permits grease
to drain into collector. Keep hole
open at all times.
Position the Grease
2: Fit Grill Pan in cooktop
Step
4: Make sure all controls are
turned to OFF. Hold Heating Unit
with terminals facing rear of the
Cooktop and level with the surface.
Insert terminals into Cooktop
receptacle as far as they will go.
(Do not force). Heating Unit should
rest on ledge of the Grill Pan.
Step
5: Place the 2 Grill Grates on
the Grill Pan over the Heating Unit.
Grates should be seated properly on
Grill Pan or grease will leak between
Grill Pan lip and main top and build
up in burner box area.
Push in control knob depending
on which side of cooktop Grill
Module is used. The right front
control knob controls the grill
when module is on the right side
and
left front
operates grill when Grill Module is
on left side of cooktop.
Turn knobs to the heat setting
you want.
control knob
10
Page 11

(.;rill
Tips
Questiom and Answers
● Do not leave grill unattended
while in use.
●
Be sure to preheat according to
cooking guide.
● Occasionally rearrange foods on
the grill, to prevent sticking and
provide better browning.
● Remove accumulated grease from
Grease Collector after each use, to
lessen smoking and odors. Grease
buildup can also become a fire
hazard.
. Trim fat from meats before
placing on grill. This will reduce
smoking and lessen grease buildup
in the collector pan. The trimmings
may be rubbed on the hot grates to
help prevent sticking.
●
Grates should be oiled or sprayed
with a nonstick vegetable oil before
cooking to prevent sticking.
● Make sure Grease Collector,
Grill Pan and Grill Spatter Shield
are clean before using grill.
● Season meats after cooking rather
than before—salt can draw out
juices and dry out meat. Use tongs
to turn and rearrange meats on the
grill; forks will pierce the meat and
release juices.
●
Your interchangeable cooktop
modules can be used on either the
right or left side of the cooktop.
When inserting or removing a
module, take care not to force the
connection or exert undue pressure
which could damage the electrical
contacts. Additional modules can
be purchased from your dealer, to
double your grill/griddle capacity
or to add two more surface units.
. If your cooktop is being operated
on low power (voltage) foods may
be lighter brown than expected. A
longer preheating and grill time
may be necessary to achieve the
desired results.
Q. I follow the cooking times
suggested, but my foods don’t get
done properly. Is there something
wrong with my grill?
A. Probably not. Suggested
cooking times should be used only
as a general guide. Variables in
food can change cooking times
required.
Q. How can I keep barbecued
meats from developing an
unattractive burned look
and taste?
A.
Sauces containing sugar will
often burn if used during the entire
cooking time. If your favorite sauce
contains sugar, try adding it only
during the last 15 to 20 minutes of
cooking time for best results.
Q. When cooking small loads
with only half the heating
elements, foods are not browning
as much as I like. What could
cause this?
A.
To get optimum cooking
performance with
small
loads, use
the rear heating element. Longer
preheating time may be required
to get the desired results.
. When cooking foods of various
sizes and thicknesses, start larger
or thicker pieces first, add
quicker-
cooking small pieces later. Press
meat lightly to lie flat on grill: slash
the fat on edges of steaks and chops
to prevent curling; break the joints
of split chickens so they will lie flat.
11
Page 12

Do not leave cooktop unattended
during “preheat” (switches
turned to “HI”) or anvtime the
switches are turned to” “HI” with
food on the Grill or Griddle.
1.
Preheat 5 minutes on HI before
cooking (except for rare steaks and
hamburgers preheat 10 minutes).
Turn to setting on guide for your
particular food.
2.
Before cooking steaks, slash fat
around edges to prevent curling of
meat.
3.
Suggested cooking times should
be used only as a guide, since
variables in-food can change
cooking times.
4.
If your cooktop is being
operated on low power (voltage),
foods may be lighter brown than
expected. A longer preheating and
grill time may be necessary for
your particular food type.
Food
Steak
%
“-1 %”
thick
Steak
1 IA
’’-2°
thick
Ground Steak or
Hamburgers
%”
thick
Chicken
Ham Slices
(Precooked) 1“ thick
Hot
~O~S
Pork Chops
Spareribs
Lamb Chops
Lobster Tails
Salmon Steaks
1“
thick
Large Sausage Links
Suggested Setting
Rare:
Medium:
Well:
Rare: HI-8
Medium:
Well:
Rare:
Medium:
Well:
Cut-Up Pieces: 8
Quarters:
Halves:
HI
8
8
8
8
HI
8
8
8
7
8
7
Cook Time
5-7 minutes per side
6-8 minutes per side
8-10 minutes per
9-11 minutes per side
13-15
minutes per side
20-23 minutes per side
6-8 minutes per side
8-10 minutes per side
11-12
minutes per side
45-60 minutes (total)
1 hr. to 1 hr. 10 minutes (total)
1 hr. to 1 hr. 25 minutes (total)
10 minutes per side
8-9 minutes (total)
15-18 minutes per side
40-50 minutes (total)
20-22 minutes per side
15-20
minutes per side
8-10 minutes per side
10-12 minutes per side
side
Comments
Preheat grill 10 minutes
Preheat grill 10 minutes for rare.
Reduce to 8 for well done.
Preheat grill 10 minutes for rare
Turn over frequently and if desired baste with
sauce last 10 to
Break joint bones. Place skin
over every 15 minutes and baste frequently as
desired. Wing-breast quarters take longer
than thigh-leg quarters.
Break joint bones. Place skin
preheated grill. Turn over and baste frequently
as desired.
Turn freauentlv.
Parboil 5 minutes before grilling. Rearrange
and turn over frequently. Baste with sauce last
10 minutes as desired. Very meaty ribs may
take about 10 minutes longer.
With a sharp knife or scissors, cut lengthwise the
undersell into
shell. Spread tail apart to expose meat while
grilling. Loosen meat but leave in
grates with nonstick coating before preheating.
Brush with melted butter.
Use bratwurst,
sausage.
15
the
kielbasa
for
rare
minutes.
side
down. Turn
side
down on
meat almost through to outer
shell.
Spray
or smoked Polish
12
Page 13

See Griddle Cooking Guide on page 15.
Your nonstick coated griddle
provides an extra-large cooking
surface for meats, pancakes, or
other food usually prepared in a
frying pan or electric skillet.
You can also use the griddle as
a warming tray, with a low-heat
setting.
Note:
Griddle is designed for use
only on the grill heating unit. Do
not use over the surface units.
Eltml to
Step 1:
before using Griddle.
%sselll~le (;riddle
Remove Grease Collector
,..—
Step 3:
turned to OFF. Hold Heating Unit
with terminals facing rear of the
Cooktop and level with the surface.
Insert terminals into Cooktop
receptacle as far as they will go.
(Do not force.) Heating Unit should
rest on ledge of the Grill Pan.
Make sure all controls are
How to Set
The control knob must be pushed
in to start; this prevents heating unit
from being turned on
Push the knob in only when it is in
the OFF position. When the knob
is in any other position, it can be
turned without pushing it in.
Griddle Control
accidenblly.
I
I
Push in control knob. The
front
control knob controls the
griddle when it is on the right side.
The
left front
griddle when it is on the left side.
knob controls the
right
Step
2:”
Position the Grill pan in
the cooktop space provided. Insert
with opening to the rear.
Step 4:
Griddle over the Heating Unit.
NOTE: Before its first use,
condition or “season” your griddle.
Apply a thin layer of cooking oil
to the top surface and heat on HI
setting for 10 minutes. Griddle
is ready to use.
Before every use,
components are clean.
Place the nonstick coated
be sure griddle
Turn knob to the heat setting
you want.
13
Page 14

Griddle Tips
● Most griddled foods require
cooking on a preheated surface,
which may be greased lightly
before adding food. Preheat griddle
5 to 10 minutes at HIGH setting
unless otherwise indicated on the
Griddle Cooking Guide (see page
17), then switch to recommended
cook setting.
. Foods which are high in natural
fat, such as bacon or sausage, may
be started on a cold griddle.
. Foods to be warmed may be
placed directly on the griddle; a
high domed metal cover such as an
inverted kettle, placed over them
will help store the heat. Foods in
covered dishes or pans may also be
warmed on the griddle. Use
resistant dishes only.
. Condition or “season” griddle
before first-time use.
● Make sure Grill Pan is clean
before using griddle.
●
To avoid marring the nonstick
finish, store griddle upright on
edge, if possible. If it is necessary
to store it flat, avoid placing other
pans or utensils on top.
heat-
c
To help maintain good food
quality and prevent spoilage, do
not keep foods warm on griddle for
more than two hours. Delicate
foods, such as eggs, should not be
kept more than 15 to 30 minutes;
entrees and casseroles may be
warmed for 30 to 60 minutes. Hors
d’oeuvres will stay hot for serving
up to 1 or 1
Y2
hours. Rearrange or
stir foods occasionally, if possible.
c
If your cooktop is being operated
on low power (voltage) foods may
be lighter brown than expected. A
longer preheating and griddle time
may be necessary to achieve the
desired results.
●
Avoid using metal utensils with
sharp points or rough or sharp
edges which might damage the
nonstick coated griddle surface. Do
not cut foods on the griddle. Use
only heat-resistant dishes when
foods in containers are to be
warmed on the griddle. For further
information on caring for your
griddle’s surface, see the cleaning
instructions on page 17.
(@%~bl~s
and
,{ns~~’ers
Q. Can my griddle be switched
to the other side of the cooktop
where it would be more convenient
for me?
A.
Your interchangeable cooktop
modules can be used on either the
right or left side of the cooktop.
When inserting or removing a
module, take care not to force the
connection or exert undue pressure
which could damage the electrical
contacts.
Additional grill modules can be
purchased from your dealer, to
double your grill/griddle capacity.
Q. Can prolonged periods of high
heat damage my griddle’s surface?
A. A brief preheating period is
often necessary for best results
with many foods, but leaving the
griddle on HIGH heat setting for
more than 10 minutes without food
can damage the nonstick coating.
Always be sure to turn control
knobs to OFF when cooking is
completed.
-
14
Page 15

Do not leave cooktop unattended
during “preheat” (switches
turned to “HI”) or
anvtime
the
switches are turned to” ’’HI” with
food on the Grill or Griddle.
1.
Suggested cooking times should be
used only as a guide since variables
in food mav
If your cooktop is being operated
2.
chamze cooking
.
time.
on low power (voltage), foods may
be
ligh~er
brown
tha~
expected. A
longer preheating and griddle time
may be necessary for your
particular food.
3.
Avoid using metal utensils with
sharp points or rough or sharp
edges which might damage the
nonstick coated griddle surface.
Do not cut foods on the griddle.
Use only heat-resistant dishes
when foods in containers are to
be warmed on the griddle.
Food
Bacon
Chops
Cube & Rib Eye
Steaks
Eggs, Fried
Suggested Preheat
Setting Time
HI-8
7
7
4
I I
Fish Steaks
Franks
French Toast
Ham Slices
Hamburgers
Pancakes
8
8
17
7
7
7
I I
Sweet Rolls
Sandwiches
Sausage Patties
18
17
HI-8
I
Keep Warm Setting WM-2
and Warming
Setting
’Ik-ay
Preheat not
necessary
At
HI
if desired
5 minutes
10 minutes at
5
minutes at HI
5
minutes at HI
10 minutes at HI
I
6minutes at HI
10 minutes at HI
if desired
5
minutes at HI
10 minutes at HI
]
5 minutes at HI
]
5 minutes at HI
Preheat not
necessary
I
HI
Cook Time
Brown each side.
Brown each side. Start cooking on HI. Switch to 7 after
Brown each side.
Doneness as desired.
2Yz
minutes, first side.
2 minutes, second side.
15 minutes each side.
Turn to brown.
2-3 minutes each side.
7 minutes each side
8-9 minutes each side.
lYz
minutes, first side. Grease lightly if desired.
1 minute, second side.
Brown each side.
5 minutes each side.
Turn to brown.
Delicate Foods:
15-30 minutes.
Entrees and Casseroles:
up to 60 minutes.
Hors d’oeuvres:
1 to
lti
hours.
Comments
Start
cooking on HI. Switch to 8 after
8 minutes.
10 minutes.
Grease lightly if desired.
Grease lightly if desired.
Grease
lightly
if desired.
Grease lightly if desired.
Grease lightly if desired.
Grease lightly if desired. Switch to 8 after
8 minutes.
Grease lightly if desired.
Start cooking on HI. Switch to 8 after
10 minutes.
To keep griddled foods warm, use WM
setting. To retain moisture, cover food with
aluminum foil or an inverted metal pot or
bowl. To use as a warming tray, set covered
heat resistant serving
on griddles at 2 setting. Keep foods warm no
more than 2 hours to preserve food quality and
safety. Occasionally rearrange or stir foods.
containem
or casseroles
15
Page 16

Cooktop
Vent System
The fan will automatically come
on when the grill/griddle is used.
The built-in vent system helps
remove cooking vapors, odors
and smoke from foods prepared
on the cooktop, grill and
accessories.
grill
How to Operate
Vent System
●
*
=
o
m
clockwise until a click
this time the exhaust fan will come
on.
Continuous use of the vent system
helps keep the kitchen comfortable
and less humid, reducing cooking
odors and soiling moisture that
normally creates a frequent need
for cleaning.
How to Clean
1
Before cleaning the vent grill, be
sure exhaust fan is shut off. To
clean
the vent grill, remove it from
the cooktop by lifting it up. Wipe
with a damp cloth. If necessary the
vent grill can be washed in the sink.
Use mild household liquid
detergents for cleaning.
The filters are a permanent type
and should be cleaned when soiled.
Warm water and liquid dishwashing
detergent are
clean the filters. The vent box may
be sponged out in the event of
spills.
To operate the vent
system manually
turn the exhaust
fan switch on the
control panel
is
heard, at
Wnt
System
I
all
that is required to
(llass-Ceramic
$hrface Unit
(Available at extra cost from your
GE dealer.)
The glass-ceramic cooktop module
combines the versatility of surface
unit cooking and wipes clean.
This module is installed and
removed as explained for surface
units. (See page 6.) It is essential
that you use flat-bottom pans on
this module.
N~E:
cooking should not be done on the
glass-ceramic cooktop module.
If not properly cared for, your
ceramic cooktop module can become
stained or scratched. Since soil
buildup can cause discoloration,
spatters and spills must be cleaned up
properly. Heavy buildup can cause a
dull film even when the cooktop is
cool. However, the film is on the
surface only and can be removed.
To keep the ceramic cooktop
looking like new, follow these
steps.
Do not cook foods packaged in
their aluminum foil trays or wrapped
in aluminum foil on glass ceramic.
Foil can melt and fuse to the unit
causing permanent damage.
Keep bottom of cookware and
cooking surface clean and dry.
In dusty or sandy areas, wipe the
cookware and cooking surface to
prevent scratching the ceramic finish.
Avoid scratching the cooktop with
rings, jewelry or other sharp items.
Canning or pressure
At least once a week, clean the
cooktop with Bon Ami brand
cleanser, or a similar product,
which is especially formulated for
cleaning glass-ceramic appliance
tops and cookware.
To use, apply Bon Ami to damp
paper towel and rub into stain until
it is removed. Be sure cooking
surface is cooled. (For stubborn
stains, apply a paste of Bon Ami
and water, cover with a wet paper
towel, and let stand for about 45
minutes. )
always rinse and dry thoroughly.
NOTE: Bon Ami brand cleanser
can be purchased from your
or Service Center. It is also sold
in many grocery, hardware, and
department stores.
Afier using Bon Ami,
dealer
Rf?t hii?rk’
With your rotisserie you add
even more flexibility to cooking
on the grill/griddle cooktop. The
rotisserie fits directly over the
grill Heating Unit.
Many foods such as large whole
meats, spareribs and skewered
foods
rotiss
well. As the food
rotates over the intense heat of the
grill, it sears on the outside while
inside juices self-baste the meat
giving an especially attractive
look to the food.
16
Page 17

,.
,.
. :, :;
‘ , , ‘
i
,. .:. ,,
& j j j f ~
.
if,,
NOTE: Let cooktop parts cool before touching or handling.
Part
Grill Pan and
Spatter Shield
Grease Collector
(Clean after
each use. )
Grill Grates
Griddle
Control Knobs
Control Panel Glass
(may be removed
for cleaning)
Cooktop Surface
Materials to Use
●
Soap and Water
●
Soap-Filled Scouring Pad
● Plastic Scouring Pad
●
Chrome
●
Warm Soapy Water
● Plastic Scouring Ball
●
Warm Soapy Water
● Plastic Scouring Ball
●
Warm Soapy Water
●
Soft Cloth
Po]
ish
. Plastic Scouring Ball
●
Mild Soap and Water
●
Soap and Water
●
Soap and Water
General Directions
Let grill cool. Remove grill heating unit and lift out Grill Pan.
Grill Pan may be cleaned using one of the methods at left.
Keep hole in center of Grill Pan open.
Can be cleaned in dishwasher.
Never use steel wool or abrasive cleaners. Do not clean
in self-cleaning oven.
Can be cleaned in dishwasher.
Do not clean in self-cleaning oven.
Can be cleaned in dishwasher.
Do not use abrasive cleaners.
Can be cleaned in dishwasher.
Pull
off knobs. Wash gently but do not soak. Dry and return controls to cooktop
making sure to match flat area on the knob and shaft.
Wash
all
glass with cloth dampened in soapy water. Rinse and polish with a
dry
cloth. If knobs on the control panel are removed, do not allow water to run down
inside the surface of glass while cleaning.
Wash, rinse, and then polish with a dry cloth. DO N(X USE steel wool, abrasives,
ammonia, acids, or commercial oven cleaners which may damage the finish.
Chrome-Plated
Surface Unit
Drip Pans
Surface Unit Coils
and Grill Heating
Unit
Filters
●
Soap and Water
● Stiff-Bristled Brush
●
Soap-Filled Scouring Pad
●
Warm Soapy Water
Clean as described below or in the dishwasher.
Wipe
all
rings after each cooking so spatter will not “burn on” next time
you cook. To remove “burned-on” spatters, use any or all cleaning materials
mentioned. Rub
lightly with scouring pad to prevent scratching of the
surface. Do not clean in self-cleaning oven.
Spatters and spills burn away when the coils are heated. At the end of a meal,
remove
all
utensils from the surface units and heat the soiled units at HI. Let the
soil burn off about a minute and switch the units to OFF. Avoid getting cleaning
materials on the coils. Wipe off any cleaning materials with a damp paper towel
befive heating the surface unit.
DO NOT handle the unit before completely cooled.
DO NOT self-clean plug-in units.
DO NOT immerse plug-in units in any kind of liquid or clean in dishwasher.
DO
NOT
wash in dishwasher.
17
Page 18

~
—
. . .
. . . . .
.–-.—– .=.
..—
—
. . . . . . . =.:-.
—–.....—.-—–
-:g,=-,,,{
.
— —.–.
.-.— .——:–
.
..—.
Questions?
—
Use This Problem Solver
PROBLEM
SURFACE UNITS ARE
N~
FUNCTIONING
PROPERLY
GRILL/GRIDDLE
UNITS ARE NOT
FUNCIVONING
PROPERLY
FOODS STICK
111 GRILL OR
GRIDDLE
POSSIBLE CAUSE AND REMEDY
● A fuse in your home may be blown or the circuit breaker tripped. Replace fuse or
reset circuit breaker.
●
Surface units are not plugged in solidly.
c
Reflector pans are not set securely in the range top.
●
Surface unit controls are not properly set or wrong surface unit control set for unit
you are using.
●
Entire surface unit module is not plugged in properly.
c
If either surface unit or glass-ceramic module fails to heat—switch the module to
the other side of cooktop. If it operates on that side, then surface unit switch maybe
at fault. If it does not heat, indications are that there is a malfunctioning component
in the module.
c
Grill/Griddle Heating Unit is not plugged in solidly.
● Grill unit control is not properly set or wrong control used.
c
Griddle was not pre-seasoned before first use. Surface of grill or griddle was not
greased before cooking.
. Food is being cooked with too high of a heat setting.
●
Nonstick coating of griddle has been damaged by use of sharp instruments
or abrasive cleaners.
—
●
EXCESSIVE SMOKE
FROM GRILLED
MEATS
Accumulated grease in drip pan or food soils on grate are causing excess smoke.
● Fats not trimmed from meats prior to cooking.
If vou need more help... call, toll free:
The GE Answer
Cen~er@
‘
800.626.2000
consumer information service
18
Page 19

If You Need Service
.
To obtain service, see your warranty
on the back page of this book.
We’re proud of our service and
want you to be pleased. If for some
reason you are not happy with the
service you receive, here are three
steps to follow for further help.
FIRST, contact the people who
serviced your appliance. Explain
why you are not pleased. In most
cases, this will solve the problem.
NEXT, if you are still not pleased,
write all the details—including
your phone number—to:
Manager, Consumer Relations
General Electric
Appliance Park
Louisville, Kentucky 40225
FINALLY, if your problem is still
not resolved, write:
Major Appliance
Consumer Action Panel
20 North Wacker Drive
Chicago, Illinois 60606
—
19
.—
Page 20

YOUR BUILT-IN COOKTOP
i
)
Save proof of
WHAT IS COVERED
WARRANTY
orlgmal
purchase date such as your sales slip or
FULL ONE-YEAR WARRANTY
For one year from date of original
purchase, we will provide, free of
charge, parts and service labor
in your home to repair or replace
any part of the cooktop
because of a manufacturing defect.
cancelled
that fails
check to establish warranty
This warranty is extended to
the original purchaser and any
succeeding owner for products
purchased for ordinary home use
in the 48 mainland states, Hawaii
and Washington,
warranty is the same except that it is
LIMITED because vou must
ship the product
or for the service technician’s travel
costs to your home.
All warranty service will be provided
by our Factory Service Centers or
by our authorized Customer
servicers during normal working
hours.
Look in the White or Yellow Pages
of your telephone directory for
GENERAL ELECTRIC COMPANY,
GENERAL ELECTRIC FACTORY
SERVICE, GENERAL
HOTPOINT
GENERAL ELECTRIC CUSTOMER
CARE@ SERVICE.
FACTORY SERVICE or
period
D.C.
In Alaska the
to~he
service
ELECTRIC-
Dav
Care@
to
;hop
IS
NOT COVERED ● Service
Some states do not allow the exclusion or limitation of incidental or consequential damages, so the above limitation or exclusion
may not apply to you. This warranty gives you specific legal rights, and you may also have other rights which vary from state to state.
To
know what your legal rights are in your state, consult your local or state consumer affairs office or your state’s Attorney General.
If further help is needed concerning this warranty, contact:
Manager—Consumer Affairs, General Electric Company, Appliance Park, Louisville, KY 40225
teach you how to use the product.
Read your Use and Care material.
If you then have any questions
about operating the product,
please contact your dealer or our
Consumer Affairs office at the
address below, or call, toll free:
The GE Answer
800.626.2000
consumer information service
● Improper installation.
If you have an installation problem,
contact your dealer or installer.
You are responsible for providing
adequate electrical, gas, exhausting
and other connecting facilities.
Warrantor: General Electric Company
triPSto
Yourhometo
Center@
. Replacement of house fuses or
resetting of circuit breakers.
● Failure of the product if it is used
for other than its intended purpose
or used commercially.
● Damage to product caused
by accident, fire, floods or acts
of God.
NOT
WARRANTOR IS
FOR CONSEQUENTIAL DAMAGES.
RESPONSIBLE
-
11/86
.——
GENERAL
-
@
ELECTRIC
JP676,
 Loading...