

Page 1
Contents
Modular
Upd&Cootip
Appliance Registration
Automatic Surface Unit
Canning
Care and Cleaning
Cleaning Guide
Controls
Energy-Saving Tips
Features
Feature Index
Grease CollectorJar
Model and Serial Numbers
Modules
Calrod” Surface Unit Module 9
Cooking Guide
Griddle Module
Cooking Guide
Grill Module
Cooking Guide
Solid Disk Module
Cooking Guide
9-14, 16-23
15
25,
;:
27
6, 18
10, 11
21,22
23
18, 19
20
12-14
16, 17
2
8
5
6
7
2
Problem Solver
Repair Service
Safety Instructions
Warranty
GEAmw CenteP
8W.62E2~
2829
31
3,4
Back Cover
Models
JP362
JP671
JP673
GEAppRances
Page 2
Help us help you...
Before using your cooktop,
read this book carefully.
It is intended to help you operate
and maintain your new cooktop
properly.
Keep it handy for answers to your
questions.
If you don’t understand something
or need more help,
your phone number):
Consumer Affairs
GE Appliances
Appliance Park
Louisville, KY 40225
write
(include
Write down the model
and serial numbers.
You’ll find them on a nameplate on
the underside of the cooktop on the
right, next to the grease jar.
These model and serial numbers
are also on the Consumer Product
Ownership Registration Card that
came with your cooktop. Before
sending in this card, please write
these numbers here:
Model Number
Serial Number
Use these numbers in any
correspondence or service calls
concerning your cooktop.
If you received
a damaged
cooktop...
Optional Accessories
To add versatility to your cooktop,
the following accessories are available
at extra cost from your dealer.
Your interchangeable cooktop
modules can be used on either side
of the cooktop. Additional modules
can be purchased from your dealer,
to double your grill/griddle capacity
or to add two more surface units.
JXDC41-Calrod@ Surface
Unit Module
Immediately contact the dealer (or
builder) that sold you the cooktop.
Save time and money.
Before you request
service . . .
Check the Problem Solver on
pages 28 and 29. It lists causes of
minor operating problems that you
can correct yourself.
JXDU7–Grill
JXDL49
(JP673
Module
only)
D1
JXDM1—Grill
0
0
DI
JXDD43–Griddle Module
JXDD46
\@
ml
JXDS42–Solid
JXDS48 (JP673
Cover
(JP673
only)
‘a>
L
Disk Module
only)
2
Page 3
When using
basic safety
be
fotiwed,
following:
●
US~
this appiiance only for
intended
rnand,
●
~~ sure
p~~tiy instaiied
by
a
quaiified
a~cordanc~ with
initiation
* Don’t
how to
cooktop, Some
work differently from those on
your previous cooktop.
●
Donzt
attempt to
or
repiace
cooktop mdess it
reeemmended b
otier servicing
to a
qutified
o Have
the Ioeation
the
b-er or W.
easy
rekrenw.
* ~efore perfodng
service,
elmtrid
p~autions
including the
use as
described
your appliance
and
&chniCian
thfi
provided
instructions+
assume
that
operate all parts of
features may
repair
any part of your
is
this book.
shouid be re%rred
technician.
instailer show
of
the
circuit
Mark it for
DISCONNECT THE
COOK~P POMR SWPLY
AT= HOUS~OLD
DIS~~ON
BY
REMQWG THE FUSE
OR SWI~HING OFF
CIRCUIT
* Do
ehfldren
or
una~ndd
appiian~
never be allowed to sit or
on any part of the appiianee.
* Don’t allow
,–.
stidor
~W~R.
not leave ti]dren aione—
shotid
is in
hang enthe
P~L
not be Iefi alone
in an area where an
tise.
They should
anyone to climb,
appliances,
should
in this
is
punded
in
you
know
the
spK14y
YOU
ay
THE
stid
cooktop.
its
An
●
Never wear 1
~fitting
hanging garments while
*eappiianm
could be ignited if brought in
conmt
and may
●
moist
hot
tim steam.
touch hot heating elements.
not use a towel or
cIoth in place of a pot holder.
●
y~ur
heattig
Q
with hot heating elements
Use
only
ar damp potholders on
surfi~s
For
your
appliance
the room.
Do not
-terkds
●
Keep hood
clean
and to
store combustible rnateriais,
vapors and liquids in the vicinity
of
*
to
awoid
this or any
Do
not let cooking
or other
accumulate on
*
Do
not
fires.
Never pick up a flaming
W.
Smother framing pan on
surface
unit by
completely with
cookie
shW or flat tray.
Fiaming
mm
be
put
baking soda
Fiamrnablemateti
cause severe burns.
dry pot
may result in
Do not let pot holders
safety,
haIders—
other
never use
far
warming
store fhunmable
near the
cookto~
aud -e
rnainMin
grease
other
other
good venting
f~s. Da
flamrna
appiiance.
flammable
the cooktap.
use
water on grease
covering ~
well-fittiug Iid,
grease outside a
out by covering with
or,
if available, a
or
using
burns
Do
buiky
~hrs
not
blegasoline or
grease
materiais
pan
mniti-purpose ~ chemid
or foam type
@inguisher.
or
*Be sure drip
Pam not
coverd and are h place.
absence
damage cooktop
during cooking couid
parts and
wiring.
Their
3
Page 4
Q
—.
w
not
replace
m~mtor
jar
grease
any
* w amid
of a
jar with a
which codd break
drips
wide
month
the possibility
bm or elwtric shti,
always be certain
controb for *1
are at 0~
the_
into it.
Wplace
canning jar.
that
heathg
@tion
md #
mayodse
when hot
with
the
ukts
units
are cool before attempting to
~
or remove them.
●
F- for frying
dry as
foods or moisture on fresh
can cause
and over
9
U* ~ttle
shtiow
FWing
-
able.
hot
sides of pan.
fat for eff~ive
or deepfat
the pm too full of
cause
spillovers when
should be
Frost
fit
to bubble up
fryiag.
on
food
fro=n
fds
kt
as
is added.
*
If a
combbtion
fats
@be
used
@ether before
of
otis
b-,
heating,
or
stir
or as
tits melt slowly.
* Nways
wa~h
* Use
heat fat
as it
heats.
slowly9
and
deep fat thermometer
whenever possible to prevent
overheating
tit beyond
the
smoking point.
SAW
T=
~STRUCTIONS
4
Page 5
Ene~y-Saving ~ps
●
Use cookware with tight-fitting
covers and flat bottoms which
completely cover the heated
portion of the surface unit.
●
Cook fresh vegetables with a
minimum amount of water in a
covered pan.
●
Watch foods when bringing them
quicuy
to cooking temperatures at
HIGH heat. When food reaches
cooking temperature, reduce heat
immediately to lowest setting that
will keep it cooking.
● Use residual heat whenever
possible. For example, when
cooking eggs in the shell, bring
water and eggs to boil, then turn
to OFF position and cover with
lid to complete the cooking.
● Always turn surface unit OFF
before removing cookware.
● Use correct heat for cooking tisk:
HIGH—to start cooking (if time
allows, do not use HIGH heat to
start).
MED
HIGH—quick browning.
MED—s1ow frying.
LOW—finish cooking most
quantities.
WM—double
boiler heat, finish
cooking, and special for small
quantities.
●
When boiling water for tea or
coffee, heat only amount needed.
It is not economical to boil a
container full of water for one
or two cups.
● Preheat griddle only when
necessary. Foods high in natural
fat, such as bacon or sausage, can
be started on a cold griddle.
5
Page 6
Features of Your
Cooktop
Model
JP362
*
.[~]
,
Model
Model
Ev”
JP6fl
JP6~
(For 208 volt imtillation)
—
6
Page 7
Feature Index
1 Surface Unit Controls. Push in and turn to set surface units from
WM to HIGH.
2 Indicator Light. Lights when any unit of the cooktop is turned on.
3
Calrod@
cooktop and can be easily removed for cleaning.
Surface Unit Module. Entire module plugs into the
(JXDC41,
optional at extra cost.)
Explained
on page
8
8
9
●
●
I
●
●
I
1.1
●
I
4 Plug-In
Calrod@
Surface Units. Units maybe easily removed to
clean reflector pans beneath each coil. Do not submerge plug-in
units in water.
5 Chrome Trim Ring and Aluminum Drip Pan. Remove for cleaning.
6 Solid Disk Module. Cast iron solid disk elements are sealed so they
are easy to clean. JXDS42 for models
for model
JP673.
(Optional at extra cost.)
7 Fixed Solid Disk Automatic Electronic
JP362
and
JP671.
Sensi-TempTM
JXDS48
Surface Unit.
Senses the temperature of the cooking container and regulates it
according to the setting selected.
8 Automatic Surface Unit Control.
9 Griddle Module. Griddle plugs into the cooktop and can be easily
removed for cleaning.
JXDD46 for model
JXDD43
JP673.
for models JP362 and
(Optional at extra cost.)
JP671.
10 Grill Module. Grill is easily removed for cleaning.
11 Grease Collector System. Uses mason jars to collect grease. Easy
removal for cleaning.
12 Cooktop Tub. Easily cleaned when module is removed.
25
25
12
15
15
21
18
18
26,27
●
● ●
● ●
● ●
●
● ●
● ●
I“l
●
●
●
7
Page 8
Controk
Surface Cooting with
Infinite Heat
Your surface units and controls
are designed to give you an infinite
choice of heat settings for surface
unit cooking.
At both OFF and HIGH positions,
there is a slight niche so control
“clicks” at those positions; “click”
on HIGH marks the highest setting;
the lowest setting is between the
words WM and OFF. In a quiet
kitchen, you may hear slight
“clicking” sounds during cooking,
indicating heat settings selected
are being-maintained:
Switching heats to higher settings
always shows a quicker change than
switching to lower settings.
Controk
How to Set the
Controk
r
Step 1: Grasp control knob and
push in.
I
‘}Qfi}
I I
Step 2:
counterclockwise to desired heat
setting.
Turn either clockwise or
OFF
I
HIGH
o
FRONT(GRIDDLE
fi~~~L
Cooting Guide
for Using Heat Settings
HIGH
MED
HIGH
MED
LOW
WM
I
At HIGH or MED HIGH, never
leave food unattended.
cause smoking; greasy
may catch fire.
Bring water to boil.
Fast fry, pan broil; maintain
fast boil on large amount of
food.
Saute and brown; maintain
slow boil on large amount
of food.
Cook after starting at
HIGH; cook with little
water in covered pan.
Steam rice, cereal;
maintain serving
temperature of most foods.
—
Boilovers
spillovers
—
Control must be pushed in to set
only from OFF position. When
control is in any position other
than OFF, it maybe rotated
without pushing in.
Be sure you turn control to OFF
when you finish cooking. An
indicator light will glow when
ANY surface unit is on.
8
Page 9
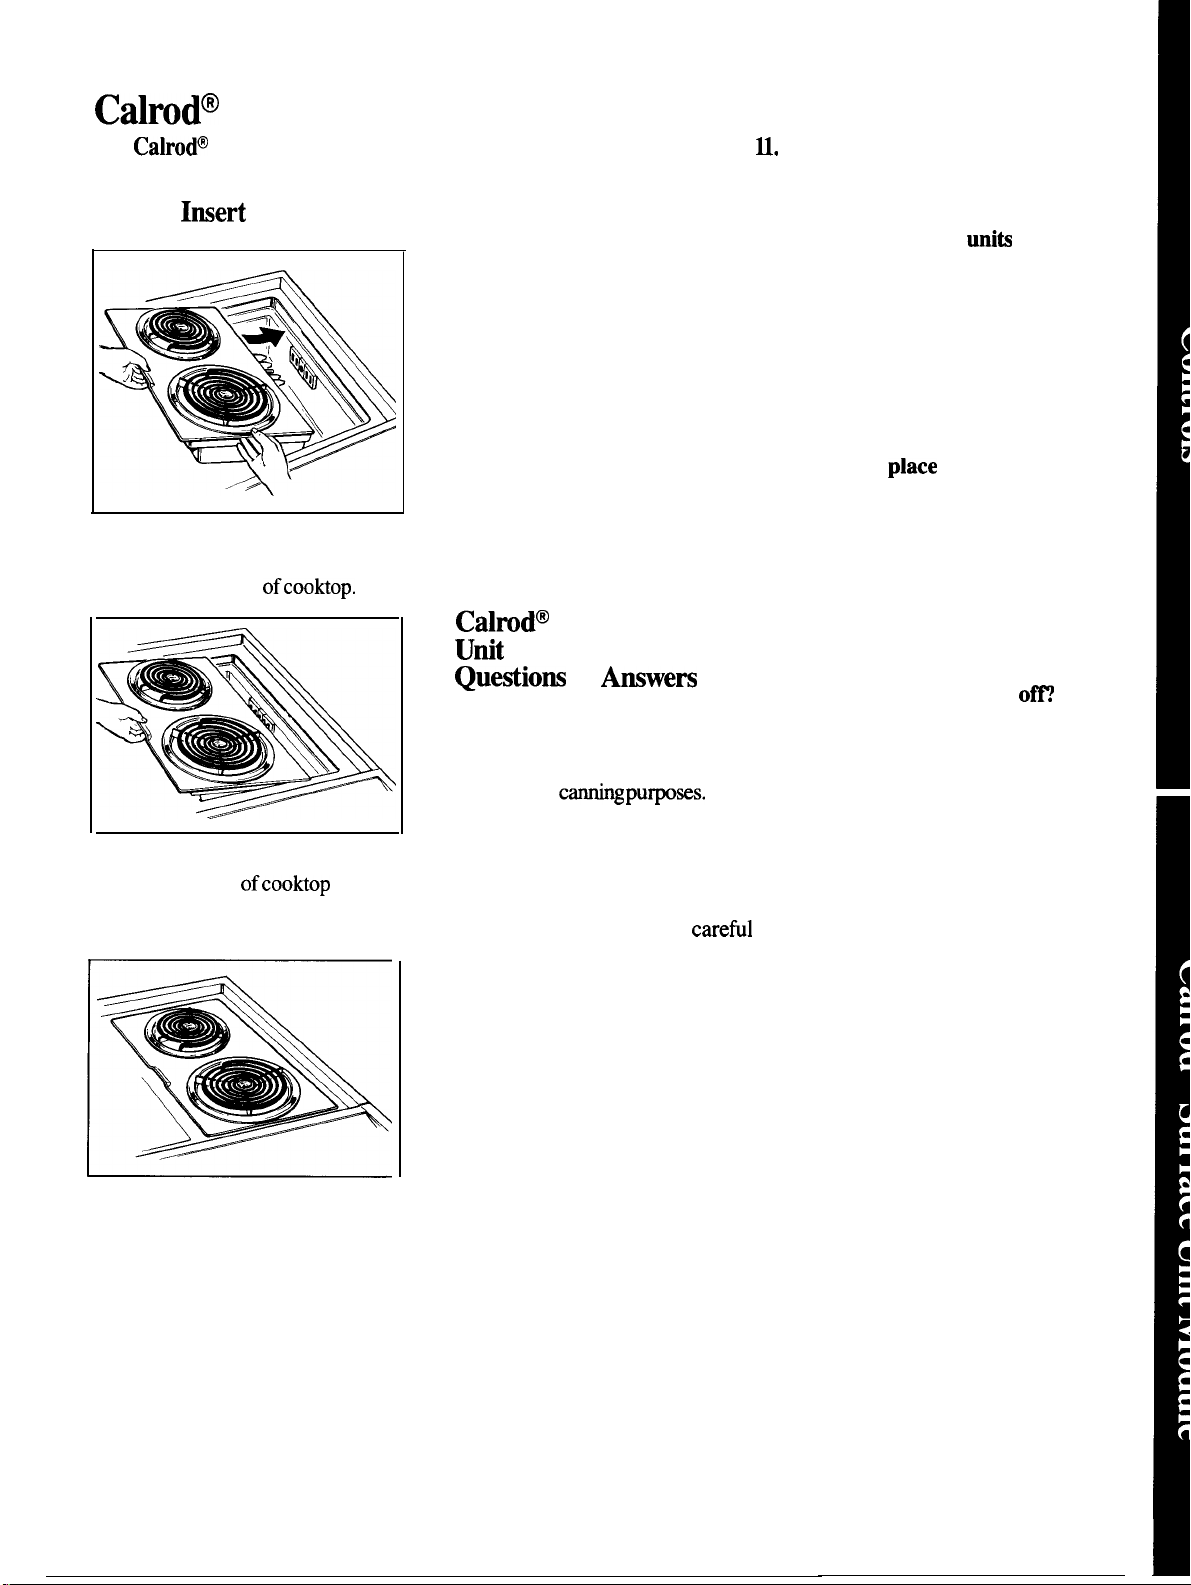
Calrod@
See
Calrod”
Surface Unit Module
Surface Unit Module Cooking Guide on pages 10 and
U.
How to Imert Module
Step 1:
to OFF. To install module, position
plug to outside wall
Step 2:
receptacle in side
plug is engaged completely in
receptacle.
Be sure controls are turned
ofcooktop.
Slide module toward
ofcooktop until
How to Remove Module
Step 1:
before attempting to remove module.
Step 2:
module until base clears the
opening at the side of cooktop.
Step 3:
the front and back edges and slide
toward center of cooktop. Lift out
when unplugged.
Step
do not stack them or store other
materials on top of them. This could
damage or mar surface of modules.
Calrod@
Ufit
Quetiiom &
Q. May I can foods and preserves
on my surface unit coils?
A. Yes,
designed for
the manufacturer’s instructions and
recipes for preserving foods. Be
sure canner is flat-bottomed and
fits over the center of your surface
unit coil. Since canning generates
large amounts of steam, be
to avoid burns from steam or heat.
Canning should only be done on
surface units.
Be sure surface units are cool
Lift up tab at inside edge of
To unplug, hold module by
4: If you are storing modules,
Surface
Module
Amwers
but only use cookware
-g
pU~SCS.
Check
carefil
Q. Why am I not getting the heat
I need from my
I have the knobs on the right
setting?
A. After turning surface unit off
and making sure it is cool, check to
make sure that your plug-in units
are securely fastened into the
surface connection.
Q.
Why does my cookware tilt
when I
unit?
A. Because the surface unit is
not flat. Make sure the feet of
your surface units are sitting on
the inside rim of the trim ring,
and the trim ring is flat on the
cooktop surface.
Q. Why is the porcelain finish on
my cookware coming
A. If you set your surface unit
coil higher than required for the
cookware material and leave it, the
finish may smoke, crack, pop, or
bum depending on the pot or pan.
Also, a too high heat for long
periods, and small amounts of dry
food, may damage the finish.
place
uniti
even though
them on the surface
o~
Step 3:
module into cooktop until it is flush
with cooking surface.
Lower the inside edge of
Q. Can I cover my drip pans with
foil?
A. No. Clean as recommended in
Cleaning Guide.
Q. Can I use special cooking
equipment, like an oriental wok,
on any surface units?
A. Cookware without flat surfaces
is not recommended. The life of
your surface unit can be shortened
and the cooktop can be damaged
from the high heat needed for this
type of cooking. A special flat
bottom wok can be used safely.
9
Page 10
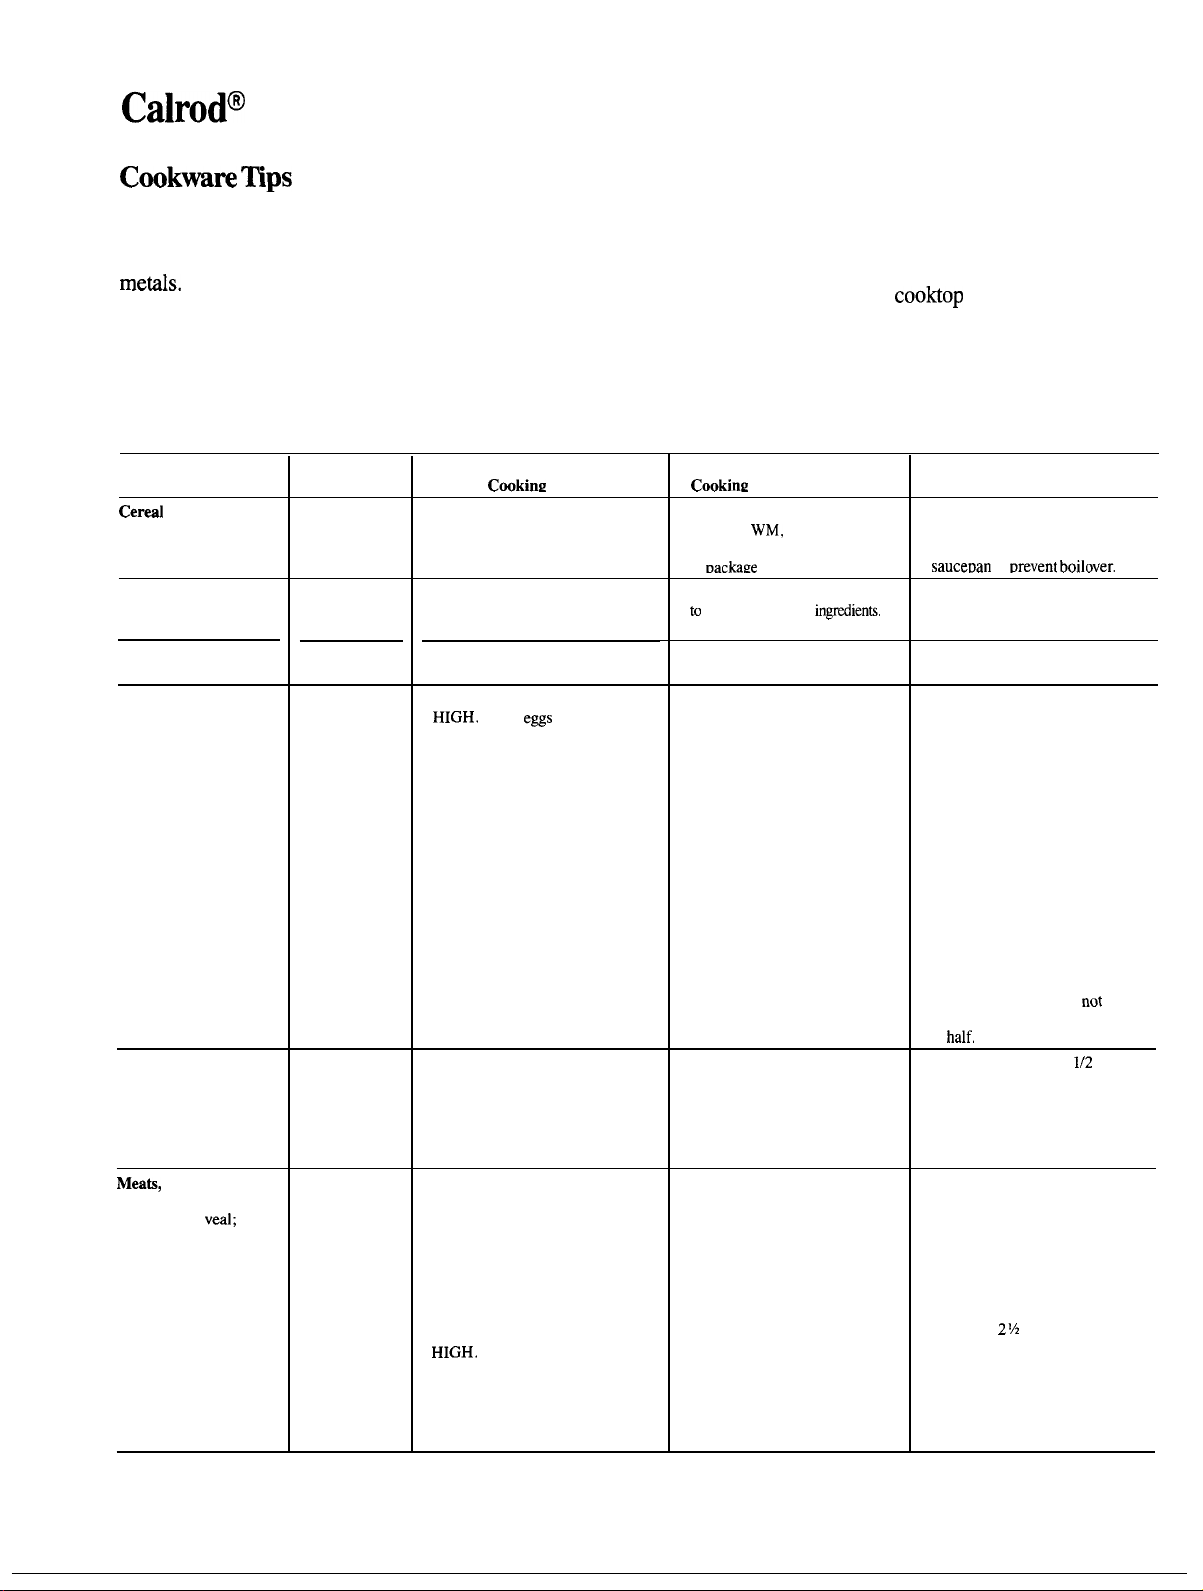
Calrod”
Surface Unit Module Cooking Guide
Cookwm
~PS
1. Use medium-or heavy-weight
cookware. Aluminum cookware
conducts heat faster than other
metis.
Cast iron and coated cast
iron cookware is slow to absorb
heat, but generally cooks evenly at
LOW or MED settings. Steel pans
may cook unevenly if not combined
with other metals.
Food
Cereaf
Cornmeal, grits,
oatmeal
Cocoa
Coffee
Eggs
Cooked in shell
Fried sunny-side-up
Fried over easy
Poached
Scrambled or omelets
Fruits
Meata,
Poultry
Braised: Pot roasts of
beef, lamb or
pork steaks and
chops
Pan-fried: Tender
chops; thin steaks up
to 3/4-inch; minute
steaks; hamburgers;
franks and sausage;
thin fish fillets
veal;
Covered
Saucepan
Uncovered
Saucepan
Percolator
Covered
Saucepan
Covered
Skillet
Uncovered
Skillet
Covered
Skillet
Uncovered
Skillet
Covered
Saucepan
Covered
Skillet
Uncovered
Skillet
2.
To conserve the most cooking
energy, pans should be flat on the
3.
Deep Fat Frying. Do not overfill
kettle with fat that may spill over
bottom, have straight sides and tight when adding food. Frosty foods
fitting lids. Match the size of the
saucepan to the size of the surface
unit. A pan that extends more than keep
bubble vigorously. Watch foods
frying at high temperatures and
cooktop
and vent system clean
an inch beyond the edge of the trim from accumulated grease.
ring traps heat which causes
discoloration ranging from blue to
dark gray on chrome trim rings.
Directions and Setting
Cookin~
to Start
HIGH.
In covered pan bring
water to boil before adding
cereal.
HIGH.
Stir together water or
milk, cocoa ingredients.
Bring just to a boil.
HIGH. At first perk, switch
heat to LOW.
HIGH.
Cover
e~s
water. Cover pan, cook
until steaming.
MED HIGH. Melt butter, add
eggs and cover skillet.
HIGH. Melt butter.
HIGH.
In covered pan bring
water to a boil.
HIGH. Heat butter until light
golden in color.
HIGH. In covered pan bring
fruit and water to boil.
HIGH. Melt fat, then add meat.
Switch to MED HIGH to
brown meat. Add water or
other liquid.
HIGH.
Preheat skillet, then
grease lightly.
with cool
Setting to Complete
CookingCookware
LOW or
Finish timing according
to
MED, to cook 1 or 2
to
LOW to maintain gentle but
steady perk.
LOW. Cook only 3 to 4
minutes for soft cooked;
Continue cooking at
MED HIGH until whites are
just about set, about 3 to 5
more minutes.
LOW, then add eggs. When
bottoms of eggs have just set,
carefully turn over to cook other
side.
LOW.
Cook uncovered about 5
minutes at MED HIGH.
MED. Add egg mixture.
Cook, stirring to desired
doneness.
LOW. Stir occasionally and
check for sticking.
LOW. Simmer until fork
tender.
MED HIGH or MED. Brown
and cook to desired doneness,
turning over as needed.
WM,
then add cereal
Dackaze
directions.
completely blend
15 minutes for hard cooked.
Carefully add eggs.
minutes
irrgredierr~.
Comments
Cereals bubble and expand as
they cook; use large enough
sauceDan
to
Drevent boilover.
Milk boils over rapidly, Watch as
boiling point approaches.
Percolate 8 to 10 minutes for
8 cups, less for fewer
If you do not cover skillet, baste
eggs with fat to cook tops evenly.
Remove cooked eggs with slotted
spoon or pancake turner.
Eggs continue to set slightly after
cooking. For omelet do
last few minutes. When set, fold
half.
in
Fresh fruit: Use 1/4 to
water per pound of fruit.
Dried fruit: Use water as package
directs. Time depends on whether
fruit has been presoaked. If not,
allow more cooking time.
Meat can be seasoned and floured
before it is browned, if desired.
Liquid variations for flavor could
be wine, fruit or tomato juice or
meat broth,
Timing: Steaks 1 to 2-inches: 1 to
2 hours. Beef Stew: 2 to 3 hours.
Pot Roast:
Pan frying is best for thin steaks
and chops. If rare is desired, preheat skillet before adding meat.
2Y2
to 4 hours.
cups.
not
1/2
stir
cup
10
Page 11

RIGHT
OVER1°
Fond
I
Cookware
Fried Chicken
Skillet
Pan fried bacon Uncovered
Sauteed: Less tender
thin steaks
round, etc.); liver;
thick or whole fish
Simmered or stewed
meat; chicken; corned
beef; smoked pork;
stewing beef; tongue;
etc.
(cbuck,
Melting chwolate,
butter. marshmallows
Pancakes or
French toast
Skillet
Covered
Skillet
Covered
Dutch Oven,
Kettle or
Large
Small
Uncovered
Saucepan.
Use small
surface unit
Skillet or
Griddle
Pasta
Noodles or spaghetti Covered
Pressure Cooking
Puddings, Sauces,
Candies, Frostings
Large Kettle
or Pot
Pressure
Cooker or
Canner
Uncovered
Saucepan
Vegetables
Fresh
Frozen Covered
Sauteed: Onions;
green peppers;
mustims: celerv:
Rce
and Grits
etc.
Covered
Saucepan
Saucepan
Uncovered
S~llet
Covered
Saucepan
WRONG
Directions and Setting
to
Stirt
Cooking
HIGH. Melt fat. Switch to
MED HIGH to brown
chicken.
HIGH. In cold skillet,
arrange bacon slices. Cook
just until starting to sizzle.
HIGH. Melt fat. Switch to
MED to brown slowly.
HIGH. Cover meat with
water and cover pan or
kettle. Cook until steaming,
NW
10
to
B tiutcs
WM.
melt through. Stir to smooth.
MED HIGH. Heat skillet
8 to 10 minutes.
Grease
li~htlv.
HIGH. In covered kettle,
bring salted water to a boil,
uncover and add pasta
slowly so boiling does
not stop.
HIGH. Heat until first
ji~le
is heard.
HIGH. Bring just to boil.
HIGH. Measure 1/2 to
1 inch water in saucepan.
Add salt and prepared
vegetable. In covered
saucepan bring to boil.
HIGH. Measure water and
salt as above. Add frozen
block of vegetable. In
covered saucepan bring
to boil.
HIGH. In skillet melt fat.
HIGH. Bring salted water
to a boil.
to
Setting to Complete
Cooking
LOW. Cover skillet and
cook until tender.
Uncover last few minutes,
MED HIGH, Cook, turning
over as needed.
LOW. Cover and cook
until tender.
LOW. Cook until fork
tender. (Water should
slowly boil). For very large
loads, medium heat may
be needed.
Cook
2 to 3 minutes per side
MED HIGH. Cook uncovered
until tender. For large
amounts, HIGH may be
needed to keep water at
rolling boil throughout
entire cooking time.
MED HIGH for foods
cooking 10 minutes or less.
MED for foods over
10 minutes.
LOW. To finish cooking
MED. Cook 1 pound 10
to 30 or more minutes,
depending on tenderness
of vegetable.
LOW. Cook according to
time on package.
MED. Add vegetable.
Cook until desired
tenderness is reached.
WM. Cover and cook
according to
time,
Comments
For crisp dry chicken, cover
after switching to LOW for 10
Uncwer and cook,
minutes,
occasionally 10 to 20 minutes.
A more attention-free method
is to start and cook at MED.
Meat may be breaded or
marinated in sauce before frying.
saft
or other seasoning
Add
before cooking if meat has not
been smoked or otherwise
cured.
When melting marshmallows, add
milk or water.
Thick batter takes slightly longer
time,
Turn over pancakes when
bubbles rise to surface.
Use large enough kettle to
boilover.
volume
Pasta doubles
after cooking.
prevent
in size when cooked.
Cooker should jiggle 2 to 3 times
per minute, or according to cooker
directions.
Stir frequently to prevent
sticking.
Uncovered pan requires more
water and longer time,
Break up or stir as needed while
cooking.
Turn over or stir vegetable as
necessary for even browning.
Triple in
Time at WM. Rice: 1 cup rice and
2 cups water-25 minutes. Grits: 1
cup grits and 4 cups
40 minutes.
ordy
-g
water—
11
Page 12

Solid Disk Module
—
See
Sotid
Disk Element Cooking Guide on pages 16 and 17.
How to Imert Module
Step 1:
to OFF. To install module, position
plug to outside
Step 2:
receptacle inside of cooktop until
plug is engaged completely in
receptacle.
Step 3:
of module into cooktop until it is
flush with cooking surface.
Be sure controls are turned
wdl
of cooktop.
Slide module toward
Lower the inside edge
How to Remove Module
Step 1:
are cool before attempting to
remove module.
Step 2:
module until base clears the
opening at the side of cooktop.
Step 3: To unplug, hold module by
the front and back edges and slide
toward center of cooktop. Lift out
when unplugged.
Step 4: If you are storing modules,
do not stack them or store other
materials on top of them. This could
damage or mar surface of modules.
Be sure solid disk elements
Lifi
up tab at inside edge of
Before
UsiW
Your Solid
Disk Module for the
The top working surface of solid
disk elements have a protective
coating which
before using the elements for the
first time. To harden this coating,
the elements should be heated
without a pan for approximately
5 minutes at HIGH setting.
Otherwise the coating will stick
to the pan.
There will be some smoke and
odor; this is normal. Heating of
the element will change the
stainless steel element trim rings
to a gold color.
T HE ELEMENT
COATING MUST BE HARDENED
~
HELP
OVER ITS LIFE.
PR~E~
must
be hardened
PR~EaIVE
THE ELEMENT
@neralInformation About
Solid Disk
Using a solid disk element is quite
similar to using an electric coil,
with which you probably are
familiar. With both types of surface
units you will enjoy the cleanliness
of electricity and the benefits of
retained heat in the elements.
However, there are differences.
●
Solid disk elements do NOT
glow red, even at HIGH setting.
● Solid disk elements reach
temperature a little slower, and
hold heat longer than conventional
elements. Solid disk elements have
very even heat distribution. Since
solid disk elements hold heat
longer, you may wish to turn the
element off sooner, and take
advantage of the residual heat.
The amount of
dependent upon the quantity and type of food, the material and
thickness of the pan and the setting
used for cooking.
● The red dot in the center of
the solid disk element indicates
built-in temperature limiters that
automatically reduce the heat if a
pan boils dry, if the element is
turned on without a pan or if the
pan is not making enough contact
with the surface of the element.
The red dots will wear off with use
without affecting the performance
of the elements.
. There is retained heat in the element.
On boilovers, wait for element to
cool before cleaning element area.
●
Solid disk element cooking takes
you a step closer to easier cleanup,
because the cooking surface is
sealed against spills and there are
no drip bowls or burner box to clean.
●
You must use proper flat
bottomed cookware, not cookware
that is warped, convex, or
concave. Improper cookware
could cause unsatisfactory
cooking results.
Elemen@
residud
heat is
—
12
Page 13

Solid Disk Element Cookware
~ps
For cooking on solid disk
elemen~, the use of appropriate
cookware is very
● Aluminum cookware conducts
heat faster than other metals.
. Cast iron and coated cast iron
containers are slow to absorb heat,
but generally cook evenly at
minimum or medium heat settings.
●
Glass cookware should be used
only as the manufacturer describes.
. Do not use a wire trivet or any
other kind of heat-retarding pad
between the cookware and the
element.
● Good pans have a thick, flat
bottom which absorbs the heat from
the element. The thick, flat bottom
provides good heat distribution
from the element to the food. This
cooking process requires little
water, fat or electricity.
. Pans with thin, uneven bottoms
do not adequately utilize the heat
coming from the element. The food
to be cooked may burn and require
more time and electricity. You
would also have to add more fat or
water.
importint.
.,, .,
.
.
.
.
‘..’..,.:.::.:.
&
●
Don’t use pans with rounded
bottoms. They don’t have enough
contact with the solid disk element
to cook properly.
FL
● Use pans of the correct diameter
only. They should be slightly larger
than the solid disk element so
spillovers
cooktop and not bake onto the
element. A damp cloth is sufficient
to remove the spill. Pans should not
overhang more than 1 inch beyond
the element.
.,.,.:,.,.:
. . . . . . . . . . . . . . . .
., ...,.
will flow onto the
. ,,,,,.:,,:.::.:,:,.:,
..;,.,,
.7
I
=J)
●
Place only dry pans on the solid
disk element. Do not place lids on
the element, particularly wet lids.
● Some special cooking procedures
require specific cookware such as
pressure cookers, deep fat fryers,
etc. All cookware must have flat
bottoms and be the correct size. The
cookware should also be covered,
if applicable to the cooking process.
Pans with uneven bottoms are not
suitible.
●
Except in pressure cooking
with water and water bath canning,
canning pots should not extend more
●
To optimize cooking time and
energy usage, you should use a
pan that is sized correctly for the
cooking process, with a well-fitted
lid to avoid evaporation loss, and
cook with as little water or fat as
possible. If the pan is too small,
energy is wasted and spillage can
flow onto the solid disk element.
To check how a pan will perform on a solid
1.
Put 1 inch of water into the pan. confirms a good heat transfer and
2. Bring water to a boil and
observe the pattern of the bubbles 4. Bubbles localized in only a
as the water comes to a boil. portion of the bottom indicate
3. A uniform pattern of bubbles
across the bottom of the pan
13
than 1 inch beyond the surface of a
solid disk element and should have
flat bottoms. When canning pots do
not meet this description, the use of
the maximum heat setting causes
excessive heat buildup and may
result in damage to the
See “Home Canning Tips” on
page 23 for further information.
disk
a good pot.
uneven contact of the pan to the
element, uneven heat transfer,
or an unsuitable pot.
cooktop.
element:
Page 14

Solid Disk Element Questions and
Q. May I can foods and preserves
on my solid disk elements?
A. Yes,
designed for canning purposes.
Check the manufacturer’s instructions
and recipes for preserving foods,
Be sure canner is flat-bottomed and
fits over the center of the solid disk
element. Since canning generates
large amounts of steam, be careful
to avoid burns from steam or heat.
Q. Why does the solid disk
element smoke when I
it on?
A.
normal and necessary. A rust
preventative is applied to each
element at the factory. When the
unit is turned on for the first time,
the coating will burn off the
element areas. This takes
approximately five minutes and
should be done without any pans
on the element. Otherwise, the
coating will stick to the pan.
but only use containers
first
turn
This initial smoking is both
Q. Why is the cooktop hot to
the touch?
A. More heat is transferred to the
cooktop by the solid disk elements
than by conventional coils because
the elements are clamped securely
to the cooktop surface. This, of
course, eliminates
getting inside the cooktop chassis.
The secret to keeping the cooktop
comfortably cooler is to turn the
cooktop on only
and its contents are placed on the
element. More heat will then be
transferred to the cookware and the
food rather than the cooktop. In
either case, however, the cooktop
temperature will not cause damage
to the cabinets, countertops or
cookware.
Q.
Why am I overcooking my
food?
A. The solid disk elements are
very energy-efficient and retain heat
much longer than coil elements.
Food
WN boti
minutes
off. We recommend that you begin
cooking at lower settings than you
have in the past and gradually
increase or decrease heat as desired.
The energy savings are significant.
afier
spillovers
afier the cookware
or ~ for ti to five
the controls are turned
Answem
from
Q. Can I use special cooking
equipment like an
A. Cookware without flat surfaces
is not recommended. The life of
your solid disk element can be
shortened and the cooktop can be
damaged from the high heat needed
for this type of cooking.
Q. Why is the porcelain finish
on my containers coming
A.
If you select a heat setting higher
than required for the container
material and leave it, the finish
may smoke, crack, pop, or burn
depending on the pot or pan. Also,
a too high heat for long periods,
and small amounts of dry food,
may damage the finish.
orientil
wok?
offl
—
—
Q. Why does it take a longtime
to cook my food?
A.
The extra time it takes compared
to the conventional coil element is
measured in seconds, not minutes.
These few seconds are due to the
greater mass of the solid disk
element. If the food is cooking
slowly, it is because the pots and
pans are warped or have an uneven
bottom surface. If flat-bottomed
pots and pans are used, cooking
performance of the solid disk
element closely parallels that of
the coil element with less energy
consumption.
14
—
Page 15

Automatic Surface Unit
●
Before Using Your
Automatic Surface Unit
for the First
The top working surface of
the automatic surface unit solid
disk element has a protective
coating which
before using the element for the
first time. To harden this coating,
the element should be heated
without a pan for approximately
5 minutes at HI setting.
Otherwise the coating will stick
to the pan.
There will be some smoke and
odor; this is normal. It is nontoxic and completely
Heating of the element will
change the
trim rings and temperature
sensor to a gold color.
T HE ELEMENT PROTEmIVE
COATING MUST BE HARDENED
TO HELP
OVER ITS LIFE.
PR~E~
me
must
be hardened
harrrdess.
staifless steel element
THE ELEMENT
@neralInformation About
the Automatic Surface Unit
Solid Disk Element
The fixed solid disk automatic
electronic Sensi-Temp
unit senses the temperature of the
pan and regulates it according to the
selected setting. You must use flat
bottomed cookware-not warped,
concave, or convex—when using
this unit. Pans that are not flat can
cause damage to your automatic
surface unit because they do not
make the proper contact.
The use of your solid disk element
is quite similar to an electric coil
surface unit, with which you
probably are familiar. With both
types you will enjoy the cleanliness
of electricity and the benefits of
retained heat in the elements.
However, there are differences.
II’M
surface
red, even at HI setting.
. There is retained heat in the
element. On
element to cool before cleaning
element area.
c
Solid disk element cooking takes
you a step closer to easier cleanup,
because the cooking surface is
sealed against
no drip pans or burner box to clean.
Automatic Surface
;ontrol
This control allows you to pre-select
the desired temperature. To turn
the element on, push in and turn
clockwise to fry; counterclockwise
to boil. At the OFF setting there is
a slight niche.
The automatic element senses the
temperature of the pan and regulates
it according to the setting selected.
modelsW6~ andW6~)
Solid disk elements do N~ glow
boilovers,
spills
wait for
and there are
Unit
TURN
FRY
AUTOMATIC SURFACE UNIT
When turned on, the automatic
surface unit element always begins
with full power, no matter where
the
did
is set. When the temperature
corresponding to that setting has
been reached, the element cycles
OFF and onto maintain the
setting automatically, similar to
your oven. Even when the dial is
set at minimum the element begins
on full power until the selected heat
setting is reached.
The automatic surface unit element
will not burn food when the correct
setting is selected. For example,
baked beans, chocolate and mashed
potatoes can be
without scorching or burning. Food
may dehydrate if
periods of time, but the heat
sensing device will not let
or pan overheat beyond
lefi
on the element
lefi
on for long
the
the
setting.
selecti
food
Special Features
The automatic surface unit saves
time and energy by letting you
know when liquid is about to boil.
The unit beeps three times just
before boiling begins so you can
add food or adjust the temperature
setting.
The automatic surface unit also
senses when a pan has just boiled
dry. After a series of rapid beeps
to alert you, it automatically turns
the heat off to protect both the
cooktop and the pan.
15
Page 16

Solid Disk Element
Suggested Heat Settings
Cooki~
Guide
—
Food
Beverages
Cocoa
Coffee
Percolator-type
Breads
French Toast,
Pancakes,
Grilled Sandwich
Butter
Cereals
Cornmeal, Grits,
Oatmeal
Meat, Fish,
Bacon
Sausage Patties
Swiss Steak,
Pot Roast, braised
~ultry
Regular Element
Start at Setting Complete at Setting
LOW—heat milk. Cover. WM—finish heating.
HIGH—bring water to perk.
MED HIGH—preheat
skillet 4-8 minutes.
WM—allow about 5 to
minutes to melt.
HIGH—cover, bring water
to a boil.
HIGH—cook until just
starting to sizzle.
HIGH—melt fat, then brown
4-5 minutes. Add liquid.
10
WM—maintain gentle but
steady perk.
MED HIGH—finish
cooking.
WM—add
timing according to package
directions.
MED HIGH—finish
cooking.
WM
tender, covered.
cereal and finish
to LOW—simmer until
Automatic Surface Unit
(Models
Bring
Place coffee in basket and water in pot. To
perk, set at HI. To keep hot, set at
Preheat skillet 4 to 5 minutes at 350-450,
add food.
Minimum—allow about 5 to 10 minutes
to melt.
Bring water to a boil at MED, add
and time according to package directions.
Cook on 350-425.
Brown meat on 350, then switch to 175 to
200, simmer until tender.
JP6fl
and
JP6~
only)
to a boil at HI. Heat milk at
LO.
SIM.
cereal
—
Chicken, fried
Chicken, Shrimp
Deep-fried
Lamb Chops,
Hamburgers,
Link Sausage
Pan Fried
Thin Steaks
Stewed Chicken,
Corned Beef,
Tongue,
Pastas
Macaroni,
Noodles,
Spaghetti
etc.—
Simmering
HIGH—melt fat, then brown
4-5 minutes, cover.
HIGH—heat oil.
HIGH—preheat skillet, then
grease lightly.
HIGH—preheat skillet, then
grease lightly.
HIGH—bring liquid to
steaming.
HIGH—bring salted water
to a
boil
in a covered
utensil, add pasta slowly
so boiling does not stop.
WM
to LOW—cook until
tender.
MED to HIGH—maintain
temperature.
MED to MED
brown meat and cook to
desired doneness.
MED to MED
brown meat and cook to
desired doneness.
WM
to LOW—covered,
cook until fork tender.
(Water should
For very
MED heat maybe needed.
MED HIGH—maintain a
rolling boil, cook
tender. For
MAX may be needed to
keep water at rolling boil
throughout entire cooking
time.
HIGH–
HIGH–
slowly
large amounts,
large
boil.)
until
amounts,
Brown chicken on 400, switch to 200 to
finish cooking.
425 or 450—to heat and maintain
temperature.
Preheat skillet and cook on 300-400.
Preheat skillet and cook on 425-475.
HI—bring a large amount of water to boil,
then switch to 200-350 simmer.
HI—bring a
add pasta and continue cooking on HI.
large amount of water to boil,
Popcorn
HIGH—heat, until popcorn
starts to pop.
LOW—finish popping.
16
300-Place oil and popcorn in pan, cover
and cook
until
it stops popping.
Page 17

S~ested
Heat Settings
Food
Rice
Chocolate
Desserts
Candy
Pudding and
Pie Filling
Eggs
Cooked-in-Shell
Fried, Scrambled
Poached
Regular Element
Start at Setting
HIGH—cover, bring water
to a boil. timing according to
WM
to LOW—allow about
10 to 15 minutes to melt
through, stir to smooth.
LOW—cook.
LOW—cook according to
package directions.
HIGH—bring water and
eggs to a boil.
HIGH—melt butter,
add eggs.
HIGH—bring water to boil,
add eggs.
CompleIe-at
WM
to LOW—cover, finish
package directions.
Follow
recipe.
OFF–time accordingly,
for soft-cooked 3 to 4
minutes or hard-cooked
20 to 25 minutes.
WM—stirring
doneness.
WM—finish cooking.
Setting
to desired
Automatic Surface Unit
(Models
Add
rice to water, cover, cook on
JP6n and JP6~
only)
LO
according to package directions.
WM to SIM—allow about 10 to E minutes
to melt through.
Place ingredients in pan and cook following
package directions on LO.
Heat water and eggs on LO, cook 3 to 4
minutes for soft-cooked eggs, or 20 to 25
minutes for hard-cooked eggs.
Melt butter on 275, then add eggs.
Boil water on HI, add eggs, reduce heat,
cook 3 to 5 minutes.
Sauces
Soup, Stews
Vegetables
Fresh
Frozen
Fried
Deep-Fat Frying
In-Pouch
Saute
NOTE: Temperature and
time are suggested guidelines only. You may vary them to suit your cooking habits and needs.
HIGH—melt fat. LOW—finish cooking.
HIGH—heat up liquid.
HIGH—cover, bring salted LOW—cook 10-30 minutes,
water to a boil.
HIGH—cover, bring
water and vegetables to a
boil.
HIGH—preheat skillet and
oil
or fat.
HIGH—heat oil.
HIGH—cover, bring water
to a boil.
HIGH—heat oil or melt
butter; add vegetables.
salted LOW—cook according to
WM—simmer.
depending on tenderness of
vegetable.
time on package.
LOW—cook
tenderness is reached.
MED to HIGH—maintain
temperature.
LOW to
timing as directed on
package.
LOW to MED—cook until
desired doneness is
reached.
until
desired
MED—finish
Melt fat and cook on SIM.
Heat and simmer on SIM.
Place fresh vegetables in pan with water,
cover and cook on LO.
Place frozen vegetables in pan with water,
cover and cook at MED.
Preheat skillet and oil at 375, add food and
cook until tender.
oil
and fry food at 425-450. To monitor
Heat
temperature, use a deep-fry thermometer.
Bring water to
Heat oil or
cook vegetables to desired doneness.
boil
and cook at MED to HI.
melt butter on 200 to 250, then
17
Page 18

Grill Module
See Grill Cooking Guide on
Grill
Jar
You can enjoy delicious grilled
food year ‘round, prepared in the
convenience of your own kitchen.
Separate heating elements can
be set at different temperatures,
allowing you to use half the cooking
surface to grill meat and the other
half to prepare potatoes or other
vegetables, for a complete meal.
page
20.
Step
3: Make sure all controls are
turned to OFF. Hold heating unit
with terminals facing side of the
cooktop and level with the surface.
Insert terminals into cooktop
receptacle as far as they will go.
(Do not force). Heating unit
support should rest on ledge
of the reflector pan.
How to Set Grill Controls
The control knob must be pushed
in to turn; this prevents heating unit
from being turned on accidentally.
Push the knob in only when it is in
the OFF position. When the knob
is in any other position, it can be
turned without pushing it in.
Front and rear units of the grill
heating unit
Heat only half the grill surface for
cooking small portions; or set each
half at
cooting
Grill settings marked on control
panel are GRILL MED and
GRILL HIGH.
are
controlled separately.
~
different temperature for
different types of foods.
How to Insert the Grill
Step 1:
jar is in place beneath the cooktop.
Step 2:
The slots in the pan permit grease to
drain into jar. Keep
all times.
Make sure grease collector
Fit reflector pan in cooktop.
slots
open at
Step
4: Place the grill grate on the
reflector pan over the heating unit.
Grate should be seated properly on
reflector pan.
Removing
When removing the parts of the
grill module to clean, be sure all
switches are in the OFF position
and unit is cool. Remove the grill
grate and then slide the heating
unit to the side until unplugged.
Remove reflector pan. Empty
grease collector jar when cool.
Be sure to replace jar.
Grill
Element
Push in control knob depending
on which side of cooktop grill
module is used. The
and
right
rear
the
grfil
when module is on the
right side. The
rear
control knobs operate grill
when grill module is on left side
)f
Cooktop.
OFF OFF
L:@~;;L
MEO MED
FRONT)G,IDO,,
Turn knobs to the heat setting
you want. The FRONT knob
controls the front half of the grill;
the REAR knob controls the rear
half of the grill, providing
maximum cooking flexibility.
ED
right front
control knobs control
left front
and
left
;@J,,
H
REAR
“G
18
Page 19

Grill
~ps
Grill
Questions and
hwrs
● Do not leave grill unattended
while in use.
●
Be sure to preheat according to
cooking guide.
● Occasionally rearrange foods on
the grill, to prevent sticking and
provide better browning.
● Remove grease from grease
collector jar after each use, to avoid
spillovers.
● Trim fat from meats before
placing on grill. This will reduce
smoking and lessen grease buildup
in the grease collector jar. The
trimmings may be rubbed on the
hot grate to help prevent sticking.
●
Grates should be oiled or sprayed
with a nonstick coating before
cooking to prevent sticking. Remove
the grate before spraying, and spray
only while cool. Spraying directly
onto a hot grill may cause a fire.
● Make sure grease collector jar
and reflector pan are clean and in
place before using grill.
● Season meats after cooking rather
than before-salt can draw out juices
and dry out meat. Use tongs to turn
and rearrange meats on the grill;
forks will pierce the meat and
release juices.
. When cooking foods of various
sizes and thicknesses, start larger
or thicker pieces first, add
quicker-
cooking smaller pieces later. Press
meat
lighdy
to lie flat on grill: slash
the fat on edges of steaks and chops
to prevent curling; break the joints
of split chickens so they
wfl He
flat.
●
If your cooktop is being operated
on low power (voltage), foods may
be lighter brown than expected. A
longer preheating and grill time
may be necessary to achieve the
desired results.
● Use the grill module ONLY with
a high air-flow vented hood to carry
away smoke and fumes. Hood
models
JV674, JV474
and
JW74
will satisfy this requirement.
mat
to do if a
flwe-up
recurs.
Grilling fat or juicy foods may
cause flame-ups. You should never
leave the kitchen while using
the
grill. It’s important to control
flame-ups so they do not get out
of hand.
TO CONTROL
FLA~-UPS
Turn the heat setting to OFF but
leave hood fan ON. Use a
long-
handled utensil to carefully remove
the food from the grill.
These steps should control the
flame until it eventually goes out.
If it does not, cover the entire grill
module with a cookie sheet or the
lid from a large roasting pan. Use a
pot holder to remove this later
because it will be hot.
~VER
GREASE
USE WATER ON A
FN.
Q. I follow the cooking times
suggested, but my foods
don’t
get
done properly. h there something
wrong with my grill?
A.
Probably not.
Sugesti
cooking
times should be used only as a
general guide. Variables in food
can change cooking times required.
Q. How can I keep barbecued
meats from developing an
unattractive burned look
and taste?
A. Sauces containing sugar will
often bum if used during the entire
cooking time. If your favorite sauce
contains sugar, try adding it only
during the last
H
to 20 minutes of
cooking time for best results.
Q. Can my
gfl
be switched to the
other side of the cooktop where it
would be more convenient for me?
A.
Your interchangeable cooktop
modules can be used on either
the
right or left side of the cooktop.
When inserting or removing a
module, take care not to force the
connection or exert undue pressure
which could damage the electrical
contacts.
Additional grill modules can be
purchased from your
deder,
to
double your grill capacity.
●
Allow space between foods when
placing them on the grill. Air needs
to circulate around the food for best
cooking results.
19
Page 20

Grill
—
Cooti~
Guide
Do not
leave
cooktop
unattended
during “preheat” (knobs turned
to HIGH) or anvtime the knobs
are turned to
the grill.
Food
Std
%
“-l%” thick
Steak
ll~~f-2,, hick
Ground Steak or
Hamburgers
3A”
thick
Chicken
Ham Slices
(Precooked) 1“ thick
Hot Dogs
Pork Chops
Spareribs
bmb Cbops
Salmon Steaks
1“ thick
=ausage
H~GH
Links
with food on
Suggested Setting Cook Time
Rare:
Medium:
I
Well:
Rare: HIGH
Medium:
Well:
Rare:
Medium:
Well:
cut-up
Pieces:
Quarters:
Halves:
I
1.
Preheat 5 minutes on HIGH
before
cooting
steah
and hamburgers ureheat 10
minutes). Turn to
(except for rare around edges to prevent curling of
s~ttin~
for your particular food.
HIGH
HIGH
MED
MED
MED
MED
HIGH
MED
MED
MED
MED
MED
MED
5-7 minutes per side
6-8 minutes
I I
8-10 minutes-per side
9-11 minutes per side
13-B
20-23 minutes per side
6-8 minutes per side
8-10 minutes oer side
11-12 minutes-per side
45-60 minutes (total)
1 hr. to 1 hr. 10 minutes (total)
1 hr. to 1 hr. 25 minutes
10 minutes per side
8-9 minutes
15-18 minutes per side
40-50 minutes (total)
20-22 minutes per side
15-20 minutes per side
8-10 minutes per side
10-12 minutes per side
uer
minutes per side
(toti)
on guide
side
(toti)
2. Before cooting
steak,
slash fat
meat.
Su~estedcooting
3.
usd ody
in food can
Comments
Preheat grill 10 minutes for rare.
Preheat grill 10 minutes for rare.
Reduce to MED for
Preheat
grill 10 minutes for rare.
as a guide, since variables
ch~nge cooting
well
times should be
times.
done.
I
Turn over frequently and if desired baste with
sauce last 10 to 15 minutes.
Break joint bones. Place skin side down. Turn
over every 15 minutes and baste frequently as
desired. Wing-breast quarters take longer than
thigh-leg quarters.
Break joint bones. Place skin side down on
preheated grill.
as desired.
I
Turn frequently.
Parboil 5 minutes before grilling. Rearrange
and turn over frequently. Baste with sauce last
10 minutes as desired. Very meaty ribs may
take about 10 minutes longer.
With a sharp knife or scissors, cut lengthwise the
undershe~
shell.
Spread tail apart to expose meat while
grilling. Loosen meat but leave in shell. Spray
grates with nonstick coating before
Brush with
I
Use bratwurst, kielbasa or smoked Polish
sausage.
I
~rn
into the
mat
melted butter.
over and baste frequently
almost through to outer
prehating.
–
20
—
Page 21

Griddle Module
See Griddle Cooking Guide on page 23.
—
Your non-stick coated griddle
provides an extra-large cooking
surface for meak, pancakes, or
other food usually prepared in
a frying pan or electric skillet.
You can also use the griddle as
a warming tray, with a low-heat
setting.
How to Imert Griddle
Step 1:
must be in place.
Step
turned to OFF. Hold griddle with
terminals facing side of the
and level with the surface. Insert
terminals into
as far as they
Griddle should rest on ledge of the
cooktop
N~E:
condition or “season” your griddle.
Apply a thin layer of cooking oil
to the top surface and heat on HIGH
setting for 10 minutes. Griddle is
ready to use.
Before every use,
components are clean.
The grease collector jar
2: Make sure all controls are
cooktop
cooktoD
wdl
tub.
Before i~ first use,
receptacle
go.
~Do n~t
force.)
be sure griddle
How to Set
The control knob must be pushed
into turn; this prevents surface
heating units from being turned on
accidentily.
it is in the OFF position. When the
knob is in any other position, it can
be turned without pushing it in.
The griddle has a self-contained
heating element which can be
controlled by setting the
control
right side), or
(when griddle is used on left side).
Push in control knob.
Turn knob to the heat setting
you want.
GridWe
Push the knob in when
(when griddle is used on
left front control
OFF
FRONT/
GRIDDLE
Control
right rear
21
Page 22

Gridde
=
● Most griddled foods require
~ps
cooking on a preheated surface,
which may be greased lightly
before adding food. Preheat griddle
5 to 10 minutes at HIGH setting
unless otherwise indicated on the
Griddle Cooking Guide (see next
page), then switch to recommended
cook setting.
●
Foods which are high in natural
fat, such as bacon or sausage, may
be started on a cold griddle.
●
Foods to be warmed may be
placed directly on the griddle; a
high domed metal cover such as an
inverted kettle, placed over them
will help store the heat. Foods in
covered dishes or pans may also be
warmed on the griddle. Use
heat-
resistant dishes only.
● Condition or “season” griddle
before first-time use.
c
Make sure griddle is clean.
● Check grease collector jar and
empty if necessary to avoid
●
To avoid marring the nonstick
sptiovem,
finish, store griddle upright on
edge, if possible. If it is necessary
to store it flat, avoid placing other
pans or utensils on top.
●
To help maintain good food
quality and prevent spoilage, do
not keep foods warm on griddle for
more than two hours. Delicate
foods, such as eggs, should not be
kept more than
E
to 30 minutes;
entrees and casseroles may be
warmed for 30 to 60 minutes. Hors
d’oeuvres will stay hot for serving
up to 1 or
llA
hours. Rearrange or
stir foods occasionally, if possible.
Q
If your cooktop is being operated
on low power (voltage), foods may
be lighter brown than expected. A
longer preheating and griddle time
may be necessary to achieve the
desired
●
resulw.
Avoid using metal utensils with
sharp points or rough or sharp
edges which might damage the
nonstick coated griddle surface.
Do not cut foods on the griddle.
For further information on
caring for your griddle’s surface,
see the cleaning instructions
on page 26.
Griddle
Questiom and Answers
Q. Can my griddle be switched
to the other side of the cooktop
where it
for me?
A.
modules can be used on either the
right or left side of the cooktop.
When inserting or removing a
module, take care not to force the
connection or exert undue pressure
which could damage the electrical
contacts.
Additional griddle modules can be
purchased from your dealer, to
double your griddle capacity.
Q. Can prolonged periods of high
heat damage my griddle’s surface?
A. A brief preheating period is
often necessary for best results
with many foods, but leaving the
griddle on HIGH heat setting for
more than 10 minutes without food
can damage the nonstick coating.
Always be sure to turn control
knobs to OFF when cooking is
completed.
wotid
be more convenient
Your interchangeable cooktop
22
—
Page 23

Griddle
Cooti~
—
Do not leave cooktop unattended
during “preheat” (knobs turned
to HIGH) or anytime the knobs
are turned to HIGH with food on
the griddle.
Guide
Suggested
used only as a guide since variables
in food may change cooking time.
cooting
times should be
—
Food
Bacon
Chops
Cube & Rib Eye
Steaks
Eggs, Fried
Fish Steaks
Franks
French Toast
Ham Slices
Hambu~ers
Pancakes
Sweet Rolls
Sandwiches
Sausage Patties
Keep Warm
Setting and
Warming Tray
Setting
Suggested Preheat
Setting
HIGH-MED HIGH Preheat not
MED HIGH
MED HIGH
MED
MED HIGH-HIGH Grease lightly if desired.
MEDHIGH-HIGH I 10minutesat HIGH
MED HIGH
MED”
HIGH 10 minutes at HIGH 7 minutes each side.
MED HIGH
HIGH 10 minutes at HIGH
MED HIGH-HIGH
MED HIGH
HIGH-MED HIGH Preheat not
WM-LOW
Time
necessary
5 minutes at HIGH
if desired
10 minutes at HIGH
5 minutes at HIGH
I
5 minutes at HIGH
I
6minutesat HIGH
I
I
5minutesat HIGH
I
5 minutes at HIGH
I
6minutes atHIGH
necessary
Cook Time
Brown each side.
Brown each side.
Brown each side.
Doneness as desired.
3 minutes, first side.
2-3 minutes, second
side.
15 minutes each side.
Turn to brown.
2-3 minutes each side.
9-10 minutes each side.
2%
minutes, first side.
1%-2
minutes, second
side.
Brown each side.
5-6 minutes each side.
Turn to brown.
Delicate Foods:
15-30 minutes.
Entrees and
Casseroles:
up to 60 minutes.
Hors d’oeuvres:
1 to
172
hours.
Comments
Start
cooking on HIGH. Switch to
MED HIGH after 8 minutes.
Start cooking on HIGH. Switch to
MED HIGH after 10 minutes.
Greas~ightly if desired.
Grease lightly if desired.
Grease lightly if desired.
Grease lightly if
Grease lightly if desired. Switch to
MED HIGH after 8 minutes.
Grease lightly if desired
Grease lightly if
Start cooking on HIGH. Switch to
MED HIGH after 10 minutes.
To keep griddled foods warm, use WM
setting. To retain moisture, cover food
with aluminum foil or an inverted
metal pot or bowl. To use as a warming
tray, set covered heat resistant serving
containers or casseroles on griddles at
WM-LOW setting. Keep foods warm
no more than 2 hours to preserve food
quality and safety. Occasionally
rearrange or stir foods.
desird.
desird.
23
Page 24

Home Canning
Canning should be done on
Calrod”
or Solid
In surface cooking, the use of pots
extending more than l-inch beyond
edge of cooking element’s trim ring
is not recommended. However,
when canning with water-bath or
pressure canner, larger-diameter
pots may be used. This is because
boiling water temperatures (even
under pressure) are not harmful to
cooktop surfaces surrounding the
cooking element.
HOWEVER, DO
LARGE DIAMETER CANNERS
OR
POTS FOR FRYING OR BOILING
FOODS
Most syrup or sauce
and all types of frying— cook at
temperatures much higher than
boiling water. Such temperatures
could eventually harm cooktop
surfaces surrounding heating units.
Surface Unit modules
Disk modules only.
N~
~HER
LARGE DIAMETER
~HER
THAN WATER.
mixtures—
~ps
USE
Observe Following
Poinfi
in Canning
1.
Be sure the canner fits over the
center of the cooking element. If
your cooktop or its location does
not allow the canner to be centered
on the cooking element, use
diameter canners for good canning
results or try putting module on
opposite side of cooktop so the
larger cooking element is in front.
2. Flat-bottomed canners must
be used. Do not use canners with
flanged or rippled bottoms (often
found in enamelware) because they
don’t make enough contact with the
solid disk element and take too
long to boil water.
MGHT
3. When canning, use recipes and
procedures from reputable sources.
Reliable recipes and procedures are
available from the manufacturer of
your canner; manufacturers of
glass jars for canning, such as Ball
and Kerr; and the United States
Department of Agriculture
Extension Service.
4. Remember that canning is a
process that generates large
amounts of steam. To avoid burns
from steam or heat, be careful
when canning.
N~E:
operated on low power (voltage),
canning may take longer than
expected, even though directions
have been carefully followed. The
process time will be shortened by:
(1)
(2) starting with HOT tap water for
fastest heating of large quantities
of water.
If your cooktop is being
using a pressure canner, and
WONG
smdler-
CAUTION:
Safe canning requires that
harmful microorganisms are
destroyed and that the jars are
sealed completely. When canning
foods in a water bath canner, a
gentle but steady boil must be
maintained continuously for the
required time. When canning
foods in a pressure canner, the
pressure must be maintained
continuously for the required
time.
If a solid disk element is used for
canning, please note that solid
disk elements heat up and cool
down more slowly than other
conventional elements. Because
of this difference, after you have
adjusted the controls it is very
importint
prescribed boil or pressure
levels are maintained for the
required time.
The solid disk elemenk have temperature limiters that help
prevent damage to the cooktop.
If the bottom of your canner is
not flat, the solid disk element
can overheat, triggering the
temperature limiters to turn the
unit off for a time. This will stop
the boil or reduce the pressure
in the canner.
Since you must make sure to
process the canning jars for
the prescribed time, with no
interruption in processing time,
you cannot can on solid disk
elemen~
canner is not flat enough.
to make sure the
if the bottom of your
—
—
24
Page 25

Care and Cleaning
Note: Ut cooktop
park
cool before touching or handling.
Proper
care and cleaning are
important so your cookt~p will give
you efficient and satisfactory service.
Follow these directions carefully in
caring for your cooktop to assure
safe and proper maintenance.
Modules
CAUTION
c
Be sure all controls are turned
OFF before attempting to remove
a module or heating unit.
. Do not attempt to clean plug-in
surface units, plug-in griddle or
grill heating units in an automatic
dishwasher.
c
Do not immerse plug-in surface
units in liquids of any kind.
c
Do not bend the plug-in surface
unit plug terminals.
● Do not attempt to clean, adjust
or in any way repair the plug-in
receptacle.
Grill Module
Pan
1
10
remove:
c
Lift off the grill grate. It can
be washed in the sink or in the
dishwasher.
c
Unplug the grill heating unit. Do
not attempt to clean the heating
●
Lifi
the reflector pan out of
the cooktop tub. Clean in sink
or dishwasher.
c
Wipe out tub with hot soapy
water then rinse with a damp cloth.
To replace:
● Place the reflector pan in the
cooktop tub with the hole for the
plug-in towards the outside of the
Cooktop.
●
Plug in the grill heating unit.
. Place the grill grate on top of the
reflector pan.
Calrod”
Surface
uni
Unit Module
Wipe around the edges of the
surface unit opening in the cooktop
or module. Clean the area below
the unit. Rinse all washed areas
with a damp cloth or sponge.
PIW-In
Plug-in units can be removed.
t.
Lift a plug-in unit about 1“ above
the trim ring—just enough to grasp
it—and you can pull it out.
Do not lift a plug-in unit more
than
flat on the trim ring when you
plug it back in.
Repeated lifting of the plug-in
unit more than 1“ above the trim
ring can permanently damage
the receptacle.
Unifi
1!’
If you do, it may not lie
Drip
Tab
Clean the area under the drip pans
often. Built-up soil, especially
grease, may catch
cleaning easier, the entire module
and the plug-in surface units are
removable.
fire.
25
To make
Page 26

Care
and
cleani~
(continued)
—
R
R
To replace a plug-in unit:
● First place the drip pan, then
the trim ring into the surface unit
cavity found on top of the
so the unit receptacle can be seen
through the opening in the side
of the drip pan.
●
Insert the terminals of the plug-in
unit through the opening in the drip
pan and into the receptacle.
●
Guide the surface unit into place
so it fits evenly into the trim ring.
Note: The drip pan must be under
the trim ring.
cooktop
Solid Disk Module
Clean the brushed chrome finish
and the stainless steel trim ring that
surrounds the solid disk element by
following the directions below.
For light soil, wash and rinse with
soapy water and then polish with a
dry cloth.
For heavy soil,
on soiled area. Cover with a moist
cloth or paper towel and allow to set
for at least 30 minutes. Then wipe
up the baking soda, rinse with a
damp cloth and polish with a dry
cloth.
DO NOT USE steel wool or
abrasives on the brushed chrome
finish of the module.
sprin~e
baking soda
Solid Disk
The solid disk elements are made
of high strength cast-iron alloy.
The trim rings are stiinless steel.
The surface has a heat-resistant
coating to preserve the surface of
the element. After the unit cools,
any boiled-over material on the
element should be removed as soon
as possible with a slightly damp
cloth. The element should then be
dried by switching on for a few
minutes. After it cools, wipe lightly
with cooking oil.
Clean very dirty solid disk
elements with a little cleaning
powder (such as Comet” cleanser)
or with a scouring pad.
The matte black surface can be
maintained by treating it periodically
with Cello
is available from your GE supplier.
Use the applicator to apply a very
thin coating of the polish to the
entire element surface. Turn the
element on high for several minutes
to bake the polish to the element.
When the element is cooled, rub
lightly with a cloth or paper towel
to remove any excess polish. Before
next use, burn off the element by
means of a short preheating period.
A slight amount of smoke and odor
will
occur.
Cooking at home and pre-delivery
factory testing will permanently
change the stainless steel trim ring
to a gold color. This normal
characteristic of stainless steel
will not affect the operation or
performance of your elements.
The stainless steel trim ring can
be cleaned with a good quality
stainless steel cleaner. This will
also restore the trim ring to its
original color, until it is reheated.
Elemen@
Electrol@
polish which
Failure to
elements as directed will result in
defacing the surface over a period
of time primarily due to corrosion,
as the elements are made of cast
iron construction.
Do not use covers over the solid
disk elements. An element turned
on while the cover is in place can
permanently damage the
Covers can also trap moisture which
may cause the elements to rust.
maintiin
the solid disk
cooktop,
Griddle Module
The griddle module can be
unplugged and removed for
cleaning.
To clean the griddle, wash it with
soap and water, using a soft cloth,
and dry it with a towel. Do not use
abrasive cleansers that can scratch
the non-stick surface. Do not wash
the griddle in an automatic
dishwasher and do not clean
it in a self-cleaning oven.
Cooktop ~b
e
Drain
Hole
~Q
/
“:@..:
.*”.
\\
\\\
/
\
Wipe out tub with hot soapy water,
then rinse with a damp cloth. Keep
drain hole open.
26
Page 27

cleani~
Guide
N~E: ht cooktop pa~
COO1
before touching or
hanting.
Part
Tub
Reflector Pan
Grease Collector Jar
Grill Grate
Griddle
Control Knobs
Control Panel
Cooktop Surface
—
Aluminum
Surface Unit
Drip Pans
Chrome-Plated
~im
Rings
Surface Unit Coils
and Grill Heating
Unit
Solid Disk Elements
and
f~ed
Temp
11’” element
(on models
JP6~)
Solid Disk Module
—.
Sensi-
JP6~,
Materials to Use
●
Hot Soapy Water
●
Soap-Filled Scouring Pad
c
Plastic Scouring Ball
●
Hot Soapy Water
●
Soap-Filled Scouring Pad
● Plastic Scouring Ball
●
Dishwasher Safe
●
Hot Soapy Water
● Soap-Fdled Scouring
● Plastic Scouring Pad
● Dishwasher Safe
● Hot Soapy Water
● Plastic Scouring Ball
● Dishwasher Safe
●
Hot Soapy Water
●
soft
Cloth
Pad
. Plastic Scouring Bdl
●
Mdd
Soap and Warm Water
●
Soap and Water
●
Hot Soapy Water
. Hot Soapy Water
● Stiff-Bristled Brush
● Soap-Filled Scouring Pad
● Dishwasher Safe
●
Hot Soapy Water
● Dishwasher Safe
● None Required
●
Soap and Water
● Cleansing Powder
● Soap-Filled Scouring Pad
● Cello
Electrol@
●
Hot Soapy Water
●
Soft Sponge
●
Soft
Cloth
Polish
General Directions
Wipe clean after each use. Make sure drain hole is not blocked. Use cotton swab or
toothpick to clean drain hole.
Let grill cool. Remove grill heating unit and
Iifi
out Reflector Pan.
Reflector Pan may be cleaned using one of the methods at left.
Can be cleaned in dishwasher.
Scoop out grease with large spoon. Set jar in pan of warm water to loosen grease if
desired. Replace with any wide mouth canning jar. Do not use a mayonnaise jar
which could break when hot grease drips into it.
Do not clean in a self-cleaning
oven.
Can be cleaned in dishwasher.
Do not use abrasive cleaners.
DO
N~
wash in dishwasher.
Pull off knobs. Wash gently but do not soak. Dry and return controls to
cooktop
making sure to match flat area on the knob and shaft.
Wash with cloth dampened in soapy water. Rinse and polish with a dry
cloth. If knobs on the control panel are removed, do not allow water to run down
inside the surface of control panel while cleaning.
Wash, rinse, and then polish with a dry cloth. DO NOT USE
steel wool, abrasives,
ammonia, acids, or commercial oven cleaners which may damage the finish.
Wipe
dl
drip pans after each cooking so spatter will not “bum on” next time you
cook. To remove “burned-on” spatters, use any or
mentioned. Rub
lightly
with scouring pad to prevent scratching of the surface.
dl
cleaning materials
Can be cleaned in the dishwasher.
Will discolor if cleaned in self-cleaning oven.
Wipe trim rings after cooking so spatters will not “burn on” the next time
YOU
cook.
Can be cleaned in the dishwasher.
DO N~ clean trim rings in a self-cleaning oven.
Spatters and spills burn away when the coils are heated. At the end of a meal,
remove all pans from the surface units and heat the soiled units at HIGH. Let the
soil burn off about a minute and switch the units to OFF. Avoid getting cleaning
materials on the coils. Wipe off any cleaning materials with a damp paper towel
before
heating the surface unit.
DO
N~
handle the unit before completely cooled.
DO NOT clean plug-in units in a self-clean oven.
DO NOT immerse plug-in units in any kind of liquid or clean in dishwasher.
The solid disk elements should be washed with a damp cloth and then dried. Finish
by wiping over
lighfly
with cooking oil when cool. Clean very dirty solid disk
elements with a little cleaning powder or a scouring pad. Do not scour the center
sensing device on the
maintained by treating it periodically with the Cello
Sensi-Temp W“
element. The matte black surface can be
Electrol@
polish. It is available
from your GE supplier. To use the finish, use the applicator to apply a very thin
coating of the polish to the entire element surface.
~rn
the element on high for
several minutes to bake the polish to the element. When the element is cool, rub
lightiy with a cloth or paper towel to remove any excess polish.
Clean the brushed chrome finish and the staidess steel trim ring that surrounds the
solid disk element by following the directions below.
For light soil, wash and rinse with soapy water and then polish with a dry cloth.
For heavy soil,
spritie
baking soda on soiled area. Cover with a moist cloth or
paper towel and allow to set for at least 30 minutes. Then wipe up the baking soda,
rinse with a damp cloth and polish with a dry cloth. DO N~ USE steel wool or
abrasives on the
solid
disk module or elements.
Page 28

-
m
.~,
-
Questiom?
Use This Problem Solver
PROBLEM
MODULES ARE
N~ FUN~lO~NG
PROPERLY
CALROD@ SH~ACE
U~TS
FuNmQmQ
PROPERLY
ARE
N~
POSSIBLE CAUSE AND REMEDY
o Difflc@ty
circuit
depe~ding on
the control
If
BUT ONLY BY
after pefiorming one
again, call
Note:
management to perform
* Controls are not properly set or wrong control is set for the module or element you
are
using,
●
Entire surface
* If~y m~~e fafis
operates on that side, then switch may beat fault. If it does
that there is a malfunctioning component in
*
Surface units are
●
Refiwtar
* Sugface unit co~~ols
you are
maybe
fise,
a
nature of the
box uses fuses,
for
Apartment tenants or condominium owners
pans are not set securely in the range top,
using.
in
the
main distribution
tiipped circuit
SOMEONE FAMILWR
of these procedures, the fuse blows or circuit breaker trips
service.
unit
module is
not
breaker,
power
supply. If a circuit breaker is involved, reset it.
tie
circuit fuse (a cartridge-type) should be changed
this pheck before
not pluggd in properly.
to
heat—switch the module to
plugged in solidly.
are not
pr~~rly set or wrOng
pa~el
of
your house caused
the
main fuse or
WITH
calling for service.
ELE~RICAL
should
the
the
module.
surface unit control set for unit
by a
the
main circuit breaker,
CIRCUITS. If,
request their building
other side of
not
cOOktOp.
heat, indications are
blown
If it
GWLL OR
UNIYIS
FUM~lONWG
PROPERLY
FOODS STICK
~ G~L OR
G~DLE
EXCESS~
FROM GWLLED
MEATS
SOLID DISK
ELEMEN~
WH&E HEA~G
G~DLE
NW
SMOKE
SMOKE
g
Grill Heating Unit is not plugged in solidly.
● Grill or Griddle unit controls are
I
* To use
controls on the side of
* Griddle was not pre-seasoned before first use. Surface of grill or griddle was not
greased before cooking.
*
#
e Accurn~lat~
Q
*
. Some smoke and odor is normal when using so~d disk elements for the
also
entire
sufia~e
~fgr~l, it is necessary
cooktop where grill
Heat setting is too
coating
Fats not trimmed from meats prior to cooking.
Ven$ h~~
Ofgfidd]e
not
after
using
high.
has b~n med by Use
grease
in
refi~tor
turn~
on,
Callo
Electrol@
not
properly set.
module is placed.
pan or fmd soils on
cleaner.
to
turn on
of
sh~
front and rear surface unit
instruments or abrasive cleaners.
grate are causing excess smoke.
first
time and
28
Page 29

—
PROBLEM
ELEMENTS WILL
NOT
MA~TAIN
ROLLING
AND/OR
RATE IS
ENOUGH
COOK~P
FEELS
N~
H~
FRYING
A
BOIL
FAST
POSSIBLE CAUSE AND REMEDY
● Absolutely
stmight edge,
●
Because
you
solid disk elements heat by
are used
If you need more help.. call, toll free:
GE Answer Center”
800.626.2000
consumer information service
flat
pans must be used. Iflight can k
tie
cooktop eIement will
not
operate properly.
conduction, the cooktop may smm
to.
This is normal.
Make sure
seen
flat-bttam
betwwn
tie pm bottom
pans fire
*W.
and
hotter&m
I
a
29
Page 30

—
30
Page 31

If You Need Service
To obtain service, see your warranty
on the back page of this book.
We’re proud of our service and
want you to be pleased. If for some
reason you are not happy with the
service you receive, here
steps to follow for further help.
FIRST, contact the people who
serviced your appliance. Explain
why you are not pleased. In most
cases, this will solve the problem.
NEXT, if you are still not pleased,
write all the details—including
your phone number—to:
Manager, Consumer Relations
GE Appliances
Appliance Park
Louisville, Kentucky
FINALLY, if your problem is still
not resolved, write:
Major Appliance
Consumer Action Panel
20 North
Chicago, Illinois 60606
Wacker
are three
40225
Drive
—
31
Page 32

YOUR
BUILTIN
COOKTOP
Save
proof of original purchase date such as your sales slip or
WHAT IS COVERED
WARRANTY
cancelled
FULL ONE-YEAR WARRANTY
For one year from date of original
purchase, we will provide, free of
charge, parts and service labor
in your home to repair or replace
any pati
because of a manufacturing defect.
LIMITED ADDITIONAL
FOUR-YEAR WARRANTY
For the second through fifth year
from date of original purchase, we
will provide, free of charge, a
replacement solid element surface
heating unit if the element fails
because of a manufacturing
defect. You pay for the service trip
to your home and service labor
charges. This warranty does not
cover Automatic Surface Unit
components, wiring, or switches.
of the cooktop
that
fails
check to establish warranty period.
This warranty is extended to
the original purchaser and any
succeeding owner for products
purchased for ordinary home use
in the 48 mainland states, Hawaii
and Washington,
warranty is the same except that it is
LIMITED because you must pay to
ship the product to the service shop
or for the service technician’s travel
costs to your home.
All warranty service will be provided
by our Factory Service Centers or
by our authorized Customer
servicers during normal working
hours.
Look in the White or Yellow Pages
of your telephone directory for
GENERAL ELECTRIC COMPANY,
GENERAL ELECTRIC FACTORY
SERVICE, GENERAL
HOTPOINT
GENERAL ELECTRIC CUSTOMER
CARE@ SERVICE.
D.C.
In Alaska the
Care”
ELECTRIC-
FACTORY SERVICE or
I
WHAT IS N~ COVERED
Some
states
may not apply to you. This warranty gives you specific legal rights, and you may also have other rights which vary from state to state.
To know what your legal rights are in your state, consult your local or state consumer affairs office or your state’s Attorney General.
do not allow the exclusion or limitation of incidental or consequential damages, so the above limitation or exclusion
If further help is needed concerning this warranty, write:
Manager—Consumer Affairs, GE Appliances, Louisville, KY 40225
● Service trips to your home to
teach you how to use the product.
Read your Use and Care material.
If you then have any questions
about operating the product,
please contact your dealer or our
Consumer Affairs office at the
address below, or call, toll free:
GE Answer
800.626.2000
consumer information service
● Improper installation.
If you have an installation problem,
contact your dealer or installer.
You are responsible for providing
adequate electrical, gas, exhausting
and other connecting facilities.
Warrantor: General Electric Company
CenteF
. Replacement of house fuses or
resetting of circuit breakers.
. Failure of the product if it is used
for other than its intended purpose
or used commercially.
● Damage to product caused
by accident, fire, floods or acts
of God.
NOT
WARRANTOR IS
FOR CONSEQUENTIAL DAMAGES.
RESPONSIBLE
E
1-90
JP362
JP&l
JPW3
CG
 Loading...