

Page 1

JP328
JP626
Owner’s Manual &
Installation Instructions
Cooktop
Electric Built-In
164D4290P111 49-80154 08-02 JR
Safety Information . . . . . . 2–4
Operating Instructions . . . . .5
Care and Cleaning
Control Knobs . . . . . . . . . . . . 6
Drip Pans . . . . . . . . . . . . . . . . .8
Glass Control Panel . . . . . . . . .6
Lift-Up Cooktop . . . . . . . . . . .8
Metal Parts . . . . . . . . . . . . . . . .8
Packaging Tape . . . . . . . . . . . .6
Porcelain Enamel Cooktop . . 7
Stainless Steel Cooktop . . . . . .7
Surface Units . . . . . . . . . . . . . .8
Installation Instructions
Electrical Connections . . . . .11
Electrical Requirements . . . . 10
Installation of the Cooktop . .11
Location . . . . . . . . . . . . . . . .10
Tools You Will Need . . . . . . . . 9
Troubleshooting Tips . . . . . 12
Consumer Support
Consumer Support . . . . . . . . 14
Warranty . . . . . . . . . . . . . . . . 13
www.GEAppliances.com
Write the model and serial
numbers here:
Model # ________________
Serial # ________________
You can find them on a label
under the cooktop.
Page 2
IMPORTANT SAFETY INFORMATION.
READ ALL INSTRUCTIONS BEFORE USING.
WARNING!
For your safety, the information in this manual must be followed to minimize the risk of fire or
explosion, electric shock, or to prevent property damage, personal injury, or loss of life.
When using electrical appliances, basic safety precautions should be followed, including the following:
■ Use this appliance only for its intended use
as described in this manual.
■ Do not attempt to repair or replace any
part of your cooktop unless it is specifically
recommended in this manual. All other
servicing should be referred to a qualified
technician.
■ Before performing any service,
disconnect the cooktop power supply
at the household distribution panel by
removing the fuse or switching off the
circuit breaker.
■ Be sure your appliance is properly installed
and grounded by a qualified technician in
accordance with the provided installation
instructions.
■ Have the installer show you the location of
the circuit breaker or fuse. Mark it for easy
reference.
■ Do not leave children alone—children
should not be left alone or unattended in
an area where an appliance is in use. They
should never be allowed to sit or stand on
any part of the appliance.
■ Teach children not to play with the
controls or any other part of the cooktop.
■ Do not allow anyone to climb, stand or
hang on the cooktop.
■
CAUTION: Items of interest to
children should not be stored in cabinets
above a cooktop— children climbing on
the cooktop to reach items could be
seriously injured.
■ Always keep combustible wall covering,
curtains or drapes a safe distance from
your cooktop.
■ Always keep dish towels, dish cloths, pot
holders and other linens a safe distance
away from your cooktop.
■ Always keep wooden and plastic utensils
and canned food a safe distance away
from your cooktop.
■ Never wear loose-fitting or hanging
garments while using the appliance.
Flammable material could be ignited if
brought in contact with hot surface units
and may cause severe burns.
■ Use only dry pot holders—moist or damp
pot holders on hot surfaces may result in
burns from steam. Do not let pot holders
touch hot surface units. Do not use a towel
or other bulky cloth. Such cloths can catch
fire on a hot surface unit.
SAFETY PRECAUTIONS
COOK MEAT AND POULTRY THOROUGHLY…
Cook meat and poultry thoroughly—meat to at least an INTERNAL temperature of 160°F. and poultry
to at least an INTERNAL temperature of 180°F. Cooking to these temperatures usually protects against
foodborne illness.
Safety Instructions
Operating Instructions
Care and CleaningTroubleshooting TipsConsumer Support
2
Page 3
Safety Instructions Operating Instructions Care and Cleaning Troubleshooting Tips
Consumer Support
3
www.GEAppliances.com
■ For your safety, never use your appliance
for warming or heating the room.
■ Do not use water on grease fires. Never
pick up a flaming pan. Turn the controls
off. Smother a flaming pan on a surface
unit by covering the pan completely with
well fitting lid, cookie sheet or flat tray. Use
a multi-purpose dry chemical or foam-type
extinguisher.
■ Flaming grease outside a pan can be put
out by covering with baking soda or, if
available, by using a multi-purpose dry
chemical or foam-type fire extinguisher.
■ When preparing flaming foods under the
hood, turn the fan on.
■ Do not let cooking grease or other
flammable materials accumulate on
the cooktop.
■ Do not touch surface units. These surfaces
may be hot enough to burn even though
they are dark in color. During and after
use, do not touch, or let clothing or other
flammable materials contact the surface
units or areas nearby the surface units;
allow sufficient time for cooling first.
■ Potentially hot surfaces include the
cooktop and areas facing the cooktop.
■ To minimize the possibility of burns,
ignition of flammable materials and
spillage, the handle of a container
should be turned toward the center of
the cooktop without extending over any
nearby surface units.
■ Always turn the surface unit control to off
before removing the cookware.
■ To avoid the possibility of a burn or
electric shock, always be certain that the
controls for all surface units are at off
position and all coils are cool before
attempting to lift or remove the unit.
■ Do not immerse or soak removable surface
units. Do not put them in a dishwasher.
■ Use proper pan size—Select cookware
having flat bottoms large enough to cover
the surface unit heating element. The use
of undersized cookware will expose a
portion of the surface unit to direct
contact and may result in ignition of
clothing. Proper relationship of cookware
to burner will also improve efficiency.
■ Never leave surface units unattended
at high heat settings. Boilovers cause
smoking and greasy spillovers that may
catch on fire.
■ Be sure the drip pans are not covered and
are in place. Their absence during cooking
could damage cooktop parts and wiring.
■ Do not use aluminum foil to line the drip
pans. Misuse could result in a shock, fire
hazard or damage to the cooktop.
WARNING!
SAFETY PRECAUTIONS
Page 4
■ Only certain types of glass, glass/ceramic,
earthenware or other glazed containers
are suitable for cooktop cooking; others
may break because of the sudden change
in temperature.
■ Never clean the cooktop surface when it
is hot. Some cleaners produce noxious
fumes and wet cloths could cause steam
burns if used on a hot surface.
■ Keep an eye on foods being fried at high
or medium high heat settings.
■ Foods for frying should be as dry as
possible. Frost on frozen foods or moisture
on fresh foods can cause hot fat to bubble
up and over the sides of the pan.
■ Use little fat for effective shallow or deep-
fat frying. Filling the pan too full of fat can
cause spillovers when food is added.
■ If a combination of oils or fats will be used
in frying, stir together before heating, or as
fats melt slowly.
■ Always heat fat slowly, and watch as it
heats.
■ Use a deep fat thermometer whenever
possible to prevent overheating fat beyond
the smoking point.
■ Never try to move a pan of hot fat,
especially a deep fat fryer. Wait until
the fat is cool.
■ Do not store flammable materials near
the cooktop.
■ Keep the hood and grease filters clean
to maintain good venting and to avoid
grease fires.
■ Do not store or use combustible materials,
gasoline or other flammable vapors and
liquids in the vicinity of this or any
appliance.
■ Clean only parts listed in this Owner’s
Manual.
■ Do not leave paper products, cooking
utensils or food on the cooktop when not
in use.
■ Keep cooktop clean and free of
accumulation of grease or spillovers which
may ignite.
■ Never heat unopened food containers.
Pressure buildup may make container
burst and cause injury.
■ Never leave jars or cans of fat drippings on
or near your cooktop.
READ AND FOLLOW THIS SAFETY INFORMATION CAREFULLY.
SAVE THESE INSTRUCTIONS
Safety Instructions
Operating Instructions
Care and CleaningTroubleshooting TipsConsumer Support
IMPORTANT SAFETY INFORMATION.
READ ALL INSTRUCTIONS BEFORE USING.
WARNING!
SAFETY PRECAUTIONS
4
Page 5
5
Safety Instructions Operating Instructions Care and Cleaning Troubleshooting Tips
Consumer Support
Using the surface units.
Throughout this manual, features and appearance may vary from your model.
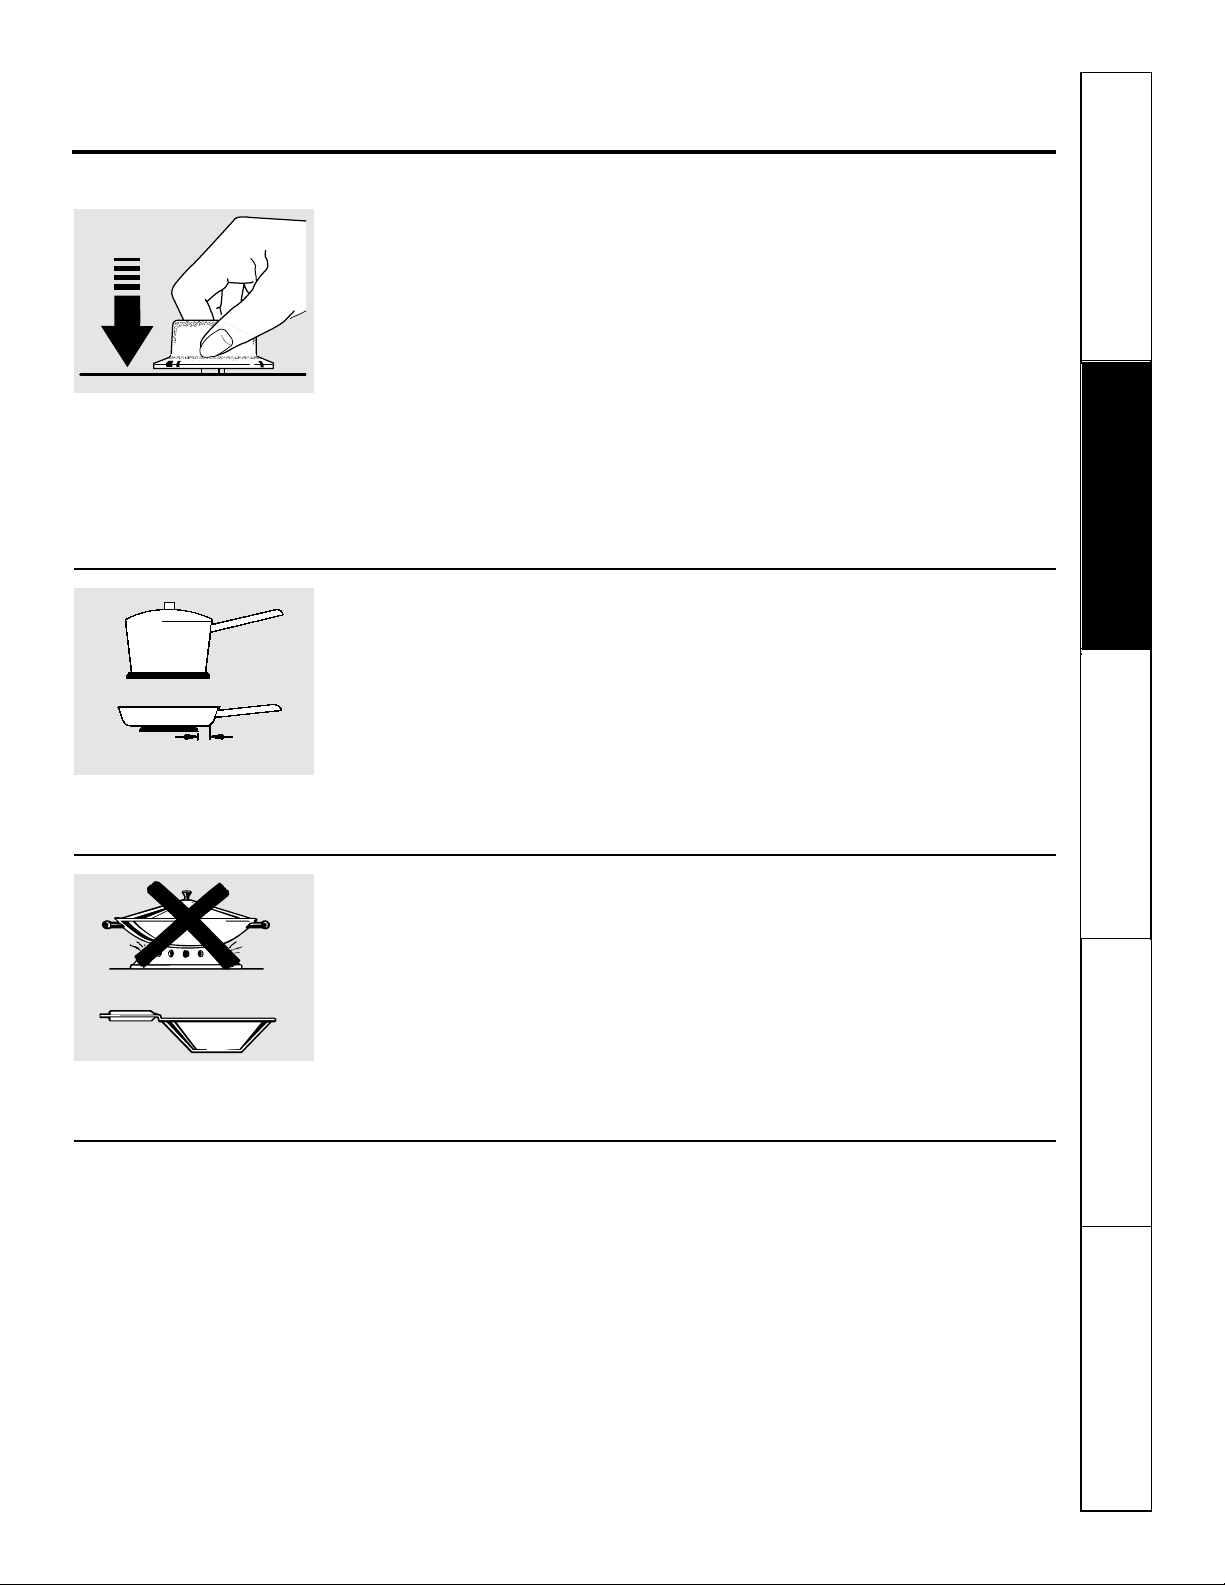
How to Set
Push the knob in and turn in either
direction to the setting you want.
At both OFF and HI the control clicks
into position. You may hear slight
clicking sounds during cooking,
indicating the control is keeping the
power level you set.
The control must be pushed in to set
only from the OFF position. When the
control is in any position other than OFF,
it may be rotated without pushing it in.
If boiling water, for more efficient use,
turn the knob to HI to bring it to a boil
faster. After the water has come to a boil,
reduce the knob setting to medium-high.
The heat will still be great enough to
maintain a boil, but you will be using less
energy.
An indicator light will glow when any
surface unit is on.
Be sure you turn the control knob to OFF
when you finish cooking.
Surface Cookware Tips
Use medium- or heavy-weight cookware.
Aluminum cookware conducts heat faster
than other metals. Cast-iron and coated
cast-iron cookware are slow to absorb
heat, but generally cook evenly at low to
medium heat settings. Steel pans may
cook unevenly if not combined with
other metals.
For best cooking results, pans should be
flat on the bottom. Match the size of the
saucepan to the size of the surface unit.
The pan should not extend over the
edge of the surface unit more than
1 inch.
Not over 1 inch.
Wok Cooking
We recommend that you use only a flat-bottomed
wok. They are available at your local retail store.
Do not use woks that have support rings.
Use of these types of woks, with or
without the ring in place, can be
dangerous.
Placing the ring over the surface unit will
cause a build-up of heat that will damage
the porcelain cooktop. Do not try to use
such woks without the ring. You could be
seriously burned if the wok tipped over.
Use only flat-bottomed woks.
Deep Fat Frying
Foods for frying should be as dry as
possible. Frost on frozen foods or
moisture on fresh foods can cause
hot fat to bubble up and over the
sides of the pan.
Page 6
Care and cleaning of the cooktop.
Be sure electrical power is off and all surfaces are cool before cleaning any part of the cooktop.
Glass Control Panel
The glass control panel on your cooktop has been
tempered to withstand sudden temperature
changes during cooking. Give it the normal care
you would give any glass material.
While it is impact-resistant, avoid
scratching it to prevent it from shattering.
If the glass is hot, wipe up spills with a dry
cloth or paper towel. When the surface
has cooled, wash, rinse and dry it.
Alternately, when the glass is cool, spray it
with glass or window cleaner. Avoid the
use of cleaning powders or harsh
abrasives that may scratch the surface.
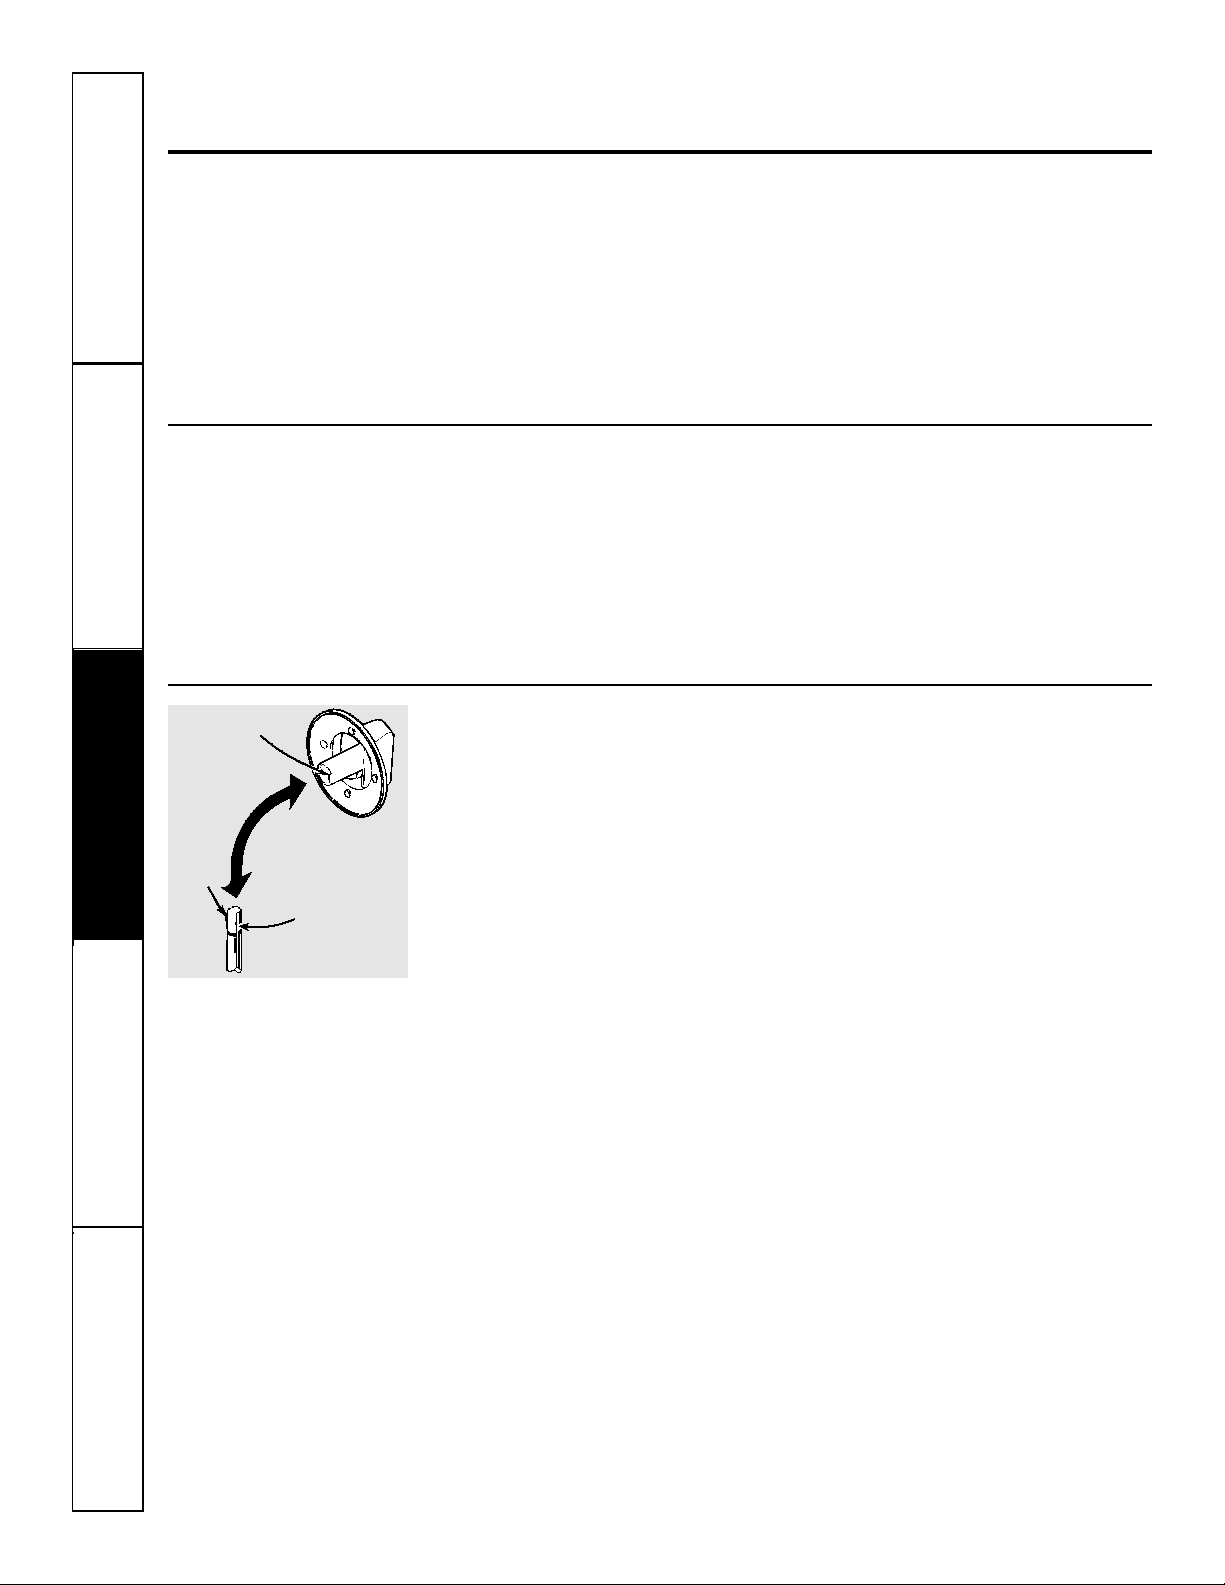
Control Knobs
The control knobs may be removed for easier
cleaning.
Before removing the knobs for
cleaning, please note that the knobs
are in the OFF position. When
replacing the knobs, check the OFF
position to insure proper placement.
The knob has a groove in each side. The
groove on one side has a spring clip. The
other groove is clear. Check the inside of
the knob and find the molded rib.
Wash knobs in soap and water but do not
soak. Avoid getting water down into the
knob stem holes.
Replace the knob by fitting the molded
rib inside the knob into the clear groove
on the stem.
Clear groove
Spring
clip
Molded rib
How to Remove Packaging Tape
To assure no damage is done to the finish
of the product, the safest way to remove
the adhesive left from packaging tape on
new appliances is an application of a
household liquid dishwashing detergent,
mineral oil or cooking oil.
Apply with a soft cloth and allow to soak.
Wipe dry and then apply an appliance
polish to thoroughly clean and protect
the surface.
NOTE: The plastic tape must be removed from all
chrome trim. It cannot be removed if it is baked on.
6
Safety Instructions
Operating Instructions
Care and CleaningTroubleshooting TipsConsumer Support
Page 7
7
Safety Instructions Operating Instructions Care and Cleaning Troubleshooting Tips
Consumer Support
Porcelain Enamel Cooktop (on some models)
The porcelain enamel finish is sturdy but
breakable if misused.
This finish is acid-resistant. However, any
acidic foods spilled (such as fruit juices,
tomato or vinegar) should not be
permitted to remain on the finish.
If acids spill on the cooktop while it is
hot, use a dry paper towel or cloth to
wipe it up right away. When the surface
has cooled, wash with soap and water.
Rinse well.
For other spills such as fat spatterings,
wash with soap and water or cleansing
powders after the surface has cooled.
Rinse well. Polish with a dry cloth.
Stainless Steel Cooktop (on some models)
Do not use a steel-wool pad; it will
scratch the surface.
To clean the stainless steel surface,
use a hot, damp cloth with a mild
detergent suitable for stainless steel
surfaces. Use a clean, hot, damp
cloth to remove soap. Dry with a
dry, clean cloth.
If food soil remains, try a general
kitchen cleaner, such as Fantastik®,
Simple Green®, or Formula 409®.
For hard-to-clean soil, use a
standard stainless steel cleaner,
such as Bon-Ami®or Cameo®.
Apply cleaner with a damp sponge.
Use a clean, hot, damp cloth to
remove cleaner. Dry with a dry,
clean cloth. Always scrub lightly
in the direction of the grain.
After cleaning, use a stainless steel
polish, such as Stainless Steel Magic
®
,
Revere Copper and Stainless Steel
Cleaner®, or Wenol All Purpose
Metal Polish®. Follow the product
instructions for cleaning the stainless
steel surface.
Metal Parts
Do not use steel wool, abrasives,
ammonia or commercial oven cleaners.
To safely clean surfaces; wash, rinse and
then dry with a soft cloth.
Page 8
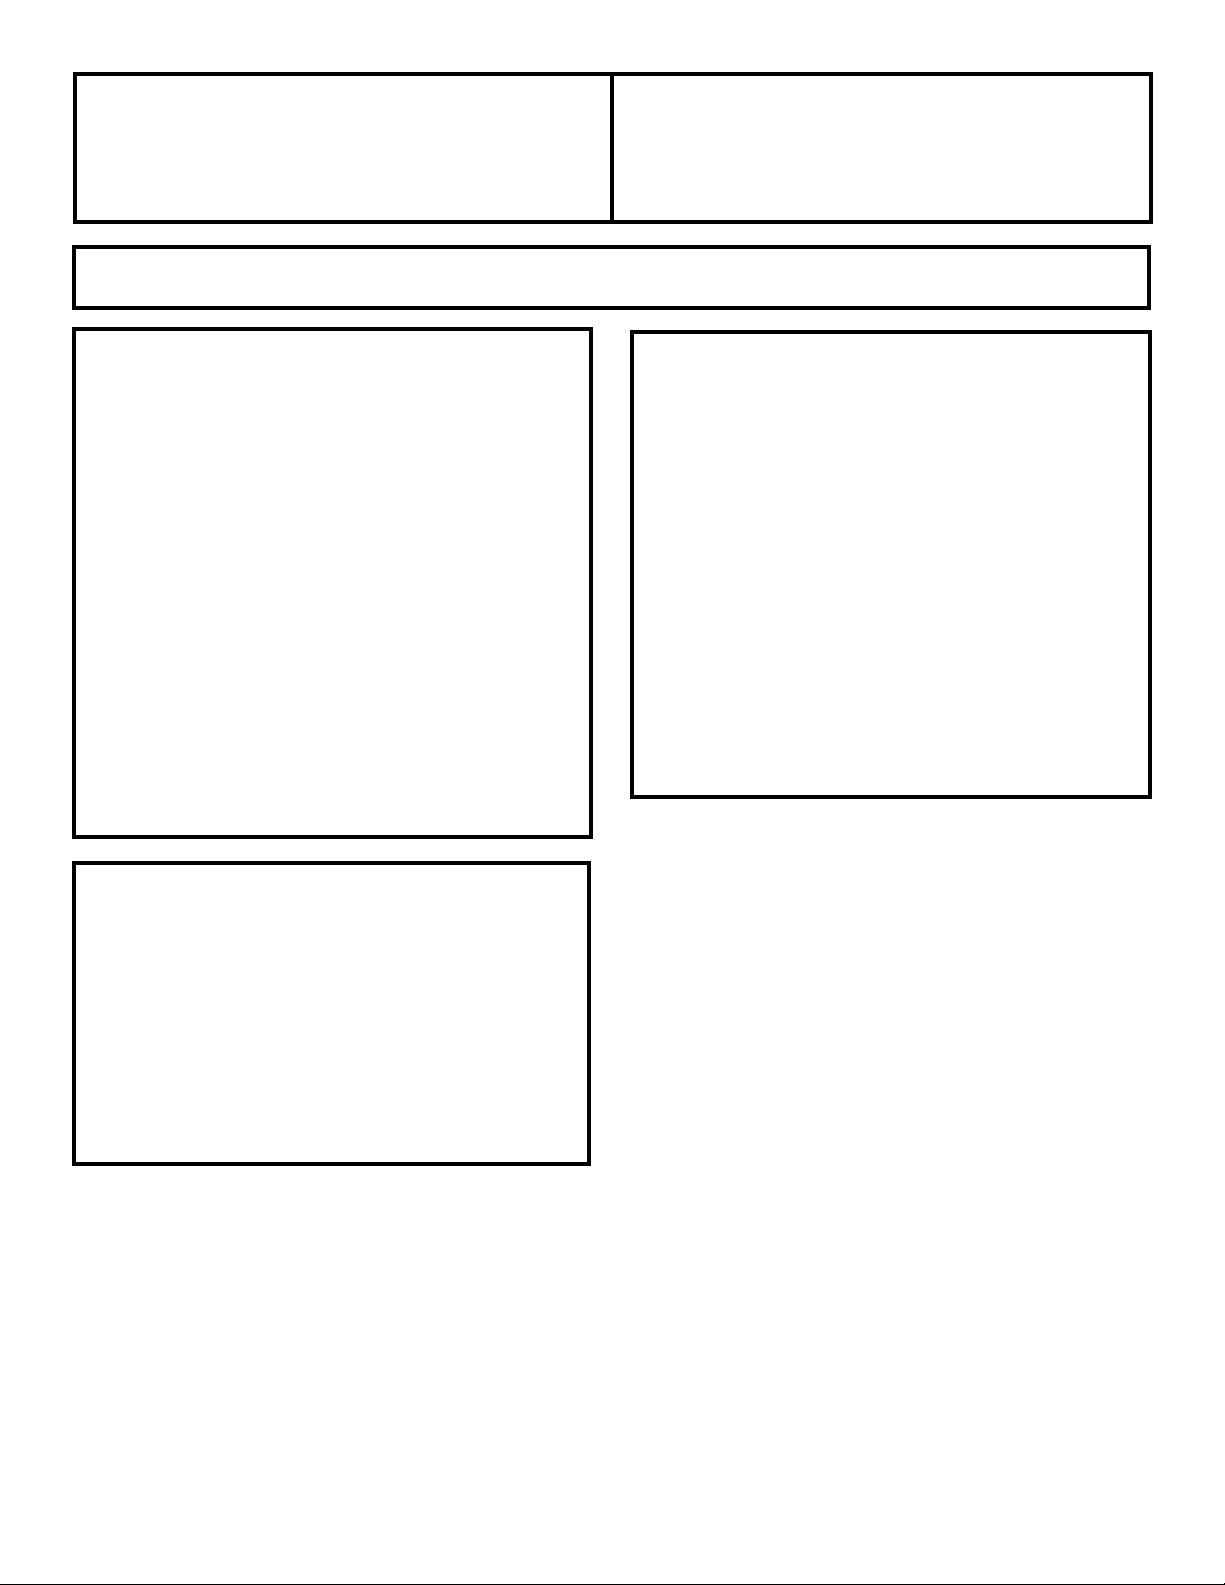
Lift-Up Cooktop
Clean the area under the cooktop often. Built-up
soil, especially grease, may catch on fire.
To make cleaning easier, the entire
cooktop may be lifted. Be sure all surface
units are turned off and are cool before
raising the cooktop.
To raise the cooktop:
Remove all four control knobs. See
the Control Knobs section.
Remove one of the front surface units
and drip pans and use this opening
to grasp the cooktop. See the Surface
Units and Drip Pans sections.
Lift the cooktop.
Raise the support rod into place and
hook it into the bracket on the
underside of the cooktop to hold it in
place while cleaning.
To clean the cooktop:
Use hot, soapy water and a clean cloth to
clean the surface under the cooktop. To
remove burned-on spills, use a cleansing
powder. Rinse well, then polish with a
dry cloth.
To lower the cooktop:
While holding the cooktop up with
one hand, carefully disengage the
support rod from the bracket and
return it to its original location.
Gently lower the cooktop.
To fasten the cooktop down, press on
the front of the cooktop to make sure
the strike engages the catch.
Replace any drip pans and surface
units that you removed.
Replace the control knobs.
5
4
3
2
1
4
3
2
1
Be sure to secure the cooktop
support rod in the cooktop
strike catch.
Support rod
8
Safety Instructions
Operating Instructions
Care and CleaningTroubleshooting TipsConsumer Support
Care and cleaning of the cooktop.
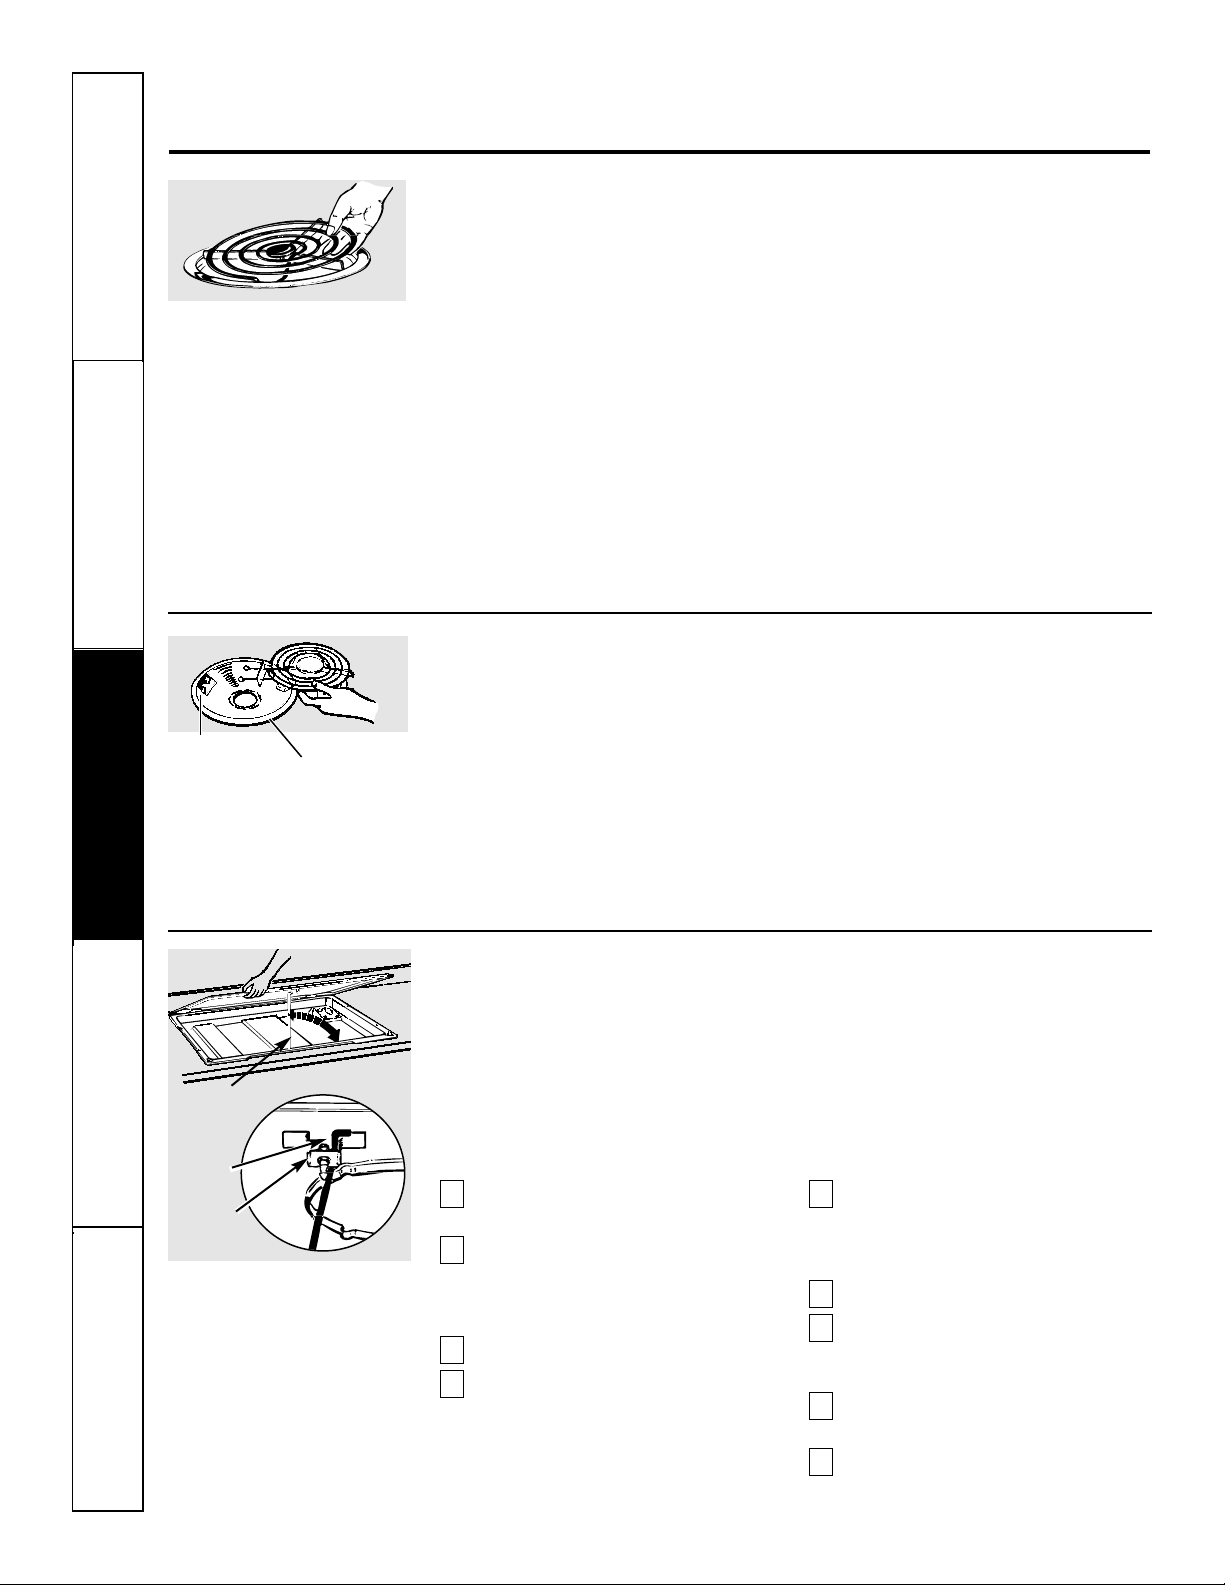
Surface Units
To clean the surface units, turn the
control to the highest setting for a
minute. The coils will burn off any soil.
To remove a surface unit:
To remove the drip pans for cleaning,
the surface units must be removed first.
Lift the surface unit about 1 inch above
the drip pan and pull it out.
Do not lift the surface unit more than 1
inch. If you do, it may not lie flat on the
drip pan when you plug it back in.
Repeated lifting of the surface unit more
than 1 inch above the drip pan can
permanently damage the receptacle.
To replace a surface unit:
Replace the drip pan into the recess in
the cooktop. Make sure the opening in
the pan lines up with the receptacle.
Insert the terminals of the surface unit
through the opening in the drip pan and
into the receptacle.
Guide the surface unit into place so it
rests evenly.
Do not immerse the surface units in liquids of
any kind.
Do not clean the surface units in a dishwasher.
Do not bend the surface unit plug terminals.
Do not attempt to clean, adjust or in any way
repair the plug-in receptacle.
Drip Pans
Remove the surface units. Then lift out
the drip pans.
Clean the drip pans by hand with warm,
soapy water.
To remove burned-on foods, soak them
in hot, soapy water for several hours.
Then scrub with a soap-filled plastic
scouring pad if necessary.
Rinse with clean water and polish with a
clean soft cloth.
The drip pans may also be cleaned in a
dishwasher.
Clean the area under the drip pans
often. Built-up soil, especially grease,
may catch fire.
Do not cover the drip pans with foil. Using foil so
close to the receptacle could cause shock, fire or
damage to the cooktop.
Drip pan
Receptacle
Lift the surface unit about 1 inch
above the drip pan and pull it out.
Support
rod
Latch
Page 9
BEFORE YOU BEGIN
Read these instructions completely and carefully.
•
IMPORTANT – Save these
instructions for local inspector’s use.
•
IMPORTANT – Observe all
governing codes and ordinances.
• Note to Installer – Be sure to leave these
instructions with the Consumer.
• Note to Consumer – Keep these instructions
for future reference.
•
WARNING: For personal safety, this
appliance must be properly grounded.See the
GROUNDING INSTRUCTIONS section in these
Installation Instructions.
• Proper installation is the responsibility of the installer.
• Product failure due to improper installation is not
covered under the Warranty.
• WARNING – Before beginning the
installation, switch power off at the service panel and
lock the service disconnecting means to prevent
power from being switched on accidentally. When the
service disconnecting means cannot be locked,
securely fasten a prominent warning device, such as a
tag, to the service panel.
• To eliminate the risk of burns or fire by reaching over
heated surface elements, cabinet storage located
above the surface units should be avoided. If cabinet
storage space is to be provided, the risk can be
reduced by installing a range hood that projects
horizontally a minimum of 5″ beyond the bottom of
the cabinets. Cabinet installation above the cooktop
may be no deeper than 13″.
• The cooktop should be easy to reach and lighted with
natural light during the day.
FOR YOUR SAFETY:
Installation Electric
Cooktop
Instructions
JP328, JP626
9
TOOLS YOU WILL NEED
• Electric or hand drill and 1/8″ drill bit
• Flat blade screwdriver
• Phillips screwdriver
• Pencil
• Ruler
• Hand or saber saw
FOR TILE COUNTERTOP INSTALLATION
• Electric drill and 5/32″ drill bit
• 43⁄16″ x 11⁄4″ masonry screws
Questions? Visit our Website at: GEAppliances.com or Call the GE Answer Center at 800.626.2000.
Page 10

10
Installation Instructions
PRODUCT DIMENSIONS
AND CLEARANCES
Counter space must be provided for installation of
the cooktop. To insure accuracy, it is best to make a
template when cutting the opening in the counter.
See illustration below for all necessary dimensions.
When choosing a location, the following minimum
clearances must be maintained between the cooktop
and adjacent combustible surfaces:
•30″ (76.2 cm) minimum vertical clearance from the
cooktop to the nearest overhead surface.
•18″ (45.7 cm)minimum vertical clearance to
adjacent cabinets.
Cooktop and cutout dimensions
13″
(33 cm)
Max.
K Min.
clearance to
side wall
L Min.
clearance to
side wall
30″
(76.2 cm)
Min.
A
H
C
D
J
F
G
E
B
I
18″
(45.7 cm)
Min.
Model
JP328 JP626
A 301⁄4″ 351⁄2″
76.8 cm 90.2 cm
B 211⁄4″ 21″
54.0 cm 53.3 cm
C 283⁄8″ 3311⁄16″
72.1 cm 85.6 cm
D 193⁄8″ 1815⁄16″
49.2 cm 48.1 cm
E 191⁄2″ 191⁄8″
49.5 cm 48.6 cm
F 281⁄2″ 337⁄8″
72.4 cm 86.0 cm
G 141⁄4″ 1615⁄16″
36.2 cm 43.0 cm
Model
JP328 JP626
H 3″ min. 3″ min.
7.6 cm 7.6 cm
I 13⁄4″ min. 13⁄4″ min.
4.4 cm 4.4 cm
J 31⁄2″ min. 21⁄2″ min.
8.9 cm 6.4 cm
K 2″ min. 33⁄4″ min.
5.1 cm 9.5 cm
L 51⁄2″ min. 33⁄4″ min.
14.0 cm 9.5 cm
M 331⁄4″ min. 413⁄8″ min.
84.5 cm 105 cm
ELECTRICAL REQUIREMENTS
ATTENTION: All electric cooktops must be hard wired
(direct wired) into an approved junction box. A plug
and receptacle is not permitted for these products.
We recommend you have the electrical wiring and
hookup of your cooktop done by a qualified electrician.
After installation, have the electrician show you where
your main disconnect is located.
Check with your local utilities for electrical codes which
apply in your area. Failure to wire your cooktop
according to governing codes could result in a
hazardous condition. If there are no local codes,
your cooktop must be wired and fused to meet the
requirements of the National Electrical Code,
ANSI/NFPA No. 70 Latest Edition. You can get a
copy by writing:
National Fire Protection Association
Batterymarch Park
Quincy, MA 02269
You should use a single phase, three wire 240/120 Volt,
60 Hertz electrical power system. If aluminum wiring is
used, all connections MUST be listed for use with
aluminum and copper wiring. It is strongly
recommended that if aluminum wiring is used, the
special terminal grease for use with aluminum wiring,
preferably with “grit”, is put into the connection to keep
it from corroding over time.
At a minimum, the National Electrical Code wire sizing
in Section 310 should be followed. It is further
recommended that No. 8 AWG copper (or No. 6 AWG
aluminum) wire or larger if required, protected with
either a double pole 40 Ampere circuit breaker or two 40
Ampere fuses be used to supply power to the cooktop.
See the section on Electrical Connections for detailed
instructions on hookup of your cooktop.
M
Page 11

Before installing the cooktop or moving it to another
location, have the electrician verify:
• That your home is provided with adequate electrical
service.
• That the addition of the cooktop will not overload the
household circuit on which it is used.
PREPARATION
11
Installation Instructions
1
Install an
approved
junction box
where it will be
easily accessible
through the
front of the
cabinet where
cooktop will be
located. See the
illustration at
right for the
suggested
mounting
location.
INSTALL THE JUNCTION BOX
2
Page 12

12
Safety Instructions
Operating Instructions
Care and CleaningTroubleshooting TipsConsumer Support
Before You Call For Service…
Troubleshooting Tips
Save time and money! Review the chart on this page
first and you may not need to call for service.
Problem Possible Causes What To Do
Surface units not The surface units are • With the controls off, check to make sure the surface
functioning properly not plugged in solidly. unit is plugged completely into the receptacle.
The surface unit • Check to see the correct control is set for the surface
controls improperly set. unit you are using.
The drip pans are not set • With the controls off, check to make sure the drip
securely in the cooktop. pan is in the recess in the cooktop and that the
opening in the pan lines up with the receptacle.
A fuse in your home may be • Replace the fuse or reset the circuit breaker.
blown or the circuit breaker
tripped.
Page 13

13
Safety Instructions Operating Instructions Care and Cleaning Troubleshooting Tips
Consumer Support
GE Built-In Cooktop Warranty.
For The Period Of: We Will Replace:
One Year Any part of the cooktop which fails due to a defect in materials or workmanship.
From the date of the During this full one-year warranty, GE will also provide, free of charge, all labor
original purchase and in-home service to replace the defective part.
■ Service trips to your home to teach you how to use
the product.
■ Improper installation.
■ Failure of the product if it is abused, misused, or used
for other than the intended purpose or used
commercially.
■ Replacement of house fuses or resetting of circuit
breakers.
■ Damage to the product caused by accident, fire, floods
or acts of God.
■ Incidental or consequential damage caused by possible
defects with this appliance.
What GE Will Not Cover:
This warranty is extended to the original purchaser and any succeeding owner for products purchased for
home use within the USA. In Alaska, the warranty excludes the cost of shipping or service calls to your home.
Some states do not allow the exclusion or limitation of incidental or consequential damages. This warranty
gives you specific legal rights, and you may also have other rights which vary from state to state. To know
what your legal rights are, consult your local or state consumer affairs office or your state’s Attorney General.
Warrantor: General Electric Company. Louisville, KY 40225
All warranty service provided by our Factory Service
Centers, or an authorized Customer Care
®
technician.
To schedule service, on-line, 24 hours a day, visit us
at www.GEAppliances.com, or call 800.GE.CARES
(800.432.2737).
Staple your receipt here.
Proof of the original purchase
date is needed to obtain service
under the warranty.
Page 14

Printed in China
Consumer Support.
GE Appliances Website
www.GEAppliances.com
Have a question or need assistance with your appliance? Try the GE Appliances Website 24 hours a day,
any day of the year! For greater convenience and faster service, you can now download Owner’s Manuals,
order parts, catalogs, or even schedule service on-line. You can also “Ask Our Team of Experts™”
your questions, and so much more...
Schedule Service www.GEAppliances.com
Expert GE repair service is only one step away from your door. Get on-line and schedule your service at
your convenience 24 hours any day of the year! Or call 800.GE.CARES (800.432.2737) during normal
business hours.
Real Life Design Studio www.GEAppliances.com
GE supports the Universal Design concept—products, services and environments that can be used by
people of all ages, sizes and capabilities. We recognize the need to design for a wide range of physical and
mental abilities and impairments. For details of GE’s Universal Design applications, including kitchen
design ideas for people with disabilities, check out our Website today. For the hearing impaired, please call
800.TDD.GEAC (800.833.4322).
Extended Warranties www.GEAppliances.com
Purchase a GE extended warranty and learn about special discounts that are available while your warranty
is still in effect. You can purchase it on-line anytime, or call 800.626.2224 during normal business hours.
GE Consumer Home Services will still be there after your warranty expires.
Parts and Accessories www.GEAppliances.com
Individuals qualified to service their own appliances can have parts or accessories sent directly to their
homes (VISA, MasterCard and Discover cards are accepted). Order on-line today, 24 hours every day or by
phone at 800.626.2002 during normal business hours.
Instructions contained in this manual cover procedures to be performed by any user. Other servicing generally
should be referred to qualified service personnel. Caution must be exercised, since improper servicing may cause
unsafe operation.
Contact Us www.GEAppliances.com
If you are not satisfied with the service you receive from GE, contact us on our Website with all the details
including your phone number, or write to: General Manager, Customer Relations
GE Appliances, Appliance Park
Louisville, KY 40225
Register Your Appliance www.GEAppliances.com
Register your new appliance on-line—at your convenience! Timely product registration will allow for
enhanced communication and prompt service under the terms of your warranty, should the need arise.
You may also mail in the pre-printed registration card included in the packing material.
14
Page 15

JP328
JP626
Manual del usuario
e instrucciones
de instalación
Estufa
Eléctrica Empotrada
164D4290P111 49-80154 08-02 JR
Instrucciones de seguridad . . 2–4
Instrucciones de operación . . . . .5
Cuidado y limpieza
Cinta de empaque . . . . . . . . . . . . .6
Panel de control de vidrio . . . . . . .6
Partes metálicas . . . . . . . . . . . . . . .8
Perillas de control . . . . . . . . . . . . 6
Recipientes de goteo . . . . . . . . . . .8
Superficie de acero inoxidable . . .7
Superficie de levantar . . . . . . . . . .8
Superficie esmaltada
en porcelana . . . . . . . . . . . . . . . . . 7
Unidades de la superficie . . . . . . .8
Instrucciones de instalación
Conexiones eléctricas . . . . . . . . .11
Requisitos eléctricos . . . . . . . . . . 10
Instalación de la estufa . . . . . . . .11
Ubicación . . . . . . . . . . . . . . . . . .10
Herramientas necesarias . . . . . . . 9
Consejos para la solución
de problemas . . . . . . . . . . . . . . . 12
Soporte al consumidor
Soporte al consumidor . . . . . . . . 14
Garantía . . . . . . . . . . . . . . . . . . . 13
www.GEAppliances.com
Escriba el modelo y los
números de serie a
continuación:
Modelo No: ____________
Serie No: ______________
Los puede encontrar en la
etiqueta que está debajo de
la superficie de la estufa.
Page 16

INFORMACIÓN DE SEGURIDAD IMPORTANTE.
LEA TODAS LAS INSTRUCCIONES ANTES DE SU USO.
¡ADVERTENCIA
Por su seguridad, se debe seguir la información de este manual para reducir el riesgo de incendio o
explosión, descarga eléctrica o para evitar daños a la propiedad, lesiones personales o la pérdida de
la vida.
Cuando use electrodomésticos, se deben seguir precauciones básicas de seguridad, incluyendo las
siguientes:
■ Use este electrodoméstico sólo para el uso
descrito en este manual.
■ No intente reparar o reemplazar alguna
parte de su estufa a menos que se
recomiende específicamente en este
manual. Cualquier otro servicio se debe
remitir a un técnico calificado.
■ Antes de realizar cualquier servicio,
desconecte la fuente de energía de la
estufa en el tablero general de distribución
retirando el fusible o apagando el
interruptor de circuitos.
■ Asegúrese de que un electricista calificado
instale y conecte a tierra correctamente el
electrodoméstico de acuerdo con las
instrucciones de instalación suministradas.
■ Pida al instalador que le muestre la
ubicación del interruptor de circuitos o
fusible. Márquelo para una fácil referencia.
■ No deje a los niños solos o sin supervisión
en una zona donde un electrodoméstico
está en uso. Nunca se debe permitir que
alguien se siente o se pare en alguna parte
del electrodoméstico.
■ Enseñe a los niños a no jugar con los
controles ni con ninguna otra parte de
la estufa.
■ No permita que nadie salte, se pare o se
cuelgue de la estufa.
■
PRECAUCIÓN: No se deben
guardar en los gabinetes encima de la
estufa artículos de interés para los niños ya
que si se suben en la estufa para alcanzar
dichos artículos pueden sufrir serias
lesiones.
■ Siempre mantenga el papel de colgadura
o las cortinas de material combustible a
una distancia prudente de la estufa.
■ Siempre mantenga las toallas y paños
para platos, guantes para ollas y otros
artículos de tela a una distancia prudente
de la estufa.
■ Siempre mantenga los utensilios plásticos y
de madera y los alimentos enlatados a una
distancia prudente de la estufa.
■ Nunca use ropa suelta o prendas
que cuelguen mientras utiliza el
electrodoméstico. El material inflamable
se podría prender si entra en contacto con
unidades calientes de la superficie y puede
causar quemaduras severas.
■ Use únicamente guantes para ollas que
estén secos, los guantes húmedos en
superficies calientes pueden causar
quemadas por el vapor. No deje que los
guantes para ollas toquen las unidades
calientes de la superficie. No use toallas u
otros paños gruesos que puedan arder si
entran en contacto con la unidad caliente
de la superficie.
PRECAUCIONES DE SEGURIDAD
COCINE LA CARNE Y LAS AVES COMPLETAMENTE...
Cocine la carne y las aves completamente. La carne se debe cocinar a una temperatura mínima INTERNA de
160° F y las aves a una temperatura mínima INTERNA de 180° F. Normalmente, cocinar a estas temperaturas
protege contra enfermedades causadas por los alimentos.
Seguridad
Operación
Cuidado y limpieza
Solucionar problemas
Soporte al consumidor
2
Page 17

Seguridad Operación
Cuidado y limpieza
Solucionar problemas Soporte al consumidor
3
■ Por su seguridad, nunca use este
electrodoméstico para calentar el
cuarto de la cocina.
■ No use agua para extinguir incendios de
grasa. Nunca levante una olla en llamas.
Apague los controles. Sofoque la olla en
llamas en una unidad de la superficie
cubriendo la olla completamente con una
tapa que encaje bien, con una bandeja de
galletas o plana. Use un extintor químico
seco multiusos o de tipo espumoso.
■ Se debe sofocar la grasa encendida por
fuera de la olla cubriéndola con soda
cáustica o si está disponible, usando un
extintor químico seco multiusos o de tipo
espumoso.
■ Cuando prepare comidas llameantes
debajo de la campana, encienda el
ventilador.
■ No deje acumular grasas u otros materiales
inflamables en la superficie.
■ No toque las unidades de la superficie.
Estas superficies pueden estar tan calientes
como para quemar aunque estén de color
oscuro. Durante y después de su uso, no
las toque, ni permita que algún paño u
otro material inflamable entre en contacto
con las unidades de la superficie o con las
áreas cercanas a las unidades de la
superficie; deje suficiente tiempo para
que se enfríen primero.
■ Las zonas potencialmente calientes son la
superficie de la estufa y las áreas al frente.
■ Para reducir la posibilidad de quemaduras,
el encendido de materiales inflamables y
los derrames, el mango de cualquier
recipiente se debe girar hacia el centro de
la estufa sin extenderse hacia ninguna
unidad cercana de la superficie.
■ Apague siempre el control de la unidad de
la superficie antes de retirar el recipiente.
■ Para evitar la posibilidad de quemaduras o
descargas eléctricas siempre asegúrese de
que los controles de todas las unidades de
la superficie estén en la posición de
apagado y que todas las resistencias estén
frías antes de intentar levantar o remover
la unidad.
■ No sumerja o ponga en remojo las
unidades removibles de la superficie.
No las ponga en la lavadora de platos.
■ Use sartenes de tamaño apropiado.
Seleccione aquellas que tengan fondos
planos suficiente para cubrir el elemento
de calentamiento de la unidad de la
superficie. El uso de ollas o sartenes de
menor tamaño expondrá una porción de
la unidad de la superficie al contacto
directo y puede causar que la ropa se
encienda. La relación correcta de la olla o
sartén con respecto al quemador también
mejorará la eficiencia.
■ Nunca deje las unidades de la superficie
sin atención en niveles de alta
temperatura. Hervir en exceso causa
humaredas y derramamientos de grasa que
se pueden encender.
■ Asegúrese de que los recipientes de goteo
no estén cubiertos y estén instalados. Su
ausencia durante la cocción podría dañar
las partes de la superficie de la estufa y el
cableado.
■ No use papel aluminio para forrar los
recipientes de goteo. Un uso incorrecto
podría causar una descarga, peligro de
incendio o daño a la estufa.
¡ADVERTENCIA!
PRECAUCIONES DE SEGURIDAD
Page 18

■ Sólo ciertos tipos de vidrios, vidrio/
cerámica, vajillas de barro u otros
recipientes de vidrio son adecuados para
cocinar en la superficie de la estufa; otros
se podrían romper debido a un cambio
brusco de temperatura.
■ Nunca limpie la superficie de la estufa
cuando esté caliente. Algunos limpiadores
producen gases nocivos y los paños
húmedos pueden causar quemaduras por
vapor si se usan en una superficie caliente.
■ Vigile los alimentos mientras se fríen a
niveles de temperatura altos o medios.
■ Los alimentos a freír deben estar lo más
secos posible. La escarcha de los alimentos
congelados o la humedad en los alimentos
frescos puede hacer que la grasa caliente
salpique por fuera de los lados de la olla.
■ Use poca grasa para freír incluso al
sumergir los alimentos en la grasa. Llenar
la olla con demasiada grasa puede resultar
en derramamientos cuando se agregan los
alimentos.
■ Si se usa una combinación de aceites o
grasas para freír, revuelva antes de calentar,
o a medida que las grasas se mezclan
lentamente.
■ Siempre caliente la grasa lentamente y
vigile mientras se calienta.
■ Cuando sea posible, use un termómetro
para grasa para evitar sobrecalentar la
grasa.
■ Nunca trate de mover una sartén con
grasa caliente, especialmente una sartén
profunda para freír. Espere hasta que la
grasa esté fría.
■ No almacene materiales inflamables cerca
de la estufa.
■ Mantenga los filtros de la campana y de la
grasa limpios para mantener una buena
ventilación y evitar que la grasa se
encienda.
■ No almacene o use materiales
combustibles, gasolina u otros vapores y
líquidos inflamables en la cercanía de éste
o cualquier electrodoméstico.
■ Limpie sólo las partes señaladas en este
manual del usuario.
■ No deje productos de papel, utensilios de
cocina o alimentos en la estufa cuando no
esté en uso.
■ Mantenga la estufa limpia y libre de
acumulación de grasa o derramamientos
que se puedan encender.
■ Nunca caliente recipientes de alimentos
sin abrir, el aumento de presión podría
causar que la lata explotara u otras
lesiones.
■ Nunca deje frascos o latas con restos de
grasa sobre o cerca de la superficie de la
estufa.
LEA Y SIGA ESTAS INSTRUCCIONES DE
SEGURIDAD CUIDADOSAMENTE.
CONSERVE ESTAS INSTRUCCIONES
INFORMACIÓN DE SEGURIDAD IMPORTANTE.
LEA TODAS LAS INSTRUCCIONES ANTES DE SU USO.
¡ADVERTENCIA!
PRECAUCIONES DE SEGURIDAD
4
Seguridad
Operación
Cuidado y limpieza
Solucionar problemas
Soporte al consumidor
Page 19

5
Cómo usar las unidades de superficie.
En este manual, las características y el aspecto pueden ser diferentes a los de su modelo.
Cómo operar
Presione la perilla y dele vuelta en
cualquier dirección al nivel que desee.
Tanto en apagado (OFF) como en
alto (HI) el control chasquea al quedar
en posición. Puede escuchar un sonido
suave de un chasquido durante la
cocción, que indica que el control
mantiene el nivel de fuerza que se
estableció.
El control se debe presionar únicamente
desde la posición de apagado (OFF).
Cuando el control está en cualquier otra
posición diferente a apagado (OFF), se
puede rotar sin empujarlo.
Para un uso más eficaz, al hervir agua,
gire la perilla a la posición HI (alto) para
que hierva más rápido. Después de que
el agua haya hervido, baje el nivel de la
perilla a un nivel medio-alto. El calor será
lo suficiente para mantener el hervor,
pero usará menos energía.
Una luz indicadora se prenderá cuando
alguna unidad de la superficie esté
encendida.
Asegúrese de girar la perilla de control
en la posición de apagado (OFF) cuando
termine de cocinar.
Consejos para la batería de cocina para la superficie
Use una batería de cocina de peso
mediano a alto. La batería de cocina de
aluminio conduce el calor más rápido
que otros metales. La batería de cocina
de hierro fundido y cubierto con hierro
fundido absorbe más lentamente el calor,
pero generalmente cocinan
uniformemente en los niveles de calor
bajo a medio. Las sartenes de acero no
cocinan uniformemente si no se
combinan con otros metales.
Para mejores resultados de cocción, las
sartenes deben ser planas en el fondo. El
tamaño de las sartenes debe ser igual a la
unidad de la superficie. La sartén no
debe extenderse más allá del borde de la
unidad de la superficie en más de 1
pulgada (25 mm).
No debe exceder una pulgada
(25 mm).
Cocción en una sartén tipo Wok
Recomendamos que sólo use ollas de fondo
plano. Están disponibles en las tiendas
minoristas.
No use ollas tipo Wok con agarraderas.
El uso de este tipo de ollas con o sin las
agarraderas instaladas, puede ser
peligroso.
Colocar la agarradera sobre la unidad de
la superficie causará una acumulación de
calor la cual puede dañar la superficie de
porcelana. No trate de usar estas ollas sin
la agarradera. Se puede quemar
seriamente si la olla se voltea.
Use únicamente sartenes tipo Wok
con el fondo plano.
Sartenes para freír
Los alimentos a freír deben estar lo
más secos posible. La escarcha de los
alimentos congelados o la humedad en
los alimentos frescos puede hacer que la
grasa caliente salpique por fuera de los
lados de la olla.
Seguridad Operación
Cuidado y limpieza
Solucionar problemas Soporte al consumidor
Page 20

Cuidado y limpieza de la estufa.
Asegúrese de que el fluido eléctrico esté apagado y que todas las superficies estén frías antes de limpiar
cualquier parte de la estufa.
Panel de control de vidrio
El panel de control de vidrio de su estufa se ha
sometido a un proceso de templado para soportar
cambios bruscos de temperatura durante la
cocción. Dele el cuidado normal que le daría a
cualquier material de vidrio.
Aunque es resistente a los impactos, trate
de no rayarlo para evitar que se rompa.
Si el vidrio está caliente, limpie los
derramamientos con un paño seco o
toalla de papel. Cuando se enfríe la
superficie, lávelo, enjuáguelo y séquelo.
Alternativamente, cuando el vidrio esté
frío, esparza un limpiador de vidrios o
ventanas. Evite el uso de polvos
limpiadores o abrasivos fuertes que
puedan rayar la superficie.
Perillas de control
Las perillas de control se deben retirar para una
limpieza más fácil.
Antes de retirar las perillas para
limpieza, cerciórese de que las perillas
estén en la posición de apagado (OFF).
Cuando reemplace las perillas, revise
que estén en la posición de apagado
(OFF) para garantizar la colocación
correcta.
La perilla tiene una ranura en cada
lado. La ranura de un lado tiene un
gancho de resorte. La otra ranura no
tiene nada. Revise el interior de la
perilla y busque la costura moldeada.
Lave las perillas en agua y jabón pero
no las deje en remojo. Evite que el
agua entre a los huecos de la boquilla
de la perilla.
Reemplace la perilla ajustando la
costura moldeada al interior de la
perilla en la ranura libre en la
boquilla.
Ranura libre
Gancho
de
resorte
Costura moldeada
Cómo retirar la cinta del empaque
Para garantizar que no se haga daño al
acabado del producto, la forma más
segura de retirar el adhesivo que queda
de la cinta de empaque en los nuevos
electrodomésticos es la aplicación de un
detergente líquido de uso casero para
lavar platos, aceite mineral o aceite para
cocinar.
Aplique con un paño suave y deje en
remojo. Seque y luego aplique una cera
para electrodomésticos para limpiar a
fondo y proteger la superficie.
NOTA: La cinta plástica se debe retirar de todos
los accesorios de cromo. No se podrán retirar
después de quemarse.
6
Seguridad
Operación
Cuidado y limpieza
Solucionar problemas
Soporte al consumidor
Page 21

7
Estufa de esmalte de porcelana
(en algunos modelos)
El acabado en esmalte de porcelana es resistente
pero se puede romper si se usa incorrectamente.
Este acabado es resistente al ácido. Sin
embargo, no se debe permitir que
permanezca sobre el acabado, cualquier
alimento ácido derramado (como jugos
de frutas, tomate o vinagre).
Si se derraman ácidos sobre la superficie
mientras está caliente, use un papel toalla
o un paño húmedo para limpiar
inmediatamente. Cuando se haya
enfriado la superficie, lave con agua
y jabón. Enjuague bien.
Para otros derramamientos como
salpicaduras de grasa, lave con agua y
jabón o limpie con polvos limpiadores
después de que la superficie se enfríe.
Enjuague bien. Brille con un paño seco..
Superficie de acero inoxidable (en algunos modelos)
No use almohadillas de fibra metálica
que rayen la superficie
Para limpiar la superficie de acero
inoxidable, use un paño caliente y
húmedo con un detergente suave
apropiado para superficies de acero
inoxidable. Use un paño limpio
caliente y humedecido para remover
el jabón. Seque con un paño limpio
y seco.
Si siguen las manchas de comida,
ensaye con un limpiador para cocina
como Fantastik®, Simple Green®, o
Formula 409®.
Para manchas difíciles de limpiar, use
un limpiador estándar de acero
inoxidable como Bon-Ami
®
o Cameo®.
Aplique el limpiador con una esponja
húmeda. Use un paño limpio, caliente
y humedecido para quitar el limpiador.
Seque con un paño limpio y seco.
Siempre restriegue suavemente en la
dirección de la veta.
Después de limpiar, use una cera para
acero inoxidable, como Stainless Steel
Magic®, Revere Copper and Stainless
Steel Cleaner®, o Wenol All Purpose
Metal Polish®. Siga las instrucciones del
producto para limpiar la superficie de
acero inoxidable
Partes metálicas
No use fibra metálica, abrasivos,
amoniaco o limpiadores comerciales de
hornos. Para limpiar superficies de forma
segura; lave, enjuague y después seque
con un paño suave.
Seguridada Operación
Cuidado y limpieza
Solucionar problemas Soporte al consumidor
Page 22

Superficie de la estufa de levantar
Con frecuencia, limpie el área bajo la superficie de
la estufa, la suciedad pegada se puede incendiar.
Para hacer la limpieza más fácil, se debe
levantar toda la superficie de la estufa.
Cerciórese de que todas las unidades estén
apagadas y frías antes de levantar
la superficie.
Para levantar la superficie de la estufa:
Retire las cuatro perillas de los
controles. Consulte la sección Perillas
de control.
Retire una de las unidades frontales de
la superficie y los recipientes de goteo
y use esta abertura para levantar la
superficie. Consulte las secciones
Unidades de la superficie y Recipientes
de goteo.
Levante la superficie.
Levante la varilla de apoyo y colóquela
en el soporte en la parte baja de la
superficie de la estufa para sostenerla
en su lugar mientras limpia.
Para limpiar la superficie de la estufa:
Use agua caliente jabonosa y un paño
limpio para limpiar la superficie debajo de
la estufa. Para retirar los alimentos
quemados adheridos, use un polvo
limpiador. Enjuague bien y luego brille con
un paño seco.
Para bajar la superficie de la estufa:
Mientras sostiene la superficie de la
estufa con una mano, cuidadosamente
libere la varilla de apoyo del soporte y
regrésela a su posición original.
Cuidadosamente baje la estufa.
Para asegurar la superficie, presione el
frente de la estufa para cerciorarse de
que las puntas encajen en los
pasadores.
Reemplace cualquier recipiente de
goteo y las unidades de la superficie
que haya retirado.
Reemplace las perillas de control.
5
4
3
2
1
4
3
2
1
Cerciórese de ajustar la varilla
de soporte de la superficie en el
pasador de la superficie de la
estufa.
Varilla de
soporte
8
Cuidado y limpieza de la estufa.
Unidades de la superficie
Para limpiar las unidades de la superficie,
gire el control al nivel más alto por un
minuto. Las resistencias quemarán
cualquier suciedad.
Para retirar una unidad de la superficie:
Para retirar los recipientes de goteo para
limpieza, se deben retirar primero las
unidades de la superficie.
Levante la unidad de la superficie cerca de
1 pulgada por encima del recipiente de
goteo y hale hacia fuera.
No levante las unidades de superficie más
de 1 pulgada, si lo hace es posible que no
quede nivelada sobre el recipiente de goteo
cuando la vuelva a conectar.
Levantar repetidamente la unidad de la
superficie más de 1 pulgada por encima del
recipiente de goteo puede dañar
permanentemente el receptáculo.
Para reemplazar una unidad de
la superficie:
Reemplace el recipiente de goteo en el
orificio de la superficie de la estufa.
Asegúrese de que la abertura del recipiente
quede alineada con el receptáculo.
Conecte los terminales de la unidad de
superficie a través de la abertura en el
recipiente de goteo hasta el receptáculo.
Guíe la unidad de la superficie a su lugar
de forma que descanse a nivel.
No sumerja las unidades de la superficie en líquidos
de ninguna clase.
No lave las unidades de la superficie en la lavadora
de platos.
No doble los terminales de enchufe de la unidad de
la superficie.
No intente limpiar, ajustar o reparar de alguna
manera el receptáculo del enchufe.
Recipientes de goteo
Retire las unidades de la superficie. Luego
levante y saque los recipientes
de goteo.
Limpie los recipientes de goteo a mano
con agua tibia y jabonosa. Para retirar los
alimentos adheridos que se han quemado,
remoje en agua caliente jabonosa por varias
horas. Luego restriegue con una esponjilla
plástica con jabón si es necesario.
Enjuague con agua limpia y brille con un
paño suave y limpio.
Los recipientes de goteo también se
pueden limpiar en la lavadora de platos.
Con frecuencia, limpie el área bajo los
recipientes de goteo. La suciedad pegada,
especialmente la grasa puede encenderse.
No cubra los recipientes de goteo con papel
aluminio. Usar papel de aluminio muy cerca del
receptáculo puede causar un corto, incendio o daño
a la estufa.
Recipiente de goteo
Receptáculo
Levante la unidad de la superficie
cerca de 1 pulgada por encima
del recipiente de goteo y hale
hacia fuera.
Seguridad
Operación
Cuidado y limpieza
Solucionar problemas
Soporte al consumidor
Varilla de
soporte
Pestillo
Page 23

ANTES DE EMPEZAR
Lea estas instrucciones completa y cuidadosamente.
•
IMPORTANTE – Guarde estas
instrucciones para el uso del inspector local.
•
IMPORTANTE – Cumpla con todos
los códigos y ordenanzas que apliquen.
• Nota para el instalador – Asegúrese de dejar
estas instrucciones al consumidor.
• Nota para el consumidor – Guarde estas
instrucciones para referencia futura.
•
ADVERTENCIA: Por seguridad
personal, este aparato se debe conectar a
tierra correctamente. Consulte la sección
INSTRUCCIONES PARA LA CONEXIÓN A
TIERRA en estas Instrucciones de instalación.
• La instalación correcta es responsabilidad
del instalador.
• La falla del producto debido a una instalación
incorrecta no está cubierta por la garantía.
• ADVERTENCIA – Antes de empezar
la instalación, mueva el interruptor a la posición de
apagado en el panel de servicio y bloquee el
suministro desconectando cualquier medio de
suministro de energía para evitar que se pueda
encender de forma accidental. Cuando no se puede
bloquear la desconexión del servicio, pegue de forma
segura al panel de servicio un letrero grande de
advertencia, como una placa.
• Para eliminar el riesgo de quemaduras o incendios
al alcanzar elementos calientes por encima de la
superficie, se debe evitar instalar gabinetes de
almacenamiento por encima de las unidades de la
superficie. Si hay gabinetes, se puede reducir el riesgo
instalando una campana de estufa que se proyecte
horizontalmente un mínimo de 5 pulgadas (15 cms)
más allá del fondo de los gabinetes. La instalación de
los gabinetes por encima de la estufa no puede ser
más profunda de 13 pulgadas (33 cms).
• La superficie de la estufa debe estar al alcance y se
debe iluminar con luz natural durante el día.
PARA SU SEGURIDAD:
Instrucciones de Estufa Eléctrica
Instalación
JP328, JP626
9
HERRAMIENTAS NECESARIAS
• Taladro eléctrico o manual y broca de 1/8″
• Destornillador de cabeza plana
• Destornillador de estrella
• Lápiz
• Regla
• Serrucho de mano
PARA INSTALACIÓN EN MOSTRADOR DE LOZA
• Taladro eléctrico y broca de 5/32″
• Tornillos de mampostería de 43⁄16″ x 11⁄4″
Page 24

10
Instrucciones de Instalación
DIMENSIONES Y ESPACIOS
PARA EL PRODUCTO
Se debe tener espacio en el mostrador para la
instalación de la estufa de mostrador. Para garantizar la
exactitud, es mejor hacer una plantilla cuando corte la
abertura en el mostrador. Consulte en la ilustración a
continuación todas las dimensiones necesarias.
Al seleccionar una ubicación, se deben mantener las
siguientes distancias entre la estufa y las superficies
combustibles adyacentes:
• Espacio mínimo vertical de 30″ (76 cms) desde la
superficie de la estufa hasta la superficie superior
Page 25

Antes de instalar la unidad o trasladarla a otro lugar, pida
al electricista que verifique:
• Que su casa tenga un servicio eléctrico adecuado.
• Que la adición de la estufa no sobrecargue el circuito
de la casa que use.
PREPARACIÓN
11
Installation Instructions
1
Instale una caja
de conexión
aprobada que
sea de fácil
acceso a través
del frente del
gabinete donde
se localizará la
estufa. Consulte
la ilustración de
la derecha para
la localización
sugerida para el
montaje.
INSTALE LA CAJA DE CONEXIÓN
2
Instale la estufa en la abertura de corte.
NOTA Si la estufa se instala en un mostrador ciego
(uno sin abertura para gabinete por debajo), las
conexiones de cable se deben hacer antes de colocar
la estufa en el corte.
INSTALE LA ESTUFA
3
Asegure la tina de la estufa a un mostrador estándar con
los tornillos de madera que vienen con la unidad.
Asegure la tina de la estufa a un mostrador de loza con 4
tornillos de mampostería. Éstos se pueden comprar en
cualquier ferretería.
ASEGURE LA ESTUFA
4
ADVERTENCIA
Se debe desconectar el fluido eléctrico hacia la línea de
alimentación de la estufa, mientras se hacen las
conexiones de la línea. No hacerlo podría resultar en
lesiones serias o en la muerte.
Al hacer las conexiones de los cable, use la longitud
completa del conducto suministrado (3 pies ó 91 cms).
No se debe cortar el conducto.
Conecte los cables negro y rojo del conducto de la unidad
del mostrador con los cables correspondientes en la caja
de conexión.
Los cables eléctricos suministrados con este
electrodoméstico están aprobados por UL para conexión
a un cableado de vivienda de calibre mayor. El aislamiento
de los cables está calificado a temperaturas aún más altas
que la calificación de la temperatura del cableado para
vivienda. La capacidad actual del conductor depende del
calibre del cable y también del nivel de temperatura del
aislamiento alrededor del cable.
INSTRUCCIONES PARA LA CONEXIÓN
A TIERRA
El cable de polo a tierra descubierto en el conducto se
conecta a la estructura de la estufa.
Cuando se conecta a un circuito ramal de 3 conductores,
si los códigos locales lo permiten, una el alambre del
conector a tierra descubierto de la estufa con el neutro
del circuito ramal (color gris o blanco).
A partir del primero de enero de 1996, el Código
Eléctrico Nacional exige que todas las construcciones
nuevas usen una (4) conexión de conductor y no
permite la conexión a tierra a través del neutro. Si se
usa en una construcción nueva después del primero
de enero de 1996, en una casa móvil o vehículo
recreacional, o si los códigos locales no permiten
conectar a tierra a través del cable neutro blanco,
haga el paso siguiente:
Una el cable de conexión a tierra del aparato (verde o
cobre descubierto) al conductor de conexión a tierra de la
residencia (verde o cobre descubierto) de acuerdo con los
códigos locales.
HAGA LAS CONEXIONES
ELÉCTRICAS
5
Tina
Caja de
conexión
Caja de
conexión
Page 26

12
Antes de llamar para un servicio...
Consejos para la solución de problemas
¡Ahorre tiempo y dinero! Revise primero la tabla de esta página y
posiblemente no necesite llamar para un servicio.
Problema Causas posibles Qué hacer
Las unidades de la Las unidades de la superficie • Con los controles en la posición de apagado, revise para
superficie no funcionan no están conectadas asegurarse de que la unidad de la superficie esté
orrectamente firmemente. conectada completamente en el receptáculo.
Los controles de la unidad • Revise que el control correcto esté instalado para la
de la superficie están instalados unidad de la superficie que está usando.
incorrectamente.
Los recipientes de goteo no • Con los controles en la posición de apagado revise
stán firmes en la superficie que el recipiente de goteo esté en su lugar y que la
de la estufa. abertura en el recipiente quede alineada con el
receptáculo.
Es posible que un fusible de • Reemplace el fusible o vuelva a reiniciar el
ela casa se haya saltado o el interruptor de circuitos.
interruptor de circuitos se
haya disparado.
Seguridad
Operación
Cuidado y limpieza
Solucionar problemas
Soporte al consumidor
Page 27

13
Garantía para la estufa empotrada de GE. (Para consumidores en los EE.UU.)
■ Viajes de servicio a su hogar para enseñarle cómo usar
el producto.
■ Una instalación incorrecta.
■ Fallas del producto si hay abuso, mal uso, o uso para
otros propósitos que los propuestos, o uso para fines
comerciales.
■ Reemplazo de fusibles de su hogar o reajuste de
interruptores de circuito.
■ Daño al producto causado por accidente, fuego,
inundaciones, o actos de Dios.
■ Daño incidental o consecuencial causado por posibles
defectos con el aparato.
Qué no cubre GE:
Esta garantía se extiende al comprador original y a cualquier propietario que lo suceda para el caso de
productos comprados para uso doméstico normal en los Estados Unidos. En Alaska, usted tendrá que pagar el
flete del producto o los costos de viaje del técnico de servicio hasta su hogar.
Algunos estados no permiten la exclusión o limitación de daños incidentales o consecuenciales. Esta garantía
le proporciona derechos legales específicos, y puede tener otros derechos que pueden variar de un estado a
otro. Para conocer los derechos legales de su estado, consulte con su oficina local de asuntos del consumidor
o al procurador general de su estado.
Garantidor: General Electric Company. Louisville, KY 40225
Todos los servicios de garantía los proporcionan nuestros Centros
de Reparación de Fábrica o nuestros técnicos Customer Care
®
autorizados. Para concertar una cita de reparación, en línea,
24 horas al día, visítenos al GEAppliances.com, o llame al
800.GE.CARES (800.432.2737).
Pegue su recibo aquí.
Se necesita la prueba de
la fecha de la compra original
para obtener servicio bajo
esta garantía.
Durante: Reemplazaremos:
Un año Cualquier parte de la estufa que falle debido a un defecto en los materiales o mano de obra.
A partir de la fecha Durante este año completo de garantía, GE también ofrecerá, sin costo alguno, toda la mano
de compra original de obra y servicio interno para reemplazar las partes defectuosas.
Seguridada Operación
Cuidado y limpieza
Solucionar problemas Soporte al consumidor
Page 28

Soporte al consumidor.
Página Web de GE Appliances
www.GEAppliances.com
¿Tiene alguna pregunta sobre su electrodoméstico? ¡Pruebe la página Web de GE Appliances 24 horas al
día, cualquier día del año! Para mayor conveniencia y servicio más rápido, ya puede descargar los Manuales
de los Propietarios, pedir piezas o incluso hacer una cita en línea para que vengan a realizar una
reparación. También puede “Ask Our Team of Experts™” (Preguntar a nuestro equipo de expertos) sobre
cualquier cuestión y mucho más...
Solicite una reparación www.GEAppliances.com
El servicio de expertos GE está a tan sólo un paso de su puerta. ¡Entre en línea y solicite su reparación
cuando le venga bien 24 horas al día cualquier día del año! O llame al 800.GE.CARES (800.432.2737)
durante horas normales de oficina.
Real Life Design Studio (Estudio de diseño para la vida real)
www.GEAppliances.com
GE apoya el concepto de Diseño Universal—productos, servicios y ambientes que pueden usar gente de
todas las edades, tamaños y capacidades. Reconocemos la necesidad de diseñar para una gran gama de
habilidades y dificultades físicas y mentales. Para más detalles cobre las aplicaciones de GE Diseño Universal,
incluyendo ideas de diseño para la cocina para personas con discapacidades, mire nuestra página Web hoy
mismo. Para personas con dificultades auditivas, favor de llamar al 800.TDD.GEAC (800.833.4322).
Garantías ampliadas www.GEAppliances.com
Compre una garantía ampliada y obtenga detalles sobre descuentos especiales disponibles mientras su garantía
está aún activa. Puede comprarla en línea en cualquier momento, o llamar al (800.626.2224) durante horas
normales de oficina. GE Consumer Home Services estará aún ahí cuando su garantía termine.
Piezas y accesorios www.GEAppliances.com
Aquellos individuos con la calificación necesaria para reparar sus propios electrodomésticos pueden
pedir que se les manden las piezas o accesorios directamente a sus hogares (aceptamos las tarjetas
VISA, MasterCard y Discover). Haga su pedido en línea hoy, 24 horas cada día o llamar por teléfono
al 800.626.2002 durante horas normales de oficina.
Las instrucciones descritas en este manual cubren los procedimientos a seguir por cualquier usuario. Cualquier
otra reparación debería, por regla general, referirse a personal calificado autorizado. Debe ejercerse precaución
ya que las reparaciones incorrectas pueden causar condiciones de funcionamiento inseguras.
Póngase en contacto con nosotros www.GEAppliances.com
Si no está satisfecho con el servicio que recibe de GE, póngase en contacto con nosotros en nuestra
página Web indicando todos los detalles así como su número de teléfono o escríbanos a:
General Manager, Customer Relations
GE Appliances, Appliance Park
Louisville, KY 40225
Registre su electrodoméstico www.GEAppliances.com
¡Registre su nuevo electrodoméstico en línea–cuando usted prefiera! El registrar su producto a tiempo le
proporcionará, si surgiera la necesidad, una mejor comunicación y un servicio más rápido bajo los términos de
su garantía. También puede enviar su tarjeta de registro pre-impresa que se incluye en el material de embalaje.
Impreso en China
14
 Loading...