

Page 1
ff
“Select-Top
Built-in Modular Downdraft Cooktop
❑
Operating
Coil Sudace Unit Module
Controls
Cooktop Comparison ....................................8
Cooktop Vent System ................................26
Features . . .
Griddle Accessory ...............................22-24
Griddle Cooking Guide
Grill Module . . . . . . . . . . . . . . . . . . . . . . . . . . . . . . . . . . . . . . . . . .
Grill Cooking
Home Canning Tips ....................................25
Optional
Radiant Module
. . . . . . . . . . . . .
. . . . . . . . . . . . . . .
Solid Disk
Care and
Control Panel and
Grease Collector Jar
Griddle
Grill Cover
Grill
Radiant Module
Solid Disk Module . .
Vent System
. . . . . . . . . . . . . . . . . . . . . . . . . . . . . . . . . . . .
. . . . . . . . . . . . . . . . . . . . . . . . . . . . . . . . . . . . . . . . . . .
...........................24
..........................30
...................................27
. . ...................................31
O, 11
18-21
16-18
2-15
5
32
Problem Solver
More questions
7
❑
1
✎ ✎ ✎ ✎ ✎ ✎ ✎ ✎ ✎ ✎ ✎ ✎ ✎
8
GE Answer
Installation Instructions
. . . . . . . . . . . . . . . . . . . . . . . . . . . . . . . . . . . . . . . . . . . . . . . . . . . . . . . . . . . . . . . . . .
Consumer Services ..................43
Phone Numbers .......................43
Model and Serial
✎ ✎
Models: JP383
JP384
JP385
.......................40,
800.626.2000
33-39
JP387
JP388
JP389
41
JP386
Page 2
US
YOU...
Before using your cooktop,
read this guide carefully.
It is intended to help you operate and maintain your
new cooktop properly.
Keep it
If you don’t
write (include your phone number):
Consumer
GE Appliances
Appliance Park
Louisville, KY 40225
Write
for answers to your questions.
something or need more help,
the model
and serial numbers.
You’ll find them on a nameplate underneath the
cooktop on the right side of the bottom chamber.
These model and serial numbers are also on the
Consumer Product Ownership Registration Card that
came with your
please write these numbers here:
Model Number
Number
Use these numbers in any correspondence or service
your cooktop.
Before sending in this car&
If you received a damaged
contact the
you the cooktop.
(or builder) that sold
Save time and money.
Before you request service...
See the Problem Solver in the back of this guide.
It lists causes of minor operating problems that you
can correct yourself.
-
YOU
To obtain service, see the
in the back of this guide.
We’re proud of our service and want you to be
pleased. If for some reason you are not happy with
the service you receive, here are three steps to follow
for further help.
FIRST, contact the people who
appliance.
most
this will solve the problem.
why you are not pleased In
page
your
if you are still not pleased, write all the
details-including your phone number—to:
Manager, Consumer Relations
GE Appliances
Park
Louisville, KY 40225
FINALLY, if your problem is stall not
Major Appliance Consumer Action Panel
20 North
Chicago, IL 60606
Drive
write:
Page 3
A
selection of moddes are available for
the cooktop.
and
plug which fits into a
outside
inserted and removed
modules can be interchanged
Each module has an
the center of the
of the cooktop. Some moddes are
than others. If your
cooktop is connected to 208 volts, you will notice
some increase in cooking times.
Modules and Accessories
See each module section for specific instructions
for installing and removing that
To purchase,
contact your nearest GE Appliances
dealer or service center. If you need assistance in
finding your nearest GE dealer, contact the GE
Answer Center” at 800.626.2000.
Model numbers are listed below.
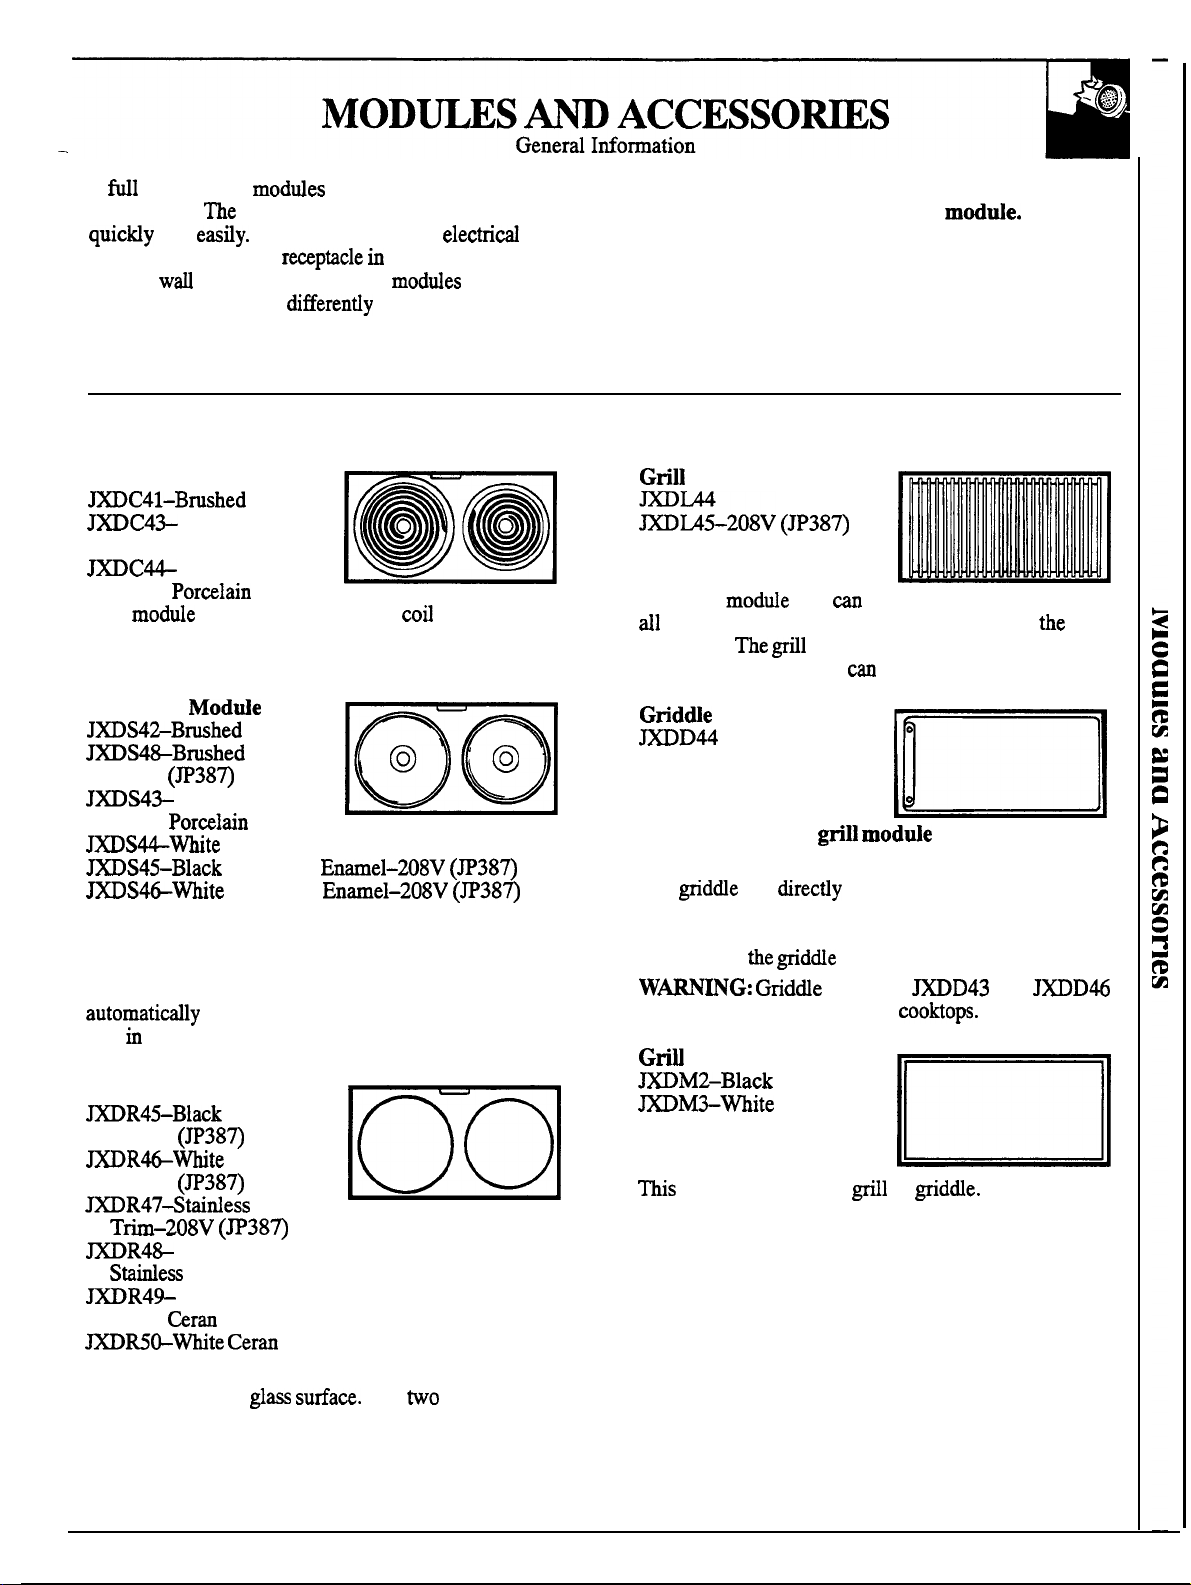
Coil Surface Unit
Chrome
Black Porcelain Enamel
White
This
Enamel
surface
unit. The surface units and drip pans are removable
for cleaning.
Solid Disk
Chrome
—
208V (JP38~
Black
Chrome-
Enamel
Porcelain Enamel
Porcelain
Porcelain
(JP38~
(JP38~
This module has one 6“ and one 8“ solid disk surface
unit. The surface units are made of cast iron and are
sealed to the cooktop. Each surface unit has a built-in
protector that keeps it from getting too hot. It will
decrease the temperature of the surface
the case of over-heating or excessively high
unit
temperatures.
Radiant Module
Radiant
–208V
Radiant
–208V
Steel
(JP38~
Module
With
this modtie you
char-broil meat indoors
year long. Fat drains away and collects in
grease jar.
front and back sections
You must have the
accessory.
The
sits
heating element is divided so the
be controlled separately.
modtie to use the griddle
over the grill heating element
and reflector pan. It has two drain holes so fat and
meat drippings can drain into the grease jar. The front
and back of
gridde are controlled separately.
modules
and
are not to be used with these
Cover
cover fits over the
or
Steel Trim
Black
This module has one 5“ and one 7“ heating coil
—
beneath a smooth
and Black Trim
and White Trim
The
surface
units are shown by the outlines on the glass. This
module provides fast heat, energy efficient operation
and is easy to clean.
3
Page 4
including the
., ,.
. u~:this Coobp
as
●
Be sure your
in this use and care
for its
is
by a qualified technician in accordance
with the provided initiation instructions.
o
Do
not assume that you know how to
of the cooWp.
differently
●
Do not
attempt to repair or
those on your previous cooktop.
recommended in this guide.
●
Have the
circuit
the
They
Do not
seriously
anyone to
Some features may work
any part
is
other servicing
a
technician.
show you the location of the
&Mark
units
it for easy reference.
unattended
in operation.
stand or hang
the
NOT BE
wear
us@ the
BE
or hanging garments
Be
when reaching
for items stored over the cooktop.
material
ignited if brought
contact with
hot
●
Use otiy dry pot
holders on hot surfaces
steam. Do
let potholders touch hot surfa~
units. Do not use a towel or other
place
. For your
holder.
never use your
or damp pot
restit
burns from
cloths in
warming or heating the room.
●
Keep the vent
to maintain good venting and to
accumulate
and the
grease or other
or
the
~ters clean
4
use
and
for
fires.
,
. DO
liquids in the vicinity of this or
* Do
a
gasotie
other flammable vapors and
materi~
combustible
other appliance.
use
pm.
Turn&e surface units off. \mo&~r
the
~i&
the flaming pan on a surface unit by covering the
pan completely with a
sheet or flat tray. Use a dry
cookie
or foam type
fire extinguisher.
Earning grease outside a pan can be put out by
covering with baking soda or,
using a
dry
av~able, by
or foam type
extinguisher.
●
Do not heat unopened food
Pressure
burst
Do
not touch the
and the container could
an injury.
units. These
surfaces
may be hot enough to burn even though they are
dark in
During and after use,
or let clothing or other flammable materials
contact
removable
units or areas
time for
hot
surface
first.
include the cooktop,
ties and areas facing
the cooktop.
●
pork
follow the directions
and always cook the meat to an internal
temperature of at least
in the
present
be safe
●
Use
proper pan
the
it
eat.
This assures
that trichina maybe
be
and the meat
cookware having
flat bottoms large enough to cover the surface unit
heating
expose a portion of the surface unit
The use of
cookware
direct
contact and may result in ignition of clothing.
Proper relationship of cookware
unit
●
Never leave the surface units unattended
improve efficiency.
high heat settings.
greasy
●
sure the
are not covered
that may catch on
drip pans (on
are
the surface
cause
Their
smoking and
ody)
absence
during cooking
wiring.
. Do
not use aluminum
tubs,
to
the
or griddle. Misuse
or damage
to
cooktop.
.
Page 5
other- containers are
service;
others
sudden change in temperature.
Ody the@ grate and the
●
TO
of
the
over
and
cookware handes shodd be
of
accessory,
heating element.
of the cooktop without extending over the
●
Keep
and the grease
drain hole in tub is
occur.
●
Do not immerse or soak the removable
units.
tub, the reflector
the@ grate
jar
the grease jars frequently.
moddq the
disk moddq
a fire
the radiant modde or the @heating element
not put them
●
turn
a dishwasher.
surface
off before’
.
Some cleaners produce
to
cooktop
steam
possible
do
apply
surface when it is ‘hot
when
fumes and wet cloths
on a hot
Top ~eaning
radiant
●
to remove
use a damp cloth or paper
~eaning
(on radiant
. Read and
Cook Top Cleaning
and
-when
The
surface
heat after the
●
Do
is
operate the radiant
broken.
the cooktop.
of the cooktop
have
turned off
or cleaning solution
units if the
penetrate a broken cooktop and create a risk
of
immediately
broken
—
●
Avoid scratching
shock
a
glass cooktop become
technician
cooktop
The cooktop can be scratched with sharp
instruments, rings or other
on clothing (on radiant
●
Do
not stand on the
cooktop.
and rivets
ody).
break.
ignition
the
the
is
residue
radiant
,,,
.
“*Never
use
cooktop surface as
cutting
*
●
Do
cooktop
on top of the
when
in use
● Be
stirring
when it is in use. They
when
on the
other
cooktop surface
hot and
(on radiant modules
●
To avoid
always be certain that
surface units are at the off position and
units are cool
burn or electric
controls for
surface
before attempting to remove a
surface unit or a
●
or
●
Do not
mayonnaise jar
grease
the kitchen
using
the grease
which
break when hot
jar with a
into it. Replace with any wide mouth
canning jar.
●
on
●
Foods
foods being fried at
heat
as
or
Frost
on frozen foods or moisture on fresh foods can cause
hot fat to bubble up
●
Use
fat for-effective
the pan too
over
or deep-tit
fat
the pan,
cause
when food is added.
. If a combination of
in
stir
together before heating, or as fats
or tits
be used
melt slowly.
.
● ’Never try to move a pan
a
●
Use a deep
deep
heat fat
Wait unti the fat is cool.
thermometer whenever possible
and watch as it heats.
fat_
prevent overheating fat beyond
To control
low
rather than off. This keeps the downdraft vent
on. @turn the vent blower to
the @off. Use along-handed
remove the food from the
control the
does
the entire
sheet or the
to remove this later because it
●
turndown
the heat setting
then turn
to
steps shodd
until
goes
with a cookie
Hit
a large roasting pan. Use a pot
be
ON
A
5
Page 6
OF
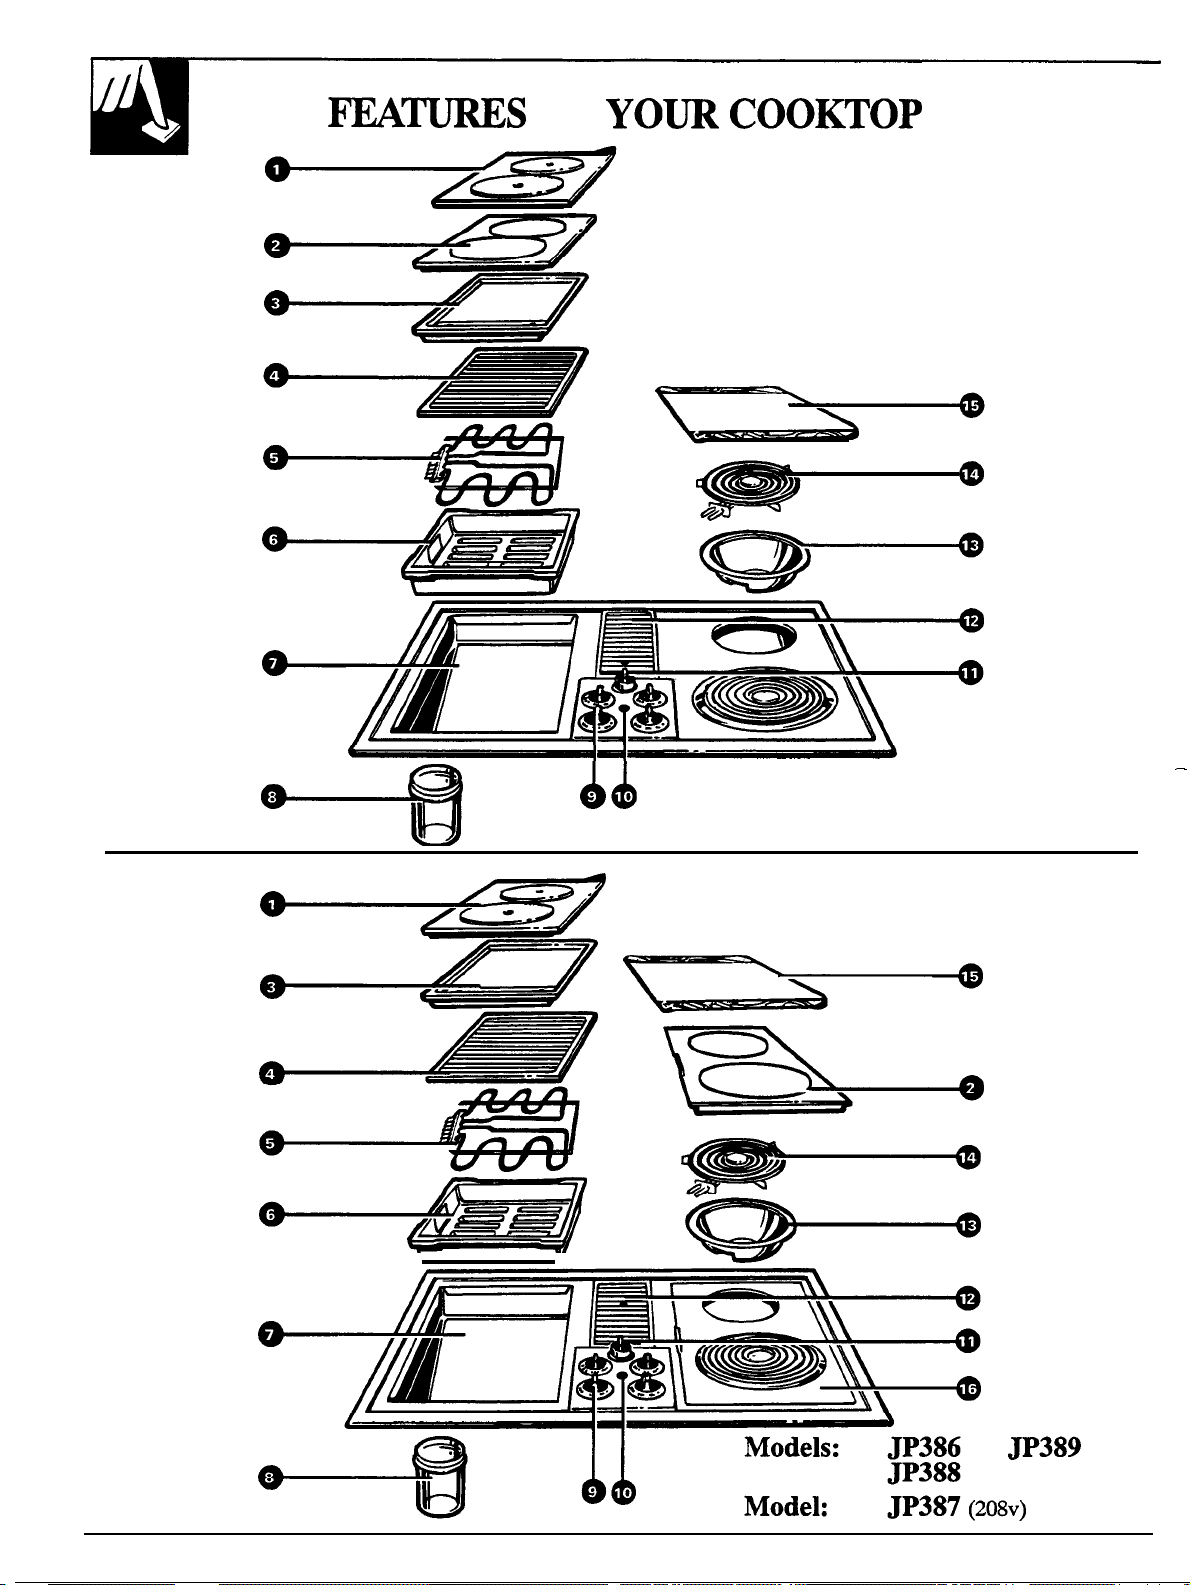
Models: JP383
JP384
JP385
6
Page 7
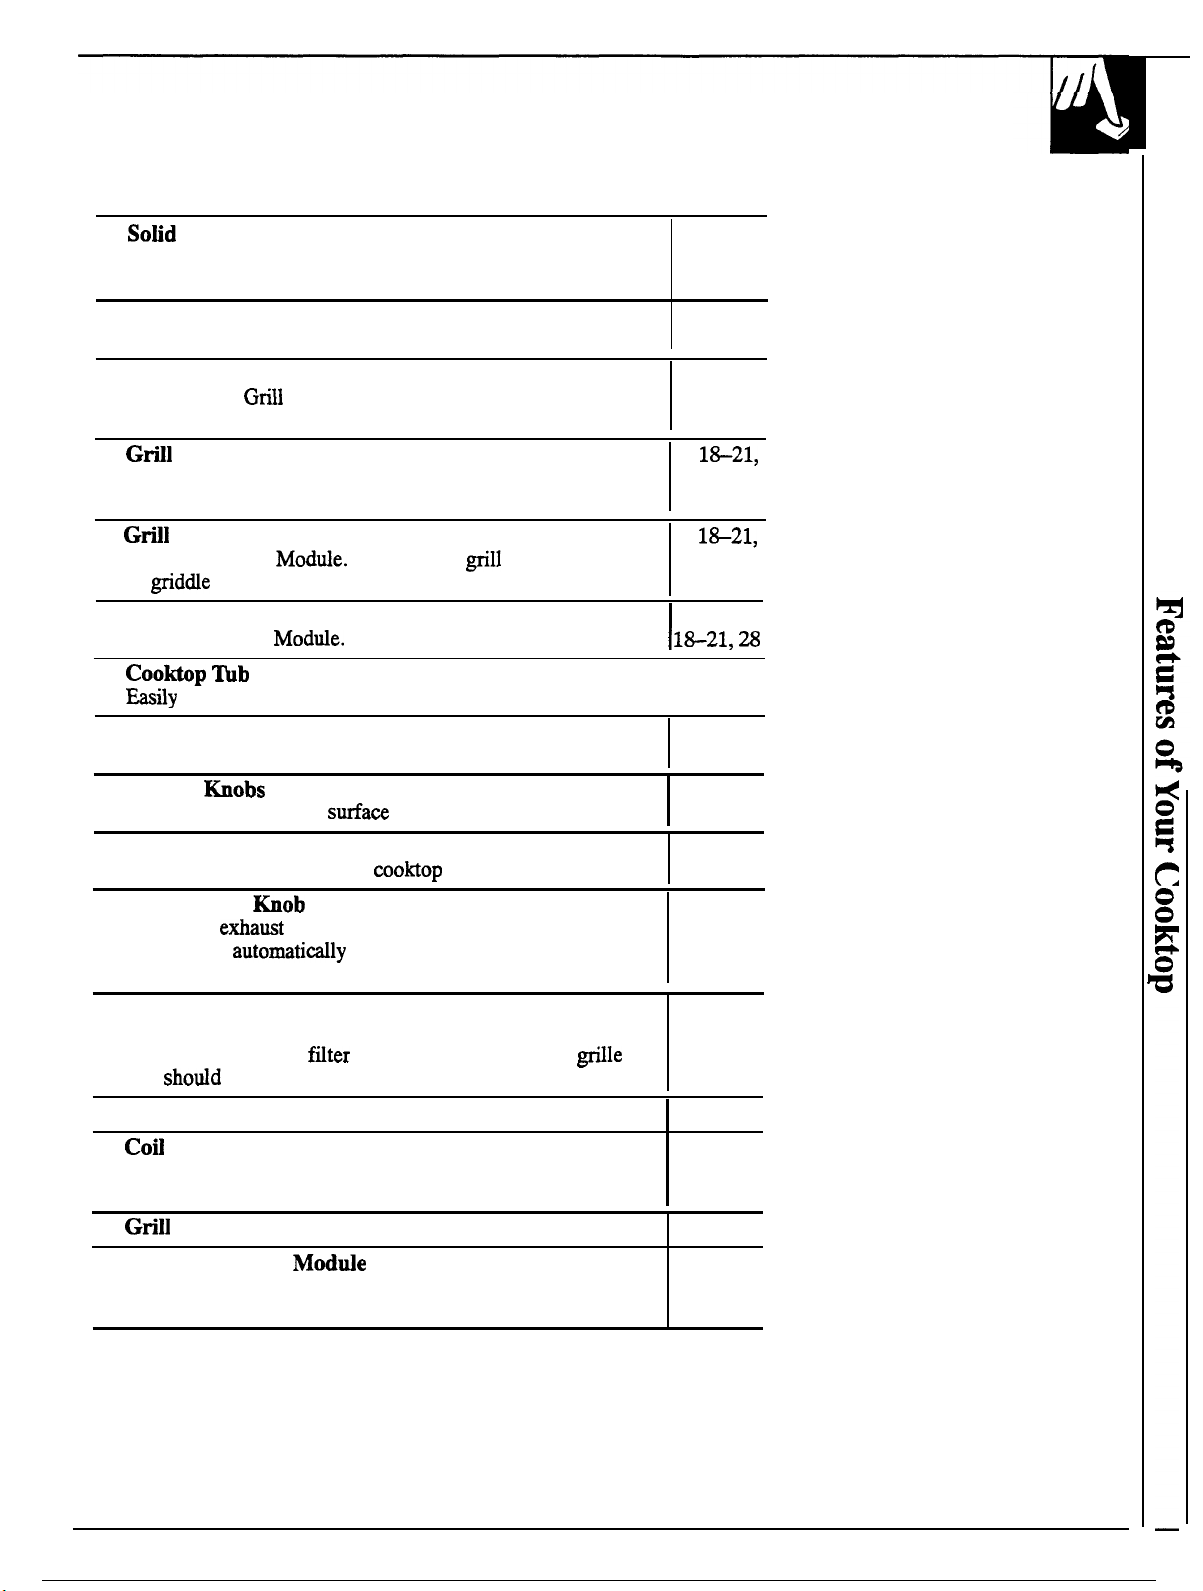
1
2 Radiant Surface Unit Module
Disk Module
3 Griddle Plate Accessory
Use with the
4
Grate
Module heating element and reflector pan.
Part of the Grill Module. Use with the heating element
and the reflector
pan.
3,5,8,
12-15,
25,31
3,5,8,
1618,32
3,4,
22-24,
29
4,
28
5
Part of the Grill
or
6 Reflector Pan
Part of the Grill
7
8 Grease Collector System
—
Uses wide-mouth
9 Control
Push in
Indicator Light
10
Lights when any unit of the
11 Vent Control
Turn onto
The blower
unit is turned on.
12
Vent System
The blower vents smoke down and out of the kitchen
and house. The vent
and
13 Drip pans
Heating Element
Use with the
grate
cleaned when modules are removed.
canning jars to collect grease.
and turn to set surfaw units from LO to HI.
is turned on.
odors, smoke or heat during cooking.
comes on when the grill heating
is located under the vent
be cleaned often.
5,
28
4,
4,28
I
5,18,
22,27
9,19,
23,27
9
5,
26,27
5,9,
19,23,
26,28
4,30
14
Surface Units
May be removed to clean the drip pans. Do not submerge
in water.
15
Cover
16 Coil Surface Unit
3,4,8,
10,11,
28,30
3,29
3,4,8,
10,11
25,30
7
Page 8
HOW DOES
COOKTOP
TO
Your
new
modular cooktop may have several types of
rooking
when you use each one.
best types of cookware to use, plus heat-up and
cool-down times, depend upon the type of burner or
unit you are using.
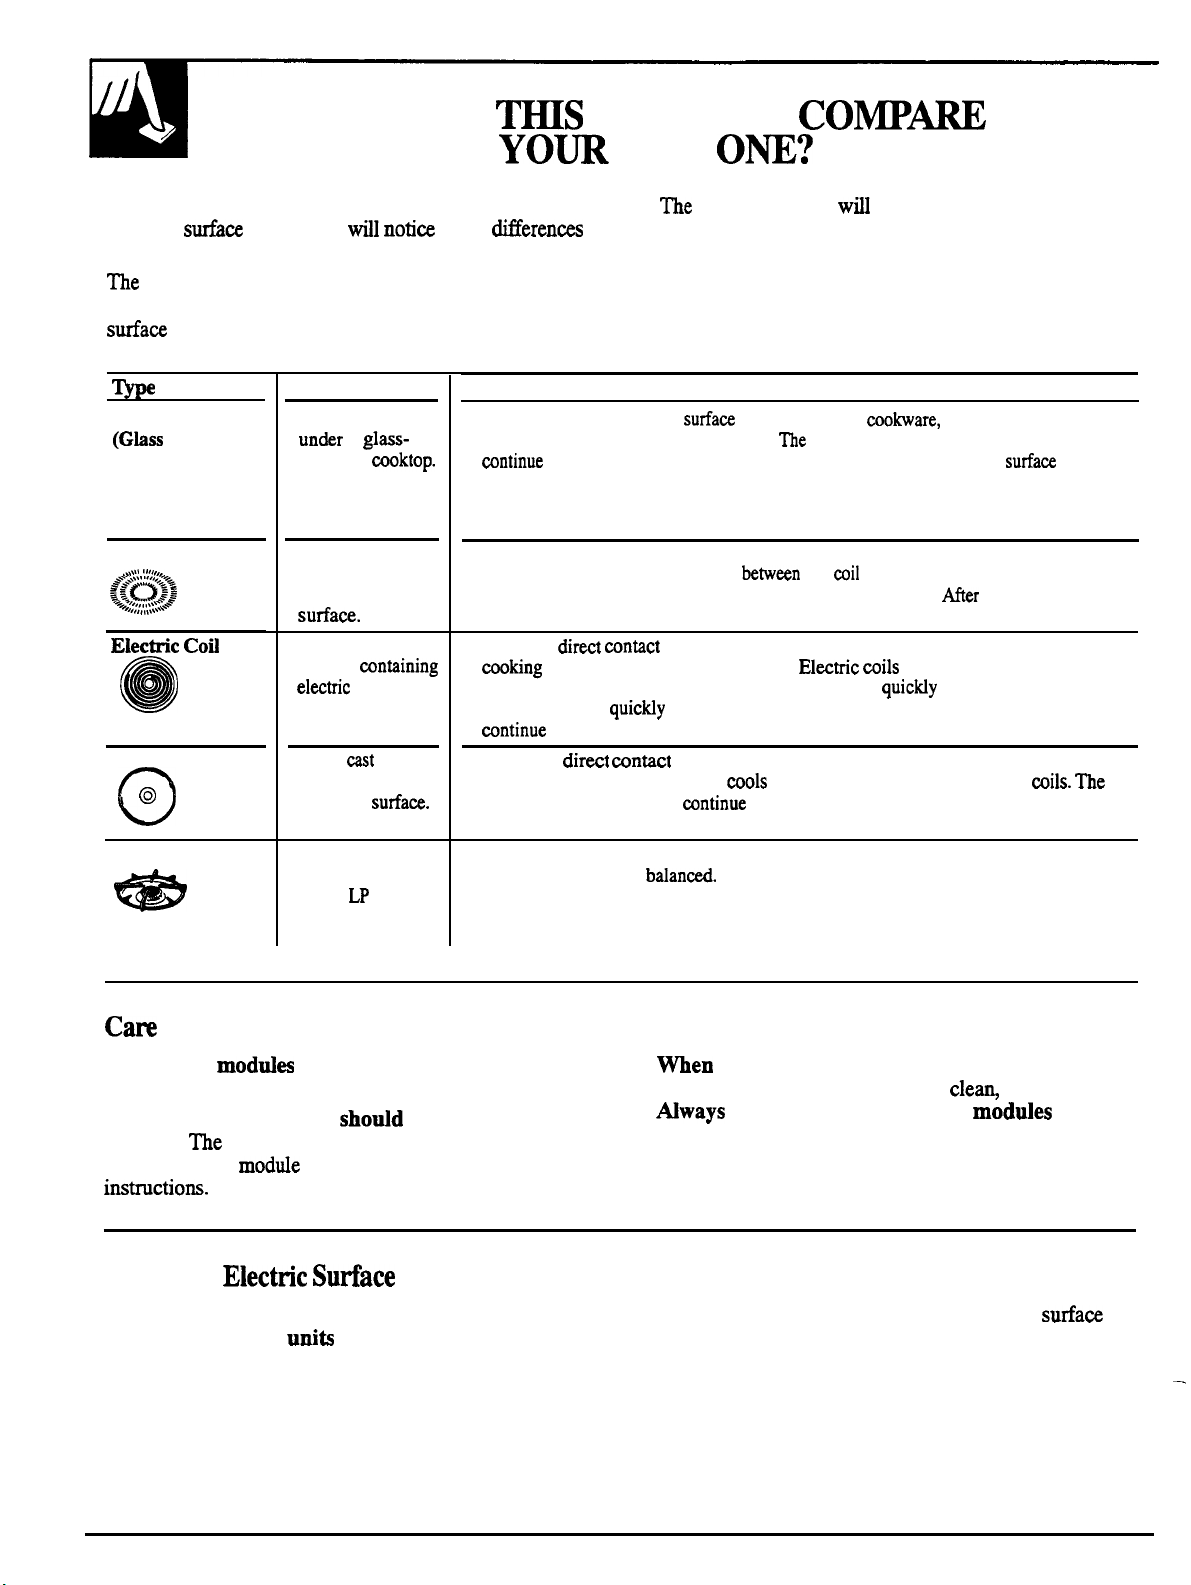
of Cooktop
Radiant
Cooktop
units. You
Description
Electric roils
ceramic
a
some
How it Works
Heat travels
the bottom for good rooking results.
cooking after it is turned off. Remove the pan from the
you want cooking to stop.
o
Induction
Solid Disk
Gas Burners
High frequency
induction coils
under a glass
Flattened metal
tubing
resistance
wire suspended
over a drip pan.
Solid
disk sealed to the
cooktop
Regular or sealed
gas burners use
either
or natural gas.
iron
gas
Pans must be made of
produced by a magnetic circuit
and changes heat settings right away, like a gas cooktop.
off, the glass cooktop is hot from the heat of
Heats by
results, use good quality pans. Elwtric
warped pans than radiant or solid disks. Heats up
heat settings as
rooking for a short time after they are turned off.
Heats by
cooking results. Heats up and
disk stays hot enough to
from the solid disk if you want the cooking to stop.
Flames heat the pans directly. Pan flatness is not critical to rooking results, but
pans should be well
heat settings right away. When you turn the control off, cooking stops right away.
OLD
following chart
differences among the various cooking surface units
and how they differ from others you may have used
in the past.
to the glass
ferrous metals (metal that attracts a magnet).
with the pan and by heating the air under the pan. For best
as gas or induction. Electric roils stay hot enough to
mntact with the pan, so pans must be flat on the bottom for good –
and then to the
glass cooktop stays hot enough to
the
down more slowly than electric
cooking after it is turned off. Remove the pan
Gas burners heat the pan right away and change
help you to understand the
so pans must be flat on
unit if
Heat is
and the pan. Heats up right away
turning the control
the
pan, but rooking stops right away.
are more forgiving of
but does not change
of the Modules
Some of the
preconditioned before using them for the first time.
Modules and accessories shotid be cleaned after
each use.
clean. See each modtie section in this guide for specific
longer a soil remains, the harder it is to
Never immerse any module in water.
Using the
You must consider heat up and cool down times for
the electric surface
cooking times.
on initial temperature settings, the type of cookware
used and the amount of food being cooked.
must be cured or
Heat up and cool down times depend
Unit Modules
8
not in the cooktop, modules and
accessories should be stored in a
could be damaged.
Start cooking at a higher setting to heat the
unit faster, then turn to a lower setting to finish
cooking. Remember, cooking continues after the
surface unit is turned off.
dry place.
or they
Page 9
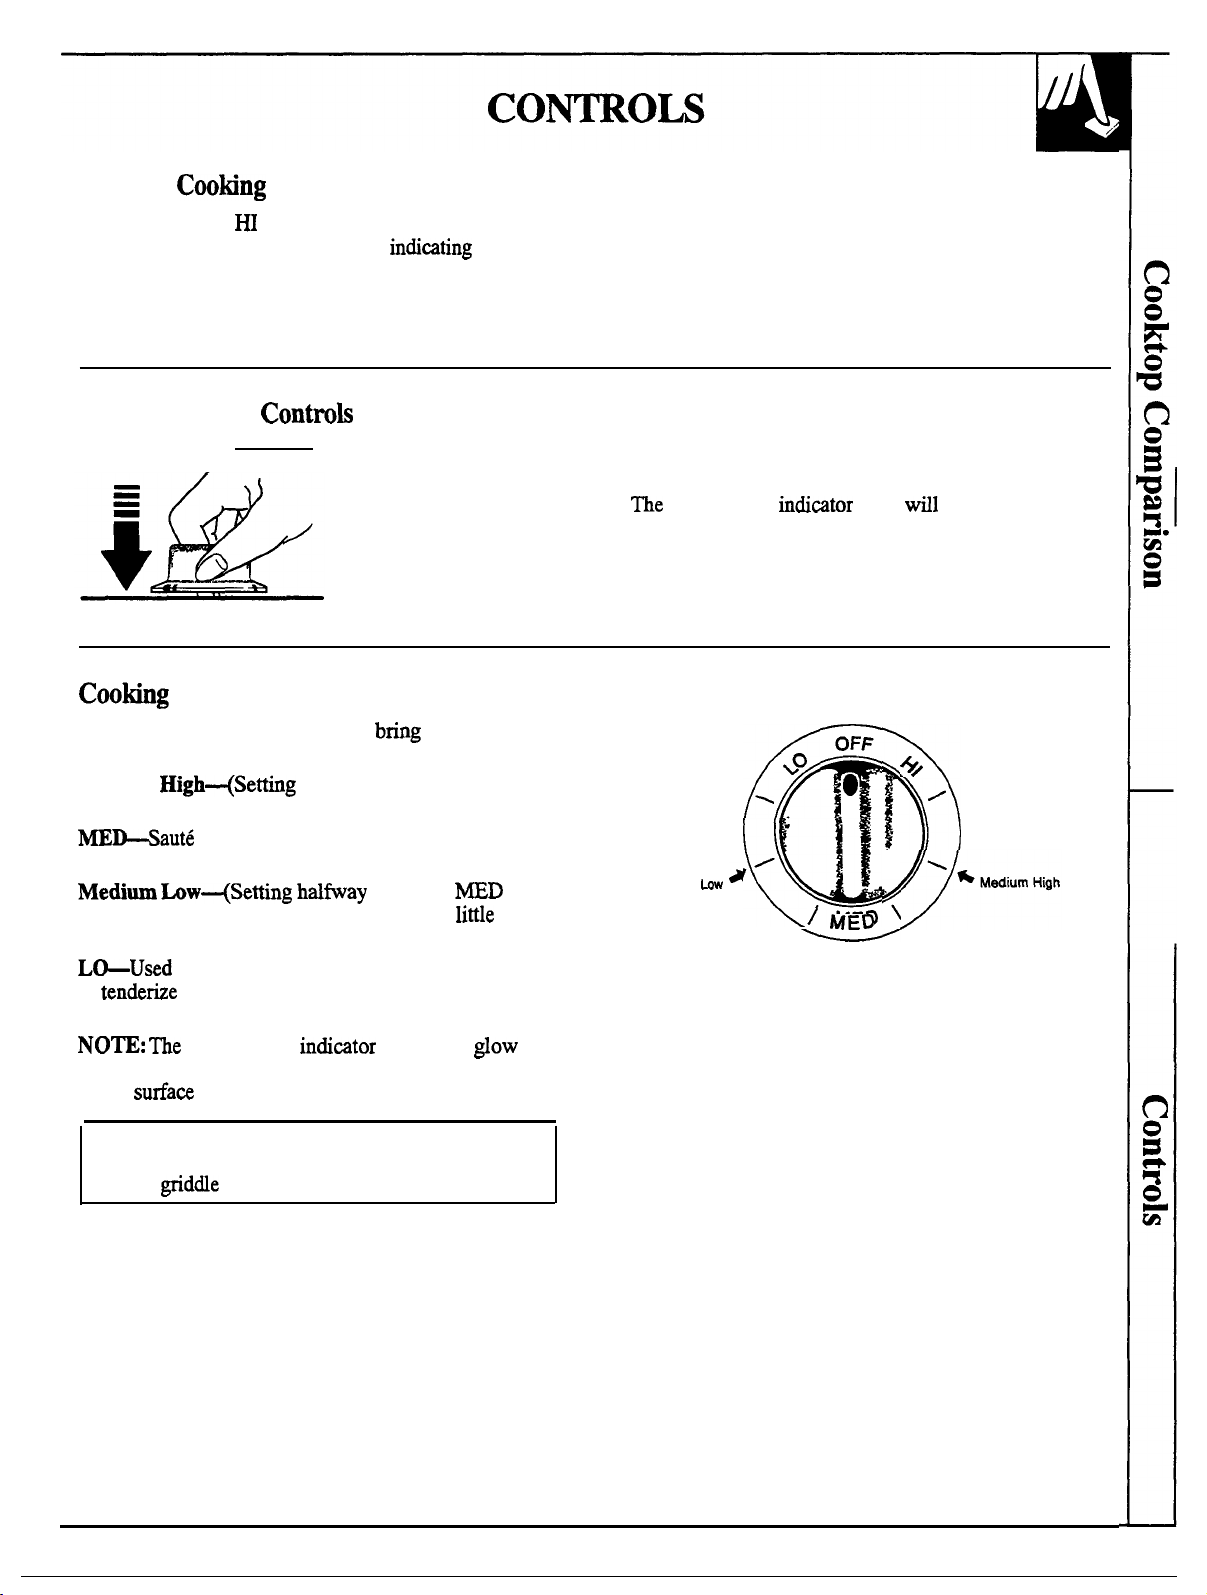
Surface
With Infinite Heat Controls
At both OFF
“clicking” sounds during cooking, indi~ting the control is keeping the unit
at the heat level you set.
Switching heats to a higher setting always shows a quicker change than
switching to a lower setting.
and
the
control “clicks” into position. You may hear slight
How to Set the
Push the knob in
and turn in either
direction to the heat
setting desired.
Be sure you turn the control to OFF when you
finish cooking.
surface unit indi~tor light
ANY heat on any module surface unit is on.
Guide for Using Heat Settings
HI—Used to begin cooking or to
to a bed. Reduce heat setting after water boils.
Medium
MED.) Maintains a fast boil on large amounts of food.
and brown; keeps food at a medium
boil or simmer.
LO.) Cook after starting at HI; cooks with
in covered pan.
for long, slow cooking (simmering)
to
to melt butter and chocolate or to keep foods warm.
between LO and OFF, but there is no power
to the
and develop flavors. Use this setting
surface unit indi~tor light may
halfway between HI and
water
between
and
water
Medium
OFF
.
.
‘
glow when
,
.
Do not be alarmed by the blower.
It will automatically come on when the
grill or
9
Page 10
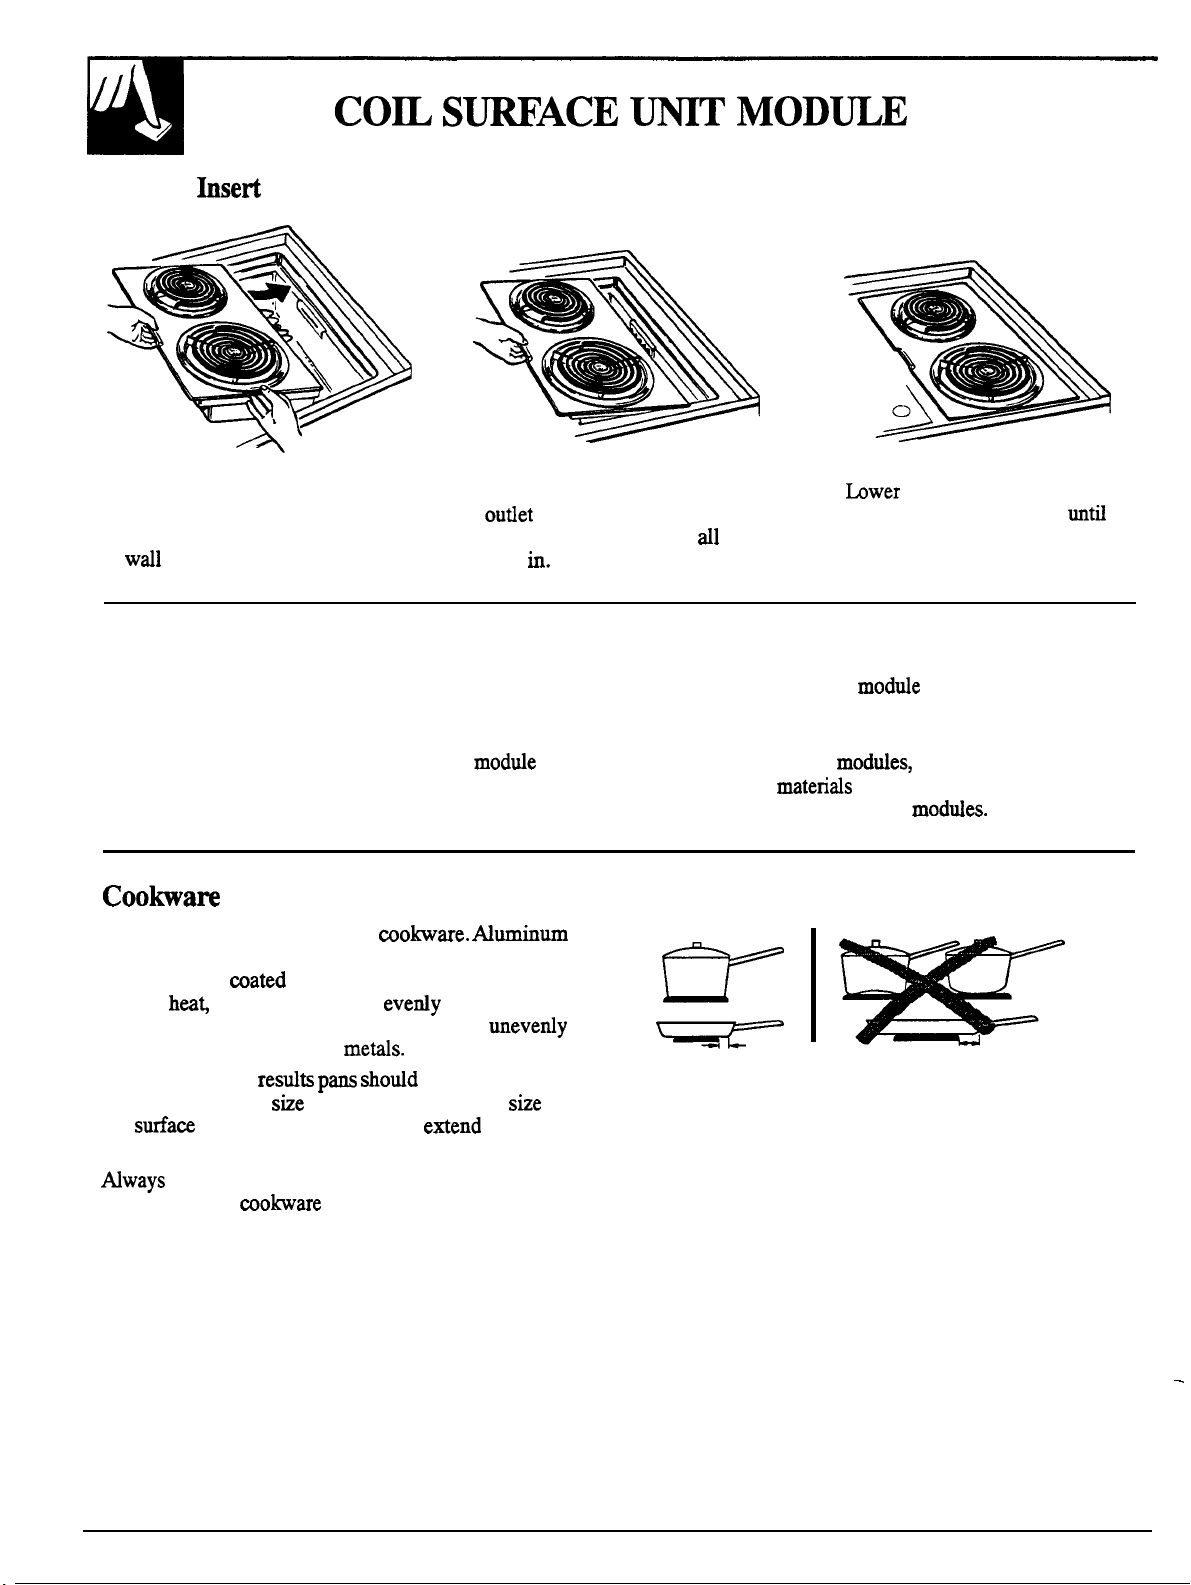
How to
1.
Be sure the controls are turned
to OFF. To install the module,
position the plug to the outside
of the cooktop.
the Module
2. Slide the module toward the
in the side of the cooktop
until the plug is pushed
way
the
3.
the inside edge of the
module into the cooktop
it is flush with the cooking
surface.
How to Remove the Module
1.
Be sure the controls are turned to OFF and the
surface units are cool before attempting to remove edges and slide toward the center of the cooktop.
the module.
2. Lift up the tab at the inside edge of the
until the base clears the opening at the side of
the cooktop.
3. To unplug, hold the
Lift out when unplugged.
do not stack them or
store other
damage the surface of the moddes.
Use medium- or heavy-weight
cookware conducts heat faster than other metals.
Cast-iron and
absorb heat but generally cook
medium heat settings. Steel pans may cook
if not combined with other
For best rooking
bottom. Match the
the
edge of the surface unit more than 1 inch.
instructions on
unit. The pan should not
shotid be flat on the
use.
at low to
of
over the
Right
Not over 1 inch
Wrong
Over 1 inch
10
Page 11
Deep Fat
Do not
Frosty foods bubble vigorously. Watch food frying at high temperatures.
Keep
cookware with fat that may spill over when adding food.
and hood clean from grease.
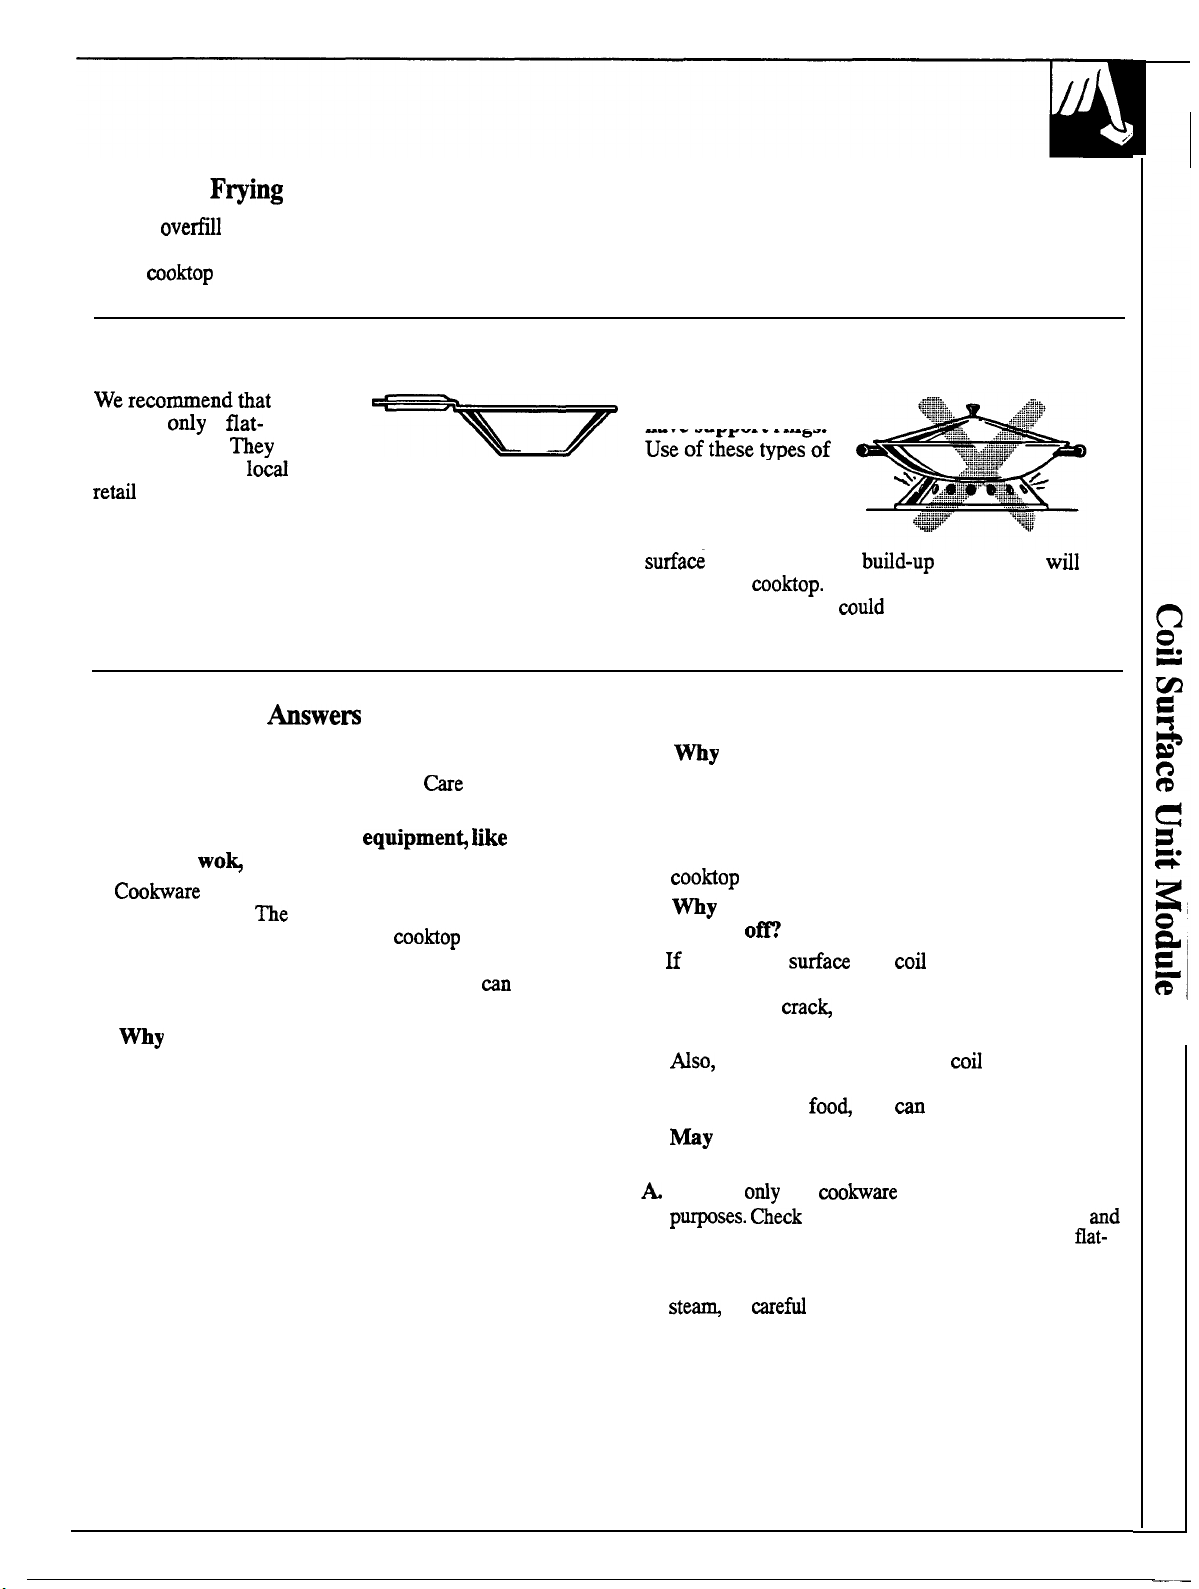
Wok Cooking
Do not use woks that
you use
bottomed wok.
available at your Iocd
store.
a
are
have support rings
.seofthesetypes;f
woks, with or-without
the ring in place can
be dangerous. Placing
the ring over the
unit will cause a
damage the
without the ring. You
wok tipped over.
Questions and
Q. Can I cover my drip pans with foil?
A. No.
Clean as recommended in the
Cleaning section.
Q. Can I use special cooking equipmen$
oriental
A.
recommended.
units can be shortened and the
damaged from the high heat needed for this type
of cooking. A special flat-bottomed wok
used safely.
Q.
A. After turning the surface units off and making sure
am I not getting the heat I need from my
surface units even though I have the controls on
the correct setting?
they are cool, check to make sure that the plug-in
units are securely plugged in.
on any surface units?
without flat surfaces is not
life of the module surface
and
an
can be
be
Q.
A.
Q.
A.
Q.
does my cookware
the surface unit?
Because the surface unit is not flat. Make sure the
feet of the surface units are sitting on the inside
rim of the drip pan and the drip pan is flat on the
surface.
is the porcelain finish on my cookware
coming
you set the
for the cookware material and leave it, the finish
may smoke,
pot or pan.
if you set the surface unit
required for a long period of time, with small
amounts of dry
I can foods and preserves on my coil
surface units?
Yes, but ody use ~okware designed for canning
recipes for preserving foods. Be sure canner is
bottomed and fits over the center of the coil surface
unit. since
be
of heat that
Do not try to use such woks
tilt
when I place it on
unit
the manufacturer’s instructions
canning generates large amounts of
to avoid burns from steam or heat.
higher than required
higher than
damage the finish.
11
Page 12
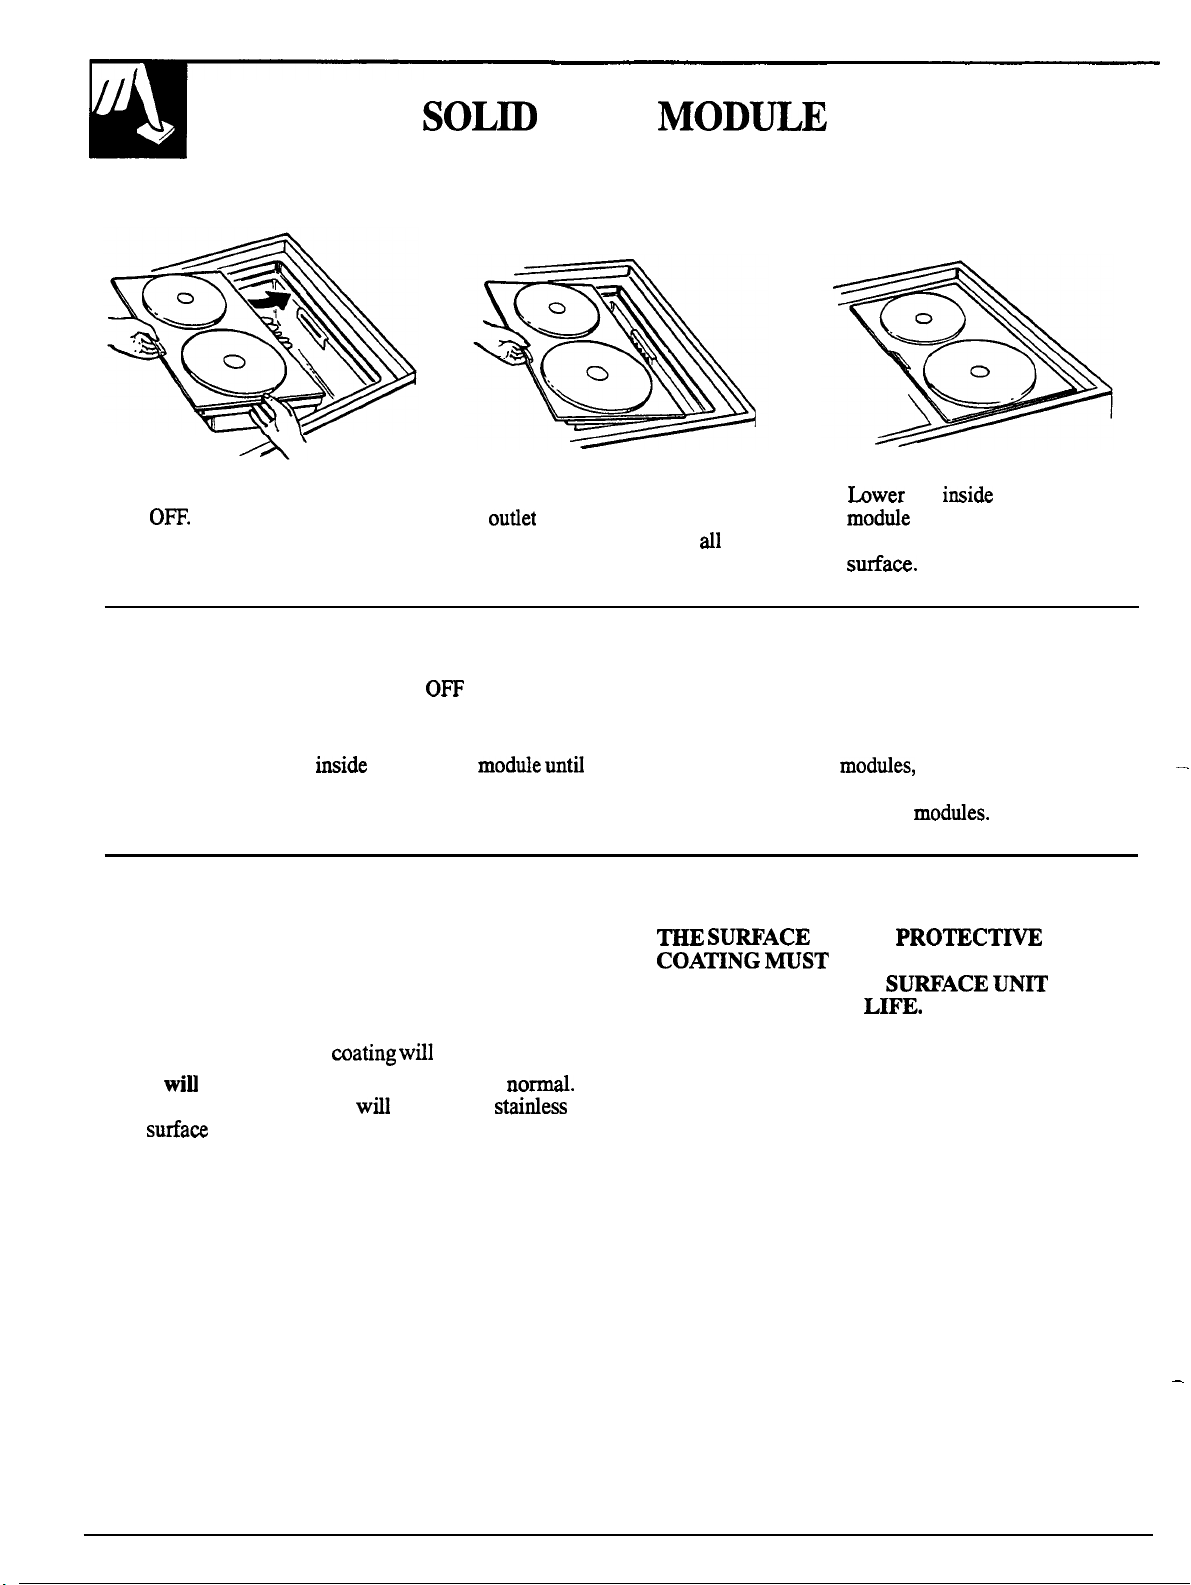
How to Insert the Module
1.
Be sure the controls are turned
to
position the plug to the outside
wall of the cooktop.
To install the module,
DISK
2. Slide the module toward the
in the side of the cooktop
until the plug is pushed
way in.
the
3.
the
it is flush with the cooking
edge of the
How to Remove the Module
.
1.
Be sure the controls are turned to
disk surface units are cool before attempting to
remove the module.
2. Lift up the tab at the
the base clears the opening at the side of the cooktop.
edge of the modtie
and the solid
3. To unplug, hold the module by the front and back
edges and slide toward the center of the cooktop.
Lift out when unplugged.
4. If you are storing moddes, do not stack them or
store other materials on top of them. This could
damage the surface of the
Before Using Your Solid Disk Module for the First Time
The top working surface of solid disk surface units
have a protective coating which must be hardened
before using the surface units for the first time. HELP PROTECT THE
To harden this coating, the surface units should be
briefly heated without a pan for about 5 minutes at the
HI setting. Otherwise the
There wi~ be some smoke and odor; this is
Heating of the surface units
steel
unit trim rings to a gold color.
stick to the pan.
change the staidess
THROUGHOUT ITS LIPE.
UNIT’S
BE
HARDENED TO
12
Page 13
Information About Solid Disk
Using a solid disk surface unit is quite similar to
using an electric
of surface units, you
surface unit. With both types
enjoy the
of
electricity and the benefits of retained heat in the
units. However, there are differences:
●
Solid disk surface units reach cooking
temperature a little slower, and hold heat
than coil units. Solid disk surface units have very
even heat distribution. Since solid disk surface units
hold heat longer, you may wish to turn the unit off
sooner, and take advantage of the
amount of
heat is dependent upon the
heat.
quantity and type of
of the pan and the setting used for cooking.
●
The red dot in the center of the solid disk surface
unit indicates built-in temperature limiters that
reduce the heat if a pan boils dry, if
the unit is turned on without a pan or if the pan is
not making enough contact with the surface of the
unit.
red dots will wear off with use without
affecting the performance of the surface units.
Tips
● There
On
retained heat in the surface
wait for the unit to cool before
cleaning the surface unit area.
● You must use proper flat bottomed cookware.
Pans with
are not
ridged or warped bottoms
Improper cookware
cause unsatisfactory cooking restits.
● Unlike electric coil surface units, solid disk
surface units do NOT turn red
setting. However, you may notice a
glow
when the surface units are on HI and the room is
lit.
● Solid disk cooking
easier cleanup
sealed against
you a step closer
the cooking surface is
are no drip pans or
burner boxes to clean.
For cooking on
disk surface units the use of
correct cookware is very
●
cookware
heat faster than
other metals.
●
Cast-iron and coated cast-iron containers are slow to
absorb heat, but
cook
at minimum
or medium heat settings.
●
Glass cookware
be used
as the
manufacturer describes.
●
Do not use a wire trivet or any other kind of
heat-retarding pad between the cookware and the
surface unit.
●
Good pans have a thick flat bottom which absorbs
the heat from the surface unit.
provides good heat distribution from the
thick flat bottom
unit
to the food.
●
Pans with thin, uneven bottoms do not do a good
job of using the heat coming from the surface unit.
The food to be cooked may bum and require more
time and electricity. You
have to add
more fat or water.
Pans with uneven bottoms are not
13
Page 14
DISK
(continued)
How to Check Pan Petiomance on a Solid Disk
Use of comet
and cleaning of
The correct mokware reduces the temperature of the
surface and minimizes the chance of
burning onto the
You must use pans with
Some pans may have curved or rounded bottoms or
may be
your pans you may do this quick test.
Turn your pan upside
down on the
place a ruler flat against
the pan surface. The
bottom of the pan and the
straight edge of the
should fit flush against each other all the way across.
Turn the
a full 360 degrees, checking for any
spare between the ruler and the bottom of the pan.
,
can affect the cooking
flat bottoms.
●
Place otiy dry pans on the solid
disk surface units. Do not place
lids on the units, particularly
wet lids.
●
We
recommend that you use
a flat-bottomed wok. They
are
at your
store. The bottom of the wok
should have the same diameter
as the
unit to insure
proper contact.
bottoms
distribution across the cookware bottom is to put one
inch of water in the pan. Bring the water to a boil and
observe the location of bubbles
boil. Good flat
distribution of bubbles over the bottom surface area of
the pan. Bubbles
bottom
surface
● Some special cooking procedures require specific
Unit
not recommended.
simple test to determine even heat
the water starts to
will have an even
uneven
uneven heat
●
Do not use woks that have
in
a portion of the
of the pan to the
or
support rings. This type of wok
will not heat on solid disk
surface units.
●
pots should not extend
more than 1 inch beyond the
surface of a solid disk surface
unit and should have flat
bottoms. When canning pots do
not meet this description, the use
of the HI heat setting causes
excessive heat
result in damage to the
See the Home Canning Tips
section for further information.
cookware such as pressure cookers, deep fat fryers,
etc.
correct
if applicable to the cooking
cookware must have flat bottoms and be the
The cookware should
- -
unsuitable pan.
and may
be covere~
—
14
Page 15
Questions and
Q. May I can foods and preserves on my solid
disk surface units?
A. Yes,
Q.
A. This initial smoking is both normal and necessary.
Q.
A. More heat is transferred to the
—
but
purposes. Check the manufacturer’s instructions
and recipes for preserving foods. Be sure the
canner is flat-bottomed and fits over the center of
the solid disk surface unit. Since canning generates
large amounts of steam, be
from steam or heat.
on the surface units. Follow our recommendations
in the Home
does the solid disk surface unit smoke
when I
A rust preventative is applied to each unit at the
factory. When the unit is turned on for the first
time, the coating will burn off the unit areas.
This takes approximately 5 minutes and should be
done without any
Otherwise, the coating will stick to the cookware.
is the
disk surface units than by electric
from getting inside the
to keeping the
turn the
contents are placed on the surface unit. More heat
will
food rather than the
temperature
countertops or cookware.
use
turn it on?
the units are clamped
This, of course, eliminates
on
be transferred to the
not cause damage to the
designed for canning
to avoid burns
shotid ofly be done
on the surface unit.
hot to the touch?
chassis. The secret
comfortably cooler is to
after the cookware
The
by the solid
units
to the
and the
its
Q.
A. The
Q.
Q. Can I use special cooking equipment like an
Q.
A. If you set the solid disk surface unit on a heat
am
disk surface units?
solid disk surface units are very
efficient and retain heat much longer than the
units. Food
controls are turned off. We recommend that you
begin rooking at lower settings than you have in
the past and
desired. The energy savings are
does it take a long time to cook my food?
It doesn’t. The extra time it takes compared to the
electric
not minutes. These few
greater mass of the surface unit.
cooking slowly, it is
warped or have an uneven bottom surface. If
bottomed pots and pans are use~ cooking
parallels that of the electric coil unit with less
energy consumption.
oriental
We recommend that you use
wok. They are available at your
The bottom of the wok
diameter as the surface unit to ensure proper
contact. Do not use woks that have support rings.
This type of wok
surface units.
is the porcelain finish on my cookware
coming
cookware’s finish may smoke, crack pop or
bum depending on the pot or pan.
amounts of dry food may damage the
boil or fry 3 to 5 minutes after the
of the solid disk
on my solid disk surface units?
than required for the cookware
let the
finish.
my food with the new
increase or decrease heat as
are due to the
the food is
the pots and pans are
unit closely
a flat-bottomed
retail store.
not heat on solid disk
sit too long, the
woking
15
Page 16

How to
1.
Be sure the controls are turned
to
position the plug to the outside
To install the module,
of the cooktop.
the Module
2.
Slide the modtie toward the
in the side of the cooktop
until the plug is pushed
way in.
How to Remove the Module
1.
Be sure the controls are turned to
radiant surface units are cool before attempting to
remove the module.
2. Lift up the tab at the inside edge of the module
until the base clears the opening at the side of
the cooktop.
and the
3. Lower the inside edge of the
the
module into the cooktop
is flush with the cooking
it
surface.
3.
To unplug, hold the module by the front and back
edges and slide toward the center of the cooktop.
Lift out when unplugged.
4. If you are storing modules, do not stack them or
store other
damage the surface of the
Information About Radiant Modules
The radiant module features heating coils beneath a
smooth glass
are shown by
●
When a surface unit is activate&
surface unit radiate heat through the glass to the
The red glow of the
visible through the glass. It
a few moments to heat up. The
to maintain your selected control setting. The coils
have temperature limiters to prevent runaway
temperatures.
●
Use the same cookware that
solid disk surface units.
●
If you are storing modules, do not stack them or
store other
the glass ceramic surface of the radiant module is
likely. Be careful not to damage or bend the
plug.
surface. The two surfaces units
on the glass.
beneath the
be instantly
take the
unit
cycles on and off
you would use with
on top of
as damage to
●
Do not let pots boil dry. Overheated metal can
bond to glass module.
overheated copper pot
leave a residue that will permanently stain
the
●
Sliding
leave
cookware across the glass
marks. These
marks
appear
as small scratches. They can be removed with Cook
Top Cleaning
●
When a surface unit is turned on, the surface unit
can be seen glowing red within a few
red
will turn on and off (cycling) to maintain
and a razor scraper.
The
the selected heat setting. With poor cookware, you
see frequent cycling of the unit off and on.
flat cookware will minimize the cycling.
●
It is safe to place hot cookware from the oven or
surface on the glass ceramic surface when the
surface is cool.
16
Page 17
of
The
cookware which
information
give good performance.
help you choose
Steel: highly recommend
Especially good with a sandwich clad bottom. The
sandwich bottom combines the benefits of
steel (appearance, durability and stability) with the
advantages of
or copper (heat
even heat distribution).
weight recommended
Good conductivity. Auminum residues sometimes
appear as scratches on the cooktop, but
removed if cleaned immediately.
low melting
thin weight aluminum should not
of its
be used.
Copper Bottom:
Good
which can appear as scratches. The residues
weight recommended
but
may leave residues
be
as long as the cooktop is cleaned immediately.
Good performance ody
bottom. Avoid
with a
dry,
flat, smooth
porcelain
melt and
fuse to the surface.
Glass-ceramic:
not recommended
Poor performance. May scratch surface. Usable, but
not recommended.
Stoneware:
not recommended
Poor performance. May scratch surface. Usable, but
not recommended.
Cast Iron:
recommended
Poor performance. May scratch surface. Usable, but
not recommended.
●
We recommend that you
use
a flat-bottomed wok.
They are available at your
retail store. The bottom
of the wok should have the
same diameter as the surface
unit to insure proper contact.
●
Do not use woks that have
support rings. This type of
wok will not heat on radiant
surfaces.
●
Some special cooking procedures require specific
such as pressure cookers, deep fat fryers,
etc.
correct she. The
cookware must have flat bottoms and be the
should
be
if applicable to the cooking process.
How to Check Pan Pefiomance
Use of correct cookware can affect the cooking
performance and cleaning of your cooktop. The
correct cookware
cooktop surface and
burning onto the
You must use pans with perfectly flat bottoms.
Some pans may have curved or rounded bottoms or
may be warped. If you are unsure of the flatness of
your pans you may do this quick test.
Turn your pan upside
down on the
place a ruler flat against
the pan surface. The
bottom of the pan and the
straight edge of the ruler
should
flush against each other all the way across,
Turn the ruler a
space between the
the temperature of the
the chance of
360 degrees, checking for any
and the bottom of the pan.
Pans with rounded, curved, ridged or warped
bottoms are not recommended.
simple test to determine even heat
distribution across the cookware bottom is to put one
inch of water in the pan. Bring the water to a
and
observe the location of bubbles as the water starts to
bed. Good flat cookware will have an even distribution
of bubbles over the bottom surface area of the pan.
Bubbles
in
a portion of the bottom
indicate uneven contact of the pan to the surface unit,
uneven heat transfer or an unsuitable pan.
Use pans that match the diameter of the surface
unit. Cooking performance
not be as good if
the cookware is either smaller or larger than the
surface unit.
17
Page 18
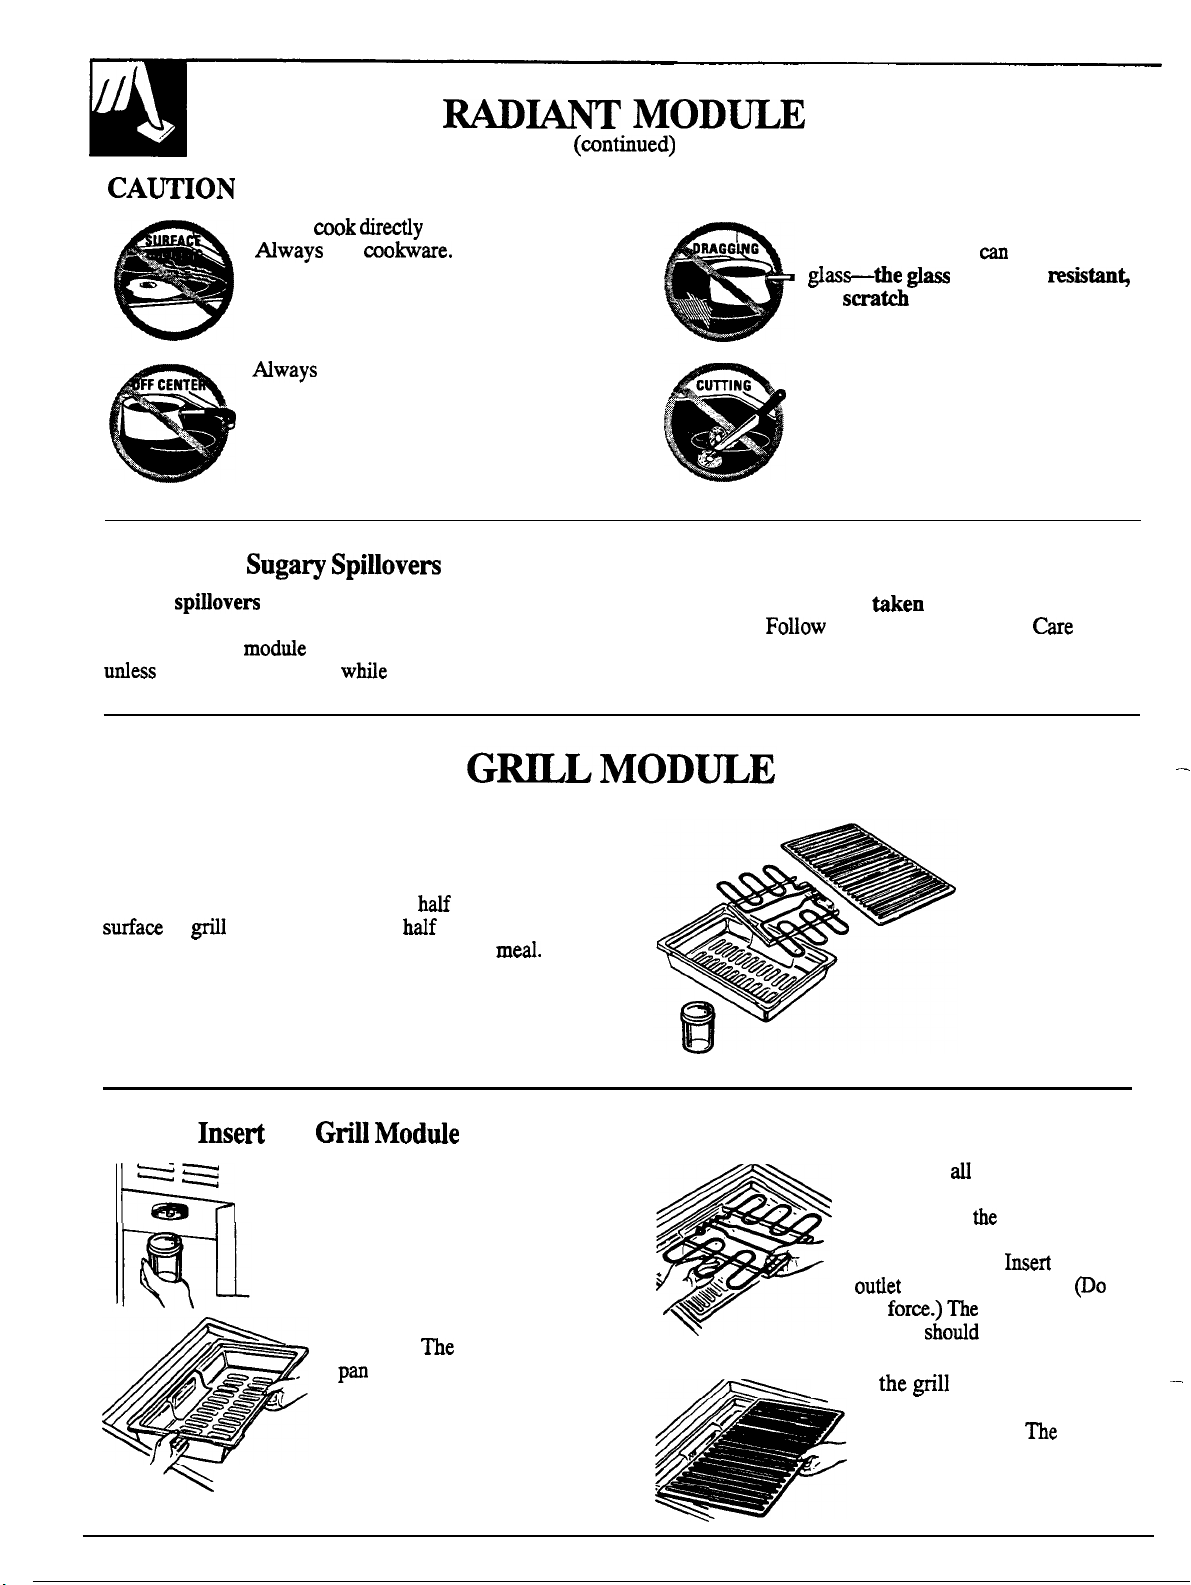
●
Never
use
on the glass.
. Do not slide cookware across the
cooktop because it
not
proof.
scratch the
is scratch resistang
●
the surface unit you are cooking on.
Plastic and
Sugary
syrups) or melted plastics can cause pitting of the
surface of your
the spill is removed
You can enjoy delicious grilled food year ‘round,
prepared in the convenience of your own kitchen.
Separate heating elements can be set at different
temperatures,
to
potatoes or other vegetables, for a complete
allowing you to use
meat and the other
place the pan in the center of
(such as jellies, fudge, candy
stall hot.
the cooking
to prepare
●
Do not use the surface as a cutting
board.
Special care should be
substances.
Cleaning section carefully.
the instructions in the
when removing hot
and
How to
18
the
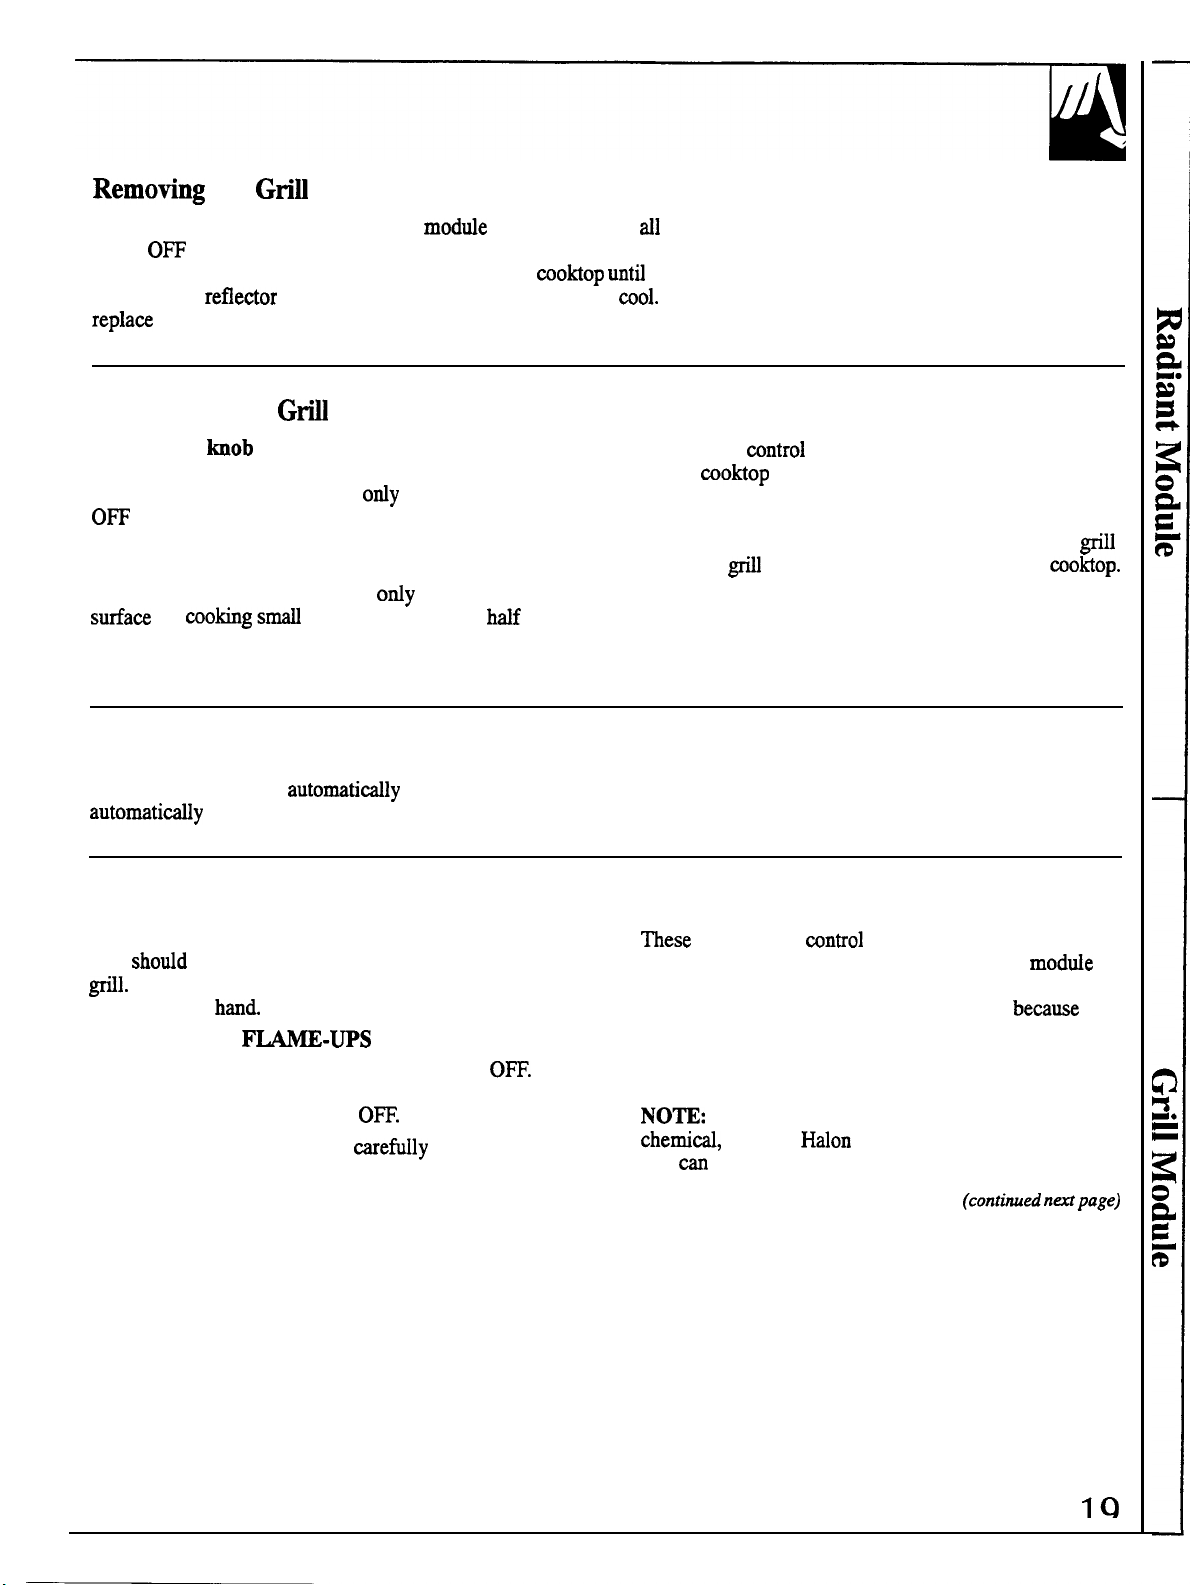
1.
Make sure the grease collector jar
is in place beneath the cooktop.
2. Fit the reflector pan in the
cooktop.
permit grease to drain
into the jar. Keep the slots
open at all times.
slots in the
3. Make sure
turned to OFF. Hold the heating
element with
side of the cooktop and level
with the surface.
as far as it will go.
not
support
of the reflector pan.
\ 4. Place the@ll grate on
the reflector pan over the
heating element.
should be seated properly
,
on the reflector pan.
controls are
plug facing the
heating element
rest on the ledge
the plug
grate
Page 19
the
When
removing the parts
in the
slide the heating element toward the renter of the
Remove the
position and the module is cool. Remove the grill grate and then
the jar.
Module
of the
pan. Empty grease collector jar when
grill modde to clean, be sure
switches are
it is unplugged,
Be sure to
How to Set The
The control
prevents the heating element from being turned on
accidentally. Push the knob in
position. When the knob is in any other position,
it can be turned without pushing it in.
Front and rear sections of the grill heating element
are controlled separately. Heat
a different temperature for cooking different types
of foods.
Automatic Blower Operation
—
The blower comes on
must be pushed in to turn;
when the grill is turned off.
Controls
when it is in the
half the grill
portions or set each
when the grill is turned on and turns off
What to Do if a Flame-Up Occurs.
Grilling fat or juicy foods may cause flame-ups.
You
It’s important to control flame-ups so they do
not get out of
TO CONTROL
Turn down the heat setting to LO rather than
This keeps the downdraft vent blower on. Or, turn the
vent to ON, then turn the grill
Using a long-handed utensil,
food from the grill.
remove the
this
at
Push in the
of the
and right rear control knobs control the grill when
the module is on the right side (on some models). The
left front and left rear control knobs operate the
when the
steps
should
goes out. If it does not, cover the entire@ modde
with a cookie sheet or the lid from a large roasting
pan. Use a pot holder to remove this later
will be hot.
Never use water on a grease fire.
the flames.
It is recommended that you have a dry
foam or
you
easily reach it in case of a rooking fire.
knob depending on which side
grill module is used. The right front
module is on the left side of the
the flame until it eventually
it
Water will spread
type fire extinguisher where
Page 20
●
Do not leave the grill unattended
●
Be sure to preheat according to the cooking guide.
●
Make sure the grease collector jar and the reflector
in use.
pan are clean and in place before using the
●
Remove grease from the grease collector jar after
each use to avoid
●
The grates should be oiled or sprayed with a non-
stick coating before cooking to prevent sticking.
Remove the grate before spraying, and spray
while cool. Spraying
onto a hot grill may
cause a fire.
●
Trim fat from meats before placing on the grill.
This will reduce smoking and lessen grease buildup
in the grease collector jar.
●
cooking foods of various
and
thicknesses, start larger or thicker pieces first, and
quicker-cooking
lightly to lie flat on
edges of
and chops to prevent curling; break
pieces later. Press meat
grill: slash the fat on the
the joints of split chickens so they will lie flat.
(continued)
●
●
●
If your house has low voltage, foods may be lighter
●
spaw
between foods when placing them on
the
best cooking results.
sticking and provide better browning.
Air needs to circulate around the food for
rearrange foods on the
to prevent
Season meats after cooking rather than
can draw out juices and dry out meat. Use tongs
to turn and rearrange meats on the grill; forks will
pierce the meat and release juices.
brown than expected. A longer preheating and grill
time may be necessary to achieve the desired results.
The
blower comes on
is turned on and turns off
when the grill
when the
is turned off.
Questions and
Q.
I
the
done properly. Is there something wrong with
my grill?
A.
Probably not. Suggested cooking times should be
used
change cooking times required.
Q. How can
developing an unattractive burned look
and taste?
A.
during the entire cooking time. If your favorite
sauce
last 15 to 20 minutes of cooking time for best
Q. Foods cooked on my grill are not browning as
much as I would like.
A. A longer preheating and grill time maybe
necessary to achieve the desired
the cooking times suggested in
cooking guide but my foods were not
as a general guide. Variables in food can
keep barbecued meats from
containing sugar will often bum if used
sugar, try adding it
during the
could cause this?
Q. Can my
be switched to the other side of the
where it would be more convenient for
me?
A. Your
interchangeable
modties can be used
on either the right or the left side of the
(on some models).
inserting or removing a
module, take care not to force the connection or
exert undue pressure which
damage the
contacts.
Q.
cooking many individud foods, what can
I do to insure that foods
cook evenly?
cooking foods of various sties and
thicknesses, start larger or thicker pieces first
and add quicker cooking,
Press the meat lightly to lie flat on the
pieces later.
Slash
the fat on the edges of steaks and chops to prevent
curling. Break the joints of split chickens so they
will lie flat.
Q.
My
grilled meats sometimes come out drier
than they should.
can I do to help
prevent this?
A.
Season meats after woking rather than
can draw out juices and dry out meat. Use
tongs to turn and rearrange meats on the grill;
forks will pierce the meat and release juices.
—
20
Page 21
Do not leave
turned to
turned to HI
unattended
or anytime the knobs are
food on the grill.
“preheat”
1. Preheat 5 minutes before grilling. Refer to
the setting in the guide for a particular food.
2.
Trim exwss fat from the meat.
3. Before cooking steaks, slash fat around edges to
prevent curling of meat.
4. Suggested cooking times
as a guide, since variables in food
be used
change
times.
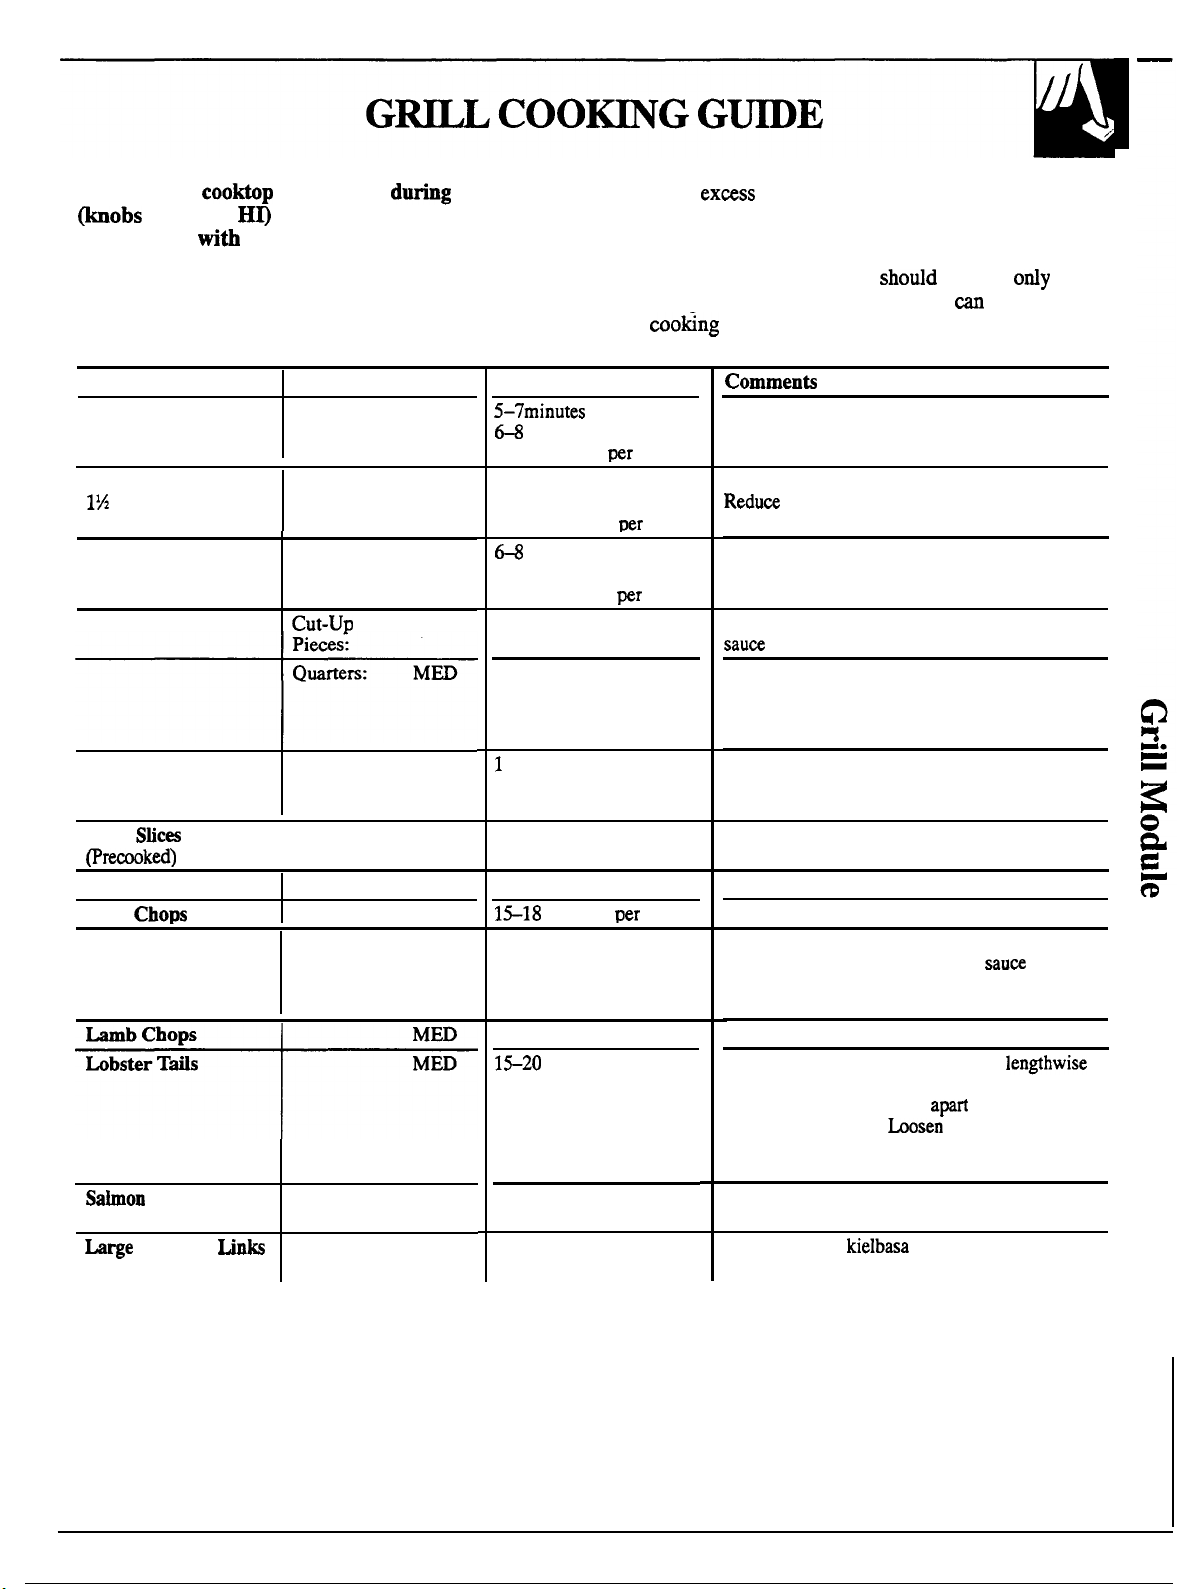
Food
Steak
3/4 inch-l% inch thick
Steak
inch-2 inches thick
Ground Steak or
Hamburgers
3/4 inch thick
Chicken
Ham
1 inch thick
Hot Dogs
Pork
Spare ribs
Steaks
1 inch thick
Sausage
Suggested Setting
Rare: HI
Medium:
Well:
Rare:
Medium:
Well:
Rare: HI
Medium:
Well:
HI
MED
Halves: MED
MED
HI
MED
MED
MED
MED
Cook Time
per side
minutes per side
8-10 minutes
9-11 minutes per side
13–15 minutes per side
20-23 minutes
minutes per side
8–10 minutes per side
11-12 minutes
45-60
minutes
(total)
1 hr. to 1 hr. 10 minutes
(total)
hr. to 1 hr. 25 minutes
(total)
10 minutes per side
8–9 minutes (total)
minutes
40–50 minutes
(total)
20–22
minutes per side
minutes per side
8–10 minutes per side
10–12 minutes per side
side
side
side
side
Preheat grill 10 minutes for rare.
Preheat grill 10 minutes for rare.
to MED for well done.
Preheat grill 10 minutes for rare.
Turn over frequently and if desired baste with
last 10 to 15 minutes.
Break joint bones. Plain skin side down. Turn
over every 15 minutes and baste frequently as
desired. Wing-breast quarters take longer than
thigh-leg quarters.
Break joint bones. Plain skin side down on
preheated grill. Turn over and baste frequently
as desired.
Turn frequently.
Boil 5 minutes before grilling. Rearrange and
turn over frequently. Baste with
10 minutes as desired. Very meaty ribs may
take about 10 minutes longer.
With a sharp knife or scissors, cut
the undersell into the meat almost through
to outer shell. Spread tail
meat while grilling.
shell. Spray grates with non-stick coating
before Preheating.
Brush with melted butter.
Use bratwurst,
Polish sausage.
meat but leave in
or smoked
last
to expose
21
Page 22
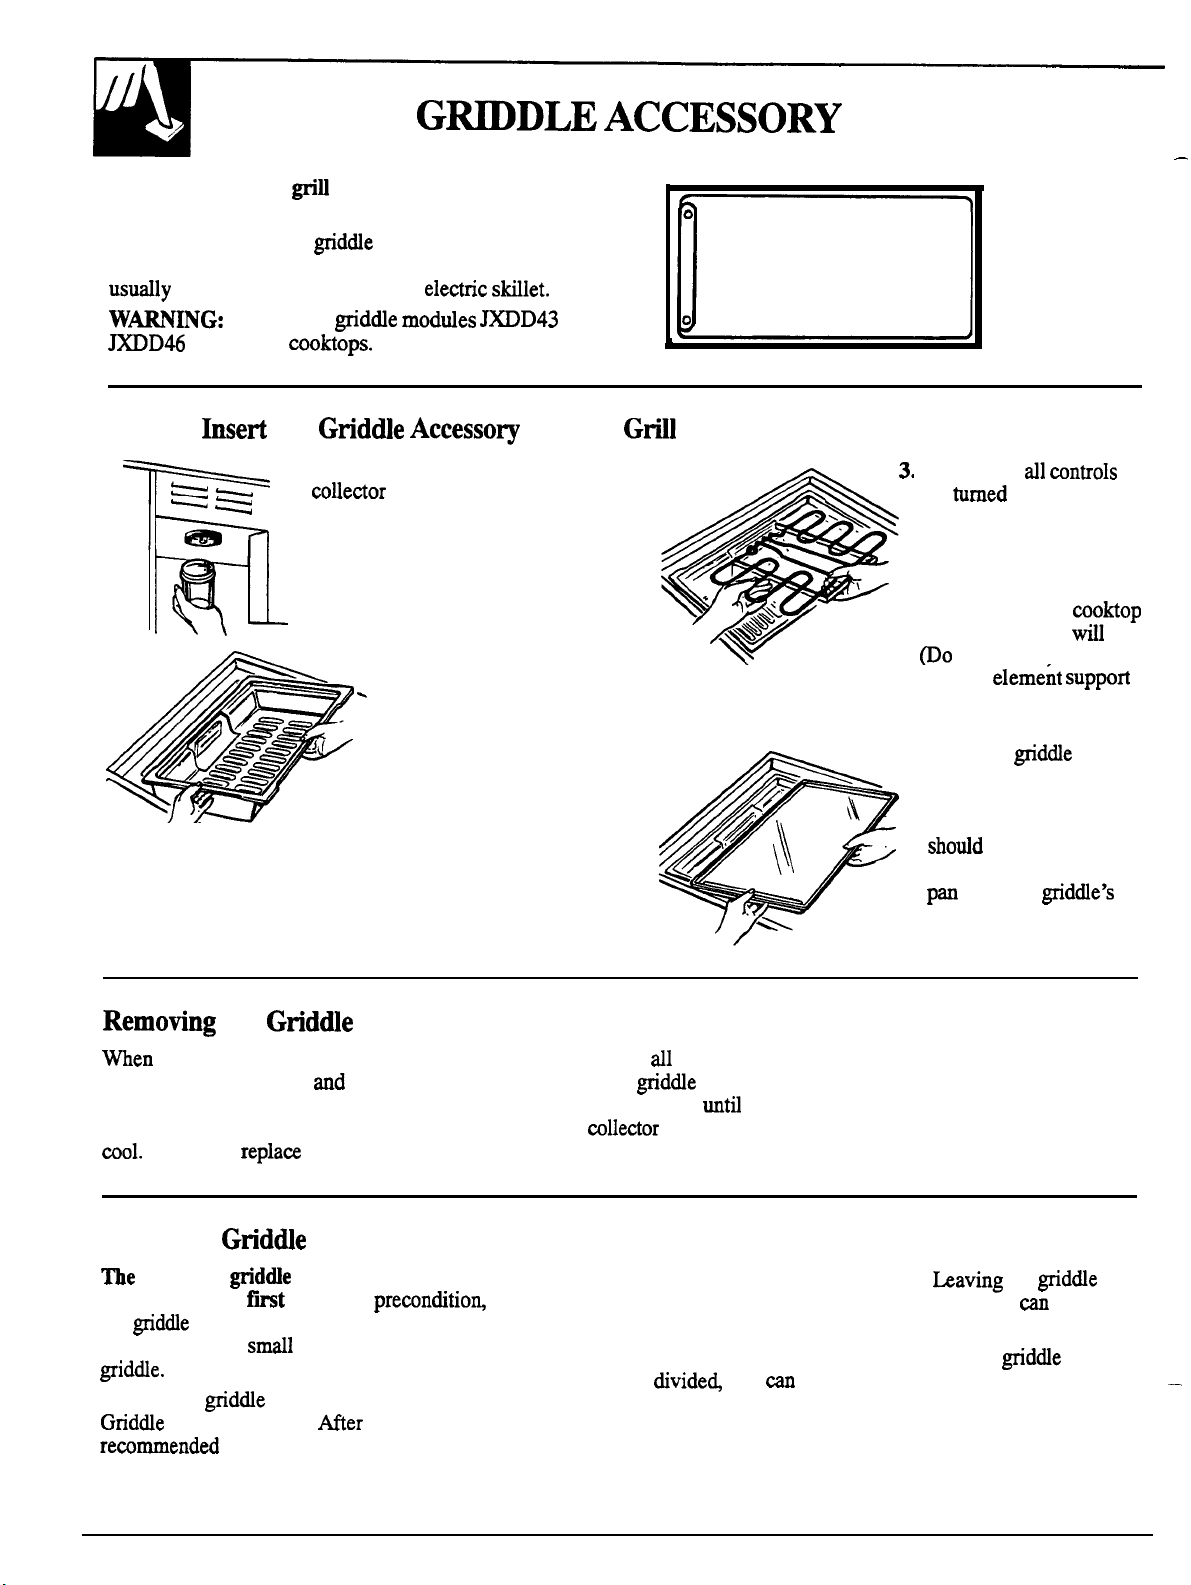
You must have the
grid&e accessory.
Your
non-stick coated gridde provides an extra-large
cooking surface for meats, pancakes, or other food
prepared in a frying pan or
Do not use
with these
module to use the
moddes
or
How to
the
1.
Make
beneath the cooktop.
sure the grease
2. Fit the reflector
pan in the cooktop.
The slots in the pan
permit grease to
drain into the jar.
Keep the slots open
at all times.
and the
Module
, Make sure
are
the heating element with
the plug facing the side
of the cooktop and level
with the surface. Insert
the plug into the
outlet as far as it
heating
should rest on the ledge
of the reflector pan.
4. Place the
on the reflector pan
over the heating
element. The plate
properly on the reflector
with the
drain holes at the front.
wntrols
to OFF. Hold
go.
—
the
removing the parts of the grill module to clean, be sure
are in the OFF position
and then slide the heating element toward the center of the cooktop
is unplugged. Remove the reflector pan. Empty grease
Be sure to
Module
switches
the module is cool. Remove the gridde plate
jar when
the jar.
Using the Gtidde
non-stick
using it for the
the gridde in soap and water and dry. Then use a paper
towel to apply a
Preheat the
Cooking Guide.
of oil or butter.
must be preconditioned before
time.
To
amount of cooking oil to the
preheating for the
first wash
Do not overheat the griddle.
HI for more than 5 minutes without food
the non-stick coating.
Because the heating element under the
you
and rear sections.
22
it
vary the temperature of the front
the
at
damage
Page 23
How
to Set The
control
this
prevents the heating element from being turned
on
the OFF position.
position, it
must be pushed in to turn;
Push the knob in
be turned without pushing it in.
Controls
when it is in
the knob is in any other
Automatic Blower Operation
Front and rear sections of the griddle heating
element are controlled separately.
the
each
for cooking small portions or set
at a different temperature for rooking
Heat
different types of foods.
Push in the control knob depending on which side of
the
and right rear control knobs
gridde module is used.
right front
the gridde when
the module is on the right side (on some models).
The left front and left rear control knobs operate the
when the
module is on the left side of
the
The blower comes on
off
when the
when the
is turned off.
Griddle Tips
●
Most gridded foods require cooking on a preheated
surface, which may be greased
food. Preheat
then switch to recommended
●
If your house has low voltage, foods may be
lighter brown than expected.
and
time maybe needed to get good
A
rooking
●
Make sure the
●
Check the grease wllector jar and empty if
is clean.
necessary to avoid
●
To avoid damaging the nonstick finish, store the
to store it flat, avoid placing other pans or
on top.
●
Foods which are high in natural fat, such as bacon
or sausage, maybe started on a mld
before adding
longer preheating
is turned on and turns
●
The blower
when the
●
Avoid using metal utensils with sharp points or
rough or sharp edges which might damage the
nonstick coated
on the
●
Foods to be warmed may be placed
inverted
the heat.
Condition or “season” the
use.
on autornatidly when the
on the
an
help store
before
23
Page 24
Questions and
Q.
Can my @dWe be switched to the other side of
the
for me?
A. Your
used on either the right or left side of the
(on some models).
exert undue pressure which could damage the
Q. Can prolonged periods of high heat damage my
griddle’s surface?
A. A brief preheating period is often necessary for
best
without food can damage the nonstick mating.
cooking is completed.
Q. Do I need special cookware for use with
my
A. Avoid using
rough or sharp edges which might damage the nonstick coated
in containers are to be warmed on the
further information on
surface, see the
where it would be more convenient
interchangeable
take care not to force the connection or
contacts.
be sure to turn control knobs to OFF when
cookware with sharp points or
surface. Do not cut foods on the
Use ody heat-resistant dishes when foods
and Cleaning section.
modules can be
inserting or removing a
For
for your
ACCESSORY
Q. How should I store my griddle when it is not
in use?
To avoid marring the non-stick finish, store
to avoid damage. If it is necessary to store it flat,
avoid placing other pans or cookware on top.
Q. How long can foods be kept warm with the
griddle without losing their appeal?
than 2 hours is rewmmended to assure
good
foods, such as eggs, should not be kept more than
15 to 30 minutes; entrees and casseroles maybe
warmed for 30 to 60 minutes. Hors d’oeuvres
stay hot for serving up to 1 or 1
Rearrange or stir food occasionally, if possible.
Q.
-
have cooked the full time?
Preheat the gridde for a longer time and leave
foods on the
degree of browning.
quality and prevent spoilage. ‘Delicate
aren’t
my
foods done even
hours.
Do not leave
turned
turned to HI with food on the griddle.
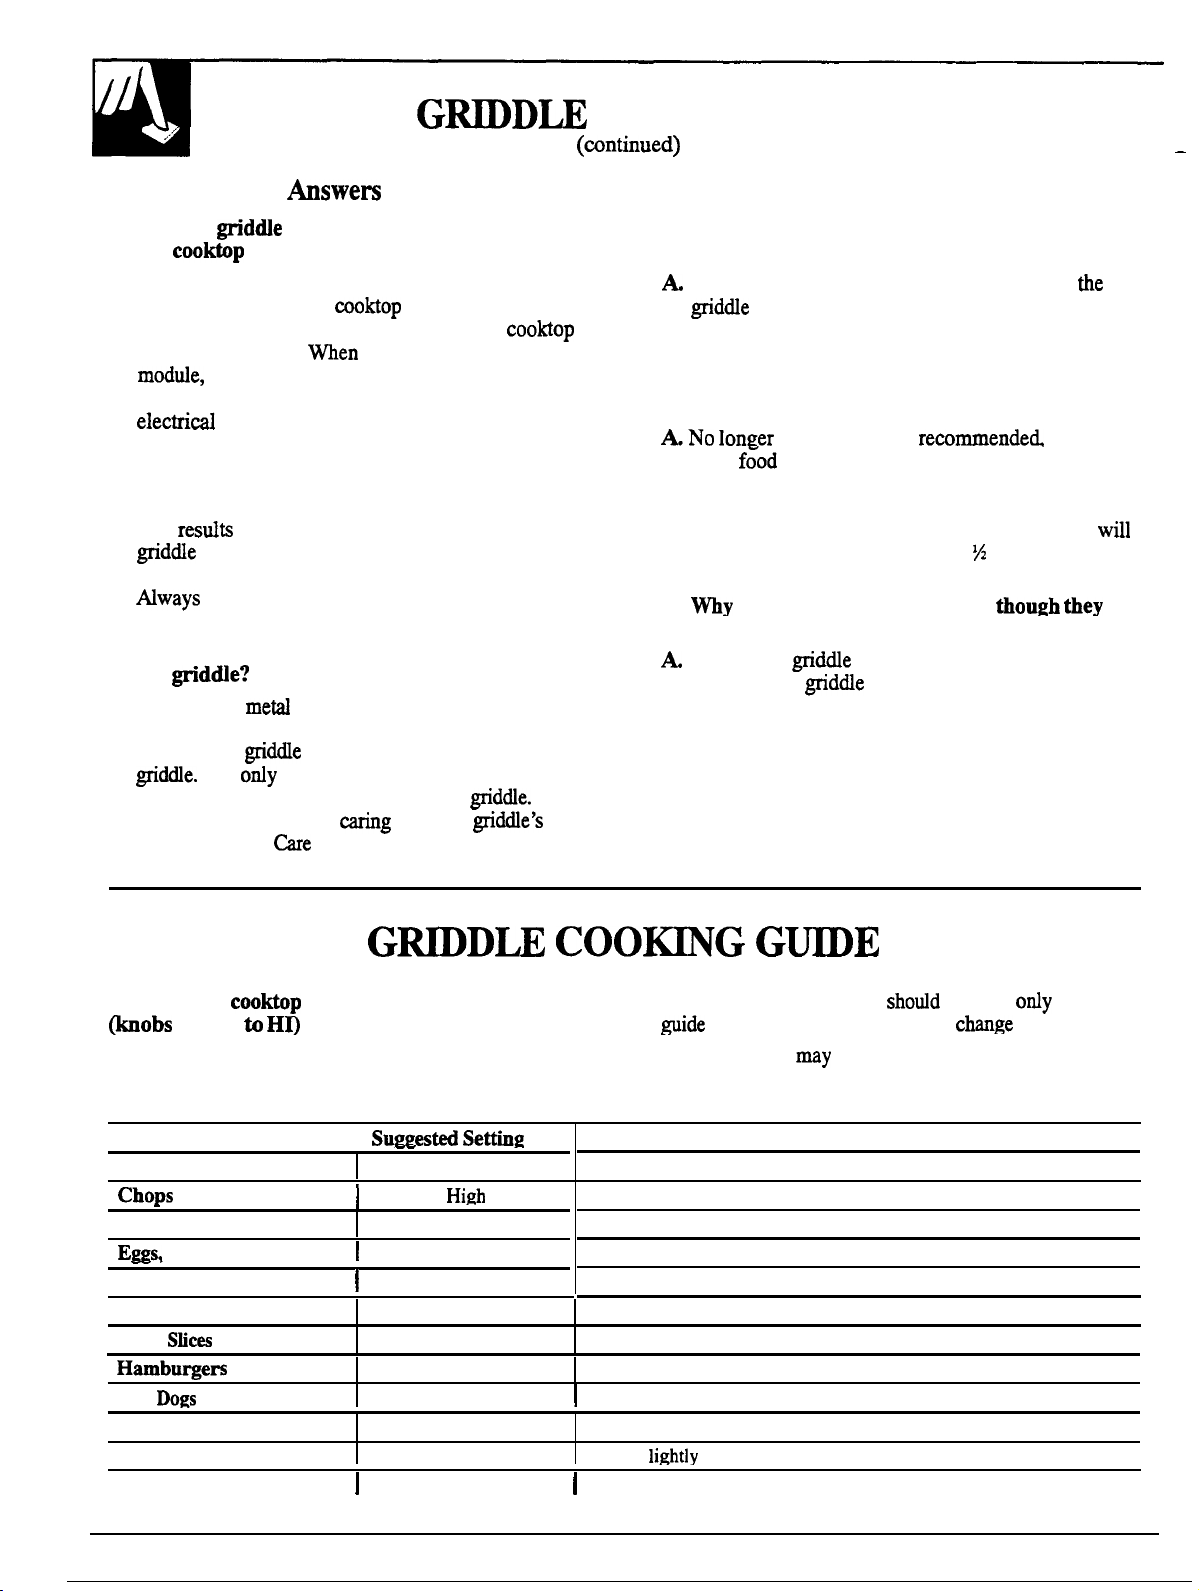
Food
Bacon
Cube &Mb Eye Steaks
Fried
Fish Steaks
French Toast
Ham
Hot
Pancakes
Sandwiches
Sausage Patties
unattended during “preheat”
or anytime the knobs are
I Su=ested
Medium High
Medium
Medium High
MED
Medium High
Medium High
Medium High
Medium High
Medium High
Medium High
MED Grease
Medium High
24
Suggested cooking times shodd be used
since variables in food may
Cooking times
downdraft vent system.
Comments
Grease lightly if desired.
Grease lightly if desired.
Grease lightly if desired.
Grease lightly if desired.
Grease lightly if desired.
Grease lightly if desired.
Grease lightly if desired.
if desired.
as a
cooking time.
be slightly longer when using the
—
Page 25

Canning should be done on the
Surface Unik,
the Solid Disk Units or the Radiant Units
Pots that extend beyond 1 inch of the surface unit are not
recommended for most surface cooking. However, when
with a water-bath or pressure canner,
diameter
maybe used This is because
water temperatures (even under pressure) are not
to cooktop surfaces
the surface unit.
DO NOT USE LARGE
CANNERS OR OTHER LARGE
FOR
THAN
types of
OR
FOODS OTHER
Most syrup or sauce rnixture%and
at temperatures much higher
POTS
than boiling water. Such temperatures could
eventually harm cooktop surfaces surrounding the
module surface units.
1.
Be sure the canner fits over the center of the surface
your cooktop or its location does not
unit.
in Canning
the
canner to be centered on the surface unit, use
for good
g results or try putting
on opposite side of cooktop (on some models)
so the larger unit is
large diameter pans do not touch the
the vent
damaged
The knobs and the vent
touched by hot
front. Be sure the canner or other
knobs or
be
2. flat-bottomed canners must be used. Do not use
canners with flanged or rippled bottoms (often
found in enamelware) because they don’t make
enough contact with the solid disk surface unit
and take a long time to boil water.
electric
surface units. They are
required
for
The
disk surface units and glass
Safe canning requires that
are destroyed and that the jars are sealed
completely. When canning foods in a water-bath
canner, a
continuously for the required time.
foods in a pressure canner, the pressure must be
maintained continuously for the required time.
but steady boil must be maintained
microorganisms
canning
If a solid disk surface unit is used for canning,
please note that solid disk surface units heat up and
units. Because of this difference, after you have
adjusted the
the prescribed
for the required time.
After you have adjusted the controls, it is very
important to make sure the prescribed boil or
pressure levels are maintained for the required time.
GLASS AND
DISK
The glass and solid disk surface units have
temperature limiters that help prevent them from
getting too hot. If the bottom of your canner is not
flat, the surface unit
overheat, triggering
temperature limiters to turn the unit off for a time. This
will stop the boil or reduce the pressure in the canner.
Since you must make sure to process the canning jars
for the prescribed time, with no interruption in processing
time, you cannot can on glass or solid
units if the bottom of your canner is not flat enough.
3. When canning, use recipes and procedures from
reputable sources. Reliable recipes and procedures
are available from the manufacturer of your canner;
manufacturers of
jars for canning, such as
Ball and Kerr; and the United States Department of
Extension Service.
4. Remember that canning is a process that generates
large amounts of steam. To avoid burns from steam
or heat, be
when canning.
If your house has low voltage, canning may
take longer than expected, even though directions
have been
time
(1)
using a pressure canner, and
(2) starting with
followed.
be shortened by:
water for fastest
heating of large quantities of water.
SOLID DISK
it is very important to make sure
or pressure levels are maintained
What is a Temperature Limiter?
Every solid disk and radiant surface unit has a
Temperature Limiter. The Temperature Limiter
protects the
surface from getting too hot
The Temperature Limiter may turn off the
surface units if:
●
pan boils dry.
●
The pan bottom is not flat.
●
The pan is off center.
There is no pan on the unit.
25
Page 26

The blower comes on
the
or
is turned off.
when the grill or
the vent is turned on using the knob, the blower
not turn off
using the knob.
The
vent system helps remove cooking
odors and smoke from foods prepared on the
and must be turned off
How to
To operate the vent system using the knob,
turn the
Some models have a control that allows you to
choose blower speeds from low to high.
Continuous use of the vent system
helps keep the kitchen comfortable and less
reducing cooking odors and
creates a frequent need for cleaning.
Vent System
knob on the control panel to ON.
cooking
mois~re that
on some models
on some models
26
Page 27

Proper care and cleaning are important so your
efficient and satisfactory service. Follow these directions carefully in
caring for your
cool before touching or
to assure safe and proper maintenance.
give you
Enamel Finish
The porcelain enamel finish
misused. This finish is acid-resistant. However,
any acidic foods spilled (such as fruit
or
vinegar)
the finish.
not be permitted to remain on
Chrome Finish
Clean the brushed chrome top with warm, soapy water or Bon
cleanser and immediately dry it with a clean, soft cloth. T&ewe to dry the
following the “grain”. To help prevent finger
spread a thin film of baby
cloth.
Grease
out grease with a large spoon.
warm water to loosen grease if desired. Clean with a
plastic or
The jar may
The jar may be replaced with any wide mouth
canning jar.
Jar
scouring pad and hot soapy water.
be cleaned in the dishwasher.
(on some models)
sturdy but
tomato
(on some
on the surface. Wipe away excess oil with a
models)
the jar in
If acids spill on the
paper towel or cloth to wipe it up right away. When
the surface has cooled wash with soap and water.
Rinse well.
For other spills such as fat smatterings, wash with soap
and water after the surface has cooled. Rinse well.
Polish with a dry cloth.
brand
after cleaning,
while hot, use a dry
Control Panel and
Clean up
Remove heavier
Clean the control panel with mild liquid dish
detergent and a soft cloth. Rub the control panel
lightly.
on the control panel.
The control
cleaning.
To remove a
Wash the
Do not allow water to run down inside the surface of
the panel
to the cootiop,
area on the
or spatters with a damp cloth.
with
Do not use abrasives of any
maybe removed for easier
it straight off the stem.
in soap and water but do not
cleaning. After drying, return the
to the shaft.
soapy water.
sure to match the flat
.
27
Page 28
CL
(continued)
Wipe out tub with hot soapy
or plastic
Make sure the drain hole
pad. Rinse with a damp cloth.
not blocked. Clean with
a soap filled
a cotton swab or toothpick.
Vent System
Before cleaning the vent grille,
blower is shut off.
To clean the vent grille, remove it from the
by lifting it up. Wipe with a damp cloth.
If necessary the vent
Use
liquid for cleaning. Rinse well and dry
Do not use abrasive cleaners.
vent
finish.
Do not clean the vent grille in the dishwasher.
To clean the vent chamber, use hot soapy water.
Do not use abrasive cleaners. They will damage
the finish.
be sure exhaust
can be washed in the sink.
will damage the
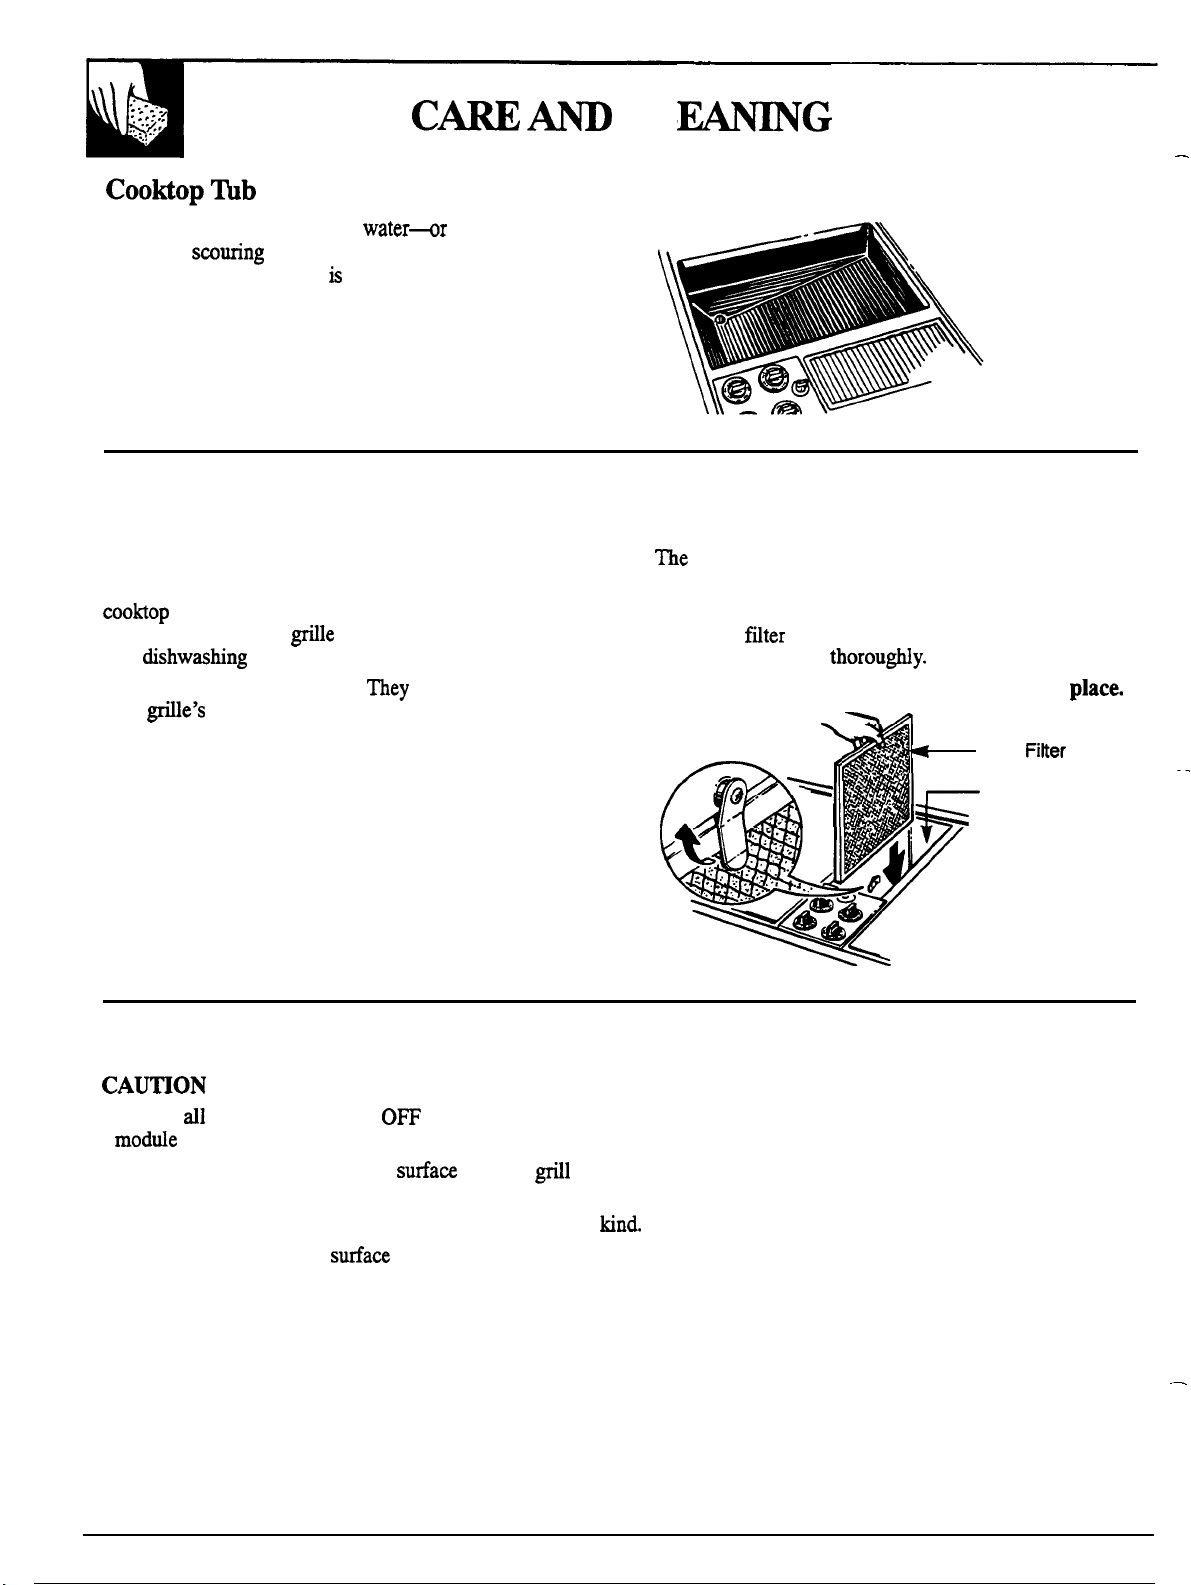
Vent Filter
filter is held in place with a metal latch. Move
latch up in either direction and lift filter up and out of
the vent opening.
Clean the
by swishing it in hot, soapy water.
Do not operate the vent without the filter in
Vent
Vent Chamber
.
Modules
●
Be sure
controls are turned
before attempting to remove a
or heating element.
●
Do not attempt to clean plug-in
units or
heating element
in an automatic dishwasher.
●
Do not immerse plug-in surface units in liquids of any kind
●
Do not bend the plug-in
●
Do not attempt to clean, adjust or in any way repair the plug-in receptacle.
unit plug terminals.
28
Page 29
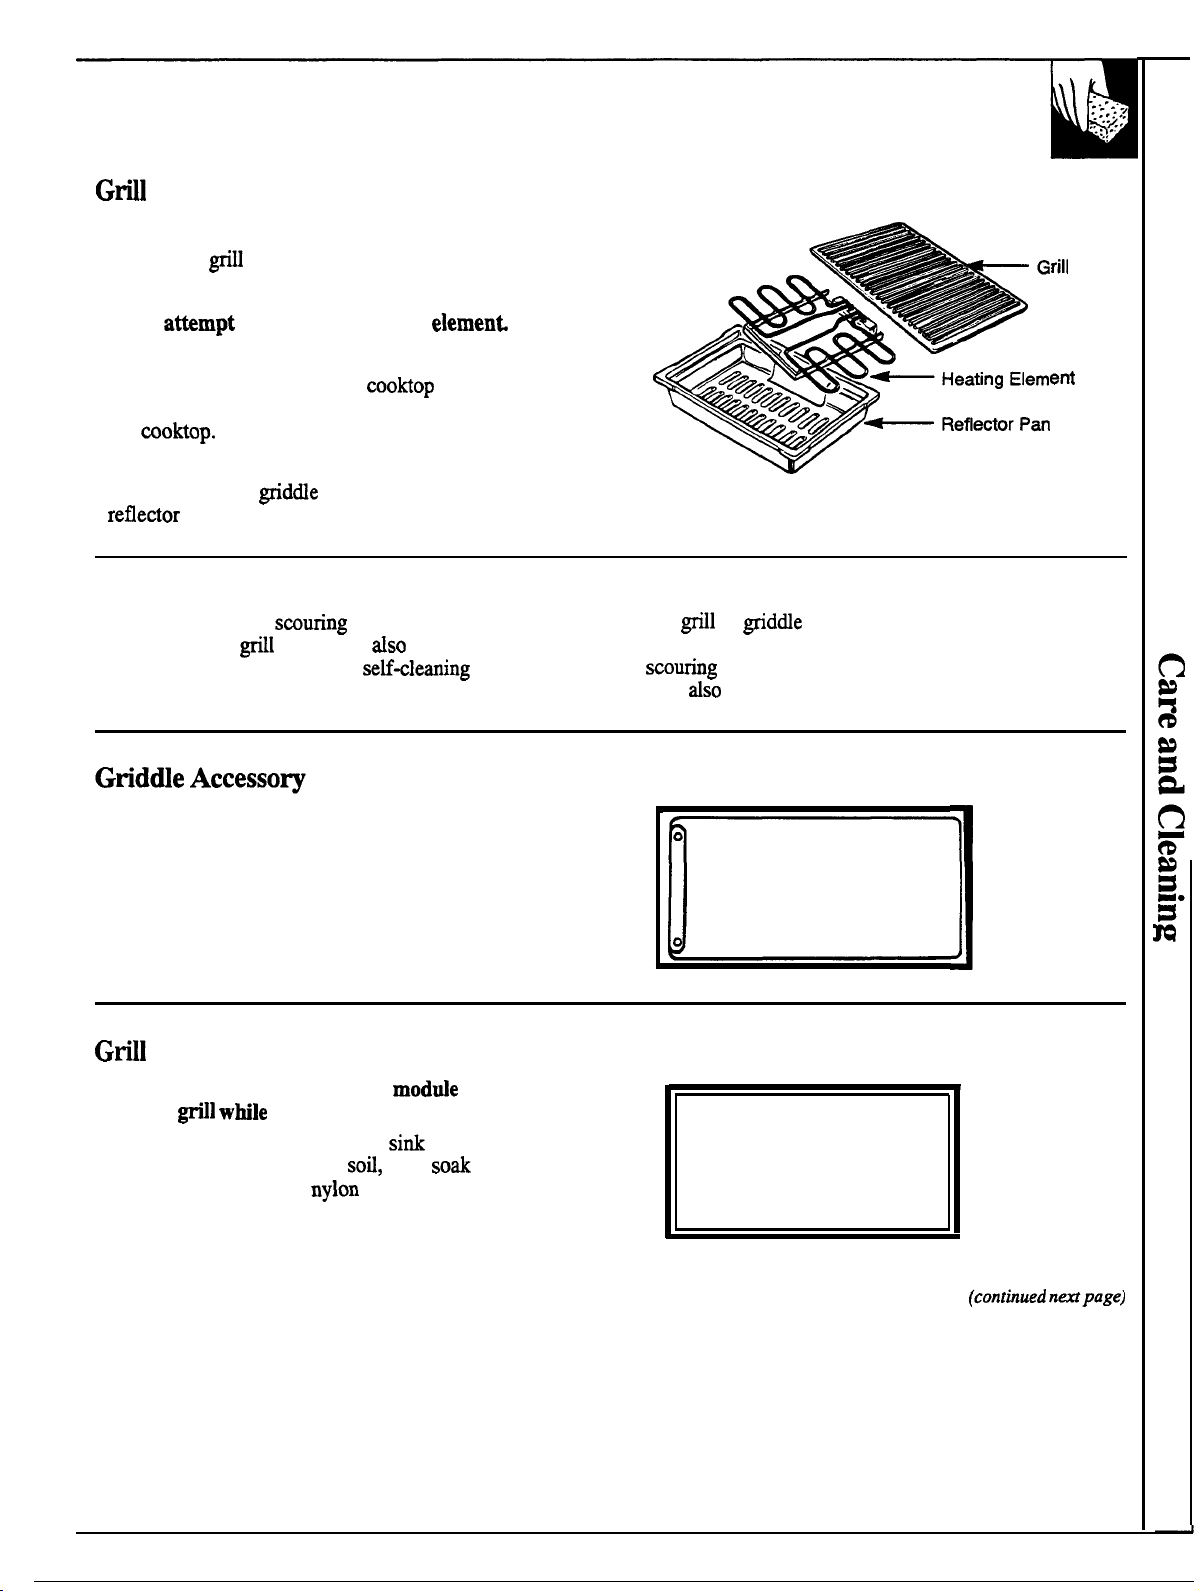
Module
To remove:
●
Lift off the
●
Unplug the heating element.
Do not
To replace:
●
Place the reflector pan in the cookop tub with
the hole for the plug-in towards the outside of
the
●
Plug in the heating element.
●
Place the grill or gridde grate on top of the
grate.
to clean the heating
Grate
Grill Grate
Clean with a plastic
Rinse well. The
grate may
dishwasher. Do not clean in a
pad and hot soapy water.
be cleaned in the
oven.
Clean with a plastic scouring pad and hot soapy water.
Rinse well. Do not use abrasive cleaners.
Do not clean in the dishwasher.
Cover
Do not place the cover on a hot modde or leave it
over the
To clean the cover, wash it at the
water and dry. For stubborn
5 to 10 minutes or use a
use a metal scouring pad or other abrasives.
Do not clean in the dishwasher.
preheating.
brush or pad. Do not
with soap and
let it
for
Reflector Pan
Let
or gridde cool, then remove. Lift out the
reflector pan. Clean with either a plastic or soap-filled
may
29
Page 30
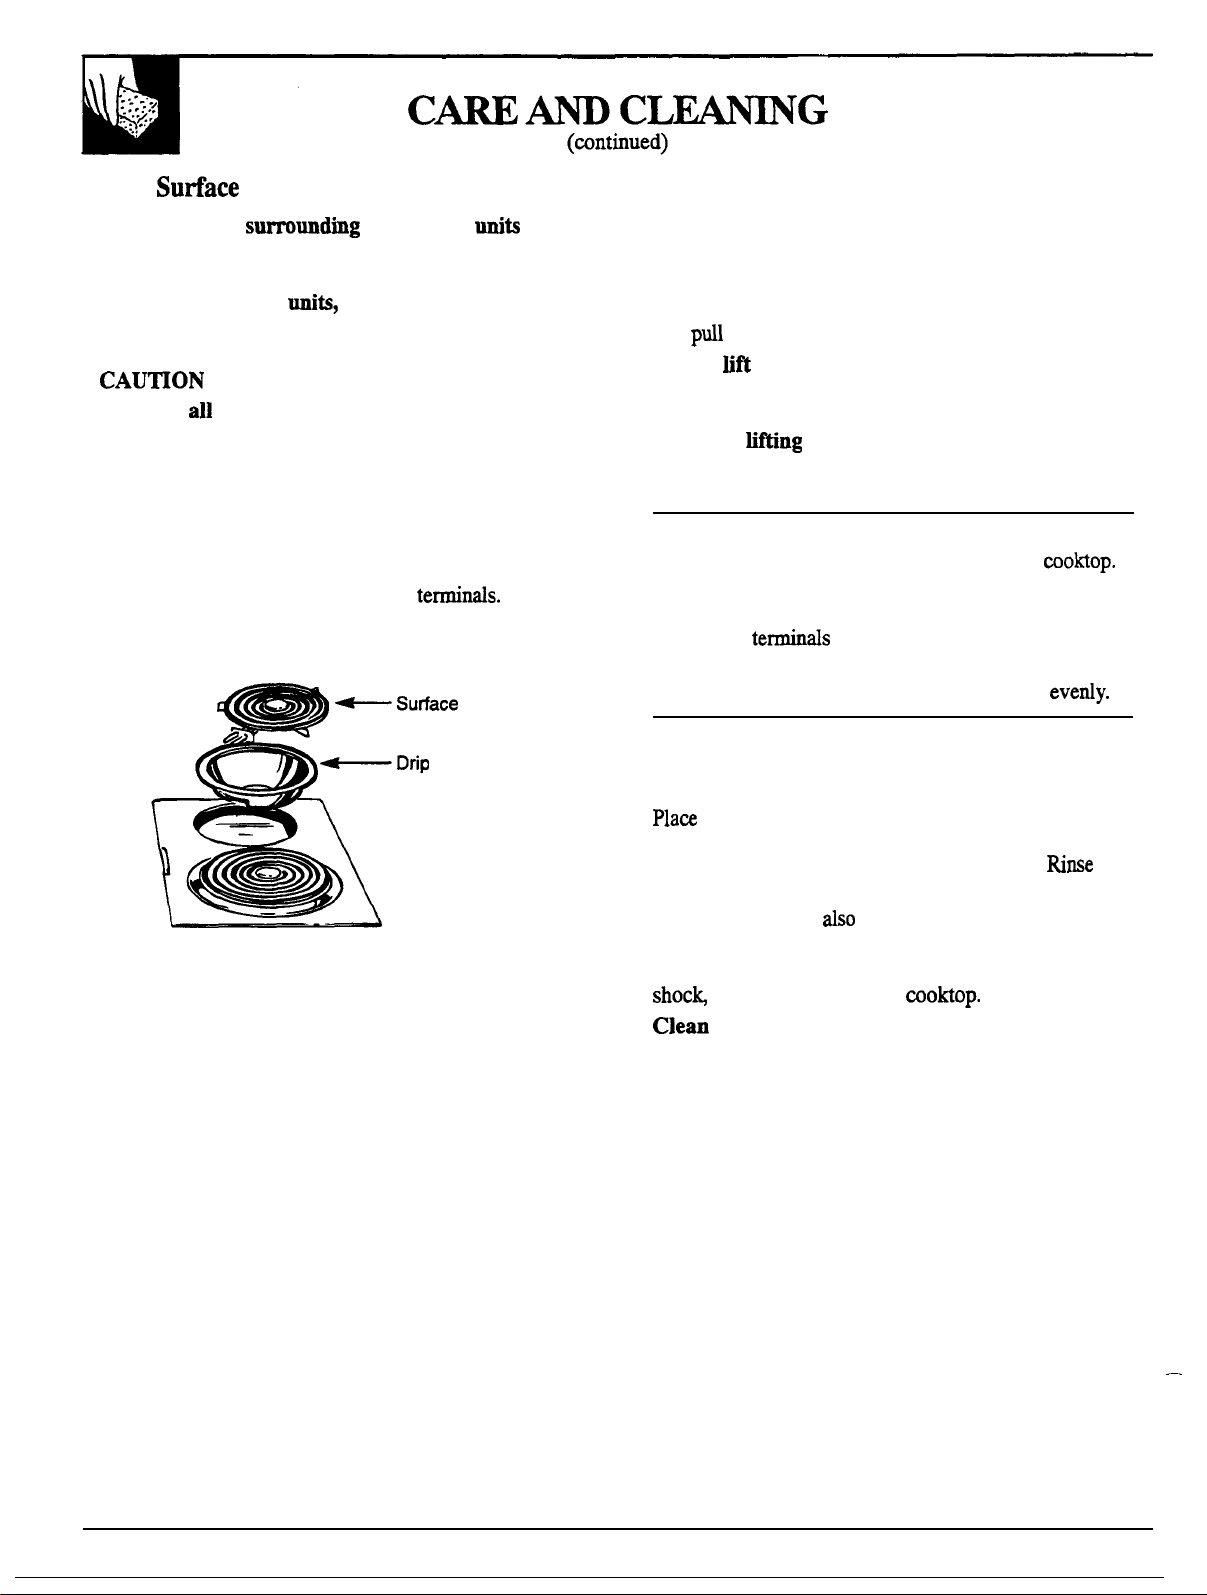
Coil
Unit Module
Clean the area
the surface uniti
according to either the Brushed Chrome or Porcelain
section (depending on your model).
To clean the surface
turn the control to the
highest setting for a minute. The coils will bum off
any soil.
● Be sure
controls are turned to OFF and
surface units are cool before attempting to
remove them.
●
Do not immerse the surface units or the module
in liquids of any kind.
●
Do not clean the surface units or the module in
a dishwasher.
●
Do not bend the surface unit plug
●
Do not attempt to clean, adjust or in any way repair
the plug-in receptacle.
Unit
Pan
To remove a surface unit:
To remove the drip pans for cleaning, the surface units
must be removed first.
Lift the surface unit about 1 inch above the drip pan
and
it out.
Do not tift the surface unit more than 1 inch. If you
do, it may not lie flat on the drip pan when you
plug it back in.
Repeated
of the surface unit more than 1
inch above the drip pan can permanently damage
the receptacle.
To replace a surface unit:
●
Replace the drip pan into the recess in the
Make sure the opening in the pan lines up with the
receptacle.
●
Insert the
of the surface unit through the
opening in the drip pan and into the receptacle.
●
Guide the surface unit into place so it rests
Drip Pans
Remove the surface units. Then lift out the drip pans.
For best results, clean the drip pans by hand.
them in a covered container (or a plastic bag)
with 1/4 cup ammonia to loosen the soil. Then scrub
with a soap filled scouring pad if necessary.
with clean water and polish with a clean soft cloth.
The drip pans may
Do not cover the drip pans with foil.
Using foil so close to the receptacle could cause
fire or damage to the
the area under the drip pans often.
Built-up soil, especially grease, may catch on fire.
-
30
Page 31
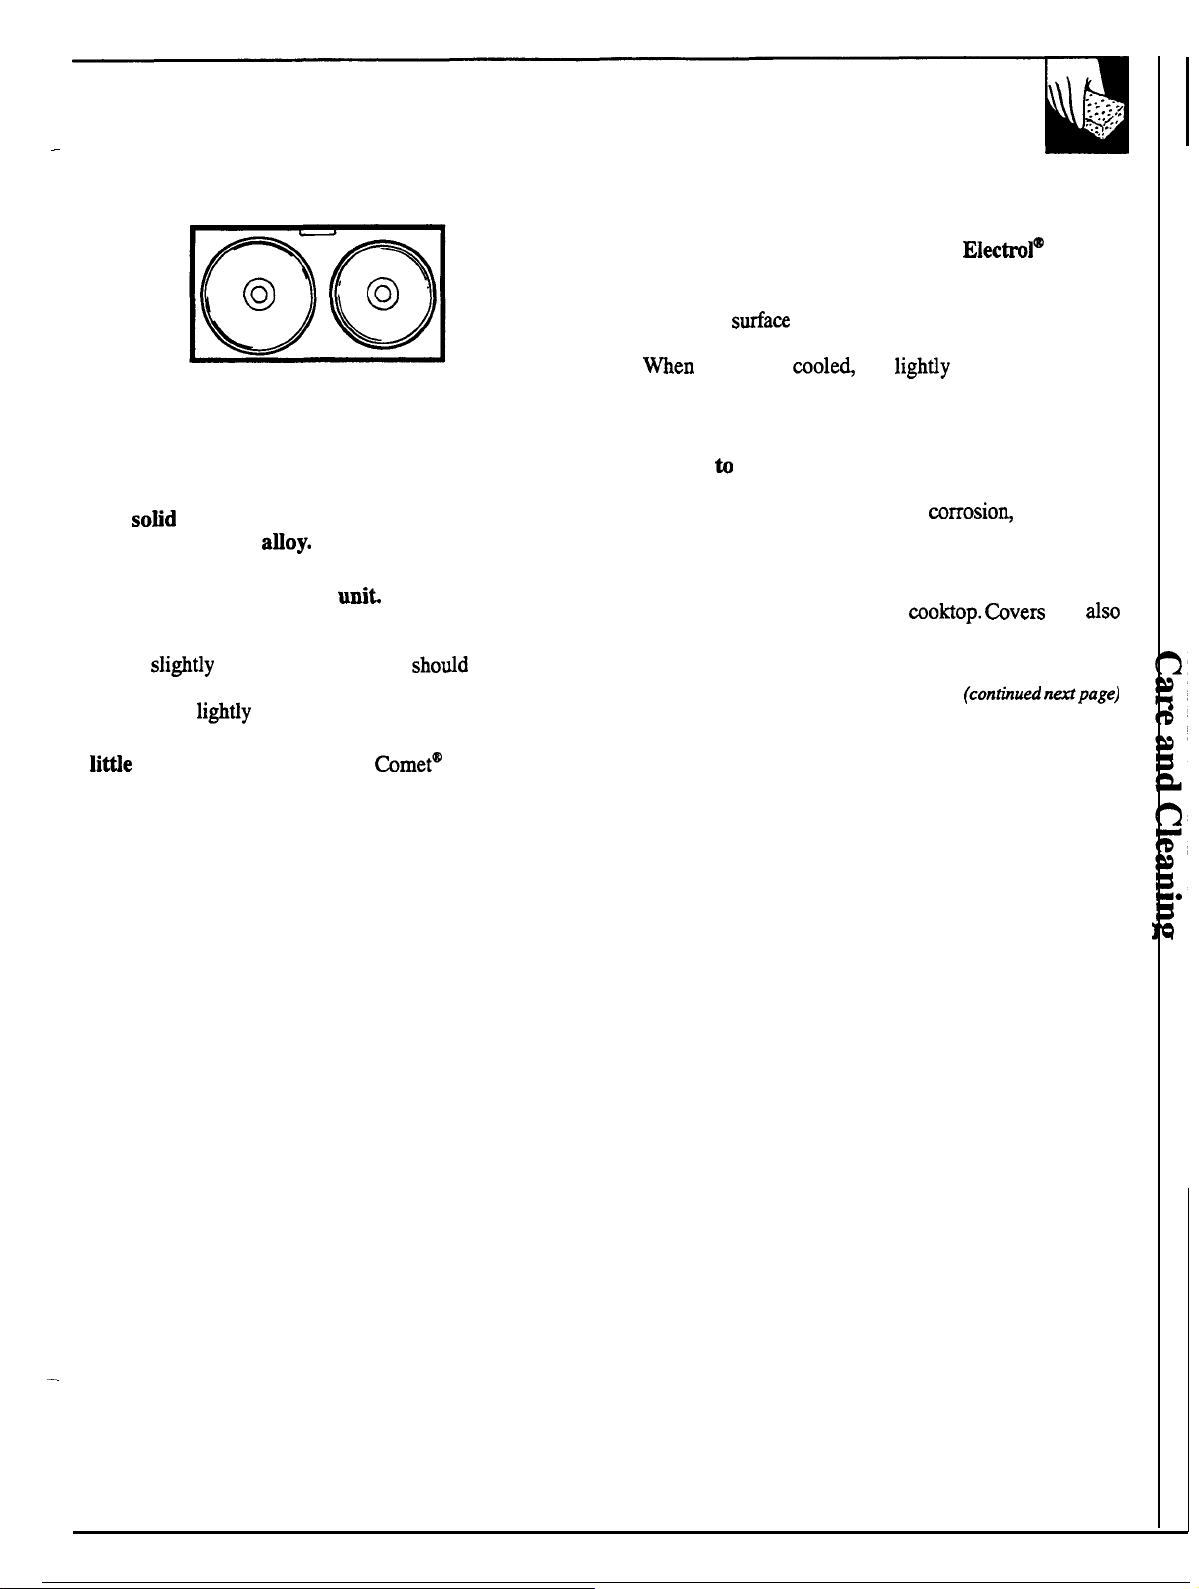
Solid Disk Module
Clean the area surrounding the solid disk surface units
according to either the Brushed Chrome or Porcelain
sections (depending on your model).
DO NOT USE steel wool or abrasives on the brushed
chrome parts of the module.
The
strength cast-iron
The surface has a heat-resistant coating to
preserve the surface of the
cools, any boded-over material on the solid disk
surface units should be removed as soon as possible
with a
dried by switching on for a few minutes. After it
cools, wipe
Clean very dirty solid disk surface units with a
or with a scouring pad.
disk surface units are made of high
After the unit
damp cloth. The unit shotid then be
with cooking oil.
cleaning powder (such as
cleanser)
The matte black surface can be maintained by
treating it periodically with Cello
which is available from your GE supplier. Use the
applicator to apply a very thin coating of the polish to
the entire
for several minutes to bake the polish to the unit.
the unit is coole~ rub
paper towel to remove any excess polish. Before next
use, bum off the unit by means of a short preheating
period. A slight amount of smoke and odor will occur.
Failure
directed will result in defacing the surface over a
period of time primarily due to
surface units are made of cast-iron construction.
Do not use covers over the solid disk surface units.
A surface unit turned on while the cover is in plain
can permanently damage the
trap moisture which may cause the solid disk surface
units to rust.
unit surface. Turn the unit on high
with a cloth or
maintain the solid disk surface units as
polish
as the
can
I
31
Page 32
Cleaning
of
ceramic cooktops is different from
Cleaning
cleaning a standard porcelain finish. To maintain and
protect the surface of your new glass ceramic
follow these basic steps.
Before using your module for the first time, clean
it with Cook Top
the top and makes clean-up easier.
Use only Cook Top Cleaning
Creme on Glass Ceramic.
For normal,
1. Rub a few drops
Creme onto the
Wipe unti
soil:
is better) of Cook Top
area using a damp paper towel.
soil and creme are
Frequent
cleaning leaves a protective coating which is essential
in preventing scratches and abrasions.
2. Clean the surface with Cook Top Cleaning Creme
after each use.
For heavy, burned on soil:
1. Apply a few drops of Cook Top Cleaning Creme
to the (cool) soiled area.
2. Using a damp paper towel, rub creme into the
burned on area. As with any burned on
this
may require some effort.
3.
scrape remaining soil with the razor
scraper. Hold the scraper at a 30° an~e against the
surface.
4. If any
For
remains, repeat the steps listed above.
after
soil has been
polish the entire surface with the Cook
Top Cleaning Creme.
5. Buff with a dry paper towel.
●
Using a razor scraper will not damage the surface
if the 30° angle is maintained.
●
Be sure to use a new, sharp razor scraper.
Do not use a dull or nicked blade.
●
Store the
scraper out of reach of children.
Special Care:
Sugary
(such as jellies, fudge,
syrups) or melted plastics can cause pitting of the
surface of your
(not covered by the warranty)
the spill is removed while still hot. Special
care should be
when removing hot
substances. Follow these instructions carefully and
remove the soil while the spill is still hot.
1. Turn off all the surface units affected by the
Remove hot pans.
2. Wearing an oven mitt, hold the razor
scraper at a 30° angle to the
and scrape the hot spill to a cool area
outside the surface unit.
3. With the
remove any
be left unti the
Do not
of the
under Heavy
in a cool
Any
to use the
has been removed.
use a dry paper towel to
of
has cooled.
surface unit
the steps
shotid
to continue the cleaning process.
General Information:
As the Cook Top Cleaning Creme cleans, it
leaves a protective coating on the
surface.
This coating helps to prevent build-up ofrninerd
deposits (water spots) and will make future cleaning
easier.
coating and therefore make the
detergents remove this protective
more
susceptible to staining.
To conveniently order more creme and/or
scrapers for cleaning your radiant range,
call our toll free number:
National Parts Center
Creme 10 oz.
Scraper
Creme and scraper kit
800-626-2002
#
#
# WB64M027
-
●
Most cleaners contain ammonia, chemicals and
abrasives which can damage the surface of your
cooktop. Use only the Cook Top Cleaning Creme
for proper cleaning and protection of your glass
ceramic surface.
●
If you slide aluminum or copper
across
the surface of your cooktop, they may leave metal
markings which appear as scratches. If this shotid
happen, use the razor scraper and Cleaning Creme to
remove these markings. Failure to remove these
residues immediately may leave permanent marks.
32
●
Water stains (mineral deposits) are removable
using Cook Top Cleaning Creme or full
white vinegar.
●
pots with a thin overlay of
enamel are allowed to
with the
This
be removed immediately before heating
dry, the overlay may bond
and leave a black discoloration.
or
again or the discoloration maybe permanent.
●
Use of window cleaner may leave an iridescent film —
on the cooktop. Cook Top Cleaning Creme will
remove this discoloration.
Read and follow
instructions and warnings
on Cook Top Cleaning Creme labels.
Page 33
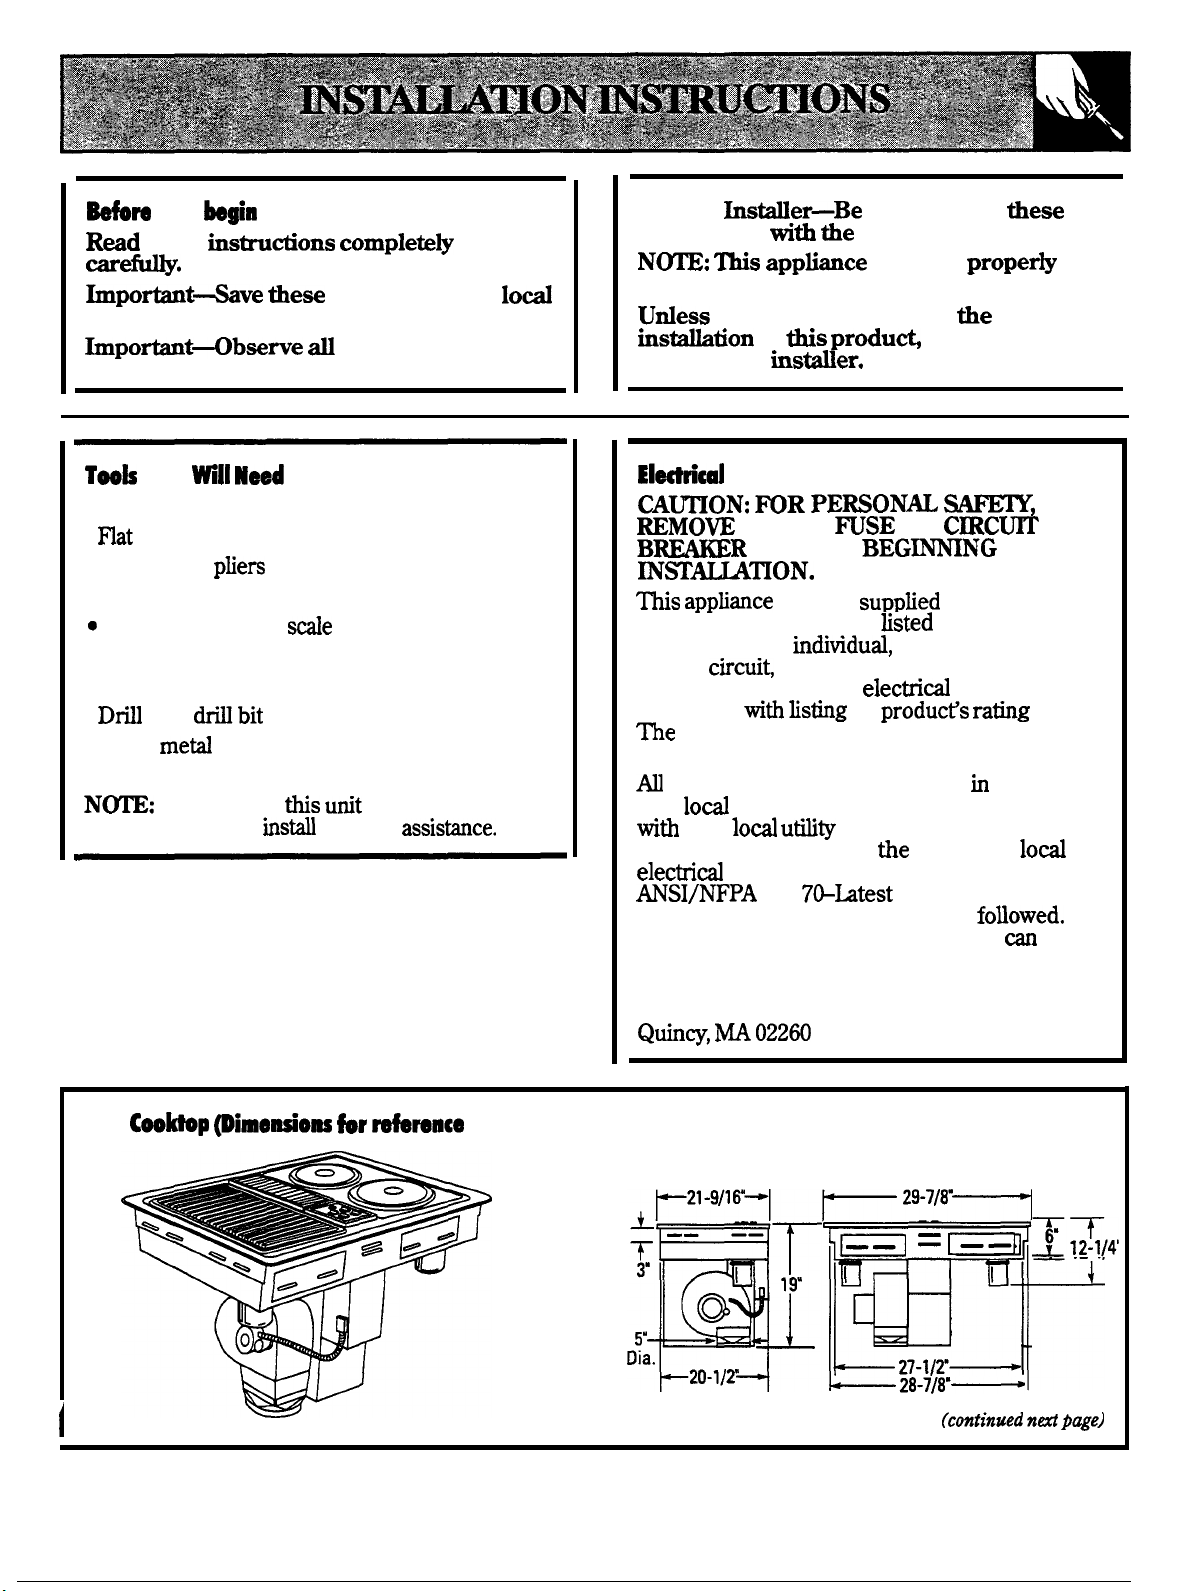
you
these
inspectors use.
and ordinances.
Note to
instructions for
governing codes
and
instructions
grounded.
very knowledgeable in
professional
appfiance must be
of
sure to leave
Consumer.
engage a
You
. Saw
●
blade screwdriver
●
Electrician
●
Duct tape
Measuring tape or
● Carpenters square
●
Wrench or socket set
●
and
●
Sheet
screws
. Junction box
Initiation of
Do not attempt to
requires 2 people.
without
Requirement
HOUSE
OR
BEPORE
voltage and frequency, as fisted with Step 9, and
connected to an
branch
time delay fuse. Proper
be verified
rating plate is located on the right-hand side
of the exhaust plenum.
wire connections must be made
with
codes and ordinances. In the absence of
electric range initiations, must be
A copy of the National Electrical Code
obtained by writing to:
National Fire Protection Association
Battery March Park
must be
with the proper
properly grounded
ratings should
on
plate.
accordance
codes and properly insulated. Check
for governing electrical
codes, the National Electric Code,
No.
Edition, governing
be
30”
@imew*o=
only)
Unit must be vented to the outside!
I
33
Page 34

Preparing for
cooktop
in a cabinet
The exhaust vent beneath the cooktop must be
located
At least 6“ must be allowed
designed
same width.
maybe
to look best when centered
studs or floor joists so that
properly
side edges
of cooktop and adjacent
Step 2
Preparing
cooktop
of cabinets.
modifications.
some cabinets, the sides may need
or cut down 2“ as shown, and the corner braces
removed in order to accommodate the
75 cm. and
the back panel may need to beat
5“ to accommodate the unit
a peninsula or island type cabinet, the sides
may need to be scooped or cut down, and the
corner braces removed in order to accommodate
the unit.
designed to fit
some cabinets may require
a
cm.
a
into a variety
European
or
a
be scooped
type
5“
for European
Avoid placing
if possible, in order to reduce the
caused by reaching overheated surface units.
can be reduced by
projects
beyond the bottom of the mbinets.
is used above
30” clearance between the cooking
surface
the bottom of any unprotected
clearance
less than 30”,
with flame retardant
thick, covered with 28 gauge sheet steel or
0.020” thick copper, Clearance between cooktop
and protected
24”.
oven or cooking
conform to the initiation instructions packed
with that
A
15”
minimum must be kept from the side
above the cooktop
a range hood that
a
cooktop and
bottom must be
must
of 5 inches
at least 1/4”
BE
of a fisted microwave
unit,
a
is
edge of cooktop to the bottom of any
not
than 15”, adjacent cabinets should beat least
6“ from side edge of cooktop.
above cooktop.
clearance is less
Step
3
Rough
an
approved junction box within shaded
area shown in diagram. Junction box must be at
least
Run conductors from residence
junction box according to
below top of cabinet.
of Jundon
FUSE OR OPEN
BEFORE
wiring to
g“
4“
codes.
34
Page 35
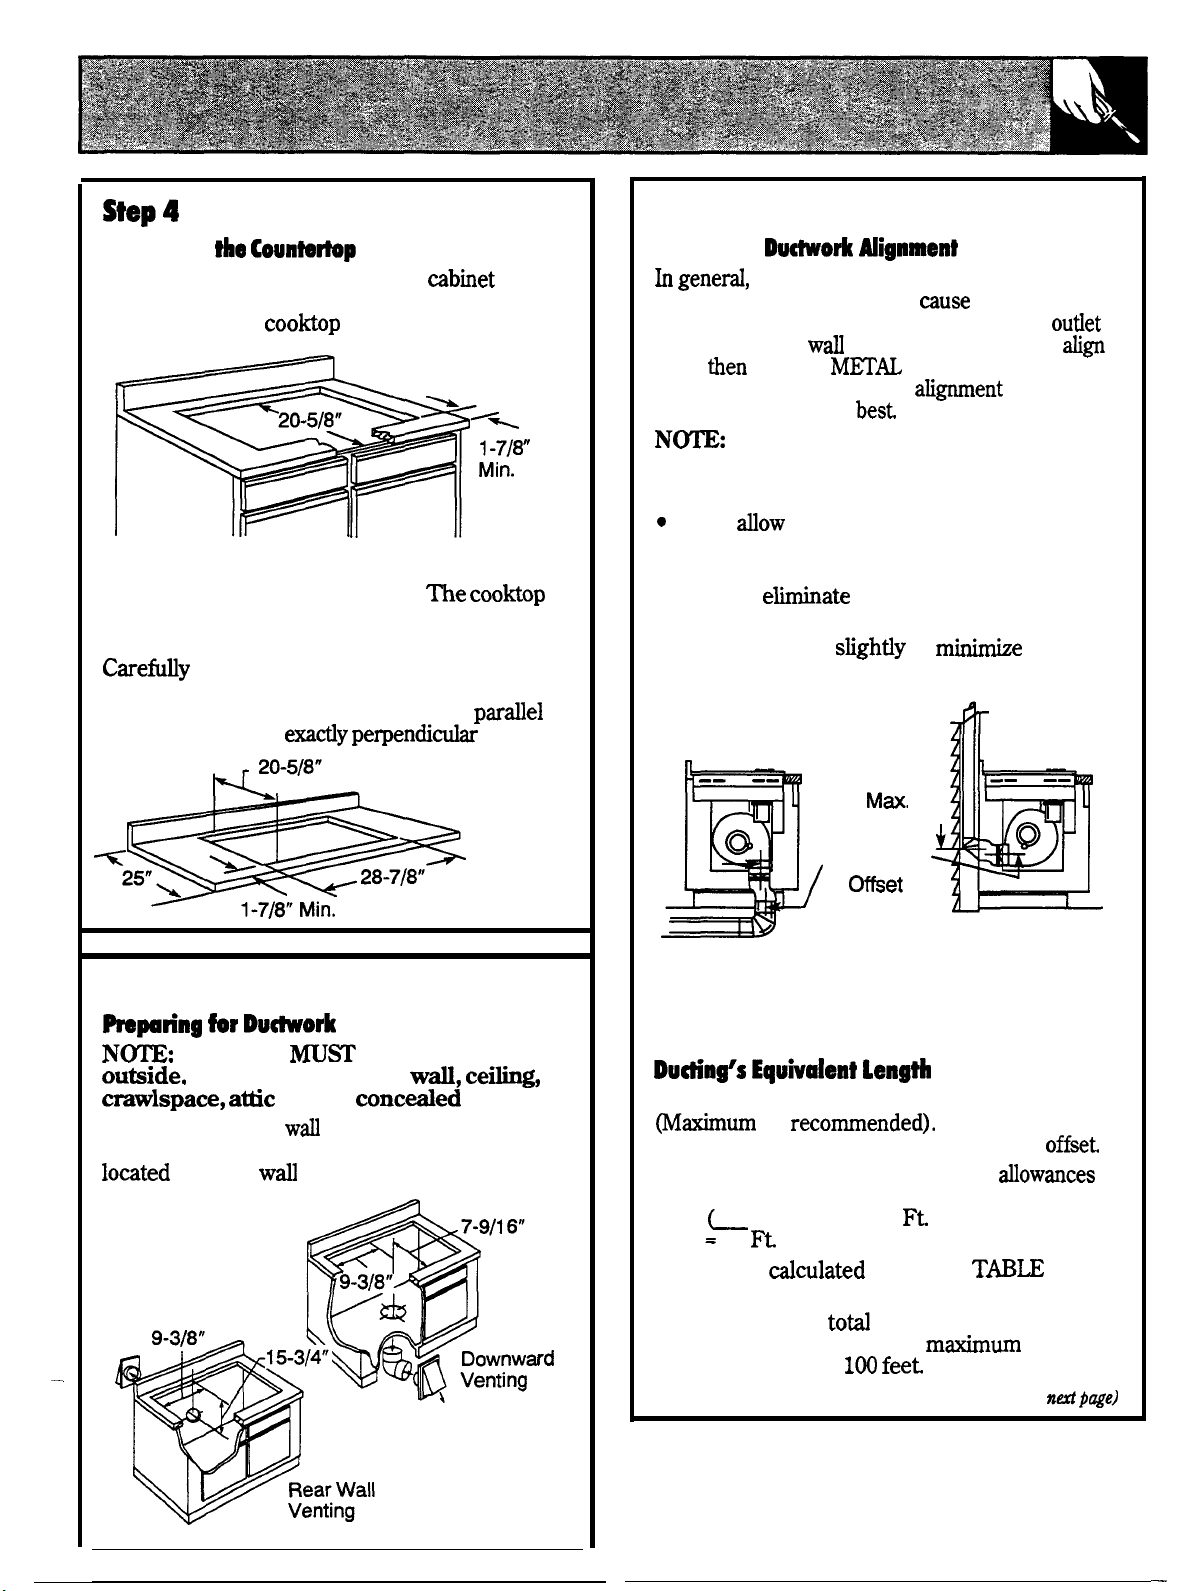
Step 5A
Preparing
Clearance
rear of countertop cutout must be 2&A” in order
to accommodate
A 1/2” wide flat area is required around the edge
of opening for support of the unit.
unit must be level and sit squarely into
countertop opening.
the dimensions shown in the frustration. Be sure
that opening is cut squarely, with sides
each other and rear
Counte~p
between inside front of
depth.
cut countertop opening according to
and
cooktop
to sides.
to
Blower to
the use of flexible ducting is
discouraged because it can
restricted airflow. However, if the blower
and the floor or
well,
flexible
to adapt to an offset. Good
duct location do NOT
ducting can be used
without use
of flexible ducting is
. Do not exceed the maximum recommended
offset of 3“.
Do not
the
flexible ducting to kink or
collapse.
. Do stretch the flexible ducting as much as
possible to
as possible.
● Do rotate blower
(see step 6).
as much of the corrugation
to
3“
Centerline
to
Centerline
off-set
Step 5
DuWork
Ductwork
DO NOT vent into a
or any
Cut
hole in cabinet
for your initiation. Make sure exhaust duct is
between
be vented to
space.
or floor as appropriate
studs or floor joists.
Bottom Venting
Steps to Determine Flexible
1.
Measure the
actual amount of offset
3“
Back Venting
The effect upon
airflow is dependent upon the amount of
2. Calculate the equivalent ducting
using:
in. offset) x (14
—
equivalent length.
3. Enter the
this initiation instruction.
4. Ensure that the
ducting does not exceed the
recommendation of
value into
per inch)
1 of
equivalent length of
(continued
35
Page 36
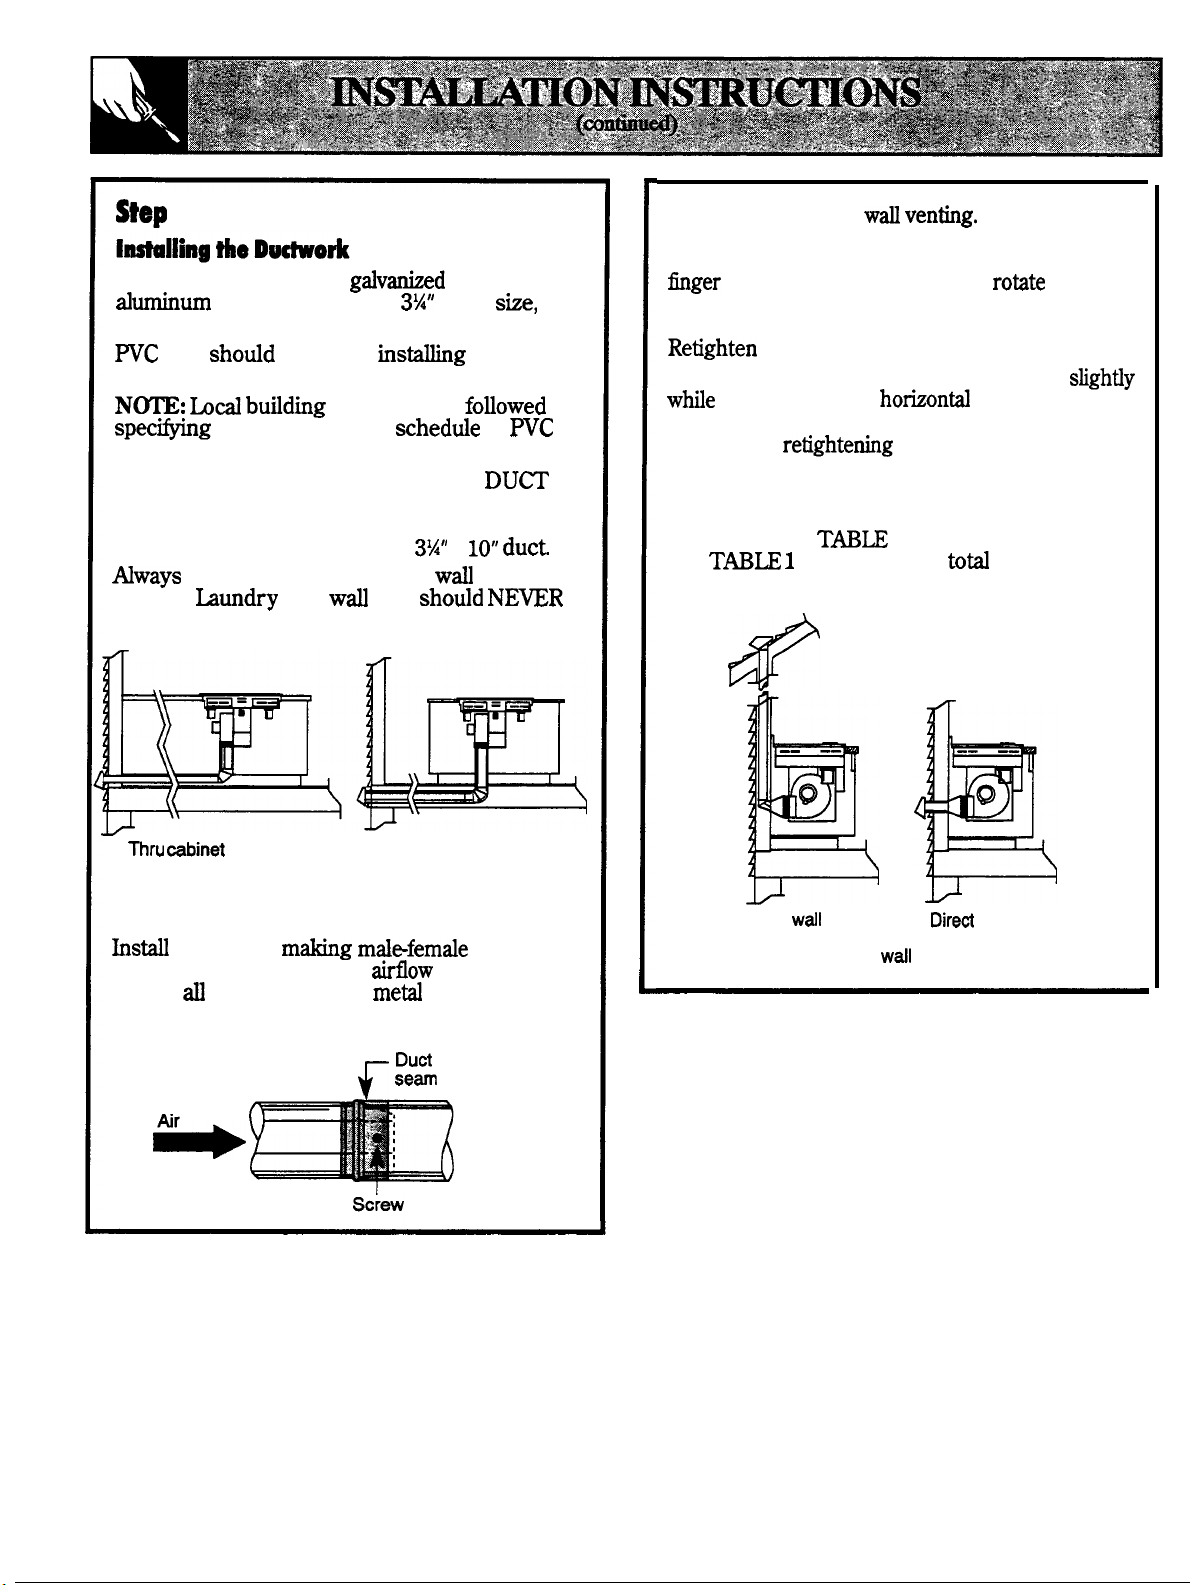
6
Use
minimum
combination of both.
duct
poured concrete slab.
duct used.
5“ round duct maybe used on SHORT
runs. But, note higher equivalent lengths for
each 5“ dia. piece used. Don’t convert back to
5“ duct after use of 6“ round or
use an appropriate roof or
damper.
be used.
26
gauge
duct in 6“ round or
be used if
approved type and
code must be
type
caps
or
24
x 10”
under a
of
x
cap with
gauge
or
in
Select
downward or
To convert
blower exhaust direction, remove four nuts
inside the plenum which hold blower and wire
guard. Remove blower and
so that
exhaust faces downward or rear direction
needed. Replace wire finger guard and nuts.
nuts.
Blower exhaust direction can be adjusted
in its vertical or
direction by
loosening four nuts holding blower, rotating
blower and
nuts.
Use the shortest and straightest duct run
possible. For satisfactory performance the duct
run should
length. Refer to
Use
length of the ductwork.
not exceed 100 feet equivalent
1 of equivalent lengths.
to calculate the
equivalent
toe space
ductwork,
Between floor joist
Downward venting
connections in direction of
Secure
joints with sheet
screws and
duct tape to assure airtight seal.
Flow
as shown.
and screw
Inside wdl to roof
Rear
36
Page 37
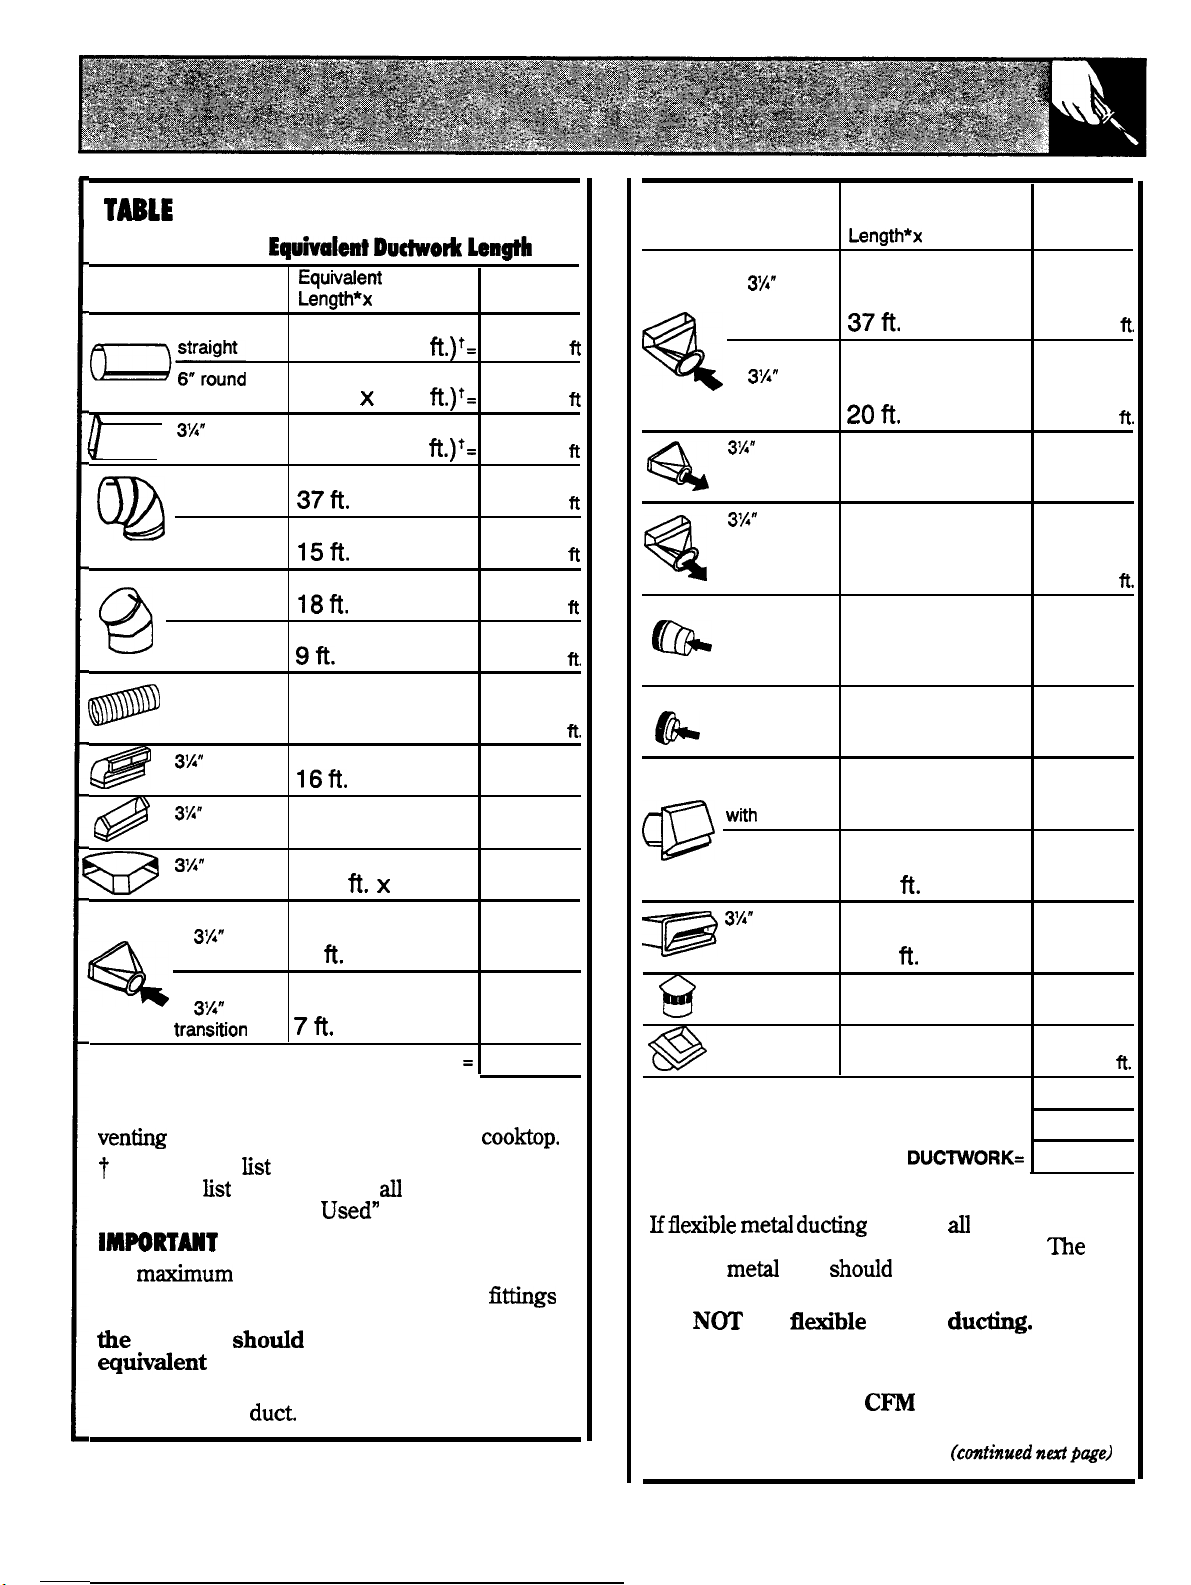
1
Calculate Total
Duct Pieces
5“ round,
2.7 X (
straight ‘
x
10”
straight
5“, 90°
elbow
6“, 90°
elbow
5“, 45°
elbow
6“, 45°
elbow
Flexible
Metal Offset See Calculations
Adapter
x
10”
1
1
in Step 5A
90° elbow
x
10”
45°
elbow
x 10“
90° flat elbow
5“
round
to
x 10”
transition
6“ round
to
x 10”
* Equivalent lengths of duct pieces are based
5fi. x ( ) =
18
3
Subtotal Column 1
on actual tests and reflect requirements for good
performance with any downdraft
Measure and
Count and
feet of straight duct used.
the quantity of
pieces for the ‘Number
For
efficiency, use the shortest and
straightest duct run possible, with as few
as possible. For satisfactory performance,
duct run
not exceed 100 feet
length.
Venting performance is improved by using
larger diameter
Used
(
x (
x ( ) =
)=
x ( ) =
( ) =
x (
x ( ) =
)=
other duct
of each type.
Equivalent
=
Length
ft.
ft.
fi.
ft.
ft.
ft.
Duct Pieces
to 6“ round
transition
5“ round collar
to 6“ round
cap transition
5“ round
wall cap
6“ round
wall cap
with damper
5“ round
to
x
transition
90° elbow
6“ round
to
x 10”
transition
90° elbow
x
10”
to
6“ round
transition
x 10”
to 6“ round
transition
90° elbow
Tapered
5“ round
damper
x
10”
Equivalent Number
10”
x ( ) =
x (
5fi. x ( ) =
12 fi. x (
6 fi. X ( ) =
13 fi. x ( ) =
84 fi. X ( ) =
21
Used
)=
)=
x ( ) =
=
wall cap
with damper
6“ round,
roof cap
6“ round,
roof vent
27
20 x ( ) =
24 X (
Subtotal Column 2 =
Subtotal Column 1 =
TOTAL DUCWORK=
Should not exceed 100 feet.
is used;
X ( ) =
)=
the equivalent
feet values in the table should be doubled.
flexible
duct
be straight and smooth
and extended as much as possible.
DO
use
plastic
Vent initiation should not exceed 100 feet
equivalent length.
Blower is rated at 400
at 0.1 inch of water
back pressure.
Equivalent
Length
ft.
ft.
ft.
ft.
ft.
ft.
ft.
n.
n.
ft.
37
Page 38
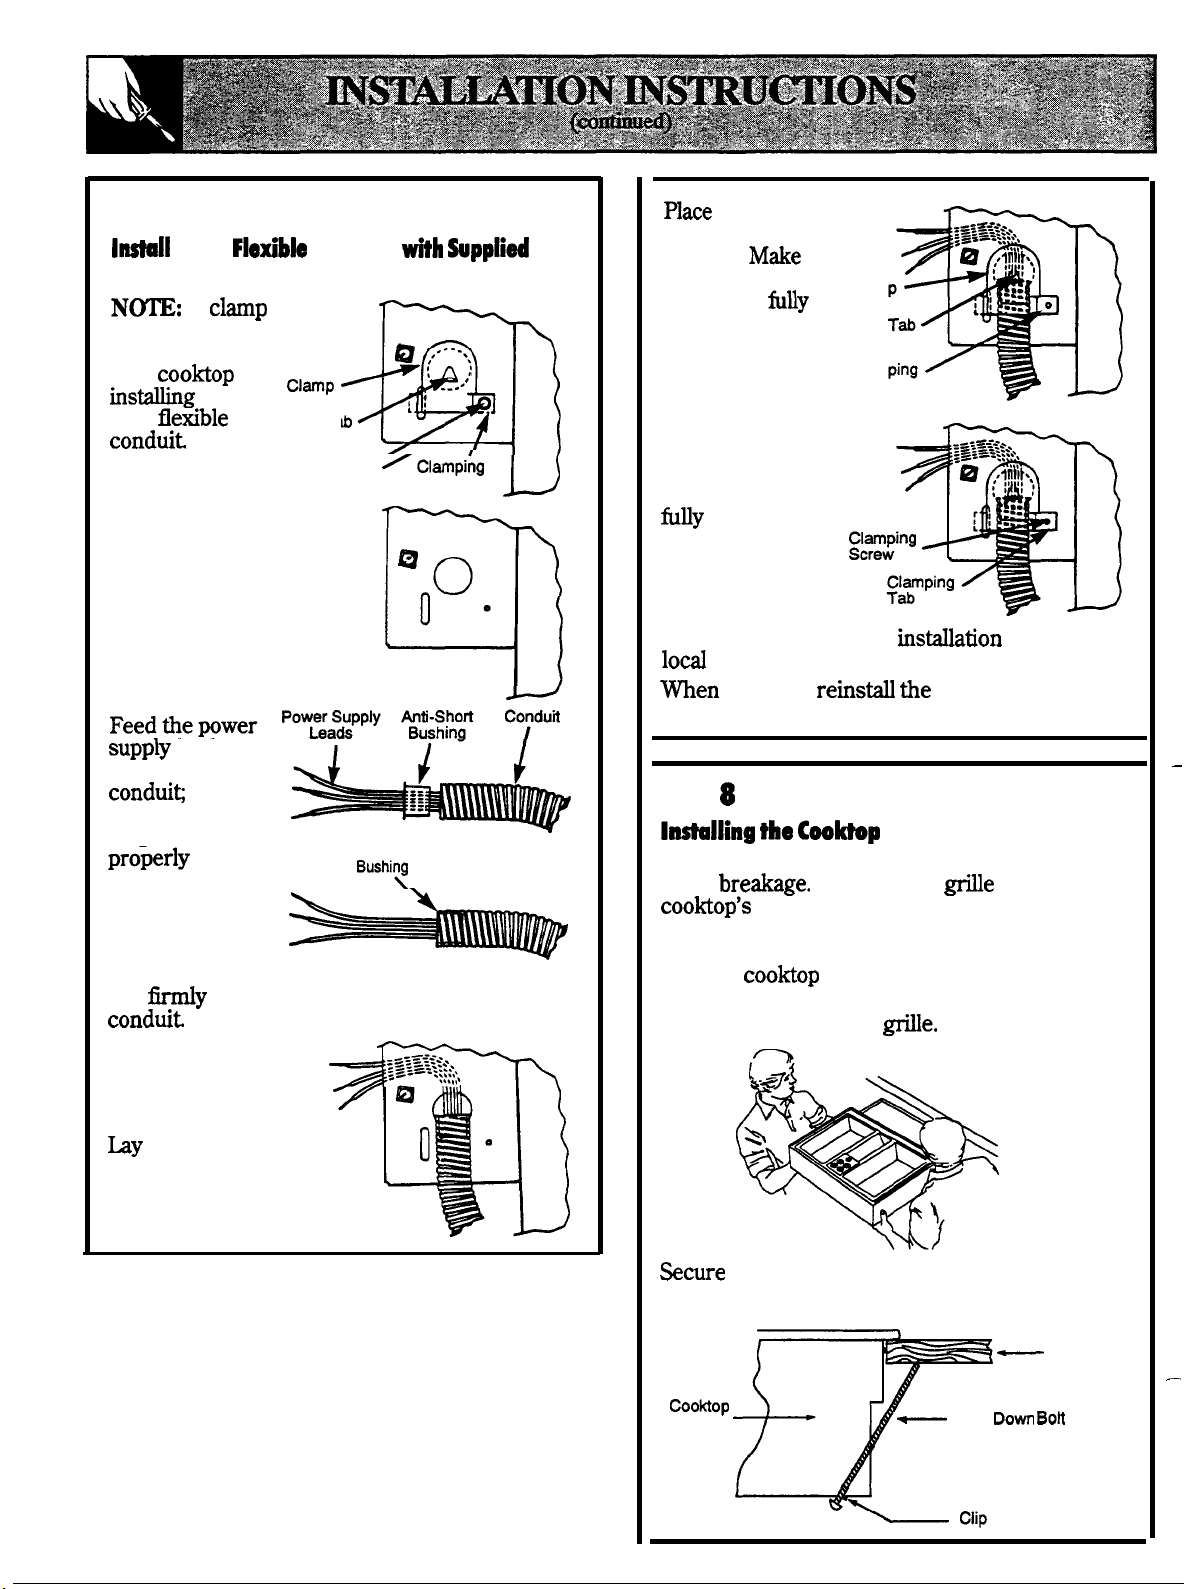
Step 7
1/2”
Clamp
A
has been
included with
the
1/2”
Remove the screws
holding the wire
compartment cover and
remove the cover.
Remove the clamping
screw and the clamp.
leads
through the
to leave enough
length to
connect these
leads to the
COOMOP
leads.
Thread the
and
Feed the leads
through the hole in
the wire
compartment
the conduit
against the side of
the wire
compartment
for
the
be sure
power
leads through an anti-short bushing
seat the bushing in the end of the
Conduit
Stop
Clamping
Screw
Tab
-.. ,
Tab
0
.
(Fully Seated)
the clamp
over the
conduit. M&e
sure the
bushing is
seated against
the stop tab in
the
clamp.
Tighten the
clamping screw
until the
clamping tab is
seated
against the wire
compartment
Complete the rest of the
codes (see steps 9 and 10).
complete
cover.
clam
stop
Clam
Tab
observing
the wire compartment
Step
Remove grease jar(s) from beneath COOMOP to
avoid
cooMop over countertop opening, with power
cable inserted through the opening.
Holding
countertop opening.
Replace jar(s) and vent
Remove vent
surface. Using 2 people, position
by side edges, lower it into
from
38
COOMOP
bottom of the COOMOP case. (2 bolts, 1 per side.)
Case
by tightening hold-down bolts in
Countertop
Hold
Boh
Page 39
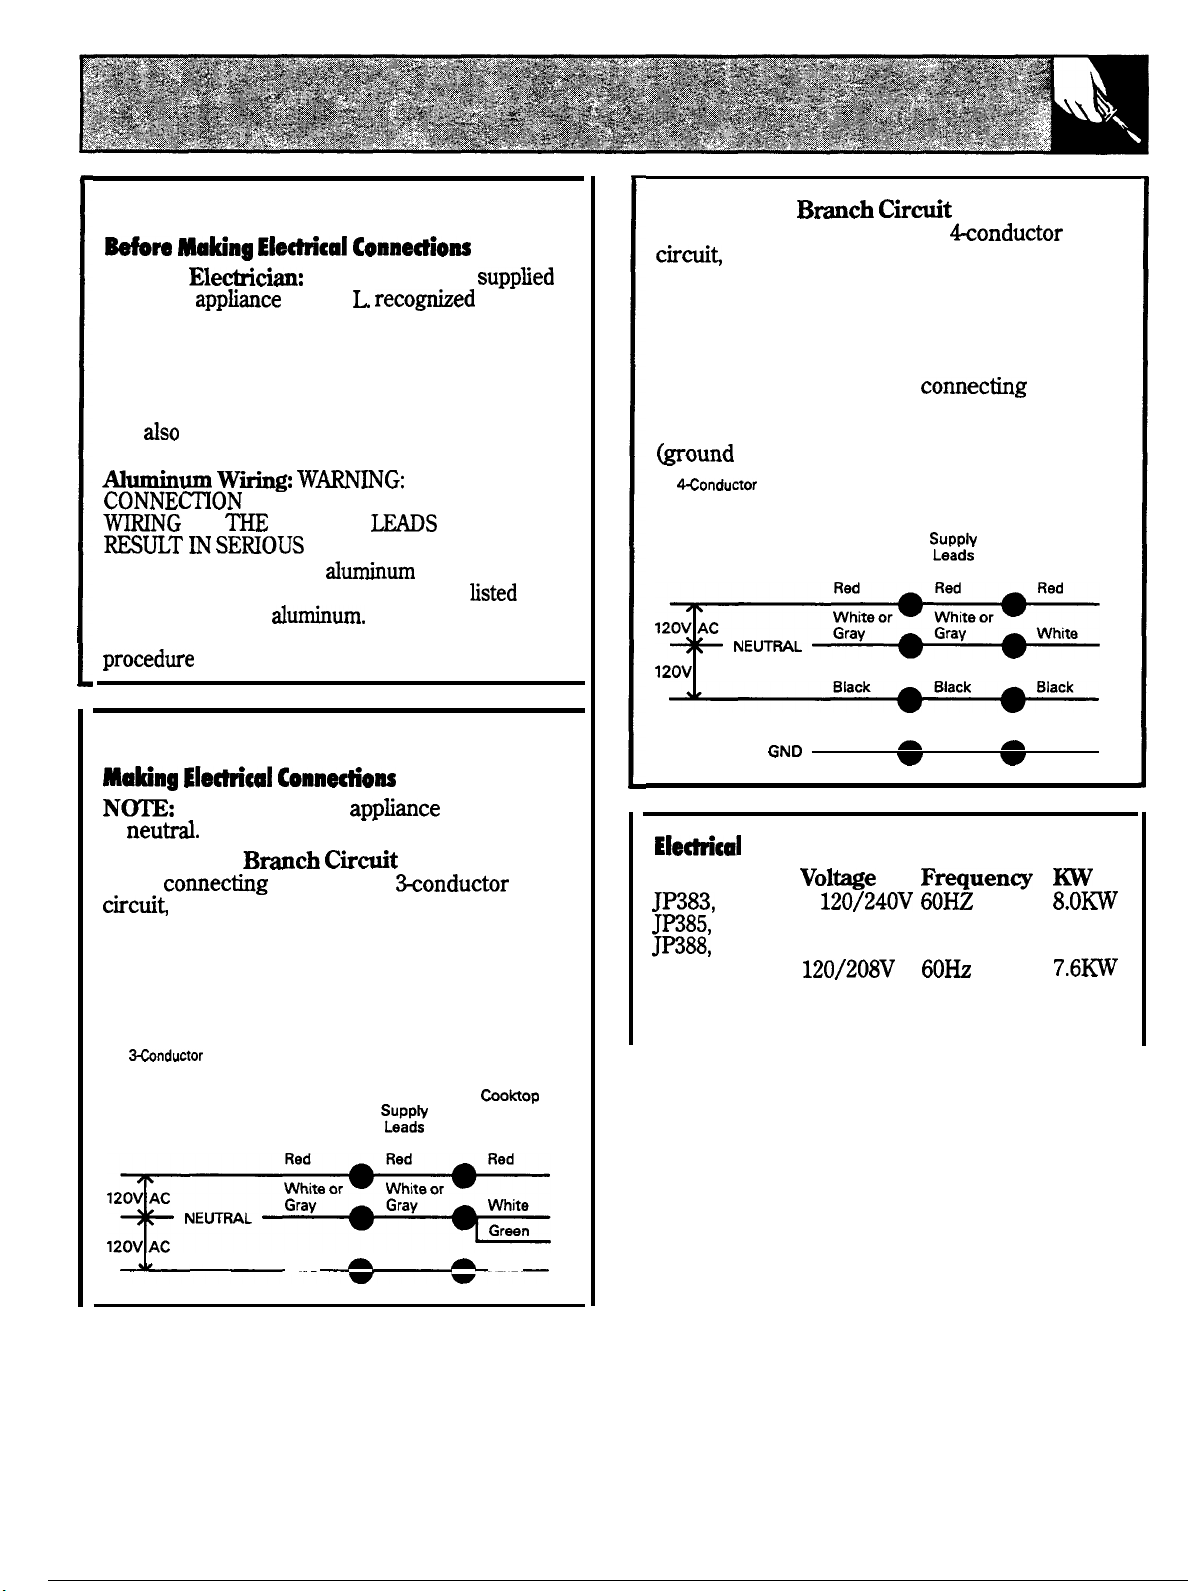
Step 9
Note to
with this
connection to large gauge household wiring. The
insulation of these leads is rated at temperatures
much higher than the temperature rating of
household wiring. The current carrying capacity
of a conductor is governed by the wire gauge
and
the temperature rating of the insulation
around the wire.
TO
Attach copper wires to
special connectors designed and U. L.
joining copper to
connector manufacturer’s recommended
are U.
The
(onne~iow
power leads
IMPROPER
OF ALUMINUM HOUSE
COPPER
PROBLEMS.
wiring using
Follow the
closely.
for
CAN
for
Step 10
4-Conductor
When connecting cooktop to a
connect the red leads of the cooktop and
the power supply to the branch circuit red lead;
connect the black leads to each other. Separate
the green and white leads of the cooktop.
Connect cooktop white lead to the power supply
and branch circuit neutral leads, which are white
or gray. Ground the unit by
the green
conductor of the cooktop to the bare or green
leads of the power supply and branch circuit
leads).
Branch Circuit
Power
Cooktop
Power
Leads
Green
AC
Branch Circuit
Bare or Bare or
Green Green
The frame of this
Connetiou
is grounded
to
3-Conductor
When
cooktop to a
connect the red leads of the cooktop and
the power supply to the branch circuit red lead;
connect the black leads to each other. Connect
the green and white leads of the cooktop to the
power supply and branch circuit neutral leads,
which are white or gray.
Branch Circuit
Branch Circuit
Black Black Black
Power
Power
Leads
Requirement
Model #
JP384
JP386
JP389
JP387
* For
reference only, verify with products
rating plate.
=
60%
39
Page 40
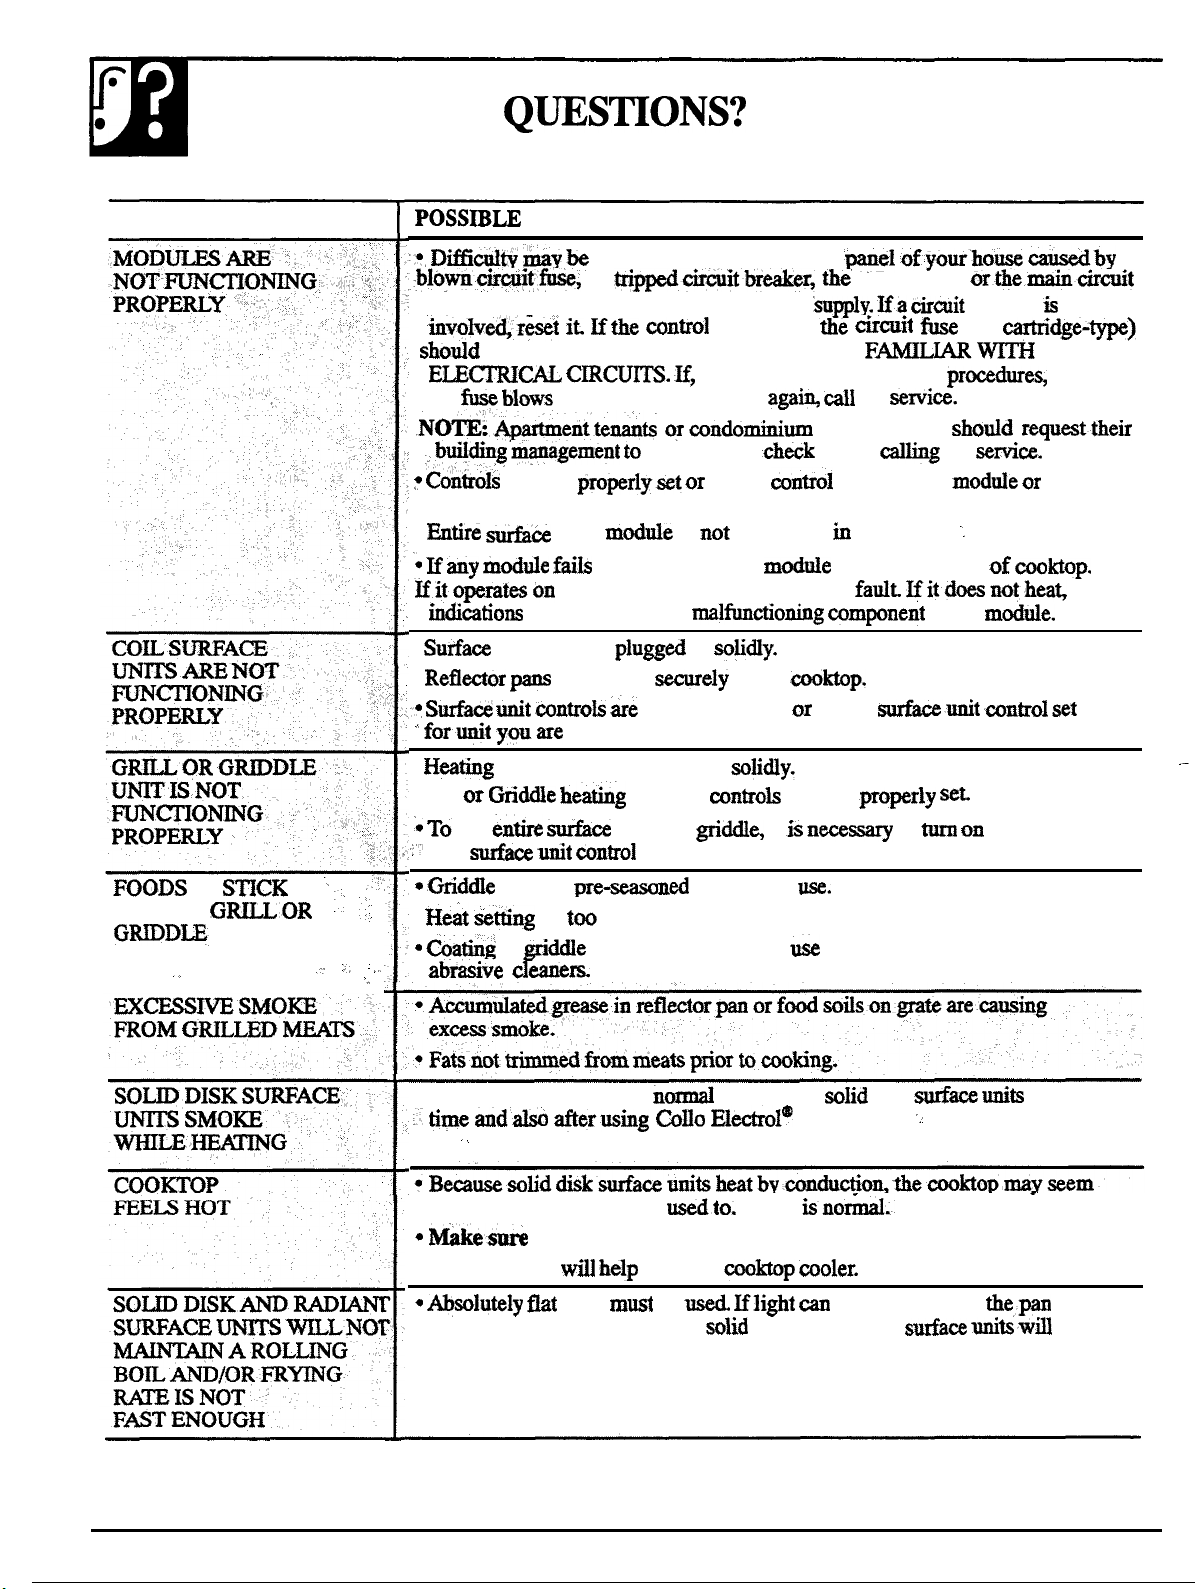
USE THIS PROBLEM SOLVER
PROBLEM
CAUSE
breaker,’ depending on nature of the power
. shodd be changed. BUT ONLY BY SOMEONE
the
.
b@ding
you are using.
●
●
●
forunit youare using..
●
. ;&l
use
rear
in the main distribution
a
or circuit breaker trips
perform this
are riot
unit
to heat-switch the
is
are that there is a
units are not
are not set
in
not properly set
element is not plugged in
element mntrok are not
of @l or
set for unit you are using.
box=-,
after performing 1 of these
owners shodd
before
wrong
is set for the
plugged’
to the other side
mmponent in the
in the
wrong
it
tifyow’house
main&
for
properly.
to
breaker
(a
for
:
mntrol set
element
front and
a
TO
:
:
.
●
was not
of
is
high.
has been damaged by
.
. Some smoke, and odor is
afterwing
hotter than you are usedto. This
●
Using the vent
flat-bottomed pans-M&
pans
bottom and a straightedge, the
before first
keep the
be
of sharp.
when using
cleaner..
be seen between
disk and radiant
instruments or
disk
-
.
for the first
not
operate properly. . .
—
40
Page 41
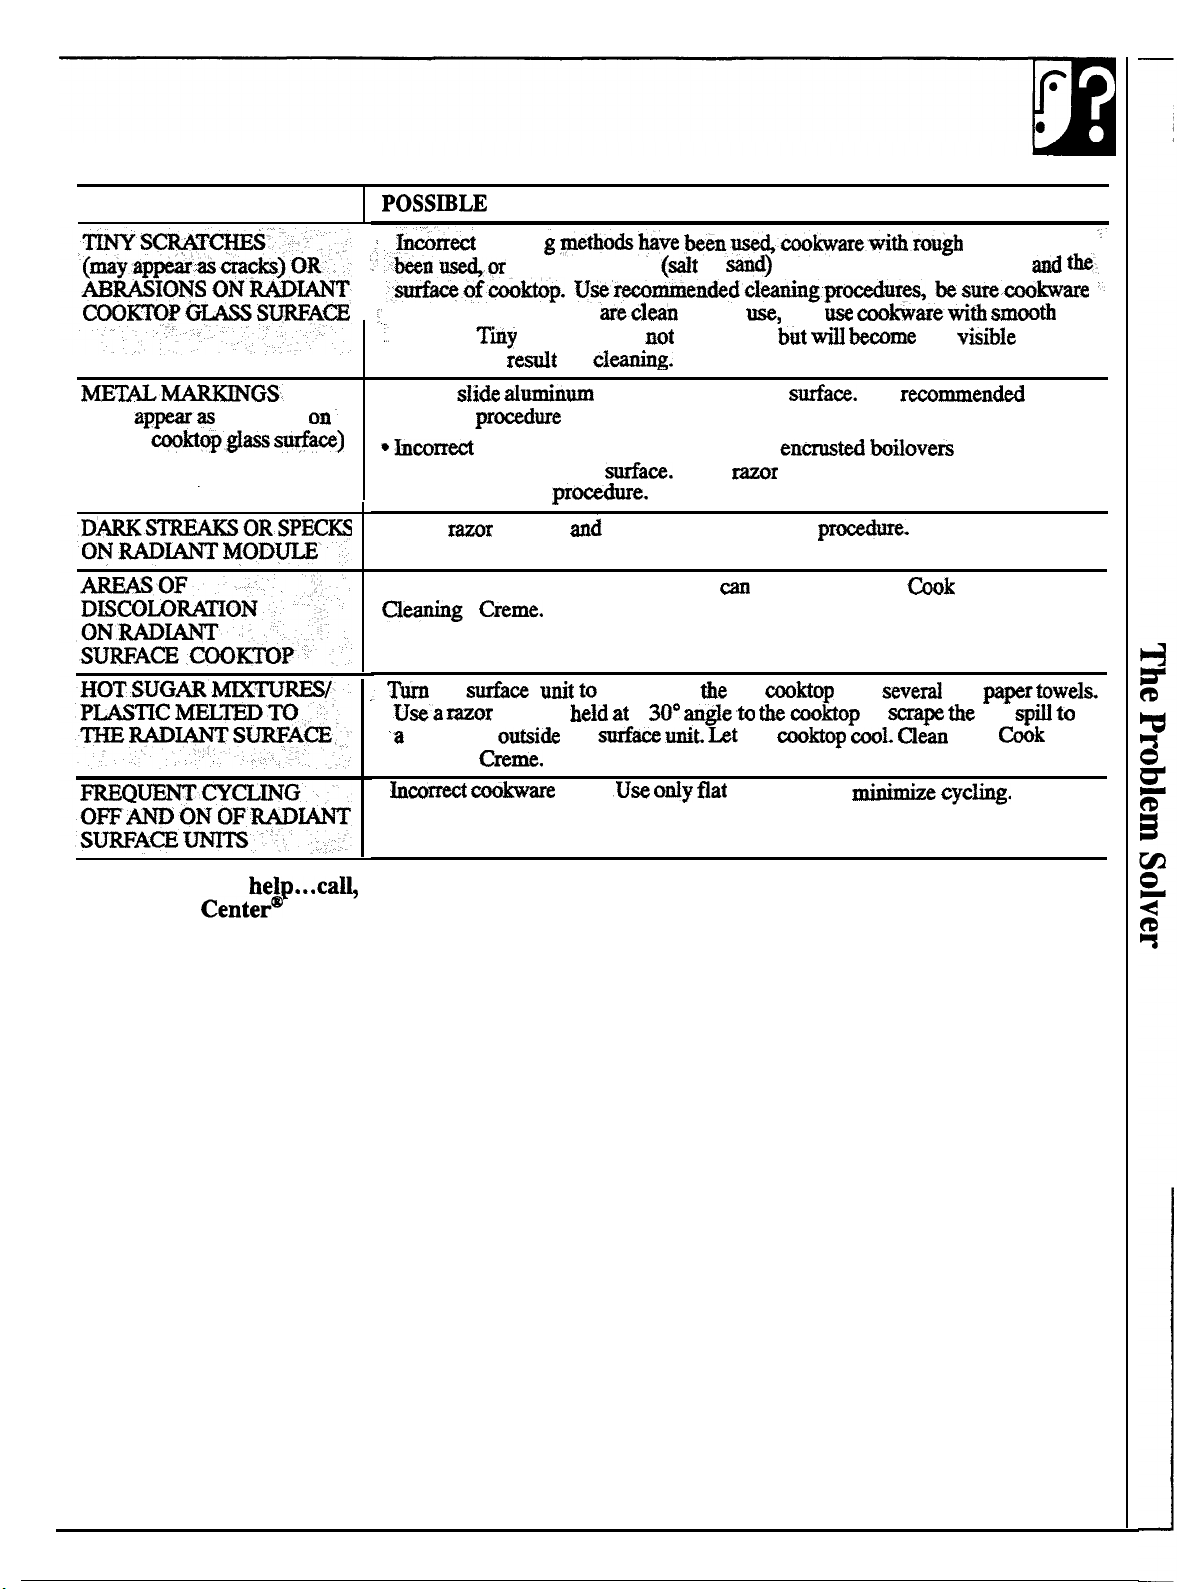
PROBLEM
CAUSE
(may
scratches
radiant cookt@.#ass
, . .
●
bottoms and cookware areclean before
bottoms.
time as a
●
Do not slide
cleaning procedwe to remove marks.
bcorrect cleaning materials have been-
spatters remain on the
cleaning
●
’ Use a
●
Mineral deposits from water or food
●
cool area
the
d&
coarse
scratches are
scraper
scraper
particles
of
cookware across the
recommended cleaning
LO,
a
the
~*
●
use&
or
removable
Use a
wipe
were between the cookware
and
scraper and r-remended
be removed with
hot
the
cookware to
Use
with
to
less
dry
bottoms has
in
or grease.
Top
hot
with
Top”
If you need more
GE
Answer
toll
800.626.2000
consumer information service
free:
41
Page 42

Page 43
We’ll Be There
With the purchase
information or assistance
AGE consumer service professional will provide expert repair service,
scheduled at a time that’s convenient for you. Many GE Consumer Service
locations offer you service today or tomorrow, or at your con-
venience
Our factory-trained technicians know your appliance inside and
repairs can be handled in just one
8086262000
Whatever your question about any GE major appliance, GE Answer Center”
information service is available to help. Your call-and your question-will be
answered
Center” service is open 24 hours a day, 7 days a week.
a.m. to
and courteously. And you can
p.m. weekdays,
GE
GE,
receive the
be
a.m. to
p.m. Saturdays).
any time. GE Answer
you have to do is c~—toll-free!
most
that
ever need
For Customers
Upon request, GE will provide
Braille controls for a variety of GE
appliances, and a brochure to
assist in planning a barrier-free
kitchen for
mobility. To obtain these items,
free of charge,
limited
800.626.2000.
SpecialNeeds...
Consumers with impaired hearing or speech who have
access to a
call 80&TDBGEAC (800-83
information or
or a conventional
You can have the secure feelhlg that GE Consumer Service will still be there
after your warranty expires. Purchase a GE contract while your warranty is still
in effect and you’ll receive a substantial discount. With a multiple-year contract,
you’re assured of future service at today’s prices.
may
to request
can have needed parts or accessories sent
their home. The GE
47,000
fully warranted.
are accepted.
to
GE Genuine
MasterCard and Discover cards
own appliances
system provides access to over
Parts are
to
maintenance instructions contained in*
User
cover procedures intended to be performed
service
improper
personnel. Caution must be
cause unsafe operation.
referred to
since
Page 44
YOUR GE BUILT-IN
IS
FULL
For one year from date of original
purchase, we will
charge,
your
home
of tie
because of a manufacturing defect.
FULL
(on
five yearn from the date of original
purchase, we will provide, free of
charge, parts and seMce labor in
your home to repair or replace the
glass cooktop due to:
●
Cracking of the glass cooktop
due to thermal shock
●
●
Wear off of the pattern on the glass
Cooktop
and seMce labor in
to repair or replace
any
models) For
of the glass
Staple sales slip or
here. Proof of original purchase date
is needed to obtain
●
Cracking of the
between the glass top and
the frame
●
Bum out
of any of the radiant
or halogen
LIMITED
FOUR-YEAR
For the
from date of original purchase, we
will provide, free of charge, a
replacement solid element
heating unit if the element fails
because of a manufacturing
defect. You pay for the
to your home and service labor
charges. This warranty does not
cover Automatic
components, wiring, or
rubber seal
units.
through fifth year
trip Centers or by our
Unit
check
under
This warranty
the original purchaser and any
succeeding
purchased for ordinary
in the 48 mainland states, Hawaii
and Washington,
warranty is the same except that it is
LIMITED because you must pay to
ship the product to the seMce shop
or for the
costs to your home.
provided by our
Customer Care”
normal working hours.
Should your appliance need
beyond,
is wended to
owner for products
home use
In Naskathe
technician’s travel
SeMce
during
during warranty period or
800-GE-CARES
IS NOT COWRED
●
Read your Use and Cars material.
If you then have any questions
about operating the product,
please
Consumer
address below, or call, toll free:
GE Answer
800.626.2000
trips to your home to
teach you how to use the product.
your dealer or our
office at the
information service
Some states do not
may not
To
to you. This warranty gives you specific legal rights, and you may also have
what your
exclusion or limitation of
rights are in your state,
If further help is needed concerning this warranty, write:
●
Improper installation.
If you have an installation
problem, contact your dealer or
installer. You are responsible for
providing adequate electrical,
gas, exhausting and other
●
Damage to the glass
caused by hardened spills of
sugary materials or
that are not cleaned
to the directions in the Use and
Care Guide.
connecting facilities as described● Damage to the product due to
in the Installation Instructions
provided with the product.
●
Replacement of house fuses or
misuse or abuse.
●
Failure of the product if it is used
for other than its intended
resetting of circuit breakers. purpose or used commercially.
Damage to the glass cooktop
caused by use of cleaners other
than the cooktop
provided
with the product.
●
Damage to product caused
by
fire, floods or acts
of God.
WARRANTOR IS NOT
RESPONSIBLE FOR
CONSEQUENTIAL DAMAGES.
your
or
or state consumer
damages, so the above limitation or exclusion
rights
or your state’s Mornay General.
vary from state to state,
Warrantor: General Electric Company
Affairs, GE Appliances, Louisville,
40225
plastic
No. 1WD2966POV
HOUSEHOLD DISTRIBUTION PANEL BY
REMOVING THE FUSE OR SWITCHING-”
—
OFF THE CIRCUIT BREAKER.
● Do not leave children alone+
be
is in use. They should never be allowed
-., . .
. . . . . .
r-. r--- -.
-L.v.... v
fire extinguisher.
●
Clean the cooktop with caution.
If
a wet sponge
or cloth is used to wipe spills on a hot surface unit,
should
an
an
be careful to avoid
produce noxious fumes if applied to a hot surface.
Some cleansers can
When the cooktop is cool, use only Cook Top
 Loading...