

Page 1
Contents
Solid Disk Cooktop
Appliance Registration
Canning Tips
Care and
Consumer
Controls
Guide
Cookware Tips
Energy-Saving Tips
Features
Model and Serial
Problem Solver
Safety Instructions
’h’ Control
Warranty
GE Answer Center
a
800.626.2000
Model No. JP330P
2
10
12
15
6
8,9
7
4
5
2
13
3,4
6
Back Cover
JP332P
JP333P
JP680P
GE Appliances
Page 2
Help us help you...
Before using your cooktop,
read this book carefully.
is
intended
and maintain
properly.
Keep it handy for answers to your
questions.
If you don’t understand something
or need more help, write (include
your phone number):
Consumer Affairs
GE Appliances
Appliance Park
Louisville, KY 40225
help you operate
your new cooktop
Write down the model and
serial numbers.
You’ll find them on a label on the
underside of the counter unit.
These model and serial numbers
are also on the Consumer Product
Ownership Registration Card that
came with your cooktop. Before
sending in this card, please write
these numbers here:
Model Number
Serial Number
Use these numbers in any
correspondence or service calls
concerning your cooktop.
If you received a damaged
Immediately contact the dealer (or
builder) that sold you the cooktop.
Save time and money.
Before you request
service...
Check the Problem Solver in the
back of this book. It lists causes of
minor operating problems that you
can correct yourself.
If you need service...
To obtain service, see the
Consumer Services page in the
back of this book.
We’re proud of our service and
want you to be pleased. If for some
reason you are not happy with the
service you receive, here are three
steps to follow for further help.
FIRST, contact the people who
serviced your appliance. Explain
why you are not pleased. In most
cases, this will solve the problem.
NEXT, if you are still not pleased,
write all the details—including
your phone number—to:
Manager, Consumer Relations
GE Appliances
Appliance Park
Louisville, KY 40225
FINALLY, if your problem is still
not resolved. write:
Major Appliance
Consumer Action Panel
20 North Wacker Drive
Chicago, IL 60606
Page 3
IMPORTANT SAFETY INSTRUCTIONS
Read all instructions before using
When using electrical appliances,
basic
be
should
the
following:
●
Use this appliance only for
intended use
as described in this
appliance.
disk elements and may
severe bums.
●
Use only dry pot
moist
damp potholders on hot
surfaces may result in bums from
steam.
not let pot holders
manual. touch hot solid disk elements. Do
●
Be
sure your appliance is
properly installed and grounded
by a qualified technician in
accordance with the provided
installation instructions.
●
Don’t attempt to repair or
replace any part of your
cooktop unless it is
recommended in this book.
All elements.
other servicing should be referred
to a qualified technician.
Before performing any service,
DISCONNECT THE COOKTOP
POWER SUPPLY AT THE
HOUSEHOLD DISTRIBUTION
PANEL BY REMOVING THE
FUSE OR SWITCHING OFF
THE CIRCUIT BREAKER.
●
Do
not leave children
children should not be left alone
or unattended in an area where an
appliance is in use. They should
never be allowed to sit or stand
on any part of the appliance,
●
Don’t allow anyone to climb,
stand or hang on the cooktop.
●
CAUTION: ITEMS OF
INTEREST TO CHILDREN
SHOULD NOT BE STORED
IN CABINETS ABOVE A
not use a towel or other bulky
cloth in place of a pot holder.
●
For your
never use
your appliance for warming or
heating the room.
●
Storage in or on appliance-
Flammable materials should
stored
or near the solid disk
Keep hood and grease filters
to maintain good venting
to avoid grease fires.
Do
not let cooking grease
other flammable materials
accumulate on the
●
Do not use water on grease
fires. Never pick up a flaming
pan. Smother flaming pan on
surface unit by covering pan
completely with well-fitting lid,
cookie
sheet or flat tray.
Flaming grease outside a pan
can
by covering with
baking soda or, if available, a
multi-purpose dry chemical
foam type
●
not
elements. These
extinguisher.
solid disk
surfaces may be
hot enough to bum even though
they are
in color. During and
after use, do not touch, or let
CLIMBING ON THE
COOKTOP TO REACH
ITEMS COULD BE
SERIOUSLY INJURED.
●
Never wear loose-fitting or
– hanging garments
the appliance.
Flammable
material could be ignited if
clothing or other flammable
materials contact solid disk
elements or areas nearby solid
disk elements; allow sufficient
time for cooling, first.
Potentially hot surfaces include
the cooktop and areas facing the
Cooktop.
brought in contact with hot solid
When cooking
directions
meat
an
at least
This assures
and
temperature
the
cook
in the remote possibility that
trichina may be present in the
meat,
meat will
●
safe to eat.
Use proper
killed and the
appliance is equipped with one or
more solid disk elements of
different size. Select cookware
flat bottoms large enough
to cover
The use
will
disk element to direct
may
solid disk element.
cookware
a portion of the solid
and
result in ignition of clothing.
Proper relationship of cookware
to burner will also improve
efficiency.
●
Never leave
disk
elements unattended at high
heat settings.
causes
smoking and greasy
that may
●
Don’t assume
how to operate
cooktop.
on fire.
you know
of
Some features may
work differently from those on
your previous cooktop,
●
Clean cooktop with
If a
wipe spills
sponge or cloth is
a hot cooking
to avoid steam burn.
used
to
cleansers can produce
noxious
if applied to a hot
surface.
certain types of
earthenware or
other glazed containers are
suitable
cooktop service;
others may break because of the
sudden
in temperature.
(See “Cookware Tips”’ on page 7
for suggestions.)
3
Page 4
{continued)
ignition of flammable
materials, and
of cookware
turned toward the
solid disk elements.
OFF
before removing cookware.
on solid disk
recommended.
element is
burnout
When
Foods for
dry as possible.
or
can
the possibility
of the
without extending
turn
foods being fried at
heat settings.
decorative
is
a
result.
hood, turn the fan
if
the
Frost on frozen
hot fat to
covers
be
foods
up
●
Use
for effective
shallow or deep-fat frying.
Filling
part
full of fat cart
food is
added.
●
combination of
wiii be used in frying,
stir
before heating, or as
slowly,
Always
and
watch as it heats.
deep fat thermometer
whenever possible
to prevent
overheating fat beyond the
smoking
THESE
INSTRUCTIONS
Energy-Saving Tips
● Use cookware of medium-weight
aluminum, with tight-fitting
covers, and flat bottoms which
completely cover the heated
portion of the solid disk element.
● Cook fresh vegetables with a
minimum amount of water in a
covered pan.
● Watch foods when bringing them
quickly to cooking temperatures at
high heat. When food reaches
cooking temperature, reduce heat
immediately to lowest setting that
will keep it cooking.
● Use residual heat whenever
possible. For example, when
cooking eggs in their shells, bring
water and eggs to boil, then turn
control knob to OFF position and
cover cookware with lid to
complete the cooking.
● Always turn solid disk element
off before removing cookware.
● Use correct heat for cooking task
(see illustrations of control knobs –
on page 6).
HI (7)—for rapid boil (if time
allows, do not use HI heat to start).
MEDIUM HI (5-6)—for quick
browning.
MED (4)—for slow frying.
MEDIUM LO (2-3)—to finish
cooking most quantities,
double boiler heat, finish cooking,
and special for small quantities.
LO (l)—to maintain serving
temperature of most foods.
● When boiling water for tea or
coffee, heat only amount needed.
It is not economical to boil a
container full of water for only
one or two cups.
● Have pan on the element, ready to
cook, before the heat is turned on.
Page 5
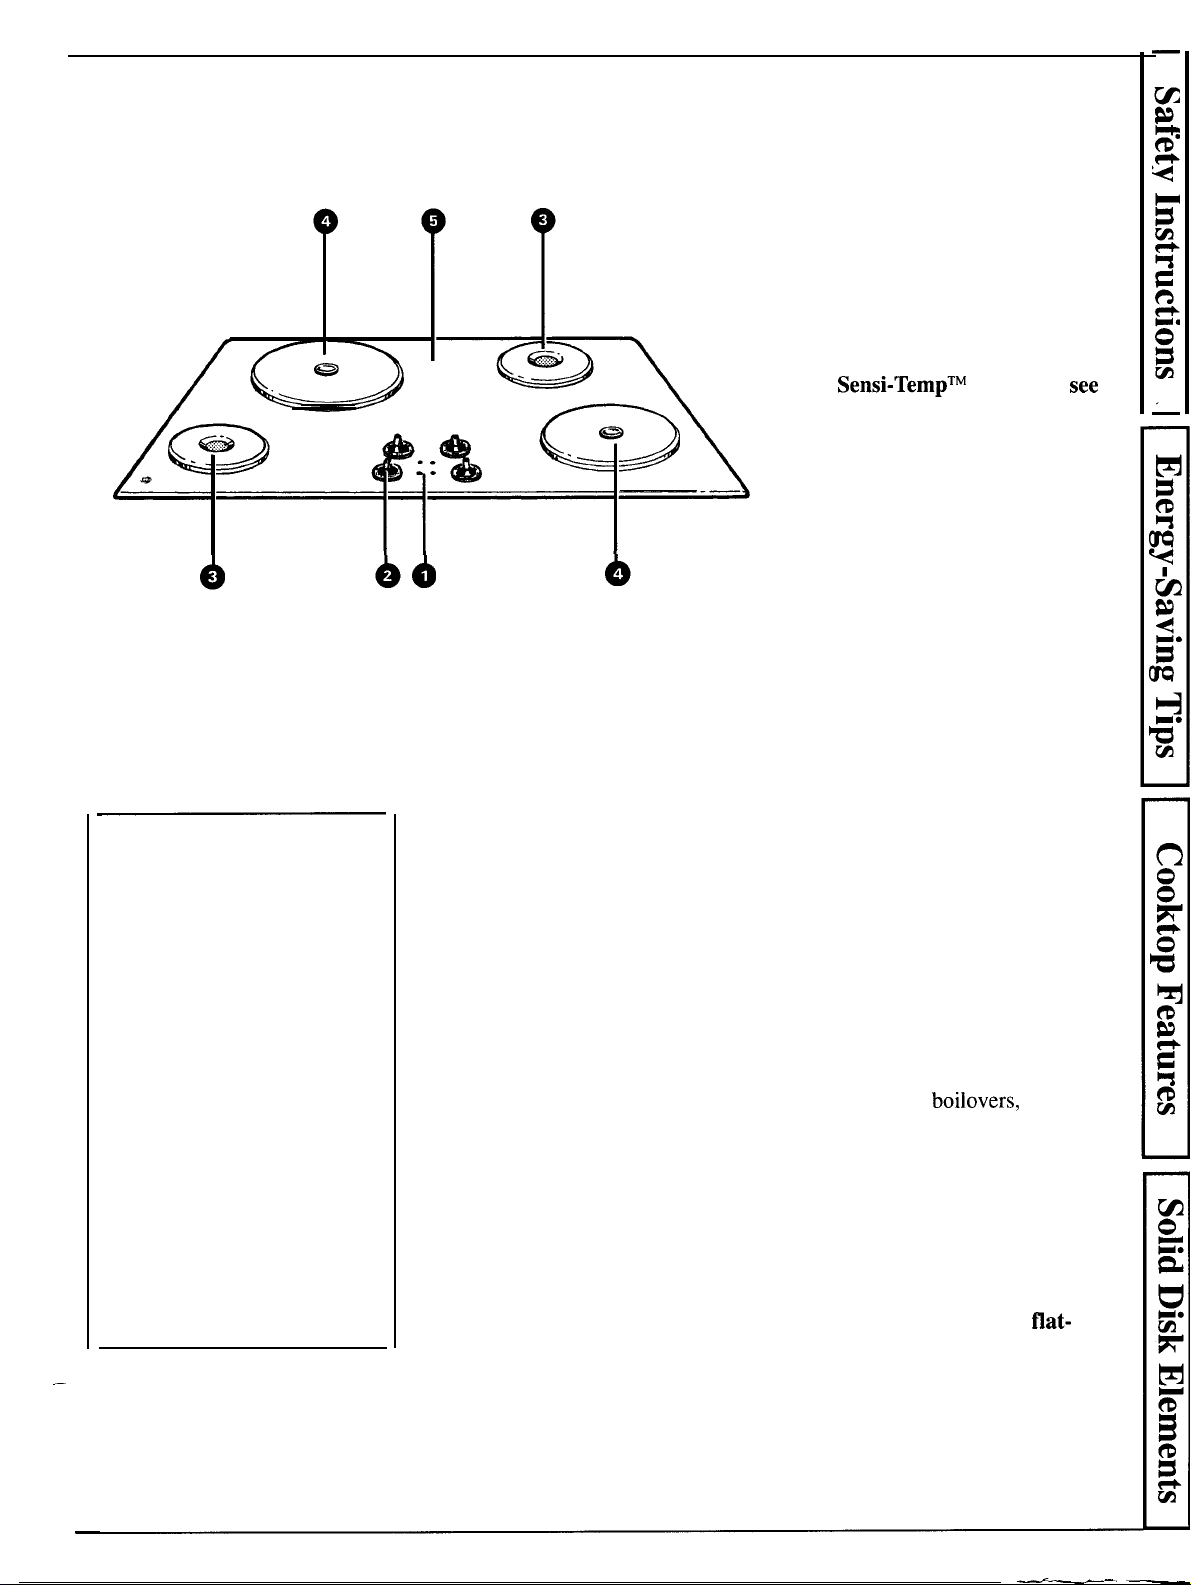
Cooktop Features
1.
Indicator lights for solid
disk elements.
2. Controls for solid
elements. (some models have
next page)
3. Solid disk elements.
4. Sensi-Temp
element. (on models so
equipped.)
5. Tempered glass top.
TM
disk
control(s)
solid disk
Solid Disk Elements
Before Using Your
Solid Disk Elements for
the First Time
The top working surfaces of
the new solid disk elements
have a protective coating that
must be hardened before using
the elements for the first time.
To harden this coating, the
solid disk elements should be
heated at HI heat setting for 3
to 5 minutes, without
cookware on the element.
There will be some smoke and
odor; this is normal.
THE SOLID DISK ELEMENT
PROTECTIVE COATING
MUST BE HARDENED TO
HELP PROTECT THE
ELEMENT OVER ITS LIFE.
General Information
About Solid Disk Elements
Using a solid disk element cooktop
is quite similar to using an electric
coil, with which you probably are
familiar. With both types of surface
units you will enjoy the cleanliness
of electricity and the benefits of
retained heat in the elements.
However, there are differences.
● Solid disk elements do NOT
glow red, even at high heat
settings.
● Solid disk elements reach
temperature a little slower, and
hold heat longer, than conventional
elements. Solid disk elements have
very even heat distribution. Since
solid disk elements hold heat
longer, you may wish to turn the
element off sooner, and take
advantage of the residual heat. The
amount of residual heat depends
on the quantity and type of food,
the material and thickness of the
pan and the setting used for
cooking.
● The red dots in the center of the
solid disk elements are built-in
temperature limiters that
automatically reduce the heat if a
pan boils dry, if the element is
turned on without a pan or if the
pan is not making enough contact
with the surface of the element.
The red dots will wear off with use
without affecting the performance
of the elements.
● There is retained heat in the
element. On
element to cool before cleaning
element area.
● Solid disk element cooking takes
you a step closer to easier cleanup,
because the cooking surface is
sealed against spills and there are
no drip pans or burner box to
clean.
● You must use proper
bottomed cookware, not
cookware that is warped, convex,
or concave. Improper cookware
will cause unsatisfactory cooking
results.
wait for
5
Page 6
Controls
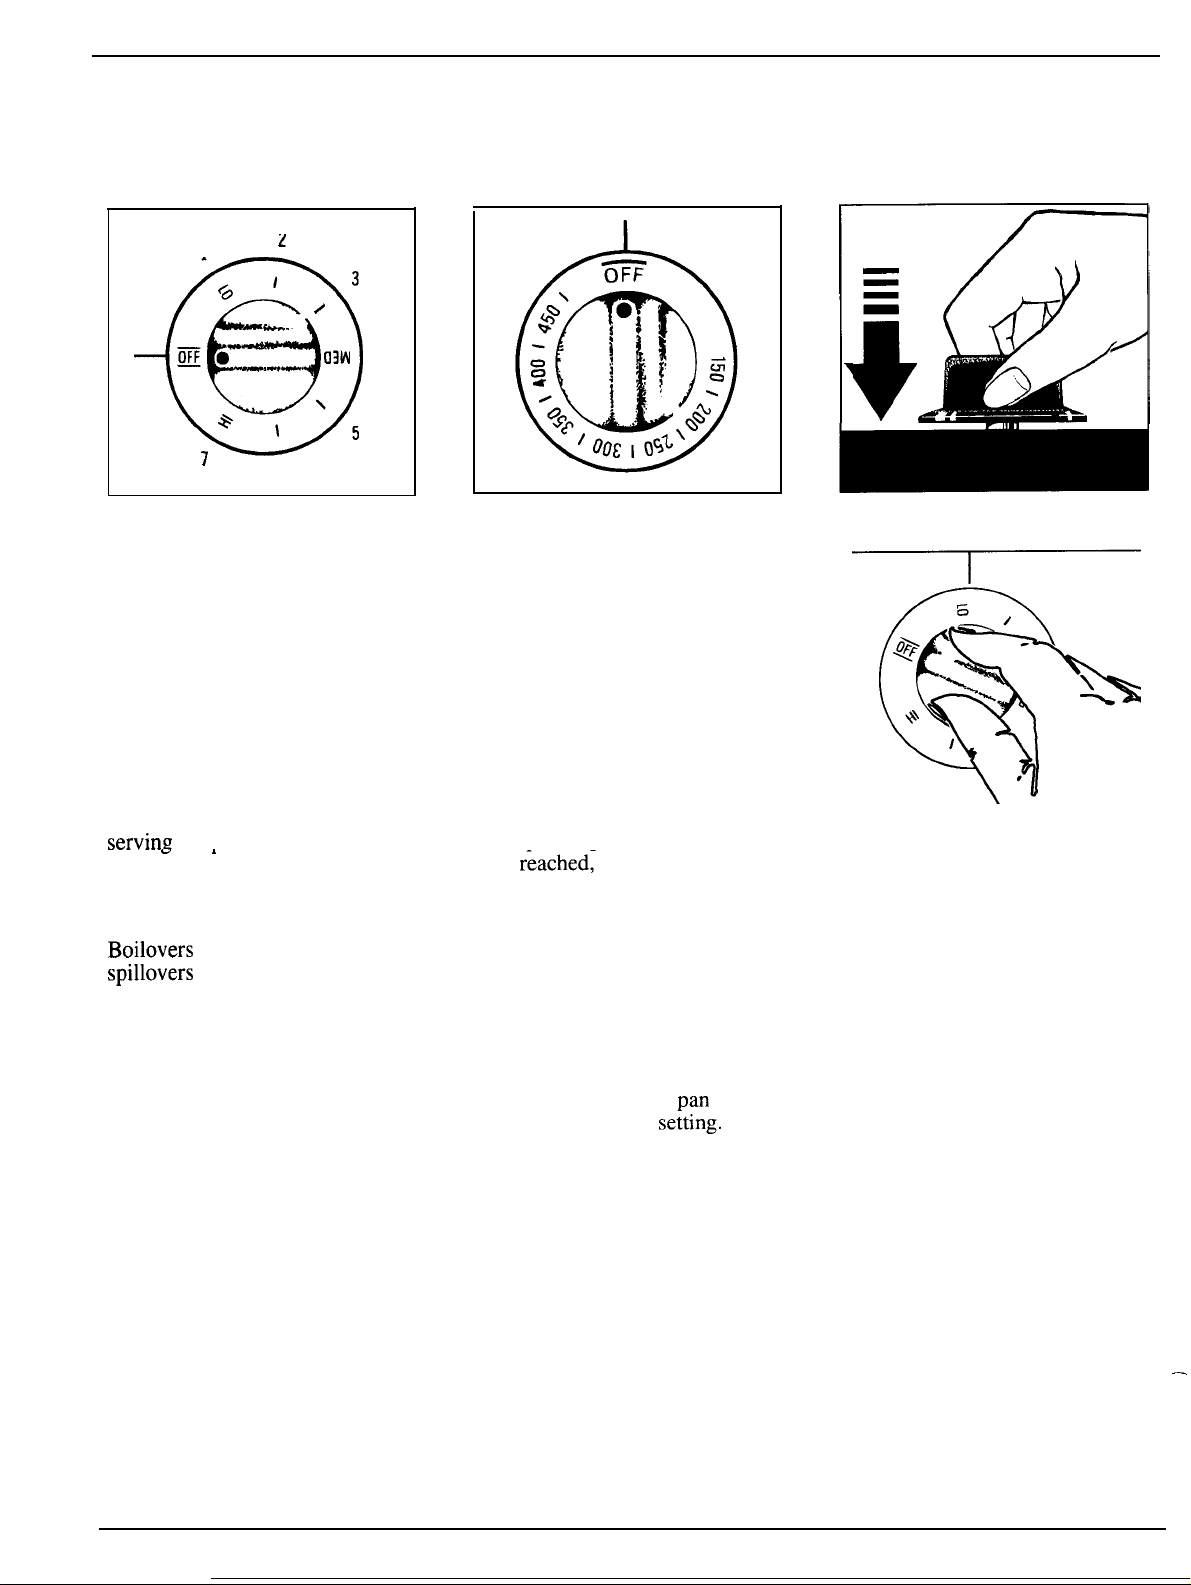
Infinite Heat Controls
1
I
6
Guide for Using Heats
HI (7)—Bring water to boil.
MEDIUM HI (5-6)—Fast fry, pan
broil; maintain fast boil on large
amount of food.
MED (4)—Saute and brown;
maintain slow boil on large amount
of food.
MEDIUM LO (2-3)—Cook after
starting at HI; cook with little
water in covered pan.
LO (l)---Steam rice,
temperature of most foods.
NOTE:
1. At HI (7) or MEDIUM HI (5-6),
never leave food unattended.
cause smoking; greasy
may catch fire.
2. At LO (1) or MEDIUM LO
(2-3), melt chocolate, butter on
small element.
cereal; maintain
3
\
5
Sensi-Temp
This control allows you to preselect the heat setting. To turn the
element ON, push in and turn the
knob counterclockwise. You will
feel a “click” at the OFF position.
The automatic element senses the
temperature of the pan and
regulates it according to the setting
selected.
When turned on, the Sensi-Temp
element always begins with full
power, no matter where the knob
is set. When the temperature
corresponding to that setting has
been reached; the element cycles
OFF and ON to maintain the
selected setting. Even when the
dial is set at minimum, the element
begins on full power until the
selected heat setting is reached.
The Sensi-Temp element will not
burn food when the correct setting
is selected. Food may dehydrate if
left on but the heat sensing device
will not let the food or
overheat beyond the
Cooktop temperatures increase
with the number of elements that
are on. With 3 or 4 elements
turned on, surface temperatures
are high, so be careful when
touching the cooktop.
TM
Control
How to Set the Controls
Step 1: Push control knob down.
Step 2: Turn the knob to desired
heat setting.
Control must be pushed in to set
only from OFF position. When
control is in any position other
than OFF, it maybe rotated
without pushing in.
Be sure you turn the control knob
to OFF when you finish cooking.
An indicator light will glow when
a surface unit is on
–
6
Page 7
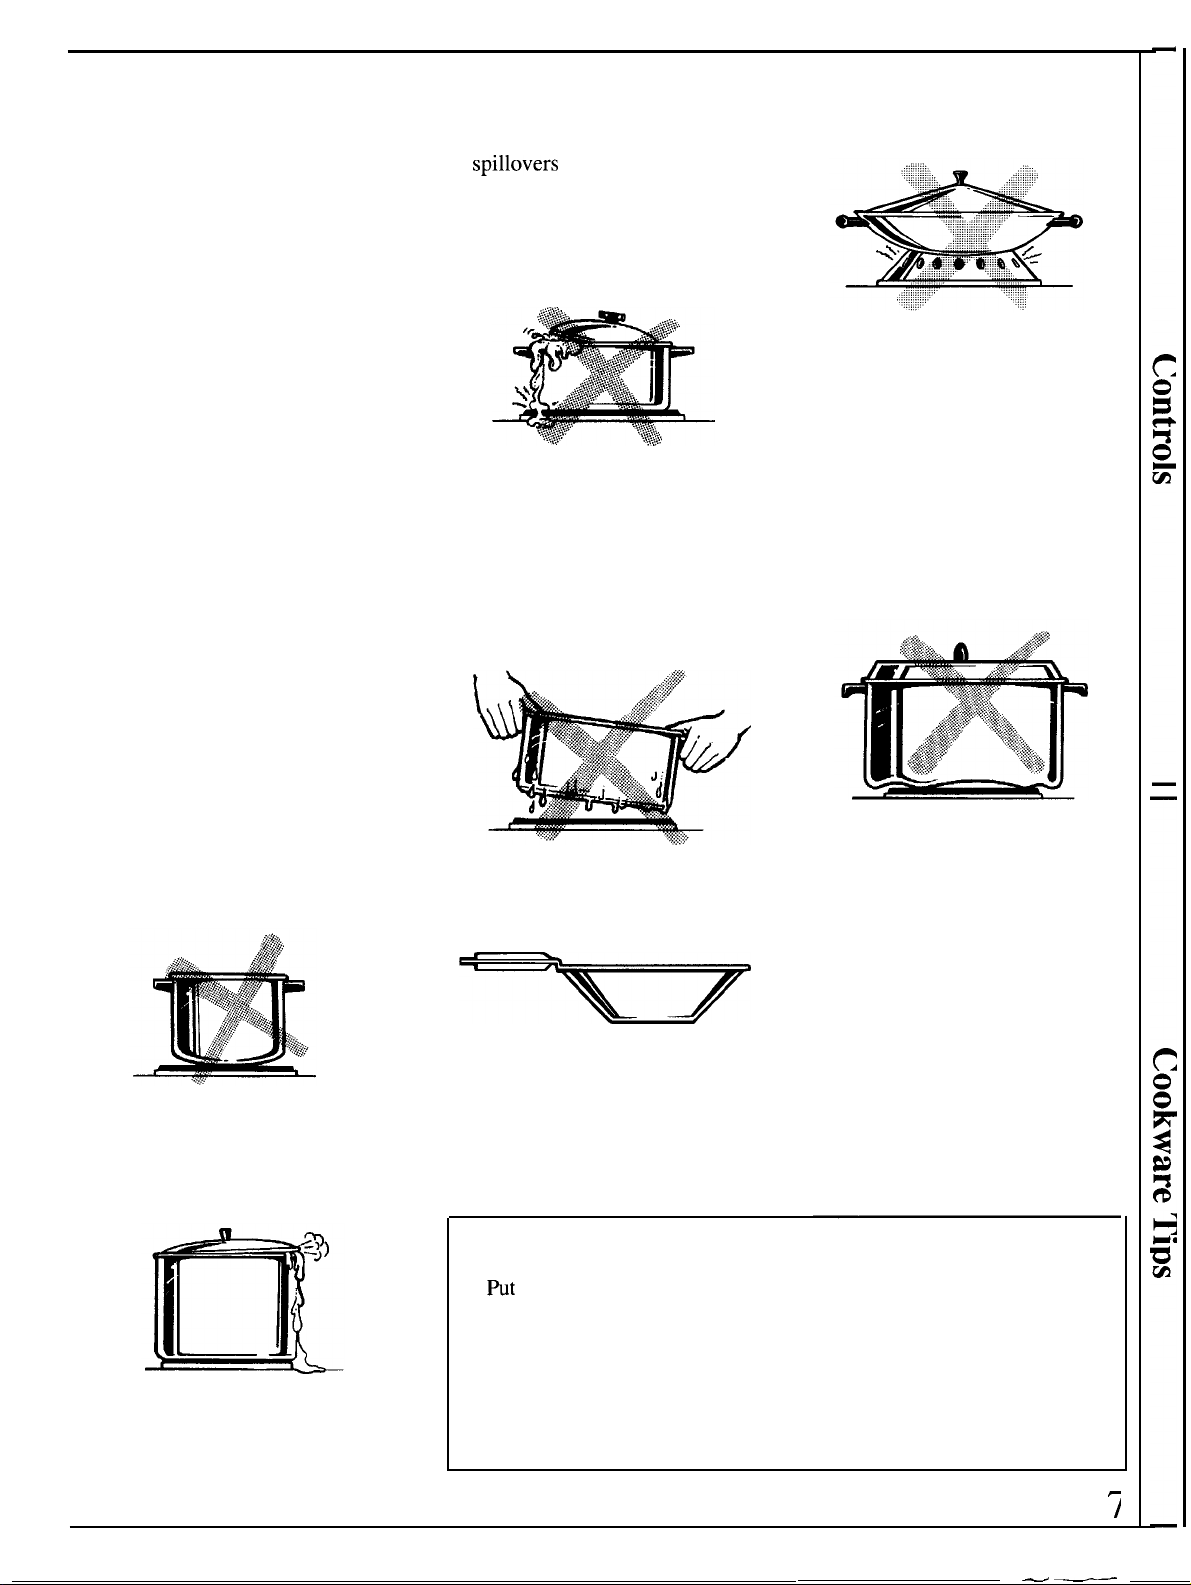
Solid Disk Element Cookware Tips
For cooking on solid disk
elements, the use of appropriate
cookware is very important.
● Aluminum cookware conducts
heat faster than other metals.
● Cast iron and coated cast-iron
containers are slow to absorb heat,
but generally cook evenly at LO or
MED heat settings.
● Glass cookware should be used
only as the manufacturer describes.
● Do not use a wire trivet or
any other kind of heat-retarding
pad between the cookware and
the element.
● Good pans have a thick, flat
bottom which absorbs the heat
from the element. The thick, flat
bottom provides good heat
distribution from the element to the
food. This cooking process requires
little water, fat or electricity.
● Pans with thin, uneven bottoms
do not adequately utilize the heat
coming from the element. The
food to be cooked may burn and
require more time and electricity.
You would also have to add more
fat or water.
Pans with uneven bottoms are
not suitable.
● Don’t use pans with rounded
bottoms. They don’t have enough
contact with the solid disk element
to cook properly.
so
will flow onto the
cooktop and not bake onto the
element. A damp cloth is sufficient
to remove the spill. Pans should
not overhang more than 1 inch
beyond the element.
● To optimize cooking time and
energy usage, you should use a pan
that is sized correctly for the
cooking process, with a well-fitted
lid to avoid evaporation loss, and
cook with as little water or fat as
possible. If the pan is too small,
energy is wasted and spillage can
flow onto the solid disk element.
● Place only dry pans on the solid
disk elements. Do not place lids on
the elements, particularly wet lids.
● We recommend that you use only
a flat-bottomed wok. They are
available at your local retail store.
The bottom of the wok should
have the same diameter as the
element to ensure proper contact.
● Do not use woks that have
support rings. This type of wok
will not heat on solid disk
elements.
● Some special cooking procedures
require specific cookware such as
pressure cookers, deep fat fryers,
etc., All cookware must have flat
bottoms and be the correct size.
The cookware should also be
covered, if applicable to the
cooking process.
● Except in pressure cooking with
water and water-bath canning,
canning pots should not extend
more than 1 inch beyond the
surface of a solid disk element and
should have flat bottoms. When
canning pots do not meet this
description, the use of the HI heat
setting causes excessive heat
buildup and may result in damage
to the cooktop. See “Home
Canning Tips” for further
information.
● Use pans of the correct diameter
only. They should be slightly
larger than the solid disk element
To check how a pan will perform on a solid disk element:
1.
1 inch of water into the pan.
2. Bring water to a boil and
observe the pattern of the
bubbles as the water comes to a
boil.
3. A uniform pattern of bubbles
across the bottom of the pan
confirms a good heat transfer
and a good pan.
4. Bubbles localized in only a
portion of the bottom indicate
uneven contact of the pan to the
element, uneven heat transfer or
an unsuitable pan.
Page 8
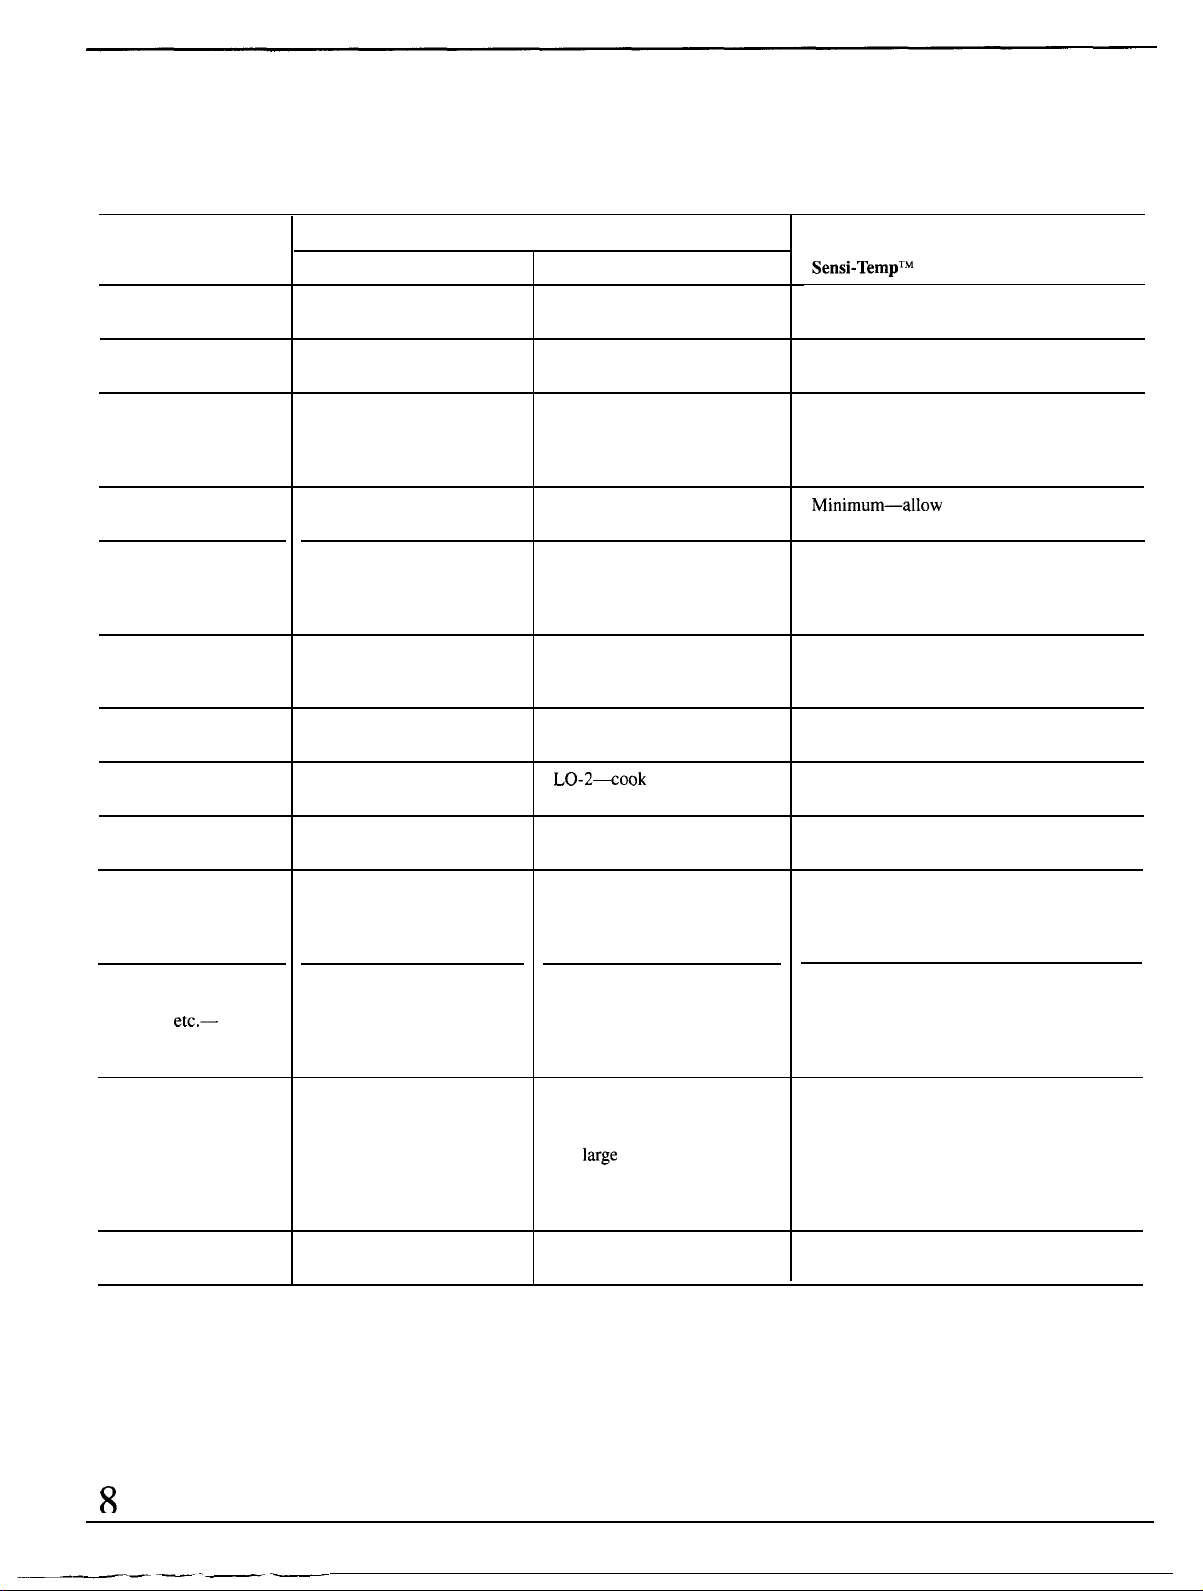
Cooking Guide
Suggested Heat Settings (See illustrations of control knobs in the “Controls” section of this book.)
Regular Element
—
Food
Start at Setting
Beverages
Cocoa
Coffee
Percolator-type
HI—bring water to perk.
Breads
French Toast,
Pancakes,
Grilled Sandwich
Butter
5—preheat skillet 4-8
minutes.
LO—allow about 5 to 10
minutes to melt.
Cereals
Cornmeal, Grits,
Oatmeal
HI-cover, bring water
to a boil.
Meat, Fish, Poultry
Bacon
Sausage Patties
Swiss Steak,
Pot Roast, braised
Chicken, fried HI—melt fat, then 4-5 to
Chicken, Shrimp
Deep-fried
Lamb Chops,
Hamburgers,
Link Sausage, pan-fried
Thin Steaks
Stewed Chicken,
Corned Beef,
Tongue,
Simmering
HI-cook until just starting
to sizzle.
HI—melt fat, then 4-5 to
brown. Add liquid.
brown chicken, cover.
HI—heat oil.
HI—preheat skillet, then
grease lightly.
HI—bring liquid to
steaming.
Complete at Setting
LO—finish heating.
LO—maintain gentle but
steady perk.
5—finish cooking.
LO-2—add cereal and finish
timing according to package
directions.
5-6—finish cooking.
LO-2—simmer until tender,
covered.
until tender.
3-4 to HI—maintain
temperature.
4-5—brown meat and cook
to desired doneness.
LO-2—covered, cook until
fork tender. (Water should
slowly boil. ) For very large
amounts MED heat may
be needed.
Element
Bring to a boil at 250.
Place coffee in basket and water in pot. To
perk, set at 275. To keep hot, set at 175.
Preheat skillet 4 to 5 minutes at 350-450,
add food.
to melt.
Bring water to a boil at 225, add cereal
and time according to package directions.
Cook on 350-425.
Brown meat on 350, then switch to 175 to
200, simmer until tender.
Brown chicken on 400, switch to 200 to
finish cooking.
425-475—to heat and maintain
temperature.
Preheat skillet and cook on 300-400.
Preheat skillet and cook on 425-475.
475—bring a large amount of water to
boil, then switch to 200-350 to simmer.
Heat
milk at 200.2-3—heat milk. Cover.
about 5 to 10 minutes
—
Pastas
Macaroni,
Noodles,
Spaghetti
Popcorn
HI—bring salted water
to a boil in a covered
utensil, add pasta slowly
so boiling does not stop.
HI—heat, until popcorn
starts to pop.
6-HI—maintain a rolling
boil, cook until tender.
For
needed to keep water at
rolling boil throughout
entire cooking time.
2-3—finish popping.
amounts, HI maybe
475—bring a large amount of water to
boil, add pasta and cook on 350.
300—Place oil and popcorn in pan, cover
and cook until it stops popping.
Page 9
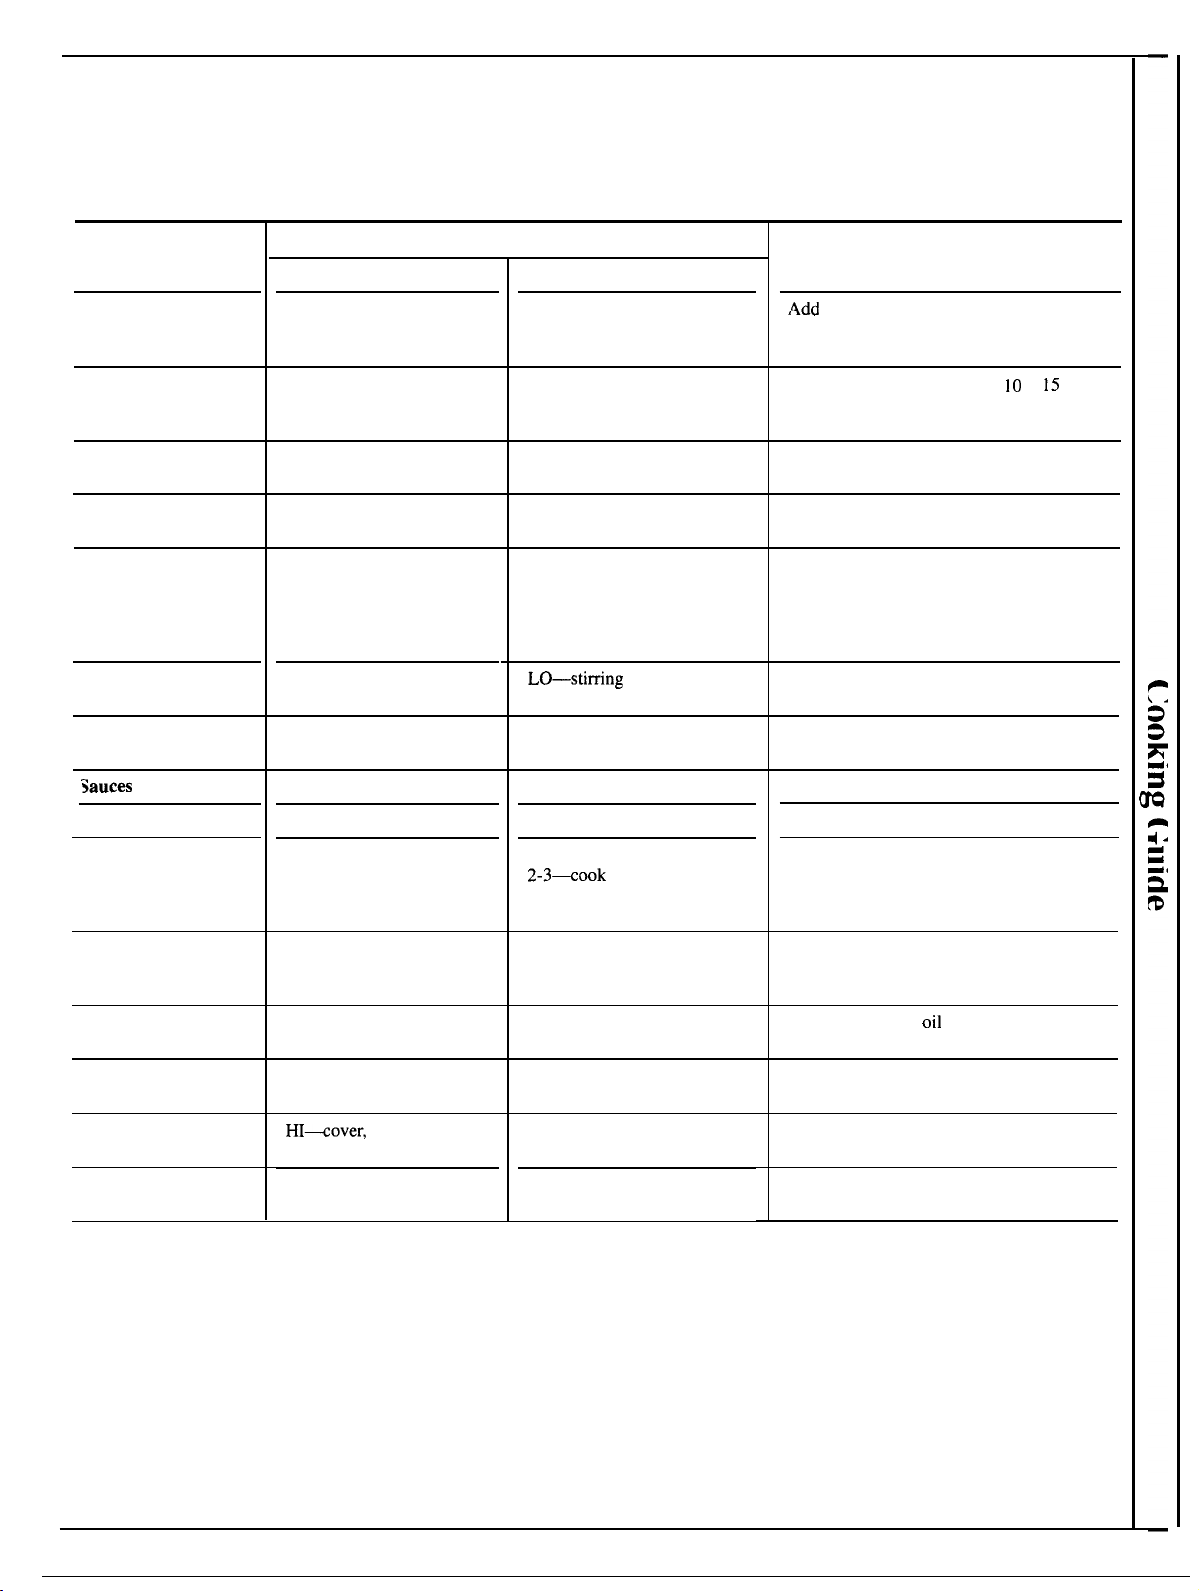
Suggested Heat Settings
Food
Rice
Chocolate
Desserts
Candy
Pudding and
Pie Filling
Eggs
Cooked-in-Shell HI—bring water to
Fried, Scrambled
Poached
Soup, Stews
Start at Setting
HI-cover, bring water to
a boil.
LO-2—allow about 10 to 15
minutes to melt through,
stir to smooth.
2-3-cook.
2-3--cook according to
package directions.
a boil, add eggs.
HI—melt butter, add eggs. Melt butter on 275, then add eggs.
HI—bring water to boil, add
eggs.
HI—melt fat.
HI—heat up liquid.
Regular Element
Complete at Setting
LO-2--cover, finish timing
according to package
directions.
Follow recipe.
OFF—time accordingly,
for soft-cooked 3 to 4
minutes or hard-cooked
15 to 20 minutes.
doneness.
LO—finish cooking.
2-3—finish cooking.
LO—simmer.
to desired
Sensi-Temp
rice to water, cover, cook on 200
according to package directions.
Minimum-150—allow about
minutes to melt through.
Place ingredients in pan and cook following
package directions on 200.
Heat water on 200, cook 22 to 24 minutes.
Heat water on 250, add eggs, cook 3 to 5
minutes.
Melt fat and cook on 200.
Heat and simmer on 200.
TM
Element
to
Vegetables
Fresh
Frozen
Fried
Deep-Fat Frying
h-Pouch
Saute
NOTE: Temperature and time are suggested guidelines only. You may vary them to suit your cooking habits and needs.
HI--cover, bring salted
water to a boil.
HI--cover, bring salted
water and vegetables to a
boil.
HI—preheat skillet and oil
or fat,
HI—heat oil. 4-HI—maintain
to a boil.
HI—heat oil or melt butter;
add vegetables.
depending on tenderness
of vegetable.
2-3--cook according to time
on package.
2-3--cook until desired
tenderness is reached.
temperature.
3-4—finish timing as
directed on package.
3-4-cook until desired d
oneness is reached.
10-30 minutes,
Place fresh vegetables in pan with water,
cover and cook on 200.
Place frozen vegetables in pan with water,
cover and cook at 225.
Preheat skillet and
food and cook until tender.
Heat oil and fry food at 425-475, use a candy
thermometer to monitor temperature.
Bring water to boil and cook at 225-250.
Heat oil or melt butter on 200, then
cook vegetables to desired doneness.
at 275, add
9
Page 10
Home Canning Tips
Canning should be done on
cooktop only.
In surface cooking, the use of
cookware extending more than
1 inch beyond edge of cooking
element’s trim ring is not
recommended. However, when
canning with water-bath or
pressure canner, larger-diameter
cookware may be used. This is
because boiling water temperatures
(even under pressure) are not
harmful to cooktop surfaces
surrounding the cooking element.
HOWEVER, DO NOT USE
LARGE DIAMETER CANNERS
OR OTHER LARGE DIAMETER
POTS FOR FRYING OR
BOILING FOODS OTHER
THAN WATER. Most syrup or
sauce mixtures—and all types of
frying—cook at temperatures
much higher than boiling water.
Such temperatures could
eventually harm cooktop surfaces
surrounding heating units.
Observe Following Points
in Canning
1.
Be sure the canner fits over the
center of the cooking element. If
your cooktop or its location does
not allow the canner to be centered
on the cooking element, use
smaller-diameter canners for good
canning results.
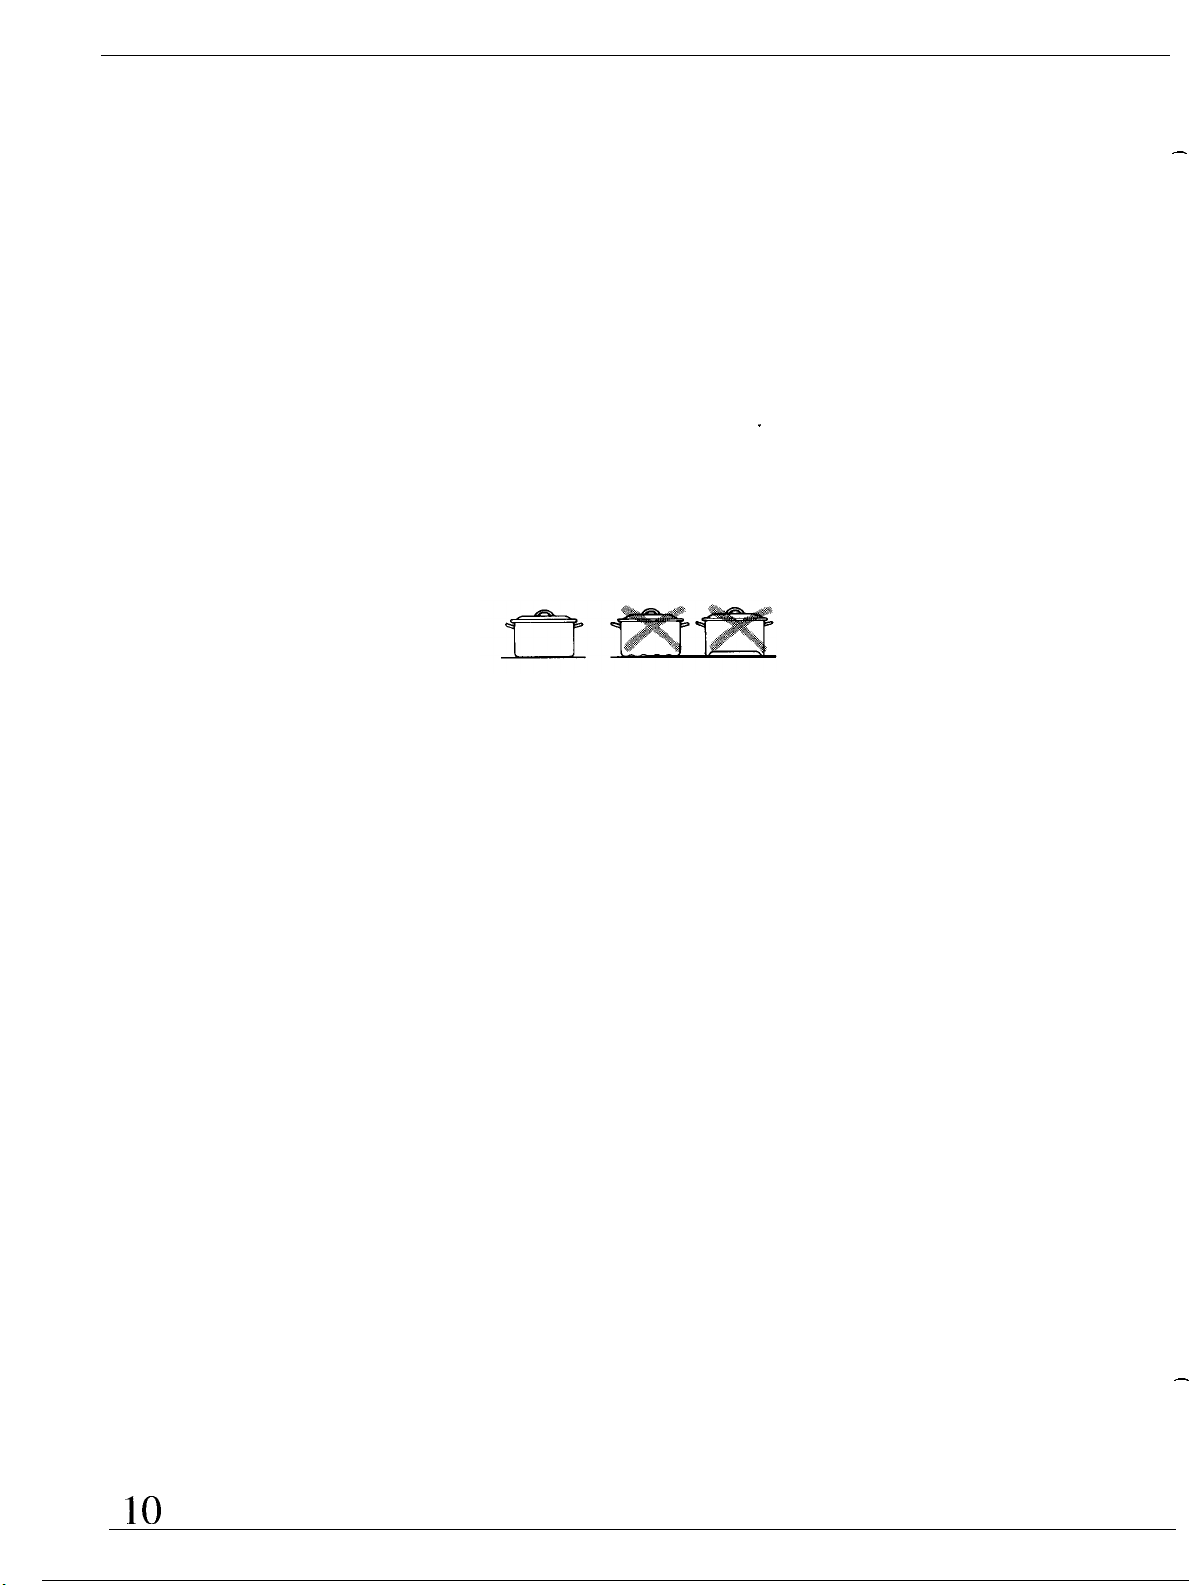
2. Flat-bottomed canners must be
used. Do not use canners with
flanged or rippled bottoms (often
found in enamelware) because they
don’t make enough contact with
the solid disk element and take too
long to boil water.
RIGHT
3. When canning, use recipes and
procedures from reputable sources.
Reliable recipes and procedures
are available from the
manufacturer of your canner;
manufacturers of glass jars for
canning, such as Ball and Kerr;
and the United States Department
of Agriculture Extension Service.
4. Remember that canning is a
process that generates large
amounts of steam. To avoid burns
from steam or heat, be careful
when canning.
NOTE: If your cooktop is being
operated on low power (voltage),
canning may take longer than
expected, even though directions
have been carefully followed. The
process time will be shortened by:
(1) using a pressure canner, and
(2) starting with HOT tap water for
fastest heating of large quantities
of water.
WRONG
CAUTION:
Safe canning requires that
harmful microorganisms are
destroyed and that the jars are
sealed completely. When canning
foods in a water-bath canner, a
gentle but steady boil must be
maintained continuously for
the required time. When
canning foods in a pressure
canner, the pressure must be
maintained continuously for
the required time.
If a solid disk element is used
for canning, please note that
solid disk elements heat up and
cool down more slowly than
other conventional elements.
Because of this difference, after
you have adjusted the controls it
is very important to make sure
the prescribed boil or pressure
levels are maintained for the
required time.
The solid disk elements have
temperature limiters that help –
prevent damage to the cooktop.
If the bottom of your canner is
not flat, the solid disk element
can overheat, triggering the
temperature limiters to turn the
unit off for a time. This will stop
the boil or reduce the pressure in
the canner.
Since you must make sure to
process the canning jars for the
prescribed time, with no
interruption in processing time,
you cannot can on solid disk
elements if your canner is not
flat enough.
Page 11
Questions and Answers
A. Yes, but only use cookware
designed for canning purposes.
Check the manufacturer’s
instructions and recipes for
preserving foods. Be sure canner is
flat-bottomed and fits over the
center of the solid disk element.
Since canning generates large
amounts of steam, be careful to
avoid burns from steam or heat.
Q. Why does the solid disk
element smoke when I first turn
it on?
A. This initial smoking is both
normal and necessary. A rust
preventative is applied to each
element at the factory. When the
unit is turned on for the first time,
the coating will burn off the
element areas. This takes
approximately five minutes and
should be done without cookware
on the element; otherwise, the
– coating
stick to the cookware.
Q. Why is the cooktop hot to
the touch?
A. More heat is transferred to the
cooktop by the solid disk elements
than by conventional coil elements
because the solid disk elements are
clamped securely to the cooktop.
This, of course, eliminates
from getting inside the
cooktop chassis. The secret to
keeping the cooktop comfortably
cooler is to turn the cooktop on
only after the cookware and its
contents are placed on the element.
More heat will then be transferred
to the cookware and the food
rather than the cooktop. The
cooktop temperature will not cause
damage to the cabinets,
countertops or cookware.
Q. Why am I overcooking my
food?
A. The solid disk elements are
very energy-efficient and retain
heat much longer than
conventional coil elements. Food
will continue to cook three to five
minutes after the controls are
turned off. We recommend that
you begin cooking at lower
settings than you have in the past
and gradually increase or decrease
heat as desired. The energy savings
are significant.
Q. Why does it take a long time
to cook my food?
A. The extra time it takes to cook
food on a solid disk element
compared to a conventional coil
element is measured in seconds,
not minutes. These few seconds
are due to the greater mass of the
solid disk element. If the food is
cooking slowly, it is because the
cookware is warped or has an
uneven bottom surface. If
bottomed cookware is used, the
cooking performance of solid disk
elements will closely parallel that
of conventional coil elements, but
with less energy consumption.
Q. Can I use special cooking
equipment like an oriental wok?
A. We recommend that you use
only a flat-bottomed wok. They are
available at your
The bottom of the wok should
have the same diameter as the
element to ensure proper contact.
Do not use woks that have support
rings. This type of wok will not
heat on solid disk elements.
Q. Why is the porcelain enamel
finish on my cookware coming
off?
A. If you set your solid disk
element on a heat setting higher
than required for the cookware
material, and let the cookware sit
too long, the cookware’s finish
may smoke, crack, pop or burn,
depending on the pot or pan. Also,
cooking small amounts of dry food
may damage the cookware’s finish.
retail store.
11
Page 12
Care and Cleaning
Note: Let cooktop parts cool before touching or handling.
Proper care and cleaning
important so your cooktop will
give you efficient and satisfactory
service. Follow these directions
carefully in caring for your
cooktop to assure safe and
proper maintenance.
Solid Disk Elements
The solid disk elements are made
of high strength cast-iron alloy.
The surface has a heat-resistant
coating to preserve the surface of
the element. After the unit cools,
any boiled-over material on the
element should be removed as
soon as possible with a slightly
damp cloth. The element should
then be dried by turning it on for a
few minutes. After it cools, wipe
lightly with cooking oil.
Clean very dirty solid disk
elements with a little cleaning
powder (such as Comet” cleanser)
or with a scouring pad.
The matte black surface can be
maintained by treating it
periodically with Cello
polish which is available from:
ELCO Sales
2545 Palmer Avenue
University Park, IL 60466
Use the applicator to apply
thin coating of the polish to the
entire surface of the element. Turn
the element on high for several
minutes to bake the polish onto the
element. When the element is
cooled, rub lightly with a cloth or
paper towel to remove any excess
polish. Before next use, burn off
the element by means of a short
preheating period. A slight amount
of smoke and odor will occur.
very
Failure to maintain the solid disk
elements as directed
defacing the surface over a long
of time primarily
corrosion as the elements are made
of cast-iron construction.
Do not place covers over the solid
disk elements. An element turned on
while the cover is in place can
permanently damage the cooktop.
Covers can also trap moisture which
may cause the elements to rust.
result in
due to
Glass Top
The glass on your cooktop has
been tempered to withstand sudden
temperature changes during
cooking. Give it the normal care
you would give any glass material.
While it is impact-resistant, avoid
scratching it to prevent it from
shattering.
If the glass around the solid disk
elements is hot, wipe up spills with
a dry cloth or paper towel. When
the surface has cooled, wash, rinse
and dry it. Alternately, when the
glass top is cool, spray it with
glass or window cleaner. Avoid
the use of cleaning powders or
harsh abrasives that may scratch
the surface.
12
Page 13
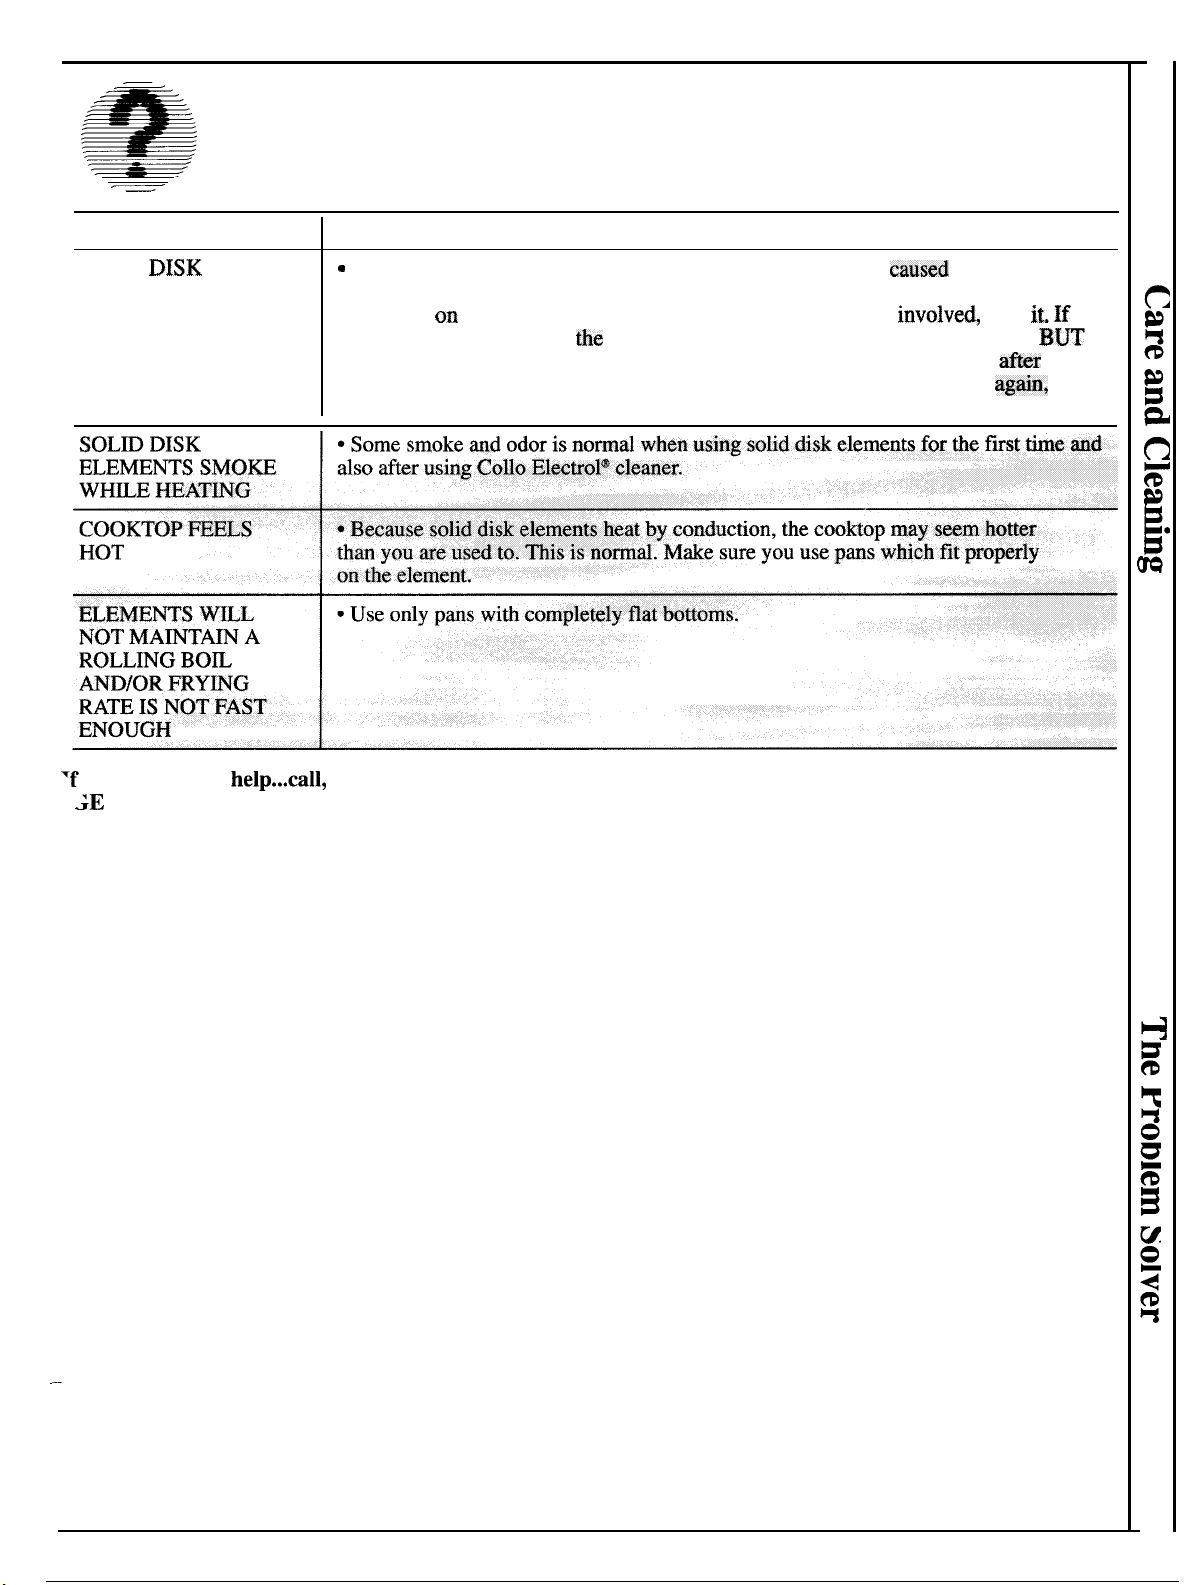
Questions?
Use This Problem Solver
PROBLEM
SOLID
ELEMENTS DO NOT circuit fuse, a tripped circuit breaker; the main fuse or the main circuit breaker,
WORK PROPERLY depending
-
you need more help...call, toll free:
POSSIBLE CAUSE
Difficulty may be in the main distribution panel of your
nature of the power supply. If a circuit breaker is
the control box uses fuses,
ONLY BY SOMEONE FAMILIAR WITH ELECTRICAL CIRCUITS. If,
performing one of these procedures, the fuse blows or circuit breaker trips
call for service.
circuit fuse (a cartridge-type) should be changed WJT
house
by a blown
reset
800.626.2000
consumer information service
13
Page 14

Notes
14
Page 15
Be There
With the purchase of your new GE appliance, receive tine
assurance that if
GE, we’ll be’ there. All you have to do is call-toll-free!
In-Home Repair
Service
A GE Consumer Service professional
—
will provide expert repair service,
scheduled at a time that’s convenient
for you. Many GE Consumer Service
company-operated locations offer you
service today or tomorrow, or at your
convenience
weekdays,
days). Our factory trained technicians
know your appliance inside and
a.m. to
ever need information or assistance
Service Contracts
You can have the secure feeling that
GE Consumer Service will still be
there after your warranty expires. Purchase a GE contract while your warranty is still in effect and you’ll receive
a substantial discount. With a
year contract, you’re assured of
service at today’s prices.
p.m.
Whatever your question about any
major appliance, GE Answer Cente@
information service is available to
help. Your call-and your
will be answered promptly and
courteously. And you can call any
time. GE Answer
open
Telecommunication Device for the Deaf
service is
one visit.
800-626-2002
Individuals qualified to service their
own appliances can have needed
parts or accessories sent directly to
their home, free of shipping charge!
The GE parts system provides access
to over 47,000 parts.. and all GE
Genuine Renewal Parts are fully
warranted.
Discover cards are accepted.
User maintenance instructions
contained in this booklet cover procedures intended to be performed by
user. Other servicing generally
should be referred to
vice personnel. Caution must be
exercised, since improper servicing
may cause unsafe operation.
MasterCard and
ser-
For Customers
Special Needs...
800.6262000
Upon request, GE will provide
controls for a variety of GE appliance
and a brochure to assist in planning
barrier-free kitchen for persons with
limited mobility. To obtain these iten
free of charge, call 800.626.2000.
Consumers with impaired hearing
or speech who have access to a TDD
or a conventional teletypewriter may
to request information or service.
(800-833-4322)
Page 16
YOUR GE COOKTOP
Save
proof of original purchase date such as your sales slip or
WHAT IS COVERED
WARRANTY
check to establish warranty period.
FULL ONE-YEAR WARRANTY
For one year from date of original
purchase, we will provide, free of
charge, parts and service labor in
your home to repair or replace
any
because of a manufacturing defect.
LIMITED ADDITIONAL
FOUR-YEAR WARRANTY
For the second through fifth year
from date of original purchase, we
will provide, free of charge, a
replacement solid element surface
heating unit if the element fails
because of a manufacturing
defect. You pay for the service trip
to your home and service labor
charges. This warranty does not
cover Sensi-Temp
wiring or switches.
cooktop that fails
TM
components,
This warranty is extended to
the original purchaser and any
succeeding owner for products
purchased for ordinary home use
in the 48 mainland states, Hawaii
and Washington,
In Alaska the
warranty is the same except that it
is LIMITED because you must pay
to ship the product to the service
shop or for the service technician’s
travel costs to your home.
All warranty service will be
provided by our Factory Service
Centers or by our authorized
Customer
servicers during
normal working hours.
Look in the White or Yellow Pages
of your telephone directory for
GENERAL ELECTRIC COMPANY,
GENERAL ELECTRIC FACTORY
SERVICE. GENERAL
or GENERAL ELECTRIC
CUSTOMER CARE” SERVICE.
.
WHAT IS NOT COVERED
Some states do not allow the exclusion or limitation of incidental or consequential damages, so the above limitation or exclusion
may not apply to you. This warranty gives you specific legal rights, and you may also have other rights which vary from state to state.
To know what your legal rights are in your state, consult your local or state consumer affairs office or your state’s Attorney General.
I
If further help is needed concerning this warranty, write:
Manager—Consumer Affairs, GE Appliances, Louisville, KY 40225
● Service trips to your home to
teach you how to use the product.
Read your Use and Care material.
If you then have any questions
about operating the product please
contact your dealer or our
Consumer Affairs office at the
address below, or call, toll free:
GE Answer Center
(m
800.626.2000
consumer information service
● Improper installation.
If you have an installation problem,
contact your dealer or installer.
You are responsible for providing
adequate electrical, gas, exhausting
and other connecting facilities.
Warrantor: General Electric Company
● Replacement of house fuses or ‘
resetting of circuit breakers.
● Failure of the product if it is used
for other than its intended purpose
or used commercially.
. Damage to product caused
by accident, fire, floods or acts
of God.
WARRANTOR IS NOT
RESPONSIBLE FOR
CONSEQUENTIAL DAMAGES.
.
1
Part No. 164 D2588P040
Pub
49-8240
MNU
06-91 CG
JP330P
JP331 P JP681 P
JP332P
 Loading...