

Page 1
Safety instructions ....................3-4
Operating Instructions, Tips
Appliance Registration ..................................2
3-in-1
Canning Tips
Care and Cleaning..................IO-l 2
Surface Unit .........................7
Built-h
●
❑
Problem
More questions
GE Answer Center” 800.626.2000
Consumer Services
Model and Serial Numbers ..........................2
Warranty ........................................Back Cover
Models: JP300N JP31ON
5
JP300R
GE Appliances
Page 2
IMPORTANT SAFETY INSTRUCTIONS
(continued)
●
To minimize the possibility
ignition of flammable
burns,
and spillage,
turn cookware handles toward the center of the
without extending
any nearby
surface
●
Always turn surface
removing cookware.
●
Always turn surface
OFF
removing cookware.
●
To
shock,
coils are
the possibility of a burn or electric
be
surface units
that the controls for
at
position and
@tempting
or
remove the
●
Don’t immerse
units.
●
When
soak removable surface
put them in a dishwasher.
pork,
the directions
exactly and always cook the meat to an internal
temperature
at least
assures that, in
the remote possibility that trichina may be present
in the meat, it will be killed and
safe
to eat,
meat will be
Carefully
flame setting,
Foods
cm frozen
foods
sides
●
●
If a combination
in
pan.
least possible
can cause
stir together
melt slowly.
Always
deep fat thwmomde~ whenever
possible to
smoking point.
THESE
INSTRUCTIONS
being fried at high
hot fat
as dry as possible.
moisture
of fat
frying. Filling
fresh
and over
effective
pan too
when food is added.
be used
heating,
as fats
slowly, and watch as it heats.
overheating fat beyond the
—
—
Use proper pan size-This appliance
equipped
with one or more surface units of different size.
Select cookware
to cover the surface unit
flat bottoms
use of
undersized cookware will expose a portion of the
surface unit to direct contact and may result in
ignition of clothing. Proper relationship of
cookware to burner will also improve
●
Never leave surface units unattended at high
heat settings.
greasy
●
sure drip pans and vent ducts are
that may
and
fire.
covered and are in place. Their absence during
cooking could damage cooktop parts and wiring.
●
use aluminum foil to line drip pans.
Misuse could result in a shock,
damage to
certain types
cooktop.
glass, glass/ceramic,
hazard or
earthenware or
suitable for cooktop service; others may
because sudden change
temperature.
—
Page 3
When using electrical appliances, basic
precautions should be followed, including the
following:
●
Use this appliance only for its intended
as
described in this manual.
●
Don’t attempt to repair or replace any part
your cooktop unless it is specifically
recommended in this book. All other servicing
should be referred to a qualified technician.
●
Before performing any
I
THE COOKTOP POWER SUPPLY AT THE
HOUSEHOLD DISTRIBUTION PANEL BY
REMOVING THE FUSE
SWITCHING
THE CIRCUIT BREAKER.
Using
●
Your Cooktop
Do not leave children alom+ehildren
not be left alone or unattended in
area where an
appliance is in use. They should never be allowed
to set or stand on any part of the appliance.
●
Don’t allow anyone to climb, stand or hang on
the cooktop.
●
CAUTION: ITEMS
CHILDREN SHOULD
INTEREST
BE STORED
IN CABINETS ABOVE A
CHILDREN CLIMBING ON THE
TO REACH ITEMS COULD BE
SERIOUSLY INJURED.
●
Never wear loose-fitting or hanging garments
while
could be ignited if brought
the appliance. Flammable
contact with hot
surface units
may cause
bums.
●
flames
use a towel
Use
surfaces may result
dry pot
damp pot holders
bums from
Do
let potholders come
lifting cookware.
bulky cloth
hot
of a pot
holder.
●
For
safety, never
for
warming or heating the room.
. —
pick
burner.
off --.-----> -..
by covering pan completely with
cookie sheet
pan can be put out by covering
flat
.
a flaming pan. Turn
-’-’’:-a
well fiffm~
baking soda
or, if available, a multi-purpose dry chemical or
foam-type fire extinguisher.
●
not
flammable materials near
●
Keep hood and grease filters
to maintain
good venting and to avoid grease
* When flaming
the
off. The fan, if operating, may spread
are under the hood, turn
the flames.
●
Do not
may be
dark in
accumulate
1
grease
the cooktop.
other flammable
Q
*
or let clothing
areas;
Potentially hot surfaces include the
and
areas facing the cooktop.
(’continued
3
Page 4
CONTROLS
Infinite Heat Controls
At both OFF and HI positions, there is a slight
niche so control “clicks” at those positions; “click” on
the word HI marks the highest setting; the lowest
setting is the word LO. In a quiet kitchen, you may
hear slight “clicking” sounds during cooking,
indicating heat settings selected are being maintained.
Switching heats to higher settings always shows a
quicker change than switching to lower settings.
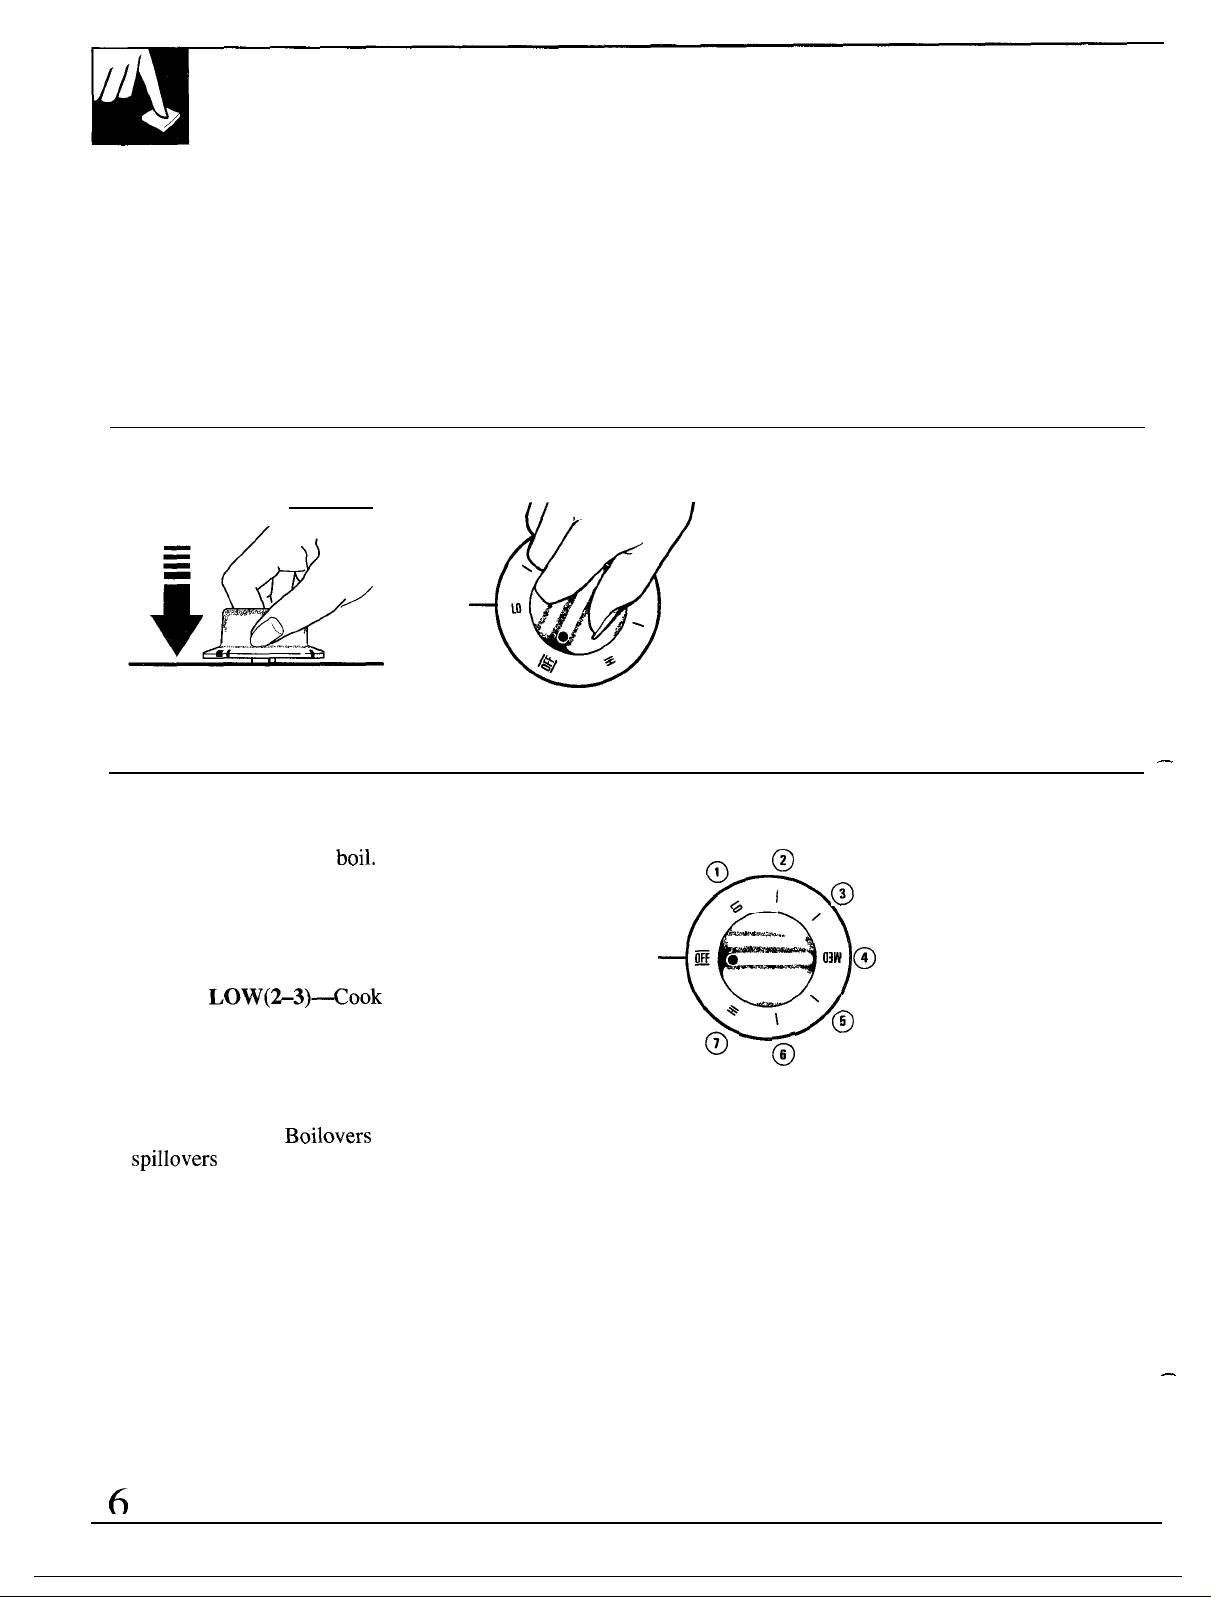
How to Set the Controls
Step 1. Grasp control knob and
push down.
Step 2. Turn the knob to desired
heat setting.
Guide for Using Heats
HI (7)—Bring water to a
MEDIUM HIGH (5-@—Fast fry, pan broil;
maintain fast boil on large amount of food.
MED (4)—Saute and brown; maintain slow boil on
large amount of food.
MEDIUM
cook with little water in covered pan.
LO (l)—Maintain serving temperature of most foods.
NOTE:
1. At HI (7) or MEDIUM HIGH (5–6), never leave
food unattended.
may catch fire.
2. At LO (1) or MEDIUM LOW (2–3), melt
chocolate, butter on small element.
after starting at HI;
cause smoking; greasy
. .
Control must be pushed
set only from OFF position.
When control is in any position
other than OFF, it may be
rotated without pushing in.
Be sure you turn the control knob
to OFF when you finish cooking.
An indicator light will glow when
a surface unit is on.
/
in to
Page 5
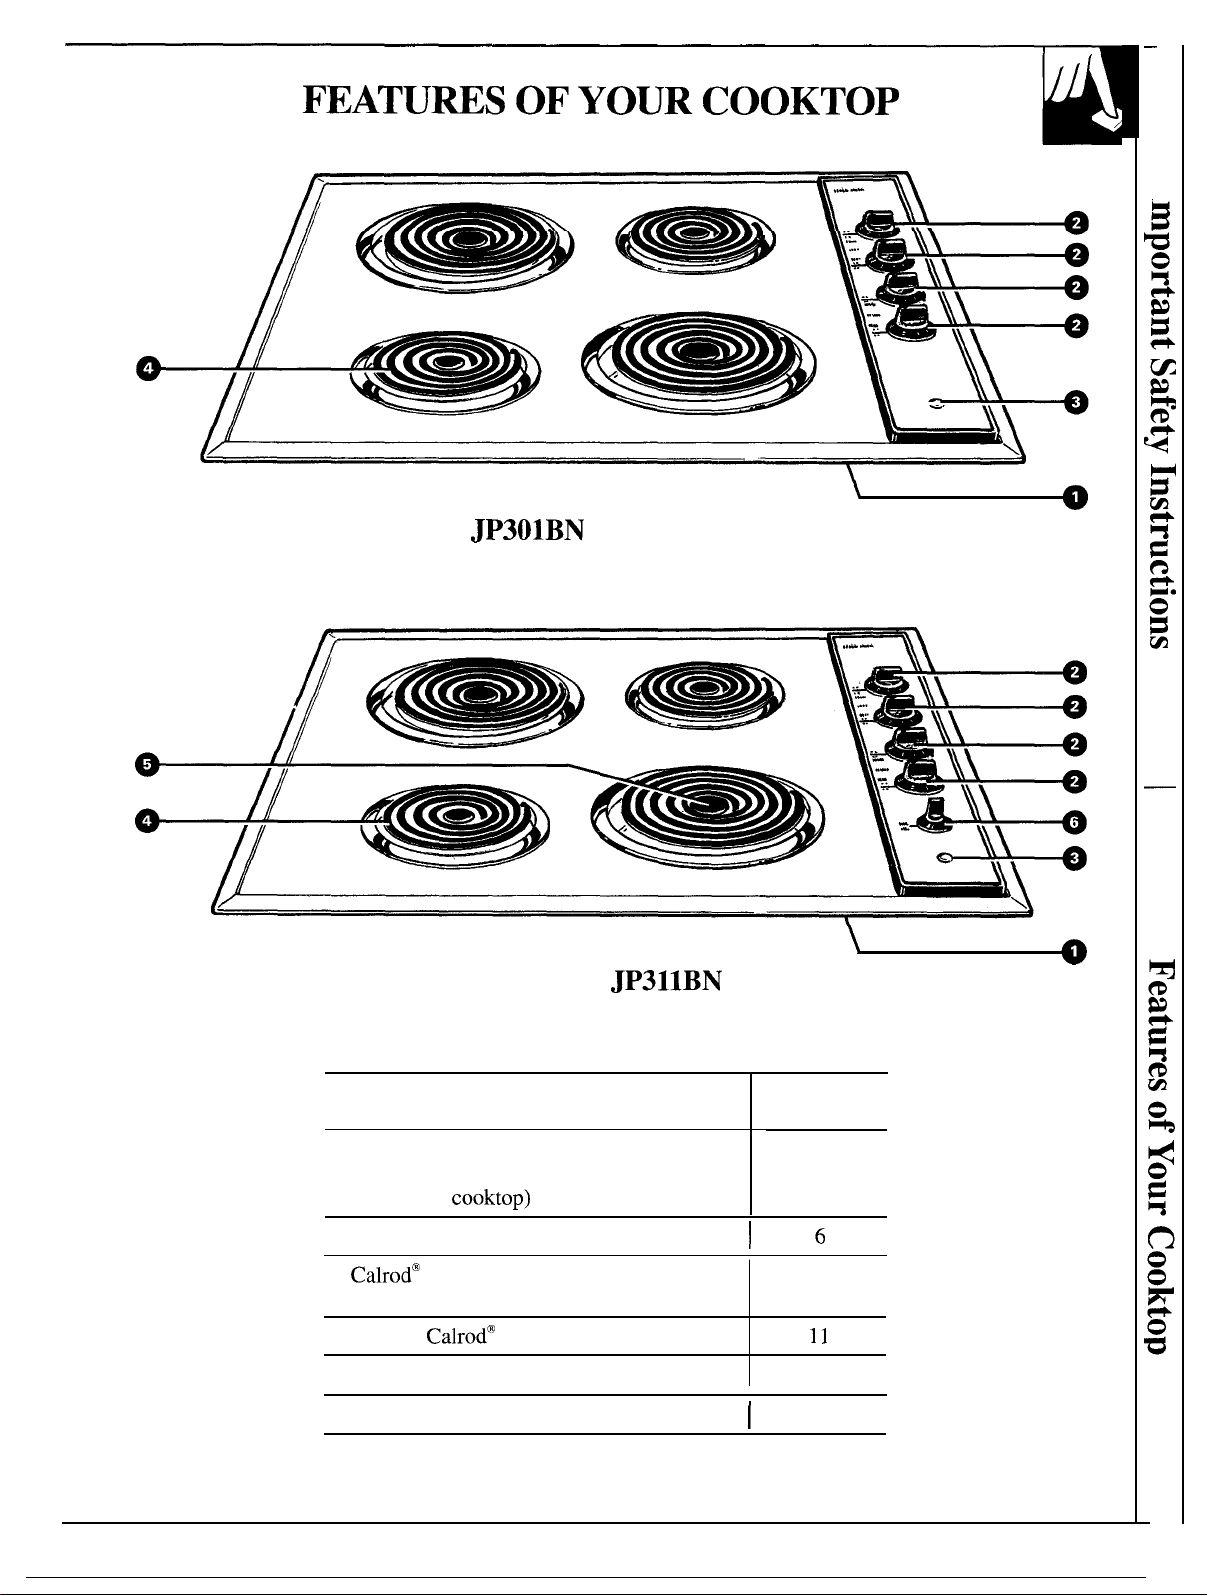
Models: JP300N
Models: JP31ON
JP300R
Feature Index
1 Model and Serial Numbers
(Located on the wire cover
under the
2 Infinite-Heat Controls
3
4 Plug-In
5 Tilt-Lock 3-in-1 Surface Unit
6 3-in-1 Surface Unit Selector Knob
Surface Unit “ON”
Indicator Light
Surface Units
Explained
on page
2
6
7, 11
7
5
Page 6
Cookware
COOKING TIPS
Use medium- or heavy-weight cookware. Aluminum
cookware conducts heat faster than other metals.
iron and coated cast-iron cookware are slow to absorb
heat, but generally cook evenly at low to medium heat
settings. Steel pans may cook unevenly if not combined
with other metals.
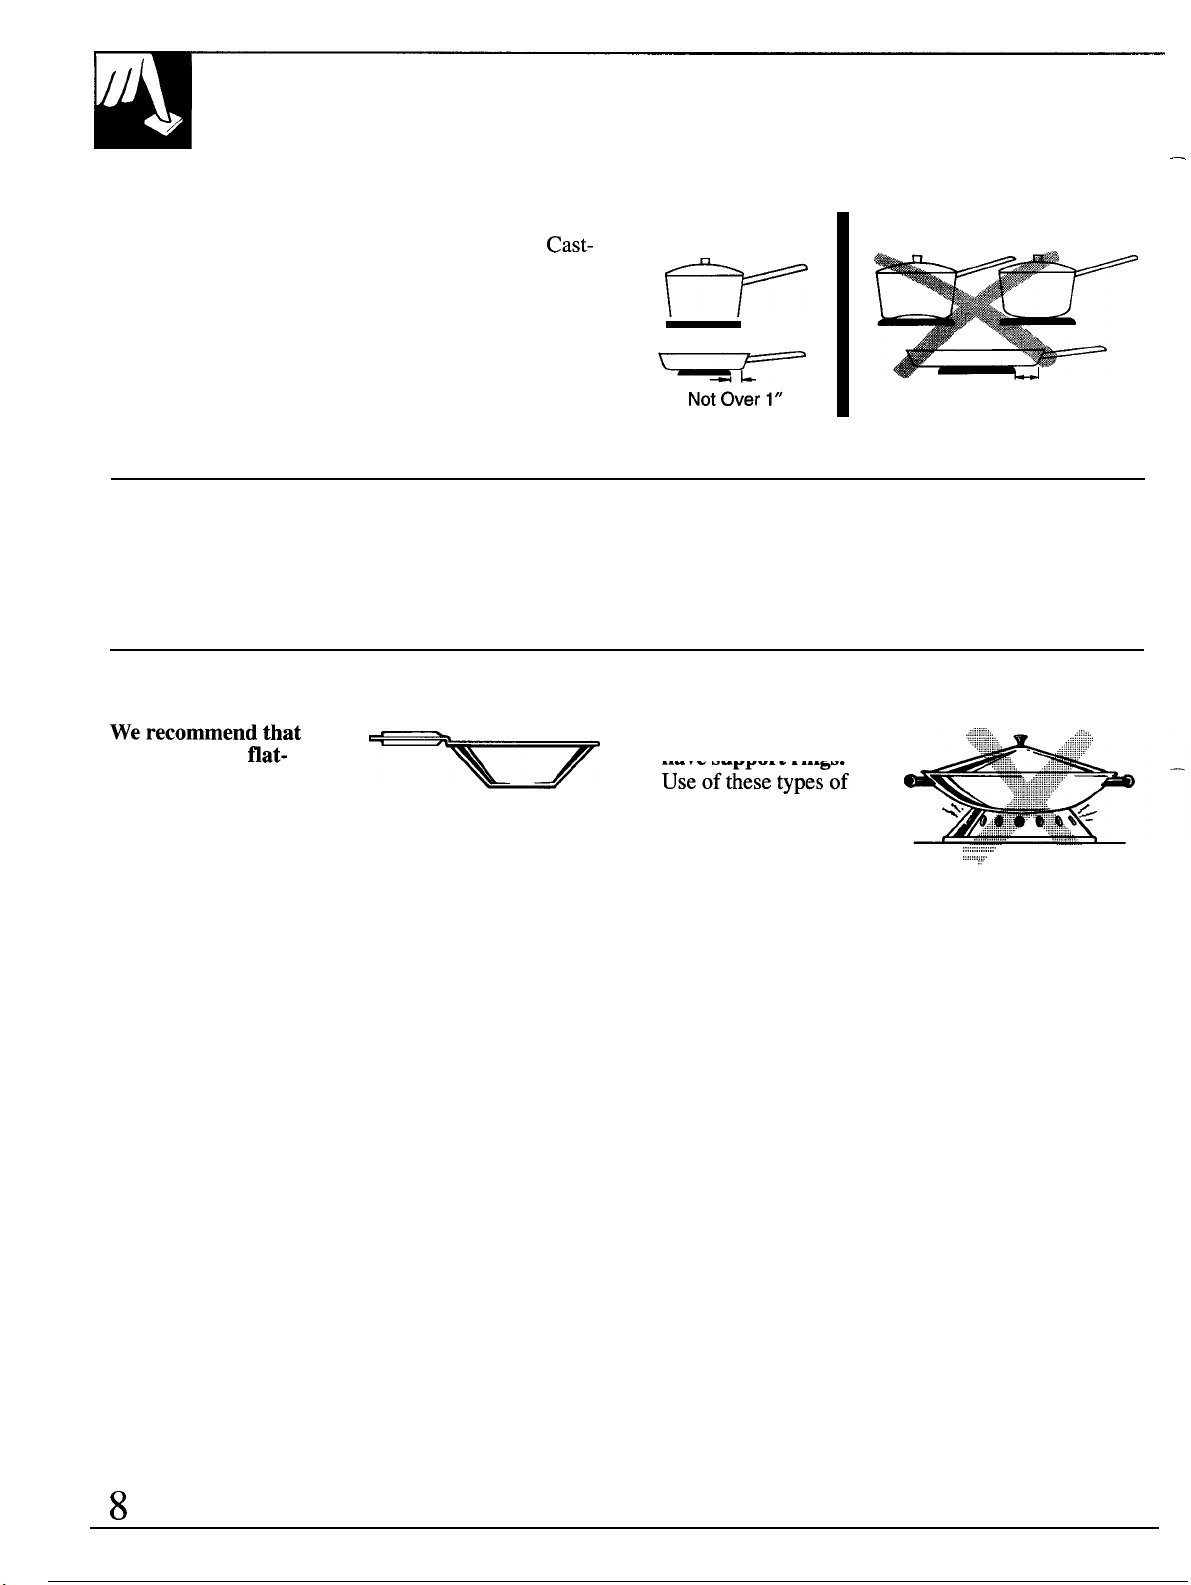
For best cooking results pans should be flat on the
bottom. Match the size of the saucepan to the size of
the surface unit. The pan should not extend over the
edge of the trim ring more than l“.
Right Wrong
Deep Fat Frying
Do not overfill cookware with fat that may spill over when adding food.
Frosty foods bubble vigorously. Watch food frying at high temperatures.
Keep range and hood clean from grease.
Wok Cooking
Do
not use woks that
you use only a
bottomed wok. They
are available at your
local retail store.
useofthesetypes~f
have support rings
woks, with or without
the ring in place, can be
dangerous. Placing the
ring over the surface
unit will cause a build-up of heat that will damage the
porcelain cooktop. Do not try to use such woks
without the ring. Your could be seriously burned if the
wok tipped over.
Over 1”
.,:
Page 7
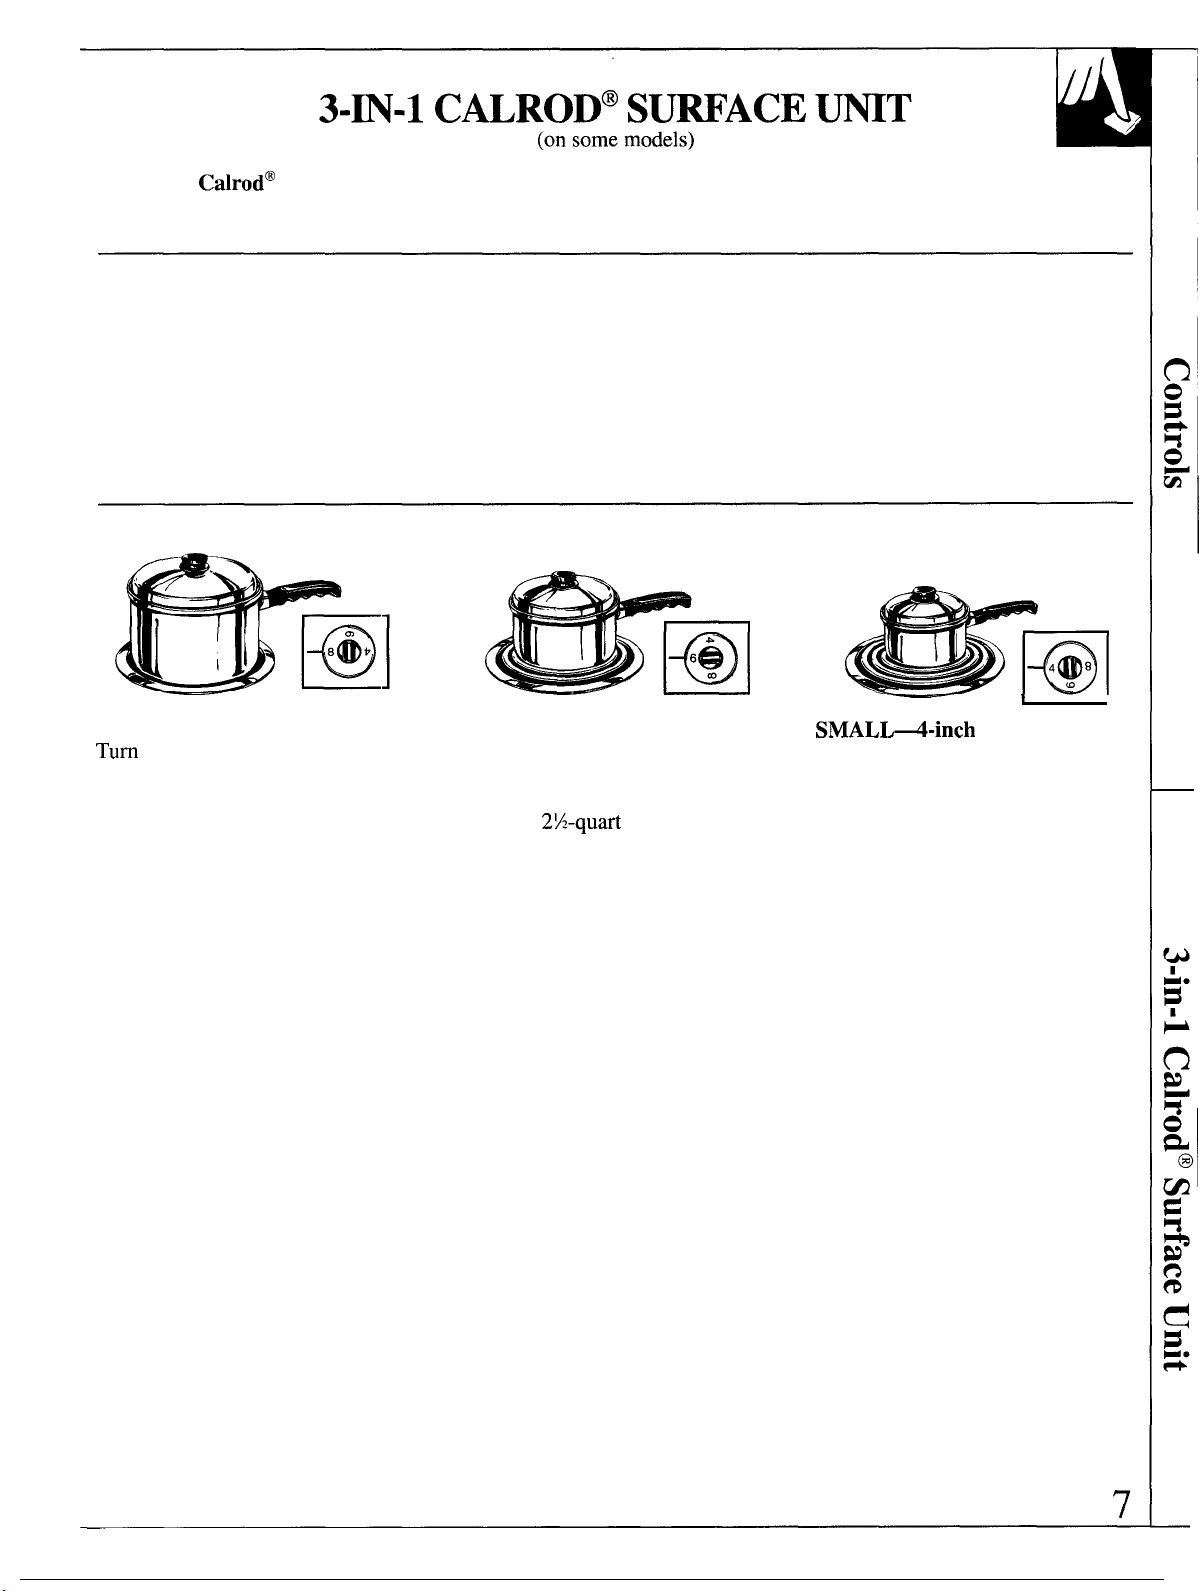
The 3-in 1
surface unit allows a choice of 4-inch, 6-inch or
8-inch heating pattern to match the size of the cookware being used.
How to Use It
1. Set appropriate pan on the unit.
2. Turn 3-in-1 Surface Unit Selector knob the select
unit size. The unit may be used as an 8-inch, 6-inch
or 4-inch unit to accommodate large, medium-sized
or small cookware. Match unit size selection to size
of cookware.
LARGE—8-inch unit.
switch to 8 when using
large cookware that completely
covers the unit (3-quart to 6-quart
saucepans or 8 to 10-inch skillets).
Then select desired heat setting.
MEDIUM—6-inch unit.
Turn switch to 6 when using
medium-sized cookware that
does not completely cover the
unit (2 to
saucepans
or 6 to 7-inch skillets). Then
select desired heat setting.
I
unit.
Turn switch to 4 when using
small cookware about 4 inches in
diameter (l-quart saucepan). Then
select desired heat setting.
Page 8
Control Knobs
CARE AND CLEANING
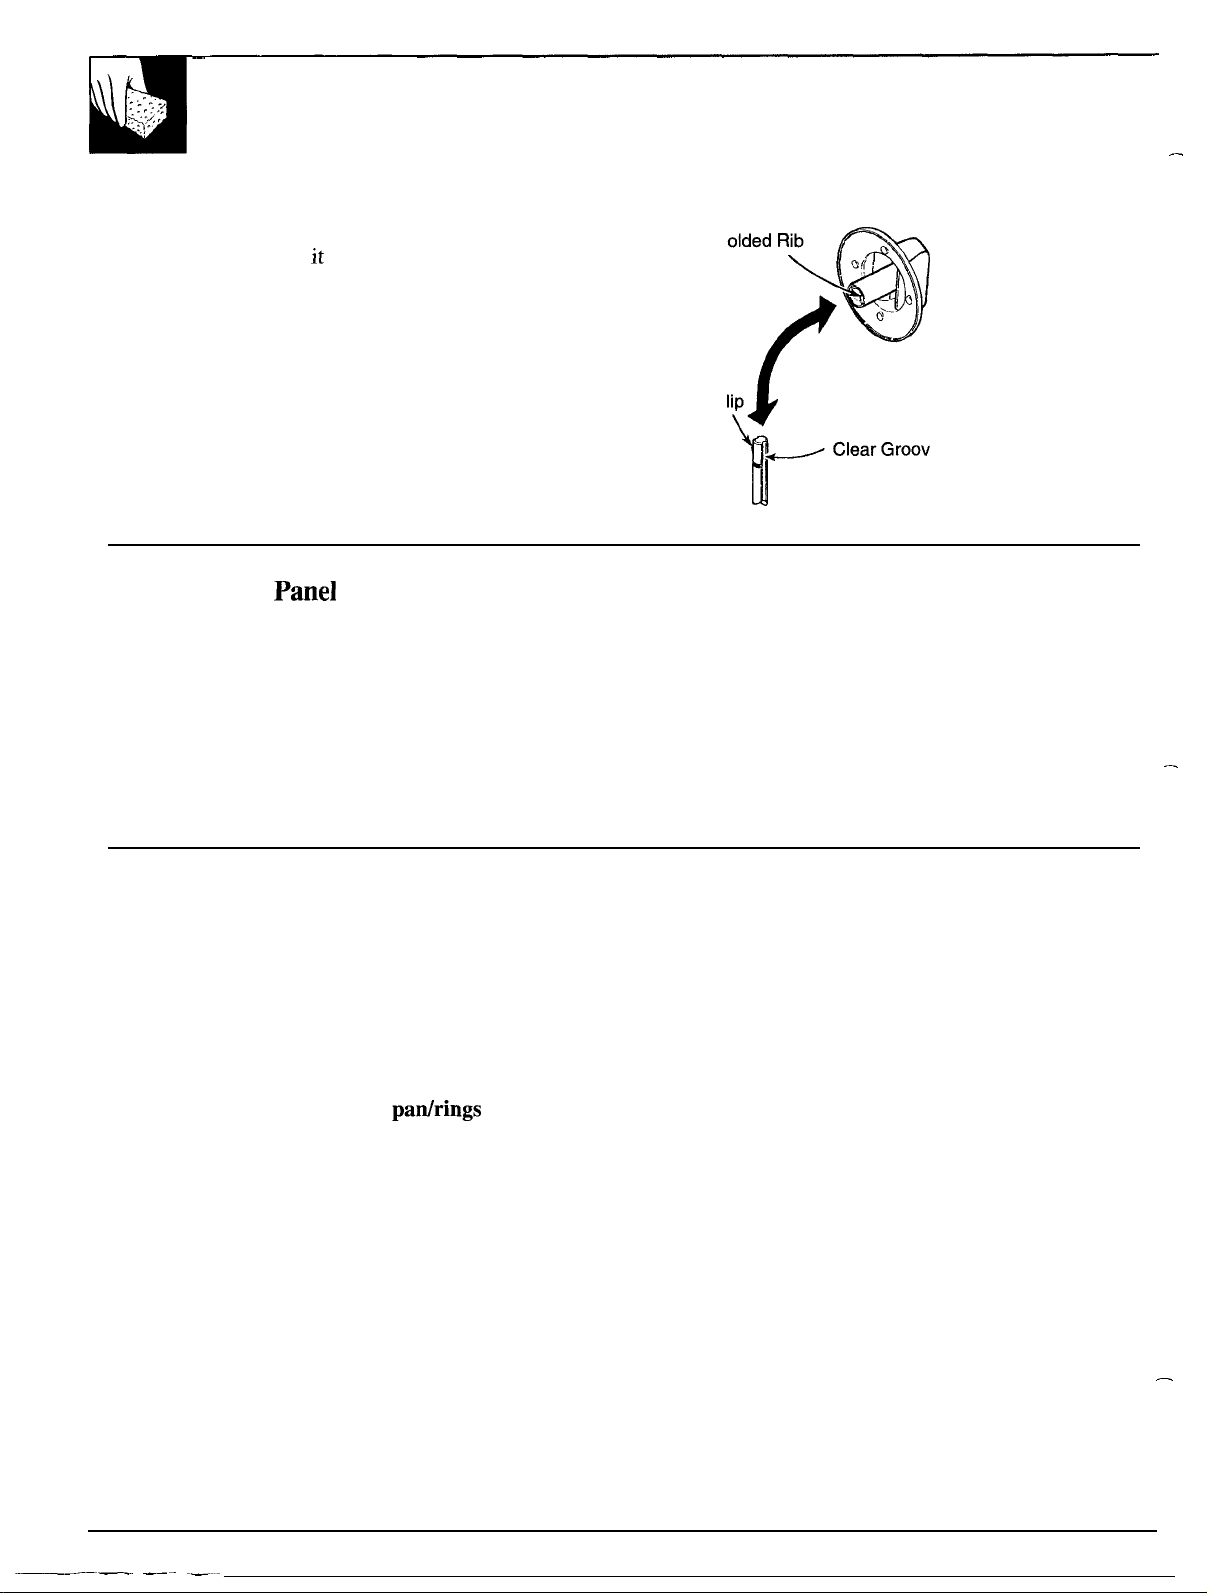
The control knobs may be removed for cleaning.
To remove knob, pull
knob is difficult to remove, place a thin cloth (like a
handkerchief) or a piece of string under and around
the knob edge and pull up.
Wash knobs in soap and water but do not soak.
Avoid getting water down into the knob stem holes.
To replace knob, locate the groove in each side of
the knob stem. One of the grooves contains a spring
clip and the other groove is clear. Locate the molded
rib inside the knob. Fit the molded rib into the clear
groove on the knob stem.
straight off the stem. If
M
Spring C
Glass Control
The glass control panel on your cooktop has been tempered to withstand
sudden temperature changes during cooking. Give it the normal care you
would give any glass material.
While it is impact-resistant, avoid scratching it to prevent it from shattering.
If the glass is hot, wipe up spills with a dry cloth or paper towel. When the
surface has cooled, wash, rinse and dry it. Alternately, when the glass is
cool, spray it with glass or window cleaner. Avoid the use of cleaning
powders or harsh abrasives that may scratch the surface.
e
Surface Units
Spatters and spills burn away when coils are
heated. At the end of the meal, heat soiled surface
units at HI. Let soil burn off for about one minute,
then switch surface units to OFF.
Avoid getting any cleaning materials on the coils. If
you do, wipe off with a damp paper towel before
heating the surface unit.
Clean the area under the drip panhings often.
Built-up soil, especially grease, may catch fire. To
make cleaning easier, tilt-lock units lift up and lock in
the up position, and plug-in units are removable.
CAUTION: Be sure all controls are turned to OFF
and surface units are cool before attempting to lift or
remove them.
After lifting the tilt-lock unit or removing a plug-in
unit, remove the drip pan/rings under the plug-in units
and the trim ring and drip pan under the tilt-lock unit.
Wipe around the edges of the surface unit opening.
Clean the area below the unit. Rinse all washed areas
with a damp cloth or sponge.
10
Page 9
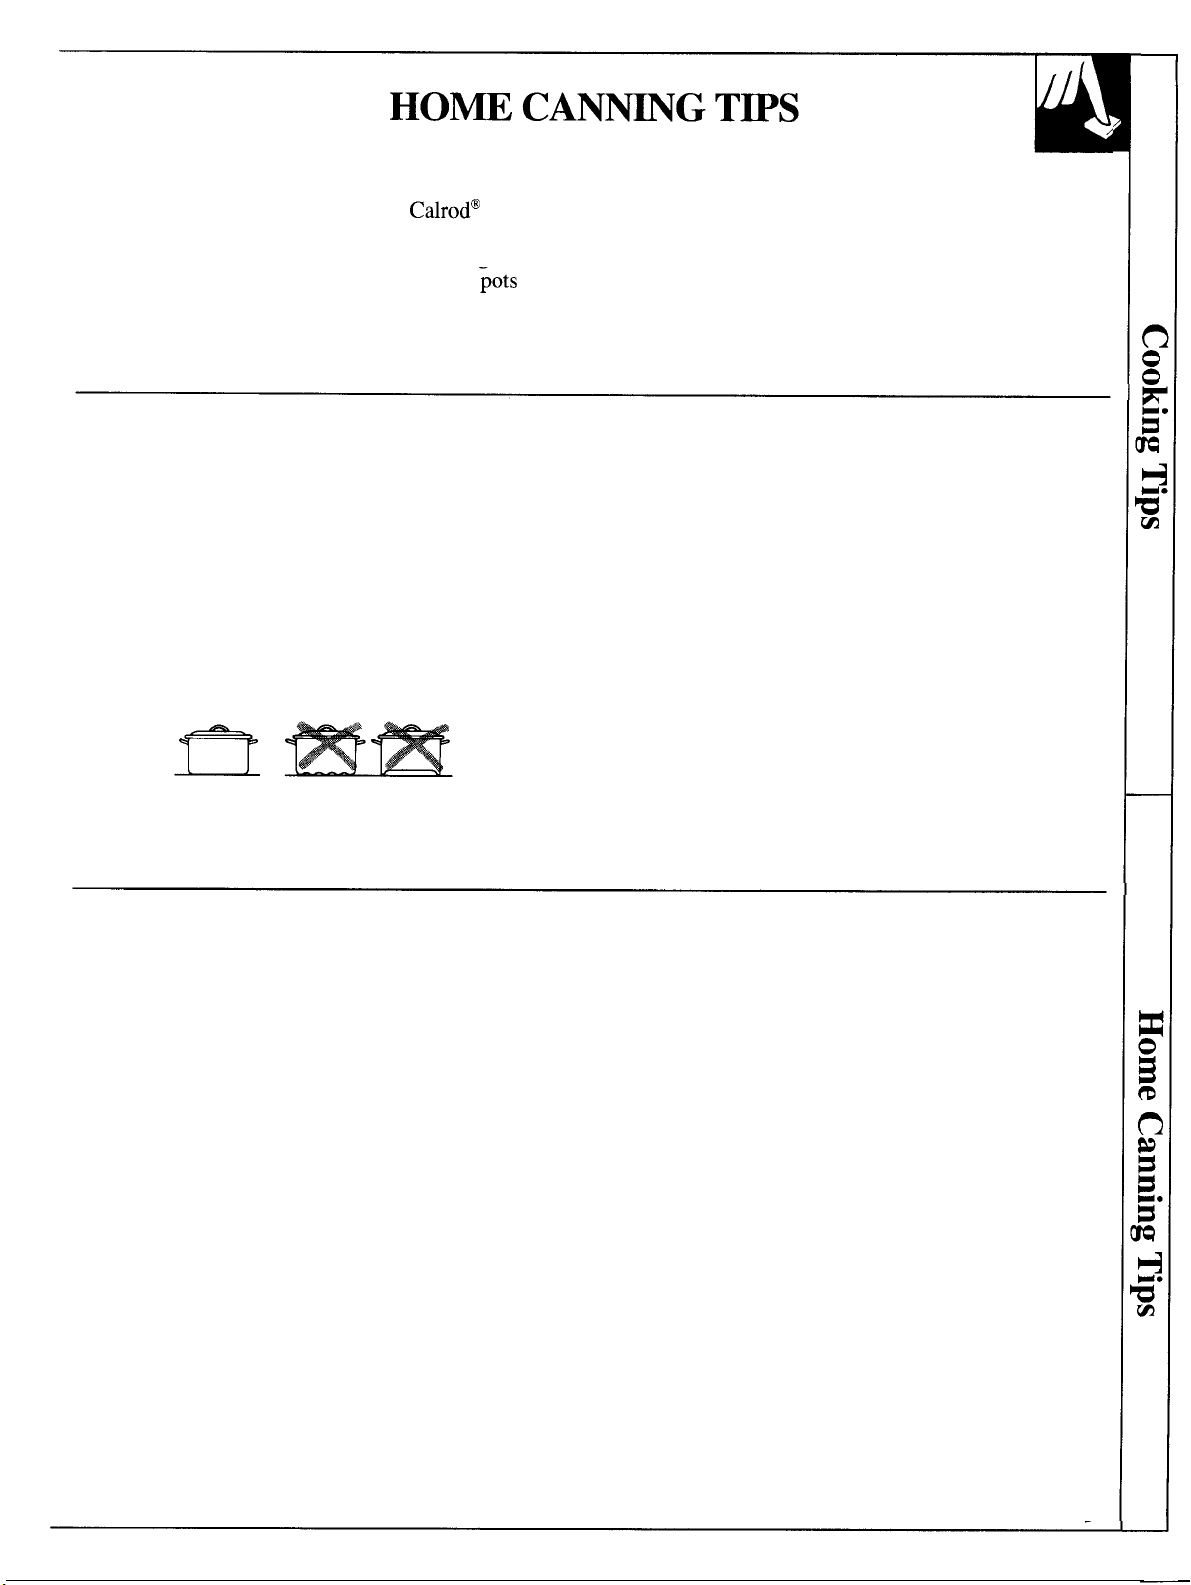
Canning should be done on surface units only.
Pots that extend beyond 1 inch of the
surface unit’s trim ring are not recommended for
most surface cooking. However, when canning with
water-bath or pressure canner, large-diameter
may be used. This is because boiling water
temperatures (even under pressure) are not harmful
to cooktop surfaces surrounding the surface unit.
Observe Following Points in Canning
1.
Be sure the canner fits over the center of the
surface unit. If your range or its location does
not allow the canner to be centered on the cooking
unit, use smaller-diameter pots for good canning
results.
2. Flat-bottomed canners must be used. Do not use
canners with flanged or rippled bottoms (often
found in enamelware) because they don’t make
enough contact with the surface unit and take too
long to boil water.
HOWEVER, DO NOT USE LARGE DIAMETER
CANNERS OR OTHER LARGE DIAMETER
COOKWARE FOR FRYING OR BOILING FOODS
OTHER THAN WATER.
Most syrup or sauce mixtures-and all types of
frying--cook at temperatures much higher than
boiling water. Such temperatures could eventually
harm cooktop surfaces surrounding surface units.
3. When canning, use recipes and procedures from
reputable sources. Reliable recipes and procedures
are available from the manufacturer of your canner;
manufacturers of glass jars for canning, such as
Ball and Kerr; and the United States Department of
Agriculture Extension Service.
4. Remember that canning is a process that generates
large amounts of steam. To avoid burns from steam
or heat, be careful when canning.
NOTE: If your house has low voltage, canning may
take longer than expected, even though directions
have been carefully followed. The process time will
be shortened by:
(1)
using a pressure canner, and
(2) starting with HOT tap water for fastest heating
of large quantities of water.
CAUTION:
Safe canning requires that harmful
microorganisms are destroyed and that the
jars are sealed completely. When canning foods
in a water-bath canner, a gentle but steady boil
must be maintained continuously for the required
time. When canning foods in a pressure canner,
the pressure must be maintained continuously for
the required time.
After you have adjusted the controls, it is
very important to make sure the prescribed
boil or pressure levels are maintained for
the required time.
9
Page 10
CARE AND CLEANING
(continued next page)
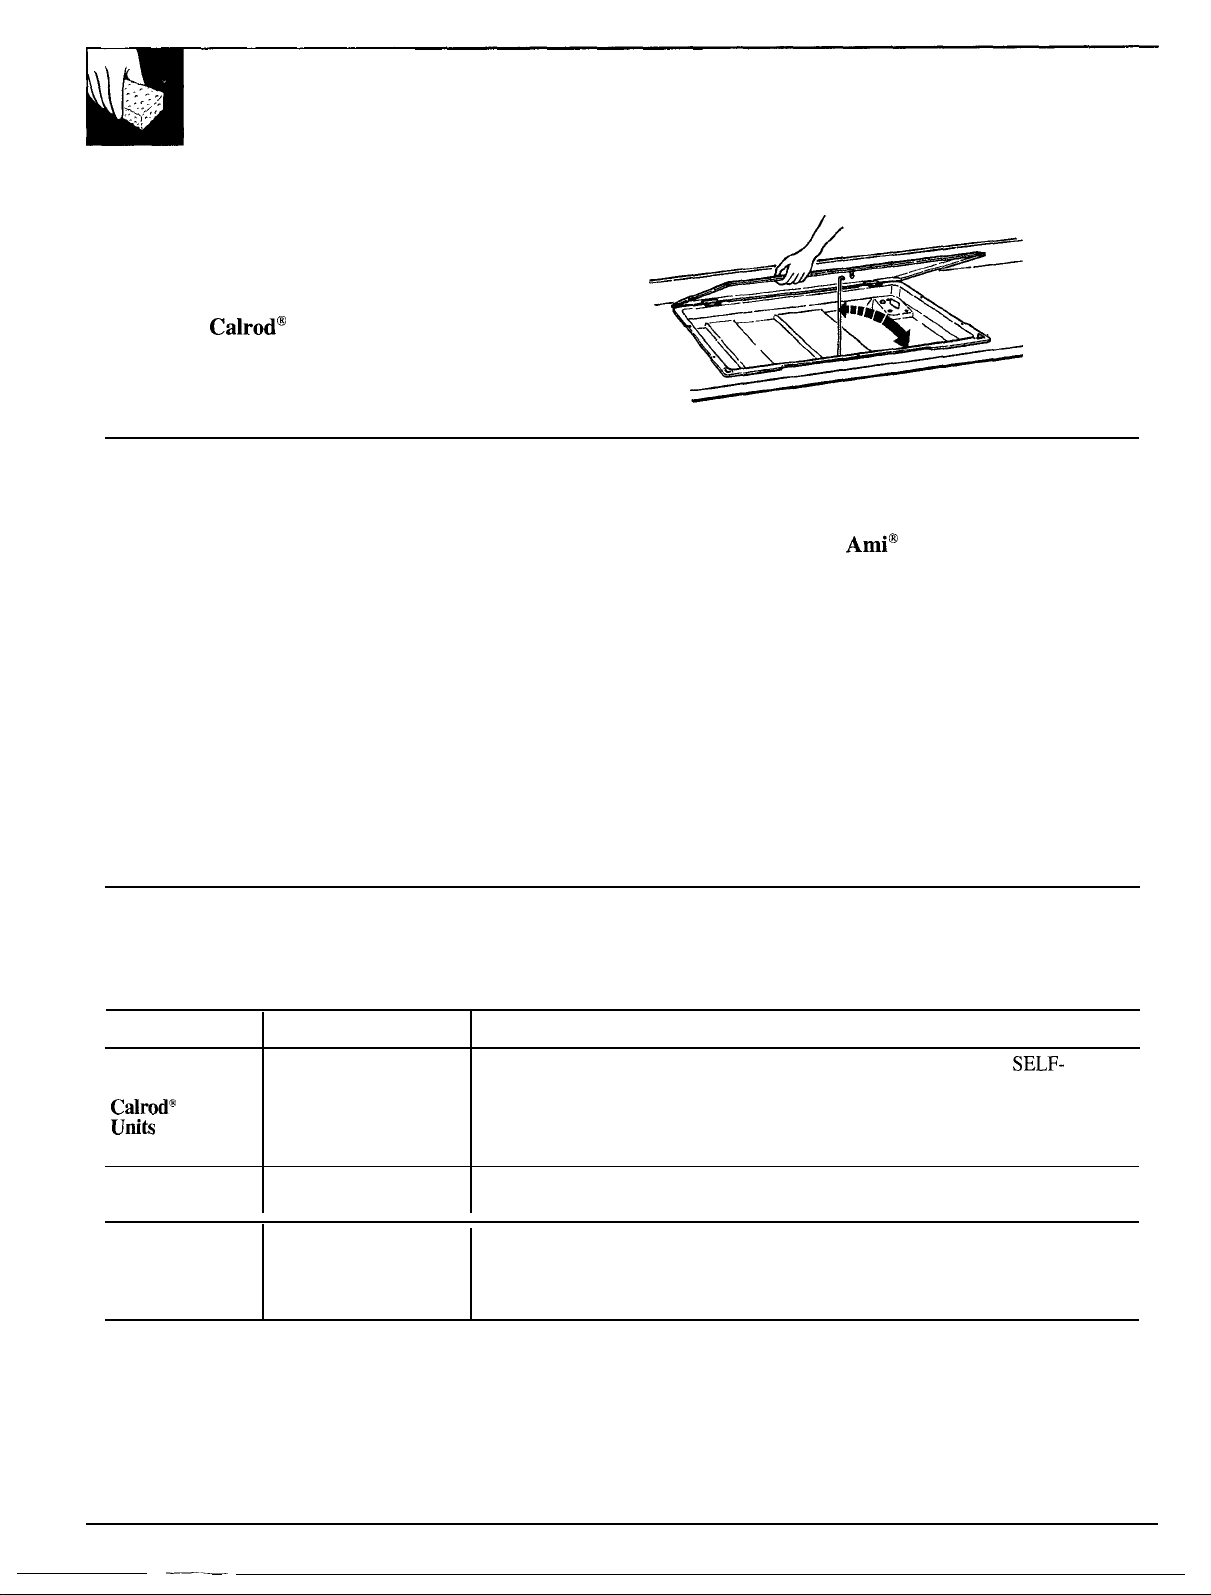
Lift-Up Cooktop
Clean the area under the cooktop often. Built-up
soil, especially grease, may catch fire.
To make cleaning easier, the entire cooktop may be
lifted up and secured with the support rod.
Be sure all
before raising the cooktop. After cleaning under the
cooktop with hot, mild soapy water and a clean cloth,
lower the cooktop. Be careful not to pinch your fingers.
surface units are turned off
Porcelain Enamel Finish
(on some models)
The porcelain enamel finish is sturdy but
breakable if misused. This finish is acid-resistant.
However, any acid foods spilled (such as fruit juices,
tomato or vinegar) should not be permitted to remain
on the finish.
Avoid cleaning powders or harsh abrasives which
may scratch the enamel.
If acids spill on the cooktop while it is hot, use a
dry paper towel or cloth to wipe it up right away.
When the surface has cooled, wash with soap and
water. Rinse well.
For other spills such as fat smatterings,
wash
with soap and water after the surface has cooled.
Rinse well. Polish with a dry cloth.
CLEANING GUIDE
NOTE: Let cooktop parts cool before touching or handling.
PART MATERIALS TO USE
●
Chrome-Plated
Drip Pans under
Surface
Soap and
● Stiff-Bristled Brush CLEANING OVEN; they will discolor. Wipe after each cooking, so unnoticed
● Soap-Filled
Scouring Pad
Water
GENERAL DIRECTIONS
Clean with soapy water
spatter will not “burn on” the next time you cook. To remove “burned-on”
spatters, use any or all cleaning materials mentioned. Rub lightly with scouring
pad to prevent scratching of surface.
Brushed Chrome Finish
(on some models)
Clean the brushed chrome top with warm,
soapy water or Bon
brand cleanser and
immediately dry it with a clean, soft cloth. Take
care to dry the surface following the “grain.” To help
prevent finger marks after cleaning, spread a thin film
of baby oil on the surface. Wipe away excess oil with
a clean, soft cloth.
or in dishwasher. DO
NOT CLEAN IN A
Outside Metal
Finish
Porcelain
Enamel
Drip Pans
12
● Soap and Water
● Ammonia Porcelain drip pans can be cleaned in dishwasher or by hand. DO NOT
● Soap-Filled CLEAN IN A SELF-CLEANING OVEN. Place them in a covered container (or
Scouring Pad
Wash, rinse, and then polish with a dry cloth. DO NOT USE steel wool, abrasives,
ammonia, acids, or commercial oven cleaners which may damage the finish.
plastic bag) with 1/4 cup ammonia to loosen soil. Then scrub with scouring
pad if necessary.
Page 11
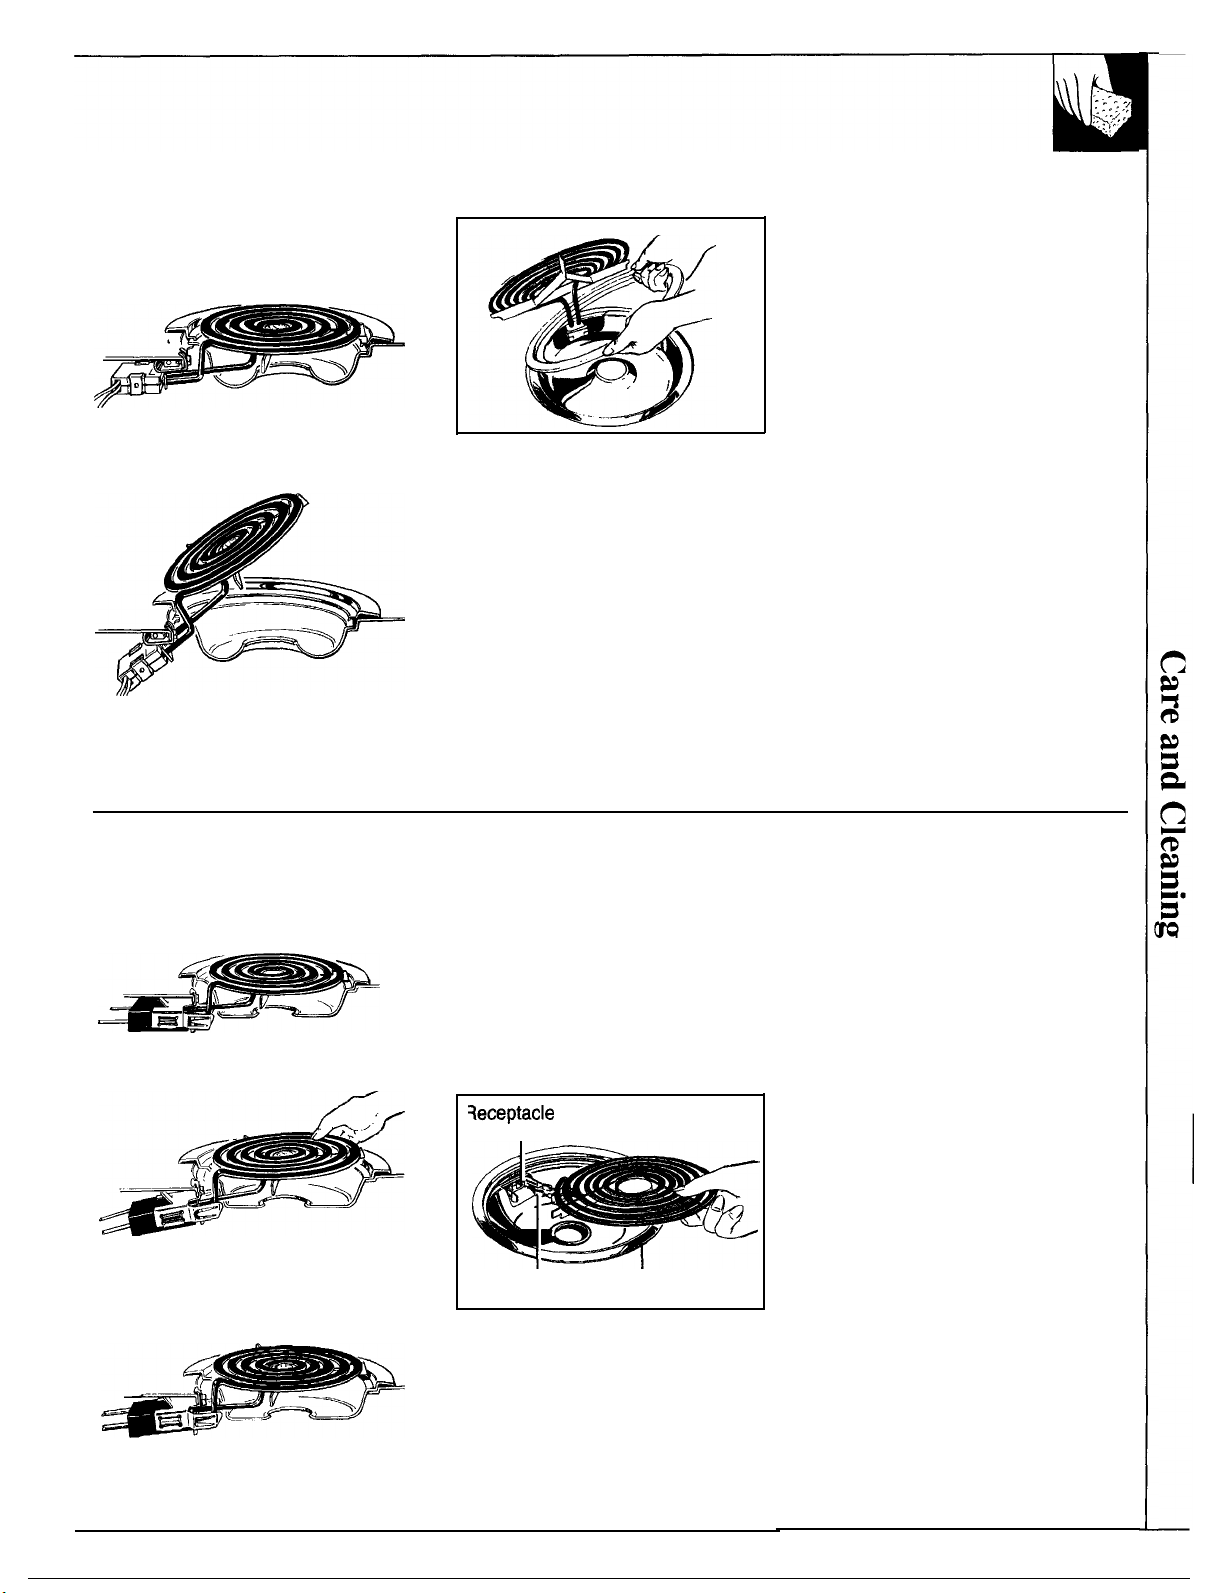
Tilt-Lock Unit (on some models)
If your cooktop is equipped
with a 3-in-1 unit, this unit is a
tilt-lock unit.
Tilt-lock units cannot
be removed.
You can lift a tilt-lock unit
upward about 6“ and it will lock
in the up position.
To reposition the tilt-lock unit:
●
Replace
the drip pan into the
recess in the cooktop.
● Put the trim ring in place over the
drip pan. The drip pan must be
under the trim ring.
● Guide the surface unit into place
so it fits evenly into the trim ring.
Plug-In Units
(on some models)
All units except the 3-in-1 unit (on
some models) are plug-in units.
Plug-in units can be removed.
Lift a plug-in unit about 1“ above
the trim ring—just enough to grasp
it—and you can pull it out.
Do not lift a plug-in unit more
than 1 inch. If you do, it may not
lie flat on the trim ring when you
plug it back in.
Repeated lifting of the plug-in
unit more than 1 inch above the
trim ring can permanently
damage the receptacle.
I
I
Terminals
Drip Pan/Ring
To replace a plug-in unit:
● Place the drip pan/ring into
the surface unit cavity found on
top of the cooktop so the unit
receptacle can be seen through
the opening in the pan.
● Insert the terminals of the plug-in
unit through the opening in the
drip pan and into the receptacle.
● Guide the surface unit into place
so it fits evenly into the trim ring.
CAUTION
● Do not attempt to clean
plug-in surface units in an
automatic dishwasher.
● Do not immerse plug-in surface
units in liquids of any kind.
● Do not bend the plug-in surface
unit plug terminals.
● Do not attempt to clean,
adjust or in any way repair the
plug-in receptacle.
(continued next page)
11
Page 12

NOTES
14
Page 13
PROBLEM
POSSIBLE CAUSE
CALROD*
UNITS IX) NOT
WORK PROPERLY
SURFACE
● Difficulty may be in the main distribution pauel of your house caused
m&n circuit breaker, depending on the
cartridge-type) should be changed
ELECTRICAL CIRCUITS. If
fuse
NOTE: Apartment tenants or
Drip pans
Surf&%
for unit you
●
Surface units are
If you need more help... call, toll free:
GE Answer
800.626.2000
consumer information service
circuit
involved, reset
circuit breaker
to perform this
controls are
set
tripped
not properly
using.
plugged in solidly.
oven circuit breaker, the main fuse or the
of
supply.
If
in the
box uses’
ONLY
after
call for service.
calling
or
owners
service.
SOMEONE
of
procedure% the
request
unit control is
a
building
13
Page 14
YOUR BUILT-IN COOKTOP
WARRANTY
Save proof of original purchase date such as your sales slip or
check to establish warranty period.
WHAT IS COVERED
WHAT IS NOT COVERED
FULL ONE-YEAR WARRANTY
For one year from date of original
purchase, we will provide, free of
charge, parts and service labor in
your home to repair or replace
parf of the cooktop
that fails
any
because of a manufacturing defect.
●
Service trips to your home to teach
you how to use the product.
Read your Use and Care material.
If you then have any questions
about operating the product, please
contact your dealer or our
Consumer Affairs office at the
address below, or call, toll free:
GE Answer
800.626.2000
consumer information service
●
Improper installation.
If you have an installation problem,
contact your dealer or installer.
You are responsible for providing
This warranty is extended to
the original purchaser and any
succeeding owner for products
purchased for ordinary home use in
the
48
mainland states, Hawaii and
Washington,
In Alaska the
warranty is the same except that it is
LIMITED because vou must
ship the product to
service
to
or for the service technician’s travel
costs to your home.
All warranty service will be
providedby our Factory Service
Centers or by our authorized
Customer
normal working hours.
Should your appliance need
service during the warranty period
or beyond, call 800-GE-CARES
(800-432-2737).
adequate electrical, gas, exhausting
and other connecting facilities as
described in the Installation
Instructions provided with the
product.
●
Replacement of house fuses or
resetting of circuit breakers.
●
Failure of the product if it is used
for other than its intended purpose
or used commercially.
Damage to product caused by
accident, fire, floods or acts of God.
WARRANTOR IS NOTRESPONSIBLE
FOR CONSEQUENTIAL DAMAGES.
5-92 CG
Some states do not allow the exclusion or limitation of incidental or consequential damages, so the above limitation or exclusion
may not apply to you. This warranty gives you specific legal rights, and you may also have other rights which vary from state to state
To know what your legal rights are in your state, consult your local or state
affairs office or your state’s Attorney General.
Warrantor: General Electric Company
If further help is needed concerning this warranty, write:
Manager—Consumer Affairs, GE Appliances, Louisville, KY 40225
JP300N
JP300R
JP301BN JP325R
. . . .
JP31
JP311
BN
 Loading...