

Page 1

ge.com
JP256
Cooktop
Radiant
49-80508 06-07 JR
Safety Instructions . . . . . . 2–4
Operating Instructions
Cookware Tips . . . . . . . . . . . . . . .8, 9
Dual Surface Element . . . . . . . . . . 7
Features of Your Cooktop . . . . . . .5
Surface Elements . . . . . . . . . . . . 6, 7
Temperature Limiter . . . . . . . . . . . .7
Care and Cleaning
Control Knobs . . . . . . . . . . . . . . . . . 9
Glass Cooktop . . . . . . . . . . . . 10, 11
Installation
Instructions . . . . . . . . . . . . .12–20
Troubleshooting Tips . . . . . 21
Consumer Support
Consumer Support . . . .Back Cover
Product Registration,
(Canada) . . . . . . . . . . . . . . . . . . 25, 26
Product Registration,
(U.S.A.) . . . . . . . . . . . . . . . . . . . 23, 24
Warranty . . . . . . . . . . . . . . . . . . . . 27
Write the model and serial
numbers here:
Model # _____________
Serial # _____________
You can find them on a label
under the cooktop.
Owner’s Manual and
Installation Instructions
La section française commence à la page 29
La sección en español empieza en la página 53
Table de
cuisson
Par rayonnement
Estufa
Radiante
Manuel d’utilisation
et Instructions
d’Installation
Manual del propietario
y Instrucciones
de instalación
Page 2
Safety Instructions
Operating Instructions
Installation
Instructions
Troubleshooting Tips
Consumer Support
IMPORTANT SAFETY INFORMATION.
READ ALL INSTRUCTIONS BEFORE USING.
WARNING!
For your safety, the information in this manual must be followed to minimize the risk of fire or
explosion, electric shock, or to prevent property damage, personal injury, or loss of life.
When using electrical appliances, basic safety precautions should be followed, including
the following:
■ Use this appliance only for its intended use as
described in this manual.
■ Do not attempt to repair or replace any part
of your cooktop unless it is specifically
recommended in this manual. All other servicing
should be referred to a qualified technician.
■ Before performing any service, disconnect
the cooktop power supply at the household
distribution panel by removing the fuse or
switching off the circuit breaker.
■ Be sure your appliance is properly installed and
grounded by a qualified technician in accordance
with the provided installation instructions. This
appliance must be supplied with the proper
voltage and frequency, and connected to an
individual, properly grounded branch circuit,
protected by a circuit breaker or fuse acceptable
for the indicated wattage on the name plate.
■ Have the installer show you the location of the
circuit breaker or fuse. Mark it for easy reference.
■ Do not leave children alone—children should not
be left alone or unattended in an area where an
appliance is in use. They should never be allowed
to sit or stand on any part of the appliance.
■ Teach children not to play with the controls or
any other part of the cooktop.
■ Do not allow anyone to climb, stand or hang on
the cooktop.
■
CAUTION:Items of interest to children
should not be stored in cabinets above a
cooktop—children climbing on the cooktop
to reach items could be seriously injured.
■ Always keep combustible wall coverings, curtains
or drapes a safe distance from your cooktop.
■ Always keep dishtowels, dish cloths, pot holders
and other linens a safe distance away from your
cooktop.
■ Always keep wooden and plastic utensils and
canned food a safe distance away from your
cooktop. They may become hot and could cause
burns.
■ Never wear loose-fitting or hanging garments
while using the appliance. Flammable material
could be ignited if brought in contact with hot
surface elements and may cause severe burns.
■ Use only dry pot holders—moist or damp pot
holders on hot surfaces may result in burns from
steam. Do not let pot holders touch hot surface
elements. Do not use a towel or other bulky cloth.
Such cloths can catch fire on a hot surface
element.
■ For your safety, never use your appliance for
warming or heating the room.
■ Do not use water on grease fires. Never pick up
a flaming pan. Turn the controls off. Smother a
flaming pan on a surface element by covering the
pan completely with a well-fitting lid, cookie sheet
or flat tray. Use a multi-purpose dry chemical or
foam-type extinguisher.
■ Flaming grease outside a pan can be put out by
covering with baking soda or, if available, by using
a multi-purpose dry chemical or foam-type fire
extinguisher.
■ Do not flame foods on the cooktop. If you do
flame foods under the hood, turn the fan on.
■ Do not let cooking grease or other flammable
materials accumulate on the cooktop.
SAFETY PRECAUTIONS
2
Name plate location
Page 3
Safety Instructions Operating Instructions
Installation
Instructions
Troubleshooting Tips
Consumer Support
COOK MEAT AND POULTRY THOROUGHLY…
Cook meat and poultry thoroughly—meat to at least an INTERNAL temperature of 160°F and
poultry to at least an INTERNAL temperature of 180°F. Cooking to these temperatures usually
protects against foodborne illness.
3
ge.com
■ Do not touch surface elements. These
surfaces may be hot enough to burn even
though they are dark in color. During and
after use, do not touch, or let clothing or
other flammable materials contact the
surface elements or areas nearby the
surface elements; allow sufficient time
for cooling first.
■ Potentially hot surfaces include the cooktop
and areas facing the cooktop.
■ To minimize the possibility of burns, ignition
of flammable materials and spillage, the
handle of a container should be turned
toward the center of the cooktop without
extending over any nearby surface
elements.
■ Always turn the surface element control
to off before removing the cookware.
■ Use proper pan size—select cookware having
flat bottoms large enough to cover the
surface element heating element. The use
of undersized cookware will expose a portion
of the surface element to direct contact and
may result in ignition of clothing. Proper
relationship of cookware to surface element
will also improve efficiency.
■ Never leave surface elements unattended at
high heat settings. Boilovers cause smoking
and greasy spillovers that may catch on fire.
■ Only certain types of glass, glass/ceramic,
earthenware or other glazed containers are
suitable for cooktop cooking; others may
break because of the sudden change in
temperature.
■ Keep an eye on foods being fried at high
or medium-high heat settings.
■ Foods for frying should be as dry as
possible. Frost on frozen foods or moisture
on fresh foods can cause hot fat to bubble
up and over the sides of the pan.
■ Use little fat for effective shallow or deep-fat
frying. Filling the pan too full of fat can cause
spillovers when food is added.
■ If a combination of oils or fats will be used
in frying, stir together before heating, or as
fats melt slowly.
■ Always heat fat slowly, and watch as it
heats.
■ Use a deep fat thermometer whenever
possible to prevent overheating fat beyond
the smoking point.
■ Never try to move a pan of hot fat,
especially a deep fat fryer. Wait until the
fat is cool.
■ Do not store flammable materials near
the cooktop.
■ Keep the hood and grease filters clean
to maintain good venting and to avoid
grease fires.
■ Do not store or use combustible materials,
gasoline or other flammable vapors and liquids
in the vicinity of this or any appliance.
■ Clean only parts listed in this Owner’s
Manual.
■ Do not leave paper products, cooking
utensils or food on the cooktop when not
in use.
■ Keep cooktop clean and free of
accumulation of grease or spillovers
which may ignite.
■ Never heat unopened food containers.
Pressure buildup may make container burst
and cause injury.
■ Never leave jars or cans of fat drippings on
or near your cooktop.
■ Never use your appliance for warming or
heating the room.
SAFETY PRECAUTIONS
WARNING!
Page 4

SAVE THESE INSTRUCTIONS
Use care when touching the cooktop. The glass surface of the cooktop will retain heat after the
controls have been turned off.
RADIANT SURFACE ELEMENTS
■ Avoid scratching the glass cooktop. The
cooktop can be scratched with items such
as sharp instruments, rings or other jewelry
and rivets on clothing.
■ Never use the glass cooktop surface as a
cutting board.
■ Do not place or store items on top of the
glass cooktop surface when it is not in use.
■ Be careful when placing spoons or other
stirring utensils on glass cooktop surface
when it is in use. They may become hot
and could cause burns.
■ Avoid heating an empty pan. Doing so may
damage the cooktop and the pan.
■ Do not allow water, other liquids or grease
to remain on the cooktop.
■ To minimize the possibility of burns, always
be certain that the controls for all surface
elements are at the off position and the
entire glass surface is cool before
attempting to clean the cooktop.
■ Do not operate the glass surface elements
if the glass is broken. Spillovers or cleaning
solution may penetrate a broken cooktop
and create a risk of electrical shock. Contact
a qualified technician immediately should
your glass cooktop become broken.
■ Clean the cooktop with caution. If a wet
sponge or cloth is used to wipe spills on
a hot surface element, be careful to avoid
steam burns. Some cleansers can produce
noxious fumes if applied to a hot surface.
■ NOTE: We recommend that you avoid
wiping any surface element areas until they
have cooled and the indicator light has gone
off. Sugar spills are the exception to this.
Please see the Cleaning the Glass Cooktop
section.
■ To avoid possible damage to the cooking
surface, do not apply the cleaning cream
to the glass surface when it is hot .
■ After cleaning, use a dry cloth or paper towel
to remove all the cleaning cream residue.
■ Read and follow all instructions and
warnings on the cleaning cream labels.
■ Use care when touching the cooktop. The
glass surface of the cooktop will retain heat
after the controls have been turned OFF.
■ Do not stand on the glass cooktop.
■ Large scratches or impacts to glass
cooktops can lead to broken or
shattered glass.
4
IMPORTANT SAFETY INFORMATION.
READ ALL INSTRUCTIONS BEFORE USING.
WARNING!
READ AND FOLLOW THIS SAFETY INFORMATION CAREFULLY.
Safety Instructions
Operating Instructions
Installation
Instructions
Troubleshooting Tips
Consumer Support
Page 5
5
Safety Instructions Operating Instructions
Installation
Instructions
Troubleshooting Tips
Consumer Support
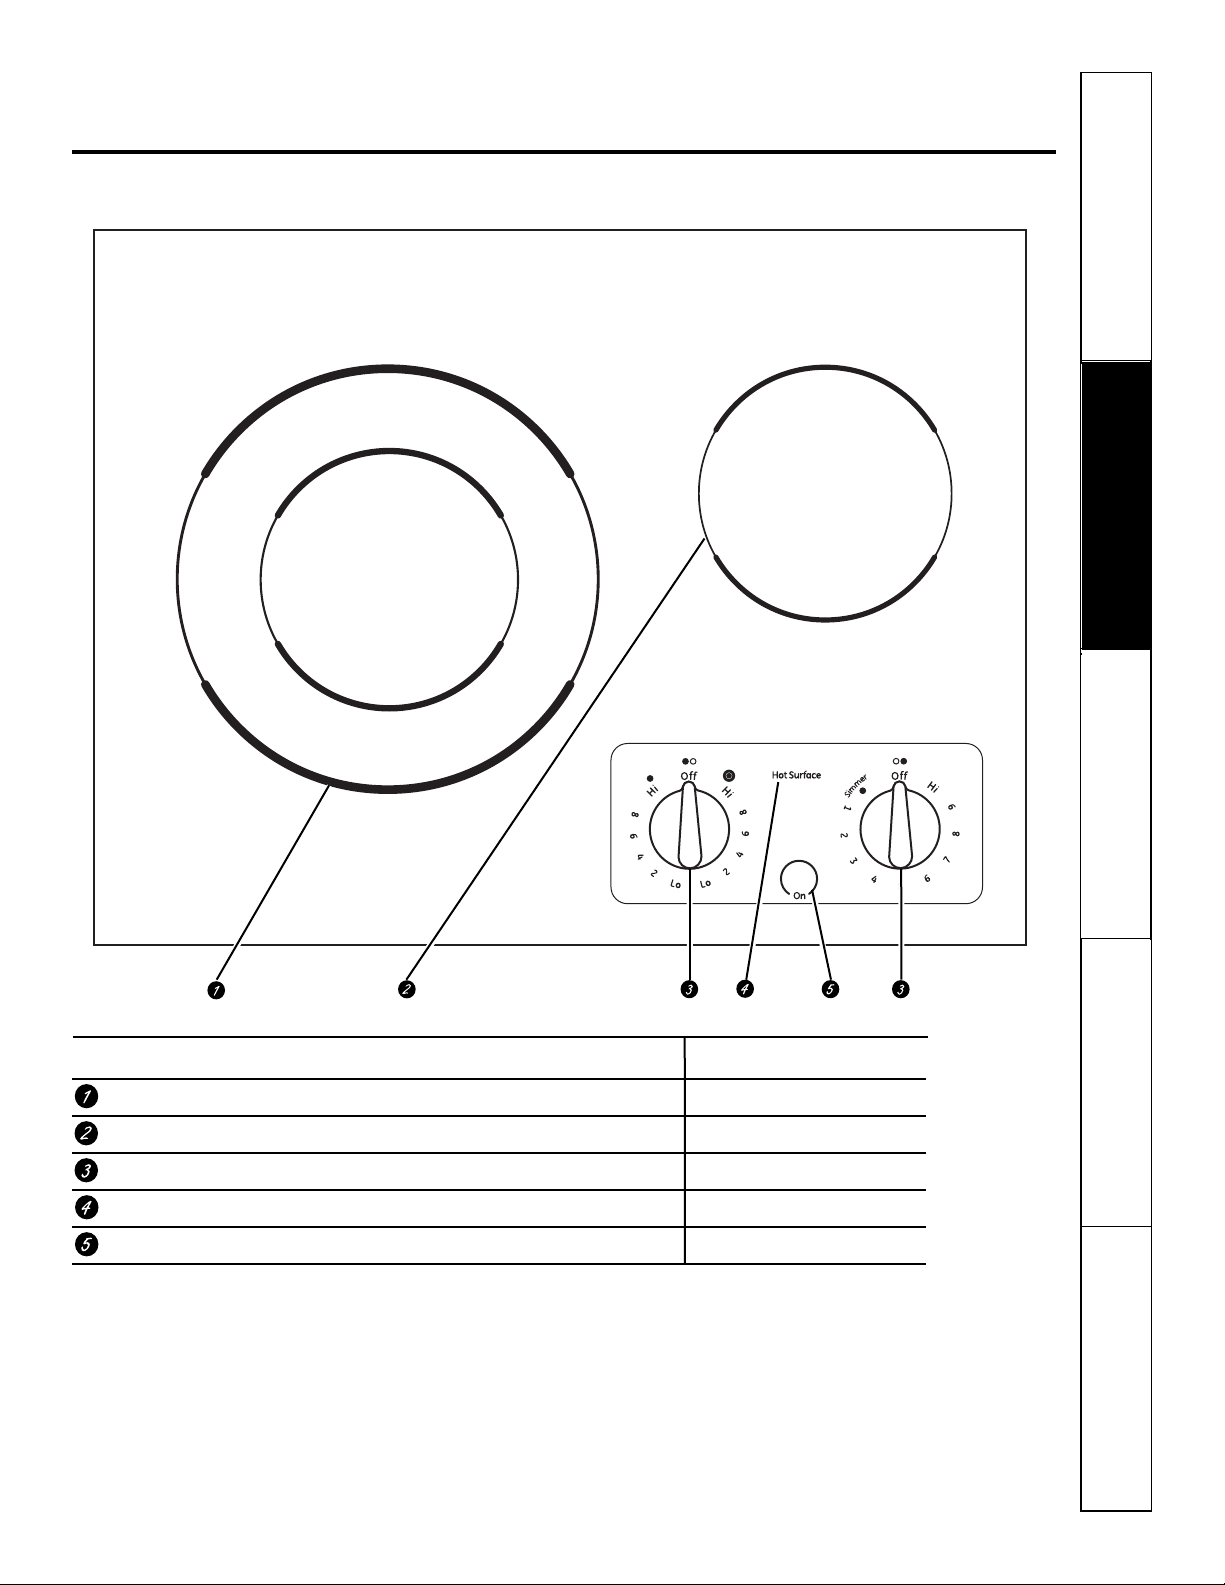
Features of your cooktop. ge.com
Throughout this manual, features and appearance may vary from your model.
Feature Index (Features and appearances may vary.) Explained on page
Dual Surface Element 6, 7
Single Surface Element 7
Surface Element Control Knobs 6
Hot Surface Indicator Light 6
“On” Indicator Light 6
Page 6

6
Safety Instructions
Operating Instructions
Installation
Instructions
Troubleshooting Tips
Consumer Support
Using the surface elements.
Throughout this manual, features and appearance may vary from your model.
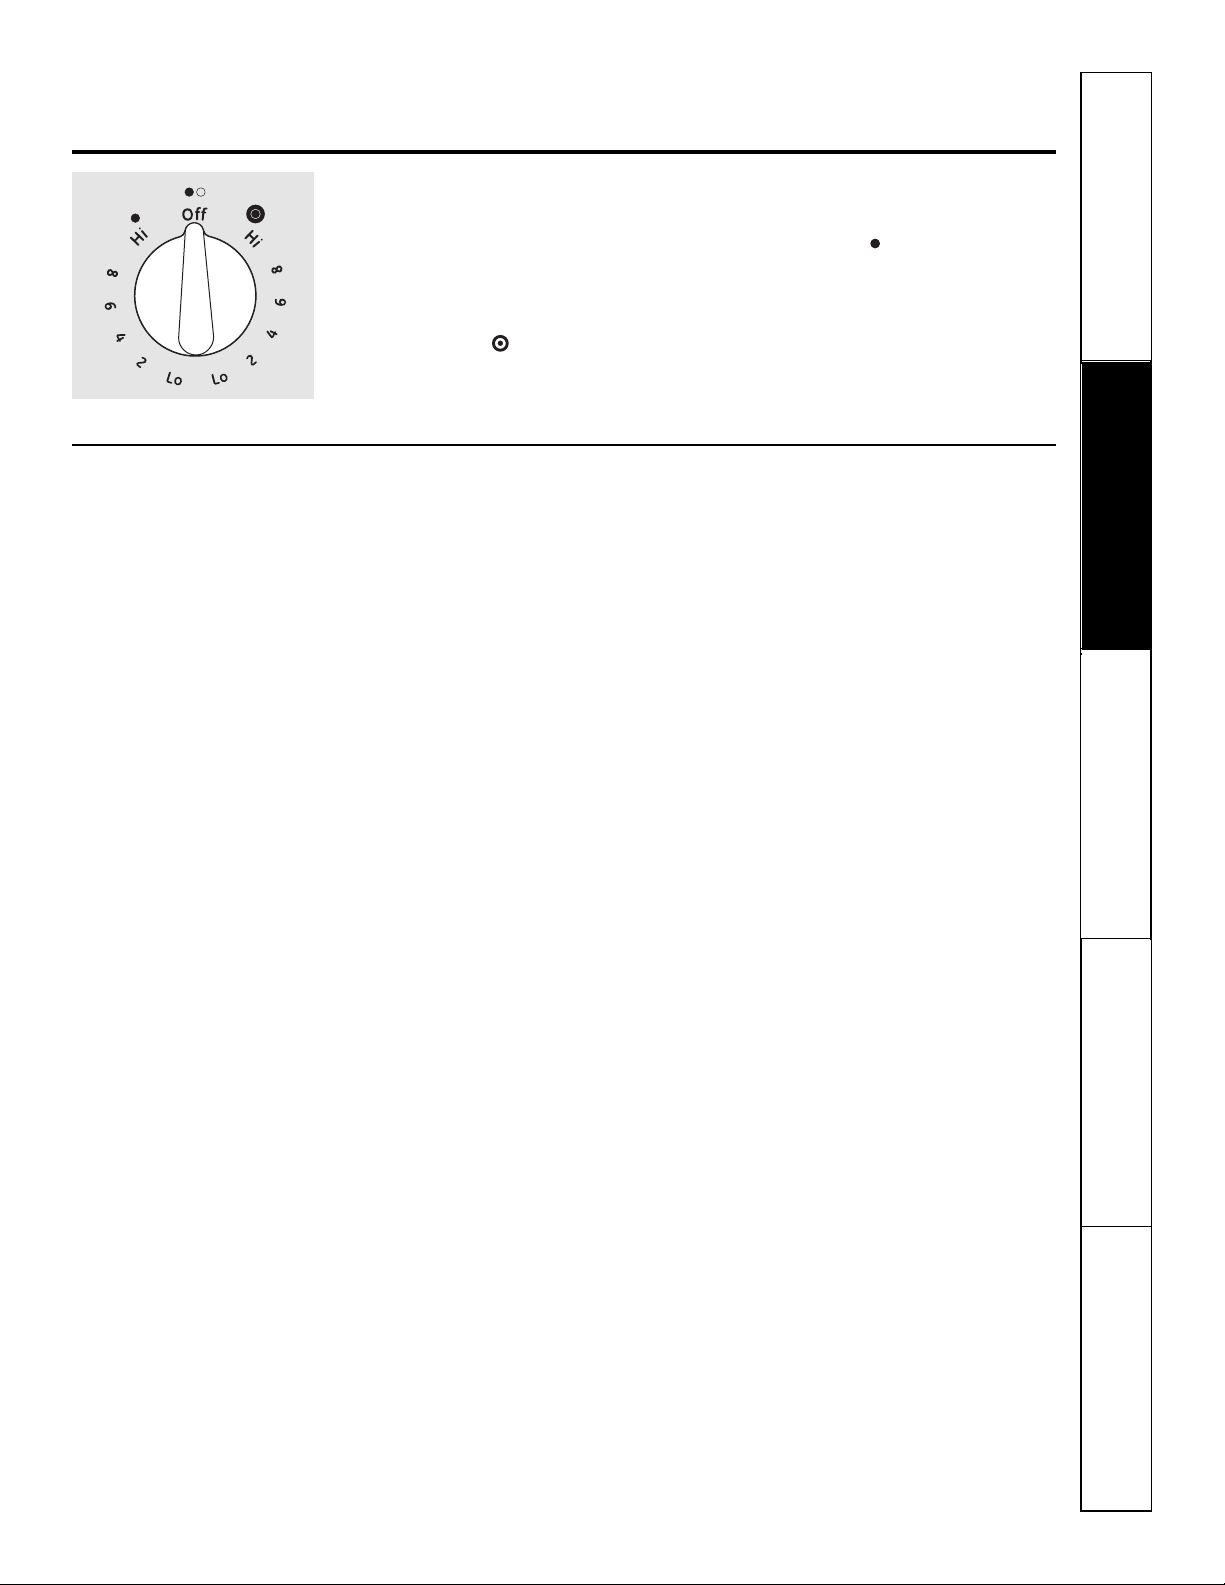
How to Set
Push the knob down and turn in either
direction to the setting you want. When
the control is in any position other than Off,
it may be rotated without pushing it down.
At Off, Hi, Lo and Simmer, the control
clicks into position. You may hear slight
clicking sounds during cooking, indicating
the control is keeping the power level
you set.
The controls for the radiant surface
elements can be set anywhere between Lo
or Simmer and Hi for an unlimited number
of heat settings. With the infinite switch,
the element cycles on and off to maintain
your selected control setting.
The On indicator light will glow when any
surface element is on.
A Hot Surface indicator light will glow
when any radiant element is turned on
and will remain on until the surface is
cooled to approximately 150°F.
NOTE:
■ It comes on when the element is hot
to the touch.
■ It stays on even after the element is
turned off.
■ It glows brightly until the element is
cooled to approximately 150°F.
■ Be sure you turn the control knob to Off
when you finish cooking.
Never cook directly on the glass.
Always use cookware.
About the radiant surface elements…
The radiant cooktop features heating
elements beneath a smooth glass surface.
NOTE: A slight odor is normal when a new
cooktop is used for the first time. It is
caused by the heating of new parts and
insulating materials and will disappear
in a short time.
NOTE: On models with light-colored glass
cooktops, it is normal for the cooking zones
to change color when hot or cooling down.
This is temporary and will disappear as
glass cools to room temperature.
The surface element will cycle on and off
to maintain your selected control setting.
It is safe to place hot cookware (from the
oven or surface) on the glass cooktop
when the surface is cool.
Even after the surface elements are turned
off, the glass cooktop retains enough heat
to continue cooking. To avoid overcooking,
remove pans from the surface elements
when the food is cooked.
Avoid placing utensils that could become
hot or plastics that could melt on the
surface element until it has cooled
completely.
■ Water stains (mineral deposits) are
removable using the cleaning cream
or full strength white vinegar.
■ Use of window cleaner may leave an
iridescent film on the cooktop. The
cleaning cream will remove this
discoloration.
■ Don’t store heavy items above the
cooktop. If they drop onto the cooktop,
they can cause damage.
■ Do not use the surface as a cutting
board.
Do not slide
cookware
across the
cooktop
because it can
scratch the
glass. The glass
is scratchresistant, not
scratchproof.
;
;;;;;
;;;;
;
;;;;
Always center the pan on the
surface element you are using.
SURFACE
COOKING
OFF CENTER
DRAGGING
Page 7
Dual Surface Element (on some models)
The left front surface element has 2 cooking
sizes to select from so you can match the
size of the element to the size of the
cookware you are using.
To use the large surface element, turn the
SELECTOR knob to . Push down and turn
the control knob to the desired setting. The
element will heat the entire area contained
by the larger circle.
To use the small surface element, turn the
SELECTOR knob to . Push in and turn the
control knob to the desired setting. The
element will only heat the area inside the
smaller circle.
Surface Elements Cycle On and Off
Surface elements will cycle on and off
to maintain the temperature you have
selected.
All radiant surface elements have a
temperature limiter that protects the glass
cooktop from getting too hot.
The temperature limiter may cycle the
elements off while cooking if:
■ The pan boils dry.
■ The pan bottom is not flat.
■ The pan is off-center.
■ There is no pan on the element .
7
ge.com
Safety Instructions Operating Instructions
Installation
Instructions
Troubleshooting Tips
Consumer Support
Page 8
8
Selecting types of cookware.
The following information will help you choose cookware which will give good performance on glass cooktops.
Stainless Steel:
recommended
Aluminum:
heavyweight recommended
Good conductivity. Aluminum residue
sometimes appears as scratches on the
cooktop but can be removed if cleaned
immediately. Because of its low melting
point, thin weight aluminum should not
be used.
Copper:
recommended
Copper Bottoms:
usable, but not recommended
Pans with copper bottoms may leave
residue appearing as scratches. Remove
any residue immediately after use. Do not
let a pot boil dry. Overheated metal can
bond to the glass cooktop and leave a
permanent stain if it is not removed
immediately.
Porcelain Enamel-Covered
Cast Iron:
recommended
As long as the cookware is covered
completely with porcelain enamel, this
cookware is recommended. Caution is
recommended for cast-iron cookware
that is not completely covered with
smooth porcelain enamel, since it may
scratch the glass ceramic cooktop.
Glass-Ceramic:
usable, but not recommended
Poor performance. May scratch the
surface.
Stoneware:
usable, but not recommended
Poor performance. May scratch the
surface.
Use pans that match the diameter of the
surface element. Cooking performance will
not be as good if the cookware is either
smaller or larger than the surface element.
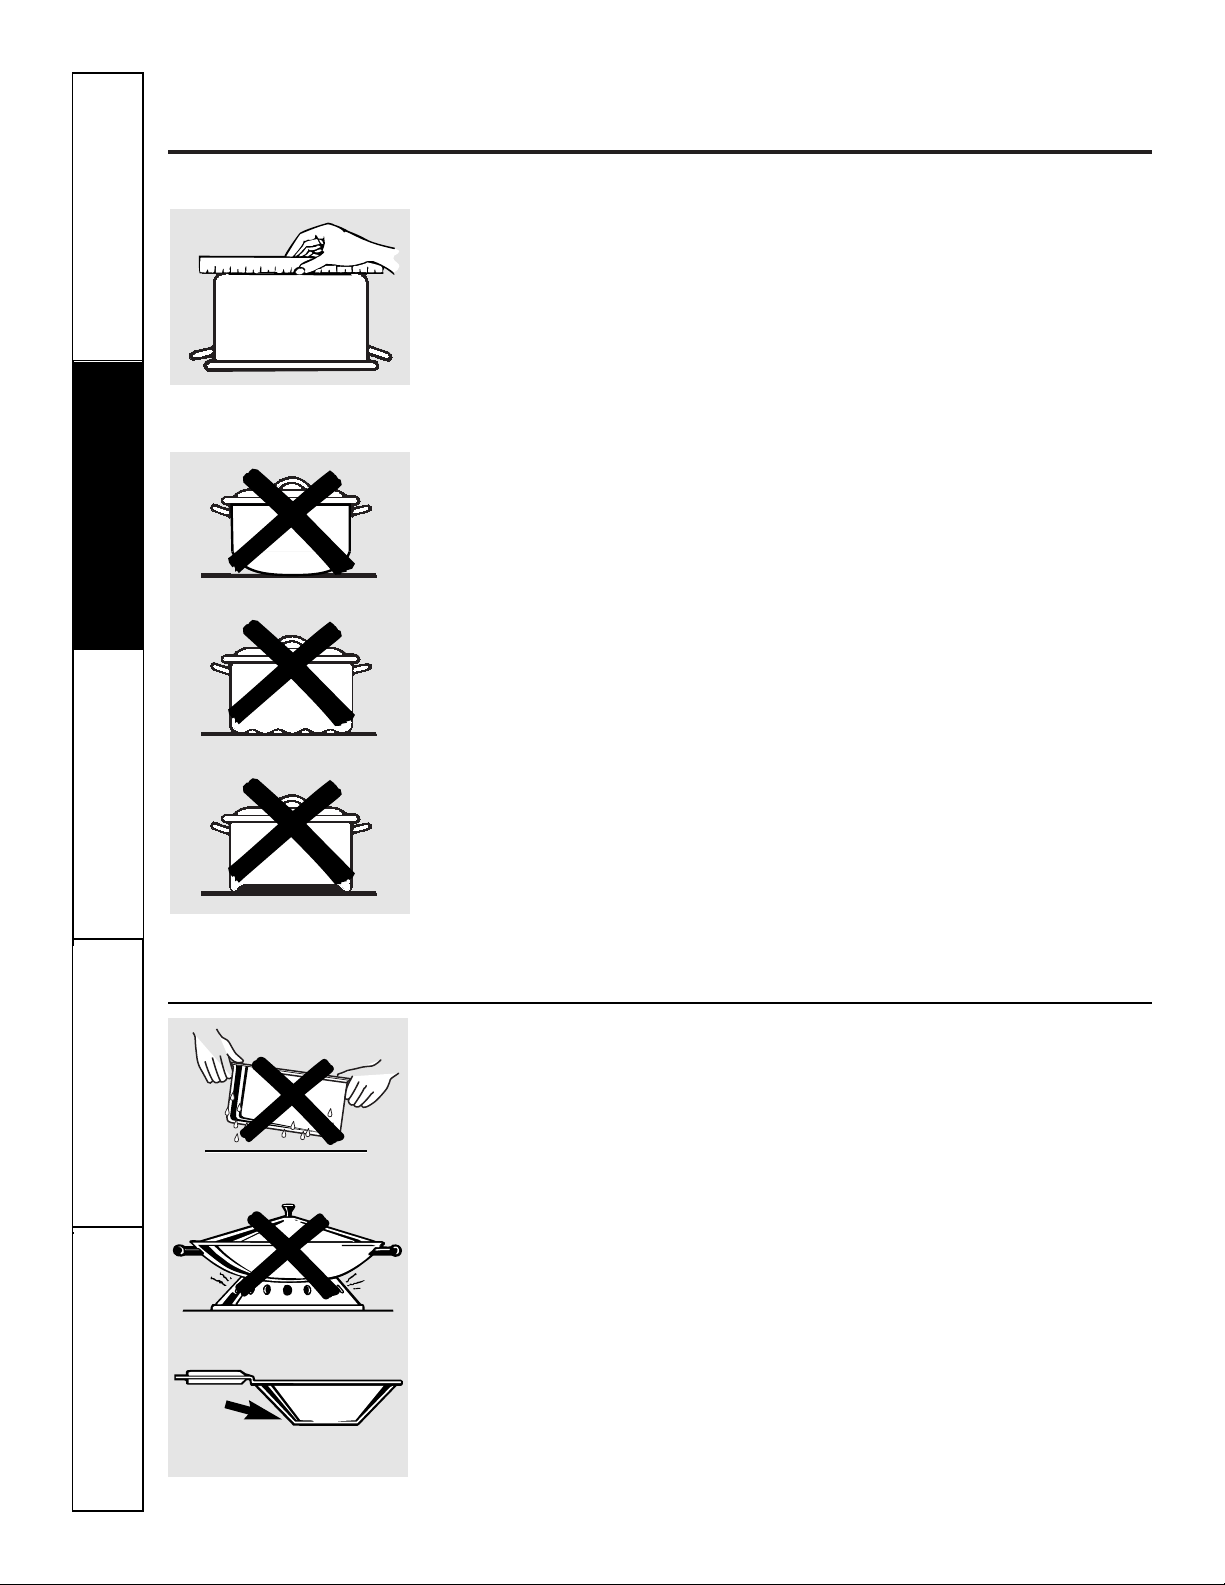
Check pans for flat bottoms by
using a straight edge.
Pans with rounded, curved, ridged
or warped bottoms are not
recommended.
For Best Results
■ Place only dry pans on the surface
elements. Do not place lids on the
surface elements, particularly wet lids.
■ Do not use woks that have support
rings. This type of wok will not heat
on glass surface elements.
■ We recommend that you use only a
flat-bottomed wok. They are available
at your local retail store. The bottom
of the wok should have the same
diameter as the surface element
to ensure proper contact.
■ Some special cooking procedures
require specific cookware such as
pressure cookers, deep-fat fryers, etc.
All cookware must have flat bottoms
and be the correct size.
Do not place wet pans
on the glass cooktop.
Do not use woks with support
rings on the glass cooktop.
Use flat-bottomed woks
on the glass cooktop.
Safety Instructions
Operating Instructions
Installation
Instructions
Troubleshooting Tips
Consumer Support
Page 9
ge.com
Note: Flat-bottomed canners are
required for glass cooktops.
Pots that extend beyond 1″ of the surface
element’s circle are not recommended for
most surface cooking. However, when
canning with water-bath or pressure
canner, larger-diameter pots may be
used. This is because boiling water
temperatures (even under pressure) are
not harmful to the cooktop surfaces
surrounding the surface elements.
HOWEVER, DO NOT USE LARGEDIAMETER CANNERS OR OTHER LARGEDIAMETER POTS FOR FRYING OR BOILING
FOODS OTHER THAN WATER. Most syrup
or sauce mixtures—and all types of
frying—cook at temperatures much
higher than boiling water. Such
temperatures could eventually harm
the glass cooktop surfaces.
Be sure the canner fits over the
center of the surface element. If your
cooktop or its location does not allow
the canner to be centered on the
surface element, use smaller-diameter
pots for good canning results.
Flat-bottomed canners must be
used. Do not use canners with
flanged or rippled bottoms (often
found in enamelware) because they
don’t make enough contact with the
surface elements and take a long
time to boil water.
When canning, use recipes and
procedures from reputable sources.
Reliable recipes and procedures are
available from the manufacturer of your
canner; manufacturers of glass jars for
canning, such as Ball and Kerr brand;
and the United States Department
of Agriculture Extension Service.
Remember that canning is a process
that generates large amounts of
steam. To avoid burns from steam
or heat, be careful when canning.
NOTE: If your house has low voltage,
canning may take longer than expected,
even though directions have been carefully
followed. The process time will be
shortened by:
(1) using a pressure canner, and
( 2) starting with HOT tap water for fastest
heating of large quantities of water.
CAUTION:
■ Safe canning requires that harmful
microorganisms are destroyed and that
the jars are sealed completely. When
canning foods in a water-bath canner,
a gentle but steady boil must be
maintained for the required time. When
canning foods in a pressure canner, the
pressure must be maintained for the
required time.
■ After you have adjusted the controls,
it is very important to make sure the
prescribed boil or pressure levels are
maintained for the required time.
■ Since you must make sure to process
the canning jars for the prescribed time,
with no interruption in processing time,
do not can on any cooktop surface
element if your canner is not flat.
Observe the Following Points in Canning
Wrong!
Right!
Safety Instructions Operating Instructions
Installation
Instructions
Troubleshooting Tips Consumer Support
Control Knobs
The control knobs may be removed for
easier cleaning.
Make sure the knobs are in the Off
positions and pull them straight off the
stems for cleaning.
The knobs can be cleaned in a dishwasher
or they may also be washed with soap and
water. Do not remove chrome accent skirt
(on some models). Make sure the insides of
the knobs are dry before replacing.
Replace the knobs in the Off position to
ensure proper placement.
9
Care and cleaning of the cooktop.
Page 10
10
Safety Instructions
Operating Instructions
Installation
Instructions
Troubleshooting Tips
Consumer Support
Cleaning the glass cooktop.
Allow the cooktop to cool.
Use a single-edge razor blade
scraper at approximately a 45°
angle against the glass surface
and scrape the soil. It will be
necessary to apply pressure
to the razor scraper in order
to remove the residue.
After scraping with the razor
scraper, spread a few drops of
CERAMA BRYTE®Ceramic Cooktop
Cleaner on the entire burned residue
area. Use the CERAMA BRYTE
®
Cleaning Pad to remove any
remaining residue.
For additional protection, after all
residue has been removed, polish
the entire surface with CERAMA
BRYTE®Ceramic Cooktop Cleaner
and a paper towel.
Burned-On Residue
WARNING: DAMAGE to your glass surface
may occur if you use scrub pads other
than the pad included with your cooktop.
Allow the cooktop to cool.
Spread a few drops of CERAMA
BRYTE®Ceramic Cooktop Cleaner
on the entire burned residue area.
Using the included CERAMA BRYTE
®
Cleaning Pad for Ceramic Cooktops,
rub the residue area, applying
pressure as needed.
If any residue remains, repeat the
steps listed above as needed.
For additional protection, after all
residue has been removed, polish
the entire surface with CERAMA
BRYTE®Ceramic Cooktop Cleaner
and a paper towel.
The CERAMA BRYTE®Ceramic
Cooktop Scraper and all
recommended supplies are
available through our Parts
Center. See instructions under
“To Order Parts” section on
next page.
NOTE: Do not use a dull or
nicked blade.
Heavy, Burned-On Residue
Use a CERAMA BRYTE®Cleaning
Pad for Ceramic Cooktops or a
Scotch-Brite®Multi-Purpose No
Scratch blue scrub pad.
Normal Daily Use Cleaning
Use CERAMA BRYTE®Ceramic Cooktop
Cleaner on the glass cooktop.
To maintain and protect the surface of
your glass cooktop, follow these steps:
Before using the cooktop for the
first time, clean it with CERAMA
BRYTE®Ceramic Cooktop Cleaner.
This helps protect the top and makes
cleanup easier.
Daily use of CERAMA BRYTE®Ceramic
Cooktop Cleaner will help keep the
cooktop looking new.
Shake the cleaning cream well. Apply
a few drops of CERAMA BRYTE
®
Ceramic Cooktop Cleaner directly
to the cooktop.
Use a paper towel or CERAMA BRYTE
®
Cleaning Pad for Ceramic Cooktops to
clean the entire cooktop surface.
Use a dry cloth or paper towel to
remove all cleaning residue. No
need to rinse.
NOTE: It is very important that you DO
NOT heat the cooktop until it has been
cleaned thoroughly.
Clean your cooktop after
each spill. Use CERAMA
BRYTE®Ceramic Cooktop
Cleaner.
Page 11
11
Safety Instructions Operating Instructions
Installation
Instructions
Troubleshooting Tips Consumer Support
ge.com
To order CERAMA BRYTE®Ceramic Cooktop
Cleaner and the cooktop scraper, please
call our toll-free number:
National Parts Center 800.626.2002
CERAMA BRYTE®Ceramic
Cooktop Cleaner . . . . . . . . . . .# WX10X300
CERAMA BRYTE®Ceramic
Cooktop Scraper . . . . . . . . . . .# WX10X0302
Kit . . . . . . . . . . . . . . . . . . . . . . . . . .# WB64X5027
(Kit includes cream and cooktop scraper)
CERAMA BRYTE®Cleaning Pads for
Ceramic Cooktops . . . . . . . . .# WX10X350
Turn off all surface elements. Remove
hot pans.
Wearing an oven mitt:
a. Use a single-edge razor blade
scraper (CERAMA BRYTE
®
Ceramic
Cooktop Scraper) to move the spill
to a cool area on the cooktop.
b. Remove the spill with paper towels.
Any remaining spillover should be left
until the surface of the cooktop has
cooled.
Don’t use the surface elements again
until all of the residue has been
completely removed.
NOTE: If pitting or indentation in the glass
surface has already occurred, the cooktop
glass will have to be replaced. In this case,
service will be necessary.
Damage from Sugary Spills and Melted Plastic
Our testing shows that if
you are cooking high sugar
mixtures such as jelly or
fudge and have a spillover,
it can cause permanent
damage to the glass
surface unless the spillover
is immediately removed.
Be careful not to slide pots and pans
across your cooktop. It will leave
metal markings on the cooktop
surface.
These marks are removable using
the CERAMA BRYTE
®
Ceramic Cooktop
Cleaner with the CERAMA BRYTE
®
Cleaning Pad for Ceramic Cooktops.
If pots with a thin overlay of
aluminum or copper are allowed
to boil dry, the overlay may leave
black discoloration on the cooktop.
This should be removed
immediately before heating
again or the discoloration may
be permanent.
WARNING: Carefully check the bottom of
pans for roughness that would scratch
the cooktop.
Metal Marks and Scratches
To Order Parts
Glass surface—potential for permanent damage.
Page 12
12
TOOLS YOU WILL NEED
MATERIALS YOU WILL NEED
Installation
30″ Electric Cooktop
Instructions
BEFORE YOU BEGIN
Read these instructions completely
and carefully.
•
IMPORTANT — Save these instructions
for local inspector’s use.
•
IMPORTANT — Observe all governing
codes and ordinances.
• Note to Installer – Be sure to leave these
instructions with the Consumer.
• Note to Consumer – Keep these instructions for
future reference.
• Product failure due to improper installation is not
covered under the Warranty.
WARNING — This appliance must be
properly grounded.
•
ATTENTION INSTALLER — ALL
COOKTOPS MUST BE HARD WIRED (DIRECT
WIRED) INTO AN APPROVED JUNCTION BOX. A
“PLUG AND RECEPTACLE” IS NOT PERMITTED
ON THESE PRODUCTS.
• Proper installation is the responsibility of the
installer and product failure due to improper
installation is NOT covered under warranty.
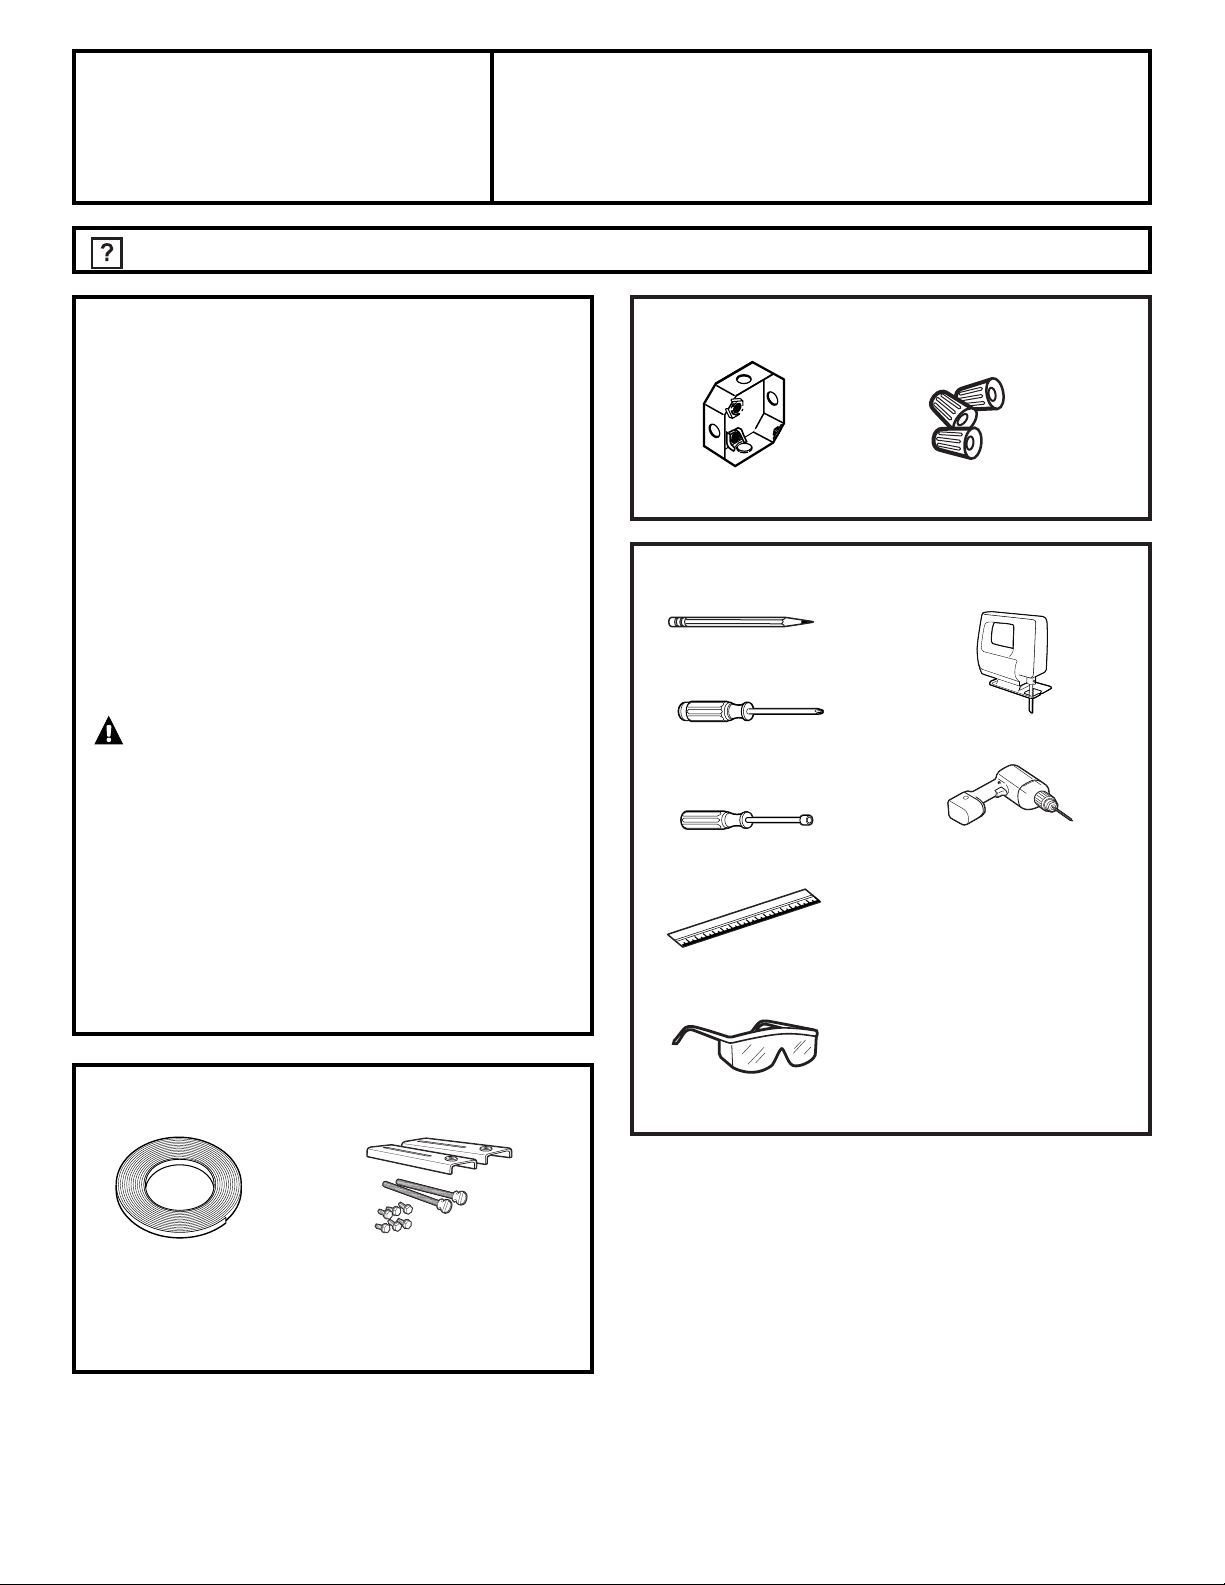
PARTS INCLUDED
Wire Nuts
Junction Box
Saber Saw
Pencil
Safety Glasses
1/8″ Drill Bit & Electric
or Hand Drill
Ruler or Straightedge
Phillips-Head
Screwdriver
JP256
“If you have questions, call 800.GE.CARES or visit our website at: ge.com”
2 Hold-Down Brackets
6 Hex-Head Screws
(4 required, 2 extra)
2 Thumbscrews
Foam Tape
1/4″ Nut Driver
Page 13
13
Installation Instructions
FOR YOUR SAFETY
• For Personal Safety, remove house fuse or open
circuit breaker before beginning installation.
Failure to do so could result in serious injury
or death.
• Be sure your cooktop is installed properly by a
qualified installer or service technician.
• To eliminate the risk of burns or fire due to
reaching over heated surface elements, cabinet
storage located above the surface units should
be avoided. If cabinet storage space is to be
provided, the risk can be reduced by installing a
range hood that projects horizontally a minimum
of 5″ beyond the bottom of the cabinets. Cabinet
installation above the cooktop may be no deeper
than 13″.
• Make sure the cabinets and wall coverings
around the cooktop can withstand the
temperatures (up to 200°F) generated by
the cooktop.
• The cooktop should be easy to reach and lighted
with natural light during the day.
• Always disconnect the electrical service to the
cooktop before repairing or servicing the
cooktop. This can be done by disconnecting the
fuse or circuit breaker. Failure to do this could
result in a dangerous or fatal shock. Know where
your main disconnect switch is located. If you do
not know, have your electrician show you.
IMPORTANT SAFETY INSTRUCTIONS
ELECTRICAL REQUIREMENTS
This appliance must be supplied with the proper
voltage and frequency, and connected to an
individual, properly grounded branch circuit,
protected by a circuit breaker or a time delay fuse
as noted on name plate.
We recommend you have the electrical wiring and
hookup of your cooktop connected by a qualified
electrician. After installation, have the electrician
show you where your main cooktop disconnect
is located.
Wiring must conform to National Electrical Code.
You can get a copy of the National Electrical Code,
ANSI/NFPA No. 70-Latest Edition, by writing:
National Fire Protection Association
Batterymarch Park
Quincy, MA 02269
In Canada, wiring must conform to the Canadian
Electrical Code (CEC).
The cooktop conduit wiring is approved for copper
wire connection only, and if you have aluminum
house wiring, you must use special UL approved
connectors for joining copper to aluminum. In
Canada, you must use special CSA approved
connectors for joining copper to aluminum.
You must use a two-wire, three conductor 208/240
VAC, 60 Hertz electrical system. A white (neutral)
wire is not needed for this unit. The cooktop must
be installed in a circuit that does not exceed 125
VAC nominal to ground.
Refer to the name plate on your cooktop for the
KW rating for your cooktop.
Name plate location
Page 14

WARNING – The electrical power to
the cooktop supply line must be shut off while
connections are being made. Failure to do so
could result in serious injury or death.
When preparing cooktop opening, make sure
the inside of the cabinet and the cooktop do
not interfere with each other. (See section on
preparing the opening.)
Remove packaging materials and literature
package from the cooktop before beginning
installation.
B
A
14
Installation Instructions
PRE-INSTALLATION CHECKLIST
Remove Installation Instructions from
literature pack and read them carefully before
you begin.
Be sure to place all literature, Owner’s Manual,
Installations, etc. in a safe place for future
reference.
Make sure you have all the tools and
materials you need before starting the
installation of the cooktop.
Your home must provide the adequate
electrical service needed to safely and
properly use your cooktop. (Refer to section
on electrical requirements.)
When installing your cooktop in your home,
make sure all local codes and ordinances are
followed exactly as stated.
Make sure the wall coverings, countertop and
cabinets around the cooktop can withstand
heat (up to 200°F) generated by the cooktop.
G
F
E
D
C
Literature
Package
Cooktop
Styrofoam
Packaging
Before you begin-Read these instructions completely and carefully.
Before you begin-Read these instructions completely and carefully.
IMPORTANT- Save these instructions for local inspector's use.
IMPORTANT- Save these instructions for local inspector's use.
IMPORTANT- OBSERVE ALL GOVERNING CODES AND ORDIANCES.
IMPORTANT- OBSERVE ALL GOVERNING CODES AND ORDIANCES.
Note to Installer- Be sure to leave these instructions with the consumer.
Note to Installer- Be sure to leave these instructions with the consumer.
OWNER- Keep these instructions for future reference.
OWNER- Keep these instructions for future reference.
Note- This appliance must be properly grounded (if applicable).
Note- This appliance must be properly grounded (if applicable).
O
H
O
T
N
Page 15
OPTIONAL INSTALLATIONS
DIMENSIONS AND CLEARANCES
To ensure accuracy, it is best to make a template
when cutting the opening in the counter.
HORIZONTAL INSTALLATION WITH CONTROLS
AT THE FRONT
In this installation, the cooktop must be installed
with the control knobs toward the front edge.
VERTICAL INSTALLATION MUST BE ORIENTED
WITH CONTROLS ON THE LEFT SIDE
To eliminate the risk of burns by reaching over a
heated surface, the cooktop must be installed with
the controls on the left side.
In this installation, countertops must be at least 25″
deep. Observe all minimum clearances at the front,
rear and sides.
4
15
Installation Instructions
The following MINIMUM clearance dimensions
must be maintained.
1
PREPARING THE OPENING
OVERALL COOKTOP DIMENSIONS
2
One and one-half inches
(1-1/2″) minimum vertical
clearance between
the cooktop bottom
and any combustible
surfaces.
3
13″ MAX. depth of unprotected
overhead cabinets
30″ MIN.
clearance from
countertop to
unprotected
overhead surface
1-3/4″ MIN. clearance
from cutout to side wall
on the left of the unit
18″ MIN. height
from countertop
to nearest cabinet
on either side
of unit
1-3/4″ MIN.
clearance from
cutout to side
wall on the right
of the unit
19-15/16″
Cooktop
21-1/2″
15-15/16″
1-1/2″ Min.
Vertical Clearance
2-3/4″ MIN.
from front edge
of cutout and
front edge of
countertop
16-1/8″ depth
of cutout
2″ MIN. between
cutout and the
wall behind
the cooktop
If a 30″ clearance between the cooking surface
and overhead combustible materials or metal
cabinets cannot be maintained, a minimum
clearance of 24″ is required and the underside
of the cabinets above the cooktop must be
protected with not less than 1/4″ insulating
millboard covered with sheet metal not less
than 0.0122″ thick.
17-1/8″
3″
2-3/4″ MIN.
from front edge
of cutout and
front edge
of countertop
20-1/8″ depth
of cutout
16-1/8″
width
of cutout
2″ MIN. between
cutout and the
wall behind
the cooktop
1-3/4″ MIN.
clearance from
cutout to left or
right side walls
1-3/4″ MIN.
clearance from
cutout to left or
right side walls
20-1/8″
width
of cutout
Page 16
OPTIONAL INSTALLATIONS
DIMENSIONS AND CLEARANCES
(cont.)
INSTALLATION OVER A GE UNDERSINK
DISHWASHER
This cooktop is only approved for installation over a
GE Undersink Dishwasher Model GSM2100. Follow
the installation instructions packed with the
dishwasher.
The controls must be oriented toward the front
edge of the countertop.
4
16
Installation Instructions
PREPARING THE OPENING (CONT.)
Make sure the wall coverings, countertop and
cabinets around the cooktop can withstand
heat (up to 200°F) generated by the cooktop.
5
Wall coverings,
cabinets and
countertop must
withstand heat
up to 200°F.
4-1/2″ MIN.
from front edge
of cutout and
front edge of
countertop
36″
Floor
1-3/4″ MIN.
clearance to
side walls
16-1/8″
depth
of cutout
2″ MIN. between
cutout and the
wall behind
the cooktop
20-1/8″
width
of cutout
Page 17
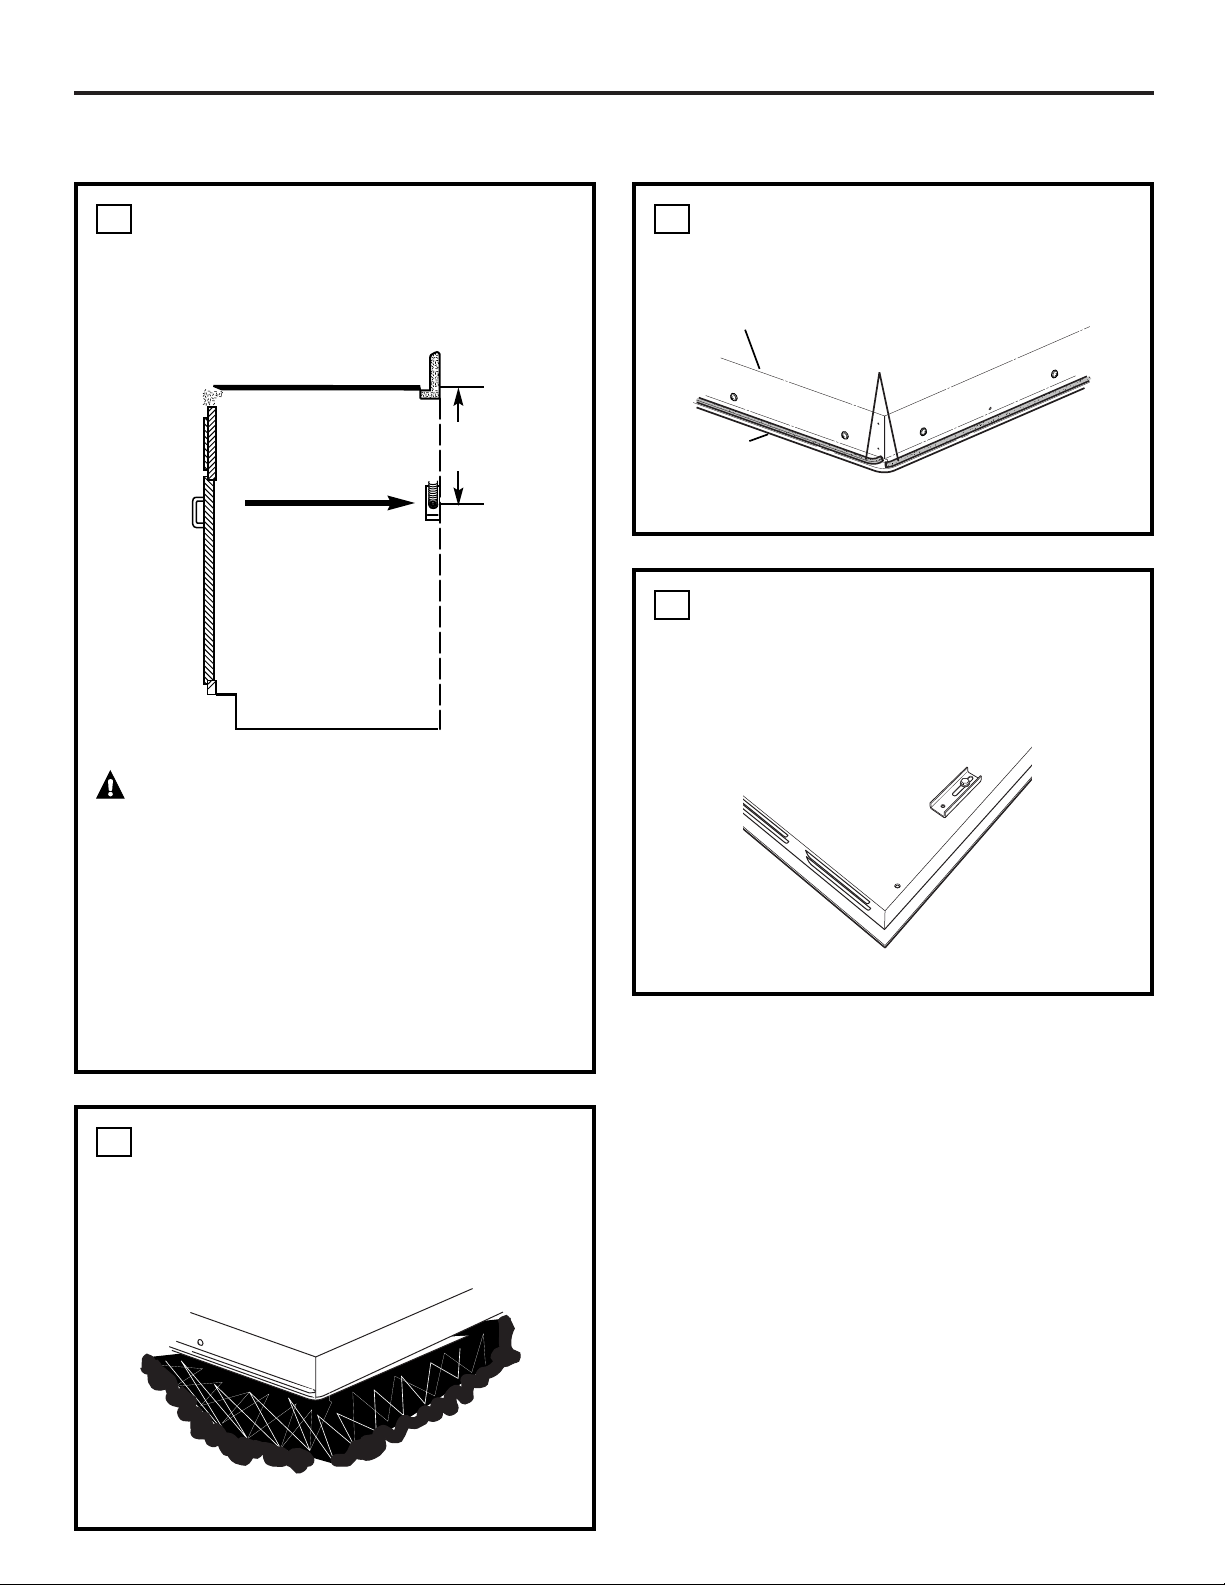
Installation Instructions
INSTALLING THE JUNCTION BOX
Install an approved junction box where it will be
easily reached through the front of the cabinet
where the cooktop will be located. The cooktop
conduit is 58″ long.
IMPORTANT:
The junction box must be
located where it will allow considerable slack in the
conduit for serviceability.
INSTALLATION OVER GSM2100 DISHWASHER
The center of the junction box should be 5″ to 7″
below the cooktop lip, so it does not interfere with
the dishwasher, installation or operation.
Electrical connections must be made before placing
the cooktop into the cutout.
1
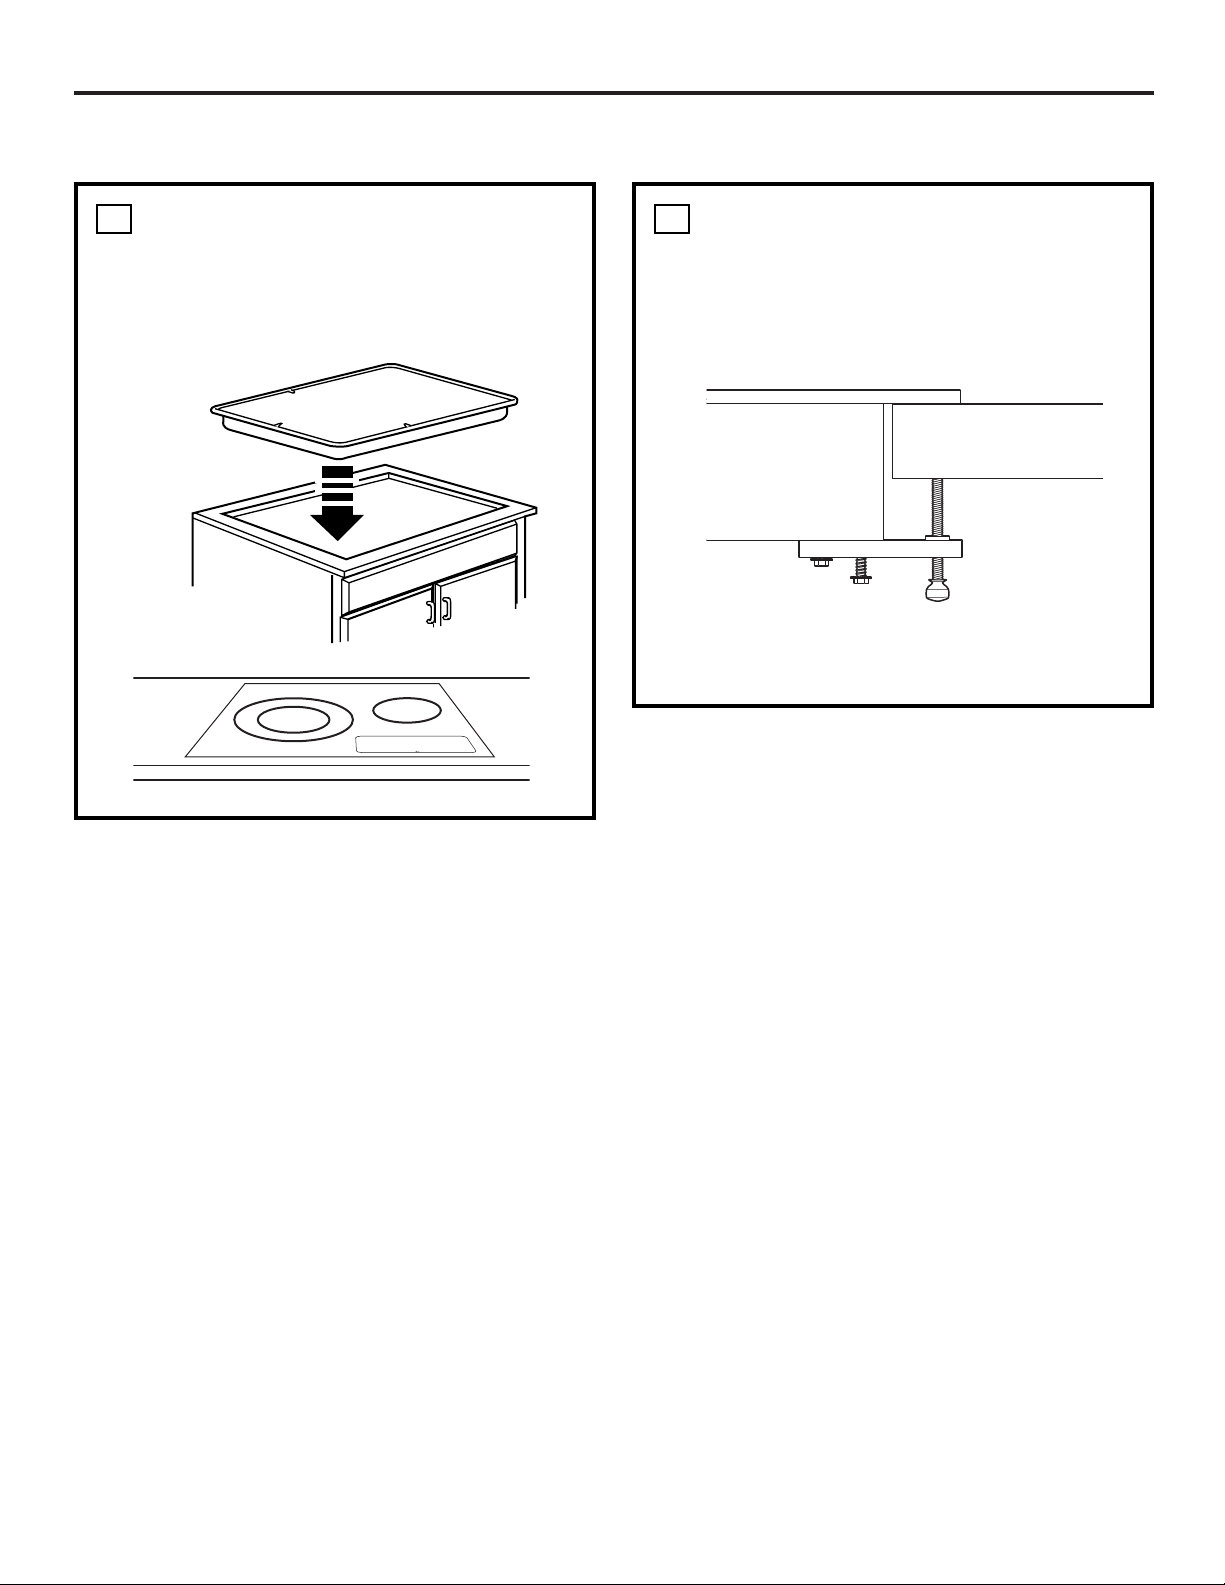
INSTALLING THE COOKTOP
PROTECT SURFACE
OF COOKTOP
Place a towel or tablecloth onto the countertop.
Lay the cooktop upside down onto the protected
surface.
2
ATTACH FOAM TAPE
Apply the foam tape around the outer edge of the
glass. Do not overlap the foam tape.
3
LOCATE MOUNTING PARTS
Start one screw through the bracket and into the
cooktop (both sides). Do not tighten. Turn the
bracket inward to avoid interference when
dropping the cooktop into the countertop.
4
Install junction box so
that it can be reached
through the front of the
cabinet.
*5″
Min.
Bottom of Cooktop
Cloth under Cooktop
Bottom of Cooktop
Foam Tape
Cooktop
Glass
*7″ Max. when
installing over
GSM2100
Dishwasher
17
Page 18
18
Installation Instructions
INSTALLING THE COOKTOP (CONT.)
INSERT COOKTOP INTO CUTOUT
Insert the cooktop centered into the cutout
opening. Make sure the front edge of the
countertop is parallel to the cooktop. Make final
check that all required clearances are met.
5
ATTACH HOLD-DOWN BRACKETS
TO CABINET
Open the cabinet door. Install the second screw
through the bracket and tighten. Then tighten the
first screw. Install the thumbscrew until it touches
the bottom of the countertop.
IMPORTANT: Turn the thumbscrew until it touches
the bottom of the countertop. Do not overtighten.
6
Cooktop
Cooktop Countertop
Page 19
19
Installation Instructions
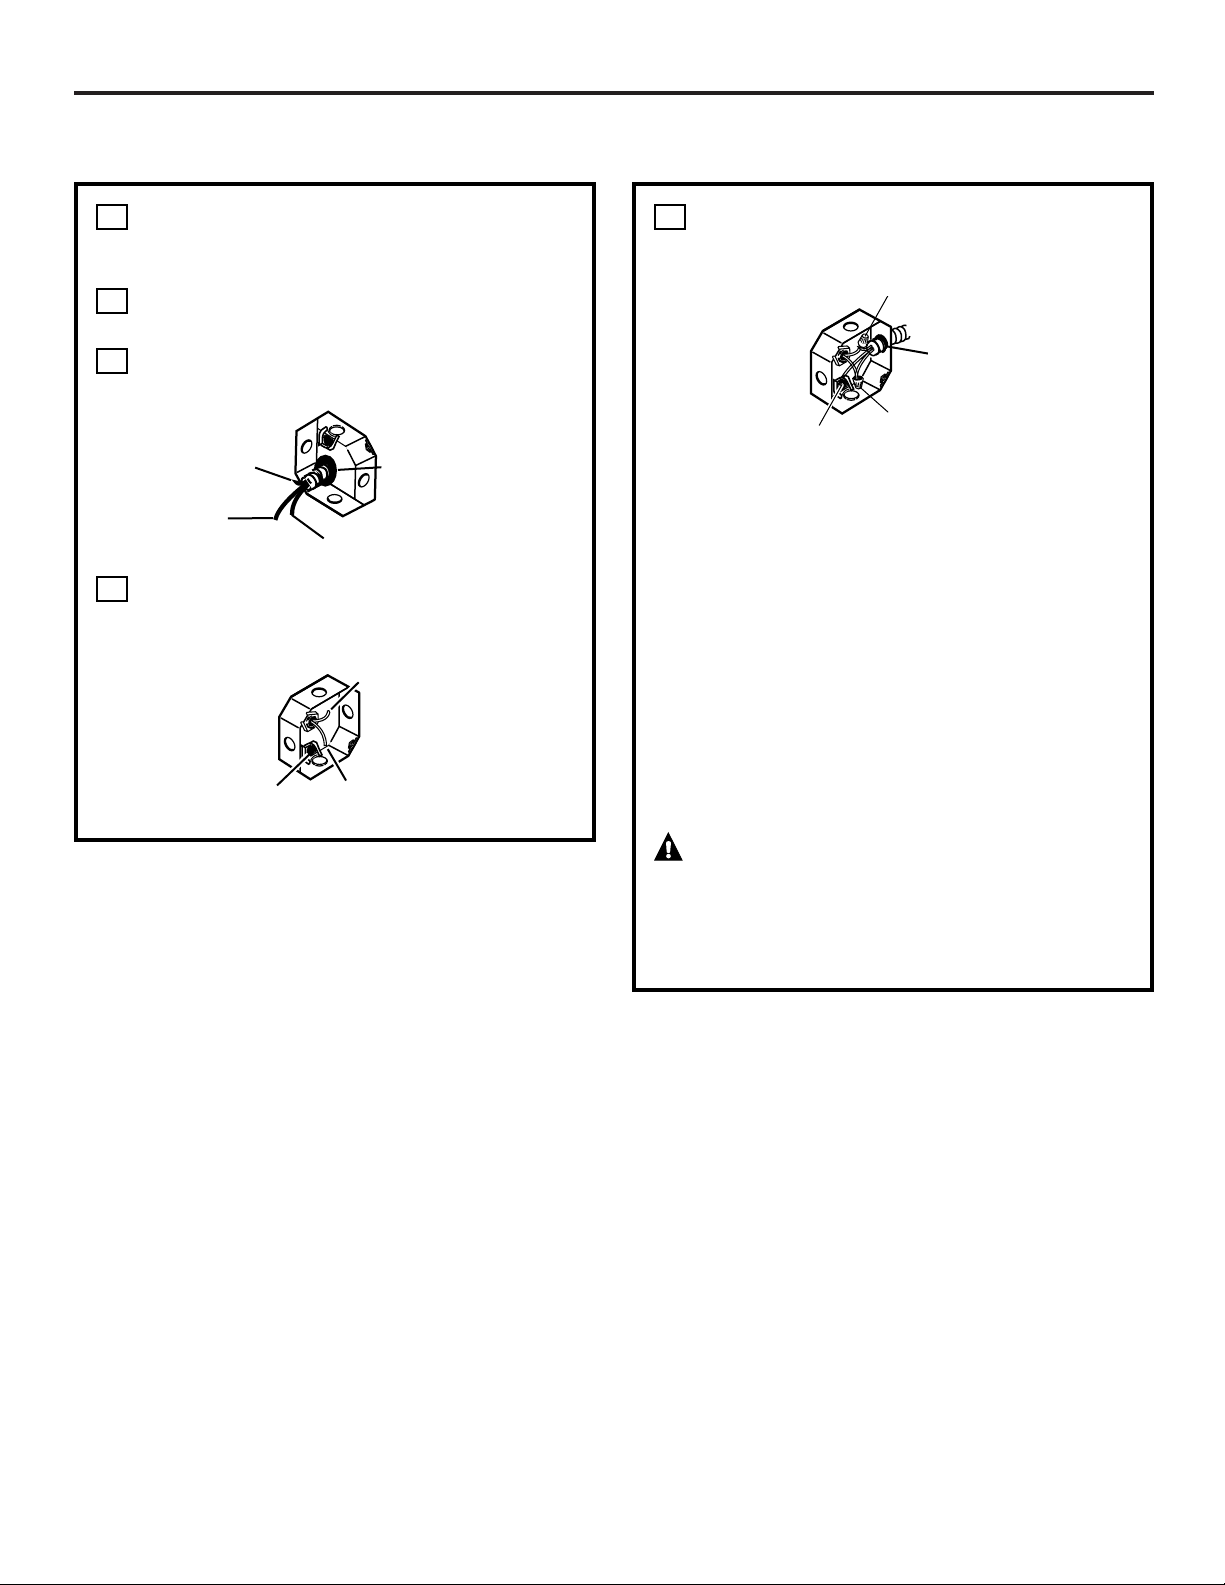
When making the wire connections, use the
entire length of conduit provided. The conduit
must not be shortened.
With the cooktop in place, open the front of
the cabinet door.
Insert the wires from the conduit through the
opening of the junction box.
Connect the red and black leads from the
cooktop conduit to the corresponding leads
in the junction box.
D
C
B
A
INSTALLATION—ELECTRICAL CONNECTIONS
Once the connections are made, secure wires
together using wire nuts.
GROUNDING INSTRUCTIONS:
The bare ground wire in the conduit is connected
to the cooktop frame. Effective January 1, 1996,
the National Electrical Code will not permit
grounding through neutral. If used in new
construction after January 1, 1996 or in a mobile
home, recreational vehicle or if local codes do not
permit grounding through the neutral white lead,
attach the appliance grounding lead (green or
copper) to the residence grounding conductor
(green or bare copper) in accordance with local
codes. When connecting to a 3 conductor branch
circuit, if local codes permit, connect the bare
ground connector lead of the cooktop to the
branch circuit neutral (gray or white in color).
IMPORTANT: If the cooktop is being
installed into a blind counter (one with no cabinet
opening below), wire connections must be made
before putting the cooktop into the cutout
opening.
E
Strain Relief Clamp
Black
Red
Ground
Strain Relief Clamp
Black
Red
Ground
Black
Red
Ground wire
location
Page 20
20
Installation Instructions
PRE-TEST CHECKLIST
Remove all protective film, if present, and any
stickers.
Check to be sure that all wiring is secure and
not pinched or in contact with moving parts.
Check level of appliance.
Check that the cooktop is properly grounded.
D
C
B
A
1
CHECKLISTS
OPERATION CHECKLIST
Remove all items from the top of the cooktop
surface.
Turn on the power to the cooktop. Verify that
all surface burners operate properly.
Check that the circuit breaker is not tripped
nor the house fuse blown.
Check that conduit is securely connected to
the junction box.
See troubleshooting list.
NOTE TO ELECTRICIAN:
The power leads supplied with this appliance are
UL recognized for connections to larger gauge
household wiring. The insulation of these leads
is rated at temperatures much higher than the
temperature rating of household wiring. The
current carrying capacity of a conductor is
governed by the wire gauge and also the
temperature rating of the insulation around
the wire.
NOTE: ALUMINUM WIRING
• WARNING:
IMPROPER CONNECTION OF ALUMINUM
HOUSE WIRING TO THE COPPER LEADS CAN
RESULT IN A SERIOUS PROBLEM.
• Splice copper wires to aluminum wiring
using special connectors designed and UL
approved for joining copper to aluminum
and follow the manufacturer’s recommended
connector procedure closely.
NOTE: Wire used, location and enclosure of
splices, etc., must conform to good wiring
practice and local codes.
E
D
C
B
A
2
Page 21
Before you call for service… ge.com
Troubleshooting Tips
Save time and money! Review the chart on this page first
and you may not need to call for service.
Problem Possible Causes What To Do
Surface elements will Improper cookware • Use pans which are absolutely flat and match
not maintain a rolling being used. the diameter of the surface element selected.
boil or cooking is slow
Surface elements do A fuse in your home may be • Replace the fuse or reset the circuit breaker.
not work properly blown or the circuit breaker
tripped.
Cooktop controls • Check to see the correct control is set for the surface
improperly set. element you are using.
Tiny scratches or metal Incorrect cleaning • Use recommended cleaning procedures.
marks or abrasions on methods being used.
radiant cooktop glass
Cookware with rough • Be sure cookware bottoms and cookware are clean
surface
bottoms being used or before use. Use cookware with smooth bottoms.
coarse particles (salt Tiny scratches are not removable but will become
or sand) were between less visible in time as a result of cleaning.
the cookware and the
surface of the cooktop.
Cookware has been
slid across the cooktop
surface.
Areas of discoloration Improper cookware • Marks from aluminum and copper pans as well as
or dark streaks on the being used. mineral deposits from water or food can be removed
cooktop with the cleaning cream.
Hot surface on a model • This is normal. The surface may appear discolored
with a light-colored cooktop. when it is hot . This is temporary and will disappear
as the glass cools.
Food spillovers not cleaned • See the Cleaning the glass cooktop section.
before next use.
Incorrect cleaning methods • Use recommended cleaning procedures.
being used.
Plastic melted to Hot cooktop came into • See the Glass surface—potential for permanent damage
the surface contact with plastic placed section in the Cleaning the glass cooktop section.
on the hot cooktop.
Pitting (or indentation) Hot sugar mixture spilled • Call a qualified technician for replacement.
of the cooktop on the cooktop.
Frequent cycling off and
Improper cookware • Use only flat cookware to minimize cycling.
on of surface elements
being used. See Surface elements cycle on and off section.
Control knob will Cooktop controls • When the knob is in the Off position, it must be
not turn improperly set. pushed in before it can be turned. When the knob
is in any other position, it can be turned without
being pushed in.
21
Safety Instructions Operating Instructions
Installation
Instructions
Troubleshooting Tips
Consumer Support
Page 22
22
Notes.
Safety Instructions
Operating Instructions
Installation
Instructions
Troubleshooting Tips
Consumer Support
Page 23

General Electric Company
Warranty Registration Department
P.O. Box 32150
Louisville, KY 40232-2150
GE Service Protection Plus
™
GE, a name recognized worldwide for quality and dependability, offers you
Service Protection Plus
™
—comprehensive protection on all your appliances—
No Matter What Brand!
Benefits Include:
• Backed by GE
• All brands covered
• Unlimited service calls
• All parts and labor costs included
• No out-of-pocket expenses
• No hidden deductibles
• One 800 number to call
You will be completely satisfied with our service protection or you may request your money back
on the remaining value of your contract. No questions asked. It’s that simple.
Protect your refrigerator, dishwasher, washer and dryer, range, TV, VCR and much more—any brand!
Plus there’s no extra charge for emergency service and low monthly financing is available. Even icemaker
coverage and food spoilage protection is offered. You can rest easy, knowing that all your valuable household
products are protected against expensive repairs.
Place your confidence in GE and call us in the U.S. toll-free at 800.626.2224
for more information.
*All brands covered, up to 20 years old, in the continental U.S.
We’ll Cover Any Appliance.
Anywhere. Anytime.*
Please place in envelope and mail to:
✁
Cut here
23
Page 24
24
Consumer Product Ownership Registration
Im
p
o
rta
n
t
M
a
il
T
o
d
a
y
!
GE Consumer & Industrial
Appliances
General Electric Company
Louisville, KY 40225
ge.com
First
Name
Mr. ■■ Ms. ■■ Mrs. ■■ Miss ■■
Street
Address
City
State
Date Placed
In Use
Month
Day
Year
Zip
Code
Apt. #
Last
Name
Phone
Number
_
_
Consumer Product Ownership Registration
Dear Customer:
Thank you for purchasing our product and thank you for placing your confidence in us.
We are proud to have you as a customer!
Follow these three steps to protect your new appliance investment:
Important: If you did not get a registration card with your
product, detach and return the form below to
ensure that your product is registered, or register
online at ge.com.
1
23
Model Number Serial Number
✁
Cut here
Complete and mail
your Consumer
Product Ownership
Registration today.
Have the peace of
mind of knowing we
can contact you in
the
unlikely event of
a
safety modification.
After mailing the
registration below,
store this document
in a safe place. It
contains information
you will need should
you require service.
Our service number
is 800.GE.CARES
(800.432.2737).
Read your Owner’s
Manual carefully.
It will help you
operate your new
appliance properly.
Model Number Serial Number
E-mail Address*
* Please provide your e-mail address to receive, via e-mail, discounts, special offers and other important
communications from GE Appliances (GEA).
■■ Check here if you do not want to receive communications from GEA’s carefully selected partners.
FAILURE TO COMPLETE AND RETURN THIS CARD DOES NOT DIMINISH YOUR WARRANTY RIGHTS.
For more information about GEA’s privacy and data usage policy, go to ge.com and click on
“Privacy Policy” or call 800.626.2224.
Page 25

25
Please place in envelope and mail to:
Veuillez mettre dans une enveloppe et envoyez à :
OWNERSHIP REGISTRATION
P.O. BOX 1780
MISSISSAUGA, ONTARIO
L4Y 4G1
(FOR CANADIAN CONSUMERS ONLY)
Page 26

26
Page 27

27
Safety Instructions Operating Instructions
Installation
Instructions
Troubleshooting Tips
Consumer Support
For The Period Of: GE Will Replace:
One Year Any part of the cooktop which fails due to a defect in materials or workmanship.
From the date of the During this limited one-year warranty, GE will also provide, free of charge, all labor
original purchase and in-home service to replace the defective part.
■ Service trips to your home to teach you how to use
the product.
■ Improper installation, delivery or maintenance.
■ Failure of the product if it is abused, misused, or
used for other than the intended purpose or used
commercially.
■ Damage to the glass cooktop caused by use of
cleaners other than the recommended cleaning
creams and pads.
■ Damage to the glass cooktop caused by hardened
spills of sugary materials or melted plastic that are not
cleaned according to the directions in the Owner’s
Manual.
■ Replacement of house fuses or resetting of circuit
breakers.
■ Damage to the product caused by accident, fire, floods
or acts of God.
■ Incidental or consequential damage caused by possible
defects with this appliance.
■ Damage caused after delivery.
■ Product not accessible to provide required service.
What GE Will Not Cover:
This warranty is extended to the original purchaser and any succeeding owner for products purchased for
home use within the USA. If the product is located in an area where service by a GE Authorized Servicer is not
available, you may be responsible for a trip charge or you may be required to bring the product to an Authorized
GE Service location. In Alaska, the warranty excludes the cost of shipping or service calls to your home.
Some states do not allow the exclusion or limitation of incidental or consequential damages. This warranty
gives you specific legal rights, and you may also have other rights which vary from state to state. To know
what your legal rights are, consult your local or state consumer affairs office or your state’s Attorney
General.
Warrantor in the USA: General Electric Company. Louisville, KY 40225
Warrantor in Canada: Mabe Canada Inc.
All warranty service provided by our Factory Service
Centers, or an authorized Customer Care
®
technician.
To schedule service, on-line, 24 hours a day, visit us at
ge.com, or call 800.GE.CARES (800.432.2737). (In Canada, call
1.800.561.3344.) Please have serial number and model number
available when calling for service.
Staple your receipt here.
Proof of the original purchase
date is needed to obtain service
under the warranty.
GE Electric Cooktop Warranty.
EXCLUSION OF IMPLIED WARRANTIES—Your sole and exclusive remedy is product repair as provided in this Limited
Warranty. Any implied warranties, including the implied warranties of merchantability or fitness for a particular
purpose, are limited to one year or the shortest period allowed by law.
Page 28

28
Notes.
Safety Instructions
Operating Instructions
Installation
Instructions
Troubleshooting Tips
Consumer Support
Page 29

Mesures de sécurité . . 30–32
Directives de fonctionnement
Caractéristiques de
votre table de cuisson . . . . . . . . .33
Conseils sur les ustensiles
de cuisson . . . . . . . . . . . . . . . .36, 37
Élément de surface double . . . .35
Éléments de surface . . . . . . 34, 35
Limiteur de température . . . . . .35
Instructions
d’installation . . . . . . . . . . .40–48
Entretien et nettoyage
Boutons de commande . . . . . . . 37
Surface de cuisson
en vitrocéramique . . . . . . . . 38, 39
Conseils de dépannage . . 49
Soutien au consommateur
Garantie . . . . . . . . . . . . . . . . . . . . 51
Soutien au consommateur . . . . 52
Enregistrement du produit . .25, 26
Transcrivez les numéros
de modèle et de série ici.
Modèle # __________________
Série # ____________________
Vous les trouverez sur une étiquette
située sous la table de cuisson.
Mesures de sécurité Fonctionnement
Soutien au
consommateur
Conseils de
dépannage
Instructions
d’installation
29
Page 30

MESURES DE SÉCURITÉ IMPORTANTES.
VEUILLEZ D’ABORD LIRE LES MESURES DE SÉCURITÉ.
AVERTISSEMENT!
Pour votre sécurité, veuillez suivre les directives données dans le présent manuel afin de réduire les
risques d’incendie ou d’explosion et de chocs électriques, et prévenir tout dommage, blessure ou décès.
Lorsque vous utilisez un électroménager, observez toujours les mesures de sécurité de base,
notamment les suivantes :
■ N’utilisez cet appareil que pour l’usage auquel il est
destiné, comme expliqué dans le présent manuel.
■ Ne tentez pas de réparer ou de remplacer toute
pièce de votre table de cuisson, à moins que cela ne
soit spécifiquement recommandé dans le présent
manuel. Confiez toute autre réparation à un
réparateur qualifié.
■ Avant d’effectuer une réparation, coupez
l’alimentation électrique à la table de cuisson en
enlevant le fusible ou en déclenchant le disjoncteur
au panneau de distribution de la résidence.
■ Assurez-vous que votre électroménager est
correctement installé et mis à la terre par un
technicien qualifié, conformément aux directives
d’installation fournies. Cet appareil électroménager
doit être alimenté avec un courant de tension et de
fréquence appropriées et être branché à un circuit
de dérivation mis à la terre de façon adéquate et
protégé par un disjoncteur ou un fusible convenant
à la puissance indiquée sur la plaque signalétique.
■ Demandez à l’installateur de vous indiquer
l’emplacement du disjoncteur ou du fusible.
Marquez-le afin de pouvoir le trouver facilement.
■ Ne laissez pas les enfants sans surveillance—les
enfants ne doivent pas être laissés seuls ou sans
surveillance à proximité d’un électroménager qui
fonctionne. Ils ne doivent jamais s’asseoir ou monter
sur une pièce quelconque de l’électroménager.
■ Apprenez aux enfants à ne pas jouer avec les
commandes ou toute pièce de la table de cuisson.
■ Ne laissez personne grimper ou monter sur la table
de cuisson, ou s’y agripper.
■ ATTENTION : Ne rangez pas dans les
armoires se trouvant au-dessus de la table de
cuisson des articles qui présentent un intérêt pour
les enfants—ceux-ci pourraient grimper sur
l’appareil pour les atteindre et pourraient se blesser
gravement.
■ Gardez toujours les revêtements muraux, les
rideaux et les draperies inflammables à une
distance sécuritaire de votre table de cuisson.
■ Gardez toujours les linges à vaisselle, les serviettes,
les mitaines de four et autres articles en tissu à une
distance sécuritaire de votre table de cuisson.
■ Gardez toujours les ustensiles en plastique ou en
bois et les aliments en conserve à une distance
sécuritaire de votre table de cuisson.
Ils pourraient
devenir chauds et provoquer des brûlures.
■ Ne portez jamais de vêtements amples lorsque
vous utilisez cet appareil. Les tissus inflammables
peuvent prendre feu au contact des éléments de
surface brûlants et causer de graves brûlures.
■ N’utilisez que des poignées ou des mitaines de four
sèches—les poignées ou mitaines de four humides
ou mouillées peuvent causer des brûlures de
vapeur. Ne laissez pas les poignées ou mitaines de
four entrer en contact avec les éléments de surface
brûlants. N’utilisez pas de serviette ou autre objet
encombrant en tissu. Ils peuvent prendre feu au
contact d’un élément de surface brûlant.
■ Pour votre sécurité, n’utilisez jamais cet appareil
pour réchauffer la pièce.
■ Ne tentez pas d’éteindre des feux de graisse
avec de l’eau. Ne prenez jamais une casserole
enflammée dans vos mains. Éteignez les
éléments. Étouffez ensuite les flammes à l’aide
d’un couvercle hermétique, d’une plaque à
biscuits ou d’un plateau. Utilisez un extincteur
chimique tout usage à poudre sèche ou à
mousse.
■ Éteignez les feux de graisse à l’extérieur du
poêlon avec du bicarbonate de soude ou, si
possible, un extincteur chimique tout usage
à poudre sèche ou à mousse.
■ Ne flambez pas les aliments sur la surface de
cuisson. Si vous le faites sous la hotte, mettez
le ventilateur en marche.
■ Ne laissez pas de graisse ou autres substances
inflammables s’accumuler sur la table de cuisson.
MESURES DE SÉCURITÉ
30
Mesures de sécurité
Fonctionnement
Instructions
d’installation
Conseils de
dépannage
Soutien au
consommateur
Emplacement de la plaque signalétique
Page 31

Faites cuire la viande et la volaille à coeur—la température INTERNE de la viande doit être d’au
moins 71 °C (160 °F), et celle de la volaille d’au moins 82 °C (180 °F). La cuisson à ces températures
internes assure généralement une bonne protection contre les intoxications alimentaires.
FAITES CUIRE LA VIANDE ET LA VOLAILLE À COEUR…
www.electromenagersge.ca
■ Ne touchez pas aux éléments de surface. Ils
peuvent être suffisamment chauds pour causer
des brûlures, même s’ils ne sont pas rouges.
Pendant et après leur utilisation, ne touchez pas
aux éléments et évitez que vos vêtements ou
autres matériaux inflammables entrent en
contact avec les éléments ou les surfaces autour
des éléments; laissez-les d’abord refroidir
suffisamment.
■ Les surfaces susceptibles de devenir brûlantes
comprennent notamment la surface de cuisson
et les parties faisant face à la table de cuisson.
■ Pour réduire les risques de brûlures et d’incendie,
de même que les renversements, tournez
toujours la poignée des ustensiles de cuisson vers
le centre de la table de cuisson, en évitant de la
placer au-dessus d’un élément adjacent.
■ Éteignez toujours l’élément de surface avant
d’enlever l’ustensile de cuisson.
■ Utilisez des ustensiles de la dimension
appropriée—choisissez un ustensile à fond plat et
suffisamment grand pour couvrir toute la surface
de l’élément chauffant. Lorsque vous utilisez un
ustensile plus petit, une partie de l’élément de
surface est exposée et vos vêtements risquent
de prendre feu au contact de l’élément. De plus,
lorsque l’ustensile de cuisson est approprié à
l’élément de surface, la cuisson est plus efficace.
■ Ne laissez jamais les éléments de surface sans
surveillance à un réglage élevé. Les aliments
renversés peuvent fumer et la graisse peut
s’enflammer.
■ Seuls certains types de verre, de céramique, de
terre cuite ou matériaux similaires conviennent
à la cuisson sur la table de cuisson. D’autres
matériaux peuvent casser en raison du brusque
changement de température.
■ Surveillez toujours les aliments que vous faites
frire à un réglage de température moyen
ou élevé.
■ Les aliments à frire doivent être aussi secs que
possible. Le givre sur les aliments surgelés ou
l’humidité des aliments frais peuvent faire
bouillonner l’huile qui risque alors de déborder
du récipient.
■ Pour la haute friture, utilisez le moins de graisse
possible afin d’éviter qu’elle ne déborde au
moment où vous ajouterez des aliments.
■ Lorsque vous utilisez plus d’un type d’huile ou de
graisse pour la friture, remuez bien l’huile avant
de la faire chauffer, ou remuez la graisse pendant
qu’elle fond.
■ Faites toujours chauffer les matières grasses
à feu doux et surveillez-les constamment.
■ Utilisez un thermomètre de cuisson pour la haute
friture, lorsque cela est possible, afin d’empêcher
que la graisse fume.
■ Ne tentez jamais de déplacer un récipient rempli
d’huile chaude, plus particulièrement une friteuse.
Attendez que l’huile ait refroidi.
■ Ne rangez pas de substances inflammables
à proximité de la table de cuisson.
■ Gardez toujours la hotte et le filtre à graisses
propres afin d’assurer une bonne ventilation
et d’éviter les feux de graisses.
■ Ne rangez jamais ou n’utilisez jamais de matières
combustibles, d’essence ou autres liquides
inflammables à proximité de cet appareil ou
de tout autre électroménager.
■ Ne nettoyez que les pièces indiquées dans le
présent manuel d’utilisation.
■ Ne laissez pas des produits en papier, des
ustensiles de cuisson ou des aliments sur la table
de cuisson lorsque celle-ci n’est pas utilisée.
AVERTISSEMENT!
MESURES DE SÉCURITÉ
Mesures de sécurité Fonctionnement
Soutien au
consommateur
31
Conseils de
dépannage
Instructions
d’installation
Page 32

VEUILLEZ LIRE ET SUIVRE À LA LETTRE CES MESURES
DE SÉCURITÉ
.
CONSERVEZ CES DIRECTIVES
MESURES DE SÉCURITÉ IMPORTANTES.
VEUILLEZ D’ABORD LIRE LES MESURES DE SÉCURITÉ.
Faites attention lorsque vous touchez à la table de cuisson. La surface de vitrocéramique de la table
de cuisson demeure chaude pendant un certain temps après que les éléments aient été éteints.
ÉLÉMENTS DE SURFACE RAYONNANTS
■ Gardez la table de cuisson propre et exempte de
toute accumulation de graisse ou d’aliments
renversés qui pourraient prendre feu.
■ Ne laissez jamais des contenants de graisse
ou d’huile sur votre table de cuisson ou à proximité
de celle-ci.
■ Ne faites jamais chauffer des contenants d’aliments
fermés. En raison de l’accumulation de pression à
l’intérieur, les contenants pourraient éclater et
causer des blessures.
■ Évitez d’égratigner la surface de cuisson en
vitrocéramique. Certains instruments pointus, les
bagues et autres bijoux, et les rivets des vêtements
peuvent égratigner la surface de cuisson.
■ N’utilisez jamais la surface de cuisson en
vitrocéramique comme planche à découper.
■ Ne placez pas ou ne rangez pas d’articles sur la
surface de cuisson en vitrocéramique lorsque
celle-ci n’est pas utilisée.
■
Faites attention lorsque vous déposez sur la
surface de cuisson en vitrocéramique des cuillères
ou autres ustensiles pendant que vous l’utilisez.
Ces ustensiles peuvent devenir chauds et vous
causer des brûlures.
■ Évitez de faire chauffer un ustensile de cuisson vide.
Vous risquez ainsi d’endommager la table de
cuisson et l’ustensile.
■ Essuyez immédiatement l’eau, la graisse ou autres
liquides sur la table de cuisson.
■ Pour réduire les risques de brûlures, assurez-vous
que les commandes des éléments de surface sont
réglées à OFF et que la surface de cuisson en
vitrocéramique a refroidi avant de nettoyer la table
de cuisson.
■
Ne faites pas fonctionner les éléments de surface
lorsque la surface de cuisson en vitrocéramique
est cassée. Les aliments renversés et les produits
nettoyants peuvent s’infiltrer sous la surface
de cuisson cassée et provoquer des chocs
électriques. Si votre surface de cuisson est cassée,
communiquez immédiatement avec un technicien
qualifié.
■ Faites attention lorsque vous nettoyez la table de
cuisson. Lorsque vous utilisez un linge ou une
éponge humide pour essuyer des aliments
renversés sur une surface brûlante, vous pourriez
vous infliger des brûlures de vapeur. De plus,
certains produits nettoyants dégagent des vapeurs
nocives lorsqu’ils sont appliqués sur une surface
brûlante.
■ REMARQUE : Nous vous recommandons de laisser
refroidir la surface de cuisson avant de l’essuyer et
d’attendre que le voyant se soit éteint. Les aliments
sucrés renversés constituent la seule exception à
cette règle. Reportez-vous à la section Nettoyage
de la surface en vitrocéramique.
■ Pour éviter d’endommager la surface de cuisson,
n’appliquez pas de crème nettoyante sur la surface
de vitrocéramique chaude.
■ Après le nettoyage, utilisez un linge ou un essuie-
tout sec pour enlever tout résidu de produit
nettoyant.
■ Veuillez lire et suivre toutes les directives et mises en
garde sur les étiquettes de la crème nettoyante.
■
Soyez prudent en touchant la table de cuisson. La
surface de verre de la table de cuisson reste chaude
une fois les commandes éteintes.
■
Ne vous tenez pas sur la surface de cuisson
en verre.
■ Les rayures importantes ou les chocs sur
les tables de cuisson en vitrocéramique peuvent
occasionner des cassures de la surface de
vitrocéramique et des éclats.
32
Mesures de sécurité
Fonctionnement
Instructions
d’installation
Conseils de
dépannage
Soutien au
consommateur
MISE EN GARDE!
MESURES DE SÉCURITÉ (cont.)
Page 33

Caractéristiques de votre table de cuisson. www.electromenagersge.ca
Les caractéristiques et l’apparence des modèles présentés dans ce manuel peuvent différer de celles
de votre modèle.
Index des caractéristiques (les caractéristiques et l’apparence peuvent varier.) Expliqué à la page
Élément de surface double 6, 7
Élément de surface simple 7
Boutons de commande des plaques électriques 6
Voyant de surface chaude 6
Voyant « On » (Marche) 6
33
Mesures de sécurité Fonctionnement
Soutien au
consommateur
Conseils de
dépannage
Instructions
d’installation
Page 34

34
Dans le présent manuel, les caractéristiques et l’apparence peuvent être différentes de celles de votre modèle.
Réglage des commandes
Enfoncez le bouton et tournez-le dans
le sens du réglage désiré. Lorsque le bouton
de commande est à une autre position que
Off (Arrêt), il peut être tourné sans avoir
à l’enfoncer.
Aux réglages Off (Arrêt), Hi (Maximum), Lo
(Minimum) et Simmer (Mijoter) la commande
s’enclenche en faisant entendre un déclic.
Pendant la cuisson, il est possible que vous
entendiez des déclics, ce qui signifie que la
commande maintient la température que
vous avez choisie.
Les boutons de commande des plaques
électriques à rayonnement peuvent être
réglés à n’importe quelle position entre
Lo (Minimum) ou Simmer (Mijoter) et Hi
(Maximum) pour vous offrir un nombre
illimité de réglages de la chaleur. Grâce au
commutateur à réglage infini, les plaques
électriques s’allument et s’éteignent afin de
conserver le bon réglage de la chaleur.
Le voyant On (Élément allumé) s’allume dès qu’un
élément de surface est allumé.
Les voyants Hot Surface (Surface brûlante)
s’allument dès que vous mettez en marche un
élément rayonnant, et demeurent allumés
jusqu’à ce que la température de la surface
soit redescendue à environ 66 °C (150 °F).
REMARQUE :
■ Ils s’allument lorsque l’élément chauffant
est brûlant.
■ Ils demeurent allumés même après que
l’élément ait été éteint.
■ Ils restent allumés jusqu’à ce que la
température de l’élément soit redescendue
à 66 °C (150 °F) environ.
■ Assurez-vous de tourner le bouton de
commande à la position « Off » après
la cuisson.
Ne faites jamais
cuire d'aliments
directement sur
la surface de
vitrocéramique.
Utilisez toujours
un ustensile de
cuisson.
À propos des éléments de surface rayonnants…
La table de cuisson par rayonnement est
dotée d’éléments chauffants situés sous
une surface de vitrocéramique lisse.
REMARQUE : Il est normal de sentir une
légère odeur lorsque la table de cuisson
neuve est utilisée pour la première fois. Cette
odeur est attribuable aux nouvelles pièces et
aux matériaux isolants qui chauffent et
disparaîtra peu de temps après.
REMARQUE : Pour les modèles à surfaces
de cuisson de couleur pâle, il est normal
que les zones de cuisson changent de
couleur en chauffant et en refroidissant.
Ce phénomène est temporaire et disparaît
lorsque le verre refroidit à la température
ambiante.
L’élément de surface s’allume et s’éteint
de façon cyclique pour maintenir la
température que vous avez choisie.
Vous pouvez placer sans danger des
ustensiles de cuisson brûlants, sortant
du four ou provenant d’un autre élément
de surface, sur la table de cuisson de
vitrocéramique froide.
Même après avoir éteint les éléments de
surface, la surface de cuisson en vitrocéramique
demeure suffisamment chaude pour poursuivre
la cuisson. Pour éviter une cuisson excessive,
retirez l’ustensile de l’élément lorsque l’aliment
est cuit.
Évitez de placer sur les plaques électriques
encore chaudes des ustensiles pouvant
devenir chauds ou des objets en plastique
qui pourraient fondre.
■ Vous pouvez faire disparaître les taches
d’eau (dépôts de minéraux) à l’aide de la
crème nettoyante ou de vinaigre blanc
non dilué.
■ L’utilisation d’un produit nettoyant pour
les vitres peut laisser une pellicule
chatoyante sur la surface de cuisson. La
crème nettoyante fera disparaître cette
décoloration.
■ Ne rangez pas d’articles lourds au-dessus
de la table de cuisson. S’ils tombent sur
l’appareil, ils pourraient l’endommager.
■ N’utilisez pas la surface de cuisson
comme planche à découper.
;;;
;
;;;;;;
;
Cuisson sur
la surface
Veillez à placer la
casserole au
centre de
la plaque
électrique
utilisée.
;;;;;;;;;
Mal centré
vitrocéramique. Bien qu’elle soit
résistante, la surface n’est pas à
l’épreuve des égratignures.
Ne faites jamais
glisser d’ustensiles
de cuisson sur la
table de
cuisson,
car vous risquez
d’égratigner la
surface de
Glisser
Utilisation des éléments de surface.
Mesures de sécurité
Fonctionnement
Instructions
d’installation
Conseils de
dépannage
Soutien au
consommateur
Page 35

35
Élément de surface double
(sur certains modèles)
La plaque électrique avant gauche vous
offre deux réglages pour que vous puissiez
adapter le diamètre de la plaque à celui de
l’ustensile de cuisson que vous utilisez.
Pour faire fonctionner le grand élément
de surface, tournez le bouton SELECTOR
(sélecteur) au réglage . Enfoncez et
tournez ensuite le bouton de commande
au réglage désiré. L’élément chauffera
toute la surface qui se trouve à l’intérieur
du grand cercle.
Pour faire fonctionner le petit élément,
tournez le bouton SELECTOR au réglage
. Enfoncez et tournez ensuite le bouton
de commande au réglage désiré. L’élément
ne chauffera que la surface qui se trouve à
l’intérieur du cercle plus petit.
Mesures de sécurité
Fonctionnement
Soutien au
consommateur
Conseils de
dépannage
Instructions
d’installation
www.electromenagersge.ca
Plaques électriques s’allument et s’éteignent
Les plaques électriques s’allument et
s’éteignent en alternance pour garder
la surface de cuisson à la température
réglée.
Les plaques électriques à rayonnement
sont toutes équipées d’un limiteur de
température qui empêche la surface de
verre de devenir trop chaude.
Le limiteur de température peut éteindre
l’élément de façon cyclique pendant un certain
temps lorsque :
■ L’ustensile chauffe à vide.
■ Le fond de l’ustensile n’est pas plat.
■ L’ustensile n’est pas au centre de l’élément.
■ Aucun ustensile n’est placé sur l’élément.
Page 36

Les renseignements qui suivent vous aideront à choisir un ustensile de cuisson offrant un bon rendement sur une
surface de cuisson en vitrocéramique.
Acier inoxydable :
recommandé
Aluminium :
épais – recommandé
Bonne conductivité. Sur la surface de
cuisson, l’aluminium laisse parfois des
résidus qui ressemblent à des égratignures.
Ces résidus peuvent disparaître si la
surface est nettoyée immédiatement.
En raison de son point de fusion peu
élevé, il n’est pas recommandé d’utiliser
l’aluminium mince.
Cuivre:
recommandé
Fond en cuivre :
utilisation possible mais non recommandée
Le cuivre laisse des résidus qui ressemblent
à des égratignures. Vous pouvez les faire
disparaître en nettoyant immédiatement la
surface de cuisson. Cependant, évitez de
faire chauffer ces ustensiles à vide. Le métal
surchauffé peut adhérer à la surface de
vitrocéramique. Un ustensile dont le fond en
cuivre a été surchauffé laisse un résidu qui
tachera de façon permanente la surface de
cuisson si vous ne faites pas disparaître le
résidu immédiatement.
Fonte émaillée :
recommandée
L’utilisation de ce type d’ustensile est
recommandée dans la mesure où
l’ustensile est complètement recouvert
d’émail vitrifié. La prudence est de mise
dans le cas d’ustensiles en fonte qui ne
sont pas complètement recouverts d’émail
vitrifié, car ils peuvent égratigner la surface
de vitrocéramique.
Vitrocéramique :
utilisation possible mais non recommandée
Rendement médiocre. Peut égratigner
la surface.
Grès :
utilisation possible mais non recommandée
Rendement médiocre. Peut égratigner
la surface.
Utilisez des casseroles assorties au
diamètre de la plaque électrique. Le
rendement de cuisson n’est pas aussi bon
lorsque l’ustensile de cuisson est plus large
ou moins large que la plaque électrique.
Vérifiez à l’aide d’une règle si le
fond de votre casserole est plat.
Il n’est pas recommandé d’utiliser
un ustensile dont le fond est
bombé, incurvé, ondulé ou
déformé.
36
Mesures de sécurité
Fonctionnement
Instructions
d’installation
Conseils de
dépannage
Soutien au
consommateur
Pour obtenir de meilleurs résultats
■ Mettez toujours des casseroles bien
sèches sur la surface chauffante. Ne
placez jamais de couvercle sur la
surface chauffante, surtout si ce
couvercle est mouillé.
■ N’utilisez jamais de wok qui ait
un anneau de soutien. Ce wok
ne chauffera pas sur la surface
chauffante en vitrocéramique.
■ Nous vous recommandons de n’utiliser
qu’un wok à fond plat. Vous en
trouverez chez votre quincailler local.
Le fond du wok doit avoir le même
diamètre que la surface chauffante
pour permettre un bon contact.
■ Certains procédés de cuisson
nécessitent un ustensile de cuisine
spécialisé, comme un autocuiseur,
une friteuse, etc. Tous ces ustensiles
doivent avoir un fond plat et un
diamètre qui corresponde à celui
de la surface chauffante.
Ne mettez jamais de casserole mouillée
sur la surface en vitrocéramique.
N’utilisez jamais de wok à anneau
de soutien sur la surface en
vitrocéramique.
Utilisez un wok à fond plat sur
la surface en vitrocéramique.
Choix des ustensiles de cuisson.
Page 37

Nous ne vous recommandons pas d’utiliser
des ustensiles de cuisson qui ont plus de
2,5 cm (1 po) de diamètre de plus que celui
de la surface de cuisson pour la plupart des
cuissons en surface. Cependant, vous pouvez
utiliser un ustensile plus large quand vous
cuisez au bain-marie ou à l’autoclave. En effet,
la température de l’eau qui bout (même sous
pression) ne peut pas endommager la surface
en vitrocéramique située autour de la surface
chauffante.
NÉANMOINS, N’UTILISEZ JAMAIS D’USTENSILE
DE MISE EN CONSERVE OU D’USTENSILE DE
CUISSON DE GRAND DIAMÈTRE POUR FAIRE
FRIRE OU BOUILLIR DES ALIMENTS AUTRES
QUE DE L’EAU. La plupart des sirops et
mélanges de sauce, et toutes les catégories
de produits frits, cuisent à une température
beaucoup plus élevée que celle de l’eau
qui bout. De telles températures peuvent
endommager les surfaces en vitrocéramique.
Assurez-vous que l’ustensile de mise en
conserve puisse bien aller au centre de
la surface chauffante. Si la surface de
vitrocéramique ou son emplacement ne
permetent pas à l’ustensile de mise en
conserve de se trouver au centre de la
surface chauffante, utilisez un ustensile
de diamètre plus petit pour obtenir de
bons résultats.
Vous devez utiliser un ustensile de mise
en conserve à fond plat. N’utilisez jamais
d’ustensile à fond ondulé ou à collerette
(souvent rencontrés parmi les ustensiles
émaillés). Ils n’entrent pas suffisamment
en contact avec la surface de cuisson et
nécessitent beaucoup de temps pour
faire bouillir de l’eau.
Pour faire des conserves, utilisez des
recettes et des procédés obtenus de
bonnes sources. Vous trouverez de
bonnes recettes et procédés chez le
fabricant de votre ustensile de mise en
conserve, chez le fabricant de pots de
verre, comme Ball et Kerr, et au service
d’extension du Ministère de l’agriculture
des Etats-Unis d’Amérique.
Vous devez vous souvenir que la
mise en conserve est un procédé qui
occasionne beaucoup de vapeur. Pour
éviter de vous brûler avec la vapeur,
faites bien attention quand vous
mettez en conserve.
REMARQUE : Si votre maison est alimentée par
du courant à basse tension, la mise en conserve
peut prendre plus de temps que prévu, même
si vous suivez soigneusement toutes les
instructions. Vous raccourcirez ce processus en :
(1) utilisant un autoclave, et
( 2) commençant vos opération avec de l’eau
provenant de votre robinet d’eau chaude,
pour accélérer le processus de chauffage
des grandes quantités d’eau.
ATTENTION :
■ Pour mettre en conserve en toute sécurité,
vous devez détruire les micro-organismes
nuisibles et sceller hermétiquement les pots.
Pour mettre en conserve dans un ustensile
à bain-marie, vous devez faire bouillir l’eau
doucement pendant tout le temps requis.
Pour mettre en conserve dans un autoclave,
vous devez conserver la pression pendant
tout le temps requis.
■ Après avoir règlé la température, vous devez
faire bien attention de conserver le niveau
requis de bouillonnement ou de pression
pendant le temps requis.
■ Comme vous devez vous assurer de
respecter le processus de mise en conserve
pendant tout le temps requis, sans aucune
interruption, ne mettez jamais en conserve
sur la surface de cuisson si votre ustensile
de mise en conserve n’a pas un fond plat.
Mesures de sécurité Fonctionnement
Soutien au
consommateur
Conseils de
dépannage
Instructions
d’installation
www.electromenagersge.ca
Note : Les ustensiles de mise en
conserve à fond plat sont requis avec
les surfaces en vitrocéramique.
Observez les instructions suivantes pour mettre en conserve
Faux!
Juste!
Entretien et nettoyage de la table de cuisson.
Boutons de contrôle
Les boutons de contrôle se retirent pour
faciliter le nettoyage.
Avant de retirer les boutons pour le
nettoyage, veuillez noter que les boutons
sont en position Off (ARRÊT).
Les boutons peuvent être lavés au lavevaisselle ou encore avec de l’eau
savonneuse. Ne retirez pas la rondelle
décorative en chrome (certains modèles).
Assurez-vous que l’intérieur des boutons
est bien sec avant de les remettre en place.
En remplaçant les boutons, vérifiez la
position Off (ARRÊT) pour assurer
le bon placement.
37
Page 38

38
Mesures de sécurité
Fonctionnement
Instructions
d’installation
Conseils de
dépannage
Soutien au
consommateur
Laissez refroidir la table de cuisson.
Tenez un grattoir à lame simple à un
angle d’environ 45º sur la surface de
vitrocéramique et raclez les résidus.
Vous devrez exercer de la pression
sur le grattoir à lame pour les
enlever.
Après avoir enlevé les résidus avec
le grattoir à lame, versez quelques
gouttes de crème nettoyante
CERAMA BRYTE®pour table de
cuisson sur les résidus calcinés.
Utilisez l’éponge CERAMA BRYTE
®
pour enlever les résidus restants.
Pour mieux protéger après avoir
enlevé les résidus, polissez toute la
surface avec la crème nettoyante
CERAMA BRYTE®et une serviette
de papier.
Résidus calcinés
AVERTISSEMENT : Vous pouvez
ENDOMMAGER votre surface en
vitrocéramique si vous utilisez des éponges
de récurage autres que celles comprises
avec votre appareil.
Laissez refroidir la table de cuisson.
Versez quelques gouttes de crème
nettoyante CERAMA BRYTE®sur tous
les résidus calcinés.
À l’aide de l’éponge de récurage
CERAMA BRYTE®pour table de
cuisson en vitrocéramique, frottez
les résidus en exerçant la pression
nécessaire.
S’il reste des résidus, répétez les
opérations indiquées ci-dessus.
Pour mieux protéger après avoir
enlevé les résidus, polissez toute la
surface avec la crème nettoyante
CERAMA BRYTE®et une serviette
de papier.
On peut se procurer le grattoir
CERAMA BRYTE®pour table de
cuisson en vitrocéramique et tous
les accessoires recommandés
dans nos Centres de pièces
détachées. Consultez les
instructions dans la section
« Comment commander des
pièces » à la page suivante.
NOTE : N’utilisez jamais une lame
émoussée ou ébréchée.
Résidus calcinés difficiles à enlever
Utilisez une éponge CERAMA
BRYTE®pour table de cuisson en
vitrocéramique ou une éponge de
récurage bleue tout usage antiégratignures Scotch-Brite®.
Nettoyage normal quotidien
Utilisez la crème nettoyante CERAMA BRYTE
®
sur votre table de cuisson en vitrocéramique.
Pour entretenir et protéger votre table de
cuisson en vitrocéramique, conformez-vous
aux instructions suivantes :
Avant d’utiliser votre table de cuisson
pour la première fois, nettoyez-la
avec de la crème nettoyante
CERAMA BRYTE®pour table de
cuisson. Cela vous aidera à la protéger
et à la conserver propre.
Votre table de cuisson conservera son
aspect neuf si vous utilisez chaque jour
la crème nettoyante CERAMA BRYTE
®
pour table de cuisson.
Secouez bien le flacon de crème
nettoyante. Versez quelques gouttes
de crème nettoyante CERAMA BRYTE
®
directement sur votre table de cuisson.
Utilisez une serviette en papier ou une
éponge CERAMA BRYTE®pour table
de cuisson en vitrocéramique afin de
nettoyer la surface de la table de
cuisson.
Utilisez une serviette en papier ou
une éponge pour nettoyer toute la
surface de la table de cuisson. Pas
besoin de rincer.
NOTE : Vous devez faire bien attention de
NE PAS faire chauffer la table de cuisson
avant de la nettoyer complètement.
Nettoyez votre table de
cuisson chaque fois
qu’elle est sale. Utilisez
la crème nettoyante
CERAMA BRYTE®pour
table de cuisson.
Nettoyage de la surface en vitrocéramique.
Page 39

Mesures de sécurité Fonctionnement
Soutien au
consommateur
Conseils de
dépannage
Instructions
d’installation
www.electromenagersge.ca
39
Pour commander la crème et le grattoir
CERAMA BRYTE®, veuillez composer notre
numéro de téléphone sans frais.
Centre national de pièces
détachées : 800.626.2002.
Crème nettoyante CERAMA BRYTE
®
pour table de cuisson
en vitrocéramique . . . . . . . . . . . . .# WX10X300
Grattoir CERAMA BRYTE
®
pour table de cuisson
en vitrocéramique . . . . . . . . . . .# WX10X0302
Trousse . . . . . . . . . . . . . . . . . . .# WB64X5027
(la trousse comprend un flacon de crème et
un grattoir)
Éponges CERAMA BRYTE
®
pour tables de cuisson
en vitrocéramique . . . . . . . . . . . .# WX10X350
Éteignez toutes les unités de la table
de cuisson. Enlevez toutes les
casseroles chaudes.
Portez des gants de cuisine :
a. Utilisez un grattoir à lame
simple (grattoir CERAMA BRYTE
®
pour table de cuisson en
vitrocéramique) pour repousser les
matières fondues sur une surface
froide de la table de cuisson.
b. Enlevez les matières fondues avec
une serviette en papier.
Vous devez laisser toute matière
fondue que vous n’avez pas réussi à
enlever jusqu’à ce que la table de
cuisson refroidisse complètement.
Ne réutilisez jamais la table de
cuisson avant d’avoir enlevé
complètement les résidus
NOTE : S’il s’est déjà formé sur votre table
de cuisson en vitrocéramique des creux
ou des piqûres, vous devrez la remplacer.
Dans ce cas, vous devez appeler le service.
Dommages causés par du sucre chaud ou des matières
plastiques fondues
D’après nos essais, il
semble que si vous
cuisinez des aliments
riches en sucre comme
de la confiture ou du
caramel, et s’ils débordent,
ils peuvent occasionner
des dommages
permanents à la surface
de vitrocéramique si
vous ne la nettoyez pas
immédiatement.
Faites attention de ne pas faire
glisser des ustensiles de cuisine sur
votre table de cuisson. Ils laisseront
des traces de métal sur la surface
de vitrocéramique.
Vous pourrez enlever ces traces en
appliquant la crème nettoyante
CERAMA BRYTE®à l’aide de l’éponge
CERAMA BRYTE®pour table de cuisson
en vitrocéramique.
Si vous laissez des casseroles
recouvertes d’une couche
d’aluminium ou de cuivre chauffer à
sec, leur métal peut laisser des traces
noires sur la table de cuisson.
Vous devez enlever ces traces
immédiatement, avant de faire
chauffer à nouveau la table de
cuisson. Autrement, les traces
risquent de devenir permanentes.
AVERTISSEMENT : Vérifiez toujours le fond
de vos casseroles pour vous assurer
qu’elles n’aient pas d’aspérités qui risquent
de rayer la table de cuisson.
Traces de métal et rayures
Comment commander des pièces
Surface de vitrocéramique—possibilité de dommages permanents.
39
Page 40

PIÈCES COMPRISES
OUTILS REQUIS
MATÉRIEL REQUIS
Instructions
Surface de cuisson de
d’installation
électrique de 76 cm (30 po)
AVANT DE COMMENCER
Lisez complètement et soigneusement les
instructions suivantes.
•
IMPORTANT — Consultez ces instructions
pour votre inspecteur local.
•
IMPORTANT — Conservez tous les codes
et les ordonnances en vigueur.
• Note au monteur – Assurez-vous de laissez ces
instructions chez le consommateur.
• Note au consommateur – Conservez ces
instructions pour les consulter plus tard.
• Toute panne de produit occasionnée par un
mauvais montage n’est pas couverte par la
garantie.
AVERTISSEMENT — Cet appareil doit
être bien mis à la terre.
•
AVIS À L’INSTALLATEUR —
TOUTES LES SURFACES DE CUISSON DOIVENT
ÊTRE RACCORDÉES DIRECTEMENT À UNE BOÎTE
DE CONNEXION APPROUVÉE. IL EST INTERDIT
D’UTILISER UN DISPOSITIF DE FICHE ET DE
PRISE SUR CES PRODUITS.
• L’installateur a la responsabilité de s’assurer que
l’installation est correcte et toute panne de
produit occasionnée par un mauvais montage
n’est pas couverte par la garantie.
Écrous pour fil de fer
Boîte de jonction
Scie à main
ou sauteuse
Crayon
Lunettes de sécurité
Mandrin de perceuse de
3 mm (1/8 po) et perceuse
électrique ou manuelle
Règle ordinaire ou de
vérification
Tournevis
à Phillips
JP256
“Des questions? Appelez le 1.800.561.3344 ou consultez notre site Web à : www.electromenagersge.ca”
Strips de mousse
40
2 supports de fixation
6 vis à tête hexagonale
(4 requises, 2
supplémentaires)
2 vis de serrage
Tourne-écrou de 1/4 po
Page 41

Instructions d’installation
POUR VOTRE SÉCURITÉ
• Pour votre sécurité personnelle, enlevez le fusible
ou ouvrez le disjoncteur de circuit de votre maison
avant de commencer votre installation. Si vous
ne le faites pas, vous pouvez occasionner des
blessures sérieuses ou même la mort.
• Assurez-vous que votre surface de cuisson soit
bien installée par un installateur qualifié ou un
technicien de service.
• Pour éliminer tout risque de brûlure ou d’incendie
causé par des armoires de cuisine situées au
dessus d’éléments de surface chauffante, vous
devez éviter de placer toute armoire de cuisine
au dessus de la surface de cuisson. Si vous êtes
obligé de placer une armoire de cuisine sur la
surface de cuisson, vous pouvez réduire le risque
en installant une hotte à four qui avance
horizontalement au moins de 12 cm (5 po) par
rapport au bas de l’armoire. Vous ne pouvez pas
installer d’armoire au dessus de la surface de
cuisson à moins de 33 cm (13 po) de profondeur.
• Assurez-vous que les armoires et les revêtements
de mur autour de la surface chauffante puissent
supporter les températures [pouvant atteindre
93°C (200°F)] produites par la surface chauffante.
• La surface chauffante doit être facile à atteindre
et éclairée par la lumière naturelle pendant
la journée.
• Coupez toujours l’alimentation électrique
de la surface de cuisson avant de la réparer
ou de l’entretenir. Vous pouvez y arriver en
débranchant le fusible ou en ouvrant le
disjoncteur de circuit. Si vous ne le faites pas,
vous pouvez causer des secousses dangereuses
ou même mortelles. Vous devez savoir où votre
disjoncteur principal d’alimentation est situé. Si
vous ne le savez pas, faites-vous montrer son
emplacement par un électricien.
INSTRUCTIONS IMPORTANTES RELATIVES À LA SÉCURITÉ
BESOINS ÉLECTRIQUES
Vous devez alimenter cet appareil ménager par un
courant de bonne fréquence et de bon voltage et
vous devez le connecter à un circuit de dérivation
particulier, bien mis à la terre, protégé par un
disjoncteur ou un fusible du même ampérage que
celui qui est noté sur la plaque signalétique de la
surface de cuisson.
Nous vous recommandons de faire exécuter le
câblage électrique et la connexion de votre surface
de cuisson par un électricien qualifié. Après le
montage, demandez à l’électricien de vous montrer
l’emplacement du disjoncteur de votre surface
de cuisson.
Le câblage doit être conforme au Code national
de l’électricité. Vous pouvez vous procurer un
exemplaire du Code national de l’électricité,
ANSI/NFPA n° 70-plus récente édition, par écrit à :
National Fire Protection Association
Batterymarch Park
Quincy, MA 02269, États-Unis
Au Canada, le câblage doit se conformer au Code
canadien de l’électricité (CCE).
Le câblage de la table de cuisson est approuvé
uniquement pour un branchement avec des fils
de cuivre, et si le câblage de votre maison est en
aluminium, vous devrez utiliser un connecteur
spécial approuvé UL pour raccorder les fils de
cuivre à ceux d’aluminium. Au Canada, vous devez
utiliser des connecteurs spéciaux homologués CSA
pour joindre le cuivre à l’aluminium.
Vous devez utiliser un système électrique à deux
fils, trois conducteurs 208/240 V c.a., 60 Hertz. Il
n’est pas nécessaire d’utiliser un fil blanc (neutre)
avec cet appareil. La table de cuisson doit être
branchée à un circuit qui ne dépasse pas
125 V c.a. de tension nominale.
Consultez la plaque signalétique de votre table
de cuisson pour connaître son régime nominal
en kilowatts.
41
Emplacement de la plaque signalétique
Page 42

AVERTISSEMENT –
On doit couper
l’alimentation électrique au câblage de la table
de cuisson lorsqu’on effectue son branchement,
sinon il peut en résulter de graves blessures et
même la mort.
Lors de la préparation de l’ouverture de la
surface de cuisson, vous devez vous assurer
que l’intérieur de l’armoire ne touche pas la
surface de cuisson. (Voir la section sur la
préparation de l’ouverture.)
Enlevez les matériaux d’emballage et la
documentation de votre surface de cuisson
avant de commencer à l’installer.
B
A
42
Instructions d’installation
LISTE DE VÉRIFICATION AVANT MONTAGE
Enlevez les instructions de montage de la
documentation et lisez-les soigneusement
avant de commencer
Assurez-vous de ranger la documentation
dans un endroit sûr pour la consulter dans
l’avenir.
Assurez-vous d’avoir tous les outils et tous les
matériaux nécessaires avant de commencer
à installer votre surface de cuisson.
Votre maison doit être alimentée en courant
électrique adéquat pour vous permettre de
bien utiliser en toute sécurité votre surface de
cuisson. (Voir la section sur les exigences en
matière de conformité électrique.)
Pour installer votre surface de cuisson
dans votre maison, assurez-vous de vous
conformer scrupuleusement à tous les codes
et à toutes les ordonnances locales.
Assurez-vous que les revêtements de mur, le
comptoir et les armoires autour de la surface
de cuisson puissent supporter la chaleur
[93° C (200° F)] produite par la surface
de cuisson.
G
F
E
D
C
Documentation
Surface de
cuisson
Emballage
Before you begin-Read these instructions completely and carefully.
Before you begin-Read these instructions completely and carefully.
IMPORTANT- Save these instructions for local inspector's use.
IMPORTANT- Save these instructions for local inspector's use.
IMPORTANT- OBSERVE ALL GOVERNING CODES AND ORDIANCES.
IMPORTANT- OBSERVE ALL GOVERNING CODES AND ORDIANCES.
Note to Installer- Be sure to leave these instructions with the consumer.
Note to Installer- Be sure to leave these instructions with the consumer.
OWNER- Keep these instructions for future reference.
OWNER- Keep these instructions for future reference.
Note- This appliance must be properly grounded (if applicable).
Note- This appliance must be properly grounded (if applicable).
Page 43

DIMENSIONS ET DÉGAGEMENTS
D’INSTALLATION FACULTATIFS
Pour assurer la justesse du découpage, il vaut
mieux faire un gabarit pour couper l’ouverture
dans le comptoir.
INSTALLATION HORIZONTALE AVEC COMMANDES
À L’AVANT
Dans cette installation, la table de cuisson doit être
installée avec les boutons de commande vers le
bord avant.
L’INSTALLATION VERTICALE DOIT ÊTRE ORIENTÉE
AVEC LES COMMANDES SUR LE CÔTÉ GAUCHE
Afin d’éliminer les risques de brûlures au-dessus
des surfaces chaudes, la table de cuisson doit être
installée avec les commandes du côté gauche.
Dans cette installation, les plans de travail doivent
avoir une profondeur minimale de 63,5 cm (25 po).
Respectez toutes les distances minimales de
dégagement à l’avant, à l’arrière et sur les côtés.
4
43
7 cm (2-3/4 po) MÍn.
du
bord avant de du découpage
au bord avant du comptoir
41 cm (16-1/8 po)
profondeur du
découpage
51 cm (20-1/8 po)
largeur du
découpage
5 cm (2 po) Mín.
entre
le découpage et le
mur à l’arrière de la
table de cuisson
Instructions d’installation
PRÉPARATION DE L’OUVERTURE
Vous devez respecter les dimensions
suivantes d’éspace vide minimum.
1
DIMENSIONS DE LA SURFACE
DE CUISSON
2
3,8 cm (1-1/2 po) espace
vide vertical minimum
du bas de la surface
de cuisson à tout
surface inflammable.
3
33 cm (13 po) MAX profondeur des
armoires non protégées en surplomb
76 cm (30 po)
MIN distance
du comptoir à
la surface en
surplomb non
protégé
4 cm (1 3/4 po) MIN espace
libre de la surface de
cuisson au mur de gauche
45 cm (18 po)
MIN hauteur de
la surface
de cuisson aux
armoires
encastrées de
chaque côté
4 cm (1 3/4 po) MIN
distance du
découpage au mur
de côté à droite
de l’appareil
44 cm
(17-1/8 po)
51 cm
(19-15/16 po)
Surface de cuisson
55 cm
(21-1/2 po)
40 cm
(15-15/16po)
8 cm
(3 po)
3,8 cm (1-1/2 po)
espace vide vertical
minimum
Si vous ne pouvez pas conserver un espace libre
de 76 cm (30 po) entre la table de cuisson et les
armoires en métal ou les matériaux inflammables
situés au-dessus d’elle, vous avez besoin d’un
espace libre d’au moins 61 cm (24 po) et vous
devez protéger le bas de ces armoires d’un carton
isolant de 6 mm (1/4 de po) recouvert d’une feuille
de métal épaisse au moins de 0,3 mm (0,0122 po).
7 cm (2-3/4 po) MÍn.
du
bord avant du découpage
au bord avant du comptoir
51 cm (20-1/8 po)
profondeur du
découpage
41 cm (16-1/8 po)
largeur du
découpage
5 cm (2 po) Mín.
entre
le découpage et le
mur à l’arrière de la
table de cuisson
4 cm (1 3/4 po) MÍN.
distance du découpage
au mur du côté gauche
ou droit
4 cm (1 3/4 po) MIN
distance du découpage
au mur du côté gauche
ou droit
Page 44

44
Instructions d’installation
PRÉPARATION DE L’OUVERTURE (suite)
DIMENSIONS ET DÉGAGEMENTS
D’INSTALLATION FACULTATIFS
(suite)
INSTALLATION AU-DESSUS D’UN LAVE-VAISSELLE
GE SOUS ÉVIER
L’installation de cette table de cuisson n’est
approuvée que sur le modèle GSM2100 de lavevaisselle sous évier GE. Suivez les instructions
d’installation comprises avec le lave-vaisselle.
Les commandes doivent être orientées vers le côté
avant du comptoir.
4
11 cm (4-1/2 po)
MIN. du bord avant du
découpage au bord
avant du comptoir
91 cm
(36 po)
Plancher
4 cm (1 3/4 po)
espace au
murs de côté
41 cm (16-1/8 po)
profondeur du
découpage
5 cm (2 po) Mín.
entre le
découpage
et le mur à
l’arrière de
la table
de cuisson
51 cm (20-1/8 po)
largeur du
découpage
Assurez-vous que les revêtements de mur,
le comptoir et les armoires autour de la
surface de cuisson puissent supporter la
chaleur [93° C (200° F)] produite par la
surface de cuisson.
5
Revêtements de
mur, armoires et
comptoir doivent
supporter la
chaleur jusqu’ à
93° C (200° F)
Page 45

Instructions d’installation
INSTALLATION DE LA TABLE DE CUISSON
INSTALLATION DE LA BOÎTE
DE JUNCTION
Installez une boîte de jonction approuvée dans un
emplacement où vous pouvez facilement l’atteindre
par le devant de l’armoire où est située la surface
de cuisson. Le conduit de la surface de cuisson
est 147 cm (58 po) de long.
IMPORTANT :
Vous devez placer la boîte
de jonction de manière à donner beaucoup de mou
au conduit afin de pouvoir faire des réparations.
INSTALLATION AU-DESSUS D’UN LAVE-VAISSELLE
GSM2100
Le centre de la boîte de connexion doit être situé de
13 à 18 cm (5 à 7 po) sous le dessus de la table de
cuisson, de façon à ne pas nuire à l’installation ou
au fonctionnement du lave-vaisselle.
Les branchements électriques doivent être faits avant
d’installer la table de cuisson dans l’ouverture.
1
PROTÉGEZ LA SURFACE DE LA
TABLE DE CUISSON
Placez une serviette ou un torchon sur le comptoir.
Posez la table de cuisson à l’envers sur la surface
protégée.
2
FIXEZ LES STRIPS DE MOUSSE
Posez les strips de mousse autour des bords
extérieurs de la vitre. Ne permettez pas de
chevauchement de strips de mousse.
3
INSTALLEZ LES PIÈCES DE FIXATION
Vissez une vis à travers la fixation dans la table de
cuisson (des deux côtés). Ne serrez pas. Tournez la
fixation vers l’intérieur pour éviter qu’elle ne gêne
lors de l’insertion de la table de cuisson dans le
plan de travail.
4
Installez la boîte de
jonction dans un endroit
où vous pouvez l’atteindre
en passant par l’avant de
l’armoire.
13 cm
(5 po) MIN
Bas de la table
de cuisson
Toile sous la table de cuisson
Bas de la table de cuisson
Strips de mousse
Verre de la
table de
cuisson
*18 cm (7 po)
Max. lorsque
l’appareil est
installé audessus d’un
lave-vaisselle
GSM2100
45
Page 46

ATTACHEZ LES SUPPORTS DE
FIXATION AU CABINET
Ouvrez la porte du cabinet. Installez la deuxième
vis à travers la support de fixation et serrez. Puis,
serrez la première vis. Installez la vis de serrage
jusqu’à ce qu’elle touche le fond du comptoir.
IMPORTANT : Vissez les vis de serrage jusqu’à ce
qu’elles touchent le fond du comptoir. Ne serrez
pas de façon excessive.
6
La table
de cuisson
Comptoir
46
Instructions d’installation
INSÉREZ LA TABLE DE CUISSON
DANS LA OUVERTURE
Insérez la table de cuisson centrée dans l’ouverture
découpée. Assurez-vous que le bord avant du
comptoir soit bien parallèle à l’extrémité de la table
de cuisson. Faites une vérification finale pour vous
assurer de bien respecter tous les espaces libres.
5
La table de cuisson
INSTALLATION DE LA TABLE DE CUISSON (suite)
Page 47

47
Instructions d’installation
Pour faire les raccords de fils, utilisez la
longueur totale de conduit fourni. Vous
ne devez pas raccourcir le conduit.
Avec la table de cuisson en place, ouvrez
l’avant de la porte de l’armoire.
Insérez les fils du conduit par l’ouverture de
la boîte de jonction.
Raccordez les fils rouge et noir du
conduit de la surface de cuisson aux fils
correspondants de la boîte de jonction.
D
C
B
A
MONTAGE—CONNEXION ÉLECTRIQUE
Une fois les fils raccordés, fixez les fils
ensemble à l’aide d’écrous à fils.
INSTRUCTIONS DE MISE À LA TERRE :
Le câble de terre nu, dans le conduit, est branché
au châssis de la table de cuisson. À compter du
1er janvier 1996, le Code national de l’électricité
ne permettra plus la mise à la terre à l’aide du fil
neutre. Si l’appareil est utilisé dans une nouvelle
construction après le 1er janvier 1996 ou dans
une maison mobile, un véhicule récréatif ou si les
codes locaux ne permettent pas la mise à la terre
à l’aide du fil blanc neutre, branchez le fil de mise
à la terre de l’appareil (vert ou cuivre nu) au
conducteur de mise à la terre de la résidence
(vert ou cuivre nu) en conformité avec les codes
locaux. Si vous branchez à un circuit de dérivation
de 3 conducteurs, si les codes locaux le
permettent, branchez le câble nu de mise à la
terre au câble neutre du circuit de dérivation (gris
ou blanc).
IMPORTANT : Si vous installez la table
de cuisson sur un comptoir sans ouverture
dessous, vous devez faire les branchements de
câbles avant de mettre la table de cuisson dans
son ouverture.
E
Collier de serrage
Noir
Rouge
Terre
Collier de serrage
Noir
Rouge
Terre
Noir
Rouge
Emplacement du
câble de terre
Page 48

48
Instructions d’installation
LISTE DE VÉRIFICATION AVANT
ESSAI
Enlevez toute la pellicule protectrice présente
et toute étiquette collée sur la table de
cuisson.
Vérifiez que tout le câblage soit sécuritaire, ne
soit pas pincé et n’entre pas en contact avec
des pièces en mouvement.
Vérifiez l’horizontalité de l’appareil
électro-ménager.
Vérifiez que la table de cuisson soit bien mise
à la terre.
D
C
B
A
1
LISTES DES VÉRIFICATION
LISTE DE VÉRIFICATION DE
FONCTIONNEMENT
Enlevez tous les articles de la surface de la
table de cuisson.
Branchez votre table de cuisson. Assurez-vous
du bon fonctionnement de toutes les unités de
la table de cuisson.
Vérifiez que le disjoncteur de circuit ne soit
pas déclanché ou que la fusible de la maison
n’ait pas sauté.
Vérifiez que le conduit soit bien connecté à la
boîte de jonction.
Consultez la liste de dépannage.
NOTE À L’USAGE DE L’ÉLECTRICIEN :
Les fils d’alimentation fournis avec cet appareil
sont approuvés CSA pour des connexions à un
câblage ménager de diamètre plus grand.
L’isolement de ces fils a une notation de
températures beaucoup plus élevées que la
notation de température du câblage ménager.
La capacité actuelle de transport d’un
conducteur est régie par le diamètre du fil et
par la notation de température de l’isolement
se trouve autour du fil.
REMARQUE : CÂBLAGE D’ALUMINIUM
• AVERTISSEMENT :
TOUTE MAUVAISE CONNEXION D’UN CÂBLE
MÉNAGER EN ALUMINIUM À UN FIL DE
CUIVRE PEUT OCCASIONNER UN PROBLÈME
SÉRIEUX.
• Joignez par épissure les vils de cuivre à des
fils d’aluminium à l’aide de contacts spéciaux
conçus et approuvés CSA pour connexion du
cuivre à l’aluminium et suivez soigneusement
les procédures d’épissure recommandées par
le fabricant.
REMARQUE : Le fil utilisé, l’emplacement et
l’isolement des épissures, etc. doivent se
conformer aux bonnes pratiques de câblage
et aux codes locaux.
E
D
C
B
A
2
Page 49

Avant d'appeler un réparateur… www.electromenagersge.ca
Conseils de dépannage
Économisez du temps et de l’argent!
Consultez d’abord le tableau ci-dessous.
Vous pourriez vous éviter d’appeler un réparateur.
Mesures de sécurité Fonctionnement
Soutien au
consommateur
Conseils de
dépannage
Instructions
d’installation
Problème Causes probables Correctifs
Les éléments de Utilisation d’un ustensile • Utilisez des ustensiles dont le fond est absolument
surface n’assurent de cuisson inadéquat. plat et dont le diamètre est très similaire à celui de
pas une ébullition l’élément de surface choisi.
continue ou une
cuisson suffisamment
rapide
Les éléments de Un fusible peut être fondu • Remplacez le fusible ou réenclenchez le disjoncteur.
surface ne fonctionnent
ou un disjoncteur déclenché
pas adéquatement dans le panneau de distribution
de votre résidence.
Commandes mal réglées. • Assurez-vous de régler le bouton de commande
correspondant à l’élément que vous désirez utiliser.
Égratignures (pouvant Mauvaises méthodes de • Utilisez les méthodes de nettoyage recommandées.
ressembler à des nettoyage.
fissures) sur la surface
Utilisation d’ustensiles de • Assurez-vous que le fond de vos ustensiles de cuisine soit
de vitrocéramique
cuisson dont le fond est propre avant de les utiliser et n’utilisez que des ustensiles
rugueux ou présence de cuisine à fond bien lisse. Vous rendrez moins visibles
de particules (sel ou sable) les égratignures peu profondes en nettoyant la table
entre l’ustensile et la surface de cuisson.
de la table de cuisson.
Vous avez fait glisser un
ustensile de cuisine sur la
surface de la table de cuisson.
Décoloration de la Utilisation d’ustensiles • Les marques laissées par les casseroles en aluminium
table de cuisson de cuisson inappropriés. ou en cuivre et les dépôts minéraux laissés par l’eau
ou la nourriture peuvent être enlevés à l’aide
de la crème nettoyante.
Surface chaude de surface • C’est normal. La surface peut apparaître décolorée
en vitrocéramique blanche. quand elle est chaude. Cette décoloration temporaire
disparaît quand la surface en vitrocéramique refroidit.
Déchets de nourriture non • Consultez la section Nettoyage de la surface en
nettoyés avant l’usage suivant. vitrocéramique.
Utilisation de méthodes • Utilisez les procédures de nettoyage recommandées.
de nettoyage inappropriées.
Matière plastique De la matière plastique • Consultez la section Surface en vitrocéramique –
fondue sur la surface a été placée sur la table de possibilité de dommages permanents dans la section
cuisson chaude. Nettoyage de la surface en vitrocéramique.
Creux ou piqûres sur Mélange contenant du sucre • Appelez un technicien pour remplacer la table
la table de cuisson chaud renversé sur la table de cuisson.
de cuisson.
Fonctionnement Utilisation d’un ustensile • Pour réduire au minimum ce fonctionnement
cyclique fréquent des de cuisson inadéquat. cyclique, n’utilisez que des ustensiles de cuisson à
éléments de surface fond plat. Voir la section Plaques électriques
s’allument et s’éteignent.
Le bouton de Les boutons de commande • Lorsque le bouton est en position « Off », on doit
commande ne veut sont mal réglés. l’enfoncer avant de pouvoir le faire tourner. Dans toute
pas tourner autre position, on peut le tourner librement
sans avoir à l’enfoncer.
49
Page 50

50
Notes.
Mesures de sécurité
Fonctionnement
Instructions
d’installation
Conseils de
dépannage
Soutien au
consommateur
Page 51

Garantie de la table de cuisson électrique.
Mesures de sécurité Fonctionnement
Soutien au
consommateur
Conseils de
dépannage
Instructions
d’installation
Toutes les réparations sous garantie sont effectuées par nos
Centres de réparation ou par nos réparateurs Mabe autorisés.
Pour obtenir du service en ligne 24 heures par jour, veuillez nous
visiter au site www.electromenagersge.ca ou appelez le no
1.800.561.3344. Veuillez fournir le numéro de série et le numéro
de modèle lorsque vous appelez pour obtenir le service.
Pendant une période de : Mabe remplacera :
Un an Toute pièce de la table de cuisson qui se révèle défectueuse en raison d’un
à compter de la date vice de matières ou de fabrication. Au cours de cette garantie limitée d’un an,
d’achat d'origine nous fournirons également sans frais la main-d’oeuvre et le service
de réparation connexe pour remplacer la pièce défectueuse.
■ Toute visite à votre domicile pour vous expliquer le
fonctionnement de l’appareil.
■ Installation, livraison ou entretien inadéquats.
■ Toute défectuosité du produit lorsqu’il a été utilisé
d’une façon abusive ou inadéquate, ou employé à des
fins commerciales ou à toute autre fin que celle pour
laquelle il a été conçu.
■ Détérioration de la surface de cuisson en verre
provoquée par l’usage de nettoyants autres que les
crèmes et tampons de nettoyage recommandés.
■ Détérioration de la surface de cuisson en verre causée
par des éclaboussures de produits sucrés durcis, ou du
plastique fondu qui n’a pas été nettoyé selon les
instructions données dans le manuel d’utilisation.
■ Le remplacement des fusibles ou le réenclenchement
des disjoncteurs du panneau de distribution de votre
résidence.
■ Tout dommage au produit attribuable à un accident,
un incendie, une inondation ou un cas de force
majeure.
■ Tout dommage direct ou indirect causé par une
défectuosité possible de cet appareil.
■ Dommages survenus après la livraison.
■ Le service s’il est impossible d’avoir accès au produit
pour ce faire.
Ce que Mabe ne couvre pas :
Cette garantie est valable pour le premier propriétaire et tout autre propriétaire du produit s’il acheté pour utilisation
domestique au Canada. Le service à domicile sous garantie sera fourni là où il est disponible et dans les régions que
Mabe considère que l’offre de service est raisonnable.
Dans certaines provinces, il est interdit d’exclure ou de limiter les dommages directs ou indirects. Il est alors
possible que les limitations ou exclusions ci-dessus ne s’appliquent pas dans votre cas. La présente garantie vous
confère des droits juridiques spécifiques. Vous pouvez bénéficier d’autres droits, qui varient d’une province à
l’autre. Pour connaître les droits dont vous bénéficiez dans votre province, communiquez avec le bureau des
relations avec les consommateurs de votre région.
Garant : Mabe Canada Inc.,
Burlington, Ontario
Agraphez votre reçu ici.
Vous devez fournir la preuve de
l’achat original pour obtenir des
services en vertu de la garantie.
EXCLUSION DE GARANTIES IMPLICITES – Votre seul et unique recours est la réparation du produit
selon les dispositions de cette Garantie limitée. Toutes les garanties implicites, incluant les
garanties de commercialité et d’adéquation à un usage spécifique, sont limitées à une année
ou à la période la plus courte autorisée par la législation.
51
Page 52

52
Imprimé aux États-Unis
Site Internet GE www.electromenagersge.ca
Pour toute question ou pour un besoin d’assistance au sujet de votre appareil ménager, consultez le site
Internet ci-dessus, accessible 24 heures sur 24 par jour, chaque jour de l’année! À partir du site, vous pouvez
télécharger les manuels d’utilisation.
Prise de rendez-vous www.electromenagersge.ca
Il est très facile de demander l’intervention d’un technicien expert en réparation GE. Appelez le
1.800.561.3344, 24 heures par jour, 7 jours par semaine.
Pièces et accessoires www.electromenagersge.ca
Pour vous renseigner sur l’achat d’une pièce ou d’un accessoire pour votre appareil, appelez notre Centre
national de pièces au 1.800.661.1616.
Pour nous contacter www.electromenagersge.ca
Si vous n’êtes pas satisfaits des services fournis par GE, contactez-nous sur notre site Internet et donnez-nous
tous les détails voulus, y compris votre numéro de téléphone, ou écrivez à : Mabe Canada Inc.
1 Factory Lane
Moncton, Nouveau-Brunswick
E1C 9M3
Enregistrement des appareils www.electromenagersge.ca
Vous pouvez enregistrer vos appareils en ligne—n’importe quand! L’enregistrement de vos appareils
permettra de meilleures communications et l’obtention plus rapide des services sous garantie nécessaires. Vous
pouvez également nous envoyer par la poste la carte d’enregistrement pré-imprimée fournie avec l’appareil, ou
détacher le formulaire qu’on trouve dans le Manuel de l’utilisateur.
Service à la clientèle.
Page 53

Instrucciones
de seguridad . . . . . . . . . . . 54–56
Instrucciones de operación
Características de su estufa . . . .57
Consejos sobre los utensilios
de cocina . . . . . . . . . . . . . . . . .60, 61
Elemento de superficie doble . . 59
Elementos de superficie . . . . 58, 59
Limitador de temperatura . . . . . .59
Cuidado y limpieza
Perillas de control . . . . . . . . . . . . . 61
Superficie de vidrio . . . . . . . . 62, 63
Instrucciones
de instalación . . . . . . . . . 62–74
Consejos para la solución
de problemas . . . . . . . . . . . . . . 73
Soporte al consumidor
Garantía . . . . . . . . . . . . . . . . . . . . . 78
Registro del producto . . . . . .75, 76
Soporte al consumidor . . . . . . . . 79
Escriba los números de
modelo y de serie aquí:
No. de modelo
No. de serie
Los puede encontrar en la
etiqueta que está debajo de
la superficie de la estufa.
Seguridad Operación
Instrucciones
de instalación
Solucionar problemas
Soporte al
consumidor
53
Page 54

Seguridad
Operación
Instrucciones
de instalación
Solucionar problemas
Soporte al
consumidor
INFORMACIÓN DE SEGURIDAD IMPORTANTE.
LEA TODAS LAS INSTRUCCIONES ANTES DE SU USO.
¡ADVERTENCIA!
Por su seguridad, se debe seguir la información de este manual para reducir el riesgo de incendio o
explosión, descarga eléctrica o para evitar daños a la propiedad, lesiones personales o la pérdida
de la vida.
Cuando use electrodomésticos, se deben seguir precauciones básicas de seguridad, incluyendo
las siguientes:
■ Use este electrodoméstico sólo para el uso
descrito en este manual.
■ No intente reparar o reemplazar alguna parte
de su estufa a menos que se recomiende
específicamente en este manual. Cualquier otro
servicio se debe remitir a un técnico calificado.
■ Antes de realizar cualquier servicio, desconecte
la fuente de energía de la estufa en el tablero
general de distribución retirando el fusible o
apagando el interruptor de circuitos.
■ Asegúrese de que un electricista calificado
instale y conecte a tierra correctamente
el electrodoméstico de acuerdo con las
instrucciones de instalación suministradas. Este
electrodoméstico debe contar con el voltaje y
frecuencia adecuados, así como conectarse con
un circuito derivado individual y descargado a
tierra adecuadamente, protegido por un
cortacircuitos o fusible aceptable para el vataje
indicado en el rótulo.
■ Pida al instalador que le muestre la ubicación del
interruptor de circuitos o fusible. Márquelo para
una fácil referencia.
■ No deje a los niños solos o sin supervisión en una
zona donde un electrodoméstico está en uso.
Nunca se debe permitir que alguien se siente o se
pare en alguna parte del electrodoméstico.
■ Enseñe a los niños a no jugar con los controles
ni con ninguna otra parte de la estufa.
■ No permita que nadie salte, se pare o se cuelgue
de la estufa.
■
PRECAUCIÓN: No se deben guardar
en los gabinetes encima de la estufa artículos de
interés para los niños ya que si se suben en la
estufa para alcanzar dichos artículos pueden
sufrir serias lesiones.
■ Siempre mantenga el papel de colgadura o las
cortinas de material combustible a una distancia
prudente de la estufa.
■ Siempre mantenga las toallas y paños para
platos, guantes para ollas y otros artículos de
tela a una distancia prudente de la estufa.
■ Siempre mantenga los utensilios plásticos y de
madera y los alimentos enlatados a una distancia
prudente de la estufa. Podrían calentarse y
provocar quemaduras.
■ Nunca use ropa suelta o prendas que cuelguen
mientras utiliza el electrodoméstico. El material
inflamable se podría prender si entra en contacto
con elementos calientes de la superficie y puede
causar quemaduras severas.
■ Use únicamente guantes para ollas que estén
secos; los guantes húmedos en superficies
calientes pueden causar quemadas por el vapor.
No deje que los guantes para ollas toquen los
elementos calientes de la superficie. No use
toallas u otros paños gruesos que puedan arder
si entran en contacto con el elemento caliente
de la superficie.
■ Por su seguridad, nunca use este electrodoméstico
para calentar el cuarto de la cocina.
■ No use agua para extinguir incendios de grasa.
Nunca levante una olla en llamas. Apague los
controles. Sofoque la olla en llamas en un elemento
de la superficie cubriendo la olla completamente
con una tapa que encaje bien, con una bandeja
de galletas o plana. Use un extintor químico seco
multiusos o de tipo espumoso.
■ Se debe sofocar la grasa encendida por fuera
de la olla cubriéndola con soda cáustica o si
está disponible, usando un extintor químico
seco multiusos o de tipo espumoso.
■ No queme alimentos sobre la estufa. Si
quema alimentos bajo la campana, encienda
el ventilador.
■ No deje acumular grasas u otros materiales
inflamables en la superficie.
PRECAUCIONES DE SEGURIDAD
54
Ubicación del rótulo
Page 55

Seguridad Operación
Instrucciones
de instalación
Solucionar problemas
Soporte al
consumidor
COCINE LA CARNE Y LAS AVES COMPLETAMENTE...
Cocine la carne y las aves completamente. La carne se debe cocinar a una temperatura mínima
INTERNA de 160° F y las aves a una temperatura mínima INTERNA de 180° F. Normalmente,
cocinar a estas temperaturas protege contra enfermedades causadas por los alimentos.
55
ge.com
■ No toque los elementos de la superficie. Estas
superficies pueden estar tan calientes como para
quemar aunque estén de color oscuro. Durante y
después de su uso, no las toque, ni permita que
algún paño u otro material inflamable entre en
contacto con los elementos de la superficie o
con las áreas cercanas a los elementos de la
superficie; deje suficiente tiempo para que se
enfríen primero.
■ Las zonas potencialmente calientes son la
superficie de la estufa y las áreas al frente.
■ Para reducir la posibilidad de quemaduras,
el encendido de materiales inflamables y los
derrames, el mango de cualquier recipiente
se debe girar hacia el centro de la estufa sin
extenderse hacia ningun elemento cercano
de la superficie.
■ Apague siempre el control del elemento de
la superficie antes de retirar el recipiente.
■
Use sartenes de tamaño apropiado. Seleccione
aquellas que tengan fondos planos suficiente
para cubrir el elemento de calentamiento del
elemento de la superficie. El uso de ollas o
sartenes de menor tamaño expondrá una
porción del elemento de la superficie al contacto
directo y puede causar que la ropa se encienda.
La relación correcta de la olla o sartén con
respecto al elemento también mejorará
la eficiencia.
■ Nunca deje los elementos de la superficie sin
atención en niveles de alta temperatura. Hervir en
exceso causa humaredas y derramamientos de
grasa que se pueden encender.
■ Sólo ciertos tipos de vidrios, vidrio/cerámica,
vajillas de barro u otros recipientes de vidrio son
adecuados para cocinar en la superficie de la
estufa; otros se podrían romper debido a un
cambio brusco de temperatura.
■ Vigile los alimentos mientras se fríen a niveles de
temperatura altos o medios.
■ Los alimentos a freír deben estar lo más secos
posible. La escarcha de los alimentos congelados
o la humedad en los alimentos frescos puede
hacer que la grasa caliente salpique por fuera
de los lados de la olla.
■ Use poca grasa para freír incluso al sumergir los
alimentos en la grasa. Llenar la olla con demasiada
grasa puede resultar en derramamientos cuando
se agregan los alimentos.
■ Si se usa una combinación de aceites o grasas
para freír, revuelva antes de calentar, o a medida
que las grasas se mezclan lentamente.
■ Siempre caliente la grasa lentamente y vigile
mientras se calienta.
■ Cuando sea posible, use un termómetro para
grasa para evitar sobrecalentar la grasa.
■ Nunca trate de mover una sartén con grasa
caliente, especialmente una sartén profunda para
freír. Espere hasta que la grasa esté fría.
■ No almacene materiales inflamables cerca de
la estufa.
■ Mantenga los filtros de la campana y de la grasa
limpios para mantener una buena ventilación y
evitar que la grasa se encienda.
■ No almacene o use materiales combustibles,
gasolina u otros vapores y líquidos inflamables en
la cercanía de éste o cualquier electrodoméstico.
■ Limpie sólo las partes señaladas en este manual
del propietario.
■ No deje productos de papel, utensilios de cocina o
alimentos en la estufa cuando no esté en uso.
■ Mantenga la estufa limpia y libre de acumulación de
grasa o derramamientos que se puedan encender.
■ Nunca caliente recipientes de alimentos sin abrir,
el aumento de presión podría causar que la lata
explotara u otras lesiones.
■ Nunca deje frascos o latas con restos de grasa
sobre o cerca de la superficie de la estufa.
■ Nunca use este electrodoméestico para calentar
el cuarto de la cocina.
PRECAUCIONES DE SEGURIDAD
¡ADVERTENCIA!
Page 56

LEA Y SIGA ESTAS INSTRUCCIONES
DE SEGURIDAD CUIDADOSAMENTE.
CONSERVE ESTAS INSTRUCCIONES
Tenga cuidado al tocar la estufa. La superficie de vidrio de la estufa retendrá el calor después de
que se hayan apagado los controles.
ELEMENTOS RADIANTES DE LA SUPERFICIE
■ Evite raspar la cubierta de vidrio de la estufa.
La estufa puede rayarse con objetos tales como
instrumentos puntiagudos, anillos u otros tipos
de joyería y remaches en la ropa.
■ Nunca use la superficie de vidrio de la estufa
como una tabla para picar.
■ No coloque o almacene objetos sobre la
superficie de la cubierta de vidrio de la estufa
cuando no esté en uso.
■ Tenga cuidado al momento de colocar cucharas
u otros utensilios para agitar sobre la cubierta de
vidrio de la estufa mientras esté en uso. Podrían
calentarse y provocar quemaduras.
■ Evite calentar una cacerola vacía. Hacerlo podría
dañar tanto a la estufa como la cacerola.
■ No deje que agua, otros líquidos o grasa
permanezcan sobre la estufa.
■ Para minimizar la posibilidad de quemaduras,
asegúrese de que los controles de todos los
elementos de la superficie estén en la posición de
apagado y que toda la superficie de vidrio de la
estufa esté fría antes de limpiarla.
■ No opere los elementos superficiales de vidrio
si el vidrio está roto. Los derrames o la solución
limpiadora pueden penetrar en una estufa rota y
crear el riesgo de un shock eléctrico. Si la cubierta
de vidrio de su estufa llegara a romperse,
póngase en contacto con un técnico calificado
de inmediato.
■ Limpie la estufa con cuidado. Si usa una esponja
o paño para limpiar los derrames en algún
elemento de superficie caliente, tenga cuidado
y evite las quemaduras por vapor. Algunos
limpiadores pueden producir emisiones tóxicas
si se les aplica sobre una superficie caliente.
■
NOTA: Recomendamos que evite limpiar las áreas
de los elementos de la superficie hasta que se
hayan enfriado y la luz indicadora se haya
apagado. Los derrames de azúcar son la
excepción a esta recomendación. Consulte
la sección Limpieza de la cubierta de vidrio de
la estufa.
■ Para evitar la posibilidad de dañar la superficie
de la estufa, no aplique la crema limpiadora a
la superficie de vidrio cuando esté caliente.
■ Después de limpiar, use un paño seco o bien una
toalla de papel para remover los residuos de
crema limpiadora.
■ Lea y siga todas las instrucciones y advertencias
de las etiquetas de la crema limpiadora.
■ Tenga cuidado al tocar la estufa. La superficie
de vidrio de la estufa retendrá el calor después
de que los controles se hayan colocado en la
posición OFF.
■ No se pare sobre la estufa con cubierta de vidrio.
■ Los rayones o impactos severos sobre las estufas
con cubierta de vidrio podrían romper o astillar el
vidrio.
56
Seguridad
Operación
Instrucciones
de instalación
Solucionar problemas
Soporte al
consumidor
INFORMACIÓN DE SEGURIDAD IMPORTANTE.
LEA TODAS LAS INSTRUCCIONES ANTES DE SU USO.
¡ADVERTENCIA!
Page 57

57
Seguridad Operación
Instrucciones
de instalación
Solucionar problemas
Soporte al
consumidor
Características de su estufa. ge.com
A lo largo de este manual, las características y apariencia pueden variar con los de su modelo.
Índice de características (Las características y la apariencia puede variar.) Se explica en la página
Elemento de superficie doble 6, 7
Elemento de superficie simple 7
Perillas de control del elemento de superficie 6
Luz indicadora de superficie caliente 6
Luz indicadora en posición de ENCENDIDO (ON) 6
Page 58

58
Seguridad
Operación
Instrucciones
de instalación
Solucionar problemas
Soporte al
consumidor
Cómo usar los elementos de superficie.
A lo largo de este manual, las características y apariencia pueden variar con los de su modelo.
Cómo operar
Presione la perilla hacia abajo y gire en una
u otra dirección para ajustar a su gusto.
Cuando el control esté en otra posición que
no sea apagado (OFF), puede girarse sin
necesidad de presionarlo.
En las posiciones apagado (OFF), alto (Hi),
bajo (Lo) o Simmer, el control encaja en su
sitio. Puede escuchar algunos chasquidos
mientras cocina, lo que indica que el
control está manteniendo el nivel de calor
que usted ajustó.
Los controles para los elementos de
superficie pueden ajustarse entre bajo (Lo)
o Simmer y alto (Hi) para un número
ilimitado de ajustes de calor. Con el
interruptor, los ciclos de los elementos se
encienden y apagan para mantener el
ajuste de control de su elección.
Se encenderá la luz indicadora cuando
cualquier elemento de superficie está
encendido.
Se encenderá una luz indicadora de
Superficie Caliente cuando se encienda
algún elemento radiante; la luz
permanecerá encendida hasta que la
superficie se enfríe aproximadamente
hasta 150 °F.
NOTA:
■ Se enciende cuando el elemento está
caliente al tacto.
■ Permanece encendida incluso después
de que el elemento se apaga.
■ Brilla intensamente hasta que el
elemento se enfríe a aproximadamente
150 °F.
■ Asegúrese de apagar la perilla de control
cuando termine de cocinar.
Nunca cocine directamente sobre
el vidrio. Siempre use piezas de
cocina.
Acerca de los elementos de superficie radiantes…
La estufa radiante tiene elementos
calentadores por debajo de una superficie
suave de vidrio.
NOTA: Un olor ligero es normal cuando una
estufa nueva es usada por primera vez. Esto es
causado por el calentamiento de las partes
nuevas y los materiales de aislamiento y
desaparecerá en corto tiempo.
NOTA: En algunos modelos de estufas con
vidrios con colores ligeros, es normal que la zona
de cocinado cambie de color cuando se calienta
o cuando se enfría. Esto es temporal y
desaparecerá conforme el vidrio se enfría a
temperatura ambiente.
El elemento de superficie hará ciclo entre
encendido y apagado para mantener los
controles de su selección.
Es seguro colocar una pieza de cocina caliente
del horno o de la superficie sobre la superficie
de vidrio cuando la superficie está fría.
Aún después de que los elementos de superficie
son apagados, la estufa de vidrio retiene
suficiente calor para continuar cocinando.
Para evitar cocinar excesivamente, remueva
las cacerolas de los elementos de superficie
cuando la comida se haya cocinado.
Evite colocar utensilios que podrían
sobrecalentarse o plásticos que podrían
derretirse sobre el elemento de superficie
hasta que se haya enfriado por completo.
■ Las manchas de agua (depósitos de
minerales) se remueven usando una crema
de limpieza o vinagre blanco puro.
■ El uso de limpiador de ventanas podría dejar
una película iridiscente sobre la estufa. La
crema de limpieza removerá esta
decoloración.
■ No almacene artículos pesados sobre la
estufa. Si se caen sobre la estufa, podrían
dañarla.
■ No use la superficie como tabla de corte.
No deslice
cacerolas
encima de la
superficie de la
estufa porque
esto podría
rasguñar el
vidrio. El vidrio
es resistente,
pero no es a
prueba de
rasguños.
;;
;
;;
;
;;;
;;;
;;;;
Siempre coloque la cacerola en el
centro del elemento de superficie
en la que está cocinando.
SURFACE
COOKING
OFF CENTER
DRAGGING
Page 59

Elemento de superficie doble (en algunos modelos)
El elemento de superficie frontal izquierdo
cuenta con 2 tamaños de cocción para su
elección, de modo que puede ajustar el
tamaño del elemento con el tamaño del
utensilio que está usando.
Para usar el elemento de superficie
grande, gire la perilla de SELECCIÓN a .
Presione y gire la perilla de control al ajuste
deseado. El elemento calentará el área
completa contenida en el círculo grande.
Para usar el elemento de superficie
pequeño, gire la perilla de SELECCIÓN
a . Presione y gire la perilla de control al
ajuste deseado. El elemento sólo calentará
el área dentro del círculo pequeño.
Ciclos de encendido y apagado de los elementos de superficie
Los elementos de superficie intercalarán
ciclos de encendido y apagado para
mantener la temperatura de su elección.
Todos los elementos de superficie
radiantes cuentan con un limitador de
temperatura que evita que la cubierta de
vidrio de la estufa se caliente demasiado.
El limitador de temperatura puede
intercalar los ciclos a apagado durante
la cocción si:
■ Después de hervir el líquido contenido
en la cacerola se evapora.
■ El fondo de la cacerola no es plano.
■ La cacerola está fuera del centro.
■ No hay ninguna cacerola sobre el
elemento.
59
Seguridad Operación
Instrucciones
de instalación
Solucionar problemas
Soporte al
consumidor
ge.com
Page 60

Seguridad
Operación
Instrucciones
de instalación
Solucionar problemas
Soporte al
consumidor
60
Cómo seleccionar los tipos de utensilios.
La información siguiente le ayudará a escoger piezas de cocina que le darán un mejor rendimiento sobre
su estufa de vidrio.
Acero inoxidable:
recomendable
Aluminio:
Se recomienda el uso de aluminio pesado
Buena conductividad. Los residuos de
aluminio a veces tienen la apariencia de
raspones sobre la estufa, pero pueden
eliminarse si se limpian de inmediato.
Debido a su punto de fusión bajo, no debe
usarse aluminio ligero.
Cobre:
recomendable
Fondos de cobre:
puede usarse, per no se recomienda
Las cacerolas con fondos de cobre pueden
dejar residuos con la apariencia de
raspones. Elimine cualquier residuo
inmediatamente después del uso. No deje
que el líquido hirviendo en una cacerola se
evapore. El metal sobrecalentado puede
adherirse a la cubierta de vidrio de la
estufa y dejar una mancha permanente
si no se retira de inmediato.
Hierro fundido con porcelana
esmaltada:
recomendable
El uso de este tipo de utensilios es
recomendable siempre que estén
cubiertos por completo con porcelana
esmaltada. Se recomienda tener cuidado
con utensilios de hierro fundido que no
estén cubiertos por completo con esmalte
de porcelana, ya que podrían rayar la
cubierta de vidrio de la estufa.
Vidrio-cerámica:
Puede usarse, pero no se recomienda
Bajo rendimiento. Podría raspar
la superficie.
Cerámica de gres:
Puede usarse, pero no se recomienda
Bajo rendimiento. Podría raspar
la superficie.
Use cacerolas que correspondan con el
diámetro del elemento de superficie. El
desempeño de cocción no será bueno si
los utensilios son más pequeños o más
grandes que el elemento de superficie.
Verifique que los fondos de las
cacerolas estén planos usando
una tablilla derecha.
No se recomienda el uso de
cacerolas con fondos
redondeados, curveados, con
protuberancias o pandeados.
Para obtener mejores resultados
■ Coloque únicamente cacerolas secas
sobre los elementos de superficie. No
coloque tapas sobre los elementos de
superficie, en especial tapas mojadas.
■ No use woks con anillos de soporte.
Este tipo de wok no se calentará sobre
elementos de superficie de vidrio.
■ Recomendamos que use únicamente
woks con fondo plano. Están
disponibles en su tienda local. El fondo
del wok debe ser del mismo diámetro
que el elemento de superficie para
garantizar un contacto adecuado.
■ Algunos procedimientos especiales
de cocción requieren utensilios
específicos tales como estufas de
presión, freidoras de aceite, etc. Todos
los utensilios deben contar con fondos
planos y ser del tamaño correcto.
Use woks con fondo plano sobre
la cubierta de vidrio de la estufa.
No use woks con anillos de soporte
sobre la cubierta de vidrio de
la estufa.
No coloque cacerolas mojadas
sobre la cubierta de vidrio de
la estufa.
Page 61

ge.com
Nota: Las enlatadoras con fondo plano
son necesarias para las estufas con
cubierta de vidrio.
Las cacerolas que tengan una superficie
mayor a 1″ del círculo del elemento de
superficie no se recomiendan para la mayor
parte de la cocción sobre la superficie. No
obstante, cuando enlate por medio de baño
María o un elemento de presión, pueden
usarse cacerolas de mayor diámetro. Esto es
debido a que las temperaturas del agua
hirviendo (incluso bajo presión) no dañan las
superficies de la estufa alrededor de los
elementos de superficie.
NO OBSTANTE, NO USE ENLATADORAS DE
GRANDES DIÁMETROS U OTRAS CACEROLAS
GRANDES PARA FREÍR O HERVIR ALIMENTOS
QUE NO SEAN AGUA. La mayoría de las
mezclas de jarabe o salsa (y todos los tipos
de fritura) se cuecen a temperaturas más
elevadas que la del agua hirviendo. Tales
temperaturas podrían eventualmente dañar
la superficie de la cubierta de vidrio de
la estufa.
Asegúrese de que la enlatadora se
ajuste al centro del elemento de
superficie. Si su estufa o su ubicación
no permiten centrar la enlatadora
sobre el elemento de superficie,
use cacerolas de menor diámetro
para obtener mejores resultados
de enlatado.
Deben emplearse enlatadoras de
fondo plano. No use enlatadoras con
fondos rebordeados u ondulados
(con frecuencia en utensilios
esmaltados), debido a que no tienen
el contacto suficiente con los
elementos de superficie y requiere
más tiempo hervir el agua.
Cuando enlate, use recetas y
procedimientos que provengan de
fuentes confiables. Las recetas y
procedimientos de fuentes confiables
están disponibles a través del
fabricante de su enlatadora;
fabricantes de frascos de vidrio para
enlatar, tales como la marca Ball and
Kerr, y el Servicio de Extensión del
Departamento de Agricultura de
EE.UU.
Recuerde que el enlatado es un
proceso que genera gran cantidad
de vapor. Para evitar quemaduras
debidas al vapor o calor, tenga
cuidado al enlatar.
NOTA: Si su casa cuenta con un voltaje
bajo, el enlatado puede tomar más tiempo
del esperado, incluso si se han seguido las
instrucciones cuidadosamente. El tiempo
del proceso disminuirá si:
(1) usa una enlatadora a presión, y
( 2) si comienza con agua del grifo
CALIENTE para un calentado más
rápido de cantidades mayores de agua.
PRECAUCIÓN:
■ El enlatado seguro requiere la
destrucción de microorganismos
dañinos y que los frascos estén
completamente sellados. Cuando enlate
alimentos con una enlatadora de baño
María, debe mantenerse un hervor ligero
pero constante durante el tiempo
requerido. Cuando enlate alimentos
con una enlatadora a presión, debe
mantenerse la presión durante el
tiempo requerido.
■
Una vez que haya ajustado los controles,
es muy importante que se asegure que
los niveles de hervor o presión prescritos
se mantengan durante el tiempo
requerido.
■ Debido a que debe asegurarse de
enlatar durante el tiempo prescrito, sin
interrupción alguna durante el período
del proceso, no enlate sobre ningún
elemento de superficie de la estufa si
su enlatadora no es plana.
Siga los siguientes puntos para la preparación de enlatados
¡Incorrecto!
¡Correcto!
Seguridad Operación
Instrucciones
de instalación
Solucionar problemas
Soporte al
consumidor
Perillas de control
Las perillas de control pueden retirarse para
facilitar la limpieza.
Asegúrese de que las perillas estén en
la posición apagado (Off) y jálelas
directamente del vástago para su limpieza.
Las perillas pueden limpiarse en un
lavavajillas o bien lavarse con agua y
jabón. No retire el borde dorado decorativo
(disponible en algunos modelos). Asegúrese
que el interior de las perillas esté seco
antes de colocarlas de nuevo en la estufa.
Coloque las perillas de nuevo en la posición
apagado (Off) para garantizar una
colocación correcta.
61
Cuidado y limpieza de la estufa.
Page 62

Seguridad
Operación
Instrucciones
de instalación
Solucionar problemas
Soporte al
consumidor
Cómo limpiar la cubierta de vidrio de la estufa.
Permita que la estufa se enfríe.
Use un raspador de navaja única
a aproximadamente un ángulo de
45º contra la superficie de vidrio
y raspe el sucio. Será necesario
aplicar presión al raspador para
remover el residuo.
Después de raspar con el raspador,
aplique algunas gotas de limpiador
de estufas de cerámica CERAMA
BRYTE®en el área entera del
residuo quemado. Use la
almohadilla de limpiar estufas de
cerámica CERAMA BRYTE
®
para
remover los residuos restantes.
Para protección adicional, después
de que todo el residuo haya sido
removido, pula la superficie entera
con el limpiador de estufas de
cerámica CERAMA BRYTE
®
y con
una toalla de papel.
Residuo quemado encima de la superficie
ADVERTENCIA: DAÑO a su superficie
de vidrio podría ocurrir si usted usa
almohadillas para restregar que no
sean las incluidas con su estufa.
Permita que la estufa se enfríe.
Riegue algunas gotas del limpiador
de estufas de cerámica CERAMA
BRYTE®en el área entera donde se
encuentra el residuo quemado.
Usando la almohadilla de limpiar
estufas de cerámica CERAMA
BRYTE®incluida, restriegue el área
de residuo, aplicando presión
donde sea necesario.
Si cualquier residuo permanece,
repita los pasos enumerados
anteriormente según sea necesario.
Para protección adicional, después
de que todo el residuo haya sido
removido, pula la superficie entera
con la crema limpiadora de estufas
de cerámica CERAMA BRYTE®y con
una toalla de papel.
El raspador de estufas de
cerámica CERAMA BRYTE®y todos
los accesorios recomendados
están disponibles a través de
nuestro Centro de partes. Ver
las instrucciones bajo la sección
“Para ordenar partes” en la
próxima página.
NOTA: No use una navaja bota
o mellada.
Residuo quemado pesado encima de la superficie
Use una almohadilla de limpiar
estufas de cerámica CERAMA
BRYTE
®
o una almohadilla de
restregar azul suave
multipropósitos Scotch-Brite
®
.
Limpieza de uso normal diario
Use limpiador de estufas de cerámica
CERAMA BRYTE®en su estufa de vidrio.
Para mantener y proteger la superficie
de su estufa de vidrio, siga estas
instrucciones:
Antes de usar la estufa por primera
vez, límpiela con limpiador de estufas
de cerámica CERAMA BRYTE®. Esto
ayuda a proteger la parte superior y
hace que la limpieza sea más fácil.
El uso diario del limpiador de estufas
de cerámica CERAMA BRYTE
®
ayudará a mantener la estufa
luciendo como nueva.
Remueva la crema de limpieza bien.
Aplique unas gotas de limpiador de
estufas de cerámica CERAMA BRYTE
®
directamente sobre la estufa.
Use una toalla de papel o una
almohadilla de limpiar estufas de
cerámica CERAMA BRYTE® para
limpiar la superficie entera de la
estufa.
Use un trapo seco o una toalla de
papel para remover los residuos de
la limpieza. No necesita enjuagar.
NOTA: Es muy importante que usted NO
CALIENTE la estufa hasta que la haya
limpiado completamente.
Limpie su estufa después
de cada derrame. Use
el limpiador de estufas
de cerámica CERAMA
BRYTE®.
62
Page 63

Apague todas las unidades de
superficie. Remueva las sartenes
calientes.
Usando un guante de hornos:
a. Use un raspador de navaja
única (Raspador de estufas de
cerámica CERAMA BRYTE®) para
remover el derrame a un área
fría en la estufa.
b. Remueva el derrame con toallas
de papel.
Cualquier resto del derrame debe
dejarse hasta que la estufa se haya
enfriado.
No use las unidades de superficie
de nuevo hasta que todos
los residuos hayan sido
completamente removidos.
NOTA: Si ya han ocurrido hendiduras o
indentaciones en la superficie de vidrio,
el vidrio de la estufa tendrá que ser
reemplazado. En este caso, será
necesario darle servicio a la estufa.
Daño de derrames de azúcar y plástico derretido
Nuestras pruebas
muestran que si usted
está cocinando con
mezclas de alta
concentración de azúcar,
tales como jalea o
caramelo y ocurre un
derrame, puede causar
daño permanente a la
superficie de vidrio de
la estufa a no ser que
sea removida
inmediatamente.
Tenga cuidado de no deslizar ollas
o sartenes a través de su estufa.
Ellas dejarán marcas sobre la
superficie de su estufa.
Estas marcas son removibles
usando el limpiador de estufas de
cerámica CERAMA BRYTE
®
con la
almohadilla de limpiar estufas de
cerámica CERAMA BRYTE®.
Si permite que ollas con cubiertas
finas de aluminio o de cobre
hiervan en seco, la cubierta podría
dejar decoloraciones negras sobre
la estufa.
Estas deberían removerse
inmediatamente antes de calentar la
estufa de nuevo o la decoloración se
convertirá en decoloraciones
permanentes.
ADVERTENCIA: Con mucho cuidado
inspeccione el fondo de las sartenes en
búsqueda de protuberancias que puedan
rasguñar la estufa.
Marcas metálicas y rasguñaduras
Para ordenar el limpiador de estufas de
cerámica CERAMA BRYTE®y el raspador
para estufas, por favor llámenos
gratuitamente al número:
Centro de partes nacional 800.626.2002
El limpiador de
estufas de cerámica
CERAMA BRYTE® . . . . . . . . .# WX10X300
Raspador de estufas
de cerámica
CERAMA BRYTE® . . . . . . .# WX10X0302
Kit . . . . . . . . . . . . . . . . . . . . .# WB64X5027
(El Kit incluye la crema y el raspador)
Almohadilla de limpiar estufas de
cerámica CERAMA BRYTE®#WX10X350
Para ordenar partes
Superficie de vidrio—potencial de daño permanente.
63
Seguridad Operación
Instrucciones
de instalación
Solucionar problemas
Soporte al
consumidor
ge.com
Page 64

PARTES INCLUIDAS
NECESITARÁ LAS SIGUIENTES
HERRAMIENTAS
NECESITARÁ LOS SIGUIENTES
MATERIALES
Instrucciones
Estufa eléctrica de
30″
de instalación
ANTES DE COMENZAR
Lea estas instrucciones por completo
y con cuidado.
•
IMPORTANTE — Conserve estas
instrucciones para el uso del inspector local.
•
IMPORTANTE — Cumpla con todos los
códigos y reglas aplicables.
• Nota para el instalador – Asegúrese de dejar estas
instrucciones en poder del consumidor.
• Nota para el consumidor – Conserve estas
instrucciones para referencias futuras.
• El mal funcionamiento del producto debido a
una instalación incorrecta no está cubierto por
la Garantía.
ADVERTENCIA — Este aparato debe
descargarse a tierra correctamente.
•
ATENCIÓN INSTALADOR —
TODAS LAS ESTUFAS DEBEN CONTAR CON
CABLEADO (CABLEADO DIRECTO) A UNA CAJA
DE EMPALMES APROBADA. ESTOS PRODUCTOS
NO ACEPTAN ENCHUFES Y RECEPTÁCULOS.
• La instalación correcta es responsabilidad del
instalador, y el mal funcionamiento del producto
debido a una instalación inadecuada NO está
cubierto bajo la garantía.
Tuercas para cables
Caja de empalmes
Sierra
Lápiz
Gafas de seguridad
Broca perforadora de 1/8″
y taladro eléctrico o manual
Regla o
regla para nivelar
Destornillador Phillips
JP256
“Si tiene alguna pregunta, llame al 800.GE.CARES o visite nuestro sitio Web en: ge.com”
Cinta de espuma
64
2 abrazaderas inferiores
6 tornillos de cabeza hexagonal
(4 necesarios, 2 adicionales))
2 tornillos de ajuste manual
Llave para tuercas de 1/4″
Page 65

Instrucciones de instalación
PARA SU SEGURIDAD
• Para su seguridad personal, retire los fusibles de
su hogar o bien abra el cortacircuitos antes de
comenzar con la instalación. El no hacerlo puede
resultar en lesiones serias o incluso la muerte.
• Asegúrese que su estufa sea instalada
correctamente por un instalador o técnico de
servicio calificado.
• Para eliminar el riesgo de quemaduras o
incendio debido al contacto con los elementos
de superficie calentados, debe evitarse el
almacenaje en los gabinetes ubicados sobre
los elementos de superficie. Si se cuenta con
espacio en un gabinete, puede reducir el riesgo
instalando una campana que se proyecte
horizontalmente un mínimo de 5″ más del fondo
de los gabinetes. La instalación de gabinetes
sobre la estufa no debe exceder 13″
de profundidad.
• Asegúrese que los gabinetes y las cubiertas
de las paredes alrededor de la estufa puedan
soportar las temperaturas generadas por la
estufa (hasta 200 °F).
• La estufa debe ser fácil de alcanzar y deberá
contar con iluminación natural durante el día.
• Siempre desconecte la toma eléctrica que va
hacia la estufa antes de reparar o dar servicio a
la estufa. Esto puede hacerse desconectando el
fusible o cortacircuitos. No hacer esto puede
resultar en un shock eléctrico peligroso o fatal.
Sepa en dónde se localiza el interruptor principal
de desconexión. Si no lo sabe, pídale a su
electricista que le muestre la ubicación.
INSTRUCCIONES DE SEGURIDAD IMPORTANTES
REQUISITOS ELÉCTRICOS
Este aparato debe contar con el voltaje y
frecuencia adecuados, y deberá conectarse a
un circuito derivado individual debidamente
descargado a tierra, protegido por un cortacircuitos
o un fusible temporizado como lo indica la placa.
Le recomendamos que un electricista calificado
conecte el cableado eléctrico y conexión de su
estufa. Después de la instalación, pídale al
electricista que le muestre en dónde se localiza el
interruptor principal de desconexión de su estufa.
El cableado debe cumplir con el Código Nacional
sobre Electricidad. Puede obtener una copia del
Código Nacional sobre Electricidad, ANSI/NFPA No.
70-Última edición, escribiendo a:
Asociación Nacional
para la Prevención de Incendios
Batterymarch Park
Quincy, MA 02269
El cableado conductor de la estufa está aprobado
para conexiones únicamente con cables de cobre,
y si cuenta con cableado de aluminio, debe usar
conectores especiales aprobados por UL para unir
cobre con aluminio.
Debe usar un sistema eléctrico con conductor de
dos cables y tres conductores 208/240 VCA, de 60
Hertz. No se requiere un cable blanco (neutral) para
esta unidad. La estufa debe instalarse en un
circuito que no exceda 125 VCA nominales de
descarga a tierra.
Consulte el rótulo sobre su estufa para conocer la
clasificación en kilovatios de su estufa.
65
Ubicación del rótulo
Page 66

ADVERTENCIA – La corriente
eléctrica a la tubería de abastecimiento de la
estufa debe cortarse durante la realización de
conexiones. El no hacerlo puede resultar en una
lesión seria o la muerte.
Cuando se prepare para la abertura de la
estufa, asegúrese que el interior del gabinete
y la estufa no interfieran uno con el otro.
(Consulte la sección de preparación de
la abertura).
Retire los materiales de empaque y el material
impreso de la estufa antes de comenzar
la instalación.
B
A
66
Instrucciones de instalación
LISTA DE VERIFICACIÓN PREVIA A LA INSTALACIÓN
Saque las instrucciones de instalación
del paquete de material impreso y léalas
cuidadosamente antes de comenzar.
Asegúrese de colocar todo el material
impreso, Manual de propietario, Instalaciones,
etc., en un lugar seguro para referencia futura.
Asegúrese de contar con todas las
herramientas y materiales que necesita antes
de comenzar la instalación de la estufa.
Su hogar debe contar con el servicio eléctrico
adecuado para el uso seguro y correcto de
su estufa. (Consulte la sección de requisitos
eléctricos).
Cuando instale la estufa en su hogar,
asegúrese de cumplir todos los códigos y
reglas locales tal y como se establecen.
Asegúrese de que las cubiertas de las
paredes, el mostrador y los gabinetes
alrededor de la estufa puedan soportar las
temperaturas generadas por la estufa (hasta
200 °F).
G
F
E
D
C
Paquete de
material impreso
Estufa
Empaque de
espuma de
poliestireno
Before you begin-Read these instructions completely and carefully.
Before you begin-Read these instructions completely and carefully.
IMPORTANT- Save these instructions for local inspector's use.
IMPORTANT- Save these instructions for local inspector's use.
IMPORTANT- OBSERVE ALL GOVERNING CODES AND ORDIANCES.
IMPORTANT- OBSERVE ALL GOVERNING CODES AND ORDIANCES.
Note to Installer- Be sure to leave these instructions with the consumer.
Note to Installer- Be sure to leave these instructions with the consumer.
OWNER- Keep these instructions for future reference.
OWNER- Keep these instructions for future reference.
Note- This appliance must be properly grounded (if applicable).
Note- This appliance must be properly grounded (if applicable).
Page 67

INSTALACIONES OPCIONALES
DIMENSIONES Y SEPARACIONES
Para garantizar la precisión, es mejor crear una
plantilla al momento de cortar la abertura en el
mostrador.
INSTALACIÓN HORIZONTAL CON CONTROLES EN
LA PARTE DELANTERA
En esta instalación, la estufa debe instalarse con las
perillas de control orientadas hacia el borde frontal.
LA INSTALACIÓN VERTICAL DEBE ORIENTARSE
CON LOS CONTROLES EN EL LADO IZQUIERDO
Para eliminar el riesgo de quemaduras debido al
contacto con una superficie sobrecalentada, la
estufa debe instalarse con los controles en el lado
izquierdo.
En esta instalación, los mostradores deben tener al
menos 25″ de profundidad. Respete todas las
distancias mínimas en la parte delantera, la parte
posterior y los laterales.
4
67
2-3/4″ MÍn.
del borde frontal del
área cortada
y el borde frontal del
mostrador
16-1/8″ profundidad
del corte
20-1/8″
ancho
del corte
2″ Mín. Entre
el área cortada y
la pared detrás
de la estufa
Instrucciones de instalación
PREPARACIÓN DE LA ABERTURA
Deben seguirse las siguientes dimensiones
MÍNIMAS de espacio libre.
1
DIMENSIONES GENERALES
DE LA ESTUFA
2
Espacio vertical mínimo
de uno pulgada y media
(1-1/2″) entre la parte
inferior de la estufa y
cualquier tipo de
superficie inflamable.
3
13″ MÁX. Profundidad de los
gabinetes superiores sin protección
30″ MÍN.
Espacio desde el
mostrador hasta la
superficie superior
sin protección
1-3/4″ MÍN. Espacio desde
el área cortada hasta la
pared lateral a la izquierda
de la unidad
18″ MÍN. Altura
desde el
mostrador hasta
el gabinete más
cercano a
cualquiera
de los lados
de la unidad
1-3/4″ MÍN. Espacio
desde el área cortada
hasta la pared lateral
a la derecha de
la unidad
17-1/8″
19-15/16″
Estufa
21-1/2″
15-15/16″
3″
1-1/2″ Mín. de
espacio vertical
Si no puede mantenerse un espacio de 30″ entre la
superficie de cocción y los materiales superiores
inflamables o gabinetes metálicos, se requiere un
espacio mínimo de 24″, así como que el lado
inferior de los gabinetes encima de la estufa estén
protegidos con no menos de 1/4″ de cartón gris
aislante cubierto con láminas metálicas de no
menos de 0.0122″ de grosor.
2-3/4″ MÍn.
del borde frontal del
área cortada
y el borde frontal
del mostrador
20-1/8″
profundidad
del área cortada
16-1/8″ ancho
del área
cortada
2″ Mín. Entre
el área cortada y
la pared detrás
de la estufa
1-3/4″ MÍN. Espacio desde
el área cortada hasta
paneles laterales a la
derecha o izquierda
1-3/4″ MÍN. Espacio desde
el área cortada hasta
paneles laterales a la
derecha o izquierda
Page 68

68
Instrucciones de instalación
PREPARACIÓN DE LA ABERTURA (cont.)
INSTALACIONES OPCIONALES
DIMENSIONES Y SEPARACIONES
(cont.)
INSTALACIÓN SOBRE UN LAVAPLATOS GE
UBICADO DEBAJO DEL LAVAMANOS
Esta estufa está aprobada únicamente para ser
instalada sobre un lavaplatos GE ubicado debajo
del lavamanos, modelo GSM2100. Siga las
instrucciones de instalación que se incluyen con
el lavaplatos.
Los controles deben orientarse hacia el borde
4
4-1/2″ MIN.
del borde frontal
del área cortada
y el borde frontal
del mostrador
36″
Piso
1-3/4″ MIN.
Espacio hasta
paneles laterales
16-1/8″
profundidad
del área cortada
2″ MIN.
Entre
el área cortada y
la pared detrás
de la estufa
20-1/8″ ancho
del área cortada
Asegúrese que las cubiertas de las paredes,
el mostrador y los gabinetes alrededor de la
estufa puedan soportar las temperaturas
generadas por la estufa (hasta 200 °F).
5
Las cubiertas
de las paredes, los
gabinetes y el
mostrador deben
soportar calor
hasta 200 °F.
Page 69

Instrucciones de instalación
INSTALACIÓN DE LA ESTUFA
INSTALACIÓN DE LA CAJA
DE EMPALMES
Instale una caja de empalmes aprobada en
un lugar de fácil acceso a través del frente del
gabinete en donde pueda colocarse la estufa.
El conducto de la estufa tiene 58″ de longitud.
IMPORTANTE: La caja de empalmes
debe localizarse en donde el conducto esté lo
suficientemente flojo para permitir que se le
dé servicio.
INSTALACIÓN SOBRE EL LAVAPLATOS GSM2100
El centro de la caja de empalmes deber
encontrarse entre 5″ a7″ debajo del borde de la
estufa, de modo que no interfiera con la instalación
o el funcionamiento del lavaplatos.
Las conexiones eléctricas deben realizarse antes
de colocar la estufa en el área cortada.
1
PROTECCIÓN DE LA SUPERFICIE
DE LA ESTUFA
Coloque una toalla o mantel sobre el mostrador.
Coloque la estufa al revés sobre el área protegida.
2
APLIQUE LA CINTA DE ESPUMA
Aplique la cinta de espuma alrededor del borde
externo del vidrio. No aplique un exceso de cinta
de espuma.
3
LOCALICE LAS PARTES
DE MONTAJE
Comience a instalar un tornillo a través de la
abrazadera y dentro de la estufa (ambos lados).
No ajuste. Gire la abrazadera hacia adentro para
evitar interferencia cuando descienda la estufa
sobre el mastrador.
4
Instale la caja de
empalmes de modo que
pueda alcanzarse
a través del frente
del gabinete.
5″
Mín.
Parte inferior de la estufa
Paño debajo de la estufa
Parte inferior de la estufa
Cinta de espuma
Vidrio de
la estufa
*7″ Máx. cuando
se instale sobre
el lavaplatos
GSM2100
69
Page 70

SUJETE LAS ABRAZADERAS DE
MONTAJE AL GABINETE
Abra la puerta del gabinete. Instale el segundo
tornillo a través de la abrazadera y ajuste. Luego
ajuste el primer tornillo. Instale el tornillo de ajuste
hasta que toque la parte inferior del mostrador.
IMPORTANTE: gire el tornillo de ajuste hasta que
toque la parte inferior del mostrador. No lo ajuste
demasiado.
6
Estufa Mostrador
70
Instrucciones de instalación
INSERTE LA ESTUFA EN
EL ÁREA CORTADA
Inserte la estufa centrada en el área cortada.
Asegúrese de que el borde frontal del mostrador
esté paralelo con respecto a la estufa. Asegúrese
de verificar al final que todos los espacios
especificados hayan sido respetados.
5
Estufa
INSTALACIÓN DE LA ESTUFA (CONT.)
Page 71

71
Instrucciones de instalación
Cuando realice las conexiones de cables,
utilice toda la extensión del conducto incluido.
El conducto no debe reducirse.
Con la estufa colocada en su lugar, abra el
frente de la puerta del gabinete.
Inserte los cables del conducto a través de
la abertura de la caja de empalmes.
Conecte los cables rojo y negro del conductor
de la estufa a los cables correspondientes en
la caja de empalmes.
D
C
B
A
INSTALACIÓN—CONEXIONES ELÉCTRICAS
Una vez que se hayan realizado las
conexiones, fije los cables con las tuercas
para cables.
INSTRUCCIONES PARA DESCARGA A TIERRA:
El cable pelado de descarga a tierra en el
conducto se conecta al armazón de la estufa. A
partir del 1 de enero de 1996, el Código Nacional
sobre Electricidad no permitirá la descarga a
tierra a través de cables neutrales. Si se usa en
una construcción nueva después del 1 de enero
de 1996 o bien en una casa rodante, vehículo
recreativo, o bien si los códigos locales no
permiten la descarga a tierra a través de cables
blancos neutrales, sujete el cable de descarga a
tierra del aparato (verde o cobre) al conductor de
descarga a tierra de la residencia (verde o cobre)
de acuerdo con los códigos locales. Cuando
conecte a un circuito derivado de 3 conductores,
si lo permiten los códigos locales, conecte el
cable del conector de descarga a tierra al
circuito derivado neutral (de color gris o blanco).
IMPORTANTE: Si la estufa se va a
instalar en un mostrador sin salida (uno sin
abertura del gabinete inferior), las conexiones del
cableado deberán realizarse antes de colocar la
estufa en el área cortada.
E
Pinza de alivio de tensión
Negro
Rojo
Descarga a tierra
Pinza de alivio de tensión
Negro
Rojo
Descarga a tierra
Negro
Rojo
Ubicación del cable de
descarga a tierra
Page 72

72
Instrucciones de instalación
LISTA DE VERIFICACIÓN PREVIA
Retire toda la película protectora, si la hay,
y las calcomanías.
Verifique que todos los cables estén fijos y
que no estén torcidos o en contacto con
partes móviles.
Verifique el nivel del aparato.
Verifique que la estufa esté descargada a
tierra correctamente.
D
C
B
A
1
LISTAS DE VERIFICACIÓN
LISTA DE VERIFICACIÓN
DE OPERACIÓN
Retire todos los objetos que se encuentren
sobre la superficie de la estufa.
Encienda la toma de corriente de la estufa.
Verifique que todas las hornillas de la
superficie funcionen correctamente.
Verifique que el cortacircuitos no esté
desactivado o que se haya fundido el fusible
de su hogar.
Verifique que el conducto esté conectado
correctamente a la caja de empalmes.
Consulte la lista de resolución de problemas.
NOTA PARA EL ELECTRICISTA:
Los cables de corriente incluidos con este
aparato cuentan con la aprobación de UL para
conexiones a cableado doméstico de mayor
calibre. El aislante de estos cables se califica a
temperaturas más elevadas que las del cableado
doméstico. La capacidad de carga actual de un
conductor depende del calibre del cable y
también de la calificación de la temperatura
del aislante alrededor del cable.
NOTA: CABLEADO DE ALUMINIO
• ADVERTENCIA:
LA CONEXIÓN INADECUADA DEL CABLEADO
DOMÉSTICO DE ALUMINIO A LOS CABLES
DE COBRE PUEDE RESULTAR EN UN
PROBLEMA GRAVE.
• Una los cables de cobre a los de aluminio con
conectores especiales diseñados y aprobados
por UL para unir cables de cobre a cables de
aluminio; asimismo, siga cuidadosamente las
recomendaciones del fabricante al manipular
el conector.
NOTA: El uso de los cables, la ubicación
y alojamiento de empalmes, etc., deben
realizarse correctamente y de acuerdo
con los códigos locales.
E
D
C
B
A
2
Page 73

Antes de llamar para solicitar servicio… ge.com
Ideas sobre la identificación y solución de problemas
¡Ahorre tiempo y dinero! Revise esta tabla primero y es posible
que no necesite llamarnos en busca de servicio.
Problema Causas posibles Qué hacer
Los elementos de
Está empleando • Use cacerolas que sean absolutamente planas y que
superficieno se
los utensilios correspondan al diámetro del elemento de superficie
mantienen hirviendo
inadecuados. seleccionado.
o la cocción es lenta
Los elementos de
Un fusible en su casa podría
• Reemplace el fusible o reajuste el interruptor de circuitos.
superficie no funcionan
haberse volado o el interruptor
apropiadamente
de circuito se aterrizó.
Los controles de la • Inspeccione que el control correcto haya sido
estufa están colocados seleccionado para el elemento de superficie que usted
inapropiadamente
.
seleccionó.
Rasguños diminutos Métodos de limpieza • Use los procedimientos de limpieza recomendados.
o marcas de metal incorrectos siendo usados.
o abrasiones sobre
Utensilios con fondos • Cerciórese de que los fondos de los utensilios y que los
la superficie de vidrio
rugosos están siendo utensilios mismos estén limpios antes de usarlos. Use
de la estufa radiante
usadas o hubo partículas utensilios con fondos lisos. No pueden eliminarse los
gruesas (sal o arena) raspones pequeños, pero serán menos visibles con el tiempo
entre los utensilios y la como resultado de la limpieza.
superficie de la estufa.
Se han deslizado utensilios
sobre la superficie de
la estufa.
Áreas de decoloración Está empleando • Pueden eliminarse las marcas de cacerolas de aluminio
o rayas oscuras en la los utensilios y cobre, así como los depósitos minerales de agua, con
estufa inadecuados. la crema limpiadora.
Superficie caliente en • Esto es normal. La superficie podría parecer decolorada
un modelo con cubierta cuando está caliente. Esto es temporal y desaparecerán
de vidrio de color claro. conforme el vidrio se enfría.
No se limpiaron los • Consulte la sección Cómo limpiar la cubierta de vidrio
derrames de alimentos de la estufa.
antes del siguiente uso.
Se están empleando los • Use los procedimientos de limpieza recomendados.
métodos de limpieza
incorrectos.
Plástico fundido La estufa caliente entró • Consulte la sección Superficie de vidrio—potencial de daño
sobre la superficie en contacto con plástico permanente en la sección Cómo limpiar la cubierta de vidrio
colocado sobre ésta. de la estufa.
Agujeros (o hendiduras) Derrame de una mezcla • Llame a un técnico calificado para que realice
en la superficie de azucarada caliente sobre un reemplazo.
la estufa la estufa.
Ciclos frecuentes de Está empleando • Para minimizar los ciclos, use únicamente utensilios
encendido y apagado los utensilios planos. Consulte la sección Ciclos de encendido y apagado
de los elementos de inadecuados. de los elementos de superficie.
superficie
La perilla de control Los controles de • Cuando la perilla se encuentre en la posición apagado
no gira la estufa están mal (Off), deberá presionar antes de poder girarla. Cuando
ajustados. la perilla esté en otra posición, puede girarse sin
necesidad de presionarla.
73
Seguridad Operación
Instrucciones
de instalación
Solucionar problemas
Soporte al
consumidor
Page 74

74
Notas.
Seguridad
Operación
Instrucciones
de instalación
Solucionar problemas
Soporte al
consumidor
Page 75

75
General Electric Company
Warranty Registration Department
P.O. Box 32150
Louisville, KY 40232-2150
Service Protection Plus™de GE
GE, una marca reconocida en todo el mundo debido a su calidad y confiabilidad,
le ofrece Service Protection Plus
™
, una protección global de todos sus artefactos:
¡Sin importar la marca!
Los beneficios incluyen:
• Respaldo de GE
• Todas las marcas están cubiertas
• Servicio técnico ilimitado
• Todas las piezas y costos de mano de obra incluidos
• Sin desembolsos
• Sin deducibles ocultos
• Un número 800 para llamar
Si no queda completamente satisfecho con nuestra protección de servicio técnico, usted puede
solicitar la devolución del dinero del tiempo restante de su contrato. Sin preguntas. Así de simple.
Proteja su refrigerador, lavavajillas, lavadoras, secadoras, cocina, televisión, videocassettera y más,
¡de cualquier marca! Además, no se cobran gastos extra por servicios técnicos de emergencia y puede
financiarse mensualmente a un bajo costo. Incluso, ofrecemos protección de máquinas de hielo y de alimentos
que se echan a perder. Usted puede quedarse tranquilo sabiendo que sus valiosos productos domésticos se
encuentran protegidos de reparaciones costosas.
Confíe en GE y llámenos en forma gratuita en los EE.UU. al 800.626.2224 para más información.
*Todas las marcas están cubiertas, hasta 20 años de antigüedad, en EE.UU. continental.
Cubrimos todos los
artefactos. En todo lugar.
En todo momento*
Coloque en un sobre y envíe a:
✁
Corte aquí
Page 76

76
Inscripción del consumidor de propiedad de producto
¡Im
p
o
rta
n
te
En
víe
h
o
y
!
GE Consumer & Industrial
Appliances
General Electric Company
Louisville, KY 40225
ge.com
Nombre
Sr. ■■ Sra. ■■ Srta. ■■
Dirección
Ciudad
Estado
Fecha de
inicio de uso
Mes
Día
Año
Código
postal
N°
Departamento #
Apellido
Número de
teléfono
_
_
Inscripción del consumidor de propiedad de producto
Estimado cliente:
Gracias por comprar nuestro producto y por depositar su confianza en nosotros.
¡Estamos orgullosos de tenerlo como cliente!
Siga estos tres pasos para proteger la inversión de su nuevo artefacto:
Importante: Si no recibió una tarjeta de inscripción con su
producto, corte y envíe el formulario siguiente para
asegurar que se producto esté registrado, o regístrelo
online en ge.com.
1
23
Número de modelo Número de serie
✁
Corte aquí
Complete y envíe
su Inscripción
del consumidor
de propiedad de
producto hoy mismo.
Tenga la tranquilidad
de saber que lo
podemos contactar
en caso de que haya
una modificación de
seguridad.
Después de enviar
la inscripción, conserve
este documento en un
lugar seguro. Contiene
la información necesaria
para solicitar servicio
técnico. Nuestro número
de servicio técnico es
800.GE.CARES
(800.432.2737).
Lea su Manual
del Propietario
cuidadosamente.
Le ayudará a operar
su nuevo artefacto
de manera correcta.
Número de modelo Número de serie
Dirección de correo
electrónico*
* Incluya esta dirección para recibir, vía correo electrónico, descuentos, ofertas especiales y otras
comunicaciones importantes de GE Appliances (GEA).
■■ Marque aquí si no desea recibir comunicaciones por parte de los socios cuidadosamente
seleccionados de GEA.
NO COMPLETAR Y DEVOLVER ESTA TARJETA NO REDUCE SUS DERECHOS DE GARANTÍA.
Para más información sobre las políticas de privacidad y de uso de información de GEA, diríjase
a ge.com y haga clic en “Política de privacidad” o llame al 800.626.2224.
Page 77

77
Seguridad Operación
Instrucciones
de instalación
Solucionar problemas
Soporte al
consumidor
Notas.
ge.com
Page 78

Por el período de: GE reemplazará:
Un año Cualquier parte de la estufa que falle debido a un defecto en los materiales o mano de obra.
A partir de la fecha Durante esta garantía limitada de un año, GE también ofrecerá, sin costo alguno, toda la de
compra original mano de obra y servicio interno para reemplazar las partes defectuosas.
■ Viajes de servicio a su hogar para enseñarle cómo usar
el producto.
■ Instalación, entrega o mantenimiento incorrectos.
■ Fallas del producto si hay abuso, mal uso, o uso para
otros propósitos que los propuestos, o uso para fines
comerciales.
■ Daño a la estufa de vidrio causado por el uso de
limpiadores diferentes a las cremas y almohadillas
recomendadas.
■ Daño a la estufa de vidrio causado por derrames
endurecidos de materiales azucarados o por plástico
derretido que no sean limpiados conforme a las
direcciones en el Manual del propietario.
■ Reemplazo de fusibles de su hogar o reajuste de
interruptores de circuito.
■ Daño al producto causado por accidente, fuego,
inundaciones o actos de Dios.
■ Daño incidental o consecuencial causado por posibles
defectos con el aparato.
■ Daños causados después de la entrega.
■ Producto no accesible para facilitar el servicio
requerido.
Lo que no está cubierto por GE:
Todos los servicios de garantía los proporcionan nuestros
Centros de Reparación de Fábrica o nuestros técnicos
Customer Care
®
autorizados. Para concertar una cita de
reparación, en línea, 24 horas al día, visítenos en ge.com, o
llame al 800.GE.CARES (800.432.2737). Cuando llame para
solicitar servicio, por favor tenga a mano el número de serie
y el número de modelo.
Pegue aquí su recibo.
Se requiere facilitar prueba
de la fecha de compra original
para obtener un servicio
bajo la garantía.
Garantía de GE para su estufa eléctrica.
Esta garantía se extiende al comprador original y cualquier comprador posterior de productos comprados para
uso residencial dentro des Estados Unidos. Si el producto está situado en un área que no dispone de servicio por
parte de un proveedor de servicio autorizado de GE, podría tener que hacerse cargo de los costes de envío o bien
podría solicitársele que lleve el producto a una centro de servicio de GE autorizado para realizar la reparación.
En Alaska, la garantía excluye el costo de envío o las visitas de servicio a su casa.
Algunos estados no permiten la exclusión o las limitaciones de daños incidentales o consecuenciales. Esta
garantía da derechos legales específicos, y usted podría tener otros derechos que variarán de estado a estado.
Para saber cuáles son sus derechos legales, consulte a la oficina de asuntos del consumidor local o la oficina
del Prucurador (Attorney General) en su localidad.
Garante: General Electric Company. Louisville, KY 40225
EXCLUSIÓN DE GARANTÍAS IMPLÍCITAS—Su único y exclusivo derecho es la reparación del producto, tal y como se
indica en esta Garantía limitada. Cualquier garantía implícita, incluyendo las garantías implícitas de
comerciabilidad o adecuación para un fin determinado, están limitadas a un año o el período de tiempo más breve
permitido por la ley.
78
Seguridad
Operación
Instrucciones
de instalación
Solucionar problemas
Soporte al
consumidor
Page 79

79
Soporte al consumidor.
Página Web de GE Appliances
ge.com
¿Tiene alguna pregunta sobre su electrodoméstico? ¡Pruebe la página Web de GE Appliances 24 horas al día,
cualquier día del año! Para mayor conveniencia y servicio más rápido, ya puede descargar los Manuales de los
Propietarios, pedir piezas o incluso hacer una cita en línea para que vengan a realizar una reparación.
Solicite una reparación ge.com
El servicio de expertos GE está a tan sólo un paso de su puerta. ¡Entre en línea y solicite su reparación cuando le
venga bien 24 horas al día cualquier día del año! O llame al 800.GE.CARES (800.432.2737) durante horas
normales de oficina.
Real Life Design Studio (Estudio de diseño para la vida real)
ge.com
GE apoya el concepto de Diseño Universal—productos, servicios y ambientes que pueden usar gente de todas
las edades, tamaños y capacidades. Reconocemos la necesidad de diseñar para una gran gama de habilidades
y dificultades físicas y mentales. Para más detalles cobre las aplicaciones de GE Diseño Universal, incluyendo
ideas de diseño para la cocina para personas con discapacidades, mire nuestra página Web hoy mismo. Para
personas con dificultades auditivas, favor de llamar al 800.TDD.GEAC (800.833.4322).
Garantías ampliadas ge.com
Compre una garantía ampliada y obtenga detalles sobre descuentos especiales disponibles mientras su garantía
está aún activa. Puede comprarla en línea en cualquier momento, o llamar al (800.626.2224) durante horas
normales de oficina. GE Consumer Home Services estará aún ahí cuando su garantía termine.
Piezas y accesorios ge.com
Aquellos individuos con la calificación necesaria para reparar sus propios electrodomésticos pueden pedir que
se les manden las piezas o accesorios directamente a sus hogares (aceptamos las tarjetas VISA, MasterCard y
Discover). Haga su pedido en línea hoy, 24 horas cada día o llamar por teléfono al 800.626.2002 durante horas
normales de oficina.
Las instrucciones descritas en este manual cubren los procedimientos a seguir por cualquier usuario.
Cualquier otra reparación debería, por regla general, referirse a personal calificado autorizado. Debe
ejercerse precaución ya que las reparaciones incorrectas pueden causar condiciones de funcionamiento
inseguras.
Póngase en contacto con nosotros ge.com
Si no está satisfecho con el servicio que recibe de GE, póngase en contacto con nosotros en nuestra
página Web indicando todos los detalles así como su número de teléfono o escríbanos a:
General Manager, Customer Relations
GE Appliances, Appliance Park
Louisville, KY 40225
Registre su electrodoméstico ge.com
¡Registre su nuevo electrodoméstico en línea—cuando usted prefiera! El registrar su producto a tiempo le
proporcionará, si surgiera la necesidad, una mejor comunicación y un servicio más rápido bajo los términos de su
garantía. También puede enviar su tarjeta de registro pre-impresa que se incluye en el material de embalaje.
Page 80

Consumer Support.
GE Appliances Website
In the U.S.: ge.com
Have a question or need assistance with your appliance? Try the GE Appliances Website 24 hours a day,
any day of the year! For greater convenience and faster service, you can now download Owner’s Manuals,
order parts or even schedule service on-line. In Canada: www.GEAppliances.ca
Schedule Service In the U.S.: ge.com
Expert GE repair service is only one step away from your door. Get on-line and schedule your service at your
convenience 24 hours any day of the year! Or call 800.GE.CARES (800.432.2737) during normal business hours.
In Canada, call 1.800.561.3344
Real Life Design Studio In the U.S.: ge.com
GE supports the Universal Design concept—products, services and environments that can be used by people of all
ages, sizes and capabilities. We recognize the need to design for a wide range of physical and mental abilities and
impairments. For details of GE’s Universal Design applications, including kitchen design ideas for people with disabilities,
check out our Website today. For the hearing impaired, please call 800.TDD.GEAC (800.833.4322).
In Canada, contact: Manager, Consumer Relations, Mabe Canada Inc.
Suite 310, 1 Factory Lane
Moncton, N.B. E1C 9M3
Extended Warranties In the U.S.: ge.com
Purchase a GE extended warranty and learn about special discounts that are available while your warranty is still
in effect. You can purchase it on-line anytime, or call 800.626.2224 during normal business hours. GE Consumer Home
Services will still be there after your warranty expires. In Canada, call 1.800.561.3344
Parts and Accessories In the U.S.: ge.com
Individuals qualified to service their own appliances can have parts or accessories sent directly to their homes
(VISA, MasterCard and Discover cards are accepted). Order on-line today, 24 hours every day or by phone at
800.626.2002 during normal business hours.
Instructions contained in this manual cover procedures to be performed by any user. Other servicing generally
should be referred to qualified service personnel. Caution must be exercised, since improper servicing may cause
unsafe operation.
Customers in Canada should consult the yellow pages for the nearest Mabe service center, or call 1.800.561.3344.
Contact Us In the U.S.: ge.com
If you are not satisfied with the service you receive from GE, contact us on our Website with all the details including
your phone number, or write to: General Manager, Customer Relations
GE Appliances, Appliance Park
Louisville, KY 40225
In Canada: www.GEAppliances.ca, or write to: Director, Consumer Relations, Mabe Canada Inc.
Suite 310, 1 Factory Lane
Moncton, N.B. E1C 9M3
Register Your Appliance In the U.S.: ge.com
Register your new appliance on-line—at your convenience! Timely product registration will allow for enhanced
communication and prompt service under the terms of your warranty, should the need arise. You may also mail
in the pre-printed registration card included in the packing material. In Canada: www.GEAppliances.ca
Printed in the United States
 Loading...