

Page 1

g
GE Consumer Service Training
Page 2

IMPORT ANT SAFETY NOTICE
This information is intended for use by individuals possessing adequate backgrounds of electrical, electronic and mechanical experience. Any attempt to repair a major appliance may result
in personal injury and property damage. The manufacturer or seller cannot be responsible for
the interpretation of this information, nor can it assume any liability in connection with its use.
DISCONNECT POWER BEFORE SERVICING
IMPORTANT - RECONNECT ALL GROUNDING DEVICES
All parts of this appliance capable of conducting electrical current are grounded. If grounding wires, screws, straps,
clips, nuts or washers used to complete a path to ground are removed for service, they must be returned to their
original position and properly fastened.
PRECAUTIONS TO BE OBSERVED
BEFORE AND DURING SERVICING TO
AVOID POSSIBLE EXPOSURE TO
EXCESSIVE MICROWAVE ENERGY
A. A microwave emission check should be per formed prior to servicing if the oven is operative.
B. Do not operate or allow the oven to be operated
with the door open.
C. If the oven operates with the door open:
I ) Instruct the user not to operate the oven and
2) contact the manufacturer and the Center for
Devices and Radiological Health immediately .
D. Make the following safety checks on all ovens to
be serviced before activating the magnetron or
other microwave source, and make repairs as
necessary
1. Interlock operation
2. Proper door closing
3. Seal and sealing surfaces (arcing, wear, and
other damage)
4. Damage to or loosening of hinges and latches
5. Evidence of dropping or abuse
E. Before turning on microwave power for any
service test or inspection within the microwave
generating compartments, check the magnetron,
wave guide or transmission line, and cavity for
proper alignment, integrity , and connections.
F. Any defective or misadjusted components in the
interlock, monitor , door seal, and microwave
generation and transmission systems shall be
repaired, replaced or adjusted by procedure
described in this manual before the oven is
released to the owner.
G. A microwave leakage check to verify compli ance with the federal performance standard
should be performed on each oven prior to
release to the owner .
MICROW AVE LEAKAGE TEST
I . Place 275 ml. water in 600 ml. beaker
(WB64X5010).
2. Place beaker in center of oven shelf.
3. Set meter to 2450 MHz scale.
4. Turn oven "ON" for 5 minute test.
5. Hold probe perpendicular to surface being tested
and scan surfaces at rate of one inch/second. Test
following areas:
• Entire perimeter of door and control panel
• Viewing surface of door window
• Exhaust vents
6. Maximum leakage 4MW/CM2.
7. Record date on service invoice and microwave
leakage report.
NOTE: MAXIMUM ALLOW ABLE LEAKAGE
IS 5MW/CM2. 4MW/CM2 IS USED TO ALLOW FOR MEASUREMENT AND METER
ACCURACY.
Inform the manufacturer of any oven found to have
emission in excess of 5MW/CM2 Make repairs to bring
the unit into compliance at no cost to owner and try to
determine cause. Instruct owner not to use oven until
it has been brought into compliance.
1
Page 3

Table of Contents
SAFETY INFORMATION............................................................................................................................ 1
CONTENTS ................................................................................................................................................ 2
KEYPADS ................................................................................................................................................... 3
KEYPADS/KEYPAD TEST PROCEDURE .................................................................................................. 4
MODEL FEATURE COMPARISON............................................................................................................ 5
SPECIFICATIONS, INSTALLATION, VENTING........................................................................................ 6
LIGHTS, FILTERS, HELP, CLOCK............................................................................................................. 7
DELAY START, TIMER ON/OFF, REMINDER/ START/PAUSE, CHILD LOCKOUT ................................ 8
TURNTABLE, VENT FAN, SURFACE LIGHT, SOUND LEVEL, AUTO NITE LIGHT............................... 9
CUSTOM COOK, ADD 30 SECONDS, TEMP COOK.............................................................................. 10
POPCORN, REHEAT, BEVERAGE, MESSAGE ..................................................................................... 11
COOK, SENSOR COOKING .................................................................................................................... 13
SINGLE FOOD, OPERATING SEQUENCE .............................................................................................. 14
GRILLE REMOVAL, CONTROL PANEL, SMART BOARD ..................................................................... 15
KEYPANEL, TRANSFORMER, INTERLOCK SWITCHES, MONITOR SWITCH ..................................... 16
FUSE, PRIMARY INTERLOCK TEST ....................................................................................................... 17
MONITOR TEST, ADJUST INTERLOCKS, DOOR ADJUSTMENT ........................................................ 18
DOOR ASSEMBLY..................................................................................................................................... 19
ANTENNA, TURNTABLE, HV CAPACITOR ............................................................................................. 20
RECTIFIER/DIODE, THERMAL CUTOUTS ............................................................................................... 21
HOOD, BOTTOM THERMAL CUTOUTS ................................................................................................... 22
GAS SENSOR TEST, SENSOR TEST....................................................................................................... 23
SENSOR DETECTION TEST, PROBE, BLOWER......................................................................................24
RUN CAPACITOR, POWER TRANSFORMER, MAGNETRON FAN....................................................... 25
POWER PERFORMANCE TEST ............................................................................................................... 27
TROUBLESHOOTING GUIDE ................................................................................................................... 28
SCHEMATIC/WIRING DIAGRAMS ............................................................................................................ 29
PARTS PAGES........................................................................................................................................... 33
2
Page 4
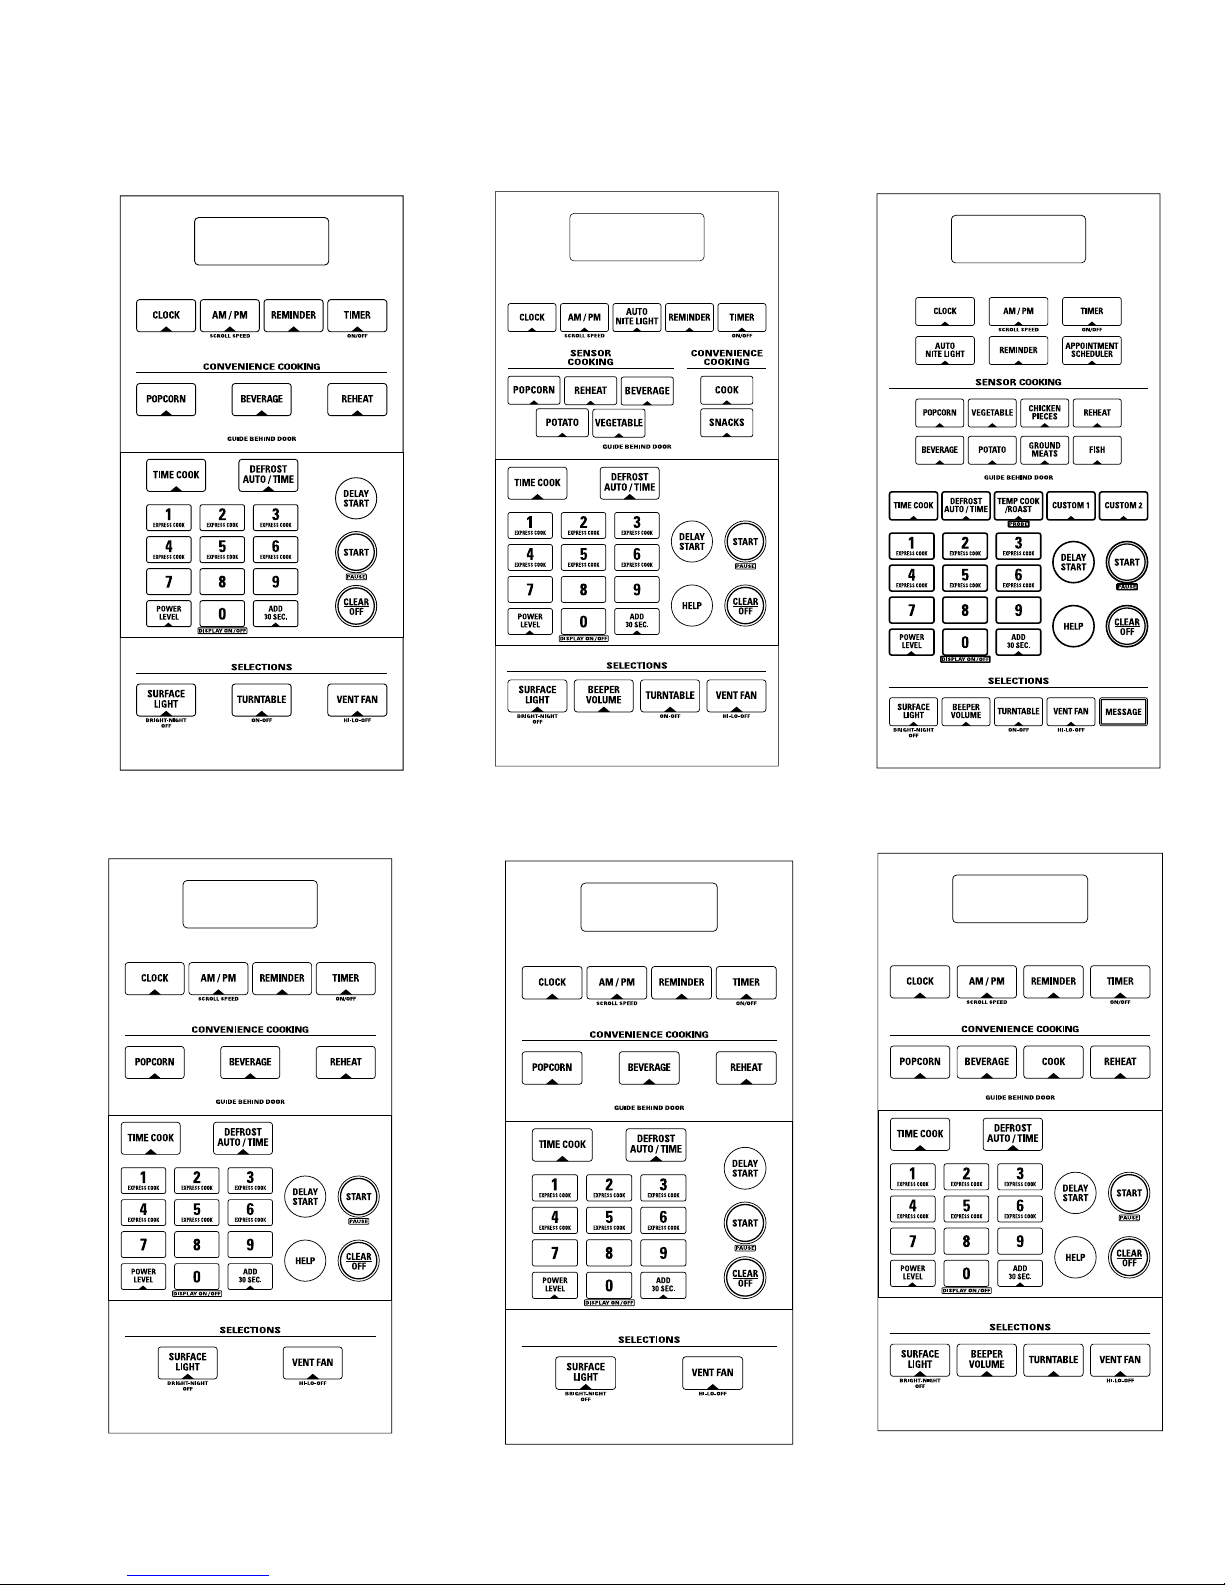
1.4 cu. ft. and 1.6 cu. ft. Keypanels
JVM1630
JVM1650 JVM1660
JVM1630/JVM1631 JVM1650/JVM1651
JVM1660
JVM1420
JVM1420
JVM1430
JVM1430
3
JVM1440/JVM1640
JVM1440
(same keypad)
Page 5
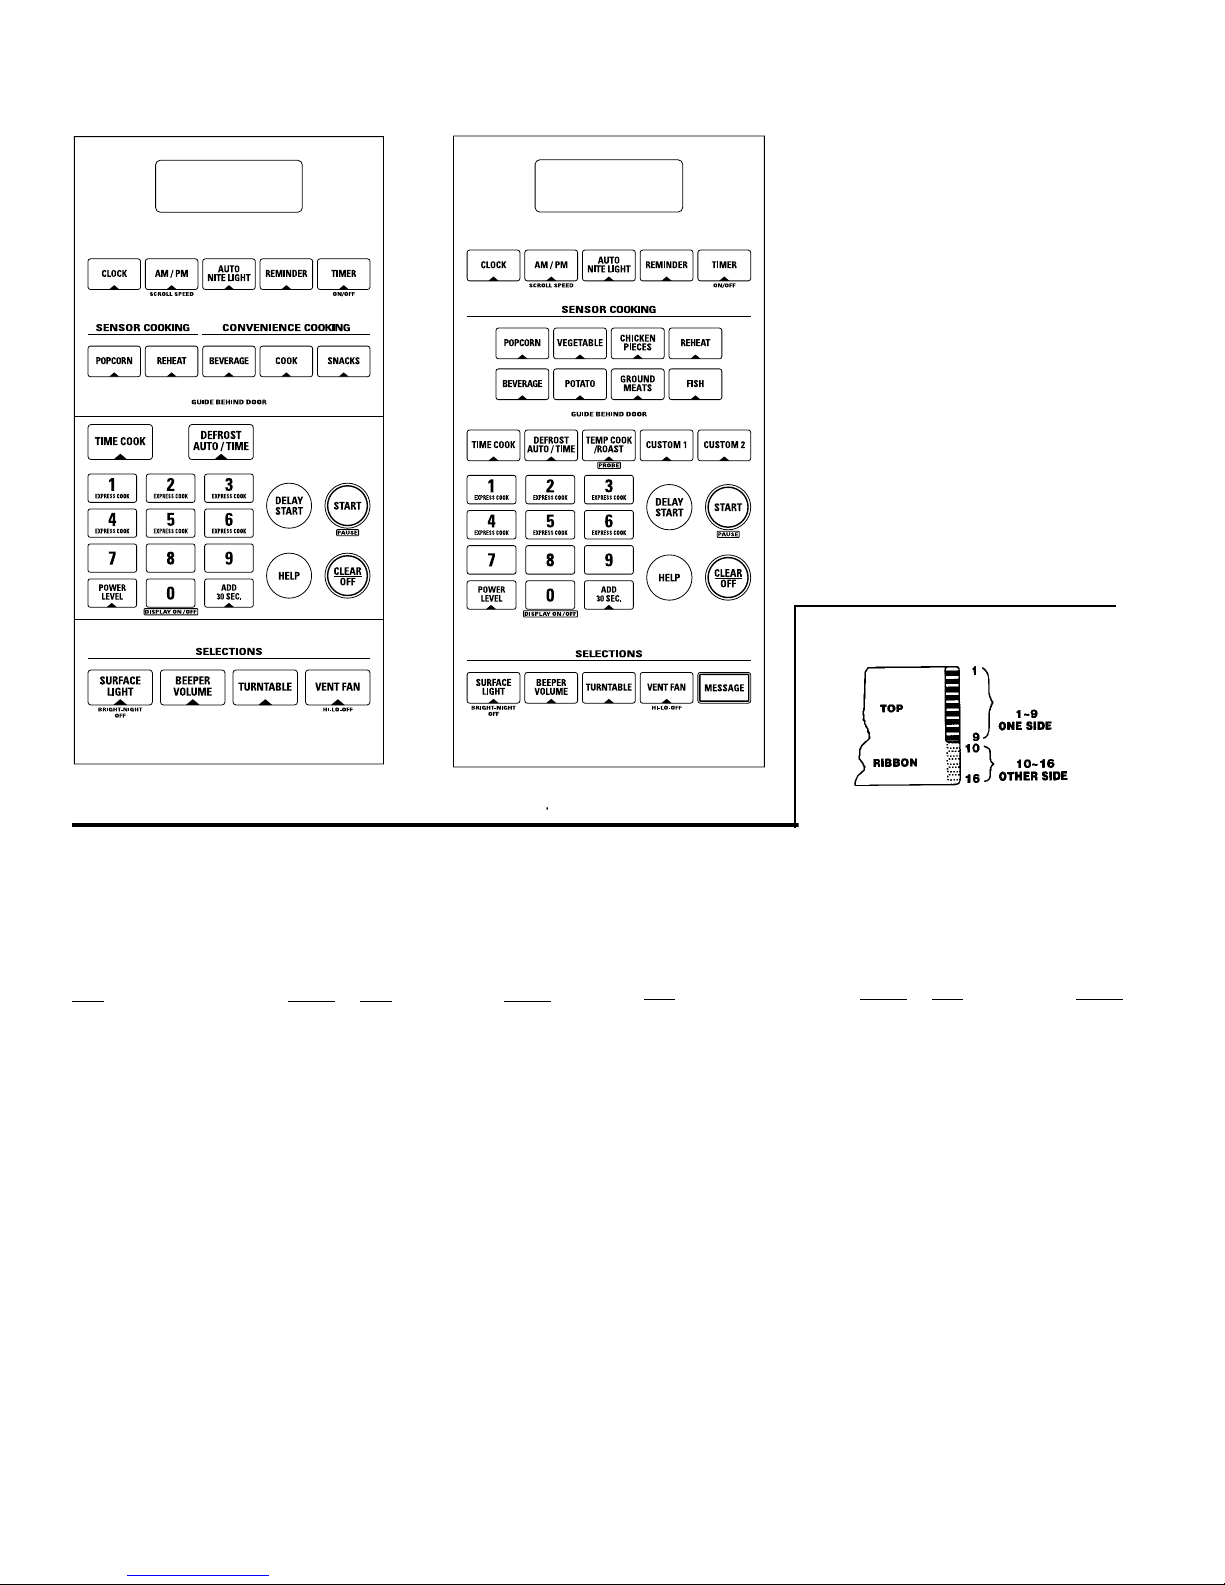
1.4 cu. ft. and 1.6 cu. ft. Keypanels
JVM1460JVM1450
JVM1450
JVM1460
KEYP ANEL TEST
If necessary the key panel pads can be verified by a continutity test. For ease of handling the key
panel should be removed and placed on a flat surface.
RIBBON
PAD CONN PAD CONN
BEEPER VOLUME 9-12 DEFROST 4-15
ADD 30 SEC. 4-11 AM/PM 9-13
POWER LEVEL 3-14 TIMER 4-13
SURFACE LIGHT 7-12 VENT FAN 8-12
CLOCK 7-13 1 9-16
POPCORN 7-11 2 8-16
AUTO NITE LIGHT 6-12 3 7-16
DELAY START 6-13 4 6-16
TURNTABLE 5-12 5 5-16
REMINDER 5-13 6 4-16
TIME COOK 5-15 7 9-15
START 3-11 8 8-15
REHEAT 8-11 9 7-15
VEGETABLE 9-10 0 6-15
BEVERAGE 6-11 BEVERAGE 9-11
POTATOES 6-10
JVM1660 ONLY
TEMPCOOK/ROST 3-15 CUSTOM 1 8-10
GROUND MEAT 3-10 CUSTOM 2 7-10
CHICKEN PIECES 4-10 MESSAGE 8-13
FISH FILLETS 5-10 APPOINTMENT 3-13
SCHEDULER
JVM 1650 ONLY
SNACKS 7-14 COOK 8-14
RIBBON
PAD CONN PAD CONN
SOUND LEVEL 9-12 DEFROST 4-15
ADD 30 SEC. 4-11 AM/PM 9-13
POWER LEVEL 3-14 TIMER 4-13
SURFACE LIGHT 7-12 VENT FAN 8-12
CLOCK 7-13 1 9-16
POPCORN 7-11 2 8-16
AUTO NITE LIGHT 6-12 3 7-16
DELAY START 6-13 4 6-16
TURNTABLE 5-12 5 5-16
REMINDER 5-13 6 4-16
TIME COOK 5-15 7 9-15
START 3-11 8 8-15
REHEAT 8-11 9 7-15
JVM1460 ONLY
TEMPCOOK/ROST 3-15 CUSTOM 1 8-10
GROUND MEAT 3-10 CUSTOM 2 7-10
CHICKEN PIECES 4-10 MESSAGE 8-13
FISH FILLETS 5-10 BEVERAGE 9-11
VEGETABLE 9-10 POTATOES 6-10
JVM 1450 ONLY
BEVERAGE 6-11 COOK 8-14
SNACKS 7-14
4
Page 6

FEATURE COMPARISON JVM1460 VS. JVM1660
0641MVJ 0661MVJ
YTICAPAC
).tf.uc9ytivaCnevO
elytS
erudecorPtseT507-CEIsttaW
slortnoChcuoTcinortcelE
metsySlortnoCtramS
latigiDgnillorcScinortcelE
yalpsiD
kcolC
deepSllorcSelbairaV
daPpleH
gnimmargorPtnerrucnoC
ffO/nOyalpsiD
slortnoCrosneS
4.16.1
egnaR-ehT-revOegnaR-ehT-revO
0590001
seYseY
seYseY
dapMP/MAsulPdapMP/MAsulP
)MP/MA/wdap-bus(deeps5)MP/MA/wdap-bus(deeps5
seYseY
seYseY
orez/wdap-busorez/wdap-bus
egareveB
nekcihC
hsiF
staeM
nrocpoP
seotatoP
taeheR
selbategeV
ecnereferPemiT
kooCsserpxE
kooCetuniM
kooCemiT/orciM
sdnoceS03ddA
naFtsuahxE
wodniW
elbaliavAsroloCrehtO
no-tnatsnI
)seceipnekcihc(no-tnatsnI
)hsif(no-tnatsnI
)staemdnuorg(no-tnatsnI
no-tnatsnI
no-tnatsnI
no-tnatsnI
)hserf,nzrf,dennac(no-tnatsnI
)9/1(tnemecnahnElortnoC)9/1(tnemecnahnElortnoC
setunim6-1no-tnatsnIsetunim6-1no-tnatsnI
setunim6-1no-tnatsnIsetunim6-1no-tnatsnI
II&III&I
no-tnatsnIno-tnatsnI
)MFC003(yticapachgiHdeepS-2)MFC003(yticapachgiHdeepS-2
weiVgiBweiVgiB
WW;SS;AA;BBBS;BW;BB
no-tnatsnI
)seceipnekcihc(no-tnatsnI
)hsif(no-tnatsnI
)staemdnuorg(no-tnatsnI
no-tnatsnI
no-tnatsnI
no-tnatsnI
)hserf,nzrf,dennac(no-tnatsnI
snoisnemiDdnathgieW
sbl27-tgW
sbl27.tgW
"4.91x"9.91x"4.33
5
Page 7
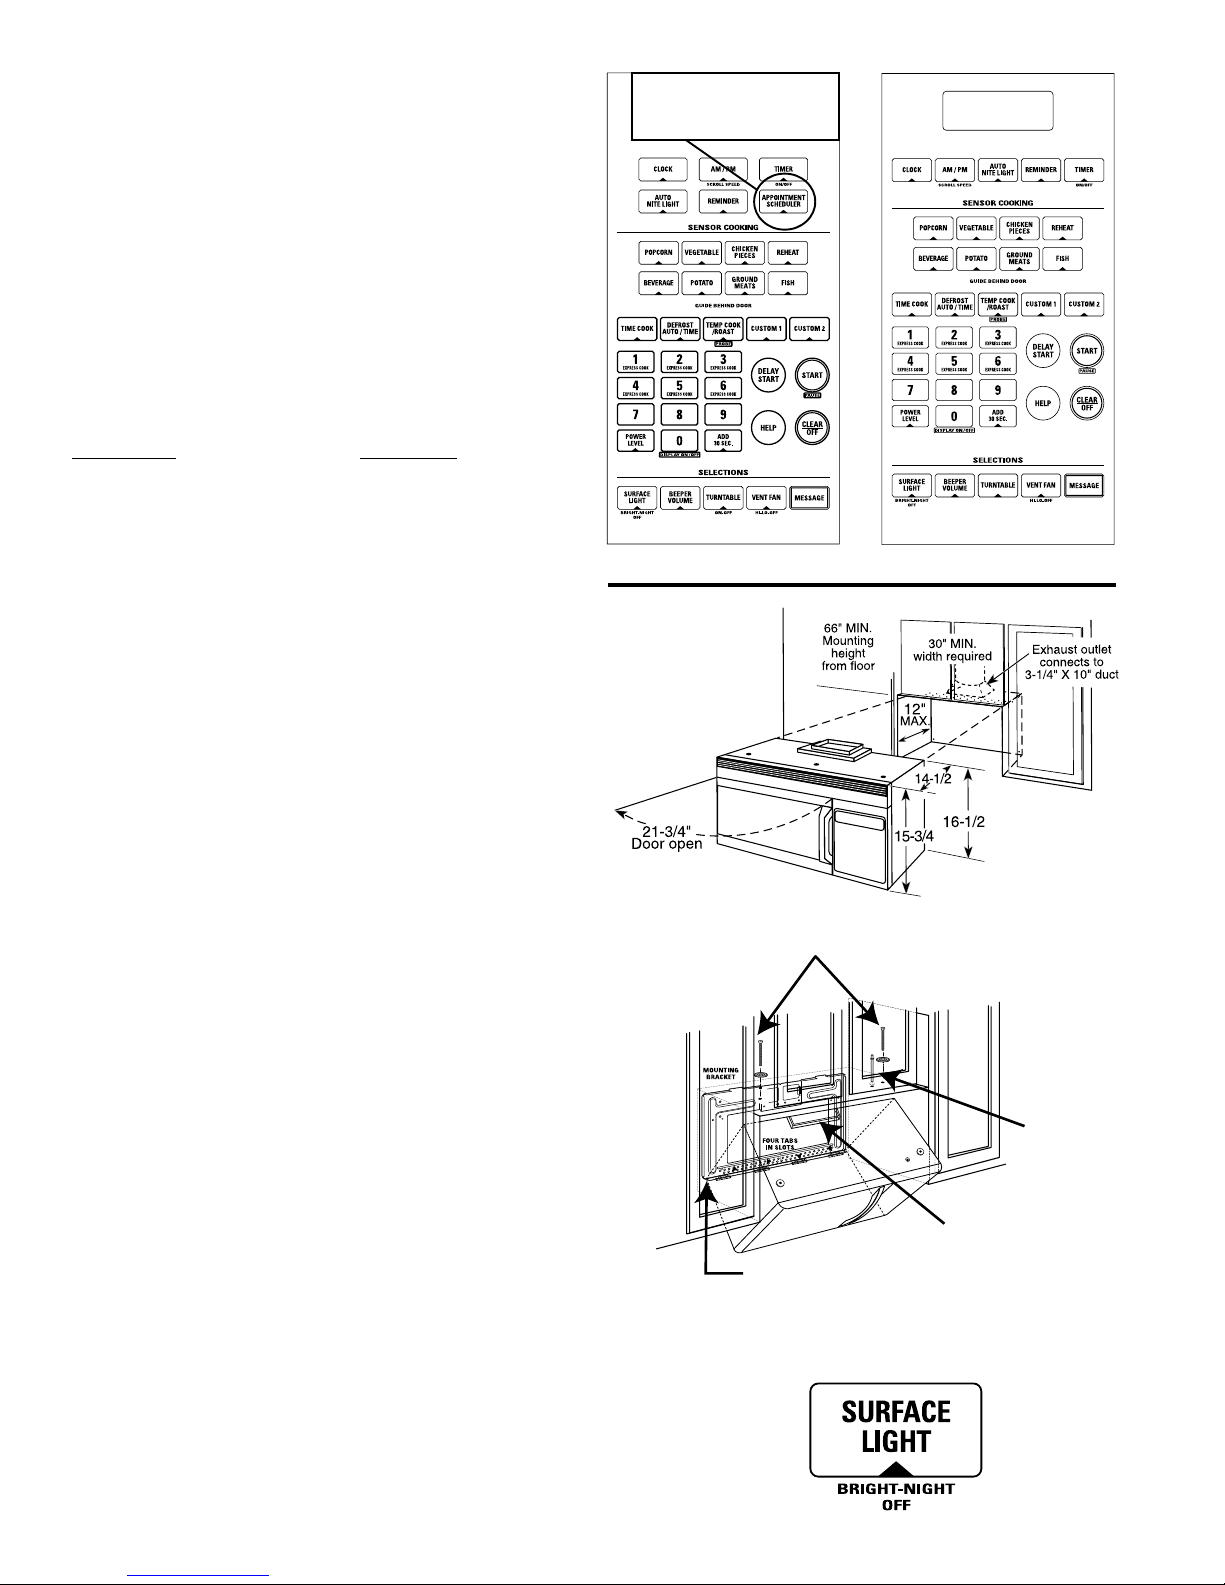
OVER THE RANGE 1.4 CU. FT.(JVM1460), AND
1.6 CU. FT. (JVM1660) SPACEMAKER
A complete new redesign 1.4 and 1.6 cu. ft. Spacemaker is
being introduced in the model line.
The most significant change is in the control and the
enlarged cavity size. It now has a scrolling message on the
control and the cavity has been increased to 1.4 and
1.6cu.ft. The JVM1660 has 1.6 cu. ft., the JVM1460 is 1.4
cu. ft., another feature has been added for the
JVM1660,
rated at 1000 watts vs 950 watts for the JVM1460.
APPOINTMENT SCHEDULER
. The JVM1660 is
The new models are:
1.4 cu. ft. 1.6 cu.ft.
JVM1460 JVM1660
JVM1450 JVM1650/51
JVM1440 JVM1640/42
JVM1430 JVM1630/31
JVM1420/25
APPOINTMENT
SCHEDULER and
CALENDAR
JVM1660
JVM1460
WEIGHT
The microwave oven weighs 72 pounds.
INSTALLATION
The Spacemaker is supported by a special bracket assembly
(mounting system) supplied with the oven. The bracket
assembly must be mounted to the wall with toggle bolts
through the wall, and a lag screw into a wall stud. The unit
is mounted to four tabs on lower mounting plate. Four bolts
are run down through the kitchen cabinet bottom and into the
oven case to pull the oven up against the bottom of the
kitchen cabinet.
NOTE: For easier removal and personal safety it is recommended that two people remove this product.
CAUTION!
The mounting surface must be capable of supporting the
cabinet load, in addition to the72 pound product, plus additional loads of up to 50 pounds or a total weight of 122
pounds. This product cannot be installed to cabinet arrangements such as an island or peninsula. It must be mounted to
both a top cabinet and wall.
SURF ACE LIGHTS
Two 40-watt screw base incandescent tubular bulbs
(WB36X10003 - 40T61/2/2) are located on the bottom
outside of the grease filters. The bulbs are user replaceable
by removing one screw and lowering access cover. The
bulbs could be difficult to remove when replaced for the first
time, a silicone glue is used to secure them during shipping.
MOUNTING SCREWS
ALIGMENT
PIN
CUT OUT
MOUNTED TO WALL PLATE USING FOUR
HINGES ON WALL PLATE TO THE FOUR
SLOTS ON MICROWAVE
6
Page 8
SURF ACE LIGHTS
Two 40-watt screw base incandescent tubular bulbs
(WB36X10003 - 40T61/2/2) are located on the bottom
outside of the grease filters. The bulbs are user replaceable
by removing one screw and lowering access cover. The
bulbs could be difficult to remove when replaced for the first
time, a silicone glue is used to secure them during shipping.
CA VITY LIGHT
A special 40-watt screw base incandescent bulb
(WB02X4235) is located in the top of the oven cavity at the
front. It is user replaceable by removing the top grill (2
screws). The bulb is then accessible by removing a metal
cover (2 screws).
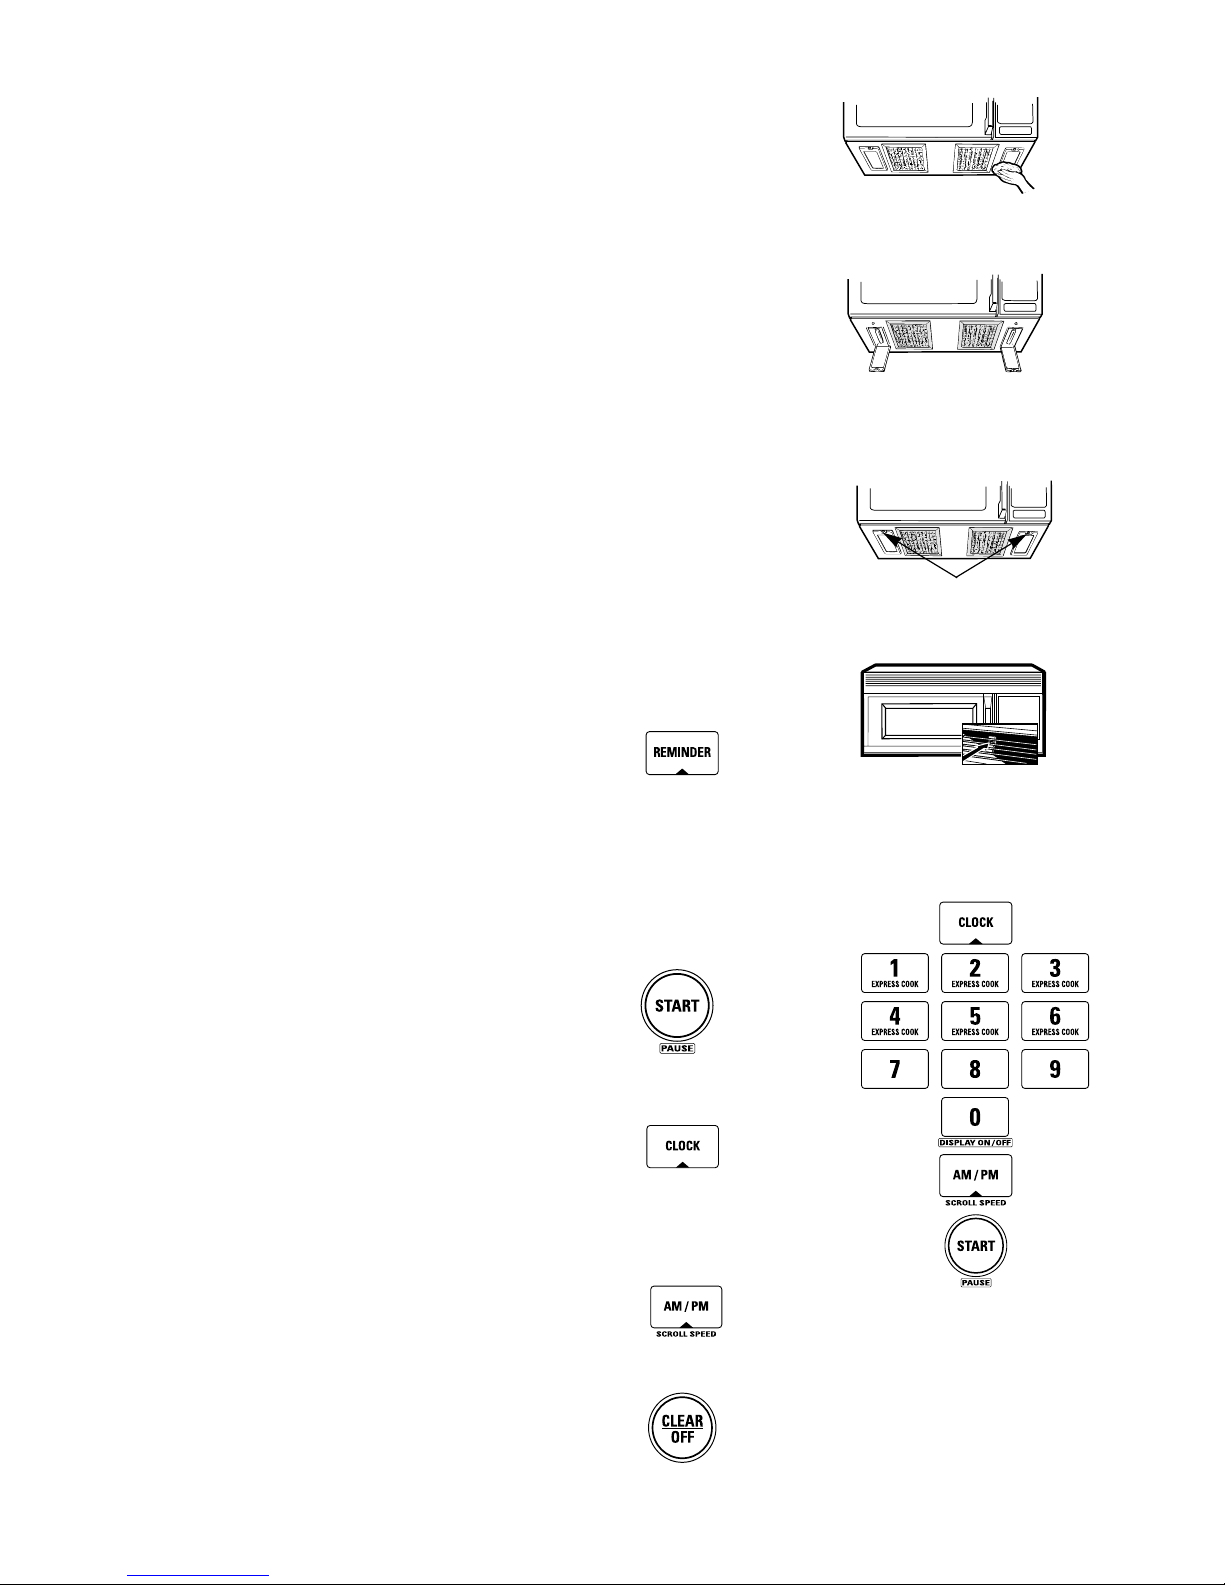
GREASE FILTERS
Grease filters should be cleaned once a month. Soak the
filter in a solution of hot water and detergent. Use of
ammonia products will darken the metal. Rinse, shake and
remove moisture before replacing. To remove: grasp the
"finger hold" and slide to the rear. Pull filter downward to
release. To replace: slide filter into the frame slot on the
back of the opening, then lift up until it locks in place.
COOKING COMPLETE REMINDER
After the completion of all defrost and cook cycles (except
Temp. Cook/Hold) the control will scroll "FOOD IS READY"
and beep once every minute and rescroll message until
door is opened or clear/off pad is touched.
HELP
HELP pad displays feature information and helpful hints.
Press HELP, then select a feature pad.
POWER UP
At power up or after a power interruption the display lights
all segments and function indicator words for 15 seconds,
and then "PLEASE PRESS CLOCK" scrolls.
CLOCK
To set the clock, touch CLOCK and enter the time-of-day.
Then enter AM/PM. Press "ST ART" (or CLOCK) to start the
clock. NOTE: The display can be turned off by pressing and
holding the 0 number pad for 3 seconds.
SCROLL SPEED
The scroll speed of the display can be changed. Press and
hold the AM/PM pad about 3 seconds to bring up the
display . Select 1-5 for slow to fast scroll speed.
CLEAR/OFF
When this pad is touched, it shuts off the oven and erases
all settings (except for the time of day).
7
Page 9
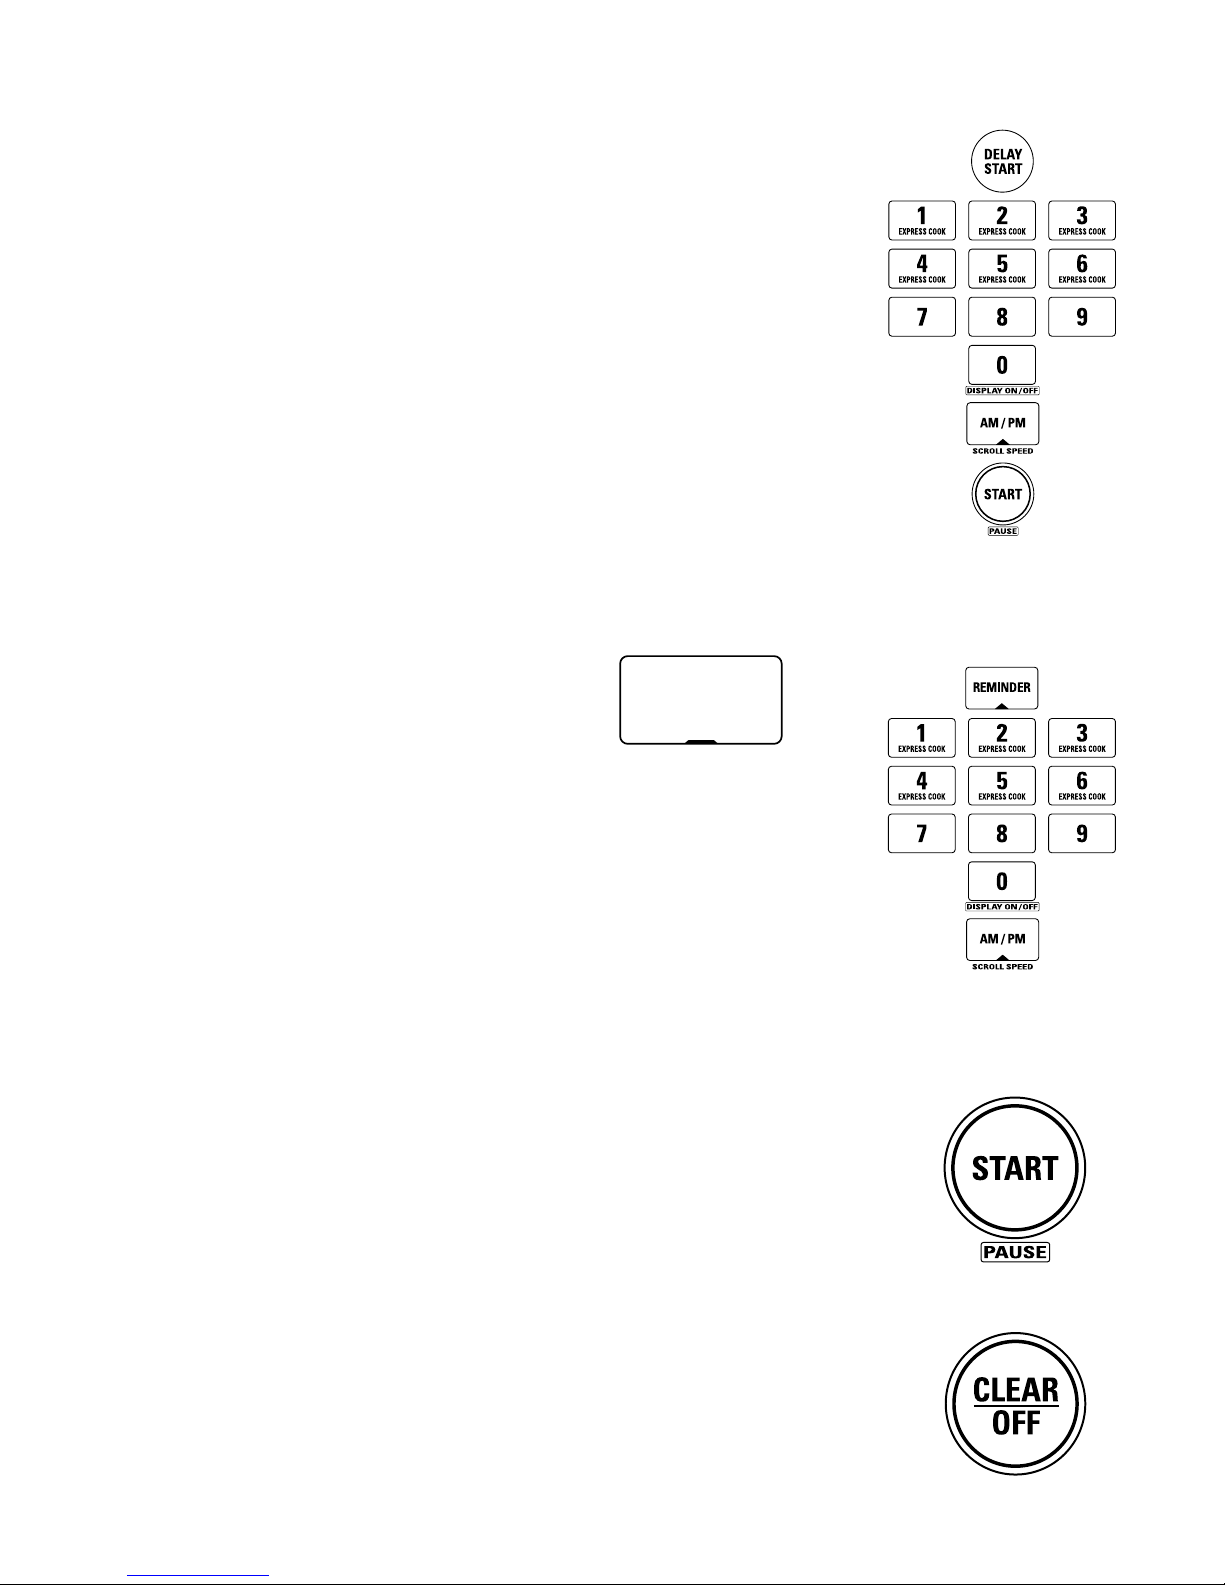
DELA Y ST ART
The DELA Y START function provides a 24-hour delay
start for any program or sequence of programs. Since it
is a 24-hour timer, the start time can be delayed up to a
maximum of 23 HOURS and 59 MINUTES. NOTE: The
time-of-day clock must be set for the DELA Y START ./
function to work. To Use Delay Start:
1. Touch DELA Y START pad.
2. Enter the time of day you want the oven to start. Be
sure the microwave oven shows the correct time of day.
3. Enter desired cooking program.
4. Touch START pad. The oven will automatically start
at the desired time.
5. The delay start time will be displayed plus "DS".
TIMER ON/OFF
The TIMER ON/OFF operates as a minute timer and
can be used at any time, even when the oven is
operating. To Use Timer On/Off
1. Press TIMER ON/OFF.
2. Enter time you want to count down.
3. Press TIMER ON/OFF to start.
NOTE: When time is up, the oven will signal. To turn
the timer signal offpress TIMER ON-OFF. The timer
indicator will be lit while TIMER ON-OFF is operating.
REMINDER
The Reminder feature, like an alarm clock, will signal
(fast beeps) when a desired time of day is reached.
Unlike earlier models this feature can be used at any
time, even when the unit is operating. To Use Reminder:
1. Touch REMINDER pad.
2. Enter the desired time of day (23 hours and 59
minutes maximum) that you want the oven to signal.
Clock must show correct TOD.
3. Select AM/PM.
4. Touch REMINDER pad.
5. When set time is reached oven will signal with fast
beeps and a scrolling message to touch REMINDER
pad.
NOTE: T o remove setting, touch REMINDER pad, then
0.
TIMER
ON/OFF
START/PAUSE
In addition to starting many functions. START/P AUSE
allows you to stop cooking without opening the door or
clearing the display .
CHILD LOCK-OUT
This feature is to lock the control panel to prevent the
microwave from being accidentally started. To lock or
unlock the control press and hold the CLEAR/OFF pad
for 3 seconds.
When the control panel is locked, an "L" will be displayed to the extreme right.
8
Page 10
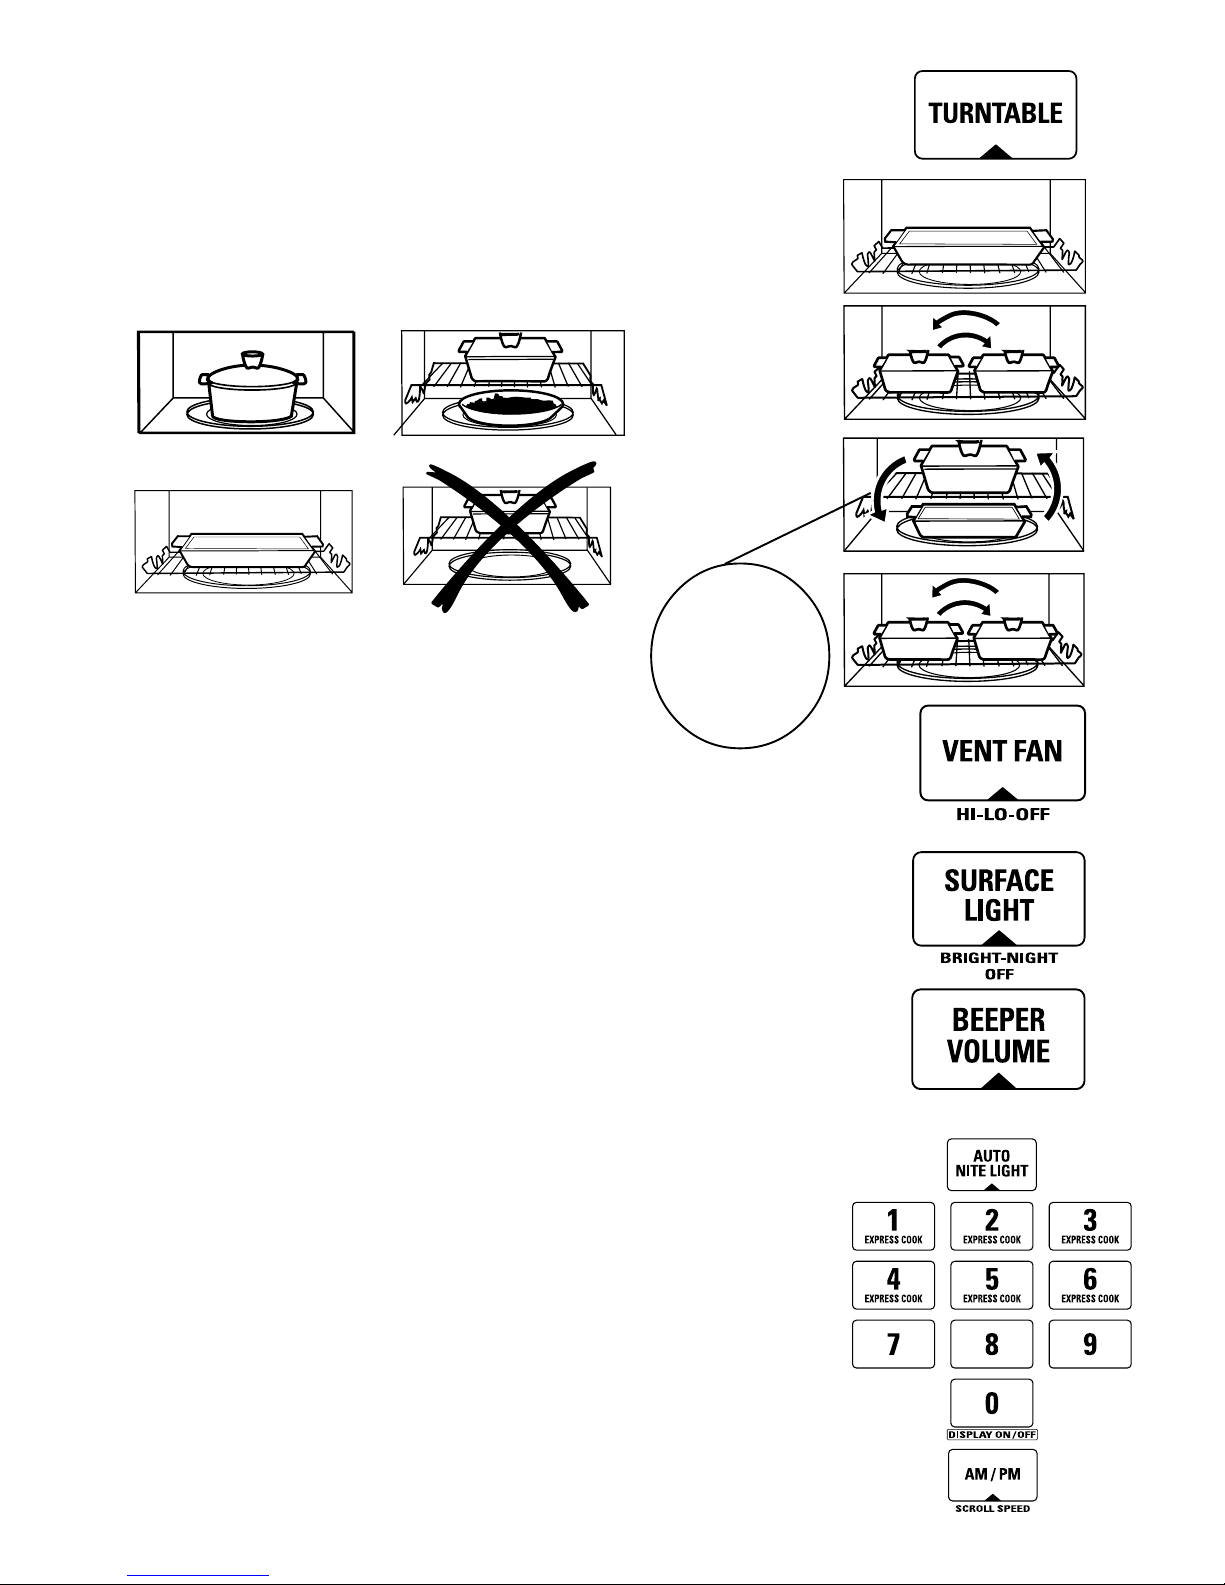
TURNTABLE
The turntable should be left on for the best cooking results,
however when a large dish must be used the turntable can be
turned off and the rack used. Illustrations shown are the
correct ways to use the rack and turntable. Press TURNT ABLE to turn the turntable off or on.
NOTE: it is normal for the turntable at times to become hot to
the touch.
VENT FAN
The vent fan removes steam and other vapors from surface
cooking. Press VENT FAN once for high speed, twice for low
speed, and a third time to turn the fan off.
NOTE:
JVM1600s’
have TWO
shelves.
SURF ACE LIGHT
The surface lights have been moved to the outside of the
bottom of the oven and now are a tubular bulb. Press SURFACE LIGHT once for bright light, twice for the night light and
three times to turn the light off.
BEEPER VOLUME
The beeper sound level can be adjusted up, down, or off.
Touch BEEPER VOLUME and choose 0-3 for mute to loud.
AUTO NITE LIGHT
This feature will allow the night light to be turned on and off at
any time. To Use Auto Nite Light:
1. Press AUTO NITE LIGHT.
2. Enter the time you want the light to turn on and select AM/
PM.
3. Press AUTO NITE LIGHT again and enter the time you
want the light to turn off and select AM/PM.
4. Press AUTO NITE LIGHT.
NOTE: NITE will stay lit to remind you that the feature is set.
Y ou can review the auto nite light settings by pressing AUT O
NITE LIGHT. To erase the settings and turn off the feature
press AUTO NITE LIGHT, then 0.
9
Page 11
TIME COOKING FUNCTIONS
or
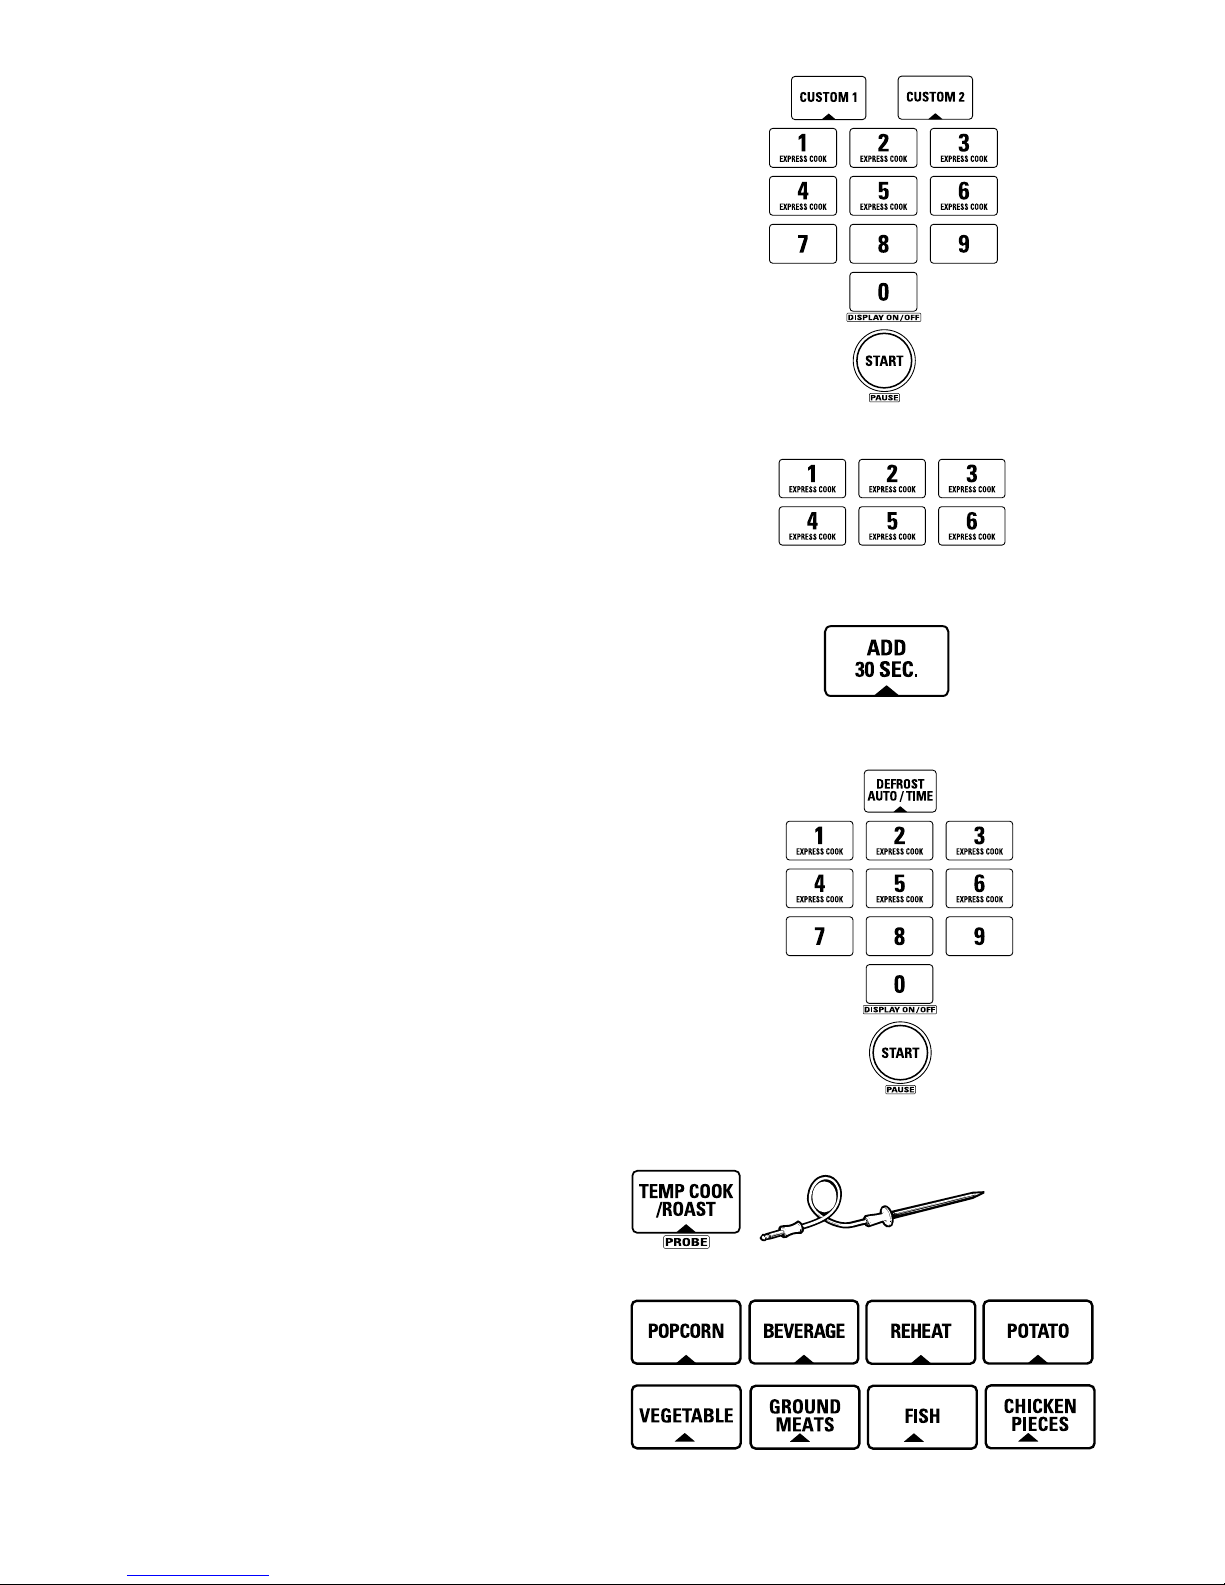
CUSTOM COOK I & ll (TIME COOK I & ll)
The Custom Cook function can be programmed for one or
two time cook cycles in the same program. The two cycle
feature is useful if a power level change is desired during the
cooking operation. Each function can be set for a maximum
of 99 minutes and 99 seconds. Custom Cook I & 2 can be
programmed in any sequence but it will always execute
Custom Cook I first.
EXPRESS COOK
This "instant on" feature will provide 1-6 minutes of cooking
at power level 10 as soon as it is selected.
ADD 30 SECONDS
The ADD 30 SECONDS feature provides "instant on" at high
power ( 10) for 30 seconds or can be used to add 30 seconds to any timed function.
DEFROSTING
DEFROST AUTO/TIME
When auto defrosting press this pad once then select food
weight. For time defrost press this pad twice then select time.
TEMPERA TURE COOKING FUNCTIONS
TEMP COOK/ROAST
There are three ways to use this feature for cooking by
temperature.
1. Set the temperature needed.
2. Temperature is automatically selected for cooking roasts
medium or well. Roast Medium - Press TEMP COOK/
ROAST twice. Roast Well - Press TEMP COOK/ROAST
three times.
3. Set for simmer; press TEMP COOK/ROAST 4 times.
NOTE: The turntable will not turn when the probe is in
use.
When setting to the temperature needed, after the temperature is reached the microwave will signal. Food will be held at
this temperature for 60 minutes and the oven will beep when
the hold time is complete.
When using the automatic roast feature (medium or well) the
microwave will signal when its time to turn the roast over. The
oven continues to cook after the signal whether or not the
roast is turned.
The simmer feature heats food to 180' F. and will hold at that
temperature up to 12 hours or until you remove it and press
CLEAR/OFF.
10
Page 12
CONVENIENCE FEATURES (TIME COOKING)
POPCORN
The popcorn feature is a pre-timed function that allows
cooking prepackaged popcorn in bags of 1.75, to
3.5 ounce bags.
To Use Popcorn:
REHEAT GUIDE
I - Pasta 2: 10 per serving
2 - Meats, casseroles, pizza 1:25 per serving
3 - Fruits and Vegetables 1: 15 per serving
4 - Beverages. 8-10 ounces 1:35 per serving
5 - Sauces and gravies 1: 15 per serving
6 - Plate of leftovers 3:45.
2-3 foods, 4 ounces each,
HOW TO ADJUST THE POPCORN PROGRAM
TO PROVIDE A SHORTER OR LONGER
COOKING TIME
If popcorn is undercooked you can make an adjustment
by adding time.
- Touch the POPCORN pad and then touch #9, this will
add 20 seconds more cooking time.
If popcorn is overcooked you can make an adjustment by
subtracting time.
- Touch the POPCORN pad and then touch # 1, this will
subtract 20 seconds of cooking time.
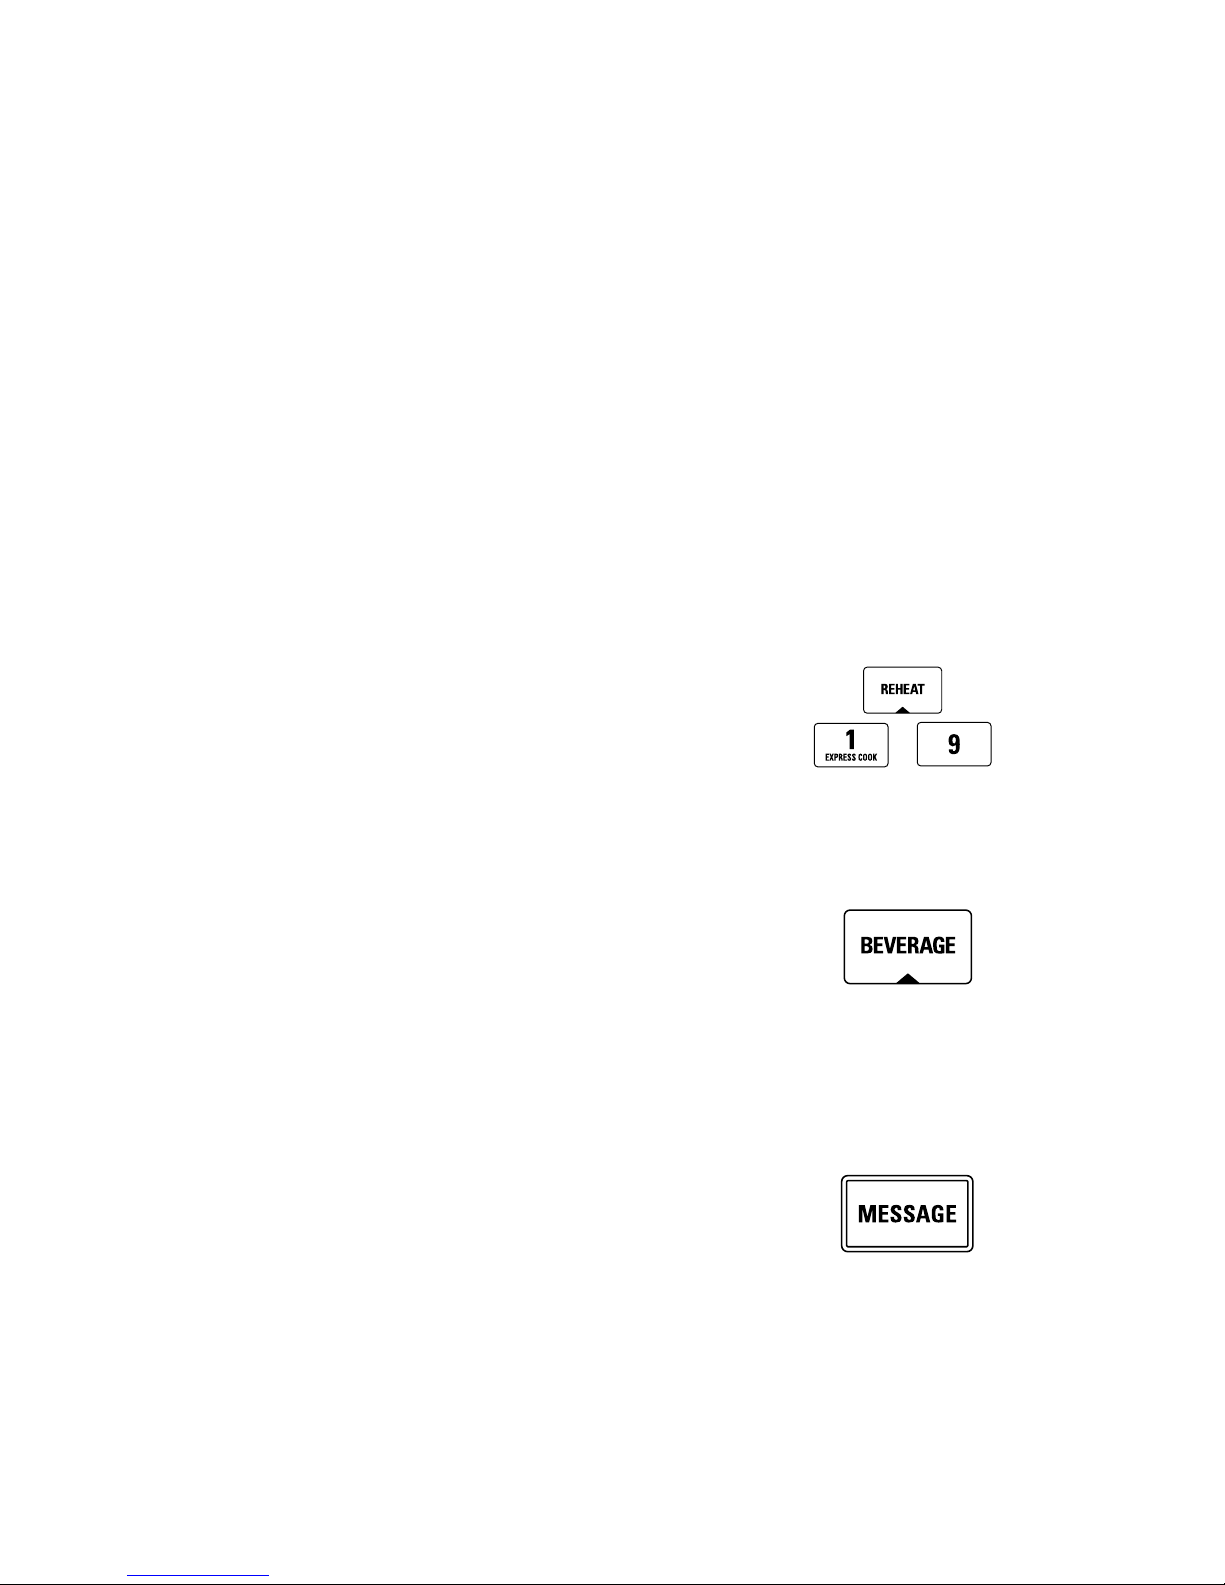
REHEAT
This feature reheats 1 -3 servings of precooked food.
To Use Reheat:
1. Press REHEA T
2. The oven signals when steam is sensed and the time
remaining begins counting down
To reduce time by 10%
--Press 1 after feature pad.
To add 10% to cooking time
--Press 9 after feature pad.
Turntable on & turntable off & no turntable
BEV - I minute 50 seconds per serving
Turntable on & turntable off
I - BAKERY 20 sec/item (1-4)
2 - SANDWICH 55 sec/sand (1-2)
3 - PIZZA 60 sec/slice (1-4)
4 - TOPPING 20 sec/serv (1-4)
5 - SOUPS 24 sec/oz. (8-40 oz)
6 - CHEESE 9 sec/oz. (4-16 oz)
(less time) (more time)
BEVERAGE
This feature is used to reheat a beverage the size of a
cup, one serving. The serving size can be changed to 2 or
3 serving size by touching that number right after
touching the beverage pad.
Note: beverages heated with this feature may be very
hot, remove container with care.
MESSAGE
The message pad allows you to record a short spoken
message.
1. Press MESSAGE.
2. Speak toward the control panel in a clear, normal voice.
3. Press MESSAGE again to save the message, immediately
or allow the time to count down to save it automatically .
To cancel a message during recording, press 0
To erase a recorded message, press 0 during playback.
11
Page 13
COOK
The oven sets the cooking time and power level for a specific
food category . To Use Cook:
1. Touch COOK.
2. Select food type , see guide.
3. Enter weight in ounces.
4. Touch START.
NOTE: To display the food type and remaining cooking
time, touch the COOK pad.
SENSOR COOKING FEA TURES
(JVM MODELS ONLY)
Note: Don't use metal shelf with Sensor
Cooking.
SENSOR COOKING CONDITION
Using the sensor assisted cooking codes, the foods are
cooked without calculating time, power level or quantity .
When the oven senses enough steam from the food, it relays
the information to the microprocessor which will calculate the
remaining cooking time and power level needed for best
results. When the food is cooked, water vapor is developed.
The sensor "senses" the vapor and its resistance increases
gradually . When the resistance reaches the value set according to the menu, supplementary cooking is started.
The time of supplementary cooking is determined by experiment with each food category and entered into the microprocessor . An example of how the sensor works: (POTATOES)
1. Potatoes at room temperature. V apor is emitted very
slowly.
2. Heated potatoes. Moisture and humidity are emitted
rapidly.
3. The sensor detects the moisture and humidity and calculates cooking time and variable power.
SENSOR COOKING PREFERENCE CONTROL
When using the sensor assisted cooking codes, except for
CANNED VEG and FROZEN VEG, it is possible to adjust the
oven cooking time by 10%.
T o Use Sensor Cooking Preference Control:
- By immediately touching the number I pad after touching a
sensor assisted pad the oven will turn off 10% sooner.
- By pressing the number 9 pad after touching a sensor
assisted pad the oven will cook 10% longer.
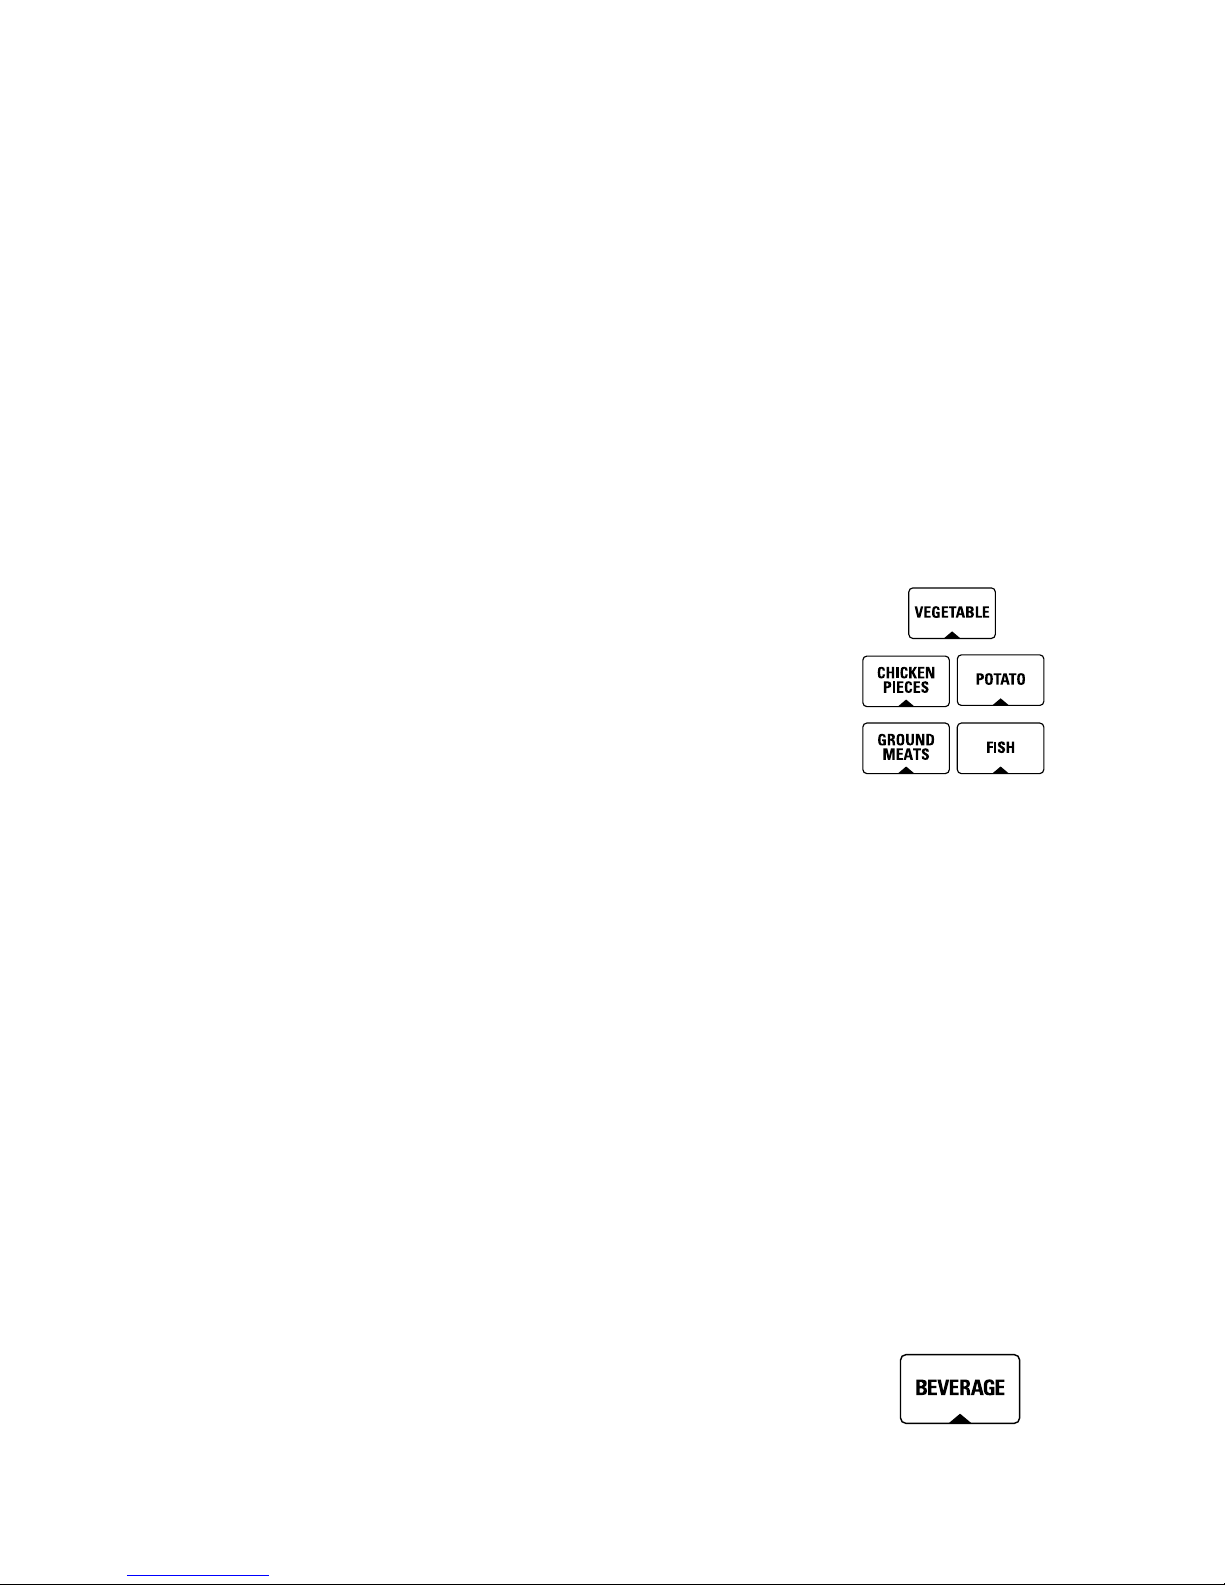
BEVERAGE
This instant on pad reheats beverages by sensing the
steam with the sensor system.
NOTE: Maximum heating time is 4: 00, preference
control not available on beverage pad.
12
Page 14

POPCORN
The POPCORN feature is a pre-programmed function
that uses the humidity sensor to automatically select the
correct cooking time.
NOTE: Use of the metal shelf with the popcorn pad is not
recommended.
This feature works best when the popcorn contents are in
the 1. 75 - 3.5 ounces range.
Maximum heating time is 4:10.
To Use Popcorn:
1. Remove the outer wrapper from the microwave popcorn.
2. Open oven door and place package of popcorn in the
center of the oven floor as directed by the manufacturer's
instructions. Close oven door.
3. Touch POPCORN pad. "POPCORN" appears on the
display . Oven turns on instantly .
4. The popcorn sensor automatically calculates the
cooking time. After the popcorn sensor detects steam,
the oven signals and displays remaining cooking time
needed.
5. When cooking is completed, the oven signals and
scrolls "FOOD IS READY". Open the door and remove the
popcorn.
How to adjust the Popcorn Program to provide a
shorter or longer cook time:
If popcorn is undercooked you can make an adjustment
by adding time.
- Touch the POPCORN pad and then touch number pad
9 once. The word "POP +" will appear on the display
adding 20 seconds to the cook time. If the 9 pad is
pressed for the second time "POP ++" will appear on
the display adding another 10 seconds for a total of 30
seconds.
If popcorn is overcooked you can make an adjustment by
subtracting time.
- Touch the POPCORN pad and then touch number pad
I once. The word "POP -" will appear on the display
subtracting 20 seconds to the cook time. If the I pad is
pressed for the second time "POP --" will appear on the
display subtracting another 10 seconds for a total of 3 0
seconds.
REHEAT
With this feature the oven automatically adjusts its
heating time to various types and amounts of precooked
food by sensing the steam that escapes as food heats. Do
not open the oven door while the word "REHEA T" IS
DISPLA YED, steam escaping will af fect oven performance.
REHEA T is an instant on function. No need to press start
after selecting REHEA T.
NOTE: Best results are obtained with foods you want to
steam or retain moisture (must be covered).
Maximum heating time is 5:00
13
Page 15

SENSOR COOKING
SINGLE FOOD AUTO COOK
Canned vegetables, frozen vegetables, fresh vegetables,
potatoes, fish fillets, chicken pieces and ground meats
are cooked with their own pad.
To Use Sensor Pads:
1. Place covered food in the oven and press the
matching pad. Oven starts immediately .
2. The oven signals when steam is sensed and
time remaining is counting down. It might be
necessary to turn or stir food.
3. When finished the oven will signal again and
the control will scroll "FOOD IS READY".
Note: Do not open the oven door until time is counting down,
sensor error message will be displayed. When using the
sensor assisted cooking codes, except for CANNED VEG
and FROZEN VEG, it is possible to adjust the oven cooking
time by 10%. (preference control).
Turntable on
Pad Max Time Serv limit
Canned Vegetables 5:30 4-16 oz
Frozen Vegetables 13:00 4-16 oz
Fresh Vegetables 8:00 4-16 oz
Potatoes 11:00 1/2-2lbs.
Fish 5:30 4-16 oz
Chicken Pieces 12:30 1-8 pieces
Ground Meat 7:30 1/2-3lbs
T urntable off
Pad Max Time Serv limit
Canned Vegetables 6:00 4-16 oz
Frozen Vegetables 13:00 4-16 oz
Fresh Vegetables 8:00 4-16 oz
Potatoes 11:00 1/2-2lbs.
Fish 5:30 4-16 oz
Chicken Pieces 12:00 1-8 pieces
Ground Meat 6:30 1/2-3 lbs
OPERATION
DESCRIPTION OF OPERATING SEQUENCE
The following is a description of component functions during
oven operation.
OFF CONDITION
Closing the door activates the door sensing and primary
interlock switches. (In this condition, the monitor switch
contacts are opened.) When oven is plugged in, 120 volts
A.C. is supplied to the smart board. The display panel lights
up for 15 seconds then "PLEASE PRESS CLOCK" scrolls.
Touch the CLOCK pad to set the clock and the oven is ready
for use. If power is disrupted at any time, the above sequence recurs, and you must reset the clock after touching
the CLEAR/OFF pad.
COOKING CONDITION
When the ST ART pad is touched the following occurs:
1. Relay contacts are closed and the following components
are turned on: Main Relay oven lamp/fan motor/stirrer motor
Power Relay power transformer
2. 120 volts A.C. is supplied to the primary winding of the
power transformer through the contacts of relay 2 and is
converted to about 3.3 volts A.C. output on the filament
winding, and approximately 2 100 volts on the high voltage
winding.
3. The filament winding voltage heats the magnetron
filament and the H.V. is sent to a voltage doubler circuit.
4. The microwave energy produced by the magnetron is
channeled through the wave guide into the cavity
feedbox, and then into the cavity where the food is to be
cooked.
5. Upon completion of the cooking time, the power
transformer, oven lamp, etc. are turned off and the
generation of microwave energy is stopped. The oven will
revert to the OFF condition.
6. When the door is opened during a cook cycle, the
monitor switch, door sensing switch, primary interlock
switch and power relay are deactivated with the following
results: The circuits to the cooling fan motor and the high
voltage components are deenergized, the oven lamp
remains on and the digital readout displays the time
remaining in the cook cycle when the door was opened.
7. The monitor switch electrically monitors the operation
of the primary interlock switch and the power relay and is
mechanically associated with the door so that it will
function in the following sequence: When the door opens,
the primary interlock switch, power relay and door
sensing switch open their contacts, then the monitor
switch contacts close.
14
Page 16

GRILLE REMOV AL
The top full-width grille is removable for service to some
components, such as: humidity sensor, oven light, door
removal, stirrer motor and flame sensor . To Remove Grille:
1. Disconnect oven power.
2. Remove Phillips-head screws (2) from grille.
3. Lift bottom of grille and push top of grille down to remove.
CONTROL P ANEL
The touch control panel is made up of the key panel and
control housing trim (I -piece) and the smart board. Touch
control will not be available as one complete assembly . If
necessary the key panels can be checked by a continuity
test.
To Remove T ouch Control:
1. Disconnect power and remove grille.
2. Remove I screw at top of control panel. Lift up on control
to release tabs.
3. Disconnect grounding screw and connectors.
4. Lift up on control to release hinge from mounting screw
(GE Models, others remove mounting screw).
CONTROL SMART BOARD (PCB)
Note: Most connectors are positive lock, check before pulling
wire The control smart board is located on the back of the
control panel. The smart board has 7 disconnect plugs and
they control the following:
CON. I -16 pin ribbon connector
CON. 2 -07 pin vent blower connection
CON. 3 -06 pin primary L.V .T. & main relay
CON. 4 -door sensing & probe connector
CON. 5 -gas sensor connector
CON. 6 -speaker and microphone connector (1460/1660)
Disconnect plugs can be used for diagnostic circuit tests.
To Remove Smart Board:
1. Disconnect power, put control in service position (open
door, remove I screw at top), and discharge capacitor.
2. Remove and mark connectors and leads from board.
3. Unscrew the 4 smart board mounting screws. Slide board
down to free from the 2 mounting tabs.
NOTE: Do not flex board.
TOUCH CONTROL PANEL ASSEMBLY TEST
The touch control panel assembly is divided into two
units, Touch Control Pad and Smart Board, and troubleshooting by unit replacement is described according to
the symptoms indicated.
1. Touch Control Pad.
The following symptoms indicate a defective touch
control pad:
a) When touching the pads, a certain pad produces no
signal at all.
b) When touching a number pad, two figures or more are
displayed.
c) When touching the pads, sometimes a pad produces
no signal.
NOTE.- If necessary touch control pad can be
checked with ohmmeter. (see page 4)
2. Smart Board
The following symptoms indicate a defective smart
board:
2-1 In connection with pads
a) When touching the pads, a certain group of pads do
not produce a signal
b) When touching the pads, no pad produce a signal.
2-2 In connection with indicators
a) At a certain digit, all or some segments do not light up.
b) At a certain digit, brightness is low.
c) Only one indicator does not light.
d) The corresponding segments of all digits do not light
up, or they continue to light up.
e) Wrong figure appears.
f) A certain group of indicators do not light up.
g) The figure of all digits flicker.
2-3 Other possible problems caused by defective
smart board
a) Buzzer does not sound or continues to sound.
b) Clock does not operate properly.
c) Cooking is not possible.
d) Proper temperature measurement is not obtained.
REMOVE SMALL GRILLE TO GAIN ACCESS TO
FUSE, SPEAKER, & CAPACITOR
15
Page 17

KEY P ANEL
The key panel has I ribbon connector on smart board.
If necessary , the key panel pads can be checked by a
continuity test.
For ease of handling, the key panel or control should be
removed and placed on a flat surface.
Part of the ribbon connections are on one side and the
remainder on the other side. Pad operation can be
checked between connections at end of ribbon (use high
Ohms scale). Use mini-manual to identify connectors.
To Replace Key Panel:
• Separate smart board and control trim/key panel asm.
• Replace with new control trim/key panel asm.
CONTROL TRANSFORMER
The control transformer is mounted on the smartboard.
TO SERVICE:
• Lower control panel and unplug leads to smart board.
• Remove smartboard and replace.
DOOR SENSING AND PRIMARY INTERLOCK
SWITCHES
The primary interlock switch is mounted to the plastic
switch bracket on the bottom, the monitor is in the
middle and the door sensing switch is mounted to the
upper portion of the plastic switch bracket.
The power relay is mounted on the smart board.
They are activated by the latch heads on the door. When
the door is opened, the switches interrupt the circuit to
all components, except the oven lamp. A cook cycle
cannot take place until the door is firmly closed thereby
activating both interlock switches. The primary interlock
system consists of the door sensing switch, primary interlock
switch and power relay .
MONITOR SWITCH
The monitor switch is operated (the contacts opened)
indirectly by the bottom latch pawl. The pawl operates a
cam switch, which in turn, actuates the monitor switch.
The switch is intended to render the oven inoperative by
means of blowing the monitor fuse when the contacts of
the primary interlock switch and power relay fail to open
when the door is opened.
Functions:
I . When the door is opened, the monitor switch contact
closes (to the ON condition). At this time the primary
interlock switch and power relay are in the OFF
condition (contacts open).
2. As the door goes to a closed position, the monitor
switch contacts are first opened and then the door sensing
switch and the primary interlock switch
contacts close. (On opening the door, each of these
switches operate inversely .)
EXHAUST
FAN MOTOR
REMOVE SCREW
DOOR SENSING SWITCH
*DOOR CLOSED 0 Ω
*DOOR OPEN Ω
MONITOR SENSING SWITCH
*DOOR CLOSED Ω
*DOOR OPEN 0 Ω
PRIMARY SWITCH
*DOOR CLOSED 0 Ω
*DOOR OPEN Ω
NOTE: REMOVE WIRES TO CHECK
CONTINUITY
TO LOWER
CONTROL
PANEL
0
0
0
0
0
0
16
Page 18

3. If the door is opened, and the primary interlock switch and
MICROPHONE
20 AMP FUSE
power relay contacts fail to open, the monitor fuse blows
simultaneously with closing of the monitor switch contacts.
CAUTION: Before replacing a blown monitorfuse, test the
primary interlock switch, door sensing switch, monitor switch
andpower relay contactsfor proper operation.
MONITOR/LINE FUSE
The fuse is an internal 20A fuse, see mini manual for test
procedure.
CAUTION: Before replacing a blown monitorfuse, test the
primary interlock switch, door sensing switch, monitor switch
andpower relay contacts for proper operation. If the
monitorfuse is blown by improper switch operation,
monitorfuse and switch must he replaced even if the monitor
switch operates normally .
PRIMARY INTERLOCK SYSTEM TEST
Disconnect the oven from power supply .
Door Sensing Switch
Isolate the switch and connect the ohmmeter to the common
(COM.) and normally open (NO) terminal of the switch, the
meter should indicate an open circuit with the door open and
a closed circuit with the door closed. If improper operation is
indicated, replace the door sensing switch.
Power Relay
Disconnect two (2) wire leads (plastic - squeeze) from the
male tab terminals on the printed wiring circuit board provided in the control panel assembly. The tab terminals are
located in the area of the circuit board on the component
side, and are connected to the contacts of the power relay.
Check the state of the relay contacts using an ohmmeter.
The relay contacts should be open. If the relay contacts are
closed, replace the circuit board entirely .
Primary Interlock Switch Test
Isolate the switch and connect the ohmmeter to the common
(COM.) and normally open (NO) terminal of the switch. The
meter should indicate an open circuit with the door open and
a closed circuit with the door closed. If improper operation is
indicated, replace the primary interlock switch.
DOOR SENSING SWITCH
*DOOR CLOSED 0 Ω
0
*DOOR OPEN Ω
0
MONITOR SENSING SWITCH
*DOOR CLOSED Ω
*DOOR OPEN 0 Ω
PRIMARY SWITCH
*DOOR CLOSED 0 Ω
*DOOR OPEN Ω
NOTE: REMOVE WIRES TO CHECK
CONTINUITY
0
0
0
0
17
Page 19

MONITOR SWITCH TEST
Disconnect the oven from power supply. Before performing
this test, make sure that the primary interlock switch and
the power relay are operating properly .
The monitor switch is located between the top and bottom
interlocks. The monitor switch is operated indirectly by the
bottom latch pawl.
HOW TO TEST MONITOR:
1. Disconnect power, open control panel, and discharge
capacitor.
2. Disconnect monitor switch leads, and test at terminals:
Door closed---some Ohms (infinity)
Door open--0 Ohms
3. Reconnect switch wiring.
4. Test Circuit Operation:
A) Connect temporary jumper across relay contacts and
primary switch to simulate shorted switch contacts. Locate
convienent connections in circuit to be certain COM and
N.O. terminals are used.
B) Connect OHM meter (LOW scale) across the two line
terminals of appliance power cord.
Continuity must show:
Door Closed--some Ohms
Door open-- 0 Ohms
C) Remove 20 Amp. Fuse --Circuit must open ( Ohms). If
not, check wiring of monitor and interlock circuits.
5. WARNING: After test, remove temporary jumpers and
reconnect monitor switch leads.
DOOR SENSING, PRIMARY INTERLOCK AND
MONITOR SWITCH REMOVAL
This procedure should be followed when replacing
switches, otherwise they could be damaged.
1. Disconnect oven from power supply and remove outer
case.
2. Discharge high voltage capacitor.
3. Disconnect wire leads from the switch(es).
4. Remove two screws holding the interlock bracket to
component compartment flange.
5. Lift latch switch bracket assembly to release catch on
bracket (top of bracket) to flange.
How To Adjust Interlocks:
The switch housing is adjustable for door fit and switch
operation.
1. Disconnect power, open control panel, and discharge
capacitor.
2. Loosen both switch housing mounting screws at enlarged
holes in vertical flange.
3. Adjust switch housing for proper switch operation, and
door fit. Retighten screws.
MICROW A VE LEAKAGE TEST
A microwave leakage test MUST BE PERFORMED an time
a door is removed, replaced, disassembled, or adjusted for
any reason. THE MAXIMUM LEAKAGE IS 4MW/CM
2
GUIDELINES FOR ADJUSTMENT OF DOOR
SENSING, PRIMARY INTERLOCK AND
MONITOR SWITCH
If the door sensing switch, primary interlock switch and
monitor switch do not operate properly due to a
misadjustment, the following adjustment should be made
1. Loosen the two (2) screws holding latch switch bracket
to the component compartment flange.
2. With door closed, adjust latch switch bracket by
moving it back and forth, and up and down. In and out
play of the door allowed by the upper and lower position
of the latch switch bracket should be less than 0.5mm
(.02"). The vertical position of the latch switch bracket
should be placed where the door sensing switch and
primary interlock switch have activated with the door
closed.
3. Firmly secure the screws with washers.
4. Check the door sensing switch operation. If the door
sensing switch has not activated with the door closed,
loosen screw and adjust the latch switch bracket.
After adjustment, check the following:
1. In and out play of door remains less than 0.5mm (.02")
when in latched position. First check upper position of
latch switch bracket, pushing and pulling upper portion of
door toward tile oven face. Then check lower portion of
the latch switch bracket, pushing and pulling lower
portion of the door toward the oven face. Both results
(movement of the door) should be less than 0.5mm
(.02").
2. The door sensing switch and primary interlock switch
interrupt the circuit before the door can be opened.
3. Monitor switch contacts close when door is opened.
4. Reinstall outer case and check for microwave leakage
around door with an approved microwave survey meter.
18
Page 20

DOOR ASSEMBLY
TOP HINGE
BOTTOM HINGE
DOOR
HINGE SCREWS
HINGE SCREWS
DOOR
The door assembly will be available as a complete
assembly with handle. The handle will also be available
as a separate part as will the rest of the door as seen in
the door breakdown.
TOP HINGE
BOTTOM HINGE
T o Adjust Door:
(Alignment with control panel)
1. Remove top grille - 2 screws.
2. Remove bottom panel - 3 screws at front.
3. Loosen top and bottom 5/16" hinge screws. The screw
holes are slotted to allow for minimal movement. Align door
and tighten screws.
5. Check interlocks and monitor for proper operation. Check
door for microwave leakage with approved meter .
To Remove Door:
1. Remove power, top grille and short out capacitor
2. Remove the 4 (2 on top & 2 on bottom) 5/16" head screws
on door hinges and #2 phillips head screw on top.
3. Door will pull away from unit with the hinges attached to
the door.
4. When reinstalling door reverse procedure and a
to the control panel before securing door hinge screws.
NOTE: Door on a microwave oven is designed to act as
an electronic seal preventing the leakage of microwave
energy from oven cavity during cook cycle. This
function does not require that door be airtight, moisture
(condensation) tight or light-tight. Therefore, occasional appearance of moisture, light or sensing of
gentle warm air movement around oven door is not
abnormal an do not of themselves, indicate a leakage of
microwave energy from oven cavity. If such were the
case, the oven could not be equipped with a vent, the
very purpose of which is to exhaust vapor-laden air
from oven cavity.
HINGE SCREWS
DOOR
DOOR
HINGE SCREWS
To Remove Door Handle:
With door open:
1. Remove inner door trim.
2. Remove door handle screws.
HANDLE
AVAILABLE
AS A
SEPARATE PART
19
Page 21

ANTENNA
A motor drives the antenna assembly and is located at the
top of the cavity . This oven uses a top feed wave guide. The
antenna blade rests on a depression inside the antenna
cover. An antenna motor shaft fits into the assembly to drive
it. When the antenna cover is removed the antenna slides off
the antenna motor shaft.
STIRRER
MOTOR
STIRRER
COVER
T o Remove the Antenna:
1. Carefully pry down, using a very small (pocket) flat
blade screwdriver, the push pin (fastener) located in
the antenna cover.
2. Turn the antenna cover counterclockwise, this will
free the tabs that are captured by the spaces built into
the ceiling.
ANTENNA (stirrer blade)
Can be accessed from
inside oven cavity by
removing stirrer cover.
GLASS
TURNTABLE
COUPLER
Coupler drive motor must
be removed prior to removing coupler
TURNTABLE
DRIVE MOTOR
T o Remove Antenna Motor:
1. Disconnect power and remove grille.
2. Remove antenna/light cover.
3. Release wiring to motor.
4. Remove two screws (snubby screwdriver) holding motor to
waveguide.
5. Lift and remove motor.
TURNTABLE
The turntable shelf is made of a ceramic type material and
the supporter ring that it rests on is plastic. The shelf also
sits on and is turned by the motor coupling, which can turn in
either direction. The turntable shelf must be used when using
oven. The turntable motor is mounted to the bottom of the
cavity . The bottom plate of the microwave covers the motor
and has to be lowered to gain access to the two screws that
secure motor .
TURNTABLE
SUPPORT
To Remove Turntable:
1. Disconnect oven from power supply .
2. Remove ceramic shelf and supporter from cavity .
3. Remove 3 screws securing bottom plate to unit and rotate
down.
4. Disconnect motor leads, two screws holding motor, motor
coupler will stay in oven.
5. When reinstalling motor it will have a "D" shaft on it that
will match the coupling.
NOTE: The turntable motor is 23V, and is NOT interchangeable with the antenna motor.
HIGH VOL TAGE CAPACITOR
The high voltage capacitor should always be discharged
by shorting a terminal with I or 2 screwdrivers or with I
screwdriver with a grounded wire attached. The capacitor
has an internal discharge "shunt" resistor, but this mechanical discharge procedure should always be followed
for personal safety.
If the capacitor is open, no high voltage will be available to
the magnetron. Disconnect input leads and check for
short or open between the terminal using an ohmmeter.
20
Page 22

Checking with a high ohm scale, if the high voltage capacitor is normal, the meter will indicate continuity for a short
time and should indicate an open circuit once the capacitor
is charged. If the above is not the case, check the capacitor
with an ohmmeter to see if it is shorted between either of the
terminals and case. If it is shorted, replace the capacitor.
To Replace Capacitor:
1. Disconnect power . Remove grille.
2. Discharge capacitor and disconnect leads.
3. Remove mounting screw that secures capacitor bracket.
4. Slide mounting bracket out of slot and pull out capacitor .
RECTIFIER/DIODE
The rectifier is located in the upper right hand portion of the
service area next to the capacitor . It can be checked for
continuity in one direction and an open in the opposite
direction (meter must be able to forward bias rectifier). If a
short is indicated in both directions, or if an infinite resistance is read in both directions, the rectifier is probably
defective and should be replaced.
WHITE WIRE
TO HV
TRANSFORMER
To Replace Rectifier/Diode:
1. Disconnect power. Lower control to service position.
2. Discharge capacitor and disconnect leads to capacitor.
3. Remove mounting screw that secures capacitor bracket
and diode ground screw .
4. Slide mounting bracket out of slot and pull out capacitor/
diode assembly .
5. Remove diode which is mounted to capacitor with one
screw.
THERMAL CUTOUTS (TCO'S)
There are 4 different thermal cutouts in this unit with 4
different purposes.
They are:
1. Oven thermal cutout (flame sensor), on cavity top.
2. Hood thermal cutout, inside control area on duct.
3. Bottom thermal cutout, on floor of control area.
4. Magnetron thermal cutout, on rnagnetron.
OVEN THERMAL CUTOUT (FLAME SENSOR)
The Oven Thermal cutout (Cavity TCO) is located on the top
side of the oven cavity , to the left of the humidity sensor by
the cavity exhaust. The thermal cutout is rated at 2120F.
(1000C) and is nonresettable. If thermal cutout opens, look
for cause. If there was a fire in the cavity all wiring must be
inspected to insure that insulation from the wires was not
burned or melted away .
1. Remove screw holding cover and remove cover .
2. Slide cutout from retaining clip and remove wiring.
NOTE: if this cutout opened there would only be power up to
lead from the fuse. Everything behind it would be dead.
HUMIDITY
SENSOR
STIRRER
MOTOR
ALL COMPONENTS REPLACEABLE WITHOUT
REMOVING OUTER CASE
REMOVE COVER TO
ACCESS STIRRER
MOTOR AND THERMAL
CUTOUT
CA VITY THERMAL
CUTOUT
21
BOTT OM THERMAL
CUTOUT
HOOD FAN
THERMAL
CUTOUT
Page 23

HOOD THERMAL CUTOUT
This cutout will protect the touch control from excessive heat
by turning the vent fan on at low speed. If the surface units of
the range are used for long periods of time heat will build up
and could damage the microwave control. In order to prevent
this a thermal cut out is installed on the duct behind the
control. This cutout will close (158'F- vent fan energized) and
open (104'F- vent fan de-energized) depending on temperatures it senses.
To Remove Hood Cutout:
1. Disconnect power and put touch control in service position.
2. Remove two wire leads and unscrew two screws capturing
cutout on duct.
NOTE: If this cutout were to open it would be difficult to
detect. The only time it functions is during an overheat
condition. It will he normally open when checked with an
ohmmeter.
BOTTOM THERMAL CUTOUT
During a fire on the stove the heat could be intense enough
to close the Hood Thermal Cutout and force the fan to run.
While at moderate high temperatures we do want it to run,
however during a fire it is advantageous to NOT have the
vent fan running. So if a fire were to start on the stove top the
Bottom Thermostat would open (248'F) and remove all power
to the microwave oven. This cutout is designed to not be
resettable.
To Remove Bottom Thermal Cutout:
1. Disconnect power and put touch control in service position.
2. Remove two wire leads and unscrew two screws holding
cutout to floor behind touch control.
NOTE: If this cutout were to open the microwave oven would
be totally dead. It is a normally closed cutout when checked
with an ohmmeter for continuity .
BOTTOM THERMAL
CUTOUT
WHITE WIRE
TO HV
TRANSFORMER
HOOD FAN
THERMAL
CUTOUT
MAGNETRON THERMAL CUTOUT
The magnetron thermal cutout is located above the leads to
the magnetron. It is designed to prevent damage to the
magnetron if an overheated condition develops in the tube
due to cooling fan failure, obstructed air ducts, dirty or
blocked air intake.
Under normal operation, the magnetron thermal cutout
remains closed. However, when abnormally high temperatures are reached within the magnetron, the magnetron
thermal cutout will open at 320F causing the oven to shut
down. After the temperature drops to 140OF it will reset and
cooking will be able to resume.
To Remove Magnetron Thermal Cutout:
1. See Removing Magnetron.
NOTE: The Mag TCO is wired across the neutral (return) leg
of the power to the board connector. Therefore, the board will
go dead but the vent fan and cooktop lights would still
operate if the TCO were to open.
22
Page 24

SENSOR
The sensor is a plug-in device located in the air exhaust
duct, behind the grille on the left side.
To Service:
1. Remove grille.
2. Separate retainer from receptacle and unplug sensor.
GAS SENSOR TEST
Microwave sensor cooking uses a special gas sensor which
detects both humidity (steam) and hydrocarbons (food
odors) during the cooking process.
Checking the initial sensor cooking condition:
1. The oven should be plugged in at least five minutes
before sensor cooking.
2. Room temperature should not exceed 95'F (350C).
3. The unit should not be installed in any area where heat
and steam are generated, for example, next to a conventional surface unit.
4. Exhaust vents are provided on the back of the unit for
proper cooling and air flow in the cavity . To permit adequate
ventilation, be sure to install so as not to block these vents.
There should be some space for air circulation.
5. Be sure the exterior of the cooking container and the
interior of the oven are dry . Wipe off any moisture with a dry
cloth or paper towel.
6. The Sensor works with food at normal storage temperature. For example, chicken pieces would be at refrigerator
temperature and canned soup at room temperature.
7. Avoid using aerosol sprays or cleaning solvents near the
oven while using Sensor settings. The sensor will detect the
vapor given off by the spray and turn off before food is
properly cooked.
8. After about 2 to 9 minutes if the sensor has not detected
the vapor of the food,
shut off.
ERROR
will appear and the oven will
SENSOR TEST (QUICK TEST)
1. With 2 fingers touch and hold the following pads at the
same time:
7 and 8
2. Observe diagnostic number in display (numbers approximate)
* 15-185 (Normal -verify with "detection test")
* 213 or higher (Sensor failed open, sensor unplugged,
wiring, or.smart board)
* Less then 6 (shorted sensor , or smart board)
NOTE: Only heater terminals (H) can be checked with
ohmmeter (30 Ohms).
CAUTION- DO NOT ATTEMPT TO CHECK
SENSOR TERMINALS (CAN DAMAGE SENSOR).
23
Page 25

SENSOR DETECTION TEST
1. Place 1/3 cup tap water in oven.
2. Touch VEGET ABLE (jvm1660), oven starts immediately.
POPCORN (jvm1650)
3. Control beeps and shuts off.
4. Touch CLEAR/OFF
A) Test OK--Normal
B) Test Fails--Check Sensor. (see quick test previous page)
PROBE RECEPTACLE
Receptacle is located on right hand side of cavity . The probe
is a sensor that has a thermistor swagged in the tip of a
stainless steel tube. The probe can be checked by using an
ohmmeter . If inserted into a container of hot water the
resistance will visibly drop.
To remove probe receptacle:
1. Disconnect power, put touch control in service position.
2. Remove black access cover (2 screws).
3. Remove nut from inside cavity .
4. Unplug wiring from smart board and remove.
THE FOLLOWING COMPONENTS REQUIRE
REMOV AL OF MICROWAVE OVEN FROM
CABLE
END
HANDLE
SENSOR
INST ALLATION FOR SERVICING.
VENT EXHAUST BLOWER SERVICE
The blower is a two speed (HI-LO) capacitor run blower
assembly located on top of the spacemaker. The blower is
operated by relays located on the smart board.
The blower motor has 3 windings which can be tested for
continuity from the front by removing the top grille and
opening the control panel.
To Test Blower Windings:
1. Disconnect power and remove grille.
2. Open control panel and discharge capacitor.
3. Disconnect two wires to run capacitor. Continuity test
across the two wires should be approximately 75 ohms of
resistance. This test allows you to read across all three
windings at the same time.
To Remove Vent Blower:
1. Remove unit from its installation.
2. Remove 1 screw under damper , and 2 screws on
rear.(1400 series).
3. Remove 1 screw under damper and 1 screw on rear (1600
series).
3. Disconnect blower plug.
NOTE: Place blower wires in routing slots to avoid pinching
of wires.
24
Page 26

RUN CAP ACITOR
The run capacitor is located behind the control panel. The
capacitor is used for more torque and electrical phasing.
Without the capacitor the blower might run but would
be much slower.
To Test the Capacitor:
1. Remove grille, discharge capacitor and disconnect one
capacitor lead.
2. Make capacitor check (with analog meter - needle should
rise & fall, cap is charging then discharging).
EXHAUST
FAN MOTOR
REMOVE SIDE PANEL TO
ACCESS HI-VOLTAGE
TRANSFORMER AND
MAGNETRON
MAGNETRON & HV TRANSFORMER
ARE MOUNTED BEHIND BLOWER
MOTOR. (NO FRONT ACCESS)
FAN TCO
EXHAUST FAN
CAPACITOR
REMOVE SCREW
TO LOWER
POWER TRANSFORMER
CONTROL
PANEL
REPLACEMENT
The high voltage power transformer
can be serviced by
removing unit from its installation.
Remember, discharge the high voltage capacitor!
There are very dangerous high voltages present at the high
voltage terminal. Do not attempt to measure the filament or
high voltage
Check power transformer by making continuity checks
across the filament, primary , and secondary windings. All of
them should have continuity .
To Replace Power Transformer:
1. Remove unit from installation.
2. Remove 4 screws that mount HV transformer to cavity.
3. Swing out bracket.
4. Lower vertical housing.
5. Detach wires including HV transformer .
6. Remove 4 screws that mount HV transformer.
TURNTABLE
MOTOR
RECEPTICALS
FOR COOKTOP
LIGHT
4 MOUNTING
SCREWS FOR
HV TRANSFORMER
4 MOUNTING
SCREWS FOR
HV TRANSFORMER
MAGNETRON F AN
The magnetron fan motor drives a blade which draws in
cool external air. This cool air is directed through the air
vanes surrounding the magnetron and cools the mag
assembly. Most of the air is then exhausted directly
through the vents. The magnetron blower is located
behind the magnetron and above the high voltage transformer.
To service this component unit must be removed from
installation and cover removed.
MAGNETRON
BLOWER
MOTOR
To Replace Magnetron Fan:
I .Disconnect power , remove adapter assembly if
vertical exhaust.
2. Follow steps 1-5 in removing power transformer.
3. Disconnect motor leads and ground wire.
4. Remove plastic housing - I screw at top middle and
release tabs in front by the latch switches.
5. Disconnect 120V supply to HV transformer .
6. Remove two screws holding fan housing in place.
25
Page 27

MAGNETRON
The magnetron location is on the side of the cavity with a top
waveguide. The magnetron thermal cutout will still be attached to the side of the mag by two screws. It is resettable.
MAGNETRON ASSEMBL Y TEST
High voltages are present during the cook cycle, so extreme
caution should be observed. Disconnect oven from power
supply and discharge the high voltage capacitor before
touching any oven components or wiring.
To test for an open filament, isolate the magnetron from the
high voltage circuit. A continuity check across the magnetron
filament leads should indicate less than I ohm.
To test for a shorted magnetron, connect the ohmmeter leads
between the magnetron filament leads and chassis ground,
This test should indicate an infinite resistance. If there is little
or low resistance the magnetron is grounded and must be
replaced.
To Replace Magnetron:
1. Disconnect power, remove adapter assembly if vertical
exhaust.
2. Follow steps 1-5 in removing power transformer. HV
transformer must be removed to remove magnetron. (see
REMOVING HV TRANSFORMER)
3. Disconnect magnetron wiring.
4. Loosen top black plastic duct to gain access to 4 Magne-
tron mounting screws and remove screws.
5. Release the front tab of the magnetron fan housing and
remove magnetron.
6. Transfer side mounting bracket to new magnetron.
CAUTION! During replacement, be certain R.F. anode gasket
is in place around anode stub. PERFORM MICROWA VE
LEAKAGE TEST .
REMOVE SIDE PANEL TO
ACCESS HI-VOLTAGE
TRANSFORMER AND
MAGNETRON
MAGNETRON & HV TRANSFORMER
ARE MOUNTED BEHIND BLOWER
F AN TCO
EXHAUST FAN
CAPACITOR
MOTOR. (NO FRONT ACCESS)
26
Page 28

POWER PERFORMANCE TEST
1. Measure line voltage (loaded). This test is based on normal voltage variations of 105V to 130V. Low voltage will
affect power and temperature rise. 2. Place WB64X0073 Beaker containing exactly one liter (1,000m 1) 59'F-75'F
water in center of shelf. Record the starting water temperature with an accurate glass thermometer. 3. Set at high
(power level 10) and set time for 2 minutes and 3 seconds. Touch ST ART.
27
Page 29

SERVICING TROUBLESHOOTING GUIDE
When troubleshooting the microwave oven, it is helpful to
follow the Sequence of Operation in performing the
checks. Many of the possible causes of trouble will require
that a specific test be performed. These tests are given a
procedure letter which will be found in the "Test Procedure" section.
IMPORT A NT: If the oven becomes inoperative because
of a blown monitor fuse in the monitor switch, primary
interlock relay and secondary interlock switch circuit,
check the monitor switch, primary interlock relay , door
sensing switch and secondary interlock switch before
replacing the monitor fuse.
28
Page 30

WIRING DIAGRAM 1400 SERIES
29
Page 31

SCHEMATIC DIAGRAM
SCHEMATIC DIAGRAM
POWER MUST BE DISCONNECTED
BEFORE SERVICING THIS APPLIANCE
MODEL NO.: JVM1450, JVM1460
W ARNING
30
Page 32

WIRING DIAGRAM 1600 SERIES
31
Page 33

SCHEMATIC DIAGRAM 1600 SERIES
SCHEMATIC DIAGRAM
W ARNING
POWER MUST BE DISCONNECTED
BEFORE SERVICING THIS APPLIANCE
MODEL NO.: JVM1650, JVM1651, JVM1660
32
Page 34

JVM1460 Parts View
33
Page 35

34
Page 36

35
Page 37

36
Page 38

37
Page 39

38
Page 40

39
Page 41

40
 Loading...