

Page 1
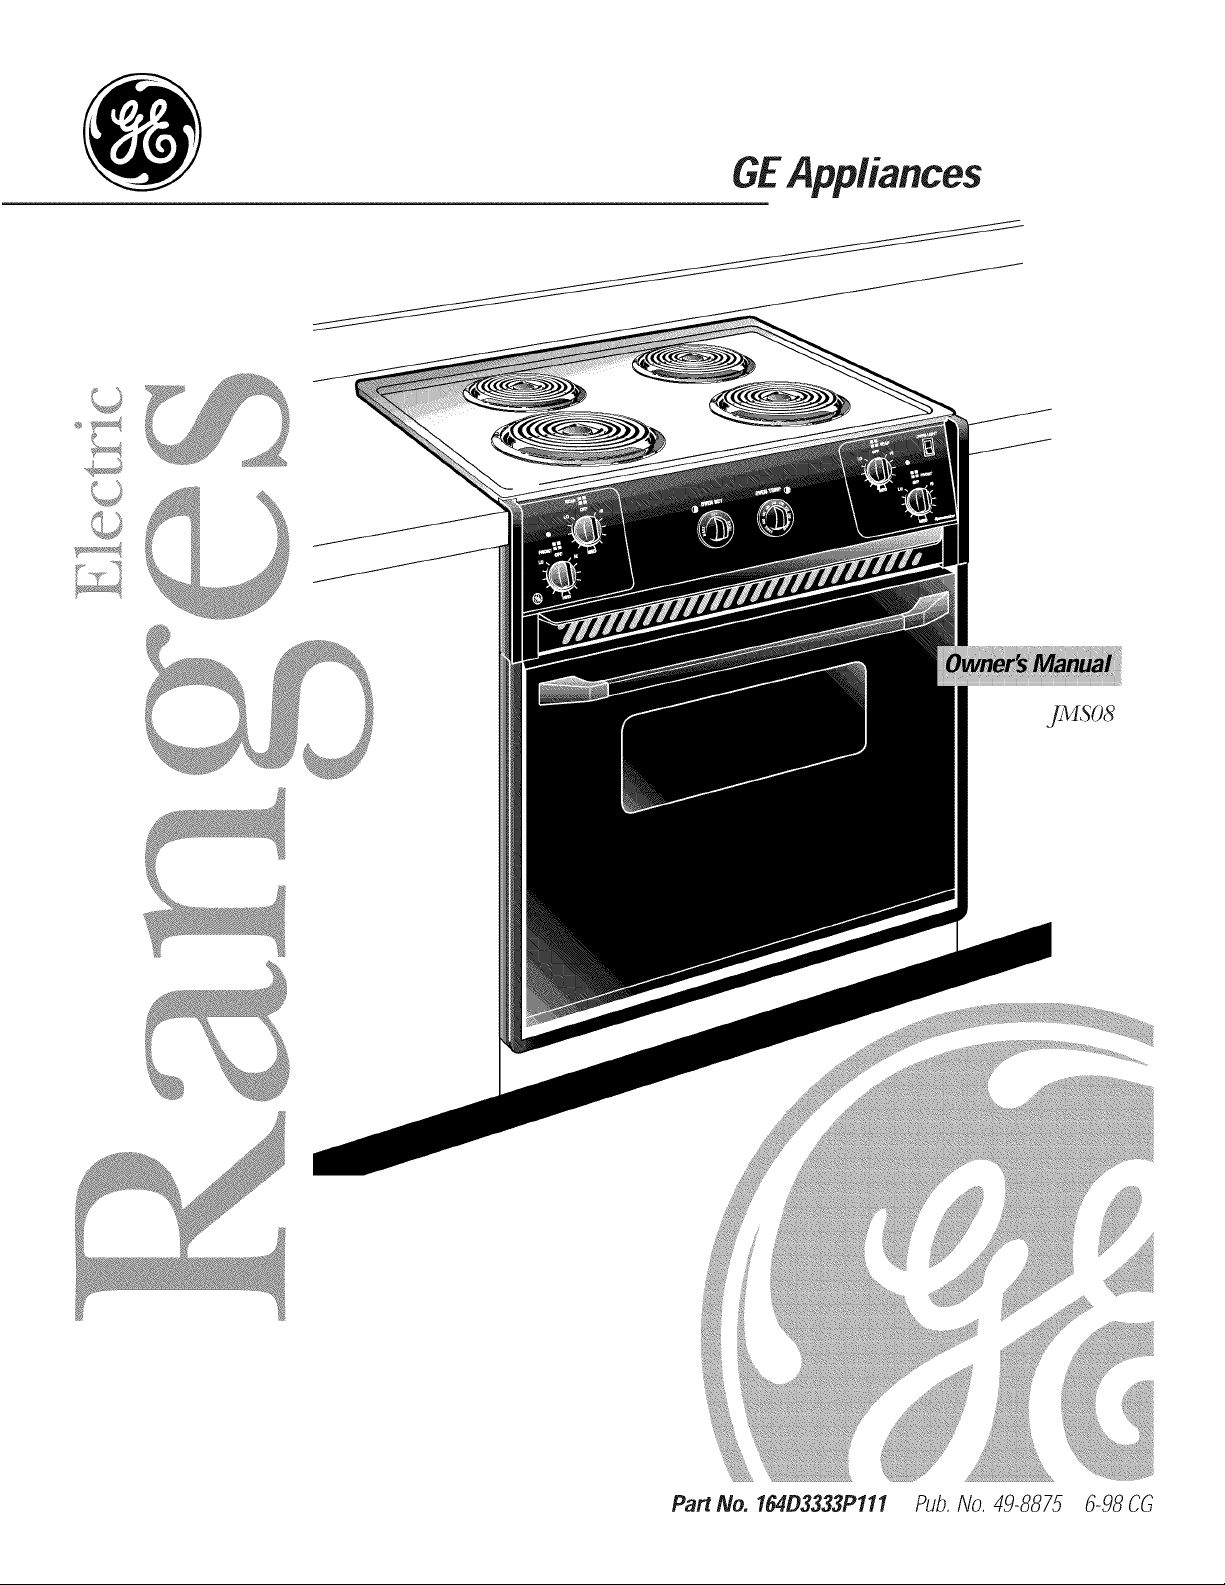
GEAppliances
JMS08
Part No. 16403333Plll Pub.No. 49-8875 6-98CO
Page 2
Safety Information
SafetyPrecautions ...... 3,4
Oven .................... 4
SurfaceCookingUnits ...... 5
Operating instructions
Usingthe SurfaceUnits ..... 6
Usingthe Oven ......... 7,8
Usingthe Clockand Timer 9, 70
OvenThermostat........ tl
Congratulations!
YouAre Now Part of the GEFamily.
Welcome to tt_e GE fhmily. We're proud of our qualib: products and we are
committed to provkting dependable ser_ice. You'll see it in tills easy-to-use Owner's
Mamtal and you'll hear it in the fliendly voices of our customer ser_ice department.
Best of all, you'll experience tt_ese values each dme you use your range. That's
important, because your new range x,_411be part of your family for many years.
And we hope you _11 be part of ours for a long time to come.
We thank you if)r buying GE. We appreciate your purchase, and hope you x_ll
condnue to rely on us whenever you need quali Wappliances fbr your home.
You,A ServicePartnership,
IMPORTANT!
Fill out and remm tt_eConsumer Product Registration Card tl_at is
packed _th this product.
CareandCleaning
Lift-Off OvenDoor ........ 13
OvenLight .............. 13
BroilerPanN Grid ....... 14
SurfaceUnits ............ 15
Lift-UpCooktop.......... 75
Troubleshooting Tips
Before YouCall
ForService........... 76_17
Customer Service
Warranty ............... 19
ServiceTelephone
Numbers ........ BackCover
FORYOURRECORDS
Write themodel andserial numbershere:
#
#
You can find them on a label behind the range door.
Staple sales slip or cancelled check here.
Proof of tt_e original pro'chase date is needed to obtain se_4ce under
tt_ewin'ran W.
READTHISMANUAL
Inside you will find many helpfld hints on how to use and maintain
your range properly.Just a little preventive care on your part can sm,e
you a great deal of dme and money over the life ofyour range.
You'll find many answers to common problems in the Before YouCall
For.Service section. If you review our chart of Troubleshooting Tips
first, you may not need to call if)r sec_ice at all.
IFYOUNEEDSERVICE
If you do need setYice, you can relax knowing help is only a phone
call away. A list of toll-fl'ee customer seta4ce mtmbers is included in
tt_e back section of tills manual. Or you can always call tt_e GE Answer
Center ®at 800.626.2000, 24 hours a day, 7 days a week.
2
Page 3

IMPORTANTSAFETYINFORMATION.
READALLINSTRUCTIONSBEFOREUSING.
WARNING!
Foryour safety, the information in this manual must be followed to minimize the risk of fire or
explosion, electric shock, or to prevent property damage, personal injury, or loss of life.
SAFETYPRECAUTIONS
When using electrical appliances, basic safety precautions should be followed, including the following:
Use this appliance only for its intended
purpose as described in this O_v_mr's
Manual.
Be sure your appliance is properly installed
and _ounded by a qualified technician in
accordance with the provided installation
instructions.
Do not attempt to repair or replace any
part of your range unless it is specifically
recommended in this manual. All other
sei_4cing should be refened m a qualified
technician.
Do not store flammable materials in an
oven or near the cooktop.
@ Have the installer showyou the location of
the circuit breaker or fuse. Mark it for easy
reference.
@Before performing any seis4ce, disconnect
the range power supply at the household
disuibution panel by remox4ng the fuse or
switching off the chcuit breaker.
@Do not leave children alone-children
should not be left alone or unattended in
an area where an appliance isin use. They
should never be allowed to sit or stand on
any part of the appliance.
@Do not allow anyone to climb, stand or
hang on the door or cooktop. They could
damage the range and cause severe
personal injmT.
Teach children not to playwith the
controls or any other part of the range.
@CAUTION:Items of interest to children
should not be stored in cabinets above a
range-children climbing on the range to
reach items could be seriously injured.
Keep the hood and grease filters clean
to maintain good venting and to avoid
grease fires.
Do not use water on grease fires. Never
pick up a flaming pan. Turn the controls
off. Smother a flaming pan on a surface
unit by covering the pan completelywith a
well-fitting lid, cookie sheet or fiat tray. Use
a multi-purpose dU chemical or foam-type
fire extinguisher.
Flaming grease outside a pan can be put
out by covering it with baking soda or, it
availat)le, by using a multi-purpose dU
chemical or foam-type fire extinguisher.
Flame in the oven can be smothered
completely by closing the oven door and
turning the oven offor by using a multi-
purpose dU chemical or foam-type fue
extinguisher.
Do not store or use combustible materials,
gasoline or other flammable vapors and
liquids in the vicinity of this or any other
appliance.
Do not touch the surfhce units, the heating
elements or the interior surface of the
oven. These surfaces may be hot enough m
burn even though they are dark in color.
During and after use, do not touch, or let
clothing or other flammable materials
contact, the surface units, areas nearby the
surface units or any interior area of the
oven; allow sufficient time for cooling Inst.
Potentially hot surfhces include the
cooktop, areas facing the cooktop, oven
vent opening, surfaces near the opening,
crevices around the oven door and metal
trim parts above the door.
REMEMBER: The inside surfhce of the oven
may be hot when the door is opened. 3
Page 4
IMPORTANTSAFETYINFORMATION.
READALLINSTRUCTIONSBEFOREUSING.
WARNING!
SAFETYPRECAUTIONS
IZ ........................................i.......
....Never wear loose4itting or hanging
garments while using the appliance. Be
careful when reaching for imms stored over
the range. Flammable material couM be
ignited it brought in contact with hot
surface units or headng elements and may
cause severe burns.
@ Use only di T pot holders-moist or damp
pot holders on hot surfaces may result in
burns from steam. Do not let pot holders
touch hot surface units or heating elements.
Do not use a towel or other bulky cloth.
@For your safety, never use your appliance
for warming or heating the room.
OVEN
@Stand away from the range when opening
the oven door. Hot aft or steam which
escapes can cause burns to hands, face
and/or eyes.
@Do not heat unopened food containers.
Pressure could build up and the container
could burst, causing an injm T.
@ Keep the oven vent unobstructed.
@ Keep the oven free from _ease buildup.
N Do not let cooking gqease or other
flammable materials accumulate in
or near the range.
@Never leave jars or cans of fat dripping
in or near your range.
N Ahvays keep dish towels, dish cloths, pot
holders and other linens a safe distance
from your range.
!'_:_Always keep wooden and plastic utensils
and canned food a safe distance from
your range.
!'_:_Always keep combustible wall coverings,
curtains or drapes a safe distance from
your range.
@When using cooking or roasting bags in the
oven, follow the manufacturer's directions.
N
Do not use the oven to dI T newspapers.
If overheated, they can catch on fire.
@
Do not use the oven for a storage area.
Items stored in an oven can ignite.
N
Do not leave paper products, cooking
utensils or food in the oven when not
in use.
@ Place the oven shelf in the desired position
while the oven is cool. ff shelves must be
handled when hot, do not let pot holder
contact the heating elements.
N Pulling out the shelf to the stop-lock isa
convenience in lilting heaxT foods. It is also
a precaution against burns from touching
hot surfaces of the door or oven walls.
@Alter broiling, ahvays take the broiler pan
out of the range and clean it. Leftover
_ease in the broiler pan can catch on
fire the next time you use the pan.
N Do not use aluminum foil to line oven
bottoms, except as suggested in this
manual, hnproper installation of
aluminum foil may result in a risk of
electric shock or fire.
COOKMEATANDPOULTRYTHOROUGHLY...
Cookmeat andpoultry thoroughly--meat toat leastINTERNAL760°F.andpoultry toat least INTERNAL180°E
4
Cookingto theseinternaltemperaturesusuallyprotectsagainstfoodbomeillness.
Page 5
SURFACECOOKINGUNITS
Use proper pan size--select cookware having flat bottoms large enough to cover the surface unit
heating element. Theuse of undersized cookware will expose aportion of the surface unit to direct
contact and may result in ignition of clothing. Proper relationship of cookware to surface unit will
also improve efficiency.
Never leave the surfhce units unattended at
high heat settings, goilovers cause smoking
and greasy spillovers that may catch on fue.
Do not use aluminum fbil m line the drip
pans or anywhere in the oven except as
described in this manual. Misuse could
result in a shock, fire hazard or damage to
the range.
Be sure tire drip pans and tire vent duct are
not covered and are in place. Their
absence during cooking could damage
range parts and wiring.
@ Only certain types of glass, glass/ceramic,
earthenware or other glazed containers
are suitable for cooktop sei_4ce; others
may break because of the sudden change
in temperature.
@To minimize the possibility of burns,
ignition of flammable materials and
spillage, the handle of a container should
be turned toward the center of the range
without extending over nearby surface
units.
@Ahvays turn the surface units offbefore
removing cookware.
Do not immerse or soak the removable
surface units. Do not put them in a
dishwasher.
When flaming foods are under the hood,
turn the fan off. The fan, it operating, may
spread the flame.
@Ahvays heat fht slowly, and watch as it heats.
To avoid the possibility of a burn or electric
shock, ahvays be certain that the controls
for all surface units are at the OFFposition
and all coils are cool before attempting to
lilt or remove a unit.
(]lean the cooktop with caution, ff a wet
sponge is used to wipe spills on a hot
cooktop, be careful to avoid steam burns.
@
Keep an eye on foods being flied at high
or medium high heat settings.
@Foods for flying should be as diy as
possible. Frost on fiozen foods or moisture
on flesh foods can cause hot fat m bubble
up and over the sides of the pan.
@Use little fat for effective shallow or deep
fat flying. Filling the pan mo full of fat can
cause spillovers when food is added.
ff a combination of oils or fats will be used
in flying, sth together before heating, or as
fats melt slowly.
Use a deep fat thermometer whenever
possible to prevent overheating fat beyond
the smoking point.
@Carefully watch for spillovers or
overheating of foods when flying at high
or medium high temperatures.
@Never UT to move a pan of hot fat,
especially a deep tat flyer. Wait until the
fat is cool.
Do not allow water, other liquids or
grease to remain on the cooktop or
the control panel.
Readandfollow thisSafet' Informationcarefull,
8,4VETHESEINSTRUCTIONS
5
Page 6
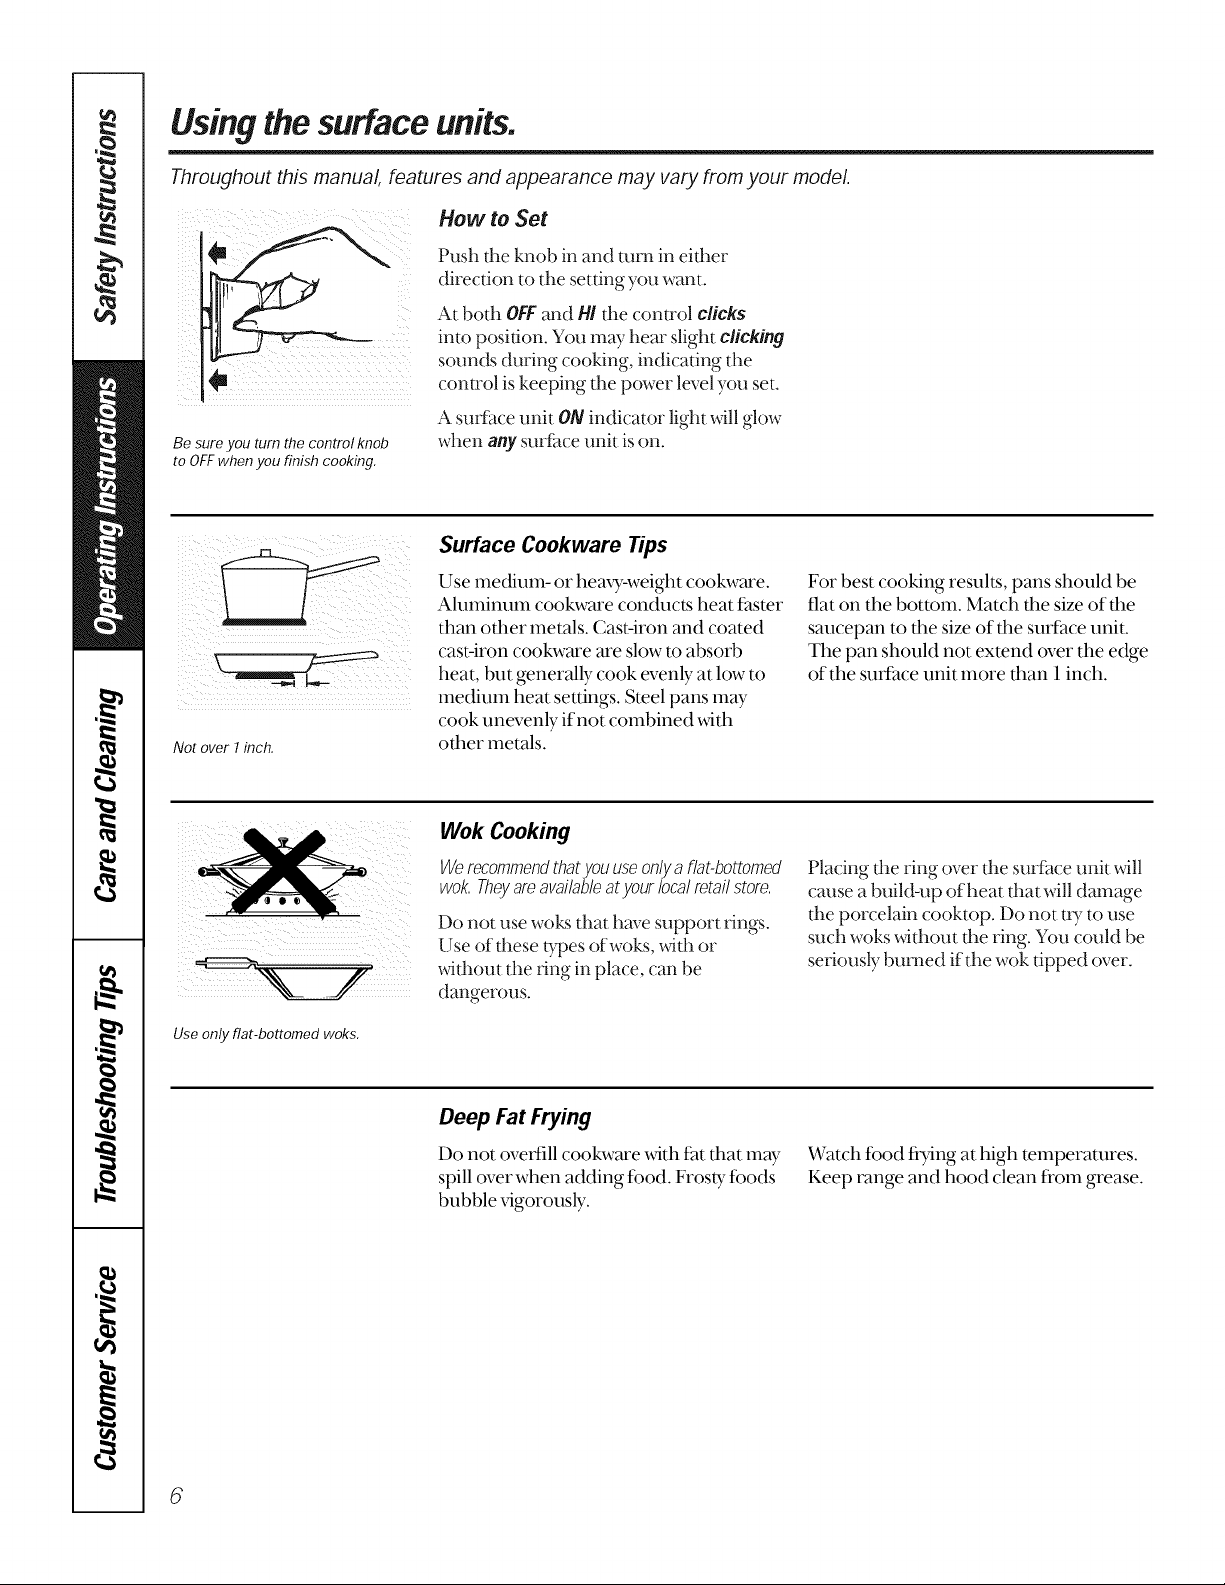
Using the surface units.
Throughout this manual, features and appearance may vary from your model.
How to Set
Push the knob in and urn1 in either
direction to the setting you want.
At both OFFand HI the control clicks
into position. You may hear slight clicking
sounds during cooking, indicating the
control is keeping the power level you set.
A sur[hce unit ON indicator light will glow
Be sureyou turn the control knob
to OFFwhen you finish cooking,
when any surf:ace unit is on.
Surface Cookware Tips
Not over 1inch,
Use only flat-bottomed woks,
Use medium- or hem)_-weight cookware.
Ahuninum cookware conduct_s heat faster
than other metals. Cast-iron and coated
cast-iron cookware are slow to absorb
heat, but generally cook evenly at low to
medium heat settings. Steel pans m W
cook unevenly if not combined with
other metals.
Wok Cooking
Werecommendthatyouuseonlya flat-bottomed
wok,Theyamavailableatyourlocalretailstore,
Do not use wok.sthat hm_esupport rings.
Use of these bqoes ofwoks, with or
Mthout the ring in place, can be
dangerous.
Deep Fat Frying
Do not ovet_ill cookware _4th fat that may
spill over when adding food. Frosty foods
bubble vigorously.
For best cooking resuh_s, pans should be
flat on the bottom. Match the size of the
saucepan to the size of the surface unit.
The pan should not extend over the edge
of the smI:ace unit more than 1inch.
Placing tim ring over tim surfime unit Mll
cruise a build-up of heat flint will damage
the porcelain cooktop. Do not tU to use
such woks Mthout the ring. You could be
seriously burned if the wok tipped over.
Watch food flying at high temperatures.
Keep range and hood clean fi'om grease.
6
Page 7

Usingtheoven.
Toavoid possible bums, place the shelves in the desired position before you turn the oven on.
Before you begin...
Theoven has 4 shelf positions,
OVEN SET OVEN TEMP
I I
T'
The shelves have stop-locks, so that when
placed correctly on tl_e supports, they will
stop befbre coming completely out, and
Mll not tilt.
Toremove a sheff, pull it toward you, tilt
the front end tip and pull it out.
Toreplace, place the end of the shelf
(stop-locks) on the support, tih tip the
When placing and removing cookware,
front and push tl_e shelf in.
pull the shelf out to the bump on the
shelf support.
Oven Control Knobs
Yourrangehastwoovencontrolknobs,
The OVENSETknob has settings for
BROIL,TIMEDBAKE,BAKE and OFF.
The oven (.3"clinglight glows until the
oven reaches your selected temperature,
then goes offand on with the oven
element(s) during cooking.
The OVEN TEMP knob maintains the
temperature you set, fl'om WM (150°E)to
BROIL(550°F.).
How to Set the Oven for Baking or Roasting
[-fl] Turn the OVENSET knob to BAKE
and the OVEN TEMP knob to the
temperature you desire.
Typeof Food Shelf Position
Frozenpies(oncookiesheet) BorC
Angelfoodcake, A
Check fbod far doneness at
minimum time on recipe. Cook
longer ifnecessapy.
t-j] Turn the OVENSET knob to OFF
when cooking is complete.
bundtorpoundcakes
Biscuits,muffins,brownies, BorC
cookies,cupcakes,
layercakes,pies
Casseroles BorC
Cut slits in the foiljust like the grid,
Preheating and Pan Placement
Preheat the oven if dm recipe calls fbr it.
To preheat, set the oven at the con'ect
temperaulre. PreheaOng is necessa U for
good results when baking cakes, cooldes,
pas W and breads.
Forovenswithoutapreheatindicatorlightor
tone,preheat70minutes,
Aluminum Foil
You can use ahuninum [bil to line the
broiler pan and broiler grid. However,
you must mold the foil tightly to the grid
and cut slit.sin itjust like the grid.
Aluminum toil may also be usedto catch a
spillover
Baking results Mll be better if baking pans
are centered in the oven as much as
possible. Pans should not much each
other or d_e walls of the oven. If you need
m use two shelves, stagger the pans so one
is not directly above tl_e odmr, and leave
approximately 1½"between pans, from
dm front, back and sides of din wall.
Never entirely cover a shelf with
ahuninum foil. This,_411disturb the heat
circulation and result in poor baking.
A smaller sheet offbil may be used to
catch a spillover by placing it on a lower
shelf several inches below the food. 7
Page 8

Usingtheoven.
Toavoid possible bums, place the shelves in the desired position before you turn the oven on.
How to Set the Oven for Broiling
Leave the door open to the broil
stop position. The door stays open
by itself, yet the proper temperature
is maintained in the oven.
Place the meat orfish on the broiler
_'id in the broiler pan.
Follow suggested shelf positions in
the Broiling Guide.
Ifyourovenisconnectedto 208volts,mmsteaks
maybebroiledbypreheatingthebroilerand
positioningtheovenshelfonepositionhigher
Broiling Guide
Shelf
Position
C
C
C
C
C
C
A
C
B
C
C
C
B
Food
Bacon
Ground Beef
Well Done
Beef Steaks
Rare
Medium
Well Done
Rare
Medium
Well Done
Chicken
Lobster Tails
Fish Fillets
Ham Slices
(precooked)
Pork Chops
Well Done
LambChops
Medium
Well Done
Medium
Well Done
Quantity and/
orThickness
1/2 lb.
(about8thin slices)
1 lb. (4patties)
1/2to 3/4" thick
1" thick
1to 11/zIbs.
11/2"thick
2 to 21/2Ibs.
1 whole
2 to 272 Ibs.,
split lengthwise
2-4
6to 8oz.each
1/4to 1/2" thick
1" thick
2(1/2" thick)
2(1" thick) about 1 lb.
2 (1" thick) about 10
to 12 oz.
2 (11/z'' thick) about 1 lb.
[-_ Turn bod_ the OVENSETand OVEN
TEMPknobs to BROIL.
_] When broiling is finished, mm the
OVENSETknob to OFF.
First Side
Time (rain.)
41/2
10
6
8
12
10
15
25
35
13-16
10
13
lO
12
14
17
Second Side
Time (rain.)
4V2
5
6
11
7-8
14-16
20-25
10-15
Do I/or
turn
over.
10
13
9
10
12
12-14
Comments
Arrange in single layer.
Space evenly. Up to 8
patties take about the
same time.
Steaks less than 1"
thick cookthrough
before browning. Pan
frying is recommended.
Slash fat.
Reducetime about5
to 10minutesper side
for cut-upchicken.
Brusheachside with
meltedbutter.Broil
skin-side-downfirst.
Cutthroughbackof
shell.Spreadopen.
Brushwith melted
butterbefore broiling
andafter halfof
broilingtime.
Handleandturn very
carefully.Brushwith
lemonbutterbefore
andduringcooking,if
desired.Preheat
broilerto increase
browning.
Increasetime 5 to 10
minutespersidefor
17/' thick or home-
curedham.
Slashfat.
Slash fat.
8
Page 9

Automatictimersand clock. (onsom mod ls)
Theautomatic timers and clock onyour range are helpful devices that serve several purposes.
12
IFF_
ToSet the CIock
To set the clock, push the center knob in
and mm the clock hands clock,_ise to the
cotr'ect time.
NOTE:The minute timer pointer will
move also; let the knob out and mm the
umer pointer to OFF.
ToSet the Minute Timer
The minute tilner has been combined
_ifll the range clock. Use it to time all
your precise cooking operations. You _411
recognize the minute timer as the pointer
which is different in color and shape than
the clock hands.
To set the minute timer, mrn the center
knob counterclock_4se, without pushing
in, until the pointer reaches the number
oflninutes you _4sh m time. (Minutes are
lnarked, up m 60, in the center ring on
the clock.)
At theendofthesettime,abuzzersoundstotell
youtimeisup.Turntheknob,withoutpushingin,
untilthepointerreachesOFFandthebuzzerstops.
STOPTIME DELAYSTART
..,%'¢% ..,,,"_,_',,,,_
5 _ 6
PUSH TO TURN
Timed Baking Uses the Automatic Timers
Using the automatic timers (the DELAY
STARTand STOPTIMEdials), you can
setyour oven to turn on and off
automatically. See the Using the timed
bakingandmastingfeatures section.
Questions and Answers
How can I use the minute timer to
make the smI:ace cooking easier?
The minute timer will help you time
%
total cooking, which includes time to
boil food and change temperatures.
Do not judge cooking tilne byvisible
steam only. Food will cook in covered
containers even though you can't see
aW steam.
@Must the clock be set on correct time
of day when I wish to use the
automatic timers fbr baking?
Yes, ifyou wish to set the DELAY
%
STARTor STOP TIMEdials to turn on
and offat set times during timed
flmctions.
NOTE:Bdbre beginning, make sure the
oven clock shows the correct time of day.
Can I use the minute timer during
@
oven cooking?
The minute timer can be used
%
during aW cooking fimction. The
automatic timers (DELAYSTARTand
STOP T/MEdials)are used with the
TIMEBAgEfunction only.
(;an I change the time of day on
@
the clock while I'm Time Baking
in the oven?
The time of day on the clock should
%
not be changed during any pro_'mn
that uses the automatic timer. You
must either stop those pro_'mns or
wait until they are finished before
changing the time.
9
Page 10

Usingthetimedbakingandroastingfeatures. (onsomemodels;
NOTE:Foods that spoil easily-such as milk, eggs, fish, stuffings, poultry and pork-should not be aflowed to sit for
more than I hour before or after cooking. Room temperature promotes thegrowth of harmful bacteria. Be sure that
the oven light is off because heat from the bulb will speed harmful bacteria growth.
Toavoid possible burns, place the shelves in the correct position before you turn the oven on.
S,OP.MEOELA'TA"Tx l_"
<,,',"1_"/,3 <,,',"_lz",',% ",.,_'-_0 60 _"
PUS_TOTU_ _:
OVE_I SET OVENITEMP
g
How to Set an immediate Start and Automatic Stop
Theoven will turnon immediatelyand cookfor a
selectedlength of time,At theendof the cooking
time the ovenwill turn off automaticall_
Make sure the clock shows the correct
time of day.
NOTE:To start cooking immediately and
mrn off automatically, you must mrn the
OVENSET knob to TIMEDBAKE.
To set the stop time, push in the
%
knob on the STOP TIME dial and mrn
the pointer to the ume of dayyou
want the oven to turn of[:, fbr
exmnple 6:00. The pointer on the
DELAY START dial should be at the
same time of day asthe clock.
Both the oven set and the oven q_cling
lights xdll come on.
The oven will start immediately, continue
to cook for the pro_'ammed amount of
time, then shut off automatically.
_] When baking is finished, a buzzer
will sound. Remove the fbod fi'om
the oven and mm the OVENSET
knob to OFF.Remember, fbods that
are left in the oven continue cooking
after the controls are off
NOTE:The oven (?:cling light and oven
set light at the TIMEDBAKEsetting may
work differently than they do at the
BAKEsetting.
Turn the OVENSET knob to TIMED
BAKE.Tm_l the OVENTEMPknob
to the desired oven temperature,
for example 250 °F.
STOP TIME RELAY START
" lz '9- _" zz '_
PUS_TOTU_N
OVE_I SET OVEN TEMP
g g
How to Set a Delayed Start and Automatic Stop
Youcanset the oven control todelay-start the
oven,cookfor a specific length of time and then
turn off automatically,
Make sure the clock shows the correct
time of day.
I
NOTE:You must hm,e the OVENSET knob
NOTE:The time on the STOPTIMEdial
must be later than the time shown on the
clock and the DELAYSTARTdial.
Turn the OVENSETknob to TIMED
BAKE.Turn the OVENTEMPknob to
the desired temperature.
on file TIMEDBAKEsetting.
The oven will start mltomatically,
[7] To set the start time, push in the
knob on the DELAYSTARTdial and
mm the pointer to the time of day
continue to cook for the programmed
amount of time, then shut off
automatically.
you want the oven to mm on, fbr
exmnple 3:30.
To set the stop time, push in the
knob on the STOPTIMEdial and
mm the pointer to the time of
dwyou want the oven to turn
_-] When baking isfinished, a buzzer
will sound. Remove the food from
the oven and mm the OVEN SET
knob to OFF.Remember, fbods that
are left in the oven continue cooking
after the controls are off..
off; for example 6:00. This means
your recipe called far 2_khours
of baking time.
10
Page 11

Adjusttheoventhermostat--Do ityourself!
Youmay find that your new oven cooks differently than the one it replaced. Useyour new oven for a few
weeks to become more familiar with it. Ifyou still think your new oven is too hot or too cold,you can adjust the
therrnostat yourself.
Do not use thermometers, such as those found in grocery stores, to check the temperature setting ofyour oven.
These thermometers may vary 20-40 degrees.
To Adjust the Thermostat
Pull the OVENTEMPknob offthe sh_ffL
look at tile back of the knob and note the
cmr'ent setting before making rely
a(tjusunent. The knob is f_tctoU set _4th
the mp screw directly under the pointer.
Pull offthe OVENTEMPknob.
%
Back of the OVENTEMPknob.
Lower screw moves toward hotter
OF Coo/eE
Loosen both screws on back of
[]
tile knob.
Hold both part_sof tile knob as
%
shown in the illustration of the back
of the OVENTEMPknob and turn so
the lower screw moves in the desired
direction. You will hear and feel the
notches as you turn the knob. Each
notch changes temperature about
10 ° Fahrenheit.
_-] Tighten the screws.
The lower screw moves toward
HOTTER to increase the temperature,
The lower screw moves toward
COOLER to decrease the temperature,
I-if] Return the OVENTEMPknob to
tile oven.
Re-checkovenperformancebefore,makingany
additionaladjustments.
Thetypeofmargarine will affect bakingperformance!
Most recipes for baking have been developed using high fat products such as butter or margarine (80%fat). Ifyou
decrease the fat, the recipe may not give the same results as with a higher fat product.
Recipe failure can result ff cakes, pies,pastries, cookies or candies are made with low fat spreads. The lower the fat
content of a spread product, the more noticeable these differences become.
Federal standards require products labeled "margarine" to contain at least 80% f:atby weight. Low f:atspreads, on the
other hand, contain less fat and more water. The high moisture content of these spreads affect the texture and flavor of
baked goods. For best resuhs with your old f:avorite recipes, use lnargarine, butter or stick spreads containing at least
70% vegetable oil.
77
Page 12

Careandcleaningof therange.
Be sure electrical power is off and all surfaces are cool before cleaning any part of the range.
How to Remove Packaging Tape
Pull the knob straight off the stem,
To assure no damage is done to the finish
of the pro&_ct, the safest way to remove
the adhesive left fi_om packaging rope on
new appliances is an application of a
household liquid dishwashing detergent,
mineral oil or cooking oil.
Control Panel and Knobs
Clean up spatters with a damp cloth.
Remove heavier soil widl warm, soapy
water.
Donotuseabrasivesofanykindonthecontrol
panel
Oven Vent
Tile oven is vented through an opening
under tile right rear suK_meunit.
Apply wifll a soft cloth and allow to soak.
Wipe dU and then apply an appliance
polish m thoroughly clean and promct
the surf_tce.
NOTE:Theplastictapemustberemovedfromaft
chrometrim,Itcannotberemovedifit isbakedon,
The control knobs ulay be relnoved fbr
easier cleaning. To relnove a knob, pull it
straight offthe stem. Wash the knobs in
soap anti water but do not soak.
Nevercovertheopeningwithaluminumfoil or
anyothermaterial,
Porcelain Enamel Cooktop
The porcelain enamel finish is sturdy but
breakable iflnisused. This finish is acid-
resistant. However, aW acidic floods
spilled (such as fruit juices, tomato or
vinegar) should not be pexmitted to
remain on the finish. If acids spill on the
cooktop while it is hot, use a dU paper
towel or cloth to wipe it up right _-I'v_ly.
Painted Surfaces
Painted suK:dces include the sides and tile
drawer fi'ont.
Clean these with soap and water or a
vinegar and water solution.
When the surfdce has cooled, wash with
soap anti water. Rinse well.
Forotherspillssuchasfat spatterings,wash
withsoapandwaterorcleansingpowdersaRer
thesurfacehascooledRinsewell,Polishwitha
drycloth,
Do not use COUlUlercialoven cleaners,
cleaning powders, steel wool or harsh
abrasives on aW painted SUI_[:dce.
12
Page 13

Oven Shelves
Lift the door straight up and off the
hinges,
Clean the oven shelves _dth an abrasive
cleanser or steel wool.
Lift-Off Oven Door
The oven door is removable for cleaning.
Do not IiR the door by the handle,
Toremovethedeer,open it to the broil
stop position. Grasp firmly on each side
and lift the door straight up and oftthe
hinges.
Do notplace handsbetween the hingeand the
ovendoorframe,
Toreplacethe door,make sure the hinges
are in the broil stop position. Position the
slots in the bottom of the door squarely
over the hinges and slowly lower it over
both hinges.
Toclean the inside of the door:
Soap and water will norlnally do the
.job. Hem,y spattering or spillovers may
require cleaning with a mild abrasive
cleaner. So_q_y,wet metal pads mW
also be used.
Donotallowfoodspillswithahighsugaroracid
content(suchastomatoes,sauerkraut,fruitjuices
orpie filling)toremainonthesurface,Theymay
causea duffspotevenaftercleaning,
After cleaning, rinse the shelves with
clean water and dt7 _dth a clean cloth.
i_:_Ifnecessa,7, you may use an oven
cleaner. Follow the package directions.
!_>_Clean the inside of the oven window
with a mild non-scratching cleaner and
a damp cloth.
Tocleantheoutsideofthe door:
Use soap and water to thoroughly clean
the top, sides and front of the oven
door. Rinse well. You may also use a
glass cleaner m clean the glass on the
outside of the door. Do not let water
drip into the vent openings.
Spillage of marinades, filfitjuices,
tomato sauces and basting materials
conufining acids lnay cause
discoloration and should be wiped up
imlnediately. When sux{:aceis cool,
clean and rinse.
ij_:_Do not use oven cleaners, cleaning
powders or harsh abrasives on the
outside of the door.
iiiiii:il
:i ii
Wire cover holder.
Oven Light Replacement
CAUTION:Before replacing your oven
light bulb, disconnect the electrical
power to the range at the main fuse or
circuit breaker panel.
Be sure to let the light cover and bulb
cool completely.
Toremovethecoven
Hold a hand under the cover so it
%
doesn't fall when released. With
fingers of the stone hand, firmly
push back the wire cover holder. Lif_
off' the cover.
Donotremoveanyscrewstoremovethe
cover
_] Replace bulb with a 40-watt
household appliance bulb.
Toreplacethe cover:
Place it into ,_'oove of the light
receptacle. Pull wire foxward to the
center of the cover until it snaps into
place.
Connect electrical power to tim
range.
13
Page 14

Careandcleaning of therange.
Oven Heating Elements
Donotcleanthebakeelementorthebroil
element,Anysoilwifl bumoff whenthe
elementsareheated,
To clean the oven floor, gently lift
the bake element. Clean xdfl_ warm
soapy water.
Broiler Pan & Grid
x
After broiling, remove the broiler
pan from the oven.
After broiling, remove the broiler pan
from the oven. Remove the ,o'i(t fl'om the
pan. Carefiflly pour out the _'ease fi'om
the pan into a proper container.
Wash and rinse the broiler pan and grid
in hot water with a soap-filled or plastic
scouring pad.
Donotstoreasoiledbroilerpanandgrid
anywhereintherange,
Porcelain Oven interior
With proper care, the porcelain emunel
finish on the inside of the oven-rap,
bottom, sides, back and inside of tim
door-will stW new-looking for years.
Let the range cool before cleaning. We
recommend that you wear rubber gloves
when cleaning tl_e range.
Soap and water _dll nommlly do the job.
Hem T spattering or spillovers may require
cleaning with a mild abrasive cleaner.
Soapy, wet metal pads may also be used.
Donotallowfoodspillswithahighsugaroracid
content(suchastomatoes,sauerkraut,fruitjuices
orpiefilling)toremainonthesurface,Theymay
causea duffspotevenaftercleaning,
If food has burned on, sprinkle the grid
with detergent while hot and cover with
wet paper rowels or a dishcloth. Soaking
the pan will remove burned-on foods.
Both the broiler pan and grid may be
cleaned with a commercial oven cleaner.
Both the broiler pan and grid can also be
cleaned in a dishwasher.
If necessmy, you may use an oven cleaner.
Follow the package directions.
Donotsprayovencleanerontheelectrical
controlsandswitchesbecauseit couldcausea
shortcircuitandresultinsparkingorfire,
Donotallowafilmfromthecleanertobuildup
onthetemperaturesensor--it couldcausethe
ovento heatimproperly,(Thesensoris located
atthetopoftheoven,)Carefullywipethe
sensorcleanaftereachovencleaning,being
carefulnottomovethesensorasa changein
itspositioncouldaffecthowtheovenbakes,
Donotsprayanyovencleanerontheoven
door,handlesoranyexteriorsurfaceofthe
oven,cabinetsorpaintedsurfaces,Thecleaner
candamagethesesurfaces,
14
HousehoM ammonia may make tim
cleaning job easier. Place 1/2 cup in a
shallow glass or potm U container in a
toM oven overnight. The ammonia
filmes will help loosen the burned-on
grease and food.
Page 15

Be sure the controls are turned to OFFand the surface units are cool before attempting to remove them.
Surfaceunit,
ReceptacJe Drippar
Surface Units
To clean the surf:ace units, mm the
conu'ol to the highest setting fbr a
minute. The coils will bum offany soil.
Toremovea surfaceunit"
To remove the drip pans for cleaning, the
surf_lce units ulust be relnoved first.
Lift the surf:ace unit about 1 inch above
the drip pan and pull it out.
Donotlift thesurfaceunitmorethan1inch.If
youdo,it maynotlieflatonthedrippanwhen
youplugit backin.
Repeated lifting of the suK:ace unit more
than 1 inch above the drip pan can
perInanently damage the receptacle.
Drip Pans
ReInove the suK_meunits. Then lifLout
the drip pans.
Toreplacea surfaceunit"
Replace the drip pan into the recess in
the cooktop. Make sure the opening in
the pan lines tip with the receptacle.
Insert the terminals of the suK_lce unit
through the opening in the drip pan and
into the receptacle.
Guide the surface unit into place so it
rests evenly.
Donotimmersethesurfaceunitsinliquidsof
anykincZ
Donotcleanthesurfaceunitsina dishwasher
Donotbendthesurfaceunitplugterminals.
Donotattempttoclean,adjustorinanyway
repairtheplug-inreceptacle.
The (kip pans may also be cleaned in a
dishwasher.
Be sure all surface units are turned
off before raising the cooktop.
For best results, clean the &ip pans by
hand. Place them in a covered container
(or a plastic bag) with 1/4 cup alranonia
to loosen the soil. Then scrub with a soap-
filled scouring pad ifnecessa U. Rinse
with clean water and polish with a clean
soficloth.
Lift-Up Cooktop
Cleantheareaunderthecooktopoften.Built-up
soil,especiallygrease,maycatchfire.
To make cleaning easier, the entire
cooktop may be lifted tip and supported
in the tip position.
Be sure all dm surface units are mined off
befbre raising the cooktop. The surface
units and (kip pans do not need to be
removed, however, you may remove one
to make raising the cooktop easier.
Clean the area under the (kip pans
often. Buih-up soil, especially _'ease,
may catch fire.
Donotcoverthedrippanswithfoil Usingfoil so
closetothereceptaclecouldcauseshock,fireor
damagetotherange.
After cleaning tinder the cooktop with
hot, soapy water and a clean cloth, lower
the cooktop. Be carefill not to pinch your
fingers.
/5
Page 16

Before YouCallForService...
Troubleshooting tips
Save time and money! Review the charts on the following
pages first and you may not need to call for service.
Possible Causes
Surfaceunits not
functioningproperly
Oven wilinot work Plug on range is not completely * Make sure electrical plug is plugged into a live, properly
Fooddoesnotbake Oven controls improperly set. * See the Using the oven section.
or roast properly
Fooddoesnot
broilproporly Door not open to the broil stop * See the Usingthe oven section.
The surface units are not
plugged in solidly.
The surface unit controls
improperly set.
The drip pans are not set
securely in the cooktop.
inserted in the electrical outlet. ,grounded outlet.
A fuse in your home may be * Replace fllse or reset circuit breaker.
blown or the circuit breaker
tripped.
Oven controls improperly set. • See tl_e Using the oven section.
Shelfposkion is incorrect * See tl_e Using the oven section.
or the sheff is not level.
Incorrect cookware or cookware * See the Using the oven section.
of improper size being used.
Oven thermostat needs * See the Adjust the oven thermostat Doit yourselfl
adjustment, section.
Oven controls improperly set. * See the Using the oven section.
position as recommended.
Improper shelf position. * See the BroilingGuide.
Food being cooked * Use the broiling pan and _'id that came Mth your range.
in a hot pan. Make sure it is (:ool.
Cookware not suited for broiling. * Use the broiling pan and _'id tl_at came with your range.
Aluminum foil used on the * See the Using the oven section.
broiling pan and grid has not
been fffted properly and slit as
recommended.
In some areas the power
(voltage) may be low.
What ToDo
* With the controls ell check to make sure the surface
unit is plugged completely into the receptacle.
. Check to see the correct control is set for tim surfime
unityou are using.
. With the controls off, check to make sure the drip
pan is in the recess in the cooktop and that tt_e
opening in the pan lines up with the receptacle.
* Preheat tt_e broil element fbr 10 minutes. Broil for
the longest period of ume recommended in the
Broiling'Guide.
16
Page 17

Clockand timerdo
not work
Possible Causes
A fuse in your home may
be blown or the circuit
What ToDo
• Replace fllse or reset circuit breaker.
breaker tripped.
Oven light does Light bulb is loose or defective. • Tighten or replace the bulb.
not work
Oven temperature too Oven thermostat • See the Adjust the oven thermostat--Do it yourselfl
hot or too cold needs adjustment, section.
Switch operating light • Call for se_Tice.
is broken.
Strong odor An odor from the insulation • This is temporaly.
Fan noise A cooling fan may
around the inside of the
oven is normal for the first
few times the oven is used.
• This is normal. The cooling fan _ill turn offand on.
automatically turn on and
off to cool internal parts.
/7
Page 18

--_ Notes
_b
--._2.
18
Page 19

GEElectricRangeWarranty
Aft warranty service provided by our Factory Service Centers
or an authorized Customer Card_'technician. For service,
call 800-GE-CARES.
Gew.Ir pla ,AtNOCharg ToYou:
Anypartof the range which f:ails&le to a defect in materials or workmanship.
Kromthe date Ofth0 During this full one-year warrant_ GE will also provide, free of charge, all labor
originalpurchase and in-home sel_ice m replace the defective pm't.
Service trips to your home to teach you how to use
the product.
!_;Improper installation.
!_;Failure of the product if it is abused, misused, or used
for other than the intended purpose or used
commercially.
This warranty is extended to the original purchaser and any succeeding owner for products purchased for
home use within the USA. In Alaska, the warranty excludes the cost of shipping or service calls to your home.
Some states do not allow the exclusion or limitation of incidental or consequential damages. This warranty
gives you specific legal rights, and you may also have other rights which vary from state to state. Toknow
what your legal rights are, consult your local or state consumer affairs office or your state's Attorney General.
i_:_Replacement of house fuses or resetting of circuit
breakers.
!_;Damage to the product caused by accident, fire, floods
or acts of God.
!_:Incidental or consequential damage to personal
property caused by possible defects with this appliance.
Warrantor:General Electric Company..Louisville, KY 40225
19
Page 20

Service TelephoneNumbers.
GEAnswerCenter_800.626.2000
The GE Answer Center ®is open 24 hours a day, 7days aweek.
In-HomeRepairServiceSOO-SE-CARES(800-432-2737)
Expert GE repair ser_4ce is only a phone call away.
SpecialNeedsService800.626.2000
800-TDD-GEAC (800-833-4322)
GE offbrs, fi'eeof charge, abrochure to assistin planning a barder-fl'ee kitchen for persons
_dd_ limited mobilibT.
ServiceContracts800-828-2224
Purchase a GE setsdce contract while your WmTanty is still in effect and you'll receive a
substantial discount. GE Consumer Seadce _dll still be there _ffteryour warranty expires.
Partsand Accessories800-828-2002
Indixdduals qualified to selsdce dmir ow_lappliances can hm,e parts or accessories sent direcdy
to their homes (VISA, MasterCard and Discover cards are accepted).
instructionscontained in this manualcoverprocedures to beperformedby anyuser.Otherservicing
generallyshould be referred toqualified servicepersonnel Cautionmustbe exercised, since
improperservicing maycause unsafeoperation.
ServiceSatisfaction
ffyou are not saOsfied with the ser_dce you receive fi'om GE:
First,contact the people who sel_dced your appliance.
Next, ifyou are soil not pleased, xs_'iteall the details-including your phone nmnber-m:
Manager, Consumer Relations
GE Appliances
Appliance Park
Louisxdlle, KY40225
Finally,if your problem is still not resolved, _,_'im:
Major Appliance Consumer Action Program
20 North Wacker Drive
Chicago, IL 60606
20 Printed in LaFayette, GA
 Loading...