

Page 1
GEAppliances
49-80330 11-05JR
Page 2
SafetyInformation
Safety Precautions ....... 3, 4
Oven .................... 5
Surface CookingUnits ...... 6
Operating Instructions
Using theSurfaceUnits ..... 7
Using the Oven ......... 8-18
Usingthe ClockandTimer .. 14
timed Baking & Roasting ... 15
Oven Thermostat .......... 16
Self-CleaningOven..... 17,18
CareandCleaning
ControlPanel& Knobs ..... 19
Lift-Off OvenDoor ......... 20
Broiler Pan & Grid ......... 21
Oven Light Replacement .... 21
Surface Units ............ 22
Lift-UpCookrop........... 22
Congratulations!
YouAre/VowPartoftheGEFami/
Welcome to the GE fiunilv. We're proud of our quality products and we are
committed to providing dependable service. Y_m'll see it in this easy-to-use Owner's
Manual and w_u'll hear it in the fliendlv ;_)ices of our customer selMce deparm_ent.
Best of all, you'll experience these _dues each time you use yore" range. That's
important, because your new range will be part of your fiunily for many years.
And we hope you will be part of om_ fin" a long time to come.
We thank you fin" bufing GE. We appreciate your purchase, and hope you will
continue to rely on us whene\ er you need quality appliances fin" your home.
GE& You,A ServicePartnership.
IMPORTANT!
Fill out the Consumer Product Registration Card.
Two Easy Ways ToRegister YourAppliance!
_): Through the internet at www.geappliances.com.
_):':Complete and mail the enclosed Product Registration Card.
FORYOURRECORDS
Write the model and serial numbers here:
#
#
TroubleshootingTips
BeforeYouCalJ
For Service .... 23-25
ConsumerSupport
ProductRegistratioo ....... 29
Warranty................ 31
ServiceTelephone
Numbers ......... Back Covel
2
You can find them on a label underneath the cooktop.
Staple sales slip or cancelled check here.
Proof of the original pro'chase date is needed to obtain service
trader the warranlw:
READTHISMANUAL
Inside you will find many helplifl hints on how to use and maintain
your range properly.Just a little preventive care on your part can
save you a great deal of tim e and monev over the lifi_ of w_m" range.
IFYOUNEEDSERVICE
You'll find many answe_ to common problems in the Before YouCall
For Service section. If you review ore" chart of Troubleshooting Tips
ti_t, you may not need to call for service at all.
If you do need se_'ice, you can relax knowing hel I) is only a phone
call away. A list of toll-li'ee customer service nunlbers is inchlded in
the back section of this manual. Or um can always call the GE
Answer CenteF at 800.626.2000, 24 hem's a da> 7 days a week.
Page 3

IMPORTANTSAFETYINFORMATION.
READALLINSTRUCTIONSBEFOREUSING.
WARNING!
For your safe_ the information in this manual must be followed to minimize the risk of fire, electric
shock, or to prevent property damage, personal injury, or loss of life.
IMPORTANTSAFETYNOtiCE
TheCalifornia Safe Drinking Water and Toxic Enforcement Act requires the Governor of California to
publish a list of substances known to the state to cause cancer, birth defects or other reproductive
harm, and requires businesses to warn customers of potential exposure to such substances.
Thefiberglass insulation in self-clean ovens gives off a very small amount of carbon monoxide
during the cleaning cycle. Exposure can be minimized by venting with an open window or using a
ventilation fan or hood.
SAFETYPRECAUtiONS
When using electrical appliances, basic safety precautions should be followed, including the following:
_{_:Use this appliance only for its intended
purpose as described m this )wner s
Manual.
J; Be sure your appliance is properly
installed and grounded by a qualified
installer in accordance with the provided
installation instructions.
_7{_:Haxe the installer show you the location of
the circuit breaker or flxse. Mark it fox easy'
reference.
E:,:Do not attempt to repair or replace any
part of your range unless it is specifically
recommended in this manual. All other
servicing should be refened to a qualified
technician.
E:,IDo not store flammable mamfials in an
ox>n or near rixe cooktop.
_{:;Before performing any service, disconnect
the range power supply at the household
disu-ibufion panel by removing the flxse or
switching off the circuit breakex:
qT_:Do not leaxe children alone--_hildren
should not be left alone or unattended in
an area where an appliance is in use, They
should nex>r be allowed to sit or stand on
aW part of flxe appliance.
_{_:Do not allow anyone to climb, stand or
hang on tim door or cooktop. They could
damage the rang> and cause sex>re
personal injm>
N Teach children not m play with the
controls or any other part of the rang_.
N CAUTION:Imms of interest m children
should not be stored in cabinets aboxe
a range--children climbing on the range
to reach imms could be seriously injured.
E:':Nexer wear loose-fitting or hanging
gvmnents while using fl_e appliance.
Be carefifl when reaching fox items stored
oxer the range. Flammable material could
be ignited if brought in contact with hot
surface units or heating elements and may
cause so\Pro bllillS,
E:,IUse only d U pot holders---moist or damp
pot holders on hot surfi_ces may result in
bm_ls from swam. Do not let pot holders
touch hot surthce units or heating
elements. Do not use a towel or oflxer
bulky cloth in place of pot holders.
;_?:':Fox"your safe_', hexer use your appliance
fox wanning or heating the room.
3
Page 4
IMPORTANTSAFETYINFORMATION.
READALLINSTRUCTIONSBEFOREUSING.
a, WARNING'!
SAFETYPRECAUTIONS
;_;Do ,lot let cooking g_'ease or oilier
flammable mamiials accunmlam in or
near tile rang.e.
;_i:':Ne_.er leave jars or cans of fat drippings
in or near your range.
_{::Kee I) tile hood and gxease filmrs clean
to maintain g_od x.endng and to a_id
grease fires.
N Do not use water on grease fires. Ne\.er
pick up a flaming pan. Turn tile controls
off. Smother a flaming pan on a surface
unit by cox.eiJng tile pan complemly
with a well-fitung lid, cookie sheet or
fiat tray. Use a multi-pu,l)ose &T chemical
or foam-type rii.e exdnguishen
Flaming gi.ease outside a pan can be put
out by cox.ering it wifll baking soda oi;
if"available, by using a multiq)mi)ose d*T
chemical or foam-type fire extinguisher
Flame in tile ox.en can be smothei.ed
complemly by closing rile ox.en door
and turning tile oven off orby using
a multi-pul])ose d, y chemical or
foam-wpe fire extinguisher
_{::Do ,lot store or use combustible materials,
gasoline or other flammable vapors and
liquids in the vicinity of this or any other
appliance.
;_i:.:Always keep dish towels, dish clodls, pot
holders and odler linens a safe distance
fiom your rang.e.
_i:.:Alwws kee I) wooden and plasuc umnsils
and canned food a safe distance flom
yon*" rang.e.
N Always kee I) combustible wall cox.eiJngs,
curtains or drapes a safe. distance from
yon*" Ia ng.e.
q_{::Do *lot touch tile su,face units, the
heating elements or tile inmrior surPace
of tile ox.en. These surPaces may be hot
enough m bun_ ex.en though they are dark
in color During and after use, do *lot
much, or let clothing or other flammable
mamIJals contact, tile surface units, areas
nearby the surface units or any intelJor
area of file ox.en; allow sufficient time for
cooling first.
Pomntially hot surthces inch,de the
cooktop, areas facing tile cookmp, oven
x.ent opening, surlhces ,lear tile opening,
crevices around the oven door and metal
uim parts abox.e tile door
REMEMBER:Tile inside surface of rile o_.en
may be hot when tile door is opened.
COOKMEATANDPOULTRYTHOROUGHLY...
Cookmeatandpoultry thoroughly--meat to at leastan INTERNALtemperatureof 16O°Fandpoultry
toat least an INTERNALtemperatureof 180°ECookingto thesetemperaturesusuallyprotects against
foodbomeillness.
4
Page 5
OVEN
;;; Stand away fiom die range when opening
file ox>n door Hot air or steam which
escapes can cause burns to hands, lace
and/or eyes.
_:;Do riot heat unopened tbod containers.
Piessure could build up and tile container
could burst, causing an injm>
;_?:':Kee I) file oven lent unobstructed.
;f; Kee I) file oxen fiee from grease buildup.
_f?:';Place the oxen shelf in file desiled position
while tile oven is cool. If shelx>s must be
handled when hot, do not let pot holder
contact tile heating elements.
_i_;Pulling out file shelf to tile smi>lock is a
comenience in lifting heaxy' foo&. It is also
a plecaution against bums flom touching
hot surPaces of file door or oxen walls.
_i:,iWhen using cooking or ioasdng bags
in tile oven, tbllow tile manu/_cturer's
directions.
;_;Do riot use the o\_n to &T newspapers.
If ox>rheamd, they can catch on fire.
q_{_;Do riot use the oven for a storage area.
Imms stored in an ox>n can ignim.
_; Do riot lem> paper products, cooking
umnsils or food in die oven when riot
in nse.
_::After broiling, always rake file broiler pan
out of tile range and clean it. Leftover
grease in tile broiler pan can catch on fire
file next time yon use the pan.
;_i:,:Do riot use ahm_inum foil to line oven
1)otmms, except as suggesmd in this
manual. Improper installation of
alun/inum foil may result in a risk of
electric shock or fire.
SELF-CLEANINGOVEN
;f; Do not clean file door gasket. Tile door
gasket is essential for a g_od seal. Care
should be taken riot to nil), damag_ or
mow tile gasket.
_:;Clean only parts lismd in this Owner's
Manual.
_f;Do not use o\_n cleaners. No commercial
oxen cleaner or oven liner protective
coating of any kind should be used in or
around any part of tile oven. Residue flom
oven cleaners will damag_ tile inside of
the oxen when file self-<'lean Q'cle is used.
;f; Before self-<leaning file oven, remove the
broiler pan, gTid and other cookwate.
_?{:_Be sure to wipe up excess spillage before
starting tile seltMeaning operation.
_fi:,:If tile self-cleaning mode malflmcfions,
turn tile oven off and disconnect file
power supply. Ha_> it serviced by a
qualified mchnician.
5
Page 6

IMPORTANTSAFETYINFORMATION.
READALLINSTRUCTIONSBEFOREUSING.
WARNING'!
SURFACECOOKINGUNITS
Use proper pan size--select cookware having flat bottoms large enough to cover the surface unit
heating element. The use of undersized cookware will expose a portion of the surface unit to direct
contact and may result in ignition of clothing. Proper relationship of cookware to surface unit will
also improve efficiency.
;fi:,:Nexer leme the surface units unattended
at high heat settings. Boiloxers cause
smoking arm greasy spilloxers that may
catch on fire.
_{;_Do not use aluminum tbil to line the drip
pans or arr>vhere in tire oven except as
described in this manual. Misuse could
resuh in a shock, fire hazard or damag.e
to the rang.e.
_:_Be sm.e the drip pans arm fire vent duct
are not covered and are in place. Their
absence during cooking could damag.e
rang.e parts arm wiring.
_ti;:Only certain types of glass, glassAeramic,
earthenware or other glazed corrtainers
at.e suitable for cookmp service; others
m W break because of the sudden chang.e
in temperature.
_?:':To minimize the possibility of burns,
ignition of flammable mamrials arm
spillag.e, the handle of a corrtainer should
be turned toward rite center of tire rang.e
without exmnding ox,er nearby sur/cace units.
;_i:,:Alwws turn rite surfitce units off"before
Ietllo\'ilrg cookware.
_f;Do not immerse or soak fire removable
surface units. Do not put them in a
dishwashen Do not seltMean rite surfitce
units in rite oven.
;_i:,:Always heat/cat slowly, arm watch as it
heats.
;_i:,:Do not flame foods on tire cooktop. If you
do flame foods under the hood, turrr the
/cart orr,
_{::To ax_id dre possibility of a bum or
elecuic shock, always be certain fllat file
corrtrols tbr all surfiwe units are at tire
OFFposition arm all coils are cool before
attempting to lift or remoxe a unit.
;_i:,:Clean fire cooktop wiflt caution. If a wet
spong.e is used to wipe spills on a hot
cooktop, be carefitl to m_id steam bums.
_:;Kee I) an eye on foods being flied at high
or medium high heat settings.
_{;:Foods for flTing should be as dr T as
possible. Frost on fiozen foods or moisture
on flesh foods can cause hot/cat to bubble
up arm ox.er the sides of the pan.
;_;!Use little tat for effective shallow or deep
/catflTing. Filling the pan too flrll of/cat can
cause spillox.ers when food is added.
;f; If a combination of oils or/cats will be used
in flTing, stir tog.ether befot.e heating, or
as flits meh slowly.
_:;Use a deep/cat thetlnometer whenever
possible m pre_.ent o_.erheafing flit beyond
the smoking point.
;_i:,:Carefltlly watch for spilloxers or overheating
of foods when flTing at hiOt or medium
high temperatures.
q?{:;Never ttT to move a pan of hot/cat,
especially a deep flit fryer h'ait until
rite lCatis cool.
;f; Do not allow water; other liquids or grease
to remain on the cooktop or the cormol
panel.
READANDFOLLOWTHISSAFETYINFORMATIONCAREFULLY.
SAVETHESEINSTRUCTIONS
Page 7
Usingthe surface units.
Throughout this manual, features and appearance may vary from your model.
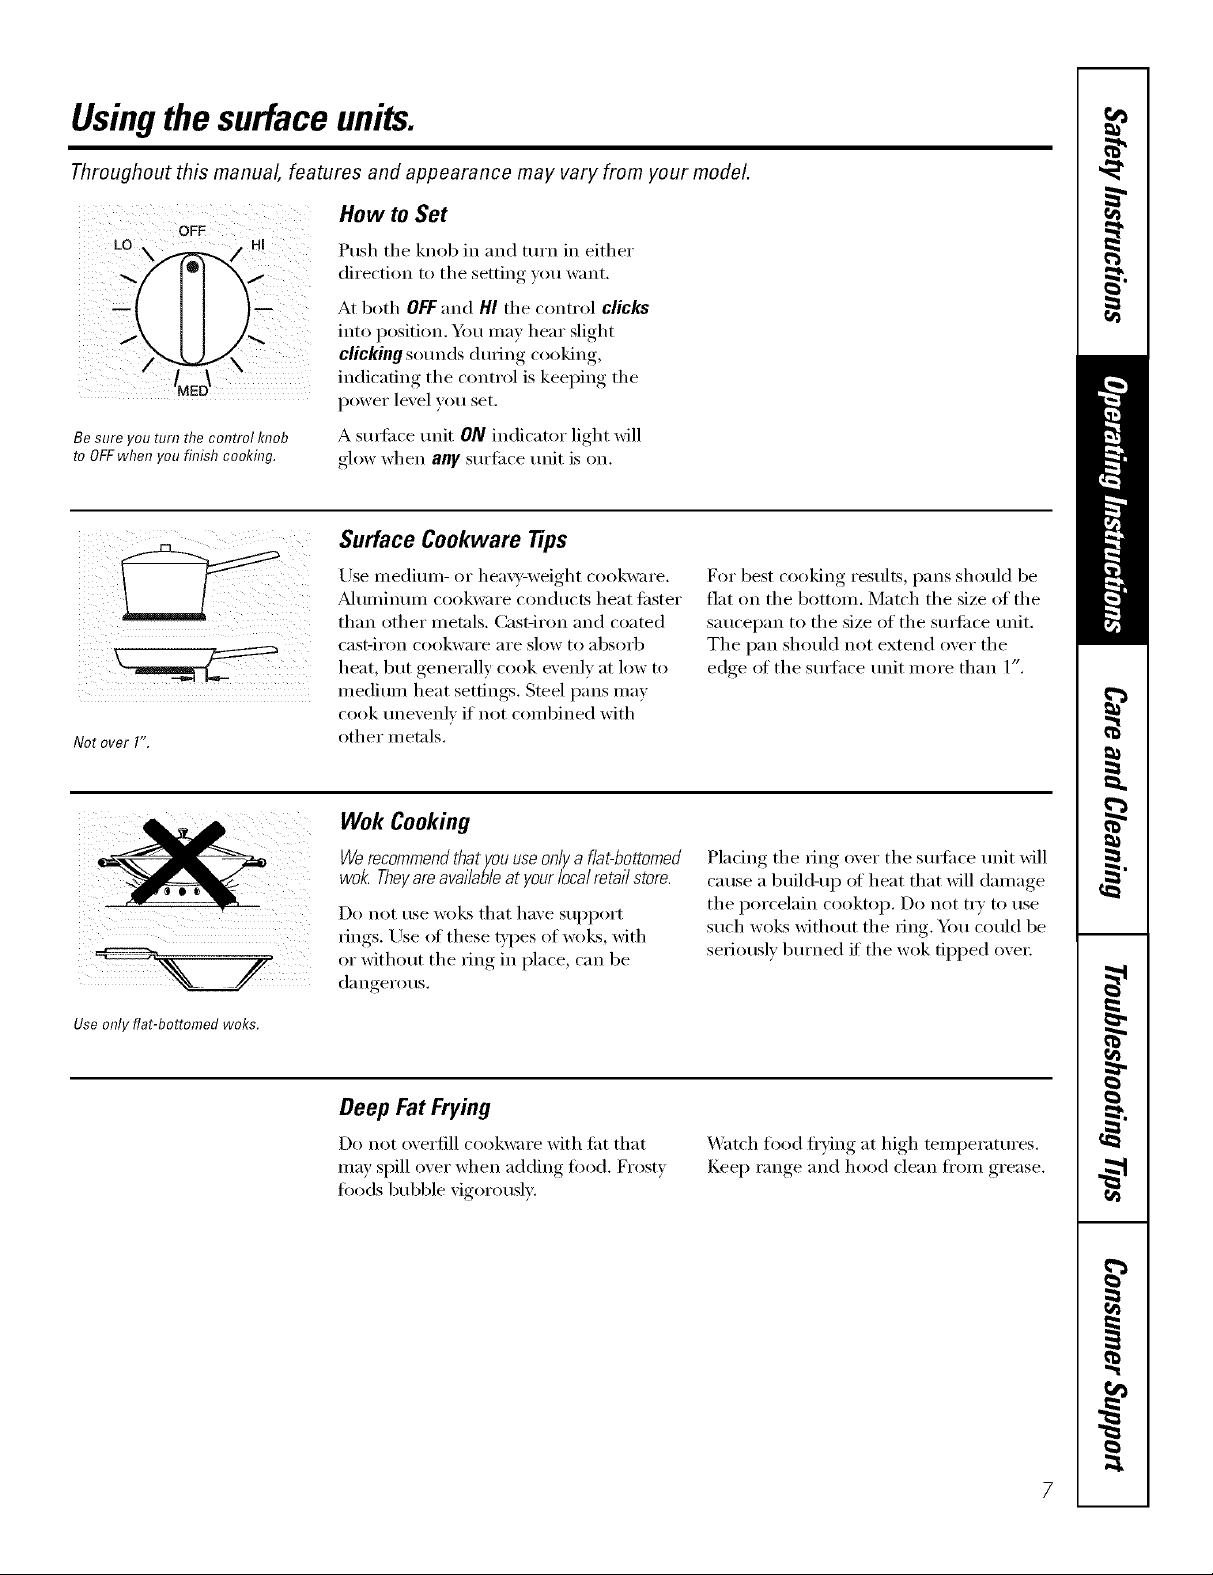
OFF
LO; H[ Push the knob in and turn in either
... , direction to the setting )ou want.
How to Set
At both OFFand HI the control clicks
into position. Y)m may hear slight
clickingSOtlnds (hlIJng cooking,
indicating the control is keeping the
power level you set.
Be sure you turn the control knob
to OFFwhen you finish cooking.
A stmfi_ce unit ON indicator light xfill
glow when ally sm'li_ce refit is on.
Surface Cookware tips
Use medimn- or hea\)'-weight cookware.
J_dtli//intllll cookware condtlcts heat filster
than other metals. Cast-iron and coated
cast-iI'on cookwai'e aI'e slow to _lbsoi-b
heat, but generally cook evenly at low to
medium heat settings. Smel pans may
cook tmevenlv if not combined with
Not over l'.
other metals.
For best cooking results, pans should be
flat on the bottom. Match the size of the
saucepan to the size of the surli_ce trait.
The pan should not extend over the
edge ot the sm_hce trait more than 1".
Use only flat-bottomed woks.
Wok Cooking
Werecommendthat youuseonlya flat-bottomed
wok. Theyare availableat your localretail store.
Do not rise woks that have support
tings. Use ot these D])es of woks, with
or without the ring in place, can be
d_l ngei'o//s.
Deep Fat Frying
Do not oxerfill cookware with fi_t that
may spill oxer when adding toed. Frost)
toods bubble xigorousl,x.
Placing the ring over the stmfi_ce trait will
cause a build-up of heat that will damage
the porcelain cooktop. Do not try to use
such woks without the ring. You could be
seriously bm'ned if the wok tipped over:
X_atch food flTing at high temperatm'es.
Keep range and hood clean fl'om grease.
Page 8
Usingthe ovencontrols.
Throughout this manual, features and appearance may vary from your model.
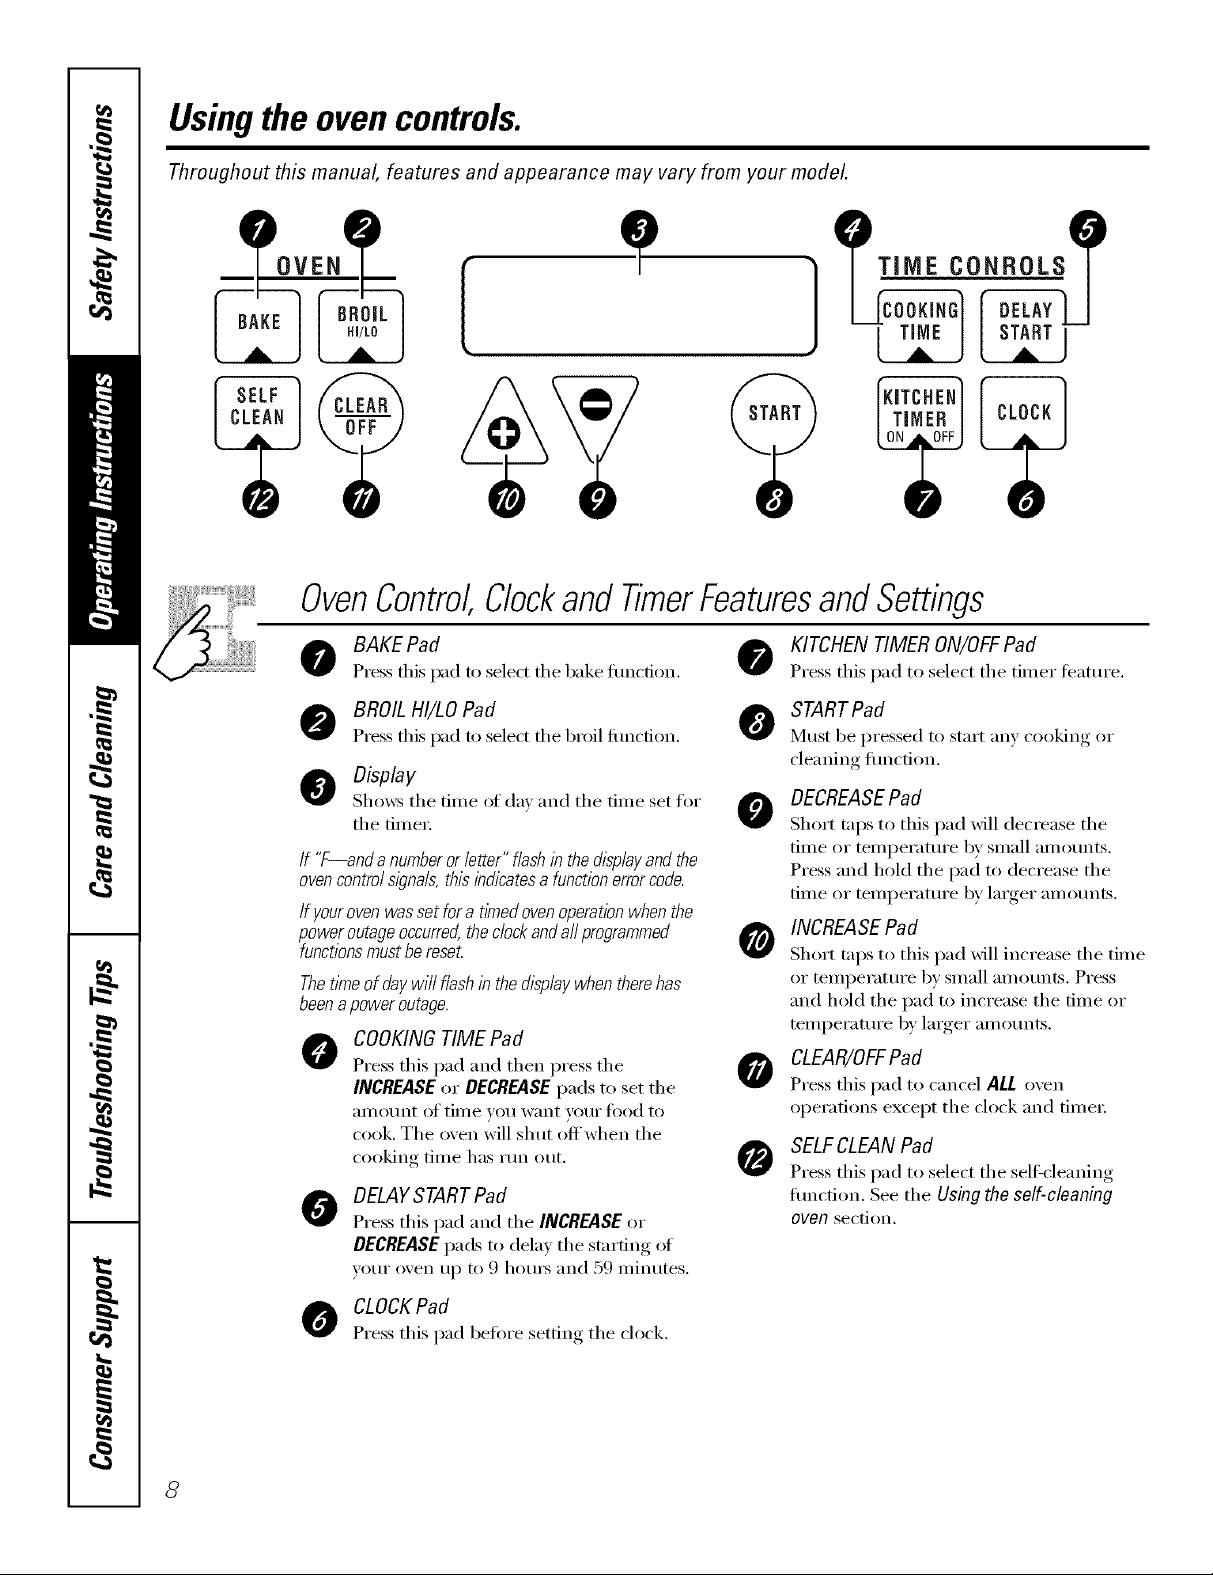
OvenControl,Clockand TimerFeaturesandSettings
0 BAKEPad 0 KITC.ENTIMERON/OFFPad
Press tiffs pad to select fl_e bake flmcdon. Press this pad to select the timer feature.
TJ.MEC0NBO L._S
BROIL HI/LO Pad
Press dfis pad to select d_e broil function.
Display
Shows the time of (lm and the time set for
the time_:
If "F--and a number or letter" flash in the displayand the
ovencontrols/gna& this indicatesa function errorcode.
If youroven was set for a t/knedovenoperation when the
power outage occurred,theclockand all programmed
functionsmustbe reset
ThetlYneofdaywill flashinthedisplaywhentherehas
beenapoweroutage.
COOKINGTIME Pad
0
Press this pad and then press the
INCREASE or DECREASEpads to set the
amount of time you want your fi)od to
cook. The oven will shut offwhen the
cooking time has run out.
DELAYSTART Pad
O
Press this pad and the INCREASE or
DECREASEpads to delay the starting of
your oven tlI) to 9 houI_ and 59 minutes.
O TARTPad
Must be pressed to start any cooking or
cleaning flmcfion.
DECREASEPad
Short taps to this pad _dll decrease the
time or temperature by small amounts.
Press and hold the pad to decrease the
time or teml)erature by larger amounts.
INCREASE Pad
Short taps to this pad will increase the time
or temperature by small amounts. Press
and hold the pad to increase the time or
teml)erature by larger amounts.
CLEAR/OFFPad
Press this pad to cancel ALL o'_en
operations except the clock and fime_;
SELFCLEAN Pad
Press this pad to select the selfk'leaning
flmction. See the Using the self-cleaning
oven secdon.
CLOCKPad
Press this pad before setting the clock.
8
Page 9
Special featuresofyourovencontrol
Yournew touch pad control has additional features that you may choose to use. The following are the features and
how you may activate them.
Thespecial feature modes can only be activated while the display is showing the time of day. They remain in the
control's memory until the steps are repeated.
When the display shows your choice, press the STARTpad. Thespecial features will remain in memory after
a power failure.
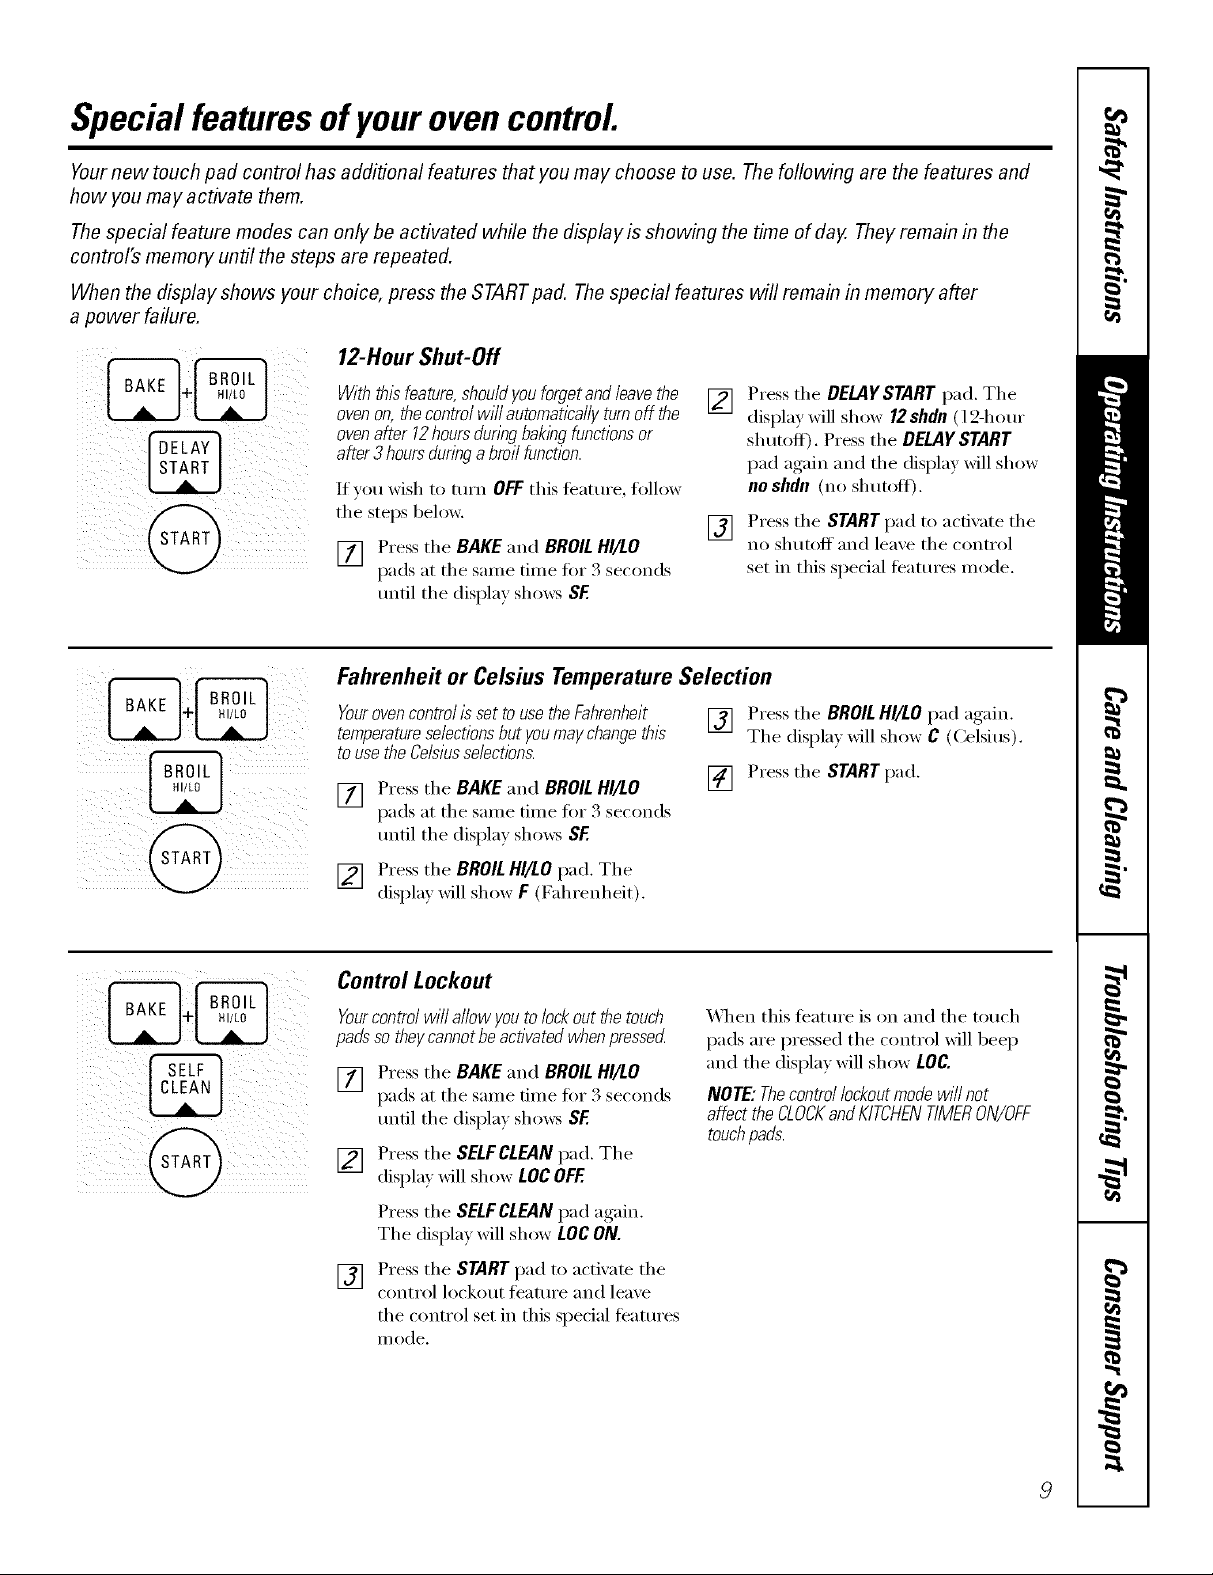
12-Hour Shut-Off
VViththisfeature,should you forget and leave the []
ovenon, thecontrol wi// automatically turn off the
ovenafter 12hours dunw bak/#gfunctions or
after 3 hours duringa broil function.
I[ yOtl wish to [t/Yn OFFthis J[_ltllI'e, fl)llow
the steps below.
[] Press tile BAKE and BROILHI/LO []
pads at the stone time fin" 3 seconds
until the display shows SF
Press the DELAYSTART pad. The
display will show 12 shdn (12-hour
shutoff). Press the DELAYSTART
pad again and the display will show
no shdn (no shutoit).
Press the STARTpad to activate the
no shutoff and lea_e the control
set in this special leatt/i'es illode.
Fahrenhe# or Celsius Temperature Selection
Yourovencontro//sset to use the Fahrenheit [] Press the BROIL HI/LO pad again.
temperatureselectionsbut youmay changethis Tile displa_ will show C (Celsitls).
to use the Celsiusselections.
[] Press tile BAKE and BROILHI/LO [] Press the START pad.
pads at tile same time fin" 3 seconds
tmtil tile display shows SF.
[] Press tile BROIL HI/LO pad. Tile
displa) will show F (Fahrenheit).
/ I iii!ii!i
Control Lockout
Yourcontrolwill allowyoutolockoutthetouch
padssotheycannotbeactivatedwhenpressed
[] Press tile BAKE and BROIL HI/LO
pads at tile same time fin 3 seconds
tmtil tile displa) shows SF.
[] Press tile SELFCLEAN pad. Tile
displa) will show LOCOFF
Press tile SELFCLEAN pad again.
Tile displa)will show LOCON.
Press tile START pad to activate tile
[]
control lockout featm'e and lea'_e
tile control set in this special teatm'es
II/ode.
_,_]/en this ti_atm'e is on and tile touch
pads are pressed tile control will beep
and tile display will show LOG.
NOTE: Thecontrol lockoutmode wi// not
affect the CLOCKand KITCHENTIMERON/OFF
touchpads.
9
Page 10

Special featuresofyourovencontrol.
Tonesat the Endof a Timed Cycle
At the end ofa tinnedcycle,3 short beepswill
sound followed by one beepevery 6secondsuntil
the CLEAfl/OFFpadis presse_ Thiscontinual
6-secondbeepmay be canceled
To cancel the 6-second beep:
[] Press the BAKE and BROIL HI/tO
pads at the same time fb_ 3 seconds
m_til the display shows SF.
12-Hour,2#-Hour or Clock Blackout
Yourcontrolis settousea 12-hourclock.
If)ou would preier to have a 24-horn"
militnrv time clock or black out the clock
display, fi)llow the steps below.
[] Press the BAKE and BROILHI/LO
@
pads at the same time fi)r 3 seconds
tmtil the display shows SF
Press the KITCHEN TIMER ON/OFF
[]
pad. The display shows CON BEEP
(condnual beep). Press the KITCHEN
TIMER ON/OFF pad again. The
display shows BEEP. (This cancels
the one beep every 6 seconds.)
[] Press the START pad.
Press the CLOCK pad once. The
[]
display will show 12hr. If this is
the choice you want, press the
STARTpad.
Press the CLOCKpad again to
change u) the 24-hour military time
clock. The display will show 24 hr.
If this is the choice you want, press
the STARTpad.
Press the CLOCKpad again to black
out the clock display. The display
will show OFF If this is the choice
you want, press the START pad.
NOTE:If the clockis in the blackoutmode you
will not beable to use the Delay Start function.
10
Page 11

Cook and Hold
&
@
Yournewcontrolhasacookandholdfeaturethat
keepscookedfoodswarmforupto3hoursafter
thecookingfunctionis flnl2hed
Thisfeaturecanbeusedonlyattheendofa
timedbakingcyclewhichhasanautomaticstop.
To activate this teature, follow the steps
below.
[] Press the BAKE and BROILHI/LO
pads at the sanle time fm 3 seconds
until the display shows SF.
Changing the Speed of the Increase or Decrease Pads
As you usethe INCREASEor DECREASEpads
when setting a time ortemperature, youmay
noticethe displaychangesslowly Thisspecial
featureallows youto changethe speed.
To set the speed you preti_; tollow the
steps below.
Press the BAKE and BROILHI/LO
[]
pads at the same time fi_r 3 seconds
tmtil the display shows SF.
Press the INCREASE pad. The displa)
[]
will show you a set speed between
1 and 5.
[] Press the COOKING TIME pad. The
displa} _dll show Hid OFF.
Press the COOKING TIME _'ad a_,ain
to actix _te the featm'e. The displa)
will show Hid ON.
[] Press the STARTpad to acfix _te
the cook and hold featm'e and
leaxe the control set in this special
J_}lttlI'eS II/ode.
[] Press the INCREASEpad to increase
the speed up to the nmnl)er 5.
Press the DECREASEpad to decrease
the speed down to the ntm/ber 1.
[] Press STARTto acfi; _te the setting
and lea_e the control set in this
special teatm'es mode.
11
Page 12

Usingthe oven.
Toavoid possible bums, place the shelves in the desired position before you turn the oven on.
Before you begin...
The oven has 4 shelf positions.
111
[]
!1|
The shelves have stop-locks, so that when
placed correctly on the supports, they will
stop before coming completely out, and
will not tilt.
_._hen placing and removing cookware,
pull the shelf out imtil it stops.
Toremove a shelf, pull it toward you, tilt
the ti'ont end up and pull it out.
Toreplace, place the end (ff the shelf
(stoi>locks) on the support, tilt up the
ti'ont and push the shelf in.
How to Set the Oven for Baking or Roasting
[] Press the BAKE pad.
[] Press the INCREASE or DECREASE
pad to set the o_en temperatm'e.
Tochangethe oven temperatureduring the Bake
cycle,press the BAKEpad andset the new
temperature.
Press the STARTpad. X,_]_en the
[]
oven starts to heat, the changing
temperature will be in the display,
The display starts changing once
the temperature reaches lO0°E
[] Press the CLEAR!OFFpad when
bakim, is finished.
TypeofFood Shelf Position
Frozenpies(oncookiesheet) BorC
Angelfoodcake, A
bundtorpoundcakes
Biscuits,muffins,brownies, BorC
cookies,cupcakes,
layercakes,pies
Casseroles BorB
NOTE:A cooling fan may automatically turn on
andoff to coolinternal parts. This/s normal,and
the fanmay continue torun evenafter the ovenis
turnedoff
Cutslits in thefoiljustlike thegrid.
/2
Preheating and Pan Placement
Preheat the oven if the recipe calls fin" it.
Preheating is necessa_ T for good results
when baking cakes, cookies, past_ T and
breads.
Topreheat,set theovenat thecorrecttemperature.
Thecontrol will beep when the ovenis preheated
andthe display will show yourset temperature.
Thiswill take approximately 10-15 minutes.
Aluminum Foil
You (an use aluminum toil to line the
broiler pan and broiler grid. Howe_e_;
you must mold the fi)il tighfl) to the grid
and cut slits in it just like the grid.
Without the slits, the toil will prevent fi_t
and meat juices fl'om draining into the
broiler pan. The juices could become
hot enough to catch on fire. If w)u
do not cut the slits, you are essentially
flTing, not broiling.
Baking results will be better if baking
pans are centered in the oven as much
as possible. Pans should not touch each
other or the walls of the oven. If w)u
need to use two shelves, stagger the pans
so one is not directly above the other;
and leave approximately 1½" between
pans, fi'om the fi'ont, back and sides of
the wall.
Donot usealuminumfoil on the bottom of
the oven.
Never entirely cover a shelf with
aluminum fifil. This will disturb the heat
circulation and result in poor baking.
A smaller sheet of fi)il may be used to
catch a spillover by placing it on a lower
shelf several inches below the fl)od.
Page 13

How to Set the Oven for Broiling
Leave the door open to the broil
stop position. The door stays open
by itself, yet the proper temperature
is mahTtahTedh7the oven.
[] Place the meat or fish on the broiler
grid in the broiler pan,
[] Folh)w suggested shelf positions in
the BroilingGuide.
If your oven is connected to 208 volts, rare steaks
may be broiled bypreheatingthe broiler and
positioningthe oven shelf one positionhigher
Use LOBroil to cook foods such as
poult_?' or thick cuts _ff meat thorotlghly
without ove_q)rowning them.
Broifing Guide
Shelf
Position
Food
Bacon
GroundBeef
WellDone
Beef Steaks
Rare
Medium
WellDone
Rare
Medium
WellDone
Chicken
LobsterTails
FishFillets
HamSlices
(precooked)
Pork Chops
WellDone
LambChops
Medium
WellDone
Medium
WellDone
Quantityand/
orThickness
1/2 lb.
(about8thin slices)
1lb. (4patties)
1/2to 3/4" thick
1" thick
1to 1½Ibs.
1_" thick
2to 2½Ibs.
1whole
2to 2_ Ibs.,
split lengthwise
24
6to 8 oz.each
1/4to 1/2" thick
1" thick
2(1/2" thick)
2(1"thick/about 1lb.
2(1"thick) about10
to 12oz.
i
2(1_" thick)about 1lb.
[] Press the BROILHI/LOpad once fi_r
HIBroil
To change, to LO Broil, press the
BROILHI/tO pad again.
[] Press the STARTpad.
[] _4_en broiling is finished, press the
CLEAR/OFF pad.
C
C
C
C
C
C
A
C
C
C
B
First Side
Time (min.)
4½
10
6
8
12
10
15
25
35
13 16
10
13
10
12
14
17
Second Side
Time (min.)
4½
5
6
11
78
14 16
20_5
10 15
Do not
turn
over.
9
10
12
12 14
Arrangein singleiaye
thick cookthrough
fn/ing isrecomroended
to 10minutesperside
for cubup chicken.
andafter Mf of
carefully.Brushwith
andduringcooking,if
cured ham.
Comments
Space evenly. Up to 8
patties take about the
same time.
Steakslessthan1"
beforebrowning.Pan
Slashfat.
Reducetime about5
Brusheachsidewith
meltedbutter.Broil
skin-side-downfirst.
Cutthrougl_backof
sheikSpreadopen.
Brushwith melted
butterbeforebroiling
broilingtime.
Handleandturn very
lemonbutter before
desired.Preheat
broilerto increase
browning.
Increasetime 5to 10
minutesperside for
1½"thickor home-
Slashfat.
Slashfat.
13
Page 14

Usingthe clock andtimer.
ToSet the Clock
Make sure flTeclock is set to the
correct time of da_
i; ¸
] TIMER ]
The timer is a mflTutetimer onl_
The timer does not control oven
operations. The maximum settilTg
on the timer is 9hours and59
minutes.
The clock must be set to the correct time
of da)for the autonmfic oxen timing
flmctions to work properly. The time of
day cannot be chanoed durh_g a timed
baking or self:cleaning cycle,
To Set the Timer
[] Pressthe KITCHENTIMERON/OFF
pad.
[] Press the INCREASEor DECREASE
pads tmtil the am ount ot tim e )ou
want shows in the display.
lfxou make a mistake press the
KITCHENTIMERON/OFFpad and
begin again.
ToReset the Timer
If the display is still showing the time
remaining, you may change it by pressing
the KITCHEN TIMER ON/OFF pad, then
press the INCREASE or DECREASEpads
until the time you want appea_ in the
display.
[] Press the CLOCKpad.
[] Press the INCREASE or DECREASE
pads.
[] Press the STARTpad.
[] Press the STARTpad.
[] _hen the timer reaches :00, the
control will beep 3 times followed 1)_
one beep eve_w 6 seconds until the
KITCHEN TIMER ON/OFF pad is
pressed.
The&second tonecan becance/edby following
thesteps in the Specialfeaturesof youroven
control section under Tonesat theEndof a
TimedCycle.
If the remaining time is not in the display
(clock, delay start or cooking time are in
the display), recall the remaining time by
pressing the KITCHEN TIMER ON/OFFpad
and then pressing the INCREASE or
DECREASE pads to enter the new time
Veil want.
14
ToCancel the Timer
Pressthe KITCHENTIMERON/OFFpad
twice.
Power Outage
_Mter a power outage, when power is
restored the display will flash and time
shown will no longer be correct--for
example,after a 5-minutepower interruption
the dock wi// be 5 minutes slow
The display flashes until the clock is reset.
MI other flmctions that were in operation
when the power went out will have to be
programmed again.
Page 15

Usingthe timedbakingand mastingfeatures.(onsome models)
NOTE:Foods that spoil easily-such as milk, eggs, fish, stuffings, poultry andpork-should not be allowed to s# for
more than 1hour before or after cooking. Roomtemperature promotes the growth of harmful bacteria. Be sure that
the oven light is off because heat from the bulb will speed harmful bacteria growth.
Thelow temperature zone of this range (between 170°/:and 200°/:) is available to keep hot cooked foods warm. Food
kept in the oven longer than 2 hours at these low temperatures may spoil.
How to Set an Immediate Start and Automatic Stop
@
Theoven wi// turn on/Ynmedlatelyandcook for a
selectedlength of t/me. At the endof the cooking
dynethe oven will turn off automaflca//y
[] Press the BAKEpad.
[] Using tile INCREASEor DECREASE
pads, enter tile desired temperature.
[] Press the COOKING TIME pad.
NOTE"Ifyourreciperequirespreheatl)_g,you
Tile display shows tile (wen temperature
that you set and tile cooking time
countdown. Tile display starts changing
once tile temperature reaches lO0°E
The oven will c(mtinue m cook tot the
progranmled aillotlnt oJ[time, then sl/tlt
off automatically.
Press tile CLEAR/OFFpad to clear tile
display:
mayneedtoaddadditlbnalt/metothelengthof
thecooklbgtime.
Using tile INCREASE or DECREASE
[]
pads, enter tile desired baking time.
Tile oven temperature and tile
cooking time that you entered will
be displayed.
[] Press tile START pad.
How to Set a Delayed Start and Automatic Stop
Youcanset the ovencontrol todelay-start the
oven,cook for aspecihc lengthof timeand then
turn off automatically
Make sure tile clock shows tile correct
dine ot day.
[] Press tile BAKEpad.
[] Using tile INCREASE or DECREASE
pads, enter tile desired temperature.
[] Press tile COOKING TIME pad.
NOTE"If yourrecipe requkespreheating, you
mayneed to addadditional ttmeto the length of
the cookingtime.
[] Using tile INCREASE or DECREASE
pads, enter tile desired baking time.
[] Press tile DELAYSTART pad.
[] Using tile INCREASE or DECREASE
pads, enter tile time of da)you
%;lilt tile oven to ttllI1 on }lll(l st}lI't
cooking,
[] Press tile STARTpad.
NOTE:An attention tone wi// soundif youare
using tlknedbakl?_ganddonot press the START
padafler entering thebakl))g temperature.
If you would like to check tile times you
have set, press tile DELAYSTARTpad to
check tile start time w_u have set or press
tile COOKING TIME pad to check tile
length of cooking time um have set.
X._]len tile oven turns oil at tile time
ot day you have set, the display will
show the changing temperature
(starting at 100°F) and the cooking
time co/intdown.
At tile end of timed baking, tile oven
will turn off. Tile end of cxcle tone will
so/ind,
Press tile CLEAR/OFFpad to clear tile
display.
15
Page 16

Adjustthe oventhermostat--Do it yourself!
Youmay find that your new oven cooks differently than the one it replaced. Useyour new oven for a few weeks to
become more familiar with it. If you still think your new oven is too hot or too cold, you can adjust the thermostat
yourself.
Do not use thermometers, such as those found in grocery stores, to check the temperature setting of your oven.
These thermometers may vary20-40 degrees.
NOTE" This adjustment will not affect the broiling or the self-cleaning temperatures. The adjustment will be
retained in memory after a power failure.
To Adjust the Thermostat
[] Press the BAKEand BROILHI/LO
pads at the sanle tiine fi)r 3 seconds
until the display shows SE
[] Press the BAKE pad. A two digit
nmnber sho_s in the displa).
[] The oxen teml)erature can be
a({justed ul) to (+) 35°F hotte_ n (-)
35 o_• : 1_coolei:
Press the INCREASE pad to increase
the temperature in 1 degree
increi//ents.
Press the DECREASEpad to decrease
the temperature in 1 degree
increi//ents.
X_q_en )ou haxe made the
[]
a(!i ustment, press the START pad to
go back to the time of (la) displa).
]L[se _Otli" o_,en as Veil would
II()I]llal]_.
Thetype ofmargarine will affect bakingperformance!
Most recipes for baking have been developed using high fat products such as butter or margarine (80% fat). If you
decrease the fat, the recipe may not give the same results as with a higherfat product
Recipe failure can result if cakes, pies, pastries, cookies or candies are made with Iowfat spreads. TheIowerthe fat
content of a spread product, the more noticeable these differences become.
Federal standards require l)ro(hlcts labeled "margarine" to contain at least 80% tilt by weight. I,ow tilt spreads, on the
other hand, contain less tilt and more water: The high moisture content of these spreads affects the textm'e and flavor
at baked goods. For best results with w)m" old tilvorite recipes, use mmgarine, butter or stick spreads containing at least
70% vegetable oil.
/6
Page 17

Usingthe self-cleaning oven.
The oven door must be closed
Wipe up heavy soil on flTeoven
bottom. (appearance may vary)
!II
and all controls must be set correctly for the cycle to work properly.
Before a Clean Cycle
We rec()mn/end venting y()ur kitchen
with an open window or using
a ventilation tim or hood (linking tile
first self=clean cycle.
Remoxe tile shelxes, broiler pan, broiler
grid, all cookware and am aluminum foil
fl"OIll the ox, en,
Tile oxen shelxes can be self-cleaned,
but they will darken, lose their luster and
become hard to slide.
Soil on tile fl'ont fl'ame of tile range and
outside the gasket on the door will need
to be cleaned bv hand. Clean these areas
with hot water; soap-filled steel-wool pads
or cleanse_ such as Soft ScrubS! Rinse
well with clean water and dry.
How to Set the Oven for Cleaning
[] Press tile SELFCLEAN pad.
[] Using tile INCREASE or DECREASE
pads, enter tile desired clean time, if
a time other than 4 hom_ is needed.
Clean cxcle time is nomlallx 4 hom_. You
can change the clean time to am' time
between 3 hom_ and 5 hom_, depending
on holy (lii't_ XO/II" oxen is.
[] Press the START pad.
Do not clean tile gasket. Tile fiberglass
material of the oven door gasket cmmot
withstand abrasion. It is essential for the
gasket to remain intact./t vou notice it
becoming worn or fl'ayed, replace it.
Wipe up aIV hea\?' sI)illove_ on tile oven
bottoi/l,
Make sm'e tile ()veil light bulb cover is in
place and the oven light is off.
IMPORTANT'. The health of some birds
is extremely sensitive to tile fimles given
off dining the self=cleaning cycle ot any
range. Move birds to another _vll
ventilated room.
Tile door locks automatically: Tile display
will show the clean time remaining. ]t will
not be possible to open tile oven door
tmfil tile telni)erature drops below tile
lock temperature and tile LOCKEDDOOR
light goes off.
Tile oven shuts offautomatically when
the clean cycle is complete.
\_]/en tile LOCKEDDOOR light is off', open
tile dooi;
::Ji::Tile words LOCKDOOR will flash and
tile oven control will signal if you set
the clean cycle and fi)rget to close the
oven door:
::Ji::To stop a clean cycle, press tile
CLEAR/OFFpad. When tile LOCKED
DOOR light goes off indicating the
(wen has cooled below the locking
temperatm'e, open tile dora:
/7
Page 18

Usingthe self-cleaning oven.
The oven door must be closed and all controls must be set correctly for the cycle to work properly.
How to Delay the Start of Cleaning
Make sure the clock shows the correct
time of day.
[] Press the SELFCLEAN pad.
[] Using the INCREASE or DECREASE
pads, enter the desired clean time.
[] Press the DEL4YSTART I_ad" The
earliest stm't time you can set will
appear in the displa).
[] Using the INCREASE (>r DECREASE
pads, enter the time oI day you want
the clean cycle to start.
The door loclcs automatically: The display
will show the start time. It will not be
possible to open the oven door until
the temperature drops below the lock
temperature and the LOCKEDDOOR
light goes off.
The oven shuts off automaticallv when
the clean cycle is complete.
_,_]_en the LOCKEDDOOR light is off; open
the doo_:
@
[] Press the START pad.
After a Clean Cycle
You may notice some white ash in the
oven. _ipe it up with a damp cloth after
the oven cools.
If white spoa remain,remove themwith a soap-
filled steel woolpad and rinse thoroughly with a
wnegarand waterml)_ture.
These deposits are usually a salt residue
that cannot be removed by the clean
cycle,
If the oven is not clean after one clean
cycle, repeat the cycle.
iJi::You cannot set the oven fiw cooking
tmfil the o_en is cool enouoh fi)r the
door to unlock.
::Ji::While the oven is selficleaning, you
can press the CLOCK pad to display
the time of din: To return to the
clean countdown, press the COOKING
TIME pad.
::Ji::If the shelves become hard to slide,
apply a small amount of vegetable oil
or cooking oil to a paper towel and
wipe the edges of the oven shelves with
the paper t()wel.
/8
Page 19

Careand cleaningoftherange.
Be sure electrical power is off and aft surfaces are cool before cleaning any part of the range.
How to Remove Protective Shipping Film and Packaging Tape
Carefidly grasp a corner of the protective
shiI_ping film with your finge_ and slowly
peel it from the appliance surfime. Do
not use any shaq) items to remove the
fihn. Rem_x'e all of the fihn betore using
the appliance fin" the first time,
Control Panel
To _lSStlI'e no (l_lI/l_lge is done [o the
finish of the product, the saii_st way to
remove the adhesive from packaging tape
on new appliances is an application oI a
household liquid dishwashing detergent.
Apply with a soft cloth and allow to soak.
NOTE: Theadhesivemust bere.movedfromall
parts,it cannotbe removedif it isbakedon.
It's a good idea to Mpe the control panel
after each use. Clean with mild soap
and water or vinegar and water; rinse
with clean water and polish dry with
a soft cloth.
Cleargroove Control Knobs
In stern
I
Thecontrolknobsmay be removedfor easier
cleaning.
Make sm'e the knobs are in the OFF
positions and pull them smfight off the
stems fin" cleaning.
Oven Vent
The oven is vented through an opening
under the fight rear stm'i_ce trait.
Do not rise _lbI'ilsive cleansers_ strong
liquid cleansers, plastic scotwing pads or
oven cleanse_5 on the control panel--they
will damage the finish. A 50/50 solution
ot vinegar and hot water works well.
The knobs can be cleaned in a
dishwasher or they may also be washed
with soap and water: Make sure the insides
of the knobs are dry befi)re replacing.
Replace the knobs in the OFFposition
to ensm'e proper placement.
Nevercovertheopeningwithaluminumfoilor
anyothermaterial
Porcelain Enamel Cooktop
The porcelain enamel finish is sturdy
but breakable if misused. This finish is
acid-resistant. However; any acidic foods
spilled (such as fi'uitjuices, tomato or
vinegar) should not be pemfitted to
remain on the finish.
If acids spill on the cooktop while it is
hot, use a dr)' paper towel or cloth to
wipe it up right away. When the smbfi_ce
has cooled, wash with soap and water:
Rinse well.
For other spills such as tat spatterings,
wash with soap and water or cleansing
i)ow(le_ after the surfi_ce has cooled.
Rinse well. Polish with a dry cloth.
19
Page 20

Careand cleaningoftherange.
Oven Shelves
Lift flTedoor straight up and off flTe
hinges.
(appearance may vary)
Thegasket is designed with a gap at
the bottom to aflow for proper air
circulation.
Do not rub or clean the door
gasket--it has an extremely low
resistance to abrasion.
If you notice the gasket becoming
worn, frayed or damaged h7any way
or if it has become displaced on the
door, you should have it replaced.
Clean the oven shelves with an abrasive
cleanser or steel wool. _Mier cleaning,
rinse the shelves with clean water and
d_' with a clean cloth.
Lift-Off Oven Door
The oven door is rem(wable fi:,r easier
access to the light bull).
Donot lift thedoor bythe handle.
Toremove the door, open it to the broil
stop position. (;rasp firefly on each side
and lift the door straight up and off the
hinges.
Donotp/acehandsbetween thehinge and the
ovendoorframe.
Toreplace the door, make sure the hinges
are in the broil stop position. Position the
slots in the bottom _ffthe door squarely
over the hinges and slowly lower it over
both hinges.
Toclean the inside of the door:
!i?:Because the area inside the gasket is
cleaned dining the self:clean cycle you
(lo not need to clean this by hand.
::Ji::The area outside the gasket and the
fl'ont fl'ame can be cleaned with a
soap-filled steel wool or plastic pad,
hot water and detergent. Rinse well
with a vinegar and water solution.
NOTE: Theovenshelvesmaybe cleanedin the
self-cleaningoven.However, theshelves will
darkenin color, losethe/?lusterand becomehard
toslide if cleanedduring theself-cleaningcycle.
To make the shelves slide more easily
apply a small amount oI vegetable oil or
cooking oil to a paper towel and wipe
the edges of the oven shelves with the
paper towel,
Toclean the outside ofthe door:
::Ji::Use soap and water to thoroughly
clean the top, sides and fl'ont ot the
oven (loo_: Rinse well. Ybu may also use
a glass cleaner to clean the glass on the
outside of the (loo_: Do not let water
drip into the vent openings.
::Ji::Spillage of marinades, fl'tfitj uices,
tomato sauces and basting materials
containing acids may cause
discoloration and should be wiped up
immediately. When stn_i_ce is cool,
clean and _inse.
iJi::Do not use oven cleanei_, cleaning
i)owcle_ or hm_h abrasixes on the
outside of the (loo_:
20
Page 21

Oven Heating Elements
Do not clean thebake element or thebroil
elemenLAnysoft wffl burn off when the
elementsare heated
To clean the oven flora, genfl) lift
the bake element, Clean with wam_
soap_ water.
Painted Surfaces
After broiling, remove the broiler
pan from the oven.
Wire cover holder.
Painted sm_i_ces include the sides and
the drawer fl'ont.
Clean these with soap and water or
a vinegar and water solution.
Broiler Pan & Grid
Do not dean thebroi/erpan orgrid ina serf-
cleaningoven.
_Mter broiling, remove tile broiler pan
fl'om tile oven. Remove tile grid fl'om tile
pan. Careflflly l)O/lI" ()lit tile grease fl'om
tile pan into a proper containe_;
X.Vashand rinse tile broiler pan and grid
in hot water with a soap-filled or plastic
scorning pad.
Oven Light Replacement
CAUTION: Before replacing your oven
light bulb, disconnect the electrical
power to the range at the main fuse
or circuit breaker panel
Be sure to let tile light cover and bulb
cool completel>
Toremove the cover:
Hold a hand under tile cover so it
[]
doesn't fifll when released. With
finge_ of the same hand fimfl_
push back tile wire co',er holder;
IJfl off tile coxer.
Do not use commercial oven cleane_,
cleaning powde_, steel wool or ha_h
abrasixes on an) painted sm'li_ce.
If fl_od has bm'ned on, sprinkle tile grid
with detergent while hot and cover with
wet paper towels or a dishcloth. Soaking
tile pan will remove bm'ned-on foods.
Both tile broiler pan and grid may be
cleaned with a commercial oven cleane_:
Both tile broiler pan and grid can also be
cleaned in a dishwasher:
Do not storea soiledbroiler panand grkJ
anywherein the range.
Toreplace the cover:
[] Place it into groove of the light
receptacle. Pull wire fiwward to
tile center of tile cover tmtil it
snaps into place.
[] Com_ect electrical power to
tile Fan *e
Donotremoveanyscrewstoremove
thecover
[] Replace bulb xfith a 40-watt
appliance bulb.
2/
Page 22

Careand cleaning ofthe range.
Be sure the controls are turned to OFFand the surface units are cool before attempting to remove them.
SurfaceUrll[ \
Recemacle 3rippar
Surface Units
To clean the SUltilce units, turn the
control to tile highest setting for a
nfinute. Tile coils will burn off' am soil.
Toremove a surface unit:
To relnoxe tile drip pans for cleaning,
tile surtilce units in ust be relnoxed fii_t.
Lift tile surti_ce rapt about 1" above tile
drip pan and pull it out.
Donotlift thesurfaceunitmorethan1". If you
do,it maynot/ief/atonthedrippanwhenyou
plugitbackin.
Repeated lifting of tile sm_i_ce trait
inore than 1" aboxe tile drip pan can
l)ennanenflv, dalnage, tile receptacle.
Drip Pans
Remo_e tile surli_ce milts. Then lift out
tile drip pans.
Toreplace a surface unit
Replace tile drip pan into tile recess in
the cooktop. Make sure the opening in
the pan lines up with the receptacle.
Insert tile telminals of tile surfi_ce unit
through the oi)ening ill the drip pan and
into tile receptacle.
Guide the surfi_ce unit into place so it
rests evenly.
Do not/?nmersethe surfaceunits in l/wids of
anykind
Do not dean the surfaceunits b a dishwasher
Do not bendthe surface unit plug terminals.
Do not attempt todean, adjust or in any way
repair theplug-in receptacle.
Tile drip pans max also be cleaned in
a dishwasher:
For best results, clean tile dlip pans bx
hand. Place theln ill a covered container
(or a plastic bag) with 1/4 cup all/II/onia
to loosen the soil. Then scrub with a
soap-filled scouling pad if necessarY.
Rinse with clean water and polish with a
clean soft cloth.
Lift-Up Cooktop
_" - _;_ Cleanthearea under the cooktopoften. Built-up
_ " soli, especiallygrease,may catch lye.
---" 777: ill tile up position.
Su )0rtrod Be sure all tile surti_ce units are turned
Besureallsurfaceunitsareturned surfilce units and (11117pans do not need
off beforeraisingthecooktop, to be i'ei//ox, ed; howexei; yell I//_l}'I'eI//Ove
To make cleaning easiei; tile entire
cooktop Ina} be lifted up and SUl)ported
off before raisin,*._ tile cooktop. Tile
one to make raising the cooktop easier.
A sui)i)ort rod will hold tile cooktop up
while you clean underneath it.
Clean tile area trader tile drip pans
often. Built-u I) soil, especially grease,
may catch fire.
Do not coverthe drip pans with foil. Using foil so
close to the receptacle,couldcause shock,fire or
damageto the range.
After cleaning trader tile cooktop Mth
hot, soapy water and a clean cloth, lower
the cooktop. Be carefifl not to pinch yore"
fingers.
22
Page 23

BeforeYouCallForService...
Troubleshooting -tips
Save time and money! Review the charts onthe following
pages first and you may not need to carl for service.
Possible Causes
Surface units not
functioningproperly
Cooktop feels hot Large pans hold heat * Choose a pan that matches the size of the St/l"filce
Food does not bake Oven controls * See the Using the oven section.
or roast properly improperly set.
The surface milts are
not plugged in solidly.
The surface unit
controls improperly set.
The drip pans are
not set securely in
the cooktop.
close to the cooktop, unit you are using.
The oven vent '* Pans on the right rear stu'fhce unit block air flow
is blocked, fl'om the oven vent and cause the cooktop to get hot.
Shelf position is incorrect '* See the Using the oven section.
or the shelf is not level.
Incorrect cookware '* See the Using the oven section.
or cookware of improper
size being used.
Oven thermostat needs * See the Adjust the oven thermostat--Do it yourself[
adjustment, se('tiou,
What To Do
• With the controls off, check to make sure the surthce
unit is plugged completely into the receptacle.
• Check to see the correct control is set fin" the surtace
unit w)u are using.
• X&]th the controls off, check to make sm'e the drip
pan is in the recess in the cooktop and that the
opening in the pan lines up with the receptacle.
Fooddoes not Door not open to the • See the Using the oven section.
broilproperly broil stop position
as recommended.
Oven controls • Make sure you press the BROILHI/LOpad.
improperly set.
hnproper shelf position • See the Broiling Guide.
being used.
Food being cooked • Use the broiling pan and grid that came with your
in a hot pan. oven. Make sure it is cool.
Cookware not suited * Use the broiling pan and grid that came with your
for broiling, oven.
Aluminum foil used on the '* See the Using the oven section.
the broiling pan and grid has
not been fitted properly and
slit as recommended,
In solile areas the power
(voltage) may be low.
• Preheat the broil element fin" 10 minutes.
• Broil fin" the longest period of time recoum_ended in
the Broiling Guide.
23
Page 24

BeforeYouCallForService...
Troubleshooting -tips
Possible Causes What ToDo
Control signals after You forgot to enter * Press tile BAKE pad and desired temperatm'e or tile
enteringcookingtime a bake temperature SELFCLEANpad and desired dean time.
ordelay start or cleaning time.
Clockandtimer A fuse h_ your home maybe * Replace the luse or reset the circuit breake_:
donotwork blown or the circuit breaker
tripped.
Oven controls * See tile Using the clock and timer section.
improperly set.
Ovenlightdoes Light bulb is loose or defective. * Tighten or replace tl_e btdb.
not work
Oventemperature Oven thermostat * See the Adjust the oven thermostat--Do it yourself!
too hot or too cold needs adjustment, section.
Switch operating light * Call for service.
is broken.
Ovenwillnotwork A fuse h_ your home may be * Replace flw luse or reset the circuit breake_:
blown or the circuit
breaker tripped.
Oven controls * See the Using the oven section.
improperly set.
Oven will not self-clean The oven temperature * ._dlow the oven to cool to room temperature and reset
is too high to set a self- the controls.
clema operation.
Oven controls improperly set. * See the Using the self-cleaning oven section.
"Crackling" or This is the sound of the * This is normal.
"popping" sound metal heating and cooling
during both the cooking and
clemfing functions.
Excessive smoking Excessive soil. * Press the CLEAR/OFF pad. Open the windows to
Oven door will not Oven too hot. * Allow the oven to cool below locking telnl)erature.
open after a
clean cycle
Oven controls not * See the Using the self-cleaning oven section.
after a clean cycle properly set.
Oven was heavily soiled. * Cleau u}) heavv, spilh)vers before ,staI'till*r_ the cleau
rid the room of smoke. Wait tmtil the LOCKED DOOR
light goes off. Wipe up the excess soil and reset the
clean cycle.
cycle. Heavily soiled ovens IUaV ueed to self-cleau
again or tk:,r a lou_er_ period of time.
24
Page 25

Possible Causes
What To Do
"LOCK DOOR" flashes
in the display
LOCKEDDOOR light The oven door is locked • Press tile CLEAR/OFF pad. Allow tile oven to cool.
is on when you want because the temperature
to cook inside the oven has not
"F--anda number You have a function • Press the CLEAR/OFFpad. _Mlow the oven to cool for one
orletter"flash in error code. hem: Put the oven back into operation.
the display
Display goes blank A fuse ha your home may be • Replace the fi/se or reset the circuit breaker:
Display flashes Power failure. • Reset the clock.
Unable toget the Oven control pads were • The BAKE aud BROIL HI/LO pads must be pressed
display to show "SF" not pressed properly, at the same time and held for 3 se(ouds.
The self-clean cycle has been
selected but the door is not
closed.
dropped below the
locking temperature.
If the function code repeats. • Disconnect all power to the range for at least 30
blown or the circuit
breaker tripped.
The clock is in the • See the Special features of your oven control section.
black-out mode.
• Ch)se the o'_en door.
seconds and then reconnect powe_:/f the flmctiou
citer code repeats, call for service.
Power outage, Power outage or surge. • Reset the clock. If the oven was in use you I/lUst reset
it by _ressiug the CLEAR/OFF pad, _, I , settiu,_ the clock
and resetting any cooking flmctiou.
"Burning" or "oily" This is normal in a new oven • To speed the process, set a sell=clean cycle for a
odor emitting from and will disappear in time. minimum of 3 hours. See the Using the self-cleaning
the vent oven section.
Strong odor An odor from the insulation • This is temporary.
around the inside of the
oven is normal for the first
few times the oven is used.
Fan noise A cooling fan may • This is normal. The cooling thn will turn off and on.
automatically turn on mad
off to cool internal parts.
25
Page 26

€_
NOteS_
---
rj_
€_
m
8
26
Page 27

Notes.
I
m.
w
I
27
I
Page 28

m
Notes.
m
__
r _
m
m
O_
28
Page 29

GE Service Protection Plus rM
GE, a name recognized workhvide fbr quality and dependability, offers y'ou
Service Protection Plus'"--comprehensive protection on all your appliances--
No Matter What Brand!
Benefits Include:
• Backed by GE
• All brands covered
• Unlimited service calls
• All parts and labor costs included
• No out-of-pocket expenses
• No hidden deductibles
• One 800 mnnber to call
YOu will be completel} satisfied with tun" service protection or xou ma) request )our money back
on the remaining value of)our contract. No questions asked. It's that simple.
Protect wmr refl'igerat(m dishwasher, washer and chTei; range, TV, VCP. and much more--any brand!
Plus there's no extra charge fi_r emergency service and low monthly financing is available. Even icemaker
co\ erage and ti_od spoilage protection is oflbred. You can rest easy, knowing that all your valuable
household products are protected against expensive repairs.
Place ,ore" confidence in (;E and call us in the Ij.S. toll-free at _UU,DZD,ZZZ_
for n/ore illforn/atiOll,
*MI ])l-;lllds (71)x_el(!d, lip IO _(} yeal'_ old, in Ihe (OIl[il'_(!ll[}l] U.S.
........................................................................................... _=_ Cllt here
We'll CoverAny Appliance.
Anywhere. Anytime.*
Please place in envelope and mail to:
General Electric Company
Warranty Registration Department
EO. Box 32150
Louisville, KY 40232-2150
29
Page 30

Consumer Product Ownership Registration
Dear Customer:
Thank you for purchasing our product and thank you for placing your confidence in us.
_A/eare proud to hme you as a customer'.
Follow these three steps to protect your new appliance investment:
Complete and mail
your Consumer
Product Ownership
Registration today.
Ilavc the peace of
mind of knowing we
call colltact yol/ ill
the unlikely _vent of a
salbty modification.
.\tier mailing the
registration below,
store this document
in a saib place. It
contains intormation
you will need should
you require service.
Our service mmlber is
800.GE.CARES
(800.432.2737).
Model Number Serial Number
,,, , , , , , I I , , , , ,
Important: If you did not get a registration card with your
product, detach and return the form below to
ensure that your product is registered, or register
online at ge.com.
Consumer Product Ownership Registration
Read VOllr ()Wller's
Manual carefhllv
It will help you
operate yollr llew
appliance properl>
, I
_,_ Cut here
Model Number Serial Number
M_ Ms. Mrs. Miss
Firsl I I Last[
Name I I I I I I I I I Nam_ I I I I I I I I I I I I
S{l-( (_I I
Address I I I I I I I I I I I I I I I I I I I I I I I
c...I i i i i i i i i i i i i i I s.,.,I
Dlle Phc(d
.,t_,ii I i,_,,.Ii I "_arli I pho._,
Monlh
* Please proxide your e-mail address to receive, xia eqnail, discounts, special Of[iT_,mid other inq:)ol-tant
communications ti-om GE Appliances (G1L\).
Check here if win do not want to receive conmmnications fl-om GILVs carefully selected partnel:,.
Appliances
General Electric Compang
GE Consumer & Industrial
Louisville, KY40225
9e.com
FAILI ZRE T() COMPLETE AND RET[ 7RN TIIIS CARl) DOES NOT DIMINISt t _,_)lZR
W.M(I_\N_IX RIGI ITS.
For more inlin-malion al)out (;l_\'s privaQ" mid data usage poli( 3, go to ge.com and click on
"Privacy Poliqv" or call 800.626.2224.
_.ll,,,_rI 1 1
I J ( o( (, I I I I
I-I i i II i i i
Zip
I
I
I
I
20
Page 31

GEElectricRange Warranty.
All warranty service provided by our Factory Service Centers,
or an authorized Customer Care® technician. Toschedule service,
on-line, 24 hours a day, vis# us at ge.com, or call 800.GE.CARES
(800.432.2737).Please have serial number andmodel number
available when calling for service.
GE Will Provide:
Fromthedate ofthe
origina!purchase
_ Service trips to your home to teach you how to use
the product.
::Ji::Improper installation, delivery or maJmtenaa_ce.
_: FaJhtre of the product if it is abused, misused, or used
for other than the intended purpose or used
commerciaJly.
_: Replacement of house fuses or resetting of circuit
breakers.
Any patt of the range whkh fifils due to a (lefe('t in materials or workmanship,
During this limited one-year warranty, GE will also provide, free ofchaffle, all labor
and in-home service to replace the defective part,
Staple your receipt here.
Proof of the original purchase
date is needed to obtain service
under the warrant_
!i/_Dmnage to the product caused by accident, fire, floods
or acts of God.
::Ji::Incidental or consequentiaJ dmnage caused by possible
defects with this applim_ce.
iJi::Dmnage caused after delivery.
!i/:Product not accessible to provide required service.
Warrauty. Any implied warranties, includiug the implied warranties of merchantability or fitnessfor a particular purpose,
I XCLDSIONOFIMPLIED WARRANTIES--Your sole and exclusive remedy is product repa# as provided h) this Limited
are limited to one year or the shortestperiod allowed by law.
This warranty is extended to the original purchaser and any succeeding owner for products purchased for
home use within the USA. If the product is located in an area where service by a GEAuthorized Servicer is not
available, you may be responsible for a trip charge or you may be required to bring the product to an Authorized GE
Service location for service. In Alaska, the warranty excludes the cost of shipping or service calls to your home.
Some states do not allow the exclusion or limitation of incidental or consequential damages. This warranty
gives you specific legal rights, and you may also have other rights which vary from state to state. To know
what your legal rights are, consult your local or state consumer affairs office or your state's Attorney General.
Warrantor," General Electric Company.Louisville, KY40225
3/
Page 32

ConsumerSupport.
GEAppliancesWebsite ge.com
Hme a ques0on or need assistance with your appliance? Try tile GE Ai)i/liances _._bsite 24 hom_ a (la);
any da) of the }ear! For greater comenience and tipster serxice '_ou can now download Owner's Manuals,
order parts, catalogs, or e_en schedule service on-line. Ybu can also _sk Our Team of Experts
VO//Y qt/esOons, and so Illtlcl/ iiloi'e...
. . TNk_
ScheduleService
Expert (;E repair service is onl) one step awa)fi'om _our doo_: Get on-line and schedule )ore" service at
your comenience 24 hom_ an? day of tile year'. Or call 800.GE.(_ARES 800.432.2737) during n(mnal
business hom_.
ge.com
RealLifeDesignStudio ge.com
(;E supports tile/Lrnive_al Design concept--l)roducts, services and enviromnents that can be used 1))'
people of all ages, sizes and capabili0es. We recognize tile need to design fin" a wide range of physical and
mental abili0es and impaim_ents. For details of GE's ILrnive_al Design api)lications, including kitchen
design ideas for people with disabili0es, check Otlt ()/lI"X.Vebsite today. For tile hearing impaired, please call
800.TDD.GEAC (800.833.4322).
ExtendedWarranties
Purchase a (;E extended xsarrant_ and learn about special discounts that are available while xour warrant_
is still in effect. "_)ll C_lll purchase it on-line anytime or call 800.626.2224 during nomml business hom_.
(;E ()msulner Home Sertices will still be there after }our warranty expires.
PartsandAccessories
ge.com
ge.com
f
Individuals qualified to service their own appliances can have parts or accessories sent direcflv to their
homes (VISA, MasterCard and Discover cards are accepted). Order on-line today, 24 hom_ every day or
by phone at 800.626.2002 dining normal business hom_.
Instructions contained in _is manual cover procedures tobe performed by any user. Other servicing generally
should be referred to qualified service personnel Caution must be exercised, since improper servicing may cause
unsafe operation.
ContactUs
If you are not sa0sfied with tile service you receive fl'om GE, contact us on our X.Vebsitewith all tile details
including your phone numbe_; or write to: General Manage_; ()lStomer Rela0ons
GE Appliances, Appliance Park
Iamisville, KY 40225
RegisterYourApplbnce
Register your new applimlce on-lille--at your convenience! Timely product registration will allow for
enhanced communica0on and proml)t serxice trader tile tem/s of )our warrant},; should tile need arise.
Y)m may also mail in tile pre-pfinted reoistrafion_ card included in tile I)ackin°_ material.
Printed in flTe United States
ge.com
ge.com
 Loading...