

GE JTS10SP1SS, JTS10DP1BB, JKS10SP2SS, JKS10SP1SS, JKS10DP1BB Owner’s Manual
...
GEAppliances.com
Safety Instructions . ....... 2-4
Operating Instructions
(;lock and Timer ............. 9
Controls .................. 5, 6
Oven .................... 7, 8
Sabbath Featme ............ 13
Special Featmes ............ 12
Thermostat ................ 11
Timed Baking and Roasting .... 10
Care and Cleaning
Control Panel .............. 14
i,ift-Off Oven Door .......... 15
Light Bulb ................. 16
Packaging Tape ............. 14
Painted Surfaces ............ 14
Porcelain Oven Interior ...... 14
Racks ..................... 14
Troubleshooting Tips .... 17, 18
Accessories ................ 19
!ii
,]KS10-27" Single Wall Ove'rz
,flS'l 0-30" Si,zqle Wall Ove'rz
Consumer Support
Consumer Support .......... 22
Warranty .................. 21
Write the model and serial
numbers here:
Model #
Serial #
You can find them on a label on
the side trim or on the flont of
the oven behind the oven dooL
49-80593 06-09 JR
IMPORTANTSAFETYINFORMATION.
READALLINSTRUCTIONSBEFOREUSING.
WARNING!
Foryour safety, the information in this manual must be followed to minimize the risk of fire or
explosion, electric shock, or to prevent property damage, personal injury, or loss of life.
SAFETYPRECAUTIONS
When using electrical appliances, basic safety precautions should be followed, including
the following:
Use this appliance only fbr its intended
purpose as described in this Owner's
Manual.
Be sure your appliance is properly
installed and grounded by a qualified
technician in accordance xdth the
prox,ided installation instructions.
Do not attempt to repair or replace any
part of your oven unless it is specifically
recommended in this manual. All other
ser\,icing should be referred to a qualified
technician.
iiiiiiiiiiiii!
Before performing any sen,ice, disconnect
the oven power supply at the household
distribution panel by remox,ing the fuse or
switching off the circuit breaker-
Do not leave children alone----children
should not be left alone or unattended in
an area where an appliance is in use. They
should never be allowed to sit or stand on
any part of the appliance.
iiiiiiiiiiiii!
Do not allow anyone to climb, stand or
hang on the door. They could damage the
oven, or cause severe personal injuPi.
Have the installer show you the location
of the circuit breaker or fuse. Mark it tbr
easy reference.
2

SAFETYPRECAUTIONS
GEAppliances.com
Be sure the oven is securely installed in
a cabinet that is firmly attached to the
house structure. Never allow anyone
m climb, sit, stand or hang on the
oven dooE
Never leave the oven door open when
you are not watching the oven.
Always keep combustible wall coverings,
curtains or drapes a s_e distance from
your ovell.
Always keep dish towels, dish cloths, pot
holders and other linens a s_e distance
flom your oven.
Always keep wooden and plastic utensils
and canned fbod a s_e distance away
flom your oven.
Teach children not to play xdth the
controls or any other part of the oven.
i,arge scratches or impacts to glass doors
can lead to broken or shattered glass.
Do not store flammable materials in
ail oveil.
CAUTION:,ternsofi.terestto
children should not be stored in cabinets
above an oven; children climbing on the
oven to reach items could be seriously
injured.
iiiiiiiiiiiii!
Never wear loose-fitting or han_ng
garments while using the appliance.
Be careful when reaching fbr items
stored in cabinets over the oven.
Flammable material could be ignited if
brought in contact with hot surfaces or
heating elements and may cause severe
burns.
Use only d U pot holders--moist or
damp pot holders on hot surfaces may
result in burns flom steam. Do not let
pot holders touch hot heating elements.
Do not use a towel or other bulky cloth.
For your safety, never use your appliance
for warming or heating the room.
Do not let cooking grease or other
flammable materials accumulate in
or llear the ovell.
Do not use water on grease fires.
Never pick up a flaming pan. Turn the
controls oil
Flame in the oven can be smothered
completely by closing the oven door and
turning the oven off or by using a multi-
propose d U chemical or foam-type fire
extinguisher.
Do not store or use combustible
materials, gasoline or other flammable
vapors and liquids in the x,icinity of this
or any other appliance.
3
IMPORTANTSAFETYINFORMATION.
READALLINSTRUCTIONSBEFOREUSING.
WARNING!
COOKMEATANDPOULTRYTHOROUGHLY...
Cookmeat andpoultry thoroughly--meat toat leastanINTERNALtemperatureof 160°Fandpoultry
toat least an INTERNALtemperatureof 180°ECookingto thesetemperaturesusuallyprotectsagainst
foodborneillness.
SAFETYPRECAUTIONS
Do not touch the heating elements or the
inmrior surface of the oven. These surfaces
may be hot enough to burn even though
they are dark in color: During and after
use, do not touch, or let clothing or other
flammable materials contact any interior
area of the oven; allow sutticient time for
cooling first.
Potentially hot surfaces include oven vent
openings, surfaces near the openings,
cre\,ices around the oven door, the edges
of the window and metal trim parts above
the door:
REMEMBER:The inside surface of the oven
may be hot when the door is opened.
Never place cooking umnsils or any other
items on the oven floor- There is a heating
element beneath the oven floor- Placing
items on the oven floor may cause the
oven to overheat, resulting in damage m
the oven and risk of damage or fire to
cabinets.
Stand ms,ay from the oven when opening
the oven door- Hot air or steam which
escapes carl cause burns to hands, face
and/or eyes.
Do not heat unopened fk)od containers.
Pressure could build up and the container
could burst, causing an in,ju U.
iiiiiiiiiKeep the oven vent unobstmcted.
iiiiiiiiiKeep the oven flee from grease buildup.
Place the oven rack in the desired position
while the oven is cool. If racks must be
handled when hot, do not let pot holder
contact the heating elements.
When using cooking or roasting bags in
the oven, f_llow the manufacturer's
directions.
Pulling out the rack to the stop-lock is a
convenience in lifting hem,y fk_ods. It is
also a precaution against burns flom
touching hot surfaces of the door or oven
walls.
Do not use the oven to drT newspapers.
If overheated, they can catch on fire.
Do not use the oven fk)r a storage area.
Items stored in an oven carl ignite.
Do not leave paper products, cooking
utensils or food in the oven when not
in use.
After broiling, always take any broiler
pan out of the oven and clean it. Leftover
grease in a broiler pan carl catch fire
next time you use the pan.
Never leave jars or cans of fat drippings in
or near your overl.
Clean only parts listed in this Owner's
Manual.
Do not use aluminum foil to line oven
bottoms, except as suggested in this
manual. Improper installation of
aluminum fk)il may result in a risk
of electric shock or fire.
READANDFOLLOWTHISSAFETYINFORMATIONCAREFULLY.
SAVETHESEINSTRUCTIONS
4
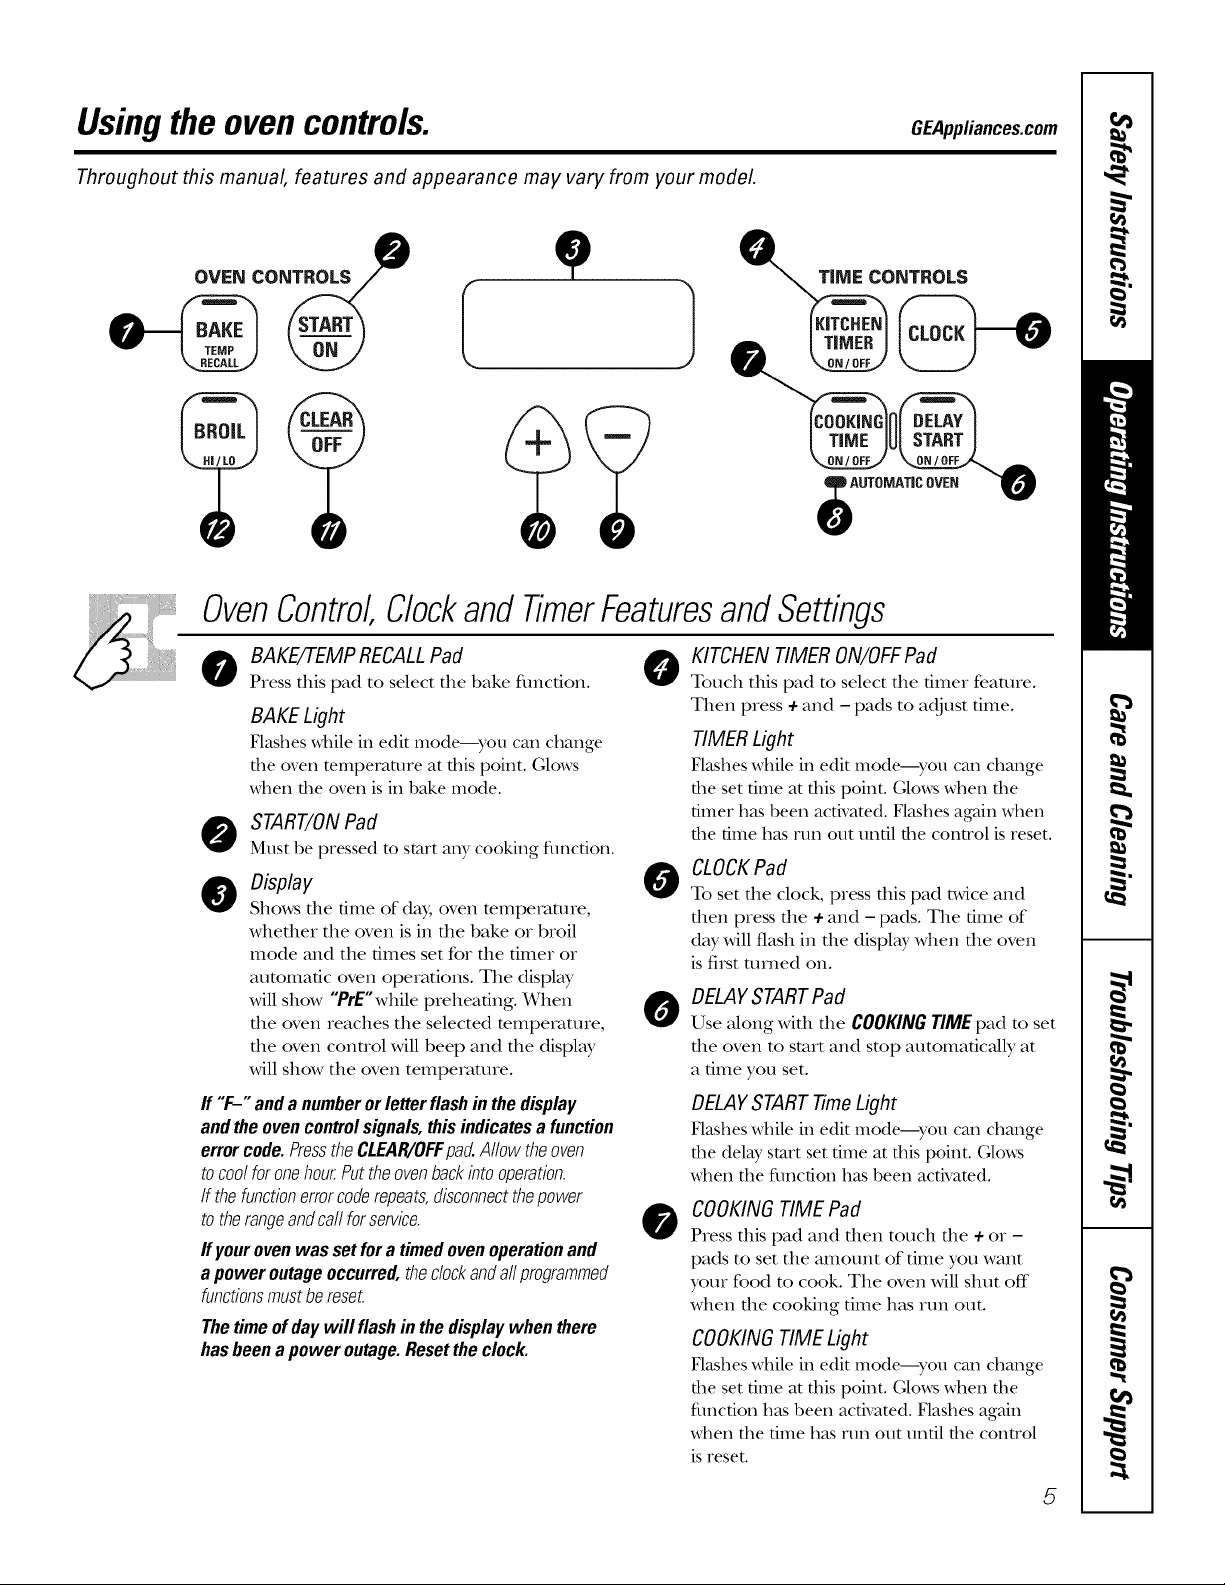
Usingthe ovencontrols.
Throughout this manual, features and appearance may vary from your model.
OVEN CONTROLS
e..
OvenControl,ClockandTimerFeaturesandSettings
GEAppliances.com
oToo..,oovE.0
BAKE/TEMP RECALLPad
Press flds pad to select file bake flmcfion.
BAKE Light
Flashes _dfile ii1edit mode---you can challge
the oven temperature at this point. Glows
_\hen the oven is in bake mode.
O START/ONPad
Must be pressed to start any cooking function.
@0,s.,. @
Shows tile time of day, oven temperaune,
whether the oven is in tile bake or broil
mode and tile times set for the timer or
automatic oven operations. Tile display
will show "PrE"while preheating. When
tile oven reaches tile selected temperature,
the oven conuol will beep and tile display
will show tile oven temperature.
ff "F-" anda numberorletterflashin thedisplay
andtheovencontrolsignals,thisindicatesa function
errorcode.PresstheCLEAR/OFFpad.Allowtheoven
tocoolforonehourPuttheovenbackintooperation.
If thefunctionerrorcoderepeats,disconnectthepower
totherangeandcallforservice.
If your ovenwas set fora timed ovenoperationand
apoweroutageoccurred,thedockandallprogrammed
functionsmustbereset.
Thetimeofdaywill flashin thedisplaywhen there
hasbeena poweroutage.Resettheclock.
O
0
KITCHEN TIMER ON/OFFPad
Touch this pad to select tile timer feature.
Then press + and - pads to adjust time.
TIMER Light
Flashes _dfile iI1edit IIlo(]e---},'Otl call change
the set time at this point. (;lo_s when the
timer has been activated. Flashes again _d_en
the time has run out until the conwol is reset.
CLOCKPad
To set tile clock, press this pad t_,viceand
then press the +and - pads. Tile time of
day will flash in tile display when tile oven
is fi_st mined on.
DELAYSTARTPad
Use along widl die COOKINGTIMEpad to set
tile oven to start and stop automatic_flly at
a time you set.
DELAYSTART TimeLight
Flashes _d/ile ill edit mo(le--you call change
the delW start set time at tiffs point. (;lo_\_
when the flmction has been activated.
COOKINGTIME Pad
Press this pad and then touch tile +or -
pads to set tile amount of time you want
your food to cook. Tile oven will shut off
when tile cooking time has mn out.
COOKINGTIME Light
Flashes _dfile iI1edit IIlo(]e---yotl call change
the set time at this point. (;lo_s when the
fullctioll has been activated. Flashes again
when the time has run out until the control
is reset.
5
Usingthe ovencontrols.
OvenControl,Clockand TimerFeaturesandSettings
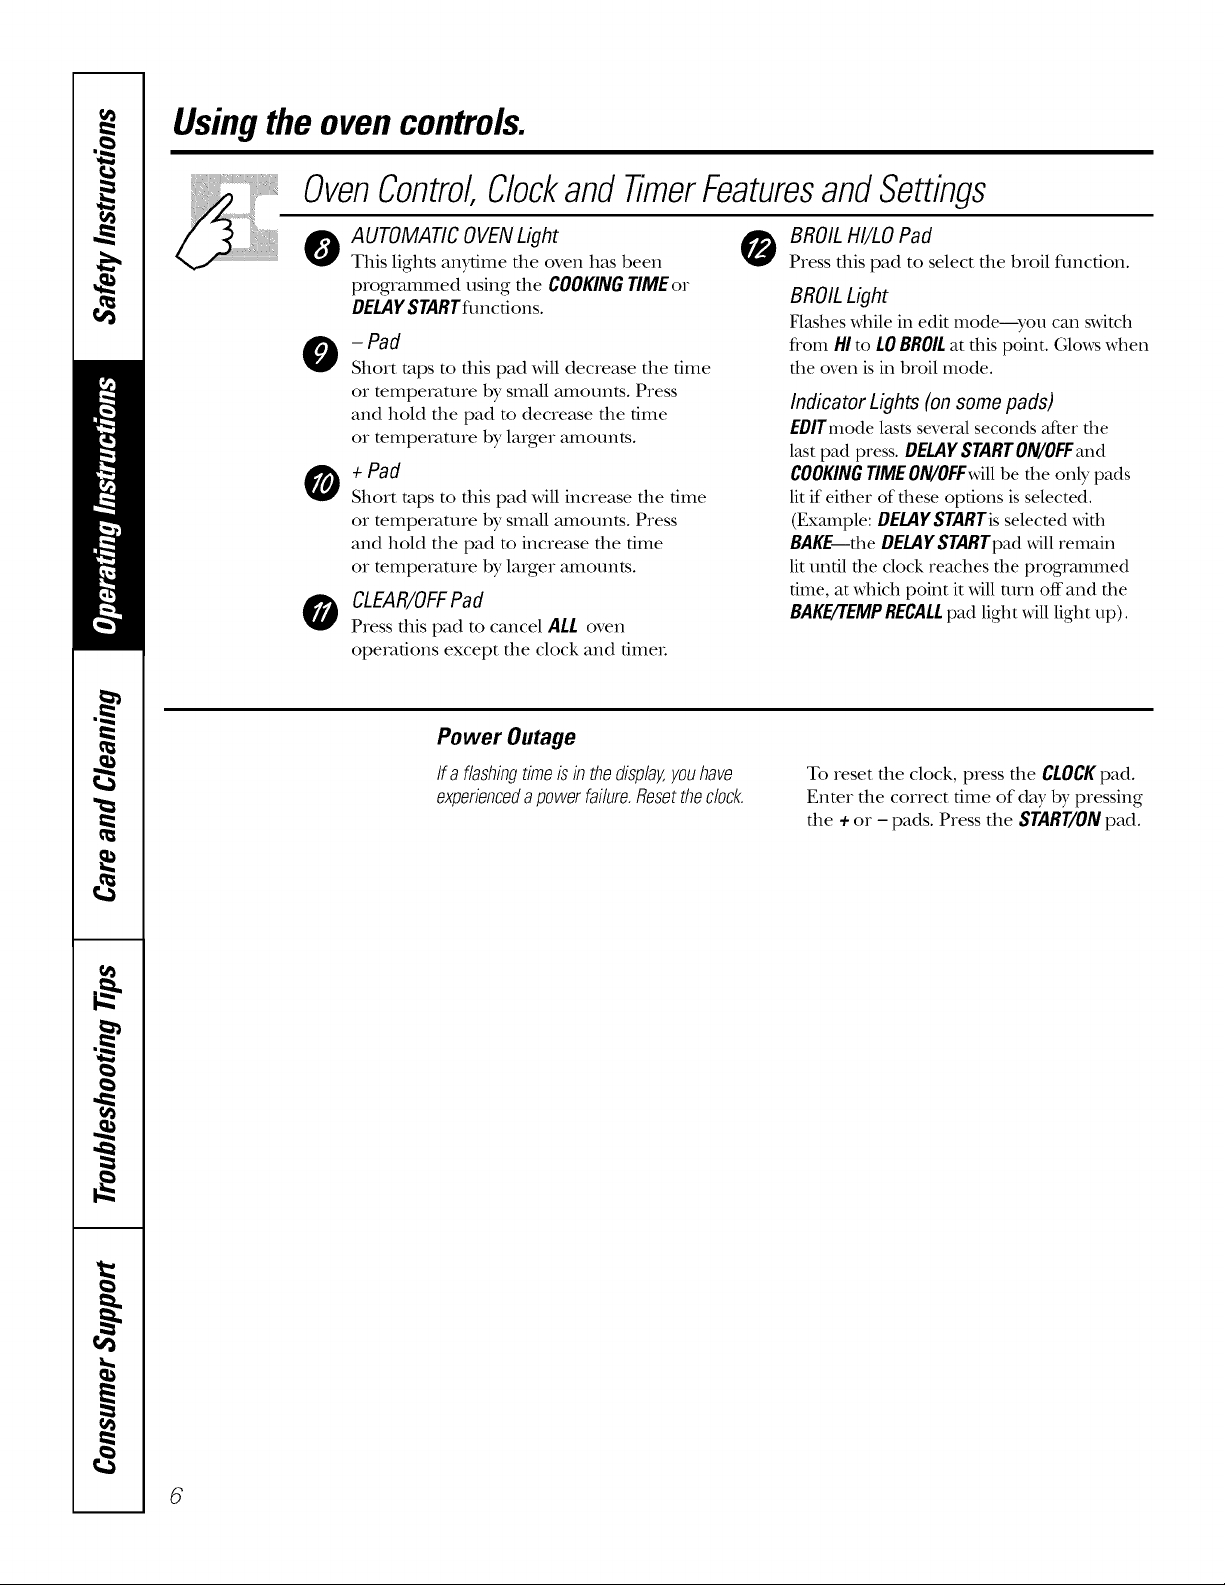
O AUtOMAticOWNLight 0 BROILHI/LOPad
This lights an)_ime the oven has been Press this pad to select the broil flmcfion.
programmed using the COOKINGTIMEor
DELAYSTARTflmctions.
- Pad
Short raps to this pad will decrease the time
or mmpe_vmlre bysmall amounts. Press
and hold the pad m decrease the time
or mmpe_mlre by larger amounts.
O +pad
Short taps to this pad will increase the dine
or mmpe_mlre by small amounts. Press
and hold the pad m increase the time
or mmpe_wture by larger amounts.
O CLEAR/OFFPad
Press this pad to cancel ALL oven
opexv_tions except the clock and timeL
BROIL Light
Flashes while in edit mode--you can switch
from HI to LOBROILat this point. (;lo_s when
the oven is in broil mode.
Indicator Lights (on some pads)
EDITmodelasts several seconds after tile
last pad press. DELAYSTARTON/OFFm_d
COOKINGTIMEON/OFF_dllbe the only pads
lit if either of these options is selected.
(Example: DELAYSTARTisselected _dfl/
BAKE the DELAYSTARTpad_dll remain
lit until the clock reaches the programmed
time, at _\t_ichpoint it _\ill mrn off and the
BAKE/TEMPRECALLpad light _ill light up).
Power Outage
Ifa flashingtimeisinthedisplay,youhave
experiencedapowerfailure.Resettheclock.
To reset the clock, press the CLOCKpad.
Enter the correct time of day by pressing
the +or - pads. Press the START/ONpad.
6
Usingthe oven. GEAppliances.com
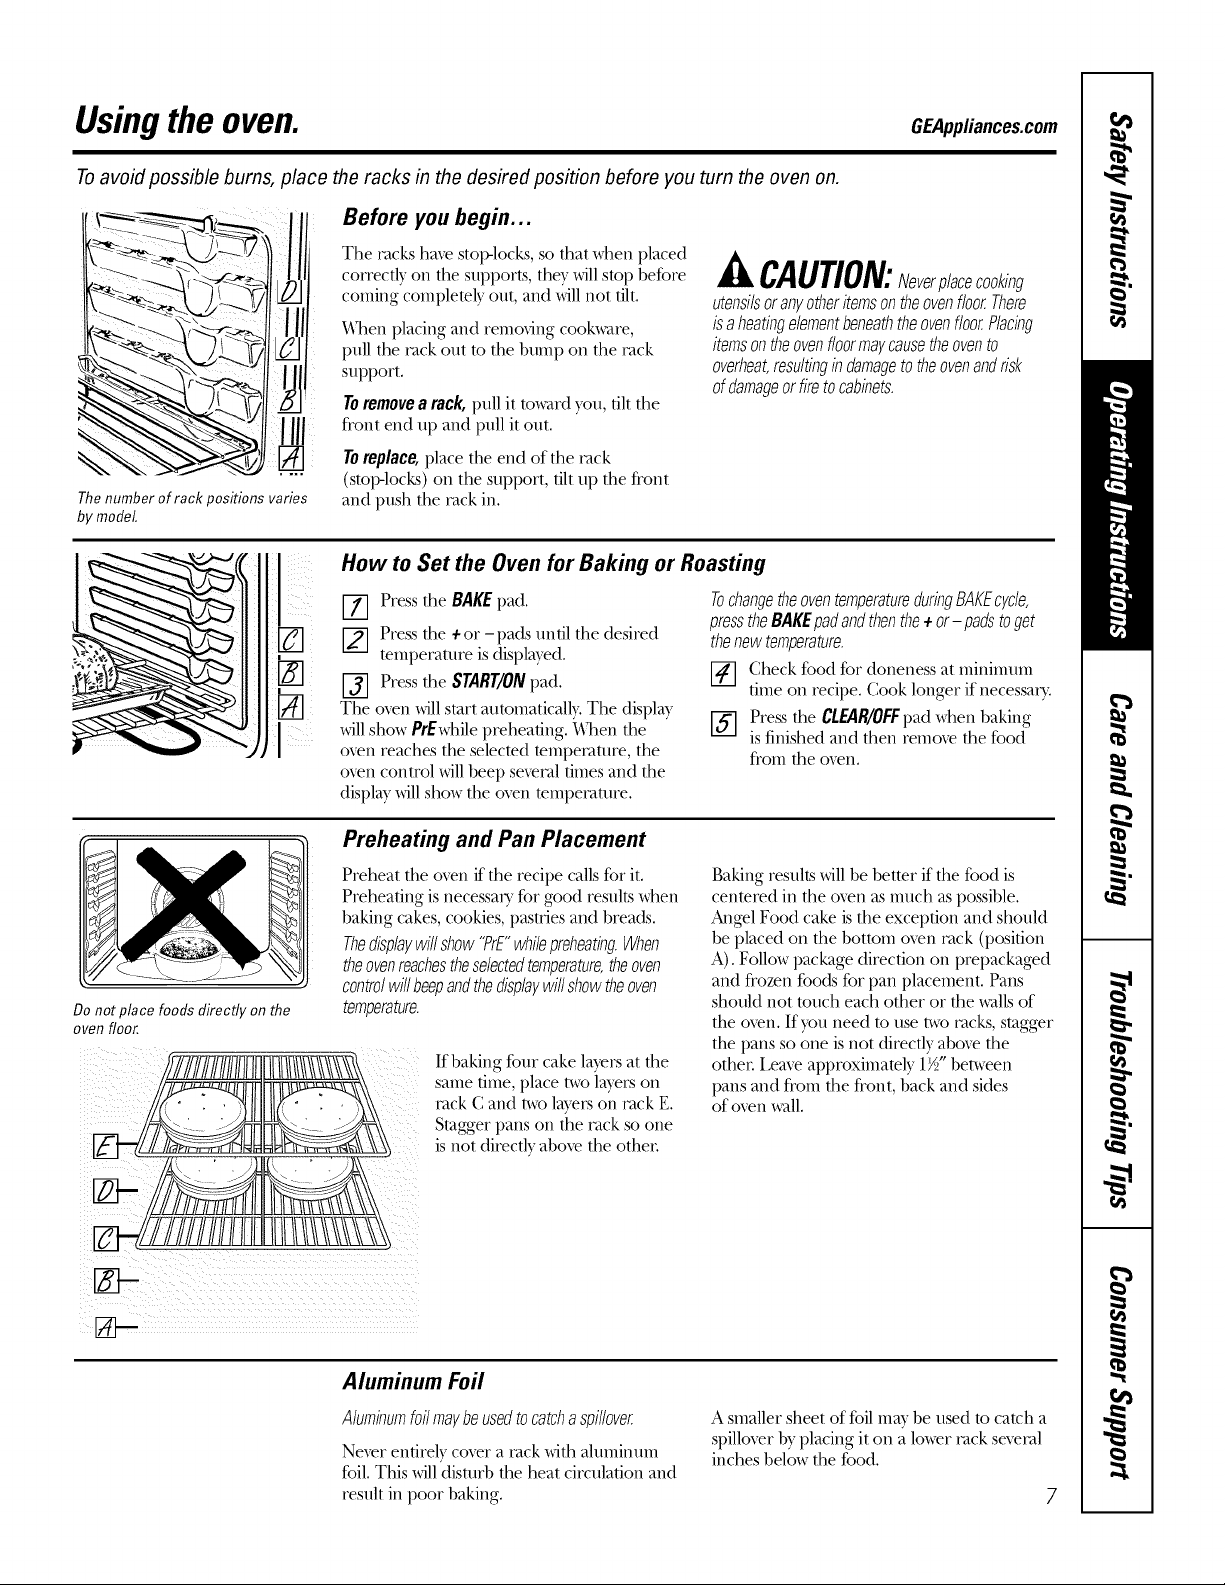
Toavoid possible bums, place the racks in the desired position before you turn the oven on.
Before you begin...
The yacks have stop-locks, so that when placed
_ _>_v ,,,
Thenumber of rack positions varies
by model.
correctly on the supports, they will stop before
coming completely out, and will not tilt.
When placing and removing cookware,
pull the rack out to the bump on the rack
support.
Toremovearack,pull it toward you, tilt the
fl'ont end up and pull it out.
Toreplace,place the end of the Iack
(stop-locks) on the support, tilt up the fl'ont
and push the rock in.
How to Set the Oven for Baking or Roasting
Jk CAUTION:Neverplacecooking
utensilsoranyotheritemsontheovenfloorThere
isa heatingelementbeneaththeovenfloorPlacing
itemsontheovenfloormaycausetheovento
overheat,resultingindamagetotheovenandrisk
ofdamageor fireto cabinets.
Do not place foods directly on the
oven floor.
Press the BAKE pad.
Press the + or - pads until the desired
tempemtui'e is displayed.
V3] Press the START/ONpad.
The o_n will start automatically. The display
will show PrEwhile preheating. "_]_en the
oxen reaches the selected temperature, the
oxen conu'ol will beep sexeral times and the
display will show the oven mmpetature.
Preheating and Pan Placement
Preheat the oven if the recipe calls for it.
Preheating is necessa U %r Good results when
baking cakes, cookies, pasu_ies and breads.
Thedisplaywillshow"PrE"whilepreheating.When
theovenreachestheselectedtemperature,theoven
controlwillbeepandthedisplaywillshowtheoven
temperature.
If baking four cake layers at the
same time, place two layers on
rock C and two layers on rack E.
Stagger pans on the rack so one
is not directly aboxe the othei:
TochangetheoventemperatureduringBAKEcycle,
presstheBAKEpadandthenthe+ or-pads toget
thenewtemperature.
[4] (.:heck food for doneness at minimum
rune on recii)e. Cook longer if necessm>
Press the CLEAR/OFFpad when baking
is finished and then remove the food
fl'om the o_n.
Baking results will be bettor if the food is
centered in the oven as much as possible.
Angel Food cake is the excei)tion and should
be placed on the bottom oven rack (position
A). Follow package direction on i)rei)ackaged
and frozen foods for i)an i)lacement. Pans
should not touch each other or the walls of
the o_en. If you need to use two iacks, stagger
the pans so one is not directly above the
other Leave approximately 1½" between
pans and fl'om the fl'ont, back and sides
of oxen wall.
m-
2/}---
Aluminum loft
Aluminumfoilmaybeusedtocatchaspi//over
Nmer entirely cover a rack with ahlinintlin
foil. This will disturb the heat ciivulation and
result in i)oor baking.
A smaller sheet of foil may be used to catch a
spillover by placing it on a lower tack several
inches below the food.
Usingthe oven.
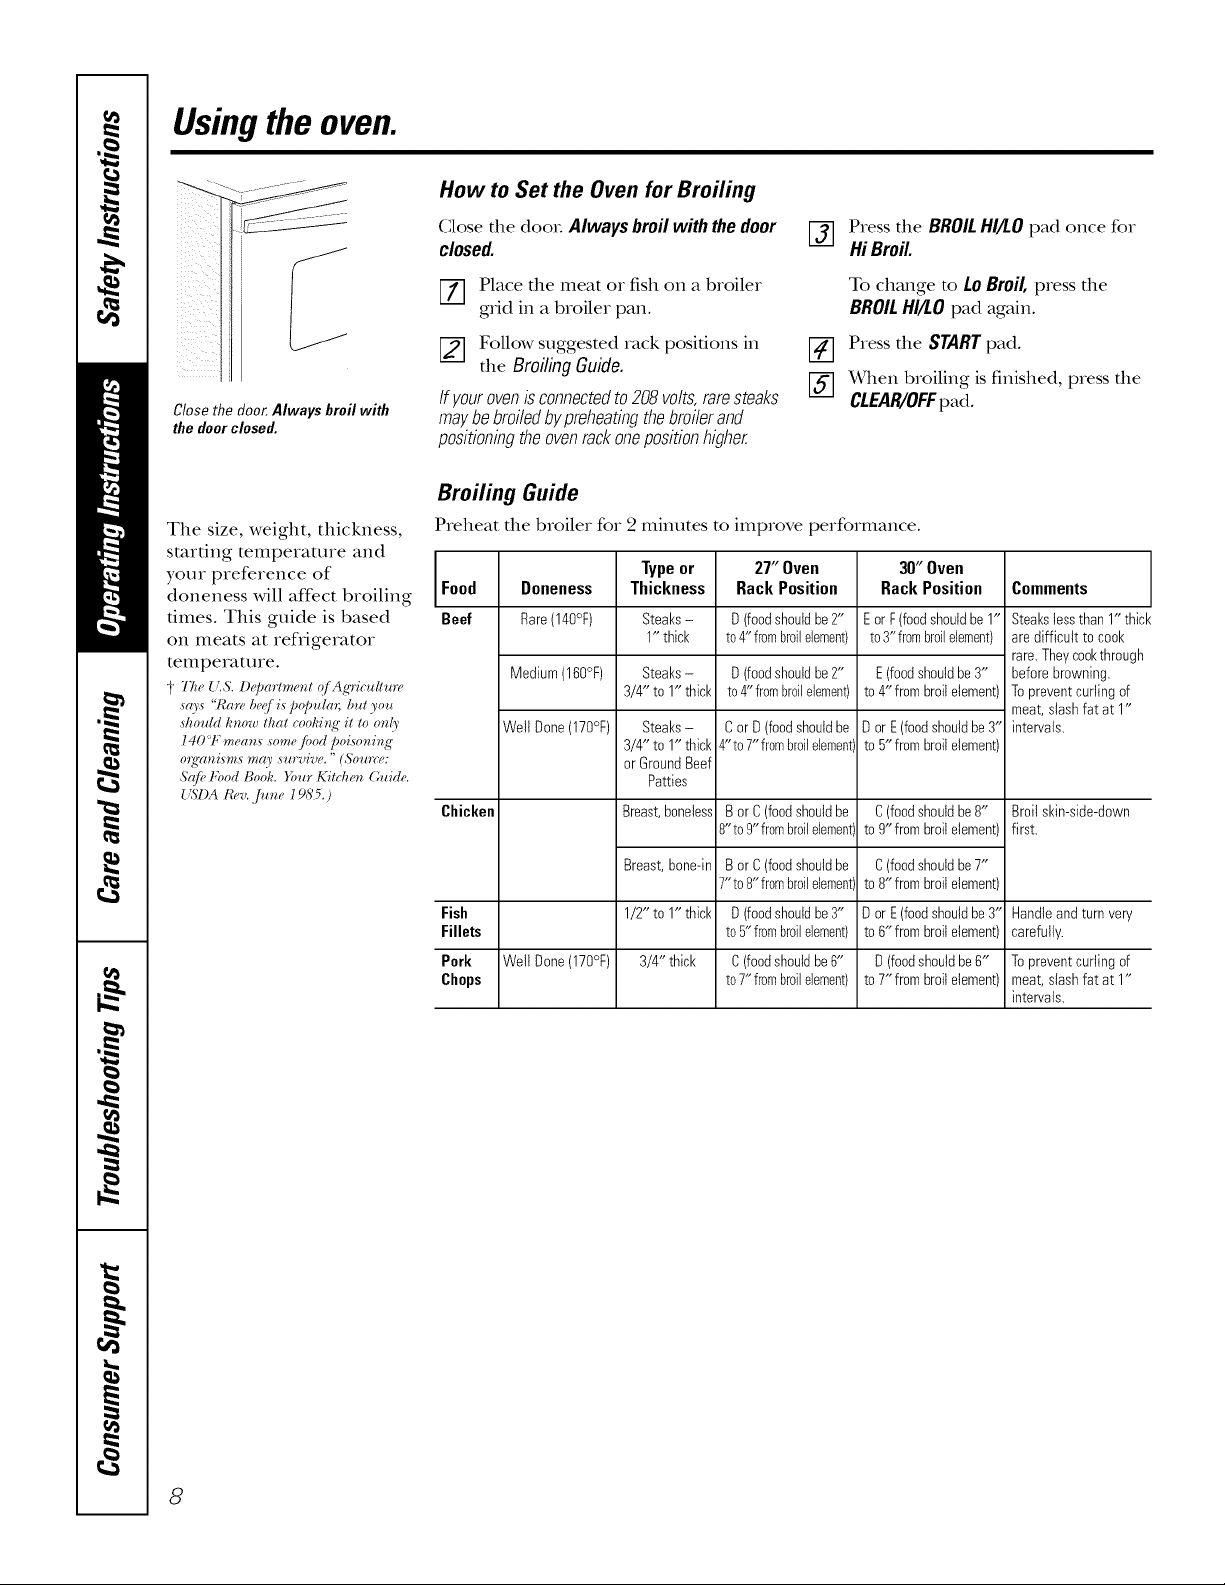
How to Set the Oven for Broiling
Close the door.Always broil with
the doorclosed.
The size, weight, thickness,
smr6ng temperature and
your preference of
doneness will affOct broiling
times. This guide is based
on meats at refrigerator
temperature.
i "/'heU.S. l)_JJartment qf Ag'_-icullure
sws "/¢are beqf ispo/)u/a), but yea
should know that cooking it to on&
140 1: means some fbod poisoning"
o)g'ani,smsmay survive. "(Soa*re:
Snji, kbod Booh. _bar Kitchen Guide.
{'SI)A Rev.,/ane 19S5.)
Close the doo_. Always broil with the door
closed.
Z] Place the meat or fish on a broiler
grid in a broiler pan.
[] Follow suggested rack positions in
[] Press the BROILHI/LOpad once for
HiBroil.
To change to LOBroil,press the
BROILHI/LOpad again.
_-] Pressthe STARTpad.
the Broiling Guide.
If yourovenisconnectedto208volts,raresteaks
[_] When broiling is finished, press the
CLEAglOFFpad.
maybebroiledbypreheatingthebroilerand
positionbgtheovenrackonepositionhigher
Broiling Guide
Preheat the broiler for 2 minutes to improve performance.
Food Doneness Thickness Rack Position Rack Position Comments
Beef Rare(140°F) Steaks- D(foodshouldbe2" EorF(foodshouldbe1" Steakstessthan1" thic
Medium(160°F) Steaks- D(foodshouldbe2" E (foodshouldbe3" before browning.
Welt Done(170°F) Steaks- C or D(foodshouldbe D orE (foodshouldbe3" intervals.
Chicken Breast,boneless B or C(foodshouldbe C(foodshouldbe8" Broilskin-side-down
Fish D(foodshouldbe3" D orE (foodshouldbe3" Handleandturn very
Fillets to5"frombroilelement) to6" frombroilelement) carefully.
Pork Welt Done(170°F) C(foodshouldbe6" D (foodshouldbe6" Topreventcurlingof
Chops to7"frombroilelement) to7" frombroilelement) meat,slashfat at 1"
Type or 27" Oven 30" Oven
1" thick to4"frombroilelement) to3"frombroilelement) aredifficult to cook
3/4" to 1" thick to 4"frombroilelement)to 4" frombroilelement) To preventcurlingof
3/4" to 1" thick 4"to7"frombroilelementto 5"frombroilelement)
orGroundBeef
Patties
8"to9"frombroilelementto 9" frombroilelement) first.
Breast,bone-in
1/2" to 1" thick
3/4" thick
Bor C(foodshouldbe
7"to8" frombroilelement
C(foodshouldbe7"
to8" frombroilelement)
rare.Theycookthrough
meat,slashfat at 1"
intervals.
8
Usingthe clock andtimer. OEApplia,oes.oom
To Set the Clock
Make sure the clock is set to the
correct time of day.
The clock must be set to the conect time
of day for the automatic oven tilning
flmcfions to work properly. The dine of
day cannot be changed during a delayed
cooking cycle.
[7] Press the CLOCKpad twice.
[_] Press the + or - pads.
If fl_e ÷or - pads are not pressed Mfldn
one minute after you press file CLOCK
pad, the displ W reverts to the original
To Turn Off the Clock Display
If you have several clocks in your kitchen,
you may wish to mm off"the time of day
clock display on your range.
Press the CLOCKpad once to ttlI'll
%
off the time of day display. Although
you will not be able to see it, the
clock maintains the correct time
of day.
setting, ff this happens, press the CLOCK
pad twice and reenter the time of day.
[_] Press the START/ON pad until the
time of day shows in the display. This
enters the time and suuts the clock.
Tocheckthetimeofdaywhenthedisplayis
showingotherbformation,simplypressthe
CLOCKpad.Thetimeofdayshowsuntilanother
padispressed.
[] Press the CLOCKpad twice to recall
the clock display.
To Set the Timer
Thetimerdoesnotcontrolovenoperations.
Themaximumsettbg onthetimeris9 hours
and59minutes.
The timer is a minute timer only. III
The timer does not control oven
operations. Themaximum setting on
the timer is 9 hours and 59minutes. I_1
FS]
To Reset the Timer
If file display is sdll showing file time
remaining, you may change it by pressing
the KITCHENTIMER ON/OFFpad, then
pressing the + or - pads until the time
you want appea_s in the display.
Press the KITCHENTIMERON/OFF
pad.
Press the ÷ or - pads until the
amount of time you want shows in
the displa).: The maximum time that
can be entered in minutes is 59.
Times more than 59 minums should
be changed m hours and minums.
Ifyoumakea mistake,presstheKITCHEN
TIMERON/OFFpadandbeginagab.
Press the START/ON pad. The time
%
will start counting down, _dthough
the display does not change until
one minute has passed.
When the timer reaches :00, the
control will beep 3 times followed
by one beep every 6 seconds until
the KITCHEN TIMER ON/OFF pad is
pressed.
If file remaining time is not in file display
(clock, delay start set time or cooking
time are in the display), recall file
remaining time by pressing file KITCHEN
TIMER ON/OFFpad and then pressing
the +or - pads to enter the new time
you want.
To Cancel the timer
Pressthe KITCHENTIMERON/OFFpad
twice.
9
Usingthetimedbakingandmastingfeatures.(onsome models)
NOTE: Foods that spoil easily-such as milk, eggs, fish, stuffings, poultry and pork-should not be allowed to sit for
more than 1hour before or after cooking. Room temperature promotes the growth of harmful bacteria. Be sure that
the oven light is off because heat from the bulb will speed harmful bacteria growth.
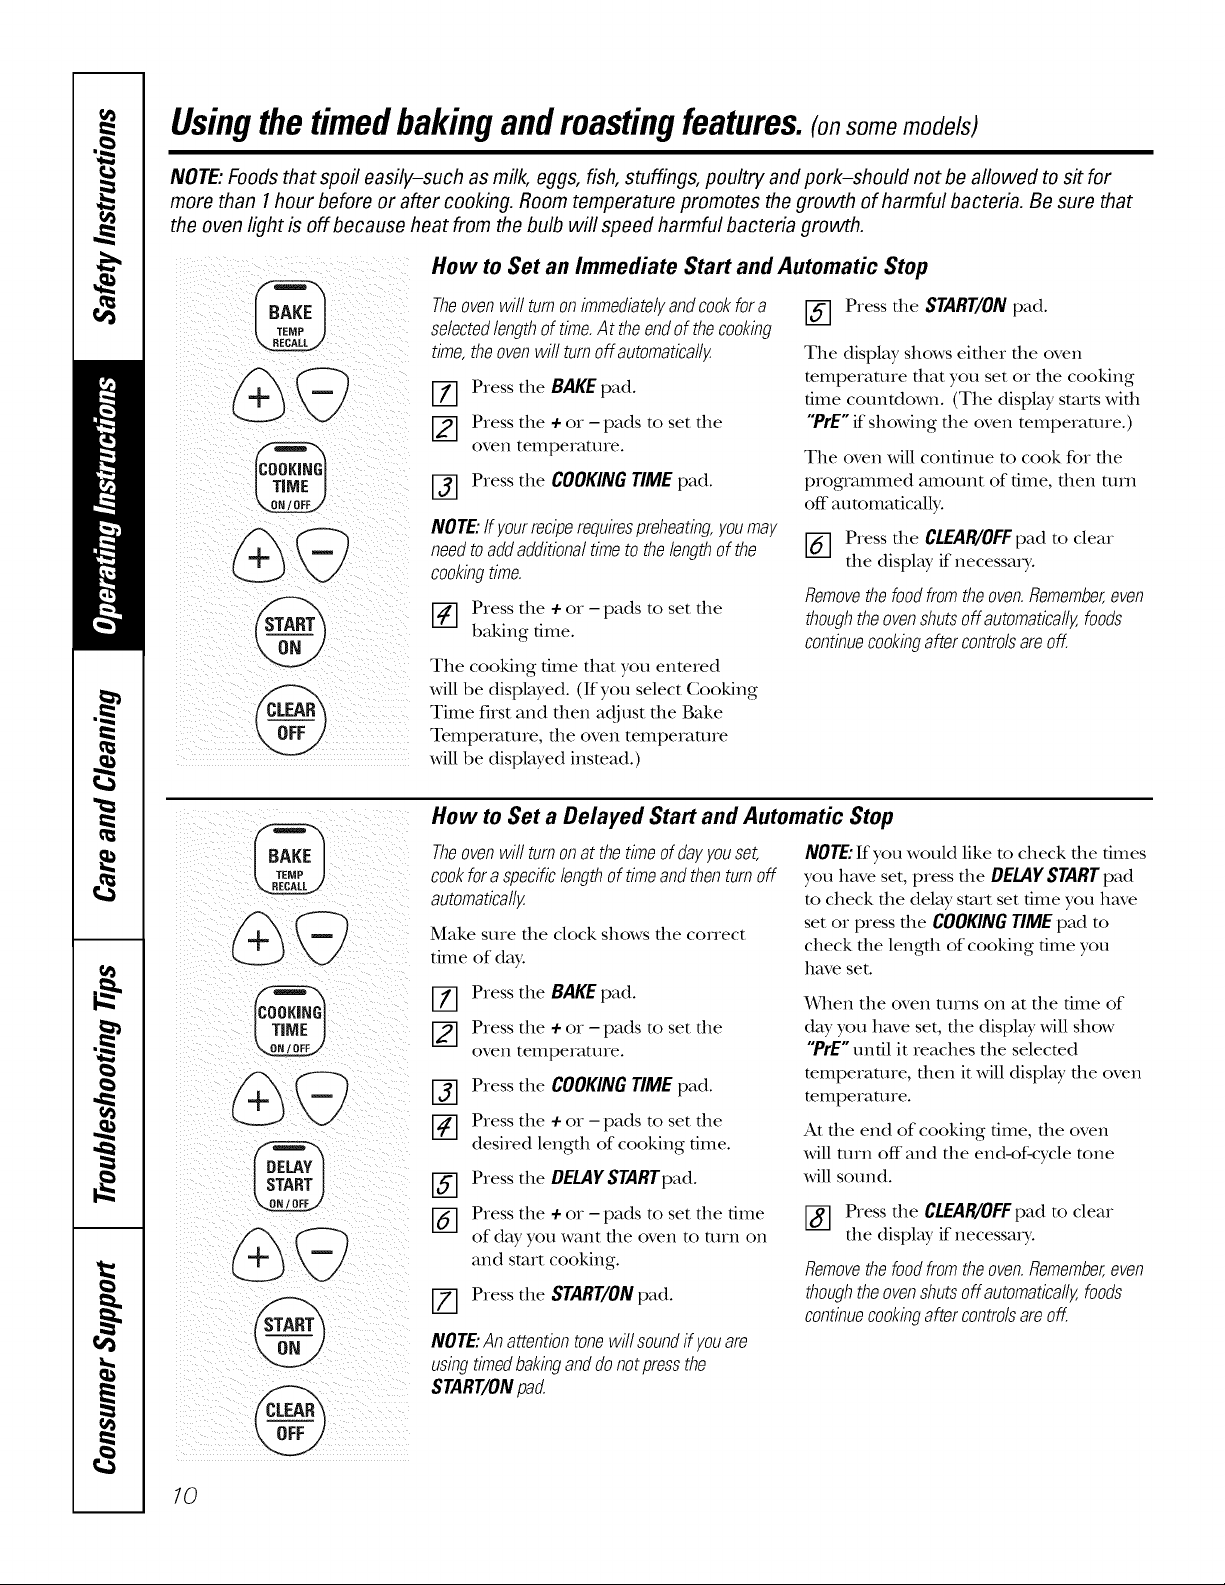
How to Set an Immediate Start and Automatic Stop
iiill_/ _iii_i__i _ _ _i iiiii_/
%
Theovenwill turnonimmediatelyandcookfora
selectedlengthoftime.At theendof thecookbg
time,theovenwill turnoffautomatically.
[Z] Press tile BAKEpad.
[_ Press tile +or - pads to set tile
oven temperature.
[-_ Press tile COOKINGTIMEpad.
NOTE:Ifyourreciperequirespreheatbg,youmay
needtoaddadditionaltimetothelengthofthe
cookbgtime.
[-_ Press tile +or - pads to set tile
baking time.
Tile cooking time that you enmred
Mll be displayed. (If you select Cooking
Time first and then adjust the Bake
Temperature, tile oven temperature
will be displayed insmad.)
How to Set a Delayed Start and Automatic Stop
Theovenwit turnonatthetimeofdayyouset,
cookforaspecificlengthoftimeandthenturnoff
automatically.
Make sure tile clock shows tile conect
time of da}_
[-_ Press tile BAKEpad.
[-_ Press tile +or - pads to set tile
oven temperature.
[_] Press tile COOKINGTIMEpad.
[] Press tile +or - pads to set tile
desired lengdl of cooking time.
_-_ Press tile DELAYSTARTpad.
[-_ Press tile +or - pads to set tile time
of day you want tile oven to turn on
and start cooking.
[-_ Press tile START/ONpad.
NOTE:Anattentiontonewillsoundif youare
usingtimedbakinganddonotpressthe
START/ONpad.
[-_ Press tile START/ONpad.
Tile display shows eifller file oven
temperature fllat you set or tile cooking
time countdown. (Tile display starts Mill
"PrE" if showing file oven temperature.)
Tile oven will continue to cook for tile
programmed amount of time, dlen mm
off automatically.
[_] Press tile CLEAR/OFFpad to clear
tile display if necessaD'.
Removethefoodfromtheoven.Remember,even
thoughtheovenshutsoffautomatically,foods
contbuecookbgaftercontrolsareoff.
NOTE:If you would like m check die times
you have set, press die DELAYSTARTpad
m check tile del W start set time you have
set or press tile COOKINGTIMEpad m
check tile length of cooking time you
have set.
When tile oven turns on at file time of
day you have set, die display Mll show
"PrE"until it reaches tile selected
temperature, dlen it Mll display die oven
temperature.
M dm end of cooking time, die oven
Mll mrn off and die end-of-cycle tone
Mll sound.
[_] Press tile CLEAR/OFFpad to clear
tile display if necessaD'.
Removethefoodfromtheoven.Remember,even
thoughtheovenshutsoffautomatically,foods
contbuecookbgaftercontrolsareoff.
10
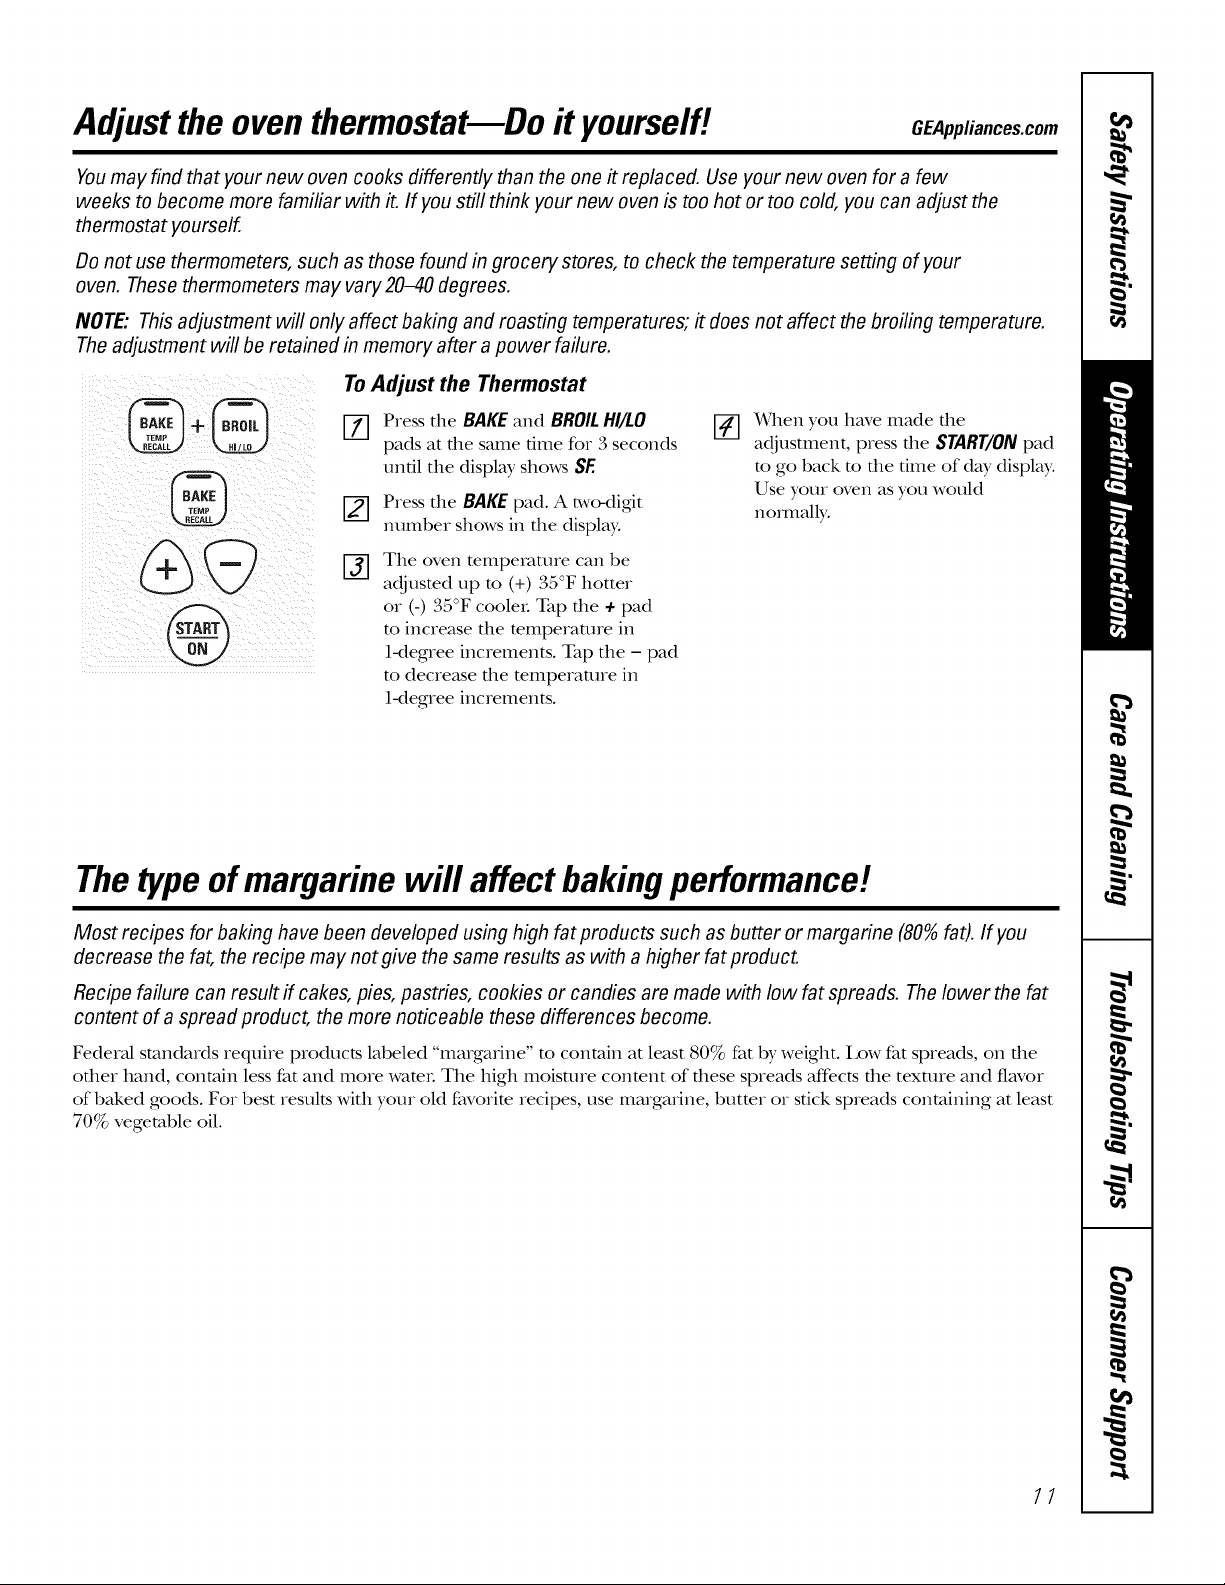
Adjustthe oventhermostat--Do it yourself! GEAppliances.com
Youmay find that your new oven cooks differently than the one it replaced. Use your new oven for a few
weeks to become more familiar with it. If you still think your new oven is too hot or too cold, you can adjust the
thermostat yourself.
Do not use thermometers, such as those found in grocery stores, to check the temperature setting of your
oven. These thermometers may vary 2040 degrees.
NOTE: This adjustment will only affect baking and roasting temperatures; it does not affect the broiling temperature.
The adjustment will be retained in memory after a power failure.
To Adjust the Thermostat
Ddlen y'ou have made the
vm
adjustment, press the START/ONpad
to go back to the time of day display.
Use your oven as you would
nommlb,.
%
I-_ Press the BAKE and BROILHI/LO
pads at the same time for 3 seconds
until the display shows SE
[] Press the BAKEpad. A two-digdt
number shows in the display.
The oven temperature can be
%
adjusted up to (+) , a F hotter
or (-) 35°F cooleL _l ) the + pad
m increase the mmperatme in
1-degree increments. Tap the - pad
m decrease the mmperamre in
1-degree increments.
Thetypeofmargarine will affect bakingperformance!
Most recipes for baking have been developed using high fat products such as butter or margarine (80%faO. If you
decrease the fat, the recipe may not give the same results as with ahigher fat product.
Recipe failure can result if cakes, pies, pastries, cookies or candies are made with low fat spreads. Thelower the fat
content of a spread product, the more noticeable these differences become.
FederM standards require products labeled "margmine" m contain at least 80% fat by weight. Low fat spreads, on the
other hand, contain less fat and more wamL The high moisture conmnt of these spreads affbcts the texture and flavor
of baked goods. For best results with your old favorite recipes, use margmine, burrer or stick spreads containing at least
70% vegetable oil.
11
Special features ofyourovencontrol
Yournew touch pad control has additional features that you may choose to use. Thefollowing are the features and
how you may activate them.
Thespecial feature modes can only be activated while the display is showing the time of day. They remain in the
control's memory until the steps are repeated.
When the display shows your choice, press the START/ONpad. Thespecial features will remain inmemory after
a power failure.
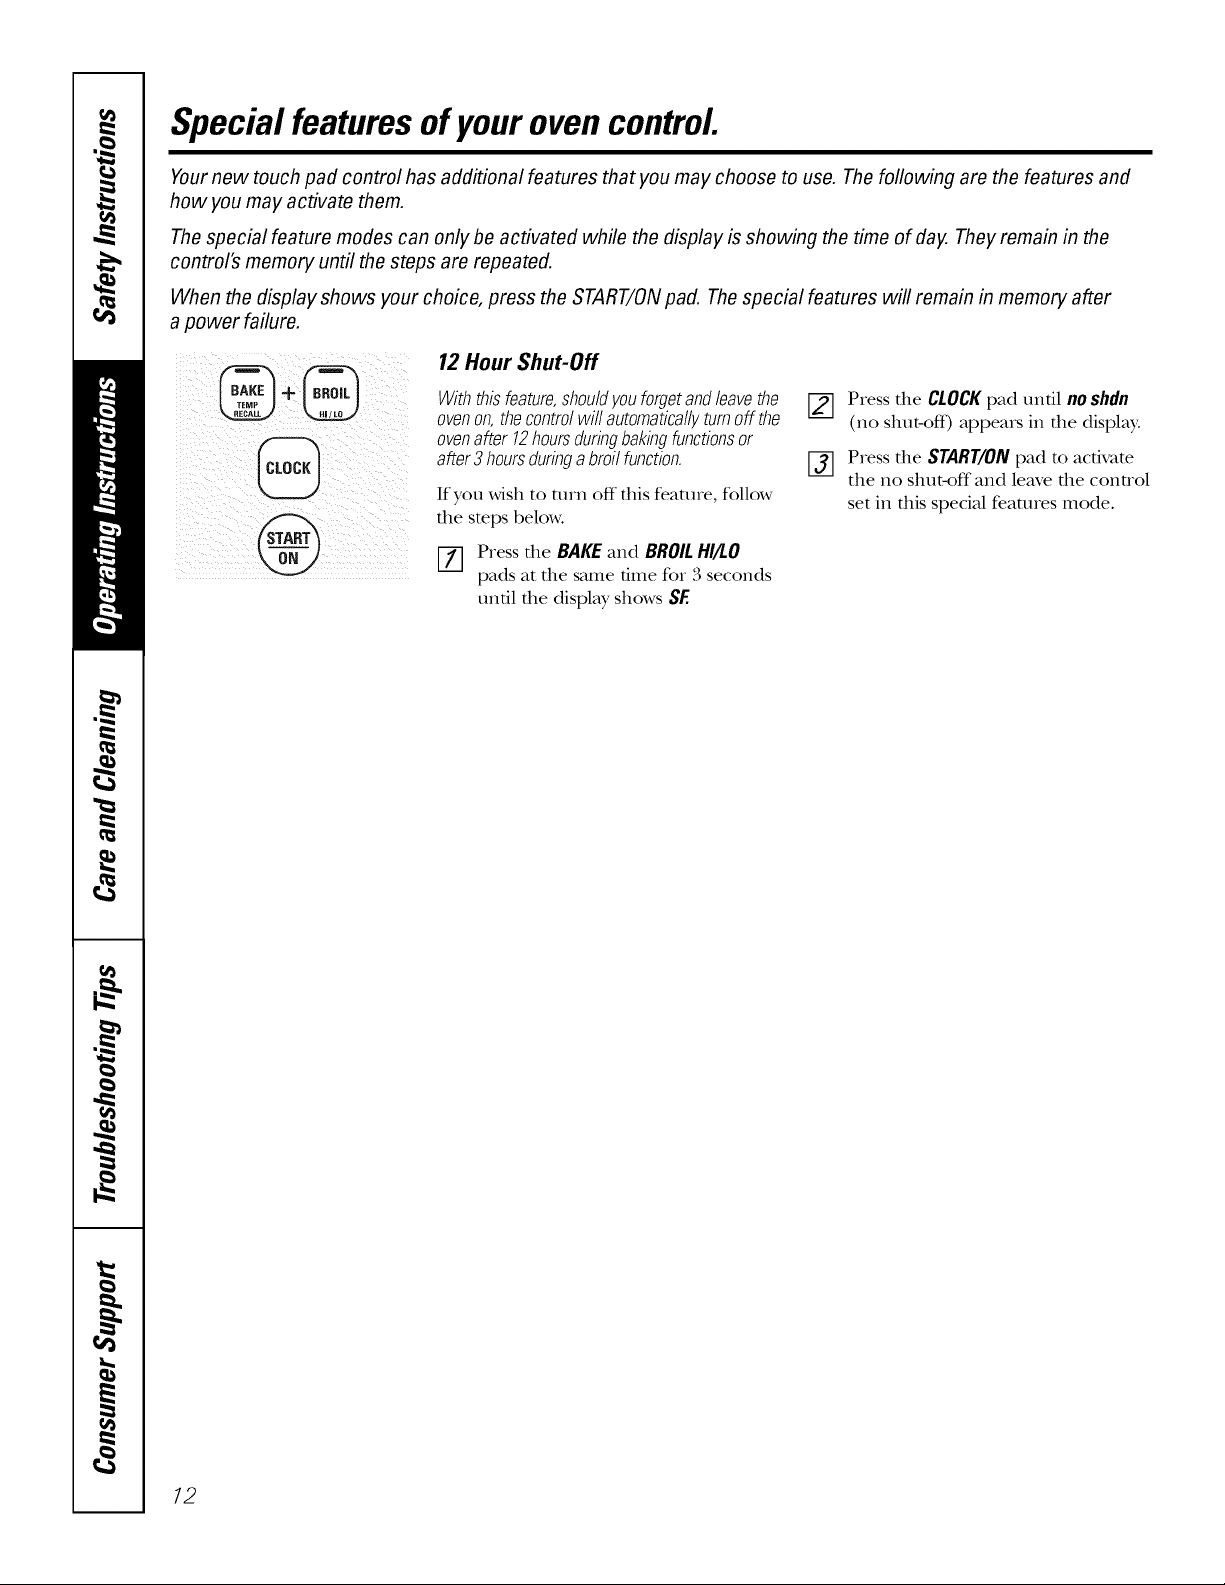
12 Hour Shut-Off
@
Withthisfeature,shouldyouforgetandleavethe
ovenon,thecontrolwill automaticallyturnoff the
ovenafter12hoursduringbakingfunctionsor
after3 hoursduringabroilfunction.
If you wish to turn off this feature, follow
the steps below.
EZ] Press the BAKE and BROILHI/LO
pads at the same time for 3 seconds
until the display shows SF.
[_] Press the CLOCKpad until noshdn
(no shut-off) appears in the display.
[_] Press the START/ON pad to activate
the no shut-off and leave the control
set in this special features mode.
12
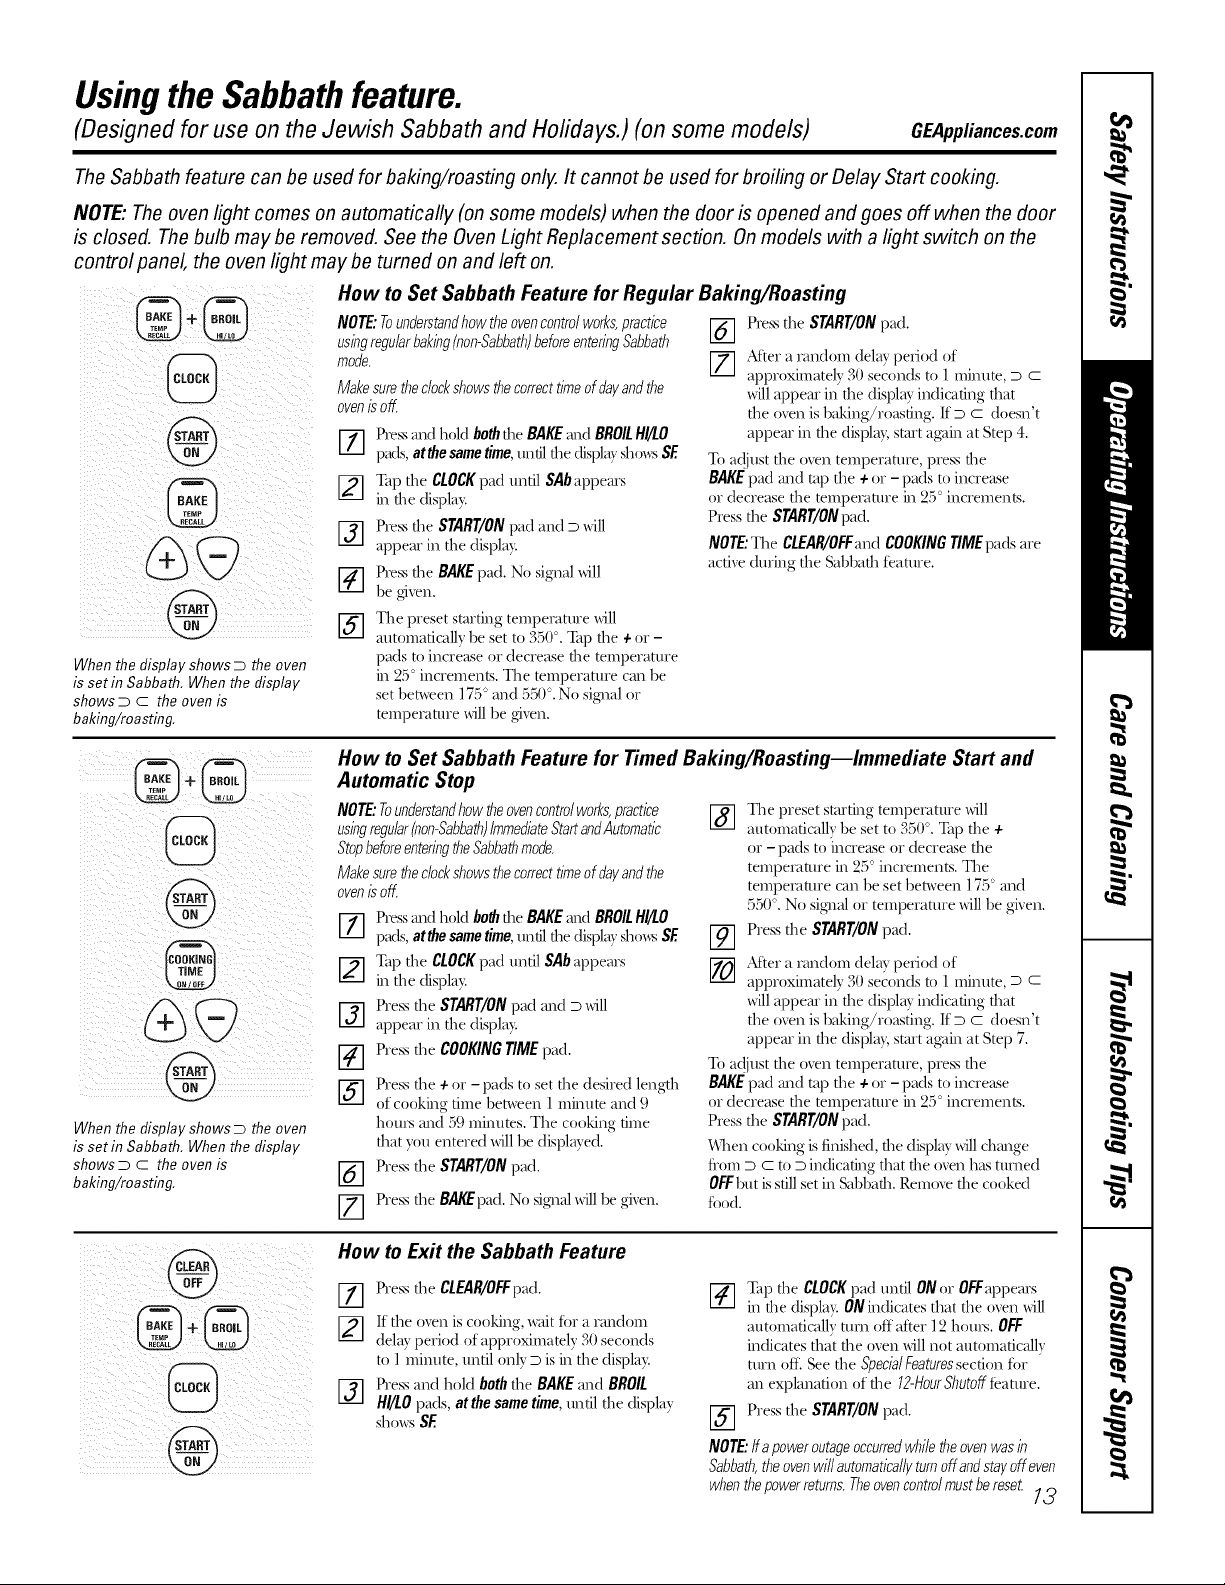
Usingthe Sabbathfeature.
(Designed for use on the Jewish Sabbath and Holidays.) (onsome models) GEAppliances.com
The Sabbath feature can be used for baking/roasting only. It cannot be used for broiling or Delay Start cooking.
NOTE: The oven light comes on automatically (on some models) when the door is opened and goes off when the door
is closed. Thebulb maybe removed. See the Oven Light Replacement section. Onmodels with a light switch on the
control panel, the oven light may be turned on and left on.
How to Set Sabbath Feature for Regular Baking/Roasting
NOTE:Tounderstandbow tbe ovencontrolworks,practice [] Pressthe START/ONpad.
usingregularbaking(non-Sabbatb)beforeenteringSabbatb
[7] After a random delay period of
approximately 30 seconds to ] minute, D C
will appeal in the display indicating that
the oven is baking/roasting. [f D c doesn't
appeal in the display, start a_dn at Step 4.
To a@lst the oven temperature, press the
RAKE pad and mp the + or - pads to increase
or decrease the temperature in 25 _'increments.
Press the START/ONpad.
NOTE:The CLEAR/OFFandCOOKINGTIME pads are
active during the Sabbath te;mu'e.
iiiiii I!IIiil ii iii iii ii
iiiiiiiiiI
When the display shows D the oven
is set in Sabbath. When the display
shows D C the oven is
baking/roasting.
Makesuretbeclockshowstbecorrecttimeofdayand tbe
ovenis off.
171p,e, andholdbo,b,heRAKEandRROIL"I O
pads,atthesametime,tmtil daedisplay shov_:,; SE
[_] ap the CLOCKpad tmtil SAbappears
in d_e displa):
_] Press the START/ONpad and D will
appear in the displa?:
[_] ress the BAKEpad. No signal _dll
he _'_en.
[_] he preset starting temperature _ill
automatically he set to 350". _p the + or -
pads to increase or decrease the temperature
in 25 _'increments. The temperature can be
set between ] 75° and 550% No signal or
tempemtme _ill be _ven.
When the display shows D the oven
is set in Sabbath. When the display
shows D C the oven is
baking/roasting.
How to Set Sabbath Feature for Timed Baking/Roasting--Immediate Start and
Automatic Stop
NOTE:Tounderstandbow tbeovencentre/works,practice The preset starting temperature _dll
usingregu/ar(non-gabbatb)ImmediateStartandAutomatic [-8-7 automatically he set to 350%_p the +
StopbeforeenteringtbeSabbatbmode. or - pads to increase or decrease the
Makesuretbecbckshowstbecorrecttimeofdayandtbe
ovenisoff
Press and hold bo_ d_e BAKEand BROILHI/LO
Ill
pads, atthe same time, madl the display sho_s SE
[_] ap the CLOCKpad tmtil SAb appears
in the display.
Press the START/ONpad and D _dll
_] appear in the display.
Press the COOKINGTIMEpad.
I
[_] ress the + or-pads to set the desired length
of cooking time hetween] minute and 9
hom.'s and 59 minutes. The cooking time
that vo[| entered _dll he displayed.
Press the START/ONpad.
%
Press the RAKE pad. No signal will he given.
D
temperature in 25° increments. The
temperature can be set between ] 75 ° and
550% No si_ml or temperature will be given.
Press the START/ONpad.
%
After a randolil delay period of
approximately 30 seconds to ] minute, D C
will appeal in the display indicating that
the oven is baking/roasting. If D C doesn't
appeal in the display, start a_dn at Step 7.
To a@lst the oven temperature, press the
RAKE pad and mp the + or - pads to increase
or decrease the temperature in 25 _'increments.
Press the START/ONpad.
When cooking is finished, the display _dll change
tiom D C to D indicating that the oven has turned
OFFbut is still set in Sabbath. Remove the cooked
ti)o(l.
How to Exit the Sabbath Feature
[_] Press the CLEAR/OFFpad.
I
[_] If the men is cooking, _ait ti)r a random
delay period of approximately 30 seconds
to ] minute, matil onh rD iS in the displa}:
f_] Press and hold boththe BAKEand BROIL
HI/LOpads, at thesametime, tmtil the display
shows SE
[_] ap the CLOCKpad tmtil ON or OFFappears
in the display. ON indicates that the oxen _ill
automatically turn off after ] 2 hotu._. OFF
indicates th;_t the oven _dll not automatically
tm'l_ oil See the Speda/Features section ti)r
an explanation of the 12-HourSbutoffteature.
[_ Press the START/ONpad.
I
NOTE:tfapoweroutageoccurredwbiletbeovenwasb
Sabbatb,tbe ovenwill automaticallyturnoffandstayoff even
wbentbepowerreturns.Tbeovencontrolmustbereset.
13
Careand cleaningof the oven.
Be sure electrical power is off and all surfaces are cool before cleaning any part of the oven.
How to Remove Protective Shipping Film and Packaging Tape
Donotallowfoodspillswitha
highsugaroracidcontent(suchas
tomatoes,sauerkraut,fruitjuices
orpiefilling)toremabonthe
surface.Theymaycauseaduff
spotevenaftercleaning.
Careflllly grasp a corner of file protective
shipping film wifll your fingeIs and slowly
peel it flom the appliance surfime. Do
not use ally shalp imms m remove the
film. Remove aU of the film before using
the appliance for the first time.
To assure no damage is done m the
finish of the product, the safest way to
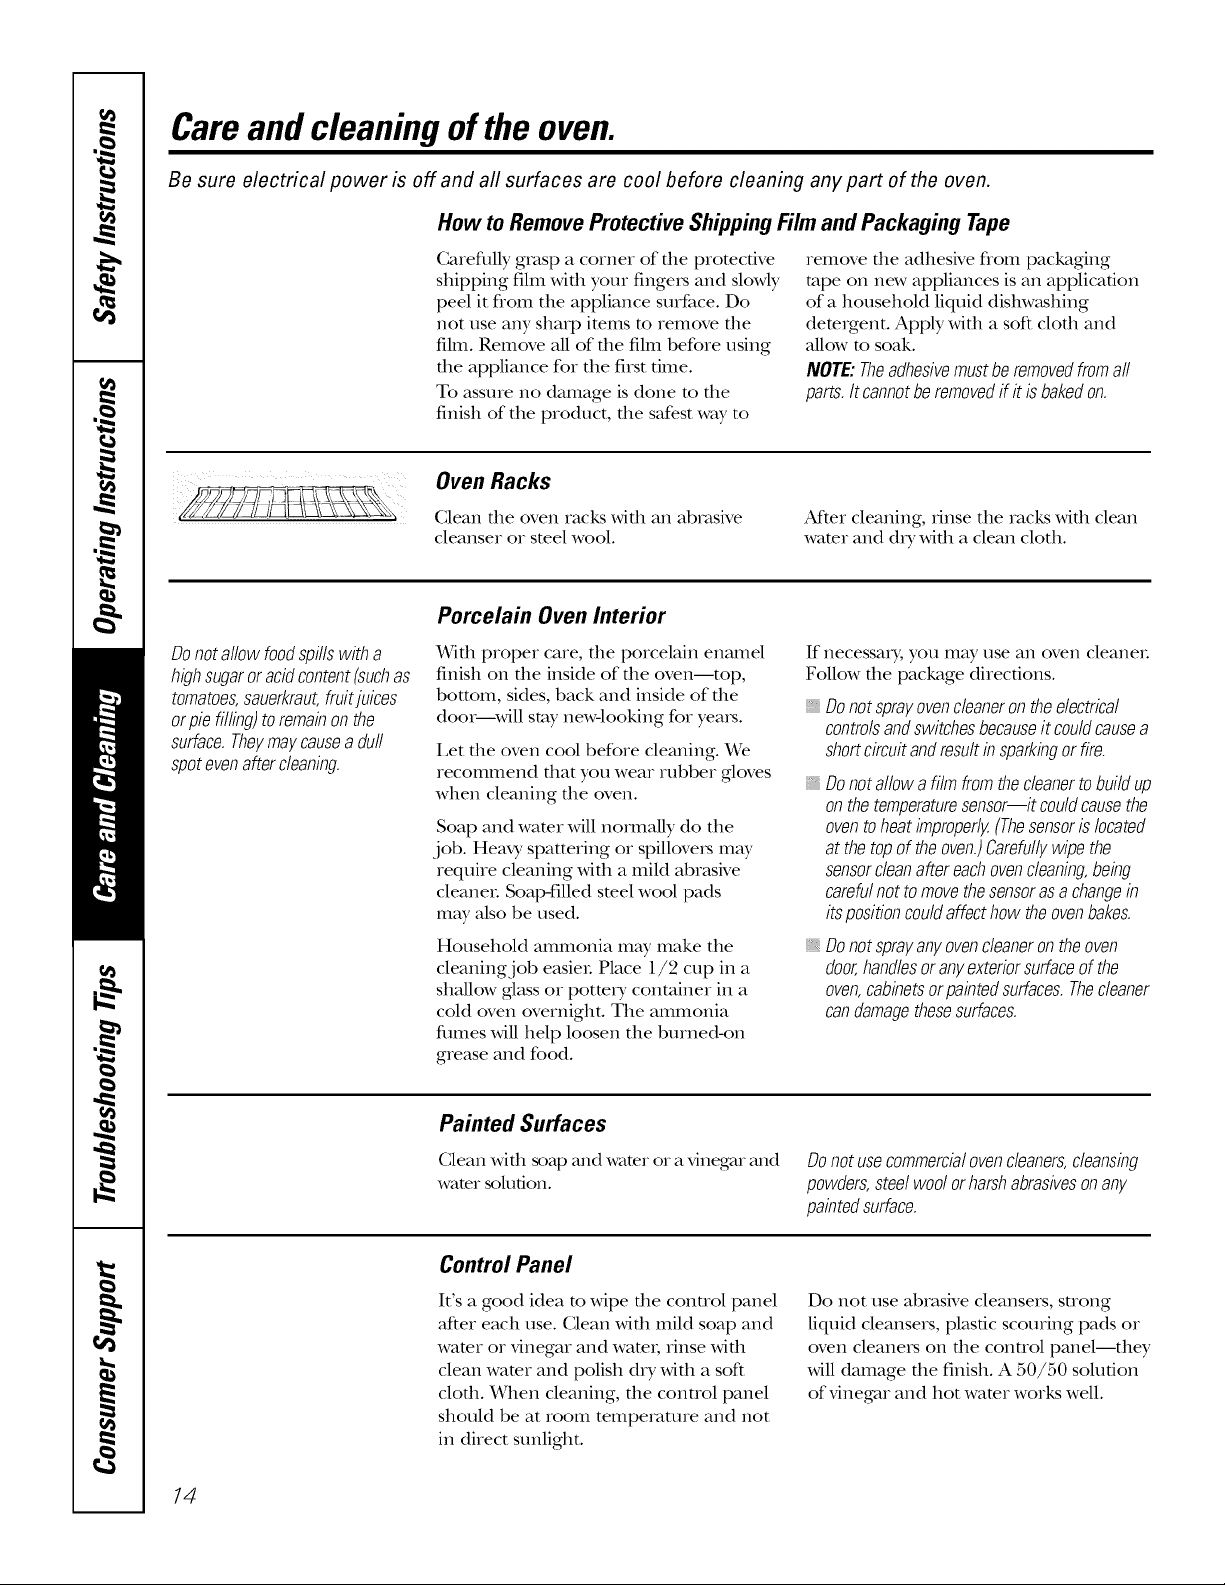
Oven Racks
Clean the oven racks with an abrasive
cleanser or smel wool.
Porcelain Oven Interior
Wifll proper care, file porcelain enamel
finish on file inside of file oven--top,
bottom, sides, back and inside of file
door--will stay new-looking for yeais.
Let file oven cool before cleaning. We
recommend fllat you wear robber gloves
when cleaning the oven.
Soap and wamr Mll nomlally do the
.job. Hea_3'spattering or spilloveis may
require cleaning with a mild abrasNe
cleaneL Soap-filled smel wool pads
may also be used.
Household ammonia may make the
cleaningjob easieL Place 1/2 cup in a
shaUow glass or potm U container in a
cold oven overnight. The ammonia
flmles will help loosen the burne&on
grease and food.
remove die adhesive flom packaging
tape on new appliances is all application
of a household liquid dishw_tshing
deteigent. Apply with a soft cloth and
aUow m soak.
NOTE:Theadhesivemustberemovedfromall
parts.Itcannotberemovedif it is bakedon.
Alker cleaning, rinse the racks wifll clean
water and dIT wifll a clean cloth.
If necessaD_ you may use all oven cleaneL
Follow file package directions.
Donotsprayovencleanerontheelectrical
controlsandswitchesbecauseitcouldcausea
shortcircuitandresultinsparkingorfire.
, Donotallowa filmfromthecleanertobuildup
onthetemperaturesensor--itcouldcausethe
oventoheatimproperly.(Thesensorislocated
atthetopof theoven.)Carefullywipethe
sensorcleanaftereachovencleaning,being
carefulnotto movethesensorasachangeb
itspositioncouldaffecthowtheovenbakes.
Do not sprayany ovencleaner on the oven
door,handlesor anyexteriorsurface of the
oven,cabinets orpainted suffaces. Thecleaner
candamagethese surfaces.
74
Painted Surfaces
Clean with soap and water ore vinegar and
water sohlfion.
Control Panel
It's a good idea m Mpe die conuol panel
after each use. Clean widl mild soap and
wamr or vinegar and wami; rinse with
clean wamr and polish dIT with a soft
cloth. When cleaning, the conuol panel
should be at room temperature and not
ill direct sunlight.
Donotusecommercialovencleaners,cleansbg
powders,steelwoolorharshabrasivesonany
pabtedsurface.
Do not use M)rasNe cleansers, suong
liquid cleansers, plastic scouring pads or
oven cleanei_ on the conuol panel--they
will damage the finish. A 50/50 solution
of vinegar and hot wamr works well.
 Loading...