

GE JKS10BM1BB, JKS10BM2BB Owner’s Manual
Safety Instructions ........ 2-4
_e. COrn
0
Operating Instructions
Clock and Timer ............ 8
Control I,ockout ............ 8
Controls ................... 5
Oven ................... 6, 7
Sabbath Feature ......... 13, 14
Special Feaulres ......... 11, 12
Thermostat ............... 10
Timed Baking and Roasting .... 9
Care and Cleaning
Control Panel ............. l 8
I,ift=Off Oxen Door ......... 16
I,ight Bulb ................ 17
Packaging Tape ............ 15
Painted Surfaces ........... 18
Porcelain Oxen Interior . .... 15
Racks .................... 15
Troubleshooting Tips ... 19, 20
Consumer Support
Consumer Support ......... 24
Product Registration ..... 91,92
_'arranty ................. 93
]A%702 7" Si_<<fe Waft Ove_
Write the model and serial
numbers here:
Model #
Serial #
You can find them on a label on
the side trim or on the ti'ont of
the oven behind the oven door.
49-80433 02-07 JR
IMPORTANTSAFETYINFORMATION.
READALLINSTRUCTIONSBEFOREUSING.
WARNING!
For your safe_, the information in this manual must be followed to minimize the risk of fire or
explosion, electric shock, or to prevent property damage, personal injury, or loss of life.
SAFETYPRECAUTIONS
When using electrical appliances, basic safety precautions should be followed, including
the following:
Use this appliance only for its intended
puq)ose as described in this Owner's
Manual.
Be sure your appliance is properly
installed and grounded by a qualified
mchnician in accordance with tile
provided installation insuucfions.
Do not atmmpt to repair or replace any
part of your oxen unless it is specifically
recommended in this manual. All other
servicing should be referred to a qualified
technician,
Before performing any service, disconnect
d_e oxen power supply at the household
distribnuon panel by removing the filse or
switching off" the ci_vuit breaker:
Do not leaxe children alone--<hildren
should not be left alone or unattended in
an area where an appliance is in use. They
should nex>r be allowed to sit or stand on
any part of the appliance.
Do not allow anyone to climb, stand or
hang on d_e door They could damag> the
o_n, or cause se_re personal injm T.
Have the installer show you the location
of the circuit breaker or fl_se. Mark it for
easy reference.
2
SAFETYPRECAUTIONS
ge.com
Be sure die oven is securely installed in
a cabinet that is firmly attached to tile
house structure. Never allow anyone
to climb, sit, stand or hang on tile
oven door
Never leax> die oven door open when
you are not watching tile ox>n.
Always kee I) combustible wall cox>lings,
curtains or drapes a safe distance flom
yo/lr o\_n.
Always kee I) dish rowels, dish clotils, pot
holders and otiler linens a sad distance
from your oxen.
Always kee I) wooden and plastic utensils
and canned food a safe distance away
from your oxen.
Teach children not to play with file
controls or any oilier part of tile oxen.
Larg> scratches or impacts to glass doors
can lead to broken or shatmred glass.
Do not store flammable mamiials in
an oven.
CAUTION: Items of interest to
children should not be stored in cabinets
aboxe an oxen; children climbing on tile
oxen to reach items could be seliousN
iiIjured.
Nexei wear loose-fitting or hanging
gaI_nents while using tile appliance.
Be carefill when reaching for imms
stored in cabinets ox>r tile oven.
Flammable mamrial could be ignited if
brought in contact witil hot sur/aaces or
heating elements and may cause sexeie
bllTllS.
Use only di T pot holders--moist or
damp pot holders on hot surfaces n/ay
result in bums from smam. Do not let
pot holders touch hot heating elements.
Do not use a towel or otiler bulky cloti/.
For your safety, never use your appliance
for wanning or heating tile room.
Do not let cooking gxease or otiler
flammable mamlials accumulate in
or Ileal tile o\_n.
Do not use water on grease fires.
Nmer pick up a flaming pan. Turn tile
controls off'.
Flame in tile ox>n can be smothered
completely by closing tile oven door and
turning tile o_ii off or by using a multi-
purpose dU chemical or foam-type fire
extinguisher
Do not store or use coinbustib]e
mamrials, gasoline or other flammable
vapors and liquids in tile vicinity of tills
or any otiler appliance.
3
IMPORTANTSAFETYINFORMATION.
READALLINSTRUCTIONSBEFOREUSING.
WARNING!
COOKMEATANDPOULTRYTHOROUGHLY...
Cookmeat andpoultrythoroughlg--meat toat leastan INTERNALtemperatureof 160Fandpoultry
toat least an INTERNALtemperatureof 180°ECookingto thesetemperaturesusuallyprotects against
foodbomeilbess.
SAFETYPRECAUtiONS
o
Do not touch die heaung elenlents or tile
intelqor sniP, tce of the ox.en. These surt_aces
m W be hot enough m bum even though
they are dark in colon Dmqng and after
use, do not touch, or let clothing or other
flammable materials contact any inmiJor
aI.ea of file ox.en; allow sufficient time fbr
cooling first.
Potentially hot surfaces include ox.en x.ent
opening:s, SUI'ICdcesnear tile opening:s,
crevices around die oven door, tile edg.es
of tile window and metal trim parts abox.e
tile door
REMEMBER:The inside surthce of die ox.en
may be hot when tile door is opened.
Nex.er place cooking utensils or any other
items on the ox.en floon There is a heating
element beneath tile ox.en floon Placing
items on file oven floor m W cause file
ox.en m ox.erheat, i.esulfing in damag.e m
file oven and risk of damag.e or fire m
cabinets.
Stand away from die oven when opening
tile ox.en door Hot air or smam which
escapes can cause bums to hands, fl_ce
and/or eyes.
Do not heat unopened food containers.
Pressure could build up and tile container
could burst, causing an iI_ni T.
Kee I) tile ox.en x.ent unobstructed.
Kee I) tile ox.en free from grease buildup.
Place dm oven rack in die desired posidon
while tile oven is cool. If racks must be
handled when hot, do not let pot holder
contact tile heating elements.
When using cooking or roasdng bags in
tile ox.en, follow tile manut_acturer's
diI.ecfions.
Pulling out the rack to the stop-lock is a
comenience in lifting heavv foods. It is also
a precaution against bums from touching
hot surfaces of tile door or oxen walls.
Do not use tile ox.en to di T newspapers.
If ox.erheamd, they can catch on fre.
Do not use the oven for a storag,e area.
Imms stored in an ox.en can ignim.
Do not leax.e paper products, cooking
umnsils or food in die oven when not
in use.
After broiling, always take any bioiler
pan out of the ox.en and clean it. Leftox.er
gi.ease in a broiler pan can catch fire
next dine you use tile pan.
Never leax.ejars or cans of t_t dlJppings in
or Ileal yo/li ox.en.
Clean only parts lismd in this Owner's
Manual.
Do not use ahuninum foil to line oxen
1)ottoms, except as suggested in this
manual. Improper installation of
ahm/inum foil may resuh in a risk
of electric shock or fire.
READANDFOLLOWTHISSAFETYINFORMAtiONCAREFULLY.
SAVETHESEINSTRUCTIONS
4
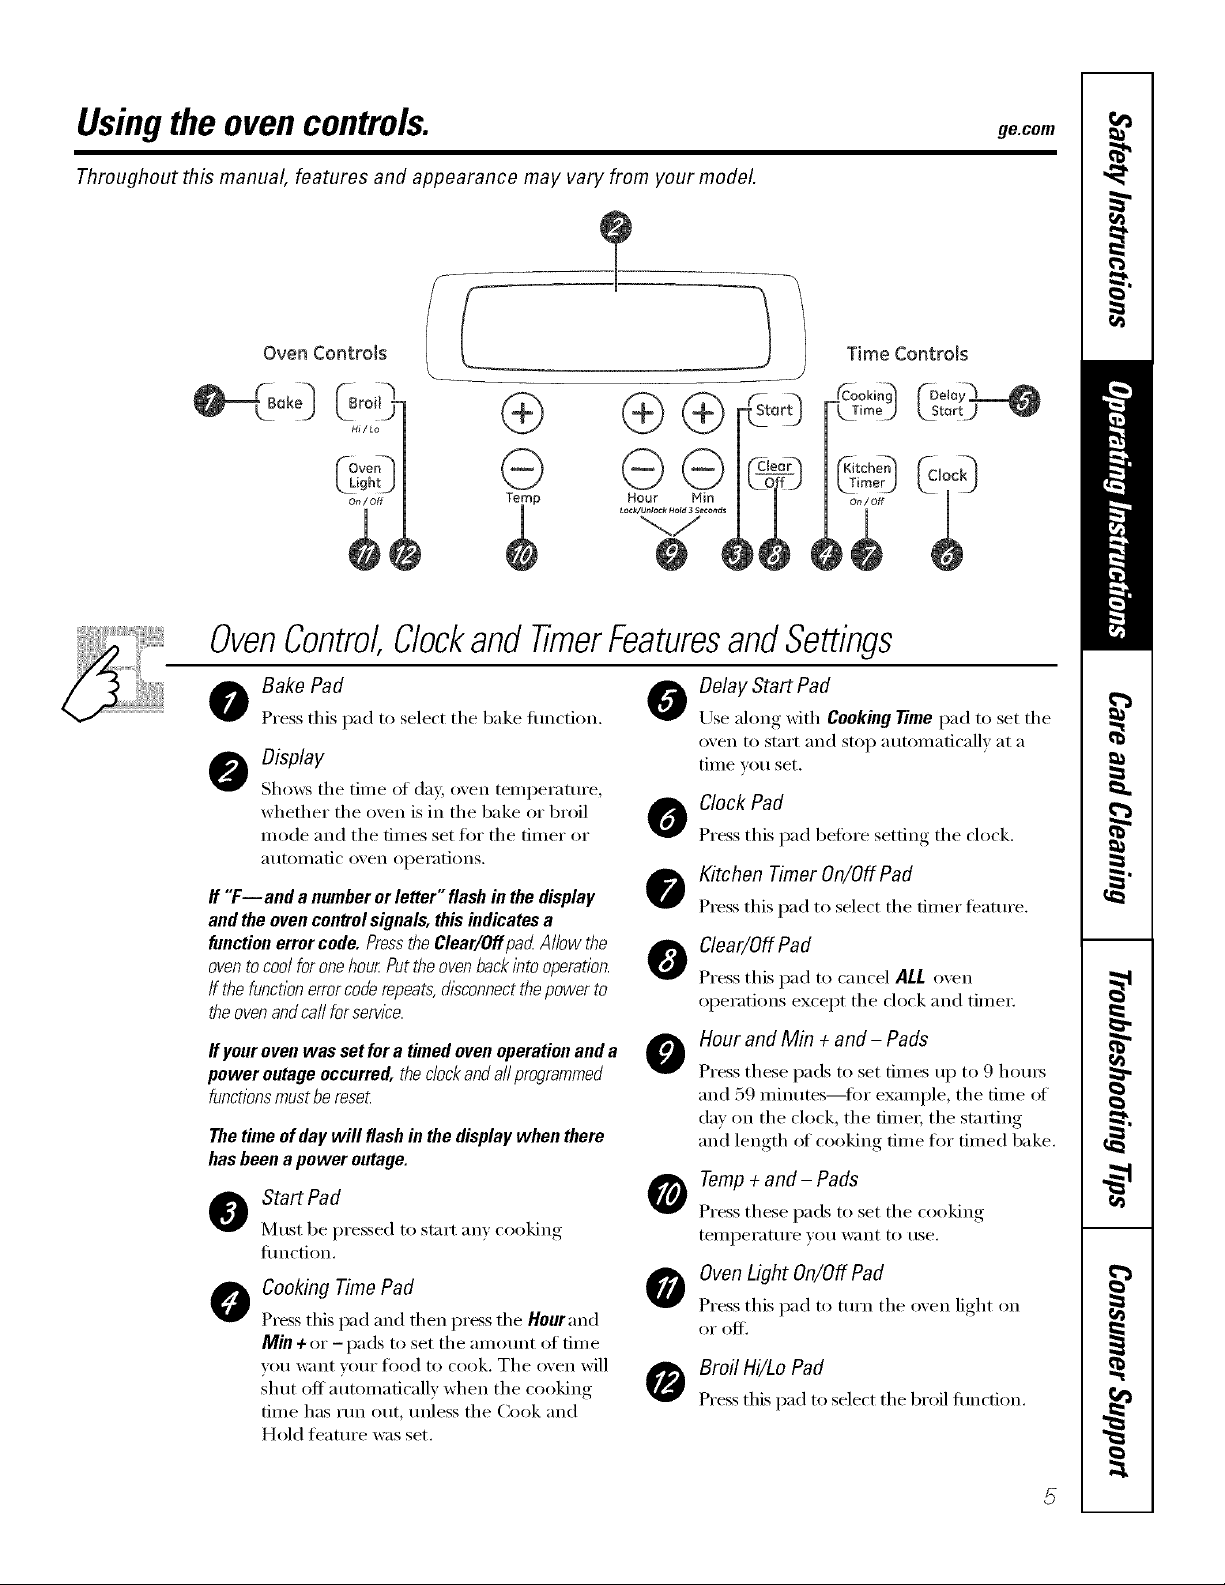
Usingthe ovencontrols, gecom
Throughout this manual, features and appearance may vary from your model.
C
Time Controls
® ®®
@-@
Temp Hour Min
tocklUnlock _old 3 Seconds
OvenControl,ClockandTimerFeaturesandSettings
Delay Start Pad
o ake Pad 0
Press this pad to select the bake timction.
Display
Shows tile time of day, oven temperature,
whether the oven is in the bake or broil
mode and the times set fiw the timer or
atltOll/atic oven operations.
/f "F--and a number or letter" flash in the display
and the ovencontrol signals, this indicates a
functionerror code. Pressthe Clear/Off pad Allow the
ovento cool for onehour.Put the ovenback into operation.
If the function errorcoderepeats,disconnectthe power to
the ovenand ca//for service.
Use along with Cooking Time pad to set the
oxen to start and stop automaticall_ at a
time _()u set.
O Clock Pad
Press this pad before setting the clock.
o Kitchen Timer On/Off Pad
Press this pad to select the timer teatm'e.
o Clear/OffPad
Press this pad to cancel ALL oxen
operations except the dock and time_:
ff your oven was set for a timed oven operationand a
power outage occurred, the clockand all programmed
functionsmust be reseL
The time of day will flash in the display when there
has been a power outage.
O StartPad
Must be pressed to start an) cooking
fimction.
O Cooking Time Pad
Press this pad and then l)r_s the Hourand
Min +or i pads to set the amount of time
w)u want w)ur food to cook. The oven will
shut off automatically when the cooking
time has run out, unless the Cook and
Hold teature was set.
o Hourand Min + and- Pads
Press these pads to set times up to 9 hom_
and 59 minutes--for example, the time of
day on the clock the time_, tile stinting
and length of cooking time for timed bake.
Tomp + and- Pads
Press these pads to set the cooking
teillpei'att/i'e yo[I ]V}lIlt to rise.
o Oven Light On/Off Pad
Press this pad to turn the oxen light on
oi" ( )f]}_
o Broil Hi/Lo Pad
Press this pad to select the broil flmcfion.
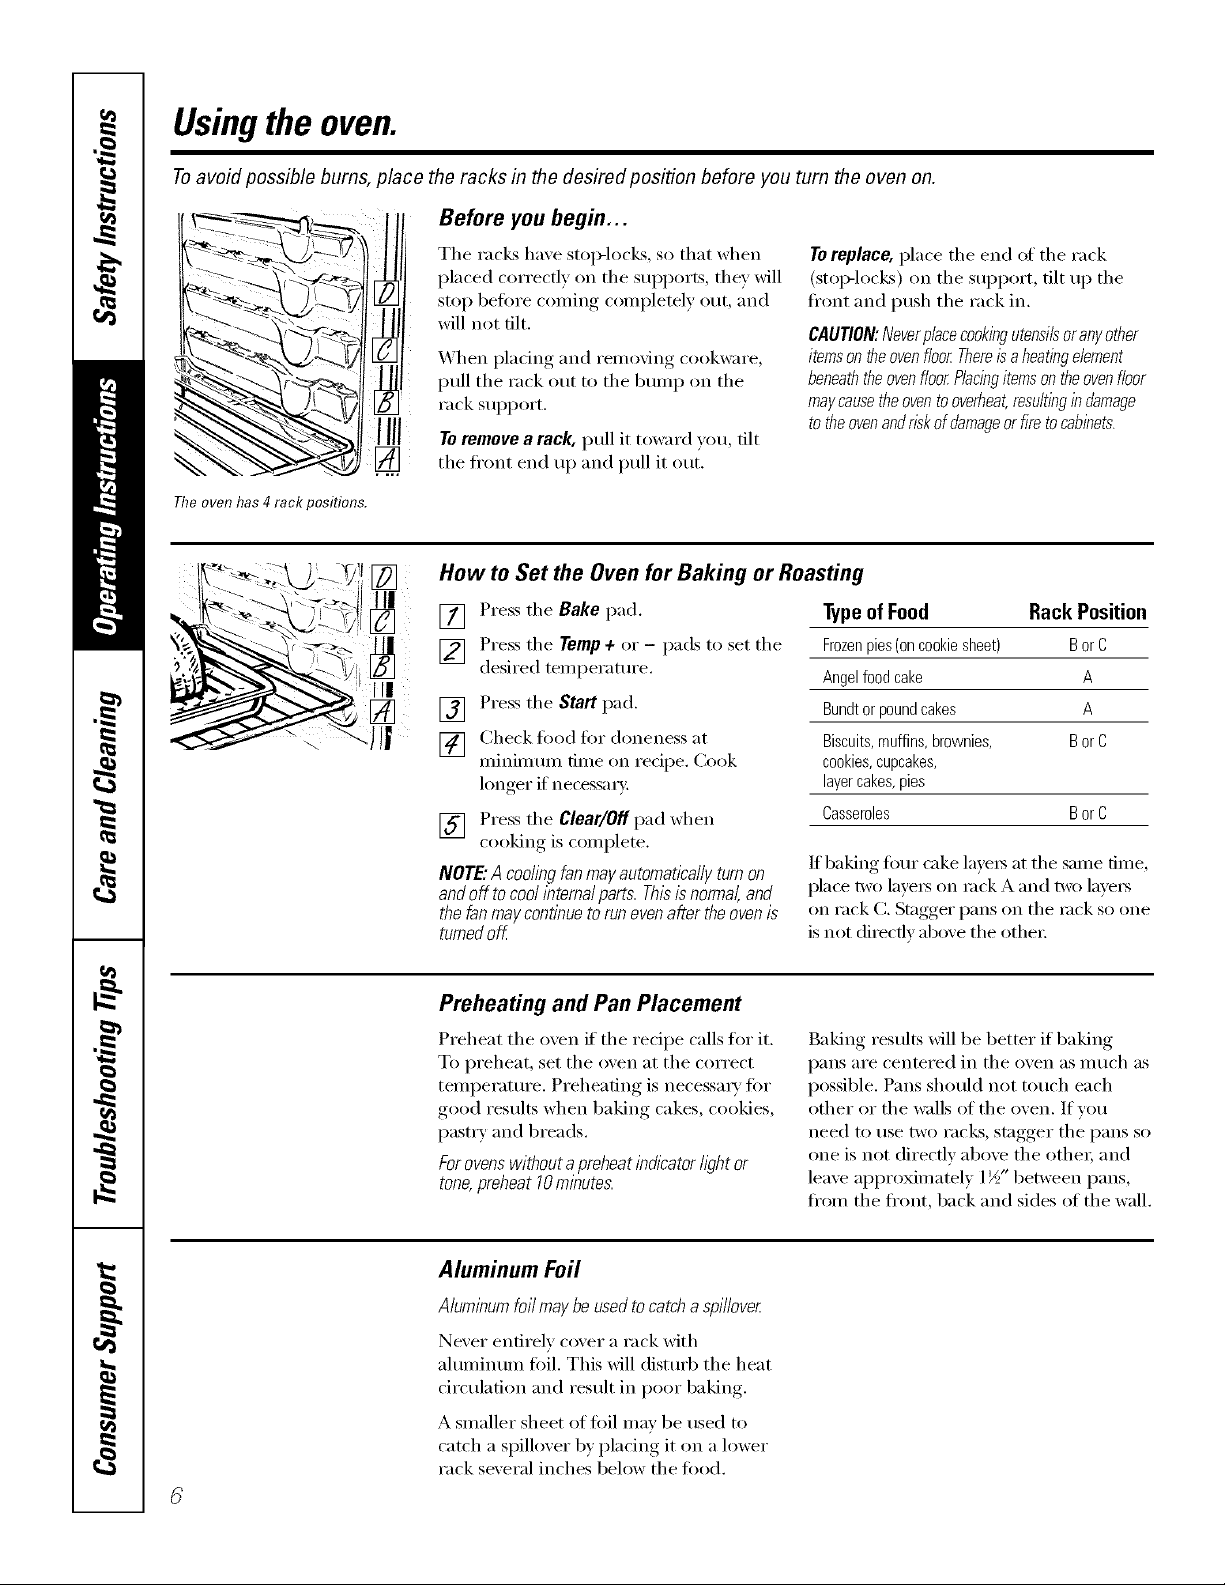
Usingthe oven.
Toavoid possible bums, place the racks in the desired posifion before you turn the oven on.
Before you begin...
The oven has4 rack positions.
The racL_ have stoI)-locLs, so that when
placed correctly on the supports, they will
stop before coming completely out, and
will not tilt.
When pladng and removing cookware,
pull the rack out to the bumi) on the
rack support.
To remove a rack, pull it toward you, tilt
the fl'ont end up and pull it out.
To replace, place the end of the rack
(Stol>locks) on the support, tilt up the
ti'ont and push the rack in.
CAUTION:Neverplacecookingutensilsoranyother
itemsontheovenfloorThereisa heatingelement
beneaththeovenfloorPlacingitemsontheovenfloor
maycausetheovento overheat,resultingindamage
totheovenandriskofdamageorfire tocabinets.
How to Set the Oven for Baking or Roasting
[] Press the Bake pad.
] Press the Temp 4-or - pads to set the
desired temperature.
[] Press the Start pad.
[] Check food for (hmeness at
minimmn time on recipe. Cook
hmger if necessm):
[] Press the Clear/Offpad when
cooking is complete.
NOTE."Acoolingfanmayautomaticallyturnon
andoff tocoolinternalparts.Thisisnormal,and
thefanmaycontinuetorunevenaftertheovenis
turnedoff
TypeofFood Rack Position
Frozenpies(oncookiesheet) BorC
Angelfoodcake A
Bundtorpoundcakes A
Biscuits,muffins,brownies, BorC
cookies,cupcakes,
layercakes,pies
Casseroles BorC
If baking fi:,m" cake layers at the same time,
i)lace two laye_ on rock A and two lave_
on rack C. Stagger pans on the rock so one
is not directly al)_we the other:
Preheating and Pan Placement
Preheat the oven if' the recipe calls for it.
To preheat, set the oven at the correct
temperatm'e. Preheating is necessm T for
good results when baking cakes, cookies,
past_ T and 1)reads.
Forovenswithout a preheat indicatorhghtor
tone,preheat 10minutes.
Aluminum Foil
Aluminum foil maybe usedto catcha spillover
Never entirely cover a rack with
aluminum foil. This will distm'b the heat
circulation and result in poor baking.
A smaller sheet of foil may be used to
catch a spilhwer by placing it on a lower
rack several inches below the food.
Baking results Mll be better if baking
pans are centered in the oven as much as
possible. Pans should not touch each
other or the walls of the oven. If you
need to use two rac!<% stagger the pans so
one is not directly above the other; and
leave approximately 1½" between pans,
from the fl'ont, back and sides of the wall.
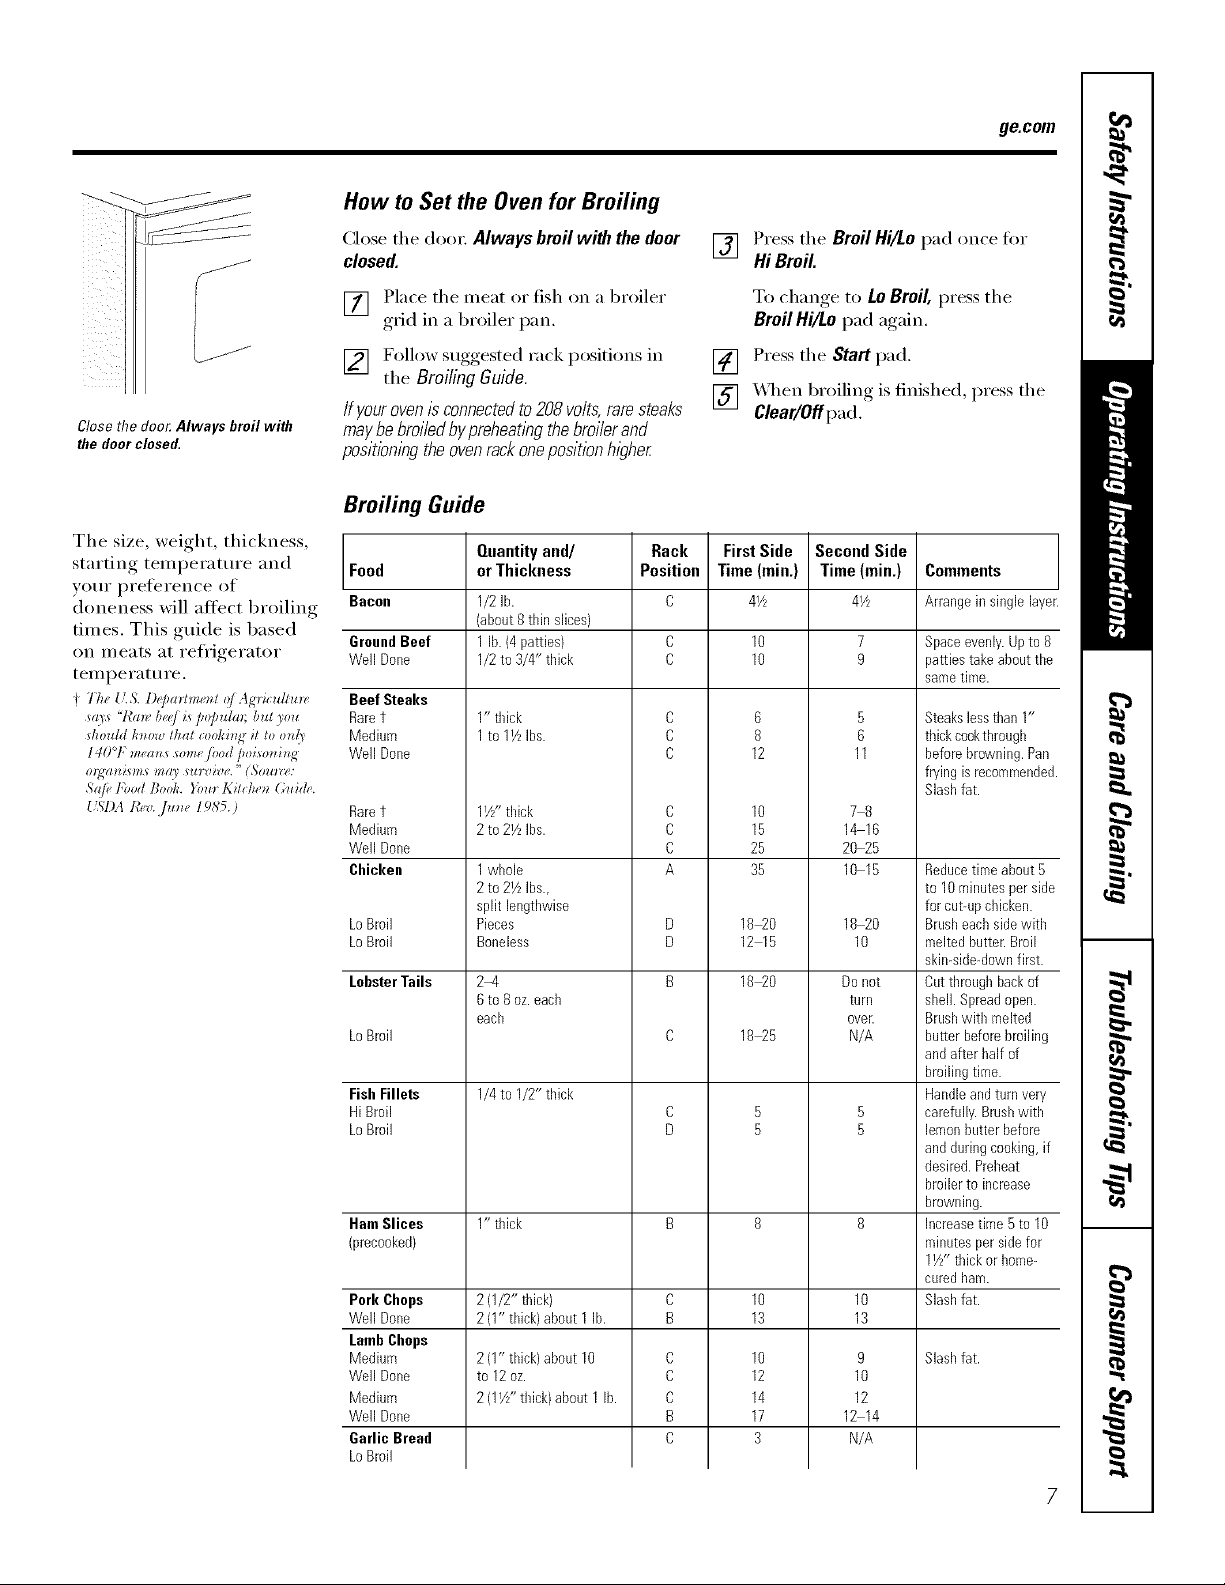
How to Set the Oven for Broiling
Close the dora: Always broil with the door
closed.
ge.com
[] Press the BroilHi/Lopad once fi)r
Hi Broil.
[] Place the meat or fish on a broiler
grid in a broiler pan.
[] Follow suggested rack positions in
the BroilingGuide.
Closethefloo_Always broil with
the door closed.
If your ovenISconnectedto 208 volts,rare steaks
maybe broiled bypreheatlhg thebroiler and
positioning the oven rackoneposition higher
Broiling Guide
The size, weight, thickness,
starting temperature and Food
your prefi_rence of
doneness will afli_ct broiling Bacon
times. This guide is based
on II/e_lt8 at refligerator
temperature.
f The IL& l)@mCme_z¢oJAg)';_:ufllm, Beef Steaks
s(l_'s '?_'(m'/)_.,./is/Jo/m/m; /)ul)0u Raret
skouht l_zo_ tkal _:ooki_¢it to 0_d_' Medium
140°l:mea_zssomefi)odpoiso_li_N Well Done
S@ Food Book. }5)znKi¢_:ken(;td(h,.
IL_l).l t_,v. pz_le 1985.)
GroundBeef
Well Done
Raret
Medium
Well Done
Chicken
LoBroil
LoBroil
LobsterTails
LoBroil
Fish Fillets
HiBroil
LoBroil
Ham Slices
(precooked/
Pork Chops
Well Done
LambChops
Medium
Well Done
Medium
Well Done
Garlic Bread
LoBroil
Quantityand/
orThickness
1/2 lb.
(about8thin slices)
1 lb.(4 patties)
1/2to 3/4" thick
1" thick
1to 1Z Ibs.
1Z" thick
2to 2VLIbs.
1whole
2to 2Z Ibs.,
split lengthwise
Pieces
Boneless
2-4
6to 8 oz.each
each
1/4to I/2" thick
1" thick
2(1/2" thick)
2(1" thick)about 1 lb.
2(1" thick)about 10
to 12 oz.
2(1Vz"thick)about 1lb.
Rack
Position
C
C
C
C
C
C
A
C
C
C
B
To change, to Lo Broil, press the
Broil Hi/Lopad again.
[] Press the Start pad,
[] _,_en broiling is finished, press the
Clear/Offpad.
First Side
Time (min,)
41/L
6
8
12
10
15
25
35
18_0
12 15
18_0
18_5
10
12
14
17
3
SecondSide
Time(rain.)
4VL
5
6
11
78
1_16
20 25
10 15
18 20
10
Donot
turn
oveE
N/A
9
10
12
12 14
N/A
Comments
Arrangein single laye
Space evenly. Upto 8
patties take about the
same time.
Steakslessthan 1"
thickcookthrough
beforebrowning.Pan
fryingis recommendec
Slashfat.
Reducetime about5
to 10 minutespersid(
for cut-@ chicken.
Brusheachside with
meltedbutter.Broil
skin-side-downfirst.
Cutthroughbackof
shell.Spreadopen.
Brushwith melted
butterbefore broiling
andafter half of
broilingtime.
Handleandturnvery
carefully.Brushwith
lemonbutterbefore
andduring cooking,if
desired.Preheat
broilerto increase
browning.
increasetime5 to 10
minutesperside for
11//"thickor home-
curedham.
Slashfat.
Slashfat.
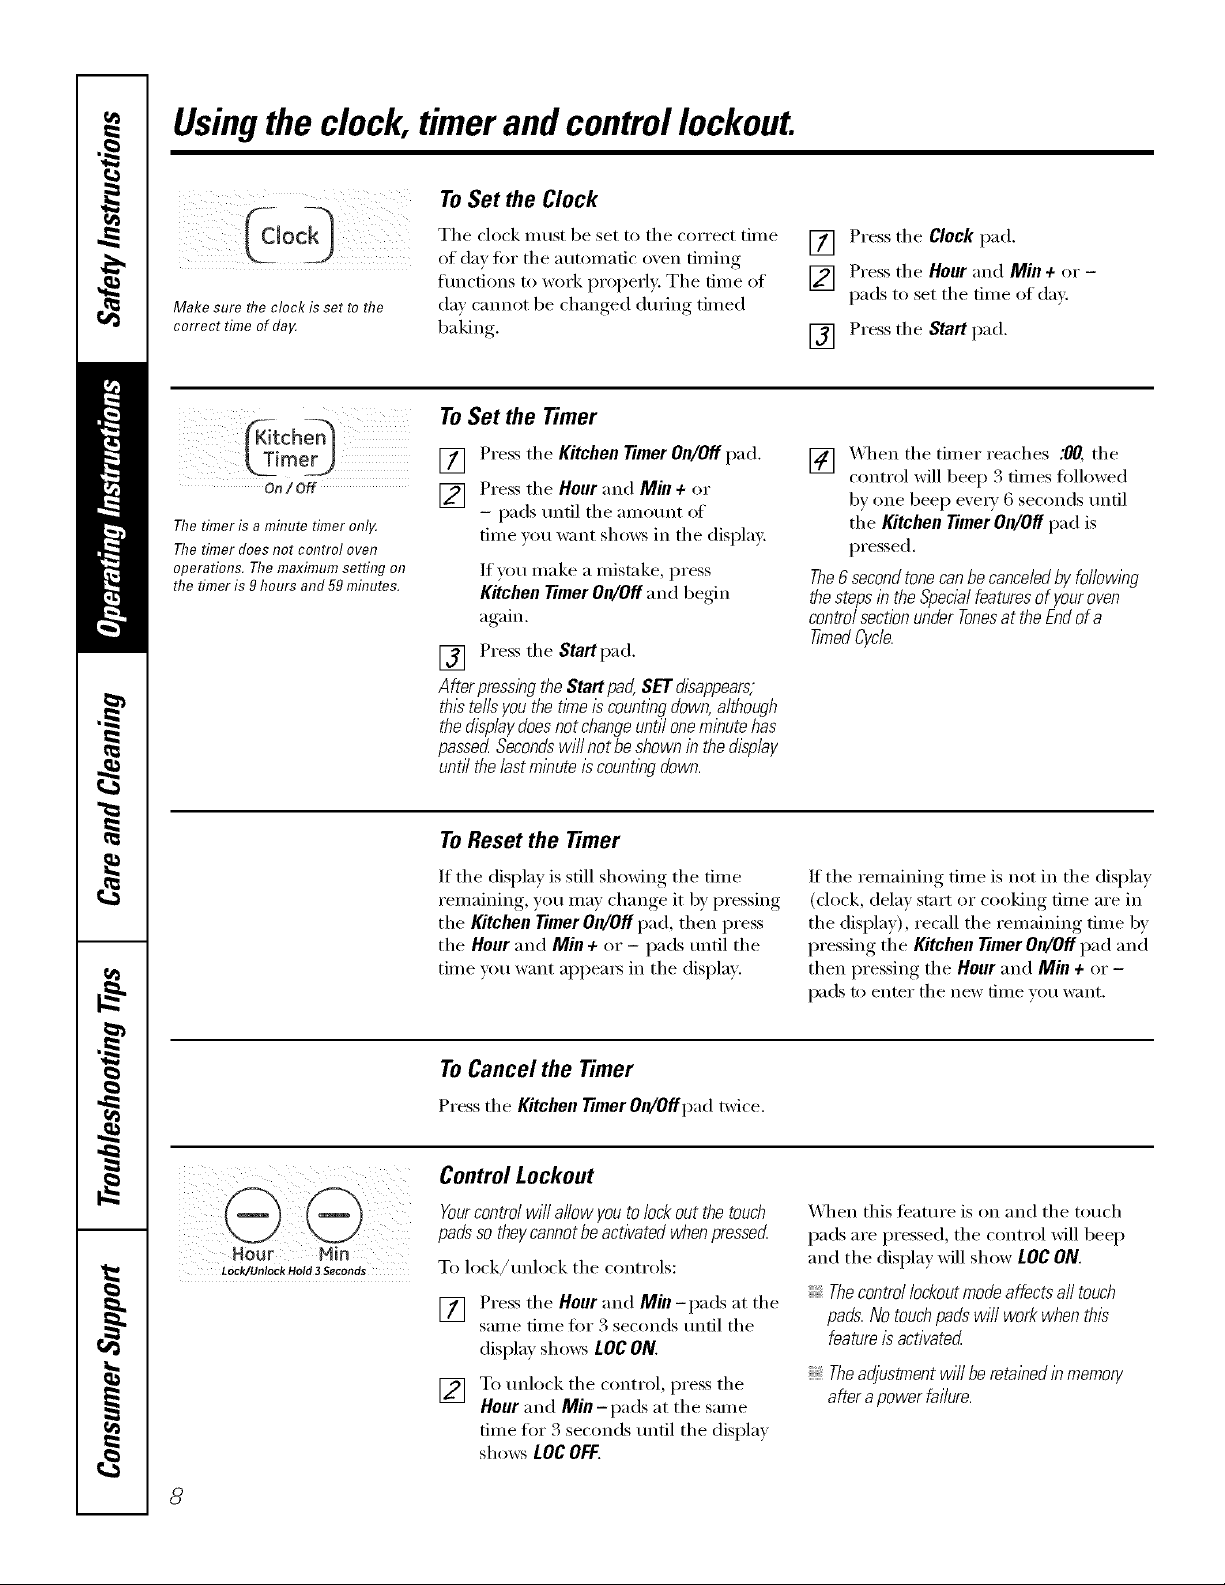
Usingthe clock, timerandcontrollockout.
ToSet the Clock
The clock must be set to the correct time
of da)fin" the autonmfic oven tinting
tractions to work properly. The time of
Make sure flTeclock is set to the
correct time of da_
day cannot be chanoed duYhlo timed
baking
To Set the Timer
[] Press the Clock pad,
] Press the Hour and Mill ÷ or -
pads to set the time of day,
[] Press the Start pad.
k_Timer_)
On/Off
Ttie t#ner is a mflTute t#ner onl_
Ttie timer does not control oven
operations. Ttie maximum setting on
ttie timer is 9 hours and 59 mflTutes.
[] Press the Kitchell timer ell/Off pad.
] Press the Hour and Mill + or
- pads until the amotmt of
time )ou want shows in the display.
If you make a mistake, press
Kitchen timer On/Off and beoin
again.
[] Press the Startpad.
After pressing the Start pad,SET disappears,
this tells you the tkne is counting down,although
the displaydoesnot changeuntil one minute has
passed Secondswill notbe shown in thedisplay
until thelast minute is countl)_gdown.
To Reset the Timer
If the display is still shoMng the time
remaining, you may change it by pressing
the Kitchen timer On/Off pad, then press
the Hour and Mill ÷ or - pads until the
time you want api)ea_ in the display:
[] X_q_en the timer reaches ;00, the
control will beep 3 times fi)llowed
bv one beep e\'els' () seconds tllltil
the Kitchen timer On/Off pad is
pressed.
The6 secondtonecanbecanceledby followl)_g
the steps inthe Special featuresof youroven
controlsection under Tonesat the Endof a
timed Cycle.
If the remaining time is not in the display
(clock, delay start or cooking time are in
the display), recall the remaining time by
pressing the Kitchen timer On/Off pad and
then pressing the Hour and Mill ÷ or -
pads to enter the new time vou want.
i i i
Hour l'4in
Lock/Unlock Hold 3 Seconds
8
ToCancel the Timer
Press the Kitchell timer On/Offpad twice.
Control Lockout
Yourcontrol wi// a/low you tolock out the touch
padsso theycannot beactivated whenpressed
To lock/unlock the controls:
] Press the Hour and Mill -pads at the
same time fin" 3 seconds until the
display sho_vs LOCON.
[] To unlock the control, press the
Hour and Mill -pads at the same
time fin" 3 seconds until the display
sh(>_vs LOCOFF.
%]_en this teatm'e is on and the touch
pads are pressed, the control will beep
and the display will show LOC ON.
Thecontrol lockoutmode affectsall touch
pads.No touchpads wi// workwhen this
featureis activated
Theadjustment will be retained in memory
after a power failure.
 Loading...