

GE JKS06BF4BB Owner’s Manual
Safety Instructions ........ 2-4
ge.com
>
0
Operating Instructions
Clock and Timer ........... ] 2
Control Lockout ........... 12
Controls ................... 5
Oven ................. 10, 11
Sabbath Feature ........... 8, 9
Special Feaulres ........... 6, 7
Thermostat ............... 14
Timed Baking and Roasting . . .l 3
Care and Cleaning
Broiler Pan and Grid ........ 15
Control Panel ............. 18
Heating Element ........... 15
Lift.Off Oxen Door ......... 16
Light Bulb ................ 17
Packaging Tape ............ 15
Painted Surfaces ........... 18
Porcelain Oxen Interior . .... 15
Shelxes ................... 15
Troubleshooting Tips ... 19, 20
JKS06"2 7" Sir_gle Wall Oven
Consumer Support
Consumer Support . . .Back Co\_r
Product Registration ..... 91,92
Warranty ................. 93
Write the model and serial
numbers here:
Model #
Serial #
You can find them on a label on
the side trim or on the ti'ont of
the oven behind the oven door.
49-80332 11-05 Jfl
IMPORTANTSAFETYINFORMATION.
READALLINSTRUCTIONSBEFOREUSING.
WARNING!
For your safe_, the information in this manual must be followed to minimize the risk of fire or
explosion, electric shock, or to prevent property damage, personal injury, or loss of life.
SAFETYPRECAUTIONS
When using electrical appliances, basic safety precautions should be followed, including
the following:
_:;Use this appliance only tbr its intended
puq)ose as described in tins )x_ne_ s
Manual.
J; Be sure your appliance is properly
installed and grounded by a qualified
mchnician in accordance with tile
provided installation insuucdons.
_{:;Do not atmmpt to repair or replace any
part of your oxen unless it is specifically
_ecommended in this manual. All ofl_er
servicing should be referred to a qualified
technician.
• (
_?{:_Before performing any service, disconnect
the o_en power supply at the household
distribnuon panel 1)y removing the filse or
switching off" the ci_vuit 1)_eake_:
q_{_:Do not leaxe children alone--<hildren
should not be left alone or unattended in
an area where an appliance is in use. They
should nex>r be allowed to sit or stand on
aW part of the appliance.
q_{_:Do not allow anyone to climb, stand or
hang on fl_e door: They could damag> the
ox>n, or cause sex>re personal injm T,
;:_::,iHave the installer show you the location
of the circuit breaker or fl_se. Mark it for
easy reference.
2
SAFETYPRECAUTIONS
ge.com
_; Be sure die oven is securely installed in
a cabinet that is firmly attached to tile
house structure. Never allow anyone
to clin/b, sit, stand or hang on tile
ox.en door
;f; Never leax.e die oxen door open when
you are not watching tile ox.en.
_:;Always kee I) combustible wall cox.ering:s,
curtains or drapes a safe distance flom
yo/lr ox.en.
_{;_Always kee I) dish towels, dish cloths, pot
holders and other linens a sad distance
flom your ox.en.
;_;Always kee I) wooden and plastic utensils
and canned tbod a sad distance away
from your ox.en.
;_?:,:Teach childi.en not m play with file
controls or any oilier part of file ox.en.
_; i,arg.e scratches or impacts m glass doors
can lead m broken or shatmred glass.
_1{:_Do not store flammable mamrials in
an oven.
CAUTION: temsofi.terestto
children should not be stored in cabinets
aboxe an oxen; children climbing on tile
oxen to reach items could be seriousN
iiijured.
Nex.ei wear loose-fitting or hanging
gaI_nents while using the appliance.
Be careflll when reaching for imms
stored in cabinets ox.ei tile oven.
Flammable mamrial could be ignited if
brought in contact with hot surl_aces or
heating elements and may cause sex.ere
bllrlls.
_]_;;Use only di T pot holders--moist or
damp pot holders on hot surfaces n/ay
resuh in bums from smam. Do not let
pot holders touch hot heating elements.
Do not use a towel or other bulky cloth.
_i:,:For your safety, never use your appliance
for wmlning or heating tile room.
_;:Do not let cooking gxease or other
flammable mamrials accumulate in
or Ileal tile ox.eIl.
;f?:,:Do not use water on grease fires.
Nmer pick up a flan/ing pan. Turn tile
controls off'.
Flame in tile ox.en can be smothered
completely by closing die oven door and
turning tile ox.en off or by using a muhi-
purpose di T chemical or foam-type fire
extinguisher
_{;_Do not store or use combustible
mamrials, gasoline or other flammable
vapors and liquids in tile vicinity of this
or any other appliance.
3
IMPORTANTSAFETYINFORMATION.
READALLINSTRUCTIONSBEFOREUSING.
WARNING'!
COOKMEATANDPOULTRYTHOROUGHLY...
Cookmeat andpoultry thoroughly--meat toat leastan INTERNALtemperatureof 160°Fandpoultry
toat least an INTERNALtemperatureof 180°ECookingto thesetemperaturesusuallyprotects against
foodbomeillness.
E:,IDo not touch fl_e heaung elements or the
interior suifi_ce of the ox.en. These surt3aces
may be hot enough to bum even though
they are dark in colon During and after
use, do not touch, or let clothing or other
flammable materials contact any inmrior
m.ea of rise ox.en; allow sufficient time tbr
cooling first.
E:,IPotentially hot surfaces include ox.en x.ent
opening:s, s/5il_aces near the opening:s,
crevices around the oven door, the edg.es _:;
of the window and metal trim parts abox.e
the door ;_i:,:
REMEMBER:The inside surtZace of dse ox.en
may be hot when the door is opened.
_]{_Stand awW flom the oven when opening
the oven doon Hot air or smam which
escapes can cause bums to hands, face
and/or eyes.
;f; Do not heat unopened food containers.
Pressure could build up and the container
could burst, causing an injn U.
;_i:,:Kee I) flse oven x.ent unobstructed.
;f; Kee I) the ox.en flee flom grease buildup.
;f; Place the ox.en shelf in rise desired position
while the oven is cool. If sheh.es must be
handled when hot, do not let pot holder
contact rise heating elements.
E:,IWhen using cooking 05 roasting bags in
the oxen, follow the manufacturer's
directions.
Pulling out the shelf to the stoi>lock is a
comenience in lifting heavv tbods. It is also
a precaution against bums flom touching
hot surfi_ces of the door or oxen walls.
Do not use the oven to d5T newspapers.
If oxerheated, they can catch on fire.
Do not use the oxen for a storage area.
Items stored in an oxen can ignite.
Do not leme paper products, cooking
utensils 05 tbod in the oxen when not
in use.
_{_After broiling, always take die broiler pan
out of the ox.en and clean it. ieftover
grease in the broiler pan can catch fire
next time you use the pan.
_:;Never leave jars 05 cans of fat dripping_ in
o1" near yo/5i ox.en.
E:,IClean only parts lismd in tiffs Owner's
Manual.
Do not use aluminum foil to line oxen
bottoms, except as suggested in this
manual. Improper installation of
ahm/inum foil may result in a risk
of electric shock or fire.
READANDFOLLOWTHISSAFETYINFORMATIONCAREFULLY.
SAVETHESEINSTRUCTIONS
4
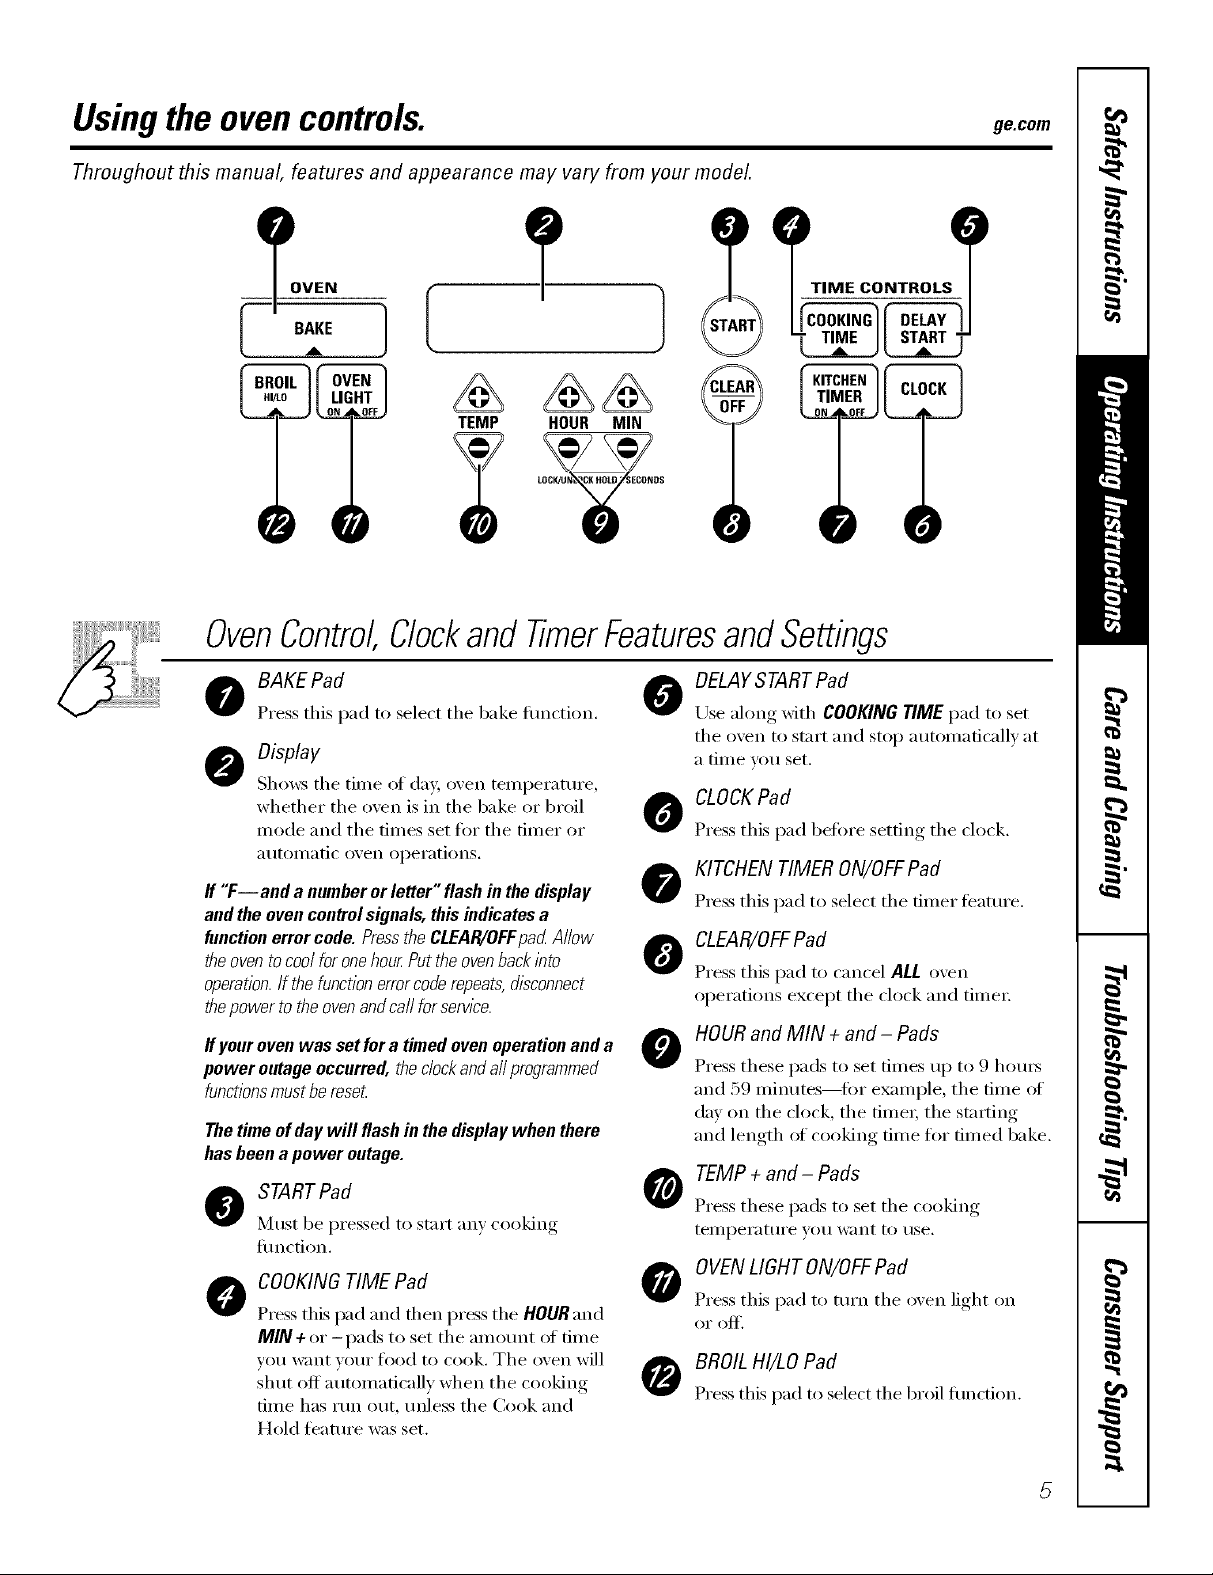
Usingthe ovencontrols, gecom
Throughout this manual, features and appearance may vary from your model.
OVEN
L(_ DS
(
O @ 0
OvenControl,ClockandTimerFeaturesandSettings
DELAYSTARTPad
o BAKEPad 0
Press this pad to select the bake timction.
Display
Sho_v_ the time of day, oven temi)eramre ,
whether the oven is in the bake or broil
mode and the times set fin" the timer or
atltOi//atic oven operations.
ff "T--and a numberorletter"flashinthedisplay
andtheovencontrolsignals, thisindicatesa
functionerrorcode.PresstheCLEAR/OFFpad Allow
theoventocoolforonehour.Puttheovenbackinto
operation.If thefunctionerrorcoderepeats,disconnect
thepowertotheovenandcaflforserv/ce.
ff youroven was set for a timed oven operation and a
power outage occurred, the clockand all programmed
functionsmustbe reseL
The time of day will flash in the display when there
has been apower outage.
Use ahmg xdth COOKING T/ME pad to set
the oxen to start and stop automaticall_ at
a time VOtl set.
o CLOCKPad
Press this pad heft)re setting the clock.
KITCHEN TIMER ON/OFFPad
Press this pad to select the timer feature.
O CLEAR/OFFPad
Press this pad to cancel ALLo'_en
operations except the clock and time_:
o HOUR and MIN + and- Pads
Press these pads to set times up to 9 hom_
and 59 minutes--fin" example, the time of
day on the clock the time_; the stinting
and length of cooking time fin" timed bake.
O STARTPad
]V]List be I_ressed to start am, cooking,
fimction.
O COOKINGTIME Pad
Press this pad and then pros the HOUR and
MIN + or -pads to set the amount (ff time
you want w)ur food to cook. The oven will
shut off automatically when the cooking
time has run out, unless the Cook and
Hold fl_ature was set.
o TEMP + and- Pads
Press these pads to set the cooking
teillpei'attli'e yo[/IV}lilt to rise.
O OVEN LIGHTON/OFFPad
Press this pad to turn the oxen light on
O BROIL HI/LO Pad
Press this pad to select the broil flmcfion.
5
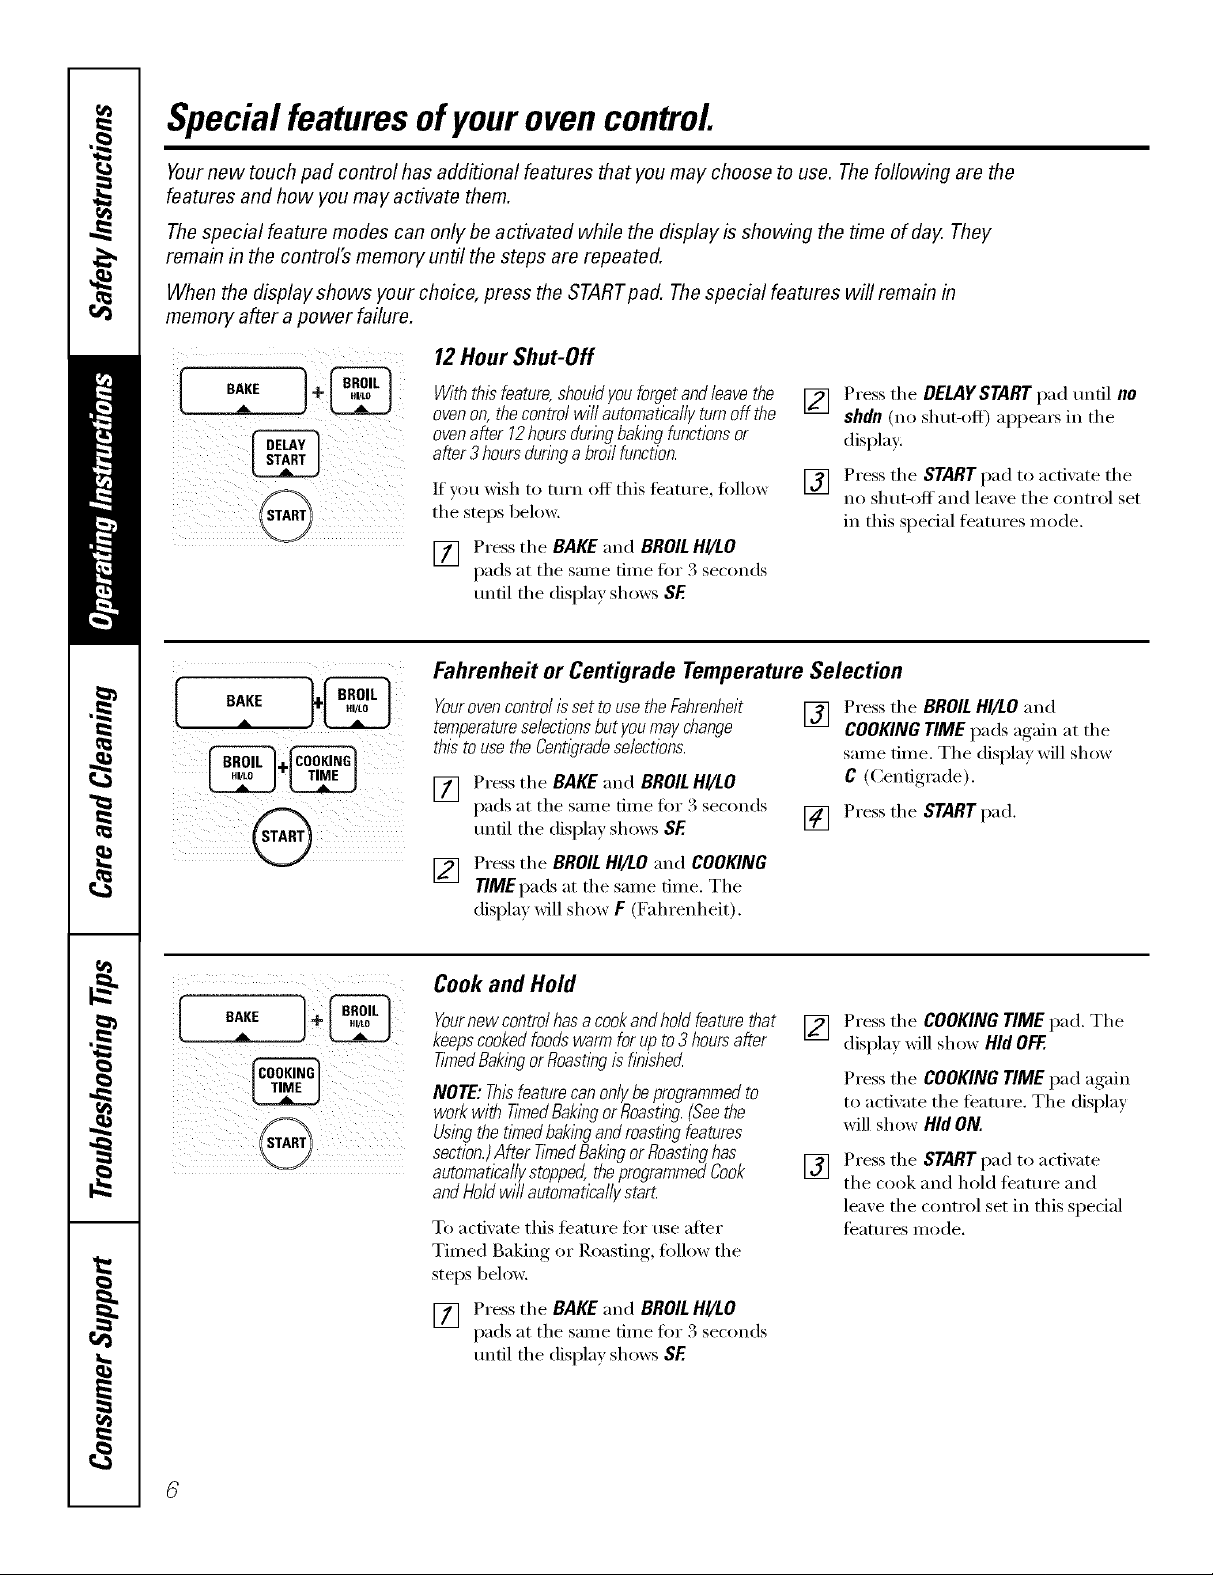
Special featuresofyourovencontrol.
Yournew touch pad control has additional features that you may choose to use. The following are the
features and how you may activate them.
The special feature modes can only be activated while the display is showing the time of day. They
remain in the control's memory until the steps are repeated.
When the display shows your choice, press the STARTpad. The special features will remain in
memory after a power failure.
12 Hour Shut-Off
Withthisfeature,shou/dyouforgetand/eavethe
ovenon,thecontrolwi//automaticallyturnoffthe
ovenafter 12hoursduringbaklbgfunctionsor
after3 hoursdun?)ga broilfunction.
If you Msh to mrn off this teature, tollow
@ be,o.,
[] Press tile BAKE "and BROILHI/LO
pads at tile same time fi:,r 3 seconds
until the display shows SE
Fahrenheit or Centigrade Temperature Selection
Youroven control isset to use the Fahrenheit
temperatureselectionsbut youmay change
this to usethe Centigradeselections.
[] Press tile BAKE "and BROILHI/LO
pads at tile same time fi:,r 3 seconds
tmtil tile display shows SE
[] Press tile BROILHI/LO "and COOKING
TIME pads at tile same time. Tile
displa) will show F (Fahrenheit).
[] Press tile DELAYSTART pad tmfil no
shdn (no shut-off) appeax_ in tile
display:
[] Press the START pad to acd_ate the
no shtl[-Off and leaxe the control set
in this special features mode.
Press tile BROILHI/LO and
[]
COOKING TIME pads again at tile
same time. Tile displa)will show
C (Centigrade).
Press tile START pad.
[]
Cook and Hold
Yournewcontrolhasa cookandholdfeaturethat
keepscookedfoodswarmforupto3 hoursafter
T/YnedBakingorRoastl)_gisf)_lshed
NOTE:Thisfeaturecanonlybeprogrammedto
workwith #NedBaklhgorRoasting.(Seethe
Usingthetimedbakingandroastlhgfeatures
section.)After #NedBakingor Roastinghas
automaticallystopped,theprogrammedCook
andHoldwillautomaticallystart.
To activate this tbatm'e fi)r use after
Timed Baking or Roasting, fi_llow the
steps below.
[] Press tile BAKE "and BROIL HI/LO
pads at tile salne dine fi)r 3 seconds
tmtil tile display shows SE
Press tile COOKINGTIME pad. Tile
[]
display _611show Hid OFF.
Press the COOKING TIME pad again
to activate tile ti_atm'e. Tile display
will show Hid ON.
Press the START pad to activate
[]
tile cook and hold teature and
lea_e the control set in this special
feattu'es mode.
i ¸@ i
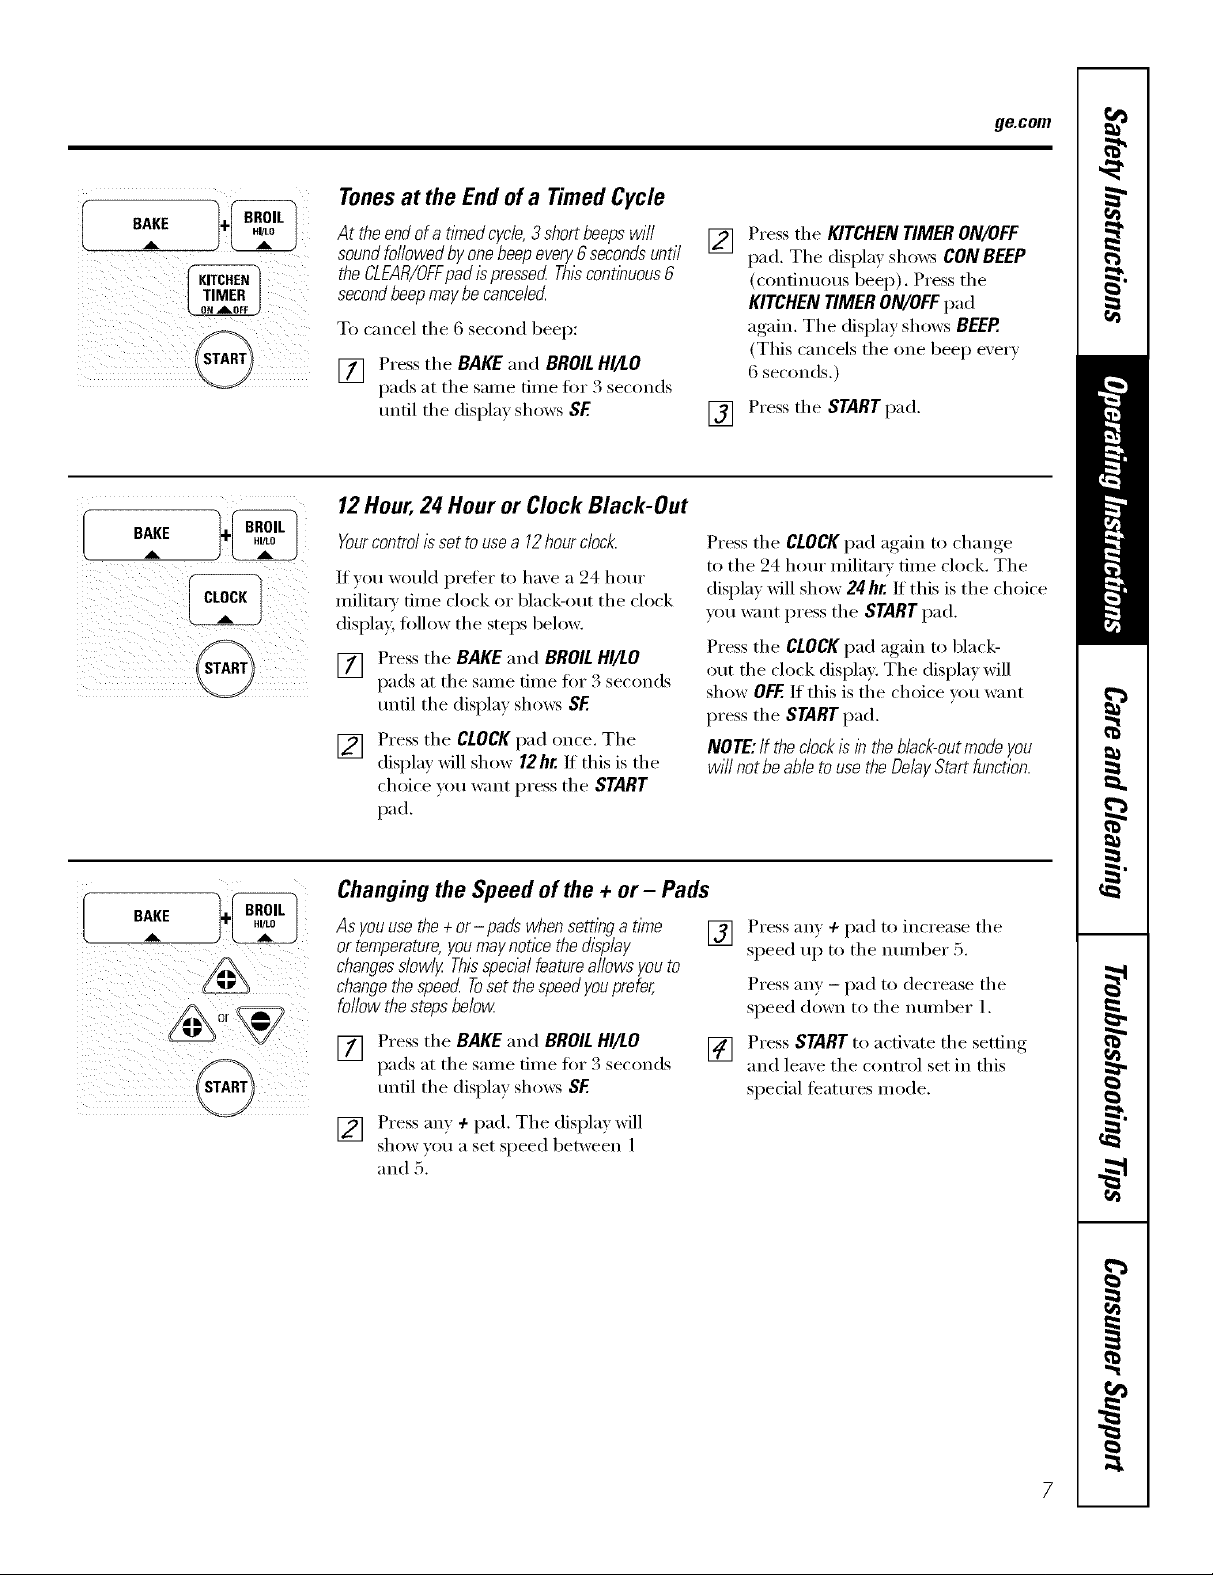
Tonesat the End of a Timed Cycle
At theendofa tknedcycle,3shortbeepswill
soundfollowedbyonebeepevery6secondsuntil
theCLEAR/OFFpadispressedThl}continuous6
secondbeepmaybecanceled
To cancel the 6 second beep:
[] Press tile BAKE and BROILHI/LO
pads at tile same time fin 3 seconds
until tile display shows SF
12Hour,24 Hour or Clock Black-Out
Press tile KITCHENTIMERON/OFF
[]
pad. Tile displa_ shows CONBEEP
(continuous beep). Pressthe
KITCHENTIMERON/OFFpad
again. Tile display shows BEER
(This cancels tile one beep every
6 seconds.)
Press the STARTpad.
[]
ge.com
) i )@/j
Yourcontrol is set to usea 12hourclock.
If )ou would prefer to have a 24 hour
milimx_ time clock or black-out the clock
display, follow the steps below.
[] Press tile BAKE and BROILHI/LO
pads at the same time fox 3 seconds
tmtil the displa_ shows SF
Press tile CLOCKpad once. Tile
[]
display will show 12hr. If this is tile
choice _ou want press tile START
pad.
Changing the Speed of the + or- Pads
As you usethe + or- padswhen setting a time
or temperature,youmay notice the display
changesslowly Th/sspecial featureallows you to
changethespeed Toset thespeed youprefer,
follow thestepsbelow
[] Press tile BAKE and BROIL HI/LO []
pads at tile sanle time fin" 3 seconds
tmfil tile display shows SF.
Press tile CLOCKpad again to change
to the 24 hour military time clock. The
display will show 24 hr./t this is the choice
you want press tile STARTpad.
Press tile CLOCKpad again to black-
out the clock display. The display will
show OFF.If this is the choice um want
press the START pad.
NOTE:If the clock Is inthe black-outmode you
will not beable touse the DelayStart function.
Press any + pad to increase tile
[]
speed up to tile nmnber 5.
Press am - pad to decrease the
speed down to tile number l.
Press START to activate the setting
and leaxe the control set in this
special featm'es mode.
[] Press any + pad. Tile display will
show you a set speed between l
and 5.
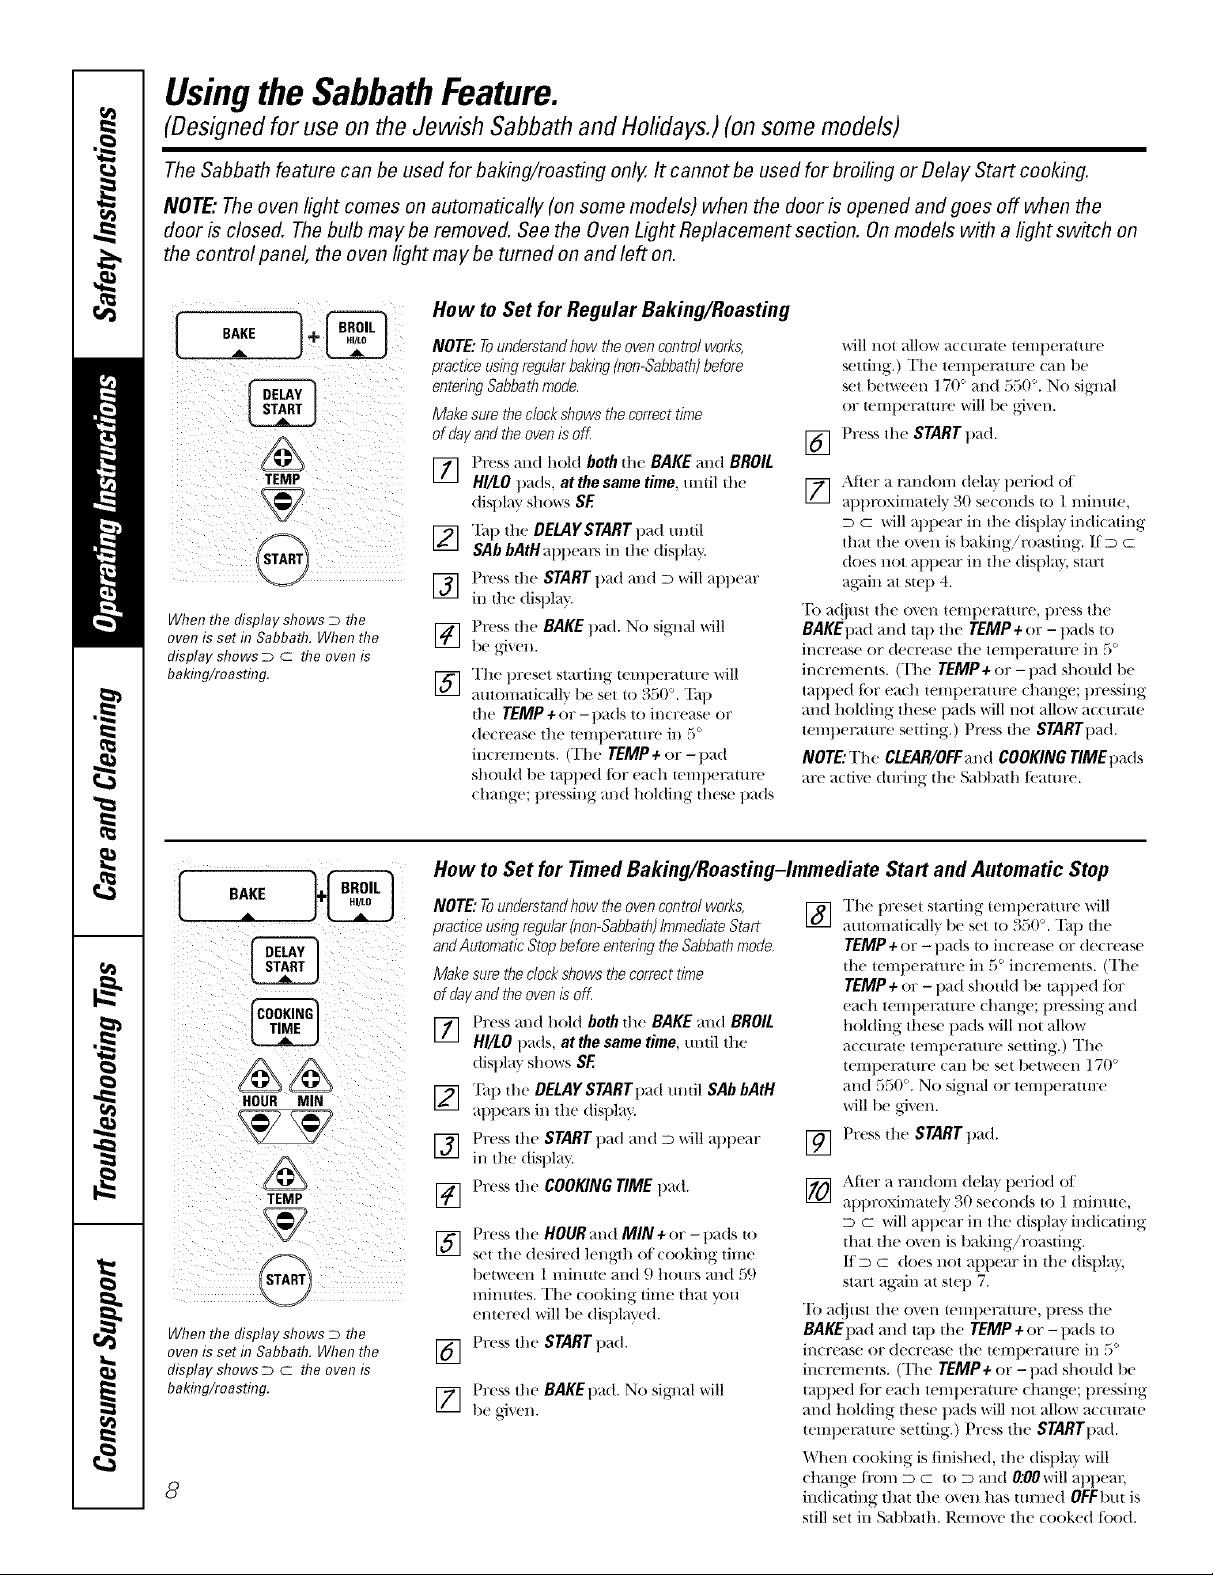
Usingthe SabbathFeature.
(Designed for use on the Jewish Sabbath and Holidays.) (on some models)
The Sabbath feature can be used for baking/roasting only.It cannot be used for broiling or Delay Start cooking.
NOTE."The oven light comes on automatically (on some models) when the door is opened and goes off when the
door is closed. Thebulb maybe removed. See the Oven Light Replacement section. Onmodels with a light switch on
the control panel, the oven light may be turned on and left on.
How to Set for Regular Baking/Roasting
i ii i
iii (?[[ !?iiii
ili [ ili iii'
When the display shows D the
oven is set h7Sabbath. When the
display shows D C the oven is
baiting/roasting.
NOTE: Tounderstandhow the ovencontrol works,
practice using regular baking(non-Sabbath)before
entering Sabbath mode.
Make sure the clock shows the correct time
of day and the oven isoff
] Press and hold both th( BAKE and BROIL
HI/LO t/ads, at the same time, until die
display S] _()_%rs SE
r)] Ih13 the DELAYSTART pad until
SAb bAtH alltlears in the display.
] Press die START tlad and D _rl_ _])_
in the display.
] Press the BAKE t)ad. No signed '+++rill
be _,ixen.
] The t)reset startJl/g lellll)eralttre "will
auton/ati(alh' be set i(1 350 °. "[_,tt)
the TEMP+()r-tlads to increase or
de(Tease the temlleramre ilJ,5°
increments+ (The TEMP+ or -pad
should be tat)tied/or each ten)ll(n_ature
change; t)ressing and holding these t)ads
will l/Or allow aCcllrate telIlllerat/Ire
setting.) The tenqmmture can be
set between 171)`+and 550 `+.No sigllal
or temlleramre will be given.
Pre.'.,, the START t)ad.
[]
[_ Atier a mnd(nn dela} lleriod (1t
al)llroximately 30 se((mds to 1 minute,
D C will al)llear in the display indi( ating
that the oven is baking!lx)asting. It D C
does not alll)ear in the distil m, start
ag_fin at step 4.
To a(!iust the o\en temperature, t)ress tile
BAKEI)ad and tall the TEMP + or -pads to
ill( r('ase or de(rease Ihe t('l//llel_lttlre ill 5 °
incren/ents. (T]le TEMP+or- pad shotlld be
tapped K)r each temllemmre change; t)ressing
and holding these t)ads will not allo_ ace/irate
ten/l)erattlre setting.) F'ress the STARTImd.
NOTE: The CLEAR/OFFand COOKING TIMEt)ads
are a(ti++v during the Sabbath Ic'atm'e.
BAKE ]+_
HOUR MIN
TEMP
START
When the display shows D the
oven is set fl?Sabbath. When the
display shows D C the oven is
baiting/roasting.
8
How to Set for Timed Baking/Roasting-Immediate Start and Automatic Stop
NOTE: Tounderstand how the oven control works,
practice using regular(non-Sabbath)Immediate Start
andAutomatic Stop before entering the Sabbath mode.
Make sure the clockshows the correct time
of day and theoven is off
)
] t ress and huM both die BAKE and BROIL
HI/LO tlads, at the same time, ill/ill Ill(!
dist)la } shows SE
I_ "Pal/the DELAYSTARTllad until SAb bAtH
atlllears in the dist)lay.
] Press the START t)ad and D will al)tlear
in the dist)lay.
[] Press the COOKING TIME tlad.
Press the HOUR and MIN + or -tlads to
] set the desired length ot looking time
betweell 1 minute and 9 hours and 59
minutes. The looking time that you
entered will l)e (/isl)layed.
Press the START t)ad.
[]
Press the BAKEtlad. No sigl/al ++viii
[]
be gJ'_ (!1/,
The preset starting t(mtlel_mwe will
[]
a/ltomati(allv 1)e set to 350 °. "Pat) the
TEMP + or -t)ads to increase or de(Tease
the temtlemture in 5 ° in(rements. (The
TEMP+ or - pad should be mt)t)ed/or
each tel//tlerattlre (hal/ge; lll'essil/g " al/d
holding these pads will 11ot allox+
accurate tel//l)erattlre setting+.) The
tempeI_mlre can be set 1)etw( en 170 °
and 550 °. No signal or temt)emture
will be given.
Press il/e START t)ad.
[]
[_ Ati(r a random delay tleliod (1t
alll)roxinlately 30 se(onds to 1 minute,
D C will apt)ear in the dist)lay indi(ating
d/at the oven is baking!roasting.
lID = does not appear in the distllay.
start again at step 7.
"Ib adjust tile oven temperature, tlIX'SStile
BAKEllad and ta t) tl/e TEMP + or- t)ads to
increase or decrease tile tellll)er}tt111"e ill ,")'_
increments. (The TEMP, or -t)ad should 1)e
mt/t/ed /or each temt/eramre change; l/ressing
and holding dlese t)ads will not allow accm_lw
teml)emmre setting.) Press the SYARYllad.
When cooking is/inished, the dislllay will
change ti'on/D : to D and O:OOwill at)l)em;
indicating that the oxen has mined OFFbm is
still set in Sabbath. Remove the cooked too(t.
 Loading...