

GE JKS06BF3BB, JKS06BF2BB, JKS06BF1BB Owner’s Manual
vvvvw.GEAppliances.com
Safety Instructions ........ 2-4
>
Operating Instructions
Clock and Timer ........... ] 2
Control Lockout ........... ] 2
Controls ................... 5
Oven ................. 10, ] ]
Sabbath Feature ........... 8, 9
Special Feanlres ........... 6, 7
Thermostat ............... ] 4
Timed Baking and Roasting . . .13
Care and Cleaning
Broiler Pan and Grid ........ 15
Control Panel ............. 18
Heating Element ........... 15
I_ift=Off ()_en Door ......... 16
Light Bulb ................ 17
Packaging Tape ............ 15
Painted Surfaces ........... 18
Porcelain O_en Interior . .... 15
Shelxes ................... 15
Troubleshooting Tips ... 19, 20
JKS06-2 7" Single W_dl Oven
Consumer Support
Consumer Support . . .Back Co\vr
Product Registration ..... 91,22
Warranty ................. 93
Write the model and serial
numbers here:
Model #
Serial #
You can find them on a label on
the side trim or on the ti'ont of
the oven behind the oven door.
i ........i
164D4290P085-1 49-80727-7 02-03 JR
IMPORTANTSAFETYINFORMATION.
READALLINSTRUCTIONSBEFOREUSING.
WARNING!
For your safe_, the information in this manual must be followed to minimize the risk of fire or
explosion, electric shock, or to prevent property damage, personal injury, or loss of life.
SAFETYPRECAUTIONS
When using electrical appliances, basic safety precautions should be followed, including
the following:
Use this appliance only tbr its intended
pnI])ose as described in tins )x_ner s
Manual.
Be sure your appliance is properly
installed and grounded by a qualified
mchnician in accordance with tile
provided installation insuuctions.
Do not atmmpt to repair or replace any
part of your oxen unless it is specifically
[ecommended in this manual. All other
servicing should be referred to a qua]ified
technician,
• (
Before performing any service, disconnect
die oxen power supply at the household
distribution panel by removing the fllse or
switching off the cflvuit breaker
Do not leaxe children alone--children
should not be left alone or unattended in
an area where an appliance is in use. They
should nex>r be allowed m sit or stand on
any part of the appliance.
Do not allow anyone m climb, stand or
hang on fl_e door They could damage the
oxen, or cause sexere personal injm T.
Have the installer show you the location
of the circuit breaker or fl_se. Mark it for
easy reference.
2
SAFETYPRECAUTIONS
www.GEAppliances.com
Be sure die oven is securely installed in
a cabinet that is firmly attached to tile
house structure. Never allow anyone
to climb, sit, stand or hang on tile
oven door
Never leax> die oven door open when
you are not watching tile ox>n.
Always kee I) combustible wall cox>lings,
curtains or drapes a safe distance flom
yo/lr o\_n.
Always kee I) dish rowels, dish clotils, pot
holders and otiler linens a sad distance
from your oxen.
Always kee I) wooden and plastic utensils
and canned food a safe distance away
from your oxen.
Teach children not to play with file
controls or any oilier part of tile oxen.
Larg> scratches or impacts to glass doors
can lead to broken or shatmred glass.
Do not store flammable mamiials in
an oven.
CAUTION: Items of interest to
children should not be stored in cabinets
aboxe an oxen; children climbing on tile
oxen to reach items could be seliousN
iiIjured.
Nexei wear loose-fitting or hanging
gaI_nents while using tile appliance.
Be carefill when reaching for imms
stored in cabinets ox>r tile oven.
Flammable mamrial could be ignited if
brought in contact witil hot sur/aaces or
heating elements and may cause sexeie
bllTllS.
Use only di T pot holders--moist or
damp pot holders on hot surfaces n/ay
result in bums from smam. Do not let
pot holders touch hot heating elements.
Do not use a towel or otiler bulky cloti/.
For your safety, never use your appliance
for wanning or heating tile room.
Do not let cooking gxease or otiler
flammable mamlials accumulate in
or Ileal tile o\_n.
Do not use water on grease fires.
Nmer pick up a flaming pan. Turn tile
controls off'.
Flame in tile ox>n can be smothered
completely by closing tile oven door and
turning tile o_ii off or by using a multi-
purpose d U chemical or foam-type fire
extinguisher
Do not store or use coinbustib]e
mamrials, gasoline or other flammable
vapors and liquids in tile vicinity of tills
or any otiler appliance.
3
IMPORTANTSAFETYINFORMATION.
READALLINSTRUCTIONSBEFOREUSING.
WARNING'!
COOKMEATANDPOULTRYTHOROUGHLY...
Cookmeatandpoultry thoroughlg--meat to at leastanINTERNALtemperatureof 160°Fandpoultry
toat least an INTERNALtemperatureof 180°ECookingto thesetemperaturesusuallyprotectsagainst
foodbomeilbess.
Do not touch fl_e heaung elements or the
intelqor sni/_tce of the ox.en. These snrPaces
m W be hot enough m bum even though
they are dark in colon Dmqng and after
use, do not touch, or let clothing or other
flammable materials contact any inmsJor
as.ea of flse ox.en; allow sufficient time fbr
cooling first.
Potentially hot surfaces include ox.en x.ent
opening:s, stsi/_aces near the opening:s,
crevices around flae oven door, the edg.es
of the window and metal trim parts abox.e
the door
REMEMBER:The inside surPace of dse ox.en
may be hot when the door is opened.
Stand awW flom the oven when opening
the oven doon Hot air or smam which
escapes can cause bums to hands, face
and/or eyes.
Do not heat unopened food containers.
Pressure could build up and the container
could burst, causing an i,lju U.
Kee I) flse oven x.ent unobstructed.
Kee I) the ox.en free flom grease buildup.
Place the ox.en shelf in the desired position
while the ox.en is cool. If sheh.es must be
handled when hot, do not let pot holder
contact rise heating elements.
When using cooking 05 roasting bags in
the oxen, follow the nmnufactuier's
directions.
Pulling out the shelf to the stop-lock is a
comenience in lifting heavv tbods. It is also
a precaution against bums flom touching
hot surfaces of the door or oxen walls.
Do not use the oven to d5T newspapers.
If oxerheated, they can catch on fire.
Do not use the oxen for a storage area.
Items stored in an oxen can ignite.
Do not leme paper products, cooking
utensils 05 fbod in the oxen when not
in use.
After broiling, always take die broiler pan
out of the ox.en and clean it. i_eftover
grease in the broiler pan can catch fire
next time you use the pan.
Never leavejars 05 cans of fat dsqpping:s in
o1" near yo/5i ox.en.
Clean only parts lismd in flsis Owner's
Manual.
Do not use aluminum foil to line oxen
bottoms, except as suggested in this
manual, hnproper installation of
ahm/inum foil may resuh in a risk
of electric shock or fire.
READANDFOLLOWTHISSAFETYINFORMATIONCAREFULLY.
SAVETHESEINSTRUCTIONS
4
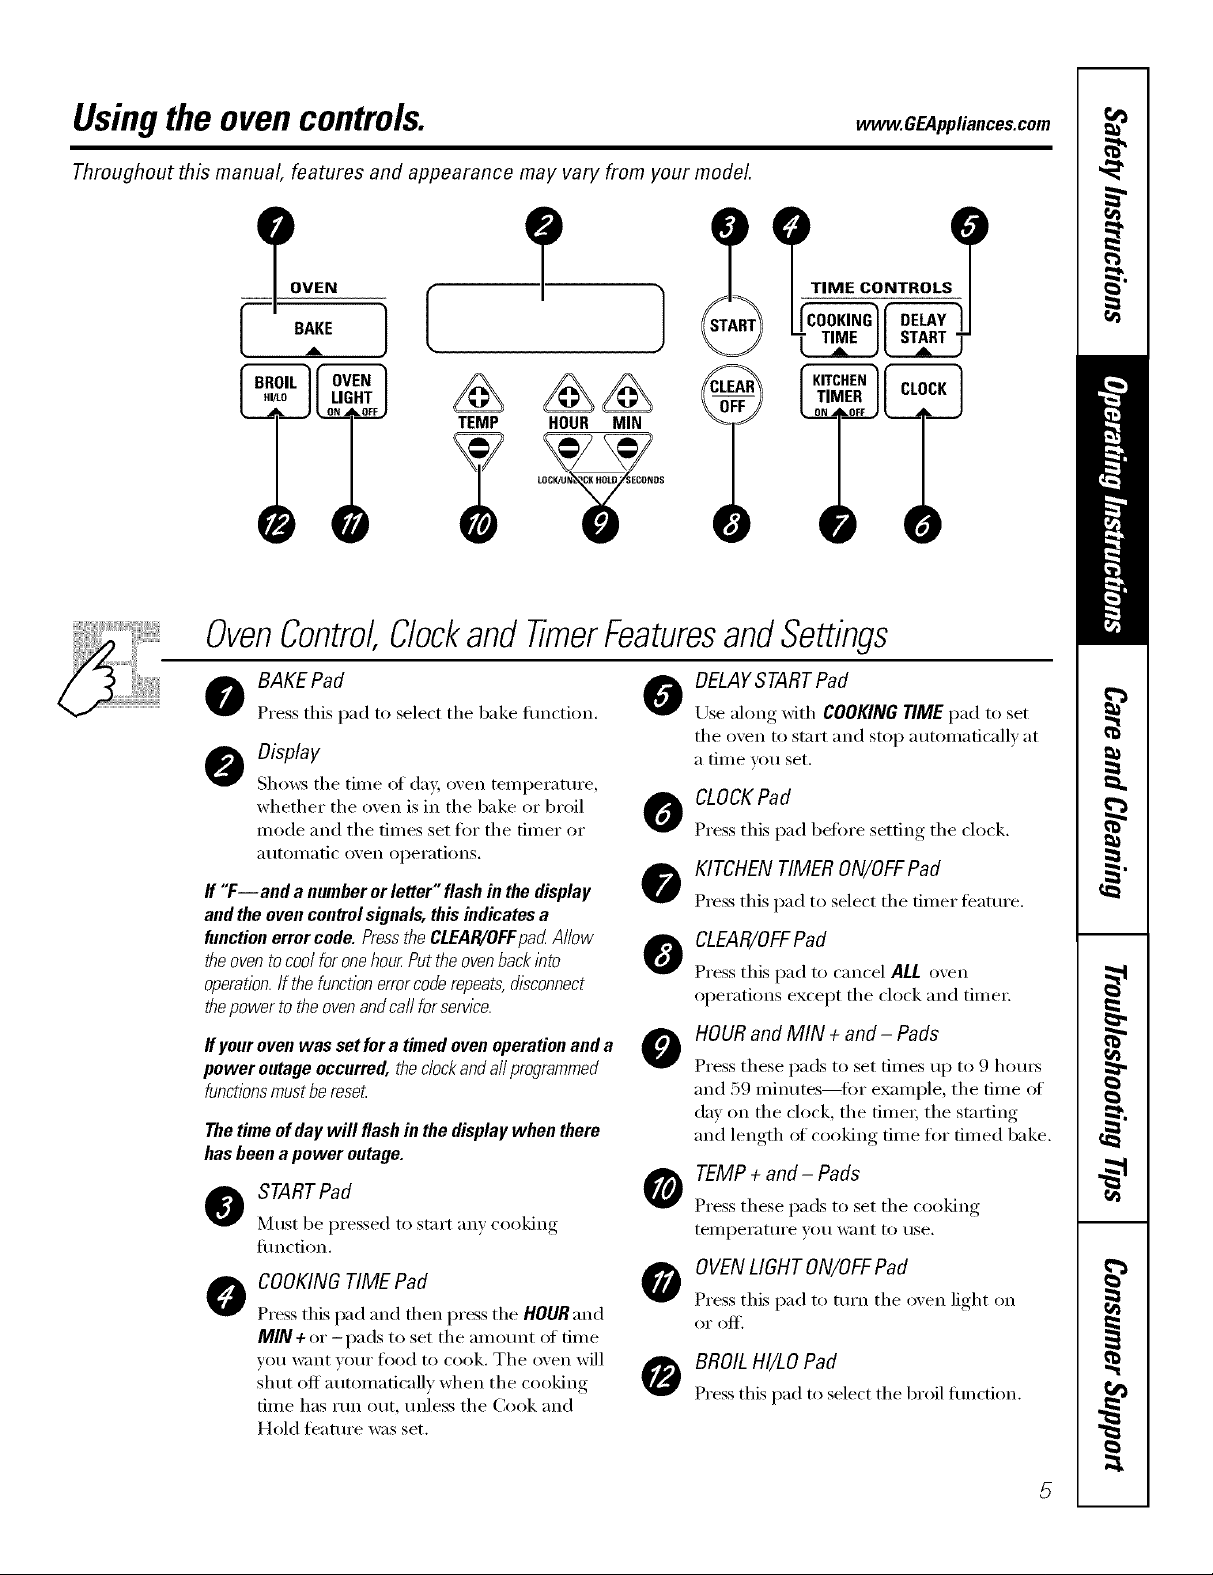
Usingthe ovencontrols, www.GEAppliances.com
Throughout this manual, features and appearance may vary from your model.
OVEN I
BAKE 1
(
O • O
OvenControl,ClockandTimerFeaturesandSettings
DELAYSTARTPad
o BAKEPad 0
Press this pad to select the bake timction.
O isplay
Sho_:_ the time of da,v, oven temperature,
whether the oven is in the bake or broil
mode and the times set fiw the timer or
_ltltOI//_ltic oven operations.
ff "F--and a numberorletter"flashinthedisplay
andthe ovencontrolsignals, thisindicatesa
functionerrorcode.PresstheCLEAR/OFFpadAllow
theoventocoolforonehour.Puttheovenbackinto
operation.If thefunctionerrorcoderepeats,disconnect
thepowertotheovenandcaflforservtce.
ff youroven was set for a timed oven operationand a
power outage occurred, the clockandallprogrammed
functionsmust be reseL
The time of day will flash in the display when there
has been a power outage.
Lrse along xdth COOKING T/ME pad to set
the oxen to start and stop automaticall_ at
a time VOtl set.
o CLOCKPad
Press this pad heft)re setting the clock.
O KITCHEN TIMER ON/OFFPad
Press this pad to select the timer t_'atm'e.
O CLEAR/OFFPad
Press this pad to cancel ALLo'_en
operations except the clock and time_:
o HOURand MIN + and- Pads
Press these pads to set times up to 9 hom_
and 59 minutes--fin" example, the time of
day on the clock the time_; the stinting
and length of cooking time for timed bake.
O STARTPad
IV]tlSt be I_ressed to stnrt am, cooking,
fimction.
O COOKINGTIME Pad
Press this pad and then pros the HOUR and
MIN + or -pads to set the amount (ff time
w)u want w)ur food to cook. The oven will
shut off automatically when the cooking
time has run out, unless the Cook and
Hold ti_ature was set.
o TEMP + and- Pads
Press these pads to set the cooking
[eiiipei'att/i'e yotl want 1() t/se.
O OVENLIGHTON/OFFPad
Press this pad to mrn the oxen light on
O BROIL HI/LOPad
Press this pad to select the broil flmcfion.
5
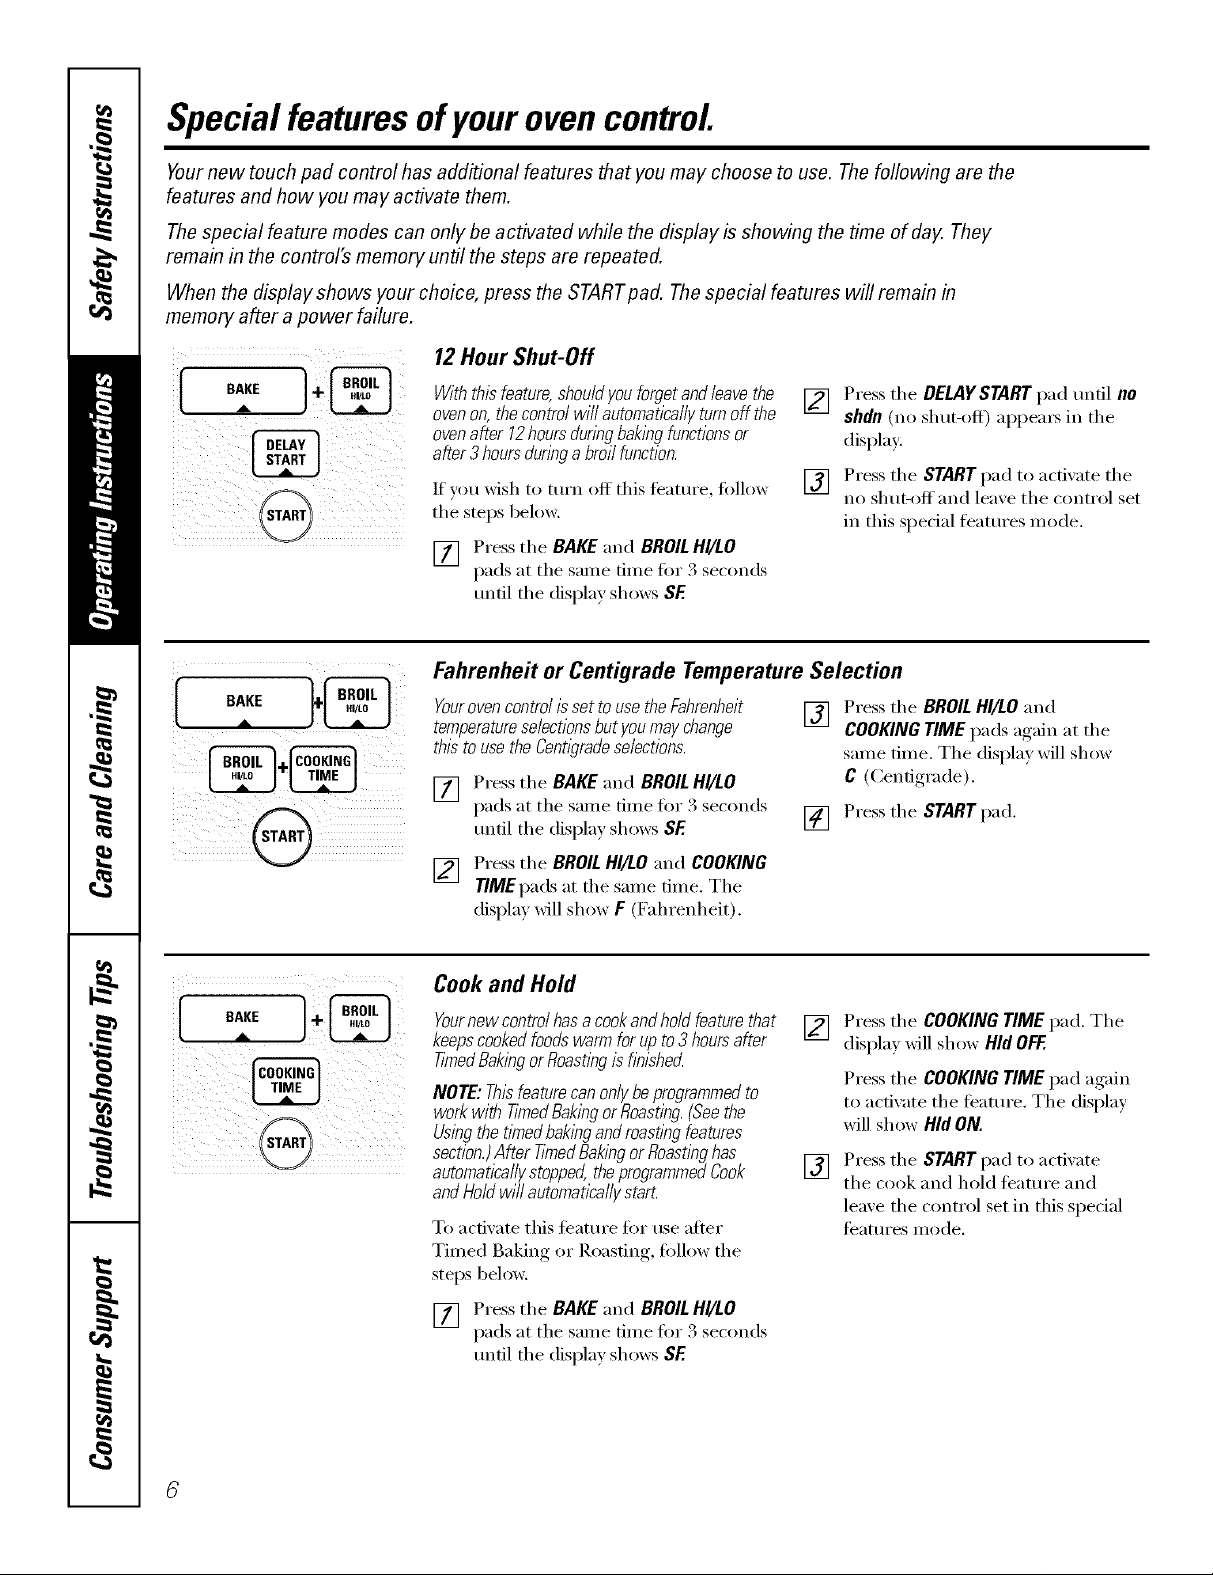
Special featuresofyourovencontrol.
Yournew touch pad control has additional features that you may choose to use. The following are the
features and how you may activate them.
The special feature modes can only be activated while the display is showing the time of day. They
remain in the control's memory until the steps are repeated.
When the display shows your choice, press the STARTpad. Thespecial features will remain in
memory after a power failure.
12 Hour Shut-Off
iI ,,,E.
_i i i _ i _ii ii
Withthisfeature,shou/dyouforgetand/eavethe
ovenon,thecontrolwillautomaticallyturnoffthe
ovenafter 12hoursduringbakingfunctionsor
after3 hoursdunnga broilfunction.
If you wish to mrn off this teature, tollow
the steps below.
[] Press the DELAYSTART pad until no
shdn (no shut-off) appeax_ in the
display:
[] Press the STARTpad to acfixate the
no shut-off and lea_e the control set
in this special features mode.
[] Press the BAKEand BROILHI/LO
pads at the sanle tiine fi:,r 3 seconds
until the display shows SE
Fahrenheit or Centigrade Temperature Selection
Youroven control isset to use the Fahrenheit []
temperatureselectionsbutyoumay change
this to usethe Centigradeselections.
[] Press the BAKE and BROIL HI/LO
pads at the same time for 3 seconds
until the display shows SE []
[] Press the BROIL HI/LO and COOKING
TIME pads at the same time. The
displa) will show F (Fahrenheit).
Press the BROILHI/LOand
COOKING TIME pads again at the
same time. The displa)will show
C (Centigrade).
Press the START pad.
Cook and Hold
Yournewcontrolhasa cookandholdfeaturethat
keepscookedfoodswarmforupto3 hoursafter
TinnedBakingorRoastIwis finished
NOTE:Thisfeaturecanonlybeprogrammedto
workwith TimedBakingorRoasting.(Seethe
Usingthetimedbakingandroastingfeatures
section.)After TimedBakingor Roastinghas
automaticallystopped,theprogrammedCook
andHoldwillautomaticallystart.
To activate this teatm'e fi)r use alter
Timed Baking or Roasting, fi_llow the
steps below,
[] Press the BAKE and BROILHI/LO
pads at the same time fin" 3 seconds
until the display shows SE
Press the COOKING TIME pad. The
[]
display _611show Hid OFF.
Press the COOKINGTIME pad again
to activate the fimture. The display
will show Hid ON.
Press the START pad to activate
[]
the cook and hold teatm'e and
leaxe the control set in this special
teatm'es mode.
,:'
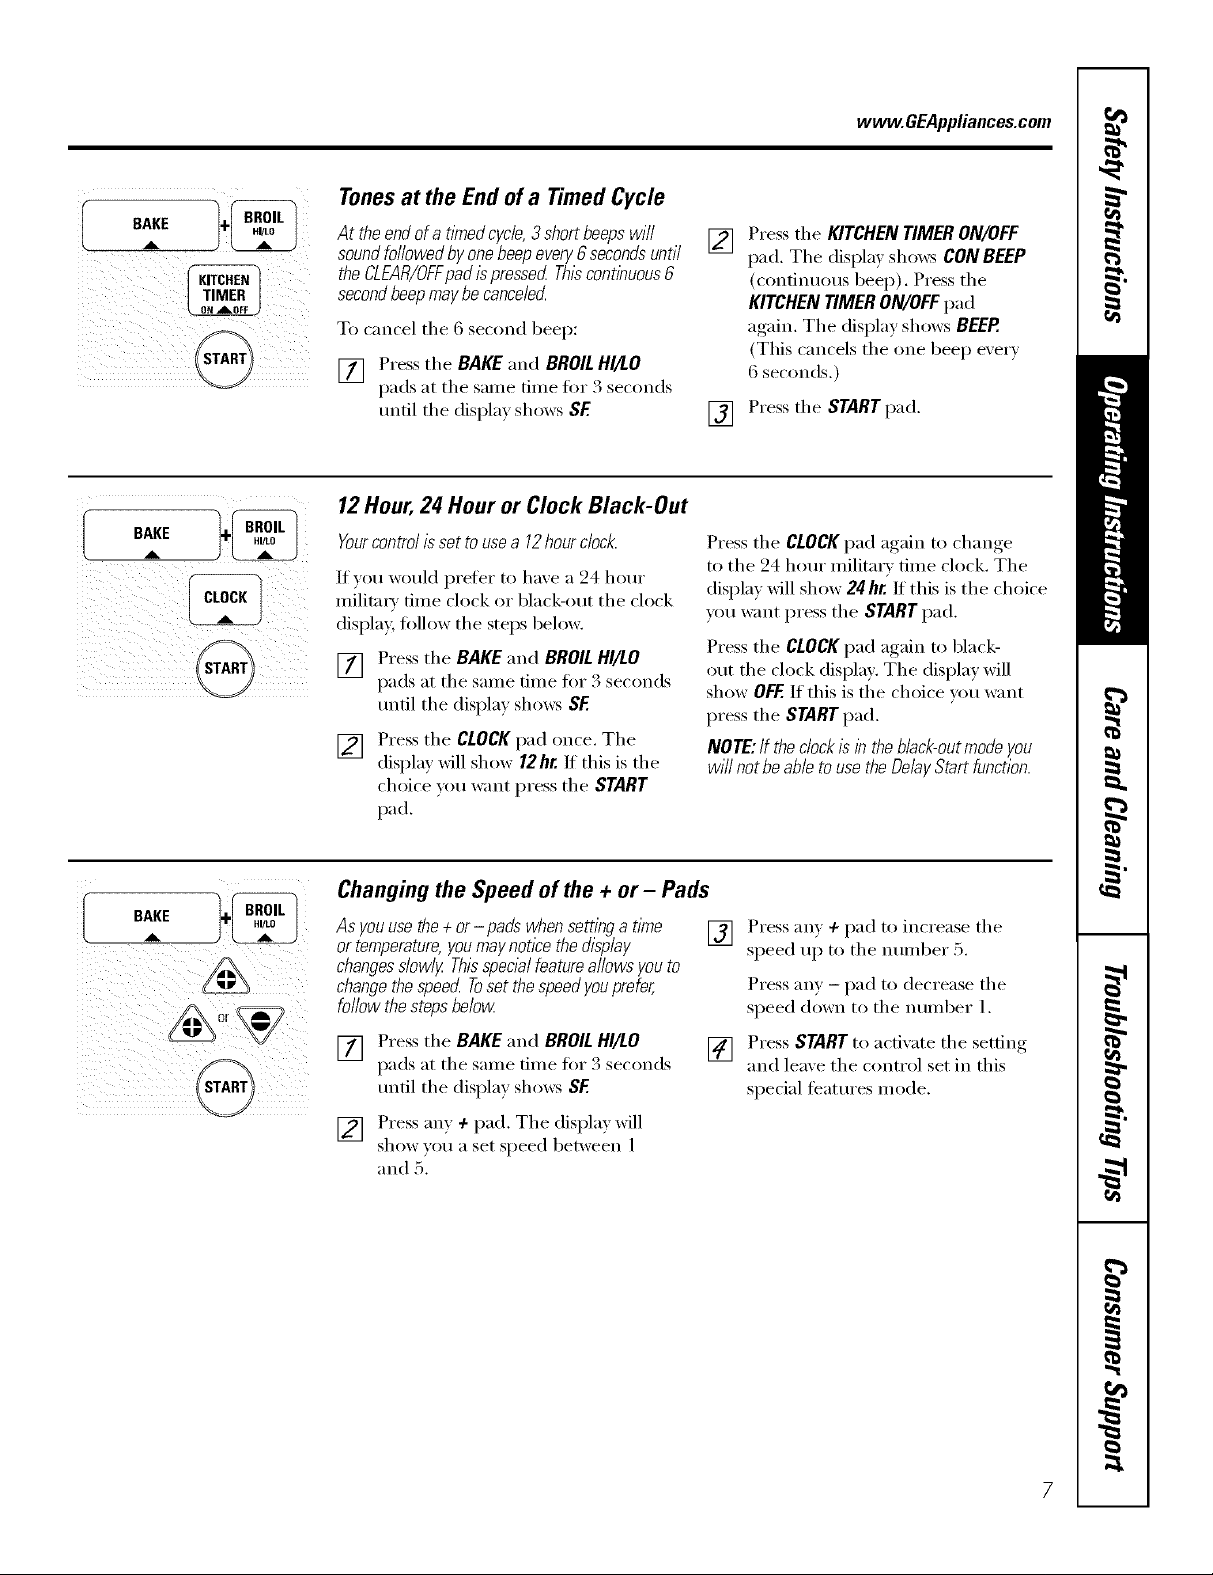
Tonesat the End of a Timed Cycle
At theendofa tknedcycle,3shortbeepswill
soundfollowedbyonebeepevery6secondsuntil
theCLEAR/OFFpadispressedThl}continuous6
secondbeepmaybecance/e_
To cancel the 6 second beep:
[] Press tile BAKE and BROILHI/LO
pads at tile sanle time fox 3 seconds
until the display shows SF
12Hour,24 Hour or Clock Black-Out
www.GEAppliances.com
Press the KITCHEN TIMER ON/OFF
[]
pad. The displa)shows CON BEEP
(continuous beep). Press the
KITCHEN TIMER ON/OFF pad
again. The display shows BEEP.
(This cancels the one beep every
() seconds.)
Press the START pad.
[]
Yourcontrol is set to usea 12hourclock.
If )ou would prefer to have a 24 horn"
militm_ time clock or black-out the clock
display, fi)llow the steps below.
[] Press the BAKE and BROIL HI/LO
pads at the same time fox 3 seconds
tmtil the displa_ shows SF
Press tile CLOCKpad once. Tile
[]
display x_ll show 12hr. If this is tile
choice xou want press tile START
pad.
Changing the Speed of the + or- Pads
Asyouusethe+or-pads whensettingatime
ortemperature,youmaynoticethedisplay
changesslowlyThisspecialfeatureallowsyouto
changethespeedTosetthespeedyouprefer,
followthestepsbelow
[] Press tile BAKE and BROILHI/LO []
pads at tile sanle time fin" 3 seconds
until tile display shows SF.
Press tile CLOCKpad again to change
to tile 24 hour militax T time clock. Tile
display will show 24 hr./t this is the choice
you want press tile STARTpad.
Press tile CLOCKpad again to black-
out the clock display. The display will
show OFF.If this is the choice um want
press the START pad.
NOTE:If the clockIsinthe black-outmode you
wi// not beable tousetheDelayStart function.
Press an) + pad to increase the
[]
speed up to tile nmnber 5.
Press am - pad to decrease the
speed down to the nunlber l.
Press START to activate the setfim,
and leaxe the control set in this
special teatm'es mode.
[] Press any + pad. Tile display will
show you a set speed between l
and 5.

Usingthe SabbathFeature.
(Designed for use on the Jewish Sabbath and Holidays.)
The Sabbath feature can be used for baking/roasting only. It cannot be used for broiling or Delay Start cooking.
NOTE."The oven light comes on automatically (on some models) when the door is opened and goes off when the
door is closed. Thebulb maybe removed. See the Oven Light Replacement section. Onmodels with alight switch on
the control panel, the oven light may be turned on andleft on.
How to Set for Regular Baking/Roasting
I
TEMP
When the display shows D the
oven is set h7 Sabbath. When the
display shows D C the oven is
baiting/roasting.
NOTE: Tounderstandhow the ovencontrol works,
practice using regular baking(non-Sabbath)before
entedng Sabbath mode.
Make sure the clock shows the correct time
of day andthe oven isoff
] Press and hold both tilt BAKE and BROIL
HI/LO pads, at the same time, until die
display S] _()_%rs SE
r2] Tall the DELAYSTART pad umil
SAb bAtH alltlears in the disphty.
] Press die START tlad and D _ri_ _]_
in the display.
] Press the BAKE pad. No signal will
be _i_en.
] The ])reset startJl/g leilll)eral/lre "will
autolnatit ally 1)e set to _:{5()'_.[:at/
llle TEMP+()r-t)ads to increase or
decrease tlie mmlleramre in 5 °
increments. (TheTEMP+or-pad
shouM be tat)tied fi)r each temtlerature
change; t)ressing and hoMing these t)ads
,,*,'illnot allow accurate |eIlll)eI'_lt/tre
setting.) The temperature can be
set between 17tP and 550 '_.No sig_lal
or temperature will be gdven.
Pre._s tile START t)ad.
[]
1_ Afler a nmdon/dela} period ot
al)llroximately 30 set Drifts to 1minute,
D C will apllear ill tlle disl)lay indi( ating
thai ll/e oven is baking!roasting. If D C
does not allt)ear in tile distlla }, start
ag_fin at step 4.
To at{iust tile ()\ell temperature, t)ress tile
BAKEt)ad and tall tile TEMP + or -pads to
ill( revise or dt't rt'ast' tilt' tel//l)eF_lttlre ill _o
ina:ements. (The TEMP+ or- pad shouM be
tapped tor each tenlllemmre change; pressing
and hoMing these pads will not allow accurate
teml)eramre setting.) Press the STARTpad.
NOTE: The CLEAR/OFFand COOKING TIME l)ads
are at ti*,_'dm:iHg tilt' Sabl)ath/;i'aml'e.
BAKE 1+_
HOUR MIN
TEMP
START
When the display shows D the
oven is set f17Sabbath. When the
display shows D C the oven is
baiting/roasting.
8
How to Set for Timed Baking/Roasting-Immediate Start and Automatic Stop
NOTE: Tounderstand how the oven control works,
practice using regular(non-Sabbath) ImmediateStart
andAutomatic Stop before entering theSabbath mode.
Make surethe clockshows the correct time
of day and theovenis off
)
] t ress and hoM both the BAKE and BROIL
HI/LO tlads, at the same time,/lntJl the
disl)la } shows SE
I_ T'tl) the DELAYSgARrllad mltil SAb bAtH
alltlears in the disphty.
] Press the START pad and D *,*,rillaptlear
in the dist)hty.
[] Press the COOKING TIME pad.
Press the HOUR and MIN + or - tlads t(_
] sei the desired length of looking time
between 1 mimm • and 9 hours and 59
mimlms. The looking time d/at you
entel'ed ,.*,rill1)e disl)layed.
Press the START pad.
[]
Press the BAKEtlad. No siglml will
[]
be gJ'_ el/.
The preset starting It mtlemmre vdll
[]
auton/aticalh' 1)e set to 350 °. Ta l) die
TEMP + or -t)ads to increase or decrease
tl/e temtlemmre in 5 ° ino:ements. (The
TEMP+ or - pad shouM be tapped/or
each temtleramre change; llressing and
hoMing these pads will n()i allow
atturate teml)eramre setting.) The
temperature call be set 1)etw_ en 170 °
and 550 °. No signal or teml)emture
will be gJven.
Press tile START t)ad.
[]
[_ ,\tier a random delay tleriod (7t
alll)roxinlately 30 se(onds to 1 minute,
D C will apt)ear in the dist)lay intlitaung
tl/at the oven is baking!roasting.
lID = does not appear in tile distllay.
start again at step 7.
"Ib adjust tile oven temperature, tlress tile
BAKEllad and ta t) tile TEMP + or- t)ads to
iHcrease or (tecrease tile teIIll)eraHIFe ill ,"f_
increments. (The TEMP+ or - t)ad should be
mllt/ed/or each temt/eraulre change; pressing
and hoMing dlese pads will not allow act umte
temperature setung.) Press tile STARTllad.
When cooking is finished, tile disl/lay will
(ha]lye if'ore D = to D and O:OOwill al)l)em;
indicating thai the ()\ell has mined OFFbm is
still set iH Sabbath. Remove tile cooked ti)o(t.
 Loading...