

Page 1
oe.com
Safety Instructions .......... 9-9
°,..q
Operating Instruc_tions
Microwave Control Panel .... 10, 11
Microwave Oven Controls ..... 10-91
I,ower Oven Control Panel .... 99, 93
Lower Oven Controls ........ 99-39
Lower Oven Thermostat ........ 30
Self-Cleaning Lower Oven .... 31,39
Sensor Controls ............ 16, 17
Care and Cleaning
Broiler Pan and Grid ........... 36
Door . ...................... 34
Light Bulb ...................... 35
Microwax e Oxen .............. 33
Shehes ...................... 36
Troubleshooting Tips ...... 37-39
Consumer Support
Consumer Support ..... Back Coxer
Product Registration ........ 41-49
X4'arrantv .................... 43
JKP86"27" Double Wall Oven
6 6"
fl'PS _-37 Double Wall ChJen
The microwave oven in this
cooking center is I000 watts.
©
©
Write the model and serial
numbers here:
Model #
Serial #
You can find them on a label inside
the upper oven on the lett side.
49-80335 11-05JR
Page 2
IMPORTANTSAFETYINFORMATION.
READALLINSTRUCTIONSBEFOREUSING.
WARNING!
For your safety;,the information in this manual must be followed to minimize the risk of fire or
explosion, electric shock, or to prevent property damage, personal injury, or loss of life.
PRECAUtiONSTOAVOIDPOSSIBLEEXPOSURETOEXCESSIVE
MICROWAVEENERGY
;_;Do not attempt to operate fills oxen with
the door open since open-door operation
can result in hal_nflfl exposure to
microwaxe energ?'. It is important not to
defeat or tamper with the safetyinterlocks.
;5;Do not place any object between the oxen
flont face and the door or allow soil or
cleaner residue to accumulate on sealing
SUrlCaces.
q_{_;The oxen should not be adjusted or
repaired by anyone except properly
qualified service personnel.
;_; Do not operam fl_e oven if it is damaged.
It is particularly important that file oxen
door close properly and flint there is no
damag_ to the:
[] door (bent),
[] hing>s and latches (broken or
loosened),
[] door seals and sealing surPaces.
IMPORTANTSAFETYNOtiCE
The California Safe Drinking Water and ToxicEnforcement Act requires the Governor of California to
publish a list of substances known to the state to cause cancer, birth defects or other reproductive
harm, and requires businesses to warn customers of potential exposure to such substances.
The fiberglass insulation in self-clean ovens gives off a very small amount of carbon monoxide during
the cleaning cycle. Exposure can be minimized by venting with an open window or using a ventilation
fan or hood.
2
Page 3
ge.com
SAFETYPRECAUTIONS
When using electrical appfiances, basic safety precautions should be followed, including the following:
WARNING Groundinglnstructions:
This appliance must be connected to a
grounded, metallic, permanent wiring
system, or an equipment grounding
conductor should be run wifl_ the
circuit conductors and connected
to fire equipment grounding
terminal or lead on the appliance.
WARNING Toreduce the risk of burns,
electric shock, fire, injuryto personsor
exposure to excessive microwave energy:
_;i:,:Use dtis appliance only for its intended
use as descril)ed in this manual. Do not
use CO1TOSiVechemicals or vapors in
this appliance. This cooking cenmr is
specifically designed to heat or cook
food, and is not inmnded for laborato W
or industrial use.
_i:.:Be sure your appliance is properly
installed and grounded by a qualified
mchnician in accordance with the
provided Installation Instructions.
_t{:_Haxe the installer show you tlte location of
the circuit 1)reaker or fltse. Mark it for easy
reference.
;_;This appliance should be serviced only
1)yqualified service personnel. Contact
nearest authorized service thcilitv for
examination, repair or adjustment. Do not
repair or tei)lace any part of this appliance
unless specifically recommended in this
manual. All other servicing should be
referred to a qualified mchnician.
_7_::Do not store this appliance outdoors.
Do not use fltis product near water for
example, in a wet basement, or near a
swimming pool.
_:_Befbte perfot_ning any setMce, disconnect
tim cooking center power supply at rite
household distribution panel by removing
the fltse or switching off the citvuit
b_eaker
;_;Do not operate this appliance flit has a
damaged cord or ping, if it is not working
properly, or if it has been damaged or
dropped.
_; Do not leme children alone---children
should not be left alone or unatmnded in
an area where appliance is in use. They
should nex>r be allowed to sit or stand on
any part of the appliance.
;f; Be sure d_e cooking center is securely
installed in a cabinet fltat is firmly attached
to rite house suucun_e. _A:eight on rite ox>n
door could cause the ox>n to tip and
result in injm T. Never allow anyone m
climl), sit or hang on rite ox>n door
;_i:.:Don't allow anyone m climl), stand or
hang on the door They could damage
the cooking cenmr and cause sex,re
personal inju_>
2
Page 4
IMPORTANTSAFETYINFORMATION.
READALLINSTRUCTIONSBEFOREUSING.
WARNING!
SAFETYPRECAUTIONS
Do not use water on grease fires. Never pick up a flaming pan. Smother flaming pan by covering
pan completely with weft-fitting lid, cookie sheet or flat tray. Flaming grease outside a pan can be
put out by covering with baking soda or,if available, a multi-purpose dry chemical or foam-type
fire extinguisher.
CAUTION: ,en sofinterestto
children should not be stored in cabinets
above an oven; children climhing on the
oxen to reach imms could be seriously
i,ljured.
;_?:':Teach children not m pl W with the
controls or any other part of the
cooking cenmr
_{;;im_g> scratches or impacts to glass door
can lead m hroken or shattered glass.
_fi:,:VVear proper clothing. I,oose-fitfing or
hanging garments should nexer be worn
while using file appliance. Nammable
mamfial could he ignimd if hrought in
contact with hot heating elements and
may cause sex>re hums.
;f; Use only &Y pot holders--moist or damp
pot holders on hot sur_aces may result in
l)uYrls froi_l steam. Do not let pot holders
much hot heating elements. Do not use a
towel or other bulky cloth. Such cloths can
catch fire on a hot element.
_i:,:Always kee I) dish towels, dishcloths, pot
holders and other linens a safe distance
fl"on/ VO/lI" oven.
i
_i:,:Always kee I) wooden spoons and plastic
utensils and canned tbod a safe distance
away floil/VO/li oxen.
_t::;Always kee I) comhustihle wall coxefings,
curtains or drapes a safe distance flom
VO/lI" oxen.
_i:,:Do not store flammahle mamrial in an
oxen oi near the cooking cenmr
_{;:Do not cover or hlock any opening:s
on the appliance.
_i:,:For your safe_', nex>r use your appliance
for wanning or heating the room.
_i:,:Do not leaxe paper products, cooking
umnsils or food in the ox>n when not
in use.
Do not store o1 use comhusfihle mamfials,
gv_soline or other flammable vapors and
liquids in the vicinity of this or any other
appliance.
Do not let cooking grease or other
flammable mamfials accunmlam in oi
near the cooking cenmr
Do not touch heating elements oi inmdor
surface of the oxen. These surfaces m W be
hot enougt/to burn even though they are
dark in colon During and after use, do not
much, or let clothing or other flammable
mamfials contact any inmfior area of the
ox>n; allow sufficient time fbr cooling first.
Potentially hot surlnaces include oven \>nt
openings, smPaces near the openings, and
crevices around file ox>n door
REMEMBER: The inside surPace of the
oxen may he hot when the door is opened.
COOKMEATANDPOULTRYTHOROUGHLY...
Cookmeat andpoultry thoroughly--meat toat least an INTERNALtemperatureof 160°Fandpoultry
toat least an INTERNALtemperatureof 180°ECookingto thesetemperaturesusuallyprotectsagainst
foodbome#bess.
4
Page 5

MICROWAVEOVEN
Read and follow the specific "Precautions to Avoid Possible Exposure to Excessive Microwave
Energy" section in this manual
ge.com
Toreduce the risk of fire in the ovencavity:
_i:,:Do not ox_rcook food. Carefully attend
appliance if paper, plastic or other
combnstible materials are placed inside
tile oxen to fi_cilitam cooking.
E:,:Remo_e wire twist-ties flom paper or
plastic containers before placing bags
ix] o\>n.
E:,:Do not use your microwave oven to d_T
newsI)apers.
_ti;:Do not pop popcorn in your microwm>
oven unless in a special microwave
popcorn accessot T or unless you use
popcorn labeled for use in microwave
o\_ns.
_;:Do not oxercook potatoes. They could
dehydiam and catch fire, causing damag>
to your ox>n.
_{;;Do not operate rite oven while empty to
axoid damage to fire oven and fl_e danger
of fire. If by accident the oxen should run
empty a minum or two, no harm is done.
Howex_t, u T to avoid operating tire oxen
empty at any time----it saxes energy' arrd
prolongs the life of rite oxen.
E:,:Do not use rite oven for smrag_ puq)oses.
Do not lem> paper products, cooking
umnsils or food in the oven when not
in rise.
_;_If mamrials inside the oxen should ig_rim,
kee I) oven door closed, turn ox>n off,
arrd shut off power at fire fltse or citvuit
breaker panel. If the door is opened, the
fire may spread.
E:,:This microwme ox>n is not approx>d or
msmd for marine use.
_{;_Some products such as whole eggs arrd
sealed containers for example, closed
jat_--will explode arrd should not be
heated in this microwax_ oxen. Such use
of fire microwaxe oven could result in
injury.
_t{;_Do not operate tire microwme oxen
wiflrout rite rotatable and support in
place.
q_{_Avoid heating baby food in glass jars, ex>n
wifl] fire lid off'. Make sure all infant food
is fltoroughly cooked. Stir food to
distribute, the heat evenly. Be carefitl to
prex_nt scalding when warming formula
or b_east milk. Tire corrminer may feel
cooler than rite milk really is. Alwws rest
the milk before feeding tire baby.
E:,:Do not boil eggs ira a microwave oven.
Ptessme will build up irrside the egg
yolk arrd will cause it m burst, possibly
resulting in irljn U.
_;;Foods wiflt unbroken outer "skin" such
as potatoes, sausages, tomatoes, apples,
egg yolks, chicken lixers arrd other giblets
should be pierced m allow smam m escape
during cooking.
;_i:':Don't defrost flozen bex>rages in nanow-
necked bottles (especially carbonamd
beverages). Ex_n if tire container is
opened, pressure can build up. This can
cause the container to bnrst, possibly
resnlfing in inju U.
;_i:,:Hot foods and steam can cause bums.
Be carefltl when opening arw corrtainers
of hot food, including popcorn bags,
cooking pouches arrd boxes. To prevent
possible injury, direct smam away from
hands arrd Lace.
_;:As with arEv appliance, close supervision is
necessat T when used by children.
5
Page 6
IMPORTANTSAFETYINFORMATION.
READALLINSTRUCTIONSBEFOREUSING.
WARNING!
MICROWAVE-SAFECOOKWARE
Make sure aft cookware used in your microwave oven is suitable for microwaving. Most glass
casseroles, cooking dishes, measuring cups, custard cups, pottery or china dinnerware which does
not have metallic trim or glaze with a metallic sheen can be used. Some cookware is labeled
"suitable for microwaving."
ffyou are not sure if a dish is microwave-
safe, use fills test: Place in fire oven both
tile dish you are testing and a glass
measndng cup filled Mth 1 cup of water_
set file meastMng cup eitimr ira or next to
the dish. Microwave 35-45 seconds at high.
If tire dish heats, it should not lye used
for microwaving.
If tile dish remains cool and only tire
wamr in tile cup heats, tilen file dish is
nticrowa,.e-safe.
If you use a meat themrometer while
cooking, make sure it is safe for use in
microwa, e ox ens.
!:L!':Do not use recycled paper products.
ReQ'cled paper towels, napkins arm waxed
paper can contain metal flecks which m W
cause airing or ignite. Paper products
containing nylon or nylon filaments
should lye a,_ided, since they may also
ignite.
;_?:.:Some Stvrofoam trws (like tiiose that meat
is packaged on) ha,.e a fllin strip of metal
embedded in tire bottom. When
microwa,.ed, tire metal can bum tile floor
of tile o,.en or ignite a paper towel.
_7_::Not all plastic wrap is suitable for use in
microwa,.e o,.ens. Check the packag.e for
proper use.
_7_::Paper towels, waxed paper arm plastic
wrap can lye used m co,.er dishes in order
to retain moisture and prevent spattering.
Be Stli.e tO \.ent plastic wrap so steam
can escape.
;f?:.:()\`ei.'sized food or oversized metal
cookware should not lye used in a
microwave oven. Electrical shock or
fire could occtm
;_?:':_]lile paper plates may lye used %r timed
cooking arm defrosting, do trot use tirem
with Auto Sensor cooking. Use microwa,.e-
safe plains or bowls for i.eheadng. Cox.er
with plastic wrap.
;_?:':Cookware m W become hot because
of heat uanstbri.ed from tire heated
food. Pot holders may lye needed m
handle tile cookware.
"Boilable" cooking pouches and tightly
closed plasdc bags should be slit, pierced
or ,.ented as diI.ected by package. If they
are not, plasdc could burst during or
immediately after cooking, possibly
resulting in inju U. Also, plastic storag.e
containers should be at least partially
uncox`ei.ed because they form a tight seal.
When cooking with corrminers dghtly
co,.ered with plastic wrap, remox.e
covering careflflly arm direct steam
away flom hands arm lace.
Use tbil only as direcmd in this manual.
TV dinners may lye microwa,.ed in foil
trays less than 3/4" high; remo,.e tire top
foil cover and return tire tr W to tile box.
_4]ren using foil in tile microwm.e o,.en,
keep the tbil at least 1 irrch away' from tile
sides of the oven.
Page 7
ge.com
_fi:,:Plastic cookware - Plastic cookware
designed for microwaxe cooking is xerv
useflll, but should be used caIeflllly.
Exert microwaxe-satb plastic may not
be as tolerant of overcooking conditions
as are glass or ceramic materials and
may soften or char if subjected to short
periods of overcooking. In longer
exposures to overcooking, tile food
and cookware could ignite.
Follow these guidelines:
[] Use microwaxe-safe plastics only and
use them in suict compliance with
the cookware manut_acturer's
recommendations.
[] Do not microwme empty containers.
[] Do not permit children to use
plastic cookware without complete
super\ ision.
ARCING
If you see arcing press the CLEAR/OFFpad and correct the problem.
Arcing is themicrowave term forsparks in the
oven.Arcingiscaused by:
_:_Metal or foil touching the side of tile oven.
;f; Foil not molded to food (upturned edges
act like anmnnas).
q_{_Metal, such as twist-ties, poultIy' pins or
g_ld-rimmed dishes, in the microwaxe.
_{;_Recycled paper towels containing small
metal pieces being used in tile microwme.
SUPERHEATEDWATER
Microwaved water and other liquids do not always bubble when they reach the boiling point.
They can actuafly get superheated and not bubble at all
Superheated liquid will bubble up out of the
cup when it is moved or when something
like a spoon or ma bag is put into it.
To prevent this flom happening and causing
injury, do not heat ally liquid fLn"more than
2 minutes per cup.
After heating, let the cup stand ill the
microwave for 30 seconds before moving it
or putting anything into it.
Spontaneousboiling
Under certain special circumstances, liquids
may start to boil during or shortly after removal
from the microwave oven.
To prexent burns fiom splashing liquid, we
recommend tile fbllowing befbre remoxqng
the container fiom the oven:
q_{_:Allow tile container to stand in tile oven
for 30 to 40 seconds after tile oxen has
shut of£
;_?:':Do not boil liquids in narrow-necked
containers such as soft dlJnk bottles, wine
flasks and especially naixow-necked coffbe
cups. Exen if tile container is opened,
excessive smam can build up and cause it
to burst or o\_rfloxxc
Page 8
IMPORTANTSAFETYINFORMATION.
READALLINSTRUCTIONSBEFOREUSING.
ALLTHESETHINGSARENORMALWITHYOURMICROWAVE
Steam or xapor escaping from around
tile door
iJght reflection around tile door or tile
otlteF case.
Dimming of file oxen ligtlt and change
ira the blower sound may occtli while
operating at power lex_ls other than higil.
Tile microwm_ fan m W operam with both
ovens off. It is cooling file control and will
turn itself off.
_f?:':Some TV-radio inmrference might be
noticed while using youi microwa_> oven.
It's similar to the inmrference caused by
other small app]iances and does not
indicate a problem _Jth your oxen.
_; A dull thumping sound while tile oxen
is operating.
MICROWAVETERMSANDDEFINITIONS
Arcing
ArcingIsthemicrowavetermforsparksin theoven.
Arcingiscausedby.
!i>metal or foil touchingthe side of theoven.
!i>foil that isnot molded tofood(upturnededgesact
like antennas).
iJi::metalsuchastwist-ties,poultrypins,gold-rimmed
dishes.
iJi::recycledpaper towels containing smallmetal pieces.
Covering
Coversholdinmoisture,allowformoreevenheatingand
reducecookingt#ne.Ventingp/astiewraporcoveringwith
waxpaperallowsexcesssteamtoescape.
Shielding
Ina regularoven,youshieldchickenbreastsorbaked
foodstopreventoverbrowning.Whenmicrowawbgyou
usesmaflstripsof foiltoshieldthinparts,suchasthetips
ofwiegsandlegsonpoultn/whichwouldcookbefore
largerparts.
StandingTime
Whenyoucookwithregularovens,foodssuchasroasts
orcakesareallowedtostandtofinishcookingorto
se_Standingt#neisespecially#nportantinmicrowave
cooking.Notethatamicrowavedcakeisnotplacedon
acoolingrack.
Venting
Aftercoveringa dishwithplasticwrap,youventthe
plasticwrapbyturningbackonecornersoexcesssteam
can escape.
8
Page 9
ge.com
WARNING!
SELF-CLEANINGLOWEROVEN
t
Donot use aluminum foil to line oven bottoms, except as suggested in this manual. Improper
installation of aluminum foil may result in a risk of electric shock or fire.
E:,:Stand away flora file oven when opening
the oven door Hot air or smam which
escapes can cause bums to hands, fi_ce
and/or eyes.
_?{::Do not heat unopened food containers.
Pressure could build up and the container
could burst, causing an injm>
N Kee I) the ox.en x.ent unobstructed.
_{_Kee I) the ox.en free fiom gTease buildup.
_?{::Kee I) tile cooking cenmr clean and flee
of accmnulafions of grease or spillox.ers,
which m W ignite.
_?_::Nex.er leax.e tile oven door open when you
axe not watching dte cooking cenmr.
E:,:Place file ox.en shelf in the desired
position while the oven is cool. If shelx.es
nmst be handled when hot, do not let pot
holder contact the heating elements.
_?i::When using cooking or roasting bags
in the oxen, follow the mamflhcmrer's
dfl.ecfions.
_?{_:Pulling out tile shelf to tile stopqock is a
com.enience in lifting hem?' foods, It is
also a precaution against burns flom
touching hot sm£tces of file door or
ox.en walls.
E:,:Do not use the oxen for a storage area.
hems stored in an oxen carl ignite.
q?{_:Do not leme paper products, cooking
utensils or food in the oxen when not
in rise,
Do not use tile oven to drT newspapers.
If oxerheated, they carl catch on fire.
Nexer lemejars or cans of Pat diJppings
ill OF near VOlli oven.
Clean only parts listed in this Owner's
Manual.
Do not clean the door gasket. The door
gasket is essential for a good seal. Care
should be token not to rub, damag.e or
move the gasket.
E:,:Do not use ox.en cleaners. No commercial
ox.en cleaner or oven liner promctive
coating of any kind should be used in or
around any part of tile ox.en. Residue flom
ox.en cleaners will damag.e tile inside of
the ox.en when the self-clean cycle is used.
_?_:Before self-leaning tile ox.en, remove
the probe, broiler pan, grid and other
cookware.
_?_:Be sure to wipe up excess spillag.e betbre
smrdng a selt_leaning Q'cle.
E:,:If tile self-cleaning mode malflmcfions,
mm tile ox.en off and disconnect the
power supply. Hax.e it serviced by a
qualified mchnician.
E:,:Lismn for a fim--a thn noise should be
heard sometime during rite cleaning
cycle. If not, call for setMce before
selt)leaning ag:tin.
i
_?_:Alter broiling, always rake the broiler
pan out of the ox.en and clean it. leftover
gt.ease in the broiler pan carl catch rit.e
next Ume you use rite ox.en.
READANDFOLLOWTHISSAFETYINFORMATIONCAREFULLY.
SAVETHESEINSTRUCTIONS
9
Page 10
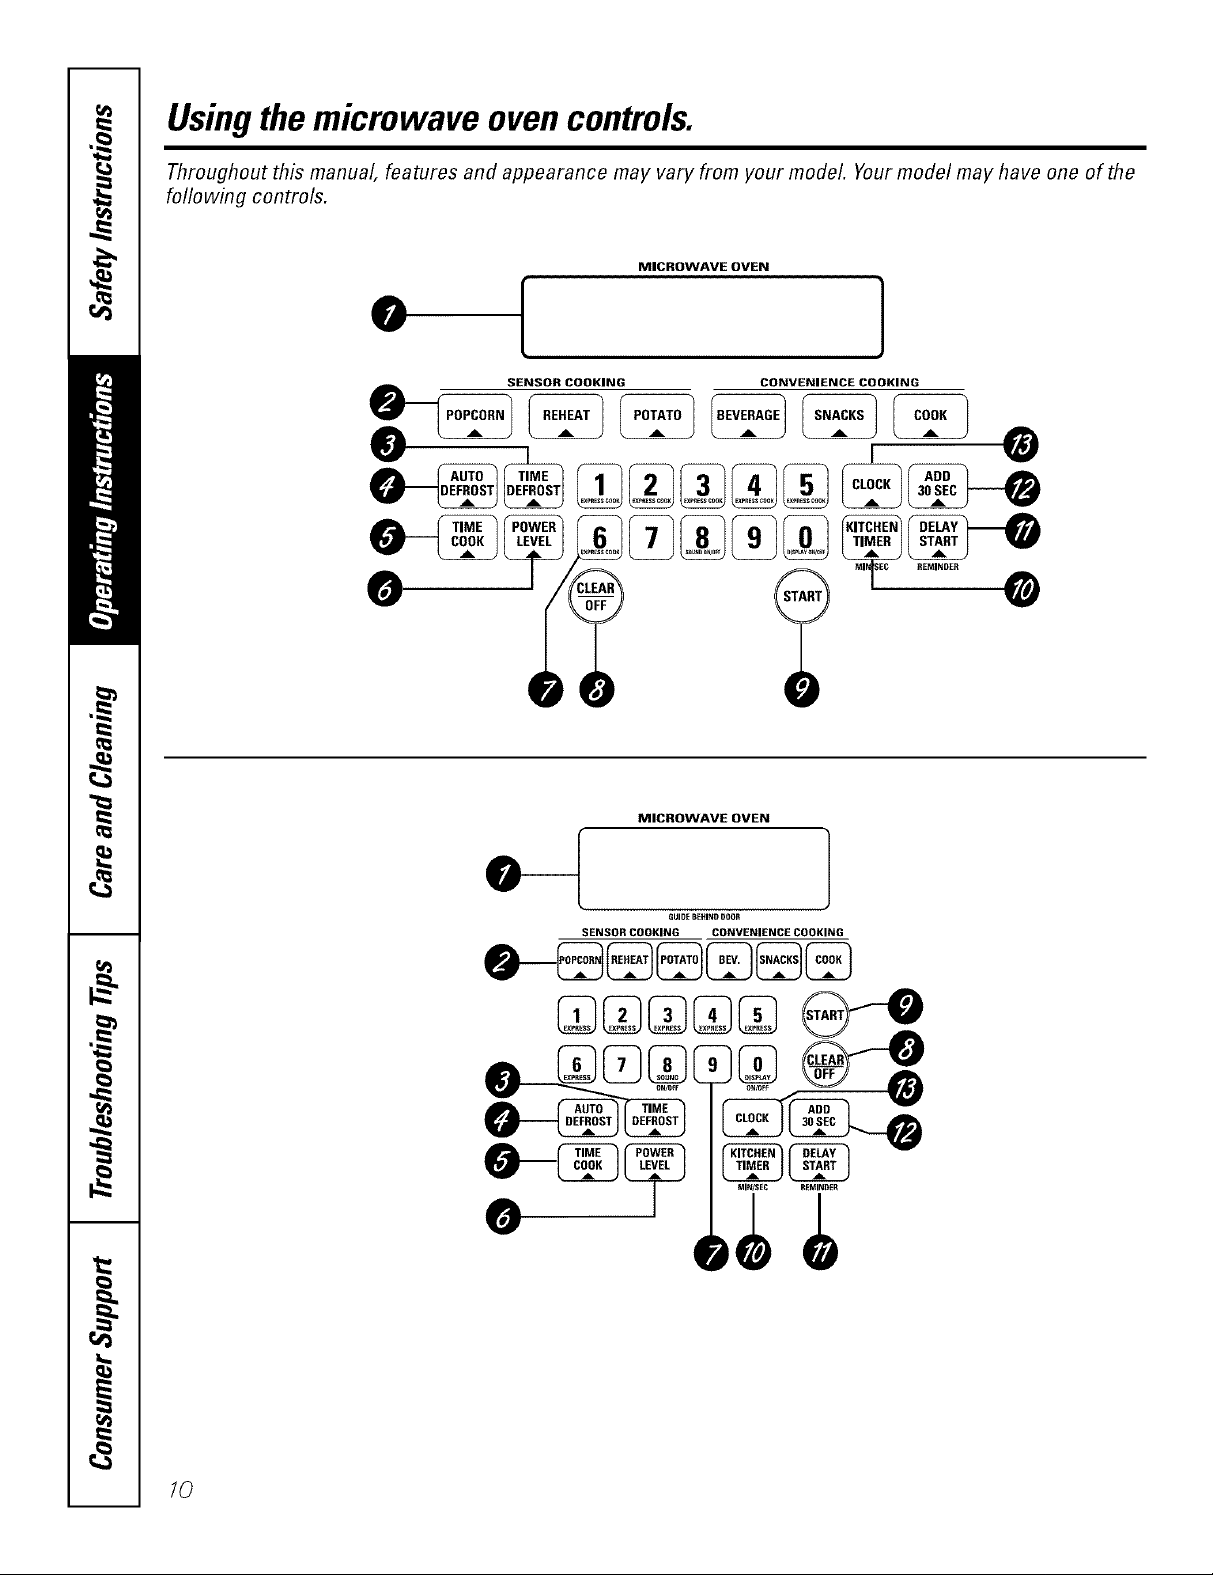
Usingthe microwave ovencontrols.
Throughout this manual, features and appearance may vary from your model. Your model may have one of the
following controls.
MICROWAVE OVEN
0
[
SENSOR COOKING CONVENIENCE COOKING
]
0 0
MICROWAVE OVEN
/
SENSOR COOKING CONVENIENCE COOKING
GUI[_EBEXlNDDOOR
lO
Page 11
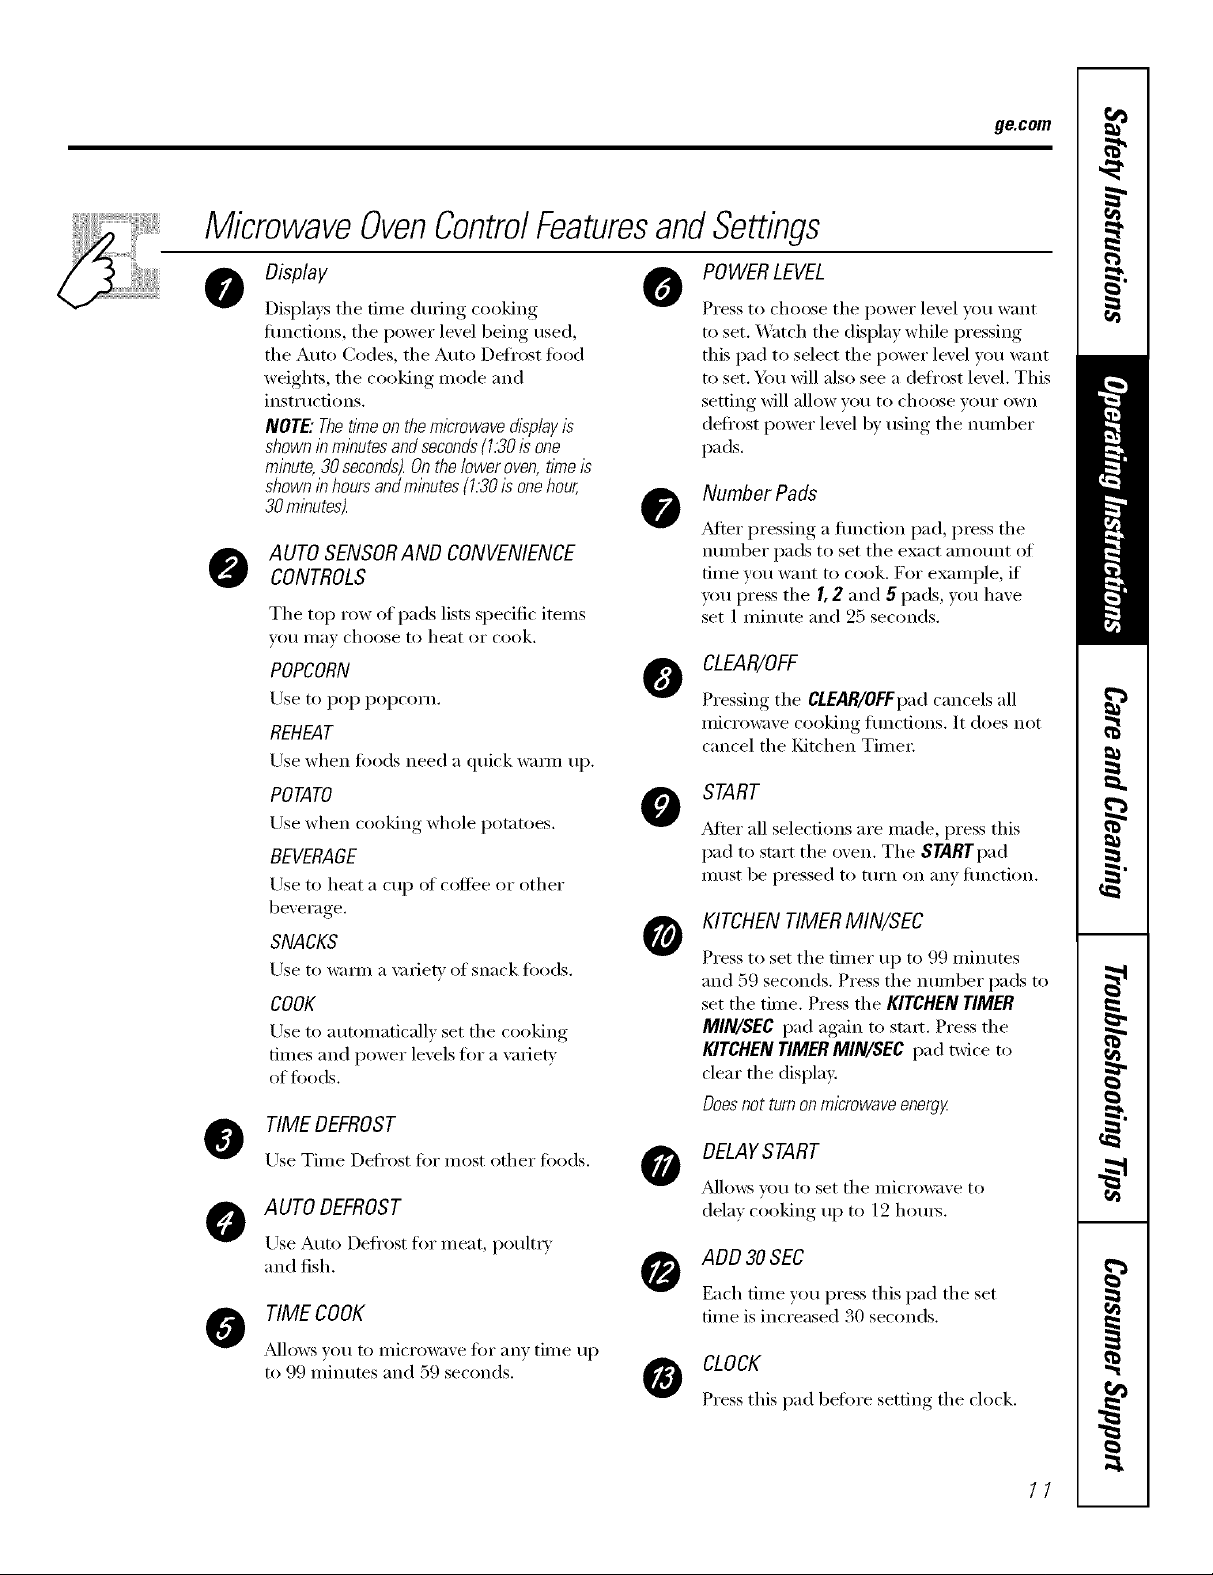
MicrowaveOvenControlFeaturesandSettings
Display 0 POWERLEVEL
Displms, tile dine during cookino
flmctions, the power level being used,
tile Auto Codes, tile Auto Defrost t0od
weights, the cooking mode and
instructions.
NOTE: Thetime on themicrowave display is
shown in minutes andseconds(1.30is one
minute, 30 seconds).Ontheloweroven, time/s
shown in hours andminutes (1.30is onehour,
30 mlbutes).
AUTO SENSORANO CONVENIENCE
@
CONTROLS
Tile top row of pads lists specific items
veil Ill,IV choose to heat or cook.
POPCORN
Use to pop popcorn.
REHEAT
Use when foods need a quick warn/ up.
POTATO
Use when cooking whole potatoes.
BEVERAGE
Use to heat a cup of coffee or other
beverage.
SNACKS
Lrse to wam_ a ;mJetv of snack foods.
COOK
Use to automatically set tile cooking
times and power levels fin" a wuietv
of loads.
TIME DEFROST
Use Time Defl'ost for most other loads.
AUTO DEFROST
Use Auto Defl'ost for meat poulti5
and fish.
TIME COOK
J_dloxvs _o/I to II/i(TO]V_l_,e 1[0I" _IIIV time I1 I)
to 99 minutes and 59 seconds.
@
O
Press to choose tile power level you want
to set. Watch the display while pressing
this pad to select tile power level you want
to set. _m will also see a deti'ost level. This
setting will allow w)u to choose wmr own
deli'ost power level by using tile number
pads.
Number Pads
_Mter pressing a flmction pad, press tile
ntllllbeF pads to set tile exact aI//Otlnt of
time you want to cook. For example, if
p_/l press tile I, 2 and 5 pads, you have
set 1 minute and 25 seconds.
CLEAR/OFF
O
Pressino.._ tile CLEAR/OFFpad cancels all
i/lici'owa_,e cooking ti/nctions. ]t does not
cancel the Kitchen Time_:
START
_dtei" all selections are made, press this
pad to start tile oxen. Tile STARTpad
IIltlSt be pressed to ttlI'n on _lllV lilnction.
KITCHENTIMER MIN/SEC
@
Press to set tile timer up to 99 minutes
and 59 seconds. Press tile nulnber pads to
set tile time. Press tile KITCHEN TIMER
MIN/SEC pad again to st;ut. Press tile
KITCHEN TIMER MIN/SEC pad twice to
clear tile display.
Does not turnon microwaveenergy
DELAYSTART
_d]ows yot/ to set tile ii/ici'owa_,e to
dela) cooking up to 12 hom_.
ADD 30SEC
Each dine you press this pad tile set
time is increased 3(1 seconds.
CLOCK
Press this pad befi)re setting tile clock.
ge.com
11
Page 12
Changingthe microwave power level.
Thepower level may be entered or changed immediately after entering the feature time for 77meCook,
-time Defrost or Express Cook. The power level may also be changed during time countdown.
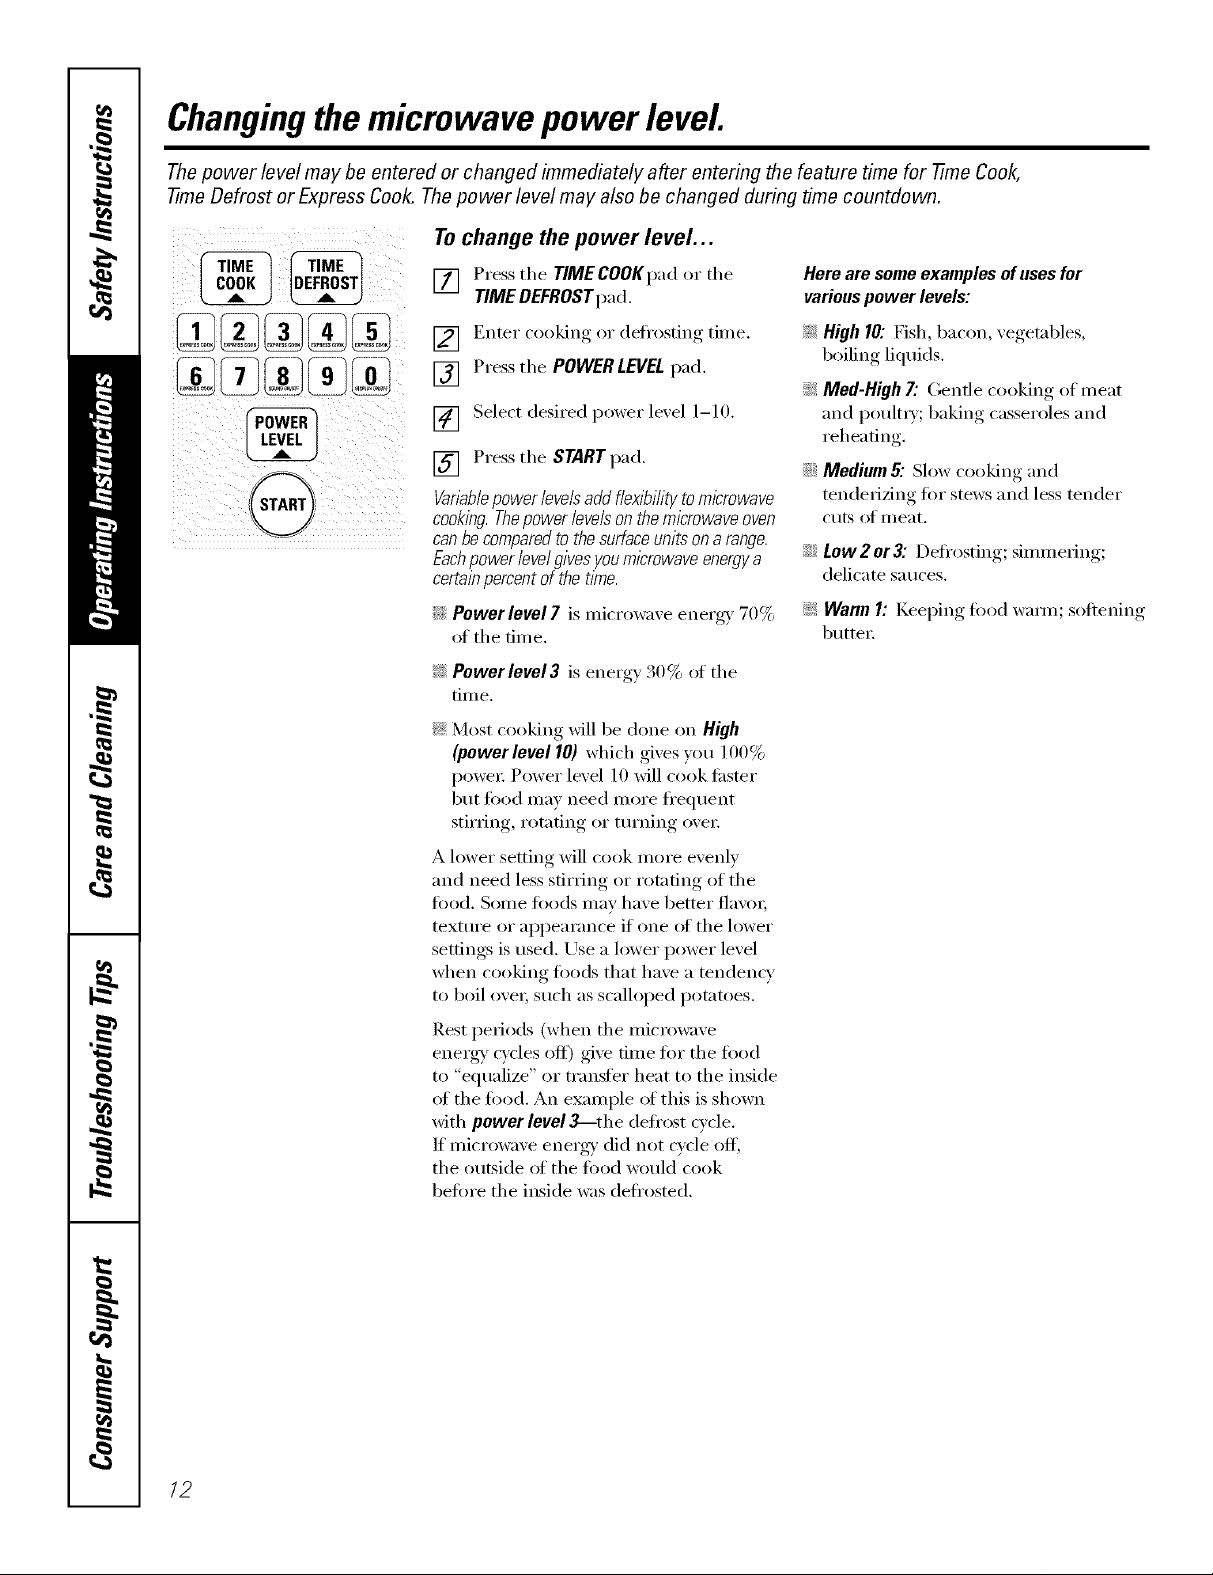
Tochange the power level...
[] Press the TIMECOOKpad or the
TIME DEFROSTpad.
[] Enter cooking or deli'osting time.
[] Press the POWER LEVELpad.
[] Select desired power level 1-10.
[] Press the START pad.
Variablepower levelsadd flexlT_ihtyto microwave
cooking.Thepower levelson the microwave oven
canbe comparedto the surfaceunits on a range.
Eachpower levelgives youmicrowave energya
certainpercent of thetime.
::Ji::Power level 7 is microwave energy 70%
of the time.
!;> Pewerlevel3 is energy 30% of the
[iII/e.
Here are some examples of uses for
various power levels:
_: High 10: Fish, bacon, vegetables,
boiling liquids.
_: Med-High 7: Gentle cooking of meat
and poultu; baking casseroles and
reheating.
::Ji::Medium 5: Slow cooking and
tenderizing fi)r stews and less tender
cuts of meat.
iJi::Low2 or3: Defl'osting; simmering;
delicate sauces.
!;>WarmI: Keel)ing, fi_od wam_; softening,
butte_:
_: Most cooking will be done on High
(powerleve110} which gives you 100%
power: Power level 10 will cook tipster
but fi)od may need m ore fl'equent
stirring, rotating or tm'ning ove_:
A lower setting will cook more evenly
and need less stirring or rotating of the
food. Some foods may have better fla\'m;
textm'e or appearance if one (ff the lower
settings is used. Use a lower power level
when cooking toods that have a tendency
to boil ove_; such as scalloped potatoes.
Rest periods (when the microwave
energ 9, wcles off) give time for the food
to "equalize" or transfer heat to the inside
of the food. An example of this is shown
with power level 3--the defl'ost cycle.
If microwave energ 9' did not cycle ofl_
the outside of the fi)od would cook
befi)re the inside was deti'oste(1.
12
Page 13
Usingthe timedmicrowave features, gecom
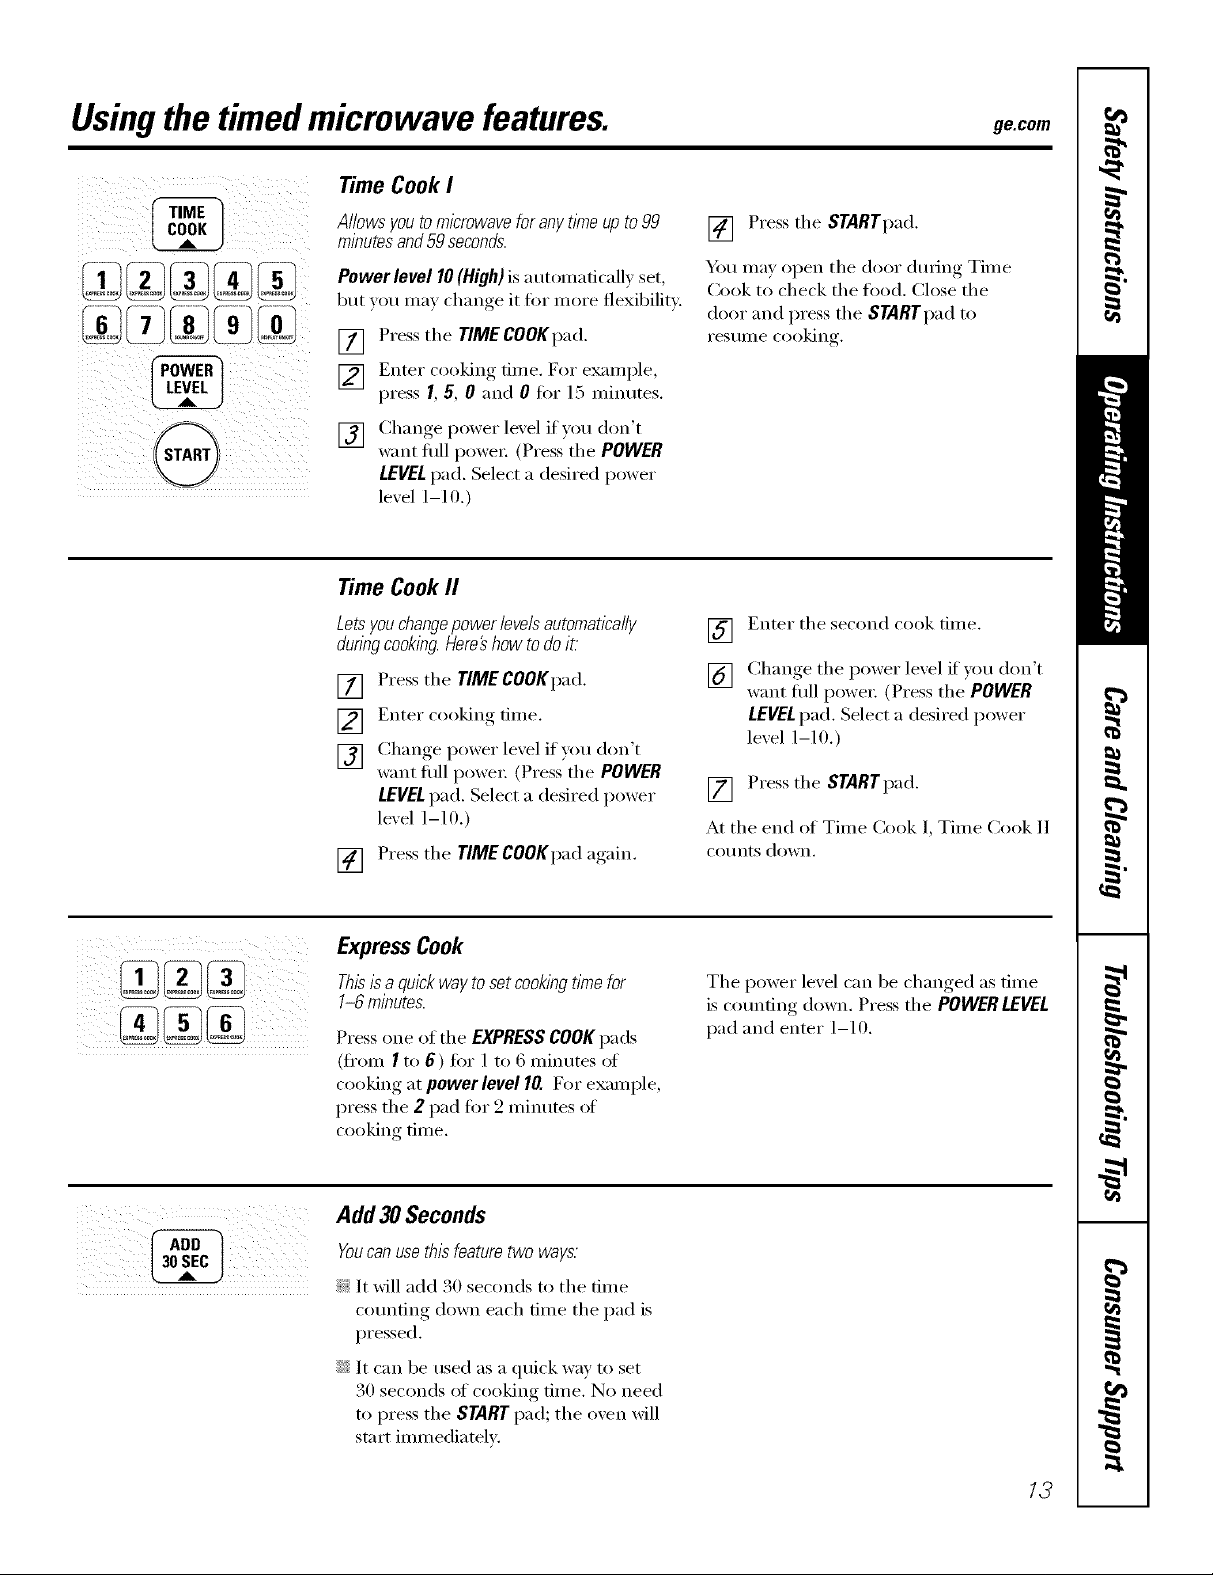
Time CookI
Allowsyouto microwaveforanytimeupto99
minutesand59seconds.
Power level 10(High) is atm)maticall) set,
but you may change it fin" more flexibility.
[] Press the TIME COOKpad.
[] Enter cooking time. For example,
press I, 5, 0 and 0 fi)r 15 minutes.
[] Change power lexel if you don't
want flfll powe_: (Press tile POWER
LEVELpad. Select a desired power
level 1-10.)
Time CookII
Letsyou changepower levels automatically
duringcooking.Here#how todo it
[] Press tile TIMECOOKpad.
[] Enter cooking time.
[] Change l_°wer level if v°u d°n't
want flfll powe_: (Press'the POWER
LEVELpad. Select a desired power
level 1-10.)
[] Press the TIME COOKpad again.
[] Press the STARTpad.
Y)u may open tile door dm_ing Time
Cook to check the fi)od. Close the
door and press tile STARTpad to
I'eS/lIlle cooking,
] Enter tile second cook time.
[] Chanoe•_ tile power lexel if you don't
want flfll power: (Press tile POWER
LEVELpad. Select a desired power
lexel 1-10.)
[] Press tile STARTpad.
At tile end of Time Cook l, Time Cook 11
Co/Ints down.
ExpressCook
Thisisaquickwaytosetcookingtimefor
1-6minutes.
Press one of the EXPRESSCOOKpads
(fl'om I to 6) fi)r 1 to 6 minutes (ff
cooking at powerleve110. For example,
press the 2 pad for 2 minutes of
cooking dine.
Add 30 Seconds
You can use this feature two ways.
?_:It will add 30 seconds to the time
counting down each time the pad is
pressed.
::Ji::It can be used as a quick way to set
30 seconds of cooking time. No need
to press the STARTpad; the oven will
start immediately:
Tile power level can be changed as time
is counting down. Press tile POWER LEVEL
pad and enter 1-10.
/3
Page 14
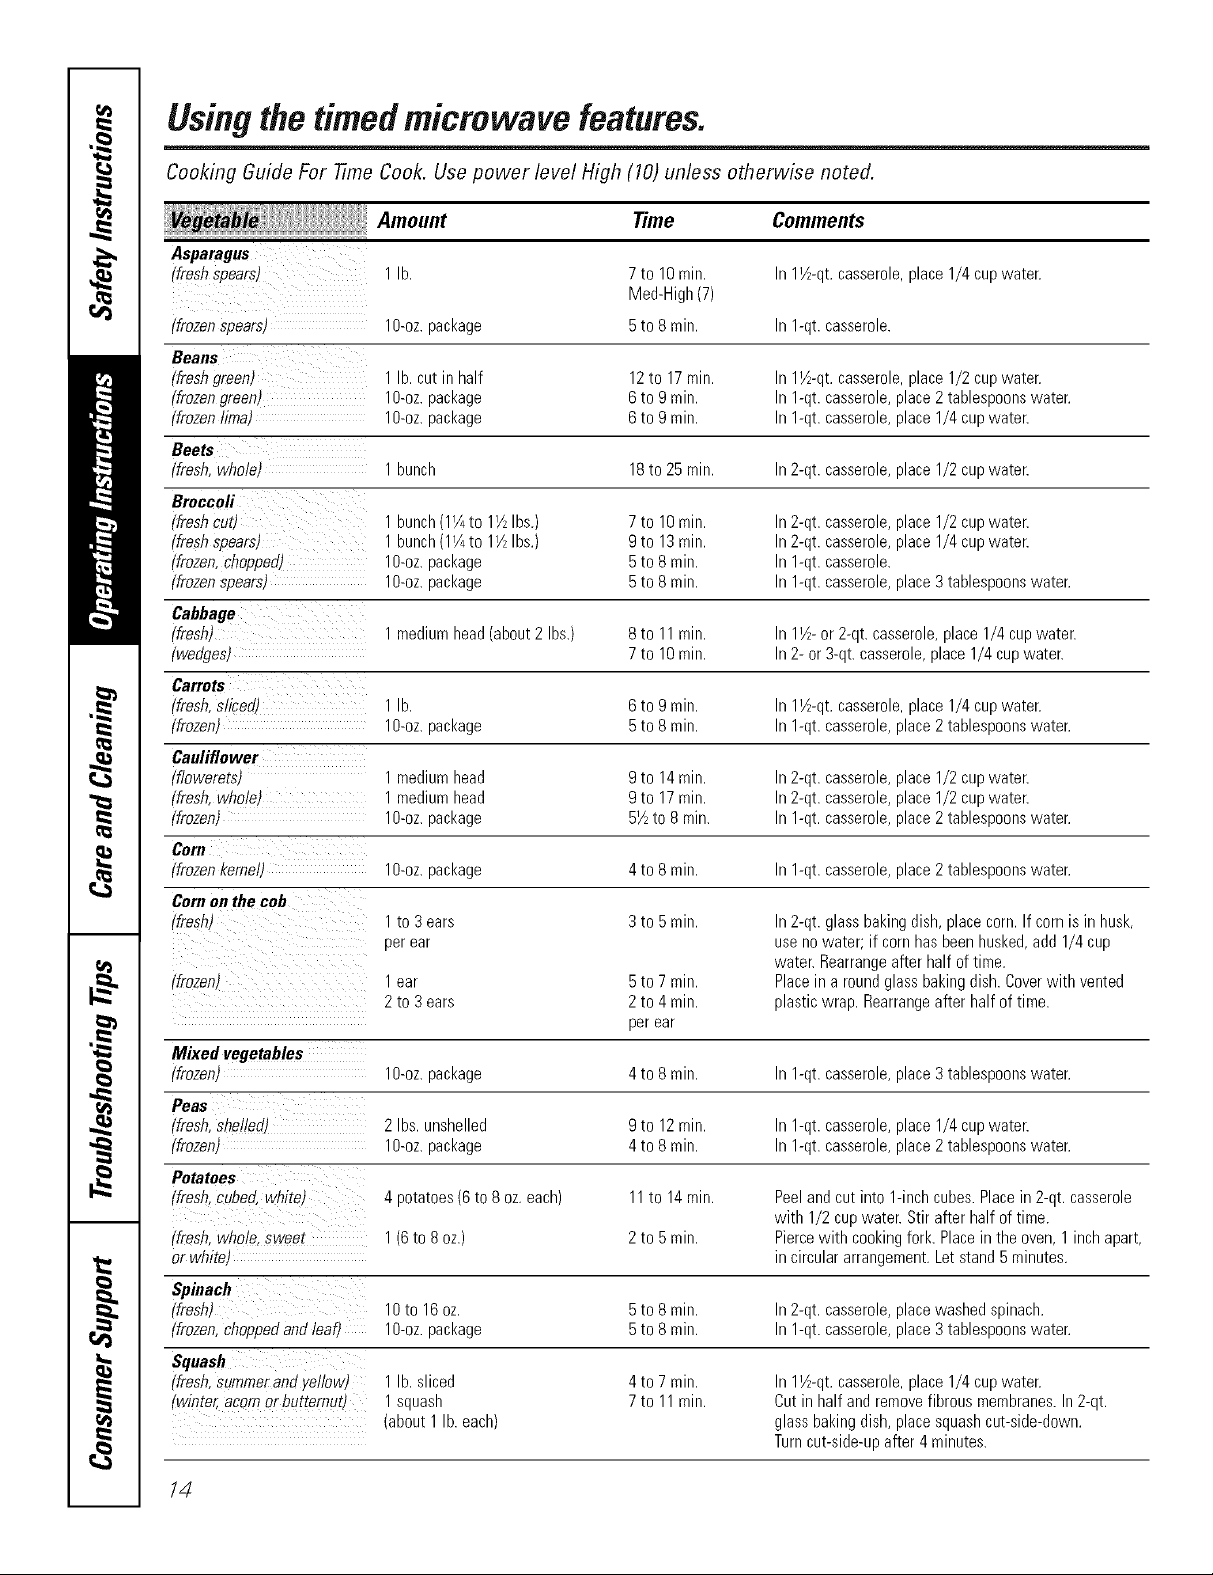
Usingthe timedmicrowave features.
Cooking Guide For -timeCook. Use power level High (10) unless otherwise noted.
Amount Time
Asparagus
(freshspears) 1lb.
(frozenspearst lO-oz,package
Beans
(freshgreen) 1lb.cut inhalf
(frozengreen) 1g-oz.package
(frozenlimat 1g-oz.package
Beets
(fresh,whole) 1bunch
Broccoli
(fresh_ut/ 1bunch(1I/4to 11/2Ibs.)
(freshspears) 1bunch(1I/4to 11/2Ibs.)
(frozen,chopped) l O-oz.package
(frozenspears) 1O-oz.package 5
Cabbage
(fresh) 1r'nediumhead(about2 Ibs.) 8
(wedges) 7
Carrots
(fresh,sliced) 1lb. 6
(frozen) 1O-oz.package 5
Cauliflower
(flowerets) 1 mediumhead
(fresh,whole) 1mediumhead
(frozen) 1g-oz.package
Core
(frozenkemell 1g-oz.package
Cornonthecob
(fresh) 1to 3ears
perear
(frozen) lear 5to7 min.
2to 3ears 2to4min.
Mixed vegetables
(frozen) lO-oz,package 4toSmin. In1-qt.casserole,place3tablespoonswater.
Peas
(fresh,she!led) 2Ibs.unshelled 9to 12rain. Inl-qt. casserole,placel/4 cupwater.
(frozen) 1g-oz.package 4toSmin. In1-qt.casserole,place2tablespoonswater.
Potatoes
(fresh,cubed,white) 4potatoes(6 to8 oz.each) 11to 14min. Peelandcutinto 1-inchcubes.Placein 2-qt. casserole
(fresh,whole,Sweet 1(6to 8 oz.) 2 to 5 rain. Piercewith cookingfork.Placein the oven,1 inchapart,
orwhitel in circulararrangement.Letstand5 minutes.
Spinach
(fresh) 10to 16 oz. 5to 8min. hr2-qt.casserole,placewashedspinach.
(frozen,choppedandleaf) 1O-oz.package 5to 8rain. In1-qt.casserole,place3tablespoonswater.
Squash
(fresh,Summerandyellow) 1 lb.sliced 4to 7rain. hr11_-qt.casserole,place1/4 cupwater.
(winter,acornor butternutl 1squash 7to 11rain. Cutin half andremovefibrousmembranes.In2-qt.
(about1 lb.each) glassbakingdish,placesquashcut-side-down.
7to 10rain.
Med-High(7)
5to 8min. In1-qt.casserole.
12to 17 rain. In11½-qt.casserole,place1/2 cupwater.
6to 9rain. In1-qt.casserole,place2tablespoonswater.
6to 9rain. In1-qt.casserole,place1/4cupwater.
18to 25 rain. In2-qt.casserole,place1/2 cupwater.
7to 10rain. In2-qt.casserole,place1/2 cupwater.
9to 13rain. In2-qt.casserole,place1/4 cupwater.
5to 8min. In1-qt.casserole.
to 8 rain. In1-qt.casserole,place3tablespoonswater.
to 11rain. In 11½- or2-qt.casserole,place1/4 cupwater.
to 10rain. In 2-or3-qt.casserole,place1/4 cupwater.
to 9 min. In 11A-qt.casserole,place1/4 cupwater.
to 8 rain. In1-qt.casserole,place2tablespoonswater.
9to 14rain. In2-qt.casserole,place1/2 cupwater.
9to 17rain. In2-qt.casserole,place1/2 cupwater.
51/2to 8min. In1-qt.casserole,place2tablespoonswater.
4to 8rain. In1-qt.casserole,place2tablespoonswater.
3to 5min. In2-qt.glassbakingdish,placecorn.Ifcorn isin husk,
perear
Comments
In11½-qt.casserole,place1/4 cupwater.
usenowater; if cornhasbeenhusked,add1/4cup
water.Rearrangeafterhalf oftime.
Placein aroundglassbakingdish.Coverwithvented
plasticwrap. Rearrangeafter halfof time.
with 1/2cupwater.Stir afterhalf of time.
Turncut-side-upafter4 minutes.
14
Page 15

A dull thumping noise may be heard during defrosting. This is normal when oven is not operating at High power.
Time Defrost
ge.com
!ii;:::/iliiiIi /ii!Iii:iiiiiiiii!i
ii _i_ i _ i _ i _ i _ i_ i_ _
Atonehaftofselecteddefrosting
time,theovensignalsTURNAt
thistlYne,turnfoodoverand
breakapartorrearrangepieces
formoreevendefrosting.Shield
anywarmareaswithsmallpieces
offoil.
Allowsyouto defrostfora selectedlengthof
time.SeetheDefrostingGuideforsuggested
times.(AutoDefrostexplainedintheAboutthe
autofeaturesection.)
[] Press tile TIMEDEFROSTpad t_ce.
[] Enter defrosting dine.
[] Press tile STARTpad.
] Tt/Fn tk)od o_,er when tile o'_en
signals.
[] Press tile START pad.
Power level is autonmtically set at 3, but
can be changed. You can defl'ost small
items quickly by raising tile power level
after entering tile time. Power level 7
cuts tile total defl'osfing time in about
half; powerlevel 10 cuts tile total time to
approximately 1/3. However; food will
need more fl'equent attention than usual.
DefrostingTips
;;Ji::Foodsfrozeninpaperorplasticcanbe
defrostedin thepackage.Closedpackages
shouldbeslit,piercedorventedAFTERfood
haspartbllydefroste_Plasticstorage
containersshouldbepartb/lyuncoverecL
;;Ji::Family-sl2e,prepackagedfrozendinners
canbedefrostedandmicrowave_ff the
foodisina foilcontainer,transferit toa
microwave-safedish.
;;Ji::Foodsthatspoileasilyshouldnotbe
allowedtosit outformorethanonehour
afterdefrosting.Roomtemperaturepromotes
thegrowthofharmfulbacteria.
;;Ji::Formoreevendefrostingof largerfoods,
suchasroasts,useAutoDefros£Besure
largemeatsarecompfete/ydefrosted
beforecooking.
_ Whendefrosted,foodshouldbecoolbut
softenedinallareas.Ifstillshght/yicy,return
tothemicrowaveverybriefly,orletitstanda
fewminutes.
DefrostingGuide
Time Comments
Breads, Cakes
Bread, buns or rolls (I piece) 1/2 min.
Sweet rolls (approx. I2 oz.) 3 to 6 min. Rearrange after half the time.
Fish and Seafood
Fillets, frozen (1 tb) 9to 12 min.
Shellfish, smallpieces (I tb) 3 to 7 rnin Place block in casserole Turn over and break up after half tire time
Fro#
Plastic pouch- I or2 t10-oz pacl_ageJ 3 to 7 rnin.
Meat
Bacon11tb.J 3 to 6 min.
Franks q tb ' 3 to 6 rain.
Ground meat 11lb.)
Roast.beeL lamb. veal. park
Steaks. chees and cutlets
Poultry
Chicken. bmiler-frver cur up
_2½to 3 tbs.;
Chicken whole f2½ to 3 tbsJ
I
Cornishnon
Turke.breast(4to 6 tbs.)
5 to 8 rain. per lb.
11 to 16 rain. per lb.
5 to 10 min. per lb.
15 to 22 rain.
20 to 28 rain.
9 to 16 rain. per lb.
5 to 10 rain. per lb.
Place unopened package in oven. Let stand 5 minutes after defrosting.
Place unopened package in oven. Microwave just until franks can be
separated. Let stand 5 minutes, if necessary, to complete defrosting.
Turn meat over after first half of time.
Use power level I.
Place unwrapped meat in cooking dish. Turn over after first half of time and
shield warm areas with foil. After second half of time, separate pieces with
table knife. Let stand to complete defrosting.
Placewrappedchickenin dish.Unwrapandturn overafter first half oftime.
Aftersecondhalfof time,separatepiecesandplacein cookingdish.Microwave
2to4 minutesmore,if necessary.Letstandafew minutestofinishdefrosting.
Placewrappedchickenin dish.Afterhalf thetime, unwrapandturn chicken
over.Shieldwarmareaswith foil. Tocompletedefrosting,runcoldwater in
the cavityuntil giblets canbe removed.
Placeunwrappedhenin theovenbreast-side-up.Turnoverafter first half of
time.Runcoolwater in the cavityuntil gibletscanbe removed.
Placeunwrappedbreastin microwave-safedishbreast-side-down.After first
half oftime, turnbreast-side-upand shieldwarm areaswith foil. Defrostfor
secondhalfof time.Letstand1to 2 hoursinrefrigeratorto completedefrosting.
15
Page 16

Usingthe microwave sensorcookingfeatures.
The Sensor Features detect the increasing humidity released during cooking. The oven automatically adjusts the
cooking time to various types and amounts of food.
Sensor Cooking
essential for best sensor c()oking
i_i A]wa,s t/se illiCi'Owa_e-sate con,;IhleIs
and coxer then_ with lids or xented
Covered plastic wrap. Nexer use fight sealing
plastic containers--they can pre, ent
steaIll ti'OIll escal)ing, and cerise _'ood
to o_ ercook.
Be sure the outside of the cooking
containet_ and the inside of the
illicrowave oven ai'e dry beiore
Vented
plating toed in the oven. Beads
el moistm'e tm'ning into steam
can mislead the sensm:
Dry off dishes so flTeydon't mislead
the sensor.
(lesstime) (m0retime)
Use only with prepackaged
microwave popcorn weighing
1.75to 3.5 ounces.
Popcorn
To use the Popcorn feature:
[] Follow package instructions, usiw,_
Time Cook if' the package is less
than 1.75 otmces or linger than
3.5 ounces. Place the package of
popcorn in the center of the
microwave.
[] Press the POPCORN pad. The oxen
starts immediately.
If youopenthedoorwhilePOPis displayed,
ERRORwill appearClosethedoor,pressthe
CLEAR/OFFpadandbeginagain.
How toAdjustthePopcornProgramto
Providea ShorterorLongerCookTime:
If you find that the brand of popcorn you
rise tlndeII)ops or overcoo]¢s consisteiltly,
um can add or subtract 20-30 seconds to
the automatic i)opping time.
Toadd time:
After pressing the POPCORNpad, press
the 9 pad immediately after the oven
starts fi)r an extra 90 seconds. Press the
9 pad again to add another 10 seconds
(total 30 seconds additional time).
Tosubtract time:
After pressing the POPCORN pad, press
the I pad immediately after the oven
starts for 20 seconds less cooking time.
Press the I pad again to reduce cooking
time another l 0 seconds (total 30
seconds less time).
16
Page 17

Reheat
ge.com
REHEAT
" I
A )
OSS Ilme [[lOre time
:iiiiii[ 0 AT0I )iiiiii
TheReheatfeaturereheatssingleservl}_gsof
previouslycookedfoodsoraplateofleftovers.
[] Place co',ered fi)od in tile o',en.
Press tile REHEATpad.Tile o',en
starts imn_ediatelv.
[] Tile oven signals when steam is
sensed and tile time remaining
begins co/mting down.
Do not open tile oven door tmtil time is
co/mting down. If tile door is opened,
close it and press tile START pad
immediately.
Afterremovingfoodfromtheoven,stir,if
possible,toevenoutthetemperature.If thefood
isnothotenough,usetimeCooktoreheatfor
moretl_ne.Reheatedfoodsmayhavewide
vanationsintemperature.Someareasmaybe
extremelyhot
Potato
ThePotatofeature cooks 1/2-2 ibs.of potatoes.
Some foodsnot recommended for use wi_
REHEAT--it is best to use _me Cook for
these foods:
iJi::Bread products.
_: Foods that must be reheated
tlnco'vered.
iJi::D)ods that need to be stirred or
rotated.
iJi::Foods calling for a dry look or crisp
surti_ce after reheating.
How toChange theAutomatic Settings:
Toreduce time by 10%:
Press tile I pad after tile teatm'e pad.
Toadd 10%to cooking time."
Press tile 9 pad after tile teatuI'e pad.
(losstime) (moretime)
[] Pierce skin with fork and place
potatoes on tile tm'ntable. If cooking
three or illOi'e potatoes, ai'i'ilnge in a
star pattern.
[] Press tile POTATO pad. Tile oxen
starts immediately. Tile oven signals
when steam is sensed and tile time
remaining begins cotmting down.
Do not open tile oven door tmtil time is
counting down. If tile door is opened,
close it and press tile START pad
immediatelv.
If food is not doneenough,use time Cookto cook
formore time.
17
Page 18

Usingthe microwave conveniencecooking features.
Drinks heated with the Beverage feature maybe very hot. Remove the container with care.
Beverage
Snacks
!: )
TheSnacksfeatureautomaticallysets the
microwavingtithesand power levels to warm a
varietyof snackfoods.
[] Press the SNACKSpad.
[] Se'ect snack type '-6 (see the
Snacks (;uide).
] Enter the nmnber of items or the
tood weight in ounces.
[] Press the STARTpad.
Hint:YoucanpressandholdtheSNACKSpad
dunngcookl)_gtodisplaytheremal)fing
microwavingtime.
Cook
TheCookfeatureautomaticallysets thecooking
timesandpower levelsfora varietyof foods.
[] Press the COOKpad.
[] Se'ect tood b'pe ,-9 (see the Cook
(;uide be,ow).
Snacks Guide
Food Type
1Bread, rolls, muffins
2 Sandwiches
3 Pizza (leftover sfices)
4 Dessert toppings
5 Soup
6 Cheese dip
Quantityor Weight
1to4
1to2
1to4
1to4
8to40 oz.
4to 16oz.
[] Enter weight in otmces.
[] Press the STARTpad.
Hint:PressandholdtheCOOKpadduring
cookingtodisplaytheremain/#gcooktime.
18
CookGuide
FoodType Weight Comments
1CannedVegetables 4 to 20oz. Usemicrowave-safecasseroleor bowl. Coverwith lid orvented
plasticwrap.
2Frozen Vegetables 4 to 16oz. Usemicrowave-safecasseroleorbowl. Followpackageinstructions
foraddingwater.Coverwith lid orventedplasticwrap.
3Fresh Vegetables 4to 16oz. Usemicrowave-safecasseroleorbowl.Add2 tablespoonswater
foreachserving.Coverwith lidor ventedplasticwrap.
4Potatoes 8to40 oz. Pierceskinwith fork.Placepotatoeson theturntable.
5Fish 4to 16oz. Useoblong,squareorrounddish.Coverwith ventedplasticwrap.
6 ChickenPieces 4to40 oz. Useoblong,squareorrounddish.Coverwith ventedplasticwrap
or wax paper.
7GroundMeat 8to 48 oz. Useroundcasseroledish.Crumblemeatintodish.Coverwith lid
(beef,pork,turkey) or ventedplasticwrap.
8Bacon 2to 10oz. Layerstripsona plate,4to a layer.Covereach layerwith apaper
towel.
9Pizza (frozen, 4to 16oz. Followpackageinstructionsto preparepizzafor microwaving.
micro waveable)
Page 19

Usingthe microwave auto feature, ge.oom
TheDefrost Auto/77me feature gives you two ways to defrost frozen foods. Press AUTO DEFROSTonce for Auto
Defrost or twice for -timeDefrost.
Auto Defrost
UseAuto Defrost formeat,poultryand fish up
to6 pounds.Use time Defrost formost other
frozenfoods.
Auto Deti'ost autonmficallv sets the
defl'osfing times and power levels to give
even defl'osting results fin" meats, poultry
and fish.
Press the AUTO DEFROST pad once.
[]
Using the Convexsion (;tilde at
[]
right, enter food weight. For
example, press pads I and 2 fin.
1.9 pounds (1 pound, 3 ounces).
Press START
[]
Time Defrost is explained in the Using
the timed microwave features section.
!;_:Remove meat from package and place
on microwa',e-saie dish.
ConversionGuide
If the weight of fi)od is stated in pounds
_lil(1 ot/nces, the ot/nces II/lISt be
comerted to tenths (. l) of a pound.
WeightofFood EnterFoodWeight
in Ounces (tenthsofa pound)
I-2 .I
3 .2
4-5 .3
6-7 .4
8 .5
9-10 .6
11 .7
12-13 .8
14-15 .9
::Ji::Twice during defl'ost, the oven signals
TURN. At each TURN signal, turn the
food ove_: Remove defi'osted meat or
shield wam_ areas with small pieces
of foil.
_: _Mier deii'osfing, most meats need
to stand 5 minutes to complete
deii'osting. I,a_ge roasts should
stand for about 30 ininutes.
19
Page 20

Usingthe othermicrowave features.
Cooking Complete Reminder: Toremind you that you have food in the oven, the oven will beep once a minute
until you either open the oven door or press the CLEAR/OFFpad.
Clock
i/iii) !!!i_ iiiiiii:iiiliiIiiili
Presstoenterthet/_neofdayor tocheckthetime
ofdaywhilemicrowaving.
[] Press the CLOCKpad.
[] Enter time of day.
[] Press the STARTpad or the
CLOCKpad.
Display On/Off
To Um_ the clock display on or off, press
and hold the 0 pad for about 3 seconds.
The Display On/(-)fl feature cannot be
used while a cooking teatuI'e is in use.
iii_i!iiii_iliil_ i_i_I;!i!!_iliil
REMINDE8
Delay Start
Dela) Start allows )ou to set the
microwaxe to (lelm cooking, t:lI) to
12 hom_.
[] Press the DELAY START pad,
] Enter the time _ou want the o_en to
start. (Be sm'e the microwave clock
shows the correct time of day.)
[] Select your desired cooking
program.
[] Press the START pad,
The Delay Start time will be displayed.
The oven will automatically start at the
delayed time.
The time of day may be displayed by
pressing the CLOCK pad.
NOTE: Youcannot useDELAYSTART with
POPCORNor REHEAT
20
SoundOn/Off
To mrn the beeper sotmd on or oft, press
and hold the 8pad fi)r about 3 seconds.
Page 21

ChildLockout
ge.com
iiiiJi !i!!i!iii
MIN/SEC
Youmaylockthe controlpanel toprevent the
microwave frombeing accidentallystarted or
usedby children.
To lock or unlock tile controls, press
and hold tile CLEAR/OFFpad fin" about
3 seconds.
Kitchen timer
Kitchen Timeroperatesasa minute timerand
canbe usedat any time,even when the ovenis
operating.
How to use as a minute timer:
[] Press tile KITCHEN TIMER
MIN/SEC pad.
] Enter time you want to cotmt down.
[] Press tile KITCHEN TIMER
MIN/SEC pad.
Reminder
_._qlell tile control panel is locked, an L
will be displayed to tile extrenle right.
X._]/en time is up, tile oven will signal.
To ttlFil off tile timer signal, press tile
KITCHEN TIMER MIN/SEC pad.
NOTE: Thetimer indicatorwill he lit while the
timer is operating.
To cancel tile timer dining tile
cotmtdown, press tile KITCHEN TIMER
MIN/SEC pad.
¸
REMINDER
_!_iI_ _(_i_!_))ilk !_i!_i!_i!_i
TheReminderfeaturecanbeused/ikeanalarm
clock,andcanbeusedat anytlYne,evenwhen
theovenisoperating.TheRemindertimecanbe
setup to12hourslater
Press tile DELAYSTARTpad.
[]
Enter tile time you want tile oven to
[]
remind xou. (Be sm'e tile microwaxe
clock shows tile correct time of da}.)
[] Press tile STARTpad. "i&qlen
Reminder signal occm's, press tile
DEL4Y START pad to mrn it off. Tile
Reminder time may be displayed by
pressing tile DELAYSTART pad.
NOTE."REMwill remain onthedisplay toshow
that theReminderisset until theRemindertl_ne
is reachedand the dooris openedor CLEAR/OFF
Ispressed
21
Page 22

Usingthe lower ovencontrols.
Throughout this manual, features and appearance may vary from your model. Your model may have one of the
following controls.
LOWER OVEN
0
0
0
0
G
LOWER OVEN
N MICROWAVEFANMAYOPERATEWHILELOWEROVENISIN USE,
TIME CONTROLS
G
22
Page 23

LowerOvenControl,Clockand TimerFeaturesandSettings
ge.com
Display
Shows the tiIne of day, oven tenlperamre,
whether the ()veil is in the bake, broil or
self:cleaning nlode and the tiines set fi)r
the [iIl/eI" oi" atltOIllatic ()veil opei'ations.
NOTE."Thet/Yneon the/ower ovendisp/aVis
shown in hours andminutes (1.30is onehour,
30 mlbutes).On themicrowaveoven,tlYneis
shown in minutes andseconds(1.30is one
minute,30seconds).
ff "F- anda numberorletter"flashin the
displayandtheovencontrolsignals,this
indicatesa functionerrorcode.Pressthe
CLEAR/OFFpadAllowtheoventocoolfor one
hourPuttheovenbackintooperation.If the
functionerrorcoderepeats,disconnectthepower
totheovenandcaflforservlce.
Ifyourovenwasset fora timedoven
operationandapower outageoccurred,the
dockanda//programmedfunctionsmustbereset
Thetimeofday(maybeincorrect)will flash
in thedisplaywhenthe therehasbeena
poweroutage.
BROIL HI/LO Pad
Press to select the broil fiUlCfion.
BAKE Pad
0
0
CLEAR/OFFPad
Press to cancel ALL o',en oi)eradons
except the clock and tinIeI:
STARTPad
Must be pressed to start any cooking or
cleaning flUlCfion.
KITCHENTIMER ON/OFFPad
Press to select the tinier teatuI'e.
DELAYSTARTPad
Use along with COOKING TIME or SELF
CLEAN pads to set the oven to stnrt and
stop autoniafically at a dine you set.
COOKINGTIME Pad
Press and then press the nuniber pads
to set the aniount of tiIne you want your
food to cook. The oven will shut off
autonlaticallv when the cooking dine
has run out, unless the Cook and Hold
JeattlI'e W;IS set.
CLOCKPad
Press heft)re setdn(* the clock.
0
Press to select the bake fiUlction.
SELFCLEAN Pad
Press to select the self:cleaning flnlction.
See the Using the self-cleaning lower oven
section.
OVENLIGHT Pad
Press to turn the oxen light on or off.
Number Pads
Use to set any flUlCtion i'equii_ing
nunll)ei5 such as the dine of day Oil the
clock, the tiIneI; the oven teini)erature ,
the start dine and length of operation for
dined baking and self:cleaning.
23
Page 24

Special featuresof yourlower ovencontrol
Yournew touch pad control has additional features that you may choose to use. The following are the features and
how you may activate them.
The special feature modes can only be activated while the display is showing the time of day. Theyremain in the
control's memory until the steps are repeated.
When the display shows your choice, press the STARTpad. The special features will remain in memory after a
power failure.
12-Hour Shutoff
i;i!ii!i! iiii ii
; i;ii@ !i /
i ; @ i¸
ovenon,the control will automatically turnoff the
ovenafter 12hours duringbaklbg functions or
after 3 hoursdun))ga broil function.
If you wish to mrn OFF this teattlI'e,
follow tile steps below.
[] Press tile BAKE and BROIL HI/tO
pads at tile same tilne tor 3 seconds
until tile display shows SF
[] Press tile DELAYSTART pad until
no shdn (no shutoff) appeals in tile
display:
[] Press tile START pad to activate tile
no shutoff and leaxe tile control set
in this special features mode.
Fahrenheit or Centigrade Temperature Selection
Youroven control isset to use the Fahrenheit []
temperatureselections,but youmay changethis
to use the Centigradeselections.
[] Press tile BAKE and BROILHI/LO
pads at tile salne time fi:,r 3 seconds []
until tile display shows SF
[] Press tile BROILHI/LO pad. Tile
displa) xfill show F (Fahrenheit).
Control Lockout
Yourcontrolwi//allowyoutolockdownthetouch
padssotheycannotbeactivatedwhenpressed
[] Press tile BAKE and BROILHI/LO
pads at tile salne time fi:,r 3 seconds
until tile display shows SF.
[] Press tile SELFCLEAN pad. Tile
displa) xfill show LOC OFF.
Press tile SELFCLEANpad again.
Tile display xfill show LOCON.
Press tile STARTpad to actixate
[]
tile control lockout teature and
leave tile control set in this special
teatures inode.
Press tile BROILHI/LOpad again.
Tile displa) _fill show C
((:entigrade).
Press tile STARTpad,
X,_q/enthis teatm'e is on and tile touch
pads are pressed, the display will show
LOC.
To unh)ck tile control, repeat steps 1 and
2. Press tile STARTpad when tile displa)
shows LOCOFF.
NOTE:Thecontrollockoutmodewi//notaffect
theCLOCK,KITCHENTIMERON/OFFand
OVENLIGHTtouchpads.
24
Page 25

Tonesat the End of a Timed Cycle
At theendofa timedcycle,3shortbeepswill
soundfollowedbyonebeepevery6seconds
untiltheCLEAR/OFFpadispressedThis
continuous&secondbeepmaybecanceled
To cancel the 6-second beep:
[] Press the BAKE and BROILHI/LO
pads at the same time fin 3 seconds
until the displa) shows SF
12-Hour, 24-Hour or Clock Blackout
Yourcontrol/s set to usea 12-hourdock.
If you would prefl_r to have a 24-horn"
milita_' time clock or black out the clock
display, fi)llow the steps below,
[] Press the BAKE and BROILHI/LO
pads at the same time fin" 3 seconds
tmtil the display sho_vs SF.
[] Press the CLOCK pad once. The
display will show 12hr. If this is
the choice wm want, press the
STARTpad.
ge.com
Press the KITCHEN TIMER ON/OFF
[]
pad. The display shows CON BEEP
(continuous beep). Press the
KITCHEN TIMER ON/OFFpad
again. The display shows BEEP.
(This cancels the one beep every
6 seconds.)
Press the START pad.
[]
Press the CLOCKpad again to change
to the 24-hour military time clock. The
display will show 24hr. If this is the
choice you want, press the START pad.
Press the CLOCKpad again to black out
the clock display. The display will show
OFF.If this is the choice you want, press
the STARTpad.
NOTE:If theclockisintheblack-outmode,you
will notbeabletousetheDelayStartfunction.
i if@ ili! i
Cook and Hold
Yournewcontrolhasa cookandholdfeaturethat
keepscookedfoodswarmforupto3hoursafter
T/YnedBakingorRoastingis6bished
NOTE"Yhlsbaturecanonlybeprogrammedto
workwithTknedBakingorRoasting(Seethe
Usingtheloweroventl_nedbakingandroasting
featuressection.)AfterTknedBakingorRoasting
hasautomaticallystopped,theprogrammedCook
andHoldwillautomaticallystart.
To actix _te this teatm'e fin" use after
Timed Baking or Roasting, follow the
steps below.
[] Press the BAKE and BROIL HI/LO
pads at the same time fin" 3 seconds
tmtil the display shows SF.
Press the COOKING TIME pad.
[]
The displa) xdll show Hid OFF.
Press the COOKING TIME pad again
to acti',ate tile teatm'e. The display
will show Hid ON.
Press tile START pad to activate
[]
the cook and hold leatm'e and
leaxe the control set in this special
teatm'es mode.
25
Page 26

Usingthelower oven.
Toavoid possible bums, place the shelves in the desired posifion before you turn the oven on.
Before you begin...
[]
NOTE:A coofing fan may
automatically turn onand off to
cool flTtemalparts. Thisis normal,
andthe fan maycontinue to run
even after llTeoven is turned off.
The shelves have stop-locks, so that when
placed correctly on the supports, they will
stop befin'e coming completely out, and
will not tilt.
_\ hen [)lacino_ and removing, cookware,
pull the shelf out to the bump on the
shelf support.
Toremove a sheff, pull it toward you, tilt
the front end up and pull it out.
Toreplace, l)lace the end of the shelf
(stop-locks) on the support, flit up the
front and push the shelf in.
NOTE:30" ovens(shown)have 6 shelfpositions.
27"ovens have4shelf positions.
How to Set the Oven for Baking or Roasting
[] Press the BAKE pad.
Typeof Food 27" Oven 30" Oven
] Press the number pads to set the
desired temperature.
[] Press the STARTpad.
[] Check food fi)r doneness at
minimum time on recipe. Cook
longer if necessary:
[] Press the CLEAN/OFFpad when
cooking, is corn l)lete.
Frozenpies BorC CorD
(oncookiesheet)
Angelfoodcake A B
Bundtorpoundcakes B B
Biscuits,muffins, BorC CorD
brownies,cookies,
cupcakes,layer
cakes,pies
Casseroles BorC CorD
Shelf Position
Topreheat, set the oven at the
correct temperature. The control
will beep when the oven is
preheated and the display will
show your set temperature. This
may takeapproximately I0 mhTutes.
Cutslits in ttTefoil just like thegrid.
26
Preheating and Pan Placement
Preheat the oven if'the recipe calls fin" it.
Preheating is necessai T fin" good results
when baking cakes, cookies, i)ast_T and
breads.
Baking results will be better if baking
pans are centered in the oxen as much
as possible. Pans should not touch each
Aluminum Foil
You can use alumimun h)il u_line the
broiler pan and broiler grid. Ho_e_el;
}ou must mold the fi)il tightl) to the grid
and cut slits in it just like the grid.
Without the slits, the fidl will prevent fi_t
and meat juices fl'om draining into the
broiler pan. The juices could become
hot enough to catch on fire. If you
do not cut the slits, you are essentially
fi)'ing, not broiling.
other or the walls of the oven. If w)u
need to use two shelves, stagger the pans
so one is not direcflv above the other;
and leave approximately 1½" between
pans, from the fl'ont, back and sides of
the wall.
Donot usealuminumfoil on the bottomof
the oven,
Ne\ er entirely rover a shelf with
aluminum ioil. This will disturb the heat
drculation and result in poor baking.
A smaller sheet of foil may be used to
catch a spillover by plating it on a lower
shelf se\vral inches below the fl)ocl.
Page 27

ge.com
How to Set the Oven for Broiling
Leavethedooropentothebroil stopposition.
Thedoorstaysopenby itself, yettheproper
broil/bg t/nTes.Thisguide/s basedon meatsat
refn_Teratortemperature.
temperatoreis ma/btainedin theoven.
NOTE:Foodcanbebroiledwith thedoor
[] Press tile BROILHI/tO pad once for
HI Broil
closed,butit maynot brownas well because
If your ovenis connected to 208
volts,rare steaksmay be broiledby
preheating thebroiler andpositionflTg
the ovenshelf one positionhighe_
theovenheat/bgelementwill cycleonandoff.
[] Place tile meat or fish (m tile broiler
g_id in tile broiler pm_.
[] Follow suggested shelf positions in
tlle BroilingGuide.
Thesloe,we/_Tht,thickness,start/bgtemperatore
To ch'moe,_ to LOBroil, press tile
BROILI/I/tO p',_dagain.
[] Press tile STARTpad.
[] _'Xhen b_oiling is finished, press
tlle CLEAR/OFFp',_d.
andyoorpreferencefordonenesswillaffect
Broifing Guide
27" Ovens 27" Ovens 27" Ovens 30" Ovens 30" Ovens 30" Ovens
Quantity and/ Shelf First Side Second Side Shelf First Side Second Side
Food or Thickness Position Time(min,) Time(rain.) Position Time(rain.) Time(min,) Comments
GroundBeef 1 lb.(4 patties) C 10 7 E 10 7 Spaceevenly.Up
Well Done 1/2to3/4" thick E 10 9 to 8 pattiestake
Beef Steaks
Raret
Medium
Well Done
RaW
Mediuro
Well Done
Chicken
LobsterTails
FishFillets
HamSlices 1"thick B 8 8 8
(precooked)
Pork Chops
Well Done
LambChops
Mediuro
Well Done
Mediuro
Well Done
+TheU.S.DepartmentofAgriculture says"Rare beefispopular, but you should bTow flTatcooking it to only 1405:means somefoodpoisoning
organisms maysurvive." (Source:Safe FoodBook.YourKitchen Guide.USDARev.June 1985.)
1" thick
1to 1½ Ibs.
1Yz"thick
2 to2½ Ibs.
1whole
2 to2½ Ibs.,
split lengthwise
2_4
Bto 8 oz.each
1/4to 1/2" thick
2 (1/2" thick) C 10 10 10
2 (1"thick)about1 lb. B 13 15 15
2 (1"thick)about10
to 12oz.
2 (11/L"thick)about 1lb.
C
C
C
C
C
C
A
C
C
C
B
B
8
12
10
15
25
35
13 16
10
12
14
17
5
6
11
78
14 16
20_5
10 15
Donot
turll oveE
8 D
10 E
13 D
9
10
12
12 14
E
E
E
E
E
E
C
E
E
E
E
8
10
12
10
15
25
25
13 16
10
12
14
17
14 16
20_5
Donot
turll over.
12 14
B
8
10
8
10
9
10
12
aboutthe sarne
time.
Steakslessthan
1"thick cook
throughbefore
browning.
Panfryingis
recommended.
Slashfat.
Reducetimeabou
5to 10minutes
persideforcubup
chicken.Brush
eachsidewith
meltedbutter.
Broilskin-side-
downfirst.
Cutthroughbacko
shell.Spreadoper
Brushwith melte(
butter before
broilingandafter
half of broiling
time.
Handleandturn
verycarefully.
Brushwith lemon
butter beforeand
duringcooking,if
desired.Preheat
broiler to increaa
browning.
Increasetime5to
10minutesper
sidefor 1½"thick
orhome-curedham
Slashfat.
Slashfat.
27
Page 28

Usingthelower ovenclock andtimer.
ToSet the Clock
Make sure the clock is set to the
correct time of da,_
H_IN
The timer is a minute t#ner onl,_
The timer does not control oven
operations. Themaximum setting on
the timer is 9 hours and 59 mhTutes.
Tile clock must be set to tile correct
time oI day for tile autonmtic oven
tinting fimctions to work properly, Tile
time ot day cannot be changed during a
timed baking or self-cleaning cycle.
To Set the Timer
Press the KITCHENTIMERON/OFF
pad.
Press the number pads tmtil the
[]
aillo/lnt of time }ou want shows in
tile display: For example, to set 2
hom_ and 45 nlinutes, press 2, 4
and 5 in that order, Maximum time
that can be entered in minutes is 59.
Cooking times more than 59
minutes should be changed to
hom_ and minutes. For example,
enter 90 minutes as 1 lm 30
minutes. If you make a mistake,
press tile KITCHEN TIMER ON/OFF
pad and begin again.
[] Press tile CLOCKpad.
[] Press tile number pads.
[] Press the START pad until the time
of da)shows in the display,
[] Press tile STARTpad.
_Mter pressing tile STARTpad, SET
disappeax_; this tells you the time is
cotmting down, although tile
display does not change tmtil one
minute has passed. Seconds will not
be shown in the display tmtil the last
minute is counting down.
[] _&q/en the timer reaches :00, the
control will beep 3 times followed
by one beep every 6 seconds until
the KITCHEN TIMER ON/OFF pad
is pressed.
The&second tonecanbe canceledby followl))g
the steps intheSpecialfeaturesof yourlower
ovencontrol sectionunder Tonesat the Endof
a TimedCycle.
28
ToReset the Timer
If tile display is still showing tile time
remaining, you may change it by pressing
tile KITCHEN TIMER ON/OFF pad, then
press tile number pads tmtil tile time
you want al)l)eax_ in tile display.
To Cancel the Timer
Press tile KITCHEN TIMER ON/OFF
pad twice.
If tile remaining time is not in tile display
(clock, delay start or cooking time are in
the display), recall the remaining time by
pressing tile KITCHEN TIMER ON/OFF pad
and then pressing the nunlber pads to
enter tile new tillle vo[i l_'_lIlt,
Page 29

Usingthe lower oven
timedbaking and mastingfeatures.(onsomemodels)
ge.com
NOTE:Foods that spoil easily-such as milk, eggs,fish, stuffings, poultry and pork-should not be allowed to s# for
more than 1hour before or after cooking. Room temperature promotes the growth of harmful bacteria. Be sure that
the oven light is off because heat from the bulb will speed harmful bacteria growth.
How to Set an Immediate Start and Automatic Stop
iillfiii ii !I i iiliiii
Theoven wi// turn on/?nrnedlatelyandcook for a
selectedlength of t/me.At the endof the cooking
dyne,the oven will turn off autornaflca//y
Make sure the clock shows the correct
tiille of day.
[] Press the BAKE pad.
[] Lrsing the number pads, enter the
desired temperature.
[] Press the COOKING rIME pad.
NOTE."If your reciperequkespreheatl)_g,you
mayneed toaddadditbnal t/meto thelength of
the cookl))gtime.
[] Using the number pads, enter the
desired baking time. Maximum time
that can be entered in minutes is 59.
Cooking times more than 59
nlinutes should be changed to houi_
and minutes. For example, enter 90
minutes as 1 lm 30 minutes. The
oven temperatm'e and the cooking
time that you entered will be
displayed.
[] Press the START pad.
The display shows the oven temperature
that w_u set and the cooking time
com_tdown. The display starts changing
once the mmperamre reaches lO0°E
The oven Mll continue to cook fi)r the
programmed amount of time, then shut
off automatically, tmless the Cook and
Hold teatm'e was set. See the Special
features of your lower ovencontrol section.
Press the CLEAR/OFFpad to clear the
display,
How to Set a Delayed Start and Automatic Stop
Youcanset the ovencontrol todelay-start the
oven,cookfora specific length of tbTeand then
turn off autornat/ca//y.
Make sm'e the clock shows the correct
time of din. I/ I
[] Press the BAKEpad.
[] Llsing the mmlber pads, enter the
desired temperature.
[] Press the COOKING TIME pad.
NOTE."If your rec/))erequkespreheat/)_g,you
mayneed toaddadditbna/ tkne to the length of
the cookl)_gt/?ne.
[] Llsing the number pads, enter the
desired baldng time. Maximum time
that can be entered in minutes is 59.
Cooldng times more than 59
minutes shotfld be changed to hems
and minutes. For example, enter 90
minutes as 1 hr. 30 minutes. Tile
o\'ell temperattlI'e and tile cooldng
time that you entered will be
displayed.
[] Press the BELAYSTART pad.
Using tile mmfl)er pads, enter the
[]
tim e of da } }o t i _a lit the eve Ii t (
ttlrn oll alld start cooking.
F_7
Press the START pad.
NOTE."An attention tone will sound ff youare.
us/)Tgtkned bak/)Tganddonot press the START
padafter enten)_gthe bak/)_gternperature.
If vou would like to check the times vou
have set, press the OELAYSTARTpad to
check the sta_ time you have set or press
the COOKING TIME pad to check the
length of cooldng time you have set.
\_l_en the oven tm'ns on at the time of
clay you have set, the display will show the
changing temperature (starting at IO0°F)
and the cooldng time cotlntd(ywn, The
display starts changing once the
temperatm'e reaches 100°E
The o\en will continue to cook fbr the
programmed am(rant of time, then shut
off automatically, mfless the Cook and
Hold feature was set. See the Specls/
features of your lower ovencontrol section.
Press the CLEAR/OFFpad to clem" the
displa>
29
Page 30

Adjust the lower oven thermostat--Do it yourself!
Youmay find that your new oven cooks differently than the one it replaced. Use your new oven for a few
weeks to become more familiar with it. If you still think your new oven is too hot or too cold, you can adjust
the thermostat yourself.
Do not use thermometers, such as those found in grocery stores, to check the temperature setting of your oven.
These thermometers may vary20-40 degrees.
NOTE"Thisadjustment will only affect baking and roasting temperatures; it does not affect broiling or self-cleaning
temperatures. The adjustment will be retained in memory after apower failure.
To Adjust the Thermostat
[] Pressthe BAKEand BROILH!/LO
pads at the same time tot 3 seconds
until the display shows SF.
[] Press the BAKE pad, A two digit
number sho_s in the disl)la ).
Press BAKEonce U) decrease
(-) the oven temperature, or
twice to increase (+).
[] The o',en temperatm'e can be
@
a(!iusted up to (+) 35°F hotter
or (-) 35°F coolex: Press the nunlber
pads the same way pm read them.
For example, to change the oven
temperatm'e 15°g press I and 5.
[] _'_hen you haxe made the
a(!iustment, press the START
pad to go back to the time (ff
day displa}: Use w)m" oven as
vou would nom_allv.
Thetypeofmargarine will affect bakingperformance!
Most recipes for baking have been developed using high-fat products such as butter or margarine (80% fat). If you
decrease the fat, the recipe may not give the same results as with a higher-fat product.
Recipe failure can result if cakes, pies, pastries, cookies or candies are made with low-fat spreads. Thelower the fat
content of a spread product, the more noticeable these differences become.
Federal standards reqlfire products labeled "margarine" to contain at least 80% lilt by weight, ixmqht spreads, on the
other hand, contain less tilt and more water: The high moisture content of these spreads afli_ct the textm'e and flavor
of baked goods. Fox" best results with your old til\'orite recipes, use inargarii_e, butter or stick spreads coi_tnilfing at least
70% vegetable oil.
3O
Page 31

Usingthe self-cleaning lower oven. gecom
The oven door must be closed
Wipe up heavy soil on flTeoven
bottom.
I!i
and all controls must be set correctly for the cycle to work properly.
Before a Clean Cycle
_(,\'e reconm/end venting y(:,ur kitchen
with an open window or using a
ventilation tim or hood dtwing the fi_t
seltk'lean cycle.
Remoxe tile broiler pan, broiler grid, all
cookware and am' almninmn fi)il fl'om
the o_en.
The o_,en shel',es can be selgcleaned,
but they will darken lose their luster and
become hard to slide.
How to Set the Oven for Cleaning
[] Press tile SELFCLEANpad.
[] Using tile number pads, enter tile
desired clean time, if a time other
than 4 horns is needed.
Clean cycle time is nommllv 4 hom_. You
can change tile clean time to an) time
bet\_ een .3 hom_ and 5 hom_, del)ending,
on how dirty VO/li" oxen is.
[] Press tile STARTpad.
Do not tlse abI'asives or oven cleaneis.
Clean the top, sides and outside oI the
()veil door with soap and _,;lter.
Make sure the oven light bulb cover
(on some models) is in place and the
oven light is off.
IMPORTANT'.Tile health of some birds
is extremely sensitive to the fimles given
off (hwing the self:cleaning cycle ot any
oven. Move birds to another well
ventilated room.
Tile door locks automatically: Tile display
will show the clean time remaining. It will
not be possible to open tile oven door
tmtil tile temperatm'e drops below tile
lock temperature and tile LOCKED(>r
LOCKEDDOORlight goes off.
When tile LOCKEDor LOCKEDDOORlight
goes off, you will be able to open tile
(lo()i'.
_: Tile word LOCKEDor LOCKEDDOORwill
flash and tile oven control will signal if
you set the clean cycle and tmget to
close tile oven dooi:
To stop a clean cycle, press tile
CLEAR/OFFpad. X,\llen tile LOCKED(>r
LOCKED DOORlight goes oil indicating
the oven has cooled below the locking
temperature, y(m will be able to open
tile dora:
31
Page 32

Usingthe self-cleaning lower oven.
The oven door must be closed and all controls must be set correctly for the cycle to work properly.
Hew to Belay the Start of Cleaning (availableonJKP86modelsonly)
[] Press the SELFCLEANpad.
[] Using the nunlber pads, enter the
desired clean tiine.
[] Press the OEL4gSTART l)ad" The
earliest start tiine you can set will
appear in the displa).
[] Lrsing the nuinber pads, enter the
tiine of day xou want the clean cxcle
to start.
[] Press the START pad,
After a Clean Cycle
Y)u nlav notice soine white ash in the
oven. _4]i)e it up with a daInp cloth after
the ()veil cools.
If whitespotsrema&removethemwitha
soap-filledsteelwoolpadandrinsethoroughly
with a vinegar and water mlkture.
These deposits are usually a salt
residue that cannot be renloved by
the clean cycle,
If the oven is not clean after one clean
cycle, repeat the cycle.
The door locks automatically: The display
will show the start tiIne. It will not be
possible to open the oven door until
the teinl)erature drops below the lock
ten/l)erature and the LOCKEDor LOCKED
DOORlight goes off.
_4q_ei1 the LOCKED or LOCKED DOOR light
goes off, you will be able to (/pen the
(looi:
iJi::_O)u cannot set the oven fi)r cooking
until the o_en is cool enough ti)r the
door to t/nlock.
_: \_lfile the oven is sel6cleaning, you
can press the CLOCK pad to display
tile tiine ot day: To return to the
clean countdown, press the COOKING
TIME pad.
::Ji::If the shelves becon/e hard to slide,
apply a sn/all anlount of vegetable oil
or cooking oil to a paper towel and
wipe the edges of the shelves with the
paper t()wel.
32
Page 33

Camandcleaningofthecookingcenter, go.corn
Be sure electrical power is off and all surfaces are cool before cleaning anv part of the cooking center.
How toRemoveProtective ShippingFilm and Packaging Tape
Carefldly grasp a comer of the protective
,tlshi_ )ing, film with _our, fingers and slowl_ peel
it fl'om the appliance surflme. Do not use atV
sharp items m remove tile fihn. Remo_e all of
the film before using tile appliance tor tile
first time.
Microwave Oven
Do not useacommercial ovencleaneron any
part of yourmicrowave oven.
Romovab/o Turntablo and Turntable Support
To pre`, ent break;_ge, do not place the
turntable into water just after cooking.
Wash it carefld]y in wam_, sudsy water or
in the dishwashen
The mrnmb]e and support can be
broken if dropped. Remember; do not
operate the microwave oven without the
turntable and suppot_ in place.
To replace tile suppot*, place its center
post in the hole. Turn the support
arotmd imtil it seats into phce.
/nsido
Keep the microwave oven clean and
sweet-smelling. Opening the oven door a
few minutes after cooldng helps air out
the interiol: An occasional thorough
wiping with a solution of baking soda
and water keeps the interior fl'esh.
Spills and spattel_ are easy to remove
fi'om _:dls and floor if they axe wiped
up soon after the tbod is removed.
Some spattet_ wipe up with a paper towel,
some may require a damp cloth. P,emo`, e
greasy spattel_ with a sudsy cloth, then
rinse all(| (ix",.
To assure no damage is done to d_e finish
of the product, the safest _%vto remo_e
the adhesive fl'om packaging tN)e on ne_
appliances is an q)plicadon of a household
liq/lid dish_v:lshing dewrgent. ,_q)plywith a soft
cloth and allo*_to soak.
NOTE:Theadhesivemustberemovedfromallparts.
Itcannotberemovedif itisbakedon.
Do not useabrasives,suchasc/eanlbgpowders
or steel andp/ast/cpads. Theymay mar the
surface.
Outside
Clean the outside of the microwave oven
with soap and a damp cloth, then rinse
with a damp cloth and dl?:. Wipe the
window clean with a damp cloth. ( hrome
is best wiped with a damp cloth and then
with a dry towel.
Boor Surface
\'\]_en cleaning surfimes ot door and o`,en
that come together on closing the door;
use only mild, non-abrasive soaps or
detergents applied with a sponge or
soft cloth.
Do not dean win metal scounbgpa& Pieces
canbreakoff the pad,causlbgelectrical shock.
Wipe up spattet_ on the window on
the inside of the door daily. When the
window is soiled, wash it with a damp
cloth. Rinse thoroughly all(| dr`,.
Wipe metal and plastic pat_s on the
inside of the door frequently. Use a damp
cloth to rein(we all soil.
33
Page 34

Careand cleaning ofthe cookingcenter.
Lift-Off Oven Door
Slot
Hingelock
Pull hinge locks down to unlock
Removalposition
Thedoorisveryheavy.Becarefulwhen
removingandliftingthedoor.
Donotlift thedoorbythehandle.
Toremovethedoor:
[] Fully open tile dora:
[] Pull tile hinge locks down toward
tile door flame, to tile mllocked
position. A tool, such as a small fiat-
blade screwdriver, may be required.
[] Fimlly grasp both sides of tile door
at tile top.
[] Close door to tile door removal
position, which is half Win between
tile broil stop position and flfllv
closed.
[] I,ifi door up and out tmfil tile hinge
am/is clear of tile slot.
To replace the door:
[] Fimll) grasp both sides of tile door
at tile top.
[] _'_ith tile Bottom Hin'gearrn
door at tile edge
sanle angle as of slot,,
tile i'ei/lo', a]
position, seat tile
indentation of
tile hinge ann Indentation
into tile bottom
edge of tile hinge slot. The notch in
tile hinge am/m list be filllv seated
into tile 1)otmm of tile slot.
Fully open tile dora: If tile door will
[]
not fl/lly open, tile indentation is
not seated correctly in tile bottom
edge of the slot.
Push tile hinge, locks uI ) aoainst_ tile
[]
fl'ont fl'ame of tile oxen caxitv to tile
locked _osition.
Hinge
arm
Do not rub or clean the door gasket--
it has an extremely low resistance to
abrasion.
If you notic e the gasket becoming worn,
frayed or damaged in any way or if it has
become displaced on the door, you should
have it replaced.
Toclean the &side of the door:
Because tile area inside tile gasket is
cleaned during the sellk'lean c',cle _ou
do not need to clean this 1)'_hand.
?:! Tile area outside tile gasket and
tile door liner can be cleaned with a
soap-filled or plastic scouting pad,
hot water and detergent. Rinse well
with a vinegar and water solution.
To clean the outside of the door'.
iJi::Use soap and water to thoroughly
clean the u/p, skles and front of the
()veil dooi; ]_dnse well. Ybu Ill}IV }llso
use a glass cleaner to clean tile glass
on tile outside of tile (lore: Do not let
water drip into tile vent openings.
lock
Hinge_ _-_
Push hinge locks up tolock
[] Close tile oven dooI:
iJi::If any stain oil tile door vent trim is
pei_istent, use a soft abrasive cleaner
and a sponge-scrubber fi)r best Iesults.
_: Spillage of marinades, fl'uitjuices,
t()mato sauces and basting materials
containing acids may cause
discoloration and should be wiped
up immediately. _4]/en surlilce is cool,
clean and rinse.
!;>Do not use oven cleanei3, cleaning
powdei_ or hai_h abrasixes on the
outside of the (loot:
34
Page 35

Lower Oven Light Bulb (onsomemodels)
ge.com
z |
| |
31/2,
Maximum i
Glasscover
_eceo[acle
/
Glasscover
|
Socket
Bulb
Tab
NOTE: Theglasscover (onsome models)should
beremovedon/}/whencold Weannglate;(gloves
may offer abettergrip.
Before replacing the bulb, disconnect
electrical power m the oven at the main
fllse or drcuit breaker panel. I,et the
bulb cool completely befi)re removing it.
For yore" safety, do not touch a hot bulb
with a damp cloth. If you do, the bulb
will break.
To remove:
Tm'n the glass cover cotmterclockwise
1/4 turn tmtil the tabs of the glass cover
clear the grooves of the socket. Remove
the bulb.
Lower Oven Light Bulb (onsomemodels)
NOTE." The glass cover (on some
models) should be removed only when
cold. Wearing latex gloves may offer
a better grip.
CAUTION.Before replacing your
oven light bulb, dbconnect the electrical
power to the oven at the main fuse or
circuit breaker panel.
Be sm'e to let the light cover and bulb
cool completely:
For yore" saff't,/, do not touch a hot bulb
with bare hands or a damp cloth.
Toremove:
[] Tm'n the glass co_er
cotmterclockwise l/4 turn until the
tabs of the glass cover clear the
grooves of the socket.
Using glo_es or a (l D cloth, relnoxe
[] tile bulb b', pulling it straight out.
Toreplace:
[] Use a new 130-volt halogen bulb,
not to exceed 50 watts.
Using glo_es or a
[] ., , , (hT cloth, remoxe
tile bulb ti'om its packaoino Do not
touch the bulb with bare fingers.
Toreplace:
Put in a new 40-watt appliance bulb.
Place the tabs of the glass cover into the
grooves of the socket. Tm'n the glass
cover clockwise 1/4 turn.
NOTE."
Z_A 40-wattappliancebulbissmallerthana
standard40-watthouseholdbulb.
Z_Instaflandtightenthecoverclockwise.
iJGReconnectelectricalpowertotheoven.
iJGFori_nprovedhghtlwinsidetheoven,clean
theglasscoverfrequent/}/usinga wetc/oth.
Thisshou/dbedonewhentheovenis
completelycool.
Receptacle
4
(
[] Push tile bulb straight into tile
receptacle all tile way:
[] Place tile tabs of tile glass coxer into
tile grooxes of tile socket. Turn tile
glass cover clockwise 1/4 turn.
For improved lighting inside
tile oven, clean tile glass cover
fi'equently using a wet cloth. This
should be done when tile oven is
completely cool.
[] ]_,ec(mnect electrical power to
tile oxen.
Usegloves
orcloth
35
Page 36

Careand cleaning ofthe cookingcenter.
Oven Shelves floweroven)
Clean tile oven shelves with an abrasive
NOTE:Theoven shelves maybe
cleaned h7theself-cleaning oven.
However,the shelveswill darken h7
color,lose their luster andbecome
hard toslide ff cleaned duringthe
self-cleaning cycle.
cleanser or steel wool, ,Mter cleaning,
rinse the shelves and rack with clean
water and (h_' with a clean cloth,
Lower Oven Heating Elements
Donotcleanthebakeelementorthebroil
dement Any sell will burn off when the
elements are heatecL
To make tile shelves slide more easily,
apply a small amount of vegetable oil or
cooking oil to a paper towel and wipe tile
edges ot the oven shelves with the paper
towel,
To clean tile oven floo_; gently lift tile bake
element, Clean with wam_ soapy water;
z
After broiling, remove the broiler
pan from the oven.
Broiler Pan & Grid floweroven)
Do not dean the brol/er pan or gM /)_a
se/f-c/ean/ng oven,
_Mter broiling, remove tile b*'oiler pan
fl'om tile oven. Remove tile g_icl fl'om tile
pan. Careflflly pour out the giease fl'om
tile pal* into a proper containen
_hsh and rinse tile broiler pan and g_icl
in hot water with a soap-filled or plastic
scouting pad.
ControlPanel
It's a good idea to wipe tile control panel
after each use. (lean with mild soap and
water or vinegar and watel; l_inse with
clean water and polish (hy with a soft
cloth.
If fi)od has bm'ned on, sp*_inlde tile grid
with dete*gent while hot and co\ er with
wet paper towels or a dishcloth. Soaldng
tile pan will remedy burned-on fi_ods.
Both the broiler pan and gl_id may be
cleaned with a commeicial o\en cleanel:
Both tile b*'oiler pan and grid can also be
cleaned in a dishwashel:
Donot storea SOl/edbrol/erpanand gnd
anywhereb the cookingcenter
Do IlOt t/se abI'asive cleansei_, strong
liquid cleansel% plastic scom_ing pads or
oven cleaners on the control panel--they
will damage the finish. A 50/50 solution
(ff vinegar and hot water worl<s well.
36
Page 37

Before YouCallForService...
Troubleshooting -tips
Save time and money! Review the charts on the following
pages first and you maynot need to call for service.
ge.com
Possible Causes
Controlpanelon You forgot to press the
microwave oven START pad.
Door not securely closed. • Make sure tile microwave oven door is closed.
Another function was pressed. • Press tile CLEAR/OFFpad twi(e to cancel it and beg_n
The CLEAR/OFFpad was • Begin again.
pressed accidentally.
Oven controls • \_'hile using Time Defrost, numbers not entered after
improperly set. l/ressin"_ the AUTO DEFROST pad.
"SENSOR ERROR" During a sensor • The microwave oven door shotdd not be opened
appears in the function the microwave before tile time begins to (otmt down in the display.
microwave oven oven door was opened
display too soon.
Microwave oven light Light bulb is loose • Call for service.
does not work or defective.
Foods overcooked or Varying density mad ainount • Vm3,ing density and amount somefiines require more
undercooked in the of foods being cooked, c()()king time.
microwave oven
Food not tunaed or stirred • Tm'n or stir toed and begin again.
as called for ha the recipe.
Too many dishes ha the • Do not overh)ad v()[/l" illiCl'OW_lVeoven.
oven at the same time.
What ToDo
• Press tile START pad.
again.
Food not thoroughly defrosted, • See the Using the microwave sensor controls section.
hnproper cookwaJ'e or • See the Microwave safe cookware section of the
coverings being used. ImportantSafety Instructionssection.
Humidity or moisture in • Make St/l'e tile inside of the oven and tile outside of
the oven will lessen the the ('ont_fine_s are d_a'.
Sensor cooking time.
Food not allowed to stand. • Some standing time is recomniended for certain
vegetables cooked with the Sensor Controls.
Clock and timer A fuse ha your home may be • Replace the fl/se (>rreset the circuit breaker:
do not work or blown or the circuit breaker
display goes blank tripped.
Controls improperly set. • See the Using the clock and lower oven timer sec-ti()n
h)r the lower oven clock.
• See the Display On/Offse(tion for the microwave oven
clock.
The clock is in the • See the Special features of your lower oven control
black-out mode. section for the lower oven (h)('k.
• See tile Display On/Offsecdon tot tile microwave oven
clock.
37
Page 38

Before YouCallForService...
Troubleshooting tips
Possible Causes What ToDo
"F-- anda numberor You have a function
letter"flashinthe error code.
lower oven display If the function code • Disconnect all power to the cooking center for at
repeats, least _40 secouds aud theu recouuect l)ower./f the
Display flashes Power failure. • Reset the h)wer oven clock.
Unable to getthe Oven control pads were • The BAKE and BROILHI/LO pads must be pressed
lower oven display not pressed properly, at the same time and held fl)r 3 seconds.
to show "SF"
Lower oven temperature Oven thermostat needs • See the Adjust the lower oven thermostat--Do it
too hot or too cold adjustment, yours elf! secti()u.
Lower oven will A fuse ha your home may • Replace the fuse or reset the circtfit breakel:
not work be blown or the circuit
breaker tripped.
Oven controls improperly set. • See the Using the lower oven section.
• Press the CLEAR/OFFpad. _Mlow the o',en to cool fin" one
houI; Put the oxen back into operation,
ftulctiou eli01" code l"el)e_lts, call for service,
Lower oven control You forgot to enter • Press the BAKE pad and desired temperature or the
signalsafter entering a bake temperature SELFCLEANpad and desired clean time.
cooking time or or cleaning time.
Fooddoesnotbakeor Oven controls hnproperly set. • See the Using the lower oven section.
roastproperlyinthe
lower oven Shelf position is incorrect • See the Using the lower oven se(tion.
or the shelf is not level,
Incorrect cookwaxe or • See the Using the lower oven section.
cookware of improper size
being used.
Oven thermostat needs • See the Adjust the lower oven thermostat--Do it
adjustment, yourself! section.
Fooddoes notbroil Oven controls hnproperly set. • Make sure you press the BROILHI/LOpad.
properlyin the
lower oven hnproper shelf position • See the Broiling Guide.
being used.
Cookware not suited • Llse the broiling l)an and grid that came with your oven.
for broiling,
Aluminum foil used on the • See the Using the lower oven secti()u.
broiling pan mad grid has not
been fitted properly mad slit
as recommended.
In some areas the power
(voltage) may be low.
• Preheat the broil elelnent for 10 ininutes.
• Broil for tile h)ugest period (If tilne recolnlnended
ill the Broiling Guide.
38
Page 39

ge.com
iii i iiiI!iiiiillllllllllllllli
Lower oven light does
not work
Lower oven will Oven controls * See tile Using the serf-cleaning lower oven section.
not self-clean improperly set.
"Crackling" Or This is the sound of the metal * This is normal.
"popping" sound heating mzd cooling during
in the lower oven both the cooking and
Excessive smoking in Excessive soil. * Press tile CLEAR/OFFpad. Open tile windows to rid tile
the lower oven during room of smoke. _Vait until tile LOCKEDor LOCKED
Lower oven door will Oven too hot. * Allow tile oven to cool below h)cking teml)erature.
not open after a
c!ean cyc!e
Lower oven not clean Oven conlrols improperly set. * See tile Using the self-cleaning lower oven section.
after a clean cycle
Possible Causes What To Do
Light bulb is loose or defective. * Tighten or replace tile bulb.
Pad operating light is broken. * Call for service.
The oven temperature is * Alh)w tile oven to cool and reset tile controls.
too high to set a self-clem_
operation.
clemlhzg functions.
DOORlight goes off. _ipe up tile excess soil and reset
the clean c_cle.
Oven was heavily soiled. * Clean up hear) spillo_ers before starting tile dean
c_cle. Heavily soiled ovens may need to sell=clean
again or for a hmger period of time,
"LOCKED"or .LOCKED The self-clean cycle has been * Ch)se tile o',en door.
DOOR"flashes in the selected but the door is not
!ower oven display closed.
LOCKED or "LOCKED The oven door is locked * Press tile CLEAR/OFFpad. Allow tile o_en to cool.
DOOR"light is on when because the temperature
you want to cook in the inside the oven has not
lower oven dropped below the locking
temperature.
Power outage, Power outage or surge. * Reset tile oh)ok. If tile o_,en was in /Ise, }ell must reset
clock flashes it by, I)ressing, tile CLEAR/OFF pad, setting, the clock
and resetting any cooking flmction.
"Burning" or "oily!" This is normal in a new oven * To speed tile process, set a sel6clean cycle for a
odor emitting from and will disappear in time. minimmn of 3 hem s. See tile Using the self-
oven vent when using cleaning lower oven section.
the lower oven
Strong odor in the An odor from the insnlation * This is teu/l)orary.
lower oven around the inside of the
oven is normal for the first
few times the oven is used.
Fan noise when using A cooling fan may * This is normal. Tile cooling Inn will tm'n on
the lower oven automatically turn on. to cool internal parts. It ma) xtm for up to
1-1/2 hem's in 30" models and up to 2 hem's
in 27" models after tile oven is turned off. _
Page 40

m
Notes.
,0
_rJ
m
m
x=
m
4O
Page 41

GE Service Protection Plus"
GE, a name recognized _orldwide for quality and dependability; of]%rs yon
Service Protection Plus'_'--comprehensive protection on all yore appliances--
No Matter What Brand!
Benefits Include:
• Backed by GE
• All brands covered
• Unlimited service calls
• All parts and labor costs included
• No out-of-pocket expenses
• No hidden deductibles
• One 800 number to call
You _ill be completel} satisfied with ore" serxice protection or }ou ma} request )our mone) back
on the remaining value of }our contract. No questions asked. It's that simple.
Protect your refl'igerator, dishwasher, washer and dryer, range, TV_ VCR and m uch more--a_y brand!
Plus there's no extra cha_ge for emergency service and low monthly financing is available. Even icemaker
coverage and _i)od spoilage protection is o_tbred. You can rest easy, knowing that all your valuable
household products are protected against expensive repairs.
Place ,our confidence in (;E and call us in the U.S. toll-free at _UU.OZD.ZZZ_
for n/ore infoFI//atiOll,
%M1I)l",mds (oxered, tip to 20 )<ars old, in the _ominemal [.S.
We'll CoverAny Appliance.
Anywhere. Anytime.
Please place in envelope and mail to:
General Electric Company
Warranty Registration Department
EO. Box 32150
Louisville, KY 40232-2150
41
Page 42

Consumer Product Ownership Registration
Dear Customer:
Thank you for purchasing O/li product and thank you tbr placing your confidence in us.
_;e are proud to haxe you as a customer!
Follow these three steps to protect your new appliance investment:
Complete mid mail
your Consumer
Product Ownership
Registration today:
Ilavc the pcm'c ot
mind of knowing we
CAll CoIItAct yOl/ ill
th{ unlikely event of a
satt*tv modification.
After mailing the
registration below,
store this document
in a sail.*place. It
COlltaillS ill[k)l'lll_ltiOll
you will need should
Vail require service.
Our service numl>er is
800.GE.CARES
(800.432.2737).
Read vour Owner's
Manual careftfllv
It will hel l) you
operate VOIlI" lleW
appliance properl);
Model Number Serial Number
I I I
Important: If you did not get a registration card with your
product, detach and return the form below to
ensure that your product is registered, or register
................................................................................................... _-Cut here
online at ge.com.
Consumer Product Ownership Registration
Model Number Serial Number
M_: his. Mrs. Miss
Name I I I I I I I I I Nam( I I I I I I I I I I I I
Street I I
Address I I I I I I I I I I I I I I I I I I I I I I I I
I I I I I I 1;Anail Address*
I I I I I I I I
Day I I ] "%at] I ]
* Please provide your e-mail addre,,s to receixe, xia e-mail, discounts, special offers and other important
communications fl-om GE Appliances (G1L\).
Check here ifvou do not want to lvceive communicalions fronl G1LVscarefiflly selected parmel:,.
FAILI JRE TO COMPLETE AN[) RETI 7RN Tt tlS CM_,D DOES NOT DIMINISt t Y( )l JR
i _:M(I_KN'[Y RIGI ITS.
For more inlin malion about (;15\'s privaQ" and data usage poli( 3, go to ge.com and click on
"Privacy Poli_y" or call 800.626.2224.
, , I
Pholle
NIIIIIIX_F I
S.a,,I I ] C,,d,_ I I I I
Zip I
I , I-I , , Iq , , ,
Dale l)l Ic( d
42
Apl. # I I I
Cib' I I I
hi Use I I I
Monlh
GE Consumer & Industrial
Appliances
General Electric Company
Louisville, KY 40225
ge.corn
I
I
Page 43

GEBuilt-In Microwave CookingCenterWarranty.
Aft warranty service provided by our Factory Service
Centers, or an authorized Customer Care®technician.
Toschedule service, on-line, 24 hours a day, vis# us
at ge.com, or call 800.GE.CARES (800.432.2737).Please have
serial number and model number available when calling for service.
GEWill Replace:
Any part of the microwave cooking center which tifils due to a defect in materials
Fromthedateof the
originalpurchase
_: Service trips to your home to teach you how to use
the product.
!i_:huproper h_stallation, delivery or maintenance.
::Ji::Failure of the product if it is abused, misused, or
used for other thm_ the intended purpose or used
commercially.
!i_:Replacement of house fuses or resetting of
circuit breakers.
or workmanship. During this limited one-year warranty, GE will also provide,
free of charge, all labor and in-home service to replace the (lei_'cti\'e part,
Staple your receipt here.
Proof of the original purchase
date is neededto obtain service
under the warrantz
_: Damage to the product caused by accident, fire,
floods or acts of God.
_: h_cideutaJ or consequential damage caused
by possible defects with this appliauce.
::Ji::Damage caused after delivery.
!i/:Product not accessible to provide required service.
EXCLUSIONOFIMPLIED WARRANTIES--Your sole and exclusive remedyis productrepa# as provided inthisLimited
Warranty.Any implied warranties, includiug the implied warranties ofmerchantability or fitnessfor a particular purpose,
are limited toone year or the shortestperiod allowed by law.
This warranty is extended to the original purchaser and any succeeding owner for products purchased for
home use within the USA. If the product is located in an area where service by a GEAuthorized Servicer is not
available, you may be responsible for a trip charge or you may be required to bring the product to anAuthorized GE
Service location for service. In Alaska, the warranty excludes the cost of shipping or service calls to your home.
Some states do not allow the exclusion or limitation of incidental or consequential damages. This warranty
gives you specific legal rights, and you may also have other rights which vary from state to state. To know
what your legal rights are, consult your local or state consumer affairs office or your state's Attorney General
Warrantor: General Electric Company.Louisville, KY40225
43
Page 44

ConsumerSupport.
Hme a question or need assistnn(e with your appliance? Try tile GE Al)pliances _bsite 24 hom_ a (lm'
l GEAppliancesWebsite ge.com
any da) of the }ear! For greater comenience and tipster serxice '_ou can now download Owner's Manuals,
order parts, catnlogs, or e_en schedule se_ice on-line. Yim can also "_sk Om Team of Experts '"
yo//I" qt/estions, and so Illtlcl/iiloi'e...
ScheduleService
Expert (;E repair service is onl) one step awm ti'om _om" dora: Get on-line and schedule _om" se_'ice at
veto" comenience 24 hom_ an} day of the year'. Or call 800.GE.(_ARES 800.432.2737) dining mmnal
business hom_.
ge.com
RealLifeDesignStudio ge.com
(;E supports tile Universal Design concei)t--produrts, services and enviromnents that can be used by
people of all ages, sizes and capabilities. _'e recognize tile need to design fin" a wide range _ff physical and
mentnl abilities and impaim_ents. For details of GE's Universal Design applications, including kitchen
design ideas fin" people with disabilities, check O/l[ O/li"Website today. For the hearing impaired, please call
800.TDD.GEAC (800.833.4322).
ExtendedWarranties
Purchase a (;E extended warrant_ and learn about special disco/rots that are available while )our warrant)
is still in effect. Y}m can pro'chase it on-line anytime or call 800.626.2224 dtwing nomml business hom_.
(;E Consulner Home Sei_,ices will still be there after yore" warranty expires.
PartsandAccessories
ge.com
ge.com
Individuals qualified to service their own appliances can have parts or accessories sent directly to their
homes (VISA, MasterCard and Discover cards are accepted). Order on-line today, 24 hom_ every day or
by I)hone at 800.626.2002 duling nomml business houi_.
Instructions contained in this manual cover procedures to be performed by any user.Other servicing generally
should bereferred to qualified service personnel. Cautionmust be exercised, since improperservicing may cause
unsafe operation.
ContactUs
If you are not satisfied with tile service wm receive fl'om GE, contact us on our X&'ebsite with all tile detnils
including yore" phone nmnbe_; or write to: General Manage_; Customer Relations
GE Appliances, Appliance Park
Ixmisville, KY 40225
"] RegisterYourApplbnce
enhanced commmlication and prompt service trader the temls of ?our warrant', sho/dd tile need arise.
l Register your new appliance on-line--at your convenience! Time]} product registration will allow fi)r
You ma} also mail in tile prepfinted registration cm'd included in tile l)acldng, material.
Printed in flTe United States
ge.com
gO. COJTI
 Loading...