

Page 1
GEAppliances
The electrica! output of the
microwave oven in this cooking
center is 1000 watts.
(IEC-705TestProcedure)
Part No. 764D3333P755 Pub, No, 49-8923 77-98 CO
Page 2
IMPORTANTSAFETYINFORMATION.
READALLINSTRUCTIONSBEFOREUSING.
WARNING!
Foryour safety, the information in this manual must be followed to minimize the risk of fire or
explosion, electric shock, or to prevent property damage, personal injury, or loss of life.
PRECAUtiONSTOAVOIDPOSSIBLEEXPOSURETOEXCESSIVE
MICROWAVEENERGY
Do not attempt to operate this oven with
the door open since open-door operation
can result in hamfful exposure to
microwave enerD,. It is important not to
defeat or tamper with the safety interlocks.
Do not place any ol?ject between tile oven
fiont face m_d the door or allow soil or
cleaner residue to acounulate on sealing
surfaces.
; The oven shoukl not be adjusted or
repaired by an}<me except properly
qualified service personnel.
Do not operate tim oven if it is damaged. It
is paniculmty important that fl_eoven door
dose properly and that there is no damage
to the:
[] door (bent)
[] hinges and latches (broken or
loosened)
[] door seals and sealing suflhces.
MICROWAVETERMSANDDEFINItiONS
Arcing
Arcingisthemicrowavetermfor,sparksib theoven.Arcing
iscausedby:
metalorfoil touchingthesideof theoven.
_,foilthatSnotmoldedtofood(upturnededgesact
likeantennas).
;;;;;;_,metalsuchastwist-ties,poultrypins,gold-rimmed
dishes.
:, recycledpapertowelscontainingstoatmetalpieces.
Covering
Coversholdin moisture,allowformoreevenheatingarid
reducecookingtime. Ventlbgplasticwraporcovenbgwith
waxpaperallowsexcesssteamtoescape.
Shielding
Ina regularoven,youshieldchickenbreastsorbaked
foodstopreventover-browning.Whenmicrowawbg,you
usesmafl,stripsoffoilto,shieldthinparts-,suchasthetips
ofvwbgsandlegsonpoultry,whichwouldcookbefore
largerparts.
StandingTime
Whenyoucookwithregularovens,foodssuchasroasts
orcakesam allowedto standtofinishcookingorto
set,Standingtimeisespeciallyimportantinmicrowave
cooking.Notethata microwavedcakeisnotplacedon
acoolingrack.
Venting
Aftercoveringadishwithplasticwrap,youventthe
plasticwrapbyturningbackonecomer,soexcess,steam
canescape.
2
Page 3
IMPORTANTSAFETYNOtiCE
TheCalifomia Safe Drinking Water and Toxic Enforcement Act requires the Governor of California to
publish a list of substances known to the state to cause cancer, birth defects or other reproductive
harm, and requires businesses to warn customers of potential exposure to such substances.
Thefiberglass insulation in self-clean ovens gives off a very stoat amount of carbon monoxide during
the cleaning cycle. Exposure can be minimized by venting with an open window or using a ventilation
fan or hood.
SAFETYPRECAUtiONS
When using electrical appliances, basic safety precautions should be followed, including the following."
WARNING--Toreducetheriskofburns,
electricshock,fire,injur7 topersonsor
exposureto excessivemicrowaveenergy:
Use this appliance only for its intended use
as described in this manual. Do not use
conosive chemicals or ww)rs in tMs
applim_ce. This cooking center is specifically
designed to heat or cook tood, and is not
inmnded Ibr lahorato U or industrial use.
Be sure your appliance is properly installed
and glounded hy a qualified technician in
accordance with the provided Installation
Instl uctions.
Have the installer show you the location of
the circuit hreaker or fuse. Mark it for easy
reference.
Be sure the cooking center is securely
installed in a cahinet that is fhmly attached
to the house structure. Weight on the oven
door could cause the oven to tip and result
in ii_juU. Never allow anyone to climh, sit,
or hang on the oven door.
This appliance nmst he connected to a
g]ounded, metallic, permanent wMng
system, or an equipment glounding
conductor should he mn with the circuit
conductors and connected to the
equipment glounding terminal or lead
on the appliance.
This appliance should he serviced only hy
qualitied sewice personnel. Contact
nearest authorized sewice facility tot
examination, repair or adjusm_ent. Do not
repair or replace any part of this appliance
unless specifically recommended in this
inanual. All ofimr sewicing should he
relerred to a qualified technidan.
Do not store this appliance outdoors.
Do not use tl_isproduct near wa/er-tbr
example, in a wet hasement, or near a
swimming pool.
Befbre perlbnning any se_s'ice, disconnect
the cooldng center power supply at the
household disuibution panel hy reinoving
the fuse or switching oft the cirodt
breaker.
Do not operate this appliance ifit has a
damaged cord or plug, if it is not working
properly, or ifit has heen damaged or
dropped.
Do not leave children alone-children
should not be left alone or unattended in
an area where appliance is in use. They
should never he allowed to sit or stand on
any part of the appliance.
Don't allow anyone to dimh, stand or
hang on the door. They could damage
the cooking center and cause severe
personal ii_juU.
3
Page 4
IMPORTANTSAFETYINFORMATION.
READALLINSTRUCTIONSBEFOREUSING.
WARNING!
SAFETYPRECAUTIONS
Do not use water on grease fires. Never pick up a flaming pan. Smother flaming pan by covering
pan completely with well-fitting lid, cookie sheet or flat tray Flaming grease outside a pan can be
put out by covering with baking soda or,if available, a multi-purpose dry chemical or foam-type
fire extinguisher.
CAUTION:IteIns of interest to children
should not he stored in cabinets ahove an
oven; chil@en dimbing on tlte oven It
reach items could be seriously injured.
Teach dfildren not m plWwith the
controls or aW other part of the
cooking center.
Wear proper clothing, lx_ose fitting or
hanging gmments should never he worn
while using the appliance. Flammable
material could he ignited ifhrought in
contact with hot heating elements and
Illav cause severe burns.
Use only &T pot holders-moist or damp
pot holders on hot sin{aces mW result fit
hums flom steam. Do not let pot holders
Rmch hot heating eleinenLs. Do not use a
towel or other hulky cloth. Such doths can
catch fire on a hot eleinent.
:Always keep dish to_vls, dish cloths, pot
hoMers, and odmr linens a safe distance
flom your oven.
:Always keep wooden spoons mtd plastic
utensils and canned fi)od a safe distance
aw W fiol_t your oven.
Always keep comhustihle wall coverings,
curtains or drapes a sate distance fiom
your oven.
Do not s/ore flainmable material in an
oven or near the cooking center.
Do not cover or hlock any openings on the
appliance.
For your safety, never use your appliance
for winruing or heating the room.
Do not leave paper products, cooking
utensils, or food in the oven when not
in use.
Do not store or use combustible materials,
gasoline or other flammable vapors and
liquids in the vicinity of this or any other
appliance.
Do not let cooking gTease or other
flammahle materials accunmlate in or
near the cooking center.
Do not touch heating elements or interior
suflace of the oven. These suflaces m W be
hot enough m hum even though they are
dark in color. Dming and after use, do not
ouch, or let dothing or other flammable
inaterials contact any interior area of the
oven; allow sufficient time for cooling first.
Potentially hot surt_tces indude oven vent
openings, surthces near the openings, and
oevices around the oven door.
REMEMBER:The inside surface of the oven
InW he hot when the door is opened.
COOKMEATANDPOULTRYTHOROUGHLY...
Cookmeat andpoultry thoroughly--meat toat leastan INTERNALtemperatureof I60°F,andpoultry
toat least an INTERNALtemperatureof ISO°FCookingto thesetemperaturesusuallyprotectsagainst
f_)odborneillness,
4
Page 5
MICROWAVEOVEN
Read and follow the specific "Precautions to Avoid Possible Exposure ToExcessive Microwave
Energy"sectionin thismanual
Tereducetheriskoffirein theoven cavity."
Do not over-cook fbod. Careihlly attend
applimlce if paper, plastic or other
comhustihle materials are placed inside
tile oven to facilitate cooking.
Remove wire twist-ties flom paper or
plastic containers hetore placing hags
in oven.
Do not use your mi(]owave oven to d_y
newspapers.
: Do not pop popcorn in your microwave
oven unless in a spedal miaowave
popcorn accesso U or unless you use
popcorn laheled tbr use in inicrowave
()veils.
Do not over-cook potatoes. They could
dehydrate and catch fire, causing damage
to your ()veil.
Do not operate the oven while empty to
avoid damage to the oven and lhe danger
of fire. If by acddent the oven should mn
empty a minute or two, no harm is done.
However, Uy m avoid operating the oven
empty at any time-it saves energy and
prolongs tile lit;e of tile oven.
Do not use the oven for storage proposes.
Do not leave paper products, cooMng
utensils or fbod in the oven when not
in use.
If materials inside the oven should ignite,
keep oven door dosed, mm oven oft,
and shut off power at tile fuse or circuit
hreaker pmml. If the door is opened, the
file may spread.
N This Inicrowave oven is not approved or
tested fbr marine use.
Some products such as whole eggs and
sealed containers-tbr example, dosed
jars-will explode and should not he
heated in this microwave oven. Such use of
tile microwave oven could result in iI_juU.
Do not operate tile mioowave oven
without tile tumlahle and support in place.
Avoid heating haby fbod in glassjars, even
with tile lid oftl Make sure all infhm tood is
thoroughly cooked. Stir tood to disuJhnte
tile heat evenly. Be careflfl to prevent
scalding when wanning tonnula or hreast
milk. Tile conlainer mW teel cooler than
tile milk ,eally is. Always lest the milk
befbre t>eding the hahy.
Do not hoil eggs in a microwave oven.
P_essure will build up inside the egg
yolk and will cause it to hnrst, possihly
iesulting in ii_juU.
Foods with unhroken outer "sMn" such as
potatoes, sausages, tomatoes, apples,
chicken livers and other _hlets, and egg
yolks should he pierced m allow steam m
escape dining cooking.
][)on't deflost flozen heverages in ham)w-
necked hottles (especially carhonated
heverages). Even if tile container is
opened, pressure can huild up. This can
cause tile container to hurst, possihly
iesulting in ii_juU.
Hot foods and steam can cause bums.
Be careful when opening any conlainers
of hot food, including popcorn hags,
cooking pouches and hoxes. To prevent
possible iI_jmy, direct steam awW tiom
hands and face.
:As with any applimlce, close supewision is
necessai 7when used hy chil&en.
5
Page 6
IMPORTANTSAFETYINFORMATION.
READALLINSTRUCTIONSBEFOREUSING.
WARNING!
MICROWAVE-SAFECOOKWARE
Make sure all cookware used inyour microwave oven is suitable for microwaving. Most glass
casseroles, cooking dishes, measuring cups, custard cups, pottery or china dinnerware which does
not have metallic trim or glaze with a metallic sheen can be used. Some cookware is labeled
"suitable for microwaving. "
Ifyou are not sure ifa dish is microwave-
safe, use this test: Place in the oven both
the dish you are testing and a glass
measuring cup filled with 1 cup of water
set the measuring cup either in or next to
the dish. Mioowave 1nfinute at high.
If the dish heats, it should not be used
fbr microwaving.
If the dish remains cool and only the water
in the cup heats, then the dish ismicrowave-
safe.
If you use a meat thermometer while
cooking, inake sure it is safe for use in
microwave ovens.
Do not use recycled paper producls.
Re(%:led paper towels, napMns and waxed
paper can contain metal flecks which may
cause arcing or i_fim. Paper products
containing nylon or nylon filamenLs should
be avoided, as they may also ignite.
Some st}_ofbam trays (like fl_ose that meat
is packaged on) have a thin strip of metal
embedded in the bottom. "_qmn
nficrowaved, the metal can bum the floor
of the oven or i_im a paper rowel.
Not all plastic _ap issuitable for use in
microwave ovens. Check the package for
proper use.
Paper towels, waxed paper and plastic
_Tap can be used to cover dishes in order
to retain moisture and prevent spattering.
Be sure to vent plastic _Tap so steam
can escape.
Oversized fi.)od or oversized metal
cookware should not be used in a
nficroxx_tveoven. Elecuk:al shock or
fire could occur.
_qfile paper plates may be used for timed
cooling and defiosting, do not use them
with Auto Sensor cooking. Use microwave-
safe plates or bowls for reheating. Cover
with plastic x.nap.
Cookware may become hot because
of heat uanstened flom the heated
food. Pot holders m Wbe needed to
handle the cookware.
"Boilable" cooking pouches and tightly
closed plastic bags should be slit, pierced
or vented as directed by package. If they
are not, plastic could burst during or
immediately after cooling, possibly
resulting in inju U. Also, plastic storage
containers should be at least partially
uncove,ed because they fbnn a tight seal.
_qmn cooking with containers tightly
covered with plastic x.nap, remove
covering carefully and direct steam
away fiom hm_ds and face.
Use foil only as directed in this manual. TV
dinners may be microwaved in fifil uays less
than 3/4" high; remove the top foil cover
and _eturn the uay to the box. _'_q_enusing
fbil in tim nficrowave oven, keep the fitil at
least 1 inch away flonl the sides of the oven.
Plastic cookware-Plastic cookware
desi_ed fbr nficrowave cooking isveU
nseful, but should he used careflflly.
Even microx._vwe-sateplastic m W not
be as tolerant of over-cooking conditions
as me glass or ceramic materials m_d
mW soften or char if suhjected to short
periods of over-cooking. In longer
exposures to over-cooking, the food
and cookwme could ignite.
Follow these guidelines:
1LJse microwave-safe plastics only and
[]
use them in strict compliance with the
cookware Inanufact/lrer's
recommendations.
] Do not microwave empty containers.
[] Do not pernfit chiMren to use
plastic cookware without complete
supe_s_ision.
Page 7
ARCING
Ifyou see arcing, press the CLEAR/OFFpad and correct the problem,
Arcing is the microwave term for sparks in the
oven. Arcing is caused by."
Metal or foil touching the side of the oven.
Foil not molded to tbod (upulmed edges
act like antennas).
Metal, such as lwist-ties, poulu 7 pins, or
gold-_immed dishes, in the microwave.
Recycled paper rowels containing small
metal pieces being used in/he microwave.
SUPERHEATEDWATER
Microwaved water and other liquids do not always bubble when they reach the boiling point.
They can actually get super heated and not bubble at all.
Super heated liquid will bubble up out of the
cup when it is moved or when something like
a spoon or tea bag is put into it.
To prevent this flom happening and causing
iI_juU, do not heat any liquid tot inore than 2
minutes per olp.
After heating, let the cup stand in the
inicrowave R_r30seconds before moving it or
putting anylhing into it.
Spontaneous boiling
Under certain special circumstances, liquids
may start to bo# during or shortly after removal
from the microwave oven.
To prevent bums floin splashing liquid, we
recommend the %llowing be%re removing
the container flom the oven:
:Allow the container to stand in the oven f()i
,%0to 40 seconds after dm oven has shut off.
Do not boil liquids in nature--necked
containers such as soft drink botdes, wine
flasks and especially narro_._mecked coffee
cups. Even it the container is opened,
excessive steam can build up and cause it
toburst or oveTIlow.
ALLTHESETHINGSARENORMALWITHYOURMICROWAVE
Steam or vapor escaping tram around
the door.
Light reflection around the door or the
outer case.
Dimming of the oven light and chm_ge
in the blower sound mW occur while
operating at power levels other dmn high.
The microwave fm_inay operate with bod_
ovens off. It is cooling the control and will
turn itself off.
Some TV-radio inte_ierence might be
noticed while using your mioowave oven.
It's similar to lhe interference caused by
other small appliances and does not
indicate a problem with your oven.
A dull thumping sound while the oven
isoperating.
Page 8
IMPORTANTSAFETYINFORMATION.
READALLINSTRUCTIONSBEFOREUSING.
WARNING!
SELF-CLEANINGLOWEROVEN
Do not use aluminum foil to line oven bottoms, except as suggested in this manual. Improper
installation of aluminum foil may result in a risk of electric shock or fire.
{iiiiiii_!iiiSi
Stand away flom tlle oven when opening
tile oven door. Hot air or steam which
escapes {:all cause burns to hands, face
and/or eyes.
Do not heat unopened food containers.
Pressure couM bniM up and the container
couM burst, causing all iI_juU.
Keep the oven vent unobstructed.
iiiiiiiii_!ii
Keep the oven flee from gTease bniMup.
{iiiiiii_!iiil
Keep tile cooking center dean and flee of
accumulations of _ease or spillovers,
which nlay ignite.
Never leave file oven door ()pen when you
are not watching tile cooking center.
Place the oven shelf ill the desired position
while file oven is cool. it shelves must be
handled when hot, do not let pot holder
conlnct the heating elements.
Vvtmn using cooldng or roasting bags ill
the oven, follow the man/da(tuiei s
directions.
{iiiiiii_!iiil
Pulling out tile shelf to tile stop-k)ck is a
convenience ill lifting heavy toods. It is also
a precaution against bums flonl touching
hot suithces of tile door or oven walls.
{iiiiiii_!iiil
Do not use the oven for a storage area.
Items stored in all oven (:all ignite.
{iiiiiii_!iiil
Do not leave paper producLs, cooking
utensils or food in the oven when not ill use.
Do not use tile oven to di)_newspapers.
Ifoverheated, they can catch on fire.
Never leave jars or calls of fat drippings
in or near yonr oven.
Clean only parLs listed ill this Use and
Care Manual.
Do not dean the door gasket. The door
gasket is essential for a gx_odseal. Care
should be laken not to iub, damage or
nlove the gasket.
Do not use oven cleaners. No commerdal
oven cleaner or oven liner pio/ective
coating of any kind should be used in or
around ally part of tile oven. Residue fiom
oven cleaners willdamage the inside of the
oven when the sell:clean c_rcleis used.
l_fbIe sell:cleaning tile oven, renlove
the probe, broiler pan, gTid and other
cookware.
Be sure to wipe up excess spillage 1)efore
starting a selfXcleaning Q,cle.
If the sell:cleaning mode nlalfunctions,
turn the oven off and disconnect the
power supply. Have it seiYiced 1)ya
qualified technician.
Listen tor a fan-- a fan noise should be
heard sometime during file cleaning
cycle. Itnot, call tor seiYice before sell:
cleaning again.
After broiling, always take file broiler pan
out of the oven and clean it. Leftover
glease in the broiler pan call catch file
next time you use the oven.
Readandfollow thisSafet Informationcarefull
SAVETHESEINSTRUCTIONS
8
Page 9
Congratulations!
YouAm NowPartoftheGEFamily.
Wel(ome to tile GE family We're proud of ore quality produ(ts andwe are
committed to prox_dmg dependable serx_ce._ oull see u m tins easy-to-use Owner s
Manual and you'll hear it in the friendly volt es of our (ustomer servk e department.
Best of all, you'll experiem e these vahms each time you use your cooking center.
That's important, becmlse your new cooldng center xd]]be part ofy_)ur imnily for
many years. And we hope you _dl] be pmt of ours for a long time to come.
We thank you ibr buying GE. We appreciate your Dirt hase, and hope you xdH
_ontinue to rely on us whenever you need quality appliances for your home.
GE& You,A ServicePartnership.
IMPORTANT!
It is important that we, tile manuii_( turer, know tile lo(ation of your
(ooldng center should a need occur ior a(!iustments. Your supplier is
responsible ior registering you as tile owner. Please (he_k _dth your
supplier to be sure he has done so. This appliance must be registered.
Please be certain that it is. Fill out and return the ( onsumer Pro&let
Registration Card that is packed _dth this pro(hlct.
lfyoumove,orif youarenottheoniyinalpurchaserpleasewriteto us,stating
modelandserbl numbers.Writeto:GEAppliances,RangeProductService,
AppliancePark,Lomsville,KY40225.
FORYOURRECORDS
Write the model and serial numbers here:
Safety information
SafetyPrecautions ..... 2 4
Microwave Oven ....... 2. 5 7
Sett-CleanbgLower Oven 8
Operating instructions
MicrowaveControlPanel.50. 77
Usin9 theMicrowave .,. !0 21
SensorControls !6. 17
LowerOvenControlPand 22.23
Us/n9 _heLowerOven... 70-32
LowerOvenThermosFa[ 30
Care and Cleaning
Self-CleaningLowerOven.37. 32
Microwave Oven .......... 33
Shelves 34
BroilerPanand Grid 35
OvenLight Bulb ...... 35
#
#
You can find them on alabel inside the upper oven on the left side.
Staple sales slip or cancelled check here.
Proof of the original purchase date is needed to obtain serxit e under
tile warranty.
READTHISMANUAL
Inside you _dllfind many helpfifl hints on h()w to use and maintain
your cooking (enter properly.Just a little preventive tare on your
pmt (an save you a great deal of time and money over tile lite of your
{ooldng center.
You'll find many answers to common problems in tile Before YouCall
ForService section. Ifyou review our chmt of Troubleshooting Tips
first, you m W ,lot need to (:allibr service at all.
/F YOUNEED.SERVICE
If you do need service, you can relax knotting help is only a phone
tall away. A list of toll-fiee olstomer servk e numbers is inchMed in
the ba_k section of this mamlal. Or you (an always _all the GE
Answer Center: at 800.626.2000, 24 hours a day, 7 days a week.
Troubleshootingtips
BerateYouCah
ForSerwce............ 36-38
Customer Service
Warrant... 39
ServiceTelephone
Numoers ....... BackCover
9
Page 10
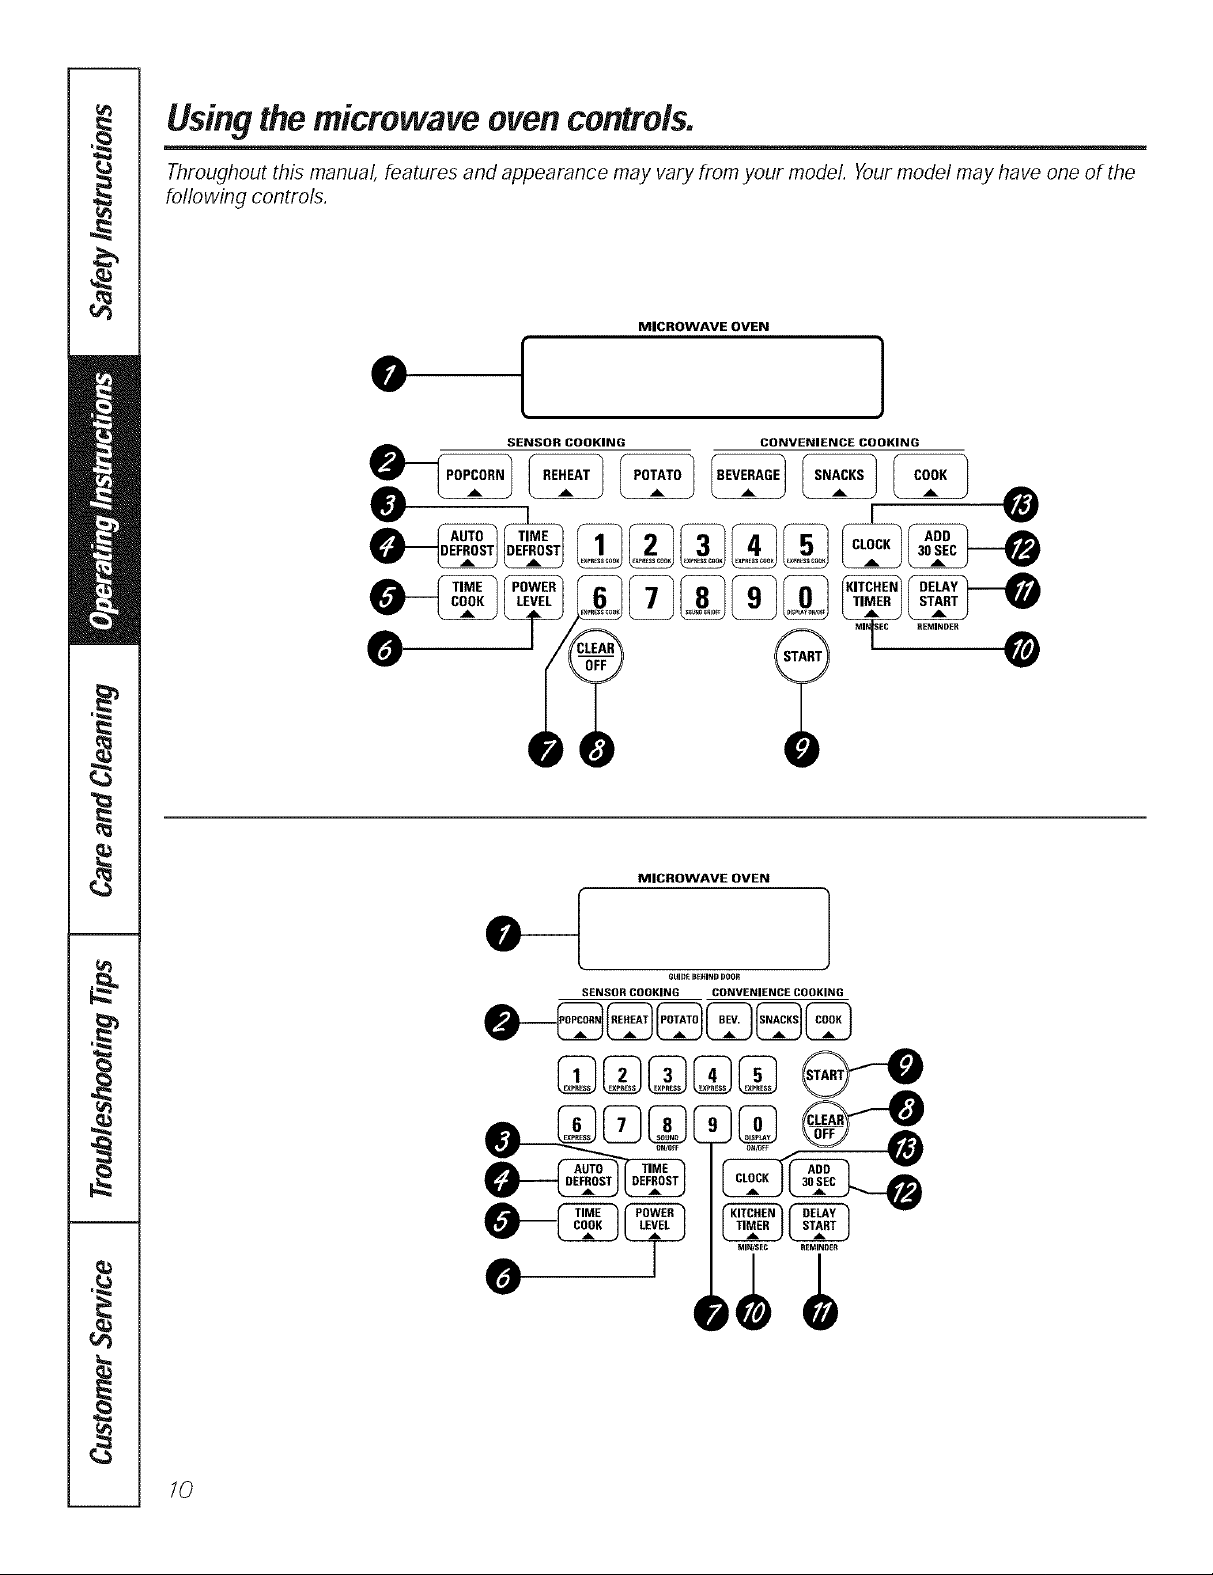
Usingthemicrowave oven controls.
Throughout this manual, features and appearance may vary from your model. Your model may have one of the
following controls.
MICROWAVE OVEN
0
[
SENSOR COOKING CONVENIENCE COOKING
.
MICROWAVE OVEN
I
}
SENSOR COOKING CONVENIENCE COOKING
GUIDEB_HINDDO0t_
10
Page 11
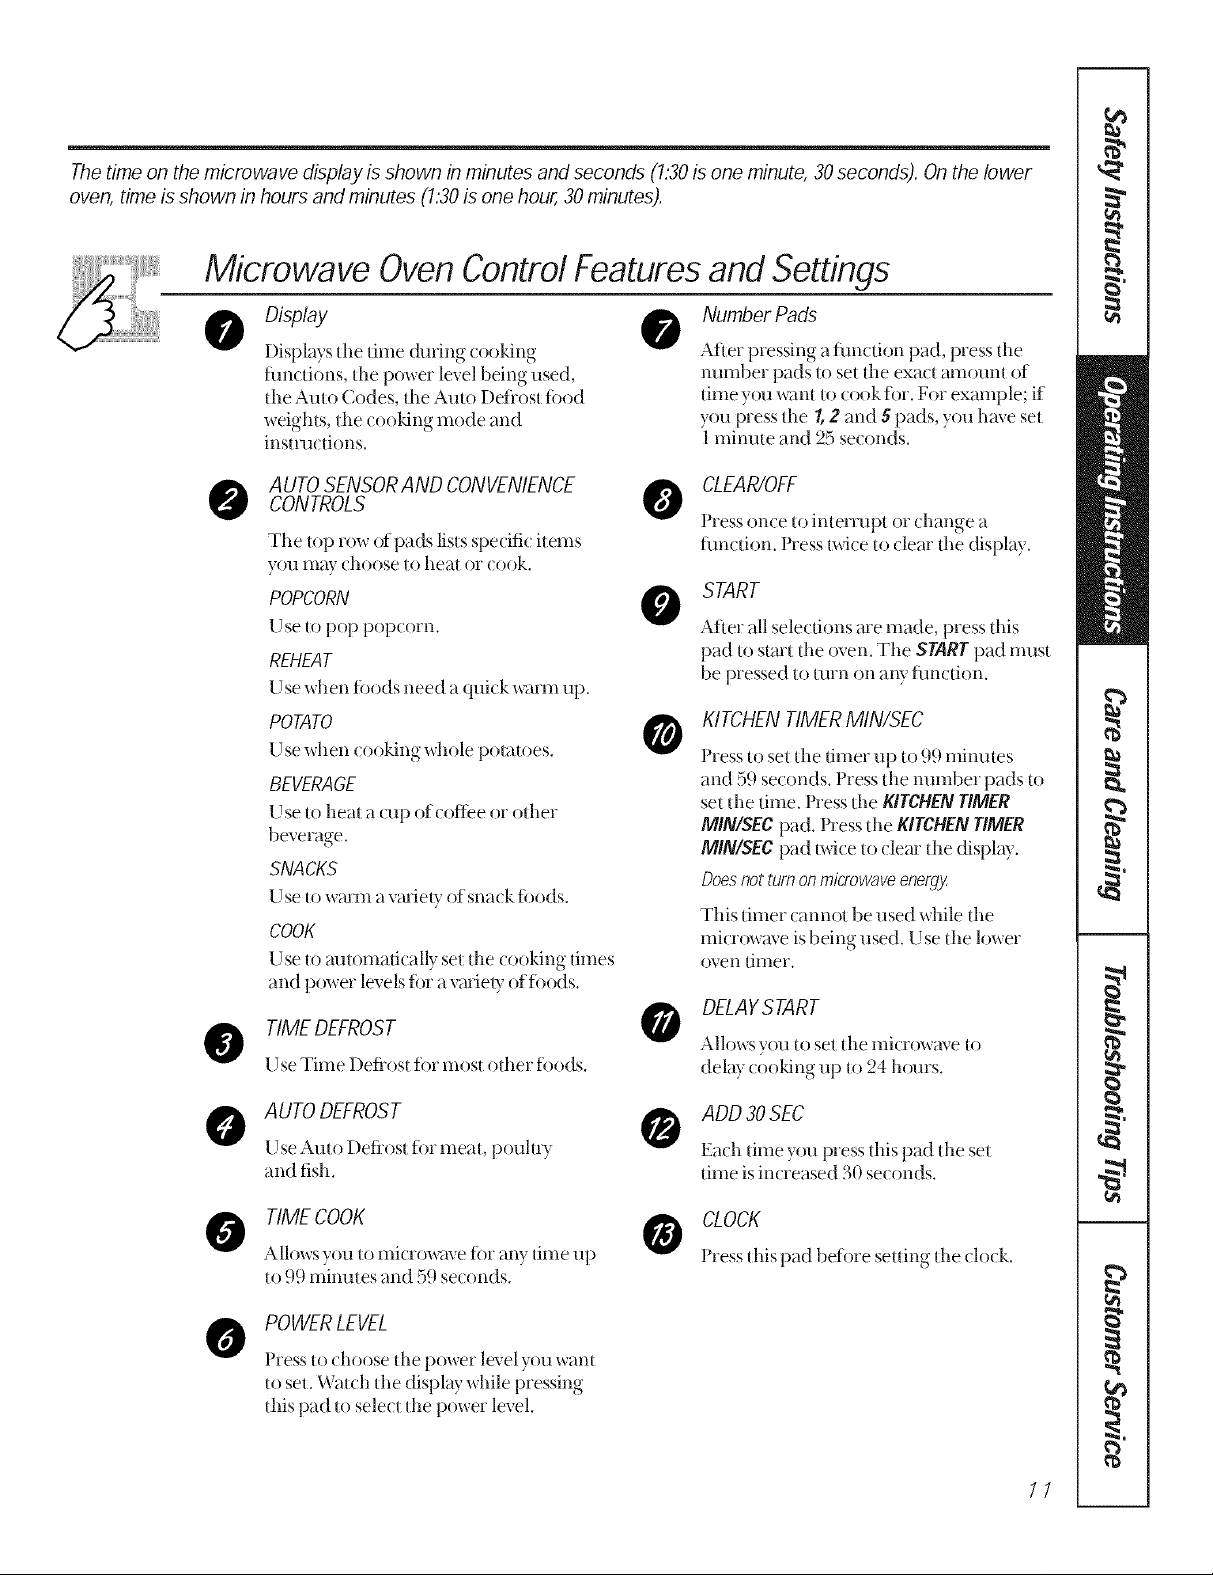
Thetime on the microwave display is shown in minutes and seconds (1:30is one minute, 30seconds). On the lower
oven, time is shown in hours and minutes (1.'30is one hour, 30 minutes).
Microwave OvenControl Features and Settings
0 Display
Displays the time during cooking
tim((ions, the power level being used,
tl, e Auto Codes, the Auto Deflost fi)od
weights, the cooldng mode and
instmt (ions.
AUTO SENSORAND CONVENIENCECONTROLS
The top row of pads lists spedik items
you may choose to heat or cook.
POPCORN
Use to pop popcorn.
REHEAT
Use when ioods need a quick warm up.
POTATO
Use when cooking whole potatoes.
BEVERAGE
Use to heat a cup oft oflb'e or other
beverage.
SNACKS
Use to wmm a variety of Shin kfoods.
COOK
Use to automatically set tile cooking dines
and power levels for avariety ofibods.
NumberPads
After pressing a time(ion pad, press the
number pads to set the exact amount of
time you want to cook tor. For example; if
you press the/, 2 and 5 pads, you have set
1minute and 25 seconds.
CLEAR/OFF
Press once to interrupt or change a
tim( (ion. Press gdce to clear the display
START
After all selections _ue made, press this
pad to start the oven. The START pad must
be pressed to 111i1_oil any _11n1riot1.
KITCHEN TIMERMIN/SEC
0
Press to set the timer up to 99 mimltes
and 59 seconds. Press die number pads to
set the time. Press the KITCHEN TIMER
MIN/SEC pad. Press the KITCHEN TIMER
MIN/SEC load mite to clem the display.
Doesnot turn onmicrowave energy
This Umer cannot be used while the
microwave is being used. Use the lower
()',,:ell [illlel'.
TIME DEFROST
Use Time Deflost fbr most other fbods.
AUTO DEFROST
Use Auto Defiost fbr meat pouhr1 V
and fish.
TIME COOK
Allows you to mi( rowave ti)r any time up
to 99 minutes and 59 seconds.
POWER LEVEL
F'ress to choose the power level you xxant
to set. Watch the display while pressing
this pad to select the power level.
DELAYSTART
Allows you to set the mi(rowave to
delay (oo_ng up to 24 horns.
e ADD 30 SEC
Ea(h time you press dfis pad dm set
time is increased 30 seconds.
O CLOCK
Press riffs pad betore setdng d_e clock.
//
Page 12
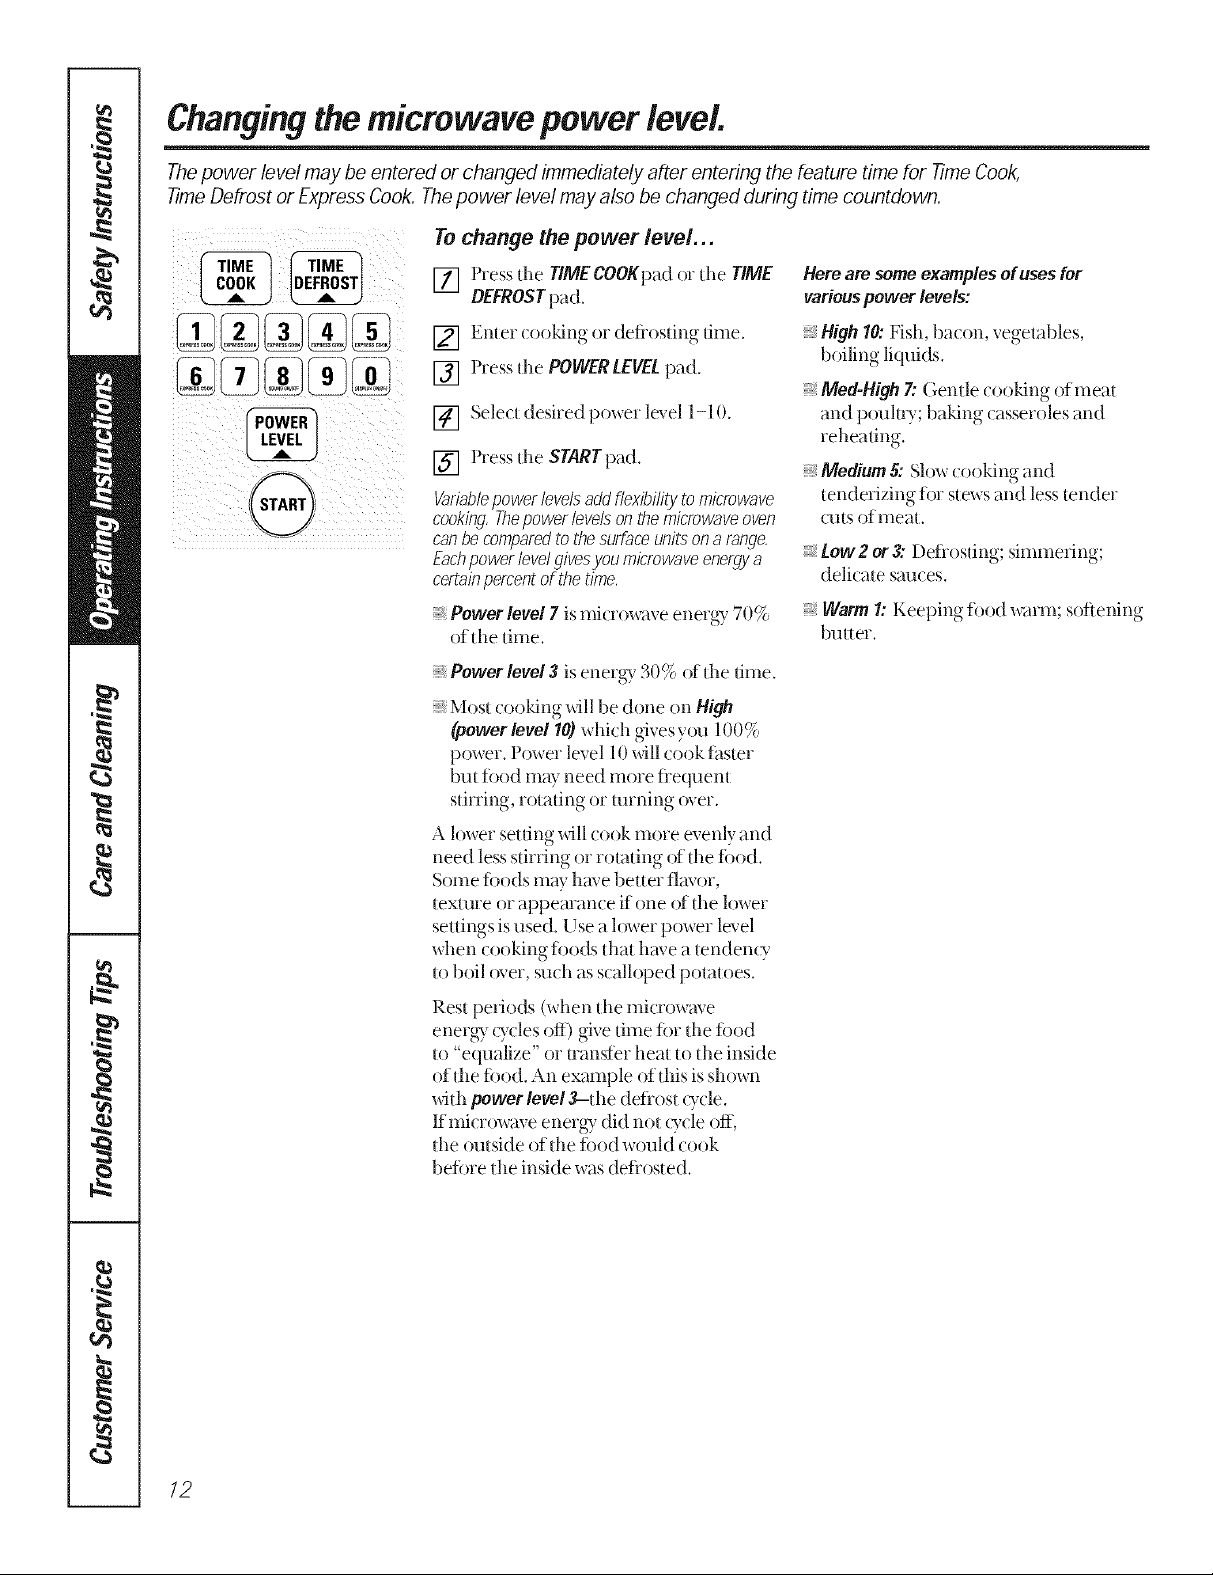
Changingthemicrowavepower level.
Thepower level may be entered or changed immediately aRer entering the feature time for 77meCook,
.timeDefrost or Express Cook. Thepower level may also be changed during time countdown.
Tochange the power level...
[] Pressthe TIMECOOKpad or the TIME
DEFROSTpad.
[] Enter cooldng or defrosting time.
[] Pressthe POWERLEVELpad.
[] Selectdesired power level 1-10.
[] Press the STARTpad.
Variablepower levels add flexibility to microwave
cooking,Thepower levels on the microwave oven
canbe comparedto the surface unitson a range.
Eachpower level givesyou microwave energya
certainpercent of the time.
Power level 7 is micrt )waxe energy 70 %
of the time.
Power level 3 is energy 30% of the time.
:_Most cooldng will be done on High
(powerlevel 10)which givesyou 100%
power. Power level 10 xdll cook thster
but food may need more flequent
stining, rotating or turning over.
A lower setting will cook more evenly and
need less stining or rotating of the tbod.
Someibods may have better flavor,
texture or appearance if one of the lower
settings is used. Use a h)wer power level
when cooking ti)ods that have a tendenQ,
to boil over, such as scalloped potatoes.
Here are some examples of uses for
various power levels:
High l& Fish, bacon, vegetables,
boiling liquids,
Meal-High 7: Gentle cooldng of meat
and pollhlz' ba_ng casseroles and
reheating.
_, Medium £ Slow cooking and
tenderizing fi)r stews and less tender
(uts of meat.
Low 2 or 3: Deflosting; simmering;
delicate sautes.
Warm 1: Keeping filed warm; softening
butter.
12
Rest periods (when tile microwave
energy ()-cles off) give time tot the fi)od
to "equalize" or uanster heat to the inside
of tile fl)od. An example of this is shown
_dth power level3-the deflost (ycle.
Ifmicr_)-waveenergy did not (3,cle off,
tile outside of the tbod would cook
belbre the inside was deflosted.
Page 13

Usingthe timedmicrowave features.
Time Cook I
youtomicrowa eforanytimeuptO minutessecon ,s.
Power level 10(High) is ram)mark ally set
but you may (hange it fi)r more flexibility.
Press the TiME COOKpad.
[]
Enter (ooldng time. For example,
[]
press 1, 5, 0 and 0 for 15 mimxtes.
Change power level if you don't
[]
want fifll power. (Press the POWER
LEVEL.pad Select a desired power
level 1-10.)
Time Cook #
Letsyouchangepowerlevelsautomatically
duringcooking,Here'showto doit;
[] Press tile TIME COOKpad.
[] Enter cooking time.
Change power level ifyou don't
[]
want fifil pov,er. (Press the POWER
LEVELpad. Seled a desired l)ower
le',el 1-10.)
[] Press tile TIMECOOKpad again.
[] Press the STARTpad.
You may open tile door (hiring Time
Cook to (lie( k tile fi)od. Close tile
door and press tile STARTpad to
resume (ooking.
] Enter the second cook time.
[] Change the power level ifyou don't
want flfil po'`ver. (Press tile POWER
LEVELpad. Seled a desired power
lexel 1-10.)
[] Pressthe STARTpad.
At tile end of Time Cook I, Time Cook II
( olin[ s do'`vl].
Express Cook
Thisis a quickway to set cookingtFne for 7-6
minutes.
Press one of tile EXPRESS COOK pads
(from 1to 6 ) %r I to 6 minutes of cooing
at power level 10. For example, press tile
2 pad fi_r 2 minutes of _ooldng time.
Add 30Seconds
Youcanusethisfeaturetwoways:
It-,,,ill add 30 seconds U) tile time
(omlfing do'`vn ea(h time the pad is
pressed.
:, It can be used as a quick way to set
30 seconds of _ooking time. No need
to press tile STARTpad, tile oven _dll
stml immediately.
Tile power level can be changed as time
is (ounfing down. FTess the POWER rEVEL
pad and enter 1-10.
13
Page 14

Using the timed microwave features.
Cooking Guide For time Cook. Use power level High (10) unless otherwise noted.
Amount Time Comments
Asparagus
(freshspears) 1Ib, 7to 10min. In17,qt, cesserole,piece1/4 cupwater.
Med High(7)
(frozenspears) 10oz,package 5to 8 m[n, In 1 qt,casserole.
(freshgreen) 1lb.cut in hell 12to 17rain, In 17_qt, casserole,place1/2 cupwater.
(frozengreen) 10oz.package 6 to 9 min, In 1 qt,casserole,place2tablespoonswater,
(frozenlima) 10oz,package 6to 9 min, In1 qt,casserole,place1/4cupwater,
(fresh,whole) 1bunch 18to 25rain, In2 qt,casserole,place1/2 cupwater,
Broccoli
(freshspears) 1bunch(1_hto 1_/_Ibs,) 9to 13min, In2 qt,casserole,place1/4 cupwater.
(frozen,chopped) 10oz,package 5to fi min, In 1 qt,casserole,
(frozenspears) 10oz,package 5to fi min, In 1 qt,casserole,place3tablespoonswater,
Cabbage
(wedges) 7to 10rain, In2 or3 qt,casserole,place1/4 cupwater,
1bunch(YAto 1_/_Ibs,) 7to 10min, In2 qt,casserole,place1/2 cupwater.
1mediumhead(about2 Ibs,) 8to 11min, In17, or 2 qt, casserole,piece1/4 cupwater,
(fresh,sliced) 1lb. 6 to 9min, In 17,qt, casserole,place1/4 cupwater.
(frozen) 10oz.package 5to fi min, In 1 qt,casserole,place2tablespoonswater.
Cauliflower
(flowerets) 1mediumhead 9to 14min, In2 qt,casserole,place1/2 cupwater.
(fresh,whole) 1mediumhead 9to 17min, In2 qt,casserole,place1/2 cupwater.
(frozen) 10oz.package 5V,tofi min, In1 qt,casserole,place2tablespoonswater.
Corn
17rozenkernel 10 oz package 4to fi min, In1 qt,casserole,place2tablespoonswater.
Cornon thecob
(fresh - to 3 ears 3to 5 min, In 2 qt. glassbakingdish,placecorn,If corn is inhusk,
)e ear usenowater; if cornhasbeenhusked,add1/4 cup
_o_nl
Mixed vegetables
(frozen) I0 oz package 4 to fi m[n, In1 qt,casserole,place3tablespoonswater.
Peas
7rash,shelleu Ibs.unshelled 9to 12min, In1 qt.cesserole,piece1/4cupwater,
lrrozem 0oz package 4 to 8min, In1 qt.casserole,place2tablespoonswater.
Potatoes
_rresn,coded,H 71reJ _potatoes(6to 8 oz,each) 11to 14min, Peelendcut into1 inchcubes,Placein2qt,casserole
fresh,whole,swee_ " (6to 8 oz,) 2to 5 min, Piercewithcookingfork,Phce inthe oven,1inchapart,
or wrote1 in circuhr arrangement,Letstand5 minutes,
Spinach
(fresh 10to 16oz, 5to fi min, In 2 qt,casserole,pieceweshedspinach,
(frozen,choooeo,anolea_' iOoz package 5 to fi min, In1 qt,casserole,place3tablespoonswater,
Squash
rresn,summer:an_yeHowl - lb.sliced 4 to 7 min, In 17,qt. casserole,place1/4 cupwater.
/wm[er_com,orbuttemutl - squash 7to 11min, Cutin half endremovefibrousmembranes.In2 qt,
- ear 5to 7 min, Placein a roundglassbakingdish.Coverwith vented
to 3ears 2to 4 min, plasticwrap, Rearrangeafter halfof time.
perear
about1 lb.each) glassbakingdish,placesquashcut sidedown,
water.Rearrangealter half oftime.
with 1/2 cupwater,Stir afterhalf of time,
Turncutsideup after4minutes,
74
Page 15

A dull thumping noise may be heard during defrosting. This is normal when oven is not operating at High power.
TimeDefrost
Allowsyout, e,thet°defr°stDefrost, gforaselected uideforsugges edlengthof
Defrosting Tips
:,Foodsfrozeninpaperorplasticcanbe
defrostedih thepackage.Closedpackages
shouldbe,slit,piercedorventedAFTERfood
haspartiallydefrosted.Plasticstorage
containersshouldbepartiallyuncoverect
:,Family-sl2e,prepackagedfrozendinnerscanbe
defrostedandmicrowavecfIfthefoodi_in a
foilcontainer,transferittoa microwave-safe
dish.
At onehalfofselecteddefrosting
time,theover}signalsRJRN.At
thistFne,turnfoodoverand
breakapartorrearrangepieces
formoreevendefrostlhg,Shield
anywarmareaswithsmaflpieces
offoil.
[] Press d_e START p_ld.
Power level is m]tom_ltical]y set _lt 3, bm
can be ch_mged. You can deflost sm_Jll
items quickly by r_ising d_e power level
after entering the time. Power level 7 cuts
tl_e tot_ll deflosfing dine in _d)out h_df;
powerleve110 cuts d_e tot_ll time to
approximately 1/3. However, fi)od _dll
need more flequenl allendon d_an usual.
:, Foodsthat spoil easily shouldnot beallowed to
,sitout for morethan one hourafter defrosting.
Roomtemperaturepromotes the growth of
harmful bacteria.
_,Formore,evendefrostlhgoflargerfoods,such
asroasts,useAutoDefrostBesurelarge
meatsarecompletelydefrostedbefore,cooking,
:, Whendefrosted, food,shouldbe coolbut
,softenedin aftareas. If still slightlyicy,return
to the microwave verybriefly, or let it standa
few minutes.
Defrosting Guide
Time Comments
Breads, Cakes
Breadbunsor_olls/7 o/ece) 1/2 min.
Sweetrolls _ooro_t12oz. 3 to 6rain. Rearrangeafterhalf the time.
Fishand Seafood
Fillets fmzer (I lb.) 9to 12m[n,
Shellfish smalloieces/7 lb. 3to 7 rain. Placeblockin casserole.Turnoverandbreakupafter halfthe time.
Fruit
Plasticoouci7 1or 2 (lO-oz.package, 3 to 7 min.
Meat
Bacon/1 lb. 3 to 6 min,
;ranks/1 Ib 3 to 6 rain,
Gfounameat I lb.
_oasr: Deer, /alT1D. eel OOrK
SteakschaosanoCUTleTs
5to 8 rain.perlb.
11to 16rain.per lb.
5to 10rain.perlb.
Placeunopenedpackagein oven.Letstand5 minutesafterdefrosting.
Placeunopenedpackagein oven.Microwavejust untilfrankscanbe
separated.Letstand5 minutes,if necessary,to completedefrosting.
Turnmeatoverafterfirst halfof time.
Usepower level 1.
Placeunwrappedmeat in cookingdish.Turnoverafter first half oftime and
shieldwarmareaswith foil. After secondhalfof time, separatepieceswith
tableknife.Letstandto completedefrosting.
Po_
Chicken,bmflet:ttveLcurue
f2_ _o3 _os.
ChicKen,wno,a/2½to3tbs.
Cornishha;
Tu_eyb_east/4to 6 lb__
15to 22min.
20to 28min.
9to 16min.perIb.
5to 10rain.perIb.
Placewrappedchickenin dish.Unwrapandturn overafterfirst half of time.
Aftersecondhalfof time, separatepiecesandplaceincookingdish.Microwave
2to 4 minutesmore,if necessary.Letstanda few minutesto finishdefrosting.
Placewrappedchickenin dish.After halfthe time, unwrapandturnchicken
over.Shieldwarm areaswith foil. Tocompletedefrosting,runcoldwater in
thecavityuntilgiblets canberemoved.
Placeunwrappedhen in theovenbreastside-up.Turnoverafter first half of
time.Runcoolwaterin the cavityuntil gibletscanberemoved.
Placeunwrappedbreastin microwavesafedishbreastside down.After first
half oftime, turnbreastsideupand shieldwarmareaswith foil. Defrostfor
secondhalfoftime.Letstand1 to 2hoursinrefrigeratortocompletedefrosting.
15
Page 16

Usingthemicrowave sensorcookingfeatures.
TheSensor Features detect the increasinghumidity released during cooking. Theoven automatically adjusts the
cooking time to various types and amounts of food.
Sensor Cooking
The proper comainers and covers are
essential for best sensor cooldng.
,_Always use illicrow_lve-s;-i[econlnhlers
and (over them Mth lids or vetoed
Covered
Vented
plastic wrap. Never use dght sealing
plastic containers-they can prevent
steam iiom escaping and cause food
to (wer(ook.
Be sure the outside of din cooldng
(omainers and dm inside of tlle
microwave oven are (hT betore
placing tood in the oven. Beads
of moisture turning into sleam
can mislead {l,e sensor.
Dry off dishes so they don't mislead
the sensor,
Use only with prepackaged
microwave popcorn weighing 1,75
to 3,5ounces,
Popcorn
TousethePopcorn feature:
[] Follow pa(k_ge instmcUons, using
Trine Cook if the package is less dmn
1.75 ounces or larger titan 3.5
ounces. Place the package of
popcorn in fl_e cemer ofd_e
Illi( I'O-WAX e.
[] Press dm POPCORNpad. The oven
starts immediat ely.
It:youopenthe doorwhilePOPIsdi,splayed,
ERRORwillappearOlosethedoor,pressthe
CLEAR/OFFpadandbeginagain.
How to Adjust the Popcorn Program to
Provide a Shorter or Longer Cook time:
If you find that tim bcand of popcorn you
use underpops or overt ooks ( onsistendy,
you can add or subuad 20-30 seconds to
dm amomadc popping dine.
Toadd time:
After pressing tl, e POPCORNpad, press
tl_e 9 pad immediately after tim oven
stuns ior an extra 20 se( onds. Press the
9 pad again to add anod_er 10 seconds
0oral 30 seconds additional time).
Tosubtract time:
After pressing the POPCORNpad, press
tlle 1pad immediately after the oven
stmls for 20 seconds less cooking time.
Press the 1pad again to re&me cooing
dine another 10 se( onds 0oral 30 seconds
less time).
16
Page 17

Reheat
r. ]
ess [Imel IN1oreume
(lesstime) (moretime)
TheReheatfeaturereheatssingleservingsof
previouslycookedfoodsoraplateofleRovem.
] Place coveredfi)od in llle o_en.
Press tim REHEATpad. The oven
SI el'IS immedialely.
[] Tile oven signalswhen steam is
sensed and tile time remaining
begins (oundng down.
Do slot open tile oven door until time is
(ouming d()wn. If tile door is opened,
close it and press tile START pad
immediately.
Afterremowngfoodfromtheoven,stir,if
possible,toevenoutthetemperature.Ifthefood
i_nothotenough,useTimeCooktoreheatfor
moret#ne,Reheatedfoodsmayhavewide
variationsintemperature.Someareasmaybe
extremelyhot,
Potato
ThePotatofeature cooks7/2-2 Ibs.of pototoes.
Pierce sldn widl fork and place
[]
potatoes on dm mrmable. If cooing
dnee or more pot}/toes, ArrAslge isl A
star pattern.
Press the POTATO pad. Tile oven
[]
starts immediately. The oxen signals
when steam is sensed and tile time
remaining begins coundng down.
Do slot open tile oven door until time is
t ounfing d()wn. If tile door is opened,
tlose it and press tile START pad
immediately.
If food is not doneenough,use TimeCookto cook
formore time.
Somefoodsnotrecommendedforusewith
REHEAT--Itis besttouseTimeCookfor
thesefoods:
_ Bread produds.
:_Foods that must be reheated
ml(_vered.
_, Foods that need to be stirred or
rotated.
_, Foods calling tbr a &7 look or trisp
smtil( e after reheating.
How to ChangetheAutomaticSettings:
Toreducetimeby 10%:
Press tile 1 pad after tile feature pad.
Toadd10%tocooking time:
Press tile 9 pad after tile ieamre pad.
77
Page 18

Usingthemicrowave conveniencecookingfeatures.
Drinks heated with the Beverage feature may be very hot. Remove the container with care.
Beverage
ii i!i !i
Pressthe BEVERAGE pad to heat a cup of
coJt!ee or od_er be_ erage.
Snacks
TheSnacksfeatureautomaticallysetsthe
microwawngtimesandpowerlevelstowarma
varietyofsnackfoods.
[] Pressdm SNACKSpad.
[] Select sna_k bq)e 1-6 (see tlle Snacks
(;uide).
] Enter the number of items or tile
food weight in ounces.
[] Press tlle STARTpad.
Hint: Youcanpressandhold the SNACKSpad
during cookingto display the remaining
microwawngtime.
Cook
Snacks Guide
Food Type Quantity or Weight
1Bread, rolls, muffins 1to 4
2 Sandwiches 1to 2
3 Pizza (leftover slices) 1to 4
4 Dessert toppings 1to 4
5 Soup 8 to 40 oz
6 Cheese dip 4 to 16 oz,
IIII iii i:
18
TheCookfeature automatically sets the cooking
tlknesandpower levels for a varietyof foods.
[] Press tl_e STARTpad.
Hi_: PressandholdtheCOOt#padduringcooking
[] Press dm COOKpad.
[] Select tbod type l-9 (see tile Cook
( ;uide below).
] Enter weight in ounces.
todisplaytheremainingcooktime.
Cook Guide
FoodType Weight Comments
1Canned Vegetables 4to 20oz, Usemicrowavesafecasseroleor bowl. Coverwith lid orvented
plasticwrap,
2Frozen Vegetables 4 to 16oz, Usemicrowavesafecasseroleorbowl. Followpackageinstructions
foraddingwater.Coverwith lid orventedplasticwrap,
3Fresh Vegetables 4to 16oz, Usemicrowavesafecasseroleor bowl. Add2 tablespoonswater
foreachserving,Coverwith lidor ventedplasticwrap.
4Potatoes 8to 40oz. Pierceskinwith fork. Placepotatoeson theturntable.
5Fish 4 to 16oz. Useoblong,squareorrounddish.Coverwith ventedplasticwrap.
6Chicken Pieces 4to 40oz, Useoblong,squareor rounddish,Coverwith ventedplasticwrap
or wax paper,
7GroundMeat 8to 48oz. Useroundcasseroledish.Crumblemeatinto dish.Coverwith lid
(beef,pork, turkey) orventedplastic wrap.
8Bacon 2to 10oz, Layerstripson a plate,4 to a layer,Covereachlayerwith apaper
9Pizza (frozen, 4to 16oz, Followpackageinstructionsto preparepkzafor microwaving.
microwaveable)
towel.
Page 19

Usingthemicrowave auto feature.
TheDefrost Auto/]Tme feature gives you two ways to defrost frozen foods. Press Defrost Auto/]Tme once for
Auto Defrost or twice for .time Defrost.
Auto Defrost
UseAutoDefrostformeat,poultryandfishup
to6pounds,UseTimeDefrostformostother
frozenfoods.
Auto ]Defiost automadcally sets the
deflosdng times and power le',els to give
e',en detiosdng results tbr meat s, pouhr,_•
and tish.
[] Press the AUYODgFROSTpadonce.
[] Using the Comersion Guide at rigM,
enter tood weiglm For example,
press pads 1and 2 tbr 1.2pounds
(1 _ound, 3 oun(es).
[] Press START.
Time Defiost is explained in the Using the
timedmicrowave features section.
Remox e meat from package and place
on mi(rowave-satb dish.
Conversion Guide
If the weight otfbod is stated in pounds
and ounces, the ounces must be
corn erred to temhs (.l ) of a pound.
Weight of Food Enter Food Weight
in Ounces (tenths of a pound)
1-2 .1
3 .2
4-5 .3
6-7 .4
8 .5
9-10 .6
11 .7
12-13 .8
14-15 .9
Twice during defiost, the oxen signals
TURN.At each TURNsignal, mrn dm
fi)od over. Remove deflosted meat or
shield warm areas xdfl_ small pieces
of foiL
After deflosdng, most meats need to
stand 5 minutes to complete deflosdng.
Iarge roasts shoukl stand for about
30 mimltes.
19
Page 20

Usingthe othermicrowave features.
Cooking Complete Reminder." Toremind you that you have food in the oven, the oven wifl beep once a minute
until you either open the oven door or press the CLEAR/OFFpad.
Clock
Pressto enter the tFneof dayor to checkthe time
of day while microwaving.
[] Press the CLOCK pad.
[] Enter time of day.
[] Press the START pad or the
CLOCK pad.
Display On/Off
To turn dm clock display on or off, press
and hold the 0 pad fi)r about ,t seconds.
The Displ W On/Oflibamre cannot be
used while a cooking teamre is in use.
!___ii_iiIII_ii_i__ !__iii!!i_II!_ii
REMINDER
i!_iIII__iiii_ii!_ii_i !_i!_i!_i!_i!_i_
OelayStart
Delay Start allows you to set dm
micrt)waxe t() delay ( ()()ld ng _.]pt()
24 homs.
[] Press d_e DELAYSTARTpad.
] Enter the time you want tile oven to
St}tI'{.(Be sure the mitrm_ave (lo(k
shows the COITeCttime of day.)
[] Sele( tyour desired cooking
program.
[] Press tile STARTpad.
The Delay Start time will be displayed.
The ()',el1 will allt Olllati( ally Stal't at tile
delayed time.
The time of day may be displayed by
pressing the CLOCKpad.
NOTE:YoucannotuseDELAYSTARTwith
POPCORNorRENEAT_
20
Sound Level
Thebeepersoundlevelcanbeadjusted.
Press tile 8 pad. Choose 0-3 fi)r mute
to loud.
Page 21

Childtock-Out
i!ii_iiiii,_i! _!L
/sc
iiii__i_ _i_ii_iiiiii_!i_I
Youmaylock the controlpanel toprevent the
microwave from beingaccidentallystarted or
usedby children.
To lock or unlock tlle comrols, press
and hold the CLEAR/OFFpad fi)r about
3 se( ollds.
Kitchen Timer
Kitchen Timeroperatesas a minute t/bTerand can
be usedat any time, evenwhen the oven is
operat/?lg.
How to use as a minute timer:.
[] Press die KITCHENTIMERMIN/SEC
pad.
] Enlel" [illle y()ll want 1o ( olin[ down,
[] Press lhe KITCHENTIMERMIN/SEC
pad.
Reminder
When tlle conuol panel is locked, an t
will be displayed t(_file exneme riglu.
When dine is up, the (wen _dll signal.
To mrn off the timer signal, press file
KITCHENTIMERMIN/SECpad.
NOTE:Thetimerindicatorwill belit while,the
timer/soperating.
To cancel die timer during tile
(ollntdown press d_e KITCHENTIMER
MIN/SECpad.
REMINDER
i!_C!/_ii_;_5 __i__;_i_i___
TheReminderfeaturecanbeusedlikeanalarm
clock,andcanbeusedatanytFne,evenwhen
theoven/soperating,TheRemindertimecanbe
setupto 72hourslater
[] Press file DELAYSTARTpad.
] Enter the time you wan[ tile oven U)
remind you. (Be sure tile microwa_ e
(lock shows die correct dine of dav.)
[] Press fl_e DELAYSTARTpad. When
Reminder signal ()(curs, press d_e
DELAYSTARTpad to mrn it oft. Tile
Reminder time may be displayed by
pressing die DELAYSTARTpad.
NOTE:REMwillremainonthedisplaytoshow
thattheReminderSsetuntil theRemindertimeis
reachedandthedoor/sopenedorCLEAR/OFF/s
pressed
21
Page 22

Usingthe lower oven controls.
Throughout this manual, features and appearance may vary from your model. Your model may have one of the
following controls.
LOWER OVEN
0
€
@
O
LOWER OVEN
MICROWAVEFANMAYOPERATEW_ILELOWE_OW_ IS IN USE,
TIME CONTROLS
0
22
Page 23

Thetime on the microwave display is shown in minutes and seconds (1:30is one minute, 30seconds). On the lower
oven, time is shown in hours and minutes (1.'30is one hour, 30 minutes).
Lower OvenControl,Clockand TimerFeaturesandSettings
0 Display
Shows the dine of day, oven temperature,
whedler the oven is in the bake, broil or
self cleaning mode and dm times set tbr
tile diner or amomadc oven operations.
If "F- and a number or letter" flash in the
display and the oven control signals, this
indicates a function error code. Pressthe
CLEAR/OFFpad. Allow the ovento cool for one
houLPutthe oven backinto operation.#the
function error coderepeats,disconnectthe power
to the ovenandcarlfor service.
ff your oven was set for a timed oven
operation and apower outage occurred, the
clock and allprogrammed functionsmust be reset.
The time of day (may be incorrec_ will flash
in the display when the there has been a
power outage.
BROIL HI/LO Pad
Press tllis pad to sele( t dm broil flmction.
BAKE Pod
Press dlis pad to select d_e bake fimcdon. 0
SELFCLEAN Pad
0
Press this pad to select the self:cleaning
flmction. See the Using the self-cleaning
lower oven section.
CLEAR/OFFPad
Press tiffs pad to cancel ALL oxen
operations except the clock and timer.
STARTPad
Must be pressed to start any cooking or
cleaning flmction.
KITCHEN TIMER ON/OFFPad
Press this pad to sele(t dm timer feature.
DELAYSTARTPad
Use along xdth COOKING TIME or SELF
CLEAN pads to set tile oven to start and
stop auton_ati( ally at a dine you set.
COOKINGTIME Pad
0
Press this pad and then press the mm_ber
pads to set the amount of dine you want
your iood to cook. The _wen _dll shut off
when the (:ooldng time has run out.
CLOCKPad
Press this pad befi)re setting tile clock.
0VENLIGHTPad
Press this pad to turn tile oven light on
or off.
NumberPads
Use to set any flmction requiring numbers
such as tim time ofd W on the clock,
the timer, the oven temperature, the start
time and length of operation fi)r dined
baking and self(leaning.
23
Page 24

Special featuresofyour lower ovencontrol
Yournew touch pad control has additional features that you may choose to use. Thefollowing are the features and
how you may activate them.
Thespecial feature modes can only be activated while the display is showing the timeof day They remain in the
control's memory until the steps am repeated.
When the display shows your choice press the STARTpad. Thespecial features will remain in memory after a
power failure.
i i
iii ii i ii iiii!iiiii
i;@
12 Hour Shut-Off
Withthisfeature,shouldyouforgetandleavethe
ovenon,thecontrolwillautomaticallyturnoffthe
ovenafter 72hoursduringbakingfunctionsor
after3hoursduringa broilfunction.
If you wish to turn OFF dfis feature, follow
the steps below.
[] Press the BAKE and BROIL HI/tO pads
Fahrenheit or Centigrade Temperature Selection
YourovencontrolSsettousetheFahrenheit
temperatureselectionsbutyoumaychangethis
tousetheCentl)radeselections.
[] Press tlle BAKE and BROILHI!tOpads
[] Press fl_e BROILHI!tO pad. The
at tile same time fi)r 3 seconds until
tl_e (fisplay shows SE
at fl_esame time/br 3 se(onds until
d_e display shows SE
display will show l: (Fahrenhei0.
Press the DELAYSTART pad. The
[]
display will show 12 shdn (12 hour
shut-oil). Press d_e DELAYSTART
pad again and fl_e display will show
no shdn (no shut-oil).
Press fl_e STARTpad to acti_ ate tl_e
[]
no shut=offand leaxe the control set
in dfis spe( ial features mode.
[] Press tile BROILHI!tO pad again. The
display will show C (Centigrade).
[] Press fl_e START pad.
24
Control Lockout
Yourcontrolwillallowyouto lockdownthetouch
padssotheycannotbeactivatedwhenpressecL
[] Press the BAKE and BROILHi!tO pads
at file same time fi)r 3 seconds until
d_e (fisplay shows SE
[] Press fl_e SELl:CLEANpad. The
display will show £0C OFF,
Press file SELl:CLEANpad again.
The display will show £0C ON.
Press the START pad to activate
[]
d_e conuol lockout tb_amre and
lea_e fl_econtrol set in dfis special
teamres mode.
\,\l_en this teamre is on and the touch
pads are pressed fl_e display _dll show LOC.
NOTE:Thecontrollockoutmodewillriotaffect
theCLOCK,KITCHENTIMERON/OFFaridOVEN
LIGHTtouchpads.
Page 25

Tones at the End of a Timed Cycle
At theendofa timedcycle,3shortbeepswill
soundfollowedbyonebeepevery6seconds
untiltheCLEAR/OFFpadi_pmssed,This
contlbuous5secondbeepmaybecanceled.
To cancel dm 6 second beep:
[] Press the BAKE and BROILHI/tO pads
at the same time fin 3 se(onds until
d_e display shows SE
12Hour, 24 Hour or Clock Black-Out
Yourcontrolissetto usea 72hourdock,
If you would preier to have a 24 hour
milita U lime (lock or bla(k-om dm (lo(k
display, follow tlle steps below.
[] Press the BAKE and BROILHI/LOpads
at tl_e same dine fin 3 seconds und]
tile display shox_s 8£
[] Press d_e CLOCKpad once. The
display xx4llsh()w 12hr. If tllis is
die choice you warn, press d_e
STARTpad.
Press the KITCHENTIMERON/Off
[]
pad. The displ_0,sho_s CONBEEP
(comim_ous beep). Pressd_e
KITCHENTIMERON/OFFpad
again. The display shows BEEP.
(This camels dm one beep every
6 se(onds.)
[] Press the START pad.
Press d_e CLOCKpad again to change to
d_e 24 hour militmy time clock. The
display xdll show 24 hr. If this is the
choi( e you wahl press die START pad.
Press dm CLOCKpad again to black-out
dm (;lock (fisplay. Tile display_dll show
OFF.If dfis is the choi( e you warn, press
dm STARTpad.
NOTE:/ftheclockIsintheblack-outmodeyou
will notbeabletousetheDelayStartfunctbn.
Cook and Hold
Yournew controlhasa cookand hold feature that
keepscooked foods warm for up to 3hoursafter
the cooking function isfintshd_
i, il !iI
i i iii iiii iiii
This ieature can beused only at d_e end
ofTimed Baking using Automatic Stop.
To actix ate this feature, follow tile steps
below.
[] Press the BAKEand BROR HI/tO pads
at the same time for 3 seconds until
tile display shows S£
[] Press the COOKINGTIMEpad.
Tile dispk 0, will show Hid Of£
Press the COOKINGTIMEpad again
to actixate the l(ature. The display
will show Hid ON.
Press the START pad to activate
[]
dm cook and hold feature and
leme tlle comrol set in dfis spedal
features mode.
25
Page 26

Usingthe loweroven.
Toavoid possib/e burns, place the shelves in the desired position before you turn the oven on.
!_:: L:_7_,_2;11,_--_-_q i¸
_'_ _ , _?" t!l
!k_Q_-_,-> _%,_ tL_
Seven shelf positions are shown.
Some models have4 or 6positions.
II
NOTE:A coofing fan may
automatically turn on and off to
cool internal parts. Thisis normal,
and the tan may continue to run
even after the oven is turned off.
Before you begin...
The shekes hme stop-locks, so d_at when
placed (one(dy on the supports, d_ey x_411
stop betbre (oming (ompletely out, and
_dll not tilt.
When placing and remox4ng cookware,
pull tl_e shelf out to tlle bump on tlle
shelf support.
How to Set the Oven for Baking or Roasting
[] Press tl_e BAKEpad.
] Press the number pads to set tl_e
desired temperature.
[] Press d_e START pad.
[] Check fi)od tbr doneness at
minimum time on recipe. Cook
longer if necesm U.
[] Pressthe CtEAR/OFFpad when
( ooking is tomplele.
To remove a shelf, pull it toward you tilt
tl_e front end tap and pull it out.
To replace, place the end of din sheff
(stop-locks) on tlle support, tih up tl_e
front and push tl_e sheffin.
TypeofFood 27" Oven 30" Oven
Frozenpies BorC CorD
(oncookiesheet)
Angelfoodcake, A B
bundtor poundcakes
Biscuits,muffins, BorC CorD
brownies,cookies,
cupcakes,layer
cakes,pies
Casseroles BorC OorD
Shelf Position
Topreheat, set the oven at the
correct temperature. The control
will beep when the oven is
preheated and the display will show
your set temperatore. This may take
approximately 70minutes.
Cut slits in the foiljust like the grid.
26
Preheating and Pan Placement
Preheat tl,e oven if tl_erecipe calls fiwit.
Preheating is necessa U fiw good resuhs
when baking cakes, cookies, pastry and
breads.
Baking resuhs will be better if ba_ng
pans me centered in tl_e oven as much
as possible.
Aluminum Foil
Youcanusealuminumfoil to linethebroiler
panandbroilergric_However,youmustmold
thefoil tightlytothegrklandcutslits initjust
likethegrkZ
Without the slits, tl,e toil xdll prevent ti_t
and meat juices tiom draining into the
broiler pan. The juices could become
hot enough to catch on fire. Ifyou
do not o_t tl_eslits, you are essentially
ii)ing, not broiling.
Pans should not touch each odmr or the
walls of the oven. Ifyou need to use two
shelves, stagger tl,e pans so one is not
directly above the other, and leave
approximately 1_A"bel_veen pans, tiom
tl_efront, back and sides of din wall.
Donotusealuminumfoilonthebottomof
theoven.
Never entirely ( over a shelfwid_
aluminum fi)il. This will disturb the heat
(it( ulation and resuh in poor baking.
A smaller sheet offi)il may be used to
(at(h a spillover by pla(ing it on a lower
shelf se_,oral in(hes below the food.
Page 27

How to Set the Oven for Broiling
Leave tile door open to the broil
stop position. Thedoor stays open
by itself, yet theproper temperatore
is maintained in the oven.
[] Pla(e the meat or fish on the broiler
grid in the broiler pan.
[] Follow suggested sheK positions in
lhe Broiling Guide,
lfyouroven is connected to 208 volts, rare steaks
may be broiled bypreheatlbgthe broiler arid
positioningthe oven .shelf one positionhigher
[] Press II_eBROILHI/LOpad once/br
HIBroil,
To (hange Io LOBroil, press 1he
BROILHI/tO pad again.
[] Press 1he START pad.
[] When broiling istinished, press
1he CLEAR/OFFpad.
Broiling Guide
27" Ovens 27" Ovens 27" Ovens 3W Ovens 30" Ovens 3W Ovens
Quantityandl Shelf FirstSide Second Side Shelf FirstSide Second Side
Food or Thickness Position Time {rain.) Time (rain.) Position Time (rain.) Time (rain.) Comments
GroundBeef 1 Ib, (4patties) ¢ 10 7 E 10 7 Spaceevenly.Up
Well Done 1/2 to 3/4" thick E 10 9 to 8patties take
Beef Steaks
Rare
Medium
Wei[ Done
Rare
Medium
Well Done
Chicken
Lobster Tails
FishFillets
HamSlices 1" thick B 8 8 D 8 8
(precooked}
PorkChops
Well Done
Lamb Chops
Medium
Well Done
Medium
Well Done
1" thick
1 to 1VzIbs,
lY/" thick
2 to2V_Ibs,
1whole
2 to27_Ibs.
split lengthwise
24
6 to8 oz,each
1/4 to 1/2" thick
2 (1/2"thick) ¢ 10 10 E 10 10
2 (1"thick)about1 Ib, B 13 13 D 15 15
2 (1"thick)about10
to 12oz,
2 (11//"thick)about 1 Ib,
¢
¢
¢
¢
¢
¢
A
¢
¢
¢
B
6
8
12
10
15
25
35
13 16
10
12
14
17
5
6
11
78
14 16
20 25
10 15
Donot
turnover.
9
10
12
12 14
E
E
E
E
E
E
¢
E
E
E
E
8
10
12
10
15
25
25
13 16
10
12
14
17
14 16
20 25
Dr)not
turnover.
12 14
6
8
10
8
10
9
10
12
about thesame
time,
Steakslessthan
1"thick car
throughbefore
browning.
Panflying is
recommended,
Slashfat,
Reducetimeabou
5to 10minutes
persideforcut up
chicken.Brush
eachsidewith
meltedbutter.
Broilskin side
downfirst.
Cutthrought_ck o
shell.Spreadoper
Brushwith melter
butterbefore
broilingandafter
half of broiling
time,
Handleandturn
verycarefully.
Brushwith lemon
butterbefore and
duringcooking,if
desired,Preheat
broiler to increas_
browning.
Increasetime 5to
10minutesper
sideter 11/?thick
r_h_me<uredhair
Slashfat,
Slashfat,
27
Page 28

Usingthe lower ovenclock and timer.
To Set the Clock
Make sure the clock is set to the
correct time of day.
iiii iiii iI
MIN]SEC
Tile timer is a minute timer only,
Tile timer does not control oven
operations. Themaximum setting on
the tinier is 9 hours and 59 minutes.
The tlotk must be set to the (x)rlet:l time
of day ti)r the automafi( oven timing
tim( fions to work properly The time of
day tanner be changed during a timed
baLdng or selik leaning ()_(le
To Set the Timer
[] Press die KITCHENTIMERON/Off
pad.
[] Press fl_e mmg)er pads until fl_e
amount of time you want shows in
die display. For example, to set 2
hours and 45 mimltes, press 2, 4
and 5 in dmt order. If you make a
mistake press the KITCHENTIMER
ON/OFFpad and begin again.
ToReset the timer
If the display is still shoMng the time
remaining, you may (hange it by pressing
d_e KITCHENTIMERON/OFFpad, then
press d_e mm_ber pads until d_e time you
want appears in d_e display.
[] Press d_e CROCKpad.
] Press ll_emlmber pads.
[] Press d_e START pad unul d_e time of
day shows in tl_e display.
[] Press d_e STARTpad.
[] When the timer reathes :00, d_e
(onuol _11 beep 3 times tbllo-wed
by one beep eve_7 6 se(onds until
fl_eKITCHENTIMERON/OFFpad
is pressed.
The5secondtonecanbecanceledbyfollovwng
thestepsintheSpecialfeaturesofyourbwer
ovencontrol,sectionunderTonesat theEndof
a Timed@'le.
If the remaining time is not in the display
(dock, delay stmt or cooking time me in
file display), recall the remaining ume by
pressing the KITCHENTIMERON/OFFpad
and then pressing the mmfl_er pads m
enter d_e new time you want.
28
To Cancel the timer
Press die KITCHENTIMERON/OFF
pad mite.
Page 29

Usingthe lower oventimedbakingandroastingfeatures.
NOTE:Foods that spoil easily-such as milk, eggs, fish, stuffings, poultry and pork-should not be allowed to sit for
more than 7hour before or after cooking, Room temperature promotes the growth of harmful bacteria, Be sure that
the oven light is off because heat from the bulb will speed harmful bacteria growth,
How to Set an immediate Start and Automatic Stop
iii iiiiill ii ii! ill iiiiii
iI i ii!:iii
TheovenwillturnonFnmediatelyandcookfora
selectedlengthoftl?_e.At the endofthecooking
tlbTetheovenwillturnoffautomatically
Make sure die clock sh_rwsdm correct
time of day.
[] Press tile BAgEpad.
[] Using tile number pads, enter tile
desired temperature.
[] Press tile COOKINGTIMEpad.
NOTE:lfyourreciperequFespreheatl?lg,youmay
needtoaddaddtionaltimeto thelengthofthe
cookingtime.
How to Set a Delayed Start and Automatic Stop
Youcansettheovencontroltodelay-startthe
oven,cookforaspecificlengthoftimeandthen
turnoffautomatically
Make sure tile clock shows tile correct
time of day.
[] Press tile BAKEpad.
[] Using tile mmlber pads, enter tile
desired temperature.
[] Press die COOKINGTIMEpad.
NOTE:lf yourreciperequFespreheating,youmay
needtoaddadditionaltimeto thelengthofthe
cookingtime.
[] Using the number pads, enter tl_e
desired ba_ng time.
[] Press tile BELAYSTRRT pad.
[] Using tile mmlber pads, enter tile
desired baking time. The oven
temperature and the (oo_ng time
that you entered will be displayed
[] Press d_e START pad.
The (fisp]ay sh_)ws tile oven temperature
that you set and the cooking time
countdown. The display starts changing
once tile temperature reaches 100 oF.
Tile oven will (ontimm to (ook fi)r tile
programmed alllOlln[ of time, dmn shin
()ff a_att)ma ti(ally.
Press die CLEAR/OFFpad u) clear die
display,
[] Using tile number pads, enter tl_e
time of day you want the o',en to turn
on and start (ooldng.
[] Press tile STARTpad.
NOTE:An attention tone will soundifyou are
using timed baking and donot pmss the START
padafter entering the baking temperature,
If you would like to check tile times you
have set, press the BELAY STARTpad to
check tile start lime you have set or press
the COOKINGTIMEpad to check the
length of cooking lime you have set.
When tile oven turns on at tile time of day
you have sol the display _dll show tile
changing temperaalre (starting at
100°F.) and the cooldng time
COUlltdt)wll.
At tile end of timed baking, tile oven will
turn off. The end of Q<le tone will sound.
Press tile CLEAR/OFFpad to clear tile
display•
29
Page 30

Adjustthe lower oven thermostat--Do ityourse/f!
Youmay find that your new oven cooks differently than the one it replaced. Use your new oven for a few
weeks to become more familiar with it. If you still think your new oven is too hot or too cold, you can adjust
the thermostat yourself.
Do not use thermometers, such as those found in grocery stores, to check the temperature setting of your oven.
These thermometers may vary 20-40 degrees.
NOTE" Thisadjustment will not affect the broiling or the self-cleaning temperatures. Theadjustment will be
retained in memory after apower failure.
To Adjust the Thermostat
[] Press the BAKE and BROIL HI/tO
pads at the same time fi)r 3 seconds
until the display shows SE
[] Press the BAKE pad. A two digit
number sho_s in the display.
Press BAKE once t() decrease
(-) dm oven temperature, or
t_x4(e to inlrease (+).
The oven tempet_tture (an be
[]
adjustedup to (+) 35°F. hotter
or (-) 35°F. {:ooler. Press the number
pads the sane wW you read them.
For example, to change tile oven
temperature 15°F., press 1 and 5.
When y()u have made tl_e
[]
a(Ijustment, press tile START
pad to go bark to the time of
day display Useyour o-_enas
you _,vonld normally.
Thetype of margarine will affect bakingperformance!
Most recipes for baking have been developed using high fat products such as butter or margarine (80% fat). Ifyou
decrease the fat, the recipe may not give the same results as with a higher fat product.
Recipe failure can result if cakes, pies, pastries, cookies or candies are made with low fat spreads. Thelower the fat
content of a spread product, the more noticeable these differences become.
Federal standards require pro&lcts labeled "margarine" to contain at least 80% tilt by weight. I_owiilt spreads, on tile
other hand, contain less tilt and m_re water. The high moisture content of these spreads affect the texture and flavor of
baked goods. For best resuhs _dth your old iilvorite recipes, use margarine, butter or stick spreads ( ontaining at least
70% vegetable oil.
30
Page 31

Using the self-cleaning lower oven.
The oven door must be closed and all controls must be set correctly for the cycle to work properly.
Before a Clean Cycle
Do not use abrasives or oven cleaners.
Clean tile top, sides and outside of the
oven door vdtb soap alK] water.
Make sure tile oxen light bulb (:o,,er
(on some models) is in place and tile
oven light is off.
IMPORTANT: Tile heahh (If some birds
is extremely sensitix e to the fimms gixen
tiff during tile self-(leaning Q,(le of any
oxen. Moxe birds to anodmr ,,,,,ell
-,entilated room.
Wipe up heavy soil on tile oven
bottom,
We re( ommend venting your kitchen
xdth an open xdndow or using a
ventilation Lm or hood &lring the first
sell:clean (T(:le.
Remove tile broiler pan, broiler grid, all
cookware and any aluminum foil iiom
the oven.
Tile oxen shelxes can be seli:cleaned, but
they will darken, lose d_eir luster and
become hard to slide.
Hew to .get the Oven for Cleaning
[] F'ress the SELFCLEAN pad.
[] Using the number pads, enter tile
desired clean time, ifa time other
than 4 hours is needed.
Clean (Tcle time is normally 4 hours You
(an (hange tile (lean time to nny time
between 3 hours and 5 hours, depending
on how dirty yo_.lr oven is
[] Press tile START pad.
The do(), locks mltomafically. The display
_dll show tile clean time remaining. It _dll
not be possible to open the oven door
until tile temperature drops below the
lo(k temperature and the LOCKEDDOOR
light goes off.
When tile LOCKED DOOR light is off,
open tile door.
;;;;;;_,Tile words LOCKDOORwill flash
and tile oxen control will signal if you
set tile clean (T(le and forget to (lose
tile oven door.
:, To stop a clean (jcle, press tile
CLEAR/OFFpad._,\q_entile LOCKED
DOOR light goes offhMk ating tile
oven has (Doled beh_w the locking
temperature, open tile door.
3/
Page 32

Using the self-cleaning lower oven.
Theoven door must be closed and all controls must be set correctly for the cycle to work properly.
How to Delay the Start of Cleaning
[] Press dm SELFCLEANpad.
[] Using the number pads, enter d_e
desired (lean time.
[] Press the DELAYSTARTpad. Tile
earliest stml time vou can set will
appear in ll_e displav•
[] Using the number pads, enter tile
time of day you want dm clean (_,cle
tO start.
[] Press tile STARTpad.
After a Clean Cycle
You may nofi( e some white ash in die
oven. Wipe it 1113with a damp (loth after
the oxen tools.
If whitespotsremain,removethemwitha soap-
filledsteelwoolpadandrinsethoroughlywitha
wbegarandwatermixture.
These deposits are usually a salt
residue fllat( annot be removed by
the (lean (_cle.
If the (),,ell is IlOt clean at/er olle (leall
13,1le, repeat tile 1_,1le.
The door locks automatically. Tile display
will show tile stmt dine. It will not be
possible to open the oven door until
dm temperature drops below the lock
temperature and tile LOCKEDDOOR
light goes otE
x,\qlen tile LOCKEDDOORlight is oJtE
open dm door.
go(1 (allllOt set tile oven for (ookillg
until tile oven is (ool enough fi)r tlle
door u) unlo(k.
:, While tile oven is self cleaning, you
can press tile CLOCKpad to display
tile time ofd W. To return to the
clean countdown, press die COOKING
TIMEpad.
_, If the shelves become hmd to slide,
apply a small amount of vegetable oil
or coo_ng oil to a paper towel and
wipe tlle edges of die shelves widl die
paper U)'`vel.
32
Page 33

Careand cleaningof the cookingcenter.
Be sure electrical power is off and all surfaces are cool before cleaning any part of the cooking center.
How toRemovePackaging Tape
To assure no dmnage is done to the finish
of the produ(t, the satest way to remove
the adhesive left tiom pacl_ging rope on
new appliant es is an application of a
household liquid dishwashing detergent,
mineral oil or cooking oil.
Microwave Oven
Removable Turntable and Turntable Support
To prevent breakage, do not place the
turntable into water just after ( ooking.
Wash it cmeiiflly in warm, sudsy water or
in the &shwasher.
Tile turntable and support can be broken
if dropped. Remember, do not operate
the microwave oven xdthout the turntable
and support in place.
To replace the support, place its center
post in the bole. Turn the support
around until it seats into plate.
/nside
Keep the mitrt rwave oven (lean and
sweet-smelling. Opening the oven do(ira
ibw mimltes after cooking helps air out
the interior. An o( casional thorough
_dping _dth a soMfion of baking soda and
water keeps the interior flesh.
Spills and spatters are eaU to remove
tiom walls and floor if they are xdped up
soon after the toed is removed. Some
spatters wipe tip with a paper towel, some
may require a damp cloth. Rem(_ve greasy
spatters _dth a sudsy (loth, then rinse
alld (h)'.
Donotcleanwithmetalscouringpads.Piecescan
breakoff thepad,caumngelectrical,shock.
App b,with a soft cloth mid all()-_ to soak.
Wipe d U and then apply an applian( e
polish to flloroughly tlean and prote(t
the smih( e.
NOTE: Theplastic tape (onsomemodels)must
be removedfromall chrometrim. It cannotbe
removedif it is bakedon.
Outside
Clean the outside of the microwave oven
with soap and a damp clodl, then rinse
_dth a dmnp clodl and d U. Wipe the
window clean _dth a damp cloth. Cllrome
isbest wiped _dth a damp cloth and then
_dth a dU towel.
Door Surface
When cleaning sm_hces of door and oven
that come togedier on closing the door,
use only mild, non-abrasive soaps or
detergents applied whh a sponge or
soft cloth.
/fyou use a Brown "IVSear Dish:
Use Ben Ami: brand cleanser. High heat
generated on the bouom of the Br{_wn'N
Sear Dish can cause stains to bake onto
tile oven floor if grease is present.
These may be removed with Boil Ami _
brand cleanser. After using this ( leanser,
rinse and &y thoroughly, tbllo_dng
(leanser instructions caretully.
Doriotuseacommercialovencleaneronanypart
ofyourmicrowaveoven.
Wipe tip spatters on the window on the
inside of the door daily. When the
win&_w is soiled, wash it with a damp
cloth. Rinse thoroughly and (by.
Wipe metal and plastic parts on tlle inside
of the door flequently Use a (lamp ( loth
to remox e all soil.
Donotuseabrasives,suchascleaningpowders
orsteelandplasticpads.Theymaymarthe
surface.
33
Page 34

Careand cleaning ofthe cookingcenter.
Oven Shelves (lower oven)
('Jean tlle oxen shelx es ``ddl an abrasive
cleanser or steel ``_eel. After cleaning,
rinse file shelves and rack``_4tll clean
water and (hT widl a (lean / loth.
NOTE:Theovenshelvesmaybecleanedinthe
self-cleaningoven.However,theshelveswill
darkenkl color,losetheirlusteraridbecomehard
toslideif cleanedduringtheself-cleaningcycle.
Lift-Off Oven Door (lower oven)
The lower o',en door is removable for
easier ac(ess t() tile light bulb.
Donot lift thedoor by the handle.
I
Lift the door straight up and off
the hinges.
Thegasket is designed with agap at
the bottom toaflow for proper air
circulation,
Do not rub or clean the door
gasket--it has an extremely low
resistance to abrasion,
If you notice the gasket becoming
worn, frayed or damaged in any way
or flit has become displaced on file
door,you should have it replaced,
To remove the door, open it to tile broil
stop position. Grasp firmly on ea(h side
and lift tile door straight up and off
tile hinges.
Donot place handsbetween the hingeand the
ovendoorframe.
Toreplacethedoor,make sure tile hinges
are in tile broil stop position. Position tile
slots in tile bottom of the door squarely
over tile binges and slowly lower it over
both hinges.
Toclean the inside of the door:
_, Because tile area inside tile gasket is
(leaned during tile self( lean Q,( le, you
do not need to (lean this by hand.
To make tile shelves slide more easily
apply a small am()unt of vegetable oil
or cooldng oil to a paper u rwel and _dpe
tile edges of die _wen shelves _ddl dm
paper towel.
:, Tile area outside tile gasket and tile
flont fiame can be cleaned Mtll a soap-
filled steel wool or plasfi( pad, hot
water and detergent. Rinse well widl a
vinegar and water sohltion.
Toclean the outside of the door:
:, Use soap and water to thoroughly clean
tile top, sides and tiont of the ()yen
door. Rinse well. You mW also use a
glass (leaner to clean die glass on tile
outside of tile door. Do not let water
drip into tile vent openings.
:, Spillage ofmminades, flail@rices,
tomato sauces and basting materials
containing acids may cause
discoloration and should be Mped up
immediately. When surlace is cool,
dean and rinse.
[)(/no1 llse (1,,el1 / ]eaners, (leaning
powders or hmsh abrasix es on tile
outside of tile door.
34
Lower Oven Heating Elements
Donotdeanthebakedementorthebroil
element,Any,soilwillburnoff whentheelements
areheated.
To ( lean tlle oven floor, gendy lift tlle bake
element. Clean wifll warm soapy water.
Page 35

Lower Oven Light Bulb
Wire cover holder.
After broiling, remove the broiler
pan from the oven,
CAUTION,"Before replacing your oven
light bulb, disconnect the electrical
power to the cooking center at the main
fuse or circuit breaker panel.
Be sure to let the lighl cover and bulb
(ool (ompletely.
Toremove the COVER
Hold a hand under tile coxer so it
[]
doesn't fall xdmn released. \,Vid_
fingers of the same hand, firmly
push ba(k tl_e whe (over hokier.
IJfl off d_e (over.
Do not remove,anyscrews to remove
the cover
[] Replace bulb widl a 40-waU
applian(e bulb.
Broiler Pan & Grid (loweroven)
Donotcleanthebmilerpanorgndibaself-
cleaningoven.
After broiling, remove the broiler pan
flom dm oven. Rein(we d_e grid from the
pan. Cmefidly p()ur out the grease fiom
d_e pan imo a proper (onminer.
Toreplace the cover:
[] Place it imo groo_e ofd_e light
re( epm(le. Pull _dre tinward u)
d_e (emer of din (o'_ er undl it
snaps into pla(e.
[] Connect elecuical power U)
d_e ( ooking (emer.
Iftbod has burned on, sprinkle dm grid
_dth detergent while hot and (;over _dd_
wet paper towels or adishclod_. Soaldng
the pan _dll rem_>veburne&on ii)ods.
Bod_ tl_e broiler pan and grid may be
cleaned p,J.[ h a (oilllller( ial o'_en (leaner.
Wash and rinse d_e broiler pan and grid
in hol waler x_4II_a soap-filled or plasli(
s(ouring pad.
Control Panel
It's a good idea to wipe the control panel
after each use. Clean _dth mild soap and
water or xinegm and water, rinse with
(;lean water and polish (h)'_dth a soft clod_.
Both d_e broiler pan and grid can also be
(leaned in a dishwasher.
Do not store,a soiledbroiler pan andgnd
anywhereib the cookingcenter
Do not use abrasive cleansers, suong
liquid cleansers, plastic scouring pads or
oven (leansers on the control panel-they
Mll damage the finish. A 50/50 sohldon
ofxinegar and 11olwater works well.
35
Page 36

BeforeYouCall ForService...
Troubleshooting tips
Save time and money! Review the charts on the following
pages first andyou may not need to carl for service.
Possible Causes What ToDo
Contro/par_/on You forgot to press the • Press file START pad.
microwave oven START pad.
will not operate Door not securely closed. , Make rare Ihe mi(Towave oven door is closed.
Another ftmcfion was pressed. ° Pressd_egtEAR/OfYpadlM(:elo(:an(:elitandbeginagain.
The CLEAR/OFF pad was • Begin again.
pressed accidentally.
Oven controls ° While using Time Defl'ost numbers nol emoted after
improperly set. pressing Ihe AUTO DEFROST pad.
"'SENSOR ERROR" During a sensor ° The microwave (wen door should not be opened
appears in the function the microwave befi)re 1lie time begins 1o (oum down in die display.
microwave oven oven door was opened
display too soon.
Microwave oven light Light bulb is loose ° Call for service.
does not work or defective.
Foods overcooked or Varying density and amount • Vm)ing densi b, and amounl sometimes require more
undercookedin the of foods being cooked. ( oo]_ng time.
microwave oven
Clock andtimer A fuse in your home maybe • Replace llie fi>e or resel ll_e (:ircuil breaker.
do not work or blown or the circuit breaker
display goes blank tripped.
Food not turned or stirred ° Turn or stir ibod and begin again.
as called for in the recipe.
Too manydishes in the • Do nol overload your mi( rowave oven.
oven at the same time.
Food not thoroughly defrosted. • See die Using the microwave sensor controls set fion.
Improper cookware or ° See die Microwave safe cookware section of the
coverings being used. Important Safety Instructions section.
Humidity or moisture in , Make sure die inside of die oven and die omside of
the oven will lessen the die coulainers are d U.
Sensor cooking time.
Food not allowed to stand. • Some standing time is recommended fi)r cerlain
vegelables (:ooked wit h tlie Sensor Comrols.
Controls improperly set. ° See die Using the clock and lower oven timer se(lion.
The clock is in the
black-out mode.
ibr die h)wev oven clock.
° See dm Display On/Offse(:fion for fl_e microwm,e oven clock.
• See tl_e Special features of your lower oven control
secfioi_ for ll_e lower oxen clock.
36
• See fl_e Display On/Offsecfion fiw tlle microwaxe oven clock.
Page 37

Possible Causes What To Do
"F-- and a number or Youhave a function * PressflleCLEAR/OFF pad.Allow the oven lo (eel f()r one
/offer'flash in the error code. hour. I)ul file oven b_wk imo owr_Jlion.
Ioweroven display If the function code • I)is('ouuecl all power 1o ll_e cooking ('emer for al
repeats, leasl 30 se('ouds m_d iheu re(oune(1 power. Iffi_e
i]lu('fion error (ode repems, ('_d]for service.
Display flashes Power failure. • Resel l l_e h)wer oven ('lock.
Unable to get the Oven control pads were ° The BAKE and BROIL HI/tO pads must be pressed
loweroven display not pressed properly. _11fi_e same time and held for 3 se(ouds.
to show "SF"
Lower oven temperature Oven thermostat needs • See the Adjust the lower oven thermostat Do ityourself!
too hot or too cold adjustment, so(lion.
Lower oven will A fuse in your home may ° Replace 1lie ihse or reset II_e (ir('uii breaker.
not work be blown or the circuit
breaker tripped.
Oven controls improperly set. • See ll_e Using the lower oven _e(-tiou.
toweroven control You forgot to enter • I'res_ the BAKE l)_ld m_d desired tempernnlre or 1he
signals after entering a bake temperature SELF CLEAN pad ;rod desired (lem_ lime.
cooking time or or cleaning time.
delay start
Food does not bake or Oven controls improperly set. • See ll_e Usingthe Ioweroven_e(liou.
roast properly in the
Ioweroven Shelf position is incorrect • See ll_e Using the lower oven _e(liou.
or the shelf is not level,
Incorrect cookware or • See ll_e Using the lower oven so(lion.
cookware of improper size
being used.
Oven thermostat needs ° See d_e Adjust the lower oven thermostat Do ityourself/
adjustment, so(lion.
Fooddoesnot br_l Door not open to the broi| stop • See file Usingthe Iowerovense(-iiou.
properly in tim position as recommended,
lower oven
Oven controls improperly set. * Make sure you press rite BROIL HI/tO pad.
Improper shelf position * See fl_e Broiling Guide,
being used.
Cookware not suited • Use Ilie broiling l)?m and grid t l_?ll(?m_e wifll your oven.
for broiling.
Aluminum foilused on the the • See rite Using the lower oven section.
broiling pan and ,grid has not
been fitted properly and silt
as recommended.
In some areas the power
• Preheat the broil element for | 0 minutes.
(voltage) maybe low.
° Broil fin" the lougest period of time re( ()mmended
• ,, %
m tlle Broiling Guide.
37
Page 38

BeforeYouCall ForService...
Troubleshooting tips
Possible Causes What ToOo
Lower oven light does Light bull) is loose or defective. * Tighlen or replace 1lie bulb.
not work
Lower oven will Oven controls ° See the Using the self-cleaning lower oven section.sell:
not clean improperly set.
"Crackling" or This is the sound of the metal • This is llOI'I]ID1.
"popping" sound heating and cooling during
in the lower oven both the cooking and
Excessive smoking in Excessive soil. ° Press tl_e CLEAR/OFF p_/(l. Open d_e windows to rid d_e
the lower oven during room (Ifsmoke. "vV_filuntil d_e LOCKED DOOR lighl goes
a clean cycle off. Wipe up 1he excess soil and l"esel the (lean ('y('le.
Lower oven door wilt Oven too hot. ° Allow 1he oven Io ('ool beh)w locking lempermure.
not open after a
clean cycle
Pad operating light is broken. • Call for service.
cleaning functions,
Lower oven not clean Oven controls improperly set. ° See 1he Using the self-cleaning lower oven section.
after a clean cycle Oven was heavily soiled, ° (;lean up heavy spilh)vers before slatting 1he (lean
(y('le Heavily soiled ovens may need 1o seli:( lean
again or for a longer period of time.
"LOCK DOOR" flashes The self-clean cycle has been • ('Aose 1he oven door.
in the lower oven selected but the door is not
display closed.
LOCKEDDOOR light The oven door is locked • Press the CLEAR/OFF pad. Alh)w 1he oven 1o (ool.
is on when_you want to because the temperature
cook in the lower oven inside the oven has not
dropped below the locking
temperature.
Power outage, Power outage or surge. ° Resel the (]o(k. if the oven was in use, you must resel
clock flashes il by pressing the CLEAR/OFF p;ld, selling 1lie (h)(k
alld l'eseHil_g ally ('ookill_ illll(qioll.
"Burning" or "oily" This is normal in a new oven ° To speed die process, set a self:(lean cycle fi)r a
odor emitting from and will disappear in time. minimum of 3 hours. See die Using the self-
oven vent when using cleaning lower oven section.
the lower oven
Strong odor in the An odor from the insulation ° This is Iempormy.
lower oven around the inside of the
oven is normal for the first
few times the oven is used.
Fan noise when using A cooling fan may • This is nornml. The ('oolin_ i_m will lurn off and on.
the lower oven automatically turn on
and off to cool internal parts.
38
Page 39

GEBuilt-in Microwave CookingCenterWarranty
All warranty service provided by our Factory Service Centers
or an authorized Customer Care_technician. For service,
call 800-GE-CARES.
GE Will Replace:
One Year Anypart ofthe mi(row_x e (oo_ng (enter which falls due m _ deiect in m_t efi_fls
Fromthedateof the or workm_mship. During dfis tall one-yearwarranty,(;E will _flsoprovide,
originalpurchase freeofcharge,all labor and in-home servicet_)repk_(refi_ede_ocfivep_rt.
LimitedAdditional
Four-Year
Forthesecondthrough
A replacement magnetron tube the m_lgneu_ m robe Jtalls because _)f_
m_mlzf_ luting deie( t. During this limited additional four-year warranty, y_)u
_ll be responsible ibr mU k_bor or in-home se_(e.
thefifthyear from date
Ofthe originalpurchase
:_ Service trips to your home to teach you how to use
the product.
:_ Improper installation.
:_ Failure of the product if it is abused, misused, or used
for other than the intended purpose or used
commercially.
Replacement of house fuses or resetting of circuit
breakers.
Damage to the product caused by accident, fire, floods
or acts of God.
Incidental or consequential damage to personal
property caused by possible defects with this appliance.
This warranty is extended to the original purchaser and any succeeding owner for products purchased for
home use within the USA. In Alaska, the warranty excludes the cost of shipping or service calls to your home.
Some states do not allow the exclusion or limitation of incidental or consequential damages. This warranty
gives you specific legal rights, and you may also have other rights which vary from state to state. Toknow
what your legal rights are, consult your local or state consumer affairs office or your state's Attorney General.
Warrantor:General Electric Company. Louisville, KY40225
39
Page 40

Service TelephoneNumbers.
GEAnswerCente#R_800.626.2000
The (,E Answe_ (_entel is open 24 hem sa day, 7days aweek
In-HomeRepairService 800-GE-CARES(800-432-2Z37)
Expert (iE repair serxfce is only a phone call mvay.
SpecialNeedsService800.626.2000
800-TDD-GEAC(800-833-4322)
GE ofle_rs,flee of charge, a brochure to assist in planning a barrier-flee -ldu:hen fi)r persons
with limited mobility.
ServiceContracts800-626-2224
Purr hase a (;E service contract while your warran U is still in effe/t and you'll ret eive a
substantial dis( aura. (;E Consumer SelMce will still be dmre after your warramy expires.
PartsandAccessories800-626-2002
Indivi&lals qualified to service their own appliances can have parts or accessories sent direcdy
to dmir homes (VISA, MasterCard and Discover cards are a(cepted).
Instructionscontainedinthismanualcoverprocedures tobeperformedbyanyuser.Otherservicing
generallyshouldbereferredtoqualified servicepersonnel Cautionmustbe exercised,since
improperservicing maycause unsafeoperation,
ServiceSatisfaction
If you are not satisfied wit h tile service you re( eive from GE:
Firs_contact tile people who serviced your appliance.
Nex_if you are still not pleased, write all the details-including your phone numberer o:
Manager, Customer Relations
GE Appliances
Applian( e Pmk
Louis;ille, KY 40225
Finally,ifyour problem is still not resolved, write:
Major Applian(e Consumer A(don Program
20 North Wacker Drixe
(;hi(ago, IL 60606
40 Printed in LaFayette, GA
 Loading...