

Page 1
tge
use of
jpM
AUTO
AUTO
EkITV
to with
to the
pu!l
ovenpY7
oven
~-> ‘ -
Page 2
$k@y Umuctions . .........3-5
Micm.w-irlg ‘rips. . . . . . . . . . ...6
Featims
Totd~Contro1Pam4 . . . ........8
EIokl~imer. . . . . . . . . . . . . . . . . U
DefrostingbyTime . . . . .......13
Cookirgby Time . . . . . .......14
Cookingby Temperature. . . . . . . E
AutomaticRoasting&
Guide . . . . . . . . . . . ......16, 17
A.Wxrx&icSimmer . . . . .......17
AutomaticDefrosting .. ....18, 19
AutomaticCooking. . . . ....20-23
AutomaticCooking
Guide . ...............24,25
AutomaticCooking
RecipeGuide . . . . . . . ....26-31
DoubIeDWyTh’Shelf.. .....32,33
SafetyInstructions . .........3-5
Features . . . . . . . . . . . . ........7
Oven Controls . . . . . . . ........9
Minute Timer, Clock,
Automatic Oven Timer .. ..10-11
Bakinga Guide . . . . . . ....35-39
Roasting& Guide . . . . . ....40-44
13zoiling& Guide . . . . . ....45-49
Operating the
Self--CleaningOven. .. ...50, 51
Oven Shelves . . . . . . . . .......52
OvenLight . . . . . . . . . . .......53
Cleaning Guide . . . . . . . . . . .. .54
ofYbtm
Cooking Center . . . . ........7
your
C r t b
It is intended to help youoperate
and maintainyournew Cooking
Center properly.
Keep it handy for answersto your
questions.
If youdon’tunderstandsomething
or need more help, write (include
your phone number):
Consumer Affairs
General Hectric Company
Appliance Park
Louisville, KY40225
t m
SW-M n
a
You’llfind themon a labelon the
front of the lower ovenbehindthe
door.
These numbers are also on the
Consumer Product Ownership
RegistrationCard that camewith
your Cooking Center. Before
sendingin thiscard, please write
these numbers here:
Use these numbers in any
correspondence or service calls
concerning your Cooking Center.
Theelectricoutput ofthe
in
‘this
cookingamter is’700watts.
r -
It isimportantthat we, the
manufacturer,knowthe location of
yourCooking Center shou~da need
occur for adjustments.
Yoursupplieris responsible for
registeringyou as the owner.
Please check withyour supplierto
be surehe hasdone so; also send in
yourConsumerProductOwnership
RegistrationCard. If you move,or
ifyouare not theoriginalpurchaser
please write to us, statingmodel
and serialnumbers. This appliance
mu.wbeK’egistemd.maw I
that it is. -
Writeto:
General Electric Company
RangeProduct Service
Appliance Park
Louisville, KY40225
your a
c e e
Immediately coriiactthe dealer
(or builder) that soldyou the
CookingCenter.
s and
Beforeyourequestservice...
check the Problem Solver on pages
55 through 57.It listscauses of
minor operatingproblems that you
can correct yourself.
BefimeU-singYour
Cooking Center . . . . ........2
Model & Serial Number
Location . . . . . . . . . .......2, 7
Energy-Saving Tips . . . . . . . . . . .6
Care and.Cleaning . . . . ....52-53
~.heproblem S@jer . . . . “‘ “55-57
A
If “YouNeed service . . . . . . . . . .59
WmTaz’ty, . , . . . . . , . .Back.Cover
All‘mew! AmNormalwith -MOW’ O-WIN
@Steam01vapor escapingfrom
around the door.
@Light reflection arounddoor or
outer case.
~Dimming ovenlightand change
in blower sound mayoccur while
operating at power levels other
than high,
2
@Dull thumping sound while
ovenis operating.
* SomeTV-Radiointerference
mightbe noticed whileusingyour
microwaveoven.It’ssimilar to the
interferencecaused by other small
appliancesand does not indicatea,
problem with youroven.
Page 3
(a) Do Not Attemptto operate
thisovenwith the door open since
open door operationcan result in
harmful exposureto microwave
energy.It is importantnotto
defeator tamper with the safety
interlocks.
(b) W Not Place any object
between the ovenfront faceand
thedoor or allowsoil or cleaner
residueto accumulate on sealing
surfaces.
if it is damag~d. It is particularly
important th-atthe ovendoor cl&e
m
..&=v=Tproperly and that there isno
V damageto the:
latches(broken or
loosened)
(3)door seals and sea~ingsurfaces.
(d) The Oven Should Not be
adjustedor repaired by anyone
exceptproperly qualified service
personnel.
Whenusing&Wricalappliances
basicsafetyprecautionsshmddbe
followed,includingthefollowing:
theriskofburns,electricshock,
fire,injurytopersonsorexposure
toexcessivemicrowaveenergy:
~Usethisapplianceonlyforits
intendeduseasdescribedinthis
manual.
*Besureyourapplianceis .
properlyinstalledandgroundedby
aqualifiedtechnicianinaccordance
withtheprovidedInstallation
Instructions.
oThisappliancemustbe
connectedtoagrounded,metallic,
permanentwiringsystem,oran
equipmentgroundingconductor
shouldberunwiththecircuit
conductorsandconnectedtothe
equipmentgroundingterminalor
leadontheappliance.
~Thisapplianceshouldbeserviced
onlybyqualifiedservicepersonnel.
Contactnearestauthorizedservice
facilityforexamination,repairor
adjustment.
@Beforeperforminganyservice,
DKK!OIW++?ECTTHEOVEN
POWERSUPPLYAl’THE
HOUSEHOLDDEHRENJTION
PANELBYREMOVINGTHE
I?US13ORswmH-m{GON?
THECIRCUITBREAKER.
@Do notcoverorMockany
openingscmtheappliance.
QDonotuseoutdoors.
@Donotoperatethisapplianceif
itisnotworkingproperly,orifit
hasbeendamagedor dropped.
s & withanyappliance,close
supervisionisnecessarywhen
usedbychildren.
8~~ fi~~ ]~~~~ ~~~~g+—.—
childrenshouldnotbeleflaloneor
unattendedinareawhereappliance
isinuse.Theyshouldneverbe
allowedtositorstandonanypart
oftheappliance.
@D()&tallowmyoneto climb~
standor hangonthe d’m’.They
coulddamage‘the(9Vene
e ~~~~~ OF
m
N m s
m ABOVEAJ$J
ONTEE REACH
l
ew p c
fittingorhanginggarmentsshould
neverbewornwhileusingthe
appliance.Flammablematerial
couklbeignitedifbroughtin
contactwithhothefi:ingelements
andmaycausesevereburns.
@@J$~‘onlydry pothokkrs-
moistordamppotholdersonhot
surfacesmayresultinburnsfrom
steam.Donotletpotholderstouch
hotheatingelements.Donotuse
atowelorotherbulkycloth.
@pJ~v~~me your for
warmingor theIro’ome
@~~iMJtstore
materialsin theoven.
eKeephoodandgreasefilters
cleantomaintaingmd venting
andtoavoidgreasefires.
oDonotM cookinggrease
or other materials
inthe Owenor
nearit.
(continuednextpage)
Loose
3
Page 4
@D!-Jnotusewater‘ongrease
EXC
fjHS ptlll on
SUr’fwx
u b-yCov$%%lgpm
withwell k.ly
COOkif2
ShWt OF”f ti$t$ye
gw-we apm
am be
putoutby with
sodaor, a
dryCBNmlicd
$mm.
nottouchheatingAm-Rem’
@Do
or
insudown These
surfacesmaybehotenoughto
burneventhoughtheyaredarkin
color.Duringandafteruse,donot
touch,orletclothingorother
flammablematerialscontactany
interiorareaoftheoven;aUow
sufficienttimeforcooling,first.
Potentiallyhotsurfacesinclude
oven.ventopeningsandsurfaces
neartheopenings,crevices
aroundtheovendoorandthe
edgesofthedoorwindow.
Theinsidesurfaceof
theoven.maybehotwhenthedoor
isopened.
s~~~e~COOki~gporkfollowour
directionsexactlyandalwayscook
themeattoatleast170°1?This
assuresthat,intheremote
possibilitythattrichinamaybe
presentinthemeat,itwillbe
killedandmeatwillbesafetoeat.
oven:
~Readandfollowthespecific
“PRECAUTIONSTOAVOID
POSSIBLE
EXm
ENfoundonpage3.
QT. reducetheriskoffireinthe
cwencavity:
–1% notmwccwkfood.CareMly
attendapplianceifpaper,p~astic
o]-otheIcombustiblematerialsare
–Removewiretwist-tiesfrom
paperorplasticbagsbefore
placingbagsinoven.
—Donotuseyourmicrowaveoven
todrynewspapers.
–Paper towels, and
waxpaper.Recycledpaper
productscancontainmetalflecks
whichmaycausearcingorignite.
Paperproductscontainingnylon
ornylonfilamentsshouldbe
avoided,astheymayalsoignite.
–Do notpoppopcorninyour
inaspecial
microwavepopcornaccessoryor
unlessyouusepopcornlabeledfor
useinmicrowaveovens.
–Do notOperatetheovenwhile
emptytoavoid
ovenandthedangeroffire.
damagetothe
Ifby
accidenttheovenshouldrun
emptyaminuteortwo,noharmis
done.However,trytoavoid
operatingtheovenemptyatall
times—itsavesenergyand
prolongslifeoftheoven.
—Ifmaterialsinsidetheoven
shouldignite,keepovendoor
closed,turnovenoff,and
disconnectthepowercord,orshut
offpoweratthefuseorcircuit
breakerpanel.
~~ome
productssuchaswhole
eggsandsealedcontainers—for
example,closedglassjars—may
explodeandshouldnotbeheated
inthisoven.
~Seedoorsurfacecleaning
instructionsonpage53.
@D6_Jn9tdefrostfrozenbeverages
innarrow-neckwlbotties(especially
carbonatedbeverages).Evenifthe
containerisopened,pressurecan
buildup.Thiscancausethe
containertoburst,resulting
injury.
in
TVdinnersmaybemicrowavedin
foiltrayslessthan3/4’’high;
removetopfoilcoverandreturn
traytobox.Whenusingmetalin
microwaveoven, (except
shelf)
at
least1inchawayfromsides
ofovene
etcookiIIg utensilsmaybecome
becauseofheattransferred
hot
fromtheheatedfood.Thisis
especiallytrueifplasticwraphas
beencoveringthetopandhandles
oftheutensil.Potholdersmaybe
neededtohandletheutensil.
@$~~@~~f3~9 ~~() fi(-)(-)~
canbecometooIhottotouch.Be
carefhltouchingthefloorduring
—
andaftercooking.
~Donotusea in
foodyouarernicrowavingwdess
thethermometerisdesignedor
recommendedforuseinthe
microwaveoven.
R31110wthetemperature
probefmlt-1the when
not
usingittocookwith.Ifyouleave
theprobeinsidetheovenwithout
insertingitinfoodorliquid,and
turnonmicrowaveenergy,itcan
createelectricalarcinginthe
oven,anddamageovenwalls.
e
AVOMktiting babyfoodin
glassjars,evenwithouttheirlids;
especiallymeatandeggmixtures.
@ eggsis not
a m
i
oven,Pressurecanbuildupinside
eggyolkandmaycauseittoburst,
resultingininjury.
placedinsidetheoventofacilitate
CXXM.ng.
Page 5
(seepreviouscaution)shmddbe
pim&xitoallowsteamtoescape
duringcooking.
~~]~~-~ ~@&&~l~s~~c ~~e~s~~s
designedfo~microwavecookingare
veryuseful,butshouldbeused
carefully.Evenmicrowaveplastic
maynotbeastolerantof
overcookingconditionsasare
glassorceramicmaterialsand
maysoftenorcharifsubjectedto
shortperiodsofovercooking,In
longerexposurestoovercooking,
thefoodandutensilscouldignite.
For-thesereasons:1)Use
microwaveplasticsonlyanduse
theminstrictcompliancewith
theutensilmanufacturer’s
recommendations.2)Donot
subjectemptyutensilsto
microwaving.3)Donotpermit
childrentouseplasticutensils
4houtcompl;tesupervision.
Umking
andtightly&N!Xxlplasticbags
shouldbeslit,piercedorvented
asdirectedinCookbook.Ifthey
arrenot,plastic
burst during
orimmediatelyaftercooking,
possiblyresultingininjury.Also,
plasticstoragecontainersshould
beatleastpartiallyuncovered
becausetheyformatightseal.
W’hencookingwithcontainers
~ightlycoveredwithplasticwrap,
removecoveringcarefullyanddirect
steamawayfromhands
and face.
o
certainspecialcircumstances,
liquidsmaystarttoboilduringor
shortlyafterremovalfromthe
microwaveoven.TOpreventburns
fromsplashingliquid,stirthe
liquidbrieflybeforeremovingthe
containerfromthemicrowaveoven.
e
useofthe DIJ’IYTM
shelfaccessory.
–Removetheshelffromoven
whennotinuse.
–Do notstoreorcookwithshelf
onfloorofoven.Productdamage
mayresult.
–Use potholderswhenhandling
theshelfandutensils.Theymay
behot.
–Do notusemicrowavebrowning
dishonshelf.Theshelfcould
overheat.Useofshelfwith
AutomaticCookingfeatureisnot
recommended.
L
astand away f the
when mwndoor.
hota forsteamwhichescapes
G?mlGNllseburns t hands?f
eyes.
Don9tBMWU f
@
theU9ven.PM?SSU.UW
i
4XNRM. up andthe
couldbw?3t9GNHingj
@~ oven ventdUCtS
unobstructed.
~Keepovenfreefromgrease
buildup.
me
laminjury.
Whenusingcookingor
EI
roastingbagsinoven,follow
themanufacturer’sdirections.
@Donotuseyouroventodry
newspapers.If’overheated,they
cancatchfire.
@Don dean d gasket.The
doorgasketisessentialforagood
seal.Careshouldbetakennotto
rub,damageormovethegasket.
@Don useovenC No
commercialovencleaneroroven
linerprotectivecoatingofanykind
shouldbeusedinoraroundany
partoftheoven.
s Cleanonlypartslistedinthis
UseandCareBook.
@ Bef(lre the ovf3n9
removebroilerpanandother
utensils.
~~~@Bf~~f~~—afannoise
shouldbeheardsometimeduring
thecleaningcycle.Ifnot,callfor
servicebeforeself-cleaning
again.
@y~o$j$icw.lkedi (such
aspasta)maytendtoboilover
morerapidlythanfoodscontaining
iessmoisture.Shouldthisoccur,
refertopage52forinstructionson
ho-wtocleantheinsideoftheoven.
~Placeovenrackindesired
positionwhileoveniscool.If
racksmustbehandledwhenhot,
donotletpotholdercontact
heatingunitsintheoven.
@Pullingoutshelftotheshelfstop
isa convenienceinliftingheavy
foods.Itisalsoaprecaution
againstburnsfromtouchinghot
surfacesofthedoororovenwalls.
5
Page 6
@use properproverlevelas
:
~
~
recommended and DO NOT
CW%UXX.
@Do notoperatetheovenwhile
empty.If by accidentthe oven
should.run empty a minute or two,
noharm is done. However,try to
~l~oidoperating the oven empty at
al~times—saves energy and aLso
ensuresgood, long-lerrnlifeofoven.
@Make sure allcookwareused in
your microwaveovenis suitablefor
microwaving.iMostglasscasseroles,
cookingdishes, measuring cups,
custard cups, pottery or china
dinnerware which does nothave
metallictrim or glazewith a metallic
sheen can be used. Somecookware
islabeled“suitableforMicrowaving:’
If youare unsure, use thisdish test:
Measure 1 cup water in a glasscup.
Place in ovenon or besidedish.
Microwave1 minute atHIGH. If
waterbecomeshot,dishismicrowave
safe. If dish heats, it should notbe
used formicrowaving.
$g$i&.
A
The panel displaysall ofthe oven “=-func~ions.Ai%r ~ seconds,all lights
disappear and “Reset” appears in
thedisplay.Touchthe CLEARKIFF
pad andthen touchCLOCK pad and
set the clock. The clock mustbe set
for thetimer functionsto work.
If poweris disruptedat anytime,
the abovesequence reoccurs and
touching C.LEAIWFF.
Q
@Preheat the ovenonly when
necessary.Most foods willcook
satisfactorilywithout preheating.
Hyoufiid preheating is necessary,
keepan eyeon the indicator light,
andput food inthe ovenpromptly
after the light goes out.
~Alwaysturn ovenOFF before
removingfood.
@.Duringbaking, avoidfrequent
door openings. Keep door open as
shorta time as possiblewhen it is
opened.
@For self-cleaning oven, be sure
to wipeup excess spillage before
self-chxmingoperation.
@Cook complete ovenmeals
insteadofjust one food item,
Potatoes,other vegetables, and
somedesserts wiHcook together
with a main-dish casserole, meat
loaf, chicken or mast. Choose
foodsthat cook at the same
temperature in approximately
the same time.
S3 resi~~a~ inoven
wheneverpossible to finish
cookingcasseroles, oven meals,
etc. Also add rolls or precooked
dessertsto warm oven, using
resid~a~heat to warm them.
*Paper towels,wax paper, and
plastic wrap can be used to cover
dishesin order to retain moisture
and preventspattering.
@Somemicrowavedfoodsrequire
stirring, rotating, or rearranging.
Check your Cookbook for specific
instructions.
~Steambuilds up pressure in foods
which are tightlycoveredby a skin
or membrane. Pierce potatoes, egg
yolksand chicken liversto prevent
bursting.
6
Page 7
—
—
-.=--,—-=-.
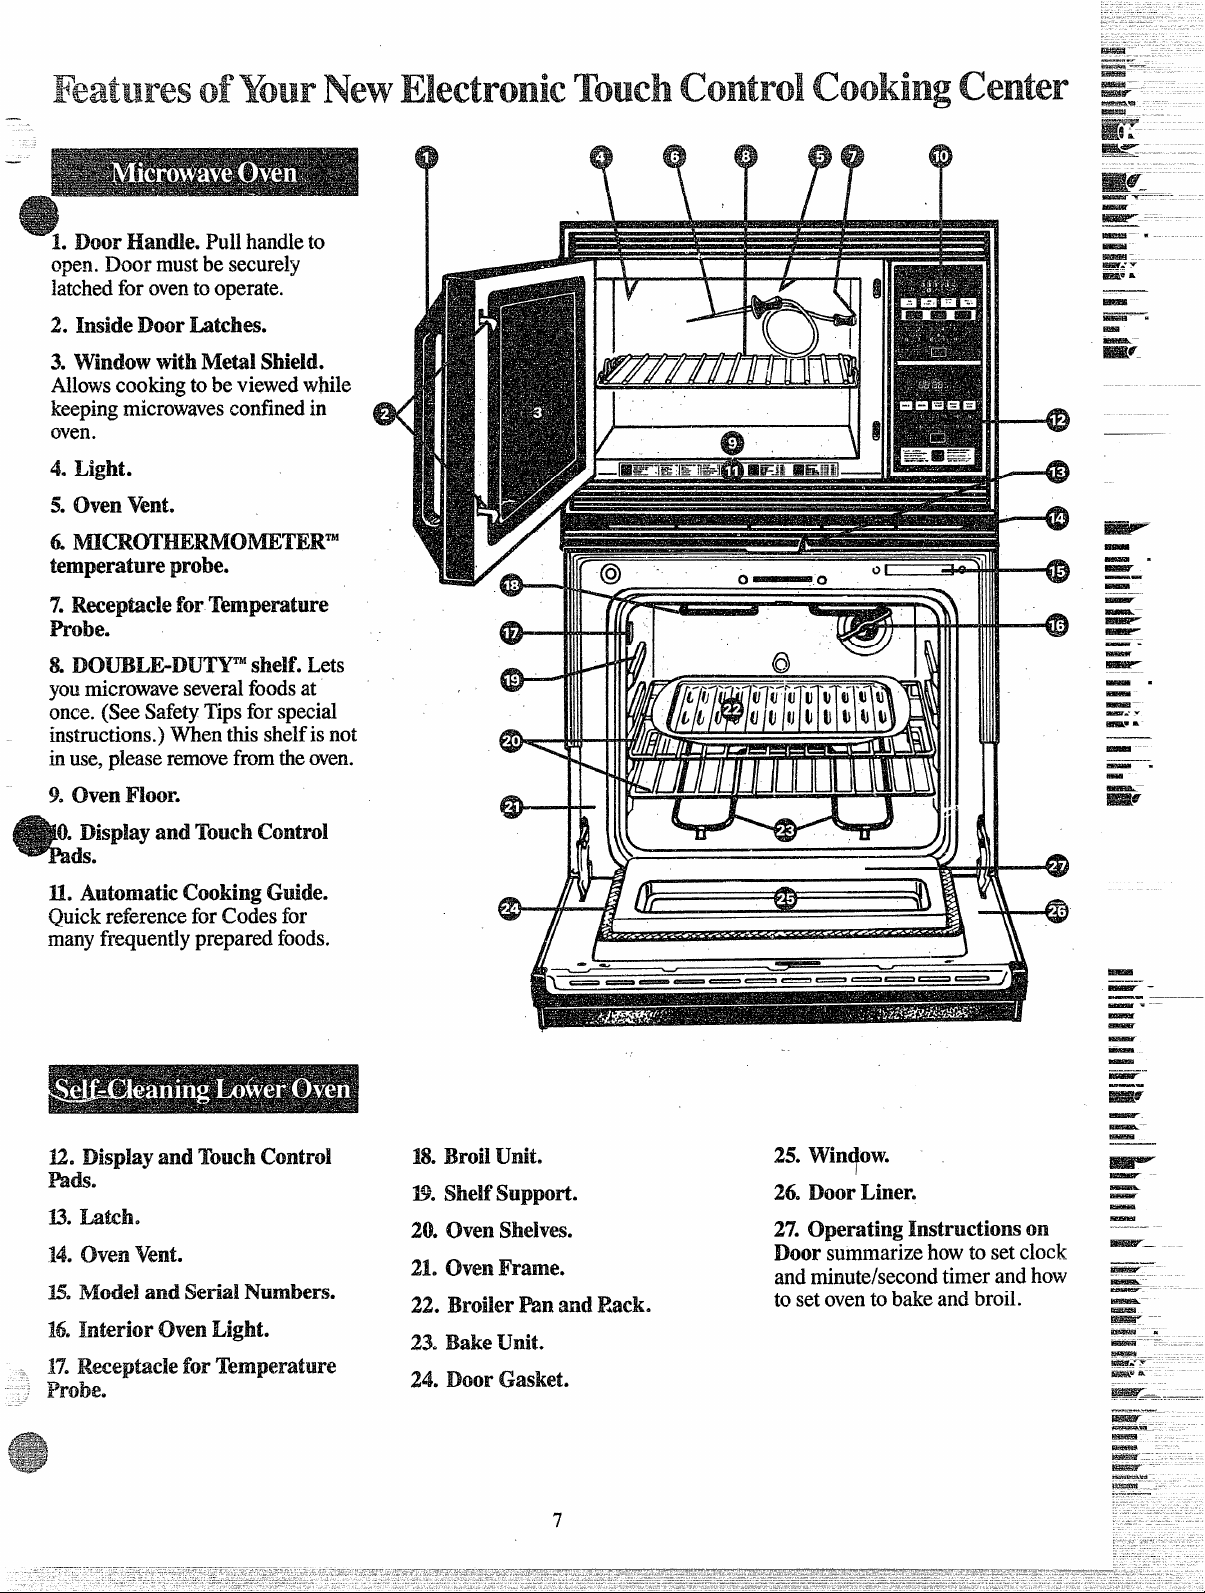
L Door Handle. PuUhandle to
open.Doormustbesecurely
latched for ovento operate.
WC:
-.
-
WEE/P=
.—
E .
E -
-
~elk
—._..—
2. Inside
DoorLatches.
3. WindowwithMetalShield.
Allows cookingto be viewed while
keepingmicrowavesconfinedin
oven.
4. Light.
5. o v
6
temperatureprobe.
7.ReceptacleforTemperature
Probe.
&DOUBLE-DU’.I’Y’mshelf.
youmicrowaveseveral foods at
once. (See Safety
instructions.) When.this shelf is not
inuse, please removefrom the oven.
Tipsfor special
9. OvenFloor.
0. DisplayandTm.lchcontrol
iis.
IL AutornatkCookingGMe.
Quickreference for Codes for
manyfrequently prepared foods.
Lets
---”43
P
-
-.
l
——
E#u@z=—
E#Ea?=—
—.
—
-=
-
-—
-.. .
!
I
-
12eI@A3yandTouchControl
Pals.
El IAdh.
M oven
v
H. ModelandSkid Numbers.
16. OvenLight.
U’.
.- Probe,
18.BroilUnite
B.
20. OvenShelves.
21. Oven l%lme.
22.
BroilerPanandRack.
23. BakeUnit.
24. Door Gasket.
25. win (IWO
‘!
26. Door Liner.
2% Operating Instructionson
summarize how to set clock
Door
and minute/secondtimer and how
to set ovento bake and broil.
~-
—. —
— --–
—
—
—
~
—
——-
~
—.
-s
K
—
—–
—-
—
—
———
l
—
EsaRlw- --—
-
Km?+g--
-
- .
Page 8
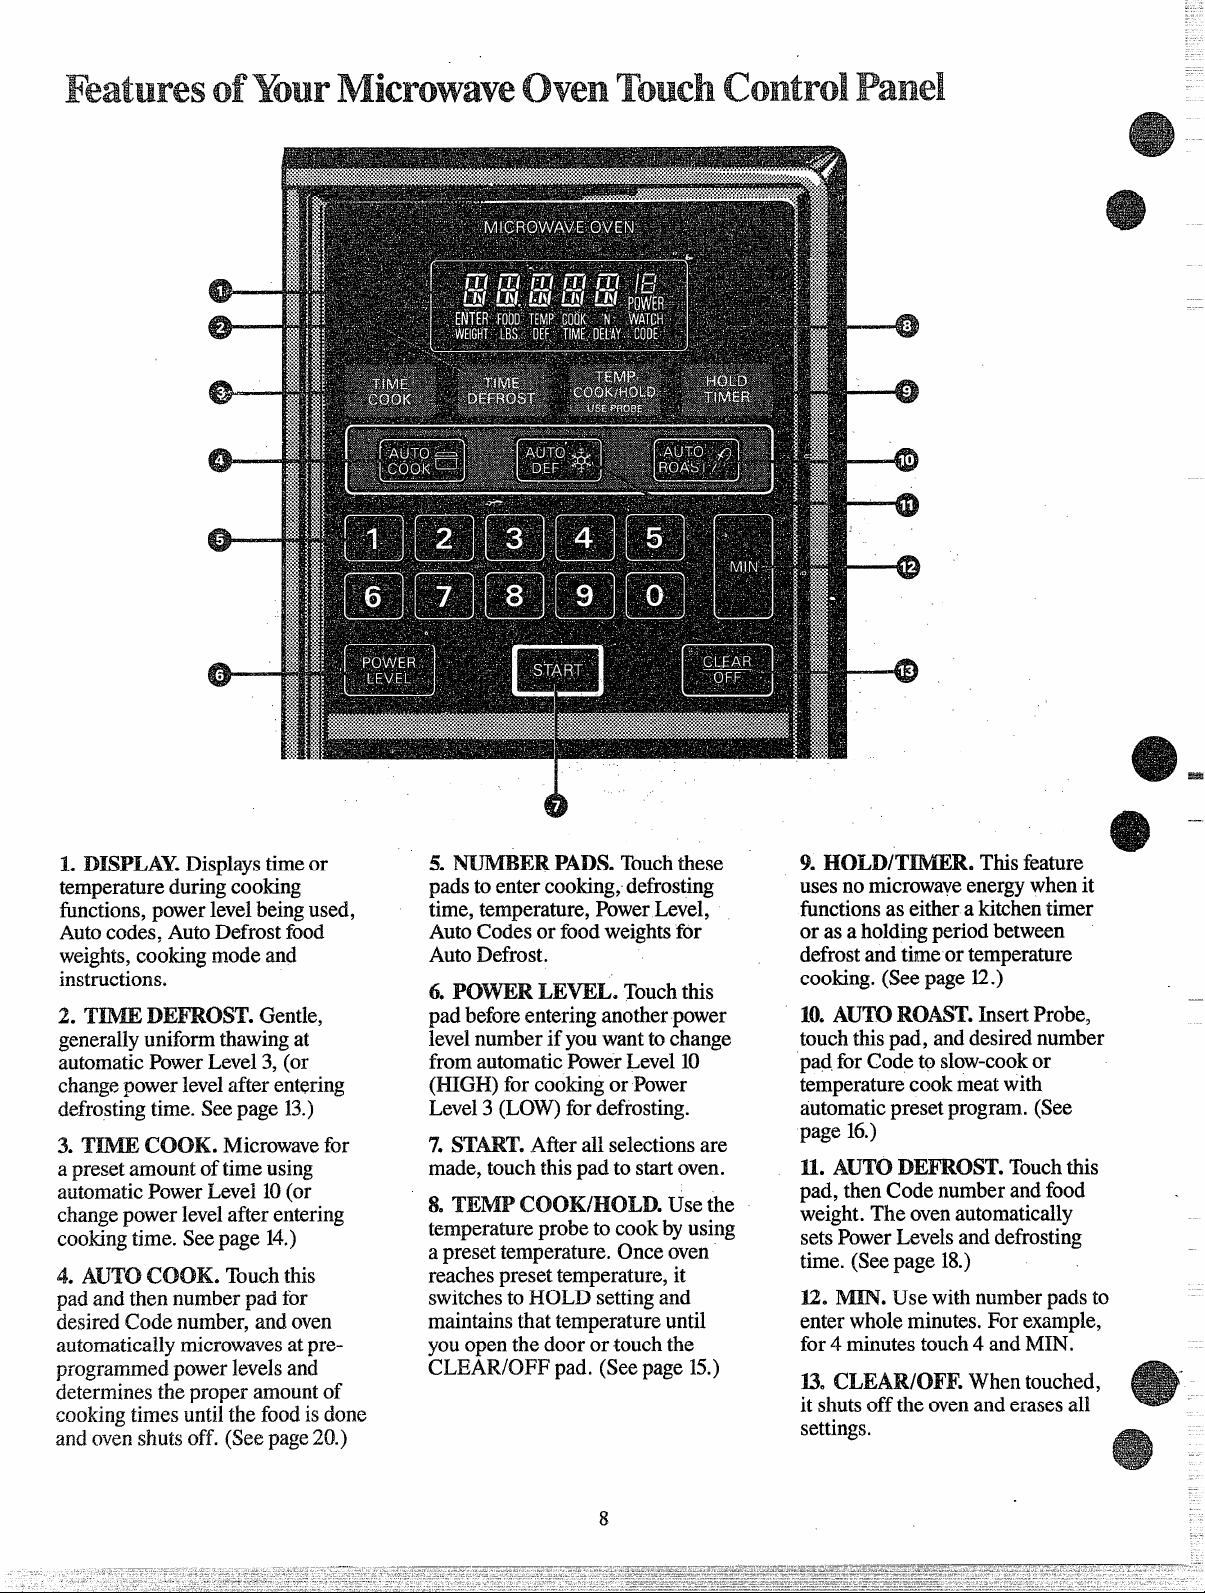
16DISPLAY.Displaystimeor
temperature during cooking
functions, powerlevel being used,
Autocodes, Auto Defrost food
weights,cooking mode and
instructions.
2. IXME DEFINX3T. Gentle,
generally uniform thawing at
automatic Power Level 3, (or
changepower levelafter entering
defrostingtime. See page 13.)
3. ‘HiMECOOK. Microwavefor
a preset amount of time using
automaticPower Level 10(or
changepower levelafter entering
cookingtime. See page 14.)
4. AIJTO COOK. Touchthis
pad and then number pad for
desired Code number, and oven
automatically microwavesat preprogrammed power levelsand
determines the proper amount of
cooking times until the food isdone
and ovenshuts off. (See page
20.)
5. NUMBEI? PADS. Touchthese
pads to enter cookingjdefrosting
time, temperature, PowerLevel,
Auto Codes or food weightsfor
Auto Defrost.
6. NYVVERLEVEL. Touchthis
pad beforeentering another power
levelnumber if youwant to change
from automatic Power Level 10
(HIGH) for cooking or Power
Level3 (LOW) for defrosting.
7.
START.After all selections are
made, touch this pad to start oven.
8. TEMPICOOWHOLD.Use the
temperature probe to cook byusing
a preset temperature. Once oven
reaches preset temperature, it
switchesto FIOLD setting and
maintains that temperature until
you open the door or touch the
CL13AR/OH?pad. (Seepage 15.)
9. HOLWI’IMERThisfeature
uses nomicrowaveenergy when it
functionsas either a kitchen timer
or as a holdingperiod between
defrost and time or temperature
cooking. (See page 12.)
10. AUTO INMJ3T.
touch thispad, and desired number
pad for Code to slow-cookor
temperature cook meat with
automaticpreset program. (See
page 16.)
InsertProbe,
IL A~O DEFROST.Touchtiis
pad,thenCodenumberandfood
weight.
The ovenautomatically
setsPowerLevelsanddefrosting
time.(Seepage18.)
E. M3N. Use with number pads to
enter whole minutes. For ex~rnple,
for 4 minutestouch 4 and MIN.
B.
CLEARKN?RWhen touched,
it shutsoff theovenand erases all
settings.
8
-.
Page 9
,,
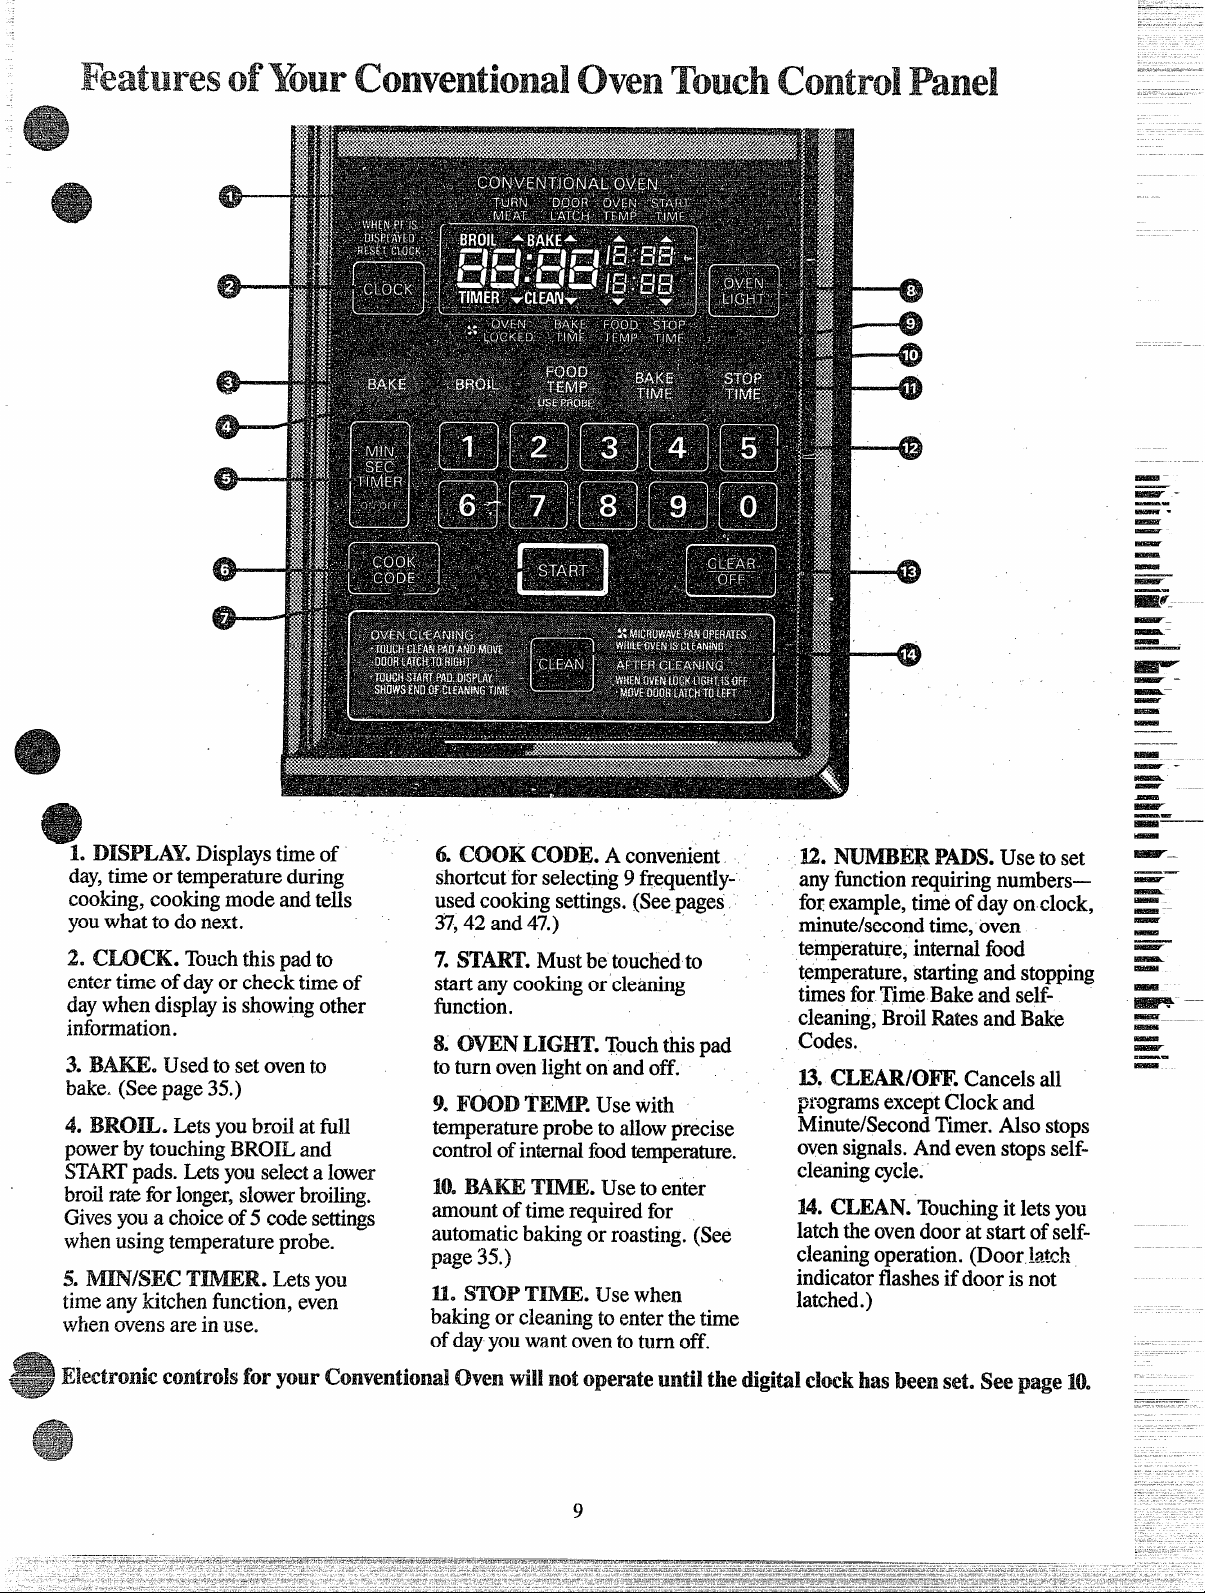
L DISPLAY.Displays time of
day,time or temperature.during
cooking, cookingmode and tells
youwhat to do next.
2. CLOCK. Touchthis pad to
enter time of dayor check time of
day when display is showingother
information.
3BAKE Used to set ovento
bake. (See page
35.)
4 BROIL Letsyoubroil at full
powerby touching EJROILand
STARTpads. L&syou selecta lower
broilrate for longer,slowerbroiling.
Givesyou.a choiceof 5 code settings
when using temperature probe.
5. Lets YOU
timeany kitchen fi.mction,even
when ovens are in use.
$xmtrdsforyour ovenvialnotoperateMM thedigitalclock hasbeenset. s p N
6. COOIK
CODE.Aconvenient
shortcut for selecting9 frequentlyused cooking settings.(See pages,
37,42 and 47.)
7. START.
Mustbe touched to
start any cooking or cleaning
function.
8. OVEN LIGHT. Touchthis pad
toturnovenlight on and off. -
9. FOIODTEMP.Use with
temperatureprobetoallowprecise
controlofinternalfd tenmerature.
*
M BAKETIME.Useto enter
amount oftime required for
automatic baking or roasting. (See
page 35.)
U. S’NW TIME. Use when
baking or cleaning to enter the time
ofday YOUwant ovento
“
turnOff.
NUMBERFADS.Use to set
D.
anyfunctionrequiring numbers—
for example,time ofday on clock,
minute/secondtime, oven
temperature, intern~ food
temperature, starting and stopping
times for Time Bake and selfcleaning,Broil Ratesand Bake
Codes.
U CLEARKM’F.Cancels all
p“ogrms exceptClock~d
Minute/SecondTimer.Alsostops
ovensignals.And even stopsself-
cleaningcycle.
14.
CLEAN.Touchingit lets you
latch theovendoor at start of selfcleaningoperation. (Door latch
indicatorflashes if door is not
latched.)
~-
—.
—-
-
—
—
—
~
—–
~-
—–
~—
—
-
—.-—
m
——
—
-
E
-
E
—
—
-
—
=
~
E
-
-
~
.
-
9
Page 10
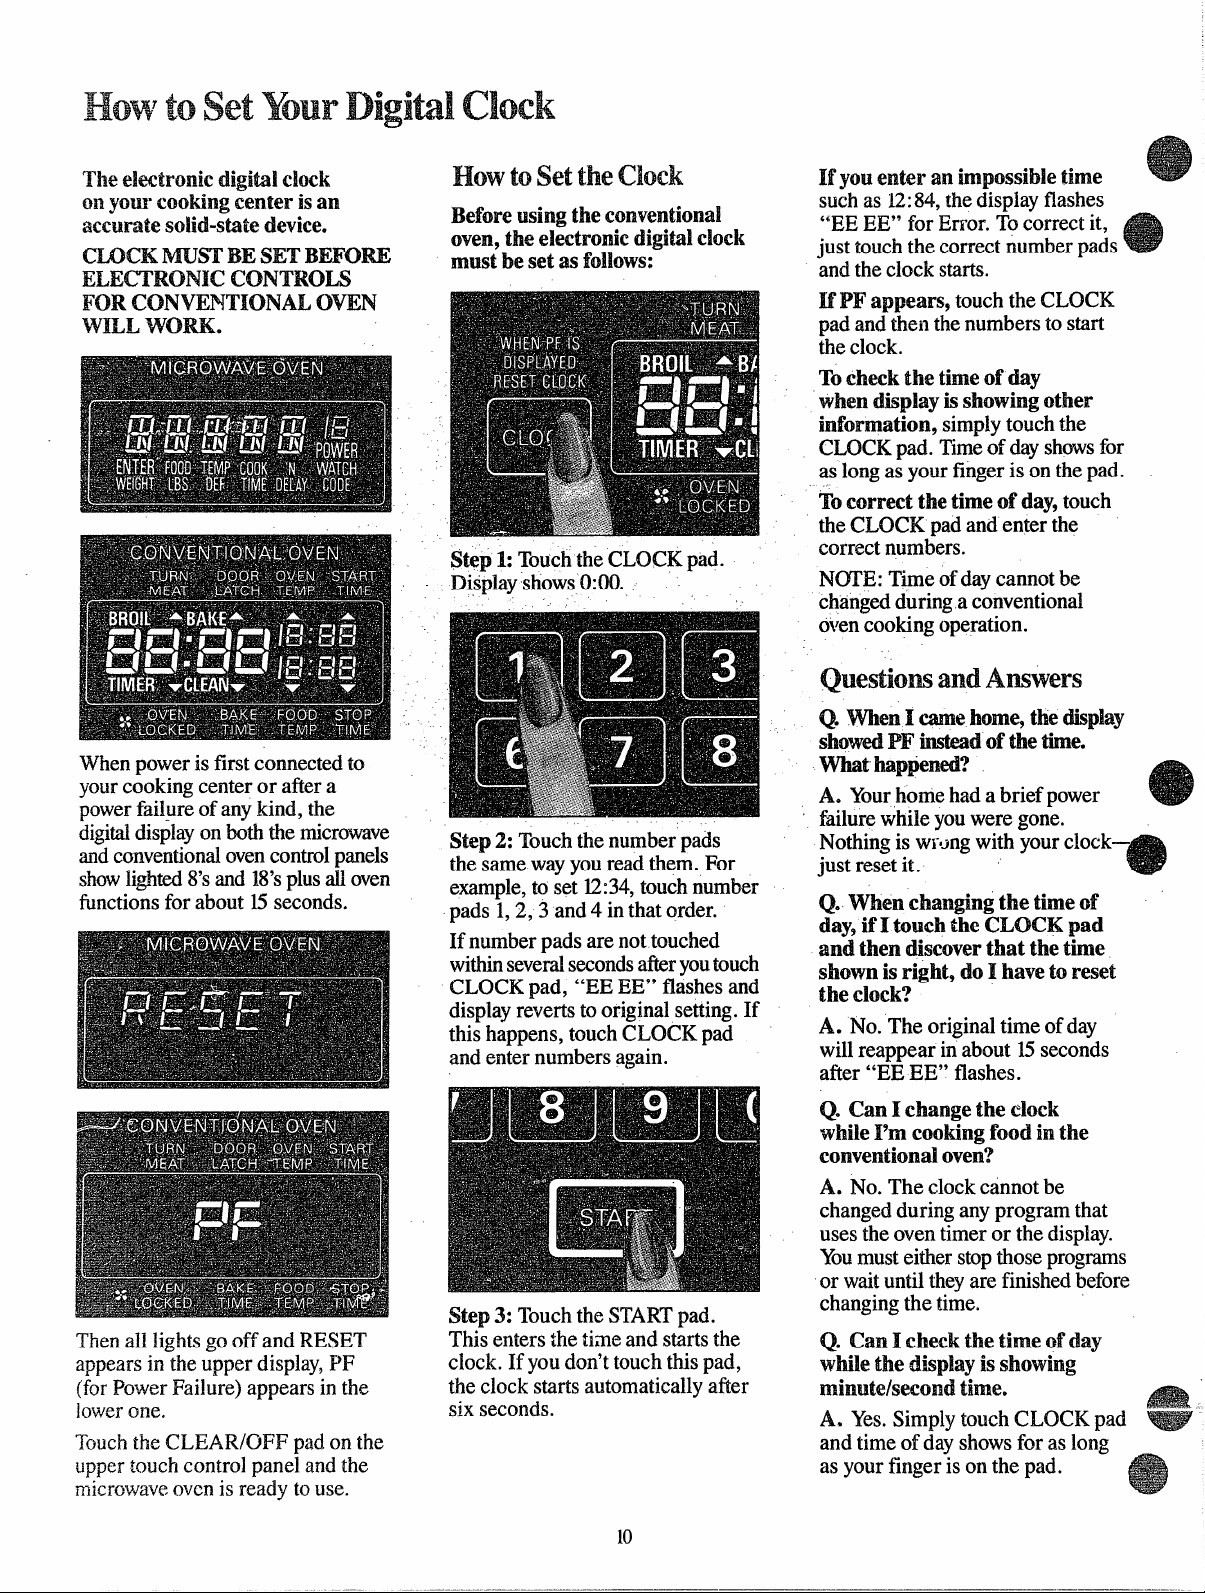
Theekctronk dock
.-— .
m yourcooking
fixmterisan
aaxn-atesolid-statedevice.
CLOCKMUST’BENH’BEFORE
IEM71’RONICCONTROLS
F(M? OVEN
WILL
When power is first connected to
yourcooking center or after a
powerfail~re of any kind, the
digitaldisplayonboththe microwave
andconventionalovencontrolpanels
showlighted$’sarid18’splusall oven
functionsfor about 15seconds.
WORK.
H t t c
BeforeWingtheamwmtiod
mm, theelectronicdigitaldock
mustbesetasM1OWS:
Step1:TouchtheCUXK pad.
DiSplayshows0:00.
Step 2: Touch the number pads
the same way youread them. For
example,to set 12:34,touch number
pads 1,2,3 and 4 in that order.
If
numberpadsarenottouched
withinseveralsecondsafteryoutouch
CLOCKpad,“IX EE”flashesarid
displayrevertstooriginalsetting.If
thishappens,touchCLOCKpad
andenternumbersagain.
MyouWUN”animpossibletime
such as 12:84,the display flashes
“EE E13°for Error. To correct it,
just touch the correct number pad!
and the clock starts.
IfPF appems9 touch the CLOCIS
pad and th~ilthe
numberstostart
theclock.
‘lbcheckthetimeofday
whendisplayisshowingother
information,simply touch the
CLOCK pad._Tim~~fdayshowsfor
as long as your finger is on the pad.
,.
To correct
the CLOCK pad and enter the
correct numbers.
thetimed?day,touch
N~E: Timeofday cannot be
changedduringa conventional
o~~encookingoperation.
os when Icamehonnf+thedi$play
showedPm’insteadof
what”hap@m’d?
Yourhome had a brief power
A.
failurewhile youwere gone.
Nothing is wrong with your clock—
just reset it.
thetime.
Q. Whenchangingthetimeof
day,ifItoldl themom pad
andthendiscoverthatthetime
shownisrightydoIhavetoreset
thedock?
A. No.
Theoriginaltimeofday
willreappearinabout15seconds
after“EEEE”flashes.
Then all lightsgo off and RESET
appears in the upper display,PF
(forPower Failure) appears in the
lowerone.
Touchthe CLEAR/OH? pad on the
upper touch control panel and the
microwaveovenis ready to use.
Step 3: Touch the STARTpad.
This enters the time arid startsthe
clock. If you don’ttouch thispad,
the clock starts automaticaHyafter
six seconds.
10
CanI changethedock
Q.
while19mcookingfoodinthe
conventionaloven?’
A. No.
changed during any program that
uses the oven timer or the display.
Youmust either stopthose programs
or waituntil they are finished before
changing the time.
The clock cannot be
Q CanIche& thetimeofday
thedisplayisshowing
while
nhutdsecmd ~imee
A. Yes.
and time of day showsfor as long
as your finger ison the pad.
Simply touch CLOCK pad
—
Page 11
to
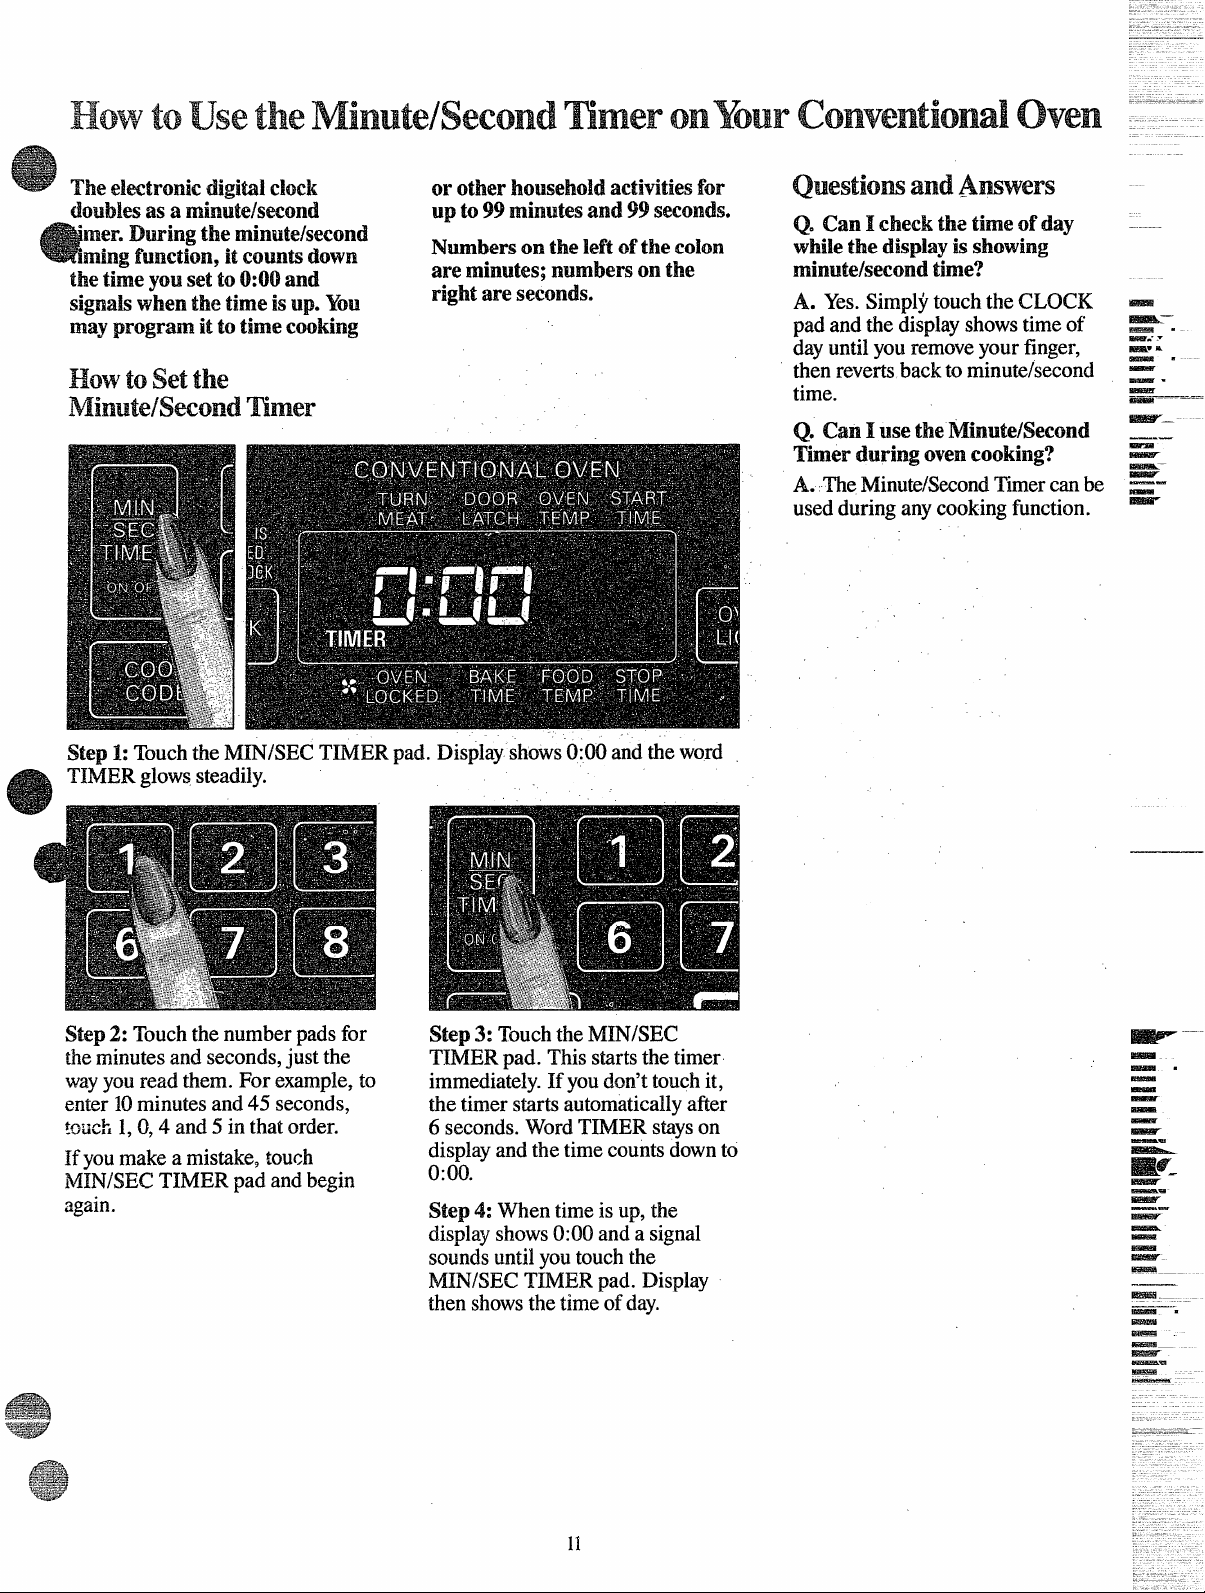
me ekcmmic digitddock
dwbks asa middsecond
‘mere & mimtdsecond
mim function.itcountsdown
tileyouS 6 and
the
signalswhenthetimeisup.You
mayprogramit totimecooking
How’to set the
‘IhMx
Steph
TIMER @WS steadily.
Touchthe M
orotherhou.w!hddactivitiesfor
99 minutesand99seconds.
upto
NumbersontheMt Ofthecolon
.
are minutes;numbersonthe
rightamseconds.
m
Q. (h I checkthetime dday
whilethedisplayisshowing
Iminutekwcondth’m?
A. Yes.
pad and the displayshowstime of
dayuntil you removeyour finger,
then reverts back to minute/second
time.
Q. CamI usetheMinute/Second
Timerduringovencooking?
A. The
used during any cooking function.
Simply touch the CLOCK
Minute/SecondTimercan be
Im?ziti
E .
-
—
—
E —
Em?5sK -
-
~
w
—
-
mlEm-
Step 2: Touchthe number pads for
the-minutesand seconds,$st the
wayyou read therm For example,
enter 10minutes and 45 seconds,
~otichI, O,4 and 5 in that order.
If you make a mistake, touch
MIN/SEC TIMER pad and begi~
again.
to
Step 3: Touchthe MIN/SEC
TIMER pad. This startsthe timer
immediately.If youdon’ttouch it,
the timer starts automaticallyafter
6 seconds. Word TIMER stayson
display and the time counts downto
0:00.
Step4:
displayshows0:00 and a signal
soundsuntil you touch the
MIN/SEC TIMER pad. Display
then showsthe time ofday.
When time is up, the
—
rim=w—.
E
—
-
-
f
=
E
—
E
-
-—
EFss3r
—.
-
—–
Page 12
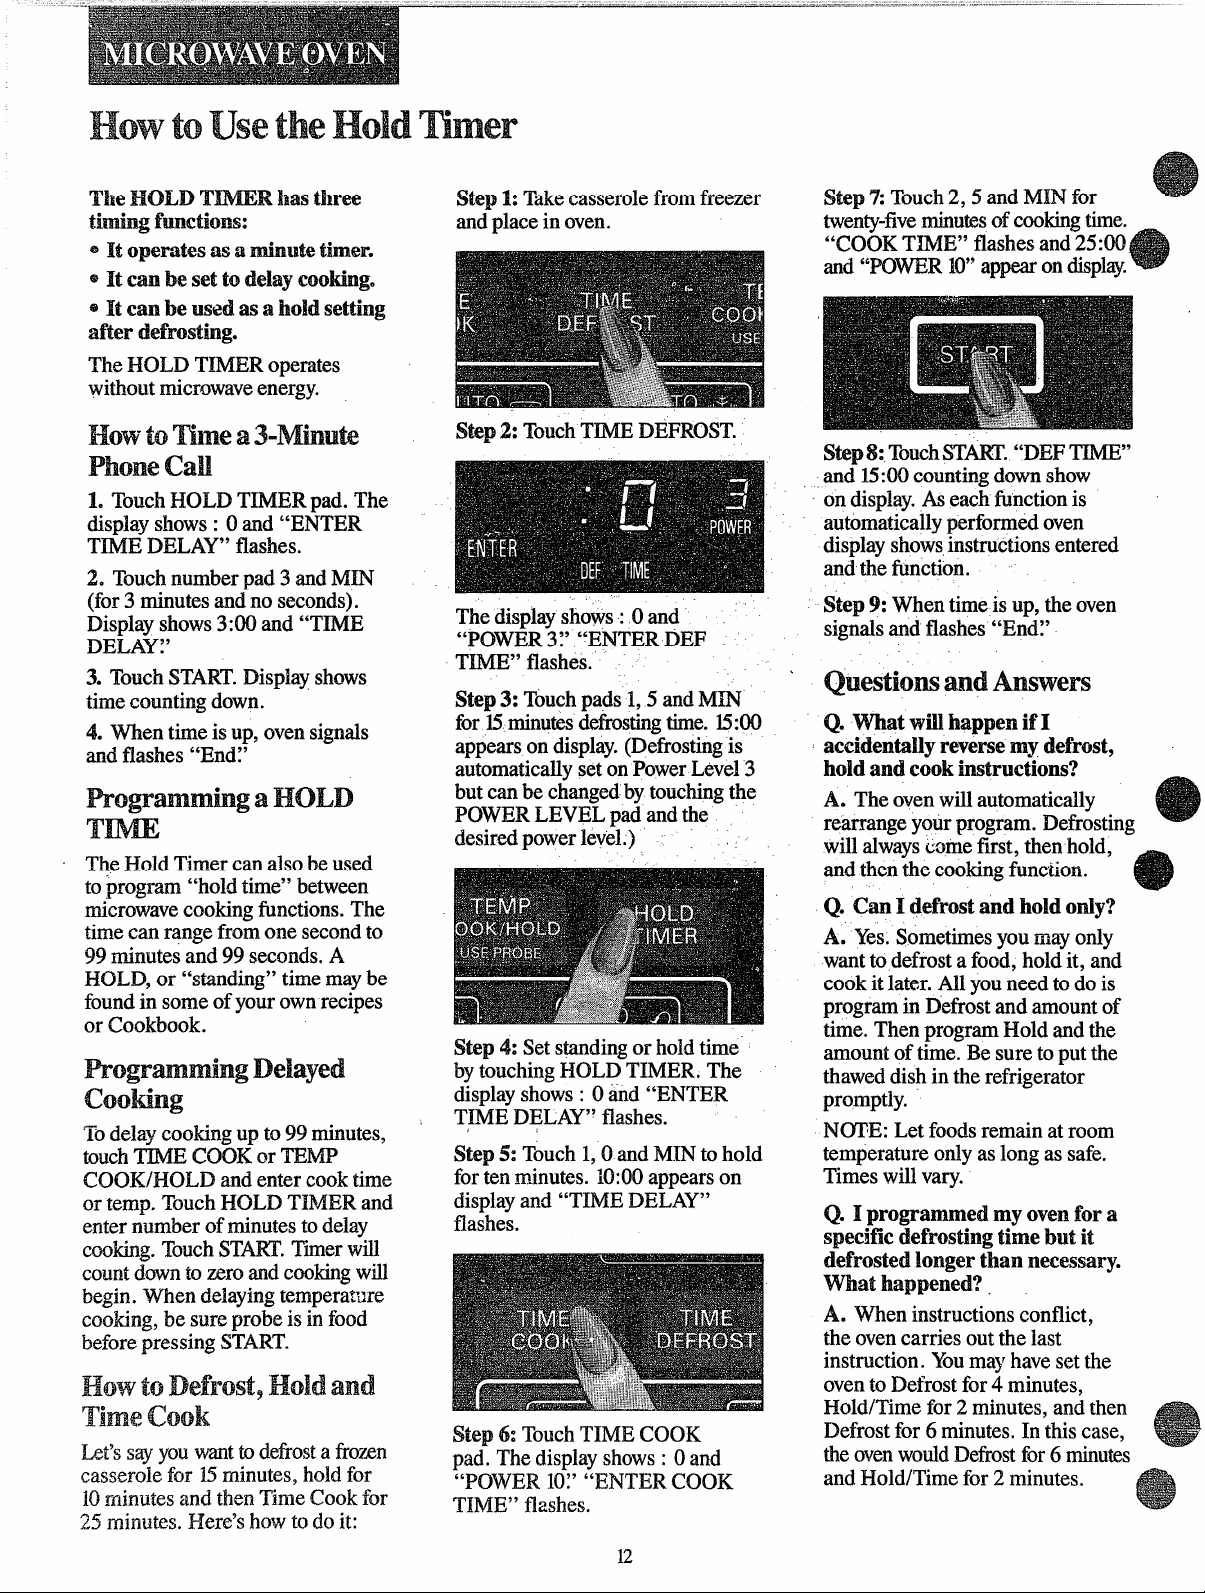
‘meHOLD hasthree
timingfumctkms:
e Itoperatesasa timer.
Itcanbe
~ It(%URbe!usedasalloklsetting
afterCMh’lBsting.
‘HEHOLD
without microwaveenergy.
S$3tt delaycooking.
TIMER operates
Step 1: Takecasserole fromfreezer
andplace in oven.
Step 7: Touch2,5 and MIN for
twenty-fiveminutesof cookingtime.
“COOK
TIME”flashesand25:00
and“POWER10”appearondisplay.
How to ‘1%1-le
can
L TouchHOLD T.IM13Rpad.The
displayshows: Oand “ENTER
TIME DELAY” flashes.
2. Touch number pad 3 and NUN
(for 3 minutes and no seconds).
Display shows3:00 and “TIME
DELAY?’
3. Touch START.Display shows
time counting down.
4. When time is up, ovensignals
and flashes “End?’
Tm
~ TQeHold Timer can also be used
toprogram “hold time” between
microwavecookingfunctions. The
time can range from one secondto
99 minutes and 99 seconds. A
HOLD, or “standing” time maybe
foundin some ofyourown recipes
or Cookbook.
‘Todelay cookingup to 99 minutes,
touchTIME COOK or TEMP
COOK/HOLD and enter cook time
or temp. Touch HOLD TIMER and
enter number of minutes to delay
cooking.TouchST... Timerwill
countdown to zero andcookingwill
begin. When delaying
temperature
cooking,besureprobeisinfood
beforepressingSTART.
How to al!ld
Time cook
L&’ssayyouwanttodefrostafrozen
casserolefor15minutes,holdfor
10minutesandthenTimeCookfor
25minutes.Here’showtodoit:
The displayshows: Oand
“POWER 3:’ “ENTER DEF
T~E” flashes.
Step 3: Touchpads 1,5 and MIN
for 15minutes defrostingtime. 15:00
appears on display.(Defrostingis
automaticallyset onPowerLevel 3
but can be changedby touchingthe
POWER LEVEL pad andthe
desired power level.)
Step4:Set standingor hold time
bytouching HOLD TIMER. The
displayshows : Oand “ENTER
TI.MEDELAY” flashes.
Step 5: Touch 1,0 and MIN to hold
for ten minutes. 10:00appears on
displayand “TIME DELAY”
flashes.
Step $5:TouchTIME COOK
pad. The display shows : Oand
“POWER 10:’ “ENTER COOK
THvIE”flashes.
12
Stepli: TouchST~. “DEF TIME”
and
15:00counting downshow
on display.Aseacb.fimctionis
automaticallyperformed oven
displayshowsinstructions entered
and the function.
Step 9: When time is up, theoven
signalsand flashes “End~’
‘
Q. What willhappenifI
accidentallyreversemydefrost,
hid andcookinstructions?
The ovenwill automatically
A.
rearrange your program. Defrosting
will alwayscome first, then hold,
and then the cookingfunction.
Q. Canl defrostandhokionly?
A. Yes.
want to defrost a food, hold it, and
cook it later. All you need to do is
program in Defrost and amount of
time. Then program Hold and the
amount oftime. Be sure to put the
thawed dish in the refrigerator
promptly.
NCJI?E:Let foodsremain at room
temperature only as long as safe.
Times will vary.
Q. Iprogramed myovumfora
specificdefrostingtimebutit
defrostedlongerthannecessary.
Whathappened?.
A.
the ovencarries outthe last
instruction. Youmay have set the
ovento Defrost for4 minutes,
Hold/Time for 2 minutes, and then
Defrost for 6 minutes. In this case,
theovenwouldDefi-ostfor6 minutes
and Hold/Time for 2 minutes.
Sometimesyou may only
When instructions conflict,
Page 13
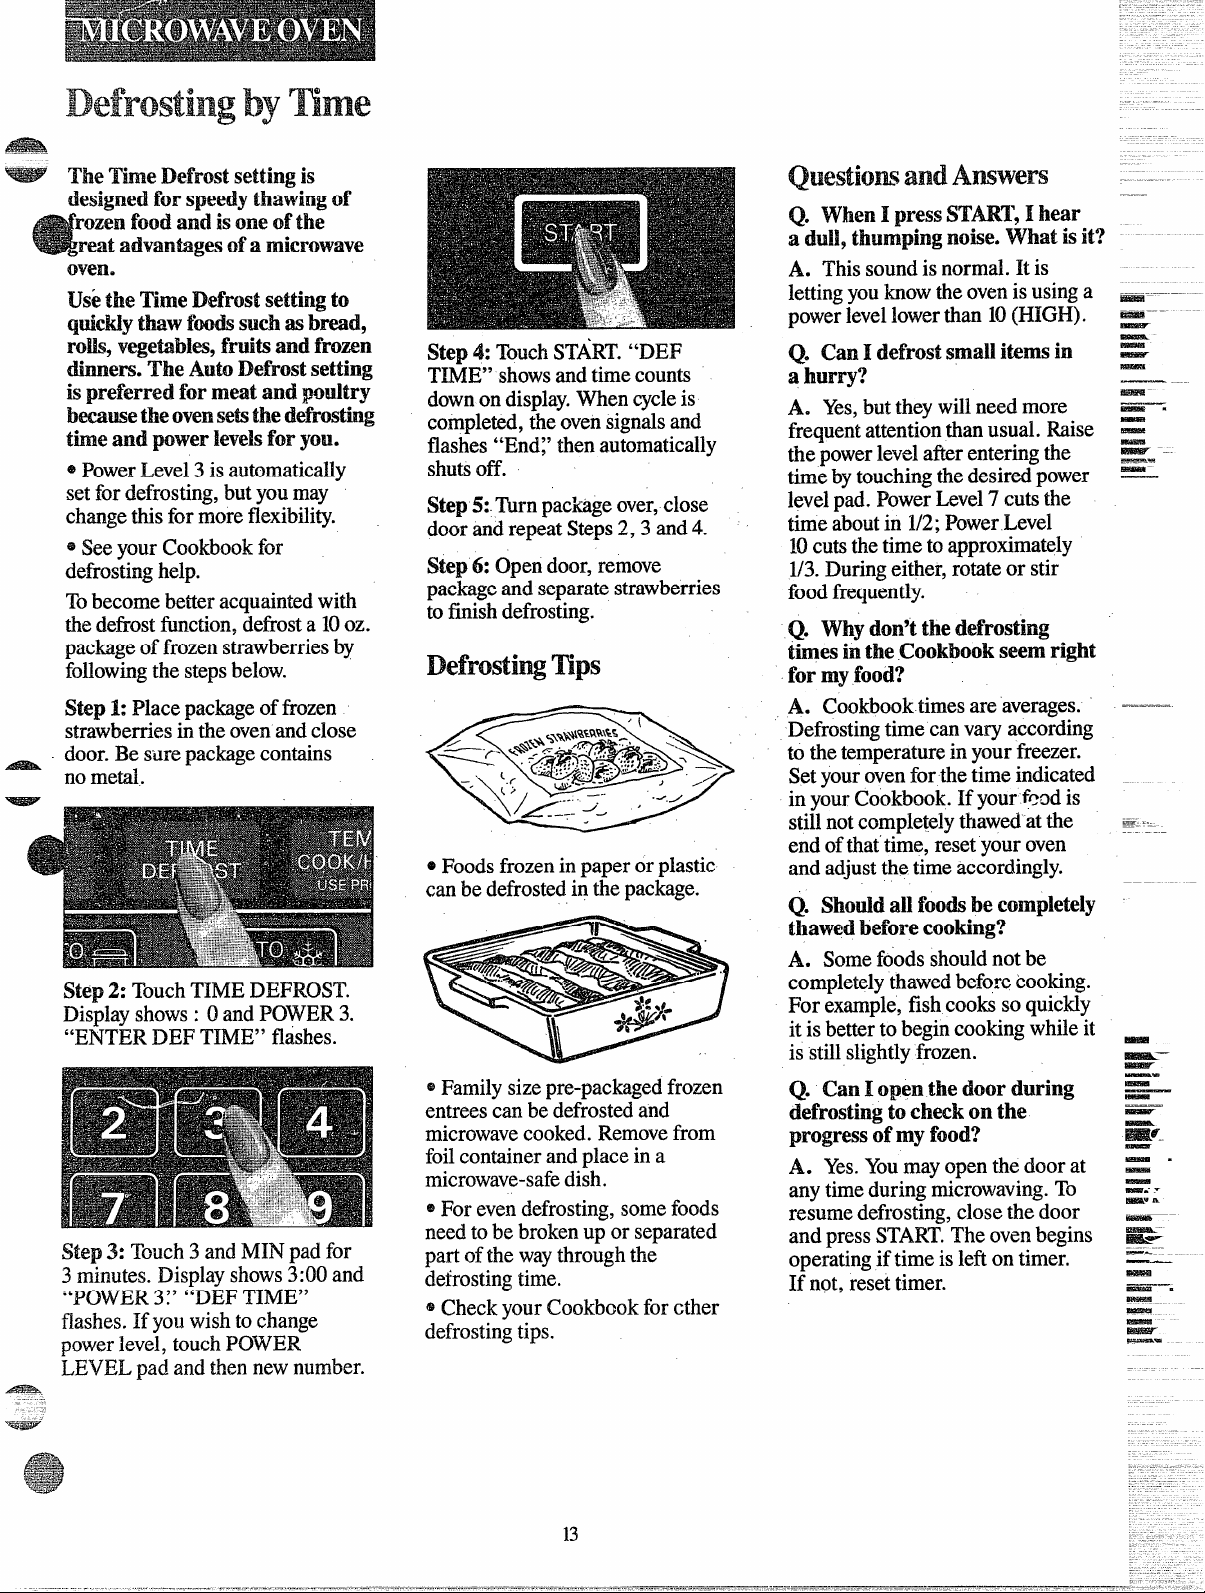
!4#!%a
setting is
designed
forspeedythawingd’
rozmfoodandisme ofthe
~reatadvantagesofa microwave
oven.
the Time Defrostsettingto
TJsi
quickiythawfoodssuchasbread,
rcdk,vegetables,fruitsandfrozen
dinners.TheAutoDefrostsetting
ispreferredformeatandpoultry
becausetheovensetsthedefrosting
timeandpowerlevelsforyou.
~Power
set for defrosting, but you.may
changethis for more flexibility.
@See your Cookbookfor
defrostinghelp.
Tobecome better acquaintedwith
the defrost fimction,defrosta 10oz.
packageof frozen strawberries by
followingthe stepsbelow.
Step 1: Place packageof frozen
strawberries in the ovenand close
_ door. Be sure package contains
no metal.
Step 2: Touch TIME DEFROST.
Display shows: Oand POWER 3.
“ENTER DEF TIME” flashes.
Level 3 isautomatically
Step 4: TouchSTART.“DEl?
T~E” showsand time counts
downon display.When cycleis
completed, theovensignalsand
flashes “End~’then automatically
shutsOff.
Step !%.Turn package over,close
door andrepeat Steps2,3 and4.
Step 6: Open door, remove
packageand separate strawberries
to finishdefrosting.
T
@Foods frozenin paper or plastic
can be defrostedin the package.
(J When lpress ST’ART,
Ihear
a dull~ noise.Whatisit?
This sound is normal. Ris
A.
lettingyou knowtheovenis using a
powerlevellowerthan 10(HIGH).
Q.
CanIdefrostsmalii@msin
ahurry?
A. Yes,
frequent attentionthan usual. Raise
the powerlevel after entering the
time bytouchingthe desired power
levelpad. Power Level 7 cuts the
time aboutin 1/2;Power Level
10cutsthe time toapproximately
1/3.During either, rotateor stir
food frequently.
Q. Whydon’t the defrosting
times in the Cookbook seem
but they will need more
right
formyfood?
Cookbooktimes are averages.
A.
Defrostingtime can vary according
to the temperaturein your freezer.
Set your oven for the time indicated
in yourCookbook. If your feed is
stillnot completely thawedat the
end ofthat time, reset your oven
and adjustthe time accordingly.
Q.
ShoddaUfoo~becolnpleteIy
thawedbeforecooking?
Somefoods shouldnotbe
A.
completely thawed before booking.
For example, fish cooks so quickly
it is better to begin cooking while it
is stillslightlyfrozen.
Step 3: Touch 3 and MIN pad for
3 minutes. Display shows3:00 and
“POWER 3;’ “DEF TIME”
flashes. If youwish to change
powerlevel, touch POWER
LEVEL pad and then new number.
@Family size pre-packagedfrozen
entrees can be defrostedand
microwavecooked. Removefrom
foilcontainer and place in a
microwave-safedish.
@For even defrosting, some foods
need to be broken up or separated
part of the waythrough the
defrostingtime.
@Check your Cookbook for ether
defrostingtips.
13
Q.
CanIopenthe doorduring
defrostingtocheckonthe
progressofmyfood?
A. Yes.
any timeduring microwaving.To
resume defrosting, close the door
and press START.The ovenbegins
operating if time is left on timer.
If not, reset timer.
Yournayopen the door at
Page 14
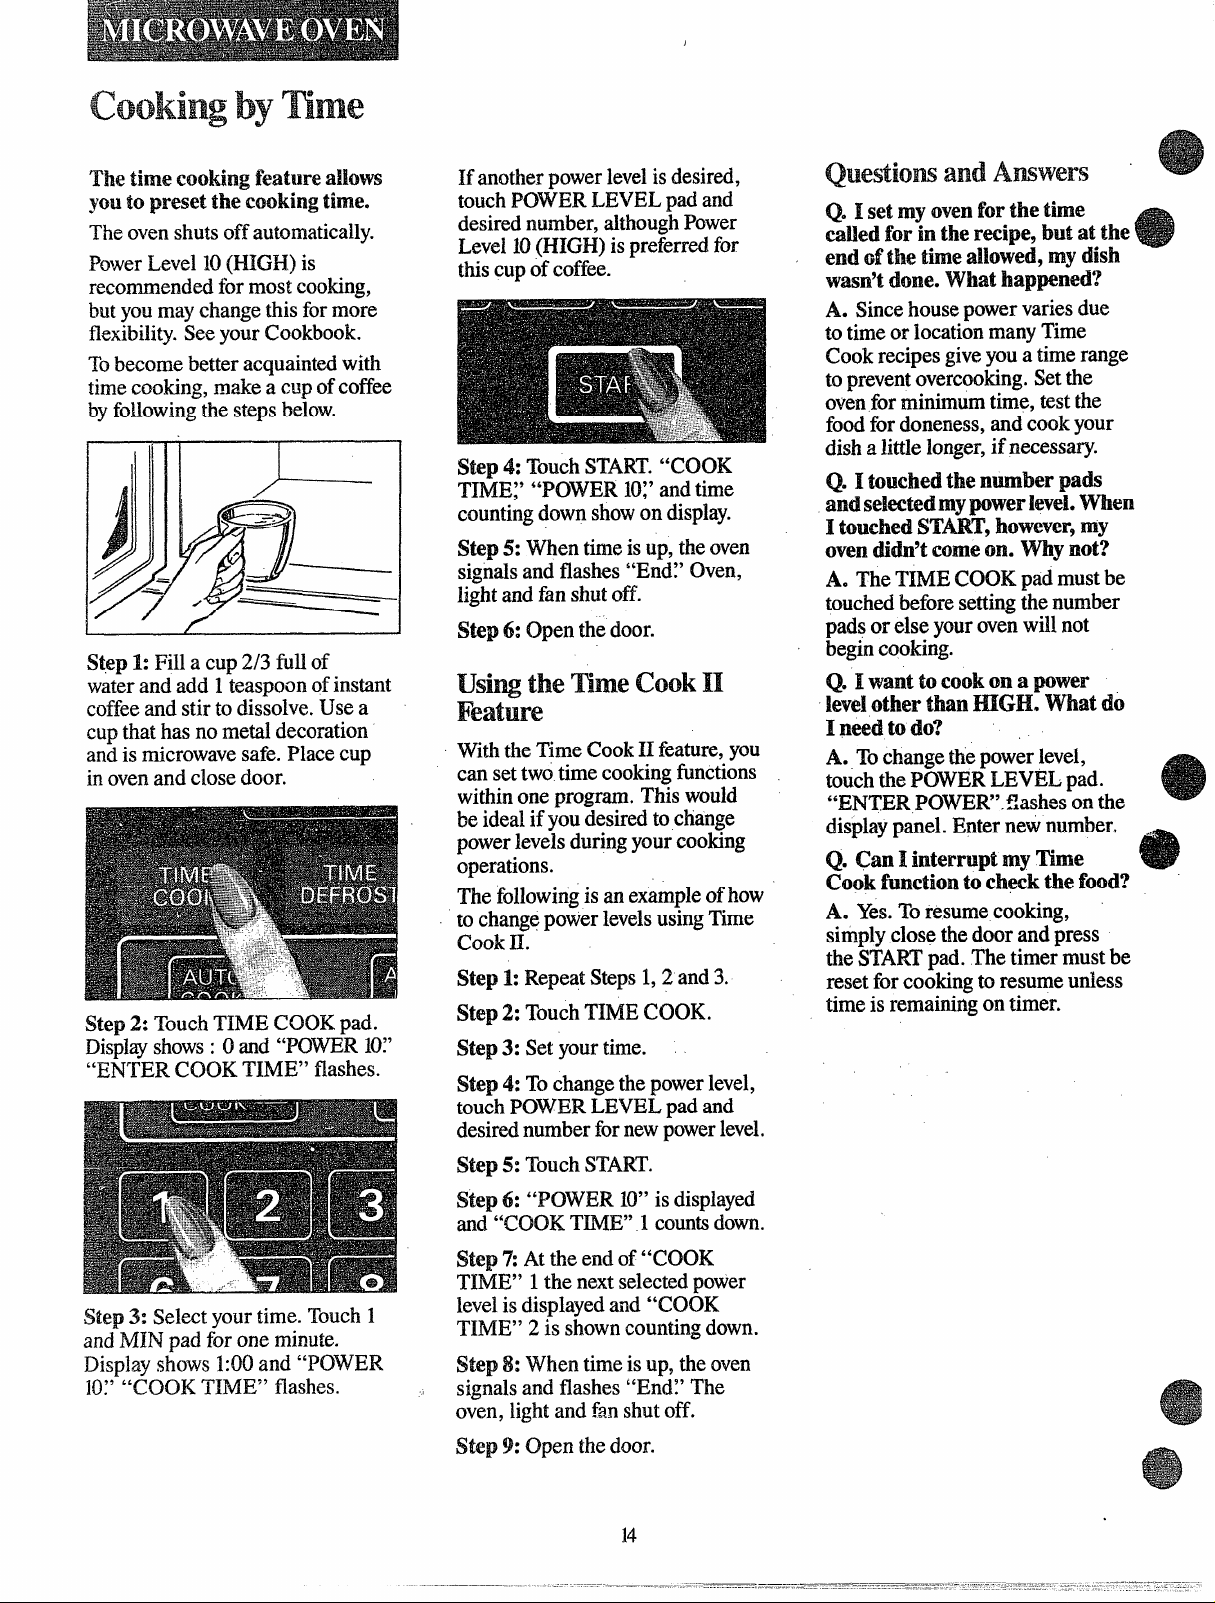
The timeCddng fi?atw$?WNVs
you
topresetthe ‘cookingtime.
The oven shuts off automatically.
PowerLevel 10(HIGH) is
recommended for most cooking,
butyou may change this for more
i3exibiMy.Seeyour Cookbook.
TObecome better acquainted with
time cooking, make a cup ofcoffee
byfollowingthe stepsbelow.
StSp 1: Fill a cup 2/3 full of
waterand add 1teaspoon ofinstant
coffeeand stir to dissolve. Use a
cup that has no metal decoration
and ismicrowavesafe. Place cup
in oven and close door.
Step 2: TouchTIME COOK pad.
Dispkryshows: Oand “POWER10~’
“ENTER COOK TIME” flashes.
If another power levelisdesired,
touch POWER.LEVEL pad and
desired number, althoughPower
Level 10(HIGH) is preferred for
thiscup of coffee.
Step 4: Touch START.“COOK
TIM13j’“POWER KIJ’and time
countingdown showon display.
Step 5: When time is up, the oven
signalsand flashes “End~’Oven,
light and fan shut off.
Step 6: Open the door.
t ‘ c
With the T’imeCook H feature, you
can set two time cooking fi.mctions
within one program. This would
be ideal if you desired to change
powerlevels during your cooking
operations.
The followingis an example of how
to changepower levelsusingTime
Cook II.
Step 1:Repeat Steps 1,2 and 3.
Step2: TouchTIME COOK.
Step 3: Set your time.
Step 4:
touch POWER LEVEL pad and
desirednumber fornewpowerlevel.
Tochangethe powerlevel,
Q. I set my mum
forinthe recipe, but atthe
calBed
forthe time
endofthetimeahved, mydish
wasn’tdone.Whathappened?
A. Sincehouse power varies due
to time or location many Time
Cook recipes giveyou a time range
to preventovercooking. Set the
ovenfor minimum time, test the
food for doneness, and cook your
dish alittle longer,if necessary.
Q. I touched the number
pads
andsekctedmypowerkwel.When
ItouchedSTART,howevq my
ovendidn’tcomem. Whynot?
A. The TIME COOK pad must be
touched before settingthe number
pads or else youroven will not
begin cooking.
Q. I
wanttocook on a power
k!velotherthanHIGH.Whatdo
I needtodo?
A. Tochangethe power level,
touch the POWER LEVEL pad.
“ENTER POWER.”flashes on the
displaypanel. Enter new number, .
Q.
CanI interruptmyTime
cook functiontocheckthefood?
A. Yes.TO resume cooking,
simply close the door and press
the STARTpad. The timer must be
reset for cookingto resume unless
time is remaining on timer.
Step 3: Select your time. Touch 1
and MIN pad for one minute.
Display shows 1:00and “POWER
H):’“COOK TIME” flashes.
Step 5: Touch START.
Step 6: “POWER W’ is displayed
and “CXXIKTIME” 1counts down.
Step ‘7:At the end of “COOK
TIME” 1the next selectedpower
levelis displayedand “COOK
TIME” 2 is shown counting down.
Step 8:
signalsand flashes “BNX’The
oven, light and fan shutoff.
Step 9: Open the door.
Whentime isup, the oven
Page 15
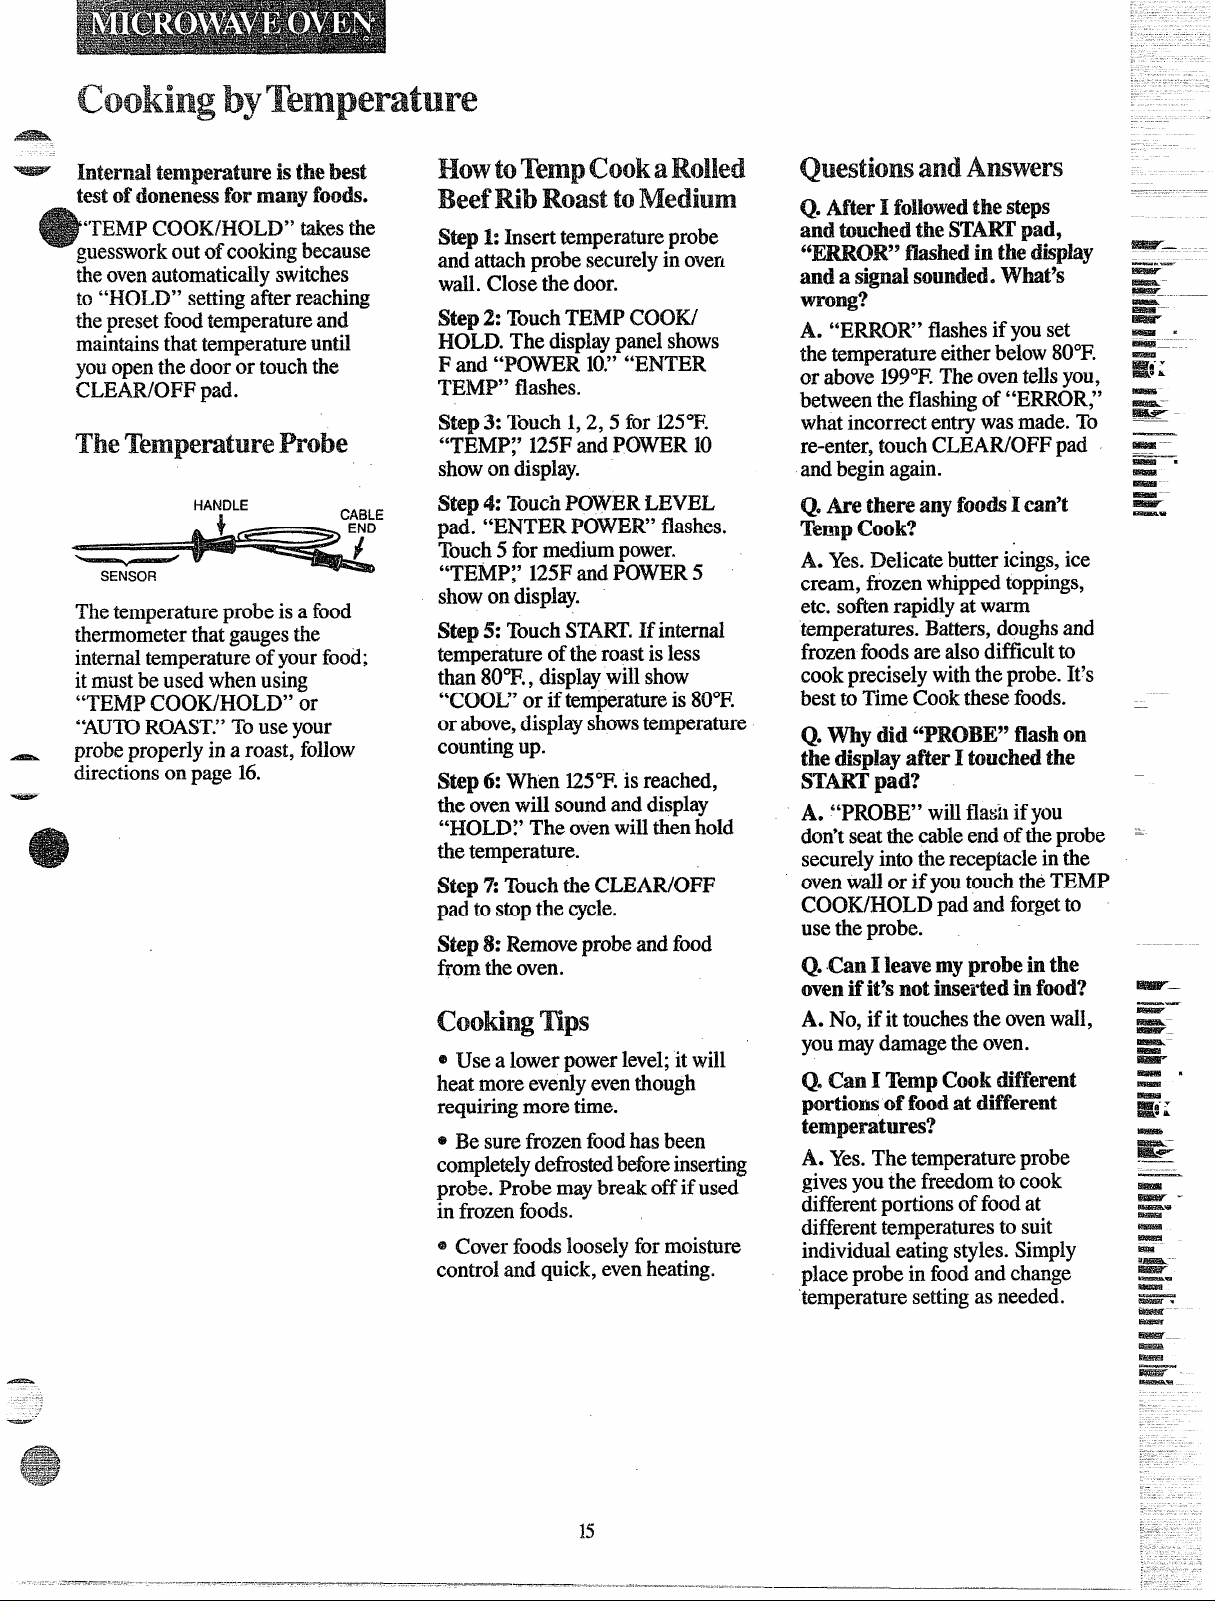
w
- Intend is thebest
t ofdomnessfix many foods.
‘TEMP C’CN3WHCLD”takesthe
guessworkout ofcooking because
theovenautomatically switches
to “HOLD” settingafter reaching
the preset food temperature and
maintainsthat temperature until
youopen the door or touch the
CLEAR/OFF pad.
.
t
Step 1: Insert temperature probe
and attachprobe securely in oven
wall. Close the door.
Step 2: Touch TEMP COOK/
HOLD. The displaypanel shows
F and “POWER 10+”“ENTER
TEN4P”flashes.
Step 3: Touch 1,2,5 for 125°F.
“TEMP;’ 125Fand POWER 10
showon display.
Q.AfterI the steps
andtouchedtheSTAKE pad,
%RM2R” flashed in the dsplay
and a tignd MMunded.what’s
wrong?
A. “ERROR” flashesif you set
the temperature eitherbelow 80”F.
or above EN°F.The oventellsyou,
between the flashingof “ERROR;’
what incorrect entry was made. To
re-enter, touch CLEAR/OFF pad
and begin again.
~
—
+
\
The temperature probe is a food
thermometer that gauges the
internaltemperature of yourfood;
itmust be used when using
“TENIPCOOK/HOIJY’ or
“AUTOROAST’.”TOuseyour
p~obeproperly in a roast, follow
directionson page 16.
/
“
Step 4: Touch POWER LEVEL
pad. “ENTER POWER” flashes.
Touch5 for medium power.
“TEMP;’ 125Fand I?OWER5
showon display.
Step 5:
temperature
than 8WF., displaywill show
“COOL” or if temperatureis 80°E
or above,displayshowstemperature
counting up.
Step 6: When 125”I?.isreached,
the ovenwill sound and display
“HOL~7 The ovenwill then hold
the temperature.
Step 7’:Touchthe CLEAR/Ol?FI
pad to stopthe cycle.
Step 8: Remove probe and food
from the oven.
Cooltqi!j mps
@Use a lowerpower level;it will
heat more evenly eventhough
requiring more time.
* Be sure frozen foodhas been
completelydefrostedbeforeinserting
probe. Probe may break off if used
in frozen foods.
@Cover foodslooseIy for moisture
control and quick, even heating.
TouchSTART.Hinternal
ofthe roast is less
00 Are there any foods
Iearl’t
‘Ikmpcook?
A. Yes.
cream, frozen whipped toppings,
etc. softenrapidly atwarm
temperatures. Batters, doughsand
frozen foodsare alsodifficultto
cook precisely with the probe. It’s
best to Time Cook these foods.
Q. Why did
Delicate buttericings,ice
“PROBE”flashcm
the(li@ay afterI touchedthe
STAR’pad?
A. “PROBE”
don’t seat the cableend oftheprobe
securely into the receptacle in the
ovenwallor if youtouch the TEMI?
COOK/HOLD pad and forgetto
use theprobe.
Q.
CanIkNwe myprobetithe
willflash if you
ovenfit’s notinsertedinfood’?
A. No,
you may damagethe oven.
Q. (3an I Temp Cook different
portions of fmd at
if it touchesthe ovenwall,
different
temperatures?
A. Yes.
givesyouthe freedom to cook
different portions of food at
different temperatures to suit
individual eatingstyles. Simply
place probe in food and change
temperature setting as needed.
The temperature probe
15
Page 16
.-—.,.—.-.
————
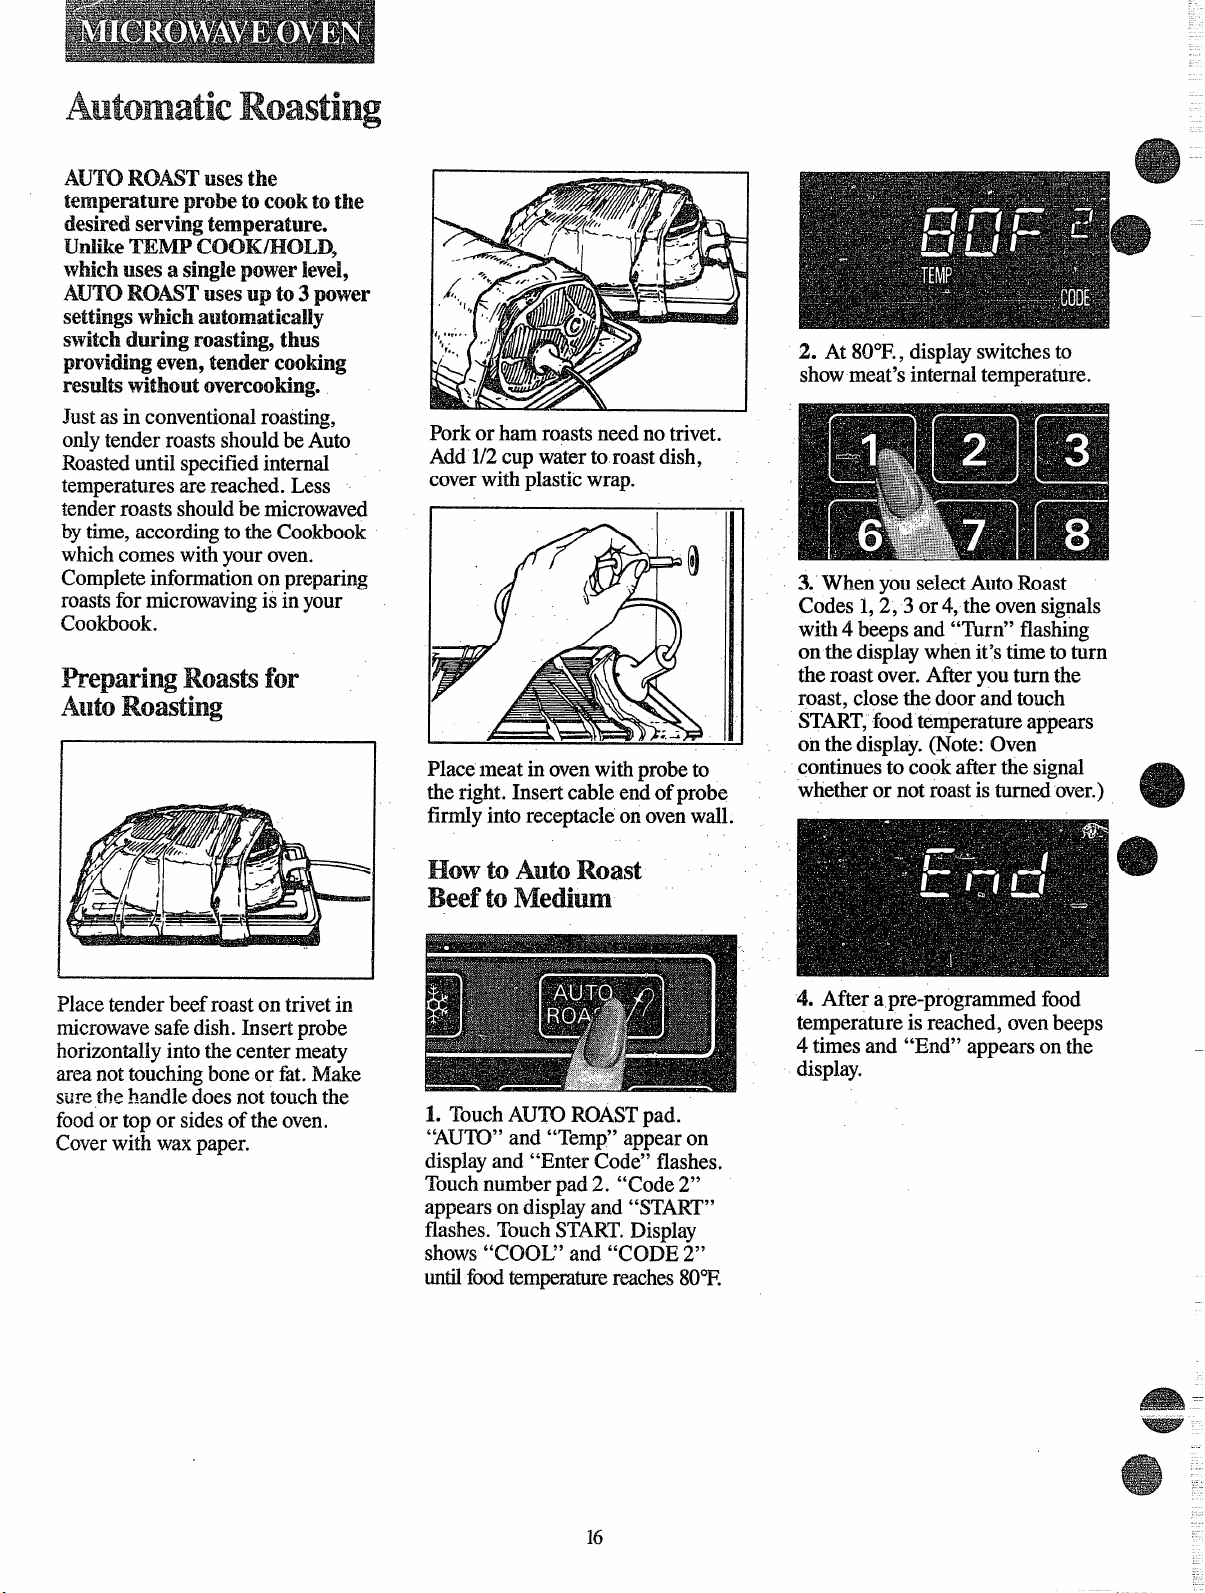
A ROAST ws th
pmbt?to mclkto the
desiredservingtemperature.
IJnlike?RmWP
whichusesasingleproverIevel,
A..TKIROAST’usesupto3 power
settingswhichautmnatically
switchduringroasting~thus
providingeven,tendercooking
resultswithoutovercooking.
Justasin
onlytender roasts should be Auto
Roasteduntil specified internal
temperatures are reached. Less
tenderroasts shouldbe microwaved
bytime, accordingto the Cookbook
which comes with your oven.
Completeinformation on preparing
roastsfor microwavingis in your
Cookbook.
conventionalroasting,
f
I
Pork or ham roasts need no trivet.
Add 1/2cup water to roast dish,
coverwith plastic wrap.
Place meat in ovenwith probe to
the right. Insert cable end of probe
firmly into receptac~eonovenwall.
2. At 80°F., display switchesto
showmeat’s internal temperature.
3. When you selectAuto Roast
Codes 1,2,3 or 4-,the ovensignals
with 4 beeps and “Thrn” flashing
on the displaywhen it’stime toturn
the roast over.After you turn the
roast, close the door and touch
START,food temperature appears
on the display.(Note: Oven
continues to cook after the signal
whether or not roast is turned over.)
Place tender beef roast on trivet in
microwavesafedish. Insert probe
horizontallyinto the center meaty
area not touchingbone or fat. Make
svrethe handle does not touch the
foodor top or sides of the oven.
Coverwith wax paper.
H t A Roast
B t
4. After apre-programmed food
temperature is reached, ovenbeeps
4 times and “End” appears on the
display.
1. Touch AUTO ROAS’I’pad.
“AUTO”and “Temp” appear on
displayand “Enter Code” flashes.
Touchnumber pad 2. “Code2”
appears on displayand “START”
flashes. Touch START.Display
shows “COOL” and “CODE 2“
until fd temperaturereaches80”F.
Page 17
A?H%Jk
A R
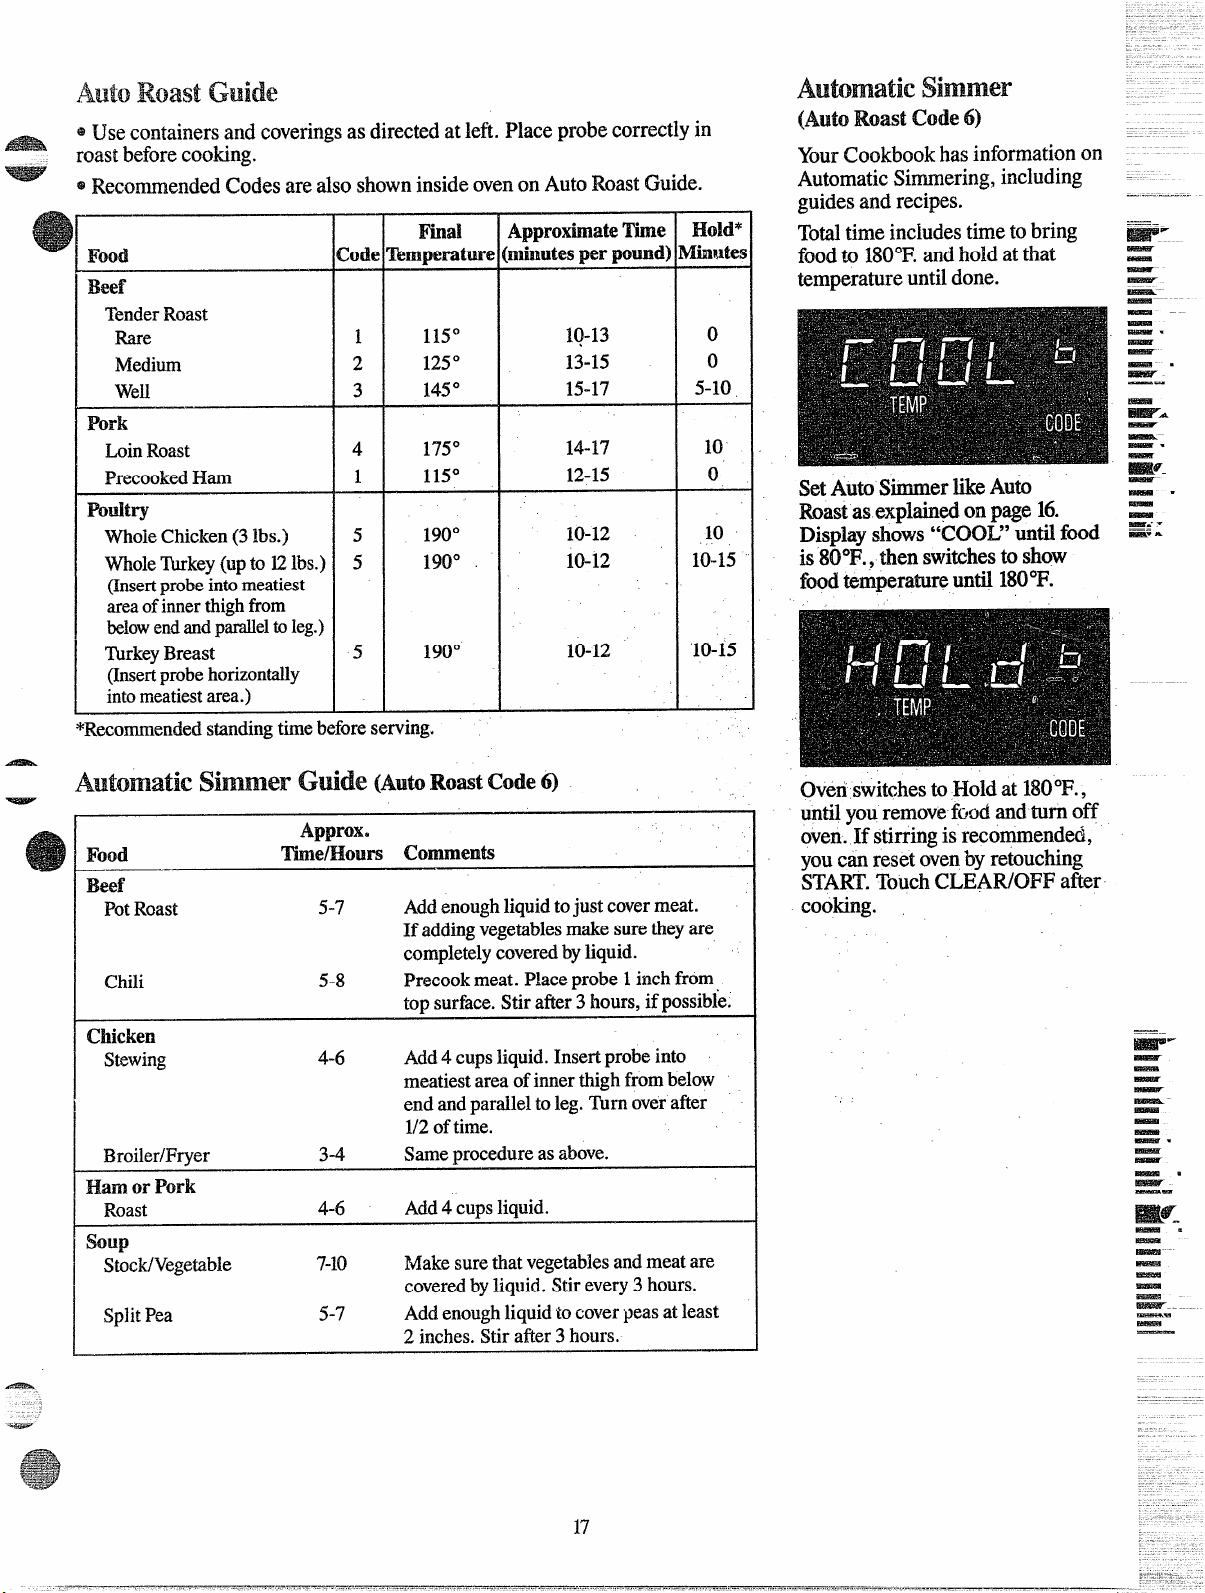
* Use containers and coveringsas directedat left. Place probe correctly in
roastbeforecooking.
@RecommendedCodes are also showninside ovenon Auto RoastGuide.
Hold”
Minutes
Wd
FiId
codeTemperature
(minutesperpound)
ApproximateTime
*f
TenderRoast
Rare
Medium
Well
M%
P{
LoinRoast
PrecookedHam
ndtry
R
WholeChicken(3Ibs.)
Whole‘Ibrkey(upto 12lbs.)
1
2
3
4 175°
1
5
5
115°
125°
1,45°
115°
190°
190°
(Insertprobeintomeatiest
areaofinnerthighfrom
belowendandparalleltoleg.)
~rkey Breast
5
190°
(Insertprobehorizontally
intomleatiestarea.)
*~ecomen~e~ standingtimebeforeserving.
-. .-
IQ-13
13-15
15-17
14-17
12-15
10-12
10-12
10-12
10-15
10-15
f (Auto Roast G& 6)
Approx.
Food
Beef
PotRoast
Chili
chicken
Stewing
Broiler/Fryer
Ham m Pork
Roast
soup
Stock/Vegetable
SplitPea
Time/Hours(JmMnents
5-7
5-8
4-6 Add4 cupsliquid.Insertprobeinto
3-4
4-6 Add4 cupsliquid.
7-1o
5-7
Addenoughliquidtojustcovermeat.
If addingvegetablesmakesuretheyare
completelycoveredbyliquid.
Precookmeat.Placeprobe1inchfrom
topsurface.Stirafler3hours,ifpossibl’e.
meatiestareaofinnerthighfrombelow
endandparalleltoleg.Turnoverafter
1/2oftime.
Sameprocedureasabove.
Makesurethat vegetablesandmeatare
coveredbyliquid.Stirevery3hours.
Addenoughliquidtocoverpeasatleast
2 inches.Stirafter3hours.
o
0
5-10
10
0
10
YourCookbookhas information on
Automatic Simmering, including
guidesand recipes.
Totaltime includestime to bring
foodto UIO”F.andhold at that
temperature untildone.
W Auto Simmer likeAuto
Roastas explainedon page 16.
Display shows“COOL” until food
is 80”F., then switchesto show
foodtemperature until 180°F.
Oven switchesto Hold at 180”F.,
until you removefca!. and turn off
oven. If stirring is recommended,
youcan reset ovenby retouching
START.TouchCLEAR/OFF after
cooking.
—
..—
——.
-
—
—
~–
-–
-–
-
—.
-
—
-- =
~
—-
-
E
—
-
-
w .
B
—
—
—
-
-
-
-
—
-m
I
-
~-
-
-
-
--
L
-
Page 18
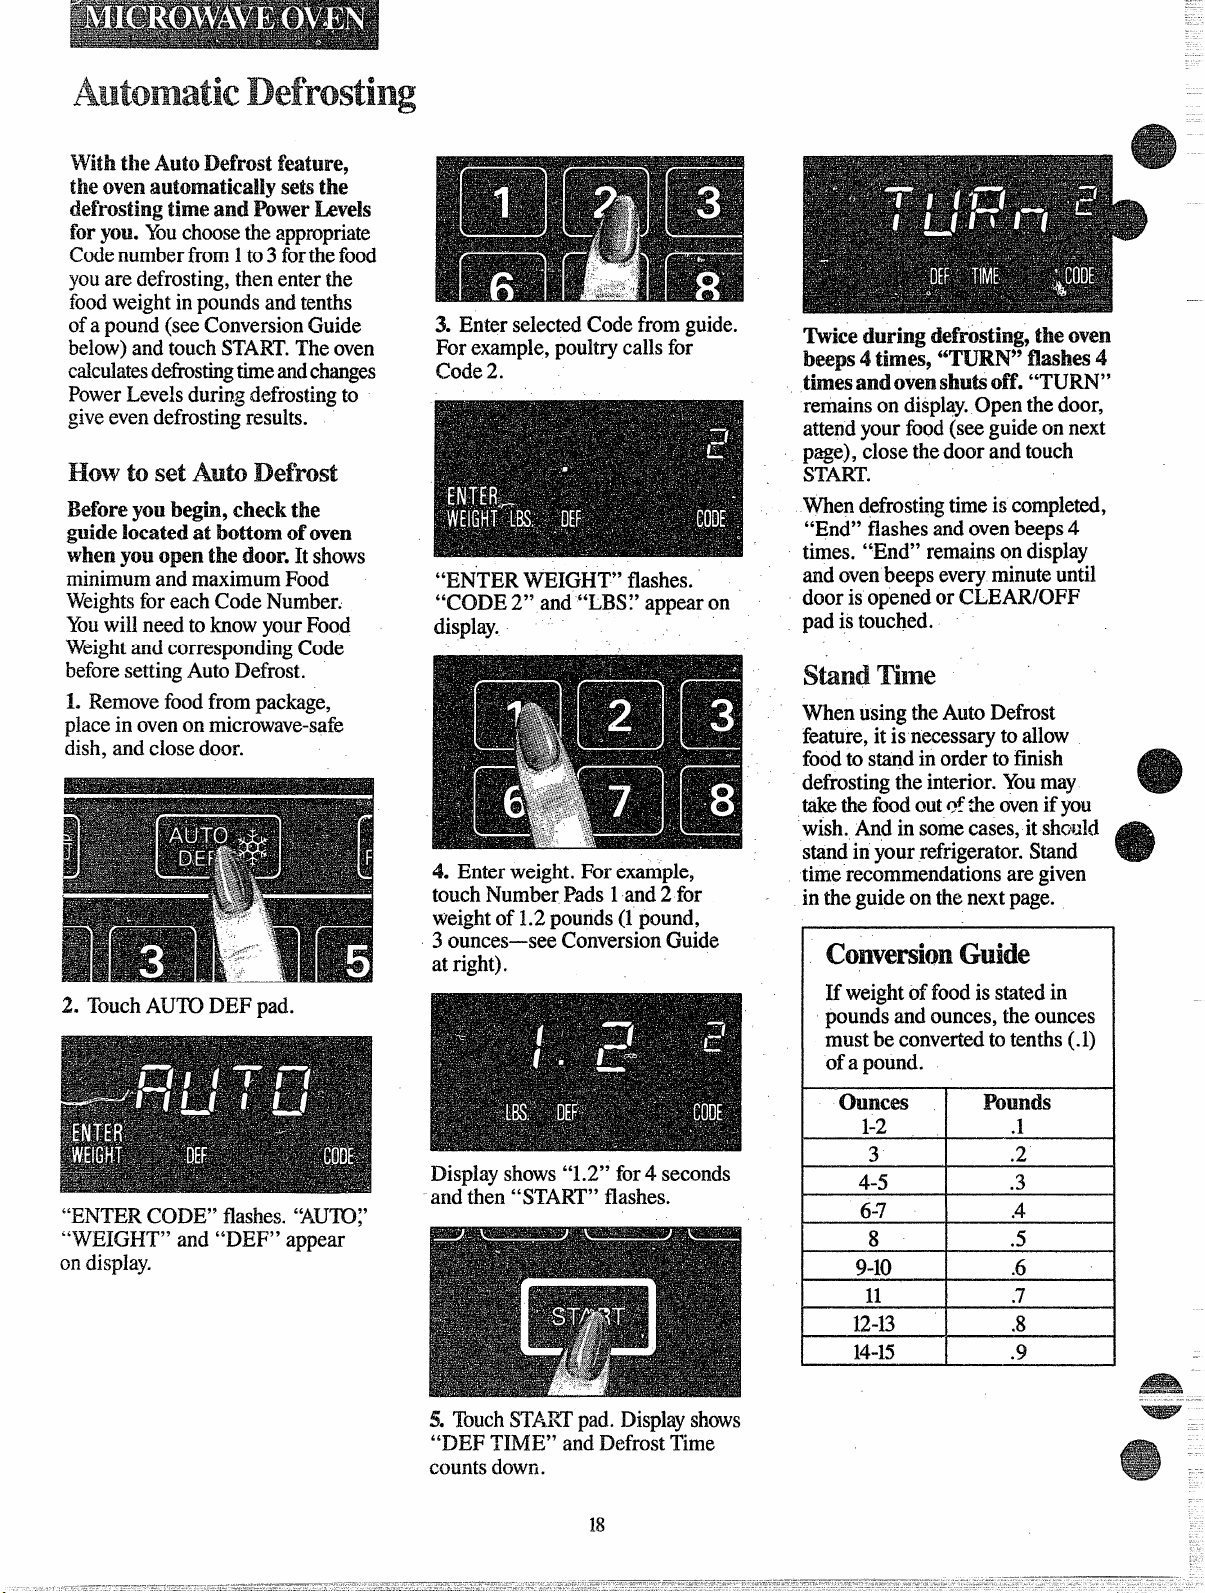
Withthe Auto Defrost feature,
-——.—
the oven set$the
defrosting time and Power Levels
for you. Youchoosethe appropriate
Codenumberfrom 1to3 forthefood
youare defrosting,then enter the
foodweightin poundsand tenths
ofa pound (see ConversionCluide
below)and touch START.The oven
calculatesdefrostingtimeandchanges
PowerLevels duringdefrostingto
giveevendefrosting results.
How to set Auto Defrost
Before you begti, check the
guide located at bottom
whenyouopenthedoor.
minimum and maximum Food
Weightsfor each Code Number.
Youwill need to know yourFood
Weightand corresponding Code
beforesetting Auto Defrost.
L Removefood from package,
place in ovenon microwave-safe
dish, and close door.
ofoven
M shows
2. Touch AUTO DEF pad.
3. Enter selected Code from guide.
For example, poultry calls for
Code 2.
“ENTER WEIGHT” flashes. ”
“CODE 2“ and “L13S?a~pear on
display.
.-
4. Enter weight. For example,
touch Number Pads 1 and 2 for
weightof 1.2pounds (1pound,
3 ounces—seeConversionGuide
at right).
‘IWiceduring defrtisting, tile oven
bee~s4times9“TURN$’ flashes 4
“TURN”
remains on display.Open the door,
attendyour food(see guide on next
page), close the door and touch
START.
When defrostingtime is completed,
“End” flashes and ovenbeeps 4
times. “End” remains on display
and ovenbeeps every minuteuntil
door is opened or CLEAR/OFF
pad is touched.
s T
When using theAuto Defrost
feature, it is necessary to allow
foodto s~d in order to finish
defrostingthe interior. Youmay
takethe fmd out ~?the ovenifyou
wish. And in somecases, it shcwki
stand in your refrigerator. Stand
time recommendations are given
in the guide on the next page.
C G
If weight of food is stated in
pounds and ounces, the ounces
must be convertedto tenths (.1)
of a pound.
“ENTER CODE” flashes. ‘&JJTO~’
“WEIGHT” and “DEF” appear
en display.
Display shows “1.2” for 4 seconds
and then “START” flashes.
5. TouchSTARTpad. Displayshows
“DEF TIME” and Defrost Time
counts down.
18
ounces
1-2
3
4-5 .3
—
6-7 .4
8 .5
9-10 .6
11 .7
12-13
14-15
Pounds
.1
.2
.8
.9
—.
‘
Page 19

.S%RE%
—
CODE
1
2
FOODS
Meat
Chops
Frankfurters,
Sausage
Ground Meat
BeefPatties
Roast
Ribs
Steak
Stew
Rmhy
Whole Chicken
TurkeyBreast
(breast sideUP)
Chicken Pieces
Comish hens
(whole)
Cornish hens (split)
m----
WEIGHT
0.1-6.0lbs.
0.1-6.0lbs.
FIRST SIGNAL
Turn over.
s s
Separateand shield
5 minutes
where necessary.
Separate.
Removedefrosted
2,minutes
pieces.
Turn over.
Removedefrosted
5minutes
areas and break
apart.
‘1’urnover.
Separatepatties.
T’urnoverand
shield.
Turn over. Removedefrosted
5 minutes
30 minutes in
refrigerator
10minutes
pieces. Shield if
necessary.
‘Ibrnover. 5 minutes
Turn overand
separate.
Tim ovei and
shield.
Separateand remove
defrostedpieces.
5 minutes
10minutes;
run cold water
in cavity.
Turn over. Shieldwhere
necessary.
Turn over. 5 minutes
Separate and remove
20 minutesin
refrigerator
defrostedpieces.
Removewmpper
and turn over.
10minutes;
run cold water
incavity. ‘
‘I’urnover,
5 minutes
-–
—
-
3
Seafood
0.1-3.0Ibs.
Turn over.Fish fillets Separate and remove
minutes
5
defrostedpieces.
Shrimp, scallops
Sep~ratG.
Separateand remove
5 minutes
defrostedpieces.
Whole fish
Turn overand
shield tail and
head.
Hold under
cold running
water.
l%kes or thin areas of meat will defrost more rapidly than other areas. After first or second signal, feel meat for warm
sp&s and shield theseareas with small pieces oi foi~.
Page 20

The AUTO COOK feature may be
usedto eliminate your need to look
up cooking time in the cookbook or
guess how longto set cooking time.
By acmalky semillg the steam
that escapes as food mimnvave!s,
$hisfeature
automaticallyadjusts
Foods
theoVen9sCo@kingtimetovarious
typesandamountsOffood.
Because most cooking containers
mustbe coveredduring automatic
cooking, this feature isbest with
foodsthat you wantto steam or
retain moisture. See page 23 for
containersand coversrecommended
forautomatic cooking.
Note:
Usedthe metalDoubleDu
shelfwithAutomaticcooking
~
isNOTrecomended.
t
A wide variety offoodsincluding meats, fish casseroles, vegetables,lefiovers
and conveniencefoodscan be Auto Cooked.
E
Simplytouch three controlpads—
NJTOCOOK,desiredCODE,and
START.Theword“AUTO”appears
onthedisplayandthesensoris
activated.tosensesteamfromfood.
F N
K D msd
Do not open the oven door while
theword “AUIU’ is dispIayed–
steamescapingfromthe ovencan
affectcooking performance. If the
dooris opened,the word “ERROR”
appears. Close the door and touch
STARTimmediately.
Foodsthat must be cooked uncovered, foods thatrequire constant attention,
foodsthat require additionof ingredients during cooking, and foods calling
for a dry look or crisp surface after cooking should not be Auto Cooked. It is
best to Time Cook them.
Foodsthat microwavebestusing the temperature probe shouldbe Temp
Cooked or Auto Roasted.
Page 21

AutomaticCooking Codes 1
———
.———
through9 are designed to giveyou
easy automatic resultswith a
number offoods.
CODE 1,designed for reheating
foodsquickly, turns the ovenoff
automatically as soon as the sensor
detectssteam from the foods.
When CODES 2 through 9 are
selected, the ovendetermines how
much additionalcookingtime is
neededafter steamhasbeen sensed,
automatically switchesto TIME
COOK, signals, and the word
“AUTO”on the displayis replaced
bycountdownnumbers indicating
remaining cooking time. When the
signalisheard, the oven door may
be opened for stirring, turningor
rotatingfood.
A guide behind the ovendoor lists
cookingcodesforfrequentlyprepared
fresh or uncooked foodsand
appropriatecodes are recommended
in the recipes and cooking guide on
pages24 through 31.
Word “AUTO”showson display,
indicatingsteamsensor isactivated.
DO N~ OPEN DOOR.
o~~mG
DOORMAYAI?HXXCOOKING
I?HWORMAIWX.
Beep
soundswhen steam is sensed
and “AUTO” isreplaced by cook
time.Rotateor stirfood, ifnecessary.
When done, ovenbeeps and stops. ,
How to Adjust
AUTO COOK codes
TO su~t Your Taste
TouchAU’10COOKpad. “ENTER
CODE” flasheson display.
Touchnumber pads 4 and 1 in that
order. “CODE” flashesuntilSTART
istouchedshowingthata shorterthan
usualtimeis preferred.CODE4 slpws
and “ST~T’” flasheson display.
Place covered foodin oven.Touch
AUTO COOK pad. “ENTER
CODE” flashes on display.
Touchnumber pad fordesiredcode.
CODE 2 shows and “START”
flashes. TOUChSTART.
By simply adding a 1after any
AUTOCOOK code number from 2
through 9, you can set the ovento
cook for 20% less time than the
code would regularly provide,
For example, if CODE 4 cooks
your seafoodmore done than you
likeit, set CODE 41next time and
you’llget 20% shorter cookingtime.
If you want a longer cooking time
than a code provides, add a 9 after
the code.
For the seafood in the example
above,CODE 49 would provide
20% longer cooking time than the
regular CODE 4 would provide.
Touch START.“AUTO” showson
display.DO NOT OPEN DOOR
until first ovensignal, then rotate
dish 1/2turn if necessary. Close
door andtouch STARTto finish
cooking.
Page 22

.-
A. Whenwing Code1,thereis no
secondphase ofminutes counting
down. All the cookingis completed
in the first phase or Auto.
Q.Ifmyfoodi n cornpkteiy
add a u the!mgge$tedl
Code,whatshouldI do?
Use TimeCo&I and Power
A.
Level 10for a few minutesuntil
completion.
Q.WIallfreshorfkozenvegetables
requirea standingperiodafter
!Ml&ingwithAutocook?
A. Mostvegetablesare cookedto
a crisp state during Auto Cook,
just as inregular microwaving.
Therefore, it is recommended that
youlet the vegetablesstand for up
to 5minutes depending on sizeand
densityof pieces. This standing
timealso enhances the overall
flavorand appearance of most
vegetables.
Q.WhatM1don’tfullycoverthe
dishinAutocook?
A. Oven senses steam too quickly
which shortensthe cookingtime
thusleavingundercooked food.
Covertightly and reset Auto Cook.
Q. lktlie sizesof
hod makea when
usingAutocook?
A. Yes,
pieces will require additional
Time Cooking. 13esureto check
suggestedarrangement of pieces in
the dish, since proper arrangement
isoften a successful tip in regular
microwaving.
in some cases, larger
Q. Dofreshorfrozenvegetables
requirewaterwhenwing Auto
cook?
A. Y& Add wateras recommended
on guide to the vegetablesand
coverwell for even, complete
cooking.
Q. ShmklI useAutoCookto
cookpuddingorsauces?
A. Most pudding and saucerecipes
require stirring many times during
cooking; therefore, Time Cook is
recommended.
Q. Myscallopedpotatoeswere
notcormpleteiycookedwhenI
removedthedishafterAuto
cook. what is wrong?
A. If you prepared the sauce in the
ovenprior to combining the sauce
with potatoes, there-mayhavebeen
too much remaining moisture in
the oven. Make sure youdry the
ovencompletely beforeusing Auto
Cook since this function operates
properly by sensing steamin the
oven. Also, starting Auto Cook
with hot foodscreates steam in the
oventoo soon, and decreases the
first sensing icycle.
Q. mypbstk containers
withwry tight
f M be
f
cooking?
A. No, most types ofplastic
storagedishes, butter tubs, etc.
with tight fittinglids are not
recommended formicrowaving.
Also tightfittingplastic lids may
preventadequate steam from
escapingand foodmay not cook
properly during Automatic
Cooking.
Q.I tried warmsomechow
rneinnoodlesusing
why dim% this work?
A. Foodmust have some moisture
in order to create steam which
helpsthe auto sensorfimction.
Extremely dry foodssuch as chow
mein noodles,potato chips and
o~er such foodsdo not have
enoughmoisture.
Q.MayI we Auto Cook when 1
am cooking
manyfoodsinmore
thanonedishorcasseroie?
A. No, because ofdifferent food
densities, attention needed during
cooking, and food amounts, itis
bestto use Time Cook when
cookingmany foods.
Auto Cook.
Q. Are there any otheribods
whicharebest‘1’keCooked>
ratherthanAutoCooked?
A. Bakery foods, candies, melted
chocolate or foods when a dry or
cr-kpsurface is desirable, are
cooked bestby Time Cook.
22
Page 23

Asa?!A
Appropriatecontainersandcoverings
help assuregood cookingresults.
~Alwayswe ticmwwe-sde
cmtahers andcoverthemwith
Ms, waxpaperorpkwticwrap.
Wonderifit’s microwavesafe?Put
it tothe test described in your
cookbook.
QNever use tight-seating pkde
covers-they can prevent steam
from escapingand cause foodto
overcook.
@’Match the mount of’food to
the size of the
container.Fill
containersat leasthalf full.
@13esure the outside of the
cookingcontainerandthebide
ofthemicrowaveovenare dry
beforeplacing foodin the oven.
Beadsof moisture turning into
steamcan mislead the sensor.
@Stir or rotate some foods
after
abeepingsignal.SeeAutomatic
cookingcontrolGuideandrecipes
ontheMiowingpages.
&
I ‘ ,,,
p
--
,=l. .
Use microwave-safecasserolesor
bowlsfor entrees and vegetables.
Coverwith lidsthat fit. If lids are
notavailable,useplastic wrap or
waxpaper. Plastic wrap shouldbe
kmsc-tierfbodtoanow Forexpansion.
Sealbypressingplastic wrap firmly
ai-oundedges.
For frozenentrees in paperboard
trays,remove tray from boxbut do
not remove fdm overtray. Thick
entrees maytake longer to cook—
see guide on page24.
For frozen foodsin metal trays,
removefoilcoveringand baked
goods, reinsert tray into box and
close ends ofbox.
Use oblongor squarecontainersfor
chickenor corn on the cob. Plastic
wrap coveringshouldbe looseover
foodto allowfor expansion. Sealby
pressingplastic wrap firmly around
edges.
Paperplates-while they maybe
us~ fo; Time and.Temperature
Cookingand Defrosting,do notuse
than tith automaticcooking.
microwave-safeplates or bowls
Use
for reheat~n~.Coverwith plastic
wrap or wax paper.
——
I
Slitplasticpouches 1inch as shown
above.13reakfood up thoroughly
after ovensignals.
23
I
FollowAutomaticCooking Control
Guide settingfor casseroles. Cover
casserole meat and vegetables with
sauce.Coolhotingredientsor sauces. -
If they are not cool, use TIME
COOK.
-.
-.
——
—
~-
-
-
-
~ —
~
Page 24

—
--
—
~Do not open ovendoor during
Autocycle.Door maybe opened
after ovenbeeps and~heco-untdown
timeis displayed.
@Match the amount of food preventspattering to kee~cwen
to the size of the container. Fill
containersat least 1/2full.
@Add 1/4-1/2cup waterto fresh
vegetables.
@Most foods shouldbe covered
with lidto dish or wax paper to
clean. Spareribs, pot roasts and
meat loaf should be coveredtightly
to ensure even cooking.
@Be sure outside of container and
insideofovenare dry.
@If food needs additionalcooking,
return to ovenand use AutoCook
Code 1.
@Use preferencecontrol “l” or “9”
to adjustcook times to suit your
individualtastes. Seepage 21.
@used Automatic cooking
fMtMIW
tith ~OmLE DUTY*M
shelfis notRxX!oXnmended.
NOTE:OvenwiU notaccept‘AutoCookCode”Mtheovenishot.If the words66AutoCooklleiay”appear,you
mustcoo!theovenbeforeusingAutoCookoryoumaychoosetouseTimeorTemperatureMkrmwweChoking.
~OOk”
“Auto
Food code Container Approx.Time
CannedFoods
Thinfoodssuchas containermatchedto
soup,broth,gravy.
Thickfoodssuchas
cannedravioli,
chunkysoups,beef
stew,allcanned
vegetables.
Leftovers 1
TVDinners
(exceptforthose (seecomments). removefoil top,returntooriginalboxand
withpasta) reclosebox.Iftrayismorethan1“deep,
FrozenEntrees
FrozenPouchMeals 2 3-8&in. Whenmicrowavingmealscontaining2
FrozenLasagna 5 1or 1%qt.casserole 10-20min. Removelasagnafromfoiltrayandplacein
Cassercdes
Withprecooked
ingredientsina white lidto dish.
saucesuchastuna
noodlecasserole,
turkeytetrazzjni.
Withrawingredients 6
suchashamburger
pattystew,scallo ed
potatoes,seafooc1
cassero~es.
—
1 Microwave-safe
sizeoffood.
1 Microwave-safe 4 min./cup Coverwithlidto dishorwaxpaper.
2 Cookincontainer
2
4
containermatchedto
sizeoffood.
Microwave-safe 4min./cup Coverwithlidtodishor waxpaper.
containermatchedto
sizeoffood.
Cookincontainer 17-20min.
(seecomments). depending
withlidtodish.
2-3qt. casserolewith 12-16min.
2-3qt.casserolewith 16-24min.
lidto dish.
2-3IIlill./CUp coverwithlidtodishor waxpaper.
8-10min.
onsize
‘comments
Iffoiltrayisnomorethan3/4”deep,
removefoodandplaceinmicrowave-safe
dishandcover.Ifdinnerisinpaperboard
container,removefkomboxandcookin
originalcontainer.
pouches,makel-inchslit in centerofeach
pouch.Placepouchcontainingmeaton
microwave-safeplate,withremaining
pouchontop.Flexpouchbeforeserving.
microwave-safedishandcover.Letstand3
to5 minutesbeforeserving.
24
Page 25

Food
Meatsarid
Chickenpieces (upto3lbs.)
Fishfdlets(1lb.)
Meatloaf(1!4lbs.)
Hamburgerpatties(4-5)
Sausagepatties(1lb.)
??orkchops(4-1”thick)
Spareribs(upto 3 Ibs.)
Swisssteak(1%Ibs.)
Chuckroast(upto5lbs.)
Shrimp(upto 1Ib.)
Rice
Regular,raw,1cup
hwarlt, 1cup
Vegetables
Freshsuchascarrots,artichokes,
;aulifiower,broccoli,brussels
$~~OUtS(1lb.)
Bakingpotatoes2-4
Frozenblocksuchaspeas,green
~ans, spinach,broccoli
Limabeans
Frozenpouchsuchasbroccoliin
rottersauce,corn, peas
$w3food
‘“ml cook”
code
5
1
9
3
5
6
7
7
7
4
9
1
2
9
1
1
2
Chtaim!r
12x8x2-in. glass
dish
12x8 x2-in. glass
dish
10-in.pieplate
12x8x2-in. glass
dish
12x8 x2-in.glass
dish
X2x8x2-in. glass
dish
13x9x2-in. glass
dish
3-qt.casserole
withlid
B x 9x2-in. glass
dish
~~-qt,glassdish
withlid
2-qt.casserole
withlid
2-qt.casserole
withlid
2-qt.casserole
withlid
None
1%-qt.casserole
withlid
1%-qt.casserole
withlid
Laypouchon
microwave-safe
dish.
Approx.Time
8-20min.
6-9min.
25-30min.
7-9min.
7-9min.
22-25min.
1hr.30min.-
1hr.45
60-65min.
65-90min.
4-6min.
21-28min.
5-8min.
IO-Bmin.
8-16min.
depending
onnumber
8-10min.
12-13min.
7-9min.
Cfmrnerlts
Coverwithwaxpaperto
preventspatters.
~overtightlywithplastic
wrap.
Covertightlywithplastic
wrap.
Coverwithwaxpaper.
Whenovensignals,rotate
dishl/2turn.
Coverwithwaxpaper.
Whenovensignals,rotate
dishl/2turn.
Bastewithbarbecuesauce.
Coverwithwaxpaper.
Whenovensignals,rotate
dishl/2turn.
Covertightlywithplastic
wrap,ventingonecorner.
Whenovensignals,
rearrangeribs.
l?ollowinstructionsonrice
package.
Followinstructionsonrice
package.
Add1/4to 1/2cupwater.
Piercewithforkandplace
onovenfloorina square
arrangement.Turnpotatoes
overwhenovensignalsand
remainingtimeisdisplayed.
Add2tablespoonswater.
Addl/4cupwater.
Make1“slitinpouch.Stir
wellbeforeserving.
Fruit
3akedapples—4
1
2-qt,casserole
withlid
12-14min.
Coreapplesandfillwith
butterandbrownsugar.
Ifa of!do C Cyclefood needsadditionalwarming,
sin@yre-eowwfoodanduseAuntoCookCodeM..
25
Page 26

—
For meatandfishloavesuse
either the round or loaf microwavesafecontainers. Fish loavesmade
with precooked or canned fish use
AutoCook Code4. 13eefloaf uses
AutoCook Code9. Cover with
waxpaper.
Fish fillets, whole fish or seafood
pieces should be in singlelayer
in flatpie plate or oblong dish to fit.
Cover with waxpaper. Use Auto
Cook Code L
H t A
CkMserok R
Toadaptyour casserole recipes for
Automatic Cooking.
1: Select recipes that do not
require adding ingredients at
difkrent stagesduring cookingor
recipes thatrequire extra attention,
stirring or rotating.
2: IJse microwave-safecontainers
that are appropriate in size to the
foodamount. Use 3-qt. containers
or smaller. .
3: For saucy casseroles, cover
container with lid or wax paper (no
vents). For cheese or crumb-topped
casseroles, removecover after oven
signalsand add topping, then
continue cooking uncovered.
4: AHOWprecookedingredientsor
hotsaucestocoolslightlybefore
addingotheringredients.
Chicken
breastsand pieces, or
turkeyparts should be placed in a
microwave-safesquare or oblong
dish. Cover withwax paper. If
cookingbag isused for whole
chicken, shield breast bone with
small strip of foil. Microwaveusing
l%ltO~OOkCode ~.
Pork Chops automatically cook
wellin 12
x 8 x 2-in. dish. Add
barbecue sauce or other sauce on
each
chop.Coverwith wax paper,
fucking&K.!ssecurely w]de; dish.
lvkrowave usingAutoCook Code 6.
mnminingtime is ciisplay~d.
Chuck
roastsshould be placed in a
microwave-safedish with 1/2cup
water. Coverwith plastic wrap,
ventingone corner. Use Auto Cook
Code 7.
Spare ribs and lmisket should be
automatically cooked in an oblong
glass container. Cover with plastic
wrap. Make sureliquid coversmeat.
MicrowaveusingAutoCook Code 7.
Rotatedish when oven signals and
remaining time is displayed.
5: Meats and vegetablesshouldbe
submerged in liquid.
--
. .
A -
-
26
Page 27

L
R
C.
Auto Cook Code8
—
Approx. Cooking Tinw-20 min.
~-~kes6 to8 Ser%lgS
1Ib.groundchuck
IJ2cupdrybreadClwlnbs
1/8teaspoonpepper
1tea$pn salt
1teaspoonchilipowder
3tabkspoonsdrymincedonions
1egg
3tmespoons ketchup
1/2Cupinstantrice
1call
1
@blespoonehik!~OWder
i
largemixing bowl, place meat,
In
bread crumbs, pepper, salt, chili
powder,onion, egg and ketchup.
Mix welland form into 18balls.
Arrangeballs in 2-qt. casserole.
Setaside.
In smallmixing bowlplace rice,
beans, tomatoesand chili powder.
Mix welland pour in casserole
overmeatballs. Cover. Microwave
on Auto Cook Code 8. Rearrange
meatballswhen oven signalsand
remainingtime isdisplayed.
sweet Tart Rank
Auto
COOkCode~
Approx.CookingTim+-10min.
Makesabout
1jar(10oz.)Currantjelly
1jar(6oz.) preparedmustard
~ibs.frankflltier$,cutinto
l-in. pieces
2Lqt.casserole stir togetherjelly
In
and mustarduntil well blended.
Addfrankfurters, stirring to coat
each piece. Cover. Microwaveon
Auto Cook Code 1.
80hOrSd’OeUVK!S
Auto Cook Code 5
Approx. Cooking
T’hne-32min.
Makes4Servings
1/4cupsoysauce
1/4cuphoney
1/3cuporangejuice
1wholechicken(about3Ibs.)
1tablespoonwater
2 tablespoonscornstarch
small cooking bag, mix soy
In
sauce, honey and orangejuice. Add
chicken to bagand tie withplastic
tie. Turn chicken on its side in
12 x 8
hour on each side. Place bird breast
side up in dish. Slash bag near
closure. Microwaveon Auto Cook
Code 5. When ovensignals,
removechicken and prepare
Teriyakisauce. In I-pt. glass
measuring cup stir together water
and cornstarch. Cut off one corner
ofcooking bag with scissorsand
drainjuices into cup. Microwaveat
High (10)2 minutes, stirring once.
Removechickenfrom bag to serving
platter. Pour sauce overchicken
just before serving.
Cx3ssk
x 2-in. dish. Marinate 1
L
AutoCookCode8
Approx. Cooking Tirm-Ni min.
Makes6 Servings
1lb.groundcookedham
1/2lb. groundfre$hpork
1/2cupsoftbreadcrumbs
1/2cupwater
2tablespoonsinstantminced
onion
1/4teaspoonpepper
Mix ground ham and pork
thoroughly with crumbs, water,
onion and pepper. Mold into flat
loaf in 9-in. pie plate. Cover with
wax paper. Microwaveon Auto
Cook Code 8.
AutoCookCode6
Approx.CookingTime—27min.
Makes6Servings
1can
creamofrnusln=oomsoup
1-1/4cupsmilk(1soupcanfu.dj)
3/4cupinstantrice
1can(4oz.)mushrooms,
sternsandpieces,drained
1pkg.(IYzoz.)dryotion
soupmix
1cutup chicken(about3Ilbs.)
In
mixing
mushrooms and onion soup mix.
Arrange chicken pieces in a 12
x 2-in. glass dish with meatiest
pieces to outside ofdish. Pour soup
mixture overchicken. Coverwith
wax paper. Microwaveon Auto
Cook Code 6.
bowlmixsoup,milk, rice,
S s
AutoCookCode7
Approx.CookingTime-65 min.
Makes6Servings
1-1/2lbs.roundsteak,l/2-in.
thick~tenderizedor
poundedwithmeatmakt
1/4cupflour
1-1/2teaspoonssalt
1/8teaspoonpepper
1mediumonion,slicedthin
1can(16oz.)tomatoes
Cut meat in 6 pieces and coat with
mixture of flour, salt and pepper.
Place in 3-qt. casserole. Cover
with onion. Break up tomatoes
with fork and pour over top. Cover.
Microwaveon Auto Cook Code 7.
Rearrange meat when oven signals
and remaining time is displayed.
X 8
27
Page 28

F o
—
—
.
wide orklrgehdve$
vegetables such as cauliflower or
squashuse AutoCook Code 2. Use
around container close to the size
ofvegetable.Add 1/2cup water.
Coverwith lid or plastic wrap.
F
Hock or loose pieces of frozen
vegetablesshouldbe placed in
suitablesize container (at leasthalf
fuH)and coveredwith lid or wax
paper. Add 1or 2 tablespoons
water.Microwaveon Auto Cook
Code 1.Stir before serving.
Piecesorsk?s ofvegetabks
require WIto 1/2cup of water. Use
appropriate sizecoveredcontainer.
Microwaveon AutoCook Code 2.
Dry root vegetableslikecarrots
rnay’needto be stirred after oven
signalsand time remaining appears
on display.Re-coverand touch
STARTto finish cooking.
Pouches of frozen vegetables
shouldbe slit 1/2”in center and
placed on microwave-safeplate.
Microwaveon Auto Cook Code 2.
Flex pouch beforeserving.
Precooked/cannedvegetables
shouldbe placedin round container.
Container shouldbe no more than
1/3full. Microwaveon Auto Cook
Code 1.Stir before serving.
“.
28
I
Page 29

c
G R
Auto cook code 21
Approx. cooking ‘h-&42 min.
Makes4Servings
1tablespoon ail
1 tabIespmn
3 medhm
1
m green pepper,
softbutter
onions,quartered
cutin M4-in.widestrips
2cupsthinly-slicedcabbage
2/3cupcarrots,slicedinthin
diagonalslices
1/4cups~icedgreenonions
1cupbroccoliflowerets
1cupcauliflowerflowerets
2stalkscehwy,sliced
diagonally
Tossvegetableswith oil and butter
in 3-qt. microwave-safecasserole.
Cover.Microwaveon Auto Cook
Code 21, stirring well when oven
signalsand time remaining appears
on display.Serve immediately.
C stew
—
AutoCookCode6
Approx.CookingTime-34 min.
Makes6to8 Servings
—
1 medium zucchini, cubed
1
largepotato,pee&land
cubed!
2 large carrots, coarselygrated
1small onion,cutinpieces
1/4smallheadofeabbage,sliced
1can(M13Aoz.) creamof
mushroomsoup
1cupshreddedcheddarcheese
1can@ oz.)rnushromnpieces,
drained
1/2poundsmokedsausage,cutin
l/4-inchpieces
In a 4-5-qt. deep casserole dish,
mix all ingredients together until
wellblended. Cover. Microwaveon
Auto Cook Code 6. Stir well before
serving.
Auto Cook Code 2
Apprax.CookingTime—9rmin.
Makes6Servings
3tablespoonsbutter
2taldespoonsflour
2takdespmlssugar
1/2teaspoonsa!t
1-1/4clqlsmilk
2eggs,beaten
1can(17-oz.)wholekernel
cornsdrained
3/4cupbutterflavoredcracker
munbs
Melt butter in 1-1/2quart casserole.
Blend in flour, sugar,and salt. Stir
in milk and eggs, blendwell. Add
corn, stir. Sprinkle cracker crumbs
evenlyovertop. Cover.Microwave
on Auto Cook Code 2. When done,
center will bejust barely set. Let
stand5 minutes beforeserving.
Auto Cook Code 5
Approx.Cooking‘l%ne-1$min.
Makes4to6 Servings
1rmediurneggp~ant
2cans(8oz.each)tomato
sauce
1to2teaspoonsoregano
1/2cupshreddedsharp
cheddarcheese
1pkg.(6oz.)Mozzarella
cheeseskes
Peel eggplant; slice l/8-in. thick.
Spread 2 tablespoons tomatosauce
in bottomof 2-qt. casserole. Layer
half ofeggplant, 1can tomato
sauce, half of oregano and halfof
shredded cheese. Repeat layers,
Cover.Microwaveon Auto Cook
Code 5.Add Mozzarella cheese
and microwaveat High (10)1to 2
minutes, until cheese has melted.
AutoCookCode6
Approx.CookingTime-16 min.
Makes4-6Servings
1pkg.(10oz.)frozenchopped
spinach,‘thawed
3/4cupinstantrice
2tablespoonsbutter,melted
1/4cupfinelychoppedonion
1cupmilk
2 eggs,beaten
1/2teaspoonsalt
1cupshreddedcheddarcheese
Combine rice, spinach, butter,
onion, milk, egg, salt and cheese.
Mix well in 2-qt. casserole. Cover
and microwaveon AutoCook Code
6.Removecoverafter ovensignals
and remainingtime is disp~ayed.
Continuecooking. Let stand 5
minutes,covered, beforeserving.
AutoCookCOde69
Approx.CookingTime—25min.
Makes4to6 Servings
2pounds(approx.5medium)
yellowsquash,fineiychopped
1/4cuponion,chopped
1/4cup-butter,melted
1teaspoonsalt
1/4teaspoonpepper
1/4teaspoonbasil
!5slicesfreshbread,cubed
1/2cupshreddedcheddarcheese
1cupsourerea,m
8stripscookedbacon,
crwnbled
In large mixing bowlmix all
ingredients, using 1/2of crumbled
bacon. Pour intoa 12
glassdish. Sprinkle top with
remainingbacon. Cover.Microwave
on Auto Cook Code 69.
x 8 x 2-in.
Page 30

Pimappk Casseroleisa tangy
dessert or meat accompaniment. In
12X 8 X 2-in. dish spread2 cans
(20oz. ea.) drained pineapple
chunks.
Mix together 1cup sugar and 1/2
cup flour. Pourmixture over
pineapple and stir to evenly coat
pineapple. Topwith mixture of2
cupsbuttery-flavoredcracker
crumbs and
Coverwith wax paper and cook
on AutoCook Code 2.
1/2cup melted butter.
BakedApp#esautomaticcook well
usingAuto Cook Code L Match
number of apples to sizeof
microwave-safecoveredcontainer.
Use Auto Cook Code 1for 13aked
Pears also.
StewedFruitandFruitCompotes
shouldbe stirred well before
microwaving,especially if sugar is
added. Cover; use AutoCook Code
2 and stir once or twice after oven
signalsand time appears on display.
TouchSTARTand finish cooking.
Desserts
&B
NutToppedMm are easy to
cook automatically.Grease bottom
imdsides of microwave-safefluted
cakecontainer and sprinkle bottom
evenlywith 1/3cup chopped nuts
or coconut. Carefully pour batter
fromone box (2-layersize) cake
mix overnuts, cover with wax
paper. Microwaveon Auto Cook
Code 6. Let stand 15minutes
beforeinverting to cool.
Caramel!BiscuitRing:Spread
1/4cup melted butter and 1/2cup
brown sugar in 8-in. round glass
dish. Sprinkle with cinnamon and
1/2cup chopped nuts. Arrange 1
can (10oz.) refrigeratedbiscuits
ai-oundedgesand place drinking
glass, open end up, in center.
Coverwith wax paper. Microwave
on Auto Cook Code 3. Invertonto
serving plate, letting dishstand
overring a few minutes before
removing.
—
BaconandCheeseTopped
Cornbread: Distribute 1/2cup
chopped crisp fried bacon and
1tablespoon Parmesan cheese in
well greased 8-in. round glass dish.
Carefidly pour batter from 1pkg.
(8-1/2oz.) cornbreadmix overabove
ingredients. Cover with wax paper.
Microwaveon AutoCook Code 6.
Rotate 1/2turn after oven sigliais
and time remaining appears on
display.Let stand 5 td ~0minutes
before inverting.
30
—
—
Page 31

—
mm
–—
Easy cake
w cook code 6
proxeCmking
alms1 (mm) m G&3
1pkg.(Z-layersize)IM@’s
Foodcakemix
3eggs
1/2cupcookingoi~
1-1/3cupswater
1/3cupfinelychoppedpecans
largebowl, place cake mix,
In
eggs,oil and water.Follow package
recommendations for mixer speed
and time.
Grease a M-cupplastic microwave
flutedor straight-sidedring mold.
Sprinklechopped nuts evenlyover
bottom. Pourbatter over nuts.
Coverwith waxpaper and
microwaveon Auto Cook Code 6.
Let standin dish 5 minutes before
inverting.
—
~
—
Auto cook code 2
ppr’ox.cooking Time-n min.
akes 6 to 8 Servings
1can (20-22oz.) prepared
cherrypiefilling
2cupsdryye$knvorwhite
cakemix(1pkg.~9oz.]or
1/2pkg.~17oz.])
1/4cupmeltedbutter
1/2cupcoarselychoppednuts
1teaspoongroundcinnamon
8-in. square dish, spread pie
In
filling.
In smallbowl, mix together cake
mix, butter, nuts, and cinnamon
untilcrumbly. Sprinkle everdy
overcherries or in three rows so
cherries are visible. Cover with
waxpaper. Microwaveon Auto
Cook Code 2.
upside
AutoCookCode61
m
Approx.CookingTime—Mnlin.
Makesabout6 servings
4cupsbreadcubes,loosely
AutoCookCode5
Approx.CookingTime-7 min.
Makes1 (thin.round)Cake
packedintocup
1/2cupbrbwnsugar
1/2teaspooncinnamon
1/4teaspoonsaM
112cupraisins
1/4cupchoppedpecans
1/4cupsliveredahnonds
1/4cupJackcheese,cubed
1/2choppedapple(3/4to1cup)
1-3/4cupsmilk
1/4cupbutter
2eggs,w6Mbeaten
Spread bread cubes evenlyin
$-inch round dish. Mix sugar,
cinnamon, salt, raisins, pecans,
almonds, cheese and apple
together. Sprinkle evenly over
bread cubes.
Measure rnilkinto l-qt. measuring
cup. Addbutter. MicrowaveatHigh
(10)4 minutes,untilbutter is melted.
Rapidly stir in beaten eggs with a
fork and mix well. Pour overbread
mixture. Cover with wax paper.
Microwaveon AutoCook Code 6L
Strmwkd
AutoCookCode2
Reserve
slicesplus water toequal 1/2cup.
In $-h. round dish place butter.
Microwaveat HIGH (10)1minute
untilmelted. Sprinkle sugarover
butter. Drain pineapple (reserving
liquid)on paper towelsand arrange
in dish. Decorate with cherries.
Place a glass, open sideup, in
center ofdish.
Prepare cake mix using 1egg, 2
tablespoonsoil, wi reserved
pineapple liquid plus water to equal
1/2cup. Mix at high speed for 2
minutes. Carefully spread batter
overfruit in dish. Cover with wax
paper. Microwaveon Auto Cook
Code 5.
c
1/4cupbutter
1/3cupbrownsugar
1can(8-1/4oz.)pineapple
slices~drained,reserving
liquid
4nuwaschinoorcan$ied
cherries,cutinhalf
1-1/2cupsyel!ow
1
egg
2tablespoonsoil
liquid frompineapple
cake mix
Approx.CookingTinM+Mlmin.
Makes6to8 Servings
6cupssliced,peeledapples
1/4cupbrownsugar
1/2cupall-purposeflour
1/3cupbrownsugar
1/3cup quick-cookingoats
1/4cupbutter
1/2teaspooncinnamon
In 8-inch square dish place apples
and 1/4cup sugar.
With pastry blender mix flour,
1/3cup sugar, oats, butter and
cinnamon untii crumbly. Sprinkle
overtop of apples. Microwaveon
Auto Cook Code 2.
Page 32

—
*Do n s or cook with
shelfon fkm ofavem Product
damagemayresult.
* ~ pothdglwyiwhenhanding
metalshelf
may be INM.
e ~~ ~(jt ~
browning dishcmmetalshelf
oDOUBLE DUTT’ shelf’
*Use
and utensils.They
.
withAlltomaticcookingisnot
recommended.
‘Mewire shelfis specifically
designedfor added capacity heating
andreheatinginyour microwave
oven.NOWmorethan one foodmay
beheated orreheated and ready to
serveatthesametime.
Whenmicrowavingwith theoven
shelf, sometechniques willdiffer
fromthe Cookbookwhich came
withyouroven.Itis important to
arrangefoodsproperly, andthisis
shownon thenextpage. UtensiIsize
isimportant; selectfrom amongthe
suggestionsbelow.Also, foodsize
shouldbe considered; foodsover4
incheshigh, or3%pounds are not
recommended for shelf cooking.
Battersand doughfoods andalso
uncookedfoodswhich needto be
prepared fromscratch shouldbe
cookedwithouttheoven shelf,
followingCookbook directions.
a
Beforeplacingfoodin thedishes
youplantouseforshelfmicrowaving,
checktoseethatthey will fittogether
onor underthe shelf.Also, besure
utensilsare microwavesafe.
Utensilsforheating or reheating
include 1cup measuring cup,
9x5x3-inchloafdishesor9-inch pie
plates.
I
Leftoversmaybe placed in small
individualceramic or plasticbowls
or divided plates.
TOposition theIXXJBLE DUTYTM
sh~lf,tip theback slightlyand fit the
shelfsupport guidesonto the
supportguides locatedoneach side
ofthe ovenintherear.
I I
—
—
Next, lower thefront untilthe shelf
supportguidesfitonto the support
guideslocated ateach sideofthe
oveninthe front.
When properly positioned, the shelf
shouldfitsnuglyinplace.
T_Jsepothokierswhen handling
foods heated t~getherwith your
ovenshelf, especially when heating
largeramountsoffood. Extra steam
~eneratedfrom multiple food
&king may makeutensils hotter
than‘withregular microwaving.
Use waxpaper or plastic wrap
insteadoflids on casseroles. Lids
mayaddtoo muchheighttodish.
32
Page 33

.—
—
‘- H H olsimilar~pes F
Tw4RpMesofh#toversrnaybe
reheatedtogether.Arrange thick
or dense foods to outsideedgesof
plateand coverwithplastic wrap.
MicrowaveatHIGH (10)for3
minutes.Reverseposition ofplates
(toptobottom)and rotate 1/2turn.
Continuemicrowavingat HIGH
(10)for2 to 3minutes. Continue
heating,if necessary, until hot.
.
—
Reheating twoeasseroies (height
shouldbe less than4 inches)isnow
possible.Coverwith plasticwrap.
Usestaggeredarrangementsof
food, placingfoodon rightsideof
shelf “andleft sideoffloor.Referto
Heatingor ReheatingGuide in
cookbookforsuggestedmicrowave
timeper casseroleand addthetimes
together.Microwaveat HIGH (10)
reversingpositionoffoods(topto
bottom)after halfoftime. Also,
heatseveralsmallbowlsof leftovers
thisway,stirring andreversing
positionsafierhalf oftime.
Howto several TypesOmbds ‘r’’gether
When heating severaldifferent
typesoffoodtogether,foodswhich
shouldbe served hot must beplaced
ontheovenfloor, while foodswhich
are only warmedshould be placed
onthe shelf. Thisis because
microwaveenergy enterstheoven
fromthe bottom only.Also, itis
importantto remember that foods
absorb microwaveenergy at
differentrates. Ratescan be affected
bythe size of the food, and its
startingtemperature.
Becauseofthevarying rates, you
mayneedto startreheating alarge
or dense fooda fewminutes ahead
—.
oftime, then add other smalleror
.-.,. lessdense foods. Alternately, if
—
oneofthe foodsyouare heating
seemsundercooked but the others
reheated satisfactorily,let the
underheated foodcontinue cooking.
Heat or reheat different types of
foodatHIGH (10).Todetermine
heatingtimes, addtimesforall
foodstogether. (Seeheatingguide
in cookbook.) After halfoftime,
stiror rearrange foods(donot
reversepositions). Check foods
(floorespecially)after 3/4of total
timeand removeany which are
done. Continuecookingothers.
TWO entrees
(WmM.
(NIto 120z. each) are both ready to
serveatthesametime.Removebatter
foods;cookthese conventionally.
Removefoilcoversand return foil
trayscontainingfoodtoboxesin
whichthey were purchased. Place
inovenwith oneTV dinner on right
shelfand the second dinner on left
floor.MicrowaveatHH-I (10)for 6
minutes. Reversepositions (topto
bottom)androtatefoods 1/2turn.
ContinuemicrowavingatHIGH
(10)for6minutes. Check dinners
forheating.If onedinner seemsless
donethandesired, return it to the
boxandcontinueheating onfloor
1to2 more minutes.
each) ortvw)wdinner’s
I i
Placeonfloorlargeordensefoods
which need the mostheating, such
asleftoverfried chicken, casseroles
ofcanned or leftovervegetables,
rice orpasta. Place onshelf those
foodswhich need onlybe warmed,
such as bakery pies, rolls, muffins
orbreads.
33
Page 34

—
Yourovenisdesigned g
bestresdtfi i baroasting
andibmibg whenusedas
Irecomendede
Beforeusing it, look at the
directions in this book for setting
itselectronic controls. Then open
the ovenand takenote of the
abbreviatedinstructions on the
insideof the door. Look at the
shelves.Takea practice run at
removingand replacing them.
And, while you’reat it, locatethe
broil unit at thetop of the ovenand
bake unitjust offthe oven floor.
L
Thelightcomes on automatically
when the door is opened.
‘lbt the lightm when the
doorisdosed,
LIGHT pad on ConventionalOven
controlpanel.
touch OVEN
The shelvesare designedwith
stop-locks.when you place them
correctly on the supports, they’ll
stopbefore coming completely
outof the oven. What’smore, they
willnot tilt when you’reremovirig
foodor when you are placing food
on therm
Toremoveshelvesf the oven,
make sure they’recool. ThenJift
up the rear of the shelf andpull it
forward with the stop-loch along
the top of the shelf support.
lb
replaceshelves theoven,
insert the shelfwith stop-locks
restingon the shelf supports. Push
shelftoward rear ofovenuntil it
fallsinto place. When shelf isin
proper position, stop-lockson shelf
will run
when the shelfis pulled forward.
undertheshelf support
-–
The ovenhas four shelf supports
marked A (bottom), B, C and D
(top). Shelfpositionsfor cooking
food are suggestedcmBaking,
Roastingand Broilingpages.
—
—
Page 35

sett BMke,the (xx&s
dry heat. Both bake mdbrd
“@areemxgkzed(the!broil
w
a raked wattage)Unt$lthe
own you-select
{ Ew t Wlreached.
‘I’he controlthen
t.urrlsm! RM%@lgl’mit$o
ad m t m the desired
teIn a quiet
oven
kitchen,you
soun~during cooking as the
heatingunits are turned off and on.
mayhar a slight“click”
Theoventemperaturedispkiywill
Slmw—!lool?.orhigherthanactual
room temperature until the oven
tenqxrature reaches 150°F.
This
ismrrmd.
Asthe ovenheats, the temperature
in the display may seesaw a few
degrees. This, too is normal
because the electronic control
accurately indicates slightchanges
in air temperature.
Most fbodscook satisfactorily
withoutpreheating the oven. If
preheating is required, put your
od in the ovenpromptly when the
ven signalsthat the desired
temperature has been reached.
When cooking food for the first
time, use the time given inyour
recipe as a guide.
Don’topen the ovendoor to check
on foodsanymore often than
necessary-doing so could cause
tmdesireablebaking results. Check
when minimum time shown on
recipe is up. Then cook food
longe~,if necessary.
Note: cooking controls will not
work after automatic oven cleaning
untilthe ovenhas cooled and you
touchthe (XEAN pad and unlatch
the door.
H ‘ Y
Step 1:Place oven shelf on shelf
support called for on IMking
Guide, page 39.
Step2: Make sure the ovendoor is
closed. Then touch BAKE pad.
Display shows “BAKE” and a
flashingindicator pointsto OVEN
THW?
Step 3: Touch the fi~mberpads
in the order that you read them to
enter the temperature called for in
yourrecipe. The temperature you
set showsin the display.
Step 4: Touch STARTpad to begin
baking.Displayshows“BAKE” and
actual oventemperature as the oven
‘I13ats.The control “beeps”sixtimes
wheri‘settemperature has been
reached. The display then shows
the settemperature continuously.
!?@ 5: Center food on the shelf.
Make sure at least 1inch of space
isleftbetween the cooking container
and the ovenwallfor proper heat
circulation. Close the ovendoor.
Step 6: If youwish, you may set
theMinute/Second Timer to the
desired cooking time as indicated
in yourrecipe (seepage 11).When
thesettime isup, the controlsignals
untilthe MIN/SEC TIMER pad
is touched again.
Step %When baking is done, touch
C,LEAR/OFF pad toturn the oven
off. Be sure foods are done before
takingthem outof the oven.
How tome Bake
Youroven
canbeset toturnon
andoffautomatically.However,
foods%viMcontinuetocookwhen
leftintheoven,eventhoughit’s
turnedoff. ‘I’M’swhyyou
shouldnotusetheBake‘l%neor
MopTimefeaturewhentimingis
criticalmless you?libeonhand
totakefoodsoutoftheoven
whenthey’redone.
TosetInnnediateMart
startsimmediately and turns off
automatically at later time): ,
Step 1: Touch BAKE pad.
(oven
Step2: Touch number pads to enter
oventemperature. For example, for
250°F.touch 2,5 and O.
(continued nextpage)
I
35
Page 36

Step 3: Touch BAKE TIME pad.
--------
Step 5: Touch STARTpad. Oven
beginscooking. Display showsthe
StopTime and oventemperature.
Tos DekqyMart(oven starts at a
latertime and automatically turns
offw-hencooking time is up):
Do Steps
ImmediateStart. Then:
1,2,3 and 4 as shown for
Step5:Touch STW?TIME pad.
Step 6: Touch number pads to enter
timeofday you want ovento turn
off. For example, to enter 6:00,
muchpads 6,0 and 0.
Step 7: Touch STARTpad. Oven
cahxdatescorrect starting time and
turns on at that time. Display shows
S~fi and Stoptimes untiloventurns
cm.Then the oven temperature and
StopT~~e are ~howno
Youmayenter Stop Timebefore
BakeTime after completing Steps
1and 2. Oven stillcalculates
“turn on” time correctly.
Enter Stop Time insteadof Bake
Time startsthe ovenimmediately
and oventurns off automatically
at StopTime.
To check oven
youset,
wiHshowbriefly.
To Check baking time that you set,
touch BAKETIME pad and it will
showbriefly.
At the end of’TimeBake, the word
End is displayedin place of time of
day and the control beeps once a
minute until you touch the CLEAR
OFF pad.
temperaturethat
touch BAKEpad and it
t
B
Step 1: Prepare brownie batter ~
according to your recipe or
directions on packaged mix. Use
either a metal or oven-proof
glass pan. Place oven shelf in
B position.
Step
2:Preheatoven.Closeoven
doorandtouchBAKEpad.Use
numberpadstosetoventemperature
to350’3?ifusingametalpan,325”F.
ifusingaglasspan.TouchSTAR’
pad.Preheatingbegins.Display
showsactualoventemperatureas
ovenheats.
Step3:Pourbrowniebatterinto
greasedpan.
Step4:Whenpresettemperatureis
reached,ovensignals.Centerthe
panontheovenshelf.
$tep5:TouchMIN/SECTIMER
andnumberpads2,5,0 andOto
enter25minutescookingtime.
Timingbeginsautomaticallyinsix
seconds.
Step6:Whenovensignals,touch
MIN/SECTIMERpadtostop
signal.Checktomakesurebrownies
aredone.Removethepan.Touch
CL~A~/~FFtoturnoven
brownies cool and then
cut into squares.
36
8“
(continued)
Q. Why men%my foodsdone
eventhoq$’11they’ve‘cUxkedthe
MI time.
A. There are variouscausesforthis
problem. Youmay haveopened the
ovendoor too oftenduring cooking.
Or perhaps you didn’tremove all
containersother thanthosein use for
baking. Check forthese conditions
and followthe suggestedbakingtips
to avoidthis problem in the fiture.
Q. If the display doesn’t show’the
correcttimeof day,mayIuse
Bakeme andStop,’1’hlle?
A. Yes,
time youwish to serveyour meal,
you shouldreset the clock to the
correct time. Do it before you enter
Bake Time and StopTime.
Q. How do I bake at high
aMtMdes?
A. You’llhaveto changethe
temperature and time of cooking as
well as alter your measurements.
For best results and fhrther
information, check your Cookbook .,
or state agricultural station.
but to startand stopatthe
Q. How do I use the a
oven t iI w t begin
cooking immediately but w
the oven shutoff while I’m gone’?
A. Touch13AKEpad and enter the
desiredoventemperatureby touching
the number pads. Then touch
STOP TIME pad and enter the time
at which you wantthe oven to shut
off. T~uch STARTpad to begin
cooking.
Note: Food will continue to cook if
left in a hot oven.
Q. Are there U foodsthatare
not fixTime Bake?
A. Foods that are highly perishable
such as milk, eggs, fish, stuffings,
poultry and pork should not be
cooked automatically unless the
standing time in the ovenis not
more than two hours before or after
cooking. Foods should alwaysbe
chilled in the refrigerator before
cooking when you use a Delayed
Start.
—
—
~
Page 37

-- -.
code settings7,8 2mil9 give yotu
Um’enkmt shortcut method for
settingyouroventobake.Each
afthemsetstheovenfora
commordy used
temperature.
Set code 7
baking
andtheoven
setsanoven
temperatureof350°F.
SWCode8 foranoven
temperatureof3’7’”l?.
Set Code 9 foranoven
kxnperatureof400°Fe
~odes and cooking times for
frequentlybaked goods and
PoDU~arfrozen convenience foods
. .
are shownin the Quick-Reference
Guide on the next page. A more
completeBaking Guide that
inckdes cook Code settingsfor a
wider selection of foods appears orI
page39.
H(NVtoset for
Step1:
Bunless
baking guides. If food doesn’t
require preheating the oven, you
can dace it in the oven immediately.
Step 2: close the ovendoor. Touch
(200K CODE pad.
Place ovenshelfon support
otherwise indicatedon
—————
Step 5: Many baked goodsrequire
preheating theovenfor best results. =
When theprogrammedtemperature =F-–—--is reached, a signalsoundsto tell =
you so. Place food inthe oven —=
~romptly when youhear it.
Step 6: The Minute/Second Timer
can be used with Code Control
baking. Touchthe MDW$EC
TIMER pad.
H#Z&+-_-
--A
Step 3: Then touch the appropriate
number pad to enter the desired
(20de setting.
Step 4: Touch the STARTpad to
begin baking. The display shows
BAISEand the programmed oven
temperature for six seconds. If the
settingsare not what you want,
touch CL13AR/Ol?Fto cancel the
program and begin again. A few
seconds after baking begins, the
displayshowsthe actual oven
temperature as it rises.
-.—
‘-—
Step 7: Then use the number pads
to enter the minimumbaking time
required. Timer startsautomatically
after six seconds.
Step 8: The oven signals when the
set time is up. Touchthe MHWS13C
TIMER pad again to shutoff the
signal.Check yourfood.If it doesn’t
seem tobe done, let it cook for a
fewmore minutes, up to the
maximum time shown in the
baking guide. Be sure food is done
before you take it out.
Touchthe CLEAR/OFF pad to
shut the oven off.
37
Page 38

BakdGxxis
Bread,Wt
( 7
( 7
(
C 8
R 9
G
(
1 2 9
C
‘BakecookiesonCshelf.
—
—
H toB L c
w c c
A. Numbers 1through 6 are settings
for Bake (Roast)with temperature
probe. Numbers 7 through 9 are
settingsfor 13akewithout the probe.
8
8
7
8
$
7
Step 1:Prepare batter accordingto
your favoriterecipe andpour it into
metal or oven-proofglasspans.
8
8
7
7
9
9
9
8
8
9
Place ovenshelf in positionB.
Step
2: Check the guideat left for
correctCodesettingandapproximate
cookingtime. SuggestedCode
settingfor scratchlayercake is 7,
with a cookingtime of 30 to 40
minutes.
Step 3: Preheat oven. Closethe
door. TouchC(XXSCODE pad and
enter code number 7.Then touch
STARI’ pad to begin heating.
Step 4: Oven signalswhen preset
temperature has been reached.
Place cake pans in oven,taking
care notto let them touch the oven
walls.
Q. W I cookusing
cook code control?
A. ‘I’hereare hundreds of kinds of
foodsthat lend themselves to Cook
Code cooking. See the Baking
Guide on page 39 for examples.
Foods similar to those in recipes
with Cook Codes can be cooked
usingthat same Code number.
Q. the oft’
aut.omatical~ywhenI useCook
CodeControi?
A. No. When using Code settings
7,8 and 9 for baking without the
probe, it’snecessary to touch the
CLEAR/OFF pad to shutoff the —
ovenheat. When the probe is used
with Code settings 1through 6, the —
ovenwill turn off automatically.
b
Step 5: TouchMIN/SEC TIMER
pad, then touch number pads 3,0,0
and Ofor 30 minutes,the minimum
cooking time recommended.
Timingbeginsautomatically in
six seconds.
Step 6: When 30 minutes are up,
the ovensignals. Touchthe MIN/
SEC TINIERpad againto turn the
signtiloff.
Check cake for doneness. If it’snot
completelydone, leaveit in the
ovenfor another few minutes up to
the maximum 40-minute cooking
time suggested.When cake is done,
it i~t of the ovenand touch the
CLEAR/OFF pad to turn the oven
off.
Step 7: Let cake cool accordingto
recipe directions. Frost and serve.
38
Page 39

—
-----
1. Aluminum pans conductheat
quickly.For niostconventional
&ing, light,shinyfinishesgenerally
ivebest results. They prevent
&erbrowning in the ~~e it takes
for heat to co&the center areas.
Dull (satin-finish)bottom surfaces
ofpans are recommended for cake
pa& and pie platesto be sure those
areas brown completely.
2. Dark or non-shiny finishes,
glass and I?yroceram” utensils
oftenabsorb heat, which may result
in dry, crisp crusts. Reduceoven
heat 25”I?.if lightercrusts are
desired. Preheat cast iron for
baking some foodsfor rapid
browningwhen foodisadded.
3. Preheating the ovenis not always
necessary, especially for foods
— —
which cook longerthan 30 to 40
minutes.For foodwith short
cookingtimes, preheatinggives bestappearance and crispness.
iRR$w—
i&&2’
m—-
-=”=-.=
-— —.
m –-
w.
4. open the ovendoor to check –=:foodas little aspossibletoprevent -–
unevenheatingand to saveenergy. =–
m—
—.
——
—
—
Food
~ontainer
Bread
Biscuits(%-in.thick)
Coffeecake
Cornbreadormut%ns
Gingerbread
Muffins
Popovers
Quickloafbread MetalorGlassLoafPans
Wastbread(2loaves) Metaior GlassLoafPans
Plainrolls
Sweetrolls
ShinyCookieSheet
ShinyMetalPanwith
satin-finishbottom
CastIronorGlass
ShinyMetalPanwith
satin-finishbottom
ShinyMetalMuffkPans
DeepGlassorCastIronCups
ShinyOblongor MuffinPans A, B
ShinyOblongor MuffinPans
~alm
(withoutshortening)
Angelfood AluminumTbbePan
Jellyroll
Sponge
Cakes
Bundtcakes
cupcakes
Fruitcakes
Layer
Layer,chocolate ShinyMetalPanwith
Loaf
cookies
Brownies
Drop CookieSheet
Refrigerator
ilolledorsliced
MetalJellyRo1lPan
MetalorCeramic Pan
MetalorCeramic Pan
ShinyMetalMuffinPans
MetalorGlassLoafor A, B
TubePan
Sl]inyMetalPanwith
satin-finishbottom
satin-finishbottom
MetalorGlassLoafPans
MetalorGlassPans
CookieSheet B, C
CookieSheet
Fruits,
(.lWrllxserts
Bakedapples GlassorMetalPan
~~stard
Fuddings,Rice
u-idCustard
GlassCustardCupsor Casserole B
(setin panofhotwater)
GlassCustardCupsor
Casserole
Pies
Frozen
Meringue
Me crust
!-Wocrust
%try shell
~~~~~~]~~~ou~
3akedpotatoes
kaliopeddishes
kmfiles
FoilPanonCookieSheet
Spreadtocrustedges
GlassorSatin-finishMetal
GlassorSatin-finishMetal
GlassorSatin-finishMetal
SetonOvenShelf
Glassor MetalPan A, B,C
Glass
SheM’
Wsition ~e~~nture
B,C 400°-4750
B,A
B
B
A,B
B
B 350°-3750 45-60 8
A,B
B,A 350°-3750
A
B
A 325”-350°
A, B 325°-3500
B
B 350°-3750
B
B 350°
B,C
B,c
B,C
A, B,C
350°-4000
400°-4500
350° 45-55 7
400°-4250
375°
375°-4250
375°-4250
325”-375° 30-55 8 11.vo-piecepanisconvenient.
375°-4000 10-15 8 Linepanwithwaxedpaper.
350°-3750 20-25 8 Paperlinersproducemo~ moist
275°-3000
350°-3750
325°-3500 25-35 7 Barcookiesfrommixusesametime.
350°-400”
400°-4250 6-12 9 25”F.to50°F.
375°-40Q0
350°-4000
300°-3500
B
. .
A
B,A
A, B
B
B 450° 12-15
A,B,C
B 300°-3500 30-75 7
325°
400°-4250 45-70
325°-3500 15-25
400°-4250 45-60
400°-4250 40-60
325°-4000 60-90
325°-3750
Time, COOK
Minutes
15-20
20-30 8
20-40
20-30
45-60
45-60 8 Darkmetalorglassgivesdeepest
10-25 9 Forthinrolls,ShelfBmaybeused.
20-30 8 Forthinrolls,ShelfBmaybeused.
45-60 7
45-65
2-4hrs.
20-35
25-30 7
40-60
10-20
CODE ~~~enh
9 Canned,refrigeratedbiscuitstake
2to4minuteslesstime.
Preheatcastironpanforcrispcrust.
9
Decrease about5 minutesformuffh
9
mix,orbakeat450T?for25minutes,
thenat 350”F.for10to 15minutes.
browning.
7
Cnlsts.
7 Use300”F.andShelfB forsmallor
individualcakes.
7
7
8 UseShelfCandincreasetemperate
formorebrowning.
7-12
30-60 8
30-60 7
Reducetemperate to300°F.forlarge
custard.Cookbreador ricepudding
50-90 7 withcustardbase80to90minutes.
9 Largepiesuse400°F.andincrease
time.
7 Toquicklybrownmeringue,use
400”F.for8to 10minutes.
Custardfillingsrequirelower
9
9 temperature,longertime.
30-60
8 Increasetimeforlargeamount
7 orsize.
Esrm
-
-
-
-
ri%%aE--
Emii&——
Page 40

to in
see chideam page 44
cob d
a baking procedure
heat.
usedformeats.TM’s whyyou
usetheBakecontrolsforroasting.
t
Sb.dd beb%’andSt&dy,keq
spatteringtoaIMinhnunl.when
Klasting9it9snotnecessaryto
scarybaste~coveroraddwaterto
yourxneateTendernwatorpoultry
canberoasteduncovered.
the weightof the meat and
place it, fat sideup, on the rack in
the broiler pan that came with your
range. This helpsthe meat to baste
itself.
a m that
f the o your meat. A roast
placed in a pan too small for its size
will drip overthe edge.
meats Cmtimle to
slightly
while h the
afterbeingrwnovedfrom
it. Thke
when determining your cooking
time.
this intoconsideration
cod
E t
Step 1: Use shelfpositionindicated
on the RoastingGuide onpage44.
For very tall roasts, removethe
second ovenshelf.
Step 2: Place meat insidethe oven
and closethe door.
Step 3: Touch BAKEpad. Display
shows“BAKE” and a flashing
indicator light pointsto OVEN
TEMP.
H t ‘ w
using Probe
For many foods, especially
roastsand poultry, internalfood
temperature isthe besttest for
doneness. The temperature probe
takesthe guessworkout ofroasting
bycookingfoodsto the exact
donenessyou want. When the
intemallemperature of the food
reaches the temperature you set,
ovenautomatically shuts off,
“End” appears on display and oven
beepsonce a minuteuntil
CLEARKIFFpadistouched.
Step 1:Insert probe into meat.
Then plugprobe into receptacle on
ovenwall.
Step 2: TouchIMKE pad. Display
shows“BAKE” and a flashing
indicatorlight points to OVEN
TEMP. Touchnumber pads 3,2
and5toenterthedesiredoven
temperatureof325°F.
—
—
‘lb frozennwatroasts
withoutthavving~Wowmore
cookingthne.
10to 25 minutesper pound. For
roastsunder 5 pounds, add 10
minutesper pound.
For large roasts, add
TO downsurfacebrowning
onturkeys,youCanusea M
“tent?
be laid loosely overthe poultry so
tie heat can circulateunder the foil.
The tent-shaped foilshould
f pm.rMryShoukl be
thawedbeforecookingtonMw
sureit%doneevenly.
however,can becookedsuccessfully
withoutthawing.Check thepacker’s
label for specific directions.
Some,
Step 4: Touchnumber pads 3,2 and
5 to enter 32501?.overitemperature.
(The exceptionis smallpoultry
which is roasted at 375”F.)
Step 5: Touch STARTpad to begin
roasting. Display showsoven
temperature as it rises, and signal
soundswhen desired temperature
is reached.
Step 6: When food iscooked,
touch CL13AR/OFFpad to turn
ovenoff.
Step 3: TouchFOOD TEMI?pad.
Flashingindicator pointsto FOOD
TEMP on display.Use number
pads to enter desired finished meat
temperature from 90° to 199°F.
Probe must be inserted into
receptacle or “PROIY’flashes on
display.
Step4:Touch STARTpad. Display
shows oven temperature rising to
preset temperature. Display also
shows actual food temperature
rising. When desired temperature
is reached ovenautomatically shuts
off, “End” appears on display and
ovenbeeps once a minute.
Step 5: Touch CLEAR/OFF pad to ===
tur~lsignal off. Removethe probe.
40
Page 41

The temperature probe serves
both the Conventionalovenand
N.bowave oven.It has a skewer-like
probe at one end and a plugat the
other end that goesinto a
receptacle on the oven wall. Use
handles of the probe and plug when
inserting and removingtheseparts
from meat and wallreceptacle. Do
not use tongstopull on cable when
removingprobe at end ofcooking—
they might damage it.
After preparing meat and placing it
on the roasting pan rack, follow
these steps for proper probe
placement.
S@? 1:Lay the probe on the
outside of the meat along thetop
or side and mark with your finger
where the edge ofthe meat comes
to on the probe. Point should rest in
the center of the thickest meaty part
of the roast.
Step 3: Plug the other end ofthe
cable into tie receptacle, making
sure thatit is securely seated, all
the wayin. Close the ovendoor.
Insert probe into meatiestpart of
inner thigh from belowand parallel
to the leg of a whole turkey.
H or L
probe intocut end, meatiest
part ofham or lamb without a
bone. For bone-inham or Iamb,
insert probe intocenter of lowest
large muscle orjoint.
‘Q.men buying a roast, $we
there any specia!ltips that would
help me cook it more evedy?
A. Yes.13uya roast as even in
thickness as pomiideor buy a
rolled roast. -
Q. Canlsealthesides ofmyfofi ““
“tent9’when roasting a turkey?
A. Youshouldn’t.Sealingit will
steamthe meat. Leaving the “tent”
unsealed lets air cifculate and
brownthe meat.
Q Whydoesmyroastcrudie
whenI trytocarveit?
A. It’sprobably too warm. Roasts
are easier to sliceif you let them
cool for 10to 20 minutes after you
takethem out ofthe oven. Be sure
to cut across the grain of the maat.
-.
-
-
--- ..
—
Step 2: Insert the probe into the
meat up to the point marked off
with your finger. It should not
—
touch bone, fat or gristle. i$Jomore
.-! tkw two inches
.—--
cmmtingthehandle,shouldbe kjl
offheprobe, not
Insert probe into center of dishes
such as meatloaf or casseroles.
When cooking fish, insert probe
from just above gill intomeatiest
area, parallel to backbone.
Q Canthetenqwratureprobe
stayin theovenwhenit9snot
insertedinfood?
A. It shouMn’t.Removeit from the
receptacle when it’snot in use. You
could damage theprobe by leaving
it in the oven duringcooking
operationsthatdo notrequireitsuse.
‘Q I the jprck? into
f
A
be completely defrosted first.
could break. Foods must
Page 42

-.
CWk settings1 6am
f m with the http
time probe.‘me
Code
settingsared’aoml.akthat
the c
ownt$?xnpram and s the probe
f the desired de(#doneness.
Meatscook auto~aticallytothe
presetKqwrature?usinglbw~
steadyheatfortellder,juicyresults
Casserolescan also be prepared
with the temperature probe using
these six Code settings.
Check the Quick-ReferenceGuide
on the nextpage and the Roasting
Guide on page44 for correct Codes
for awide selectionof foods.
~~t~~~~eimetiedinfOo~,
~he~YOU
setthis
codeno. oven temp.
1
2
3 325° 170”
4 325° 190°
5
6 350°
Ovenaut~~atically
atthis
325” 130”
325°
375” 1900
roastsfood
tothis
internaltemp.
150°
170”
t
C c
Step 1: Insert temperature probe
intomeat and plug other end of
cable intoovenwallreceptacle.
(Seepage4L)
Step 2: Touch COOK CODE pad.
Step4:Touch STARTpadto
begincooking.Forsixseconds,the
displayshows“BAKE”andthe
programmedoventemperatureplus
theprogrammedfiiishedfood
temperature.Ifsettings
whatyou
want,touchCIJ3AR/OFF
are not
padandbeginagain.
Step 3: Enter appropriate codeby
touchinga number pad from 1to 6.
Step 6: When food reaches the
preset temperature, oven shutsoff
automatically, “End” appears cm
display and oven beeps once a
minute until you remove food from
ovenand touch CLEAR/OFF pad.
Remember, food will continue to
cook in a hot oveneven after it is
turriedoff.
_-
“e-”
-......—.....-....-——-——
—.
42
——.—-—
Page 43

Howto a
Rib using
c C
code
1
2
C P
P
.-
—
3
2
6
:
6
3
4
B
B
B
B
B
B
B
B
B
B
Step 1: Place the meat, fat sideup,
on therack of thebroiler pan that
came withyour oven.Don’tcover
it or add any liquid. Insert
temperature probe into meaty part
ofroast, awayfrom fator bones, as
shownon page 41.’
Step 2: Position ovenshelf at B, or
use A forwell donemeat or if roast
isvery tall. Removeother oven
shelfif necessary. Place roastin
ovenand insert plug end of probe
intoovenwall receptacle.
Step 3: TouchCOOK CODE pad,
then usenumber pad to enter
desired code. Use Code 1for rare
roastbeef, Code 2 for medium, and
Code 3 for well done,
Q.what hqpm$ if I f
insert the p
A. The oven will remind you to
insert it for anyfi.mctionthat
requires its use. The ovenwill
signaland displaywill show
“PROB” as soon as you touch the
STARTpad. Cooking will not
begin until the probe is inserted.
Q. Canlclmnge the fiihed
temperature-controlled Cook
Code cycles?
A. No, but youcan stopthe cooking
cycleat a lowertemperature simply
bytouching the CLEAR/Ol?F pad.
Q. why dOiil$tl!u~hl$ Sayto
placesneatfatsideup?
Meat will baste itself in itsown
A.
juices when the fat side is up.
Q. 1touched COOK CXM3Epad
and
enteredananher, usingthe
nwnberpads.Thedisplayflashed
46EEEE?TT%athappened?
Youenteredan incorrectnumber.
A.
Any code number from 1through 9
may be used. Hany other number
is entered, “H3 IiH3”will flash to
showthat an error was made.
—
Step 4: Touch STARTpad. For six
seconds, display shows“BAKE”
and programmed oventemperature
plus selectedfinished food
temperature. Then display shows
‘WW@’ actual temperature ofthe
ovenas it rises, and actual rising
temperature ofthe food.
Step 5: When meat reaches preset
temperature, ovenautomatically
turns off, “End” appears on
displayand signal sounds oncea
minuteuntilyoutouchCLEAR/OFF
pad. Removeroast from oven.
CAUTION: PROBE WILL BE
Elm. war Ovenmitt Oruse pot
holder to remove it.
Step 6: Let roast stand for 10or 20
minutesbefore slicingit,
43
Page 44

1.Position oven shelf at B for
‘“’%%
-k@s@
small-sizeroasts (3 to lbs.) and
at A for larger roasts.
2.Place meat fat-side up,or poultry
breast-side up, on broiler pan or
other shallowpan with trivet. Do
notcover.Do not stuff poultry until
just before roasting. Use meat
probe formore accurate doneness.
Control signalswhen food has
reached set temperature. (Do not
place probe in stuffing.)
3. Removefat and drippingsas
necessary. Basteas desired.
4. Standing time recommended for
roastsis10t020minutestoallowroast
to firm up and make it easier to
carve. Internal temperature will rise
about 5°to IO”F.;tocompensate for
temperaturerise, if desired, remove
roast fromoven at 5°to 10”F4less
than temperature onguide.
5Frozen r can be
conventionallyroasted by adding
10to 25 minutesper pound more
time than given in guide for
refrigerated roasts. (10minutes
perpmmdforroastsurider 5 pounds.)
Defrostpoultry beforeroasting.
Meat
Tendercuts;rib,highquaiitysiriointip,
rumportopround~
LambLegorbone-inshouidefi
Veaishouider,iegorioinx
Porkioin,ribor shouider*
Ham,precooked
&
325°
325°
325°
325°
325°
Rare:
Medium:
WeiiDone:
Rare:
Medium:
WeiiDone:
Weii Done:
WeiiDone:
ToWarm:
3toWbs.
24-30
30-35
35-45
21-25
25-30
30-35
35-45
35-45
iO
minutesperpound(anyweight)
IJnder10-lbs.
Ham,raw
*Forboneiessroiiedroastsover6-inchesthick,add5to 10 perpoundtotimesgivenabove.
ihdtry
ChickenorDuck
Chickenpieces
Turkey
325°
WeiiDone:
20-30 17-20
I
3 to 5-M+.
325° WeiiDone: 35-40
375° WeiiDone: 35-40
325°
WeiiDone: 20-25 15-20
10to15-lbs.
6 tO$-ibs.
18-22
22-25
28-33
20-23
24-28
28-33
10to15-lbs.
Over5-lbs.
30-35
Over15-lbs.
Internal
Tem~rature‘1’
i50°-1600
170°-1850
i30°-1400
150°-1600
i70°-i850
i70°-1800
170°-1800
125°-1300
i60°
185°-1900
185°-1900
Inthigh:
185°-1900
C(MK
C(MJE
1
2
3
1
2
3
3
3
1
3
4
5
4
—
. .
-,*-
-—..—
.—.—.-
--
Page 45

a see C&dem
rooking foodsby
is
* Mse radiant heat
f the
pperheating u i the own.
when fbod isibrumd, onlyone
a at i exposedto the
side
heating
Soum.t?eMost fkillsteaks
f and tender 11-!wsOfrmat’
suchassteaks orchops arebest
whenbroiled.
Your
ovenletsyouchose between
two
broiling methods,
For regular broiling,likeyou’ve
alwaysbeen used to, do this:
You
canalsosetyourovento
broilata lowerratefrom1(low)
to4 (mediumII@). Foodsbroil
s!ower~andthebroillflavor
deveiopsovera longerhe.
Step 1: Place foodin ovenon shelf
in C position. Touchthe BROIL
pad. Display shows“BROIL?’
With the
the BROIL pad,
f method, you touch
thentheSTART
padandtheovenbroilsonthe
fhstestrate(5)
T secondmethod,orTlariabie
Broil,givesyoutheoptionof
choosinga lowerbroilrate(less
heat)from1to4.
NOmatter which method youuse,
the followingsuggestionsapply:
@ meat on the broiler rack on
-== the broiler pan. Alwaysuse the
rack so fat drips into the pan.
~
@JPlace pan in oven on shelf
position C. If yourovenis
onnected to 208 volts,rare steaks
maybe broiled bypreheatingthe
broil heater and pkicingthe oven
shelf one position higher.
@
Leave the door ajar a fewinches
(exceptwhen broiling chicken).
The door staysopen by itselfyet the
proper temperature is maintained
in theoven.
Step 1: Touchthe BROIL pad.
Displayshows “IM)IL?
Step2: Touchthe STARTpad to
begincooking.Ovenis automatically
set to broil at the high rate, with
100%power.
Step2:Touchanumberpad–l, 2,
3or4—forthedesiredBroilRate.
Displayshows“BROILRATE”
andtheselectedcodenumber.
Step3:TouchtheSTARTpadto
begincooking.
Step 4:Turn meat over when
recommended broilingtime for
first side is up.
Step 5: Touch CLEAR/OFF pad to
shutbroil heatw offwhen cooking
is finished.
- a Turn food only once during
cooking.
5-High . . . . . . . . . . . . 100%power
4-Medium High . . . . . .97% power.
“-< ?-Medium . . . . . . . .
2-Medium Low . . . . . .84% power
PLOW. . . . . . . . . . . . . .78% power
. .90% power ~
Step 3: When cooking is done,
touch the CLEAR/OFF pad. Serve
foodimmediately.Leavepanoutside
ovento cool foreasy cleaning.
(continue dnetipage)
45
Page 46

(continued)
R
This guide showsfoodsand the
broilr @xMk?)
t use.
Use shelfposition C exceptwhere
otherwise noted.
Leavedoor ajar about 3 inches
(exceptwhen broiling chicken).
BKM
31/2 31/2
5
( 5
& 5
H
1V2-2
5
5
3
1
5
3
1
4
3
4
3
2
3
1
7
9
5
8
6
8
8
10
~1/2
7
9
5
8
6
8
a
(). kit O.K. line the broiler
panandrack
foil?
A. Yes,
thoroughlyto the rack and slitit
to conform to the slits in the rac~.
These slitslet meatjuices drain
intothe broiler pan. Thisminimizes
smokingand spatteringand helps
preventthe possibilityoffire from
overheateddrippings.
Q. should Isaltther’neat before
broiling?
A. No. Saltdraws outthejuices
and allowsthem toevaporate.
Alwayssalt after cooking.Piercing
meat with a fork alsoletsjuices
escape. That’swhyyou shoulduse
tongsto turn meat. When broiling
poultry or fish, brush.each side
oftenwith butter.
Q. men broiling, is
necessarytousea rackinthepan?
A. Yes.
meat overthe pan. As the meat
cooks, thejuices drop into thepan
and keepthe meat drier. Juices are
protectedby the rack and stay
cooler. This preventsexcessive
smokingand spatter.
With
if you rn@l the foil
italways
The rack suspendsthe
IQ. iw3 IWMXnOttirtig
outasbrownastheyshould?
some areas, the power –
A. In
(voltage)to the ovenmaybe low.If
so in your area, preheat the oven
with thebroil unitfor 10minutes
beforeplacing foodin the oven.
Anotherpossiblereason-you might
notbe usingthe recommendedshelf
position.
Also see if this works. Broilfor the
longestperiod oftime indicated in
the BroilingGuideon page49, and
turn food only once.
Q Should Ikavethe doorajar
when broilingchicken?
A. No.
closed, and shelfposition A is
recommended.
Chicken is the only food
recommended for closed-door
broiling. This isbecause chicken is
relativelythicker than other foods youbroil. Closing the door holds =
more heat in the oven which allows
chicken to cook evenlythroughout.
Theovendoor shouldbe
-*-
1/2”) 5
3
10
12
13-16
Q. Do 1need
togreasemybroiler
racktokeepmeatfromsticking?
A. No.The broiler rack is
designed to reflect broiler heat.
10
1
13
5
.
6
This keepsthe surfacecool enough
to preventmeat from stickingto the
surface.
46
Page 47

.-
.—.—._—.——
.-—
.
13milcode 10
WghM h’ bmihg
with the !iAp
o
probe.with this
~ethod~youenteronlytwodigits
andtheovendoestherest.The
sekctedcodedeterminesthe
finishedfbodteqwaature. Itsets
thevariablebroilpowerkxq
andtheoveneventellsyouwhen
%0turnthemeatover.
A tiety offoods may be broiled
usingCook Code~ Control
includingsteaks, chops, ham steaks
and chickenbreast fillets. Foods
broiled usingCook Code should be
approximately I-IV2inches thick.
Caution: Probe is not
recommended when preheating the
ovenis required because youmight
be burned touchingthe hot broil
heating unit.
Use hotpads when removingprobe
after cooking is done. Do not use
tongsto pull on it—theymight
—
damage it.
o not unplugprobe from oven
tack duringcooking.cooking
P-= b cancelkd ifyoudo.
Step 1: thick steak
on top of rack in broiler pan. Lay
probe on top of steakto determine
position of probe anddistance from
edgeto center oflargest muscle.
Mark with thumb where edge of
or fat meets probe.
Makesure thatno more than 2“of
probe, not counting the handle,
will stickout ofthe meat.
-—......—...-.
Step 3: Place ovenshelf in position
C andplacepan inmiddleofshelf. ‘Plug other end ofprobe into
receptacle on ovenwalL Leave
door ajar about 3 inches.
Step 4: Select code setting
accordingto desired finished
temperature from Quick-Reference
BroilingGuide on page 48.
Step 5: Then touch number pads
forsekctedcodei ntheorderthat --youread them.
L
.
.
I
Step2: Lift probe from meat,
keepingthumb in place on probe.
Insert probe as near as possibleto
the center ofthickness of steak.
Push probe into steak to where
thumb meets meat or fat.
47
Step6:Touch STARTpad to begin
cooking. For six seconds, display
shows“BROIL~’selected variable
broil power leveland programmed
finished food temperature.
Page 48

Step 7:Displaythen shows“13R01E”
1
andactual foodtemperature as it
rises. In a quiet kitchen, youmay
hear a slightclicking sound
indicatingovenis workingproperly.
Whenyou set thisCode
(Ito1!42”Steak}
lo-well mm?
1 Well
1
C)ven sets
Broil
Rat%?
Broil
U%3w?a’
1 78.10!0
2 84.4%
3
4 98.40/0
5
90.60/0
100%0 135°
Finished
mod Terng
17!5°
165°
155°
145°
1.
Step 8: At end of first cooking
period, oven signalsand TURN
MEAT’indicator flashes. After you
turn meat over,be sure to leave
ovendoor ajar about 3 inches.
Step 9: When desired finished
temperature is reached, oventurns
offautomatically, “End” appears
on displayand ovenbeeps once a
minuteuntilyoutouchCLEAR/OFF
padto shutoffsignal.Unplugprobe
andtakesteakoutofthe oven.
Removeprobe, butbe careful-it will
behot.
Q. I $x#ectedcode setting14,
butwhenItouchedtheSTART
pad,theovenSignahxiand
displayshowed‘6PRCMR’mat
happened?
A. CodeSetting
temperature-controlledcooking
cycle. You forgotto usethe
temperatureprobe.
Q. Doestheovenhavetobe
preheated?
A. For most broilingpurposes, no.
Youmay preheatit if you wish
whenbroilingvery thin foodsor to
increasebrowning.
Q. MayIchangethebroilrateor
finished food
using codes 10
A. No. If you want a differentbroil
rate or ftished foodtemperature,
youmust selecta Variable 13roil
Code. Touch theMUXL.pad, then
numberpad forbroil rate if it’s
otherthan 5. Next, touchFOOD
TEMP pad and numberpads for
desiredfinishedfoodtemperature.
Then, touch START pad.
14is a
twnperaturewhen
through14?
the’
Q steaksamdchopsalways
curlupwhenIbroil.HowcanI
preventthis?
A. Before broiling, slashthe fat
evenlyaroundthe edges of each
steakor chop. Cutcrosswise
throughthe outer fat surfacejust to
the edge of the meat.
Q.
MayIbroilotherfoodsin
myovenattheswnetkneI cook
steakwithCookCodeControl?
A. No. Even when you cook
nothingbut severalsteaks, ifthey
vary in thickness,you’llget an
accurate reading of internalfood
temperatureonly from the steak
with theprobe.
Page 49

Alwaysusebroiler partand rack
at comes with your oven. It is
designedto minimize smokingand
spatteringbytrappingjuices in the
shieldedlower part of the pan.
2. Oven door shouldbe ajar for all
foodsexcept chicken; there isa
specialposition on door which
holdsdoor open correctly.
3. For steaks and chops, slash fat
evenlyaroundoutsideedgesofmeat.
Toslash, cut crosswisethrough
outer fat surfacejust to theedgeof
the meat. Use tongsto turn meat
overto preventpiercing meatand
losingjuices.
4. If desired, marinate meats or
chickenbeforebroiling. Or brush
withbarbecue saucelast5 to 10
minutesonly.
5. When arranging food on pan,
do notlet fattyedgeshang over
sides,which could soilovenwith
fatdripping.
6Broiler does not need to be
preheated. However,for very thin
foods,or to increase browning,
preheat if desired.
7. Frozen Steaks can be
conventionallybroiled by
positioning the ovenshelf at next
lowestshelf position and increasing
cookingtime givenin this guide
Iti times per
$. If your ovenisconnected to
208volts,rare steaksmaybe broiled
bypreheating broilheater and
positioningthe ovenshelf one
positionhigher.
side.
Quantityandlor Shelf
Food
Bacon I/i-lb.(about8 c
Gromd Beef l-lb.(4patties)
Well Done
Thi&lws
thinslices)
%to %-in.thick c 1
Wsition
BeefsRare
l-in~~thick
Mxlium (1to1~-lbs.)
WellDone
11~-in.thick c
Medium
(2 to2Hbs.)
WellIloae c
C&~en 1whole
(2to2M-lbs.),
Spiitlengthwise
BakeryPrO&.@s
Bread(Toast)or 2to4slices c
ToasterPastries 1pkg.(2)
EnglishMui%ns
EdYsterwails 2-4
(6to8-oz.each)
Fish Nb.fillets%to
HamSlices
$mcooked)
Pork
Chops
WellDone
Lmlbchops
Wxlium
iVellDone
$fedium
WellDone
—
Y%enemandsimilar
recookedsausages,
matwurst
2(split) c 5
%-in.thick
l-in.thick
2(% inch) c
2(1-in.thick) B
about1lb.
2(1 inch) c
about10to12oz. c
2(1?4inch) c
about1lb.
l-lb. pkg. (10) c
Variable
BroilRate
5
I%stSide
Time,Minutes Time,Minutes Comments
31/$
c 5
c
c
3 9
1
5
c 3
1
A 5
5
B
c
B 3 8
B 1
4 13-16
4
5
1 13
3 8 4-7
1
3
5 6
1~-z
SecondSide
31/3
7
4-5
7 7
9
13 13
10
15
7-8 Slashtit.
14-16
Arrangeinsinglelayer.
Spaceevenly.
Upto8pattiestakeaboutsametime.
Steakslessthaa1inchcookthro~~h
beforebrowning.Panfryingis
recommended.
25 20-25
35 10-,15
lleducetimesabout5to10minutesper
sideforcut-upchicken.Brusheachside
withmeltedbutter.Broilwithskin
dowrifirstandbroilwithdoorclosed.
‘/2 Spaceevenl;y.PlaceEnglishmuffins
3-4
Donot Cutthroughbackofshell.Spread
turnover. open.Brushwithmeltedbutter
5 5 Handleandturnverycarefully.
8
10 10 Slashfit.
13
10 10
10 4-6
17 12-14
1-2
cut-side-upandbrushwithbutter,if
desired.
beforeandafterhalftime.
Brushwithlemonbutterbeforeand
duringcookingifdesired.Preheat
broilertoinc~e browning.
Increasetimes5to10minutesper side
forI%-inchthickorhome
Slashfat.
Ifdesired,splitsausagesinhalf
lengthwiseinto5totli-inchpieces.
cured.
..—
d
m
-“A
-
.—.
—
E
-
-
-
J
49
Page 50

T
s k
Removebroiler pan, broiler rack
and othercookware from the oven.
@ven shelvesmaybe Ieflin oven.
Nbte: Shelvesmay become gray
after severalcleanings.)
Stepz!
Wipeupheavysoilonoven
bottom.
A.ovenFkontFrame
B.ovenDoor
c openingsinDoor
D. oven Light
step3:
spatters or spills on oven
C%a.n
front frame (A) and oven door
outsidegasket (I3)with a dampened
cloth. Polish with a dry cloth. Do
notclean gasket (I3).Do not allow
waterto
in top ofdoor (C). Never use a
commercial ovencleaner in or
around self-cleaning oven.
step 4:
Closeovendoor and make sure
ovenlight (D) is off.
rundownthroughopenings
Ga$ket
s k
Touchthe
shows“CLEAN” and flashing
indicatorpoints to DOOR LA~H.
If door isnot latchedwithin K
seconds, displayrevertsto OFF’
and youhaveto startover. -,.. .-. ..
N R kIYWEWW3W cm~
comes on when oven ckanhg
Indicator gkwbg during bver
oven%self-ck!aningcycle.
may Use the.M.icm%’aveoven
t’hwing
CLEAN pad. Display
You
t t
Q
t\
\
s 2
Movedoor latch all thewayto the
right as fiiras it will go.
(l ftempemtureprobeis accidentally
leftpluggedintothe ovenreceptacle,
displayshows “HKN3” untilyou
removeit. TouchCLEAR/OFF pad,
unlatch door and removeprobe.
Repeat steps 1and 2 toreset.)
s 3:
‘I” detmhg
touchthe STARTpad. Display
showsStopTime-3 hours from
the operation sm.
a
odor, especid~yduMg the ~irstfew
cleanings. ‘1’hisis norfial during
the self-cleaningcycleand is no
cause for alarm.
When cleaning temperatureis
reached, the Indicator Light points
to OVEN L0CK13Dand the door
cannot be unlatched.
s 4;
When cleaning isdone, the oven
turns offautomatically.When it
cools down, which takes about 30
minutes, the OVEN LOCKED
lightgoes out and the door can be
opemxl.Unlatchthedoorby moving
it to the left as far as it will go.
Display showstime of day.
TO(May w Om?ating:
s 1:
TouchCLEAN pad and latch door.
50
-.
..
Page 51

step 2:
ThentouchWXX?TIMEpad.Display
shows“CLEAN” and flashing
indicatorpointsto Stop Time.
s 3:
Us~number pads to enter desired
StopTime. (you may efiterany
not more than il hours aid 59
tirrk
—
minutesand not less than 3 hours
s 4:
TouchSTAR’ pad and the oven
calculates the proper Start Time
and StopTime untilcleaning
begins. Then only Stop Time is
shown.
When cleaning is done, the oven
turns offautofiatically. Step 4 on
page
50teHsyouwhe~and-howto
open the door.
m
()’.why Wm’t my ovens
cleaningevehthough19W2s all
Cultrds correctly?
the
A Check to be sure the display
showsthe correct time ofday.Also
check tobe sure the ovenlatch is
closed securely and youhave
touched the
Q. I.ftk!displaydoesn show
cleanmyoven?
A. No. Youmust set yourclock.
Time ofdiy mustbe showingin the
displaybecause theclock starts and
stopsthe self-cleanimgcycle.
Q. my Cadt I kt~h the OV6XI
door to startthe sdf-ckm cycle
even though 1%5 touched.the
CLEAN pad?
A. The electronic control wti not
Ietyou setup the clean cyclewhen
the ovenis hotter than 500”F.Let
the ovencool and try again.
Q. What shouldI doif excessive
smokingOCcu!rs
A. Excessive grease is the cause.
Touchthe
windowsanddoorsto
of smoke. Let the ovencool for at
least onehour before opening the
door. Unlatch door, wipe up excess
grease and reset the cleaning cycle.
Q. M the 46craciding99soundI
hearduring
A Yes.Metal heating and cooling
during cooking and cleaning
fimctionsmake this sound.
Q. Whatcausesthehair-like
linesontheenameledsurfaceof
myoven?
A. Heating and cooling during
cleaning. It’scommon. The hair-
like lines don’taffect your oven’s
performance.
Q
w doI havea kft my
a cleaning?
oven
ii. Sometypes of soil leavea
deposit of ash, Youcan remove it
with a damp sponge or cloth.
STARTpad.
I Stiidself”
duringCkmh’g?
CLEAR/OFFpad.Open
rid the room
Ckming ml-mar?
Q.My ovenSkh?s don W%?
easily.what%them
A. Aflerclcxming,oven shelves
maybe soclean that they will not
slideeasily.They will again if you
dampen yourfingertipswith a little
cookingoil and rub lightly overthe
sidesofthe shelf.
Q. Mywen shdvesbeam
egray
aim’severalCkatingseIsthis
nwmd?
A. Yes.And aflerrnany cleanings,
they’ll lose their luster and change
to a deeper gray color.
Q. (!hhtcepWMk?dt?!tltig
cycle’a Ckming hasbegun?
Yes,but youwon’tbe able
A.
to openthe door untilthe oven
coolsto a safetemperature. Touch
CI.XAR/Ol?Fpad to cancel the
cleaningcycle.When Door Locked
indicatorlightgoes out, unlatch
the door.
Q.
~fthe inside4Df~y Well door
is
the demhg cycle?
it bedeamd during
A. Yes.The raised section ofthe
ovendoor
cleaned automatically.The area
insidethegasket will be
outsidethe oven gasketmust be
cleaned byhand as describixiin the
Cleaning Guide on page 54.
Q. why WOUl]~~ want to setEIly
oven to startckming at a later
time (may?
A. Some utility companies offer
lowerrates attimes when electrical
consumptionis lowest. Since these
times oftenoccur late at night, you
can setyourovenbeforegoingto bed
so cleaningisdonewhileyou sleep.
Q.
chxmhg cycle
the oven ICOd but stillcannot set
the sdff=dean cycleagain. ‘WRy?
A. Youmust unlatchthe door,touch
theCLEAN pad, latch the doorand
touch the STARTpad before the
self-clean cyclestarts again.
the Sdf’-
the rnkklk9 I let
Ea$&EK.
lm3%fL—
U
—.
=
-
-
W
—
—
-
-
-
-
-
Em?c—
Bs@$?kY—
Es3Fc—
~
—.
-
- ———
—. ——-
51
Page 52

Properawe and Ck%ming
are w ymr Cuwng
c will g you ‘&malt and
s BWCDWthese
dh’edions Careftwyi c f
i
tohelp assure safe andproper
maintenance.
BEsw ELE~WC POm~
1SWI!’ CLEANIFJG
ANYPm OFYom
CWKII?JGCEPJTER
F&MS
Don’tusesharp-edged
aroundthe control panels. They
mightgetdamaged.
Cleanthe panels with a Iighdy
dampenedcloth. D(3NOT USE
cleaningsprays or large amountsof
soapand water. These can cause
problemswith the control
mechanisms.
utensils
replace microwaveovenlamp,
To
fimt disconnect power at main!
fuse or circuit breaker ptmk
Removethe grilleby removingthe
3 screwson toPand the 3 screwson
the bottom of&e grille using a
blade-type screwdriver.
Yourshelf accessory is designed
for use in a microwaveoventirdy;
do not use in a conventionaloven.
Do not use a browning dish with
the shelf. Arcing could occur.
Clean shelf with mild soap and
water or in the dishwasher.Do not
dean h self-demhg oven.
Use metal only asdirected in the
Cookbook. Metal traysno more
than3/4° dekp maybe used for TV
dinners, and the metal temperature
probe is designed for microwave
ovenuse. Alwayskeep metal at
least one inch awayfrom sides
of oven.
l?lxlbe
Theprobe is sturdy,but care
should be taken in handling it. Do
nottwist it. Avoiddropping it.
Clean as soon as possible afteruse.
W@eitwith a sudsycloth, then rub
metalparts with a plastic scouring
pad ifnecessary. Rinse and dry.
(C)r,washthe probe in an automatic
dishwasher.)
M
Why’you we it
Xl XXI”place a sheetofabinum
foi~onany shelf in either your
microwaveor conventional oven.If
youdo, your foodsmay not cook
properly.The oven finish maybe
damaged,and there may bean
increasein heat on the outside
surfacesof the oven.
Foil on shelWX!+——
The lamp is locatedon the leftside
behind the grille.
twist thebulb to break the
white silicone adhesiveattached to
the bulband socket to prevent
damageduring shipping. Unscrew
the bulb and replace with a bulb of
same type and wattageavailable
fromyourGeneralElectric supplier.
Screw replacement bulb in socket
and replace grille. Re-cormect
powerto Cooking Center.
Clean the outside of your microwave
ovenwith soap and damp cloth,
then rinse with damp cloth and dry.
Wipe the window clean with H.
damp c~oth.Chrome is best wiped
with a damp cloth and then with a
dry towel.
Keep your mimmm oven
andsweet-s~eIlingo
ovendoor a few minutes after
cooking helps air out the interior.
An occasional thorough wiping
with a solution ofbaking soda and
water keeps the interior fresh.
Opening the
clean
52
>
.
Page 53

and spatterstire efwyto
removef walk and fkor’.
‘- That’sbecause there’slittleheat
~ exceptin the food, or sometimesin
the utensil. Somespatterswipeup
‘itha paper towel, some may
quire a damp cloth. Remove
greasy spatterswith a sudsycloth,
then rinse and dry.
r+33VER
OVEN
I A
FART
OFMXIR CWEN,
wipe upspattersonthi window
ontheinsideQfthedoordaily,
Washwindow,when it’ssoiled,
with a minimumof sudsy,warm
water.Rinse thoroughlyand dry.
wipe metal and plastic parts on
the inside Ofthe door frequently.
Use a damp clothto removeall
soil. DO NOT USE A13RASIVES,
such as cleaning powdersor steel
and plasticpads. They maymar the
surface.
Door Surface. When cleaning
surfaces ofdoor and oventhat
come togetheron c~osingthe door,
—
use only mild, nonabrasivesoaps
or detergentsapplied with a sponge
—
or soft cloth.
sing a Brown ‘Nsear Dish?
se I&mAmi@brand cieanwx=.
igh heat generated on the bottom
ofthe Brown ‘N Sear Dish can
cause scorched appearing stainsto
bakeonto the floor ifgrease is
present. These may be removed
with Bon Ami@brand cleanser.
After using thiscleaner, rinse and
drythoroughly,followinginstructions
on can. Do not use it on the painted
NJrf!!cessuch as the walls—itmay
scratch the paint.
~~’~~
The ovenis ventedthrougha duct
that’s located on the right side of
the ovenjust abovethe doorhandle
(seepage 7). Moisture and vapors
from,theovenare ventedthrough it
whenovenisin use.Nevercoverthe
hole in the duct. Todo so prevents
itfkom functioning properly during
cookingand cleaning.
L
C.AmON: BeforeI=epkacingymr
kmp hdb9 dis(xm’md the
oven
ektric
centeratthe
breakerprBesure tolet the
kunpcoverandbulbcoolcompletely
beforeremovingor replacing them.
The ovenlamp (bulb) is covered
with a glassremovablecover which
isheki~n place with a bail-shaped
wire. Removeovendoor,ifdesired,
to reach cover easily.
TOremove:
@Hold hand undercover soit doesn’t
fhllwhen released. With fingers of
same hand, firmly push back wire
bail untilit clears cover.Liftoff
cover.DO NOI’ REMOVE ANY
SCREWS TO REMOVE COVER.
@Replace bulb with 40-watthome
appliance bulb.
T H!phx?cover:
@Place it into grooveof lamp
receptacle. Pull wire bail forward
to center of coveruntil it snaps into
place. When in place, wire holds
coverfirmly. 13ecertain wire bail is
in depression in center ofcover.
@Connect e~ectricpower to oven.
pm%’er f your Cooking
m fuse or c
——
If youwish, you mayline the
broiler pan with aluminum foiland
coverthe rack with it for broiling.
ALWAYS13ESURE ‘IX)NIOLD
THE IKXL TH(XUXJGHLY TO
THE 13R0HJ3RRACK&Wl SLIT
THE HXL ’10 CXXWWRMWITH
SLITS IN THE RACK. Stopping
fat and meatjuices from draining
into the broiler pan preventsthe
rack horn serving its purpose and ~–
MAYLET JUKXlS13EC0ME —–
EKYI’
13N0UGH’10CATCHFIRE. = -
D
‘Eoremove door, open to BROIL
position, or where~ou. feelhinge
catch slightly.Grasp door at sides;
lifi door up and awayfrom hinges.
TOIFeplace, grasp door at sides.
Line up door with hinges and push
door firmly into place.
(See Cleaning Guide nextpage.)
y’ ‘
Page 54

Pm
—
.
BakeUnitandBroilUnit
BroilerPanandRack
OutsideGlassFinish
—.
Metal,including
ChromeSideTrims
andTrimStrips
PorcelainEnamel
surfilce*
MATERML-S‘lPOUSE
*SoapandWater
@Soap-FilledScouringPad
e PlasticScouringPad
~SoapandWater
~Soapand
~PaperTowel
o Drycloth
@SoapandWater
GENERALDIRECTIONS
Donotcieanthebakeunitorbroilunit.Anysoilwillburnoffwhentheunitis heated.
NOTE:Thebakeunitisnothingedandcannotbeliftedtocleantheovenfloor.if spillover,
residueor ashaccumulatesaroundthebakeunit,gentlywipearoundtheunitwithwarm
water.
Drainfit, coolpanandrackslightly.(Donotletsoiledpanandrackstandinoventocool.)
Sprinkleondetergent.Fillpanwithwarmwater andspreadclothorpapertowelovertherack.
Letbothstandforafw minutes.Wash;scourif necessary.Rinseanddry.@TION:The
broilerpanandrackmayalsobecleaned inadishwasher.
Washallglasswithclothdampenedinsoapywater.Rinseandpolishwithadrycloth.
Wash,rinse,andthenpolishwithadrycloth,DON(YI’USEsteelwool,abrasives,ammonia,
acids,orcommercialovencleaners whichmaydamagethefinish.
Avoidcleaningpowdersorharshabrasiveswhichmayscratchtheenamel.
Ifacidsshouldspillontheovenwhileitishot,useadry papertowelorcloth@wipe
away.Whenthesurtke washandrinse.
Upright
Forotherspills,suchasfit smatterings,etc.,washwithsoapandwaterwhencooledandthen
rinse.Polishwithd~ cloth.
insideOvenDoor*
oSoapand Water
Onthisoven,cleanONLYthedoorlineroutsidethegasket.Thedooris automaticallycleaned
iftheovenisintheself-cleaningcycle.If spilloveror spatteringshouldoccurincooking
fimction,wipethedoorwithsoapandwater. DONOTrubordamagegasket.Avoidgetting
soapandwater onthegasketorintherectangularflangeson thedoor.
OvenGasket*
OvenLine@
~SoapandWater
AvoidgettingANYcleaningmaterialsonthegasket.
Coolbeforeclear&g.Frequentwipingwithsoapandwaterwillprolongthetimebetween
majorcleanings.Besuretorinsethoroughly.Forveryheavysoiling,useyourself-cleaning
cycleoften.
Shelves
(SeeSelf-Cleaning
~SoapandWater
OvenDirections.)
*SDilla~eofmarinades,fruit iuices,andbastingmaterialscontainingacidsmaycausediscoloration.Spilloversshouldbewipedupirnmd%ic]y,withcarebeing
&en fiottotouchany-hotP&ion oftheoven~Whenthesurfaceis&ml,cle~ andrinse.
Yourshelvescanbecleanedwiththeself-cleaningfunctionin theoven.Forheavysoil,clean
byhand,usinganyandallmentionedmaterials.Rinsethoroughlytoremoveallmaterialsafter
cleaning.Donotckanmicrowaveovenshelfinself-cleanoven.
-.
Page 55

m o f
CONTROLPANEL
ON, ‘Y-ETOVEN WILL
NOI”OPERATE
Fc)ms owRcmmD
OR UNDERCOOKED
s
STARTpad nottouched.
@Door not securely closed.
@Another function wastouched. TouchCLEAR/OFF to cancel.
@Numbers not entered.after touchingTime Cook.
e Finished temperatw-enot enteredafter touchingTempCOOk.
@CL13AR/OFFpad touched accidentally.
~No code number entered.after touchingAutoCook, Auto Roastor AutoDefrost.
@Not enough time @when usingTime Cook functionbecause starting temperatures
of foods varied widely.
@Varyingdensity and amountof foodswi~lsometimesrequire more cookingtime.
@Dish in Auto Cook not covered
@Humidity or moisture in ovenwill lessenthe cookingtime in the AutoCook
function. Make sure inside of ovenand outsideofcontainersare dry.
~ Some standingtime is recommended for,certain vegetablescooked withthe Auto
Cook setting.
~Probe nQtinsefied properly into meat or dish. Check Cookbook or AutoRoast
section ofthis book.
@Incorrect power level entered.
@Dish not rotated, turned or stirred as called for in recipe.
@Toomany dishes in ovenat same time.
~Food not thoroughly defrosted.
~Improper use ofcoverings. Check Cookbook and this book for instructions.
asdirected.
MICROWAVEOVEN
~A~
COMES ON
WHEbJ0W5N 1SOFF
“mom” APPEARS
ON DISPLAY
“ERROR” APPEARS
ON DEWLAY
@Microwaveoven.fan isused during self-cleaningofconventional ovento keep
components cool. Microwavepoweris noton.
@Probe not inserted properly into ovenreceptacle or food.
@Probe not used, although Auto Roastor TernpCook pads havebeen touched.
@W-hen.using the ‘1’empCook function, you haveentered a temperature ofless than
80”F.or more than 199”F.
@Door was opened during “AU’Ill” cycleofAuto Cook fimction. Close door and
touch STARTpad.
Au!‘These Am on Yom’ oven:
Qf$teal~or escaping from
around the dool”+ ovenis operating.
~I&hi reflection around door 01 @IMnning ovenlightand.change
outer case.
@DuH, thumping soundwhile
in blowersound may occur while
operating at power levelsother
than high.
@Some ‘1’V-Radiointerference
mightbe noticed while usingyour
microwaveoven. II’ssimilar to the
interference caused byother small
appliances and doesnot indicatea
problem with yotiroven.
(continuednextpage)
55
Page 56

.
PwxmHLEG?JLJSIEAND IREMEDY
OVENVwL
Nor OPERATE
ELECTRONIC
TOUCHPADS
V?HJLNOTWORK
EMKI’RONIC
DISPLAY PANEL
GOES BLANK
OR BLINKS
FOOD DOES NOT
BROIL PROPERLY
@Difilculty may be in the main distributionpanel ofyourhouse bya blownoven
circuit fuse, a tripped oven circuit breaker, the main fuse or the maincircuit breaker,
depending on nature ofthe powersupply.If a circuit breaker is involved,reset it. If the
control boxuses fuses, the ovenfuse (a cartridge-type) should be changedBUT ONLY
BY SOMEONE I?AMILIARWITH ELECTRICAL CIRCUITS. If after doing one of
these procedures, the fuse blowsor circuit breaker trips again, call for service.
NOTE: Apartment tenants or condominiumowners should request their building
management toperform this check before calling for service.
@Clvencontrols not properly set.
@Door left in locked position after cleaning.
@Light bulb ishwse or bulb is burned out.
@Clock not set. TouchCLOCK pad and entertime.
~Hit cannot be reset by touching pads, electrical service to your residence has caused
interference signals on the main power line. Disconnect your cookingcenter at the
main fuse or circuit breaker panel. Waitone minute and recomect power. Resetclock.
~13R01Land STARTpads nottouched.
@If usinga lower broil rate, the correct number from 1-5was nottouched after BROIL.
@Probe not fully inserted into the cwenreceptacle or food when using
Cooking Code Control. ,
~Improper shelf position isbeing used.
@Food isbeing cooked on a hotpan.
~Utensils are not suited for brofling.
@Aluminum foil used on the broil rack has not been fitted properly aid slit.
,.
FCK)D
IKJ4STma?mlx
Fcx3DDOESI-4a’
BAKEPROPERLY
DOESINCH’
@BAKE and STAR” pads not touched.
~Oven temperature not set correctly. Incorrect number pads tou@ed.
@Probe not folly inserted into theoven receptacle or food when using
Cooking Code Control.
@Shelf position is incorrect.
@Roastingpan is too small.
@Improper cookware is beingused.
@A foiltent was notused when needed to slowdown browning.
@BAKE and STARTpads not touched-.
@Oven shelf is notlevel.
~She]f is not on correct shelf positionr
@The wrong cookware is being used.
~ Ibo many utensils in the oven.
@Temperature setting is incorrect.
Page 57

OVEN WON’T
W’m-xx
Pmximx awtmm
@LatchisnotinCLEANposition.
@Excessivespills, spatkws?and soildeposits are not being cleaned up prior to
Self-ch%ming.
e(xJm”J pad n WdMxL
aSTARTpad.r touched.
E!4.NSTAYS0?4WHEN
lxxx M OPENED
@Sdf-ckaning
Microwavepowerisnotonunlessmicrowaveovenisinoperation.
If need morehelp. ..(%3H,ml f
G 14.mww’Center@
txmsmer
service
lowerovenl.lsesmicrowaveovenfilntokeepcomponentscool.
......
..-.
.
*%2;..-.:
y.-~. --
Rxa.wl --
&zKs%-----:
K
r
57
Page 58

~ ik back ~ageof t b -
.
$ p ~ s a
w y
happywith the
serviceyou receive, here arethree
stepsto followfor further help.
FIRST, contactthe people who
servicedyour appliance. Explain
whyyouare notpleased. In most
cases, this will solvethe problem.
NEXT,if are still not pleased,
write all the details-including
your @i~ne n~mber—t~:
Manager, Consumer Relations
General Electric
ApplianceI&k
Louisville,Kentucky
NNAIJX, if yourproblem is still
notresolved, write:
Major Appliance
Consumer ActionPanel
20 North WackerDrive
Chicago,Illinois
40225
60606
Page 59

FULL
Forone yearfrom date of original
purchase,we WNprovide,free of
charge,parts and service labor
in your home to repair or replace
anypad of the
center that
a f
!% the second through fifth
will provide,free of charge,a
replacement tube if
the magnetron tube fails because
of a manufacturing defect. Youpay
for the servicetrip to your home
and service labor charges.
!~ ~ Servicetripstoyourhometo
teach you hbwto ~sethe product.
Read your Useand Carematerial.
If then have any questions
about operating the product,
piqasecontact your dealer orour
Consumer
address below,or call, toll free:
The GEAnswer Center@
800.626.2000
consumer information service
~ ~mproperinstallation.
This warranty is extended to
the original purchaser and any
succeeding owner for products
purchased forordinary home use
in the
48 mainland states, Hawaii
and Washington, DC. InAlaska the
warranty isthe same except that it is
IJM6?EDbecause you must payto
ship the product tothe service shop
or forthe service technician’s travel
coststo your home.
All warrantyservice will be provided
byour FactoryService Centers or
byour authorized Customer Care@
servicersduring
if you havean installation problem,
contact your dealer or installer.
Youare responsible for providing
adequate electrical, exhausting
and other connecting facilities.
 Loading...