

Page 1
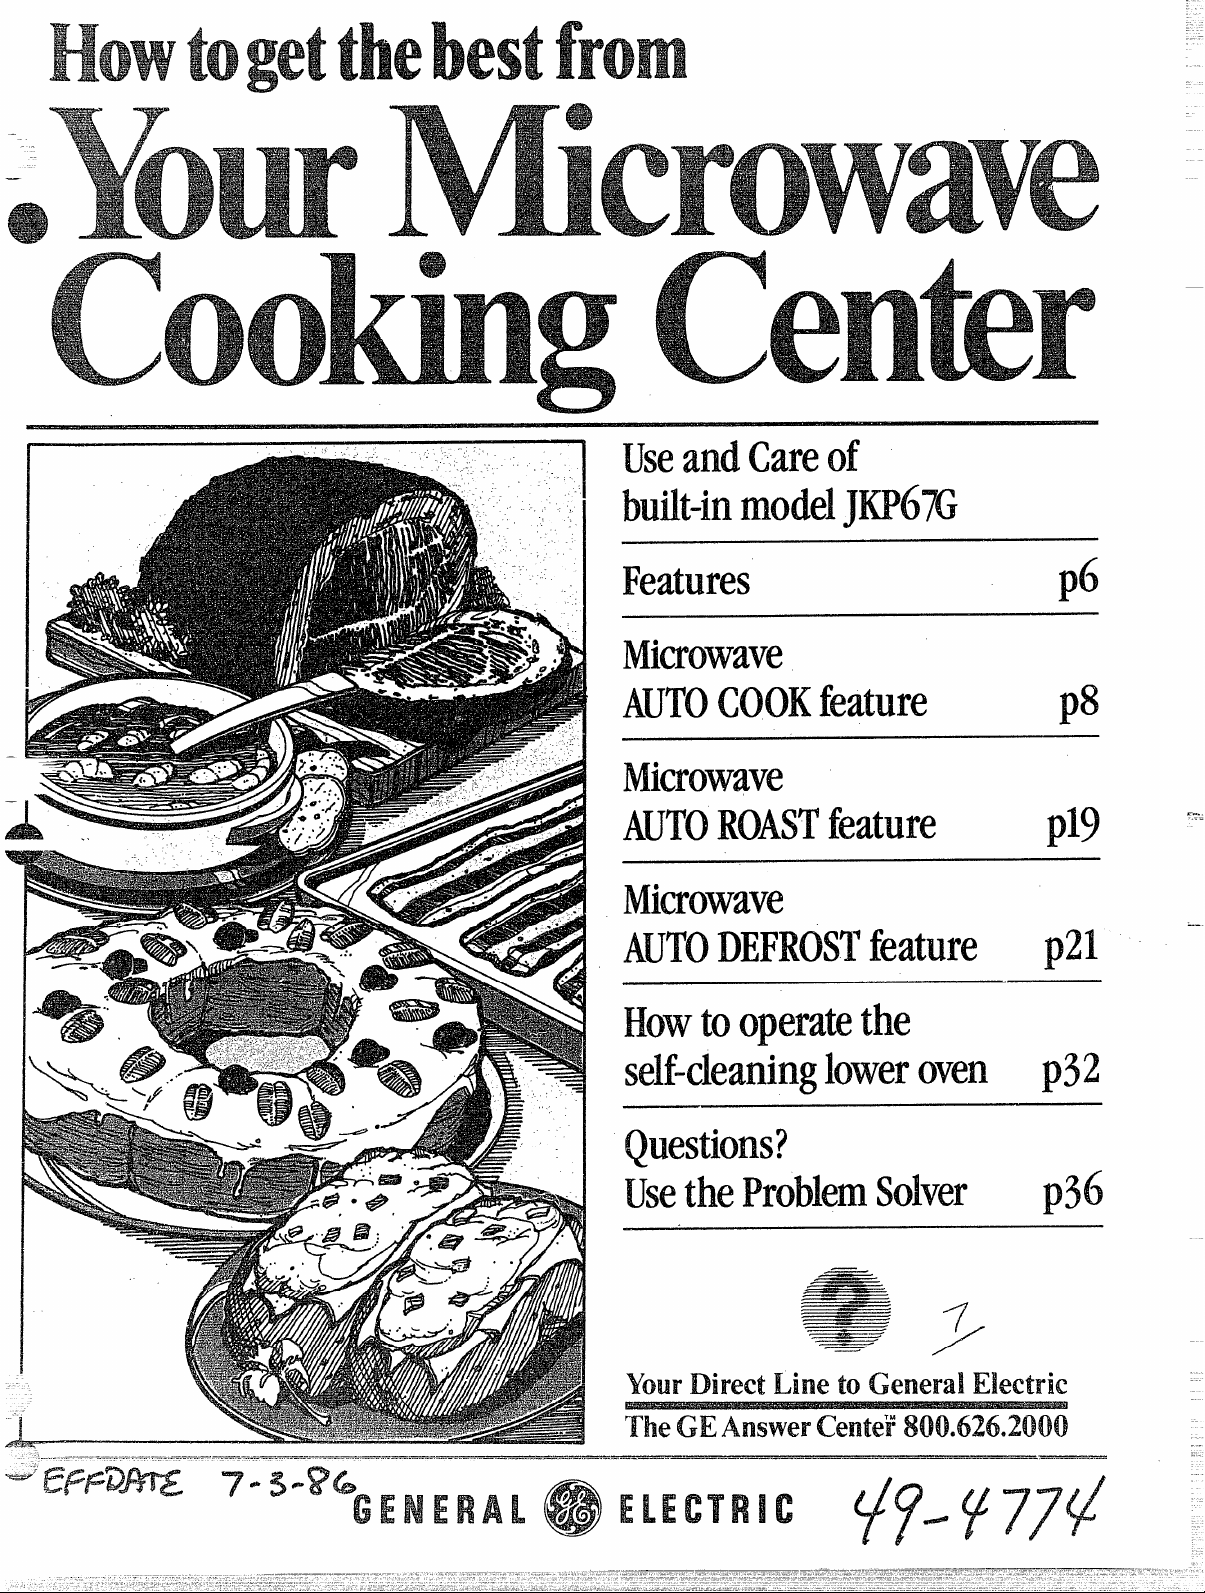
UseandCareof
built-in
Features
Microwave
AUTOCOOKfeature
AUTOROASTfeature
AUTODEFROSTfeature
Howtooperatethe
self-cleaningloweroven
I
p$
x .
p
p21
p32
Usethe Solver
YourDirect L toG E
The center
.
—
—.
p
Page 2
sai
i%?
sure’ your %wenis
Nwill help youoperate and maintain
your newCooking Center properly.
Keepit hardy for answersto your
questions.
Ifyou don’t understand something
or need more help, write: (include
your phone number)
Consumer Affairs
General Electric Company
Appliance Park
Louisville, KY40225
It is important that we, the manufacturer, know the Iocaticmof your
Cooking Center should a need
occur for adjustments.
Yoursupplier is responsible for
registering you as the owner.
Pleasecheck with your suppiier to
besure he has done so; also send
in your Consumer Product Owner-
ship Registration Card. If you move,
(24)!30 Not to operate this
oven with the door open since open
door operation can result in harmful
exposure to microwave energy. It is
important not to defeat or tamper
with the safety interlocks.
or if you are not the original purchaser pleasewrite to us, stating
hi? and
model and serial numbers. This
appliancemustbe registered.
Pleasebecerlainthatit is.
(b) Do No?Mace any object
between the oven front face and the
door or allow soil or cleaner residue
to accumulate on sealing surfaces.
You’llfind them on a label on the
front of the lower oven behind the
door.
These numbers are also on the
Consumer Product Ownership
Registration Card that came with
your Cooking Center. Before
sending in this card, pleasewrite
these numbers here:
Model No.
Serial No.
Write to:
General Electric Company
Range Product Service
Appliance Park
Louisville, KY 40225
H you received $3damaged
awen.
❑ m
immediately contact the dealer (or
builder) that sold you the Cooking
Center.
save mm and muxq$.
(c) Do Not Operate the oven if it is
damaged. It is particularly important
that the oven door close properiy
and that there is no damage to the:
(1) door (bent),
(2) hinges and latches (broken or
loosened),
—.–
(3) door sealsand sealing surfaces. ‘--:’.
id) Th@Oven No%be
adjusted or repaired by anyone
except properly qualified service
personnel.
--
Beforeyourequed swwice,check
Usethese numbers in any
correspondence or service calls
concerning your Cooking Center.
theProblemSolveron page 35. It
lists minor causesof operating
problems that you can correct
yourself.
@ Make sure all utensils used in
your microwave oven are labeled
“suitable for microwaving”. Check
your Cookbook for specific test
to determine “microwave-safe”
The panel displays five 8’s and
18 POWERon the upper portion
and all of the oven functions on the
lower portion. After 15seconds, all
lights disappear and “RESET”
appears in the upper portion. Touch
the CLEAR/OFF pad and oven is
readyfor use and the clock can
be set.
utensils.
@ Papertowels, wax paper, and
plastic wrap can be used to cover
dishes in order to retain moisture
and prevent spattering.
@ Some microwaved foods require
stirring, rotating, or rearranging.
Check your Cookbook for specific
instructions.
If power is disrupted at any time,
the above sequence reoccurs, and
you must resetCLOCK after
touching CLEAR/OFF.
@ Some foods such as unshelled
eggs and hot dogs must be pierced ~-=-
t. allow steam to escapeduring ~:~~~-’
cooking.
2
Page 3
‘r’Microwaving Tips. . . . . ........2
~afety instructions . . . . . . . . . .~-~
&*
$$~$$$iaturesof YourOven . ........6
>ouch Control Panel.. .........7
Automatic Cooking. . ........8,9
Questions and Answers .. ...10
RecipeGuide . . . . . . .......11
Main Dishes . . . . . .. ....12, 13
Vegetables . ...........14, 15
Fruits & Desserts. . ......16, 17
Automatic Cooking Chart. .. ...18
Automatic Roasting
&Chart . ..............19,20
Automatic Defrosting . . .......21
Manual Defrosting . . . . .......22
Time Cook . . . . . . . . . . .......23
TempCook/Hold . . . . . .......24
Minute/Second Timer . .......25
Whuselecappl
basic safety precautions sh
b follinclt
follo
WARNIret r
o bureleshfi
injt pero expt
excemicrene
~ LJseapplonf i
inteu a desci t
man
6 13eyoappli
propinsta gro
b a qualtechi
accorwit pro
instalinstr
e Thapplmub c
nect a groumet
permwirsyso a
equigroucon
Safety instructions . .........3-5
Features. . . . . . . . . . . . ........6
OvenControls ., . . . . . ........6
—Oven Light . . . . . . . . . . .......26
=ven Shelves . . . . . . . .......26
_-,;&;= Timer, Clock,
Automatic CWenTimer .. ....26
king . . . . . . . . . . . . . .......27
aking Chart . . . . . . . . .......28
Roasting . . . . . . . . . . . .......29
Broiling . . . . . . . . . . . . .......29
RoastingChart . . . . . . . .. .....30
BroilingChart.. . . . . . . .......31
Self-Clean Operation . . .......32
shob r wit cir
condua connt
t equigrout
mio leo t appl
e Thapplshb s
vionb qualser
persoConnea
authoserfacf
examinreo
adjus
6 Befperfa
servDISCT
OVPOSUA
T HOUSDIST
TIPAB REM
T FUO SWIT
Before Using Your
Cooking Center . . . . ........2
Energy-SavingTips . . . ........5
Modei&Seriai Number
Location . . . . . . . . . . ........6
CleaningChart . . . . . . .......33
CareofYour Cooking Center ...34
OvenVentDuct . . . . . . .......35
LampRepiacement. . . .......35
OvenThermostatAdjustment ..35
ThePrQb~emSo~ver. ......36,37
ifYouNeed Service . . . .......39
Warranty
:-
. . . ....Back
O T CIFBRE
a D n coo bla
openo t appl
e D n u outd
e D n opethapp
if it is not working properly, or if
it has been damaged
o dro
G A wia applcl
superi necew
usb chil
@ Do not k%we akxle=—
chilshon b leal
@ Dcm’!MOW to(’mab,
stand or R’mg cmthe CkMM’.‘They
$mdd Me own.
~ Do No-r
OF’ -i-c)
63 Wear proper Loose
fitting or hanging garments
should
n b w w
ust apFl
mac b i i
bri cow h h
i ela m c
sebu
@ u o d p@
moo d poo
h su‘ r i b
f stD n l p
hot h h e
meD n u a t o
otb c
@ Never LMey43ur for
wao het P
@ Do not store materii t o
@
Keep hood arldl grease filters
clt mag v
a t a g f
@ D n l cog O
other 2XXN-
IIi t c o n i
4 D n u w o g
fiF’i c c b
Smelb
cld a
@ pork follow
o direxa
alc t m t a l
17T ast i t
repost t
m b pri t m i
w b kia m w b
s t e
o unatti arwh
appli i usThsh
neb allt s o st
c a pao t appl
EN
AN
cm‘WE TO
BE
( n p
3
Page 4
(continued)
doo
ENERG
—Remo
newspap
filame
unle
ov
fu
exam
3/
Potho
ra
‘-
@DOnot RN.!heat
eh’neo
interiorSwf
o oveThesurfama
b hoenout buev
thouthardai col
Durianaftusd no
touco leclotho oth
flammamatercontan
interaro thoveall
sufficitifocoolfir
Othpotentihosurf
incluthovveopen
ansurfanethopeni
creviarouthovdo
anthedgo thdowind
RemembThinssurf
o thovmayhowhth
i open
—!not cqxt o
wh
emptytoavoid damage
to the oven and the danger of
I b acct
fire.
sh
r ema mio t n
hai doHowt t
avopert ovem
a a timsaena
proliio t ov
—-mateint o
shoignkeovd
clotuovofa
discot pocoo
sho poa t
o
cirbrepa
eSoprosua wh
ega
f
sealed containers—
clglja
m expa shn b
heai thov
e Reanfollthspec
“PRECAUTT AVO
POSSIEXPOST
EXCESSMICRO
e
TO reduthrio fii th
fouo pa2
ovecavi
—DnoovercfooCaref
atteappliai papplas
o othcombustmater
arplacinsithovt
facilitcooki
witwist-fr
papo plasbabef
placibai ove
—Dnousyomicro
ovet dr
—Paptowenapkan
wapapeRecycpap
producacontmetfle
whimacauarco igni
Papproducontainyl
o nyl
shob
avoida thmaaligni
—DnopopqXi yo
ovunli a
specimicrowpopc
accesso
yous
popcolabefousi
microwoven
@Av
gljaevwitth
liespemea e
mixt
e S dosurcle
instro pa3
6 Do
beverages
bot(especarb
beverEvi t con
i opeprec bu
u Thc cat con
t burresui inj
e U
in Cookbook.
o meroa helw
usa shi Coo
T dinmamicr
i fotrleth
Whusmei mic
ovke
DOUBLE DUTYTMshelf) at least
f in~~ away from sides d oven.
63(looking utensils may
I
become Imt
1
transfrt hefo
handle the utensil.
$9~Q~~~~~~~, t~~ ~Ve~ f~~~~
can I&xmme too hot to touch.
Be
heating baby food i
defrost frozen
i nane
metal only as directed
Fosta u
hi
metal (except for
beco h
m b net
cartout fl
dura afcoo
@Foods cooked in liquids -—
( a p mab ‘
o m
t f
conl mo
Sht o r t p
3 f inso h t
c t i o t o
e D n u a
f
YOU a miunk?ss
thermometer i
t thei d o
recf u i t
mio
1 Re
probe from the oven when not
using it
the temperature
t c w I y l
t p i t o w
ini i f o l a
t o mie i c
crela i t
o a d o w
6
Boiling eggs is not
recommended in a microwave
oven.
Prc b u
ine y a m c i
t burei i
@
Foods with unbroken
outer “skin”
s a p
—
—
satca
chl a o g
a e y ( p
cas b p t
a s t e d
co
@Pl
LJtensik4-Plastic
utdef m
coa v u b
shb u caE
mip m n b a
too ovc
a a g o c m
a m s o c i s
t s peo ovh
loext ov
t f a utc
igF t r 1 U
miplo a u
t i s cow
t utman
reco2 D n
sue utt
mic3 D n p
cht u p u
wicosu
4
Page 5
-“$ “EkM3k#’ (xmking pcwc
circumsta
pothold
microw
th
- ..:
dosed pksk bags
‘~houb slipiero ven
direci CookbI th
notplascouburdur
o immediaaftcooki
possiresulti injuAls
plaststorcontai
shoubeleaparti
uncovebecathfoa
tigseaWhcookwi
containtighcovewi
plastwraremocover
carefuandiresteaw
frohananfac
s sponta~boiling—
certaspec
liquimastat boduro
shortaftremofrth
microwoveT prevbur
frosp!ashliqustth
liqubriebeforemov
thcontaifrth
microwove
—
—Remove thshefrov
e noi us
—Dnostoo cowishe
o floo oveProddam
maresul
—Us
whhand
thsheanutensThma
b hot
—Dnous
browndio sheTh
shecouoverheUso she
witAutomaCookfeat
i nurecommen
‘$>staaw‘ham thov
whe
hot airm’ steamwhich esca
cacauIN.R
openingovdoor. Th
tohands,
s Keep ovventdu
unobst
@Keovfrfrgr
buil
@plovrack indesired
posiwhovi coI
ramub hanwh
hod n l pothcon
heauni t ov
@Pulo sht t sh
@U prp l a
recommended and DONOT
OVERCOOK.
DO not operate the ovenwhile
@
empty.If byaccident the oven
should run empty a minute or two,
no harm is done. However,try to
avoidoperating the ovenempty at
all times—saves energy andalso
ensuresgood long-term life of oven.
sti a convei lif
hefooR i ala prec
agabufrtouh
surfo t
* When using cooking or
roasbai ovfot
manufacdire
@D n u yoovt d
newspI overt
c cafi
@Do lrmt clean door gasket.
T dogasi essf
a goseCashb
tan t rudao
mot gas
@Do ~~t ~~~ ~v~~ c~~~~e~~,
N commeovcleo
ovliprotcoao
a kishob usi o
aroa pao t ov
@Clonpalii
U a CaBo
@Befself-c
oven,
rembrop a
otuten
@~i~t~~ f~~ fan—af noise
shob hesom
durt clecyI
nocaf serbe
self-caga
dooror ovenwalls.
the
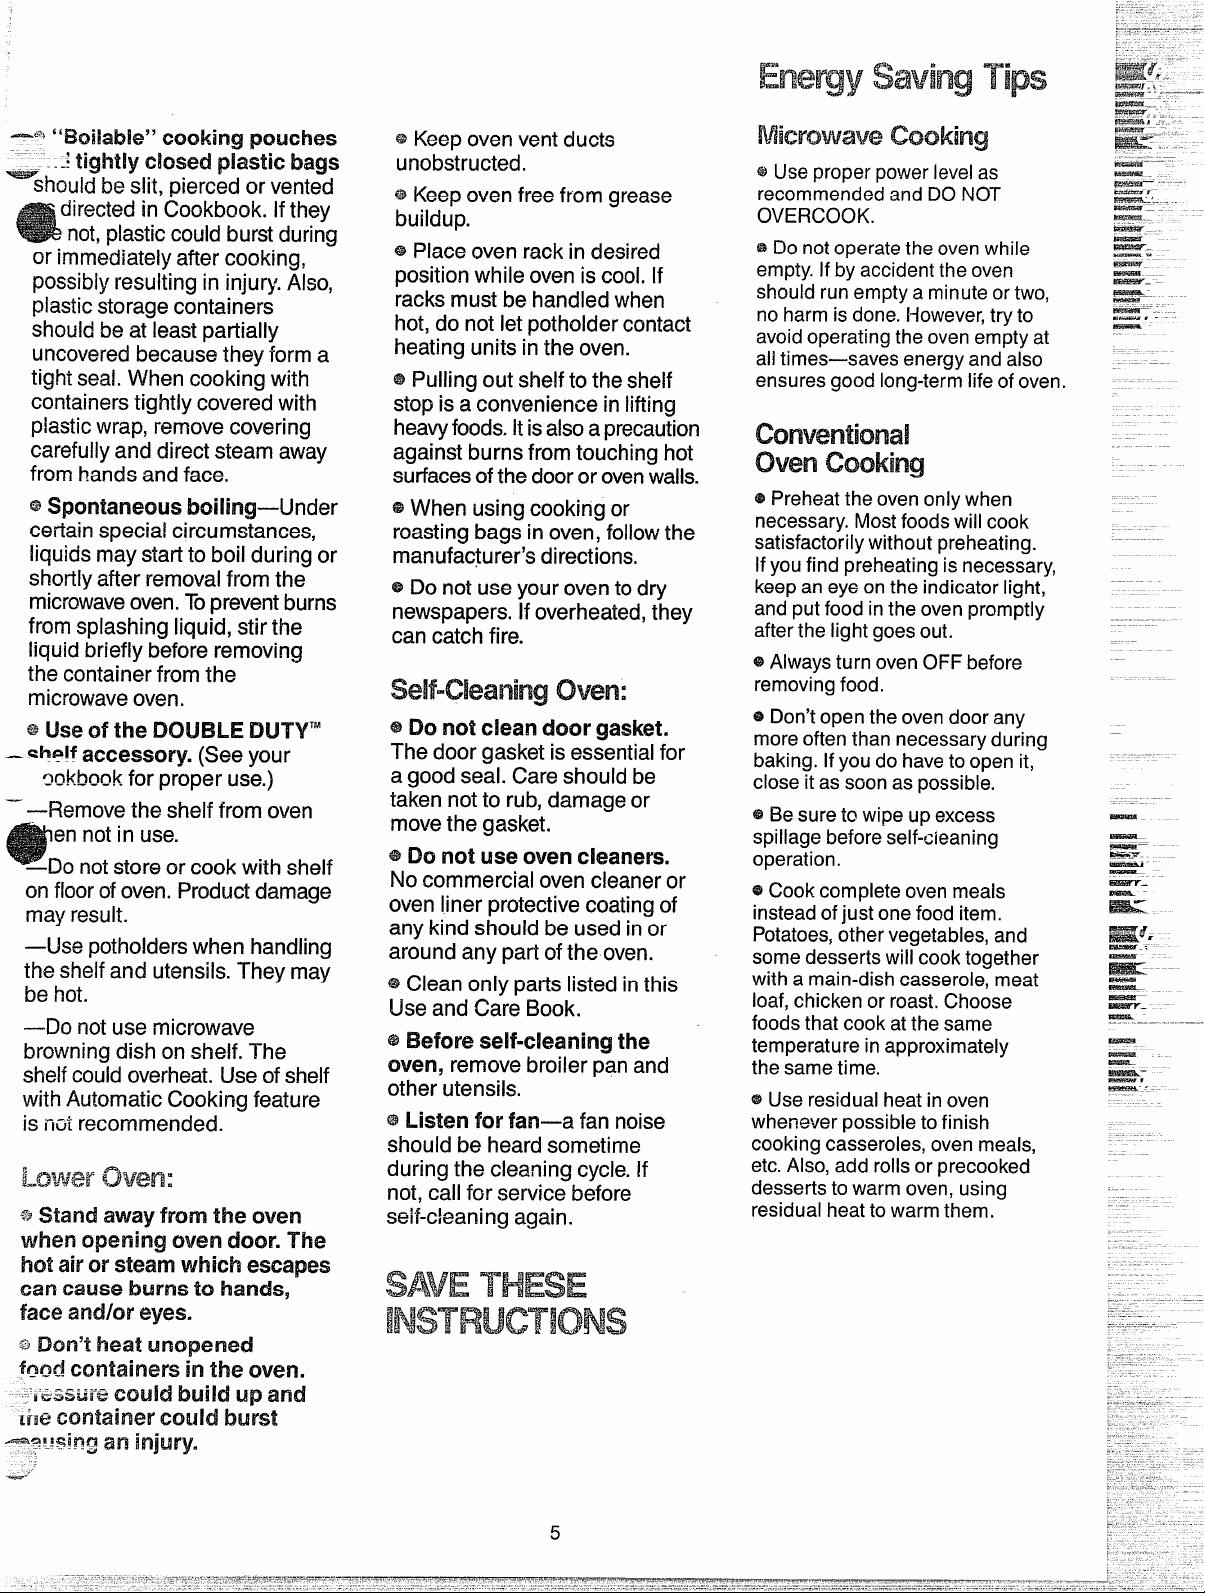
@Preheat the oven only when
necessary.Most foodswill cook
satisfactorily without preheating.
Ifyou find preheating is necessary,
keepan eyeon the indicator light,
and putfood inthe oven promptly
after the light goes out.
e Alwaysturn oven OFF before
removingfood.
e Don’t open the oven door any
moreoften than necessary during
baking. Ifyou do haveto open it,
close it assoon aspossible.
a+Besure to wipe up excess
spillage before self-cieaning
operation.
@Cookcomplete ovenmeals
insteadof just one food item.
Potatoes,other vegetables, and
some desserts will cook together
with a main-dish casserole, meat
loaf, chicken or roast.Choose
foods that cook at the same
temperature in approximately
the same time.
@Use residual heat in oven
whenever possible to finish
cooking casseroles, oven meals,
etc.Also, add roils or precooked
desserts to warm oven, using
residual heat to warm them.
facearldeye
5
Page 6
—
s
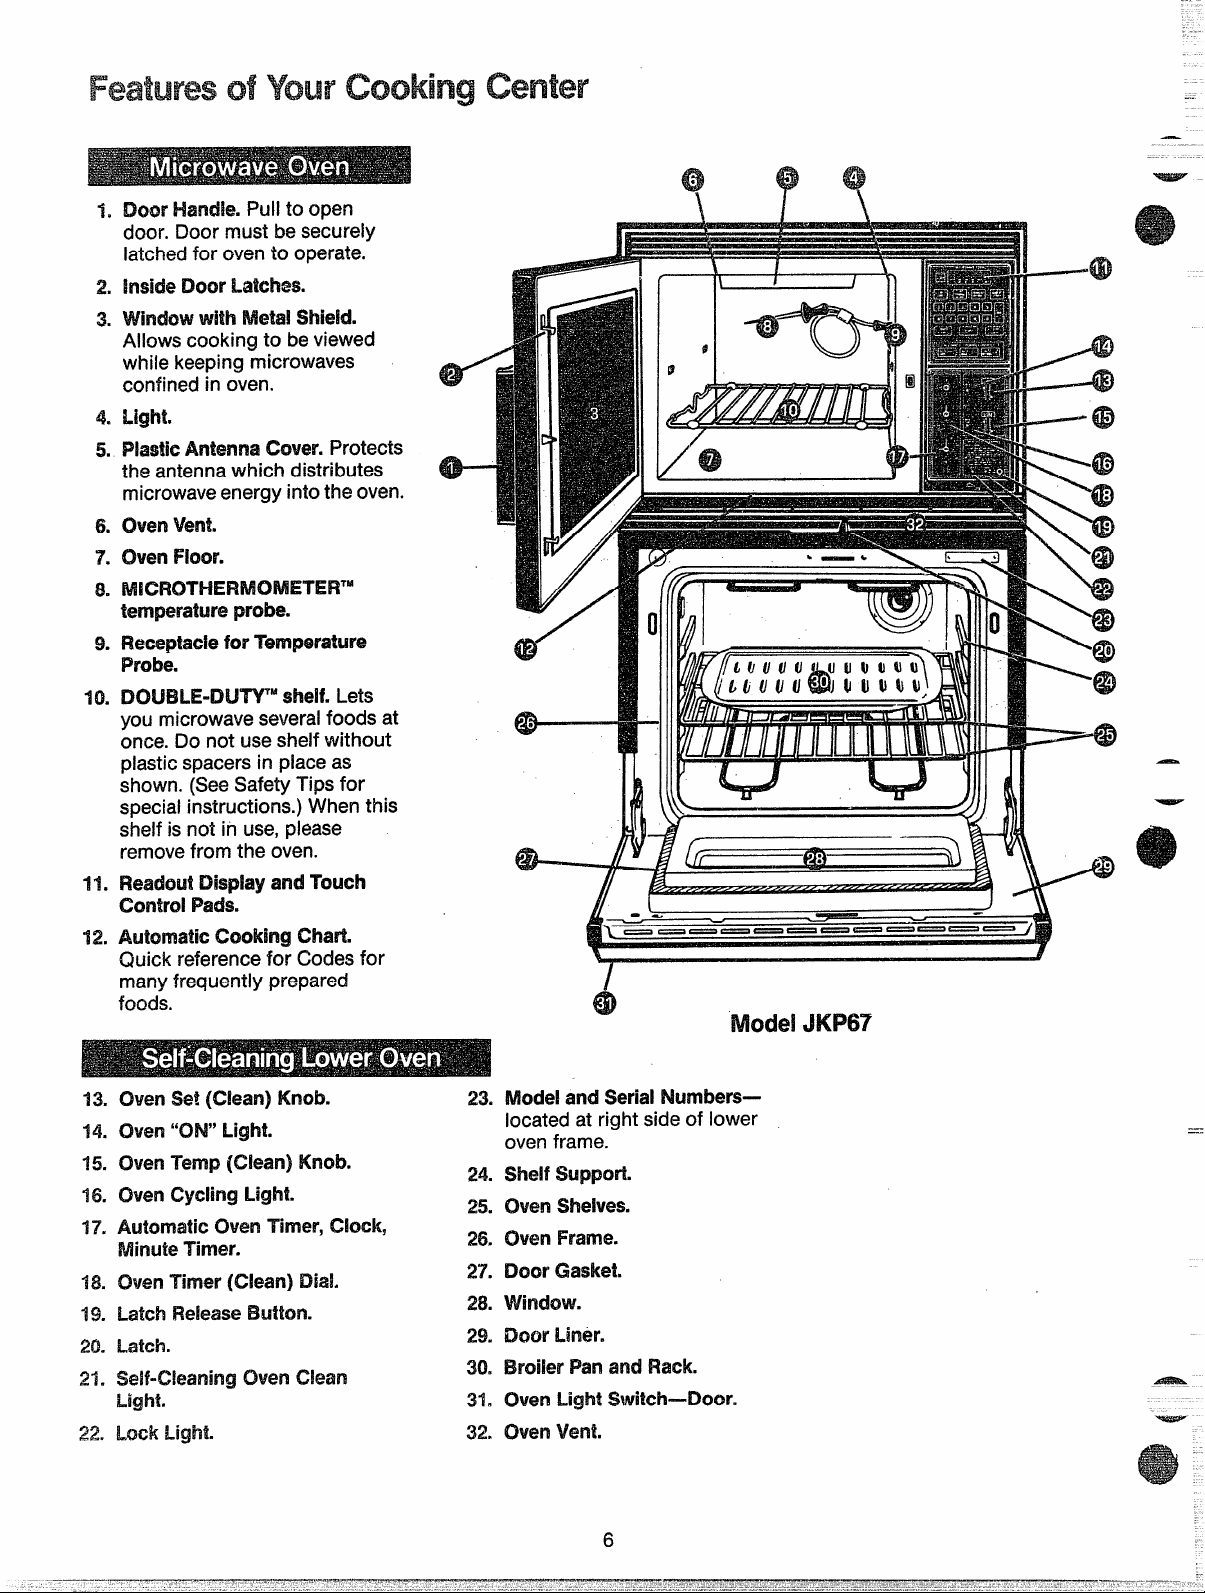
!DOHandPut op
1,
door. Door must be securely
latched for oven to operate.
hlside ?300rLatches.
2.
3.
AHOWScooking to beviewed
while keeping microwaves
confined in oven.
Light.
4.
Plastic An@nna Cover. Protects
5.
the antenna which distributes
microwaveenergy into the oven.
oven vent.
6.
Oven Floor.
7.
8.
Mlperam%?probe.
ReceptacleforTemperature
9.
Probe.
IXXJEILE-ENJTYMshelf. Lets
10=
youmicrowave severalfoods at
once. Do not use shelf without
plastic spacers in place as
shown. (SeeSafety Tips for
special instructions.) When this
shelf is not in use, please
removefrom the oven.
Readout Display and Touch
11.
ControlF%ds.
Ammam cooking chart.
12.
Quick reference fo~Codes for
many frequently prepared
foods.
withMetal shield.
w
\
Mode! JKP67
@
—--a)
===49
OvenSet (Clean) IKnob.
#3.
14.
(XKNll“Cm”Light.
(hen Tmp (Clean) Knob.
15.
16.
(Men Cycling Light.
Automaticoven Timer, Clock,
17”
Timer.
18.
OvenTimer (Clean) EM!.
Latch ReleaseButton.
19.
20.
Latch.
21.
Light.
22
CNenClean
Modeland SerialNwnbers—
23*
located at right side of lower
oven frame.
shelf SLq3pcwt.
24.
25.
CMmishdves.
(Men Frame.
26.
Door Gasketm
27.
VVind43w.
28.
Dow Liner.
29”
BroilerPanand Flack.
30.
(Mm LightSwiMw4Xmrm
31.
C?venVent.
6
Page 7
-.
--
—
—
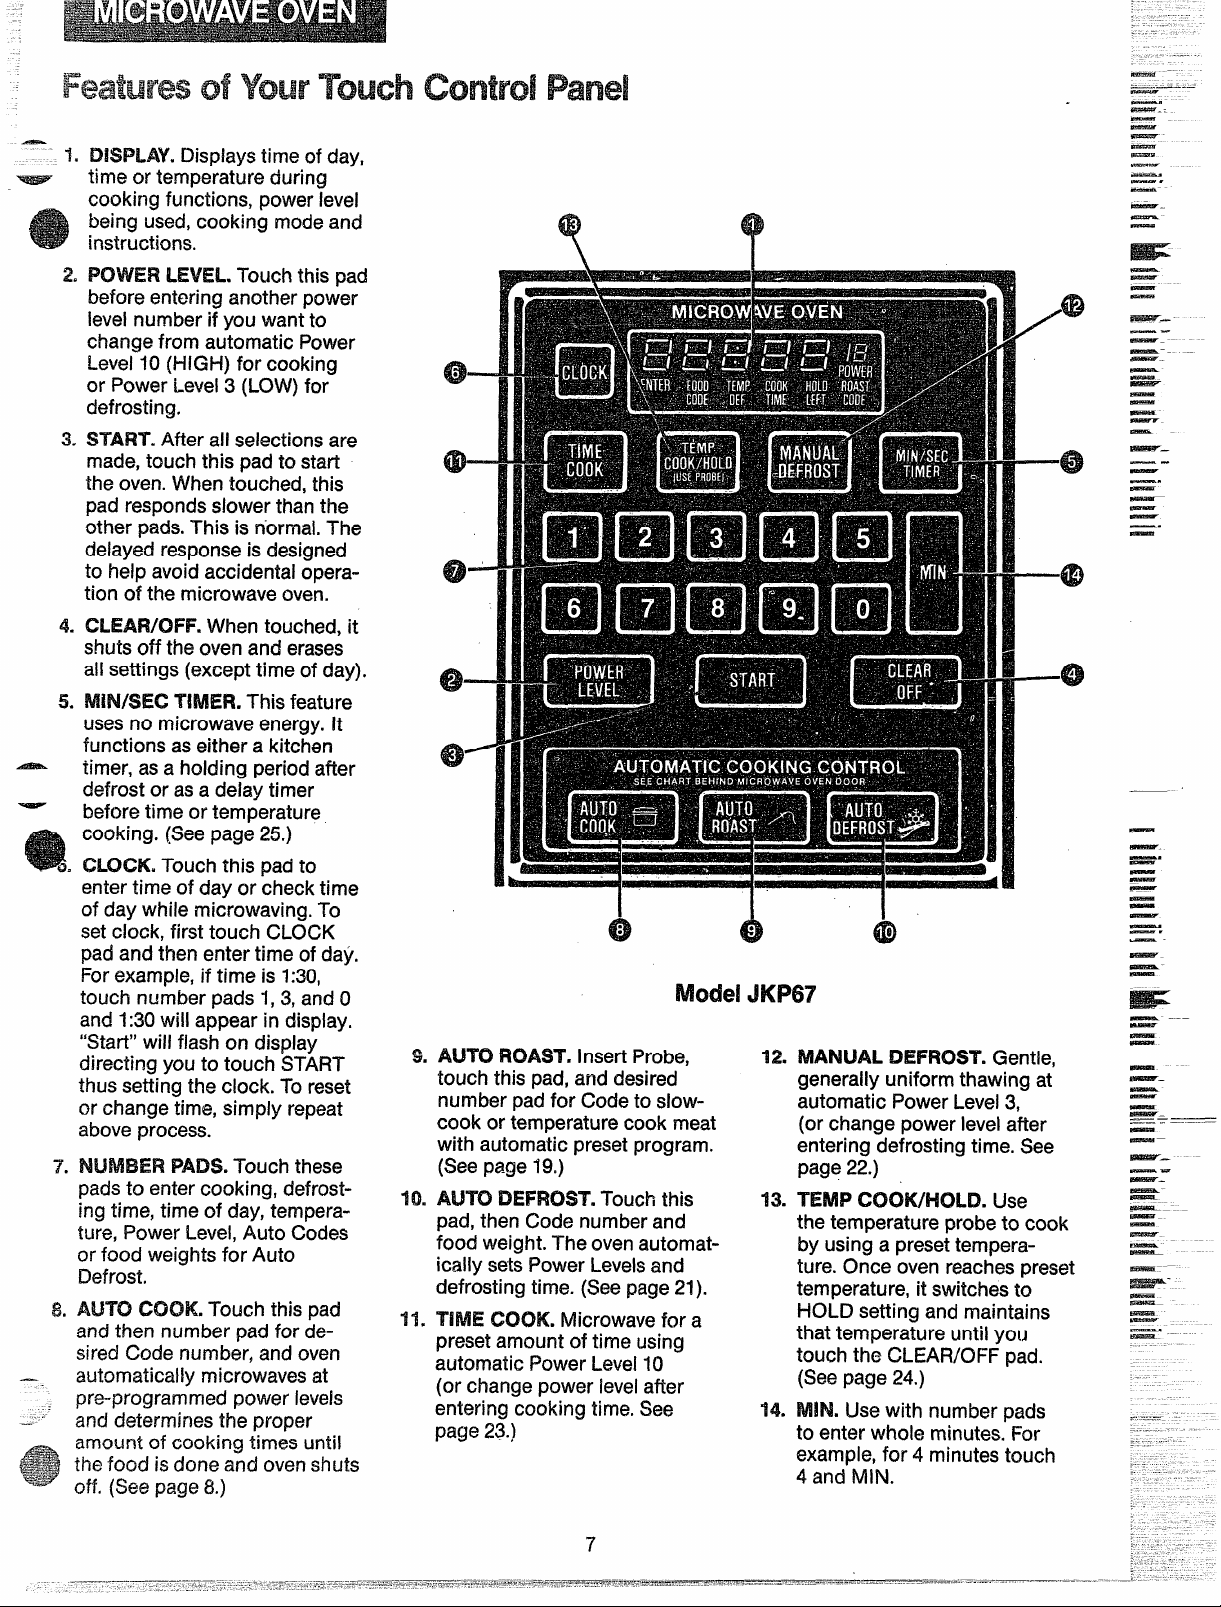
Displays time of day,
time or
cooking functions, power level
being used,cooking modeand
instructions.
2.
before entering another power
level number if you want to
change from automatic Power
Level 10 &iiGi-i) for cooking
or Power Levei 3 (LOW) for
defrosting.
3.
START. After aii selections are
made, touch this pad to start
the oven. When touched, this
pad responds siower than the
other pads.This is n’ormal.The
deiayed response is designed
to heip avoid accidental opera-
tion of the microwave oven.
CLEAR/OFF. When touched, it
4.
shuts off the oven and erases
aii settings (except time of day).
iWN/SEC TM4ER.This feature
5*
usesno microwave energy. it
functions aseither a kitchen
timer, as a hoiding period after
defrost or asa deiay timer
before time or temperature
cooking. (See page 25.)
CLOCK. Touch this pad to
enter time of day or check time
of day whiie microwaving. To
set ciock, first touch CLOCK
pad and then enter time of day.
Forexampie, if time is 1:30,
touch number pads 1,3, and O
and 1:30wi!i appear in dispiay.
“Start” wiii fiash on dispiay
directing you to touch START
thus setting the ciock. To reset
or change time, simpiy repeat
above process.
padsto enter cooking, defrost-
ing time, time of day, temperature, Power Levei, Auto Codes
or food weights for Auto
Defrost,
AUTO COOK. Touch this pad
andthen number pad for desired Code number, and oven
automatically microwaves at
Ore-programmedpower ieveis
anddetermines the proper
~mount of cooking times urttii
:hefood is done and oven shuts
off, (Seepage 8.)
temperaduring
ILEVEL. Touch this pad
PADS.Touch these
● —
0
@-
@–
63$--
I
:
MoJK
AUTO FKMWT.Insert Probe,
touch this pad, and desired
number pad for Code to siowcook or temperature cook meat
with automatic preset program.
(Seepage 19.)
AUTO IDEFROST.Touch this
pad, then Code number and
food weight. The oven automatically sets Power Levelsand
defrosting time. (See page 2!).
COOK. Microwave for a
preset amount of time using
automatic Power Levei 10
(or change power ieveiafter
entering cooking time. See
page 23.)
●
(!3
12.
MANUAL DEFROST. Gentie,
generaily uniform thawing at
automatic Power Levei3,
(or change power ievel after
entering defrosting time. See
page 22.)
TEMP COOIWKNJ3. Use
13.
the temperature probe to cook
by using a preset temperature. Once oven reachespreset
temperature, it switches to
HOLD setting and maintains
that temperature until you
touch the CLEAR/OFF pad.
(Seepage 24.)
MIN. Use with number pads
?4.
to enter whoie minutes. For
exampie, for 4 minutes touch
4 and MIN.
I
8
a)
&
—
—
—
—
—
—
—
~.-
—.
—.
—––
—.
—
—
—
—
—
—
—
~.
—.
—
—.
—
—
—
—
—.
—
—
—.
—.
—
—
-
-
—
—
—
—r
—-
—.
—-
—
— –-–—
—
—
—
-
—.
—
—
—
—.
———
c— . ——
—
——
~.
—.
—.
—–
EE.?M6?--- —
—.
—
7
Page 8
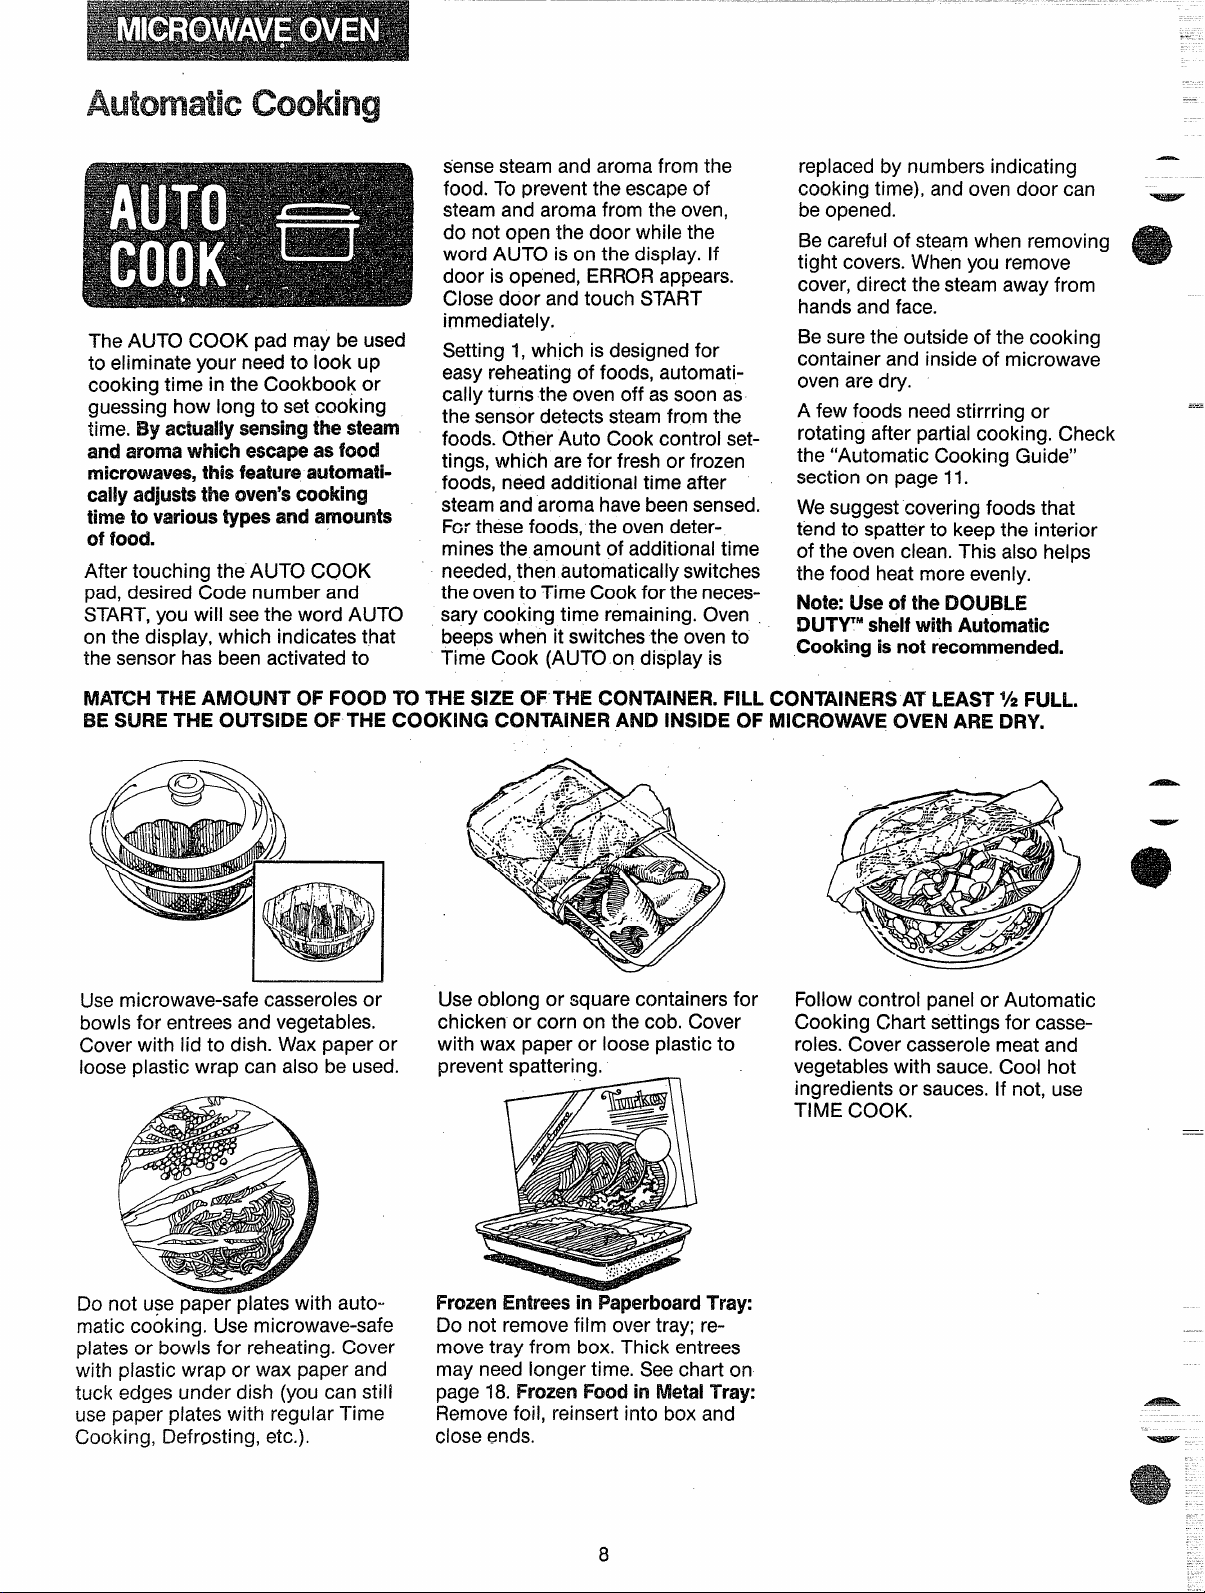
The AUTO COOK pad may be used
—
to eliminate your need to look up
cooking time in the Cookbook or
guessing how long to set cooking
time. By actwaiiysensing the steam
andaromawhichescapeas food
microwaves,thisfeatureautomaticallyadjusisthe oven’scooking
timeto varioustypesand amounts
offood.
After touching the AUTO COOK
pad, desired Code number and
START,you will seethe word AUTO
on the display, which indicates that
the sensor has beenactivated to
sensesteam and aroma from the
food. To prevent the escapeof
steam and aroma from the oven,
do not open the door while the
word AUTO is on the display. If
door is opened, ERRORappears.
Close door and touch START
immediately,
Setting 1, which is designed for
easy reheating of foods, automatically turns the oven off assoon as
the sensor detects steamfrom the
foods. Other Auto Cook control set-
tings, which are for fresh or frozen
foods, need additional time after
steam and aroma havebeensensed.
Forthese foods, the oven determines the amount of additional time
needed,then automatically switches
the ovento Time Cook for the necessary cooking time remaining. Oven
beepswhen it switches the oven to
Time Cook (AUTO on display is
replaced by numbers indicating
cooking time), and ovendoor can
beopened.
Be careful of steam when removing
tight covers.When you remove
cover, direct the steam away from
hands and face.
Be sure the outside of the cooking
container and inside of microwave
oven are dry.
A few foods needstirrring or
rotating after partial cooking. Check
the “Automatic Cooking Guide”
section on page 11.
Wesuggest covering foods that
tend to spatter to keepthe interior
of the oven clean. This also helps
the food heat more evenly,
Note: use of the DOUBLE
DUTY” shelfwithAutomatic
Cookingisnot recommended.
MATCHTHE AMOUNT OF FOOD TO THE WE OF THE CONTAINER.FILL CONTAINERSAT LEA~T
BESURE THE OUTSIDE OF THE COOKING CONTAINERAND INSIDE OF IWIKXOWAVEOVEN ARE DRY.
‘ FULL.
/
I
Usemicrowave-safe casserolesor
bowls for entrees and vegetables.
Cover with lid to dish. Wax paper or
loose plastic wrap can also be used.
1
Useoblong or square containers for
chicken or corn on the cob. Cover
with wax paper or loose plastic to
rxevent s~atterina.
Follow control panel or Automatic
Cooking Chart settings for casseroles. Cover casserolemeat and
vegetableswith sauce,Cool hot
ingredients or sauces.If not, use
TIME COOK.
—
Do not use paper plates with automatic cooking. Use microwave-safe
plates or bowls for reheating. Cover
with plastic wrap or wax paper and
tuck edges under dish (you can still
use paper plates with regular Time
Cooking, Defrosting, etc.).
l%wzenEntreesin PaperboardTray:
Do not removefilm over tray; remove tray from box. Thick entrees
may need longer time. See chart on
page 18.Frozen !J%mdin MetalTray:
Removefoil, reinsert into box and
close ends.
Page 9
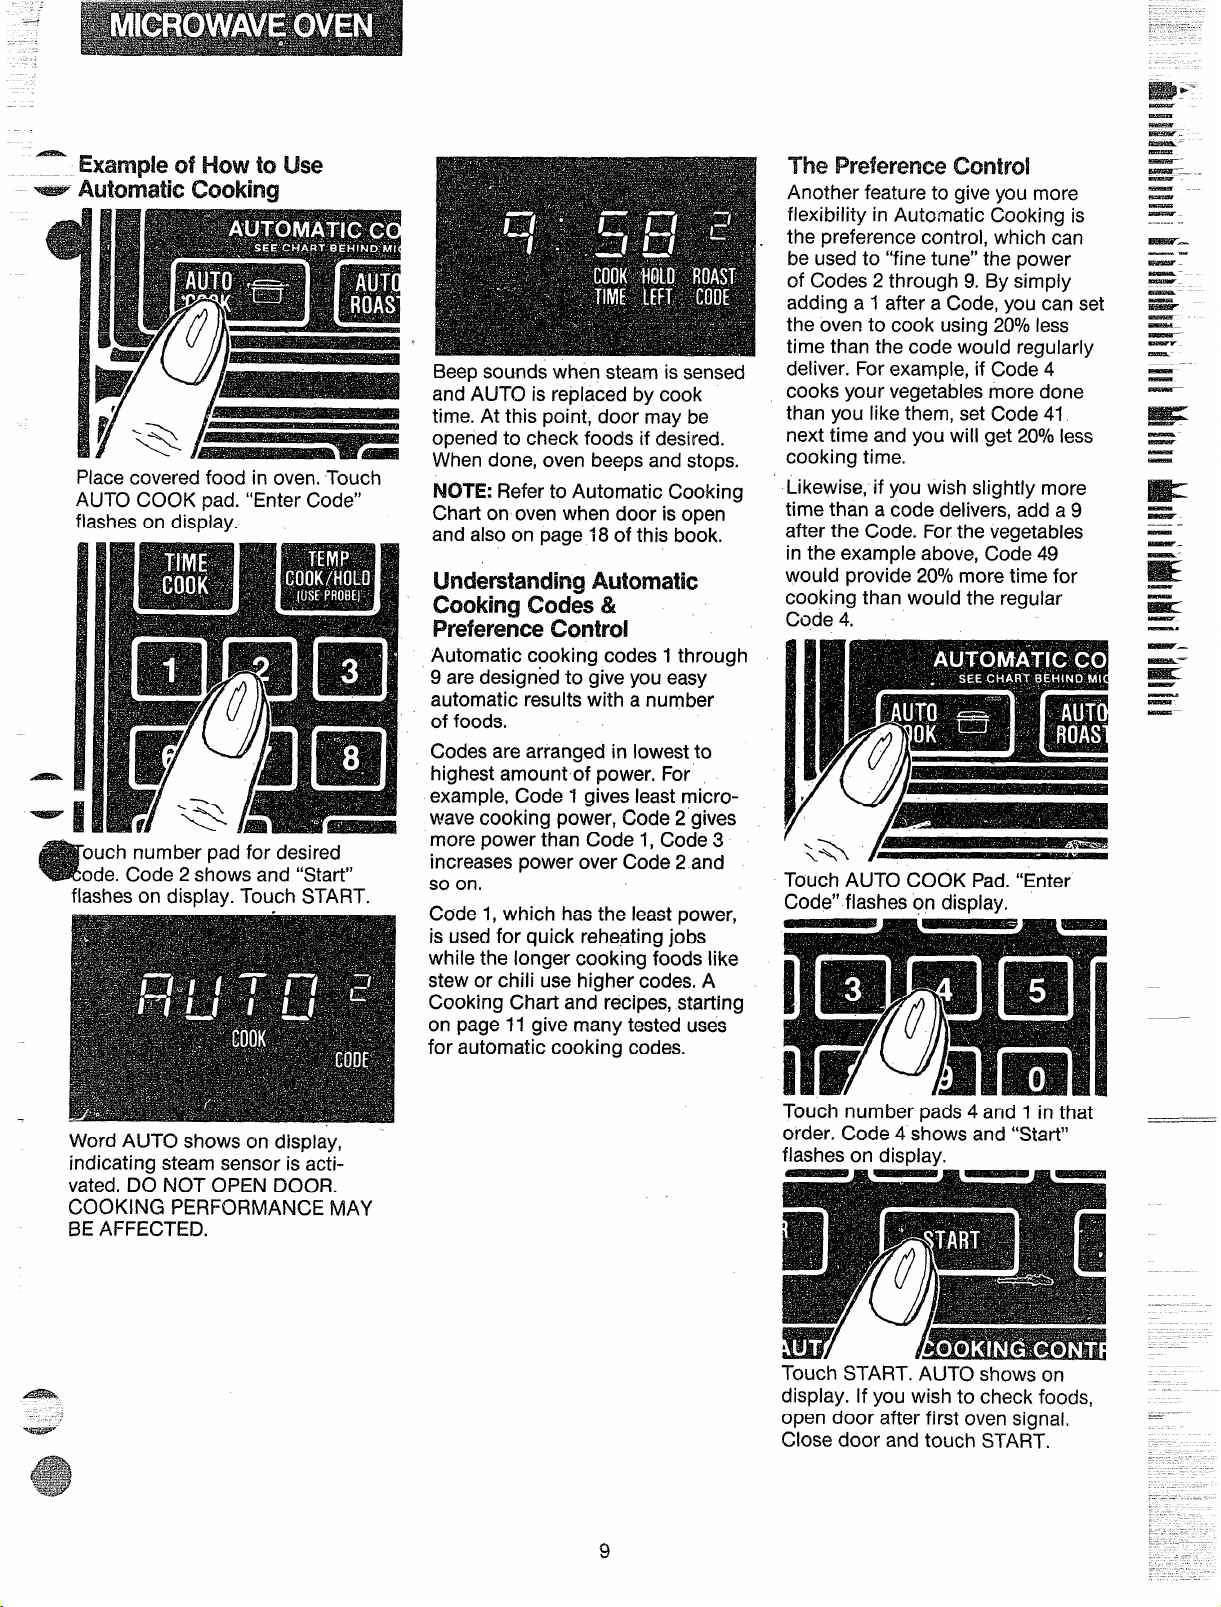
- d How toUse
WS3= Choking
Placecovered food in oven. Touch
AUTO COOK pad. “Enter Code”
flashes on display.
ouch number pad for desired
ode. Code 2 shows and “Start”
flashes on display. Touch START.
Beepsounds when steam is sensed
and AIJTO is replaced by cook
time. At this point, door may be
opened to check foods if desired.
Whendone, oven beepsand stops.
NOTE: Refer to Automatic Cooking
Chart on oven when door is open
and also on page 18of this book.
Auk
Cooking Codes &
Preference Control
Automatic cooking codes 1through
9 aredesigned to give you easy
automatic resultswith a number
of foods.
Codes are arranged in lowest to
highest amount of power. For
example, Code 1 gives least micro-
wavecooking power, Code 2 gives
more power than Code 1,Code 3
increasespower over Code 2 and
so on.
Code 1, which hasthe least power,
is usedfor quick reheating jobs
while the longer cooking foods like
stew or chili use higher codes. A
Cooking Chart and recipes,starting
on page 11give many tested uses
for automatic cooking codes.
“
Another feature to give you more
flexibility in Automatic Cooking is
the preference control, which can
be usedto “fine tune” the power
of Codes 2 through 9. By simply
adding a 1 after a Code, you can set
the oven to cook using 20°/0less
time than the code would regularly
deliver. Forexample, if Code 4
cooks your vegetablesmore done
than you like them, set Code 41
next time and you will get 20°/0less
cooking time.
Likewise, if you wish slightly more
time than a code delivers, add a 9
after the Code. Forthe vegetables
in the example above,Code 49
would provide 20°/0more time for
cooking than would the regular
Code 4.
Touch AUTO COOK Pad.“Enter
Code” flashes on display,
.—----..
—
—
—.
—–
—
—-
-—.
—
—
—
—-
-—..... .
misi$%w.
—.
—.
—–
—–
—-
—
~
—
—–
——
—
—
—
—
—
—
—
—
—
—
—
——-
—
—.
~—
——
—
—
——
-.
Word AUTO shows on display,
indicating steam sensor is activated. DO NOT OPEN DOOR.
COOKING PERFORMANCE MAY
BE AFFECTED.
Touch number pads4 and 1 in that
order, Code 4 shows and “Start”
flashes on disdav.
Touch START. AUTO shows on
display. If you wish to check foods,
open door after first oven signal.
Close door and touch START.
Page 10
Q. Why does my oven
—
cutoffafterWeAUTO cyclewhen
usingAutoCook C%ntm)iCode1
V#Wnitdoesnot!or otfwrsettings?
A. When using Code 1,there is no
second phaseof minutes counting
down. All the cooking is completed
in the first phaseor AUK?.
c1.Hthe food
cooked
Code, what shouk! ! do?
A. Differences in recipes may result
in different cooking times. Use
Time Cook and Power Level 10for
a few minutes until completion or
re-cover and useAuto Cook Code 1
if more time is needed.
CL!30 ailfreshor frozenvegetables
requireastandingperiodafter
cookingwithAuto Cook?
A. Most vegetablesare cooked to a
crisp state during Auto Cook, just
as in regular microwaving. Therefore, it is recommended that you let
the vegetablesstand for up to 5
minutes depending on size and
density of pieces.This standing
time also enhances the overall
flavor and appearance of most
vegetab~es.
CLWhat if !don’tcoverthedishin
Autocook?
A. While cooking without the cover
does not affect sensor performance,
we suggest covering dishes that
may spatter to keep the oven clean.
Covering aiso helps foods heat
evenly.
ism?tmmpkkdy
afterwing the suggested
C?.Do the shapes and sizesof food
makea differencewhenusingAuto
cook’?
A=Yes,in some cases,larger pieces
will require additional Time Cook-
ing, Be sure to check suggested
arrangement of pieces in the dish,
sirme proper arrangement is often
a successful tip in regular
microwaving.
Q. Should i useAutoCook tocook
puddingorsauces?
A. Most pudding and sauce recipes
require stirring many times during
cooking; therefore, Time Cook is
recommended since you should not
open the door during the AUTO
phase of cooking without affecting
end cooking results.
Ct.My scallopedpotatoeswerenot
completelycookedwhen 1removed
the dishafterAutoCook.M/hatis
wrong?
A. If you prepared the sauce in the
oven prior to combining the sauce
with potatoes, there may have been
too much remaining moisture in the
oven. Makesure you dry the oven
completely before using Auto Cook
since this function operatesproperly
by sensing steam and aroma in the
oven. Also starting Auto Cook with
hot foods creates steam and aroma
in the oven too soon, and decreases
the first sensing cycle.
Q. Are there any otherfoodswhich
are bestTime Cooked, ratherthan
Auto Cooked?
A. Bakery foods, candies, melted
chocolate or foods when a dry or
crisp surface is desirable, are
cooked best by Time Cook.
Q. 00 freshor frozen vegdabks
requirewaterwhenusin~Auto
cook?
A. Yes.Add water to the vegetables
asrecommended on chart and cover
well for even, complete cooking,
CLWouldmy piasticcontainerswith
verytightfittinglids13eappropriate
forAutomaticCooking?
A. No, most types of plastic storage
dishes, butter tubs, etc. with tight
fitting lids are not recommended for
microwaving. Also tight fitting lids
may prevent adequate steam and
aroma from escaping and food may
not cook properly during Automatic
Cooking. -
Q. I triedto warmsomechow mein
noodlesusingAutoCook. Why
didn’tthiswork?
A. Food must havesome moisture
in order to createsteam which helps
the auto sensorfunction. Extremely
dry foods such aschow mein noodles, potato chips and other such
foods do not haveenough moisture.
Q. Should1useAutoCook when 1 ~
am cookingmanyfoodsin more
thanonedishor casserole?
A. No, becauseof different food
densities, attention neededduring
cooking, and food amounts, it is bestto useTime Cook when
cooking many foods,
dxsfma
~
.
10
Page 11
.—
.;-.—---
—
—
--- Automatic Cooking Control is a
_-, ti;ly-automatic electronic control
systemthat lets your microwave
vendo the cooking for you. The
harts and recipes in this section
are designed to help you makethe
most of this feature.
Standard cooking techniques
require setting the oven for aspeci-
fied cooking time or a selected fin-
ishedtemperature, And that means
looking up recipes in acookbook. . .
trying to convert old recipes for
microwave cooking. . .or just resorting to guesswork. This control
method works on an entirely different basis—with a special electronic sensorthat detects steam
and aromas from cooking food.
The oven “knows” how the food is
cooking; so it can automatically set
the correct cooking time and maintain the proper power level for different types and amounts of food.
And it’s adjustable to suit your individual taste.
Eatouse
Simply touch two control pads—
AUTO COOK and the desired Code
number—and then START.A chart
on the oven control panel givesa
list of Codes for frequently prepared foods. The display shows
AUTO until steam is sensedand
then signals, and displays time
counting down. During AUTO, oven
should notbe opened, but after
oven signals, door may be opened
to check foods if desired. Check the
Automatic Cooking Chart for
suggestions.
Appropriate containers and coverings help assure good cooking
results. Containers should match in
size to the size of the food being
cooked. Coverings such as wax
paper, the lid that came with the
container, or microwave-safe plastic
domes are ideaL For examples of
containers and coverings, see page
8 and the following recipes.
Pre
With Preference Control, you can
adjust the Automatic Cooking Feature to your individual taste by
adding either “l” or “9’ after Code
number. If aftertrying the suggested
Code, you would prefer lesscooking
time, simply add the number “l”
after the Code and the oven automatically lessensthe cooking time
by 20°/0.If you wish more cooking
time, add “!3”after the Code to
increasecooking time by 20°/0
Jkubmtic Roasting
Automatic Roasting usesthe temperature probe rather than the elec-
tronic sensorto cook meatsevenly
to the desired degree of doneness.
The oven continually monitors the
food’s internal temperature. Unlike
ordinary Temperature Cooking, the
oven changes power levelstwo or
three times depending on the
degree of doneness during cooking
to give you the best results automatically. Meat is cooked evenly,
without toughening because lower
power levelsare used asthe meat
temperature rises thus cooking
meats evenly while retaining the
natural juices. After cooking the
oven switches automatically to Hold
for an hour. Food stays warm
without overcooking.
IFm’
FoN Fkc
—
—
—
—
—
E —
—
E7——–—
~—
BlEw!5—
—
—.
—r
—
-—
—–
—–
—
—,
-–
—
——
—-–
——
—
—
—
—.
—
—
—.
—–
—
—
—–
—
—.
—
—
—–
—. -
E
—
-
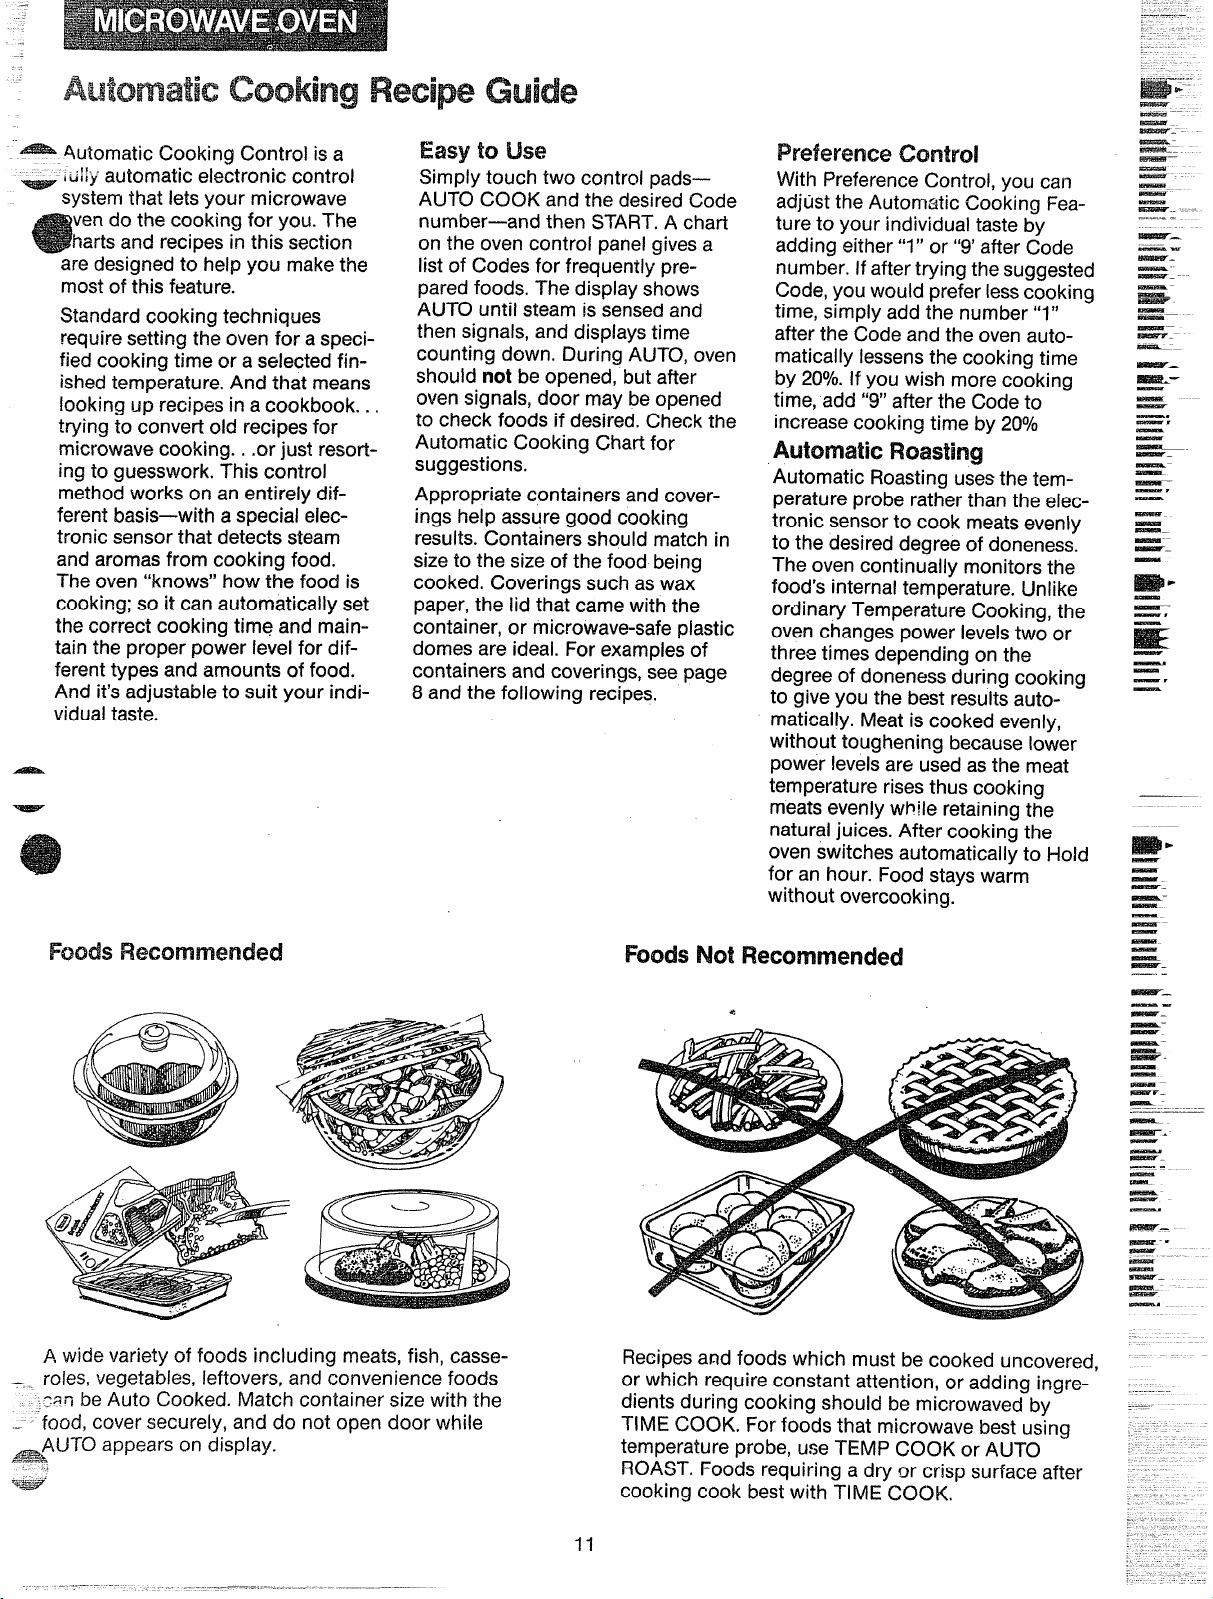
A wide variety of foods including meats, fish, casse-
—
roles, vegetables, leftovers, and convenience foods
c~fi be Auto Cooked. Match container size with the
.- -“food, cover securely, and do not open door while
AAUTO appears on display.
..
“%~y”
Recipesand foods which must be cooked uncovered,
or which require constant attention, or adding ingredients during cooking should be microwaved by
TIME COOK, For foods that microwave best using
temperature probe, use TEMP COOK or AUTO
ROAST, Foods requiring a dry or crisp surface after
cooking cook best with TIME COOK,
—
—
—
ET:
—
.——--—-.
.——
—
E
—
—
—
- .
—
—
—
—
—
—
~
—
Page 12
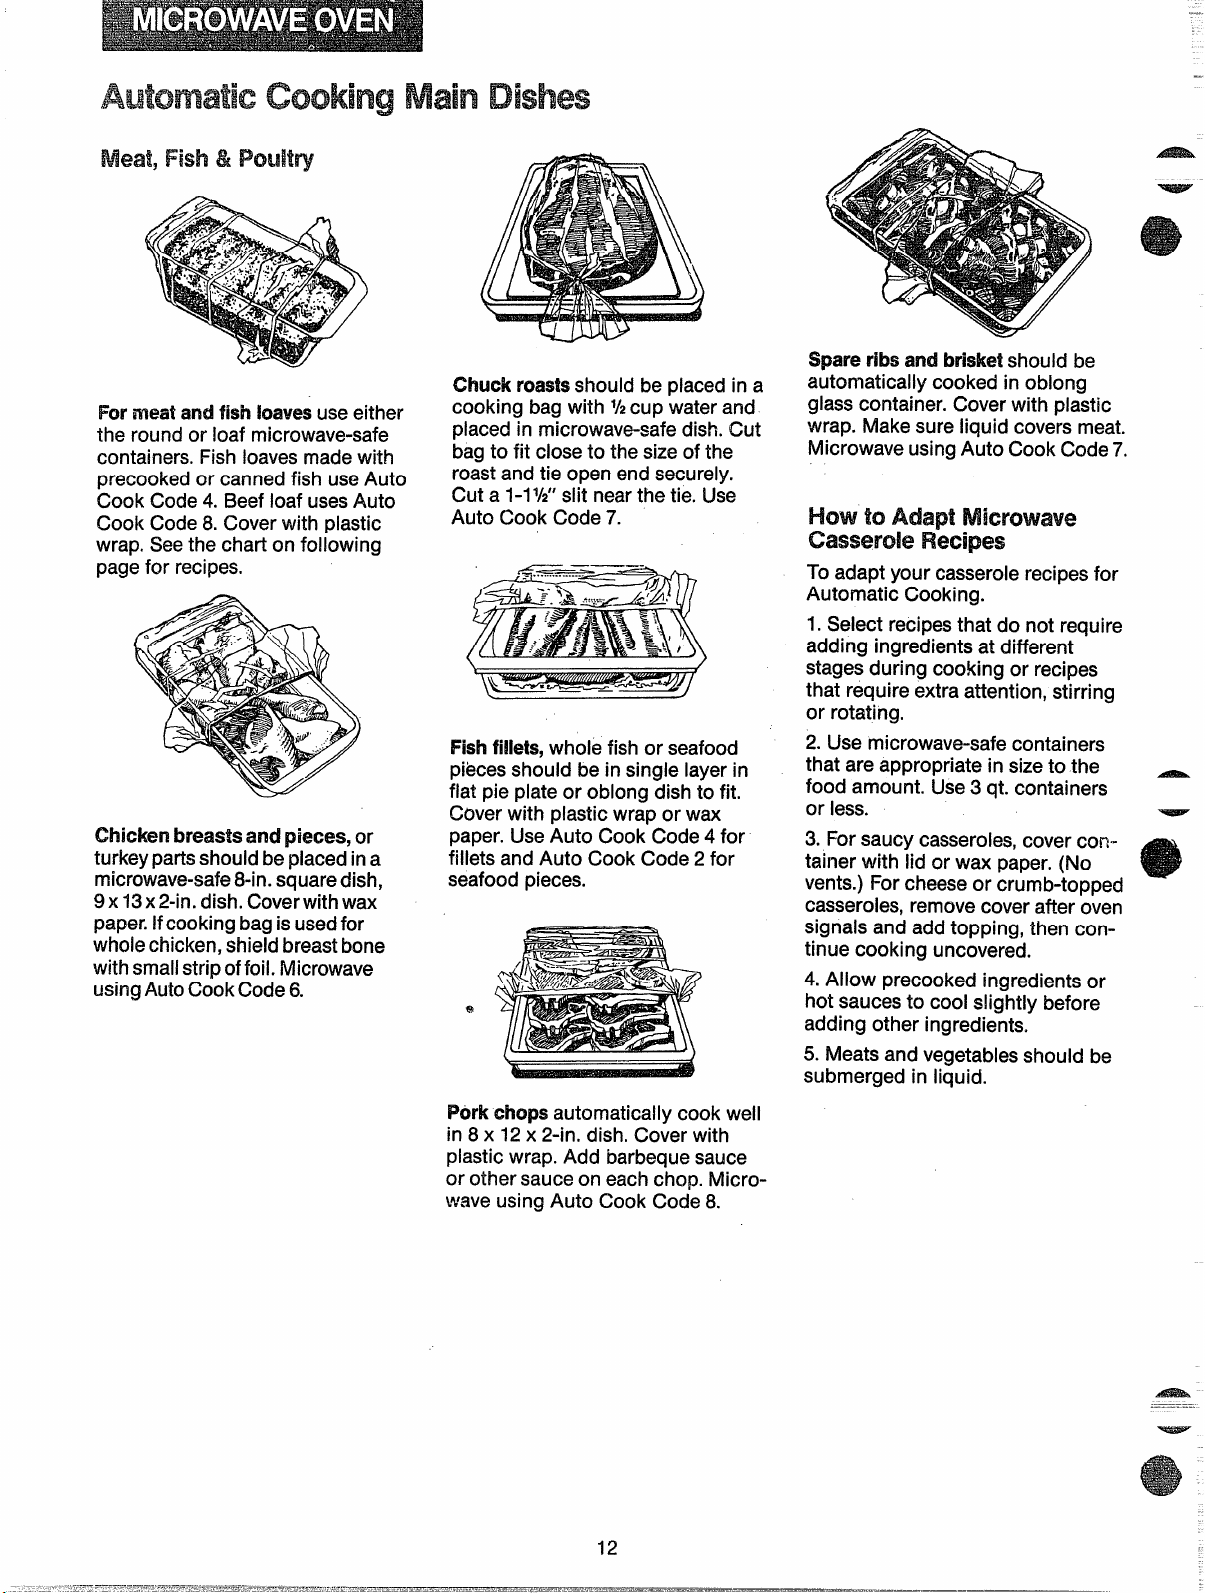
Formeatandfishloavesuseeither
.——
the round or loaf microwave-safe
containers. Fish loaves made with
precooked or canned fish useAuto
Cook Code 4. Beef loaf usesAuto
Cook Code 8. Cover with plastic
wrap. Seethe chart on following
page for recipes.
Chickenbreas$sand pieces, or
turkeypartsshould beplaced in a
microwave-safe8-in.squaredish,
9x13x 2-in. dish. Coverwith wax
paper.Ifcooking bagis usedfor
wholechicken, shield breast bone
with small strip of foil. Microwave
usingAuto CookCode 6.
Chuckmastsshould be placed in a
cooking bag with %cup water and
placed in microwave-safe dish. Cut
bag to fit close to the sizeof the
roast and tie open end securely.
Cut a I-IW’ slit nearthe tie. Use
AuCook Code 7.
Fish fi!lets, whole fish or seafood
piecesshould be in single layer in
flat pie plate or oblong dish to fit.
Cover with plastic wrap or wax
paper. UseAuto Cook Code 4 for
fillets and Auto Cook Code 2 for
seafood pieces.
Spareribsandbrisketshould be
automatically cooked in oblong
glass container. Cover with plastic
wrap. Make sure liquid covers meat.
Microwave using Auto Cook Code 7,
to
R
To adapt your casserole recipesfor
Automatic Cooking.
1.Select recipesthat do not require
adding ingredients at different
stages during cooking or recipes
that require extra attention, stirring
or rotating.
2. Use microwave-safe containers
that are appropriate in sizeto the
food amount. Use3 qt. containers
or less.
3. For saucy casseroles,cover container with lid or wax paper. (No
vents.) For cheeseor crumb-topped
casseroles, remove cover after oven
signals and add topping, then continue cooking uncovered.
4. Aliow precooked ingredients or
hot saucesto cool slightly before
adding other ingredients,
5. Meats and vegetables should be
submerged in liquid.
F%rkchopsautomatically cook well
in 8 x 12x 2-in. dish, Cover with
plastic wrap. Add barbeque sauce
or other sauce on each chop. Microwave using Auto Cook Code 8.
12
-%ss$-
Page 13

-A?!%& casserole
.—....—
=aEii@-Aim cock cock?6
Approx.CookingTime—17 min.
akes6 to 8 Servings
t lb.groundchuck
?/2 cup dry Mead crumbs
1/8 te&pobn pepper
1/2 teaspoonsalt
1teaspoonchilipowder
3 tabbpoons ehj mincedonions
1 egg
3 tablespoonsketchup
1/2 cupinstantrice
i can(q51/’z
O kidney b
(undrained)
1 can($6oz.) tornaioes,chopped
andundrained
1tablespoonchilipowder
1 teaspoonsalt
In large mixing bowl, place meat,
bread crumbs, pepper, salt, chili
powder, onion, egg and ketchup.
Mix well and form into 12balls.
Arrange balls in a circle in 2 qt.
casseroie.Set aside.
In small mixing bowl place rice,
beans,tomatoes and chili powder.
‘a- Mix well and pour in center of cas-
~ serole and over meatballs. Cover
and microwave at Auto Cook
ode 6.
-rW
Auto Cmls Code9
Apprmx.CookingTime—-32min.
Makes4 Serwings
1/4 cup soy sauce
1/3 cup honey
t/3 cup orangejuice
1 wholechicken(about3 Ibs.)
2 tablespoonscornstarch
1 tablespoonwater
In small cooking bag, mix soy
sauce, honey and orange juice. Add
chicken to bag and tie with plastic
tie. Turn chicken on itsside in
12x 8 x 2-in. dish. Marinate 1 hour
on each side. Place bird breast side
up in dish. Slash bag near closure.
Microwave on Auto Cook Code 9.
When oven signals, remove chicken
and prepare Teriyaki sauce. In l-pt.
glass measuring cup stir together
water and cornstarch. Cut off one
corner of cooking bag with scissors
and drain juices into cup. Microwaveat High (10) 2 minutes. Remove chicken from bagto serving
platter. Pour sauce overchicken
just before serving.
Cma R
AutoCookCode 9
Approx.CookingTimie—25min.
Makes6 Servings
1 can (10-1/2 oz.] condensed
cream0?mushroomsoup
1-1/4 cupsmilk (1 soupcanM)
3/4 cupinstantrice
1 can (4oz.) rnuslwooms,stems
andpieces,drained
1 pkg.(1-1/2 oz.)dryonion
soupmix
1 cutup chicken(about3 b.)
In small mixing bowl mix soup and
milk; reserve1/2 cup of the mixture.
Blend remaining soup mixture, rice,
mushrooms and half of the onion
soup mix. Pour into 12x 8 x 2-in.
glass dish.
Placechicken pieces on rice mix-
ture, arranging with meatiest pieces
to outside of dish, Pour reserved
soup mixture over chicken and
sprinkle with remaining soup mix.
Cover with wax paper and tuck
under dish. Microwave at Auto
Cook Code 9.
—
W=
———
—
—
——
—
——
—
—
—.
.—. -
E
—
—
E
—-
—..—
—
-.
—
—
—
—
——
—
l
—
—
—
—
—
—
..
Page 14

Fro Canned W’egetabies
-A%faik
Wholeor largehalvesofvegetables
such as cauliflower or squash use
Auto Cook Code 4. Use round or
square container close to the size of
vegetable.Add V2cup water. Cover
with lid or plastic wrap.
Mock or loosepiecesof frozen Pouches of frozen vegetables
vegetables should be placed in suitable size container (at least half full) placing directly on oven floor. Set
with lid or plastic wrap. Add 1 or 2
tablespoons water. Set Auto Cook
Code 2. SeeAuto Cook Chart for
lima beans.
Piecesorslicesof vegetables
require 1/4to ‘/2cup of water. Use
appropriate size covered container.
Set Auto Cook Code 4. Dry root
vegetables like carrots may need to
be stirred after oven signals and
time remaining appearson display.
Re-coverand touch STARTto finish
cooking.
FrV’ec
should be slit W’ in center before
Auto Cook Code 3.
Precooked/cannedvegetables
should beplaced in round container
similar in sizeto amount being
cooked (at least half full). Microwave on Auto Cook Code 2. Stir
before serving.
.—
Page 15

-.--
.—
–-––
.-
- $Mk Fry
Auto cook code 4
--
MexZucLas
Au
cook code 6
Appmx.Cooking-rhme-t6 min. Approx.CookingThne—35min.
alms4 Servings
- 1 MNespoon oil
1 tablespoonsoftbutter
3 mediumonions,quartered
1 sma;!greenpepper,cut in
l/4-in. widestrips
2 cupsthinly-slicedcabbage
2/3 cup carrots,sliceddiagonally
1/4 cup (1 bunch)slicedgreen
onions
1 cup broccoliflowerets
1 cupcauliflowerf!owerets
2 stalkscelery,sliceddiagonally
Tossvegetableswith oil and butter
in 2 qt. microwave-safe casserole.
Cover. Microwave on Auto Cook
Code 4 stirring well when oven signals and time remaining appears on
display. Serve immediately.
SummGardSt
Autocook code ‘6
Approx.CookingTime—51 min.
—
Makes6 to 8 Servings
4 largezucchini,cubed
—
3 llargepotatoes,peeledand
cubed
4 largecarrots,coarselygrated
1 mediumonion,cutin pieces
W small headof cabbage,sliced
1 can (10%oz.) creamofcelery
soup
[?03/4) creamof mushroom
1 can
soup
1 Mock @oz.) pasteurized
processedcheese,cubed
2 cans(4 oz.each) mushroom
pieces
I noundsmokedsausage,sliced
in t-inch pieces
In a 4 qt. casserole dish, mix all
ingredients together until well
blended. Cover. Microwave on
Auto Cook Code 6.
Makes8 to 10 Servings
1 largezucchini
1-1/2 poundsgroundchuck
1/4
cup greenonions,thinlysliced
1 can (15 oz.)tomatopuree
1 can(4 02.) greenchilies,
drainedandchopped
1/4 teaspoongroundcumin
1 teaspoonItalianseasoning
(optional)
1 can @02.) ripeolives,
choppedand drained
12oz. Ricottaor cottagecheese
1/2 cup gratedF?omanocheese
1 egg
2 taMespoonsflour
4 oz. Mozzarellacheese
1/4 cup gratedRomanocheese
1 cup@ oz.) sourcream
(optional)
Washzucchini and cut into l/8-inch
lengthwise slices. In 12x8x 2-in.
dish, place 1/2 of slices. In 2-qt.
casserole, place ground chuck,
onions, tomato puree, green chilies,
cumin, Italian seasoning, and olives.
Set aside.
In small bowl, mix together Ricotta,
Romano cheese,and egg.
Sprinkle flour on zucchini in dish,
layer half of Ricotta mixture, then
meat sauce and Mozzarella.Repeat,
sprinkle with Romano cheese.Cover
with plastic wrap, vent corner, and
microwave on Auto Cook Code 6.
Servewith sour cream, if desired.
a’R
AutoCook Code 6
Approx.CookingTime--l6 min.
Makes4to 6 Servings
1 pkg.(10oz.) frozenchopped
spinach,thawedand we~l
drained
1-1/2 cupscookedrice
1 cup water
1/4 cupbu~ter,melted
1/4 cupfine~ychoppedonion
1 cup milk
II egg,beaten
1/2 teaspoonsalt
1 cup shreddedcheddarcheese
To cooked rice, add spinach, butter,
onion, miik, egg, salt and cheese.
Mix well. Cover and microwave at
Auto Cook Code 6. Let stand 5
minutes covered before serving.
CoS Y S
AutoCook Code 6
Approx.CookingTime—If min.
Makes4to 6 Servings
1 teaspoonsalt
2 poundsyellowsquash,cubed
1/4 cupyellowonion,chopped
1/4 cup butter,melted
1/4 teaspoonpepper
1/4 teaspoonbasil
3 slicesfreshbread,cubed
1/2 cupshreddedcheddarcheese
1 cup sourcream
8 stripscrisplycooked,crumbled
bacon
In 2 qt. glass dish, mix together all
ingredients, using 1/2 of crumbled
bacon. Sprinkle top with remaining
bacon. Cover. Microwave on Auto
Cook Code 6.
&;,--
—...
—-..
—–—
—
—.–--
—–
-—–
—.
——
—.
—
—
—
—–
-—-~—
—.
——
~
—-
—-
—
~-
—
—
—–-
-r.
—=
—
—
—
—
—
—
—
—
—
.
Page 16

Fruits
—
desse
Coo
—
PineappleCasserolei atan
i
(20oz. ea.) drained pineapple
chunks, 1cup sugar and ‘h cup
flour. Top with mixture of 2 cups
buttery-flavored cracker crumbs
and Vzcup melted butter.Cover
with wax paper and cook on
o meaccompan
12x8x 2-in. dish spread 2 cans
Au
Co5.
Baked Appies automaticcookwell
usingAuto Cook Code2. Match
number ofapples to sizeof
microwave-safecoveredcontainer.
UseAuto Cook Code2for Baked
Pearsalso.
StewedF andFruitCompotes
should be stirred well before microwaving, especially if sugar is added.
Cover; use
A C C 2a
s o o t a o s
a t apo d
“Start” and finish cooking.
Touch
Desserts & Br
ToppedCakesare easyto cook
Nut
automatically. Grease bottom and
sides of microwave-safe fluted cake
container and sprinkle bottom
wenly with 1/3 cup chopped nuts
or coconut. Carefully pour batter
from one box (2-layer size) cake
mix over nuts, cover with wax paper.
Microwave on
AuCoCo
91Lesta1 minubef
invertt coo
CaramelBiscuitRing:Spread
1/4 cup melted butter and 1/2C
brown sugar in 8-in. round glass
dish. Sprinkle with cinnamon and
112cup chopped nuts if desired.
Arrange 1 can (10oz.) refrigerated
biscuits around edges and place
drinking glass,open end up, in
center. Cover with plastic wrap.
Microwave on Auto Cook Code 3.
Invert onto serving plate, letting
Baconand CheeseTopped
Cornbread:Distribute 1/2cup
chopped crisp fried bacon and
1tablespoon Parmesancheese in
greased8-in. roundglassdish.
Carefully pour batterfrom 1pkg.
(8V2oz.)cornbread mixoverabove
ingredients. Coverwith waxpaper.
Microwaveon AutoCook Code3.
Letstand 5to 10 minutes before
inverting.
dishstand over ring a few minutes
before removing.
-.
Page 17

—
.——
------
pkg. (M3yet’ size)
1
Food cakemix
eggs
3
cupcookingoil
1/2
1-1/3
cupswater
1/4
cupfinelychoppedpecans
In large bow{ place cake mix, eggs,
oil and water. Blend on medium
speedof mixer, about 2 minutes,
until smooth and creamy.
Lightly greasea 16cup plastic
microwave fluted or straight-sided
ring mold. Sprinkle chopped nuts
evenlyover bottom. Pour batter
over nuts.
Coverwith wax paper tucked under
dish and microwave on Auto Cook
Code 91. Letstand in dish 5 min-
utes before turning out.
—
Devil’s
CheCXhb$er
Auto cook code 3
Approx. Cooking Time—16min.
Makes6 to 8 Servings
t
can (20-22oz.) preparedcherry
piefilling
2
cupsdryyelloworwhitecake
mix{1 pkg. [9 oz.] or
1/2 pkg.[17
cup meltedbutter
1/4
1/2
cupcoarselychoppednuts
1
teaspoongroundcinnamon
In 8-in. square glassdish, spread
pie filling.
in smaii bowi, mix together cake
mix, butter, nuts, and cinnamon
until crumbiy. Sprinkle eveniy over
cherriesor, in three rows so cherriesare visibie. Cover with wax
paper and tuck under dish, Microwaveon Auto Cook Code 3.
02.])
D c
AutoCook Code 3
Approx.CookingTime—-fiOmin.
Makes1 (IMn. round)Cake
1/4 CUpbutter
W3cup brownsugar(packed)
1 can (8-1/4 oz.)pineapple
slices
4 maraschinoorcandied
cherries,cutin haif
3/4 cup ail purposeflour
1/2 cupsugar
1-1/2 teaspoonsbakingpowder
1/4 teaspoonsalt
4/4 cupsoftshortening
1 egg
1/3 cup liquidfrompineapple
3/4 teaspoonvanillaextract
in 8-in. round dish piace butter.
Microwave at HIGH (10)for 1 minute untii meited. Sprinkie sugar over
butter. Drain pineappie (saveiiquid)
on papertowels and arrange in dish.
Decorate with cherries. Piacea cus-
tard cup, open side up, in center of
dish.
In smaii mixer bowi place fiour,
sugar, baking powder, sait, shortening, egg, iiquid and vaniiia. Beat
3 minutes on iowes! mixer speed,
scraping bowi constantly first 1/2
minute. Carefuiiy spread batter over
fruit in dish. Cover with wax paper
and tuck under dish. Microwave on
Auto Cook Code 3.
.-.—.—.
..
--
e
-
-.
m?za:–
—
-..
—–
d
—
—
—
—
—
E
—
—
—
—
—
—
—
-
?
—
—
—
—
—
—
—
Page 18

L@ d the I!XJTY’MshelfWmt Ccmkhgisnot
@Do not open door during Auto
cycle. Door may be opened after
oven beepsand the countdown
time is displayed.
~Add %to %
vegetables.
@Most foods should becovered
with lid to dish or wax paper to pre-
cup water to fresh
~ Match the amount of food to the vent spattering to keep oven clean.
sizeof the container. Fill containers
at least
1 full.
Fish,seafood, spare ribs, and meatloaf sould be coveredtightly to
ensure even cooking.
@Be sure outside of container and
inside of oven are dry.
s If food needs additional cooking,
return to oven and useAuto Cook
Code 1.
@Use preference control “l” or “9”
to adjust cook times to suit your
individual tastes.
Food
CannedFoods
Thin foods such as soup, broth,
gravy
Thick foods such ascanned ravioli, 2
chunky souPs, beef stew,ail canned
vegeta-bles“
Leftovers
TV Dinners
(except for those with pasta)
Entrees
Frozen
Such aslasagna, meat& potatoes
TV Dinners
With pasta such as macaroni &
cheese,spaghetti, mexican dinners
with burrittos or enchiladas
Casseroles
With precooked ingredients in a
white sauce such as tuna noodle
casserole,turkey tetrazinni
All others with precooked ingreclientssuch asfranks and beans,
chow mein
With raw ingredients such as ham- 6
burger patty stew, hamaghetti casserole, scalloped potatoes, seafood
casseroles
Chili
Meatsand Seafood
Chicken pieces (up to 3 Ibs.)
Fish Fillets (1 lb.)
Meatloaf (1%lb.)
Hamburger patties (4-5)
Sausage patties (1 lb.)
Pork chops (4-1” thick)
Spare ribs (up to 3 lb.)
Swiss steak (1%lb.)
Chuck roast (up to 5 Ibs.)
Shrimp (up to 1 lb.)
Rice
Reguiar, raw, 1cup
instant, 1 cup
Vegetables
Freshsuch as carrots, artichokes,
cauliflower, broccoli, brussei sprouts
{1 lb.)
Baking potatoes—2-4
Frozen block such as peas, green
beans,spinach, broccoli.
Lima beans
Frozen pouch such as broccoli in
cheesesauce, corn, peas
Alto
cook
Code Container
?vlicrowave-safecontainer 2-3 min./cup
1
matched to sizeof food
2
4 Cook in container
(Seecomments)
4
3
4 2-3 qt. casserole with lid
to dish
5
3 qt. casserole with lid
9
to dish
12x 8 x 2-in glass dish
6
4
glass !oaf dish
8
12x 8 x 2-in. glass dish
4
5
8
7
13x 9 x 2-in. glass dish
7
2 qt. casserole with lid
7
13x 9 x 2-in. glass dish
,1/2qteglass dish with lid
2
2 qt. casserole with lid
6
2
2 qt. casserolewith lid 10-15min.
4
None
6
11/2qt. casserole with lid
2
3
Lay pouch on microwave 7-9 min.
3
safe dish,
II
##
:1
<1
81
#r
II
II
II
It
A#ilil:x.
4 min./cup
4 min./cup
8-10 min.
&10min.
depending
on size
8-10 min.
12-16min.
18-22min.
16-24min.
25-40 min.
8-20 min.
6-9min.
30-35 min.
7-9 min.
7-9 min.
11-17min.
1 hr. 30 min. to
1 hr. 45 min.
60-75 min.
65-90 min.
4-6 min.
21-28 min. Follow instructions on rice package.
5-8 min.
8-16 min.
depending on
number
8-10 min.
12-13min.
(hmnents
Cover with lid to dish or wax paper.
,1
##
If foil tray is no more than 3/4” deep, remove foil
top, return to original box and reclose box. If tray
is
more than 1“ thick, remove food and place in
microwave safedish and cover. If dinner is in
paper board container, remove from box and
cook in original container. If dinner has cake or
brownies, remove before cooking.
Cover with wax paper to prevent spatters.
Cover tightly with plastic wrap to cook evenly.
Cover with wax paper,
Cover with wax paper.
Baste with barbeque sauce. Cover with
plastic wrap.
Cover tightly with plastic wrap to cook evenly.
Place in cooking bag with% cup water. Slit
bag 1“.
Cover tightly to ensure even cooking.
1/4to 1/2cup water.
Add
Pierce with fork and place on oven floor.
Add 2tablespoons water.
Add %cup water.
Make 1“ slit in pouch.
It
rl
Baked apples--4
2 2 qt. casserole with [id 12-14min.
Core appies and fill with butter and brown sugar.
Page 19

T-seeAuRoaChcmpage 20.
Auto Roasl usesthetemperature
probeto cookto thedesiredsewing
temperature.!.Mike T&np Cook/
Hold,which usesa sir@epower
level,Auto Roastisdesignedto use
up go3 powersettingswhichautomaticallyswitchduringroasting,for
evenandtendercookingresults
withoutovercooking.
H
SE
ciw
H toPreRoasts
forAuRoa
H toA R
B k
SBw.!. !
Placetender beef roastson trivet in
microwave-safe dish. Insert probe
from the front horizontally into
center meaty area not touching
bone or fat. Cover with wax paper.
r
Step 1: Touch AUTO ROAST Pad.
Display flashes“Enter Code”.
Touch number pad 3. “START”
flashes.Touch START.Display
showsAUTO.
— —
E?--=
——–
—
E
Rzf2––
——
—–
——
—
—
—.
——.
..—.
~—
—.
—–
—–
—.
—
—
~-
—
—
—-=
——
~—
—.
——
—
———
—
—
—.
—–
—
I
—
—
—
—
Just as in conventional roasting,
only tender roasts should beAuto
Roasteduntil specified internal
temperatures are reached. Less
tender roastsshould be microwaved
by time, according to the Cookbook
hich comes with your oven, Complete information on preparing
roasts for microwaving is in your
Cookbook.
Poultry, pork or ham roasts need
no trivet. Add %cup water to roast
dish, cover with plastic wrap. (For
cooking bag method, see cook-
book,) Insert probe into center
meaty area.
Step 2: At 80°, display switches to
show meat’s interna! %mperature.
Step3: Oven monitors internal
temperature,automatically switching
to lower power as meat’stemperature rises.This helps prevent
toughening or overcooking.
—
—
—–
—–
—
——
—
—-.
—
—
—
—–
-—.
—
~.
——
—–
— ––
—
Placemeat in oven with probe to
the right. Insert cable end of probe
firmly into receptacle on oven wall.
Step 4: After temperature is
reached, oven switches to HOLD
for 1 hr., then shuts off, Hold prevents overcooking while keeping
meat warm,
Page 20

-..
Food Code Temp (Min. per lb.) Minutes
Beef
Tender Roast
Rare 2
Medium
Well
Meatloaf
(loaf or round)
Pork
Loin Roast
Precooked Ham
Poultry
Whole Chicken 5
(3 lb.)
Whole Turkey 5
(Up to 12 Ibs.)
(Insert probe into meatiest area of inner t~gh from b;?; end and p;;a:~l to leg.)
Turkey Breast 20
(Insert probe horizontally into meatiest area.)
*Recommended standing
timebeforeserving.
3
4 170° 17-18
4
4 170° 18-20
1 115° 11-14
Final Approx.Time l-told’
125° 12-14
140°
170°
190° 13-15
190° 13-15
14-16 10-15
15-20
5-1o
5::0
53!0
QWstkanAAnswver$
Q. why wasn’t my roast fully
cookedeventhoughthetemperatureon the displaywascorrec~and
AutoRoastwascompleted.
A. The temperature probe must be
properly inserted when you Auto
Roast.Check your Cookbook to see
what you might have done wrong.
Q. Do some types of trivetswork
betterthan others?
A. Yes.Flat glasstrivets generally
provide more browning to the
bottom of meatsthan plastic trivets.
Also, ceramic ridge-bottomed
roasting dishes usually work well.
Plastic trivets may require meat to
beturned over more often than
glasstrivets do becausethe grid
design
and legs let the bottom Of
the meat stay cooler than glass
trivets do,
Q. Vi/henI’mcookingwithAuto
Roast,whydoesn’tmy roastcontinueto cookduringthehokfing
time’?
A..When your food reachesfinished
temperature, the oven automatically
switches to a lower heat level.The
even temperature that’s maintained
in the food during this holding
period keeps it warm without
overcooking.
20
20
Here’show to Automatic Simmer a
few popular foods. SeeYour Cookbook for more cooking’charts,
recipes and techniques.
Set Auto Simmer like you do Auto
Roast except touch number pad 6.
Display shows AUTO until food is
80°,then switches to show tempera-
ture until food reaches180°.
Oven switches to HOLD when
food’s internal temperature reaches
180° and maii”!tainsthat temperature
until food isdone. If stirring is recommended, you can resetthe oven by
retouching START.Touch CLEAR/
OFF when cooking is finished.
AJs c
Food
Beef
Pot Roast*
Stew
Chili
Chicken*
Stewing
Broiler/Fryer
Ham or Pork
Roast
soup
Stock/Vegetable
Split Pea
*For frozen, add 2 to 3 hours,
Agwoximate
~~me/Hrs.
6-8
6-8
11-13
11-12
4-6
4-6
3-6
72-15
Page 21

HC‘ Au
Step 1: Placefrozen food in a
microwave-safe dish, put it in the
oven and close the door. (Food
frozen in paper or plastic can be
defrosted in the package.
Your microwaveovenautomatically
calculatesdefrostingtime,changes
powerlevelsduringdefrosting,tells
youwhen toturn your food,and
holdsfood fora shorttimeafter
defrostingtime isup to finishthe
thawingofthe insideof thefood.
Here’swhat you do:
E3dcYoSal
toAukDefrost
First, check the Auto Defrost chart
below or the one at the bottom of
the oven when you open the door.
v>&
Step 2: Touch AUTO DEFROST
pad. “Enter Code” flashes on
display.
They show minimum and maximum
food weights for each code
number.
Then, if your food’s weight is stated
in pounds and ounces, usethe
- chart below to conveti ounces to “
tenths (.1) of a pound.
Sfe~ 3: Enter selected code from
Ca’werchart
1to 2 ounces
3 ounces
4 to 5 ounces
6 to 7 ounces
8 ounces
9 to 10ounces
ounces
11
12to 13ounces
14to 15ounces
= .1 pound
= .2 pounds
= .3 pounds
= .4 pounds
= .5 pounds
= .6 pounds
= .7 pounds
= .8 pounds
= .9 pounds
cha’rt.For example, ground beef
calls for Code 3.
Step 4: Enter weight. Forexample,
touch number pads 3 and Ofor
weight of 3 pounds. Display shows
3.0,Code 3, and “Start” flashes.
Note: If ERRORappears after you
enter food weight, check the Code
Chart to make sure weight corresponds to the code number you
entered.
Step 5: Touch STARTpad. Defrost
time begins counting down on
display.
Step 6: When half the defrosting
time is up, the oven signals and
“TURN” flashes in the display.
Open the door and turn your food
over.
Step7: Close the door and touch
the START pad—defrosting will not
continue until you do. Display
shows remaining defrosting time
counting down.
Step8: When defrosting time is up,
oven automatically switches to a
HOLD period (5seconds for Code
3). HOLD shows in display.
Step9: When holding time is up,
the oven signals, “END” flashes,
and the oven turns off.
.——
—
—
—.
—-
-.
~.-
—.
—
—
—
-–.
—
~.
—.
—
—
—
—
—
~—–
—
—
—–
—–
—
—
—
—
—
—
—
—
—Jr
—- -
—
—
—
—
—
—
—
—
—.
—
—
—–
—–
—
—
—
—
—
—
—
—–
—.
—
~—
—
—
—
—–
—–
—.
—
—.
—
—
~
—_–—
—
—
Foods
Chicken Pieces
Fish
Ground Beef
Roasts, bone in
Roasts,boneless
Steaks
,;@%.
@
‘In Auto Defrost, it is necessary to let the meat stand during holding time to finish
*<-.
“ defrosting. Youmay take the meat out of the oven at this time if you prefer,
anChops
Code
1
.5to 4.9’pourids
2 .5to 3.9 pounds
3 .5to 5.9 pounds
4
5
3.0 to 5.9 pounds
3.0to 5.9 pounds 20 minutes
6 .5to 3.9pounds
Time*
5 seconds
5 seconds
5 seconds
20 minutes
5 seconds
21
Q. I enteredAuto!DefrosiCede 1,
thenthenumber4 for4 poundsof
chicken.The displayflashedSTART
butwhen ! touched*heSTARTpad,
“ERROR”flashed.Why?
A. You must enter4 (for pounds)
and O(for ounces). Touch CLEAR/
OFF and begin again. “ERROR” will
also flash if a wrong weight for a
particular code is entered.
-.
=------
.
------- ---
Page 22

The Elefi=d setting is designed for
.—
eventhawing necessa9 for large
amountscdfoodand is one ofthe
mostimportantadvantagesof a
microwaveoven.
~ Power Level3 is automatically set
for defrosting, but you may change
this for more flexibility.
@Seeyour Cookbook for defrosting
help.
To become better acquainted with
the defrost functions, defrost frozen
pork chops by following the steps
below.
Step t: Place package of frozen
chops in the oven and close door.
Step 3: Touch number pad “8” then
MIN Pad. “Def Time”, 8:00and
Power3 are displayed.
a An
Q. When !pressSTART,i heara
dui!thumpingnoise.Whatisit?
A. This sound is normal. It is letting
you know the oven is using a Power
Levellower than HIGH.
Q. Can I Defrostsmall itemsin a
hurry?
Step 4: Touch START. “Def Time
Left” shows and time counts down
on display. When cycle is completed, “END” flashes, the oven signals and automatically shuts off.
Step 5: Turn package over,close
door and repeat Steps 2,3 and 4.
Step & When oven signals, “END”
flashes and oven shuts off. Remove
package and separatechops to
finish defrosting.
DefroTi
@Foods frozen in paper or plastic
can be defrosted in the package.
@IFor evendefrosting, many foods
needto be broken up or separated
part of the way through the defrost-
ing time.
Homemade djnners can be frozen
@
in shal!ow foil trays and heatedfor
later use. (Do not heat on DOUBLE
DUTYTMshelf.) Select foods which
microwave well.
@Pre-packaged frozen dinners can
be defrosted and microwave
cooked.
@Check your Cookbook for other
defrosting tips.
A. Yes,but they will need more frequent attention than usual. Raise
the Power Level after entering the
time by touching POWERLEVEL
and 7 or 10. Power Level 7 cuts the
time about in 1/2;Power Level 10
cuts the time to approximately%.
During either, rotate or stir food
frequently.
Q. Can I openthe doorduring
DEFFKNT tocheckon theprogress
of myfood?
A. Yes.You may open the door at
any time during microwaving. To
resume defrosting, close the door
and press START.
Q. Whydon’tthedefrostingtimes
in the Cookbookseemrightfor
myfood?
A. Cookbook times are average.
Defrosting time can vary according
to the temperature in your freezer.
Set your oven for the time indicated
in your Cookbook. If your food is
still not completely thawed at the
end of that time, re-setyour oven
and adjust the time accordingly.
Q. Can !seBecta PowerLevelother
thanautomaticPowerLevel3 for
defrosting.?
A. Yes.Some smaller foods may be
defrosted quicker on higher Power
Levelsbut for even,carefree defrosting, Power Level 3 issuggested.
Check the chart in the Cookbook
for specific times and Power Levels.
Q. When I’m enteringminuteswith
no secondsdo ! needto touch“O”
then“O”?
A. No. Youtouch the number pad
then the MINIPadwhich automatically enters two “00”.
22
Agi%3a-
“+
-.
Page 23

—
The Time Cookfeatureallowsyou
— topresetthecookingtime.The
ovenshutsoffautornalica!ly.
Power Level10is automatically set
for time cooking, but you may
change this for more flexibility,
Seeyour Cookbook.
To become better acquainted with
Time Cook function, make acup of
coffee by following these steps
below.
/
Step ?: Fill a cup 2/3full of water
and add 1teaspoon of instant
coffee. Usea cup that has no metal
decoration. Place cup in ovenand
closedoor.
—
Step 2: Touch TIME COOK. The
display shows :0 and Power 10.
“Enter Cook Time” flashes.
Step4: Touch START.“Cook Time
Left”, Power 10,and time counting
down show on display.
Step5: When time is up, oven
sounds 3 times. Display flashes
“END”. Oven, light, and fan shut off.
Ch.Nxmmsa A
Q. ! set my oven for the time called
forin the recipebutat the end of
thetimeallowed,my dishwasn’t
done.Whathappened?
A. Since house power varies due to
time or location, many Time Cook
recipes giveyou a time range to
prevent overcooking. Set the oven
for minimum time, test the food for
doneness, and cook your dish a
little longer, if necessary.
CL! want to cook my dishon a
PowerLevelotherthanHIGH, what
do !needto do?
A. To change the Power Level,
touch the POWERLEVEL pad.
“Enter Power” flashes on the display panel. Enter the desired
number.
Q. Can I interruptmy Time Cook
functionto checkthefood?
A. Yes.To resume cooking, simply
close the door and touch START.
NOTE: Microwave power will not
come on until you are ready. You
must touch START for cooking to
begin.
Q. i touchedthe numberpadsand
selectedmy powerievel.When i
touchedSTART,however,my oven
didn’tcome on. Why not?
A. The TIME COOK pad must be
touched before setting the number
pads or else your oven will not
begin cooking.
—
——-
—
--–
—
—
—.
—
—
!
m
—
—
—– –-
—.
—
—
—
—
——
—–
-
. ..
—..—
,—
—
—
—
—
~.
—.
—
—–
—–
—–
E2%E$-
—
—
—
—–
—
Page 24

.—
..—
For many foods, internaltempera-
ture is the best test d doneness.
FUmts or poultryarecookedto
yourpreferencewhentemperature
cooking.Heatingor reheatingfoods
accuratelytoa sewing#temperature
YOUdesireissimpleandeasy.
Ternp Cook/Hdcl takestheguess-
workout of cookingbecausethe
ovenautomaticallyswitchesto
HOLD settingafterreachingthe
presetfoodtemperatureandrnaintairwthat temperatureuntilyou
touchthe CLEARKWFpad.
The Probe
The temperature probe is afood
thermometer that gauges the
internal temperature of your food;
it must be usedwhen using Temp
Cook/Hold or Auto Roast. Follow
the directions for use and insertion
on page 19.
How to T’mp cook
a Rol!ed Beef Rib Roast
to
Step 1: Insert temperature probe as
directed in Cookbook and attach
probe securely in oven wall. Close
the door.
Step 2: Touch TEMP COOKA+OL13.
The display panel shows O, F,and
Pcwer 10.“Enter Temp” flashes.
Step 3: Touch 1,3,0 for 130°.
“Ternp”, 130 Fand Power 10show
on display. “START” flashes.
Step 4: Touch POWERLEVEL pad.
“Enter Power” flashes. Touch 5 for
MEDIUM power. “Temp”, 130 Fand
Power 5 shows on display.
step 5: Touch START. If internal
temperature of the roast is less than
80°, display will show “COOL” or if
temperature is 80° or above,display
shows temperature counting up.
Step& When 130° is reached,the
oven will sound and flash HOLD.
The oven will then hold the
temperature.
Step 7: Touch the CLEAR/OFF pad
to stop the cycle.
Step 8: Removeprobe and food
from the oven.
Tips
@Usea lower power levelsetting; it
will heat evenly even though requir-
ing more time.
* Be sure frozen food has been
completely defrosted before insert-
ing probe. Probe may break off if
used in frozen foods.
@Always insert probe into the
center of meaty areas;take care not
to tcuch the fat or the bone.
@Insert probe as horizontally as
possible into foods asdirected in
the recipes. Make sure the handle
does not touch the food.
@Usethe clip to keepthe probe in
place while heating.
@Cover foods as directed in Cook-
book for moisture control and quick
heating,
a A
(
AfterI followedfhestepsand
touchedSTART,“HMKN3”flashed
in the displayanda signalsounded.
Whatiswrong?
A. “ERROR”flasheson display if
you setthe temperature either below
80° or greater than 199°. The oven
tells you betweenthe flashing of
“ERROR”what the incorrect entry
was that you set. Tore-enter, touch
CLEAR/OFF pad and begin steps
again.
Q. Arethereanyfoods1can’tTemp
cook?
A. Yes.Delicate butter icings, ice
cream, frozen whipped toppings,
etc., soften rapidly at warm temperatures. Batters and doughs as well
asfrozen foods are also difficult to
cook precisely with the probe. It is
bestto Time Cook these foods.
Q. Whydid “PROBE”flashonthe
displayafter1touchedStart?
A. “PROBE” will flash on the display
if you havenot securely seatedthe
end of the probe into the receptacle
in the oven wall or if you touch
TEMP COOK/HGLO and haveforgotten to usethe probe.
Q. Can I leavemy probein the oven
if it’snot insertedinthefood?
A. No. If the probe is left inside the
oven, touching the oven wall, and
not inserted in food, you may
damage the oven.
Q. Can I Temp Cookdifferent
portionsoffoodat different
temperatures?
A. Yes.The temperature probe
givesyou the freedom to cook different portions of food at different
temperatures to suit individual
eating styles. Simply place the
probe in the food and change the
temperature setting as needed.
A?4%%-
24
Page 25

~- The iWN/SEC Timer, hasthree
_ Ming functions:
* Noperatesasa minutetimer.
* Kcan be setto delaycooking.
* #ican be used
as a holdsetting
afterdefrosting.
The MIN/SEC Timer operates
without microwave energy.
to Time a
FW3Cd
‘!
Touch fvl\N/SECTIMER pad.
Displayshows :0. “Enter Time”
fiashes.
2.Touch number pads3,0 and
O(for 3 minutes and no seconds).
Display shows 3:00and HOLD.
3.Touch START. Display shows
Hold Time Left and time counting
down.
4.When time is up, oven signals,
disp!ay flashes “END” and shows
time of clay.
How to Defrost, Hold and
Time cook
Let’ssay you want to defrost a
frozen casserolefor 15minutes,
hold for 10minutes and then Time
Cook for 25 minutes. Here’s how
to do it:
Step f: Takecasserolefrom freezer
and place it in the oven.
Step 2:Touch MANUAL DEFROST
pad. ‘
Display shows Enter Def Time, ;0,
and Power3.
$Nep3: Touch pads 1,5 and MIN for
15minutes defrosting time. Def
Time, 15:00,and Power3 appear on
display.
Step4: Set hold time by touching
MilWSEC TIMER pad. Display
shows Enter Time and:0
Step 5:Touch pads 1,0, and MIN
for 10minutes holding time. Display
shows 10:00and HOLD.
Step & Touch TIME COOK pad.
Display shows Enter Cook Time,
:0,and Power 10.
Step 7:Touch pads2,5, and MIN
for 25 minutes of cooking time.
Display shows Cook Time, 25:00,
and power 10.
Step8:Touch START pad. Display
shows Def Time Left, Power 3, and
15:00counting down.
As each function is automatically
performed, display shows the
information you entered as you set
up the oven to defrost, hold and
cook.
Cma A
Q. Whatwill happenif I accicfental!y
reversemydefrost,holdand cook
instructions?
A. The oven automatically rear-
rangesyour program. Defrosting
always comes first, then hold, and
then the cooking function.
Q. Can !defrostand holdonly?
A. Yes,Sometimes you may only
want to defrost afood, hold it, and
cook it iater. Al; you needto do is
program in Defrost and amount oi
time. Then program Hold and the
amount of time. Besure to put the
thawed dish in the refrigerator
promptly.
NOTE: Let foods remain at room
temperature only as long assafe.
Times will vary.
Q. i programmedmy ovenfor a
specificdefrostingtime but it
defrostedlongerthan necessary.
Whathappened?
A. When instructions conflict, the
oven carries out the last instruction.
Youmay haveset the oven to
defrost for 4 minutes, hold for
2 minutes, and then defrost for
6 minutes. In this case,the oven
would defrost for 6 minutes and
hold for 2 minutes and ignore your
first defrost instruction.
~–
—
-—
-
-—-
-—
-
&
—
-
-
-
-
-
-
—
—
E
—
iRi3i%
-
-
-
M#z --
-
—.
-.
-.
=—
—
-.
-—
—
—
—
—
=
-
- =
—
. .
=
—
—
—
-
-
—
-
-
-
—
—
—
-
Page 26

Your cwen is designedto giveyou
Cwe
-Ass&
—- — —..———
thebestresultsin baking,broiling,
androastingwhen usedas recommended.Beforeusingyouroven,
readthe directionsforsettingand
usingal!of the controlsandtimer.
L@ht
shF%3
Light comes on automatically when
AUoven m-w,
MhT
door is opened or use switch on
window door to turn it on when
door is ciosed.
oven Sheh
When the shelves are correctly
placed on shelf supports they are
designed with stop-iocks to prevent
them from coming out of the oven
or tilting when food is placed on
them.
TO REMOVE, lift up rear of shelf
and pull forward with stop-locks
aiong top of shelf support.
TO REPLACE, insert shelf with
stop-locks resting on shelf supports
and push toward rear of oven untii
it faiis into correct position under
shelf supports.
The oven has four sheif supports
marked A (bottom), B, C and D
(top). Shelf positions for cooking
food aresuggested on Baking,
Roasting and Broiling pages.
OvenTimer Controls are designed
to automatically start and stop certain oven functions (TIME BAKE or
CLEAN). Dials aretimed by a spe-
cial Clock with index marks
(denoting numerals) and hands.
(For iocation see page 6.)
TO SET CLOCK, push in the center
knob of Minute Timer and turn the
Clock hands to correct time, then
let knob out.
TO SET MNWJTETIMER, turn knob
to desired minutes. (Knob must be
out to set Minute Timer.) Minute
Timer wiil buzz when time has fin-
ished and must be turned off
manually,
Usethe Microwave Oven Clock for
easy reference to time of day.
~
26
....
--
Page 27

- Hotoset
—.=—.-
“%&%w~~~~
o h
Sk BakingCharton page28.
tep 1: Placeshelf on embossed
shelf support “B” or as indicated on
Baking Chart, page 28.
Step 2: After making sure that the
oven door is closed, turn the OVEN
SET Knob to BAKE. Oven “On”
Light will come on and remain on
as long as OVEN SET Knob is
on BAKE.
Step 3:Turn OVENTEMP Knob to
the temperature called for in recipe.
Oven Cycling Light comes on and
remainson until preset oven tem-
perature is reached. It reappears
eachtime oven temperature drops
below preset temperature.
tep 4: You may set your Minute
imer to the desired cooking time
as indicated in your recipe. If your
cooking time is longer than sixty
minutes, Minute Timer must be
reset.
Most foods cook satisfactorily
without preheating. If preheating is
required, put your dish promptly in
the range after Oven Cycling Light
goes out.
Step5: Placefood inside the oven.
Make sure at least 1“ of space is left
between the cooking container and
the oven wall for proper heat circulation. Close the oven door.
NOTE: Avoid opening your oven
door frequently. This could cause
undesirable results in your baking.
Only check foods at the minimum
time of the recipe. Then cook
longer if necessary.
Step& When the BAKE cycle is
complete, turn off heat. When
cooking food for the first time in
your oven, use the time on your
recipe as a guide. Be sure foods are
done before removing from oven.
I’toT’B
Your Automatic OvenTimer controls
your Time Bake feature. When you
Time Bake,your oven can be preset
to start and stop automatically if
you are not home.
Step1:Be sure the range Clock
shows correct time of day since
Clock controls the Oven Timers.
Start dial pointer must indicate
same time of day as on Clock. If
you want the oven to turn on at a
later time, set that time by pushing
in knob on Start dial and turn
pointer to time that you want oven
to start. (There’s no needto set
Start dial when starting time is the
present time of day.)
Step2: To determine Stop time, add
the food’s cooking time to time set
on Start dial. Push in knob on Stop
dial ~nd turn pointer to time oven is
to turn off.
Step3:Turn OVEN SET Knob to
TIME BAKE. Oven “On” Light
comes on immediately even if the
Start time is later.
Step4: Turn OVEN TEMP Knob to
temperature setting,~
~. Your oven automati-
cally turns on and off at the times
you set.
Step5: Removefood and turn OVEN
SET Knob to OFF.
.
~
——.—.-
—
—r
—
—
—r
—
—–
—
—
—
K
—
—
—
—
—
—
—
—
—
—
——
-––—
—-.
—
—
—
~=:
—
E
—
—
—
—
——
——
—
—–
—
—
—
—
—-
E
‘-
—
27
—
——
Page 28

1. Aluminum pans conduct heat quickly. For most conventional oven heat 25° if lighter crusts are desired. Preheat cast iron for
—
—
baking light shiny finishes generally give best results beCaUSethey
prevent overbrowning in the time it takesfor heat to cook the
center areas. Dull (satin-finish) bottom surfaces of pans are
recommended for cake pansand pie plates to be sure those areas
brown completely.
Z Dark or non-shiny finishes, also glassand pyroceram, generally
absorb heatwhich may result in dry, crisp crusts. Reduce
baking some foods for rapid browning when food is added,
3. Preheating the oven is not always necessary,especially for
foods which cook longer than 30 or 40 minutes, For food with
short cooking times, preheating gives best appearance an?
crispness.
4. Open the oven door to check food as little as possible to prevent uneven heating and to saveenergy,
_-
Fwd
E3read
Biscuits(%-in.thick)
Coffeecake
Corn breador muffins
Gingerbread
Muffins
Popovers
QuickLoaf Bread
Yeastbread(2loaves)
Plainrolls
Sweetrolls
Cakes
(withoutshortening)
Angelfood
Jelly roll
Sponge
Cakes
Bundtcakes
Cupcakes
Fruitcakes
Layer
Layer,Chocolate
Loaf
a3ddes
Brownies
Drop
Refrigerator
Rolledor sliced
Fruits,
Other I!MswWS
Bakedapples
Custard
Puddings,Riceand
Custard
Pies
Frozen
Meringue
Onecrust
Twocrust
PastryShell
M&3edkwveous
Bakedpotatoes
Scallopeddishes
Souffles
Container
ShinyCookieSheet
shelf
Position
B,C
Owen
Temp.
400°-475°
?ime9
Min.
1
co
Cannedrefrigeratedbiscuitstake
2-4min. lesstime.
ShinyMetal Panwith
B,A ‘
350°-4000
2
Satin-finishbottom
CastIronor Glass
ShinyMetalPanwith
B
B
400°-450°
350°
2
4
Preheatpanfor crispcrust.
Satin-finishbottom
ShinyMetalMuffin Pans
DeepGlassor CastIron Cups
A, B
B
400°-4250
375°
2
4
Decreaseabout 5 min.for muffin mix.
Or bakeat450° for 25 min.,then at
350° for 10-15min.
Metalor GlassLoafPans
Metalor GlassLoafPans
B
A, B
350° -375°
375° -425°
4
4
Darkmetalor glassgivedeepest
browning.
ShinyOblong or Muffin Pans
ShinyOblong or Muffin Pans
Aluminum TubePan
MetalJellyRoll Pan
Metalor CeramicPan
Metalor CeramicPan
ShinyMetal Muffin Pans
A, B
B,A
A
B
A
A, B
B
375°-4250
350°-3750
325°-3750
375°-4000
325°-3500
325°-3500
350°-3750
1
2
30-55
10-15
45-60
45-65
20-25
Forthin rolls, Shelf B maybeused.
Forthin rolls, Shelf B maybeused.
Two piecepan is convenient.
Line panwith waxedpaper.
Paperliners producemore moist
crusts.
Metalor GlassLoafor
TubePan
ShinyMetal Panwith
A, B
B
275° -300°
350”-375°
2-4hrs.
20-35
Use300° and Shelf B for smallor
individual cakes.
Satin-finishbottom
ShinyMetal Panwith
B
350°-3750
25-30
Satin-finishbottom
Metalor GlassLoafPans
Metalor GlassPans
CookieSheet
.
CookieSheet
CookieSheet
Glassor Metal
GlassCustardCupsor
Casserole(setin pan of
notwater)
GlassCustardCupsor
B
B,C
B,C
B,C
B,C
.—.—
A, B,C
B
B
350°
325°-350°
350°-400°
400°-425°
375°-4000
350° -400°
300°-3500
325°
40-60
25-35
10-20
6-12
7-12
30-60
30-60
50-90
Barcookiesfrom mix usesametime.
Use Shelf C and increasetemp. 2550° for more browning.
Reducetemp. to 300°for largecustard. Cook bread or rice pudding
with custardbase80to 90 minutes.
Casserole
‘oil Panon CookieSheet
A
400°-4250
45-70
Largepiesuse400° and increase
time,
Spreadto crust edges
B,A
325°-3500
15-25
Toquickly brown meringueuse
400° for 8-10 min.
31assor Satin-finishMetal
Slassor Satin-finishMetal
21assor Satin-finishMetal
A, B
B
B
400° -425°
400°-4250
450°
45-60
40-60
12-15
Custardfillings requirelowertemp.,
longer time.
A%wajet on OvenShelf
Nassor Metal
Yass
A, B, C
A, B,C
El
325°-4000
325°-3750
300° -350°
60-90
30-60
30-75
Increasetime for largeamount or
size.
—
28
Page 29

f
!iii
SeeRoastingCharton page30.
~ Rep 1:Check the weight of the
meat and place, fat side up, on the
ack in the broiler pan that came
with your range.This helps the
meatto basteitself.
$Nep2: Useshelf position “A” or
“B”; or the one indicated on Roasting Chart, page30. PlaceOvenShelf
on correct embossedshelf support.
Forvery tall roasts, removesecond
oven shelf.
Step 3:Turn the OVEN TEMP Knob
t. 3250.(The exception is small
poultry which is roasted at 3750.)
Step 4: Close the oven door and
—
turn the OVEN SET Knob to BAKE,
- Oven“On” Light comes on and
—
stayson until OVEN SET Knob is
urr?edto OFF.Oven Cycling Light
omes on and remains on until
temperature is reached.
Step 5: Placeyour meat inside the
oven, making sure the pan is not
touching the oven walls or door.
Ti
@Be sure meat iscooked to your
satisfaction. Most meats continue to
cook slightly while standing after
being removedfrom the oven,This
should be taken into consideration
when determining your cooking
time.
@Always use a roasting pan that
fits the size of your meat.A roast
placed in a pan too small for its size
will drip overthe edge.
@You may cook frozen meat roasts .
without thawing. However,you
must allow more cooking time. For
large roasts,add 10-25minutes per
pound. For roasts under 5 pounds,
add 10 minutes per pound.
@To slow down surface browning
on turkeys, you can usea foil “tent”.
The tent-shaped foil should be laid
loosely over the poultry so the heat
can circulate under the foil.
~ Most frozen poultry should be
thawed before cooking to ensure it
is done evenly. Some, however,can
be cooked successfully without
thawing. Check the packer’s label
for specific directions.
See Broiling Charton page3fl.
Step 1: Placethe meat on the
broiler rack in the broiler pan.
Always usethe rack so fat drips
into the broiler pan.
Step 2: Position oven shelf as indi-
cated on Broiling Chart, page31.
Step 3: Turn the OVEN SET Knob
and OVEN TEMP Knob to BROIL.
Both OvenIndicator Lights come on.
Step4: Leaveoven door ajar about
3 inches (except chicken, see
below).The door will stay open itself
yet the proper temperature will be
maintained in the oven. During
cooking, turn the food only once.
Step 5:Turn OVEN SET Knob to
OFFand servefood immediately.
Leavethe pan outside the oven to
cool during the mealfor easy
cleaning.
C2-
/
-
S#2Ba-”.
w
S
E
.
E&&a:::‘
m
~
—..
—-
—
—
—
—
.
—
—
—
—
—
—
—
—
—
—
—
—
—
—
—
—
—
—
Step 6:Turn off the heat when the
roasting cycle is complete.
29
* Foil may be used to line the
broiler pan and rack. However, be
sure to cut openings in the foil to
correspond with the slits in the
broiler rack so fat drips into the pan
below.
@For all weights of chicken, broil
doorclosed.
with
~ Placing food closer to the top of
the oven increasessmoking, spattering, exterior browning on the
meat and the possibility of food tat
catching on fire. Always keep rack
3-5 inches from the broiling unit.
iiazs%——
—.
—–
—–
—
——
—.
—.
—
——
—–
—
—.—
—
—–
—
-–
Page 30

1. Position oven shelf at B for small-size roasts (3 to 7 Ibs.) and
-—
at A for larger roasts.
2. Place meat fat side up or poultry breast-side up on broiler
pan or other shallow pan with trivet. Do not cover. Do not stuff
poultry until just before roasting. Use meat thermometer, for
more accurate doneness. (Do not place thermometer in
stuff ing.)
3. Remove fat and drippings as necessary. Baste as desired.
4$.S4macting thuwe recommended for roasts is 10 to 20 min. to
allow roast to firm up and make it easier to carve. It will rise
about 5° to 10° internal temperature; to compensate for temperature rise, if desired, remove roast from oven at 5° to 10° less
than temperature on chart.”
5. Frozen roasts can be conventionally roasted by adding 10
to 25 min. per pound more time than given in chart for refriger-
ated. (10 min. per lb. for roasts under 5-lbs.) Defrost poultry
before roasting.
Type
Tender cuts: rib, high quality
sirloin tip, rump or top round*
Lamb Legor bone-in shoulder*
Vealshoulder, leg or loin*
Pork loin, rib or shoulder*
l-lam,pre-cooked
Ham,raw
●Forboneless rolled roasts over 6-in.
Poultry
Chicken or Duck
Chicken pieces
Turkey
ov
-
325°
325°
325°
325°
325°
325°
k,add 5to 10 min. Derlb. to times qiven above.
325°
375”
325°
Doneness
Rare:
Medium:
Well Done:
Rare:
Medium:
Well Done:
Well Done:
Well Done:
To Warm:
Well Done:
Well Done:
Well Done:
Well Done: 20-25
ApproximateRoastingTime,
in iMirwu8esperPound
3
t 5-RX%
24-30
30-35
35-45
21-25
25-30
30-35
35-45
35-45
10reins. per lb. (anyweight)
Under YOlbs.
20-30
3 to5-lbs.
35-40
35-40
oto 45 [k.
‘i
I
6
18-22
22-25
28-33
20-23
24-28
28-33
30-40
30-40
t oto 45 Ibs.
17-20
Over5 Ibs,
30-35
Ower15 lbs.
15-20
t a-lb%
huternd
Temp.”F
130°-140°
150°-160°
170°-185°
130°-140°
150°-160°
170°-185°
170°-1800
170°-180°
125°-130°
160°
185°-190°
185°-1900
Inthigh:
185°-190°
30
Page 31

...——
-----
- —-
—..-. .—.-..-..
1. Always use broiler pan and rack that comes with your oven.
Itis designed to minimize smoking and spattering by trapping
juices in the shielded lower part of the pan.
2. Oven door should be ajar for most foods; there is a special
osition on door which ho!ds open correctly.
. For steaks and chops, slash fat evenly around outside edges
of meat. To siash, cut crosswise through outer fat surface just
to the edge of the meat, Use tongs to turn meat’over to prevent
piercing meat and loosing juices. broiled by preheating the broil heater and positioning the oven
4L If desired, marinate meats or chicken before broiling. Or,
brush with barbeque sauce last 5 to 10 minutes only.
~. When arranging food on pan, do not let fatty edges hang
over sides, which could soil oven with fat dripping.
+S.Broiler does not need to be preheated. However, for very
thin foods or to increase brownina, cweheatif desired.
7. ll%ozert SWak can be conv~nt’ionally broiled by positioning the oven shelf at next lowest shelf position and
increasing cookinq time qiven in this chart 1%times per side.
8. If your-range is-conne~ted to 208 Volts rare steaks may be
shelf one position higher.
s
~
~
?3.—
— w
-––
—
—
—
—-
-
—
~
— .
—
—
—
—
—
—
—
Food
Well done
Rare
Medium
Well Done
Rare
Medium
Well Done
c
—
—
dkery Products
Toaster Pastries
English Muffins
L
(6 to 8-oz. each)
(p:ecooked)
Lamb chops
Medium
Well Done
Medium
Wie!lDone
VYier%&Ysand similar
precooked sausages,
bratwurst
—
Quantity
8md/or
Thickness
%-lb. (about 8
thin slices)
I
l-lb. (4 patties)
%to 3/q-in.thick
1 inch thick
(1-1’/2Ibs.)
1%-in. thick
(2-2’/2lbs.)
1 whole
(2 2’/2-lbs.),
split lengthwise
t
2-4 slices c
1 pkg. (2)
2-split
2-4
l-lb. fillets %to
%-in. thick
l-in. thick
2 (% inch)
2 (l-in. thick)
about 1 lb.
2 (1 inch)
about 10-12 oz.
2 (1’/2inch)
about 1 lb.
l-lb. pkg. (10)
shelf
$%mmiom
c
First Wife
Time9Min.
3%
c 7 4-5
c
c
c
c
c
c
A 35 10-15
c
B 13-16
c
B
7
9
13
10
15
25
i
1 ‘/2-2
3-4
5
8Ham dices
I
c
B
c
c
c
B
c
10
13
8
10
10
17
6
Time, Min.
31/2
7
9
13
7-8
14-16
20-25
‘
(Do not
turn
over)
5
8
10
13
4-7
10
4-6
12-14
1-2
Side
Comments
Arrange in single layer.
Space evenly.
Up to 8 patties take about same
time.
Steaks less than l-in. cook through
before browning. Panfrying is
recommended.
Slash fat.
Reduce times about 5-10 min. per
side for cut-up chicken. Brush each
side with melted butter. Broil with
skin side down first and broil with
door closed.
Space evenly. Place English muffins
cut-side-up and brush with butter, if
desired.
Cut through back of shell. Spread
open. Brush with melted butter
before and after half time.
Handle andturn very carefully.
Brush with lemon butter before and
during cooking if desired. Preheat
broiler to increase browning.
Increase times 5-10 min. per side for
lY2.in. thick or home cured.
.-
Slash fat,
Slash fat.
If desired, split sausages in half
lengthwise into 5 to 6-in. pieces.
.———
—.
—-.
—.
—-
—–
—
—
—
—
e:
—
~—
—.
—–-
—
—
—-
—
—–
—
.
31
Page 32

if done properly,it will takeonly
a few moments to startMe seif-
c!eaning cycle on your oven. After
setting your ovento self-clean, a
highheattemperatureremovesthe
soilinthe ovencavity.Thedirtwill
thendisappearbyturninginto an
ashwasteor evaporatinginto an
odorlessandcolorlessvapor.When
thecycle iscomplete,a!lowyour
rangeto cool.
withyour seif-cieardng oven, we
recommend 2 hoursfortheaverage
cleaningfunction,butin some
casesa longercleaningtime, up to
3 hoursmay be necessary.In order
to judge the degree of soil, look at
the oven floor and walls. Light
spatter and thinner spills would
generally need only 2 hours cleaning. Heavy greasy spills and spatter
on the oven interior would need up
to 3 hours.
Step f: Removeall cookware and
food as well as heavysoil deposits
from the oven.Clean spatters or
spills around the oven door, rectangular flanges, and gasket. Then
closethe door.
0’
1
Step 2: Turn OVEN SET Knob and
OVEN TEMP Knob clockwise to
CLEAN. The control will snap into
final position when the CLEAN posi-
tion is reached.
Step 3: Push and hold Latch
ReleaseButton while latching door.
OvenTimer:
@Push in knob on Stop (Clean)
dial and turn to the time you wish
oven to stop cleaning. Add the
number of hours neededfor
cleaning to the presenttime of day.
@Cleaning Indicator Lights come
on when all steps areset properly,
@If you wish to clean at a later time
set Start dial to that time.
NOTE: A slight odor may be
detected especially during the first
few cleanings. Do not be alarmed.
This is normal during the selfcleaning cycle.
When cleaning temperature is
reached, Lock Light comes on and
door cannot be unlatched until
Lock Light goes off.
Step 5:When Lock Light goes off,
push and hold the Clean Lock
Button while sliding Latch to OPEN.
Turn OVEN SET Knob to OFF.
——
—
1(=J
Step6:Turn OVEN SET Knob to
OFF.
\
Panin microwaveovencomeson
whenLockLightisglowingduring
self-cleaningoperation.You may
stilluseyourmicrowaveatthis
time.
Qua A
Q. Why istherestillsomeblacksoil
leftaftercleaning?
A. You did not time the oven to
clean long enough. This deposit will
be removed in later cleanings.
Q. if my ovenclockisnotworking
can i stillself-cleanmyoven?
A. No. Your Automatic Oven Timer
usesthe range clock to help start
and stop your self-cleaning cycle.
Q. Why did the LockLightcome on
when 1firstsettheovenfor CLEAN?
A. Lock Light glowing indicates that
oven is too hot. Turn OVEN SET
Knob to OFF and open oven door
to COOIthe internal cavity. After a
short period of time, reset controls
for cleaning.
Q. MY ovenshelveshavebecome
grayafterseveralcleanings.Isthis
normal?
A. Yes. After many cleanings, the
shelvesmay lose some luster and
discolor to a deep gray color.
Q. Why do i haveashleft in my
ovenaftercleaning.
A. Some types of soil will leavea
deposit which is ash. It can be re-
movedwith a damp sponge or cloth.
Q. What shouldIdo ifexcessive
smokingoccursduring cleaning?
A. This is caused by excessive
greaseand you should switch the
OVEN SET Knob to OFF. Open
windo,yvsand doors to rid room of
smoke. Allow the oven to cool for at
least one hour before opening the
door. Wipe up the excess grease
and resetthe clean cycle.
32
W
Page 33

F&Me:Let wen partscod beforecleaningmanually.
DM
clean the bake unit or broil unit. Any soil will burn
NOTE:
a
—
—
—
—
m
FzsmE&--
—
B &
O
i
P
S
S
D
S
S
S
n
a
a d
a
a
a
a
s
a
a
s
r
t
—.
—.. —
—.>, —
W
—
—
—
—
—
—
—r–
—
~—
—.
—
——
—
—
—
—
s
m m t
“Spillage of marinades, fruit juices, and basting materials containing acids may cause discoloration. Spillovers should be wiped
up immediately, with care being taken to not touch any hot portion of the oven. When the surface is cool, clean and rinse.
——.-
Page 34

o
-4a%z%
Proper awe and cleaning are irnfxw-
tad so ytxlr Ch3khlg centerMM
giveyou effkknt and satisfactory
service.RMow thesedirections
carefuilyin earingfor it tohelp
assuresafeandpropermaintenance.
BESURE ELECTRIC POWERIs
OFF 13EF0RECLEANING ANY
PARTOF YOURCOOKING
CENTER
RW
Don’t use sharp-edged utensils
around the control panels.They
might damage it.
Clean the panelswith a lightly
dampened cloth. DO NOT USE
cleaning sprays or large amounts of
soap and water. These can cause
problems with the control
mechanisms.
Probe
The probe issturdy, but care
should be taken in handling it. Do
not twist it. Avoid dropping it. Clean
assoon as possible after use.Wipe
it with a sudsy cloth,
parts with a plastic scouring pad if
necessary.Rinseand dry. DO NOT
washthe probe in an automatic
dishwasher.
Foill on
why you l!!ilseit
DO NOT place a sheet of aluminum
foii on any shelf in either your microwaveor conventional oven. If you
do, your foods may not cook properly. The oven finish may be damaged-.Andthere may be an increase
in heat on the outside surfaces of
the oven.
then rub metal
The oven lamp bulb is long-lasting.
Only a qualified servicetechnician
should replace it.
ENJn””
Your shelf accessory is designed
for use in a microwave oven only;
do not usein a conventional oven.
Do not usea browning dish with
the shelf. Arcing could occur.
Clean shelf with mild soap and
water or in the dishwasher. Do not
remove plastic spacersfrom the
shelf when cleaning. Do not clean
inself-cleaningoven.
for use of
Use metal only as directed in the
Cookbook. Metal trays no more
than 3/4” deep may be used for TV
dinners, and the metaltemperature
probe is designed for microwave
oven use.Always keep metal at
least one inch away from sides
of oven.
Clean the outside of your microwave
oven with soap and water, then
rinse and dry. The outer pane of the
window is glass.Wipe it clean with
a damp towel. Chrome is best
wiped with a damp cloth and then
with a dry towel.
Keep it cleanand swee#-smelling.
Opening the oven door a few m[nutes after cooking helps air out the
inside. An occasional thorough wiping with a solution of baking soda
and water keeps the interior fresh.
Spilisandspattersareeasyto re-
movefromwalls,floorand antenna
cover,That’s becausethere’s little
heat except in the food, or some-
times in the utensil. Some spatters
wipe up with a paper towel, some
may require a damp cloth. Remove
greasy spatters with asudsy cloth,
then rinse and dry.
NEVERUSEA
OVEN CLEANER(X’+IANY PART
OF YOLIR CM%!.
Wipeup spatters on the glass on
the insideofthedoordaily.Wash
glass, when it’s soiled, with a minimum of sudsy, warm water. Rinse
thoroughly and dry.
Wipemeta!and plasticpartson the
insideof th&doorfrequently.Usea
damp cloth to removeall soil. DO
NOT USEABRASIVES, such as
cleaning powders or steel and plastic pads.They may marthe surface.
DoorSurface.When cleaning surfaces of door and oven that come
together on closing the door, use
only mild, non-abrasive soapsor
detergents applied with a sponge
or soft cloth.
Do not removetheplasticantenna
coveratthetop ofthe oven (see
page6.) Youwilldamagethe oven
if you do,
Usinga Brown‘N Sear Dish?Use
BarKeepersFriend@Cleanser.
High heat generated on the bottom
of the Brown ‘N SearDish can cause
scorched appearing stains to bake
onto the floor if grezseis present.
These may be removedwith Bar
Keepers Friend@Cleanser by
SerVassLaboratories, Inc.
After using this cleaner, rinse and
dry thoroughly, following instruc-
tions on can. Do not use it on the
painted surfaces such as the walls—
it may scratch the paint.
Bar Keepers Friend@Cleanser is
sold in many grocery, hardware and
department stores.
V
34
Page 35

A?a&k /
@waseen fi!hrcmghgkiss control
panelafterknob is removed.)
The temperature on your newoven
has beenaccurately set at the factory. However,if your food consistently browns too much or too little,
you may make a simple adjustment
behind your OVEN TEMP Knob. To
readjust your thermostat:
@Rotate OVEN TEfViPKnob to
CLEAN position and pull knob off
the shaft revealing area behind
knob.
@ Insert the tip of a 3/16” standard
screwdriver, into the indented area
directly under the notch and turn in
—
the desired direction. Be careful not
to scratch glass control panei.
To increase oven temperature
move diai one notch counterclockwise. To iower oven temperature,
move diai one notch ciockwise.
(Each notch representsapproximately 150.)
ISReturn knob to the range by
matching the fiat area of the knob
to the shaft.
@ Recheck oven performance
before making an additional
adjustment.
Duet
The oven isvented through a duct
that’s located orI the right side of
the oven just above th~ door handie
(seepage 6). Moisture and vapors
from the oven are vented through it
when oven is in use. Nevercover
the hoie in the duct. To do so prevents it from functioning properiy
during cooking and cieaning.
LampFM@acmyixit
C3WiiK)hk Beforereplacing your
oveniiarnpbulb, disconned the
electric powerfor your Cooking
Centerath mainfuse or circuit
Meaker pand. Be sure to iet the
iampcoverandbuib cooicompletely
beforeremoving or repiacing them.
The oveniamp (buib) is covered
with a giass removabiecoverwhich
is heid in piacewith a baii-shaped
wire. Removeoveri door,if desired,
to reach cover easiiy.
Toremove:
~i-ioidhand undercover soit
doesn’t faii when reieased. With
fingers of same hand, firmiy push
backwire baii untii it ciears cover.
Lift off cover.DONOT REMOVE
ANY SCREWSTOREMOVE
COVER
~ F?epiacebuib with 40-watt home
appiiance buib.
if you wish, you may iine the broiier
pan with aiuminum foii and cover
the rack with it for broiiing. ALWAYS
BE SURE TO MOLD THE FOiL
THOROUGHLYTO THE BROiLER
RACK AND SLiT THE FOiL TO
CONFORM WiTH SLiTS iN THE
RACK. Stopping fat and meat juices
from draining into the broiier pan
prevents the rack from serving its
purpose and MAY LET JUiCES
BECOME HOT ENOUGH TO
CATCHFiRE.
—.
—
—
~—
—- -
——
—
—.
—
—
—
—
—
——-–—
—r.
—
—.
—–
—–
—
—
—
E
—-
—
—
iE%%%”-
—
—
—–
—
—
E
—
——
—
Toreplace cover:
@Piace it intogroove of iamp
receptacle. Puiiwire baii forward to
center of cover untii it snaps into
piace.When in piac~, wire hoids
coverfirmiy. Be certain wire baii is
in depression incenter of cover.
@Connect e!ectric power to oven.
Page 36

WKmlmvi
—-..
‘=4%
‘OVEN WILL NOT
!P(XEU3LECAUSEAND FmvEm’
Difficulty may be inthe main distribution panel of your house bya blown oven
W(3FK circuit fuse, a tripped ovencircuit breaker,the main fuse orthe main circuit breaker,
depending on nature ofthe powersupply. If acircuit breakeris invoived, reset it. Ifthe
control boxuses fuses, the ovenfuse (acartridge-type) should be changed BUT ONLY
BY SOMEONE FAMILIARWITH ELEGH31CALCIRCUITS.If after doing one of these
procedures,the fuse blowsor circuit breakertrips again, call for service.
NOTE:Apartment tenants or condominium owners should requesttheir building
management to perform this check beforecalling for service.
Oven controls are not ~roperly set.
Door left in locked position after cleaning.
OVEN LIGHT
DOES NOTWORK
FOOD DOES NOT OVEN SET knob notset at BROIL.
BROIL PROPERLY
FOOD DOES NOT OVEN SET knob not set on BAKE.
ROASTOR BAKE
PROPERLY
OVEN WILL NOT
SELF-CLEAN
OVEN DOOR
WON’T LATCH
Light bulb is loose.
Bulb is defective. Replace.
Switch operating oven light is broken. Call for service.
OVEN TEMP knob not set at BROIL.
Door not left ajar as recommended.
improper shelf position is being used. Check Broiling Chart.
Necessary preheating was notdone.
Foodis being cooked on hot pan.
Utensils are not suited for broiling,
Aluminum foil usedon the broil pan rack has not beenfitted properly and slit
as recommended.
OVEN TEMP knob not set correctly.
Shelf position is incorrect. Check Roasting or Baking Charts.
Oven shelf is not level.
Wrong cookware is being used. When roasting, pan is toosmall.
A foil tent was not usedwhen neededto slow down browning during roasting.
Automatic time diai/diaIs not set or not set properly.The STOPdial must be set and
advanced beyond the time noted onoven clock.
The STOPdial was not advanced for long enough.
Both OVEN SET and OVENTEMP knobs must be atCLEAN setting.
A thick pile of spillover when cleaned leavesa heavylayer of ash in spots which could
have insulated the area from further heat.
Latch not in “CLEAN” position.
TurnOVEN SET knob to CLEAN. Glowing Locked Light aflterknob isturned indicates
oven is too hot from previous useand door won’t latch. TCIcool oven,open door wide,
then latch can be moved.
OVEN SET knob must beat CLEAN or OFF before Latchcan be moved.
Latch Release Button not pushed when moving Latch.
36
—..
Page 37

FONN3LE CAUSE AND REMEDY
.—
e
CXNW-ROLPANEL
LKH-rED, YET
CNEN
W!LLNOTSTART
“ERROR” APPEARS
ON READOUT entered.
“PROBE” APPEARS
ON READOUT
RXN3S ARE EITHER Cooking times may varybecause of starting food temperature, food density or amount
C)VEF4COCNG33OR
LJNmmcoobam
Door II(Msecurely dosed.
STARTmust be touched after entering cooking selection.
Another selection entalri o a CLn tot c i
Makesure you have enteredcooking time after touching TIME (XXX.
CLE24FUCWFwastouched accidentally. Resetcooking program and touch START
Temperatureprobe not inserted properly ornot being used during Auto Roastor Ternp
Cook.
Makesure you haveentered desired finished temperature after touching TEMP
C(XMKKXD.
Makesure you entered a code number aftertouching AUTO(XXX, AUTOROASTor
AUTO IXH%3ST.
When using Tem.pCook, atemperature lessthan NY% or more than 199°F.has been
Doorisopened during ‘%UKY’ cycleof AutoCookfunction. Closedoor and touchSTART
Weight is incorrect for Auto Defrostcode on chart. It is necessary to resetoven.
Robe has been forgotten or not seated properly in oven wall when using Auto Roast or
TempCook functions.
of foods in oven. TouchTUVECOOKand additional cooking time for completion. ~
incorrect power levelentered. Check (lookbookfor recommended powerlevelor
changing levelsduring cooking if necessary.
Dish was not rotated, turned or stirred. Some dishes require specific instructia?%.
Check Cookbook or recipe for these instructions.
Toomany dishes in ovenat same time. Cooking time must be increased when cooking
morethan one food item. Check Cookbookfor recommendation cmincreasing time.
Dish not completely coveredas directed during Auto Cook.
Previous microwaving left humidity or moisture in oven,thus lesseni~g the cooking
time in Auto Cook function.
Certain vegetables need a standing time after using Auto Cook. Check Automatic
Cooking Chart.
Oven door was opened during “AUTO” cycle of AutoCook function.
Probe not inserted properly into meator dish when using TempCook or Auto Roast
functions. Check Cookbook or AutoRoast section of this book for specific instructions.
Check Cookbook for food placement and instructions when using ‘DoubleDutymShelf.
All ‘These Are
On
@When Lock Light comes on
during self-cleaning lower oven, a
fan in the microwave oven comes
onto kecmoven components cool.
QSteamor vapor escaping from
aro~ncl Me dOor.
.
Owen:
@Light reflection around door or
outer case.
~Some TV-Radio interference
might be noticed while using your
microwave oven. It’s similar to the
interference caused byother small
appliances and does not indicate a
problem with your oven.
37
@Dimming oven light and change
in blower sound may occur while
operating at powerlevels other
than high.
QDull thumping sound while
operating at power levelsother
than higfi.
Page 38

Ti2obtainservice,seeyourwarranty
onthe back page of this book.
We$reproud of our service and
wantyou to be pleased. Iffor some
masonyou are not happywith the
sewice you receive,here arethree
stepsto follow for further help.
FIRST,contact the people who
serviced your appliance. Explain
whyyou are not pleased. In most
cases,this will solve the problem.
NEXT,ifyou arestili not pleased,
write ail the details—including your
phone number—to:
Manager,Consumer Relations
General Eiectric
Appliance Park
Louisville, Kentucky4022!5
FINALLY,if your problem is still not
resolved,write:
MajorAppliance
Consumer Action Panel
20 North WackerDrive
Chicago, Illinois 60606
—
—
—
—
—
—,
——
—
—
—.
—
—
-.
——
Page 39

‘“ 1s
,
al
/
,
>;
—
-z -
FUONE-
For one year from date of original
purchase, we will provide,free of
charge, parts and service labor in
your home to repair or replaceany
part of themicrowaveoven/range
that fails becau$g.,oj
uring defect.
LIMITED A!3DIT60NAL
FOUR=YEARWARRANTY
For the second through fifth year
from date of original purchase,
we will provide, free of charge, a
replacement magnetron tube if the
magnetron tube fails becauseof a
manufacturing defect. Youpay for
the service trip to your home and
service labor charges.
a man
This warranty is extended to the
original purchaserand any succeed-
ing owner for products purchased
for ordinary home use in the 48
mainland states, Hawaii and
Washington, D.C.In Alaska the
warranty is the same except that it
is LIMITEDbecause you must pay
to ship the product to the service
shop or for the service technician’s
travel costs to your home.
All warrantyservice will be provided
by our Factory Service Centers or
by our authorized Customer Care@
servicersduring normal working
hours.
Look in the White or Yellow Pages
of your telephone directory for
GENERALELECTRICCOMPANY,
GENERALELECTRICFACTORY
SERVICE,GENERALELECTRIC-
HOTPOINTFACTORYSERVICEor
GENERALELECTRICCUSTOMER
CARE” SERVICE.
Some states e l i c
To know what your legal rights are in your state, consult your local or state consumer affairs office or your state’s Attorney General.
I
..
,.
,1
,
. . ,-
<
Manager–-ConsumerAffairs, Genera! Electric Company,Appliance Park, Louisville, KY40225
~, . * * . . , .
[s
~Service trips to your home to
teach you how to use the product.
ReadyourUse and Care material.
If you then haveany questions
about operating the product,
please contact your dealer or our
Consumer Affairs office at the
address below,or call, toll free:
The GE Answer Center@
800.626.2000
consumer information service
~ Improper installation.
@Replacement of house fuses
or resetting of circuit breakers.
~ Failure of the product if ii !s
used for other than its intended
purposeor used commercially.
o Damageto product caused
by accident, fire, floods or acts
of Gocl.
WARRANTORIS NOTF?ESPONSIBLE FORCONSEQUENTIAL
DAMAGES.
If you havean installation p,roblem,
contact your dealer or installer.
Youare responsible for providing
adequate electrical, exhausting
and other connecting facilities.
This warranty gives you specific legal rights, and you may also have other rights which vary fr?m state to state.
Warrantor:General Electric Company
If further help is neededconcerningthis warranty,contact:
,“
‘“
.’ - - ,’
w< >
~~lqiw
~-s=$;’”--
-L=-------
.—
x
~
+
—.
.
!$??
 Loading...