

GE JKP66 Use and Care Manual

Howtogetthebestfrom
‘YOUI?AMicrowav
Center
Useand Careof
built-inmodelJffP66
Featuresof
vourCookingCenter
1)6
Howto use the microwave
AU’10COOKfeature p8
Howto use the microwave
AUIDROASTfeature
I31O
Howto use the microwave
AU’10DEFROSTfeature
p12
Howto operate the
self-cleaningoven
t)20
Savetimeand money.
Beforeyoucallfor service,
use the ProblemSolver
P36
,-
L
‘*
,
... . .—...--..-——.-—— —---.—. —.—---—----——
:
:.
GENERA
—.....
;’ ELECTRIC
@
-.—-.—.--.-
Your Direct Line to General Electric
The GE Answer CenteF800.626.2000
Help US Help YOU. . ■
It is designed to help you operate and maintain your
new Cooking Center properly.
Keep it handy for answers to your questions.
If you don’t understand something or need more
help. . .Call, toll free:
The GE Answer Center-’”
800.626.2000
consumer information service
or write: (include your phone number);
Consumer Affairs
General Electric Company
Appliance Park
Louisville, KY 40225
, @.?”..~
~! , :&= :>~l$ppa ~~cJ ~Q~~f
zric 3EX~k
You’11find them on a label on the front of the lower
oven behind the door.
These numbers are also on the Consumer Product
Ownership Registration Card that came with your
Cooking Center. Before sending in this card, please
write these numbers here:
Model No.
Serial No.
Use these numbers in any correspondence or ser-
vice calls concerning your Cooking Center.
Numbers
It is important that we, the manufacturer, know the
location of your Cooking Center should a need
occur for adjustments.
You’re supplier is responsible for registering you as
the owner.
Please check with your supplier to be sure he has
done so; also send in your Consumer Product
Ownership Registration Card. If you move, or if you
are not the original purchaser please write to us,
stating model and serial numbers. This appliance
must be registered. Please be certain that it is.
Write to:
General Electric Company
Range Product Service
Appliance Park
Louisville, KY 40225
IF YOU RECEIVED A DAMAGED OVEN, immediately contact the dealer (or builder) that sold you
the Cooking Center.
Save Time and’ Mcmsx ,
Before You Call for S&vics
Check the Problem Solver (page 36). It lists minor
causes of operating problems that you can correct
yourself.
It could save you an unnecessary service call.
Precautions to Avoid Possible Exposure to Excessive Microwave Energy
1. Do Not Attempt to operate this oven with the
door open since open door operation can result in
harmful exposure to microwave energy. It is important not to defeat or tamper with the safety
Interlocks.
2. Do Not Place any object between the oven front
face and the door or allow soil or cleaner residue to
accumulate on sealing surfaces.
3. DO Not Operate the oven if it is damaged. H
particularly important that the oven door close
properly and that there is no damage to the (1) door
(bent), (2) hinges and latches (broken or loosened),
(3) door seals and sealing surfaces.
4. The Oven Should not be adjusted or repaired by
anyone except properly qualified service Personnel.
2
is
MICROWAVE OVEN
Microwaving Tips . . .. .. .. .. .. . . . ..3
Safety Tips . . . .. . . . . .. .. .. .. .. . . .4-5
Features of Your Oven .. .. .. .. .. ...6
Touch Control Panel . . . .. .. .. .. ...7
Automatic Cooking . .. . . .. .. ....8.9
Automatic Roasting &Charts ..10, 11
Automatic Defrosting . . . . . . .. .. .. 12
Time Cook . .. .. .. .. .. . . . . . . . ....14
Defrost . . .. . . .. .. .. .. .. . . . . . . . ...15
Temperature Cook . .. .. .. . . . . ....16
Hold/Timer . . . .. .. . . . . . . . .. .. . ...17
CONVENTIONAL OVE?l
Safety Tips . . . . . . . . .. .. .. .. .. ....4-5
Features . . . . . . . . . . .. . . . .. .. .. .. ...6
Oven Controls . .. . . .. .. . . . . . . . . ...6
Oven Light . . . . . . . . . . . .. .. .. .. ...18
Oven Shelves . . . . . . . . . . . . . . . . . ...18
Minute Timer, Clock,
Automatic Oven Timer . . . . . . . . . . . 18
Baking . . . . . . . . . . . . . . . . . . . . . . . ...18
Broiling . . . . . . . . . . . . . . . . . . . . . . ...19
Roasting . . . . . . . . . . . . . . . . . . . . . ...19
Baking Chart . . . . . . . . . . . . . . . . . ...22
Broiling Chart . . . . . . . . . . . . . . . . ...23
Roasting Chart
. . . . .. .. .. .. .. ....24
CARE OFYOUR COOKING CENTER
Self-Clean Operation . . .. .. .. .. .. . 20
Oven Vent Duct . .. .. .. .. . . . . . . ...21
Lamp Replacement . .. .. . . . . . . ...21
Oven Thermostat Adjustment .. .. . 21
‘ Care of Microwave Oven&
Temperature Probe . . . . . . .. .. .. .. . 21
Cleaning Chart (All Parts) . .. .. .. . 25
GENERAL
Before Using Your Range.... . . . . . . 2
Energy Saving Tips . . . . .. . . .. .. ...3
Model &Serial Number Location .. . 6
The Problem Solver . . .. .. .. ...36. 37
Automatic Cooking
Recipe Guide . .. .. .. .. .. . . . . . . ...27
Meats . . . .. . . . . . . . . . . .. .. .. .28,29
Vegetables . . .. .. .. .. .. . . . . .30,31
Desserts . .. .. .. .. .. .. .. . . . ..32,33
Automatic Cooking Chart . . ...34.35
Consumer Services . . . .. . . .. .. ...39
Warranty . .. .. .. . . .. .. ...Back Cover
5WCW Saving Tips
NlicrowXe Cooking
Use proper power level as
recommended and DO NOT
OVERCOOK.
Do not operate the oven while
empty. If by accident the oven
should run empty a minute or
two, no harm isdone. However,
try to avoid operating the oven
empty atalitimes—saves energy
and also ensures good long
term Iife ofoven.
Oven Cooking
Preheat the oven only when
necessary. Most foodswill cook
satisfactorily without preheating. Ifyou find preheating isnecessary,
light, and put food in the oven
promptly after the light goes
out.
Always turn oven OFF before
removing food.
During baking, avoid frequent
door openings. Keepdooropen
as short a time as possible
when it is opened.
For self-cleaning oven, be sure
to wipe up excess spillage
before self-cleaning operation.
Cook complete oven meals
instead of just one food item.
Potatoes, other vegetables, and
some desserts will cook together with a main-dish casserole, meat loaf, chicken or
roast. Choose foods that cook
at the same temperature in
approximately thesametime.
Useresidual heat in oven whenever possible to finish cooking
casseroles, oven meals, etc.
Also add rolls or precooked
desserts to warm oven, using
residual heatto warm them.
watch the indicator
s Make sure all utensils used ,n
your microwave oven are !abelea
“suitable for microwaving”’, Check
your Cookbook for specific test to
determine “microwave-safe” utensils.
a Paper towels, wax paper. and
plastic wrap can be used to cover
dishes in order to retain moisture
and prevent spattering.
@ Some microwaved foods require
stirring, rotating, or rearranging.
Check your Cookbook for specific
instructions.
● Some foods such as unshelled
eggs and hot dogs must be pricked
to allow steam to escape during
cooking.
When Power is Connected to the
The readout panel displays five 8’s and 18 POWER
on the upper portion and all of the oven functions
on the lower portion. After 15 seconds, all lights
disappear and “RESET” flashes in the upper portion. Touch the CLEAR/OFF pad and oven is ready
-,
for use.
If power is disrupted at any time, the above
sequence reoccurs, and you must reset CLOCK
after touching CLEAR/OFF.
Safety Tips ..,,,.,.,,..,,..,,0..
e
when you Get Your Cooking Center
@
Havethe installer show you the location of the
circuit breaker or fuse, and mark it for easy
reference.
~ Have it installed and properly grounded by a
qualified installer.
UsingYour Cooking Center
Don’t leave children aloneor unattended where an .
oven is hot or in operation. They could be
seriously burned.
Don’t allow anyone to climb, stand or hang onthe
door or drawer. They could damagethe oven. =
Donot touch heating elements or interior surface
of oven.
burn even though they are dark in color. =
During and after use, do not touch, or let
clothing or other flammable materials con- *
tact any heating elements or any interior
area of the oven; allow sufficient time for
cooling first. Other potentially hot surfaces
include oven vent openings and surfaces
near the openings, crevices around the oven
door and the edges of the door window.
Wear proper clotfing. Loose fitting or hanging
garments should never be worn while using Microwave Oven
fhe appliance.
Never use your appliance for warming or
heating the room.
Be sure oven vent ducts are unobstructed.
Do not use your oven to dry newspapers. If *
overheated, they can catch fire.
CAUTION: 00 NOTSTORE
CHILDREN IN CABINETS ABOVE THE OVEN–
CHILDREN CLIMBING ON THE OVEN TO REACH
ITEMS COULD BESERIOUSLYINJURED.
Donotstore flammable materials in the ovens.
Use only dry potholders–moist
potholders on hot surfaces may result in .
burns from steam. Do not let potholders
touch hot heating elements. Do not use a
towel or other bulky cloth.
Don’t use aluminum foil anywhere in the oven
except as described in this book. Misuse .
could result in a shock, fire hazard, or
damage to the cooking center.
Donot usewater onareasefires. When cooking in
the oven, flame can-be smothered by completely
closing door andturning OVENSETto OFF.
These surfaces may be hot enough to
ITEMS OFINTERESTTO
or damp
Standaway from the ovenwhen opening door. The
lot air or steam which escapescancauseburns to
:hehands, face and/or eyes.
Q
<eep oven free from grease build up.
‘lace oven rack in desired position while
●
)ven is cool. If racks must be handled when
lot, do not let potholder contact heat units in
:he oven.
%llin~ out shelf to the shelf stop is a conven-
ience m lifting heavy foods. It is also a pre~aution against burns from touching hot
wrfaces of the door or oven walls.
lon’t heat unopened food containers in the oven.
%essure could build up and the container could
]urst causing an injury.
A/hen using cooking or roasting bags in
)ven, follow the manufacturer’s directions.
II/hencooking pork either conventionally or in
he microwave oven, follow our directions
?xactly and always cook the meat to at least
170°. This assures that, in the remote possibility that trichina may be present in the
neat, it will be killed and meat will be safe to ‘
?at.
●
Don’t heat unopenedfood containers or nonvented
plastic-covered dishes in the oven. Pressure can
build up causing the container or plastic covering
to explode and result in injury.
Don’tdefrost frozen beverages
bottles especially carbonated ones. Even if
the container is opened, pressure can build
up. This can cause the container to burst,
resulting in injury.
●
Boiling eggs in or out of the shell is not recommended for microwave cooking.
build up inside the yolk and cause it to burst,
resulting in injury.
Foodswith unbroken outer “skin” such as pota-
toes, hot dogs or sausages, tomatoes,
apples, chicken livers and other giblets, and
eggs (see above) should be pierced to allow
steam to-escape during cooking.
Remove wire twist-ties on pa er and plastic
bags before placing in oven. wist-ties sometimes cause bag to heat and may cause fire.
● Avoid heating baby food in glass jars even with- ,=
out their lids, especially meat and egg mixtures.
in narrow necked
Pressure can
f
1
!
{
{
.

i
●
●
Do not pop popcorn in your microwave oven
unless in a special microwave popcorn
accessory or unless you use popcorn in a
,’
package labeled for microwave ovens.
Because of heat generated, without these
precautions, the container could catch fire.
Do
not use any thermometer in food you are
microwaving unless thatthermometeris designed
or recommended for use in the microwave oven.
Don’t operate the oven while empty in order to
prolong the life of the oven andsave energy.
.
accident the oven should run empty a minute
or two, noharm is done.
If by
Sometimes, the oven floor can become too hot to
touch.
and after cooking.
●
Remove the temperature probe from the oven
when not using it
probe inside the oven without inserting it in
food or liquid, and turn on microwave
energy, it can create electrical arcing in the
oven, and damage oven walls.
●
If food should ever ignite: Keep the oven door
closed.
CLEAR/OFF or disconnect power cord or shut
off power at the fuse/circuit breaker panel.
Be careful touching the floor during
to cook with. If you leave the
Turn off the power immediately. Touch
Cooking utensils may become hot because of
●
Do
heat transferred from the heated food. This is
especially true if plastic wrap has been covering the top and handles of the utensil. Pot
holders may be needed to handle the utensil.
9
“Boilable” cooking pouches and tightly closed
plastic bags should be slit, pricked or vented
as directed in Cookbook. If they are not,
plastic could burst during or immediately
after cooking, possibly resulting in injury.
Also, plastic storage containers should beat
least partially uncovered because they form
a tight
seal. When cooking with containers,
tightly covered with plastic wrap, remove
covering carefully and direct steam away
from hands and face.
Don’t over cook. Excessive over cooking dehy-
●
Cleaning Your Cooking Center
not use your microwave oven to dry news-
papers.
If overheated, they can catch fire.
Useof Double Duty’” shelf accessory. To position
shelf so that it is securely “seated, ” insert
into the oven cavity above shelf supports
and completely to the back oven wall. Drop
into place so that the recessed areas are over
the shelf supports. To remove shelf, lift shelf
above supports and then pull forward and
out. Do not place food on shelf unless it is
securely “seated” on the supports.
●When the shelf is not in use, remove from
the oven.
s Do not use a microwave browning dish on
shelf.
drates potatoes, and may cause them to catch fire
causing damage.
Plastic utensils
cooking are very useful, but should be used
carefully. Even microwave plastic may not
be as tolerant of overcooking conditions as
are glass or ceramic materials and may
soften or char if subject to short periods of
overcooking. In longer exposures to overcooking, the food and containers may even
.
.
ignite. For these reasons: 1) Use microwave
plastics only and use them in strict compliance with the container manufacturer’s
[commendations. 2) Do not subject empty
containers to microwaving. 3) Do not permit
children to use plastic containers without
complete supervision.
designed for microwave
Usemetal only asdirected in the Cookbook.Metal
strips as used on meat roasts are helpful in
cooking food when used
trays may be used for TV dinners. However,
,-’
when using metal in the oven,
least 1-inch away from sides of the oven.
as directed. Metal
keep metal at
Clean only parts listed in this Use and Care
Book.
Do not clean door gasket. The door gasket is
essential for a good seal, Care should be
taken not to rub, damage or move the
gasket.
Before self-cleaning the oven, remove broiler
pan and other containers.
Do not use oven cleaners. No commercial
oven cleaner or oven liner protective coating
of any kind should be used in or around any
part of the oven.
Listen for Fan—A fan noise should beheard some-
time during the cleaning cycle. If not, call a serviceman before self-cleaning again.
You Need Service
Read
Don’t attempt to repair or replace any part of
your range unless it is specifically recommended in this book. All other servicing
should be referred to a qualified technician.
Disconnect range at range circuit breaker or
main fuse before performing any service.
“The Problem Solver” on page 36.
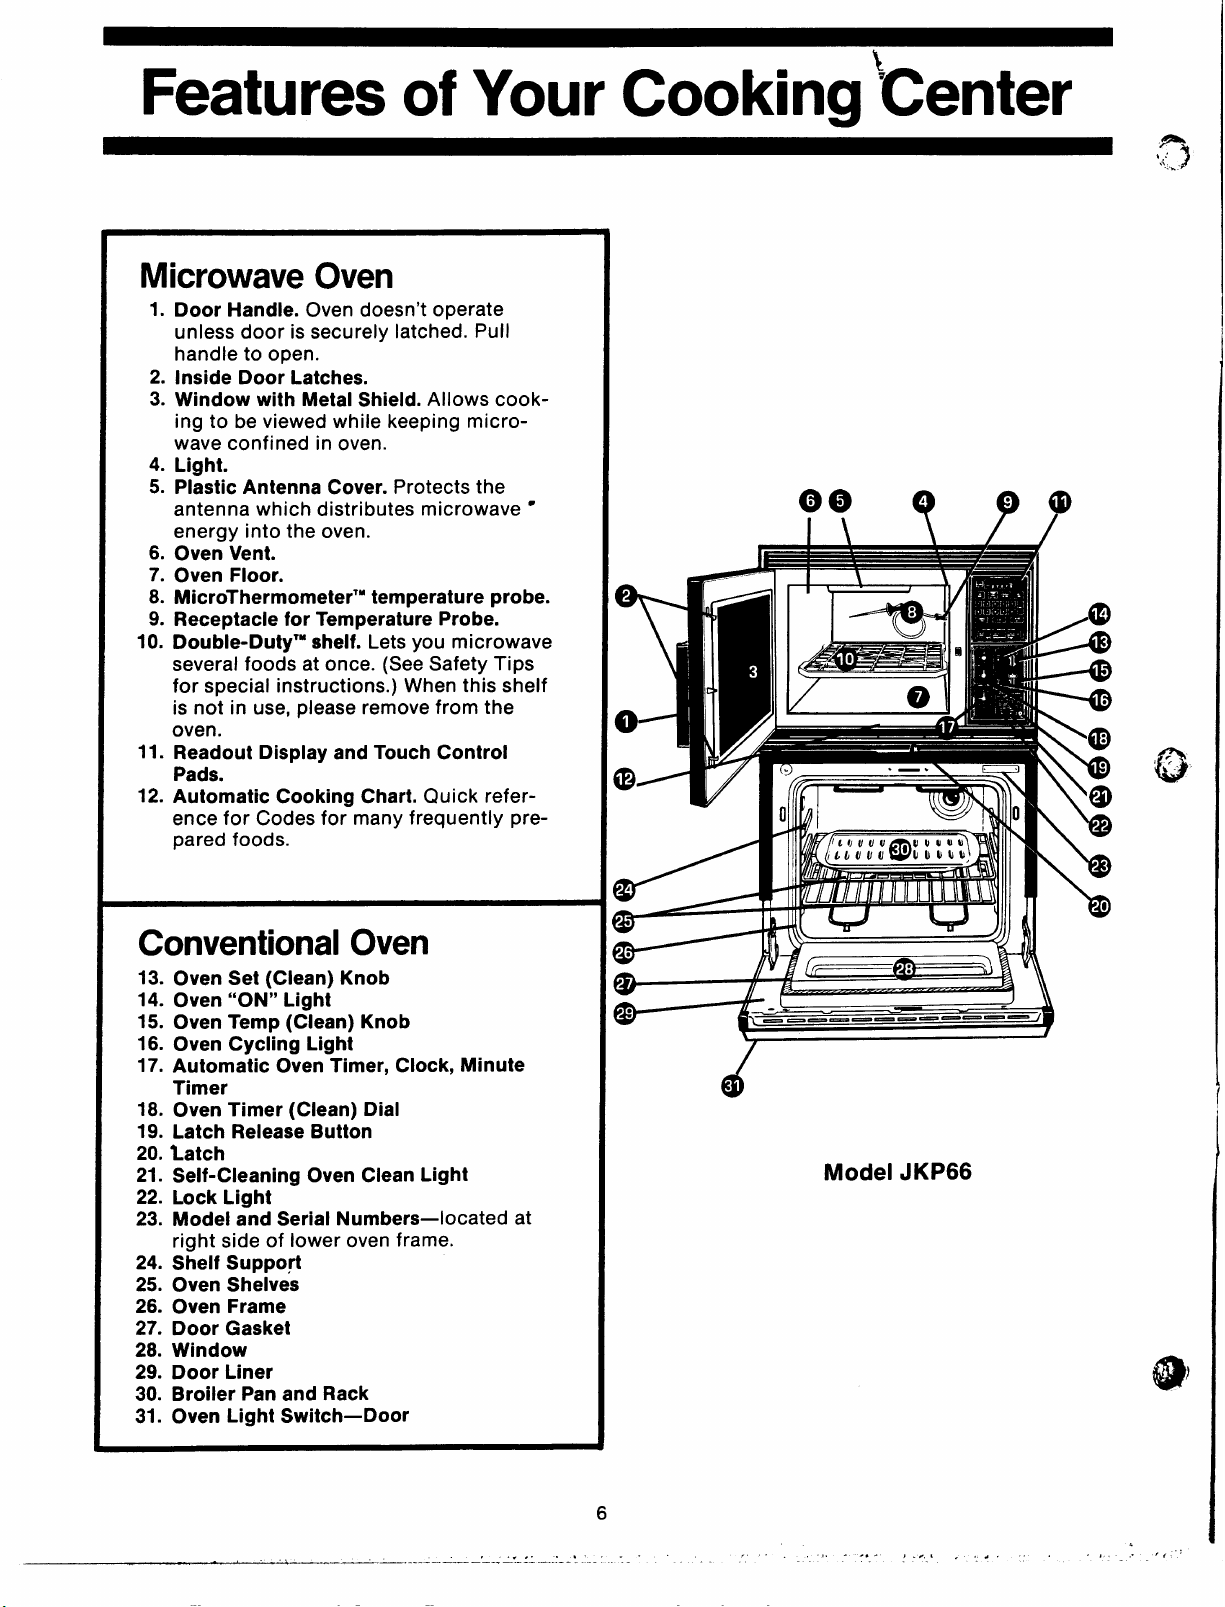
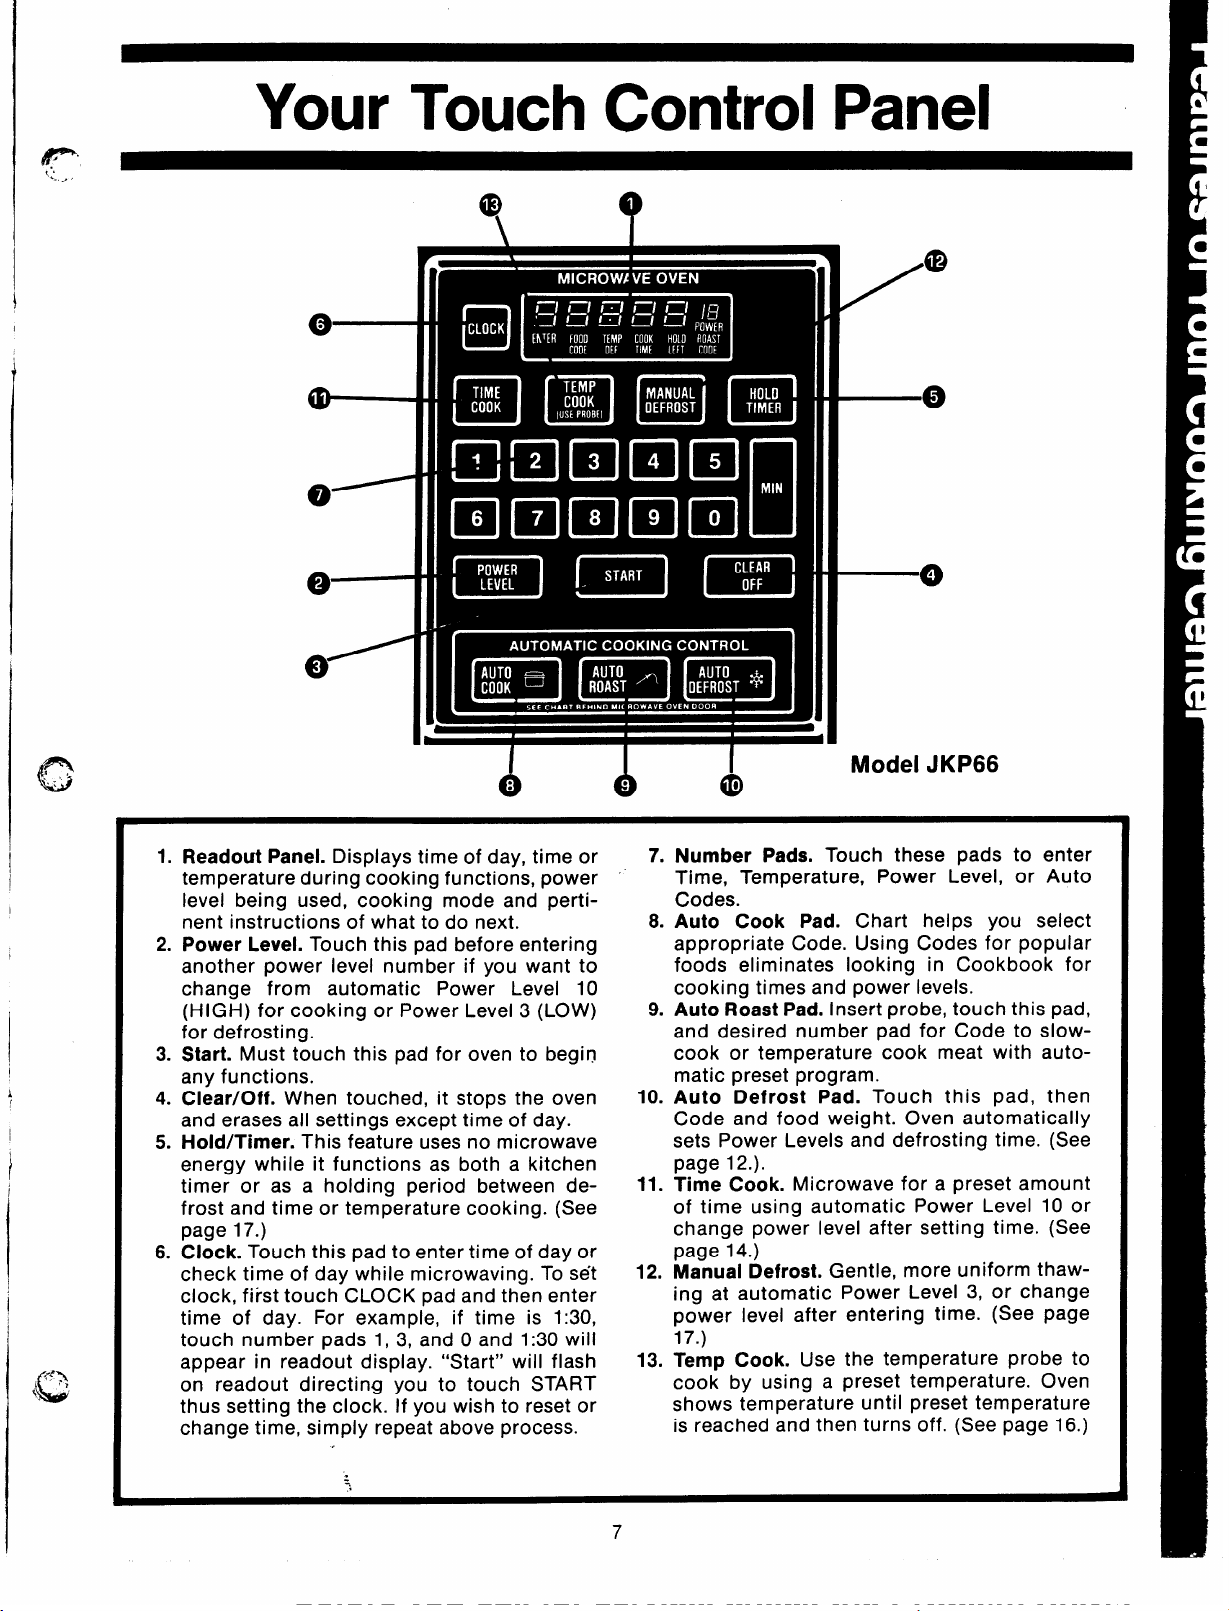
Features of Your Cooking ‘Center
Microwave Oven
1. Door Handle. Oven doesn’t operate
unless door is securely latched. Pull
handle to open.
2. Inside Door Latches.
3. Window with Metal Shield. Allows cooking to be viewed while keeping microwave confined in oven.
4. Light.
5. Plastic Antenna Cover. Protects the
antenna which distributes microwave “
energy into the oven.
6. Oven Vent.
7. Oven Floor.
8. MicroThermometer’” temperature probe.
9. Receptacle for Temperature Probe.
10. Double-Duty’” shelf. Lets you microwave
several foods at once. (See Safety Tips
for special instructions.) When this shelf
is not in use, please remove from the
oven.
11. Readout Display and Touch Control
Pads.
12. Automatic Cooking Chart. Quick refer-
ence for Codes for many frequently prepared foods.
o
A
Conventional Oven
13. Oven Set (Clean) Knob
14. Oven “ON” Light
15. Oven Temp (Clean) Knob
16. Oven Cycling Light
17. Automatic Oven Timer, Clock, Minute
Timer
18. Oven Timer (Clean) Dial
19. Latch Release Button
20. Latch
21. SeIf-Cleaning Oven Clean Light
22. Lock Light
23. Model and Serial Numbers—located at
right side of lower oven frame.
24. Shelf Support
25. Oven Shelves
26. Oven Frame
27. Door Gasket
28. Window
29. Door Liner
30. Broiler Pan and Rack
31. Oven Light Switch—Door
. ..-0 -0 ---— —
6
Model JKP66
6
Your Touch Control Panel
‘r
@
● —
o
I
:
o
1. Readout Panel. Displays time of day, time or
temperature during cooking functions, power ‘
level being used, cooking mode and pertinent instructions of what to do next.
I
I
1
2. Power Level. Touch this pad before entering
another power level number if you want to foods eliminates looking in Cookbook for
change from automatic Power Level 10
(HIGH) for cooking or Power Level 3 (LOW)
for defrosting.
3. Start. Must touch this pad for oven to begin cook or temperature cook meat with autoany functions. matic preset program.
4. Clear/Off. When touched, it stops the oven 10. Auto Defrost Pad. Touch this pad, then
and erases all settings except time of day.
5. Hold/Timer. This feature uses no microwave sets Power Levels and defrosting time. (See
energy while it functions as both a kitchen page 12.).
timer or as a holding period between defrost and time or temperature cooking. (See
page 17.) change power level after setting time. (See
6. Clock. Touch this pad to enter time of day or page 14.)
check time of day while microwaving. To set
clock, first touch CLOCK pad and then enter
time of day. For example, if time is 1:30,
touch number pads 1, 3, and O and 1:30 will
appear in readout display. “Start” will flash
on readout directing you to touch START
thus setting the clock. If you wish to reset or
change time, simply repeat above process.
,
*
=.
,
7. Number Pads. Touch these pads to enter
Time, Temperature, Power Level, or Auto
Codes.
8. Auto Cook Pad. Chart helps you select
appropriate Code. Using Codes for popular
cooking times and power levels.
9. Auto Roast Pad. Insert probe, touch this pad,
and desired number pad for Code to slow-
Code and food weight. Oven automatically
11. Time Cook. Microwave for a preset amount
of time using automatic Power Level 10 or
12. Manual Defrost. Gentle, more uniform thaw-
ing at automatic Power Level 3, or change
power level after entering time. (See page
17.)
13. Temp Cook. Use the temperature probe to
cook by using a preset temperature. Oven
shows temperature until preset temperature
is reached and then turns off. (See page 16.)
/
—A
o
Model JKP66
7
~1 Microwave Oven 1~
1
1
Automatic Cooking
*
s
A
Ii
=
Ii!!!ll
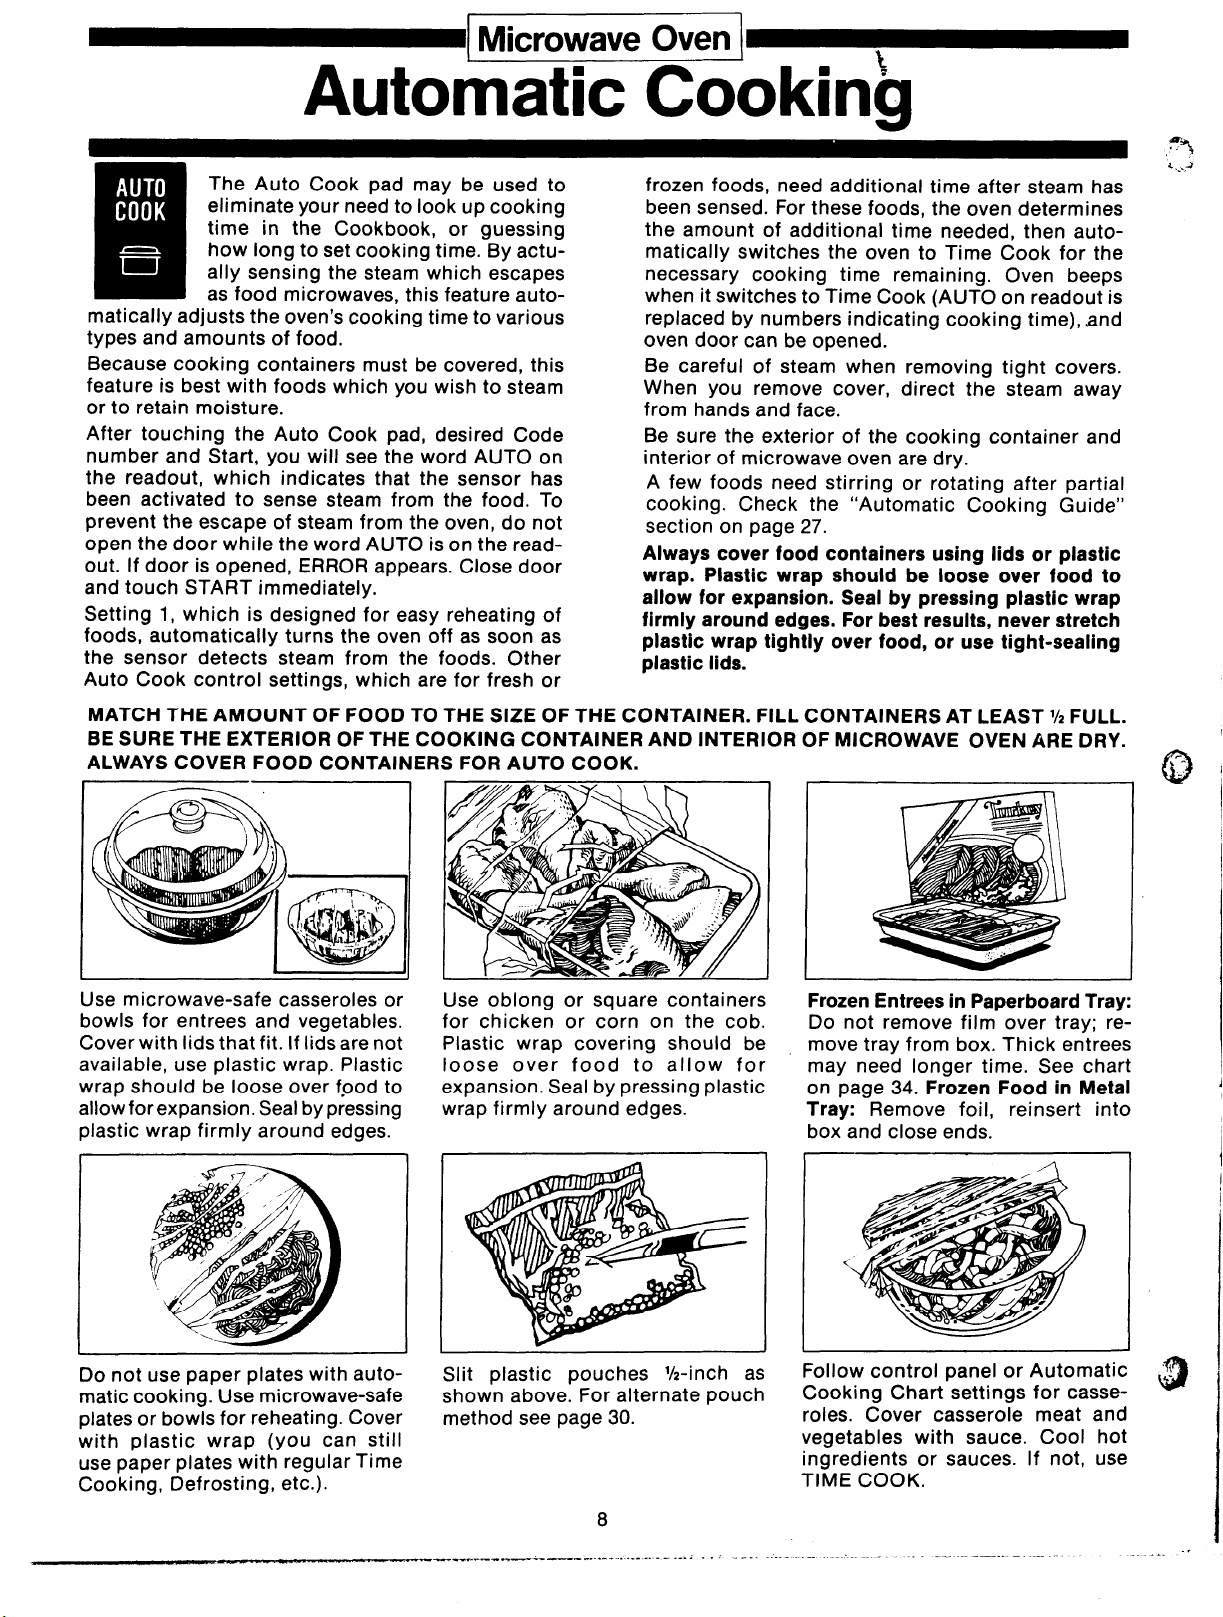
matically adjusts the oven’s cooking time to various
types and amounts of food,
Because cooking containers must be covered, this
feature is best with foods which you wish to steam
or to retain moisture.
After touching the Auto Cook pad, desired Code
number and Start, you will see the word AUTO on
the readout, which indicates that the sensor has
been activated to sense steam from the food. To
prevent the escape of steam from the oven, do not
open the door while the word AUTO is on the read-
out. If door is opened, ERROR appears. Close door
and touch START immediately.
Setting 1, which is designed for easy reheating of
foods, automatically turns the oven off as soon as
the sensor detects steam from the foods. Other
Auto Cook control settings, which are for fresh or
MATCH THE AMOUNT OF FOOD TO THE SiZE OF THE CONTAINER. FILL Containers AT LEAST
BE SURE THE EXTERIOR OF THE COOKING CONTAINER AND iNTERIOR OF MiCROWAVE OVEN ARE DRY.
ALWAYS COVER FOOD Containers FOR AUTO COOK.
The Auto Cook pad may be used to
I
eliminate your need to look up cooking
time in the Cookbook, or guessing
how long to set cooking time. By actually sensing the steam which escapes
as food microwaves, this feature auto-
frozen foods, need additional time after steam has
been sensed. For these foods, the oven determines
the amount of additional time needed, then automatically switches the oven to Time Cook for the
necessary cooking time remaining. Oven beeps
when it switches to Time Cook (AUTO on readout is
replaced by numbers indicating cooking time), ,and
oven door can be opened.
Be careful of steam when removing tight covers.
When you remove cover, direct the steam away
from hands and face.
Be sure the exterior of the cooking container and
interior of microwave oven are dry.
A few foods need stirring or rotating after partial
cooking. Check the “Automatic Cooking Guide”
section on Daae 27.
Always cover food containers using lids or plastic
wrap. Plastic wrap should be loose over food to
allow for expansion. Seal by pressing plastic wrap
firmly around edges. For best resuits, never stretch
plastic wrap tightly over food, or use tight-sealing
piastic iids.
,-
1/2 FULL.
Use microwave-safe casseroles or
bowls for entrees and vegetables.
Cover with Iidsthat fit. If Iidsare not
available, use plastic wrap. Plastic
wrap should be loose over food to
allow for expansion. Seal by pressing
plastic wrap firmly around edges.
Do not use paper plates with automatic cooking. Use microwave-safe
plates or bowls for reheating. Cover
with plastic wrap (you can still
use paper plates with regular Time
Cooking, Defrosting, etc.).
Use oblong or square containers
for chicken or corn on the cob.
Plastic wrap covering should be
loose over food to allow for
expansion. Seal by pressing plastic
wrap firmly around edges.
Slit plastic pouches %-inch as
show”n above: For alternate pouch
method see page 30.
8
—-...T------ .—.-—--- ------ . . --- -. - - --- : . . .“
Frozen Entrees in Paperboard Tray:
Do not remove film over tray; remove tray from box. Thick entrees
may need longer time. See chart
on page 34. Frozen Food in Metai
Tray: Remove foil, reinsert into
box and close ends.
Follow control panel or Automatic
Cooking Chart settings for casseroles. Cover casserole meat and
vegetables with sauce. Cool hot
ingredients or sauces. If not, use
TIME COOK.
----- -------- -------- ------ -------
.—-— .. —--—.
‘~
a
. ..- .
I

I
Example of How to Use Automatic Cooking
I
I
~
Place covered food in
oven. Touch Auto Cook
pad. “Enter Code” flashes
on readout.
I
I
I
NOTE: Refer to Automatic Cooking Chart on oven when door is Open and also on pages 34 and 35 of this book.
I
I
Understanding Automatic Cooking Codes & Preference Control
Automatic cooking codes 1 through 9 are designed to
give you easy automatic results with a number of
foods.
Codes are arranged in lowest to highest amount of
I
~
power.
For example, Code 1 gives least microwave
\ (Q cookin9 Power!
!
1, Code 3 increases power over Code 2 and so on.
The Preference Control
I
I
1
I
Another feature to give you mor&? flexibility in Auto-
matic Cooking is the preference control, which can be
used to “fine tune” the power of Codes 2 through 9. By
simply adding a 1 after a Code, you can set the oven to
cook using 20°/0 less time than the code would reguIarly deliver. For example, if Code 4 cooks your vege-
Touch number pad for
desired code. Code 2
shows and “Start” flashes
on readout. Touch START.
Code ~ gives more power than Code
Word AUTO shows on
readout, indicating steam
sensor is activated. DO
NOT OPEN DOOR, DOING
SO MAY AFFECT COOKING PERFORMANCE.
Beep sounds when steam
is sensed and AUTO is
replaced by cook time. At
this point, door may be
opened to check foods if
desired. When done, oven
beeps and stops.
Code 1, which has the least power, is used for quick
reheating jobs while the longer cooking foods like
stew or chili use high codes. A Cooking Chart and
recipes, starting on page 27 give many tested uses for
automatic cooking codes. Remembering that you can
adjust the power up or down by increasing or
decreasing the Code will give you added flexibility.
tables more done than you like them, set Code 41 next
time and you will get 20°/0 less cooking time.
Likewise, if you wish slightly more time than a code
delivers, add a 9 after the Code. For the vegetables in
the example above, Code 49 would provide 20°/0 more
time for cooking than would the regular Code 4.
Touch Auto Cook Pad. “Enter
Code” flashes on readout.
N!@’
Touch number pads 4 and 1 in that
order. Code 4 shows and “Start”
flashes on readout.
9

~
Microwave Oven
K
Automatic Roasting
I
-1,
IiiH
~ tin9s which automatically switch during
roasting, for even and tender cooking results
without overcooking.
Auto Roast uses the temperature
I
probe to cook to the desired serving
temperature. Unlike Temp Cook, which
uses a single power level, Auto Roast
is designed to use up to 3 power set-
Preparing Roasts for Auto Roasting
Place tender beef roasts on trivet in
microwave safe dish. Insert probe
horizontally into center meaty area
not touching bone or fat. Cover
with wax paper.
Poultry, pork or ham roasts need Place meat in oven with probe to
no trivet. Add % cup water to roast
dish, cover with plastic wrap. (For firmly into receptacle on oven wall.
cooking bag method, see cookbook.) Insert probe into center
meaty area.
Just as in conventional roasting, only tender roasts
should be Auto Roasted until specified internal temperatures are reached. Less tender roasts should be
microwaved by time, according to the Cookbook
which comes with your oven. Complete information
on preparing roasts for microwaving is in your
Cookbook.
I
the right. Insert cable end ‘of probe
l-low to Auto Roast Beef to Medium
1. Touch AUTO ROAST Pad. Readout flashes “Enter 2. At 80°, readout switches to show meat’s internal
Code”. Touch number pad 3. “START” Flashes.
Touch START Readout shows AUTO.
3. Oven monitors internal temperature, automatitally switching to lower power as meat’s tem-
perature rises. This helps prevent toughening or
overcooking.
temperature.
4. After temperature is reached, oven switches to
HOLD for 1 hr., then shuts off. Hold prevents over-
cooking while keeping meat warm.
10
I
I
#-
..f
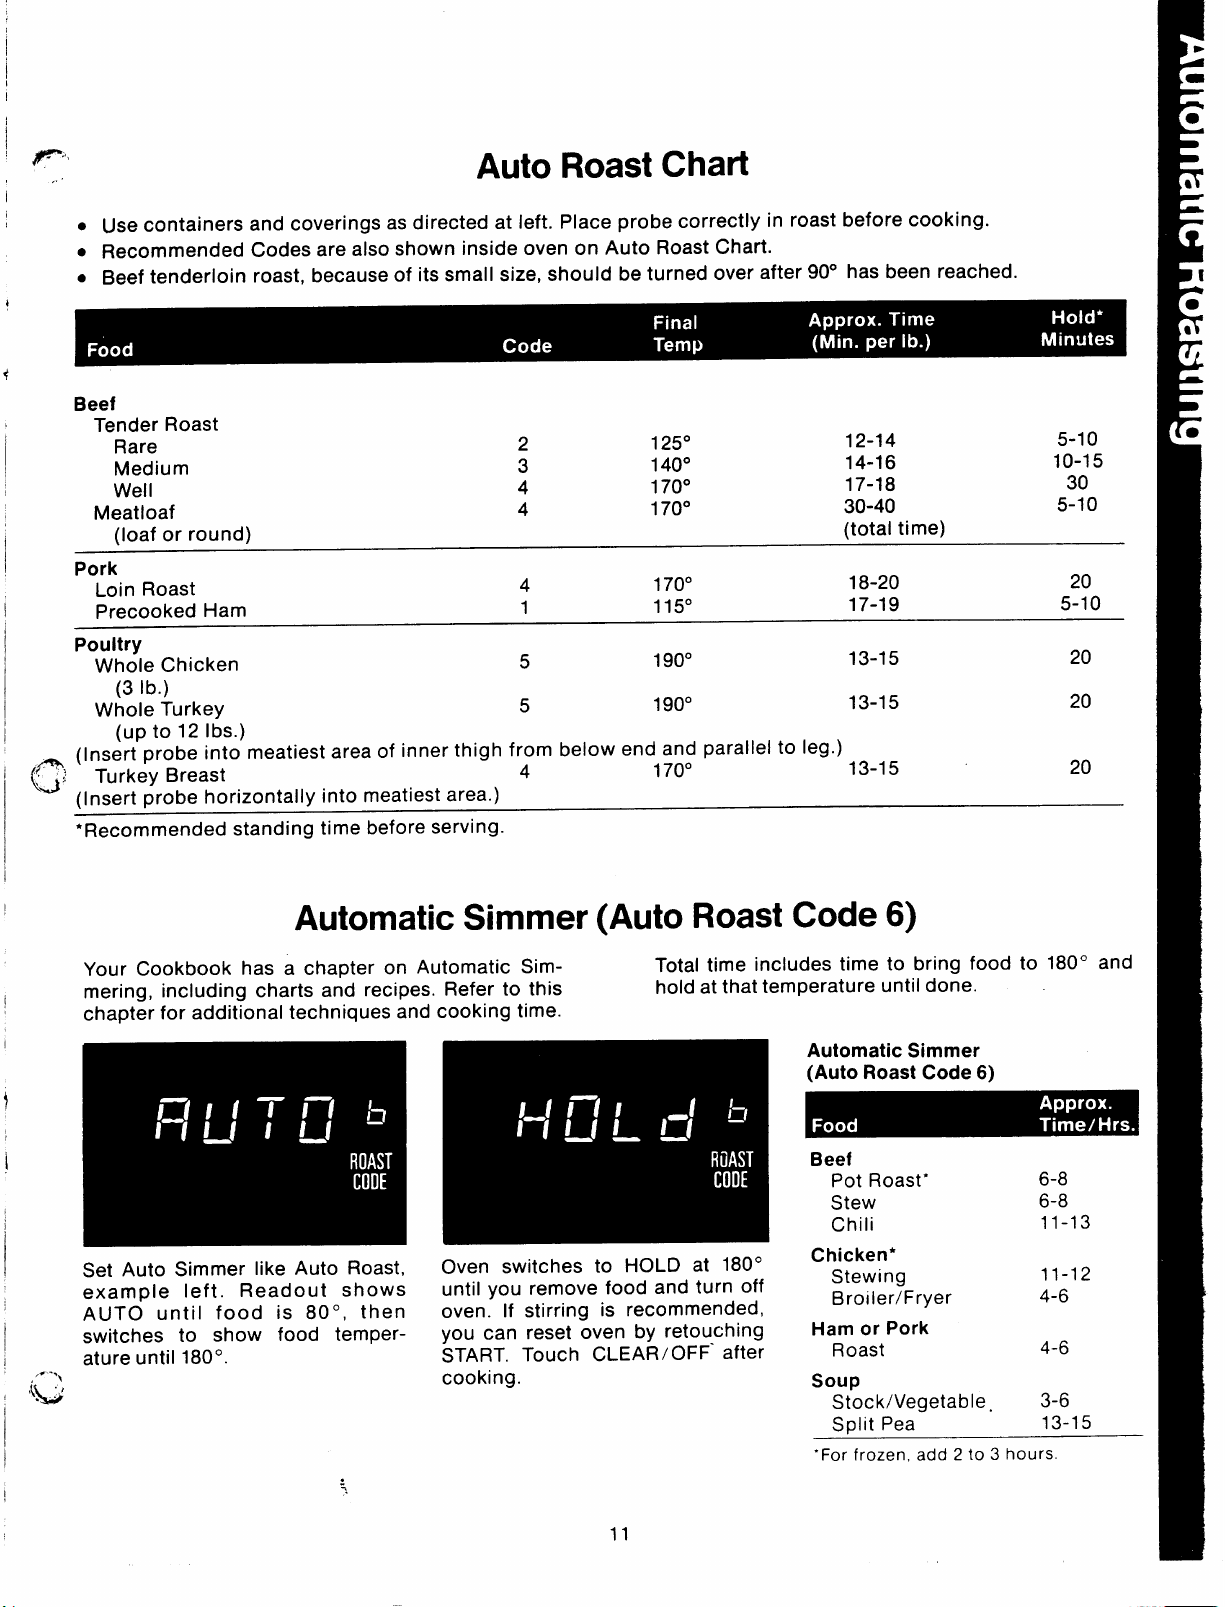
Auto Roast Chart
● Use containers
. Recommended
. Beef tenderloin
I
Pork
Loin Roast
Precooked Ham
Poultry
Whole Chicken
and coverings as directed at left. Place probe correctly in
Codes are also shown inside oven on Auto Roast Chart.
roast, because of its small size, should be turned over after 90° has been reached.
4
1
5
170°
115°
190°
(3 lb.)
Whole Turkey
5
190°
(Up to 12 Ibs.)
~ (Insert probe into meatiest area of inner thigh from below end and parallel to leg.)
(~~ Turkey Breast
4
170°
(Insert probe horizontally into meatiest area.)
●Recommended standing time before serving.
roast before cooking.
18-20
17-19
13-15
13-15
13-15
20
5-1o
20
20
20
I
Automatic Simmer (Auto Roast Code 6)
Your Cookbook has a chapter on Automatic Sim-
I
mering, including charts and recipes. Refer to this
chapter for additional techniques and cooking time.
I
Set Auto Simmer like Auto Roast,
example left.
Readout shows
AUTO until food is 80°, then
switches to show food temperature until 180°.
,+-.,
(~
I
Oven switches to HOLD at 180°
until you remove food and turn off
oven. If stirring is recommended,
you can reset oven by retouching
START. Touch CLEAR/OFF- after
cooking.
Total time includes time to bring food to 180° and
hold at that temperature until done.
Automatic Simmer
(Auto Roast Code 6)
Beef
Pot Roast*
Stew
Chili
6-8
6-8
11-13
Chicken*
Stewing
Broiler/Fryer
11-12
4-6
Ham or Pork
Roast
4-6
soup
Stock/Vegetablea 3-6
Split Pea
“For frozen, add 2 to
11
Microwave Oven
~1
t
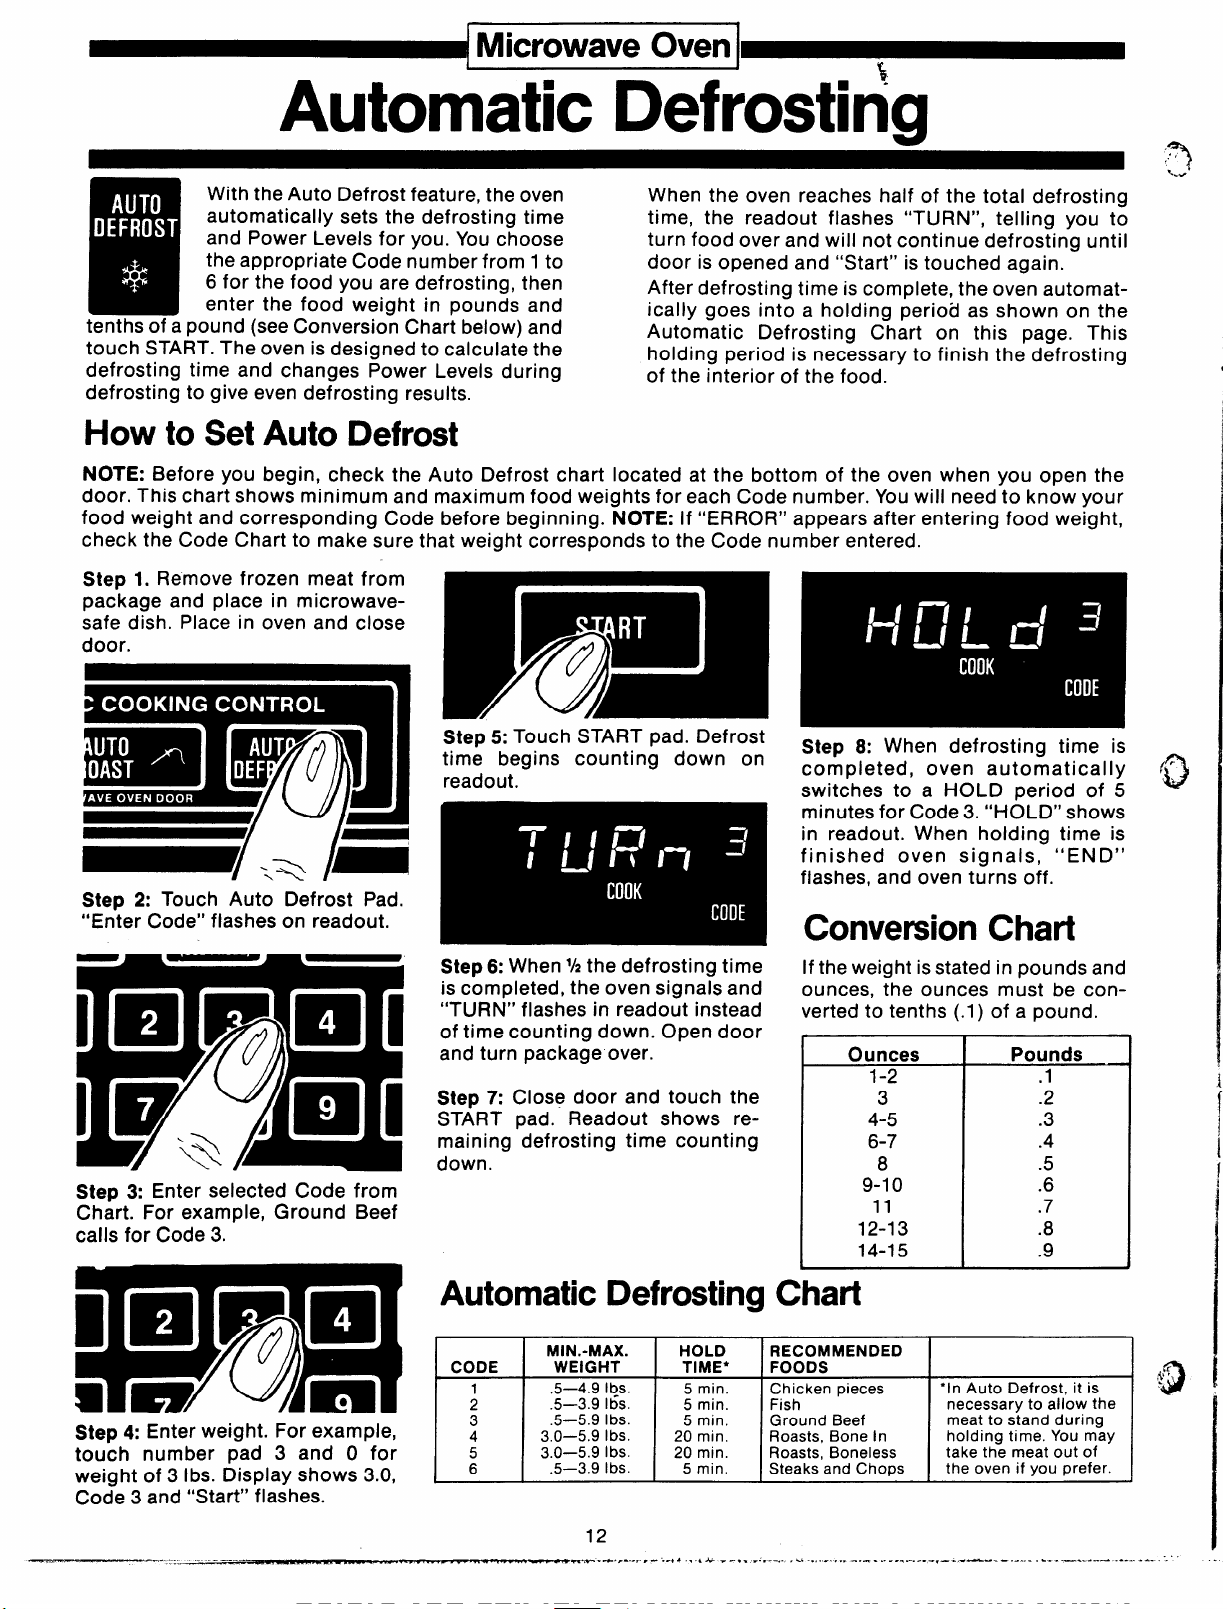
Automatic Defrosting
With the Auto Defrost feature, the oven
automatically sets the defrosting time
and Power Levels for you. You choose
the appropriate Code number from 1 to
6 for the food you are defrosting, then
enter the food weight in pounds and
tenths of a pound (see Conversion Chart below) and
touch START. The oven is designed to calculate the
defrosting time and changes Power Levels during
defrosting to give even defrosting results.
When the oven reaches half of the total defrosting
time, the readout flashes “TURN”, telling you to
turn food over and will not continue defrosting until
door is opened and “Start” is touched again.
After defrosting time is complete, the oven automat-
ically goes into a holding period as shown on the
Automatic Defrosting Chart on this page. This
holding period is necessary to finish the defrosting
of the interior of the food.
How to Set Auto Defrost
NOTE: Before you begin, check the Auto Defrost chart located at the bottom of the oven when you open the
door, This chart shows minimum and maximum food weights for each Code number. You will need to know your
food weight and corresponding Code before beginning. NOTE: If “ERROR” appears after entering food weight,
check the Code Chart to make sure that weight corresponds to the Code number entered.
Step 1. Remove frozen meat from
package and place in microwavesafe dish. Place in oven and close
Step 5: Touch START pad. Defrost
time begins counting down on
readout.
Step 2: Touch Auto Defrost Pad.
“Enter Code” flashes on readout.
Step 6: When% the defrosting time
is completed, the oven signals and
“TURN” flashes in readout instead
of time counting down. Open door
and turn package over.
Step 7: Close door and touch the
START pad. Readout shows remaining defrosting time counting
down.
Step 3: Enter selected Code from
Chart. For example, Ground Beef
calls for Code 3.
Step 8: When defrosting time is
completed, oven automatically
switches to a HOLD period of 5
minutes for Code 3. “HOLD” shows
in readout. When holding time is
finished oven signals, “END”
flashes, and oven turns off.
Conversion Chart
If the weight is stated in pounds and
ounces, the ounces must be converted to tenths (.1) of a pound.
Ounces
1-2 .1
3
4-5 .3
6-7
8 .5
9-1o
11 .7
12-13
14-15
Pounds
.2
.4
.6
.8
.9
Automatic
MIN.-MAX. HOLD RECOMMENDED
CODE
WEIGHT TIME* FOODS
.5—4.9 lps.
.5—3.9 Ibs.
.5—5.9 Ibs.
3.0—5.9 Ibs.
3.0—5.9 Ibs.
.5—3.9 Ibs.
—---- +.?----.--..
Defrosting
5 min.
5
min.
5 min.
20 min.
20 min.
5 min.
12
*4 . ..** >.-. .
Chart
Chicken pieces
Fish
Ground Beef
Roasts, Bone In
Roasts, Boneless
Steaks and Chops
. . . . . . . . . . . . . . . . . .
. . . . . . . . . . . . .. -.-.x —.- .-.. . . . . . . . . . . . --
“In Auto Defrost, it is
necessary to allow the
meat to stand during
holding time. You may
take the meat out of
the oven if you prefer.
. . . .. . . . . .
. . .
 Loading...