

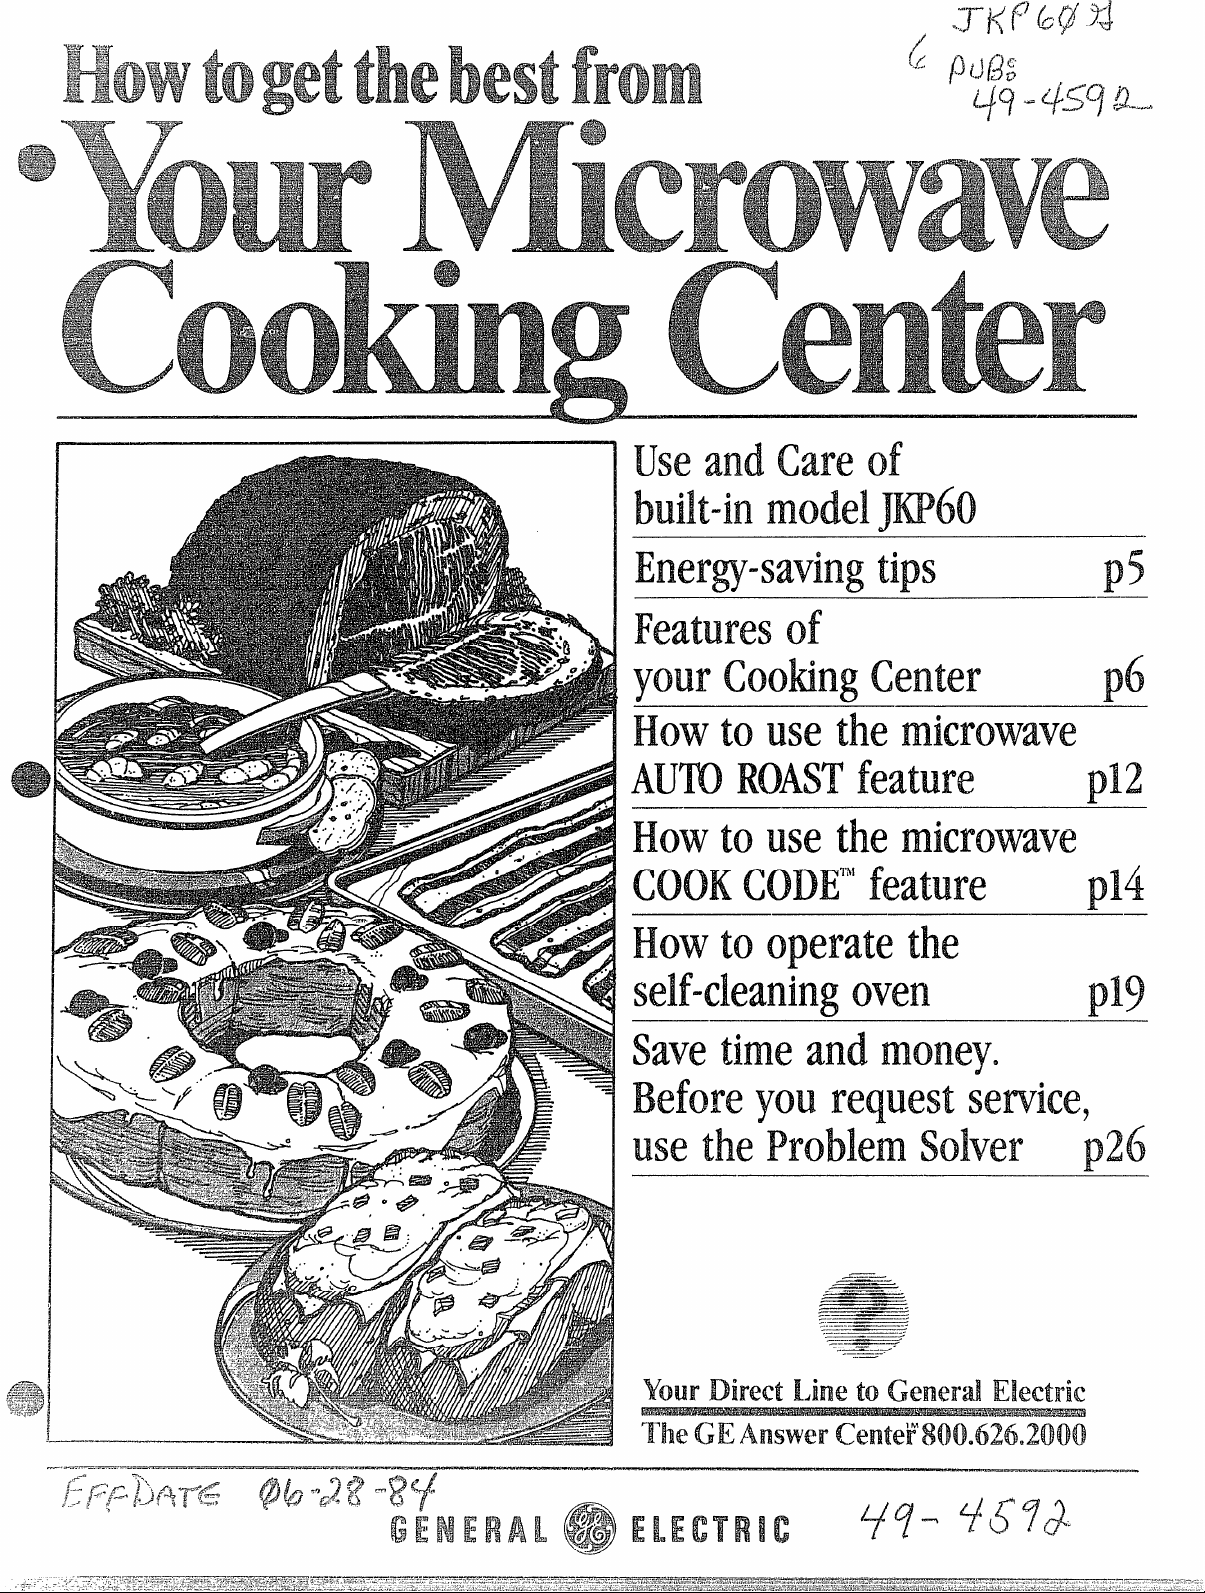
Page 1
.
Ip6
use careof
tips
of
tow%the
toWw the
CODE’”
HOWto the
oven
save
Use
timeand
‘you
the
p5
D12
LM!
p26
s=.====-
——
————
—..
-.—.. ~. -:
...—.—— --
—~.--——
———
--==—-=’
---------
.—..
.——. .
.—
Your Direct Line toGeneralEkxm’k
Page 2

TO
.
!aeacithis
It will help you operate and maintain your new Cooking Center
properly.
Keep it handy for answersto your
questions.
you don’t understand something
if
or need more help. . .
Call, toll free:
The GE Answer center’”
consumer information service
or write: (include your phone
number);
Consumer Affairs
General Electric Company
Appliance Park
Louisville, KY 40225
writefhwvnthe lmddl and
serial
You’llfind them on a label on the
front of the lower oven behind the
door.
These numbers are also on the
Consumer Product Ownership
Registration Card that came with
your Cooking Center. Before
sending in this card, pleasewrite
these numbers here:
ModelNo.
numbers.
Be’sure oven is
It is important that we, the manufacturer, know the location of your
Cooking Center should a need
occur for adjustments.
Your supplier is responsible for
registering you as the
Pleasecheck with your supplier to
be sure he hasdone so; also send
in your Consumer Product Ownership Registration Card. If you move,
or if you are not the original purchaser pleasewrite to us, stating
model and serial numbers. This
appiiarwemustbe registered.
Pleasebe certainthat it is.
Write to:
General Electric Company
Range Product Service
Appliance Park
Louisville, KY40225
If you received a Ckmaged
OV~Ulm. .
immediately contact the dealer (or
builder) that sold you the Cooking
Center.
Save time and money.
Bdcm you requestserwice,check
the ProblemSOhw on page 26. It
lists minor causes of operating
problems that you can correct
yourself.
owner.
(a) DONCJt to operate this
oven with the door open since open
door operation can result in harmful
exposure to microwave energy. It is
important not to defeat or tamper
with the safety inter60clcs.
(b) ifloNotPkce any object
between the oven front face and the
door or allow soil or cleaner residue
to accumulate on sealing surfaces.
(c) DoNd Operatethe oven if it is
damaged. His particularly important
that the oven door close properly
and that there is no damage to the:
(1) door (bent),
(2) hinges and latches (broken or
loosened),
(3) door sealsand sealing surfaces.
(d)?he OwenShoukilNot be
adjusted or repaired by anyone
except properly qualified service
personnel.
SerialNo,
Usethese numbers in any
correspondence or service calls
concerning your Cooking Center.
@ Make sure all utensils used in
your microwave oven are labeled
“suitable for microwaving”, Check
your Cookbook for specific test
to determine “microwave-safe”
utensils.
@ Papertowels, wax paper, and
plastic wrap can be used to cover
dishes in order to retain moisture
and prevent spattering.
@ Some microwaved foods require
stirring, rotating, or rearranging.
Check your Cookbook for specific
instructions.
~ Some foods suct7 as unshelled ‘
eggsand hotdogsmustbe pierced ~=
to allow steam to escape during
cooking.
2
>gq&
o
Page 3
ivlkxcwaweown
safety Instructions . . . . . . . . . . . .3-5
Featuresof Youroven . .
Trne Cook ., .. . . . .. . .. . ., ... ,. 8
13efrost., ... , . . . . . , . . . . . .. .. . . 9
Temperature Cook . . . .. . . . .. . . 10
i+ola/Tirner . . .. .. . .. . . . . . . . . . . 11
Auto Roast & Chat-t . . . . . . ““s12-13
Cook Co&TMcontroi. . . . . . . .. 14-15
Conventional Oven
Safety
Features . . . . . . . . . . . . . . . . . . . . . . 6
OvenControis . . . . . .. . . . . .. . . . . 6
Oven Light . . . .. . . . .. . . . . .. . . . 17’
OvenSheives ... , , . . . . . . . .. . . . 17
Minute Timer, Ciock,
Baking . . . . .. . .. . . . .. . .. . .. . . . 17
Broiiing .. . . . .. .. . .. . .. . . . . . . . 18
Roasting . . . . .. . , . . . . .. . . . . . . . 18
Baking Chart . . . .. . . . . . . . . . . . . 22
Broiling Chart . . . . . . . . . . . .. . . . 23
Roasting Chart . . . . .. . . . . .. . . . 24
Careof Your Cookhq Center-
Seif-Clean Operation .. . .. . . . . . 19
Careof Your Cooking Center .. . 20
Oven Vent Duct. . .. .. . . . . .. . . . 21
Lamp Replacement. . . . . . . . . . . . 21
Oven-rherrnostat
RemovableOven Door. .,,..... 21
Cleaning Chart (Aii Parts) . . . .. . 25
General
Before Using Your
Energy Saving Tips, . . . . . . . . .. . . 5
Model t3Serialf’Jumber
The Probiem Soiver . . . . . ....26-27
Corisumer Services, . . . . . . . . . . . 31
Warranty . . . . .. .. . .. . . Back Cover
instructions . . . . . . . . .. ..3-5
Automatic C)venTimer . . . . .. . 17
Adjustment . .. . . . .. . . . . . . . . . 21
Cooking Center.. .. . . . . . . .. . . 2
Location . . . . . .. . . . . . . . . . .. . . 6
. . . . . . .6-’/
When usirtg electrical appliances
basic safety precautionsshouid
be fotiowed, including the
following:
WARNING—To reducethefisk
of burns, e[ectric shock, fire,
injury to persons orexposure to
excessive microwave energy:
@ LJsethis applianceonlyfor its
intended use as described in this
manual.
a Be sureyourappliance is
properfyinstalfed and grounded
by aquafified technician in
accordance with the provided
installation instructions.
e This appliance must be con-
nectedto a grounded, metallic,
permanent wiring system, oran
equipment grounding conductor
shou!d be run with the circuit
conductors and connected to
the equipment grounding terminalor lead ontheappliance.
e This appliance should
beservicedonly by qualified service
personnel. Contact nearest
authorized service facility for
examination, repairer
adjustment.
e Before performing any
service, DISCONNECTTt-iE
OVEN POWER SUPPL’?ATTI-IE
HOUSEHOLD DISTRIBUTION
PANEL BY REMOVING THE
FUSE OR SWITCHING OFF
THE CIRCUIT BREAKER.
e
Do not cover or block any
openings on the appliance.
SY
Do not use outdoors.
e
Do not operate this appliance
if it is not working properly, or if
it has been damaged or dropped.
@As with any appliance, close
supervision is necessarywhen
used by children,
@ !3(3not k2%NK3 akMw?—’—
children should not be left alone
or unattendeci in area where
appliance is in use,They should
nevw be allowed to sit or stand
on any part of the appliance,
@
akM# to
Small CM’hang ‘cmthe door. They’
CX’WM the
*
Wenm
Do
OF -’i-cl
IIN
ABOVE
AN
‘cm!‘THE -in
r’mms BE
@ proper Loose
fitting or hanging garments
should neverbe worn while
using the appliance. Flammable
material could be ignited if
brought in contact with hot heating elements and may cause
severe burns.
@ Llseonly dry pMMMde$%+-—
mo[st or damp potholders on
hot surfaces may result in burns
from steam. Do not let pot-
holders touch hot heating elements.
Do not use a towel or
other bulky cloth.
@ Never use your apphnce for
warmingor heatingthe room.
@JKMnot storefkmmakdemate-
rialsin the cwem
@ Keephood and greasefilters
dean to maintain good venting
and to avoid grease fires.
@ iDonot let cooking greaseor
otherflammablematerialsaccwBmkm h’!the ovenor near if.
@ Do not useVWakron grease
fires.Fkme in ovencan be
smotheredby
dosing ckmrand tm.@Wtg
—
CLEAWCWF,
when CCmkhlgpork follow
@
our directions exactly and
always cook the meat to at least
170°.
This assures that, in the
remote possibility that trichina
may be present in the meat, it
will be killed and meat will be
safe to eat,
(continuednext page)
.
.
,&.-—*> :-,.. ..—
.
.
. . .
. .
3
Page 4
s DO not!kxmh ele-
~~~~$ g-jf’ ~~@~~(J~~~rf~~fjof ~v~~”
These surfaces may be hot
enough to
blurneventhough they
aredark in color. During and
afier use,do not touch,
c!oth!ng
materials contact any interior
area of the oven; allow sufficient
or other flammable
or let
time for cooling, first.
Other potentially hot surfaces
include the oven vent openings
and surfacesnear the openings,crevicesaround the oven
door and the edges of the door
window.
Remember: The inside surfaceof
the oven may be hot when the
door is opened.
~ Read and follow the specific
‘PRECAUTIONS TO AVOID
POSSIBLE EXPOSURETO
EXCESSIVE MICROWAVE
ENERGY” found on page 2.
~ To reduce the risk of fire in
the oven cavity:
not overcook food. Care-
—Do
fully attend appliance if paper,
plastic, or other combustible
materials are placed inside the
ovento facilitate cooking.
—Remove wire twist-ties from
paper or plastic bags before
placing bag in oven.
—Do not use
oven to dry newspapers.
—Paper towels and napkins,
wax paper.
products can contain metal
your microwave
Recycled paper
fiecks which may causearcing
or ignite. Paper products con-
taining nylon or nylon filaments
shouid be avoided, as they may
aiso ignite.
—Do not pop popcorn in your
oven uniessin a
qxxiai microwave popcorn
WCe.SSQryor uniess you use
popcorn
microv~ave ovens.
labeled for use in
—Do
notqxwaw?the Owen while
towok! damage tothe
CW?UIwd h? da!’iger d fire. if by
accident the oven shouid
empty a minute or two, no harm
is done. However, try to avoid
operating the oven empty at aii
times—it saves
energy and pro-
iongs iife of the oven.
—If materiais insidethe oven
should
ciosed, turn oven off, and disconnect the power
ignite, keep oven door
cord, or shut
off power at the fuse or circuit
breaker panel.
~ Some products such as
whoie eggs and seaiedcontainers—for exampie, ciosed
giass jars—may expiode and
should not be heated in this
oven.
~ Avoid heating baby food in
glass jars, even without their
iids; especially meatand egg
mixtures.
@ Seedoor surface cieaning
instructions on page 20.
~ Don’%defrost frozenbever-
ages in narrow necked botties;
especially carbonated ones.
Evenif the container is opened,
pressure can buiid up. This can
causethe container to burst,
resuiting in injury.
49 Use metal only asdirectediin
OxW.mok. Metai strips as used
on meat, roasts are heipfui when
used as shown in Cookbook.
TV dinners
may be cooked in
metai trays but when using sheif
they must be repiaced in their
box. However, when using metai
in microwave oven, keep metal
(except for DOUBLE !DLJTYTM
shelf) a?least “1-inchaway from
sides of oven.
~ Cooking utensils may
become hot becauseof heat
transferred from the heated
food. This is especially true if
piastic wrap has been covering
the top and hanc!iesof the
utensii. Potholders may be
needed to handie the utensii.
run
@
ltwxmfe km Ihclttokind-i.
(X3F%
the CJwi?nlmmr
Be carefui touching the fioor
during and after cooking.
@ Do not use any
in food you are microwaving
uniess that thermometer is
designed or recommended for
use in the microwave oven.
a Remove the temperature
probe from the oven when not
using it to cook with. If you ieave
the probe inside the oven without
inserting it in food or iiquid, and
turn on microwave energy, it can
create electrical arcing in the
oven, and damage oven waiis.
~
Eh3iihg eggs (in and out cd
she!!) is not uwxmwnended
for
microwave cooking. Pressure
can buiid up inside egg yoik and
may cause it to burst, resuiting
in injury.
a Foods wi~hunbrokenouter
“skin”such as potatoes, hot
dogs or sausages,tomatoes,
appies, chicken iivers and other
gibiets, and eggs (seeabove)
shouid be pierced to aiiow
steam to escape during cooking.
~
Plastic Utensik+Piastic
utensiis designed for microwave
cooking arevery usefui, but
shouid be used carefuiiy. Even
microwave piastic may not be as
toierant of overcooking conditions as are giass or ceramic
materiais and may soften or
char if subjected to short periods
of overcooking. in ionger exposures to overcooking, the food
and utensiis couid ignite. For
these reasons: 1) Use micro-
wave piastics oniy “and use
them” in strict compliance with
the utensii manufacturer’s
recommendations. 2) Do not
subject empty utensiis to microwaving. 3) Do not permit chiidren
to use piastic utensiis without
compiete supervision.
4
Page 5

= “Ekik3bh’2”
and
Cdtxxd bags
sfiou\cjbe slit, pierced or vented
#s&==Lasdirected in C~~kb~~k. If they
a are not, ~la$tic
ing or
immediately after cooking,
pcssibiy resulting iri injury. Also,
plastic storage containers should
beat least partially uncovered
because they form
When cooking with containers
tightly covered with plastic wrap,
removecovering carefully and
direct steam away from hands
and face.
@ use of the DUTVM
shelfaccessory. (Seeyour Cookbook for proper use.)
—Removethe shelf from oven
when not in use.
—Do not store or cook with
shelf on floor of oven. Product
damage may result.
—Usepotholders when handling
the shelf and utensils.
hOt
be
not use microwave
—Do
browning dish on shelf.
shelf could overheat.
@Stand
‘whenopening oven door. T-he
hoi air or
cm came bums to hands,face
and/cWeyes.
@ imm’theat Wlcp?rled!food
Containersin h? oven. PressLure
txmk!build up and m? CCmkmwr
CWUMburstcausingan ihjury.
* Keep oven vent ducts
unobstructed.
~ Keep oven free from grease
build up.
@ Placeoven rack in desired
position while oven is cool. If
racks must be handled when
hot, do not let potholder contact
heating units in the oven.
~ Puliing out shelf to the shelf
stop is a convenience in lifting
heavy foods. It is also a precau-
$~~t~~n
against ~urn~ fr*m ~o(jc~~ng
-- fi[)~~Ljrf~~~:;Of~h~~~or or oven
??J<?IIS.
couId bUR~du~-
a tight seal.
They may
The
away from the oven
steamwhich escapes
@ When using cooking or roast--
ing bags in oven, follow the
manufacturer’s directions.
@ Do not use your oven
tO dv
newspapers. if overheated,they
can catch fire.
@ Do notdean dcmr gasket
The door gasket is essentialfor
a good seal. Care should be
taken not to rub, damage, or
movethe gasket.
@ Do no$useoven cleaners.
No commercial oven cleaner or
oven liner protective coating of
any kind should be used in or
around any part of the oven.
@ Clean only parts listed in this
Use and Care Book.
@ Before seif=cleaningthe oven,
remove broiler pan and other
utensils.
* Listen for fan—a fan noise
should be heard sometime during the cleaning cycle. If not,
call for service before selfcleaning again.
@ Use proper power level as
recommended and DO NOT
OVEF4CXX)K.
Do not operate the oven while
@
empty. If’by accident the oven
should run empty a minute or two,
no harm is done. However,try to
avoid operating the oven empty at
all times—savesenergy and also
ensuresgood long term life of oven.
@ preheat the
necessary.Most foods will cook
satisfactorily without preheating.
If you find preheating is necessary,
keepan eye on the indicator light,
and put food in the oven promptly
after the light goes out.
Always turn Oven OFF before
@
removing food.
@ Don’t open the oven door any
more often than necessaryduring
baking. If you do haveto open it,
close it as soon as possible.
@ Be sure to wipe up excessspillage before self-cleaning operation.
@ Cook complete oven meals
instead of just one food item.
Potatoes, other vegetables,and
somedesserts will cook together
with a main-dish casserole, meat
loaf, chicken or roast. Choose
foods that cook at the sametemperature in approximately the same
time.
@ USeresidual heat in oven
ever possible to finish cooking casseroles,oven meals,etc. Also add
rolls or precooked dessertsto warm
oven, using residual heat to warm
them.
oven only when
when-
5
Page 6
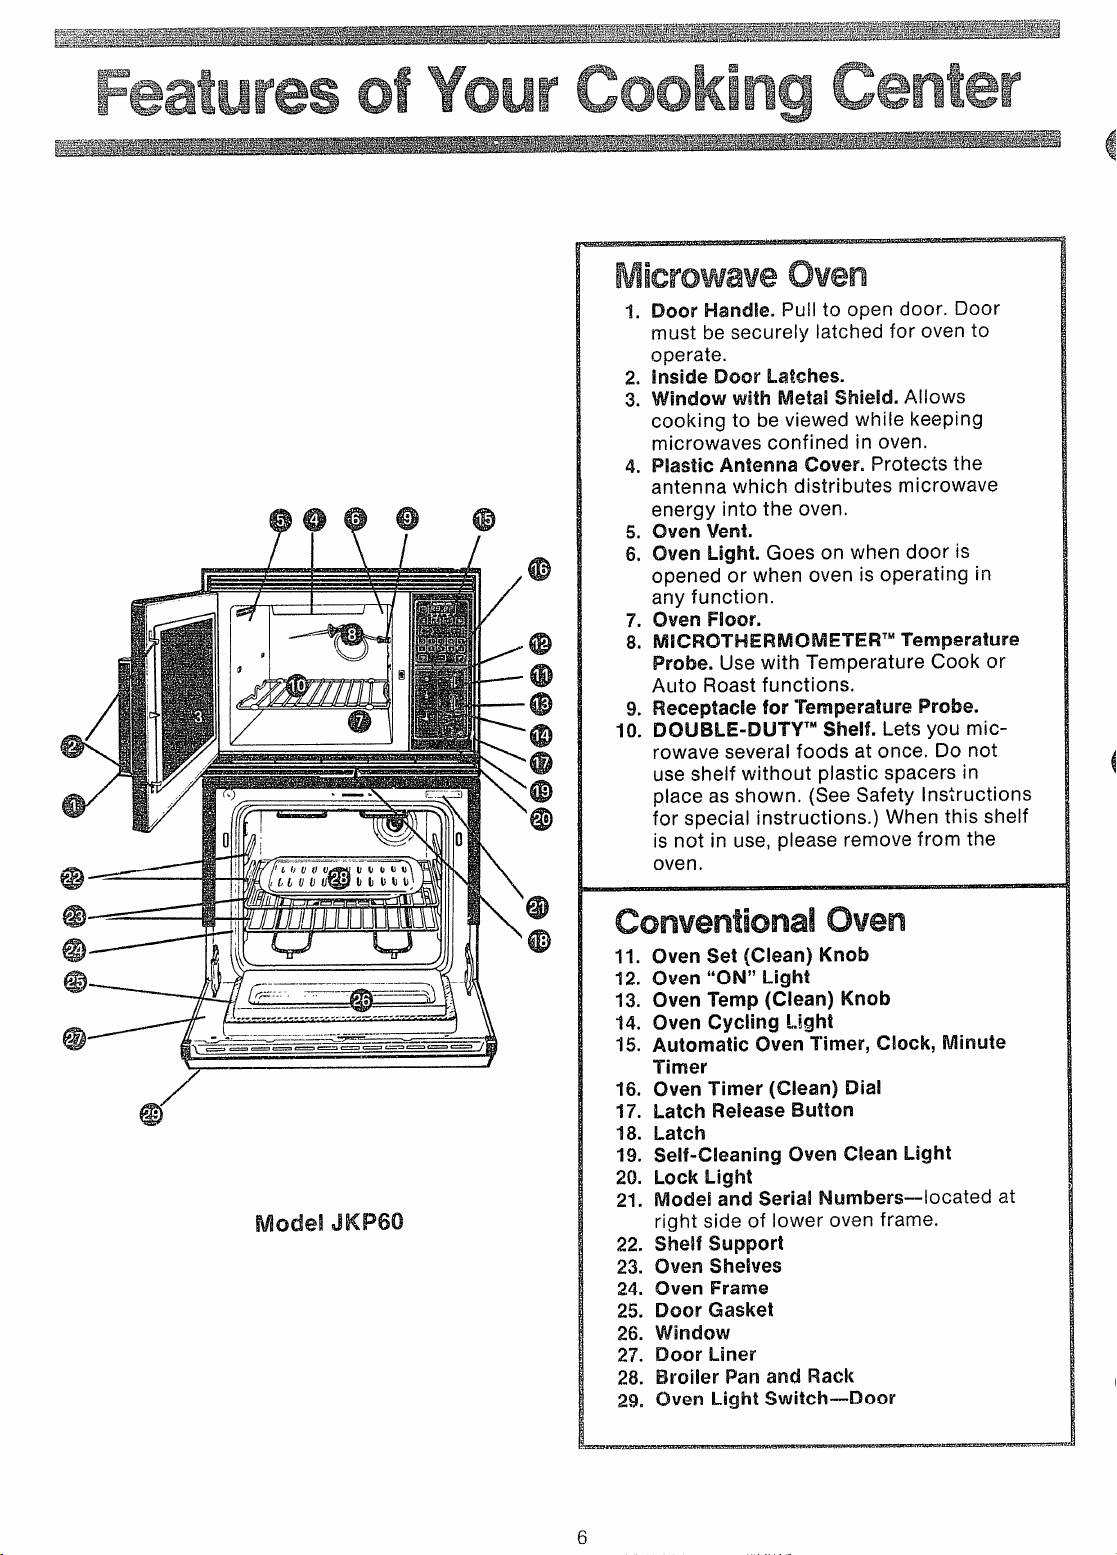
of
1. Door l+and!e. Pull to open door. Door
must be securely latched for oven to
operate.
2. Inside Door Latches”
3. with Metal Shieid. Allows
cooking to be viewed while keeping
microwaves confined in oven.
4. Wastic Antenna Cover. Protects the
antenna which distributes microwave
energy into the oven.
5. Oven Vent.
& Oven Light. Goes on when door is
opened or when oven is operating in
any function.
7. oven Floor.
8. Temperature
Probe. Use with Temperature Cook or
Auto Roast functions.
9. Receptacle for Temperature Probe.
10. DOLJBLE-DLJTYT”Shelf. Lets you microwave several foods at once. Do not
use shelf without plastic spacers in
place as shown. (See Safety Instructions
for special instructions.) When this shelf
is not in use, please remove from the
oven.
11. oven Set (Clean) Knob
-.—.-——.——.-
——.—
/77”:-
.—-....-..—..————
1~
.---..--.P --------- ---
@
--..~-====---.===~
- —————-----—=
——.
——-—
12. oven “oh!” Light
13. OvenTermp(Clean) Knob
14. Oven Cycling Light
15. Automatic Oven ‘Tlfner,Clock, Minute
Tinwr
16. (Men Timer [Clean) Dial
17. Latch Release Button
18. Latch
19. Self-Cieaningj Oven Clean ‘Light
20. Lock Light
21. Model and Serial Numbers—located at
right side of lower oven frame.
22. shelf support
23. Oven Shelves
24. Oven Frame
25. Door Gaskefi
26. window
27. Door Liner
28. Broiler Pan and flack
29. Oven Light Swikh-t300r
——
6
Page 7
‘\
.-
@
A—
o
.,- -
@
‘!
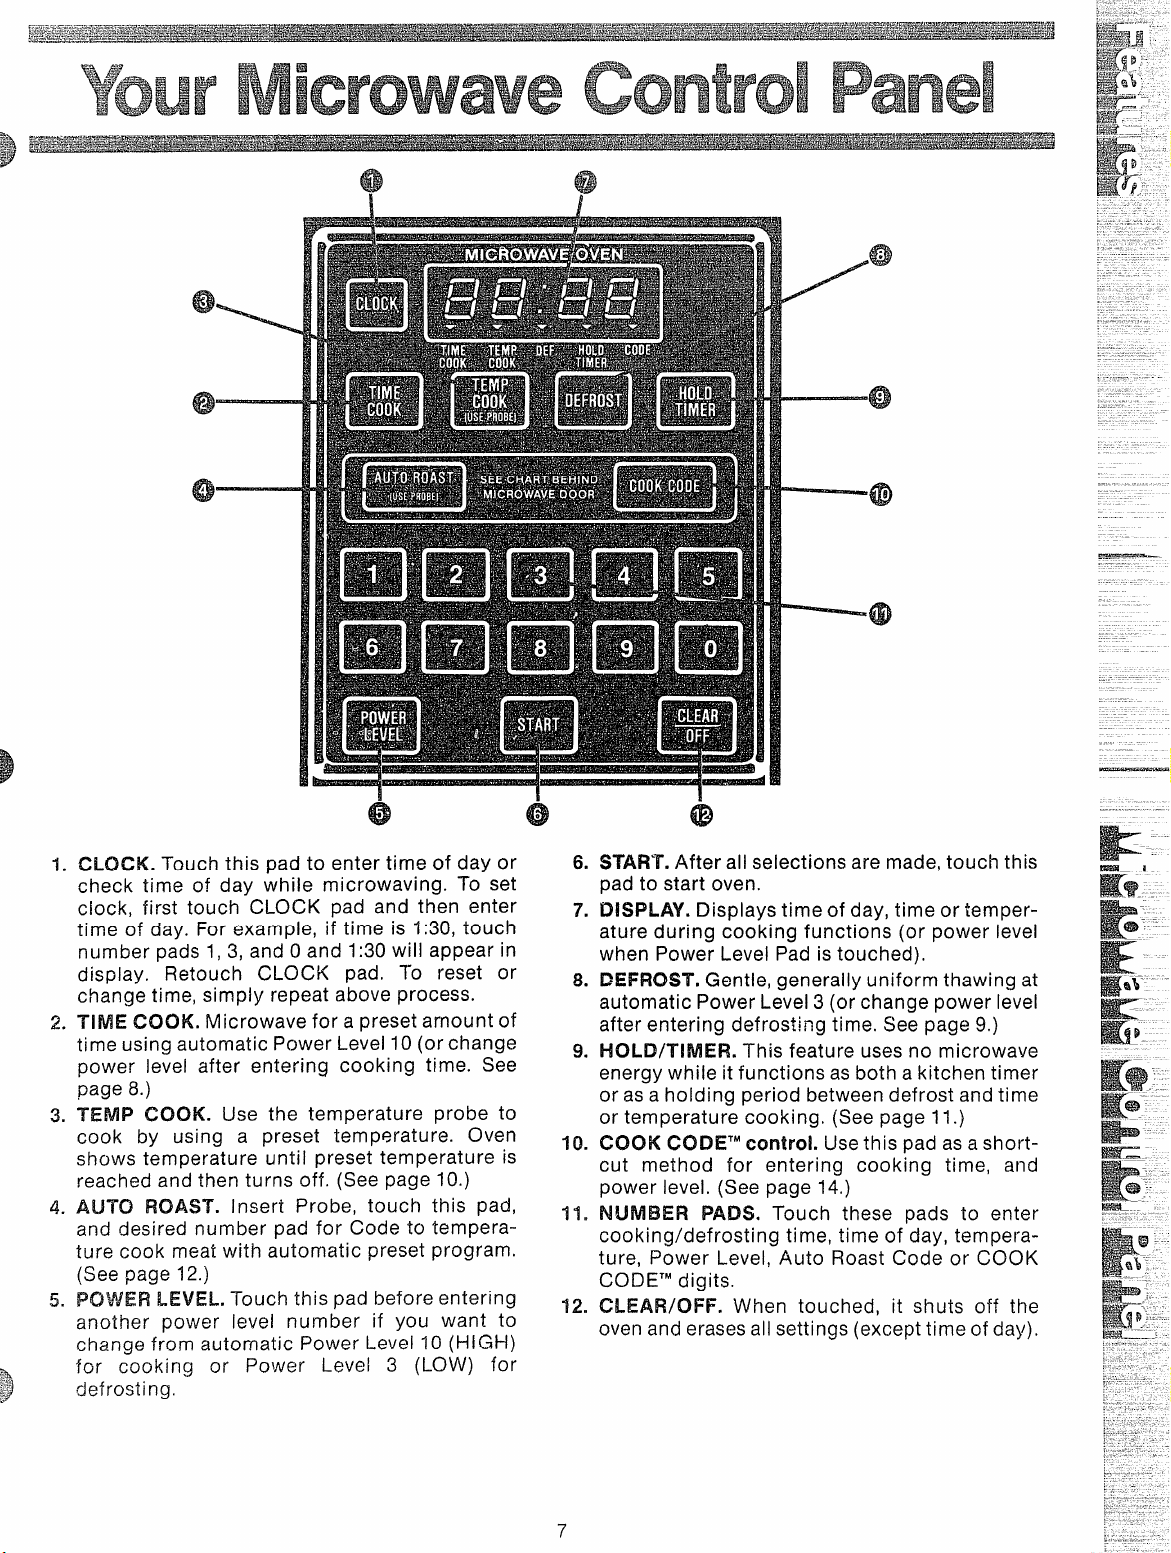
1.
CLOCK. Touch this pad to enter time of day or
check time of day while microwaving. To set
clock, first touch CLOCK pad and then enter
time of day. For example, if time is 1:30, touch
number pads 1, 3, and Oand 1:30 will appear in
display. Retouch CLOCK pad. To reset or
change time, simply repeat above process.
TIME COOK. Microwave for a preset amount of
2.
time using automatic Power Level 10 (or change
power level after entering cooking time. See
page 8.)
TEMP COOK. Use the temperature probe to
3.
cook by using a preset temperature. Oven
shows temperature until preset temperature is
reached and then turns off. (See page 10.)
AUTO ROAST. Insert Probe, touch this pad,
4.
and desired number pad for Code to temperature cook meat with automatic preset program.
(See page 12.j
5.
another power level number if you want to
change from automatic Power Level 10 (HIGH)
f’or cooking or Power Level 3 (LOW) for
defrosting.
LEVEL. Touch this pad before entering
6
0
0
& START. After all selections are made, touch this
pad to start oven.
7. DISPLAY. Displays time of day, time or temperature during cooking functions (or power level
when Power Level Pad is touched).
8. DEFROST, Gentle, generally uniform thawing at
automatic Power Level 3 (or change power level
after entering defrosting time. See page 9.)
9. HOLD/TIMER. This feature uses no microwave
energy while it functions as both a kitchen timer
or as a holding period between defrost and time
or temperature cooking. (See page 11.)
10. COOK CODE’” control. Use this pad as a shortcut method for entering cooking time, and
power level. (See page 14,)
t 1. NUMBER PADS. Touch these pads to enter
cooking/defrosting time, time of day, tempera-
ture, Power Level, Auto Roast Code or COOK
CODETMdigits.
12. CLEAF1/OFF. When touched, it shuts off the
oven and erases all settings (except time of day),
B
@
CR$w— 1-
KiT-
E3!lwz
e -
K--
.-
7
Page 8
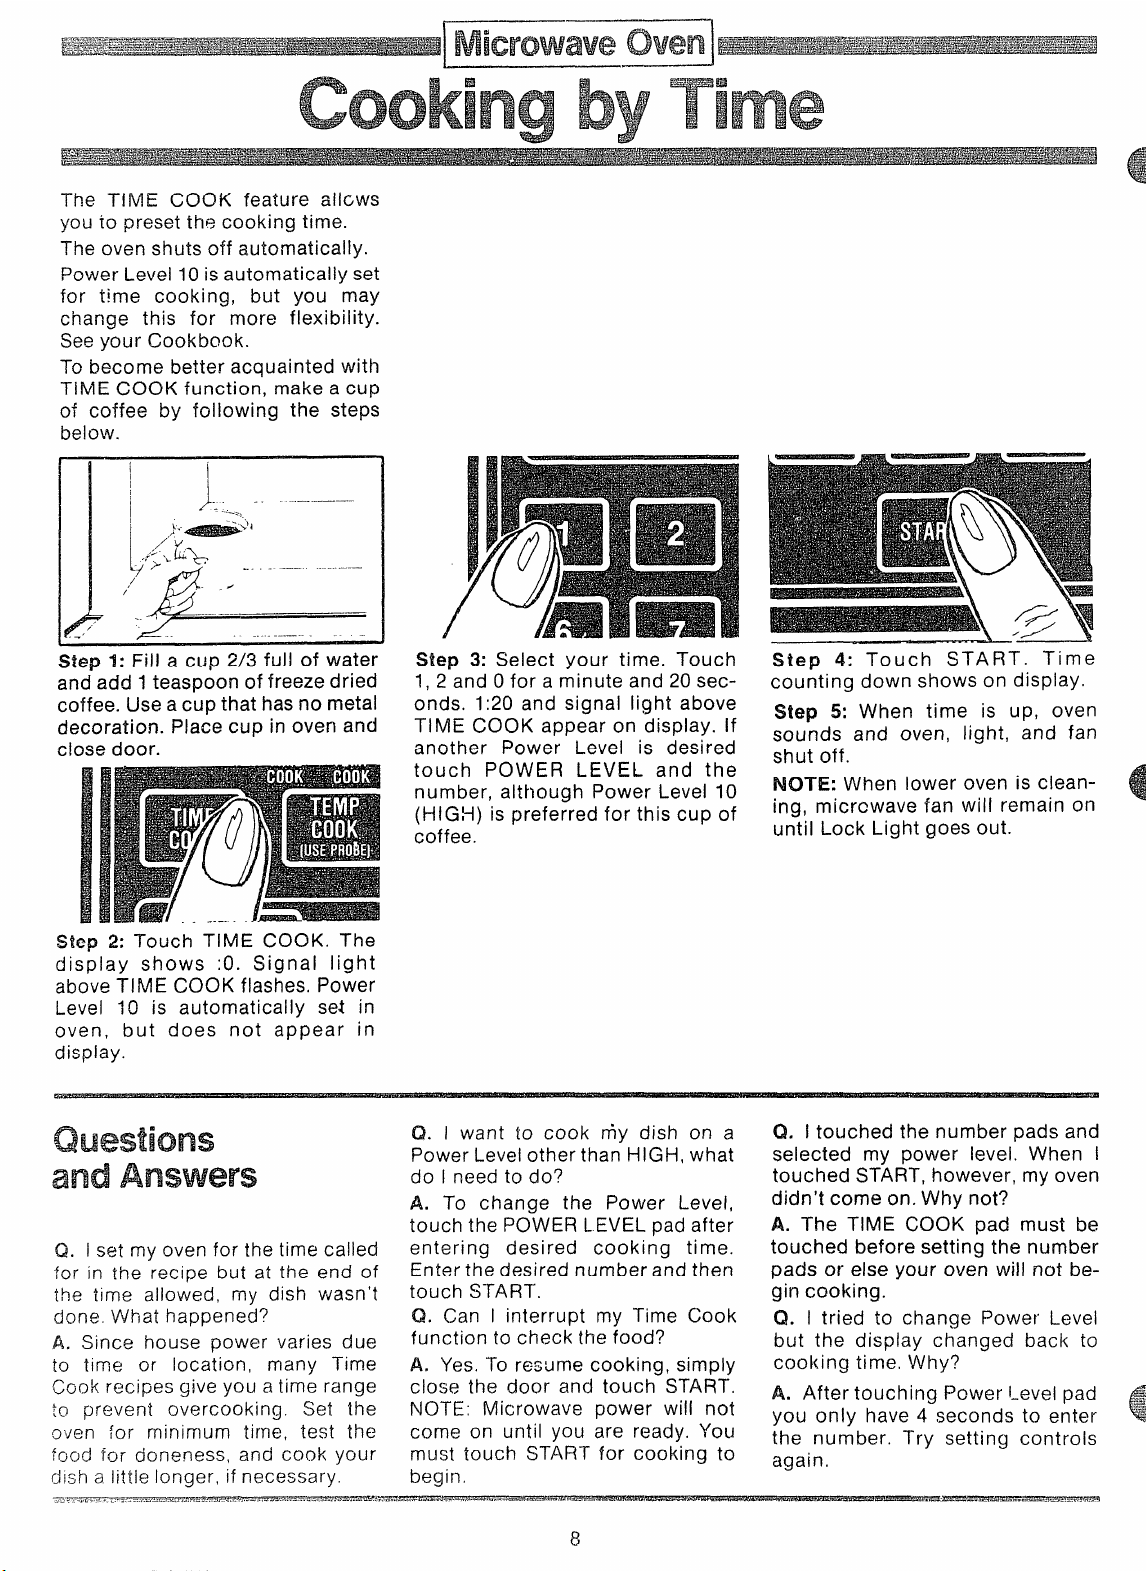
The TiME COOK feature allGws
you to preset the cooking time.
The oven shuts off automatically.
power Level 10is automatically set
for time cooking, but you may
change this for more flexibility.
Seeyour Cookbook,
To become better acquainted with
TiME COOK function, make a cup
of coffee by following the steps
below.
I
I
):
--:.
——.———
Step 1: Fill a cup 2/3 full of water
and add 1teaspoon of freeze dried
coffee. Use a cup that has no metal
decoration. Place cup in oven and
c!ose door.
Step 2: Touch TIME COOK. The
display shows :0. Signal light
above TIME COOK flashes. Power
Level 10 is automatically set in
oven, but does not appear in
display.
and
Q, I set my oven for the time called
for in the recipe but at the end of
the time allowed, my dish wasn’t
done. What happened?
A. Since house power varies due
to time or location, many Time
~~ok recipes
!Q prevent overcooking. Set the
~>Jen;Or minimum time, test the
food Ior doneness, and
dish a little longer, if necessary.
g~ve you a time ran9e
cook your
Step 3: Select your time. Touch
1, 2 and O for a minute and 20 seconds. 1:20 and signal light above
TIME COOK appear on display. If
another Power Level is desired
touch POWER LEVEL and the
number, although Power Level 10
(HIGH) is preferred for this cup of
coffee.
Q. 1 want to cook my dish on a
Power Level other than HIGH, what
do I need to do?
A. To change the Power Level,
touch the POWER LEVEL pad after
entering desired cooking time.
Enter the desired number and then
touch START.
Q. Can I interrupt my Time Cook
function to check the food?
A. Yes. To resume cooking, simply
close the door and touch START.
NOTE: Microwave power will not
come on until you are ready. You
must touch START for cooking to
begin.
\
Step 4: Touch START. Time
counting down shows on display.
Step 5: When time is up, oven
sounds and oven, light, and fan
shut off.
NOTE: When lower oven is c!eaning, microwave fan will remain on
until Lock Light goes out.
Q. I touched the number pads and
selected my power level. When I
touched START, however, my oven
didn’t come on. Why not?
A. The TIME COOK pad must be
touched before setting the number
pads or else your oven will not begin cooking.
Q. I tried to change Power Level
but the display changed back to
cooking time, Why?
$4.After touching Power Level pad
you only have 4 seconds to enter
the number. Try setting controls
again,
x
Page 9
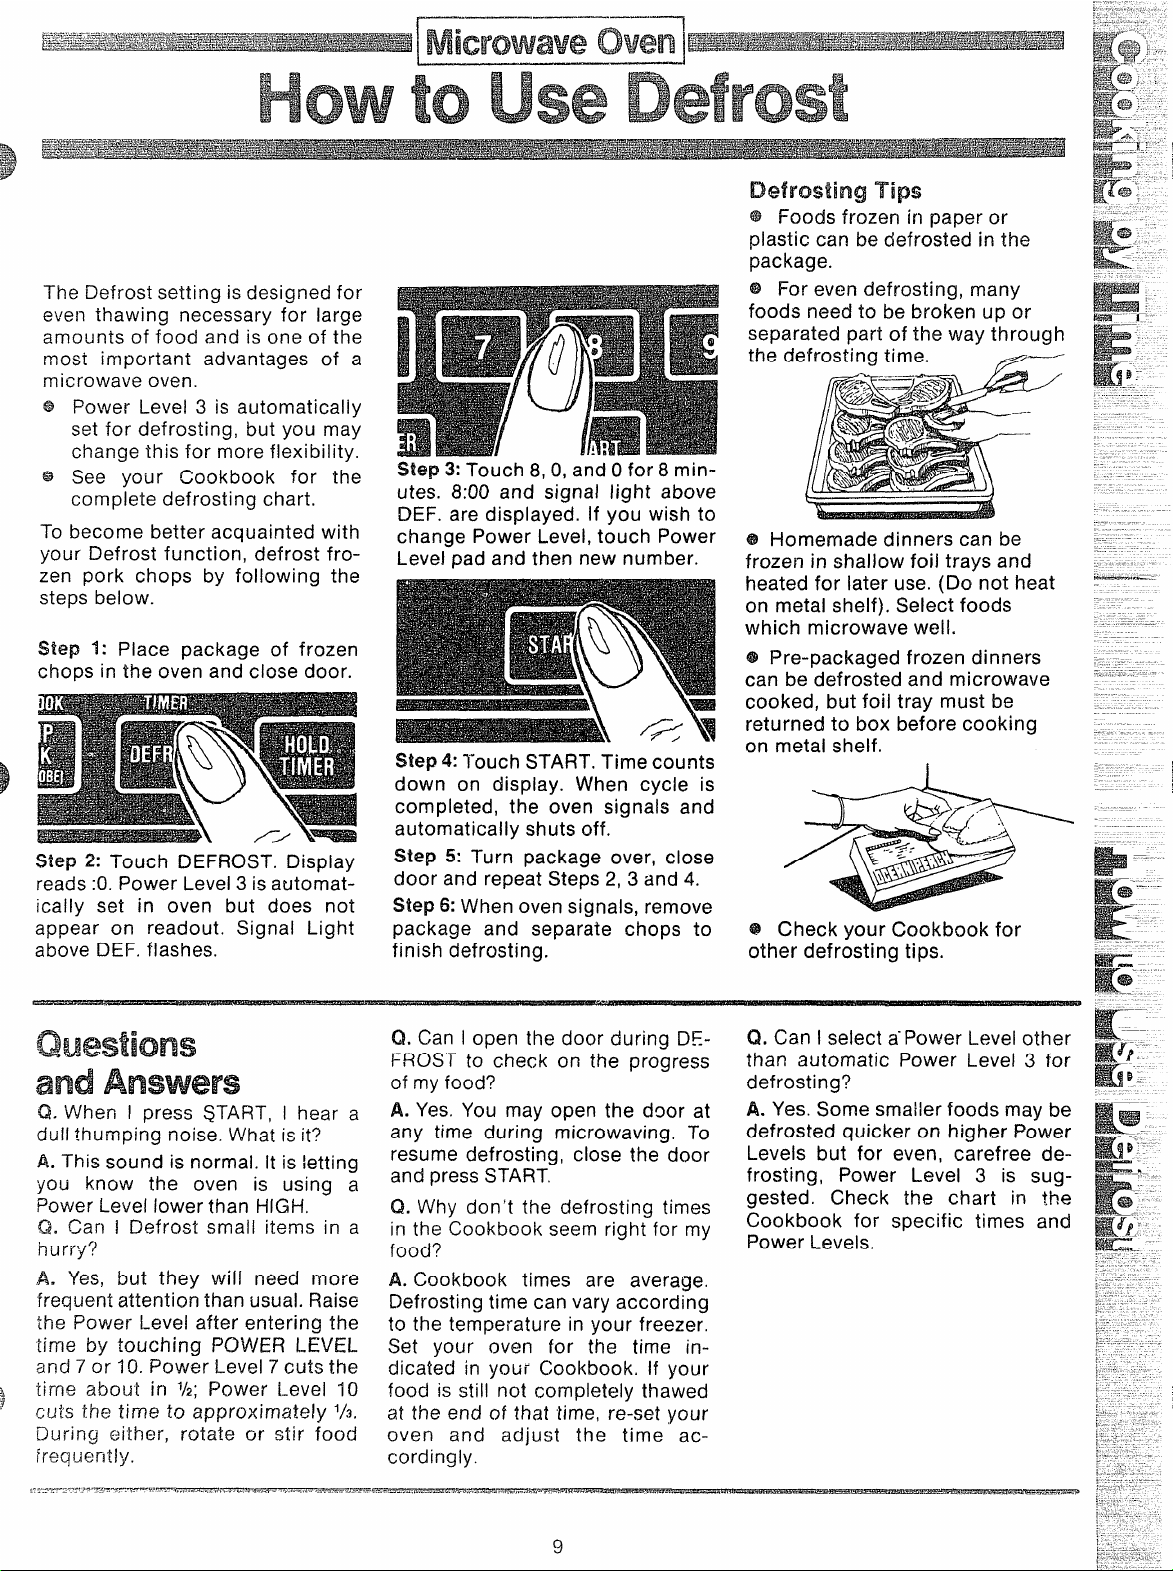
The Defrost setting is designed for
even thawing necessary for large
amounts of food and is one of the
most important advantages of a
microwave oven.
Power Level 3 is automatically
set for defrosting, but you may
change this for more flexibility.
your Cookbook for the
See
complete defrosting chart.
become better acquainted with
your Defrost function, defrost frozen pork chops by following the
steps below.
Step 1: Place package of frozen
chops in the oven and close door.
Step 2: Touch DEFROST. Display
reads :0. Power Level 3 is automatically set in oven but does not
appear on readout. Signal Light
above DEF. flashes.
Step 3: Touch 8,Cl,and Ofor 8 minutes. 8:00 and signal light above
DEF. are displayed. If you wish to
change Power Level, touch Power
Level pad and then new number.
Step 4: l-ouch START. Time counts
down on display. When cycle is
completed, the oven signals and
automatically shuts off.
Step 5: Turn package over, close
door and repeat Steps 2, 3 and 4.
Step 6: When oven signals, remove
package and separate chops to
finish defrosting.
Tips
@ Foods frozen in paper or
plastic can be defrosted in the
package.
@ For even defrosting, many
foods need to be broken up or
separated part of the way through
the defrosting time.
@Homemade dinners can be
frozen in shallow foil trays and
heated for later use. (Do not heat
on metal shelf). Select foods
which microwave well.
@Pre-packaged frozen dinners
can be defrosted and microwave
cooked, but foil tray must be
returned to box before cooking
on metal shelf.
@ Check your Cookbook for
other defrosting tips.
Z==—
—
G!.When I press START, I hear a
dull ~humping noise. What is it?
A. This sound is normal. It is letting
you know the oven is using a
Power Level iower than HIGH.
Q. Can i Defrost small iterns in a
hurry?
A. Yes, but they will need more
frequeniattention than usual. Raise
the Power Level after entering the
time by touching POWER LEVEL
and 7or 10. Power Level 7 cuts the
time about in
cuts the time to approximately
During either, rotate or stir food
frequenlly.
,-:.~—-:--...=-p,=,-p,=.—.-..
1/2; Power Level I O
-..”.-.< .-. *-W ..-.<+ 1-..-.-= ..--.”,...-. e--=--.e-==a%:-
%,,,.
Q. Can I open the door during DEFROST to check on the progress
of myfood?
A. Yes. You may open the door at
any time during microwaving. To
resume defrosting, close the door
and press START.
Q. Why don’t the defrosting times
in the Cookbook seem right for my
food?
A. Cookbook times are average.
Defrosting time can vary according
to the temperature in your freezer.
Set your oven for the time indicated in your Cookbook. If your
food is still not completely thawed
1/3.
at the end of that time, re-set your
oven and adjust the time accordingly.
9
Q. Can I select a-Power Level other
than automatic Power Level 3 for
defrosting?
A. Yes. Some smaller foods may be
defrosted quicker on higher Power
Levels but for even, carefree de-
frosting, Power Level 3 is sug-
gested. Check the chart in the
Cookbook for specific times and
Power Levels,
—a~..—
.e--.. r---
Page 10

by
For many foods, internal temperature is the best
d C!CNM31V3SS.
test
Roasts or poultry are cooked to your preference
when temperature cooking. Heating or reheating
foods accurately to a serving temperature you
desire is simple and easy.
TEMP COOK takes the guesswork out of cooking
because the oven shuts ~ff automatically when the
food is done.
Step 1: Insert temperature probe
as directed in Cookbook and attach probe securely in oven wall.
Close the door.
step 2: Touch TEMP COOK. The
readout display shows Oand signal
light above TEMP COOK flashes.
Step 4: Touch POWER LEVEL pad.
Touch 5 for MEDIUM power. P-5
shows on display and then display
reverts back to set finished
temperature.
Step 5: Touch START. Display
shows temperature of food counting up.
Step 3: TOUCII1, 3, 0 or 130°. 130
shows on display. Power Level 10
is automatically set in oven but
Step & When 130° is reached, the
oven will signal. Remove probe and
food from the oven.
does not appear on readout.
‘TTw2
.
The temperature probe is a food thermometer that
gauges the internal temperature of your food; it
must be used when using TEMP COOK or AUTO
ROAST. Follow the directions for use and insertion
on page 12.
6Ew-
SENSOR
HANDLE
/
CLIP
CABLE
END
~1’
-rips
@ Usea lower power level setting;
it will heat more evenly even
though requiring more time.
@ Be sure frozen food has been
completely defrosted before inserting probe. Probe may break off if
used in frozen foods.
@ Always insert probe into the
center of meaty areas; take care
not to touch the fat or the bone.
@ Insert probe as horizontally as
possible into foods as directed in
the recipes. Make sure the handle
does not touch the food.
@ Use the clip to keep the probe
in place while heating.
@ Cover foods as directed in
Cookbook for moisture control and
quick, even heating.
Q, Are there any foods I can’t
TEWIP COOK?
A.
Yes. Delicate butter icings, ice
cream, frozen whipped toppings,
etc., soften rapi”diy a?warm temperatures. Batters and doughs as
weiI as frozen foods are also diffi-
CIJII to COOK precisely with the
probe. It is best to TIME COCJK
iI-!esefoods.
._,—..—
—7.-._:,,,. =~,~..- ..—....=~.~-~-
- . !-!37.— -.-—.
Q. After I followed the steps and
touched START, asignal sounded
and oven did not start. What is
wrong ?
A. If you set the temperature either
below 80° or gredter than 199° the
oven will not start. To re-enter,
touch CLEAR/OFF pad and begin
steps again.
Q. Oven sounded and would not
start although I entered the temperature correctly. What is wrong?
A. If you have not securely seated
the end of th~ probe into the
re~eptacle in the oven wall, if YOU
touch TEI’vIPC(XJK and have forgotten to use the probe or if the
actual food temperature is higher
10
than set temperature, oven will
sound and not start.
Q. Can I leave my probe in the
oven if it’s not inserted in the food?
A. No. If the probe is left inside the
oven, touching the oven wall, and
not inserted in food, you may c@nage the oven.
Q. t-low do I know what tempera-
ture to set?
A. Your Cookbook contains sec-
tions on all types of foods showing
the temperatures needed to cook
the foods to different degrees of
doneness. For reheating, refer to
Reheating Charts in the front
of the Cookbook for specific
temperatures.
—ffi—
Page 11

Your HOLD~àTIMER, which oper-
ates without microwave energy,
has three timing functions.
It operates as a Minute Timer, it
can be set to delay cooking or may
be used as a hold setting after defrosting. Hoid~Timer can be set up
to 99 minutes.
Step 1: Touch l-iOLD/TIMER pad.
The display shows :0. Signal light
above HOLDTFIMER flashes.
Step 2: Select the amoun$ of time
you desire. Touch the appropriate
number pads. If, for example, you
are timing a three minute phone
call, touch 3, 0, and O.The display
shows 3:00. .
Step 3: Touch START. The readout
display shows the time as it counts
down.
Step 4: W-hentime is up, oven will
signal and display will show time
of day.
The HOLD/TIMER can also be
used to program “standing time”
between microwave cooking func-
tions. The time can range from one
second to 99 minutes and 99 seconds. A HOLD, or “standing” time
may be found in some of your own
recipes or Cookbook.
To set the oven to delay cooking
up to 99 minutes follow Steps 1
and 2 to enter hold time, then set
Time Cook and time, or Temp
Cook and temperature desired
before pressing START. When
hold ing before temperature
cooking, be sure probe is in food
before pressing START.
To help you become acquainted with the HOLD/TIMER feature as used with
Time Cook or TempCook follow
steps below to defrost a frozen casserole for 15minutes, then hold 10 minutes and then cook 25 minutes. If using
Temp Cook after Hold/Timer, be sure to insert probe correctly as shown on page 12.
Step 1: Remove casserole from the
freezer and place in oven. Touch
the DEFROST pad. The readout
panel shows :0 and signal light
above DEF. flashes.
Step 3: Set standing or hold time
by touching HOLD/TlfvlER. :0 appears on display. Signal light above
HOLD/TIMER flashes.
Step 5: Touch the TIME COOK
pad. l-his display shows :0 and
signal light above TIME COOK
tlashes.
Step 6: Touch 2, 5, 0 and O for
twenty-five minutes of cooking
time. 25:00appears on display.
Step 2: Touch 1, 5, 0 and O for
defrosting time. 15:00 appears on
display panel. (Defrosting is auto-
matically set on Power Level 3 but
can be changed by touching
POWER LEVEL pad and the new
Power Level.)
‘Step 4: Touch 1, 0, 0 and Oto hold
for ten minutes. 10:00 appears on
display.
Step 7’:Touch START. 15:00count-
ing down shows on display, .%
each function isautomatically performed oven display shows entered
information and light above that
function comes on. While cooking,
you may touch appropriate pad to
recalI times you set.
Q. What will happen if I acciden-
a IIy reverse the instructions?
t
A. If you accidentally reverse the
sequence of programming instruc-
.&-%
tions, your oven
.-.
rearranges yfiu r program. Defrost-
“-;:;;
ing a!ways
comes first, then hold,
automatically
,Ind Ihen the cocking func1ion.
Q. I programmed my oven for a
specific defrosting time but it defrosted Iongpr than necessary.
What happened?
A. When instructions conflict, the
oven carries out the last instruction. You may have set the oven to
Defrost for 4 minutes, Hold/Time
for 2 minutes, ~nd then Defrost for
6 minutes. In this case, the oven
would Defrost for 6 minutes and
Hold /Time for 2 minutes.
Q. Can I Defrost-Hold only on my
oven?
A. Yes, for foods you don’t want
to cook, like frozen fruit, frozen
whipped topping, etc.—refer to
Cookbook.
NOTE: Allow foods to remain at
room temperature only as long as
safe. Times will vary.
Page 12

R
Auto Roast uses the temperature probe to cook to
the desired serving temperature. Unlike Temp
Cook, which uses a single power level, Auto Roast
is designed to use up to 3 power settings which
automatically switch during roasting, for even and
tender cooking results without overcooking.
for
1
I
r
1
Placetender beef roasts on trivet in
microwave safe dish. Insert probe
horizontally into center meaty area
not touching bone or fat. Cover
with wax paper.
Poultry, pork or ham roasts need
no trivet. Add M cup water to roast
dish, cover with plastic wrap. (For
cooking bag method, see cookbook.) Insert probe into center
Just as in conventional roasting, cmly tender roasts
should be Auto Roasted until specified internal ternperatures are reached. Lesstender roasts should be
microwaved by time, according to the Cookbook
which comes with your oven. Complete information
on preparing roasts for microwaving is in your
Cookbook.
r----
I
—.
‘T”–”_lUl
Place meat in oven with probe to
the right. insert cable end of probe
firmly into receptacle on oven wall.
1. Touch AUTO ROAST Pad. Cooking signal light
over Code flashes. Touch number pad 3. Touch
START.
3. @Ien rnonit~r$ internal temperature, automati~aI~~ 5Witc hing
tO Iower power as meat’s tem -
~~eraturerises. This helps prevent toughening or
Ove;”cooking,
2. Light over Code shows on display. Readout displays internal food temperature.
4. After temperature is reached, oven signals.
-12
Page 13

~ Use containers and coverings as directed at left. Place probe correctly in roast before cooking.
@ Recommended Codes are also shown inside oven on Auto Roast Chart.
s Beef tenderloin roast, because of its small size, should be turned over after 90° has been reached.
Beef
Tender Roast
Rare
Medium
Well
Meatloaf
2
3
4 170°
4
125° 12-14
14’0°
170° 30-40
(loaf or round)
Pork
Loin Roast
Precooked Ham
4
1
170° 18-20
115°
Poultry
Whole Chicken
5
190° 13-15
(3 lb.)
Whole Turkey
(Up to 12 Ibs.)
(Insert probe into meatiest area of inner thigh from below end and parallel to leg.)
~
~
Turkey Breast
(Insert probe horizontally into meatiest area.)
5 190°
4 170°
*Recommended slanding time before serving.
5-10
14-16 10-15
17”18 30
5-1o
20
17-19 5-1o
20
13-15
20
13-15 20
Q. Are there any particular trivets
that work better than others7
A, Yes, flat glass trivets such as lids
or dish covers generally give more
even cooking resuits than
plastic
trivets. Aiso, ceramic ridgebottorned roasting
work weil. Piastic trivets generaiiy
require meat to be turned over
more frequently because the grid
design and iegs aiiow the bottom
of the meat to stay cooler as it
cooks,
than giass trivets do.
dishes usuaiiy
Q. Why was my roast not fuily Q. is it necessary to aiways cover
cooked even though the tempera- foods during Auto Roast?
ture on the readout was correct
and Auto Roast compieted?
A. When cooking with Auto Roast,
A. No, but a ioose covering heips
prevent spattering and hoid moisture in food.
the temperature probe must be
inserted properly asf’dily described
in the Cookbook. Check to make
sure the probe hasn’t siipped or
changed position.
Page 14

Cook
.
‘TM
*
The Cook CodeTMcontrol provides a short-cut
method for entering time and the Power Level
your microwave oven.
for recipes which need little or no attention, and
which require no change of power level during cooking. Recipes which require additional ingredients,
attention or change in power ieve[ during microwaving should be cooked in the usual manner. Also,
recipes with cooking time of less than one minute or
more than 99 minutes can not use Cooking Codes.
To understand the Cook Code control, it is important to know what the numbers mean and what the
sequence is. The first and second numbers, if setting a3 digit Cooking Code, indicate the amount of
time you desire; the last control entry number is
always the Power Level. For example, 125 means
12 minutes at Power Level 5. NOTE: Your oven can
only be programmed to 99 minutes when using the
Cook Code control and the highest Power Level is
10 which is represented by “O”.
2 digit Cook Code control entry, the first is time, the
second is power level. For example, 50 means
5 minutes at Power Level 10.
Cooking Codes are only used
When setting a
017
On the following page is shown many frequently
prepared foods and their codes. It’s easy, though,
to make Cooking Codes for many other recipes.
Just select one or two digits representing the length
of cooking time desired, and a final digit for the
Power Level required. The Cooking Codes given on
the chart are for the minimum time needed, to avoid
overcooking which can dry out food and make it
tasteless and tough. If you feel that more cooking is
needed, add additional time by changing the first
digit of the Code. You cannot add seconds to the
cycle time—Cooking Codes are for whole minutes
only. If your recipe calis for Power Level changes or
different amounts of time needed between addition
of ingredients, you may set one Cooking Code for
the first part of the recipe, then after completion, set
another Cooking Code for that period of time and
Power Level.
Remember that Cooking Codes are for micro-
waving by time only. If you are microwaving by
temperature, you must use the Temp Cook or Auto
Roast function.
COOKING CODE
50
R
Time in
Minutes
Power Level
High (10)
R
Time-in Power Level
Minutes
Med (5)
to
Programming your oven for Cook CodeT”Control operation is easy. Follow the simple steps below.
~~~~ ~: Touch C(3OK CODE.
Signal light above Code flashes.
~~~~ ~: Enter the proper code
{nto Cook Code control. For example, a recipe calling for 12 minutes
cooking time at Power Level 10
would be 120. 120 appears on the
display panel.
~~~~ ~: Touch START. Signal
light above TIME COOK shows as
well as time counting down on
display.
14
Page 15

TI-)e Cook CodeTMcontrol feature gives you an easy
autcmatk way to accurately set microwave tin7e for
foods requiring only one power level and little
attention during cooking. The Chart below shows
frequently prepared foods and the suggested
Cooking Codes to use with each. For specific
information on stirring, turning or rotating, check
the Microwave Guide and Cookbook which comes
with vour microwave oven. Always use microwave-
Appetizers (Warming)
Dip (Cream Cheese)
‘/2cup
1 cup
Dips (Sour Cream)
‘/2cup
1 cup
Pastry Bites (Reheating)
2 Servings
4 Servincas
Breads and Desserts
Apples
(2)
Bran Muffins
(5-6)
Brownies (Mix)
Cakes (Mix)
(16 cup fluted mold)
110
Cheese Bread, Yeast
(1 loaf)
105
Chocolate Chip Bars
Pudding Mix ( 3 oz. pkg.)
Eleverages
Coffee, Soup
(1 cup)
Milk Bases
(1 CUD)
Frozen Feds (Defrost)
Note: Times given below are for entire defrost
cycle. Usually food must be rotated, broken up or
turned over while defrosting. Check Cookbook for
specific information.
Cake, Whole iced
Chicken, Cut-Up
(2’/2-3’/’2[k..)
143
Dessert Topping, Whipped
Doughnuts or Pastries
(2-4)
Fish Fillets
(1 lb.)
Hamburgers
(2 Ills.)
123
p~~,Fruit Filling
(Whole)
Roast
(L&sjb~.)
283
$jI:eak~r chops
——,-—
(2 \bs.)
—. .- .——
103
25
45
23
43
10
20
40
37
60
50
60
10
28
23
23
13
83
83
..-.
“15
safe containers and microwave techniques as described in the Cookbook.
To set Cookin~ codes for many other foods or
re;ipes refer to-page 14 in the Us& and Care E3mk.
Cook Code’” control codes given are for minimum
time. Check and add time if necessary to complete
cooking.
Bacon
2 Slices
4 Slices
28
48
Chicken
8-10 pieces
2 pieces
4 pieces
200
50
100
Chuck Roast
(3 Ibs.)
665
Eggs, Baked
2 Eggs
27
Eggs, Scrambled
2 Eggs
20
Entrees, Frozen
8
OZ.
16 OZ.
2 Ibso
50
120
200
Fish Fillets
(1 lb,)
30
Franks (in bun)
2
4
10
30
Meat Loaf
(1‘h Ibs.)
170
Sausage (Raw)
4 Patties (% lb.)
4 Links
Swiss Steak
(2 Ibso)
40
20
705
Frozen TV Dinner
(12 oz.)
70
Beans, Green
(1 lb.)
150
Broccoli
(1M-1% Ibs.)
Spears
cut
Cauliflower, Head
157
120
137
Corn on Cob
(4)
120
Potatoes
(4)
120
Squash
(1 lb.)
100
Zucchini
(1 lb,)
100
Page 16

\
——..—=..-p-r.+. . . . .
..—...--=..
---.—-—-—
----
Your oven is designed to give you the best results in
baking, broiling, and roasting when used as recommended. Before using your oven, look at the directions for setting and using all of the controls and
timer.
Light comes on automatically when door is opened
or use switch on window door to turn it on when
door is closed.
When the shelves are correctly placed on shelf supports they are designed with stop-locks to prevent
them from coming out of the oven or tilting when
food is placed on them. TO REMOVE, lift up rear of
shelf and pull forward with stop-locks along top of
shelf support. TO REPLACE, insert shelf with stopIocks resting on shelf supports and push toward
rear of oven until it falls into correct position under
shelf support.
IOven
Oven Timer Controls are designed
to automatically start and stop certain oven functions (TIME BAKE
or CLEAN). Dials are timed by a
special
(denoting numerals) and hands.
(For location see page 6.) TO SET
THIS CLOCK, push in the center
knob of Minute
Clock hands to correct time, then
let knob out. TO SET MINUTE
TIMER, turn knob to desired min-
utes. (Knob must be out to set
Minute Timer.) Minute Timer will
buzz when time has finished and
must be turned off manually.
Use the Microwave Oven Clock for
easy reference to time of day.
Clock with index marks
Timer andturn the
-.
(Also see Baking Chart, page 22.)
Step 1: Place shelf on embossed
she{f support “B” or as indicated
on Baking Chart, page 22.
Step 2. After making sure that the
eve-n door is closed, turn the Oven
M Knob to BAKE. -Oven ‘‘On
Light comes on and remains on as
long asOven Set Knob is on BAKE.
Step ~: Turn Oven Temp Knob to
the temperature called for in recipe. Oven
and remains on until preset oven
temperature is reached. It reappears each time oven temperature
drops blow preset temperature.
S$2Vq; You may set your Minute
Timer to the desired cooking time as
indicated ]n your recipe. if your
CGDk;ng tirne
minutes, i’itlinu?e Timer must be
~~~gw>;.
cycling Light comes on
is
longer than sixty
Most foods cook satisfactorily
without preheating. If preheating
is required, put your dish promptly
in the oven after Oven Cycling
Light goes out.
Step 5: Place food inside the oven.
Make sure at least 1“ of space is
left between the cooking container
and the oven wall for proper heat
circulation. Close the oven door.
NOTE: Avoid opening your oven
door frequently. This could cause
undesirable results in your baking.
Only check foods at the minimum
tii~e of the recipe. Then cook
longer if necessary.
Step & When the BAKE cycle is
complete, turn off heat. When
cooking food for the first time in
your oven, usethe tirae on your recipe as a guide. Be sure foods are
done before removing from oven.
HGAW%f3$h9tYour
farThreeBake
Your Automatic Oven Timer controls your TIM E BAKE feature.
When you TIME BAKE, your oven
can be preset to start and stop
automatically if you are not home.
Step 1: Be sure the oven Ciock
shows correct time of day since
Clock controls the Oven Timers.
Start dial pointer must indicate
same time of day as on Clock. If
you want the oven to turn on at a
later time, set that time by pushing
in knob on Start dial and turn
pointer to time that you want oven
to start. (There’s no need to set
Start dial when starting time is the
present time of day.)
Step 2: To determine Stop time,
add the food’s cooking time to
time set on Start dial. Push in knob
on Stop dial and turn pointer to
time oven is to turn off.
Step 3: Turn Oven Set Knob to TIME
BAKE. Oven “On” Light comes on
immediately even if the Start time is
later.
Step 4: Turn Oven Temp Knob to
temperature setting. Oven Cycling
Light comes on even though heat
is not on in the oven if a later start
time is used. Your oven automat-
ically turns on and off at the times
you set.
Slep 5: Remove food and turn
Oven Set Knob to OFF.
Page 17

‘ ‘-.+-
--
iiii
$%
_“y.. .
*%
. -.
. .
.=
<
..
-. ,.
,- .
.-
—
K
ggf?j- --
—
.-
Ycur oven is designed to give you the best results in
baking, broiling, and
mended. Before using your oven, look at the directions for setting and using all of the controls and
timer.
Light comes on automatically when door is opened
or use switch on window door to turn it on when
door is closed.
When the shelves are correctly placed on shelf supports they are designed with stop-locks to prevent
them from coming out of the oven or tilting when
food is placed on them. TO REMOVE, lift UPrear of
shelf and pull forward with stop-locks along top of
shelf support. TO REPLACE, insert shelf with stop-
Iocks resting on shelf supports and push toward
rear of oven until it falls into correct position under
shelf support.
Your
roastingwhen used as recom-
Oven Timer Controls are designed
to automatically start and stop certain oven functions (TIME BAKE
or CLEAN). Dials are timed by a
special Clock with index marks
(denoting numerals) and hands.
(For location see page 6.) TO SET
THIS CLOCK, push in the center
knob of Minute Timer and turn the
Clock hands to correct time, then
let knob out. TO SET MINUTE
TIMER, turn knob to desired min-
utes. (Knob must be out to set
Minute Timer.) Minute Timer will
buzz when time has finished and
must be turned off manually.
Usethe Microwave Oven Clock for
easy reference to time of day.
~
--
(Aiso see Baking Chart, page 22.)
Step 1: Place shelf on embossed
shelf support “B” or as indicated
on Baking Chart, page 22.
Sep 2. After making sure that the
eve-n door is closed, turn the Oven
Set Knob to BAKE. -Oven “On”
Light comes on and remains on
long asOven Set Knob is on BAKE.
Step 3: Turn Oven Temp Knob to
the temperature called for in rec-
ipe. Oven Cycling Light comes on
and remains on until preset oven
temperature is reached. It reappears each time oven temperature
drops below preset temperature.
!3t9p 4: YoLi may set your Minute
Timer to the desired cooking time as
indicated in your recipe. If your
cooking time is longer than sixty
minutes, Minute Timer must be
reset.
Most foods cook satisfactorily
without preheating. If preheating
is required, put your dish promptly
in the oven after Oven Cycling
Light goes out.
Step 5: Place food inside the oven.
Make sure at least 1“ of space is
left between the cooking container
and the oven wall for proper heat
circulation. Close the oven door.
NOTE: Avoid opening your oven
door frequently. This could cause
undesirable results in your baking.
Only check foods at the minimum
time of the recipe, Then cook
longer if necessary.
as
Step & When the BAKE cycle is
complete, turn off heat. When
cooking food for the first time in
your oven, usethe time on your rec-
ipe as a guide. Be sure foods are
done before removing from oven.
Your Automatic Oven Timer controls your TIME BAKE feature.
When you TIME BAKE, your oven
can be preset to start and stop
.
automatically if you are not home.
Step 1: Be sure the oven Clock
shows correct time of day since
Clock controls the Oven Timers.
Start dial pointer must indicate
same time of day as on Clock. If
you want the oven to turn on at a
later time, set that time by pushing
in knob on Start dial and turn
pointer to time that you want oven
to star?. (There’s no need to set
Start dial when starting time is the
present time of day.)
Step 2: To determine Stop time,
add the food’s cooking time to
time set on Start dial. Push in knob
on Stop dial and turn pointer to
time oven isto turn off.
Step3: Turn Oven Set Knob to TIME ‘-=
BAKE. Oven “OtI” Light comes on -immediately even if the Start time is
later.
Step 4: Turn Oven Temp Knob to
temperature setting. Oven Cycling -.
Light comes on even though heat --is not on in the oven if a later start .--.._-.
time is used, Your oven automat- “=-: ---
ically turns on and off at the times “- ‘“you set.
Step 5: Remove food and turn =-~-:-Oven Set Knob to OFF.
.-
Page 18

Step 3: Place the meat on the
broiler rack in the broiler pan. Always use the rack so fat drips into
the broiler pan.
Step 2: Position Oven Shelf as indicated on Broiling Chart, page 23.
Step 3: Turn the Oven Set Knob
and Oven Ternp Knob to BROIL.
Both Oven Indicator Lights come on.
Step 4: Leave oven door ajar
about 3 inches (except chicken,
see beiow). The door wiil stay open
itself yet the proper temperature
will be maintained in the oven. Dur-
ing cooking, turn the food only
once.
Step 5: Turn Oven Set Knob to
OFF and serve food immediately.
Leave the pan outside the oven to
cool during the meal for easy
cleaning.
Foil may be used to line the
@
broiler pan and rack. However,
be sure to cut openings in the
foil to correspond with the slits
in the broiler rack so fat drips
into the pan below.
For all weights of chicken, broil
with door closed.
Placing food closer to the top
of the oven increases smoking,
spattering, exterior browning
on the meat and the possibility
of food fat catching on fire. Always keep rack 3-5 inches
from the broiling unit.
Step 1: Check the weight of the
meat and place, fat side up, on the
rack in the broiler pan that came
with your oven. This helps the
meat to baste itself.
Step 2: Use shelf position “A” or
“B”; or the one indicated on
Roasting Chart, page 24. Place
Oven Shelf on correct embossed
shelf support. For very tall roasts,
remove second oven shelf.
$fep S: Turn the Oven Ternp Knob
to &?5°. (The exception is small
podRry which is roasted at 375°.)
~fe~ 4S Close the oven door and
turn the Oven Set Knob to BAKE.
Oven “on’” Light comes on and
stays on until Oven Set Knob is
turned to OFF. Oven Cycling Light
comes on and remains cm until
temperature is reached.
Step 5:
Placeyour meat inside the
oven, making sure the pan is not
touching the oven walls or door.
%
~~
?I
Sfep 6: Turn off the heat when the
roasting cycle is complete
6U
Be sure meat is cooked to your
satisfaction. Most meats continue to cook slightly while
standing after being removed
from the oven. This should be
taken into ~consideration when
determining your cooking time.
Always use a roasting pan that
fits the size of your meat. A
roast placed in a pan too small
for its size will drip over the
edge.
You may cook frozen meat
roasts without thawing. However, you must allow more
cooking time, For large roasts,
add 10-25 minutes per pound.
For roasts under 5 pounds, add
s
10 minutes per pound.
To slow down surface browning
on turkeys, you can use a foil
“tent”.
The tent-shaped foil
should be laid loosely over the
poultry so the heat can circulate
under the foil.
Most frozen poultry should be
thawed before cooking to ensure it is done evenly, Some,
however, can be cooked successfully without thawing.
Check the packer’s label for
specific directions.
18
Page 19

Ifdone properly, it will take only a few moments to
start the self-cleaning cycle on your range. After
setting your range to self-clean, a high heat temperature removes the soil in the oven cavity. The
dirt will then disappear by turning into an ash waste order to judge the degree of soil, look at the oven
or evaporating into an odorless and colorless vapor.
When the cycle is complete, allow your range to
cool .
—
1: Remove ail cookware
and food as weH as heavysoil deposits from the oven. Clean spat-
ters or spills around the oven door,
rectangular flanges, and gasket.
Then dOSt?the door.
~~~~ ~: Push and hold Latch
ReieaseButton while latching door.
while you aFelbecornirlg acquainted with your self”
cleaning cwen,we ffeccmmend 2 knowsfor the overage cleaning function, but in some cases a hanger
cleaning time, up to 3 hours may be necessary. in
floor and walls. Light spatter and thinner spills
would generally need only 2 hours cleaning. Heavy
greasy spills and spatter on the oven interior would
need up to 3 hours.
NOTE: A slight odor may be detected especially during the first
few cleanings. Do not be alarmed.
This is normal during the selfcleaning cycle.
When cleaning temperature is
reached, Lock Lightcomes on and
door cannot be unlatched until
Lock Light goes off.
STEP 5: When Lock Light goes
off, push and hold the Clean Lock
Button while sliding Latch to
● Turn Oven Set Knob to
M-N \
L--==”—----—--—-
..——._-——
STEP 2: Turn (Mm Set Knob
and Oven Temp Knob clockwise to
CLEAN. The control will snap into
final position when the CLEAN position is reached.
@
Push in knob on Stop (Clean)
Dial and turn to the time you
wish oven to stop cleaning.
the numberof hours needed
cleaning to the present time of
day.
@
Cleaning indicator Lights come
on when all steps are set
properly.
e
If you wish to clean at a later
time set Start Dialto that time.
Add
for
OPEN.
OFF.
—-+
STEP 6: TurnOvenSet Knob to
OFF.
—.-
Q. Why is there still some black
soil left after cleaning?
A. You did not time the oven to
clean long enough. This deposit
will be removed in later cleanings.
Q. The fan in the microwave
runs during self-c Jeaning lower
oven. !s this normal?
#.,‘(es, ~~efan ~~mes on when the
Lock Light glows. This fan heips
keep the components
Coolc
oven
INOTE: Fan in microwave oven
comeson when Lock Light is glowing during cleaning lower oven.
You may use your microwave oven
during this time.
Q. Why did the Lock Light come
on when I first set the oven for
CLEAN?
A. Lock Light glowing indicates
that oven is too hot. Turn Oven Set
Knob to OFF and open Oven Door
to cool the internal cavity. After a
short period of time, reset controls
for cleaning.
My oven shelves have become
~.
gray after several cleanings. Is this
normal?
A. Yes. After many cleanings, the
shelves may lose some luster and
discolor to a deep gray color.
19
Q. Why do I have ash left in my
oven after cieaning?
A. Some types of soil will leave a
deposit which is ash. It can be re-
moved with a damp sponge or cloth.
Q. What should I do if excessive
smoking occurs during cleaning?
A. This is caused by excessive
grease and you should switch the
Oven Set Knob to OFF, Open win-
dows and doors to rid room of
smoke. Allow the oven to cool for
at kxNt one hour’ before opening
the door. Wipe up the excess
grease and reset the clean cycle,
Page 20

pE+OpEWCX3W and cleaningare
—
-
importan?soyourCookingCenter
WNgiveyouefficientand satisfac-
toryservice.Followthesedirections
carefullyin caringfor it to help
assuresafeandpropermaintenance.
BESURE EIECTRIC POWER $s
OFF BEFORECLEANING ANY
PARTOF YOURCXXIKING
CENTER.
control Panels
Don’t use sharp-edged utensils
around the control panels. They
might damage it.
Clean the panels with a lightly
dampened cloth. DO NOT USE
cleaning spraysor large amounts of
soap and water. These can cause
problems with the control
mechanisms.
-i’impemtwe Probe
The probe is sturdy, but care
should be taken in handiing it. Do
not twist it. Avoid dropping it. Ciean
assoon aspossible after use.Wipe
it with a sudsy cloth, then rub metal
parts with a plastic scouring pad if
necessary.Rinseand dry. DO NOT
wash the probe in an automatic
dishwasher.
Foil cm sl’whles—
ywl Shcmh’a’tLJseit
why
DO NOT place a sheet of aluminum
foil on any shelf in either your microwaveor conventional oven. If you
do, your foods may not cook properly. The ovenfinish may be damaged. And there may be an increase
in heat on the outside surfaces of
the oven.
ownLamp
The oven lamp bulb is long-lasting.
Only a qualified servicetechnician
should replace it.
DUTYTM
shelf Axx?s$ory
Yourshelf accessory is designed for
use in a microwave ovenonly; do
not usein a conventional oven. Do
not usea browning dish with the
shelf. Arcing could occur.
Clean shelf with mild soapand
water or in the dishwasher. Do not
remove plastic spacersfrom the
shelf when cleaning. Do notclean
inself-ckaning oven.
lPrtxxNJtk3risfor Use of Metal
Usemetal only as directed in the
Cookbook. Metal trays no more
than 3/4” deep may be used for TV
dinners, and the metal temperature
probe is designed for microwave
oven use.Always keep rnetaiat
leastone inch away from sides
of oven.
Ckankg-CMside
Clean the outside of your microwave
oven with soap and water, then
rinse and dry. The outer paneof the
window is glass.Wipe it clean with
a damp towel. Chrome is best
wiped with a damp cloth and then
with a dry towel.
Cieaning—hside
Keep itcleanand sweet-smelling.
Op&ing the oven door a few m[nutes after cooking helps air out the
inside. An occasional thorough wiping with a solution of baking soda
and water keepsthe interior fresh.
Spi~~sand spatters are easyto re-
movefromwalls,floorand antenna
cover.That’s becausethere’s little
heat except in the food, or sometimes in the utensil. Some spatters
wipe up with a paper towel, some
may require a damp cloth. Remove
greasy spatters with a sudsy cloth,
then rinse and dry.
NEWERUSE A
OVEN CLEANER 054ANY PART
OF YOUR OVEN.
Wipeupspatterson the glasson
theinsideof the door daily.Wash
glass,when it’s soiled, with a min-
imum of sudsy, warm water. Rinse
thoroughly and dry.
Wipemeialand plasticpartson the
insideof the doorfrequently.Usea
damp cloth to remove ali soil. DO
NOT USEABRASIVES, such as
cleaning powders or steel and plastic pads.They may mar the surface.
DoorSurface.When cleaning surfaces of door and oven that come
together on closing the door, use
only mild, non-abrasive soaps or
detergents appiied with a sponge
or soft cloth.
Do not removethe plasticantenna
coveratthe topof the oven (see
page6.) Youwill damage the oven
if you do.
!.king a Brown‘N Sear Dish?Use
BarKeepersFriend@Ckanser.
High heat generated on the bottom
of the Brown ‘N Sear Dish can cause
scorched appearing stains to bake
onto the floor if grease is present.
These may be removed with Bar
Keepers Friend@Cleanser by
SerVaasi..aboratories, inc.
After using this cleaner, rinse and
dry thoroughly, following instructions on can. Do not use it on the
painted surfaces such asthe walls—
it may scratch the paint.
Bar Keepers Friend@Cleanser is
sold in many grocery, hardware and
department stores.
20
Page 21

IDt.!d
The oven is vented through a duct
that’s located on the right side of
the oven just abovethe door handle
(seepage 6). Moisture and vapors
from the oven are vented through it
when oven is in use.Nevercover
the hole in the duct. To do so prevents it from functioning properly
during cooking and cleaning.
(Area seen through glasscontrol
pane!afterknobis removed.)
The temperature cmyour new oven
hasbeenaccurately set at the
tory.
However, if your food consistently browns too much or too little,
you may make a simple adjustment
behind your OVEN TEMP Knob. To
readjustyour thermostat:
~ Rotate OVEN TEMP Knob to
CLEAN position and pull knob off
the shaft revealing area behind
knob.
~ insert the tip of a 3/16” standard
screwdriver, into the indented area
-directly under the notch and turn in
.,ISdesired direction. Be careful not
to scratch glasscontrol panel.
@To increase oven temperature
movedial one notch counterclock-
wise.To lower oven temperature,
movedial one notch ciockwise.
(Each notch represents approxi-
mately 150.)
~ Return knob to the range by
matching the flat area of the knob
to the shaft.
@Recheckoven performance
before making an additional
adjustment.
fac-
Lamp
CMA.JTKN’4:Beforereplacingyour
ovenlampMb, disconnect?he
electricpowerfor your Cooking
Centerat the mainfuseor circuit
breakerpanel. Be sureto let the
lamp cover and bulb cool completely before removing or
replacing them.
-’0
Toremove:
@Take out 3 slo~ed screws as
shown in lamp diagram.
~ Detach lamp cover and remove
bulb.
‘Toreplace:
~ Put in a new 40-watt appliance
bulb.
@Install lamp cover. Replace3
screws and tighten them, making
sure cover fits flush with ovenwall.
@Reconnect electric power to the
Cooking Center.
If you wish, you may line the broiler
pan with aluminum foil and cover
the rack with it for broiling. ALWAYS
BE SURETO MOLD THE FOIL
THOROUGHLYTO THE BROILER
RACKAND SLiT THE FOiL TO
CONFORM WiTH SLiTS iN THE
RACK. Stopping fat and meat juices
from draining into the broiier pan
preventsthe rack from serving its
purpose and MAYLET JUICES
BECOME HOT ENOUGH TO
CATCHFiRE.
FM’’mvabk
&-------- ---
\
TO REMOVE door, open to BROiL
position, or where you feei hinge
catch siightiy. Grasp door at sides;
iift door up and away from hinges.
TO REPLACE,grasp door at sides.
Line up door with hinges and push door fi_rmiyinto piace.
ovenmm’
.
-,
)
“..i—“
,1
‘+1
Page 22

4. Aluminumpansconductheat quickly. For most conventional
baking light shiny finishes generally give best results because
they prevent overbrowning in the time it takes for heat to cook
the center areas. Dull (satin-finish) bottom surfaces of pans are
recommended for cake pans and pie plates to be sure those
areas brown completely.
2, Dark or non-shiny finishes, aiso glass and pyroceram, generally absorb heat which may result in dry, crisp crusts, Reduce
E%9d!
EmMEd
Biscuits(%-in. thick) B, C
Coffee cake
Corn bread or muffin:
Gingerbread
Muffins
Popovers
Quick Loaf Bread
Yeast bread (2 loaves)
Plain rolls
Sweet rolls
cakes
(without shortening)
Angel food
Jelly roll
Sponge
cakes
Bundt cakes
Cupcakes
Fruit cakes
Layer
Layer, Chocolate
Loaf
Cormilfdwr
Shiny Cookie Sheet
Shiny Metal Pan with
Satin-finish bottom
Cast Iron or Glass
Shiny Metal Pan with
Satin-finish bottom
Shiny Metal Muffin Pans
Deep Glass or Cast iron Cups
Metal or Glass Loaf Pans
Metal or Glass Loaf Pans
Shiny Oblong or Muffin Pans
Shiny Oblong 01 Muffin Pans
Aluminum Tube Pan
Metal Jelly Roll Pan
Metal or Ceramic Pan
Metal or Ceramic Pan
Shiny Metal Muffin Pans
Metal or Glass Loaf or
Tube Pan
Shiny Metal Pan with
Satin-finish bottom
Shiny Metal Pan with
Satin-finish bottom
Metal or Glass’-Loaf Pans
cm.bkie$3
Brownies
Drop
Refrigerator
Rolled or sliced
Fruitsf.
cnmerEMsm?rts
Baked apples
Custard
Puddings, Rice and
Custard
Pies
Frozen
Meringue
one crust
Two crusl
Pastry Shell
fwi3G@i3ar3eoLlf3
Baked potatoes
Scalloped dishes
~~uffl~~
Metal or Glass Pans
Cookie Sheet
Cookie Sheet
Cookie Sheet
Glass or Metal
Glass Custard Cups or
Casserole (set in pan of
hot water)
Glass Custard Cups or
Casserole
Foil
Panon Cookie Sheet
Spread to crust edges
Glass or Satin-finish Metal
Glass or Satlrl-flnlsh Metal
Glass or Satin-f tnish Metal
Set on Oven Shelf
Glass or Metal
Glass
WBeuf
F%Dsnikm
B, A
B
B
A, B
B
B
A, B
A, B
B, A
A
B
A
A, B
B
A, B
B
B
B
B, C
B, C
B, C
B, C
A, B, C
B
B
A
B, A
A, B
B
B
—.—
A, B, C
A, B, C
B
heat25° if lighter crustsaredesired,Preheatcastiron for
oven
baking some foods for rapid browning when food is added.
3, Preheating the oven is not always necessary, especiaHy for
foods which cook longer than 30 or 40 minutes. For food with
short cooking times, preheating gives best appearance and
crispness.
& open the oven door to check food as little as possible to
prevent uneven heating and to save energy.
%hnm
Tw’m.
400°-4750
350°-4000
400°-4500
350°
400°-4250
375°
350°-3750
375°-4250
375°-4250
350°-3750
325”-375°
375°-4000
325°-3500
325°-3500
350°-3750
275”-300°
350°-3750
350°-3750
350°
325°-350”
350°-400°
400°-4250
375°-4000
350°-400°
3o00-350~
325°
Tim?j
MiBa.
15-20
20-30
20-40
45-55
20-30
45-60
45-60
45-60
I
10-25
20-30
30-55
10-15
45-60
45-65
20-25
2-4hrs
20-35
25-30
40-60
25-35
10-20
6-12
7-12
30-60
30-60
50-90
Ua3mmenfa?$
Canned refrigerated biscuits take
2-4 rein, less time.
Preheat pan for crisp crust.
Decrease about 5 min. for muffin
mix. Or bake at 450° for 25 min.,
then at 350° for 10-15 min.
Dark metal or glass give deepest
browning.
For thin rolls, Shelf B may be used.
For thin rolls, Shelf B may be used.
Two piece pan is convenient.
Line pan with waxed paper.
Paper liners produce more moist
crusts.
Use 300° and Shelf B for small or
individual cakes.
Bar cookies from mix use same
time, Use Shelf C and increase
temp. 25-50° for more browning.
Reduce temp. to 300° for large
custard. Cook bread or rice pudding
with custard base 80 to 90 m.!~(.ii~~.
—
400°-4250
325°-3500
400’’-425”
400°-425”
450°
325”-400°
325”-375”
300°-350°
45-70
15-25
45-60
40-60
12-15
——. -
60-90
30-60
30-75
Large pies use 400° and increase
time.
To quickly brown meringue use
400” for 8-10 min.
Custard fillings require lower temp.,
longer time.
Increase time for large amount or
size.
22
Page 23

i. Always use broiler pan ar?drack that comes with your oven. It
IS d~Signed to minimize smoking and spattering by traPPin9
)uices in the shielded iower part of the pan.
2?.Oven door should be ajar for most foods; there is a special
position on door which holds door open correctly.
~, For steaks and chops, slash fat evenly around outside edges
of meat. To slash, cut crosswise through outer fat surface just to
edge of the meat. Use tongs to turn meat over to prevent
the
piercing meat and loosing juices.
~. If desired, marinate meats or chicken before broiling. Or,
brush with barbecue sauce last 5 to 10 minutes only.
QMmmy
mod
B$%COS3
GroundBeef,
done
~ell
EleefSteaks
Rare
Medium
Well Done
Rare
Medium
Weii Done
Chicken 1 whole
Ekkery Products
Bread (Toast) or
Toaster Pastries
English Muffins
i.’obeifter fiaiis
(6 to 8-o.z.each)
Fish l-lb. fillets %to
(precooked)
Pork chops
Well Done
Lamb chops
!Mediurn
Well Done
fi~edlum
w~ll ~o~~
bratwurst
Thickmims
%-lb. (about 8
thin slices
l-lb. (4 patties)
%to 3/d-in.thick
1 inch thick
‘/2 Ibs.)
(1-1
1%-in. thick
(2-2V2Ibs.)
(2 to 2%-lbs.),
split lengthwise
2-4 slices
1 pkg. (2)
2-split
2-4
%-in. thick
l-in. thickHam %!icfxi
2 (% inch)
2 (l-in. thick)
about 1lb.
2 (1 inch)
about 10-12
2 (1MInch)
about 1 lb,
l-lb. pkg. (10)
mld/cw
OZ.
Sihenf
Position
c
c
c
c
c
c
c
c
A 35 10-15
c
c
B
c
B
c
B
c
c
c
B
c
!5. When arranging food on pan, do nol let fatty edges hang over
sides, which could soil oven with fat dripping.
4$.Broiler does not need to be preheated. However, for very thin
foods or to increase browning, preheat if desired.
7. IFm%zem $Mc+tal$scan be conventionally broiled by positioning the oven shelf at next lowest shelf position and
increasing cooking time given in this chart 1%times per side.
8. If your range is connected to 208 Volts rare steaks may be
broiled by preheating the broil heater and positioning the oven
shelf one position higher.
—
First Shh
Time, Min.
3’/2
7
7
9
13
10
15
25
1V2-2
3-4
13-16
5
—
8
10
13
8
10
10
17
6 1-2
Setxmd
T’h@39Min.
Side
Gmnmltmts
31/2 Arrange in single layer.
4-5
7
9
13
7-8
14-16
20-25
Space evenly.
Up to 8 patties take about same
time.
Steaks less than l-in. cook through
before browning. Panfrying is
recommended.
Slash fat.
Reducetimesabout5-10min.,per
side
for cut-up chicken. Brush each
side with melted butter. Broil with
skin side down first and broil with
door closed.
’12
(Do not
turn
over)
5
8
10
13
4-7
10
4-6
12-14
Space evenly. Place English muffins
cut-side-up and brush with butter, if
desired.
Cut through back of shell, Spread
open, Brush with melted butter
before and after half time.
Handle and turn very carefully.
Brush with lemon butter before and
during cooking if desired. Preheat
broiler to increase browning.
Increase times 5-10 min. per side
fOr 1%-in thick or home cured,
Slash fat.
Slash fat.
If desired, split sausages in half
lengthwise into 5 to 6-in, pieces,
——
—
.
23
Page 24

-,
q. Position oven shelf at Elfor small-size roasts (3 to 7 Ibs,) and
at A for larger roasts.
2?.Place meat fat side up or poultry breast-side up on broiler
pan or other shallow pan with trivet. Do not cover. Do not stuff
poultry until just before roasting. Use meat probe, for more
accurate doneness. Control signals when food has reached set
temperature. (Do not place probe in stuff ing.)
~. Remove fat and drippings as necessary. Baste as desired.
owm
Type
Meat
Tender cuts:
sirloin tip, rump or top round”
Lamb Leg or bone-in shoulder*
Veal shoulder, leg or loin*
Pork loin, rib or shoulder*
Ham, pre-cooked
Ham, raw
nb,high quality
●For bofieiess rolled roasts over 6-in. <
F%u!ary
Chicken or Duck
Chicken pieces
Turkey
Temp.
325”
325”
325°
325°
325°
325”
:k, add 5 to 10 r
325°
375°
325°
Doneness
Rare:
Medium:
Well Done:
Rare:
Medium:
Well Done:
Well Done:
Well Dane:
ToWarm:
Well Done:
per lb. to times gl~
Well Done:
Well Done:
Well Done:
& SV&wadliin@tlttm$i?recommended for roasts is 10 to 20 min. to
allow roast to firm up and make it easier to carve. It will rise
about 5° to 10° internal temperature; to compensate for temperature rise, if desired, remove roast from oven at 5° to 10° less
than temperature on chart.
43.IFtwzm FO&@Scan be conventionally roasted by adding 10
to 25 min. per pound more time then given in chart for refriger-
ated. (10 min. per lb. for roasts under 5-lbs.) Defrost poultry
before roasting.
Approximate Roasting Time,
in MimMesiperPound
3 to !54LX3. 6 to I?Hx6.
24-30 18-22
30-35
35-45
21-25
25-30
30-35
35-45 30-40
35-45
10 reins. per lb. (any weight)
22-25
28-33
20-23
24-28
28-33
30-40
Urmxnd
%’Wmp.“F
1 30°-140”
1500-160°
170°-185°
1 30°- 140°
1500-160°
170°-1850
1700-180°
1700-180°
125°-1300
Under104bs. 10to 45”N3S.
20-30
above.
380 5-W%
35-40
35-40
to15-ib$.
10
20-25
17-20
over 54bs.
30-35
Over 15-M3s.
15-20
160°
185°~190°
185°-190°
IntM@:
-190”
185°
Page 25

JisiRA
.. ,..
- Y’Q~r Cooking Center is c!ean~d two ways: manually
and by using the automatic self-cleaning function.
This chart describes parts of your cooking center,
cleaning materials to use on each part, and general
Bake Unit and
Broil Unit
@Soapand Water
@Soap-Filled
Scouring Pad
63
plastic Scouring
Pad
Mild Soap and Water
Soapand Water
Soapand Water
@ Paper Towel
@ Dry Cloth
@ Soap and Water
—
—
Broiier Pan& Rack
Oven Control Knobs
Outside Glass Finish
Metal, including
Chrome Side Trims
and Trim Strips
Porcelain Enamel:::
directions for cleaning. Be sure to follow these directions carefully to assure maximum use of your cook-
ing center. NOTE: Let oven parts cool before cleaning
manually.
Do not clean the bakeunit or broil unit. Any soil will burn off
when the unit is heated. NOTE: The bake unit is hinged and
can be lifted to clean the oven floor. If spillover, residue, or ash
accumulates around the bake unit, gently wipe around the unit
with warm water.
Drain fat, cool pan and rack slightly. (Do not let soiled pan and
rack stand in oven to cool). Sprinkle on detergent. Fill pan with
warm water and spread cloth or paper towel over the rack. Let
both stand for a few minutes. Wash; scour if necessary. Rinse
and dry. OPTION: The broiler pan and rack may also be cleaned
in a dishwasher.
Pull off knobs. Washgentiy but do not soak. Dry and return controls to range making sure to match flat area on the knob and
shaft.
Wash all glass with cloth dampened in soapy water. Rinse and
polish with a dry cloth. If knobs on the control panel are removed, do not allow water to run down inside the surface of
glass while cleaning.
Wash, rinse, and then polish with a dry cloth. DC)NOT USE steel
wool, abrasives, ammonia, acids, or commercial oven cleaners
which may damage the finish.
Avoid cleaning powders or harsh abrasives which may scratch
the enamel.
If acids should spill on the range while it is hot, use a dry paper
towel or cloth to wipe up right away. When the surface has
cooled, wash and rinse.
For other spills, such as fat smatterings, etc., wash with soap
and water when cooled and then rinse. Polish with a dry cloth.
-..
----
On this oven, clean ONLY the door liner outside the gasket. The
door is automatically cleaned if the oven is in the self-cleaning
Inside Oven Door’::
Oven Gasket:;:
Oven Liner
Shelves
Self-Cleaning
(See
Soap and Water
Soapand Water
Soap
and Water
OvenDirections)
‘Spillage of marinades,fruit juices,and bastingmaterialscontaining acidsmaycausediscoloration. Spilloversshould
wiped up immediately, with care being taken to not touch any hot portion of the oven.Whenthesurfaceiscool,
be
cycle. If spillover or spattering should occur in cooking function, wipe the door with soap and water, DO NOT rub or damage gasket. Avoid getting soap and water on the gasket or in the
rectangular flanges on the door,
Avoid getting ANY cleaning materials on the gasket.
Cool before cleaning, Frequent wiping with mild soap and water
will prolong the time between major cleanings. Be sure to rinse
thoroughly. For heavy soiling, use your self-cleaning cycie uften.
Your shelves can be cleaned with the self-cleaning function in
the oven. For heavy soil, clean by hand using any and all mentioned materials. Rinse thoroughly to remove all materials after
cleaning,
cieanand rinse.
25
Page 26

The
TO
I!you have a problem, It may be minor YOU may be able to correct It yourself Just use this Problem Solver to
locate
your problem and then follow the suggested recommendations.
~PROBLEM
OVEN WILL NOT WORK
OVEN LIGHT
DOES NOT WORK
FOOD DOES NOT
~BROIL PROPERLY
FOOD DOES NOT ROAST
OR BAKE PROPERLY
POSSIBLE CAUSE AND REMEDY
Difficulty may be in the main distribution panel of your house by a
blown oven circuit fuse, a tripped oven circuit breaker, the main fuse
or the main circuit breaker, depending on nature of the power sup-
ply. If a circuit breaker is involved, reset it. If the control box uses
fuses, the oven fuse (a cartridge-type) should be changed BUT
ONLY BY SOMEONE FAMILIAR WITH ELECTRICAL CIRCUITS. If
after doing one of these procedures, the fuse blows or circuit
breaker trips again, call for service,
NOTE: Apartment tenants or condominium owners should request
their building management to perform this check before calling for
service.
Oven controls are not properly set,
Door left in locked position after cleaning.
Light bulb is loose.
Bulb is defective. Replace.
Switch operating oven light is broken. Call for service.
OVEN SET Knob not set at BROIL.
OVEN TEMP Knob not set at BROIL.
Door not left ajar as recommended,
Improper shelf position is being used. Check Broiling Chart.
Necessary preheating was not done,
Food is being cooked on hot pan.
Utensils are not suited for broiling.
Aluminum foil used on the broil pan rack has not been fitted properly
and slit as recommended,
OVEN SET Knob n~t set on BAKE,
OVEN TEMP Knob not set correctly.
Shelf position is incorrect. Check Roasting or Baking Charts,
Oven shelf is not level.
Wrong cookware is being used. When roasting, pan is too small.
Afoil tent was not used when needed to slow down browning during
roasting.
OVEN WILL NOT
I
I
SELF-CLEAN
1
1
!
~OVEN
I
DOOR VVON’T LATCH
4utomatic time dial/dials not set or not set properly, The STOP dia!
must be set and advanced beyond the time noted
The STOP dial was not advanced for long enough,
3oth OVEN SET and OVEN TEMP Knobs must beat CLEAN setting.
4 thick pile of spillover when cleaned leaves a heavy layer of ash in
spots which could have insulated the area from further heat.
.atch not in “CLEAN” position.
rum OVEN SET Knob to CLEAN, Glowing L~ked Light ~fter knob
s turned indicates oven is too hot from previous use and door won’t
atch, To cool oven, open door wide, then latch can be moved.
3VEN SET KNOB Must be at CLEAN or OFF before Latch can be
noved.
.atch Release Button not pushed when moving Latch,
.——
———
26
017 oven clock.
.—
Page 27

PROBLEM
—
POSSIBLE CAUSE AND REMEDY
C~~TR~L PANEL LIGHTED,
YET OVEN W!LL NOT START
Door not securely closed.
START
must be touched after entering cooking selection.
Another selection entered already in oven and CLEAR/OFF not
touched to cancel it.
Makesure you haveentered cooking time after touching TIME COOK.
CLEAR/OFF was touched accidentally. Reset cooking program and
touch START.
Temperature probe not inserted properly or not being used during
Auto Roast or Temp Cook.
Mak”e sure you have entered desired finished temperature after
touching TEMP COOK.
Make sure you entered a code number after touching COOK CODETM
or AUTO ROAST.
FOODS ARE EITHER Over-
cooking times may vary because of starting food temperature, food
COOKED OR UNDERCOOKED density or amount of foods in oven. Touch TIME COOK and addi-
tional cooking time for completion,
Incorrect Power Level entered. Check Cookbook for recommended
Power Level or changing levels during cooking if necessary.
Dish was not rotated, turned or stirred. Some dishes require specific
instructions. Check Cookbook or recipe for these instructions.
Too many dishes in oven at same time. Cooking time must be
increased when cooking more than one food item. Check Cookbook
for recommendation on increasing time.
.-
Probe not inserted properly into meat or dish when using Temp
Cook or Auto Roast functions. Check Cookbook or Auto Roast section of this book for specific instructions.
Check Cookbook for food placement and instructions when using
Double Duty’” Shelf.
1. ‘When Lock Light comes on during self-cleaning
lower oven, a fan in the microwave oven comes on
to keep oven components cool.
2. Steam or vapor escaping from around the door.
3. Light reflection around door or outer case.
4. Dimming oven light and change in blower sound
may occur while operating at power levels other
high.
than
5. Dull thumping sound while operating at power
levels other than high.
& Some TV-Radio interference might be noticed
while using your microwave oven. !t’s similar to the
interference caused by other small appliances and
does not indicate a problem with your oven.
27
Page 28

-..—....-—=...-
-.—.——
.-..l=
——-
—
—
.-
—
Ai Genera!Electricwe’recommittedto providing you with the best appliances we know how
buildand weknow that youwantyourappliancesto giveyoumanyyearsof dependable
to
service.
OurConsumerServicesaredesignedwith your needsand wants in mind.
Yournewapplianceis a well designedandengineered Seethe warrantyonthe backpageof this bookfor
product.Beforeit left the factory,it wentthrough
rigoroustests to detectmanufacturingdefects.And
youhavea written warrantyto protectyou.
Whetheryourapplianceis in or out of warranty,
you’rejust a phonecall awayfromour nationwide
networkof FactoryTrainedServiceprofessionals.
Simdv ca!iourGEserviceoraanization.You’llfind
them k theWhite Pagesund;r “GeneralElectric
Company”or “GeneralElectricFactoryService:’
andin the YellowPagesunder“GeneralElectric
CustomerCare@Service!’
Serviceis scheduledat yourconvenienceandthe
techniciandrivesa fully-stockedpartsservicetruck
sothat, in mostcases,the repaircanbecompleted
in onevisit.
We’reproudof our serviceandwant youto be
pleased,but if for somereasonyouarenot happy
with the serviceyou receive,herearethreestepsto
follow for furtherhelp.
—..—
service atyour
—---.—---
———.—.—.
details.
FIRST,contactthe peoplewhoservicedyour
appliance.Explainwhyyouarenot pleased,In most
cases,this will solvethe problem.
NEXT,if youarestill not pleasedwriteall the details
— includingyourphonenumberto:
Manager,ConsumerRelations
GeneralElectricCompany
AppliancePark
Louisville,Kentucky40225
FINALLY,if your problemis still not resolved,write:
MajorApplianceConsumerAction Panel
20NorthWackerDrive
Chicago,Illinois 60606
--—----..-—.
..-..”—..—----.-...-.————.......——.-.=—-.
.——..=.-.
—————
service contracts
For 11’oubk”freeSerwice
writtenwarrantyperktd.
the
If youpreferto budget
insteadof beingsurprisedbythem,GEoffer
servicecontractsfor varyinglengthsof time
all GEmajorappliances.With
beyond conditionduringthe contractperiodat
your repairexpenditure
acontract,we’li onlyGenuineGEparts.
‘The(hick Fix@ System
hi can savemoney and time
by doing it ym’sdf.
Fordo-it-yourseiferswhowouid
preferto fix GE
themseNes... GE offers an industry
first, the Quick
major appliances
Fix@System.
forY&JBy
Shouidyouneedhelpin the seiectionand purchase
of newappliances,or havequestionsabout the
operationof the GEappiianc~syou nowown-orhave
anyotherquestionsabout our consumerproducts
or services, youareonlya TOLL-FREEcali away.
pyourappliancein goodoperating
noadditionalcharge.Servicecontracts
let you paytoday’spricesfor service
a month,a year,or severalyearsfrom
now.And,you’ll receiveservicefrom
GEtrainedservicetechniciansusing
A programfordo-it-yourselfappliancerepair,
the system inciudesstep-by-steprepair
manua/sfor refrigerators,mostnon-microwave
electric ranges,dishwashers,andstandard
andlargecapacitywashersanddryers,plus
speciallypackagedreplacementparts,and
technicalheipwith a to//he 800numbe~
TheGEAnswerCenterTM800,626.2000
consumerinformation serviceis open24 hoursa
day,sevendaysa week.
Ourstaff of expertsstands readyto assist you
anytime.
-
-=
&—..——
aiiif!5—
‘a:= ‘RwGEAKww
Your DirectLine toCkmerd!ihWk
————
3-1
Page 29

*
-
>
~,-
-
-1
. .
w
L
‘-a
*
-,
<u
>
,
!s
FULL.cmE”YEmR
For one yearfrom date of original
purchase,we will provide, free of
charge, parts and service labor in
your home to repair or replace any
partof the microwaveoven/range
thatfails becauseof a manufacturingdefect.
LIMITEDADDITIONAL
I=OIJF?=WEARWARRANTY
For the second through fifth year
from date of original purchase,
we will provide,free of charge, a
replacement magnetrontubeif the
magnetron tube fails because of a
manufacturing defect. You pay for
the service trip to your home and
service labor charges.
This warranty is extended to the
original purchaser and any succeed-
ing owner for products purchased
for ordinary home use in the 48
mainland states, Hawaii and
Washington, D.C.In Alaska the
warranty is the same except that it
is LIMITEDbecauseyou must pay
to ship the product to the service
shop or for the service technician’s
travel costs to your home.
All warrantyservicewill be provided
by our Factory Service Centers or
by our authorized Customer Care@
servicers during normal working
hours.
Look in the White or Yellow Pages
of your telephone directory for
GENERALELECTRICCOMPANY.
GENERALELECTRICFACTORY‘
w’
SERVICE,GENERALELECTRIC-
I-IOTPOINTFACTORYSERVICEor
GENERALELECTRICCllSTOMER
.4
CARE@SERVICE.
‘ I
, I
.;
‘! .
is~()~ oServicetripstoyourhometo
teach you how to use the product.
ReadyourUseand Care material.
If youthen haveanyquestions
aboutoperatingthe product,
pleasecontactyour dealer or our
e Replacement of house fuses
or resetting of circuit breakers.
~ Failure of the product if it is
used for other than its intended
purpose or used commercially.
Consumer Affairs office at the
address below, or call, toll free:
The GE Answer CenterTM
I
800.626.2000
consumer informaticm service
o Improper installation.
@Damageto product caused
by accident, fire, floods or acts
of God.
WARRANTORISNOT RESPON-
SIBLE FORCONSEQUENTIAL
DAMAGES.
If you havean installation problem,
contact your dealer or installer.
I
Youare responsible for providing
adequate electrical, exhausting
and other connecting facilities.
—.
Some states do not allow the exclusion or limitation of incidental or consequential damages, so the above limitation or excluskm
may not apply to you. Thiswarrantygives you specific legal rights, and you may also have other rights whichvaryfrom state to state.
Toknowwhatyourlegalrightsarein yourstate,consultyourlocal or stateconsumeraffairsoffice oryourstate’sAttorneyGeneral.
———.
Warrantor:Genera! Electric Company
If further help is needed concerningthis warranty,contact:
Manager–Consumer Affairs, General Electric Company,Appliance Park, Louisville, KY 40225
-.
“.
 Loading...